

Page 1

Electric chain saw EN
Tronçonneuse électrique prime F
Sierra eléctrica ES
HELPLINE NUMBER
HELPLINE NUMBER
1-866-354-WORX (9679)
WG300 WG303 WG304
P07
P19
P32
Page 2

Page 3

Page 4
4 5 6
7
8
9
10
13 14 151716
11
12
3
2
1
18
14
A1
Page 5
18
17
15
14
13
78
11
20
19
3-6mm
a
1
1
2
5
USE THIS GRIP
THUMB BELOW
HANDLE
A2 C1
B
C2 D E1
E2 F G1
IHG2
Page 6
19
a
b
Z
Y
kg
Z
Y
2 2
W
Y
Z
X
50 mm
50 mm
111
2
2/3
1
1/3
1
2
1/3
2/3
USE THIS GRIP
THUMB BELOW
HANDLE
J
K
M
N
L
O
P
Q
R
S
Page 7

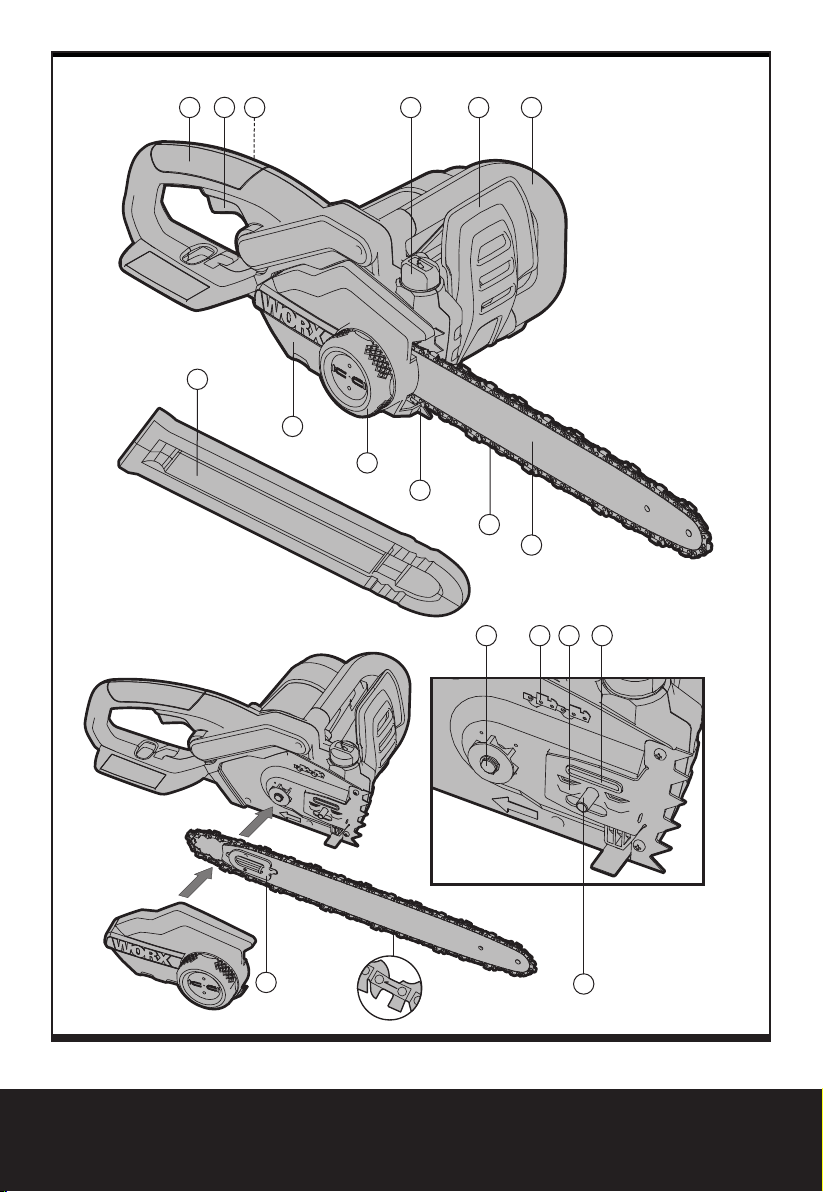
1. REAR HANDLE
2. ON/OFF SWITCH
3. LOCK-OFF BUTTON
4. OIL FILLER CAP
5. ACTIVATION LEVER FOR KICKBACK BRAKE(HAND GUARD)
6. FRONT HANDLE
7. CHAIN BAR
8. CHAIN
9. GRIPPING TEETH
10. LOCKING KNOB/ CHAIN TENSIONING KNOB
11. COVER PLATE
12. BLADE PROTECTION COVER
13. DRIVE SPROCKET
14. SYMBOL FOR ROTATION AND CUTTING DIRECTION
15. GUIDE FINS FOR CHAIN BAR
16. OIL OUTLET
17. FASTENING BOLT
18. CHAIN TENSIONING CATCH
19. OIL LEVEL GAUGE (See Fig. H)
20. CHAIN CATCH BOLT (See Fig. C2)
76
* Not all the accessories illustrated or described are included in standard delivery.
Electric chain saw EN
Page 8

Electric chain saw EN
98
TECHNICAL DATA
WG300 WG303 WG304
Voltage 120V~60Hz 120V~60Hz 120V~60Hz
Amps 14A 14.5A 15A
Bar length 14“ 16“ 18“
Chain speed 10m/s 12m/s 12m/s
Oil tank capacity 200ml 200ml 200ml
Chain pitch 3/8” 3/8” 3/8”
Number of chain links 53 57 63
Chain gauge 0.05” 0.05” 0.05”
Saw chain type
Bar type
Weight( chain & bar included) 10.8lbs 11lbs 11.2 lbs
Protection class
Oregon
(91VG053X)
Oregon,
(140SCEA041)
/II /II /II
Oregon
(91VG057X)
Oregon,
(160SCEA041)
Oregon
(91VG063X)
Oregon,
(180SCEA041)
ACCESSORIES
WG300 WG303 WG304
Lubrication oil 100ml 100ml 100ml
blade protection cover 1 1 1
Chain 1 1 1
Chain bar 1 1 1
We recommend that you purchase your accessories from the same store that sold you the tool.
Use good quality accessories marked with a well-known brand name. Choose the type according
to the work you intend to undertake. Refer to the accessory packaging for further details. Store
personnel can assist you and offer advice.
Page 9

98
Electric chain saw EN
98
Read all very carefully and make
sure that you fully understand them
before using the unit
Retain these instructions for further
reference
WARNING: When using an electric
chain saw, basic safety precautions
should always be followed to reduce the risk
of fire, electric shock, and injury to persons,
including the following:
1. CAUTION! Do not use a replacement saw
chain unless:
a) It has been designated as meeting
the ANSI B175 kickback performance
requirements on that specific power head;
b) It has been designated as “Low- Kickback”
saw chain in accordance with ANSI B175.1;
or
c) It is the saw manufacturer’s replacement
catalogue (or equivalent) number.
Low-Kickback saw chain is a chain which has
met the kickback performance requirements
of ANSI B175.1 when tested on the
representative sample of chain saws.
2. Use the extension cord to be a type
acceptable for outdoor use, for example –
SJTW, and the size should be 14AWG or
larger. An undersized cord will cause a drop
in line voltage resulting in loss of power and
overheating. Make sure the extension cord
is in good condition before using; and keep
the cord away from the cutting area and to
position cord so that it will not be caught on
branches, and the like, during cutting.
3. NOMENCLATUER (See Fig A1)
a) Bucking – The process of cross cutting a
felled tree or log into lengths.
b) Chain Brake – A device used to stop the
chain saw.
c) Chain saw power head – A chain saw
without the saw chain and guide bar.
d) Clutch – A mechanism for connecting and
disconnecting a driven member to and
from a rotating source of power.
e) Drive Sprocket or Sprocket – The toothed
part that drives the saw chain.
f) Felling – The process of cutting down a
tree.
g) Felling Back Cut – The final cut in a tree
felling operation made on the opposite
side of the tree from the notching
undercut.
h) Front Handle (6)– The support handle
located at or toward the front of the chain
saw.
i) Hand guard (5)– A structural barrier
between the front handle of a chain saw
and the guide bar, typically located close
to the hand position on the front handle
and sometimes employed as an activating
lever for a chain brake.
j) Chain bar(7) – A solid railed structure that
supports and guides the saw chain.
k) Kickback – The backward or upward
motion, or both of the guide bar occurring
when the saw chain near the nose of the
top area of the guide bar contacts any
object such as a log or branch, or when the
wood closed in the pinches the saw chain
in the cut.
l) Kickback, Pinch – The rapid pushback of
the saw which can occur when the wood
closes in and pinches the moving saw
chain in the cut along the top of the guide
bar.
m) Kickback, Rotational – The rapid upward
and backward motion of the saw which can
occur when the moving saw chain near the
upper portion of the tip of the guide bar
contacts an object, such as a log or branch.
n) Low-Kickback Chain – A chain that
complies with the kickback performance
requirements of ANSI B175.1-1991 when
tested on a representative sample of chain
saws.
o) Normal Cutting Position – Those positions
assumed in performing the bucking and
felling cuts.
p) Notching Undercut – A notch cut in a tree
that directs the tree’s fall.
q) Oiler Control – A system for oiling the
guide bar and saw chain.
r) Rear Handle (1)– The support handle
located at or toward the rear of the saw.
s) Reduced Kickback Guide Bar – A guide bar
which has been demonstrated to reduce
kickback significantly.
Page 10

Electric chain saw EN
1110
t) Replacement Saw Chain – A chain that
complies with the kickback performance
requirements of ANSI B175.1-1991 when
tested with specific chain saws. It may not
meet the ANSI performance requirements
when used with other saws.
u) Chain(8) – A loop of chain having cutting
teeth, that cut the wood, and that is driven
by the motor and is supported by the guide
bar.
v) Gripping teeth (Spike)(9) – The pointed
tooth or teeth for use when felling or
bucking to pivot the saw and maintain
position while sawing.
w) On/Off switch (2)– A device that when
operated will complete or interrupt an
electrical power circuit to the motor of the
chain saw.
x) Switch Linkage – The mechanism that
transmits motion from a trigger to the
switch.
y) Lock-off button(3)– A movable stop that
prevents the unintentional operation of the
switch until manually actuated.
FOR ALL DOUBLE-INSULATED CHAIN
SAWS
1) Replacement Parts
When servicing use only identical
replacement parts.
2) Polarized Plugs
To reduce the risk of electric shock, this
equipment has a polarized plug (one blade
is wider than the other). This plug will fit
in a polarized outlet only one way. If the
plug does not fit fully in the outlet, reverse
the plug. If it still does not fit, contact a
qualified electrician to install the proper
outlet. Do not change the plug in any way.
FOR ALL CHAIN SAWS
1) Keep work area clean.
Cluttered areas invite injuries.
Do not start cutting until you have a clear
work area, secure footing, and a planned
retreat path from the falling tree.
2) Consider work area environment.
Use extreme caution when cutting small
size brush and saplings because the
slender material may catch the saw chain
and be whipped toward you or pull you off
balance.
Do not operate a chain saw in a tree unless
specifically trained to do so.
When cutting a limb that is under tension
be alert for spring back so that you will not
be struck when the tension in the wood
fibers is released.
Don’t expose chain saw to rain.
Don’t use chain saw in damp or wet
locations.
Do not use chain saw in presence of
flammable liquids or gases.
3) Protect yourself against electric shock
Prevent body contact with grounded
surfaces. For example: metal pipes, wire
fences.
4) Keep children away
Do not let visitors contact the chain saw or
extension cord.
All visitors should be kept away from work
area.
5) Store idle chain saw
When not in use, chain saws should be
stored in a dry, and high or locked-up place
– out of the reach of children.
When storing saw, use a scabbard or
carrying case.
6) Don’t force chain saw
It will do the job better and safer at the rate
for which it was intended.
7) Use right tool
Cut wood only.
Don’t use chain saw for purpose not
intended – for example – Don’t use chain
saw for cutting plastic, masonry, non-wood
building materials.
8) Dress properly
Do not wear loose clothing or jewelry.
They can get caught in moving parts.
Rubber gloves and non-skid footwear are
recommended when working outdoors.
Wear protective hair covering to contain
long hair.
9) Use safety glasses/safety visor
Also use safety footwear; snug fitting
clothing; protective gloves; hearing and
head protection.
10) Carrying saw
Carry the chain saw by the front handle
Page 11

1110
Electric chain saw EN
1110
with the saw stopped, finger off the switch,
the guide bar and saw chain to the rear.
11) Maintain Chain saw with care
Inspect chain saw cords periodically and
if damaged, have repaired by authorized
service facility.
Keep cord clear of the chain and operator
at all times. Never carry saw by the cord or
pull it to disconnect from receptacle. Keep
cord from oil and sharp edges.
Inspect extension cords periodically and
replace if damaged.
Keep tools sharp and clean for better and
safer performance.
Follow instructions for lubrication and
changing accessories.
Keep handles dry, clean, and free from oil
and grease.
12) Disconnect chain saw
Disconnect chain saw when not in use,
before servicing, and when changing
accessories and attachments, such as saw
chain and guard.
13) Outdoor use extension cords
Use only extension cords intended for use
outdoors and so marked.
14) Stay alert
Watch what you are doing. Use common
sense. Do not operate chain saw when you
are tired.
Keep all parts of the body away from the
saw chain when the motor is operating.
Before you start the saw, make sure the
saw chain is not contacting anything.
15) Check damaged parts
Before further use of the chain saw, a
guard or other part that is damaged should
be carefully checked to determine that
it will operate properly and perform its
intended function. Check for alignment of
moving parts, binding of moving parts,
breakage of parts, mounting, and any other
conditions that may affect its operation. A
guard or other part that is damaged should
be properly repaired or replaced by an
authorized service center unless otherwise
indicated elsewhere in this instruction
manual.
Have defective switches replaced by
authorized service center.
Do not use chain saw if the switch does not
turn it on and off.
Do not operate a chain saw that is
damaged, improperly adjusted, or is not
completely and securely assembled. Be
sure that the saw chain stops moving when
the trigger is released.
16) Guard against kickback
The following precautions should be
17) Power supply
Connect chain saw to correct voltage, that
18) WARNING: To minimize the risk
WARNING: KICKBACK may occur
when the nose or tip of the guide bar
touches an object, or when the wood
closes in and pinches the saw chain in the
cut. Tip contact in some cases may cause a
lightning fast reverse reaction, kicking the
guide bar up and back towards the
operator. Pinching the saw chain along the
top of the guide bar may push the guide
bar rapidly back towards the operator.
Either of these reactions may cause you to
lose control of the saw which could result
in serious injury to user.
followed to minimize kickback.
(1) Grip saw firmly.
Hold the chain saw firmly with both
hands when the motor is running. Use
a firm grip with thumbs and fingers
encircling the chain saw handles.
(2) Do not over reach.
(3) Keep proper footing and balance at all
times.
(4) Don’t let the nose of the guide bar
contact a log, branch, ground or other
obstruction.
(5) Don’t cut above shoulder height.
(6) Use devices such as low kickback chain,
guide bar nose guards, chain brakes and
special guide bars that reduce the risks
associated with kickback.
(7) Only use replacement bars and chains
specified by the manufacturer or the
equivalent.
is, be sure that the voltage supplied is the
same as that specified on the nameplate of
the tool.
of eye injury, always use eye
protection!
Page 12

Electric chain saw EN
1312
SAVE THESE INSTRUCTIONS
General safety precautions for chain saw users
1. Fatigue causes carelessness. Be more
cautious before rest periods and towards
the end of your shift.
2. Personal protective clothing required by
your safety organizations, government
regulations, or your employer should be
used. At all times when using a chain saw,
snug-fitting clothing, protective eyewear,
safety footwear, and hand, leg, and hearing
protection should be worn.
NOTE: personal protective clothing should
meet the requirements of applicable
standards.
3. When felling, keep at least 2 tree lengths
away from your fellow workers.
4. Plan your work, ensuring an obstacle-free
work area and, in the case of felling, at
least one escape path from the falling tree.
5. Follow the instructions in your operator’s
manual for starting the chain saw and
control the chain saw with a firm grip on
both handles when it is in operation. Keep
handles dry, clean, and free of oil.
6. When transporting your chain saw, use the
appropriate transportation covers, which
should be available for the guide bar and
saw chain.
7. Do not attempt a pruning or limbing
operation in a standing tree unless
specifically trained to do so.
8. Guard against kickback. Kickback is the
upward motion of the guide bar that occurs
when the saw chain, at the nose of the
guide bar, contacts an object. Kickback can
lead to dangerous loss of control of the
chain saw.
9. A chain saw is intended for two-handed
use. Serious injury to the operator, helpers,
and/or bystanders can result from onehanded operation.
10. See symbol definitions.
11. Keep other persons or animals a safe
distance away from a running chain saw or
the area where a tree is being felled.
12. Use extreme caution when cutting small
brush and saplings because slender
material can catch the saw chain and be
whipped toward you.
13. When cutting a limb that is under tension
or compression, be alert for springback.
14. This electrically powered saw is classified
by CSA as a Class 2C saw. It is intended
for infrequent use by homeowners,
cottagers, and campers, and for such
general applications as clearing, pruning,
cutting firewood, etc. it is not intended for
prolonged use.
Page 13
1312
Electric chain saw EN
1312
SYMBOLS
Warning
Read and follow all safety
precautions in the owner’s manual
Failure to follow to instruction could
result in serious injury to user.
Protective goggles/visor ,protective
helmet & hearing protetction
Gloves with saw protection
Boots with saw protection, steel toecap and non-slip sole
Correct Direction of Cutting-Teeth
Chain brake
Tip contact may cause the guide
bar to move suddenly upward
and backwards, which may cause
serious injury to user.
Contact of the guide bar tip with any
object should be
ASSEMBLY
WARNING! Do not connect the
chain saw to mains before it is
completely assembled.
Always use gloves when handling the
chain.
CHAIN AND CHAIN BAR ASSEMBLY
1. Unpack all parts carefully.
2. Place the chain saw on any suitable flat
surface.
3. Use only genuine WORX chains
designed for chainbar.
4. Slide the chain (8) in the slot around the
chain bar (7). Ensure chain is in correct
running direction by comparing with chain
symbol (14). Ensure the chain tensioning
catch (18) is facing outwards. (See Fig. A2)
5. Fit the chain onto the drive sprocket (13)
and guide the chain bar (7), so that the
fastening bolt (17) and the two guide fins
(15) fit into the keyway of the chain bar(7).
(See Fig. B)
6. Check if all parts are seated properly and
hold chain and chain bar in a level position.
(See Fig. C1)
7. Fit cover plate, ensure that the chain catch
bolt (20) fits into the groove of the cover
plate(11). (See Fig. C2)
8. Screw on the cover plate (11) with the
locking knob (10). (See Fig. D)
The chain is not yet tensioned. Tensioning
the chain applies as described under
“Tensioning chain”.
Do not use one handed when
operating the chain saw.
Always use two hands when
operating the chain saw.
Double insulation.
When servicing, use only identical
replacement parts.
10º
The chain saw kickback angle is 10º,
with a chain brake.
TENSIONING CHAIN
New saw chains will stretch. Check chain
tension frequently when first used and tighten
when chain becomes loose around chain bar.
WARNING: Unplug chain saw from
power source before adjusting saw
chain tension.
WARNING: Cutting edges on chain
are sharp. Use protective gloves
when handling chain.
WARNING: Maintain proper chain
tension always. A loose chain will
increase the risk of kickback. A loose
chain may jump out of guide bar groove.
This may injure operator and damage
Page 14
Electric chain saw EN
1514
chain. A loose chain will cause chain,
chain bar, and sprocket to wear rapidly.
1. Place the chain saw on any suitable flat
surface.
2. Turn the locking knob/ chain tensioning
knob (10) clockwise until the locking knob
is screwed tightly. The correct chain tension
will be reached automatically.
The ratchet mechanism(a)E2 prevents the
chain tension from loosening.(See Fig. E2)
3. The correct chain tension is reached when
the chain (8) can be raised approx. 3 – 6
mm from the chain bar in the centre. This
should be done by using one hand to
raise the chain against the weight of the
machine. (See Fig. E1)
4. When the chain looses, unscrew the locking
knob/ chain tensioning knob absolutely
and then Screw on the cover plate with the
locking knob tightly again.
LUBRICATION
IMPORTANT: the chain saw is
not supplied filled with oil. It is
essential to fill with oil before use. Never
operate the chain saw without chain
oil or at an empty oil tank level, as this
will result in extensive damage to the
product.
Chain life and cutting capacity depend on
optimum lubrication. Therefore, the chain is
automatically oiled during operation via oil
outlet.
Filling oil tank:
1. Set chain saw on any suitable surface with
oil filler cap facing upward.
2. Clean area around the oil filler cap with
cloth unscrew cap.
3. Add WORX chain saw oil until reservoir is
full.
4. Avoid dirt or debris entering oil tank, refit
oil filler cap (4) and tighten.
IMPORTANT: To allow venting of
the oil reservoir, small breather
channels are provided between the oil
filler cap and the strainer, to prevent
leakage ensure machine is left in a
horizontal position (oil filler cap (4)
uppermost) when not in use.
It is important to use only the
recommended oil to avoid damage to the
chain saw. Never use recycled/old oil.
Use of non approved oil will invalidate
the warranty.
Checking the automatic oiler
Proper functioning of the automatic oiler can
be checked by running the chain saw and
pointing the tip of the chain bar towards a
piece of cardboard or paper on the ground.
Caution: Do not touch the ground with the
chain. Ensure safety clearance of 20 cm.
If an increasing oil pattern developes, the
automatic oiler is operating fine. If there is no
oil pattern, despite a full oil reservoir, contact
WORX customer service agent or approved
service agent.
OPERATION
1. SWITCHING ON AND OFF (See Fig. F)
ATTENTION! Check the voltage and
current supply: The voltage and
current supply must comply with the
ratings on the type plate.
For switching on the machine, press the
lock-off button, then fully press the on/off
switch and hold in this position. The lock-off
button can now be released.
For switching off, release the on/off switch.
Do not stop chain saw after sawing by
activating the front hand guard (kickback
brake).
2. KICKBACK BRAKE (See Fig. G1)
The kickback brake is a safety mechanism
activated through the front hand guard
(5), when kickback occurs. Chain stops
immediately.
The following function check should be
carried out at regular intervals. Pull front
hand guard (5) forwards (position )and start
the chain saw. The chain must not start. To
deactivate the kickback brake, release On/Off
switch (2) and push hand guard (5) backwards
(position ).
CUTTING
Is the oil reservoir filled? Check oil level gauge
Page 15

1514
Electric chain saw EN
1514
(19) prior to starting and regularly during
operation. Refill oil when oil level is low. The
oil tank filling will last approx. 16minutes,
depending on sawing intensity and stops.
(Fig. G2)
Check new replaced chain tension approx.
every 10 minutes during operation.
1. Connect saw to extension cord. Connect
extension cord to power supply.
2. Make sure section of log to be cut is not
laying on ground. This will keep chain from
touching ground as it cuts through log.
Touching ground with moving chain will
dull chain.
3. Use both hands to grip saw. Always use
left hand to grip front handle and right
hand to grip rear handle. Use firm grip.
Thumbs and fingers must wrap around
saw handles.(See Fig.H)
4. Make sure your footing is firm. Keep feet
apart. Divide your weight evenly on both
feet.
5. When ready to make a cut, push the lockoff button completely forward with the
right thumb and squeeze the trigger. This
will turn saw on. Releasing trigger will turn
saw off. Make sure saw is running at full
speed before starting a cut.
6. When starting a cut, place moving chain
against wood. Hold saw firmly in place
to avoid possible bouncing or skating
(sideways movement) of saw.
7. Guide saw using light pressure. Do not
force saw. The motor will overload and can
burn out. It will do the job better and safer
at the rate for which it was intended.
8. Remove saw from a cut with saw running
at full speed. Stop saw by releasing trigger.
Make sure chain has stopped before
setting saw down.
9. Practice until you can maintain a steady,
even cutting rate.
KICKBACK SAFETY DEVICES ON THIS
SAW
This saw has a low-kickback chain and
reduced kickback chain bar. Both items reduce
the chance of kickback. Kickback can still occur
with this saw.
The following steps will reduce the risk of
kickback.
• Use both hands to grip saw while saw is
running. Use firm grip. Thumbs and fingers
must wrap around saw handles.
• Keep all safety items in place on saw.
Make sure they work properly.
• Do not overreach or cut above shoulder
height.
• Keep solid footing and balance at all times.
• Stand slightly to left side of saw. This keeps
your body from being in direct line with
chain.
• Do not let guide bar nose touch anything
when chain is moving.
• Never try cutting through two logs at same
time. Only cut one log at a time.
• Do not bury guide bar nose or try plunge
cut (boring into wood using guide bar
nose).
• Watch for shifting of wood or other forces
that may pinch chain.
• Use extreme caution when reentering a
previous cut.
• Use low-kickback chain and guide bar
supplied with this chain saw.
• Never use dull or loose chain. Keep chain
sharp with proper tension.
GENERAL BEHAVIOR
Use the chain saw only with secure footing.
Hold the chain saw at the right-hand side of
your body. (See Fig. I)
The chain must be running at full speed
before it makes contact with the wood. Use
the metal gripping teeth to secure the saw
onto the wood before starting to cut. Use the
gripping teeth as a leverage point “a” while
cutting. (See Fig. J)
Do not operate the chain saw with arms fully
extended or attempt to saw areas which are
difficult to reach, or on a ladder. Never use the
chain saw above shoulder height.
(See Fig. K)
CUTTING WOOD UNDER TENSION (See
Fig. L)
WARNING: When cutting limb that
is under tension, use extreme
caution. Be alert for wood springing
back. When wood tension is released,
Page 16

Electric chain saw EN
1716
limb could spring back and strike
operator causing severe injury or death.
When sawing logs supported on both ends,
start the cut from above(Y) about 1/3 of the
diameter into the log and then finish the cut
(Z) from below, in order to avoid contact of
the chain saw with the ground. When sawing
logs supported on only one end, start the cut
from below (Y) about 1/3 of the diameter into
the log and finish the cut from above (Z) in
order to avoid log splitting or jamming of the
chain saw.
FELLING TREES (See Fig. M)
Always wear hard hat to protect head
against falling branches.
The chain saw can only be used to fell
trees smaller in diameter than the length
of the chain bar.
Secure work area. Ensure no persons
or animals are in the vicinity of the
falling tree.
Never attempt to free a jammed saw
with the motor running. Use wooden
wedges to free chain and chain bar.
When cutting and felling operations are
being performed by two or more persons,
at the same time, the felling operations
should be separated from the cutting
operation by a distance of at least twice
the height of the tree being felled. Trees
should not be felled in a manner that
would endanger any person, strike any
utility line or cause any property damage.
If the tree does make contact with any
utility line, the company should be notified
immediately.
The chain saw operator should keep on the
uphill side of the terrain as the tree is likely
to roll or slide downhill after it is felled.
An escape path should be planned and
cleared as necessary before cuts are
started. The escape path should extend
back and diagonally to the rear of the
expected line of fall.
Before felling is started, consider the
natural lean of the tree, the location of
larger branches and the wind direction to
judge which way the tree will fall.
Remove dirt, stones, loose bark, nails
staples, and wire from the tree.
Notching undercut: Make the notch (x-w)1/3
the diameter of the tree, perpendicular to the
direction of falls as make the lower horizontal
notching cut first. This will help to avoid
pinching either the saw chain or the guide bar
when the second notch is being made.
WARNING: Do not cut all the way
through tree. Leave about two
inches of tree diameter uncut directly
behind felling notch (See Figure M). This
uncut portion acts as a hinge(Y). The
hinge helps keep tree from twisting and
falling in wrong direction.
As the felling gets close to the hinge the tree
should begin to fall. If there is any chance
that the tree may not fall in desired direction
or it may rock back and bind the saw chain,
stop cutting before the felling back cut is
complete and use wedges of wood, plastic, or
aluminum to open the cut and drop the tree
along the desired line of fall.
When the tree begins to fall remove the chain
saw from the cutting, stop the motor, put the
chain saw down, and then use the retreat path
planned. Be alert for overhead limbs falling
and watch your footing.
To complete the felling operation, drive a
wedge (Z) into the horizontal cut.
LIMBING A TREE (See Fig. N)
Limbing is removing the branches from a
fallen tree. When limbing leave larger lower
limbs to support the log off the ground.
Remove the small limbs in one cut as
illustrated. Branches under tension should be
cut from the bottom up to avoid binding the
chain saw.
BUCKING A LOG (See Fig. O)
Bucking is cutting a log into lengths. It is
important to make sure your footing is firm
and your weight is evenly distributed on both
feet. When possible, the log should be raised
and supported by the use of limbs, logs or
chocks. Follow the simple directions for easy
cutting.
When the log is supported along its entire as
illustrated, it is cut from the top (overbuck).
When the log is supported on one end,
Page 17

1716
Electric chain saw EN
1716
as illustrated, cut 1/3 the diameter from
the underside (underbuck). Then make the
finished cut by overbucking to meet the first
cut. (See Fig. P)
When the log is supported on both ends,
as illustrated, cut 2/3 the diameter from the
top overbuck. Then make the finished cut by
underbucking the lower 1/3 to meet the first
cut. (See Fig. Q)
WARNING: (See Fig. R)
2. Inspect chain saw before and after each
use. Check saw closely if guard or other part
has been damaged. Check for any damage
that may affect operator safety or operation
of saw. Check for alignment or binding of
moving parts. Check for broken or damaged
parts. Do not use chain saw if damage affects
safety or operation. Have damage repaired by
authorized service center.
• If on slope, make sure log will not
roll down hill. Secure log by using
wooden stakes. Drive wooden stakes
into ground on downhill side of log.
Stand on uphill side of log while
cutting. Log may roll after cutting.
• Never try cutting through two logs
at same time. This could increase the
risk of kickback.
• While cutting log, never hold log with
your hand, leg, or foot.
• While cutting log, never allow another
person to hold log.
• Turn off and unplug saw before
moving from one place to another.
SAW MAINTENANCE AND
KICKBACK SAFETY
Follow maintenance instructions in this
manual. Proper cleaning of saw and chain and
guide bar maintenance can reduce chances of
kickback. Inspect and maintain saw after each
use. This will increase the service life of your
saw.
NOTE: Even with proper sharpening, risk of
kickback can increase with each sharpening.
MAINTENANCE AND
STORAGE OF CHAIN SAW
1. Unplug chain saw from power source
• When not in use
• Before moving from one place to another
• Before servicing
• Before changing accessories or
attachments, such as saw chain and guard
3. Maintain chain saw with care.
• Never expose saw to rain.
• Keep chain sharp, clean, and lubricated for
better and safer performance.
• Follow steps outlined in this manual to
sharpen chain.
• Keep handles dry, clean, and free of oil and
grease.
• Keep all screws and nuts tight.
• Inspect power cord often. If damaged,
have repaired by authorized service center.
• Never carry chain saw by power cord.
• Never yank power cord to unplug it.
• Keep power cord from heat, oil, and sharp
edges.
• Inspect extension cords often and replace
if damaged.
4. When servicing, use only identical
replacement parts.
5. When not in use, always store chain saw
• In a high or locked place, out of children’s
reach
• In a dry place
Replacing Saw Chain/chain bar
Replace chain when cutters are too worn
to sharpen or when chain breaks. Only use
replacement chain noted in this manual.
Always include new drive sprocket when
replacing chain. This will maintain proper
driving of chain.
Inspect guide bar before sharpening chain. A
worn or damaged guide bar is unsafe. A worn
or damaged guide bar will damage chain. It
will also make cutting harder.
Fit the tensioning catch into the new bar by
tightening the screw clockwise. The catch
Page 18

protrude (b) must be fitted into the bar hole.
(See fig. S)
SHARPENING SAW CHAIN
WARNING: Unplug chain saw from
power source before servicing.
Severe injury or death could occur from
electrical shock or body contact with
moving chain.
WARNING: Cutting edges on chain
are sharp. Use protective gloves
when handling chain.
Keep chain sharp. Your saw will cut faster and
more safely. A dull chain will cause undue
sprocket, guide bar, chain, and motor wear. If
you must force chain into wood and cutting
creates only sawdust with few large chips,
chain is dull.
Electric chain saw EN
Page 19

1. POIGNÉE ARRIÈRE
2. COMMUTATEUR
3. BOUTON DE VERROUILLAGE
4. BOUCHON D’HUILE
5. LEVIER D’ACTIVATION DU FREIN DE REBOND (PROTÈGE-MAIN)
6. POIGNÉE AVANT
7. GUIDECHAÎNE
8. CHAÎNE
9. MAILLON DE PRISE DENTS
10. BOUTON DE VERROUILLAGE / POIGNÉE DE TENSIONNEMENT DE LA CHAÎNE
11. PLAQUE DE COUVERTURE
12. COUVERCLE DE PROTECTION POUR LA LAME
13. PIGNON D’ENTRAÎNEMENT
14. SYMBOLE POUR LA DIRECTION DE COUPE ET LA RÉVOLUTION
15. DOIGTS DE GUIDAGE POUR GUIDE-CHAÎNE
16. SORTIE D’HUILE
17. BOULON DE FIXATION
18. DOIGT D’ENTRAÎNEMENT DU TENSIONNEMENT DE LA CHAÎNE
19. INDICATEUR DE NIVEAU D’HUILE (Fig. H)
20. BOULON À ERGOT POUR CHAÎNE (Fig. C2)
1918 1918
* Tous les accessoires illustrés ou décrits ne sont pas inclus dans une livraison
standard.
Tronçonneuse électrique prime F
Page 20

Tronçonneuse électrique prime F
2120
DONNÉES TECHNIQUES
WG300 WG303 WG304
Tension 120V~60Hz 120V~60Hz 120V~60Hz
Courant assigné 14A 14.5A 15A
Longueur du guide 14“ 16“ 18“
Vitesse de chaîne 10m/s 12m/s 12m/s
Capacité du réservoir d’huile 200ml 200ml 200ml
Pas de chaîne 3/8” 3/8” 3/8”
Nombre de maillons de chaînes 53 57 63
Indicateur de chaîne 0.05” 0.05” 0.05”
Type de chaîne de scie
Type de guide-chaîne
Poids de la machine 10.8lb(4.9kg) 11lb(5kg) 11.2 lb(5.1kg)
Double isolation
Oregon
(91VG053X)
Oregon,
(140SCEA041)
/II /II /II
Oregon
(91VG057X)
Oregon,
(160SCEA041)
Oregon
(91VG063X)
Oregon,
(180SCEA041)
ACCESSOIRES
WG300 WG303 WG304
Lubrifiant 100ml 100ml 100ml
Couvercle de protection pour la lame 1 1 1
Chaîne 1 1 1
Guidechaîne 1 1 1
Nous vous recommandons d’acheter tous vos accessoires du même magasin qui vous a vendu
l’outil. N’utilisez que des accessoires de bonne qualité de marque renommée. Choisissez le type
d’outil approprié au travail que vous désirez entreprendre. Pour de plus amples renseignements,
consultez l’emballage de l’accessoire. Le personnel du magasin peut également vous conseiller.
Page 21

2120
2120
Tronçonneuse électrique prime F
S’assurer d’avoir lu et compris toutes les
directives de la rubrique Consignes de
Sécurité Importantes.
Lisez toutes les instructions
AVERTISSEMENT: Lors de l’utilisation
d’appareils électriques de jardinage, des
précautions de base doivent être observées
afin de réduire les risques de feu, choc
électrique, et blessure grave, incluant ce qui
suit :
1. AVERTISSEMENT! N’utilisez pas une chaîne
de rechange à moins que :
a) Sa tête motorisée n’ait été conçue pour
être conforme à la norme ANSI B175 sur le
rebond ;
b) Elle ait été conçue comme une chaîne de
scie avec “faible rebond” conformément à
la norme ANSI B175.1;
c) Son numéro de série (ou équivalent) figure
dans le catalogue du fabriquant.
Chaîne à faible recul Chaîne qui réduit le
risqué de recul selon la norme ANSI B175.11991
2. Avec cette tronçonneuse, utiliser la rallonge
correcte. Utiliser uniquement des rallonges
spécifiées pour l’usage à l’extérieur. La
taille de la rallonge doit être de 14AWG ou
plus. Un cordon de dimension insuffisante
provoquera une chute de tension au niveau de
la tronçonneuse. La tronçonneuse perdra de la
puissance et surchauffera. Assurez-vous que
le cordon de rallonge soit en bon état avant de
l’utiliser ; Tenir le cordon éloigné de la zone de
coupe. S’assurer qu’il n’est pas accroché dans
les branches ou billes durant la coupe.
3. NOMENCLATURE (Fig A1)
a) Tronçonnage –Coupe d’un arbre abattu ou
d’une bille en tronçons.
b) Frein de chaîne – dispositif utilisé pour
arrêter la tronçonneuse.
c) Groupe moteur –Tronçonneuse sans chaîne
ni guide-chaîne. Aussi nommé carter.
d) Embrayage – mécanisme de connexion et
de déconnexion d’un membre motorisée
vers et depuis une source de courant
rotative.
e) Pignon –Roue dentée qui entraîne la chaîne.
f) Taille (élagage) –Coupe des branches d’un
arbre sur pied.
g) Coupe d’abattage–Coupe finale pour
l’abattage d’un arbre. Faire cette entaille du
côté oppose au sifflet.
h) Poignée avant (6)–Située à l’avant du carter
de la tronçonneuse.
i) Écran de protection avant de la main(5)–
Protection située entre la poignée avant et
la guide-chaîne. Protège la main gauche
pendant l’utilisation de la tronçonneuse.
j) Guide-chaîne(7) –Lame métallique qui
prolonge le carter de la tronçonneuse. La
guide-chaîne soutient et guide la chaîne.
k) Recul –Mouvement brusque vers l’arrière
et vers le haut de la guide-chaîne. Le
recul peut se produire quand le bout de la
guide-chaîne touche un objet pendant le
mouvement de la chaîne. La guide-chaîne
fait alors un mouvement brusque vers
le haut et vers l’arrière, en direction de
l’utilisateur.
l) Recul, Pincement – La rapide poussée
vers l’arrière de la tronçonneuse peut se
produire lorsque que le bois se referme et
pince la chaîne dans la coupe le long du
guide-chaîne.
m) Recul, Rotation– Le mouvement rapide vers
le haut et vers l’arrière de la tronçonneuse
peut se produire quand la partie supérieure
de l’extrémité supérieure du guide-chaîne
touche un objet comme une souche ou une
branche.
n) Chaîne à faible recul Chaîne qui réduit le
risqué de recul selon la norme ANSI B175.1-
1991.
o) Position normale de coupe –Position à tenir
pendant le tronçonnage et l’abattage.
p) Sifflet –Entaille en forme d’encoche faite
dans un arbre qui dirige sa chute.
q) Dispositif de lubrification –Système de
lubrification de la guide-chaîne et de la
chaîne.
r) Poignée arrière(1)–Poignée située à l’arrière
du carter.
s) Guide-chaîne à recul réduit –Guide-chaîne
qui réduit le risque de recul.
t) Chaîne de rechange –Chaîne conforme à
la norme ANSI B175.1-1991quand elle est
utilisée avec une tronçonneuse spécifique.
Page 22

Tronçonneuse électrique prime F
2322
Il se peut qu’elle ne soit pas conforme aux
exigences CSA quand elle est utilisée avec
d’autres tronçonneuses.
u) Chaîne(8) –Boucle de chaîne ayant des
dents tranchantes pour couper le bois. C’est
le moteur qui entraîne la chaîne. La guidechaîne soutient la chaîne.
v) Pointe pare-chocs (9) –Dent pointue située à
l’avant du carter, à côté de la guide-chaîne.
Garder la pointe pare-chocs contre le bois
lors de l’abattage ou du tronçonnage. Elle
facilite le maintien de la position de la
tronçonneuse pendant la coupe.
w) Interrupteur(2)–Dispositif qui ferme ou
ouvre le circuit électrique du moteur de la
tronçonneuse.
x) Tringlerie d’interrupteur –Ce dispositif
relie l’interrupteur à la gâchette. Il déplace
l’interrupteur quand on appuie sur la
gâchette.
y) Verrou d’interrupteur(3)–Dispositif qui
réduit le risque de mise en marche
involontaire de la tronçonneuse.
POUR TOUS LES APPAREILS
ÉLECTRIQUES À DOUBLE ISOLATION
1) Pièces de remplacement
Lors de l’entretien de l’appareil,
n’utilisez que des pièces identiques de
remplacement.
2) Connexions polarisées des appareils
électriques
Afin de réduire le risque de choc électrique,
cet outil a une fiche de connexion polarisée
(une des lames est plus large que l’autre).
Si la fiche ne s’accouple pas complètement
dans la prise murale, tournez la fiche. Si
la fiche ne fait toujours pas, contactez
un électricien qualifié afin d’installer une
prise murale appropriée. Ne changez pas
la fiche de l’équipement, réceptacle du
cordon prolongateur, ou la fiche du cordon
prolongateur, de quelque façon que ce soit.
POUR TOUS LES APPAREILS
1) Veillez à ce que l’aire de travail soit propre
et bien éclairée.
Le désordre et le manque de lumière
favorisent les accidents.
Avant de couper, toujours prévoir les
elements suivants :une zone de travail
dégagée, un équilibre stable, un chemin de
dégagement pour s’écarter de l’arbre qui
tombe.
2) Évitez les environnements dangereux.
Couper la broussaille peu épaisse et les
jeunes pousses avec grandes précautions
car ces matériaux légers peuvent se
prendre dans la chaîne et être projetés vers
l’utilisateur. Dans ce cas, il risque aussi de
perdre l’équilibre.
Ne pas utiliser la tronçonneuse quand on
se trouve sur un arbre ou une échelle, à
moins d’avoir été formé spécialement.
Quand on coupe une branche ou un tronc
d’arbre sous tension, faire également très
attention.
Le bois fait ressort : quand la tension
disparaît, la branche projetée risque de
heurter l’utilisateur.
N’utilisez pas sous la pluie.
N’utilisez pas les appareils dans des
locations très humides ou mouillées.
Ne pas utiliser la tronçonneuse là où
se trouvent des liquides ou gaz très infl
ammables .
3) Pour prévenir les chocs électriques
Éviter tout contact du corps avec des objets
reliés à la terre, tels que des conduites, des
clôtures et des poteaux métalliques.
4) Tenez les enfants éloignés.
Maintenir en permanence le cordon à
l’écart de la chaîne et de l’opérateur.
Tous les visiteurs devraient se tenir
éloignés de l’aire de travail.
5) Entreposez à l’intérieur les appareils
qui ne sont pas utilisés fréquemment.
Lorsqu’inutilisés, les appareils devraient
êtres entreposés à l’intérieur dans un
endroit sec, élevé et gardé sous clef, hors
de la portée des enfants.
Mettez la scie dans un fourreau ou un étui
lorsque vous la rangez.
6) Ne forcez pas l’appareil.
Il fera un meilleur travail et sera moins
dangereux en travaillant à la charge pour
laquelle il est conçu.
7) Utilisez le bon appareil.
Utiliser uniquement la tronçonneuse pour
couper du bois.
Page 23

2322
2322
Tronçonneuse électrique prime F
Ne pas utiliser la tronçonneuse à des fi ns
pour lesquelles elle n’a pas été prévue. Ne
pas l’utiliser pour couper du plastique, du
béton, etc.
8) Habillez-vous convenablement.
Ne portez pas des vêtements lâches ou des
bijoux. Ils peuvent se prendre dans des
pièces en mouvement. L’utilisation de gants
de caoutchouc et chaussures épaisses est
recommandée lors de travaux extérieurs.
Portez une protection pour cheveux afin de
contenir les cheveux longs.
9) Utilisez des lunettes de sécurité
Lors de l’utilisation de la tronçonneuse,
porter l’équipement de sécurité suivant
sécurité à bout acier, gants en caoutchouc,
serre-tête antibruit, casque de sécurité
10) Pour transporter la tronçonneuse d’un
endroit à un autre.
Pour transporter la tronçonneuse d’un
endroit à un autre tenir l’outil par la
poignée avant; ne pas laisser le doigt sur la
gâchette ; placer la guide-chaîne et la chaîne
vers l’arrière.
11) Entretenez les appareils avec soin.
Inspectez le cordon d’alimentation
électrique de l’appareil périodiquement,
et si endommagé, faites le réparer par un
dépôt de service autorisé.
Gardez les arêtes de coupe aiguisées et
propres pour une meilleure performance et
risque réduit de blessure.
Inspectez les cordons prolongateurs
périodiquement et remplacez si
endommagés. Gardez les poignées sèches,
propres, et libres d’huile et de graisse.
Suivez les instructions pour lubrifier et
changer les accessoires.
Gardez les poignées sèches, propres, et
libres d’huile et de graisse.
12) Déconnectez l’appareil. Déconnectez
l’appareil de l’alimentation électrique
lorsqu’il n’est pas utilisé, avant d’en
faire l’entretien, lors du changement
d’accessoires tels que lames, et autres
accessoires du même genre.
13) Conditions Requises
Utiliser uniquement des rallonges
électriques spécifi ées pour l’usage à
l’extérieur.
14) Restez alerte. Faites attention à ce que vous
faites. Utilisez votre bon sens. N’utilisez pas
l’appareil lorsque vous êtes fatigué.
Lorsque l’outil est en marche, n’approcher
de la chaîne aucune partie du corps.
Avant de mettre l’outil en marche, s’assurer
que la chaîne ne touche rien.
15) Vérifier les pièces endommagées.
Avant d’employer l’appareil, une garde
ou autre pièce endommagée devrait être
soigneusement vérifiée afin de déterminer
qu’elle fonctionnera correctement et
exécutera la fonction pour laquelle elle a
été conçue. Vérifier l’alignement des parties
mobiles, leur pincement, la brisure de
pièces, montage, et toute autre condition
qui peut affecter son opération. Une garde
ou autre pièce endommagée devrait être
correctement réparée ou remplacée par un
centre de service autorisé à moins d’avis
contraire ailleurs dans ce manuel.
Faire remplacer l’interrupteur défectueux
par un réparateur agréé.
Ne pas utiliser la tronçonneuse si la
gâchette ne commande pas la mise
en marche et l’arrêt; la chaîne doit
s’immobiliser dès qu’on lâche la gâchette.
Ne pas utiliser la tronçonneuse si elle est
abîmée, mal réglée ou incomplètement
assemblée. ; la chaîne doit s’immobiliser
dès qu’on lâche la gâchette.
16) Prenez garde aux effets de rebond
AVERTISSEMENT: Un recul peut se
produire lorsque le nez ou le bout de
la guide-chaîne touche un objet ou lorsque
le bois se resserre et pince la chaîne de la
tronçonneuse dans la coupe. Dans certains
cas, un contact du bout peut provoquer une
réaction inverse extrêmement rapide,
propulsant la guide-chaîne vers le haut et
vers l’arrière en direction de l’opérateur. Un
pincement de la chaîne de la tronçonneuse
le long de la partie supérieure de la
guidechaîne peut repousser rapidement la
guide-chaîne vers l’opérateur. Ces réactions
peuvent toutes deux provoquer une perte
de contrôle de la tronçonneuse pouvant
entraîner des blessures graves pour
l’utilisateur.
On peut prendre les mesures suivantes
Page 24

Tronçonneuse électrique prime F
2524
pour réduire le risque de recul :
(1) Tenir l’outil d’une poigne ferme.
Se servir des deux mains pour
tenir la tronçonneuse pendant son
fonctionnement. Tenir l’outil d’une
poigne ferme. Les pouces et les doigts
doivent enveloper les poignées.
(2) N’essayez pas d’utiliser l’appareil hors
de votre portée normale.
(3) Gardez votre équilibre et les pieds bien
ancrés au sol.
(4) Ne pas laisser le nez de la guide-chaîne
toucher un objet pendant que la chaîne
est en mouvement.
(5) Ne pas essayer d’atteindre trop loin ni
de couper au-dessus de la hauteur de
l’épaule.
(6) Cette tronçonneuse est munie d’une
chaîne à faible recul et d’une guidechaîne à recul réduit. Ces deux éléments
réduisent le risque de recul.
(7) Utilisez uniquement les guides et
chaînes de rechange recommandées par
le fabricant ou leur équivalent.
17) Prise de courant
Utiliser uniquement la tension de
courant électrique indiquée sur la plaque
signalétique de la tronçonneuse.
18) AVERTISSEMENT: Lors de
l’utilisation de la tronçonneuse,
porter
l’équipement de sécurité suivant protection
des yeux telle que lunettes de sécurité!
CONSERVEZ CES INSTRUCTIONS
Précautions de sécurité générales pour les
utilisateurs de tronçonneuse
1. N’utilisez pas la tronçonneuse lorsque vous
êtes fatigué. Soyez plus prudent avant les
périodes de repos et vers la fin de votre
période de travail.
2. Lors de l’utilisation de la tronçonneuse,
porter l’équipement de sécurité suivant
sécurité à bout acier, gants en caoutchouc,
serre-tête antibruit, casque de sécurité
NOTE: les vêtements de protection
individuelle doivent être conformes aux
normes applicables.
3. Lors de la coupe, gardez une distance d’au
moins deux arbres de vos collègues.
4. Avant de couper, toujours prévoir
les elements suivants un chemin de
dégagement pour s’écarter de l’arbre qui
tombe.
5. S’assurer d’avoir lu et compris toutes les
directives de la rubrique Consignes de
Sécurité Importantes. Se servir des deux
mains pour tenir la tronçonneuse pendant
son fonctionnement. Garder les poignées
sèches, propres et sans traces d’huile ou de
graisse.
6. Lorsque vous transportez votre
tronçonneuse, utilisez les housses de
transport adéquates que vous devriez
avoir reçues avec le guide-chaîne et la
tronçonneuse.
7. Ne pas utiliser la tronçonneuse quand on
se trouve sur un arbre ou une échelle, à
moins d’avoir été formé spécialement.
8. Faites attention aux effets de rebond.
Un recul peut se produire lorsque le nez
ou le bout de la guide-chaîne touche un
objet ou lorsque le bois se resserre et
pince la chaîne de la tronçonneuse dans
la coupe. Ces réactions peuvent toutes
deux provoquer une perte de contrôle de
la tronçonneuse pouvant entraîner des
blessures graves pour l’utilisateur.
9. Se servir des deux mains pour
tenir la tronçonneuse pendant son
fonctionnement. Ne jamais la tenir d’une
seule main pendant son fonctionnement.
10. Voir la définition des symboles.
11. Maintenir enfants, animaux et toutes
personnes présentes à l’écart de la
tronçonneuse et de la rallonge électrique.
12. Couper la broussaille peu épaisse et les
jeunes pousses avec grandes précautions
car ces matériaux légers peuvent se
prendre dans la chaîne et être projetés vers
l’utilisateur.
13. Quand on coupe une branche ou un tronc
d’arbre sous tension, faire également
très attention. Le bois fait ressort : quand
la tension disparaît, la branche projetée
risque de heurter l’utilisateur, entraînant
des blessures graves ou la mort.
14. La CSA a classifié cette tronçonneuse
électrique dans la Classe 2C. Elle est
conçue pour être utilisée sporadiquement
Page 25

2524
2524
Tronçonneuse électrique prime F
par les propriétaires de maison et de chalet
et les campeurs. Elle peut également servir
à effectuer des tâches générales telles que
le déblaiement, l’émondage, la coupe de
bois de chauffage, etc. et n’est pas conçue
pour être utilisée de façon prolongée.
SYMBOLES
Avertissement
l’utilisateur doit lire ce mode
d’emploi
Lunettes de sécurité/visière-écran,
casque protecteur et dispositif de
protection anti-bruit
Gants avec protecteurs contre la
tronçonneuse
Bottes avec protecteurs contre la
tronçonneuse, embout de sécurité
et semelle antidérapante
Direction adéquate des maillons
coupants
Frein de chaîne
AVERTISSEMENT! Prenez garde aux
effets de rebond
Évitez le contact avec le nez de
guide
N’utilisez pas d’une seule main
Tenez la tronçonneuse
adéquatement avec les deux mains.
Double isolation
L’angle de rebond de la
10º
tronçonneuse est de 10º, avec un
frein de chaîne.
Page 26

Tronçonneuse électrique prime F
2726
ASSEMBLAGE
AVERTISSEMENT! Avant de régler
la tension de la chaîne, débrancher
le cordon de la prise de courant.
Porter des gants de protection pour
manipuler la chaîne.
ASSEMBLAGE DU GUIDE-CHAÎNE ET DE
LA CHAÎNE
1. Déballez les pièces avec précaution.
2. Placez la tronçonneuse sur une surface
plane.
3. N’utilisez que des chaînes WORX
authentiques conçues pour les guidechaînes.
4. Glissez la chaîne (8) dans la fente autour
du guide-chaîne (7). En vous référant au
symbole de chaîne (14), assurez-vous
que la chaîne est dans la bonne direction
de coupe. Assurez-vous que le doigt
d’entraînement du tensionnement de la
chaîne (18) est face à l’extérieur. (Fig. A2)
5. Assemblez la chaîne dans le pignon
d’entraînement (13) et orientez le guidechaîne(7) de sorte à ce que le boulon de
fixation (17) et les deux doigts de guidage
(15) puissent s’emboîter dans le chemin de
clavette du guide-chaîne (7). (Fig. B)
6. Vérifiez si toutes les pièces sont bien
logées et tenez la chaîne et le guide-chaîne
à niveau. (Fig. C1)
7. Mettez la plaque de couverture, vérifiez
si les flèches sont toujours alignées
et assurez-vous que le boulon de
tensionnement de la chaîne (20) est bien
ajusté dans la rainure de guide de la
plaque de couverture (11). (Fig. C2)
8. Vissez sur la plaque de couverture (11)
avec le bouton de verrouillage(10). (Fig. D)
La chaîne n’est pas encore tensionnée.
Le tensionnement de la chaîne doit
être effectué tel qu’expliqué dans «
Tensionnement de la chaîne ».article 1-7.
TENSION DE LA CHAÎNE
Les nouvelles chaînes ont tendance à s’étirer.
Vérifi ez fréquemment la tension de la chaîne
les premières fois que vous vous en servirez;
resserrez la chaîne lorsqu’elle semble lâche au
niveau du guide-chaîne.
AVERTISSEMENT : Avant de régler
la tension de la chaîne, débrancher
le cordon de la prise de courant.
AVERTISSEMENT : Les tranchants
de la chaîne sont affûtés. Porter
des gants de protection pour manipuler
la chaîne.
AVERTISSEMENT : Toujours
maintenir la chaîne tendue
correctement.
Une chaîne détendue augmente le risque
de recul. De plus, elle risque de sauter
hors de la rainure de la guidechaîne.
Ceci pourrait blesser l’utilisateur et
endommager la chaîne. En outre, une
chaîne détendue provoque l’usure rapide
de la chaîne, de la guide-chaîne et du
pignon.
1. Déposer la chaîne à plat.
2. Tournez le bouton de verrouillage/poignée
de tension de la chaîne (10) dans le sens
des aiguilles d’une montre avec cliquetis
jusqu’à l’obtention de la bonne tension
de chaîne. La tension correcte de la
chaîne sera atteinte automatiquement.
Le mécanisme à cliquet (a)E2 empêche la
tension de la chaîne de se desserrer. (Fig.
E2)
3. La bonne tension de chaîne est obtenue
lorsque le (8) de la chaîne peut être monté
à environ 3-6 mm du guide-chaîne au
centre. Ceci doit être effectué en utilisant
une main afin d’élever la chaîne contre le
poids de la machine. (Fig. E1)
4. Lorsque la chaîne prend du jeu, dévissez
en entier le bouton de blocage/le bouton
de tension de la chaîne puis revissez
fermement le sur le plateau du couvercle.
LUBRIFICATION
AVERTISSEMENT ! La tronçonneuse
ne vient pas remplie d’huile. Vous
devez absolument la remplir d’huile
avant de l’utiliser. Ne faites jamais
fonctionner la tronçonneuse sans huile à
chaîne ou lorsque le réservoir d’huile est
vide, car cela pourrait causer de graves
dommages au produit.
Une lubrification optimale influence la
Page 27

2726
2726
Tronçonneuse électrique prime F
durée de vie de la chaîne et sa capacité
de coupe. Par conséquent, la chaîne est
automatiquement huilée par la sortie d’huile
pendant le fonctionnement.
Remplissage du réservoir d’huile:
1. Mettez la tronçonneuse sur n’importe
quelle surface en prenant soin de placer
le bouchon de remplissage d’huile vers le
haut.
2. Nettoyez la zone se trouvant autour du
bouchon de remplissage d’huile avec un
linge et prenez soin de dévisser le bouchon.
3. Ajoutez l’huile pour tronçonneuse WORX
jusqu’à ce que le réservoir soit plein.
4. Évitez que de la saleté ou des débris
ne s’infiltrent dans le réservoir d’huile,
remettez le bouchon de remplissage d’huile
(4) et serrez.
AVERTISSEMENT : Afin de
permettre au réservoir d’huile de
ventiler, de petits canaux de reniflards
sont insérés entre le bouchon de
remplissage d’huile et la crépine. Afin
d’éviter les fuites, assurez-vous que
la machine est en position horizontale
(bouchon de remplissage d’huile (4) en
dessous) lorsque vous ne l’utilisez pas.
Afin d’éviter des dommages à la
tronçonneuse, il est important d’utiliser
seulement l’huile recommandée.
N’utilisez jamais d’huile recyclée/vieille.
L’utilisation d’une huile non approuvée
annule la garantie.
Vérification de l’huileuse automatique
Vous pouvez vérifier le bon fonctionnement de
l’huileuse automatique en faisant fonctionner
la tronçonneuse et en pointant le bout du
guide-chaîne vers un morceau de carton ou
vers le sol. Attention : Ne laissez pas la chaîne
toucher le sol. Assurez-vous qu’il y a un
espace sécuritaire de 20 cm. Si l’huile semble
se distribuer, alors l’huileuse automatique
fonctionne correctement. Si l’huile ne semble
pas se distribuer malgré que le réservoir soit
plein, communiquez avec un agent du service
à la clientèle ou un agent de service approuvé
WORX.
OPÉRATION
1. INTERRUPTEUR MARCHE/ARRÉT DE
SÉCURITÉ (Fig. F)
AVERTISSEMENT! Utiliser
uniquement la tension de courant
électrique indiquée sur la plaque
signalétique de la tronçonneuse.
Afin d’éviter les démarrages accidentels un
système de sécurité de l’interrupteur Marche –
Arrêt est installé sur cette scie circulaire. Pour
démarrer votre scie circulaire, appuyez sur
le bouton de sécurité puis sur l’interrupteur
Marche – Arrêt. L’interrupteur Marche – Arrêt
est alors actif et vous pouvez relâcher la
pression sur le bouton de verrouillage.
Lorsque vous relâchez complètement
l’interrupteur Marche – Arrêt votre machine
s’arrête et le système de sécurité de
l’interrupteur Marche – Arrêt se ré-active.
Après avoir scié, n’arrêtez pas la tronçonneuse
en activant le protège-main avant (frein de
rebond).
2. FREIN DE REBOND (Fig. G1)
Le frein de rebond est un dispositif de sécurité
que l’on peut activer avec le protège-main
avant (5) lorsque l’effet de rebond survient. La
chaîne s’arrête immédiatement.
La vérification de fonctionnement
suivante doit être effectuée à intervalles
réguliers. Tirez sur le protège-main avant
(5) vers l’avant (position ) et démarrez la
tronçonneuse. La chaîne n’est pas suppose
démarrer. Pour désactiver le frein de rebond,
relâchez l’interrupteur marche-arrêt (2) et
poussez le protège-main (5) vers l’arrière
(position ).
COUPE
-le réservoir d’huile est-il rempli? Vérifiez
l’indicateur de niveau d’huile (19) avant de
démarrer et faites-le régulièrement pendant
la période d’utilisation. Remplissez l’huile
lorsque le niveau est bas. Un remplissage de
réservoir d’huile durera environ 16 minutes
selon l’intensité du sciage et la fréquence des
arrêts. (Fig. G2)
Vérifiez la tension de la nouvelle chaîne
remplacée environ toutes les dix minutes
Page 28

Tronçonneuse électrique prime F
2928
pendant la période d’utilisation.
1. Relier la tronçonneuse à une rallonge
électrique. Brancher la rallonge à une prise
de courant.
2. La section de bille à tronçonner ne doit
pas se trouver sur le sol. Ceci évite que
la chaîne ne touche le sol à la fi n du
tronçonnage. Une chaîne en mouvement
qui touche le sol s’émousse.
3. Se servir des deux mains pour tenir la
tronçonneuse. Toujours utiliser la main
gauche pour saisir la poignée avant et la
main droite pour saisir la poignée arrière.
Tenir fermement. Les pouces et les doigts
doivent entourer les poignées.(Fig. H)
4. Veiller à maintenir un bon équilibre.
Garder les pieds écartés. Répartir le poids
également sur les deux pieds.
5. Lorsqu’on est prêt à faire une coupe,
pousser complètement vers l’avant avec
le pouce droit le bouton de verrouillage
et appuyer sur la gâchette. Ceci met la
tronçonneuse en marche. Elle s’arrête
quand on lâche la gâchette. S’assurer que
la chaîne tourne à la vitesse maximum
avant d’entamer l’entaille.
6. Au moment d’entamer l’entaille, placer
la chaîne en mouvement contre le bois.
Tenir la tronçonneuse fermement en place
pour éviter qu’elle rebondisse ou dérape
(movement latéral).
7. Guider l’outil en exerçant une légère
pression. Ne pas forcer dessus. Le moteur
serait surcharge et pourrait griller. Il
fonctionnera de façon plus effi cace et
plus sûre à la vitesse pour laquelle il a été
prévu.
8. Retirer la tronçonneuse d’une coupe en
gardant la tronçonneuse à pleine vitesse.
Arrêter la tronçonneuse en relâchant
la gâchette. S’assurer que la chaîne est
arrêtée avant de poser la tronçonneuse.
9. S’exercer à scier jusqu’à ce qu’on puisse
maintenir une allure régulière.
DISPOSITIFS DE PROTECTION CONTRE
LE RECUL SUR CETTE TRONÇONNEUSE
Cette tronçonneuse est munie d’une chaîne
à faible recul et d’une guide-chaîne à recul
réduit. Ces deux éléments réduisent le risque
de recul. Cependant, celui-ci peut encore se
produire.
On peut prendre les mesures suivantes pour
réduire le risque de recul :
• Se servir des deux mains pour
tenir la tronçonneuse pendant son
fonctionnement. Tenir l’outil d’une poigne
ferme. Les pouces et les doigts doivent
enveloper les poignées.
• Tous les dispositifs de sécurité doivent être
maintenus en place sur la tronçonneuse.
S’assurer qu’ils fonctionnent correctement.
• Ne pas essayer d’atteindre trop loin ni
de couper au-dessus de la hauteur de
l’épaule.
• Garder en permanence un solide appui au
sol et un bon équilibre.
• Se tenir légèrement à gauche de l’outil.
Le corps n’est pas ainsi en prolongement
direct de la chaîne.
• Ne pas laisser le nez de la guide-chaîne
toucher quelque chose quand la chaîne est
en mouvement.
• Ne jamais essayer de couper deux billes
en même temps. En couper seulement une
à la fois.
• Ne pas enfouir le nez de la guide-chaîne ni
essayer de couper en plongeant (faire un
trou dans le bois en enfonçant le nez de la
guide-chaîne).
• Surveiller le mouvement du bois ou
les autres forces qui pourraient pincer
lachaîne.
• Faire très attention quand on repénètre
dans une entaille.
• Utiliser la chaîne à faible recul et
la guidechaîne fournies avec cette
tronçonneuse.
• Ne jamais utiliser une chaîne émoussée
ou détendue. Maintenir la chaîne affûtée et
tendue correctement.
COMPORTEMENT GÉNÉRAL
Veiller à maintenir un bon équilibre. Tenez la
tronçonneuse sur le côté droit de votre corps.
(Fig. I)
Voir Rallonges Électriques pour connaître
le calibre approprié. Avant de commencer à
couper, utilisez le maillon de prise dents en
métal afin de fixer la tronçonneuse au bois.
Page 29

2928
2928
Tronçonneuse électrique prime F
Lors de la coupe, utilisez le maillon de prise
dents avec la prise « a ». (Fig. J)
Ne pas utiliser la tronçonneuse quand on
est sur une échelle ou toute autre surface
instable. Ne pas couper de branches audessus de la hauteur de l’épaule.(Fig. K)
COUPER DU BOIS SOUS TENSION (Fig. L)
AVERTISSEMENT: Pour couper une
branche sous tension, faire très
attention. Veiller au bois qui fait ressort:
quand la tension disparaît, la branche
projetée risque de heurter l’utilisateur,
entraînant des blessures graves ou la
mort.
La bille est soutenue aux deux extrémités.
Faire la première entaille à partir du dessus
de la bille. Scier sur le tiers du diamètre
de la bille. Faire la seconde entaille sur le
dessous de la bille, directement au-dessous
de la première. La bille est soutenue à une
extrémité,faire la première entaille sur le
dessous de la Bille. Scier sur le tiers du
diamètre de la bille. Faire la seconde entaille
directement au-dessus de la première. Aller
jusqu’à la rencontre de la première entaille.
Ceci permet d’éviter le pincement de la guidechaîne et de la chaîne.
ABATTAGE D’UN ARBRE (Fig. M)
Lors de l’utilisation de la tronçonneuse, porter
l’équipement de sécurité suivant casque de
sécurité.
La tronçonneuse peut être utilisée
seulement pour abattre des arbres qui
sont plus petits en diamètre que la
longueur du guide-chaîne.
Assurez-vous que l’espace de travail
est sécuritaire. L’utilisateur seul doit
se trouver dans la zone de travail.
N’essayez jamais de décoincer
une tronçonneuse bloquée lorsque
le moteur fonctionne. Utilisez les
bondieux afin de décoincer la chaîne
et le guide-chaîne.
Si deux ou plusieurs personnes participent
aux travaux de tronçonnage et d’abattage
en meme temps, prévoir un espace suffi
sant entre les différentes opérations. Il faut
une distance au moins égale à deux fois la
hauteur de l’arbre à abattre.
Lors de l’abattage d’un arbre, bien
étudier les alentours. Ne mettre
personne en danger. Veiller à ne
pas heurter de lignes de services
publics et à ne pas causer de dégâts
matériels. Si l’arbre heurte une
ligne de service public, contacter
immédiatement les responsables.
Lors de l’abattage d’un arbre, rester du
côté amont de la pente car il pourrait
rouler ou glisser après sa chute.
Avant d’abattre un arbre, prévoir un
chemin de dégagement et le dégager. Le
prévoir à l’opposé de la direction de chute
de l’arbre.
Étudier l’inclinaison naturelle de l’arbre,
l’emplacement des grosses branches et
la direction du vent. Ceci aide à juger où
l’arbre va tomber.
Débarrasser l’arbre où l’on va effectuer
les entailles de saleté, cailloux, écorce
détachée, clous, agrafes et fi l de fer qui
pourraient s’y trouver.
Siffl et d’abattage: Faire l’entaille inférieure
aussi près du sol que possible. Tenir la
tronçonneuse de manière à ce que la guidechaîne soit horizontale. Tailler sur
(x-w)1/3 du diamètre du tronc d’arbre.
Toujours commencer par faire cette entaille
inférieure horizontale. Si l’on fait cette entaille
en second, l’arbre risque de pincer la chaîne
ou la guide-chaîne.
AVERTISSEMENT : Ne pas scier
l’arbre complètement. Laisser
environ 50mm (2 po) de bois non
scié directement derrière le siffl et
d’abattage. (Fig M) Cette partie non
sciée sert de charnière(Y). La charnière
empêche l’arbre de se tordre et de
tomber dans la mauvaise direction.
Lorsque le trait d’abattage approche de la
charnière, l’arbre doit commencer à tomber.
Si nécessaire, enfoncer des coins dans le trait
d’abattage pour contrôler la direction de la
chute. Si l’arbre revient en arrière et pince
la chaîne, enfoncer des coins dans le trait
d’abattage pour libérer la tronçonneuse.
Lorsque l’arbre commence à tomber, faire très
Page 30

Tronçonneuse électrique prime F
3130
rapidement les opérations suivantes :sortir
la tronçonneuse du trait d’abattage ;lâcher la
gâchette pour arrêter la tronçonneuse;poser
la tronçonneuse sur le sol ;s’éloigner par le
chemin de dégagement.
Pour compléter l’abattage, dressez un coin
d’abattage (Z) dans la coupe horizontale.
ÉBRANCHAGE (Fig. N)
L’ébranchage est la coupe des branches
d’un arbre tombé. Ne pas retirer les grosses
branches sous l’arbre qui soutiennent le tronc
surélevé. Retirer chaque branche d’une seule
coupe. Pour éviter le pincement, entamer
l’entaille sur des branches libres, à partir du
dessus de la branche. Pour les branches sous
tension, entamer l’entaille à partir du dessous
de la branche.
TRONÇONNAGE D’UNE BILLE (Fig. O)
Le tronçonnage d’une bille se fait en la
coupant en tronçons. Veiller à maintenir
un bon équilibre. Garder les pieds écartés.
Répartir le poids également sur les deux
pieds. Se tenir légèrement à gauche de la
tronçonneuse. Ceci évite que le corps ne soit
en prolongement direct de la chaîne. Autant
que possible, soulever la bille ou le tronçon
audessus du sol. Pour ce faire, utiliser des
branches, tronçons, cales, etc. Procéder de la
façon suivante pour tronçonner une bille.
Tronçonner la bille à partir du dessus.
La bille est soutenue à une extrémité, Faire la
première entaille sur le dessous de la
bille. Scier sur le tiers du diamètre de la bille.
Cette entaille permet d’éviter la production
d’éclats de bois. (Fig. P)
La bille est soutenue aux deux extrémités,
Faire la première entaille à partir du dessus
de la bille. Scier sur le tiers du diamètre 2/3
de la bille. Cette entaille permet d’éviter la
production 1/3 d’éclats de bois. (Fig. Q)
AVERTISSEMENT : (Fig. R)
• Si l’on se trouve sur une pente,
s’assurer que la bille ne roulera pas.
La maintenir en place à l’aide de
piquets de bois. Enfoncer les piquets
dans le sol du côté aval par rapport à
la bille. Se tenir du côté amont de la
bille pour tronçonner car les tronçons
risquent de rouler.
• Ne jamais essayer de tronçonner
deux billes à la fois. Ceci pourrait
augmenter le risque de recul.
• Pendant le tronçonnage d’une bille,
ne jamais tenir la bille avec la main,la
jambe ou le pied.
• Pendant le tronçonnage d’une bille, ne
jamais laisser quelqu’un d’autre tenir
la bille.
• Arrêter la tronçonneuse et la
débrancher avant de la déplacer d’un
endroit à un autre.
ENTRETIEN DE LA
TRONÇONNEUSE ET
PROTECTION CONTRE LE
RECUL
Suivre les instructions d’entretien fi gurant
dans ce manuel. Les risques de recul peuvent
être réduits par le nettoyage et l’entretien
adéquats de l’outil, de la chaîne, de la guidechaîne. Après chaque utilisation, inspecter la
tronçonneuse et l’entretenir. Ceci prolonge sa
durée en service.
NOTE: Même si la chaîne est affûtée
correctement, le risque de recul peut
augmenter à chaque affûtage.
ENTRETIEN ET REMISAGE
DE LA TRONÇONNEUSE
1. Débrancher le cordon de la prise de
courant:
• Quand on n’utilise pas la tronçonneuse,
• Avant de la déplacer d’un endroit à un
autre,
• Avant de procéder à son entretien,
• Avant de changer des accessoires, tels
que la chaîne et l’écran de protection de la
tronçonneuse.
2. Inspecter la tronçonneuse avant et après
chaque utilisation. Bien contrôler l’outil si
une protection ou une pièce quelconque
a été endommagée. Bien vérifi er pour
Page 31

3130
3130
Tronçonneuse électrique prime F
déceler tout dégât pouvant affecter la
sécurité de l’utilisateur ou le fonctionnement
de l’outil. Vérifi er que les pièces mobiles
sont bien alignées et ne sont pas coincées.
Vérifi er qu’il n’y a pas de pièces cassées
ou endommagées. Ne pas utiliser la
tronçonneuse si les dégâts affectent la
sécurité ou son fonctionnement. Faire
remettre l’outil en état par un réparateur
agréé.
3. Se servir de l’outil avec précaution :
• Ne jamais l’exposer à la pluie.
• Garder la chaîne affûtée, propre et lubri
ée pour améliorer le rendement et la
sécurité.
• Suivre la procédure décrite dans ce
manuel pour l’affûtage de la chaîne.
• Garder les poignées sèches, propres et
sans traces d’huile ou de graisse.
• Garder vis et écrous bien serrés.
• Inspecter souvent le cordon d’alimentation
électrique. S’il est abîmé, le faire remettre
en état par un réparateur agréé.
• Ne jamais transporter la tronçonneuse
en la tenant par le cordon d’alimentation
électrique.
• Ne jamais tirer sur le cordon pour
débrancher la fi che de la prise de courant.
• Tenir le cordon à l’écart de la chaleur, de
l’huile et des bords coupants.
• Inspecter souvent les rallonges et les
remplacer si elles sont abîmées.
4. Pour la réparation, utiliser uniquement des
pièces de rechange identiques.
5. Lorsqu’on ne s’en sert pas, toujours ranger
la tronçonneuse
• Dans un endroit en hauteur ou verrouillé,
hors de la portée des enfants,
• Dans un endroit sec,
• Dans une malette de transport ou avec un
fourreau recouvrant la guide-chaîne.
de rechange spéci- fi ée dans ce manuel.
Toujours remplacer le pignon d’entraînement
par un neuf lors du remplacement de la
chaîne. On obtient ainsi l’entraînement correct
de la chaîne.
Inspecter la guide-chaîne avant d’affûter
la chaîne. Une guide-chaîne usée ou
endommagée présente des dangers. Elle
endommage la chaîne. Le sciage devient
également plus diffi cile.
Positionnez le doigt d’entraînement du
tensionnement dans le nouveau guide en
resserrant la vis dans le sens des aiguilles
d’une montre. Le doigt fendu (b) doit être fixé
au trou du guide. (Fig. S)
AFFÛTAGE DE LA CHAÎNE
AVERTISSEMENT : Avant de
procéder à l’entretien, débrancher
la tronçonneuse de la prise de courant.
Des blessures graves ou la mort
peuvent être provoquées par les chocs
électriques et le contact du corps avec
la chaîne en mouvement.
AVERTISSEMENT : Les tranchants
de la chaîne sont affûtés. Porter
des gants de protection pour manipuler
la chaîne.
Maintenir la chaîne affûtée. La tronçonneuse
scie plus rapidement et de façon plus
sécuritaire. Une chaîne émoussée provoque
l’usure prématurée du pignon, de la
guide-chaîne, de la chaîne et du moteur.
Si l’utilisateur est contraint de forcer sur la
chaîne pour la faire entrer dans le bois et si
le sciage ne produit que de la sciure avec
peu de gros copeaux, c’est que la chaîne est
émoussée.
Remplacement de la chaîne/ guidechaîne
Remplacer la chaîne lorsque les taillants
sont trop usés pour être affûtés ou lorsque la
chaîne casse. Utiliser uniquement la chaîne
Page 32

Sierra eléctrica ES
3332
1. MANGO TRASERO
2. INTERRUPTOR DE
3. INTERRUPTOR DE DESTRABADO
4. TAPA DEL TANQUE DE ACEITE
5. PALANCA DE ACTIVACIÓN DEL FRENO DE CONTRAGOLPES (GUARDA DE MANO)
6. MANGO DELANTERO
7. BARRA DE GUÍA
8. CADENA SERRADA
9. DIENTES DE AGARRE
10. PERILLA DE BLOQUEO / PERILLA DE TENSIÓN DE LA CADENA
11. PLACA DE CUBIERTA
12. CUBIERTA DE PROTECCIÓN DE LA CUCHILLA
13. CADENA DENTADA IMPULSORA
14. SÍMBOLO DE ROTACIÓN Y DIRECCIÓN DE CORTE
15. ALETAS DE GUÍA DE LA BARRA DE CADENA
16. SALIDA DE ACEITE
17. PERNO DE SUJECIÓN
18. CIERRE DE TENSIÓN DE LA CADENA
19. INDICADOR DE NIVEL DE ACEITE (Fig. H)
20. PERNO DE CIERRE DE LA CADENA (Fig. C2)
* Tenga en cuenta que todos los accesorios ilustrados o descritos se encuentran
incluidos en una entrega estándar.
Page 33

3332
3332
Sierra eléctrica ES
DATOS TÉCNICOS
WG300 WG303 WG304
Voltios 120V~60Hz 120V~60Hz 120V~60Hz
Velocidad 14A 14.5A 15A
Longitud de la barra 14“ 16“ 18“
Velocidad de la cadena 10m/s 12m/s 12m/s
Capacidad del depósito de
aceite
Paso de la cadena 3/8” 3/8” 3/8”
Número de eslabones 53 57 63
Calibre de la cadena 0.05” 0.05” 0.05”
Tipo de cadena
Tipo de barra
Peso 10.8 libras(4.9kg) 11 libras(5kg) 11.2 libras(5.1kg)
Clase de protección
200ml 200ml 200ml
Oregon
(91VG053X)
Oregon,
(140SCEA041)
/II /II /II
Oregon
(91VG057X)
Oregon,
(160SCEA041)
(180SCEA041)
Oregon
(91VG063X)
Oregon,
ACCESORIOS
WG300 WG303 WG304
Aceite lubricante 100ml 100ml 100ml
Cubierta de protección de la cuchilla 1 1 1
Cadena serrada 1 1 1
Barra de guía 1 1 1
Le recomendamos que compre todos los accesorios en la tienda donde adquirió la herramienta.
Use accesorios de buena calidad una marca bien conocida. Seleccione los que más convengan
al trabajo que intenta hacer. Consulte el empaque de los accesorios para obtener más detalles. El
personal de la tienda también puede ayudarle y aconsejarle.
Page 34

Sierra eléctrica ES
3534
Asegúrese de leer y comprender
completamente todas las instrucciones
en información importante de seguridad.
Lea todas las instrucciones
¡ADVERTENCIA! Cuando se emplean
herramientas eléctricas para jardinería,
siempre deben seguirse ciertas pautas
básicas de seguridad a fin de reducir el riesgo
de incendio, descarga eléctrica o lesión seria,
incluyendo las siguientes:
1. ¡ADVERTENCIA! No utilice una cadena de
reemplazo a menos que:
a) Cumpla con los requisitos de rendimiento
de contragolpe ANSI B175 en dicho cabezal
motriz;
b) Haya sido designada como una cadena de
“contragolpe reducido” de acuerdo con
ANSI B175.1; o
c) Es el número de cadena (o equivalente) del
catálogo de reemplazo del fabricante de la
sierra.
Cadena de contragolpe reducid –Cadena
que educe las probabilidades de
contragolpe según la orma ANSI B175.1-
1991.
2. Utilice cables de prolongación adecuados
para esta sierra. Utilice sólo cables de
prolongación para el aire libre. El tamaño
deberá ser 14 AWG o más. El uso
de un cable demasiado fi no perderá voltaje
al llegar a la sierra. La sierra perderá potencia
y recalentará. Asegúrese de que el cable de
extensión esté en buenas condiciones antes
de utilizarlo. Mantenga el cable lejos del área
de corte. Asegúrese de que no se enriede en
ramas o troncos.
3. NOMENCLATURA (Fig A1)
a) Desmembramiento –El proceso de cortar
ramas de un árbol talado.
b) Freno de cadena – Dispositivo utilizado
para detener la sierra de cadena.
c) Cabezal –La sierra eléctrica sin la cadena ni
la arra de guía.
d) Acoplamiento – Mecanismo para conectar
o desconectar un miembro impulsado
hacia o desde una fuerte giratoria de
energía.
e) Rueda dentada–Rueda dentada que
impulsa la cadena.
f) Talar –El proceso de cortar y derribar
unárbol.
g) Tala fi nal –El último corte que se realiza
al talar un árbol. Debe realizarse del lado
opuesto a las muescas.
h) Mango anterior (6)–Se encuentra en la
parte frontal de la sierra.
i) Protector de mano frontal(5)–Escudo entre
el ango frontal y la barra de guía. Protege
la ano izquierda mientras se utiliza la
sierra.
j) Barra de guíar(7)–La barra de guía sostiene
y guía la cadena serrada.
k) Contragolpe –Movimiento rápido hacia
arriba y acia atrás de la barra de guía. Los
contragolpes ueden producirse cuando
el extremo de la barra e guía toca algún
objeto mientras la cadena e halla en
movimiento. La barra de guía se acude
hacia arriba y hacia atrás, en dirección l
operario.
l) Contragolpe, Presión –Retroceso ápido de
la sierra eléctrica. Puede ocurrir si a parte
de la cadena que se encuentra sobre la
arra de guía queda presionada, atrapada o
toca lgún objeto extraño.
m) Contragolpe, Giratorio – Movimiento
rápido hacia arriba y atrás de la sierra
que puede ocurrir cuando la cadena de la
sierra en movimiento cerca de la porción
superior de la punta de la barra de guía
entra en contacto con un objeto, como por
ejemplo, un tronco o rama.
n) Cadena de contragolpe reducid –Cadena
que educe las probabilidades de
contragolpe según la orma ANSI B175.1-
1991.
o) Posición de corte normal –Postura utilizada
alrealizar cortes para talar un árbol.
p) Corte de la muesca –Sujete la sierra e
modo que la barra de guía se encuentre en
osición horizontal.
q) Control de lubricación –Sistema para
lubricar la cadena y la barra de guía.
r) Cuerpo de la unidad (1) –Cuerpo principal
de lasierra de cadena.
s) Barra de guía de contragolpe reducido
–Barra de guía que reduce las
Page 35

3534
3534
Sierra eléctrica ES
probabilidades de contragolpe.
t) Cadena de repuesto –Cadena que satisface
la norma ANSI B175.1 -1991 cuando se la
utiliza con una sierra específi ca. Puede no
satisfacer las exigencias de ANSI si se la
utiliza con otras sierras.
u) Cadena(8) –Una cadena cerrada que tiene
eslabones dentados para cortar madera. El
motor impulsa la cadena y la barra de guía
la sostiene.
v) Dientes de fi jación(9) –Protuberancias
(“dientes”) que se hallan en la sección
frontal cabezal, junto a la barra de guía.
Mantenga estos dientes en contacto con
la madera al talar o trozar, ya que esto
contribuye a mantener la posición de la
sierra al cortar.
w) Interruptor (2)–Dispositivo que cierra o
interrumpe el circuito eléctrico del motor
de la sierra.
x) Vínculo con el interruptor –Este dispositivo
conecta el interruptor con el gatillo. Al
oprimirse el gatillo, este vínculo mueve el
interruptor.
y) Traba de seguridad(3)–Dispositivo que
impide el accionamiento accidental de la
sierra.
PARA TODAS LAS HERRAMIENTAS DE
DOBLE AISLACIÓN
1) Piezas de repuesto.
Toda vez que efectúe un servicio técnico
emplee piezas de repuesto idénticas.
2) Conexiones polarizadas de la herramienta.
Para reducir el riesgo de descarga eléctrica,
esta herramienta posee un enchufe
polarizado (un perno es más ancho que
el otro). El enchufe de la herramienta se
inserta en el cable prolongador polarizado
de un único modo. Si aún así no se inserta,
acuda a un electricista calificado para
instalar el tomacorriente apropiado. Bajo
ningún concepto cambie el enchufe del
equipo ni el enchufe o el receptáculo del
prolongador.
PARA TODAS LAS HERRAMIENTAS
1) Mantenga su lugar de trabajo limpio y bien
iluminado.
Bancos de trabajo desordenados y lugares
oscuros invitan a los accidentes.
Antes de comenzar a cortar, asegúrese de
contar con: zona de trabajo limpia; calzado
firme; camino de retirada para el momento
de caída del árbol.
2) Evite ambientes peligrosos.
Al cortar matorrales y plantas tiernas,
proceda con cuidado. Los materiales finos
pueden atascarse en la cadena y azotar
contra su cuerpo o provocar que pierda el
equilibrio.
No utilice la sierra cuando esté arriba de
un árbol o sobre una escalera, a menos
que se encuentre capacitado para hacerlo.
Proceda con sumo cuidado al cortar ramas
o vástagos de árboles que se encuentran
en tensión. Esté preparado para actuar
en caso de contragolpe de la madera. Al
liberarse la tensión de la Madera.
No trabaje bajo la lluvia.
No utilice las herramientas en lugares
húmedos o mojados.
No utilice la sierra en presencia de líquidos
o gases altamente inflamables
3) Para protegerse de un shock eléctrico,
evite el contacto corporal con objetos
conectados a tierra tales como caños,
vallas, cercas y postes de metal.
4) Mantenga alejados a los niños.
Mantenga a los niños, animales y
observadores alejados de la sierra y del
cable de prolongación.
Todos los visitantes deben mantenerse a
distancia del área de trabajo.
5) Guarde las herramientas que no usa en
lugares cerrados.
Cuando no se encuentran en uso, las
herramientas deben guardarse en un lugar
seco, elevado o cerrado con llave, lejos del
alcance de los niños.
Utilice una funda o caja de transporte para
guardar la sierra.
6) No fuerce la herramienta.
Hará un trabajo mejor y más seguro a la
velocidad para la cual fue diseñada.
7) Utilice la herramienta correcta.
Utilice la sierra sólo para cortar madera.
No la utilice con fines para los que no ha
sido diseñada. No la utilice para cortar
plásticos, mampostería, etc.
Page 36

Sierra eléctrica ES
3736
8) Vístase apropiadamente.
No use ropas sueltas o alhajas, ya que
pueden quedar atrapadas en las piezas
móviles. Cuando se trabaja al aire libre se
recomienda el uso de guantes de goma
y calzado resistente. Emplee protección
adecuada para contener el cabello largo.
9) Utilice gafas de seguridad.
Utilice los siguientes elementos de
seguridad para utilizar la sierra eléctrica: Al
utilizar la sierra, lleve ropa ajustada; utilice
guantes de goma casco de seguridad;
orejeras o tapones para los oídos;
10) Lleve la sierra eléctrica
Lleve la sierra eléctrica de un lugar a otro
tomándola por el mango anterior; con el
dedo fuera del gatillo; con la barra de guía
y la cadena mirando hacia atrás.
11) Mantenga la herramienta con cuidado.
Examine periódicamente el cable de la
herramienta y si está dañado hágalo
reparar por un agente autorizado.
Examine periódicamente los prolongadores
y sustitúyalos si están dañados.
Conserve los bordes cortantes limpios y
bien afilados, a fin de obtener el mejor
rendimiento y reducir los riegos de
lesiones.
Siga las instrucciones para la lubricación y
el cambio de accesorios.
Mantenga los mangos secos, limpios y
libres de aceite y grasa.
12) Desconecte la herramienta.
Cuando no se encuentre en uso, antes
de hacer mantenimiento o al cambiar
accesorios tales como hojas de corte o
similares, desenchufe la herramienta del
tomacorriente.
13) Cable de Prolongación
Utilice sólo cables de prolongación
diseñados para el aire libre.
14) Permanezca alerta.
Ponga siempre atención en lo que está
haciendo. Utilice el sentido común. No
opere la herramienta cuando esté cansado.
Mantenga todas las partes del cuerpo
alejadas de la sierra mientras la cadena
esté en movimiento.
Antes de activar la sierra, asegúrese de que
no se encuentre en contacto con nada.
15) Verifique las piezas dañadas. Las guardas
protectoras u otras partes dañadas deben
verificarse cuidadosamente antes de
cualquier uso futuro de la herramienta, a fin
de determinar si funcionarán correctamente
y realizarán la función prevista. Compruebe
que las piezas móviles se encuentren
alineadas y correctamente ajustadas, que
no haya rotura de piezas, de montaje o
cualquier otra condición que pueda afectar
su funcionamiento. Una guarda protectora
u otra pieza que se encuentre dañada debe
ser reparada o sustituida correctamente en
un centro de servicio autorizado, a menos
que en este manual de instrucciones se
indique lo contrario.
Si el interruptor se encuentra defectuoso,
hágalo reemplazar en un centro de
servicios autorizado.
No utilice la sierra si no es posible
encenderla y apagarla mediante el gatillo.
No utilice la sierra cuando ésta se
encuentre dañada, mal ajustada o armada
de manera incompleta e insegura.
La cadena debe dejar de moverse al soltar
el gatillo.
16)Protección frente a contragolpes
¡ADVERTENCIA! Los contragolpes
pueden ocurrir cuando el extremo o
la punta de la barra de guía toca un objeto
o cuando la madera “se cierra” y presiona
la cadena dentro del corte. En algunos
casos, el contacto de la punta de la barra
puede provocar una rápida reacción de
contragolpe y conducir la barra de guía
repentinamente hacia arriba y hacia atrás,
en dirección al operario. La compresión de
la cadena serrada contra la barra de guía
puede lanzar la sierra rápidamente hacia
atrás, también en dirección al operario.
Cualquiera de estas reacciones puede hacer
que el operario pierda el control de la sierra
y provocarle lesiones graves.
Las siguientes medidas reducen el riesgo
de contragolpe:
(1) Sujétela con firmeza
Utilice ambas manos para sujetar
la sierra mientras se encuentre en
funcionamiento. Sujétela con firmeza:
los mangos de la sierra deben quedar
Page 37

3736
3736
Sierra eléctrica ES
bien tomados en sus dedos.
(2) No se extralimite.
(3) Manténgase firme y con buen equilibrio
en todo momento. Manténgase firme y
con buen equilibrio en todo momento.
(4) No permita que el extremo de la barra
de guía toque el objeto mientras la
cadena está en movimiento
(5) No se extienda por demás ni realice
cortes por encima de la altura de sus
hombros.
(6) Esta sierra tiene una cadena de
bajo contragolpe y una barra de
guía de reducción de contragolpes.
Ambas características reducen las
probabilidades de contragolpe.
(7) Utilice únicamente las barras y cadenas
de repuesto especificadas por el
fabricante u otras de tipo equivalente.
17) Voltaje eléctrico
Utilice sólo el voltaje eléctrico indicado en
la placa del modelo de la sierra.
18) ¡ADVERTENCIA! Utilice los
siguientes elementos de
seguridad para utilizar la sierra
eléctrica: protección ocular, tal como
gafas de seguridad o una pantalla
facial.
CONSERVE ESTAS INSTRUCCIONES
Precauciones generales de seguridad para
usuarios de sierras eléctricas
1. No utilice la sierra cuando se sienta
cansado. Extreme las precauciones antes
de los periodos de descanso y al finalizar
su turno.
2. Utilice los siguientes elementos de
seguridad para utilizar la sierra eléctrica: Al
utilizar la sierra, lleve ropa ajustada; utilice
guantes de goma casco de seguridad;
orejeras o tapones para los oídos;
NOTA: las prendas de protección personal
deben satisfacer los requisitos de las
normas aplicables.
3. El espacio que separa a ambas personas
debe ser por lo menos igual al doble de la
altura del árbol que se está talando.
4. camino de retirada para el momento de
caída del árbol.
5. Asegúrese de leer y comprender
completamente todas las instrucciones en
Información Importante De Seguridad.
Sujete la sierra firmemente con ambas
manos. Nunca utilice la sierra con una
sola mano. Mantenga los mangos siempre
secos, limpios y sin aceite o grasa.
6. Durante el transporte de la sierra eléctrica,
utilice una cubierta de transporte apropiada
que cubra la barra de guía y la cadena de la
sierra.
7. No utilice la sierra cuando esté arriba de un
árbol o sobre una escalera, a menos que se
encuentre capacitado para hacerlo.
8. Protección frente a contragolpes. Los
contragolpes pueden ocurrir cuando el
extremo o la punta de la barra de guía toca
un objeto o cuando la madera “se cierra”
y presiona la cadena dentro del corte.
Cualquiera de estas reacciones puede
hacer que el operario pierda el control de la
sierra y provocarle lesiones graves.
9. Utilice ambas manos para sujetar la sierra
mientras se encuentre en funcionamiento.
Nunca utilice la sierra con una sola mano.
10. Consulte la definición de los símbolos.
11. Al talar un árbol, mantenga a los niños,
animales y curiosos alejados del área.
12. Al cortar matorrales y plantas tiernas,
proceda con cuidado. Los materiales finos
pueden atascarse en la cadena y azotar
contra su cuerpo o provocar que pierda el
equilibrio.
13. Proceda con sumo cuidado al cortar ramas
o vástagos de árboles que se encuentran
en tensión. Esté preparado para actuar en
caso de contragolpe de la madera.
14. Esta sierra eléctrica ha sido clasificada
según la norma CSA como sierra de Clase
2C. Ha sido diseñada para su uso poco
frecuente por usuarios domésticos y de
campo, y para aplicaciones generales,
como limpieza, podas, cortado de árboles,
etc. No ha sido diseñada para su uso
prolongado. Si el uso intencionado implica
largos periodos de funcionamiento,
podría causar problemas circulatorios
en las manos del usuario debido a las
vibraciones. Puede ser mejor utilizar una
sierra con función anti-vibración.
Page 38

Sierra eléctrica ES
3938
SÍMBOLOS
Advertencia
El usuario deberá leer el manual de
instrucciones
Utilice protección para ojos, oídos y
cabeza
Guantes con protección contra
sierras
Botas con protección contra
sierras con punta de acero y suela
antideslizante
Dirección correcta del diente de
corte
Freno de cadena
¡ADVERTENCIA! Tenga cuidado con
los contragolpes.
El contacto de la punta de la barra
de guía con cualquier objeto debe
evitarse.
Nunca opere la sierra con una sola
mano
Utilice siempre ambas manos
mientras opera la sierra mecánica.
Doble aislamiento
El ángulo de contragolpe de la
10º
sierra de cadena es 10º, con un
freno de cadena.
ENSAMBLE
¡Advertencia! Utiliser uniquement
la tension de courant électrique
indiquée sur la plaque signalétique de la
tronçonneuse.
Al manipular la cadena, utilice guantes
de protección.
MONTAJE DE LA CADENA Y LA BARRA
DE CADENA
1. Desembale todas las piezas con cuidado.
2. Coloque la sierra eléctrica sobre una
superficie plana adecuada.
3. Utilice sólo cadenas WORX originales,
diseñadas para la barra de cadena.
4. Deslice la cadena (8) en la ranura situada
alrededor de la barra de cadena (7).
Asegúrese de colocar la cadena en la
dirección de desplazamiento correcta
comparándola con el símbolo de la cadena
(14). Asegúrese de que el cierre de tensión
de la cadena (18) se encuentre orientado
hacia fuera. (Fig. A2)
5. Inserte la cadena en el piñón motor (13) y
pásela por la barra de cadena (7), de modo
que el perno de sujeción (17) y las dos
aletas de guía (15) encajen en la ranura de
la barra de cadena (7). (Fig. B)
6. Compruebe si todas las piezas se
encuentran bien asentadas y sostenga
la cadena y la barra de cadena en una
posición equilibrada. (Fig. C1)
7. Instale la placa de cubierta, compruebe
que las flechas continúen encontrándose
alineadas y asegúrese de que el perno de
cierre de la cadena (20) encaja en el surco
de la placa de cubierta (11). (Fig. C2)
8. Atornille la placa de cubierta (11) utilizando
la perilla de bloqueo (10). (Fig. D)
La cadena no se encuentra tensada aún.
El proceso de tensado de la cadena se
describe en la sección “Tensar la cadena”.
TENSIÓN DE LA CADENA SERRADA
Las nuevas cadenas de la sierra se estirarán.
Verifique con frecuencia la tensión de la
cadena cuando la use por primera vez y
ajústela cuando la cadena se afloje alrededor
de la barra guía.
Page 39

3938
3938
Sierra eléctrica ES
ADVERTENCIA: Desenchufe la
sierra eléctrica antes de ajustar la
tensión de la cadena serrada.
ADVERTENCIA: Los bordes de
corte de la cadena son afilados. Al
manipular la cadena, utilice guantes de
protección.
ADVERTENCIA: Siempre mantenga
la cadena debidamente tensionada.
Si la cadena se encuentra suelta, existe
mayor riesgo de contragolpes. Además,
la cadena suelta puede salir despedida
de la ranura de la barra de guía. Esto
puede lesionar al operario y provocar
daños en la cadena. Si la cadena está
suelta, la cadena, la rueda dentada
y la barra de guía se desgastarán
rápidamente.
1. Estire la cadena sobre una superficie plana.
2. Gire la perilla de bloqueo / perilla
de tensión de la cadena (10) hacia la
derecha progresivamente hasta alcanzar
la tensión correcta de la cadena. Se
logrará automáticamente la tensión de
cadena correcta. El mecanismo de ajuste
progresivo (a) E2 evita que la tensión de la
cadena disminuya. (Fig. E2)
3. La tensión correcta de la cadena se alcanza
cuando ésta (8) puede elevarse aprox.
3–6mm desde la barra cadena por su parte
central. Dicha operación debe realizarse
utilizando una mano para elevar la cadena
venciendo el peso de la máquina. (Fig. E1)
4. Cuando se afloje la cadena, desatornille la
perilla de bloqueo / perilla de tensión de
la cadena por completo y luego vuelva a
atornillar la placa de cubierta con la perilla
de bloqueo.
LUBRICACIÓN
¡ADVERTENCIA! La sierra eléctrica
no se entrega llena de aceite. Es
fundamental llenarla de aceite antes de
comenzar a usarla. No utilice la sierra
eléctrica sin aplicar aceite de cadena
o con el depósito de aceite vacío. Ello
podría provocar grandes daños en el
producto.
La duración de la cadena y su capacidad
de corte dependerán de una lubricación
óptima. Por tanto, la cadena se engrasa
automáticamente durante su funcionamiento
a través de la salida de aceite.
Lubricación:
1. Coloque la sierra eléctrica sobre una
superficie adecuada, con el tapón de
llenado de aceite orientado hacia arriba.
2. Limpie el área situada alrededor del
tapón de llenado de aceite con un paño y
desenrósquelo.
3. Agregue aceite para sierras eléctricas
WORX hasta que el depósito se encuentre
lleno.
4. Evite que penetren suciedad o residuos en
el depósito. Vuelva a colocar el tapón (4) y
apriételo.
¡ADVERTENCIA! Para fomentar la
ventilación del depósito de aceite,
existen pequeños canales aireación
entre el tapón de llenado de aceite
y el filtro. A fin de evitar posibles
fugas, asegúrese de que la máquina se
encuentra en posición horizontal (con
el tapón de llenado de aceite (4) en la
parte superior) mientras no se encuentre
en uso.
Es importante utilizar únicamente aceite
del tipo recomendado para evitar dañar
la sierra eléctrica. No utilice aceite
reciclado / antiguo. El uso de aceite no
homologado invalidará la garantía.
Comprobar el engrasador automático
Es posible comprobar el funcionamiento
del engrasador automático poniendo en
marcha la sierra eléctrica y apuntando con la
punta de la barra de cadena hacia un trozo
de cartulina o papel colocado en el suelo.
Precaución: No toque el suelo con la cadena.
Mantenga una distancia de seguridad de 20
cm. Si se desarrolla un patrón de aceite en
aumento, el engrasador automático funciona
correctamente. Si no se desarrolla ningún
patrón de aceite a pesar de que el depósito
de aceite se encuentre lleno, póngase en
contacto con un agente del servicio de
atención al cliente de WORX o un agente de
servicio autorizado.
Page 40

Sierra eléctrica ES
4140
FUNCIONAMIENTO
1. LLAVE DE ENCENDIDO/APAGADO DE
SEGURIDAD (Fig. F)
¡CUIDADO! Utilice sólo el voltaje
eléctrico indicado en la placa del
modelo de la sierra.
El gatillo está trabado para evitar el
encendido accidental. Presione el botón
para destrabarlo luego el gatillo y suelte
el botón para destrabarlo.
La sierra se encenderá. Para apagarla, suelte
el gatillo.
No detenga la sierra eléctrica después de
serrar activando la guarda de mano delantera
(freno de contragolpe).
2. FRENO DE CONTRAGOLPE (Fig. G1)
El freno de contragolpe es un mecanismo
de seguridad que se activa utilizando la
guarda de mano delantera (5) cuando se
produce un contragolpe. La cadena se detiene
inmediatamente.
La siguiente operación debe llevarse
a cabo a intervalos regulares. Tire de la
guarda de mano delantera (5) hacia delante
(posición ) y ponga en marcha la sierra
eléctrica. La cadena no debe desplazarse.
Para desactivar el freno de contragolpe, libere
el interruptor de Encendido / Apagado (2) y
presione la guarda de mano (5) hacia atrás
(posición ).
CORTE:
-¿Está lleno el depósito de aceite? Compruebe
el indicador de nivel de aceite (19) antes
de poner en marcha la sierra eléctrica y
regularmente durante su funcionamiento.
Vuelva a llenarlo de aceite si el nivel de aceite
es demasiado bajo. Un depósito de aceite
lleno durará aproximadamente 16 minutos,
dependiendo de la intensidad de serrado y las
pausas realizadas. (Fig. G2)
Si la cadena es nueva, compruebe la tensión
cada 10 minutos aproximadamente durante
el uso.
1. Conecte la sierra al cable de prolongación,
y éste a un tomacorriente.
2. Cerciórese de que la porción del tronco que
desee cortar no yazca sobre el suelo. De
este modo, evitará que la cadena toque el
suelo al cortar a través de él. Si la cadena
toca el suelo mientras se encuentra en
movimiento, se desafilará.
3. Utilice ambas manos para sujetar la sierra.
Utilice siempre la mano izquierda para
asir el mango anterior y la derecha para
tomar la posterior. Sujétela con firmeza:
los mangos de la sierra deben quedar bien
tomados por sus dedos.(Fig. H)
4. Asegúrese de mantener una pisada firme.
Mantenga los pies separados y distribuya
su propio peso sobre ambos pies en forma
equilibrada.
5. Cuando esté dispuesto a realizar un
corte, presione la traba de seguridad
completamente hacia adelante con el
pulgar derecho y apriete el gatillo; la
sierra se encenderá. Al soltar el gatillo, se
apagará. Cerciórese de que la cadena está
girando a su máxima velocidad antes de
comenzar a cortar.
6. Al comenzar a cortar, coloque la cadena
en movimiento sobre la madera. Sujete la
sierra firmemente en su lugar para evitar
que la sierra rebote hacia arriba y hacia
abajo o hacia los lados.
7. Conduzca la sierra ejerciendo una ligera
presión. No la someta a un esfuerzo
excesivo; de lo contrario, el motor se
sobrecargará y se quemará. La sierra
funcionará de manera mejor y más segura
si se la utiliza según ha sido diseñada.
8. Retire la sierra del corte con la cadena
girando a la máxima velocidad. Para
interrumpir el corte, suelte el gatillo.
Asegúrese de que la cadena haya dejado
de moverse antes de asentar la sierra.
9. Ejercítese hasta que sea capaz de mantener
una velocidad de corte estable y pareja.
DISPOSITIVOS DE SEGURIDAD DE ESTA
SIERRA CONTRA CONTRAGOLPES
Esta sierra tiene una cadena de bajo
contragolpe y una barra de guía de reducción
de contragolpes. Ambas características
reducen las probabilidades de contragolpe.
Sin embargo, aún pueden ocurrir contragolpes
con esta sierra.
Las siguientes medidas reducen el riesgo de
contragolpe.
Page 41

4140
4140
Sierra eléctrica ES
• Utilice ambas manos para sujetar la sierra
mientras se encuentre en funcionamiento.
Sujétela con firmeza: los mangos de la
sierra deben quedar bien tomados en sus
dedos.
• Mantenga todos los dispositivos
de seguridad de la sierra en su
lugar. Asegúrese de que funcionen
correctamente.
• No se extienda por demás ni realice cortes
por encima de la altura de sus hombros.
• Manténgase en posición rme y con buen
equilibrio en todo momento.
• Permanezca ligeramente a la izquierda
de la sierra. De esta manera, su cuerpo
no estará directamente alineado con la
cadena.
• No permita que el extremo de la barra de
guía toque nada mientras la cadena se
halle en movimiento.
• Nunca intente cortar dos troncos de una
sola vez. Corte uno por vez.
• No hunda el extremo de la barra de guía
ni intente realizar cortes “de punta”
(perforando la madera utilizando el
extremo de la barra de guía).
• Manténgase alerta a los cambios de
posición de la madera y a otras fuerzas
que pueden provocar presión sobre la
cadena.
• Proceda con suma cautela al reingresar a
un corte realizado previamente.
• Utilice la cadena y la barra de guía de
contragolpe reducido suministrados con
esta sierra.
• Nunca utilice cadenas romas (desgastadas)
o sueltas. Mantenga la cadena afilada y
tensada.
COMPORTAMIENTO GENERAL
Asegúrese de contar con una pisada firme.
Sostenga la sierra con la mano derecha.(Fig. I)
Asegúrese que la sierra esté funcionando
a toda velocidad antes de comenzar un
corte. Utilice los dientes de agarre metálicos
para fijar la sierra sobre la madera antes
de comenzar a cortar. Utilice los dientes de
agarre como punto de palanca “a” durante el
corte. (Fig. J)
Ne pas essayer d’atteindre trop loin ni de
couper au-dessus de la hauteur de l’épaule.
(Fig. K)
CORTAR MADERA EN TENSIÓN (Fig. L)
ADVERTENCIA: Proceda con
sumo cuidado al cortar ramas o
vástagos de árboles que se encuentran
en tensión. Esté preparado para actuar
en caso de contragolpe de la madera.
Al liberarse la tensión de la madera, la
rama puede moverse hacia el operario,
golpearlo y provocarle lesiones graves y
aun la muerte.
Tronco apoyado sobre ambos extremos, haga
el primer corte del lado superior del
Tronco (Y). Atraviese 1/3 del diámetro del
tronco. Haga el segundo corte directamente
debajo del primero. Tronco apoyado en un
extreme, Haga el primer corte del lado inferior
del tronco (Z), Atraviese 1/3 del diámetro del
tronco. Haga el segundo corte directamente
encima del primero. Corte hacia abajo hasta
unir ambos cortes. Este corte impedirá que la
barra de guía y la cadena queden atrapadas
por la presión del tronco.
TALA DE UN ÁRBOL (Fig. M)
Utilice los siguientes elementos de seguridad
para utilizar la sierra eléctrica casco de
seguridad.
La sierra eléctrica sólo debe utilizarse
para talar árboles de diámetro inferior a
la longitud de la barra de cadena.
Área de trabajo segura. Sólo el
operario de la sierra debe permanecer
en el área de trabajo.
No intente liberar una sierra atascada
con el motor en marcha. Utilice cuñas
de madera para liberar la cadena y la
barra de cadena.
Si dos o más personas realizan tareas de
tala y trozado al mismo tiempo, cerciórese
de que haya una buena cantidad de
espacio entre ellos. El espacio que separa
a ambas personas debe ser por lo menos
igual al doble de la altura del árbol que se
está talando. Al talar un árbol, manténgase
alerta a su entorno. No provoque daños
ni ponga a riesgo a ninguna persona o
línea de servicios públicos. Si el árbol
Page 42

Sierra eléctrica ES
4342
cae sobre alguna línea de un servicio
público, comuníquese con la compañía
correspondiente de inmediato.
Al talar el árbol, manténgase cuesta arriba
de él. Una vez derribado, el árbol puede
rodar o deslizarse cuesta abajo.
Planee y despeje un trayecto de retirada
para el momento de la caída. Éste debe
ser en sentido contrario al de la caída del
árbol.
Analice la inclinación natural del árbol, la
posición de sus ramas más grandes y la
dirección del viento. Todo esto le ayudará
a decidir hacia qué lado derribar el árbol.
Retire la tierra, piedras, corteza suelta,
clavos, grampas y alambres de las partes
del árbol donde aplicará la sierra.
Corte de la muesca:
Haga el corte inferior de la muesca tan cerca
del suelo como sea posible. Sujete la sierra
de modo que la barra de guía se encuentre
en posición horizontal. Corte a través del
tronco del árbol hasta atravesar (X-W)1/3 de
su diámetro. Haga siempre este corte inferior
horizontal en primer lugar. Si la hace en
segundo lugar, el árbol puede presionar la
cadena o la barra de guía.
ADVERTENCIA: No atraviese
el árbol completamente. Deje
alrededor de cinco centímetros de
diámetro sin cortar, directamente detrás
de la muesca (Fig. M). Esta porción sin
cortar funciona a manera de bisagra.
La bisagra ayuda a evitar que el árbol
se tuerza y caiga en la dirección
equivocada.
A medida que el corte final se aproxime
al punto de bisagra, el árbol comenzará a
caer. Si es necesario, inserte cuñas dentro
del corte de tala final para controlar la
dirección de la caída. Si el árbol se echa hacia
atrás y presiona la cadena, inserte cuñas
dentro del corte final para extraer la sierra.
Utilice siempre cuñas de madera, plástico o
aluminio. Nunca utilice cuñas de metal, ya
que podrían provocar contragolpes y dañar la
cadena.
Cuando el árbol comience a caer, proceda
rápidamente a retirar la sierra del corte de
tala final; soltar el gatillo para apagar la sierra;
asentar la sierra; salir del área por el trayecto
de retirada.
Introduzca las estacas en el suelo(Z), del lado
del tronco que se encuentra cuesta abajo.
DESMEMBRAMIENTO DE UN ÁRBOL
(Fig. N)
Desmembrar un árbol significa retirar las
ramas de un árbol caído. No retire las ramas
grandes que se encuentran por debajo del
tronco y separan a éste del suelo.
Retire cada rama con un solo corte. Para
evitar el atrapamiento de la sierra, comience
por cortar las ramas que cuelgan libremente,
desde arriba hacia abajo. Para cortar ramas en
tensión, comience a cortarlas desde abajo.
TROZADO DE UN TRONCO (Fig. O)
Trozar un tronco significa cortarlo en
secciones. Asegúrese de tener una pisada
firme. Mantenga los pies separados y
distribuya su propio peso sobre ambos pies
en forma equilibrada. Cuando sea posible,
levante y separe del piso el tronco o la
sección por cortar, utilizando ramas, troncos,
cuñas, etc.
La totalidad del tronco sobre el suelo, corte el
tronco comenzando por arriba.
Tronco apoyado en un extremo, Haga el
primer corte del lado inferior del
Tronco, atraviese 1/3 del diámetro del tronco.
Este corte impedirá la producción de astillas en
esta sección al completarse el corte.(Fig. P)
Tronco apoyado sobre ambos extremos
1. Haga el primer corte del lado superior del
tronco. Atraviese 1/3 del diámetro del tronco.
Este corte impedirá la producción de astillas en
esta sección al completarse el corte. (Fig. Q)
ADVERTENCIA: (Fig. R)
• Si se halla en una colina, asegúrese
de que el tronco no vaya a rodar
cuesta abajo. Asegúrelo con estacas
de madera. Introduzca las estacas en
el suelo, del lado del tronco que se
encuentra cuesta abajo. Permanezca
en posición cuesta arriba del tronco
al cortar, ya que éste puede rodar
después de realizarse un corte.
• Nunca intente cortar a través de
Page 43

4342
4342
Sierra eléctrica ES
dos troncos de una sola vez. De lo
contrario, puede aumentar el riesgo
de contragolpes.
• Al cortar un tronco, nunca lo sostenga
con la mano, la pierna o el pie.
• Al cortar un tronco, no permita que
otra persona lo sostenga.
• Apague y desenchufe la sierra antes
de trasladarse de un lugar a otro.
MANTENIMIENTO DE LA
CADENA Y SEGURIDAD
CONTRA CONTRAGOLPES
Siga las instrucciones de mantenimiento
de este manual. La limpieza correcta de la
sierra y el mantenimiento adecuado de la
cadena y la barra de guía pueden reducir las
probabilidades de contragolpe. Después de
cada uso, inspeccione su sierra y realice las
tareas de mantenimiento necesarias. Esto
prolongará la vida útil de la sierra.
NOTA: el riesgo de contragolpe puede
incrementar cada vez que se afila la cadena,
aun al afilarla debidamente.
MANTENIMIENTO Y
ALMACENAMIENTO DE SU
SIERRA ELÉCTRICA
1. Desenchufe la sierra de la fuente de
alimentación
• Cuando no se encuentre en uso;
• Antes de trasladarla de un lugar a otro;
• Antes de realizar tareas de servicio en ella;
• Antes de recambiar piezas o accesorios de
la misma, tales como la cadena serrada y
el protector.
2. Inspeccione la cadena serrada antes y
después de cada uso. Inspeccione la sierra
detenidamente si se daña el protector u otra
parte. Compruebe que no presente daños que
pueden afectar la seguridad del operario o de
la herramienta en sí. Verifique la alineación
y la articulación de las piezas móviles.
Compruebe que no haya piezas rotas o
dañadas. No utilice la sierra si presenta daños
que afectan su funcionamiento o la seguridad
del operario. Haga reparar los daños en un
centro de servicios autorizado.
3. Cuide de su sierra eléctrica.
• Nunca la exponga a la lluvia.
• Mantenga la cadena alada, limpia y
lubricada para mayor rendimiento y
seguridad.
• Para alar la cadena, siga los pasos
delineados en este manual.
• Mantenga los mangos siempre secos,
limpios y sin aceite o grasa.
• Mantenga ajustadas todas las tuercas y
tornillos.
• Inspeccione el cable de alimentación
a menudo. Si se encuentra dañado,
hágalo reparar en un centro de servicios
autorizado.
• Nunca acarree la sierra eléctrica llevándola
del cable de alimentación.
• Nunca tire del cable de alimentación para
desenchufarlo.
• Mantenga el cable de alimentación alejado
del calor, el aceite y los bordes afilados.
• Inspeccione los cables de prolongación
con frecuencia; si están dañados,
reemplácelos.
4. El realizar tareas de servicio, utilice solo
piezas de repuesto idénticas.
5. Cuando no utilice la sierra, guárdela
• En un sitio alto o bajo llave, fuera del
alcance de los niños;
• En un lugar seco;
• En un estuche o con la funda colocada
sobre la barra de guía.
Recambio de la cadena serrada/ sierra
bar
Reemplace la cadena cuando los elementos
de corte se encuentren demasiado gastados
para ser afilados o cuando se rompa la
cadena. Utilice únicamente la cadena
de repuesto indicada en este manual. Al
reemplazar la cadena, cambie también la
rueda dentada. De ese modo asegurará el
correcto accionamiento de la cadena.
Si esto ocurre, reemplace la barra de guía.
Inspeccione la barra de guía antes de afilar
la cadena. Una barra de guía desgastada o
Page 44

dañada es insegura y daña la cadena. También
dificulta la realización de cortes.
Coloque el cierre de tensión en la barra nueva
apretando el tornillo hacia la derecha. La
protuberancia del cierre (b) debe encajar en el
orificio de la barra. (Fig. S)
AFILADO DE LA CADENA
ADVERTENCIA: Desenchufe la
sierra antes de realizar tareas de
servicio.
Un shock eléctrico o el contacto de su
cuerpo con la cadena en movimiento
puede provocarle lesiones graves y aun
la muerte.
ADVERTENCIA: Los bordes de corte
de la cadena son afilados. Utilice
guantes de protección al manipular la cadena.
Mantenga la cadena afilada. La sierra cortará
de manera más rápida y segura. El uso de
una cadena desafilada provocará el desgaste
innecesario de la rueda dentada, la barra de
guía y el motor. Si resulta necesario aplicar
fuerza para introducir la cadena en la madera,
y si al cortar sólo obtiene viruta y algunos
trozos grandes, la cadena está desafilada.
Sierra eléctrica ES
Page 45

4544
Page 46

Page 47

Page 48

Designed in Italy. Made in China
Conçu en Italie. Fabriqué en Chine
Diseñado en Italia. Fabricado en China
Copyright © 2009, Positec. All Rights Reserved.
 Loading...