


tif
-
3
j=
User
Manual
ALDI
aco
PORTABLE
BANDSAW
WITH
STAND
Original
instructions

Contents
Assembly
List of contents
and features
be
Introduction
6
Reading
and
storing
the user
manual
6
Explanation
of
symbols
6
Safety
7
Scope
of
use
cd
Residual
risks
7
Additional
safety
instructions
for the DaANGSAW......nn-cmmnmn
sO
General
Working
Stand
Safety
Warnings...
om
Before
using
the
bandsaw.
12
Checking
the
bandsaw
and
pack
contents...
12
12
Fitting/
changingthe
saw
blade..
12
Fitting
the bandsaw
to the stand
13
Adjusting
the
guide
bar.
14
Adjusting
the
auxiliary
handle
14
Securing
the
workpiece
15
Using
the
bandsaw
5
Mains connection
15
Switching
ON / OFF
16
Speed
control
16
Operating
the
bandsaw.
7
Adjusting
the
angle
scale
for mitre cuts
soe B

Maintenance,
cleaning,
storage
and
transport...
Maintenance
Cleaning
21
Storage
.
21
Transport
;
21
Troubleshooting
22
Technical
specifications
22
Noise/vibration
information.
23
Noise emission
levels
23
Recycling
24
Disposal
of
the
packaging 24
Disposing
of
old
appliances 24
EC
Declaration
of
Conformity.
25
List of
contents
and
features
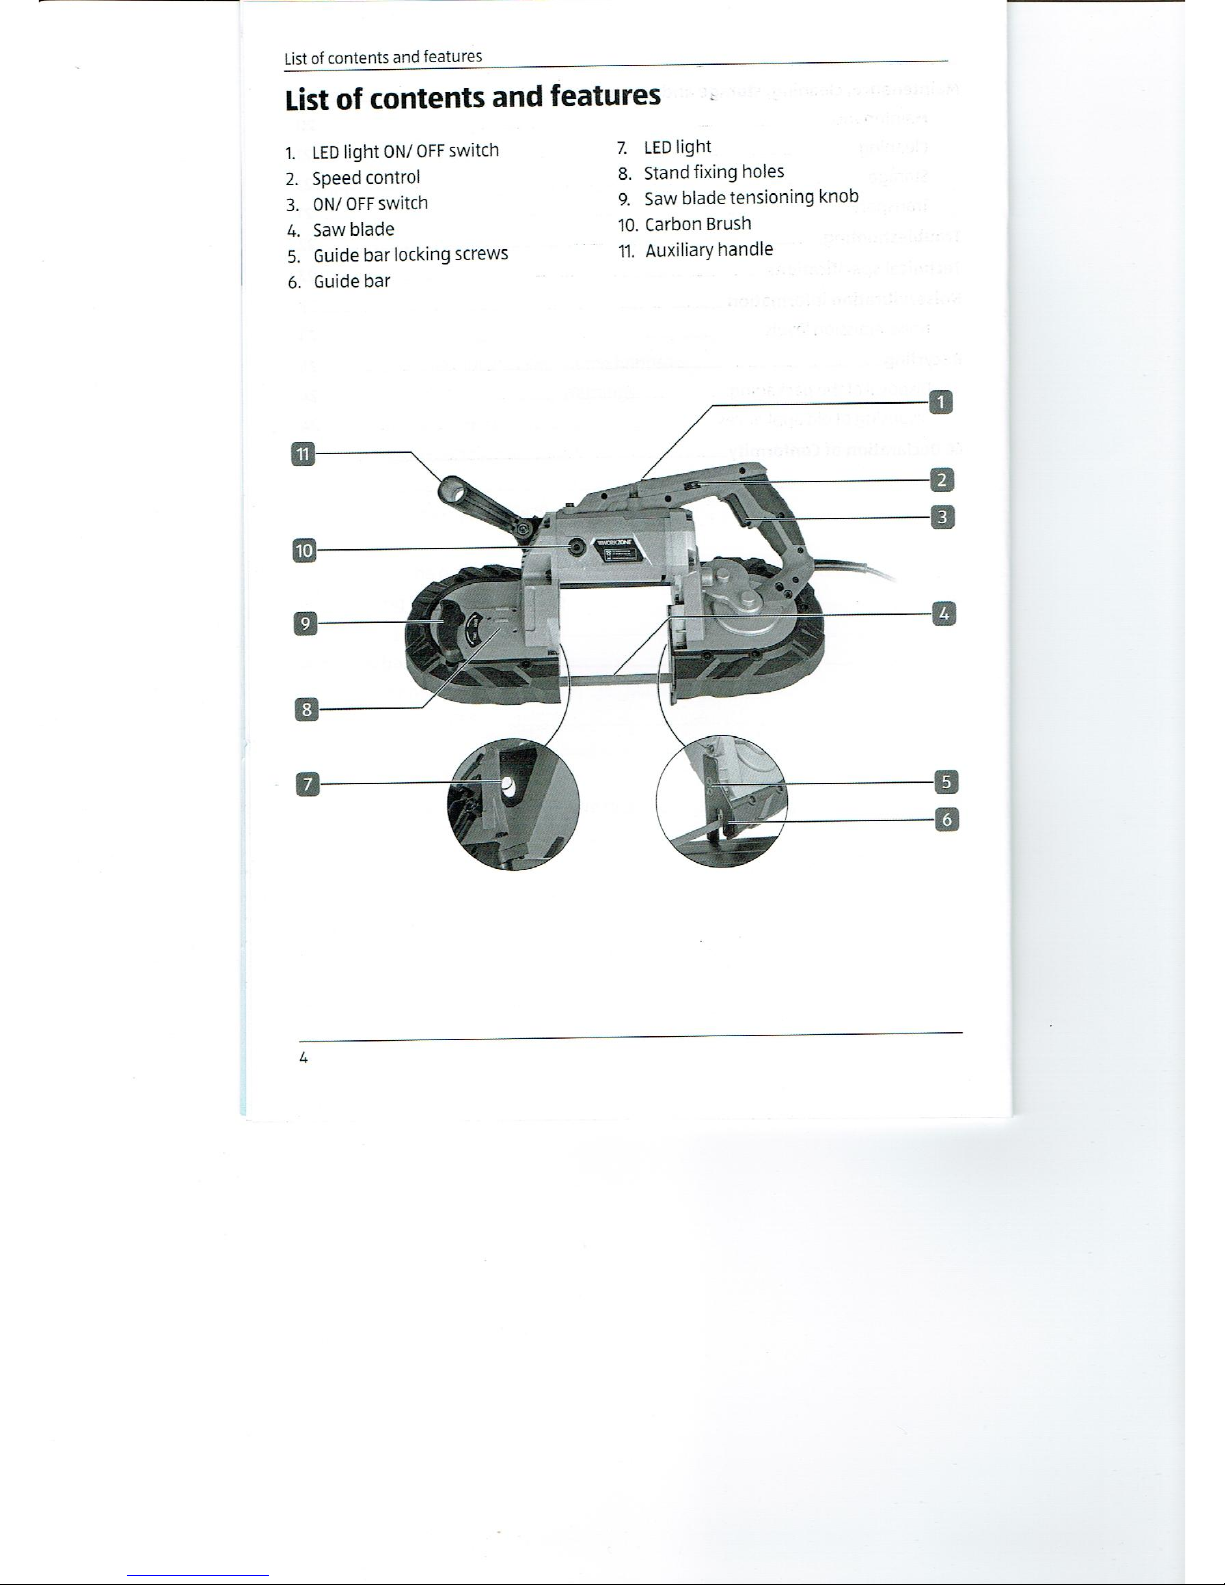
List
of
contents
and
features
1. LED
light
ON/ OFF
switch
7. LED
light
2.
Speed
control
8. Stand
fixing
holes
3. ON/
OFF
switch
9. Saw
blade
tensioning
knob
4. Saw
blade
10. Carbon
Brush
5. Guide
bar
locking
screws
1.
Auxiliary
handle
6.
Guide
bar

List
of
contents and features
12.
Drive
wheel
19. Vise
fixing
knob
13. Saw
blade
guide
bearing
20.
Arm
fixing
bolts
(3x)
14. Air
intake
21.
Washers
(3x)
15. Stand arm
22.
Locking
washers
(3x)
16.
Angle locking
knob
23.
No.
4allen
key
17.
Angle
scale for arm
24. No.
5 allen
key
18.
Stand Vise
25. No. 6
allen
key
°
8
SS
oO=—00
==—

Introduction
Introduction
Reading
and
storing
the
user
manual
These
operating
instructions
form an
integral part
of
this
portable
bandsaw
with
stand
(referred
to as
bandsaw
or stand in
the
remainder
of
this
manual).
They
contain
important
instructions
on
safety,
use
and
disposal
of the bandsaw.
Please
familiarise
yourself
with all
operating
and
safety
instructions
before
using
the
bandsaw.
Only
use
the bandsaw
asdescribed
and for
the
stated
purpose.
If the
bandsaw
is
passed
on
to
a
third
party,
please
provide
all
documents
to
the
third
party
together
with
the bandsaw.
Keep
the
operating
instructions
safe
for
the future
reference.
Explanation
of
symbols
The
following symbols
and
signal
words
are
used in
this user manual,
on
the
screwdriver
or on the
packaging.
Indicates
a
hazardous
situation
that, if
not avoided,
could
r
,
,
Nh
result
in death
or
serious
injury.
Indicates
a hazardous
situation
that,
if
not
avoided,
could
result
in
minor or
moderate
injury.
A\__NOTICE!
warns of
possible
damage
to
property.
.
This
symbol
provides
you
with useful
additional
information
lL
regarding
assembly
or
operation.
Declaration
of
Conformity
(see chapter
“EC
Declaration
of
Conformity”):
Products
labelled
with this
symbol
meet all
applicable
provisions
of the
European
Economic
Area.
©
(LU
Read
the
user manual.
©
Wear
protective
goggles.
Wear
ear
protection.
Protection
class II
@
Wear
respiratory
protection.
O
3
3
year
warranty

Introduction
Safety
Scope
of use
This
bandsaw is
exclusivelydesigned
for
private
use
and for
hobby
and
DIY
projects
for
the
following purposes:
*
For
cutting
wood,
metal and
plastic.
It
must be used
in
accordance
with
the
instructions and
safety
warnings
contained
in
this manual
and
may
not
be
used for
any
other
purpose.
It
is
designed
for
DIY
use
only
and
is not
suitable for
commercial or
heavy
duty
use,
such
use
may
damage
your
bandsaw and
invalidate
your
warranty.
Neither the
manufacturer
nor
the
retailer
can
accept
any
responsibility
for
injury,
loss or
damage
caused
by
misuse
of
this bandsaw
of
any
kind.
Examples
of
misuse
are
given
in
the
following
non-
exhaustive
list:
*
Use of
the
bandsaw for
any
other
than
its
intended
purpose
*
Non-observance of
the
safety
warnings
and
instructions as
well
as the
assembly,
operating,
cleaning
and
maintenance
instructions
contained in
this
manual
*
Non-observance
of
any applicable health,
safety
and
accident
prevention
regulations
concerning
the
use
of this
bandsaw
¢
Use
of
accessories
or
spare parts
that are
not
suitable
for
the
bandsaw
¢
Use of
the
bandsaw
in
modified
form
*
Commercial or
otherwise
excessive use
Anyone
who
operates
or
services the
bandsaw
must be
familiar
with
these
instructions and
must
be aware
of
possible
dangers.
This
bandsaw may
only
be used
by
a
competent
person
-
in
case of
doubt seek
training
or
advice from
an
expert.
Non-observance
of
the
safety,
assembly
and
operating
instructions
while
operating
the
bandsaw
counts
as misuse.
Any
applicable
health and
safety regulations
must be
followed.
Any
other
applicable
local
and
national
legislation
must
also be
followed. The
bandsaw
may
not be
modified
as
modifications
may
cause
damage
or
injury.
Residual
risks
A
residual risk
of
injury
remains
even if
the
bandsaw is
used
for its
intended
purpose
in
accordance
with the
safety,
assembly
and
operating
instructions.
Dueto
the
nature of
the
bandsaw,
the
following
dangers
may
arise:
*
Contact
with the
uncovered
part
of
the saw
blade
*
Toxic
dust
may
be
produced

Introduction
General
safety
instructions
ye
ee
Read all
safety
warnings
and all
instructions.
Failure to
follow
the
warnings
and
instructions
may
result
in
electric
shock,
fire and/or
serious
injury.
Save all
warnings
and
instructions
for future
reference.
The term
“power
tool"
in the
warnings
refers to
your
mains-operated
(corded) power
tool
or
battery-operated
(cordless)
power
tool.
1)
Work
area
safety
a) Keep
work
area
clean
and well
lit.
C/uttered
or dark
areas
invite
accidents.
b)
Do not
operate
power
tools
in
explosive
atmospheres,
such
as
in
the
presence
of
flammable
liquids, gases
or dust.
Power
tools
create
sparks
which
may
ignite
the
dust or fumes.
c) Keep
children
and
bystanders
away
while
operating
a
power
tool.
Distractions
can cause
you
to lose
control.
2)
Electrical
safety
a)
Power tool
plugs
must
match the
outlet.
Never
modify
the
plug
in
any
way.
Donot
use
any
adapter plugs
with earthed
(grounded)
power
tools. Unmodified
plugs
and
matching
outlets will
reduce
risk of
electric
shock.
b)
Avoid
body
contact
with
earthed
or
grounded
surfaces,
such as
pipes,
radiators,
ranges
and
refrigerators.
There
isan
increased
risk
of electric
shock
if
your
body
is
earthed
or
grounded.
c)
Do not
expose
power
tools
to rain
or wet
conditions.
Water
entering
a
power
tool will
increase
the
risk
of electric
shock.
d)
Do
not abuse
the
cord.
Never
use
the cord
for
carrying,
pulling
or
unplugging
the
power
tool.
Keep
cord
away
from
heat, oil,
sharp
edges
or
moving parts.
Damaged
or
entangled
cords
increase
therisk
of electric
shock.
e)
When
operating
a
power
tool
outdoors,
use an
extension
cord
suitable
for
outdoor
use.
Use
ofa cord
suitable
for outdoor
use
reduces
the
risk
of electric
shock.
f)
If
operating
a
power
tool
in
a damp
location
is
unavoidable,
use
a residual
current
device
(RCD)
protected
supply.
Use of an
RCD
reduces
the
risk
of electric
shock.
Introduction
3)
Personal
safety
a)
Stay
alert,
watch what
you
are
doing
and use
common
sense
when
Operating
a
power
tool. Do not
use a
power
tool while
you
are tired
or
under the
influence of
drugs,
alcohol or
medication. A
moment
of
inattention while
operating power
tools may
result
in
serious
personal
injury.
b)
Use
personal
protective
equipment.
Always
wear
eye protection.
Protective
equipment
such as
dust
mask,
non-skid
safety
shoes,
hard
hat,
or
hearing protection
used
for
appropriate
conditions
will
reduce
personal
injuries.
c)
Prevent
unintentional
starting.
Ensure the
switch
is in
the off-
position
before
connecting
to
power
source
and/or
battery pack,
picking
up
or
carrying
the tool.
Carryingpower
tools with
your
finger
on
the
switch or
energising power
tools that
have the
switch
on invites
accidents.
d)
Remove
any
adjusting key
or
wrench
before
turning
the
power
tool on. A
wrench ora
key
left attached
to a
rotating part
of
the
power
tool
may
result in
personal
injury.
e)
Do
not
overreach.
Keep proper
footing
and
balance at
all
times.
This enables
better control
of
the
power
tool
in
unexpected
situations.
f)
Dress
properly.
Do not
wear
loose
clothing
or
jewellery.
Keep
your
hair,
clothing
and
gloves
away
from
moving
parts.
Loose
clothes,
jewellery
or
long
hair
can
be
caught
in
moving parts.
g)
If
devices
are
provided
for
the
connection
of dust
extraction
and
collection
facilities,
ensure
these
are
connected
and
properly
used.
Use of
dust
collection can
reduce
dust-related
hazards.
4)
Power tool
use
and care
a)
Do not
force
the
power
tool. Use
the
correct
power
tool for
your
application.
The
correct
power
tool
will do
the
job
better
and
safer at
the
rate for
which
it was
designed.
b)
Do not use
the
power
tool if
the
switch
does
not turn
it on
and
off.
Any power
tool that
cannot be
controlled with
the
switch is
dangerous
and
must be
repaired.
c)
Disconnect
the
plug
from
the
power
source
and/or
the
battery pack
from
the
power
tool
before
making
any
adjustments,
changing
accessories,
or
storing power
tools.
Such
preventive
Safety
measures
reduce
the risk of
starting
the
power
too/
accidentally.
d)
Store idle
power
tools out
of
the reach
of
children
and do not
allow
9

Introduction
persons
unfamiliar
with the
power
tool
or
these
instructions
to
operate
the
power
tool.
Power
tools
are
dangerous
in the
hands
of
untrained
users.
e)
Maintain
power
tools.
Check
for
misalignment
or
binding
of
moving
parts,
breakage
of
parts
and
any
other
condition
that
may
affect
the
power
tool’s
operation.
If
damaged,
have
the
power
tool
repaired
before
use.
Many
accidents
are caused
by poorly
maintained
power
tools.
f) Keep
cutting
tools
sharp
and
clean.
Properly
maintained
cutting
tools
with
sharp
cutting
edges
are
less
likely
to bind
and
are
easier
to
control.
g)
Use
the
power
tool,
accessories
and
tool
bits
etc.
in accordance
with
these instructions,
taking
into account
the
working
conditions
and
the
work
to be
performed.
Use
of
the
power
tool
for
operations
different
from
those
intended
could
result
in a hazardous
situation.
5)
Service
a)
Have
your
power
tool
serviced
by
a
qualified
repair
person
using
only
identical
replacement
parts.
his
will ensure
that
the
safety
of
the
power
tool
is maintained.
Additional
safety
instructions
for
the
bandsaw
*
Hold
power
tool
by
insulated
gripping
surfaces,
when
performing
an
operation
where
the
cutting
accessory may
contact
hidden
wiring
or
its own
cord.
Cutting
accessories
contacting
a
"live"
wire
may
make
exposed
metal
parts
of
the
power
tool
"live"
and could
give
the
operator
an electric
shock.
¢
Remove
chips
and
shavings
only
when the
tool
has
come
toa
stop
and
the
plug
has
been
pulled
from
the
socket.
©
Do
not
attempt
to
decelerate
the saw
blade,
when
the
bandsaw
has
been
switched
off.
©
Donot
leave
the
bandsaw
unattended.
Ensure
that
the
plug
has
been
pulled
and
the
saw
blade
has
stopped
before
leaving
the
bandsaw.
*
Do
not
use
damaged
or
worn
saw
blades.
Damaged
or worn
blades
are
more
likely
to
break
and
cause
personal
injury.
10

Introduction
General
Working
Stand
Safety
Warnings
CEs
Read
all
safety warnings
and
all
instructions
provided
with
the
working
stand
and the
power
tool to
be mounted.
Failure to
follow the
warnings
and
instructions may
result
in electric
shock,
fire and/or
serious
injury.
Save all
warnings
and
instructions for
future
reference.
The term
“power
tool" in
the
warnings
refers to
your
mains-operated
(corded)
power
tool or
battery-operated (cordless)
power
tool.
Disconnect
the
plug
from the
power
source
and/or the
battery pack
from
the
power
tool
before
making any
adjustments
or
changing
accessories.
Accidental
starting
of the
power
tool is a cause
of
some
accidents.
Properly
assemble
the
working
stand
before
mounting
the
tool.
Proper
assembly
is important
to
prevent
risk
of
collapse.
Securely
fasten
the
power
tool to the
working
stand
before
use.
Power tool
shifting
on the
working
stand can cause
loss
of control.
Place the
working
stand
on
a
solid,
flat
and
level
surface. When
the
working
stand can
shift or
rock,
the
power
tool or
workpiece
cannot be
Steadily
and
safely
controlled.
Do not install
any
other electrical
tools
to this stand.
This
stand is
only
for use
with the
supplied
bandsaw.
Do
not use dull or
bent
blades.
Always keep
hands
and
fingers
away
from
the blade.
"1

Before
using
the bandsaw
Before
using
the
bandsaw
Checking
the
bandsaw
and
pack
contents
°
Take
the
bandsaw
out of the
packaging.
°
Check
that the
delivery
is
complete
(see
section:
“List
of contents
and
features’).
©
Check
whether
the bandsaw
orany
of
its individual
parts
are
damaged.
®
|fthis
is the
case,
do
not
use the
bandsaw.
Contact
the manufacturer
at the
service
address
specified
on the
warranty
card.
Assembly
Fitting/
changing
the
saw
blade
Disconnect
the
bandsaw
from
the
mains before
fitting
or
replacing
the
saw
blade
&.
Wear
protective
gloves!
*
Open
the
saw blade
tensioning
knob
¢
Feed the
saw
blade
through
the
saw
blade
quide
bearings
HED.
12

Assembly
e
Feed the saw
blade around the drive
wheels
GDB.
©
Close the saw blade
tensioning
knob.
Fitting
the bandsaw to the stand
[A
CAUTION!
|]
Ensure the bandsaw is not connected to
the mains before
mounting
to
the stand.
¢
Disconnect the bandsaw from the mains.
¢
Connect the bandsaw
to the stand
arm by
placing
the arm
fixing
bolts
washers
and
fixing
avers
in
the stand
fixing
holes
*
Ensure all
bolts are
tight
with the no. 5 Allen
key
BA.
13

Assembly
Adjusting
the
guide
bar
[A
‘caurTion!
|
Ensure
the bandsaw
is not connected
to the
mains before
mounting
to
the stand.
¢
Open
the
guide
bar
locking
screws
=s.
©
The
guide
bar
&4M
can
now be
adjusted.
*
Tighten
the
guide
bar
locking
screws
to
fix the
guide
bar
in
place.
*
To
adjust
the
auxiliary
handle
loosen the
locking
nut
@3@
using
the
No. 6 allen
key
BB.
*
Move
the
auxiliary
handle
to the
desired
position.
¢
Fix the
auxiliary
handle
in
place
by
tightening
the
locking
nut
using
the
No.
6 allen
key.
14

ny
Using
the
bandsaw
Securing
the
workpiece
*
Open
the
vise
fixing
knob SEB.
*
Place the
workpiece
in
the stand
vise
and
push
the
vise
tight against
the
workpiece.
*
Tighten
the vise
fixing
knob to
secure
the
workpiece
in
place.
Using
the
bandsaw
Mains
connection
Ensure that
the
local
mains
voltage agrees
with the
information
on
the
bandsaw’s
rating
label.
The bandsaw
is
designed
for
use with
single-phase
alternating
current
230-240 V
AC /
50 Hz and
is
double-insulated.
If the
work
area is
not
close to
the
mains
outlet,
an
extension
cable
with
a
sufficient
conductor cross
sectional area
(min.
1.5
mm2)
must be
used.
The
extension cable
used
should beas
short as
possible.
Always
ensure that
any
extension
cord used
is
fully
unwound to
avoid a risk
of
overheating.
15

Using
the
bandsaw
Switching
ON /
OFF
|A_
WARNING!
|
During operation
fine
dust will
be
generated.
Some
dust
is
highly
inflammable
and
explosive.
Do
not smoke
during operation,
keep
heat
sources
and
open
flames
out
of
the
working
area.
Always
wear a dust
mask to
protect
yourself
against
hazards
resulting
from
fine dust.
To switch
the bandsaw
ON:
©
Pull
the On/
Off
switch EB.
To
switch the
bandsaw
OFF:
e
Release
the On
/
Off
switch.
Speed
control
The
variable
speed
control
facilitates
stepless adjustment
of
the
speed
from
0.7 to 2.4
m/s.
The
thumbwheel
speed
control
is marked
with
6
settings,
with 1
being
the
lowest
and
6
being
the
highest
speed.
16

Using
the
bandsaw
Operating
the
bandsaw
COL
Grip
the
bandsaw
with
both
hands when
cutting.
Harmful or
toxic dust
may
be
produced
when
sawing.
Contact
with,
or
inhalation
of these
dusts can
endanger
the
health
of the
operator
or
bystanders.
Keep
bystanders
out of
the
area,
wear
an
approved
dust mask
or
respirator
suitable
for
the
material
bein
sanded
and
connect the
bandsaw to
a
dust
extraction
device. If in
doubt
consult an
expert.
Do
not
press
the
blade down
onto the
workpiece
roughly
or
with
excessive force
as
this can
lead to
the
saw
head
‘kicking
back'
(danger
of
injury).
*
Position the
workpiece
as
desired and
secure it in
place
using
the
stand vise
GE or
another
vise.
e
|
Additional
support
(roller
stands,
tables
etc.)
must
be used
when
sawing
Z|
long workpieces.
¢
Position the
guide
bar
&4ll
on
the
workpiece
and
ensure the
blade is
vertically
above
the
workpiece.
7

Using
the bandsaw
©
Switch
the bandsaw
on
and allow it
to
reach full
speed
before
engaging
the
cut.
¢
Gripping
the
bandsaw
with both
hands
gently
lower
the blade into
the
cut.
e
|
Applying
excess
pressure
to thetool
or
twisting
of the blade
may
cause
E
|
bevel
cutting
or
may
cause
damage
to the
saw blade.
°
When
the
cutting
is
finished,
turn the bandsaw
off and remove
the
plug.
Adjusting
the
angle
scale
for
mitre cuts
Always
make
a trial cut
on a
piece
of waste
material
first,
particularly
if
a
very
exact
angle
is
required.
©
Loosen
the
angle
locking
knob
&
by
turning
it
anti-clockwise.
18

*
Turn
the table to
the
desired
position.
*
Secure the
angle by tighten
the
angle
locking
knob
by
turning
it
clockwise.
The
table can
be
angled
between 0°
-
45°.
fale
Using
the
bandsaw
19

Maintenance,
cleaning, storage
and
transport
Maintenance,
cleaning, storage
and
transport
A, WARNING!
Disconnect
the bandsaw from
the
mains
before
performing any
type
of maintenance or
adjustments.
ZX
CAUTION!
Keep
the
internal
parts
of the bandsaw
dry
when
cleaning.
Maintenance
Pay
particular
attention to the mains cable.
Damaged
mains cables must be
replaced
immediately
with
original replacement parts
available from the manufacturer
or an
authorised
workshop.
lf the
replacement
of the
supply
cord is
necessary,
this has to be done
by
the
manufacturer or his
agent
in order to avoid a
safety
hazard.
Regularly
check the condition of the bandsaw. Among
other things,
check to make
sure:
e
that the switches are not
damaged,
°
thatthe accessories are in
proper
condition,
¢
that
the mains cord and the
plug
are not
damaged,
¢
that the vents are unobstructed and clean. If
applicable,
use a soft brush to clean
them.
lf
you identify any damages, you
must have them
repaired
by
a specialist workshop
to
prevent
risks.
Replacing
the carbon brushes
Have the carbon brushes
(10)
checked
by
a
competent person, qualified
electrician
or an authorised service centre after
approximately
30 hours of
operation.
The carbon brushes may
only
be
replaced
by
a specialist
workshop
or
qualified
specialist
personnel.
20

Maintenance,
cleaning, storage
and
transport
Cleaning
Never immerse the
cutter
in
water or other
liquids.
Clean
the sander
regularly
to
prevent
wear and
corrosion
damage.
Use
a soft cloth or brush to
clean the
housing.
Do not use
any aggressive
cleaners,
sharp
or
metallic
cleaning
utensils such as
knives,
hard
scrapers
and the
like.
They
could
damage
thesurfaces.
Clean the vents and the area
around the saw
blade holder. Remove dust or
chips by
blowing
them out with
compressed
air.
Storage
We recommend using
the
case for
storage
or
covering
the
bandsaw witha suitable
cloth
or enclosure to
protect
it
against
dust.
Always
store the
bandsaw in
a
place
that
is
inaccessible to children. The ideal
storage temperature
is
between 10 °C and 30 °C.
°
Clean the
bandsaw as described above.
*
Store
the bandsaw and its
accessories in a dark,
dry,
frost-free,
well-ventilated
place.
Transport
Pack the
bandsawinits case before
transport.
Protect the bandsaw
against
knocks and vibrations
during transport.
21

Troubleshooting
Troubleshooting
Problem
Possible cause
Solution
Bandsaw
will not start.
The
mains
plug
has not
been inserted
in a socket.
Insert the mains
plug.
The cable
is
damaged.
Have the
cable
replaced
by
a
qualified
person.
Carbon
brushes are worn.
Have the
carbon brushes
replaced by
a
qualified
person.
The switch
is defective.
Contact our
service
centre.
Sawblade
is loose.
Tensioning
knob not
closed.
Close
the
tensioning
knob
to
tighten
the saw blade.
Cutting
results are
poor.
The saw blade
is blunt.
Replace
the saw
blade.
Saw blade running
slowly.
Increase the saw
blade
speed
using
the
speed
control.
Technical
specifications
Bandsaw
Model No.
WWPBS-18
Rated
power
1100 W
Rated
voltage
220-240
V
~
50 Hz
No load
speed:
0,7-2,4
m/s
Max.
cutting
capacity
127 mm
x 127 mm
Protection
class
ll
Weight
6.6
kg
Stand
Model No.
P1101
Dimensions
46.5 X28
x
16.5cm
Weight
6.8
kg
22

Noise/vibration
information
Noise/vibration
information
Noise
emission
levels
Measured as
per
DIN
EN
60745-1.
The
noise at
your
workplace
may
exceed 85 dB
(A);
protective
measures are
necessary
in
this case
(wear
suitable ear
protection).
*
Sound
pressure
level
—
Lp,
89
dB(A)
¢
Sound
power
level
Lwa
100
dB(A)
¢
Uncertainty
K3
dB(A)
The
aforementioned
values
are noise
emission
values and
therefore,
do
not
necessarily
represent
safe values
for
the
workplace.
The
correlation
between
emission
and
emission
levels cannot
reliably provide
for
a
conclusion
as to
whether
additional
precautionary
measures
are
necessary
or
not.
Factors that
could
affect the
actual
emission
level
at the
workplace
include the
specification
of
the
work area
and
the
surrounding
area,
the
duration of
exposure,
other
noise
sources
etc.
You
must also
observe
any
divergences
in
national
regulations
with
respect
to
the
permissible
workplace
levels.
The
aforementioned
information
does,
however,
allow
the user
to better
assess
dangers
and
risks.
*
Vibration
value
ah,cm
6,62
m/s2
an,cw
6,08
m/s2
¢
Uncertainty
K
1.5
m/s2
Ne
The
aforementioned
vibration
emission
level
(vibration
value)
has
been
measured
in
accordance
with a test
method
standardised
in DIN EN
60745-1 and
can
be used
to
compare
one
power
tool
to another.
It is
also suited
for
preliminary
estimation
of
exposure
to
vibration.
The
vibration
emission
level
during
actual
use of
the tool can
differ from
the
declared
vibration level
depending
on
the
way
in
which
the
bandsaw
is
used,
for
example:
>
Is the
bandsaw
in
good
condition and
hasit
been
properly
maintained,
~
How
and
for which
material the
bandsaw is
used,
~
Use of
the
right
accessories
and
whether
they
are
in
good
condition,
-
Afirm
grip
of
the bandsaw
by
the
operator,
23

Recycling
-
Is the bandsaw
properly
used as described
in this user manual.
If the bandsaw
is
improperly
used it can cause vibration-related
ailments.
YU cy
Depending
on howthe bandsaw is used
and the
operating
conditions,
the
following
safety precautions
must be taken to
protect
the user:
-
Avoid
exposure
to vibrations as
much as
possible.
-
Only
use accessories
in
perfect
working
order.
-
Wear anti-vibration
gloves
when
using
the bandsaw.
-
Follow the user
manual on care and maintenance of the
bandsaw.
-
Avoid
using
the bandsaw at
temperatures
below 10
°C.
-
Plan
your
work so
you
do not haveto
use
heavily
vibrating
bandsaw over several
consecutive
days.
Recycling
Disposal
of the
packaging
Sort the
packaging
materials
according
to
type
and
dispose
of each
separately.
Dispose
of cardboard
as waste
paper
and shrink wrap
via
the
recyclable
material collection
service.
Disposing
of old
appliances
pi
This
symbol
indicates that this
product may
not be
disposedoftogether
with
domestic waste in
compliance
with the
(2012/19/EU)
Regulation
pertaining
to
waste electrical and electronic devices
(WEEE).
This
product
must be
handed
in at a collection
point
intended for the
purpose.
This can
occur,
for
example, by
handing
it
in at an authorised
collecting point
for
the
recycling
of waste
electrical and electronic
equipment. Owing
to
potentially
hazardous
substances
that are
frequently
contained in waste electronic
equipment,
incorrect
handling
of waste
equipment may
have a
negative
impact
on
the environment and onthe health of human
beings. By disposingof
this
product correctly, you
are also
contributing
towards an
efficient use of
natural resources.
Information on
collecting points
for
waste
equipment
can be obtained
from
your
municipal
authorities,
the
public
law
disposal
authorities,
an authorised institution
for the
disposal
of waste electrical and
electronic
equipment
or the waste collection services.
24

EC Declaration
of
Conformity
EC
Declaration
of
Conformity
CE
&
EU/EC
DECLARATION
OF CONFORMITY
We
(4)
exoressly
declare,
under our sole
responsibilty,
that
the
object
(1)
ofthis
declaration isin
conformity
with all
relevant
provisions
of the
following
Union harmonisation
legistation
(2).
References to
the
harmonised standards used
(3).
The
technical fle is
available from:
4).
a
@
@)
Mod:
WWPBS-18
Portable bandsaw
with stand
-
30-0320
~
EN
60745-1:2009+A11:2010;
EN
60745-2-20:2008;
ary
2D0cHerEl
EN 55014-
1:2006+A1:2009+A2:2011;
aoaeOeu
EN
55014-2:2015;
soe
EN
61000-3-2:2014;
EN
61000-3-3:2013;
EN
50581:2012;
EN ISO
12100:2010
@
Welter
Werkzeuge Salzburg
GmbH
Gewerbeparkstr. 9, A-5081,
Anif,
Austria
Head
offProduct
Management
Safzburg,
18.06.2018
25

26


Great care has
gone
into the manufacture
of this
product
and it
should
therefore
provide you
with
years
of
good
service when used
properly.
In
the
event
of
product
failure
within
it’s intended use
over the
course of the
first 3
years
after date
of
purchase,
we
will
remedy
the
problem
as
quickly
as
possible
once
it has been
brought
to
our attention.
In the
unlikely
event
of such
an occurrence,
or
if
you require any
information
about the
product,
please
contact usvia
our
helpline
support
services,
details
of which are
to be
found both in this
manual
and on the
product
itself.
Ge)
Ce)
PRODUCED
IN CHINA FOR:
ALDI STORES
LTD.,
PO BOX
26,
ATHERSTONE,
WARWICKSHIRE,
CV9 2SH.
ALDI STORES
(IRELAND)LTD.
PO BOX
726, NAAS,
CO.
KILDARE.
Visit us at www.aldi.com
AFTER SALES SUPPORT
86075
ES
GE
00800 925 837
88
(IE)
00800 925 837 88
a
www.walteronline.com
MODEL:
WWPBS-18
09/2018
YEAR
WARRANTY
 Loading...