


CORDLESS DRILL/SCREWDRIVER
Original operating instructions
AFTER-SALES SERVICE
GB 0845 872 2740
IRL 019022605
www.coreservice.co.uk
MODEL: J0Z-SP38-1016, 11/2013, 90891

Scope of delivery
1
1
6
7
8
9
10
3
2
4 + 4a
5
1 Quick-action drill chuck
2 Torque preselection ring
3 Switch for speed change
4 Battery level indicator
4a Button for battery level indicator
5 Handle
6 Integrated LED work lamp
7 Switch for direction of rotation
8 ON/OFF switch
9 Battery
10 Release button
11 Charging cradle
12 Battery charger
13 Power indicator
14 8 x drill bits to drill in metal and plastics - screw bit holder
15 8 x screw bits
16 Original operating manual (not shown)
17 Storage case (not shown)
11
12
13
!
!
!
!
!
!
!
!
14
15
!
6
15
16
17

Contents
03
General
03 Using and storing the operating manual
03 Intended use
04
Description of symbols
04 Symbols in the operating manual
04 Key to symbols
05
Safety instructions
05 General safety instructions for power tools
05 Safety at the workplace
05 Electrical safety
06 Personal safety
06 Using and taking care of the power tool
07 Using and taking care of the battery-powered tool
08 Service
08 Special safety instructions for drill/screwdrivers
08 Special safety instructions for cordless drill/screwdrivers
08 Safety instructions for rechargeable batteries and battery chargers
09 Safety instructions for the LED work lamp
10
Operation
10 Functional description
11 Prior to initial operation
11 Starting operation
11 Charging the battery
12 Inserting the battery
12 Checking the battery level
12 Fitting the instrument (drill bit or screw bit with screw bit holder)
14 Changing the mechanical speed
15 Setting the torque
16 Setting the torque for screwing
16 Setting the torque for drilling
16 Setting the direction of rotation
17 Switching the tool on
18 Switching the tool o
AFTER-SALES SERVICE
GB 0845 872 2740
IRL 019022605
www.coreservice.co.uk
J0Z-SP38-1016/90891

18
Cleaning and maintenance
19 Cleaning the tool
19 Storing the tool
20
Technical data
20 Drill/screwdriver
20 Battery
20 Battery charger
21
Disposal information
22 EC DECLARATION OF CONFORMITY
23 Exploded view drawing
24 Spare parts list
AFTER-SALES SERVICE
GB 0845 872 2740
IRL 019022605
www.coreservice.co.uk
J0Z-SP38-1016/90891
General
1
Using and storing the operating manual
This operating manual is intended to provide you with information on how to safely operate
your new tool.
As we want you to enjoy your new product and its many benets as much as possible, we
recommend reading this operating manual carefully before operating the tool. Keep the
operating manual in a safe place so that you can also read it at a later date.
You can order a copy of this operating manual. Contact details can be found on the
warranty card.
Intended use
• The tool is solely intended for inserting and removing screws and for drilling in materials
such as wood, metal or plastics. Any other use is not permitted.
• This tool has been designed for use in private households and is not intended for industrial
use.
WARNING! This tool produces an electromagnetic field during operation.
This field may interfere with active or passive medical implants under certain
circumstances. To reduce the risk of serious or fatal injuries, we recommend that
people with medical implants consult their doctor and the manufacturer of the
medical implant before operating the tool.
REMAINING RISKS! Even if you operate this tool according to the instructions,
there is always a possibility of remaining risks occurring. The following risks
may occur in conjunction with the design and construction of this tool:
• Lung damage if a suitable dust mask is not worn.
• Hearing damage if suitable hearing protection is not worn.
• Health risks that result from hand-arm vibrations if the tool is used over a long period
of time or is not used or maintained properly.
AFTER-SALES SERVICE
GB 0845 872 2740
IRL 019022605
www.coreservice.co.uk
J0Z-SP38-1016/90891

Description of symbols
Symbols in the operating manual
The symbols in this operating manual have the following denitions:
CAUTION! Risk of injury
Information on the type and source of risk.
• Follow the instructions of the necessary safety precautions
and countermeasures.
CAUTION! Damage to the tool
Information on the risk of damage to the tool.
• Follow the instructions of the necessary safety precautions and countermeasures.
Note:
Additional important information for the user.
Symbols on the tool
2
CE conformity marking
For indoor use! Protect the electrical power tool from moisture!
Safety class II
The tool must not be disposed of in household waste. Dispose of the
tool in an environmentally-safe way if you no longer wish to keep
the tool. Dispose of the tool at a public collection point.
The battery must not be disposed of in household waste. Dispose of
the battery at a public collection point for used batteries.
Li-Ion
Only use the charged battery to operate the drill/screwdriver up to a
maximum ambient temperature of 50°C!
AFTER-SALES SERVICE
GB 0845 872 2740
IRL 019022605
www.coreservice.co.uk
J0Z-SP38-1016/90891

Polarity
Do not throw the battery in the re - risk of explosion!
Do not throw the battery into water - risk of explosion!
Read the operating manual and observe the warnings and
safety instructions.
The tool complies with the requirements of the Product Safety Act
(ProdSG).
1 hour charging time
Fuse
Safety instructions
General safety instructions for power tools:
WARNING! Read all safety warnings and instructions. Failure to observe the
following instructions may result in electric shocks, re and/or serious injury.
Keep all safety warnings and instructions for future reference. The
term "power tool" used in the safety instructions refers to
mains-operated power tools (with power cable) and battery-operated
power tools (without a power cable).
Safety at the workplace:
• Keep your working area clean and well lit. Untidiness or unlit
working areas can lead to accidents.
• Do not operate the power tool in explosive atmospheres, such as in the
presence of ammable liquids, gases or dust. Power tools create sparks that may
ignite the dust or fumes.
AFTER-SALES SERVICE
GB 0845 872 2740
IRL 019022605
www.coreservice.co.uk
3
J0Z-SP38-1016/90891

• Keep children and other persons at a distance while you are using the power tool.
Distractions may cause you to lose control of the tool.
Electrical safety:
• The plug on the tool must t in the socket. Never modify the plug in any way.
Do not use any adapter plugs with earthed (grounded) power tools. Unmodied plugs
and suitable sockets reduce the risk of an electric shock.
• Avoid physical contact with earthed surfaces such as pipes, heating systems, cookers
or refrigerators. There is an increased risk of an electric shock if your body is earthed.
• Protect the tool from rain and moisture. Penetration of water into a power tool increases
the risk of an electric shock.
• Do not misuse the cable by using it to carry or hang up the power tool or to pull the
plug out of the socket. Keep the cable away from heat, oil, sharp edges and moving
parts of the tool. Damaged or entangled cables increase the risk of an electric shock.
• When operating the power tool outside, only use extension leads that are suitable for
outdoor use. Using an extension lead suitable for use outdoors reduces the risk of an electric
shock.
• If operation of the power tool in a moist environment cannot be avoided, use a
residual current device (RCD). The use of a residual current device reduces the risk of an
electric shock.
Personal safety:
• Be alert, pay attention to what you are doing and be sensible when you are working
with a power tool. Do not use a power tool while you are tired or under the inuence of
drugs, alcohol or medication. A moment of carelessness while operating the tool may result
in serious personal injury.
• Use personal protective equipment and always wear eye protection. Wearing personal
protective equipment such as dust masks, slip-free safety shoes, safety helmets or ear
protectors, depending on the type of power tool and its use, reduces the risk of injuries.
• Remove adjusting tools or spanners before you switch the power tool on. A tool or
spanner in a rotating part of the tool may cause injuries.
• Ensure that the power tool cannot be switched on accidentally. Make sure that the
power tool is switched o before you connect it to the power supply and/or insert the
battery pack, or before picking it up and carrying it. Carrying the power tool while your
nger is on the switch or plugging in the power tool with the switch in the ON position invites
accidents.
• Avoid working in an uncomfortable position. Keep proper footing and balance at all
times. This enables better control of the power tool in unexpected situations.
• Wear suitable clothing. Do not wear loose clothing or jewellery. Keep your hair,
clothing and gloves away from moving parts. Loose clothing, jewellery or long hair can be
caught in moving parts.
• If tools are provided for the connection of dust extraction and collection facilities,
ensure these are connected and properly used. Use of a dust extractor may reduce the
risks caused by dust.
AFTER-SALES SERVICE
GB 0845 872 2740
IRL 019022605
www.coreservice.co.uk
J0Z-SP38-1016/90891

Using and taking care of the power tool:
• Do not overload the tool. Use the correct power tool for your application. The correct
power tool will do the job better and safer in the capacity range specied.
• Do not use a power tool with a faulty switch. A power tool that can no longer be switched
on or o is hazardous and must be repaired.
• Disconnect the plug from the power source and/or the battery pack from the tool
before making any adjustments, changing accessories or storing the tool. Such
precautionary safety measures reduce the risk of the power tool starting up accidentally.
• Keep power tools that are not in use out of the reach of children. Do not allow people
who are not familiar with the tool or who have not read these instructions to use the tool.
Power tools are dangerous in the hands of inexperienced users.
• Maintain your power tool with care. Check that moving parts of the tool are working
perfectly and not sticking, check whether parts are broken or damaged in such a way
that operation of the power tool is impaired. If damaged, have the power tool repaired
before use. Many accidents are caused by poorly maintained power tools.
• Keep cutting tools sharp and clean. Properly maintained cutting tools with sharp cutting
edges are less likely to jam and are easier to control.
• Use the power tool, accessories and insert tools in accordance with these instructions.
Take the working conditions and the job being carried out into account. Use of the power tool
for applications other than those intended could result in a hazardous situation.
Using and taking care of the battery-powered tool:
• Recharge the battery only with the charger recommended by the manufacturer. A
charger that is suitable for one type of battery pack may create a risk of re when used with
another battery pack.
• Only use the battery packs intended for the power tools. Useof other battery packs may
result in injuries and risk of re.
• Keep unused batteries away from paperclips, coins, keys, nails, screws or any other
small metal objects that could cause bridging of the contacts. Shorting the battery
terminals together may cause burns or a re.
• If misused, liquid may leak from the battery. Avoid contact with this liquid. If contact
occurs, ush with water. If the liquid comes into contact with the eyes, seek medical attention.
Liquid from the battery may cause skin irritation or burns.
Service:
• Only have your power tool repaired by qualied specialists using original spare parts.
This will ensure that the safety of the tool is maintained.
Special safety instructions for cordless drill/screwdrivers and
drilling machines:
AFTER-SALES SERVICE
GB 0845 872 2740
IRL 019022605
www.coreservice.co.uk
J0Z-SP38-1016/90891

• Wear hearing protection when drilling. The noise may cause hearing loss.
• Use the additional handles provided with the tool. Loss of control may lead to injuries.
• Hold the power tool by the insulated gripping surfaces when performing work where
the insert tool may come into contact with hidden wiring. Contact with a "live" wire can
make metal parts of the tool "live" and give the operator an electric shock.
• Fix the workpiece using screw clamps or a vice. Non-secured workpieces may result in
injuries for the user or people nearby.
• Before working on walls, ooring or the like, ensure that all power lines in the working area
are switched o at the main switchbox.
• Before drilling, check the area where you want to drill a hole for any type of cables and
pipes (e.g. water, gas, electricity). Use a suitable device, such as a metal detector or power
line detector, for this purpose. In case of doubt, consult a qualied electrician or the
corresponding supply company.
• When drilling, the tool and workpiece can both heat up considerably. Leave them to cool
down suciently before processing. Wear suitable gloves.
Safety instructions for rechargeable batteries and chargers:
• The battery charger can be used by children aged 8 and above as well as by people with
reduced physical, sensory or mental capabilities or with a lack of experience and knowledge
if they are supervised or have been instructed on the safe use of the tool and understand the
resulting risks.
• Children must not play with the tool.
• Cleaning and user maintenance must not be carried out by
children without supervision.
• If the power supply cable of this tool is damaged, it must be replaced by the manufacturer
or its customer service or by a similarly qualied individual to prevent risks from occurring.
• Do not charge non-rechargeable batteries. Only charge the battery in well-ventilated areas.
• Only plug the battery charger into suitable sockets. Only charge the battery with the battery
charger provided.
• Only use the battery charger for the battery provided; do not use it to charge any other
batteries or non-rechargeable batteries.
• Protect the battery and battery charger from moisture.
• Do not operate the battery charger outdoors.
• Disconnect the battery charger from the power supply if it is not used and before it is
cleaned or repaired.
• Handle the battery with care. Do not allow the battery to fall on hard surfaces. Do not exert
any pressure or other mechanical loads on the battery.
• Keep the battery away from extreme heat and cold.
• Only charge the battery at an ambient temperature between 10°C and 40°C. A charged
battery can be used to power the drill/screwdriver at temperatures between 0°C and 50°C.
When the battery is not in use, store this in a dry place and at a temperature between 10°C
and 30°C.
• Do not open the battery or the battery charger and do not attempt to repair them. Should
parts be faulty, have them repaired by a qualied technician or send them to our customer
service department for repair. If the power supply unit or the power cable of the battery
AFTER-SALES SERVICE
GB 0845 872 2740
IRL 019022605
www.coreservice.co.uk
J0Z-SP38-1016/90891

charger is damaged, they must be replaced by our customer service department to prevent
risks from occurring.
WARNING! Danger! Make sure that there are no metal parts
(screws, nails, etc.) in the battery charger.
• Do not store the battery together with metal parts that may cause short circuits between
the contacts. The battery may overheat, catch re or explode.
• If a person comes into contact with acid or a similar liquid contained in the battery, wash
o these substances immediately with plenty of water. If these substances come into contact
with the eyes, rinse with plenty of water and seek medical attention immediately.
• Risk of explosion! Do not throw the rechargeable battery in the re and do not immerse in
water.
• The rechargeable battery must not be disposed of in household waste regardless of whether
it has been used or not. In accordance with the battery directives, it must
be taken to a local battery collection point or sent back to us with the label "used
battery".
• Do not use the battery charger at altitudes of over 2000 m.
Safety instructions for the LED work lamp:
CAUTION! Risk of injury to the eyes!
Never shine the light beam directly at people or animals and
never look directly into the light beam of the LED work lamp yourself.
Before use
Note: Initial operation
When you use the tool for the rst time, please observe the notes in the section "Prior
to initial operation"
4
Functional description
This cordless drill/screwdriver is the ideal tool for drilling as well as tightening and loosening
screws.
The following functions are available to you with this tool:
• The tool is mobile as it is powered by a battery.
• Protection against deep discharging: The battery is protected against deep discharging by
an electronic system. If the battery is almost empty, the power is automatically disconnected.
AFTER-SALES SERVICE
GB 0845 872 2740
IRL 019022605
www.coreservice.co.uk
J0Z-SP38-1016/90891

Please charge the battery, see section "Start-up".
• The tool is tted with a quick-clamp drill chuck (1) so that you do not need a drill chuck key
to t the instrument.
• Change between the two speed settings using the switch (3) for screwing and drilling work.
• Using the torque preselection ring (2) select the appropriate torque for
your work piece
• You can control the direction of rotation using the switch (7). The middle position of this
switch locks the ON / OFF switch (8) and prevents the drill/screwdriver from being switched
on accidentally.
• The drill/screwdriver operates when you push the ON / OFF switch.
• The drill/screwdriver is secured by means of an automatic overload protection. If the tool
is overloaded or the temperature of the battery exceeds 45°C, the overload protection
disconnects the power supply. If the safety shut-down function is activated due to
overheating of the battery, the tool can only be used again when the battery temperature has
been lowered to between 0°C and +45°C.
Note: Spare battery
You can obtain a second battery from our service partner, see guarantee card
(at the end of these instructions).
Unpacking
CAUTION! Danger of suocation Keep plastic lm and plastic bags away from
babies and infants.
1. Remove the packaging and all protective lm.
2. Check the tool including accessories for visible damage. Do not use the tool under
any circumstances if you detect any kind of damage.
Removing the battery (9)
CAUTION! Risk of injury A
If the tool is switched on accidentally, there is a risk of injury.
• When the drill/screwdriver is in idle mode, put the switch
for the direction of rotation (7) in the middle position so that
the ON / OFF switch (8) locks. (Fig. A).
1. To remove the battery (11), press the release button (10)
and pull the battery forwards from the base of the tool.
(Fig. A1)
Charging the battery
The battery must be charged prior to using the tool for the rst time.
CAUTION! Damage to the tool
Using the wrong charger may damage the battery.
• Only use the charger (12) supplied to charge the battery
AFTER-SALES SERVICE
GB 0845 872 2740
IRL 019022605
www.coreservice.co.uk
J0Z-SP38-1016/90891

• Before connecting the battery charger, check that the voltage specications of the
charger (see Technical data) match the voltage of your mains power supply.
1. Connect the supply cable of the charger (12)
with the socket on the charging cradle (11)
(Fig. B).
2. Push the battery (11) into the charging cradle (12)
until it clicks into place (Fig. C).
CAUTION! Risk of overload
Risk of overloading extension leads and sockets.
• When using extension leads and
sockets, ensure that they are large enough to cope with the power load
3. Plug the power supply unit into a suitable socket. The power indicator
(13) of the charger will light up (Fig. D). The following operating statuses are displayed:
- No battery connected: GREEN
- Battery is charging: RED
- Battery charged, charging completed: GREEN.
D
11
12
13
4. When the battery is fully charged, remove the power
supply unit from the socket.
5. Press the release button (10) and remove the battery
from the charging cradle (Fig. E).
The battery is charged and you can now insert it in the
drill/screwdriver.
Inserting the battery
CAUTION! Risk of injury
If the tool is switched on accidentally, there is a risk of injury.
• When the drill/screwdriver is in idle mode, put the switch for the direction of
rotation (7) in the middle position so that the ON / OFF switch (8) locks.
6. Slide the battery into the drill/screwdriver until it locks into place (Fig. F).
Once the battery is inserted, the tool is ready for use.
Checking the battery level
The battery has an integrated battery level indicator (4) with three coloured LEDs.
- Press the battery level indicator button (4a), to activate it. One or several LEDs will light up.
AFTER-SALES SERVICE
GB 0845 872 2740
IRL 019022605
www.coreservice.co.uk
J0Z-SP38-1016/90891
The following battery levels are displayed:
- GREEN/YELLOW/RED: Battery is fully charged
- YELLOW/RED: Battery is partially charged
- RED: Battery is empty and must be re-charged
Fitting the instrument (drill bit or screw bit with screw bit holder)
Drill and screw bits will hereinafter be referred to as instruments.
Only use instruments that can be securely tted in the drill chuck and that are designed for
this tool. Also refer to the specications in the "Technical Data" section.
CAUTION! Risk of injury
If the tool is switched on accidentally, there is a risk of injury.
• When the drill/screwdriver is in idle mode, put the switch for the direction of
rotation (7) in the middle position so that the ON / OFF switch (8) locks.
Note: Magnetic screw bit holder
The magnet in the screw bit holder holds the screw in place and makes it easier to
tighten screws.
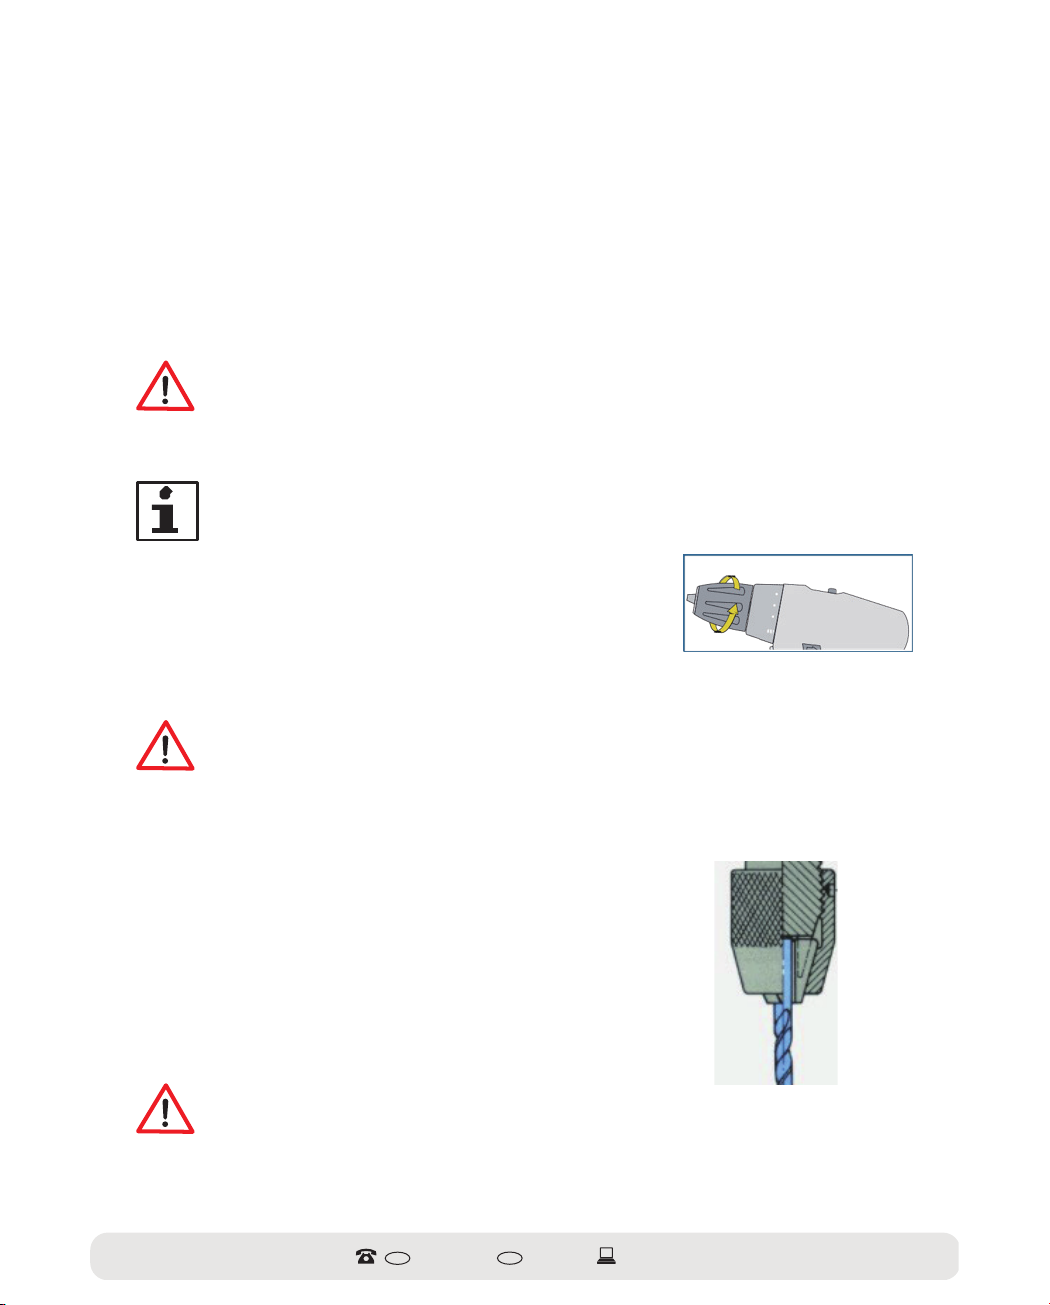
1.Open the catch on the quick-action drill chuck
(1), to do so turn the drill chuck anti-clockwise.
Open the drill chuck so you can insert the instrument (Fig. G)
Open drill chuck (2)
CAUTION! Risk of injury
Risk of cuts.
• Wear gloves when tting a drill bit into the quick-clamp drill chuck.
• Tighten the drill chuck when tting the instrument
2. Put the instrument in the drill chuck as follows:
a: Inset the screw bits (15) as far as they will go
b: Only insert the shaft of the drill bit (14) into the drill chuck.
(Fig. H) Ensure that the instrument is straight.
It must NOT be tilted. (Fig. H)
3. Turn the drill chuck clockwise and tighten it securely.
4. To remove the instrument, turn the drill chuck anti-clockwise.
Changing the mechanical speed
H
CAUTION! Damage to the tool
Never change the speed setting while the tool is in operation; this can
cause damage.
• Use the switch (3) only when the drill/screwdriver has come to a standstill.
AFTER-SALES SERVICE
GB 0845 872 2740
IRL 019022605
www.coreservice.co.uk
J0Z-SP38-1016/90891

The tool has two mechanical speeds that can be selected using the switch (3).
1st speed setting: Slide the switch (3)
away from the drill chuck (1).
The number "1" will be displayed on the
switch. (Fig I)
Selecting the 1st speed setting
In the 1st speed setting, the drill/screwdriver works at a low rotational speed and a high
torque. This setting is used for drilling large drill diameters, for
drilling into wood and plastic as well as the screwdriver function.
2nd speed setting: Slide the switch (4) towards
the drill chuck. The number "2" will be displayed
on the switch.(Fig. J)
Selecting the 2nd speed setting
In the 2nd speed setting, the drill/screwdriver works at a high rotational speed and a low
torque. This setting is used for drilling small drill diameters and drilling into metal.
Setting the torque
CAUTION! Damage to the tool
Never change the torque while the tool is in operation; this can cause damage.
• Operate the torque preselection ring (2) only when the drill/screwdriver has
come to a standstill.
When tightening and loosening screws, select a low torque to avoid damages to the work
piece (particularly work pieces made of wood) or to the screw.
Select the drill setting for drill work (drill symbol), see section
"Setting the torque for drilling".
Note: Test object
First carry out a trial on a test object, not your actual work piece, and set the required
torque before beginning the actual work.
Using the torque preselection
ring (2) select the appropriate
K
torque for your work piece. (Fig. K)
Setting the torque
AFTER-SALES SERVICE
GB 0845 872 2740
IRL 019022605
www.coreservice.co.uk
J0Z-SP38-1016/90891

Turn the torque setting until the arrow on the upper part of the casing points to the desired
setting.
• The higher the number the arrow points to on the torque setting, the higher the maximum
torque which you can work with before the torque coupling slips.
Setting the torque for screwing
Turn the torque setting
until the arrow on the casing points to "1".
(Fig. L)
• In this position, the torque coupling will slip,
even if the drill chuck only has a small load.
L
• Select a higher torque by selecting a higher
number according to requirements (dependant
on the material and screw diameter).
Setting the torque for screwing
Setting the torque for drilling
Turn the torque setting clockwise until the arrow on the
casing points to the drill symbol. (Fig. M)
M
• In this position, the torque coupling will not slip.
Setting the torque for drilling
Note: Locking
After using the drill/screwdriver, always put the switch for the direction of rotation in
the middle position to avoid accidentally switching on the tool and causing injuries.
AFTER-SALES SERVICE
GB 0845 872 2740
IRL 019022605
www.coreservice.co.uk
J0Z-SP38-1016/90891

Operation
5
Switching the tool on
CAUTION! Risk of electric shock!
Risk of electric shock.
• Before starting work on walls, oors or similar surfaces, ensure that all power lines
in the working area are switched o at the main switch cabinet.
1.Check the working area for pipes or cables (electricity, water, gas). It may be useful to use a
suitable tool for this such as a metal or a wire and pipe detector or to consult with a qualied
electrician or a utility company.
2. Wear protective clothing as well as eye and ear protection.
3. Ensure that the instrument is securely tted.
4. Release the safety lock with the switch (7) and select a direction of rotation.
5. Press the ON / OFF switch (8) to switch the tool on.
• Hold the ON / OFF switch (8) for continuous operation.
• Pressing the ON / OFF switch controls the rotational speed. The more you
press the ON / OFF switch, the higher the rotational speed.
• While the tool is in operation, the LED work lamp (6) is activated to light up the work piece.
When drilling, note the following points:
• Always keep the tool at a 90° angle to the work piece.
• First place the drill bit on the work piece and then switch the tool on.
• If the drill twists in the work piece, change the direction of rotation and remove the
drill bit. Do not exert excessive pressure when drilling. When drilling, note the following
points:
• Always keep the tool at a 90° angle to the work piece.
• Note the direction of rotation of the screw. Pre-drill holes in hard materials.
CAUTION! Risk of eye injury!
Never direct the light beam at people or animals and
never look directly into the beam of the LED work light (6).
CAUTION! Risk of burning!
While drilling, the instrument and the work piece may become extremely hot, thus
creating the risk of burning.
• Wait a few minutes and let the instrument and work piece cool down before you
continue working.
• Put on gloves.
AFTER-SALES SERVICE
GB 0845 872 2740
IRL 019022605
www.coreservice.co.uk
J0Z-SP38-1016/90891

Switching the tool o
1. To switch o the tool, release the ON / OFF switch (8).
2. Put the switch for the direction of rotation (7) in the middle position to
lock the ON / OFF switch and to avoid accidentally switching on the tool.
3. Clean the tool as described in the chapter "Cleaning and maintenance"
Cleaning and maintenance
CAUTION! Risk of electric shock!
Risk of electric shock
• Wait until the tool has cooled down and remove the battery from the tool.
• Ensure that no water enters the inside of the tool.
Do not damage the surfaces of the tool under any circumstances.
Do not use any aggressive cleaning agents, metal or
nylon brushes or sharp or metallic cleaning implements
such as knives, hard scrapers or similar items. (Fig. N)
6
N
Cleaning the tool
1. Use a mild cleaning agent and a dry or wet cloth, but not dripping wet. Do not use cleaners
that contain solvents under any circumstances!
2. Always keep the air inlets free from dust build-up to avoid the drill/screwdriver
overheating.
3. Dry the tool and the attachments with a soft cloth.
Note: Lubrication
There are no parts inside this tool that require further maintenance or lubrication.
Storing the tool
Keep the tool in the storage box provided (17) in a dry place and out of reach of children.
AFTER-SALES SERVICE
GB 0845 872 2740
IRL 019022605
www.coreservice.co.uk
J0Z-SP38-1016/90891

Technical data
Drill/screwdriver
Model name:
Rated voltage:
No-load speed n0 1st/2nd speed setting:
Useable drill sizes:
Maximum drilling capacity:
Sound pressure level LpA:
Sound power level LWA:
Vibration emission:
Battery
Model name:
Voltage:
Battery type:
J0Z-SP38-1016/90891
16 V - - 0 - 400 / 0 - 1300 min-1
1.5 - 10 mm
Steel: Ø 10 mm
Wood: Ø 30 mm
In idle mode 64.5 dB(A), K = 3 dB(A)
In idle mode 75.5 dB(A), K = 3 dB(A)
Drilling into metal ah,D ≤2.5 m/s
Screws ah ≤2.5 m/s2, (0.888 m/s2)
K = 1.5 m/s
J0Z-SP38-1016-1
16 V - - Li-ion batteries, 1.5Ah
2
2
, (2.426 m/s2)
7
Battery charger
Model name:
Rated voltage:
Output voltage:
Charging time to load the battery type
Li-ion, 1.5 Ah, 4 cells:
Safety class II
corresponds to EN 60335-2-29
for indoor use only
NOTE: The vibration values stated have been calculated in accordance with a standardised
test method and can be used to compare one product with another. Additionally, this value is
suitable to estimate in advance the strains for the user that occur due to vibrations.
AFTER-SALES SERVICE
GB 0845 872 2740
SMVCH001172000G
230-240 V~, 50/60 Hz, 50W
17 V - - - , 2 A
1 hour
IRL 019022605
www.coreservice.co.uk
J0Z-SP38-1016/90891

Depending on how you use the product, the actual
vibration values may deviate from the values stated! Take measures
to protect yourself against vibration loads. Bear in mind the entire workow, even when the
product is working under no load or is switched o! Suitable measures include regular care
and maintenance of the product and instrument attachments, keeping your hands warm,
taking regular breaks as well as well-planned workows!
Disposal information
The tool and the battery must not be disposed of in household waste. Dispose of the
tool in an environmentally-safe way if you no longer wish to keep it.
Dispose of the tool and the battery at a public collection point
Parts of the packaging can be recycled. Dispose of the
packaging in an environmentally safe way and dispose of it with recyclable
waste. Dispose of then at a public collection point.
You will nd more information from your municipal disposal site.
8
AFTER-SALES SERVICE
GB 0845 872 2740
IRL 019022605
www.coreservice.co.uk
J0Z-SP38-1016/90891

EU Declaration of conformity
We,
MEROTEC GmbH
Graf-Recke-Strasse 82, 40239 Düsseldor f
declare that the product
Cordless drill/screwdriver J0Z -SP38-1016
Battery charger SMVCH00117200 0B
based on its design and type of construction as well as the
model marketed by us corresponds with the following directives:
EMC specifications: 2004/108/EC
Machinery Directive specifications:
2006/42/EC Low Voltage Directive
(2006/95/EC) RoHS Directive
2011/65/EU
Harmonised standards applied
EN55014-1:2006+A1:200 9
EN55014-2:1997+A1:2001+A2:200 8
EN61000-3-2:2006+A1:2009+A2:200 9
EN61000-3-3:200 8
EN 60745-1:2009+A11:201 0
EN60745-2-1: 201 0
EN60745-2-2: 201 0
ZEK 01.4-08/11.1 1
EN60335-1:2012
EN60335-2-29:2004 + A2:201 0
EN62233:2008
EN 50581:2012
Authorised signature
2013-08-01
Signature:
Name: Thorsten von der Heyde
General Manager
MEROTEC GmbH
AFTER-SALES SERVICE
CE marking affixed in: 13
GB 0845 872 2740
IRL 019022605
Documentation representatives:
Michael Willms
MEROTEC GmbH
Graf-Recke-Strasse 82 40239
Düsseldorf, Germany
www.coreservice.co.uk
J0Z-SP38-1016/90891

Exploded view drawing
AFTER-SALES SERVICE
GB 0845 872 2740
IRL 019022605
www.coreservice.co.uk
J0Z-SP38-1016/90891

Exploded view drawing
Ref. Description
1. Countersunk screw M5X20 left
2. Quick-action drill chuck
3.Torque adjustable sleeve
4. Torque adjusting nut
5. Torsional spring
6. Torque regulator washer
7. Output shaft
8. Ball bearing φ2
9. Flat ball washers
10. Oil bearing
11. Front gearbox casing
12. Seal
13. Resistance element
14. Circlip φ8
15. Straight pin φ5X6
16. Ball φ5
17. Retaining ring
18. Straight pin φ3X6
19. Stopper
20. Ring gear
21. Power output piece
22. The third level of the planetary gear
23. Gear seal kit
24. Jumper wire
25. Rear gearbox casing
26. Phillips head screws ST2.9X9.5
Ref. Description
27.Second level of the planet carrier
28. The second level of the planetary gear
29. Actions within the toothed rim
30. First level of the planet carrier
31. The rst level of the planetary gear
32. Fixed ring gear
33. Cover panel of the gear unit
34. Motor plate
35. Motor pinion
36. Direct current motor
37. Power indicator compartment
38. Battery indicator
39. Battery indicator light
40. Charge level display
41. Coil
42. Switch assembly
43. Switch for speed change
44. Light
45. LED light
46. Switch model
47. Left half of the casing
48. Power supply subassembly
49. Right half of the casing
50. Screw 3X14
51. Battery assembly
16V LI-ION CORDLESS
DRILL/SCREWDRIVER
The guarantee shall last three years and begin on the day of purchase. Please retain the receipt as proof of purchase.
Faulty cordless drill/screwdrivers may be sent free of charge to the service address below during the
warranty period. You will then receive a new or repaired tool.
Before sending the tool to be repaired, please call customer services on the number supplied below. They will
provide you with a returns sticker to send your tool back to us free of charge.
Even after the warranty period has expired you may send the faulty tool to the address below for repair. Repairs carried
out following expiry of the guarantee period will be charged. This guarantee does not affect your statutory rights .
Your information:
Name __________________________________________________________________________________________ __
Address _________________________________________________________________________________________ _
___________________________ E-mail _________________________________________________________ __
Date of purchase* _________________________________________________________________________________ __
Place of purchase _________________________________________________________________________________ __
Description of the fault:
Please send the completed guarantee card to:
Unit A&B
Escrick Business Park
Escrick
York
YO19 6FD
Email:
Tel Great Britain: 0845 872 2740
Tel Ireland: 019022605
support@coreservice.co.uk
AFTER-SALES SERVICE
GB 0845 872 2740
IRL 019022605
www.coreservice.co.uk
MODEL: J0Z-SP38-1016, 11/2013, 90891
YEARS GUARANTEE

IMPORTED BY: MEROTEC GmbH
Graf-Recke-Strasse 8240239
Düsseldorf, Germany
 Loading...