

Page 1

KNIFE & TOOL SHARPENER
WSKTS-KO USER GUIDE
WorkSharpTools.com
To reduce the risk of injury, the user must read and understand this instruction
• CAUTION
manual before using product. Save these instructions for future reference.
Page 2
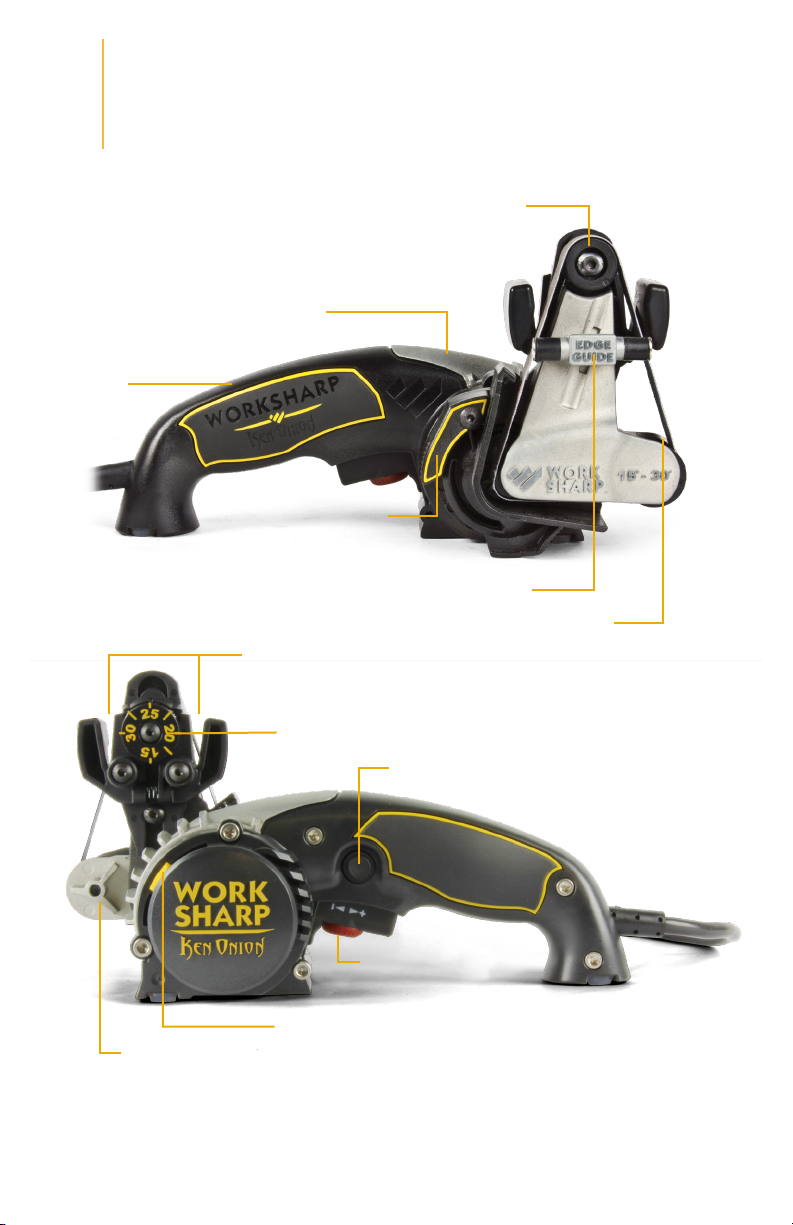
Getting To Know
1
Handle
Your Tool
Sharpening Cassette
Power Platform
Cassette
Lock Lever
Edge Guide
Belt Tensioner
Sharpening Guide Slots
Belt Change Lever
Not Pictured:
Angle Adjustment Knob
Power Switch Lock Out
Power Switch
with variable speed dial
Belt Tracking Lever
Bench Mount Fastener (1/4” x 20)
Page 3
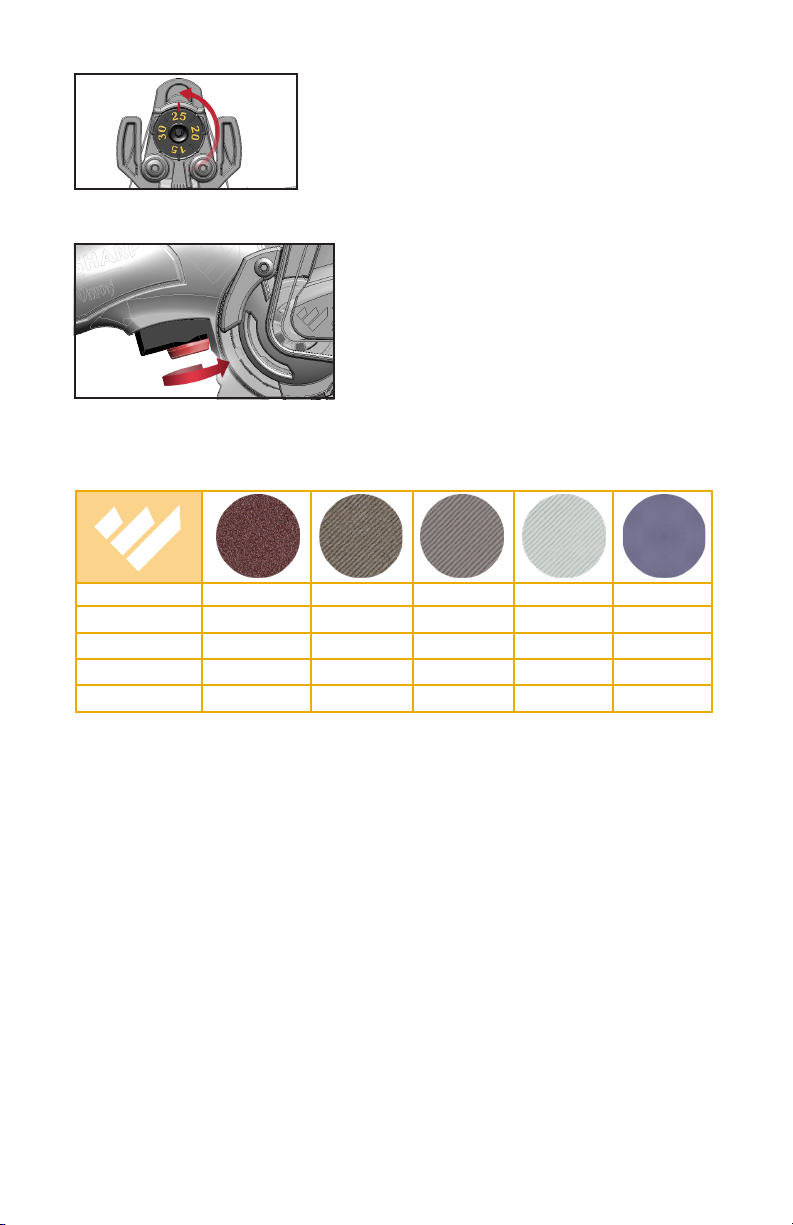
Knife Sharpening Guide Adjustment
15° - 30° in 1° increments. The dial
indicates the angle per side. Align
desired angle with the indicator line on
top of guide.
Speed Control Adjustment
Low speed (+/-) is 1200 SFM
Mid speed (+/-) is 2000 SFM
High speed (+/-) is 2800 SFM
SFM = Surface Feet per Minute
Belt Information
Belt Name
Grit
Size
What it Sharpens
Uses
Extra Coarse
P120
Norton SG
Tool Sharpening
Knife Repair
Coarse
X65
Norax 65µ
Knife
Shape
Medium
X22
Norax 22µ
Knife
Sharpen
Fine
X4
Norax 4µ
Knife & Scissor
Hone
Extra Fine
6000
SiC 2µ
Gut Hooks
Serrations
• Engineered abrasives are long lasting and will meet your sharpening needs.
• Keep clean for best performance and optimum life.
• 6000 Belt is narrow for improved gut hook sharpening.
• Belt Grits are labeled on backing (μ = micron).
• For reference, belts are equivalent to: X65 (P220) | X22 (P1000) | X4 (P3000)
Abrasive Belt Wear
Belt discoloration is not an indicator of wear. Engineered belts expose new
abrasive as they break down. Used belts may take extra strokes but will
continue to remove material. These belts will keep going longer than you
think. Keep using them as long as they cut.
Page 4
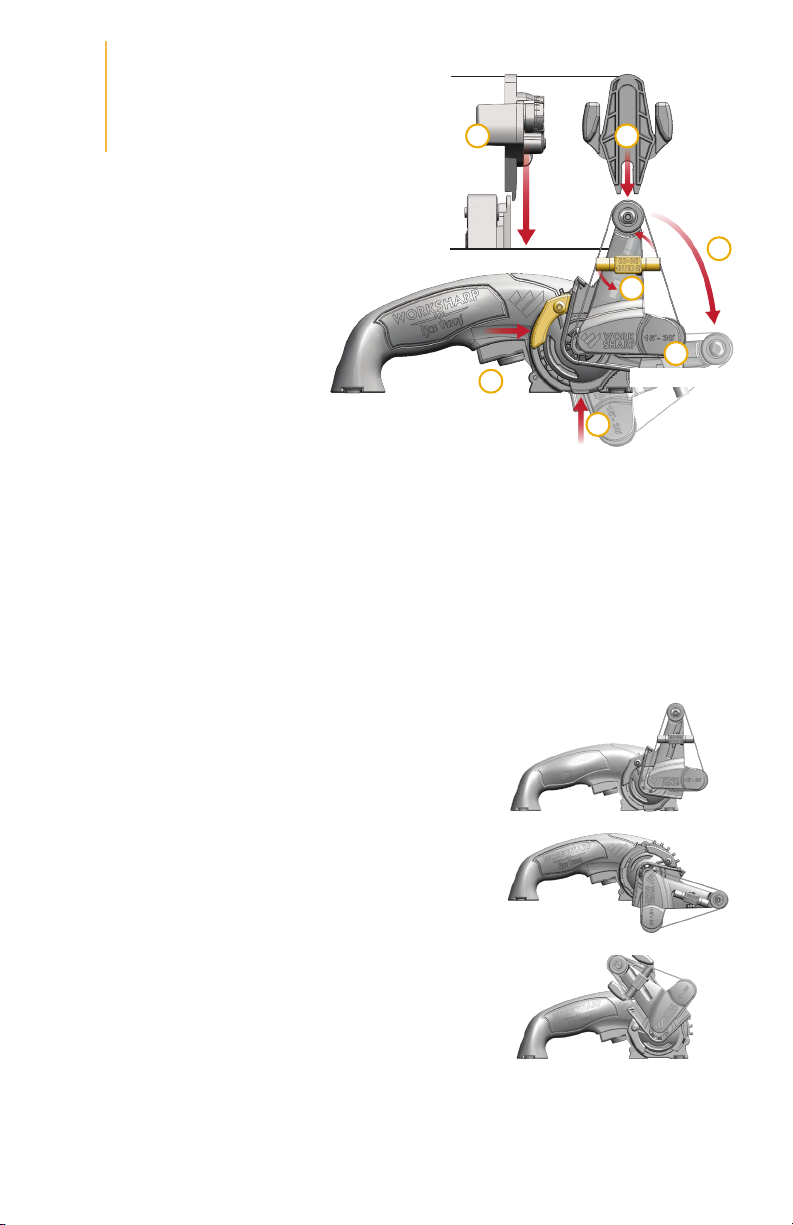
Setting up
2
Slide guide onto cassette (A)
Snap into place. Pull firmly to release.
Cassette Lock Lever (B)
Push & hold to rotate cassette from
sharpening to grind mode.
Edge Guide: Pull & Rotate (C)
Clockwise to use, Counterclockwise to parked position.
Bench Mounting (D)
Use 1/4” 20 fastener to secure
tool.
Belt Change Lever (E)
Lift to reduce belt tension during belt changes.
Belt Change:
Lift & hold Belt Change Lever to remove belt. Route belt around all 3
pulleys, then release the lever. Be sure belt is within pulley flanges. Lay
tool onto its side for easier belt changes.
Belt Tracking Lever
Push lever inward, then slide up or down to track belt onto the center of
the top pulley (factory set at center).
Trigger Lock
Pull trigger & push button in to lock “on” position.
Pull trigger to release. Not intended for use when
knife sharpening, use for grinding applications only.
Your Tool
Side View
B
AA
C
E
On Other Side
D
Sharpening
B
Sharpening Guide:
Rotate knob to select angle. Align number with
mark on top. The dial indicates the angle per side.
Removing the Sharpening Cassette:
1. Remove belt from sharpening cassette.
2. Push and hold lock lever and rotate cassette to
position shown.
3. Dismount cassette by pulling outward.
4. Locate this same position to re-install
sharpening cassette or attachments.
Grinding
Remove
Page 5
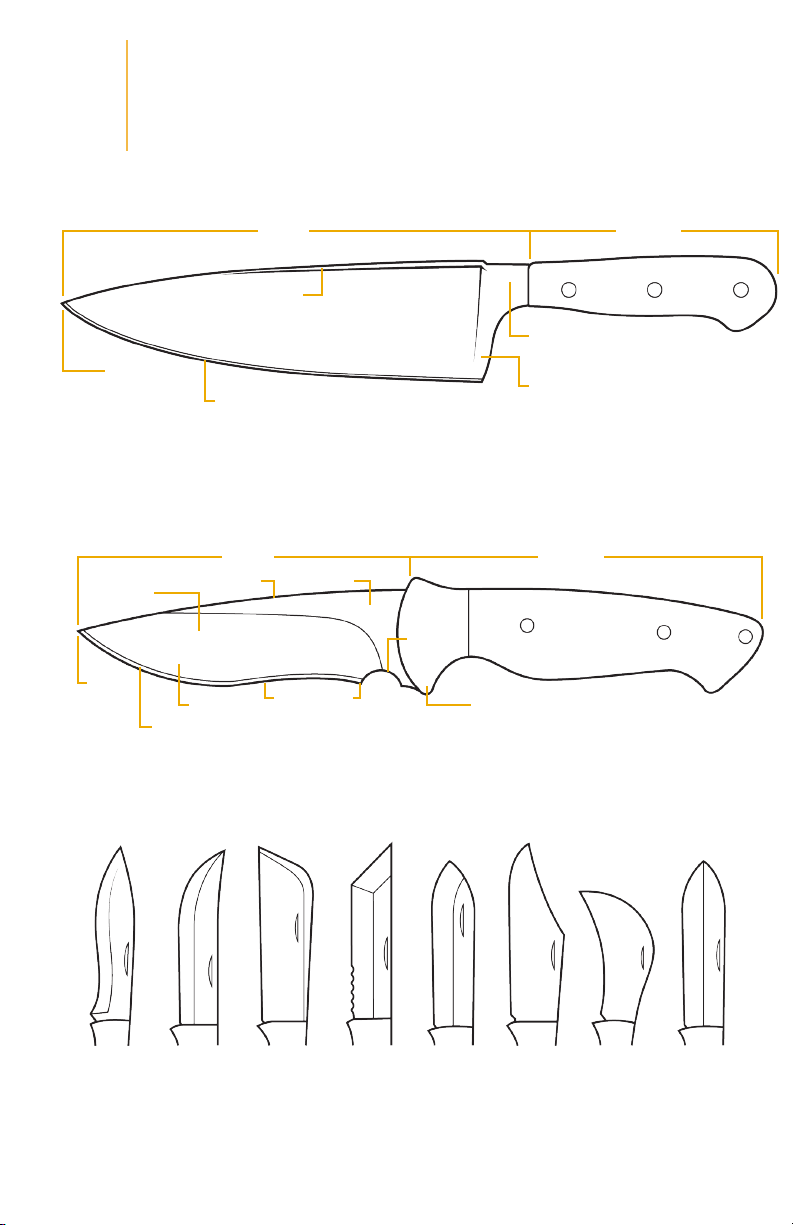
Know your
3
Tip
Primary
Bevel
Point
knife
Point
Tip
Edge
Edge
Spine
Belly
Spine
Blade
Ricasso
Heel
Re-Curve
Kitchen Knife
HandleBlade
Bolster
Heel
Finger Guard
Outdoor Knife
Handle
Choil
Finger Guard
Blade Types
Re-Curve Skinner Drop
Tanto
Point
Hawk BillSheepfoot ClipCombo
Spear
Point
Page 6
Sharpening
4
reference chart
Kitchen Knives
Pull rate: 1”/sec • Use Edge Guide
Speed
L
L
L
H
L
Western
Asian
Paring
Cleaver
Bread
Angle
20°
16°
20°
30°
X
Outdoor Knives
Pull rate: 1”/sec • No Edge Guide
Pocket
Hunting
Fillet
Serrated
Gut Hook
Angle
25°
25°
20°
X
X
Speed
L/M
L/M
L/M
L
M
X65
4-8
0
4-8
4-8
0
X65
6-10
6-10
6-10
0
0
X22
4-8
4-8
4-8
2-8
0
Number of strokes per side.
X22
6-10
6-10
6-10
0
0
Number of strokes per side.
X4
10
10
10
X4
0
0
10
10
10
6000
0
0
0
0
2
6000
0
0
0
0
0
2
2
Best Techniques:
• Resharpen using X4 only.
• Follow the curve of the knife when sharpening for best results.
• Use the Edge Guide on long or flexible blades when possible.
• Masking tape can protect blade from scratching during sharpening.
• Use a practice knife to learn.
Position belt at the very start of
the edge with motor off.
Place blade in guide then simultaneously
power up and pull the blade.
Page 7

Sharpening outdoor knives
5
1. Place the blade in the guide
n Best Techniques:
When and why to use the Edge Guide:
• Most pocket / outdoor knives are best
• It is helpful to support and guide long blades
Reference Section 4 and the Sharpening Reference Chart for recommended
angle settings, belt selection, stroke count, speed and choice of edge type.
With power off, insert blade into right side of sharpening
guide all the way to the start of the edge.
Place knife to bottom and outside edge of guide slot.
Do not put pressure onto / into the sharpening guide. It is
intended to provide a reference point for blade position.
Only use light pressure (weight of the blade) when using the
sharpening guide to yield best results.
sharpened without using the Edge-Guide
since they often have thumb studs or belt
clips that can obstruct full blade insertion.
(filet knives and machetes) through the
sharpening process.
Pull and Rotate
2. Power on and Pull the knife
With power off and blade placed in the guide, simultaneously squeeze the
power switch and pull blade steadily through the guide (1” per second).
Follow the curve of the blade as
you pull through the guide. Keep
cutting edge perpendicular to the
belt for best and most consistent
results.
Use only the weight of the blade
– do not press down into / onto
guide. Hover the blade and let the
tool do the work for best results.
Guide will ‘tip over’ if too much
outer pressure is applied.
Power off as you come to the point, while the blade is still supported by the belt.
Page 8

3. Repeat and feel for burr
Continue sharpening on right side of guide.
Check for a burr every 2-3 strokes (see picture).
Sharpen until a burr is created along the entire
length of the edge.
If burr is not yet raised, See
sharp”
in Troubleshooting section.
“Knife not getting
Repeat same number of strokes on other side of blade / sharpening guide.
Once the edge is shaped / formed, continue with finer grit belts using
alternating strokes. Alternating strokes removes the burr and refines the
edge faster.
See Sharpening Reference Chart in Section 4 for recommended belt use and
stroke count based on the edge you want (Toothy, Shaving, Shiny).
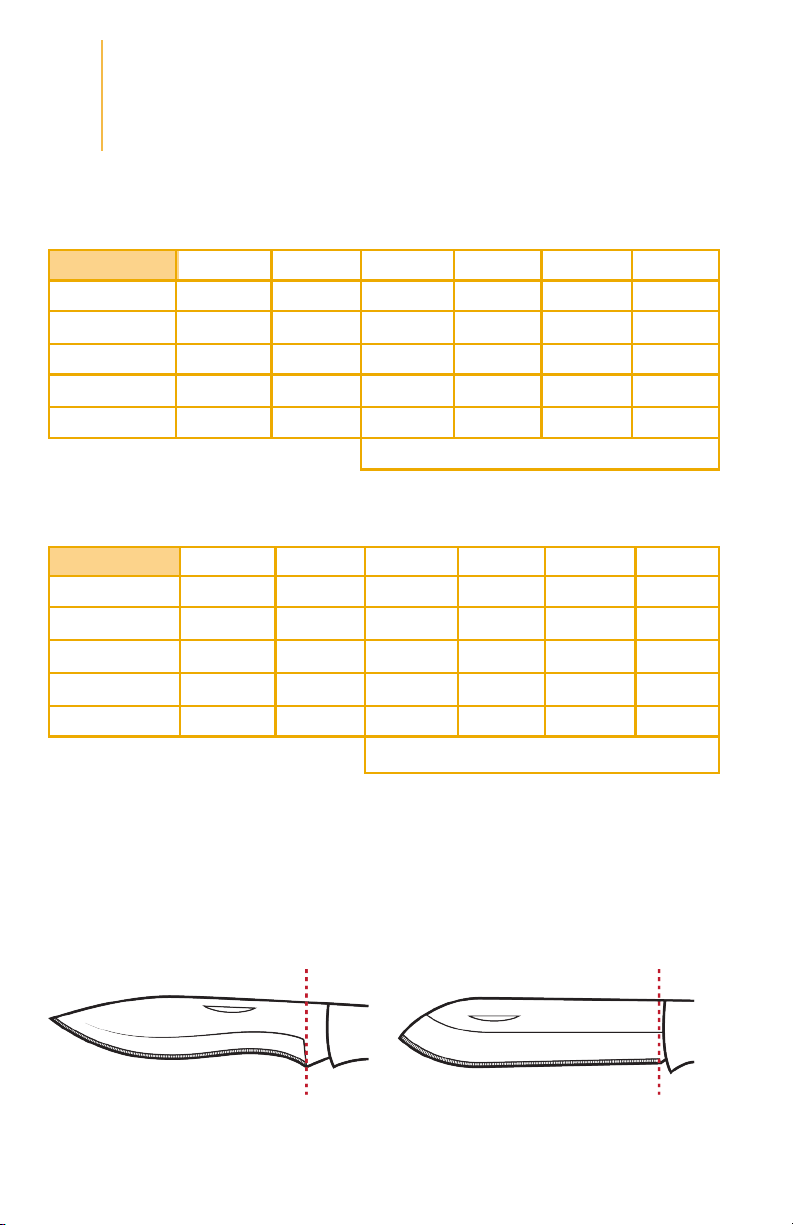
n Best Techniques: (Avoid rounding the tip)
Maintain factory blade profile / shape:
STOP STOP
Check for a burr by
brushing fingers across/
away from the blade edge.
Follow the curve of the blade so
the edge remains perpendicular
to the belt. Turn off the power as
you come to the point.
Use this technique for these
blade types:
Abrasive Belt
Abrasive Belt
Pull straight through the guide and
stop on the middle of the belt. Do not
lift the blade handle. Turn power off
as knife point contacts belt.
Use this technique for these blade
types:
Page 9

Sharpening
6
Most serrated knives have a flat side and a bevel side
on the blade; Sharpen only the flat side.
Only use the finest grit 6000 belt (purple, narrow) for serrated sharpening.
Place flat side of blade at the bolster / handle against the fine grit abrasive
belt. Set to low speed and squeeze the power switch and pull knife steadily
across the belt from bolster to tip. An 8” blade should take 8 seconds.
Repeat until no burr remains on the flat side of the blade and serration
‘teeth’ are sharp.
Serrated Knives
Flat Side
Beveled Side
n Best Techniques:
Serrated knives can be
sharpened with or without the
Knife Sharpening Guide installed
depending on height of serrated knife.
Only place serrated blades on downhill
- right side of belt. Otherwise you risk
cutting the belt.
Blade
Belt
Page 10

Sharpening
7
Reference the Sharpening Reference Chart in Section 4 for recommended
angle settings, belt selection and speed. Otherwise sharpening a filet knife
is the same as other knives.
Use the Edge Guide to help support these long, flexible blades during
sharpening to ensure a consistent sharpening along the entire edge.
Use very light pressure in the sharpening guide so the
blade does not flex.
FiLet Knives
Sharpening
8
Gut Hooks
Only use finest grit 6000 belt (purple,
narrow) for sharpening gut hooks.
Place curve of gut hook over the
belt on downhill side; allow belt to
conform to blade’s curve. Squeeze
power switch; hone 2 to 4 seconds.
Repeat on other side.
n Best Techniques:
Only place gut hook on downhill - right side of
belt. Otherwise you risk cutting the belt.
Page 11

Sharpening Kitchen Knives
9
1. Place the blade in the guide
With power off, insert blade into right side of sharpening
guide all the way to the beginning of the edge or finger guard.
Place knife to bottom and outside edge of guide slot.
2. Power on and Pull the knife
With power off and blade placed in the
guide, simultaneously squeeze the power
switch and pull blade steadily through
the guide (1” per second).
Reference the Sharpening Reference Chart in Section 4 for recommended
angle settings, belt selection and speed. Otherwise sharpening a kitchen knife
is the same as other knives.
Most kitchen knives should be sharpened with the Edge-Guide.
No finger guard Finger guard
Follow the curve of the blade as you pull
through the guide. Keep cutting edge
perpendicular to the belt for best and
most consistent results.
Use only the weight of the blade – do not
press down into / onto guide. Hover the
blade and let the tool do the work for best results.
Guide will ‘tip over’ if too much outer pressure is applied.
Continue sharpening on right side of guide until a burr is created along the
entire length of the edge.
Repeat same number of strokes on other side of blade / sharpening guide.
Continue sharpening with finer grit belts using alternating strokes.
Alternating strokes removes the burr and refine the edge faster.
Page 12

Sharpening
10
Sharpen only the beveled side of your scissors. Marking the beveled side
with a black marker will make it easier to see when the cutting edge has
been sharpened.
Use the 6000 grit belt at medium to hone or touch-up scissors.
Use the X22 belt at medium speed to sharpen
damaged scissors.
Once scissor blade is properly placed in
Sharpening Guide, squeeze power switch and
simultaneously pull the scissor blade steadily
through the guide.
Repeat 1-2 more times or until marker is
removed from cutting edge.
Scissors
Beveled
Side
Repeat on other scissor blade.
Test scissors for sharpness. Continue
sharpening as needed.
Page 13

Grinding, Polishing,
11
Remove Sharpening Guide. Pull up firmly.
Ensure the Edge Guide is in the parked position
and that the Knife Sharpening Guide has been
removed before grinding.
Push Cassette Lock Release Lever to rotate
cassette to grind mode.
Use the P120 belt and high speed for light
sharpening and grinding tasks.
NOTE: Tools such as these
do not require sharpening
to a precise angle; just let
the belt conform to the
edge of the tool. It will take
longer to restore an edge to
severely damaged tools.
Deburring
n Best Techniques
• Always clamp or fixture work piece before grinding for optimum safety.
• Let the tool do the work. Do not overload the tool during grinding.
Abrasive selection and belt speed are already optimized.
• Only sharpen tools on the right hand / downhill side of the belt.
• Tool Grinding Attachment available for heavier grinding tasks (see
Section 12).
Page 14

Tool Grinding
12
Hub Fastener
(Left-Handed Thread
with Yellow Lettering)
Ball Detent
Attachment
Tracking Lever
Quick Lock
Tensioner
Platen Grind
Slack Grind
Installation
Push lock release lever and rotate knife sharpening cassette to
position shown, pull outward to remove cassette.
1. Install pulley drive hub onto tool using provided Left-Hand Thread Hub
Fastener – turn LEFT to tighten and RIGHT to loosen, do not over-tighten
fastener. Be sure the drive pulley is properly aligned onto the keyed
motor shaft.
2. Install metal Tool Grinding Attachment by pressing inward and rotating
forward.
3. Push in and turn tensioner to install / uninstall belt. Use tracking lever to
center belt on pulley.
Page 15

Sharpen Mower Blade
Use high speed
and low pressure.
Deburr Pipe
Belt Information:
P60
Norton ZA
Grinding
n Best Techniques:
• Remember – Lefty Tighty / Righty Loosey on Hub Fastener.
• Keep tool and attachment clean for optimum life and performance.
• Avoid overheating tool.
- Allow tool to cool to room temperature between rated operating periods.
• Speed Setting: Use at full speed for optimum performance.
• Always secure work piece and wear eye protection when grinding.
Belt Selection and Education:
P60 grit Zirconia Alumina belt from
Norton is designed and intended for
grinding tasks in metal.
NOTE: Never use this abrasive for
knife sharpening – it is too coarse.
Page 16

Blade Grinding
13
Reference
Plate
Tensioner
Assembly
Attachment
Short Center Distance
Angle
Indicator
Tracking
Knob
90°
Grind
Plate
Hub Fastener
(Left-Handed Thread
with White Lettering)
Long Center Distance
Angle
Adjustment
Lever
Angle Selection
Tensioner Assembly
Clamp Lever
Belt Information:
For reference, belts are equivalent to: X65 (P220) | X22 (P1000) | X4 (P3000)
Clamp Knob
Bench
Mount Tabs
Grit
Color
Size
Use
P120
Red
Norton SG
Repair
X65
Brown
Norax 65µ
Shape
X22
Light Grey
Norax 22µ
Sharpen
X4
White
Norax 4µ
Hone
12000MM
Grey
SiC 1µ
Strop
Installation
Push lock release lever & rotate knife sharpening cassette to remove
cassette (see Section 12).
Install Blade Grinding Attachment by aligning the chassis to the keyed
‘on / off’ position then rotate into ‘sharpening position’.
Install Hub Fastener with white lettering onto drive shaft. Turn LEFT to
tighten, RIGHT to loosen.
Optional: Use a clamp to secure to work bench.
Push in and turn tensioner clockwise to install / uninstall belt.
Use tracking knob to center belt on pulley.
Page 17

fig. 1 fig. 2
1. Choose either short or long center location for pulley depending on
preference.
2. Select desired sharpening angle by moving the Angle Adjustment Lever.
3. Tighten Angle Selection Clamp Knob to secure selected angle.
4. Mount the belt of your choice based on task at hand (see chart left).
5. Turn on power to medium speed and press switch lock out button.
6. Ensure belt is tracking properly so it is centered on the pulleys.
7. Place blade flat onto reference plate
(see fig. 1).
8. While keeping blade flat, move up onto belt surface and place the heel
of the blade edge onto the abrasive. Use very light pressure on belt
(3/16” deflection).
9. Move blade flat across abrasive (1” per second) and stop the tip on the
middle of the belt. Then pull blade away from the belt.
10. Continue until a burr is raised along entire edge (count strokes).
11. Repeat same number of strokes on other side of blade.
12. Continue up the grit scale until desired sharpness is achieved.
13. Ensure tracking and tension is properly set when you change belts.
n Best Techniques:
Be mindful that accommodations will need to be made for every blade
such as thumb studs, pocket clips, blade profile or handle design. Test run
the blade through the process on both bevels without power first to ensure
accommodations can be made before sharpening.
Do not over tension belt or it may negatively affect belt tracking or motor
performance.
Page 18

Troubleshooting
14
Knife not getting sharp?
• More strokes - Grind all the way to the edge. Continue until a burr is
raised. Then progress to a finer belt.
• Higher Speed - Slow belt speeds may not be removing enough material.
• Coarser Belt - Coarser grit belts will remove material more aggressively.
a) Problem: The tips of my knives are becoming rounded. See Section 5.
Solution 1: Stopping with the point still supported by the belt while
powering down the tool will reduce tip rounding.
Solution 2: Keep the blade edge perpendicular to the belt. To reduce tip
rounding, follow the curve of the blade.
b) Problem: The belt is cutting into the sharpening guide or edge guide.
Solution 1: Use the belt tracking lever to re-adjust the belt position to
center of the pulley.
c) Problem: How do I feel for a burr at the cutting edge to know when to
proceed to a finer belt?
Solution 1: Slide your finger perpendicular and away from the cutting
edge. The burr will feel like a small ‘ridge’ or ‘wire’ at the edge.
d) Problem: My knives are cutting through my edge guide.
Solution 1: Use much lighter pressure on the Edge Guide. Using only the
weight of the blade provides best results.
e) Problem: How do I avoid scratch marks on the side of my blade?
Solution 1: Run a piece of masking tape along the blade, exposing just
the bevel.
n Best Techniques:
Only use P120 on blades with edge damage, thick / wide edges or very hard
blade steels (D2, S30V, 154CM, etc.). This belt will remove material and raise
a burr very quickly. Use sparingly and check for a burr after every stroke.
Page 19

Parts index
15
Accessory List:
Replacement Belts:
WSKTS-KO Belt Kit (¾” x 12” belts): WSSAKO81113
Extra Coarse P120 Grit Belt Kit (¾” x 12” belt): WSSAKO81117
Coarse X65 Grit Belt Kit (¾” x 12” belt): WSSAKO81118
Medium X22 Grit Belt Kit (¾” x 12” belt): WSSAKO81119
Fine X4 Grit Belt Kit (¾” x 12” belt): WSSAKO81120
Extra Fine 6000 Grit Belt Kit (½” x 12” belt): WSSA0002705
Tool Grinding Attachment:
WSKTS-KO Tool Grinding Attachment: WSSAKO81111
WSKTS-KO Tool Grinding Belt Kit (¾” x 12” belts): WSSAKO81114
Blade Grinding Attachment:
WSKTS-KO Blade Grinding Attachment: WSSAKO81112
WSKTS-KO Blade Grinding Belt Kit (1” x 18” belts): WSSAKO81115
Extra Coarse P120 Grit Belt Kit (1” x 18” belts): SA0003564
Coarse X65 Grit Belt Kit (1” x 18” belts): SA0003585
Medium X22 Grit Belt Kit (1” x 18” belts): SA0003584
Fine X4 Grit Belt Kit (1” x 18” belts): SA0003565
Extra Fine 12,000 Grit Belt Kit (1” x 18” belts): SA0003566
Cloth Belt Kit (1” x 18” belts with honing and polishing compound): WSSAKO81121
Visit worksharptools.com for a full list of replacement parts.
Warranty
1-year warranty on all WORK SHARP® components; excludes abrasives.
Warranty for consumer not industrial use.
Register online at www.worksharptools.com
...or complete and mail back the Warranty Registration card:
Darex, LLC
PO Box 730
210 E. Hersey St.
Ashland, OR 97520 USA
 Loading...