


WS2000
Fast, Easy,
& Versatile
Tool Sharpening
Afilado rápido, fácil, y versátil de herramientas
Affûtage d’outils rapide, précis  et polyvalent
USER’S GUIDE
GUÍA DEL USUARIO
MODE D'EMPLOI

Thank You
Thank you for purchasing a WORK SHARP™ WS2000. As president of this company, I am very excited and proud to offer you this quality, innovative product. I am equally proud of the great people at Professional Tool Manufacturing, LLC who are dedicated to designing, marketing, and manufacturing great products. At ProTool Manufacturing, we strive to make every sharpening experience easy, fast, and effective. I am confident you will find the performance and precision you expect in this high quality sharpening system. With this breakthrough approach to sharpening, you can now sharpen your tools much faster and without the heat of a bench grinder. It will work every time.
If you have questions, suggestions, or need help with Work Sharp™ The Tool Sharpener, please contact us. Our customer representatives are here to help. We support what we build and we appreciate hearing from you!
Though we believe operating your Work Sharp™ tool will be intuitive, please read this User’s Guide to ensure you achieve the superior results you desire. We have included some sharpening tips you may find handy.
We also invite you to visit our website at www.worksharptools.com. There you will find:
•Demonstrations of all operations with the sights and sounds leading to successful tool sharpening
•Downloadable copies of this User’s Guide
•Warranty registration
•Service and contact numbers
Thank you again for buying Work Sharp™ The Tool Sharpener. Enjoy its performance, quality, and precision.
And remember, Work Smart, Work Sharp!
Hank O’Dougherty
President, Professional Tool Manufacturing, LLC
Maker of Work Sharp™, Drill Doctor™, and DAREx™
www.worksharptools.com |
|
Table of Contents |
|
Thank You and Welcome........................................ |
2 |
Safety Warnings and Precautions.......................... |
4 |
Getting to Know Your Tool..................................... |
9 |
Unpacking and Assembly..................................... |
10 |
Sharpening Guide................................................ |
11 |
Selecting the Right Abrasive for the Job.............. |
14 |
Sharpening Tips................................................... |
15 |
Care and Maintenance......................................... |
17 |
Troubleshooting................................................... |
18 |
Technical Support & Warranty............................ |
19 |
Spanish................................................................ |
20 |
French.................................................................. |
40 |
|
www.worksharptools.com |
 ! IMPORTANT Safety Warnings & Instructions
For your own safety, please read this User’s Guide before operating the Work Sharp™ WS2000.
Installation / Assembly
•Carefully unpack Work Sharp™ The Tool Sharpener and set it on a table or workbench. Check to see that no damage has occurred in shipment. Check all packing material to be sure that all parts are present. See User’s Guide page 10 for part identification diagram.
•The Work Sharp™ WS2000 unit needs to be placed on a flat stable tabletop to complete assembly.
•Connect to properly wired outlet, or electrical shock may occur.
Precautions
FIRE CAN CAUSE DEATH, INJURY AND PROPERTY DAMAGE! Reduce the risk of death, injury or property damage from fire. Read, understand and follow these safety instructions. Make certain that anyone else who uses this sharpener or who is a bystander in the sharpening area understands and follows these safety instructions as well.
SHARPENING DEBRIS CAN INJURE EYES AND BURN SKIN! Reduce the risk of injury from sharpening debris. Read, understand and follow these safety instructions.
FIRE PREVENTION
Sharpening operations create hot sparks and sharpening debris:
1. The work area must be kept clean and free from all flammable material.
2.The workbench should be protected with an appropriate heat resistant cover
to prevent fire or scorching of surfaces.
3.Keep an approved fire extinguisher of the proper size and type in the work area. Inspect it regularly to ensure that it is in proper working order. Know how to use the
fire extinguisher.
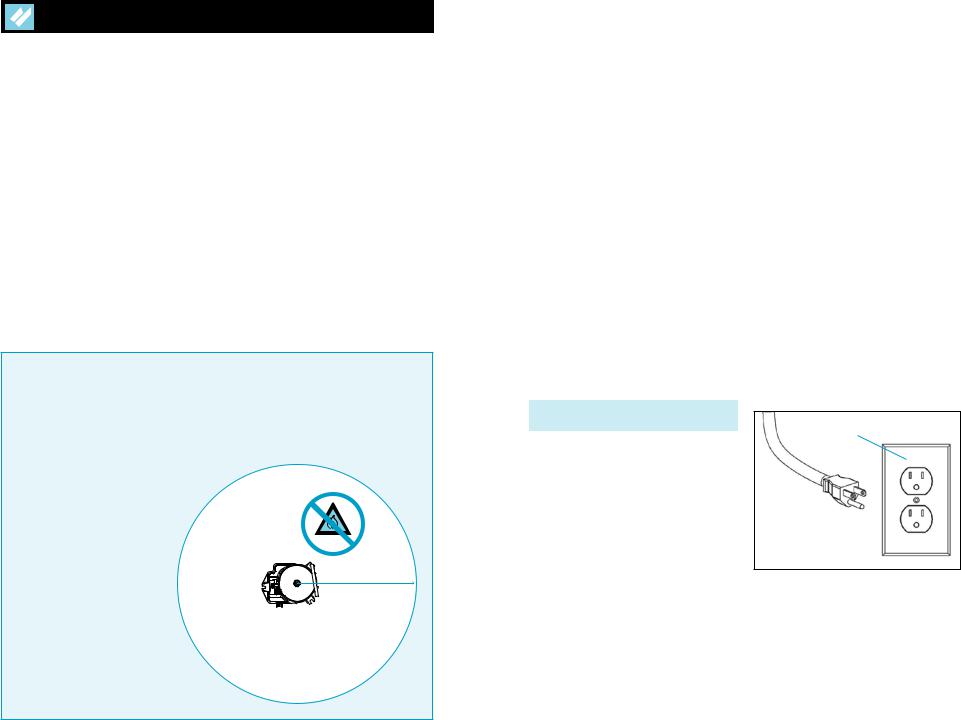
4.WARNING: Never perform sharpening operations in the presence of flammable liquids or gases.
flammable materials
18" minimum
www.worksharptools.com
ELECTRIC SHOCK
WARNING Electric shock can kill! Read, understand and follow ALL safety instructions.
•AVOID BODY CONTACT WITH EARTHED OR GROUNDED SURFACES (e.g., pipes, radiators, ranges, refrigerators).
•DO NOT ABUSE THE CORD. Never yank the cord to disconnect it from the socket. Keep the cord away from heat, oil and sharp edges. Do not modify the electrical plug provided—if it will not fit the outlet, have the proper outlet installed by a qualified electrician.
•USE PROPER EXTENSION CORD. Use only 3-wire extension cords that have 3-prong grounding plugs and 3- pole receptacles that accept the tool’s plug. Make sure your extension cord is in good condition. When using an extension cord, be sure to use one heavy enough to carry the current your product will draw. Please refer to the following table for minimum cord size requirements:
Ampere |
Volts |
|
Extension Cord Length |
|||||
Rating |
|
|
|
|
|
|
|
|
|
|
|
|
|
|
|
|
|
More |
Not |
120v |
25 |
|
50 |
|
100 |
150 |
than |
More |
|
ft. |
|
ft. |
|
ft. |
ft. |
|
Than |
|
|
|
|
|
|
|
|
|
|
|
|
|
|
|
|
0 |
6 |
|
|
|
|
AWG |
|
|
|
|
|
|
|
|
|
||
|
|
|
18 |
|
16 |
|
16 |
14 |
|
|
|
|
|
|
|
|
|
•DISCONNECT TOOLS. Always disconnect Work Sharp™ WS2000 when cleaning, inspecting, and changing accessories. When not in use, disconnect from the power supply. Never touch internal parts of the sharpener when it is turned on or plugged in.
•GROUNDING INSTRUCTIONS: In the event of a malfunctions or breakdown, grounding provides a path of least resistance for electric current to reduce risk of electric shock. This tool is equipped with an electric cord having an equipment-grounding conductor
and grounding plug. The plug must be plugged into a matching outlet that is properly installed and grounded in accordance with all local codes and ordinances. Improper connection of the equipment-grounding conductor can result in a risk of electric shock. The conductor with insulation having an outer surface that is green with or without yellow stripes is the equip- ment-grounding conductor. If repair or replacement of the electric cord or plug is necessary, do not connect the equipment-grounding conductor to a live terminal. Check with a qualified electrician or service personnel if the grounding instructions are not completely understood, or if in doubt as to whether the tool is properly grounded. Repair or replace damaged or worn cord immediately.
•THIS TOOL IS INTENDED FOR USE ON A CIRCUIT THAT HAS AN OUTLET THAT LOOKS LIKE THE ONE ILLUSTRATED IN FIGURE A. The tool has a grounding plug that looks like the plug illustrated in Figure A. A tem-
Cover of Grounded
Outlet Box
Grounding Pin
Fig. A
porary adapter, which looks like the adapter illustrated in Figures B and C,

Cover of Grounded Outlet Box
Adapter
Metal |
Grounding |
Screw |
Means |
Fig. B |
Fig. C |
may be used to connect this plug to a 2-pole receptacle as shown in Figure B if a properly grounded outlet is not available. The temporary adapter should be used only until a properly grounded outlet can be installed by a qualified electrician. The green-col- ored rigid ear, lug, and the like, extending from the adaptor must be connected to a permanent ground such as
a properly grounded outlet box.
PERSONAL PROTECTION
Sharpening operations can create hot sparks and metal debris, loud noises and dust.
•ALWAYS USE SAFETY GLASSES. Everyday eyeglasses only have impact resistant lenses, they are NOT safety glasses.
•USE EAR PROTECTION DURING USE. The Work Sharp™ WS2000 can generate in excess of 85 dB(A) noise emissions under certain load conditions.
•USE FACE OR DUST MASK if working operations create dust.
•WEAR CLOSED, NON FLAMMABLE PROTECTIVE CLOTHING. Do not wear loose clothing, gloves, neckties, rings, bracelets, or other jewelry which may get caught in moving parts. Wear protective hair covering to contain long hair
www.worksharptools.com
•KEEP WORK AREA CLEAN. Cluttered areas and work benches invite accidents.
•FREQUENTLY CLEAN SHARPENING DEBRIS FROM UNIT AND WORK AREA.
•DO NOT USE IN DANGEROUS ENVIRONMENT. Do not use in damp or wet locations, avoid exposure to rain. Keep work area well lit. Do not use tools in the presence of flammable liquids or gases.
•KEEP CHILDREN AWAY. All visitors should be kept safe distance from work area, do not let persons not involved in the work touch the tool or power cord.
•MAKE WORKSHOP KID PROOF with padlocks, master switches, or by removing starter keys.
•SECURE TOOL. Use clamps or a vise to hold tool when practical. It’s safer than using your hand and it frees both hands to operate the tool.
•USE THE RIGHT TOOL. Don’t force tool or attachment to do a job for which it was not designed. Don’t force small tools to do the job of a heavy duty tool. Do not use the tool for purposes not intended.
•NON-SLIP FOOTWEAR IS RECOMMENDED.
•NEVER LEAVE TOOL RUNNING UNATTENDED. Ensure tool has come to a complete stop before leaving work area.
•MAINTAIN TOOL WITH CARE. Keep the Work Sharp™ WS2000 clean for best and safest performance. Follow instructions for maintenance and changing accessories. Inspect cords periodically and if damaged have them repaired by an authorized service facil-
www.worksharptools.com |
|
ity. Inspect extension cords periodically and replace if damaged. Keep unit dry, clean and free from oil and grease.
•STORE IDLE TOOLS. When not in use, tools should be stored in a dry, lockedup place out of the reach of children.
•AVOID UNINTENTIONAL STARTING. Make sure switch is in the “OFF” position before plugging in.
•STAY ALERT. Watch what you are doing, use common sense and do not operate the tool when you are tired or impaired.
•DON’T OVERREACH. Keep proper footing and balance at all times.
•NEVER STAND ON TOOL. Serious injury could occur if the tool is tipped or if the cutting tool is unintentionally contacted.
•CHECK DAMAGED PARTS. Before use of the tool, it should be carefully checked to determine that it will operate properly and perform its intended function. Check for alignment of moving parts, binding of moving parts, breakage of parts, mounting and any other conditions that may affect its operation. A guard or other part that is damaged should be properly repaired or replaced by an authorized service center unless otherwise indicated in the instruction manual. Have defective switches replaced by an authorized service center. Do not use the tool if the switch does not turn it on and off.
•INSPECT GRINDING WHEELS FOR DAMAGE. Do not use tool if grinding wheel is damaged as injury may occur.
•WARNING. The use of any accessory or attachment other than one recommended in this user’s guide may present a risk of personal injury.
•HAVE YOUR TOOL REPAIRED BY A QUALIFIED PERSON. This electric tool complies with applicable safety standards. Repairs should only be carried out by qualified persons using original spare parts; otherwise this may result in considerable danger to the user.
•SAVE THESE INSTRUCTIONS AFTER READING.
For Service Contact:
Professional Tool Manufacturing, LLC
WORK SHARP™
210 E. Hersey St.
Ashland, OR 97520 USA
Phone: 1-800-597-6170 FAX: 541-552-1377
Email: tech@worksharptools.com
WARNING:
Work Sharp Tempered Glass Wheel is NOT intended for use on the WS2000 model. Use ONLY the Edge-Vision™ wheel on model WS2000.
WARNING:
Some dust created by power sanding, grinding, miscellaneous construction activities, as well as contents from the machine including the molding, wiring, grinding wheel, or any other parts may contain chemicals known to the State of California to cause cancer, birth defects or other reproductive harm and can be hazardous to your health.

WARNING:
Keep your WORK SHARP™ WS2000 and the work space clean for best performance and safety. Do not let sharpening debris accumulate on, in or around the WORK SHARP™ WS2000. Accumulated fine metal sharpening debris can be very hot and may present a fire danger if the machine or your workspace is not properly cleaned and maintained. Accumulated sharpening debris can also degrade the life of your WORK SHARP™ WS2000 and cause premature wear on some components.
If sharpening debris has accumulated, do not immediately throw it into a trash receptacle without ensuring the debris is completely cool and free of heat. Improperly disposing of the accumulated sharpening debris may present a fire risk. Do not collect the sharpening debris during sharpening. This increases the risk of heat build up in the debris and the potential for fire.
www.worksharptools.com
SAFETY FEATURE:
Lock out power switch
ON |
OFF |
OFF-LOCKED OUT |
To lock out power switch, remove the lock-out key. The machine can now be turned off, but not on.
To turn the machine on, insert lock-out key in the front of the power switch. Machine may now be turned on or off.
www.worksharptools.com |
|
|
|
|
|
1 |
Getting to Know Your Tool |
|
|
Top Knob |
|
Top Tool Rest for |
for securing |
|
wheel |
||
top-side freehand |
||
|
||
sharpening |
|
|
Wheel Direction |
|
|
Indicator |
|
Alignment fence keeps tool square during sharpening
Also accepts standard 6" PSA abrasives with trimming
Wheel direction indicator
Tool hold-down keeps tool flat during sharpening
Chisel Port is 15/8" wide
with fixed 25° angle. Heat
sink is diamond plated to remove burr.
 6' grounded power cord
Durable plastic housing and
base
Durable cast aluminum top
Air-cooling vent  ports for routed
  air flow cooling
Locking power switch
Air-cooling vent ports for routed air flow cooling
Edge-Vision™ Slotted Wheel allows you to see the cutting edge as you sharpen!
Edge-Vision™ underside sharpening port
& grit exhaust port
1⁄5 hp induction motor produces 1750 rpm max. wheel speed
Tool Specs
• 1⁄5 horsepower induction motor |
Bench mounting tabs |
|
•1750 RPM max. wheel speed
•Edge-Vision™ slotted wheel—accepts slotted or solid abrasive media
•Cast aluminum top, cast aluminum chisel sharpening port with diamond plated heat sink; Cast metal top tool rest; Impact and vibration resistant tool grade plastic housing and base
•Air-cooling system: Heat sink and routed airflow
•Industrial grade switch with safety lockout and grounded 6' power cord
•150 mm adhesive-backed abrasives for adhering to grinding wheel

10 |
www.worksharptools.com |
2 Unpacking and Assembling
1.Carefully remove the tool and the accessories kit from the box.
2. The Work Sharp™ WS2000 includes:
• Work Sharp™ WS2000 unit
• Edge-Vision™ slotted wheel
(fig. 2-1)
• Top tool rest (fig. 2-2)
•Abrasives kit including standard and slotted adhesive-backed abrasives (fig. 2-3)
•User’s guide
3.Remove all packing materials and store in case you ever need to return the unit for servicing.
4.Visually inspect your tool for potential damage incurred during shipment. If there is damage, call 800-
597-6170 to speak to a Customer Service Representative.
5.Your Work Sharp™ WS2000’s Edge-Vision™ slotted see-through wheel (fig. 2-1) can be used two ways. Use it with the Edge-Vision™ Underside Port for sharpening small carving and lathe tools, screwdrivers, and other general purpose grinding tasks. You can also use it with solid abrasive media for fast and easy topside sharpening of putty knives, axes, and other bladed tools.
6.To apply the 150mm adhesivebacked abrasive disks, a clean work environment is critical. Peel the backing film off the abrasive disk. Handle the abrasive disk by the outer edges, being careful not to get any contaminants on the adhesive backing. Flex
Fig. 2-1
Edge-VisionTM
Slotted Wheel
Fig. 2-2
Top Tool Rest
Fig. 2-3
Abrasives Kit (standard and slotted)
www.worksharptools.com
Fig. 2-4
the paper into a “U” (fig. 2-4) shape so the center of the abrasive is centered on the wheel. Slowly flatten out the abrasive from the center working toward the outer edge of the wheel. Adhere the slotted abrasive in the same manner outlined above. Be sure all the slots in the abrasive properly align with the slots in the wheel surface. This will ensure proper performance of the Edge-Vision™ slotted wheel during use.
11
7. To install your
top tool rest, slide the top tool rest into
the T-slots on the top of the unit. Locate the desired height, then gently snug the two thumb screws. Do not
over tighten the thumbscrews, as you can potentially stress and/or damage the T-slots in the top casting.
8.Mount the grinding wheel to the wheel hub and secure the wheel with the top knob.
9.Your tool is now ready for use!
3 Sharpening Guide
Read all safety warnings before operating this tool.
Chisel Sharpening
Port—For chisels and plane blades up to 1 5/8" wide
STEP 1
STEP 2
Flatten tool back on topside of abrasive wheel. Lay tool down heel first onto wheel. After flattening tool back, flip grinding wheel over so coarse abrasive is now face down for bevel grinding.
Chisel Sharpening Port
Mount the grinding wheel onto the unit with coarse side up.

12
STEP 3
Place tool in sharpening port under the tool hold-down, on the right side of alignment fence.
STEP 4
Slide fence against left edge of tool in port and hand tighten alignment fence knob.
STEP 5


Keeping the tool flat on the sharpening port diamond surface; “plunge and pull” the tool in and out of the sharpening port to sharpen the bevel.
www.worksharptools.com
Pull
Only contact the wheel during “plunge” for one-half to one second.
Repeat “plunge and pull” sharpening in the sharpening port until a consistent finish, or desired sharpness is achieved. For best surface finish and sharpness, flip wheel so fine abrasive is face down and repeat step 5.
Edge-VisionTM Underside Port—
For small carving tools, screwdrivers, and general grinding
 Edge-VisionTM Port
Tip
Use a permanent marker to color the edge of your tool to be sharpened.
Step 1
Mount the Edge-VisionTM slotted wheel and turn unit around so you are facing the underside port on backside of tool.
www.worksharptools.com |
13 |
Step 3
Look down through the spinning EdgeVisionTM wheel to see the cutting edge. Sharpen the tool to your desired shape and sharpness.
Tip
Use a shop light to shine through the top of the Edge-Vision™ wheel to improve your view of the tool being sharpened.
Step 4
Raise tool or handle to create or re-sharp- en a beveled edge if desired.
Pull slowly towards you
 Rotation

Step
 5
5
Repeat this step on the other side of the blade tool being sharpened. Continue until desired finish or sharpness is achieved.
Use side-to-side motion
Topside Freehand
Sharpening (top tool rest use optional)—For putty knives, scrapers, axes, hatchets and other flat-blade tools
Step 1
Mount the Edge-Vision™ wheel onto the unit.
Step 2
Lay blade face onto the right side of grinding wheel.
Step 3
General Purpose Grinding
Larger work pieces are best ground using the top side of the Edge-VisionTM wheel. You can use either slotted or solid abrasive media for these tasks. Smaller work pieces are best ground using the Edge-VisionTM wheel with slotted abrasives and the Underside Port. This enables you to take advantage of the Edge-Vision’s unique ability to let you see through the wheel and actually see the material surface as you grind it.
Step 2
Slowly bring tool into the Edge-VisionTM underside port under the wheel.
Pull blade towards you keeping blade face flat on the grinding surface.

14 |
|
|
|
|
|
|
www.worksharptools.com |
|
Which WORK SHARP™ Port Should I Use? |
|
|||||||
|
|
|
|
|
|
|
|
|
|
|
|
|
|
Chisels & |
Carving tools, |
Putty knives, |
General |
|
|
|
|
|
plane blades up |
screwdrivers, |
scrapers, |
grinding |
|
|
|
|
|
to 15/8" |
detail |
axes, hatchets |
|
|
|
|
|
|
|
sharpening |
and other flat |
|
|
|
|
|
|
|
|
blade tools |
|
|
|
|
|
|
|
|
|
|
|
|
|
|
|
|
|
|
|
Sharpening Port |
X |
|
|
|
||||
|
|
|
|
|
|
|
|
|
Edge-VisionTM Port |
|
X |
|
X |
||||
Topside Freehand |
|
|
X |
X |
||||
|
|
|
|
|
|
|
|
|
4 Selecting the Right Abrasive for the Job
Either solid or slotted abrasives can be used for grinding and sharpening tasks.
•For damaged tools or heavy grinding:
Use the coarse solid abrasive for fastest results.
•For light grinding tasks: Use the fine solid abrasive.
•For Edge-Vision™ Grinding: Use the coarse slotted abrasive.
•For Edge-Vision™ Sharpening: Use the fine slotted abrasive.
About WORK SHARP™
Abrasive Technology
Finish
•Coated abrasive disks start flat and stay flat. (Bonded abrasives used in stones and most power systems require frequent dressing to keep the wheel flat.)
•The grit size is engineered to provide optimal sharpness and surface finish at each stage of sharpening. (Users who are interested in a “utility sharp” edge will find exceptional edge performance on the faster coarse grits.)
Speed
•The abrasive selection is integrated with design of the WORK SHARP™ drive train and cooling system to provide the fastest material removal rate while minimizing the risk of overheating tool steels.
•The sharpening port includes a diamond lapping abrasive that provides superior burr control and allows for 1-step re-sharpening.
Simplicity
•Accepts readily available standard 150 mm or 6" adhesive–backed abrasives with trimming. (No custom abrasives or expensive custom wheels required. Coarse grits are available at most hardware/woodworking stores. Fine grits are readily available at any automotive paint supply store.)
•Slotted abrasives are available through a Work Sharp retail outlet or direct from Work Sharp.
www.worksharptools.com |
15 |
5 Sharpening Tips
Sharpening Port Tips
When sharpening chisels and plane blades up to 15/8" wide
•Choose Coarse Grit for damaged or chipped tools
•Choose Fine Grit for re-sharpening tools
•Chisels under ½" wide should be sharpened on the left side of the sharpening port.
•Chisels wider than ½" should be sharpened on the right side of the sharpening port.
•Leave fence loose enough against chisel so the chisel can slide between the fence and guide rail.
•“Plunge and pull” method in sharpening port will yield best results. Contact wheel for only ½–1 second.
Edge-VisionTM Underside
Sharpening Port Tips
When using the Edge-VisionTM slotted wheel
•Use a permanent marker to color the edge of your tool to be sharpened. This will help you better see the edge you are sharpening.
•Shine a shop light or drop light onto the top of the unit to better see through the slotted wheel.
•Sharpen tools with the cutting edge at the 12:00 or 2:00 position, and not 10:00. This will ensure you are sharpening your tools edge with the wheel spinning away from you for optimum safety and control.
•Do not leave chisel against abrasive wheel for longer than 1 second, or you may risk overheating your tools.
•Keeping chisels flat on the sharpening port diamond lapping plate will ensure burr removal, optimum heat control and proper bevel edge sharpening.
Correct 2:00 
 position
Correct 12:00 position 
Incorrect 10:00 position

16
Top Side Freehand Sharpening Tips (top tool rest use optional)
•Use the coarse abrasive surface for aggressive grinding, or use the fine grit abrasive surface for light grinding.
•Always place the blade face onto the right side of grinding wheel so that the wheel spins away from you.
•Raise tool or handle to create or resharpen a beveled edge if desired.
•The top tool rest can be used to assist in the sharpening process if desired.
Pull slowly towards you
Rotation
•Axes and hatchets are best sharpened using the top tool rest and a sweeping motion to grind the bevel. With the
power switch in the “off” position, lay
www.worksharptools.com
the bevel onto the wheel and find the proper grind angle. Then turn on your machine and grind the corresponding bevel onto each side of the axe or hatchet.
•The height adjustability of the top tool rest can assist in more precise bevel grinding of your tools. Adjust the top tool rest and blade projection to achieve more precise bevel grinding of tools.
Top tool rest height adjusts up or down
6 Care and Maintenance
After sharpening only a few tools, sharpening debris will accumulate on your workbench and also under the grinding wheel. Sharpening debris may promote premature wear in the WS2000 unit and can potentially pose a fire risk. Cleaning the unit on a consistent basis can add life to your machine and increase safety. Before any maintenance or cleaning is performed, be sure to unplug your WORK SHARP™ WS2000.
Cleaning your WORK SHARP™ WS2000
With the WORK SHARP™ WS2000 unplugged, remove the grinding wheel to expose the top of the unit and sharpening port. Brush away the accumulated sharpening debris from the wheel and sharpening port area. Remove sharpening debris with a small, dry brush. Dispose of the sharpening debris in a safe and environmentally approved manner.
www.worksharptools.com
▲Important Safety Tip
DURING CLEAN UP, BE SURE GRIT IS NOT HOT OR GLOWING, AS IT MAY START A FIRE!
Determining if replacing the abrasive is required
The provided selection of abrasives with the WORK SHARP™ WS2000 is designed to give you the best sharpening performance available. We have included premium abrasives that will provide you with long-lasting results. However, the abrasive will wear out eventually. It may need to be changed if:
•When sharpening a tool, it takes noticeably longer to achieve sharp results
•Abrasive is ‘loading up’ and is not able to be cleaned
•There is a tear, wrinkle, or hole in the abrasive
•There is a bubble or lump under the abrasive
17
For best results, use the WORK SHARP™ replacement abrasives kits. WORK SHARP™ recommends the type of abrasives we provide because they create a finish superior to oil and water stones— without the mess.
However, if you choose, you can also use any standard 6" adhesive backed abrasive available at your local hardware store or tool distributor. Trimming of standard 6" abrasives will be required to fit the 150mm grinding wheels. Or, you can also use a standard 8" × 11" sheet of your preferred sandpaper, and cut it to size. First spray the abrasive backing with a spray tack adhesive, then place the grinding wheel onto the paper and trim to fit.
Contact the store or dealer where you purchased WORK SHARP™ The Tool Sharpener, or contact WORK SHARP™ directly at www.worksharptools.com, to purchase replacement abrasive kits.
7 Troubleshooting
Problem
Not sharpening entire Chisel bevel face
Solutions
•The bevel angle previously sharpened onto tool is not 25°. Continue sharpening.
•Sharpening not complete yet. Use coarse grit for fast material removal.
•Tool being sharpened is not completely flat on the heat sink during sharpening.
•Sharpening port fence is not snug against tool, which allows tool to skew in port.
Problem
Excessive heat build-up
Solutions
•Plunging tool against abrasive disk too long.
•Applying too much load pressure against abrasive disk during sharpening.
•Abrasive needs to be cleaned or replaced.
•Smaller tools should be sharpened on the left side of port using light pressure and less sharpening time. Use slotted media with smaller tools.

18
Problem
Cannot get damage removed from tool cutting edge
Solutions
•You have not spent enough time on the coarse grit during sharpening. Ensure all damage at cutting edge has been removed before proceeding to the finer grit.
•The back of your tool is not flat. Flatten the tool back on the topside of the grinding wheel.
•Abrasive needs to be cleaned or replaced.
Problem
Sharpening takes excessively long time
Solutions
•Abrasive needs to be cleaned or replaced.
•Tool being sharpened is excessively damaged and should be reground or re-shaped using the coarse abrasive.
Problem
Excessive vibration
Solutions
•Grinding wheel is damaged. STOP IMMEDIATELY and inspect wheel for damage.
•WORK SHARP™ unit not placed stably on workbench or work area. Clamp to work bench with mounting tabs for best performance and stability.
•If excessive vibration continues, call a customer service agent for direction.
Problem
Tool is not sharp
Solutions
•Back of chisel is not flat at the cutting edge.
www.worksharptools.com
•Bevel has not been sharpened all the way to the cutting edge.
•Burr has been created at cutting edge. Follow repeated “plunge and pull” method for best results in the chisel sharpening port.
•Marks from previous (coarser) grit have not yet been removed.
Problem
Tool will not stay sharp
Solutions
•The burr at the cutting edge was not removed. Follow repeated “plunge and pull” method for best results.
•Tools made of softer steels do not hold an edge as long and may need to be sharpened more often.
Problem
Wheel stall
Solutions
•You are pushing too hard. Apply less load force in sharpening port.
•Light pressure during sharpening yields best results.
For Technical Support
1-800-418-1439
(toll-free USA and Canada only)
1-541-552-1301
Please call 6:00 AM–3:30 PM Pacific Time.
www.worksharptools.com |
19 |
Warranty
2-year warranty on all WORK SHARP™ components; excludes abrasives
Your WORK SHARP™ is warranted to be free of defects due to workmanship or design for 2 years from the purchase date. If your WORK SHARP™ fails to operate, or if any operating problem occurs, contact WORK SHARP™ Technical Service at:
1-800-418-1439
(toll-free USA and Canada only)
1-541-552-1301
Please call 6:00 AM–3:30 PM Pacific Time.
Do not return this product to the store where you purchased it. Do not attempt any service or repairs other than those suggested by a WORK SHARP™ Technical Service Representative (TSR). During the period of warranty, WORK SHARP™ will, at our discretion, repair or replace this product free of charge and will refund Standard Ground UPS postage or shipping charges providing that the following conditions are met:
1.A copy of the proof of purchase is provided.
2.The product has been operated for the purpose intended as described in the operating instructions and has not been abused or mishandled in any way.
3.The product has not been dismantled and no service or repairs have been attempted other than those suggested by a WORK SHARP™ TSR.
4.The Return Goods Authorization number (RGA #) (assigned by the WORK SHARP™ TSR) is written on the shipping label.
Please make certain to package items in such a way as to eliminate further damage during shipping. Ship via a traceable carrier and properly insure the package. No CODs are accepted. Unapproved shipping charges are nonrefundable.
Complete and mail back the Warranty Registration & Customer Survey in the WORK SHARP™ box, or register online:
Professional Tool Manufacturing, LLC
WORK SHARP™
210 E. Hersey St. Ashland, OR 97520 USA
www.worksharptools.com
Please Fill in the Following for Your Records.
WORK SHARP™ Serial Number:
_____________________
Date of Purchase:
_____ / _____ / _______
Purchased from:
_____________________
 Loading...