

Page 1
KNIFE & TOOL
SHARPENER
WSKTS USER GUIDE
WorkSharpTools.com
To reduce the risk of injury, the user must read and understand this instruction
• CAUTION
manual before using product. Save these instructions for future reference.
Page 2
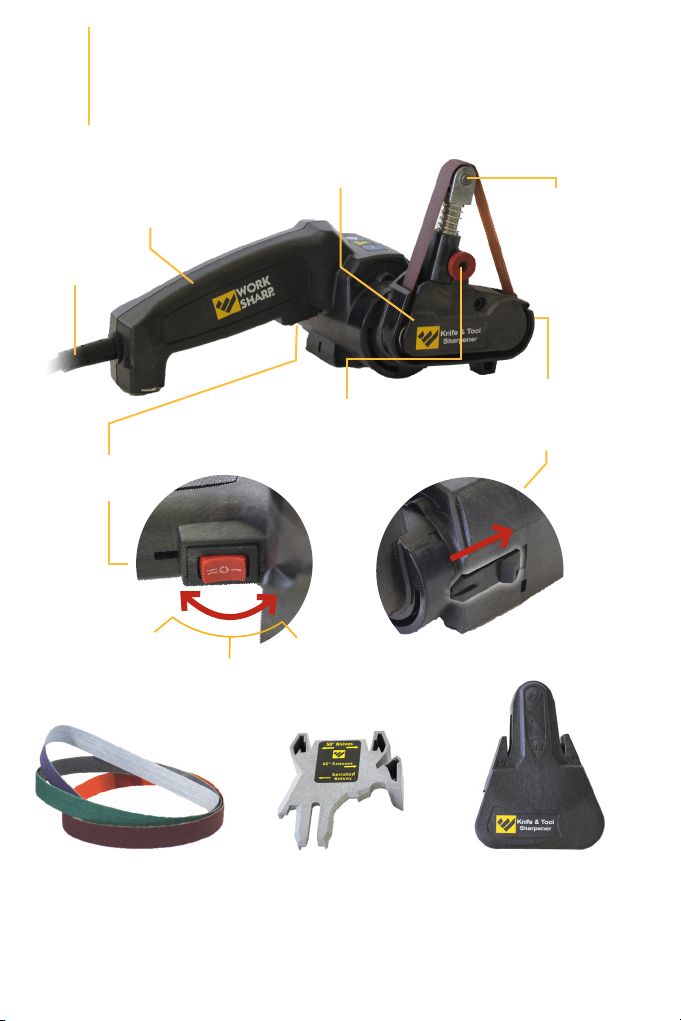
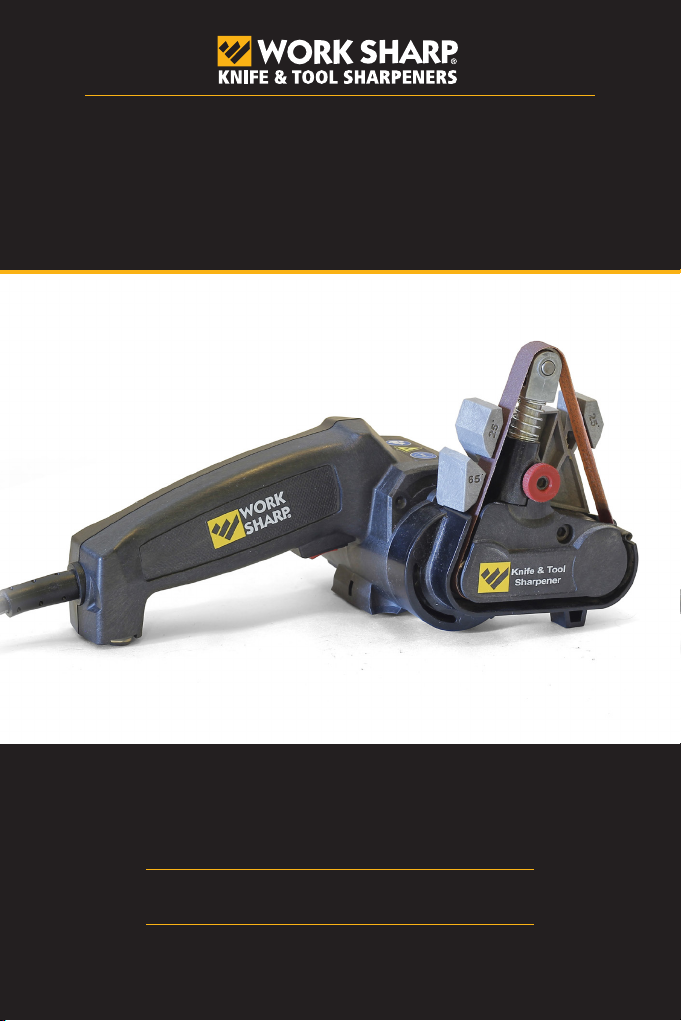
Getting to Know Your
1
3-position power
knife & Tool Sharpener
Hand Grip
Cord
Switch
Sharpening—
momentary
Sharpening cassette
Belt-tracking
adjustment knob
Grinding—on
Off
Quick-lock
belt tensioner
Sharpening cassette
release button -
(on front of machine)
Abrasive belts—
P80 Coarse (Green)
P220 Medium (Red)
6000 Fine (Purple)
Outdoor knife guide (50°)—
includes serrated knife and
scissor guide with magnet to
help position blades properly
Kitchen knife
guide (40°)
Page 3
Setting Up Your
2
Knife & Tool Sharpener
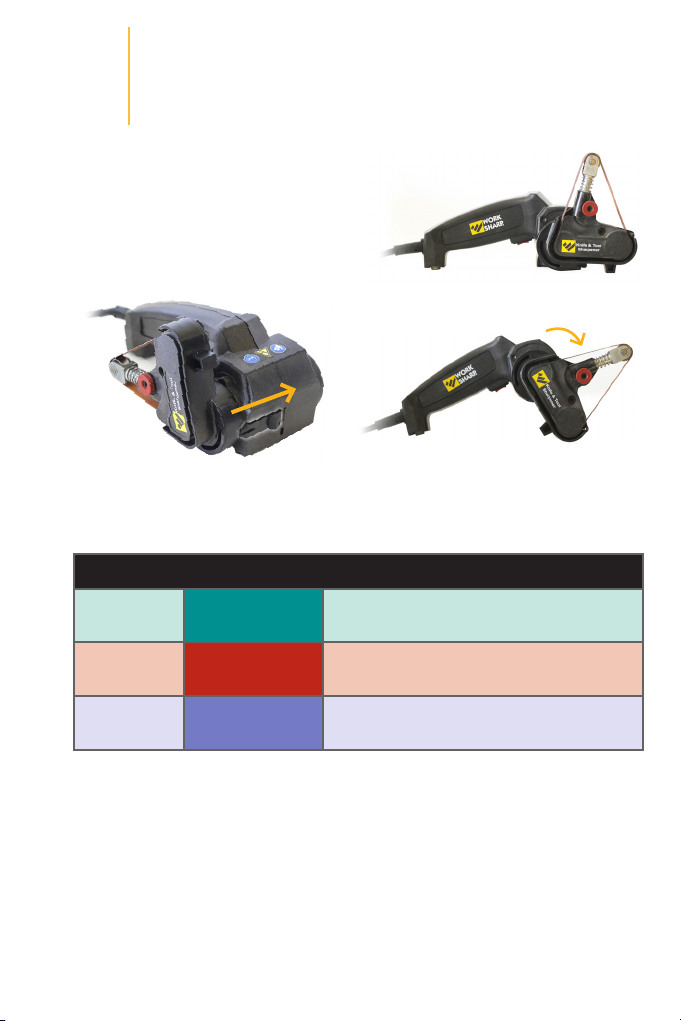
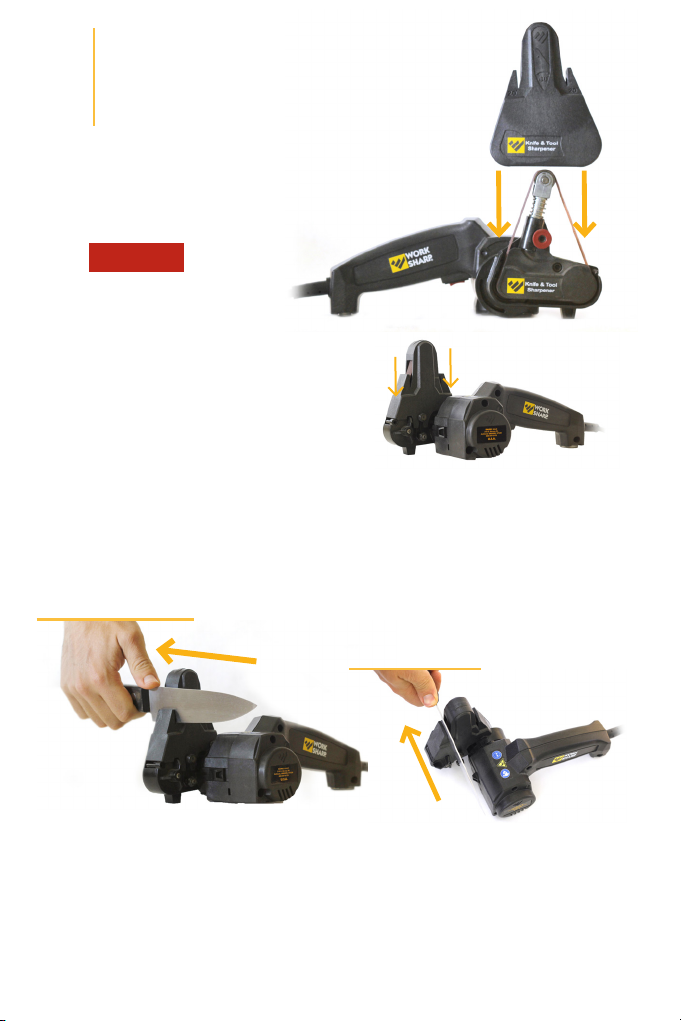
Step 1
Slide sharpening cassette
release button as shown
and rotate the cassette to
sharpening (A) or grinding (B).
Step 2
Install desired belt.
BELT SELECTION GUIDE
Coarse
WSSA0002703
Medium
WSSA0002704
P80 GREEN
P220 RED
(A) Sharpen
(B) Grind
for grinding and sharpening most tools
for knife & scissor sharpening
Fine
WSSA0002705
Abrasive belt dimensions: ½” x 12” Belt weight: .10 ounces
For Replacement abrasive belts, visit
6000 PURPLE
You are now Ready to Sharpen/Grind
for honing knives
www.worksharptools.com.
Page 4
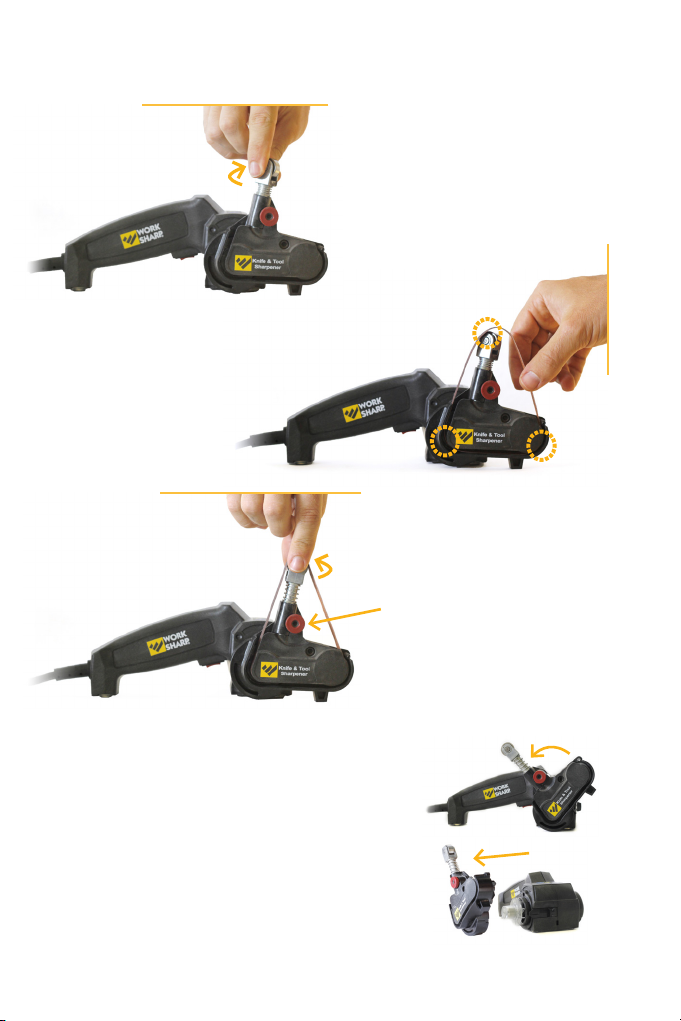
These abrasives have been engineered to be long lasting to meet your
sharpening needs.
Push tensioner down and
make ¼ turn to the right to
lock in place.
Center belt on all
three pulleys.
Turn tensioner ¼ turn
to the left to release.
NOTE: Use red knob to
adjust top pulley for belt
tracking.
Removing the Sharpening Cassette
To remove the sharpening cassette for
cleaning, storage or repair, slide the
release button and rotate the cassette
to the position shown. Pull the cassette
outward, away from the power platform.
Page 5

Anatomy of
3
A. Point. . . . . . . . . The very end of the knife, which is used for
B. Tip . . . . . . . . . . The first third of the blade (approximately) which
C. Edge . . . . . . . . . The cutting surface of the knife, which extends
D. Heel . . . . . . . . . .The rear part of the blade, used for cutting
E. Spine . . . . . . . . . The top, thicker portion of the blade, which adds
F. Bolster . . . . . . . . .The thick metal portion joining the handle and
G. Finger Guard . . . .The portion of the bolster that keeps the user’s
a knife
Handle
Blade
E
F
G
D
piercing
is used for small or delicate work
from the point to the heel
activities that require more force
weight and strength
the blade, which adds weight and balance and
keeps the user’s hand from slipping
hand from slipping onto the blade
C
B
A
Knives are made of different steels. Softer steels
will sharpen quickly. Harder steels will take longer
to sharpen, but they also hold their edge longer.
Page 6
Sharpening Kitchen
4
and Filet Knives
Smooth-edged kitchen knives
Step 1
Belt: P220 RED
Install red belt. Slide kitchen
knife guide onto sharpening
cassette in sharpening
position A.
Opposite View:
Guide in place
Step 2
Starting with the knife in the right side
of the guide, squeeze power switch, and
pull knife straight and steadily through guide from bolster to point
of blade. Turn off the power as you come to the point while the blade
is still supported by the belt.
Continue until a slight burr develops on the opposite side
(usually 5 strokes –harder steels may require more strokes).
TIP: Keep blade against outer
edge of guide as shown.
Top View
Note: Proper knife-sharpening position: blade against outer edge of
guide. Place knife blade in the guide so that the side of blade is against
the outside edge of the guide slot. Insert knife blade all the way to the
bolster / finger guard. Use only the weight of your blade as you pull
through for best results.
Page 7

Step 3
Repeat Step 2 now using the
left side of guide. Repeat
for the same number of
strokes used in Step 2 so
you sharpen evenly.
Your knife will now be “tomato sharp”.
If you choose, you can proceed with the purple 6000 grit
belt and hone the edge for even sharper results!
Step 4
Belt: 6000 PURPLE
Remove red belt, install purple belt and reinstall the kitchen knife
guide. Hone knife by making alternating strokes (5 strokes per side).
NOTE: When re-sharpening, use the red belt until you raise a burr
(approximately 2 strokes per side), then the purple belt for 5 honing
strokes per side.
SHARPEN RE-SHARPEN
P220
RED
×
10
NOTE: Heavy duty or more rigid filet knives can be sharpened using
the outdoor knife guide. See section 5.
6000
PURPLE
×
10
P220
RED
×
2
6000
PURPLE
×
10
Page 8

Sharpening Outdoor Knives
5
Pocket knives & hunting knives
Step 1
Belt: P220 RED
Install red belt. Slide outdoor
knife guide over the belt
onto sharpening cassette in
sharpening position A.
Opposite View:
Guide in place
Step 2
Starting with the knife in the right side
of the guide, squeeze power switch,
and pull knife straight and steadily
through guide from bolster to point of
blade. Turn off the power as you come to the point while the blade is
still supported by the belt (4-in. knife should take 1 second per stroke).
Continue until a slight burr develops on the opposite side
of the blade (usually 5 strokes).
TIP: Keep blade against outer
edge of guide as shown.
Top View
NOTE: Proper knife-sharpening position: blade against outer edge of
guide. Place knife blade in the guide so that the side of blade is against
the outside edge of the guide slot. Use only the weight of your blade as
you pull through for best results.
Page 9

Step 3
Repeat Step 2 now
using the left side
of guide. Repeat for
the same number of
strokes used in Step 2
so you sharpen evenly.
Top View
Your knife will now be “rope-cutting sharp”.
If you choose, you can proceed with the purple 6000 grit belt and
hone the edge for even sharper results!
Step 4
Belt: 6000 PURPLE
Remove red belt, install purple belt and reinstall the outdoor knife
guide. Hone knife by making alternating strokes (5 strokes per side).
NOTE: When re-sharpening, use the red belt until you raise a burr
(aproximately 2 strokes per side), then the purple belt for 5 honing
strokes per side.
SHARPEN RE-SHARPEN
P220
RED
×
10
6000
PURPLE
×
10
P220
RED
×
2
6000
PURPLE
×
10
Page 10

Sharpening
6
NOTE: Serrated knives have
a flat side and a beveled side
on the blade; sharpen ONLY
the flat side with your Work
Sharp Knife & Tool Sharpener.
Serrated Knives
Step 1
Belt: 6000 PURPLE
Install purple belt; slide outdoor knife
guide (includes serrated guide) over the belt.
The serrated guide is located below the 25° slot.
Step 2
Place flat side of blade against the
serrated knife guide at the bolster /
handle. Squeeze power switch; pull knife
steadily across belt from bolster to tip of
blade; 8-in. knife should take 2 seconds.
Flat SideBeveled Side
NOTE: Proper serrated-blade position: only place
serrated blades on downhill / right side of belt;
otherwise, you risk cutting the belt.
Repeat 2 to 3 strokes.
Page 11

Sharpening Knives with
7
Partial Serrations
Step 1
Follow instructions for smooth-edged
knives on the standard portion of the
blade using the outdoor knife guide.
Use outdoor guide with
this portion of blade.
Step 2
Follow instructions for serrated
knives on the serrated portion of the
blade using the outdoor knife guide.
Use serrated guide with
this portion of blade.
Page 12

Sharpening Hunting Knives
8
with Gut Hook & Blades with
Deep Concave Curves
Step 1
Follow instructions for smooth-edged knives
on the standard portion of the blade using
the outdoor knife guide.
Step 2
Belt: 6000 PURPLE
To sharpen the gut hook, remove
any knife guides; install purple belt.
Step 3
Place curve of gut hook over
the belt on downhill side;
allow belt to conform to
blade’s curve.
Squeeze power switch; hone
2 to 4 seconds.
Step 4
Repeat on other side of
gut hook.
NOTE: Only use the downhill / right side of
the belt or you will cut the belt.
Page 13

Sharpening
9
Single-Bevel Knives
Step 1
Belt: P220 RED
Install red belt. Follow instructions for smooth-edged knives on the
beveled side of the blade using the outdoor knife guide. Continue
until a slight burr develops on the flat side.
Step 2
Belt: 6000 PURPLE
Install purple belt and hone beveled
side of the blade; continue using the
outdoor knife guide
Step 3
Hone flat side of the blade using the serrated guide;
continue using the outdoor knife guide.
TIP: It may be necessary to repeat this alternating
process of bevel sharpening and back honing to
achieve the sharpest results (no burr).
Page 14

Sharpening
10
NOTE: Sharpen only the beveled side of your scissors. Marking the
beveled side with a black marker will make it easier to see when the
cutting edge has been sharpened.
Scissors
Step 1
Belt: 6000 PURPLE
Install purple belt
and the outdoor
knife guide (includes
scissor guide).
Hold scissors as shown
to keep blades open
during sharpening.
Step 2
Pull scissors steadily through guide
along full length of blade.
NOTE: For proper scissors-sharpening
position. Place scissor blade in guide
slot all the way to the hinge. Guide
magnet will help keep the blade flat
and stable during sharpening.
Step 3
Repeat Step 2 about 5 times or
until black marker is sharpened
off at the cutting edge.
Scissor
Guide
Step 4
Repeat Steps 1 to 3 on
other scissors blade. Test
scissors, repeat as needed.
TIP: Damaged or chipped scissors may require red P220 belt.
Magnet
Page 15

Sharpening Tools
11
Shovels, Hoes, Axes, Pick Axes, Post-Hole
Diggers, & Other Edged Tools
NOTE: Tools such as these do not require sharpening to a precise
angle; just let the belt conform to the edge of the tool. It will take
longer to restore an edge to severely damaged tools. Remember, the
tool is not intended for heavy-duty use; do not exceed 20 minutes
use in 1 hour.
Step 1
Belt: P80 GREEN
Remove knife guide, install
green belt; move sharpening
cassette to grinding position B.
Step 2
Clamp tool to be sharpened
securely in bench vise.
Squeeze power switch; grind edge of tool
until you are satisfied with the sharpness.
Page 16

Sharpening Tools
12
Pruners, Shears, & Other Bypass
Cutting Tools
NOTE: These tools usually have only one sharp, beveled blade.
Re-sharpen ONLY the beveled blade. These tools do not require
sharpening to a precise angle; just let the belt conform to the edge of the
tool. Remember, the tool is not intended for heavy-duty use; do not
exceed 20 minutes use in 1 hour.
Step 1
Belt: P220 RED
Remove guide, install red belt; move
sharpening cassette to grinding position B.
Step 2
Clamp pruners in a bench vise.
NOTE: Some tools require the
blade to be inserted through
the grinding frame opening
(as shown) to allow belt
access to the cutting edge.
Repeat 2 to 4 strokes or until you are satisfied
with the sharpness.
TIP: Tools that are not damaged or chipped may only require a honing
with 6000 grit purple belt.
Page 17

Sharpening Tools
13
Lawnmower Blades, Straight & Curved
(Mulching) Blades
NOTE: Lawnmower blades do not require sharpening to a precise
angle; just let the belt conform to the shape of the blade edge,
whether straight or curved. Remember, the tool is not intended for
heavy-duty use; do not exceed 20 minutes use in 1 hour.
Step 1
Remove blade from mower
following manufacturer’s
instructions; secure blade in
bench vise.
Step 2
Belt: P80 GREEN
Remove knife guide, install green belt;
move sharpening cassette to grinding
position B; grind edge until you are
satisfied with the sharpness.
Step 3
Unclamp blade, rotate 180º and
sharpen other side of blade.
Step 4
Balance blade to manufacturer’s specifications and reinstall
on lawnmower following manufacturer’s instructions.
Page 18

Grinding, Polishing,
14
The Work Sharp Knife & Tool Sharpener is the ideal handheld grinder
for small tasks, from deburring to polishing. Remember, the tool is not
intended for heavy-duty use; do not exceed 20 minutes use in 1 hour.
• Deburr tubing
• Grinding metal
• Grinding plastic
Deburring
• Sanding wood
• Automotive fabrication
• Any detail grinding task
Belt: P80 GREEN
Grinding position B
WARRANTY
1-year warranty on all WORK SHARP® components; excludes abrasives.
Warranty for consumer not industrial use.
Complete and mail back the Warranty Registration in the
WORK SHARP® box, or register online:
http://www.worksharptools.com
Darex, LLC
PO Box 730
210 E Hersey St
Ashland OR, 97520, USA
Do not attempt any service repairs other than those suggested by a
Work Sharp Technical Service Representative.
 Loading...