

Woodstream WFC User Manual

IC Radio Standards Specification: RSS-210
ACS Report Number: 10-0086.W03.25.A
Manufacturer: Woodstream Corporation
Certification Exhibit
FCC ID: SNA-WFC
FCC Rule Part: 15.247
Model: 5134G-C
Manual
5015 B.U. Bowman Drive Buford, GA 30518 USA Voice: 770-831-8048 Fax: 770-831-8598
Custom-Shape
Wireless Dog Fence
Instruction Manual
PRIOR TO INSTALLATION
Fully Charge the System
Controller for 6 hours.
Welcome
Congratulations and thank you for choosing the Custom-Shape
Wireless Dog Fence from Havahart
®
, the leader in safe, caring
control for pets and wildlife for more than 60 years.
Featuring breakthrough, patented, wireless technology, the CustomShape Wireless Dog Fence is designed to maximize the freedom and
safety of your dog, with minimal effort, investment and impact on
your property. It is the industry’s most-advanced, do-it-yourself, dog
containment system.
The Custom-Shape Wireless Dog Fence gives you all the advantages of a
professionally-installed, underground wire fence system without all the
hassles and costs. Our revolutionary technology allows you to shape the
wireless fence to the specific configuration of your yard -- maximizing the
space for your dog to roam. It also allows you to add custom Exclusion
Zones thereby keeping your dog out of your garden or swimming pool.
There are no wires to bury or break. No back pains from digging.
No money wasted on trenching. Just a Fast & Easy Setup and
Freedom to Roam!
To ensure your complete satisfaction
and your dog’s safety, please read
and follow all of these instructions
carefully. Should you need assistance,
our Consumer Care Specialists are
ready to help. Call 1-800-800-1819,
and press “1”.
Thank you for purchasing the
Custom-Shape Wireless Dog Fence
from Havahart
®
!
Havahart® Custom-Shape Wireless Dog Fence
1

Table of Contents
IMPORTANT SAFETY REMINDERS ............................................................................................................................................. 3
SYSTEM COMPONENTS .................................................................................................................................................................... 4
THE TECHNOLOGY BEHIND THE SYSTEM .......................................................................................................................... 5
Controller
Bases
Collar
GETTING STARTED ............................................................................................................................................................................... 6
Quick Checklist
Planning Your Wireless Fence System
INSTALLING THE CUSTOM-SHAPE WIRELESS DOG FENCE ...................................................................................... 7
Setting Up the Bases ........................................................................................................................................................ 7
1
- Installing the Bases
- Activating the Bases
Setting Up the Fence Boundary ............................................................................................................................ 9
2
- Fence Boundary Flag Placement
- Fence Boundary Activation
- Removing a Flag
- Removing a Fence Boundary
3
Setting Up the Exclusion Zones (Optional) ................................................................................................... 12
- What are Exclusion Zones (Ex. Zones)?
- Exclusion Zone Flag Placement
- Exclusion Zone Activation
- Removing an Exclusion Zone Flag
- Removing an Exclusion Zone
- Naming an Exclusion Zone
- Deactivating /Reactivating an Exclusion Zone
4
Setting Up the Collar(s) .............................................................................................................................................. 18
- Activating a Collar
- Naming a Collar
- Adjusting the Correction Level of a Collar
- Removing a Collar
- Fitting a Collar
Table of Contents
TRAINING YOUR DOG ....................................................................................................................................................................... 22
WARRANTY INFORMATION ........................................................................................................................................................ 28
WIRELESS FENCE PLANNING GRID .......................................................................................................................................... 29
Havahart® Custom-Shape Wireless Dog Fence
2

Important Safety Reminders
To ensure the safe and effective operation of your Custom-Shape Wireless Dog Fence, please read and follow all
safety guidelines and instructions:
s The Custom-Shape Wireless Dog Fence is designed for dogs older than 6 months and weighing
Important Safety Reminders
more than 8 pounds.
s It is necessary to fully charge the system Controller for 6 hours PRIOR TO INSTALLATION.
sAll Bases must be installed indoors and should not be exposed to inclement weather (e.g. rain or snow).
sEach Base must be plugged into a properly grounded 120V AC outlet.
sChanges or modifications to any system component may cause permanent system damage and void
manufacturer warranties.
sTo prevent system damage due to unexpected power surges, it is recommended that you unplug any devices
from wall outlets during thunderstorms. Also, do not attempt to install the system during stormy weather.
sTo help prevent skin irritation, do not leave the Collar on your dog for more than 12 consecutive hours.
sAlways remove the Collar from your dog before adjusting any of the system components.
sThe system is intended to provide safe containment of your dog. All components should be kept out of
the reach of children.
Havahart® Custom-Shape Wireless Dog Fence
3
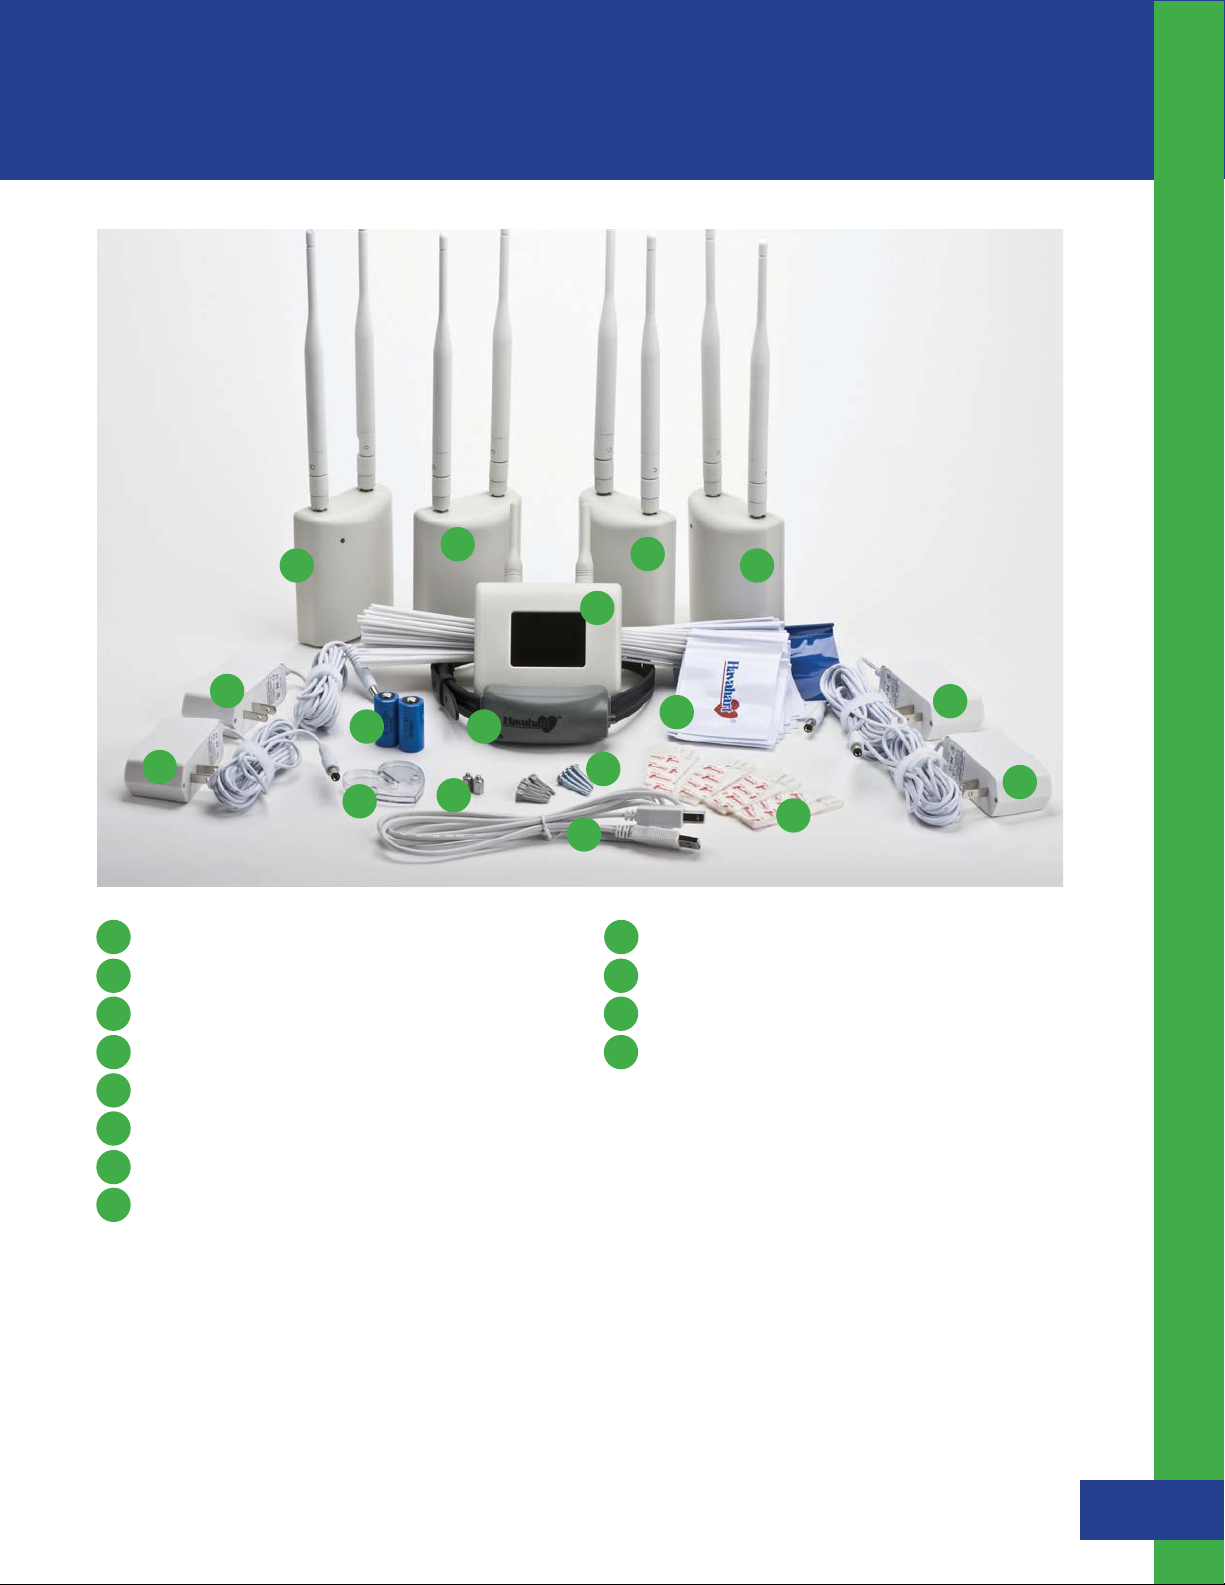
System Components
System Components
D
C
A
E
HI
E
K
A I
Controller
B
USB cable
C
Master Base
D L
3 Bases
E
4 AC power adapter cords for Bases
J
G
B
D
L
D
F
2 CR123 batteries for Collar
J
Extra set of small Collar probes
K
Heart-shaped Collar tester
74 white flags, 1 blue flag
Instructional DVD
E
E
F
Removable wall-mount adhesive tape
G
4 Screws and 4 wall anchors
H
Collar
Other Items You May Need:
s Scissors
s Drill
s Pen and Paper
s Tape Measure
s Pliers
s Permanent Marker
Instruction manual
Quick Setup Guide
Havahart® Custom-Shape Wireless Dog Fence
4

The Technology Behind the System
The Custom-Shape Wireless Dog Fence from Havahart® is driven by a nanoLOC TRX 2.4 GHz transceiver that has
been enhanced with complex algorithms, strategic distortion filtering and modular signal amplification to deliver
advanced time-of-flight-ranging technology and precision event-stamp mapping. These enhancements comprise
the core of the patented elements that provide an unparalleled level of technical sophistication in the wireless dog
fencing industry. This first-of-its-kind, cutting-edge Custom-Shape Wireless Dog Fence gives you the advantage of
allowing your dog to go to the edge of your property while keeping him safe and out of designated areas.
The Technology Behind the System
The revolutionary technology behind the Custom-Shape Wireless Dog Fence allows you to create a wireless fence
boundary and Exclusion Zones. The wireless fence boundary is a wireless perimeter that can be shaped to the exact
configuration of your yard. It is used to enclose your property’s Roaming Area where your dog can roam and play. By
contrast, an Exclusion Zone is a specific area such as a flower bed, children’s play area, pool, or patio where you want
to restrict your dog’s access. One blue and 74 white boundary flags are used to mark the wireless fence boundary
and any Exclusion Zones throughout your property. The flags are also used during training to indicate the location of
the wireless fence for your dog. Extra flags can be purchased if needed by going to www.havartwireless.com.
Fence Components:
Controller: The Controller puts all the power of the Custom-Shape Wireless Dog Fence at your fingertips. Through
auditory alerts and an intuitive graphic user interface (GUI) with a touch screen, the Controller provides easy, step-
by-step instructions for setting up, activating and managing your system. The Controller will notify you if your dog
breaches the fence boundary, if there is a problem with any of the fence components or if the Collar’s battery
life is low.
Bases: The system features a Master Base and 3 additional Bases, which are easily installed inside the home
using the removable wall-mount adhesive tape or screws. Each Base deploys the patented time-of-flight-ranging
technology with enhanced signal penetration to accurately and reliably determine the location of your dog by
transmitting a radio signal to his Collar. Working in concert with the Controller, the Bases identify and store the
location of the custom-shape fence boundary and Exclusion Zones(s) through precision event-stamp-mapping.
Based on data that is continuously captured, filtered and refined by the system, the Master Base determines whether
or not a correction should be delivered through the Collar.
The Bases also interact with one another to increase the range of the fence boundary, allowing you to create a
containment area up to 400 feet in any direction. No other do-it-yourself, wireless fence system offers a larger
containment area with the ability to custom-fit the fence boundary to the shape of your yard.
Collar: The comfortable, water-proof Collar houses a CR123 battery, 2 correction probes and a state-of-the-art radio
receiver with advanced antenna assembly that communicates with the Bases to constantly track the location of your
dog with regard to the wireless fence boundary and Exclusion Zones(s). When the Bases sense that the Collar is near
the fence boundary or an Exclusion Zone, they send a signal to the Collar to produce an auditory tone. When any
zone is breached, the Bases send another signal to the Collar to deliver a correction through the probes. Using the
Controller, you can progam in any of 5 static correction levels or an auditory correction tone, depending upon the
size and/or stubbornness of your dog. The default correction level is tone-only. You can use your Controller to set up,
name and manage up to 4 Collars for use on multiple dogs.
NOTE: Integrated Motion Sensor technology allows the Collar to conserve battery life when appropriate. Long
battery life will depend on the degree of your dog’s activity during training and beyond.
Havahart® Custom-Shape Wireless Dog Fence
5
Getting Started
d
Swing Set
t
A
Garden
Garde
n
Shed
Swing Set
t
ROAMING AREA
d
Shed
RO
ool
Quick Checklist:
Before you begin the installation process, be sure to
check the following:
Make sure that you have all system components ready
and available.
Getting Started
Some Helpful Tips:
When creating your fence boundary,
make sure to completely close the loop
to create an enclosed containment
area. Use the blue flag as a reference
point to ensure you are closing the loop.
Detailed instructions are found under the
“Boundary Flag Placement” section.
Charge the Controller for 6 hours.
Regardless of the fence layout you
choose, make sure your house is inside
Insert a new battery in the Collar. If using more than
the enclosed boundary.
one Collar, DO NOT insert batteries in all the Collars at
the same time. It is necessary to insert batteries and
activate the Collars one at a time. Find detailed
instructions under the “Setting Up The Collar(s)”
When addressing a curved area, avoid
creating sharp turns or tight corners as
this may cause gaps in your boundary.
section of this manual on page 18.
The distance between the fence
Watch the instructional DVD and use the
Quick Setup Guide.
boundary and Exclusion Zones, and
the distance between Exclusions Zones
must be wider than 12 feet to ensure
adequate access and proper system
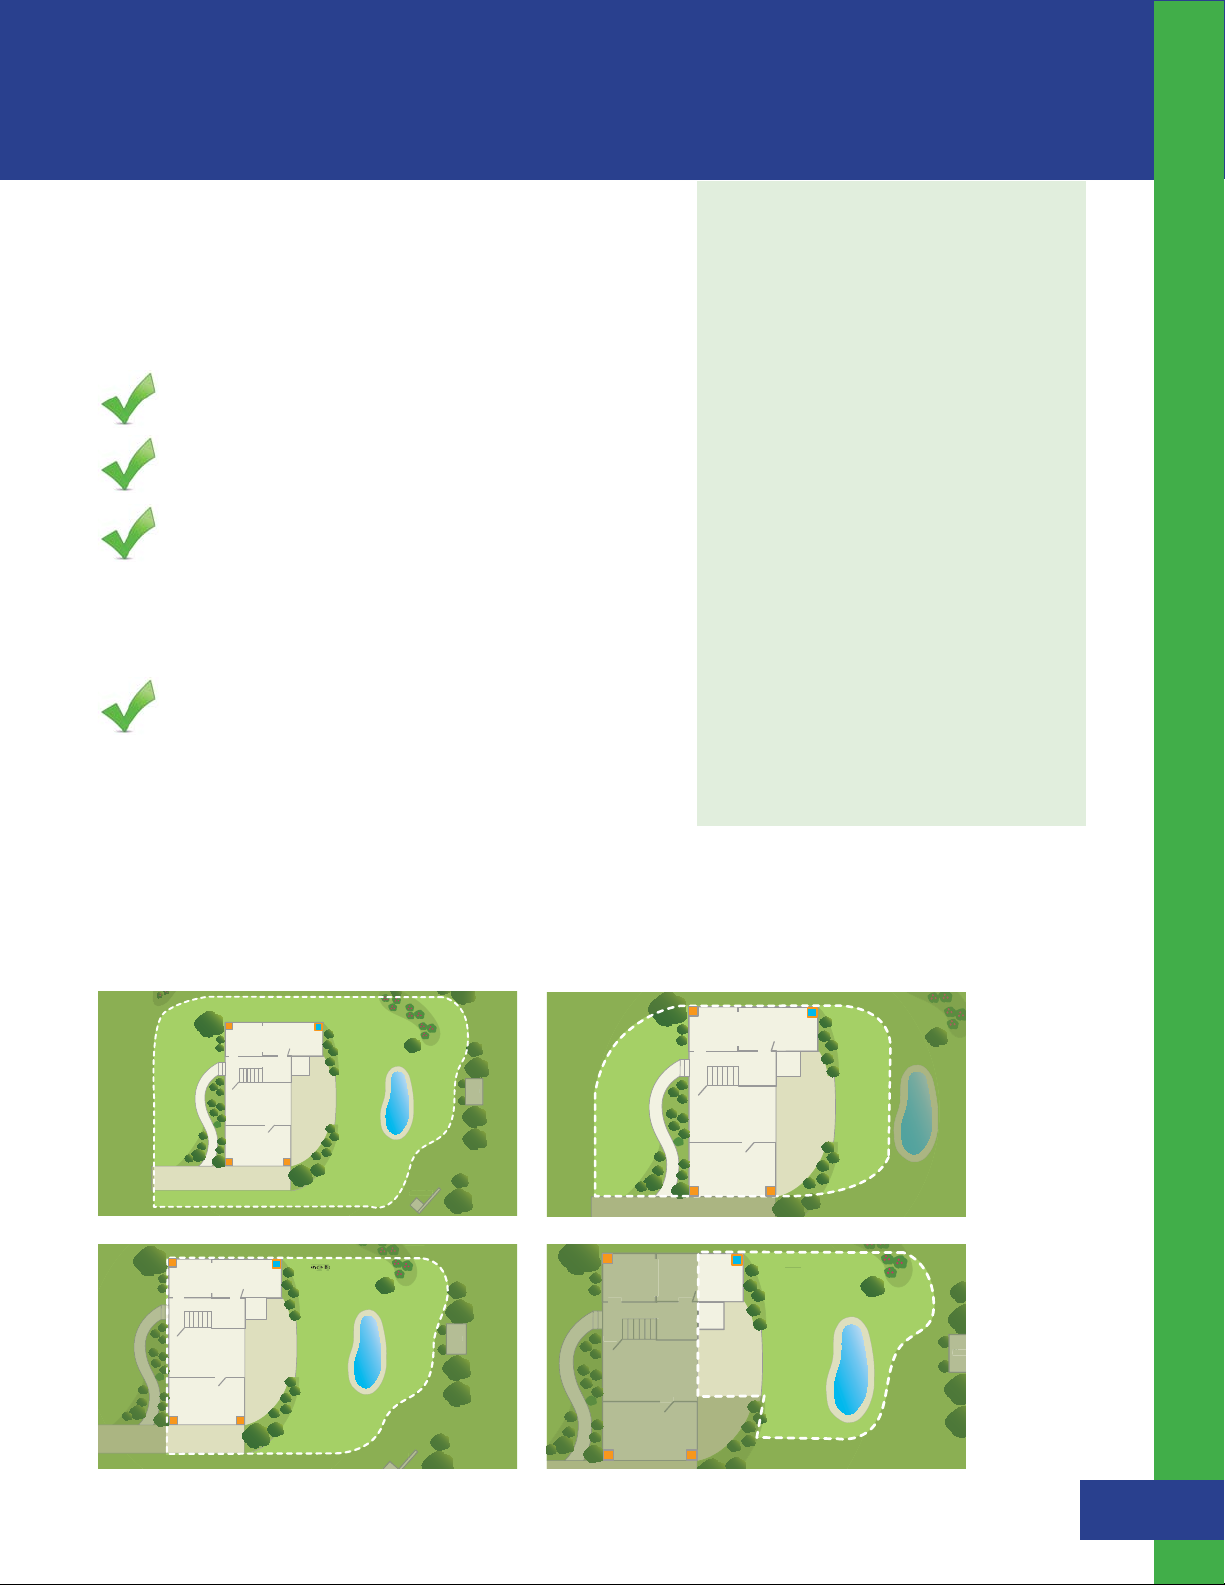
Plan Your Wireless Fence Boundary & Exclusion Zones:
performance.
Because the Custom-Shape Wireless Dog Fence is so flexible, there
are an infinite number of installation layout options you can design. Prior to installation, it is important to map
out how you envision the layout of your wireless fence to ensure it suits the custom shape of your yard while
providing your dog optimum freedom and safety. You may use the grid on page 27 to sketch your design.
The following are sample layouts, which you may consider implementing on your property:
Fence Boundary
Base
Master Base
ROAMING ARE
Deck
Flower
Garden
ence Boundar
F
Shed
Pool
She
Base
y
Master Base
ROAMING AREA
Deck
Fence Boundary
PoolP
Base
Base Base
Base Base
Master Base
Fence Boundary
Deck
Fence Boundary
Fence Boundary
Swing Set
Base
Base Base
Master Base
Fence Boundary
AMING AREA
Pool
Swing Set
Shed
Deck
Fence Boundary
Base Base
Pool
Havahart® Custom-Shape Wireless Dog Fence
She
6
Installing the Custom-Shape Wireless Dog Fence
Important Note:
1
Setting Up the Bases
Installing the Bases:
Position all 4 Bases at the far corners inside of your home and near a
power outlet (including the attached garage if it applies).
The Controller must be fully charged
before you begin the installation process
(full charge takes approximately 6 hours).
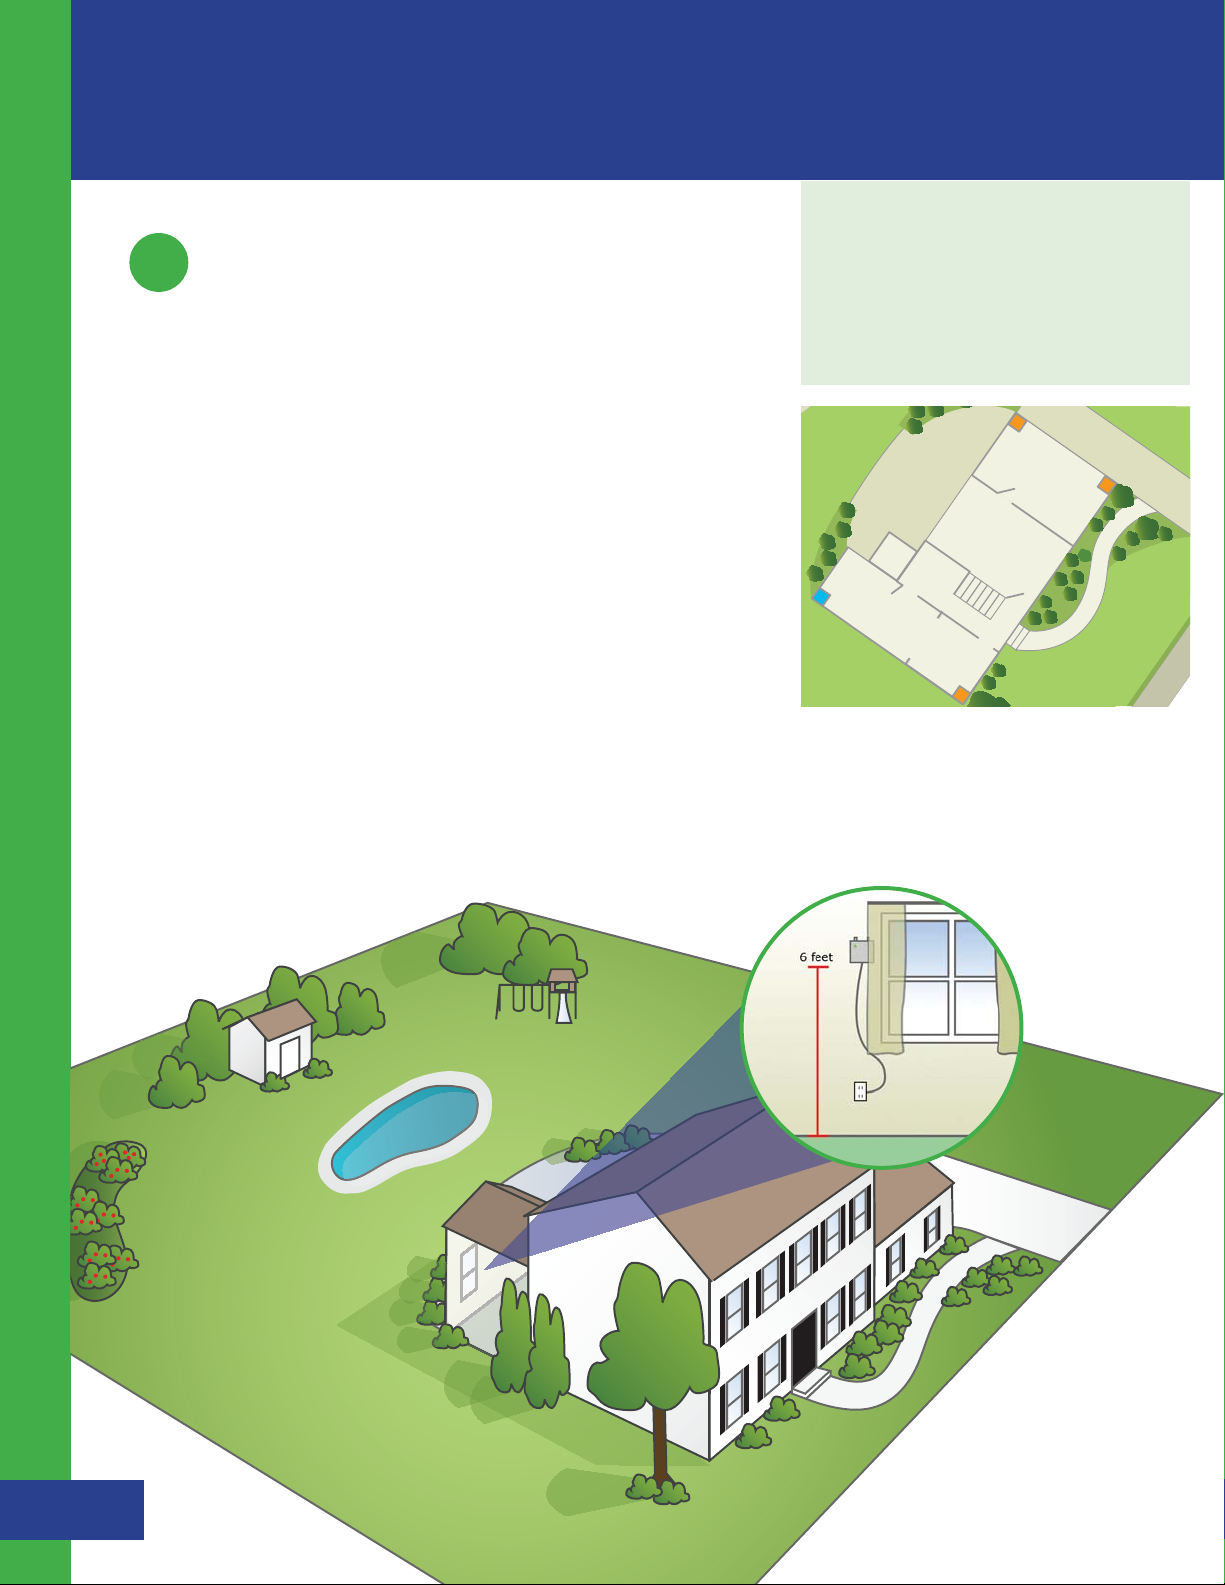
1. Install the Master Base first. To identify it from the rest of the Bases,
check to find the words, “Master Base” printed on the back of the unit.
2. Position the Master Base in an interior corner wall near the area where
your dog spends most of his time outdoors. Make sure a power
outlet is nearby. (see Illustration A)
3. Peel and place the removable wall-mount adhesive tape to the
back of the Master Base. If preferred, use the screws provided to
mount the Master Base. (See page 8 for details)
Installing the Custom-Shape Wireless Dog Fence - Setting Up the Bases
4. Attach the Master Base to a wall or window frame approximately
6 feet off the floor and plug into the power outlet.
(see Illustration B)
5. A green power light will display indicating the Base unit is on.
Deck
BaseBase
Master Base Base
Illustration A
Illustration B
Havahart® Custom-Shape Wireless Dog Fence
7

Attaching Base using the adhesive tape:
s Clean surface with isopropyl rubbing alcohol, wipe gently, let dry.
DO NOT USE household cleaners.
s Separate strips (if still connected) at the perforation.
s Peel the back from one piece of tape and attach it vertically to the
middle of the Controller with the tab pointed upward toward the
antennas.
s Connect the fasteners (Velcro-like teeth) on the tape of the
Controller to the fasteners on the other piece of tape. The tab
on the other piece of tape should point downward away from the
antennas -- the opposite direction of the tab on the piece of tape
on the Controller.
s Peel the back from the other piece of tape and attach it to the wall
with pull-tab facing downward toward the floor and the Controller
antennas facing upward toward the ceiling.
6. Repeat these steps to install the rest of the Bases in the
remaining 3 corners of your home.
7. Touch the screen of the Controller to turn it on and press
“Get Started”. (See Figure 1.2)
To remove the adhesive tape:
s Peel the Controller gently from the
wall. DO NOT pull the fasteners off the
Controller or the wall.
s Start with the piece of tape on the wall.
To prevent the fastener from snapping
your fingers, press one hand on the end
of the tape opposite the tab and use your
other hand to pull the tab of the tape
slowly down straight against the
surface of the wall stretching the tab
at least 12 inches until the strip releases.
Repeat for the tape attached to the
Controller.
Installing the Custom-Shape Wireless Dog Fence - Setting Up the Bases
Activating the Bases:
1. Once all Bases are installed, plugged in and displaying a green
power light, stand within 10 feet of the Master Base and press the
“Complete” Button on the Controller. This will activate all the
Bases simultaneously. (See Figure 1.3)
If successful, a positive auditory tone will sound and the Controller will indicate
you are now ready to proceed to setup your fence boundary. (See Figure 1.4)
If you are unsuccessful, a negative auditory tone will sound and the Controller
will advise you to re-check each Base to ensure that it is properly installed,
plugged in and displaying a green power light. (See Figure 1.5)
Figure 1.4
Figure 1.5
Figure 1.2
Figure 1.3
Havahart® Custom-Shape Wireless Dog Fence
8
 Loading...