

Page 1

IC Radio Standards Specification: RSS-210
ACS Report Number: 10-0086.W03.55.A
Manufacturer: Woodstream Corporation
Certification Exhibit
FCC ID: SNA-RFB
FCC Rule Part: 15.247
Model: 5134G-B
Manual
5015 B.U. Bowman Drive Buford, GA 30518 USA Voice: 770-831-8048 Fax: 770-831-8598
Page 2
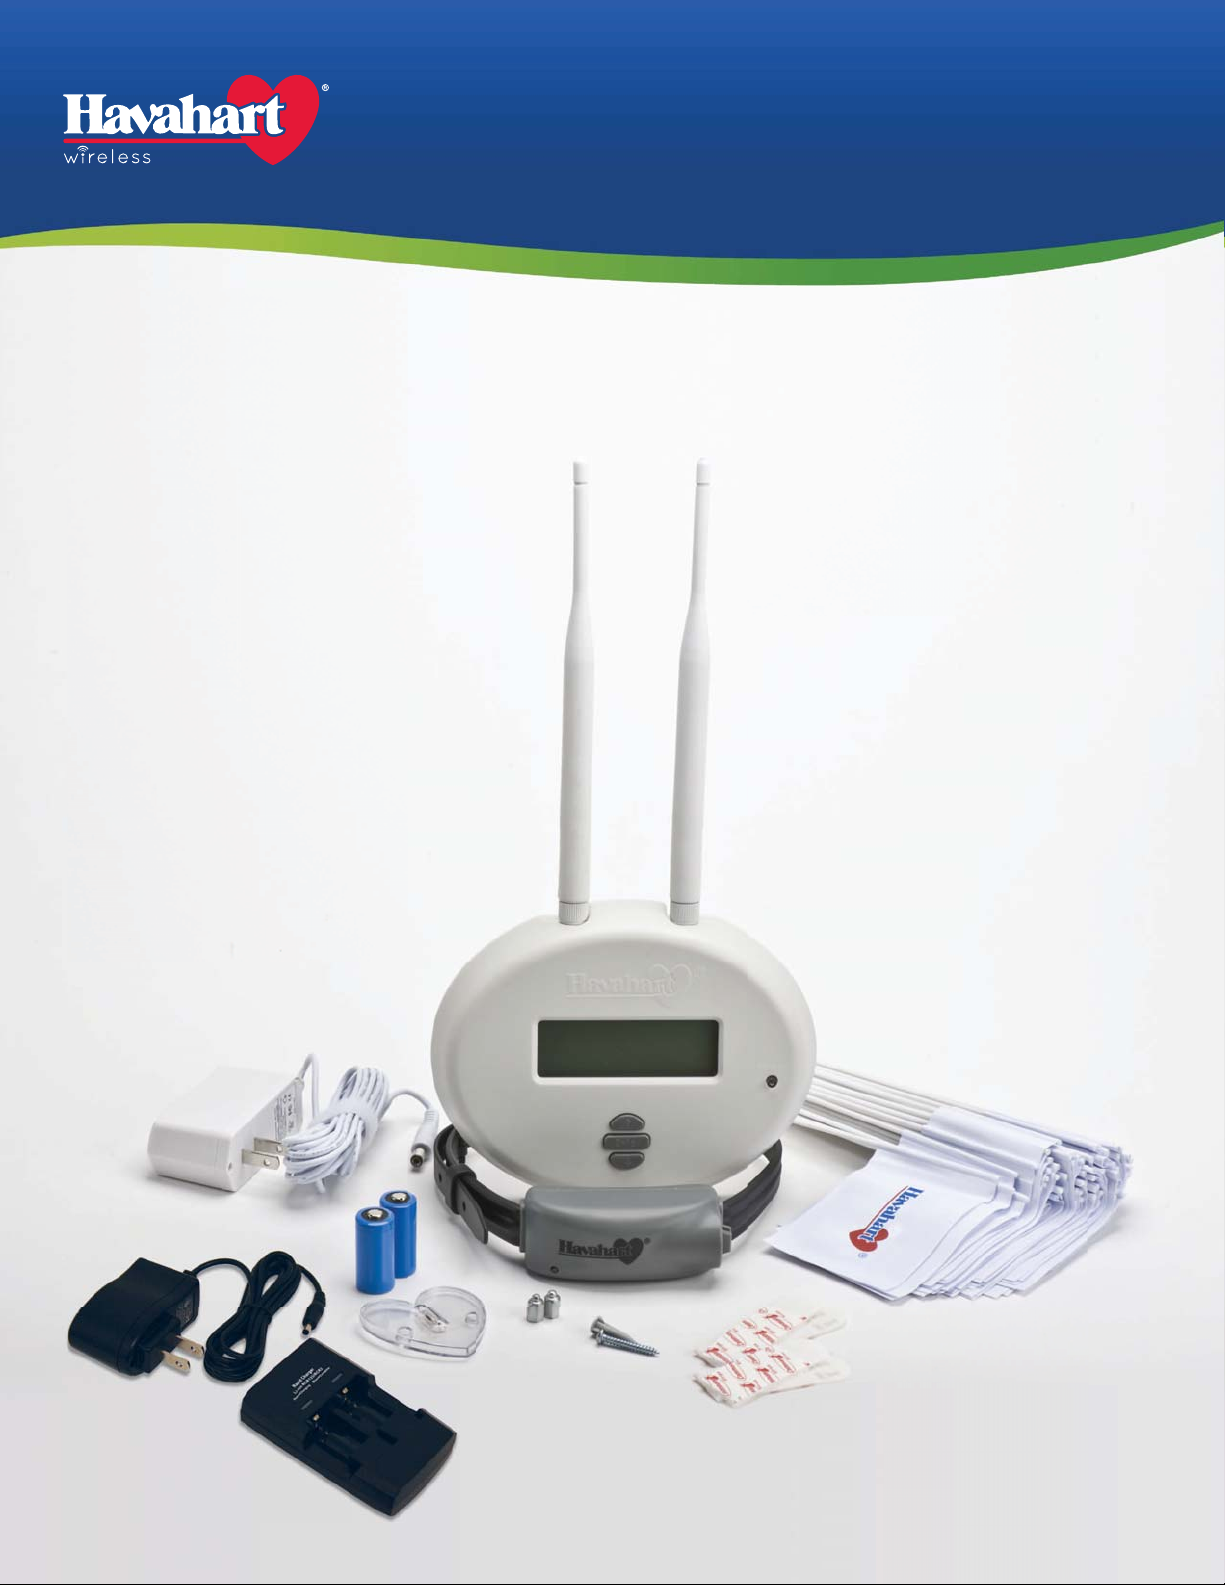
Radial-Shape
Wireless Dog Fence
Instruction Manual
Model 5134G
Page 3
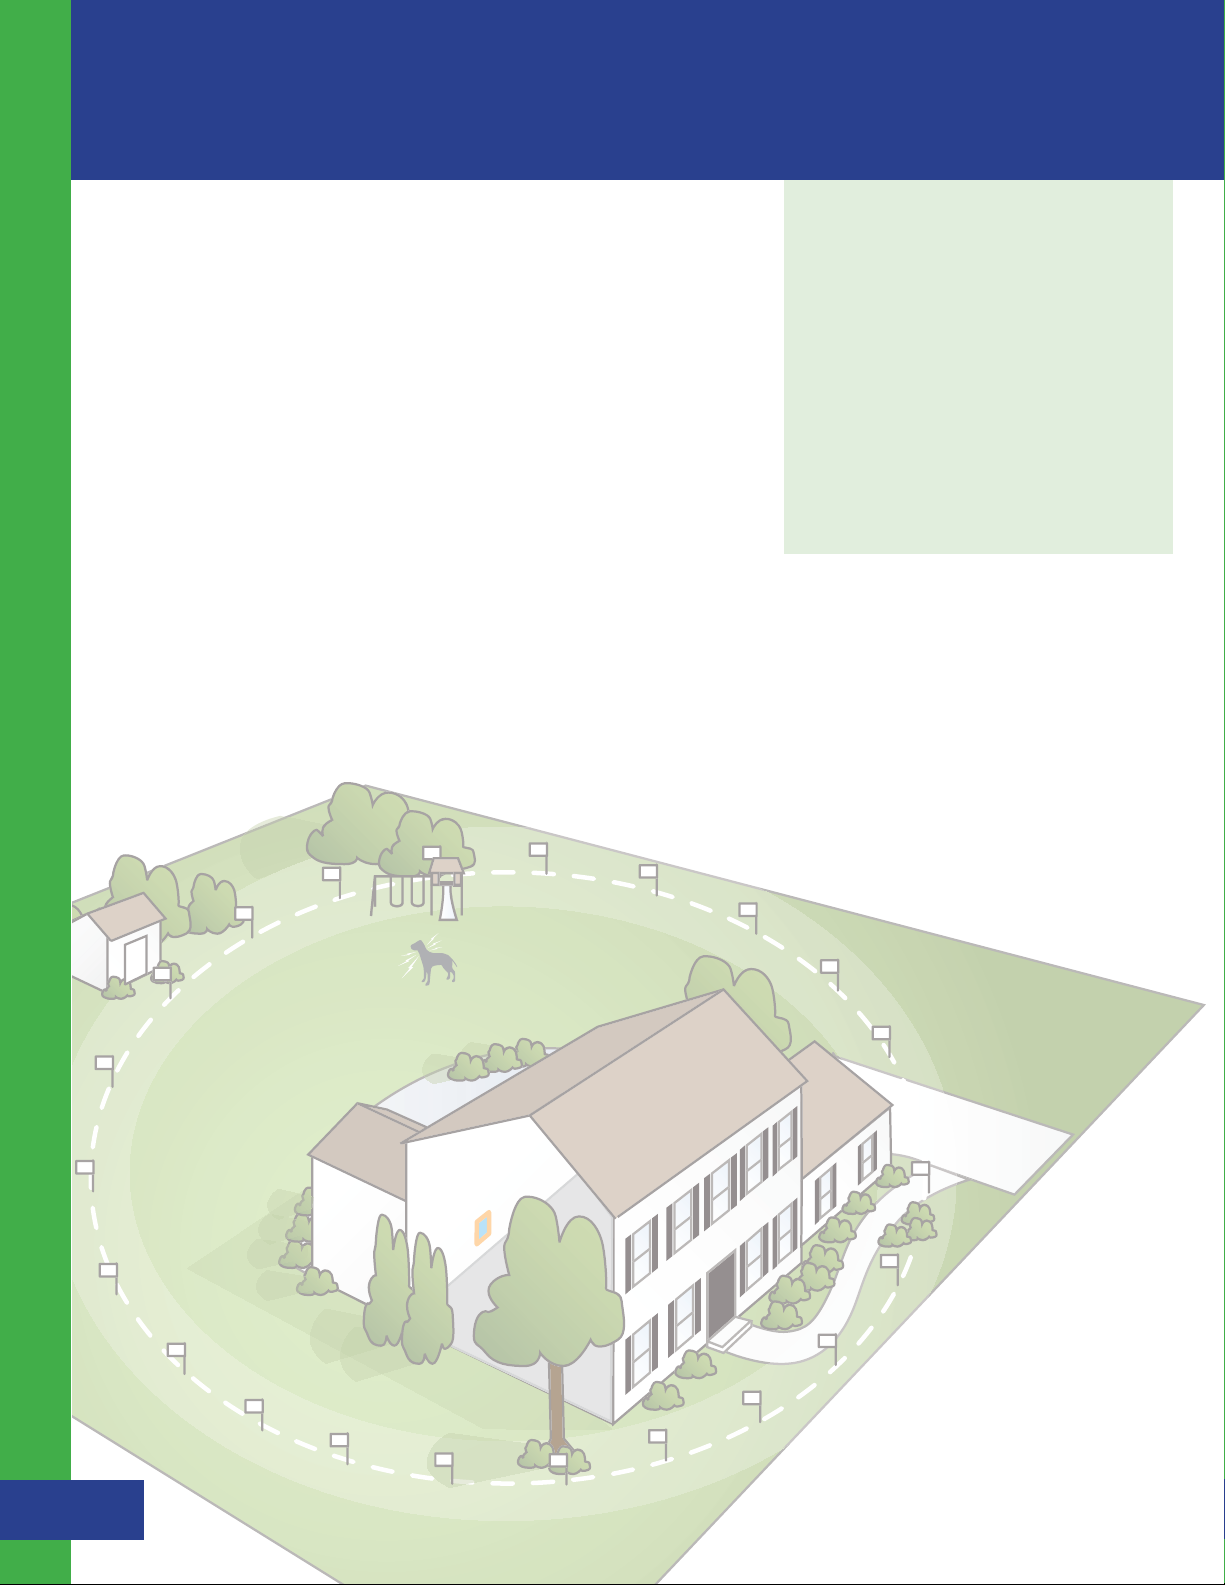
Controlle
Welcome
Congratulations and thank you for choosing the Radial-Shape
Wireless Dog Fence from Havahart
®
Wireless - the leading innovator
of digital wireless fence solutions.
Featuring breakthrough, patented wireless technology, the RadialShape Wireless Dog Fence is designed to provide maximum freedom
and safety for your dog and peace of mind for you with minimal effort,
investment and impact on your property. It is the industry’s mostadvanced, do-it-yourself, INSTANT-CIRCULAR dog containment system.
It is the first to offer a Roaming Area that can extend from 40 up to
400 feet in all directions with technology housed in a Controller that is
smaller than a Frisbee. There are no wires to bury or break, no back pains
from digging, and no wasted money on trenching — just a fast & easy
setup and freedom for your dog to roam!
Proper training of your dog is the most critical element in ensuring
the successful operation of your wireless dog fence. Consult the
training section of this manual once you have set up your wireless
dog fence.
To ensure your complete satisfaction
and your dog’s safety, please read
and follow all of these instructions
carefully. Should you need
assistance, our Consumer Care
Specialists are ready to help. Call
1-800-800-1819, Option 1.
Thank you for purchasing the
Radial-Shape Wireless Dog Fence
®
from Havahart
Wireless!
Havahart® Radial-Shape Wireless Dog Fence
1
www.havahartwireless.com
r
Page 4

Table of Contents
IMPORTANT SAFETY REMINDERS ..........................................................................................................................
SYSTEM COMPONENTS ..............................................................................................................................................
KEY DEFINITIONS, TECHNOLOGY & HOW IT WORKS ....................................................................................
- Roaming Area
- Trigger Zone
- Controller
- Havahart
GETTING STARTED ........................................................................................................................................................
- Planning Your Wireless Fence System
- Quick Checklist
INSTALLING THE RADIAL-SHAPE WIRELESS DOG FENCE ..............................................................................
Setting Up the Controller
1
- Installing & Activating the Controller
Setting Up the Collar
2
- Installing a Battery
- Checking Battery Status
- Recharging a Battery
- Activating a Collar
- Adjusting the Correction Level of a Collar
- Turning a Collar Off/On
- Removing a Collar
®
Collar
.........................................................................................................................
...................................................................................................................................
3
4
5
7
9
9
11
Table of Contents
3
Setting Up the Fence Boundary/Trigger Zone
- Establishing the Fence Boundary/Trigger Zone Distance
- Placing Training Flags
- Turning the Trigger Zone Off/On
- Display Options
4
Fitting a Collar ................................................................................................................................................
TRAINING YOUR DOG ...................................................................................................................................................
FREQUENTLY ASKED QUESTIONS ............................................................................................................................
FACTORS AFFECTING SIGNAL STRENGTH ............................................................................................................
TROUBLESHOOTING ....................................................................................................................................................
TERMS OF USE AND LIMITATION OF LIABILITY .................................................................................................
WARRANTY INFORMATION ......................................................................................................................................
WIRELESS FENCE PLANNING GRID ..........................................................................................................................
(Viewing Distance to Dog and Battery Status, Turning the Display Off/On, Setting Alarm Options)
...............................................................................
Havahart® Radial-Shape Wireless Dog Fence
1-800-800-1819, Option 1
14
18
20
27
32
33
36
37
38
2
Page 5

Important Safety Reminders
To ensure the safe and effective operation of your Radial-Shape Wireless Dog Fence, please read and follow all
safety guidelines and instructions:
s The Radial-Shape Wireless Dog Fence is designed for dogs older than 6 months that weigh more
Important Safety Reminders
than 8 pounds.
s The Controller must be installed indoors and should not be exposed to moisture (e.g. rain or snow).
sThe Controller must be plugged into a properly grounded 120V AC outlet.
sChanges or modifications to any system component may cause permanent system damage and void
manufacturer warranties.
sTo prevent system damage due to unexpected power surges, it is recommended that you unplug the
Controller from the wall outlet during thunderstorms. All settings will be retained in system memory. Also do
not attempt to install the system during stormy weather.
sTo help prevent skin irritation and increase battery life, do not leave the Collar on your dog for more than
12 consecutive hours.
sAlways remove the Collar from your dog before adjusting any of the system components or settings.
sThe system is intended to provide safe containment of your dog. All components should be kept out of
the reach of children.
sFollow your established leash laws. There may be cases where this system will be prohibited by law.
sProper training of your dog is the most critical element in ensuring the safe and successful operation
of your wireless dog fence.
DO NOT RETURN THIS PRODUCT
TO THE STORE FOR ANY REASON
CONTACT HAVAHART® WIRELESS DIRECTLY!
CALL 1-800-800-1819, OPTION 1.
Havahart® Radial-Shape Wireless Dog Fence
3
www.havahartwireless.com
Page 6
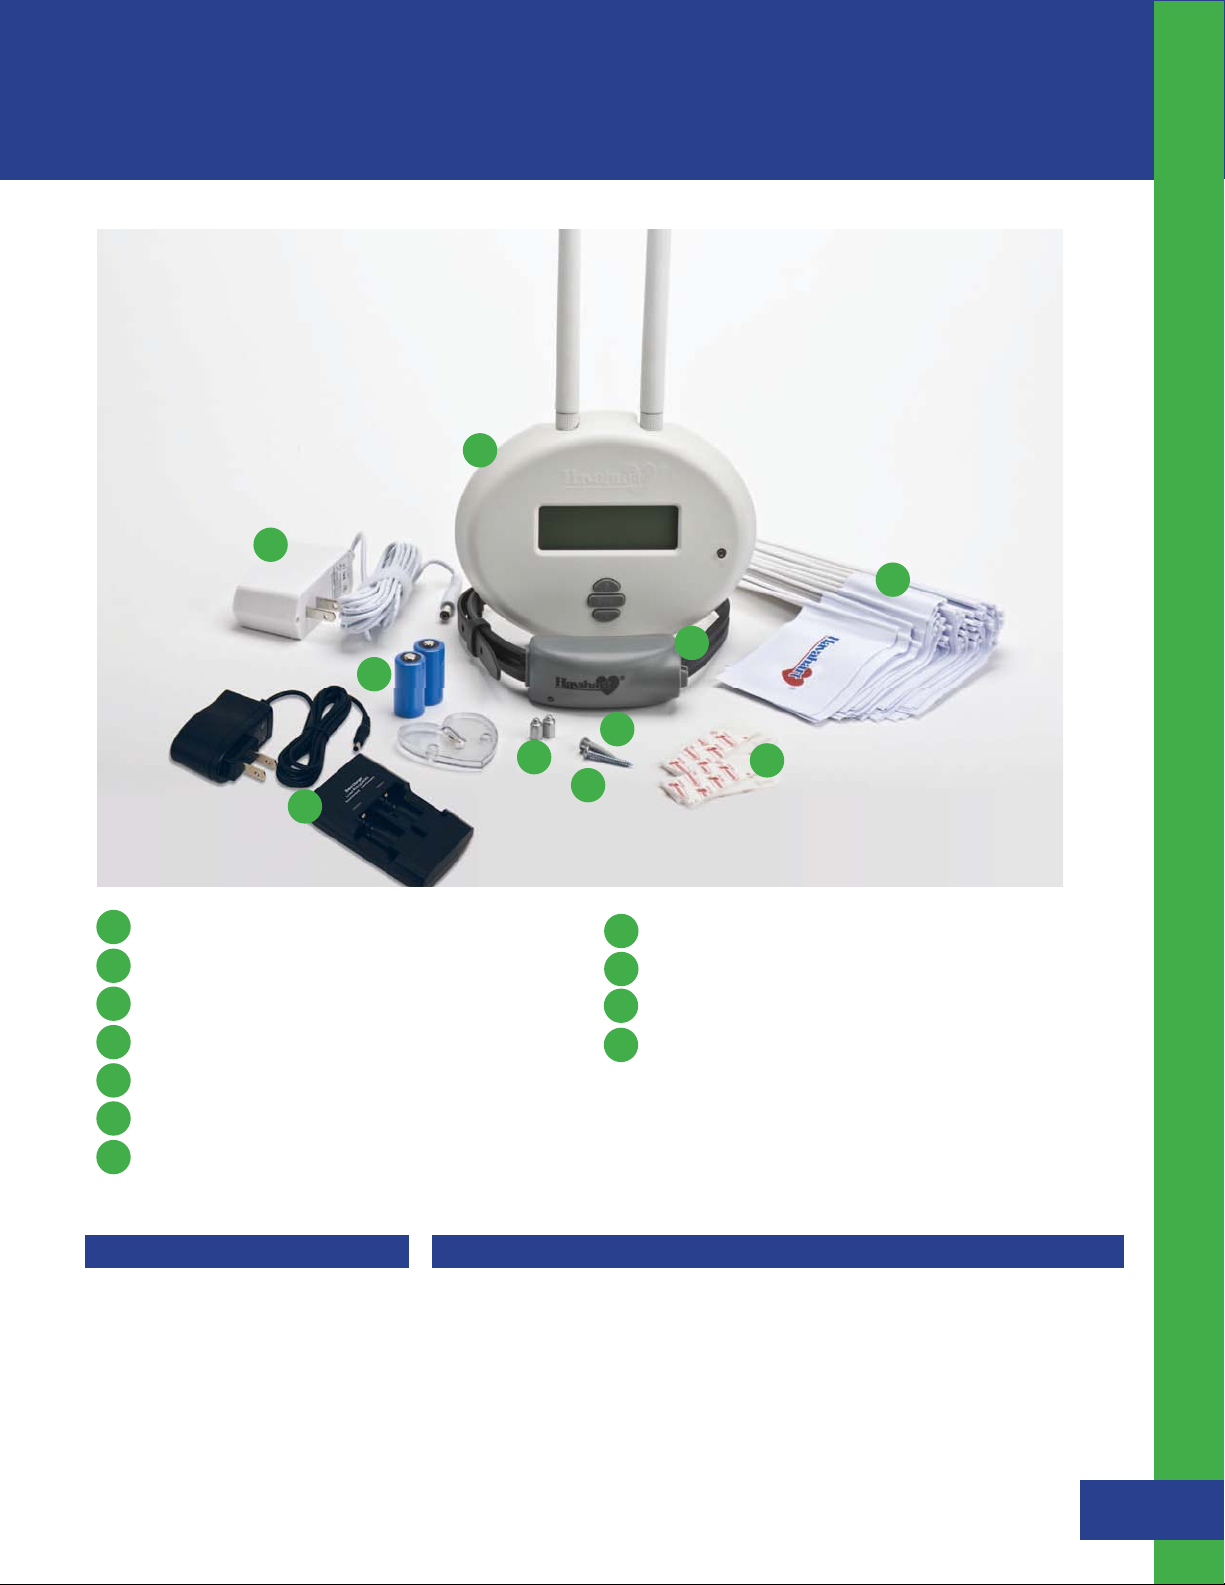
System Components
Ensure that the following components are
included with your system. If a component is
missing, please call 1-800-800-1819, Option 1.
A
B
G
K
Model 5134G
System Components
J
F
E
H
D
C
A
Controller
B
AC Adapter Power Cord
C
Removable Wall-Mount Adhesive Strips
D
Screw
E
Wall Anchor
F
Collar
G
2 RCR123A Batteries For Collar
Other Items You May Need:
Scissors
s
s Drill
s Tape Measure
s Screw Driver
s Pliers
s Permanent Marker
Accessories:
Extra Collar - 5134GX
s
s 25 Flag Pack - HW25FLAGPACK
s Heart-Shaped Collar Tester - HWHEARTSCT
s 2 Controller Antennas - HW2ANT
s 2 Pack Of Batteries - HW2REBATPACK
s Battery Recharger - HWBATRECHARG
s Isopropyl Rubbing Alcohol
s Soft Cloth
H
Extra Set Of Collar Probes For Short-Haired Dogs
I
Heart-Shaped Collar Tester
75 Training Flags
J
K
Battery Recharger
Instructional DVD
Instruction Manual
Quick Setup Guide
s Collar Battery Cap - HWCBATCAP
s 2 Long Probes - HW2LPROBES
s 2 Short Probes - HW2SPROBES
s AC Adapter - HWACCORD
Havahart® Radial-Shape Wireless Dog Fence
1-800-800-1819, Option 1
4
Page 7
Key Definitions, Technology & How it Works
Key Definitions:
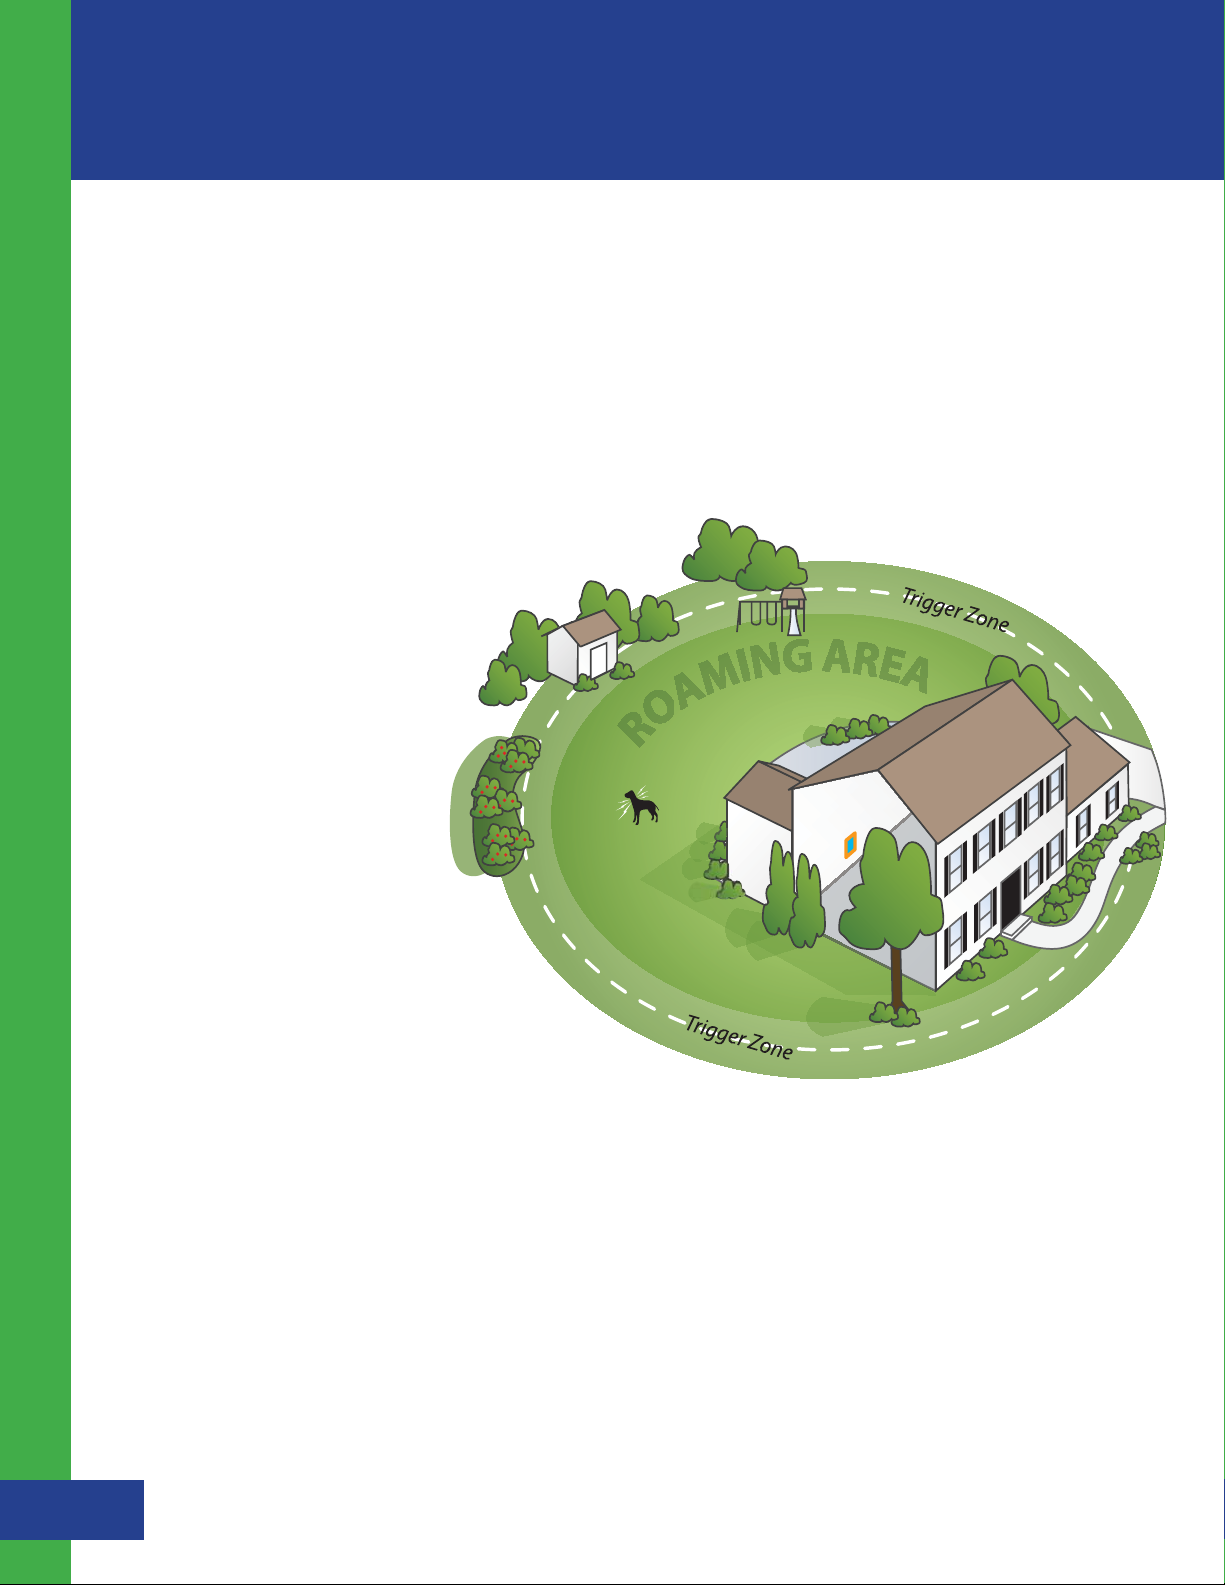
Roaming Area: Area between the Controller and the Trigger Zone where your dog is free to roam and play.
Capable of expanding from 40 feet up to 400 feet in all directions.
Trigger Zone: The zone, which may be up to 13 feet wide, located outside the Roaming Area that establishes the
fence boundary. Correction is triggered by your dog crossing into the Trigger Zone which can be set to tone-only
(auditory alarm) or static correction. The correction is not constant but cyclical. It will continue through its cycle for
up to 30 seconds while your dog is outside the Roaming Area or until your dog returns approximately 10 feet back
into the Roaming Area.
Key Definitions, Technology & How it Works
Controller: Through auditory alerts and an
LCD screen, the Controller provides intuitive
navigation for setting up, activating and
managing your fence. The Controller
houses a state-of-the-art transceiver
and displays the real-time distance to
your dog. It will notify you if your dog
breaches the fence boundary, if there
is a problem with any of the system
components or if the battery life of
the Collar is running low. You can
use your Controller to set and
manage up to 2 Collars.
Controller
Havahart
®
Collar: The comfortable,
water-proof Collar houses a rechargeable
RCR123A battery, two correction Probes and
a state-of-the-art radio transceiver with
advanced antenna assembly. The Collar
communicates continuously with the Controller
to track the real-time location of your dog. Using the
Controller, the Collar can be programmed to tone
only (auditory correction) or one of 5 different static correction
levels depending upon the size, age and temperament of your dog.
The default correction level is tone only. Use long or short Probes depending upon the thickness of your dog’s
coat. The Havahart
®
Collar features exclusive Integrated Motion Sensor Technology to optimize battery life.
The Technology Behind the System:
The Havahart® Radial-Shape Wireless Dog Fence is driven by two nanoLOC TRX 2.4 GHz transceivers that have been
enhanced with complex algorithms, strategic distortion filtering and modular signal amplification to deliver timeof-flight ranging technology. These enhancements comprise the core of the patented elements that allow the
Havahart
wireless dog fencing industry.
®
Radial-Shape Wireless Dog Fence to provide an unparalleled level of technical sophistication in the
Havahart® Radial-Shape Wireless Dog Fence
5
www.havahartwireless.com
Page 8
How it Works:
Both the Havahart® Collar and the Controller contain nanoLOC TRX 2.4 GHz transceiver chipsets that send and
receive radio transmissions from one another like 2-way radios. When radio signals are sent from the antennas of
either component to the other, they propagate in an omni-directional or spherical manner. The ranging process,
performed by the nanoLOC chipsets with their associated antenna pairs, where data is continuously captured,
filtered and refined, yields the distance between the Havahart
®
Collar and the Controller.
The Controller is designed so that a custom fence radius of 40 to 400 feet can be set. This radius between the
Controller and the Trigger Zone is what defines the circular Roaming Area for your dog. The Havahart
®
Collar and
the Controller range continuously to calculate the distance between them so that the system can track the realtime location of your dog. When the user-defined fence radius distance is reached inside the Trigger Zone, the
Controller sends a command to the Collar to take action and correct (tone or static --- based on user settings). The
Collar will correct your dog until one of these two conditions are met:
1. Your dog returns approximately 10 feet within the Roaming Area.
2. The Collar’s Safety Time-Out Feature stops the correction cycle after 30 seconds.
In the first case, the system automatically returns to normal operating mode. After the correction cycle times out
in the second case, your dog will NOT be corrected for returning to the Roaming Area. The Collar will revert
to normal operating mode only when your dog is at least 10 feet back inside the Roaming Area. After that, the
Controller will not send another correction command until your dog moves back into the Trigger Zone.
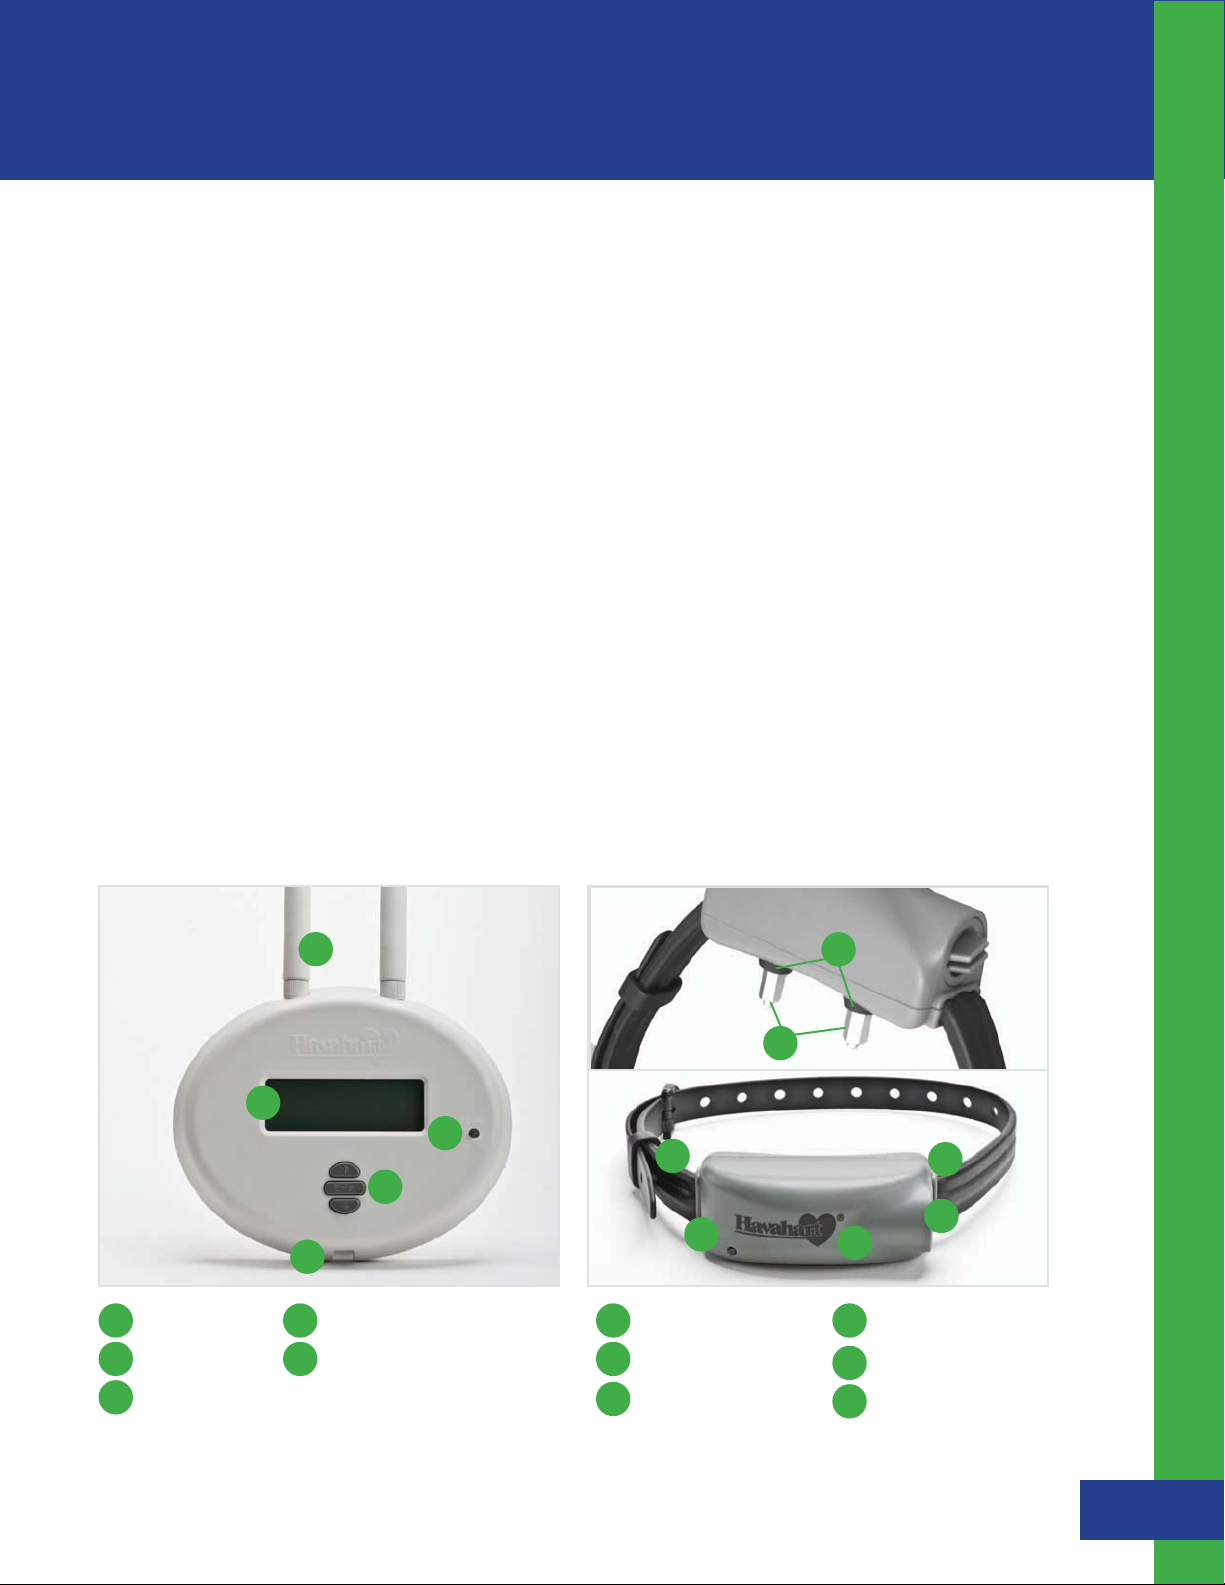
Controller Features Collar Features
A
K
J
Key Definitions, Technology & How it Works
A
Antennas
B
LCD Screen
C
Power Buttton
B
C
D
E
D
Up, Enter & Down Buttons
E
DC Power Connection
F
G
F
Antennas
G
Indicator Light
H
Battery Container
Havahart® Radial-Shape Wireless Dog Fence
F
I
H
I
Battery Cap
Probes
J
Washers
K
1-800-800-1819, Option 1
6
Page 9
Getting Started
O
RO
A
ROAMING AREA
O
A
Getting Started
Plan Your Wireless Fence Boundary:
The most important step in setting up your Havahart
Wireless Dog Fence is determining the proper location to mount the
Controller on a wall. The system creates a circular boundary that can
extend from 40 feet up to 400 feet in all directions from the Controller.
Choose a wall inside your home nearest the center of the desired circular
containment area. This is where you will install the Controller. Be sure
that there is a standard 120V AC power outlet outlet that the 6 foot AC
adapter power cord can reach. Remember, proper training is essential for
your dog to learn the boundary that you set.
Use the Wireless Fence Planning Grid on page 38 to help with positioning
of the Controller.
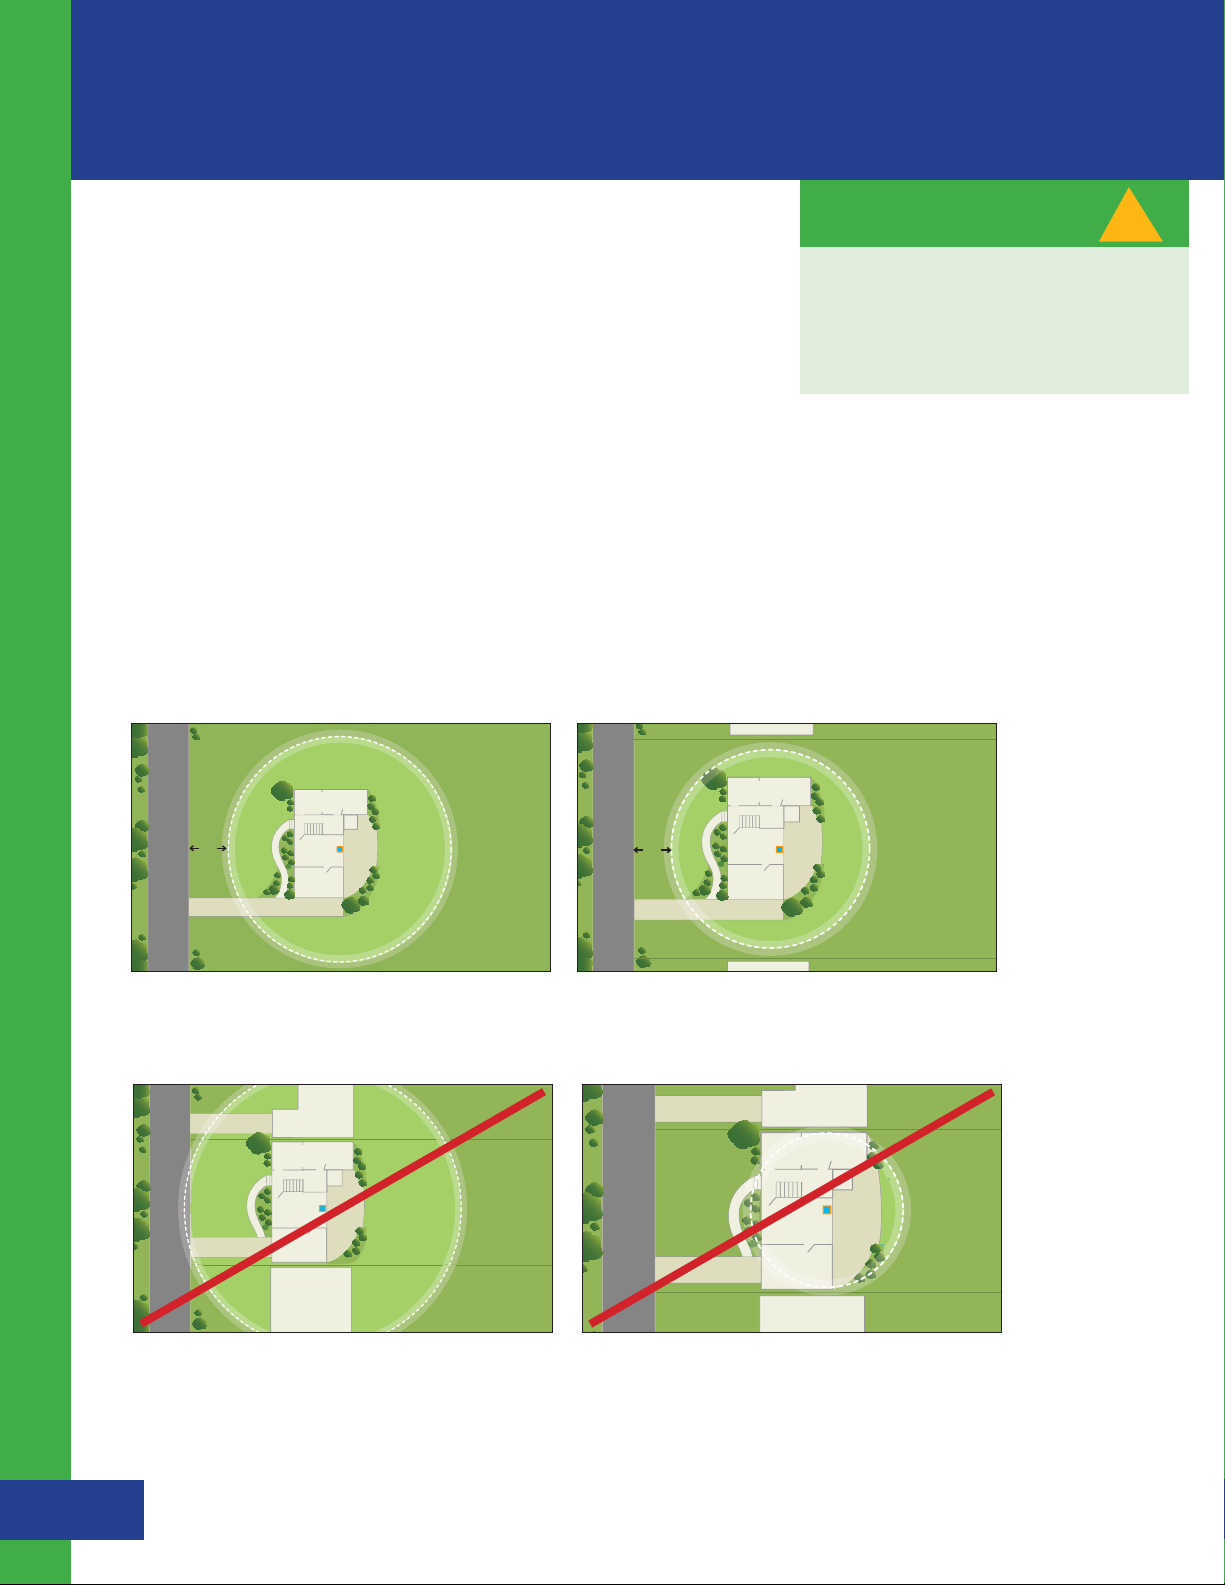
The following are sample layouts for your reference:
Good Good
®
Radial-Shaped
IMPORTANT MESSAGE
Your Fence Boundary/ Trigger Zone
should NOT be closer than 6 feet to ANY
!
ROAD, SIDEWALK OR THOROUGHFARE
FOR YOUR DOG’S SAFETY.
Trigger Zone
R
AMING AREA
10 ’
Controller
10 ’
Trigger Zone
Controller
R
AMING ARE
Trigger Zone
Dog has full access to house and yard within the Roaming
Area.
Dog has full access to house and yard within the Roaming
Area.
May Cause Problems May Cause Problems
Trigger Zone
AMING ARE
Controller
Trigger Zone
Roaming Area contains part of neighbors’ property and
extends onto the road. Dog will have access to neighbors’
property and to the road. Consequences could be severe.
Havahart® Radial-Shape Wireless Dog Fence
7
www.havahartwireless.com
Dog has limited access to house and yard within Roaming
Area. Collar should be removed upon entering house,
otherwise your dog will be corrected inside the home.
Trigger Zone
Trigger Zone
Controller
Trigger Zone
Page 10

QUICK CHECKLIST
Before you begin the installation process, be sure to check the following:
s Make sure that you have all system components ready and available.
Getting Started
s Insert a new battery in the Collar.
s Read the Quick Setup Guide and watch the instructional DVD.
s Commit to set aside time to properly train your dog.
Havahart® Radial-Shape Wireless Dog Fence
1-800-800-1819, Option 1
8
Page 11
Installing the Radial-Shape Wireless Dog Fence
in
Setting Up the Controller
1
Setting Up the Controller
Installing & Activating the Controller:
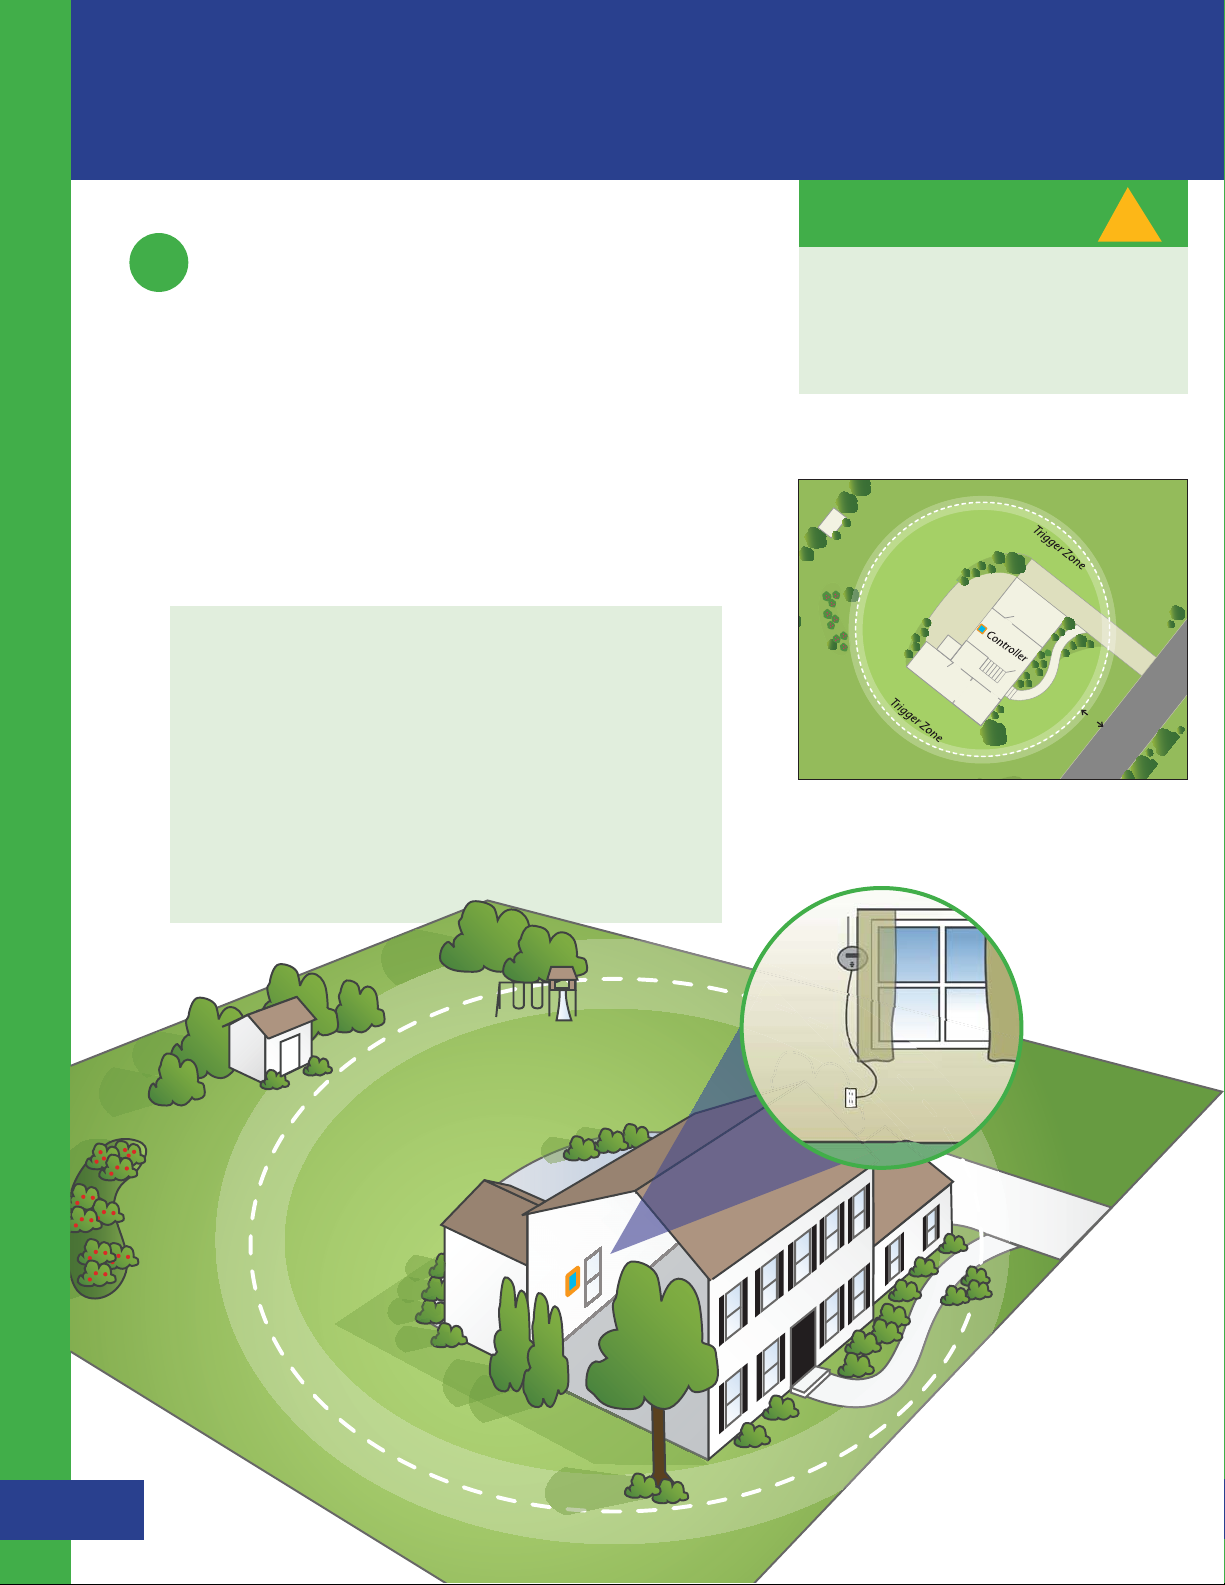
1. Position the Controller inside your home on a wall nearest the
center of your desired containment area. (see Illustration A)
Make sure a standard 120 V AC power outlet is nearby. Mount
the Controller on the appropriate wall, approximately 6 feet
off the ground or at eye level. (see Illustration B)
2. Use the removable wall-mount adhesive strip or screw
& wall anchor to attach the Controller to the wall.
NOTE: It is recommended to use the removable wall mount
adhesive strip in the event that you later determine the
Controller is not in the correct place and it needs to be relocated.
If the strip will not work on the wall of your choice and you want
to get a rough idea of where the Fence Boundary/Trigger Zone
will exist before you attach the Controller to the wall, find a
way to keep the Controller propped upright and as close to the
desired final position as possible.
IMPORTANT MESSAGE
Position the controller at least 3 feet
away from large metal objects and major
appliances as these items may reduce the
size and shape of your Roaming Area.
Sw
Illustration A
!
10 ’
Make sure the power supply cord will reach the Controller
from a standard electrical outlet.
Illustration B
Havahart® Radial-Shape Wireless Dog Fence
9
www.havahartwireless.com
Page 12
3. Plug the Controller (DC power connection located on
the bottom of the Controller) into a nearby standard
electrical outlet.
NOTE: When the unit is first activated, you may receive a
“POWER FAILURE DETECTED!!!” warning. Disregard this
message and Press ENTER.
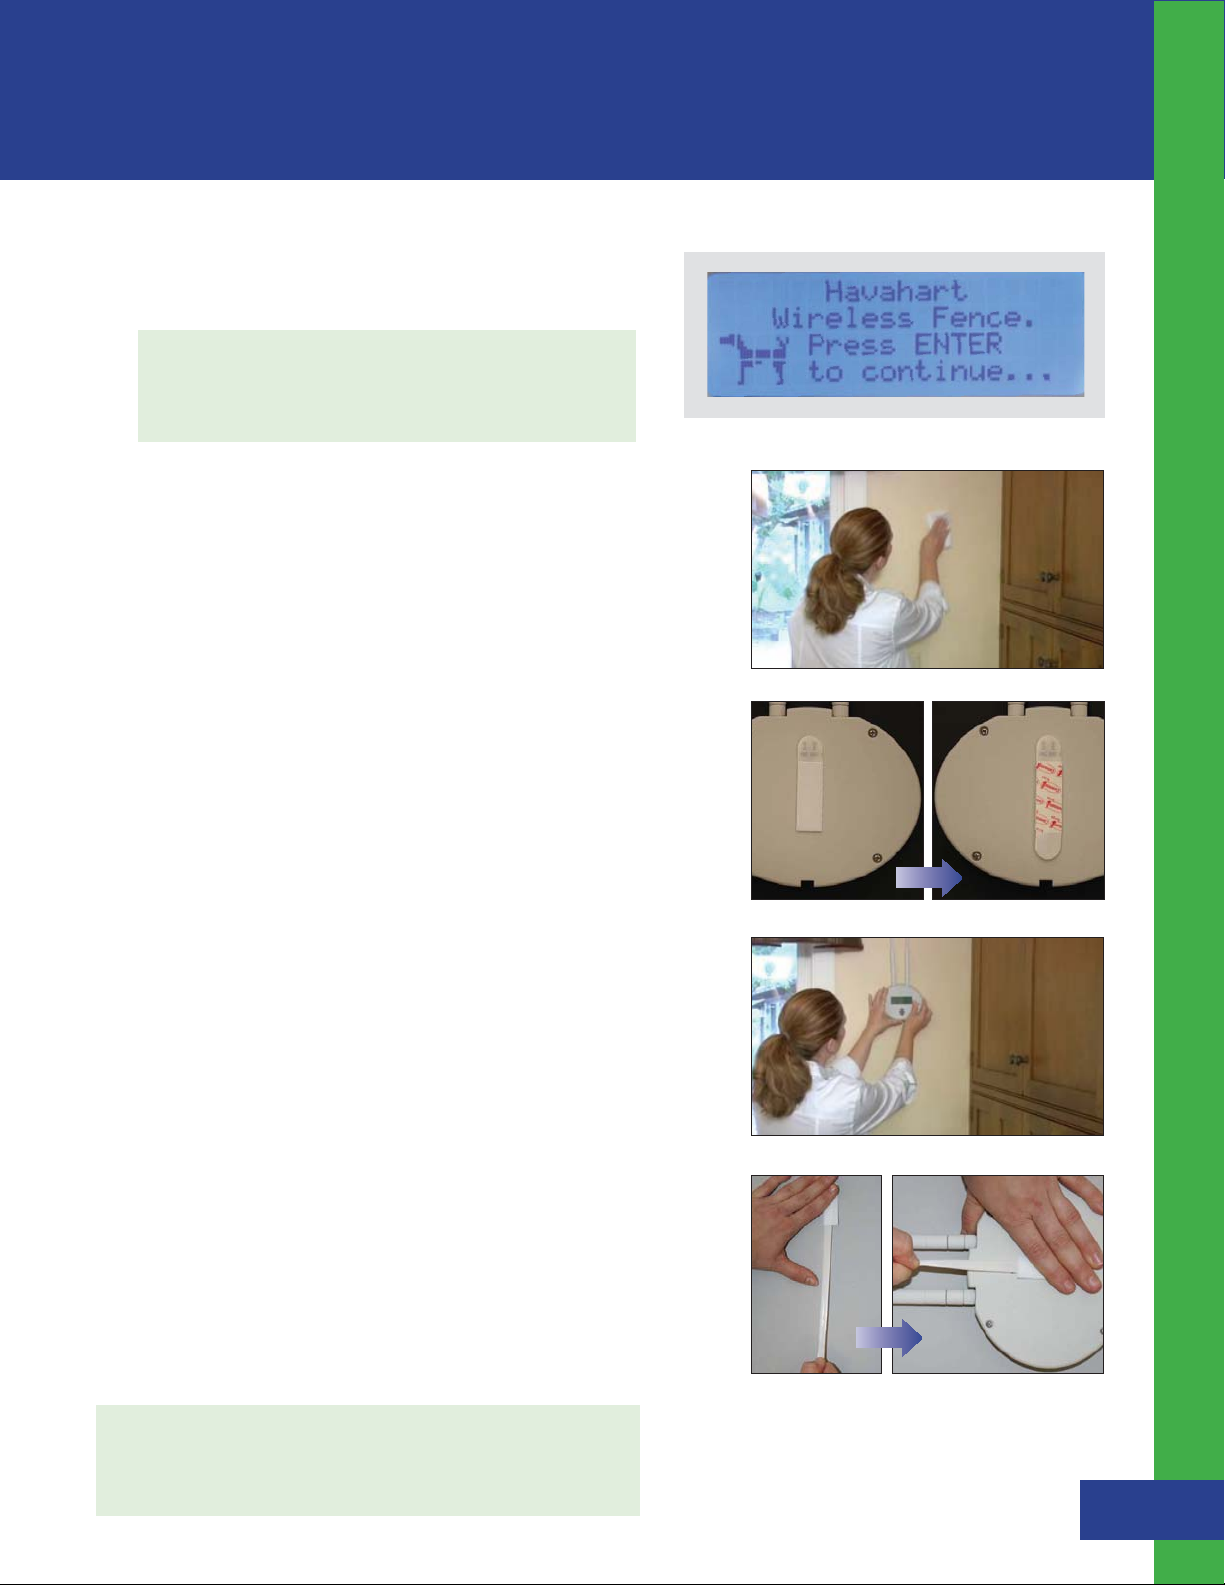
4. ”Havahart Wireless Fence.” will display (see Screen 1.1)
5. Press “Enter”
To attach using the removable wall-mount adhesive strips:
s Clean the surface of the desired location of the Controller
with isopropyl rubbing alcohol, wipe gently with a soft cloth
and let dry. DO NOT USE household cleaners. (see Figure 1.1)
s Separate strips (if still connected) at the perforation.
s Peel the liner from the back of one of the strips and attach it
vertically to the middle of the Controller with the release-tab
pointed upward toward the antennas. (see Figure 1.2a)
Setting Up the Controller
Screen 1.1
Figure 1.1
s Connect another strip to the strip on the Controller by
pressing the fasteners of both strips firmly together until
they snap. The release-tab on the other strip should point
downward away from the antennas - the opposite direction
of the release-tab of the strip on the Controller (see Figure 1.2b).
s Peel the liner from the back of the other strip and attach it
to the wall with the release-tab facing downward toward the
floor and the Controller antennas facing upward toward the
ceiling. (see Figure 1.3)
To remove the adhesive strips:
s Pull the Controller gently from the wall by disconnecting
the fasteners. DO NOT pull the strips off the Controller or
the wall.
s Start with the strip on the wall. Press one hand on the end of
the strip opposite of the release-tab and use your other hand
to pull the release-tab slowly straight down against the wall
stretching it at least 12 inches until the strip releases. Repeat
for the strip attached to the Controller (see Figures 1.4a & b).
NOTE: The removable wall-mount adhesive strips are not
recommended for wallpaper. Apply to surfaces above 50˚F .
Adhesive could soften and lose adhesion above 105˚F.
Figure 1.2a
Figure 1.3
Figure 1.4a
Havahart® Radial-Shape Wireless Dog Fence
1-800-800-1819, Option 1
Figure 1.2b
Figure 1.4b
10
Page 13
Installing the Radial-Shape Wireless Dog Fence
Setting Up the Collar
Setting Up the Collar
2
Installing a Battery:
1. Make sure a battery is fully charged before installing it in the
Collar (see Recharging a Battery). Turn the battery cap on the
Collar counterclockwise about 1/4 turn and pull it out. With the
positive side facing outward, install one RCR123A battery into
the Collar. (see Figure 1.5) Replace the battery cap and turn it
clockwise to lock it in place.
2. A green light should flash every 5 seconds. If it does not, check
the direction that the battery was installed --- positive side
should be facing outward.
NOTE : The Collar is always “on” when a good battery is installed. However,
the Collar may be awake or asleep. Integrated Motion Sensor Technology
allows the Collar to conserve battery life when appropriate by putting the
Collar to sleep. The light on the Collar will not flash when the Collar is
asleep. Movement, such as gently shaking the Collar, will awaken it and
the green light will flash. A red light will flash to indicate that the battery
needs to be recharged. The Controller will also produce an auditory tone
to alert you that the battery is low.
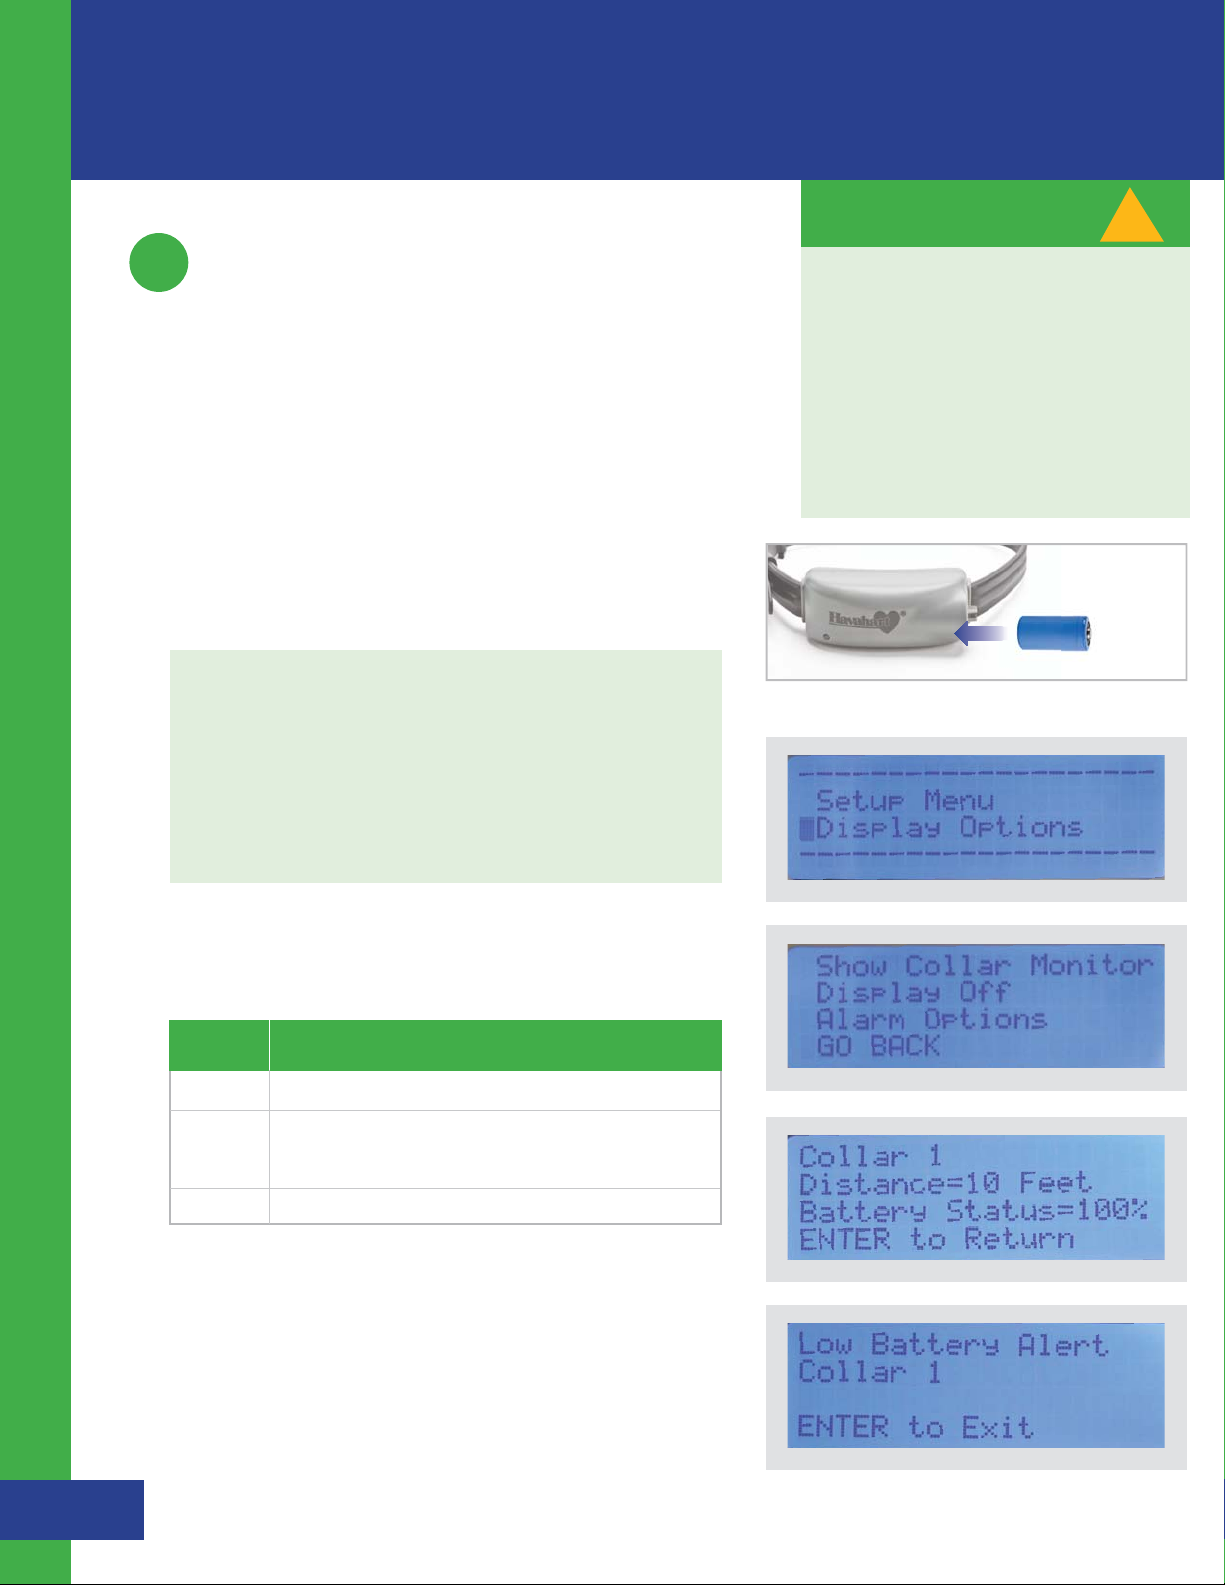
Checking Battery Status:
IMPORTANT MESSAGE
The Collar should not be placed on your
dog until after you have successfully
installed it on the system.
Install one Collar at a time. The system
allows you to activate up to 2 Collars.
The default correction level of the Collar
is set to Tone Only, which you need to use
to set up your fence boundary.
Battery Installation
CR123A 3V
-
Figure 1.
Screen 1.2
!
+
1. Select “Display Options” (see Screen 1.2)
2. Select “Show Collar Monitor” (see Screen 1.3)
Battery
Status Collar is:
NA Asleep to conserve battery life
OK Battery life is shown as a percentage (see screen 1.4). When a
battery needs to be recharged, a Low Battery Alert will
appear (see screen 1.5).
LOW Awake, but battery needs to be recharged soon
11
Havahart® Radial-Shape Wireless Dog Fence
www.havahartwireless.com
Screen 1.3
Screen 1.4
Screen 1.5
Page 14

Recharging a Battery:
-Remove the low battery from the Collar
-Make sure the battery recharger is properly connected to a grounded
120V AC outlet
-Properly orient the battery in the recharger with the positive side closest
to the lights of the recharger
-Remove the battery when recharging is complete
Recharging Light Colors:
Blue - when on standby (no battery in chamber),
- when the battery is in the chamber the wrong way
- when the battery is fully charged
Red - when the battery is charging
You want to see the red light come on when you place the battery in the recharger. You can charge up to two batteries
at the same time. When the battery is close to being fully charged, the light will flicker red and blue. Do NOT take the
battery out until the light turns full blue. It takes less than 3 hours to fully charge a battery.
Note: Recharging the RCR123A battery is similar to recharging a mobile phone. Always have a spare battery ready to go
when your other battery gets low.
Activating a Collar:
1. Hold the Collar within 6 feet of the Controller
2. On the Controller...
+
-
Correct way to
Insert a Battery in
the Recharger.
Warning: Do NOT put a non-rechargeable battery in
the battery recharger.
Setting Up the Collar
s Select Setup Menu (see Screen 1.6)
s Select Collar Setup (see Screen 1.7)
s Select Add a Collar (“Searching for new Collars... ” will
appear on screen (see Screen 1.8)
s Gently move or shake the Collar to keep it awake. The
flashing green light will confirm that it is awake.
s “New Collar Found! Collar ID=1” will appear on screen
s Press Enter
s Repeat this process to add more Collars.
3. If no Collar is found, check that the above steps were
completed, the battery is correctly installed, the Collar is
active (green light is flashing) and within 6 feet of the
Controller - then repeat Step 2 again.
NOTE : If using more than one Collar, mark each using a
permanent marker to indicate which is Collar 1 and
which is Collar 2.
Screen 1.6
Screen 1.7
Screen 1.8
Havahart® Radial-Shape Wireless Dog Fence
1-800-800-1819, Option 1
12
Page 15

Installing the Radial-Shape Wireless Dog Fence
Adjusting the Correction Level of a Collar:
Setting Up the Collar
1. Hold the Collar within 6 feet of the Controller
2. On the Controller...
s Select Setup Menu (see Screen 1.6)
s Select Collar Setup (see Screen 1.7)
Select Correction Level - If you have more than one Collar installed,
s
select the number of the Collar that you would like to change
(see Screen 1.8)
s Select Correction Level (see Screen 1.9)
s Use the up or down arrow keys to choose the desired
correction level. 5 is the highest static correction level. 1 is
the lowest static correction level. Tone Only is the auditory
correction level (sound only). (see Screen 2.0)
s Press Enter
s Select Ok
Turning a Collar Off/On:
1. Hold the Collar within 6 feet of the Controller
IMPORTANT MESSAGE
The correction level of the Collar may
be adjusted using the Controller based
on the size, age and temperament of
your dog. There are 5 static correction
levels and one tone level (sound only).
The default correction level of the
Collar is Tone Only.
It is recommended to start with a
lower correction level when training
your dog.
You may need to gently move or shake
the Collar to keep it awake so that it will
accept changes from the Controller.
The flashing green light will indicate
that it is awake.
!
2. On the Controller...
s Select Setup Menu (see Screen 1.6)
s Select Collar Setup (see Screen 1.7)
s Select Correction Level (see Screen 1.8)
s Select Turn Collar off/on (see Screen 1.9)
s Press Enter
Removing a Collar:
1. Hold the Collar within 6 feet of the Controller
2. On the Controller...
s Select Setup Menu (see Screen 1.6)
s Select Collar Setup (see Screen 1.7)
s Select Delete a Collar (see Screen 1.8) - If you have more than
one Collar installed, select the number of the Collar that you
would like to remove
s Select YES
s Select OK
s Select OK Again
Screen 1.8
Screen 1.9
Screen 2.0
13
Screen 2.1
Havahart® Radial-Shape Wireless Dog Fence
www.havahartwireless.com
Page 16

Setting Up the Fence
A
3
Boundary/Trigger Zone
Establishing the Fence Boundary/Trigger Zone Distance:
1. Estimate the distance between the Controller and the
desired boundary location. This distance will be the radius
of the Trigger Zone all the way around the Controller.
TIP : Use the shortest distance to a physical boundary as a
starting point for the radius of the Trigger Zone (see Illustration C).
2. Set the radius on the Controller
IMPORTANT MESSAGE
!
Your Trigger Zone should be NO closer
than 6 feet to ANY ROAD, SIDEWALK
OR THOROUGHFARE FOR YOUR DOG’S
SAFETY.
The actual distance from the Trigger
Zone to the Controller may be less than
the set radius. This reduced boundary
may be the result of Factors Affecting
Signal Strength (page 32).
Setting Up the Fence Boundary
s From the Set Up Menu, select Fence Setup (see Screen 1.7)
s Use the up/down arrow to scroll to the desired radial
distance and press Enter. The minimum radius is 40 feet,
and the maximum radius is 400 feet from the Controller
in all directions (see screen 2.1).
s Select OK to Save Your Settings
3. Test the Trigger Zone
s To confirm that the location of the actual boundary is
correct...
- Hold the Collar by the strap with your arm fully
extended down by your side (see Figure 1.6). Make
sure that your body does not get between the Collar
and the Controller as your body may affect the signal
and cause the boundary to shift inward (see Factors
Affecting Signal Strength on page 32).
- Walk toward the boundary while gently moving the
Collar until the Collar beeps and the Collar light flashes
red. To confirm that the distance is correct, step back 6
feet until the Collar stops beeping and then walk in the
same direction until the Collar beeps and the Collar light
flashes red again. Note how far from desired location
the actual setting is.
ROAMING ARE
10 ’
Illustration C
Figure 1.6
F
e
n
c
e
B
o
u
n
d
a
r
y
/
T
r
i
g
g
e
r
Z
o
n
e
TIP : Place a flag at the boundary location (see Illustration D).
4. Adjust the Fence Distance on the Controller accordingly
using the instructions in Step 2 until the desired boundary
Illustration D
location is established.
Havahart® Radial-Shape Wireless Dog Fence
1-800-800-1819, Option 1
14
Page 17

Installing the Radial-Shape Wireless Dog Fence
Placing Training Flags:
Once your boundary is established, it’s time to place the Training Flags.
Training Flags are critical for the effective training of your dog and
should be placed every 6 feet at the fence boundary to enclose the
Roaming Area, where it will be safe for your pet to roam and play.
TIP : 6 feet is about 2 paces.
1. Hold the Collar by the strap or grey battery container. Do not hold
Setting Up the Fence Boundary/Trigger Zone
the area where the strap meets the Collar on either side as this is
where the antennas are located (see the raised areas of the strap)
and your hand may interfere with the signal. Fully extend your arm
down by your side. Make sure that your body does not get between
the Collar and the Controller as your body may affect the signal and
cause the boundary to shift inward (see Factors Affecting Signal
Strength on page 32).
2. Walk toward the boundary while gently moving the Collar until
the Collar beeps and the Collar light flashes red (see Figure 1.7). To
make sure that the distance is correct, step back 6 feet into the
Roaming Area until the Collar stops beeping and then walk
forward in the same direction until the Collar beeps and the
Collar light flashes red again. ( see Illustration E )
IMPORTANT MESSAGE
!
The fence boundary may not form a
perfect circle. Large metal objects such
as a car or refrigerator can slightly distort
the roundness of your fence boundary.
However, once set, the boundary location
will remain consistent over time.
(see Factors Affecting Signal Strength
on page 32. )
F
e
n
c
e
B
o
u
n
d
a
r
y
/
T
r
i
g
g
e
r
Z
o
n
e
Illustration E
15
Havahart
®
Radial-Shape Wireless Dog Fence
www.havahartwireless.com
Controller
Page 18

Placing Training Flags: (continued):
we
we
3. Place a Boundary Training Flag in the ground (see Figure 1.8).
Move back into the Roaming Area until the Collar stops beeping.
screwdriver to poke a hole in the ground, place the flag in
the new hole and make sure it is upright.
4. Repeat this process by walking toward the fence boundary
TIP: If hard ground makes it difficult to place a flag, use a
(about 6 feet over from the last flag), placing a flag, and
then stepping back into the Roaming Area until the entire
containment area is surrounded. (see Illustration E.)
fence and will be used later to train your dog. Be sure that
the flags form an enclosed area and that your dog has safe,
adequate entry to your house.
NOTE: These flags represent the location of your wireless
Turning the Trigger Zone Off/On:
IMPORTANT MESSAGE
If you have difficulty hearing the tone of the
Collar, you can use the Heart-Shaped Collar
Tester to visually confirm the boundary.
Hold the metal contact points located inside
the holes of the Heart-Shaped Collar Tester
against the Probes of the Havahart
so that metal is touching metal. Carry the
Havahart
of the Collar with the Heart-Shaped Collar
Tester held against the Probes. Fully extend
your arm down by your side. Make sure that
your body does not get between the Collar
and the Controller as your body may affect
the signal and cause the boundary to shift
inward. Walk to a boundary point and watch
the Heart-Shaped Collar Tester illuminate.
®
Collar by the grey battery container
®
Collar
!
Setting Up the Fence Boundary/Trigger Zone
1. Navigate to the Menu where Setup Menu and Display
Options are listed. (see Screen 2.3)
2. Press the blue flashing Power Button to Turn Off the
Trigger Zone. (see Screen 2.4)
3. Press the Power Button again to Turn On the
Trigger Zone.
when you Turn Off the System.
NOTE: All settings will be retained in system memory
Screen 2.3
Figure 1.7
Figure 1.8
Screen 2.4
Havahart® Radial-Shape Wireless Dog Fence
1-800-800-1819, Option 1
16
Page 19

Installing the Radial-Shape Wireless Dog Fence
Display Options
Display Options:
Viewing Distance to Dog and Battery Status: (see Screen 2.7)
s Select Display Options (see Screen 2.5)
s Select Show Collar Monitor (see Screen 2.6)
NOTE: See Battery Status Level meanings on page 11.
Turning the Display Off/On: (see Screen 2.6)
s Select Display Options (see Screen 2.5)
s Select Display Off (see Screen 2.6)
s Press Enter to turn display back on
Setting Alarm Options:
Set Alarm Volume Level: (see Screen 2.8)
s Select Display Options (see Screen 2.5)
s Select Alarm Options (see Screen 2.6)
s Select Alarm Volume Level (see Screen 2.8)
s Use the up or down arrow keys to choose the desired alarm
level. Select HIGH, LOW, or OFF (see Screen 2.9)
s Press Enter
s Select OK to save
NOTE: It is recommended to select HIGH.
Screen 2.5
Screen 2.6
Screen 2.7
Screen 2.8
Turning Boundary Breach Alert Off/On: (see Screen 3.0)
s Select Display Options (see Screen 2.5)
s Select Alarm Options (see Screen 2.6)
s Select Boundary Breach (see Screen 2.8)
s Use the up or down arrow keys to turn the boundary breach
alert OFF or ON (see Screen 3.0)
s Press Enter
s Select OK to save
NOTE: It is recommended to keep the Boundary
Breach Alert ON.
17
Havahart® Radial-Shape Wireless Dog Fence
www.havahartwireless.com
Screen 2.9
Screen 3.0
Page 20

Fitting a Collar
4
IMPORTANT MESSAGE
The Collar should be snug enough so that
it does not move when your dog moves.
!
Fitting a Collar
To ensure safe and effective operation of the system, it is
important to make sure that the Collar is fitted properly.
1. Be sure the fence is turned off at the Controller.
(see page 16)
2. With your dog standing comfortably, position the Collar
high on your dog’s neck, underneath the chin with the
Probes facing upward centered on your dog’s neck. The
word “Havahart
at your dog.
3. Make sure the Probes maintain contact with skin.
s Collar is factory installed with long Probes for thick or
long-haired breeds.
s Short Probes for short-haired dogs are included
s To change the Probes, simply unscrew the long Probes
and replace them. Be sure the rubber washer is
between the probe and the grey battery container.
Use your fingers to tighten the Probes as far as you can.
Do not over tighten.
®
” should be right side up when you look
To help prevent skin irritation, it is
recommended that you never leave
the Collar on your dog for more than
12 consecutive hours at a time.
Figure 1.9
NOTE: It may be necessary to trim the hair around the
Probes to ensure reliable contact.
5. Adjust the Collar to fit snugly but not tightly. You should
be able to slide the tip of one finger between your dog’s
coat and one of the Probes on the Collar. The tip of your
finger should not be able to slip between the two easily,
but with some effort. It should be a tight squeeze.
Separately, you should be able to slide one finger
between the strap of the Collar and the back of your
dog’s neck. (see Figure 1.9)
NOTE: If your dog is going to continue to grow or grows a
long winter coat, leave extra room before trimming off
the excess.
6. Once the Collar is adjusted to correct length, remove the
Collar and trim the excess using scissors. (see Figure 2.0)
Figure 2.0
Havahart® Radial-Shape Wireless Dog Fence
1-800-800-1819, Option 1
18
Page 21

Installing the Radial-Shape Wireless Dog Fence
Fitting a Collar
Important Collar Safety Guidelines:
1. During training, do not let your dog wear the Collar
without direct supervision.
2. Each time you take the Collar off your dog, look for any
indication of a sore or rash.
3. Should you find any indication of a sore or rash on your
dog, stop using the Collar for a few days.
4. If the rash or sore exists for more than 2 days, consult
your veterinarian.
5. Wash your dog’s neck weekly with mild soap and a
wash cloth and then rinse clean.
5. Wash the Probes of the Collar weekly with mild soap
and a wash cloth and then rinse clean.
WARNING
If you do not remove the Collar from
your dog’s neck at least every 12 hours
AND clean your dog’s neck and the
Collar, Pressure Necrosis may occur
which is a deterioration of your dog’s
skin. It is caused by extended contact to
the pressure of the Probes of the Collar
combined with the oil and dirt that may
accumulate on the Probes if not
kept clean.
!
19
Havahart
www.havahartwireless.com
®
Radial-Shape Wireless Dog Fence
Page 22

Training Your Dog
IMPORTANT MESSAGE
IMPORTANT REMINDERS:
Please read the following information completely before you
begin training:
s Proper training of your dog is essential to help ensure the
successful operation of your Radial-Shape Wireless Dog Fence.
s We recommend that you train your dog for a minimum of 15
consecutive days. Use a calendar to track your dog’s progress.
s Keep your training sessions short and frequent -- approximately 10-15 minutes long, 2-3 times a day.
s Every dog is unique and may respond differently to the training depending on its age, size,
temperament and ability to learn. For this reason, you may need to adjust your training schedule accordingly.
s It may be necessary to decrease the speed of the training schedule or add more training days if your dog seems
to be under stress. Signs that your dog may be under stress include: tail between legs, ears pulled back,
refusal to go outside the home and nervous shaking.
s Before beginning Collar-assisted training, allow your dog to get used to wearing the Havahart® Collar with
the battery removed.
The Radial-Shape Wireless Dog Fence
from Havahart® is not a physical boundary.
It is necessary to contain your dog using a
leash or other means during training.
!
Training Your Dog
s Have fun with your dog during the training process and end each session with positive praise and play
time in the Roaming Area at least 10 feet away from the Training Flags.
s Be patient and consistent in your approach.
s Remove the Havahart® Collar after each training session.
s If you need to take your dog out of the Roaming Area during training, remove the Havahart® Collar and
use one of the following methods.
1. Walk your dog outside of the Roaming Area while on a leash. Cross the same area of the Trigger Zone
flag line each time, giving a command such as “CROSS”, and praising your dog for crossing this specific area.
Always leave this area with your dog on a leash.
2. Carry your dog out.
3. Take your dog out in a car.
s If you are training more than one dog, train each dog separately.
s Should your dog breach the Trigger Zone while wearing the Collar, unlike an underground wire fence, your dog
will not receive a separate correction for returning through the Trigger Zone back into the Roaming Area.
s It is important that you complete the entire training process and do not skip any phases.
Havahart® Radial-Shape Wireless Dog Fence
1-800-800-1819, Option 1
20
Page 23

Training Your Dog
Training Your Dog
PRELIMINARY PHASE -- Flag AwarenessTraining - Optional (2-3 training sessions per day: each 10-15 minutes long)
Completing this phase will add 3 days to your training, but will give your dog more time to get used to the
Training Flags if you choose to complete it.
1. Turn OFF the fence (see page 16)
2. Fit the Havahart
non-metal collar above the Havahart
Make sure that this collar does not apply pressure to the Probes on
the Havahart
the leash.
3. Using the leash, walk your dog around inside the Roaming Area for
5 minutes, avoiding contact with the Trigger Zone.
4. Approach one of the Training Flags with your dog. When your dog gets close to the flag, gently shake the
flag while saying “Bad Flags” in a firm, disapproving tone. Do not yell or frighten your dog.
5. Lead your dog back into the Roaming Area and praise your dog.
6. Repeat this process at several different Training Flags.
®
Collar around your dog’s neck. Place a different
®
Collar as this could hurt your dog when you pull on
®
Collar and attach a leash to it.
7. End with lots of playtime and praise for your dog in the Roaming Area at least 10 feet away from the
Training Flags.
8. Be sure to remove the Havahart
®
Collar from your dog after each training session.
NOTE: You may proceed to PHASE 1 when your dog avoids going near the Training Flags
but will walk anywhere within the Roaming Area.
21
Havahart® Radial-Shape Wireless Dog Fence
www.havahartwireless.com
Page 24

PHASE 1 -- Passive Training -- DAY 1-3 (2-3 training sessions per day: each 10-15 minutes long)
1. Turn ON the fence (see Page 16) and set the correction level to Tone Only (see Page 12).
Training Your Dog
2. To ensure that the system is working properly, take the Havahart
®
Collar by itself out to the Trigger Zone and listen for the tone.
3. Fit the Havahart
non-metal collar above the Havahart
®
Collar around your dog’s neck. Place a different
®
Collar and attach a leash to it.
Make sure that this collar does not apply pressure to the Probes on
the Havahart
®
Collar as this could hurt your dog when you pull on
the leash.
4. Using the leash, walk your dog around inside the Roaming Area for
5 minutes, avoiding contact with the Trigger Zone.
5. Calmly approach the Trigger Zone flag line -- do not look at your dog.
6. Give your dog the opportunity to pass into the Trigger Zone. He will hear a tone within the Trigger Zone.
7. Allow your dog to stay in the Trigger Zone for a few seconds while hearing the tone.
8. Gently shake a Training Flag while saying “Bad Flags” in a firm, disapproving tone to show your dog
that the flags are associated with the tone coming from the Havahart
®
Collar. Do not yell or
frighten your dog.
9. Lead your dog back into the Roaming Area and praise your dog.
10. Repeat this process at several different Training Flags.
11. As training progresses over the next 2 days, you should notice that when your dog hears the tone, he
will return to the Roaming Area without your prompting.
12. End with lots of playtime and praise for your dog in the Roaming Area at least 10 feet away from
the Training Flags.
13. Be sure to remove the Havahart
®
Collar from your dog after each training session.
NOTE: You may proceed to PHASE 2 when your dog avoids going near the Training Flags
when you approach and actually turns to go back to the Roaming Area without your aid.
Havahart® Radial-Shape Wireless Dog Fence
1-800-800-1819, Option 1
22
Page 25

Training Your Dog
Training Your Dog
PHASE 2 -- Active Training -- DAY 4-7 (2-3 training sessions per day: each 10-15 minutes long)
1. Set the correction level to Static Level 1 (see Page 12)
2. To ensure the system is working properly, take the Havahart® Collar to the Trigger Zone and use the
Heart-Shaped Collar Tester (see Page14). The Heart-Shaped Collar Tester should light up.
3. Fit the Havahart
and attach a leash to it. Make sure that this collar does not apply pressure to the Probes on the Havahart
Collar as this could hurt your dog when you pull on the leash.
4. Using the leash, walk your dog around inside the Roaming Area for
5 minutes, avoiding contact with the Trigger Zone.
5. Calmly approach the Trigger Zone flag line -- do not look at your dog.
6. Give your dog the opportunity to pass into the Trigger Zone. He will
hear a tone and then receive a static correction within the Trigger Zone.
7. Allow your dog to stay in the Trigger Zone for a few seconds while
hearing the tone and receiving the static correction.
8. Gently shake a Training Flag to remind your dog that the flags are associated with the tone and static
correction coming from the Collar.
®
Collar around your dog’s neck. Place a different non-metal collar above the Havahart® Collar
®
9. Lead your dog back into the Roaming Area and praise your dog.
10. Repeat this process at a few Training Flags.
CAUTION: Do not force your dog to receive too many static corrections as this may make your dog
nervous or anxious. It may be necessary to decrease the speed of the training schedule or add more
training days if your dog seems to be under stress.
11. If your dog does not respond to the static correction, check to make sure that the Havahart
®
Collar fits
properly (see Page 18). If your dog continues to not respond to the static correction, you may need to
increase the static correction to level 2 or higher as necessary.
NOTE: If your dog leaves the Roaming Area, he will be corrected on the way out only. Your dog will
NOT be corrected when returning to the Roaming Area from outside the Trigger Zone.
12. End with lots of playtime and praise for your dog in the Roaming Area at least 10 feet away from the
Training Flags.
13. Be sure to remove the Havahart
®
Collar from your dog after each training session.
NOTE: You may proceed to PHASE 3 when your dog avoids going near any of the Training Flags.
23
Havahart® Radial-Shape Wireless Dog Fence
www.havahartwireless.com
Page 26

PHASE 3 -- On-Leash Distractions -- DAY 8-11 (2-3 training sessions per day: each 10-15 minutes long)
Training Your Dog
1. Fit the Havahart
non-metal collar above the Havahart
®
Collar around your dog’s neck. Place a different
®
Collar and attach a leash to
it. Make sure that this collar does not apply pressure to the Probes
on the Havahart
®
Collar as this could hurt your dog when you pull
on the leash.
2. Using the leash, walk your dog toward the Training Flags.
Create a distraction by:
1. Tossing a toy or treat outside the Trigger Zone.
2. Having someone walk by and not pay attention to your dog.
3. Having someone walk his/her own dog outside of the Trigger Zone.
3. If your dog does not move toward the distraction, immediately praise him.
4. If your dog moves toward the distraction, allow him to walk through the Trigger Zone and feel
the correction.
5. Gently shake a Training Flag to remind your dog that the flags are associated with the tone and
static correction coming from the Havahart
®
Collar.
6. Promptly lead your dog back to the Roaming Area if he does not return within a few seconds and
praise him.
7. Repeat this process at several different Training Flags.
8. If your dog does not respond to the static correction, check to make sure that the Havahart
®
Collar
fits properly (see Page 18). If your dog continues to not respond to the static correction, you may
need to increase the static correction by one level or more as necessary.
9. End with lots of playtime and praise for your dog in the Roaming Area at least 10 feet away from the
Training Flags.
10. Be sure to remove the Havahart
®
Collar from your dog after each training session.
NOTE: You may proceed to PHASE 4 when your dog will not go beyond the Trigger Zone -- even with distractions, but will walk anywhere within the Roaming Area.
Havahart® Radial-Shape Wireless Dog Fence
1-800-800-1819, Option 1
24
Page 27

Training Your Dog
Training Your Dog
PHASE 4 -- Off-Leash Supervision -- DAY 12-15
Begin with short training sessions 10-15 minutes in length and gradually increase the sessions to
an hour or more
1. Do not leave your dog unattended during this phase of training.
2. Fit the Havahart Collar around your dog’s neck. Place a different
non-metal collar above the Havahart
3. Walk around inside the Roaming Area and play with your dog while
off the leash. (see Figure 2.1)
4. Now focus your attention elsewhere and walk to another part of the
yard while keeping an eye on your dog. (see Figure 2.2)
5. If your dog crosses into and goes beyond the Trigger Zone, lead him
back inside the Roaming Area. Your dog will not be corrected when
he comes back into the Roaming Area.
6. Gently shake a flag to remind your dog that the flags are associated
with the tone and static correction coming from the Havahart
®
Collar.
®
Collar.
Figure 2.1
7. Repeat the training from Phase 3 with distractions and a
leash as necessary.
8. End with lots of playtime and praise for your dog in the Roaming Area at least 10 feet away from the
Figure 2.2
Training Flags.
9. Be sure to remove the Havahart
®
Collar from your dog after each training session.
NOTE: You may proceed to PHASE 5 when your dog no longer goes beyond the Trigger Zone -- even with distractions.
25
Havahart® Radial-Shape Wireless Dog Fence
www.havahartwireless.com
Page 28

PHASE 5 -- Dog Monitoring -- DAY 16 AND BEYOND
Start with short sessions and gradually increase duration
1. Your dog should now be comfortable within the Roaming Area and reluctant to cross the Trigger Zone
with or without distractions.
Training Your Dog
2. Fit the Havahart
Havahart
3. Allow your dog to roam freely off leash and unsupervised within the Roaming Area.
4. Keep an eye on him from inside your house.
5. End with lots of playtime and praise for your dog in the Roaming Area at least 10 feet away from the
®
Collar.
®
Collar around your dog’s neck. Place a different non-metal Collar above the
Training Flags.
6. Be sure to remove the Havahart
®
Collar from your dog after each training session.
Leaving the Roaming Area with Your Dog
Once your dog becomes accustomed to the Trigger Zone, he may become uncomfortable leaving the
Roaming Area for activities such as walks or riding in the car. If you need to take your dog out of the Roaming
Area, ALWAYS remove the Havahart
1. Walk your dog outside of the Roaming Area while on a leash. Cross the same area of the Trigger Zone
®
Collar and use one of the following methods.
flag line each time, giving a command such as “CROSS”, and praising your dog for crossing this specific
area. Always leave this area with your dog on a leash.
2. Carry your dog out.
3. Take your dog out in a car.
NOTE: After completing the training and three additional weeks of successful dog
containment, you can begin to gradually remove the Training Flags by taking away every
other flag, every few days.
CONGRATULATIONS TO YOU AND YOUR DOG FOR SUCCESSFULLY COMPLETING
ALL PHASES OF TRAINING!
Havahart® Radial-Shape Wireless Dog Fence
1-800-800-1819, Option 1
26
Page 29

Frequently Asked Questions
Question: Answer:
Is the Havahart
®
Collar waterproof?
Frequently Asked Questions
Can I use more
than one Havahart
with the Wireless Fence?
Is there a hand-held
remote training device
that will work with the
Havahart
How long will the
Havahart
my dog if he leaves the
Roaming Area?
®
Collar?
®
Collar correct
®
Collar
Yes. Do not allow dirt or debris to get inside the battery container when
changing the battery.
Yes. You can use up to 2 Havahart® Collars with the Wireless Fence. You must
purchase an additional Havahart
®
Collar for each dog.
No.
When your dog moves outside the Roaming Area, he will receive a correction
for up to 30 seconds. The correction runs through a prescribed repeating cycle,
it is not constant. The Havahart
®
Collar has a Safety Time-Out Feature to stop
the cyclical correction and beeping after 30 seconds until your dog returns to
the Roaming Area. Should your dog stay outside the Trigger Zone for more than
30 seconds, he will NOT be corrected again when he crosses back into
the Roaming Area.
Which Probes
should I use for
my dog’s Havahart
Collar?
Is there a smaller
Havahart
®
Collar or
another different
Havahart
®
Collar that I
can use with the
Controller?
Can I use my CustomShape Havahart
with my Radial-Shape
Wireless Dog Fence?
27
Havahart® Radial-Shape Wireless Dog Fence
www.havahartwireless.com
®
®
Collar
Use the Short Probes for short-haired dogs and the Long Probes for long or
thick-haired dogs. It may be necessary to trim your dog’s hair where the Probes
touch your dog’s neck to ensure reliable contact with his skin.
Not at this time.
Not at this time. Different software is loaded inside each type of Havahart
Collar. Even though the Havahart
®
Collars appear to be identical, they can only
®
be used on their respective types of systems.
Page 30

Question: Answer:
What kind of a battery
does the Havahart
®
Collar use?
How often does the
Havahart
®
Collar battery
need to be changed?
How do I know the
battery in the Havahart
Collar is working?
Each Havahart® Collar needs one RCR123A battery to operate.
Frequently Asked Questions
®
The battery life of the Havahart
dog tests the Trigger Zone and the degree of your dog’s activity. The Havahart
Collar features exclusive Integrated Motion Sensor Technology to optimize
battery life. The Havahart
seconds when recharging is needed. The Controller will also alert you when
the battery is low and needs to be rehcarged. NEVER put a non-rechargeable
battery in the battery recharger.
®
The Indicator Light should flash green when you gently shake the Havahart
Collar. The Havahart
®
Collar should also beep when you take it by itself and walk
into the Trigger Zone. The Controller alarm should also beep (if it is turned ON)
when the Havahart
®
Collar crosses into the Trigger Zone. If any of this does not
happen, replace the battery.
Collar is dependent upon how frequently your
®
Collar Indicator Light will flash red every 4 to 5
®
®
Why can my Havahart
®
Collar be set to Tone
Only?
Can a leash be attached
to the Havahart
®
Collar?
What do I do if my dog’s
neck appears to be red
or irritated?
The Havahart
®
Collar can be set to Tone Only to train your dog to his Trigger
Zone or to warn well-trained dogs that no longer require static correction that
they cannot go beyond the Trigger Zone.
No. This could harm your dog. This can result in the Probes being pulled too
tightly against your dog’s neck when you pull on the leash. Instead, attach a
leash to a separate, non-metal collar and place it above the Havahart
This could be caused by the Probes of the Havahart
skin. Discontinue use of the Havahart
®
Collar for a few days. Consult with a
®
Collar irritating your dog’s
®
Collar.
veterinarian if the condition persists beyond 2 days. When the skin returns to
normal, replace the Havahart
it comes into contact with the Probes. Make sure that the Havahart
®
Collar and closely monitor your dog’s skin where
®
Collar fits
properly (see Page 18) and that the Probes and your dog’s neck are kept clean.
Havahart® Radial-Shape Wireless Dog Fence
1-800-800-1819, Option 1
28
Page 31

Frequently Asked Questions
Question: Answer:
How large of an area
Frequently Asked Questions
can be covered by the
Wireless Fence?
Will a slope or incline
affect the Roaming Area?
Will the Wireless Fence
keep other dogs out of
the Roaming Area?
Where can I learn more
about my Wireless
Fence, get answers to my
questions, and receive
service if necessary?
The Wireless Fence forms a circular shape can expand from a 40 foot radius up
to a 400 foot radius (800 foot diameter) --- giving it the largest containment
area of any do-it-yourself wireless fence system
The Controller signal extends up to 400 feet in all directions. A slope can cause
the Roaming Area to appear larger or smaller than expected depending on
the steepness and shape of the sloped area in relation to the position of the
Controller. Repositioning the Controller may help optimize your Roaming Area.
Once set, the Roaming Area will remain consistent.
No. The Wireless Fence is only effective on dogs that wear the Havahart
Collar.
Our dedicated Consumer Care specialists strive for excellence in providing our
consumers with the very best customer service experience. For any questions
you may have, just call 1-800-800-1819 Option 1 or visit
www.havahartwireless.com.
®
Can the Controller run
on batteries?
Is the Wireless Fence
Portable?
29
Havahart® Radial-Shape Wireless Dog Fence
www.havahartwireless.com
No. The Controller should be plugged into a 120V AC power outlet. Make
sure there is one nearby when you plan the placement of the Controller in your
house.
Yes. Follow the setup procedures wherever you want to contain your dog. It
is necessary to setup the new Roaming Area and mark it with Training Flags
so your dog can learn his new Trigger Zone. You may want to conduct some
additional training for your dog to be comfortable with his new Roaming
Area. Note: The size of the Roaming Area may be reduced if you are setting
up in a vehicle or metal building. Remember to remove the battery from the
Havahart
source from a car or elsewhere, make sure to use an inverter rated for
50 watts or more.
®
Collar before turning off the Controller. If you use a DC power
Page 32

Question: Answer:
What happens if there
is a power outage?
What maintenance
does the Wireless Fence
require?
Will buildings and other
objects (trees, metal
objects, etc.) affect the
performance of the
Wireless Fence?
The Controller is designed to remember all of your settings in the case of a
power outage or system disconnection. The Controller is also designed not
to activate the Havahart
®
Collar when there is a power outage or shutdown.
However, your dog may receive a static correction if he is near the Trigger Zone
during a power outage. Connecting the Controller to a battery backup device
may decrease the chance of this occurring if you have frequent power outages.
s Check your dog’s neck daily for irritation from the Probes of the Havahart® Collar.
s Clean your dog’s neck weekly where it comes into contact with the Probes.
s Check the Probes weekly to make sure they are clean and tight.
s Check the fit of the Havahart® Collar each time you put it on your dog.
s Check the Havahart® Collar Indicator Light. If it flashes red, the battery needs
to be recharged.
s Check the Controller. It will alert you when the battery is low and needs to
be recharged.
This is possible. See the section about Factors Affecting Signal Strength
(page 32). The Trigger Zone will remain consistent once set.
Frequently Asked Questions
What if my neighbor
purchases the same
Wireless Fence?
Will the Wireless Fence
interfere with my
computer, TV, cordless
phone, cell phone, garage
opener or other electronic
device if I place the
Controller near them?
Can the Wireless Fence be
used indoors to keep my
dog out of certain rooms
or areas of the home?
Neither Wireless Fence will interfere with the other. Havahart
®
Collars from
either system can be added to the other system. However, each Havahart
Collar can be active on only one system at a time.
No. They operate on different frequencies. Microwaves may cause limited
interference.
No. The Wireless Fence is designed to be an outdoor fence only.
Havahart® Radial-Shape Wireless Dog Fence
1-800-800-1819, Option 1
®
30
Page 33

Frequently Asked Questions
Question: Answer:
How old should my dog
be before I start training
Frequently Asked Questions
him with the Wireless
Fence?
Can the Wireless Fence
be used on very small
dogs like Yorkshire
Terriers, Chihuahuas or
Miniature Dachshunds?
Can the Wireless
Fence be used on an
aggressive dog?
Can the Wireless Dog
Fence be used on a cat?
The Wireless Fence is designed for dogs older than 6 months that weigh more
than 8 pounds.
The Wireless Fence can be used as long as your dog meets the age and weight
requirements of being over 6 months old and weighing over 8 pounds.
Because the Wireless Fence is not a physical boundary, we do NOT recommend
using it on any aggressive dog. Consult with a veterinarian or a certified trainer
if you are not certain if your dog is aggressive.
Not at this time.
Should my dog be on a
leash the first time he
gets a correction from
the Havahart
How long will I need to
keep the Training Flags
up in my yard?
31
Havahart® Radial-Shape Wireless Dog Fence
www.havahartwireless.com
®
Collar?
Yes, absolutely! Your dog should be on a leash as described in the Phase
Training. Follow the Phase Training to allow your dog to progress to not being
on a leash.
After completing the training and three additional weeks of successful dog
containment, you can begin to gradually remove the Training Flags by taking
away every other flag, every few days. The length of time is completely
dependent upon how much time you spend training your dog and how well
your dog responds
to your training.
Page 34

Factors Affecting Signal Strength
NOTE: Once set, your Fence Boundary / Trigger Zone will remain consistent.
Various objects can interfere with the wireless signal strength of your Wireless Fence, resulting in a gradual loss in
the measured distance of the radio signal from the Controller to a set Trigger Zone. The part of the Trigger Zone
that is obstructed by an object may bow or dip inward toward the Controller. The resulting shape of the Trigger
Zone may be slightly different from a perfect circle and the Roaming Area may be slightly reduced. When this
happens, the object between the Controller and the set Trigger Zone is said to attenuate the radio signal or the
Trigger Zone.
Obstacles that can slightly obstruct any wireless signal (including mobile phones) include: walls, trees, concrete,
foundations, bricks, above-ground bodies of water (swimming pools), people and animals. Metal objects and
mirrors have a deeper obstructing effect as well as heavily damp objects such as a tree after a strong rainstorm
or snowstorm.
The closer an obstructing object is to the Trigger Zone or the closer a metallic object such as a mirror is to the
Controller, the greater the interfering effect it can have on the Trigger Zone. Likewise, the more dense an
obstructing object is, the more severe the dip or shaping effect of the Trigger Zone.
Factors Affecting Signal Strength
With perfect line of sight and no obstructions between the Controller and the Havahart
®
Collar, the system will
create a Trigger Zone about 6 feet wide. With obstructions, the Trigger Zone can expand to around 13 feet wide.
Without performing complex calculations and accounting for all factors, it is very difficult to predict the exact
amount of interference different objects can cause and how the Trigger Zone and Roaming Area will be affected.
Only Havahart
®
Wireless Fences perform complex algorithms, strategic distortion filtering and modular signal
amplification at a continuous rate to accommodate for and minimize interference and attenuation.
Despite all of these measures, attenuation is difficult to totally prevent. Dark glasses attenuate sunlight, lead
attenuates X-rays, buildings attenuate cell phone reception, and more than likely your home will attenuate your
dog’s Roaming Area and cause some inward dips in the Trigger Zone. In most cases the dipping should be a minor
issue that may not even be noticed.
In the event that your system experiences severe interference or attenuation with which you are not
comfortable, there are few things that you can try to counter or lessen the effects.
s Place the Controller above or at least 3 feet away from appliances and other large metal objects like mirrors.
s Raise the Controller to 6-8 ft or to a higher floor in the home.
s If the first two methods prove ineffective, choosing an altogether different Fence Controller location in
the home may be necessary to mitigate the effects of a severe undesirable dip.
Should you need additional help to minimize wireless signal interference for your Havahart
Fence, please call 1-800-800-1819, Option 1.
Havahart® Radial-Shape Wireless Dog Fence
1-800-800-1819, Option 1
®
Wireless Dog
32
Page 35

Troubleshooting
Troubleshooting
IF ANY OF THE ANSWERS TO YOUR QUESTIONS CANNOT BE FOUND, PLEASE CALL 1-800-800-1819
Option 1 or visit www.havahartwireless.com
Question: Answer:
The Controller is not able
to find the Havahart® Collar
and add it to the system.
The Controller Distance to
Dog does not exactly match
the actual distance to the
Havahart
The Trigger Zone seems to
fluctuate.
®
Collar
s See Page 12 -- Activating a Collar.
s Make sure that the battery is properly installed and awake -- green light is flashing.
s Gently shake the Collar to keep it awake when the Controller searches for it.
s If you are adding an additional Collar to the system, use a permanent marker
to identify which Collar is which and make sure that you are not trying to
add the old Collar to the system as it is has already been added.
s If the Collar has already been added to the system, remove the Collar from
the system (see Page 13) and then add the Collar again.
s Even though you can set your Trigger Zone distance to any number between
40-400 feet, the displayed Distance to the Dog on the Controller increases
and decreases to the nearest 10 foot increment. The system keeps an
internal distance that is more accurate so that the alarm will sound and the
Collar will deliver a correction when your dog crosses into the Trigger Zone.
This increases battery life.
s This is normal. The Trigger Zone can be up to 6-13 feet wide as a result of
interference from other objects (see Page 32).
s Where the Havahart® Collar delivers a correction is influenced by the speed
and orientation of the Havahart® Collar as your dog crosses the Trigger Zone.
The Havhart
beeping when setting up
the Trigger Zone.
The Havahart
beeping or delivering a
static correction.
33
Havahart® Radial-Shape Wireless Dog Fence
www.havahartwireless.com
®
Collar is not
®
Collar is not
s Check that the Controller is plugged into a working 120-volt outlet, turned
on, the LCD screen is displaying text, and the correction level and Trigger
Zone distance are set to your desired levels.
s Make sure that the Collar has a new, properly installed battery. The positive
side faces outward. If the batter needs to be replaced, do so within 6 feet of
the Controller.
s Make sure that the Collar has been properly added to the Controller (see
Page 12).
s If you cannot hear the beep because you are in a noisy area, use the Heart-
Shaped Collar Tester (see Page 14) to determine the location of the Trigger Zone.
s Check that the Controller is plugged into a working 120-volt outlet, turned
on, the LCD screen is displaying text, and the correction level and Trigger
Zone distance are set to your desired levels.
s Make sure that the Collar has a new, properly installed battery. The positive
side faces outward. If the battery needs to be replaced, do so within 6 feet of
the Controller.
s Make sure that the Collar has been properly added to the Controller (see
Page 12).
Page 36

Question: Answer:
Troubleshooting
The Havahart® Collar is
beeping everywhere.
The Havahart
®
Collar is
beeping inside the home.
s Check that the Controller is plugged into a working 120-volt outlet, turned
on, the LCD screen is displaying text, and the correction level and Trigger
Zone distance are set to your desired levels.
s Make sure that the Collar has a new, properly installed battery. The positive
side faces outward. If the battery needs to be replaced, do so within 6 feet
of the Controller.
s Make sure that the Collar has been properly added to the Controller (see Page 12).
s If the situation persists, the Controller may need to be moved:
1. Place the Controller above or at least 3 feet away from appliances
and other large metal objects like mirrors.
2. Raise the Controller to 6-8 feet or to a higher floor in the home.
3. If the first two methods prove ineffective, choosing an altogether
different Controller location in the home may be necessary.
s If relocating the Controller, remove the Havahart® Collar from your dog
before turning off the Controller.
s Check that the Controller is plugged into a working 120-volt outlet, turned
on, the LCD screen is displaying text, and the correction level and Trigger
Zone distance are set to your desired levels.
s Make sure that the Collar has a new, properly installed battery. The positive
side faces outward. If the battery needs to be replaced, do so within 6 feet
of the Controller.
s Make sure that the Collar has been properly added to the Controller (see Page 12).
s Ensure the entire home is within the Roaming Area. If not, adjust the
Trigger Zone distance or move the Controller to include the entire home in
the Roaming Area.
s If relocating the Controller, remove the Havahart® Collar from your dog
before turning off the Controller.
The Havahart
®
Collar is
beeping but my dog is not
responding to the static
correction.
The LCD screen on the
Controller is not on.
s Make sure the static correction level is set to 1 or above.
s Test the Havahart® Collar with the Heart-Shaped Collar Tester.
s If the Tester lights up, check the fit of the Havahart® Collar.
s If necessary, trim your dog’s hair where the Probes touch the neck and/or
switch to the Long Probes.
s increase the static correction by one level.
s Repeat training steps as necessary.
s Make sure the Controller power switch is on (blue light is flashing) and
the AC Adapter Power Cord is fully connected and plugged into the
Controller and a working standard 120-volt outlet. Make sure that the
electrical outlet to which the AC Adapter Power Cord is connected is not
controlled by a light switch. If it is, move the AC Adapter Power Cord to
another outlet or make sure the light switch stays on all the time.
Havahart® Radial-Shape Wireless Dog Fence
1-800-800-1819, Option 1
34
Page 37

Troubleshooting
Troubleshooting
Question: Answer:
The Havahart® Collar is
beeping in the middle of
the yard.
s Check that the Controller is plugged into a working 120-volt outlet, turned
on, the LCD screen is displaying text, and the correction level and Trigger
Zone distance are set to your desired levels.
s Make sure that the Collar has a new, properly installed battery. The positive
side faces outward. If the battery needs to be replaced, do so within 6 feet
of the Controller.
s Make sure that the Collar has been properly added to the Controller (see Page 12).
s The Havahart® Collar may beep when it loses the Controller signal as a
result of interference from other objects (see the section about Factors
Affecting Signal Strength). This sometimes occurs if a large metallic object
is between the Havahart
Havahart® Collar changes near the Trigger Zone, or if the surrounding
electronic signals interfere with the signal.
1. Place the Controller above or at least 3 feet away from appliances and
other large metal objects like mirrors.
2. Raise the Controller to 6-8 ft or to a higher floor in the home.
3. If the first two methods prove ineffective, choosing an altogether
different Controller location in the home may be necessary.
s If relocating the Controller, remove the Havahart® Collar from your pet
before turning off the Controller.
®
Collar and the Controller, if the orientation of the
The Havahart
beeping but my dog is not
responding to the static
correction.
My dog reacts strongly to
the static correction and
has demonstrated signs of
stress.
The Indicator Light on the
Havahart
a solid green color and the
Controller is not sensing the
Havahart
®
Collar is
®
Collar has turned
®
Collar.
s Make sure the static correction level is set to 1 or above.
s Test the Havahart® Collar with the Heart-Shaped Collar Tester.
s If the Tester lights up, check the fit of the Havahart® Collar.
s If necessary, trim your dog’s hair where the Probes touch the neck and/or
switch to the Long Probes.
s Increase the static correction by one level.
s Repeat training steps as necessary.
s If possible, lower the static correction level.
s Make sure you are in control of the situation when your dog receives
his first static corrections (have him on a leash attached to a separate, non-
metal collar) and lead him into the Roaming Area and praise him. If your
dog continues to show signs of stress, suspend training and start again the
next day.
s Make sure to end all training sessions on a positive note with lots of
playtime and praise in the Roaming Area at least 10 feet away from the
Training Flags.
s Twist the battery cap slightly clockwise or counterclockwise and make sure
not to unscrew the battery cap.
s If the situation persists, unscrew the battery cap, remove the battery,
replace the battery and screw the battery cap back in place.
35
Havahart® Radial-Shape Wireless Dog Fence
www.havahartwireless.com
Page 38

Page 39

Warranty Information
Havahart® Radial Fence 10 Year Parts & 12 Month Labor
Warranty Information
LIMITED WARRANTY TO ORIGINAL PURCHASER
Woodstream Corporation warrants its products to be free from defects in materials and workmanship for the warranty period from the purchase date.
Activate your warranty online at www.havahartwireless.com or return the completed form included with your product.
All parts are covered under warranty for ten (10) years from the date of purchase by the original purchaser and labor is covered for a period of one year (and
under no circumstances to exceed a period of 365 days) from the date of purchase by the original purchaser. Thereafter, a service charge may apply for the
repair or replacement of the product. This warranty DOES NOT cover any accessories.
This limited warranty begins on the original date of purchase, and is valid only on products purchased and used in the United States by the original
purchaser. To receive warranty service, the purchaser must first contact Woodstream Corporation for problem determination and service procedures. Please
have the product available when discussing your experience.
If Woodstream Corporation determines that this product needs to be returned, Woodstream Corporation will issue a Return Goods Authorization (RGA)
number. The defective unit or parts must be returned to Woodstream Corporation, or specified authorized agent, for warranty inspection with the RGA
number labeled on the outside of the package within (10) days of return authorization date. Products returned without authorization will be refused.
Woodstream Corporation will repair or replace this product, at our option and at no charge as stipulated herein, with new or reconditioned parts or
products if found to be defective during the limited warranty period specified above. All replaced parts and products become the property of Woodstream
Corporation or authorized agent. Replacement parts and products assume the remaining original warranty, or ninety (90) days, whichever is longer
.
Limitations and Exclusions:
This product is neither a physical barrier nor a substitute for traditional obedience training. Due to variances in canine personality, temperament, size, and
age, as well as due to potential influences on your dog outside of Woodstream Corporation’s control, Woodstream does not guarantee or warrant the
effectiveness of this product.
This limited warranty covers manufacturing defects in materials and workmanship encountered in normal, noncommercial use of this product, and shall
not apply to the following, including, but not limited to: damage which occurs in shipment; delivery and installation; applications and uses for which
this product was not intended; altered product or serial numbers; cosmetic damage or exterior finish; accidents, abuse, neglect, fire, water, lightning or
other acts of nature; use of products, equipment, systems, utilities, services, parts, supplies, accessories, applications, installations, repairs, external wiring
or connectors not supplied or authorized by Woodstream Corporation which damage this product or result in service problems; incorrect electrical line
voltage, fluctuations and surges; customer adjustments and failure to follow operating instructions, cleaning, maintenance and environmental instructions
that are covered and prescribed in the instruction book.
THERE ARE NO EXPRESS WARRANTIES OTHER THAN THOSE LISTED AND DESCRIBED ABOVE, AND NO WARRANTIES WHETHER EXPRESS OR IMPLIED,
INCLUDING, BUT NOT LIMITED TO, ANY IMPLIED WARRANTIES OF MERCHANTABILITY OR FITNESS FOR A PARTICULAR PURPOSE, SHALL APPLY AFTER THE
EXPRESS WARRANTY PERIODS STATED ABOVE, AND NO OTHER EXPRESS WARRANTY OR GUARANTY GIVEN BY ANY PERSON, FIRM OR CORPORATION
WITH RESPECT TO THIS PRODUCT SHALL BE BINDING ON WOODSTREAM CORPORATION. WOODSTREAM CORPORATION SHALL NOT BE LIABLE
FOR LOSS OF REVENUE OR PROFITS, FAILURE TO REALIZE SAVINGS OR OTHER BENEFITS, OR ANY OTHER SPECIAL, INCIDENTAL OR CONSEQUENTIAL
DAMAGES CAUSED BY THE USE, MISUSE OR INABILITY TO USE THIS PRODUCT, REGARDLESS OF THE LEGAL THEORY ON WHICH THE CLAIM IS BASED,
AND EVEN IF WOODSTREAM CORPORATION HAS BEEN ADVISED OF THE POSSIBILITY OF SUCH DAMAGES. NOR SHALL RECOVERY OF ANY KIND AGAINST
WOODSTREAM CORPORATION BE GREATER IN AMOUNT THAN THE PURCHASE PRICE OF THE PRODUCT SOLD BY WOODSTREAM CORPORATION AND
CAUSING THE ALLEGED DAMAGE. WITHOUT LIMITING THE FOREGOING, PURCHASER ASSUMES ALL RISK AND LIABILITY FOR LOSS, DAMAGE OR INJURY TO
PURCHASER AND PURCHASER’S PROPERTY AND TO OTHERS AND THEIR PROPERTY ARISING OUT OF THE USE, MISUSE OR INABILITY TO USE THIS PRODUCT
SOLD BY WOODSTREAM CORPORATION NOT CAUSED DIRECTLY BY THE NEGLIGENCE OF WOODSTREAM CORPORATION. THIS LIMITED WARRANTY SHALL
NOT EXTEND TO ANYONE OTHER THAN THE ORIGINAL PURCHASER OF THIS PRODUCT, IS NONTRANSFERABLE AND STATES YOUR EXCLUSIVE REMEDY.
Some states do not allow limitations on how long an implied warranty lasts, or the exclusion or limitation of incidental or consequential damages, so the
above limitations or exclusions may not apply to you. This warranty gives you specific legal rights, and you may also have other rights which vary from state
to state.
CONTACTING WOODSTREAM CORPORATION:
To obtain product assistance or warranty service for your product, please choose one of the following:
1. Online Troubleshooting Assistance at www.havahartwireless.com
2. Email Consumer Care at [email protected]
3. Call Consumer Care at 800-800-1819, Option 1
37
Havahart® Radial-Shape Wireless Dog Fence
www.havahartwireless.com
Page 40

Wireless Fence Planning Grid
Wireless Fence Planning Grid
38
Page 41

DO NOT RETURN THIS PRODUCT
TO THE STORE FOR ANY REASON.
CONTACT HAVAHART® WIRELESS DIRECTLY!
CALL 1-800-800-1819, OPTION 1.
Havahart ® Wireless
Woodstream Corporation
69 North Locust Street
Lititz, PA 17543 | 1-800-800-1819
www.havahartwireless.com
 Loading...