


IC Radio Standards Specification: RSS-210
ACS Report Number: 10-0086.W03.45.A
Manufacturer: Woodstream Corporation
Certification Exhibit
FCC ID: SNA-CFR
FCC Rule Part: 15.247
Model: 5144G-R
Manual
5015 B.U. Bowman Drive Buford, GA 30518 USA Voice: 770-831-8048 Fax: 770-831-8598
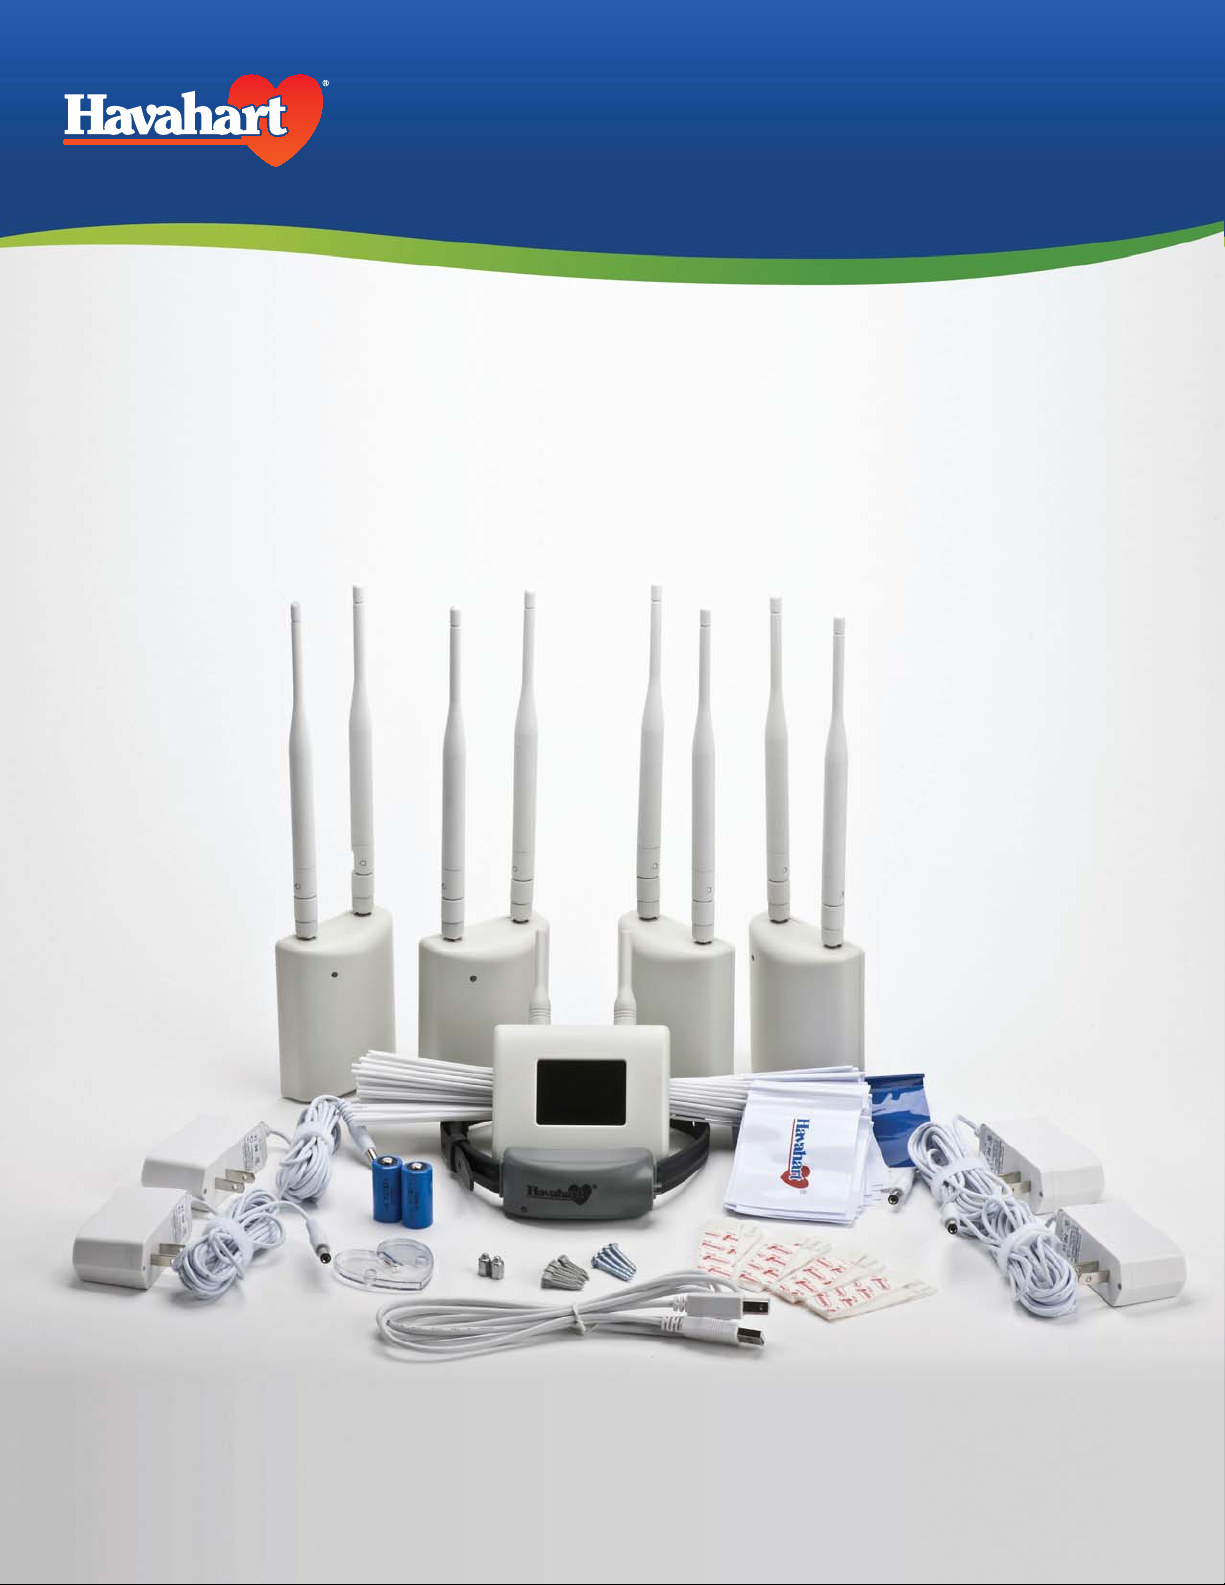
Custom-Shape
Wireless Dog Fence
Instruction Manual
PRIOR TO INSTALLATION
Fully Charge the System
Controller for 6 hours.
Welcome
Congratulations and thank you for choosing the Custom-Shape
Wireless Dog Fence from Havahart
®
, the leader in safe, caring
control for pets and wildlife for more than 60 years.
Featuring breakthrough, patented, wireless technology, the CustomShape Wireless Dog Fence is designed to maximize the freedom and
safety of your dog, with minimal effort, investment and impact on
your property. It is the industry’s most-advanced, do-it-yourself, dog
containment system.
The Custom-Shape Wireless Dog Fence gives you all the advantages of a
professionally-installed, underground wire fence system without all the
hassles and costs. Our revolutionary technology allows you to shape the
wireless fence to the specific configuration of your yard -- maximizing the
space for your dog to roam. It also allows you to add custom Exclusion
Zones thereby keeping your dog out of your garden or swimming pool.
There are no wires to bury or break. No back pains from digging.
No money wasted on trenching. Just a Fast & Easy Setup and
Freedom to Roam!
To ensure your complete satisfaction
and your dog’s safety, please read
and follow all of these instructions
carefully. Should you need assistance,
our Consumer Care Specialists are
ready to help. Call 1-800-800-1819,
and press “1”.
Thank you for purchasing the
Custom-Shape Wireless Dog Fence
from Havahart
®
!
Havahart® Custom-Shape Wireless Dog Fence
1
Table of Contents
IMPORTANT SAFETY REMINDERS ............................................................................................................................................. 3
SYSTEM COMPONENTS .................................................................................................................................................................... 4
THE TECHNOLOGY BEHIND THE SYSTEM .......................................................................................................................... 5
Controller
Bases
Collar
GETTING STARTED ............................................................................................................................................................................... 6
Quick Checklist
Planning Your Wireless Fence System
INSTALLING THE CUSTOM-SHAPE WIRELESS DOG FENCE ...................................................................................... 7
Setting Up the Bases ........................................................................................................................................................ 7
1
- Installing the Bases
- Activating the Bases
Setting Up the Fence Boundary ............................................................................................................................ 9
2
- Fence Boundary Flag Placement
- Fence Boundary Activation
- Removing a Flag
- Removing a Fence Boundary
3
Setting Up the Exclusion Zones (Optional) ................................................................................................... 12
- What are Exclusion Zones (Ex. Zones)?
- Exclusion Zone Flag Placement
- Exclusion Zone Activation
- Removing an Exclusion Zone Flag
- Removing an Exclusion Zone
- Naming an Exclusion Zone
- Deactivating /Reactivating an Exclusion Zone
4
Setting Up the Collar(s) .............................................................................................................................................. 18
- Activating a Collar
- Naming a Collar
- Adjusting the Correction Level of a Collar
- Removing a Collar
- Fitting a Collar
Table of Contents
TRAINING YOUR DOG ....................................................................................................................................................................... 22
WARRANTY INFORMATION ........................................................................................................................................................ 28
WIRELESS FENCE PLANNING GRID .......................................................................................................................................... 29
Havahart® Custom-Shape Wireless Dog Fence
2

Important Safety Reminders
To ensure the safe and effective operation of your Custom-Shape Wireless Dog Fence, please read and follow all
safety guidelines and instructions:
s The Custom-Shape Wireless Dog Fence is designed for dogs older than 6 months and weighing
Important Safety Reminders
more than 8 pounds.
s It is necessary to fully charge the system Controller for 6 hours PRIOR TO INSTALLATION.
sAll Bases must be installed indoors and should not be exposed to inclement weather (e.g. rain or snow).
sEach Base must be plugged into a properly grounded 120V AC outlet.
sChanges or modifications to any system component may cause permanent system damage and void
manufacturer warranties.
sTo prevent system damage due to unexpected power surges, it is recommended that you unplug any devices
from wall outlets during thunderstorms. Also, do not attempt to install the system during stormy weather.
sTo help prevent skin irritation, do not leave the Collar on your dog for more than 12 consecutive hours.
sAlways remove the Collar from your dog before adjusting any of the system components.
sThe system is intended to provide safe containment of your dog. All components should be kept out of
the reach of children.
Havahart® Custom-Shape Wireless Dog Fence
3
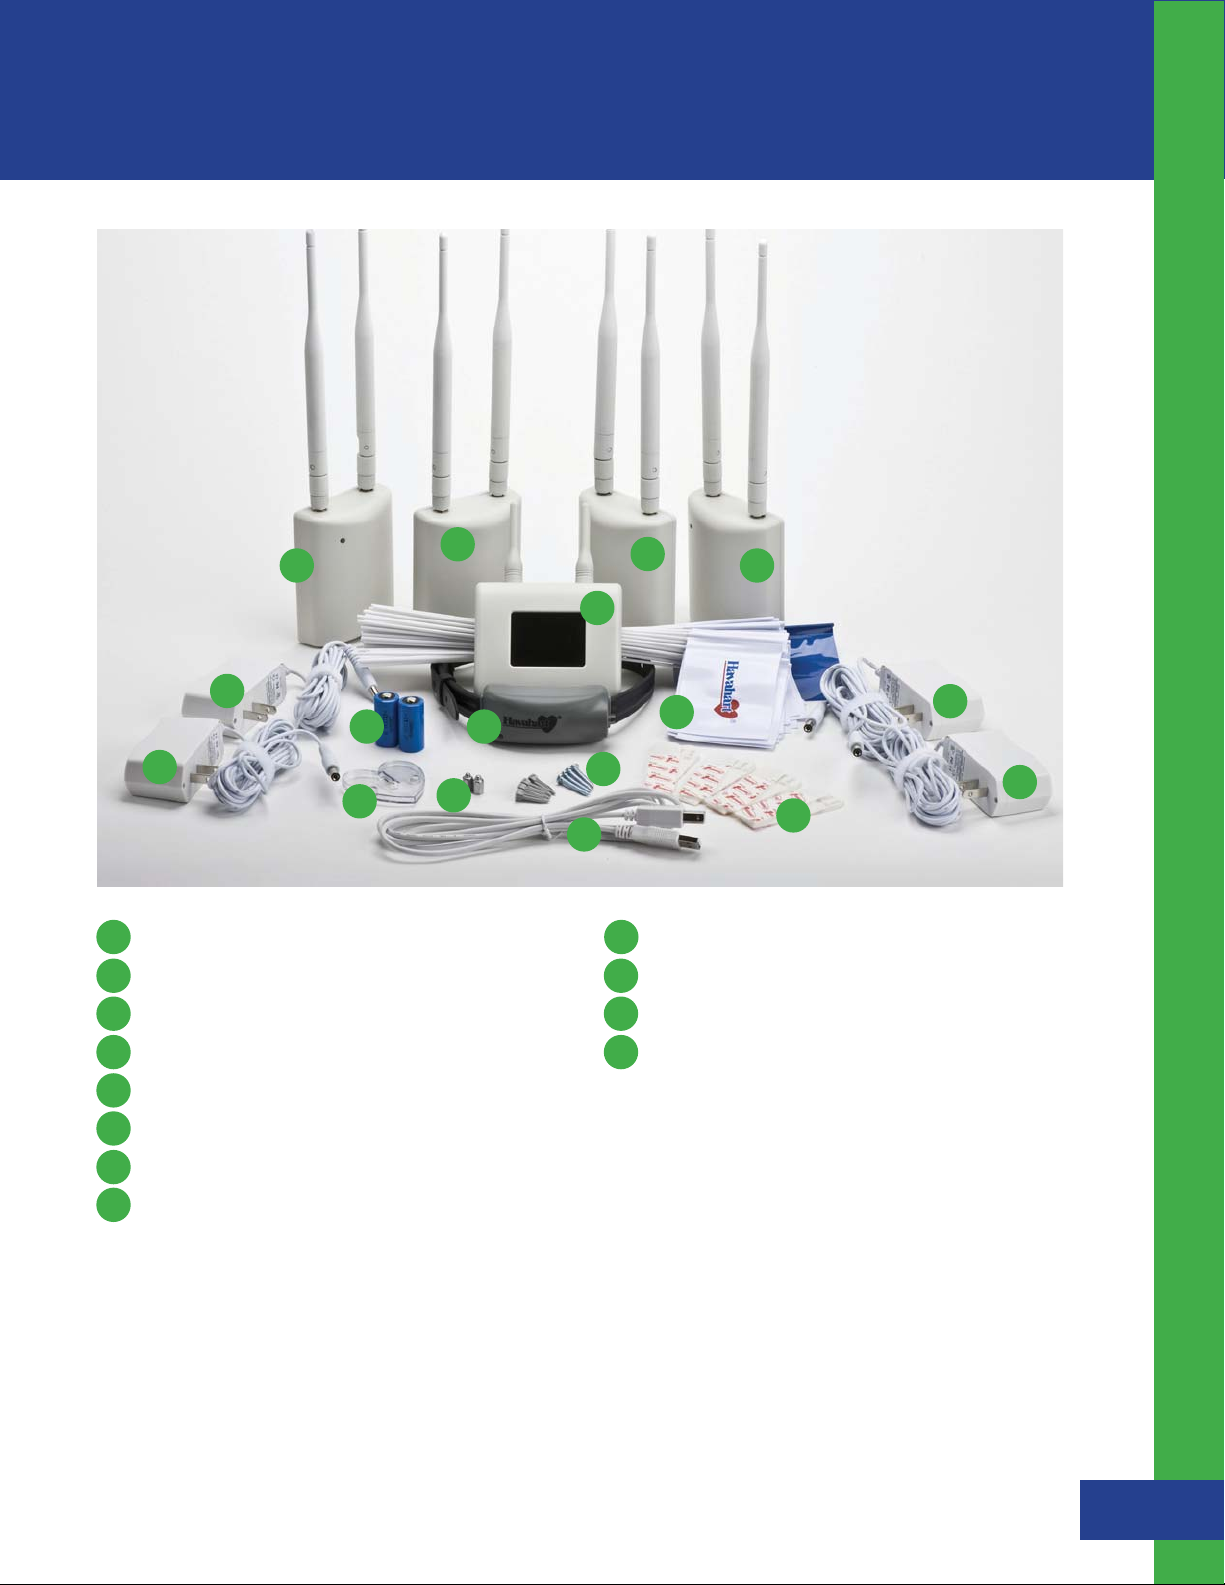
System Components
System Components
D
C
A
E
HI
E
K
A I
Controller
B
USB cable
C
Master Base
D L
3 Bases
E
4 AC power adapter cords for Bases
J
G
B
D
L
D
F
2 CR123 batteries for Collar
J
Extra set of small Collar probes
K
Heart-shaped Collar tester
74 white flags, 1 blue flag
Instructional DVD
E
E
F
Removable wall-mount adhesive tape
G
4 Screws and 4 wall anchors
H
Collar
Other Items You May Need:
s Scissors
s Drill
s Pen and Paper
s Tape Measure
s Pliers
s Permanent Marker
Instruction manual
Quick Setup Guide
Havahart® Custom-Shape Wireless Dog Fence
4

The Technology Behind the System
The Custom-Shape Wireless Dog Fence from Havahart® is driven by a nanoLOC TRX 2.4 GHz transceiver that has
been enhanced with complex algorithms, strategic distortion filtering and modular signal amplification to deliver
advanced time-of-flight-ranging technology and precision event-stamp mapping. These enhancements comprise
the core of the patented elements that provide an unparalleled level of technical sophistication in the wireless dog
fencing industry. This first-of-its-kind, cutting-edge Custom-Shape Wireless Dog Fence gives you the advantage of
allowing your dog to go to the edge of your property while keeping him safe and out of designated areas.
The Technology Behind the System
The revolutionary technology behind the Custom-Shape Wireless Dog Fence allows you to create a wireless fence
boundary and Exclusion Zones. The wireless fence boundary is a wireless perimeter that can be shaped to the exact
configuration of your yard. It is used to enclose your property’s Roaming Area where your dog can roam and play. By
contrast, an Exclusion Zone is a specific area such as a flower bed, children’s play area, pool, or patio where you want
to restrict your dog’s access. One blue and 74 white boundary flags are used to mark the wireless fence boundary
and any Exclusion Zones throughout your property. The flags are also used during training to indicate the location of
the wireless fence for your dog. Extra flags can be purchased if needed by going to www.havartwireless.com.
Fence Components:
Controller: The Controller puts all the power of the Custom-Shape Wireless Dog Fence at your fingertips. Through
auditory alerts and an intuitive graphic user interface (GUI) with a touch screen, the Controller provides easy, step-
by-step instructions for setting up, activating and managing your system. The Controller will notify you if your dog
breaches the fence boundary, if there is a problem with any of the fence components or if the Collar’s battery
life is low.
Bases: The system features a Master Base and 3 additional Bases, which are easily installed inside the home
using the removable wall-mount adhesive tape or screws. Each Base deploys the patented time-of-flight-ranging
technology with enhanced signal penetration to accurately and reliably determine the location of your dog by
transmitting a radio signal to his Collar. Working in concert with the Controller, the Bases identify and store the
location of the custom-shape fence boundary and Exclusion Zones(s) through precision event-stamp-mapping.
Based on data that is continuously captured, filtered and refined by the system, the Master Base determines whether
or not a correction should be delivered through the Collar.
The Bases also interact with one another to increase the range of the fence boundary, allowing you to create a
containment area up to 400 feet in any direction. No other do-it-yourself, wireless fence system offers a larger
containment area with the ability to custom-fit the fence boundary to the shape of your yard.
Collar: The comfortable, water-proof Collar houses a CR123 battery, 2 correction probes and a state-of-the-art radio
receiver with advanced antenna assembly that communicates with the Bases to constantly track the location of your
dog with regard to the wireless fence boundary and Exclusion Zones(s). When the Bases sense that the Collar is near
the fence boundary or an Exclusion Zone, they send a signal to the Collar to produce an auditory tone. When any
zone is breached, the Bases send another signal to the Collar to deliver a correction through the probes. Using the
Controller, you can progam in any of 5 static correction levels or an auditory correction tone, depending upon the
size and/or stubbornness of your dog. The default correction level is tone-only. You can use your Controller to set up,
name and manage up to 4 Collars for use on multiple dogs.
NOTE: Integrated Motion Sensor technology allows the Collar to conserve battery life when appropriate. Long
battery life will depend on the degree of your dog’s activity during training and beyond.
Havahart® Custom-Shape Wireless Dog Fence
5
Getting Started
d
Swing Set
t
A
Garden
Garde
n
Shed
Swing Set
t
ROAMING AREA
d
Shed
RO
ool
Quick Checklist:
Before you begin the installation process, be sure to
check the following:
Make sure that you have all system components ready
and available.
Getting Started
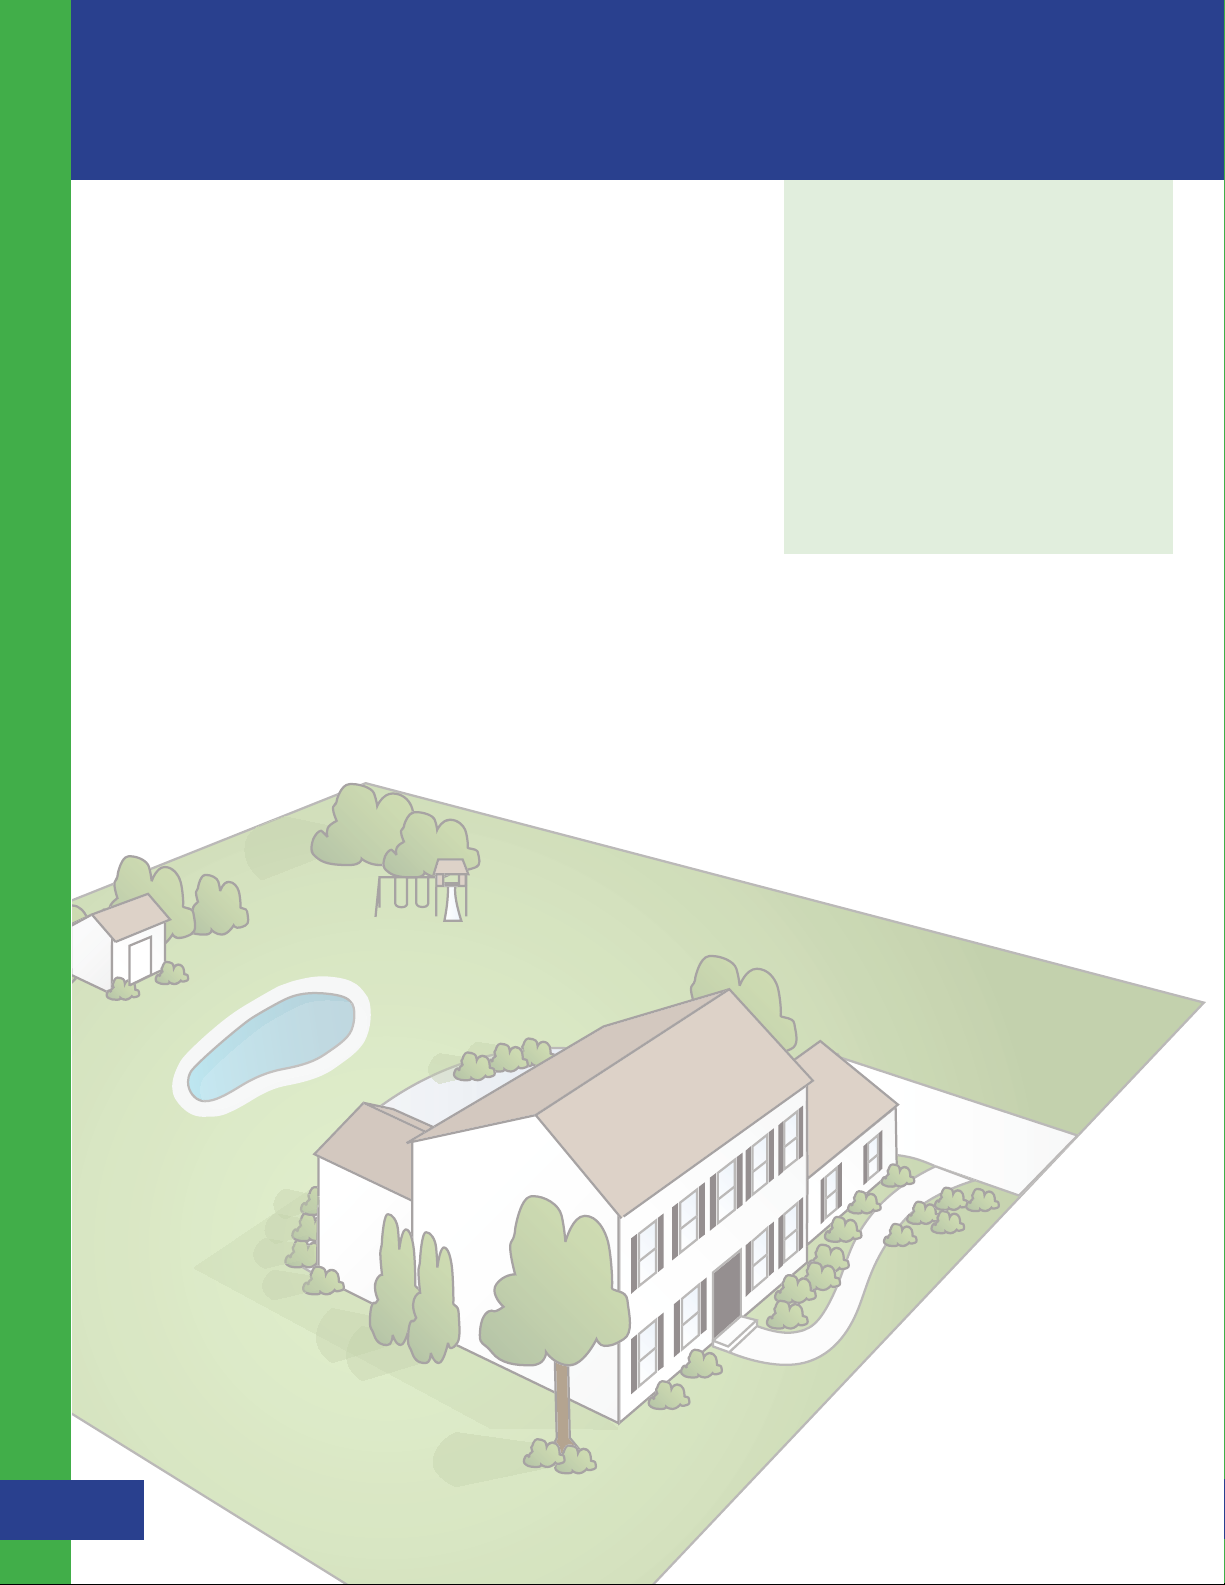
Some Helpful Tips:
When creating your fence boundary,
make sure to completely close the loop
to create an enclosed containment
area. Use the blue flag as a reference
point to ensure you are closing the loop.
Detailed instructions are found under the
“Boundary Flag Placement” section.
Charge the Controller for 6 hours.
Regardless of the fence layout you
choose, make sure your house is inside
Insert a new battery in the Collar. If using more than
the enclosed boundary.
one Collar, DO NOT insert batteries in all the Collars at
the same time. It is necessary to insert batteries and
activate the Collars one at a time. Find detailed
instructions under the “Setting Up The Collar(s)”
When addressing a curved area, avoid
creating sharp turns or tight corners as
this may cause gaps in your boundary.
section of this manual on page 18.
The distance between the fence
Watch the instructional DVD and use the
Quick Setup Guide.
boundary and Exclusion Zones, and
the distance between Exclusions Zones
must be wider than 12 feet to ensure
adequate access and proper system
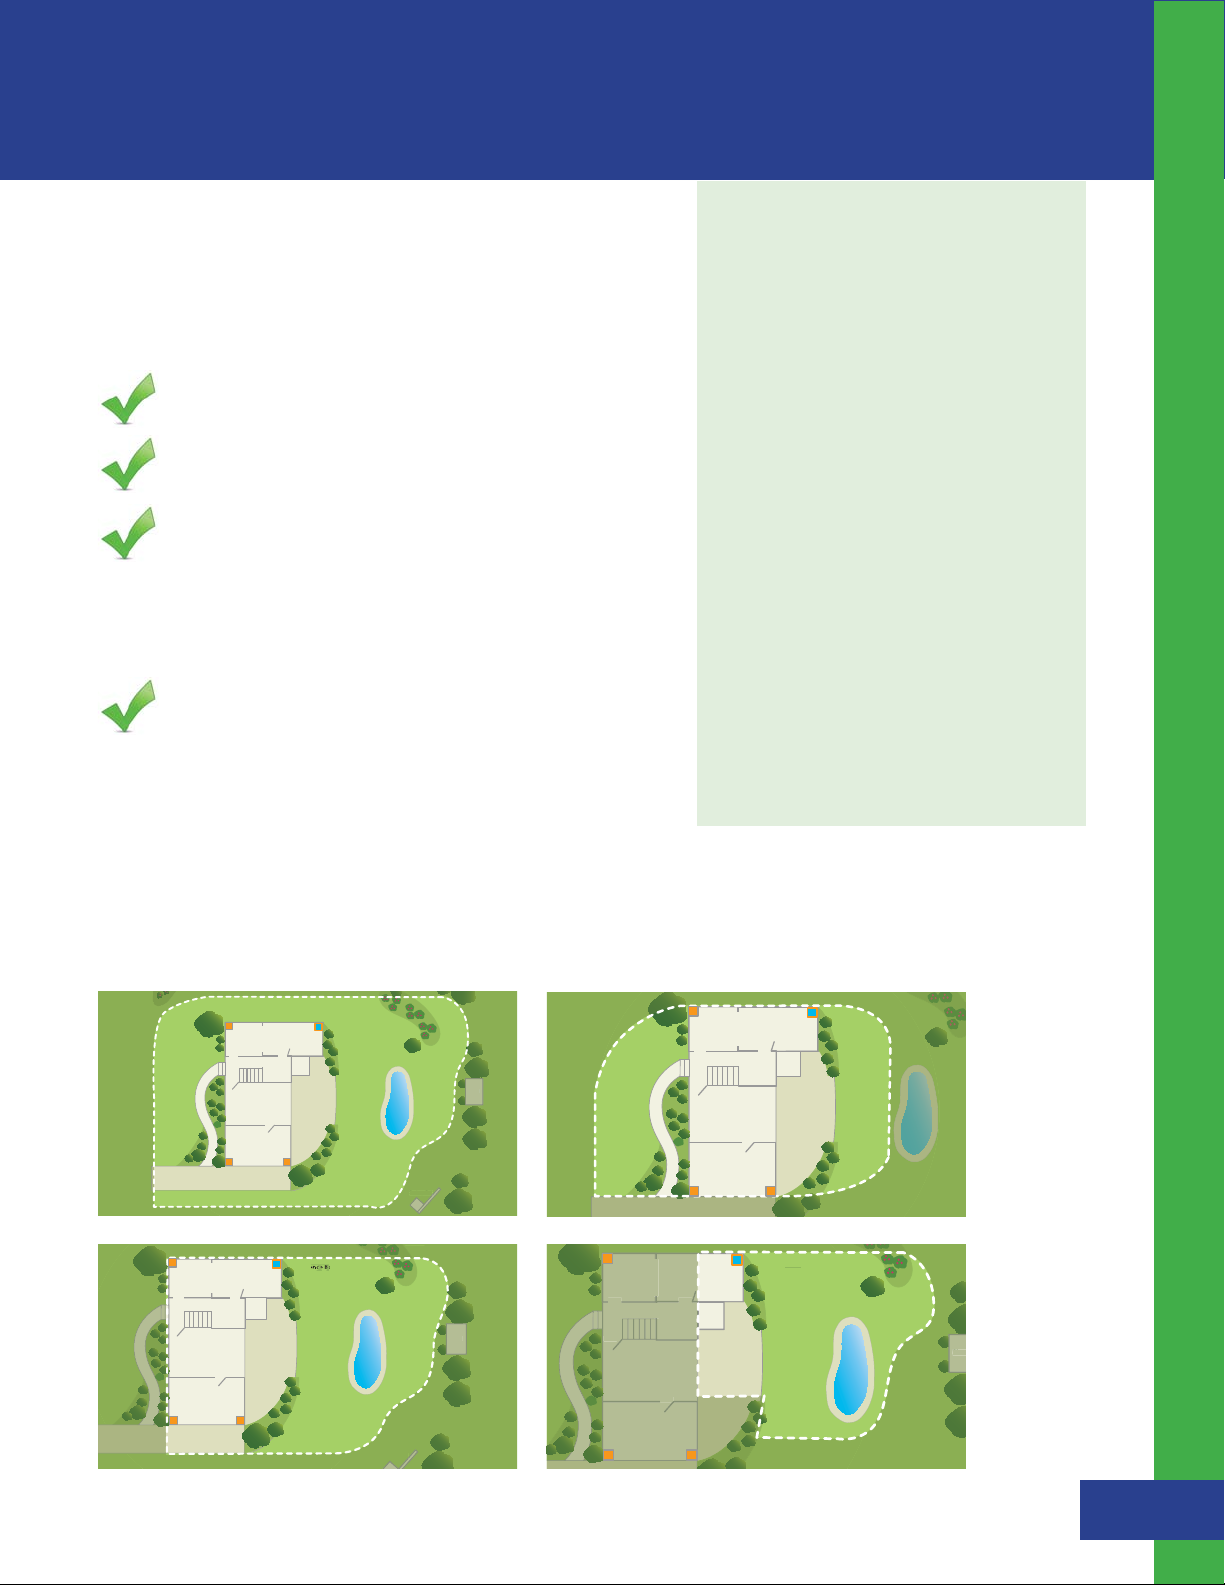
Plan Your Wireless Fence Boundary & Exclusion Zones:
performance.
Because the Custom-Shape Wireless Dog Fence is so flexible, there
are an infinite number of installation layout options you can design. Prior to installation, it is important to map
out how you envision the layout of your wireless fence to ensure it suits the custom shape of your yard while
providing your dog optimum freedom and safety. You may use the grid on page 27 to sketch your design.
The following are sample layouts, which you may consider implementing on your property:
Fence Boundary
Base
Master Base
ROAMING ARE
Deck
Flower
Garden
ence Boundar
F
Shed
Pool
She
Base
y
Master Base
ROAMING AREA
Deck
Fence Boundary
PoolP
Base
Base Base
Base Base
Master Base
Fence Boundary
Deck
Fence Boundary
Fence Boundary
Swing Set
Base
Base Base
Master Base
Fence Boundary
AMING AREA
Pool
Swing Set
Shed
Deck
Fence Boundary
Base Base
Pool
Havahart® Custom-Shape Wireless Dog Fence
She
6
Installing the Custom-Shape Wireless Dog Fence
Important Note:
1
Setting Up the Bases
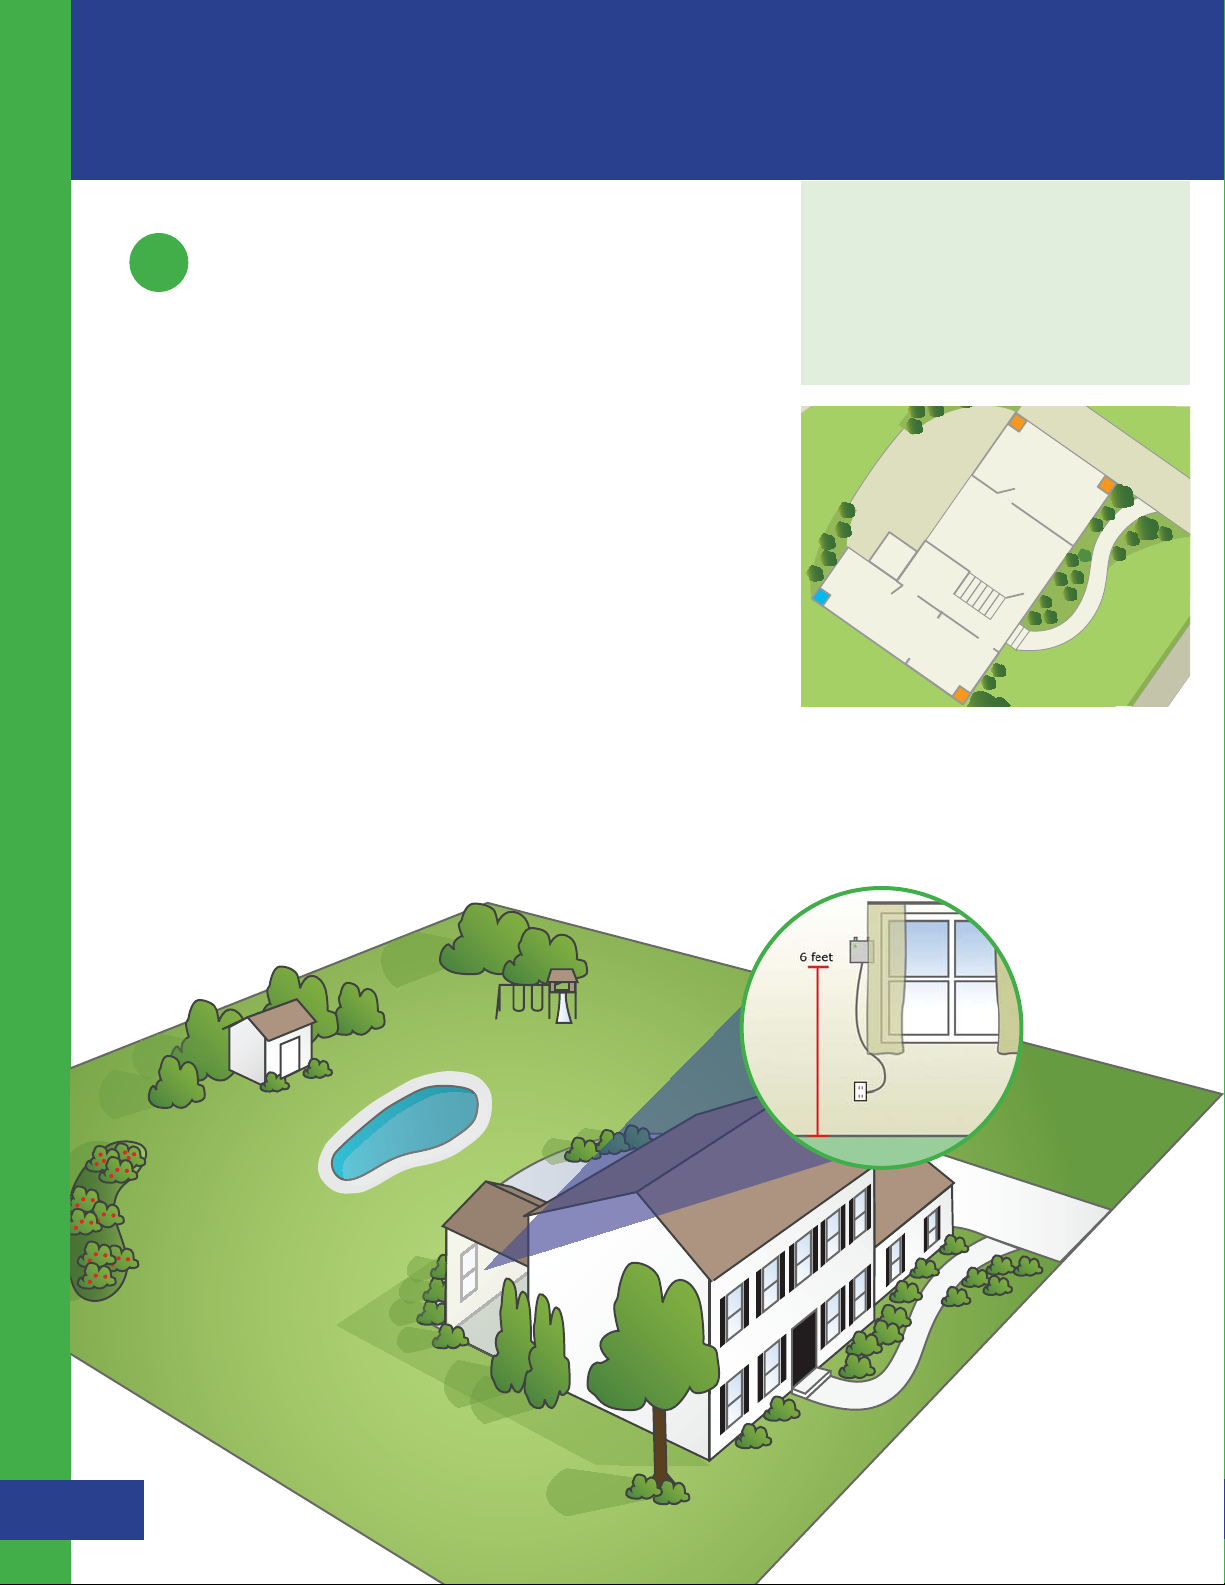
Installing the Bases:
Position all 4 Bases at the far corners inside of your home and near a
power outlet (including the attached garage if it applies).
The Controller must be fully charged
before you begin the installation process
(full charge takes approximately 6 hours).
1. Install the Master Base first. To identify it from the rest of the Bases,
check to find the words, “Master Base” printed on the back of the unit.
2. Position the Master Base in an interior corner wall near the area where
your dog spends most of his time outdoors. Make sure a power
outlet is nearby. (see Illustration A)
3. Peel and place the removable wall-mount adhesive tape to the
back of the Master Base. If preferred, use the screws provided to
mount the Master Base. (See page 8 for details)
Installing the Custom-Shape Wireless Dog Fence - Setting Up the Bases
4. Attach the Master Base to a wall or window frame approximately
6 feet off the floor and plug into the power outlet.
(see Illustration B)
5. A green power light will display indicating the Base unit is on.
Deck
BaseBase
Master Base Base
Illustration A
Illustration B
Havahart® Custom-Shape Wireless Dog Fence
7
Attaching Base using the adhesive tape:
s Clean surface with isopropyl rubbing alcohol, wipe gently, let dry.
DO NOT USE household cleaners.
s Separate strips (if still connected) at the perforation.
s Peel the back from one piece of tape and attach it vertically to the
middle of the Controller with the tab pointed upward toward the
antennas.
s Connect the fasteners (Velcro-like teeth) on the tape of the
Controller to the fasteners on the other piece of tape. The tab
on the other piece of tape should point downward away from the
antennas -- the opposite direction of the tab on the piece of tape
on the Controller.
s Peel the back from the other piece of tape and attach it to the wall
with pull-tab facing downward toward the floor and the Controller
antennas facing upward toward the ceiling.
6. Repeat these steps to install the rest of the Bases in the
remaining 3 corners of your home.
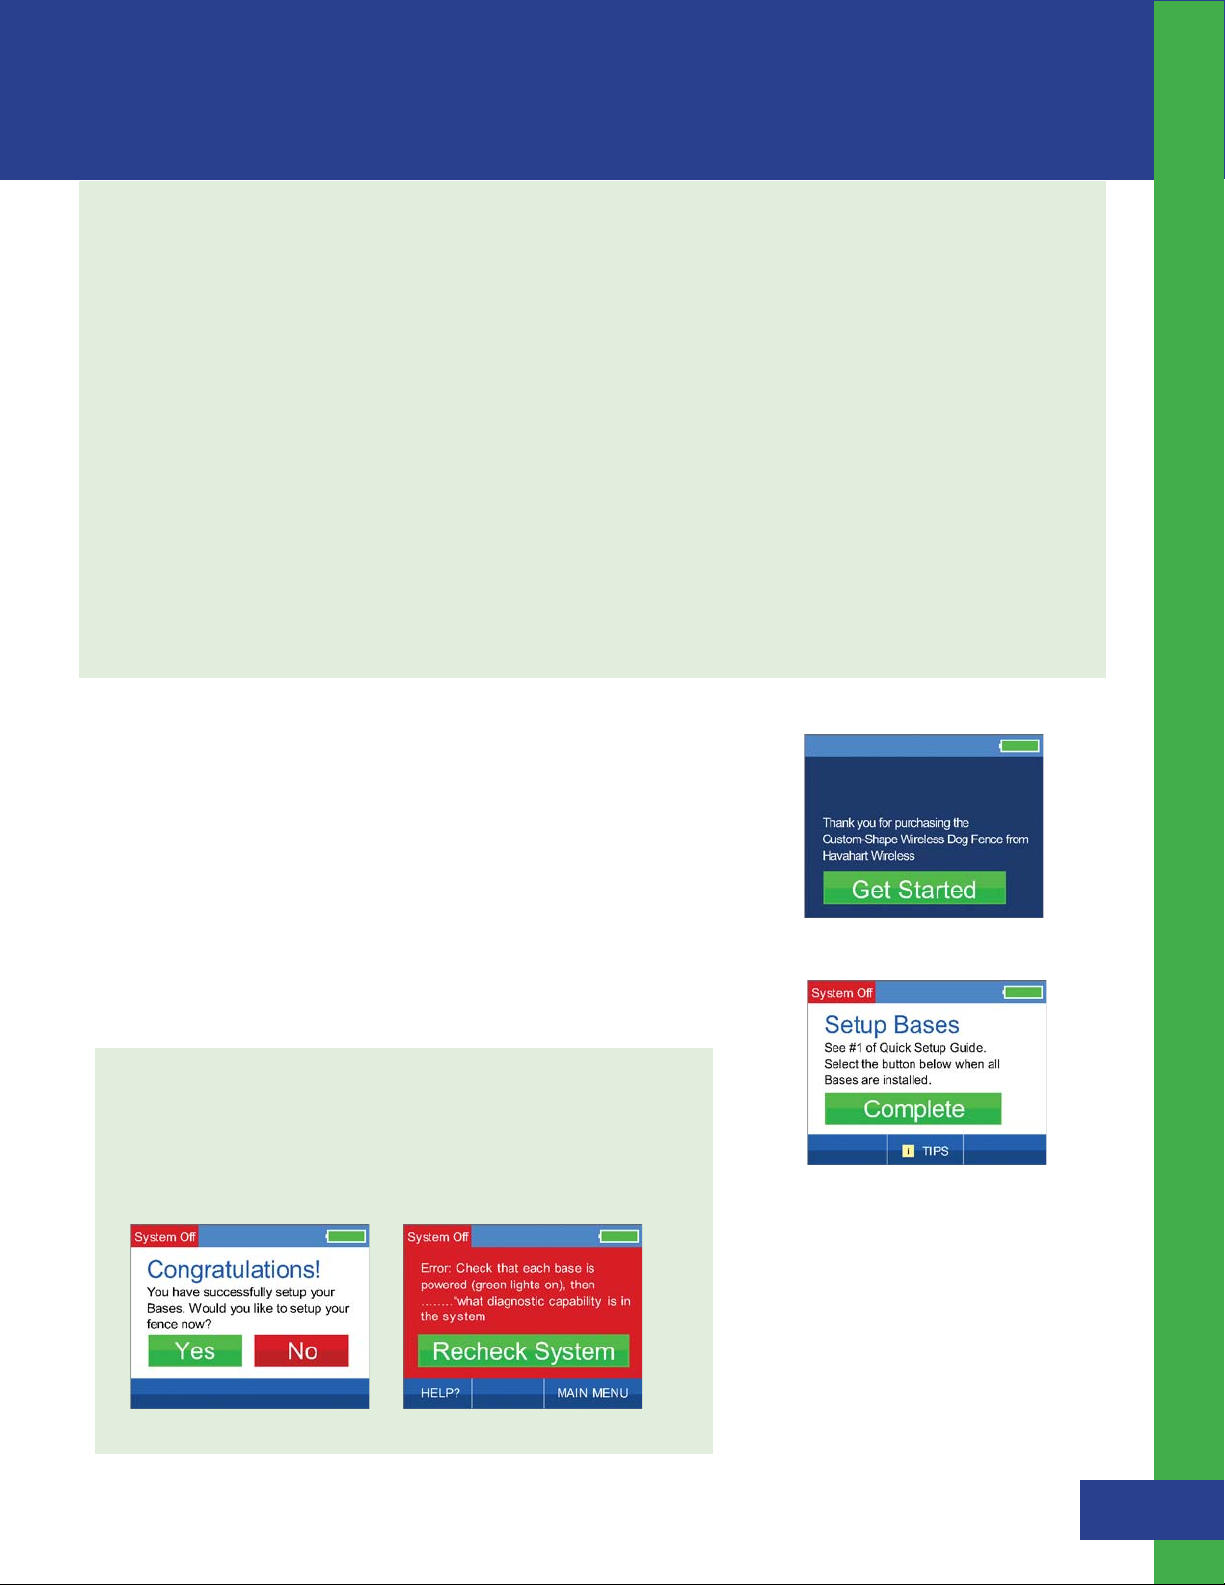
7. Touch the screen of the Controller to turn it on and press
“Get Started”. (See Figure 1.2)
To remove the adhesive tape:
s Peel the Controller gently from the
wall. DO NOT pull the fasteners off the
Controller or the wall.
s Start with the piece of tape on the wall.
To prevent the fastener from snapping
your fingers, press one hand on the end
of the tape opposite the tab and use your
other hand to pull the tab of the tape
slowly down straight against the
surface of the wall stretching the tab
at least 12 inches until the strip releases.
Repeat for the tape attached to the
Controller.
Installing the Custom-Shape Wireless Dog Fence - Setting Up the Bases
Activating the Bases:
1. Once all Bases are installed, plugged in and displaying a green
power light, stand within 10 feet of the Master Base and press the
“Complete” Button on the Controller. This will activate all the
Bases simultaneously. (See Figure 1.3)
If successful, a positive auditory tone will sound and the Controller will indicate
you are now ready to proceed to setup your fence boundary. (See Figure 1.4)
If you are unsuccessful, a negative auditory tone will sound and the Controller
will advise you to re-check each Base to ensure that it is properly installed,
plugged in and displaying a green power light. (See Figure 1.5)
Figure 1.4
Figure 1.5
Figure 1.2
Figure 1.3
Havahart® Custom-Shape Wireless Dog Fence
8

Installing the Custom-Shape Wireless Dog Fence
Important Note:
2
Setting Up the Fence Boundary
Fence Boundary Flag Placement: ( See Illustration C )
1. Use the blue flag to mark your starting point. Place boundary
flags in the ground, 6 feet apart from one another to establish the
desired perimeter of your boundary. You do not need to place flags
across driveways if the width of the driveway is more than 6 feet.
2. Using the Controller, select “Fence” from the main menu.
(See Figure 1.6)
If more flags are needed than were
provided, they can be purchased online at
www.havahartwireless.com
3. Select “Add Fence” (See Figure 1.7)
4. Once you have confirmed that all flags are in the proper position,
press the “Complete” Button. (see See Figure 1.8)
NOTE : These flags represent the location of your wireless fence
and will be used later to train your dog. Be sure that the flags
form an enclosed area and that your house is inside the boundary.
Installing the Custom-Shape Wireless Dog Fence - Setting Up the Fence Boundary
Illustration C
Figure 1.6
Figure 1.7
Figure 1.8
Havahart® Custom-Shape Wireless Dog Fence
9

Fence Boundary Activation:
1. Starting with the blue flag, hold the Controller at waist level
over the flag and press the “Flag Here” Button. (See Figure 1.9)
If successful, a positive auditory tone will sound and “Flag Successfully
Entered!” will appear briefly and then automatically take you to the
next screen. (See Figure 2.0)
If unsuccessful, a negative auditory tone will sound and “Failure to Enter
Flag” will appear, directing you to repeat the process as the signal may
not have been properly received. (See Figure 2.1)
Figure 1.9
Figure 2.0
Figure 2.1
2. Proceed in sequential order, holding the Controller over each white
flag and pressing the “Flag Here” Button. Once you have activated
the last white flag (before returning to the blue flag), press the
“Done” Button. (See Figure 2.2)
3. If you are certain that you are finished activating boundary points
for your fence, press the “YES” Button. If you are not finished or
pressed the “Done” Button by accident, press the “NO” Button
and you will be returned to the previous screen to continue
activating boundary points. (See Figure 2.3)
If successful, a positive auditory tone will sound and the “Congratulations”
screen will appear indicating that you’ve successfully installed your
Custom-Shape Wireless Dog Fence. (See Figure 2.4)
If unsuccessful, a negative auditory tone will sound and you will be
directed to press the “Try Again” Button. (See Figure 2.5)
Figure 2.2
Figure 2.3
Important Note:
DO NOT enter the blue flag twice.
After activating the final white flag
and pressing the “Done” Button, the
fence boundary will automatically
connect to the blue flag to enclose
the area.
Installing the Custom-Shape Wireless Dog Fence - Setting Up the Fence Boundary
Figure 2.4
Figure 2.5
Havahart® Custom-Shape Wireless Dog Fence
10

Installing the Custom-Shape Wireless Dog Fence
Removing a Flag:
NOTE: You can only remove the last flag that you just activated and
only if you have not pressed “Done” to complete the installation of
your fence boundary.
If you accidentally hit the “Flag Here” Button or activated a flag in the
wrong location and wish to remove it, follow these steps:
1. Press the “UNDO LAST FLAG” Button located in the lower left corner
of the screen. (See Figure 2.6)
2. Press the “Yes” Button. (See Figure 2.7)
If successful, , a positive auditory tone will sound,”Flag Successfully
Removed” will appear briefly and then return you to flag activation. (See
Figure 2.8) If unsuccessful, a negative auditory tone will sound and you
will be directed to try again. (See Figure 2.9)
Figure 2.6
Figure 2.7
Installing the Custom-Shape Wireless Dog Fence - Setting Up the Fence Boundary
Figure 2.8
Removing a Fence Boundary:
Should you have the need to remove your fence boundary (you move
or add another building to your property or simply want to change your
fence boundry), follow these steps:
1. Using the Controller, select
“Fence” from the main
menu. (See Figure 3.0)
2. Select “Remove Fence”
(See Figure 3.1)
3. Press the “Yes” Button.
(See Figure 3.2)
Figure 2.9
If successful, “Fence Successfully
Removed” will appear briefly then
return you to adding a new fence
boundary. (See Figure 3.3)
Figure 3.3
Figure 3.0
Figure 3.1
Figure 3.2
Havahart® Custom-Shape Wireless Dog Fence
11

d
RO
R
ROAM
AMING ARE
3
ROAM
AMING ARE
d
R
Setting Up the Exclusion Zones
(optional)
What are Exclusion Zones (Ex. Zones)?
Exclusion Zones are target areas on your property where you
wish to restrict your dog’s access, such as a flower bed,
children’s play area, pool or patio. Exclusion Zones are
optional and may be added either during or after the initial
installation process. Up to 4 Exclusion Zones can be created.
The following are examples of possible Exclusion Zones:
Good Bad
Fence Boundary
Important Note:
If you choose to add an Exclusion Zone
after the initial installation process, you
will need to retrain your dog to familiarize
him with the new restricted area.
Fence Boundary
Distance of 12
feet or greater
Flower
Garden
Exclusion
Zone 1
Good
Bad
ROAMING A
Exclusion
Zone 1
Distance of 12
feet or greater
ShedShe
Pool
Exclusion
Zone 2
Distance is less
than 12 feet
Exclusion
Zone 1
AMING A
Exclusion
Zone 1
Pool
Flower
Garden
Flower
Garden
Distance is less
than 12 feet
Exclusion
Zone 2
Installing The Custom-Shape Wireless Dog Fence - Setting Up the Exclusion Zones
ShedShe
Using the Controller, you have the ability to:
s Add/Remove an Exclusion Zone
s Name an Exclusion Zone
s Turn an Exclusion Zone On or Off
Havahart® Custom-Shape Wireless Dog Fence
12

Installing the Custom-Shape Wireless Dog Fence
Exclusion Zone Flag Placement:
1. Similar to fence boundary flag placement, place white flags in the
ground, six feet apart from one another to establish the desired
Exclusion Zone boundary. The blue flag is not required for Exclusion
Zone setup. (See Illustration D)
2. Using the Controller, select “Ex.Zones” from the main menu.
(See Figure 3.4)
3. Select “Add Ex.Zone” (See Figure 3.5)
4. Once you have confirmed that all flags are in the proper position,
press the “Complete” Button. (See Figure 3.6)
NOTE : These flags will represent the location of your wireless
Exclusion Zone and will be used later to train you dog. Be sure
that the flags form an enclosed zone.
Figure 3.4
Figure 3.5
Make sure that there are at least12 feet between different
Exclusion Zones and between Exclusion Zones and the fence
boundary. (If more flags are needed than were provided, they
can be purchased online at www.havahartwireless.com.)
Installing the Custom-Shape Wireless Dog Fence - Setting Up the Exclusion Zones
Illustration D
Figure 3.6
Havahart® Custom-Shape Wireless Dog Fence
13

Exclusion Zone Activation
1. Starting with the first white flag, hold the Controller at waist level
over the flag and press the “Ex.Zone Flag Here” Button. (See Figure 3.7)
If successful, a positive auditory tone will sound and “Ex.Zone Flag
Successfully Entered!” will appear briefly and then automatically go to the
next screen. (See Figure 3.8)
If unsuccessful, a negative auditory tone will sound and “Failure to Enter
Flag” will appear, directing you to repeat the process as the signal may not
have been properly recieved. (see Figure 3.9)
Figure 3.7
Figure 3.8
Figure 3.9
2. Proceed in sequential order, holding the Controller over each
white flag and pressing the “Ex.Zone Flag Here” Button. Once you
have activated the last white flag, press the “Done” Button. (See
Figure 4.0)
3. If you are certain that you are finished activating perimeter points for
your Exclusion Zone, press the “Yes” Button. If you are not finished or
pressed the “Done” Button by accident, press the “Yes” Button
and you will be returned to the previous screen to continue
activating perimeter points. (See Figure 4.1)
If successful, a positive auditory tone will sound and “Congratulations” will
appear, indicating that you’ve successfully set up an Exclusion Zone. (See
Figure 4.2)
You have the opportunity to name
the Exclusion Zone now if you desire.
Otherwise, the Exclusion Zone will be
given the default name of EXZONE1,
EXZONE2, etc. (See “Naming an
Exclusion Zone” on page 16 for more
information.)
Figure 4.0
Figure 4.1
Installing the Custom-Shape Wireless Dog Fence - Setting Up the Exclusion Zones
Figure 4.2
4. Repeat this process to create additional Exclusion
Zones on your property.
Havahart® Custom-Shape Wireless Dog Fence
14

Installing the Custom-Shape Wireless Dog Fence
Removing an Exclusion Zone Flag:
NOTE: You can only remove the last flag that you just activated and
only if you have not pressed “Done” to complete the activation
of your Exclusion Zone.
If you accidentally hit the “Flag Here” Button or activated a flag in the
wrong location and wish to remove it, follow these steps:
1. Press the “UNDO LAST FLAG” Button located in the lower left corner
of the screen. (See Figure 4.3)
2. Press the “Yes” Button on this screen. (See Figure 4.4)
If successful, a positive auditory tone will sound, ”Ex.Zone Flag
Successfully Removed” will appear briefly and then return you to flag
activation. (See Figure 4.5) If unsuccessful, a negative auditory tone will
sound and you will be directed to try again. (See Figure 4.6)
Figure 4.3
Figure 4.4
Installing the Custom-Shape Wireless Dog Fence - Setting Up the Exclusion Zones
Figure 4.5
Removing an Exclusion Zone:
Should you have the need to permanently remove an Exclusion Zone (you
move or add/remove a structure from your property), follow these steps:
1. Using the Controller, select “Ex. Zones” from the main menu.
(See Figure 4.7)
2. Select “Remove Ex. Zone”.
3. Press the “NEXT” Button to show all of the Exclusion Zones.
(See Figure 4.8)
4. Press the Exclusion Zone that you would like to remove (can be active
or inactive).
5. If you are certain that this is the Exclusion Zone that you would like
to permanently remove, press the “Yes” Button. Press the “No”
Button to return to the previous selection screen. (See Figure 4.9)
Figure 4.6
Figure 4.7
Figure 4.8
Figure 4.9
Havahart® Custom-Shape Wireless Dog Fence
15

Removing an Exclusion Zone - continued:
6. Upon successful removal, you will be returned to the selection screen
and the Exclusion Zone that you chose to remove will no longer
appear. (See Figure 5.0)
7. Repeat this process to remove other Exclusion Zones.
Naming an Exclusion Zone:
You can name each Exclusion Zone using the Controller.
1. Select “Ex. Zones” from the main menu. (See Figure 5.1)
2. Press the “Name Ex. Zone” Button. (See Figure 5.2)
Figure 5.0
3. Press the “NEXT” Button to show all of the Exclusion Zones
(See Figure 4.8)
4. Choose which Exclusion Zone you would like to name. No Dsp Screen
5. Create the name of the Exclusion Zone. Use the left or right arrows
to highlight the letter you would like to change. Then use the up or
down arrows to choose the character that you want from A-Z and
0-9. The name can be up to 8 characters in length. Repeat this
process until you are satisfied with the name. (See Figure 5.3)
You can also change the name of an Exclusion Zone back to its
default name by pressing the “DEFAULT NAME” Button in the lower
left corner.
6. Once you are satisfied with the name of the Exclusion Zone,
press the “SAVE” Button and a confirmation will display briefly and
then take you back to Exclusion Zone Options. (See Figure 5.4)
Figure 5.1
Installing the Custom-Shape Wireless Dog Fence - Setting Up the Exclusion Zones
Figure 5.2
Figure 5.3
Figure 5.4
Havahart® Custom-Shape Wireless Dog Fence
16

Installing the Custom-Shape Wireless Dog Fence
Important Notes:
Deactivating / Reactivating an Exclusion Zone:
1. To deactivate a particular Exclusion Zone, select “Exclusion Zones”
from the main menu.
2. Press the “Turn On/Off Ex. Zone” Button. (See Figure 5.5)
3. Press “NEXT” to show all Exclusion Zones. (See Figure 5.6)
4. Press the desired Exclusion Zone Button to deactivate and it will turn
gray to indicate that it is now OFF. To reactivate the Exclusion Zone,
press the desired Exclusion Zone Button and it will turn green to
indicate that it is now ON. (See Figure 5.7)
Frequently deactivating and reactivating
Exclusion Zones is not recommended as
your dog must be retrained each time
in order to avoid receiving unnecessary
corrections.
Figure 5.5
Installing the Custom-Shape Wireless Dog Fence - Setting Up the Exclusion Zones
Figure 5.6
Figure 5.7
Havahart® Custom-Shape Wireless Dog Fence
17

4
Setting Up the Collars
Activating a Collar:
Important Note:
The Collar should not be placed on your
dog until after you have successfully
installed it on the system.
The system allows you to activate up to 4 Collars using the
Controller. Before initiating the setup process, make sure to install a
new CR123 Battery in the Collar.
1. Position the Collar within 10 feet of the Master Base
while you are inside the house.
2. Select “Collars” from the main menu. (See Figure 5.8)
3. Select the “Add Collar” Button (See Figure 5.9)
4. Press the “Install Collar” Button (See Figure 6.0)
If successful, a positive auditory tone will sound and “Congratulations”
will appear, indicating that the Collar has been properly set. You may
proceed to name your Collar. If you choose not to name it, the Collar will
be given the default name of Collar1, Collar2, etc. For more information on
“Naming a Collar” see page 19. (See Figure 6.1)
If unsuccessful, , a negative auditory tone will sound and you will be
directed to try again. (See Figure 6.2)
If you plan to activate more than 1
Collar, DO NOT insert batteries in
all the Collars at the same time. It
is necessary to insert batteries and
activate the Collars ONE AT A TIME.
Each Collar uses a CR123 Battery.
Installing the Custom-Shape Wireless Dog Fence - Setting Up the Collars
Figure 5.8
Figure 6.1
Figure 6.2
Figure 5.9
Figure 6.0
Havahart® Custom-Shape Wireless Dog Fence
18

Installing the Custom-Shape Wireless Dog Fence
Naming a Collar:
You can name each Collar using the Controller.
1. Select “Collars” from the main menu. No Dsp Screen
2. Press the “Name Collar” Button. (See Figure 6.3)
3. Press “NEXT” to show all Collars.
4. Press the Collar Button you would like to name. No Dsp Screen
5. Create the name of the Collar. Use the left or right arrows to
highlight the letter you would like to change. Then use the up or
down arrows to choose the character that you want from A-Z and
0-9. The name can be up to 8 characters in length. Repeat this
process for each letter until you are satisfied with the name. You
can also change the name of a Collar back to its default name by
pressing the “DEFAULT NAME” Button in the lower left corner
Installing the Custom-Shape Wireless Dog Fence - Setting Up the Collars
(See Figure 6.4)
Important Note:
The correction level of the Collar may be
adjusted by the Controller based on the
size and temperament of your dog. There
are 5 static correction levels and one tone
level (sound only). The default correction
level of the Collar is tone.
It is recommended to start with a lower
correction level when training your dog.
Figure 6.3
6. Once you are satisfied with the name of the Collar, press
the “SAVE” Button and (See Figure 6.5) will display.
Adjusting the Correction Level of a Collar:
1. To adjust the correction level of a Collar, first select “Collars” from the
main menu. No Dsp Screen
2. Press the “Edit Collar Correction Level” Button. (See Figure 6.3)
3. Press “NEXT” to show all of the Collars.
4. Press the Collar Button that you wish to adjust. No Dsp Screen
5. Using the up or down arrow, adjust the correction level to the desired
setting -- 5 being the highest correction level and 1 being the lowest
correction level. (See Figure 6.6)
6. Press “APPLY” and a confirmation will display briefly and then return
you to Collar Options. No Dsp Screen
Figure 6.4
Figure 6.5
Havahart® Custom-Shape Wireless Dog Fence
19
Figure 6.6

Removing a Collar:
1. To permanently remove a Collar, select “Collars”
from the main menu.
CAUTION:
Before fitting the Collar on your dog,
make sure the battery is not in the
Collar. Insert the battery after the Collar
has been fitted to your dog.
2. Press the “Remove Collar” Button. (See Figure 6.7)
3. Press “Next” to show all Collars. No Dsp Screen
4. Press the Collar Button that you wish to permanently remove.
5. If you are certain that this is the Collar that you would like to
permanently remove, press the “Yes” Button. Press the “No”
Button to return to the previous selection screen. (See Figure
6.8)
Select “No” if you picked the wrong Collar or if you have
changed your mind and you will be returned to the list showing
all Collars.
6. Upon successful removal, you will be returned to the selection
screen and the Collar that you chose to remove will no longer
appear. No Dsp Screen
7. Repeat this process to remove other Collars.
Important Notes:
To help prevent skin irritation, it is
recommended that you never leave
the Collar on your dog for more than 12
consecutive hours at a time.
about dog growing.
Figure 6.7
Add note
Installing the Custom-Shape Wireless Dog Fence - Setting Up the Collars
Figure 6.8
Havahart® Custom-Shape Wireless Dog Fence
20

Installing the Custom-Shape Wireless Dog Fence
Fitting a Collar:
To ensure safe and effective operation of the system, it is
important to make sure that the Collar is fitted properly.
1. Be sure the fence is turned off at the Controller.
2. Position the Collar high on your dog’s neck, with the probes
facing upward centered on your dog’s neck.
3. Make sure that the probes maintain contact with the skin.
- The Collar is factory-installed with long probes for
thick or long-haired breeds.
- Short probes are also provided for short-haired dogs.
4. To change the probes, simply unscrew the long probes and
replace them. Be sure the rubber insulator is between the probe
and the Collar strap. Hand tighten the probes as far as you can.
Do not over tighten.
Installing the Custom-Shape Wireless Dog Fence - Setting Up the Collars
5. Adjust the Collar to fit snugly but not tightly. You should be able to
slide the tip of one finger between your dog’s coat and one of the
probes on the Collar. The tip of your finger should not be able to slip
between the two easily, but with some effort. It should be a tight
squeeze. Separately, you should be able to slide one finger between
the strap of the Collar and the back of your dog’s neck. (See Figure 6.9)
Important Notes:
The Collar should be snug enough so that
it does not move when your dog moves.
If your dog is going to continue to grow or
grows a long winter coat, leave extra room
before trimming off the excess.
To help prevent skin irritation, it is
recommended that you never leave
the Collar on your dog for more than 12
consecutive hours at a time.
WARNING
If you do not remove the Collar from your
dog’s neck at least every 12 hours AND
clean your dog’s neck and the Collar,
Pressure Necrosis may occur, which is a
deterioration of your dog’s skin. It is
caused by extended contact to the
pressure of the probes of the Collar
combined with the oil and dirt that may
accumulate on the probes if not kept clean.
6. Once Collar is adjusted to correct length, remove Collar and trim the
excess using scissors.(See Figure 7.0)
s During training, do not let your dog wear the Collar without direct
supervision.
s You should be able to slide the top of one finger between your dog’s coat
and one of the probes on the Collar. Your finger should not be able to slip
between the two easily, but with a little effort. It should be a tight squeeze.
s Each time you take the Collar off your dog, look for any indication of a sore
or rash.
s Should you find any indication of a sore or rash on your dog, stop using the
Collar for a few days.
s If the rash or sore exists for more than 2 days, consult your veterinarian.
s Wash your dog’s neck weekly with mild soap and a wash cloth and then
rinse clean.
s Wash the probes of the Collar weekly with mild soap and a wash cloth and
then rinse clean.
Havahart® Custom-Shape Wireless Dog Fence
21
Figure 6.9
Figure 7.0

Training Your Dog
Important Note:
IMPORTANT REMINDERS:
Please read the following information completely before you
begin training:
s Proper training of your dog is essential to help ensure the
successful operation of your Radial-Shape Wireless Dog Fence.
s We recommend that you train your dog for a minimum of 14
consecutive days. Use a calendar to track your dog’s progress.
s Keep your training sessions short and frequent--approximately 10-15 minutes long, 2-3 times a day.
s Every dog is unique and may respond differently to the training depending on his/her own temperament
and ability to learn. For this reason, you may need to adjust your training schedule accordingly.
s It may be necessary to decrease the speed of the training schedule or add more training days if your dog seems
to be under stress. Signs that you dog may be under stress include: Tail between legs, ears pulled back, refusal to
go outside the home and nervous shaking.
The Custom-Shape Wireless Dog Fence
from
Havahart
It is necessary to contain your dog using a
leash or other means during training.
®
is not a physical boundary.
Training Your Dog
s Before beginning Collar-assisted training, allow your dog to get used to wearing the Havahart® Collar with the
battery removed.
s Have fun with your dog during the training process and end each session with positive praise and play time
within 11 feet of the fence boundary.
s Be patient and consistent in your approach.
s Remove the Havahart® Collar after each training session.
s If you need to take your dog out of the Roaming Area during training, remove the Havahart® Collar and
either carry your dog out or take him out in a car.
s If you are training more than one dog, train each dog separately.
s It is important that you complete the entire training process and do not skip any phases.
Havahart® Custom-Shape Wireless Dog Fence
22

Training Your Dog
Training Your Dog
PRELIMINARY PHASE -- Flag AwarenessTraining - Optional (2-3 training sessions per day: each 10-15 minutes long)
Completing this phase will add 3 days to your training, but will give your dog more time to get used to the
flags if you choose to complete it
1. Turn the fence OFF
s Navigate to the Menu where Setup Menu and Display Options are listed
s
Press the blue flashing Power Button to Turn Off the Fence Boundary
s Once finished, Press the Power Button again to Turn On the Fence Boundary
2. Fit the Havahart
3. Attach a 6’ leash to the other collar and make sure that this collar does not apply pressure to the probes on the
Havahart
4. Using the leash, walk your dog around inside the Roaming Area for 5 minutes, avoiding contact with the
boundary flags.
5. Approach one of the boundary flags and shake it while saying ‘No. Bad Flags’ in a firm, disapproving tone. Do not
yell or frighten your dog.
6. Step back from the flag and praise your dog with treats in the Roaming Area
®
Collar around your dog’s neck. Place a different non-metal collar on top of the Havahart® Collar.
®
Collar as this could hurt your dog when you pull on the leash.
7. Repeat this process at several different boundary flags.
8. End with lots of playtime and praise for your dog within 11 feet of the fence boundary.
9. Be sure to remove the Collar from your dog after each training session.
NOTE: You may proceed to PHASE 1 when your dog refuses to go near the flags but will walk
anywhere within the Roaming Area.
Screen 41
Havahart® Custom-Shape Wireless Dog Fence
23

PHASE 1 -- Passive Training -- DAY 1-3 (2-3 training sessions per day: each 10-15 minutes long)
Training Your Dog
1. Turn fence ON and set the correction level to TONE-ONLY. Refer to page 4 of this instruction manual to
properly adjust the correction level of your Havahart
2. To ensure that the system is working properly, take the Havahart
®
Collar to tone-only using the controller.
®
Collar by itself out to a boundary flag
and listen for the tone.
3. Fit the Havahart Collar around your dog’s neck. Place a different non-metal collar on top of the
Havahart
4. Attach a 6’ leash to the other collar and make sure that this collar does not apply pressure to the probes on
the Havahart
5. Using the leash, walk your dog around inside the Roaming Area for 5 minutes, avoiding contact with the
®
Collar.
®
Collar as this could hurt your dog when you pull on the leash.
boundary flags.
6. Calmly approach the boundary flag line -- do not look at your dog.
7. Give your dog the opportunity to pass the flag line. As he does, he will hear a tone near the boundary and
he will continue to hear the tone when he crosses the line.
8. Allow your dog to stay in the boundary area for a few seconds and then pull him back to the
Roaming Area.
9. Gently shake a boundary flag to remind your dog that the flags represent an area of discomfort.
10. Step back from the flag and praise your dog with treats in the Roaming Area.
11. Repeat this process at several different boundary flags.
12. As training progresses over the next 2 days, you will notice that when your dog hears the tone, he will
return to the Roaming Area without your prompting.
13. End with lots of playtime and praise for your dog within 11 feet of the fence boundary.
14. Be sure to remove the Collar from your dog after each training session.
NOTE: You may proceed to PHASE 2 when your dog refuses to go near the flags when you
approach and actually turns to go back to the Roaming Area without your aid.
Havahart® Custom-Shape Wireless Dog Fence
24

Training Your Dog
Training Your Dog
PHASE 2 -- Active Training -- DAY 4-7 (2-3 training sessions per day: each 10-15 minutes long)
1. Refer to page 4 of this instruction manual to properly adjust the correction level of your Havahart
Controller to static correction level 1.
2. To ensure that the system is working properly, attach the Heart-Shaped Collar Tester to the Havahart® Collar probes
and carry the Havahart
3. Fit the Havahart
4. Attach a 6’ leash to the other collar and make sure that this collar does not apply pressure to the probes on the
Havahart
5. Using the leash, walk your dog around inside the Roaming Area for 5 minutes, avoiding contact with the
boundary flags.
6. Calmly approach the boundary flag line -- do not look at your dog.
7. Give your dog the opportunity to pass the flag line. As he does, he will first hear a tone near the boundary and will
then receive a low static correction when he crosses the line.
8. Allow your dog to stay in the boundary area for a few seconds and then pull him back to the Roaming Area.
®
Collar by the strap to a boundary point and watch the Heart-Shaped Collar Tester light up.
®
Collar around your dog’s neck. Place a different non-metal collar on top of the Havahart® Collar.
®
Collar as this could hurt your dog when you pull on the leash.
®
Collar using the
9. Gently shake a boundary flag to remind your dog that the flags represent an area of discomfort.
10. Now step back a few feet from the flags and praise your dog with treats.
11. Repeat this process at a few boundary flags.
NOTE: Multiple corrections may make your dog nervous or anxious during this phase of training.
12. If your dog does not respond to the static correction, you will need to use the Controller to increase the static
correction to level 2 or higher as necessary.
13. End with lots of playtime and praise for your dog within 11 feet of the fence boundary.
14. Be sure to remove the Havahart
®
Collar from your dog after each training session.
NOTE: You may proceed to PHASE 3 when your dog refuses to go near any of the boundary flags.
Havahart® Custom-Shape Wireless Dog Fence
25

PHASE 3 -- On-Leash Distractions -- DAY 8-11 (2-3 training sessions per day: each 10-15 minutes long)
Training Your Dog
1. Fit the Havahart Collar around your dog’s neck. Place a different non-metal collar on top of the
Havahart
2. Attach a 6’ leash to the other collar and make sure that this collar does not apply pressure to the probes on
the Havahart
3. Using the leash, walk your dog toward the boundary flags. Create a distraction by:
®
Collar.
®
Collar as this could hurt your dog when you pull on the leash.
1. Tossing a toy or treat past the boundary line.
2. Having someone walk by and not pay attention to your dog
3. Having someone walk his/her own dog outside of the boundary.
4. If your dog does not move toward the distraction, immediately praise him and offer him a treat.
5. If your dog moves toward the distraction, allow him to walk through the boundary line and feel the
correction. Promptly lead him back to the Roaming Area if he does not return within a few seconds.
6. Reach out and gently shake a flag and then step back a few feet from the boundary line.
7. Repeat this process at several different boundary flags.
8. If your dog does not respond to the static correction, use the controller to increase the static correction by
one level or more as necessary.
9. End with lots of playtime and praise for your dog within 11 feet of the fence boundary.
10. Be sure to remove the Havahart
®
Collar from your dog after each training session.
NOTE: You may proceed to PHASE 4 when your dog refuses to go beyond the boundary
flags--even with distractions--but will walk anywhere within the Roaming Area.
Havahart® Custom-Shape Wireless Dog Fence
26

Training Your Dog
Training Your Dog
PHASE 4 -- Off-Leash Supervision -- DAY 11-14
Begin with short training sessions 10-15 minutes in length and gradually increase the sessions
to an hour or more.
1. Do not leave your dog unattended during this phase of training.
2. Fit the Havahart
3. Walk around inside the Roaming Area and play with your dog while off the leash.
4. Now focus your attention elsewhere and walk to another part of the yard while keeping an eye on your dog.
5. If your dog crosses the flag line and goes beyond the boundary, remove the Havahart
back inside the Roaming Area. Reach out and gently shake a flag to remind him that the flags represent an
area of discomfort.
6. Repeat this process until your dog no longer leaves the Roaming Area.
PHASE 5 -- Dog Monitoring -- DAY 15 AND BEYOND
®
Collar around your dog’s neck. Place a different non-metal collar on top of the Havahart® Collar.
®
Collar and walk him
1. Your dog should now be comfortable within the Roaming Area and reluctant to cross the boundary line with or
without distractions.
2. Your dog may require training to become comfortable leaving the Roaming Area for activities such as walks or
riding in the car. This may be accomplished by:
1. Removing the Havahart
®
Collar and walking your dog outside of the Roaming Area while on a leash. Cross
the same area of the boundary line each time, giving the command ‘OK’ and praising your dog for crossing this
specific area. Always leave this area with your dog on a leash.
2. Removing the Havahart
®
Collar, putting your dog in the car and driving outside the Roaming Area.
NOTE: Within 60-90 days, you can begin to gradually remove the boundary flags by taking
away every other flag, every few days.
CONGRATULATIONS TO YOU AND YOUR DOG FOR SUCCESSFULLY COMPLETING
ALL PHASES OF TRAINING!
Havahart® Custom-Shape Wireless Dog Fence
27

Warranty Information
Woodstream warrants that this product will be free from defects in material and workmanship under normal use
for 1 year from the date of original consumer purchase.
Within 30 days of the original consumer purchase, this product is covered by Woodstream”s 30-day money back
guarantee. If you are not satisfied with the performance of this product, you may return it with the original receipt
to the place of purchase for a full refund.
After 30 days and during the initial 12 month period Woodstream will, at our option, repair or replace the defective
part(s) for a $15 processing fee. Shipping costs to our facility are not covered by the Warranty. A copy of the original
receipt showing the place and date of purchase must accompany the returned item. Please contact Woodstream
for a Return Authorization Number (RGA), 800-800-1819, before returning the product to Woodstream. Products
without an RGA number will be refused.
After one year from the date of the original consumer purchase, a prorated schedule is available to provide
additional coverage. For information regarding this schedule, please contact our Consumer Care Department at
800-800-1819 ext 490.
Use the following address when returning product via UPS or U. S. mail:
WOODSTREAM CORPORATION
69 NORTH LOCUST ST.
LITITZ, PA 17543
ATTN: CONSUMER CARE DEPARTMENT
RGA# _______________
Warranty Information
This Limited Lifetime Warranty is offered only to the original consumer purchaser. This Limited Lifetime Warranty is subject to the condition that any covered
defect occurs under normal conditions of use and maintenance and that Woodstream receives prompt written notice of the discovery of the defect within
the Limited Lifetime Warranty period. It does not apply to damage or failures that result from physical abuse or misuse of the product. The Limited Lifetime
Warranty is void if any attempts are made to alter or repair the product prior to returning it to our facility within the Limited Lifetime Warranty period. This
Limited Lifetime Warranty does not cover lost parts, broken probe studs or items displaying excessive wear. Wire that has been removed from the spool and /
or placed in the ground and flags that are rusted or have been used are examples of items displaying excessive wear.
EXCEPT AS SPECIFICALLY SET FORTH HEREIN, THERE ARE NO WARRANTIES, REPRESENTATIONS, PROMISES OR ASSURANCES BY WOODSTREAM, EITHER EXPRESSED
OR IMPLIED, WHETHER BY LAW, CUSTOM, PREVIOUS TRANSACTION OR OTHERWISE, INCLUDING WITHOUT LIMITATION, WARRANTIES OR MERCHANTABILITY
OR FITNESS FOR A PARTICULAR PURPOSE WITH REGARD TO THE PRODUCT. WOODSTREAM”S LIABILITY IS SOLELY AS STATED HEREIN AND NO OTHER LIABILITY
SHALL EXIST, WHETHER BY NEGLIGENCE, STRICT LIABILITY, TORT OR ANY OTHER CAUSE OR ACTION. ALL LIABILITIES FOR WOODSTREAM STATED HEREIN ARE
THE SOLE AND EXCLUSIVE REMEDIES OF THE ORIGINAL CONSUMER PURCHASER. IN NO EVENT SHALL WOODSTREAM BE LIABLE FOR ANY CONSEQUENTIAL
OR INCIDENTAL DAMAGES, OR ANY OTHER TYPE OF DAMAGE WHICH MAY BE CAUSED IN WHOLE OR IN PART BY ANY FAILURE, DEFECT OR PROBLEM OF THE
PRODUCT
This product is not a substitute for traditional obedience training. Woodstream does not guarantee the effectiveness of this product due to variances in canine
personality, temperament and influences outside of Woodstream”s control. Some states do not allow the exclusion or limitation of consequential damages, so
the above limitation or exclusion may not apply in all instances.WFF 0807
For more information go to: www.havahartwireless.com
If you have any questions or concerns, contact Woodstream Consumer Care at 1-800-800-1819 and PRESS 1 between 8 am - 8 pm EST
Monday through Friday and 8 am - 2 pm on Saturday.
Havahart® Custom-Shape Wireless Dog Fence
28

Wireless Fence Planning Grid
Wireless Fence Planning Grid
Havahart® Custom-Shape Wireless Dog Fence
29


Havahart
®
Woodstream Corporation
69 North Locust Street
Lititz, PA 17543 | 1-800-800-1819
www.havahart.com
www.havahartwireless.com
 Loading...