

Page 1
WE 430
Originalbetriebsanleitung
Originalbetriebsanleitung
Original operating instructions
Original operating instructions
Notice d‘instructions d‘origine
Notice d‘instructions d‘origine
Istruzioni per l‘uso originali
Istruzioni per l‘uso originali
Originele gebruiksaanwijzing
Originele gebruiksaanwijzing
Originale driftsvejledning
Originale driftsvejledning
Alkuperäinen käyttöohjekirja
Alkuperäinen käyttöohjekirja
Originale driftsanvisningen
Originale driftsanvisningen
Originalbruksanvisning
Originalbruksanvisning
Originální návod k obsluze
Originální návod k obsluze
Eredeti üzemeltetési útmutató
Eredeti üzemeltetési útmutató
Oryginalna instrukcja obsugi
Oryginalna instrukcja obsugi
Originalna uputa za rad
Originalna uputa za rad
Originálny návod na obsluhu
Originálny návod na obsluhu
Izvirno navodilo za obratovanje
Izvirno navodilo za obratovanje
Page 2
3
M1 M2 M3
M4 M5 M6 M7
M10 M11
M8 M9
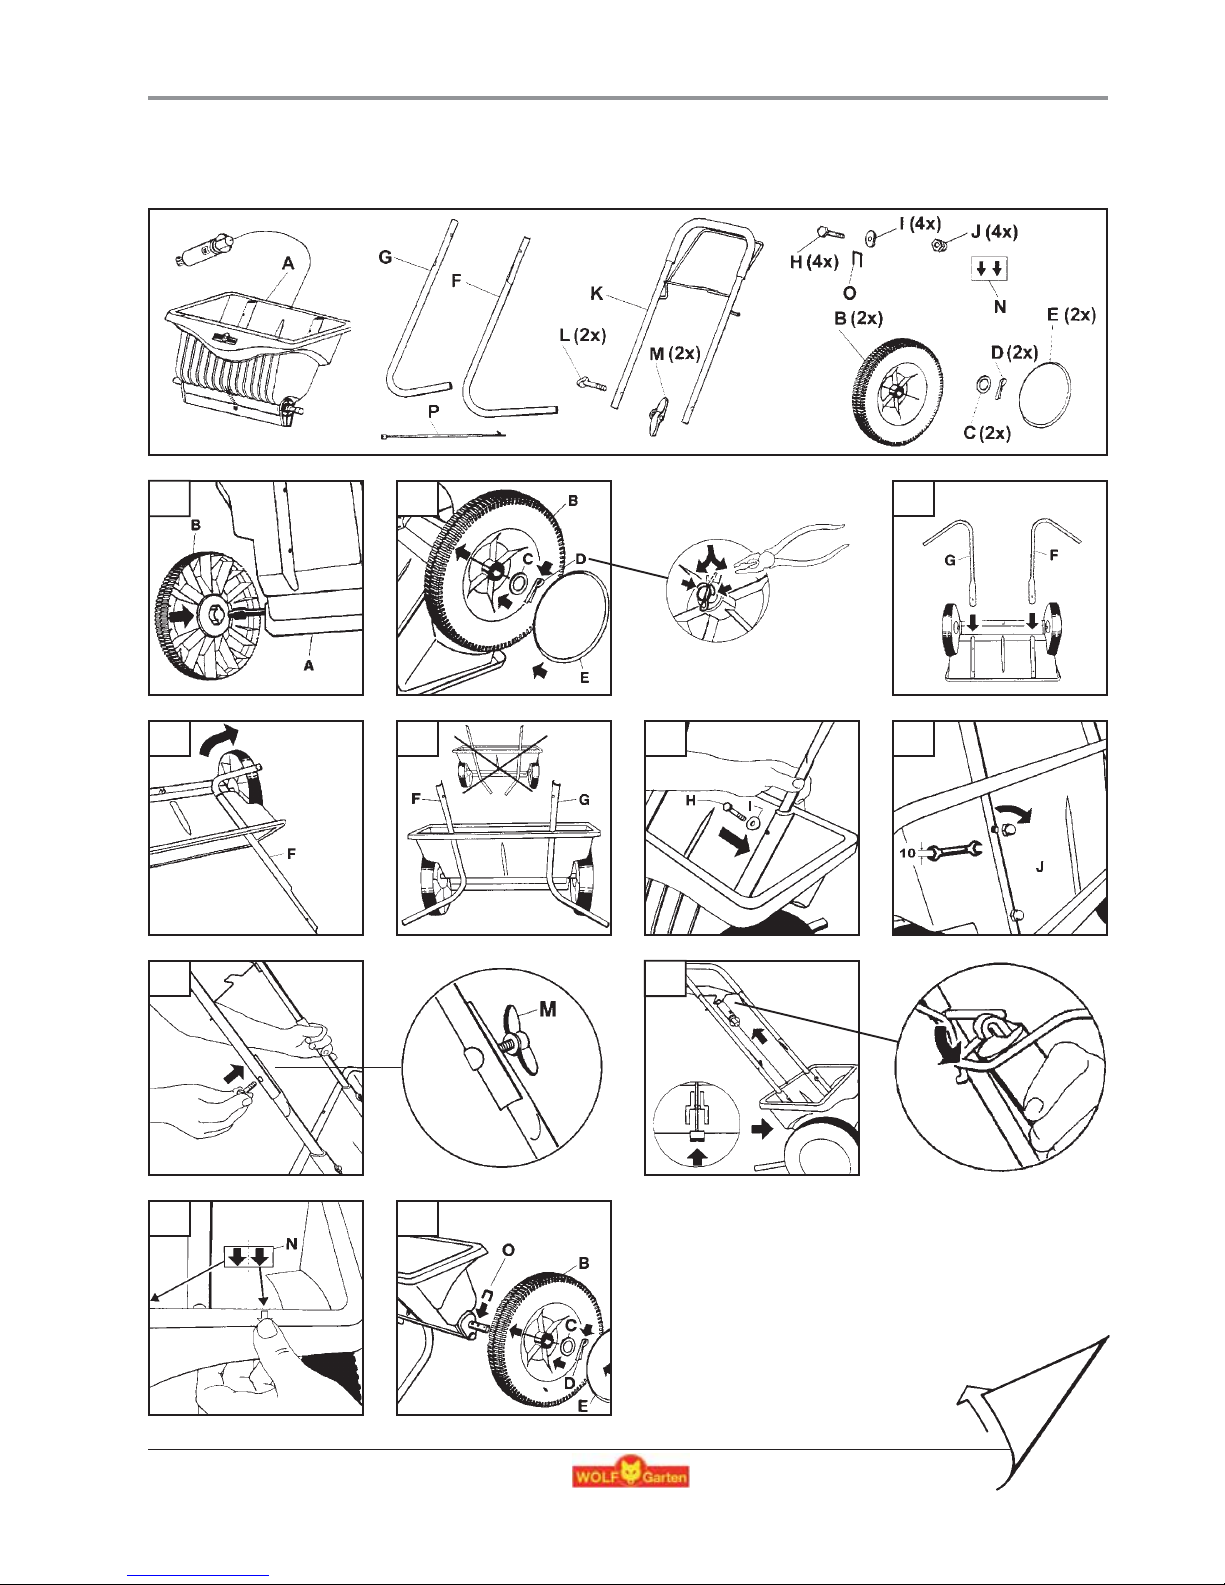
- Montage - Assembly - Montage - Montaggio - Montage - Montering - Asennus - Montering -
- Montering - Montáž - Szerelés - Montaž - Montaža - Montážny návod - Montaža -
Page 3
M12 M13
B1 B2 B3
M14
1
2
3
- Montage - Assembly - Montage - Montaggio - Montage - Montering - Asennus - Montering -
- Montering - Montáž - Szerelés - Montaž - Montaža - Montážny návod - Montaža -
- Betrieb - Operation - Utilisation - Messa in opera - In werking stellen - Drift - Käyttö -
- Drift - Funktion - Provoz - Üzemeltetés - Eksploatacja - Pogon - Prevádzka - Obratovanje -
Page 4
4
12
12
12
12
12
20
21-22
Forord
Montering
Drift
Vedlikehold
Garantibetingelser
Instillinger
Garanti
7
7
7
7
7
20
21-22
Préface
Montage
Fonctionnement
Entretien
Conditions de la garantie
Réglages
Garantie
8
8
8
8
8
20
21-22
Prefazione
Montaggio
Messa in opera
Manutenzione
Condizioni di garanzia
Regolazioni
Garanzia
19
19
19
19
19
20
21-22
Uvod
Montaža
Obratovanje
Servisiranje
Garancijski pogoji
Nastavitve trosenja
garancijske kartice
15
15
15
15
15
20
21-22
Előszó
Szerelés
Üzemeltetés
Karbantartás
Garanciális feltételek
Beállítások
Garancia
14
14
14
14
14
20
21-22
Předmluva
Montáž
Provoz
Údržba
Záruční podmínky
Nastavení
Záruka
16
16
16
16
16
20
21-22
Wstęp
Montaž
Eksploatacja
Ostrezeżenie
Warunki gwarancji
Ustawienia
Gwarancja
17
17
17
17
17
20
21-22
Predgovor
Montaža
Pogon
Održavanje
Uvjeti garancije
Podešavanja rasipanja
Grancijsku kartu
18
18
18
18
18
20
21-22
Predslov
Montážny návod
Prevádzka
Údržba
Podmienky záruky
nastavenie rozmetu
Záručného
9
9
9
9
9
20
21-22
Voorword
Montage
Gebruik
De verzorging
Garantievoorwaarden
Afstellingen
Garantie
10
10
10
10
10
20
21-22
Forord
Montering
Drift
Vedligeholdelse
Garantibetingelser
Instillinger
Garanti
5
5
5
5
5
20
21-22
Vorwort
Montage
Betrieb
Wartung
Garantiebedingungen
Streueinstellungen
Garantie
6
6
6
6
6
20
21-22
Preface
Assembly
Operation
Maintenance
Guarantee terms
Settings
Guarantee
13
13
13
13
13
20
21-22
Preface
Montering
Drift
Underhåll
Garantivillkor
Inställningar
Garanti
11
11
11
11
11
20
21-22
Esipuhe
Asenus
Käyttö
Huolto
Takuuehdot
Säädöt
Takuu
- Inhalt - Contents - Sommaire - Contenuto - Inhoud - Inhold - Sisällys -
- Innhold - Innehåll - Obsah - Tartalom - Treść - Sadržaj - Obsah - Vsebina -
Page 5

5
Ihnen zu Ihrem Traumrasen zu verhelfen und bewährtes noch deutlich zu verbessern gehört bei WOLF-Garten zur guten Tradition.
Unsere Rasenexperten haben die Aufgabe, die Produkte zu
entwickeln die es ermöglichen, dass jedermann unabhängig von
Klima und Boden seinen Traumrasen haben kann. Mit unserem
Rasensaatgut und den Rasenspezialdüngern ist dieses Ziel erreicht.
Saatgut und Dünger kann man jedoch nur mit einem Streuwagen
exakt und genau ausbringen. Dieser Streuwagen wurde gemäß
den Anforderungen aus der professionellen Anlagepflege völlig neu
entwickelt. Das Ergebnis: der erste Exakt-Streuwagen zum präzisen
und dosierten Ausbringen von Saatgut und Dünger.
Die spezielle Streumechanik sorgt dafür, dass die unterschiedlichen
Streumittel exakt dosiert und präzise auf dem Boden verteilt
werden können. Besonders praktisch ist der Streu-Stopp-Bügel am
Gerätegriff. Damit können Sie exakt bestimmen, wo gestreut wird.
Wir wünschen Ihnen viele erholsame Stunden auf Ihrem Traumrasen.
Kalibrieren (Grundeinstellung) der Streuschiene (Abb.
M12/M13/M14)
• Stellen Sie die Einstellschraube am Dosierer auf Nr. 5. Die 5
muss vollständig zu erkennen sein (M12).
•
Verbinden Sie den Bügel fest am Griff mit dem Blitzbinder (M13).
• Dann legen Sie den Streuwagen nach vorne um. Kontermutter
M14 (1) lösen und Kalibrierschraube M14 (2) soweit drehen,
bis die vordere Kante der Streuschiene M14 (3) und die
Markierung übereinstimmen (siehe Pfeil Abb. M14), bzw. der
Abstand von der unteren Kante bis zur Markierung 6 mm
beträgt (M14 Q). Danach halten Sie die Kalibrierschraube (2)
und drehen die Kontermutter (1) fest an.
• Lösen Sie nun den Blitzbinder wieder und Ihr Streuwagen ist
einsatzbereit (M13).
Streugut einfüllen
Nicht auf der Rasenfläche, weil eventuell versehentlich
verschüttetes Streugut verloren geht, oder der Rasen durch
extreme Überdüngung verbrennt.
Streumenge einstellen (Abb. B1)
• Beachten Sie zur Streueinstellung die Hinweise auf dem Etikett
oder Beiblatt. Achten Sie auch auf die Hinweise auf den Dünger/
Saatgut Verpackungen.
• Gewünschte Streueinstellung (Zahl) mit Einstellschraube am
Dosierer einstellen.
Streumuster (Abb. B2)
Ein gutes Streumuster erreichen Sie, wenn Sie in der Längsrichtung
des Rasens ausstreuen. Achten Sie darauf, dass so überlappend
gestreut wird, dass keine Fläche unbestreut bleibt. Es ist zweckmäßig,
an den Kopfseiten zunächst einige Streubreiten quer auszustreuen.
Wir empfehlen:
• Den Streuwagen schieben, bevor Sie den Streubügel anheben!
• Den Streubügel freigeben, bevor Sie aufhören zu laufen.
Hinweis (Abb. B3/M9/M10/M11)
Wenn Sie nur gerade Bahnen fahren, empfehlen wir den Einbau des
Mitnehmers. Sie treiben die Streuwelle nun mit beiden Rädern an.
Wartung und Pflege
• Nach jedem Einsatz:
- Streuwagen entleeren
- Behälter gründlich säubern
- Streuöffnungen und Führungsschiene mit harter Bürste
gründlich reinigen.
Bei starker Verschmutzung (Verkleben) waschen Sie den
Streuwagen mit heißem Wasser. Für den nächsten Einsatz muss
der Streuwagen völlig trocken sein.
Erneutes Kalibrieren (Grundeinstellung)
Die Grundeinstellung kann sich im Laufe der Zeit verändern.
Gehen Sie bei einer erneuten Kalibrierung wie unter Montage,
M12/M13/M14 beschrieben vor.
In jedem Land gelten die von unserer Gesellschaft oder dem Importeur
herausgegegeben Garantiebestimmungen. Störungen beseitigen wir
an ihrem Gerät im Rahmen der Gewährleistung kostenlos, sofern ein
Material- oder Herstellungsfehler die Ursache sein sollte. Im Garantiefall wenden Sie sich bitte an Ihren Verkäufer oder die nächstgelegene
Niederlassung.
Vorwort
Montage
Betrieb
Wartung
Garantie
Page 6

6
The WOLF-Garten tradition comprises the principles of helping you to
create your dream lawn as well as making appreciable improvements
to established lawns. It is the responsibility of our lawn experts to
develop the products which make the possibility of creating a dream
lawn available to everyone, independent of climate and soil conditions.
This goal is achieved using our lawn seed and special lawn fertiliser.
However, seed and fertiliser can only be distributed efficiently using a
scattering car. This scattering car has been completely redeveloped
according to the requirements of professional garden care.
The result: the first efficient scattering car for the precise and measured distribution of seed and fertiliser.
The special scattering mechanism ensures that the various scattering
materials are distributed over the ground precisely and in accurately
measured amounts. The scatter-stop-lever fitted to the handle of the
unit is particularly practicable. This can be used for accurate determination of the scattering areas.
We would like to wish you many hours of recreation on your dream lawn.
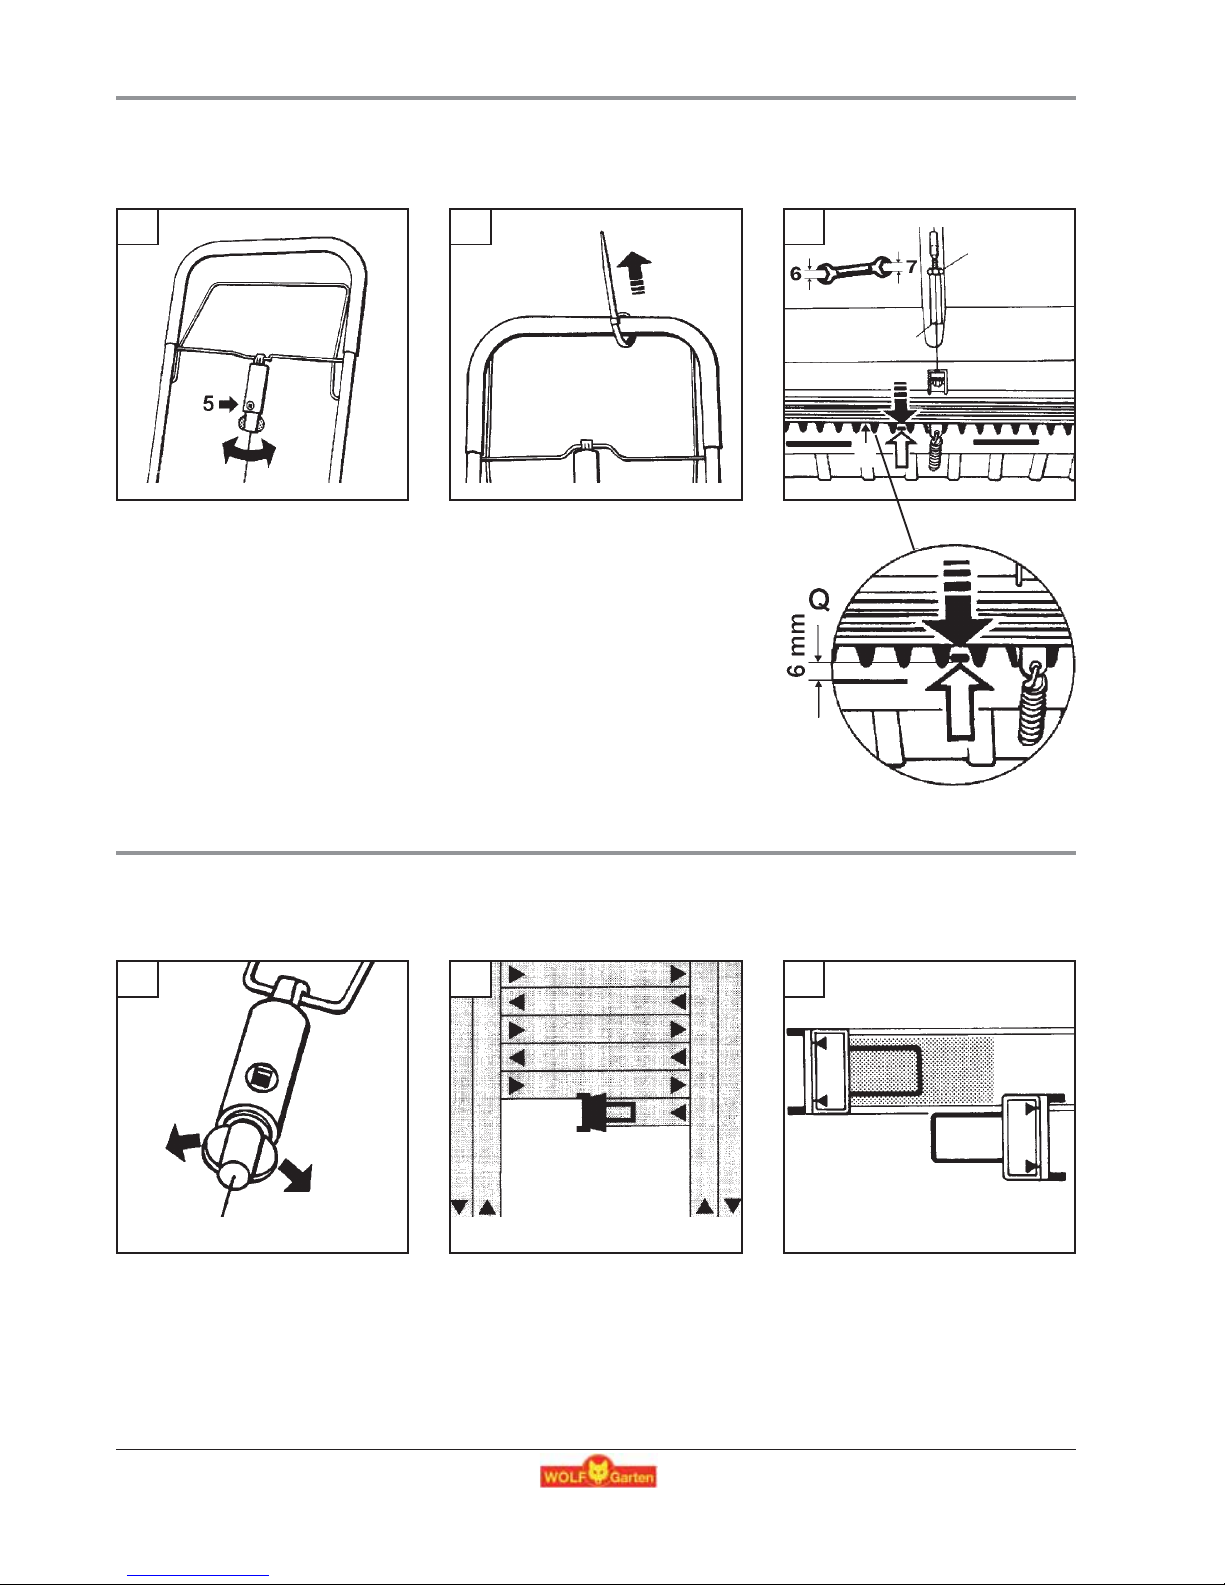
Calibration (basic setting) of the scattering rail (fig. M12/
M13/M14)
• Set the adjustment screw on the dosing device to no. 5 (M12).
The number 5 must be fully identifiable.
• Fix the lever to the handle using a quick fastener (M13).
• Then tip the scattering car forwards. Loosen the lock nut M14
(1) and turn the calibration screw M14 (2) until the front edge
of the dispersal bar M14 (3) and the marking are aligned (see
arrow in figure M14), or until there is 6 mm clearance between
the lower edge and the marking (M14 Q). Then hold the
calibration screw (2) and tighten the lock nut (1).
• The quick fastener must then be released (pull the small strap
according to M14, D). Your scattering car is now ready for use.
The quick fastener is reusable M13).
Fill with scattering material
• This should not be done on the lawn as scattering material may
be lost through accidental spillage or the lawn may be damaged
through extreme over-fertilisation.
Set scattering quantity (fig. B1)
• For scattering settings, please observe the instructions on the
label or accompanying leaflet. Please also observe the instruc-
tions on the packaging.
• Set the desired scattering settings (number) via the adjustment
screw on the dosing device (illus.).
Scattering pattern (fig. B2)
A good scattering pattern can be achieved by scattering in
the longitudinal direction of the lawn. It must be ensured that
scattering overlaps, so that no areas are left uncovered. It is
recommended that several strips are scattered in the lateral
direction at the ends of the lawn.
We recommend that you:
• push the scattering car before lifting the scattering lever;
• release the scattering lever before you stop walking.
Note (fig. B3/M9/M10/M11)
If you only mow in straight lines, we recommend the installation of the
coupler. The scattering shaft is then driven by both wheels.
Maintenance and care
• After each utilisation
- Empty scattering car
- Thoroughly clean container
- Clean scattering apertures using a stiff brush.
Wash the scattering device with of water if extremely dirty (sticky
deposits). The scattering device must be thoroughly dry before
the next utilisation.
Recalibrate (basic setting)
The basic setting can change over time. To recalibrate, proceed
as described under assembly, M12/M13/M14.
The warranty rules issued by our company or the importer apply to
every country. As part of the warranty, we remedy malfunctions on your
appliance free of charge provided that this malfunction is caused by
a material or manufacturing defect. In the event of a warranty claim,
please turn to your dealer or the nearest branch office.
Preface
Assembly
Operation
Maintenance
Warranty
Page 7

7
Il est de tradition chez WOLF-Garten de vous aider à obtenir la pelous
de vos rêves et d’améliorer nettement ce qui a déjà fait ses preuves.
Nos experts en matière de gazon ont pour mission de développer
les produits qui permettront à chacun d’obtenir, indépendamment
du climat et du sol, la pelouse de ses rêves. Avec nos semences
et l’engrais spécial pour gazon, ce but est atteint. L’épandage des
semences et de l’engrais ne peut cependant être effectué avec
précision qu’à l’aide d’un épandeur. Cet épandeur est de conception
entièrement nouvelle pour répondre aux exigences d’un traitement
professionnel des surfaces. Résultat: c’est le premier épandeur de
haute précision pour l’épandage dosé de semences et d’engrais.
Le mécanisme spécial d’épandage garantit un dosage exact et précis
et permet de répartir les matières les plus différentes sur le sol. L’étrier
d’arrêt d’épandage situé sur le guidon est particulièrement pratique. Il
vous permet de déterminer avec précision la zone à traiter.
Nous vous souhaitons de passer d’agréables heures sur le gazon de vos rêves.
Calibrage (réglage de base) de la tôle d’épandage (fig.
M12/M13/M14)
• Positionnez la vis d’ajustage du doseur sur 5. Le 5 doit être
clairement visible (fig. M12).
• Reliez solidement la poignée étrier au guidon à l’aide d’une
attache rapide (fig. M13).
•
Puis, faites basculer l’épandeur vers l’avant. Dévisser le contre-
écrou M14 (1) et serrer la vis de calibrage M14 (2) jusqu’à ce
que la bordure avant du rail de dispersion M14 (3) et le repère
coïncident (voir flèche fig. M14) ou que l’écartement entre le bord
inférieur et le repère soit de 6 mm (M14 Q). Maintenez ensuite la
vis de calibrage (2) et revissez fermement le contreécrou (1).
• Otez l’attache rapide. Votre épandeur estg maintenant prêt à
fonctionner. L’attache rapide peut être réutil (M13).
Remplissage du matériau d’épandage
•
Evitez de le faire sur des surfaces gazonnées, car vous pourriez
éventuellement perdre du matériau en le renversant par inadvertance
ou bien provoquer un jaunissement du gazon dû à une surfertilisation.
Evaluation des quantités nécessaires de matériau
d’épandage (fig. B1)
• Respectez les indications portées sur l’étiquette ou la notice
concernant le réglage de l’épandage. Soyez attentif aux
remarques inscrites sur les emballages.
• Effectuez le réglage d’épandage désiré (chiffre) à l’aide de la vis
d’ajustage du doseur.
Méthode d’épandage (fig. B2)
Vous obtiendrez un bon résultat d’épandage si vous travaillez
dans le sens de la plus grande longueur du gazon. Assurez-vous
que l’épandage se chevauche, de manière à ce qu’aucune surface
ne reste non traitée. Il est recommandé de traiter en premier le
haut et le bas du terrain par quelques largeurs d’épandage.
Il est recommandé:
• de faire avancer l’épandeur avant de relever l’étrier d’épandage;
• de libérer l’étrier d’épandage avant de vous arrêter.
Remarque (fig. B3/M9/M10/M11)
Si vous ne travaillez qu’en ligne droite, nous recommandons l’emploi
de l’entraïneur. L’entraînement de l’arbre d’épandage s’effectue avec
les deux roues.
Maintenance et nettoyage
• Après chaque utilisation
- Videz l’épandeur
- Nettoyez soigneusement le récipient
- Nettoyez à la brosse dure les ouvertures d’épandage.
Si l’épandeur est fortement encrassé (agglomérations de matériaux)
lavez-le à l’eau chaude. Veillez à ce que l’épandeur soit parfaitement
sec pour la prochaine utilisation.
Calibrage renouvelé (réglage de base)
Le réglage de base peut changer au fil du temps. Pour procéder
ŕ un nouveau calibrage, procédez conformément ŕ la description
du montage, M12/M13/M14.
Dans chaque pays les conditions de garantie en vigueur sont celles
publiées par notre société ou par notre importateur. Si pendant la durée de la garantie votre appareil présente des vices de matière ou de
fabrication, la réparation est gratuite. En cas de recours en garantie,
veuillez vous adresser à votre revendeur ou à notre succursale la plus
proche.
Préface
Montage
Utilisation
Entretien
Garantie
Page 8

8
Fa parte della buona tradizione WOLF-Garten aiutar Vi a realizzare
il prato dei Vostri sogni e a migliorare ancora di più ciò che è già
comprovato. I nostri esperti in giardinaggio hanno il compito di realizzare
prodotti che consentano a chiunque di avere un prato da favola
indipendentemente dal clima e dal terreno. Con le nostre sementi e i
concimi speciali per tappeti erbosi questo obiettivo é stato raggiunto.
Tali sementi e concimi tuttavia si possono distribuire con precisione soltanto
con un’apposita macchina spanditrice. La nostra macchina, in particolare,
si basa su un impianto completamente nuovo, che parte dalle esigenze di
una manutenzione professionale dei prati. Il risultato: la prima spanditrice
esatta, per un distribuzione precisa e dosata di semenza e concime.
Il meccanismo speciale di distribuzione provvede a dosare essamente
i diversi materiali da spargere e a distribuirli con precisione sul suolo.
Particolarmente pratica è la staffa per l’interruzione della distribuzione
sul manubrio del dispositivo. In questo modo è possibile definire
esattamente l’area in cui operare.
Vi auguriamo lunghe ore di ricreazione nel giardino dei Vostri sogni.
Calibratura (regolazione di base) del profilo di distribuzione
(fig. M12/M13/M14)
• Portare la vite di registrazione del dosatore sul n. 5. Il 5 si deve
riconoscere per intero M12.
•
Fissare la staffa sul manubrio con una fascetta serracavi lampo (M13).
• Ribaltare quindi in avanti la macchina. Mollare il controdado
M14 (1) ed avvitare la vite di calibrazione M14 (2) fino a che
lo spigolo anteriore della rotaietta di dispersione M14 (3) e la
marcatura corrispondono perfettamente (vedi freccetta figura
M14), ossia fino a che la distanza fra lo spigolo anteriore e la
marcatura ammonta a 6 mm (M14 Q). Dopodiché tener ferma
la vite di calibratura (2) e serrare il controdado (1).
• Sciogliere quindi di nuovo la fascetta serracavi lampo. La
spanditrice è ora pronta per l’uso. La fascetta serracavi è
riutilizzabile (M13).
Riempire con il prodotto da spandere
Non eseguire quest’operazione sul tappeto erboso, poiché la sostanza
versata distrattamente sul terreno potrebbe andar persa del tutto o
potrebbe addirittura bruciare il prato per eccessiva concimazione.
Regolare la quantità da spandere (fig. B1)
• Per la regolazione della quantità, fare attenzione alle indicazioni
sull’etichetta o sul foglietto accluso. Osservare anche le indica-
zioni riportate sulle confezioni.
• Impostare la regolazione desiderata di distribuzione (numero)
con la vite di registrazione situata sul dosatore.
Esempio di distribuzione (fig. B2)
Una corretta distribuzione del prodotto da spandere si ottiene
muovendo la macchina nel verso della lunghezza del prato. Durante
l’operazione di spargimento distribuire il prodotto in sovrapposizione,
in modo che nessuna superficie rimanga scoperta. Sarebbe opportuno
cominciare la distribuzione dapprima in senso trasversale alla
lunghezza del prato, sulle zone di inizio e fine del tappeto erboso.
Consigliamo:
• Di spingere la macchina prima di sollevare la staffa che aziona
lo spargimento.
• Di rilasciare la staffa prima di fermarsi.
Nota (fig. B3/M9/M10/M11)
Se si percorrono solo traiettorie diritte è consigliabile montare
il nottolino di trascinamento. L’albero per spandere viene ora
azionato da entrambe le ruote.
Manutenzione e cura
• Dopo ogni impiego
- Svuotare la spanditrice.
- Pulire a fondo il contenitore.
-
Pulire con una spazzola dura le aperture da cui esce il prodotto.
In caso di sporco resistente (incrostazioni) lavare il dispositivo per
spargere con acqua calda. Per l’impiego successivo, il dispositivo
deve essere completamente asciutto.
Ricalibrazione (regolazione di base)
Col passar del tempo, i dati di base preselezionati possono
modificarsi. Per rieffettuare la calibrazione, Vi preghiamo di procedere
come descritto alla posizione „Montaggio, M12/M13/M14“.
In ogni paese sono valide le condizioni di garanzia pubblicate dalla
nostra società, o dall‘importatore. Nei limiti della garanzia, eliminiamo
gratuitamente guasti alla vostra macchina, se originati da difetti di materiale o di fabbricazione. In caso di garanzia siete pregati di rivolgervi
al Vostro rivenditore o alla filiale più vicina.
Prefazione
Montaggio
Messa in opera
Manutenzione
Garanzia
Page 9

9
Het is traditie bij WOLF-Garten dat ernaar gestreefd wordt dat u een
droomgazon krijgt en dat de reeds betrouwbare producten nog verder
verbeterd worden.
Onze grasspecialisten hebben tot taak om producten
te ontwikkelen die het mogelijk maken dat iedereen onafhankelijk van
klimaat en ondergrond zijn droomgazon kan hebben. Dit doel wordt
bereikt met ons zaaigoed en speciale bemesting.
Het zaaigoed en de mest kunnen echter alleen met behulp van een
strooiwagen nauwkeurig worden gedoseerd. Deze strooiwagen is
volgens de eisen van het professionele groenbeheer volledig nieuw
ontwikkeld. Het resultaat is de eerste nauwkeurige strooiwagen voor
een exacte en gedoseerde verspreiding van zaaigoed en mest.
Het speciale strooimechanisme zorgt ervoor dat de verschillende
strooimiddelen exact gedoseerd worden en nauwkeurig verdeeld
worden. Bijzonder handig is de strooistopbeugel bij de bediening van
de machine. Hiermee kunt u exact bepalen waar wordt gestrooid.
Wij wensen u vele ontspannende uren op uw droomgazon.
Strooigeleider kalibreren - basisinstelling - (afb. M12/M13/
M14)
• Zet de afstelbout op de doseerder op nr. 5. De 5 moet goed
zichtbaar zijn (M12).
•
Verbind de beugels met een snelklem stevig op de stuurstang (M13).
• Klap de strooiwagen vervolgens naar voren. De borgmoer M14
(1) losdraaien en de kalibreerschroef M14 (2) zover draaien
totdat de voorste kant van de strooirail M14 (3) en de markering
overeenkomen (zie pijl, afbeelding M14), c.q. de afstand van de
onderste rand tot de markering 6 mm bedraagt (M14 Q). Houd
vervolgens de kalibreerschroef (2) vast en draai de contramoer
(1) goed fast.
• Haal de snelklem weer los. De strooiwagen kan nu worden
gebruikt. De snelklem kan opnieuw worden gebruikt (M13).
Strooigoed bijvullen
Niet op het gazon omdat anders eventueel strooigoed verloren
gaat of het gazon door overmatige bemesting verbrandt.
Strooihoeveelheid instellen (afb. B1)
•
Lees de aanwijzingen op het etiket of infoblad voor het instellen
van de hoeveelheid. Lees ook de aanwijzingen op de verpakking.
• Stel de gewenste hoeveelheid (getal) met afstelbout op de
doseerder af.
Strooipatroon (afb. B2)
U verkrijgt een goed strooipatroon wanneer u in de lengterichting van
het gazon strooit. Let erop dat de banen overlappen zodat overal
wordt gestrooid. Geadviseerd wordt om aan de uiteinden van het
gazon eerst enkele banen in de breedterichting te strooien.
Wij adviseren om:
• de strooiwagen te duwen voordat u de beugel optilt;
• de strooibeugel los te laten voordat u stopt met lopen.
Opmerking (afb. B3/M9/M10/M11)
Wanneer u alleen rechte banen strooit, raden wij aan een meenemer
in te bouwen. Nu wordt de strooias met beide wielen aangedreven.
Onderhoud en verzorging
• Na ieder gebruik
- de strooiwagen leegmaken,
- het reservoir grondig reinigen,
- de strooiopeningen met een harde borstel reinigen.
Was de strooier met heet water uit wanneer deze sterk vervuild is
(wanneer vuil vastgekleefd zit). Voor het volgende gebruik moet
de strooier dan echter wel helemaal droog zijn.
Opnieuw kalibreren (begininstelling)
De begininstelling kan in de loop van de tijd veranderen. U
dient bij een nieuwe kalibrering zo te werk te gaan, zoals in het
hoofdstuk „montage M12/M13/M14“ staat omschreven.
In elk land gelden de garantiebepalingen die door onze maatschappij
of importeur worden uitgegeven. Storingen aan uw apparaat verhelpen
wij kosteloos in het kader van de garantie, indien een materiaal- of
produktiefout hiervan de oorzaak is. Neem voor een reparatie binnen
de garantietermijn contact op met uw leverancier of de dichtstbijzijnde
vestiging.
Voorword
Montage
In werking stellen
De verzorging
Garantie
Page 10

10
Hos WOLF-Garten er der tradition for at hjælpe kunderne til en
drømmeplæne og konstant forbedre selv det mest velfungerende
udstyr. Vores græsslåningseksperter har til opgave at udvikle
produkter, som gør det muligt, at enhver husejer uafhængigt af
vejret og jordforholdene kan få sin drømmeplæne. Takket være
vores græsudsæd og vores specielle plænegødning har vi kunnet
opnå vores mål.
Præcist og eksakt doseret udbringning af udsæd
og gødning kræver dog en spredevogn. Vi har nu nyudviklet denne
spredevogn baseret på kravene fra professionelle gartnere. Resultatet
er den første eksakte spredevogn til eksakt doseret udbringning af
udsæd og gødning.
Den specielle spredemekanisme sørger for, at forskelligt spredegods
doseres eksakt og fordeles præcist på jorden. Særlig praktisk
er stopbøjlen i grebet, der standser spredningen, og giver Dem
mulighed for at bestemme, hvor udsæd osv. skal spredes.
Vi ønsker Dem mange behagelige timer på Deres drømmeplæne.
Sprendeskinnens kalibrering - grundindstilling - (Fig. M12/
M13/M14)
• Sæt justeringsskruen på doseringsenheden på nr. 5 . 5 skal
kunnes ses helt (M12).
• Fastgør bøjlen på grebet med en hurtiglukning (M13).
• Læg spredevognen fremad på underlaget. Kontramøtrikken
M14 (1) løsnes og kalibreringsskruen M14 (2) drejes så meget,
at den forreste kant på strøskinnen M14 (3) og markeringen
passer sammen (se pil, fig. M14) resp. at afstanden fra den
nederste kant til markeringen er på 6 mm. (M14 Q). Hold
derefter fast i kalibreringsskrue (2), og spænd kontramøtrik (1).
• Løsn hurtiglukningen. Spredevognen er nu klar til brug.
Hurtiglukningen kan genanvendes (M13).
Påfyldning af spredegods
Ingen påfyldning på plænen, da spredegods, der evt. spildes
uagtsomt, går tabt, eller plænen får brune pletter på grund af for
meget gødning.
Indstilling af spredemængde (Fig. B1)
•
Læs venligst bemærkningerne til spredeindstilling på etiketten eller
den vedlagte anvisning. Læs også bemærkningerne på emballagen.
• Indstil den ønskede spredeindstiling (tal) på doseringsenheden
ved hjælp af justeringsskruen.
Spredemønster (Fig. B2)
For at opnå et godt spredemønster skal De køre langs plænens
lange side. Sørg for, at banerne overlapper hinanden tilstrækkeligt,
så hele overfladen dækkes. Det er hensigtsmæssigt at køre nogle
gange langs plænens korte side ved enderne.
Aanbefaling:
• Skub spredevognen, inden De løfter spredebøjlen.
• Frigiv spredebøjlen, inden De holder op med at gå.
Bemærk (fig. B3/M9/M10/M11)
Hvis De kun kører lige baner, anbefaler vi monteringen af
medbringeren (O). Spredeakslen drives så af begge hjul.
Vedligeholdelse og pleje
• Efter hver brug:
- Tøm spredevognen.
- Rens bakken omhyggeligt.
- Rens spredeåbningerne med en hård børste.
Hvis spredevognen er særlig tilsmudset, vaskes den med varmt
vand. Ved næste ibrugtagning skal spredevognen være helt tør.
Ny kalibrering (Grundindstilling)
Grundindstillingen kan ændre sig i tidens løb. En ny kalibrering
foretages som beskrevet under Montage, M12/M13/M14.
I hvert land gælder de garantibetingelser, som vort salgsselskab
resp. importør i det pågældende land har udgivet. Fejl på maskinen
repareres gratis i garantiperioden, hvis de skyldes en materiale- eller
produktionsfejl. Hvis De vil gøre Deres garanti gældende, bedes De
henvende Dem til Deres forhandler eller nærmeste filial.
Forord
Montering
Drift
Vedligeholdelse
Garanti
Page 11

11
Nurmettajat ja nurmikoiden hoitajat ovat jo pitkään luottaneet
WOLF-Garten-tuotteisiin.
Nurmikkoasiantuntijamme kehittävät tuotteita, joita käyttämällä saa
itselleen unelmanurmikon ilmastosta ja maaperästä riippumatta.
Nurmikonsiemenemme ja erikoislannoitteet auttavat pääsemään
tavoitteeseen. Siemenet ja lannoitteet saa kuitenkin levitettyä
tarkasti vain kylvövaunulla. Tämä kylvövaunu on kehitetty
nurmikonhoidon ammattilaisten vaatimusten pohjalta.
Tulos: ensimmäinen kylvövaunu, joka annostelee ja levittää
siemenet ja lannoitteet täsmällisesti.
Erityinen mekanismi annostelee erilaiset materiaalit ja levittää ne
tarkasti Aisan pysäytinsanka on erityisen käytännöllinen ominaisuus.
Voit itse päättää, mihin materiaalia levitetään.
Nauti pitkään unelmanurmikosta.
Levityskiskon kalibrointi (perussäätö) (kuva M12/M13/M14)
• Kierrä annostelulaitteen säätöruuvin numeron 5 kohdalle.
Numeron 5 on oltava täysin näkyvissä (M12).
• Kiinnitä sanka aisaan nippusiteellä (M13).
• Kallista kylvövaunu eteenpäin. Löysää lukkomutteri M14 (1), ja
kierrä kalibrointiruuvia M14 (2), kunnes kylvökiskon etureuna
M14 (3) ja merkintä ovat linjassa (katso nuoli, kuva M14),
tai alareunan ja merkinnän etäisyys on 6 mm (M14 Q). Estä
kalibrointiruuvin (2) pyöriminen ja kiristä lukkomutteri (1).
• Poista nippuside, ja kylvövaunu on käyttövalmis (M13).
Täytä kylvettävä materiaali
Älä täytä nurmikolla, koska maahan joutunut materiaali menee
hukkaan, tai liikalannoitus polttaa nurmikon.
Säädä annos (kuva B1)
• Huomioi etiketin tai pakkausselosteen ohjeet. Noudata myös
pakkauksen ohjeita.
• Säädä annos (luku) annostelulaitteen säätöruuvilla.
Kylvöjälki (kuva B2)
Kylvöjälki on hyvä, kun työskentelet nurmikon pituussuuntaan.
Liiku niin, että kylvöjäljet menevät hieman päällekkäin – sillo.in
materiaali leviää koko alalle. Alueen päädyissä kannattaa kylvää
muutama leveys poikittain
Suositus:
• Lähde kylvövaunun kanssa liikkeelle ennen kuin nostat
kylvösankaa!
• Vapauta kylvösanka ennen kuin pysähdyt.
Huomaa (kuva B3/M9/M10/M11)
Kun ajat vain suoria kylvöjälkiä, vaunuun kannattaa asentaa
vääntiö. Kumpikin pyörä käyttää silloin levitysakselia
Huolto ja kunnossapito
• Aina käytön jälkeen:
- Tyhjennä vaunu.
- Puhdista säiliö kunnolla.
- Puhdista syöttöaukot ja kisko huolellisesti kovalla harjalla.
Kun kylvovaunu on erittäin likainen, pese se kuumalla
vedellä. Kylvövaunun on oltava täysin kuiva ennen seuraavaa
käyttökertaa.
Uusi kalibrointi (perussäätö)
Perussäätö voi muuttua ajan mittaan. Kun kalibroit uudelleen,
noudata asennusohjeita (M12/M13/M14).
Takuu kattaa materiaali – ja valmistevikojen osalta varaosat ja työn.
Takuuaika ostopäivästä lukien: 2 vuotta. Takuu ei korvaa, jos vika on
aiheutunut virheellisestä käytöstä tai huollosta. Takuutapauksissa on
otettava yhteys myyjäliikkeeseen tai valtuutettuun huoltoliikkeeseen.
Esipuhe
Asenus
Käyttö
Huolto
Takuuehdot
Page 12

12
WOLF-Garten har mangeårig erfaring innen plenprodukter og hjelper
deg gjerne med å realisere drømmeplenen. Våre eksperter har som
målsetting å utvikle produkter som muliggjør en perfekt gressplen
uavhengig av klima og jordbunnforhold. Med våre produkter –
gressplenfrø og spesialgjødsel – er dette målet nådd.
Plenfrø og gjødsel fordeles best med en strøvogn. Vi anbefaler
vår strøvogn som er helt nyutviklet etter kravene for profesjonell
anleggspleie. Resultatet: Den første eksakte strøvogn for nøyaktig og
dosert fordelling av plenfrø og gjødsel.
Den spesielle strø-mekanikken sørger for at de ulike strømidler
doseres i riktig mengde og fordeles jevnt på jordbunnen. Spesielt
praktisk er stoppebøylen på håndtaket som stanser strøingen når
du måtte ønske det. Slik kan du nøyaktig regulere hvor du ønsker
å strø.
Vi hjelper deg å opprettholde gleden av egen hage.
Kalibrering (grunninnstilling) av strøskinnen (fig. M12/
M13/M14)
• Justeringsskruen på dosereren stilles på nr. 5. De 5 skal kunne
identifiseres komplett (M12).
• Bøylen festes riktig på håndtaket med en hurtigbinding (M13).
• Deretter legges strøvognen ned forover. Løsne kontramutter
M14 (1). Kalibreringsskruen M14 (2) skrues så langt inntil
strøskinnens forkant M14 (3) og markeringen stemmer overens
(se pil figur M14), henholdsvis avstanden fra underkanten til
markeringen er 6 mm (M14 Q). Hold nå kalibreringsskruen (2)
og stram kontramutteren (1).
• Løsne hurtigbindingen. Strøvognene er nå klar til bruk.
Hurtigbindingen kan brukes om igjen (M13).
Påfylling av strømiddel
Påfylling må ikke skje på gressplenen da noe middel kan falle
utenfor vognen og ved for konsentrert mengde gjødsel kan
plenen bli svidd.
Innstilling av strømengde (fig. B1)
• Følg merknadene på etiketten eller på vedlegget for riktig
strøinnstilling. Les øgsa merknadene på forpakningen.
• Ønsket strøinnstilling (tall) stilles inn med justeringsskruen på
dosereren.
Strømønster (fig. B2)
Optimal strømønster får man ved å strø plenen i lengderetning.
Pass på å overlappe – unngå at steder ikke blir strødd. Det er
hensiktsmessig å starte med å strø i bredden (på tvers) ved
plenendene.
Vi anbefaler:
• Skyv strøvognen før du løfter strøbøylen.
• Slipp strøbøylen før du stanser opp.
Merk (fig. B3/M9/M10/M11)
Dersom du bare vil strø i rette felter, anbefaler vi montering av en
medbringer. Strøakselen vil nå drives av begge hjulene.
Vedlikehold og pleie
• Etter hver bruk
- Tøm strøvognen.
- Beholderen rengjøres grundig.
- Rengjør strøåpningene med en hard børste.
Dersom strøenheten er sterk tilsmusset, kan den vaskes med varmt
vann. Strøenheten må alltid være helt tørr den tas i bruk igjen.
Gjentatt kalibrering (grunninnstilling)
Grunninnstillingen kan endres i løpet av tiden. Følg en ny
kalibrering som beskrevet under montering, M12/M13/M14.
I hvert land gjelder de garantibestemmelsene som er utgitt av vårt
firma hhv. vår importør. Feil på maskinen blir reparert gratis i henhold
til ansvarsbetingelsene, dersom årsaken skulle skyldes material- eller
produksjonsfeil. I garantitilfeller må du henvende deg til forhandleren
eller til nærmeste salgskontor.
Forord
Montering
Drift
Vedligehold
Garanti
Page 13

13
Att hjälpa dig fä en drömgräsmatta och tydligt förbättra den hör till
god tradition hos WOLF-Garten. Våra fräsmatteexperter har till uppgift
att utveckla produkter, som möjliggör för var och en att oberoende av
klimat och underlag uppnå sin drömgräsmatta. Med vårt gräsutsäde
och specialgödslet för gräsmattor uppnås detta mål.
Utsäde och gödsel kan man emellertid endast fördela exakt och
noggrant med en spridarvagn. Denna spridarvagn utvecklades
baserat på kraven från den professionella parkskötseln.
Resultatet: den första Exaktspridarvagnen för exakt och doserad
spridning av utsäde och gödsel.
Den speciella spridartekniken sörjer för att de mest olika
spridarmedier kan doseras exakt och fördelas jämnt på underlaget.
Speciellt praktisk är spridarstopp-bygeln vid redskapets handtag.
Med den kan du bestämma exakt var spridning skall ske.
Vi önskar dig många vederkvickande timmar på din drömgräsmatta.
Kalibrering (grundinställning) av spridarskenan (bild M12/
M13/M14)
• Ställ doserarens inställningsskruv på 5. 5 måste vara fullständigt
möjlig att identifiera (M12).
• Fäst bygeln vid handtaget med ett snabblås (M13).
• Därefter lutas spridarvagnen framåt. Lossa på kontramuttern
M14 (1) och vrid kalibreringsskruven M14 (2) så pass långt, att
ströskenans M 14 (3) framkant stämmer överens med
markeringen (se pil I bild M 14), resp att avståndet mellan den
nedre kanten och markeringen är 6 mm (M 14 Q). Därefter
hålles kalibreringsskruven (2) samtidigt som kontramuttern (1)
skruvas fast.
• Snabblåset lossas. Spridarvagnen är nu klar att användas.
Snabblåset kan återanvändas (M13).
Påfyllning av material
Undvik att vara på gräsmattan så slipper du riskera att
spilla gödning, som i för koncentration kan skada gräset pga
övergödsling.
Påfyllning av material för spridning (bild 1)
• ej på gräsytan, då genom förbiseende material kan spillas ut
eller att gräsmattan bränns på grund av extrem övergödning;
• önskad spridarinställning (tal) ställs in med inställningsskruven
på doseraren.
Spridarmönster (bild 2)
Ett bra spridarmönster erhålles om spridningen sker i
gräsmattans längsriktning. Var uppmärksam på att spridningen
sker överlappande, så att ingen yta utelämnas. Det är lämpligt att
först sprida några maskinbredder tvärs i gräsmattans kortändar.
Vi rekommenderar:
• att spridarvagnen är i rörelse innan spridarbygeln lyftes;
• att spridarbygeln frigöres innan vagnen stannar.
Upplysning (bild B3/M9/M10/M11)
Om endast raka banor köres, rekommenderar inbyggnad av
medbringaren. Spridaraxeln drives då av bägge hjulen.
Underhåll och skötsel
• Efter varje insats
- töm spridarvagnen,
- rengör behållaren noggrant,
- rengör spridaröppningarna med en hård borste.
Vid kraftig försmutsning (igenklibbning) tvättas spridaren med varmt
vatten. Före nästa insats måste spridaren vara fullständigt torr.
Ny kalibrering (grundinställning)
Grundinställningen kan förändras med tiden. En ny kalibrering ska
utföras på samma sätt som vid montaget, se beskrivning, M 12/
M13/M14.
För varje land gäller vår representants garantivillkor. Eventuella fel på
maskinen repareras kostnadsfritt under garantitiden såvida orsaken är
material- eller tillverkningsfel. Kontakta återförsäljaren eller vår representant vid garantifall.
Preface
Montering
Drift
Underhåll
Garanti
Page 14

14
Naplňte posypový materiál
Neplňte vozík na travní ploše – případné vysypání osiva nelze
posbírat a vysypáním hnojiva na trávník hrozí spálení trávníku.
Nastavení množství posypu (obr. B1)
• dodržujte pro nastavení informace na etiketě nebo letáku
výrobce. Dodržujte odkazy na balení.
• doporučené množství nastavte pomocí růžice na madle.
Nepoužívejte vyšší granulaci jak 4 mm.
Překrytí (obr. B2)
Dobrého výsledku sypání dosáhnete pokud jezdíte pouze
v podélném směru. Dbejte na to, aby se jednotlivé stopy
překrývali a nevznikla tak neposypaná místa. Na konci a na
začátku plochy udělejte několik příčných stop.
Doporučujeme:
• Sypač uveďte do pohybu dříve, než zvednete páčku sypání!
• Dříve než sypač zastavíte, uvolněte nejprve páčku sypání.
Odkaz (obr. B3/M9/M10/M11)
Pokud aplikujete pouze na rovných plochách bez překážek,
doporučujeme montáž unašeče dle návodu k montáži Sypací
hřídel tak poháníte oběma koly.
Kalibrace (základní nastavení) posypové lišty (obr. M12/
M13/M14)
• nastavte růžici na rukojeti na Nr. 5. Číslo 5 musí být plně
viditelné (M12).
• madlo připevněte k rukojeti přiloženou sponkou (M13).
• otočte vozík rukojetí dolů. Uvolněte kontramatku M14 (1) a
otáčejte kalibračním šroubem M14 (2) tak dlouho, dokud přední
hrana sypací lišty M14 (3) nebude proti značce (viz šipku v obr.
M14), popř. dokud odstup spodní hrany ke značce nebude
činit 6 mm (M14 Q). Poté podržte kalibrační šroub (2) a pevně
dotáhněte kontramatku (1).
• odstraňte sponu a váš vozík je nastaven (M13).
Pomoci vám k vysněnému trávníku a osvědčené ještě zlepšovat,
patří u WOLF-Gartena k dobrým tradicím. Naši experti na trávník
mají za úkol vyvíjet produkty, které umožní každému, bez závislosti
na klimatických podmínkách a půdě, mít vysněný trávník. Našim
osivem a speciálním hnojivem na trávník dosáhnete vysněného
výsledku. Avšak osivo a hnojivo je nutné exaktně a přesně dávkovat
pouze sypacím vozíkem. Tento sypací vozík byl vyvíjen na základě
požadavků profesionálů. Výsledek : první absolutně přesný vozík k
precizní a dávkované aplikaci osiva a hnojiva.
Speciální sypací mechanismus umožňuje aplikaci přesnou aplikaci
rozdílných osiv a hnojiv do půdy. Zvláště praktické je madlo na
rukojeti pro ovládání posypové lišty. Tím si určujete s naprostou
přesností, kde se má sypat a kde ne.
Přejeme vám mnoho hodin odpočinku na vašem vysněném trávníku.
Údržba
• Po každém použití
- vyprázdněte vozík
- nádobu pečlivě vyčistěte
- sypací otvory vyčistěte hrubším smetákem.
Při silném znečištění (slepení) sypač omyjte horkou vodou. Pro
další použití musí být sypač zcela suchý.
Nová kalibrace (základní nastavení)
Základní nastavení se časem může změnit. Při nové kalibraci
postupujte tak, jak je popsáno v kap. Montáž, M12/M13/M14.
V každé zemi platí záruční ustanovení vydané naší společností nebo
dovozcem. Poruchy na Vašem nářadí odstraníme v rámci záruky bezplatně,
pokud je příčinou chyba materiálu nebo výrobní chyba. V případě záruky
se prosím obraťte na Vašeho prodavače nebo na nejbližší pobočku.
Pedmluva
Montáž
Provoz
Údržba
Záruní podmínky
Page 15

15
A WOLF-Garten legjobb hagyományaihoz tartozik, hogy Önt hozzásegítse álmai pázsitjához, és a beváltat tovább javítsa.
Gyepszakértőink feladata olyan termékek kifejlesztése, amik
mindenkinek lehetővé teszik – függetlenül a klíma- és talajadottságoktól
– álmai pázsitjának megvalósítását. Ezt a célt pázsitfű
magkeverékeinkkel és speciális műtrágyáinkkal érheti el. A vetőmagot
és a műtrágyát csak egy szórókocsival lehet pontosan kijuttatni. Ezt a
szórókocsit, a professzionális parkápolás során szerzett tapasztalatok
alapján, a követelményeknek megfelelően terveztük újra.
Az eredmény: az első precíziós szórókocsi, amelyik alkalmas
vetőmag és műtrágya pontos kijuttatására.
A speciálisan kialakított szórómechanika gondoskodik arról, hogy a
különféle szórt anyagokat pontosan adagolva ossza szét a talajon.
Különösen is praktikus a tolókaron levő szórásmegállító fogantyú.
Ezzel pontosan meghatározhatja, hová kíván szórni.
Sok pihentető óra eltöltését kívánjuk Önnek, álompázsitján.
A szórósín kalibrálása - alapbeállítás - (M12/M13/M14 ábra)
• Állítsa az adagoló szabályozó csavarját 5-re. Az 5-ös teljesen
meg kell jelenjék (M12).
•
Egy gyorskötővel szorosan kösse a fogantyút a tolókarhoz (M13).
• Billentse előre a szórókocsit. Lazítsa meg a biztosító anyát
M14 (1) és addig forgassa a kalibráló csavart M14 (2), amíg
a szórósín M14 (3) első éle a jelöléshez ér (lásd a nyilat az
M14. ábrán), illetve a sín alsó éle és a jelölés között a távolság
6 mm lesz (M14 Q). Ebben a helyzetben fogja meg a (2)
kalibráló csavart, és húzza meg az (1) biztosító anyát.
• Távolítsa el a gyorskötőt, ezzel szórókocsija üzemképes (M13).
A szórni való betöltése
A betöltést ne végezze a pázsitfelületen, mert a véletlenül kiömlő
anyag kárba vész, illetve a túltrágyázott folton a gyep kiéghet.
A szórási mennyiség beállítása (B1 ábra)
• A szórási mennyiség beállításakor vegye figyelembe a címkén
vagy kísérő lapon feltüntetetteket. Ügyeljen a csomagoláson
szereplő útmutatásra.
• A szabályozó csavarral állítsa be az adagolón, a kívánt szórási
mennyiséget (számot).
Szórási minta (B2 ábra)
Jó szórási mintát érhet el, ha hosszában halad végig a pázsiton.
Ügyeljen arra, hogy átfedéssel szórjon, nehogy csíkok kimaradjanak.
Célszerű a terület végein néhány csíkot keresztben is kiszórni.
Javasoljuk, hogy:
• már tolja a szórókocsit, mielőtt megemelné a szórófogantyút!
• engedje el a szórófogantyút, mielőtt a kocsival megállna
Útmutatás (B3/M9/M10/M11 ábra)
Amennyiben csak egyenes vonalú szórásra használja, javasoljuk,
szerelje fel a menesztőt. Így mindkét kerékkel hajtja a szórótengelyt.
Ápolás és karbantartás
• Minden használat után:
- ürítse ki a szórókocsit,
- alaposan tisztítsa ki a tartályt,
- egy erős szőrű kefével alaposan tisztítsa meg a
szórónyílásokat és a vezetősínt.
Erős elszennyeződés (beragadás) esetén a szórókocsit forró
vízzel mossa ki. A következő használat előtt a szórókocsit
teljesen meg kell szárítani.
Ismételt kalibrálás (alapbeállítás)
Az idő múlásával az alapbeállítás módosulhat. Az ismételt kalibrálás
során a szerelésnél, M12/M13/M14, leírtak szerint járjon el.
Minden országban érvényesek az általunk vagy a forgalmazónk által
kiadott szavatossági feltételek. Minden készülék üzemzavarait térítésmentesen, a szavatosság keretein belül elhárítjuk, amennyiben azok
anyag- vagy gyártási hibák miatt keletkeztek.
Elszó
Szerelés
Összeszerelés
Karbantartás
Garancia
Page 16

16
Do dobrej tradycji firmy WOLF-Garten należy niesienie Państwu pomocy
dla osiągnięcia wymarzonego trawnika oraz wyraźnej poprawy istniejącego.
Nasi eksperci mają za zadanie projektowanie produktów
umożliwiających każdemu osiągnięcie niezależnie od klimatu i gleby
trawnika marzeń. Ten cel osiąga się tylko wykorzystując nasz materiał siewny oraz specjalne nawozy do trawy. Materiał siewny i nawóz
można jednak rozsiewać w sposób dokładny dysponując tylko wóz-
kiem siewnym. To urządzenie zostało zaprojektowane zupełnie na
nowo zgodnie z wymaganiami profesjonalnego doglądu urządzeń.
Wynik: dokładny wózek siewny do precyzyjnego i dozowanego
rozsiewania materiału siewnego i nawozów. Specjalna mechanika
rozsiewania dba o to, że różne środki siewne mogą być dokładnie
dozowane i precyzyjnie rozdzielone na podłożu. Szczególnie praktyczny jest dźwignia z opcją siania i postoju na uchwycie urządzenia.
Dzięki temu można dokładnie określić, gdzie nastąpi wysiew.
Życzymy Państwu wielu relaksujących godzin na Państwa wymarzonym trawniku.
Kalibrowanie (ustawienie podstawowe) szyny siewnej
(rys. M12/M13/M14)
• Należy ustawić śrubę regulacyjną na dozowniku na nr 5. 5
musi być w całości widoczne (M12).
•
Zamocować dźwignię na uchwycie środkiem szybkowiążącym (M13).
• Następnie przełożyć wózek siewny do przodu. Zwolnić nakrętkę
kontrującą M14 (1) i śrubę kalibrującą M14 (2) okręcać tak
długo, aż przednia krawędź szyny rozsiewającej M14 (3)
będzie zgadzać się z oznaczeniem (patrz strzałka rys. M14),
względnie odstęp od dolnej krawędzi do oznaczenia wynosi 6
mm (M14 Q). Następnie przytrzymać śrubę kalibracyjną (2) i
obrócić nakrętkę kontrującą (1).
• Teraz należy zluzować spoiwo szybkowiążące i urządzenie
siewne jest gotowe do działania (M13).
Napełnić materiałem siewnym
Nie na powierzchni trawnika, ponieważ przypadkowo rozsypany
materiał gubi się lub trawnik wypala się w wyniku ekstremalnego
nawożenia.
Ustawianie ilości użytej do obsypywania (rys. B1)
• Przy ustawianiu parametrów obsypywania należy w danym
wypadku przestrzegać wskazówek podanych na etykiecie lub
ałączonej ulotce. Należy też zwrócić uwagę na wskazówki na
opakowaniach.
• Żądane ustawienie wózka siewnego (liczbę) wyregulować za
pomocą śruby regulacyjnej na dozowniku.
Wzory rozsiewania (rys. B2)
Dobry wzór rozsiewania osiąga się, jeśli rozsiewa się w kierunku
podłużnym trawnika. Należy zwrócić uwagę na to, żeby rozsiewać w
taki sposób, aby żadna powierzchnia nie została nie obsiana. Zaleca
się na krawędziach rozsiewać na pewnej szerokości w poprzek.
Zalecamy:
• Wózek rozsiewający przesunąć przed uniesieniem uchwytu
rozsiewacza!
• Zwolnić uchwyt rozsiewacza przed zatrzymaniem się.
Wskazówka (rys. B3/M9/M19/M11)
Jeśli przesuwają się Państwo tylko po prostych, zalecamy montaż
zbieraka. Wałek rozsypujący napędza się obydwoma kołami.
Konserwacja i dogląd
• Po każdym zastosowaniu:
- Wózek siewny opróżnić
- Zbiornik gruntownie wyczyścić
- Otwory siewne i szynę prowadzącą gruntownie wyczyścić
twardą szczotką.
Przy silnym zanieczyszczeniu (sklejenie) wózek rozsiewający
należy umyć gorącą wodą. Do następnego użycia wózek musi
być całkowiecie suchy.
Ponowne kalibrowanie (ustawienie podstawowe)
Ustawienie podstawowe może z biegiem czasu ulec zmianie.
Przy ponownym kalibrowaniu należy postępować jak opisano w
rodziale dotyczącym montażu, M12/M13/M14.
W każdym kraju obowiązują warunki gwarancji wydanej przez nasze
przedstawicielstwo handlowe w tym kraju lub przez importera.
Ewentualne usterki urządzenia usuwane są w okresie gwarancji
bezpłatnie, o ile spowodowane są one błêdem materiałowym lub
produkcyjnym. W przypadku roszczenia gwarancyjnego proszę
zwrócić się do sprzedawcy lub najbliższego oddziału naszej firmy.
Wstp
Montaž
Eksploatacja
Ostrzeenie
Gwarancja
Page 17

17
U svakoj zemlji važe garancijske odredbe koje je objavila naša
organizacija ili uvoznik. Smetnje na vašem stroju u okviru garancije
otklanjamo besplatno, ukoliko je njihov uzrok materijalna ili proizvodna greška. Ako je stroj još pod jamstvom obratite se prodavaču ili
najbližoj filijali.
Održavanje i njega
• Nakon primjene:
- Isprazniti kolica za sijanje
- Temeljito očistiti posudu
- Temeljito očistiti otvor za sijanje i traku za vođenje sa čvrstom
četkom.
Operite kod jakog zaprljanja (zaljepljenja) kolica za sijanje sa
vrućom vodom. Za slijedeću primjenu moraju kolica za sijanje biti
potpuno suha.
Ponovno kalibriranje (osnovno namještanje)
Osnovno namještanje se može promijeniti u tijeku vremena.
Ponovno kalibrirajte kao što je opisano u poglavlju Montažom,
M12/M13/M14.
Napuniti sjeme
Ne na travnatoj površini, zato što eventualno nehotimično rasuto
sjeme može biti izgubljeno ili trava može izgorjeti zbog ekstremno
velikog gnojenja.
Namjestiti količinu sijanja (slika B1)
• Obratite pažnju kod namještanja sijanja na upute na etiketi ili
priloženom listiću. Obratite pažnju na upute na ambalaži za
gnojenje/sjeme.
• Namjestiti željeno namještenje sijanja (broj) sa vijkom za
namještanje na doziraču.
Uzorak sijanja (slika B2)
Dobar uzorak sijanja pospješujete ako sijete po dužini trave.
Obratie pažnju na to, da sijete sa preklapanjem, tako da ne
ostane neposijana površina. Smisleno je na čelnim stranma
najprije posijati nekoliko širina sijanja ukoso posijati.
Preporučujemo:
• Gurati kolica za sijanje prije nego nadignete stremen za sijanje!
• Oslobodite stremen za sijanje prije nego prestanete hodati.
Uputa (slika B3/M9/M10/M11)
Ako vozite samo ravne trake preporučujemo ugradnju uređaj
za uzimanje. Tako pogonite val sijanje sa oba kotača.
Kalibriranje (osnovno namještanje) trake za sijanje (slika
M12/M13/M14)
• Namjestite vijak za namještanje na doziraču na br. 5. Broj 5
mora biti jasno vidljiv (M12).
• Čvrsto povežite stremen na ručki sa brzim vezačem (M13).
• Tada prebacite kolica za sijanje prema naprijed. Otpustiti maticu
za kontriranje M14 (1) i okrenuti maticu za kalibriranje M14
(2) tako daleko, dok se prednji rub trake za sijanje M14 (3)
i oznaka ne preklope (vidi strelicu slika M 14), odnosno dok
razmak od donjeg ruba do oznake ne iznosi 6 mm (M14 Q).
Držite nakon toga vijak za kalibriranje (2) i zategnite maticu za
kontriranje (1).
• Opustite sada ponovno brzi vezač i vaša su kolica za sijanje
pripremljena za rad (M13).
Da bi Vam pomogli u dobivanju travnjaka iz snova, te prokušano još
znatnije poboljšati spada kod WOLF-Garten-a u dobru tradiciju.
Naši stručnjaci za travu imaju zadatak, razviti proizvode koji
omogućuju da svatko, neovisno o klimi i tlu, može imati travnjak iz
snova. Sa našim sjemenom za travu i specijalnim gnojivom za travu
je postignut ovaj cilj.
Sjeme i gnojivo se ipak mogu posijati samo sa kolicima za sijanje.
Ta kolica za sijanje su potpuno novo razvijena prema zahtjevima
iz profesionalne njege rasadnika. Rezultat: prva precizna kolica za
sijane za precizno sijanje i doziranje sjemena i gnojiva.
Specijana mehanika sijanja brine za to, da se različita sredstva za
sijanje egzaktno doziraju i precizno mogu rasporediti na tlu. Posebno
je praktičan sijanje-stremen-stop na ručki uređaja. Time možete
točno odrediti, gdje će se sijati.
Želimo Vam odmorne sate na Vašem travnjaku iz snova.
Predgovor
Montaža
Pogon
Održavanje
Jamstvo
Page 18

18
Snaha pomôcť Vám získať Váš vysnívaný trávnik a výrazne zlepšiť
to čo sa už osvedči-lo, patrí už k tradičným úlohám fi rmy WOLFGarten. Naši odborníci na trávu majú úlohu vyvíjať také výrobky,
ktoré umožnia, aby každý zá-kazník mohol nezávisle na klimatických
a pôdnych podmienkach vlastniť svoj obľúbený trávnik. Našim
trávnikovým materiálom a pomocou špeciálnych prihnojovacích
príprav-kov sa tento cieľ dá dosiahnuť.
Osivo a hnojivo sa totiž dá presne aplikovať len pomocou vhodného
osievacieho zaria-denia. Toto zariadenie vo forme vozíka bolo
úplne nanovo vyvinuté podľa požiadaviek z oblasti profesionálneho
ošetrovania zelených plôch. Výsledok: prvý presný posýpací vozík
na presné a dávkované aplikovanie osiva a hnojiva.
Špeciálna posýpacia mechanika zabezpečuje, že existuje
možnosť presného dávkova-nia a rozdeľovania rôznych osív do
pôdy. Mimoriadne praktický je náš posýpací strmeň s funkciou
prerušovania akcie umiestnený na držiaku zariadenia. Pomocou
neho môžete presne určovať, kde sa posyp uskutoční.
Prajeme Vám veľa príjemných hodín stávených na Vašom obľúbenom trávniku.
Kalibrovanie (základné nastavenie) posypovej lišty (obr.
M12/M13/M14)
• Nastavovaciu skrutku na dávkovači dajte do polohy na č. 5.
Číslo 5 musí byť spoľahli-vo identifi kovateľné (M12).
•
Spojte posýpací strmeň na držiaku pevne s rýchlospojkou (M13).
•
Potom posýpací vozík podajte smerom dopredu. Povolte
kontramaticu M14 (1) a kali-brovaciu skrutku M14 (2) otáčajte
dovtedy, kým sa predný okraj posypovej lišty M14 (3) a značka
budú vzájomne zhodovať (pozri šípku na obr. M14), príp. kým
vzdiale-nosť od dolného okraja po značku bude činiť 6 mm (M14
Q). Potom kalibrovaciu skrut-ku (2) podržte a pevne utiahnite
kontramaticu (1).
• Teraz znovu povolte rýchlospojku (M13) a Váš posýpací vozík je
týmto pripravený na použitie.
Plnenie posypového materiálu
Plnenie nevykonávajte na ploche trávnika, pretože prípadné
vysypané osivo sa stratí, alebo sa trávnik presýti [spáli]
nadmerným prehnojením.
Nastavenie množstva posypu (obr. B1)
• Pri nastavovaní množstva posypu rešpektujte pokyny uvedené
na etikete, alebo na pri-loženom liste. Dbajte aj na pokyny
uvedené na obale hnojiva / osiva.
• Požadovanú intenzitu posypu (vyjadrenú číslom) zvolte
nastavovacou skrutkou na dáv-kovači.
Posypová vzorka (obr. B2)
Dobrú vzorku posypu dosiahnete vtedy, keď budete posyp
vykonávať v pozdĺžnom sme-re trávnika. Dbajte na to, aby sa posyp
vykonal prekrýaným spôsobom tak, aby nezos-tala neposypaná
žiadna plocha. Odporúča sa vykonať najprv posyp niekoľkých šírkových plôch na čelných stranách ošetrovanej plochy.
Odporúčame
• posúvať posýpací vozík skôr ako nadvihnete posýpací strmeň!
• povoliť posýpací strmeň skôr ako sa prestanete pohybovať
dopredu.
Upozor nenie (obr. B3/M9/M10/M11)
Keď budete posýpať len rovné úseky, odporúčame nainštalovanie
unášača. Teraz bude-te posýpací hriadeľ poháňať obidvomi kolieskami.
Údržba a ošetrovanie
• po každom použití zariadenia:
- posýpací vozík vyprázdnite
- nádržku dôkladne vyčistite
- posýpacie otvory a vodiace lišty dôkladne očistite tvrdým
kartáčom.
V prípade silného znečistenia (zalepenie) umyte posýpací vozík
horúcou vodou. Pred ďalším použitím musí byť posýpací vozík
úplne suchý.
Nové prekalibrovanie (základné nastavenie)
Základné nastavenie sa môže po určitom čase zmeniť. Pri
novom kalibrovaní tohoto za-riadenia postupujte podľa pokynov
uvedených v kapitole montáž, M12/M13/M14.
V každej krajine platia záručné ustanovenia vydané našou spoločnosťou alebo dovozcom. Eventuálne poruchy vzniknuté na Vašom prístroji, odstránime v priebehu záručnej doby bezplatne, v prípade, ak
je príčinou poruchy chyba materiálu alebo výrobcu. V prípade záruky
sa, prosím, obráťte na Vášho obchodníka alebo najbližšiu pobočku.
Elszó
Szerelés
Összeszerelés
Karbantartás
Garancia
Page 19

19
K dobri tradiciji podjetja WOLF-Garten sodi, da vam pomagamo
ustvariti vašo sanjsko trato in da preizkušeno še dodatno izboljšamo.
Naši strokovnjaki za trate imajo nalogo, da razvijajo proizvode, ki
omogočajo, da vsakdo neodvisno od klime in kakovosti tal pride do
svoje sanjske trate. Z našimi semeni in posebnimi gnojivi za trato
smo ta cilj dosegli.
Vendar semena in gnojivo lahko enakomero in natančno raztrosimo
le s trosilnim vozičkom. Ta voziček smo razvili popolnoma na novo,
v skladu z zahtevami profesionalnih vrtnarij. Rezultat: prvi trosilni
voziček za precizno in dozirano trosenje semen in gnojiva.
Posebna trosilna mehanika skrbi za to, da se različna sredstva
za trosenje na trato porazdelijo eksaktno in v pravi meri. Posebej
praktična je ročica za zaustavljanje trosenja na ročaju naprave. Z njo
lahko natančno določite, kje boste trosili.
Želimo vam mnoge prijetne ure na vaši sanjski trati.
Kalibriranje (osnovna nastavitev) trosilne tračnice (sl.
M12/M13/M14)
• Nastavite naravnalni vijak na dozirniku na št. 5. Št. 5 mora biti
popolnoma razpoznavna (M12).
• Povežite ročico z ročajem s hitro vezico (M13).
• Nato položite trosilni voziček vnaprej na hrbtno stran. Odvijte
kontra-matico M14 (1) in obračajte kalibrirni vijak M14 (2) tako
daleč, dokler se sprednji rob trosilne tračnice M14 (3) in oznaka
ujemata (glej puščico sl. M14), oz. znaša razmak od spodnjega
roba do oznake 6 mm (M14 Q). Pridržite nato kalibrirni vijak (2)
in trdno privijte kontra-matico (1).
• Ponovno odvežite hitro vezico in vaš trosilni voziček je
pripravljen za uporabo (M13).
Polnjenje materiala za trosenje
Ne počenjajte tega na trati, ker se raztrosen material lahko
porazgubi, ali se trata „zažge“ zaradi prevelike količine
raztrošenega gnojiva.
Nastavitev količine trosenja (sl. B1)
• Upoštevajte navodila za nastavitev količine trosenja materiala,
ki so navedena na etiketi ali prilogi. Pazite na napotke na
embalaži gnojiva/semen.
• Nastavite količino trosenja materiala (število) z naravnalnim
vijakom na dozirniku.
Vzorci trosenja (sl. B2)
Dober vzorec trosenja boste dosegli, če boste trosili v vzdolžni
smeri trate. Pazite na to, da trosite v prekirvajočih se progah,
da ne ostanejo neobdelane površine. Koristno je, da na čelnih
straneh raztrosite material po širini nekaj prog v prečni smeri.
Priporočamo:
•
Najprej potiskajte trosilni voziček, preden dvignete trosilno ročico!
• Spustite trosilno ročico vedno, preden se ustavite.
Nasvet (Abb. B3/M9/M10/M11)
Če peljete le po ravnih progah, vam priporočamo vgradnjo
sojemalnika. Sedaj se trosilna gred poganja z obema kotačima.
Nega in vzdrževanje
• Po vsaki uporabi:
- Izpraznite trosilni voziček
- Temeljito očistite posodo
-
Temeljito očistite trosilne odprtine in vodilno tračnico s trdo krtačo.
V primeru močne onesnaženosti (zalepljenje) umijte voziček
z vročo vodo. Pri naslednji uporabi mora biti trosilni voziček
popolnoma suh.
Ponovno kalibriranje (osnovna nastavitev)
Osnovna nastaviev se tekom časa lahko spremeni. Pri
ponovnem kalibriranju postopajte tako, kot je opisano v pogl.
Montaža, M12/M13/M14.
V vsaki državi veljajo garancijski pogoji, ki jih določa naše podjetje
ali uvoznik. Motnje na napravi nadomestimo v okviru garancijskih
pogojev brezplačno, če je vzrok napaka v materialu ali v proizvodnem
procesu. V primeru, da se naprava pokvari, se oglasite pri prodajalcu
oziroma pri najbližji avtorizirani servisni službi.
Uvod
Montaža
Obratovanje
Servisiranje
Garancija
Page 20

20
WE 430
A (g/m²) B
WOLF LP / LP-N 20 18
WOLF LJ 20
21
WOLF LF / LG / LR / LR-D / LU-RS / L-GR
20 24
WOLF LH 25 8
WOLF LY 25 9
WOLF LH-MU / LK-MU / LN-MU / LX-MU 25 10
WOLF LE / LN 22,5 8
WOLF LX / LX-A 23,5 10 1/3
WOLF LX-N (NL/B) 20 11
WOLF L-PF 18 9 1/3
WOLF LW (D)
Moosvernichter und Rasendünger
30
7 2/3
WOLF LQ (D)
Unkrautvernichter plus Rasendünger
30 7
WOLF Novaplant® Supra /
Set: Premium-Rasen
20 (Saatgut, seeds)
25 (Dünger, fertilizer)
18
8
WOLF Novaplant® Loretta /
Set: Strapazier-Rasen
20 (Saatgut, seeds)
25 (Dünger, fertilizer)
21
8
WOLF Novaplant® Family /
Set: Spiel-Rasen
20 (Saatgut, seeds)
25 (Dünger, fertilizer)
24
9
WOLF Novaplant
®
Shadow (NL/B)
20 (Saatgut, seeds)
25 (Dünger, fertilizer)
18
9
WOLF Rasen-Reparatur-Set L 150 G
20 (Saatgut, seeds)
25 (Dünger, fertilizer)
24
12 1/3
WOLF SQ (A)
Unkrautvernichter und Rasendünger
30 7
WOLF SW (NL/B)
Mosbestrijder met gazonmest
35
10
Einstellungen
Settings
Réglages
Regolazioni
Afstellingen
Instillinger
Säädöt
Innstillinger
Inställningar
Nastavení
Beállítások
Ustawienia
Podešavanja
stavitve
nastavenia
B
Ausstreurate
Scattering rate
Taux d‘épandage
Quanti di distribuzione
Strooihoeveelheid
Udstrøningsmængde
Levitys määrä
Strødose
Spridningsgrad
Množství
Kiszórandó mennyiség
Stopień rozsiewania
Rata rasipanja
koefi cient rozmetu
Stopnja trosenja
A
Page 21

21
Notes
Page 22

www.WOLF-Garten.com Teil-Nr. 0054 392 / 0110 - HDS/TB
 Loading...