

Page 1
UV 34 E
UV 32 EV
UV 30 EV
Gebrauchsanweisung 6
Instruction manual 11
Mode d’emploi 16
Istruzione d’uso 21
Gebruiksaanwijzing 26
Brugsanvisning 31
Käyttöohje 36
Bruksanvisning 41
Bruksanvisning 46
Návod k použtí 51
Használati utasítás 56
Instrukcja obslugi 61
Upute za upotrebu 66
Návod na obsluhu 71
Navodilo za uporabo 76
Инструкция за употреба 81
Инструкция по применению 87
Instrucţiuni de folosire 93
Kullanım Kılavuzu 98
Οδηγίες Χρήσης 103
UV 34 E
UV 32 EV
UV 30 EV
Page 2
2
Page 3
3
Page 4
4
UV 34 E - UV 32 EV - UV 30 EV
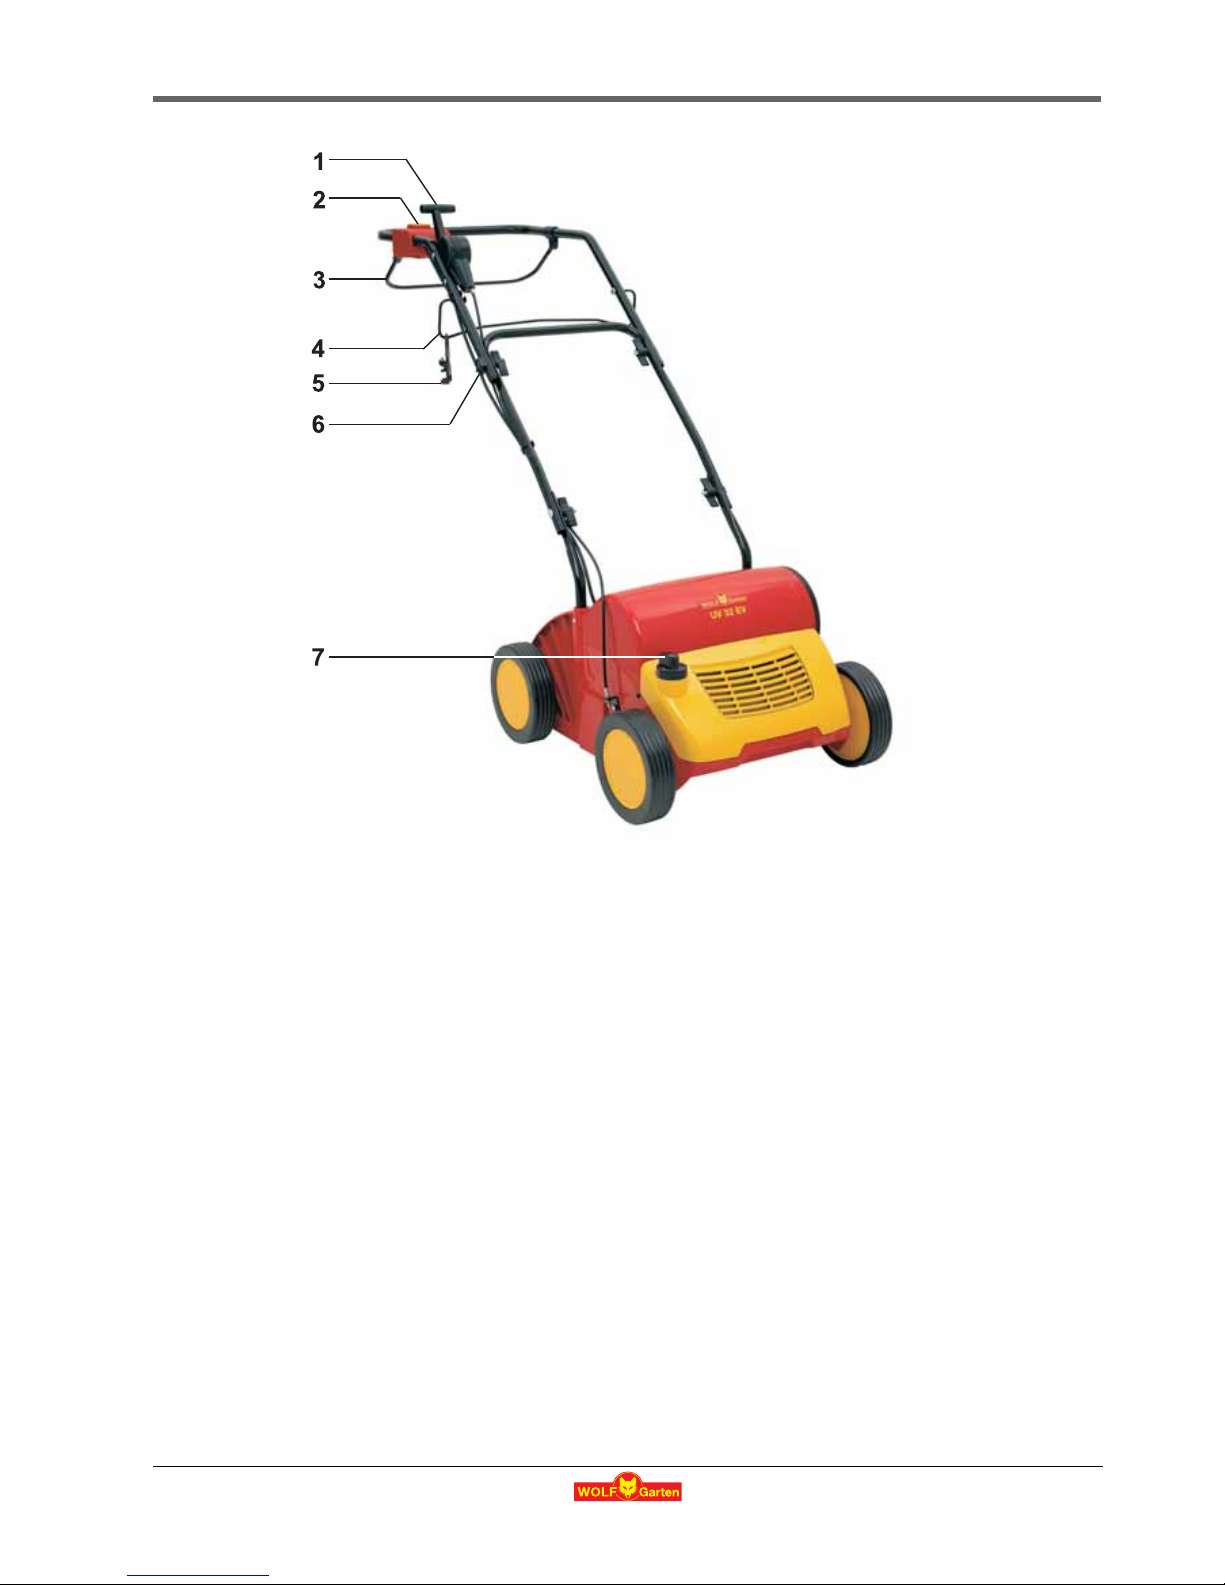
D
1
Stellhebel Arbeits-/Transportstellung
2 Ein- Ausschalter
3 Sicherheitsbügel
4 Kabelführung (Flick/Flack®)
5 Kabelzugentlastung
6 Kabel-Knickschutz
7 Arbeitstiefeneinstellung
G
1
Setting lever working / transport position
2 On-/off switch
3 Operator presence bail arm
4 Cable-guide (Flick/Flack®)
5 Cable-kink protection
6 Cable anti-king protection
7 Adjustment of working depth
F
1 Levier de commande des positions travail
/ transport
2 Interrupteur
3 Etrier de sécurité
4 Guide-cable (Flick/Flack®)
5 Guide-câble de sécurité
6 Protection antipliage du câble
7 Réglage de profondeur de travail
I
1
Leva di comando posizione di lavoro/di
trasporto
2 Interrutore per avviare
3 Archi di sicurezza
4 Slitta (Flick/Flack®)
5 Portacavo
6 Regolazione profondità di lavoro
7 Regolazione di lavoro
n
1
Hendel werk-/transportstand
2 In- en uitschakelaar
3 Beugelschakelaar
4 Kabelgeleiding (Flick/Flack®)
5 Kabeltrekontlaster
6 Kabelknikbescherming
7 Werkdiepte instelknop
d
1
Betjeningsarm arbejds-/transportstilling
2 Afbryder
3 Sikkerhedsbøjle
4 Kabelføring (Flick/Flack®)
5 Kabeltrækaflastning
6 Kabelknækbeskyttelse
7 Indstilling af arbejdsdybde
Page 5

5
f
1
Käyttö-/kuljetusasennon säätövipu
2 Virtakytkin
3 Turvasanka
4 Kaapelinohjain (Flick/Flack®)
5 Vedonpoistin
6 Kaapelin taittosuoja
7 Työsyvyyden säätäminen
N
1 Innstillingshåndtak arbeids-/transportstilling
2 På-/av bryter
3 Sikkerhetsbøyle
4 Kabelføring (Flick/Flack®)
5 Kabelstrekkavlastning
6 Knekkebeskyttelse for kabel
7 Arbeidsdybdeinnstilling
S
1
Spak för arbets- och transportläge
2 Omkopplare TILL / FRÅN
3 Säkerhetsbygel
4 Kabeldragning (Flick/Flack®)
5 Kabeldragavlastning
6 Kabel-knäckskydd
7 Inställning av arbetsdjup
C
1 Páka nastavení pracovní/pepravní
polohy
2 Spínač
3 Bezpečnostní madlo
4 Vedení kabelu (Flick/Flack®)
5 Omezovač tahu kabelu
6 Ochrana kabelu
7 Nastavení pracovní hloubky
H
1
Az állítókar munka-/szállítási helyzetbe
hozása
2 be- / kikapcsoló
3 Biztonsági kapcsolókar
4 kábelvezető (Flick/Flack®)
5 kábelkihúzás gátló
6 kábeltörés gátló
7 munkamélység beállító
p
1
Dýwignia regulująca ustawienie robocze i
transportowe
2 Włącznik / Wyłącznik
3 Blacha prowadząca
4 Prowadnica kabla (Flick/Flack®)
5 Zabezpieczenie przed splątaniem kabla
6 Ochrona przeciwzgięciowa kabla
7 Regulacja głębokości pracy
h
1
Poluga za radni/transportni položaj
2 Uključna –isključna sklopka
3 Sigurnosni stremen
4 Vodilica kabela (Flick/Flack®)
5 Rasterećenje kabela na vlak
6 Zaštita kabela od prijeloma
7 Namještanje radne dubine
s
1
Brzdiaca páka pracovnál / transportná
poloha
2 Zapnutie - vypnutie
3 Poistné rameno
4 Vedenie kábla (Flick/Flack®)
5 Odľahčenie t’ahu kábla
6 Kábel - zlomová ochrana
7 Nastavenie pracovnej hĺbky
O
1
Vzvod za delovno/transportno lego
2 Stikalo za vklop/izklop
3 Varnostna prečka
4 Vodilo kabla (Flick/Flack®)
5 Razbremenitvena sponka kabla
6 Varovalo kabla proti zlomu
7 Nastavitev delovne globine
b
1
Изпълнителен лост Работно /
транспортно положение
2 Включване - Изключване
3 Предпазна скоба
4 Водач на кабела (Flick/Flack®)
5 Автоматично изключване на кабела
6 Предпазител на кабела от прегъване
7 Настройка за дълбочина на работа
R
1
Переводной рычаг длэ переключениэ в
рабочее/транспортировочное
положение
2 Выключатель
3 Предохранительная скоба
4 Кабелепровод (Flick/Flack®)
5 Предохранитель кабеля
6 Защита от перегиба кабеля
7 Устан овк а глубины обработки
o
1
Manetă de reglare pentru poziţia de lucru /
de transport
2 Comutator pornit/oprit
3 Etrier de siguranţă
4 Ghidajul cablului (Flick/Flack®)
5 Dispozitiv pentru descărcarea
6 Protecţie contra îndoirii
7 Ajustarea pe înălţime a poziţiei de lucru
T
1
Çalýţma yüksekliđi ayarlayýcý
2 Întrerupător pornit - oprit
3 Emniyet maşası
4 Kablo yolu (Flick/Flack®)
5 Dispozitiv de slăbire a cablului
6 Kablo-kırılma koruması
7 Çalışma derinliği ayar
g
1
Μοχλός χειρισμού θέσης
λειτουργίας/μεταφοράς
2 Διακόπτης on/off
3 Βάση ασφαλείας
4 Οδηγός καλωδίου (Flick/Flack®)
5 Προστασία έλξης καλωδίου
6 Προστατευτικό κάμψης καλωδίου
7 Ρύθμιση βάθους εργασίας
Page 6

6
D
D Herzlichen Glückwunsch zum Kauf Ihres WOLF-Produkts
Inhaltsverzeichnis
Technische Daten . . . . . . . . . . . . . . . . . . 6
Sicherheitshinweise . . . . . . . . . . . . . . . . . 7
Montage . . . . . . . . . . . . . . . . . . . . . . . 8
Betrieb . . . . . . . . . . . . . . . . . . . . . . . . 8
Wartung . . . . . . . . . . . . . . . . . . . . . . . 9
Ersatzteile . . . . . . . . . . . . . . . . . . . . . . 9
Beseitigung von Störungen . . . . . . . . . . . . . 10
Garantiebedingungen . . . . . . . . . . . . . . . . 10
EG-Konformitätserklärung . . . . . . . . . . . . . 108
Technische Daten
Lesen Sie die Gebrauchsanweisung sorgfältig, und
machen Sie sich mit den Bedienungselementen und
dem richtigen Gebrauch des Gerätes vertraut. Der Benutzer ist verantwortlich für Unfälle mit andere n Personen oder deren Eigentum. Beachten Sie die Hinweise,
Erläuterungen und Vorschriften.
Lassen Sie nie Kinder oder andere Personen, die die
Gebrauchsanweisung nicht kennen, den Vertikutierer
benutzen. Jugendliche unter 16 Jahre dürfen das Gerät nicht benutzen. Örtliche Bestimmungen können das
Mindestalter des Benutzers festlegen.
Änderungen aus technischen Gründen vorbehalten.
D Lärmmessung am Ohr der Bedienperson in Anlehnung an
EN 13684
E Schwingungen gemessen am Führungsholm, mit Bedien-
person nach EN 1033 und EN 13684. Die bewertete Beschleunigung beträgt typischerweise:
UV 34 E UV 32 EV UV 30 EV
Typ 3634 ... 3632 ... 3630 ...
A 62 cm 62 cm 62 cm
B 55 cm 55 cm 55 cm
C 54 cm 54 cm 54 cm
D LP 80 dB (A) LP 80 dB (A) LP 80 dB (A)
E a
hw
≤ 2,5 m/s
2
a
hw
≤ 2,5 m/s
2
a
hw
≤ 2,5 m/s
2
Nennleistung 1600 W 1300 W 1100 W
Stromstärke 7,1 A 7,9 A 7,4 A
Netzspannung 230 VAC 230 VAC 230 VAC
Arbeitsbreite 34 cm 32 cm 30 cm
Gewicht 22 kg 20 kg 18 kg
Gebrauchsanweisung
Page 7
7
D
Sicherheitshinweise
Bedeutung der Symbole
Allgemeine Hinweise
z Wegen körperlich er Gefährdung des Benutzers darf der Ver-
tikutierer nicht benutzt werden.
– als Motorhacke
– zum Einebnen von Bodenerhebungen, wie Maulwurfhü-
geln.
z Lassen Sie nie Kinde r oder andere Personen, die mit der Wir-
kungsweise der Maschine nicht vertraut s ind, mit dem Vertikutierer arbeiten. Jugendliche unter 16 Jahren dürfen das Gerät
nicht benutzen.
z Setzen Sie die Maschi ne niemals ein, während Pe rsonen, be-
sonders Kinder oder Tiere in der Nähe sind.
z Die Bedienperson ist für Unfälle oder Risiken mit anderen Per-
sonen oder deren Eigentum verantwortlich.
z Den Vertikuti erer nur auf abgetrocknetem Rasen einsetzen.
z Arbeiten Si e nur bei Tageslicht oder mit entsprechender
künstlicher Beleuchtung.
Vor dem Vertikutieren
z Tragen Sie immer geeignete Arbeitskleidung; keine weite
Kleidung etc. die vom Schneidwerkzeug erfasst werden kann.
Festes Schuhwerk! Schützen Sie auch Ihre Beine (z. B. durch
lange Hosen) und Hände (Handschuhe).
z Bringen Sie den mitgelieferten Prallschutz bzw. Fangeinrich-
tung an. Achten Sie auf festen Sitz. Die Benutzung ohne o der
beschädigter Schutzeinrichtungen ist verboten.
z Entfernen Sie vor dem Vertikutieren alle Fremdkörper wie
Steine, Holzstücke, Knochen o. ä. aus dem zu vertikutierenden Rasen.
z Kontrollieren Sie das Arbeitswerkzeug auf
– festen Sitz der Befesti g un g s te il e
– Beschädigung oder starke Abnutzung
z Beim Austausch Einbauhinweise beachten.
z Die am Gerät außen installierte Leitung und das Anschlusska-
bel auf Beschädigung und Alterung (Brüchigkeit) untersuchen. Nur in einwandfreiem Zustand benutzen.
z Lassen Si e Reparaturen am Kabel n ur vom Fachmann durch-
führen.
z Überprüfen Sie die Grasfangeinrichtung häufiger auf Ver-
schleißerscheinungen.
z Vor dem Einstellen oder Säubern des Gerätes oder vor dem
Prüfen, ob die Anschlussleitung verschlungen oder verletzt
ist, das Gerät ausschalten und den Netzstecker ziehen.
Kabel
1 Achtung! Stromschlag durch Kabelsch ad e n
Wenn das Kabel durchtrennt oder beschädigt wird, löst
nicht immer die Sicherung aus.
z Kabel nicht berühren, bevor der Netzste cker aus der
Steckdose gezogen ist.
z Beschädigtes Kabel komple tt austauschen. Es ist verbo-
ten, das Kabel mit Isolierband zu flicken.
z Lassen Si e Reparaturen am Kabel nur vom Fachmann durch-
führen (siehe „Wartung“, Seite 9).
z Anschlusskabel an der Zugentlastung befestigen. Nicht an
Kanten, spitzen oder scharfen Gegenständen scheuern lassen.
z Schalt einrichtungen dürfen nicht entfernt oder überbrückt
werden (z. B. Anbinden des Schalthebels am Führungsholm).
z Verwenden Si e aussc hließ lic h Verlängerung skabe l, die nic ht
leichter sind als Gummischlauchleitungen, Typ:HO 7 RN-F,
Mindest-Querschnitt 3 x 1,5 mm
2
, Länge: max. 25 m.
z Die Kabel müssen spritzwassergeschützt sein.
Beim Start
z Schalten Sie den Motor nur ein, wenn Ihre Füße in sicherem
Abstand von den Schneidwerkzeugen sind.
z Kippen Si e das Gerät nicht, wenn Sie den Motor einschalte n,
es sei denn, das Gerät muss beim Anlassen gekipp t werden.
Wenn dies der Fall ist, kippen Sie das Gerät nic ht mehr als unbedingt notwendig ist und heben nur den Teil an, de r vom Benutzer entfernt ist. Überprüfen Sie immer, dass sich beide
Hände in Arbeitsstellung befinden, bevor das Gerä t wieder auf
den Boden zurückgestellt wird.
Beim Vertikutieren
z Achtung, Gefahr! Schneidwerkzeug läuft nach!
z Halte n Sie den durch die Führungsholme gegebenen Sicher-
heitsabstand ein.
z Führen Sie ni emals Hände oder Füße an sich drehende Teile.
z Halte n Sie sich immer entfernt von der Auswurföffnung.
z Schalten Sie den Motor nur ein, wenn Ihre Füße in sicherem
Abstand von den Schneidwerkzeugen sind.
z Wenn möglich, ist der Einsatz des Gerätes bei nassem Gras
zu vermeiden oder üben Sie besondere Vorsicht, um ein Ausrutschen zu vermeiden.
z Achten Sie auf sicheren St and, beson ders an Abhänge n. Nie
laufen, ruhig vorwärtsgehen.
z Vertikutieren Sie nicht an steilen Abhängen.
z Seien Sie besonders vorsichtig, wenn Sie die Fahrtrichtung
am Hang ändern.
z Seien Sie besonders vorsichtig, wenn Sie die Maschine um-
kehren oder sie zu sich heranziehen.
z Das Kabel ist beim Vertikutieren vom Arbeitswerkzeug fernzu-
halten. Das Arbeitswerkzeug kann die Leitung beschädigen
und Kontakt mit stromführenden Teilen führen.
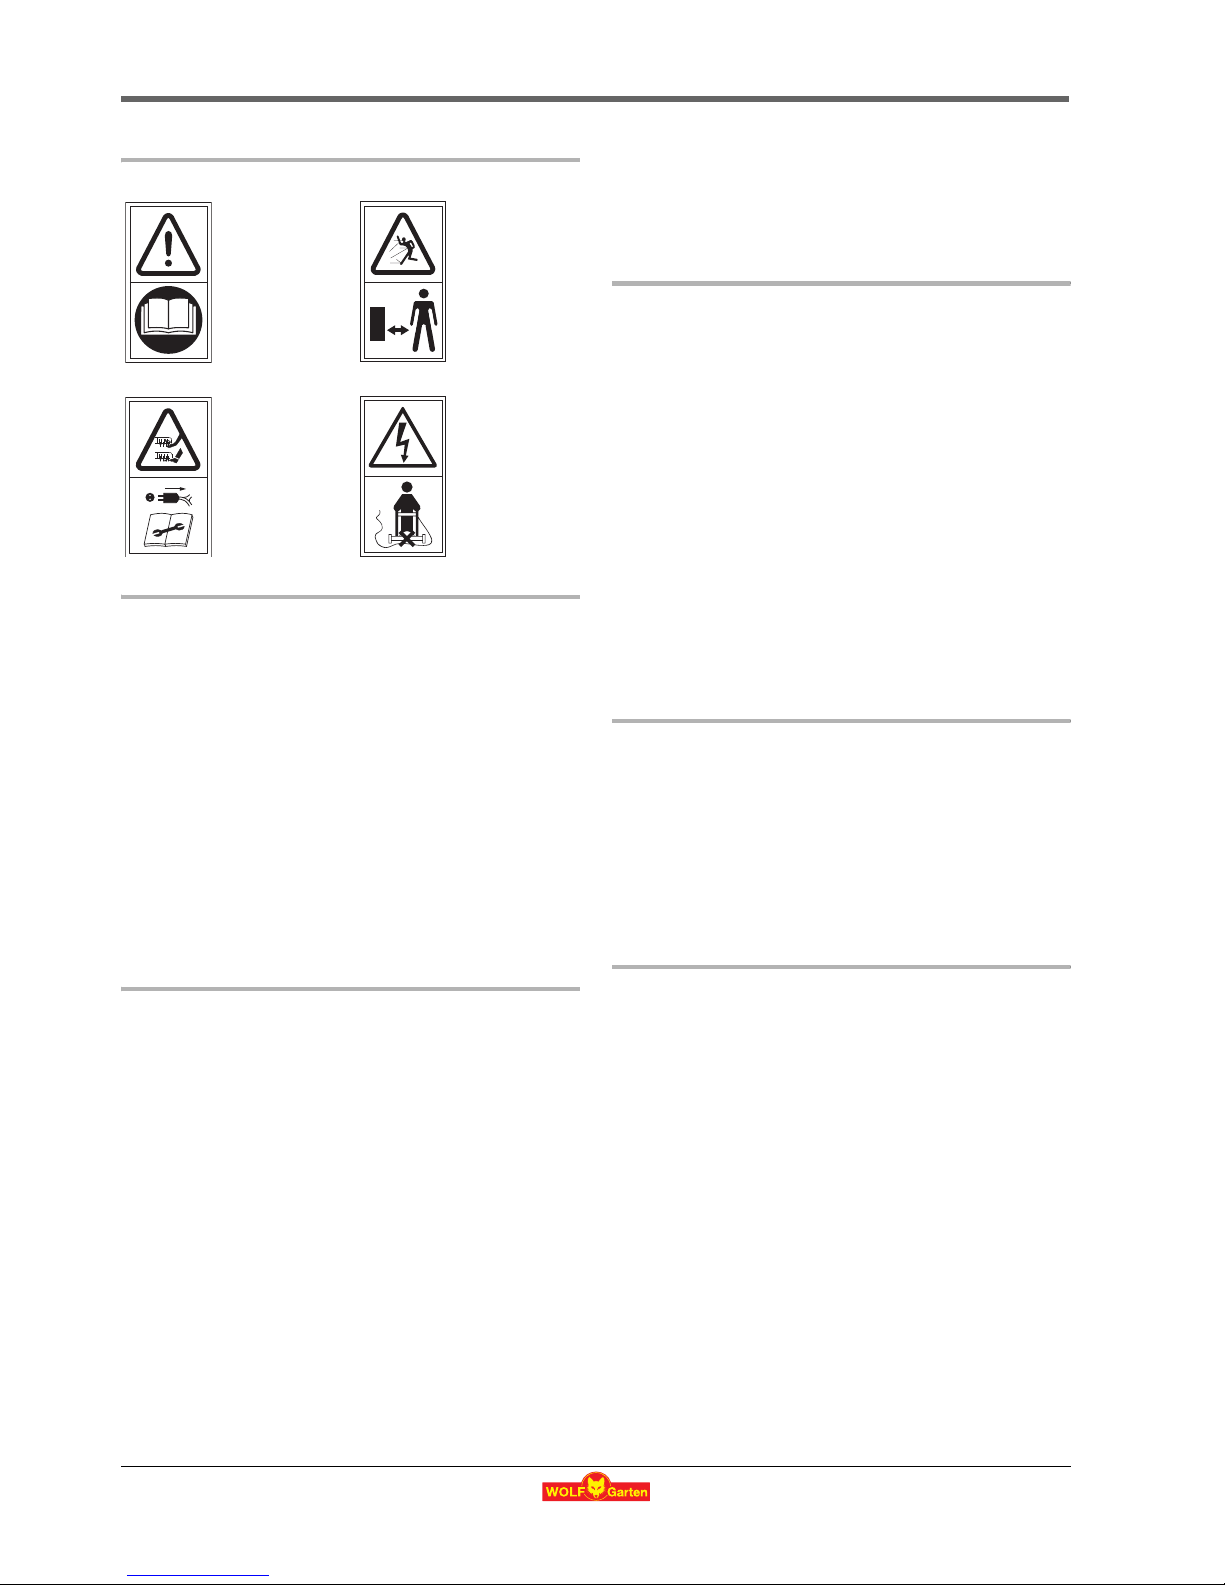
Warnung!
Vor
Inbetriebnahme
die Gebrauchsanweisung
lesen!
Dritte aus dem
Gefahrenbereich
fernhalten!
Vorsicht! - Scharfe
Schneidmesser vor Wartungsarbeiten und bei Beschädigung der
Leitung den
Stecker aus dem
Netz entfernen!
Anschlusskabel von der
Arbeitswalze
fernhalten!
Page 8
8
D
z Halten Sie die Arbeitswerkzeuge an:
– wenn die Maschine zum Transport gekippt werden muss.
– wenn andere Flächen als Gras überquert werden.
– wenn die Maschine transportiert wird.
z Gebra uchen Sie den Vertikutierer nie, we nn Schutzeinrichtun-
gen oder Gehäuseteile beschädigt sind oder fehlen.
z Bevor Sie den Vertikutierer aufheben oder wegtragen, schal-
ten Sie den Motor ab und warten Sie bis die Arbeitswerkzeuge
zum Stillstand gekommen sind.
z Vor Abnahme der Grasfangeinrichtung oder dem Verstellen
der Arbeitshöhe ist der Motor abzustellen und der Stillstand
der Arbeitswerkzeuge abzuwarten.
z Abgenutzte oder beschädigte Messer satzweise erneuern.
Beachten Sie die Einbauhinweise. Aus Sicherheitsgründen
nur Original-Ersatzteile verwenden.
z Wartungs- und Reinigungsarbeiten am Vertikutierer sowie
das Abnehmen der Schutzeinrichtungen dürfen nur bei abgestelltem Motor vorgenommen werden.
z Stell en Sie den Vertikutierer nicht in feuchten Räumen oder in
der Nähe von offenen Flammen ab.
z Sollt en Sie einmal auf ein Hindernis gefahren sein , lassen Sie
den Vertikutierer sicherheitshalber von einem Fachmann
überprüfen (siehe Werkstattverzeichnis).
z Wenn die Anschlussleitung während des Gebrauchs beschä-
digt wird, muss sie sofort vom Netz getrennt werd
en. Leitung
nicht berühren bevor sie vom Netz getrennt ist.
z Unter folgenden Umständen muss das Gerät abgeschaltet,
der Netzstecker gezogen werden und das Gerät stehen:
– beim Verlassen des Vertikutierers
– um ein blockiertes Messer frei zu machen
– um das Gerät zu überprüfen, zu reinigen oder daran zu ar-
beiten
– wenn ein Fremdkörper getroffen wurde (Überzeugen Sie
sich erst, ob Gerät oder Schneidwerkzeuge beschädigt
worden sind. Beseitigen Sie dann zunächst die Beschädigung).
– wenn der Vertikutierer durch Unwucht stark vibriert (sofort
abschalten und Ursache suchen).
– wenn die Anschlussleitung während des Gebrauchs be-
schädigt wird.
Wartung
1 Achtung! Rotierendes Messer
Vor allen Wartungs- und Reinigungsarbeiten:
z Netzstecker ziehen.
z Nicht an laufende Schneiden greifen.
Entsorgung
Montage
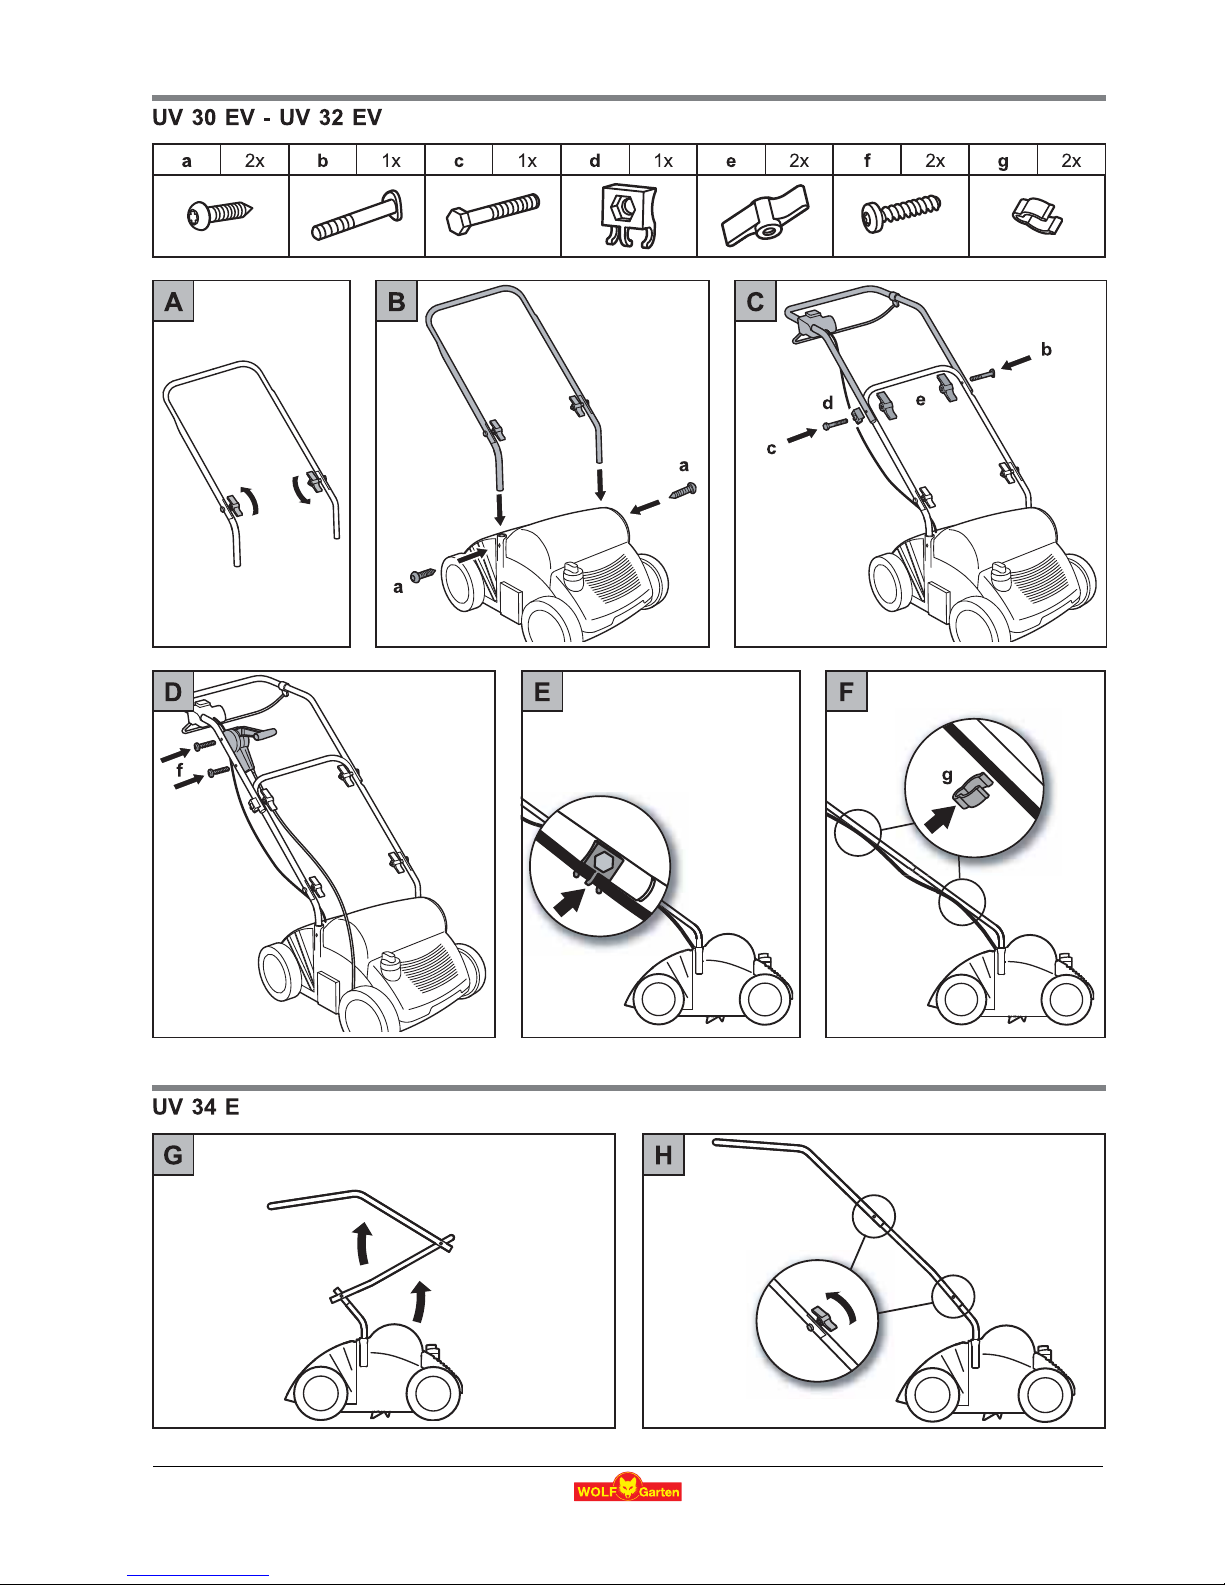
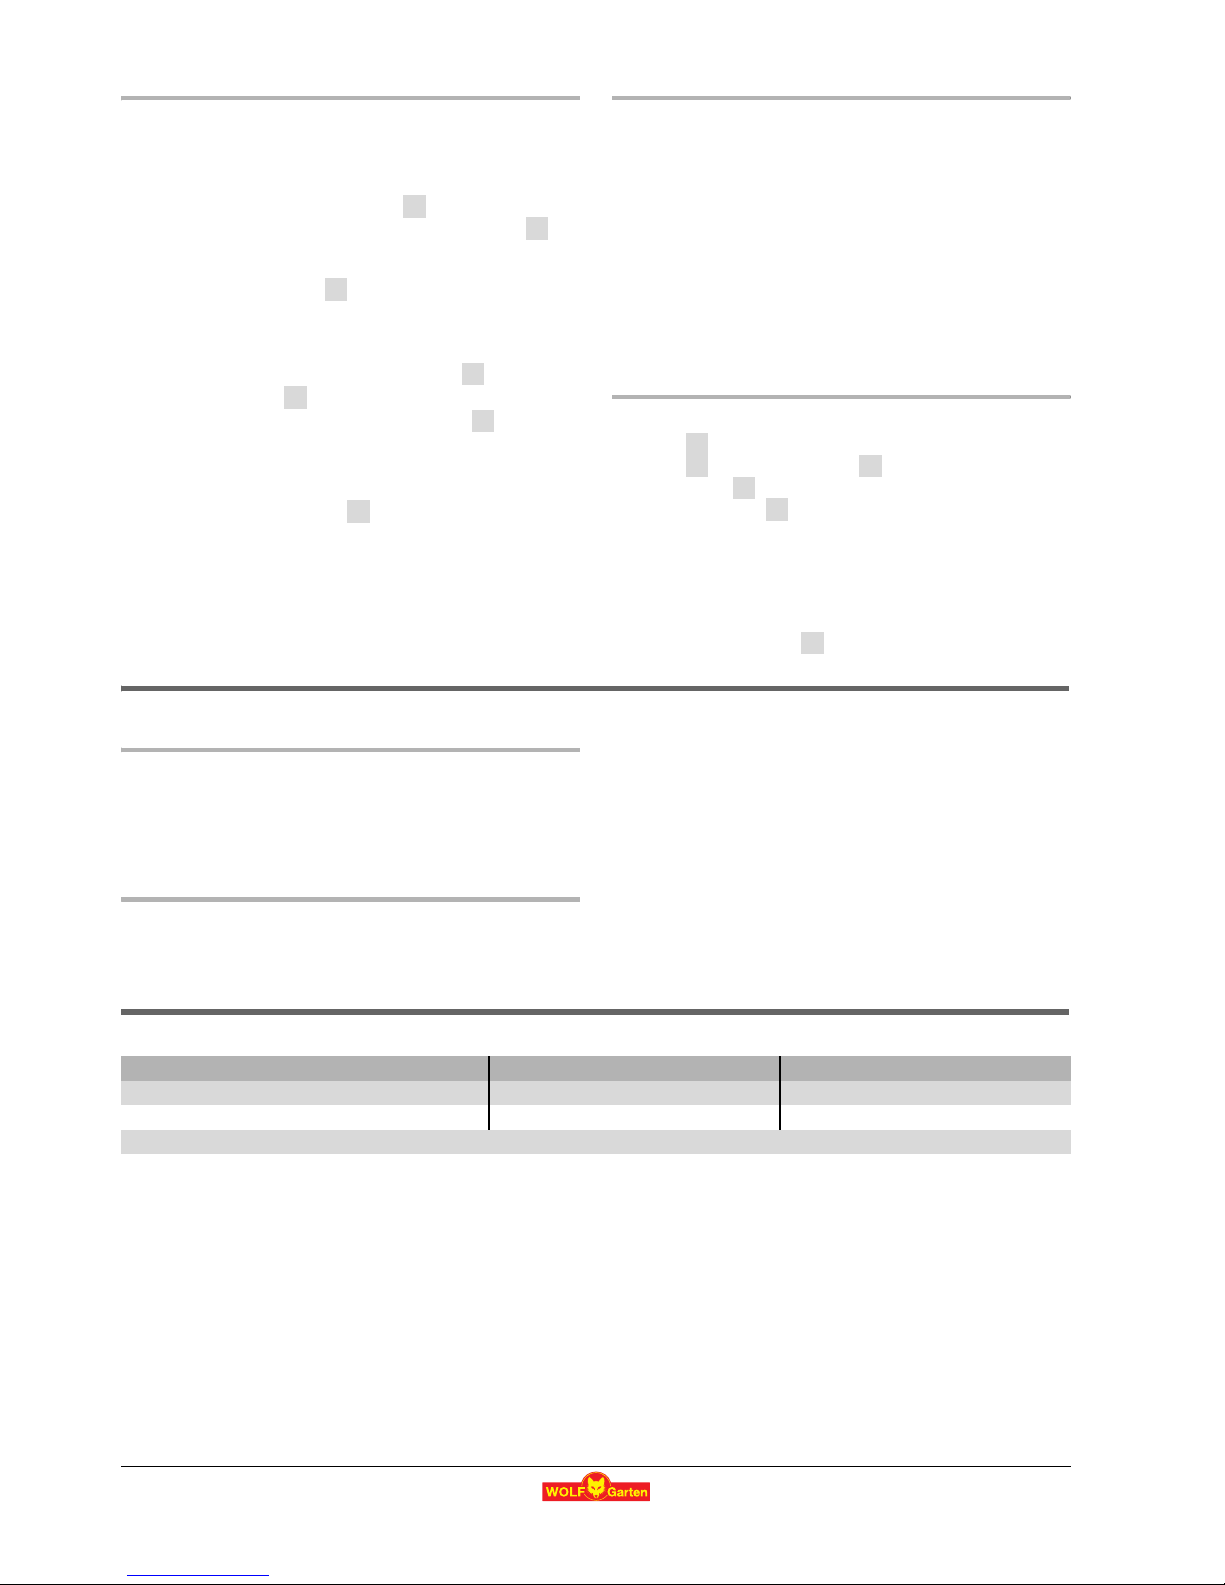
Griffgestänge befestigen
1 Vorsicht!
Beim Zusammenlegen oder Ausklappen des Griffgestänges können Kabel und Bowdenzug beschädigt werden.
z Achten Sie darauf, Kabel und Bowdenzug nicht zu kni-
cken.
z Montage siehe Abbildungen.
Betrieb
Betriebszeiten
z Bitte regionale Vorschriften beachten.
z Erfragen Sie die Betriebszeiten bei Ihrer örtlichen Ordnungs-
behörde.
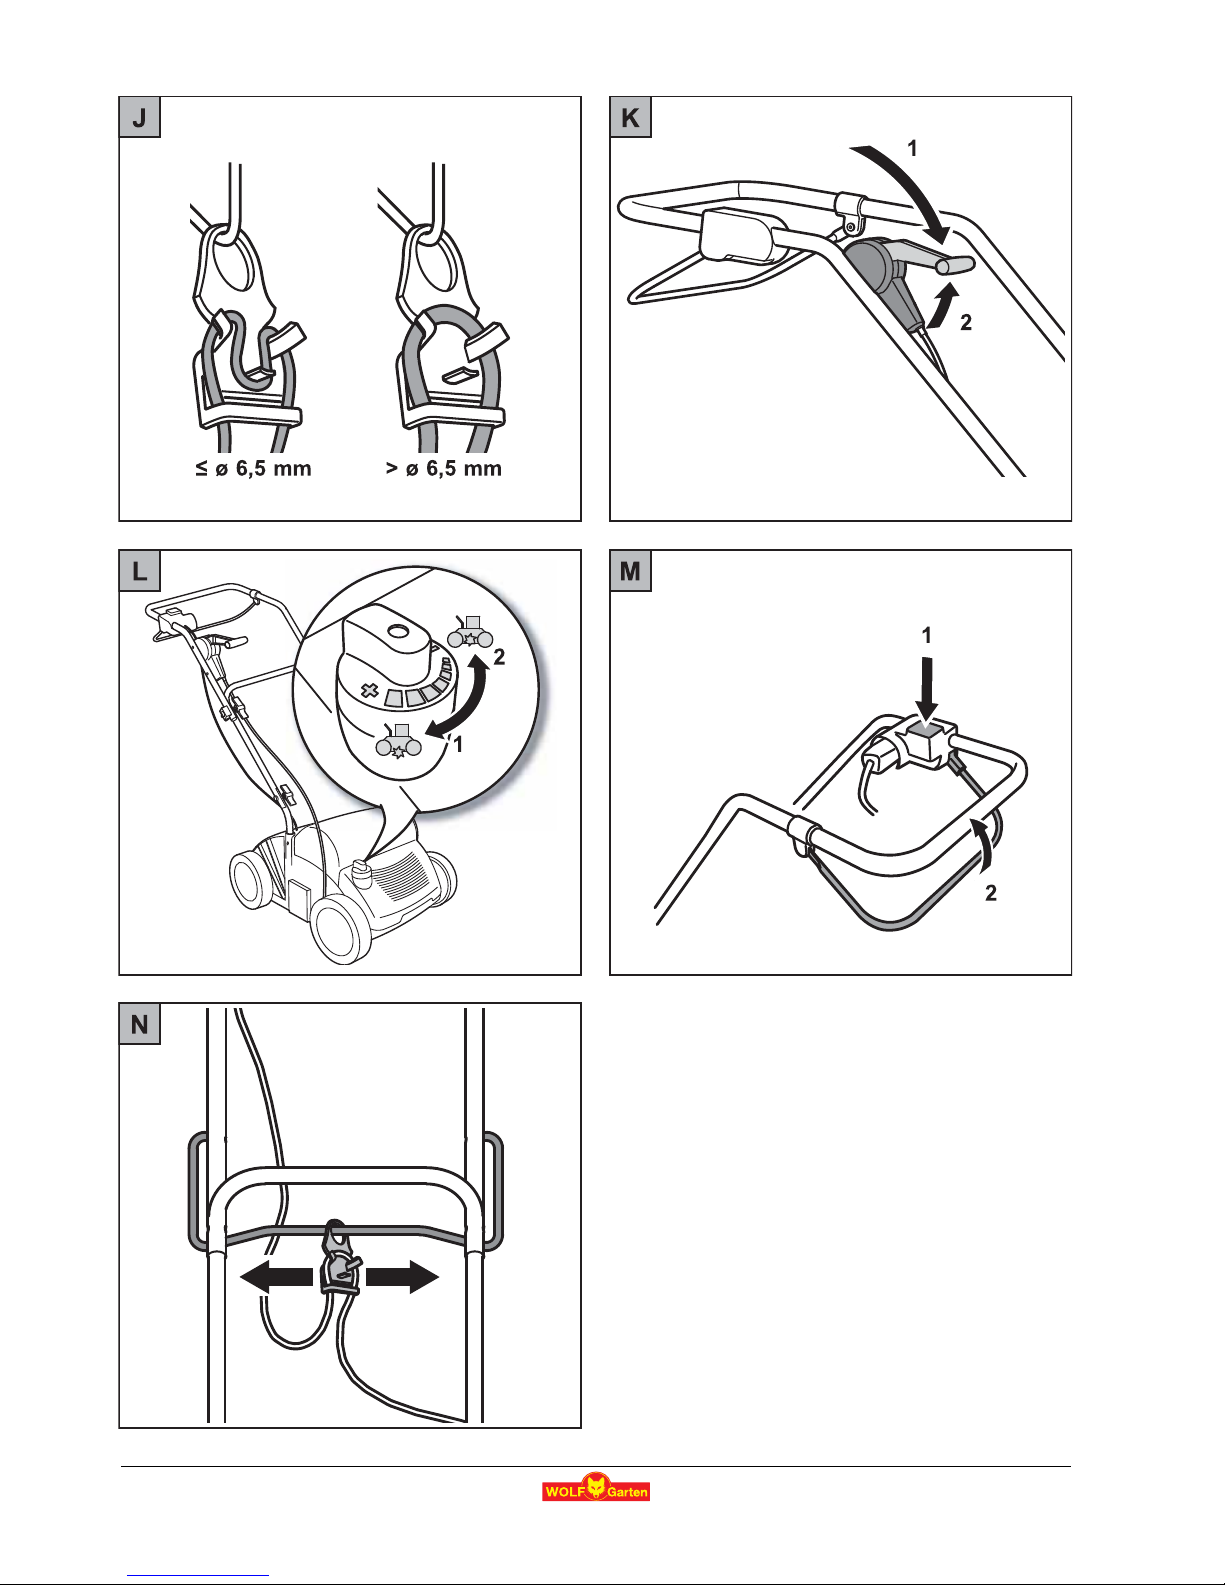
Kabel in die Zugentlastung führen
z Bitte führen Sie das Kabel anhand der Abbildung in die Zug-
entlastung
.
Anschluss an die Steckdose (230 Volt, 50 Hz)
z Das Gerät nur an Steckdosen anschließen, die mit einer
16 Amp. Sicherung träge (oder LS-Schalter Typ B) abgesichert sind.
3 Hinweis: Fehlerstromschutzeinrichtung
Diese Schutzeinrichtungen schützen beim Berühren von
beschädigten Leitungen, Isolationsfehlern und in bestimmten Fällen auch beim Beschädigen von unter Spannung stehenden Leitungen vor schweren Verletzungen.
z Wir empfehlen, das Gerät nur an Steckdosen anzu-
schließen, die mit einer Fehlerstromschutzeinrichtung
(RCD) mit einem Fehlerstrom von nicht mehr als 30 mA
abgesichert sind.
z Für Alt-Instal lationen gibt es Nachrüstsätze. Sprechen Sie mit
einer Elektro-Fachkraft.
Elektrogeräte gehören nicht in den Hausmüll. Gerät, Zubehör und Verpackung einer umweltfreundlichen Wiederverwertung zuführen.
ABCDEFG
H
J
Page 9
9
D
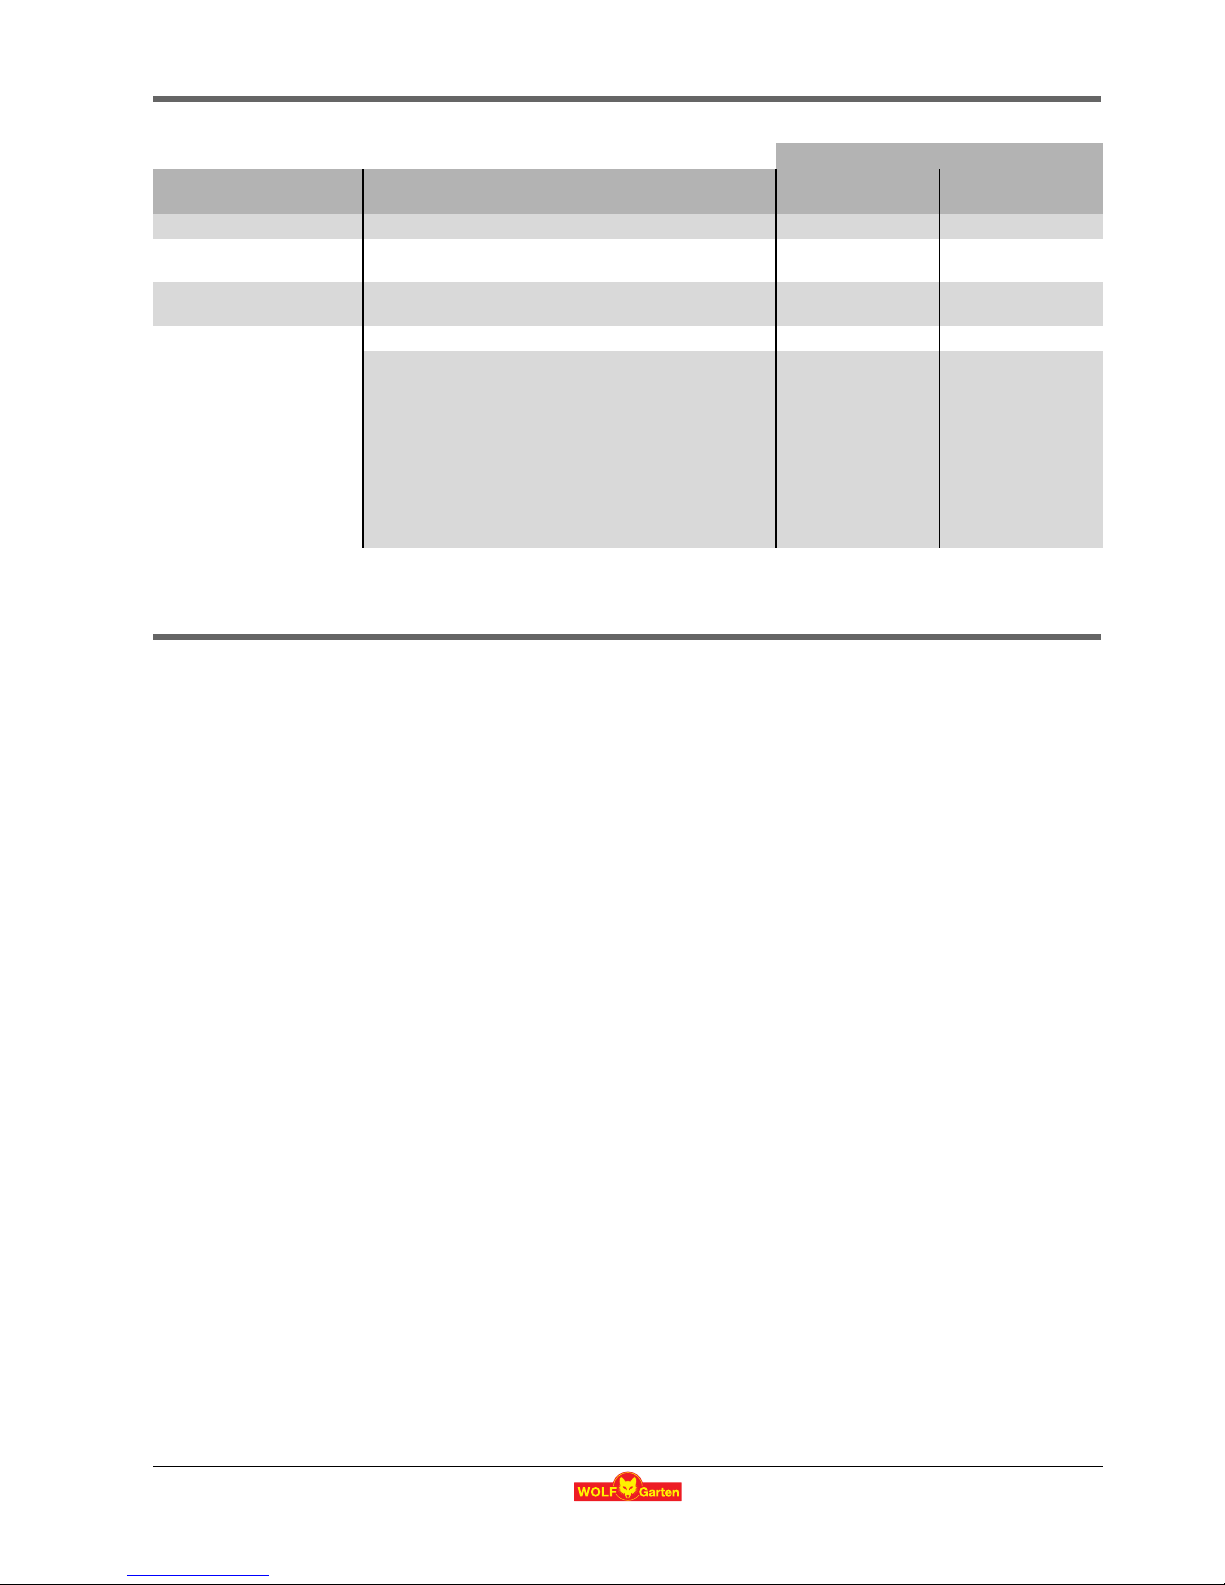
Arbeitstiefe einstellen
Nur bei abgeschaltetem Motor und stillstehender Vertikutierwalze. Die Arbeitstiefe muss auf die jeweiligen Gras- und Bodenverhältnisse eingestellt werden.
z Den Arbeitshebel nach vorne legen (1).
z Arbeitstiefe erhöhen (Messer in Richtung Boden) (1)
– Drehen Sie das Handrad „Arbeitstiefeneinstellung“ nach
rechts
z Arbeitstiefe verringern (2)
– Drehen Sie das Handrad „Arbeitstiefeneinstellung“ nach
links (eine Umdrehung = 1,5 mm Arbeitstiefe)
3 Vertikutierprobe:
z Arbeitshebel wieder nach oben ziehen (2)
z Gerät starten
z Arbeitshebel langsam nach vorne legen
(1)
z Gerät langsam in Arbeitsrichtung schieben
z Bei Steinschlaggeräus chen oder Bl ockieren des Mo tors
das Gerät sofort ausschalten
z Arbeitstiefe verringern (2): Drehgriff 1-2 Umdrehun-
gen nach links drehen
z Erneute Vertikutierprobe
z Nach häufigem Gebrauch kann die Vertikutiertiefe entspre-
chend der Messerabnutzung nachgestellt werden.
Empfehlungen zur Arbeitstiefe
z gepflegte Flächen mit steinfreiem, weichem Boden
– Arbeitsstellung exakt auf Bodenhöhe einstellen
z steinige, unsaubere Flächen
– Arbeitswerkzeug auf Bodenhöhe einstellen
– Bei Steinschlag geringere Arbeitstiefe einstellen
z ungepflegte, stark vermooste Flächen
– mit geringer Arbeitstiefe beginnen
– Gerät nicht überlasten (bei Blockieren des Motors Arbeits-
tiefe verringern)
– mehrmals kreuzweise vertikutieren
– nachsäen mit WOLF Rasen-Samen, z. B. >>Loretta<<
Vertikutieren
1. Knopf (1) drücken und halten.
2. Hebel (2) anziehen, Knopf
(1) loslassen.
3. Arbeitshebel (1) langsam nach vorne legen.
4. Motor aus: Hebel
(2) freigeben.
1 Achtung!
Legen Sie das Kabel stets sicher auf Terrasse, Wege oder
die bereits bearbeitete Fläche.
3 Hinweis (UV 32 EV / UV 34 E)
WOLF Flick-Flack® ermöglicht beim Wenden ein leichtes Umlegen des Stromkabels .
Wartung
Allgemein
1 Achtung! Rotierendes Messer
Vor allen Wartungs- und Reinigungsarbeiten:
z Netzstecker ziehen.
z Nicht an laufende Schneiden greifen.
Reinigung
z Nach jedem Vertikutieren reinigen Sie bitte das Gerät mit einem
Handfeger.
z Spritzen Sie den Mäher keinesfalls mit Wasser ab.
z Gerät trock en lagern.
3 Wir empfehlen
Lassen Sie Ihr Gerät im Herbst von einer WOLF Kundendienstwerkstatt überprüfen, dann ist es im Frühjahr sofort einsatzbereit.
Ersatzteile
K
LLK
M
K
LMM
M
KMN
Bestell-Nr. Artikel-Bezeichnung Artikel-Beschreibung
3632 060 TK-VV Fangsack
3568 081 UV-EV Ersatzmesser (15 Stk.)
Die Lieferung erfolgt über Ihren Händler .
Page 10
10
D
Beseitigung von Störungen
Garantiebedingungen
Die vom Verkäufer ausgefüllte Garantiekarte bzw. den Kaufbeleg
bitte sorgfältig aufbewahren.
Für die Dauer von 24 Monaten vom Kaufdatum an leistet die Firma
WOLF-Garten eine dem jeweiligen Stand der Technik und dem Verwendungszweck/Anwendungsgebiet entsprechende Garantie. Die
gesetzlichen Rechte des Endverbrauchers werden durch die nachstehenden Garantierichtlinien nicht beeinträchtigt.
Voraussetzungen für den 24monatigen Garantieanspruch:
- Einsatz des Gerätes für den ausschließlichen privaten Gebrauch.
Im gewerblichen Bereich oder Verleihgeschäft reduziert sich die
Garantie auf 12 Monate.
- Sachgemäße Behandlung und Beachtung aller Hinweise in der Gebrauchsanweisung, die Bestandteil unserer Garantiebedingungen
ist.
- Beachtung der vorgeschriebenen Wartungsintervalle.
- Keine eigenmächtige Änderung der Konstruktion.
- Einbau von Original WOLF Ersatzteilen/Zubehör.
- Vorlage der ausgefüllten Garantiekarte und/oder des Kaufnachweises.
Die Garantie erstreckt sich nicht auf den normalen Verschleiß von
Messern, Messerbefestigungsteilen wie Reibscheiben, Keil-/Zahnriemen, Laufräder/Reifen, Luftfilter, Zündkerzen und Zündkerzenstecker. Bei eigenmächtiger Reparatur erlischt automatisch sofort
jeglicher Garantieanspruch.
Auftretende Fehler und Mängel, deren Ursachen auf Material- oder
Fertigungsfehler zurückzuführen sind, werden ausschließlich durch
unsere Vertragswerkstätten (der Verkäufer hat das Recht zur Nachbesserung) in Ihrer Nähe oder, falls er näher liegt, durch den Hersteller beseitigt. Über die Garantieleistung hinausgehende Ansprüche
sind ausgeschlossen. Ein Anspruch auf Ersatzlieferung besteht nicht.
Etwaige Transportschäden sind nicht uns, sondern dem zuständigen
Transportträger zu melden, da sonst die Ersatzansprüche an diese
Unternehmen verloren gehen.
Abhilfe (X) durch
Problem Mögliche Ursache
WOLF
Service Werkstatt
Selbst
Kein Vertikutierergebnis • Arbeitstiefe zu gering eingestellt
--- X
Unruhiger Lauf, starkes vibrieren des Gerätes
• Messer schadhaft und/oder lose
X ---
Abnorme Geräusche am
Gerät - klappern
• Messer und/oder Schrauben lose
--- X
Motor läuft nicht
• Haus-Sicherung schadhaft
--- X
• Kabelschaden:
1 Achtung! Stromschlag durch Kabelschaden
Wenn das Kabel durchtrennt oder beschädigt wird,
löst nicht immer die Sicherung aus.
z Kabel nicht berühren, bevor der Netzsteck er aus
der Steckdose gezogen ist.
z Beschädigtes Kabel komplett aus tauschen. Es
ist verboten, das Kabel mit Isolierband zu flicken.
X ---
Im Zweifelsfall immer eine WOLF Service-Werkstatt aufsuchen.
Achtung: Vertikutierer vor jeder Prüfung oder vor Arbeiten am Messer abstellen, und Netzstecker ziehen.
Die Garantieleistungen werden erfüllt durch unsere autorisierten
Kundendienstwerkstätten oder bei:
a
WOLF-Garten Austria Ges.m.b.H
Businesspark Wien Süd, Campus 21
Liebermannstraße F02-402
2345 Brunn am Gebirge
Tel.: ++ 43 (1) - 8 66 70 - 2 25 30
Fax: ++ 43 (1) - 8 66 70 - 2 25 40
E-mail: info@at.WOLF-Garten.com
Z
WOLF-Garten Schweiz AG
Nordringstraße 16
4702 Oensingen
Tel.: ++ 41 (62) - 3 88 04 50
Fax: ++ 41 (62) - 3 88 04 60
D
WOLF-Garten GmbH & Co KG
Industriestraße 83-85
57518 Betzdorf
Tel.: ++ 49 (27 41) - 28 15 00
Fax: ++ 49 (27 41) - 28 12 99
E-mail: info@de.WOLF-Garten.com
Page 11

11
G
GCongratulations on your purchase of a WOLF scarifier
Contents
Technical data . . . . . . . . . . . . . . . . . . . . 11
Safety instructions . . . . . . . . . . . . . . . . . . 12
Assembly. . . . . . . . . . . . . . . . . . . . . . . 13
Operation. . . . . . . . . . . . . . . . . . . . . . . 13
Maintenance . . . . . . . . . . . . . . . . . . . . . 14
Spare parts. . . . . . . . . . . . . . . . . . . . . . 14
Faults and how to remedy . . . . . . . . . . . . . . 15
Guarantee terms . . . . . . . . . . . . . . . . . . . 15
EC Declaration of Conformity . . . . . . . . . . . 108
l
Technical data
It is important that you read, fully understand
and observe the following safety precautions and
warnings. Careless or improper use of the machine
may cause serious or fatal injury. The user is
responsible for any accidents involving other people
or other people‘s property.
Never let children or other persons who are not
familiar with the operating instructions use the
scarifier. Juveniles under l6 years may not use
the equipment. Local regulations may specify the
minimum age of the operator.
We reserve the right of technical changes.
D Measurement of noise at the operator's ear according to EN
13684
E Measurement of vibrations at the handlebar held by the ope-
rator according to EN 1033, EN 13684. The typical weighte d
acceleration is:
UV 34 E UV 32 EV UV 30 EV
Type 3634 ... 3632 ... 3630 ...
A 62 cm 62 cm 62 cm
B 55 cm 55 cm 55 cm
C 54 cm 54 cm 54 cm
D LP 80 dB (A) LP 80 dB (A) LP 80 dB (A)
E a
hw
≤ 2,5 m/s
2
a
hw
≤ 2,5 m/s
2
a
hw
≤ 2,5 m/s
2
Performanche 1600 W 1300 W 1100 W
Amperage 7,1 A 7,9 A 7,4 A
Voltage 230 VAC 230 VAC 230 VAC
Working width 34 cm 32 cm 30 cm
Weight 22 kg 20 kg 18 kg
Instruction manual
Page 12

12
G
Safety instructions
Meaning of the symbols
General Notes
z Due to physi cal danger of the user the aeriator must not be
used:
– As motorised hoe
– For the levelling of ground elevations like mole hills
z Never let children or other persons who are not familiar with
the operation of the tool use the aerator. Children under 16 years of age are not permitted to use the tool.
z Never use the machine if persons, especially children or ani-
mals are in the vicinity.
z The operator is responsible for accidents or risks with other
persons or their property.
z Only use the aeriator on dry grass.
z Only work in daylight or appropriate artificial lightning.
Before aeriating
z Always wear suitable clothing; never loose clothing which
could be caught by the cutting tool. Wear suitable footwear!
Also protect your legs (e. g. with long trousers) and your
hands (gloves).
z Attach the deflector and collecting device respectively inclu-
ded in the delivery. Make sure it is attached securel y. The use
without or with damaged devices is not permitted.
z Remove all foreign particles like stones, wood pieces, bones
or similar from the lawn prior to aeriating.
z Check the operating tool for
– tight fit of the attachment parts
– damage or heavy wear and tear - When replacing observe
installation instructions
z Examine line installed on the outside of the tool and the con-
nection cable for damage and wear and tear (brittleness).
Only use when no damages can be found.
z Repairs to the cable may only be carried out by a specialist.
z Check the grassbox more often for wear and tear.
z Before adjusting or cleaning of the tool or before checking
whether the connection line has been knotted u p or damaged
switch off the tool and pull plug out of the socket.
Cables
1 Attention! Electric shock through cable damage
When the cable is cut through or damaged, the safety fuse
doesn’t always trip.
z Do not touch cable, before pulling out the power plug
from the socket.
z Damaged cable has to b e completely replaced. Patching
the cable with insulating tape is forbidden.
z Please use safety cables. Cables used as connecting lines
must not be lighter than HO7 RN-F rubber-sheathed cables
with a minimum cross-section of 3 x 1.5 mm
2
. Do not exceed
a maximum length of 25 m.
z Plugs and couplings must be protected from splashes.
z Use a residua l current protection device (RCD) with a residual
current not exceeding 30 mA.
z Fit the conne ction cab le to the mains lead cle at. Do n ot allow
to rub against edges or against sharp or pointed objects. Do
not squeeze cables through tight door or window openings.
Switch devices must not be removed or circumvented (e.g.
connecting the switch lever to the handle bars).
Starting up
z Only switch on motor when your f eet are at a safe distance
from the cutting tools.
z Do not ti lt the lawnmower when switching on the motor, unless
the lawnmower has to be tilted when starting. I f t hat is the case, do not tip the lawnmower more than absolutely necessary,
and only lift the part furthest removed from the user. Always
ensure that both hands are in the operating position bef ore replacing the lawnmower on the ground.
During aeriation
z Warning, Danger! Cutting tool is lagging!
z Adhere to the saf ety distance given by the guidance spars.
z Never put your hands or feet near the rotating parts.
z Always keep away from the ejection opening.
z Only switch on motor when your f eet are at a safe distance
from the cutting tools.
z If possible, avoid the use of the unit when the grass is wet
otherwise exercise extreme caution to avoid slipping.
z Always make sure that you h ave a safe foot ing, especia lly on
slopes. Never run, always walk slowly.
z Do not use the aeriator on steep slopes.
z Always move aeriator horizontally to the slope, never up and
down.
z Take particular care when changing direction on inclined
ground.
z Take part icular care when turning the machine or when pulling
it towards you.
z Stop the working tools if:
– the machine needs to be tilted for transport.
– if areas other than grass are to be crossed
– when transporting the machine.
Attention!
Read Instruction
manual before
use!
Keep bystanders
away!
Attention!
- Sharp knives before performing a maintenance work or if
the cable is damaged pull out
the plug. Keep
the supply flexible cord away
from the cutting
blade!
Keep the supply flexible
cord away
from the cutting blade!
Page 13

13
G
z Never use the aeriato r when protective devices or housing
parts are damaged or missing.
z Before lif ting or removing the aeriator switch off motor an wait
until the operating tools have come to a complete standstill .
z Before removing the grassbox or adjusting of the operating
height switch off motor and wait for the complete standstill of
the operating tools.
z Replace worn or damage d blades as a complete set. Observe
installation instructions. For safety reasons always use original spare parts.
z Maintenanc e and cleaning procedures o n the aeriator as well
as removing the protective devices may only be carried out
when the engine is switched off.
z Never store the aeriator in damp surroundi ngs or near open fl
ame.
z Should have run over an object with the aeriator it should be
examined by a specialist (see list of repair shops) for safety reasons.
z If the connection cable is damaged during use it must be dis-
connected immediately. Do not touch the cable until it is disconnected.
z Switch off the lawnmower, pull the mains pl ug and wait for the
lawnmower to stop running if, for example:
– leaving the lawnmower
– unblocking a blade
– intending to check, clean or work on the lawnmower
– you have encountered a foreign object, in which case you
should check the lawnmower for damage and carry out any
necessary repairs.
– the lawnmower is vibrating heavily (switch off immediately
and ascertain the cause).
– you wish to change the settings or carry out cleaning work.
– you wish to check whether the connection cables have be-
come tangled or damaged.
– If the connection cable is damaged during use, it must be
immediately disconnected from the mains power supply.
Do not touch the cable before it has been disconnected
from the mains power supply.
Maintenance
1 Attention! Rotary cutter blade
Before all maintenance and cleaning work:
z Pull out the power plug.
z Do not touch running blades.
Disposal
Assembly
Fixing the grab handle
1 Caution!
When collapsing and unfolding the grab handle, the cable
could be damaged.
z Take care that you do not kink the electrical cable and
the Bowden cable.
z See illustrations for assembly.
Operation
Operating times
z Please check noise abatement regulations prevailing in your
country.
Feed cable through the strain relief
z Please feed cable through the strain relief.
Connecting to the mains (230 Volts, A.C., 50 Hz)
z The mower operates from any normal household mains supp-
ly, provided with a 16 Amps. fuse.
3 Note: Residual current protection device
These protection devices safeguard while touching
damaged wires, from insulation flaws and in ce rt ain c ases,
also while damaging live wires.
z We recommend that the equipment onl y be plugged into
a power socket, which is protected by a residual current
protection device (RCD) with a residual current of not
more than 30 mA.
z Retrofi t kits are avail able for old instal lations. Consult an elec-
trician.
Do not dispose of electrical equipment in do mestic
waste. Recycle equipment, accessories and packaging in an environment-friendly manner.
ABCDEFGHJ
Page 14

14
G
Adjust operating depth
Only with motor switched off and non-mowing aeriating roller. The
operating depth must be adjusted to the corresponding grass and
ground conditions.
z Move operating lever towards front (1).
z Inc reasing the working depth (cutters towards the
ground) (1)
– Turn the handwheel "Working Depth Adjustment" to the
right
z Reducing the working depth (2)
– Turn the handwheel "Working Depth Adjustment" to the left.
(One turn = 1.5 mm working depth)
3 Aeriating test:
z Pull operating lever up again (2)
z Start tool
z Push operating lever slowly forward (1)
z Move tool slowly into operating direction
z On hearing stones being hit or blocking of the motor im-
mediately switch off tool
z Turn rotating handle 1–2 rotations towards the left
(2).
z Start aeriating test again
z When used regularly the aeriating depth may be adjusted ac-
cording to the wear of the blade (+).
Recommended working heights
z well kept lawns with stone-free, soft ground
– Set tool exactly to ground height
z stony, untidy lawns
– Set tool to ground height
– Increase working height if stones are thrown up
z unkempt, extremely mossy lawns
– Start with a high working height
– Do not overload appliance (reduce working height if motor
blocks)
– Cut vertically and crossways several times
– Re-saw with WOLF >>Loretta<< lawn seeds
Scarifying
1. Depress button (1) and hold.
2. Lift up bar (2) and release button
(1).
3. Place lever (1) slowly into forward position.
4. Switch-off motor: Release bar
(2).
1 Important:
Place the cable firmly off the lawn or on the already cut side
of the lawn when starting to mow.
3 Turning (UV 32 EV / UV 34 E)
The cable relief holder enables you to move the cable from one
side of the handle frame to the other. Thus you ensure that the
cable always trails on the ride of the lawn already cut – and not
in front of the machine .
Maintenance
General
1 Attention! Rotary cutter blade
Before all maintenance and cleaning work:
z pull out the power plug.
z Do not touch running blades .
Cleaning
z Clean the unit thoroughly with a brush after each use.
z Do not spray with water.
z Store unit in a dry room.
3 We recommend
Allow a WOLF-service centre to check the unit in the autumn.
Spare parts
K
LLK
M
K
LMM
M
KMN
Item number Order description Product information
3632 060 TK-VV Grass catcher
3568 081 UV-EV Replacement blade (15 x)
Supplied by your dealer .
Page 15

15
G
Faults and how to remedy
Guarantee terms
Please carefully retain the guarantee card completed by the seller, or the proof of purchase.
The company WOLF-Garten provides a guarantee for 24 months from
the date of purchase. This guarantee is in accordance with the relevant state of technology and the utilisation purpose / area of application. The consumer‘s statutory rights are not affected by the following
guarantee guidelines.
Pre-conditions for the 24-month guarantee entitlement:
- Deployment of the device solely for private use.
The guarantee is reduced to 12 months in the commercial sector
or leasing business.
- Proper handling and observance of all information given in the operating manual, which forms part of our guarantee terms.
- Observance of the prescribed maintenance intervals.
- No unauthorised alteration of the design.
- Installation of original WOLF replacement parts / accessories.
- Presentation of the completed guarantee card and/or proof of
purchase.
This guarantee does not extend to normal wear-and-tear on blades,
blade mounting components or friction disks, V-belts/toothed belts,
running wheels/tyres, air filters, spark plugs and spark plug connectors. Any guarantee claim shall be immediately void in the event of
unauthorised repairs. Faults and defects which can be traced to material or manufacturing faults will be rectified exclusively by our contracted workshops (the seller has the right to remedy a defect) in your
vicinity, or by the manufacturer if the latter is closer. Any claims going
beyond the provision of a guarantee are ruled out. There is no entitlement to a replacement. Any transport damage should be reported not
to us but to the shipper in question since, otherwise, any compensation claims vis-à-vis the shipper would be voided.
Remedy (X) by:
Problem Possible cause
WOLF
service-workshop
Yourself
No scarification result • The working depth is set too low
--- X
Machine runs unevenly, with
heavy vibrations
• Blade is damaged due to contact with hard objects
X---
Abnormal noises or rattling in
the machine
• Screws are loose
--- X
Motor will not run
• Fuse blown
--- X
• Cable damaged:
1 Attention! Electric shock through cable damage
When the cable is cut through or damaged, the
safety fuse doesn’t always trip.
z Do not touch cable, before pul ling out the power
plug from the socket.
z Damaged cable has to be completely replaced.
Patching cable with insulating tape is forbidden.
X ---
When in doubt, always consult a WOLF service workshop.
Important: switch off the scarifi er and disconnect the mains plug before inspecting, cleaning or working on the blades.
The guarantee services will be performed by our authorized repair shops or:
G
WOLFGarden Ltd.
Crown BusinessPark
Tredegar
Gwent, NP22 4EF
Tel. : ++ 44 / 14 95 30 66 00
Fax : ++ 44 / 14 95 30 33 44
E-mail: info@uk.WOLF-Garten.com
Page 16

16
F
F Nous vous félicitons d’avoir acheté un scarificateur WOLF
Sommaire
Données Techniques . . . . . . . . . . . . . . . . 16
Consignes de sécurité . . . . . . . . . . . . . . . . 17
Montage . . . . . . . . . . . . . . . . . . . . . . . 18
Fonctionnement . . . . . . . . . . . . . . . . . . . 18
Entretien . . . . . . . . . . . . . . . . . . . . . . . 19
Pièces de rechange . . . . . . . . . . . . . . . . . 19
Comment remédier aux pannes . . . . . . . . . . . 20
Conditions de la garantie . . . . . . . . . . . . . . 20
Déclaration de conformité CE . . . . . . . . . . . 108
Données techniques
Lisez soigneusement la notice d‘utilisation
et familiarisez-vous avec les commandes du scarificateur et son utilisation correcte. L’utilisateur est responsable des accidents causés aux tiers ou à
leur propriété. Observez les indications, explications
et prescriptions.
Ne laissez jamais des enfants ou d’autres personnes
n'ayant pas lu la notice d'utilisation utiliser le
scarificateur. L'utilisation de cet appareil est interdite
à tout adolescent de moins de 16 ans. Respectez
la réglementation locale concernant l'âge minimum
d'utilisation de cet appareil.
Droits de modifications techniques réservés.
D Mesurage du bruit au niveau de l'oreille de l'o pérateur selon
EN 13684
E Mesurage des vibrations au guidon tenu par un opérateur
selon EN 1033, EN 13684. L’accélération pondérée normale
est de:
UV 34 E UV 32 EV UV 30 EV
Type 3634 ... 3632 ... 3630 ...
A 62 cm 62 cm 62 cm
B 55 cm 55 cm 55 cm
C 54 cm 54 cm 54 cm
D LP 80 dB (A) LP 80 dB (A) LP 80 dB (A)
E a
hw
≤ 2,5 m/s
2
a
hw
≤ 2,5 m/s
2
a
hw
≤ 2,5 m/s
2
Puissance 1600 W 1300 W 1100 W
Courant nominal 7,1 A 7,9 A 7,4 A
Tension 230 VAC 230 VAC 230 VAC
Largeur de travail 34 cm 32 cm 30 cm
Poids 22 kg 20 kg 18 kg
Mode d’emploi
Page 17

17
F
Consignes de sécurité
Signification des symboles
Généralités
z Afin d‘éviter toute blessure de l‘utilisateur, il est interdit d‘utili-
ser le scarificateur
– comme motobineuse
– pour l‘égalisation du sol, des buttes de taupe par ex.
z Ne laissez jamais des enfants ou d’autres personnes ne
s’étant pas familiarisées avec le fonctionnement de l‘appareil ,
utiliser le scarificateur. L‘utilisation de c et appareil est interdite
à tout adolescent de moins de 16 ans.
z N’allumez jamais la machine quand des personnes, en
particulier des enfants ou des animaux se trouvent à
proximité.
z En cas d'accident, l'utilisateur est responsable du préjudice
causé à un tiers ou à ses biens personnels.
z N’utilisez le scarificateur que sur un gazon sec.
z Ne travaill ez que de jo ur ou avec un éclai rage électri que suffi
sant.
Avant de scarifier
z Portez to ujours porter des vêtements de travail adéquats, pas
des vêtements amples, etc. qui pourraient être happés par
l‘outil de coupe. Portez des chaussures fermées ! Pensez
également à protéger vos jambes (en portant par ex. un pantalon long) et ses mains (en portant des gants).
z Montez la protect ion contre les éjections livrée ou le bac de ra-
massage. Vérifiez qu‘il/elle soit bien inséré(e). Il est interdit
d‘utiliser cet appareil sans protection ou avec une protection
défectueuse.
z Eloignez tout corps étranger (pierres, branches, os, etc.) se
trouvant sur la surface à aérer.
z Contrôle de l‘outil de coupe ;
– vérifiez le serrage des éléments de fixation
– vérifiez l‘état ou l‘usure des pièces
z En cas d’échange des pièces, respectez les consignes de
montage.
z Contrôlez l‘état des connexions extérieures et du câble d‘ali-
mentation de l‘appareil. N’utilisez l’appareil que si ces éléments sont en parfait état.
z Tout e réparation à la partie électrique doit être effectuée par
un spécialiste.
z Contrôl ez souvent l’état d’usure du bac de ramassage.
z Arrêtez l’appareil et débranche r la prise de co urant avant tout
réglage et nettoyage de l’appareil ou contrôle des câbles de
raccordement.
Câble
1 Attention ! Danger d’électrocution en cas de câble
endommagé
z Quand le câble est coupé ou détérioré, le fusible de sé-
curité ne se déclenche pas toujours.
z Ne touchez pas le câble avant d’avoir sorti la fiche
d’alimentation de la prise de courant.
z Un câbl e défectueux doit être é changé. Il est strictement inter-
dit de réparer le câble avec de la toile isolante.
z Les réparat ions du câble doivent être effectuées par un spé-
cialiste (voir chapitre « Entretien », page 17)
z Fixe r le câble de raccordement dans le guide-câble . Ne le lais-
sez pas frotter contre des bordures ou des objets pointus ou
coupants.
z Les organes de commande ne doivent être ni retirés, ni pon-
tés (il ne faut pas p.ex. relier le levier de commande au guidon).
z N’utilisez que des rallonges qui ne soient pas plus flexibles
que des câbles souples en caoutchouc, du type HO 7 RN-F,
section minimale 3 x 1,5 mm
2
, longueur max. 25 m. Les câb-
les doivent être étanches aux projections d’eau.
Au démarrage
z N’enclenchez le moteur que lorsque vos pieds se trouvent à
une distance de sécurité raisonnable des outils de coupe.
z Ne pas pe ncher l’appareil lorsque vous enclenchez le moteur,
à moins que cela soit nécessaire pour cette opération. Si tel
est le cas, ne penchez pas l’appareil plus qu’il ne faut et soulevez uniquement la partie qui est éloignée de l’utilisateur.
Veillez à ce que les deux mains se trouvent e n position de travail avant de remettre l’appareil sur le sol.
Pendant la scarification
z Attent ion, danger ! Les outils de coupe tournent encore un peu
après l’arrêt !
z Respect ez la distance de sécurité indi quée par la longueur du
guidon.
z Ne jamais mettre les pieds ou les mains près des éléments
tournants.
z Tenez -vous toujours à l’écart de l’ ouverture d’éjection des dé-
chets.
z Ne démarrer l’appareil que lorsque vos pieds se trouvent à
une distance de sécurité raisonnable des outils de coupe.
z Soyez particulièrement prudent sur les terrains en pente. Ne
jamais courir, avancer toujours tranquillement.
z Si possible, évitez d’utiliser l’appareil sur de l’herbe mouillée
ou conduisez-le avec prudence pour éviter de glisser.
z Ne pas aérer les surfaces trop en pente.
Attention!
Avant utilisation
lire la notice d’utilisation !
Tenir les tiers à
l‘écart de la
zone dangereuse!
Attention! - Couteaux tranchants - Avant
d‘entreprendre
des travaux de
maintenance et
si le câble est endommagé, retirer
la prise de courant.
Tenir le câble
d’alimentation éloigné de
l‘outil de coupe!
Page 18

18
F
z Pour aérer les surfaces en pente, avancez toujours en diago-
nale et jamais en avant ou en arrière.
z Fai tes parti cul iè re ment att ent ion lors de s change ment s de di -
rection.
z Le câble doit toujours être éloigné de l’outil de coupe. L’outil
peut endommager le câble et provoquer un court-circuit.
z Arrêtez les outils de travail :
– si la machine doit être basculée pour le transport.
– si vous traversez des surfaces autres que l’herbe
– pour du transport de la machine.
z Ne jamais utiliser le scarificateur lorsque des dispositifs de
protection ou des pièces du châssis ont été endommag és ou
manquent.
z Avant de soulever ou de transporter scarificateur, arrêtez le
moteur et attendez l’arrêt complet des outils de coupe.
z Avant de démonter le bac de ramassage ou de régler la
hauteur de travail de l‘appareil, arrêter le moteur et attendre
l‘arrêt complet des outils de coupe.
z Remplac ez le jeu complet des outils de coupe lorsque ceux-ci
sont usés ou endommagés. Respecter les consignes de montage. Pour des raisons de sécurité, n’utilis ez que des pièces
de rechange d’origine.
z L‘entretien et le nettoyage de l‘appareil ainsi que le démonta-
ge des dispositifs de protection ne doivent être effectué s que
lorsque le moteur est à l‘arrêt.
z Ne jamai s remiser le sc arificate ur dans un end roit humi de ou
à proximité d’une source de feu.
z Si vous avez roulé sur un corps étranger avec le scari ficateur,
il est recommandé de le faire inspecter par un spécialiste
(consulter la liste des centres de réparation agréés).
z En cas de détérioration du câble d‘alimentation lors de l‘utili-
sation de l‘appareil, débrancher immédi atement le câble. Ne
pas toucher le câble tant qu‘il est branché sur secteur.
z Arrêtez le scarificat eur, débranchez la prise et attendez l’arrêt
complet des outils de coupe lorsque p.ex. :
– vous vous éloignez de l’appareil
– vous voulez débloquer un couteau
– vous désirez contrôler ou nettoyer l’appareil
– vous avez heurté un corps étranger. Vérifiez dans un pre-
mier temps que l’appareil ou les outils de coupe ne sont pas
endommagés, puis réparer les dommages.
– l’appareil est mal équilibré et vibre fortement (arrêtez immé-
diatement et recherchez la cause)
– Si le câble de raccordement es abîmé pendant le travail.
L’entretien
1 Attention ! Couteau rotatif
Avant toute opération d’entretien et de nettoyage :
z Sortir la fiche d’alimen tation électrique.
z Ne touchez pas les aubes en état de fonct ionnement.
Élimination de l’appareil
Montage
Fixation du guidon
1 Précautions !
Lorsque vous dépliez ou repliez la poignée, le câbles
peuvent subir une détérioration.
z Veillez à ne pas plier le câble électrique ou le câble de
traction.
z Montage : voir illustrations
Fonctionnement
Périodes et heures de travail
z Observez les dispositions locales en vigueur.
z Renseignez-vous auprès de la commune.
Introduisez le câble dans le guide-câble
z Veuillez introduire le câble dans le guide-câble selon illustra-
tion.
Raccordement au secteur (230 V, 50 Hz)
z Ne raccorder l’appareil qu’à une prise de courant sécurisée
par un fusible de 16 A à action retardée (ou un commutateur
LS type B).
3 Remarque : Disjoncteur différentiel
Ces dispositifs de protection vous évitent de graves
blessures si vous touchez des fils détériorés, contre les
défauts d’isolation et dans certains cas lors de
détériorations de fils sous tension.
z Nous recommandons de ne raccorder cet appareil qu’à
une prise de courant protégée par un disjoncteur
différentiel (FI) avec une valeur nominale ne dépassant
pas 30 mA.
z Il existe pour l es anciennes installations des sets d’adap-
tation. Consultez un électricien agréé.
Ne jetez pas l’équipement électrique avec les ordures ménagères. Recyclez équipement, accessoires et emballage de façon écologique.
ABCDEFGHJ
Page 19

19
F
Réglage de la hauteur de travail
A n’effectuer que lorsque le moteur et le rotor de scarification sont
à l’arrêt. Réglez la hauteur de travail en fonction de l’état du terrai n
et de l’herbe.
z Abaissez le levier de commande (1).
z Relevez la prof ondeur de travail (couteaux vers le sol)
(1)
– Actionnez la manette « réglage de la profondeur de travail
» vers la droite.
z Réduction de la profondeur de travail (2)
– Actionnez la manette « réglage de la profondeur de travail
» vers la gauche. (Un tour = 1,5 mm de profondeur de travail)
3 Essai de scarification:
z Relevez le levier de commande (2)
z Démarrer le scarificateur
z Abaissez lentement le levier de commande (1)
z Poussez l’appareil lentement en position de travail
z Éteindre l’appareil au pre mier brui t de pierres ou en cas
de blocage du moteur
z Réduire la profondeur de travail
(2): Tournez la ma-
nette de 1 – 2 tours vers la gauche.
z Procédez à un nouvel essai de scarification
z Procédez à un nouveau réglage de la hauteur de travail de
l’appareil après une utilisation prolongée et en fonction de
l’état d’usure des couteaux (+).
Conseils pour la hauteur de travail
z Surfaces entretenues, sans pierres, sol tendre
– Réglez la position de travail exactement à la hauteur du sol
z Surfaces inégales, pierreuses
– Réglez la position de travail à la hauteur du sol
– En cas de projection de pierres, diminuez la profondeur de
travail
z Surfaces peu soignées, forte présence de mousse
– Commencez le travail à une profondeur de travail minime
– Ne pas forcer l’appareil (en cas de blocage du moteur, dimi-
nuez la profondeur de travail)
– Passez le scarificateur plusieurs fois dans le sens de la lon-
gueur et de la largeur
– Procédez ensuite à un sursemis avec p.ex. la semence ga-
zon « Loretta »
Démarrage
1. Appuyez sur le bouton (1) et maintenez-le enfoncé.
2. Amenez la poignée (2) vers le guidon et lâchez le bouton
(1).
3. Amenez lentement le levier de commande vers l’avant (1).
4. Arrêt: Lâchez la poignée
(2).
1 Attention
Posez toujours le câble sur une terrasse, un chemin ou sur
la partie de la surface déjà scarifiée.
3 Indication (UV 32 EV / UV 34 E)
Grâce au guide-câble Flick-Flack, le câble passe facilement
d’un côté à l’autre lorsque vous faites demi-tour .
Entretien
Général
1 Attention! Couteau rotatif
Avant toute opération d’entretien et de nettoyage :
z sortez la fiche d’alimentation électrique.
z Ne pas saisir les couteaux en mouvement.
Nettoyage
z Nettoyez l’appareil au moyen d’une balayette après chaque
scarification.
z Ne giclez en aucun cas l’appareil avec un jet d’eau.
z Remiser l’appareil dans un endroit sec.
3 Nous vous recommandons
de faire vérifier votre machine en automne par un atelier
WOLF agréé, de manière à ce qu’elle soit prête à travailler
dès le printemps.
Pièces de rechange
K
LLK
M
K
LMM
M
KMN
Numéro d‘article Désignation de l’article Description de l’article
3632 060 TK-VV Sac de ramassage
3632 097 UV-EV 32 Couteaux de rechange (15 pièces)
La livraison sera effectuée par votre revendeur.
Page 20

20
F
Comment remédier aux pannes
Conditions de garantie
Conserver soigneusement le bon de garantie rempli par le revendeur resp. la quittance d’achat.
La société WOLF-Garten accorde une garantie de 24 mois à partir de
la date d'achat, qui correspond à l'état actuel de la technique et à l'affectation/domaine d'application. Les directives de garantie ci-dessous ne réduisent pas les droits légaux de l'utilisateur final.
Conditions donnant droit à la garantie de 24 mois :
- Appareil exclusivement réservé à un usage privé.
En cas d’utilisation industrielle ou en location, la garantie est réduite à 12 mois.
- Utilisation conforme aux prescriptions du mode d'emploi, qui font
partie intégrante de nos conditions de garantie.
- Respect des intervalles d'entretien prescrits.
- Toute modification à la conception du produit est interdite
- Montage de pièces détachées et accessoires WOLF exclusivement.
- Carte de garantie dûment remplie et signée et/ou quittance d'achat.
La garantie ne couvre pas l'usure normale des lames et pièces de fixation des lames (disques de friction, courroie trapézoïdale/dentée,
roues motrices/pneumatiques, filtre à air, bougies d'allumage et capuchons des bougies d'allumage). Les réparations effectuées à titre personnel annulent automatiquement et immédiate-ment tous les droits
de garantie. Seul nos ateliers agréés ou le fabricant sont habilités à
remédier à toute panne et défaut dont les causes sont imputables à
une erreur de matériau ou de fabrication. Les droits de garantie ne
peuvent être étendus. Un quelconque droit à une livraison de remplacement est exclu. D’éventuels dommages causés lors du transport
sont à signaler immédiatement et directement au transporteur concerné, afin que la prise en charge d’indemnités par cette entreprise soit
garantie.
Mesures à prendre (X) par :
Dysfonctionnements Causes possibles
L‘atelier de service
après-vente WOLF
L‘utilisateur
Aucun résultat de scarification • La profondeur de travail est trop faible
--- X
Marche irrégulière, fortes vibrations de I‘appareil
•
Couteaux défectueux et/ou mal fixés
X ---
Bruits anormaux de I‘appareil, claquements
• Couteaux mal fixés et/ou vis desserrées
--- X
Le moteur ne démarre pas
• Un fusible de l’armoire électrique est défectueux
--- X
• Le câble est endommagé:
1 Attention ! Danger d’électrocution en cas de
câble endommagé
Quand le câble est coupé ou détérioré, le fusible de
sécurité ne se déclenche pas toujours.
z Ne touchez pas le câble avant d’avoir sorti la
fiche d’alimentation électrique de la prise de
courant.
z Un câble défectueux doit être échangé. Il est
strictement interdit de réparer le câble avec de la
toile isolante.
X ---
En cas de doute, adressez-vous à un centre d’entretien WOLF agréé.
Attention: Avant tout contrôle ou intervention sur les couteaux, arrêtez et débranchez le scarificateur.
Les prestations de garantie sont assurées par nos ateliers de
service après-vente agréés ou par :
B
Graham NV-SA
Zoning Industriel21
1440 Wauthier-Braine
Tel.: ++ 32 (2) - 3 67 16 11
Fax: ++ 32 (2) - 3 67 16 12
E-mail: com@graham.be
Z
WOLF-Garten Schweiz AG
Nordringstraße 16
4702 Oensingen
Tel.: ++ 41 (62) - 3 88 04 50
Fax: ++ 41 (62) - 3 88 04 60
l
WOLF-Garten GmbH & Co KG
Industriestraße 83-85
57518 Betzdorf
Tel.: ++ 49 (27 41) - 28 15 00
Fax: ++ 49 (27 41) - 28 12 99
E-mail: info@de.WOLF-Garten.com
Page 21

21
I
IComplimenti per aver scelto un arieggiatore WOLF
Contenuto
Dati tecnici . . . . . . . . . . . . . . . . . . . . . . 21
Indicazioni di sicurezza . . . . . . . . . . . . . . . 22
Montaggio . . . . . . . . . . . . . . . . . . . . . . 23
Messa in opera. . . . . . . . . . . . . . . . . . . . 23
Manutenzione . . . . . . . . . . . . . . . . . . . . 24
Ricambi . . . . . . . . . . . . . . . . . . . . . . . 24
Interventi di riparazione . . . . . . . . . . . . . . . 25
Condizioni di garanzia . . . . . . . . . . . . . . . . 25
Dichiarazione CE di Conformità . . . . . . . . . . 108
Dati tecnici
Leggere attentamente le istruzioni per l‘uso e
familiarizzare con gli elementi di comando e con
il coretto utilizzo dell‘apparecchio. L‘utente è
responsabile degli incidenti causati ad altre persone
o alla loro proprietà. Osservare le indicazioni, le
spiegazioni e le prescrizioni.
Non fate lavorare con lo scarificatore bambini o
altre persone che non conoscono il funzionamento
della macchina. Le disposizioni locali possono
eventualmente limitare l’età minima per l’operatore.
Ci riserviamo pertanto eventuali modifiche tecniche dovute
all' u l teriore sviluppo dei nostri prodotti.
D misurazione della rumorositá all'altezza dell'orecchio
dell'utente eseguita in conformtià alla norma EN 13684.
E Vibrazioni misurate sul manubrio di guida, con utente, in
conformitá a EN 1033, EN 13684. L’accelerazione ponderata tipica è di:
UV 34 E UV 32 EV UV 30 EV
Tipo 3634 ... 3632 ... 3630 ...
A 62 cm 62 cm 62 cm
B 55 cm 55 cm 55 cm
C 54 cm 54 cm 54 cm
D LP 80 dB (A) LP 80 dB (A) LP 80 dB (A)
E a
hw
≤ 2,5 m/s
2
a
hw
≤ 2,5 m/s
2
a
hw
≤ 2,5 m/s
2
Potenza 1600 W 1300 W 1100 W
Corrente normale 7,1 A 7,9 A 7,4 A
Tensione 230 VAC 230 VAC 230 VAC
Larghezza di lavovo 34 cm 32 cm 30 cm
Peso 22 kg 20 kg 18 kg
Istruzione d’uso
Page 22

22
I
Indicazioni di sicurezza
Leggenda simboli
Istruzioni generali
z Per sicurezza personale dell‘utente non usare il tagliaerba
– come motozappa
– per livellare elevazioni del terreno tipo mucchi di talpa
z Non far utilizzare il tagliaerba da bambini o da altre persone
che non hanno dimestichezza con la macchina. Giovani sotto
i 16 anni non devono usare l‘apparecchi.
z
Non utilizzare la macchina se nelle vicinanze vi sono altre persone, soprattutto bambini o animali.
z
L'operatore è responsabile per eventuali incidenti o rischi ai
danni di terzi o delle loro proprietà.
z Impiegare l‘apparecchio solo con prato asciutto.
z Lavorare solo alla luce del giorno o con rispettiva illuminazio-
ne artificiale.
Prima del taglio
z Portare semp re abbigliamento di lavoro adatto, non largo ecc.
Che potrebbe venire afferrato dalle lame. Calzature robuste!
Proteggere anche le gambe (ad es. con pantaloni lunghi) e le
mani (guanti).
z Montare la protezione d‘urto consegnata e il raccoglitore.
Controllare che sianomontati correttamente. L‘utilizzo dell a
macchina con i dispositivi di protezione danneggiati o mancanti è vietato.
z Prima del taglio rimuovere dal prato tutti i corpi es tranei come
pietre, rami, ossa ecc.
z Controllare che gli utensili di lavoro
– siano ben fissi nella loro sede
– non presentino danni o forti usure
z Per il ricambi o osservare le modalità di montaggio.
z Control lare che la installata conduttura e il cavo di collega-
mento non siano danneggiati o alterati (frangibili). Utilizzare
solo in stato ineccepibile.
z Far eseguire riparazioni al cavo solo da una persona specia-
lizzata.
z Controllare spesso che il dispositivo di raccolta non presenti
usure.
z Prima della reg olazio ne o della puli zia del l‘apparecchi o oppu-
re prima di controllare che il cavo non si sia attorc igli ato o sia
danneggiato, disinserire la macchina e sfilare la spina di collegamento.
Cavi
1 Attenzione! Scarica elettrica da cavo danneggiato
Quando il cavo è tagliato completamente o danneggiato, il
fusibile di sicurezza non sempre funziona.
z Non toccate il cavo prima di estrarre la spina dalla pres a
di corrente.
z Il cavo danneggiato deve essere comple tametne sostitu-
ito. E’ proibito rappezzare il cavo con nastro isolante.
z Lavorare soltanto con cavi di sicurezza. Come cavo di colle-
gamento si dovranno utilizzare soltanto cavi, che non siano
più leggeri dei cavi flessibili in go mma HO7 RN-F con u na sezione minima di 3x1,5 mm
2
. La lunghezza massima non dov-
rebbe superare i 25 m.
z Spine e g iunti dovranno essere protetti dagli spru zzi d’acqua.
z Utilizzare un interruttore di sicurezza per correnti di guasto
(RCD) con una corrente di dispersione non superiore a 30 mA.
z Fissare il cavo di collegamento sullo scarico della trazione.
Non far sfregare su bordi, oggetti appuntiti o taglienti. Non
schiacciare i cavi attraverso le fessure di po rte o finestre. I dispositivi elettrici non devono essere tolti o cavallottati (per es.
per attaccare la leva del cambio all‘asta dell‘impugnatura).
Avviamento
z Mettere in funzion e il motore solo quando i piedi si trovano ad
una sicura distanza dall‘utensile di taglio.
z Non inclinare l’apparecchio, quando si accende il motore, a
meno che l’apparecchio debba essere inclinato per l’avviamento. In tal caso non inclinare l‘apparecc hio più di quanto sia
assolutamente necessario e sollevare soltanto la parte, che è
distante dall‘operatore. Verificare sempre che le due mani si
trovino in posizione di lavoro, prima di ricollocare l‘apparecchio sul terreno.
Tagliando
z Attenzi one, pericolo! L‘utensile di taglio continua a girare!
z Mantenere tramite il mani co di guida l a prevista distan za di si-
curezza.
z
Non avvicinare le mani o i piedi alle parti rotanti.
z
Mantenersi distanti dall'apertura di espulsione.
z Mettere in funz ione il motore solo quando i piedi si trovano a
sicura distanza dall‘utensile di taglio.
z
Se possibile, evitare di utilizzare l'apparecchio su erba bagnata;
in caso contrario, prestare particolare attenzione per evitare
scivolamenti.
z Mantenere una buona stabilità, specialmente sui pendii. Non
correre mai, procedere con calma.
z Tagliando su pendii ripidi.
z
Prestare un'attenzione particolare nel cambiare direzione di
marcia sui pendii.
Attenzione!
Prima dell‘uso
leggere istruzioni!
Allontanare le
persone dalla
zona di pericolo!
Attenzione! Lame da taglio
affilate - staccare
la spina prima di
qualsiasi intervento di manutenzione ed in
presenza di danni alla linea. Tenere lontani i cavi
collegamento
dall‘utensile da
taglio!
Tenere lontani i cavi collegamento
dall‘utensile
da taglio!
Page 23

23
I
z Tagliare sui pendii sempre di t raverso, non in discesa o in sa-
lita.
z
Usare particolare cautela nel girare la macchina o nel tirarla
verso di sé.
z
Arrestare gli utensili di lavoro nei seguenti casi:
– quando è necessario inclinare la macchina per il trasporto.
– quando si attraversano superfici non erbose.
– quando la macchina viene trasportata.
z Non utilizza re il tagliaerba quando i dispositivi di sicurezza o
parti del carter sono danneggiati o mancanti.
z Prima di solle vare o trasportare il tagliaerba, disinnestare il
motore e attendere l‘arresto degli utensili di taglio.
z Prima della rimossa del dispositivo di raccolta o della regola-
zione di lavoro in altezza si deve disinnestare il motore e attendere l‘arresto degli utensili di taglio.
z Sostit uire in serie le la me usurate o danneg giate. Prest are at-
tenzione alle indicazioni di montaggio. Per motivi di sicu rezza
utilizzare solo ricambi originali.
z I lavori d i manutenzione e di puliz ia, come pure la rimossa dei
dispositivi di sicurezza, vanno effettua ti solo a mot ore spent o.
z Non deposit are il tagliaerba in locali umidi o nel le vicinanze di
fiamme libere.
z Se si è passati su di un ostacolo, far co ntrollare il ta gliaerba a
titolo di sicurezza da una persona specializzata (vedi lista de lle officine).
z Se durante l‘utili zzo viene danneggiat o il cavo di allac ciamen-
to, questo deve venire subito staccato dalla rete. Non t occare
il cavo prima dello svincolo dalla rete.
z Spegnere l’apparecchio, staccare la spina e aspettare che
l’apparecchio si arresti, se si vuole per es.
– lasciare il tosaerba
– sbloccare una lama bloccata
– controllare, pulire l‘apparecchio e poi lavorarci sopra
– controllare eventuali danneggiamenti dell‘apparecchio, se
si sono incontrati corpi estranei ed eseguire le riparazioni
necessarie.
– se il tosaerba vibra molto a causa dello squilibrio (spegnere
subito e cercare la causa).
– se si vuole eseguire lavori di regolazione o pulitura.
– controllare, se i cavi di collegamento sono attorcigliati o
danneggiati.
– Se il cavo di collegamento viene danneggiato durante l’uso,
deve essere subito staccato dalla rete. Non entrare in contatto con il cavo, prima che sia staccato dalla rete.
La manutenzione
1 Attenzione! Lama rotante
Prima di effettuare qualsiasi manutenzione e pulizia:
z Estrarre la spina elett rica.
z Non toccate lame in movimento.
Smaltimento rifiuti
Montaggio
Fissaggio della tiranteria
1 Precauzione
Quando si chiude o si apre la tiranteria, il cavo e il tirante
Bowden possono subire danni.
z Attenzione a non piegare il cavo e il tirante Bowden.
z Per il montaggio, vedere le illustrazioni.
Messa in opera
Tempo d’esercizio
z Si prega di osservare l e prescrizioni vigenti nei singoli stati.
Fate passare il cavo attraverso il tensionatore
z Fate passare il cavo attraverso il tensionatore.
Inserire la spina della corrente (corrente alternata
230 Volt, 50 Hz)
z Si pot rà allacc iare l‘at trezzo a q ualsia si presa, purch è sia mu-
nita di una valvola di protezione di 16 Ampere (oppure di un
Interruttore-LS tipo B).
3 Nota: Dispositivo di protezione contro corrente residu-
ale
Questi dispositivi di protezione proteggono quando si toccano fili danneggiati, da difetti di isolamento ed, in certi casi,
anche quando si danneggiano fili sotto tensione.
z Raccomandiamo che l’att rezzo sia collegat o ad una pre-
sa di corrente che sia protetta da un dispositivo di pro tezione contro la corrente residuale (RCD) con una
corrente residuale non superiore a 30 mA.
z Sono disponibili dei retr ofit p er i ve cchi i mpiant i. Consul-
tate un elettricista.
Non smaltire apparecchiature elettriche insieme ai
rifiuti domestici. Riciclare componenti, accessori e
imballaggi in modo ecologico.
A B C D E F G HJ
Page 24

24
I
Regolazione dell’altezzla di taglio
Solo con motore spento e cilindro di taglio fe rmo. L’alt ezza di tag lio deve essere regolata a seconda delle rispettive condizioni
dell’erba e del terreno.
z Spostare in avanti la leva di regolazione (1).
z Aumentare la profondità di lavoro (lama in direzione del
suolo) (1)
– Girare la manovella "Regolazione della profondità di lavoro"
verso destra
z Ridu rre la profondità di lavoro (2)
– Girare la manovella "Regolazione della profondità di lavoro"
verso sinistra. (un giro = profondità di lavoro di 1,5 mm)
3 Prova di taglio:
z Spostare lenta mente la leva di regol azione in avanti
z Spingere lentamente l’apparecchio nella direzione di ta-
glio
z In caso di rumori di sassi o del blocco del motore,disin-
nestare subito l’apparecchio.
z Ruotare a sinistra il pomello di 1–2 giri
(2).
z Nuova prova di taglio
z Con uti lizzazione frequente si può regolare l’altezza di taglio
in corrispondenza all’usura delle lame (+).
Consigli sulla profondità lavorazione
z Superfici curate con suolo molle, privo di sassi
– Regolare perfettamente L‘attrezzo di lavoro in base all‘all-
tezza del suolo
z Superfici sassose e sporche
– Regolare L‘attrezzo di lavoro in base all‘altezza del suolo
– In presenza di sassi impostare una profondità di lavorazio-
ne più ridotta
z Superfici non curate, forte presenza di muschio
– Comminciare con una profondità di lavorazione più ridotta
– Non sollecitare I‘apparecchio (con blocco del motore im-
postare una profondità di lavorazione più profonda
– Scarificare più volte a strisce parallele
– Seminare di nuovo con I‘inseminatore da giardino WOLF
modello >>Loretta<<
Avviamento
1. T e ne r premuto il pulsante (1).
2. Tirare la leva (2) e lasciare il pulsante
(1).
3. Muovere la leva di regolazione lentamente in avanti (1).
4. Per spegnere il motore: Lasciare la leva
(2).
1 Attenzione
Mettete sempre il cavo in maniera sicura sul terrazzo, sul
sentiero o sull’erba già tosata.
3 Effettuare una svolta (UV 32 EV / UV 34 E)
Svoltando, il guida cavo facilita lo spostamento Si dovrebbe
svoltare solo sulla superficie già tosata .
Manutenzione
Generale
1 Attenzione! Lama rotante
Prima di qualsiasi lavoro di manutenzione e di pulitura:
z estraete la spina elettrica.
z Non toccate lame in movimento.
Pulizia
z Dopo ogni lavoro pulite l’attrezzo con una scopetta.
z Mai spruzzare acqua.
z Riporre l’attrezzo in locale asciutto.
3 Noi consigliamo
Lasciare il vostro attrezzo in autunno presso un’officina autorizzata WOLF in modo che in primavera sia perfettamente efficiente.
Ricambi
K
LLKML
M
M
M
K
M
N
Articolo N° Denominazione articolo Informazione sul prodotto
3632 060 TK-VV Sacco di raccolta
3568 081 UV-EV Lama di ricambio (15x)
Fornitura attraverso il Vostro Rivenditore.
Page 25

25
I
Interventi di riparazione
Condizioni di garanzia
Custodite con cura il certificato di garanzia compilato dal venditore oppure il documento d‘acquisto.
Per la durata di 24 mesi a partire dalla data d‘acquisto, la Ditta WolfGarten presta garanzia in conformità al rispettivo stato della tecnica e
allo scopo/campo d‘applicazione. I diritti legali del consumatore finale
non vengono compromessi mediante i criteri di garanzia di seguito
elencati.
Premesse per il diritto alla garanzia di 24 mesi:
- Impiego dell‘apparecchio esclusivamente per uso privato.
Nel campo industriale oppure negli esercizi di noleggio, la garanzia viene ridotta a 12 mesi.
- Uso conforme allo scopo e rispetto di tutte le avvertenze delle istruzioni sull‘uso che formano parte integrante delle nostre condizioni
di garanzia.
- Rispetto degli intervalli di manutenzione prescritti.
- Nessuna variazione della costruzione su propria iniziativa.
- Montaggio delle parti di ricambio originali/accessori della WOLF.
- Presentazione del documento di garanzia compilato e/o del certificato d‘acquisto.
La garanzia non si estende alla normale usura delle lame, alle parti di
fissaggio delle lame come ruote di frizione, cinghie trapezoidali e cinghie dentate, ruote portanti/pneumatici, filtri dell‘aria, candele d‘accensione e cappucci per candele. In caso di riparazioni effettuate in
proprio, si estingue automaticamente ogni diritto di garanzia. I difetti e
le carenze che si dovessero presentare le cui cause sono riconducibili
a difetti di materiale o di produzione, vengono rimossi esclusivamente
dalle nostre officine autorizzate (il venditore ha il diritto alla riparazione) oppure dal produttore stesso poiché. Sono escluse rivendicazioni non rientranti nella prestazione di garanzia. Non ammessa una
rivendicazione per la fornitura di parti di ricambio. Eventuali danni
dovuti al trasporto non devono essere segnalati a noi, ma alla ditta
competente per il trasporto, poich in caso contrario i diritti all‘indennizzo da parte di queste imprese decadono.
Rimedio (X) :
Problema Possibi cause
Officina Di assisten-
za WOLF
In modo autonomo
Nessun risultato di scarificazione
• Profondità di lavoro regolata troppo bassa
--- X
Corsa rumorosa, forte vibrazione dell‘apparecchio
• Lama danneggiata a causa del passaggio su oggetti solidi
X---
Rumori anormali dell’apparecchio – Vibrazioni
• Viti allentate
--- X
Il motore non funziona
• Fusibile danneggiato
--- X
• Cavo danneggiato
1 Attenzione! Scarica elettrica da cavo danneg-
giato
Quanto il cavo è tagliato completamente o danneggiato, il fusibile di sicurezza non sempre funziona.
z Non toccate il cavo prima di estrarre la spina dal-
la presa di corrente.
z Il cavo danneggiato deve es sere completamet-
ne sostituito. E’ proibito rappezzare il cavo con
nastro isolante.
X ---
In caso di dubbio rivolgersi sempre ad un centro assistenza WOLF.
Attenzione, prima di ogni controllo o lavoro alle lame occorre disinserire I‘arieggiatore ed estrarre la spina d‘alimentazione.
Le prestazioni in garanzia vengono rese dalle nostre officine autorizzata contrattualmente o nel caso di:
I
WOLF Italia S.r.l.
Via G. Galilei 5
20060 Ornago (Mi)
Tel.: ++ 39 (0 39) - 62 86 41
Fax: ++ 39 (0 39) - 6 01 02 57
E-mail: info@it.WOLF-Garten.com
Z
WOLF-Garten Schweiz AG
Nordringstraße 16
4702 Oensingen
Tel.: ++ 41 (62) - 3 88 04 50
Fax: ++ 41 (62) - 3 88 04 60
Page 26

26
n
n Hartelijk gefeliciteerd met de aanschaf van uw WOLF-Garten verticuteermachine
Inhoud
Technische gegevens . . . . . . . . . . . . . . . . 26
Veiligheidsvoorschriften . . . . . . . . . . . . . . . 27
Montage . . . . . . . . . . . . . . . . . . . . . . . 28
Gebruik. . . . . . . . . . . . . . . . . . . . . . . . 28
De verzorging . . . . . . . . . . . . . . . . . . . . 29
Reserveonderdelen . . . . . . . . . . . . . . . . . 29
Opheffen van storingen . . . . . . . . . . . . . . . 30
Garantievoorwaarden . . . . . . . . . . . . . . . . 30
EG-Conformiteitsverklaring . . . . . . . . . . . . 108
Technische gegevens
Lees het instructieboekje aandachtig door en stelt u
zich op de hoogte van de bedieningselementen en het
correcte gebruik van het apparaat. De gebruiker is aansprakelijk voor ongevallen met andere personen en
voor schade aan hun eigendommen. Neem de aanwijzingen, voorschriften en de verklarende teksten in
acht.
Kinderen of andere personen die de gebruiksaanwijzing niet kennen, mogen de verticuteermachine nooit
gebruiken. Voor kinderen onder de zestien is het gebruik van het apparaat verboden.
Veranderingen en technische aanpassingen voorbehouden.
D Lawaaimeting aan het oor van de bedienende pe rsoon wordt
uitgevoerd overeenkomstig EN 13684.
E Trillingen gemeten aan de duwboom, met bedienende per-
soon, conform EN 1033, EN 13684. De gemiddelde gewogen versnelling is:
UV 34 E UV 32 EV UV 30 EV
Type 3634 ... 3632 ... 3630 ...
A 62 cm 62 cm 62 cm
B 55 cm 55 cm 55 cm
C 54 cm 54 cm 54 cm
D LP 80 dB (A) LP 80 dB (A) LP 80 dB (A)
E a
hw
≤ 2,5 m/s
2
a
hw
≤ 2,5 m/s
2
a
hw
≤ 2,5 m/s
2
Vermogen 1600 W 1300 W 1100 W
Verbruik 7,1 A 7,9 A 7,4 A
Spanning 230 VAC 230 VAC 230 VAC
Werkbreedte 34 cm 32 cm 30 cm
Gewicht 22 kg 20 kg 18 kg
Gebruiksaanwijzing
Page 27

27
n
Veiligheidsvoorschriften
Betekenis van de symbolen
Algemene aanwijzingen
z Wegens geva ar voor lichaamsdelen van de ge bruiker mag de
verticuteermachine niet worden gebruikt
– als motorhakfrees;
– voor het egaliseren van bodemverheffingen, zoals molsho-
pen.
z Laat nooit kinderen of ande re personen die de werkwi jze van
de machine niet kennen met de verticuteermachine werken.
Jongeren onder 16 jaar mogen de machine niet gebruiken.
z Zet de mach ine nooit aan, terwijl perso nen, vooral kinderen of
dieren, in de buurt zijn.
z De gebruiker is aansprake lijk voor ongevallen of risico's aan
andere personen of hun eigendom.
z Gebruik de verticuteermachine alleen op droog gras.
z Maai alleen bij daglicht of met voldoende verlichting.
Voordat u gaat verticuteren
z Draag alti jd geschikte werkkleding, geen wijde kleding enz.,
die in de messen kunnen blijven steken. Draag stevige schoenen! Bescherm ook uw benen (bijv. door een lange broek) en
handen (handschoenen).
z Bevestig de bijgeleverde stootplaat resp. grasopvanginrich-
ting. Let erop dat deze goed vast zitten. Het is niet toegestaan
de machine zonder bescherminrichtingen of met beschadigde
bescherminrichtingen te gebruiken.
z Verwijder voor het verticuteren alle vreemde voorwerpen zo-
als stenen, stukken hout, botten e.d. van het gazon.
z Controleer het gereedschap op
– vaste zitting van de bevestigingsonderdelen
– beschadiging of sterke slijtage
z Neem bij het vervangen ervan de inbouwinstructies in acht.
z Control eer de aan de buitenkant van de machine geï nstalleer-
de kabel en de aansluitkabel op beschadigingen en slijtage
(poreuze plekken). Gebruik de machine alleen als deze zich
in goede staat bevindt.
z Laat de kabels uitsluitend door erkend vakpersoneel repare-
ren.
z Schakel de machine uit en trek de netst ekker erui t, voord at u
gaat controleren of de aansluitkabel ged raaid of beschadigd is
of als u de machine wilt instellen of reinigen.
Kabels
1 Opgelet! Elektrische schok door kabelschade.
Wanneer de kabel doorgesneden of beschadigd is, s laat de
zekering niet altijd door.
z Raak de kabel niet aan voor men de stekker uit het
stopcontact haalt.
z Beschadigde kabel moet geh eel word en vervange n. De
kabel afplakken met isolatietape is verboden.
z Werk a.u. b. met vei l igh eidskabe ls. Al s aansl uitl ei ding mogen
uitsluitend kabels worden gebruikt, die niet licht er zijn dan de
neopreenkabel HO7 RN-F met een minimale diameter van
3x1,5 mm
2
. Als maximale lengte mag de 25 m niet overschre-
den worden.
z Stekkers en koppelingen moeten spatwaterdicht zijn.
z Gebruik een el ektrische beveiliging (RCD) met een maximale
stroomsterkte van 30 mA.
z Aansluitkabel aan de trekontlasting bevestigen. Niet langs
randen en/of langs spitse of scherpe voorwerpen laten schuren. De kabel niet tussen deur- of raamopeningen klemmen.
Schakelinrichtingen mogen niet verwijderd of overbrugd worden (bijv. schakelhendel aan de stang van de handgreep binden).
Bij het starten
z Schakel de mot or alleen in, al s u uw voeten op een veil ige af-
stand van de messen hebt.
z Kantel de verticteermachine niet, als u de motor inschakelt,
tenzij de machine bij het opstarten gekanteld moet worden.
Als dit het geval is, kantel de machine dan niet meer dan absoluut noodzakelijk is en til alleen het gedeelte omhoog dat
zich niet aan de kant van de gebruiker bevindt. Controleer altijd, of uw handen allebei in werkposit ie zi jn, voordat u d e machine weer terug op de bodem zet.
Bij het verticuteren
z Let op, gevaar! Messen lopen door!
z Houd u zich aan de veiligheidsafstand tussen de duwboom en
de machine.
z Houd nooit uw handen of voeten bij draaiende onderdelen.
z Blijf altijd uit de buurt van het uitwerpkanaal.
z Schakel de mot or alleen in, al s u uw voeten op een veil ige af-
stand van de messen hebt.
z Vermijd zo mogelij k he t ge brui k van het a pparaa t b ij nat gras
of wees bijzonder voorzichtig om uitglijden te voorkomen.
z Houd de machine op een vei lige afstand, vooral op hellin gen.
Nooit rennen met de machine, maar rustig lopen.
z Verticuteer niet op steile hellingen.
Opgelet!
Voor gebruik de
gebruiksaanwijzing lezen!
Anderen buiten
de gevarenzone houden!
Voorzichtig! Scherpe snijmessen - vóór
onderhoudswerkzaamheden
en bij beschadiging van de kabel
de stekker uit het
stroomnet trekken. Aansluitkabels mogen niet
in de buurt komen van het snijgereedschap!
Aansluitkabels mogen
niet in de buurt komen van
de messen!
Page 28

28
n
z Verticu teer hel li nge n alt ij d in d wars richt in g e n niet van bov en
naar beneden of omgekeerd.
z Wees bij zonder voorzichtig als u de rijrichting op de helling ve r
andert.
z Wees bij zonder voorzichtig a ls u de machine omkeert of naar
zich toetrekt.
z Stop de draaiende delen:
– als de machine voor het transport moet worden gekanteld.
– als u andere oppervlakken dan gras moet oversteken
– als de machine wordt getransporteerd.
z Gebruik de verticuteermachine nooit als de bescherminrich-
tingen of onderdelen van de behuizing beschad igd zijn of ontbreken.
z Schakel de motor uit en wacht tot de messe n tot sti lstand zij n
gekomen, voordat u de verticuteermachine optilt of
wegdraagt.
z Schakel de motor uit en wacht tot de messe n tot sti lstand zij n
gekomen, voordat u de grasopvangzak verwijdert of de werkdiepte verstelt.
z Vervang versleten of beschadigde messen alleen per set.
Neem hiervoor de montage-aanwijzingen in acht. Gebruik om
veiligheidsredenen uitsluitend originele vervangingsonderdelen.
z Onderhouds- en reinigingswerkzaamheden aan de verticu-
teermachine en het verwijderen van de bescherminricht ingen
mogen alleen worden uitgevoerd bij een uitgeschakel de motor.
z Zet de ve rticuteermachine ni et in vochtige ruimten of in de bu-
urt van open vuur.
z Mocht u op een hindernis zi jn ge reden, l aat de verticutee rma-
chine dan voor de veiligheid door erkend vakpersoneel controleren (zie werkplaatsindex).
z Als de aansluitkabel tijdens het gebruik wordt beschadigd,
moet u onmiddellijk de netstekker eruit trekken. Raak de kabel
niet aan, voordat deze van het elektriciteitsnet is gescheiden.
z De machine uitzetten, stekker uittrekken en wachten totdat de
machine stil staan, als u bijv:
– de machine alleen laat staan
– een geblokkeerd mes vrij maakt
– de machine wilt controleren, reinigen of eraan wilt werken
– als u een vreemd voorwerp heeft geraakt, controleer de ma-
chine dan op beschadiging en voer de noodzakelijke reparaties uit.
– als de machine door onbalans sterk vibreert (onmiddellijk
uitschakelen en de oorzaak zoeken).
– instellings -of reinigingswerkzaamheden wilt uitvoeren.
– wilt controleren, of de aansluitleiding in een lus zit of be-
schadigd is.
– Wanneer de kabel tijdens het gebruik beschadigd wordt,
moet de stekker van de kabel onmiddellijk uitget rokken worden. Kabel niet aanraken voordat de stekker uit het stopcontact getrokken is.
Het onderhoud
1 Opgelet! Roterend snijmes.
Vóór al het onderhoud en schoonmaakwerk:
z Haal de stekker eruit.
z Raak de draaiende messen niet aan.
Afvalverwijdering
Montage
Duwboom bevestigen
1 Attentie!
Bij het opvouwen of uitklappen van de duwboom kunne n de
kabel en bedieningskabel worden beschadigd.
z Let op dat de kabel en de bedieningskabel niet worden
geknikt.
z Zie afbeeldingen voor montage.
Gebruik
Gebruikstijden
z Gelieve de specifieke nationale verordeningen in acht te ne-
men.
Voer de kabel door de kabelontspanner
l a.u.b. aan de hand van de grafiek in de trekontlasting.
Aansluiting op een stekkerdoos (230 V, 50 Hz)
z Aansluiting op een stekkerdoos (230 V, 50 Hz) Sluit het ap-
paraat alleen op stekkerdozen aan die met ee n zekering van
16 amp. traag (of LS-schakelaar type B) zijn beveiligd.
3 Aanwijzing: aardlekbeveiligingsinrichting
Deze beveiligingsinrichtingen beschermen bij het aanraken
van beschadigde kabels, isolatiefouten en in sommige gevallen ook bij het beschadigen van onder spa nning staande
leidingen tegen zwaar letsel.
z Wij adviseren om het apparaat alleen op stekkerdozen
aan te sluiten die met een aardlekbeveiligingsinrichting
(RCD) met een aardlek van niet meer dan 30 mA zijn beveiligd.
z Er bestaan uitbreidi ngspakkett en voor ou de instal lati es.
Neem contact op met een elektricien.
Afgedankte elektrische apparatuur mag niet met
het huishoudelijk afval meegegeven worden. Recycle apparatuur, accessoires en verpakking op milieuvriendelijke wijze.
A B C D E F G H J
Page 29

29
n
Werkdiepte instellen
Alleen bij een uitgeschakelde motor en een stilstaande verticuteercilinder. De werkdiepte moet op de afzonderlijke gras- en bodemcondities worden afgesteld.
z De hefboom naar voren zetten (1).
z Werkdiepte vergroten (messen in richting bodem) (1)
– Draai de instelknop „werkdiepte-instelling“ naar rechts
z Werkdiepte verk leinen (2)
– Draai de instelknop „werkdiepte-instelling“ naar links. (één
omwenteling = 1,5 mm werkdiepte)
3 Verticuteerproef:
z Trek de hefboom weer naar boven (2)
z Start de machine
z Zet de hefboom langzaam na ar voren
(1)
z Schuif de machine langzaam in de werkrichting
z Schakel de machine bij gelu iden van steenslag of als de
motor blokkeert onmiddellijk uit
z Draai de instelknop 1–2 omwentelingen naar links
(2). Een omwenteling komt overeen met 1,5 mm.
z Voer nogmaals een verticuteerproef uit
z Na regelmatig g ebruik kan de verticuteerdiept e overeenkoms-
tig de slijtage van de messen worden bijgesteld (+).
Aanbevelingen voor de werkdiepte
z Verzorgd gazon met zachte bodem zonder stenen
– Messen exact instellen op bodemhoogte
z Steenachtige, slordige oppervlakken
– Messen instellen op bodemhoogte
– Stel bij steenslag een kleinere werkdiepte in
z Slordige , sterk bemoste oppervlakken
– Begin met een kleinere werkdiepte
– Zorg ervoor, dat de machine niet overbelast wordt (als de
motor blokkeert, stelt u de werkdiepte hoger in)
– Verticuteer meerdere malen kruisgewijs
– Zaai het gazon bij met WOLF graszaad >>Loretta<<
Verticuteren
1. Knop (1) indrukken en vasthouden.
2. Beugelschakelaar (2) aantrekken, knop
(1) loslaten.
3. Hendel (1) langzaam naarvoren brengen.
4. Motor uitzetten: Hefboom
(2) loslaten.
1 Opgelet
Leg de kabel steeds veilig neer op terrassen, paden, of op
het reeds gevertucuteerde gras.
3 Keren (UV 32 EV / UV 34 E)
De kabelhouder maakt een gemakkelijk verleggen van de kabel
mogelijk. Het keren van de machine moet op het reeds geverticuteerde plaatsvinden .
De verzorging
Algemeen
1 Opgelet! Roterend snijmes
Voor al het onderhoud en schoonmaakwerk:
z Haal de stekker eruit.
z Raak de snijmessen niet aan.
Reinigen
z Na gebruik het apparaat met handveger reinigen.
z Niet met water afspuiten.
z In een drog e ruimte opbergen.
3 Aanbeveiling:
Laat uw machine in de herfst nakijken bij een WOLF-Garten
Servicewerkplaats.
Reserveonderdelen
K
LLK
M
K
LMM
M
KMN
Artikelnummer Artikelnaam Productinformatie
3632 060 TK-VV Opvangzak kpl
3568 081 UV-EV Verticuteermessen (15x)
Levering via een WOLF-Garten verkooppunt.
Page 30

30
n
Opheffen van storingen
Garantievoorwaarden
Gelieve de door de verkoper ingevulde garantiekaart en het aankoopbewijs zorgvuldig te bewaren.
Gedurende een periode van 24 maanden, te rekenen vanaf de aankoopdatum, verstrekt de firma WOLF-Garten een garantie, die met de
respectievelijke stand van de techniek en met het gebruiksdoeleinde/toepassingsgebied overeenstemt. Aan de wettelijke rechten van
de eindgebruiker doen de hierna volgende garantierichtlijnen geen afbreuk.
Vereiste voorwaarden voor de garantieclaim gedurende 24
maanden:
- Gebruik van het toestel uitsluitend voor privé-doeleinden.
Voor industrieel gebruik of verhuur wordt geen garantie verstrekt.
- Deskundige behandeling en inachtneming van alle instructies in de
gebruiksaanwijzing, die een bestanddeel van onze garantie-voorwaarden vormt.
- Inachtneming van de voorgeschreven tussentijden voor het onderhoud.
- Geen eigenmachtige wijziging van de constructie.
- Inbouw van originele WOLF reserveonderdelen/toebehoren.
- Voorlegging van de ingevulde garantiekaart en/of van het aankoopbewijs.
De garantie is niet van toepassing voor de normale slijtage van messen, mesbevestigende onderdelen zoals frictieschijven, V-riemen,
tandriemen, loopwielen/banden, luchtfilters, ontstekingskaarsen en
bougiestekkers. In geval van een eigenmachtige reparatie komt iedere garantieclaim automatisch te vervallen. Fouten en gebreken, die
zich voordoen en waarvan de oorzaken aan materiaal- of fabricagefouten te wijten zijn, worden uitsluitend door onze contractueel gebonden werkplaatsen in uw buurt of, indien deze dichterbij gesitueerd is,
door de fabrikant verholpen. Buiten de verstrekte garantie ressorterende claims zijn uitgesloten. Een aanspraak op levering van reserveonderdelen bestaat niet. Eventueel door het transport resulterende
beschadigingen dienen niet aan onze firma, doch aan de bevoegde,
met het transport belaste firma te worden gerapporteerd. In het andere geval gaan de schadeclaims ten opzichte van dergelijke bedrijven
immers verloren.
Oplossing (X) door:
Probleem Mogelijke oorzaak
WOLF
Servicewerkplaats
Zelf
Geen verticuteerresultaat • Wertkdiepte te gering ingesteld
--- X
Onrustige motor, sterk vibre
ren van het toestel.
• De messen werden door het raken van vaste voorwerpen beschadigd
X ---
Ongewone geluiden binnen
het toestel / klapperen
• Schroeven los
--- X
De motor slaat niet aan
• Zekering defect
--- X
• Kabel beschadigd:
1 Opgelet! Elektrische schok door kabelschade.
Wanneer de kabel doorgesneden of beschadigd is,
slaat de zekering niet altijd door.
z Raak de kabel niet aan voor men de stekker uit
het stopcontact haalt.
z Beschadigde kabel moet g eheel worden vervan-
gen. De kabel afplakken met isolatietape is verboden.
X ---
In geval van twijfel steeds een WOLF-Garten servicewerkplaats contacteren!
Attentie: Altijd de stekker uit het stopcontact halen, als u de verticuteermachine controleert of eraan werkt.
Werkzaamheden die onder de garantie vallen, worden uitge voerd door onze geautoriseerde werkplaatsen of bij:
n
WOLF-Garten Nederland B. V.
Postbus 32
5240 AARosmalen
Tel.: ++ 31 (73) 5 23 58 50
Fax: ++ 31 (73) 5 21 76 14
E-mail: info@nl.WOLF-Garten.com
B
Graham NV-SA
Zoning Industriel21
1440 Wauthier-Braine
Tel.: ++ 32 (2) - 3 67 16 11
Fax: ++ 32 (2) - 3 67 16 12
E-mail: com@graham.be
l
WOLF-Garten GmbH & Co KG
Industriestraße 83-85
57518 Betzdorf
Tel.: ++ 49 (27 41) - 28 15 00
Fax: ++ 49 (27 41) - 28 12 99
E-mail: info@de.WOLF-Garten.com
Page 31

108
D
EG-Konformitätserklärung
d
EC-konformitetserklæring
G
EC Declaration of Conformity
f
EY-vastaavuustodistus
F
Déclaration de conformité CE
N
EF-overensstemmelseserklæring
I
Dichiarazione CE di Conformità
S
EG-konformitetsintyg
n
EG-Conformiteitsverklaring
Wir / We / Nous / Noi / Wij / Vi / Täten / Vi / Vi
WOLF-Garten GmbH & Co KG
Industriestr. 83-85, D-57518 Betzdorf
erklären, dass die Maschine / declare that the machine / déclarons que la machine / dichiariamo che la macchina / verklaren dat de
machine / da stroje todistamme, että / erklærer, at maskinen / erklærer, at maskinen / förklarar, att maskinen
Rasenmäher, handgeführt und netzbetrieben
Lawnmower, walk behind and mains-operated
Tondeuse à conducteur à pied commandées à la main
falciatrice per prati, manuale e alimentata dalla rete
Grasmaaimachine, met de hand bediend en met netvoeding
Plæneklipper, håndstyret og netdrevet
Käsinohjattava, verkkovirtatoiminen ruohonleikkuri
Gressklipper, manuelt styrt og strømdrevet
Handdriven gräsklippare med elanslutning
Typ, type, type, tipo, type, Type, tyyppi, type, typ:
3634 ... - 3632 ... - 3630 ...
mit folgenden EG-Richtlinien übereinstimmt - conforms to the specifications of the following EC directives - est conforme aux spécifications des
directives CE suivantes - è conforme alle seguenti direttive CE - met volgende EG-richtlijnen overeenstemt, stemmer overens med følgende
EU-direktiver - vastaa seuraavia EY-direktiivejä - oppfyller kravene i henhold til EU-retningslinjene - stämmer överens med följande EU-riktlinjer
- se shoduje s následujícími smìrnicemi EG:
98/37/EG, 2006/95/EG, 2004/108/EG, 2000/14/EG, 2005/88/EG, 2002/95/EG
Angewandtes Konformitätsverfahren - Conformity assessment procedure followed - Procédure de conformité appliquée - procedura di conformità
applicata - toegepaste conformiteitmethode - Anvendte overensstemmelsesmetoder - sovellettu vastaavuusmenettely - anvendt konformitetsprosess - använt konformitetsförfarande:
Anhang V
3634 ... 3632 ... 3630 ...
Schnittbreite - Cutting width - Largeur de coupe - Larghezza di taglio
Maaibreedte - Klippbredd - Skærebreede - Klippbredde - Leikkuuleveys
34 cm 32 cm 30 cm
Drehzahl - R. P. M. - Régime - N. giri - Toerental
Varvtal - Omdrejningstal - Turtall - Kierrosluku
2.950 1/min 2.950 1/min 2.950 1/min
1. 89 dB 89 dB 89 dB
2. 91 dB 91 dB 91 dB
1. Repräsentativer gemessener Schallleistungspegel - representative measured sound power level - Niveau de puissance acoustique
mesuré représentatif - livello di potenza sonora approssimativo misurato - representatief gemeten geluidsoverdrachtniveau - Repræsentativt
målte støjniveau - Edustava mitattu melutaso - representativt målt lydeffektnivå - representativ uppmätt ljudeffektnivå.
2. Garantierter Schallleistungspegel - guaranteed sound power level - Niveau de puissance acoustique garanti - livello di potenza sonora
garantito - gewaarborgd geluidsoverdrachtniveau - Garanteret støjniveau - Taattu melutaso - garantert lydeffektnivå.
Betzdorf, den 01.11.2007
J. Hörmann (Geschäftsführung)
Dr.-Ing. M. Simon (Entwicklungsleitung)
Page 32

109
C
Prohlášení o shodě EU
b
Декларация за съответствие на ЕО
H
EU-megfelelőségi nyilatkozat
R
ЕС-Заявление о соответствии
p
Oświadczenie zgodności z EU
o
Declaraţia de conformitate UE
h
EG-Izjava o konformitetu
T
AT-Uygunluk Beyanı
s
Vyhlásenie o zhode s predpismi EU
g
Δήλωση συμμόρφωσης EG
O
EG Izjava o skladnosti
My / Mi / My / Mi / My / Izjavljamo / Ние / Мы/ Noi / Biz / Εμείς
WOLF-Garten GmbH & Co KG
Industriestr. 83-85, D-57518 Betzdorf
Prohlašujeme, že stroj / kijelentjük, hogy a / oswiadczamy, ze maszyna, objašnjavamo, da stroj / prehlasujeme, že stroj / декларираме,
че машината / заявляем, что машина / declarăm că maşina / aşağıda yazılı makineye ilişkin olarek beyan ederiz ki / δηλώνουμε, ότι η μηχανή
Vertikutátor, ručně vedený se sít’ovým napájením
villamos hálózatról működő, kézzel mozgatott, talajlazítógép
Nóż do trawników, prowadzony ręcznie i zasilany sieciowo
Vertikutator sa elektromotorom
Vertikutátor s elektromotorom
Prezračevalnik z elektromotorjem
Сенокосачка, ръчно управление с двигател
Аэратор с ручным управлением, с двигателем внутреннего сгорания
Maşină de tuns iarba, condusă manual cu motor cu ardere internă
Elle yönlendirilen içten yanmalı motora sahip çim biçme makinesi
Εκριζωτής
βρυών, ωθούμενος με κινητήρα καύσης
Melynek, típusa, typ, typ, typ, typ, модел, Тип, Tip, Model, Τύπος:
3634 ... - 3632 ... - 3630 ...
Se shoduje s následujícími smernicemi EG - megfelel a következo EU irányelveknek - odpowiada nastepujacym wytycznym Unii Europejskiej odgovaraju s ovim smjernicama - Sú v súlade s nasledovnými predpismi - ustrezajo naslednjim smernicam - отговаря на следните директиви
на ЕО - соответствует следующим Директивам ЕС - este conformă cu urm ătoarele directive ale UE - aşağıdaki AT Yönetmeliklerine uygundur
- αποκρίνεται στις παρακάτω κατευθυντήριες οδηγίες της ΕΚ:
98/37/EG, 2006/95/EG, 2004/108/EG, 2000/14/EG, 2005/88/EG, 2002/95/EG
Použitý postup prohlášení o shode - Az alkalmazott megfeleloségi eljárások - Stosowana procedura zgodnosci - primijenjeni postupak
konformiteta - použitý spôsob odsúhlasenia - uporabljenemu postopku o skladnosti - Приложен метод на съгласуване - Применённая
методика соответствия - Procedura de conformitate aplicată - Uygulanan uygunluk yöntemi -
Διαδικασία, που εφαρμόζεται σχετικά με την
πιστοποίηση:
Anhang V
3634 ... 3632 ... 3630 ...
Šírka strihu - Vágásszélesség - Szerokosc scinania - Širina rezanja -
Záber - Rezalna širina - Широчина на рязане - Ширина среза -
Lãþime de tãiere - Kesim genişliği - Πλάτος κοπής
34 cm 32 cm 30 cm
Pocet otácek - Fordulatszám - Ilosc obrotów - Broj okretaja - Otácky
število vrtljajev - Обороти - Число оборотов - Turaţie - Devir sayısı -
Αριθμός στροφών
2.950 1/min 2.950 1/min 2.950 1/min
1. 89 dB 89 dB 89 dB
2. 91 dB 91 dB 91 dB
1. Reprezentativní naměřená hodnota hladiny hluku - a mért hangnyomás jellemző értéke - reprezentatywny zmierzony poziom natęźenia
dźwięku - Reprezentativno mjerena zvučna razina - Reprezentatívna nameraná hlučnost - reprezentativno izmerjen nivo moči zvoka Представително измерено ниво на шума - Выборочно измеренный уровень шума - Nivelul puterii zgomotului măsurat reprezentativ Temsili ölçülen ses seviyesi - Αντιπροσωπευτική στάθμη μέτρησης θορύβου
2. Zarucená hodnota hladiny hluku - garantált maximális hangnyomás - gwarantowany poziom natezenia dzwieku - Garantirana zvucna razina
- Garantovaná hlucnost - rarantiran nivo moci zvokael - Гарантирано ниво на шума - Гарантированный уровень шума - Nivelul garantat
al puterii zgomotului - Garanti edilen ses seviyesi - Εγγυημένη στάθμη θορύβου
Betzdorf, den 01.11.2007
J. Hörmann (Geschäftsführung)
Dr.-Ing. M. Simon (Entwicklungsleitung)
Page 33

www.WOLF-Garten.com
Teil-Nr. 0054 571 - TB
 Loading...