

Wolfgang Puck BFPR1000 Use And Care Manual

LIFE IS ABOUT BALANCE
AND EATING WELL
Induction Food Processor
I M P O R T A N T N O T I C E
If you have any problems with this unit, contact
Consumer Relations for service PHONE: 1-800-275-8273
or visit our website at wphousewares.com
Please read operating instructions before using this
product. Please keep original box and packing materials
in the event that service is required.
W.P. APPLIANCES, INC. Toll Free (800) 275-8273
Model BFPR1000 Printed In China REV 1.0
USE AND CARE
Photos throughout this manual may differ slightly from actual product

IMPORTANT SAFEGUARDS
Read all instructions.
To protect against risk of electrical shock, do not put base in water or
other liquid. For detailed cleaning instructions see the section marked
‘Care and Cleaning’ in this instruction manual.
Close supervision is necessary when any appliance is used by or near
children.
Unplug from outlet when not in use, before putting on or taking off
parts, before removing food and before cleaning. To unplug, grasp plug
and pull from electrical outlet. Never pull cord. Avoid
contact with moving parts.
Blades are sharp. Handle them carefully.
Do not use outdoors.
Do not let cord hang over edge of table or counter or touch hot
surfaces.
Do not operate any appliance with a damaged cord or plug, or after
appliance has been dropped or damaged in any way. Return appliance
to the nearest authorized service facility for examination, repair or
electrical or mechanical adjustment.
Keep hands as well as spatulas and other utensils away from moving
blades or discs while processing food, to prevent the possibility of
severe personal injury or damage to food processor.
Avoid contact with moving parts. Never push food down by hand.
Always use food pusher.
Make sure motor has completely stopped before removing lid. Never use
the lid interlock as a means of turning on or shutting off the motor. Only
use the On button or Pulse button to operate this appliance.
To reduce the risk of injury, no blade or disc should be placed on the
shaft except when the bowl is properly locked in place. Store blades and
discs as out-lined in this instruction manual and keep the appliance out
of reach of children.
1
2
3
4
5
6
7
8
9
10
11
12
Additional Safety Information
Short Power Cord
A short power-supply cord is provided to reduce the hazards resulting
from entanglement or tripping over a longer cord. An extension cord
may be used with care; however, be sure the marked electrical rating is
at least as great as the electrical rating of this appliance. The extension
cord should be positioned such that it does not drape over the counter
or tabletop where it can be pulled on by children or tripped over. The
electrical rating of this appliance is listed on the bottom panel of the unit.
Polarized Plug
This appliance has a polarized plug (one blade is wider than the other).
To reduce the risk of electric shock, this plug will fit in a polarized outlet
only one way. If the plug does not fit fully in the outlet, reverse the plug.
If it still does not fit, contact aqualified electrician. Do not attempt to
modify the plug in any way.
Be sure Lid and Feed Tube are securely locked in place before operating
food processor.
Never try to override or tamper with lid interlock mechanism.
Do not operate this, or any other motor-driven appliance, while under the
influence of alcohol or other substances that affect your reaction time or
perception.
The use of attachments not recommended or sold by WP Appliances,
Inc. specifically for this model may cause fire, electrical shock, personal
injury, or damage to your food processor.
13
14
15
16
When using electrical appliances, basic safety precautions should always
be followed, including the following:
SAVE THESE INSTRUCTIONS
HOUSEHOLD USE ONLY
Before Your First Use
Prior to using your Food Processor, wash all parts as outlined in the
section “Care and Cleaning."
2 3

Wolfgang Puck,
owner of the famous Spago restaurants
and one of the most influential chefrestauranteurs in America, is credited
with reviving California’s rich culinary
heritage. His cooking innovations, a result
of blending fresh California ingredients
with his classical French techniques,
are enjoyed by world leaders, stars and
fellow chefs alike. He established other
trend-setting restaurants like Postrio in
San Francisco, Chinois on Main in Santa
Monica, Trattoria del Lupo, Cut, and
his latest creation, Jai, an Asian fusion
restaurant in San Diego. Home chefs can also share Mr. Puck’s
talents through his cookbooks, cutlery, cookware and, of
course, through his appliances!
Important Safeguards
Additional Safety Information
Before Your First Use
Additional Safety Precautions
About Wolfgang Puck
Know Your Food Processor
Attachments For Your Food Processor
Assembling Your Food Processor
Assembling Your Attachments
Using Your Food Processor
Storing Your Food Processor
Helpful Hints
Disassembly of Your Food Processor
Care and Cleaning
Recipes
Limited Warranty
Contact Information
2
3
3
4
4
6
8
9
10
11
12
14
16
17
18
75
BACK
Table of ContentsAdditional Safety Precautions
If you have any concerns regarding the performance and use of your
appliance, please contact Consumer Service Line at 800-275-8273.
Always use extreme care when handling processing blades and
cutting discs. These are extremely sharp and may cause injury
if handled incorrectly. Always store processing blades and cutting
discs as referenced in the section “Storing Your Food Processor”.
Unplug from power outlet when not in use, before putting on or taking
off attachments, and before cleaning.
Do not put hot liquids into the food processor, warm liquids are
acceptable.
Avoid contacting moving parts at all times.
Place the processor bowl onto the base of the processor before fitting
any attachments.
All blades and attachments should be removed with care before
cleaning.
Do not overfill the processor. The maximum levels for the 12 cup work
bowl is 6 cupsof liquid, or 10 cups of solids.
Always remove the blade before emptying the processor bowl of its
contents.
•
•
•
•
•
•
•
•
About Wolfgang Puck
4 5
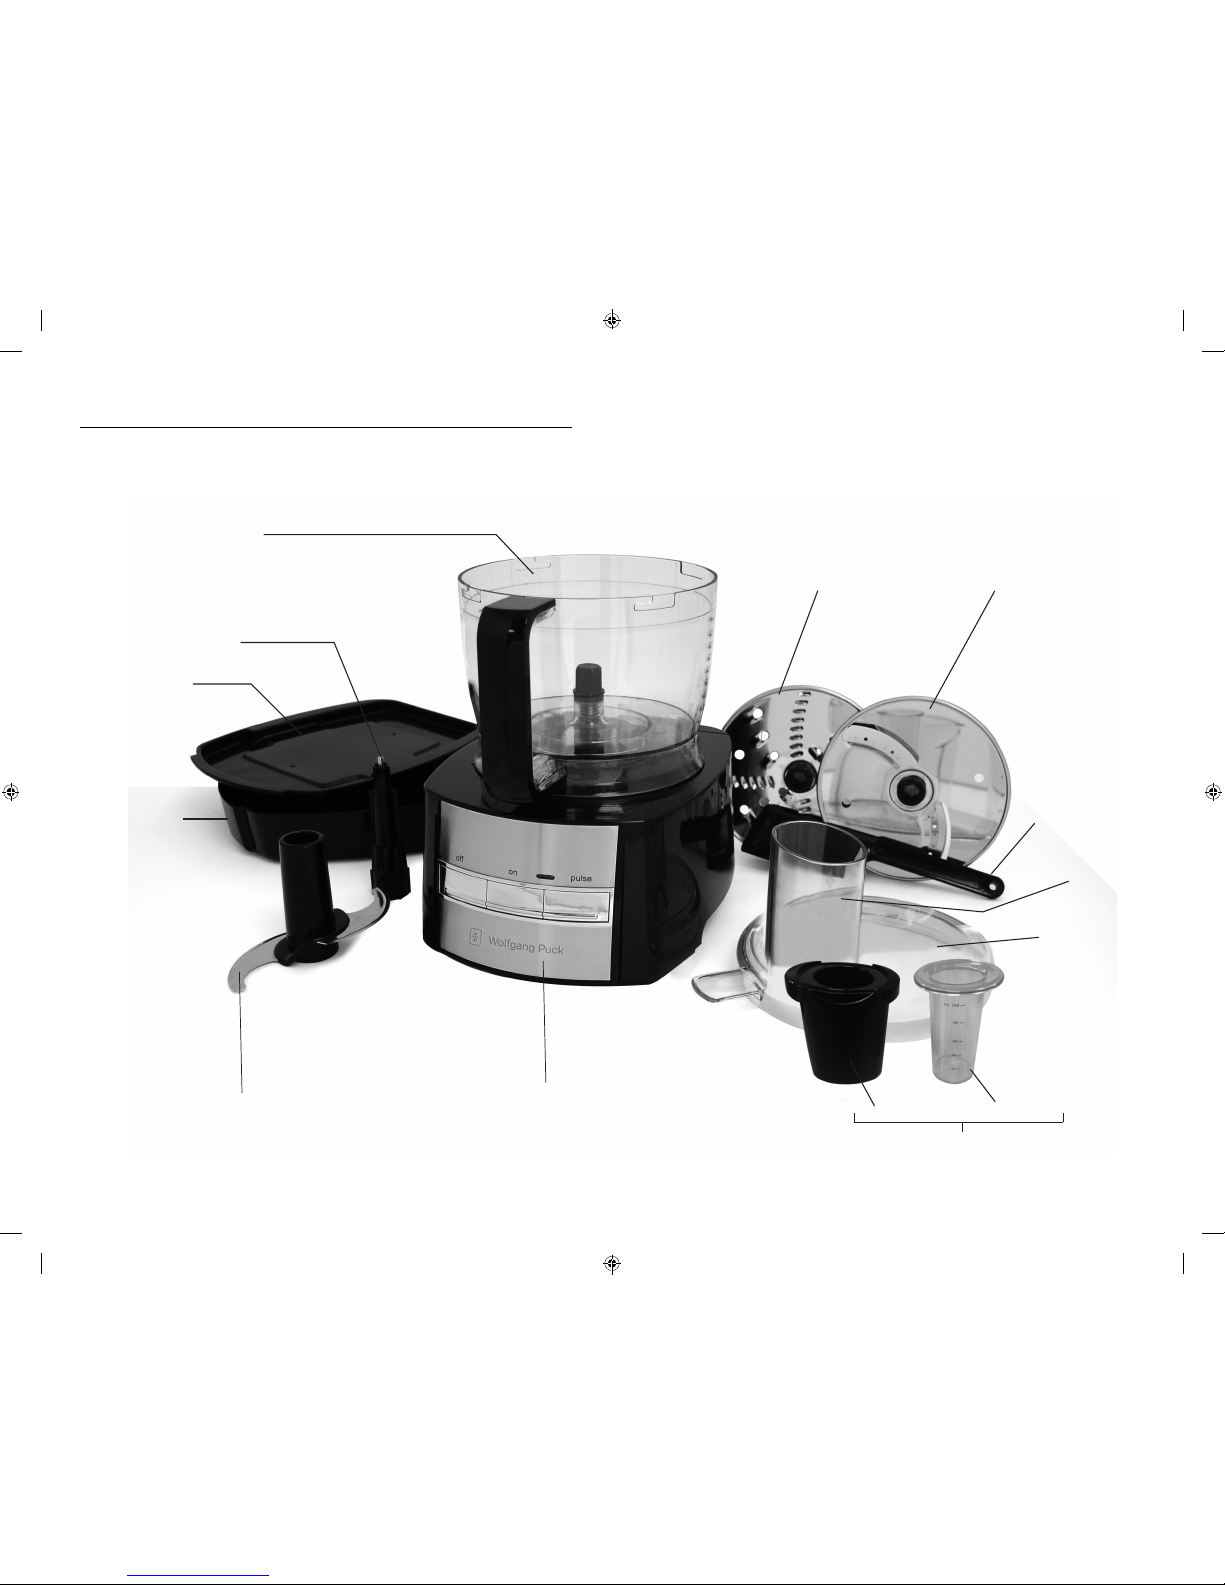
Know Your Food Processor
6 7
Work Bowl
Storage
Tray Cover
Storage Tray
Spindle
Reversible Shredding Disc
Reversible Slicing Disc
Spatula
Feed
Tube
Bowl
Lid
Food Pusher
(Two Piece Food Pusher Set)
Food Pusher Insert
Processing Blade
Motor Housing
Attachments For Your
Food Processor
Processing Blade
Spatula
5-Cup Mini Bowl and Mini Processing Blade
Reverse Shredding Disc
Reverse Slicing Disc
Stainless steel dual edged processing blade
is designed for chopping, mixing, blending,
pureeing and kneading.
The spatula is ideal for assisting with all
food processing tasks.
Caution:
Never use spatula while food
processor is plugged in.
Fits directly into the 12-cup Work Bowl
and is perfect for smaller batches such as
spices, garlic cloves etc.
The reversible shredding disc allows for a
choice between fine (2mm) on one side,
and coarse (5mm) on the other.
Precision honed slicing disc with 2mm on
one side, and 5mm on the other.
Only handle by
black center hub
Only handle by
black center hub
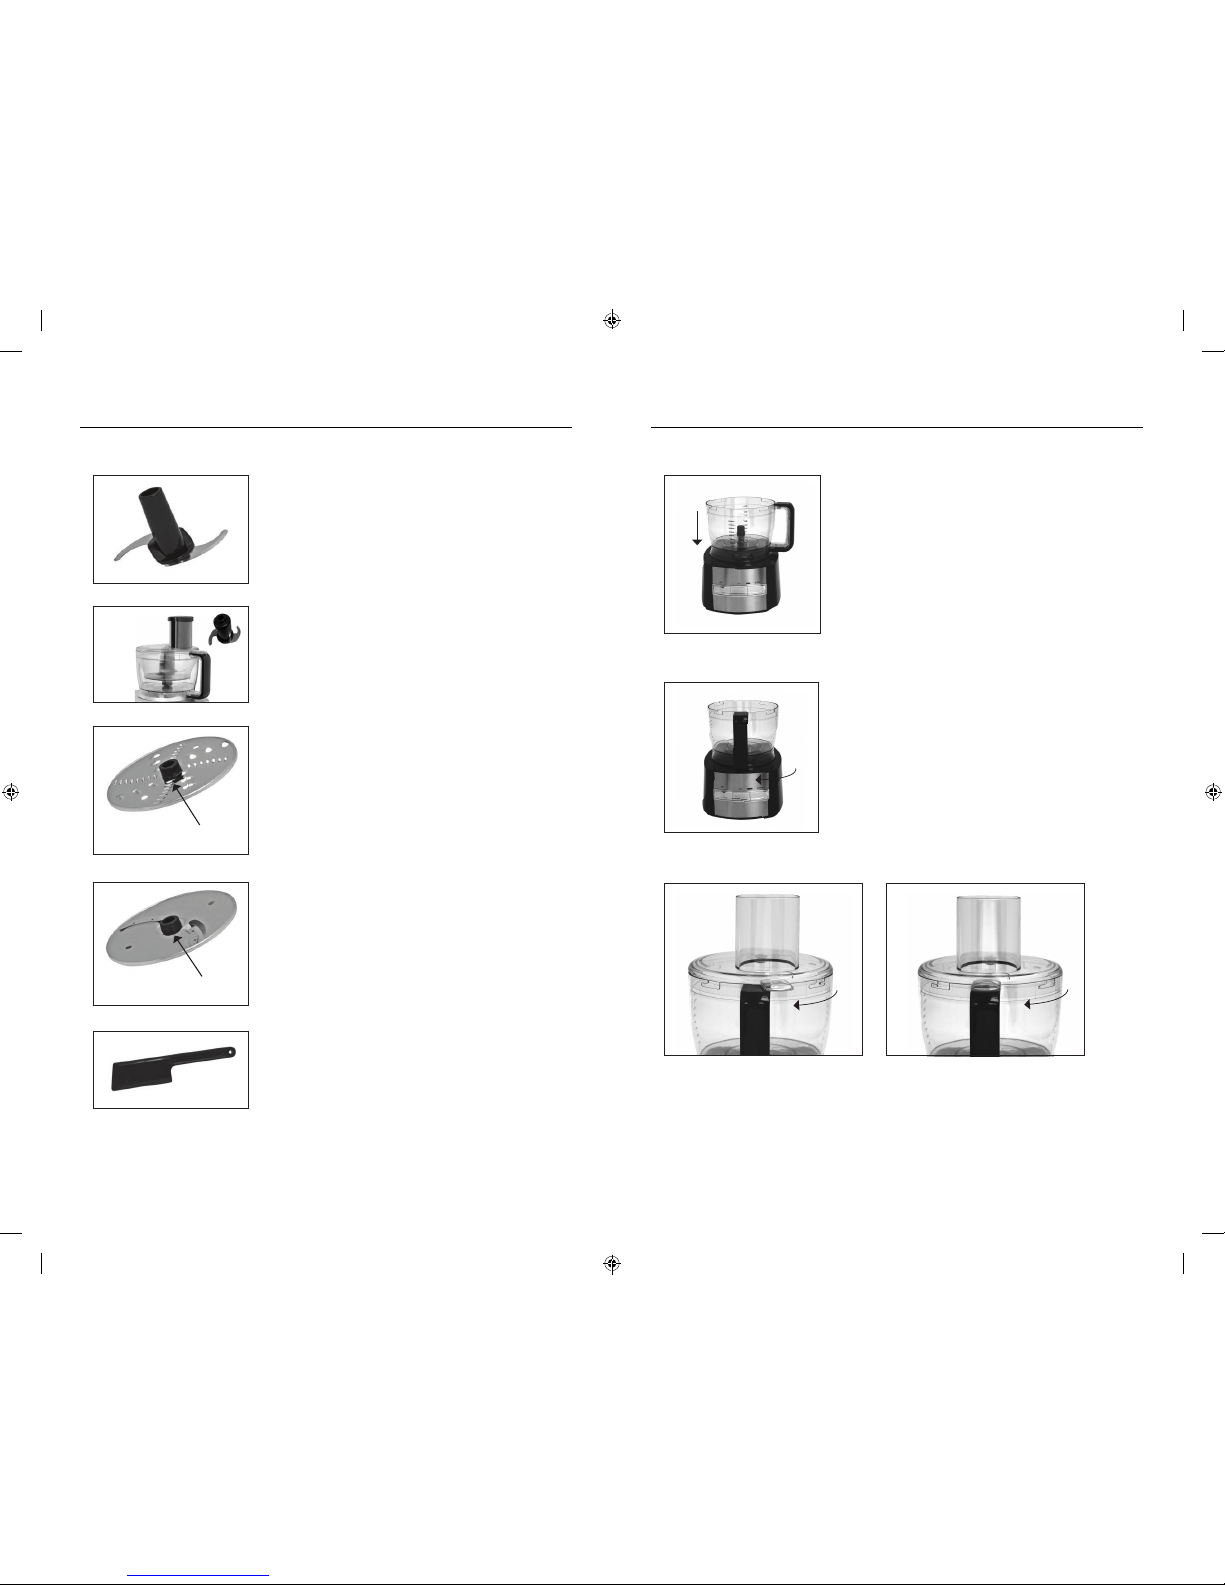
Assembling Your
Food Processor
Before you assemble the food processor,
ensure that the power cord is unplugged.
Place the Motor Housing facing you on a
dry, level surface.
Place the Work Bowl onto the Motor
Housing. The Work Bowl will only sit
correctly on the Motor Housing when the
handle is at the 3 o’clock position (see
figure 1).
Rotate the handle clockwise to lock, until
the handle is at the 6 o’clock position (see
figure 2).
Position the lid onto the Work Bowl as
shown in figure 3a. Ensure that all four
tables on the lid are recessed in the
receptacles of the Work Bowl. To lock,
turn the lid clockwise as shown in figure
3b until it clicks into place.
1
2
3
4
Note: Your food processor motor will not
turn on unless both the bowl and lid are
properly assembled as outlined above.
Figure 1
Figure 2
Figure 3a Figure 3b
8 9

Assembling Your
Attachments
Warning: Use caution, as blades are
extremely sharp. Always handle all blades
by their central plastic section. Never
grasp the cutting blade itself.
Note: All attachments must be firmly
attached to the Spindle. Always adjust the
attachments until you are sure that they
are correctly fitted.
Processing Blade
Fit the Work Bowl and Spindle as detailed
in figures 1, 2 & 4.
Fit the Processing Blade over the Spindle.
It may be necessary to turn the blade
slightly left or right in order to fit the
blade properly onto the Spindle (See
figure 5).
Place ingredients into the Work Bowl.
Fit the Bowl Lid onto the Work Bowl (see
figure 3), and place the two-piece food
pusher into the Feed Tube.
Plug the power cord into a 120V AC
power outlet.
Start processing using the On or Pulse
buttons.
When processing is complete, press the
Off button or release the Pulse button to
turn the motor off and unplug the cord
from the wall outlet. Remove the Spindle
and Processing Blade from the Work Bowl
before removing the processed food.
1
2
3
4
5
6
7
Figure 4
Figure 5
Assembling Your
Attachments (Cont.)
Reversible Slicing & Shredding Discs
Fit the Work Bowl and Spindle as
detailed previously, in figures 1, 2 and 4.
Select the ‘Reversible’ disc of your choice
- Shredding (fine or coarse) or Slicing
(fine or coarse) as seen in figures 6 and 7.
Warning: Use caution as the blades are
sharp.
Fit the Bowl Lid onto the Work Bowl as
previously shown in figures 3a and 3b.
Place the two-piece food pusher in the
feed tube.
Plug the power cord into a 120V AC
power outlet.
Start processing using the On or Pulse
buttons.
When processing is complete, press the
Off button or release the Pulse button to
turn the motor off and unplug the cord
from the wall outlet. Remove the disc
and Spindle from the Work Bowl before
removing the processed food.
1
2
3
4
5
6
Figure 6
Figure 7
Using Your Food Processor
Important: If the processing bowl and lid are not correctly assembled,
the Food Processor will not function.
Note: For maximum control load the feed tube first before turning
on your food processor. Always use the food pusher for more evenly
processed foods and never use your fingers.
Important: The Food Processor is fitted with a safety thermal cut-out
device and will shut off in the event of overload. If this occurs, switch the
appliance off, wait 10 minutes, and it will automatically reset when cool.
Plug the power cord into a 120V AC power.
Using the On button on the control panel, press once to start
processing. The Pulse function remains on as long as the Pulse
button is pressed down. Further ingredients can also be added
while processing by pouring through the feed tube once the
food pusher has been removed.
After you have completed processing, press the Off button or
release the Pulse button to turn the motor off and unplug the
cord from the wall outlet.
1
2
3
10 11
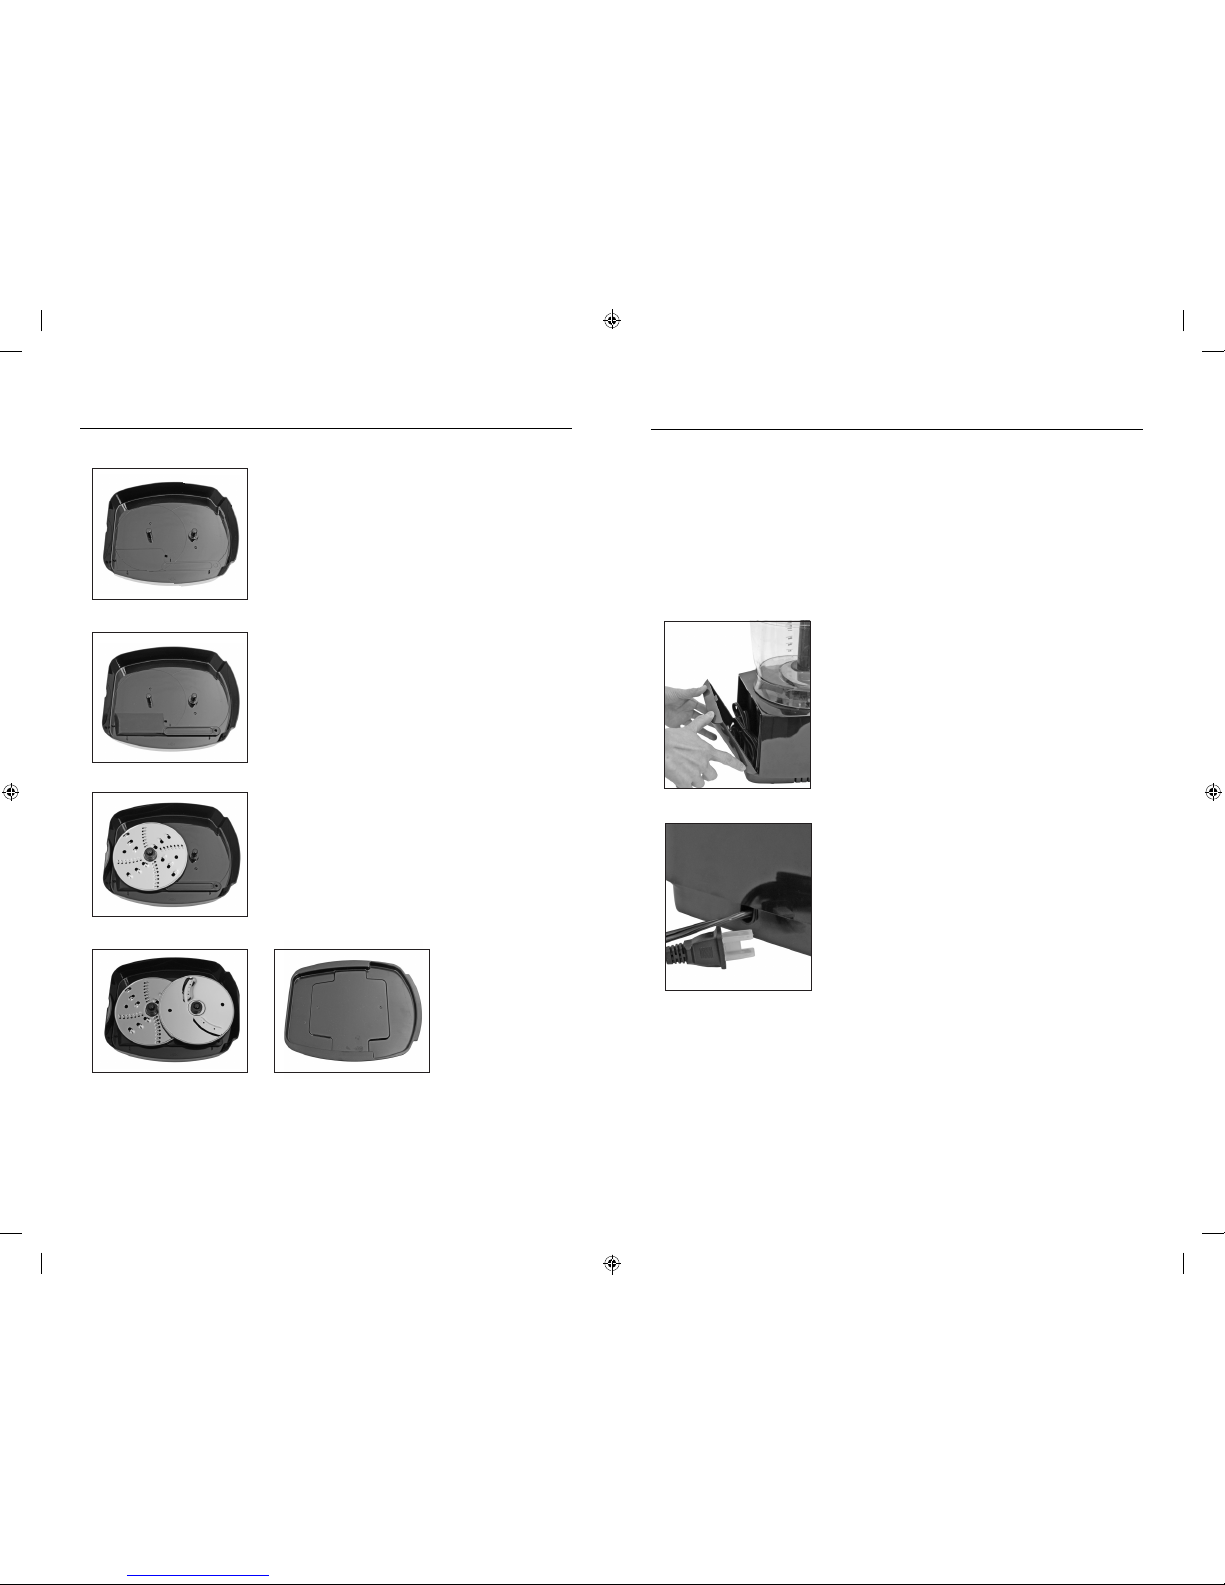
Storing Your Food Processor
Remove the cover from the Storage Tray.
Place the Spatula in the Storage Tray following the graphic outline in the Storage
Tray itself and as show in figure 9.
Place one of the Reversible Discs over the
tray nub in Storage Tray (see figure 10).
Place the second disc on the other nub
(see figure 11).
Place the Storage Tray Cover on the Storage Tray (see figure 12).
Your Storage Tray is now properly stored.
When storing your food processor you
can sit the assembled Motor Housing on
top of the Storage Tray.
Storage Tray
Your Food Processor includes a Storage Tray
to hold the processing discs and Spatula.
This will prevent damage to the precision
honed blades when storing. The Spindle
and Processing Blade store within the Work
Bowl. The Storage Tray Cover allows the
food processor to nest on top when not in
use.
Storing Your Accessories
1
2
3
4
5
6
Figure 8
Figure 9
Figure 10
Figure 11 Figure 12
Processing Bowl Storage
Fit the Work Bowl and Spindle as detailed in figures 1, 2 and 4.
Place the Processing Blade over the Spindle and then fit the Bowl
Lid onto the Work Bowl. Store the Work Bowl and lid in the unlocked
position when not in use.
Place the two-piece food pusher in the Feed Tube.
1
2
3
Figure 13
Figure 14
Cord storage
Your Food Processor comes with
convenient cord storage to reduce
clutter. Simply press down from the
top of the cord storage cover and pull
away from the housing (see figure 13).
Place the cord through the opening of
the housing (see figure 14) and snap
the cover back into place.
Storing Your Food Processor (Cont.)
12 13

Helpful Hints
•
•
•
•
•
•
For consistent results, you should try to process pieces of food that are
approximately equal in size. When you break, cut or tear food into
uniform pieces before you begin processing, the finished results will be
more uniform. More consistent processing results are achieved when
processing small batches.
Pre-cut meat into cubes approximately 1” square. It is best to process
very cold meat (not frozen). Always use the Pulse button in 2 second
increments.
The quantities that can be processed within the Work Bowl will vary with
the density of the mixture.
When various recipes require dry ingredients such as flour, add them
directly into the Work Bowl before processing. There is no need to sift
ingredients when using your food processor. Liquid ingredients may be
added while the processor is operating by pouring through the Feed Tube
in the Bowl Lid.
When processing sauces or semi-liquid ingredients, stop the food
processor and scrape down the container sides with the spatula provided.
When slicing or shredding, cut all ingredients to a size that fits
comfortably into the Feed Tube. Pack the feed tube and, while holding
food steady and upright with the food pusher, press down evenly until all
ingredients are sliced or shredded. Do not use excessive force or you may
damage the food processor.
Warning:
Never use fingers to push food down the Feed Tube. Always use the
food pusher.
Helpful Hints (Cont.)
•
•
•
For best results when slicing, the Feed Tube should always be packed
firmly to allow each piece of food to support the others. There will always
be a small portion of food left unprocessed between the Food Pusher and
the Processing Blade. When using the Slicing Disc, excessive force will
cause food to be sliced unevenly. Only slight pressure is needed from the
food pusher when using this attachment.
For best results when shredding and grating remember that softer foods
such as cheese (cheddar, mozzarella or swiss) should be well chilled (not
frozen) before processing. Harder foods such as Parmesan or Romano
cheese should be at room temperature before processing. Never attempt
to shred or grate cheese that cannot be pierced with a fork or a knife tip.
Figure 15
Figure 16
The most important factor for successful slicing and shredding is the way
in which the food is packed into the Feed Tube. To prepare shorter slices,
pack the food items vertically in the Feed Tube, see figure 15. To prepare
longer slices, pack food items horizontally in the Feed Tube (see figure
16).
14 15
Care and Cleaning
Ensure that your food processor is unplugged from the electrical outlet
before cleaning. Wipe the Motor Housing and cord with a warm soapy
cloth and wipe clean with a damp cloth. Dry thoroughly. Do not use any
abrasive cleaners or scouring pads on the housing as this will damage
the finish. Wash the Work Bowl, lid and all attachments (except Motor
Housing) in warm water using a mild detergent (or see dishwasher
instructions below). Dry each part thoroughly before use.
Warning: Care must be taken when handling the metal blade and discs
as these items are extremely sharp.
Dishwasher Use
All plastic components deteriorate through the prolonged use of a
dishwasher for cleaning. However all parts of your Food Processor are
tolerant to dishwasher use, (excluding the Motor Housing). If using the
dishwasher place parts only on the top rack of your dishwasher.
Once your food processor and accessories have been cleaned and dried
thoroughly, store your food processor as outlined in the section “Storing
your Food Processor.”
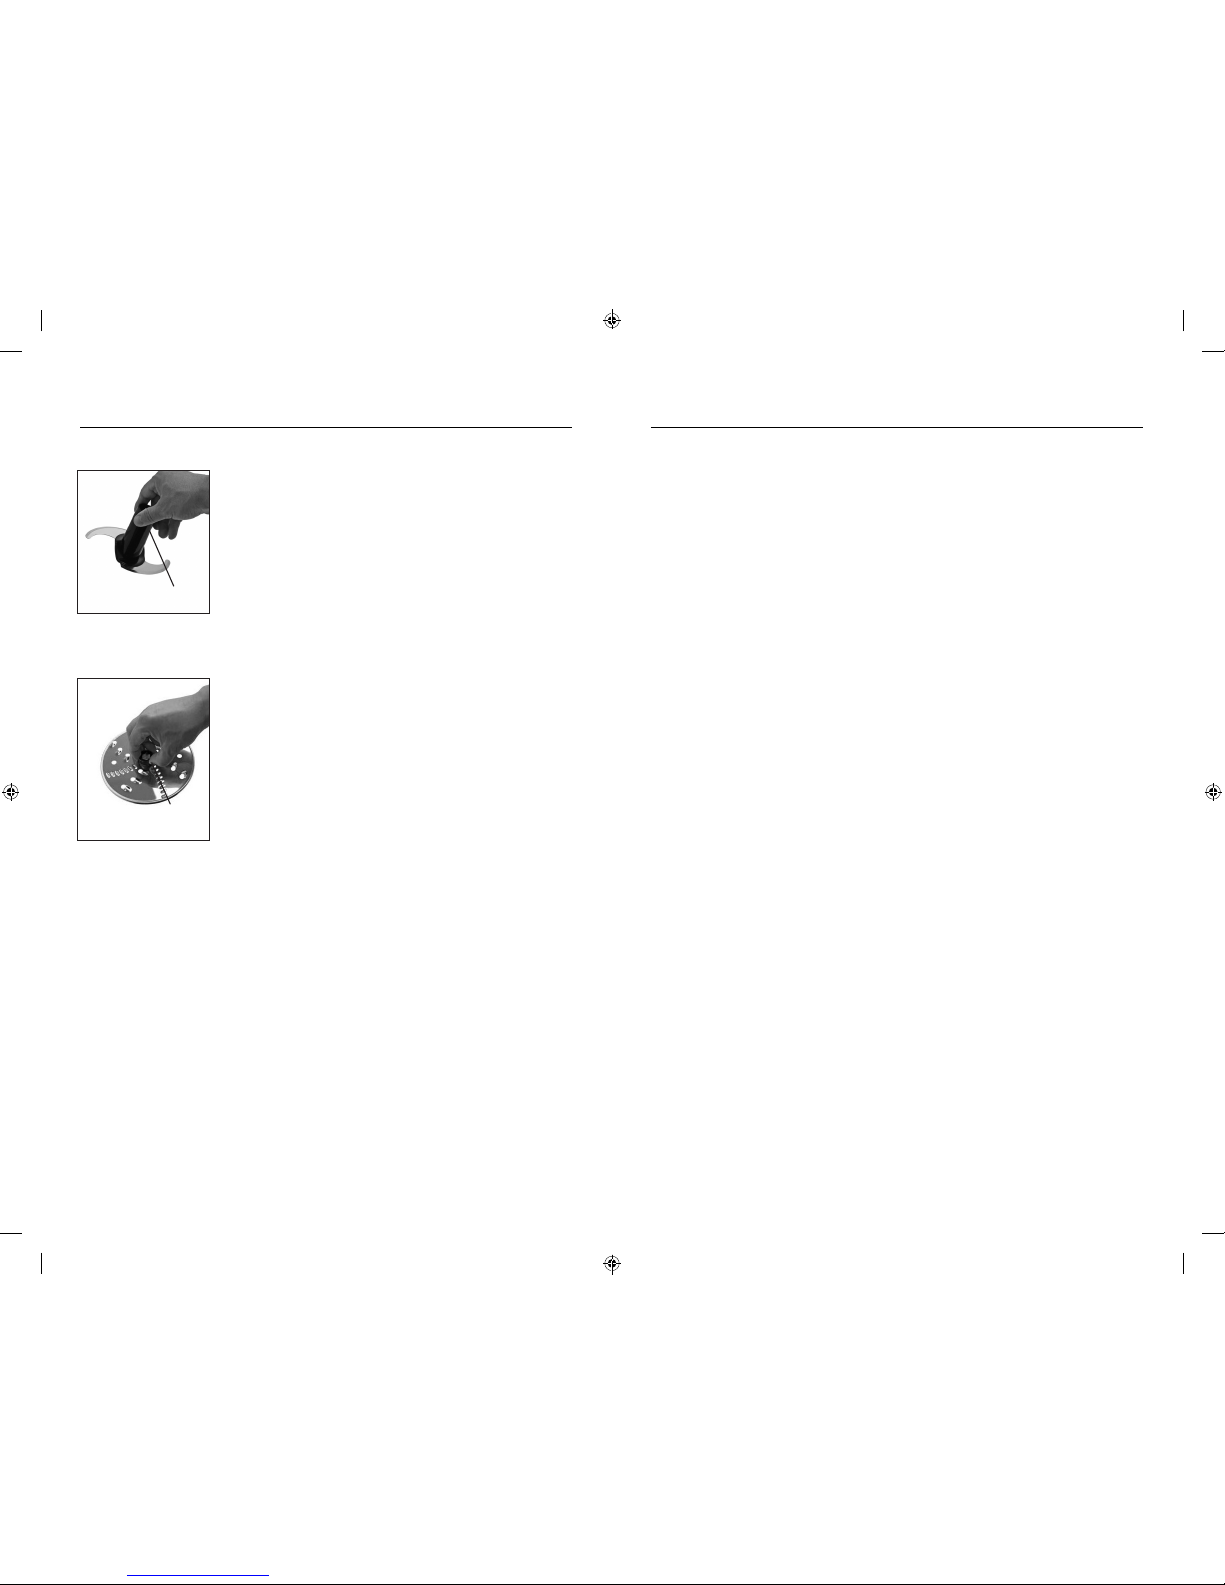
Disassembly of Your
Food Processor
Remove the Bowl Lid by turning
counter-clockwise and lifting straight up.
If using the Processing Blade, lift straight up
to remove from Spindle. Never handle the
blade itself, always hold the blade by the
black plastic stem (see figure 17).
If using one of the Reversible Discs, remove
first by grasping the center plastic section
of the Disc (see figure 18). Lift straight up to
remove, then remove Spindle.
To remove the Work Bowl, grasp the handle
and turn counter-clockwise to the 3 o’clock
position and lift straight up.
Warning: Always wait for the processing blade to
stop moving completely before removing the lid.
Unplug your food processor from the wall outlet
prior to removing or adding accessories.
1
2
3
4
Figure 17
Figure 18
Only grasp under lip
Only grasp by center
plastic section
16 17

18 19
Appetizers,
Salads and
Entreés
Spinach Artichoke Dip
Makes about 2 cups, 4 - 6 servings
INGREDIENTS
3 bunches spinach, washed, stems removed
1 10 - ounce package frozen artichoke hearts, thawed
1 cup mayonnaise
1/3 cup mascarpone cheese
1/3 cup crème fraiche
1/4 cup freshly grated Parmesan cheese
2 tablespoons goat cheese
2 tablespoons roasted garlic
1 tablespoon lemon juice
1 teaspoon salt
1/4 teaspoon black pepper
TOPPING
1/4 cup freshly grated Parmesan cheese
2 tablespoons breadcrumbs
1/4 teaspoon paprika
METHOD
1. In large metal sieve, blanch one bunch of spinach for about 1 minute in
large pot of boiling water. Transfer in sieve to bowl of iced water and
leave for 30 seconds. Remove sieve from water and with the back of
a large metal spoon drain out excess water. Set aside. Repeat with
remaining bunches of spinach.
2. Place artichokes in bowl of your food processor fitted with the Processing
blade. Process for about 5 to 7 seconds or until very coarsely chopped.
Pre-heat oven to 375 degrees F.
3. Add mayonnaise, mascarpone cheese, crème fraiche, Parmesan, goat
cheese, roasted garlic, lemon juice, salt and pepper. Process for another 5
seconds or until combined.
4. Add blanched spinach and pulse a few times or until well blended. The
dip should still have some texture and not be completely smooth. Spoon
into a shallow ovenproof dish.
5. In small bowl combine all ingredients for topping and sprinkle over
spinach dip. Bake in a 350 degrees F oven for about 15 to 20 minutes
or until heated through and top is golden brown. Serve hot surrounded
by slices of crispy French bread or crackers.

20 21
Wolfgang's Vegetable
Spring Rolls
Makes 20 to 24 rolls
Forget about the greasy, tasteless spring rolls you once tasted from the take
out restaurant. These are wonderful, crisp, fresh-tasting morsels that look a
lot more complicated to make than they really are. I find them a lot of fun to
put together and people are often amazed that you are able to master an
alien cuisine!
INGREDIENTS
Aromatics
2 tablespoons fresh ginger, chopped
1 tablespoon garlic, chopped
2 tablespoons green onions, chopped
Pinch of red pepper flakes
1/2 cup peanut oil
Pinch of salt
Pinch of freshly ground black pepper
Pinch of sugar
1. Prepare the aromatic mixture: In your food processor fitted with
the Processing blade, combine the ginger, garlic, green onions and red
pepper flakes. Turn on machine, slowly add oil and process mixture to a
puree. Cook mixture in a small saucepan over medium heat for 1 to 2
minutes. Season with salt, pepper and sugar. Set aside.
2. Prepare the filling: In a wok or heavy skillet, stir fry mushrooms in peanut
oil for 30 seconds, then add remaining vegetables and cook for 1 minute.
Season with salt and pepper. Drain and transfer to a mixing bowl. Stir in
noodle, mushroom soy sauce, chili paste, sesame oil, and cilantro. Add
aromatics mixture. Season with salt and pepper. Set aside to cool
completely. When ready to form the spring rolls,squeeze out all the
excess liquid.
Filling
1/2 cup onions, julienned
1 medium carrot, julienned
4 ounces shiitake mushrooms, stems
discarded, sliced into julienne
1 1/2 cups red bell pepper, julienned
2 cups green cabbage, julienned
3 tablespoons peanut oil, for stir-frying
Salt and freshly ground black pepper
4 ounces glass noodles, soaked in water
for 10 minutes, chopped into smaller
strands
1/4 cup mushroom soy sauce
2 tablespoons chili paste
1 tablespoon Asian sesame oil
1/2 cup cilantro, chopped
METHOD
To form spring rolls
1 package wonton wrappers
1 egg with 1 tablespoon each of
water and cornstarch, beaten
together for eggwash
Peanut oil, for deep-frying
Hot Chinese Mustard Sauce
(see separate recipe in Sauces &
Dressings section)
Wolfgang's Vegetable
Spring Rolls (Cont.)
3. To make the spring rolls, place about 1/4 cup of prepared filling per wonton
wrapper. Place filling as per directions alongside. Roll the wrapper, tuck
ends in, and complete as if wrapping a parcel. Seal edges with the egg
wash. Repeat the process until all filling is used.
4. In a heavy deep saucepan, heat oil to 350 degrees F. and deep fry spring
rolls, 3 or 4 at a time until golden, about 2 to 3 minutes. Drain on paper
towels.
5. Trim off the ends and slice diagonally. Drizzle top with Hot Chinese
Mustard Sauce. Serve immediately.

22 23
Black and Green Tapenade
With Goat Cheese Costini
Makes 1 heaping cup
Crostini are thin versions of the classic Italian Bruschetta. Tapenade is the
great olive spread of Provence. It's a perfect combination.
INGREDIENTS
For the Tapenade
1 cup Niçoise olives, pitted
1 cup small green French olives (Picholine), pitted
1/4 cup Oven-Dried Tomatoes (see recipe on page 24), drained
1 tablespoon capers
1 garlic clove
1 anchovy fillet
1/2 tablespoon chopped fresh basil leaves
1/2 tablespoon chopped fresh thyme leaves
1/2 tablespoon chopped fresh flat-leaf parsley leaves
1/4 tablespoon chopped fresh oregano leaves
1/4 cup extra-virgin olive oil
For the Crostini
1 loaf crusty French bread, cut into slices on a bias
Goat cheese
METHOD
1. In your food processor fitted with the Processing blade, combine all the
ingredients for the tapenade except the olive oil. Using the pulse button,
process until coarsely chopped and well blended. Continue to process,
slowly adding the olive oil. Refrigerate in a covered container. Use as
needed for up to 1 month.
2. Preheat oven to 400 degrees F.
3. Place bread slices on a cookie sheet and bake for 5 minutes, or until
lightly toasted.
4. Spread crostini toast with a thin layer of goat cheese, and then add
tapenade. Serve immediately.
Potato Latkes
Serves 12
The ever-popular potato pancakes of the Jewish kitchen make a wonderful
appetizer, side dish, or even a vegetarian main course.
INGREDIENTS
8 medium baking potatoes, peeled
1 medium onion, peeled
Lemon juice
1 cup all-purpose flour
1 cup milk
1 egg
1 tablespoon baking powder
2 tablespoons unsalted butter, melted
Peanut oil
Freshly grated nutmeg
Salt and pepper to taste
Watercress, for garnish
Caviar, for garnish (optional)
Applesauce, for garnish (optional)
Crème fraiche or sour cream, for garnish
METHOD
1. With the shredding blade large side up in your food processor shred the
potatoes and onions and transfer into a large mixing bowl. Toss them
with a squeeze of lemon juice. A handful at a time, squeeze out as much
liquid as possible from the shreds.
2. In another mixing bowl, stir together the flour, milk, egg, baking powder,
and nutmeg. Stir this batter into the potatoes and then stir in the melted
butter.
3. Heat a large, heavy skillet over medium-high heat. Add an even film of
peanut oil about 1/4 inch deep and, when it is hot, form pancakes about
1 heaping tablespoonful large, spreading out and smoothing the top
surface with the back of the spoon. When the undersides are golden
brown, about 3 minutes, use a metal spatula to flip the pancakes over and
cook until their other sides are browned.
4. Serve the pancakes as a side dish or appetizer, garnished with watercress.
If serving as an appetizer, also accompany the pancakes with your choice
of caviar or applesauce, along with some crème fraiche or sour cream.
 Loading...