

Page 1
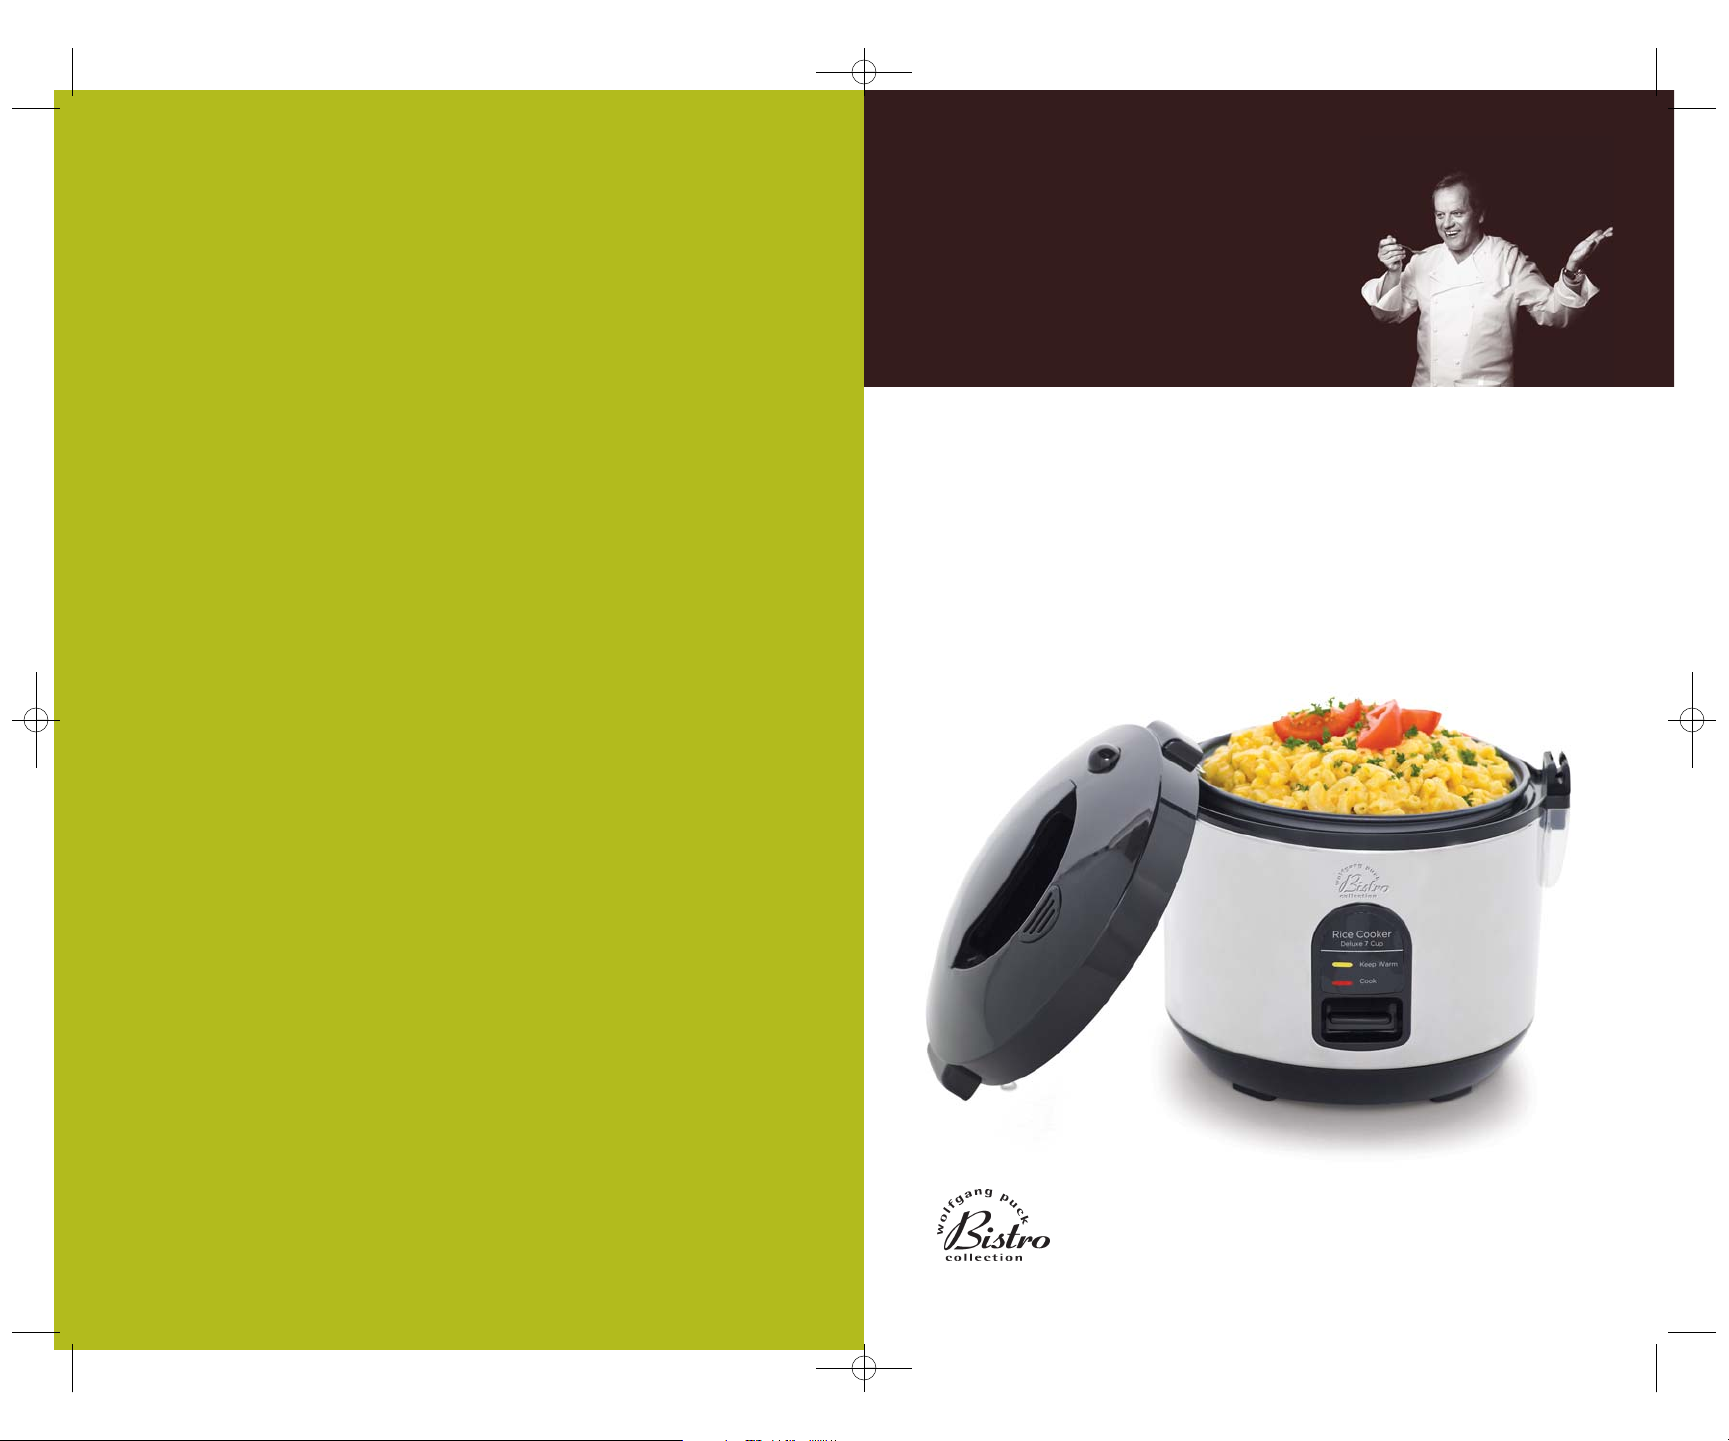
Wolfgang Puck
IMPORTANT NOTICE
PLEASE DO NOT RETURN TO STORE.
If you have any problems with this unit,
contact Consumer Relations for service
PHONE: 1-800-275-8273 or
visit our website at www.wphousewares.com
Please read operating instructions
before using this product.
Please keep original box and packing materials
in the event that service is required.
W.P. APPLIANCES, INC. Toll Free (800) 275-8273
Model BDRCRB007 Printed in China REV 2.0
All trademarks, service marks and trade names (collectively the “Marks”) are proprietary
to Wolfgang Puck World Wide.
7 Cup Electric Rice Cooker
with Detachable Lid
Use and Care
HSN7C_RiceCooker08 8/13/08 3:30 PM Page 1
Page 2

1 2
ADDITIONAL SAFETY
INFORMATION
IMPORTANT SAFEGUARDS
When using electrical appliances, basic safety precautions should always
be followed, including the following:
1 Read all instructions carefully.
2 Do not touch hot surfaces. Use handles only.
3 To protect against risk of electric shock, do not immerse appliance,
cord, or plug in water or other liquid.
4 Close supervision is necessary when any appliance is used by
or near children.
5 Unplug from outlet when not in use and before cleaning. Allow
to cool before putting on or taking off parts, and before cleaning
the appliance.
6 Do not operate any appliance with a damaged cord or plug or after
the appliance malfunctions or is dropped or damaged in any manner.
Return the appliance to an authorized service facility for examination,
repair, or electrical or mechanical adjustment.
7 Do not place on or near a hot gas or electric burner, or in a
heated oven.
8 The use of accessory attachments not recommended or sold by the
appliance manufacturer may cause fire, electric shock, or injury.
9 Do not use outdoors.
10 Do not let cord hang over edge of table or counter or touch hot
surfaces, including the stove.
11 Extreme caution must be used when moving an appliance
containing hot oil or other hot liquids.
12 Do not use this appliance for other then intended use.
13 Always attach plug to appliance first, then plug cord into the wall
outlet. To disconnect turn any control to “OFF”, then remove plug
from wall outlet. Always hold the plug, never pull the cord.
14 To reduce the risk of shock, cook only in removable container.
15 To ensure continued protection against risk of electric shock,
connect to properly grounded outlets only.
SAVE THESE INSTRUCTIONS
HOUSEHOLD USE ONLY
GROUNDING INSTRUCTIONS: This appliance must be grounded. It is
equipped with a 3-prong cord having a grounded plug. The plug must be
plugged into an outlet which is properly installed and grounded.
Warning: Improper use of the grounded cord can result in the risk of
electric shock. Consult a qualified electrician if necessary. Do not attempt to
defeat this safety feature by modifying plug.
A short power-supply cord is provided to reduce the hazards resulting
from entanglement or tripping over a longer cord. If it is necessary to
use an extension cord, it should be positioned such that it does not
drape over the counter or tabletop where it can be pulled on by children
or tripped over and:
A. Use only 3-prong extension cord with 3-blade grounding plug.
B. The marked rating of the extension cord must be equal to or
greater then the rating of this appliance. The electrical rating is
listed on the bottom of this unit.
Before Your First Use
Carefully unpack the Rice Cooker and remove all packaging materials.
Wash all removable parts (inner lid, inner pot, condensation collector,
steaming tray, measuring cup & scoop and clean according to the
Care & Cleaning instructions in this manual.
Warning: Do not immerse rice cooker housing or power cord in water
or any other liquid. Reassemble the unit after cleaning.
HSN7C_RiceCooker08 8/13/08 3:30 PM Page 1
Page 3

3 4
Table of Contents
Important Safeguards 1
Before Your First Use 2
About Wolfgang Puck 3
Know Your Rice Cooker 5
Caution 7
Removing the Detachable Lid 9
Attaching the Detachable Lid 10
Using Your Rice Cooker/
Steamer to Cook Rice 11
Using Your Rice Cooker/
Steamer to Steam Vegetables 12
Helpful Hints 13
Care & Cleaning 14
Vegetable Steaming Chart 15
Main Dish and Side Dish Recipes 16
Desserts 41
Limited Warranty 54
Contact Information Back
Wolfgang Puck,
owner of the famous
Spago restaurants and
one of the most influential
chef-restauranteurs in
America, is credited with
reviving California’s rich
culinary heritage. His
cooking innovations,
a result of blending fresh
California ingredients with his classical French techniques, are enjoyed
by world leaders, stars and fellow chefs alike. He established other
trend-setting restaurants like Postrio in San Francisco, Chinois on
Main in Santa Monica, Trattoria del Lupo, and his latest creation, Cut,
a gourmet steakhouse in the Beverly Wilshire Hotel. Home chefs can
also share Mr. Puck’s talents through his cookbooks and, of course,
through his appliances!
HSN7C_RiceCooker08 8/13/08 3:30 PM Page 3
Page 4
5
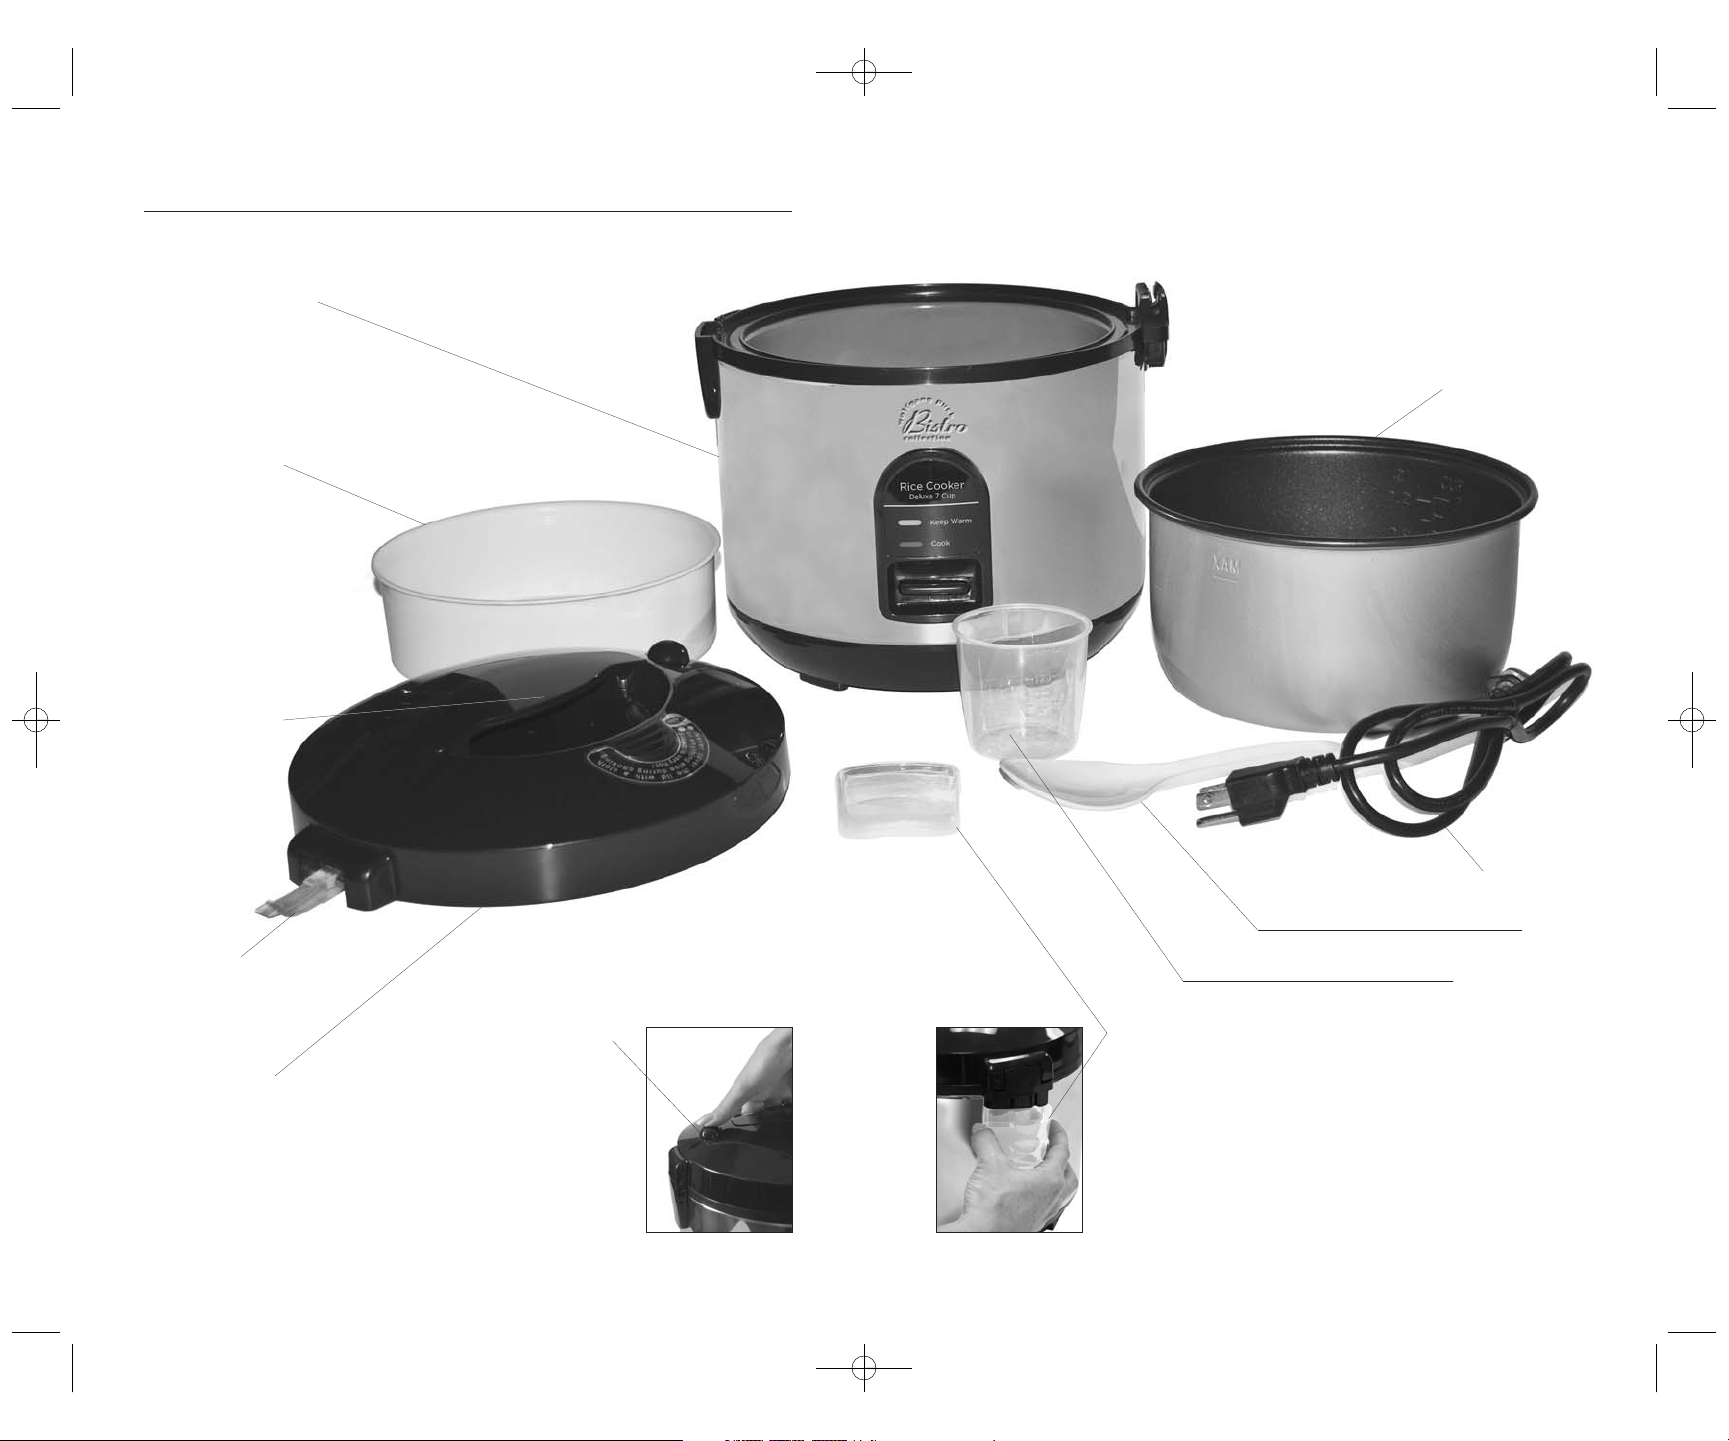
Know Your Rice Cooker
Rice Cooker Housing
Detachable Lid
Lid Release Button
Carrying Handle
Steaming Basket
Detachable
Lid Stem
6
Condensation
Collector
Power Cord
Measuring Cup
Rice Cooker Pot
Scoop
HSN7C_RiceCooker08 8/13/08 3:30 PM Page 5
Page 5

7 8
Caution
Be sure to observe the following to prevent malfunction that may cause
an accident:
1
Measure the quantity of rice and water according to the Instructions on
pages 1 1 - 12.
2
Clean the Rice Cooker, particularly the condensation collector, after each
use (see Care & Cleaning section of this manual).
3
Set the unit on a stable, level surface.
4
DO NOT expose to water, high humidity, or heat sources. DO NOT use the
pot directly on an open flame.
5
Be sure to keep the unit out of the reach of children.
6
Keep holes that drain into the condensation collector clean and free
of debris.
7
Cooking with the switch in KEEP WARM position will cause low heat
cooking and this will not cook the rice properly.
8
The unit becomes hot when in use. DO NOT touch the lid with your hand,
and do not place your face or hand directly over the steam coming from
the cooker.
9
Always keep the outside bottom of the pot and the heating plate
clean and dry. Any foreign matter between them will cause the unit
to malfunction.
10
DO NOT tilt the Rice Cooker on its edge or place it upside down with
its power supply plug connected or with food in the pot as this may
cause damage to the cooker or injury to yourself. When tilting or placing
the Rice Cooker upside down, make sure to disconnect the power
supply plug.
11
Do not fill the unit above the MAXIMUM CUP MARKING.
12
The lid must be closed tightly in the latched position at all times during
cooking. (i.e. The unit must not be operated with the lid opened).
13
DO NOT cover the lid with a cloth. The lid may deform or change color.
14
DO NOT damage the power cord and do not attempt to repair it if it
is damaged.
15
Never attempt to customize the cord. Keep the cord away from high
temperatures. Avoid unnecessary bending, twisting and pulling on the
cord. Never place heavy objects on the cord or attempt to tie it up. Using
a damaged power cord can lead to electrical shock, shorting or fire.
16
Ensure that the plug fits all the way into the outlet, partially plugged-in
cords may cause electric hazard.
17
DO NOT MOVE the unit while cooking.
Caution
HSN7C_RiceCooker08 8/13/08 3:30 PM Page 7
Page 6
109
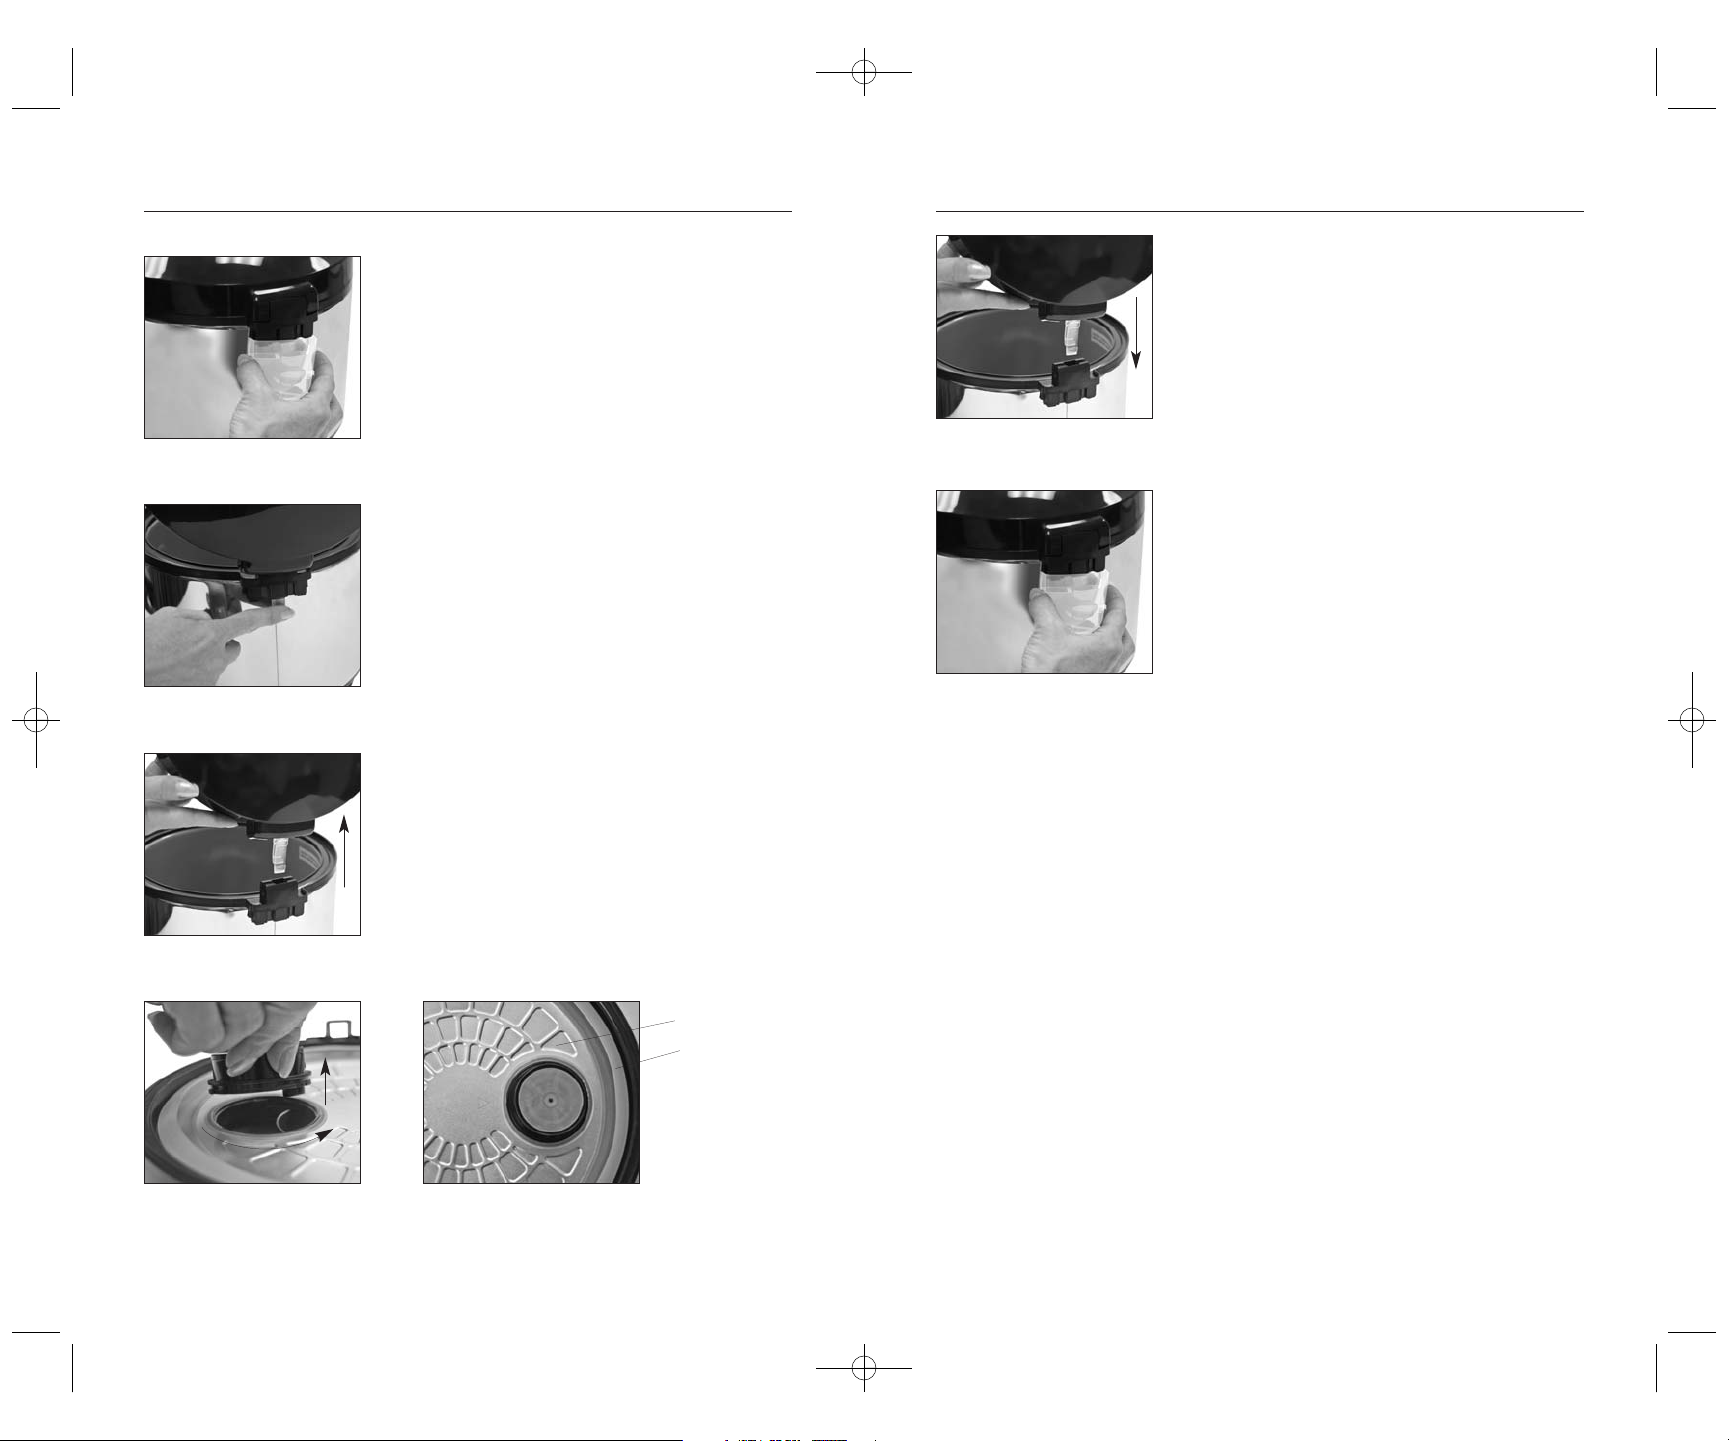
Attaching the Detachable Lid
1 To attach the Detachable Lid, slide the
Lid Stem into the Lid Stem Receptacle
on the Rice Cooker Housing. Push
straight down until the Lid clicks in
place.
CAUTION: Ensure that your Lid Stem is
locked in place by attempting to
remove it by pulling straight up. A
Serious burn injury can occur if you try
to move your Rice Cooker without the
Lid locked into place.
2 Replace the Condensation Collector by
pressing straight in over the Lid Stem
until snaps into place.
Figure 2
Figure 1
Removing the Detachable Lid
1 To remove the Detachable Lid, first
remove the Condensation Collector
located under the Lid hinge by pulling
it away from the Rice Cooker Housing.
See Figure 1.
2 Remove the Detachable Lid by pushing
the Detachable Lid Stem in while lifting
the lid straight up. See Figures 2 and 3.
3 Do not attempt to remove the
Inner Lid or silicone gasket. See
Figure 5. Do not place the Removable
Lid in the dishwasher. Simply wash
the Inner Lid with warm soapy water
and rinse thoroughly.
4 If needed, the Condensation Valve can
be removed in order to rinse the steam
vent. To remove the inner condensation
valve, turn it counter-clockwise and lift
straight up. See Figure 3.
Figure 2
Figure 1
Figure 3
Figure 4
Figure 5
Inner Lid
Silicone Gasket
1
2
HSN7C_RiceCooker08 8/13/08 3:30 PM Page 9
Page 7

11 12
Using Your Rice
Cooker/Steamer to Cook Rice
1 Only measure rice with the enclosed measuring cup. For best results
rinse measured rice until the water becomes relatively clear (see
“Helpful Hints” section for details).
2 Place rinsed rice in the pot, add water. For 7 cups of uncooked
rice (yields 12 cups of cooked rice), measure 7 full scoops of rice,
using the rice measure included with your unit. Add to the Rice
Cooker Pot.
3 Add water to the 7 cup line on the inside of the pot. Always add the
rice to the pot BEFORE adding the water to the pot. The water level
marked on the inner pot is based upon having rice added already.
4 Place the pot in the rice cooker.
5 Close the outer lid. The lid is properly closed when it clicks.
6 Plug in and immediately press the switch down to “Cook”.
The “Cook” indicator light will illuminate to indicate the rice
is cooking.
7 The rice cooker will automatically switch to “Keep Warm” when the
cooking process has completed. The Keep Warm function will
continue until the unit is unplugged.
8 Open the rice cooker by pressing the release button on the handle.
Be sure to open the lid facing away from you to avoid any hot steam.
9 Remove and clean the condensation collector after every use.
Using Your Rice
Cooker/Steamer to Steam
Vegetables
1 Pour 1 cup of water into the pot.
2 Place inner pot in the rice cooker housing and place the steaming
basket on the pot.
3 Add ingredients to steaming basket (see “Steaming Chart”
in this manual for suggested cooking times).
4 Close the outer lid. The lid is properly closed when it clicks.
5 Plug in and immediately press the switch down to “Cook”.
The “Cook” indicator light will illuminate to indicate steaming
process has started.
6 Time the cooking manually as the unit will automatically switch to
“Keep Warm” should the water evaporate.
HSN7C_RiceCooker08 8/13/08 3:30 PM Page 11
Page 8

13 14
Helpful Hints
• Using the Keep Warm function for more than 5 hours may cause
discoloration or an odor in the rice.
• You can adjust the amount of water and/or rice to your own
taste preferences.
• When steaming vegetables please reference the steaming chart in
this manual. The charts are merely a guide, you may wish to adjust
the times according to your own taste preferences.
Washing Rice
When rice is milled some bran and residues adhere to the surface of
the rice. You can remove these residues by first washing the rice with
water before cooking. This will remove excess starch & residues,
which will provide you with much whiter, fluffier rice.
Remember to always use the measuring cup provided to accurately
measure the rice. Add the desired amount of rice to the rice cooker
inner pot. Fill with cold water until all of the rice is submerged. Wash
the rice by simply stirring the rice around in the water and rubbing
between your hands. You will notice that the color of the water will
become cloudy as the rice is cleaned. Without spilling the rice tip the
inner pot to remove the cloudy water and repeat several times until
the water remains clear.
Cooking other types of rice
Your Wolfgang Puck Rice Cooker can handle a wide variety or rice
such as long grain rice, wild rice, yellow rice, brown rice, basmati rice,
etc. When cooking rice other than short grain white rice it will be
necessary to increase the amount of water by 1.5 – 2 times more
than the standard short grain white rice recipe. Adjust to suit your
own personal taste.
A note about the measuring cup provided with your rice cooker
Your Rice Cooker is able to cook a maximum of 7 cups of raw rice,
which is the equivalent of 12 cups of cooked rice. A rice cooker cup
is equivalent to 6 ounces, or approx 3/4 of a cup. This is why it is
important to use the measuring cup that comes with your rice
cooker and not a standard 8-ounce cup measure.
Helpful Hints cont.
• If the rice cooker switches to KEEP WARM before the food is done,
you probably need to add more liquid.
• Foods that are overly sweet or oily can cause the rice cooker to
switch to KEEP WARM earlier than desired. If this happens, add
some liquid like water, wine, stock, milk or juice.
• When baking in the rice cooker, it is usually necessary to push COOK
more than once. You will need to wait for about 10 minutes after the
machine switches to KEEP WARM to be able to press it back to
COOK. This is normal.
• The temperature of the KEEP WARM setting is a little over 180
degrees. This is hot enough to very gently cook foods and far too
hot for any bacteria to grow or for food to spoil. It is very safe to
keep foods at this setting for several hours.
• Do not double recipes in the rice cooker. The tightly closed lid will
force excess liquid out of the steam vent if you do.
•
Care & Cleaning
1 DO NOT immerse the Rice Cooker in water.
2 Clean the Rice Cooker Housing with a damp cloth. DO NOT use
abrasive cleaners as this would scratch the surface of the Housing.
3 Wash the Rice Cooker Pot, Lid, Steaming Basket, Measuring Cup,
Scoop and Condensation Collector in warm soapy water.
HSN7C_RiceCooker08 8/13/08 3:30 PM Page 13
Page 9

15 16
Main Dish
and Side Dish Recipes
for the 7-cup Rice Cooker
Fresh Vegetable
Steaming Chart
Pour 1 cup of water into steamer; place vegetables in steamer basket.
VEGETABLE QUANTITY TIME
Asparagus, stems 1 pound 10 to 12 minutes
trimmed
Green or Wax Beans, 1/2 pound 12 to 13 minutes
whole
Broccoli, spears 3/4 pound 13 to 15 minutes
Broccoli, flowerets 3/4 pound 12 to 14 minutes
Cabbage, 1/2 medium head 16 to 18 minutes
cut into 4 wedges (1 pound)
Carrots, 1-inch slices 1/2 pound 10 to 12 minutes
Carrots, 1-inch slices 1 pound 13 to 15 minutes
stir halfway
through cooking
Cauliflower, flowerets 1 pound 12 to 14 minutes
(about 6 cups)
Corn-on-the cob, 2 ears 12 to 14 minutes
each halved
Red or white potatoes, 1 pound 18 to 20 minutes
medium, quartered
Red or white potatoes, 2 pounds medium 27 to 30 minutes
medium, quartered stir halfway
through cooking
Sweet potatoes, 1 pound 19 to 20 minutes
medium, quartered
Snow peas 1/2 pound 8 to 9 minutes
Spinach, stems trimmed 1/2 pound 10 to 11 minutes
Zucchini or summer 1 pound 11 to 12 minutes
squash, sliced
HSN7C_RiceCooker08 8/13/08 3:30 PM Page 15
Page 10

1817
Shrimp and Sausage Jambalaya
4 servings
INGREDIENTS
2 measures long-grain rice
2 tablespoons olive oil
4 ounces shrimp, peeled and deveined
1/2 pound hot andouille sausage, cut into 1”-slices
1/4 cup diced onions
1/4 cup diced green bell peppers
3 cloves garlic, minced
1 tablespoon tomato paste
1/4 cup marsala wine
2 cups chicken stock (fish stock or water may be substituted)
1 bay leaf
salt and pepper to taste
METHOD
1 Rinse rice thoroughly in cold water and set aside.
2 Heat olive oil in a large sauté pan. Add shrimp and sauté until
cooked through. Remove shrimp and set aside.
3 Add sausage, onions, peppers and garlic to the same pan. Sauté
until onions are translucent. Add tomato paste and stir.
4 Deglaze pan with Marsala wine and let simmer for 3-4 minutes. Add
chicken stock and bay leaf.
5 Pour mixture into Rice Cooker Pot and add reserved rice and salt.
Press COOK.
6 When rice cooker switches to KEEP WARM (approximately 20
minutes), add cooked shrimp and stir. Jambalaya will be ready in 15
minutes.
Pad Thai
2 Servings
INGREDIENTS
1 box pad thai stir-fry rice noodles with sauce
2 cups water
1/2 cup fresh vegetables
1/2 pound medium shrimp, peeled and deveined
METHOD
1 Put water and sauce in Rice Cooker Pot. Put steamer basket on top
with shrimp and vegetables. Press COOK.
2 After 20 minutes add noodles, vegetables, and shrimp to sauce. Stir,
close lid, and let cook for 5 minutes.
Recipe courtesy Debra Murray, Wolfgang Puck HSN Host
HSN7C_RiceCooker08 8/13/08 3:30 PM Page 17
Page 11

2019
Sausage and Sauerkraut
2 - 4 Servings
INGREDIENTS
1 pound bag or jar fresh sauerkraut, drained
1 pound kielbasa, smoked sausage or other sausage, cooked
1 carrot, peeled and cut into chunks
1 cup beer, chicken stock or water
4 small, red potatoes, scrubbed and quartered
METHOD
1 Combine all ingredients into the Rice Cooker Pot. Press COOK.
2 As soon as carrots and potatoes are tender, it is ready. If rice cooker
has not switched to KEEP WARM after 25 minutes, check sausages.
If they boil for too long, they tend to split open. This does not
change the flavor, just the appearance.
Recipe courtesy Marian Getz
Corned Beef and Cabbage
3 - 4 Servings
INGREDIENTS
1 small corned beef brisket
1 bottle of your favorite beer, or stock if desired
1 cup beef or chicken stock
1/2 small head green cabbage, cut into small wedges
4 small red bliss potatoes, scrubbed
METHOD
1 Place brisket, beer and stock into the Rice Cooker Pot. Close lid and
press COOK.
2 Cook for 2 1/2 to 3 hours. Check for tenderness. If liquid has
evaporated, cooker will switch to KEEP WARM. Add 1 more cup
liquid if needed and add cabbage and potatoes to steamer basket.
3 Close lid and press COOK again for 20 minutes or until cabbage and
potatoes are tender.
Recipe courtesy Marian Getz.
HSN7C_RiceCooker08 8/13/08 3:30 PM Page 19
Page 12

2221
Sloppy Joes
4 - 5 Servings
INGREDIENTS
1 small onion, chopped
1 clove garlic, minced
1/2 bell pepper, chopped
1 can (6 ounces) tomato paste
1/2 cup water
2 tablespoons brown sugar
1 tablespoon Worcestershire sauce
1 teaspoon yellow mustard
1 teaspoon cider vinegar
1 1/2 teaspoons chili powder
1 pound lean ground beef
salt and pepper, to taste
METHOD
1 Into the Rice Cooker Pot, combine onion, garlic, bell pepper, tomato
paste, water, brown sugar, Worcestershire sauce, mustard, vinegar,
and chili powder. Stir until mixed.
2 Crumble ground beef over mixture and stir well.
3 Close lid and press COOK.
4 When rice cooker switches to KEEP WARM, stir the mixture and
press COOK again.
5 When rice cooker switches to KEEP WARM the second time, stir well
and serve.
Recipe courtesy Christina Chancey
Split Pea and Ham Soup
3 - 4 Servings
INGREDIENTS
1 cup dried split peas
2 1/2 cups homemade chicken broth or good quality canned broth
1 small meaty ham hock or 4 ounces chopped ham
2 strips bacon, diced
1 teaspoon lemon juice
1 rib celery, diced
1 carrots, peeled and diced
1 small onion, peeled and diced
salt, pepper and cayenne pepper to taste
METHOD
1 Combine all ingredients into the Rice Cooker Pot. Press COOK. Set
timer for 45 minutes.
2 After 45 minutes, switch to KEEP WARM for an additional hour.
Check for seasoning. The rice cooker keeps the soup hot for as long
as you want.
Recipe courtesy Marian Getz
HSN7C_RiceCooker08 8/13/08 3:30 PM Page 21
Page 13

2423
Braised Pork and Apples
This is one of my very favorite recipes. Pork and apples just go
together well and taste good year-round to our family.
2 - 3 servings
INGREDIENTS
1 1/2 pounds pork Boston butt
1 granny smith apple, sliced
1 tablespoon chicken bouillon powder*
6 fresh sage leaves
1 medium spanish onion, sliced
4 cloves garlic
1/4 cup brown sugar
1 cup apple juice
1 tablespoon apple cider vinegar
2 tablespoons unsalted butter
kosher salt and fresh pepper, to taste
METHOD
1 Combine all ingredients into the Rice Cooker Pot.
2 Close lid and press COOK for 2 hours or until meat is fall-apart
tender. If meat is not tender after 2 hours, add a bit more apple juice
and press COOK again.
3 Remove meat and taste liquid, adjusting seasoning if necessary. Skim
off excess fat and serve. (It tastes even better the next day.)
*We recommend Maggi brand.
Recipe courtesy Marian Getz
Beer Braised Baby Back Ribs
2 - 3 Servings
INGREDIENTS
1/2 slab baby back ribs, cut in 4 pieces
1/2 teaspoon seasoning salt*
2 teaspoons olive oil
6 ounces beer
1/2 cup stock
3/4 cup barbecue sauce
METHOD
1 Wash the slab of ribs and pat dry. Season with salt rub.
2 Turn rice cooker to COOK and add oil. When hot, add ribs and
brown on meat side.
3 Add beer, stock, and barbecue sauce. Press COOK and let cook
for 1 hour.
SERVING IDEAS
Place steamer basket on top for the last ten minutes with
2-3 small ears of corn.
*If you do not have a favorite seasoning salt, you can blend in equal
proportions of salt, pepper and paprika.
HSN7C_RiceCooker08 8/13/08 3:30 PM Page 23
Page 14

25
Chicken and Dumplings
3 Servings
INGREDIENTS
3 medium skinless chicken thighs or legs
1/2 teaspoon salt
1/8 teaspoon poultry seasoning
1/2 teaspoon pepper
1 teaspoon olive oil, optional
1/2 cup diced onion
1/2 cup diced celery
1/2 cup baby carrots, peeled
1/2 cup mushrooms, sliced
1 1/4 cups chicken stock
1 can (10 3/4 ounces) cream of mushroom or cream of chicken soup
sprig thyme
1 recipe Dumplings, see next page
METHOD
1 Wash chicken pieces and pat dry. Sprinkle with salt, pepper, and
seasoning.
2 Press COOK on the rice cooker. Add olive oil.
3 When oil is hot, add chicken pieces and brown both sides.
4 Add onion, celery, carrots, and mushrooms and saute for a minute.
5 Add remaining ingredients, except for the dumplings. Stir, close lid,
and let cook for 45 minutes. Make sure rice cooker is on COOK.
6 Prepare dumpling batter. Open rice cooker and spoon 6 mounds of
dumpling batter over chicken. Close lid and press COOK. Cook for 5
minutes. Turn rice cooker to KEEP WARM until ready to eat.
26
Dumplings
3 Servings
INGREDIENTS
1/2 cup all-purpose flour
1/4 teaspoon salt
1/2 teaspoon baking powder
1 tablespoon shortening
1/4 cup buttermilk
1 1/2 teaspoons chopped fresh herbs
(i.e. flat leaf parsley, chives, thyme, sage)
METHOD
1 In a medium bowl, mix flour, salt and baking powder together.
2 Add shortening and herbs; the mixture will look like crumbs.
3 Add buttermilk and stir until moist.
Recipe courtesy Debra Murray, Wolfgang Puck HSN Host
HSN7C_RiceCooker08 8/13/08 3:30 PM Page 25
Page 15

2827
Macaroni & Cheese
This is hands-down the favorite recipe made in the rice cooker! It is
comfort food at its finest and is child’s play to prepare.
2 - 3 Servings
INGREDIENTS
1 1/2 cups elbow macaroni
1 1/2 cups chicken broth, or water and a
good-quality chicken bouillon cube
1 cup heavy cream
3/4 cup shredded cheddar cheese
1/2 cup shredded mozzarella cheese
1/4 cup shredded Parmesan cheese
1/4 teaspoon kosher salt, or to taste
METHOD
1 Combine macaroni, broth and cream in rice cooker. Press COOK.
Stir occasionally.
2 When machine switches to KEEP WARM, add remaining ingredients
and stir thoroughly until all cheese is melted.
3 Press COOK again. The rice cooker will switch to KEEP WARM after
just a few minutes; this is the point where the cheese on the bottom
turns that delicious brown. Serve.
Recipe courtesy Debra Murray, Wolfgang Puck HSN Host
Soy Steamed Salmon Filets
with Shiitake Brown Rice
This recipe is so healthy but is also very pretty and full of flavor. It is a
real treat and a snap to prepare. The busier my life gets, the more
grateful I am to have a rice cooker and wonderful recipes like this.
2 Servings
INGREDIENTS FOR STEAMED SALMON
2 salmon filets, 3-4 ounces each
1 tablespoon mushroom soy sauce
2 teaspoons fresh ginger, cut into julienne strips
1 green onion, cut into julienne strips
1 big clove garlic, cut into julienne strips
INGREDIENTS FOR RICE
2/3 cup brown rice, preferably organic
1 1/4 cup stock or water
1 bay leaf
2 teaspoons olive oil
1/2 cup dried shiitake mushrooms, rehydrated in 1 cup hot water,
squeeze to remove excess water (use this leftover liquid
in place of part of the stock called for, if desired)
2 teaspoons mushroom soy sauce
1 clove garlic, smashed
1/2 teaspoon sambal oelek or chili flakes
kosher salt and pepper, to taste
1 green onion, sliced thinly on the bias
METHOD
1 Place salmon in steamer basket. Set on a plate to catch any dripping.
Rub mushroom soy sauce over salmon. Top evenly with ginger, green
onion and garlic. Set aside to marinate for 20 minutes.
2 Add remaining rice ingredients, except for green onion, into Rice
Cooker Pot. Stir, close, and press COOK. After 20 minutes, add
basket with salmon. Cook 5-10 minutes or until fish is done to
your liking.
3 When rice cooker switches to KEEP WARM, fluff rice and fold in
remaining green onion.
Recipe courtesy Marian Getz
HSN7C_RiceCooker08 8/13/08 3:30 PM Page 27
Page 16

29
One Pot Pasta
Once you have made this easy recipe, tailor it to suit your own tastes.
Add your favorite shape of pasta and change up the sauce. Add
meat and veggies. Recipes like this make busy days so much easier.
3 Servings
INGREDIENTS
1 1/2 cups dry pasta (like penne, ziti)
2 cups liquid (beef or chicken stock or water)
1 cup favorite pasta sauce, bottled or homemade
1/4 cup shredded Parmesan or mozzarella cheese
METHOD
1 Place all ingredients into Rice Cooker Pot.
2 Close lid, press COOK.
3 When the unit switches to KEEP WARM (approx. 18 to 20 minutes),
open lid and stir. Close lid and leave on KEEP WARM setting for
5 minutes. Serve hot.
Recipe courtesy Debra Murray, Wolfgang Puck HSN Host
30
One Pot Pasta Primavera
3 - 4 Servings
INGREDIENTS
1 1/2 cups dry pasta (ziti, penne, etc.)
1 1/2 cups beef, chicken, or vegetable stock
1 1/2 cups pasta sauce, bottled or homemade
1 cup fresh vegetables (zucchini, broccoli, mushrooms)
1/4 cup shredded mozzarella cheese, optional
METHOD
1 Add pasta, stock, and sauce to rice cooker. Press COOK.
2 After 10 minutes, stir in vegetables and sprinkle cheese on top.
Cook for 2 to 3 minutes.
3 Switch to KEEP WARM until ready to eat.
HSN7C_RiceCooker08 8/13/08 3:30 PM Page 29
Page 17

3231
Wasabi Mashed Potatoes
I like serving this with quickly-seared ahi tuna steaks.
4 Servings
INGREDIENTS
1 1/2 pounds russet potatoes, peeled and cut into 1-inch cubes
1 cup water
1 teaspoon kosher salt
2 tablespoons unsalted butter
1/2 cup heavy cream (or milk if your diet would prefer)
2 tablespoons wasabi paste, either dry powder mixed with water,
or tube of paste
1 teaspoon juice from pickled ginger (the kind used for sushi)
METHOD
1 Add potatoes to Rice Cooker Pot and add water and salt. Close lid
and press COOK.
2 When rice cooker switches to KEEP WARM, either mash with a
potato masher or pass potatoes through ricer or food mill (the best
way to get perfectly smooth mashed potatoes).
3 Return mashed potatoes to pot and gently stir in butter, cream,
wasabi, pickled ginger juice and any additional salt if needed. If
potatoes are too dry, add more cream.
4 Taste for seasoning. Serve immediately or keep hot on the KEEP
WARM setting.
Recipe courtesy Marian Getz
Flavorful Smashed Potatoes
4 Servings
INGREDIENTS
1 1/2 teaspoons olive oil
1 clove garlic, whole
3 russet potatoes, peeled and quartered
1/2 rutabaga, peeled into 2" pieces
6 ounces chicken stock
1/4 teaspoon salt
1/2 teaspoon pepper
1 1/2 tablespoons butter or margarine
1 1/2 teaspoons cream or milk
METHOD
1 Add oil to Rice Cooker Pot and press COOK. When oil is hot, sauté
garlic for several minutes. Do not allow to brown.
2 Add potatoes, rutabaga, and stock. Cook for 30 minutes.
3 After 30 minutes, add remaining ingredients and smash with a
potato masher. Mixture will be slightly chunky.
Note: Substitute celery root, parsnips, or turnips for rutabaga.
For added flavor, add 1 tablespoon fresh rosemary and thyme leaves
right after cooking garlic.
Recipe courtesy Debra Murray, Wolfgang Puck HSN Host
HSN7C_RiceCooker08 8/13/08 3:30 PM Page 31
Page 18

3433
Green Rice
4 servings
INGREDIENTS
2 measures long-grain white rice
(using rice measure included with rice cooker)
1 can (4 ounces) chopped green chilies
1 small green pepper, chopped
1 clove garlic, minced
1 bunch fresh cilantro, chopped
1 bunch flat leaf parsley, chopped
1 tablespoon fresh lime juice
1 small onion, minced
2 cups chicken broth, approximately
METHOD
1 Measure and rinse rice according to the instruction manual.
2 Place all ingredients, except the chicken broth, into the Rice Cooker
Pot.
3 Fill the rice cooker with chicken stock to the 2-cup mark.
4 Close the lid and press COOK.
5 Unit will switch to KEEP WARM setting in approximately 22- 25
minutes. Serve immediately.
SERVING IDEAS
This rice has amazing flavor and is terrific with grilled fish!
Recipe courtesy Debra Murray, Wolfgang Puck HSN Host
Easy Red Beans and Rice
3 - 4 servings
INGREDIENTS
1 1/2 measures long-grain rice
(using rice measure included with rice cooker)
1/2 cup canned or cooked red beans, drained
1 small rib celery, chopped
1/2 small onion, chopped
1 clove garlic, minced
1/4 cup ham, diced
1/4 cup smoked sausage, sliced
1 cup beef stock
1/2 teaspoon hot sauce
1/2 teaspoon Worcestershire sauce
1 whole bay leaf
METHOD
1 Measure and rinse rice according to instructions. Place into the Rice
Cooker Pot.
2 Add all remaining ingredients.
3 Close lid and press COOK.
4 Unit will switch to KEEP WARM setting in approximately 20-25
minutes. Serve immediately.
Recipe courtesy Debra Murray, Wolfgang Puck HSN Host
HSN7C_RiceCooker08 8/13/08 3:30 PM Page 33
Page 19

35
Risotto with Asparagus
4 servings
INGREDIENTS
2 measures arborio rice, measured and rinsed
according to instructions
8 ounces fresh asparagus, peeled and cut into 1-inch pieces
1 small onion, chopped
2 tablespoons butter, melted
1/2 teaspoon salt and freshly cracked pepper
1 1/2 cups chicken stock
1/4 cup grated Parmesan cheese
METHOD
1 Add all ingredients, except the Parmesan cheese, to the Rice Cooker
Pot. Stir to make sure all ingredients are well mixed.
2 Close lid and press COOK.
3 When the rice is finished cooking, stir in the Parmesan cheese.
4 Unit will switch to KEEP WARM setting in approximately 20 minutes.
Serve immediately.
Recipe courtesy Debra Murray, Wolfgang Puck HSN Host
36
Cauliflower Mashers
2 - 4 servings
INGREDIENTS
1 small head cauliflower, cut into florets
1 cup chicken broth or stock
1/2 cup milk
1/2 teaspoon lemon juice
kosher salt and fresh cracked pepper, to taste
butter or cream cheese, if desired
METHOD
1 Combine all ingredients into the Rice Cooker Pot.
2 Close lid and press COOK. After 15 minutes, test cauliflower. When
fork tender, unplug machine and remove inner pot using potholders.
3 Drain away and reserve most of the liquid. Puree cauliflower using an
immersion blender or potato masher until mostly smooth. Stir in
enough reserved liquid to make the puree a desirable texture. Taste
carefully and adjust seasoning.
4 Serve immediately or close lid and keep hot on KEEP WARM setting.
Recipe courtesy Marian Getz
HSN7C_RiceCooker08 8/13/08 3:30 PM Page 35
Page 20

38
Quickie Cornbread
3 - 4 Servings
INGREDIENTS
1/2 cup yellow cornmeal
1/2 cup all-purpose flour
2 tablespoons sugar
1 1/2 teaspoons baking powder
1/2 teaspoon kosher salt
1/2 cup whole milk
1/4 cup vegetable oil
2 eggs
1/2 cup fresh or frozen corn kernels
METHOD
1 Whisk all dry ingredients together in a mixing bowl. Pour over wet
ingredients and whisk until smooth.
2 Spray Rice Cooker Pot with nonstick spray. Pour in cornbread
mixture. Press COOK.
3 After several minutes, the machine will switch to KEEP WARM. After
25 minutes, check cornbread. It is done when the top is pale and
domed. A toothpick inserted off center should come out clean.
If not done, press COOK again.
4 Unplug machine and, using potholders, remove Rice Cooker Pot
from Rice Cooker. Invert carefully onto a serving platter. The bottom
will be a beautiful golden brown. Serve warm with butter.
Recipe courtesy Marian Getz
37
Gorgonzola Cheese Polenta
3 - 4 Servings
INGREDIENTS
2 tablespoons unsalted butter
1/2 onion, chopped
1 clove garlic, peeled and minced
1/2 cup homemade chicken broth or good-quality canned chicken broth
3/4 cup half and half or milk
1/2 cup coarse-grain polenta, either white or yellow
salt and pepper, as desired
1/4 cup heavy cream
3 ounces gorgonzola or blue cheese
METHOD
1 Add butter, onion and garlic to Rice Cooker Pot and press COOK.
Saute onion and garlic, stirring occasionally, until fragrant and
translucent.
2 Add all ingredients, except the cream and gorgonzola. Stir
occasionally.
3 When rice cooker switches to KEEP WARM, add cheese and cream.
Taste and adjust seasoning if needed.
Note: This is a great accompaniment to lamb.
Recipe courtesy Marian Getz
HSN7C_RiceCooker08 8/13/08 3:30 PM Page 37
Page 21

40
Steel Cut Oatmeal
2 - 3 servings
INGREDIENTS
3/4 cup steel-cut oats, preferably organic
2 cups water
1/4 teaspoon salt
1/4 teaspoon pure vanilla extract
2 tablespoons raisins
METHOD
1 Place ingredients into the Rice Cooker Pot.
2 Press COOK. Oatmeal will be ready in 10 - 15 minutes.
Variations: Add dried fruit or 1/2 cup honey and 1 teaspoon ground
cinnamon at the start of the cooking cycle.
39
Sweet Potato Puree With
Gingersnap Cookies
4 Servings
INGREDIENTS
1 1/2 pounds sweet potatoes
3 tablespoons unsalted butter
6 gingersnap cookies, crumbled
1 tablespoon brown sugar
1 cup heavy cream
kosher salt and fresh cracked pepper to taste
METHOD
1 Peel and cut sweet potatoes into uniform chunks. Add to Rice
Cooker Pot. Add 1 cup water, close lid, and press COOK.
2 When rice cooker switches to KEEP WARM, check potatoes. They
should be very tender. Add remaining ingredients and mash until
quite smooth. Taste for seasoning.
3 Serve right away or keep hot in the KEEP WARM setting.
Recipe courtesy Marian Getz
HSN7C_RiceCooker08 8/13/08 3:30 PM Page 39
Page 22

42
Steamed Chocolate
Cup Custard
1 Serving
INGREDIENTS
1/2 cup whole milk
1/4 cup half and half
1/3 cup chocolate chips, excellent quality
2 tablespoons packed dark brown sugar
1 teaspoon pure vanilla
2 egg yolks
1 pinch of kosher salt
METHOD
1 Microwave milk and half and half in the microwave until hot. Add
chocolate chips and stir until chocolate melts. Whisk in remaining
ingredients. Pour chocolate mixture into a buttered ramekin.
2 Add 2 cups hot tap water to bottom of Rice Cooker Pot. Place
steamer basket on top. Cover ramekin with plastic wrap and place
in basket.
3 Close lid and press COOK. Set timer for 20 minutes. When time is
up, check custard. It should be barely set with a very wobbly center.
Use caution; it is easy to overcook this dessert.
4 Remove, cool and enjoy
Recipe courtesy Marian Getz
41
Dessert Recipes
for the 7-cup Rice Cooker
HSN7C_RiceCooker08 8/13/08 3:30 PM Page 41
Page 23

43 44
Wolf’s Bread Pudding
3 - 4 Servings
INGREDIENTS
1 1/2 cups heavy cream
4 eggs
1/2 cup brown sugar
A pinch of kosher salt
1 teaspoon pure vanilla extract
1 teaspoon fresh lemon juice
2 cups cubed leftover bread
1 cup mixed fresh berries
METHOD
1 Stir all but bread and berries together into the Rice Cooker Pot
until sugar is dissolved. Fold in bread and berries. Close lid and
press COOK.
2 Rice cooker will switch to KEEP WARM after a few minutes. Wait 10
minutes, and then press COOK again.
3 After 45 minutes, press mixture to test for doneness. If the pudding
is solid and no cream oozes out of center, it is baked. Serve hot or
warm with powdered sugar.
Recipe courtesy Marian Getz
Raspberry White Chocolate
Bread Pudding
4 Servings
INGREDIENTS
2 1/2 cups heavy cream
3/4 cup sugar
4 whole eggs
1/2 teaspoon kosher salt or 1/4 teaspoon regular salt
1 teaspoon fresh lemon juice
1 teaspoon pure vanilla, best quality you can find
5 slices bakery-type egg bread cut into 2-inch cubes (challah or brioche)
1/2 cup fresh or frozen raspberries
1/4 cup white chocolate pieces
METHOD
1 To the Rice Cooker Pot, add the cream, sugar, eggs, salt, lemon juice
and vanilla. Whisk until smooth. Using an immersion blender makes
this part fast and easy! You have now made the custard part. Add
bread cubes to this and gently push the bread under the custard
with a large spoon or your clean hands. This will help the bread soak
up the custard.
2 Press COOK. When rice cooker switches to KEEP WARM, open the
lid and gently stir the bread pudding. It will be set around the sides
and bottom but the center will still be liquid. Close and press COOK.
Repeat if necessary.
3 Open lid and scatter the raspberries and chocolate pieces over the
bread pudding and gently stir them in. Close and leave on KEEP
WARM until chocolate is melted and custard is set. Serve hot or
warm with raspberry sauce and softly whipped cream.
Recipe courtesy Marian Getz
HSN7C_RiceCooker08 8/13/08 3:30 PM Page 43
Page 24

45 46
Chocolate Crazy Cake
This is a recipe I grew up with. It just happens to be a Vegan recipe.
It is very easy to mix and is moist and delicious. I love recipes that
use simple pantry items! It is amazing how well the rice cooker bakes
cakes. Try it with your favorite recipe or a boxed mix. Bake no more
than 3 cups of batter per batch.
4 - 6 Servings
INGREDIENTS
1 1/2 cups all-purpose flour
3/4 cup granulated sugar
3 tablespoons good-quality unsweetened cocoa powder
1 teaspoon baking soda
1/2 teaspoon kosher salt or 1/4 teaspoon iodized salt
1 teaspoon pure vanilla extract
1/4 cup vegetable oil
1 cup water
1 tablespoon white, cider or wine vinegar
METHOD
1 Pour all ingredients into (ungreased) Rice Cooker Pot. Stir until
combined. A few lumps will remain and batter will be quite thin.
2 Close lid and press COOK. After a few minutes, the rice cooker will
switch to KEEP WARM even though the cake is not done. This is
normal. Keep rice cooker on KEEP WARM setting for about 10
minutes, and then press COOK again. The cooker will switch to KEEP
WARM again but this is okay. After 30 minutes or so, open and
check cake with a toothpick. When inserted slightly off-center and
then removed, moist crumbs should cling to the toothpick.
3 Remove with potholders and invert onto serving plate. Wipe out
Rice Cooker Pot and make glaze in it (recipe follows).
Recipe courtesy Debra Murray, Wolfgang Puck HSN Host
Chocolate Glaze for Crazy Cake
This is such an easy recipe. It uses simple pantry staples and tastes
so good. I use it for an ice cream topping, as a filling for cookies, and
a topping for waffles and even cream puffs.
Makes 1 cup
INGREDIENTS
3/4 cup granulated sugar
1/4 cup water
2 tablespoons cocoa powder
1 tablespoon vegetable oil
1 teaspoon pure vanilla extract
small pinch kosher salt or very small pinch iodized salt
METHOD
1 Combine all ingredients in Rice Cooker Pot. Press COOK. Do not
close the lid.
2 When mixture comes to a full boil, unplug pot and carefully remove
Rice Cooker Pot, using potholders. Pour hot glaze over Crazy Cake.
Serve warm.
Recipe courtesy Marian Getz
HSN7C_RiceCooker08 8/13/08 3:30 PM Page 45
Page 25

47 48
Raspberry Coulis
INGREDIENTS
12 ounces frozen raspberries, thawed
3/4 cup sugar
METHOD
1 Puree using blender, food processor, or immersion blender.
Recipe Courtesy, Marian Getz
Rice Pudding
This recipe, along with the macaroni and cheese recipe, are the
favorites of everyone at the studio when we air the rice cooker! With
Wolfgang, the cameramen and backstage hands all fighting for it
when we roll off air, the pot practically cleans itself! This recipe gets
the most phone calls when we are on-air. I think it is because warm
rice pudding is such a homey comfort food
3 - 4 Servings
INGREDIENTS
2 cups cooked rice
1 cup heavy cream
1 cup water
1/3 cup sugar
1/2 teaspoon kosher salt
1 teaspoon lemon juice
1 teaspoon excellent vanilla extract
1/4 cup dried fruit, if desired
METHOD
1 Stir all ingredients together in rice cooker and press COOK.
2 Stir occasionally. It will be ready to eat in 15 minutes. Serve with
Raspberry Coulis (see recipe next page).
HSN7C_RiceCooker08 8/13/08 3:30 PM Page 47
Page 26

5049
Steamed Lemon Cup Custard
1 Serving
INGREDIENTS
1/2 cup heavy cream
2 tablespoons sugar
1 egg
1 egg yolk
1 teaspoon fresh lemon juice
Zest from 1/2 lemon
METHOD
1 Whisk all ingredients together and pour into a buttered ramekin.
Cover top with a piece of aluminum foil.
2 Add 2 cups hot tap water to bottom of rice cooker. Place steamer
basket on top and place ramekin in basket.
3 Close lid and press COOK. Set timer for 20 minutes.
4 When time is up, check custard. It should be set but still very
wobbly in the center. It is important to use a timer as custards are
easily overcooked.
Note: The flavor of this recipe can easily be changed. For vanilla, omit
lemon and add 1 teaspoon pure vanilla extract. For coffee, omit
lemon and add 1 teaspoon instant coffee. For ginger, omit lemon and
add 1 teaspoon grated fresh ginger.
Recipe courtesy Marian Getz
Rice Cooker Cakes
INGREDIENTS
1 store-bought cake mix, any flavor,
Additional ingredients listed on back of cake mix packaging
Non-stick cooking spray
METHOD
1 Mix cake ingredients together according to package directions.
Spray Rice Cooker Pot with nonstick spray.
2 Add 3-4 cups of batter, close lid and press COOK. After 10 minutes
check cooker. It will probably be on KEEP WARM. If it is press, COOK
again. If it will not stay in the COOK position, wait a few minutes and
then press COOK again. You will need to repeat this process one
more time, so that you will have pressed the COOK button and
allowed the appliance to cycle through 3 times.
3 Most cakes take about 45 minutes to cook. Test for doneness by
inserting a toothpick off center into the cake. The pick should have
a few moist crumbs clinging to it. If it has a streak of wet-looking
batter on it, press COOK again. It is very difficult to burn anything
in the rice cooker!
NOTE: You can bake all kinds of things in your rice cooker from corn
bread to cobbler using these same baking guidelines!
Recipe courtesy Marian Getz
HSN7C_RiceCooker08 8/13/08 3:30 PM Page 49
Page 27

5251
Recipe Notes Recipe Notes
HSN7C_RiceCooker08 8/13/08 3:30 PM Page 51
Page 28

53 54
Limited Warranty
This warranty covers all defects in workmanship or materials in the
mechanical and electrical parts, arising under normal usage and care, in
this product for a period of 12 months from the date of purchase
provided you are able to present a valid proof-of-purchase. A valid
proof-of-purchase is a receipt specifying item, date purchased, and
cost of item. A gift receipt with date of purchase and item is also an
acceptable proof-of-purchase. Product is intended for household use only.
Any commercial use voids the warranty.
This warranty covers the original retail purchaser or gift recipient. During
the applicable warranty period within normal household use,we will
repair or replace, at our discretion, any mechanical or electrical part
which proves defective, or replace unit with a comparable model.
To obtain service under the terms of this warranty,
call Toll Free (800) 275-8273.
THIS LIMITED WARRANTY COVERS UNITS PURCHASED AND USED
WITHIN THE UNITED STATES AND DOES NOT COVER:
• Damages from improper installation.
• Defects other than manufacturing defects.
• Damages from misuse, abuse, accident, alteration, lack of proper
care and maintenance, or incorrect current or voltage.
• Damage from service by other than an authorized dealer or
service center.
This warranty gives you special legal rights and you may also have other
rights to which you are entitled which may vary from state to state.
Recipe Notes
HSN7C_RiceCooker08 8/13/08 3:30 PM Page 53
 Loading...