

Page 1
USE & CARE GUIDE
E Series Built-In Ovens
Page 2

Contents
Important Note
Wolf E Series Built-In Ovens . . . . . . . . . . . . . . . . . . . . 3
Safety Instructions . . . . . . . . . . . . . . . . . . . . . . . . . . . . 4
E Series Oven Features . . . . . . . . . . . . . . . . . . . . . . . . 6
E Series Oven Operation . . . . . . . . . . . . . . . . . . . . . . . 9
E Series Oven Care . . . . . . . . . . . . . . . . . . . . . . . . . . . 32
Wolf Cooking Guide . . . . . . . . . . . . . . . . . . . . . . . . . . 34
Troubleshooting Guide . . . . . . . . . . . . . . . . . . . . . . . . 37
Service Information . . . . . . . . . . . . . . . . . . . . . . . . . . . 38
Wolf Warranty . . . . . . . . . . . . . . . . . . . . . . . . . . . . . . . 39
Features and specifications are subject to change at any time
without notice. Visit our website, wolfappliance.com for the
most up-to-date information.
IMPORTANT NOTE: Throughout this guide, dimensions in
parentheses are millimeters unless otherwise specified.
o ensure the safe and efficient use of Wolf equipment,
T
please take note of the following types of highlighted
information throughout this guide:
IMPORTANT NOTE highlights information that is
especially important.
CAUTION signals a situation where minor injury or product
damage may occur if instructions are not followed.
WARNING states a hazard that may cause serious injury or
death if precautions are not followed.
Page 3

Wolf E Series Built-In Ovens 3
wolfappliance.com
Thank You
our purchase of a Wolf E series oven attests to the impor-
Y
tance you place upon the quality and performance of your
cooking equipment. We understand this importance and
have designed and built your oven with quality materials
and workmanship to give you years of dependable
service.
We know you are eager to start cooking, but before you
do, please take some time to read this use & care guide.
Whether you are a beginning cook or an expert chef, it will
be to your benefit to familiarize yourself with the safety
practices, features, operation and care recommendations
of the Wolf E series oven.
Your Wolf E series oven is protected by a warranty that is
one of the finest in the industry. Take a moment to read
the warranty statement at the end of this guide and refer
to it should service become necessary.
IMPORTANT NOTE: P
the electrical supply is less than 240 volts.
Do not place cookware on oven floor or use aluminum
foil or other material to line the oven floor or side walls.
Failure to adhere to this notice will damage the porcelain and will void your warranty.
erformance may be compromised if
Page 4

Safety Instructions 4
IMPORTANT INSTRUCTIONS
IMPORTANT NOTE: Read all safety instructions before
using this appliance.
•
Read this use & care guide carefully before using
your new built-in oven to reduce the risk of fire,
electric shock or injury to persons.
•
Ensure proper installation and servicing. This appliance must be properly installed and grounded by a
qualified technician.
•
Warranty service must be performed by Wolf factory
certified service.
•
Have installer show you where the fuse or electrical
box is located in your home. Learn how and where
to shut off the electricity to the oven.
•
Use oven only for cooking tasks expected of a home
oven as outlined in this guide.
•
Always properly clean and maintain the oven as
recommended in this guide. Clean only those parts
listed in this guide.
Do not place cookware on oven floor or use
aluminum foil or other material to line the oven floor
or side walls. Failure to adhere to this notice will
damage the porcelain and will void your warranty.
GENERAL SAFETY REQUIREMENTS
•
Always use dry pot holders when removing pans
from the oven. Wet or damp pot holders can cause
steam burns. Do not let pot holders touch hot
heating elements. Do not use a towel or other bulky
cloth.
•
Exercise caution when opening the oven door. Let
hot air or steam escape before looking or reaching
into the oven.
•
Be sure that the oven cool air intake (located above
the door) and oven exhaust vent (located below the
door) are unobstructed at all times.
•
Position oven racks in desired locations when oven
is cool. If a rack must be repositioned after the oven
is already hot, be certain oven mitt does not contact
a hot heating element in the oven.
•
Before using the self-clean feature, remove broiler
grill and pan, oven racks, oven rack guides and any
other utensils.
•
The cooling fan should be operating during the selfclean feature. If you notice that the cooling fan is not
operating, contact Wolf factory certified service
before using the self-clean feature again.
Page 5

Safety Instructions 5
wolfappliance.com
IMPORTANT INSTRUCTIONS
•
GENERAL SAFETY REQUIREMENTS
•
Do not use commercial oven cleaners or oven liner
protective coatings, such as aluminum foil, on any
part of the oven.
•
Do not place cookware on the floor of the oven.
•
Do not repair or replace any part of the oven unless
specifically recommended in literature accompanying this appliance. All service should be referred to
Wolf factory certified service.
•
Do not use oven for warming or heating a room.
•
Do not leave children alone or unattended in the area
where the oven is in use. Never allow children to sit
or stand on any part of the oven. Do not let children
play with the oven.
•
Do not use water on grease fires. Smother any
flames with a lid, baking sheet or flat tray. Flaming
grease can be extinguished with baking soda or a
multipurpose chemical or foam extinguisher.
•
Do not heat unopened food containers as they could
burst and cause injury.
Do not use abrasive or caustic cleaners or detergents on this appliance as these may cause permanent damage. Do not use aerosol cleaners as these
may be flammable or cause corrosion of metal parts.
•
Do not clean the oven gasket, because rubbing or
moving the gasket may eliminate the required tight
door seal.
•
Do not wear loose or hanging apparel while using
the oven.
•
Do not touch heating elements or interior surfaces of
the oven. Heating elements may be hot even though
they are dark in color. Interiors of the oven become
hot enough to cause burns. During and after use, do
not touch, or let clothing or other flammable materials contact heating elements or interior surfaces of
the oven until they have had sufficient time to cool.
Other surfaces of the oven may become hot enough
to cause burns. These surfaces include the oven
door, window, oven vent and the surface near the
oven vent.
•
Do not store combustible, flammable or explosive
materials in the oven or adjacent cabinets.
Do not store items of interest to children above the
oven, as they could climb on the appliance to reach
items and be injured.
Page 6
E Series Oven Features 6
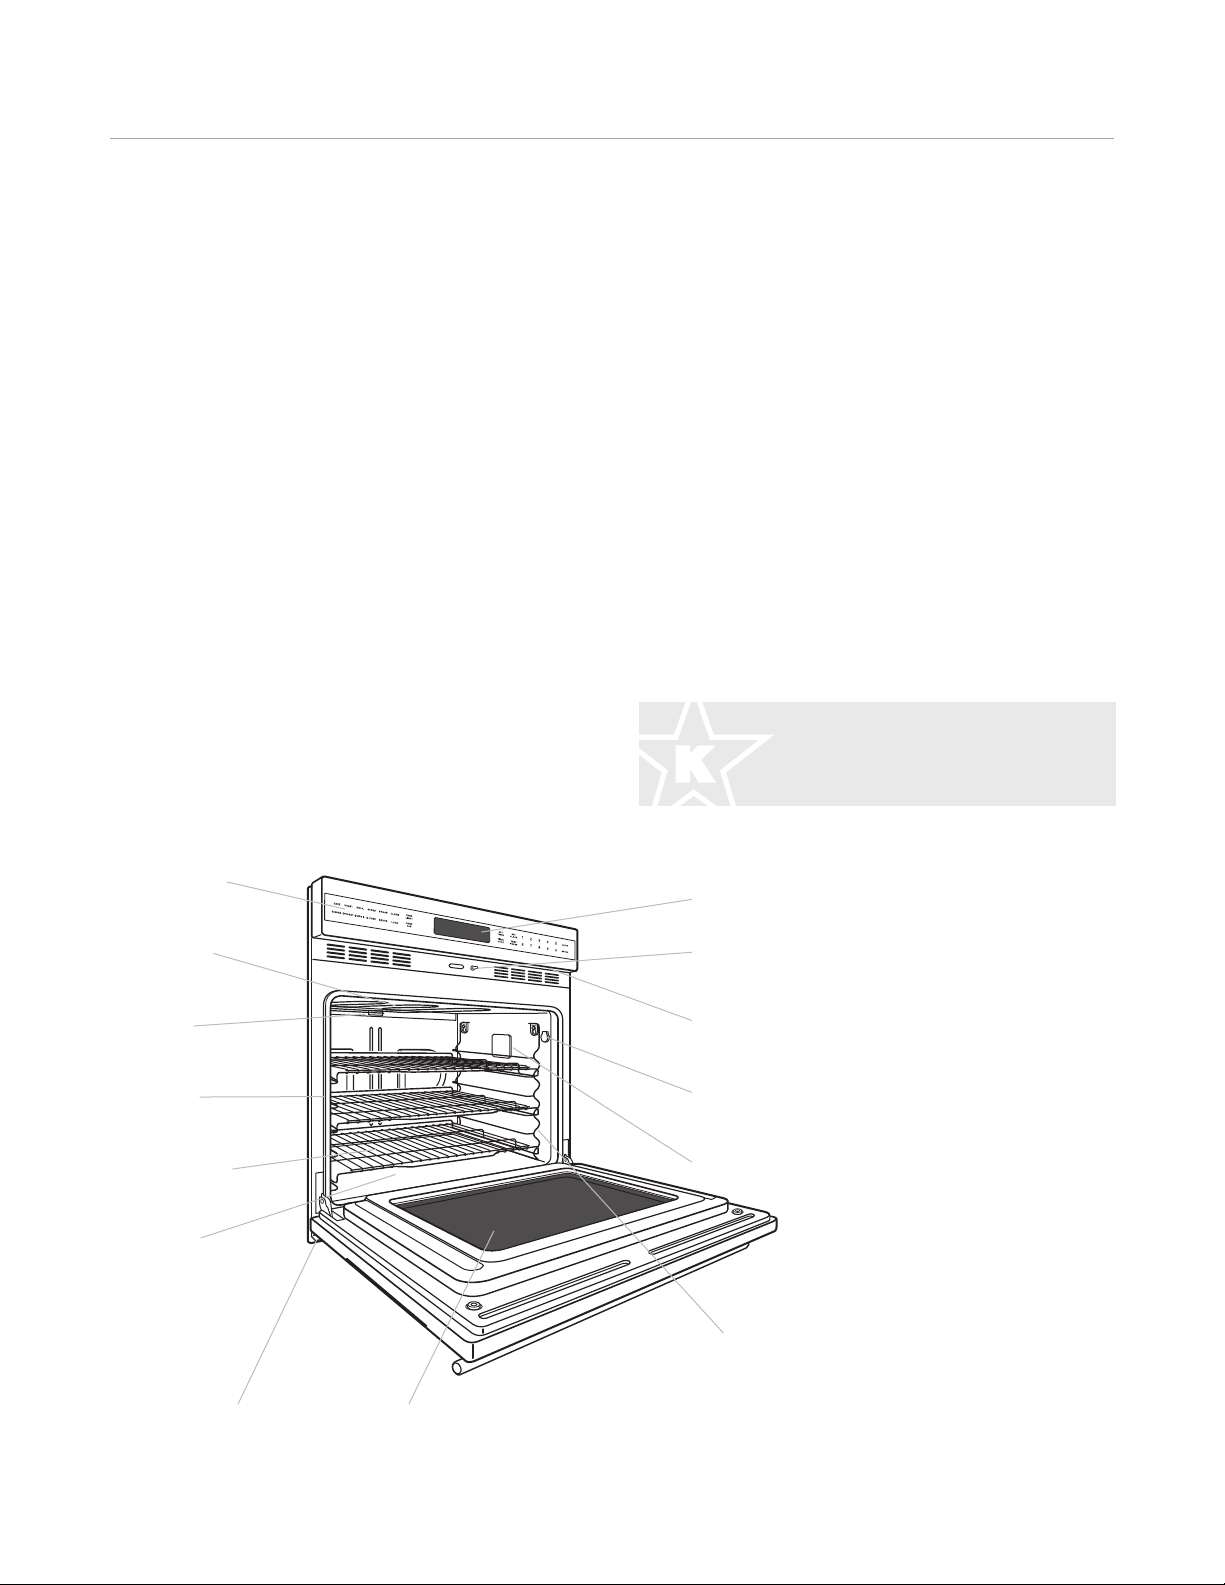
E Series Single Oven Features
Large viewing, double-pane window and dual halogen
Framed and unframed door styles with tubular handle.
•
• Black glass model with tubular handle.
• Can be installed in a standard or flush inset application.
• Crafted of heavy-duty stainless steel.
• Dual convection oven with two fans for even heat
distribution.
• Ten cooking modes—bake, roast, broil, convection
bake, convection roast, convection broil, convection
and proof—bake stone and dehydration modes require
accessory.
• Cobalt blue porcelain oven interior.
• Six-level rack guides with three adjustable oven racks;
one full-extension easy glide, one full-extension door
glide and one standard.
E SERIES BUILT-IN SINGLE OVEN
Model SO30-2U/S shown
•
interior lights.
• Hidden bake element and recessed broil element.
• Temperature probe and broiler pan.
• Self-clean, delayed start, timed cook and Sabbath
features.
• Balanced door hinge system for smooth opening and
closing.
• CSA certified for US and Canada.
• Two and five year residential warranty—exclusions
apply, see warranty at the end of this guide.
This appliance is certified by Star-K to meet
strict religious regulations in conjunction with
specific instructions found on www.star-k.org.
Electronic touch
control panel
Recessed broil
element
Thermostat
Oven gasket
Adjustable oven
racks
Hidden bake
element
Exhaust vent
Control panel
display
Oven door light
switch
Product rating
plate
Probe receptacle
Halogen light
Six-level rack
guides
Double-pane
window
Page 7
E Series Oven Features 7
wolfappliance.com
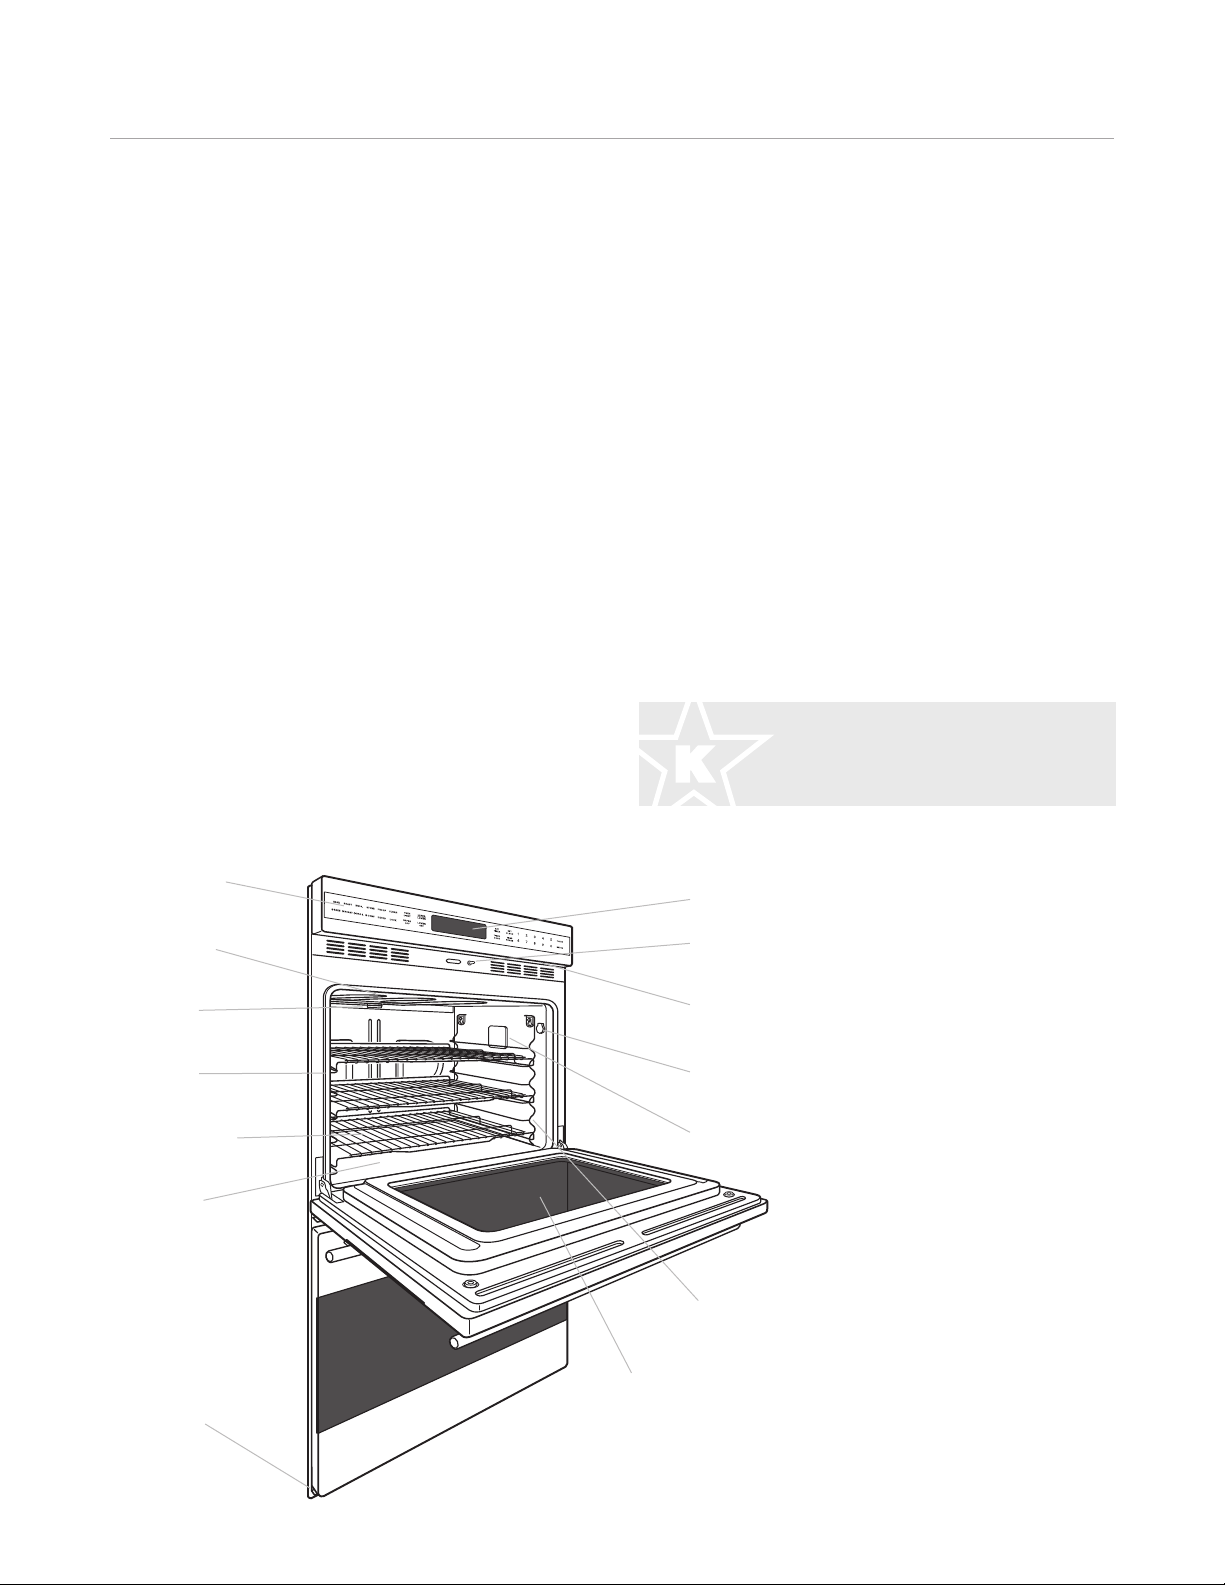
E Series Double Oven Features
Large viewing, double-pane windows and dual halogen
Framed and unframed door styles with tubular handles.
•
• Black glass model with tubular handles.
• Can be installed in a standard or flush inset application.
• Crafted of heavy-duty stainless steel.
• Dual convection upper oven with two fans for even
heat distribution—lower oven is single convection.
• Ten cooking modes in upper oven—bake, roast, broil,
convection bake, convection roast, convection broil,
convection and proof—bake stone and dehydration
modes require accessory. Four modes in lower oven.
• Cobalt blue porcelain oven interiors.
• Six-level rack guides with three adjustable oven racks;
one full-extension easy glide, one full-extension door
glide and one standard in each oven.
E SERIES BUILT-IN DOUBLE OVEN
Model DO30-2U/S shown
•
interior lights.
• Hidden bake elements and recessed broil elements.
• Temperature probe and broiler pan.
• Self-clean, delayed start, timed cook and Sabbath
features.
• Balanced door hinge system for smooth opening and
closing.
• CSA certified for US and Canada.
• Two and five year residential warranty—exclusions
apply, see warranty at the end of this guide.
This appliance is certified by Star-K to meet
strict religious regulations in conjunction with
specific instructions found on www.star-k.org.
Electronic touch
control panel
Recessed broil
element
Thermostat
Oven gasket
Adjustable oven
racks
Hidden bake
element
Exhaust vent
Control panel
display
Oven door light
switch
Product rating
plate
Probe receptacle
Halogen light
Six-level rack
guides
Double-pane window
Page 8
E Series Oven Features 8
E Series Oven Features
Multiple cooking modes, each dedicated to giving the
•
best results for a specific kind of cooking. This is the
ultimate in oven performance, fine-tuned for your individual cooking preferences.
• Large, easy-to-see and read graphics on control panel.
• Electronic responses and directions on the control
panel are displayed using clear, concise words.
• Large cooking cavity increases usable oven capacity
for extra-large baking pans and oversized turkeys.
• Bake element located beneath the oven floor makes it
easy to access any spillover.
• Bottom rack can be fully extended, making it easier
and safer to reach food in a hot oven.
Do not place cookware on oven floor or use aluminum
foil or other material to line the oven floor or side walls.
Failure to adhere to this notice will damage the porcelain and will void your warranty.
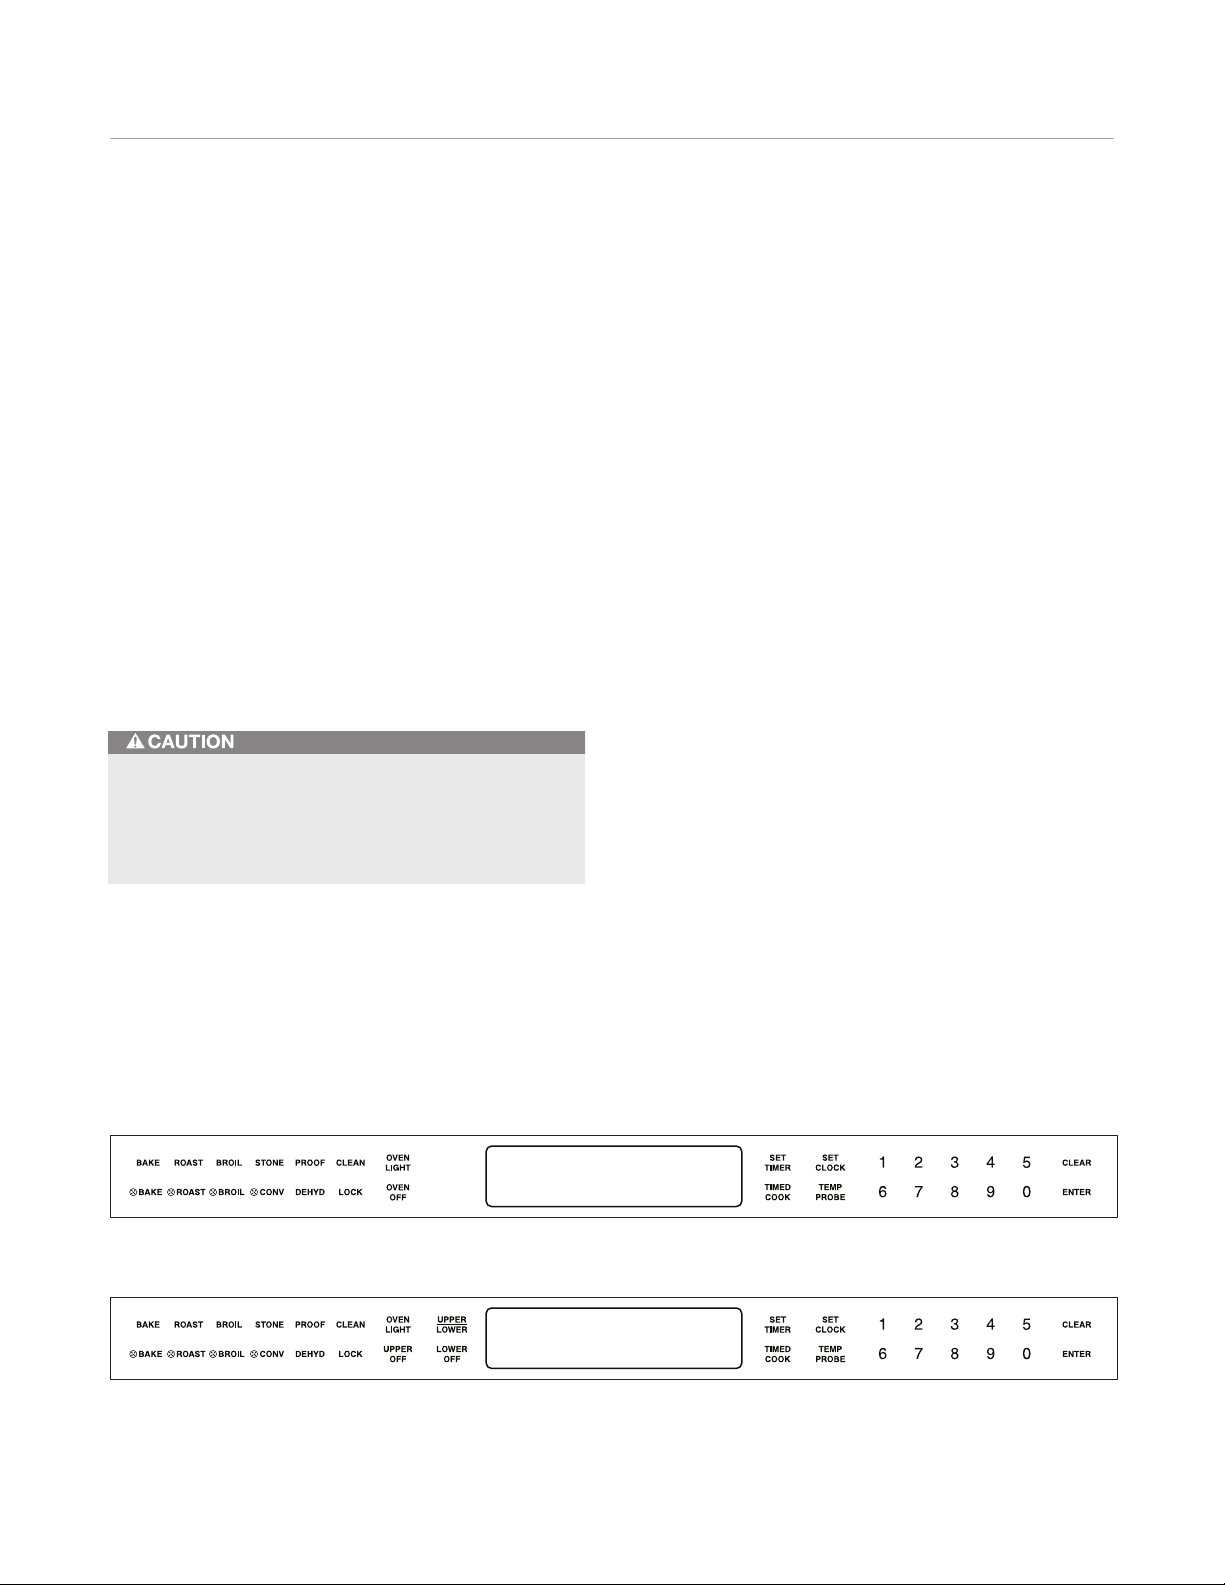
Electronic Control Panel
The electronic control panel features touch pads for
cooking modes and other operations. Refer to the illustrations below.
For the single oven, you can begin a cooking mode by
simply touching the desired mode on the control panel.
For double ovens, touching the desired mode will automatically turn on the upper oven. To turn on the lower
oven, first touch the UPPER/LOWER touch pad so that the
lower oven icon is selected in the control panel display.
Then touch the desired mode to turn on the lower oven.
The control panel can be locked to keep it child-safe
and prevent the oven from accidentally being turned on.
To lock the control panel, press and hold LOCK for 3
seconds. All controls except for OFF and LOCK will be
locked and silenced. ‘KEY LOCKED’ will appear in the
control panel display when a touch pad is pressed while
locked. To unlock, press and hold LOCK for 3 seconds.
Single oven control panel.
Double oven control panel.
Page 9

E Series Oven Operation 9
wolfappliance.com
Oven Operation
CHANGING OVEN TEMPERATURE
The oven temperature can be changed at any time once a
cooking mode has been selected.
1) Touch the number pads to enter in the new
temperature.
2) Touch ENTER.
This will change the oven temperature immediately. If
ENTER is not touched, the oven will automatically switch
to the new oven temperature within five seconds.
RAPID MODE CHANGE
The oven has the ability to quickly change cooking modes.
This is a method of switching cooking modes without
turning the oven on and off. If one mode is already started,
instead of turning the oven off to change cooking modes,
simply touch the desired cooking mode touch pad.
OVEN PREHEAT
IMPORTANT NOTE:
a manner unsuitable for cooking.
The oven preheat feature is used for all cooking modes
except broil and convection broil. In order not to damage
food, preheating will not occur once the oven reaches its
set temperature. Increasing oven temperature during
cooking will result in the oven taking a very long time to
reach the new temperature. To reach a new temperature
quickly, touch OFF to exit the current mode. Touch ON,
then the desired cooking mode and enter a new temperature of at least 50° higher than the previous operating
temperature.
During preheat, the oven is heated in
BEFORE USING FOR THE FIRST TIME
Before using your E series oven for the first time, clean
thoroughly with hot water and a mild detergent. Rinse and
dry with a soft cloth. Refer to care recommendations on
page 33.
Turn on the oven when prompted, set the language by
touching 1 for English, 2 for German, 3 for French, 4 for
Spanish or 5 for Italian.
Next, set the single oven or the upper cavity of the double
oven to ROAST (convection roast) at 550°F (260°C) for
one hour. For a double oven, wait until the upper oven has
finished convection roasting for one hour, and then set the
bottom oven to ROAST at 550°F (260°C) for one hour.
Refer to page 17 for convection roast mode instructions
and page 14 for roast mode. Allow the oven to cool gradually with the door closed.
This process will burn off any residual oil and grease used
during the manufacturing process. A small amount of
smoke and odor may be noticed during the initial break-in
period. The oven door can be opened after the oven has
cooled significantly. The first time the self-clean feature is
used, there will be further burn-off that may create smoke
and odor.
AUTOMATIC SHUT OFF
As a safety feature, the E series oven(s) will shut off automatically after 12 hours of continual use, unless dehydration mode or Sabbath feature is in use.
Page 10

E Series Oven Operation 10
Time-of-Day Clock
mmediately after the oven is installed, set the 12-hour
I
clock to the current time of day. It may need to be reset
after a prolonged power failure. The clock is visible on the
panel during all modes. If the upper oven timer is set, the
clock will not be visible in the upper oven control panel
display.
SETTING CLOCK
1) Touch SET CLOCK.
2) Touch number pads to set current time of day. A
10-second period of inactivity will result in the oven
returning to the original time.
3) Touch ENTER and when prompted, touch 1 for AM or
2 for PM.
4) Touch ENTER again to start clock.
Extended Options
The screen scrolls in the order of language, temperature
scale, temperature offset, 12/24 hour clock, backlight
brightness, chime tone and contrast adjustment.
1) Touch and hold SET CLOCK on the control panel for
5 seconds to enter the extended options screens.
2) Touch ENTER to scroll through the different option
screens.
3) When finished selecting all options touch CLEAR to
return to the main display.
TEMPERATURE OFFSET
The temperature offset option is intended to be adjusted
by Wolf factory authorized service only. If you feel your
oven is not maintaining the proper set point, contact Wolf
customer care at 800-222-7820 for information.
12/24 HOUR CLOCK
1) When prompted, touch 1 for 12-hour clock or 2 for
24-hour clock.
BACKLIGHT BRIGHTNESS
1) When prompted, touch 1 for low brightness, 2 for
medium brightness or 3 for high brightness.
BACKLIGHT BRIGHTNESS 2 (BLACK GLASS MODELS
ONLY)
Adjusts backlight for clock in idle mode.
1) When prompted, touch 1 for low brightness, 2 for
medium brightness or 3 for high brightness.
CHIME TONE
There are three different frequency tones for the oven
chime.
1) When prompted, touch 1 for the low frequency tone,
2 for the medium frequency tone or 3 for the high
frequency tone.
LANGUAGE
1) When prompted, touch 1 for English, 2 for German,
3 for French, 4 for Spanish or 5 for Italian.
TEMPERATURE SCALE
The oven can be changed from Fahrenheit (°F) temperature to Celsius (°C) or vice versa.
1) When prompted, touch 1 for Fahrenheit (°F) or 2 for
Celsius (°C).
CONTRAST ADJUSTMENT
The contrast can be adjusted to ensure a crisp readout on
the control panel display.
1) When prompted, touch 1 through 9 on the number
pad to adjust the contrast setting to your personal
preference.
Page 11

E Series Oven Operation 11
wolfappliance.com
Oven Timer
ach oven has a timer which operates independently from
E
the controls and from each other. Only one timer will work
at one time. Once a time is set in hours and minutes, the
countdown is seen in the control panel display. Only the
last minute counts down in seconds.
An audible signal acts as a reminder when the amount of
time runs out. To stop the signal, touch CLEAR. The
maximum time that can be set is 9 hours and 59 minutes.
SETTING TIMER
1) Touch SET TIMER.
2) Touch number pads to set the hours and minutes.
3) Touch ENTER or SET TIMER to start. Touch CLEAR at
any time to stop the timer and exit.
4) Touch SET TIMER while the current timer is still active
to restart and set a new time.
5) To clear the timer: If oven is off, touch CLEAR. If oven
is on, touch SET TIMER, then CLEAR.
Cooking Modes and Features
series ovens feature ten cooking modes and multiple
E
features for precise, easy-to-use control. Instructions for
setting controls and tips for success are outlined for each
mode and feature on the following pages.
COOKING MODES AND FEATURES
• Bake mode . . . . . . . . . . . . . . . . . . . . . . . . . . . . . . . 13
• Roast mode. . . . . . . . . . . . . . . . . . . . . . . . . . . . . . . 14
• Broil mode. . . . . . . . . . . . . . . . . . . . . . . . . . . . . . . . 15
• Convection bake mode . . . . . . . . . . . . . . . . . . . . . . 16
• Convection roast mode . . . . . . . . . . . . . . . . . . . . . . 17
• Convection broil mode . . . . . . . . . . . . . . . . . . . . . . 18
• Convection mode . . . . . . . . . . . . . . . . . . . . . . . . . . 19
• Proof mode . . . . . . . . . . . . . . . . . . . . . . . . . . . . . . . 20
• Bake stone mode (with accessory) . . . . . . . . . . . . . 21
• Dehydration mode (with accessory) . . . . . . . . . . . . 23
• Delayed start feature . . . . . . . . . . . . . . . . . . . . . . . . 25
• Temperature probe feature . . . . . . . . . . . . . . . . . . . 26
• Timed cook feature . . . . . . . . . . . . . . . . . . . . . . . . . 28
• Sabbath feature . . . . . . . . . . . . . . . . . . . . . . . . . . . 28
• Self-clean feature . . . . . . . . . . . . . . . . . . . . . . . . . . 30
IMPORTANT NOTE: The cooking modes and features on
the following pages outline the operation for a single oven.
For a double oven, follow the same steps as for a single
oven, with the exception of cooking modes that can only
be used in the upper oven.
For double ovens, to switch from the upper oven to the
lower and vice versa, simply touch the UPPER/LOWER
touch pad on the control panel. The icon of the selected
oven will be highlighted in the control panel display.
Page 12
E Series Oven Operation 12
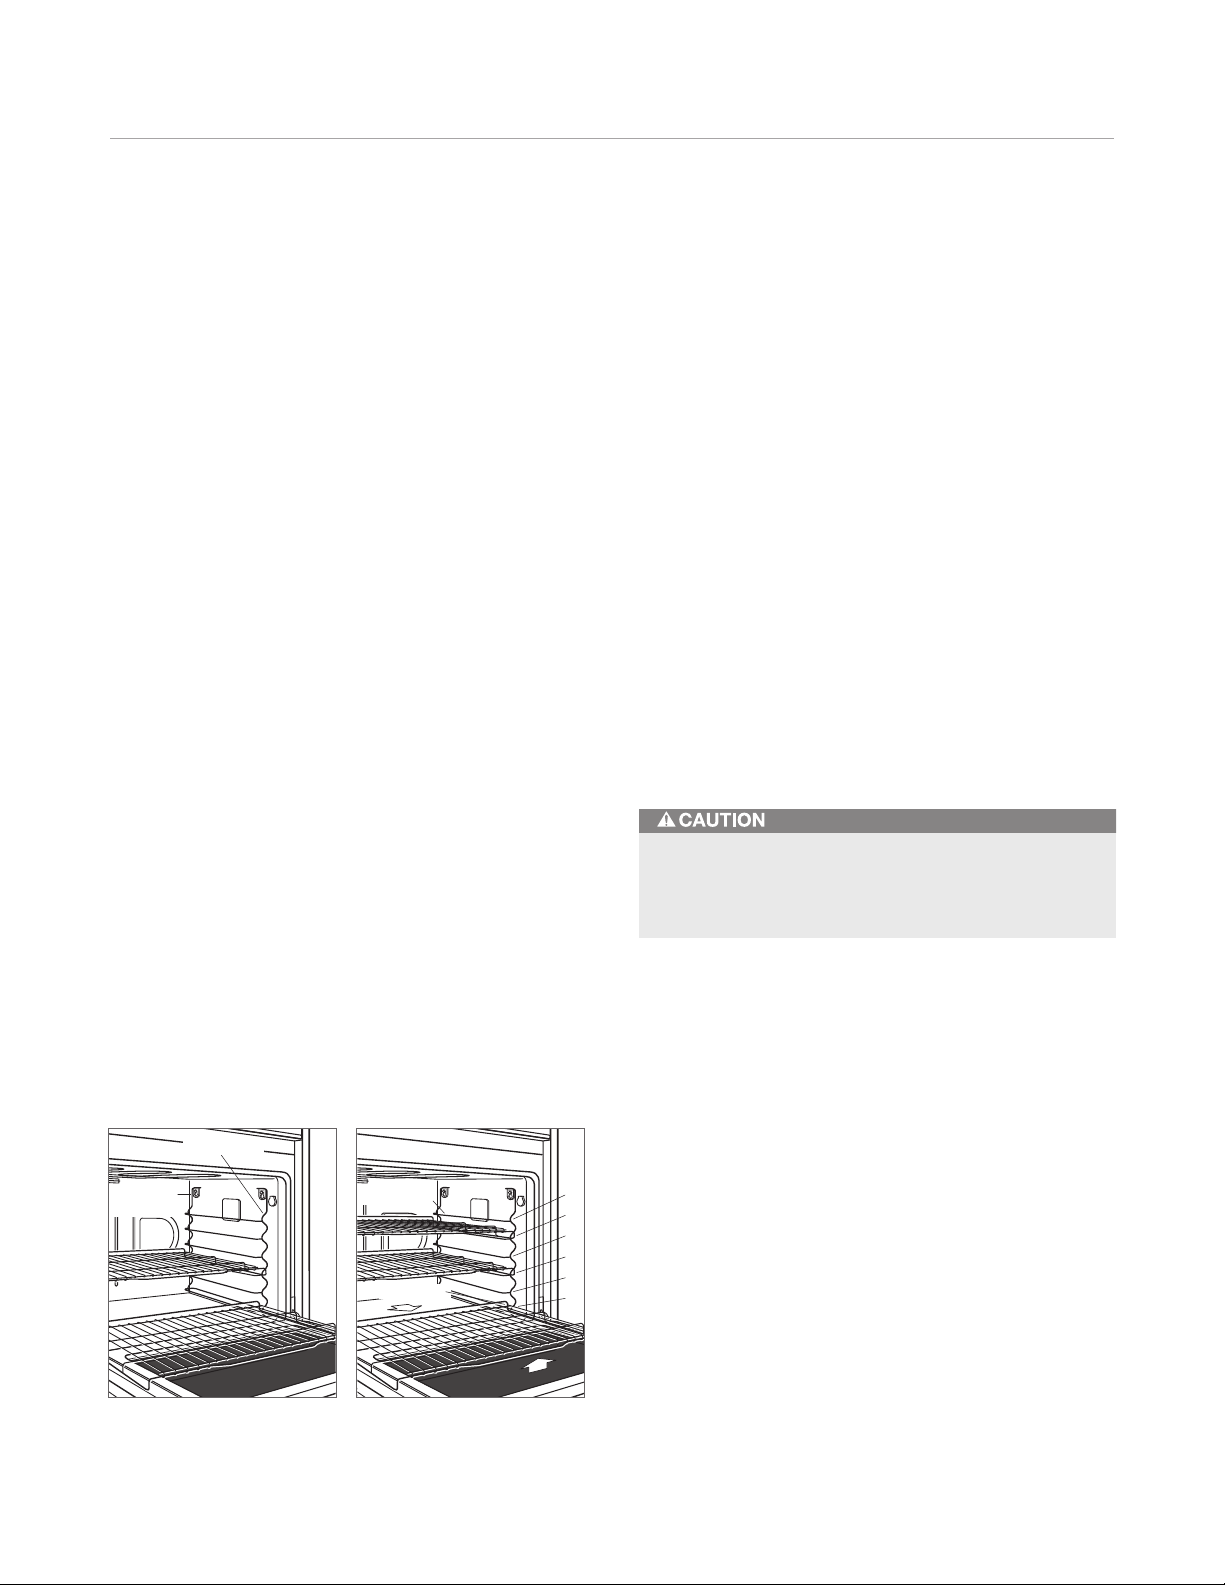
RACK GUIDE
MOUNTING
TABS
6
5
4
3
2
1
RACK GUIDE
AN
T
I
-
T
I
P LO
C
K
Oven Racks
OVEN RACK GUIDES
To insert the rack guides in the oven, locate the screws in
the oven side walls. Place the rack guide mounting tabs
over the screw heads and slide down until the screws are
fully seated in the tabs. Refer to the illustration below.
To remove the rack guides, pull the rack guide straight up
and then out so that the mounting tabs clear the screw
heads. Remove the rack guide from the oven.
IMPORTANT NOTE: Remove all oven racks and rack
guides before using the self-clean feature. They will
discolor if left in the oven during self-clean.
OVEN RACKS
To insert a rack in the oven, place the rack anti-tip lock
under the side rack guide rails. Slide the rack toward the
back of the oven and lift up to clear the rack stops. Continue sliding the rack until it is completely inside the oven.
To remove a rack from the oven, slide the rack forward
and lift up and out, clearing the rack stops from the side
rack guide rails. Refer to the illustration below.
The bottom oven rack has a full-extension capability. With
the rack in rack guide position 1, slide it onto the stainless
steel door guides. This adds stability to the rack when
using a heavy pan for large meat and poultry. With the
rack fully extended, it is easier to safely reach hot food.
Refer to the illustration below for rack guide positions.
OVEN RACK ARRANGEMENT
One of the factors affecting optimum cooking results is the
level of rack placement in the oven. Rack position 1 is
closest to the bottom and position 6 is closest to the top.
The Wolf cooking guide on pages 34–36 provides
suggested rack positions for optimum results.
• When using only one rack, place rack in the center of
the oven.
• When using only one rack for roasting meats, place
rack on rack guide position 1, 2 or 3.
• When using two or three racks, place at least one rack
position between them.
• When positioning racks, the easy glide rack can be
placed in any position except position 1. The fullextension bottom rack was specifically designed to be
placed in position 1.
Use dry pot holders when handling oven racks. Racks
become hot when the oven is on and hold heat after it
is turned off.
Oven rack guide removal. Oven rack positions and full
extension bottom rack.
Page 13

E Series Oven Operation 13
wolfappliance.com
Bake Mode
n bake mode, both the hidden bake element and the broil
I
element are used to heat the air, and they cycle on and off
to maintain temperature. This mode is best for single-rack
cooking, primarily baked foods. Always use bake mode for
your standard recipes. The temperature probe may be
used in this mode.
Refer to the Wolf cooking guide on pages 34–36. Use
cooking times as a guide for similar foods.
WOLF TIPS FOR SUCCESS
• Always preheat for bake mode.
• During preheat, convection fans (if applicable) and
elements are used to quickly and uniformly heat the
oven.
• Use only one rack.
• Allow at least 1"
(25) between edge of pan and walls of
oven.
• Size, shape and finish of cookware affects baking time.
• Food cooked in dark metal pans cook somewhat faster
than food cooked in shiny pans.
• Dark, nonstick pan coatings brown more than light,
nonstick coatings.
• Use the interior oven light and window to check
browning. Limit frequent door openings to prevent
losing heat and lengthening total cooking time.
SETTING CONTROLS
1) Touch BAKE. For double ovens, this will turn on upper
oven. To turn on lower oven, first touch the
UPPER/LOWER touch pad so that the lower oven icon
is selected in the control panel display. Then touch
BAKE.
2) Oven temperature is preset at 350°F
(175°C). Oven
begins to heat after 10 seconds. To change oven
temperature from the default temperature of 350°F
(175°C), immediately enter another temperature using
the number pads.
3) Touch CLEAR once to clear the oven temperature
setting; touch CLEAR twice to return the oven to the
time-of-day display.
4) Touch ENTER to start the cooking mode immediately,
otherwise the oven will automatically start the mode in
10 seconds if there is no action.
5) Add food when the chime signals that the oven has
reached preheat temperature.
6) If the temperature probe is used (upper oven only),
follow temperature probe feature directions on
pages 26–27.
7) If the timer is set, the oven will chime when the cooking
time is finished. If the timer is not cleared, it will
continue to chime every 10 seconds.
8) Remove food. Always use dry pot holders when
removing hot pans from the oven.
Do not place cookware on oven floor or use aluminum
foil or other material to line the oven floor or side walls.
Failure to adhere to this notice will damage the porcelain and will void your warranty.
9) Touch oven OFF to end this mode.
Page 14

E Series Oven Operation 14
Roast Mode
n roast mode, both bake and broil elements are used to
I
heat the air, and they cycle on and off to maintain temperature. This is designed especially for roasting less tender
cuts of meat that should be covered, such as chuck
roasts, lamb shanks, pot roasts and stew meat. The
temperature probe may be used in this mode.
Refer to the Wolf cooking guide on pages 34–36. Use
cooking times as a guide for similar foods.
WOLF TIPS FOR SUCCESS
SETTING CONTROLS
1) Touch ROAST. For double ovens, this will turn on upper
oven. To turn on lower oven, first touch the
UPPER/LOWER touch pad so that the lower oven icon
is selected in the control panel display. Then touch
ROAST.
2) Oven temperature is preset at 350°F
(175°C). Oven
begins to heat after ten seconds. To change oven
temperature from 350°F
(175°C), immediately enter
another temperature using the number pads.
• Always preheat for roast mode.
• During preheat, convection fans and elements are used
to quickly and uniformly heat the oven.
• Roasting bags may be used.
• When roasting a large item, such as a turkey, the pan
should not cover the entire rack and block heat from
circulating naturally.
• Cook stuffed turkeys weighing over 15 lbs
(6.8 kg) in
roast mode. Always cook stuffing to an internal
temperature of 165°F
(75°C).
3) Touch ENTER to start the cooking mode immediately,
otherwise the oven will automatically start the mode in
10 seconds if there is no action.
4) Add food when the chime signals that the oven has
reached preheat temperature.
5) If the temperature probe is used, follow temperature
probe feature directions and USDA temperature
recommendations on pages 26–27.
6) If the timer is set, the oven will chime when the cooking
time is finished. If the timer is not cleared, it will
continue to chime every 10 seconds.
7) Remove food. Always use dry pot holders when
removing hot pans from the oven.
8) Touch oven OFF to end this mode.
Page 15

E Series Oven Operation 15
wolfappliance.com
Broil Mode
n broil mode, the top heating element is used to produce
I
an intense, radiant heat that browns one side of the food
at a time.
Broiled foods usually must be turned over to brown the
other side and finish cooking. The high heat cooks quickly
and gives a rich, brown outer appearance. This mode is
best for meats, fish and poultry pieces up to 1"
(25) thick.
The temperature probe cannot be used with this mode.
Refer to the Wolf cooking guide on pages 34–36. Use
cooking times as a guide for similar foods.
WOLF TIPS FOR SUCCESS
• Do not preheat for broil mode.
• Broil with oven door closed.
• Preferred for meat, fish and poultry pieces equal to or
less than 1"
(25) thick.
• Always use the two-piece broiler pan shipped with your
oven. Always use slotted top grid of broiler pan. It
allows fat to drip away from food and from intense
radiant heat. This reduces spattering, smoking and risk
of fire.
• Turn food halfway through cooking time.
SETTING CONTROLS
1) Place food in oven at the desired rack position. Close
oven door.
2) Touch BROIL. For double ovens, this will turn on upper
oven. To turn on lower oven, first touch the
UPPER/LOWER touch pad so that the lower oven icon
is selected in the control panel display. Then touch
BROIL.
3) Oven temperature is preset at 1 for 550°F
(290°C),
high broil. Oven begins to broil after five seconds. To
change setting, immediately touch number pad 2 for
medium broil, 450°F
(175°C).
(230°C) or 3 for low broil, 350°F
4) Touch ENTER to start the cooking mode immediately,
otherwise the oven will automatically start the mode in
10 seconds if there is no action.
5) If the timer is set, the oven will chime when the cooking
time is finished. If the timer is not cleared, it will
continue to chime every 10 seconds.
6) Remove food. Always use dry pot holders when
removing hot pans from the oven.
7) Touch oven OFF to end this mode.
• Brush lean meat and fish with peanut oil before
cooking to prevent sticking.
• Start cooking poultry with skin side down.
• Begin with cold food directly from the refrigerator.
When turning food or checking doneness, open the
door carefully. Smoke and steam may have accumulated. Never use heatproof glass (e.g. Pyrex) or pottery.
They can shatter.
Page 16

E Series Oven Operation 16
Convection Bake Mode
IMPORTANT NOTE: F
mode can only be used in the upper oven.
Convection bake mode combines heat from two convection elements with some heat from the bake element that
is located beneath the oven floor. Two convection fans
circulate this heat within the oven cavity. The added heat
source from the bottom of the oven makes this mode ideal
for pie baking. The temperature probe may be used in this
mode.
Refer to the Wolf cooking guide on pages 34–36. Use
cooking times as a guide for similar foods.
WOLF TIPS FOR SUCCESS
• Always preheat for convection bake mode.
• Reduce standard recipe temperatures by 25° in this
mode.
• Bake multiple pies on the same rack, rather than on
different racks.
• This mode is ideal for single rack baking.
or double ovens, convection bake
SETTING CONTROLS
1) Touch BAKE.
2) Oven temperature is preset at 375°F
begins to heat after five seconds. To change oven
temperature from 375°F
another temperature using the number pads.
3) Touch ENTER to start the cooking mode immediately,
otherwise the oven will automatically start the mode in
10 seconds if there is no action.
4) Add food when the chime signals that the oven has
reached preheat temperature.
5) If the temperature probe is used, follow temperature
probe feature directions on pages 26–27.
6) If the timer is set, the oven will chime when the cooking
time is finished. If the timer is not cleared, it will
continue to chime every 10 seconds.
7) Remove food. Always use dry pot holders when
removing hot pans from the oven.
8) Touch oven OFF to end this mode.
(190°C), immediately enter
(190°C). Oven
Page 17

E Series Oven Operation 17
wolfappliance.com
Convection Roast Mode
IMPORTANT NOTE: F
or double ovens, convection roast
mode can only be used in the upper oven.
In convection roast mode, heat from both convection fans,
with additional heat from the broil element, intensifies the
convective and radiant heating. This combination gently
browns the exterior and seals in juices, making it perfect
for roasting tender cuts of beef, lamb, pork and poultry.
The temperature probe may be used in this mode.
Refer to the Wolf cooking guide on pages 34–36. Use
cooking times as a guide for similar foods.
WOLF TIPS FOR SUCCESS
• Always preheat oven for convection roast mode.
• Use low-sided, uncovered pans on a roast rack to cook
food.
• Reduce standard recipe temperatures by 25° in this
mode.
• The lower part of the broiler pan with a meat rack
makes an excellent roasting pan.
• Roasting time may be less than expected; check
doneness earlier than usual.
SETTING CONTROLS
1) Touch ROAST. Oven temperature is preset at
325°F
(165°C). Oven begins to heat after five seconds.
To change oven temperature from 325°F
(165°C),
immediately enter another temperature using the
number pads.
2) Touch ENTER to start the cooking mode immediately,
otherwise the oven will automatically start the mode in
10 seconds if there is no action.
3) Add food when the chime signals that the oven has
reached preheat temperature.
4) If the temperature probe is used, follow temperature
probe feature directions and USDA temperature
recommendations on pages 26–27.
5) If the timer is set, the oven will chime when the cooking
time is finished. If the timer is not cleared, it will
continue to chime every 10 seconds.
6) Remove food. Always use dry pot holders when
removing hot pans from the oven.
7) Touch oven OFF to end this mode.
• Select foods that are to be roasted uncovered.
• Begin with cold food directly from the refrigerator.
• Cook stuffed turkeys weighing over 15 lbs
(6.8 kg) in
Roast mode. Always cook stuffing to an internal
temperature of 165°F
(75°C).
Page 18

E Series Oven Operation 18
Convection Broil Mode
IMPORTANT NOTE: F
or double ovens, convection broil
mode can only be used in the upper oven.
In convection broil mode, intense radiant heat from the top
element browns and sears the surface of the food while
both convection fans circulate hot air around the food.
This mode shortens broiling times for thicker cuts of meat,
fish and poultry. The heat of the broiler browns the
exterior, while the convection fans keep the interior moist
and juicy. The temperature probe cannot be used with this
mode.
Refer to the Wolf cooking guide on pages 34–36. Use
cooking times as a guide for similar foods.
WOLF TIPS FOR SUCCESS
• Do not preheat for convection broil mode.
• Convection broil with oven door closed.
• Preferred for meat, fish and poultry pieces thicker than
1"
(25).
• Always use the two-piece broiler pan packaged with
your oven. Always use slotted top grid of broiler pan.
It allows fat to drip away from food and from intense
radiant heat. This reduces spattering, smoking and risk
of fire.
SETTING CONTROLS
1) Place food in oven at the desired rack position. Close
oven door.
2) Touch BROIL. Oven temperature is preset at 1 for
550°F
(290°C), high broil. Oven begins to broil after five
seconds. To change setting, immediately touch number
pad 2 for medium broil, 450°F
350°F
(175°C).
(230°C) or 3 for low broil,
3) Touch ENTER to start the cooking mode immediately,
otherwise the oven will automatically start the mode in
10 seconds if there is no action.
4) If the timer is set, the oven will chime when the cooking
time is finished. If the timer is not cleared, it will
continue to chime every 10 seconds.
5) Remove food. Always use dry pot holders when
removing hot pans from the oven.
6) Touch oven OFF to end this mode.
When turning food or checking doneness, open the
door carefully. Smoke and steam may have accumulated. Never use heatproof glass (e.g. Pyrex) or pottery.
They can shatter.
• Turn food halfway through cooking time.
• Brush lean meat and fish with peanut oil before
cooking to prevent sticking.
• Start cooking poultry with skin side down.
• Begin with cold food directly from the refrigerator.
Page 19

E Series Oven Operation 19
wolfappliance.com
Convection Mode
IMPORTANT NOTE: F
or double ovens, convection mode
can only be used in the upper oven.
In convection mode, dual convection fans, each with a
heating element, operate from the back of the oven to
move the heated air throughout the entire oven cavity.
Uniform air movement makes it possible to multi-level
rack cook in this mode. The heat is cycled on and off to
maintain the temperature, resulting in evenly browned
food. The temperature probe may be used in this mode.
Refer to the Wolf cooking guide on pages 34–36. Use
cooking times as a guide for similar foods.
WOLF TIPS FOR SUCCESS
• Always preheat for convection mode.
• Use low-sided, uncovered pans to cook foods.
• A 14"
(356) x 16" (406) baking sheet is an optimum size.
Allow at least 1"
(25) between edge of pan and walls of
oven.
• Reduce standard recipe temperatures by 25° in this
mode.
SETTING CONTROLS
1) Touch CONV.
2) Oven temperature is preset at 325°F
(165°C). Oven
begins to heat after five seconds. To change oven
temperature from 325°F
(165°C), immediately enter
another temperature using the number pads.
3) Touch ENTER to start the cooking mode immediately,
otherwise the oven will automatically start the mode in
10 seconds if there is no action.
4) Add food when the chime signals that the oven has
reached preheat temperature.
5) If the temperature probe is used, follow temperature
probe feature directions on pages 26–27.
6) If the timer is set, the oven will chime when the cooking
time is finished. If the timer is not cleared, it will
continue to chime every 10 seconds.
7) Remove food. Always use dry pot holders when
removing hot pans from the oven.
8) Touch oven OFF to end this mode.
• Pans do not need to be staggered when cooking on
more than one rack.
• Baking time may be less than expected; check
doneness 5 to 10 minutes early.
Page 20

E Series Oven Operation 20
Proof Mode
n proof mode, a combination of broil and bake elements
I
are used to heat and balance the air to maintain temperature. This mode is ideal for proofing, or rising bread dough.
WOLF TIPS FOR SUCCESS
• No need to preheat for proof mode.
• Proof bread until dough has doubled in bulk.
• For best results, place a shallow pan with 1 to 3 cups
(.2–.7 L) boiling hot water on rack position 1 to keep the
air moist inside the oven cavity.
• The oven does not allow the temperature to be set
above 110°F
(45°C) in proof mode. If the oven is too
hot, the oven door should be opened to allow the oven
to cool down below 120°F
(50°C) to prevent destroying
the yeast.
• Allow at least 1"
(25) between edge of pan and walls of
oven.
• Limit frequent door openings to prevent losing heat
and lengthening proofing time.
SETTING CONTROLS
1) Place dough in oven-safe dish in oven.
2) Touch PROOF.
3) Oven temperature is preset to 85°F
(30°C). Touch
ENTER on the control panel. To change the temperature from 85°F
(30°C), immediately touch another
temperature using the number pads. The maximum
temperature in proof mode is 110°F
(45°C).
4) If the timer is set, the oven will chime when the cooking
time is finished. If the timer is not cleared, it will
continue to chime every 10 seconds.
5) Remove food. Always use dry pot holders when
removing hot pans from the oven.
6) Touch oven OFF to end this mode.
Do not place cookware on oven floor or use aluminum
foil or other material to line the oven floor or side walls.
Failure to adhere to this notice will damage the porcelain and will void your warranty.
Page 21
E Series Oven Operation 21
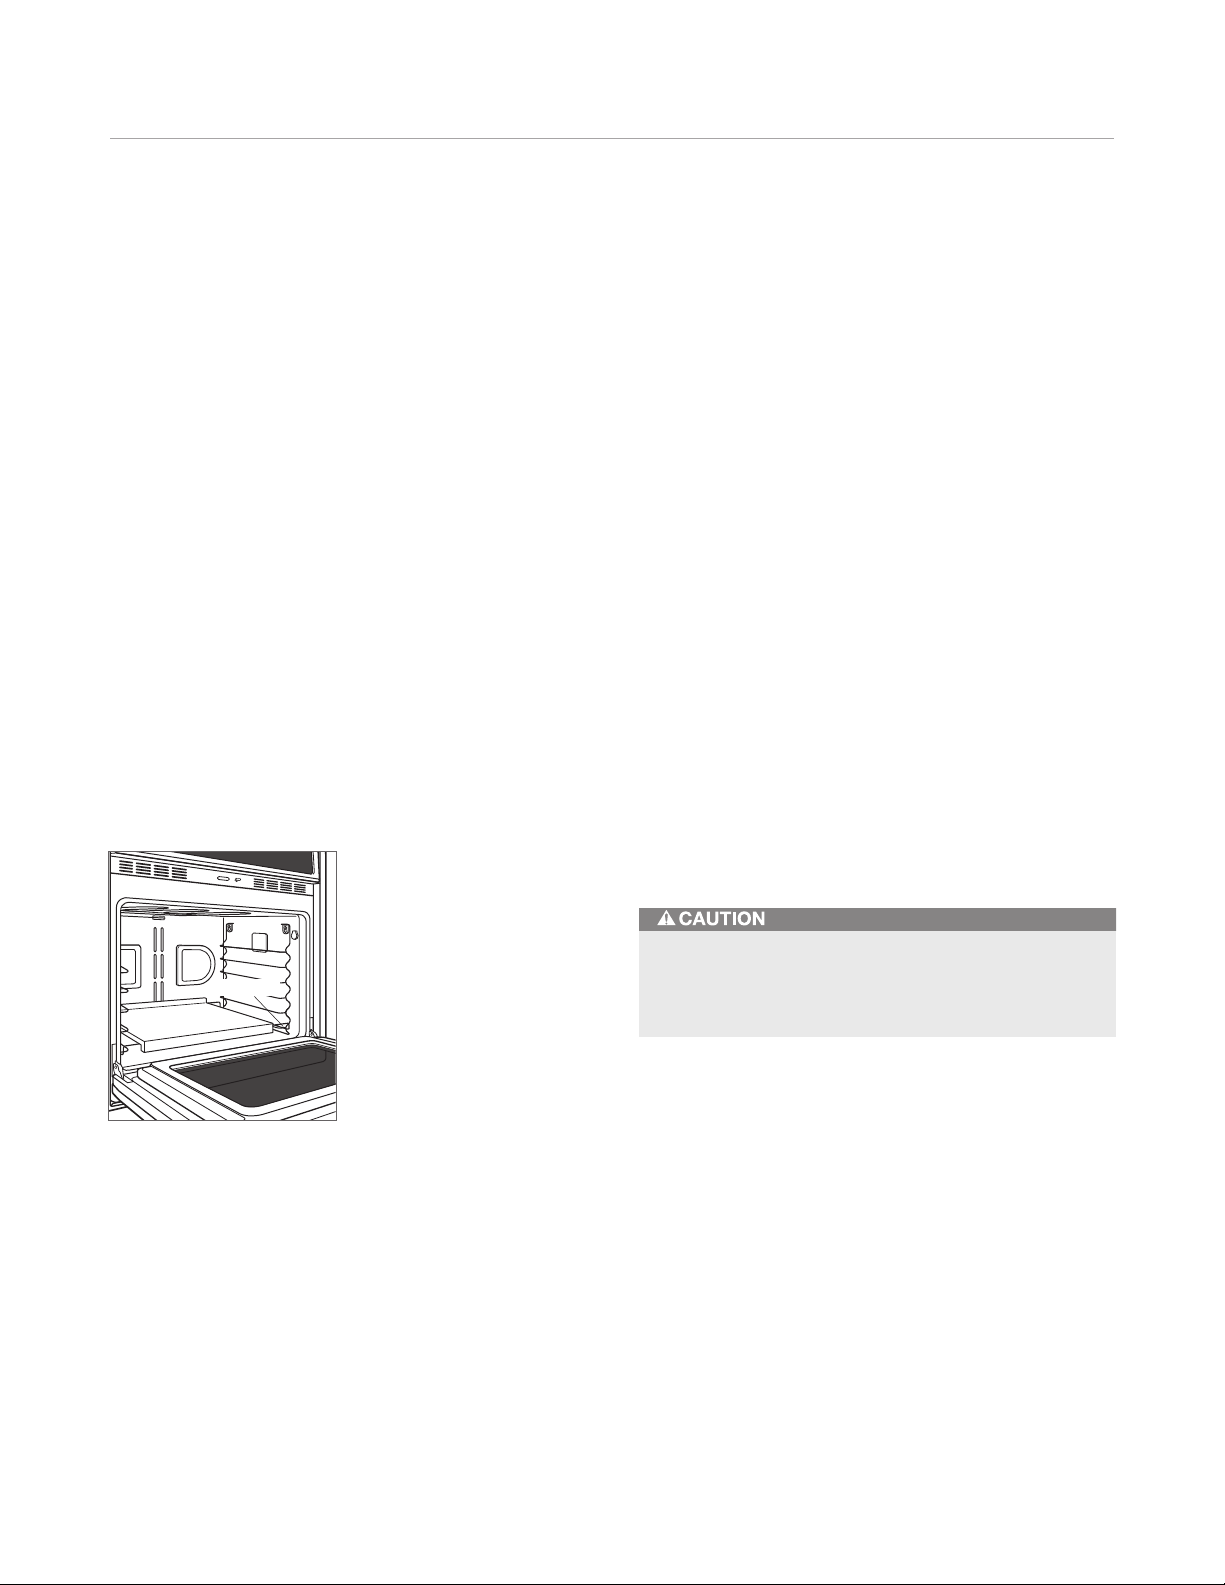
BAKE STONE
POSITION 1
wolfappliance.com
Bake Stone Mode
specially designed rack and bake stone are used for
A
bake stone mode to assure the food quality expected from
this specific form of cooking. To produce a hot oven environment necessary for baking on a ceramic stone, the
heat from all elements creates the perfect “brick oven”
effect. Both convection fans help circulate the air throughout the oven cavity, so even temperatures are achieved.
The temperature probe may be used in this mode.
To prepare the oven, remove all oven racks. Slide the bake
stone rack onto rack guide position 1 and place the bake
stone on the rack with the lip hanging over front edge of
rack. Refer to the illustration below. Preheat the oven for
approximately 35 minutes when using bake stone mode.
IMPORTANT NOTE: Use care in handling the bake stone.
It will chip or break if dropped.
Refer to the Wolf cooking guide on pages 34–36. Use
cooking times as a guide for similar foods.
WOLF TIPS FOR SUCCESS
• Always preheat for bake stone mode after positioning
the oven rack and ceramic stone. Allow approximately
35 minutes for this function to reach the set oven
temperature. For best results, preheat oven for one
hour before adding food.
• During preheat, convection fans and all elements are
used to quickly and uniformly heat the oven.
• Use only the Wolf bake stone in bake stone mode.
• Use only one bake stone rack per oven.
• Food is usually cooked directly on the stone. To
prevent sticking, apply plenty of cornmeal or flour to
the bottom of the food.
• When baking a series of breads or pizzas in a row,
allow 5 minutes between foods for the bake stone to
return to the proper temperature.
• Bake stone and rack should be removed after baking
and not left in oven during any of the other cooking
modes.
Avoid cooking foods with a high fat content on the
bake stone. The porous ceramic material will absorb
grease and discolor the stone. Flare-ups can occur.
Bake stone placement.
Page 22

E Series Oven Operation 22
Bake Stone Mode
SETTING CONTROLS
1) Touch STONE.
2) Oven temperature is preset at 400°F
begins to heat after five seconds. To change oven
temperature from 400°F
another temperature using the number pads.
3) Touch ENTER to start the cooking mode immediately,
otherwise the oven will automatically start the mode in
10 seconds if there is no action.
4) Add food when the chime signals that the oven has
reached preheat temperature.
5) If the temperature probe is used, follow temperature
probe feature directions on pages 26–27.
6) If the timer is set, the oven will chime when the cooking
time is finished. If the timer is not cleared, it will
continue to chime every 10 seconds.
7) Remove food. Always use dry pot holders when
removing hot pans from the oven.
8) Touch oven OFF to end this mode.
(205°C), immediately enter
(205°C). Oven
BAKE STONE ACCESSORY
The bake stone accessory is available through your
authorized Wolf dealer. For local dealer information,
visit the find a showroom section of our website,
wolfappliance.com. Additional use & care information is
provided with the bake stone accessory.
BAKE STONE CARE
Remove excessive food using a scraper. Brush off any
crumbs. Allow the stone to cool completely before wiping
with a wet cloth. Wet cloths on a hot surface can cause
steam burns. Do not soak or immerse the bake stone in
water and do not use soap or detergent. The ceramic
stone could absorb the taste and transmit those flavors to
the food.
Stubborn stains may occur on the bake stone. These will
not impair the flavor of the food being baked.
Allow the bake stone to cool completely before removing
from oven.
IMPORTANT NOTE: Use care in handling the bake stone. It
will chip or break if dropped.
Allow the bake stone to cool completely before wiping
with a wet cloth. Wet cloths on a hot surface can cause
steam burns.
Page 23

E Series Oven Operation 23
wolfappliance.com
Dehydration Mode
IMPORTANT NOTE: F
can only be used in the upper oven.
Dehydration mode allows for slowly drying out food for
preservation and other cooking uses. Use the convection
mode for dehydration. Wolf accessory dehydration racks
(not included with the oven) are required. This mode is
suitable for drying a variety of fruits, vegetables, herbs
and meat strips. Refer to the dehydration guide on the
following page.
IMPORTANT NOTE: As a safety feature, the E series oven
will shut off after 12 hours. Dehydration mode overrides
the 12-hour shut off.
DEHYDRATION ACCESSORY
Dehydration racks are available through your authorized
Wolf dealer. For local dealer information, visit the find a
showroom section of our website, wolfappliance.com.
Additional instructions are provided with the dehydration
rack accessory.
WOLF TIPS FOR SUCCESS
or double ovens, dehydration mode
SETTING CONTROLS
1) Place food in oven on dehydration racks.
2) Place door stop (supplied with accessory package)
in the proper position to keep oven door open. Refer to
instructions provided with the accessory kit.
3) Touch DEHYD.
4) Oven preset temperature is 135°F
the temperature setting, immediately touch another
temperature, 110°F
number pads.
5) Leave food in the oven until completely dry to the
touch.
6) Remove food from racks before completely cool for
easy removal. If excessive sticking occurs, place
dehydration trays back in the oven to warm slightly for
easier removal.
7) Touch oven OFF to end this mode.
(45°C) to 160°F (70°C), using the
(60°C). To change
• Do not preheat when using dehydration mode.
• Multiple racks can be used simultaneously.
• Some foods require as many as 14 to 15 hours to fully
dehydrate.
• Consult a food preservation book for specific times
and handling of various foods.
Page 24

E Series Oven Operation 24
Dehydration Mode
DEHYDRATION GUIDE
The following is a list of foods commonly dehydrated. Use
dehydration times as a guide for similar foods. Place food
on dehydration racks with no overlapping. Oven preset
temperature for dehydration is 135°F
(60°C).
• Apples
1
Slice
/4" (6) thick. Remove seeds and stems.
Dehydrate 6–7 hours.
• Bananas
1
Slice
/4" (6) thick. Dehydrate 12–13 hours.
• Green Bell Peppers
Wash, seed and stem. Slice
1"
(25) x 2" (51) chunks. Dehydrate 14–15 hours.
1
/4" (6) thick or into
• Tomato Slices
Wash, seed and stem. Slice
1
/4" (6) thick. Dehydrate
6–7 hours.
• Tomato Chunks
Wash, seed and stem. Cut each tomato into 16 equal
pieces. Dehydrate 12–13 hours.
Foods must be dried to below .60 water activity or
dry to the touch to be safely stored with no danger of
mold, yeasts or bacteria growing. When in doubt,
dehydrate for the maximum time specified.
Page 25

E Series Oven Operation 25
wolfappliance.com
Delayed Start Feature
elayed start feature controls the automatic timing of the
D
oven’s ON and OFF function. Set a mode to start later in
the day and shut off when the cooking is complete or set it
to shut off at a preset time. Use in combination with any
cooking mode except broil, convection broil and bake
stone.
WOLF TIPS FOR SUCCESS
• Ovens can be set independently.
• Do not delay the start when preheating is critical to the
cooking results.
• When using the delayed start feature, place food
directly from the refrigerator into the oven.
• The time-of-day clock must display the correct time
prior to programming a timed activity.
SETTING CONTROLS
1) Touch cooking mode (except BROIL, CONVECTION
BROIL and BAKE STONE). For double ovens, this will
turn on upper oven. To turn on lower oven, first touch
the UPPER/LOWER touch pad so that the lower oven
icon is selected in the control panel display. Then
touch desired mode. Note that some cooking modes
are not available for lower oven. Change preset
temperature if needed.
2) Touch TIMED COOK. Use the number pads to set the
number of hours /minutes the oven will stay on (COOK
DURATION). Example: Set 3:30 for the oven to remain
on for 3
1
/2 hours.
3) When prompted, use the number pads to set the time
of day the oven will shut off (STOP TIME). Example:
Set 6:00 for the time of day the oven turns off.
FOOD SAFETY GUIDELINES
Food safety is important. Adhere to the following
guidelines to avoid potential illness or spoilage of food:
• Perishable food should not be left out more than 2
hours at room temperature; 1 hour when the temperature is above 90°F
(30°C). For more information, see
www.usda.com.
• Avoid using foods that will spoil before the cooking
cycle begins. These include eggs, dairy products,
cream soups, cooked and uncooked meats, poultry
and fish.
• If cooking will not begin immediately, place only very
cold or frozen food into the oven.
4) Touch ENTER. The display appears as if the oven is on.
Using the example above, heating will start at 3
1
/2
hours prior to six o’clock which will be 2:30 on the
time-of-day clock.
5) One audible chime will sound when the cooking time is
complete. If the timer is not cleared, it will continue to
chime every 10 seconds.
6) The oven will shut off after the STOP TIME has been
reached.
7) Remove food. Always use dry pot holders when
removing hot pans from the oven.
8) Touch oven OFF to clear the display and stop the
signal.
Page 26

E Series Oven Operation 26
Temperature Probe Feature
IMPORTANT NOTE: F
or double ovens, temperature probe
feature can only be used in the upper oven.
The temperature probe measures doneness by measuring
the internal temperature of food without opening the oven
door. It is a convenient and accurate way to achieve the
perfect doneness regardless of the type, cut or weight of
the food. Calculating a total cooking time by weight is no
longer necessary using this feature. Use with all modes
except broil and convection broil modes.
IMPORTANT NOTE: The accuracy of the probe is
decreased for all temperatures below 100°F
(40°C).
Food taken directly from the refrigerator could display the
incorrect temperature until it has reached 100°F
(40°C).
WOLF TIPS FOR SUCCESS
• Insert sensor into the thickest part of meat before
placing in oven.
• To determine the center, hold sensor outside of the
meat with point at center of cut. Mark length of insertion by placing your fingers on sensor at top of meat.
Move sensor to thickest part of meat and insert up to
your fingers.
INTERNAL TEMPERATURE
The internal temperatures shown in the chart below are
USDA recommended carving temperatures.
INTERNAL TEMPERATURE
DONENESS INTERNAL TEMP
BEEF, LAMB AND VEAL
Rare 140°F
Medium Rare 145°F (
Medium 160°F (
Well Done 170°F (75°C)
PORK
Well Done 170°F (
POULTRY
Well Done Breast 170°F
Well Done Thigh 180°F (80°C)
Well Done Stuffing 165°F (75°C)
(60°C)
65°C)
70°C)
75°C)
(75°C)
• Standing time refers to the 10- to 15-minute time
period the meat rests before being carved. This helps
more juices to be retained in the meat.
• For poultry, insert probe into the thickest part of the
thigh.
• Use aluminum foil to cover meat during the standing
time to help keep it hot before carving.
• Wash probe by hand; do not soak or clean in the
dishwasher.
Page 27

E Series Oven Operation 27
wolfappliance.com
Temperature Probe Feature
SETTING CONTROLS FOR MEATS
1) Preheat oven to desired oven temperature in desired
mode.
2) Place meat on a rack in the roasting pan. Insert the
probe sensor into the thickest part of the meat as
described in tips for success on the previous page.
3) When the oven signals that preheat is completed, use
a dry pot holder to lift the probe sensor cover. Slide the
probe connector into the receptacle on the wall of the
oven until it snaps into place. Close the oven door.
4) Touch TEMP PROBE. Touch number pads for the
carving temperature of the meat. It is recommended to
allow meat to rest before carving.
5) Touch ENTER. If ENTER is not touched, the oven will
automatically start the temperature probe feature in 8
seconds. The control panel display shows the oven
temperature and the rising probe temperature counting
up to the doneness setting.
6) When the carving temperature is reached, two chimes
will signal. Remove probe from the oven receptacle.
The chime continues every 10 seconds until the probe
is unplugged or until you touch CLEAR.
7) To end this feature and turn the oven off, touch oven
OFF.
SETTING CONTROLS FOR BREADS
1) Preheat oven to desired oven temperature in bake or
bake stone mode.
2) Place bread on bake stone or in oven in bread pans.
3) Bake 10 minutes at the desired oven temperature.
4) Insert probe sensor into the thickest part of the bread.
5) Using a dry pot holder, lift the probe sensor cover.
Slide the probe connector into the receptacle on the
wall of the oven until it snaps into place. Close the
oven door.
6) Touch TEMP PROBE. Touch number pads for the end
internal baking temperature 195°F
(100°C).
7) Touch ENTER. The control panel display shows the
oven temperature and the rising probe temperature
counting up to the doneness setting.
8) When the carving temperature is reached, two chimes
will signal. Remove probe from the oven receptacle.
The chime continues every 10 seconds until the probe
is unplugged or until you touch CLEAR.
9) To end this feature and turn the oven off, touch oven
OFF.
(90°C) to 210°F
IMPORTANT NOTE: If the probe connector is not fully
seated into the probe receptacle, you will hear an audible
signal, and ‘PROBE SHORTED’ will show in the control
panel display. Refer to the troubleshooting guide on
page 37.
Probe and probe sensor cover become very hot.
Handle with a dry pot holder.
Page 28

E Series Oven Operation 28
Timed Cook Feature
imed cook feature allows the oven to shut off automati-
T
cally when cooking is complete. Use in combination with
any cooking mode except broil, convection broil and bake
stone.
SETTING CONTROLS
1) Touch cooking mode, such as BAKE. Change preset
temperature if needed.
For double ovens, this will turn on upper oven. To turn
on lower oven, first touch the UPPER/LOWER touch
pad so that the lower oven icon is selected in the
control panel display. Then touch desired mode.
2) Touch TIMED COOK. Use the number pads to set the
number of hours /minutes the oven is to stay on.
3) Touch ENTER. Oven begins to heat after five seconds.
Stop time will automatically be added to the display.
At the end of cook time, oven turns off.
4) Touch oven OFF or CLEAR to clear the display.
Sabbath Feature
STAR-K CERTIFIED
Sabbath feature allows for baking or keeping food warm
while adhering to the “no work” requirements on religious
Sabbath days. It provides an unchanging heat source for
an uninterrupted extended period of time. Once the oven
reaches its desired temperature, it does not change. Use
this feature only in the bake and roast modes.
While in Sabbath mode, the oven will stay on indefinitely
until manually turned off. Oven temperature may be
adjusted, but the display will remain unchanged. Lights
stay either on or off, all chimes are turned off and heating
cycles are not interrupted by opening the door.
For double ovens, ovens can be set independently, though
both ovens will be set in Sabbath feature. Each oven can
have options individually set such as temperature and
lights.
IMPORTANT NOTE: As a safety feature, the E series oven
will shut off after 12 hours. Sabbath feature overrides the
12-hour shut off.
IMPORTANT NOTE: After a power outage, the oven will
not return to the Sabbath feature settings.
Page 29

E Series Oven Operation 29
wolfappliance.com
Sabbath Feature
SETTING CONTROLS
1) Touch OVEN LIGHT, turning on the lights in one or both
ovens (optional).
2) Touch BAKE or ROAST. Oven is preset at 350°F
(175°C).
To change oven temperature, immediately enter
another temperature using number pads.
3) Touch ENTER. If preferred, repeat the above steps with
other oven.
4) Touch and hold ENTER for five seconds to set to
Sabbath. ‘SABBATH’ appears in the control panel
display.
5) Touch oven OFF to end this feature. Oven remains on
until this feature is cancelled.
EXAMPLE: To set Sabbath feature in a double oven with
upper oven in roast mode set at 240°F
oven in bake mode set at 200°F
(115°C) and lower
(95°C).
• To set upper oven: Touch ROAST. Enter 2-4-0 using the
number pads. Touch ENTER.
• To set lower oven: Touch the UPPER/LOWER touch
pad to select the lower oven. Touch BAKE. Enter 2-0-0
using the number pads. Touch ENTER.
SETTING CONTROLS FOR TIMED COOK
1) Add food to the oven.
2) Touch oven ON.
3) Touch BAKE or ROAST. Oven is preset at 350°F
(175°C).
To change oven temperature, immediately enter
another temperature using number pads.
4) Touch TIMED COOK. Use the number pads to set the
number of hours /minutes the oven will stay on.
Example: Set 3:30 for the oven to remain on for 3
1
/2
hours.
5) Touch STOP TIME. Use the number pads to set the
time of day the oven will shut off.
6) Touch OVEN LIGHT on or off as desired.
7) Touch and hold ENTER for five seconds. ‘SABBATH’
will appear in the control panel display.
8) When the food is finished, remove the food. Oven
remains unable to be reset until the Sabbath feature is
ended.
9) After the Sabbath or holiday is over, touch oven OFF to
end this feature.
• Touch and hold ENTER for five seconds to enter
Sabbath feature.
• Touch single or double oven OFF to end this feature.
Oven(s) remain on until the feature is cancelled.
Page 30
E Series Oven Operation 30
Self-Clean Feature
ith the self-clean feature, the oven is heated in gradu-
W
ated steps to a high preset temperature. During this
process, food soil is burned off, leaving some white ash
residue. For safety, the oven door automatically locks
during self-clean and unlocks when the oven has cooled
to below 300°F
before completion, the door will remain locked until the
oven has cooled sufficiently. Oven lights are deactivated
during self-clean.
Set in combination with delayed start feature, the selfclean feature can be programmed to start at a later time.
Refer to delayed start feature on page 25.
IMPORTANT NOTE: For a double oven, the self-clean
feature may be used in only one oven at a time and the
other oven cannot be used for cooking.
IMPORTANT NOTE: Before using the self-clean feature,
remove all oven racks and rack guides. They will discolor
if left in the oven during self-clean. Refer to oven racks on
page 12.
IMPORTANT NOTE: Never use oven cleaners. They are not
necessary with the self-clean feature.
(150°C). If you stop the self-clean cycle
ou may hear a popping or crackling sound during the
Y
self-clean cycle. These sounds are normal and are caused
by the expansion and contraction of metal surfaces as
they heat up and cool down. It is also normal to see a brief
flame-up, depending on the amount and content of the
soil.
IMPORTANT NOTE: A small amount of smoke and odor
may be noticed during the first self-clean cycle, as
residual oil and grease used during the manufacturing
process is burned off.
Do not use commercial oven cleaners or oven liner
protective coatings on or around any part of the oven.
The oven gasket is important for a good seal. Do not
hand clean, rub, puncture or remove this gasket.
Never wipe a warm or hot porcelain surface with a
damp sponge. It may cause chipping or crazing (tiny
hairlike lines).
Page 31

E Series Oven Operation 31
wolfappliance.com
Self-Clean Feature
WOLF TIPS FOR SUCCESS
• Before using the self-clean feature, remove the oven
racks and rack guides. They will discolor if left in the
oven during self-clean.
• Remove broiler pan and any other utensil stored inside
the oven.
• Remove any food particles and grease from spillovers
before starting self-clean.
• Food with high sugar or acid content, such as fruit
juice, milk and tomatoes, may cause a permanent dull
spot. Wipe up immediately or remove with a razor
blade scraper before using the self-clean feature.
• Use the self-clean feature as often as necessary.
Do not wait until heavy soil accumulates.
• After the self-clean cycle is complete and the oven has
cooled, use a damp sponge or paper towel to wipe up
any ash.
SETTING CONTROLS
1) Remove all oven racks and rack guides before self-
cleaning.
2) Touch SELF CLEAN. For double ovens, this will start
self-clean for upper oven. To self-clean lower oven,
first touch the UPPER/LOWER touch pad so that the
lower oven icon is selected in the control panel display.
Then touch SELF CLEAN. The control panel will automatically scroll the following message: REMOVE ALL
RACKS AND RACK GUIDES. PRESS ENTER.
3) Touch ENTER to start the default clean for a total time
of 3 hours; self-clean for 2 hours and cool down for
1 hour.
4) The cleaning time can be adjusted to any amount of
time between 2
then enter the clean time. For best results, the cleaning
time should be set at 4 hours.
5) Enter the desired stop time and touch ENTER. The
oven will automatically start and stop based on the
desired cleaning time and stop time.
1
/2 and 4 hours. Touch TIMED COOK,
6) Touch desired oven OFF to clear the display when
oven is finished cleaning.
During self-clean, exterior surfaces may get hotter than
usual. Children should be kept away.
Page 32
E Series Oven Care 32
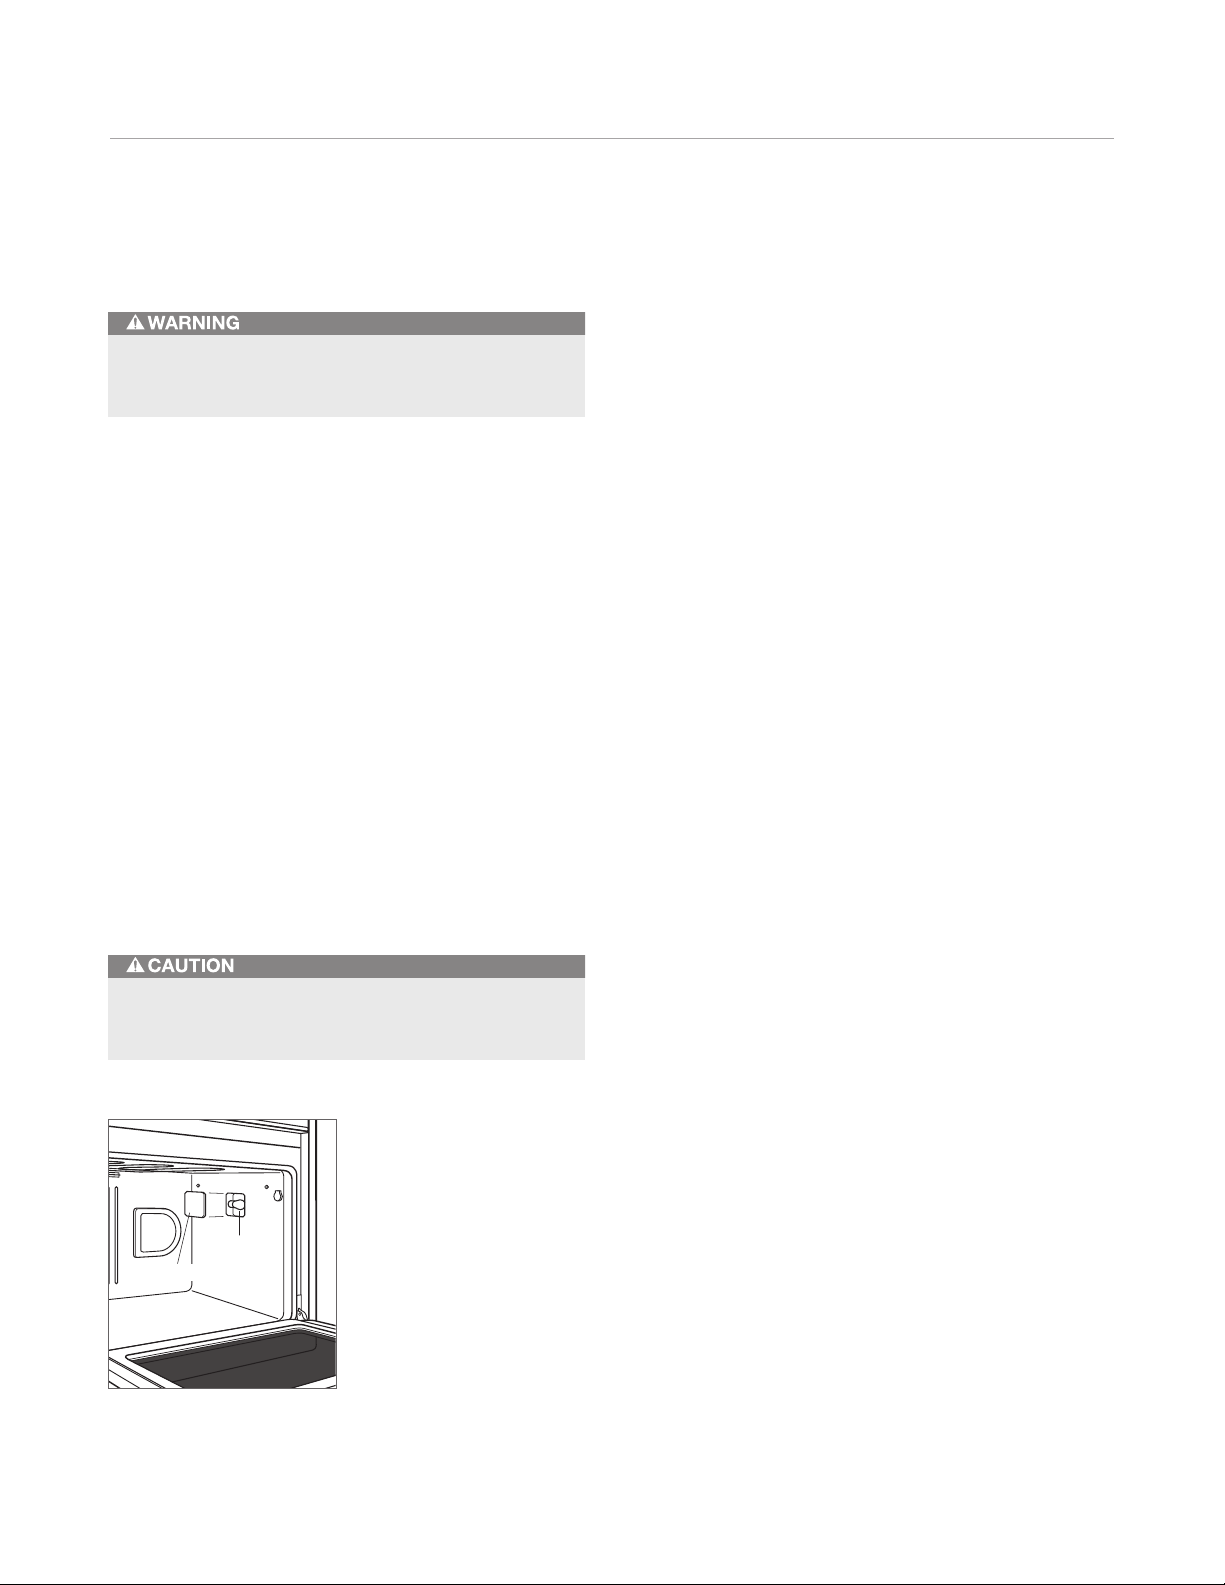
LIGHT BULB
LIGHT COVER
Light Bulb Replacement
Shut off electrical power to the oven before replacing
light bulb.
IMPORTANT NOTE: Allow the oven to cool sufficiently
before replacing the light bulb.
The oven uses a 20-watt halogen light bulb. Oven rack
guides must be removed to access the light bulb. Refer to
page 12.
To remove the light cover, place a hot pad against the
oven wall, press a screwdriver against the hot pad and
under the edge of the light cover. Gently pry the edge of
the light cover up and away from the wall. Be careful not
to scratch the porcelain oven interior. Use a paper towel to
handle the light bulb and remove it from the socket.
Avoid direct contact with the replacement bulb. Handle
with a paper towel to keep oil from fingers off the bulb, or
the bulb will burn out at first use. To replace the light bulb,
insert the bulb prongs into the socket until it snaps into
place. Replace the light cover and oven rack guides. Turn
on electrical power and reset the time-of-day clock.
Bakeware Selection
or best results, we recommend medium- to heavy-weight
F
bakeware. Use the following guidelines when selecting
bakeware:
• A 14"
• Size, shape and finish of bakeware affects the baking
• Dark, nonstick pan coatings brown more than light,
(356) x 16" (406) baking sheet is an optimum size
for the ovens. Allow at least 1"
(25) between edge of
pan and walls of oven.
time. Food on insulated bakeware cooks more slowly.
Food cooked in dark metal pans may cook faster than
food cooked in shiny pans.
nonstick coatings.
Use caution when handling light bulbs. Halogen bulbs
get hot instantly and adjacent parts may retain heat.
Light bulb replacement.
Page 33

E Series Oven Care 33
wolfappliance.com
Care Recommendations
ven racks and rack guides (nickel-plated steel).
ven exterior, handle and trim.
O
O
• Do not use abrasive cleaners; they will permanently
scratch the surface.
• Stainless steel exterior: Use a soft, nonabrasive stain-
less steel cleaner like Signature polish and apply with
a soft, lint-free cloth. To bring out the natural luster,
lightly wipe the surface with a water-dampened
microfiber cloth, followed with a dry microfiber cloth.
All work should follow the grain direction of the finish.
Best results are obtained by keeping the cloth in
continuous contact with the metal. Signature polish is
available from Signature Limited Laboratory, P. O. Box
13436, Dayton, Ohio 45413, 877-376-5474.
• Black glass exterior: Spray glass cleaner on a soft
cloth to clean.
Oven cavity and door interior (porcelain enamel).
• Never wipe a warm or hot porcelain surface with a
damp sponge; it may cause chipping or crazing (tiny
hairlike cracks).
• General care: When cool, clean splatters and spills
immediately. Do not allow food with a high sugar or
acid content, such as milk, tomatoes, sauerkraut, fruit
juices or pie filling, to remain on any porcelain enamel
surface. Failure to remove these foods may cause a
permanent dull spot. When hand cleaning a spot, use
only non-abrasive cleaners or scrubbers.
• Self-clean feature can be used.
Oven door window (heat-tempered glass).
• When the window is cool, use a razor blade to gently
lift baked-on foods with a multi-surface spray cleaner.
• Before using the self-clean feature, remove oven racks
and rack guides. They will discolor if left in the oven
during self-clean. Clean with steel wool soap pad and
hot water. Rinse and dry.
Oven gasket (fiberglass netting and wire).
• Do not hand clean, rub, puncture or remove the oven
gasket; this may compromise the tight door seal.
Broiler pan (porcelain enamel).
• Top: While slightly warm, place in the sink and lay dish
towels on top. Pour very hot water on the towels and
allow steam to soften cooked-on residue. Clean with
hot water and a mild detergent. Rinse and dry.
• Bottom: Pour grease into a disposable can. When cool,
wash in hot water and a mild detergent. Rinse and dry.
Bake stone (ceramic).
• Use care in handling the bake stone. It will chip or
break if dropped. Do not soak or immerse the bake
stone in water and do not use soap or detergent. Refer
to bake stone care on page 22.
Control panel (polycarbonate plastic).
• Do not use abrasive cleaners, steel-wool pads, gritty
washcloths or some paper towels. Damage may occur.
• Use glass cleaners or all-purpose cleaners (without oil)
with soft cloth or sponge. Apply cleaner to soft cloth or
sponge, not directly to the panel.
Oven light cover (heat-tempered glass).
• When the oven is cool, follow instructions on page 32
to remove oven light cover. Wash with mild abrasive
cleaner. Rinse and dry thoroughly. Replace oven light
cover. A 20-watt halogen oven light bulb replaces the
existing bulb.
Page 34

Wolf Cooking Guide 34
Cooking Guide
BAKED GOODS
FOOD COOKING MODE OVEN TEMPERATURE RACK POSITION COOKING TIME
BREAD
iscuits* Bake 450°F
B
(multiple trays) Convection 425°F
Cinnamon rolls Bake 350°F
multiple trays) Convection 325°F
(
(230°C) 4
(220°C) 2 and 5 or 2, 4 and 6 8–10 min
175°C)
(
165°C)
(
4 20–25 min
and 5 20–25 min
2
Rolls Bake 350°F (175°C) 4 20–25 min
(multiple trays) Convection 325°F
Yeast bread** Convection 325°F
Yeast loaf** Bake Stone 400°F
Cornbread Convection 375°F
(165°C) 2 and 5 15–20 min
165°C)
(
205°C)
(
190°C)
(
4 25–30 min
1 10–15 min
4 20–25 min
Quick breads (single or multiple) Convection 325°F (165°C) 3 or 2 and 5 40–45 min
CAKES
Angel food Bake 350°F
Bundt Convection 325°F
Mixes Bake 350°F
(multiple) Convection 325°F
Cupcakes Bake 350°F
175°C)
(
(165°C) 4 40–45 min
(175°C) 4 30–40 min
(165°C) 2 and 5 25–30 min
(175°C) 4 20–25 min
2 37–45 min
(multiple trays) Convection 325°F (165°C) 2 and 5 18–23 min
8–10 min
COOKIES
Brownies Bake 350°F
(multiple trays) Convection 325°F
Sugar Bake 350°F
(multiple trays) Convection 325°F
Chocolate chip Bake 375°F
(175°C) 4 20–25 min
(165°C) 2 and 5 15–20 min
(175°C) 4 8–12 min
(165°C) 2 and 5 or 2, 4 and 6 8–12 min
(190°C) 4 8–12 min
(multiple trays) Convection 350°F (175°C) 2 and 5 or 2, 4 and 6 8–9 min
MUFFINS
Muffins Bake 400°F
(single tray) Convection 375°F
(205°C) 4 15–20 min
(190°C) 4 10–15 min
(multiple trays) Convection 375°F (190°C) 2 and 5 10–15 min
PIES
Filled Conv Bake 375°F
Frozen Conv Bake 375°F
(190°C) 4 40–45 min
(190°C) 4 50–55 min
Lemon meringue Broil Low (3) 4 21/2 min
Pumpkin Conv Bake 425°F
(220°C) / 325°F (165°C) 4 15 min / 1 hr
Pastry crust Conv Bake 425°F (220°C) 4 10–12 min
OTHER
Popovers (single tray) Bake 450°F
(multiple trays) Convection 450°F
Puff pastry Bake 400°F
(single or multiple) Convection 375°F
Cream puffs Convection 400°F
(230°C) / 350°F (175°C) 4 15 min / 20 min
(230°C) / 350°F (175°C) 2 and 5 15 min / 20 min
(205°C) 4 10–12 min
(190°C) 4 or 2, 4 and 6 10–12 min
(205°C) 4 or 2, 4 and 6 30–35 min
Custard and Pudding Bake 350°F (175°C) 4 35–40 min
*For refrigerated biscuits, follow package directions. **Internal temperature of 195–200°F (90–95°C). This chart is a guide; recipe or package
directions should take precedence.
Page 35

Wolf Cooking Guide 35
wolfappliance.com
Cooking Guide
MEATS
FOOD COOKING MODE OVEN TEMP RACK COOKING TIME INTERNAL TEMP
BEEF
huck roast, 2–4 lbs
C
(.9–1.8 kg) C
Ground, patties Broil High (1) 6 10–12 min Med 150°F (65°C)
Rib roast, 4–6 lbs (
irloin rump roast, 4–6 lbs
S
1.8–2.7 kg)
1.8–2.7 kg)
(
Sirloin tip roast, 3–5 lbs (1.3–2.3 kg) Conv Roast 325°F (165°C) 3 30–35 min/lb Rare 140°F (60°C)
Steaks, 11/2" (38) thick Conv Broil High (1) 5 20–25 min Rare 140°F (60°C)
Steaks, 1" (
Tenderloin, 2–3 lbs (
25)
thick Broil High (1) 5 12–15 min Rare 140°F (
.9–1.3 kg)
POULTRY
Chicken, bone-in breasts Conv Broil Med (2) 5 20–25 min Well 170°F
Chicken, boneless breasts Broil Med (2) 6 10–15 min Well 170°F (
Chicken, quarters Conv Broil Med (2) 5 30–35 min 180°F (
Chicken, thighs Conv Broil Med (2) 5 20–25 min Well 180°F
Chicken, whole Conv Roast 325°F (165°C) 3 18–20 min/lb 180°F (80°C) in thigh
Turkey breast, whole Conv Roast 300°F
Turkey, pieces Conv Broil Med (2) 4 40–45 min 180°F
Turkey, whole Conv Roast 325°F
Cornish game hens Conv Roast 325°F
Cornish game hens Roast 350°F
Duck, 5–7 lbs
(2.3–3.2 kg) Conv Roast 325°F (165°C) 3 18–20 min/lb 180°F (80°C) in thigh
Goose, 8–10 lbs (3.6–4.5 kg) Conv Roast 325°F (165°C) 2 18–20 min/lb 180°F (80°C) in thigh
onv Roast 325°F
Conv Roast 325°F (
onv Roast 325°F
C
Conv Roast 325°F (
(165°C) 3
165°C)
165°C)
(
165°C)
(150°C) 2 12–15 min/lb 170°F (75°C) in breast
(165°C) 1 11–14 min/lb 180°F (80°C) in thigh
(165°C) 3 28–33 min 180°F (80°C) in thigh
(175°C) 3 28–33 min 180°F (80°C) in thigh
3 25–30 min/lb Rare 140°F (
3
3 20–25 min/lb Rare 140°F (
20–25 min/lb Med 160°F
30–35 min/lb Rare 140°F
80°C)
(80°C) in thigh
(70°C)
60°C)
60°C)
(
60°C)
60°C)
(75°C)
75°C)
in thigh
(80°C)
PORK
Chops, 1"
(25) thick Broil Med (2) 6 10–15 min Med 160°F (70°C)
Loin, 3–4 lbs (1.3–1.8 kg) Conv Roast 325°F (165°C) 3 18–22 min/lb Med 160°F (70°C)
Steak, 1" (25) thick Broil Med (2) 5 25–30 min Med 160°F (70°C)
Ham,1/2" (13) thick Broil High (1) 6 6–8 min 140°F (60°C)
Ham, 1" (25) thick Broil High (1) 6 10–12 min 140°F (60°C)
LAMB
3
Chops,
/4" (19) thick Broil High (1) 5 8–10 min Med Rare 145°F (65°C)
Chops,3/4" (19) thick Broil High (1) 5 11–12 min Med 160°F (70°C)
Leg, 4–6 lbs (1.8–2.7 kg) Conv Roast 325°F (165°C) 3 20–25 min/lb Med Rare 145°F (65°C)
Crown rack Conv Roast 325°F (165°C) 1 15–18 min/lb Med Rare 145°F (65°C)
OTHER
Veal roast, 2–3 lbs
(.9–1.4 kg) Conv Roast 300°F (150°C) 3 30–35 min/lb Med Rare 140°F (60°C)
Meat loaf Conv Roast 325°F (165°C) 3 50–60 min 160°F (70°C)
Sausage Broil Med (2) 5 8–10 min Med 160°F (70°C)
*Min/lb indicates specified cook time per pound or .45 kg. Probe cannot be used in broil or convection broil modes, use a meat thermometer
to check internal temperature. This chart is a guide; recipe or package directions should take precedence.
Page 36

Wolf Cooking Guide 36
Cooking Guide
ENTREES AND MISC
FOOD COOKING MODE OVEN TEMPERATURE RACK POSITION COOKING TIME
ENTREES
alzone Bake Stone 400°F
C
Quiche Bake (convection not advised) 375°F
Soufflé Bake 375°F (
(205°C) 1
(190°C) 4 40–50 min
190°C)
4 35–40 min
PIZZA
rozen Bake Stone 400°F
F
Homemade Bake Stone 450°F (
(205°C) 1
230°C)
1 10–13 min
SEAFOOD
1
Fillet,
/2" (13) thick Broil Med (2) 6 5–7 min
Fillet, 1"
25)
(
thick Conv Broil Med (2) 6 12–17 min
Red snapper Broil Med (2) 6 5–7 min
Salmon,
1
/2" (13) thick Broil Med (2) 6 12–15 min
Swordfish, 11/2" (38) thick Broil Med (2) 6 10–12 min
9–10 min
8–14 min
VEGETABLES
Potatoes Bake 400°F
Sweet potatoes Bake 400°F
Winter squash Convection 350°F
(205°C) 3 45–60 min
(205°C) 3 40–50 min
(175°C) 3 40–45 min
Winter squash Bake 375°F (190°C) 3 50–55 min
OTHER
Baked Alaska Broil Low (3) 4 5–7 min
French bread pizza Broil Med (2) 5 2–3 min
Garlic bread, 1"
(25) thick Broil or Conv Broil Med (2) 5 3–3
1
/2 min
Toast,1/2" (13) thick Broil Med (2) 6 2 min
Probe cannot be used in broil or convection broil modes, use a meat thermometer to check internal temperature. This chart is a guide; recipe
or package directions should take precedence.
Page 37

Troubleshooting Guide 37
wolfappliance.com
Troubleshooting
xcessive smoke when broiling.
f your Wolf E series oven is not operating properly, use
I
the following troubleshooting guide before calling Wolf
factory certified service. This guide will save you time and
trouble and may help you avoid the expense of a service
call.
E
• Pan other than two-piece broiler pan is being used.
• Failure to trim off extra fat.
• Lower rack level or shorten time.
Oven door not closing properly.
• Oven racks or rack guides not installed properly.
Exterior browning is uneven.
• Pan is too large for good heat circulation or too many
pans on a rack.
• Rack covered with aluminum foil, trapping heat below.
Oven temperature is too hot.
• Food cooked in glass, glass ceramic, or dark metal
which holds more heat than shiny pans.
• Oven temperature setting is too high or baking pan too
large for recipe.
• Change rack level or cooking mode.
Oven temperature is not hot enough.
• Oven is not fully preheated.
• Door opened too often or left open too long.
• Food wrapped in foil; check mode for tips that give
best results.
Warm air venting into kitchen after oven has been
turned off.
• Warm air exhaust is a normal function and is necessary
to maintain and cool down oven temperatures. It turns
off automatically when oven cools sufficiently.
PROBE SHORTED flashes when using probe feature.
• Touch oven OFF. Push probe into probe receptacle
completely until it snaps into place. Reset oven
temperature and probe temperature.
• Pan is too small for recipe.
Page 38

Service Information 38
Service Information
hen requesting information, literature, replacement parts
W
or service, always refer to the model and serial numbers of
your Wolf E series oven. This information is found on the
product rating plate located below the control panel.
The oven door must be open to view the rating plate. For
location of the rating plate, refer to the illustration for your
specific model on pages 6–7. Record the rating plate
information below for future reference.
BEFORE CALLING FOR SERVICE
Before calling Wolf factory certified service, refer to the
troubleshooting guide on page 37.
PRODUCT REGISTRATION
Register your new Wolf product today so that we may
ensure your satisfaction. You may register by one of the
following options:
Model Number:
Serial Number:
Installation Date:
Wolf Factory Certified Service:
Phone:
Authorized Wolf Dealer:
Phone:
1) Mail in the completed Wolf product registration card.
2) Register online at wolfappliance.com.
3) Register by phone by calling Wolf customer care at
800-222-7820.
The model and serial numbers of your unit are printed on
the enclosed Wolf product registration card. If you provide
us with your e-mail address, we will send you exciting new
product updates and recipes as they become available,
along with information on special events.
The information and images in this guide are the copyright property of Wolf Appliance, Inc. Neither this guide nor any information or images contained herein
may be copied or used in whole or in part without the express written permission of Wolf Appliance, Inc. ©Wolf Appliance, Inc. all rights reserved.
Wolf, Wolf & Design, Wolf Gourmet, W & Design and the color red as applied to knobs are registered trademarks and service marks of Wolf Appliance, Inc.
Sub-Zero, Sub-Zero & Design, Dual Refrigeration, Constant Care and The Living Kitchen are registered trademarks and service marks of Sub-Zero, Inc.
(collectively,the“Company Marks.”) All other trademarks or registered trademarks arepropertyof theirrespectiveownersin the United States and othercountries.
Page 39

Wolf Appliance Products Limited Warranty
FOR RESIDENTIAL USE ONLY
FULL TWO YEAR WARRANTY*
For two years from the date of original installation, your Wolf Appliance product warranty covers all parts and
labor to repair or replace, under normal residential use, any part of the product that proves to be defective in
materials or workmanship. All service provided by Wolf Appliance under the above warranty must be performed
by Wolf factory certified service, unless otherwise specified by Wolf Appliance, Inc. Service will be provided
during normal business hours.
LIMITED FIVE YEAR WARRANTY
For five years from the date of original installation, Wolf Appliance will repair or replace the following parts that
prove to be defective in materials or workmanship: gas burners (excluding appearance), electric heating
elements, blower motors (ventilation hoods), electronic control boards, magnetron tubes and induction
generators. The part(s) will be repaired or replaced, free of charge, with the owner paying for all other costs
including labor. All service provided by Wolf Appliance under the above warranty must be performed by Wolf
factory certified service, unless otherwise specified by Wolf Appliance, Inc. Service will be provided during
normal business hours.
TERMS APPLICABLE TO EACH WARRANTY
The warranty applies only to products installed for normal residential use. The warranty applies only to products
installed in any one of the fifty states of the United States, the District of Columbia or the ten provinces of
Canada. This warranty does not cover any parts or labor to correct any defect caused by negligence, accident
or improper use, maintenance, installation, service or repair.
THE REMEDIES DESCRIBED ABOVE FOR EACH WARRANTY ARE THE ONLY ONES THAT WOLF APPLIANCE,
INC. WILL PROVIDE, EITHER UNDER THIS WARRANTY OR UNDER ANY WARRANTY ARISING BY OPERATION
OF LAW. WOLF APPLIANCE, INC. WILL NOT BE RESPONSIBLE FOR ANY CONSEQUENTIAL OR INCIDENTAL
DAMAGES ARISING FROM THE BREACH OF THIS WARRANTY OR ANY OTHER WARRANTY, WHETHER
EXPRESS, IMPLIED OR STATUTORY.
Some states do not allow the exclusion or limitation of incidental or consequential damages, so the above
limitation or exclusion may not apply to you. This warranty gives you specific legal rights and you may also have
other legal rights that vary from state to state.
To receive parts and/or service and the name of Wolf factory certified service nearest you, contact Wolf
Appliance, Inc., P.O. Box 44848, Madison, WI 53744; check the contact & support section of our website,
wolfappliance.com or call 800-222-7820.
*Stainless steel doors, panels, handles, product frames and interior surfaces are covered by a limited 60-day
parts and labor warranty for cosmetic defects.
*Replacement filters for ventilation hood recirculating kits are not covered by the product warranty.
Page 40
WO LF AP PLIAN CE, INC. P. O. BOX 44 848 MA DISON , WI 5 3744 WOLFAPP LIANC E.COM 800.222.7820
819 065 R EV-A 7/20 11
 Loading...