

Page 1

ProScaler
Page 2

ProScaler
Preface
ABOUT THIS BASIC USER AND CONNECTIVITY GUIDE
This guide is designed for use with the Wolf Cinema DCL-200FD Home Cinema Projector and outboard ProScaler™ Video
Processor. Information in this document has been carefully checked for accuracy; however, no guarantee is given to the correctness
of the contents. The information and specifications in this document are subject to change without notice.
COPYRIGHT
© Copyright 2010 Wolf Cinema.
This document contains proprietary information protected by copyright. All rights are reserved. No part of this guide may be
reproduced by any mechanical, electronic or other means, in any form, without prior written permission of the manufacturer.
TRADEMARKS
All trademarks and registered trademarks are the property of their respective owners.
FCC COMPLIANCE
This device complies with Part 15 of the FCC Rules. Operation is subject to the following two conditions:
(1) This device may not cause harmful interference, and
(2) This device must accept any interference received, including interference that may cause undesired operation.
FEDERAL COMMUNICATIONS COMISSION (FCC) STATEMENT
This equipment has been tested and found to comply with the limits for a Class B digital device, pursuant to part 15 of the
FCC Rules. These limits are designed to provide reasonable protection against harmful interference in a residential installation.
This equipment generates, uses and can radiate radio frequency energy and, if not installed and used in accordance with the
instructions, may cause harmful interference to radio communications. However, there is no guarantee that interference will not
occur in a particular installation. If this equipment does cause harmful interference to radio or television reception, which can be
determined by turning the equipment off and on, the user is encouraged to try to correct the interference by one or more of the
following measures:
Reorient or relocate the receiving antenna.
Increase the separation between the equipment and the receiver.
Connect the equipment to an outlet on a circuit different from that to which the receiver is connected.
Consult the dealer or an experienced radio/TV technician for help.
The lighting flash with arrow head within an equilateral triangle is intended to alert the user to the presence
of “dangerous voltage” within the product's enclosure that may be of sufficient magnitude to constitute a risk
of electric shock to persons.
The exclamation point within an equilateral triangle is intended to alert the user to the presence of important
operating and maintenance (servicing) instructions in the literature accompanying the appliance.
WARNING: TO REDUCE THE RISH OF FIRE OR ELECTRIC SHOCK, DO NOT EXPOSE THIS APPLIANCE TO RAIN OR MOISTURE.
DANGEROUS HIGH VOLTAGES ARE PRESENT INSIDE THE ENCLOSURE. DO NOT OPEN THE CABINET. REFER SERVICING TO
QUALIFIED PERSONNAL ONLY.
1
Page 3

ProScalerHigh Definition Video Processor User’s Manual
Notices
WARNING! To meet FCC requirements, a shielded power cord is recommended in order to prevent interference. It
is essential that only the supplied power cord is to be used. Use only shielded cables to connect I/O devices to this
equipment. You are cautioned that changes or modifications not approved by the party responsible for compliance
could void your authority to operate the equipment.
WARNING! High-brightness light source. Do not stare into the beam of light, or view directly. Be especially careful
and ensure that children do not stare directly into the beam of light.
WARNING! To reduce the risk of fire or electric shock, do not expose this product to rain or moisture.
CAUTION! For minimal servicing and to maintain high image quality, we recommend that you use the projector in
an environment that is smoke and dust free. When used in areas where there is a lot of smoke or dust, the filter
and lens should be cleaned often to lengthen the service life of the projector.
WARNING! Some IC chips in this product include confidential and/or trade secret property belonging to Texas
Instruments. Therefore you may not copy, modify, adapt, translate, distribute, reverse engineer, reverse assemble
or decompile the contents thereof.
WARNING! The ventilation slots and objects next to them may get extremely hot during operation. Do not touch
these areas until they have sufficiently cooled down.
DISPOSAL Do not use household or municipal waste collection services for disposal of electrical and
electronic equipment. EU countries require the use of separate recycling collection services.
2
Page 4

ProScaler
Contents
Preface.................................................................................................................................................................................1
Notices .................................................................................................................................................................................2
Introduction
Features ...............................................................................................................................................................................5
Connectivity
Flexible Component Video Inputs....................................................................................................................................6
S-Video..........................................................................................................................................................................6
HDMI 1.3 .......................................................................................................................................................................7
Other Rear Panel Connectors .........................................................................................................................................7
Setup
Before Setting Up
Your Wolf Cinema DCL-200FD system can be connected to:...........................................................................................8
Connecting the Power Cords ..........................................................................................................................................8
Cable Types
Which Cable Should I Use?.............................................................................................................................................9
Input Cables...................................................................................................................................................................9
System Remote Control – Key ProScaler Functions .............................................................................................................10
Connecting the Projector and ProScaler ..............................................................................................................................11
Connecting Video Equipment...............................................................................................................................................14
Connecting a Computer ......................................................................................................................................................15
“Plug and Play” Functions [PC] ...........................................................................................................................................15
Remote & Menus
Controlling ProScaler
Menus and User Interface ............................................................................................................................................16
Menu Organization.......................................................................................................................................................17
Main Menu
Select Input .................................................................................................................................................................18
Input Select Selection ..................................................................................................................................................18
Zoom and Pan..............................................................................................................................................................18
Zoom Control Screen ...................................................................................................................................................18
Independent Horizontal and Vertical Zoom....................................................................................................................18
Pan H or V ....................................................................................................................................................................19
Zoom using the Remote Control ...................................................................................................................................19
Aspect Ratio Control using Menus or Remote ...............................................................................................................19
Picture Controls ...........................................................................................................................................................19
Brightness Control .......................................................................................................................................................20
Contrast Control...........................................................................................................................................................20
Color Saturation...........................................................................................................................................................20
Hue..............................................................................................................................................................................20
3
Page 5

ProScalerHigh Definition Video Processor User’s Manual
Picture Controls
ProScaler Enhancement...............................................................................................................................................21
Mosquito Noise Reduction............................................................................................................................................21
Settings
Settings Menu .............................................................................................................................................................22
Output Format..............................................................................................................................................................22
Switching Output Formats
Input Priority ................................................................................................................................................................22
Settings Audio
Select Audio Output .....................................................................................................................................................23
Associate Audio and Video Inputs .................................................................................................................................23
Rename Inputs.............................................................................................................................................................23
Game Mode........................................................................................................................................................................24
Factory Defaults .................................................................................................................................................................24
Remote Control
The Wolf Cinema’s ProScaler Universal Remote................................................................................................................25
Modes .........................................................................................................................................................................26
Punch Through ............................................................................................................................................................26
Macros ........................................................................................................................................................................27
Programming the Remote
1 Programming the remote with the preprogrammed code ..........................................................................................27
2 Programming the remote with Learning Method........................................................................................................29
3 Programming the remote with Advanced Functions...................................................................................................30
Advanced Functions
Test Patterns.......................................................................................................................................................................33
Advanced Features in the Main Menu
Deinterlacer Bias Controls............................................................................................................................................35
Auto Wake Up ..............................................................................................................................................................35
Auto Standby ...............................................................................................................................................................35
Component Input.. .......................................................................................................................................................36
Hot Plug Source ...........................................................................................................................................................36
Device Codes
Code Tables...................................................................................................................................................................37-55
4
Page 6

ProScaler
Introduction
Wolf Cinema’s ProScaler serves as the nerve center of your home cinema. It is both an intelligent central switching hub for all
your video components, plus provides for advanced video processing on all types of video signals. It comes with a simple, easy
to use IR universal remote controller so that you can operate the entire system with just the one remote.
In addition to simplifying system interoperability, Wolf Cinema’s ProScaler delivers world-class video processing to your home cinema
projector. The two operate together to deliver some of the finest video images yet available, no matter the source.
The Wolf Cinema ProScaler features six HDMI video inputs, two sets of component video inputs, one composite and one S-Video
input. The ProScaler boasts dual HDMI output connectors, one dedicated video output to the projector an a second audio-only
HDMI pass through. This configuration delivers optimal performance and ease of use in typical home theater systems using an
outboard surround sound processor or AV Receiver. Full IR and RS-232 control capabilities simplifies the integration with today’s
advanced home control systems and third party remote controllers.
Wolf Cinema’s ProScaler Basic Features
• Accepts inputs from up to 10 video sources.
• Outputs video signals to your Wolf Cinema projector via HDMI.
• Dedicated audio HDMI output routes audio to your AV Receiver or Surround Processor.
• Intuitive on-screen menus for operating your Wolf Cinema system.
• Automatically switches inputs using preprogrammed priority. Alternatively, you can manually switch inputs using the IR
remote or via the On-Screen Menus.
• The ProScaler Wizard helps guide you through setup of input components.
• User programmable audio/video lip sync; up to 200mS delay.
• Simple Aspect Ratio controls available on the remote or via the On-Screen menu
• Calibration adjustment, aspect ratio and other viewing modes are iindividually configurable for each video input.
• The backlit universal remote controls all the components in your system.
5
Page 7

ProScalerHigh Definition Video Processor User’s Manual
Connectivity
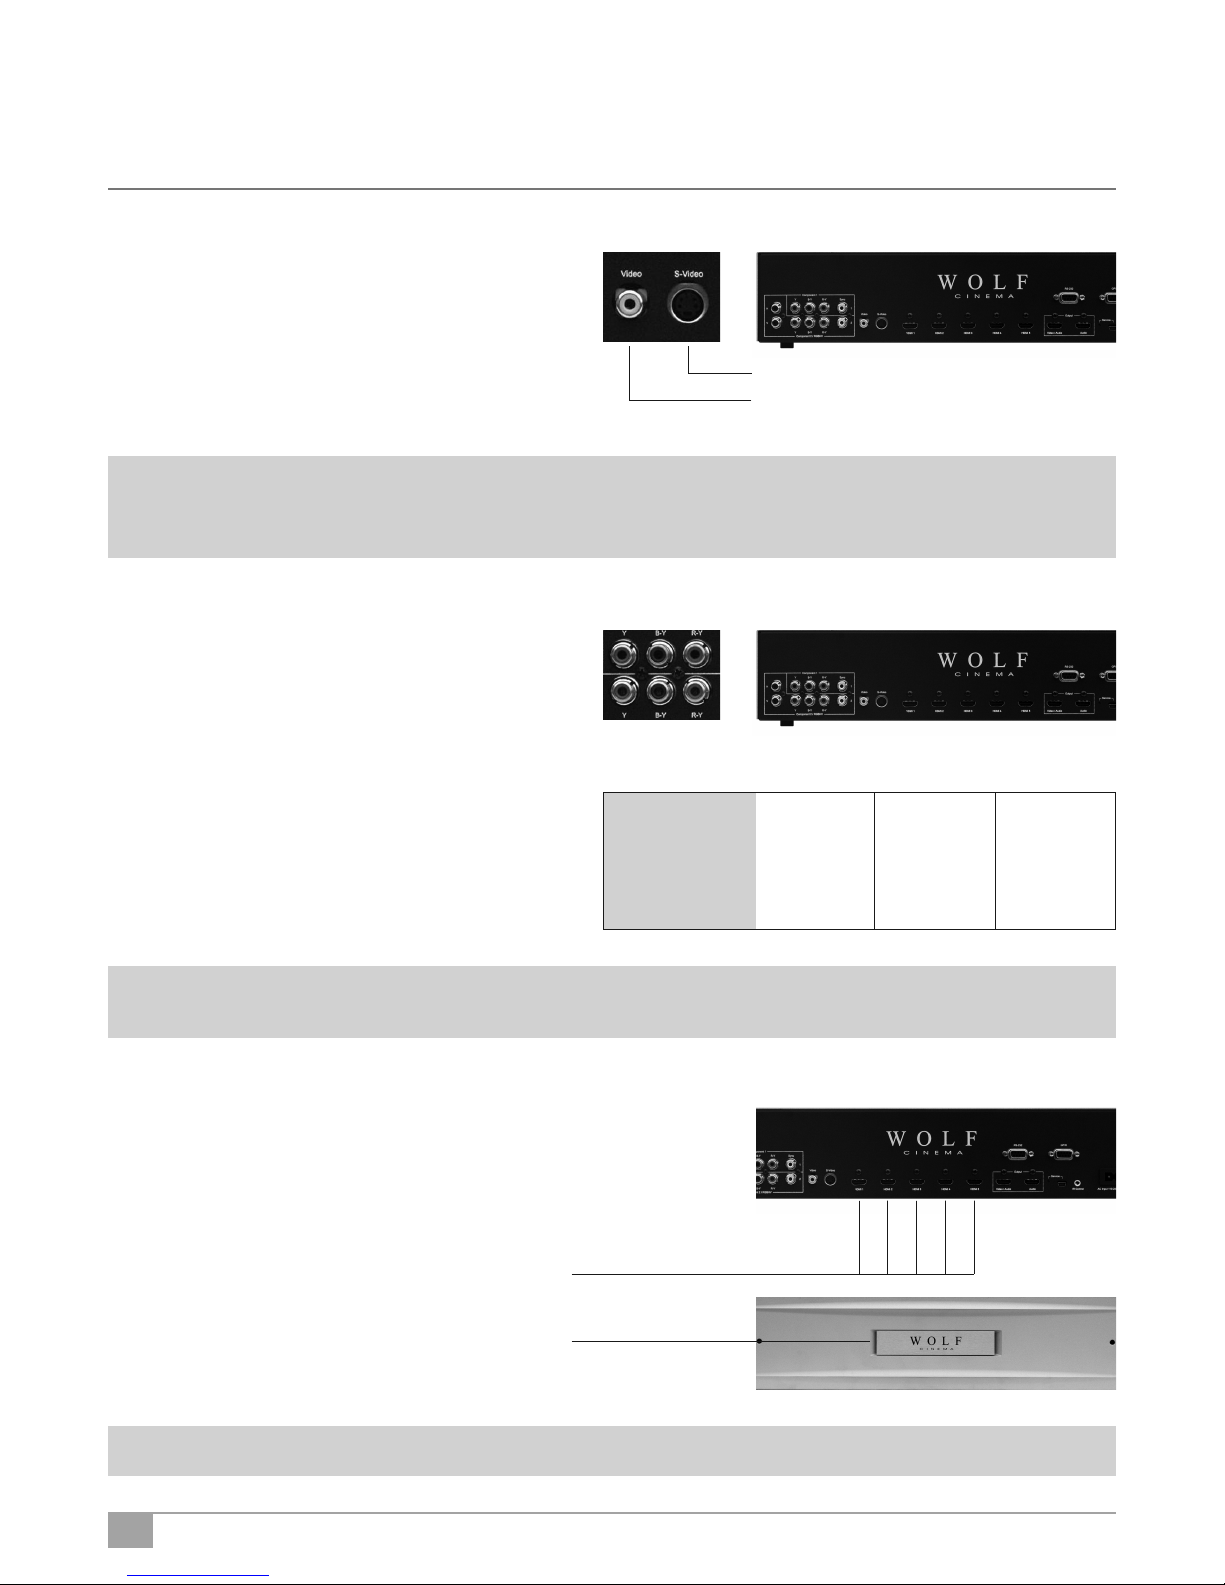
Component Video Inputs
Composite Video
S-Video
Flexible Component Video Inputs
This group of connectors can accept 3 types of analog component video inputs:
Component (YPbPr) (2 Inputs)
This is the most common type of component analog signal. Cables are usually 3 RCA-> RCA type.
HDMI 1-5 (HDMI 6 on Front Panel)
HDMI Video/Audio Output
HDMI Audio Outpute
RS-232 Port
GPIO Port
AC Input
IR - In
Service
Reset
RGBHV
RGBHV stands for “Red, Green, Blue, Horizontal Sync, Vertical Sync”.
It is commonlyy used to connect a computer’s analog VGA output using the VGA to RGBHV adapter cable.
The Wolf Cinema ProScaler can accept these formats via RGBHV:
VGA 640 x 480 @ 60 Hz
SVGA 800 x 600 @ 60 Hz
XGA 1024 x 768 @ 60 Hz
SXGA 1280 x 1024 @ 60 Hz
RGB + CVBS
For use with a SCART breakout cable. SCART is primarily a European connector type. CVBS means Composite Video
Broadcast Signal; typically this would be an analog PAL or SECAM signal. Connect the breakout cable to a SCART
connector, then connect Red, Green and Blue to the component inputs, then connect CVBS to the Sync input
horizontally adjacent to the component inputs.
Video Input (yellow RCA connector)
Composite video input. This signal is also known as “base band NTSC” and accepts European analog standards PAL
and SECAM.
S-Video
S-Video is a analog input signal format similar to base band NTSC (or PAL/SECAM), except that the chroma and luma/sync
components are on separate conductors for improved signal quality. If you have a choice between Video or S-Video,
choose S-Video.
6
Page 8

ProScaler
HDMI 1.3
ProScaler has a total of 6 HDMI inputs, version 1.3. Five inputs are on the rear panel, and one HDMI inputs is located on the
front of the unit, just under the removable Wolf Cinema logo plate. HDMI carries both video and audio signals.
Note: HDMI is compatible with DVI using an HDMI to DVI adapter cable.
DVI connectors do not carry the audio signal stream, as do HDMI interconnections.
HDMI Video/Audio Output
This connector is used to send all video signals to your Wolf Cinema projector.
HDMI Audio Output
This connector is intended to connect to an AV Receiver or Surround Sound Processor. The ProScaler will automatically
sent audio via this connector if it is connected to a powered-up AV Receiver, or you can manually configure ProScaler’s
audio output. This HDMI connector does not output video.
Other Rear Panel Connectors
RS-232
Connect any 9-pin RS-232 cables from your external home automation or control system.
GPIO
Not used.
Service
This connector is used for system software upgrades, using a mini-USB cable. Refer to our web site:
www.wolfcinema.com for any recent software updates.
Reset
This resets the ProScaler, if needed, bringing it back into a predefined operating condition. Reset initially does not change
your settings. If Reset is desired but you wish to retain settings, it should be pressed and released quickly
(less than 2 seconds).
The reset button will also restore the factory defaults. If the reset button is pressed and held, the front panel LED will blink
for about 5 seconds. When it stops blinking and stays on, the reset button can be released. All factory defaults will have
been restored, and any user settings will be erased.
IR - In
This connecter can be used in installations where line-of-sight IR reception is not possible. You will need certain
accessories that allow for remote IR connections.
AC Input
Power connection for your ProScaler.
7
Page 9

ProScalerHigh Definition Video Processor User’s Manual
Setup
Before Setting Up
Note: • Before connecting, be sure to turn off both the projector, the ProScaler and the devices to be connected. After making
all connections, turn on the projector, ProScaler and then the other devices.
• When connecting a computer, be sure that it is the last device to be turned on after all the connections are made.
• Be sure to read the operation manuals of the devices to be connected before making connections.
Your Wolf Cinema DCL-200FD system can be connected to:
Video Equipment:
• VCR, Laser disc player, camcorders or other video equipment.
• Satellite, Cable or DTV* sources.
• Blu-ray players, DVD players.
Computers:
• HD 15-pin VGA to RGBHV cabling (optional items sold separately).
• HD 15-pin VGA to HDMI converter box and cabling (optional item sold separately).
*DTV is the umbrella term used to describe the new digital television system in the United States.
Connecting the Power Cords
Plug in the supplied power cords into the AC socket from the base of the Projector and rear of ProScaler.
Supplied Accessories: Power cords (2)
Note: The projector power cord has a right angle head to fit within the case.
8
Page 10

ProScaler
Cable Types
HDMI: HDMI, or High Definition Multimedia Interface, is the only interconnection scheme that can carry both
audio and video on the same cable.
Coax: Coax is a shorthand way of saying “coaxial cable.” In the consumer audio/video industry, the term “Coax”
is is a type of digital audio interconnect which uses an RCA style cable. Single coax video cables may be
colored white or yellow; the component bundle may be colored red-green-blue. Coax can also carry a
digital audio signal called SP/DIF.
S-Video: S-Video is a cable that separates the color portion of the video signal from the black and white portions.
It is typically colored with a yellow or black tip.
Analog Stereo: Analog Stereo is an audio interconnect found usually on older equipment. As the name implies, the signals
are analog and a stereo 2 channel signal is carried on RCA style connectors. Usually, these cables are
colored red and white.
Which Cable Should I Use?
Your audio and video components may have multiple types of connectors, Which type should you use if you have a choice?
Your choice of cables can affect the performance capabilities of your Wolf Cinema video projection system. The guide below
will help you choose the optimum cable for your setup.
Cables to your Projector
The Wolf Cinema projector features a dedicated HDMI input, so use the appropriate length HDMI cable. Connect the cable
from the Video/Audio connector on the back connector panel of the ProScaler to the HDMI input of the projector.
A RS-232 control cable may be required when integrating your Wolf Cinema projector to today’s latest home automation systems.
Audio Cabling to your AV Receiver or Surround Sound Processor
If your AV Receiver or Surround Sound Processor has HDMI inputs, you should use an HDMI to HDMI cable, connected
between the HDMI Audio output of the Wolf Cinema’s ProScaler and an HDMI input on your receiver/processor.
If your AV Receiver does not have an HDMI input, then you will need to connect and associate each device’s audio output
with the appropriate inputs on your receiver/processor.
Input Cables
Video Cable Hierarchy
If you have a choice of video cables, use the list below to make the best choice. Use the lowest numbered cable on the list
to achieve the optimum video quality.
1 HDMI: HDMI to HDMI cable. This cable carries both audio and video information.
2 DVI: DVI to HDMI adapter cable.You will need a separate cable for audio information, as DVI carries video signals only.
3 Component: Component to Component cable. You will need separate cabling for audio.
4 S-Video: S-Video cable. You will need separate cabling for audio.
5 Video: Video cable. You will need separate cabling for audio.
9
Page 11
ProScalerHigh Definition Video Processor User’s Manual
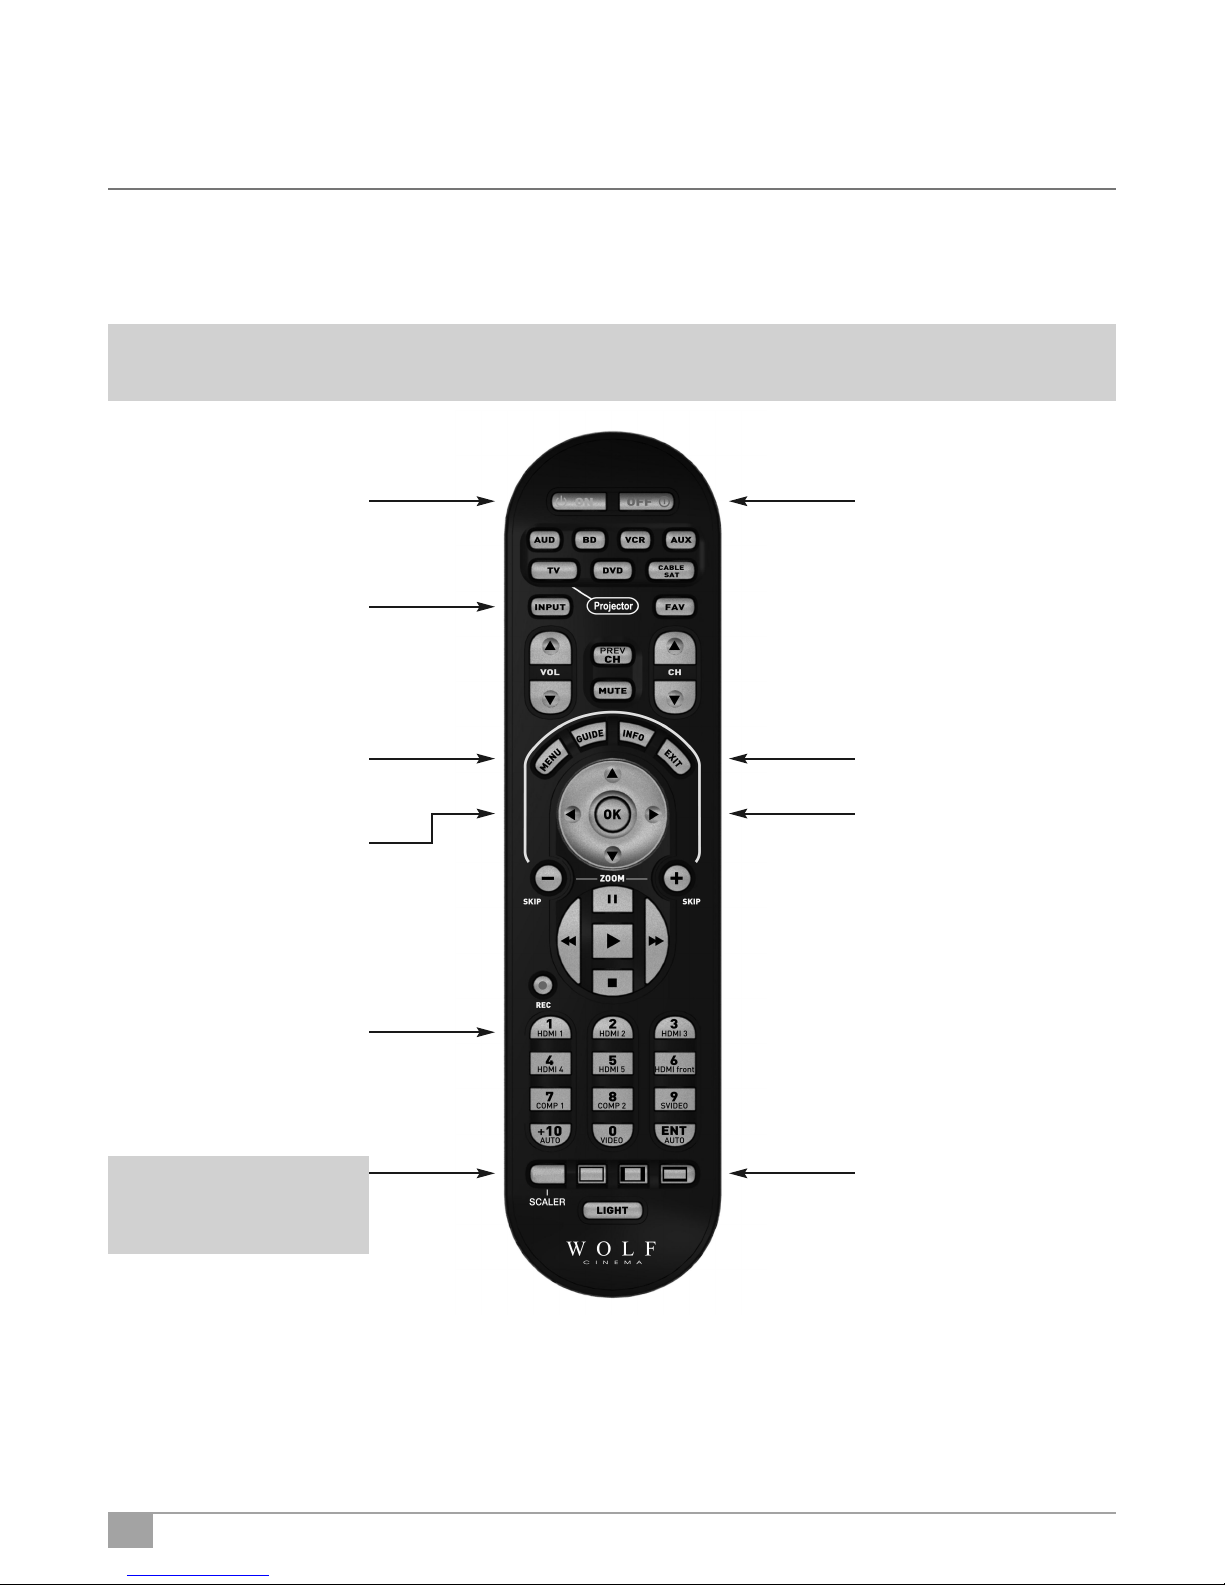
System Remote Control – Key ProScaler Functions
The following are the key PROSCALER functions, within the common remote control structure.
Note: SELECT THE SCALER BUTTON TO ENABLE THE PROCESSOR CONTROLS.
Also refer to the separate Wolf Cinema ProScaler User Guide for additional details.
Processor Power ON Button
Press to turn the Processor on
Input Select Button
Press to select available
device inputs
Menu Button
Press to enable on-screen
display menus
OK Enter Button
Select items or make
adjustments from the menu
Source Device Input Buttons
Press to directly select the
available components connected
to the ProScaler Processor
Processor Power OFF Button
Press to turn the processor off
Exit Menu Button
Exits the on-screen display
Adjustment Navigation
(Up, Down, Left, Right)
Navigates through on-screen menus
ProScaler Select Button
Press to change remote from
Projector controls to ProScaler
Processor functions
10
ProScaler Aspect Control
Buttons
Adjust image sizing via the
ProScaler software
Page 12

ProScaler
Wolf Cinema’s DCL-200FD projector is optimized to work with the included ProScaler.The ProScaler and projector are carefully
calibrated at the factory to support all basic functionality “out of the box.”
The projector uses one primary HDMI input, which accepts all incoming video signals as delivered from the ProScaler.The
ProScaler processes and routes the variety of source components via the input selected.
There are 10 video inputs on the ProScaler: 6 HDMI [one front panel], 1 Component, 1 Component/RGB, 1 S-Video and
1 Composite input.
For additional DCL-200FD projector operation details, refer to this guide and the separate user manual: WOLF CINEMA
DCL-200FD USER MANUAL
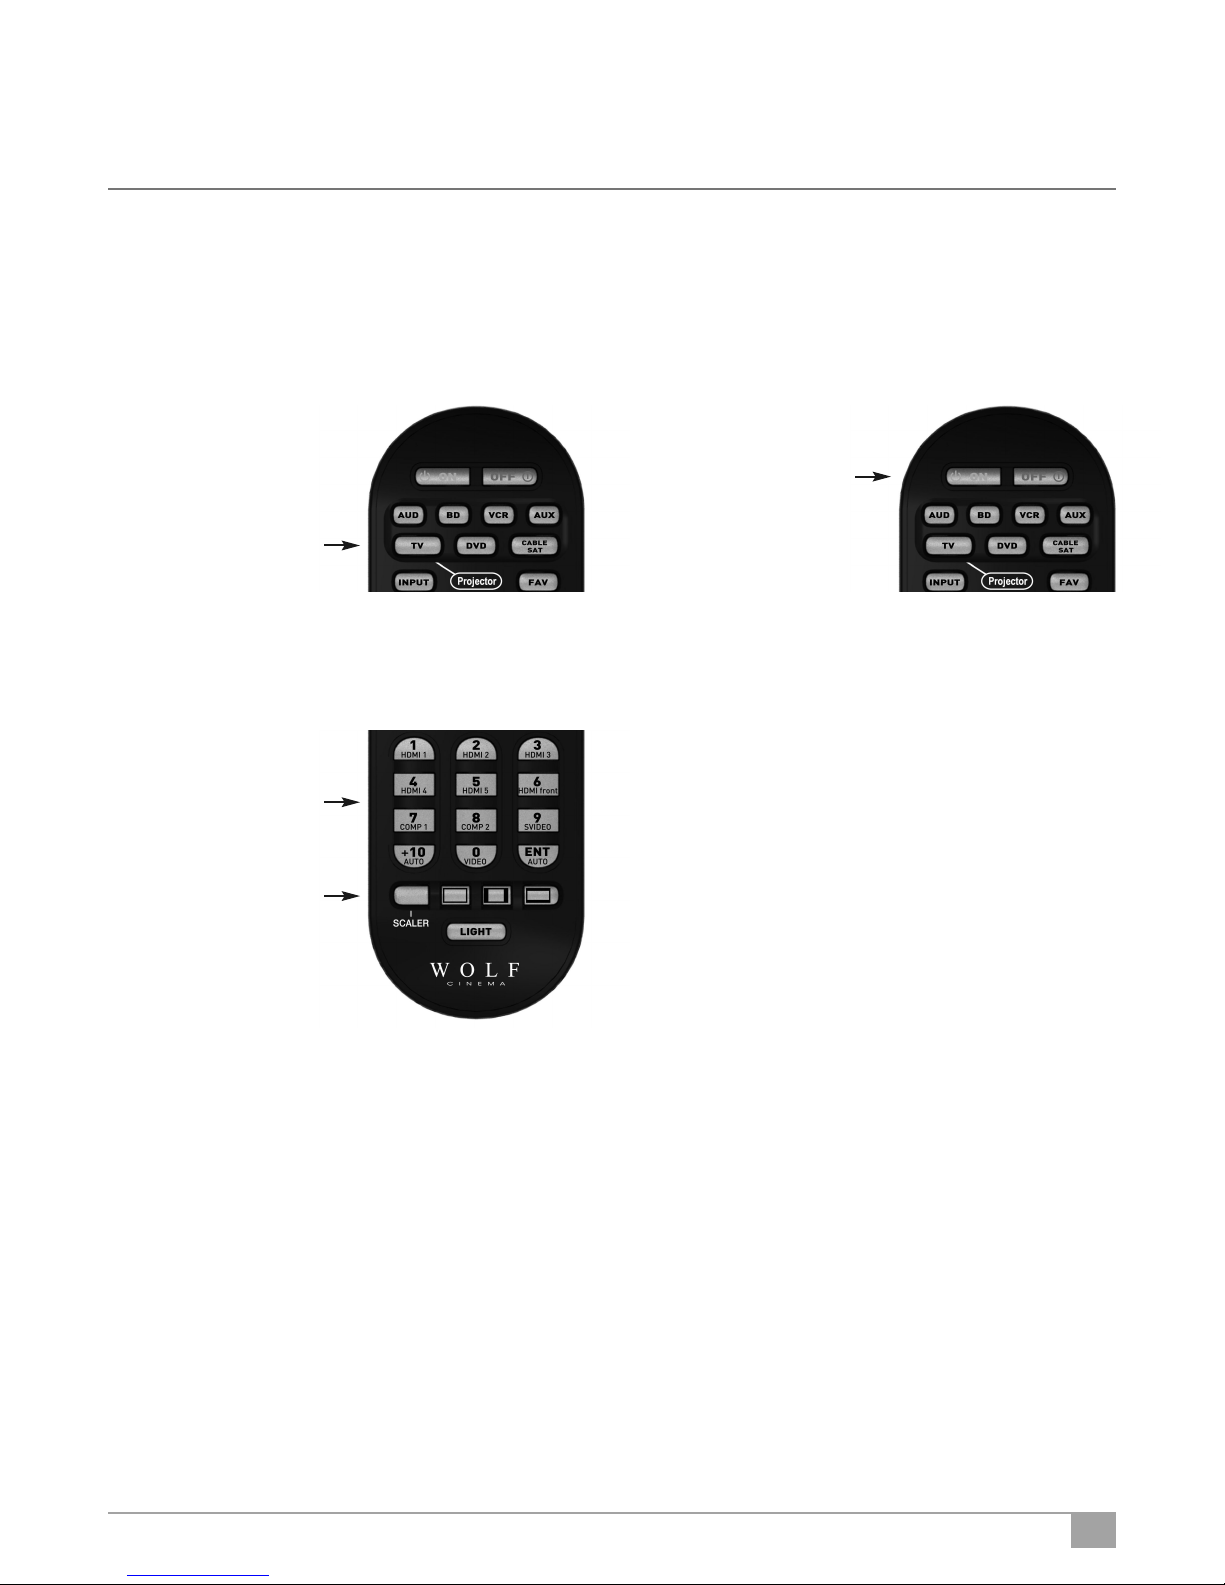
Connecting the Projector and ProScaler
The following basic steps are to be performed to connect all source components, Projector and ProScaler:
1 Connect all sources to the inputs of the ProScaler. For additional details please see the ProScaler Owners Manual.
Note: HDMI input #6 is under the removable WOLF CINEMA logo plate on the panel front.
2 Connect the HDMI signal cable to projector: Connect your long run HDMI video signal cable between the ProScaler
video output directly to the Projector. Connect the Audio Only HDMI cable (pass through) to your surround sound
receiver or processor.
Audio-only signal pass through. Connect
via HDMI cable to an available input on your
surround sound receiver or A/V processor
Connect HDMI cable from ProScaler to Projector.
11
Page 13

ProScalerHigh Definition Video Processor User’s Manual
Note: Wolf Cinema always recommends that you, your custom installer or video calibrator thoroughly test the HDMI video
cable(s) with the entire system prior to final installation. HDMI cables vary greatly in overall quality and signal integrity.
Many HDMI cables are not designed to support certain information and signal timings over long cable runs. Contact Wolf
Cinema technical support and/or your cable manufacturer for additional information regarding recommended HDMI
cable lengths and overall system compatibility.
3 RS-232: Route and connect any 9-pin RS-232 cables from your external home automation or control system, separately
to both Projector and ProScaler. These two components should be controlled independently.
Note: The GPIO port not used in the DCL-200FD system. It is reserved for discrete
communication protocol between the ProScaler and our DCX-series of video
X
RS-232 interconnect between ProScaler and external control system
projectors. Leave disconnected.
4 Connect both Projector and ProScaler to AC power.
Note: Use extreme care when connecting AC Power to any products. Review the important safety notices indicated on pages
1-3 of this manual.
5 Power on the two components:
ProScaler: The ProScaler will automatically turn on. If a Red LED is shown on the right side of the front panel, the scaler is
receiving AC power but no video input signal is detected. If a Blue LED is shown, the scaler is receiving AC power and a good
video signal has been detected. No LED indicates there is no AC power to the scaler.
If the ProScaler does not turn on automatically, depress the SCALER button on the lower left of the system remote control and
then depress the green POWER ON button at the top.
Step 1 - Select the
SCALER button to
activate all the
ProScaler IR
commands via the
remote control
Step 2 - Aim the
remote at the
ProScaler. Select the
green POWER ON
button to turn on
the ProScaler
12
Page 14
ProScaler
Projector: The Projector will remain in a stand-by OFF mode until turned on via the supplied IR remote control, or by receipt of
a discrete ON command from your home automation control system.
To activate the Projector, select the TV/Projector button on the IR remote control, then depress and HOLD the green POWER ON
button at the top of the remote. The projector will turn on in approximately 30 seconds.
Step 1 - Select the
TV/Projector button
to activate all
the Projector IR
commands via the
remote control
5 Select from the desired components connected to the ProScaler:
Upon power up, the ProScaler defaults to the HDMI #1 input. Other inputs may be directly accessed via the numeric keypad on
the ProScaler remote:
To select from available
sources, first select the
SCALER button, aim the
remote at the ProScaler
and then depress the
desired input button, as
noted on the keypad.
remote at the Projector.
green POWER ON button
Step 2 - Aim the
Depress and HOLD the
for 2 seconds to turn
on the Projector
13
Page 15
ProScalerHigh Definition Video Processor User’s Manual
Connecting Video Equipment
Using an S-Video or a Composite Video Cable
Using an S-Video or a Composite Video cable, a VCR, laser
disc player or other video equipment can be connected to
the labeled input terminals.
Note: The S-VIDEO terminal uses a video signal system in which the picture is separated into color and luminance signals to
realize a higher-quality image. To view a higher-quality image, use a commercially available S-Video cable to connect
the INPUT 3 terminal on the projector and the S-Video output terminal on the video equipment.
Connecting to Component Video Equipment
Using a Component Cable
Use a component cable (commercially available) when
connecting to the COMPONENT INPUT terminals, using
component video equipment such as DVD players and DTV*
decoders. Connect using analog component output terminals.
S-Video cable (commercially available)
Composite video cable (commercially available)
*DTV is the umbrella term used to describe the new digital television
system in the United States.
The component jack for a DVD and so forth may be indicated
with Y, CB or CR. Connect each jack as shown right.
Note: When connecting the projector to the video equipment in this way, select Component for Input Source in the ProScaler
MENU.
Connecting Video Components with an
HDMI to HDMI Cable
Use an HDMI to HDMI cable (supplied accessory) when
connecting HDMI video equipment such as Blu-ray players,
DVD players and more to the six available inputs.
HDMI Inputs #1 through #5 are located
on the rear pannel of the ProScaler.
HDMI input #6 is under the removable
WOLF CINEMA logo plate on the panel front.
ProScaler
DVD player or
DTV decoder
Y
Y
Y/G
B-Y
PB
CB
R-Y
PR
CR
Note: Select the signal output type from the video equipment set up menu
14
Page 16

ProScaler
Connecting a Computer
Connect the computer by either a 15-pin VGA to RGBHV
cable (optional accessory, sold separately) or to a VGA to
HDMI converter (also an optional accessory, sold separately).
The 15-pin VGA to RGBHV cable may be connected to the
appropriate component input (1 or 2, depending on the
type of PC sync).
Note: • See page 43 “Computer Compatibility Chart” for a list of computer signals compatible with the system. Use with
computer signals other than those listed may cause some of the functions not to work.
• A Macintosh adaptor may be required for use with some Macintosh computers. Contact your nearest Authorized
Service Center or Dealer.
• Depending on the computer you are using, an image may not be projected unless the signal output setting of the
computer is switched to the external output. Refer to the computer operation manual for switching the computer
signal output settings.
“Plug and Play” Functions [PC]
This projector and ProScaler ensemble is compatible with VESA-standard DDC 1/DDC 2B. The system and a VESA DDC compatible
computer will communicate their setting requirements, allowing for quick and easy setup.
Before using the “Plug and Play” function, be sure to turn on the projector and ProScaler first and the connected computer last.
15
Page 17

ProScalerHigh Definition Video Processor User’s Manual
Remote & Menus
Controlling ProScaler
Menus and User Interface
You can control Wolf Cinema’s ProScaler using the Menu system. The Menus are logically organized to make control and
setup easy while using just a few remote buttons.
Main Menu
EXIT NEXT
< >
Select Input
Adjustment Navigation
(Up, Down, Left, Right)
Navigates through
on-screen menus
Exit Menu Button
Exits the on-screen display
To see menus press
ProScaler Select Button
then
Menu Button
Select a video input and its associated input
Up & Down Arrows
move Highlite Bar
On-Screen Hints
Left Arrow
goes to previous or Exits
Menus from Main Screen
Highlite Bar
Menu Path
Right Arrow
go to next screen
16
Page 18

ProScaler
Menu Organization
The system Menus are organized as a hierarchy, in which you move from left to right. Think of the Main Menu screen as the
leftmost or “highest place” in the hierarchy. Up/Down Arrows move a Highlight Bar vertically. Right Arrow moves to the next
screen until you reach a screen where you can make changes.
Move to the left in the hierarchy using the left arrow. This takes you “higher” or “back to the original area” in the hierarchy.
An example of using the Menus to adjust brightness is shown in the figure below.
Main Menu
From Main, use Down Arrow
to move the highlight bar to
Picture Controls
Right Arrow moves to
Picture Control Screen
< >
EXIT NEXT
P
icture controls
Right Arrow moves to
Adjust Brightness Screen
Left Arrow goes to
Previous Screen
Changes to Picture Control are applied to
current input display top right.
Picture Controls
< >
EXIT NEXT
Brightness
Brightness adjusts the level of black.
Brightness
<
BACK
+0
Exit Menu Button
Exit Menus
Brightness adjusts the level of black.
17
Page 19

ProScalerHigh Definition Video Processor User’s Manual
Main Menu
Select Input
Scaler -> Main Menu -> Select Input
Input Select Selection
There are 2 ways to select source components (inputs):
1 Switch inputs using the Select Input Menu, or
2 Select first the SCALER button and then access the desired input using the numeric keypad.
Zoom and Pan
Scaler -> Main Menu -> Zoom & Pan -> Zoom
The Zoom control allows you to magnify your picture. As the picture magnifies, the area around the ProScalers becomes
invisible [shifting off the sides, top, and bottom of your display].
Pan lets you to move around on a zoomed picture. You can shift left, right, up or down. Shift has no effect unless the picture is
zoomed. If the picture is not zoomed, the Pan control will be grayed, meaning it is unavailable.
The Zoom and Pan settings you choose apply only to the current input. You can customize the zoom settings for every input
if you so choose. Zoom and Shift settings will be stored and will not change until you deliberately change them.
Zoom Control Screen
Scaler -> Main Menu -> Zoom & Pan -> Zoom
Independent Horizontal and Vertical Zoom
Scaler -> Main Menu -> Zoom & Pan -> Zoom H or V
Zoom H or V gives you independent horizontal and vertical zoom control. The original aspect ratio is not maintained using
this control.
The Zoom H or V control works differently from most other control screens. It uses Up/Down arrows to zoom vertically, and
Left/Right arrows to zoom horizontally. The OK button takes you to the previous screen, or you can press the EXIT button
your remote to exit menus.
18
Page 20

ProScaler
Pan H or V
Scaler -> Main Menu -> Zoom & Pan -> Pan H or V
The pan feature allows you to move around on a zoomed picture. As you move around, you expose parts of the picture that
were not visible because the picture was Zoomed. Pan works only on a Zoomed picture.
The controls on this screen work differently than most screens. The controls are work like the Zoom H or V described on the
previous page.
Uses Up/Down arrows to zoom vertically, and Left/Right arrows to zoom horizontally. The OK button takes you to the previous
screen, or you can press the EXIT button your remote to exit menus.
Zoom using the Remote Control
You can Zoom directly from remote without using the Menus. All Zoom controls apply to the currently selected input, giving
you independent Zoom controls on every video input.
Aspect Ratio Control using Menus or Remote
Scaler -> Main Menu -> Aspect Ratio
Select the Aspect Ratio choice from the Menu, or select from the available Aspect Ratios at the bottom of the remote control.
Aspect Ratio controls apply to the currently selected input, for independent Aspect Ratio controls per input.
Picture Controls
Picture Controls let you make adjustments to your picture. The set of Picture Controls available are briefly described below:
Brightness Adjusts black level (the dark portions of the image).
Contrast Adjust white levels (the bright portions of the image).
Color Saturation Adjusts the vividness (intensity) of colors
Hue Color adjustments that shift the shading of color. Also sometimes called tint. This
color control adjusts color shading without changing Luminance (picture brightness)
or color saturation.
Detail Enhancement Sharpening control that influences picture details
ProScaler Enhancement Sharpening control that influences large image features
Mosquito Noise Reduction Type of noise filtering that removes “mosquito noise,” a common video compression
artifact often visible in the image.
Picture Controls apply to the currently selected input, giving you independent Picture Control of every input component.
Scaler -> Main Menu -> Picture Controls
19
Page 21

ProScalerHigh Definition Video Processor User’s Manual
Brightness Control
Scaler -> Main Menu -> Picture Controls -> Brightness
Video brightness controls work by adjusting black levels. When you make an adjustment to the brightness control, all levels
of interscene image brightness (from black to peak white, but most noticeably in the dark areas of the picture) are shifted
from darker to brighter.
The Brightness control is complimentary to the Contrast control on the next page. Contrast controls adjust the level or intensity
of interscene white levels.
Contrast Control
Scaler -> Main Menu -> Picture Controls -> Contrast
Contrast controls works by adjusting the levels of white. Contrast is complimentary to the Brightness control. Contrast controls
should be used carefully because if overly adjusted, some details in the lighter images areas can become “less visible” and
affect image clarity.
Contrast and Brightness controls, like all picture controls, are independently adjustable for every video input. When you
make a change to a picture control, the change applies only to the currently selected video input.
Press SCALER, press MENU, select Picture Controls, select Contrast
Color Saturation
Scaler -> Main Menu -> Picture Controls -> Color Saturation
Color Saturation refers to the intensity of “color” in the picture. Increasing Color Saturation makes colors look more vivid,
while decreasing Color Saturation makes colors look more “washed out.” Changes to either Brightness or Contrast can also
affect your image’s Color Saturation. You can use this control to balance the mix of color verses brightness.
Color Saturation, like all picture controls, is independently adjustable for every video input. When you make a change to a
picture control, the change applies only to the currently selected video input.
Hue
Scaler -> Main Menu -> Picture Controls -> Hue
Hue is a an adjustment to color “shading.” The changes made with a Hue control effect what some other television sets
refer to as “tint.” Hue controls cause a shift in color spectra. Shifting more in one direction moves the video shade towards
a more “green” image while adjustments in the opposite direction moves the video towards a more “red” dominant image.
Hue, like all picture controls, is independently adjustable for every video input. When you make a change to a picture control,
the change applies only to the currently selected video input.
20
Page 22

ProScaler
Picture Controls
Detail Enhancement
Scaler -> Main Menu -> Picture Controls -> Detail Enhancement
Detail Enhancement is a control to increase (or decrease) the ProScaler detail (“sharpness”) of the image. Use this control in
moderation, as excessive settings adjustments may cause the image to look distorted and unnatural.
ProScaler Enhancement
Scaler -> Main Menu -> Picture Controls -> ProScaler Enhancement
ProScaler Enhancement can be used to sharpen large scene objects (verses the Detail Enhancement control, which will
sharpen ProScaler details such as grass or the texture of a plaster wall). It it useful when you want to sharpen a lower
quality picture, such as Standard Definition (SD) content.
ProScaler Enhancement, like all picture controls, is independently adjustable for every video input. When you make a
change to a picture control, the change applies only to the currently selected video input.
Mosquito Noise Reduction
Press SCALER, press MENU, select Picture Controls, select Mosquito NR
About Mosquito Noise Reduction
The term “noise” in the context of video images refers to unwanted or unnatural looking elements that find their way into
video signals. “Mosquito Noise” is a particular type of image noise that is caused by video compression processing. Video
compression is common for all types of transmitted video, including cable, satellite, and over-the-air broadcasts. Compression
is also used with DVD, Blu-ray discs and other prerecorded media. The visibility of Mosquito Noise will vary. In some cases,
it can become objectionable. Mosquito Noise will be more obvious in standard definition video, although it is sometimes
present in high definition video.
Your Wolf Cinema’s ProScaler has a Mosquito Noise Reduction feature that can remove some of this noise. An example
of mosquito noise in a TV weather report is shown on the left side of the next page. The same image with Mosquito Noise
Reduction applied is shown on the right side of the next page.
Mosquito Noise reduction works by analyzing the image for features that are likely to cause Mosquito Noise. It then
intelligently applies filtering to those areas to remove the noise.
21
Page 23

ProScalerHigh Definition Video Processor User’s Manual
Settings
Settings Menu
Scaler -> Main Menu -> Settings
Your Wolf Cinema’s ProScaler provides a rich set of configuration options, accessible through the Settings Menus.
Output Format: Output format refers to the resolution scanning scheme (progressive or interlaced) and frame rate of
the output.
Input Priority: Used to select which inputs will displayed with multiple inputs are active and Auto Priority is selected in
the menu: Main Menu -> Select Inputs -> Auto Select.
Audio Settings: Adjusts configuration options related to audio.
Note: Not available in most baseline configurations of the Wolf Cinema ProScaler.
Rename Inputs: Renames inputs so that the names make sense to you.
Game Mode: Sets a particular input in game mode for better response through your game controller.
Factory Default: Restores the original factory settings.
Output Format
Scaler -> Main Menu -> Settings -> Output Format
Switching Output Formats
Input Priority
Scaler -> Main Menu -> Settings -> Input Priority
Input Priority is used to decide which input to use when multiple inputs are active at the same time and Input Select:is set
to “Auto.” If multiple inputs are active at the same time and “Auto Select” is selected in the “Input Select” menu, then the
input with the highest priority will be selected.
You can find Input Select at this path name: Scaler -> Main Menu -> Input Select
22
Page 24

ProScaler
Settings Audio
Select Audio Output
Scaler -> Main Menu -> Settings -> Select Audio Output
Decision Logic for Auto Select: The table below shows the connector choice for audio when Auto Select is chosen.
Note: “EDID” is information about the capability of a display or AV Receiver that is automatically read by ProScaler over
the HDMI or DVI cable.
Output Connector Conditions
Video/Audio HDMI Display has audio capability (reported via the EDID). No AV Receiver connected to the Audio HDMI
port, or an AV Receiver is connected but powered off.
Audio HDMI AV Receiver with HDMI inputs is connected to the Audio HDMI port and powered on.
Optical Not Available
If you are using an AV Receiver for processing audio, then you need to configure your receiver to accept audio from the
input that is connected to the Wolf Cinema’s ProScaler. You need only do this once, because your Wolf Cinema’s ProScaler
will handle HDMI audio switching.
Associate Audio and Video Inputs
Main Menu -> Settings -> Select Audio Input
If you have a non-HDMI input component – Component, Composite or S-Video - this particular function is not available.
You must select the desired video input on the Wolf Cinema ProScaler and then select the associated audio input on your
outboard AV Receiver or Surround Sound Processor
If your source component uses DVI for video output, and you are connecting to ProScaler using a DVI to HDMI adapter cable,
then you will have to connect audio via a separate cable and select the two devices accordingly.
Rename Inputs
Scaler -> Main Menu -> Settings -> Rename Inputs
The Rename Inputs feature lets you customize your setup. The names you enter will appear in the “Select Input” menu.
Use the Arrow keys to move the highlighted character around on the keyboard.
OK puts the selected character in the edit bar.
Cancel exits the window with no changes.
Finish exits the window and applies the new name.
23
Page 25

ProScalerHigh Definition Video Processor User’s Manual
Game Mode
Scaler -> Main Menu -> Settings -> Game Mode
About Game Mode
The video processing performed in the Wolf Cinema ProScaler adds a few milliseconds of delay to your video and audio.
For most viewing this delay is not a problem, but if you are playing video games that require quick response on your game
controls, the delay can be noticeable and annoying.
Game Mode is a special processing feature that minimizes delays so your game control inputs are more responsive.
Removing delay requires some tradeoffs in processing. You may notice differences in picture quality if Game Mode is enabled.
If the incoming video signal is an interlaced format, Game Mode may result in a lower-resolution image due to the changes
in deinterlace processing required to minimize delay.
If the incoming video signal is a progressive format, and Game Mode in enabled, some processing features will be unavailable,
including Mosquito Noise Reduction, Detail Enhancement, and ProScaler Enhancement.
Factory Defaults
Scaler -> Main Menu -> Settings -> Factory Defaults
Factory Defaults is a quick way to “undo” any settings that have been made, and restore the ProScaler’s original default settings.
Default Video Output
The Default video format setting is *Auto” In Auto mode, the ProScaler will automatically communicate with your Wolf Cinema
projector and output the preferred format.
Default Picture Controls
Restores default settings to Brightness, Contrast, Hue, Mosquito Noise Reduction, Detail Enhancement, and ProScaler
Enhancement.
Default Input Names
Restores default names for video inputs.
All Defaults
Restores all defaults.
24
Page 26

ProScaler
Remote Control
The Wolf Cinema’s ProScaler Universal Remote
The earlier chapters focused on controlling the Wolf Cinema ProScaler. This chapter discusses the use of the remote to
control other components in your system.
Wolf Cinema’s ProScaler remote is a universal type. It allows you to control up to 8 components (including the Wolf Cinema
Projector and ProScaler) in your audio/video system with this single remote.This remote can be used for the day to day
operation of your entire system.
Retain your other component remotes: you will need the remotes for your other devices when you set up your system for the
first time, plus you will likely need the other remotes occasionally when you need to make changes to your system setup.
The Universal Remote Overview
This section presents a brief overview for using the remote from a system perspective and points out functions and
features unique to the Wolf Cinema ProScaler remote control. Details of programming the remote are in the section titled
“Programming the Remote.”
The remote has 3 primary features that work in combination to make control of your system as simple as possible:
1 Modes: You put the remote into a mode for controlling a particular component in your system by pressing
one of the 8 mode buttons. Once the remote is switched to a particular mode, it controls a single
component in your system.
2 Punch Through: Punch Through is a feature that minimizes the need for switching modes as much as possible.
Some of the buttons on your remote control have related functions. For example, the VOLUME,
and MUTE buttons both control sound volume, so they are related. Another example is the PLAY,
PAUSE, FAST FORWARD, FAST REVERSE, and STOP buttons. Buttons that have related functions
are a “group.”
Punch Through allows one group of buttons for a particular component to work while the remote is
switched into a mode for a different component. For example, DVD players typically don’t control
sound volume. Sound volume may be typically controlled by an AV Receiver. Punch Through
allows you to control sound volume while in the DVD operating mode. If you program punch
through to control your sound device for all your components, then one doesn’t have to think
about what mode is currently selected. Instead, sound control becomes a function, and you no
longer have to remember which component controls sound.
3 Macros: A Macro allows you to perform a series of button presses using a single button. Macros are useful
if you find that you use a particular series of button presses over and over. A Macro allows you to
invoke the entire series with one button.
25
Page 27

ProScalerHigh Definition Video Processor User’s Manual
Modes
You can control individual components in your setup by pressing one of the mode buttons. This switches the remote into
a mode in which it communicates with the component you selected. Seven of the mode select buttons are located near
the top near the power on/off. The TV/Projector labeled button controls the Wolf Cinema Projector functions. The mode
button for controlling the Wolf Cinema’s ProScaler is located near the bottom left of the remote.
The devices that can be controlled using these 7 buttons are as follows:
AUD: Audio
Operates the audio component in your system. Typically, the AUD button is used if you have an AV Receiver that performs
surround sound processing and drives your speakers.
BD: BluRay Disc
Controls your Blu Ray high definition DVD Player.
VCR:
Controls your Video Cassette Recorder
AUX: Auxiliary
Auxiliary can be used for a device that is not already used by the other buttons. You can think of it as a “spare” device
select button.
TV: Television
Operates your Wolf Cinema Projector.
DVD:
Controls your DVD player.
Cable/SAT:
Controls your cable or satellite set top box.
Punch Through
As described above, Punch Through is a feature of the universal remote that allows control of certain features of one
component while in the operating mode of another. For example, your setup uses an AV Receiver as an audio processor,
and you are playing a DVD in your DVD player. You have your remote in DVD mode so you can control the Play, Pause, Fast
Forward, etc. on your DVD player. But you also want to quickly select and adjust your audio volume. Punch Through enables
the volume up/down and mute buttons on the remote to control your receiver even if you are in DVD mode. You don’t have
to switch modes from DVD to Audio to control volume: instead, you simply press the volume button while still in DVD mode.
To set up Punch Through when you program your remote, refer to the section in this manual.
26
Page 28

ProScaler
Macros
A Macro allows you to perform a series of button presses using a single button. Macros are useful if you find that you often
repeat the same series of button presses.
For example, a Macro can be used to power up all the components in your system with a single button press.
Let’s say that find that you often pick up your remote and power up your Projector, AV Receiver, and set-top box together:
this particular set of power-up button sequences is used again and again in your setup.
This series of multiple button presses could be put into a macro, so that one button selection powers up the 3 components
used in this example. Note that we did not power on the Wolf Cinema’s ProScaler because it will sense a signal from the
Set Top Box and it will power itself on automatically.
There are 9 buttons that can be used for Macros. They are the Power On/ Off pair, and the 7 component select buttons
(AUD, BD, VCR, etc.). When you use one of these buttons for a Macro, it can no longer be used for its previous function.
Therefore, the best choice for a Macro button is one that is not being used for anything else in your system.
Programming the Remote
The Wolf Cinema’s remote control has been designed to operate 6 different Audio/Video components in addition to the
Projector and ProScaler. The remote control is preprogrammed to operate major brand's AUDIO, DVD, CD, VCR, SAT/CABLE
and AUX (Light, Media PC etc.).
The remote control also has seven learning modes for learning the functions from the original remote controls of manufacturers.
The remote control provides distinct visual feedback with LED under the Device buttons to assist you in programming.
1 Programming the remote with the preprogrammed code
A complete listing of 3 digit codes is provided at the end of this section.
A. Using Three Digit Setup Code Number Method
Step 1] Turn on the Device you want to operate manually.
Step 2] Press the Source Device Input button and the OK buttons simultaneously and hold for 3 seconds until the
Device LED turns on. (The LED will stay on for 20 seconds. The next step must be entered during this period).
Step 3] Point the remote control toward the Device and press in the first three-digit Setup Code number for that Device
using the number buttons (0-9) on the remote control. (The Device LED will blink once for each button pressed).
Tip: Your Device will turn off when the corrected Setup code number has been selected. If the device does not turn off,
press in the next Setup Code numbers until your device turns off.
If you have tried all of the Setup Code numbers listed and it still did not turn off, please proceed to the Auto Search Method.
Step 4] Once your Device turns off, press the Source Device Input button selected in the Step 2 once again to store
the Setup Code number. (The Device LED will blink three times to confirm that the code has been stored).
Step 5] Please repeat the above steps to program the remote control for each of other devices.
27
Page 29

ProScalerHigh Definition Video Processor User’s Manual
B. Using Auto Search Method
Step 1] Turn on the Device you want to operate manually.
Step 2] Press the Source Device Input button and the OK buttons simultaneously and hold for 3 seconds until the
Device LED turns on. (The LED will stay on for 20 seconds. The next step must be entered during this period).
Step 3] Point the remote control toward the Device and press the Cursor + (or Cursor -) button one at a time (or keep it
at pressed) until turn of the Device.
Tip: Each the Cursor + (or Cursor -) button sends the Power signal of one Setup Code number.
Tip: Once the Device turns off, you are able to test other functions by pressing the buttons except the Device, Cursor+/-,
Number 0-9 and Light buttons. Power On, Off, MUTE and Volume and Channel number buttons (0-9). (The Device button
LED will blink once for each button pressed).
Step 4] Once your Device turns off, press the Source Device Input button selected in the Step 2 once again to store
the Setup Code number. (The Device LED will blink three times to confirm that the code has been stored).
Step 5] Repeat the above steps to program the remote control for each of other Devices.
Tip: You are able to go back to the Using Three Digit Code Method mode by pressing the Channel number buttons (0-9)
the OK button in the Step 3.
Tip: If you are still missing the Setup Code numbers to control any of your devices, use the Learning Method on the next page.
C. Programming a Second DVD, etc. to Other Device Buttons
This feature is used to program the remote control for two or more DVDs, etc., or to program a device into other device
buttons. You can program the Setup Code number for any Device into any other unused Source Device Input button.
Example: If you have two DVD players. First, using the DVD button, program the remote via standard setup to operate
the first DVD player. Then, program your second DVD into a Source Device Input button that is not being used, e.g., AUX
using this method.
Step 1] Turn on the DVD player manually.
Step 2] Press the AUX button and the OK buttons simultaneously and hold for 3 seconds until the AUX LED turns on.
(The AUX device LED will stay on for 20 seconds. The next step must be entered during this period).
Step 3] Press the DVD button to program the DVD's Setup Code numbers.
Step 4] Point the remote control toward the DVD player and press in the first three-digit Setup Code number for that Device
using the number buttons(0-9) on the remote control. (The DVD Device LED will blink once for each button pressed).
Tip: Your DVD player will turn off when the corrected Setup code number has been selected. If the DVD does not turn off,
press in the next Setup Code numbers until your DVD turns off.
Step 5] Once your Device turns off, press the AUX button once again to store the Setup Code number. (The AUX Device
LED will blink three times to confirm that the code has been stored).
D. Finding the Setup Code number that was stored in the Device
Step 1] Press the Source Device Input button you wish to verify and the OK buttons simultaneously and hold for 3
seconds until the Device LED turns on. (The LED will stay on for 20 seconds. The next step must be entered
during this period).
28
Page 30

ProScaler
Step 2] Press the INFO button.
The Device LED will blink number of times indicating the number of each digit of the Setup Code number. Each digit is
separated by 1 second interval of the LED being turned off.
For example: One blink, three blinks and eight blinks indicate the code number 138.
Tip: Ten blinks are equal to the number “0”.
2 Programming the remote with Learning Method
All buttons in 7 Device modes can learn except the LIGHT button.
-. Learning available carrier frequency is from 15KHz to 480KHz.
-. Learned functions override any existing preprogrammed functions on the remote control.
-. Learned functions are automatically erased when a new function is learned on the same button.
-. Learned functions are retained even after a different Setup Code number is programmed into the remote control.
-. To return to an original preprogrammed function, a learned functioned should be erased.
A. Learning a New Command
Step 1] Press the Source Device Input button and the ENT buttons simultaneously and hold for 3 seconds until the
Device LED turns on. (The LED will stay on for 20 seconds. The next step must be entered during this period).
Step 2] On the remote control, press the button that is to be taught the new command. (The Device LED will blink one time).
Step 3] On the original remote control, press and hold the button for the command to be learned until the Device LED
blinks twice.
Tip: The LED will flash 5 times if there is error in process of learning. Please repeat Step 2 and Step 3.
Repeat Step 2 and Step 3 for any other buttons to be taught in the Device mode selected in Step 1.
Step 4] Once you have completed learning new commands to buttons in the selected Device mode, press and hold the
Source Device Input button and ENT button simultaneously to save learned functions. The Source Device
Input button LED will blink three times to confirm the programming.
Please repeat for any other Device modes starting from Step 1.
B. To Erase a Learned Command From a Button
Step 1] Press the Source Device Input button and the ENT buttons simultaneously and hold for 3 seconds until the
Device LED turns on. (The LED will stay on for 20 seconds. The next step must be entered during this period).
Step 2] On the remote control, press the button that is to be erased for 3 seconds. (The Device button LED will blink
twice to confirm it).
Repeat Step 2 for any other buttons to be erased in the selected Device mode.
Step 3] To exit this feature, press and hold the Device button and the ENT button simultaneously, once again. (The LED
will blink three times).
29
Page 31

ProScalerHigh Definition Video Processor User’s Manual
C. To Erase All the Learned Commands in One Device Mode
Step 1] Press the Source Device Input button and the ENT buttons simultaneously and hold for 3 seconds until the
Device LED turns on. (The LED will stay on for 20 seconds. The next step must be entered during this period).
Step 2] Press the Source Device Input and Pause buttons simultaneously and hold for 5 seconds until the LED blinks
two times.
Step 3] To exit this feature, press and hold the Source Device Input button and the ENT button simultaneously, once
again. (The LED will blink three times).
3 Programming the remote with Advanced Functions
A. Programming Multi Commands to Macro Buttons
There are nine (7 for R5) Macro buttons (ON, System Off and 7 (5 for R5) Device buttons) that are designed to store up
to 20 commands in each button.
Pressing any one of the Macro button will send out the series of commands that are stored in the button. For example,
you either turn on or off several devices at a time by storing Power On/Off commands to these buttons.
Step 1] For programming Macro Commands on a Device button, press the Source Device Input and the MUTE buttons
simultaneously and hold for 3 seconds until the Device LED turns on. (The LED will stay on for 20 seconds. The
next step must be entered during this period).
For programming Macro Commands on the POWER ON or SYSTEM OFF button, Press the POWER ON or SYSTEM OFF
button and the MUTE buttons simultaneously and hold for 3 seconds until the TV and SAT/CABLE Devices LED turns on.
(The LED will stay on for 20 seconds. The next step must be entered during this period).
Step 2] Press one of the Macro buttons.
Step 3] Press in up to 20 buttons you wish to store in the Macro. (The Device LED will blink once for each button pressed).
Tip: Pressing a Device button to change device modes is considered as one command.
Step 4] Press the Channel UP button to save the selection. (The LED will blink three times to confirm the programming).
Note: You can program delays in between commands by pressing the PAUSE button. Each press add half a second to
the delay.
Note: If you add the delay time at the first step of macro commands, the remote will send the macro commands once
you pressed the Macro button for 2 seconds. (Press & Hold Function).
Note: You cannot program the CH + and PAUSE buttons as a macro command.
30
Page 32

ProScaler
B. Erasing the Macro Commands
Step 1] Press the Source Device Input button and the MUTE buttons simultaneously and hold for 3 seconds until the
Device LED turns on. (The LED will stay on for 20 seconds. The next step must be entered during this period).
Step 2] Press the Macro button you wish to erase commands.
For erasing Macro Commands on the POWER ON or SYSTEM OFF button,
Press the POWER ON or SYSTEM OFF button and the MUTE buttons simultaneously and hold for 3 seconds until the
TV and SAT/CABLE Devices LED turns on. (The LED will stay on for 20 seconds. The next step must be entered during
this period).
Step 3] Press the CH UP button to save the selection. (The LED will blink three times to confirm the programming).
C. Programming Punch Through
1 Volume Control “Punch Through”
The remote control can be programmed so that either the Audio or TV Volume controls (Volume UP, Down and
MUTE) will operate in any of the seven device modes.
Step 1] Press the Source Device Input button and the OK buttons simultaneously and hold for 3 seconds until the
Device LED turns on. (The LED will stay on for 20 seconds. The next step must be entered during this period).
Step 2] Press the VOL Up button. (The Device LED will blink one time).
Step 3] Press the Audio button to set up for Audio volume control (or the TV button to set up for TV volume control.
(The Device LED will blink three times to confirm the program).
2 Channel Control “Punch Through”
You can program the remote so that either the CABLE or TV Channel Controls (Channel Up, Down, Prev.CH and
Channel number (0-9 buttons) will also operate in other modes on the remote control.
Step 1] Press the Source Device Input button and the OK buttons simultaneously and hold for 3 seconds until the
Device LED turns on. (The LED will stay on for 20 seconds. The next step must be entered during this period).
Step 2] Press the CH Up button. (The Device LED will blink one time)
Step 3] Press the SAT button to set up for SAT channel control (The Device LED will blink three times to confirm
the program).
3 Transport Control “Punch Through”
You can program the remote control so that VCR or DVD Transport Controls (Play, Stop, FF, REW, PAUSE, SKIP+,
SKIP- and Record buttons) will also operate in other modes on the remote control.
Step 1] Press the Source Device Input button and the OK buttons simultaneously and hold for 3 seconds until the
Device LED turns on. (The LED will stay on for 20 seconds. The next step must be entered during this period).
Step 2] Press the PLAY button. (The Device LED will blink one time)
Step 3] Press the DVD button to set up for DVD transport control (or the VCR button to set up for VCR transport
control. (The Device LED will blink three times to confirm the program).
31
Page 33

ProScalerHigh Definition Video Processor User’s Manual
4 OSD Control “Punch Through”
You can program the remote control so that SAT or DVD OSD Controls (MENU, GUIDE, INFO, EXIT, OK and 4 Cursor
buttons) will also operate in other modes on the remote control.
Step 1] Press the Source Device Input button and the OK buttons simultaneously and hold for 3 seconds until the
Device LED turns on. (The LED will stay on for 20 seconds. The next step must be entered during this period).
Step 2] Press the MENU button. (The Device LED will blink one time)
Step 3] Press the SAT button to set up for SAT OSD control or the DVD button to set up for DVD OSD control. (The
Device LED will blink three times to confirm the programming).
C. Back Lighting
The backlighting turns on for 10 seconds any time the LIGHT button is pressed and will remain lit an additional
10 seconds with each subsequent button press when the light is already on.
D. Factory Reset
To erase EVERYTHING you programmed, press and hold the TV and REC buttons for 10 5 seconds until TV SAT/CABLE
device LED will blink 5 times. The remote erase all of your settings and return to the factory default setup.
32
Page 34

ProScaler
Advanced Functions
Advanced Functions
A new set of controls is now available for advanced users and calibration professionals. They are located in the “Settings”
menu under “Advanced Controls.”
The ProScaler design concept is to create a product that automatically adjusts and configures itself for the variety of
video formats, color spaces, signal levels. The consumer electronics industry has specified a number of methods by which
products communicate with each other for self-configuration. Sometimes, these communication methods are incorrectly
implemented. The advanced features in this platform give you a way to manually make adjustments that previously were
performed automatically.
For most of these settings, there is an “Auto” choice, which is the same function as in Firmware 1.0, but with manual selections
that give you control over these functions.
In general, the safest thing to do with these settings is to leave them in their default state.
Test Patterns
There are 35 test patterns available, for advanced users and calibration professionals. These patterns automatically resize,
and use the correct colorimetry for the current output format.
Test patterns are useful for calibration of your setup.
1:1 Frame Rate
When 1:1 Frame Rate is enabled, the output frame rate from ProScaler will track the input frame rate. This avoids performing
frame rate conversion, which can result in stuttering motion in some cases.
If 1:1 Frame Rate is disabled, then the output frame rate from ProScaler will be fixed.
The 1:1 Frame Rate feature is useful when you need to display video from both 60Hz and 50Hz sources, as long as your
video display can operate at both frame rates. Some video sources, such as Blu-Ray DVD players, can output 24Hz video. If
you have a 24Hz source and your display can also accept 24Hz, then enabling 1:1 Frame Rate will allow the 24Hz video to
pass through the ProScaler from source to the Projector.
Safe Mode
Safe Mode is a new feature in Firmware v1.1. It is entered and exited by pressing the GUIDE button when the remote is in
SCALER mode.
Safe Mode was added to solve a potential problem when using 1:1 Frame Rate. When 1:1 Frame Rate mode is enabled, the
ProScaler’s output frame rate will track the input frame rate, which means that ProScaler’s output frame rate can and will
change. Occasionally the Projector may see a source with a frame rate that it cannot support, it may go blank,leaving you
with no picture. If that happens, you can press the GUIDE button to enter Safe Mode.
In Safe Mode, ProScaler will revert to an output format that will give you a picture. You will have access to the menus and
you can make whatever changes you need to prevent the screen from going blank. Usually, the change you need to make
is to disable 1:1 Frame Rate.
Safe Mode also resets Underscan back to 0, because Underscan can also cause a breakup in your picture under certain conditions.
If you make changes to menus while in Safe Mode, these changes do not take effect until you exit Safe Mode.
Use GUIDE button to enter and exit Safe Mode.
33
Page 35

ProScalerHigh Definition Video Processor User’s Manual
Underscan
The Underscan control has not changes from Firmware v1.0. But Underscan is effected by Safe Mode as mentioned on the
previous page.
Output Color Space
The Output Color Space control provides 4 choices for output color space. If you are unsure what to use,Auto is the safe choice.
Auto: usually output color space will be RGB
RGB: Red, Green, Blue color space standard using 8 bits per primary color.
YCbCr 4:4:4: Component color space used for video standards; 8 bits per component.
YCbCr 4:2:2: Component color space used for video standards: 10 bits per component.
Output Colorimetry
Colorimetry refers to the standards by which RGB is converted to YCbCr. There are two standards for performing this conversion:
ITU BT .601: This is the colorimetry standard for Standard Definition video formats.
ITU BT .709: This is the colorimetry standard for High Definition video formats.
Output Video Level
Video Levels refer to the dynamic range of the video signals themselves. The video industry evolved levels that allowed for
some guard band in the signal levels to account for overshoot or other signaling problems. The computer industry evolved
levels that allocate the entire dynamic range possible for the image information.
The ProScaler will drive video displays, which use video signaling levels, and computer displays which use computer signal levels.
The Output Video Level control gives you control over what signaling levels are output from ProScaler.
Input Video Level
This control is similar to the OutputVideo Level control described on the previous page, except that it applies to input video signals.
Video Levels refer to the dynamic range of the video signals themselves. The video industry evolved levels that allowed for
some guard band in the signal levels to account for overshoot or other signaling problems. The computer industry evolved
levels that allocate the entire dynamic range possible for the image information.
The ProScaler must accept signals from video components, such as DVD players, set top boxes, video recorders, etc. Most
of these devices use video signaling levels. ProScaler must also connect to personal computers and came consoles, which
may use computer signal levels.
The Input Video Level control gives you control over what signaling levels are used for inputs
PReP
PReP is an exclusive processing technology developed by Anchor Bay Technologies.
Standard definition input formats such as 480p, 576p, and were deinterlaced at some point before reaching ProScaler.
Deinterlacing is a complex processing technology that has a significant impact on image quality. The deinterlacing in
ProScaler uses Anchor Bay Technologies' high performance VRS Deinterlacer.
PReP accepts one of the formats mentioned, and reconverts it back into an interlaced format. It can then be deinterlaced
again using the VRS technology in ProScaler, which usually results in a higher quality picture.
The PReP control allows users to disable this function. Most users will never need to disable PReP.
34
Page 36

ProScaler
The menu user window lets you control PReP for standard definition (480p or 576p) or high definition (1080p). Auto: PReP
will be enabled when AUTO is selected and the input format is 480p or 576p. If this window was entered from the 1080p
selection in the previous window, then PReP will be enabled when AUTO is selected and the input format is 1080p. Off will
disable PReP for the selected input format.
Advanced Features in the Main Menu
Deinterlacer Bias Controls
Wolf Cinema’s ProScaler users have some control over the deinterlace processing using the Deinterlacer selection in the
Main Menu. This control was added to the Main Menu to allow quick access, and was added in response to requests from
ProScaler users in 50Hz (PAL) countries.
These controls require the user to have some knowledge of the original source type of the motion picture. If you are unsure,
leave this setting on “Auto.”
Auto: Deinterlacer will automatically detect the original source type and process accordingly.
Film: Biases the detection toward film. Choosing “Film” may improve deinterlacing performance for motion pictures that
were originally shot on film.
Video: Biases the detection toward video cameras. Choosing “Video” may improve deinterlacing performance for motion
pictures that were originally shot with video cameras.
Auto Wake Up
Auto Wake Up gives you more control over the conditions in which ProScaler will automatically power on. The Auto Wake Up
window gives you 3 options for defining the conditions in which the ProScaler will power itself on:
Off: ProScaler will power on using the remote. Use this option if you want ProScaler to remain powered down even if input
signals become active.
Mode 1: ProScaler will power on automatically only if it powered down automatically. If inputs to the ProScaler become
inactive, ProScaler will automatically power itself off. If an input becomes active again, ProScaler will automatically power
on. If the ProScaler is powered down with the remote, then it will not power on when an input becomes active in Mode 1.
Mode 2: ProScaler will automatically power on whenever an input signal is present on any input. In Mode 2, it does not
matter how ProScaler entered the powered down state; an active input will power it on.
Auto Standby
Auto Standby gives you control over the conditions in which ProScaler will power itself down.
Auto Standby is a simple ON/OFF control. If Auto Standby is OFF, the ProScaler will not automatically power down. This is
useful in cases where you may not have an active video signal, but you may have an active audio signal passing through
ProScaler. In this case, you want ProScaler to remain powered on. If Auto Standby is ON, then ProScaler will automatically
power down if all video input signals become inactive.
35
Page 37

ProScalerHigh Definition Video Processor User’s Manual
Component Input
Component Input menu gives you control over the analog component inputs. To use this control, you must select Component 1
or Component 2, otherwise, this menu item will be grayed out.
The Component Inputs window gives you 3 options for controlling Automatic Gain Control on Analog Inputs:
Single Sync: This is the default setting. Most component inputs will have sync on the Y signal and should use Single Sync.
Triple Sync: A few devices will add sync to all three component input signals (Y, Pb, Pr). In you know your device does this,
choose Triple Sync.
AGC Disable: This choice disables Automatic Gain Control. In some cases, AGC will cause brightness levels to be incorrect
due to distortions in the analog input signals. Disabling AGC may correct this problem. You probably don’t know if a device
that generates an analog component signal puts sync on Y, or on all three inputs, or if it distorts the incoming signal. In general,
it may be best to use Single Sync. If your picture does not look correct, experiment with the other settings.
Hot Plug Source
Hot Plug Source is a new feature that improves compatibility with certain source components that connect to the ProScaler
through an HDMI input.
When Hot Plug Source is enabled for an HDMI input, a signal on the HDMI input connector, called Hot Plug, is toggled when
switching to that input. Toggling Hot Plug causes the source component and ProScaler to perform an HDCP re-authentication.
HDCP is a copy protection technology that is part of the HDMI standard.
Enable Hot Plug Source if you experience problems switching to a particular source component. These problems can include
very slow switching with flashing on the screen, or colored noise over the entire screen. Two common components that
benefit from enabling Hot Plug Source are the Sony PS3 game console and the Oppo 970 DVD player.
Hot Plug Source can be independently enabled for each HDMI input. To enable Hot Plug Source, first select an HDMI input,
then select the Hot Plug Source window.
To enable Hot Plug Source, first select an HDMI input, then go to the menus to the window shown above, and select ON.
If you are unsure whether Hot Plug Source will help, then you should go ahead and enable it. The only downside to enabling
Hot Plug Source is that switching could be a little slower due to the time it takes to re-authenticate.
36
Page 38

Code Tables
AV Receivers and Audio Processors
Manufacturer/Brand Set-Up Code Number
ADC 007
ADCOM 082 092 225 161 269 355 356
AIWA 170 018 104 202 203 213 211 188
AKAI 189
AMC 125 126 127 281 282
ANGSTROM 42
ANTHEM 335 337
ARCAM 141 418
ATLANTIC TECHNOLOGY 342
AUDIO FILE 071
AUDIO MATRIX 167
AUDIO TECHNICA 134
B & K 096 097
BOSE 070 170 224 347 409 460
BOSTON ACOUSTICS 447
BRIX 555
CARVER 006 028 061 071 201 214 226 185 022 077 284
CINEMA SOUND 134
CITATION 148 272
CLARION 026
DELPHI 515
DENON 109 215 230 234 259 330 340(Default)
ELAN 057 290
ENLIGHTENED AUDIO 099 098
ESCIENT 368 451
FISHER 047 214 182 297
FLEXTRONICS 378
FOSGATE AUDIONICS 231 342
GE 056
GOLDSTAR 008
HARMAN KARDON 231 233 153 154 118 318
HITACHI 020
INTEGRA 275
JAMO 398
JCPENNEY 216
JENSEN 058
JVC 163 191 114 279 291
KENWOOD 026 066 145 192 182 005 280 374
KLH 331
KOSS 216
KRELL 150 072 376 384
KYOCERA 007
LEXICON 120 235 236 237 357 360
ProScaler
Device Codes
37
Page 39

ProScalerHigh Definition Video Processor User’s Manual
AV Receivers and Audio Processors continued
LINN 124 377
LUXMAN 137 139 052 165 115 004 009
LXI 056
MAGNAVOX 086 164 152 208
MARANTZ 006 028 031 040 063 185 186 251 265 119 289 296
MCINTOSH 238 286
MERIDIAN 100 012 013
MITSUBISHI 242 243 204
MONDIAL 157 158 042 043 081 112
MYRYAD 276 293
NAD 186 113 283 478 479
NAKAMICHI 111 244 245 172 183 287
NEC 176
NIRO 343
NILES 403
ONKYO 017 046 108 080 209 275
OPTIMUS 026 041
OUTLAW 342
PANASONIC 032 195 219 177 292 383
PARASOUND 129 130 132 261 294 295 333 334
PHILIPS 249 250 251 063 119
PIONEER 014 039 044 069 168 116 035 078 198 480
POLKAUDIO 515
PROCEED 144 268
RCA 010 048 117 156 067 288
REALISTIC 019 056 073 075 095
ROTEL 074 083 085
RUSSOUND 379 391 392
SAMSUNG 016
SANSUI 040 048 110 119 065 228
SANYO 047 059
SCOTT 019 091
SHARP 026 094 131 175
SHERWOOD 024 102 106 447
SIRIUS 555
SONY 018 247 248 166 101 184 218 271 369 372 380
SOUNDESIGN 036
SSI 068
SUNFIRE 344 345 346
TEAC 005 019 049 111 212 217
TECHNICS 122 176 193 219 178 177 200 257 262
THETA DIGITAL 136
TOSHIBA 060 087 198 278
XM SATELLITE RADIO 515
YAMAHA 026 253 169 067 173 205 264 232 089 264 274 285 373
ZENITH 143 210
38
Page 40

Audio – Satellite Radios
Manufacturer/Brand Set-Up Code Number
BRIX 555
DELPHI 515
POLKAUDIO 515
SIRIUS 555
XM SATELLITE RADIO 515
Blu-ray & HD DVD
Manufacturer/Brand Set-Up Code Number
LG 004
PANASONIC 002
PIONEER 003
SAMSUNG 005
SONY 001
TOSHIBA 006
ProScaler
CD Players (no dedicated remote button is provided; see programming method 1C)
Manufacturer/Brand Set-Up Code Number
ADCOM 062 042
AIWA 089 170 187
AKAI 202
AMC 231 232
ARCAM 238
AUDIO ACCESS 119 147
AUDIO EASE 165
AUDIO TECHNICA 046
CALIFORNIA AUDIO 103 008
CARVER 185 041 044 050 107 130 134 135 138 139 203 204 167
CREEK 159
DENON 256 123
EMERSON 042
FISHER 050 185 134 008
GENEXXA 010
HARMAN KARDON 033 047 208
HITACHI 042 175
iNKEL 130
JCPENNEY 141
JENSEN 158
JVC 257 022 136 163 213 214 242 243
KENWOOD 185 259 023 055 071 072 142 137 254
KRELL 241
KYOCERA 258
39
Page 41

ProScalerHigh Definition Video Processor User’s Manual
CD Players continued
LUXMAN 011 028 070 249 252
MAGNAVOX 044 107
MARANTZ 041 044 051 077 107 209 246
MCINTOSH 212 247
MEMOREX 010
MISSION 044 107
MITSUBISHI 179
MONDIAL 147
MYRYAD 244 155
NAD 258 178
NAKAMICHI 217 218
NEC 062
NIKKO 046
NSM 044 107
ONKYO 030 038 039 168 169
OPTIMUS 010 050 081
PANASONIC 103 172 008 068 248
PARASOUND 233 240
PHILIPS 041 044 107 246
PIONEER 010 020 174 175 176
PROCEED 239
PROTON 044 107
QUASAR 103 008
RCA 017 042 150
REALISTIC 042 050 051 187
ROTEL 044 107 161 178 250
SAE 044 107
SANSUI 044 107 128 171 190 125
SANYO 050
SHARP 026 031 051
SHERWOOD 019 051 096 112 115 119 166
SIGNATURE 033
SONY 048 081 097 126 133 177 225 226 164
SOUNDESIGN 251
SUMO 155
SYLVANIA 044 107
SYMPHONIC 052
TANDY 010
TEAC 051 052 140 079
TECHNICS 103 172 184 008 068
THETA DIGITAL 234 235
VICTOR 257 022
WARDS 185 033
YAMAHA 024 046 054 186 183 245
40
Page 42

ProScaler
Video Cassette Recorders (VCR)
Manufacturer/Brand Set-Up Code Number
AIWA 034 161
AKAI 016 146 043 046 124 125
AMPRO 072
ANAM 145
AUDIO DYNAMICS 012 023 039 043
BROKSONIC 035 037 129
CANON 028 145
CAPEHART 108
CRAIG 003 040 135
CURTIS MATHES 145 041
DAEWOO 111 116 117 119 005 007 010 065 108 110 112
DAYTRON 108
DBX 012 023 039 043
DYNATECH 034 053
ELECTROHOME 059
EMERSON 006 029 035 017 025 027 145 034 036 037 046 101 129 131 153 162 116
FISHER 003 010 008 009
FUNAI 034
GE 145 072 147 063 107 109 144
GO VIDEO 132 136 155 040 115
GOLDSTAR 101 106 114 013 020 012 123
HARMAN KARDON 012 045
HITACHI 004 026 150 018 034 043 063 137 160 013
INSTANTREPLAY 145
JCL 145
JCPENNEY 012 013 015 040 066 101
JENSEN 043
JVC 048 043 130 150 055 060 012 145 050 152 166
KENWOOD 014 048 034 047
LG 101 106 114 013 020 012 123
LLOYD 034
LXI 034 003 009 017 106
MAGIN 040
MAGNAVOX 067 145 034 068 041 156 164
MARANTZ 067 069 012 145 156
MARTA 101
MATSUI 027 030
MEI 145
MEMOREX 101 003 010 014 145 034 053 072 102 134 139
MGA 045 046 059
MINOLTA 013 020
MITSUBISHI 059 061 151 013 020 045 046 051 049 168
MTC 034 040
MULTITECH 024 034
41
Page 43

ProScalerHigh Definition Video Processor User’s Manual
Video Cassette Recorders (VCR) continued
NEC 012 023 039 043 048
NORDMENDE 043
OPTONICA 053 054
ORION 025
PANASONIC 066 070 145 083 133 140 157 163 074 167
PENTAX 013 020 145 063
PHILCO 145 034 067
PHILIPS 145 067 034 101 054 071 156
PILOT 101
PIONEER 021 013 048
PORTLAND 108
PULSAR 072
QUARTZ 002 014
QUASAR 066 145 075
RADIO SHACK 123
RCA 107 109 144 147 158 041 145 013 020 140 034 040
REALISTIC 003 008 010 014 145 034 040 053 054 101
RICO 058
RUNCO 148
SALORA 014
SAMSUNG 102 104 113 115 112 120 032 040 066 107 109 125
SANSUI 022 043 048 135
SANYO 003 010 007 014 134 102
SCOTT 017 037 112 129 131
SEARS 003 008 010 014 013 101 009 017 073 112
SHARP 149 054 145 159 165
SHINTOM 024
SIGNATURE 034
SONY 056 057 058 057 052 003 078 076 145 149 154
SOUNDESIGN 034
STS 013
SYLVANIA 145 034 059 067
SYMPHONIC 034
TANDY 010 034
TATUNG 039 043
TEAC 034 039 043
TECHNICS 145 070
TEKNIKA 145 019 034 101
THOMAS 034
TMK 006
TOSHIBA 112 131 079 008 059 047 082 013
TOTEVISION 040 101
UNITECH 040
VECTOR RESEARCH 012
VICTOR 048
VIDEO CONCEPTS 012 034 046
42
Page 44

Video Cassette Recorders (VCR) continued
VIDEOSONIC 040
WARDS 003 013 017 024 145 034 040 053 054 131
YAMAHA 012 034 039 043
ZENITH 072 056 048 101 034 058
VCR-TV/VCR Combos
Manufacturer/Brand Set-Up Code Number
DAEWOO 005 117
EMERSON 153
FUNAI 034
GOLDSTAR 101 123
HITACHI 034
JCPENNEY 101
LG 101 123
LLOYD 034
MAGNAVOX 034 067
MEMOREX 101
PANASONIC 070 167
PHILIPS 034 067
RADIO SHACK 123
RCA 034
SEARS 101
SONY 057 154
SYLVANIA 067
SYMPHONIC 034
THOMAS 034
ZENITH 034
ProScaler
PVR, TIVO
Manufacturer/Brand Set-Up Code Number
HUGHES 001
HUMAX 001
PHILIPS 001
REPLAY NETWORKS 775
SONY 804 805
TIVO 001
TOSHIBA 001
43
Page 45

ProScalerHigh Definition Video Processor User’s Manual
AUX – PC & iPod
Manufacturer/Brand Set-Up Code Number
APPLE 401 412
BOSE 409
DLO 418
GRIFFIN 471
IPORT 419
KENSINGTON 406
SONACE 419
TEN TECHNOLOGY 401
AUX – Media PC
Manufacturer/Brand Set-Up Code Number
DELL 261 262
GATEWAY 261 262
HAUPPAUGE 294 295
HP 261 262
KEYSPAN 297
SONY 261 262
TOSHIBA 261 262
WINBOOK 261 262
AUX – Gaming Systems
Manufacturer/Brand Set-Up Code Number
MICROSOFT / XBOX 408 107
SONY / PS2 414
AUX – Lighting
Manufacturer/Brand Set-Up Code Number
LITE-TOUCH 208 257
LUTRON 158 159 077
X-10 183 093
44
Page 46

TV
Manufacturer/Brand Set-Up Code Number
ABEX 025
ADMIRAL 072 251 161 160
ADVENT 247
ADVENTURA 002
AKAI 197 146 248 473 474 475
A MARK 112 143
AMPRO 167 073 157 183
AMSTRAD 052
ANAM 043 054 056 080 112
AOC 197 004 112 058
APEX DIGITAL 006
ASTAR 477
AUDIOVOX 076
BARCO 233
BELCOR 116
BELL&HOWELL 161 072
BLAUPUNKT 088
BROKSONIC 238
BROCKWOOD 116
CAIRN 201
CANDLE 197 002 003 004
CAPEHART 058
CELEBRITY 070
CENTURION 197
CETRONIC 043
CITIZEN 197 002 003 004 043 101 103 143
CLASSIC 043
CLP CLASSIC 161
COLORTYME 116 197
CONCIERGE 073 157 183
CONCERTO 004
CONTEC 043 050 051
CORNEA 116
CORONADO 143
CRAIG 043 054
CROWN 043 143
CURTIS MATHES 197 101 004 143
CXC 043
DAEWOO 004 016 043 044 076 103 114 125 127 143
DAYTRON 004 143
DELL 319 320 321
DIMENSIA 161
DREAMVISION 235
DUKANE 011 025
DUMONT 116 073 157 183
ProScaler
45
Page 47

ProScalerHigh Definition Video Processor User’s Manual
TV continued
DURABRAND 096
DWIN 177 257
DYNASTY 043
DYNATECH 062
DYNEX 400
EIKI 187
ELECTROBAND 070
ELECTROGRAPH 466
ELECTROHOME 143 024 076 196
ELEKTRA 072
ELEMENT 363 494 526
EMERSON 028 048 043 155 005 197 004 047 050 051 076 096 143 151 153 154
ENVISION 116 197
ESA 323
FISHER 007 057
FUJITSU 198 246 346
FUNAI 028 043 052
FUTURETECH 043
GATEWAY 242 268
GE 160 144 165 073 197 008 009 034 056 074 130 155 161 004 157 183
GIBRALTAR 116 073 157 183
GOLDSTAR 113 116 102 004 106 112 119 127 143
HALL MARK 004
HAIER 164 363
HANNSPREE 381
HISENSE 419 442
HITACHI 011 166 004 009 010 012 023 075 143 158 072 250
HP 316 327 378
HUMAX 518
ILO 472
INFINITY 164
INFOCUS 230 330 333 547 548
INTEQ 073 157 183
INSIGNIA 350 354 400 457
JANEIL 002
JBL 164
JCB 070
JCPENNEY 004 024 197 008 009 030 065 101 143 160
JENSEN 013
JVC 038 034 070 083 199 210 240 241 406
KAWASHO 116 070 197
KEC 043
KENWOOD 197 070
KLEGG 466
KLOSS 002 059
KMC 143
46
Page 48

ProScaler
TV continued
KNOLL SYSTEMS 230
KONKA 457
KREISEN 530
KTV 043 197 143 154
KURAZAI 072
LG 113 116 102 004 106 112 119 127 143 243 284 363
LODGENET 072
LOEWE 164
LOGIK 072
LUXMAN 004
LXI 166 007 138 052 251 160 164
MAGNAVOX 164 059 197 003 060 061 004 063 064 127 022 160 094 239 226 467
MAJESTIC 161 072
MARANTZ 197 164
MATSUI 164
MAXENT 242
MEGATRON 116 197 011
MEMOREX 007 072 004
METZ 088
MGA 197 004 024 028 042
MIDLAND 161 073 157 183
MINERVA 088
MINUTZ 008
MITSUBISHI 109 124 024 004 028 040 042 146 191 348
MONTGOMERY WARD 161 072
MTC 197 004 062 101
NAD 138 025
NEC 132 130 134 197 040 016 024 056 019 237 262 272
NET TV 202
NIKEI 043
NIKKO 116 197
NIKO 527
NORCENT 390
NUVISION 351
OLEVIA 432
ONKING 043
ONWA 043
OPTIMUS 025
OPTONICA 019 251
OPTOMA 265 270 249
ORION 096
PANASONIC 034 056 080 092 164 208
PHILCO 197 003 059 060 064 164 004 024 056 063
PHILIPS 164 005 093 038 197 003 004 059 127 206 239 259 161
PILOT 116
PIONEER 135 025 197 018 023 116 234 272
47
Page 49

ProScalerHigh Definition Video Processor User’s Manual
TV continued
POLAROID 323 328 353 354 356 457 494 505
PORTLAND 004 143
PROSCAN 144 160 161 165 167
PROTON 004 112 058 143 171 172 193
PROTRON 498 499
PROVIEW 494
PULSAR 116 073 157 183
QUASAR 034 056 092
RADIO SHACK 019 004 143 043 127
RCA 160 165 065 144 161 197 004 024 056 152 023 074 333
REALISTIC 007 019 043 047
REVOLUTION HD 466
ROCTEC 186
RUNCO 072 169 178 179 180 181 182 183 073 157 342 416
SAMPO 197 058 004 202
SAMSUNG 050 089 101 105 004 127 143 160 228 229 258
SAMSUX 197
SANSUI 096 400
SANYO 166 007 020 053 057 082 187
SCEPTRE 276
SCOTCH 116 197
SCOTT 028 043 004 048 143 497
SEARS 138 030 004 007 028 057 143 094 160 082 165 166
SELECO 189 200 205 011
SHARP 019 014 028 029 004 022 143 175 251 308
SHOGUN 116
SIEMENS 088
SIGNATURE 072
SIMPSON 003
SOLE 231 232
SONY 070(Default) 139 147 126 185 085 213 277 279
SOUNDESIGN 028 004 003 043
SOYO 528
SPECTRICON 112
SPECTRONIQ 499
SSS 004 043
SUPRA 116
SUPRE MACY 002
SUPREME 070
SVA 328
SYLVANIA 197 003 052 059 060 063 064 164 044 160 127
SYNTAX OLEVIA 161 144 160 376 432
TANDY 251
TATUNG 056 062
TECHNICS 034 080
TECHWOOD 004
48
Page 50

ProScaler
TV continued
TEKNIKA 002 003 004 024 028 043 072 101 143
TELEFUNKEN 037 046
TELERENT 072
TERA 172
TMK 004
TOSHIBA 138 030 007 040 062 101 325 230
TOTEVISION 143
TRUTECH 529
UNIVERSAL 008 009
VICTOR 038
VIDEO CONCEPTS 146
VIDIKRON 174 164 188 192 342
VIDTECH 004
VIEWSONIC 242 433
VIKING 002
VIORE 472
VISCO 526
VITO 363
WARDS 004 008 009 019 028 060 061 063 064 072 074 143 164 034
WESTINGHOUSE 076 280 070
YAMAHA 197 004 370
YORK 004
YUPITERU 043
ZENITH 073 072 095 103 157 183 243 284
ZONDA 112
Cable Boxes
Manufacturer/Brand Set-Up Code Number
ABC 004 103 003 039 042 046 053
ADELPHIA 043 074
ADVANCED NEWHOUSE 043
ALTRIO 043
AMERICAST 099
ARMSTONG 074
AT&T BROADBAND 074 035
ATLANTIC BROADBAND 043 074
BELL SOUTH 099
BLUE RIDGE 043 074
BRESNAN 074
BRIGHT HOUSE 043 110
BUCKEYE COMM 074
CABLEVISION 043 074 108
CHARTER 043 074
CISCO 043 003 041 042 045 046
49
Page 51

ProScalerHigh Definition Video Processor User’s Manual
Cable Boxes continued
COGECO 074
COMCAST 043 074 110
COMSAT 074
COX DIGITAL 043 074
DIGEO 111
EAGLE 020 030 040
EASTERN 057
GEMINI 008
GENERAL INSTRUMENT 074 103 104
GNC 099
GOLDEN CHANNEL 030
HAMLIN 049 050 055
HITACHI 103 055
INSIGHT 074
JERROLD 074 004 103 002 003 008 009 010 069
MAGNAVOX 010 012
MASSILLON 074
MEDIACOM 074
MEMOREX 052
MOTOROLA 074 110 148 111 112 036
MOVIE TIME 028
MOXI 111
NCTC 074
NSC 015 028 038 071
OAK 031 037 053
PACE 043 074
PANASONIC 044 047
PARAGON 052
PHILIPS 006 012 013 020 085
PIONEER 043 103 034 051 063 076 105
PULSAR 052
QUEST 112
RCA 047
RCN 074
REGAL 049 050
REGENCY 057
RODGERS 043
SAMSUNG 030
SCIENTIFIC ATLANTA 043 003 041 042 045 046
SEREN 043
SERVICE ELECTRIC 074
SHAW 074
SIGECOM 043
SONY 108
SPRUCER 047
STARCOM 002 004 008 009
50
Page 52

Cable Boxes continued
STARGATE 008 030 104
SUSQUEHANNA 043 074
TIME WARNER 043 074
TOCOM 039 040 056
TOSHIBA 052
UNITED CABLE 004 053
VERIZON 110
VIDEOTRON 043
WIDE OPEN WEST 043 099
ZENITH 052 060 093 100
Satellite Boxes
Manufacturer/Brand Set-Up Code Number
CABLEVISION 148
DIRECTV 173
DISH NETWORK 122
ECHOSTAR 122
EXPRESSVU 122
GENERAL ELECTRIC 151 116 150
GENERAL INSTRUMENT 148
GOI 122
HITACHI 139 140
HTS 122
HUGHES 114
JVC 122
LG 170
MITSUBISHI 114
MOTOROLA 148
NEXT LEVEL 148
PANASONIC 142 160
PHILIPS 152 153 156 114
PROSCAN 151 116 150
RADIOSHACK 148
RCA 151 116 150
SAMSUNG 155 163 169 175
SKY 164
SONY 115
STAR CHOICE 148
TOSHIBA 127 114 158
VOOM 148
ZENITH 159
ProScaler
51
Page 53

ProScalerHigh Definition Video Processor User’s Manual
DVD
Manufacturer/Brand Set-Up Code Number
AIWA 146
AKAI 281
ALPINE 098
APEX DIGITAL 087 111 115
BROKSONIC 130
CINEVISION 091
COBY 260
CYBERHOME 271
DENON 138 080 173
DURABRAND 091
DVD 2000 017
EMERSON 091 143
ESA 143
FISHER 147
FUNAI 143
GE 026 027
GO VIDEO 137 091 220 221 222
GOLDSTAR 091
HARMAN KARDON 084 140
HITACHI 101
ILO 268
INITIAL 111
INSIGNIA 143
INTEGRA 142 180
JBL 084
JVC 012
KENWOOD 151
KISS 279
KLH 135
KRELL 104
LEXICON 148
LG 091 057 074
LITEON 264 265
MAGNAVOX 001 096 143 282
MALATA 267
MARANTZ 083 095
MERIDIAN 153
MICROSOFT 027
MINTEK 111 282
MITSUBISHI 017
MYRYAD 102 134
NAD 088
NAKAMICHI 103
ONKYO 076 035 180
OPPO 266
52
Page 54

DVD continued
OPTIMUS 107
ORION 130
PANASONIC 021 042 138 144 150
PHILIPS 001 083 095 105 166
PHILIPS-MAGNOVOX 035 001
PIONEER 023 092 099 107 108 131
POLAROID 233
POLK AUDIO 035 001
PROCEED 086
PROSCAN 026 027
RCA 026 027
RJTECH 269
SAMSUNG 056 165 170 137 159
SANSUI 154
SANYO 147
SEARS 130
Sensory Science 222
SHARP 094
SONY 033 118 145 126 191
SUPERSCAN 143
SV2000 143
SYLVANIA 143
SYMPHONIC 143
TATUNG 102
TEAC 107
TECHNICS 042
TECHWOOD 088
THOMPSON 026 027
TOSHIBA 035 034 130 141 164 188
VENTURER 149
X-BOX 027
YAMAHA 042 089 166 138 197
ZENITH 057 074 091
ProScaler
53
Page 55

ProScalerHigh Definition Video Processor User’s Manual
DVD Recorders
Manufacturer/Brand Set-Up Code Number
CYBERHOME 271
GO VIDEO 220 221 222
ILO 268
KISS 279
LITEON 265
PANASONIC 138
SENSORY SCIENCE 222
SONY 191
TOSHIBA 188
DVD-TV/DVD Combos
Manufacturer/Brand Set-Up Code Number
AIWA 146
AKAI 281
DURABRAND 143
ESA 143
FUNAI 143
INSIGNIA 143
MAGNAVOX 282
MINTEK 282
SAMSUNG 165
SV2000 143
SYLVANIA 143
SYMPHONIC 143
TOSHIBA 130
DVD-TV/DVD/VCR Combos
Manufacturer/Brand Set-Up Code Number
EMERSON 143
INSIGNIA 143
MAGNAVOX 143
PANASONIC 144
SUPERSCAN 143
SYLVANIA 143
TOSHIBA 164
54
Page 56

DVD-DVD/VCR Combos
Manufacturer/Brand Set-Up Code Number
GO VIDEO 137
PANASONIC 150
PHILIPS 105 (VCR Functions for VCR 067)
SAMSUNG 137 159
SANSUI 154
SONY 145 191
TOSHIBA 141
ZENITH 091 (VCR Functions for VCR101)
ProScaler
55
Page 57

© 2 010 W o l f C i n e m a
Distribut e d wor l d wid e by S u m i ko
2431 Fi f t h St . Be r k e l e y .CA 94710
Te l :510 . 8 4 3 . 4 5 0 0 . Fax:510 . 8 4 3.7120
www. w o l f c i n e m a . c o m
 Loading...