

Page 1

CONVECTION MICROWAVE OVEN WITH GRILL
USE & CARE INFORMATION
GUÍA DE USO Y MANTENIMIENTO
GUIDE D’UTILISATION ET D’ENTRETIEN
INFORMAZIONI SU USO E MANUTENZIONE
BEDIENUNGS- UND PFLEGEANLEITUNG
Page 2

Page 3

ENGLISH
ITALIANO
Wolf Convection Microwave Oven 5
Safety Instructions and Precautions 6
Wolf Convection Microwave Features 13
Wolf Convection Microwave Installation 16
Wolf Convection Microwave Operation 20
Wolf Convection Microwave
Automatic Operation 36
Wolf Convection Microwave Care 45
Wolf Troubleshooting 46
Wolf Service Information 48
ESPÃNOL
Horno microondas por convección de Wolf 51
Precauciones e instrucciones de seguridad 52
Propiedades del microondas por
convección de Wolf 59
Instalación del microondas por
convección de Wolf 62
Funcionamiento del microondas
por convección de Wolf 66
Funcionamiento automático
del microondas por convección de Wolf 82
Mantenimiento del microondas
por convección de Wolf 91
Localización y solución de problemas de Wolf 92
Información de mantenimiento de Wolf 94
Forno a microonde a convezione Wolf 143
Precauzioni e istruzioni sulla sicurezza 144
Caratteristiche del forno a microonde
a convezione Wolf 151
Installazione del forno a microonde
a convezione Wolf 154
Funzionamento del forno a microonde
a convezione Wolf 158
Funzionamento automatico del
forno a microonde a convezione Wolf 174
Manutenzione del forno a microonde
a convezione Wolf 183
Risoluzione dei problemi Wolf 184
Informazioni sull’assistenza Wolf 186
DEUTSCH
Wolf Umluftmikrowelle 189
Sicherheitshinweise und Vorsichtsmaßnahmen 190
Wolf Umluftmikrowelle - Leistungsmerkmale 197
Wolf Umluftmikrowelle - Installation 200
Wolf Umluftmikrowelle - Betrieb 204
Wolf Umluftmikrowelle
Automatischer Betrieb 220
Wolf Umluftmikrowelle - Pflege 229
Wolf Fehlersuche 230
Serviceinformationen von Wolf 232
FRANÇAIS
Four micro-ondes à convection Wolf 97
Instructions et mesures de sécurité 98
Caractéristiques du micro-ondes à
convection Wolf 105
Installation du micro-ondes à
convection Wolf 108
Fonctionnement du micro-ondes à
convection Wolf 112
Fonctionnement automatique
du micro-ondes à convection Wolf 128
Entretien du micro-ondes à
convection Wolf 137
Dépistage des pannes Wolf 138
Service après-vente Wolf 140
3
Page 4

WOLF®is a registered trademark of Wolf Appliance, Inc.
As you read this Use & Care Information,
take particular note of the CAUTION and
WARNING symbols when they appear.
This information is impor tant for safe and
efficient use of the Wolf equipment.
signals a situation where minor injury or
product damage may occur if you do not
follow instructions.
states a hazard that may cause serious
injury or death if precautions are not
followed.
In addition, this Use & Care Information may
signal an IMPORTANT NOTE which highlights
information that is especially important.
Page 5

WOLF CONVECTION MICROWAVE OVEN
THANK YOU
Your purchase of a Wolf convection
microwave oven attests to the importance
you place upon the quality and performance
of your cooking equipment. We understand
this importance and have designed and built
your microwave oven with quality materials
and workmanship to give you years of
dependable service.
We know you are eager to start cooking, but
before you do, please take some time to read
this Use & Care Information. Whether you are
a beginning cook or an expert chef, it will be
to your benefit to familiarize yourself with the
safety practices, features, operation and care
recommendations of the Wolf convection
microwave oven.
We appreciate your choice of a Wolf Appliance product and welcome any suggestions
or comments you may have. To share your
opinions with us, visit www.wolfappliance.com.
The symbol on the product or on its packaging indicates that this product may not be
treated as household waste. Instead it shall
be handed over to the applicable collection
point for the recycling of electrical and electronic equipment. By ensuring this product is
disposed of correctly, you will help prevent
potential negative consequences for the environment and human health, which could
otherwise be caused by inappropriate waste
handling of this product. For more detailed
information about recycling of this product,
please contact your local city office, your
household waste disposal service or the shop
where you purchased the product.
Read all instructions before using
this appliance to reduce the risk
of burns, electric shock, fire,
injury to persons or exposure to
excessive microwave energy.
PRECAUTIONS
TO AVOID
POSSIBLE EXPOSURE
TO EXCESSIVE
MICROWAVE ENERGY
Do not attempt to operate this
microwave oven with the door open
since open-door operation can result
in harmful exposure to microwave
energy. It is important not to defeat
or tamper with the safety interlocks.
Do not place any object between the
microwave oven front face and the
door or allow soil or cleaner residue
to accumulate on sealing surfaces.
Do not operate the microwave oven
if it is damaged. It is particularly
important that the oven door close
properly and that there is no damage
to the: door (bent), hinges and
latches (broken or loosened) or door
seals and sealing surfaces.
CONTACT
INFORMATION
Website:
wolfappliance.com
The microwave oven should not be
adjusted or repaired by anyone
except properly qualified service
personnel.
5
Page 6

IMPORTANT SAFETY INSTRUCTIONS
AND PRECAUTIONS
READ ALL INSTRUCTIONS BEFORE USING THIS APPLIANCE
TO AVOID THE DANGER OF FIRE
The microwave oven should not be
left unattended during operation.
Power levels that are too high or
cooking times that are too long may
overheat foods resulting in a fire.
The electrical outlet must be readily
accessible so that the unit can be
unplugged easily in an emergency.
The AC power supply must be
230-240 V, 50 Hz, with a minimum
16 A distribution line fuse, or a
minimum 16 A distribution circuit
breaker.
It is recommended that a separate
circuit serving only this appliance be
provided.
Do not store or use the oven
outdoors.
If food being heated begins to
smoke, DO NOT OPEN THE DOOR.
Turn off and unplug the oven and
wait until the food has stopped
smoking. Opening the door while
food is smoking may cause a fire.
Do not place flammable materials
near the oven or ventilation
openings. Do not block the ventilation openings.
Remove all metallic seals, wire
twists, etc., from food and food
packages. Arcing on metallic
surfaces may cause a fire.
Do not use the microwave oven to
heat oil for deep frying. The temperature cannot be controlled and the
oil may catch fire.
To make popcorn, only use special
microwave popcorn makers.
Do not store food or any other items
inside the oven.
Check the settings after you start the
oven to ensure the oven is operating
as desired.
Only use microwave-safe containers
and utensils. See page 35.
Do not leave the oven unattended
when using disposable plastic,
paper or other combustible food
containers.
Clean the waveguide cover, the
oven cavity and the turntable after
use. These must be dry and free
from grease. Built-up grease may
overheat and begin to smoke or
catch fire.
6
Page 7

TO AVOID THE POSSIBILITY
OF INJURY
Do not operate the oven if it is
damaged or malfunctioning.
Check the following before use:
a) The door; make sure the door
closes properly and ensure it
is not misaligned or warped.
b) The hinges and door safety
latches; check to make sure
they are not broken or loose.
c) The door seals and sealing
surfaces; ensure that they
have not been damaged.
d) Inside the oven cavity or on
the door; make sure there are
no dents.
e) The power supply cord and
plug; ensure that they are not
damaged.
Do not operate the oven with the
door open or alter the door safety
latches in any way.
Do not operate the oven if there is
an object between the door seals
and sealing surfaces.
Do not allow grease or dirt to build
up on the door seals and adjacent
parts. Follow the instructions for
“Cleaning and Care” on page 45.
Failure to maintain the oven in a
clean condition could lead to a deterioration of the surface that could
adversely affect the life of the appliance and possibly result in a
hazardous situation.
Individuals with PACEMAKERS should
check with their doctor or the manufacturer of the pacemaker for precautions regarding microwave ovens.
Never adjust, repair or modify the
oven yourself. It is hazardous for
anyone other than a competent
person to carry out any service or
repair operation which involves
the removal of a cover which
gives protection against exposure
to microwave energy.
7
Page 8

IMPORTANT SAFETY INSTRUCTIONS
AND PRECAUTIONS
TO AVOID THE POSSIBILITY
OF ELECTRIC SHOCK
Under no circumstances should you
remove the outer cabinet.
Never spill or insert any objects into
the door lock openings or ventilation
openings. In the event of a spill, turn
off and unplug the oven immediately
and call an authorised service agent.
Do not immerse the power supply
cord or plug in water or any other
liquid.
Do not allow the power supply cord
to run over any hot or sharp
surfaces, such as the hot air vent
area at the top rear of the oven.
Do not attempt to replace the oven
lamp yourself or allow anyone who is
not authorised to do so. If the oven
lamp fails, please consult your dealer
or an authorised service agent.
If the power supply cord of this
appliance is damaged, it must be
replaced with a special cord. The
exchange must be made by an
authorised service agent.
8
Page 9

TO AVOID THE POSSIBILITY OF
EXPLOSION AND SUDDEN BOILING
Liquids and other foods must not
be heated in sealed containers
since they are liable to explode.
Never use sealed containers.
Remove seals and lids before use.
Sealed containers can explode due
to a build up of pressure even after
the oven has been turned off.
Take care when microwaving liquids.
Use a wide-mouthed container to
allow bubbles to escape.
Microwave heating of beverages can
result in delayed eruptive boiling,
therefore care has to be taken when
handling the container.
Do not cook eggs in their shells, and
whole hard boiled eggs should not
be heated in microwave ovens since
they may explode even after
microwave cooking has ended. To
cook or reheat eggs which have not
been scrambled or mixed, pierce the
yolks and the whites, or the eggs
may explode. Shell and slice hard
boiled eggs before reheating them
in the microwave oven.
Pierce the skin of such foods as
potatoes, sausages and fruit before
cooking, or they may explode.
To prevent sudden eruption of
boiling liquid and possible scalding:
1) Stir liquid prior to heating/reheat-
ing.
2) It is advisable to insert a glass rod
or similar utensil into the liquid
whilst reheating.
3) Let liquid stand for at least 20
seconds in the oven at the end of
cooking time to prevent delayed
eruptive boiling.
9
Page 10

IMPORTANT SAFETY INSTRUCTIONS
AND PRECAUTIONS
TO AVOID THE POSSIBILITY
OF BURNS
Use pot holders or oven gloves
when removing food from the oven
to prevent burns.
Always open containers, popcorn
makers, oven cooking bags, etc.,
away from the face and hands to
avoid steam burns.
To avoid burns, always test food
temperature and stir before serving
and pay special attention to the
temperature of food and drink given
to babies, children or the elderly.
Temperature of the container is not a
true indication of the temperature of
the food or drink; always check the
food temperature.
Always stand back from the oven
door when opening, to avoid burns
from escaping steam and heat.
Slice stuffed baked foods after
heating to release steam and avoid
burns.
Keep children away from the door to
prevent them burning themselves.
Do not touch the oven door, outer
cabinet, rear cabinet, oven cavity,
ventilation openings, accessories
and dishes during GRILL mode,
CONVECTION mode, DUAL mode,
AUTO COOK and AUTO COOK
FROM FROZEN operation as they
will become hot. Before cleaning
make sure they are not hot.
10
Page 11

TO AVOID MISUSE BY CHILDREN
OTHER WARNINGS
Never modify the oven in any way.
Only allow children to use the
oven without supervision when
adequate instructions have been
given so that the child is able to
use the oven in a safe way and
understands the hazards of
improper use.
This appliance is not intended for
use by persons (including children)
with reduced physical, sensory or
mental capabilities, or lack of experience and knowledge, unless they
have been given supervision or
instruction concerning use of the
appliance by a person responsible
for their safety.
Children should be supervised to
ensure that they do not play with the
appliance.
Do not move the oven while it is in
operation.
This oven is for home food preparation only and may only be used for
cooking food. It is not suitable for
commercial or laboratory use.
Do not lean or swing on the oven
door. Do not play with the oven or
use it as a toy.
Children should be taught all important safety instructions: use of pot
holders, careful removal of food
coverings; paying special attention
to packaging (e.g. self-heating materials) designed to make food crisp,
as they may be extra hot.
11
Page 12

IMPORTANT SAFETY INSTRUCTIONS
AND PRECAUTIONS
TO PROMOTE TROUBLE-FREE
USE OF YOUR OVEN AND AVOID
DAMAGE
Never operate the oven when it is
empty except where recommended
in the operation manual, see page
27. Doing so may damage the oven.
When using a browning dish or selfheating material, always place a
heat-resistant insulator such as a
porcelain plate under it to prevent
damage to the turntable due to heat
stress. The preheating time specified
in the dish’s instructions must not be
exceeded.
Do not use metal utensils, which
reflect microwaves and may cause
electrical arcing. Do not put cans in
the oven.
Use only the turntable designed for
this oven.
NOTE:
If you are unsure how to connect
your oven, please consult an authorised, qualified electrician.
Neither the manufacturer nor the
dealer can accept any liability for
damage to the oven or personal
injury resulting from failure to
observe the correct electrical
connection procedure.
Water vapour or drops may occasionally form on the oven walls or
around the door seals and sealing
surfaces. This is a normal occurrence and is not an indication of
microwave leakage or a malfunction.
SAVE THESE
INSTRUCTIONS
Do not place anything on the outer
cabinet during operation.
Do not use plastic containers for
microwaving if the oven is still hot
from using the GRILL mode,
CONVECTION mode, DUAL mode,
AUTO COOK and AUTO COOK
FROM FROZEN, because they may
melt. Plastic containers must not be
used during above modes unless the
container manufacturer says they
are suitable.
12
Page 13
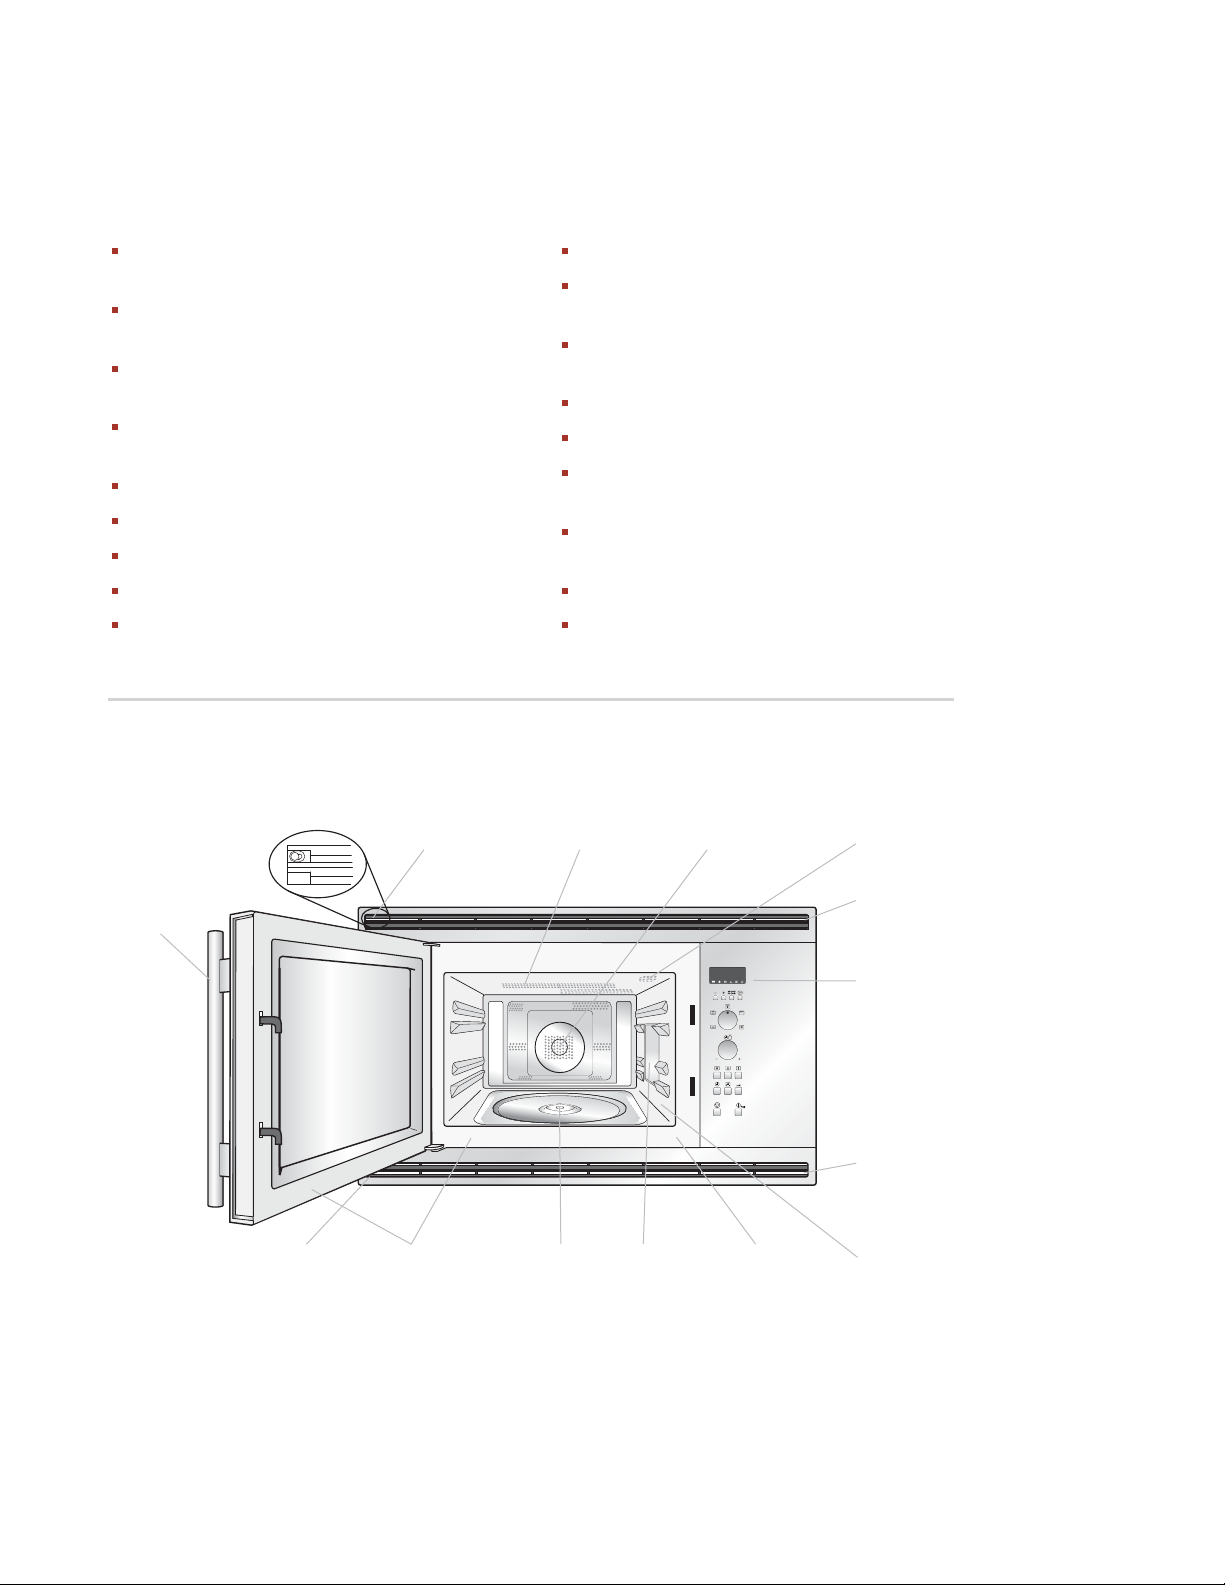
WOLF CONVECTION MICROWAVE FEATURES
MICROWAVE OVEN FEATURES
Built-in convection microwave oven with
40 L capacity
230 V model output power—microwave
900W, grill 1300W and convection 1450W
240 V model output power—microwave
900W, grill 1400W and convection 1400W
Trim allows microwave to be built in to fit
above a Wolf built-in oven
Classic stainless steel trim
5 auto-cook settings
Multiple language settings
Energy save mode
10 convection temperature settings
5 cook settings
Removable 362 mm turntable and turntable
support
Removable low rack for broiling and
removable high rack for baking
Oven door with window
Multiple rack baking
Safety door latches—oven will not operate
unless the door is closed
Oven light comes on when oven is
operating or door is open
Tight door seals
Rear ventilation openings
CONVECTION MICROWAVE OVEN WITH GRILL
Model ICBMW30-230/ICBMW30-240
Fixing
point
Grill heating
element
Convection
heating element
Oven
lamp
Door opening
handle
point
Door seals and
sealing surfaces
Fixing
point
Control
panel
Fixing
point
CouplingFixing
Waveguide
cover
Rating
plate
Oven
cavity
13
Page 14
WOLF CONVECTION MICROWAVE FEATURES
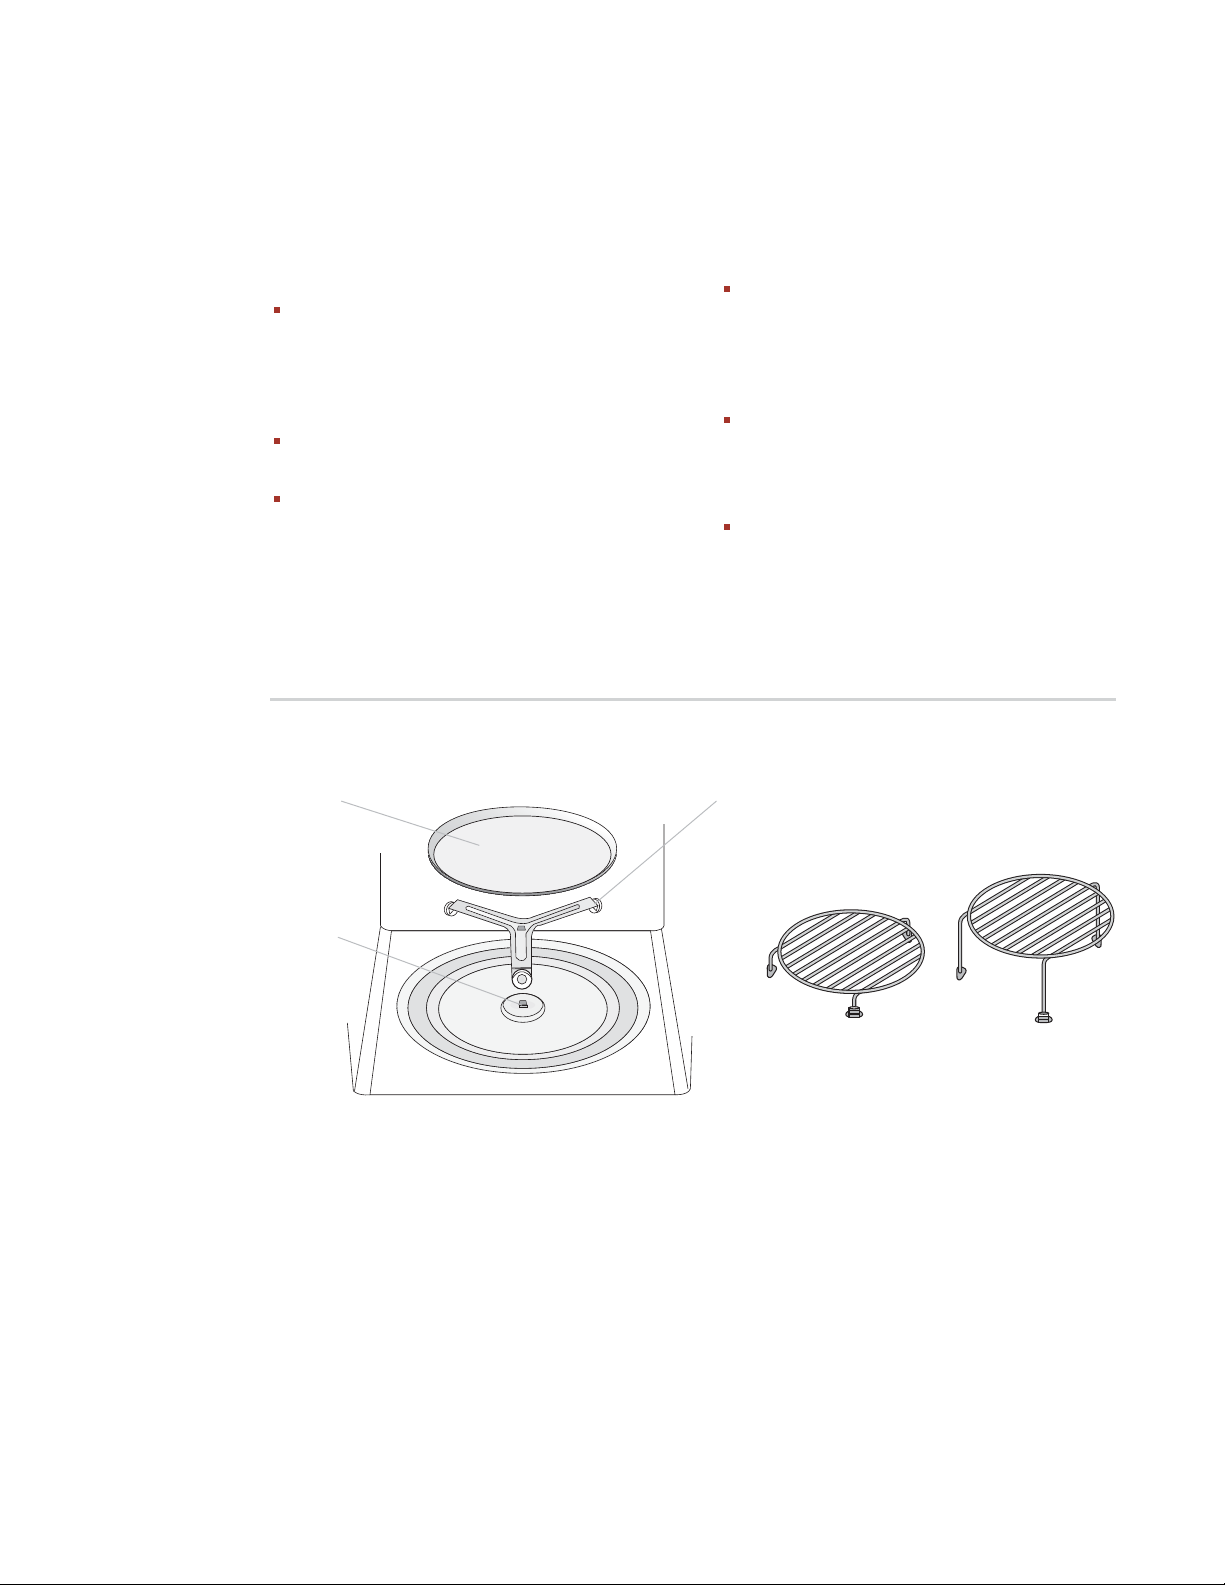
MICROWAVE OVEN ACCESSORIES
Check to make sure the accessories shown in
the illustrations below are supplied.
Place the turntable support into the
coupling in the centre of the oven floor,
ensuring you place it TOP side up, (TOP is
engraved on one side). It should be able to
freely rotate around the coupling.
Place the turntable on to the turntable
support.
Place the high/low racks onto the turntable
if necessary.
MICROWAVE OVEN ACCESSORIES
Turntable
NOTES:
Always operate the oven with the turntable
and support fitted correctly. This promotes
thorough even cooking. A badly fitted
turntable may rattle, may not rotate
properly and damage the oven.
The turntable rotates clockwise or counter
clockwise. The rotary direction may change
each time you start the oven. This does not
affect cooking performance.
When you order accessories, please
mention two details: part name and model
name to your dealer or service agent.
Turntable
support
14
Coupling
Low rack
These racks are used for cooking
in Convection, Dual or Grill mode.
High rack
Page 15
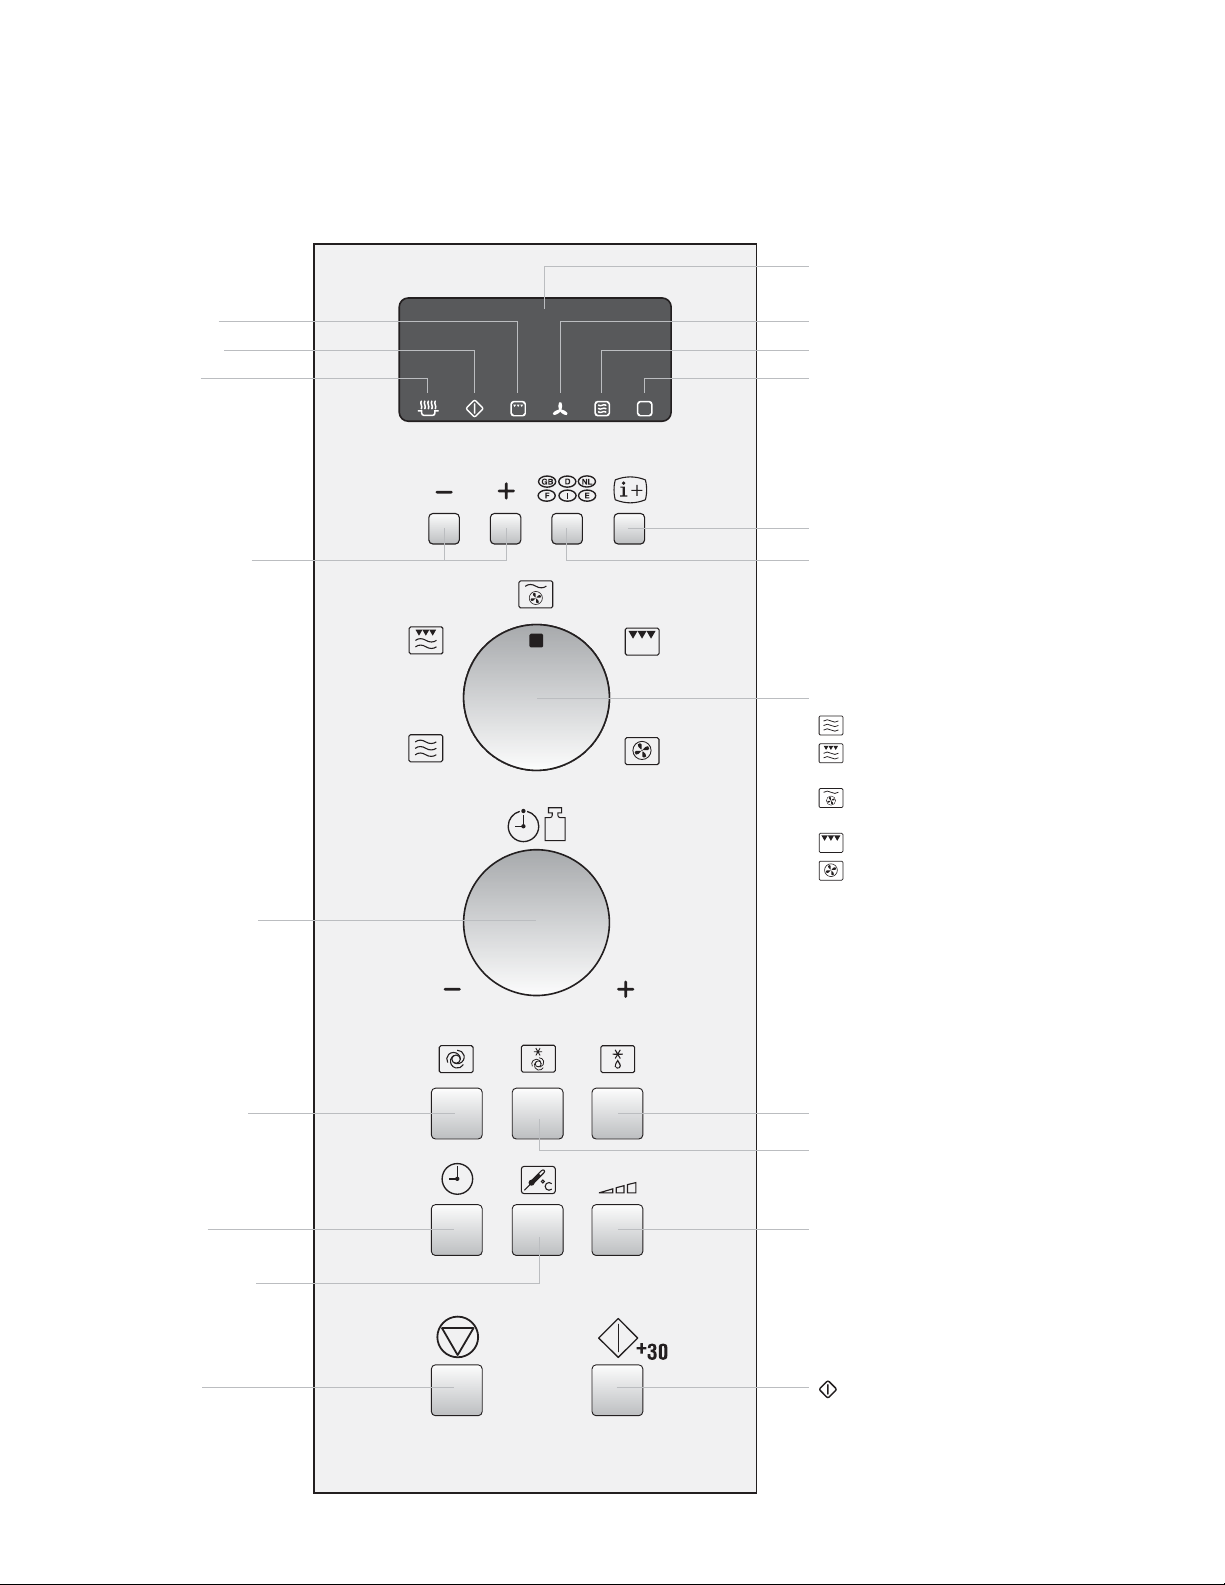
WOLF CONVECTION MICROWAVE
CONTROL PANEL
FEATURES
Digital Display
GRILL indicator
START indicator
COOKING IN
PROGRESS indicator
LESS/MORE buttons
CONVECTION indicator
MICROWAVE indicator
INFORMATION indicator
INFORMATION button
LANGUAGE button
COOKING MODE knob
for microwave cooking
for microwave cooking
with GRILL
for microwave cooking
with CONVECTION
for GRILL
for CONVECTION
TIMER/WEIGHT knob
Rotate the knob to
enter either the
cooking/defrost time
or weight of food.
AUTO COOK button
TIMER button
CONVECTION button
STOP button
AUTO DEFROST button
COOK FROM FROZEN
button
MICROWAVE POWER
LEVEL button
+30 button (START)
15
Page 16

WOLF CONVECTION MICROWAVE INSTALLATION
SPECIFICATIONS
230 V Model 240 V Model
AC Line Voltage
230 V, 50 Hz, single phase 240 V, 50 Hz, single phase
AC Power required:
Microwave 1.5 kW 1.55 kW
Grill 2.8 kW 2.85 kW
Grill/Microwave 2.8 kW 2.95 kW
Convection 2.8 kW 2.85 kW
Convection/Microwave 2.95 kW 2.95 kW
Output power:
Microwave 900 W (IEC 60705) 900 W (IEC 60705)
Grill heating elements 1300 W (650 W x 2) 1400 W (700 W x 2)
Convection 1450 W 1400 W
All Models
Distribution line fuse/circuit breaker
Microwave Frequency
Outside Dimensions
2450 MHz * (Group 2/Class B)
759 mm (W) x 460 mm (H) x 537 mm (D)
Minimum 16A
16
Cavity Dimensions
Oven Capacity
Turntable
Weight
Oven lamp
*This Product fulfils the requirement of the European standard EN55011. In conformity with this standard,
this product is classified as group 2 class B equipment. Group 2 means that the equipment intentionally
generates radio-frequency energy in the form of electromagnetic radiation for the heat treatment of food.
Class B equipment means that the equipment is suitable to be used in domestic establishments.
**Internal capacity is calculated by measuring maximum width, depth and height. Actual capacity for
holding food is less.
375 mm (W) x 272 mm (H) x 395 mm (D) **
40 litres **
ø362 mm, ceramic
30 kg
25 W/240–250 V
This oven complies with the requirements of Directives 2004/108/EC, 2006/95/EC,
2009/125/EC and 2011/65/EU.
SPECIFICATIONS ARE SUBJECT TO CHANGES WITHOUT NOTICE AS
PART OF CONTINUOUS IMPROVEMENT.
Page 17
WOLF CONVECTION MICROWAVE INSTALLATION
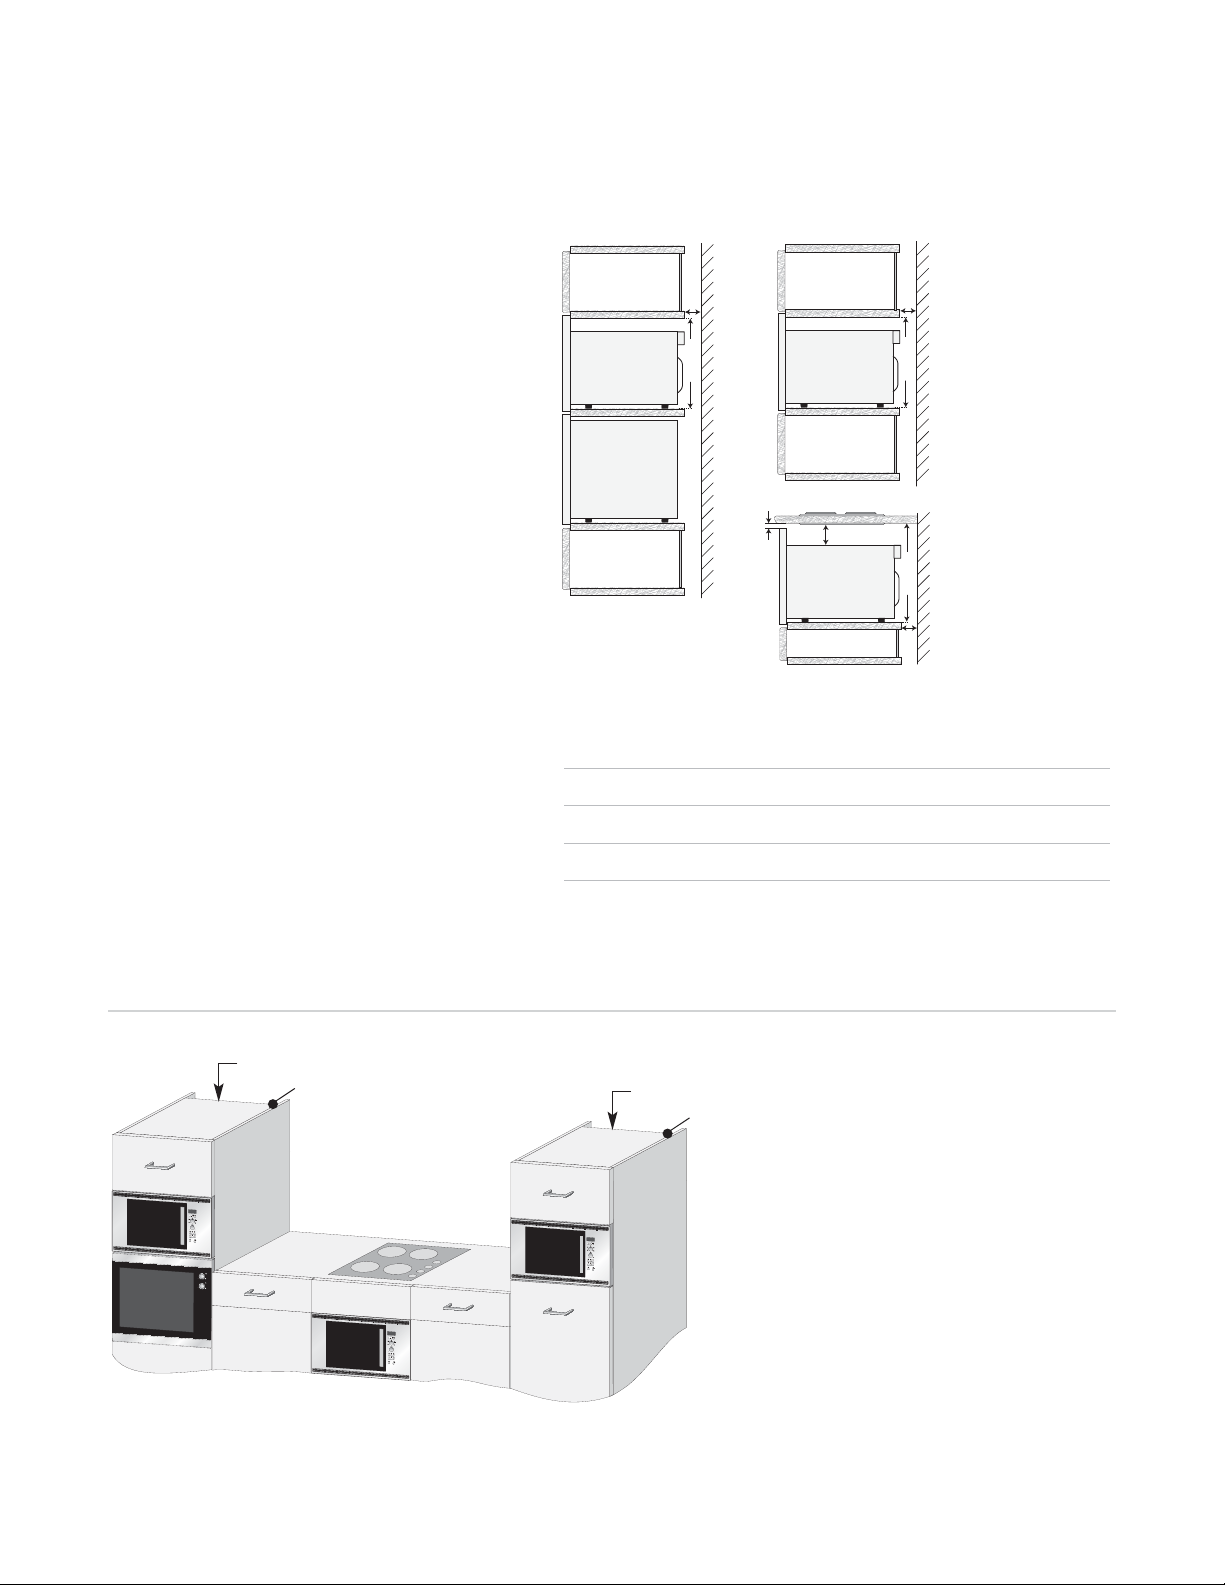
INSTALLING THE MICROWAVE
1)
Remove all packaging and check carefully
for any signs of damage.
2)
If the microwave is fitted in position C,
ensure that the minimum air gaps are maintained as shown in the diagram.
3)
Secure four cupboard retention blocks in
Position A
position using the setting template
(TMAPTA004URR0).
4)
Fit the appliance into the kitchen cupboard,
Conventional
oven
lift over the bottom/front blocks then push
slowly, and without force, until the front
frame of the oven seals against the front
opening of the cupboard.
5)
Ensure the appliance is stable and not
leaning.
6)
Fix the oven in position with the screws
provided. The fixing points are located
within the louvre areas at the top and
bottom of the oven (see illustration on
page 13).
7)
Fit the frame fastner caps to the four fixing
positions (2 spare caps are provided).
8)
It is important to ensure that the installation
of this product conforms to the instructions
in this operation manual and the conven-
Position W x D x H (min) Cupboard & Ceiling
A 730 x 610 x 450 20 50
B 730 x 610 x 450 20 50
C 730 x 610 x 450 20 Not Applicable
Measurements in millimeters
tional oven or hob manufacturer’s installation instructions.
min. 20 mm
450 mm
5 mm
Position B
65 mm
Position C
min. 20 mm
450 mm
450 mm
20 mm
Niche Size Chimney Gap Between
Chimney
Cable clip
Position A
Conventional
oven
Position C
The microwave can be fitted in position A, B or C
Chimney
Cable clip
Position B
D
17
Page 18
WOLF CONVECTION MICROWAVE INSTALLATION
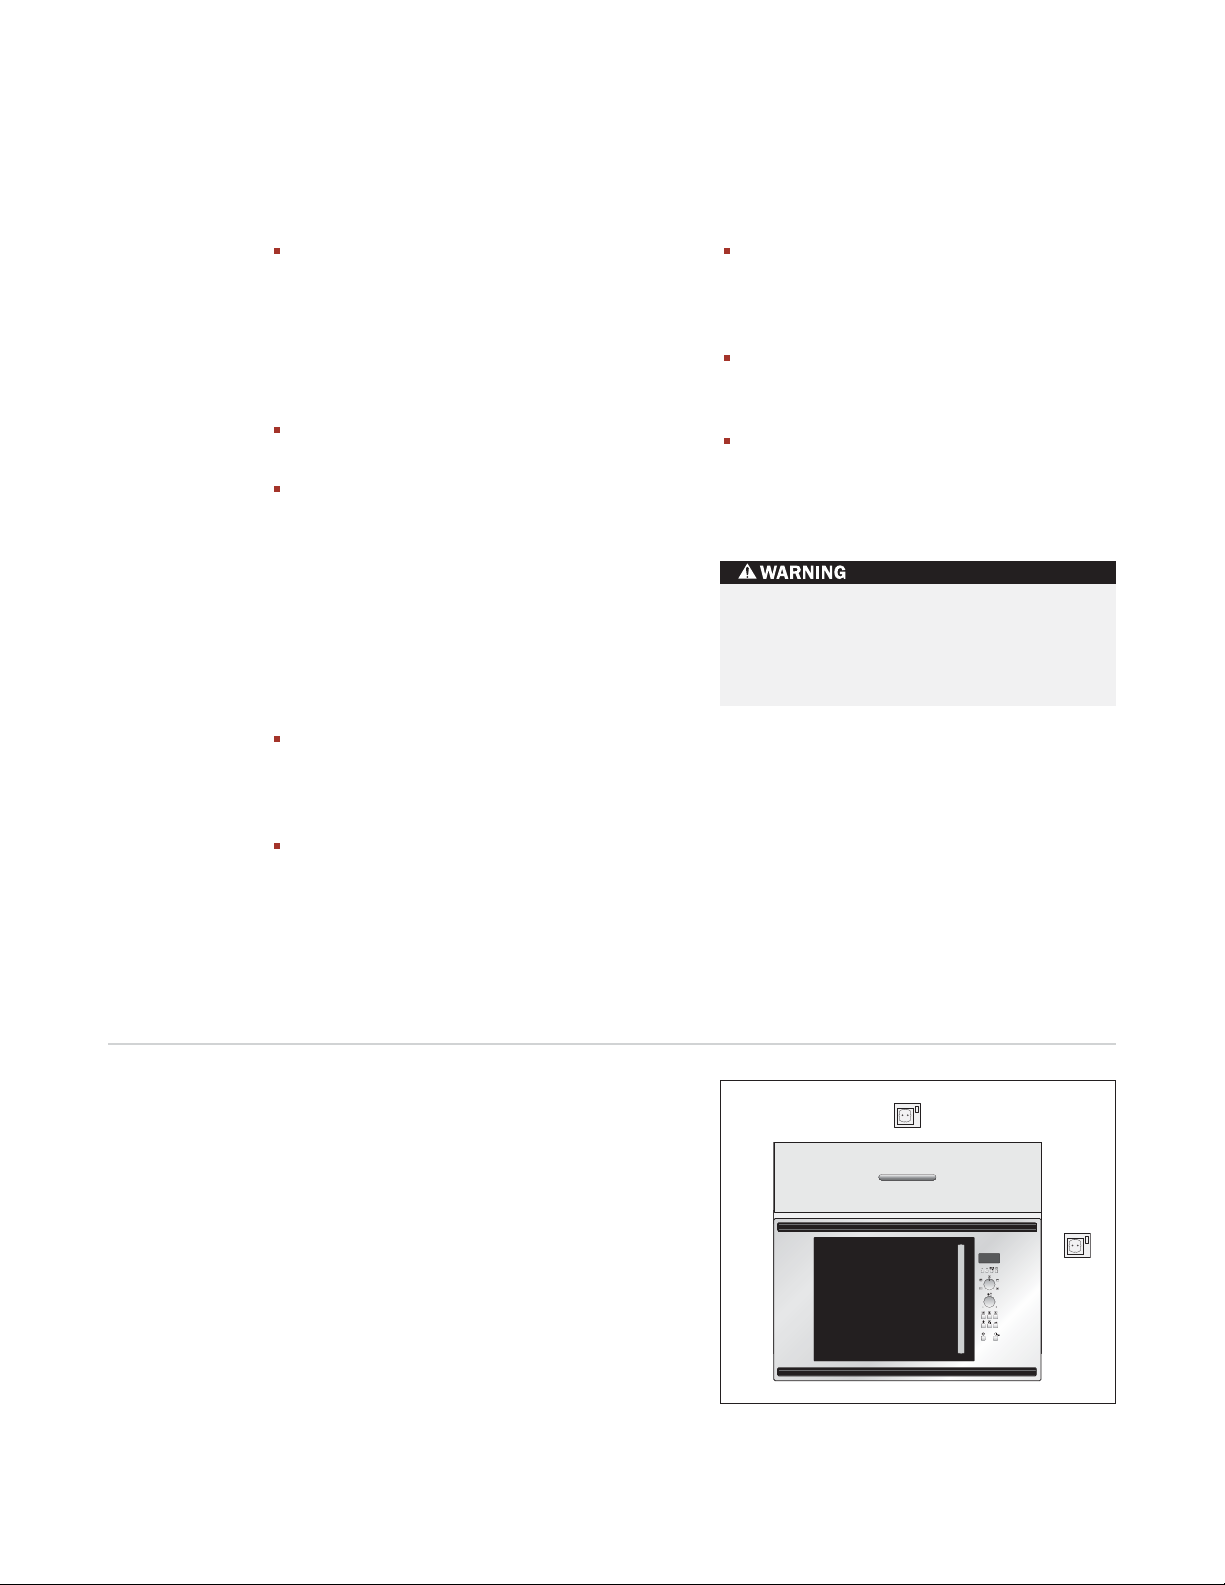
ELECTRICAL REQUIREMENTS
The electrical outlet should be readily
accessible so that the unit can be
unplugged easily in an emergency. Or it
should be possible to isolate the oven
from the supply by incorporating a
switch in the fixed wiring in accordance
with the wiring rules.
The socket should not be positioned
behind the cupboard.
The best position is above the cupboard,
see (A). If connection is to be made to
position (A), remove the clip from position
15 on the rear of the oven (see page 13)
and use the clip to secure the power supply
cord to the top of the housing unit (see
page 17). When not connecting the power
supply cord to position (A), the power
supply cord should be routed under the
oven.
Connect the appliance to a single phase
230-240 V/50 Hz alternating current via a
correctly installed earth socket. The socket
must be fused with a 16 A fuse.
Before installing, tie a piece of string to the
power supply cord to facilitate connection
to point (A) when the appliance is being
installed.
When inserting the appliance into the highsided cupboard, DO NOT crush the power
supply cord.
Do not immerse the power supply cord or
plug in water or any other liquid.
ELECTRICAL CONNECTIONS
THIS APPLIANCE MUST BE EARTHED
The manufacturer declines any liability
should this safety measure not be
observed.
If the plug that is fitted to your appliance is not
suitable for your socket outlet, you must call
your local service agent.
The power supply cord may only be
replaced by an electrician.
(A)
18
Electrical outlet
Page 19

WOLF CONVECTION MICROWAVE INSTALLATION
ECOLOGICAL
DISPOSAL
PACKAGING MATERIALS
Microwave ovens require effective packaging to protect them during transportation.
Only the minimum packaging necessary is
used.
Packaging materials (e.g. foil or styrofoam)
can place children at risk.
Danger of suffocation. Keep packaging
material away from children.
All packaging materials used are environment friendly and can be recycled. The
cardboard is made from recycled paper and
the wooden parts are untreated. Plastic
items are marked as follows:
«PE» polyethylene eg packaging film
«PS» polystyrene eg packaging (CFC-free)
«PP» polypropylene eg packaging straps
By using and re-using the packaging, raw
materials are saved and waste volume is
reduced.
OLD APPLIANCES
Old appliances should be made safe before
disposal by removing the plug, and cutting off
and disposing of the power cable. It should
then be taken to the nearest recycling centre.
Check with your local Council or Environmental Health Office to see if there are facilities in
your area for recycling the appliance.
Packaging should be taken to your nearest
recycling centre. Contact your local council
for information.
19
Page 20

WOLF CONVECTION MICROWAVE
OPERATION
WHAT ARE
MICROWAVES?
Like radio and television waves, microwaves
are electromagnetic waves.
Microwaves are produced by a magnetron
inside the microwave oven, and these vibrate
the molecules of water present in the food.
The friction this causes produces heat, which
ensures that the food is defrosted, heated or
cooked through.
The secret of the reduced cooking times is the
fact that the microwaves penetrate the food
from every direction. Energy is used to the full.
In comparison, the energy from a conventional
hob passes from the burner through the pan
and so to the food. This method wastes a great
deal of energy.
CHARACTERISTICS OF MICROWAVES
Microwaves penetrate all non-metal objects
made of glass, china, earthenware, plastic,
wood or paper. This is why the microwaves
never make these materials hot. Dishes
become hot only because the food inside them
is hot.
The food absorbs the microwaves and is
heated. Microwaves cannot pass through
objects made of metal and so they are
deflected. For this reason metal objects are not
normally suitable for microwave cookery.
There are exceptions where you can actually
make use of the fact that the microwaves
cannot pass through metal. If you cover food
with aluminium foil at specific points while it is
defrosting or cooking, you can prevent those
parts from getting too warm, too hot, or overcooked. Please check out the advice given in
the guide.
20
Page 21

WOLF CONVECTION MICROWAVE
WHAT YOUR MICROWAVE CAN DO
OPERATION
MICROWAVE OPERATION
By using the microwave facility in your new
combination microwave oven you can, for
example, quickly heat up ready-prepared
meals or drinks, or melt butter or chocolate in
no time at all.
The microwave oven is equally good at
defrosting food. Sometimes, however, it is
better to combine the microwave with convection heating or grilling (combined operation).
You can then cook the food rapidly and brown
it at the same time. Cooking times are generally much shorter than in conventional food
preparation.
COMBINED OPERATION
(MICROWAVE OPERATION WITH
CONVECTION OR GRILL)
By combining two modes of operation the
benefits of your oven are cleverly linked
together.
You are able to choose between
CONVECTION OPERATION
You can also use convection without
microwave. The result is like using a conventional oven. The circulating air quickly heats up
the external parts of the food without drying
up the meat juices and the foods.
This sealing process means that the meals
remain tasty and cook in a shorter time than
with conventional ovens with upper and lower
heaters.
GRILL OPERATION
This appliance comes with a quartz grill above
the cooking area. It can be used as a conventional grill without microwave. You can quickly
bake or grill dishes. It’s also suitable for steaks,
chops and cakes.
microwave + convection (ideal for joints of
meat, poultry, puddings, bread and cakes)
and
microwave + grill (ideal for pizzas, snacks,
quick fry-ups, joints, poultry, chicken legs,
kebabs, Welsh rarebit and cooking au
gratin).
Using the combination facility you can cook
and brown food at the same time.
The advantage is that the convected heat or
the heat from the grill quickly seals the pores
in the outer layers of the food. The
microwaves ensure a short and gentle cooking
period. The juices are preserved inside the
food and the outside is crisp.
21
Page 22
WOLF CONVECTION MICROWAVE OPERATION
BEFORE OPERATION
1)
Plug in the oven. Nothing will appear on
the display at this time.
2)
Open the door. The oven display will show
“SELECT LANGUAGE” in 6 languages.
3)
Close the door. The oven display will show
.
NOTE:
power will go off automatically. Nothing
will appear on the display at this time. To
restore power on, open the door.
4)
Heat the oven without food (see page 27).
COOKING HINTS
The oven has an ‘Information Display System’
which offers you step by step instructions to
easily guide you through each feature, and
enable you to gain information in your desired
language. The oven has an INFORMATION
button for getting instructions for each button.
Indicators will appear in the display, after
pressing a button, to inform you of the next
operation step.
If you do nothing for 3 minutes, the
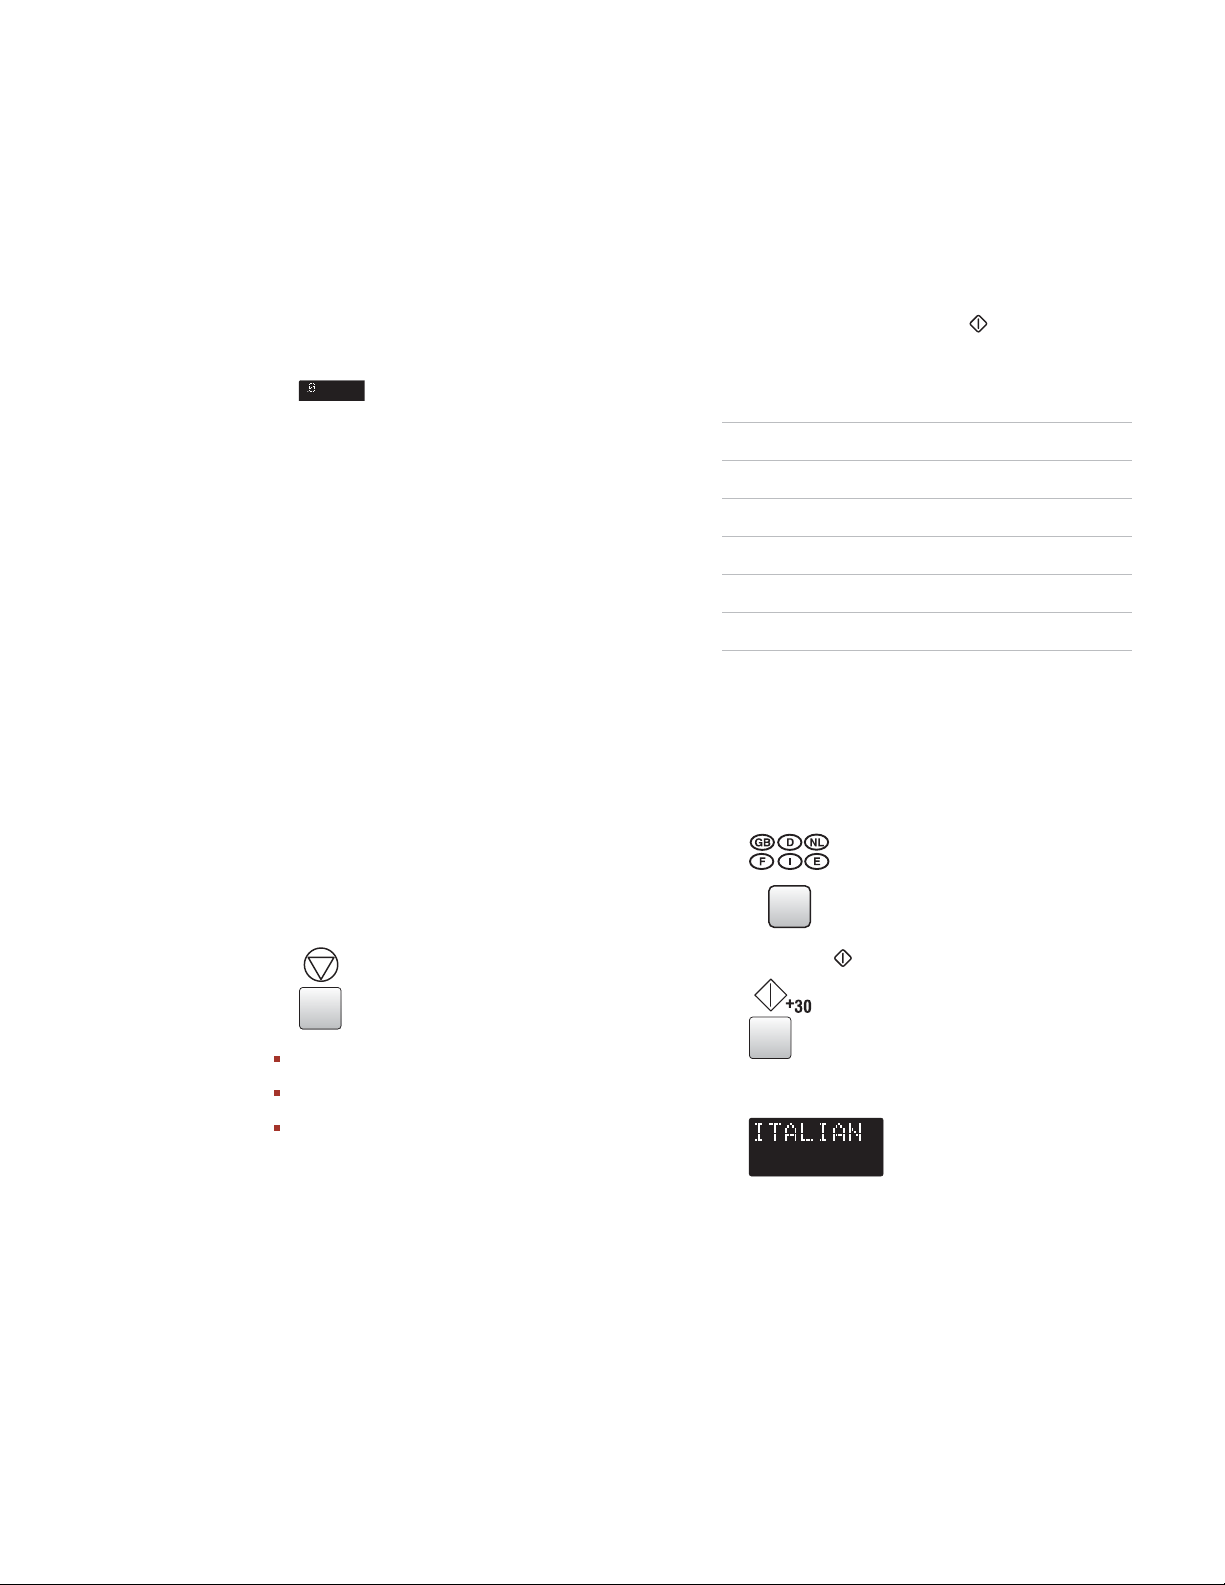
SELECTING THE LANGUAGE
The oven comes set for English. You can
change the language. To change, press the
LANGUAGE
is displayed. Then press the
Press LANGUAGE
Button LANGUAGE
3 times NEDERLANDS
4 times FRANÇAIS
5 times ITALIAN
6 times ESPAÑOL
EXAMPLE
To select
1)
Choose the desired language by pressing
the
button until the desired language
+30
button.
once ENGLISH
twice DEUTSCH
Italian
:
LANGUAGE
button.
USING THE
Use the
Erase a mistake during programming.
Stop the oven temporarily during cooking.
Cancel a programme during cooking, press
the
STOP
STOP BUTTON
STOP
button to:
button twice.
x5
2)
Press the
+30
button to start the setting.
x1
3) Check the display.
NOTE:
The selected language will be memorised even
if the electical power supply is interrupted.
22
Page 23

WOLF CONVECTION MICROWAVE OPERATION
NOTES
23
Page 24

WOLF CONVECTION MICROWAVE OPERATION
MICROWAVE POWER LEVELS
Your oven has 5 power levels. To choose the
power level for cooking, follow the advice
given in the recipe section. Generally the
following recommendations apply:
900 W
used for fast cooking or reheating e.g.
soup, casseroles, canned food, hot beverages,
vegetables, fish, etc.
630 W
used for longer cooking of dense foods
such as roast joints, meat loaf and plated
meals, also for sensitive dishes such as cheese
sauce and sponge cakes. At this reduced
setting, the sauce will not boil over and food
will cook evenly without over cooking at the
sides.
450 W
for dense foods which require a long
cooking time when cooked conventionally, eg.
beef dishes, it is advisable to use this power
setting to ensure the meat will be tender.
270 W
(Defrost setting) to defrost, select this
power setting, to ensure that the dish defrosts
evenly. This setting is also ideal for simmering
rice, pasta, dumplings and cooking egg
custard.
TO SET THE POWER LEVEL
1)
Rotate the
COOKING MODE
dial to the
microwave setting.
2)
Rotate the
TIMER/WEIGHT
knob clockwise
or counter-clockwise to select cooking time.
3)
Press the
MICROWAVE POWER LEVEL
button until the desired power level
appears on the display. (If the
POWER LEVEL
button is touched once,
MICROWAVE
will be displayed. If you miss your
desired level, continue pressing the
MICROWAVE POWER LEVEL
button until
you reach the level again).
4)
Press the
+30
button.
NOTE:
If the power level is not selected, 900 W is
automatically set.
90 W
for gentle defrosting, eg. cream gateaux
or pastry.
W = WATT
24
Page 25
WOLF CONVECTION MICROWAVE OPERATION
MICROWAVE COOKING
3)
Your oven can be programmed for up to 90
minutes (90.00). The input unit of cooking
(defrosting) time varies from 10 seconds to
five minutes. It depends on the total length of
the cooking (defrosting) time as shown on the
table opposite:
Cooking Time: Increasing unit:
0–5 minutes 10 seconds
5–10 minutes 30 seconds
10–30 minutes 1 minute
30–90 minutes 5 minutes
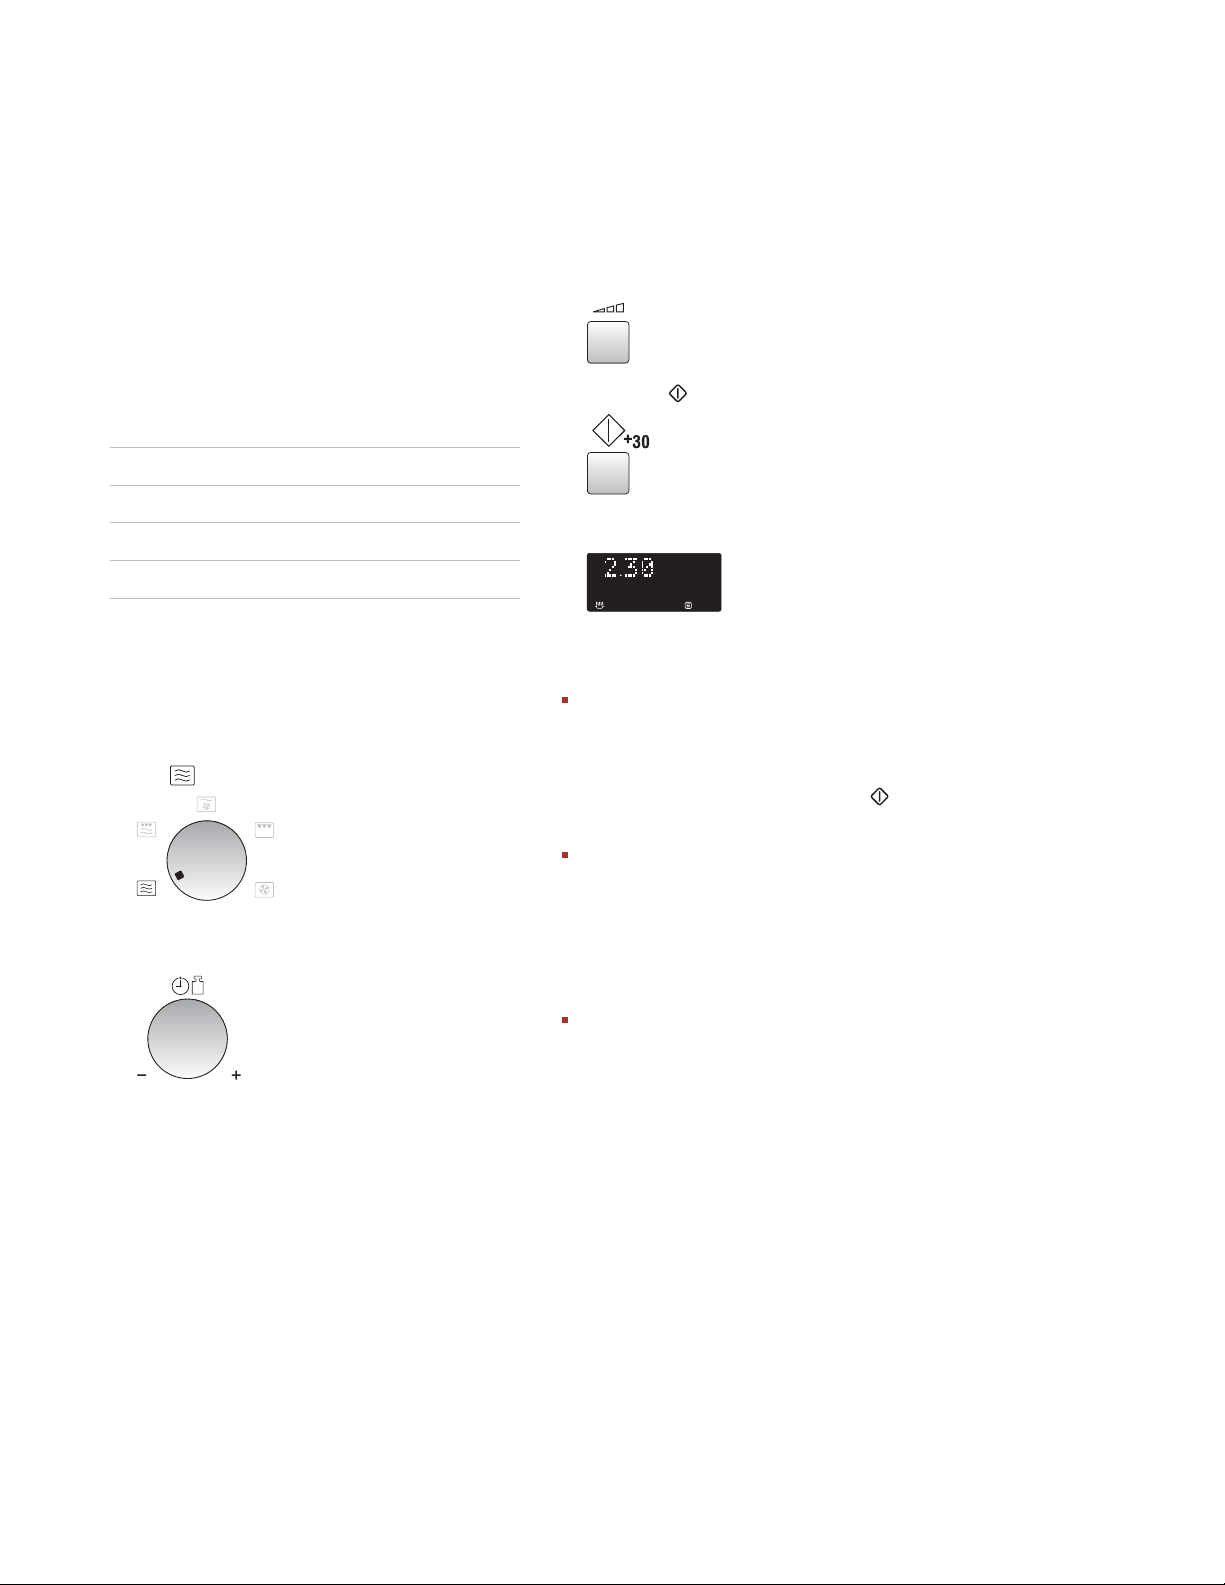
Press the
button twice for 630 W microwave power.
4)
Press the
5) Check the display.
MICROWAVE POWER LEVEL
x2
+30
button once to start cooking.
x1
EXAMPLE
To heat soup for 2 minutes and 30 seconds on
630 W microwave power.
1)
Rotate the
the microwave setting.
2)
Enter desired cooking time by rotating the
TIMER/WEIGHT
COOKING MODE
knob clockwise.
dial to
NOTES:
When the door is opened during the
cooking process, the cooking time on the
digital display stops automatically. The
cooking time starts to count down again
when the door is closed and the
button is pressed.
If you wish to know the power level during
cooking, press the
LEVEL
pressing the
button, the power level will be displayed.
You can rotate the
clockwise or counter-clockwise. If you rotate
the dial counter-clockwise, the cooking time
will decrease from 90 minutes by degrees.
button. As long as your finger is
MICROWAVE POWER
MICROWAVE POWER LEVEL
TIMER/WEIGHT
+30
knob
25
Page 26
WOLF CONVECTION MICROWAVE OPERATION
GRILL COOKING
The grill heating element at the top of the oven
cavity has one power setting only.
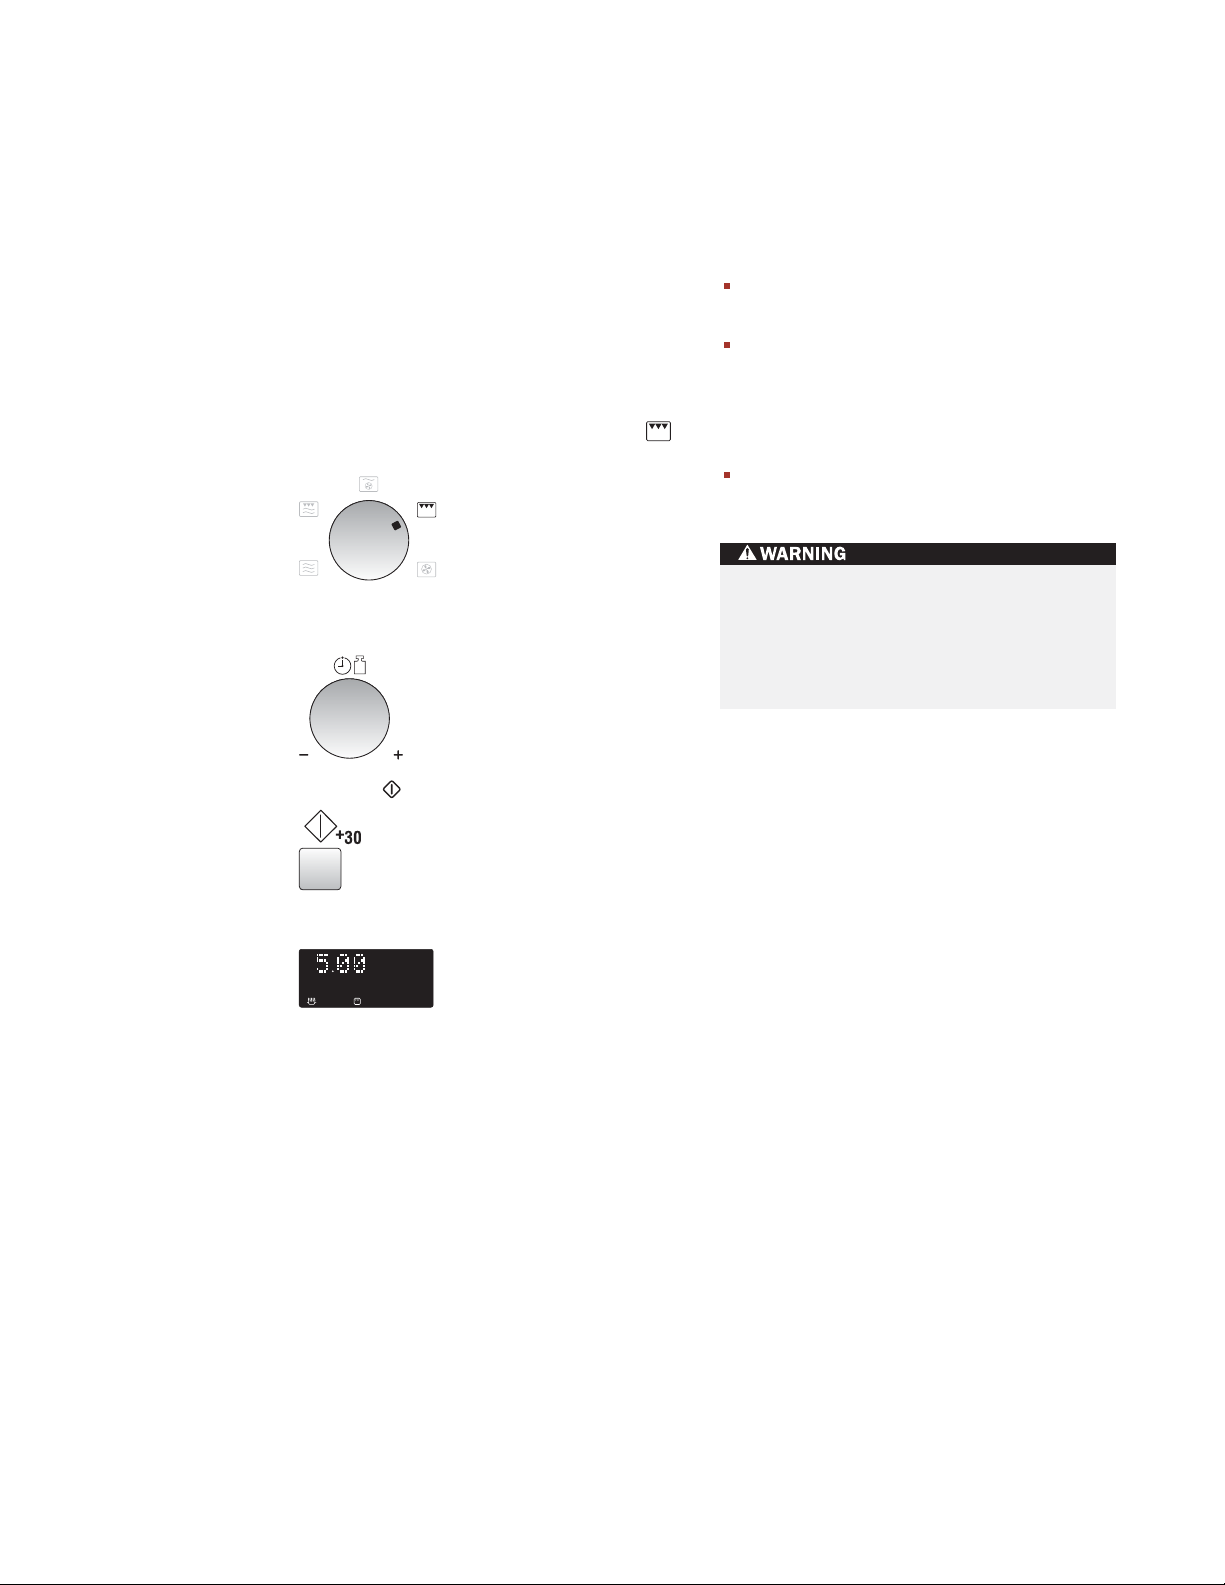
EXAMPLE
To cook cheese on toast for 5 minutes (place
toast on the high rack).
1)
Rotate the
COOKING MODE
dial to the
Grill setting.
2)
Enter the desired cooking time by rotating
the
TIMER/WEIGHT
3)
Press the
+30
knob clockwise.
button to start cooking.
NOTES:
The high or low racks are recommended
when grilling.
You may detect smoke or a burning smell
when using the grill for the first time, this is
normal and not a sign that the oven is out
of order. (Please see heating without food
below.)
After cooking the display may show ‘NOW
COOLING’.
The oven cavity, door, outer cabinet,
turntable, racks and dishes will become
very hot, always use thick oven gloves
when removing the food or turntable
from the oven to prevent burns.
x1
4) Check the display.
26
Page 27

WOLF CONVECTION MICROWAVE OPERATION
HEATING WITHOUT FOOD
You may detect smoke or a burning smell
when using the grill and convection for the
first time. This is normal and not a sign that
the oven is out of order.
To avoid this problem, when first using the
oven, heat the oven without food for 20
minutes on grill and then at convection 250 ˚C.
IMPORTANT NOTE:
During operation, to
allow smoke or smells to disperse open a
window or switch the kitchen ventilation on.
Make sure there is no food in the oven.
EXAMPLE
1)
Rotate the
GRILL
2)
Enter the required heating time (20 min).
3)
Start cooking by pressing the
COOKING MODE
or
CONVECTION
dial to the
setting.
+30
button.
x1
The oven will count down. When the oven has
finished cooking, open the door to cool the
oven cavity.
The oven door, outer cabinet & oven
cavity will become hot. Take care to
avoid burns when cooling the oven down
after operation.
27
Page 28
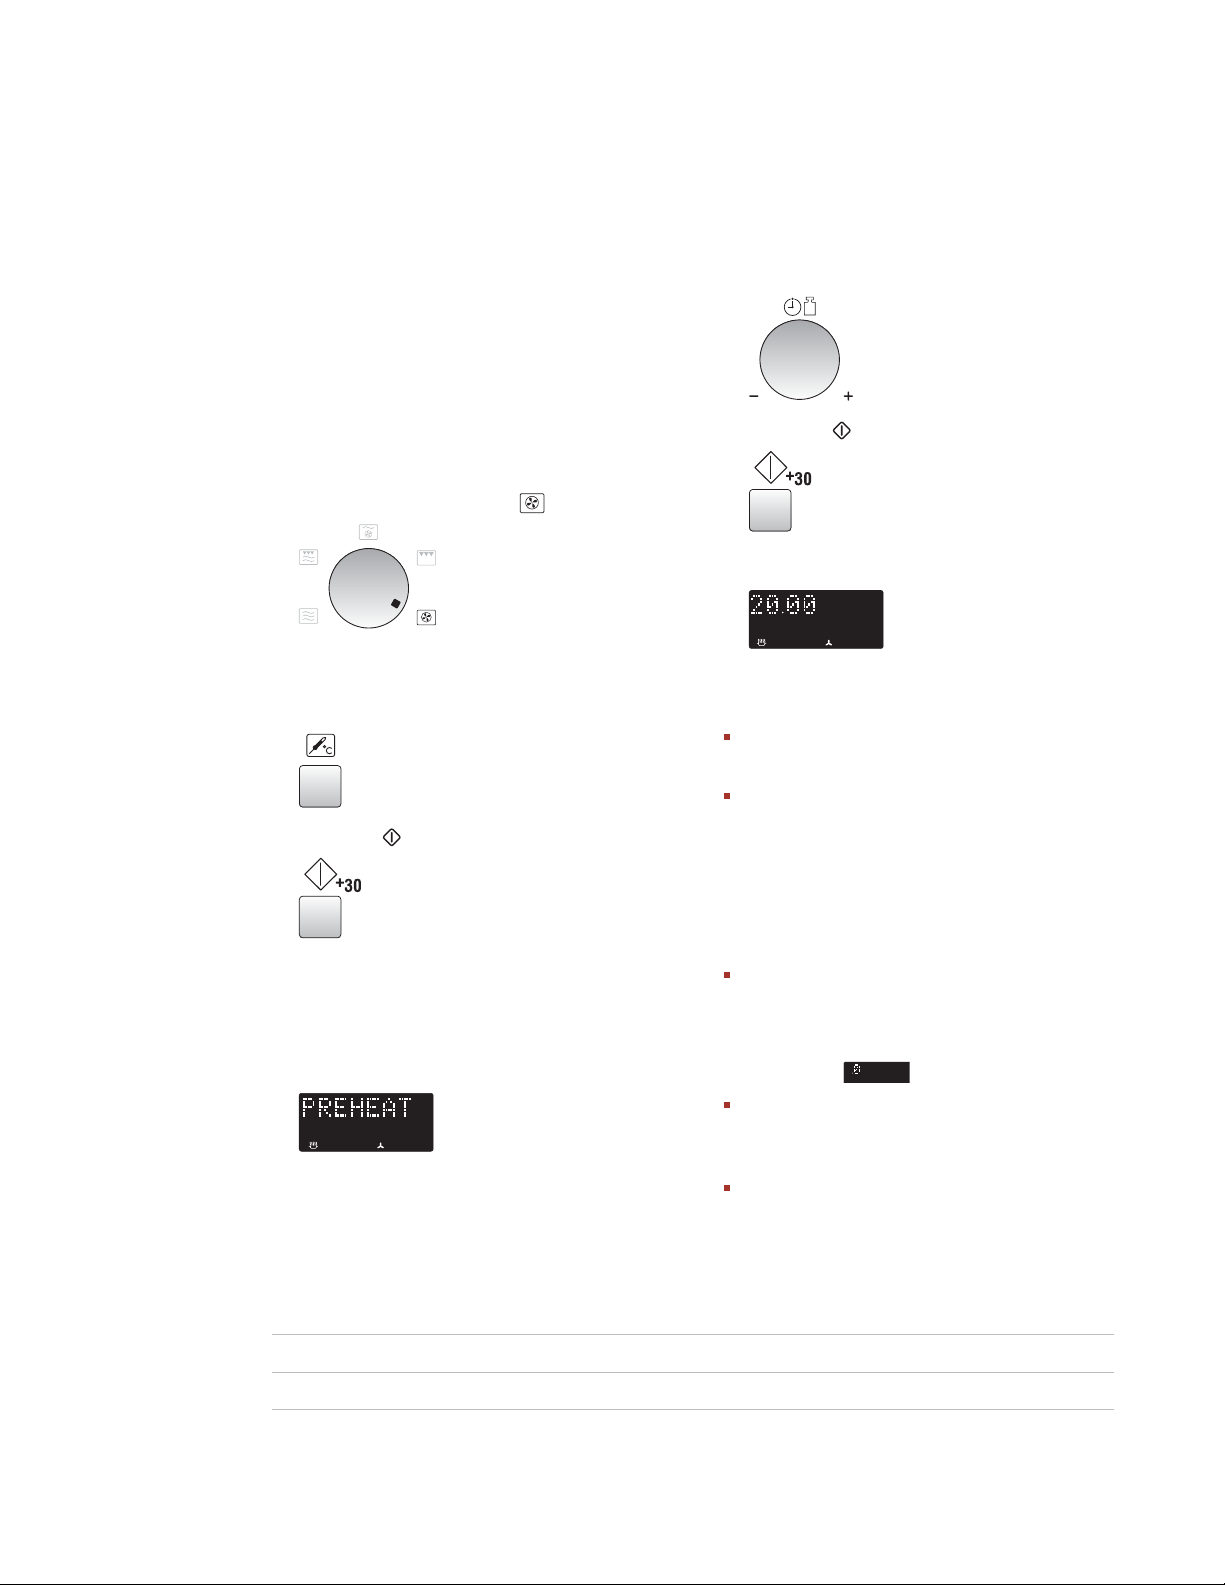
WOLF CONVECTION MICROWAVE OPERATION
CONVECTION COOKING
4)
Your oven can be used as a conventional oven
using the convection facility and 10 pre-set
oven temperatures. Refer to the chart below.
EXAMPLE 1
TO COOK WITH PREHEATING
Use the
cooking time (20 min).
TIMER/WEIGHT
knob to input the
To pre-heat to 180 ˚C and cook for 20 minutes
at 180 ˚C.
1)
Select the cooking mode by rotating the
COOKING MODE
2)
Enter the desired preheat temperature by
pressing the
times. The display will show 180 ˚C.
dial to .
CONVECTION
button six
x6
3)
Press the
+30
button to start pre-heating.
x1
When the pre-heated temperature has been
reached the audible signal sounds, the
display will show 180 ˚C, open the door and
place the food inside the oven. Close the
door.
5)
Press the
+30
button.
x1
6) Check the display.
NOTES:
When the oven is preheating, the turntable
should be in the oven.
After preheating, if you want to cook
at a different temperature press the
CONVECTION
setting appears on the display. In the
example above, to change the temperature
you would press the
after entering the cooking time.
When the oven reaches the programmed
preheating temperature, it will automatically hold at the pre-heated temperature for
30 minutes. After 30 minutes the display
may show or “NOW COOLING”.
button until the desired
CONVECTION
button
28
After cooking the oven will automatically
cool and the display may show “NOW
COOLING”.
To get the best results when following pack
instructions for convection, please follow
the instructions for “conventional oven”.
CONVECTION SETTINGS
Press CONVECTION Button 1 2 3 4 5 6 7 8 9 10
Oven Temperature (˚C) 250 230 220 200 190 180 160 130 100 40
Page 29
WOLF CONVECTION MICROWAVE OPERATION
CONVECTION COOKING
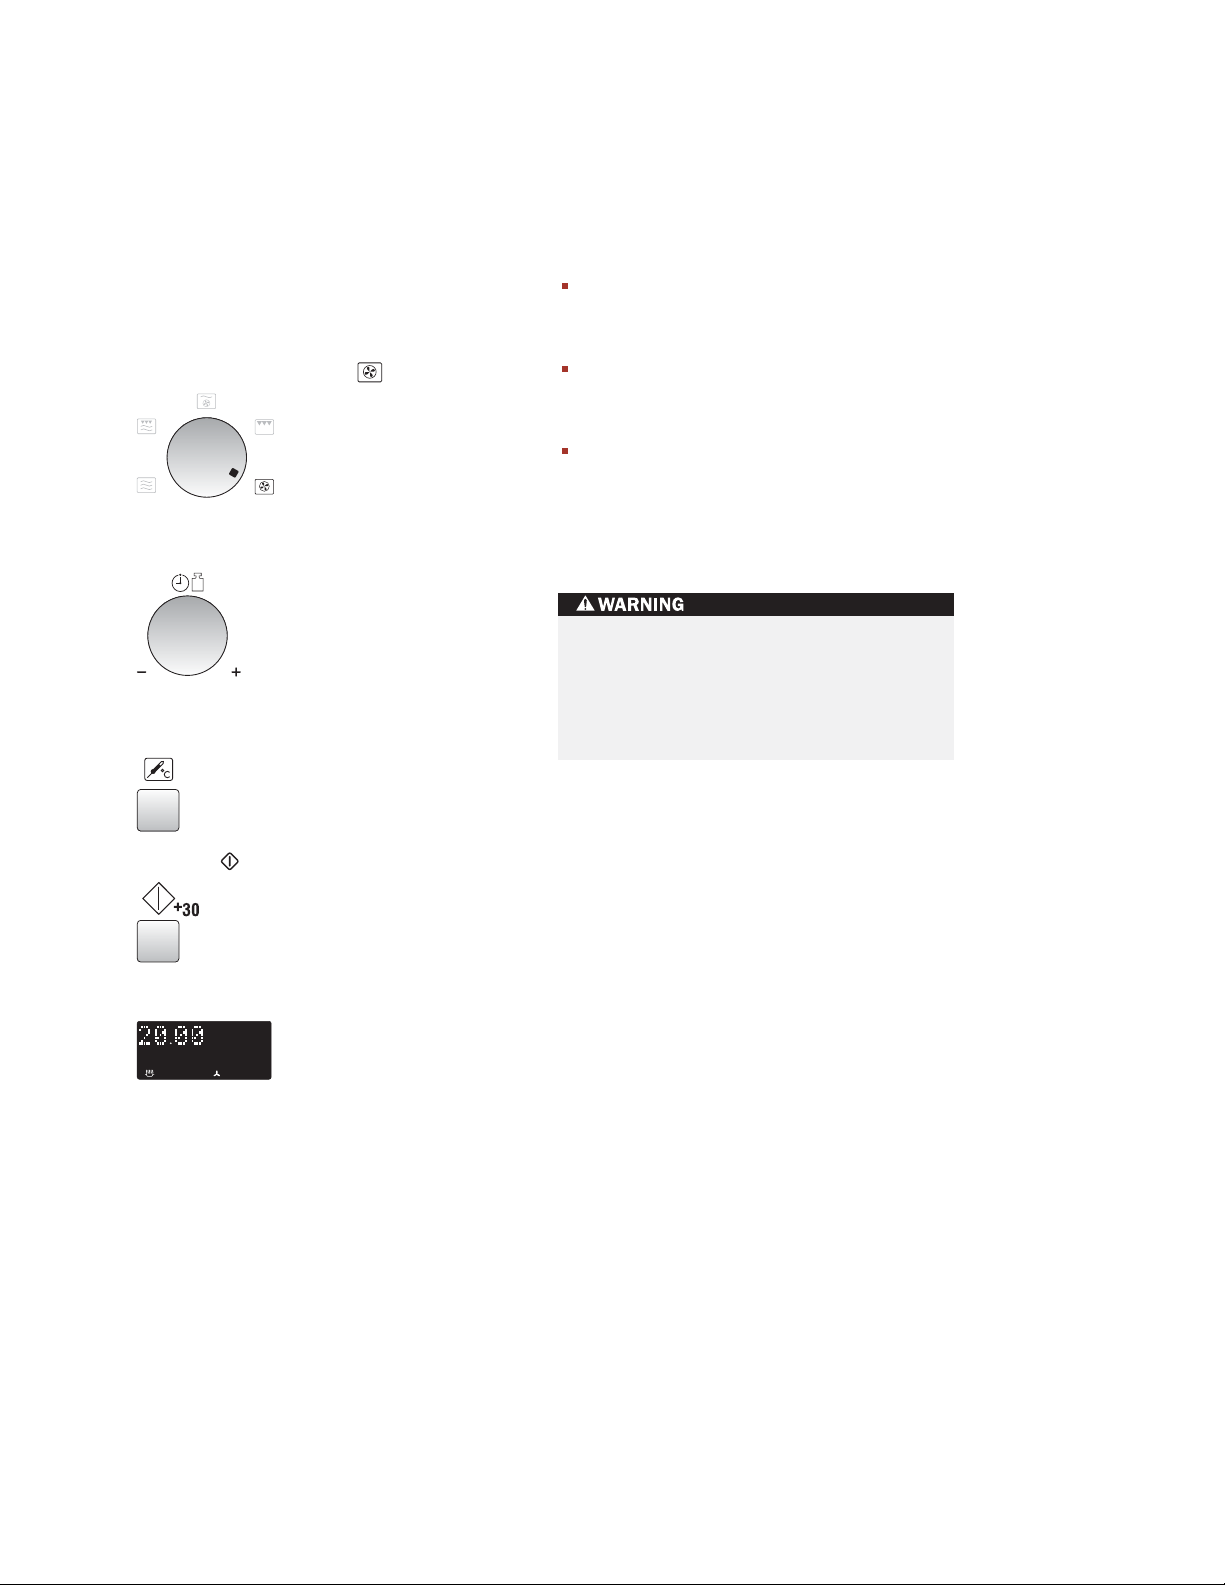
EXAMPLE 2
TO COOK WITHOUT PREHEATING
To cook at 250 ˚C for 20 minutes.
1)
Select the cooking mode by rotating the
COOKING MODE
2)
Use the
cooking time (20 min).
3)
Select the desired cooking temperature.
(250 ˚C).
TIMER/WEIGHT
dial to .
knob to input the
x1
NOTES:
After cooking the oven will automatically
cool and the display may show “NOW
COOLING”.
To change the convection temperature,
press the
desired temperature appears on the display.
You may detect smoke or a burning smell
when using convection for the first time.
This is normal and is not a sign that the
oven is out of order. (Please see “Heating
Without Food” on page 27.)
The oven cavity, door, outer cabinet,
turntable, racks and dishes will become
very hot, always use thick oven gloves
when removing the food or turntable
from the oven to prevent burns.
CONVECTION
button until the
4)
Press the
+30
button.
x1
5) Check the display.
29
Page 30
WOLF CONVECTION MICROWAVE OPERATION
DUAL COOKING
DUAL
Your oven has 2
combining 1) Convection & microwave, 2) Grill
with microwave.
To select the
COOKING MODE
then choose the cooking time. Generally, dual
cooking time shortens the total cooking time.
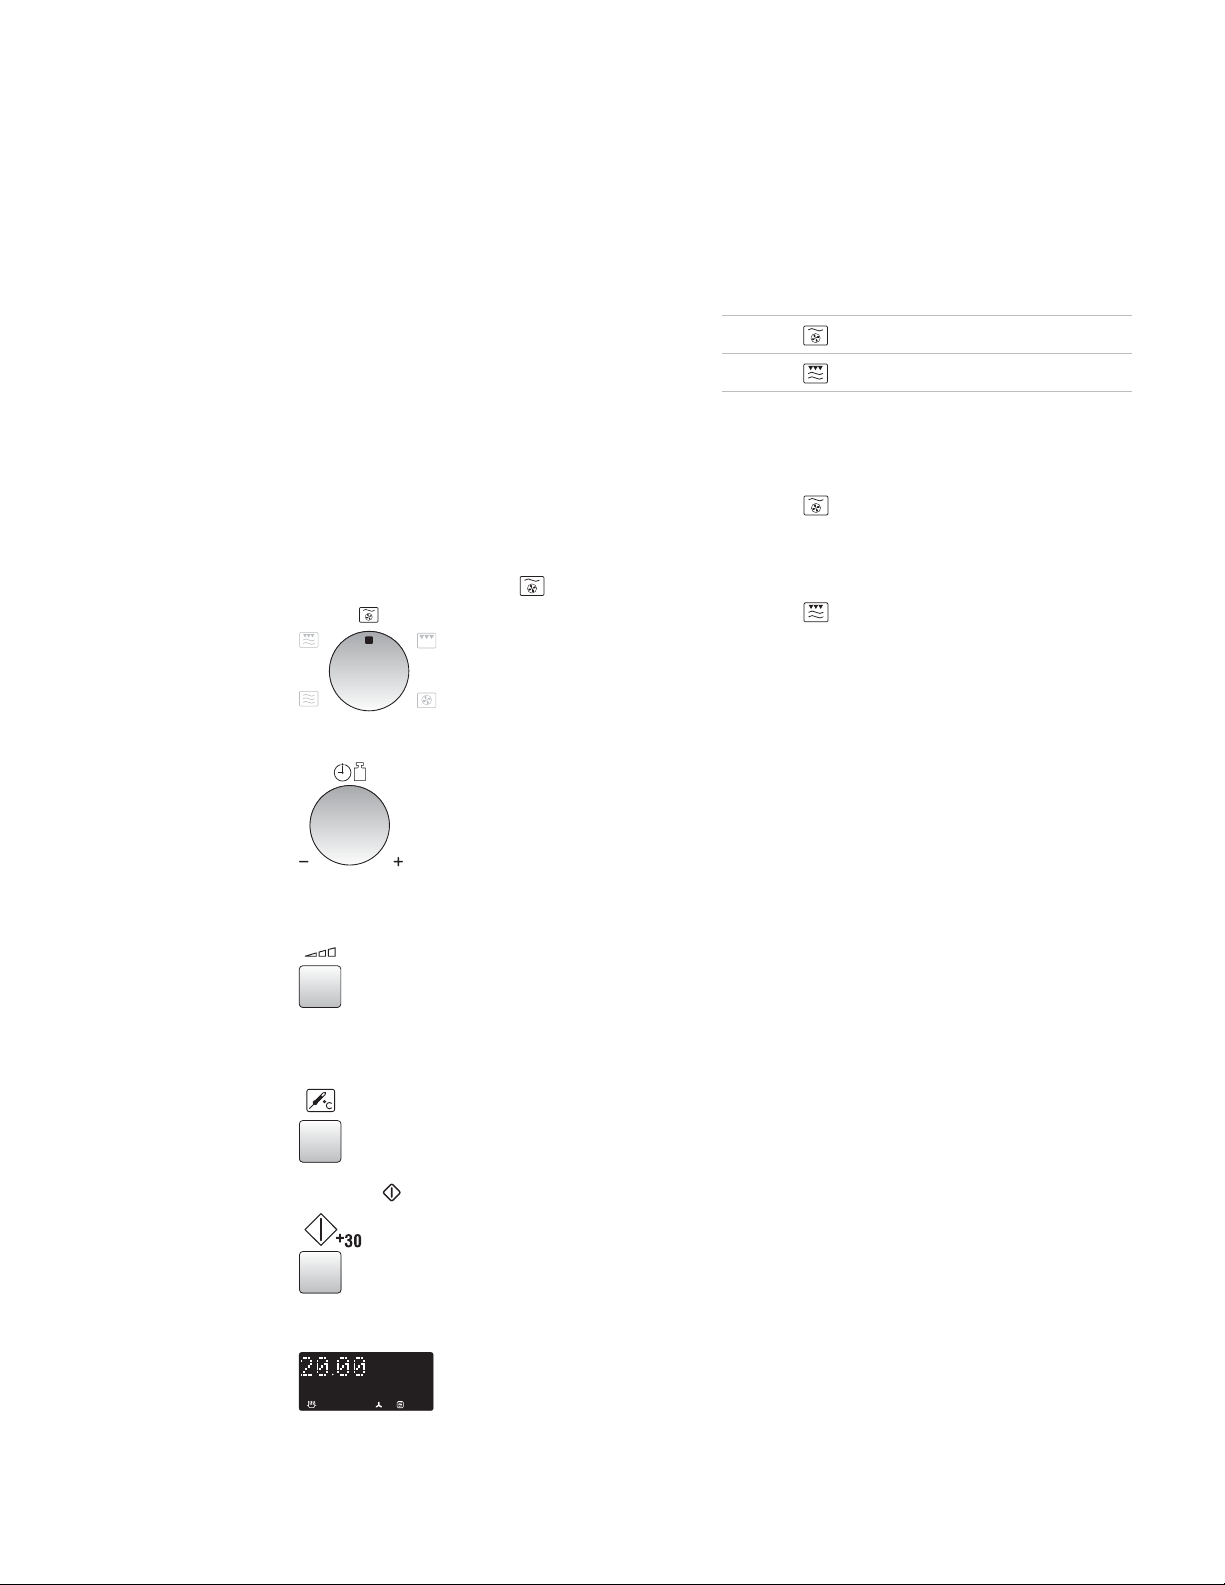
EXAMPLE 1
To cook for 20 minutes on DUAL 1 using 90 W
microwave power and 200 ˚C convection.
1)
Select the cooking mode by rotating the
COOKING MODE
2)
Enter the desired cooking time (20 min).
DUAL
cooking modes
cooking mode rotate the
dial to the desired setting,
dial to .
Initial
COOKING Cooking Microwave
MODE Method Power
DUAL 1
DUAL 2
NOTES:
The power settings are variable:
DUAL 1
changed from 40 ˚C to 250 ˚C in ten levels.
Microwave power levels can be changed from
90 W–630 W in four levels.
DUAL 2
changed from 90 W–900 W in five levels.
Convection 250 ˚C 270 W
Grill 270 W
: The oven temperature can be
: Microwave power levels can be
3)
Press the
button twice (90 W).
MICROWAVE POWER LEVEL
x2
4)
Press
CONVECTION
(200 ˚C).
x4
5)
Press the
+30
button.
x1
6) Check the display.
button four times
30
Page 31
WOLF CONVECTION MICROWAVE OPERATION
DUAL COOKING
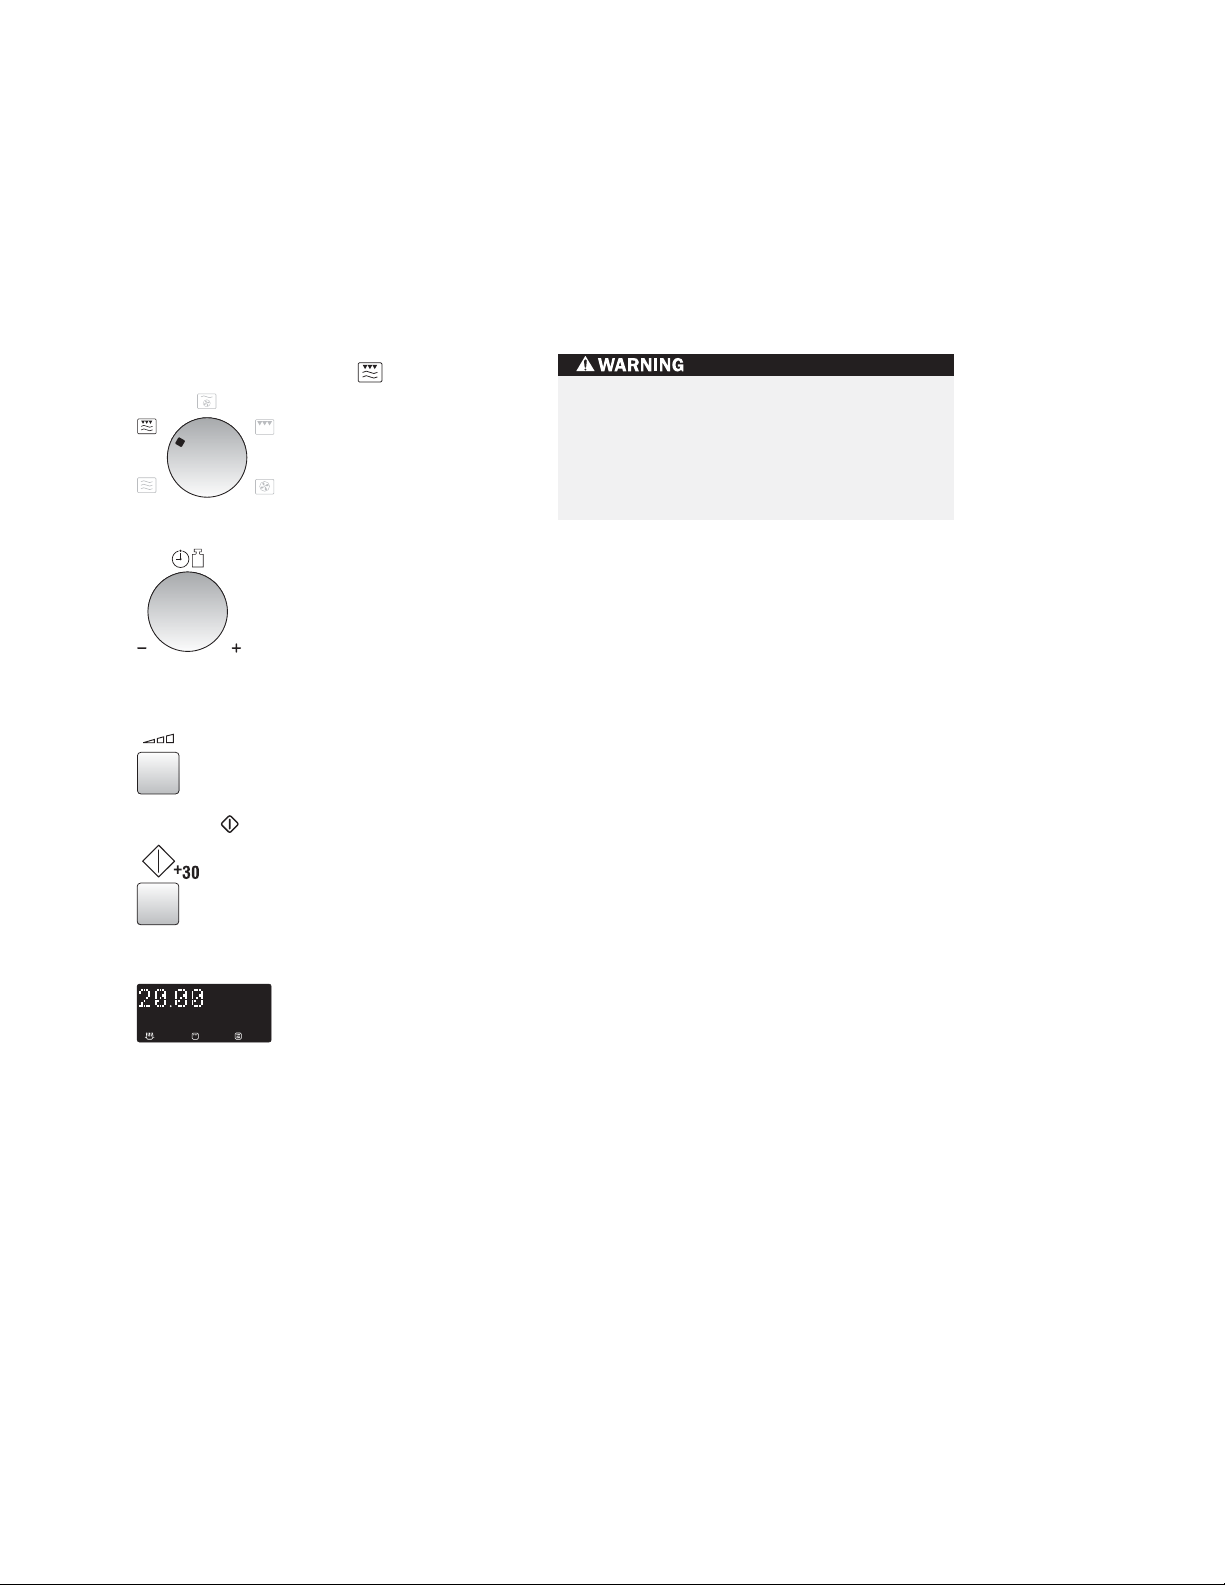
EXAMPLE 2
To cook for 20 minutes on DUAL 2 using 90 W
microwave power and GRILL.
1)
Select the cooking mode by rotating the
COOKING MODE
2)
Enter the desired cooking time (20 min).
3)
Press the
button twice (90 W).
MICROWAVE POWER LEVEL
dial to .
x2
4)
Press the
+30
button.
NOTE:
After cooking, the oven will automatically cool
and the display may show “NOW COOLING”.
The oven cavity, door, outer cabinet,
turntable, racks and dishes will become
very hot, always use thick oven gloves
when removing the food or turntable
from the oven to prevent burns.
x1
5) Check the display.
31
Page 32
WOLF CONVECTION MICROWAVE OPERATION
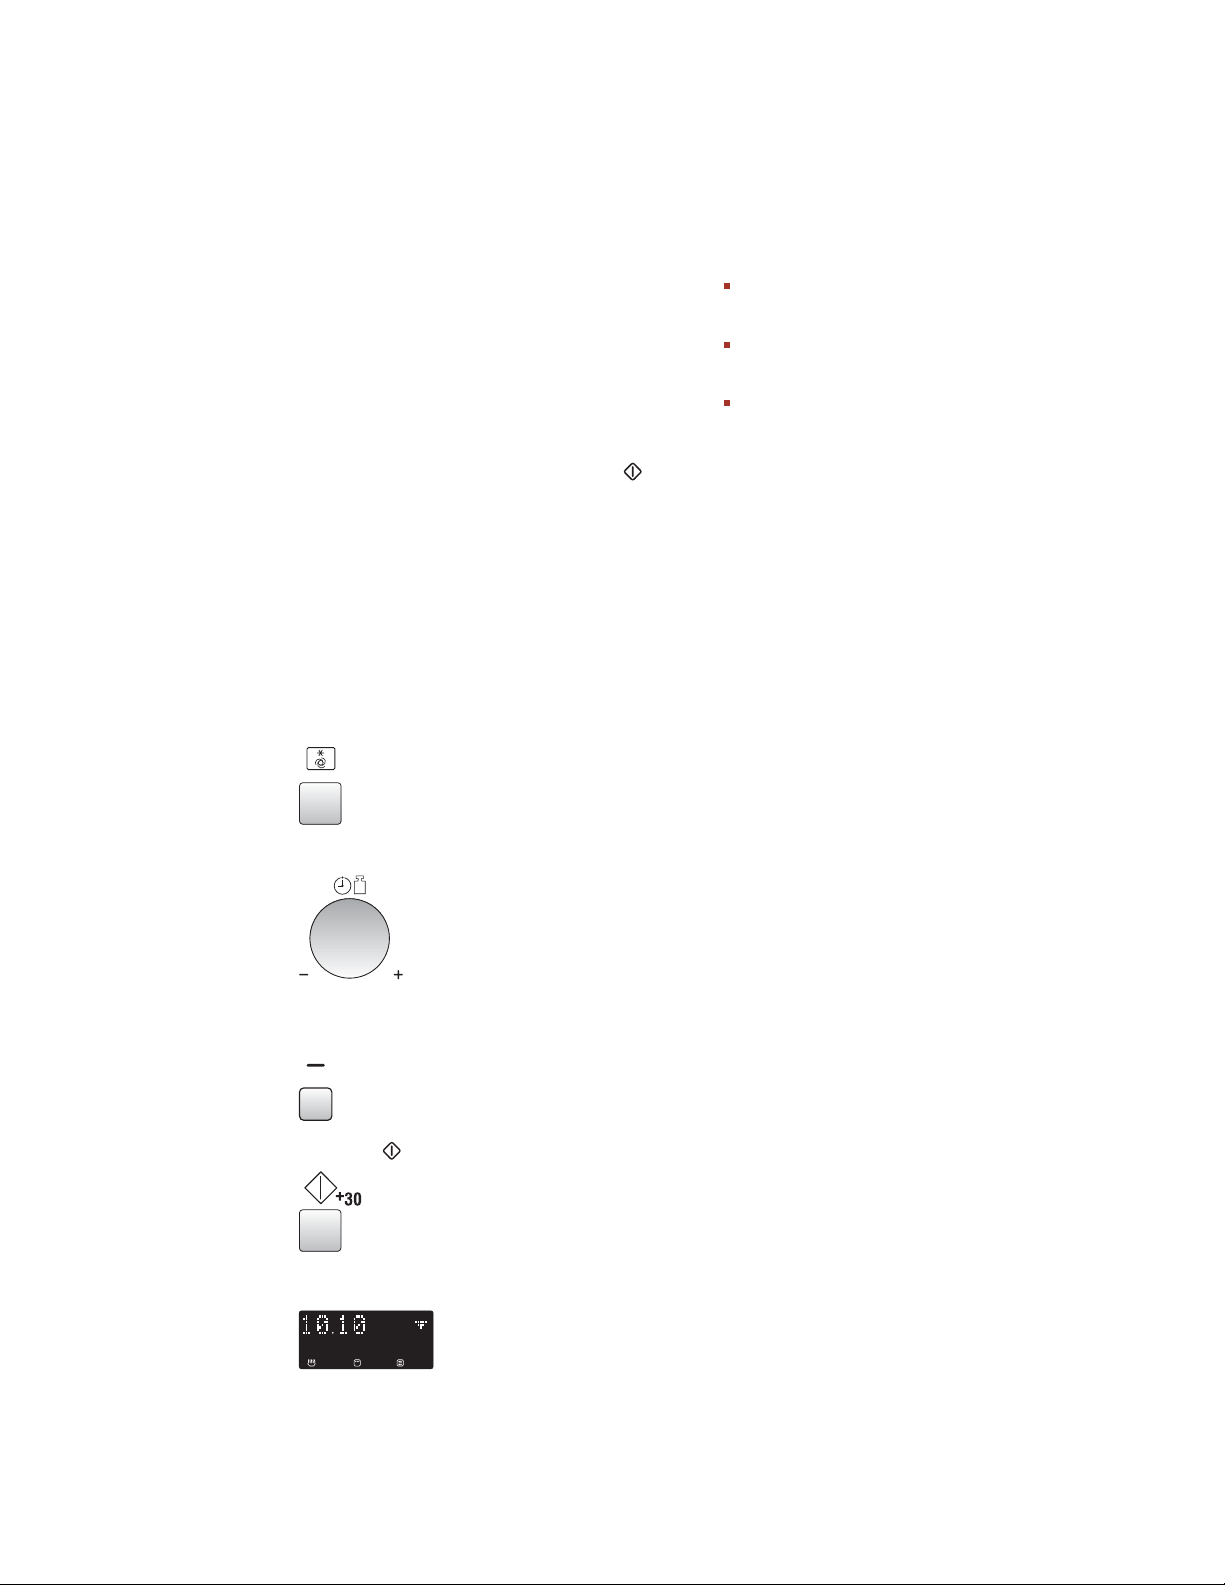
LESS (–) / MORE (+) BUTTON
The
LESS
(–) and
to decrease or increase programmed setting
times easily, (for a less well or more well
cooked result), when cooking is in progress.
CHOOSING AUTOCOOK WITH
LESS/MORE
Press the
entering weight and before pressing the
button. (See cooking charts for menus that use
LESS
EXAMPLE
To cook 0,2 kg French Fried Potatoes using
AUTO COOK FROM FROZEN
1)
LESS
and
MORE
Choose the
for French Fried Potatoes by pressing the
button four times.
MORE
(–) and
.)
AUTO COOK FROM FROZEN
(+) buttons allow you
MORE
(+) button after
.
+30
x4
NOTES:
To cancel
button again.
To change
LESS
To change
MORE
CHANGING THE HEATING TIME
WHILE THE OVEN IS OPERATING
During the manual cooking progress, the
cooking time can be decreased or increased in
30 seconds steps each time the
MORE
NOTE:
You can use this function for manual cooking
only.
LESS
or
MORE
MORE
(–) button.
LESS
(+) button.
(+) buttons are pressed.
to
to
press the same
LESS
MORE
simply press the
simply press the
LESS
(–) and
2)
Enter the amount (0,2 kg).
3)
Choose the “thin” French Fried Potatoes by
pressing the
LESS
(–) button once.
x1
4)
Press the
+30
button.
x1
5) Check the display.
32
Page 33
WOLF CONVECTION MICROWAVE OPERATION
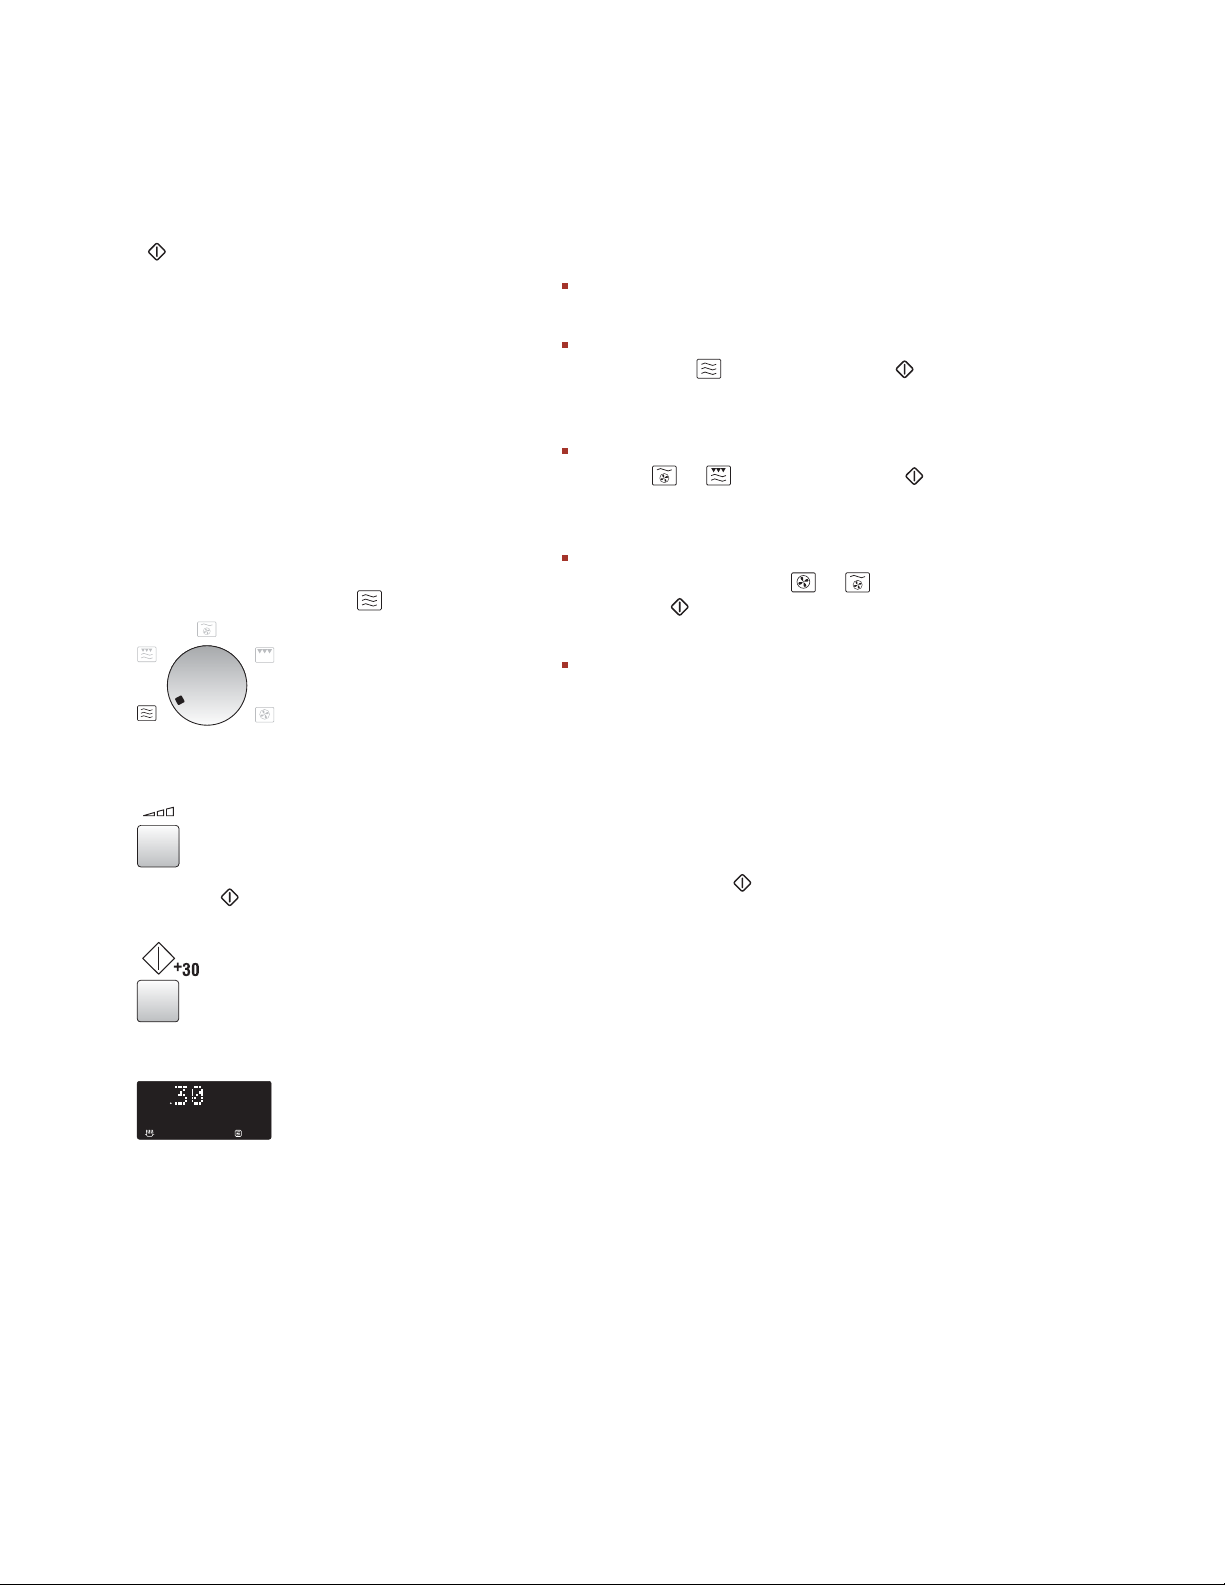
ADD 30 SECONDS FUNCTION
+30
The
following functions:
30 SECONDS COOKING
You can cook on your desired cooking mode
for 30 seconds without entering the cooking
time.
EXAMPLE
To cook for 30 seconds on 630 W microwave
power.
1)
Select the cooking mode by rotating the
COOKING MODE
button allows you to operate the
dial to (Microwave).
NOTES:
You can use this function for manual
cooking only.
When the
microwave ( ) and you press the
button, the microwave power is always
900 W.
When the
DUAL ( or ) and you press the
button, the microwave power is always
270 W.
When the
convection or DUAL 1 ( or ) and you
press the
temperature is always 250 ˚C.
COOKING MODE
COOKING MODE
COOKING MODE
+30
button, the convection
dial is on
+30
dial is on
+30
dial is on
2)
Change the power by pressing the
MICROWAVE POWER LEVEL
x2
3)
Press the
cooking.
+30
button once to begin
x1
4) Check the display.
button.
To avoid misuse by children the
seconds
minutes after the preceding operation, ie
closing the door, pressing the
or end of cooking.
EXTEND THE COOKING TIME
You can extend the cooking time in multiples
of 30 seconds if the
while the oven is in operation.
NOTE:
You can use this function for manual cooking
only.
function can be used only within 3
+30
button is pressed
add 30
STOP
button
33
Page 34
WOLF CONVECTION MICROWAVE OPERATION
CHECK SETTINGS WHILE OPERATING
You can check the power level and the actual
oven temperatures ie: when pre-heating.
TO CHECK THE POWER LEVEL
To check the microwave power level during
cooking press the
LEVEL
The oven continues to count down, although
the display shows the power level.
As long as your finger is pressing the button,
the power level will be displayed.
TO CHECK THE CONVECTION
TEMPERATURE
To check the convection temperature during
cooking press the
button.
MICROWAVE POWER
CONVECTION
button.
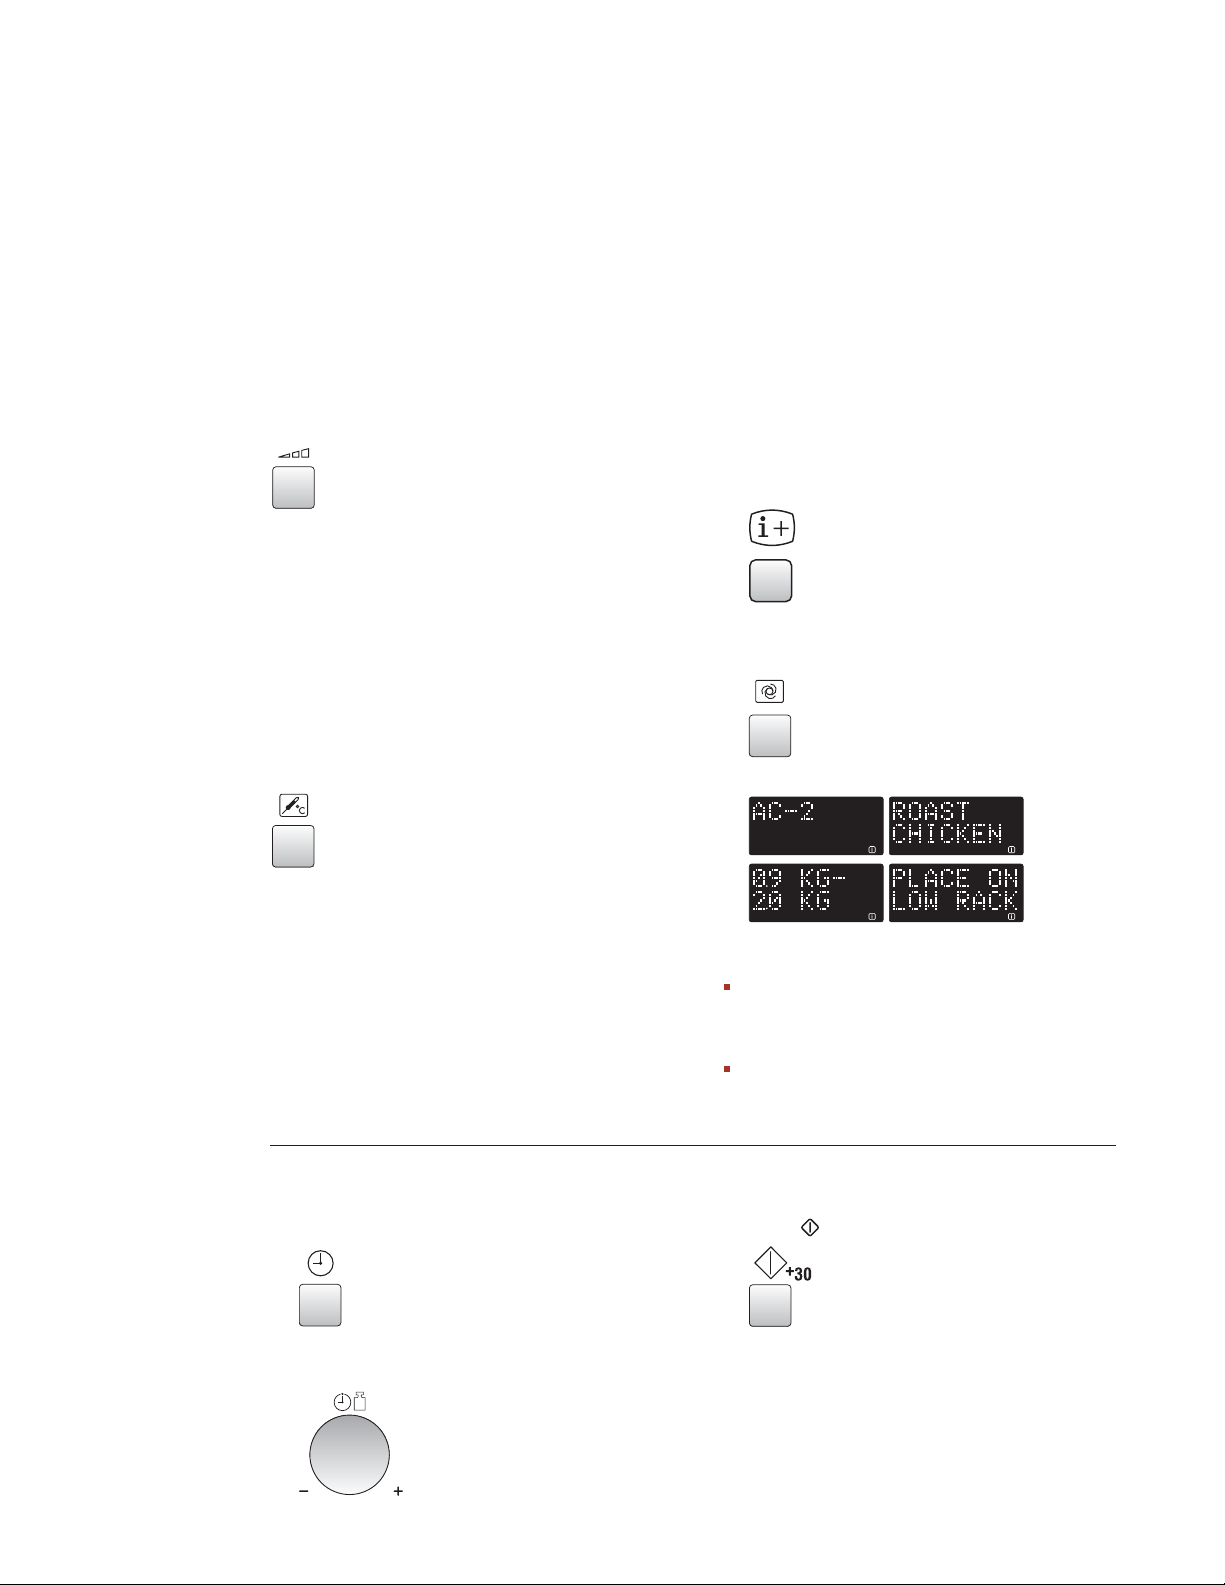
INFORMATION BUTTON
Each button carries useful information.
If you wish to get the information, press the
INFORMATION
desired button.
EXAMPLE
To get information about AUTO COOK menu
number 2, Roast chicken:
1)
Choose the
button before pressing the
INFORMATION
button function.
x1
2)
Press the
select Roast Chicken.
AUTO COOK
button 2 times to
x2
When the oven is pre-heating, you can check
the actual oven temperature.
As long as your finger is pressing the button,
the convection temperature in ˚C will be
displayed.
TIMER BUTTON
1)
Press the
TIMER
button once.
x1
2)
Enter the time by rotating the
TIMER/WEIGHT
knob clockwise.
NOTES:
The information message will be repeated
twice, and then the display will show the
time of day, if set.
If you want to cancel the information press
the
STOP
button.
3)
Press
+30
button to start.
x1
The oven will count down.
34
Page 35
WOLF CONVECTION MICROWAVE OPERATION
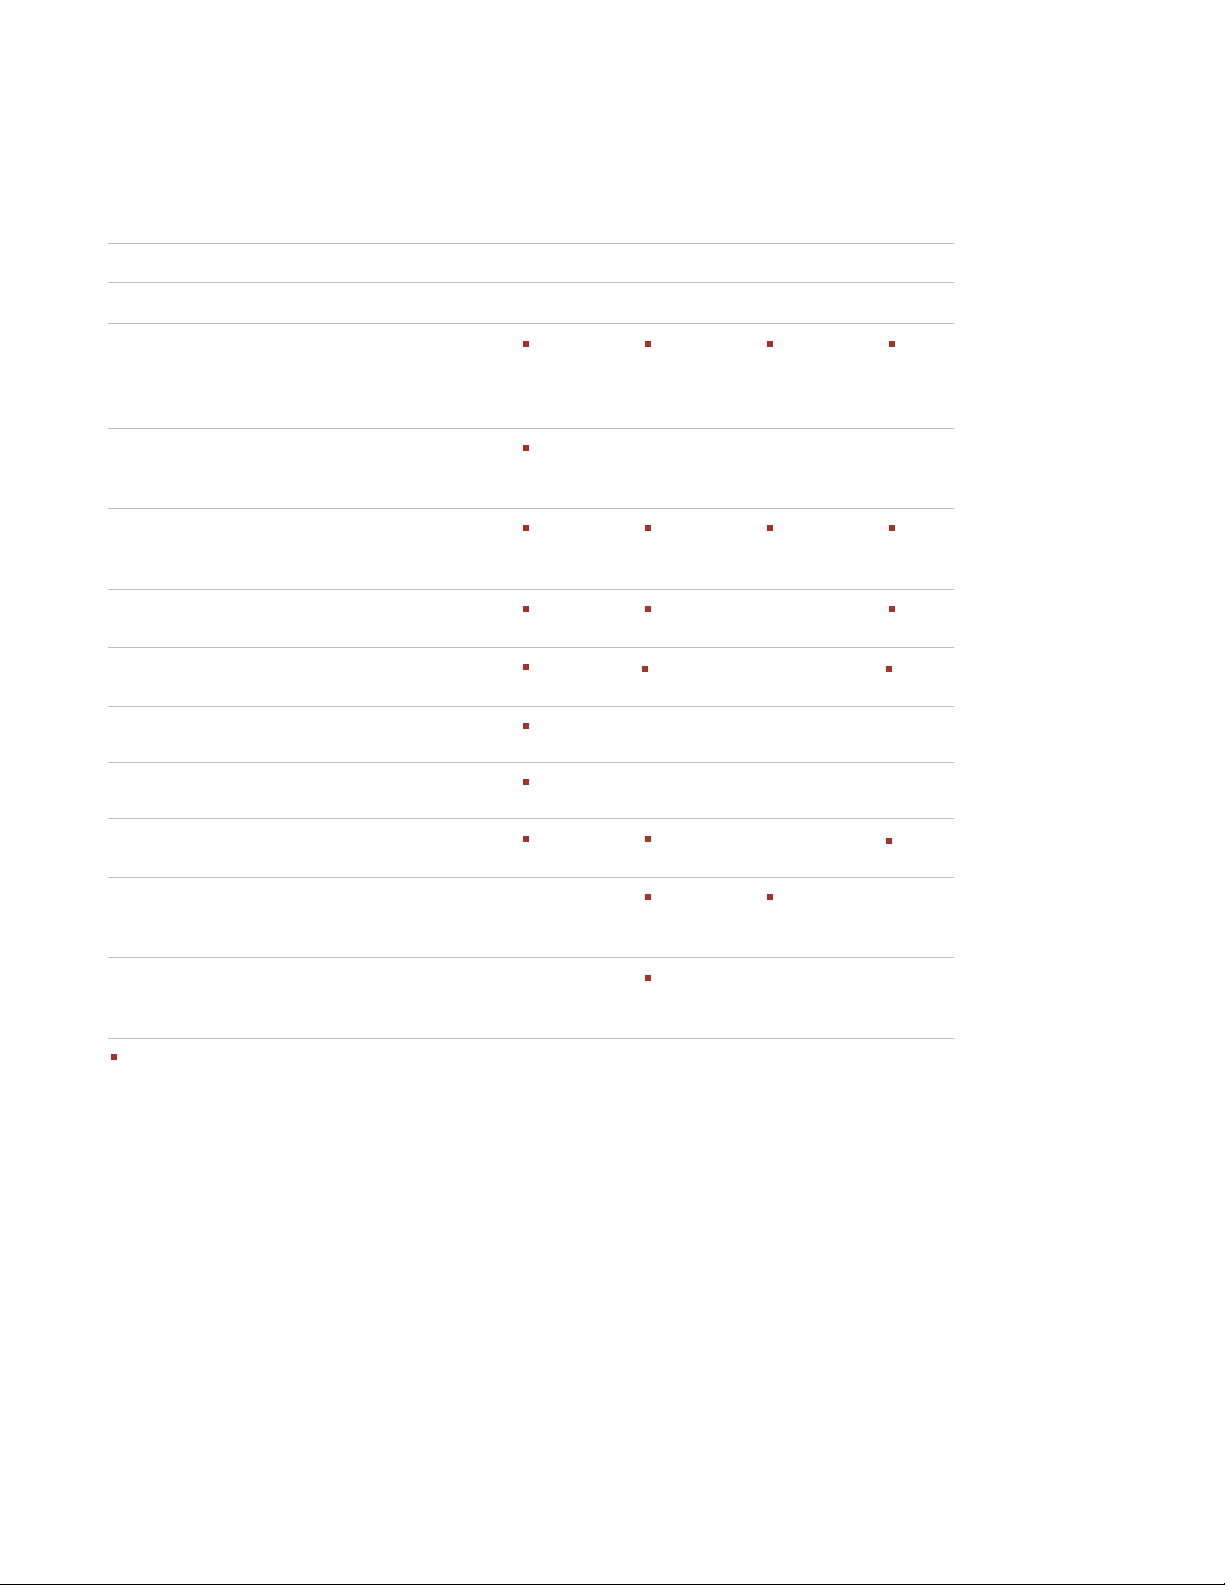
SUITABLE OVENWARE GUIDE
OVENWARE MATERIAL MODE OF OPERATION
Microwave Convection Grill Combination
Ovenproof glass and ceramic dishes
(without any metal parts, e.g. Pyrex,
oven-to-tableware, glass tray).
Non ovenproof glass and porcelain
(e.g table crockery.
1
— — —
Glass ceramic and vitroceramic made of
fire/frostproof material (e,g. Arcoflam).
Ovenproof earthware.
2
Plastic heat-resistant up to 200 ˚C.
3 3
—
—
Paper, cardboard — — —
Cling film — — —
Microwaveable roasting bag.
4
Metal roasting pans, e.g. enamel or
— —
—
cast-iron dishes.
Black-lacqued or silcone-coated
— — —
baking tins.
3
4
suitable — not suitable
1) excluding silver, gold, platinum or metal decoration
2) does not include glaze containing metal
3) please note the maximum temperature stated by the manufacturer
4) convection + microwave combined function
35
Page 36
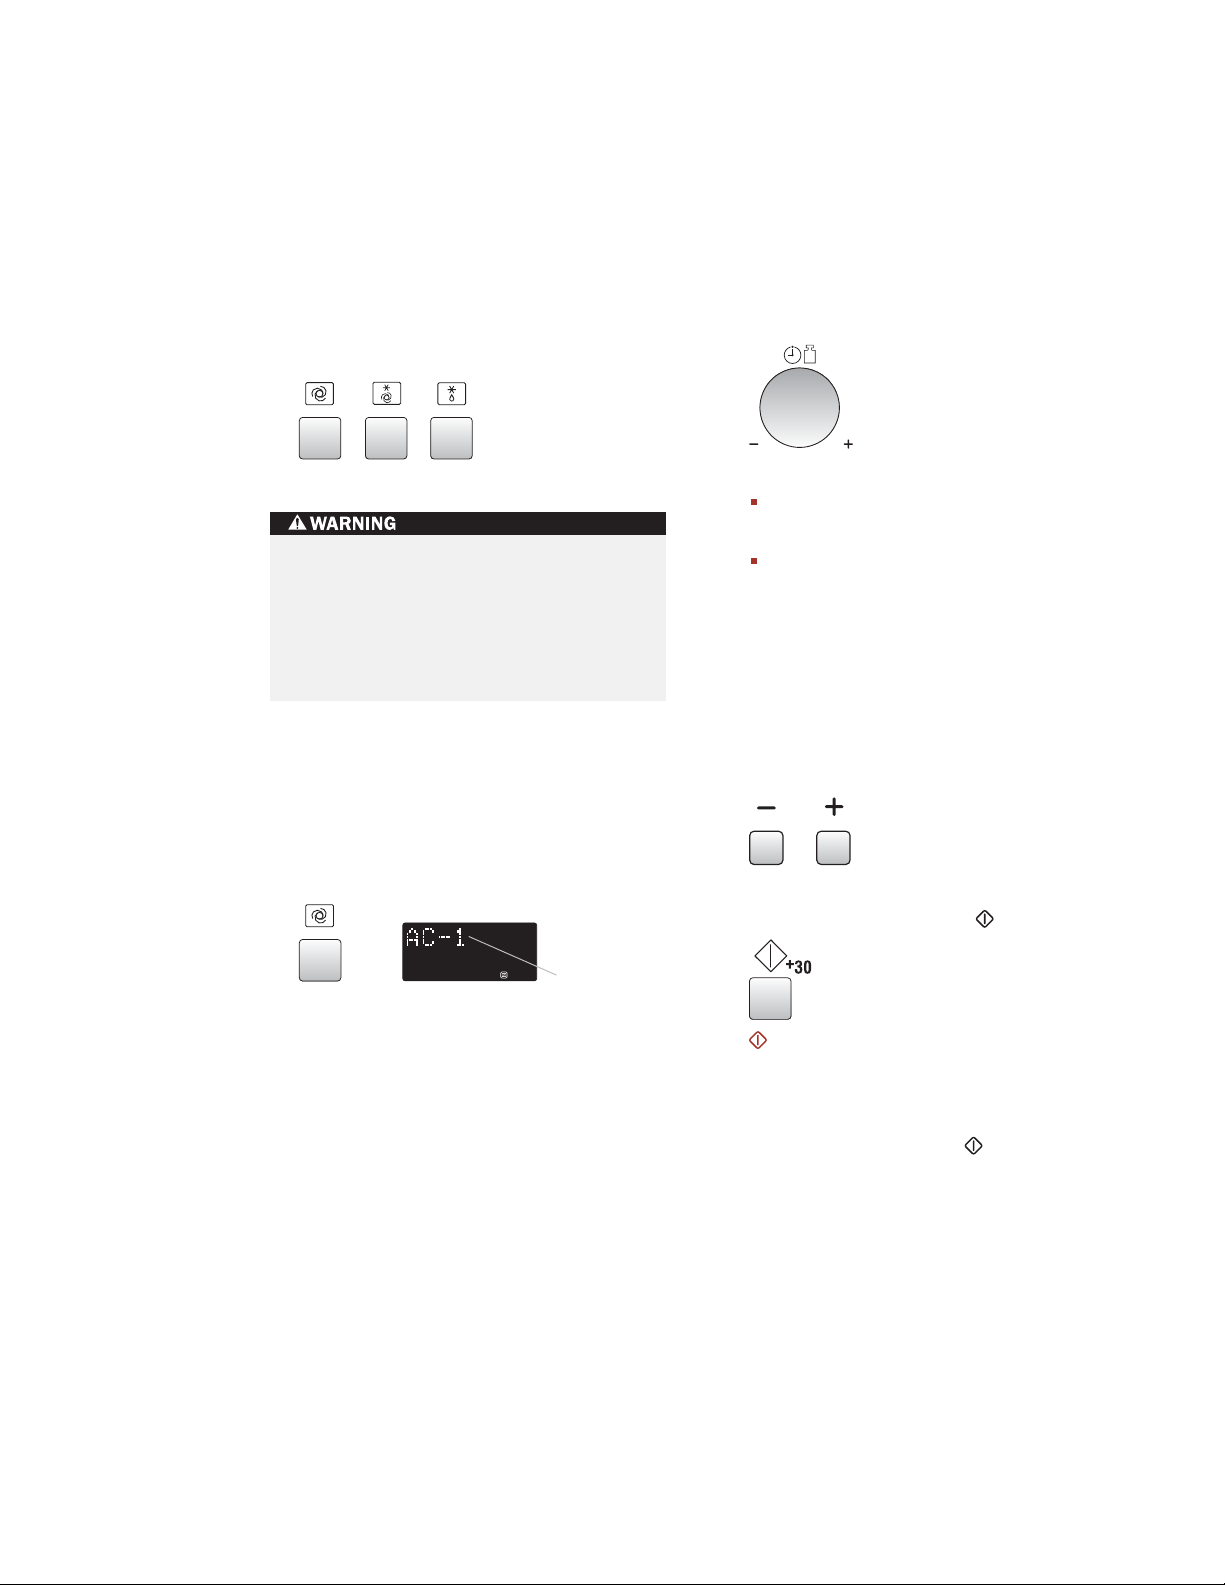
WOLF CONVECTION MICROWAVE AUTOMATIC OPERATION
AUTOMATIC OPERATIONS
AUTOMATIC OPERATIONS
The
automatically
work out the correct cooking mode and
cooking time. You can choose from 5
COOK
menus, 4
menus and 7
AUTOMATIC buttons
For AUTO COOK and AUTO COOK FROM
FROZEN: The oven cavity, door, outer
cabinet, turntable, racks and dishes will
become very hot. Use thick oven gloves
when removing food or the turntable
from the oven to prevent burns.
AUTO COOK FROM FROZEN
AUTO DEFROST
AUTO
menus.
WHEN USING THIS AUTOMATIC
FUNCTION:
1)
Enter the menu by pressing the
COOK
,
AUTO COOK FROM FROZEN
AUTO DEFROST
button until the desired
AUTO
menu number appears in the display.
or
2)
The weight or quantity of the food can be
input by rotating the
TIMER/WEIGHT
until the desired weight/quantity is
displayed.
TIMER/WEIGHT knob
Enter the weight of the food only. Do not
include the weight of the container.
For food weighing more or less than
weights/quantities given in the cooking
chart, cook using manual programmes.
3)
The programmed cooking times are
average times. If you want to alter cooking
times pre-programmed in the automatic
operations, use the
LESS
(–) or
MORE
buttons. See page 32 for details. For best
results, follow cooking chart instructions.
LESS/MORE buttons
knob
(+)
x1
Menu Number
4)
To start cooking press the
+30 button
+30
button.
When action is required (e.g. to turn food over)
the oven stops and the audible signals sound,
the display shows the necessary action. To
continue cooking, press the
+30
button.
The final temperature will vary according to
the initial temperature. Check food is piping
hot after cooking. If necessary, you can extend
the cooking time and change the power level.
36
Page 37
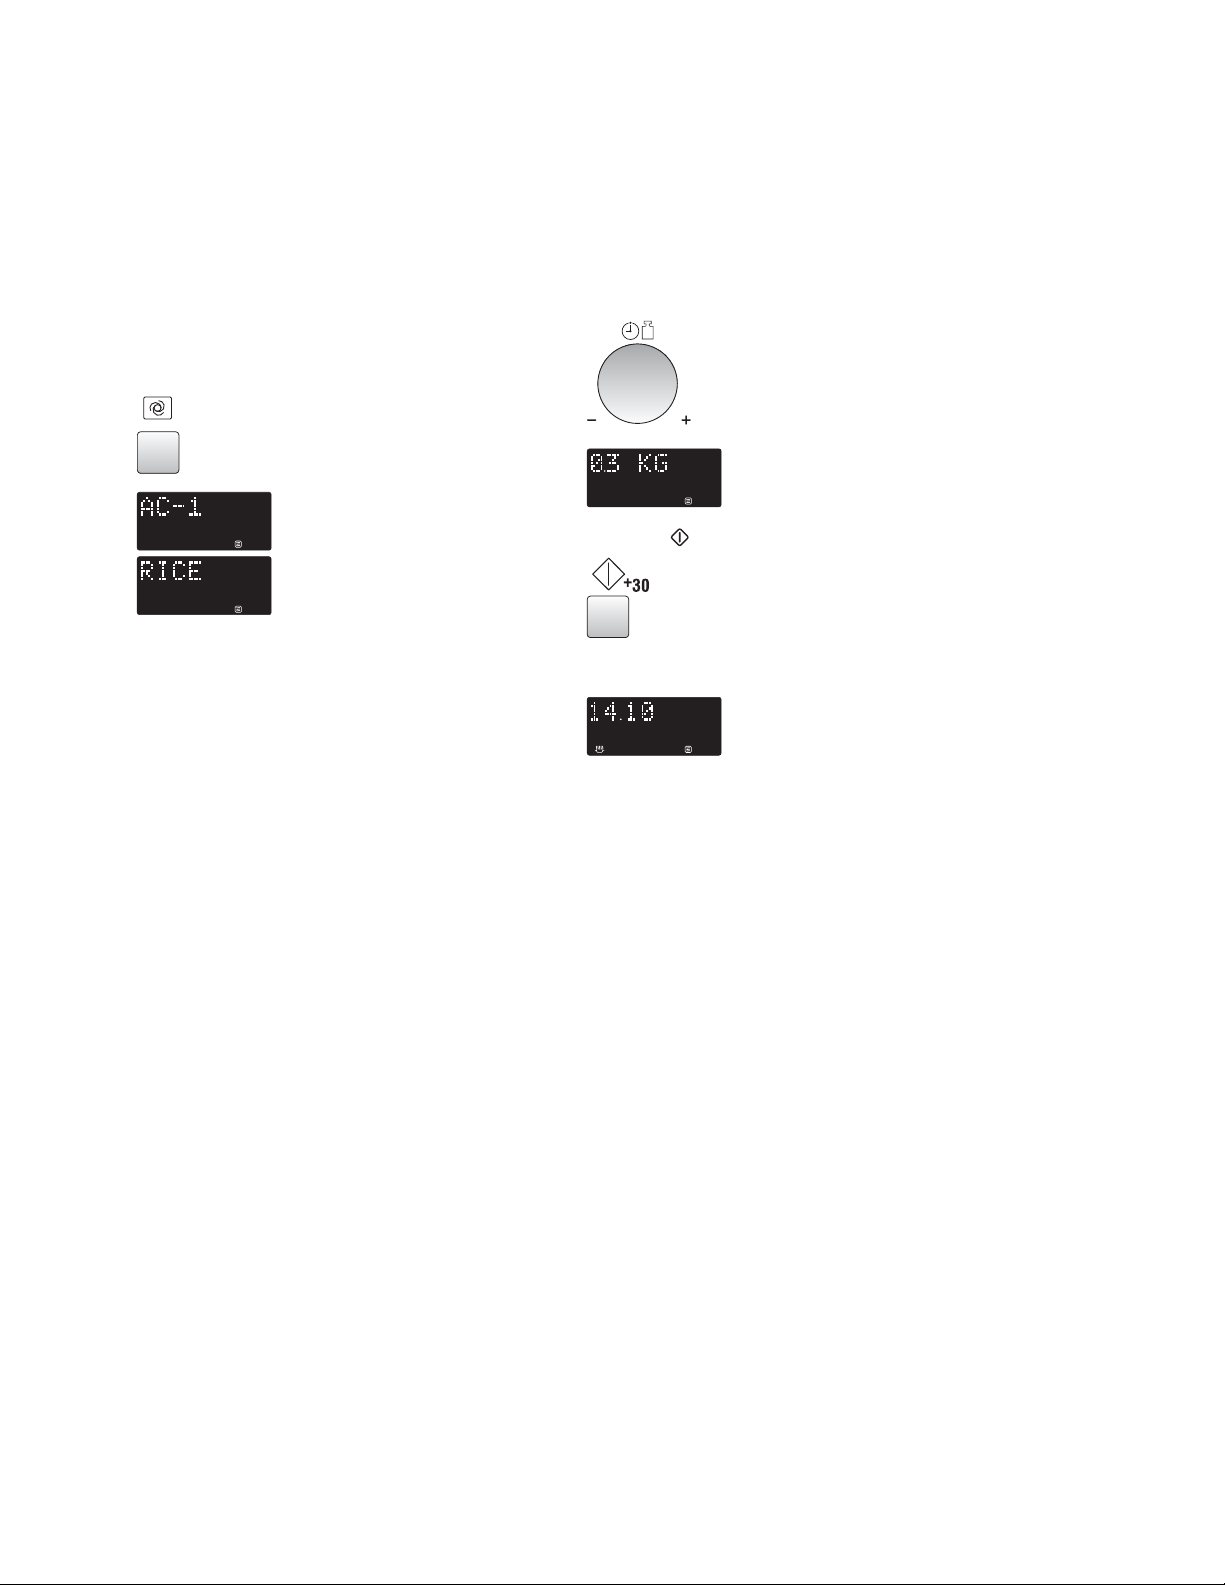
WOLF CONVECTION MICROWAVE AUTOMATIC OPERATION
AUTOMATIC OPERATIONS
EXAMPLE
To cook 300 g of Rice using AUTO COOK
(AC-1).
1)
Press the
select Rice.
AUTO COOK
button once to
x1
2)
Enter the weight by rotating the
TIMER/WEIGHT
weight is displayed.
3)
Press the
knob until the desired
+30
button to start cooking.
x1
4) Check the display.
37
Page 38
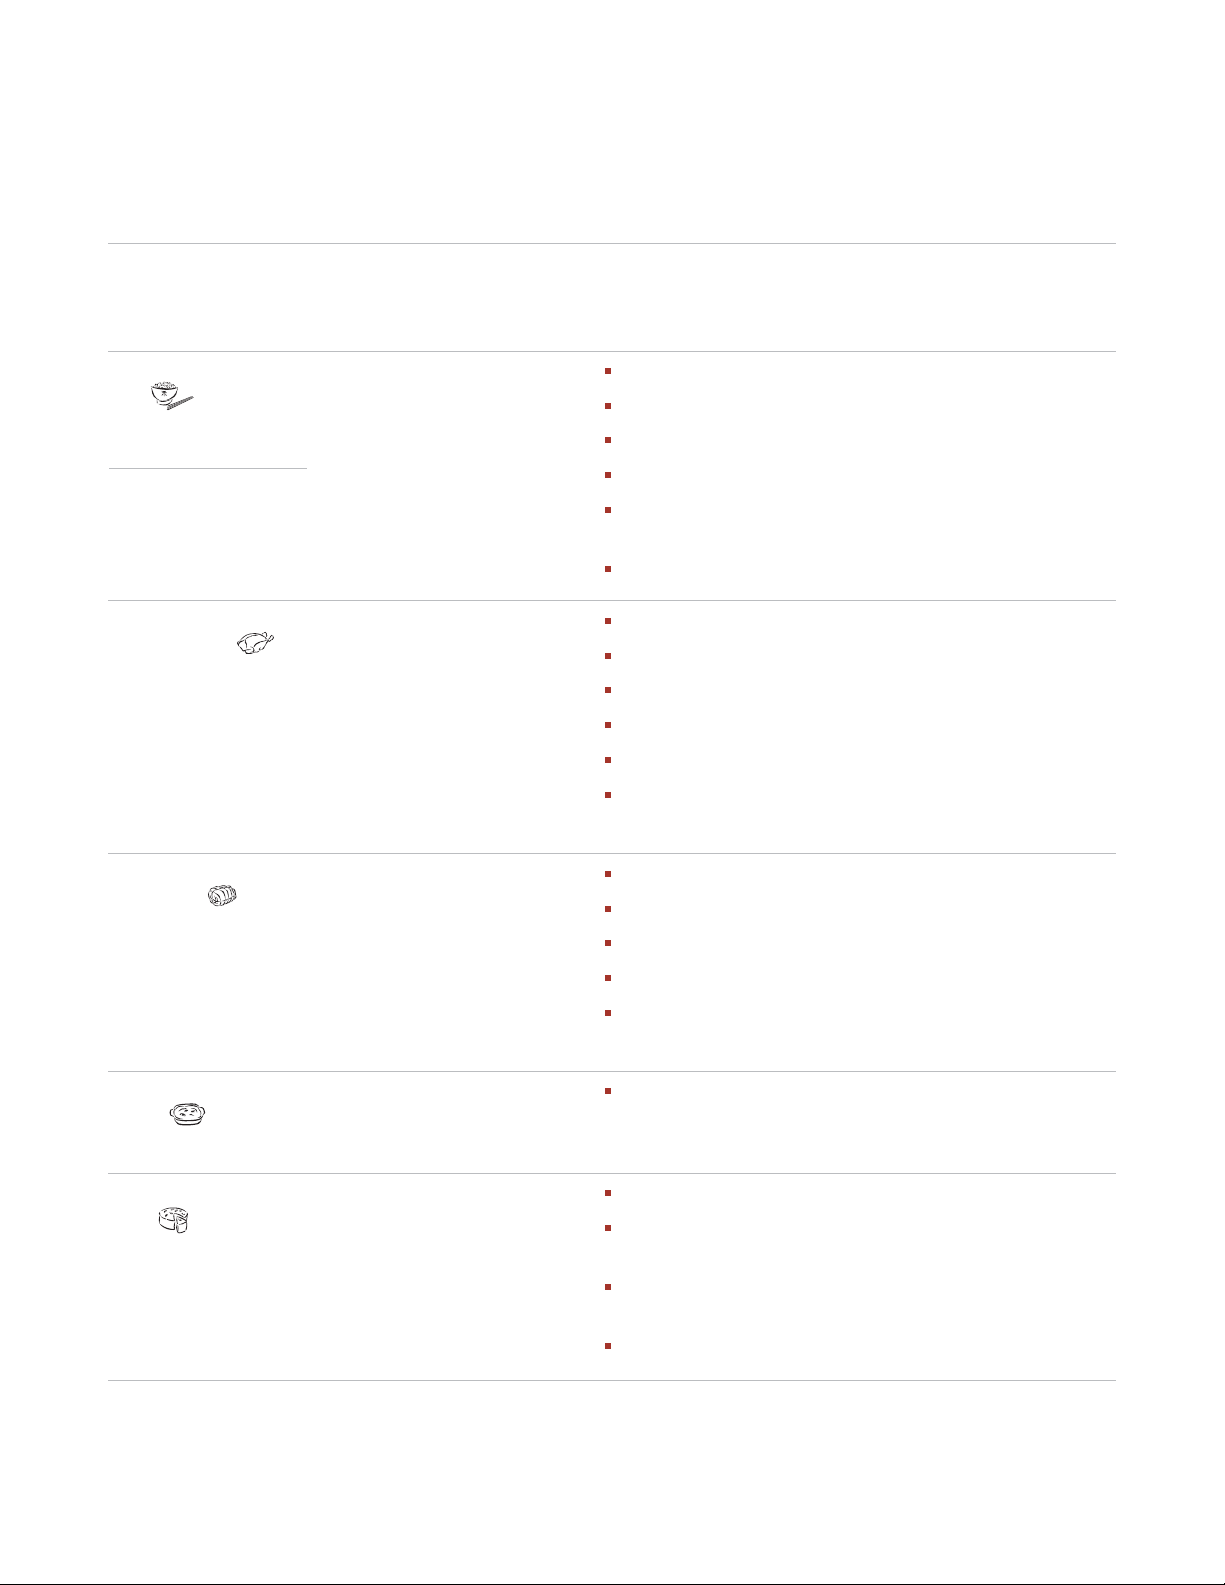
WOLF CONVECTION MICROWAVE AUTOMATIC OPERATION
AUTO COOK
GUIDE
MENU NO.
AC-1
Rice
Rice Boiling Water
100 g 250 ml
200 g 450 ml
300 g 650 ml
AC-2
Roast Chicken
Ingredients for 1,2 kg
Roast chicken:
Salt and
Pepper, 1 tsp sweet paprika,
2 tbsp oil
WEIGHT
(INCREASING UNIT)
& UTENSILS
0,1–0,3 kg (100 g)
Big bowl & lid
0,9–2,0 kg (100 g)
Low Rack
PROCEDURE
Place in a big bowl and add boiling water.
Cover with a lid.
Place the dish in the centre of the turntable.
When the audible signals sound, stir and recover.
When the audible signals sound again, stir and recover,
replace into the oven and press start.
Stand for approx. 10 mins after cooking.
Mix the ingredients and spread on the chicken.
Pierce the skin of the chicken.
Put chicken breast side down in a flan dish.
Place on the low rack and cook.
When audible signal sounds, turn over.
AC-3
Roast Pork
Ingredients for 1 kg rolled
lean pork:
1 garlic clove,
crushed, 2 tbsp oil, 1 tbsp
sweet paprika, a little cumin
powder, 1 tsp salt
AC-4
Gratin
AC-5
Cake
0,6–2,0 kg (100 g)
Low Rack
0,5–2,0 kg* (100 g)
Gratin dish
Low Rack
0,5–1,5 kg (100 g)
Baking tin, Saucer
Low rack
After cooking, let the food stand for approx. 3 min in
the oven, remove and put on a plate for serving.
Lean pork is recommended.
Mix the ingredients and spread them on the pork.
Place the pork in a flan dish and cook.
When audible signal sounds, turn over.
After cooking, let the food stand wrapped in aluminium
foil for approx. 10 min.
See recipes for “Gratin” on page 42.
Prepare the cake referring to page 43.
Put a saucer upside down on the low rack and place the
baking tin on it.
Let the cake stand for approximately 10 min after
baking.
Remove the cake from the baking tin.
*Total weight of all ingredients.
Important: Chilled foods are cooked from 5 ˚C, frozen foods are cooked from -18 ˚C.
38
Page 39
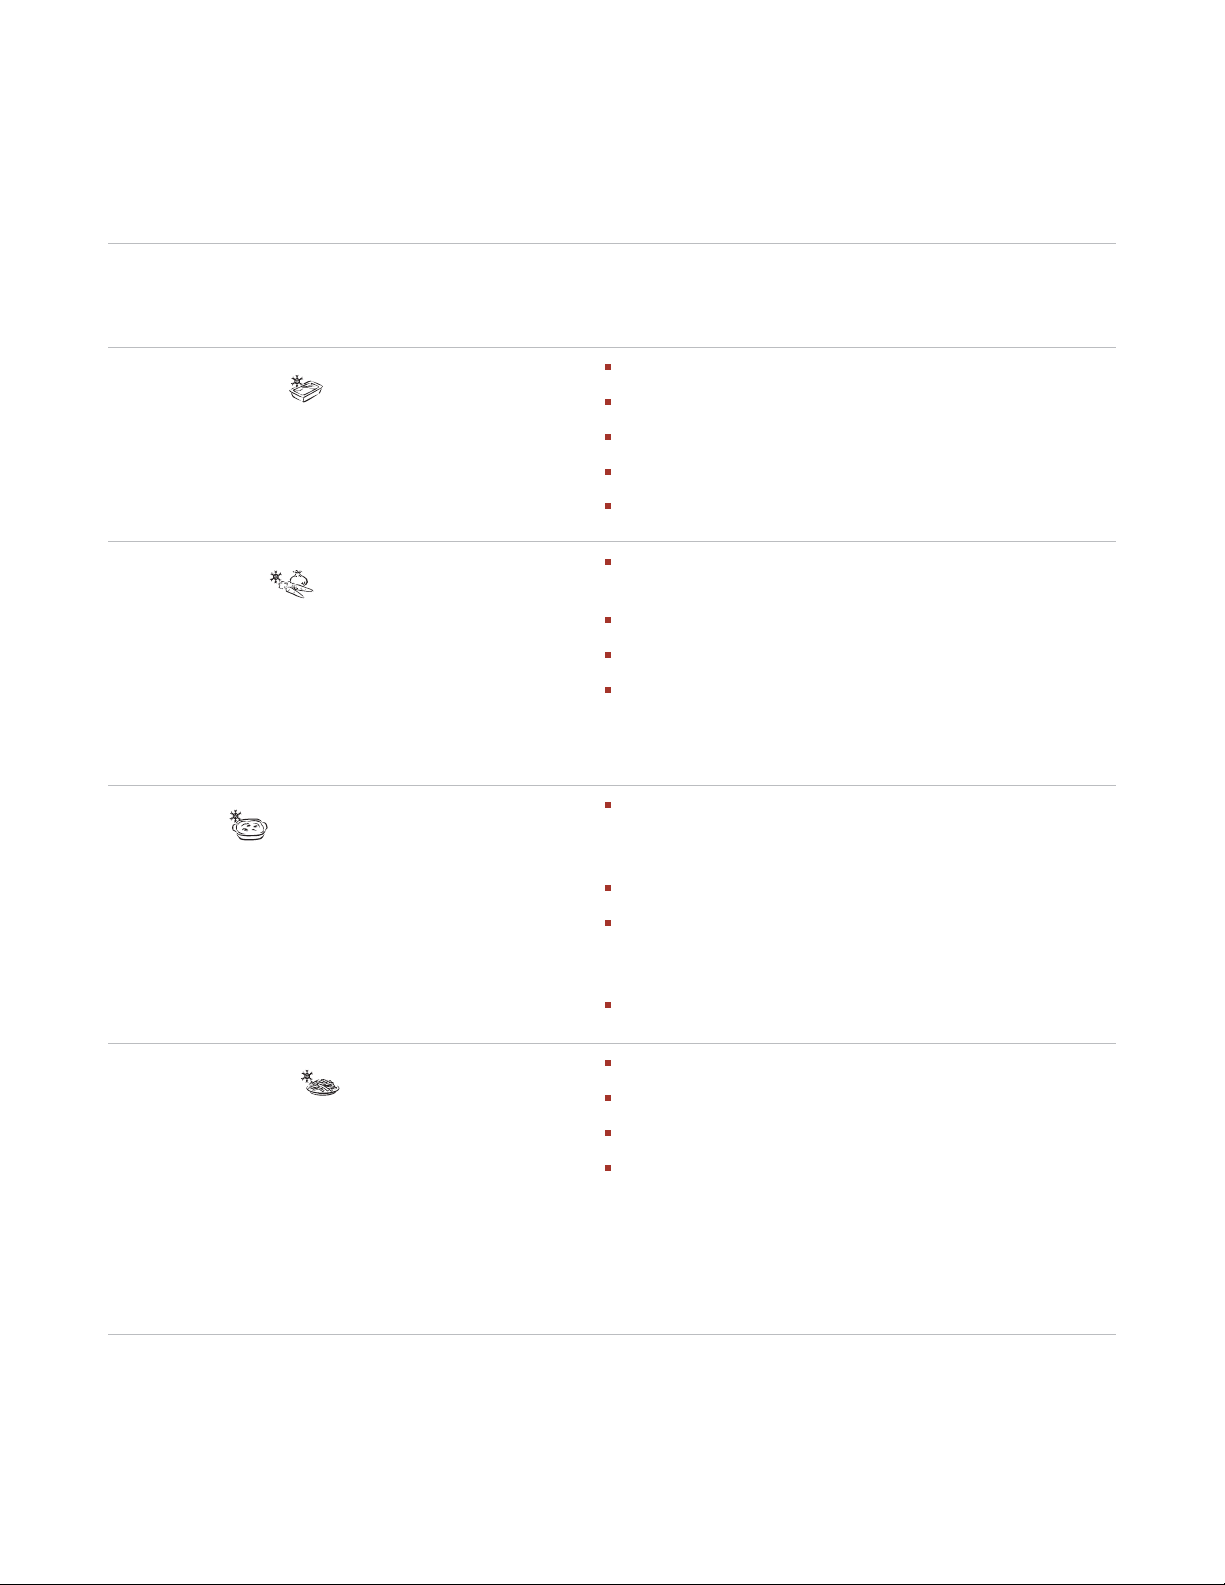
WOLF CONVECTION MICROWAVE AUTOMATIC OPERATION
AUTO COOK FROM FROZEN GUIDE
WEIGHT
(INCREASING UNIT)
MENU NO.
& UTENSILS
PROCEDURE
ACF-1 Cook
Frozen Ready Meals
(Stirrable)
ACF-2 Cook
Frozen Vegetables
ACF-3 Cook
Frozen Gratin
0,3–1,0 kg* (100 g)
Bowl & lid
0,1–0,8 kg (100 g)
Bowl & lid
0,2–0,6 kg (100 g)
Shallow, oval gratin dish
and microwave cling film
or original container and
microwave cling film
Transfer meal to suitable microwave-proof dish.
Cover with a lid.
Cook without cover if manufacturer instucts.
When audible signal sounds, stir and re-cover.
After cooking, stir and stand for approx. 2 min.
Add 1 tbsp water per 100 g and salt as desired. (For
mushrooms no additional water is necessary).
Cover with a lid.
When audible signal sounds, stir and re-cover.
After cooking, let stand for approx. 2 min.
NOTE:
If frozen vegetables are compacted together,
cook manually.
Remove the frozen gratin from package. If the container
is not suitable for microwave ovens, transfer gratin to a
suitable microwave proof dish.
Cover with microwave cling film.
If the container is suitable for microwave ovens,
remove original paper cover and cover with microwave
cling film.
After cooking, let stand for approx. 5 min.
ACF-4 Cook
French Fried Potatoes
(Oven chips)
0,20–0,40 kg (50 g)
Flan Dish
High Rack
Place the frozen french fried potatoes in a flan dish.
Place the dish on the high rack and cook.
When the audible signal sounds, turn over.
After cooking, remove from the dish and put on a plate
for serving. (No standing time is necessary).
IMPORTANT:
with the
For thin type of French fried potatoes, cook
LESS
(–) button. The dish gets very hot during
cooking. To avoid burning yourself, please use oven
gloves to remove the flan dish from the oven.
*Total weight of all ingredients.
Important: Chilled foods are cooked from 5 ˚C, frozen foods are cooked from -18 ˚C.
39
Page 40
WOLF CONVECTION MICROWAVE AUTOMATIC OPERATION
AUTO DEFROST GUIDE
WEIGHT
(INCREASING UNIT)
MENU NO.
& UTENSILS
PROCEDURE
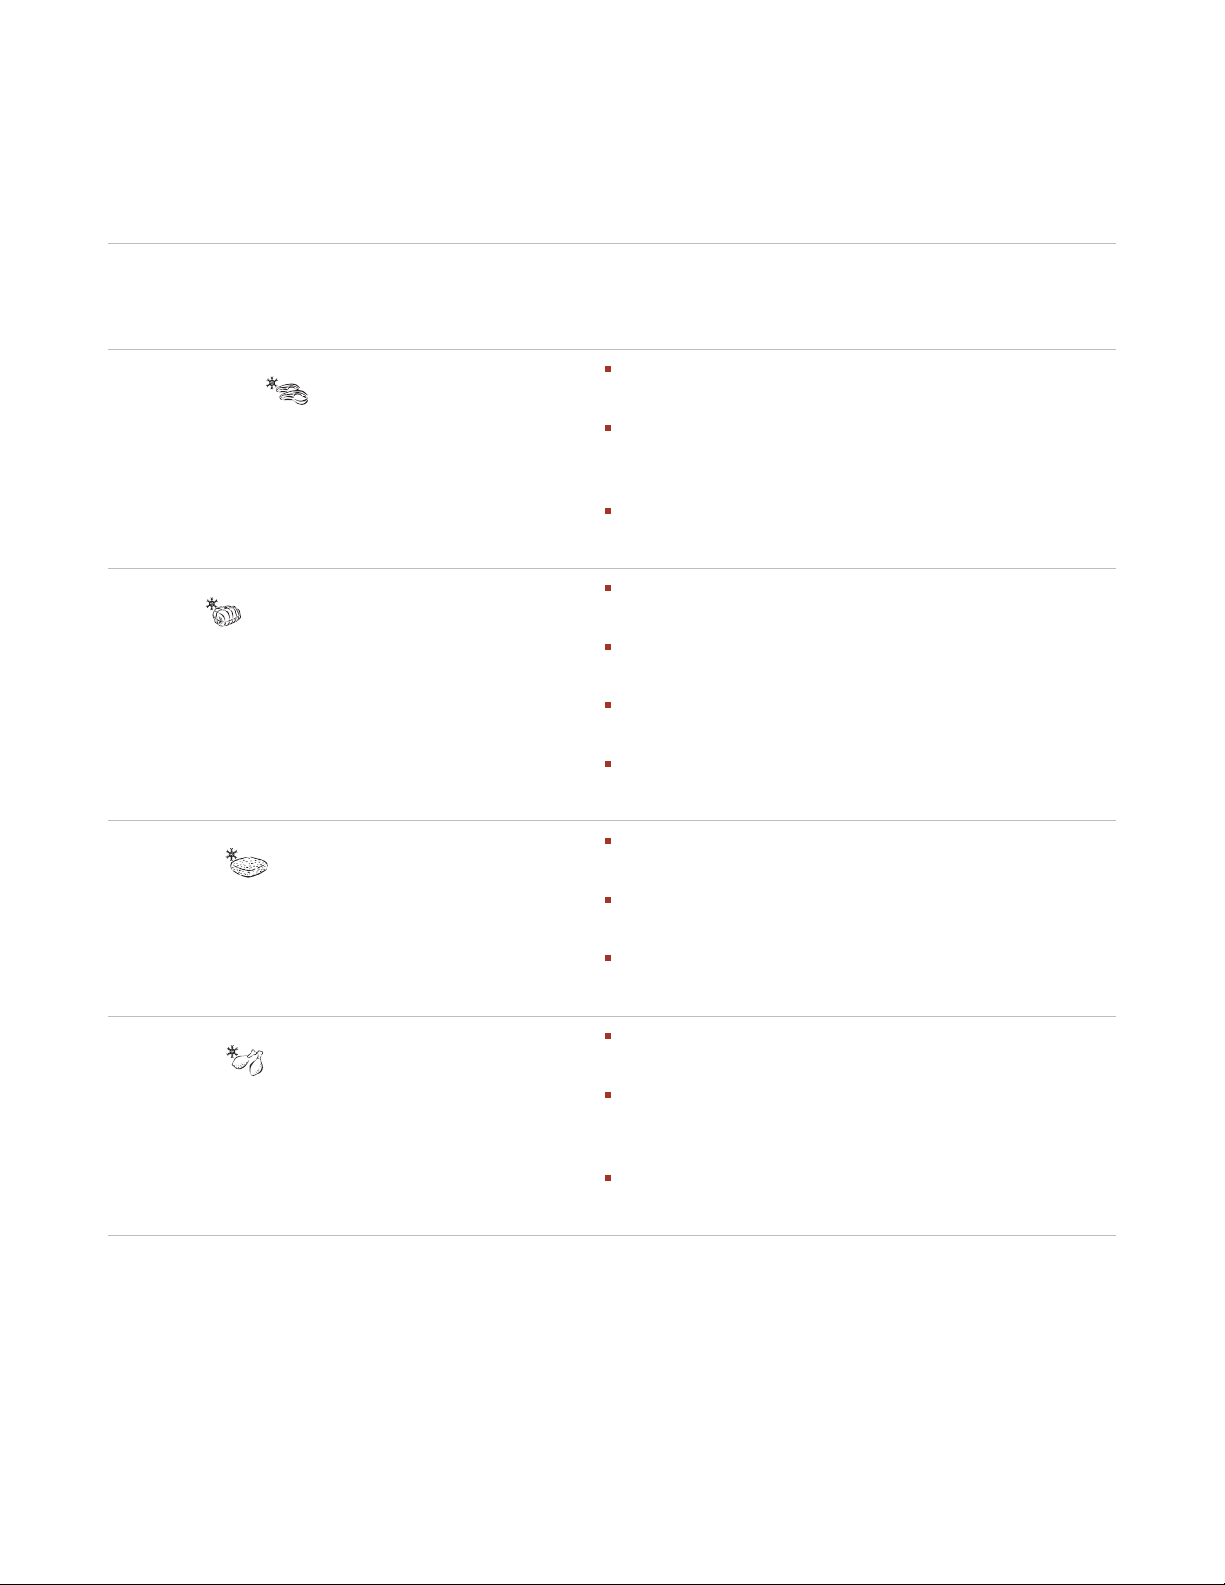
AD-1 Defrost
Steaks and Chops
AD-2 Defrost
Meat Joint
AD-3 Defrost
Minced Meat
0,2–1,0 kg (100 g)
(See note below)
0,6–2,0 kg (100 g)
(See note below)
0,2–1,0 kg (100 g)
Flan dish
(See note below)
Place the food in a flan dish in the centre of the
turntable.
When the audible signal sounds, turn the food over,
rearrange and separate. Shield thin parts and warm
spots with aluminium foil.
After defrosting, wrap in aluminium foil for 10–15 min,
until thoroughly defrosted.
Place the meat in a flan dish in the centre of the
turntable.
When the audible signal sounds, turn the food over.
Shield the defrosted parts with aluminium foil.
If audible signal sounds, turn the food over and shield
again.
After defrosting, wrap in aluminium foil and stand for
15–30 min, until thoroughly defrosted.
Place the block of minced meat in a flan dish in the
centre of the oven.
When the audible signal sounds, turn the food over.
Remove the defrosted parts if possible.
After defrosting, cover in aluminium foil and stand for
5–10 min, until thoroughly defrosted.
AD-4 Defrost
Chicken Legs
0,20–1,00 kg (50 g)
(See note below)
Place the food in a flan dish in the centre of the
turntable.
When the audible signal sounds, turn the food over,
rearrange and separate. Shield thin parts and warm
spots with aluminium foil.
After defrosting, cover with aluminium foil and stand
for 10–15 min, until thoroughly defrosted.
Important: Chilled foods are cooked from 5 ˚C, frozen foods are cooked from -18 ˚C.
NOTES:
1. Steaks and Chops should be frozen in one layer.
2. Minced meat should be frozen in a thin shape.
3. After turning over, shield the defrosted portions with small, flat pieces of aluminium foil.
4. Poultry should be processed immediatly after defrosting.
5. Gateaux topped and coated with cream are very sensitive to microwave energy. For the best result, if the cream begins to
soften rapidly, remove it from the oven immediately and stand for 10–30 minutes at room temperature.
40
Page 41
WOLF CONVECTION MICROWAVE AUTOMATIC OPERATION
AUTO DEFROST GUIDE
WEIGHT
(INCREASING UNIT)
MENU NO.
& UTENSILS
PROCEDURE
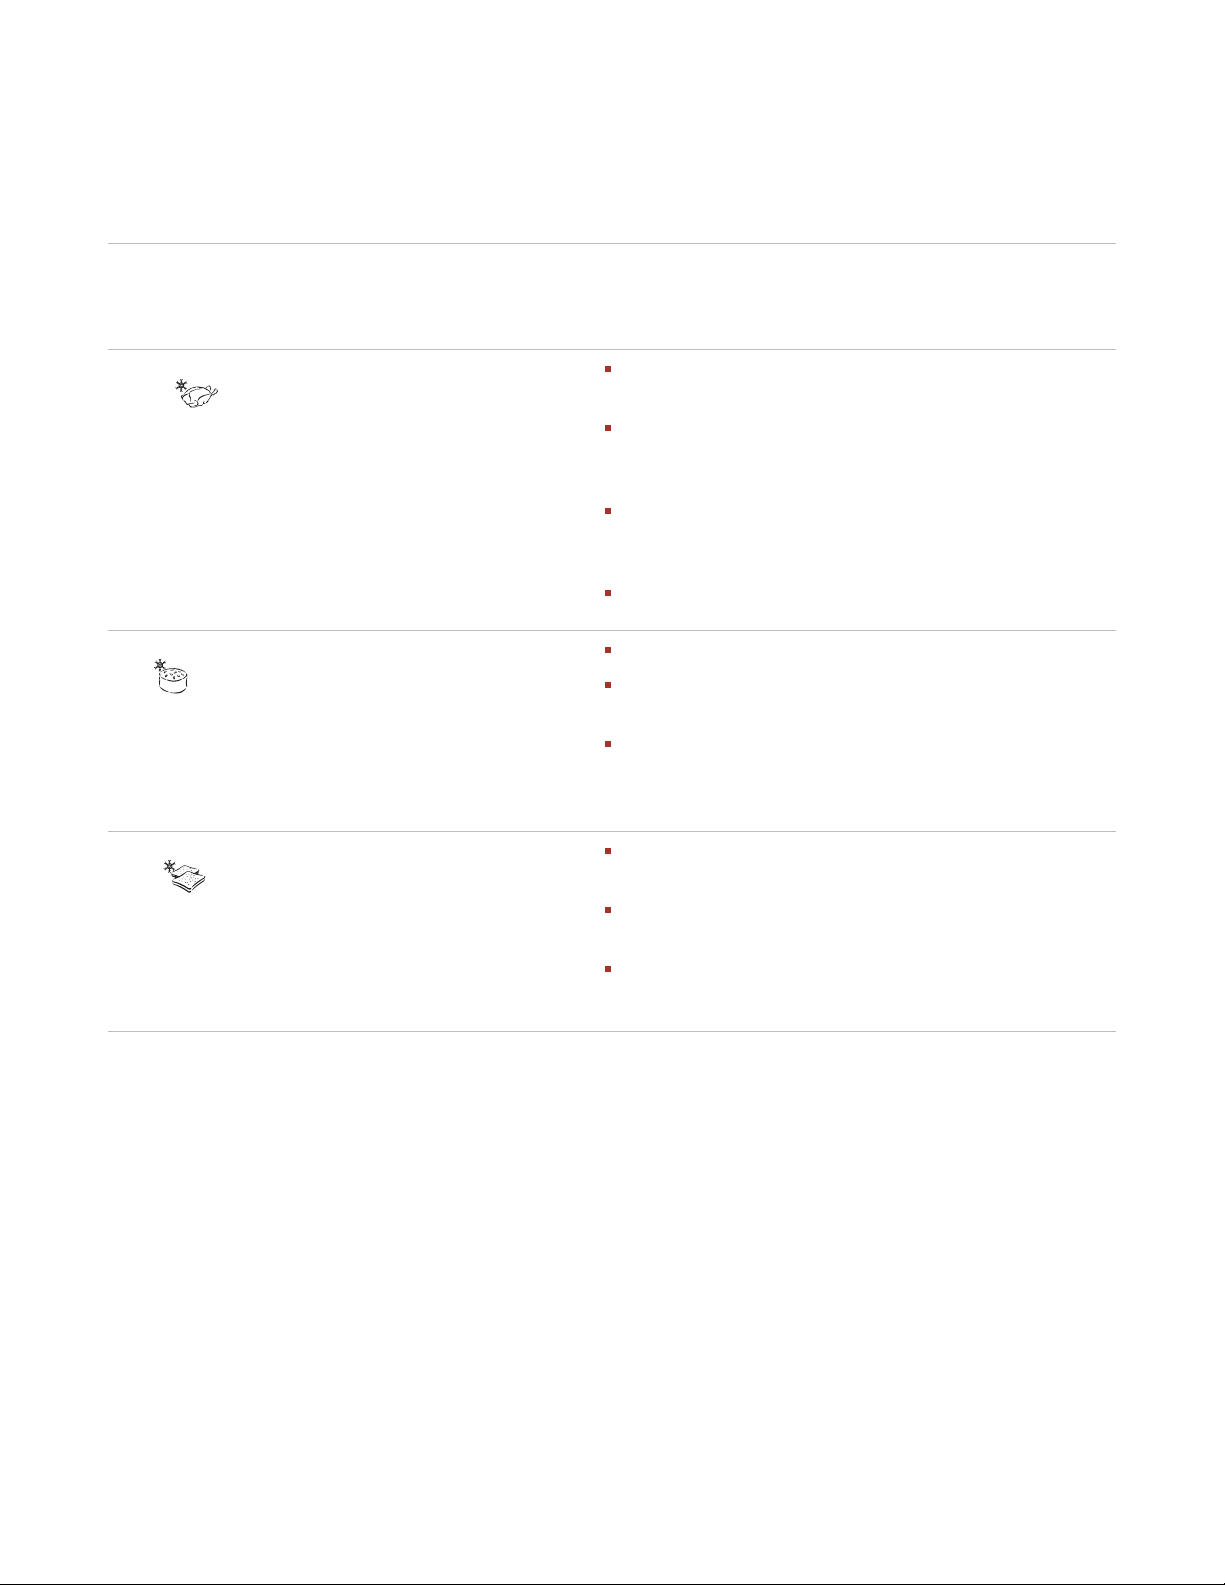
AD-5 Defrost
Poultry
AD-6 Defrost
Cake
AD-7 Defrost
Bread
0,9–2,0 kg (100 g)
(See note below)
0,1–1,4 kg (100 g)
Plate
0,1–1,0 kg (100 g)
Plate
(Only sliced bread is
recommended for this
programme.)
Place the poutlry in a flan dish in the centre of the
turntable.
When audible signal sounds, turn over and shield tthin
parts and warm spots with small pieces of aluminium
foil.
After defrosting, rinse with cold water, cover with
aluminium foil and stand for 15–30 min until thoroughly defrosted.
Finally clean the poultry under running water.
Remove all packaging from the cake.
Place directly on the turntable, or on a plate in the
middle of the turntable.
After defrosting, cut the cake into similar sized pieces
keeping space between each piece and let stand for
15–30 min, until evenly defrosted.
Distribute on a flan dish in the centre of the turntable.
For 1,0 kg distribute directly on the turntable.
When the audible signal sounds turn over, rearrange,
and remove defrosted slices.
After defrosting cover in aluminium foil and stand for
5–10 min, until thoroughly defrosted.
Important: Chilled foods are cooked from 5 ˚C, frozen foods are cooked from -18 ˚C.
NOTES:
1. Steaks and Chops should be frozen in one layer.
2. Minced meat should be frozen in a thin shape.
3. After turning over, shield the defrosted portions with small, flat pieces of aluminium foil.
4. Poultry should be processed immediatly after defrosting.
5. Gateaux topped and coated with cream are very sensitive to microwave energy. For the best result, if the cream begins to
soften rapidly, remove it from the oven immediately and stand for 10–30 minutes at room temperature.
41
Page 42

WOLF CONVECTION MICROWAVE AUTOMATIC OPERATION
RECIPES FOR AUTO COOK AC-4
GRATIN
BAKED COURGETTES & PASTA
Makes about 1,5 kg
Utensils:
30 cm round ovenproof Pyrex dish
2 L microwave-safe bowl
Ingredients
500 ml Water
1
/2 tsp Oil
Salt
80 g Macaroni
400 g Tinned tomatoes, chopped
3 Onions (150 g), finely chopped
Basil, thyme
Salt & pepper
1 tbsp Oil (to grease the dish)
450 g Courgette, sliced
150 g Sour cream
2Eggs
100g Grated Cheddar cheese
Preparation
1)
Put water, oil and salt in microwave-safe
bowl. Cover and bring to a boil.
Microwave 3–5 min 900 W
2)
Break macaroni into pieces and add them to
the dish. Stir and allow to soak.
Microwave 9–11 min 270 W
Drain pasta and allow to cool.
3)
Mix tomatoes, onions and seasoning.
Grease round dish. Add macaroni and pour
tomato sauce over all. Arrange courgette
slices on top.
4)
Beat sour cream and eggs; pour over
tomato sauce. Sprinkle with grated cheese.
Cook on the low rack using
AC-4
.
5)
Allow the dish to stand for 5 to 10 minutes
AUTO COOK
after cooking.
GRATIN
BAKED BROCCOLI & POTATO
WITH MUSHROOMS
Makes about 1,5 kg
Utensils:
26 cm round ovenproof Pyrex dish
2 L microwave-safe bowl
Ingredients
400 g Potatoes, peeled and optionally
halved
400 g Broccoli florets
6 tbsp Water (60 ml)
1 tsp Butter or margarine
(to grease the dish)
400 g Mushrooms, sliced
1 tbsp Parsley, finely chopped
Salt & pepper
3 Eggs
125 ml Cream
125 ml Milk
Salt & pepper
Nutmeg
100 g Grated gouda cheese
Preparation
1)
Put potatoes and broccoli in microwavesafe bowl. Add water, cover and cook. Stir
once during cooking.
Microwave 9–12 min 900 W
2)
Slice potatoes into discs.
3)
Grease round dish. Add broccoli, mushrooms and potatoes alternately in layers.
Sprinkle with parsley and season with salt
and pepper.
4)
Combine eggs, cream, milk, salt, pepper
and nutmeg. Pour over vegetables. Sprinkle
cheese over all. Cook on the low rack using
AUTO COOK AC-4
5)
Allow the dish to stand for 10 minutes after
.
cooking.
42
Page 43

WOLF CONVECTION MICROWAVE AUTOMATIC OPERATION
RECIPES FOR
AUTO COOK AC-5
CARROT CAKE
Makes about 1,1 kg
Utensils:
28 cm round oven-safe
springform tin
Ingredients
1 tsp Butter or margarine
(to grease the tin)
5 Egg yolks
250 g Sugar
250 g Carrots, finely grated
Juice of one lemon
250 g Ground almonds
80 g Flour
1 tbsp Baking powder
5 Egg whites
Preparation
1)
Grease springform tin.
2)
Cream egg yolks and sugar with a hand
mixer.
GUGELHUPF
Dough will weigh about 0,9 kg
Utensils:
22 cm gugelhupf tin
Ingredients
1 tsp Butter or margarine
(to grease the tin)
170 g Butter or margarine
140 g Icing sugar
4 Egg yolks
40 g Slivered almonds
40 g Raisins, washed
Finely grated lemon peel
4 Egg whites
1 Pck. Baking powder (15 g)
280 g Flour
Preparation
1)
Grease gugelhupf mould.
2)
Beat butter and icing sugar with a mixer
until smooth. Add egg yolks, one at a time.
3)
Add carrots, lemon juice and almonds.
4)
Combine flour and baking powder. Add to
the egg mixture and mix well.
5)
Beat egg whites until stiff and carefully fold
into batter. Spread mixture in the baking
tin, place it on the low rack and bake using
AUTO COOK AC-5
6)
Allow to cool in the tin for 5 minutes after
.
baking.
3)
Gradually stir in slivered almonds, raisins
and lemon peel. Mix well.
4)
Beat egg whites until stiff and fold into the
mixture. Mix baking powder and flour,sift
and carefully fold it into the mixture.
5)
Transfer the dough to the mould and bake
on the low rack using
AUTO COOK AC-5
.
43
Page 44

WOLF CONVECTION MICROWAVE AUTOMATIC OPERATION
RECIPES FOR
AUTO COOK AC-5
APPLE TART WITH CALVADOS
Makes about 1,3 kg
Utensils:
28 cm round oven-safe
springform tin
Ingredients
200 g Flour
1 tsp Baking powder
100 g Sugar
1 Pck. Vanilla sugar
1 pinch Salt
1 Egg
3-4 drops Bitter almond oil
125 g Butter
1 tsp Butter or margarine
(to grease the dish)
50 g Ground hazelnuts
600 g Apple (russets approx. 3–4)
Cinnamon
2 Eggs
1 pinch Salt
4 tbsp Sugar, divided
4 tbsp Calvados (apple liqueur)
1
1
/2 tbsp Cornflour
125 g Double cream
Icing sugar (for dusting)
Preparation
1)
Mix flour and baking powder. Add sugar,
vanilla sugar, salt, egg, almond oil and
butter. Knead to a paste with the kneading
hook of a hand mixer.
2)
Cover pastry dough and leave in a cool
place for 30 minutes.
3)
Grease springform tin. Roll out pastry
dough between two sheets of foil and
place it in the tin. Form an edge to the
pastry dough about 3 cm high.
4)
Sprinkle hazel nuts over the pastry shell.
5)
Peel apples, cut into quarters, remove the
core and cut into slices. Arrange the slices
to overlap each other on top of hazel nuts
and lightly dust them with cinnamon.
6)
Separate the eggs. Beat egg whites until
stiff, gradually adding salt and 1 tbsp
sugar.
7)
Stir together egg yolk, remaining sugar and
vanilla sugar until creamy.
8)
Add Calvados, cornflour and double cream
and mix well. Fold in beaten egg whites
and spread mixture evenly over the apple
slices.
44
9)
Place on the low rack and bake using
AUTO COOK AC-5
10)
Cool and dust with icing sugar.
.
Page 45

WOLF CONVECTION MICROWAVE CARE
CLEANING AND CARE
OVEN INTERIOR
DO NOT USE COMMERCIAL OVEN
CLEANERS, STEAM CLEANERS,
ABRASIVE, HARSH CLEANERS, ANY
THAT CONTAIN SODIUM HYDROXIDE OR
SCOURING PADS ON ANY PART OF
YOUR MICROWAVE OVEN.
After Grill, Dual, Convection, AUTO cook,
AUTO COOK FROM FROZEN modes, the
oven cavity, door, oven cabinet and
accessories will become very hot. Before
cleaning, make sure they are completely
cool.
CLEAN THE OVEN AT REGULAR INTERVALS
AND REMOVE ANY FOOD DEPOSITS.
Failure to maintain the oven in a clean
condition could lead to a deterioration of
the surface that could adversely affect the
life of the appliance and possibly result in a
hazardous situation.
1)
For cleaning, wipe any splatters or spills
with a soft damp cloth or sponge after each
use while the oven is still warm. For heavier
spills, use a mild soap and wipe several
times with a damp cloth until all residues
are removed.
Do not remove the waveguide cover.
2)
Make sure that mild soap or water does not
penetrate the small vents in the walls which
may cause damage to the oven.
3)
Do not use spray type cleaners on the oven
interior.
4)
Heat up your oven regularly by using the
convection and grill, refer to “Heating
without food” on page 27. Remaining food
or fat splashed can cause smoke or bad
smell.
ACCESSORIES
The accessories should be washed in a mild
washing up liquid solution and dried. They are
dishwasher safe.
OVEN EXTERIOR
The outside of your oven can be cleaned easily
with mild soap and water. Make sure the soap
is wiped off with a moist cloth, and dry the
exterior with a soft towel.
OVEN CONTROLS
Open the door before cleaning to de-activate
the oven controls. Care should be taken when
cleaning the oven control. Using a cloth
dampened with water only, gently wipe the
panel until it becomes clean. Avoid using
excessive amounts of water. Do not use any
sort of chemical or abrasive cleaner.
DOOR
To remove all trace of dirt, regularly clean both
sides of the door, the door seals and adjacent
parts with a soft, damp cloth. Do not use harsh
abrasive cleaners or sharp metal scrapers to
clean the oven door glass since they can
scratch the surface, which may result in shattering of the glass.
NOTE:
Keep the waveguide cover and accessories clean at all times. If you leave grease or
fat in the cavity or accessories, it may
overheat, cause arcing, smoke or even catch
fire when next using the oven.
NOTE:
A steam cleaner should not be used.
45
Page 46
WOLF TROUBLESHOOTING
TROUBLESHOOTING
GUIDE
SYMPTOM POSSIBLE SOLUTIONS
The microwave appliance
is not working properly
Check that
the fuses in the fuse box are working,
there has not been a power outage.
If the fuses continue to blow, please contact an authorised
service agent.
The microwave mode is
not working
Check that
the door is properly closed,
the door seals and their surfaces are clean,
the
+30
button has been pressed.
The turntable is not turning
Check that
the turntable support is correctly connected to the drive,
the ovenware does not extend beyond the turntable,
food does not extend beyond the edge of the turntable
preventing it from rotating.
The microwave will not
switch off
The interior light is not
working
The food is taking longer
to heat through and cook
than before
there is nothing in the well beneath the turntable.
Isolate the appliance from the fuse box.
Call an authorised service agent.
Call an authorised service agent. The interior light bulb can
be exchanged only by a trained service agent.
Set a longer cooking time (double quantity = nearly double
time) or
if the food is colder than usual, rotate or turn from time to
time or
set a higher power setting.
46
Page 47

WOLF TROUBLESHOOTING
TROUBLESHOOTING
1)
If you cook the food over the standard time
with only 900 W, the power of the oven will
lower automatically to avoid overheating.
(The microwave power level will be
reduced).
COOKING MODE Standard Time
Microwave 900 W cooking 20 min
Grill cooking 15 min
DUAL 1 Micro – 40 min
DUAL 2 Micro – 15 min
(900 W microwave power) Grill – 15 min
DUAL 2 Micro – 40 min
(630 W microwave power) Grill – 15 min
2)
After
GRILL, DUAL, CONVECTION, AUTO
COOK, AUTO COOK FROM FROZEN
cooling fan will run and “NOW COOLING”
may appear on the display. Also, when you
press the
STOP
button and open the door
during these cooking modes, the cooling
fan will run; you may, therefore, feel air
blowing from the ventilation openings.
, the
47
Page 48

WOLF
SERVICE INFORMATION
SERVICE INFORMATION
CONTACT
INFORMATION
Website:
wolfappliance.com
When requesting information, literature,
replacement parts or service, always refer
to the model and serial number of your
microwave oven. This information is found
on the product rating plate. Refer to page 13
for the location of the rating plate.
Record the rating plate information below
for future reference.
Model Number
Serial Number
Installation Date
Wolf Dealer and Phone
BEFORE CALLING FOR SERVICE
Before calling your Wolf dealer, check the
household fuse or circuit breaker to see if it
has been blown or tripped and that the electrical connection to the appliance has not been
disconnected. A power outage may also have
caused a disruption in service.
48
The information and images in this book are the
copyright property of Wolf Appliance, Inc., an
affiliate of Sub-Zero, Inc. Neither this book nor
any information or images contained herein may
be copied or used in whole or in part without the
express written permission of Wolf Appliance,
Inc., an affiliate of Sub-Zero, Inc.
©Wolf Appliance, Inc. all rights reserved.
Page 49

Page 50

WOLF®es una marca comercial registrada de Wolf Appliance, Inc.
Cuando lea esta guía de uso y mantenimiento,
deberá prestar especial atención cuando aparezcan los símbolos de PRECAUCIÓN y ADVERTENCIA. Esta información es importante para utilizar
de forma segura y eficaz el equipo de Wolf.
indica una situación en la que se pueden
sufrir heridas leves o provocar daños secundarios al producto si no se siguen las
instrucciones.
indica peligro de que se produzcan heridas
personales graves o incluso puede provocar
la muerte si no se siguen las precauciones
especificadas.
Además, esta guía de uso y mantenimiento
puede incluir una NOTA IMPORTANTE para
resaltar información especialmente importante.
Page 51

HORNO MICROONDAS POR CONVECCIÓN DE WOLF
GRACIAS
La compra de un horno por convección Wolf
confirma la importancia que usted da a la
calidad y al rendimiento de su equipo de cocina.
Entendemos esta importancia y hemos diseñado
y creado su horno microondas con materiales y
mano de obra de primera calidad para proporcionarle un servicio seguro y eficaz durante
muchos años.
Lea atentamente las instrucciones
antes de utilizar este aparato para
reducir el riesgo de quemaduras,
descargas eléctricas, incendio y
lesiones personales, así como una
exposición a una energía excesiva
Sabemos que está deseando empezar a cocinar
pero, antes de hacerlo, debe leer esta guía de
uso y mantenimiento. Tanto si es un cocinero
novato como si es un chef experto, le resultará
útil familiarizarse con las prácticas de seguridad,
las características, el funcionamiento y las
recomendaciones de mantenimiento del
microondas por convección de Wolf.
Apreciamos que haya decidido comprar un producto de Wolf Appliance y agradecemos cualquier sugerencia o comentario que desee realizar.
Si desea compartir su opinión con nosotros,
visite nuestra página wolfappliance.com.
El símbolo que figura en el aparato o en su
embalaje indica que este producto no se puede
tratar como residuo doméstico. En lugar de ello,
se deberá llevar a un punto de recogida
adecuado para el reciclado de los componentes
eléctricos y electrónicos. Al desechar este
producto de manera correcta, contribuirá a
evitar posibles consecuencias negativas para el
medioambiente y la salud humana, las cuales se
podrían producir si este producto se sometiera a
un tratamiento de residuos inadecuado. Si desea
información más detallada sobre el reciclaje de
este producto, póngase en contacto con su
representante más cercano, con el servicio de
recogida de residuos domésticos de su ciudad o
con la tienda en la que adquirió el producto.
de las microondas.
PRECAUCIONES PARA
EVITAR UNA POSIBLE
EXPOSICIÓN A UNA
ENERGÍA EXCESIVA
DE LAS MICROONDAS
No intente hacer funcionar el microon-
das con la puerta abierta, puesto que
ello podría provocar una exposición
perjudicial a energía de las microondas. Es importante no manipular ni
forzar los dispositivos de seguridad.
No coloque ningún objeto entre la
parte frontal del microondas y la
puerta ni permita que se acumulen
residuos en las superficies de cierre
hermético.
No ponga en marcha el microondas si
está dañado. Es especialmente importante que la puerta del microondas se
cierre correctamente y que no se
observen daños en: la puerta
(curvada), las bisagras, los pasadores
(rotos o flojos) ni en los sellos de las
puertas y superficies de cierre
hermético.
INFORMACIÓN
DE CONTACTO
Página web:
wolfappliance.com
El horno microondas sólo debe ser
ajustado y reparado por personal de
mantenimiento debidamente cualificado.
51
Page 52

PRECAUCIONES E INSTRUCCIONES
IMPORTANTES DE SEGURIDAD
LEA ATENTAMENTE TODAS LAS INSTRUCCIONES ANTES DE
UTILIZAR ESTE APARATO
PARA EVITAR EL RIESGO DE INCENDIO
No se debe dejar desatendido el
microondas mientras esté funcionando. Los niveles de potencia
demasiado elevados o los tiempos
de cocción demasiado prolongados
pueden calentar excesivamente los
alimentos, lo que podría desencadenar un incendio.
La toma eléctrica debe estar accesible
para poder desenchufar fácilmente la
unidad en caso de emergencia.
La fuente de alimentación CA debe ser
de 230-240 V, 50 Hz, con un fusible de
cable de distribución de 16 A como
mínimo o un cortacircuitos de
distribución de 16 A al menos.
Se recomienda disponer de un circuito
independiente que preste servicio sólo
a este aparato.
No almacene ni utilice el horno en
exteriores.
Si los alimentos que se estén calentando comienzan a echar humo,
NO ABRA LA PUERTA. Apague y
desenchufe el horno, y espere hasta
que se disipe el humo. Si abre la
puerta mientras la comida echa humo,
puede provocar un incendio.
No coloque materiales inflamables
cerca del horno o de las aberturas de
ventilación. No bloquee las salidas de
ventilación.
Retire todos los sellos metálicos,
alambres, etc. de los alimentos y
paquetes de comida. Los arcos que se
forman en las superficies metálicas
pueden provocar fuego.
No utilice el horno microondas para
calentar aceite para freír. No es posible
controlar la temperatura, por lo que el
aceite se puede prender fuego.
Si desea hacer palomitas, utilice únicamente productos especiales para
microondas.
No guarde alimentos ni otros objetos
en el interior del horno.
Compruebe el ajuste después de
activar el horno para asegurarse de
que funcione según sus necesidades.
52
Utilice únicamente recipientes y
utensilios aptos para microondas.
Consulte la página 81.
No deje desatendido el horno si utiliza
plástico desechable, papel u otros
recipientes alimentarios combustibles.
Limpie la cubierta del guiaondas, la
cavidad del horno y el plato giratorio
después de su uso. Estos deben estar
secos y sin grasa. La acumulación de
grasa se puede sobrecalentar y
empezar a echar humo o inflamarse.
Page 53

PARA EVITAR LA POSIBILIDAD
DE SUFRIR LESIONES
No haga funcionar el horno si está
dañado o no funciona correctamente. Compruebe los siguientes
elementos antes de utilizarlo:
a) Puerta: asegúrese de que la
puerta se cierre correctamente y
de que no esté mal alineada o
curvada.
b) Bisagras y enganches de seguri-
dad de la puerta: asegúrese de
que no estén rotos ni sueltos.
c) Sellos de la puerta y superficies
de cierre hermético: compruebe
que no estén dañados.
d) Interior de la cavidad del horno
o en la puerta: compruebe que
no tenga abolladuras.
e) Cable eléctrico y enchufe:
compruebe que no estén
dañados.
No manipule, repare ni altere el
horno por su cuenta. Para cualquier persona que no esté cualificada, es peligroso llevar a cabo
tareas de mantenimiento o reparación que impliquen la extracción
de una cubierta que protege frente
a la exposición a energía de
microondas.
No haga funcionar el microondas con
la puerta abierta ni modifique de
ninguna manera los enganches de
seguridad de la puerta.
No haga funcionar el microondas si
hay un objeto entre los sellos de la
puerta y las superficies de cierre
hermético.
No deje que se acumule grasa ni
suciedad en los sellos de la puerta ni
en las zonas adyacentes. Siga las
instrucciones de “Limpieza y mantenimiento” de la página 91. Si no se
mantiene limpio el horno, esto podría
hacer que se deteriorase la superficie,
lo que influiría negativamente sobre la
vida útil del aparato y podría derivar
en una situación peligrosa.
Las personas que tengan implantado
un MARCAPASOS deberán consultar a
su médico o al fabricante del marcapasos qué precauciones debe tomar en
relación con los hornos microondas.
53
Page 54

PRECAUCIONES E INSTRUCCIONES
IMPORTANTES DE SEGURIDAD
PARA EVITAR LA POSIBILIDAD DE
DESCARGA ELÉCTRICA
No desmonte bajo ningún concepto
el armazón exterior.
No vierta ni inserte jamás ningún
objeto en las aberturas de la cerradura
de la puerta ni en las salidas de ventilación. En caso de derrame, apague el
horno y desenchúfelo inmediatamente
y llame a un técnico de mantenimiento
autorizado.
No sumerja el cable eléctrico ni lo
enchufe con agua ni cualquier otro
líquido.
Vigile que el cable eléctrico no pase
por encima de superficies calientes o
afiladas, como la zona del ventilador
de aire caliente situada en la parte
superior trasera del horno.
No intente sustituir la bombilla del
horno por su cuenta ni deje que lo
haga nadie que no esté autorizado a
ello. Si se avería la bombilla, consulte
a su distribuidor o a un técnico de
mantenimiento autorizado.
Si el cable eléctrico de este aparato
resulta dañado, deberá sustituirlo por
un cable especial. La sustitución
deberá llevarla a cabo un técnico
autorizado.
54
Page 55

PARA EVITAR LA POSIBILIDAD DE
EXPLOSIÓN O COCCIÓN REPENTINA
No se pueden calentar líquidos ni
otros alimentos en recipientes
cerrados ya que pueden explotar.
No utilice nunca recipientes cerrados.
Quite siempre los sellos y las tapas
antes de utilizarlos. Los recipientes
cerrados pueden explotar por la
acumulación de presión, incluso
después de apagar el horno.
Tenga cuidado si introduce líquidos en
el microondas. Utilice un recipiente de
abertura ancha para que puedan
escapar las burbujas.
El calentamiento de bebidas en el
microondas puede provocar una
cocción excesiva demorada, por lo
que es necesario tener cuidado al
manipular el recipiente.
No cocine huevos con la cáscara ni
caliente huevos cocidos enteros en
el microondas, puesto que pueden
explotar, incluso después de terminar
el ciclo del microondas. Para cocinar o
recalentar huevos sin revolver o batir,
pinche la yema y la clara para evitar
que exploten. Pele y corte en rodajas
los huevos duros antes de recalentarlos en el microondas.
Perfore la piel de alimentos como
patatas, salchichas y frutas antes de
cocinarlos. En caso contrario, es
posible que exploten.
Para evitar la erupción repentina de
líquido hirviendo y posibles
quemaduras:
1) Remueva el líquido antes de calen-
tarlo/recalentarlo.
2) Es conveniente introducir en el
líquido una varilla de cristal o un
utensilio similar al recalentarlo.
3) Deje reposar el líquido durante
20 segundos al menos en el horno
al final del tiempo de cocción para
evitar un estallido demorado de
cocción.
55
Page 56

PRECAUCIONES E INSTRUCCIONES
IMPORTANTES DE SEGURIDAD
PARA EVITAR LA POSIBILIDAD DE
SUFRIR QUEMADURAS
Use asas para cazuelas o guantes
protectores para evitar quemaduras al
sacar los alimentos del microondas.
Abra siempre los recipientes, bolsas
de palomitas, bolsas para cocinar en
microondas, etc. a cierta distancia de
la cara y las manos para evitar
quemarse con el vapor.
A fin de evitar quemaduras,
compruebe siempre la temperatura de
los alimentos y remuévalos antes de
servir y preste especial atención a la
temperatura de la comida y bebidas
para bebés, niños y ancianos.
La temperatura del recipiente no
indica realmente la temperatura de lo
que contienen; compruebe siempre la
temperatura de los alimentos.
Aléjese siempre de la puerta del
microondas al abrirla para no sufrir
quemaduras por el vapor y el calor
que pueda expulsar.
Parta en rodajas los alimentos rellenos
después de calentarlos a fin de liberar
el vapor y evitar quemaduras.
Mantenga a los niños alejados de la
puerta para que no se quemen.
No toque la puerta del microondas,
los armazones exterior y trasero, la
cavidad del microondas, las salidas
de ventilación, los accesorios ni los
platos cuando el microondas esté
funcionando en los modos GRILL,
CONVECCIÓN, DUAL, AUTO COCCIÓN
y AUTO COCCIÓN CONGELADO ya
que es posible que alcancen temperaturas elevadas. Asegúrese de que
estos componentes no estén calientes
antes de limpiarlos.
56
Page 57

PARA EVITAR UNA UTILIZACIÓN
INCORRECTA POR PARTE DE LOS NIÑOS
No permita a los niños utilizar el
horno sin supervisión a menos que
se les hayan proporcionado las
instrucciones adecuadas de forma
que el niño pueda usarlo de
manera segura y comprenda los
riesgos que conlleva hacerlo incorrectamente.
Este aparato no está diseñado para su
uso por parte de personas (incluyendo
niños) con sus capacidades físicas,
sensoriales o mentales mermadas, o
con falta de experiencia y conocimientos, a menos que una persona responsable de su seguridad les controle o
enseñe cómo utilizarlo.
Es preciso supervisar a los niños para
asegurarse de que no jueguen con el
aparato.
OTRAS ADVERTENCIAS
No modifique nunca el horno de
ningún modo.
No abra el horno mientras esté
funcionando.
Este horno está diseñado para
preparar alimentos y solamente se
puede utilizar con este fin. No es
apropiado para su uso comercial o
en laboratorios.
No se apoye ni se columpie en la
puerta del microondas. No juegue con
el microondas ni lo utilice como un
juguete.
Se debe enseñar a los niños a respetar
todas las instrucciones de seguridad
importantes: uso de asas para
cazuelas, tener cuidado al destapar los
recipientes; prestar especial atención
a los envases (materiales que se autocalienten, por ejemplo) preparados
para tostar la comida, ya que pueden
estar extremadamente calientes.
57
Page 58

PRECAUCIONES E INSTRUCCIONES
IMPORTANTES DE SEGURIDAD
PARA PROPICIAR EL USO CORRECTO
DEL MICROONDAS Y EVITAR DAÑOS
No ponga nunca el horno en funcionamiento si está vacío, excepto en las
circunstancias recogidas en el manual
de instrucciones, véase la página 73.
Si lo hace, puede dañar el horno.
Si va a utilizar un plato para dorar
alimentos u otro material que se autocaliente, coloque debajo un aislante
resistente al calor, como puede ser un
plato de porcelana, para evitar que
sufra daños el plato giratorio debido
a la tensión térmica. Nunca se deberá
superar el tiempo de precalentamiento
especificado en las instrucciones del
plato.
No utilice utensilios de metal, ya que
reflejan las microondas y pueden
hacer que se produzca un arco
voltaico. No introduzca latas en el
horno.
Utilice únicamente el plato giratorio
diseñado para este horno.
NOTA:
Si no sabe cómo conectar el horno,
póngase en contacto con un técnico
electricista autorizado y cualificado.
Ni el fabricante ni el distribuidor aceptarán responsabilidad alguna por
daños provocados al horno o daños
personales derivados del no cumplimiento del procedimiento correcto
de conexión eléctrica.
En las paredes del microondas y
alrededor de los sellos de la puerta y
las superficies de cierre hermético se
puede formar ocasionalmente vapor
o gotas de agua. Esto se produce
como consecuencia del funcionamiento normal del aparato y no indica
en absoluto que haya fugas o averías
en el microondas.
CONSERVE ESTAS
INSTRUCCIONES
58
No coloque nada sobre el armazón
exterior durante el funcionamiento.
No utilice recipientes de plástico para
el microondas si éste está todavía
caliente por haber utilizado los modos
GRILL, CONVECCIÓN, DUAL, AUTO
COCCIÓN o AUTO COCCIÓN CONGELADO, ya que se pueden fundir. No se
deben utilizar recipientes plásticos con
ninguno de los modos anteriores a
menos que su fabricante indique que
son aptos para ello.
Page 59
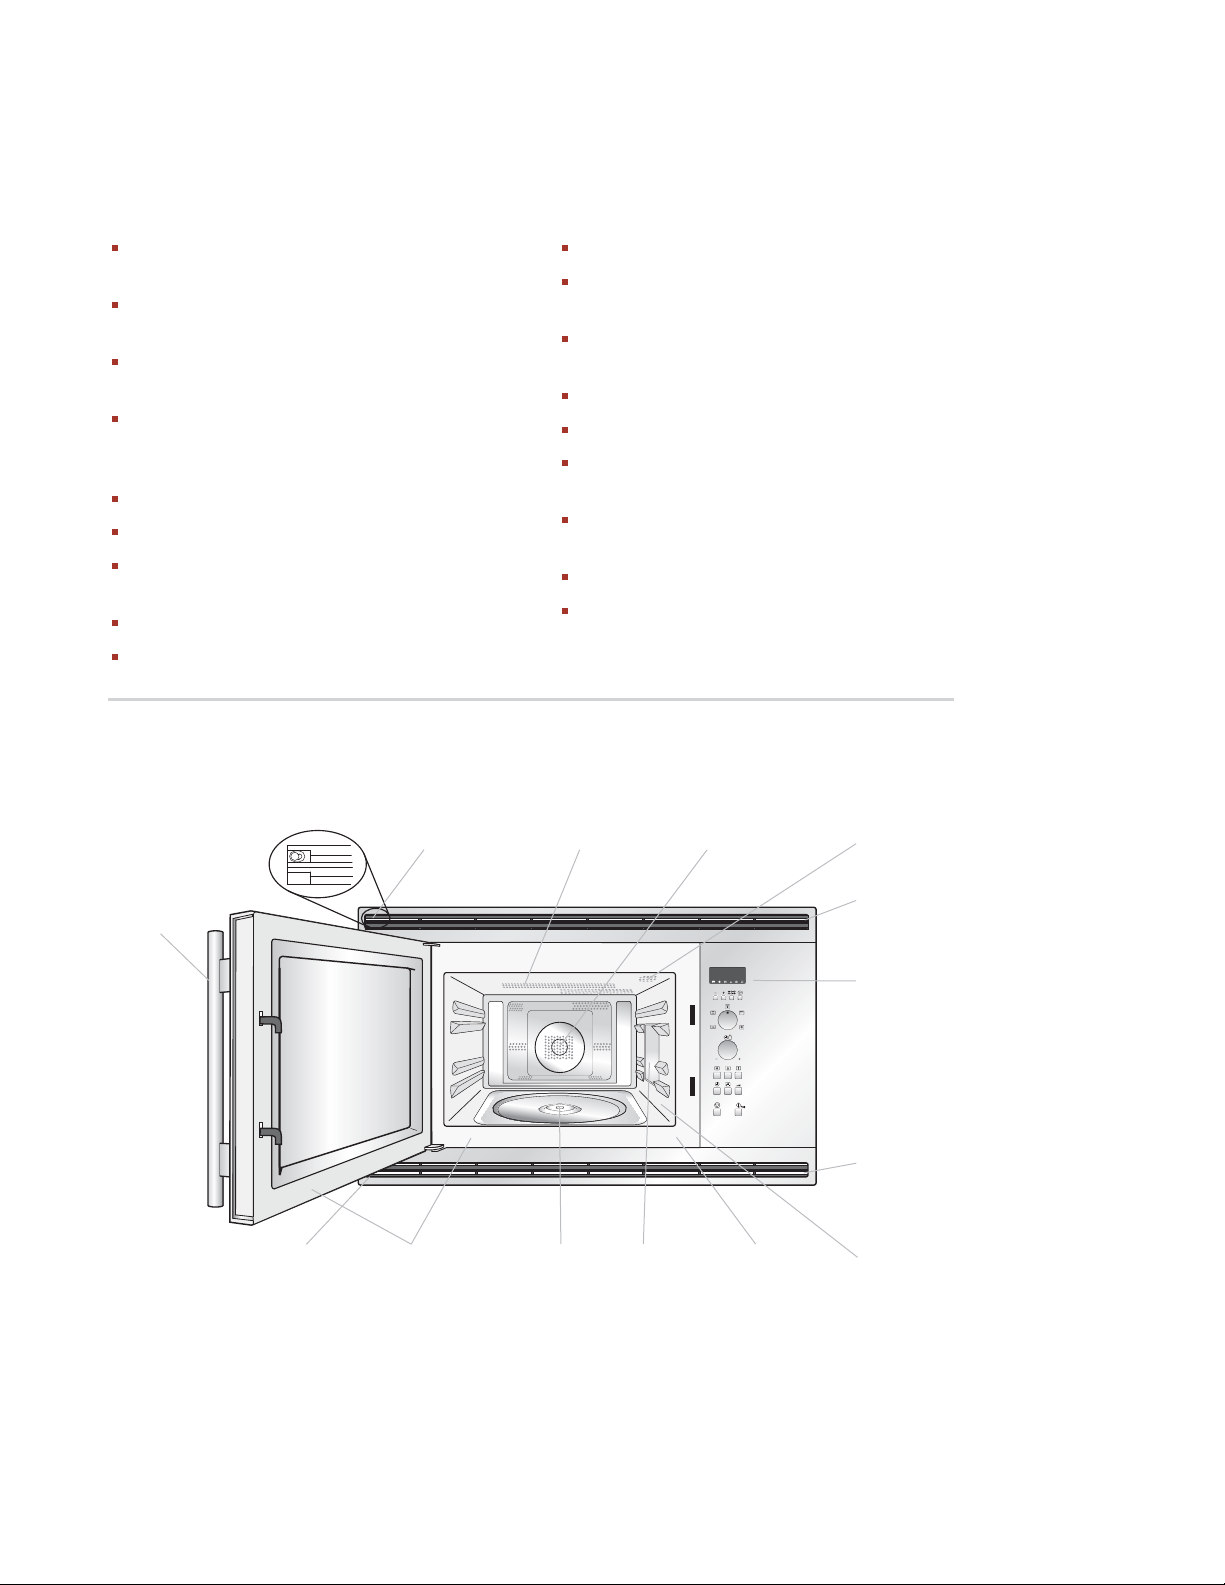
CARACTERÍSTICAS DEL MICROONDAS POR CONVECCIÓN WOLF
CARACTERÍSTICAS DEL MICROONDAS
Horno microondas por convección empotrable
con 40 l de capacidad
modelo con 230 V de potencia—microondas
900 W, grill 1.300 W y convección 1.450 W
modelo con 240 V de potencia—microondas
900 W, grill 1.400 W y convección 1.400 W
El marco permite empotrar el microondas de
forma que se pueda colocar encima de un
horno Wolf integrable
Marco en acero inoxidable clásico
5 posiciones de auto cocción
Posibilidad de seleccionar el funcionamiento
en varios idiomas
Modo de ahorro de energía
5 posiciones de cocción
Plato giratorio extraíble de 362 mm y soporte
giratorio
Rejilla baja extraíble para asar a la parrilla y
rejilla alta extraíble para hornear
Puerta del microondas con ventanilla
Posibilidad de hornear en distintas rejillas
Enganches de seguridad de la puerta—el
horno no funciona si la puerta no está cerrada
La luz del horno se enciende cuando éste está
en funcionamiento o si la puerta está abierta
Cierre hermético de la puerta
Aberturas traseras de ventilación
10 posiciones de temperatura de convección
HORNO MICROONDAS POR CONVECCIÓN CON GRILL
Modelo ICBMW30-230/ICBMW30-240
Punto de
fijación
Elemento
calorífico del
grill
Elemento calorífico
de convección
Bombilla
del horno
Tirador de
apertura del
microondas
fijación
Sellos de la puerta
y superficies de
cierre hermético
Punto de
fijación
Panel
de mandos
Punto de
fijación
AcoplamientoPunto de
Cubierta del
guiaondas
Placa de
datos
Cavidad
del horno
59
Page 60
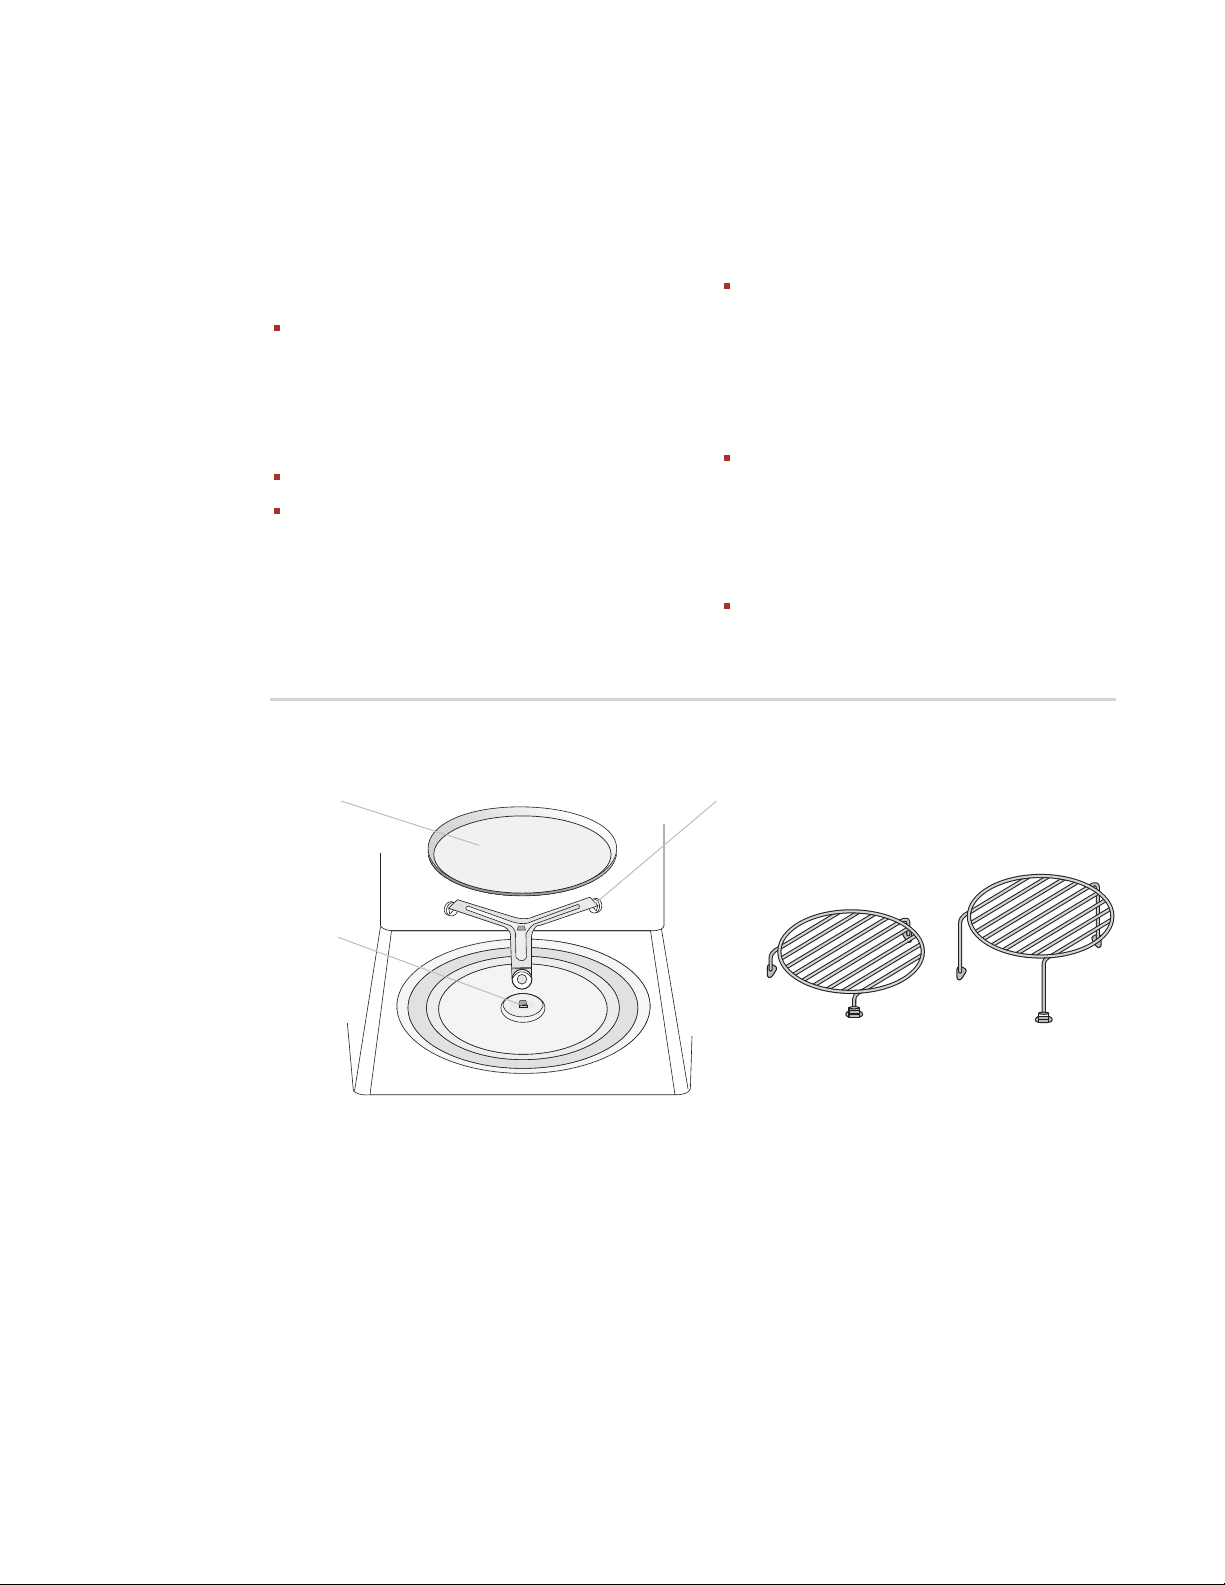
CARACTERÍSTICAS DEL MICROONDAS POR CONVECCIÓN WOLF
ACCESORIOS DEL MICROONDAS
Compruebe que se le han entregado todos los
accesorios que se muestran en las siguientes
ilustraciones.
Coloque el soporte del plato giratorio en el
acoplamiento del centro del microondas,
asegurándose de que la parte SUPERIOR
quede hacia arriba (la parte SUPERIOR está
grabada por un lado). Debería girar libremente
alrededor del acoplamiento.
Coloque el plato giratorio sobre su soporte.
Coloque las rejillas alta/baja sobre el plato
giratorio si es necesario.
ACCESORIOS DEL MICROONDAS
Plato giratorio
NOTAS:
Siempre que utilice el microondas, el plato
giratorio y su soporte deben estar colocados
correctamente. Esto permite una cocción
uniforme. Si el plato giratorio está mal
colocado, puede vibrar o girar de manera
incorrecta, lo que podría provocar daños al
horno.
El plato giratorio puede girar en el sentido de
las agujas del reloj o en sentido contrario. La
dirección de giro puede cambiar cada vez que
el microondas se ponga en funcionamiento.
Esto no influye sobre las propiedades de
cocción.
A la hora de pedir accesorios, indique siempre
a su distribuidor o técnico de mantenimiento
estos dos datos: nombre de la pieza y nombre
del modelo.
Soporte del
plato giratorio
60
Acoplamiento
Rejilla baja
Estas rejillas se utilizan para cocinar en
los modos de Convección, Dual o Grill.
Rejilla alta
Page 61
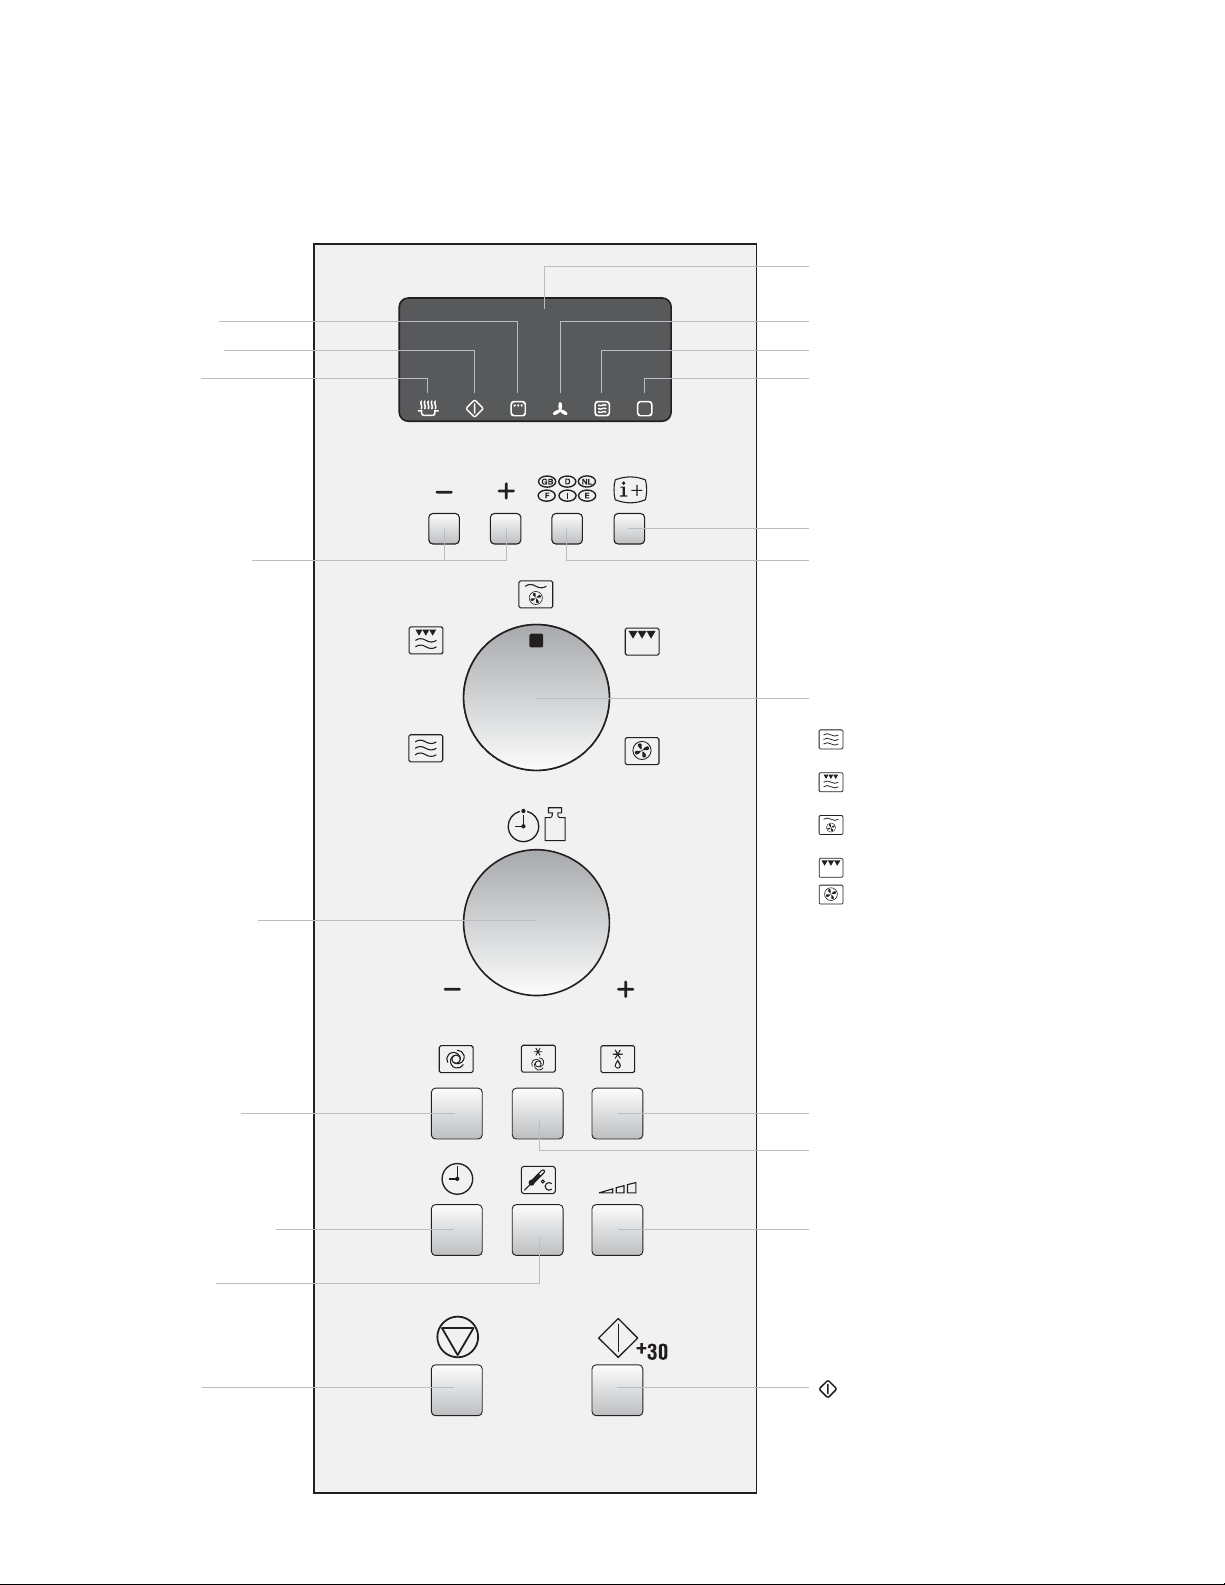
CARACTERÍSTICAS DEL MICROONDAS POR CONVECCIÓN WOLF
PANEL DE MANDOS
antalla digital
P
Indicador de GRILL
Indicador de INICIO
Indicador de
COCCIÓN EN CURSO
Botones MÁS/MENOS
Mando de TEMPORIZADOR/PESO
Gire el mando para
indicar el tiempo de
cocción/descongelado
o el peso de los
alimentos.
Indicador de CONVECCIÓN
Indicador de MICROONDAS
Indicador de INFORMACIÓN
Botón de INFORMACIÓN
Botón de IDIOMA
Mando de MODO DE
COCCIÓN
para cocina a microondas
para cocina a microondas con GRILL
para cocina a microondas con CONVECCIÓN
para GRILL
para CONVECCIÓN
Botón de AUTO
COCCIÓN
Botón TEMPORIZADOR
Botón de
CONVECCIÓN
Botón de
PARADA
Botón de AUTO DESCONGELADO
Botón COCCIÓN CONGELADO
Botón de NIVEL DE POTENCIA
DE MICROONDAS
Botón +30 (INICIO)
61
Page 62

INSTALACIÓN DEL MICROONDAS POR CONVECCIÓN WOLF
ESPECIFICACIONES
Modelo de 230 V Modelo de 240 V
Línea de voltaje CA
230 V, 50 Hz, monofásica 240 V, 50 Hz, monofásica
Alimentación de CA necesaria:
Microondas 1,5 kW 1,55 kW
Grill 2,8 kW 2,85 kW
Grill/Microondas 2,8 kW 2,95 kW
Convección 2,8 kW 2,85 kW
Convección/Microondas 2,95 kW 2,95 kW
Potencia de salida:
Microondas 900 W (IEC 60705) 900 W (IEC 60705)
Elementos caloríficos del grill 1.300 W (650 W x 2) 1.400 W (700 W x 2)
Convección 1.450 W 1.400 W
Todos los modelos
Fusible del cable de distribución/cortacircuitos
Frecuencia del microondas
Medidas exteriores
759 mm (Anch.) x 460 mm (Alt.) x 537 mm (Prof.)
2.450 MHz * (Grupo 2/Clase B)
Mínimo 16A
62
Medidas de cavidad
Capacidad del horno
Plato giratorio
Peso
Bombilla del horno
*Este producto cumple los requisitos de la norma europea EN55011. De conformidad con esta norma, este producto
se clasifica en la categoría de equipos del grupo 2 clase B. El grupo 2 implica que el equipo genera de manera intencionada energía de radiofrecuencia en forma de radiación electromagnética para el tratamiento calorífico de alimentos. Los equipos encuadrados en la clase B son apropiados para su uso en instalaciones domésticas.
**La capacidad interna se calcula midiendo la anchura, profundidad y altura máximos. La capacidad real para
alimentos es inferior.
375 mm (Anch.) x 272 mm (Alt.) x 395 mm (Prof.) **
40 litros **
ø362 mm, cerámico
30 kg
25 W/240–250 V
Este horno cumple los requisitos de las Directivas 2004/108/CE, 2006/95/CE,
2009/125/CE y 2011/65/EU.
LAS ESPECIFICACIONES PUEDEN MODIFICARSE SIN PREVIO AVISO COMO
PARTE DEL PROCESO DE EVOLUCIÓN CONTINUA.
Page 63
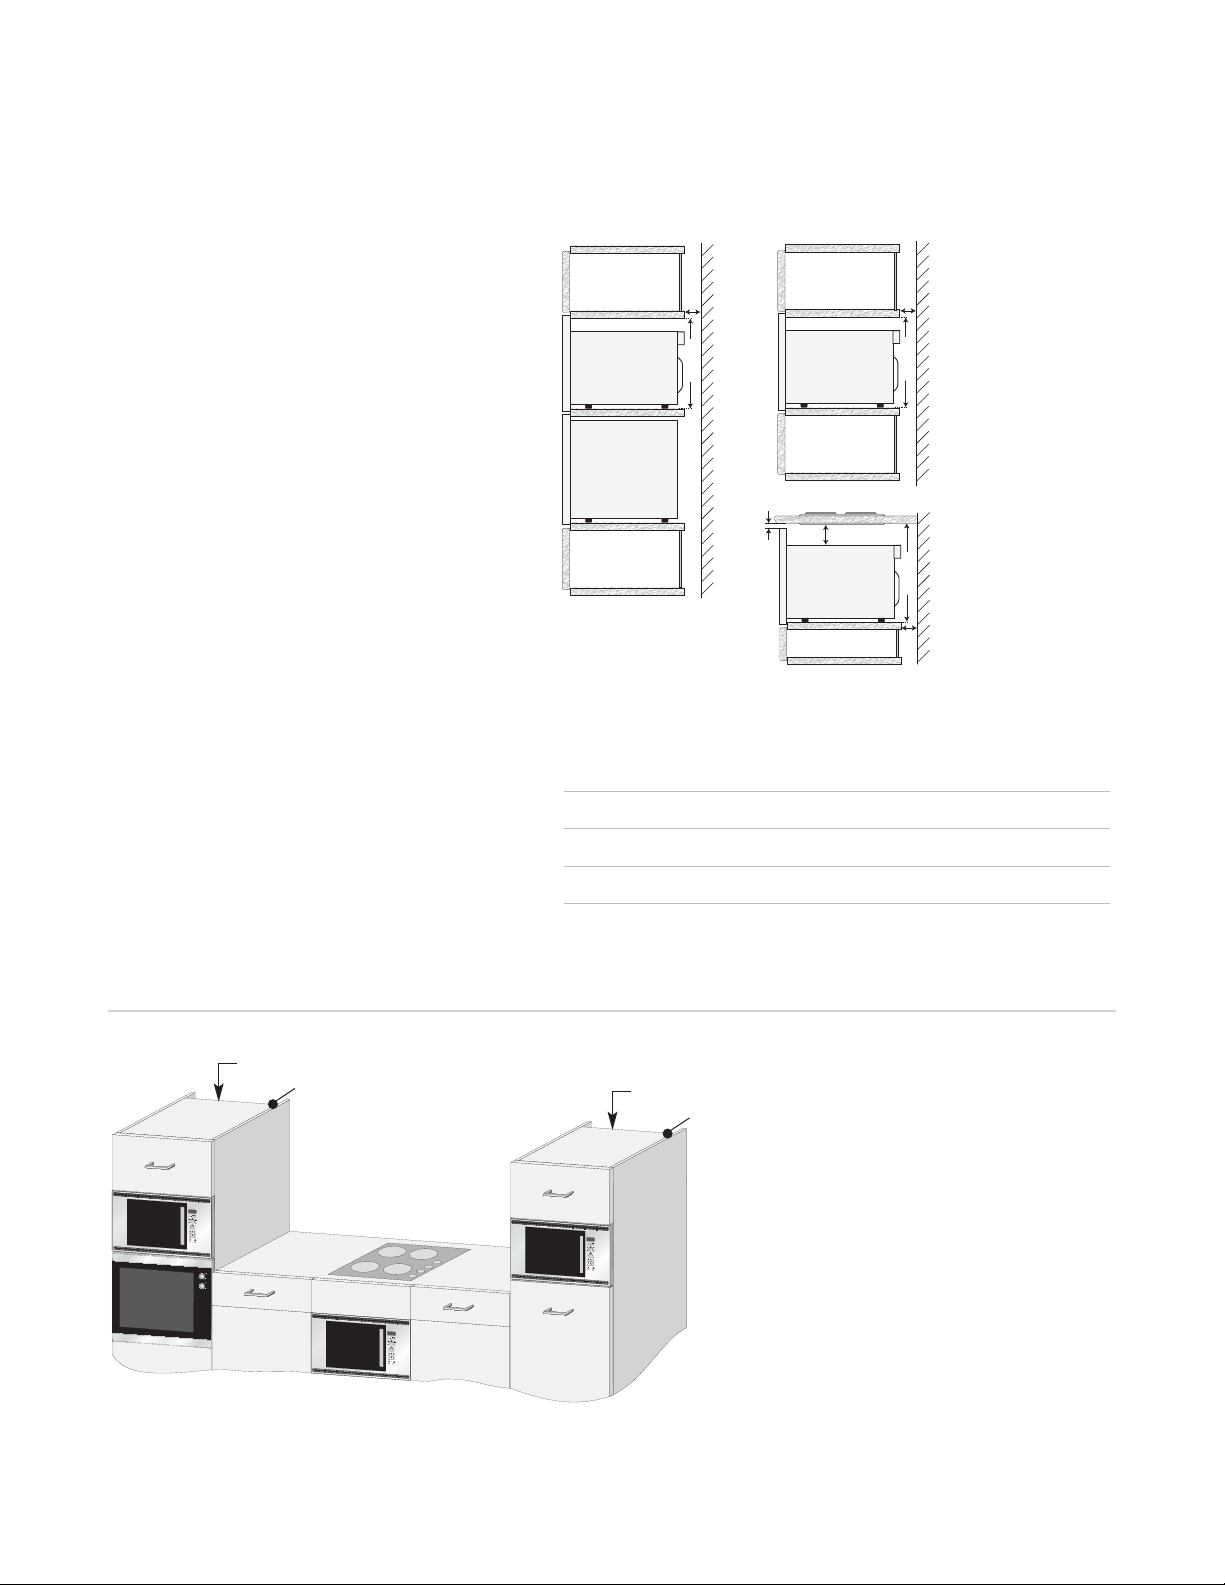
INSTALACIÓN DEL MICROONDAS POR CONVECCIÓN WOLF
INSTALACIÓN DEL MICROONDAS
1)
Quite todo el embalaje y compruebe minuciosamente que no presente daños.
2)
Si el microondas se instala en la posición C,
min. 20 mm
asegúrese de que se dejen las entradas
mínimas de aire, como se muestra en el
diagrama.
3)
Coloque en posición cuatro bloques de
Posición A
450 mm
fijación de armarios mediante la plantilla de
instalación (TMAPTA004URR0).
4)
Instale el aparato en el armario de la cocina,
Horno conven-
cional
levante los bloques inferior/delantero y a
continuación empuje lentamente y sin ejercer
fuerza hasta que el marco delantero del horno
quede al mismo nivel que la apertura frontal
del armario.
5)
Asegúrese de que el aparato esté estable y
no esté inclinado.
6)
Fije el horno en posición con los tornillos
suministrados. Los puntos de fijación están
situados en las zonas de los listones en la
parte superior e inferior del horno (véase la
ilustración de la página 59).
7)
Ponga las tapas de cierre del marco en las
cuatro posiciones de fijación (se suministran
Posición Anch. x Prof. x Alt. (mín.) y el techo
A 730 x 610 x 450 20 50
B 730 x 610 x 450 20 50
Tamaño Espacio entre
del hueco Chimenea el armario
dos tapas de repuesto).
8)
Es importante asegurarse de que la instalación
de este producto se realice conforme a las
C 730 x 610 x 450 20 No aplicable
Medidas en milímetros
instrucciones del presente manual de instrucciones y a las instrucciones de instalación del
fabricante de la hornilla o el horno.
5 mm
Posición B
65 mm
Posición C
min. 20 mm
450 mm
450 mm
20 mm
Chimenea
Sujetador de cable
Posición A
Horno
convencional
El microondas se puede instalar en las posiciones A, B o C
Posición C
Chimenea
Sujetador de cable
Posición B
D
63
Page 64
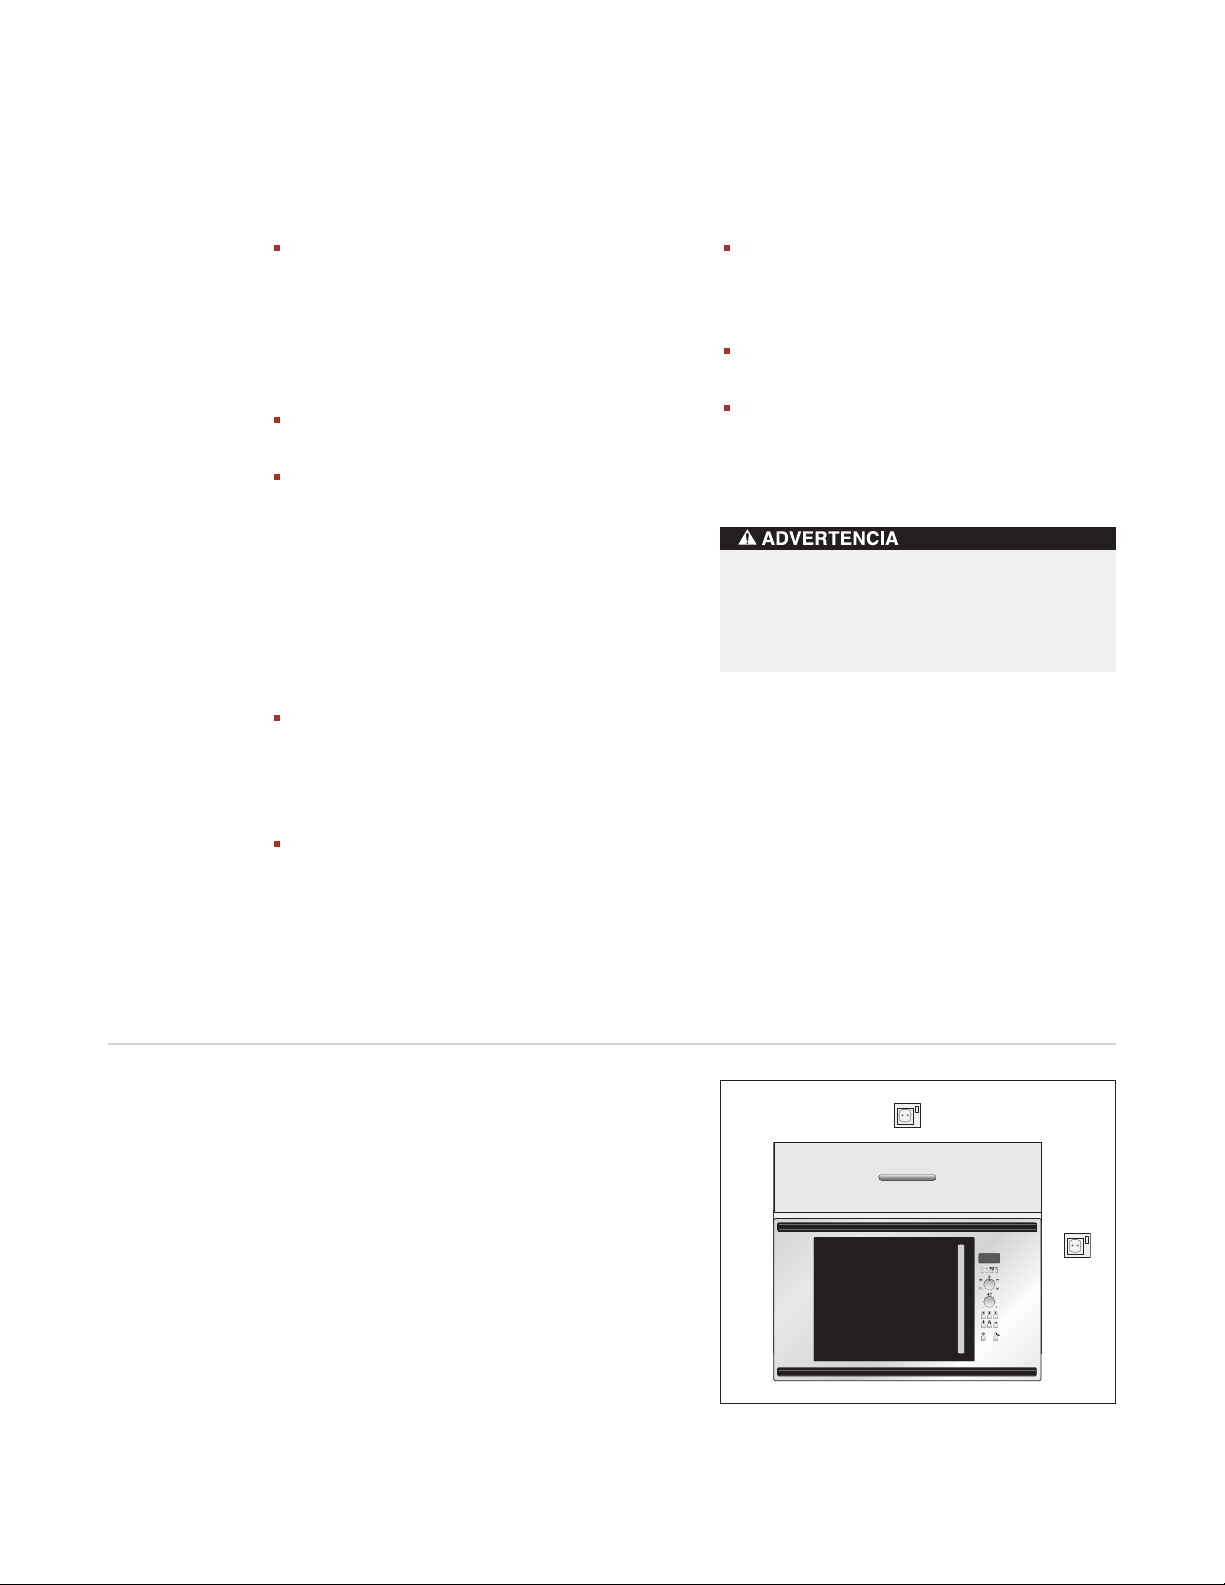
INSTALACIÓN DEL MICROONDAS POR CONVECCIÓN WOLF
REQUISITOS ELÉCTRICOS
La toma eléctrica debe estar accesible para
poder desenchufar fácilmente la unidad en
caso de emergencia. Al menos debe ser
posible aislar el horno de la alimentación al
instalar un interruptor en el cableado fijo
de conformidad con las normas sobre
cableado.
La toma no debe estar colocada detrás
del armario.
La mejor opción es instalarla encima del
armario, véase la figura (A). Si la conexión se
va a realizar en la posición (A), quite el clip de
sujeción de la posición 15 situado en la parte
posterior del microondas (véase la página 59)
y utilícelo para fijar el cable eléctrico a la parte
superior del armazón (véase la página 63). Si
no se va a conectar el cable eléctrico a la
posición (A), éste se deberá pasar por debajo
del microondas.
Conecte el equipo a una corriente alterna
monofásica de 230-240 V/50 Hz por medio de
una toma puesta a tierra instalada convenientemente. La toma deberá incorporar un fusible
de 16 A.
El cable eléctrico sólo puede ser sustituido
por un técnico electricista.
Antes de proceder a la instalación, ate un
trozo de cuerda al cable eléctrico para facilitar
la conexión con el punto (A) cuando se vaya a
instalar el aparato.
Al introducir la unidad en el armario alto,
NO aplaste el cable eléctrico.
No sumerja el cable eléctrico ni lo enchufe
con agua ni cualquier otro líquido.
CONEXIONES ELÉCTRICAS
ESTE APARATO DEBE ESTAR CONECTADO
A TIERRA El fabricante no asumirá responsabilidad alguna en el caso de que no se
cumpla esta medida de seguridad.
Si el enchufe que viene con su aparato no es
adecuado para su toma de corriente, póngase en
contacto con su representante de mantenimiento.
64
(A)
Toma eléctrica
Page 65

INSTALACIÓN DEL MICROONDAS POR CONVECCIÓN WOLF
TRATAMIENTO ECOLÓGICO
DE LOS
RESIDUOS
MATERIALES DE EMBALAJE
Los hornos microondas precisan un embalaje
eficaz que los proteja durante el transporte.
Se utiliza el embalaje mínimo necesario.
Estos materiales (por ejemplo, el papel de
aluminio o la espuma de poliestireno) pueden
suponer un riesgo para los niños.
Peligro de asfixia. Mantenga el material de
embalaje fuera del alcance de los niños.
Todos los materiales de embalaje utilizados
son ecológicos y se pueden reciclar. El cartón
está fabricado a partir de papel reciclado y las
piezas de madera no están tratadas. Los
componentes plásticos están etiquetados
de la siguiente manera:
“PE” polietileno, como el papel de embalaje
“PS” poliestireno, como el embalaje (sin CFC)
“PP” polipropileno, como las cintas de
embalaje
El uso y reutilización de los materiales de
embalaje permite ahorrar materias primas y
reduce el volumen de residuos.
Estos materiales se deben llevar al punto de
reciclaje más cercano. Póngase en contacto
con su ayuntamiento si necesita más información.
APARATOS USADOS
Los aparatos usados se deben hacer seguros
antes de deshacerse de ellos al quitar el enchufe
y cortar y tirar el cable eléctrico. A continuación
se deberán llevar al punto de reciclaje más
cercano. Infórmese en su ayuntamiento u oficina
de medio ambiente de si existen instalaciones en
su ciudad para reciclar la unidad.
65
Page 66

FUNCIONAMIENTO DEL MICROONDAS POR CONVECCIÓN WOLF
¿QUÉ SON LAS
MICROONDAS?
Al igual que las ondas de radio y televisión, las
microondas son ondas electromagnéticas.
Las microondas se producen en un magnetrón
situado en el interior del horno y éstas hacen
vibrar las moléculas de agua presentes en los
alimentos. La fricción que causa esto produce
calor, lo que hace que se descongelen, calienten
o cocinen los alimentos.
El secreto de los tiempos reducidos de cocción es
el hecho de que las microondas penetran en la
comida desde todas las direcciones. La energía se
aprovecha al máximo. En comparación, la energía
de una hornilla convencional pasa del quemador
a la cazuela y de ahí a la comida. Este método
derrocha una gran cantidad de energía.
CARACTERÍSTICAS DE LAS MICROONDAS
Las microondas penetran en todos los objetos no
metálicos de cristal, loza, barro, plástico, madera
o papel. Ésta es la razón por la que las microondas no calientan nunca estos materiales. Los
platos se calientan simplemente porque los
alimentos que contienen están calientes.
La comida absorbe las microondas y se calienta.
Las microondas no pueden atravesar los objetos
metálicos y por lo tanto se desvían. Por esta
razón, normalmente estos utensilios no suelen
ser apropiados para cocinar en el microondas.
Hay excepciones en las que sí se puede
aprovechar el hecho de que las microondas no
atraviesen el metal. Si cubre los alimentos con
papel de aluminio en puntos específicos mientras
se descongelan o se cocinan, evitará que esas
partes se calienten demasiado o se pasen.
Consulte las recomendaciones que se ofrecen
en la guía.
66
Page 67

FUNCIONAMIENTO DEL MICROONDAS POR CONVECCIÓN WOLF
QUÉ PUEDE HACER SU MICROONDAS
FUNCIONAMIENTO DEL MICROONDAS
Con la función de microondas de su nuevo horno
combinado puede, por ejemplo, calentar rápidamente comidas o bebidas ya preparadas o
derretir mantequilla o chocolate en un abrir y
cerrar de ojos.
El horno microondas es igual de bueno descongelando alimentos. En ocasiones, sin embargo,
es mejor combinar las microondas con el calentamiento por convección o el grill (funcionamiento combinado). Entonces puede cocinar la
comida rápidamente y dorarla al mismo tiempo.
Por lo general, los tiempos de cocción son
bastante más cortos que en la preparación
convencional de las comidas.
FUNCIONAMIENTO COMBINADO
(FUNCIONAMIENTO DE MICROONDAS
CON CONVECCIÓN O GRILL)
Al combinar dos modos de funcionamiento, los
beneficios de su horno se asocian de forma
inteligente.
Puede elegir entre
microondas + convección (ideal para trozos de
carne, pollo, pudín, pan y tartas) y
microondas + grill (ideal para pizzas, tentempiés, fritadas rápidas, pedazos de carne, pollo,
muslos de pollo, kebab, Welsh rarebit (Tostada
con salsa de queso) y para gratinar).
Si utiliza la función combinada, puede cocinar y
dorar la comida al mismo tiempo.
La ventaja es que el calor de convección o el
procedente del grill cierra rápidamente los poros
de las capas exteriores de los alimentos. Las
microondas permiten un periodo corto y suave al
cocinar. Los jugos se mantienen en el interior,
mientras que el exterior queda crujiente.
FUNCIONAMIENTO DE LA CONVECCIÓN
También puede utilizar la función de convección
sin microondas. El resultado es que se comporta
como un horno convencional. El aire circulante
calienta rápidamente el exterior de los alimentos
sin secar los jugos de la carne ni otros alimentos.
Este proceso de sellado supone que las comidas
se mantienen sabrosas y se cocinan en menos
tiempo que en hornos convencionales con calentadores superiores e inferiores.
FUNCIONAMIENTO DEL GRILL
Este aparato incorpora un grill de cuarzo por
encima de la zona de cocción. Ésta se puede
utilizar de manera convencional sin microondas.
Puede hornear o gratinar platos rápidamente.
También es adecuado para filetes, chuletas y
tartas.
67
Page 68
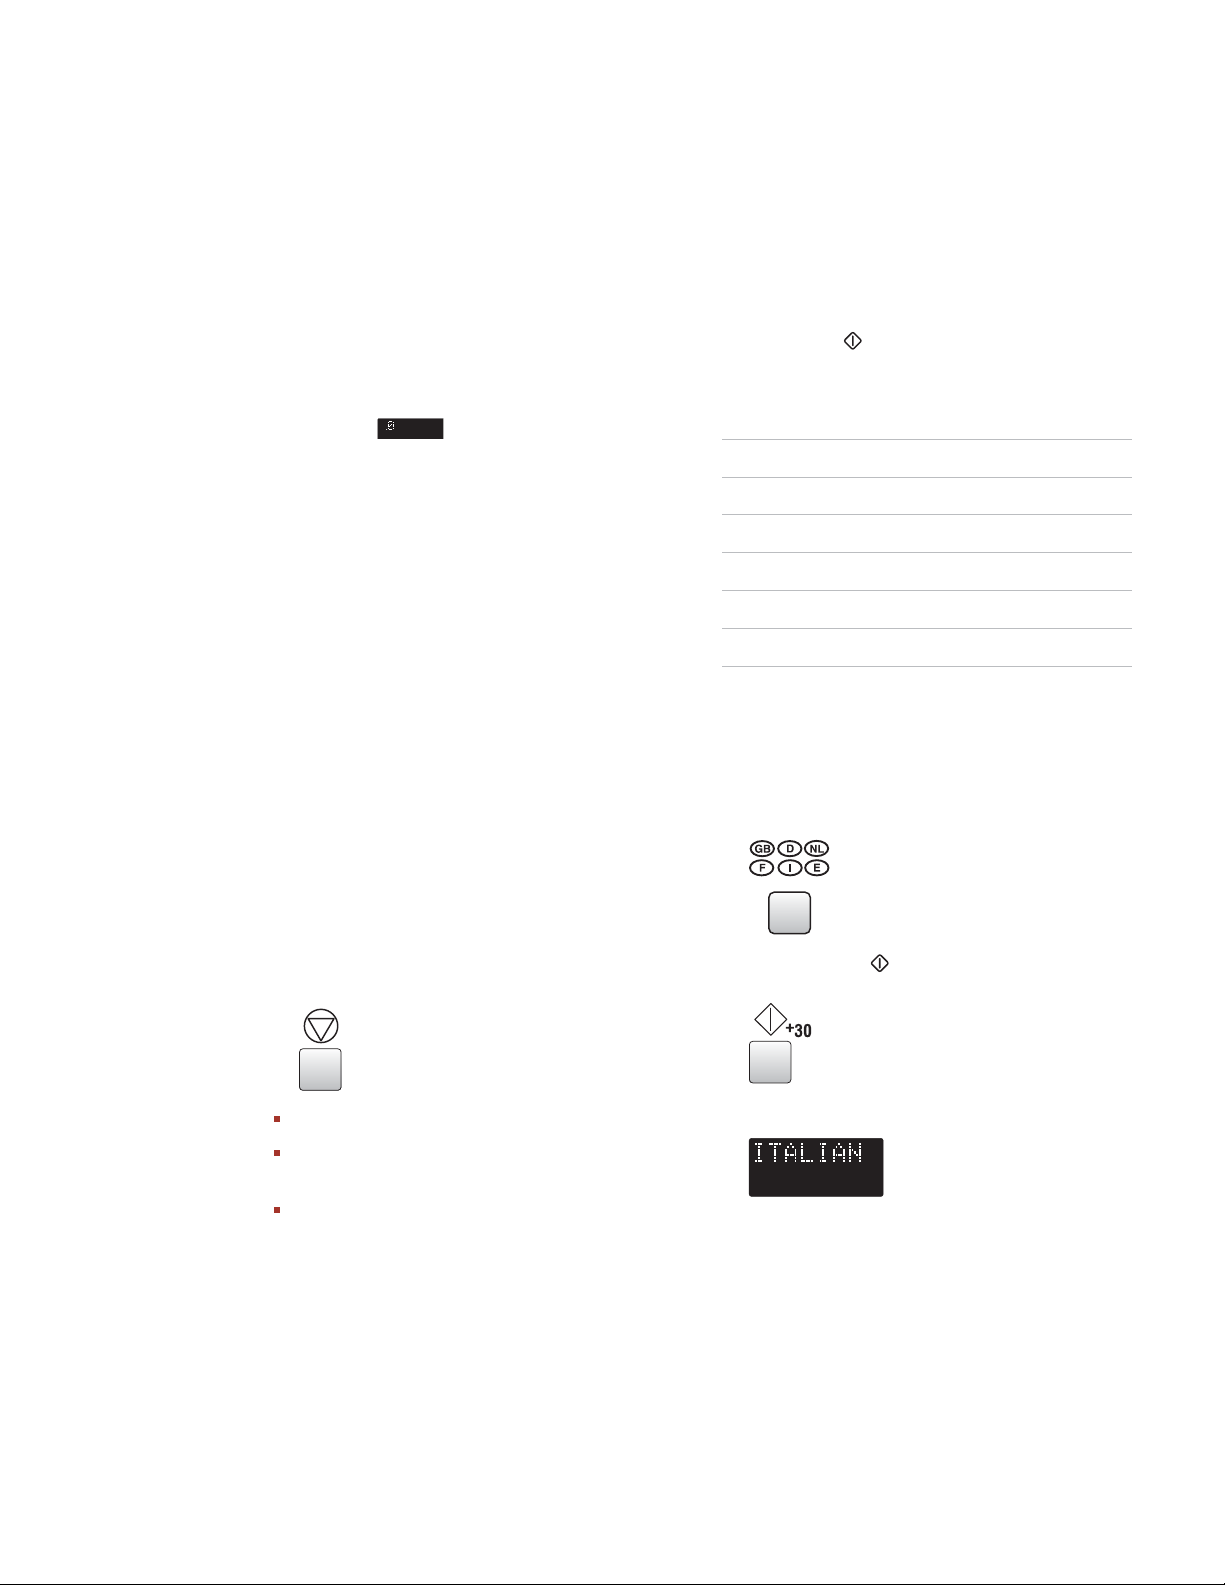
FUNCIONAMIENTO DEL MICROONDAS POR CONVECCIÓN WOLF
ANTES DE PONERLO EN
FUNCIONA-MIENTO
1)
Enchufe el horno. En este momento no aparecerá nada en la pantalla.
2)
Abra la puerta del horno. Se mostrará el
mensaje “SELECCIONE IDIOMA” en seis
idiomas.
3)
Cierre la puerta. La pantalla del horno
mostrará .
NOTA:
minutos, la unidad se apagará automáticamente. En este momento no aparecerá nada
en la pantalla. Para volver a encender la
unidad, abra la puerta.
4)
Caliente el horno sin alimentos (consulte la
página 73).
RECOMENDACIONES PARA COCINAR
El horno incorpora un “sistema de visualización
de información” que le da instrucciones paso a
paso para guiarle fácilmente en cada función y le
permite obtener información en el idioma que
prefiera. El horno incorpora un botón de INFORMACIÓN que le da instrucciones para cada botón.
Después de pulsar cada uno de ellos aparecen
indicadores en la pantalla que le informan del
siguiente paso.
Si no realiza ninguna acción durante 3
SELECCIÓN DEL IDIOMA
El horno viene predeterminado en inglés. Puede
modificar el idioma. Para ello, pulse el botón
IDIOMA
Pulse el botón
POR EJEMPLO
Para seleccionar
1)
hasta que se muestre el idioma deseado.
+30
.
Pulse el botón
IDIOMA IDIOMA
una vez INGLÉS
dos veces ALEMÁN
tres veces NEERLANDÉS
cuatro veces FRANCÉS
cinco veces ITALIANO
seis veces ESPAÑOL
italiano
Elija el idioma deseado pulsando el botón
IDIOMA
.
:
68
UTILIZACIÓN DEL
Use el botón
Borrar un error durante la programación.
Detener temporalmente el horno mientras
está cocinando.
Cancelar un programa durante la cocción,
pulse dos veces el botón
DETENER
BOTÓN DETENER
para:
DETENER
x5
2)
Pulse el botón
ración.
+30
para iniciar la configu-
x1
3) Compruebe la pantalla.
.
NOTA:
El idioma seleccionado quedará memorizado
incluso en el caso de que se interrumpa la
alimentación eléctrica.
Page 69

FUNCIONAMIENTO DEL MICROONDAS POR CONVECCIÓN WOLF
NOTAS
69
Page 70

FUNCIONAMIENTO DEL MICROONDAS POR CONVECCIÓN WOLF
NIVEL DE POTENCIA DEL
MICRO-ONDAS
El horno dispone de cinco niveles de potencia.
Para seleccionar el nivel de potencia para cocinar,
siga las recomendaciones que se ofrecen en la
sección de recetas. Por lo general se suelen
aplicar las siguientes recomendaciones:
900 W
se utiliza para cocinar o recalentar rápidamente, por ejemplo sopas, guisos, comida enlatada, bebidas calientes, verduras, pescado, etc.
630 W
se utiliza para cocinar durante más tiempo
alimentos densos como asados, pasteles de carne
y comidas cubiertas, así como platos más delicados como salsas de quesos y pasteles esponjosos. Con este nivel menos potente, la salsas no
hervirán ni se derramarán y los alimentos se cocinarán de manera más uniforme sin pasarse por
los lados.
450 W
para alimentos densos que precisen
mucho tiempo de preparación al cocinarlos
convencionalmente, como platos de ternera. Es
conveniente utilizar este nivel de potencia para
que la carne quede tierna.
270 W
(Nivel de descongelación) para descongelar, seleccione este nivel de potencia para que el
plato se descongele uniformemente. Este nivel es
ideal también para hervir arroz, pasta y masas
lentamente y para cocinar crema de huevo.
90 W
para descongelar suavemente, por ejemplo
pasteles de crema o pastas.
W = WATIO
PARA CONFIGURAR EL NIVEL DE
POTENCIA
1)
Gire el mando
MODO DE COCCIÓN
hasta la
configuración del microondas.
2)
Gire el mando
TEMPORIZADOR/PESO
en el
sentido del reloj o en el sentido inverso para
seleccionar el tiempo de cocción.
3)
Pulse el botón
MICROONDAS
NIVEL DE POTENCIA DEL
hasta que aparezca el nivel de
potencia deseado en la pantalla. (Si toca una
vez el botón
MICROONDAS
NIVEL DE POTENCIA DEL
, aparecerá en la
pantalla. Si se pasa el nivel deseado, siga
pulsando el botón
MICROONDAS
4)
Pulse el botón
NIVEL DE POTENCIA DEL
hasta que vuelva a aparecer).
+30
.
NOTA:
Si no se selecciona ningún nivel de potencia, se
configura automáticamente el de 900 W.
70
Page 71
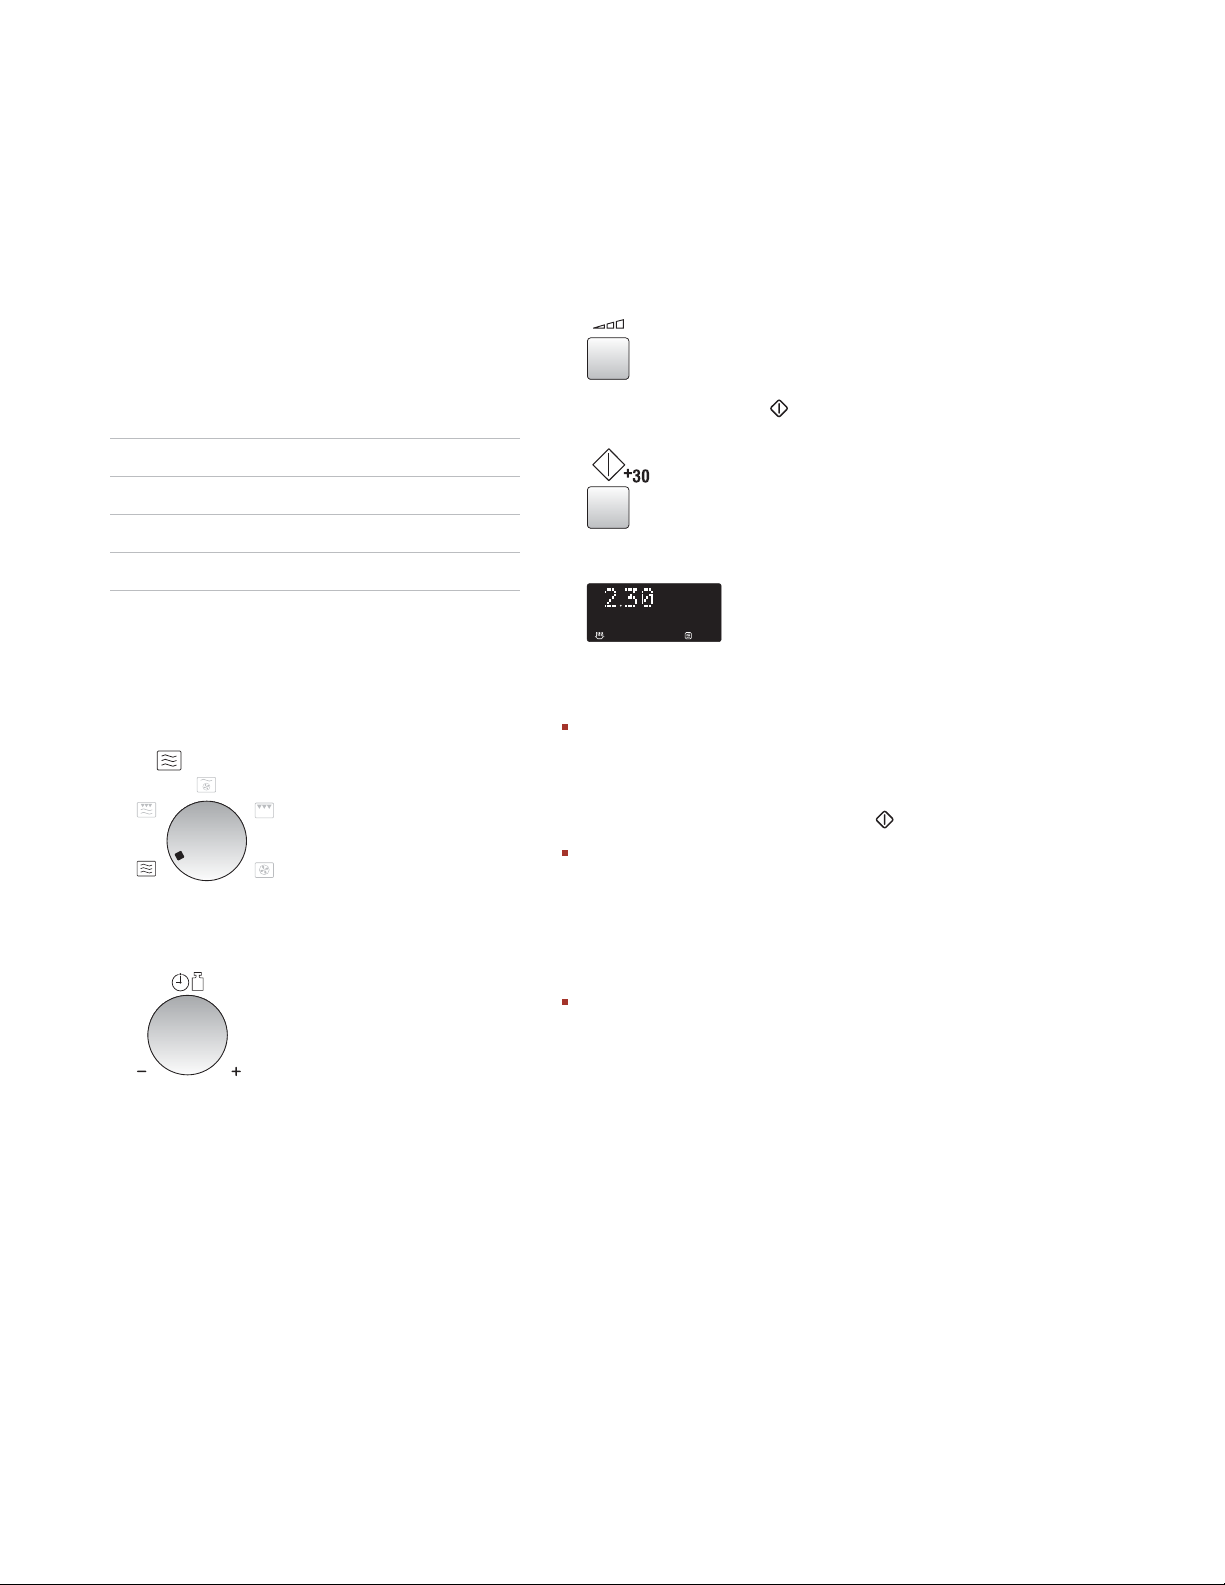
FUNCIONAMIENTO DEL MICROONDAS POR CONVECCIÓN WOLF
COCINAR AL MICROONDAS
3)
El horno se puede programar hasta para 90
minutos (90.00). La unidad para los tiempos de
cocción (descongelación) varía entre 10 segundos
y cinco minutos. Depende de la duración total de
la cocción (descongelación) como se muestra en
la tabla opuesta:
Tiempo de cocción: Unidad de aumento:
0–5 minutos 10 segundos
5–10 minutos 30 segundos
10-30 minutos 1 minuto
30-90 minutos 5 minutos
Pulse dos veces el botón
POTENCIA DEL MICROONDAS
cionar la potencia de 630 W.
x2
4)
Pulse una vez el botón
cocinar.
x1
5) Compruebe la pantalla.
NIVEL DE
para selec-
+30
para empezar a
POR EJEMPLO
Para calentar sopa durante 2 minutos y
30 segundos a 630 W de potencia.
1)
Gire el mando
la configuración del microondas.
2)
Introduzca el tiempo de cocción deseado al
girar el mando
el sentido de las agujas del reloj.
MODO DE COCCIÓN
TEMPORIZADOR/PESO
hasta
en
NOTAS:
Si se abre la puerta durante el proceso, el
tiempo de cocción de la pantalla digital se
detiene automáticamente. El tiempo de
cocción empieza a correr otra vez cuando se
cierra la puerta y se pulsa el botón
Si desea conocer el nivel de potencia durante
la cocción, pulse el botón
POTENCIA DEL MICROONDAS
potencia se seguirá mostrando mientras siga
pulsando el botón
MICROONDAS
Puede girar el mando
en el sentido de las agujas del reloj o en el
sentido inverso. Si lo gira en el sentido
contrario, el tiempo de cocción disminuirá
desde los 90 minutos.
NIVEL DE POTENCIA DEL
.
NIVEL DE
. El nivel de
TEMPORIZADOR/PESO
+30
.
71
Page 72
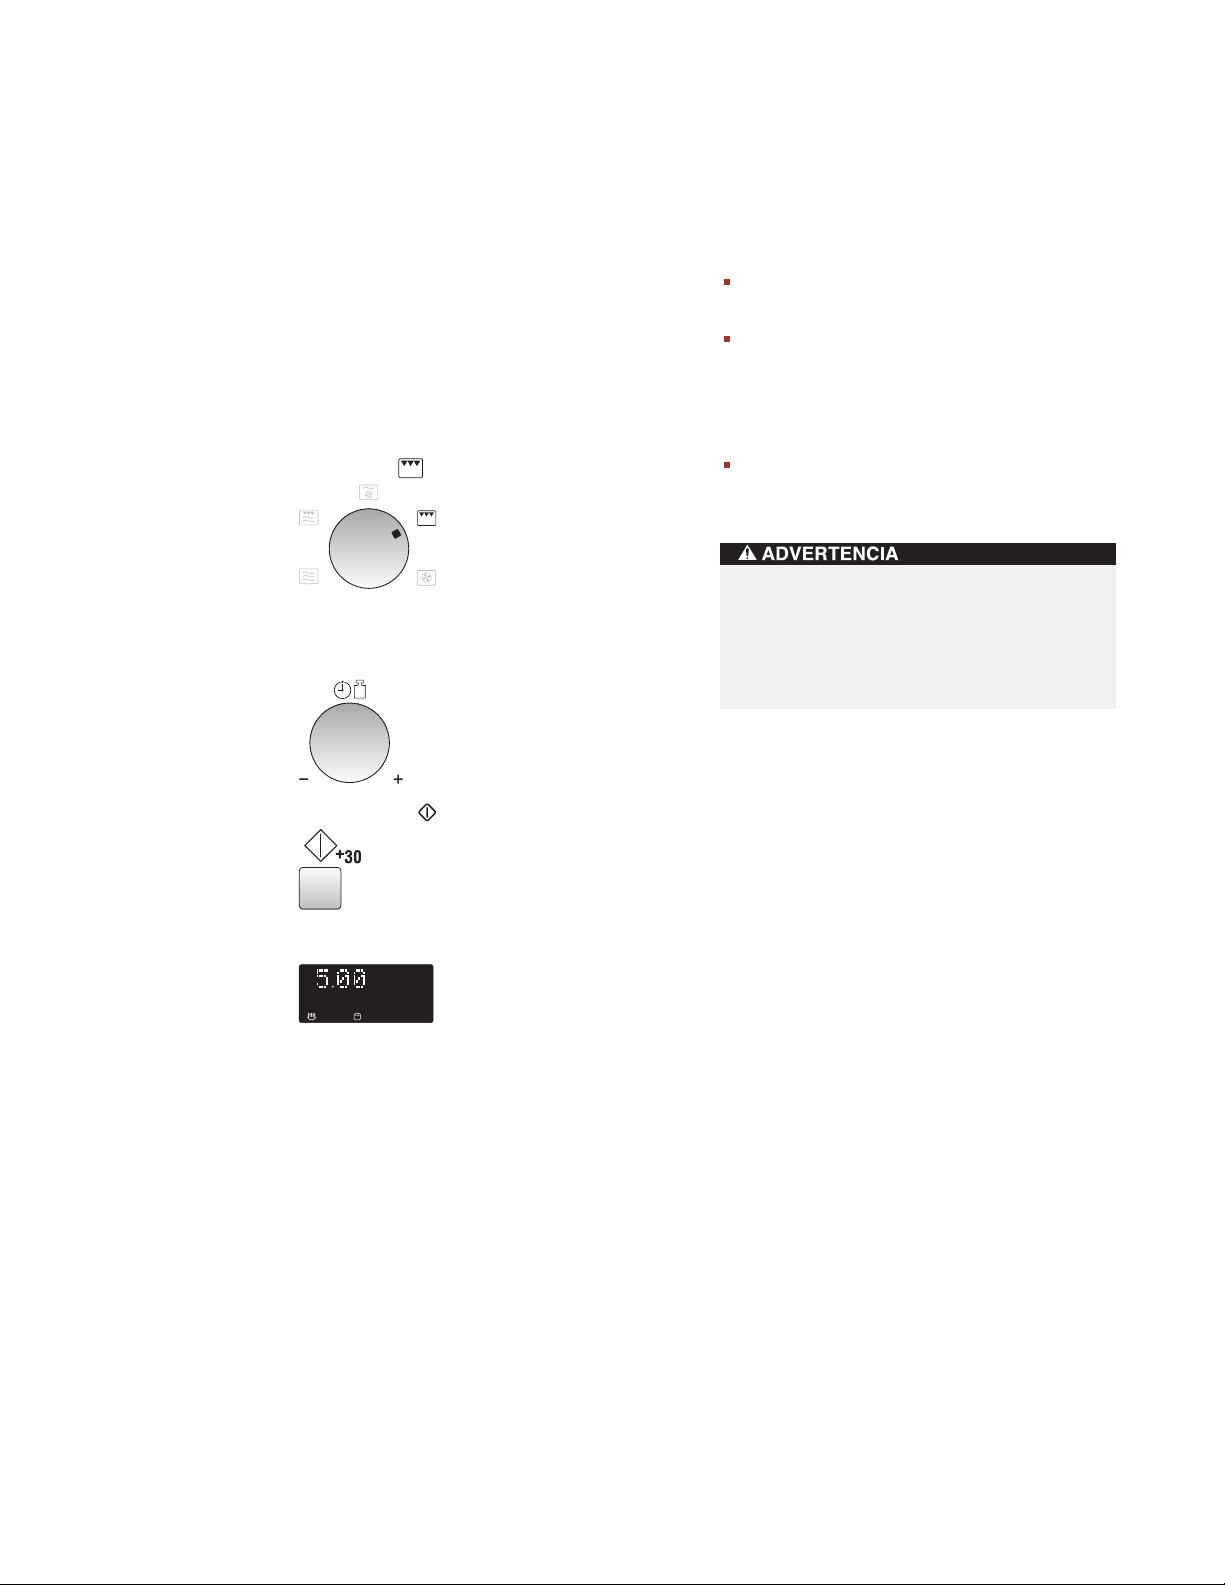
FUNCIONAMIENTO DEL MICROONDAS POR CONVECCIÓN WOLF
COCCIÓN CON EL
GRILL
El elemento calorífico del grill situado en la parte
superior de la cavidad del horno sólo dispone de
una configuración de potencia.
POR EJEMPLO
Para cocinar queso en una tostada durante 5
minutos (coloque la tostada en la rejilla alta).
1)
Gire el mando
MODO DE COCCIÓN
hasta la
posición de Grill.
2)
Introduzca el tiempo de cocción deseado al
girar el mando
TEMPORIZADOR/PESO
en el
sentido de las agujas del reloj.
NOTAS:
Para cocinar con el grill se recomienda utilizar
la rejilla alta o la baja.
Es posible que observe humo o que huela a
quemado al usar el grill por primera vez.
Esto es normal y no indica que el horno esté
averiado. (Consulte más abajo “calentar sin
alimentos”).
Después de cocinar, en la pantalla aparece
“ENFRIÁNDOSE “.
La cavidad, la puerta, el armazón exterior,
el plato giratorio, las guías y los platos del
horno alcanzan temperaturas elevadas, por
lo que debe usar siempre guantes gruesos
de horno al sacar la comida o el plato giratorio del horno para evitar quemaduras.
3)
Pulse el botón
+30
para empezar a cocinar.
x1
4) Compruebe la pantalla.
72
Page 73
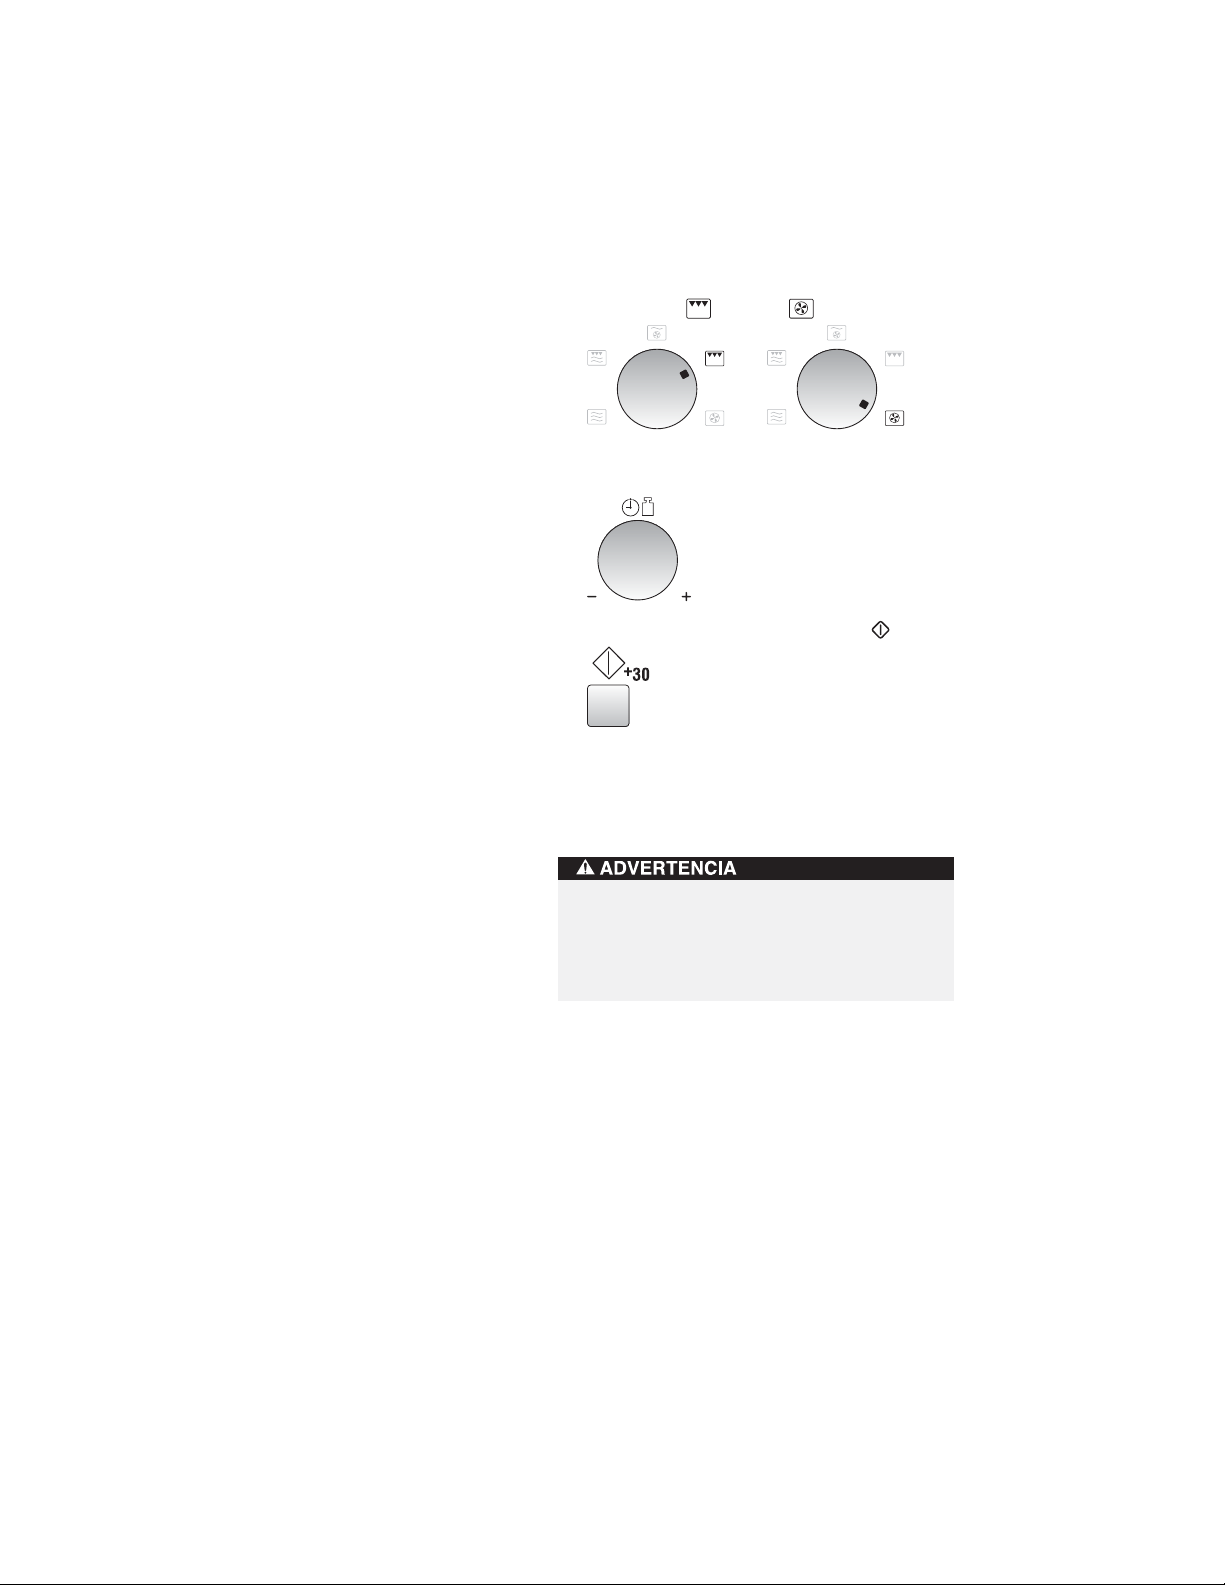
FUNCIONAMIENTO DEL MICROONDAS POR CONVECCIÓN WOLF
CALENTAR SIN ALIMENTOS
Es posible que observe humo o que huela a
quemado al utilizar el grill y la convección por
primera vez. Esto es normal y no indica que el
horno esté averiado.
Para evitar este problema, cuando vaya a utilizar
por primera vez el horno, caliéntelo sin alimentos
durante 20 minutos con el grill y después por
convección a 250 °C.
NOTA IMPORTANTE:
Para que se disipe el humo
o los olores durante la operación, abra una
ventana o active la ventilación de la cocina.
Compruebe que no haya comida en el interior
del horno.
POR EJEMPLO
1)
Gire el mando
posición de
2)
Indique el tiempo deseado de calentamiento
MODO DE COCCIÓN
GRILL
o
CONVECCIÓN
hasta la
(20 min).
3)
Inicie el proceso al pulsar el botón
+30
x1
El horno comenzará una cuenta atrás. Una vez
que haya finalizado la cocción, abra la puerta
para que se enfríe la cavidad del horno.
.
.
La puerta, el armazón exterior y la cavidad
del horno alcanzan temperaturas elevadas.
Tenga cuidado para evitar quemaduras al
enfriar el horno después de utilizarlo.
73
Page 74
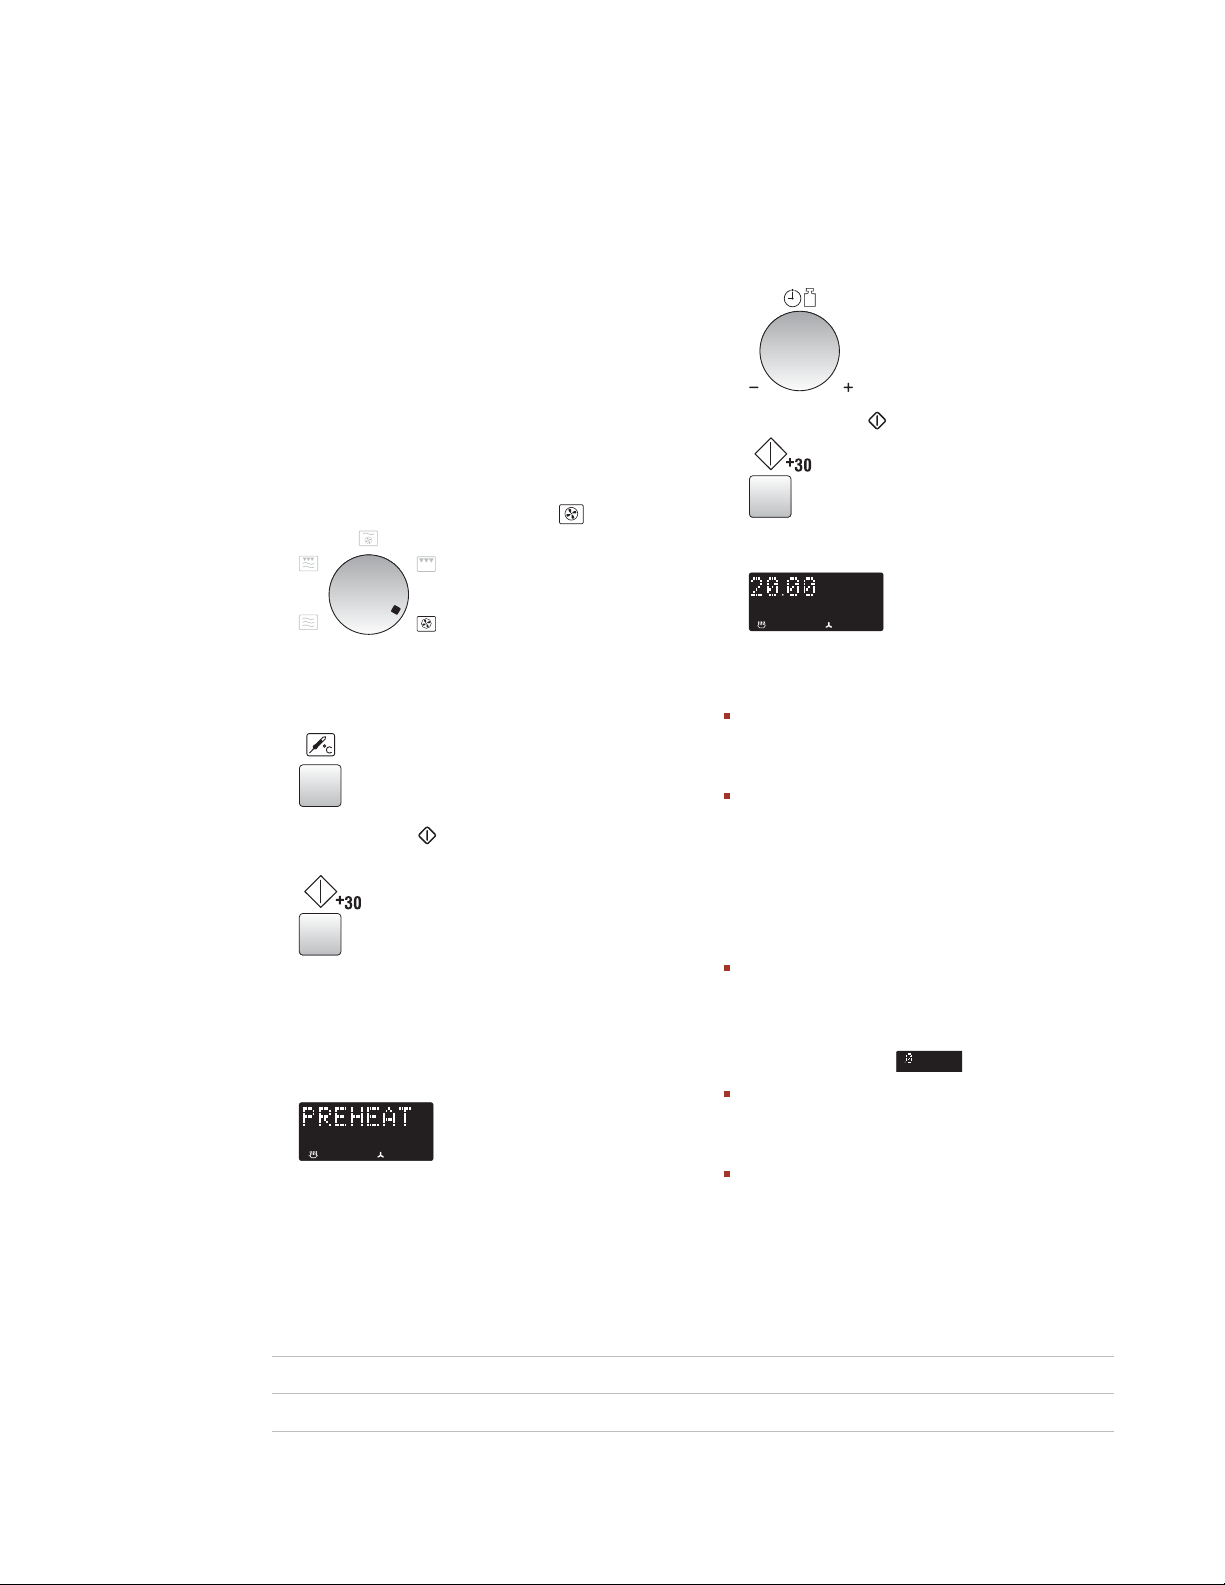
FUNCIONAMIENTO DEL MICROONDAS POR CONVECCIÓN WOLF
COCCIÓN POR CONVECCIÓN
4)
Puede utilizar el horno de modo convencional por
medio de la función de convección y 10 temperaturas predeterminadas. Observe la tabla que
aparece más abajo.
EJEMPLO 1
COCINAR CON PRECALENTAMIENTO
Para precalentar a 180 °C y cocinar durante
20 minutos a 180 °C.
1)
Seleccione el modo de cocción al girar el
mando
MODO DE COCCIÓN
a .
Introduzca el tiempo de cocción (20 min.) por
medio del mando
5)
Pulse el botón
TEMPORIZADOR/PESO
+30
.
x1
6) Compruebe la pantalla.
.
2)
Introduzca la temperatura de precalentamiento
deseada al pulsar seis veces el botón
VECCIÓN
. En la pantalla aparecerá 180 °C.
CON-
x6
3)
Pulse el botón
lentar.
+30
para empezar a preca-
x1
Cuando el horno alcance la temperatura seleccionada de precalentamiento, sonará una
señal acústica y en la pantalla aparecerá
180 °C. Abra la puerta e introduzca los alimentos en el horno. Cierre la puerta.
NOTAS:
Durante el proceso de precalentamiento, el
plato giratorio debe estar en el interior del
horno.
Tras el precalentamiento, si desea cocinar
a una temperatura diferente, pulse el botón
CONVECCIÓN
ratura deseada en la pantalla. En el ejemplo
anterior, para cambiar la temperatura tendría
que pulsa el botón
introducir el tiempo de cocción.
Cuando el horno alcance la temperatura de
precalentamiento programada, se mantendrá
automáticamente a esta misma temperatura
durante 30 minutos. Después de 30 minutos, la
pantalla mostrará o “ENFRIÁNDOSE”.
Después de cocinar, el horno se enfriará
automáticamente y en la pantalla puede
aparecer el mensaje “ENFRIÁNDOSE”.
Para obtener los mejores resultados al seguir
las instrucciones de embalaje para la convección, siga las instrucciones de “horno convencional”.
hasta que aparezca la tempe-
CONVECCIÓN
después de
74
CONFIGURACIÓN DE LA CONVECCIÓN
Pulse el botón CONVECCIÓN 1 2 3 4 5 6 7 8 9 10
Temperatura del horno (°C) 250 230 220 200 190 180 160 130 100 40
Page 75
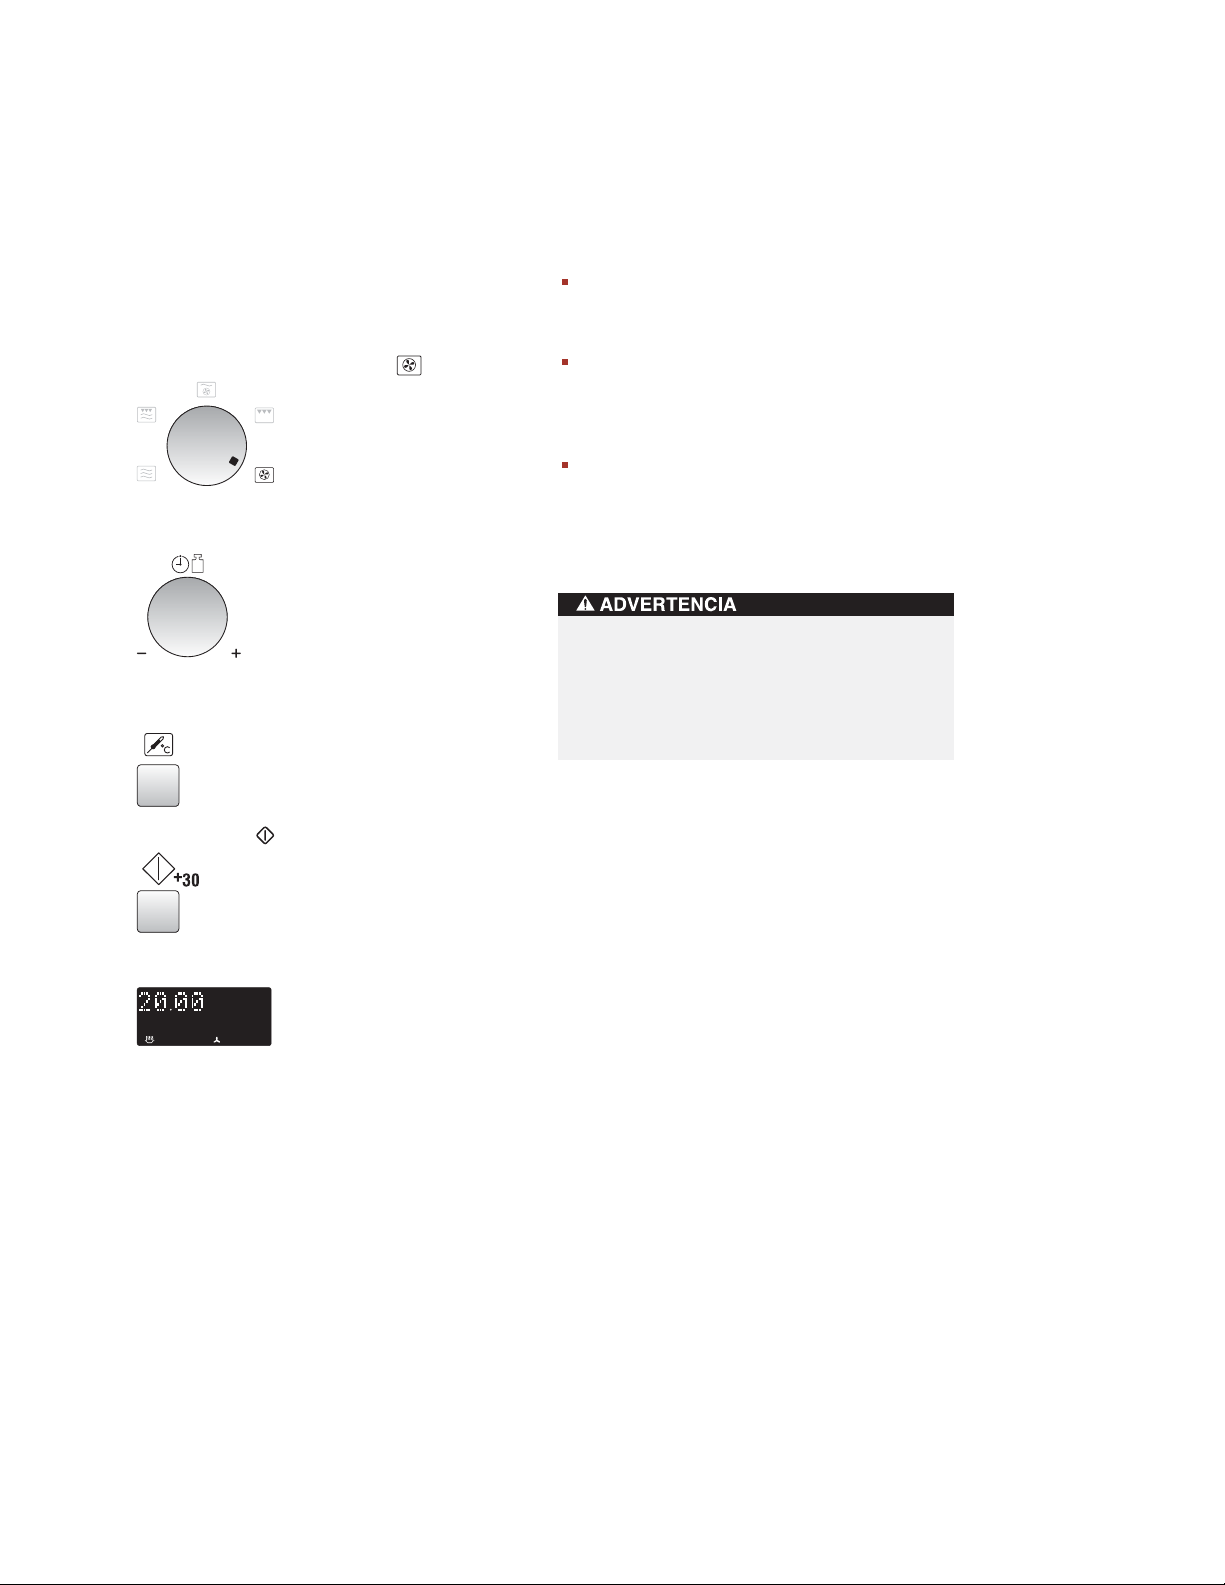
FUNCIONAMIENTO DEL MICROONDAS POR CONVECCIÓN WOLF
COCCIÓN POR
EJEMPLO 2
COCINAR SIN PRECALENTAMIENTO
Para cocinar a 250 °C durante 20 minutos.
1)
Seleccione el modo de cocción al girar el
mando
2)
Introduzca el tiempo de cocción (20 mín.) por
medio del mando
3)
Seleccione la temperatura de cocción
deseada. (250 °C).
MODO DE COCCIÓN
CONVECCIÓN
a .
TEMPORIZADOR/PESO
NOTAS:
Después de cocinar, el horno se enfriará
automáticamente y en la pantalla puede
aparecer el mensaje “ENFRIÁNDOSE”.
Para cambiar la temperatura de convección,
pulse el botón
aparezca en la pantalla la temperatura
deseada.
Es posible que observe humo o que huela a
quemado al utilizar la convección por primera
vez. Esto es normal y no indica que el horno
.
esté averiado. (Consulte “Calentar sin alimentos” en la página 73).
La cavidad, la puerta, el armazón exterior,
el plato giratorio, las guías y los platos del
horno alcanzan temperaturas elevadas, por
lo que debe usar siempre guantes gruesos
de horno al sacar la comida o el plato giratorio del horno para evitar quemaduras.
CONVECCIÓN
hasta que
x1
4)
Pulse el botón
+30
.
x1
5) Compruebe la pantalla.
75
Page 76
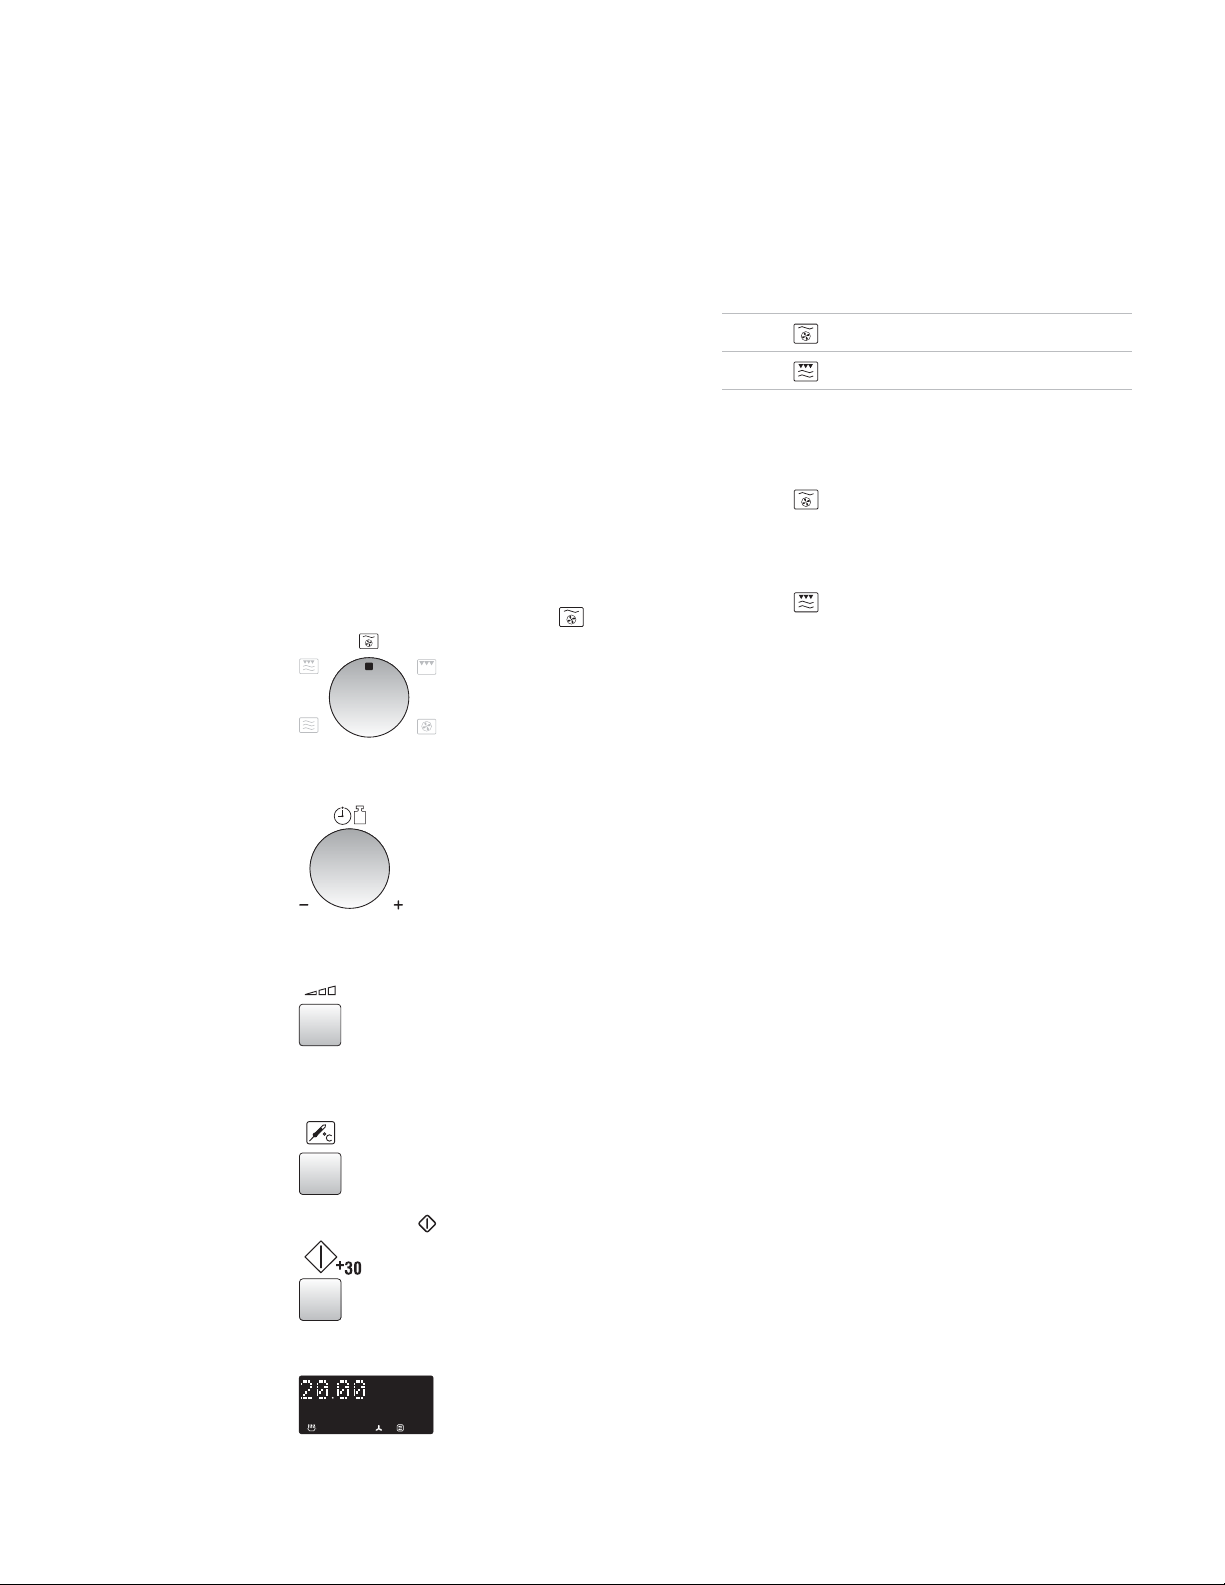
FUNCIONAMIENTO DEL MICROONDAS POR CONVECCIÓN WOLF
COCCIÓN EN MODO DUAL
Su horno dispone de dos modos de cocción
DUAL
que combinan 1) Convección y micro-
ondas, 2) Grill con microondas.
DUAL
Para seleccionar el modo de cocción
el mando
deseada y después seleccione el modo que
quiera utilizar. El modo de cocción dual generalmente reduce el tiempo total de cocción.
EJEMPLO 1
Para cocinar durante 20 minutos en modo DUAL
1 con 90 W de potencia de microondas y 200 °C
de convección.
1)
2)
MODO DE COCCIÓN
Seleccione el modo de cocción al girar el
mando
Indique el tiempo deseado de preparación
(20 min).
MODO DE COCCIÓN
hasta la posición
a .
, gire
Potencia
MODO Método inicial de
DE COCCIÓN de cocción microondas
DUAL 1
DUAL 2
NOTAS:
Las configuraciones de potencia son variables:
DUAL 1
cambiar de 40 °C a 250 °C en 10 niveles. Los
niveles de potencia de microondas se pueden
cambiar de 90 W a 630 W en cuatro niveles.
DUAL 2
ondas se pueden cambiar de 90 W a 900 W en
cinco niveles.
Convección 250 °C 270 W
Grill 270 W
: La temperatura del horno se puede
: Los niveles de potencia de micro-
76
3)
Pulse dos veces el botón
POTENCIA DEL MICROONDAS
x2
4)
Pulse cuatro veces el botón
(200 °C).
x4
5)
Pulse el botón
+30
.
x1
6) Compruebe la pantalla.
NIVEL DE
(90 W).
CONVECCIÓN
Page 77
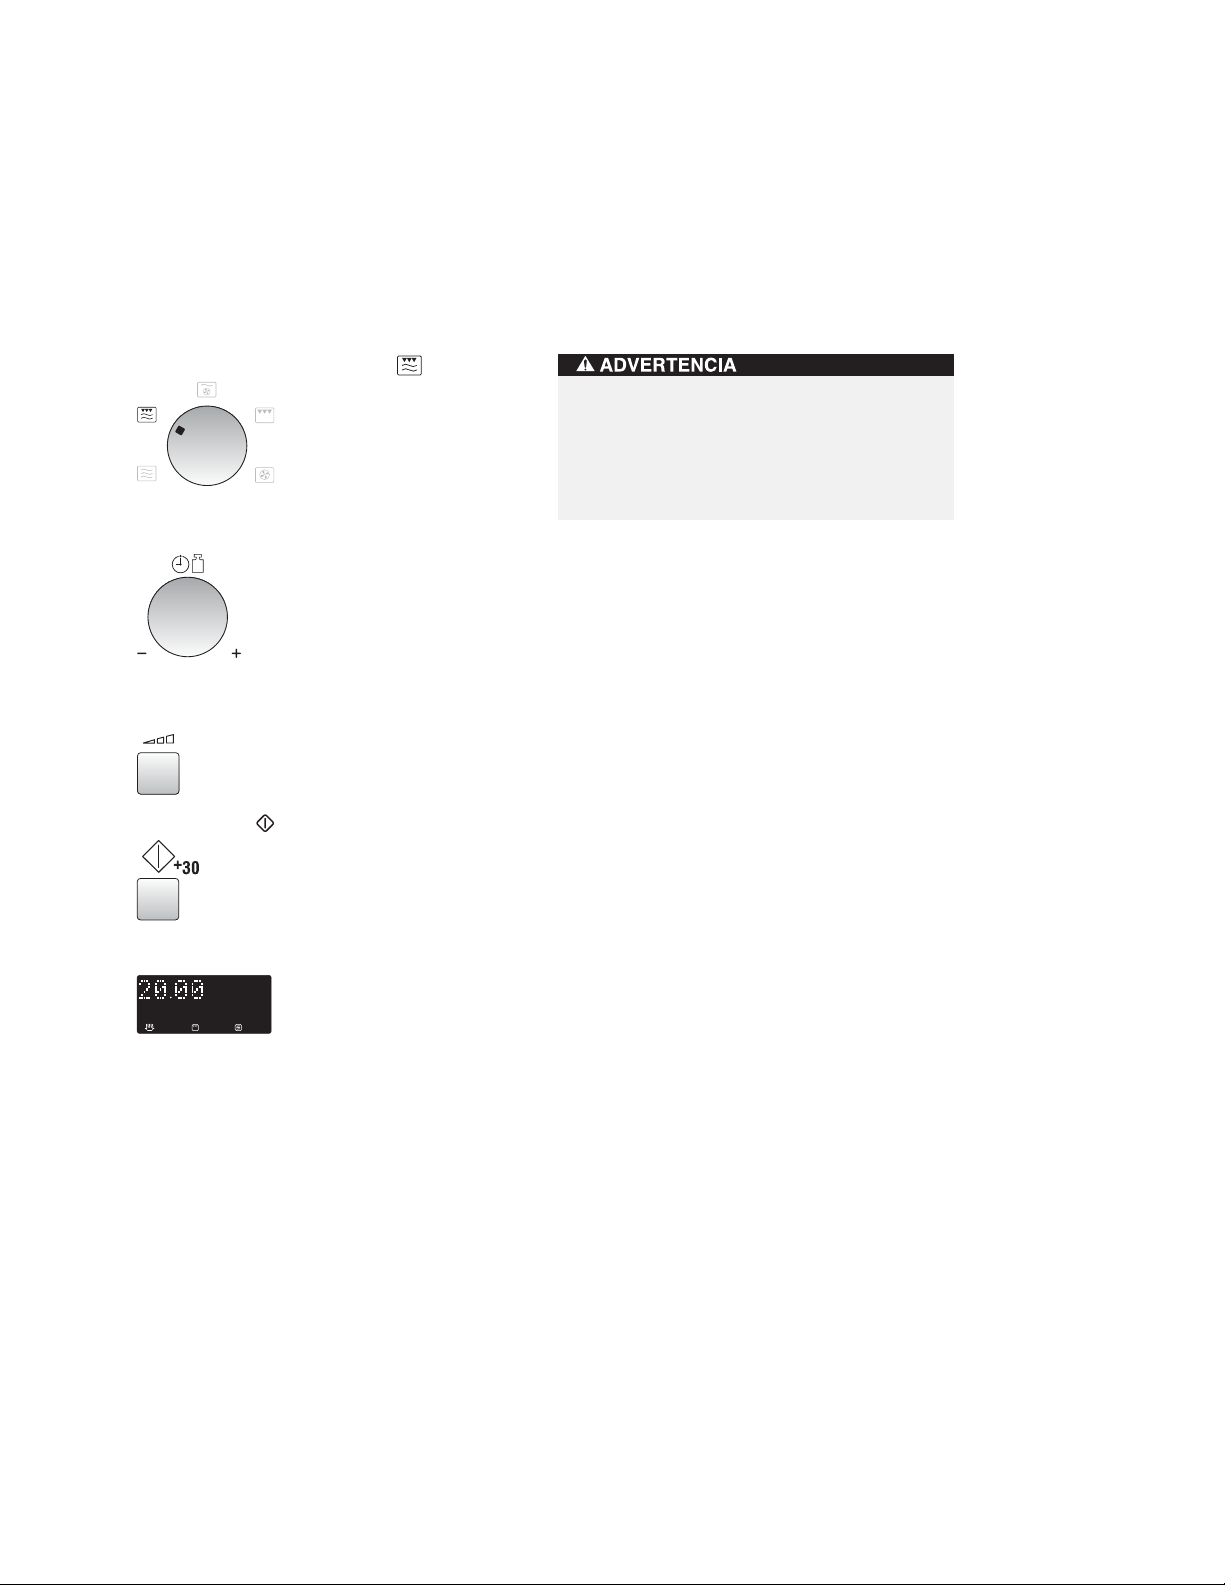
FUNCIONAMIENTO DEL MICROONDAS POR CONVECCIÓN WOLF
COCCIÓN EN MODO
EJEMPLO 2
Para cocinar durante 20 minutos en modo DUAL
2 con 90 W de potencia de microondas y GRILL.
1)
Seleccione el modo de cocción al girar el
mando
2)
Indique el tiempo deseado de preparación
(20 min).
3)
Pulse dos veces el botón
POTENCIA DEL MICROONDAS
MODO DE COCCIÓN
DUAL
a .
NIVEL DE
(90 W).
NOTA:
Después de cocinar, el horno se enfriará automáticamente y en la pantalla puede aparecer el
mensaje “ENFRIÁNDOSE “.
La cavidad, la puerta, el armazón exterior,
el plato giratorio, las guías y los platos del
horno alcanzan temperaturas elevadas, por
lo que debe usar siempre guantes gruesos
de horno al sacar la comida o el plato giratorio del horno para evitar quemaduras.
x2
4)
Pulse el botón
+30
.
x1
5) Compruebe la pantalla.
77
Page 78
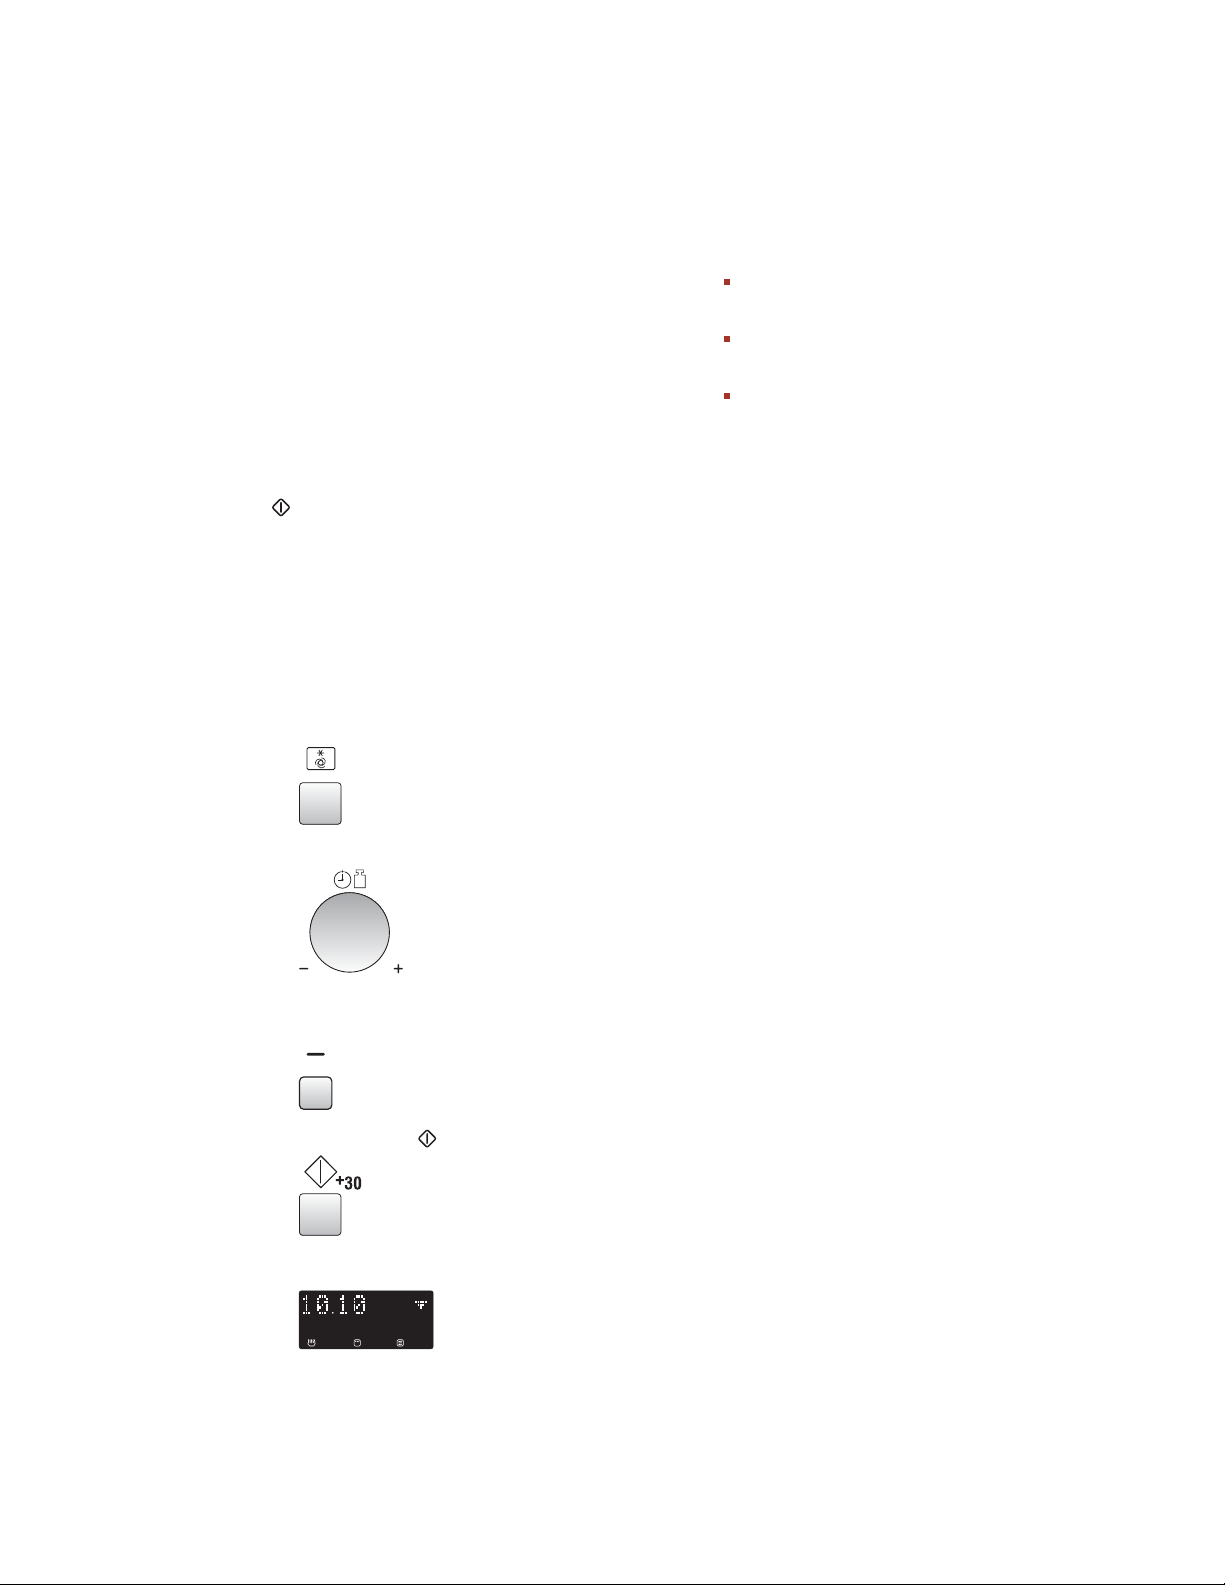
FUNCIONAMIENTO DEL MICROONDAS POR CONVECCIÓN WOLF
BOTÓN MENOS (– ) / MÁS (+)
Los botones
reducir o aumentar fácilmente los tiempos
programados (para que la comida esté más o
menos cocinada) mientras está en curso la
cocción.
SELECCIONAR AUTOCOCCIÓN
CON MENOS/MÁS
Pulse el botón
de introducir el peso y antes de pulsar el botón
+30
ver los menús que utilizan
POR EJEMPLO
Para cocinar 0,2 kg de patatas fritas por medio
de la función
1)
Seleccione
para patatas fritas al pulsar el botón cuatro
veces.
MENOS
. (Consulte las tablas de preparación para
AUTO COCCIÓN CONGELADO
AUTO COCCIÓN CONGELADO
MENOS
(–) y
MÁS
(–) y
MÁS
MENOSy MÁS
(+) le permiten
(+) después
).
.
x4
2)
Introduzca la cantidad (0,2 kg).
NOTAS:
Para cancelar
el mismo botón.
Para cambiar de
botón
MENOS
Para cambiar de
botón
MÁS
MODIFICACIÓN DEL TIEMPO DE
CALENTAMIENTO CON EL HORNO
EN FUNCIONAMIENTO
Mientras la cocción manual está en curso, el
tiempo de cocción se puede reducir o aumentar
en intervalos de 30 segundos cada vez que se
pulsan los botones
NOTA:
Sólo se puede utilizar esta función para el modo
de cocción manual.
MENOSo MÁS
MÁSa MENOS
(–).
MENOSa MÁS
(+).
MENOS
vuelva a pulsar
, pulse el
, pulse el
(–) y
MÁS
(+).
78
3)
Seleccione las patatas fritas “finas” al pulsar
una vez el botón
MENOS
(–).
x1
4)
Pulse el botón
+30
.
x1
5) Compruebe la pantalla.
Page 79
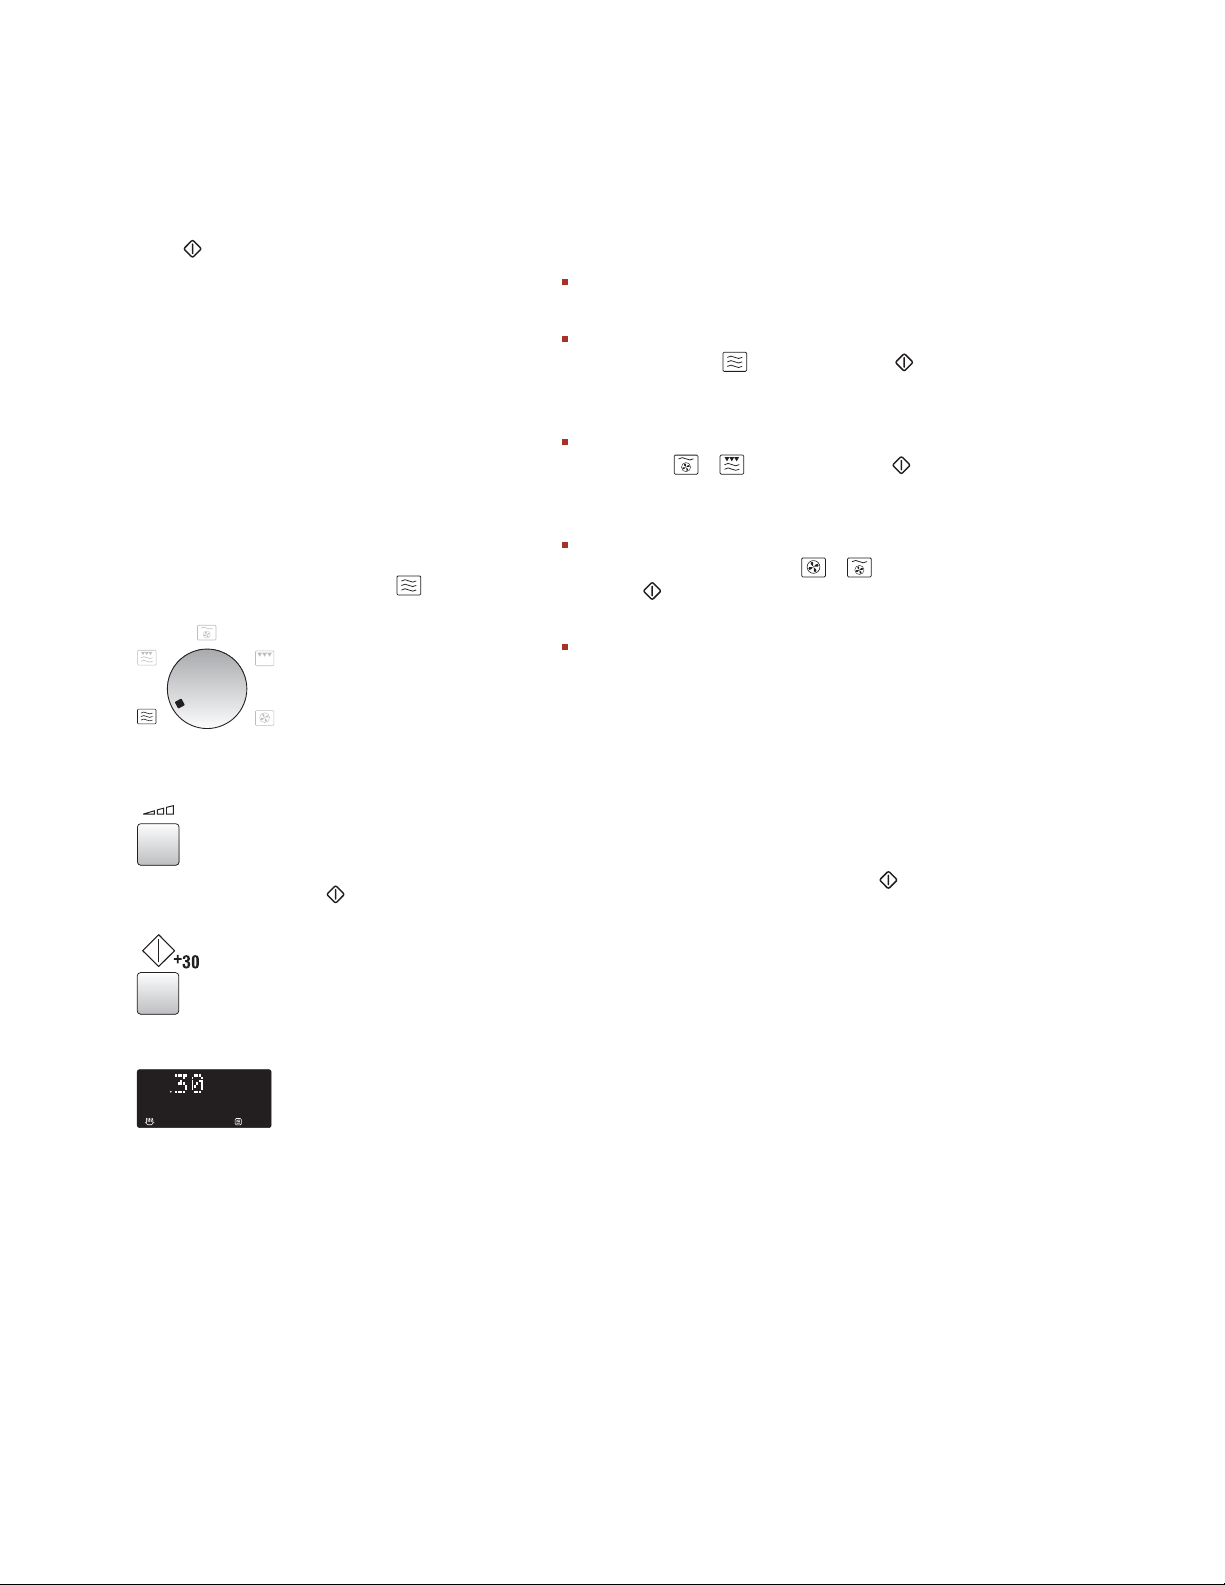
FUNCIONAMIENTO DEL MICROONDAS POR CONVECCIÓN WOLF
FUNCIÓN
El botón
funciones:
COCCIÓN DE 30 SEGUNDOS
Puede cocinar en el modo deseado de
preparación durante 30 segundos sin introducir
el tiempo de cocción.
POR EJEMPLO
Para cocinar durante 30 segundos con 630 W
de potencia de microondas.
1)
Seleccione el modo de cocción al girar el
mando
ondas).
2)
Cambie la potencia al pulsar el botón
DE POTENCIA DE MICROONDAS
AÑADIR 30 SEGUNDOS
+30
le permite manejar las siguientes
MODO DE COCCIÓN
a (Micro-
NIVEL
.
NOTAS:
Sólo se puede utilizar esta función para el
modo de cocción manual.
Cuando el mando
en microondas ( ) y pulsa el botón
la potencia de microondas es siempre de
900 W.
Cuando el mando
en DUAL ( o ) y pulsa el botón
la potencia de microondas es siempre de
270 W.
Cuando el mando
en convección o DUAL 1 ( o ) y pulsa el
botón
es siempre de 250 °C.
Para evitar que los niños puedan hacer mal
uso del aparato, la función
segundos
hayan transcurrido tres minutos desde la
última acción, es decir, cerrar la puerta, pulsar
el botón
+30
no se puede utilizar hasta que no
DETENER
MODO DE COCCIÓN
MODO DE COCCIÓN
MODO DE COCCIÓN
, la temperatura de convección
añadir 30
o finalizar la cocción.
está
+30
está
+30
está
,
,
x2
3)
Pulse una vez el botón
a cocinar.
x1
4) Compruebe la pantalla.
+30
para empezar
AMPLIAR EL TIEMPO DE PREPARACIÓN
Puede ampliar el tiempo de preparación en múltiplos de 30 segundos al pulsar el botón
mientras el horno está en funcionamiento.
NOTA:
Sólo se puede utilizar esta función para el modo
de cocción manual.
+30
79
Page 80
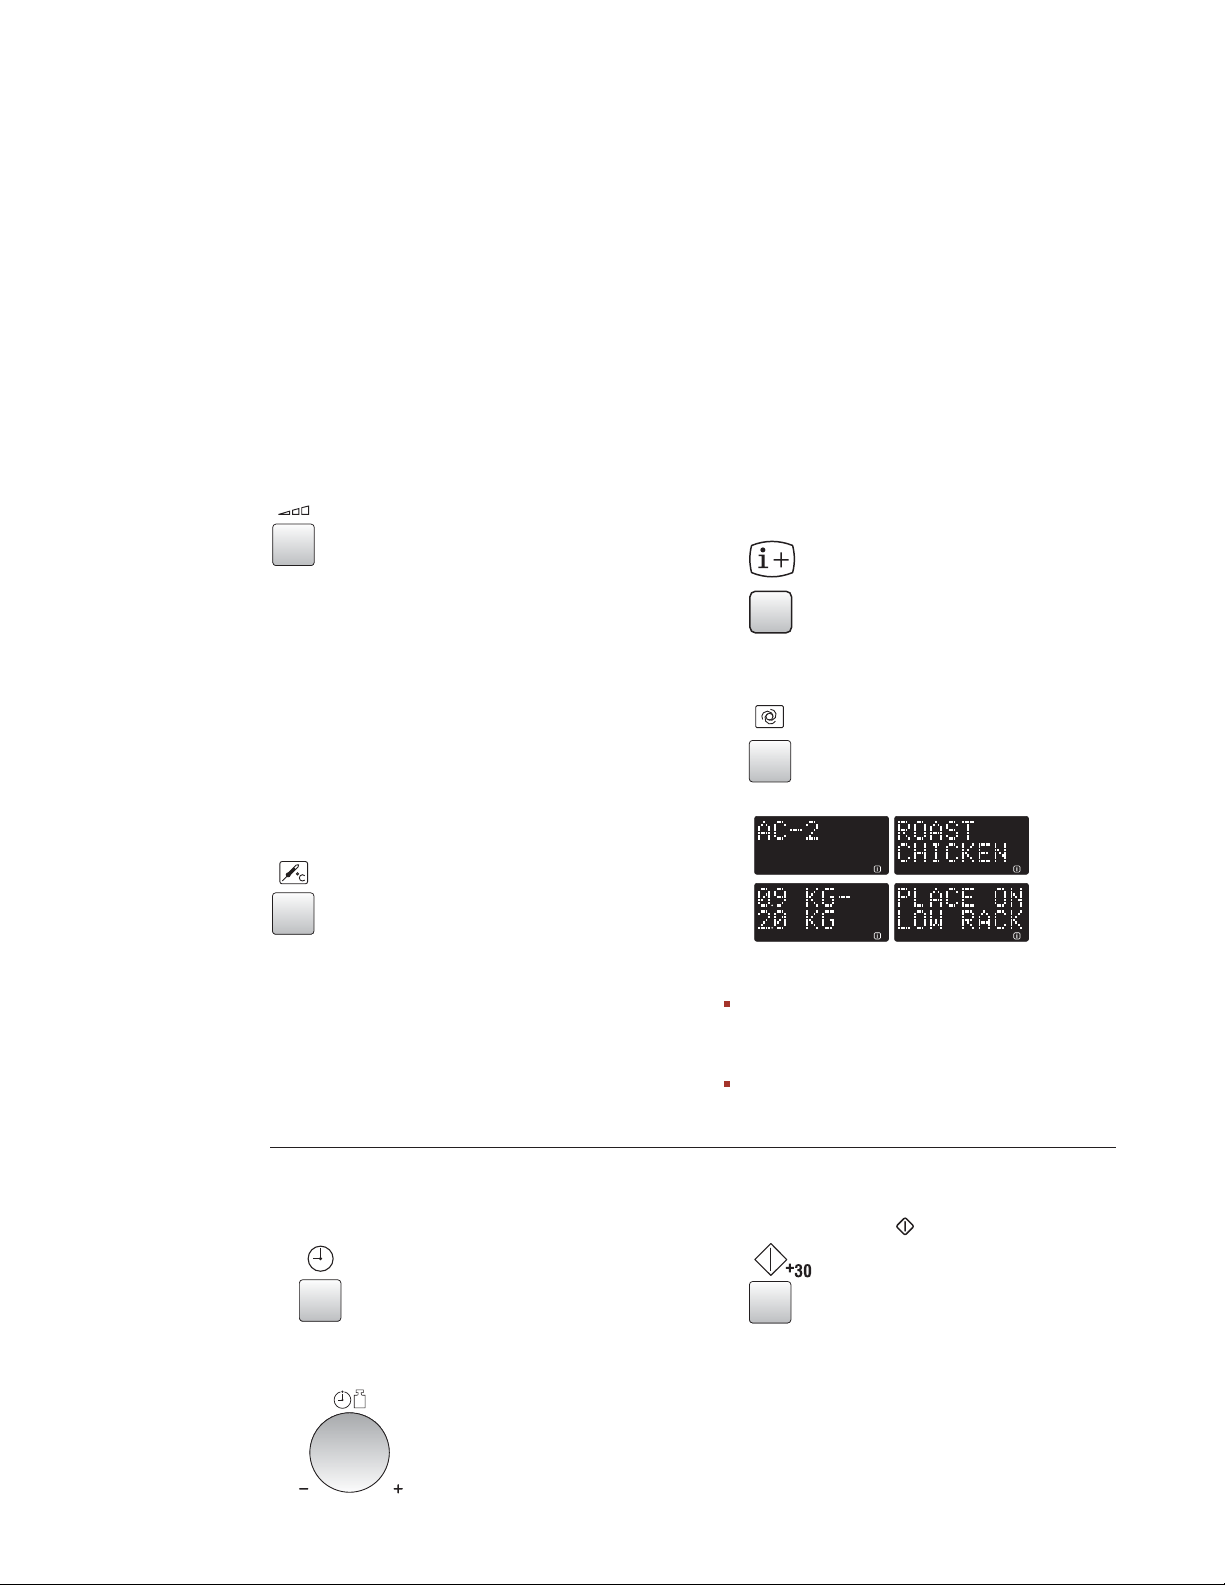
FUNCIONAMIENTO DEL MICROONDAS POR CONVECCIÓN WOLF
COMPROBACIÓN DE CONFIGURACIÓN
DURANTE EL FUNCIONA-MIENTO
Puede comprobar el nivel de potencia y la
temperatura real del horno durante el precalentamiento.
PARA COMPROBAR EL NIVEL
DE POTENCIA
Para comprobar el nivel de potencia del microondas durante la cocción, pulse el botón
POTENCIA DEL MICROONDAS
El tiempo marcado en el horno sigue corriendo,
aunque en la pantalla aparezca el nivel de
potencia.
El nivel de potencia se seguirá mostrando
mientras siga pulsando el botón.
PARA COMPROBAR LA TEMPERATURA
DE CONVECCIÓN
NIVEL DE
.
BOTÓN DE
Todos los botones ofrecen información útil.
Si desea consultarla, pulse el botón
CIÓN
antes de pulsar el botón correspondiente.
POR EJEMPLO
Para obtener la información sobre el menú
AUTO COCCIÓN número 2, pollo asado:
1)
Seleccione la función del botón
CIÓN
INFORMACIÓN
INFORMA-
INFORMA-
.
x1
2)
Pulse dos veces el botón
para seleccionar “pollo asado”.
AUTO COCCIÓN
x2
Para comprobar la temperatura de convección
durante la cocción, pulse el botón
Cuando el horno esté precalentándose, puede
comprobar la temperatura real del mismo.
La temperatura de convección en °C se seguirá
mostrando mientras siga pulsando el botón.
BOTÓN TEMPORIZADOR
1)
Pulse el botón
TEMPORIZADOR
CONVECCIÓN
una vez.
x1
2)
Introduzca el tiempo al girar el mando
TEMPORIZADOR/PESO
en sentido horario.
.
NOTAS:
El mensaje de información se repetirá dos
veces y a continuación en la pantalla aparecerá la hora, si está configurada.
Si quiere cancelar la información, pulse el
botón
DETENER
3)
Pulse el botón de
.
+30
x1
El horno iniciará una cuenta regresiva.
para comenzar.
80
Page 81
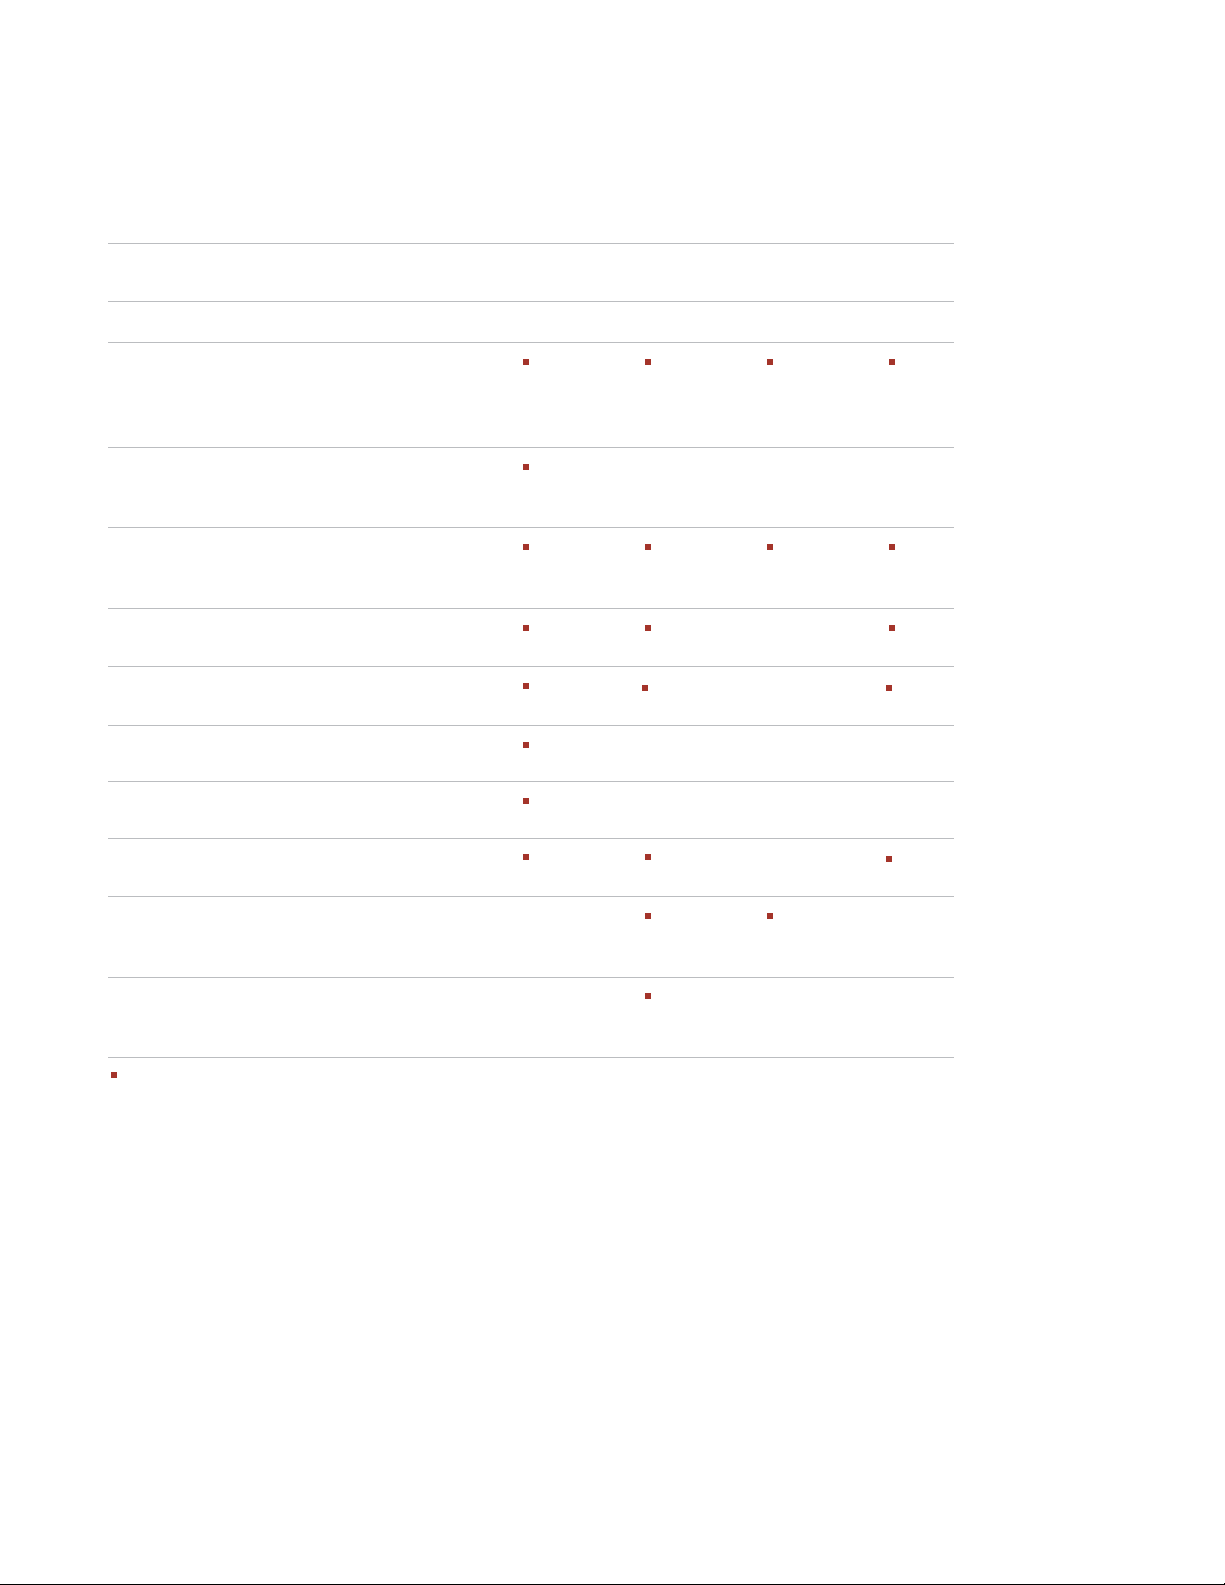
FUNCIONAMIENTO DEL MICROONDAS POR CONVECCIÓN WOLF
GUÍA DE
MATERIAL DE VAJILLA
VAJILLA APROPIADA PARA EL HORNO
MODO DE FUNCIONAMIENTO
REFRACTARIA
Microondas Convección Grill Combinación
Platos de cristal y cerámica apropiados
para horno (sin partes metálicas, como
Pyrex, utensilios para horno, bandeja de
cristal).
Cristal y porcelana no aptos para horno
(por ejemplo, vajilla de mesa).
1
— — —
Cerámica vidriada y vitrocerámica
fabricada en material a prueba de
calor/congelación (por ejemplo, Arcoflam).
Barro apto para el horno.
2
Plástico termorresistente hasta 200 °C.
3 3
—
—
Papel, cartón — — —
3
Film transparente — — —
Bolsa de asar para microondas.
4
Utensilios metálicos para asar, como
— —
—
platos de esmalte o hierro-fundido.
Moldes de hornear lacados o con
— — —
revestimiento de silicona.
apto — no apto
1) excepto decoraciones en plata, oro, platino o metal
2) no incluye metal vidriado
3) tenga presente la temperatura máxima marcada por el fabricante
4) función combinada convección + microondas
4
81
Page 82
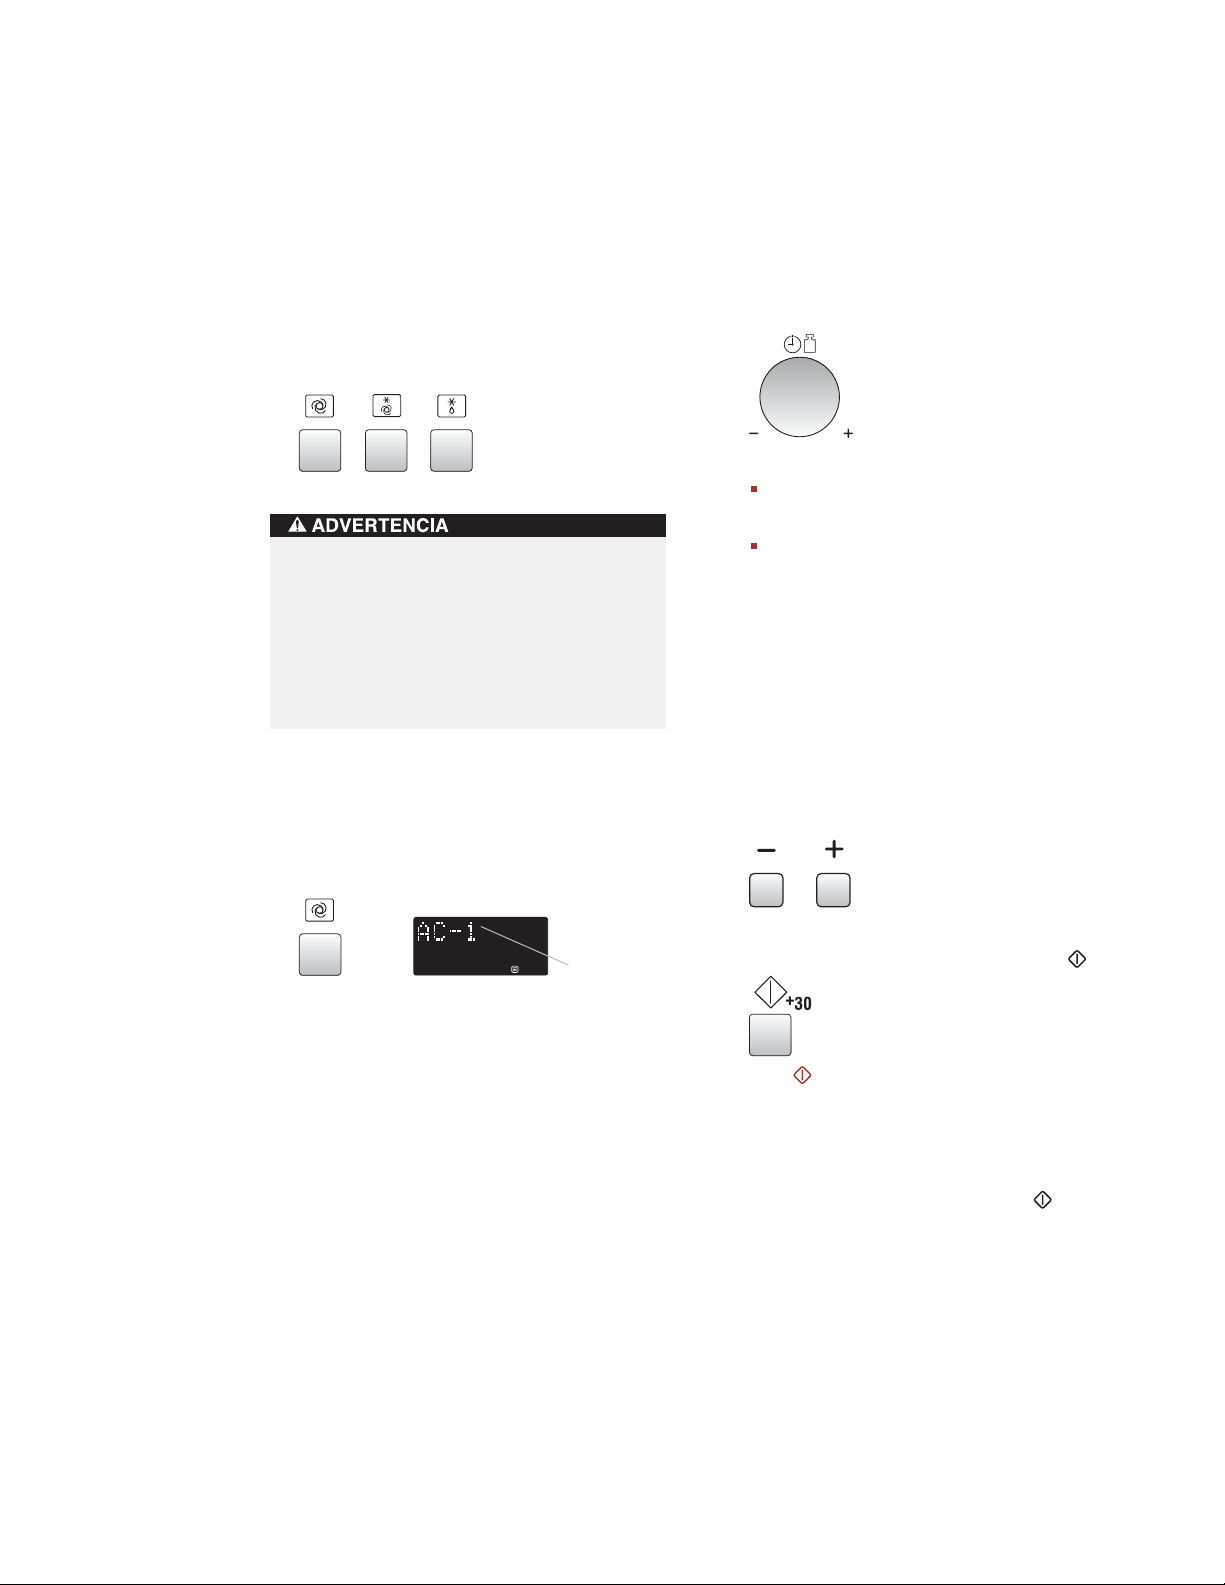
FUNCIONAMIENTO AUTOMÁTICO DEL MICROONDAS POR CONVECCIÓN WOLF
FUNCIONES
Las
FUNCIONES AUTOMÁTICAS
AUTOMÁTICAS
detectan
automáticamente el modo y el tiempo de
preparación correctos. Puede seleccionar entre 5
menús de
COCCIÓN CONGELADO
DESCONGELADO
Para AUTO COCCIÓN y AUTO COCCIÓN
CONGELADO: La cavidad, la puerta, el
armazón exterior, el plato giratorio, las
bandejas y los platos del horno alcanzan
temperaturas muy elevadas. Use guantes
protectores gruesos para evitar quemaduras
al sacar los alimentos o el plato giratorio del
horno.
AUTO COCCIÓN
.
Botones AUTOMÁTICOS
, 4 menús de
y 7 menús
AUTO
AUTO
PARA UTILIZAR ESTA FUNCIÓN
AUTOMÁTICA:
1)
Indique el menú al pulsar el botón
COCCIÓN
AUTO DESCONGELADO
,
AUTO COCCIÓN CONGELADO
hasta que aparezca
AUTO
en pantalla el número del menú deseado.
2)
El peso o la cantidad de los alimentos se
pueden indicar al girar el mando
RIZADOR/PESO
hasta que aparezca el
TEMPO-
peso/cantidad deseado.
Mando TEMPORIZADOR/PESO
Indique solamente el peso de la comida.
No incluya el peso del recipiente.
Si los alimentos pesan más o menos que
los pesos/cantidades que aparecen en la
tabla de preparación, cocínelos con los
programas manuales.
3)
Los tiempos de preparación programados son
tiempos medios. Si desea modificar estos
tiempos preprogramados en las funciones
automáticas, utilice los botones
o
MÁS
(+). Consulte la página 78 para más
MENOS
(–)
información. Para obtener los mejores resultados, siga las instrucciones de la tabla de
preparación.
o
82
x1
Número de menú
Botones MENOS/MÁS
4)
Para empezar a cocinar, pulse el botón
Botón +30
+30
Cuando es necesario realizar alguna acción (dar
la vuelta a la comida, por ejemplo), el horno se
detiene y suenan las señales acústicas. En la
pantalla aparece la acción correspondiente.
Para seguir cocinando, pulse el botón
+30
.
La temperatura final variará en función de la
inicial. Compruebe que la comida esté bien
caliente después de cocinarla. Si es necesario,
puede ampliar el tiempo de preparación y modificar el nivel de potencia.
.
Page 83
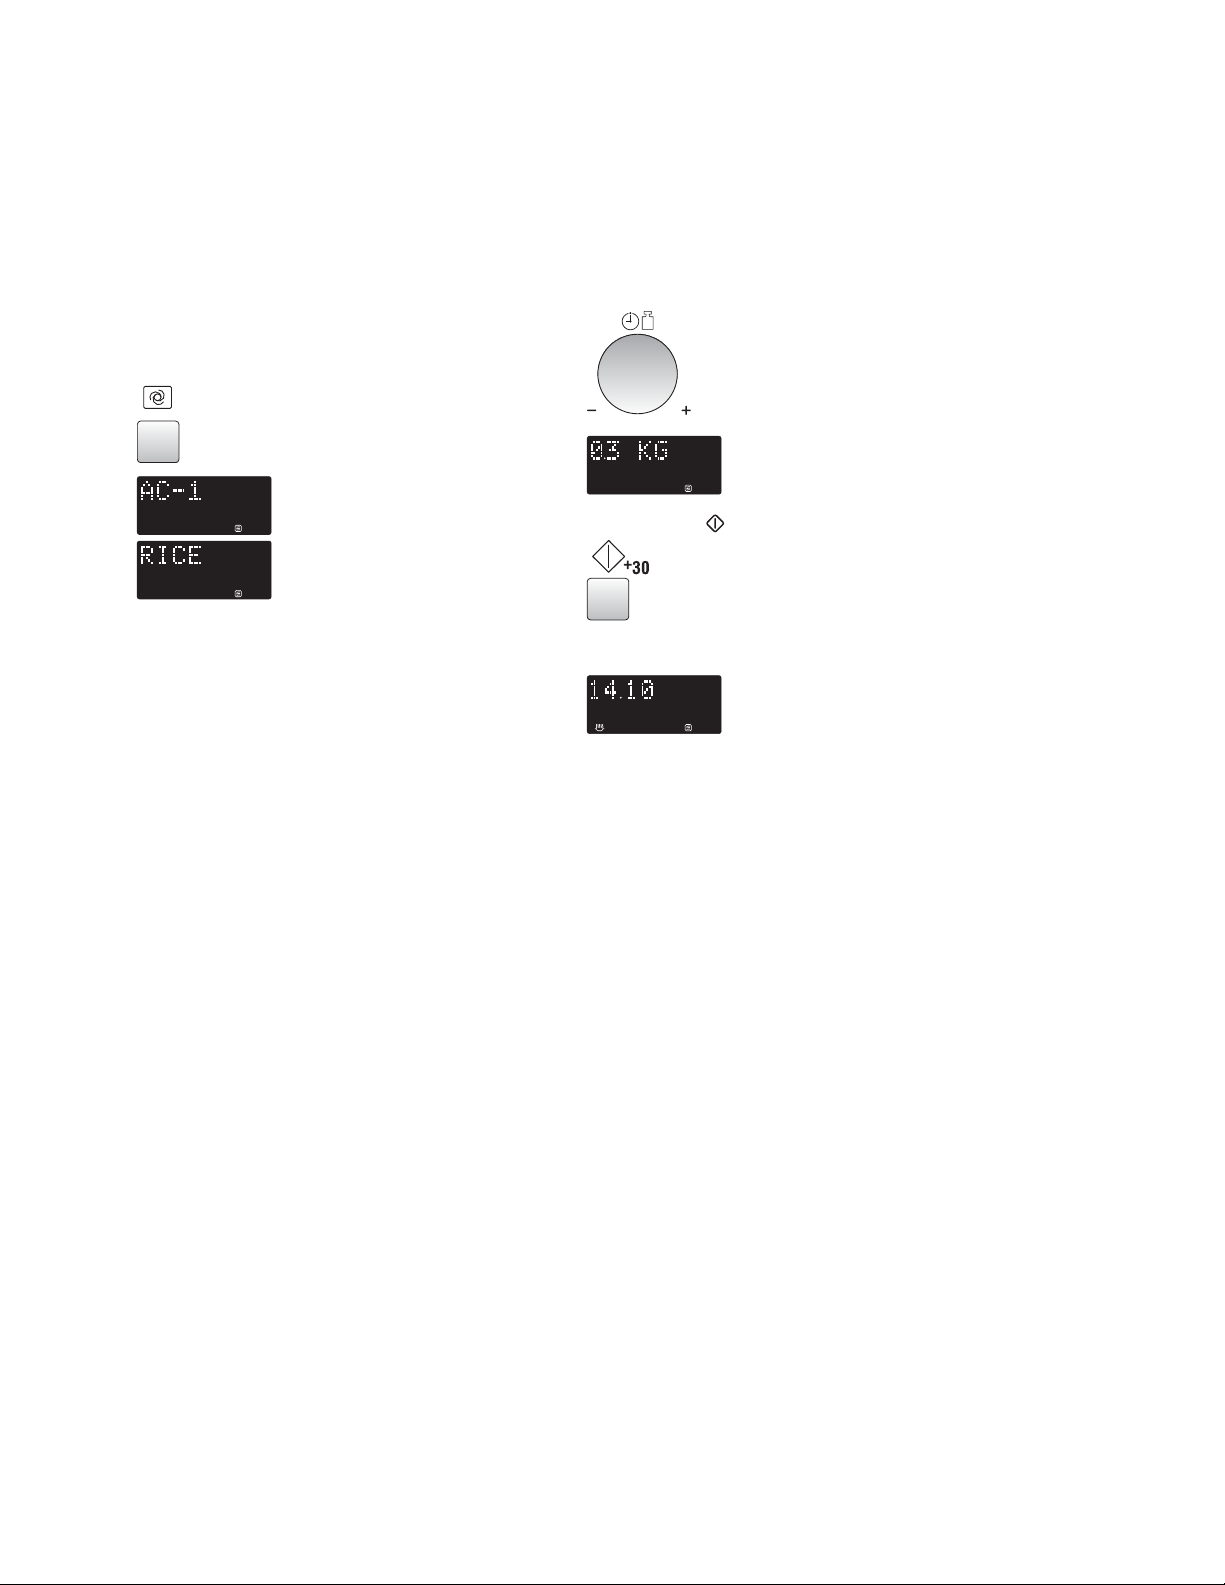
FUNCIONAMIENTO AUTOMÁTICO DEL MICROONDAS POR CONVECCIÓN WOLF
FUNCIONES
POR EJEMPLO
Para cocinar 300 g de arroz con AUTO COCCIÓN
(AC-1).
1)
Pulse una vez el botón
seleccionar “arroz”.
AUTOMÁTICAS
AUTO COCCIÓN
para
x1
2)
Introduzca el peso al girar el mando
RIZADOR/PESO
deseado.
3)
Pulse el botón
hasta que aparezca el peso
+30
para empezar a cocinar.
x1
4) Compruebe la pantalla.
TEMPO-
83
Page 84
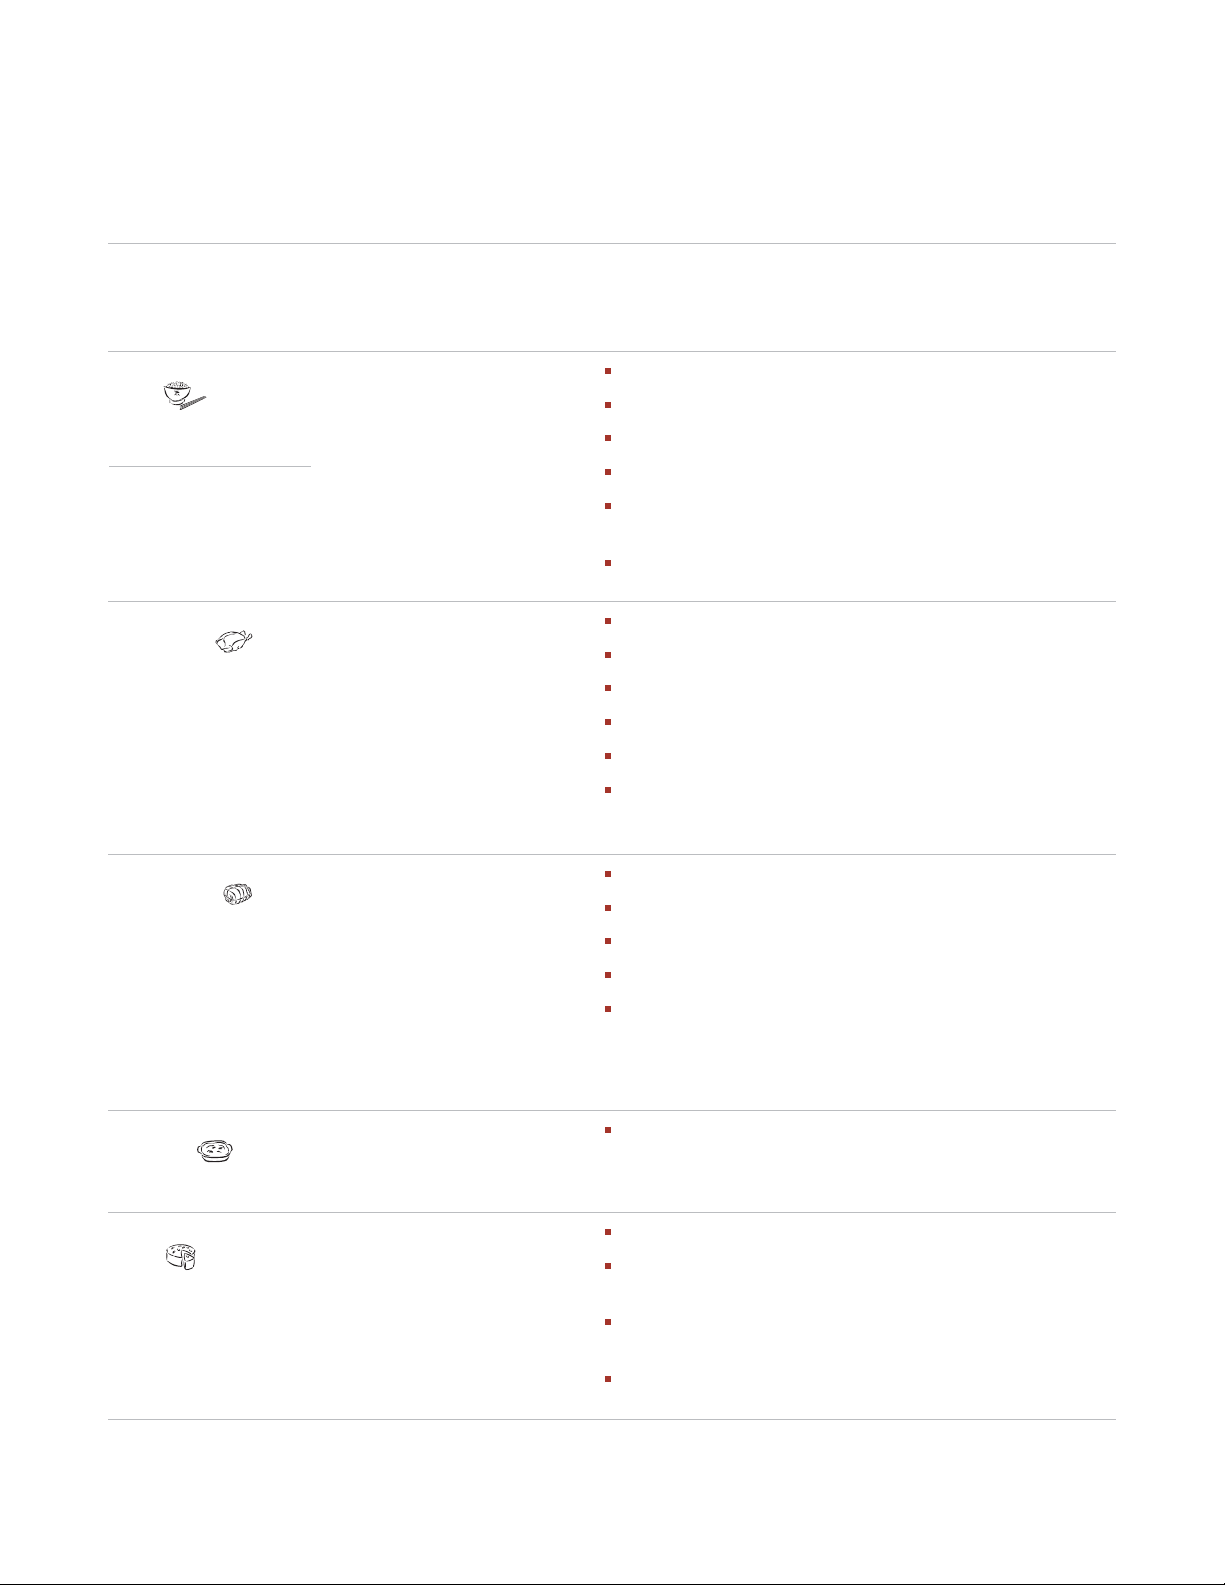
FUNCIONAMIENTO AUTOMÁTICO DEL MICROONDAS POR CONVECCIÓN WOLF
GUÍA DE
AUTO COCCIÓN
N.° DE MENÚ
AC-1
Arroz
Arroz Agua hirviendo
100 g 250 ml
200 g 450 ml
300 g 650 ml
AC-2
Pollo asado
Ingredientes para 1,2 kg de
pollo asado:
Sal y pimienta,
una cucharadita de pimentón
dulce, 2 cucharadas de aceite
PESO
(INCREMENTO
DE LA UNIDAD)
Y UTENSILIOS
0,1–0,3 kg (100 g)
Cuenco grande y tapa
0,9–2,0 kg (100 g)
Rejilla baja
PROCEDIMIENTO
Colóquelo en un cuenco grande y añada agua hirviendo.
Cúbralo con una tapa.
Ponga el plato en el centro del plato giratorio.
Cuando suene la señal acústica, remueva y vuelva a cubrir.
Cuando suene de nuevo la señal, remueva, vuelva a cubrir,
colóquelo de nuevo en el horno y pulse Inicio.
Deje reposar aprox. 10 min después de la cocción.
Mezcle los ingredientes y extiéndalos sobre el pollo.
Perfore la piel del pollo.
Coloque la pechuga del pollo boca abajo en una fuente.
Colóquelo en la rejilla baja y cocínelo.
Cuando suene la señal acústica, déle la vuelta.
Después de cocinarlo, deje reposar la comida alrededor
de 3 minutos en el horno, remuévala y colóquela en una
fuente para servir.
AC-3
Cerdo asado
Ingredientes para 1 kg de
cerdo magro enrollado:
1 diente de ajo machacado,
2 cucharadas de aceite,
1 cucharadas de pimentón
dulce, una pizca de comino
0,6–2,0 kg (100 g)
Rejilla baja
Se recomienda utilizar cerdo magro.
Mezcle los ingredientes y extiéndalos sobre el cerdo.
Ponga el cerdo en una fuente y cocínelo.
Cuando suene la señal acústica, déle la vuelta.
Después de cocinarlo, deje reposar envuelto en papel de
aluminio durante aproximadamente 10 min.
en polvo, 1 cucharaditas
de sal
AC-4
Gratinado
0,5–2,0 kg* (100 g)
Plato para gratinar
Consulte las recetas para “Gratinado” en la página 88.
Rejilla baja
AC-5
Tartas
0,5–1,5 kg (100 g)
Molde para hornear,
platillo
Rejilla baja
Prepare el pastel consultando la página 89.
Coloque un platillo boca abajo en la rejilla baja y ponga el
molde encima.
Después de hornear el pastel, déjelo reposar durante
aproximadamente 10 minutos.
Desmolde el pastel.
*Peso total de todos los ingredientes.
Importante: Los alimentos refrigerados se cocinan a partir de 5 °C, mientras que los congelados se cocinan a partir de -18 °C.
84
Page 85
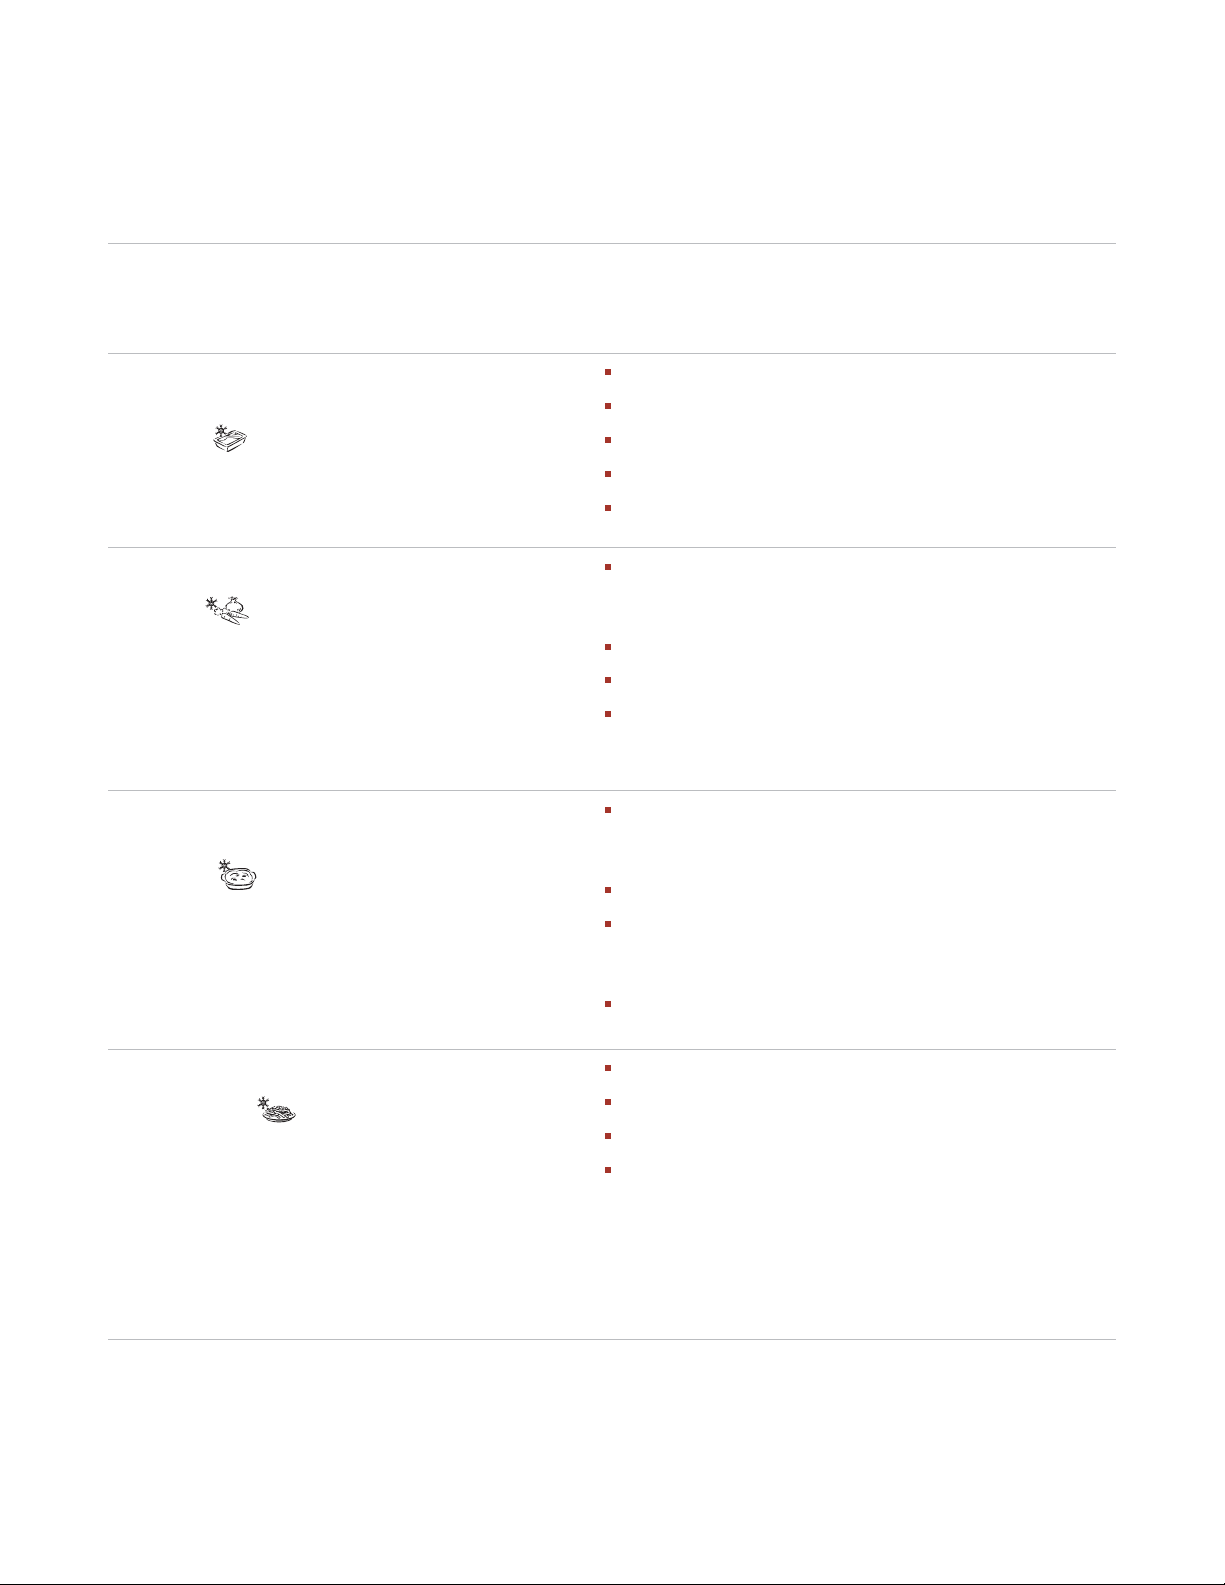
FUNCIONAMIENTO AUTOMÁTICO DEL MICROONDAS POR CONVECCIÓN WOLF
GUÍA DE
AUTO COCCIÓN DESDE CONGELADO
N.° DE MENÚ
ACF-1 Cocinar
Comidas
preparadas
congeladas
(removibles)
ACF-2 Cocinar
Verduras
congeladas
PESO
(INCREMENTO
DE LA UNIDAD)
Y UTENSILIOS
0,3–1,0 kg* (100 g)
Cuenco y tapa
0,1–0,8 kg (100 g)
Cuenco y tapa
PROCEDIMIENTO
Coloque la comida en un plato apto para microondas.
Cúbralo con una tapa.
Cocínelo sin tapa si el fabricante así lo indica.
Cuando suene la señal acústica, remueva y vuelva a cubrir.
Después de cocinarlo, remueva y déjelo reposar aprox.
2 min.
Añada una cucharada de agua por cada 100 g y sal al
gusto. (Para los champiñones no es necesario añadir
agua).
Cúbralo con una tapa.
Cuando suene la señal acústica, remueva y vuelva a cubrir.
Después de cocinarlo, déjelo reposar aprox. 2 min.
NOTA:
Si las verduras congeladas están hechas un bloque,
cocínelas de forma manual.
ACF-3 Cocinar
Productos
congelados
para gratinar
0,2–0,6 kg (100 g)
Plato poco profundo y
ovalado para gratinar y
film transparente para
microondas o recipiente
original y film transparente para microondas
Extraiga el producto para gratinar de su envase. Si el
recipiente no es apto para microondas, colóquelo en un
plato adecuado.
Cúbralo con film transparente para microondas.
Si el recipiente es adecuado para microondas, retire la
cubierta original de papel y cúbralo con film transparente
de microondas.
Después de cocinarlo, déjelo reposar aprox. 5 min.
ACF-4 Cocinar
Patatas fritas
(patatas al horno)
0,20–0,40 kg (50 g)
Fuente
Rejilla alta
Coloque las patatas fritas congeladas en una fuente.
Ponga la fuente en la rejilla alta y cocínelas.
Cuando suene la señal acústica, déles la vuelta.
Después de cocinarlas, cámbielas a otra fuente para servir.
(No es necesario reposo).
IMPORTANTE:
MENOS
Para patatas fritas finas, cocine con el botón
(–). La fuente se pone muy caliente durante la
cocción. Para evitar quemarse, utilice guantes de horno al
sacar la fuente del horno.
*Peso total de todos los ingredientes.
Importante: Los alimentos refrigerados se cocinan a partir de 5 °C, mientras que los congelados se cocinan a partir de -18 °C.
85
Page 86
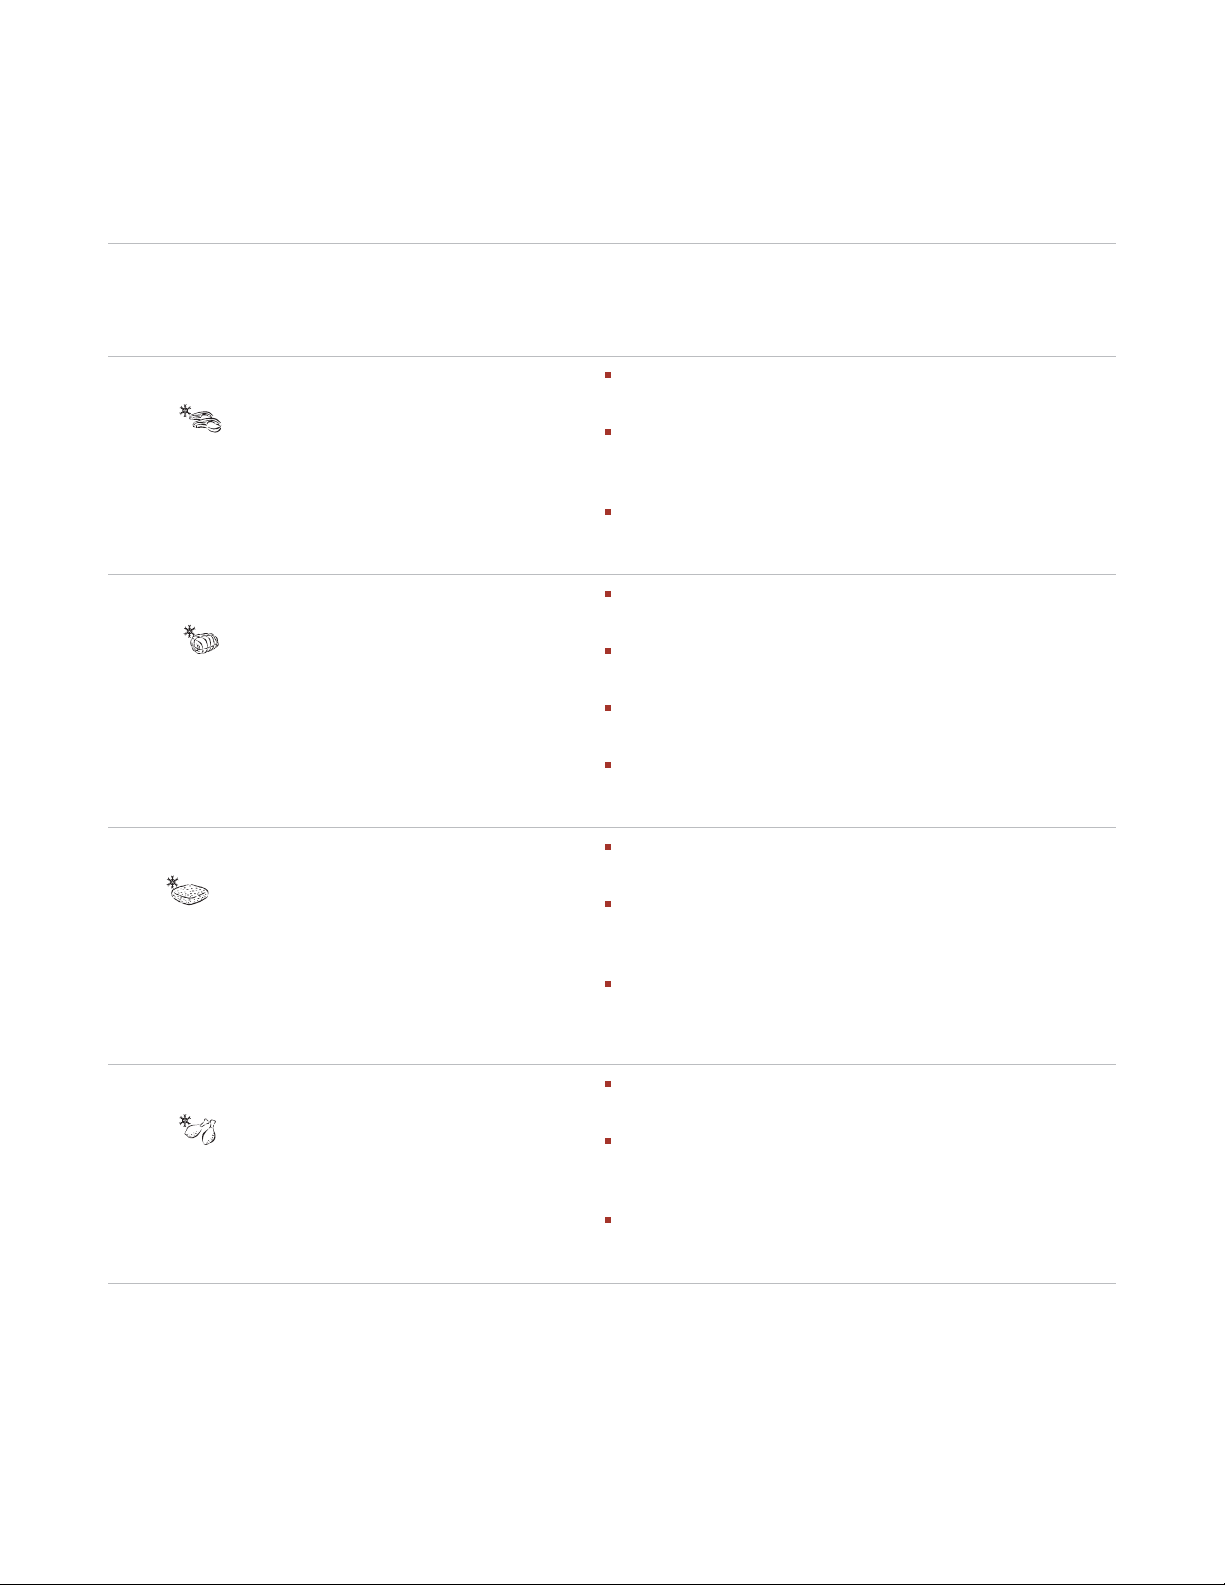
FUNCIONAMIENTO AUTOMÁTICO DEL MICROONDAS POR CONVECCIÓN WOLF
GUÍA DE
AUTO DESCONGELADO
N.° DE MENÚ
AD-1 Descongelado
Filetes y
chuletas
AD-2 Descongelar
Trozo
de carne
PESO
(INCREMENTO
DE LA UNIDAD)
Y UTENSILIOS
0,2–1,0 kg (100 g)
(Véase la nota más abajo)
0,6–2,0 kg (100 g)
(Véase la nota más abajo)
PROCEDIMIENTO
Ponga los alimentos en una fuente en el centro del plato
giratorio.
Cuando suene la señal acústica, déles la vuelta y sepárelos. Proteja las partes más finas y los puntos calientes con
papel de aluminio.
Tras descongelar, envuelva en papel de aluminio durante
10-15 minutos, hasta que estén bien descongelados.
Ponga la carne en una fuente en el centro del plato giratorio.
Cuando suene la señal acústica, déle la vuelta. Proteja las
partes descongeladas con papel de aluminio.
Si suena la señal acústica, déle la vuelta a la comida y
vuelva a protegerla con papel de aluminio.
Tras descongelar, envuelva en papel de aluminio y deje
reposar durante 15-30 minutos, hasta que esté bien
descongelada.
AD-3 Descongelar
Carne
picada
0,2–1,0 kg (100 g)
Fuente
(Véase la nota más abajo)
Ponga el bloque de carne picada en una fuente en el
centro del horno.
Cuando suene la señal acústica, déle la vuelta. Si es
posible, vaya separando las partes que ya estén descongeladas.
Tras descongelar, cubra con papel de aluminio y deje
reposar durante 5-10 minutos, hasta que esté bien descongelada.
AD-4 Descongelar
Muslos
de pollo
0,20–1,00 kg (50 g)
(Véase la nota más abajo)
Ponga los alimentos en una fuente en el centro del plato
giratorio.
Cuando suene la señal acústica, déles la vuelta y sepárelos. Proteja las partes más finas y los puntos calientes con
papel de aluminio.
Tras descongelar, cubra con papel de aluminio y deje
reposar durante 10-15 minutos, hasta que estén bien
descongelados.
Importante: Los alimentos refrigerados se cocinan a partir de 5 °C, mientras que los congelados se cocinan a partir de -18 °C.
NOTAS:
1. Los filetes y chuletas se deben descongelar en una capa.
2. La carne picada se debe descongelar con una forma fina.
3. Después de darle la vuelta, proteja las partes descongeladas con trozos pequeños y planos de papel de aluminio.
4. El pollo se debe cocinar inmediatamente después de descongelar.
5. Los pasteles con cobertura o recubiertos de nata son muy sensibles a la energía de las microondas. Para obtener el mejor resultado,
si la nata empieza a ablandarse rápidamente, sáquelo inmediatamente del horno y déjelo reposar entre 10 y 30 minutos a temperatura
ambiente.
86
Page 87
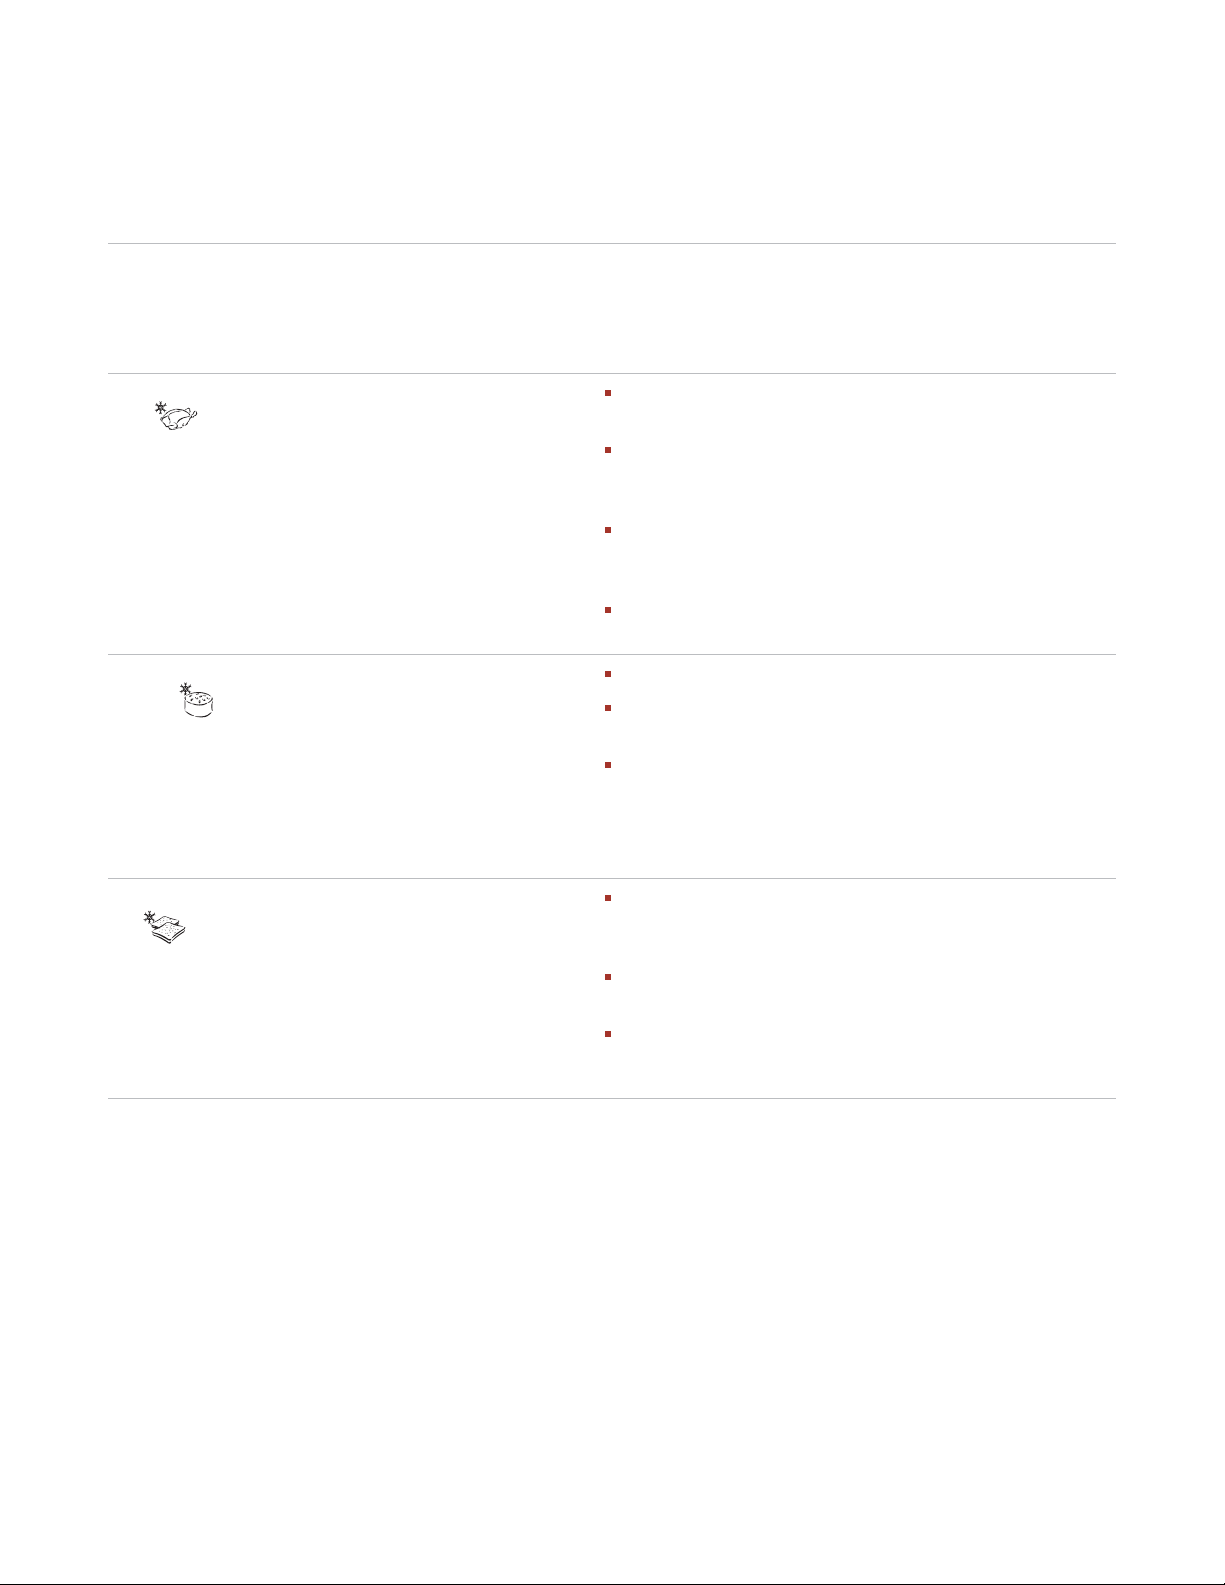
FUNCIONAMIENTO AUTOMÁTICO DEL MICROONDAS POR CONVECCIÓN WOLF
GUÍA DE
AUTO DESCONGELADO
N.° DE MENÚ
AD-5 Descongelar
Pollo
AD-6 Descongelar
Pasteles
PESO
(INCREMENTO
DE LA UNIDAD)
Y UTENSILIOS
0,9–2,0 kg (100 g)
(Véase la nota más abajo)
0,1–1,4 kg (100 g)
Plato
PROCEDIMIENTO
Ponga el pollo en una fuente en el centro del plato
giratorio.
Cuando suene la señal acústica, déle la vuelta y proteja las
partes más finas y puntos calientes con trozos pequeños
de papel de aluminio.
Tras descongelar, enjuáguelo con agua fría, cubra con
papel de aluminio y deje reposar entre 15 y 30 minutos,
hasta que esté bien descongelado.
Por último, limpie el pollo bajo el chorro del grifo.
Quite todos los envoltorios del pastel.
Colóquelo directamente sobre el plato giratorio o sobre un
plato en el centro de éste.
Tras descongelarlo, corte el pastel en trozos del mismo
tamaño dejando un espacio entre cada uno de ellos y deje
reposar entre 15 y 30 min hasta que se descongele de
manera uniforme.
AD-7 Descongelar
Pan
0,1–1,0 kg (100 g)
Plato
(Se recomienda utilizar
únicamente pan cortado
en rebanadas para este
programa).
Distribúyalo en una fuente en el centro del plato giratorio.
Para 1,0 kg, colóquelo directamente sobre el plato
giratorio.
Cuando suene la señal acústica, recolóquelo y saque las
rebanadas que ya se hayan descongelado.
Tras descongelar, cubra con papel de aluminio y deje
reposar durante 5-10 minutos, hasta que esté bien
descongelado.
Importante: Los alimentos refrigerados se cocinan a partir de 5 °C, mientras que los congelados se cocinan a partir de -18 °C.
NOTAS:
1. Los filetes y chuletas se deben descongelar en una capa.
2. La carne picada se debe descongelar con una forma fina.
3. Después de darle la vuelta, proteja las partes descongeladas con trozos pequeños y planos de papel de aluminio.
4. El pollo se debe cocinar inmediatamente después de descongelar.
5. Los pasteles con cobertura o recubiertos de nata son muy sensibles a la energía de las microondas. Para obtener el mejor resultado,
si la nata empieza a ablandarse rápidamente, sáquelo inmediatamente del horno y déjelo reposar entre 10 y 30 minutos a temperatura
ambiente.
87
Page 88

FUNCIONAMIENTO AUTOMÁTICO DEL MICROONDAS POR CONVECCIÓN WOLF
RECETAS PARA AUTO COCCIÓN AC-4
AL GRATÉN
CALABACINES Y PASTA HORNEADOS
Alrededor de 1,5 kg
Utensilios:
Plato Pyrex redondo de 30 cm
apto para microondas
Cuenco de 2 l apto para
microondas
Ingredientes
500 ml Agua
1
/2 cucharaditas Aceite
Sal
80 g Macarrones
400 g Tomates de lata, picados
3 Cebollas (150 g), cortadas finas
Albahaca, tomillo
Sal y pimienta
1 cucharada Aceite (para engrasar el plato)
450 g Calabacín en rodajas
150 g Nata agria
2 Huevos
100g Queso Cheddar rallado
Preparación
1)
Ponga agua, aceite y sal en un cuenco apto
para microondas. Cubra y deje que hierva.
Hornee en el microondas durante 3–5 min
900 W
2)
Rompa los macarrones y añádalos al plato.
Remueva y deje en remojo.
Hornee al microondas durante 9–11 min
270 W
Escurra la pasta y deje enfriar.
3)
Mezcle los tomates, las cebollas y el aliño.
Engrase el plato redondo. Agregue los macarrones y vierta la salsa de tomate encima del
conjunto. Ponga las rodajas de calabacín por
encima.
4)
Bata la nata agria y los huevos; eche la mezcla
por encima de la salsa de tomate. Espolvoree
con el queso rallado. Cocínelo en la rejilla baja
con el modo
5)
Deje reposar el plato entre 5 y 10 minutos
AUTO COCCIÓN AC-4
.
después de cocinar.
AL GRATÉN
BRÓCOLI Y PATATAS ASADAS
CON CHAMPIÑONES
Alrededor de 1,5 kg
Utensilios:
Plato Pyrex redondo de 26 cm
apto para microondas
Cuenco de 2 l apto para
microondas
Ingredientes
400 g Patatas, peladas y se desea,
partidas por la mitad
400 g Floretes de brócoli
6 cucharadas Agua (60 ml)
1 cucharadita Mantequilla o margarina
(para engrasar el plato)
400 g Champiñones, en láminas
1 cucharada Perejil muy picado
Sal y pimienta
3 Huevos
125 ml Nata
125 ml Leche
Sal y pimienta
Nuez moscada
100 g Queso Gouda rallado
Preparación
1)
Ponga las patatas y el brócoli en un cuenco
apto para microondas. Añádale agua, cúbralo
y cocínelo. Remueva una vez durante la
cocción.
Hornee al microondas entre 9 y 12 min
900 W
2)
Corte las patatas en rodajas.
3)
Engrase el plato redondo. Añada el brócoli,
los champiñones y las patatas en capas
alternas. Espolvoree con perejil y aderece
con sal y pimienta.
4)
Mezcle los huevos, la nata, la leche, la sal, la
pimienta y nuez moscada. Vierta la mezcla
sobre las verduras. Espolvoree queso por
encima. Cocínelo en la rejilla baja con el modo
AUTO COCCIÓN AC-4
5)
Deje reposar el plato durante 10 minutos
.
después de cocinar.
88
Page 89

FUNCIONAMIENTO AUTOMÁTICO DEL MICROONDAS POR CONVECCIÓN WOLF
RECETAS PARA AUTO COCCIÓN AC-5
PASTEL DE ZANAHORIA
Alrededor de 1,1 kg
Utensilios:
molde redondo de 28 cm
apto para microondas
Ingredientes
1 cucharadita Mantequilla o margarina
(para engrasar el molde)
5 Yemas de huevo
250 g Azúcar
250 g Zanahorias, ralladas finas
Zumo de un limón
250 g Almendra molida
80 g Harina
1 cucharada Levadura en polvo
5 Claras de huevo
Preparación
1)
Engrase el molde.
2)
Bata las yemas de huevo y el azúcar con un
batidor manual.
3)
Añada las zanahorias, el zumo de limón y las
almendras.
4)
Mezcle la harina y la levadura. Añádalas a la
mezcla de huevo y mezcle bien.
5)
Bata las claras de los huevos hasta que estén
firmes e incorpórelas con cuidado a la masa.
Extienda la mezcla sobre el molde, colóquelo
en la rejilla baja y hornee con el modo
COCCIÓN AC-5
6)
Deje que se enfríe en el molde durante 5
.
minutos después de hornear.
AUTO
GUGELHUPF
La masa pesará alrededor de 0,9 kg
Utensilios:
molde de 22 cm para gugelhupf
Ingredientes
1 cucharadita Mantequilla o margarina
(para engrasar el molde)
170 g Mantequilla o margarina
140 g Azúcar glasé
4 Yemas de huevo
40 g Almendras tostadas laminadas
40 g Pasas, lavadas
Peladura de limón rallada fina
4 Claras de huevo
1 sobre Levadura en polvo (15 g)
280 g Harina
Preparación
1)
Engrase el molde para gugelhupf.
2)
Bata la mantequilla y el azúcar glasé con un
batidor hasta que quede suave la mezcla.
Añada las yemas de una en una.
3)
Vaya añadiendo poco a poco mientras
remueve las almendras tostadas, las pasas y
la peladura de limón. Mezcle bien.
4)
Bata las claras de los huevos hasta que estén
firmes e incorpórelas a la mezcla. Mezcle la
levadura en polvo y la harina, tamice e incorpore con cuidado a la mezcla.
5)
Ponga la masa en el molde y hornéela en la
rejilla baja en el modo
AUTO COCCIÓN AC-5
.
89
Page 90

FUNCIONAMIENTO AUTOMÁTICO DEL MICROONDAS POR CONVECCIÓN WOLF
RECETAS PARA
AUTO COCCIÓN AC-5
TARTALETA DE MANZANA
CON CALVADOS
Alrededor de 1,3 kg
Utensilios:
molde redondo de 28 cm
apto para microondas
Ingredientes
200 g Harina
1 cucharadita Levadura en polvo
100 g Azúcar
1 sobre Azúcar vainillada
1 pizca Sal
1 Huevo
3-4 gotas Aceite de almendra amarga
125 g Mantequilla
1 cucharadita Mantequilla o margarina
(para engrasar el plato)
50 g Avellanas molidas
600 g Manzana (roja aprox. 3–4)
Canela
2 Huevos
1 pizca Sal
4 cucharadas Azúcar, dividida
4 cucharadas Calvados (licor de manzana)
1
1
/2 cucharadas Harina de maíz
125 g Nata para montar
Azúcar glasé (para espolvorear)
Preparación
1)
Mezcle la harina y la levadura en polvo.
Añada el azúcar, el azúcar vainillada, la sal,
los huevos, el aceite de almendra y la mantequilla. Amase la pasta con el utensilio para
amasar de un batidor.
2)
Cubra la masa de pastelería y deje reposar
en un sitio fresco durante 30 minutos.
3)
Engrase el molde. Estire la masa entre dos
láminas de papel de aluminio y colóquela en
el molde. Forme el borde de la masa de
aprox. 3 cm de altura.
4)
Espolvoree avellanas sobre la masa.
5)
Pele las manzanas, córtelas en cuatro partes,
quíteles el corazón y parta en rodajas.
Disponga las rodajas de forma que se
solapen una con otra por encima de las avellanas y espolvoree con un poco de canela.
6)
Separe los huevos. Bata las claras de huevo
hasta que estén firmes y añada poco a poco
sal y una cucharada de azúcar.
7)
Bata la yema de huevo, el azúcar restante y el
azúcar vainillada hasta que quede una mezcla
cremosa.
8)
Añada el Calvados, la harina de maíz y la nata
para montar y mezcle bien. Incorpore las
claras batidas y extienda la mezcla uniformemente sobre las rodajas de manzana.
9)
Colóquela en la rejilla baja y hornee en el
modo
AUTO COCCIÓN AC-5
10)
Deje enfriar y espolvoree con azúcar glasé.
.
90
Page 91
MANTENIMIENTO DEL MICROONDAS POR CONVECCIÓN WOLF
LIMPIEZA Y MANTENIMIENTO
INTERIOR DEL HORNO
1)
NO UTILICE LIMPIADORES DE HORNO
COMERCIALES, LIMPIADORES DE VAPOR,
PRODUCTOS ABRASIVOS O AGRESIVOS
QUE CONTENGAN HIDRÓXIDO DE SODIO NI
UTILICE ESTROPAJOS EN NINGUNA PARTE
DEL MICROONDAS.
Pase un paño o esponja húmedos para limpiar
las salpicaduras o derrames después de cada
uso mientras el horno esté todavía caliente.
Para derrames más cuantiosos, utilice un
jabón suave y límpielos varias veces con un
paño húmedo hasta que desaparezcan todos
los residuos.
No quite la cubierta del guiaondas.
2)
Tenga cuidado de que el jabón suave o el
Después de utilizar los modos Grill, Dual,
Convección, AUTO Cocción, AUTO COCCIÓN
CONGELADO, la cavidad, la puerta, el
armazón y los accesorios del horno alcanzarán temperaturas elevadas. Asegúrese de
que estos componentes estén completamente fríos antes de limpiarlos.
LIMPIE EL HORNO PERIÓDICAMENTE Y
RETIRE CUALQUIER RESTO DE COMIDA. Si no
se mantiene limpio el horno, esto podría hacer
que se deteriorase la superficie, lo que influiría
agua no penetren en las pequeñas salidas de
ventilación de las paredes, ya que esto puede
provocar daños en el horno.
3)
No pulverice con limpiadores en el interior
del horno.
4)
Caliente periódicamente el horno mediante la
convección y el grill, consulte “Calentar sin
alimentos” en la página 73. Los restos de
comida o grasa pueden provocar humo o
malos olores.
negativamente sobre la vida útil del aparato y
podría derivar en una situación peligrosa.
ACCESORIOS
EXTERIOR DEL HORNO
La parte externa del horno se limpia fácilmente
con jabón suave y agua. Aclare el jabón con un
paño húmedo y seque el exterior con una toalla
suave.
MANDOS DEL HORNO
Abra la puerta antes de limpiar para desactivar
los mandos del horno. Al limpiar el panel de
mandos es preciso tener cuidado. Pase suavemente por el panel un paño mojado sólo en agua
hasta que quede limpio. No utilice demasiada
agua. No utilice ningún tipo de producto de
limpieza ni abrasivo.
Los accesorios se deben lavar con una solución
líquida suave y secar a continuación. Se pueden
meter en el lavavajillas.
PUERTA
Para eliminar las manchas, limpie periódicamente
los dos lados de la puerta, los cierres y las partes
adyacentes con un paño suave y húmedo. No
utilice limpiadores abrasivos ni rasquetas metálicas afiladas para limpiar el cristal de la puerta del
horno, ya que pueden rayar la superficie, lo que
podría provocar que se rompiera el cristal.
NOTA:
Mantenga siempre limpia la cubierta del
guiaondas y los accesorios. Si deja grasa en la
cavidad o en los accesorios, ésta se puede
calentar en exceso, provocar arcos voltaicos,
humo o incluso inflamarse cuando vuelva a
utilizar el horno.
NOTA:
No utilice limpiadores de vapor.
91
Page 92
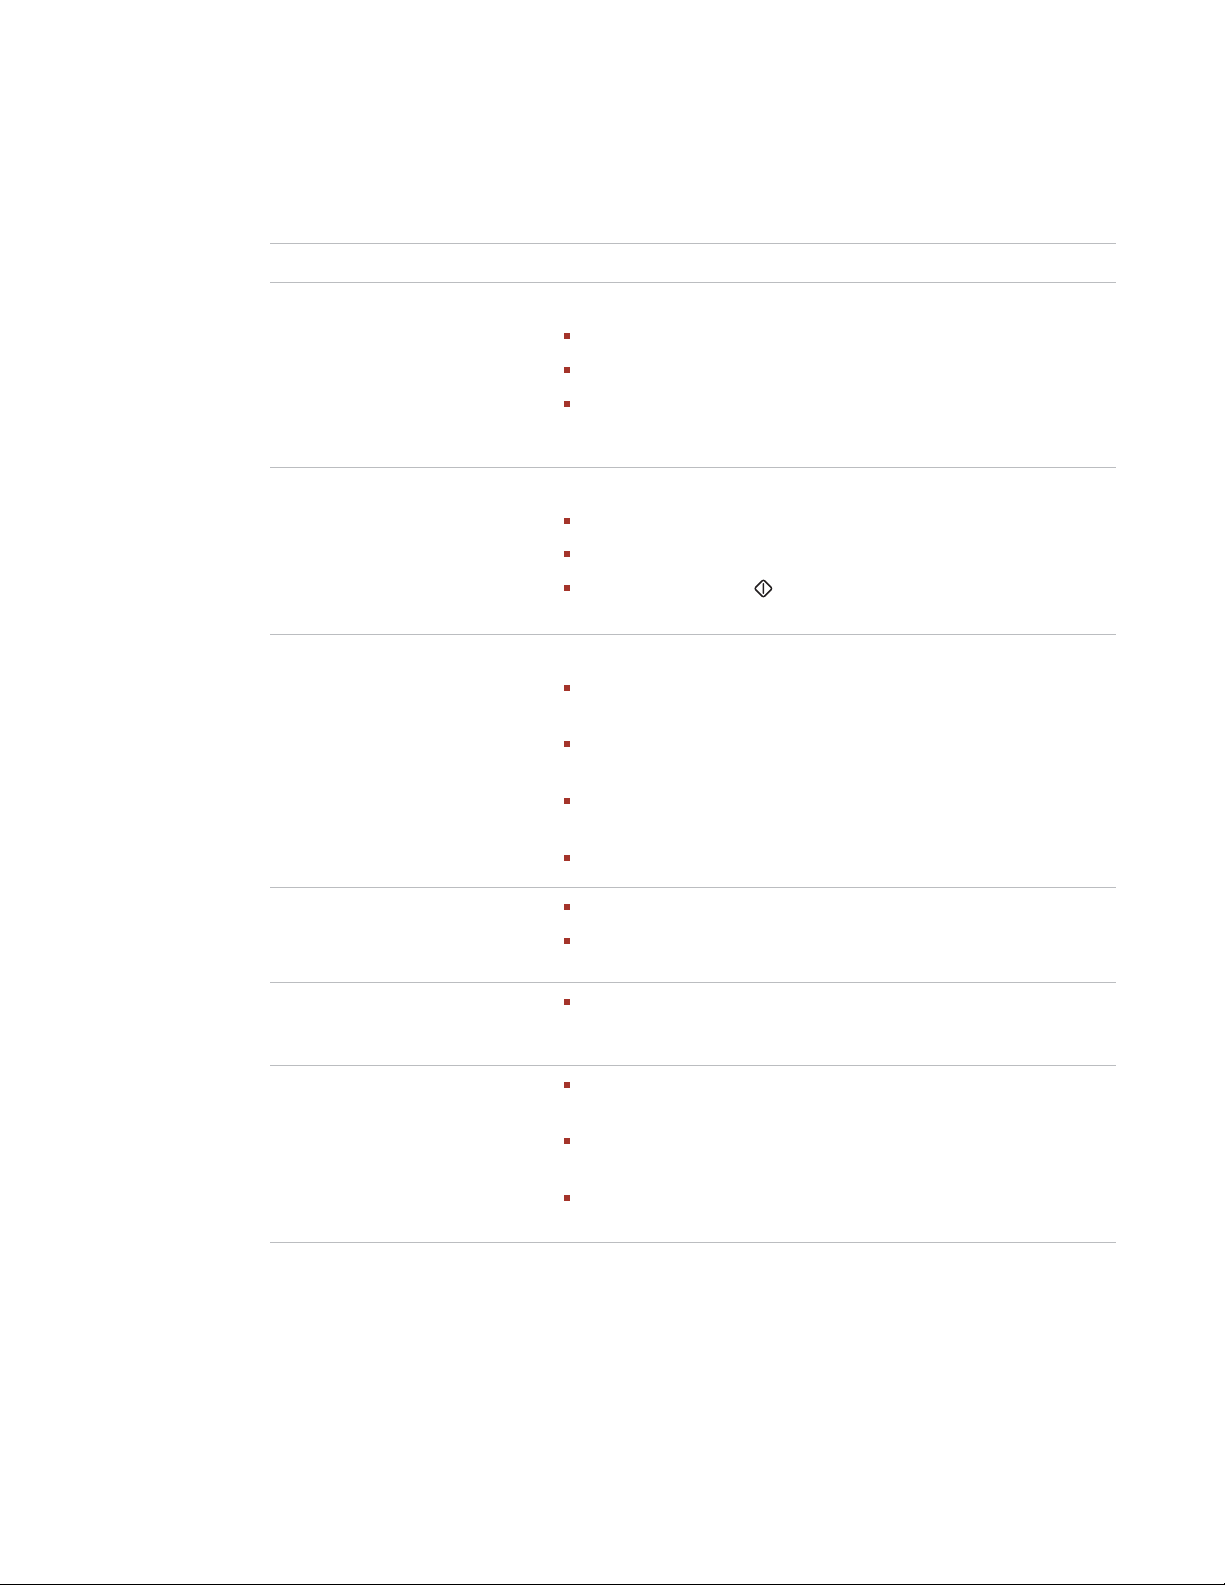
LOCALIZACIÓN Y SOLUCIÓN DE PROBLEMAS DE WOLF
GUÍA DE
LOCALIZACIÓN Y SOLUCIÓN DE PROBLEMAS
SÍNTOMA POSIBLE SOLUCIÓN
El aparato microondas
no funciona correctamente
Compruebe que
funcionen los fusibles de la caja de fusibles,
no se haya producido un corte en el suministro eléctrico.
Si los fusibles siguen saltando, póngase en contacto con un
técnico de mantenimiento autorizado.
El modo microondas
no funciona
Compruebe que
la puerta esté bien cerrada,
los cierres de la puerta y sus superficies estén limpias,
ha pulsado el botón
El plato giratorio
no da vueltas
Compruebe que
el soporte del plato esté conectado correctamente al mecanismo motor,
la fuente de horno que esté utilizando no sobresalga del plato
giratorio,
los alimentos no sobresalgan del borde del plato y eviten que
gire,
que no haya nada en el hueco debajo del plato giratorio.
+30
.
El microondas no
se apaga
La luz interior no funciona
Los alimentos tardan más
en calentarse y cocinarse
que antes
Aísle el aparato de la caja de fusibles.
Llame a un técnico de mantenimiento autorizado.
Llame a un técnico de mantenimiento autorizado. La bombilla
de la luz interior sólo puede ser sustituida por un técnico cualificado.
Seleccione un tiempo de cocción más prolongado (doble de
cantidad = casi el doble de tiempo) o
si la comida está más fría de lo normal, déle vueltas de vez en
cuando o
seleccione un nivel de potencia mayor.
92
Page 93

LOCALIZACIÓN Y SOLUCIÓN DE PROBLEMAS DE WOLF
LOCALIZACIÓN Y SOLUCIÓN
DE PROBLEMAS
2)
1)
Si cocina los alimentos en el tiempo estándar
con sólo 900 W, la potencia se reducirá
automáticamente para evitar el sobrecalentamiento. (El nivel de potencia del microondas
se reduce).
Modo de COCCIÓN Tiempo estándar
Cocina a microondas a 900 W 20 min
Después de utilizar los modos
CONVECCIÓN, AUTO COCCIÓN, AUTO
COCCIÓN CONGELADO
lador de refrigeración y puede aparecer en la
pantalla “ENFRIÁNDOSE”. Asimismo, si pulsa
el botón
DETENER
el aparato está funcionando en cualquiera de
estos modos, también se activará el ventilador
de refrigeración; por esta razón, es posible
que note que sale aire procedente de las aber-
Cocina con grill 15 min
turas de ventilación.
DUAL 1 Micro – 40 min
DUAL 2 Micro – 15 min
(potencia de microondas
de 900 W) Grill – 15 min
GRILL, DUAL,
, se activará el venti-
y abre la puerta mientras
DUAL 2 Micro – 40 min
(potencia de microondas
de 630 W) Grill – 15 min
93
Page 94

INFORMACIÓN DE
MANTENIMIENTO DE WOLF
INFORMACIÓN DE MANTENIMIENTO
INFORMACIÓN
DE CONTACTO
Página web:
wolfappliance.com
Cuando solicite información, documentación,
piezas de repuesto o asistencia técnica, debe
proporcionar la referencia del modelo y el
número de serie del horno microondas. La información se encuentra en la placa de datos del
producto. Consulte la página 59 para ver el lugar
en el que está situada la placa de datos.
Copie a continuación la información de la placa
de datos para tenerla como referencia en el
futuro.
Referencia del modelo
Número de serie
Fecha de instalación
Distribuidor de Sub-Zero y teléfono
ANTES DE LLAMAR AL SERVICIO
TÉCNICO
Antes de llamar al distribuidor de Wolf,
compruebe que los fusibles de su hogar no
estén fundidos y que la red eléctrica funciona y
compruebe también que el aparato no está
desconectado. Un corte de electricidad también
puede causar la interrupción del servicio.
94
La información y las imágenes que se incluyen en
esta guía son propiedad de Wolf Appliance, Inc., una
filial de Sub-Zero, Inc. Este documento junto con la
información y las imágenes que en él se incluyen no
pueden copiarse ni utilizarse, total ni parcialmente,
sin el consentimiento por escrito de Wolf Appliance,
Inc., una filial de Sub-Zero, Inc.
©Wolf Appliance, Inc. se reserva todos los derechos.
Page 95

Page 96

WOLF®est une marque déposée de Wolf Appliance, Inc.
Vous remarquerez tout au long de ce Guide
d’utilisation et d’entretien les mentions MISE EN
GARDE et AVERTISSEMENT, destinées à fournir
des recommandations importantes afin d’assurer
la sécurité et l’efficacité de l’équipement Wolf.
signale un danger qui pourrait causer une
blessure mineure ou endommager le produit
si vous ne suivez pas les instructions.
signale un danger qui pourrait causer des
blessures graves voire fatales si vous ne
prenez pas certaines précautions.
De plus, la mention REMARQUE IMPORTANTE
met l’accent sur un renseignement particulièrement important.
Page 97

FOUR MICRO-ONDES À CONVECTION WOLF
MERCI
Votre achat d’un four micro-ondes à convection
Wolf démontre l’importance que vous accordez
à la qualité et à la performance des appareils de
cuisson. Nous comprenons vos besoins et à ce
titre, nous avons conçu et fabriqué votre four
micro-ondes en utilisant des matériaux de
qualité et une main-d’œuvre qualifiée qui vous
assureront une fiabilité et une satisfaction
durables.
Bien entendu, vous êtes impatient(e) de
commencer à cuisiner ; mais tout d’abord,
veuillez prendre le temps de lire le présent
Guide d’utilisation et d’entretien. Que vous
soyez un cuisinier débutant ou un chef
chevronné, vous avez tout intérêt à vous familiariser avec les mesures de sécurité, les caractéristiques, le fonctionnement et les recommandations d’entretien qui s’appliquent au four
micro-ondes à convection Wolf.
Nous apprécions votre choix d’un appareil
ménager Wolf et vos suggestions ou commentaires éventuels sont les bienvenus. Pour nous
faire part de vos remarques, veuillez nous contacter par le biais de notre site Internet, www.wolfappliance.com.
Le symbole apposé sur le produit ou son
emballage indique qu’il ne peut être traité
comme des ordures ménagères. Il doit être
apporté à un centre de récupération approprié
pour le recyclage des équipements électriques
et électroniques. En vous débarrassant de ce
produit de manière appropriée, vous contribuez
à éviter les conséquences potentielles négatives
sur l’environnement et la santé que pourrait
entraîner une mise au rebut non conforme à ces
directives. Pour plus de détails sur le recyclage
de cet appareil, veuillez contacter votre municipalité, les services de traitement des déchets
ménagers ou le magasin où vous avez acheté
cet appareil.
PRÉCAUTIONS À
PRENDRE POUR
ÉVITER TOUT
EXPOSITION POSSIBLE
À UN EXCÈS D’ÉNERGIE
MICRO-ONDE
Afin de minimiser les risques de
brûlures, de choc électrique d’incendie, de blessure ou d’exposition
à un excès d’énergie micro-onde,
lisez attentivement toutes les
directives avant d’utiliser votre
nouvelle appareil.
N’essayez pas d’utiliser le four micro-
ondes avec la porte ouverte car tout
fonctionnement dans ces circonstances
peut entraîner une exposition nocive à
l’énergie micro-onde. Il est important
de ne pas entraver le fonctionnement
ou de modifier les verrouillages de
sécurité.
Ne placez aucun objet entre la façade
du four micro-ondes et la porte ; ne
laissez aucune saleté ou résidu de
produit nettoyant s’accumuler sur les
surfaces d’étanchéité.
N’utilisez pas le four micro-ondes s’il
est endommagé. Il est particulièrement
important que la porte du four se
ferme correctement et que les
éléments suivants ne soient pas
endommagés : porte (tordue),
charnières et loquets (cassés ou
desserrés), joints de porte ou
surfaces d’étanchéité.
CONTACT
Site Internet :
wolfappliance.com
Le four micro-ondes ne doit être réglé
ou réparé que par des techniciens
professionnels agréés.
97
Page 98

INSTRUCTIONS ET MESURES
DE SÉCURITÉ IMPORTANTES
LISEZ TOUTES LES INSTRUCTIONS AVANT D’UTILISER CET
APPAREIL
POUR ÉVITER TOUT RISQUE
D’INCENDIE
Le four micro-ondes ne doit pas rester
sans surveillance pendant son fonctionnement. Des niveaux de puissance
trop élevés ou des temps de cuisson
trop longs peuvent entraîner une
augmentation de la température des
aliments avec un potentiel d’incendie.
La prise secteur doit être facilement
accessible pour pouvoir débrancher
rapidement l’appareil en cas d’urgence.
La tension d’alimentation. doit être de
230-240 V, 50 Hz, avec un fusible de
distribution de 16 A minimum ou un
disjoncteur de 16 A minimum.
Un circuit indépendant, alimentant
uniquement cet appareil ménager,
est fortement conseillé.
Ce four ne doit être ni rangé, ni utilisé
à l’extérieur.
Si les aliments en train d’être chauffés
commencent à fumer, N’OUVREZ PAS
LA PORTE. Désactivez et débranchez le
four et attendez que la fumée se soit
dissipée. Le fait d’ouvrir la porte alors
que les aliments produisent de la
fumée pourrait entraîner un incendie.
Ne mettez pas de matières inflammables à proximité du four ou des ouies
de ventilation. Ne bloquez pas les ouies
de ventilation.
Retirez tous les joints, les attaches,
etc. métalliques des aliments ou des
emballages alimentaires. La production
d’étincelles sur les surfaces métalliques
peut entraîner un incendie.
N’utilisez pas le four micro-ondes
pour chauffer de l’huile de friture. La
température ne peut pas être contrôlée
et l’huile peut s’enflammer.
Pour faire du pop-corn, n’utilisez que
les sachets de pop-corn conçus pour
micro-ondes.
Ne rangez ni nourriture, ni quoi que ce
soit dans le four.
Vérifiez les réglages après avoir mis le
four en service pour vous assurer que
le four fonctionne comme vous le
désirez.
98
N’utilisez que des récipients et des
ustensiles conçus pour les fours
micro-ondes. Voir page 127.
Ne laissez pas le four sans surveillance
lorsque vous utilisez des récipients en
matière plastique jetables, en papier
ou tout autre récipient en matériaux
combustibles.
Nettoyez le cache du guide des ondes,
la cavité du four et le plateau tournant
après utilisation. Ils doivent être secs
et dépourvus de graisses. Les graisses
accumulées peuvent surchauffer et
commencer à fumer ou à brûler.
Page 99

POUR ÉVITER TOUT RISQUE
DE BLESSURE
N’utilisez pas le four s’il est
endommagé ou s’il ne fonctionne
pas correctement. Vérifiez les
points suivants avant toute
utilisation :
a) La porte ; veillez à ce que la
porte ferme correctement et
assurez-vous qu’elle ne
présente aucun défaut d’alignement et qu’elle n’est pas voilée.
b) Les charnières et les loquets de
sécurité de porte ; vérifiez qu’ils
ne sont ni cassés, ni desserrés.
c) Les joints de porte et les
surfaces de contact des joints ;
veillez à ce qu’ils ne soient pas
endommagés.
d) L’intérieur de la cavité du four
ou sur la porte ; veillez à ce qu’il
n’y ait aucune déformation.
e) Le câble d’alimentation et la
prise : veillez à ce qu’ils ne
soient pas endommagés.
N’utilisez pas le four avec la porte
ouverte ; ne modifiez pas les loquets
de sécurité de la porte de quelle
manière que ce soit.
N’utilisez pas le four si un objet se
trouve entre les joints de porte et les
surfaces de contact du joint.
Ne laissez pas les matières grasses
ou la saleté s’incruster sur les joints
de porte ou les surfaces adjacentes.
Respectez les instructions concernant
le nettoyage et l’entretien décrites à la
page 137. Le non-respect des
consignes de nettoyage du four
pourrait entraîner une détérioration de
la surface susceptible d’affecter négativement la durée de vie de l’appareil,
voire même d’être à l’origine de situations dangereuses.
Les personnes portant des STIMULATEURS CARDIAQUES (pacemakers)
doivent s’adresser à leur médecin ou au
fabricant de l’appareil pour s’informer
sur les précautions à prendre relatives
aux micro-ondes.
N’essayez pas de régler, de réparer
ou de modifier vous-même le four.
L’exécution de toute réparation ou
tout entretien impliquant le retrait
d’un couvercle protégeant contre
l’exposition à l’énergie microonde présente un danger pour
quiconque ne possédant pas la
formation nécessaire pour ces
tâches.
99
Page 100

INSTRUCTIONS ET MESURES
DE SÉCURITÉ IMPORTANTES
POUR ÉVITER TOUT RISQUE
DE CHOC ÉLECTRIQUE
Vous ne devez en aucun cas retirer le
compartiment extérieur.
N’introduisez aucun objet ou liquide
dans les ouvertures des verrous de la
porte ou les ouies de ventilation. En
cas de déversement, désactivez et
débranchez immédiatement le four et
adressez-vous à un service après-vente
agréé.
Ne plongez pas le câble d’alimentation
ni la fiche dans de l’eau ou tout autre
liquide.
Ne laissez pas le câble d’alimentation
passer au-dessus de surfaces chaudes
ou acérées comme la zone de ventilation de l’air chaud du four à l’arrière
de celui-ci.
N’essayez pas de remplacer vous-même
la lampe du four ni ne laissez quiconque
autre qu’un professionnel qualifié s’en
occuper. Si la lampe du four grille,
veuillez vous adresser à votre revendeur
ou à un service après-vente agréé.
Si le câble d’alimentation de l’appareil
est endommagé, il doit être remplacé
par un câble spécial. Demandez à un
service après-vente agréé de se charger
de ce remplacement.
100
 Loading...