


E SERIES BUILT-IN OVENS
USE & CARE INFORMATION
GUÍA DE USO Y MANTENIMIENTO
GUIDE D’UTILISATION ET D’ENTRETIEN
INFORMAZIONI SU USO E MANUTENZIONE
BEDIENUNGS - UND PFLEGEANLEITUNG


ENGLISH
ITALIANO
Wolf E Series Built-In Ovens 5
Safety Instructions & Precautions 6
Wolf E Series Built-In Oven Features 8
Wolf E Series Built-In Oven Operation 12
Wolf E Series Built-In Oven Care 33
Wolf Troubleshooting Guide 35
Wolf Service Information 36
ESPÃNOL
Hornos integrables Serie E de Wolf 38
Precauciones e instrucciones de seguridad 39
Características de los hornos integrables
Serie E de Wolf 41
Funcionamiento de los hornos integrables
Serie E de Wolf 45
Mantenimiento de los hornos integrables
Serie E de Wolf 66
Guía de localización y solución
de problemas de Wolf 68
Información de mantenimiento de Wolf 69
FRANÇAIS
Fours encastrables Wolf Série E 71
Instructions et mesures de sécurité 72
Caractéristiques des fours
encastrables Wolf Série E 74
Fonctionnement des fours
encastrables Wolf Série E 78
Entretien des fours
encastrables Wolf serie E 99
Guide de dépistage des pannes Wolf 101
Service après-vente Wolf 102
Forni built-in Wolf Serie E 104
Precauzioni e istruzioni di sicurezza 105
Funzioni dei forni built-in Wolf Serie E 107
Funzionamento dei forni built-in
Wolf Serie E 111
Manutenzione dei forni built-in
Wolf Serie E 132
Guida alla soluzione dei problemi Wolf 134
Informazioni sull’assistenza Wolf 135
DEUTSCH
Einbaubacköfen der E-Serie von Wolf 137
Sicherheitshinweise u.
Vorsichtsmaßnahmen 138
Leistungsmerkmale des Einbaubackofens
der E-Serie von Wolf 140
Betrieb des Einbaubackofens der E-Serie
von Wolf 144
Pflege des Einbaubackofens der E-Serie
von Wolf 165
Anleitung zur Fehlersuche von Wolf 167
Serviceinformationen von Wolf 168
3

WOLF®is a registered trademark of Wolf Appliance, Inc.
As you read this Use & Care Information,
take particular note of the CAUTION and
WARNING symbols when they appear.
This information is impor tant for safe and
efficient use of the Wolf equipment.
signals a situation where minor injury or
product damage may occur if you do not
follow instructions.
states a hazard that may cause serious
injury or death if precautions are not
followed.
In addition, this Use & Care Information may
signal an IMPORTANT NOTE which highlights
information that is especially important.

WOLF
E SERIES BUILT-IN OVENS
THANK YOU
Your purchase of a Wolf E Series built-in oven
attests to the importance you place upon the
quality and performance of your cooking
equipment. We understand this importance
and have designed and built your oven with
quality materials and workmanship to give
you years of dependable service.
We know you are eager to start cooking, but
before you do, please take some time to read
this Use & Care Information. Whether you are
a beginning cook or an expert chef, it will be
to your benefit to familiarize yourself with the
safety practices, features, operation and care
recommendations of the Wolf oven.
We appreciate your choice of a Wolf
Appliance product and welcome any
suggestions or comments you may have.
To share your opinions with us, please visit
www.wolfappliance.com.
DO NOT place any cookware on oven
floor or use aluminum foil or other
material to line the oven floor or side
walls. Failure to adhere to this notice will
damage the porcelain and will void your
warranty.
CONTACT
INFORMATION
Website:
wolfappliance.com
5

SAFETY INSTRUCTIONS AND PRECAUTIONS
WHAT TO DO
IMPORTANT NOTE: Read all
instructions before using this
appliance.
Read this Use & Care Information
carefully before using your new
built-in oven to reduce the risk of
fire, electric shock or injury to
persons.
Ensure proper installation and
servicing. This appliance must be
properly installed and grounded by
a qualified technician.
Have installer show you where the
fuse or electrical box is located in
your home. Learn how and where to
turn off the electricity to the oven.
Use oven only for cooking tasks
expected of a home oven as outlined
in this book.
Always properly clean and maintain
the oven as recommended in this
book.
Always use dry pot holders when
removing pans from the oven. Wet
or damp pot holders can cause
steam burns. Do not let pot holders
touch hot heating elements. Do not
use a towel or other bulky cloth.
Exercise caution when opening the
oven door. Let hot air or steam
escape before looking or reaching
into the oven.
Be sure that the oven cool air intake
(located above the door) and oven
exhaust vent (located below the
door) are unobstructed at all times.
Position oven racks in desired locations when oven is cool. If a rack
must be repositioned after the oven
is already hot, be certain oven mitt
does not contact a hot heating
element in the oven.
Before using Self-Clean mode,
remove broiler grill and pan, oven
racks, oven rack guides and any
other utensils.
Clean only those parts listed in
this book.
Cooling fan should be operating
during the Self-Clean mode. If you
notice that the cooling fan is not
operating, contact a Wolf authorized
service center before using SelfClean mode again.
6
WHAT NOT TO DO
DO NOT place any cookware on
oven floor or use aluminum foil
or other material to line the oven
floor or side walls. Failure to
adhere to this notice will damage
the porcelain and will void your
warranty.
Do not place cookware on the floor
of the oven.
Do not repair or replace any part
of the oven unless specifically
recommended in literature accompanying this appliance. All service
should be referred to a Wolf authorized service center.
Do not use oven for warming or
heating a room.
Do not leave children alone or unattended in the area where the oven is
in use. Never allow children to sit or
stand on any part of the oven. Do
not let children play with the oven.
Do not use water on grease fires.
Smother any flames with a lid,
baking sheet or flat tray. Flaming
grease can be extinguished with
baking soda or a multipurpose
chemical or foam extinguisher.
Do not heat unopened food containers as they could burst and cause
injury.
Do not use commercial oven
cleaners or oven liner protective
coatings, such as aluminum foil, on
any part of the oven.
Do not use abrasive or caustic
cleaners or detergents on this appli-
ance as these may cause permanent
damage. Do not use aerosol
cleaners as these may be flammable
or cause corrosion of metal parts.
Do not clean the oven gasket,
because rubbing or moving the
gasket may eliminate the required
tight door seal.
Do not wear loose or hanging
apparel while using the oven.
Do not touch heating elements or
interior surfaces of oven. Heating
elements may be hot even though
they are dark in color. Interiors of
the oven become hot enough to
cause burns. During and after use,
do not touch, or let clothing or other
flammable materials contact heating
elements or interior surfaces of oven
until they have had sufficient time to
cool. Other surfaces of the appliance
may become hot enough to cause
burns. These surfaces include the
oven vent and the surface near the
oven vent. The oven door and
window could also become hot
enough to cause burns.
Do not store combustible, flammable or explosive materials in the
oven or adjacent cabinets.
Do not store items of interest to
children above the oven, as they
could climb on the appliance to
reach items and be injured.
7
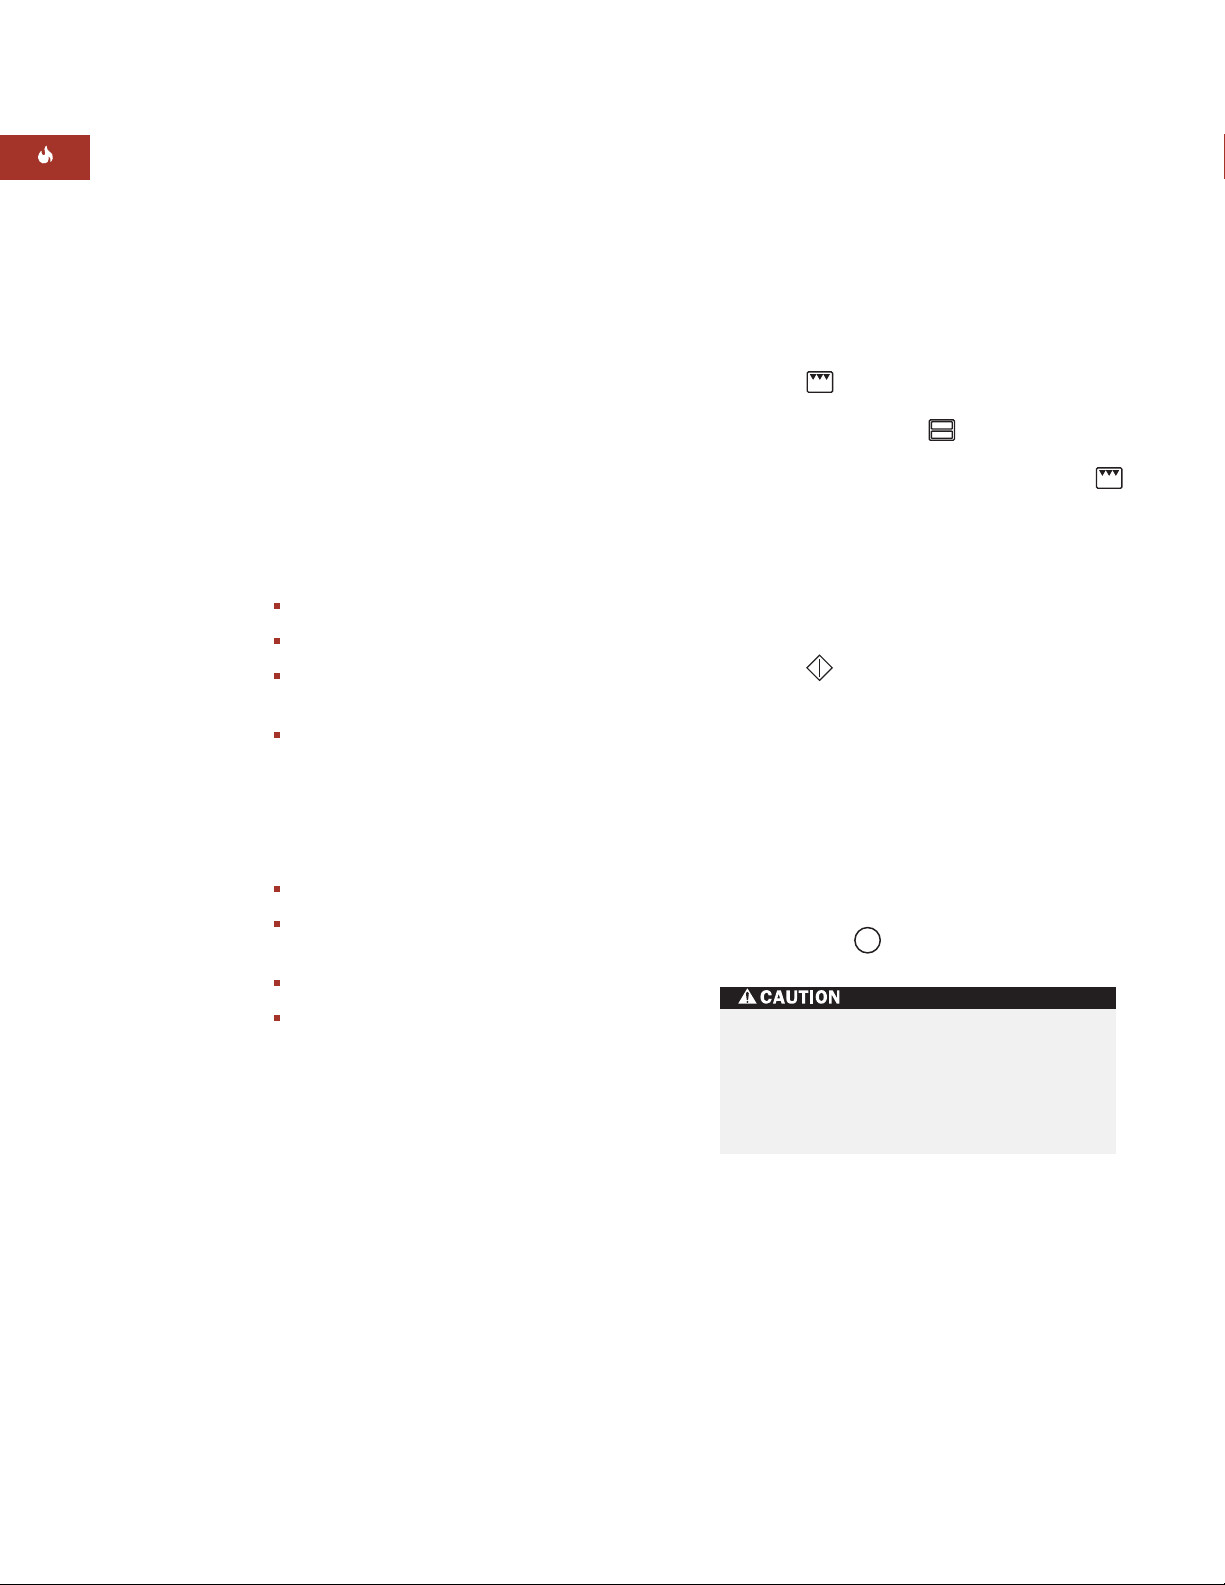
WOLF E SERIES BUILT-IN OVEN FEATURES
E SERIES SINGLE OVEN FEATURES
Model ICBSO30-2F/S
Framed
Model ICBSO30-2U/S
Unframed
Framed and unframed door styles available
Available in classic stainless steel finish only
Dual convection logic control system
Ten cooking modes—bake, roast, broil,
convection bake, convection roast,
convection broil, convection, bake stone
(accessory required), dehydrate (accessory
required) and proof
Touch control panel with LCD readout
Cobalt blue porcelain oven interior
Three removable racks with full-extension
bottom rack and two removable six-level
rack guides
Large viewing double pane window
E SERIES BUILT-IN SINGLE OVEN
Models ICBSO30-2F/S and ICBSO30-2U/S (shown)
Dual interior halogen lighting
Hidden dual bake element and recessed
broil element
Temperature probe and receptacle
Delayed start, self-clean and Sabbath
features (certified by Star-K)
Balanced door hinge assures smooth
opening and closing of the door
This appliance is certified by Star-K
to meet strict religious regulations in
conjunction with specific instructions
found on www.star-k.org.
Electronics and
door cooling vents
Recessed broil
element
Thermostat
Oven gasket
Three removable
racks
Hidden bake
element
Exhaust vent
Electronic
control panel
Oven door light
switch
Rating plate
location
Probe receptacle
Halogen light
Removable, six-level
rack guides
Double pane
window
8

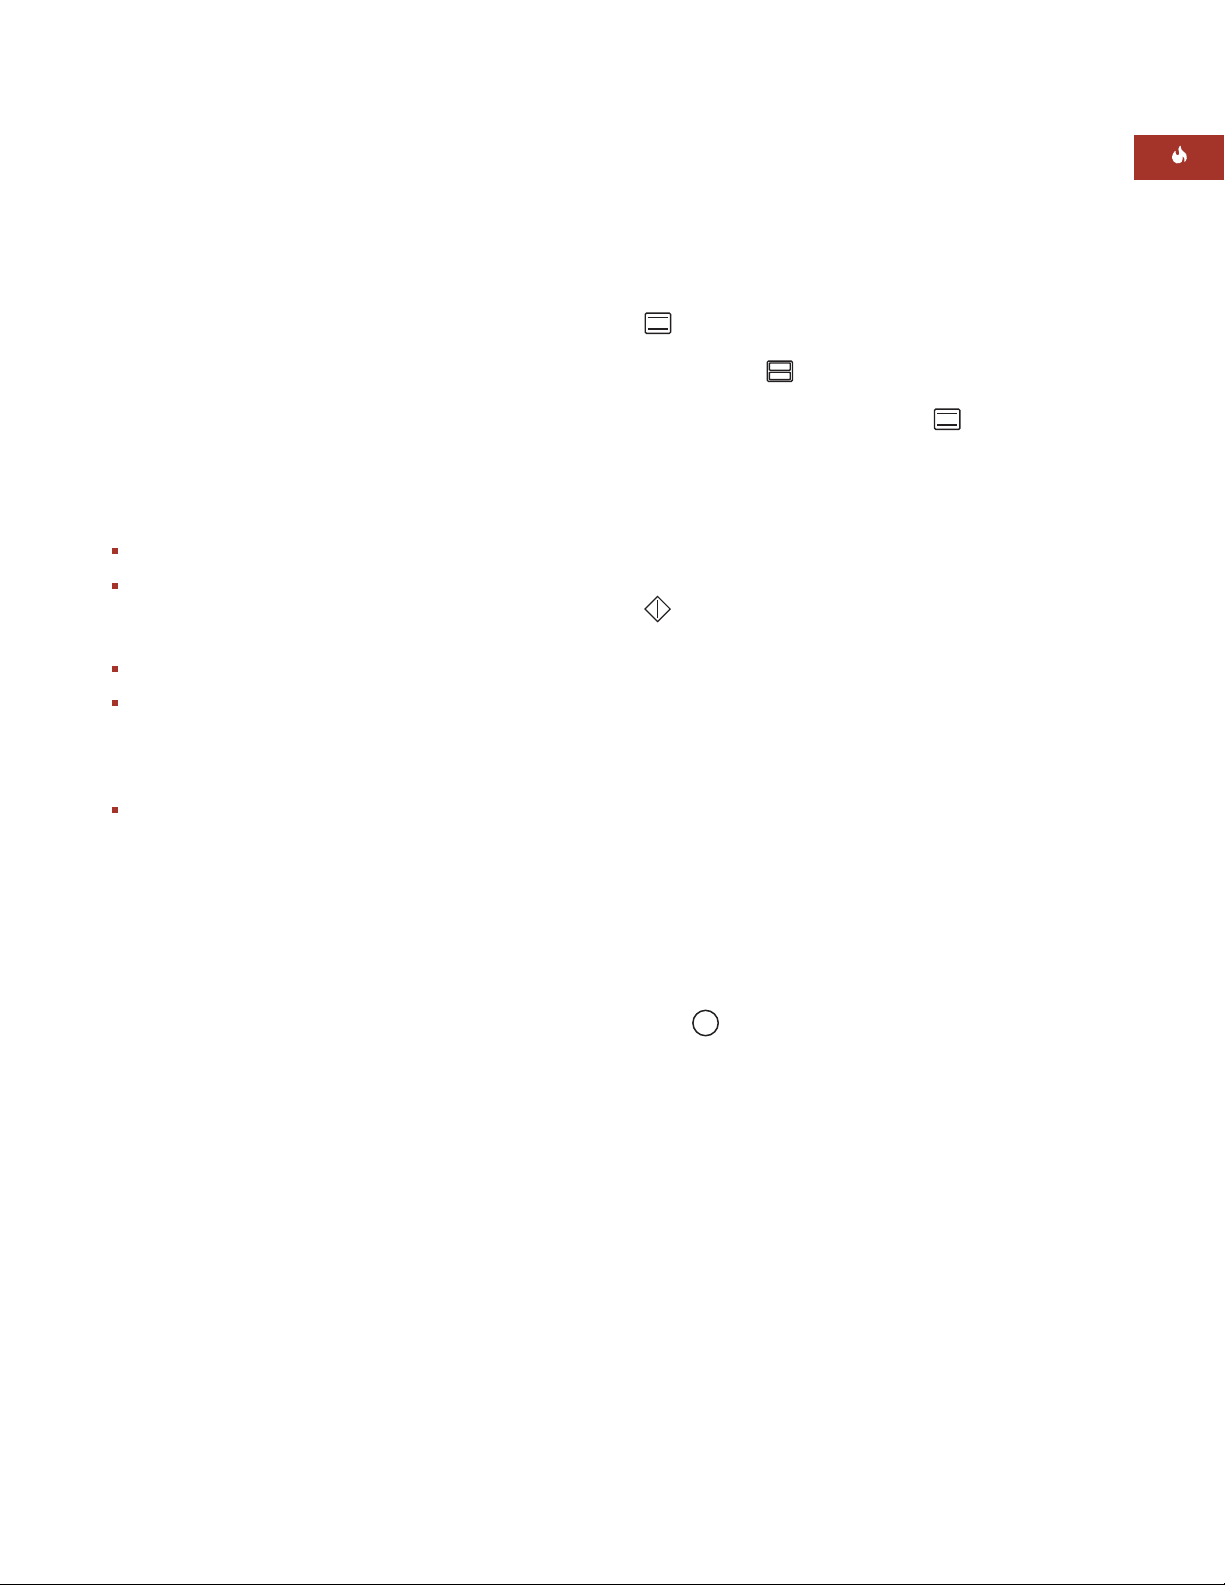
WOLF E SERIES BUILT-IN OVEN FEATURES
E SERIES DOUBLE OVEN FEATURES
Framed and unframed door styles available
Available in classic stainless steel finish only
Dual convection logic control system in
upper oven with ten cooking modes—bake,
roast, broil, convection bake, convection
roast, convection broil, convection, bake
stone (accessory required), dehydrate
(accessory required) and proof
Non-convection lower oven has four
standard cooking modes—bake, roast,
broil and proof
Cobalt blue porcelain oven interiors
Three removable racks with full-extension
bottom rack and two removable six-level
rack guides (per oven)
Large viewing double pane windows
Dual interior halogen lighting in each oven
E SERIES BUILT-IN DOUBLE OVEN
Models ICBDO30-2F/S and ICBDO30-2U/S (shown)
Hidden dual bake element and recessed
broil element in each oven
Temperature probe and receptacle in upper
oven
Delayed start, self-clean and Sabbath
features (certified by Star-K)
Balanced door hinges assure smooth
opening and closing of the doors
This appliance is certified by Star-K
to meet strict religious regulations in
conjunction with specific instructions
found on www.star-k.org.
Model ICBDO30-2F/S
Framed
Model ICBDO30-2U/S
Unframed
Electronics and
door cooling vents
Recessed broil
element
Thermostat
Oven gasket
Three removable
racks per oven
Hidden bake
element
Exhaust vent
Electronic
control panel
Oven door light
switch
Rating plate
location
Probe receptacle
Halogen light
Removable, six-level
rack guides per oven
Double pane window
9
WOLF E SERIES BUILT-IN OVEN FEATURES
OVEN FEATURES
COOKING MODES AND FEATURES
DO NOT place any cookware on oven
floor or use aluminum foil or other
material to line the oven floor or side
walls. Failure to adhere to this notice will
damage the porcelain and will void your
warranty.
Multiple cooking modes,
each dedicated
to giving the best results for a specific kind
of cooking. This is the ultimate in oven
performance, fine-tuned for your individual
cooking preferences.
Large, easy-to-see
and read graphics on
control panel.
Electronic responses and directions on
the control panel
are displayed using clear,
concise words.
Large cooking cavity
increases usable
oven capacity for extra-large baking pans
and oversized turkeys.
Bake element located beneath the oven
floor
makes it easy to access any spillover.
Bottom rack can be fully extended
,
making it easier and safer to reach food in a
hot oven.
Timed Cook Feature – page 12
Bake Mode – page 15
Bake Stone Mode – page 16
(bake stone accessory required)
Broil Mode – page 18
Roast Mode – page 19
Convection Mode – page 20
Convection Bake Mode – page 21
Convection Broil Mode – page 22
Convection Roast Mode – page 23
Proof Mode – page 24
Delayed Start Feature – page 25
Dehydration Mode – page 26
(dehydration accessory required)
Temperature Probe Feature – page 28
Sabbath Feature – page 30
Self-Clean Mode – page 31
IMPORTANT NOTE:
The cooking modes and
features on the following pages outline the
operation for a single oven. For a double oven,
follow the same steps as for a single oven,
with the exception of cooking modes that can
only be used in the upper oven.
10
10
IMPORTANT NOTE:
For double ovens, to
switch from the upper oven to the lower and
vice versa, simply touch the
UPPER/LOWER
touch pad on the control
panel. The icon of the selected oven will be
highlighted in the LCD display.
WOLF E SERIES BUILT-IN OVEN FEATURES
OVEN OPERATION
BEFORE USING FOR THE FIRST TIME
Before using your built-in oven for the first
time, clean thoroughly with hot water and a
mild detergent. Rinse and dry with a soft cloth.
Refer to Care Recommendations on page 34.
Turn on the oven when prompted, set the
language by touching 1 for English, 2 for
German, 3 for French, 4 for Spanish, or 5 for
Italian.
Next, set the single oven or the upper cavity of
the double oven to CONVECTION ROAST at
260°C for one hour. For a double oven, wait
until the upper oven has finished Convection
Roasting for 1 hour, and then set the bottom
oven to ROAST at 260°C for one hour. Refer
to page 23 for Convection Roast mode instructions and page 19 for Roast instructions. Allow
the oven(s) to cool gradually with the door(s)
closed.
This process will burn off any residual oil and
grease used during the manufacturing process.
A small amount of smoke and odor may be
noticed during the initial break-in period. The
oven door(s) can be opened after the oven(s)
have cooled significantly.
The first time the oven is self-cleaned, there will
be further burn off that will create smoke and
odor.
OVEN SELECTION
For the single oven, you can begin a cooking
mode by simply touching the desired mode on
the control panel. For double ovens, touching
the desired mode will automatically turn on
the upper oven. To turn on the lower oven,
first touch the
UPPER/LOWER
touch pad
so that the lower oven icon is selected in the
LCD display. Then touch the desired mode to
turn on the lower oven.
CHANGING OVEN TEMPERATURE
The oven temperature can be changed at any
time once a cooking mode has been selected.
1)
Touch the number pads to enter in the new
temperature.
2)
Touch
ENTER
.
This will change the oven temperature
immediately. If
ENTER
is not touched, the
oven will automatically switch to the new oven
temperature within five seconds.
RAPID MODE CHANGE
The oven has the ability to quickly change
cooking modes. This is a method of switching
cooking modes without turning the oven on
and off. If one mode is already started, instead
of turning the oven off to change cooking
modes, simply touch the desired cooking
mode touch pad.
Single oven control panel
Double oven control panel
11
11

WOLF E SERIES BUILT-IN OVEN OPERATION
OVEN OPERATION
OVEN PREHEAT
IMPORTANT NOTE:
During preheat, the oven
is heated in a manner unsuitable for cooking.
The oven preheat feature is used for all cooking
modes except broil and convection broil. In
order not to damage food, preheating will not
occur once the oven reaches its set temperature. Increasing oven temperature during
cooking will result in the oven taking a very
long time to reach the new temperature. To
reach a new temperature quickly, touch
OFF
to exit the current mode. Then touch the
desired cooking mode and enter a new temperature of at least 10˚C higher than the previous
operating temperature.
TIME-OF-DAY CLOCK
Immediately after the oven is installed, set the
12-hour clock to the current time of day. It may
need to be reset after a prolonged power
failure. The clock is visible on the panel during
all modes. If the upper oven timer is set, the
clock will not be visible in the upper oven
display window.
OVEN TIMER
Each oven has a timer which operates independently from the controls and from each
other. Once a time is set in hours and minutes,
the countdown is seen in the display window.
Only the last minute counts down in seconds.
An audio signal acts as a reminder when the
amount of time runs out. To stop the signal,
touch
CLEAR
. The maximum time that can
be set is 9 hours and 59 minutes.
SETTING TIMER
1)
Touch
2)
Touch number pads to set the hours and
SET TIMER
.
minutes.
3)
Touch
start. (Touch
ENTER
or
CLEAR
SET TIMER
to
at any time to stop
the timer and exit.)
4)
Touch
SET TIMER
while the current
timer is still active to restart and set a new
time.
5)
To clear the timer: If oven is off, touch
CLEAR
then
. If oven is on, touch
CLEAR
.
SET TIMER
,
12
SETTING CLOCK
1)
Touch
2)
Touch number pads to set current time of
SET CLOCK
.
day. A 10-second period of inactivity will
result in the oven returning to the original
time.
3)
Touch
ENTER
and when prompted,
touch 1 for AM or 2 for PM.
4)
Touch
ENTER
again to start clock.
TIMED COOK FEATURE
SETTING CONTROLS
1)
Touch cooking mode, such as
BAKE
Change preset temperature if needed.
For double ovens, this will turn on upper
oven. To turn on lower oven, first touch the
UPPER/LOWER
touch pad so that the
lower oven icon is selected in the LCD
display. Then touch desired mode.
2)
Touch
TIMED COOK
. Use the number
pads to set the number of hours/minutes
the oven is to stay on.
3)
Touch
ENTER
. Oven begins to heat after
five seconds. Stop time will automatically
be added to the display. At the end of cook
time, oven turns off.
4)
Touch oven
OFF
or
CLEAR
to clear
the display.
.

WOLF E SERIES BUILT-IN OVEN OPERATION
EXTENDED OPTIONS
The screen scrolls in the order of Language,
Temperature Scale, Temperature Offset, 12/24
Hour Clock, Backlight Brightness, Chime Tone
and Contrast Adjustment.
1)
Touch and hold
SET CLOCK
on the
control panel for 5 seconds to enter the
extended options screens.
2)
Touch
ENTER
to scroll through the
different option screens.
3)
When finished selecting all options touch
CLEAR
to return to the main display.
SETTING LANGUAGE
1)
When prompted, touch 1 for English, 2 for
German, 3 for French, 4 for Spanish, or 5
for Italian.
SETTING TEMPERATURE SCALE
The oven can be changed from Fahrenheit (˚F)
temperature to Celsius (˚C) or vice versa.
1)
When prompted, touch 1 for Fahrenheit (°F)
or 2 for Celsius (˚C).
12/24 HOUR CLOCK
1)
When prompted, touch 1 for 12 hour clock
or 2 for 24 hour clock.
BACKLIGHT OPTIONS
1)
When prompted, touch 1 for low brightness,
2 for medium brightness, or 3 for high
brightness.
CHIME OPTIONS
There are three different frequency tones for
the oven chime.
1)
When prompted, touch 1 for the low
frequency tone, 2 for the medium frequency
tone, or 3 for the high frequency tone.
CONTRAST ADJUSTMENT
The contrast can be adjusted to ensure a crisp
readout on the LCD display.
1)
When prompted, touch 1through 9on the
number pad to adjust the contrast setting to
your personal preference.
TEMPERATURE OFFSET
The temperature offset is used to keep the
center of the oven cavity at the set point.
Negative values will result in cooler cavity
temperatures, while positive offsets result in
hotter cavity temperatures.
1)
When prompted, enter the temperature
offset.
2)
Select negative or positive offset by
touching the
SET TIMER
touch pad. The
maximum oven offsets are +/- 19°C.
13
WOLF E SERIES BUILT-IN OVEN OPERATION
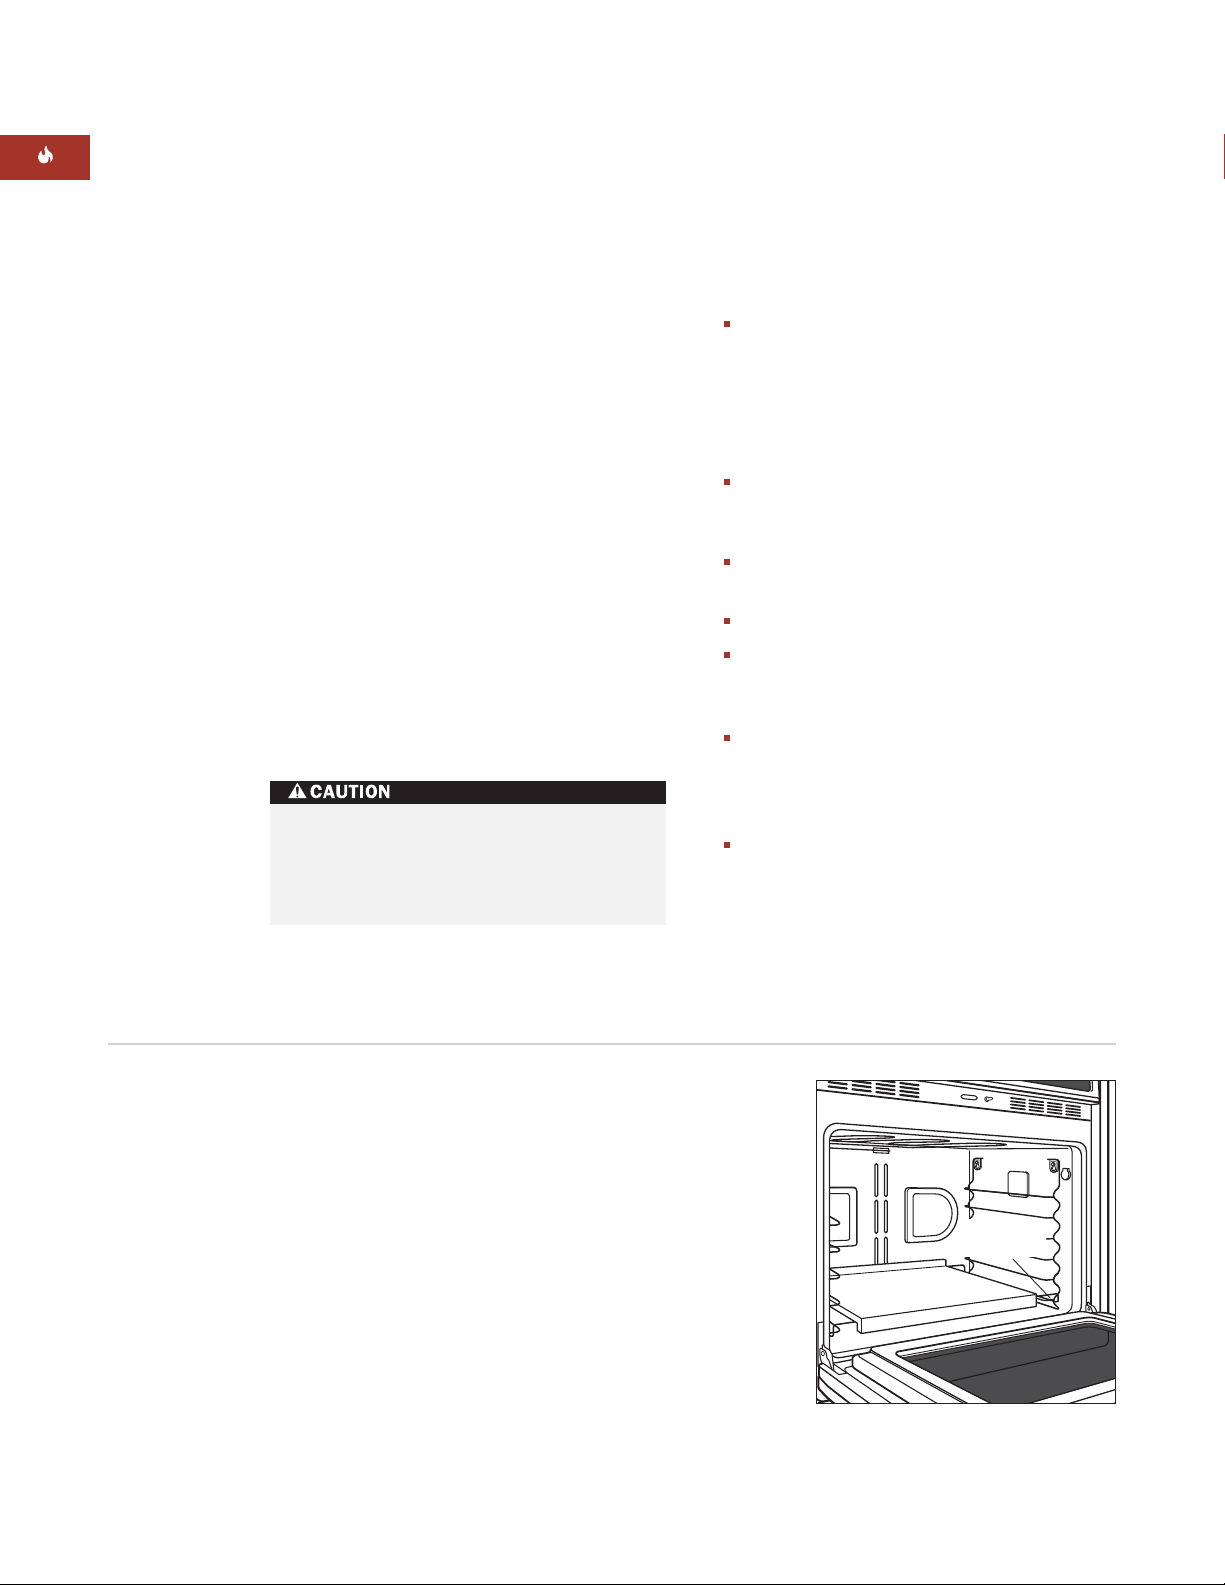
Rack Guide
Mounting Tabs
Rack Guide
6
5
4
3
2
1
Rack Guide
Anti-Tip Lock
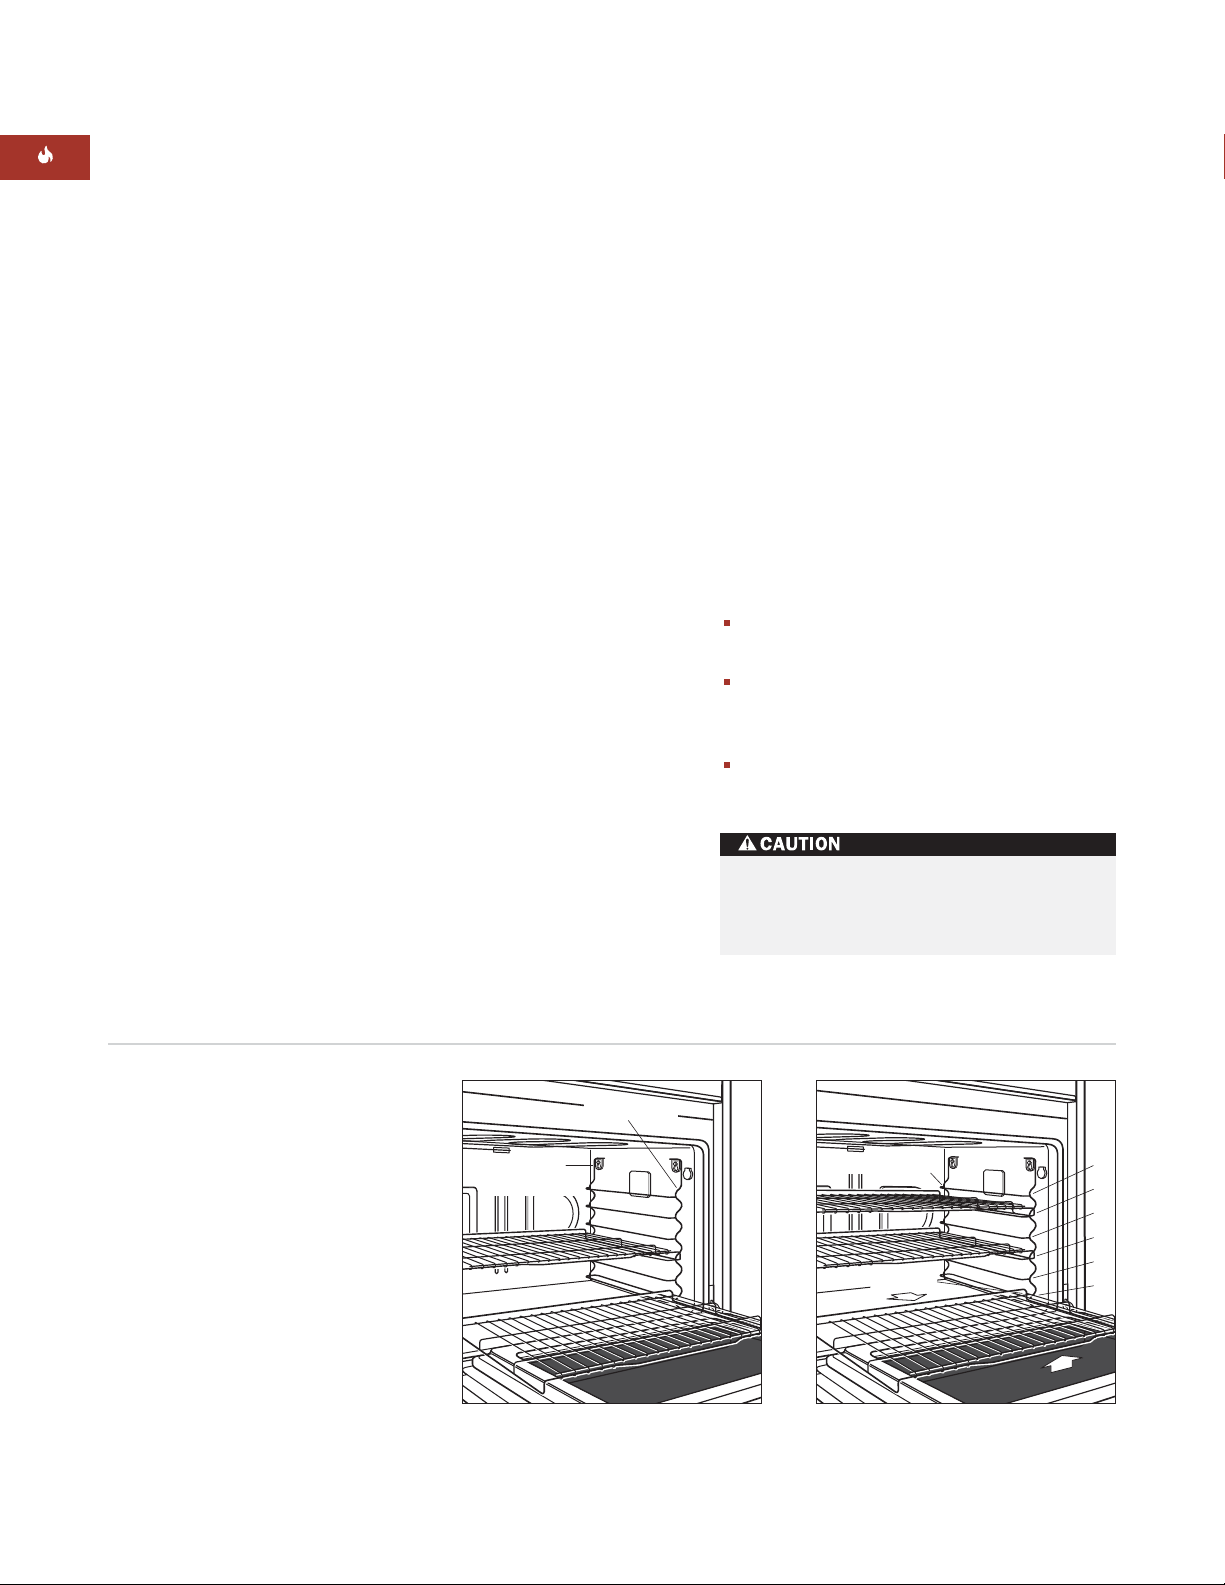
OVEN RACKS AND RACK GUIDES
OVEN RACK GUIDES
To insert the rack guides in the oven,
locate
the screws in the oven side walls. Place the
rack guide mounting tabs over the screw
heads and slide down until the screws are fully
seated in the tabs. Refer to the illustration
below.
To remove the rack guides,
pull the rack
guide straight up and then out so that the
mounting tabs clear the screw heads. Remove
the rack guide from the oven.
IMPORTANT NOTE:
and rack guides before using
mode
. They will discolor if left in the oven
Remove all oven racks
Self-Clean
during this mode.
OVEN RACKS
To insert a rack in the oven,
place the rack
anti-tip lock under the side rack guide rails.
Push the rack toward the back of the oven and
lift up to clear the rack stops. Continue sliding
the rack until it is completely inside the oven.
The bottom oven rack has a full-extension
capability. With the rack in rack guide position
1, slide it onto the stainless steel door guides.
Refer to the illustration for rack guide positions. This adds stability to the rack when
using a heavy pan for large meat and poultry.
With the rack fully extended, it is easier to
safely reach the hot food.
OVEN RACK ARRANGEMENT
One of the factors affecting optimum cooking
results is the level of rack placement in the
oven. Rack position 1 is closest to the bottom
and position 6 is closest to the top.
When using only one rack, place rack in the
center of the oven.
When using only one rack for roasting
meats, place rack on rack guide position
1, 2 or 3.
When using two or three racks, place at
least one rack position between them.
To remove a rack from the oven,
pull the rack
forward and lift up and out, clearing the rack
stops from the side rack guide rails. Refer to
the illustration below.
Oven rack guide removal
Use dry pot holders when handling oven
racks. Racks become hot when the oven
is on and hold heat after it is turned off.
Oven rack guide positions and full
extension bottom rack
14
WOLF E SERIES BUILT-IN OVEN OPERATION
BAKE MODE
How Bake mode works:
Both the hidden bake
element and the broil element are used to heat
the air, and they cycle on and off to maintain
temperature. This mode is best for single-rack
cooking, primarily baked foods. Always use
Bake mode
for your standard recipes. The
temperature probe may be used in this mode.
WOLF TIPS FOR SUCCESS
For Bake mode:
Always preheat for
Bake mode
.
During preheat, convection fans (if applicable) and elements are used to quickly and
uniformly heat the oven.
Use only one rack.
Allow at least 25 mm between edge of pan
and walls of oven.
Size, shape and finish of cookware affects
baking time.
Food cooked in dark metal pans cook
somewhat faster than food cooked in shiny
pans.
Dark, nonstick pan coatings brown more
than light, nonstick coatings.
Use interior oven light and oversize window
to check browning. Limit frequent door
openings to prevent losing heat and lengthening total cooking time.
SETTING CONTROLS
For Bake mode:
1)
Touch
BAKE
. For double ovens, this will
turn on upper oven. To turn on lower oven,
first touch the
UPPER/LOWER
touch
pad so that the lower oven icon is selected
in the LCD display. Then touch
2)
Oven temperature is preset at 175˚C. Oven
BAKE
begins to heat after 10 seconds. To change
oven temperature from the default temperature of 175˚C, immediately enter another
temperature using the number pads.
3)
Touch
temperature setting; touch
CLEAR
once to clear the oven
CLEAR
to return the oven to the time-of-day
display.
4)
Touch
ENTER
to start the cooking mode
immediately, otherwise the oven will automatically start the mode in 10 seconds if
there is no action.
5)
Add food when the chime signals that the
oven has reached preheat temperature.
6)
If the temperature probe is used (upper
oven only), follow
feature
7)
If the timer is set, the oven will chime when
directions on pages 28–29.
Temperature Probe
the cooking time is finished. If the timer is
not cleared, it will continue to chime every
10 seconds.
.
twice
DO NOT place any cookware on oven
floor or use aluminum foil or other
material to line the oven floor or side
walls. Failure to adhere to this notice will
damage the porcelain and will void your
warranty.
8)
Remove food. Always use dry pot holders
when removing hot pans from the oven.
9)
Touch oven
OFF
to end this mode.
15
WOLF
Bake Stone
Rack Guide
Position 1
E SERIES BUILT-IN OVEN OPERATION
BAKE STONE MODE
IMPORTANT
NOTE
The Wolf bake
stone accessory is
required when
using Bake Stone
mode.
How Bake Stone mode works:
A specially
designed rack and bake stone are used for this
mode to assure the food quality expected from
this specific form of cooking. To produce a hot
oven environment necessary for baking on a
ceramic stone, the heat from all elements
creates the perfect “brick oven” effect. Both
convection fans help circulate the air throughout the oven cavity, so even temperatures are
achieved. The temperature probe may be used
in this mode.
Oven preparation:
Remove all racks from the
oven. Slide the bake stone rack onto rack guide
position 1 and place the bake stone on the rack
with the lip hanging over front edge of rack.
Refer to the illustration below. Preheat the
oven for approximately 35 minutes when using
Bake Stone mode
IMPORTANT NOTE:
.
Use care in handling the
bake stone. It will chip or break if dropped.
Avoid cooking foods with a high fat
content on the bake stone. The porous
ceramic material will absorb grease and
discolor the stone. Flare-ups can occur.
WOLF TIPS FOR SUCCESS
For Bake Stone mode:
Always preheat for
Bake Stone mode
positioning the oven rack and ceramic
stone. Allow approximately 35 minutes for
this function to reach the set oven temperature. For best results, preheat oven for one
hour before adding food.
During preheat, convection fans and all
elements are used to quickly and uniformly
heat the oven.
Use only the Wolf bake stone in the
Stone mode
.
Use only one bake stone rack per oven.
Food is usually cooked directly on the
stone. To prevent sticking, apply plenty of
cornmeal or flour to the bottom of the food.
When baking a series of breads or pizzas in
a row, allow 5 minutes between foods for
the bake stone to return to the proper
temperature.
Bake stone and rack should be removed
after baking and not left in oven during any
of the other cooking modes.
after
Bake
16
Bake stone accessory installation
WOLF E SERIES BUILT-IN OVEN OPERATION
BAKE STONE MODE
SETTING CONTROLS
For Bake Stone mode:
1)
Touch
2)
Oven temperature is preset at 205˚C. Oven
STONE
.
begins to heat after five seconds. To change
oven temperature from 205˚˚C, immediately
enter another temperature using the
number pads.
3)
Touch
ENTER
to start the cooking mode
immediately, otherwise the oven will automatically start the mode in 10 seconds if
there is no action.
4)
Add food when the chime signals that the
oven has reached preheat temperature.
5)
If the temperature probe is used, follow
Temperature Probe feature
directions on
pages 28–29.
6)
If the timer is set, the oven will chime when
the cooking time is finished. If the timer is
not cleared, it will continue to chime every
10 seconds.
7)
Remove food. Always use dry pot holders
when removing hot pans from the oven.
8)
Touch oven
OFF
to end this mode.
BAKE STONE ACCESSORY
The bake stone accessory is available from
your Wolf dealer. Additional Use & Care Information is provided with the bake stone accessory.
BAKESTONE30
(807143)
BAKE STONE CARE
Remove excessive food using a scraper. Brush
off any crumbs. Allow the stone to cool
completely before wiping with a wet cloth. Wet
cloths on a hot surface can cause steam burns.
Do not soak or immerse the bake stone in
water and do not use soap or detergent. The
ceramic stone could absorb the taste and
transmit those flavors to the food.
Stubborn stains may occur on the bake stone.
These will not impair the flavor of the food
being baked.
Allow the bake stone to cool completely before
removing from oven.
IMPORTANT NOTE:
Use care in handling the
bake stone. It will chip or break if dropped.
ACCESSORIES
Optional accessories are available
through your
Wolf dealer.
Allow bake stone to cool completely
before wiping with a wet cloth. Wet
cloths on a hot surface can cause steam
burns.
17
WOLF E SERIES BUILT-IN OVEN OPERATION
BROIL MODE
How Broil mode works:
The top element is
used to produce an intense, radiant heat that
browns one side of the food at a time.
Broiled foods usually must be turned over to
brown the other side and finish cooking. The
high heat cooks quickly and gives a rich,
brown outer appearance. This mode is best for
meats, fish and poultry pieces up to 25 mm
thick. The temperature probe cannot be used
with this mode.
WOLF TIPS FOR SUCCESS
For Broil mode:
Do not preheat for
Broil mode
.
Broil with oven door closed.
Preferred for meat, fish and poultry pieces
equal to or less than 25 mm thick.
Always use the two-piece broiler pan
packaged with your oven. Always use
slotted top grid of broiler pan. It allows fat
to drip away from food and from intense
radiant heat. This reduces spattering,
smoking and risk of fire.
Turn food halfway through cooking time.
Brush lean meat and fish with peanut oil
before cooking to prevent sticking.
SETTING CONTROLS
For Broil mode:
1)
Place food in oven at the desired rack
position. Close oven door.
2)
Touch
BROIL
. For double ovens, this
will turn on upper oven. To turn on lower
oven, first touch the
UPPER/LOWER
touch pad so that the lower oven icon is
selected in the LCD display. Then touch
BROIL
.
3)
Oven temperature is preset at 1for 290˚C
(High Broil). Oven begins to broil after five
seconds. To change setting, immediately
touch
2
number pad for 230˚C (Medium
Broil) or
4)
Touch
3
for 175˚C (Low Broil).
ENTER
to start the cooking mode
immediately, otherwise the oven will automatically start the mode in 10 seconds if
there is no action.
5)
If the timer is set, the oven will chime when
the cooking time is finished. If the timer is
not cleared, it will continue to chime every
10 seconds.
6)
Remove food. Always use dry pot holders
when removing hot pans from the oven.
7)
Touch oven
OFF
to end this mode.
18
Start cooking poultry with skin side down.
Begin with cold food directly from the
refrigerator.
When turning food or checking doneness,
open the door carefully. Smoke and
steam may have accumulated. Never use
heatproof glass or pottery. They can
shatter.
WOLF E SERIES BUILT-IN OVEN OPERATION
ROAST MODE
How Roast mode works:
Both bake and broil
elements are used to heat the air, and they
cycle on and off to maintain temperature. This
is designed especially for roasting less tender
cuts of meat that should be covered, such as
chuck roasts, lamb shanks, pot roasts and stew
meat. The temperature probe may be used in
this mode.
WOLF TIPS FOR SUCCESS
For Roast mode:
Always preheat for
Roast mode
.
During preheat, convection fans and
elements are used to quickly and uniformly
heat the oven.
Roasting bags may be used.
When roasting a large item, such as a
turkey, the pan should not cover the entire
rack and block heat from circulating
naturally.
Cook stuffed turkeys weighing over 6.8 kg
in
Roast mode
. Always cook stuffing to an
internal temperature of 75˚C.
SETTING CONTROLS
For Roast mode:
1)
Touch
ROAST
. For double ovens, this
will turn on upper oven. To turn on lower
oven, first touch the
UPPER/LOWER
touch pad so that the lower oven icon is
selected in the LCD display. Then touch
ROAST
2)
Oven temperature is preset at 175˚C. Oven
.
begins to heat after ten seconds. To change
oven temperature from 175˚C, immediately
enter another temperature using the
number pads.
3)
Touch
ENTER
to start the cooking mode
immediately, otherwise the oven will automatically start the mode in 10 seconds if
there is no action.
4)
Add food when the chime signals that the
oven has reached preheat temperature.
5)
If the temperature probe is used, follow
Temperature Probe feature
directions on
pages 28–29.
6)
If the timer is set, the oven will chime when
the cooking time is finished. If the timer is
not cleared, it will continue to chime every
10 seconds.
7)
Remove food. Always use dry pot holders
when removing hot pans from the oven.
8)
Touch oven
OFF
to end this mode.
19
WOLF E SERIES BUILT-IN OVEN OPERATION
CONVECTION MODE
IMPORTANT NOTE:
For double ovens,
Convection mode can only be used in the
upper oven.
How Convection mode works:
Dual convection fans, each with a heating element, operate
from the back of the oven to move the heated
air throughout the entire oven cavity. Uniform
air movement makes it possible to multi-level
rack cook in this mode. The heat is cycled on
and off to maintain the temperature, resulting
in evenly browned food. The temperature
probe may be used in this mode.
WOLF TIPS FOR SUCCESS
For Convection mode:
Always preheat for
Convection mode
.
Use low-sided, uncovered pans to cook
foods.
A 356 mm x 406 mm baking sheet is an
optimum size. Allow at least 25 mm
between edge of pan and walls of oven.
Reduce standard recipe temperatures by
4˚C in this mode.
Pans do not need to be staggered when
cooking on more than one rack.
SETTING CONTROLS
For Convection mode:
1)
Touch
2)
Oven temperature is preset at 165˚C. Oven
CONVECTION
.
begins to heat after five seconds. To change
oven temperature from 165˚C, immediately
enter another temperature using the
number pads.
3)
Touch
ENTER
to start the cooking mode
immediately, otherwise the oven will automatically start the mode in 10 seconds if
there is no action.
4)
Add food when the chime signals that the
oven has reached preheat temperature.
5)
If the temperature probe is used, follow
Temperature Probe feature
directions on
pages 28–29.
6)
If the timer is set, the oven will chime when
the cooking time is finished. If the timer is
not cleared, it will continue to chime every
10 seconds.
7)
Remove food. Always use dry pot holders
when removing hot pans from the oven.
8)
Touch oven
OFF
to end this mode.
20
Baking time may be less than expected;
check doneness 5 to 10 minutes early.
WOLF E SERIES BUILT-IN OVEN OPERATION
CONVECTION BAKE MODE
IMPORTANT NOTE:
For double ovens,
Convection Bake mode can only be used in the
upper oven.
How Convection Bake mode works:
This
mode combines heat from two convection
elements with some heat from the bake
element that is located beneath the oven floor.
Two convection fans circulate this heat within
the oven cavity. The added heat source from
the bottom of the oven makes this mode ideal
for pie baking. The temperature probe may be
used in this mode.
WOLF TIPS FOR SUCCESS
For Convection Bake mode:
Always preheat for
mode
.
Convection Bake
Reduce standard recipe temperatures by
4˚C in this mode.
Bake multiple pies on the same rack, rather
than on different racks.
This mode is ideal for single rack baking.
SETTING CONTROLS
For Convection Bake mode:
1)
Touch
2)
Oven temperature is preset at 190˚C. Oven
CONVECTION BAKE
.
begins to heat after five seconds. To change
oven temperature from 190˚C, immediately
enter another temperature using the
number pads.
3)
Touch
ENTER
to start the cooking mode
immediately, otherwise the oven will automatically start the mode in 10 seconds if
there is no action.
4)
Add food when the chime signals that the
oven has reached preheat temperature.
5)
If the temperature probe is used, follow
Temperature Probe feature
directions on
pages 28–29.
6)
If the timer is set, the oven will chime when
the cooking time is finished. If the timer is
not cleared, it will continue to chime every
10 seconds.
7)
Remove food. Always use dry pot holders
when removing hot pans from the oven.
8)
Touch oven
OFF
to end this mode.
21
WOLF E SERIES BUILT-IN OVEN OPERATION
CONVECTION BROIL MODE
IMPORTANT NOTE:
For double ovens,
Convection Broil mode can only be used in the
upper oven.
How Convection Broil mode works:
Intense
radiant heat from the top element browns and
sears the surface of the food while both
convection fans circulate hot air around the
food. This mode shortens broiling times for
thicker cuts of meat, fish and poultry. The heat
of the broiler browns the exterior, while the
convection fans keep the interior moist and
juicy. The temperature probe cannot be used
with this mode.
WOLF TIPS FOR SUCCESS
For Convection Broil mode:
Do not preheat for
Convection Broil mode
Convection Broil with oven door closed.
Preferred for meat, fish and poultry pieces
thicker than 25 mm.
Always use the two-piece broiler pan
packaged with your oven. Always use
slotted top grid of broiler pan. It allows fat
to drip away from food and from intense
radiant heat. This reduces spattering,
smoking and risk of fire.
Turn food halfway through cooking time.
Brush lean meat and fish with peanut oil
before cooking to prevent sticking.
SETTING CONTROLS
For Convection Broil mode:
1)
Place food in oven at the desired rack
position. Close oven door.
2)
Touch
CONVECTION BROIL
temperature is preset at
Broil). Oven begins to broil after five
seconds. To change setting, immediately
touch the number
3
for Low Broil, 175˚C.
3)
Touch
ENTER
immediately, otherwise the oven will automatically start the mode in 10 seconds if
there is no action.
4)
If the timer is set, the oven will chime when
.
the cooking time is finished. If the timer is
not cleared, it will continue to chime every
10 seconds.
5)
Remove food. Always use dry pot holders
when removing hot pans from the oven.
6)
Touch oven
When turning food or checking doneness,
open the door carefully. Smoke and
steam may have accumulated. Never use
heatproof glass or pottery. They can
shatter.
. Oven
1
for 290˚C (High
2
for Medium Broil, 230˚C
to start the cooking mode
OFF
to end this mode.
22
Start cooking poultry with skin side down.
Begin with cold food directly from the
refrigerator.

WOLF E SERIES BUILT-IN OVEN OPERATION
CONVECTION ROAST MODE
IMPORTANT NOTE:
For double ovens,
Convection Roast mode can only be used in
the upper oven.
How Convection Roast mode works:
Heat
from both convection fans, with additional
heat from the broil element, intensifies the
convective and radiant heating in this mode.
This combination gently browns the exterior
and seals in juices, making it perfect for
roasting tender cuts of beef, lamb, pork and
poultry. The temperature probe may be used in
this mode.
WOLF TIPS FOR SUCCESS
For Convection Roast mode:
Always preheat oven for
mode
.
Convection Roast
Use low-sided, uncovered pans on a roast
rack to cook food.
Reduce standard recipe temperatures by
4˚C in this mode.
The lower part of the broiler pan with a
meat rack makes an excellent roasting pan.
Roasting time may be less than expected;
check doneness earlier than usual.
SETTING CONTROLS
For Convection Roast mode:
1)
Touch
CONVECTION ROAST
. Oven
temperature is preset at 165˚C. Oven begins
to heat after five seconds. To change oven
temperature from 165˚C, immediately enter
another temperature using the number
pads.
2)
Touch
ENTER
to start the cooking mode
immediately, otherwise the oven will automatically start the mode in 10 seconds if
there is no action.
3)
Add food when the chime signals that the
oven has reached preheat temperature.
4)
If the temperature probe is used, follow
Temperature Probe feature
directions on
pages 28–29.
5)
If the timer is set, the oven will chime when
the cooking time is finished. If the timer is
not cleared, it will continue to chime every
10 seconds.
6)
Remove food. Always use dry pot holders
when removing hot pans from the oven.
7)
Touch oven
OFF
to end this mode.
Select foods that are to be roasted
uncovered.
Begin with cold food directly from the
refrigerator.
Cook stuffed turkeys weighing over 6.8 kg
in
Roast mode
. Always cook stuffing to an
internal temperature of 75˚C.
23
WOLF E SERIES BUILT-IN OVEN OPERATION
PROOF MODE
IMPORTANT NOTE:
For double ovens, Proof
mode can only be used in the upper oven.
How Proof mode works:
A combination of
broil and bake elements are used to heat and
balance the air to maintain temperature. This
feature is ideal for proofing, or rising bread
dough.
WOLF TIPS FOR SUCCESS
For Proof mode:
No need to preheat for this mode.
Proof bread until dough has doubled in
bulk.
For best results, place a shallow pan with
.2–.7 L boiling hot water on rack position 1
to keep the air moist inside the oven cavity.
The oven does not allow the temperature to
be set above 45˚C in
Proof feature
. If the
oven is too hot, the oven door should be
opened to allow the oven to cool down
below 50˚C to prevent destroying the yeast.
SETTING CONTROLS
For Proof feature:
1)
Place dough in oven-safe dish in oven.
2)
Touch
3)
Oven temperature is preset to 30˚C. Touch
ENTER
PROOF
.
on the control panel. To change
the temperature from 30˚C, immediately
touch another temperature using the
number pads. The maximum temperature
in
Proof mode
4)
If the timer is set, the oven will chime when
is 45°C.
the cooking time is finished. If the timer is
not cleared, it will continue to chime every
10 seconds.
5)
Remove food. Always use dry pot holders
when removing hot pans from the oven.
6)
Touch oven
OFF
to end this mode.
Allow at least 25 mm between edge of pan
and walls of oven.
Limit frequent door openings to prevent
losing heat and lengthening proofing time.
DO NOT place any cookware on oven
floor or use aluminum foil or other
material to line the oven floor or side
walls. Failure to adhere to this notice will
damage the porcelain and will void your
warranty.
24
WOLF E SERIES BUILT-IN OVEN OPERATION
DELAYED START FEATURE
How Delayed Start feature works:
This
feature controls the automatic timing of the
oven’s
ON
and
OFF
function. Set a mode to
start later in the day and turn off when the
cooking is complete or set it to turn off at a
preset time. Use in combination with any
cooking mode except
and
Bake Stone
Broil, Convection Broil
.
WOLF TIPS FOR SUCCESS
For Delayed Start feature:
Ovens can be set independently.
Do not delay the start when preheating is
critical to the cooking results.
When using the
Delayed Start feature
place food directly from the refrigerator into
the oven.
The time-of-day clock must display the
correct time prior to programming a timed
activity.
SETTING CONTROLS
For Delayed Start feature – to start cooking
later and automatically turn off heat when
finished:
1)
Touch cooking mode, except
CONVECTION BROIL
STONE
. For double ovens, this will turn on
and
BROIL
BAKE
,
upper oven. To turn on lower oven, first
touch the
UPPER/LOWER
touch pad so
that the lower oven icon is selected in the
LCD display. Then touch desired mode.
Note that some cooking modes are not
available for lower oven. Change preset
temperature if needed.
2)
,
pads to set the number of hours/minutes
Touch
TIMED COOK
. Use the number
the oven will stay on (COOK DURATION).
Example: Set 3:30 for the oven to remain on
1
for 3
/2 hours.
3)
When prompted, use the number pads to
set the time of day the oven will turn off
(STOP TIME). Example: Set 6:00 for the time
of day the oven turns off.
4)
Touch
ENTER
. The display appears as if
the oven is on. Using the example above,
heating will start at 3
1
/2 hours prior to six
o’clock which will be 2:30 on the time-ofday clock.
5)
One chime will ring when the cooking time
is complete. If the timer is not cleared, it
will continue to chime every 10 seconds.
6)
The oven will turn off after the STOP TIME
has been reached.
7)
Remove food. Always use dry pot holders
when removing hot pans from the oven.
8)
Touch oven
OFF
to clear the display and
stop the signal.
25

WOLF
E SERIES BUILT-IN OVEN OPERATION
DEHYDRATION MODE
IMPORTANT
NOTE
The Wolf accessory
dehydration racks
are required when
using Dehydration
mode.
IMPORTANT NOTE:
For double ovens,
Dehydration mode can only be used in the
upper oven.
How Dehydration mode works:
This feature
allows for slowly drying out food for preservation and other cooking uses.
The Wolf accessory dehydration racks (not
included with the oven) are required for this
mode. This mode is suitable for drying a
variety of fruits, vegetables, herbs and meat
strips.
WOLF TIPS FOR SUCCESS
For Dehydration mode:
Do not preheat when using
mode
.
Dehydration
Multiple racks can be used simultaneously.
Some foods require as many as 14 to 15
hours to fully dehydrate.
Consult a food preservation book for
specific times and handling of various
foods.
26
WOLF E SERIES BUILT-IN OVEN OPERATION
DEHYDRATION MODE
SETTING CONTROLS
For Dehydration mode:
1)
Place food in oven on dehydration racks.
2)
Place door stop supplied with accessory
package in proper position to keep oven
door open. Refer to instructions provided
with the accessory kit.
3)
Touch
4)
Oven preset temperature is 55˚C. To change
DEHYDRATION
the temperature setting, immediately touch
another temperature (45˚C to 70˚C) using
the number pads.
5)
Leave food in the oven until completely dry
to the touch.
6)
Remove food from racks before completely
cool for easy removal. If excessive sticking
occurs, place dehydration trays back in the
oven to warm slightly for easier removal.
7)
Touch oven
OFF
to end this mode.
DEHYDRATION ACCESSORY
Dehydration racks are available from your
Wolf dealer. Additional instructions are
provided with the dehydration rack accessory.
DEHY/OVEN-30
(804683)
Foods must be dried to below .60 water
activity or dry to the touch to be safely
stored with no danger of mold, yeasts or
bacteria growing. When in doubt, dehydrate for the maximum time specified.
27

WOLF E SERIES BUILT-IN OVEN OPERATION
TEMPERATURE PROBE FEATURE
IMPORTANT NOTE:
For double ovens, the
Temperature Probe feature can only be used in
the upper oven.
How Temperature Probe feature works
: The
probe measures doneness by measuring the
internal temperature of food without opening
the oven door. It is a convenient and accurate
way to achieve the perfect doneness regardless of the type, cut or weight of the food.
Calculating a total cooking time by weight is
no longer necessary using this feature. Use
with all modes except
Broil modes
.
Broil
and
Convection
WOLF TIPS FOR SUCCESS
For Temperature Probe feature
Insert sensor into the thickest part of meat
before placing in oven.
To determine the center, hold sensor
outside of the meat with point at center of
cut. Mark length of insertion by placing
your fingers on sensor at top of meat. Move
sensor to thickest part of meat and insert
up to your fingers.
Standing time refers to the 10- to 15-minute
time period the meat rests before being
carved. This helps more juices to be
retained in the meat.
For poultry, insert probe into the thickest
part of the thigh.
Use aluminum foil to cover meat during the
standing time to help keep it hot before
carving.
Wash probe by hand; do not soak or clean
in the dishwasher.
IMPORTANT NOTE:
The accuracy of the probe
is decreased for all temperatures below 40˚C.
Food taken directly from the refrigerator could
display the incorrect temperature until it has
reached 40˚C.
28
WOLF E SERIES BUILT-IN OVEN OPERATION
TEMPERATURE PROBE FEATURE
SETTING CONTROLS
For Temperature Probe feature with meats:
1)
Preheat oven to desired oven temperature
in desired mode.
2)
Place meat on a rack in the roasting pan.
Insert the probe sensor into the thickest
part of the meat as described in Tips For
Success on page 28.
3)
When the oven signals that preheat is
completed, use a dry potholder to lift the
probe sensor cover. Slide the probe connector into the receptacle on the wall of the
oven until it snaps into place. Close the
oven door.
4)
Touch
TEMP PROBE
. Touch number
pads for the carving temperature of the
meat. It is recommended to allow meat to
rest before carving.
5)
Touch
ENTER
. If
ENTER
is not
touched, the oven will automatically start
the Temperature feature in 8 seconds. The
display shows the oven temperature and
the rising probe temperature counting up
to the doneness setting.
6)
When the carving temperature is reached,
two chimes will signal. Remove probe from
the oven receptacle. The chime continues
every 10 seconds until the probe is
unplugged or until you touch
7)
To end this feature and turn the oven off,
touch oven
OFF
.
CLEAR
SETTING CONTROLS
For Temperature Probe feature with breads:
1)
Preheat oven to desired oven temperature
in
Bake
or
Bake Stone mode
2)
Place bread on bake stone or in oven in
.
bread pans.
3)
Bake 10 minutes at the desired oven
temperature.
4)
Insert probe sensor into the thickest part of
the bread.
5)
Using a dry potholder, lift the probe sensor
cover. Slide the probe connector into the
receptacle on the wall of the oven until it
snaps into place. Close the oven door.
6)
Touch
TEMP PROBE
. Touch number
pads for the end internal baking temperature 90˚C to 100˚C.
7)
Touch
ENTER
. The display shows the
oven temperature and the rising probe
temperature counting up to the doneness
setting.
8)
When the carving temperature is reached,
two chimes will signal. Remove probe from
the oven receptacle. The chime continues
every 10 seconds until the probe is
unplugged or until you touch
9)
.
To end this feature and turn the oven off,
touch oven
OFF
. Oven temperature
CLEAR
.
stays on even when probe is unplugged.
IMPORTANT NOTE:
If the probe connector is
not fully seated into the probe receptacle, then
you will hear an audio signal, and
SHORTED
will show in display. Refer to the
PROBE
Troubleshooting Guide on page 35.
Probe and probe sensor cover become
very hot. Handle with a dry potholder.
29
WOLF E SERIES BUILT-IN OVEN OPERATION
SABBATH FEATURE
This appliance
is certified by
Star-K to meet
strict religious
regulations in
conjunction with
specific instructions found on
www.star-k.org.
Star-K Certified
How the Sabbath feature works:
This mode
allows for baking or keeping food warm while
adhering to the ”no work” requirements on
religious Sabbath days. It provides an unchanging heat source for an uninterrupted extended
period of time. Once the oven reaches its
desired temperature, it does not change. Use
this feature only in the
Bake
and
Roast modes
WOLF TIPS FOR SUCCESS
Ovens can be set independently, though
both ovens will be set in
Sabbath feature
.
Sabbath feature may be used simultaneously in both ovens of a double oven.
Each oven can have options individually set
such as temperature and lights.
Lights stay either on or off.
All tones are turned off during operation.
Heating cycles are not interrupted by the
opening of doors.
Ovens will stay on indefinitely until
manually turned off.
On Holidays, oven temperature may be
adjusted, but display will remain
unchanged. The oven temperature will not
change immediately.
SETTING CONTROLS
For Sabbath feature:
Example:
To set Sabbath feature in a double
oven with upper oven in
115˚C and lower oven in
95˚C.
To set upper oven:
Enter
2-4-0
using the number pads. Touch
ENTER
.
To set lower oven:
UPPER/LOWER
.
Touch the
touch pad to select the
lower oven. Touch
using the number pads. Touch
Touch and hold
ENTER
to enter Sabbath feature.
Touch single or double oven
this feature. Oven(s) remain on until the
feature is cancelled.
SETTING CONTROLS
For Timed Cook in Sabbath mode:
1)
Add food to the oven.
2)
Touch either
BAKE
(temperature preset at 175°C).
3)
Change preset temperature if desired. To
change oven temperature, immediately enter
another temperature using number pads.
4)
Touch
TIMED COOK
pads to set the number of hours/minutes
the oven will stay on.
5)
Touch
STOP TIME
. Use the number pads to
set the time of day the oven will turn off.
Roast mode
Bake mode
Touch
BAKE
ROAST
. Enter
for five seconds
or
ROAST
. Use the number
set at
set at
2-0-0
ENTER
OFF
.
.
to end
30
1)
Touch
OVEN LIGHT
, turning on the
lights in one or both ovens (optional).
2)
Touch
BAKE
or
ROAST
. Oven is
preset at 175˚C. To change oven temperature, immediately enter another temperature
using number pads.
3)
Touch
ENTER
. If preferred, repeat the
above steps with other oven.
4)
Touch and hold
to set to Sabbath.
ENTER
SABBATH
for five seconds
appears in the
display window.
5)
Touch oven
OFF
to end this feature.
Oven(s) remain on until this feature is
cancelled.
6)
Touch
OVEN LIGHT
on or off as
desired.
7)
Touch and hold
SABBATH
8)
When the food is finished, remove the food.
will show in the display window.
ENTER
for five seconds.
(Oven remains unable to be reset until the
Sabbath feature is ended.)
9)
After the Sabbath or Holiday is finished,
touch oven
IMPORTANT NOTE:
oven will not return to the
OFF
to end this feature.
After a power outage, the
Sabbath feature
settings.

WOLF E SERIES BUILT-IN OVEN OPERATION
SELF-CLEAN MODE
How Self-Clean mode works:
The oven is
heated in graduated steps to a preset high
temperature. During this process, food soil is
burned off, leaving some white ash residue.
Set in combination with
feature
, cleaning the oven can be programmed
Delayed Start
to start and stop while you sleep. Refer to
Delayed Start feature
on page 25.
For safety purposes, the door automatically
locks during cleaning and unlocks when the
cavity has cooled completely. Should you stop
this mode after beginning
Self-Clean mode
,
the door will still remain locked until the
temperature inside the oven has cooled to
below 150˚C. The oven lights are always deactivated in this mode.
IMPORTANT NOTE:
one oven may be in
For a double oven, only
Self-Clean mode
at a
time and the other oven cannot be used for
cooking.
IMPORTANT NOTE:
and rack guides before using the
mode
. They will discolor if left in the oven
Remove all oven racks
Self-Clean
during this feature. Refer to Oven Racks on
page 14.
IMPORTANT NOTE:
It is possible to hear a
popping or crackling noise during the operation of the oven(s). These normal sounds are
caused by the expansion and contraction of
the metal surfaces during the heating and
cooling of the oven(s). Running the oven(s)
through a self-clean cycle will help with the
level of these noises.
Do not use any commercial oven cleaners
or oven liner protective coatings on or
around any part of the oven.
The oven gasket is important for a good
seal. Do not hand clean, rub, puncture or
remove this gasket.
During Self-Clean mode, exterior surfaces
may get hotter than usual, therefore,
children should be kept away.
When hand cleaning a spot, use only mild
abrasive cleaners or plastic scrubbers.
IMPORTANT NOTE:
Do not allow food with
high sugar or acid content, such as fruit juice,
milk and tomatoes, to remain on the porcelain
enamel surface. Wipe up immediately with a
dry towel. Failure to do so may cause a permanent dull spot.
IMPORTANT NOTE:
They are not necessary with
IMPORTANT NOTE:
Never use oven cleaners.
Self-Clean mode
During the first self-clean
cycle, some smoke and odor is normal as
remaining oils left over from the initial break-in
period will finish burning off.
.
31

WOLF E SERIES BUILT-IN OVEN OPERATION
SELF-CLEAN MODE
WOLF TIPS FOR SUCCESS
For Self-Clean mode:
Before using
Self-Clean mode
, remove the
oven racks and oven rack guides. They will
discolor if left in the oven during this mode.
Remove broiler pan and any other utensil
stored inside the oven.
Remove any moist food or grease from
spillovers before starting this mode.
It is normal to see a brief flame-up, depending on the amount and content of the soil.
Use this mode as often as necessary. Do
not wait until heavy soil accumulates.
After the mode is finished and the oven
cavity cools, use a damp sponge or paper
towel to wipe up any ash.
You may hear a popping or ”oil canning”
sound during the operation of the oven.
These sounds are normal and are caused
by the expansion and contraction of the
metal surfaces as they heat up and cool
down.
SETTING CONTROLS
For Self-Clean mode:
1)
Remove all oven racks and rack guides
before self-cleaning.
2)
Touch
SELF CLEAN
. For double ovens,
this will start self-clean for upper oven.
To self-clean lower oven, first touch the
UPPER/LOWER
touch pad so that the
lower oven icon is selected in the LCD
display. Then touch
SELF CLEAN
control panel will automatically scroll the
following message:
REMOVE ALL RACKS AND RACK GUIDES.
PRESS ENTER.
3)
Touch
ENTER
to start the default clean
for a total time of 4 hours — self-clean for
3 hours and cool down for 1 hour.
4)
The cleaning time can be adjusted to any
amount of time between 2
1
/2 and 4 hours.
Touch TIMED COOK, then enter the
clean time. For best results, the cleaning
time should be set at 4 hours.
5)
Enter the desired stop time and touch
ENTER
. The oven will automatically start
and stop based on the desired cleaning
time and stop time.
. The
32
6)
Touch desired oven
OFF
to clear the
display when oven is finished cleaning.
Never wipe a warm or hot porcelain
surface with a damp sponge. It may cause
chipping or crazing (tiny hairlike lines).

WOLF E SERIES BUILT-IN OVEN CARE
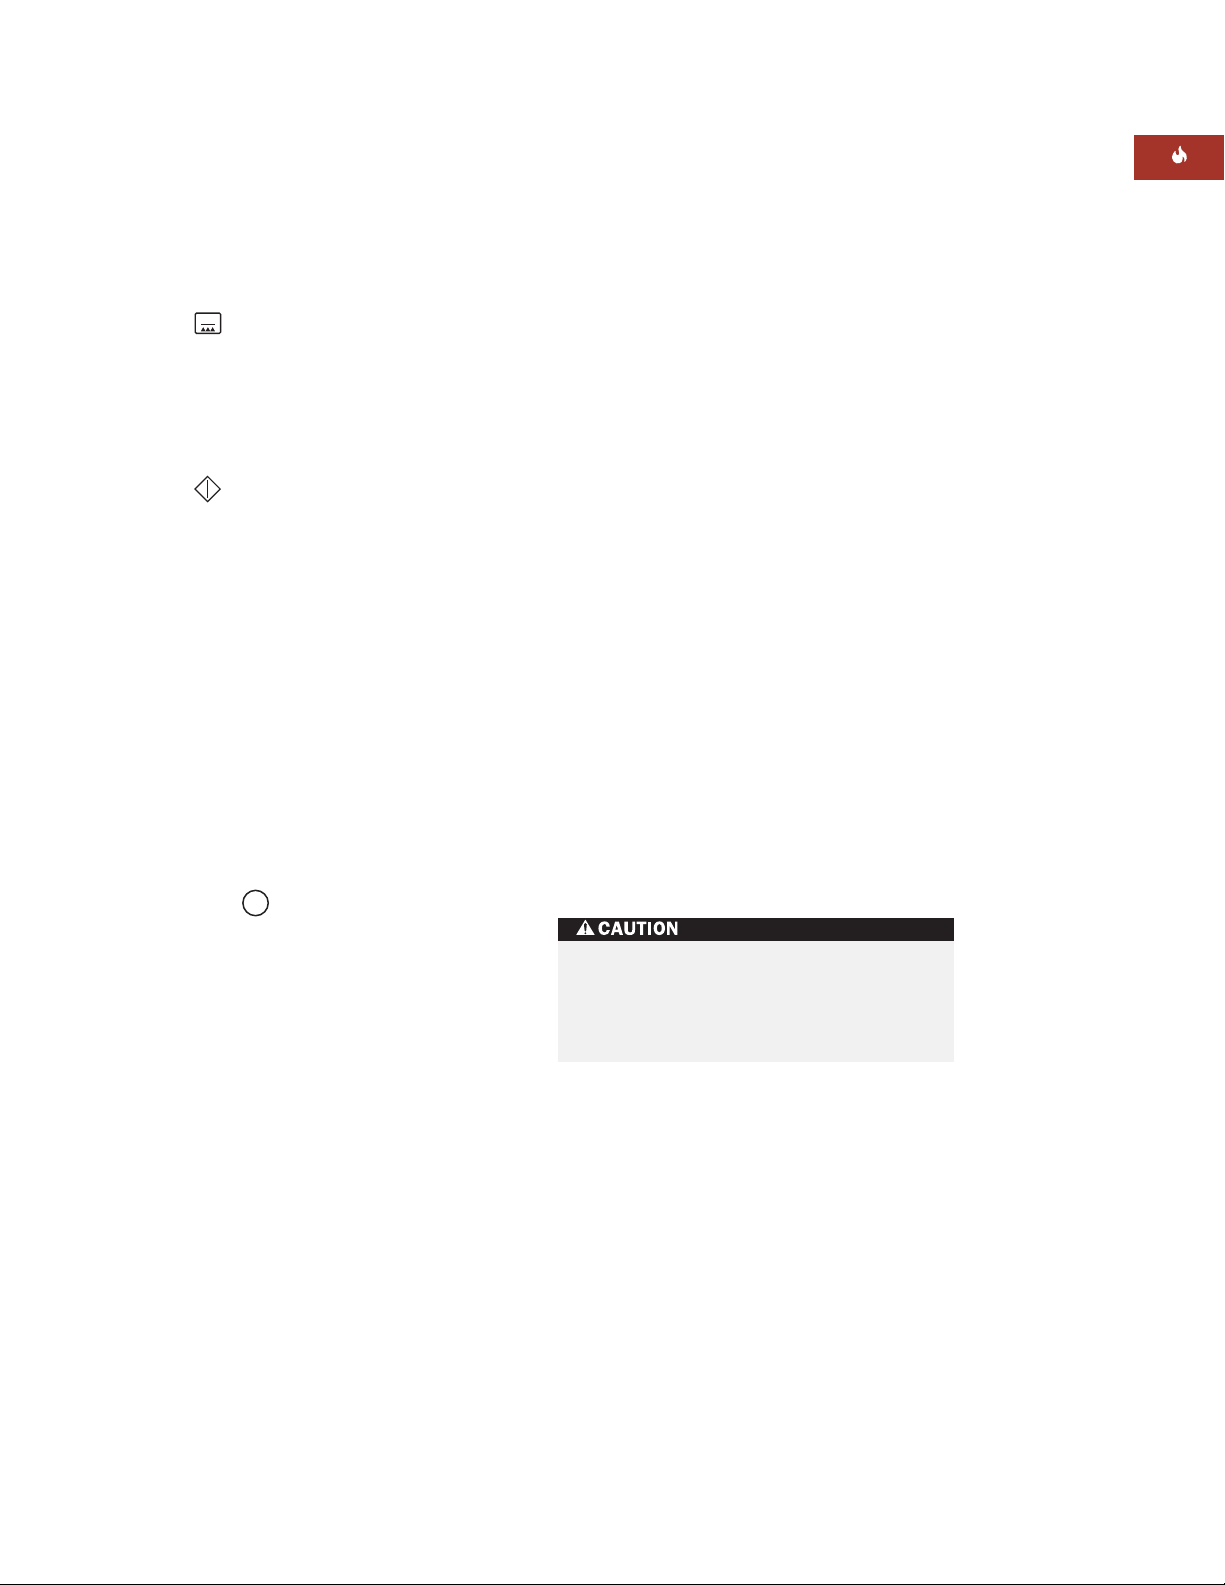
Light Bulb
Light Cover
OVEN LIGHT BULB REPLACEMENT
Turn off electrical power to the oven
before replacing light bulb.
IMPORTANT NOTE:
Allow the oven to cool
sufficiently before replacing the light bulb.
The oven uses a 20-watt halogen light bulb;
replacement part #803816.
To remove the oven light bulb,
remove the
oven rack guides as described on page 14.
Place a hot pad against the oven wall. Using a
flat-head screwdriver, press the screwdriver
against the hot pad and under the edge of the
light cover. Be careful not to scratch the porcelain oven interior. Twisting the screwdriver,
gently pry the edge of the light cover up away
from the wall and remove. Use a paper towel
to handle the light bulb and remove it from the
socket.
To replace the oven light bulb,
avoid direct
contact with the replacement bulb. Use a paper
towel to handle the new light bulb to keep oil
on fingers from touching the bulb. Failure to
do this will cause the bulb to burn out at first
use. Insert the light bulb prongs into the socket
until it snaps into place. Replace the light cover
and oven rack guides. Turn on electrical power
and reset the time-of-day clock.
Use caution when handling light bulbs.
Halogen bulbs get hot instantly and
adjacent parts may retain heat.
Light bulb replacement
33

WOLF E SERIES BUILT-IN OVEN CARE
CARE RECOMMENDATIONS
COMPONENT CARE RECOMMENDATION
Oven Exterior,
Handle and Trim
Classic stainless
steel
Oven Cavity and
Interior Door
Porcelain enamel
Oven Door Window
Heat-tempered glass
Oven Light Cover
Heat-tempered glass
Do not use abrasive cleaners; they will permanently scratch the surface.
Exterior cleaning:
with a soft, lint-free cloth. To bring out the natural luster, lightly wipe the
surface with a water-dampened microfiber cloth, followed with a dry
microfiber cloth. All work should follow the grain direction of the finish.
Best results are obtained by keeping the cloth in continuous contact with
the metal.
Never wipe a warm or hot porcelain surface with a damp sponge; it
may cause chipping or crazing (tiny hairlike cracks).
General care:
allow food with a high sugar or acid content, such as milk, tomatoes, sauerkraut, fruit juices or pie filling, to remain on any porcelain enamel surface.
Failure to remove these foods may cause a permanent dull spot. When hand
cleaning a spot, use only non-abrasive cleaners or scrubbers.
Self-Clean mode
When the window is cool, use a razor blade to gently lift baked-on foods
with a multi-surface spray cleaner.
When the oven is cool, follow instructions on page 33 to remove oven light
cover. Wash with mild abrasive cleaner. Rinse and dry thoroughly. Replace
oven light cover. A 20-watt halogen oven light bulb replaces the existing
bulb (part #803816).
Use a soft, nonabrasive stainless steel cleaner and apply
When cool, clean splatters and spills immediately. Do not
can be used.
34
Rack and
Rack Guides
Nickel-plated steel
Oven Gasket
Fiberglass netting/
stainless steel wire
Broiler Pan
Glossy-finish
porcelain enamel
Bake Stone
Ceramic
Control Panel
Classic stainless
steel /polycarbonate
plastic
Before using the
They will discolor if left in the oven during this feature. Clean with steel wool
soap pad and hot water. Rinse and dry.
Do not hand clean, rub, puncture or remove the oven gasket; this may
compromise the tight door seal.
Top:
While slightly warm, place in sink and lay dish towels on top. Pour very
hot water on towels and allow steam to soften cooked-on residue. Clean
with hot water and a mild detergent. Rinse and dry.
Bottom:
a mild detergent. Rinse and dry.
Use care in handling the bake stone. It will chip or break if dropped.
Do not soak or immerse the bake stone in water and do not use soap or
detergent. Refer to Bake Stone Care instructions on page 17.
Do not use abrasive cleaners, steel-wool pads, gritty washcloths or some
paper towels. Damage may occur.
Use glass cleaners or all-purpose cleaners (without oil) with soft cloth or
sponge. Apply cleaner to soft cloth or sponge, not directly to the panel.
Pour grease into disposable can. When cool, wash in hot water and
Self-Clean mode
, remove oven racks and rack guides.

WOLF TROUBLESHOOTING GUIDE
TROUBLESHOOTING GUIDE
PROBLEM POSSIBLE ISSUE/SOLUTION
Exterior browning
is uneven.
Oven temperature
is too hot.
PROBE SHORTED
flashes when using
probe feature.
Excessive smoke when
broiling.
Pan too large for good heat circulation.
Rack covered with aluminum foil trapping heat below.
Too many pans on a rack.
Food cooked in glass, glass ceramic, or dark metal holds more heat
than shiny pans.
Baking pan is too large for the recipe.
Change rack level or cooking mode.
Oven temperature setting is too high for recipe.
Follow this procedure:
Touch oven off.
Push probe into probe receptacle completely until it snaps into place.
Reset oven temperature and probe temperature.
Using pan other than two-piece broiler pan.
Trim off excess fat.
Lower rack level or shorten time.
Lower broil setting to 2 or 3.
Oven temperature is not
hot enough.
Warm air venting into
kitchen after oven has
been turned off.
Lower oven won’t enter
convection mode.
Oven door won’t open
after self clean.
Oven not fully preheated.
Door opened too often or left open too long.
Food wrapped in foil; check mode for tips that give best results.
Pan is too small for the amount of food in it.
Warm air exhaust is a normal oven function, needed to maintain and
cool down oven temperatures. It turns off automatically when the heat
cools to a safe temperature.
Lower oven isn’t equiped with convection fans.
Choose another mode.
Oven must reach a safe temperature before door will unlock for use.
35

CONTACT
INFORMATION
Website:
wolfappliance.com
WOLF
SERVICE INFORMATION
SERVICE INFORMATION
When requesting information, literature,
replacement parts or service, always refer to
the model and serial number of your built-in
oven. This information is found on the product
rating plate located below the control panel.
For location of the rating plate, refer to the
illustration for your specific model on pages
8–9. Record the rating plate information below
for future reference.
Model Number
Serial Number
Installation Date
Wolf Dealer and Phone
BEFORE CALLING FOR SERVICE
Before calling your Wolf authorized service
center, refer to the Troubleshooting Guide on
page 35. Check the household fuse or circuit
breaker to see if it has been blown or tripped
and that the electrical connection to the appliance has not been disconnected. A power
outage may also have caused a disruption
in service.
36
The information and images in this book are the
copyright property of Wolf Appliance, Inc., an
affiliate of Sub-Zero, Inc. Neither this book nor
any information or images contained herein may
be copied or used in whole or in part without the
express written permission of Wolf Appliance,
Inc., an affiliate of Sub-Zero, Inc.
©Wolf Appliance, Inc. all rights reserved.

Cuando lea esta guía de uso y mantenimiento,
PRECAUCIÓN
AVISO
deberá prestar especial atención cuando
aparezcan los símbolos de PRECAUCIÓN
y AVISO. Esta información es importante
para utilizar de forma segura y eficaz el
equipo de Wolf.
indica una situación en la que se pueden
sufrir heridas leves o provocar daños
secundarios al producto si no se siguen
las instrucciones.
indica peligro de que se produzcan
heridas personales graves o incluso
puede provocar la muerte si no se siguen
las precauciones especificadas.
Además, esta guía de uso y mantenimiento
puede incluir una NOTA IMPORTANTE
para resaltar información especialmente
importante.
WOLF®es una marca comercial registrada de Wolf Appliance, Inc.

INFORMACIÓN
PRECAUCIÓN
DE CONTACTO
Página Web:
www.sub-zero.
eu.com
HORNOS INTEGRABLES SERIE E DE WOLF
GRACIAS
La compra de un horno integrable de Wolf
confirma la importancia que usted da a la calidad
y al rendimiento de su equipo de cocina.
Entendemos esta importancia y hemos diseñado
y creado su horno con materiales y mano de obra
de primera calidad para proporcionarle un
servicio seguro y eficaz durante muchos años.
Sabemos que está deseando empezar a cocinar
pero, antes de hacerlo, debe leer esta guía de uso
y mantenimiento. Tanto si es un cocinero novato
como si es un chef experto, le resultará útil
familiarizarse con las prácticas de seguridad,
las características, el funcionamiento y las
recomendaciones de mantenimiento del
horno de Wolf.
Le agrademos que haya elegido un producto Wolf
y valoramos cualquier sugerencia o comentario
que desee hacer. Para que pueda compartir sus
opiniones con nosotros, visite nuestra página
www.sub-zero.eu.com.
NO coloque ningún utensilio de cocina
sobre el horno ni utilice papel de
aluminio u otro material para forrar la
superficie o las paredes del horno. Si
no sigue esta advertencia, la porcelana
del horno se dañará y la garantía
quedará anulada.
38

PRECAUCIONES E INSTRUCCIONES DE SEGURIDAD
QUÉ DEBE HACER
NOTA IMPORTANTE: Lea las
instrucciones antes de utilizar este
electrodoméstico.
Lea con detenimiento esta guía de
uso y mantenimiento antes de
utilizar el nuevo horno para reducir
el riesgo de que se produzca un
incendio, una descarga eléctrica o
de sufrir lesiones personales.
Asegúrese de que la instalación y el
mantenimiento se llevan a cabo de
manera correcta. Este aparato debe
ser instalado y conectado a tierra
de manera correcta por un técnico
cualificado
Solicite al instalador que le muestre
en qué lugar de la casa están el
fusible y la caja de conexiones.
Aprenda cómo y dónde debe apagar
el suministro eléctrico del horno.
Utilice el horno sólo para realizar
las tareas culinarias propias de un
hogar tal y como se especifica en
esta guía.
Limpie y realice el mantenimiento
del horno siguiendo siempre
las recomendaciones que se
proporcionan en esta guía.
Utilice siempre elementos aislantes
secos para sacar los recipientes del
horno. Si los elementos aislantes
están húmedos o mojados pueden
producirle quemaduras por vapor.
Los elementos aislantes no deben
tocar los elementos caloríficos
calientes. No utilice un paño de
cocina ni otro paño acolchado.
Tenga especial cuidado al abrir la
puerta del horno. Deje que el aire
caliente o el vapor salgan antes de
mirar en el interior del horno o de
alcanzar algún alimento.
Asegúrese que la entrada de aire frío
(situada encima de la puerta) y la
rejilla extractora del horno (situada
debajo de la puerta) no están nunca
obstruidas.
Coloque las rejillas en las
ubicaciones que desee cuando el
horno esté frío. En el caso de que
tenga que colocar una rejilla cuando
el horno todavía está caliente,
asegúrese de que la manopla para
horno no toca ningún elemento
calefactor del horno.
Antes de utilizar el modo de
limpieza automática, extraiga
la bandeja para asar y el asador,
las rejillas y las guías de las rejillas
y cualquier otro utensilio que tenga
dentro del horno.
Limpie sólo las piezas que se
especifican en esta guía.
El ventilador debe estar en marcha
durante el modo de limpieza
automática. Si observa que el
ventilador no funciona, póngase
en contacto con un centro de
mantenimiento autorizado de Wolf
antes de volver a utilizar el modo
de limpieza automática.
39

QUÉ NO DEBE HACER
PRECAUCIÓN
PRECAUCIÓN
NO coloque ningún utensilio
de cocina que esté sobre la
superficie del horno ni utilice
papel de aluminio ni otro
material para forrar la superficie
o las paredes del horno. Si no
sigue esta advertencia, la
porcelana del horno se dañará
y la garantía quedará anulada.
No coloque utensilios de cocina sobre
la superficie del horno.
No repare ni cambie ninguna pieza
del horno a menos que se recomiende
específicamente en los documentos
que se proporcionan con este aparato.
Todas las tareas de mantenimiento
deben ser realizadas por un centro de
asistencia técnica autorizado de Wolf.
No utilice el horno para calentar la
habitación.
No debe dejar a los niños solos o
desatendidos en el área en la que se
esté utilizando el horno. No permita
que los niños se sienten o estén de
pie sobre el horno. No permita que
los niños jueguen con el horno.
No utilice agua para apagar los
incendios producidos por grasa.
Tape las llamas con una tapadera,
una bandeja de horno o una bandeja
metálica. Puede apagar la grasa que
esté ardiendo con bicarbonato de
sosa, con un producto químico
multiusos o con un extintor de
espuma.
No utilice limpiadores de horno
comerciales ni materiales para proteger
el revestimiento, por ejemplo, papel de
aluminio, en ninguna parte del horno.
No utilice limpiadores ni detergentes
abrasivos o cáusticos para limpiar este
electrodoméstico ya que podrían
dañarlo de manera permanente. No
utilice pulverizadores para limpiar el
horno ya que podrían ser inflamables
o podrían oxidar las piezas metálicas.
No limpie la junta del horno ya que al
frotar o mover la junta puede eliminar
el sellado hermético de la puerta.
No lleve nunca prendas sueltas u
holgadas mientras está utilizando
el horno.
No toque los elementos calefactores ni
las superficies interiores del horno. Es
posible que los elementos calefactores
estén calientes aunque ya no estén
rojos. Es posible que el interior del
horno esté caliente con lo que podría
causarle quemaduras. Mientras esté
utilizando el horno y después de
utilizarlo, no toque ni deje que la ropa
ni otros materiales inflamables toquen
los elementos calefactores ni las
superficies interiores del horno hasta
que haya pasado un tiempo y se hayan
enfriado lo suficiente. Otras superficies
del horno también pueden estar
calientes y causarle quemaduras.
Estas superficies incluyen la rejilla de
ventilación del horno y la superficie
alrededor de la rejilla. La ventana y
la puerta del horno también pueden
calentarse y causarle heridas si las
toca cuando están calientes.
40
No caliente envases de comida si no
están abiertos ya que podrían estallar
y causarle heridas.
No almacene materiales explosivos,
combustibles e inflamables en el
horno o en los armarios circundantes.
No almacene artículos que
puedan gustar a los niños encima
del horno ya que pueden saltar
sobre él para alcanzarlos y
podrían resultar heridos.

HORNOS INTEGRABLES SERIE E DE WOLF
CARACTERÍSTICAS DEL HORNO
SENCILLO
SERIE E
Puerta disponible con marco o sin marco
Disponible solamente en acero inoxidable
clásico
Sistema de control lógico con doble ventilación
Diez modos de cocción —horneado, asado,
parrilla, horneado con convección, asado con
convección, convección, horneado a la piedra
(se necesita accesorio), deshidratación (se
necesita accesorio) y fermentación
Iluminación halógena doble en el interior
Elemento para horneado oculto y elemento
trasero para asar a la parrilla
Receptáculo y sensor de temperatura
Inicio programable, limpieza automática
y modo Sabbath (certificado Star-K)
Bisagra equilibrada en la puerta que asegura
una apertura y cierre suave de la misma
Panel de mandos digital con pantalla LCD
Interior de porcelana azul cobalto
Tres rejillas extraíbles con rejilla inferior de
extracción total y dos guías para rejillas de seis
niveles extraíbles
Ventana amplia de cristal doble
Este aparato lleva el certificado Star-K
que indica que cumple rigurosas normas
religiosas junto con instrucciones
específicas que aparecen en la página
www.star-k.org.
HORNO SENCILLO INTEGRABLE SERIE E
Modelos ICBSO30-2F/S y ICBSO30-2U/S (se muestran en la ilustración)
Modelo ICBSO30-2F/S
Con marco
Modelo ICBSO30-2U/S
Sin marco
Sistema electrónico y
rejillas de enfriamiento
Elemento acoplado
para asar a la
parrilla
Termostato
Junta del horno
Tres bandejas
extraíbles
Elemento de
horneado
oculto
Rejilla extractora
Panel de
mandos electrónico
Interruptor de la
puerta del horno
Ubicación de la
placa de datos
Receptáculo para
sensor de temperatura
Luz halógena
Guías de rejilla
de seis niveles
extraíbles
Ventana de cristal
doble
41

HORNOS INTEGRABLES SERIE E DE WOLF
CARACTERÍSTICAS DEL HORNO
DOBLE
SERIE E
Modelo ICBDO30-2F/S
Con marco
Modelo ICBDO30-2U/S
Sin marco
Puerta disponible con marco o sin marco
Disponible solamente en acero inoxidable
clásico
Sistema de control lógico con doble ventilación
en el horno superior con diez modos de
cocción —horneado, asado, parrilla, horneado
con convección, asado con convección, parrilla
con convección, convección, horneado a la
piedra (se necesita accesorio), deshidratación
Doble elemento oculto para horneado y
elemento acoplado para asar a la parrilla
Receptáculo y sensor de temperatura en
el horno superior
Inicio programable, limpieza automática
y modo Sabbath (certificado Star-K)
Bisagra equilibrada en las puertas que asegura
una apertura y cierre suave de la mismas
(se necesita accesorio) y fermentación
Horno inferior sin sistema de convección con
cuatro modos de cocción estándar —horneado,
asado, parrilla y fermentación
Interiores de porcelana azul cobalto
Tres rejillas extraíbles con rejilla inferior de
extracción total y dos guías para rejillas de
seis niveles extraíbles (en cada horno)
Este aparato lleva el certificado Star-K
que indica que cumple rigurosas normas
religiosas junto con instrucciones
específicas que aparecen en la página
www.star-k.org.
Ventanas amplias de cristal doble
Doble iluminación halógena interior en
cada horno
HORNO DOBLE INTEGRABLE SERIE E
Modelos ICBDO30-2F/S y ICBDO30-2U/S (se muestran en la ilustración)
Sistema electrónico
y rejillas de
enfriamiento
Elemento acoplado
para asar a la
parrilla
Termostato
Junta del horno
Tres rejillas
extraíbles por horno
Elemento de
horneado oculto
Rejilla extractora
Panel de
mandos electrónico
Interruptor de la
puerta del horno
Ubicación de la
placa de datos
Receptáculo para
sensor de
temperatura
Luz halógena
Seis guías para
bandeja de seis
niveles extraíbles
en cada horno
Ventana de
cristal doble
42

HORNOS INTEGRABLES SERIE E DE WOLF
PRECAUCIÓN
CARACTERÍSTICAS
DEL HORNO
NO coloque ningún utensilio de cocina
sobre la superficie del horno, ni utilice
papel de aluminio ni otro material para
forrar la superficie o las paredes del
horno. Si no sigue esta advertencia, la
porcelana del horno se dañará y la
garantía quedará anulada.
Varios modos de cocción
proporcionar los mejores resultados para
cada uno de los diferentes tipos de cocción
específicos. Esta característica es lo más
novedoso en cuanto al rendimiento del horno:
modos de cocción excelentemente ajustados
para adaptarse a las necesidades culinarias
de cada individuo.
Gráficos grandes, fáciles de ver
panel de mandos.
Las indicaciones y las respuestas
electrónicas que aparecen en el panel de
mandos
Gran cavidad para cocinar
capacidad utilizable del horno para introducir
bandejas muy grandes para hornear y para
cocinar pavos de gran tamaño.
Elemento de horneado situado debajo de
la superficie del horno
al horno para limpiar las manchas si algo
se derrama.
La rejilla inferior es de extracción total
le permite alcanzar los alimentos de manera
fácil y segura cuando el horno está caliente.
utilizan palabras claras y concisas.
dedicados a
y leer en el
que aumenta la
que facilita el acceso
lo cual
CARACTERÍSTICAS Y MODOS
DE COCCIÓN
Cocción programada – página 45
Modo de horneado – página 48
Modo de horneado a la piedra – página 49
(se necesita piedra para hornear)
Modo de parrilla – página 51
Modo de asado – página 52
Modo de convección – página 53
Modo de horneado con convección –
página 54
Modo de parrilla con convección –
página 55
Modo de asado con convección – página 56
Modo de fermentación – página 57
Opción de inicio programable – página 58
Modo de deshidratación– página 59
(se necesita accesorio para deshidratar)
Sensor de temperatura – página 61
Modo Sabbath – página 63
Modo de limpieza automática – página 64
NOTA IMPORTANTE:
modos de cocción que se especifican en las
páginas siguientes corresponden al
funcionamiento de un horno sencillo. En el caso
de un horno doble, realice los mismos pasos que
para un horno sencillo, excepto para los modos de
cocción que sólo se pueden utilizar en el horno
superior.
NOTA IMPORTANTE:
cambiar del horno superior al inferior y viceversa,
sólo tiene que pulsar el botón
en el panel de control. El icono del horno seleccionado aparecerá iluminado en la pantalla LCD.
Las características y los
En los hornos dobles, para
UPPER/LOWER
42
43
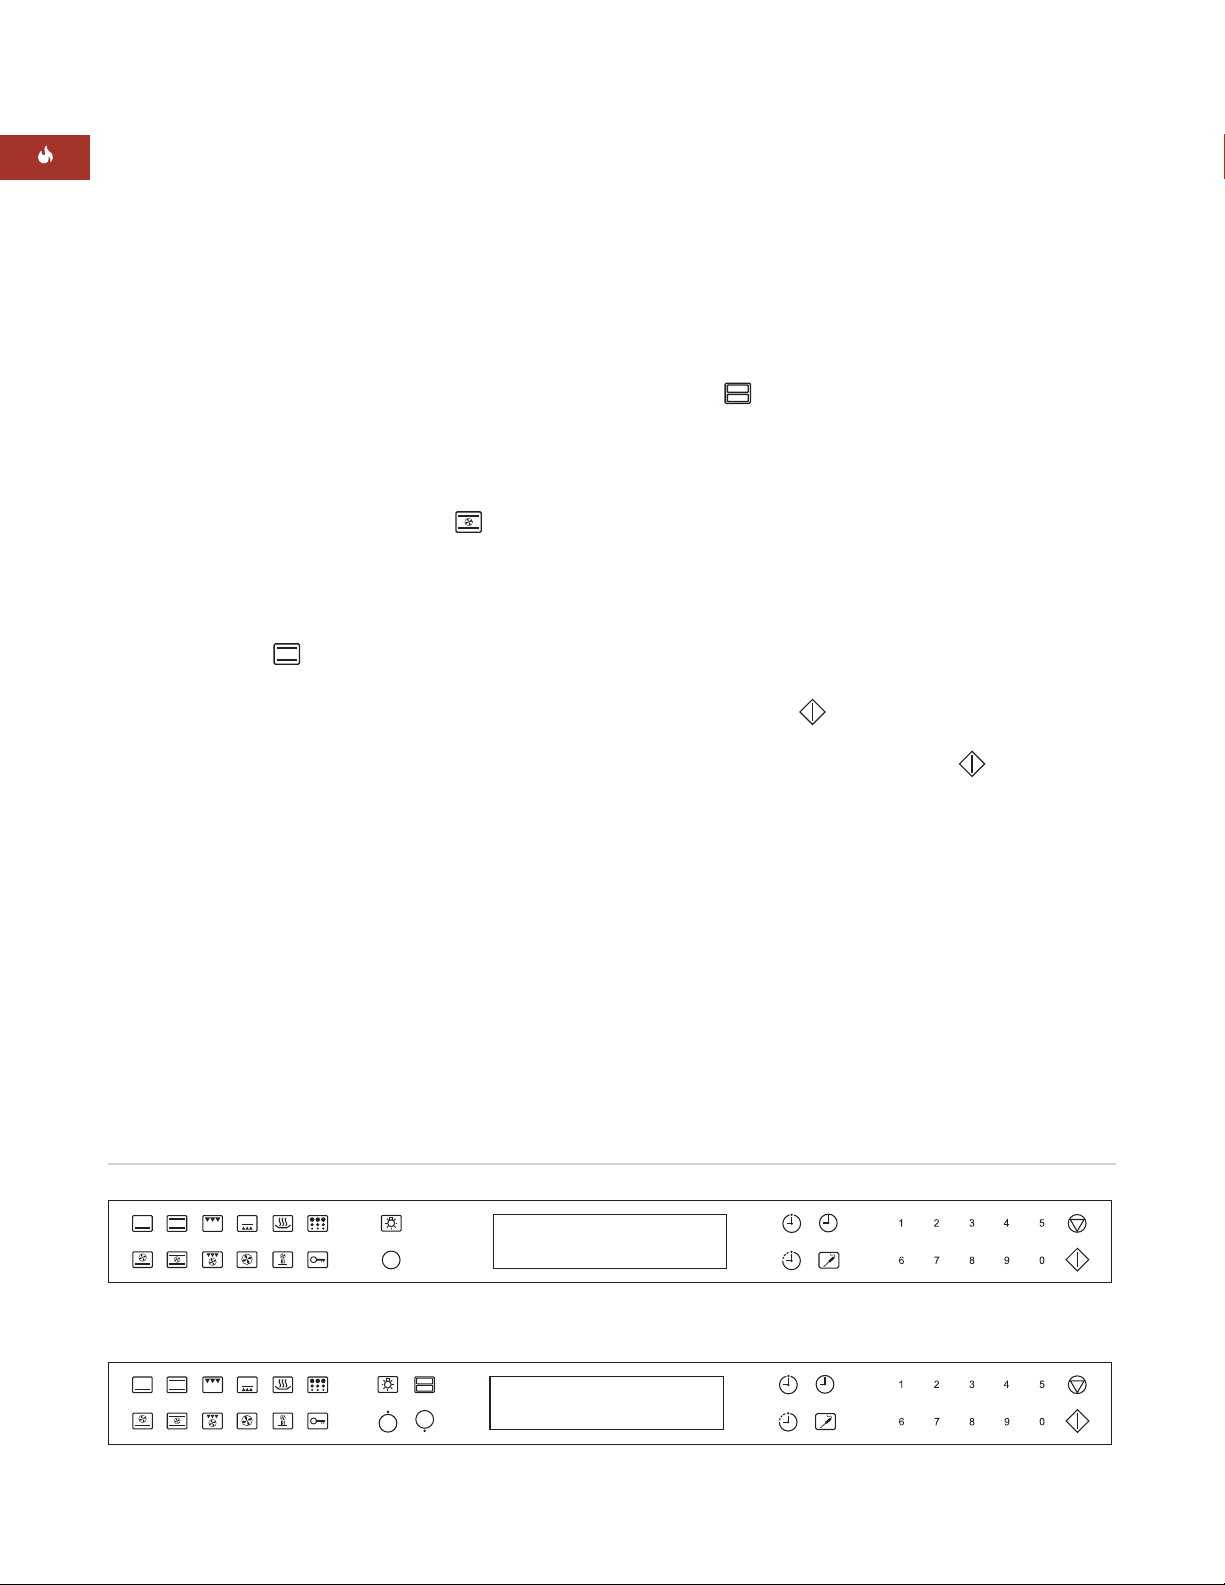
HORNOS INTEGRABLES SERIE E DE WOLF
FUNCIONAMIENTO DEL HORNO
ANTES DE UTILIZAR EL HORNO
POR PRIMERA VEZ
Antes de utilizar el horno integrable por primera
vez, límpielo detenidamente con agua caliente y
detergente suave. Aclárelo y séquelo con un paño
suave. Consulte la sección Recomendaciones de
mantenimiento en la página 67.
Encienda el horno cuando esté listo, seleccione
el idioma pulsando 1 para inglés, 2 para alemán 3
para francés 4 para español o 5 para italiano.
A continuación, configure el horno sencillo o la
cavidad superior del horno doble con el modo de
asado con convección CONVECTION ROAST
con una temperatura de 260°C durante una hora.
Para el horno doble, espere hasta que el horno
superior haya acabado el modo de asado con
convección durante 1 hora y, a continuación,
configure el horno inferior con el modo de asado
ROAST a una temperatura de 260°C durante
una hora. Consulte la página 56 para obtener las
instrucciones correspondientes al modo de asado
con convección y la página 52 para obtener las
instrucciones correspondientes al modo de asado.
Deje que el/los horno(s) se enfríen de manera
gradual dejando la puerta cerrada.
Con este proceso se quemarán todos los restos de
grasa y aceite que hayan quedado en el proceso de
fabricación. Es posible que se produzca un poco de
humo y también que huela a humo durante el
periodo de arranque inicial. La puerta del horno se
puede abrir una vez que el horno se haya enfriado
notablemente.
La primera vez que aplique el modo de limpieza
automática, los residuos también se quemarán,
crearán humo y desprenderán olor.
SELECCIÓN DEL HORNO
En el horno sencillo, puede iniciar un modo de
cocción pulsando el modo que desee en el panel
de mandos. En los hornos dobles, al pulsar el
modo de cocción que desee se encenderá
automáticamente el horno superior. Para encender
el horno inferior, en primer lugar, pulse el botón
UPPER/LOWER
inferior aparezca seleccionado en la pantalla LCD.
A continuación, pulse el modo que desee para
encender el horno inferior.
para que el icono del horno
CÓMO CAMBIAR LA TEMPERATURA
DEL HORNO
Puede cambiar la temperatura del horno
en cualquier momento siempre que haya
seleccionado un modo de cocción.
1)
Pulse las teclas numéricas para introducir la
nueva temperatura.
2)
Pulse
A continuación, la temperatura del horno cambiará
inmediatamente. Si no pulsa
cambiará automáticamente a la nueva temperatura
una vez que hayan transcurrido cinco segundos.
ENTER
.
ENTER
, el horno
CAMBIO DE MODO RÁPIDO
El horno tiene la capacidad de cambiar los modos
de cocción de manera rápida. Mediante este
método, puede cambiar los modos de cocción sin
tener que encender y apagar el horno. Si ya se ha
iniciado un modo de cocción, en lugar de tener
que apagar el horno para cambiar a otro modo
de cocción, sólo tiene que pulsar el botón
correspondiente al modo de cocción que desee.
Panel de control del horno sencillo
Panel de control del horno doble
44

FUNCIONAMIENTO DEL HORNO INTEGRABLE SERIE E DE WOLF
FUNCIONAMIENTO DEL HORNO
PRECALENTAMIENTO DEL HORNO
NOTA IMPORTANTE:
precalentamiento, el horno se calienta pero lo hace
de una manera que no es la adecuada para cocinar.
La opción de precalentamiento del horno se utiliza
en todos los modos de cocción excepto en el modo
de parrilla y parrilla con convección. Para no
estropear los alimentos, el precalentamiento
no se lleva a cabo una vez que el horno alcanza
la temperatura establecida. Si la temperatura del
horno sube mientras está cocinando, el horno
tardará mucho tiempo en alcanzar la nueva
temperatura. Para alcanzar la nueva temperatura
rápidamente, pulse
actual. A continuación, pulse el modo de cocción
que desee e introduzca la nueva temperatura. Esta
nueva temperatura tiene que superar en 10°C la
temperatura de funcionamiento anterior.
Durante el periodo de
OFF
para salir del modo
RELOJ CON LA HORA DEL DÍA
Inmediatamente después de que haya instalado
el horno, configure el reloj de 12 horas con la
hora del día actual. Es posible que sea necesario
restablecer el reloj en el caso de que haya un corte
eléctrico prolongado. El reloj se puede ver en el
panel en todos los modos. Si el temporizador del
horno está configurado, el reloj no se verá en la
ventana de visualización del horno superior.
CONFIGURACIÓN DEL RELOJ
TEMPORIZADOR DEL HORNO
Cada horno dispone de un temporizador que
funciona independientemente de los controles y del
otro horno. Una vez que haya establecido la hora en
horas y minutos, podrá ver la cuenta atrás en la
ventana de visualización. El reloj realiza la cuenta
atrás en segundos sólo durante el último minuto.
Cuando el tiempo predefinido se agote, el horno
emitirá un sonido a modo de recordatorio. Para
apagar el sonido, pulse
puede configurarse por un periodo máximo de 9
horas y 59 minutos.
CLEAR
. El temporizador
CONFIGURACIÓN DEL TEMPORIZADOR
1)
Pulse
2)
Pulse los botones numéricos para configurar
las horas y los minutos.
3)
Pulse
comenzar. (Pulse
momento para parar el temporizador y salir).
4)
Pulse
actual sigue activo para reiniciarlo y establecer
una nueva hora.
5)
Para poner a cero el temporizador: Si el horno
está apagado, pulse
está encendido, pulse
continuación, pulse
SET TIMER
ENTER
SET TIMER
o
.
SET TIMER
CLEAR
mientras el temporizador
CLEAR
SET TIMER
CLEAR
para
en cualquier
. Si el horno
y, a
.
OPCIÓN DE COCCIÓN
PROGRAMADA
1)
Pulse
2)
Pulse los botones numéricos para configurar
la hora del día actual. A continuación, el horno
entrará en un periodo de inactividad de 10
segundos tras el cual el horno volverá a la
hora original.
3)
Pulse
pulse 1 para AM o 2 para PM.
4)
Pulse
en marcha.
SET CLOCK
ENTER
ENTER
y cuando se le solicite,
de nuevo para poner el reloj
.
CONFIGURACIÓN DE LOS MANDOS
1)
Pulse el modo de cocción, por ejemplo,
BAKE
. Cambie la temperatura predefinida si
es necesario.
En los hornos dobles, esto hará que el horno
superior se encienda. Para encender el horno
inferior, en primer lugar, pulse el botón
UPPER/LOWER
horno inferior en la pantalla LCD. A continuación,
pulse el modo que desee.
2)
Pulse
numéricas para configurar el número de
horas/minutos que quiere que el horno
esté encendido.
3)
Pulse
una vez que hayan transcurrido cinco segundos.
La hora de parada aparecerá automáticamente en
la pantalla. Cuando el tiempo de cocción finalice,
el horno se apaga.
4)
Pulse
pantalla.
para seleccionar el icono del
TIMED COOK
ENTER
OFF
o
. Utilice las teclas
. El horno comienza a calentarse
CLEAR
para borrar la
45

FUNCIONAMIENTO DEL HORNO INTEGRABLE SERIE E DE WOLF
OPCIONES AMPLIADAS
En la pantalla se muestran las siguientes opciones
en el orden de Idioma, Escala de temperatura,
Intervalo de temperatura, Reloj de 12/24 horas,
Brillo de retroiluminación, Tono del timbre y
Ajuste de contraste.
1)
Pulse y mantenga pulsado el icono
CLOCK
segundos para que aparezcan las pantallas
de opciones ampliadas.
2)
Pulse
pantallas de las distintas opciones.
3)
Cuando haya terminado de seleccionar todas
las opciones, pulse
la pantalla principal.
en el panel de mandos durante 5
ENTER
para desplazarse por las
CLEAR
para volver a
SET
CONFIGURACIÓN DEL IDIOMA
1)
Cuando se le solicite, pulse 1 para inglés, 2
para alemán, 3 para francés, 4 para español
o 5 para italiano.
CONFIGURACIÓN DE LA ESCALA
DE TEMPERATURA
La temperatura del horno se puede cambiar de
grados Fahrenheit (ºF) a Celsius (°C) o viceversa.
1)
Cuando se le solicite, pulse 1 para Fahrenheit
(°F) o 2 para Celsius (°C).
RELOJ DE 12/24 HORAS
1)
Cuando se le solicite, pulse 1 para reloj de 12
horas o 2 para reloj de 24 horas.
OPCIONES DE RETROILUMINACIÓN
1)
Cuando se le solicite, pulse 1 para brillo de baja
intensidad, 2 para brillo de intensidad media o
3 para brillo intenso.
OPCIONES DEL TIMBRE
Hay tres tonos de frecuencia diferentes para el
timbre del horno.
1)
Cuando se le solicite, pulse 1 para el tono de
frecuencia baja, 2 para el tono de frecuencia
media o 3 para el tono de alta frecuencia.
AJUSTE DEL CONTRASTE
El contraste se puede ajustar para asegurarse de
que la lectura de la pantalla LCD resulta óptima.
1)
Cuando se le solicite, pulse de 1a 9en las
teclas numéricas para ajustar el contraste de
acuerdo a sus preferencias personales.
INTERVALO DE TEMPERATURA
El intervalo de temperatura se utiliza para
mantener el centro de la cavidad del horno en
el punto de temperatura establecido. Los valores
negativos darán como resultado temperaturas
más frías en la cavidad mientras que los ajustes
positivos proporcionan temperaturas más altas
en la cavidad.
1)
Cuando se le solicite, introduzca el intervalo
de temperatura.
2)
Seleccione el intervalo positivo o negativo
pulsando el botón
intervalos máximos de temperatura del
horno son +/- 19°C.
SET TIMER
. Los
46

FUNCIONAMIENTO DEL HORNO INTEGRABLE SERIE E DE WOLF
Pestañas
de montaje
de la guía
de rejilla
Guía de rejilla
6
5
4
3
2
1
Guía de rejilla
Bloqueo anti-vuelco
PRECAUCIÓN
REJILLAS DEL HORNO Y GUÍAS
DE LA REJILLA
GUÍAS DE LA REJILLA DEL HORNO
Para insertar las guías de la rejilla en el horno,
localice los tornillos en las paredes laterales del
horno. Coloque las pestañas de montaje de las
guías de la rejilla sobre las cabezas de los
tornillos y deslícelas hasta que los tornillos
queden totalmente introducidos en las pestañas.
Observe la siguiente ilustración.
Para quitar las guías de la rejilla,
tire hacia arriba
de la guía de la rejilla y, a continuación, sáquela de
manera que las pestañas de montaje se separen
de las cabezas de los tornillos. Extraiga la guía de
la rejilla del horno.
NOTA IMPORTANTE:
Saque todas las rejillas
del horno y las guías de las rejillas antes de
utilizar el
modo de limpieza automática
. Éstas
se decolorarán si se dejan en el horno durante
este modo.
REJILLAS DEL HORNO
Para insertar una rejilla en el horno,
coloque
el bloqueo anti-vuelco de la rejilla debajo de los
rieles de las guías de rejilla laterales. Empuje la
rejilla hacia la parte trasera del horno y levántela
para salvar los topes de la rejilla. Continúe
deslizando la rejilla hasta que esté metida en
el horno completamente.
Para sacar una rejilla del horno,
tire de la rejilla
hacia adelante, levántela y sáquela salvando los
topes de la rejilla de los rieles de la guía de la
rejilla. Observe la siguiente ilustración.
La rejilla inferior del horno es de extracción total.
Con la rejilla en la posición 1 de la guía, deslícela
por las guías de la puerta de acero inoxidable.
Consulte la ilustración para ver las posiciones
de las guías de la rejilla. Las guías proporcionan
estabilidad a la rejilla cuando utilice una cazuela
pesada para cocinar mucha carne o aves de gran
tamaño. Con la rejilla extraída totalmente le
resultará más fácil alcanzar los alimentos
calientes de manera segura.
COLOCACIÓN DE LAS REJILLAS
DEL HORNO
Uno de los factores que afecta al resultado óptimo
de la cocción es el nivel de la colocación de la
rejilla en el horno. La posición 1 de rejilla es la
que está más cerca de la parte inferior del horno
y la posición 6 es la que está más cerca de la parte
superior del horno.
Cuando esté utilizando sólo una rejilla,
colóquela en el centro del horno.
Cuando esté utilizando sólo una rejilla para
asar carne, coloque la rejilla en la posición
1, 2 ó 3 de la guía para rejilla.
Cuando esté utilizando dos o tres rejillas, deje
al menos una posición entre ellas.
Utilice elementos aislantes cuando esté
manejando las rejillas del horno. Las
rejillas se calientan cuando el horno está
encendido y se mantienen calientes una
vez que se haya apagado.
Extracción de la guía de rejilla
Posiciones de las guías de la
rejilla del horno y rejilla inferior
de extracción total
47

FUNCIONAMIENTO DEL HORNO INTEGRABLE SERIE E DE WOLF
PRECAUCIÓN
MODO DE HORNEADO
Funcionamiento del modo de horneado:
el elemento oculto para hornear como el elemento
para asar a la parrilla se utilizan para calentar
el aire y se encienden y apagan para mantener
la temperatura. Este modo está diseñado
especialmente para cocinar con una sola rejilla,
principalmente alimentos horneados. Utilice el
modo de horneado
siempre. El sensor de temperatura se puede
utilizar en este modo.
para cocinar las recetas de
Tanto
CONSEJOS DE WOLF PARA
COCINAR CON ÉXITO
Para el modo de horneado:
Precaliente siempre el horno cuando vaya
a utilizar el
Durante el periodo de precalentamiento, los
ventiladores de convección (si son necesarios)
y los elementos se utilizan para calentar el
horno de manera rápida y uniforme.
Utilice sólo una rejilla.
Deje un espacio de al menos 25 mm entre el
borde de la bandeja y las paredes del horno.
El tamaño, la forma y el acabado de los
recipientes de cocina repercute en la duración
del horneado.
Los alimentos cocinados en recipientes
metálicos oscuros aceleran la cocción más
que los que se cocinan en cazuelas con brillo.
Las cazuelas con revestimientos antiadherentes
oscuros se ennegrecen más que las cazuelas
con revestimiento antiadherente claro.
Utilice la luz del interior del horno y la ventana
para comprobar si los alimentos están dorados.
Debe evitar abrir la puerta con frecuencia si
desea que el horno no pierda calor y para que
el tiempo de cocción total no se alargue.
modo de horneado
.
CONFIGURACIÓN DE LOS MANDOS
Para el modo de horneado:
1)
Pulse
encenderá el horno superior. Para encender
el horno inferior, en primer lugar, pulse el
botón
del horno inferior aparezca seleccionado en la
pantalla LCD. A continuación, pulse
2)
La temperatura del horno está preconfigurada
a 175°C. El horno comienza a calentarse una
vez que hayan transcurrido 10 segundos.
Para cambiar la temperatura del horno de la
temperatura predefinida de 175°C, introduzca
inmediatamente otra temperatura utilizando las
teclas numéricas.
3)
Pulse
temperatura del horno; pulse
veces si desea que en la pantalla del horno
aparezca de nuevo la hora del día.
4)
Pulse
cocción inmediatamente o, si no ha realizado
ninguna acción el horno iniciará el modo
automáticamente en 10 segundos.
5)
Introduzca los alimentos cuando el timbre
indique que el horno ha alcanzado la
temperatura de precalentamiento.
6)
Si utiliza el sensor de temperatura (sólo horno
superior), siga las indicaciones que se
especifican en la sección
temperatura
7)
Si el temporizador está configurado, el timbre
del horno emitirá un sonido cuando haya
finalizado el tiempo de cocción. Si el
temporizador no se ha puesto a cero,
continuará sonando cada 10 segundos.
8)
Retire los alimentos. Utilice siempre elementos
aislantes secos para sacar los recipientes
calientes del horno.
9)
Pulse
BAKE
. En los hornos dobles, esto
UPPER/LOWER
CLEAR
ENTER
OFF
una vez para borrar la
para iniciar el modo de
en las páginas 61–62.
para apagar este modo.
para que el icono
Sensor de
CLEAR
BAKE
dos
.
48
NO coloque ningún utensilio de cocina
sobre la superficie del horno, ni utilice
papel de aluminio u otro material para
forrar la superficie o las paredes del
horno. Si no sigue esta advertencia, la
porcelana del horno se dañará y la
garantía quedará anulada.

FUNCIONAMIENTO DEL HORNO INTEGRABLE SERIE E DE WOLF
PRECAUCIÓN
MODO DE HORNEADO A LA PIEDRA
Funcionamiento del modo de horneado a la
piedra:
En este modo se utiliza una rejilla y una
piedra de horneado con diseño especial para
asegurar que la calidad de los alimentos que se
cocinan utilizando este método específico es la
adecuada. Para que en el horno se forme el calor
preciso y necesario para hornear en una piedra
cerámica, el calor de todos los elementos crea
el efecto “horno de ladrillo” perfecto. Los
ventiladores de convección ayudan a que el aire
circule por toda la cavidad del horno y de esta
manera se logra obtener temperaturas uniformes.
El sensor de temperatura se puede utilizar en
este modo.
Preparación del horno:
Extraiga todas las rejillas
del horno. Deslice la rejilla de la piedra de hornear
en la posición 1 de la guía de la rejilla y coloque
la piedra de hornear en la rejilla de manera que el
borde quede suspendido sobre la parte delantera
de la rejilla. Observe la siguiente ilustración.
Precaliente el horno durante aproximadamente
35 minutos cuando utilice el
a la piedra
.
NOTA IMPORTANTE:
modo de horneado
Tenga cuidado al manejar la
piedra de hornear. Si se cae podría romperse o
desconcharse.
Procure no cocinar alimentos con alto
contenido en grasa en la piedra para
hornear. El material cerámico poroso
absorbe la grasa y decolora la piedra.
Además, es posible que ardan.
CONSEJOS DE WOLF PARA
COCINAR CON ÉXITO
Para el modo de horneado a la piedra:
Precaliente siempre el horno para el
de horneado a la piedra
después de colocar
modo
la rejilla del horno y la piedra cerámica. Para
que esta función alcance la temperatura
establecida es necesario que pasen 35 minutos
aproximadamente. Para obtener los mejores
resultados, precaliente el horno durante una
hora antes de introducir los alimentos.
Durante el periodo de precalentamiento,
los ventiladores de convección y todos los
elementos se utilizan para calentar el horno
de manera rápida y uniforme.
Utilice la piedra para hornear de Wolf sólo en
el
modo de horneado a la piedra
.
Utilice sólo una rejilla para la piedra de hornear
en cada horno.
Los alimentos se cocinan directamente sobre
la piedra. Para evitar que los alimentos se
peguen, eche harina o harina de maíz debajo
de los alimentos.
Cuando vaya a hornear varios panes o pizzas
uno detrás de otro, deje que pasen 5 minutos
entre uno y otro para que la piedra adquiera
la temperatura correcta.
Debe sacar la piedra para hornear y la rejilla
después de hornear y no debe dejarlas en el
horno cuando esté cocinando en los otros
modos de cocción.
NOTA
IMPORTANTE
Es necesario
utilizar la piedra
para hornear de
Wolf cuando
cocine en el
modo de
horneado
a la piedra.
Instalación del accesorio para
hornear a la piedra
49

FUNCIONAMIENTO DEL HORNO INTEGRABLE SERIE E DE WOLF
PRECAUCIÓN
MODO DE HORNEADO A LA PIEDRA
ACCESORIOS
Podrá disponer
de accesorios
opcionales a través
de su distribuidor
de Wolf.
CONFIGURACIÓN DE LOS MANDOS
Para el modo de horneado a la piedra:
1)
Pulse
2)
La temperatura del horno está preconfigurada
a 205°C. El horno comienza a calentarse una
vez que hayan transcurrido cinco segundos.
Para cambiar la temperatura del horno de
205°C, introduzca inmediatamente otra
temperatura utilizando las teclas numéricas.
3)
Pulse
cocción inmediatamente o, si no realiza
ninguna acción, el horno iniciará el modo
automáticamente en 10 segundos.
4)
Introduzca los alimentos cuando el timbre
indique que el horno ha alcanzado la
temperatura de precalentamiento.
5)
Si utiliza el sensor de temperatura, siga las
indicaciones que se especifican en la sección
Sensor de temperatura
6)
Si el temporizador está configurado, el timbre
del horno emitirá un sonido cuando haya
finalizado el tiempo de cocción. Si el
temporizador no se ha puesto a cero,
continuará sonando cada 10 segundos.
7)
Retire los alimentos. Utilice siempre elementos
aislantes secos para sacar los recipientes
calientes del horno.
8)
Pulse
STONE
ENTER
OFF
.
para iniciar el modo de
en las páginas 61–62.
para apagar este modo.
ACCESORIO PARA HORNEAR A LA
PIEDRA
La piedra para hornear está disponible a través
de su distribuidor de Wolf. Con este accesorio
se proporciona información adicional de uso y
mantenimiento.
BAKESTONE30
(807143)
MANTENIMIENTO DE LA PIEDRA
PARA
Retire los restos de alimentos utilizando un
raspador. Limpie las migas si hay alguna. Deje
que la piedra se enfríe completamente antes de
limpiarla con un paño húmedo. Si utiliza paños
húmedos en una superficie caliente pueden
producirle quemaduras por vapor. No moje ni
sumerja la piedra para hornear en agua y no
utilice jabón ni detergente. La piedra cerámica
puede absorber los sabores y transmitirlos a
los alimentos.
En la piedra también se pueden formar manchas
resistentes. Estas no afectarán al sabor de los
alimentos que se estén horneando.
Deje enfriar la piedra completamente antes de
sacarla del horno.
NOTA IMPORTANTE:
la piedra de hornear. Si se cae podría romperse
o desconcharse.
HORNEAR
Tenga cuidado al manejar
50
Deje que la piedra se enfríe
completamente antes de limpiarla con
un paño húmedo. Si utiliza paños
húmedos en una superficie caliente
pueden producirle quemaduras por vapor.

FUNCIONAMIENTO DEL HORNO INTEGRABLE SERIE E DE WOLF
PRECAUCIÓN
MODO DE PARRILLA
Funcionamiento del modo de parrilla:
elemento superior se utiliza para producir un
calor radiante e intenso que dora los alimentos
por un lado.
Normalmente, es necesario dar la vuelta a
los alimentos asados a la parrilla para que se
terminen de cocinar bien. El calor intenso cocina
los alimentos rápidamente y proporciona un
aspecto exterior dorado y apetecible. Este modo
es el más apropiado para asar filetes de carne,
pescado y pollo con un grosor de hasta 25 mm.
El sensor de temperatura no se puede utilizar
con este modo.
El
CONSEJOS DE WOLF PARA
COCINAR CON ÉXITO
Para el modo de parrilla:
No precaliente el horno para el
parrilla
.
Mientras esté asando a la parrilla, la puerta del
horno debe estar cerrada.
Este modo es ideal para asar filetes de carne
y pescado con un grosor de 25 mm o menos.
Utilice siempre la bandeja de dos piezas para
asar a la parrilla que se incluye con el horno.
Utilice siempre la parte superior ranurada de
la bandeja para asar. De esta manera, la grasa
escurre de los alimentos y no entra en contacto
con el calor radiante intenso. Esto reduce el
riesgo de que la grasa salpique y de que se
produzca un incendio.
Gire los alimentos media vuelta para que se
vayan asando por todos los lados.
Unte con aceite de cacahuete la carne o el
pescado bajo en calorías antes de asarlos a
la parrilla para evitar que se pegue.
Cuando cocine carne de ave, empiece a
asarla con la zona de la piel en contacto
con la parrilla.
Cuando comience a asar, ase primero los
alimentos fríos recién sacados del frigorífico.
modo de
CONFIGURACIÓN DE LOS MANDOS
Para el modo de parrilla:
1)
Coloque los alimentos en el horno en la
posición de rejilla que desee. Cierre la
puerta del horno.
2)
Pulse
encenderá el horno superior. Para encender
el horno inferior, en primer lugar, pulse el
botón
el icono del horno inferior en la pantalla LCD.
A continuación, pulse
3)
La temperatura del horno está preconfigurada
a
1
horno comienza a asar a la parrilla una vez
que hayan transcurrido cinco segundos.
Para cambiar la configuración, pulse
inmediatamente la tecla numérica
230°C (Parrilla con calor medio) o
175°C (Parrilla con calor bajo).
4)
Pulse
cocción inmediatamente o, si no realiza
ninguna acción, el horno iniciará el modo
automáticamente en 10 segundos.
5)
Si el temporizador está configurado, el
timbre del horno emitirá un sonido cuando
haya finalizado el tiempo de cocción. Si el
temporizador no se ha borrado, continuará
sonando cada 10 segundos.
6)
Retire los alimentos. Utilice siempre elementos
aislantes secos para sacar los recipientes
calientes del horno.
7)
Pulse
Cuando vaya a dar la vuelta a los
alimentos o cuando desee comprobar si
están hechos, abra la puerta con cuidado.
Es posible que se haya acumulado humo
y vapor. No utilice nunca cristal resistente
al calor ni recipientes de barro ya que
pueden estallar.
BROIL
. En los hornos dobles, esto
UPPER/LOWER
para 290°C (Parrilla con calor intenso). El
ENTER
OFF
para iniciar el modo de
para apagar este modo.
para seleccionar
BROIL
.
2
para
3
para
51

FUNCIONAMIENTO DEL HORNO INTEGRABLE SERIE E DE WOLF
MODO DE ASADO
Funcionamiento del modo de asado:
elemento para hornear como el elemento para
asar se utilizan para calentar el aire y se encienden
y apagan para mantener la temperatura. Este
modo está diseñado especialmente para asar
trozos de carne menos tiernos que deben taparse
para cocerse, por ejemplo, carne de espalda,
piernas de cordero, carne para asar y carne para
guisar. El sensor de temperatura se puede utilizar
en este modo.
Tanto el
CONSEJOS DE WOLF PARA
COCINAR CON ÉXITO
Para el modo de asado:
Precaliente siempre el horno cuando vaya a
utilizar el
Durante el periodo de precalentamiento, los
ventiladores de convección y los elementos
se utilizan para calentar el horno de manera
rápida y uniforme.
También puede utilizar bolsas para asar.
Cuando esté asando una cantidad de carne
grande, por ejemplo un pavo, la cazuela no
debe ocupar toda la rejilla para no obstruir
el calor y que circule de manera natural.
Puede cocinar pavos rellenos que pesen más
de 6,8 Kg en el
siempre el relleno a una temperatura interna
de 75°C.
modo de asado
modo de asado
.
. Cocine
CONFIGURACIÓN DE LOS MANDOS
Para el modo de asado:
1)
Pulse
encenderá el horno superior. Para encender
el horno inferior, en primer lugar, pulse el
botón
el icono del horno inferior en la pantalla LCD.
A continuación, pulse
2)
La temperatura del horno está preconfigurada
a 175°C. El horno comienza a calentarse una
vez que hayan transcurrido diez segundos.
Para cambiar la temperatura del horno de
175°C, introduzca inmediatamente otra
temperatura utilizando las teclas numéricas.
3)
Pulse
de cocción inmediatamente o, si no realiza
ninguna acción, el horno iniciará el modo
automáticamente en 10 segundos.
4)
Introduzca los alimentos cuando el timbre
indique que el horno ha alcanzado la
temperatura de precalentamiento.
5)
Si utiliza el sensor de temperatura, siga las
indicaciones que se especifican en la sección
Sensor de temperatura
6)
Si el temporizador está configurado, el timbre
del horno emitirá un sonido cuando haya
finalizado el tiempo de cocción. Si el
temporizador no se ha puesto a cero,
continuará sonando cada 10 segundos.
7)
Retire los alimentos. Utilice siempre elementos
aislantes secos para sacar los recipientes
calientes del horno.
8)
Pulse
ROAST
ENTER
OFF
. En los hornos dobles, esto
UPPER/LOWER
para iniciar el modo
para apagar este modo.
para seleccionar
ROAST
en las páginas 61–62.
.
52

FUNCIONAMIENTO DEL HORNO INTEGRABLE SERIE E DE WOLF
MODO DE CONVECCIÓN
NOTA IMPORTANTE:
modo de convección sólo se puede utilizar en el
horno superior.
Funcionamiento del modo de convección:
ventiladores de convección dobles, cada uno de
ellos con un elemento calefactor, funcionan desde
la parte trasera del horno y hacen circular el aire
caliente por toda la cavidad del horno. El
movimiento de aire uniforme hace posible que
en este modo pueda cocinar en rejillas situadas
en varios niveles. El calor se apaga y enciende
para mantener la temperatura y conseguir así
que los alimentos se doren igual por todas partes.
El sensor de temperatura se puede utilizar en
este modo.
En los hornos dobles, el
Los
CONSEJOS DE WOLF PARA
COCINAR CON ÉXITO
Para el modo de convección:
Precaliente siempre el horno cuando vaya a
utilizar el
Utilice recipientes poco hondos y sin tapadera
para cocinar.
Una bandeja para horno de 356 mm x 406 mm
es un tamaño perfecto para cocinar en este
modo. Deje un espacio de al menos 25 mm
entre el borde de la bandeja y las paredes
del horno.
En este modo, debe reducir la temperatura que
indique la receta de cocina en 4°C.
No es necesario escalonar las bandejas o
cazuelas cuando cocine en más de una rejilla.
Es posible que el tiempo de cocción sea menos
del previsto; compruebe si los alimentos están
ya hechos 5 ó 10 minutos antes de lo normal.
modo de convección
.
CONFIGURACIÓN DE LOS MANDOS
Para el modo de convección:
1)
Pulse
2)
La temperatura del horno está preconfigurada
a 165°C. El horno comienza a calentarse una
vez que hayan transcurrido cinco segundos.
Para cambiar la temperatura del horno de
165°C, introduzca inmediatamente otra
temperatura utilizando las teclas numéricas.
3)
Pulse
cocción inmediatamente o, si no realiza
ninguna acción, el horno iniciará el modo
automáticamente en 10 segundos.
4)
Introduzca los alimentos cuando el timbre
indique que el horno ha alcanzado la
temperatura de precalentamiento.
5)
Si utiliza el sensor de temperatura, siga las
indicaciones que se especifican en la sección
Sensor de temperatura
6)
Si el temporizador está configurado, el timbre
del horno emitirá un sonido cuando haya
finalizado el tiempo de cocción. Si el
temporizador no se pone a cero, continuará
sonando cada 10 segundos.
7)
Retire los alimentos. Utilice siempre elementos
aislantes secos para sacar los recipientes
calientes del horno.
8)
Pulse
CONVECTION
ENTER
OFF
para apagar este modo.
.
para iniciar el modo de
en las páginas 61–62.
53

FUNCIONAMIENTO DEL HORNO INTEGRABLE SERIE E DE WOLF
MODO DE HORNEADO CON
CONVECCIÓN
NOTA IMPORTANTE:
modo de horneado con convección sólo se puede
utilizar en el horno superior.
Funcionamiento del modo de horneado con
convección:
elementos de ventilación con el calor del elemento
de horneado situado debajo de la superficie del
horno. Este calor circula y se extiende por toda
la cavidad del horno gracias a los dos ventiladores
de convección. La otra fuente de calor situada en
la parte inferior del horno hace que este modo
resulte ideal para hornear tartas y pasteles. El
sensor de temperatura se puede utilizar en
este modo.
Este modo combina el calor de dos
En los hornos dobles, el
CONSEJOS DE WOLF PARA
COCINAR CON ÉXITO
Para el modo de horneado con convección:
Precaliente siempre el horno cuando vaya a
utilizar el
En este modo, debe reducir la temperatura que
indique la receta de cocina en 4°C.
Es preferible que hornee varios pasteles en
la misma rejilla, en lugar de hacerlo en
rejillas diferentes.
Este modo resulta ideal para hornear utilizando
una sola rejilla.
modo de horneado con convección
CONFIGURACIÓN DE LOS MANDOS
Para el modo de horneado con convección:
1)
Pulse
2)
La temperatura del horno está preconfigurada
a 190°C. El horno comienza a calentarse una
vez que hayan transcurrido cinco segundos.
Para cambiar la temperatura del horno de
190°C, introduzca inmediatamente otra
temperatura utilizando las teclas numéricas.
3)
Pulse
cocción inmediatamente o, si no realiza
ninguna acción, el horno iniciará el modo
automáticamente en 10 segundos.
4)
Introduzca los alimentos cuando el timbre
indique que el horno ha alcanzado la
temperatura de precalentamiento.
5)
Si utiliza el sensor de temperatura, siga las
indicaciones que se especifican en la sección
.
Sensor de temperatura
6)
Si el temporizador está configurado, el timbre
del horno emitirá un sonido cuando haya
finalizado el tiempo de cocción. Si el
temporizador no se ha puesto a cero,
continuará sonando cada 10 segundos.
7)
Retire los alimentos. Utilice siempre elementos
aislantes secos para sacar los recipientes
calientes del horno.
8)
Pulse
CONVECTION BAKE
ENTER
OFF
para iniciar el modo de
en las páginas 61–62.
para apagar este modo.
.
54

FUNCIONAMIENTO DEL HORNO INTEGRABLE SERIE E DE WOLF
PRECAUCIÓN
MODO DE PARRILLA CON
CONVECCIÓN
NOTA IMPORTANTE:
modo de parrilla con convección sólo se puede
utilizar en el horno superior.
Funcionamiento del modo de parrilla con
convección:
intenso desde el elemento superior que dora y
asa los alimentos por abajo mientras que los
ventiladores de convección hacen que circule aire
caliente alrededor de los alimentos. Con este
modo tardará menos tiempo en asar a la parrilla
los trozos de carne, pollo o pescado más gruesos.
El calor del asador dora la parte exterior de los
alimentos mientras que los ventiladores de
convección mantienen el interior jugoso. El
sensor de temperatura no se puede utilizar
con este modo.
Este modo proporciona calor radiante
En los hornos dobles, el
CONSEJOS DE WOLF PARA
COCINAR CON ÉXITO
Para el modo de parrilla con convección:
No precaliente el horno para el
parrilla con convección
Mientras esté utilizando este modo, la puerta
del horno debe estar cerrada.
Este modo es ideal para asar a la parrilla filetes
de carne y pescado que tengan un grosor
superior a 25 mm.
Utilice siempre la bandeja de dos piezas para
asar a la parrilla que se incluye con el horno.
Utilice siempre la parte superior ranurada de
la bandeja para asar. De esta manera, la grasa
escurre de los alimentos y no entra en contacto
con el calor radiante intenso. Esto reduce el
riesgo de que la grasa salpique y de que se
produzca un incendio.
Gire los alimentos media vuelta para que se
vayan asando por todos los lados.
Unte con aceite de cacahuete la carne o el
pescado bajo en calorías antes de cocinarla
para evitar que se pegue.
Cuando cocine carne de ave, empiece a
cocinarla con la zona de la piel boca abajo.
Cuando comience a cocinar, ase primero los
alimentos fríos recién sacados del frigorífico.
.
modo de
CONFIGURACIÓN DE LOS MANDOS
Para el modo de parrilla con convección:
1)
Coloque los alimentos en el horno en la
posición de rejilla que desee. Cierre la
puerta del horno.
2)
Pulse
temperatura del horno está preconfigurada a
para 290°C (Parrilla con calor intenso). El horno
comienza a asar a la parrilla una vez que hayan
transcurrido cinco segundos. Para cambiar la
configuración, pulse inmediatamente la tecla
numérica
o
3
3)
Pulse
cocción inmediatamente o, si no realiza
ninguna acción, el horno iniciará el modo
automáticamente en 10 segundos.
4)
Si el temporizador está configurado, el timbre
del horno emitirá un sonido cuando haya
finalizado el tiempo de cocción. Si el
temporizador no se ha puesto a cero,
continuará sonando cada 10 segundos.
5)
Retire los alimentos. Utilice siempre elementos
aislantes secos para sacar los recipientes
calientes del horno.
6)
Pulse
Cuando vaya a dar la vuelta a los
alimentos o cuando desee comprobar si
están hechos, abra la puerta con cuidado.
Es posible que se haya acumulado humo
y vapor. No utilice nunca recipientes de
cristal termoaislante ni de barro ya que
pueden estallar.
CONVECTION BROIL
2
para asar con calor medio, 230°C
para asar con calor bajo, 175°C.
ENTER
OFF
para iniciar el modo de
para apagar este modo.
. La
1
55

FUNCIONAMIENTO DEL HORNO INTEGRABLE SERIE E DE WOLF
MODO DE ASADO CON
CONVECCIÓN
NOTA IMPORTANTE:
modo de asado con convección sólo se puede
utilizar en el horno superior.
Funcionamiento del modo de asado con
convección:
de los dos ventiladores de convección y a través
del elemento de asado, lo cual intensifica el calor
radiante y convectivo. Esta combinación va
dorando poco a poco la parte exterior de los
alimentos a la vez que los deja muy jugosos por
dentro con lo cual resulta perfecto para asar los
filetes más tiernos de ternera, cordero, cerdo o
pollo. El sensor de temperatura se puede utilizar
en este modo.
Este modo proporciona calor a través
En los hornos dobles, el
CONSEJOS DE WOLF PARA
COCINAR CON ÉXITO
Para el modo de asado con convección:
Precaliente siempre el horno cuando vaya a
utilizar el
Utilice cacerolas o bandejas poco hondas y sin
tapadera para cocinar.
En este modo, debe reducir la temperatura que
indique la receta de cocina en 4°C.
La parte inferior de la bandeja para asar junto
con la rejilla para carne forman una bandeja
de asado excelente.
Es posible que el tiempo de asado sea menos
del que espera; compruebe si los alimentos
están hecho antes de lo previsto.
Seleccione alimentos que se puedan asar sin
que sea necesario taparlos.
Comience a cocinar alimentos fríos recién
sacados del frigorífico.
Puede cocinar pavos rellenos que pesen más
de 6,8 Kg en el
siempre el relleno a una temperatura interna
de 75°C.
modo de asado con convección
modo de asado
. Cocine
.
CONFIGURACIÓN DE LOS MANDOS
Para el modo de asado con convección:
1)
Pulse
temperatura del horno está preconfigurada
a 165°C. El horno comienza a calentarse una
vez que hayan transcurrido cinco segundos.
Para cambiar la temperatura del horno de
165°C, introduzca inmediatamente otra
temperatura utilizando las teclas numéricas.
2)
Pulse
cocción inmediatamente o si no realiza
ninguna acción, el horno iniciará el modo
automáticamente en 10 segundos.
3)
Introduzca los alimentos cuando el timbre
indique que el horno ha alcanzado la
temperatura de precalentamiento.
4)
Si utiliza el sensor de temperatura, siga las
indicaciones que se especifican en la sección
Sensor de temperatura
5)
Si el temporizador está configurado, el timbre
del horno emitirá un sonido cuando haya
finalizado el tiempo de cocción. Si el
temporizador no se ha puesto a cero,
continuará sonando cada 10 segundos.
6)
Retire los alimentos. Utilice siempre elementos
aislantes secos para sacar los recipientes
calientes del horno.
7)
Pulse
CONVECTION ROAST
ENTER
OFF
para iniciar el modo de
en las páginas 61–62.
para apagar este modo.
. La
56

FUNCIONAMIENTO DEL HORNO INTEGRABLE SERIE E DE WOLF
PRECAUCIÓN
MODO DE FERMENTACIÓN
NOTA IMPORTANTE:
modo de fermentación sólo se puede utilizar en
el horno superior.
Funcionamiento del modo de fermentación:
este modo para calentar y compensar el aire para
mantener la temperatura es necesario combinar
los elementos para asar y hornear. Ese modo
resulta ideal para fermentar o yeldar la masa
del pan.
En los hornos dobles, el
En
CONSEJOS DE WOLF PARA
COCINAR CON ÉXITO
Para el modo de fermentación:
En este modo no es necesario precalentar
el horno.
Deje que la masa del pan se fermente hasta
que su tamaño sea el doble.
Para obtener los mejores resultados, coloque
una bandeja poco honda con 0,2 – 0,7 de agua
caliente hirviendo en la posición 1 de la rejilla
para mantener la humedad dentro de la
cavidad del horno.
El horno no permite que la temperatura supere
los 45°C en el
horno está demasiado caliente, puede abrir
la puerta del horno para dejar que el horno
se enfríe y adquiera una temperatura inferior
a 50°C para que la levadura no se estropee.
Deje un espacio de al menos 25 mm entre el
borde de la cazuela o bandeja y las paredes
del horno.
Debe evitar abrir la puerta de manera frecuente
para que el horno no pierda calor y para no
alargar el tiempo de fermentación.
modo de fermentación
. Si el
CONFIGURACIÓN DE LOS MANDOS
Para el modo de fermentación:
1)
Coloque la masa en un plato resistente para
horno e introdúzcalo en el horno.
2)
Pulse
3)
La temperatura del horno está preconfigurada
a 30°C. Pulse
mandos. Para cambiar la temperatura del
horno de 30°C, introduzca inmediatamente
otra temperatura utilizando las teclas
numéricas. La temperatura máxima en
el
modo de fermentación
4)
Si el temporizador está configurado, el
timbre del horno emitirá un sonido cuando
haya finalizado el tiempo de cocción. Si el
temporizador no se ha puesto a cero,
continuará sonando cada 10 segundos.
5)
Retire los alimentos. Utilice siempre elementos
aislantes secos para sacar los recipientes
calientes del horno.
6)
Pulse
PROOF
OFF
.
ENTER
para apagar este modo.
en el panel de
es de 45°C.
NO coloque ningún utensilio de cocina
sobre la superficie del horno, ni utilice
papel de aluminio u otro material para
forrar la superficie o las paredes del
horno. Si no sigue esta advertencia,
la porcelana del horno se dañará y
la garantía quedará anulada.
57

FUNCIONAMIENTO DEL HORNO INTEGRABLE SERIE E DE WOLF
OPCIÓN DE INICIO PROGRAMABLE
Funcionamiento de la opción de inicio
programable:
temporización automática de la función
y
OFF
del horno. Configure un modo para que se
Esta función controla las
ON
encienda en una determinada hora del día y para
que se apague cuando la cocción haya finalizado o
para que se apague a la hora que usted determine.
Puede utilizar esta función con cualquiera de los
modos de cocción excepto con los modos de
parrilla, parrilla con conveccióny horneado
a la piedra
.
CONSEJOS DE WOLF PARA
COCINAR CON ÉXITO
Para la opción de inicio programable:
Los hornos se pueden configurar de manera
independiente.
No programe el inicio cuando sea necesario
precalentar el horno para que los resultados
de la cocción sean óptimos.
Cuando utilice la
programable
opción de inicio
, introduzca los alimentos en
el horno inmediatamente después de sacarlos
del frigorífico.
El reloj con la hora del día debe mostrar la hora
correcta entes de programar una cocción
programada.
CONFIGURACIÓN DE LOS MANDOS
Para la opción de inicio programable - para
comenzar a cocer más tarde y para que el horno
se apague automáticamente cuando finalice:
1)
Pulse el modo de cocción, excepto los modos
BROIL
,
BAKE STONE
CONVECTION BROIL
. En los hornos dobles, esto
y
encenderá el horno superior. Para encender
el horno inferior, en primer lugar, pulse el
botón
UPPER/LOWER
para seleccionar
el icono del horno inferior en la pantalla LCD.
A continuación, pulse el modo que desee.
Recuerde que hay algunos modos de cocción
que no se pueden utilizar en el horno inferior.
Cambie la temperatura predeterminada si
es necesario.
2)
Pulse
TIMED COOK
. Utilice las teclas
numéricas para configurar el número de
horas/minutos que quiere que el horno esté
encendido.(DURACIÓN DE LA COCCIÓN). Por
ejemplo: Marque 3:30 para que el horno
permanezca encendido durante 3
3)
Cuando se le solicite, utilice las teclas
1
/2horas.
numéricas para configurar la hora del día en
la que el horno debe apagarse (HORA DE
PA RA DA ). Por ejemplo: Marque 6:00 para
indicar la hora del día en la que el horno
se debe apagar.
4)
Pulse
ENTER
. La pantalla aparece como
si el horno estuviera encendido. Teniendo en
cuenta el ejemplo anterior, el horno empezará a
calentarse 3
1
/2horas antes de las seis, que
serán las 2:30 en el reloj con la hora del día.
5)
Cuando finalice el tiempo de cocción, sonará
una campana. Si el temporizador no se ha
puesto a cero, continuará sonando cada
10 segundos.
6)
El horno se apagará cuando se llegue al
TIEMPO DE PARADA.
7)
Retire los alimentos. Utilice siempre elementos
aislantes secos para sacar los recipientes
calientes del horno.
8)
Pulse
OFF
para borrar la pantalla y detener
la señal.
58

FUNCIONAMIENTO DEL HORNO INTEGRABLE SERIE E DE WOLF
MODO DE DESHIDRATACIÓN
NOTA IMPORTANTE:
En los hornos dobles,
el modo de deshidratación sólo se puede utilizar
en el horno superior.
Funcionamiento del modo de deshidratación:
Este modo permite desecar alimentos lentamente
para que se conserven y para otros usos
culinarios.
Para utilizar este modo, es necesario utilizar las
rejillas de deshidratación de Wolf (que no se
incluyen con el horno). Este modo resulta
perfecto para secar frutas, verduras, hierbas
y tiras de carne.
CONSEJOS DE WOLF PARA COCINAR
CON ÉXITO
Para el modo de deshidratación:
No precaliente el horno cuando utilice el
modo de deshidratación
.
Se pueden utilizar varias rejillas de manera
simultánea.
Algunos alimentos necesitan 14 ó 15 horas
para que se deshidraten completamente.
Consulte un libro de conservación de alimentos
para conocer el tiempo y el modo de
deshidratar distintos tipos de alimentos.
NOTA
IMPORTANTE
Debe utilizar
las rejillas de
deshidratación
de Wolf cuando
utilice el modo
de deshidratación.
59

FUNCIONAMIENTO DEL HORNO INTEGRABLE SERIE E DE WOLF
PRECAUCIÓN
MODO DE DESHIDRATACIÓN
CONFIGURACIÓN DE LOS MANDOS
Para el modo de deshidratación:
1)
Coloque los alimentos en el horno en las
rejillas de deshidratación.
2)
Coloque el tope de puerta que se incluye en el
paquete de accesorios en la posición correcta
para que la puerta del horno se mantenga
abierta. Consulte las instrucciones que se
proporcionan con el kit de accesorios.
3)
Pulse
4)
La temperatura predeterminada del horno
es 55°C. Para cambiar la temperatura del
horno, introduzca inmediatamente otra
temperatura (de 45°C a 70°C) utilizando
las teclas numéricas.
5)
Deje los alimentos en el horno hasta que al
tocarlos compruebe que están totalmente
secos.
6)
Para quitar los alimentos de las rejillas de
manera sencilla, hágalo antes de que se
enfríen completamente. Si los alimentos se
han pegado mucho, vuelva a colocar las
bandejas de deshidratación en el horno
para que se calienten un poco y pueda
limpiarlas fácilmente.
7)
Pulse
DEHYDRATION
OFF
para apagar este modo.
ACCESORIO PARA DESHIDRATACIÓN
Podrá disponer de las rejillas de deshidratación a
través de su distribuidor de Wolf. Con la rejilla de
deshidratación que se proporciona como accesorio
se incluyen instrucciones adicionales.
DEHY/OVEN-30
(804683)
60
Los alimentos deben desecarse hasta que
el agua se haya evaporado en un 60 por
ciento o hasta que compruebe que están
secos al tocarlos para que se puedan
almacenar sin que haya peligro de que se
enmohezcan, fermenten o críen bacterias.
Si tiene alguna duda, deshidrátelos el
máximo tiempo especificado.

FUNCIONAMIENTO DEL HORNO INTEGRABLE SERIE E DE WOLF
OPCIÓN DE SENSOR DE
TEMPERATURA
NOTA IMPORTANTE:
de sensor de temperatura sólo se puede utilizar en el
horno superior.
Funcionamiento del sensor de temperatura
detecta si los alimentos están hechos o no midiendo la
temperatura de los alimentos por dentro sin que sea
necesario abrir la puerta. Es una manera cómoda y
precisa de lograr que los alimentos queden en su
punto, independientemente del tipo, corte o peso de
los mismos. Gracias a esta función, ya no es necesario
calcular el tiempo de cocción total según el peso de la
pieza. Esta función se puede utilizar con todos los
modos excepto con el modo de
con convección
En los hornos dobles, la opción
: El sensor
parrillay parrilla
.
CONSEJOS DE WOLF PARA
COCINAR CON ÉXITO
Para la opción de sensor de temperatura
Inserte el sensor en la parte más gruesa de la
carne antes de introducirla en el horno.
Para determinar el centro, sujete el sensor por
fuera de la carne apuntando al centro del corte.
Marque la longitud de inserción colocando los
dedos sobre el sensor en la parte superior de
la carne. Mueva el sensor hacia la parte más
gruesa de la carne e introdúzcalo hasta que
llegue hasta donde tiene colocados los dedos.
El periodo de reposo hace referencia al periodo
de tiempo de 10 a 15 minutos que la carne se
deja reposar antes de cortarla. Esto ayuda a
que los jugos se mantengan dentro en la carne.
Si está cocinando carne de ave, inserte el
sensor en la parte más gruesa del muslo.
Utilice papel de aluminio para cubrir la carne
durante el periodo de reposo para que se
mantenga caliente antes de cortarla.
Lave el sensor a mano; no lo sumerja en agua
ni lo introduzca en el lavavajillas.
NOTA IMPORTANTE:
disminuye cuando se utiliza con temperaturas
inferiores a 40°C. Los alimentos que se sacan
directamente del frigorífico pueden mostrar
una temperatura incorrecta hasta que alcanzan
los 40°C.
La precisión del sensor
61

FUNCIONAMIENTO DEL HORNO INTEGRABLE SERIE E DE WOLF
PRECAUCIÓN
OPCIÓN DE SENSOR DE
TEMPERATURA
CONFIGURACIÓN DE LOS MANDOS
Opción de sensor de temperatura para carnes:
1)
Precaliente el horno con la temperatura que
desee en el modo en que vaya a cocinar.
2)
Coloque la carne en una rejilla en la bandeja
para asar. Inserte el sensor en la parte más
gruesa de la carne tal y como se ha descrito
en la sección Consejos para cocinar con
éxito en la página 61.
3)
Cuando el horno indique que el periodo de
precalentamiento ha finalizado, utilice un
elemento aislante seco para levantar la carcasa
del sensor. Inserte el conector del sensor en el
receptáculo de la pared del horno hasta que se
coloque en su lugar. Cierre la puerta del horno.
4)
Pulse
numéricas para establecer la temperatura
correcta para trinchar la carne. Es recomendable dejar que la carne repose antes de
trincharla.
5)
Pulse
el horno iniciará automáticamente la opción
de temperatura en 8 segundos. En la pantalla
se muestra la temperatura del horno y la
temperatura del sensor según va aumentando
y cuenta hasta que la carne esté hecha.
6)
Cuando la carne alcance la temperatura apta
para trinchar, sonarán dos campanadas a
modo de indicación. Extraiga el sensor del
receptáculo del horno. La campana continua
sonando cada 10 segundos hasta que el sensor
se desenchufe o hasta que pulse
7)
Para finalizar está función y apagar el horno,
pulse
NOTA IMPORTANTE:
no está bien colocado en el receptáculo, escuchará
un sonido y en la pantalla aparecerá el mensaje
PROBE SHORTED
de localización y solución de problemas en la
página 68.
TEMP PROBE
ENTER
OFF
.
. Consulte la sección Guía
. Pulse las teclas
. Si no ha pulsado
So el conector del sensor
ENTER
CLEAR
.
CONFIGURACIÓN DE LOS MANDOS
Opción de sensor de temperatura para pan:
1)
Precaliente el horno con la temperatura que
desee en el modo de
a la piedra
2)
Coloque el pan en la piedra para hornear o en
el horno en bandejas para pan.
3)
Hornee 10 minutos a la temperatura que desee.
4)
Inserte el sensor en la parte más gruesa
del pan.
5)
Levante la carcasa del sensor utilizando un
elemento aislante seco. Deslice el conector del
sensor en el receptáculo de la pared del horno
hasta que se coloque en su lugar. Cierre la
puerta del horno.
6)
Pulse
numéricas para configurar la temperatura
de horneado interna de 90°C a 100°C.
7)
Pulse
,
la temperatura del horno y la temperatura del
sensor según va aumentando y cuenta atrás
hasta que el pan esté hecho.
8)
Cuando se alcance la temperatura apta para
cortar el pan, sonarán dos campanadas a
modo de indicación. Extraiga el sensor del
receptáculo del horno. La campana continua
sonando cada 10 segundos hasta que el sensor
se desenchufe o hasta que pulse
9)
Para finalizar está función y apagar el horno,
pulse
permanece encendida incluso cuando el
sensor se ha desenchufado.
El sensor y la carcasa del sensor pueden
llegar a estar muy calientes. Cuando
tenga que tocarlos, utilice un elemento
aislante seco.
.
TEMP PROBE
ENTER
OFF
horneadoo horneado
. Pulse las teclas
. En la pantalla se muestra
. La temperatura del horno
CLEAR
.
62

FUNCIONAMIENTO DEL HORNO INTEGRABLE SERIE E DE WOLF
MODO SABBATH
Certificado Star-K
Funcionamiento del modo Sabbath:
Este modo
permite hornear y mantener la comida caliente a
la vez que se siguen los preceptos religiosos de
”no trabajar” en los días Sabbath. Este modo
proporciona una fuente de calor que no cambia
durante un periodo de tiempo largo ininterrumpido.
Cuando el horno alcanza la temperatura que desee,
ya no cambia. Utilice esta función sólo en los modos
de
horneado
y de
asado
.
Por ejemplo:
horno doble con el horno superior en el
asado
inferior en el
Para configurar el horno superior:
ROAST
numéricas. Pulse
Para configurar el horno inferior:
botón
Configurar el modo Sabbath en un
con una temperatura de 115°C y el horno
modo de horneado
. Pulse
2-4-0
utilizando las teclas
ENTER
UPPER/LOWER
el horno inferior. Pulse
CONSEJOS DE WOLF PARA
COCINAR CON ÉXITO
Los hornos se pueden configurar de manera
independiente aunque ambos hornos deben
configurarse en el
modo Sabbath
.
El modo Sabbath se puede utilizar de manera
simultánea en los dos hornos de un horno doble.
En cada horno se pueden configurar las opciones
2-0-0
utilizando las teclas numéricas. Pulse
ENTER
.
Pulse y mantenga pulsado el botón ENTER
durante cinco segundos para configurar el
modo Sabbath.
Pulse
OFF
en el horno sencillo o doble para
apagar esta función. Los hornos permanecen
encendidos hasta que se cancele esta función.
de manera individual, por ejemplo, la temperatura
y las luces.
Las luces pueden permanecer encendidas
o apagadas.
Todos los tonos se apagan mientras este modo
está en funcionamiento.
Al abrir las puertas, los ciclos de calor no se
interrumpen.
Los hornos permanecerán encendidos de manera
indefinida hasta que se apaguen de manera
manual.
En periodos vacacionales, la temperatura del
horno se puede ajustar pero la pantalla no
cambia. La temperatura del horno no cambia
inmediatamente.
CONFIGURACIÓN DE LOS MANDOS
Modo Sabbath para cocción programada:
1)
Introduzca los alimentos en el horno.
2)
Pulse
BAKE
o
ROAST
predeterminada a 175°C).
3)
Cambie la temperatura predefinida si es
necesario. Para cambiar la temperatura del
horno , introduzca inmediatamente otra
temperatura utilizando las teclas numéricas.
4)
Pulse
TIMED COOK
. Utilice las teclas
numéricas para configurar el número de
horas/minutos que quiere que el horno
esté encendido.
5)
Pulse
STOP TIME
. Utilice las teclas numéricas
para configurar la hora del día en la que desea
CONFIGURACIÓN DE LOS MANDOS
Para el modo Sabbath:
1)
Pulse
OVEN LIGHT
para encender las luces
en uno o en ambos hornos (opcional).
2)
Pulse
BAKE
o
ROAST
. El horno está
preconfigurado a 175°C. Para cambiar la
temperatura del horno, introduzca
inmediatamente otra temperatura utilizando
las teclas numéricas.
3)
Pulse
ENTER
. Si lo prefiere, puede repetir los
pasos anteriores con el otro horno.
4)
Pulse y mantenga pulsado el botón
ENTER
que el horno se apague.
6)
Pulse
OVEN LIGHT
para encender o apagar
la luz del horno.
7)
Pulse y mantenga pulsado
5 segundos. En la pantalla aparece la palabra
SABBATH
8)
Cuando los alimentos se hayan cocinado,
retírelos del horno.
.
(El horno no puede
reiniciarse hasta que finalice el modo Sabbath).
9)
Una vez que haya finalizado el Sabbath o el
periodo vacacional, pulse
finalice este modo.
durante cinco segundos para configurar el modo
Sabbath. En la pantalla aparece la palabra
SABBATH
5)
Pulse
.
OFF
para apagar esta función. Los
NOTA IMPORTANTE:
Si se produce un corte
eléctrico, el horno no vuelve a la configuración
del
modo Sabbath
.
hornos permanecen encendidos hasta que se
cancele esta función.
modo de
a 95°C.
Pulse
.
Pulse el
para seleccionar
BAKE
. Pulse
(temperatura
ENTER
OFF
durante
para que
Este electrodoméstico lleva el
certificado Star-K
que indica que
cumple rigurosas
normas religiosas
e instrucciones
específicas que
aparecen en
la página
www.star-k.org.
63

FUNCIONAMIENTO DEL HORNO INTEGRABLE SERIE E DE WOLF
PRECAUCIÓN
PRECAUCIÓN
AVISO
MODO DE LIMPIEZA AUTOMÁTICA
Funcionamiento del modo de limpieza
automática:
hasta alcanzar una temperatura predefinida.
Durante este proceso, se quema la suciedad que
han dejado los alimentos dejando un poco de
ceniza blanca. Si lo configura junto con la opción
de
inicio programable
puede programar para que se inicie y detenga
mientras usted está durmiendo. Consulte la
sección
Por su seguridad, la puerta se bloquea
automáticamente mientras el horno se está
limpiando y se desbloquea cuando la cavidad se
ha enfriado completamente. Si detiene este modo
una vez que se haya iniciado la
automática
que la temperatura interior del horno esté por
debajo de los 150°C. En este modo las luces del
horno están siempre desactivadas.
NOTA IMPORTANTE:
de limpieza automática
los dos hornos a la vez; mientras se aplica en uno
de ellos, el otro no puede utilizarse para cocinar.
NOTA IMPORTANTE:
horno y las guías de las rejillas antes de utilizar
el
modo de limpieza automática
decolorarán si se dejan en el horno durante este
modo. Consulte la sección Rejillas del horno en
la página 47.
Cuando limpie a mano una mancha, utilice
solamente limpiadores no abrasivos o estropajos
de plástico.
NOTA IMPORTANTE:
alto contenido en azúcares o ácidos, por ejemplo,
zumo de frutas, leche y tomates, permanezcan en
la superficie de esmalte de porcelana. Límpielos
inmediatamente con un paño seco. Si no lo hace
es posible que se forme una mancha permanente.
NOTA IMPORTANTE:
para hornos. No es necesario utilizarlos con el
modo de limpieza automática.
NOTA IMPORTANTE:
limpieza automática, es normal que aparezca un
poco de humo y olor ya que se pueden terminar
de quemar los aceites que han quedado en el
periodo de arranque inicial.
El horno se calienta gradualmente
, la limpieza del horno se
Inicio programable
, la puerta permanece bloqueada hasta
en la página 58.
limpieza
En un horno doble, el
no se puede aplicar en
Saque todas las rejillas del
. Éstas se
No deje que alimentos con
No utilice nunca limpiadores
Durante el primer ciclo de
modo
NOTA IMPORTANTE:
un sonido semejante al de un estallido o un
crujido mientras el horno está en funcionamiento.
Estos sonidos son normales y se producen debido
a la expansión y contracción de las superficies
metálicas durante el calentamiento y enfriamiento
de los hornos. Cuando utilice la función de
limpieza automática escuchará más sonidos
de este tipo.
No utilice limpiadores de horno
comerciales ni materiales para proteger
el revestimiento en ninguna parte del
horno.
La junta del horno es muy importante
para que el cierre sea hermético. No
limpie a mano, ni frote, pinche o retire
esta junta.
Durante el modo de limpieza automática,
las superficies exteriores pueden
calentarse más de lo normal, por lo que
los niños deben mantenerse alejados de
las mismas.
Es posible que escuche
64

FUNCIONAMIENTO DEL HORNO INTEGRABLE SERIE E DE WOLF
PRECAUCIÓN
MODO DE LIMPIEZA AUTOMÁTICA
CONSEJOS DE WOLF PARA COCINAR
CON ÉXITO
Para el modo de limpieza automática:
Antes de utilizar el
automática
modo de limpieza
, extraiga las rejillas del horno y
las guías de las rejillas. Éstas se decolorarán
si se dejan en el horno durante este modo.
Saque la bandeja para asar y cualquier otro
utensilio almacenado dentro del horno.
Limpie las salpicaduras de grasa o los restos
de alimentos húmedos antes de iniciar
este modo.
Es normal que se produzca una pequeña
llamarada, dependiendo de la cantidad y
del tipo de suciedad.
Puede utilizar este modo todas las veces que
sea necesario. No espere hasta que se acumule
la suciedad.
Cuando el modo de limpieza automática haya
finalizado y la cavidad del horno se haya
enfriado, utilice una esponja o papel de cocina
humedecido para limpiar la ceniza.
Mientras que el horno está en funcionamiento,
es posible que escuche un sonido similar al de
un estallido o al de una ”distorsión térmica”
Estos sonidos son normales y se producen
debido a la expansión y contracción que
sufren las superficies metálicas al enfriarse
y calentarse.
CONFIGURACIÓN DE LOS MANDOS
Para el modo de limpieza automática:
1)
Saque todas las rejillas del horno y las guías
de las rejillas antes de utilizar el modo de
limpieza automática.
2)
Pulse
SELF CLEAN
. En los hornos dobles,
esta acción iniciará el modo de limpieza
automática en el horno superior. Para
limpiar el horno inferior, pulse el botón
UPPER/LOWER
para que el icono del horno
inferior aparezca seleccionado en la pantalla
LCD. A continuación, pulse
SELF CLEAN
En el panel de control aparecerá
automáticamente el siguiente mensaje:
REMOVE ALL RACKS AND RACK GUIDES.
PRESS ENTER. (EXTRAIGA TODAS LAS
REJILLAS Y LAS GUÍAS DE LAS REJILLAS.
PULSE ENTER).
3)
Pulse
ENTER
para iniciar la limpieza
por un tiempo total de 4 horas — 3 horas de
limpieza y 1 de enfriamiento.
4)
El tiempo de limpieza se puede establecer
con cualquier periodo de tiempo entre 2
1
/
2
y 4 horas. Pulse TIMED COOK y, a
continuación, introduzca un periodo de
tiempo para realizar la limpieza. Para que
los resultados sean óptimos, el tiempo de
limpieza debe ser de 4 horas.
5)
Introduzca la hora de parada que desea y
pulse
ENTER
. El horno se iniciará
automáticamente y se detendrá según el
periodo de limpieza y la hora de parada
que haya establecido.
6)
Pulse
OFF
en el horno que desee
para borrar la pantalla cuando la limpieza
haya finalizado.
.
No limpie nunca una superficie de
porcelana templada o caliente con una
esponja mojada. La superficie podría
agrietarse o desconcharse (grietas
pequeñas y muy finas).
65

HORNOS INTEGRABLES SERIE E DE WOLF
AVISO
Bombilla
Tapa de la luz
PRECAUCIÓN
CAMBIO DE LA BOMBILLA DEL
HORNO
Desconecte la alimentación eléctrica del
horno antes de cambiar la bombilla.
NOTA IMPORTANTE:
enfríe lo suficiente antes de cambiar la bombilla.
El horno utiliza una bombilla halógena de 20
vatios; pieza de repuesto #803816.
Para quitar la bombilla del horno,
guías de las rejilla tal y como se ha descrito en
la página 47. Coloque una almohadilla caliente en
la pared del horno. Si utiliza un destornillador de
cabeza plana, apoye el destornillador contra la
almohadilla caliente por debajo de la carcasa de
la luz. Tenga cuidado de no rayar el interior de
porcelana del horno. Gire el destornillador,
apalanque suavemente el borde de la carcasa de
la luz, tire de ella hacia arriba y retírela. Utilice un
paño para tocar la bombilla y tire de ella para
sacarla de su casquillo.
Para poner una bombilla de repuesto,
el contacto directo con la bombilla de repuesto.
Utilice papel de cocina para tocar la nueva
bombilla y procure no tocarla con los dedos si
están grasientos. Si no lo hace, la bombilla se
fundirá la primera vez que la encienda. Inserte
las púas de la bombilla en el casquillo hasta
que se coloque perfectamente en su lugar.
Coloque de nuevo la carcasa de la luz y las
guías de las rejillas. Conecte la alimentación
y ponga en hora el reloj con la hora del día.
Deje que el horno se
extraiga las
evite
Tenga cuidado cuando cambie la
bombilla. Las bombillas halógenas se
caliente enseguida y calientan las piezas
que están alrededor.
66
Cambio de la bombilla del horno

HORNOS INTEGRABLES SERIE E DE WOLF
RECOMENDACIONES DE
MANTENIMIENTO
COMPONENTE RECOMENDACIÓN DE MANTENIMIENTO
Exterior del horno,
tirador y borde
Acero inoxidable
clásico
Cavidad del horno
puerta interior
Esmalte de
porcelana
Ventana de la puerta
Cristal templado
No utilice limpiadores abrasivos ya que pueden rayar la superficie permanentemente.
Limpieza exterior:
con un paño suave que no deje pelusas. Para que el acero inoxidable adquiera un brillo
natural, frote suavemente la superficie con un paño de microfibra empapado en agua y,
a continuación, séquelo con un paño de microfibra seco. La limpieza deberá realizarse
siguiendo la dirección del acabado. Obtendrá mejores resultados si mantiene el paño en
contacto continuo con el metal.
No limpie nunca una superficie de porcelana templada o caliente con una esponja
mojada; la superficie podría agrietarse o desconcharse (grietas pequeñas y muy finas).
Mantenimiento general:
inmediatamente. No deje que alimentos con alto contenido en azúcar o ácido, por ejemplo,
leche, tomates, col fermentada, zumos de frutas o relleno de pastel, permanezcan en la
superficie de esmalte de porcelana. Si lo hace, es posible que estos alimentos creen una
mancha mate permanente. Cuando limpie a mano una mancha, utilice solamente
limpiadores no abrasivos o estropajos.
Puede utilizar el
Cuando la ventana esté fría, utilice una cuchilla para raspar los alimentos pegados y aplique un
limpiador multiusos en spray.
Utilice un limpiador de acero inoxidable suave no abrasivo y aplíquelo
Cuando el horno esté frío, limpie las manchas y las salpicaduras
modo de limpieza automática
.
Carcasa de la luz
del horno
templado
Rejilla y guías de
la rejilla
niquelado
Junta del horno
Fibra de vidrio/
hilo metálico de
acero inoxidable
Bandeja para
asar
de porcelana
con brillo
Piedra para hornear
Cerámica
Cristal
Acero
Esmalte
Cuando el horno esté frío, siga las instrucciones de la página 66 para cambiar la bombilla del
horno. Lávela con un limpiador que no sea demasiado abrasivo. Aclárela y, a continuación,
séquela completamente. Coloque de nuevo la carcasa de la luz. Puede cambiar la bombilla
existente por una bombilla halógena de 20 vatios (pieza #803816).
Antes de utilizar el
de las rejillas. Éstas se decolorarán si se dejan en el horno durante este modo. Límpielas con
estropajos de lana de acero y con agua caliente. Aclare y séquelas.
No limpie a mano, ni frote, pinche o quite la junta del horno; podría dañar el sellado hermético
de la puerta.
Superior:
de cocina. Eche agua muy caliente sobre los paños y deje que el vapor actúe y ablande los
residuos de los alimentos quemados. Límpiela con detergente suave y agua caliente. Aclare y
séquela.
Inferior:
con detergente suave. Aclare y séquela.
Tenga cuidado al manejar la piedra de hornear. Si se cae podría romperse o
desconcharse.
detergente. Consulte las instrucciones de la sección mantenimiento de la piedra para
hornear en la página 50.
Mientras está aún un poco caliente, introdúzcala en el fregadero y tápela con paños
Vierta la grasa en un envase desechable. Cuando esté fría, lávela con agua caliente y
modo de limpieza automática
No moje ni sumerja la piedra para hornear en agua y no utilice jabón ni
, extraiga las rejillas del horno y las guías
Panel de mandos
Acero inoxidable
clásico / plástico de
policarbonato
No utilice limpiadores abrasivos, estropajos de lana de acero, esponjillas ásperas ni papel de
cocina. Es posible que los materiales se dañen.
Utilice limpiacristales o limpiadores multiusos (sin aceite) con un paño suave o una esponja.
Aplique el limpiador en un paño suave o en una esponja; no lo aplique directamente sobre
el panel.
67

GUÍA DE LOCALIZACIÓN Y SOLUCIÓN DE PROBLEMAS DE WOLF
GUÍA DE
LOCALIZACIÓN Y SOLUCIÓN DE PROBLEMAS
PROBLEMA POSIBLE PROBLEMA/SOLUCIÓN
El dorado exterior
de los alimentos
no es uniforme.
La temperatura
del horno es
demasiado alta.
La cazuela es demasiado grande para que el calor circule de manera óptima.
La rejilla forrada de papel de aluminio atrapa el calor debajo.
Hay demasiadas cazuelas o bandejas en una rejilla.
Los alimentos cocinados en recipientes de cristal, cristal cerámico o los
recipientes de metal oscuro mantienen mejor el calor que los recipientes con
brillo.
La bandeja para hornear es demasiado grande para la receta que se está
cocinando.
Cambie el nivel de la rejilla o el modo de cocción.
La temperatura del horno es demasiado alta para el plato que está cocinando.
El mensaje SENSOR
CORTOCIRCUITADO
parpadea al utilizar la
opción de sensor.
Realice el siguiente procedimiento:
Apague el horno.
Inserte bien el sensor en el receptáculo hasta que se coloque
completamente en su lugar.
Reinicie la temperatura del horno y la temperatura del sensor.
Sale demasiado
humo al asar a
la parrilla.
El horno no está
suficientemente
caliente.
Sale aire caliente a la
cocina una vez que el
horno se ha apagado.
En el horno inferior no
funciona el modo de
convección.
La puerta del horno no se
abre después de aplicar
el modo de limpieza
automática.
Está utilizando una bandeja diferente a la bandeja para asar de dos piezas.
Quite el exceso de grasa.
Baje el nivel de la rejilla o reduzca el tiempo de asado.
Baje la configuración del asado a 2 ó 3.
El horno no se ha precalentado totalmente.
La puerta se ha abierto con demasiada frecuencia o se ha dejado abierta
durante mucho tiempo.
Alimentos envueltos en papel de aluminio; compruebe el modo para seguir
los consejos y obtener los mejores resultados.
La cazuela o bandeja es demasiado pequeña para la cantidad de alimentos
que hay en ella.
La salida de aire templado es una función normal del horno y es necesaria
para mantener las temperaturas del horno y para enfriarlo. Se apaga
automáticamente cuando el calor baja hasta alcanzar una temperatura segura.
El horno inferior no está equipado con ventiladores de convección.
Seleccione otro modo.
El horno debe alcanzar una temperatura segura antes de que la puerta se
desbloquee para que se pueda utilizar.
68

INFORMACIÓN DE MANTENIMIENTO DE WOLF
INFORMACIÓN SOBRE EL
MANTENIMIENTO
Cuando solicite información, documentación,
piezas de repuesto o asistencia técnica, debe
proporcionar la referencia del modelo y el número
de serie del horno integrable. Esta información se
encuentra disponible en la placa de datos del
producto situada en la parte inferior del panel de
mandos. Para conocer la ubicación de la placa de
datos, consulte la ilustración correspondiente a su
modelo en las páginas 41-42. Guarde la información de la placa de datos de voltaje para utilizarla
como referencia en el futuro.
Referencia del modelo
Número de serie
Fecha de instalación
INFORMACIÓN
DE CONTACTO
Página Web:
www.sub-zero.eu.com
Distribuidor de Sub-Zero y teléfono
ANTES DE LLAMAR AL SERVICIO
TÉCNICO
Antes de llamar a un centro de mantenimiento
autorizado de Wolf, consulte la Guía de
localización y solución de problemas en la
página 68. Compruebe que los fusibles de su
hogar no estén fundidos y que la red eléctrica
funciona y compruebe también que el aparato
no está desconectado. Un corte de electricidad
también puede causar la interrupción del servicio.
La información y las imágenes que se incluyen en
esta guía son propiedad de Wolf Appliance, Inc., una
filial de Sub-Zero, Inc. Este documento junto con la
información y las imágenes que en él se incluyen no
pueden copiarse ni utilizarse, total ni parcialmente,
sin el consentimiento por escrito de Wolf Appliance,
Inc., una filial de Sub-Zero, Inc.
©Wolf Appliance, Inc. se reserva todos los derechos.
69

MISE EN GARDE
ATTENTION
WOLF®est une marque déposée de Wolf Appliance, Inc.
Vous remarquerez tout au long de ce Guide
d’utilisation et d’entretien les mentions MISE
EN GARDE et ATTENTION, destinées à fournir
des recommandations importantes
afin d’assurer la sécurité et l’efficacité de
l’équipement Wolf.
signale un danger qui pourrait causer
une blessure mineure ou endommager
le produit si vous ne suivez pas
les instructions.
signale un danger qui pourrait causer des
blessures graves voire fatales si vous ne
prenez pas certaines précautions.
De plus, la mention REMARQUE IMPORTANTE
met l’accent sur un renseignement
particulièrement important.

FOUR S ENCASTRABLES WOLF SERIE E
MISE EN GARDE
MERCI
Votre achat d’un four encastrable Wolf Série E
démontre l’importance que vous accordez à la
qualité et à la performance des appareils de
cuisson. Nous comprenons vos besoins et à ce
titre, nous avons conçu et fabriqué votre four
en utilisant des matériaux de qualité et une
main-d’œuvre qualifiée qui vous assureront
une fiabilité et une satisfaction durables.
Bien entendu, vous êtes impatient de
commencer à cuisiner ; mais tout d’abord,
veuillez prendre le temps de lire le présent Guide
d’utilisation et d’entretien. Que vous soyez un
cuisinier débutant ou un chef chevronné, vous
avez tout intérêt à vous familiariser avec les
mesures de sécurité, les caractéristiques, le
fonctionnement et les recommandations
d’entretien qui s’appliquent au four Wolf.
Nous nous réjouissons que vous ayez choisi un
produit Wolf Appliance et vos suggestions ou
commentaires éventuels sont les bienvenus.
Pour nous en faire part, veuillez consulter
www.wolfappliance.com.
NE placez AUCUN récipient sur la base
de la cavité du four et n’utilisez pas de
papier aluminium ou autre matériau
pour recouvrir les parois latérales.
Le non-respect de cette consigne
entraînera des dommages de la
porcelaine et annulera la garantie.
CONTACT
Site Internet :
wolfappliance.com
71

INSTRUCTIONS ET MESURES DE SECURITE
CE QU’IL FAUT FAIRE
REMARQUE IMPORTANTE : Lisez
toutes les instructions avant
d’utiliser cet appareil.
Afin de minimiser les risques
d’incendie, de choc électrique et de
blessure, lisez attentivement ce
Guide d’utilisation et d’entretien
avant d’utiliser votre nouveau four.
Assurez-vous que cet appareil est
installé et entretenu de façon
appropriée. Il doit être correctement
installé et mis à la terre par un
poseur qualifié.
Demandez au poseur de vous
montrer où se trouve le coffret à
fusibles ou le coffret électrique dans
votre maison. Apprenez à couper
l’alimentation électrique au four.
Utilisez votre four uniquement pour
les tâches de cuisson domestiques,
tel qu’indiqué dans ce guide.
Nettoyez et entretenez toujours
ce four de façon appropriée,
conformément aux recommandations fournies dans ce guide.
Utilisez toujours des poignées
sèches lorsque vous retirez
les récipients du four. La vapeur
dégagée par des poignées
mouillées ou humides pourrait
provoquer des brûlures. Les
poignées ne doivent donc pas
toucher les résistances chauffantes
chaudes. N’utilisez pas de serviette
ou autre torchon encombrant.
Ouvrez la porte du four avec
précaution. Laissez l’air très chaud ou
la vapeur s’échapper avant de regarder
dans le four ou d’y accéder.
Assurez-vous que l’entrée d’air frais du
four (située au-dessus de la porte) et la
ventilation aspirante (située au-dessous
de la porte) ne sont jamais obstruées.
Mettez les grilles en place lorsque le
four est froid. Si vous devez changer
une grille de place lorsque le four est
déjà chaud, assurez-vous que vos
gants isolants ne contactent aucune
résistance chauffante chaude du four.
Avant de lancer le mode Autonettoyage,
retirez le lèche-frites, les grilles, les
guides de grille et autres ustensiles
du four.
Nettoyez uniquement les pièces
indiquées dans ce guide.
Le ventilateur devrait fonctionner
lorsque le mode Autonettoyage est
activé. Si vous remarquez qu’il ne
fonctionne pas, contactez une antenne
de service agréée Wolf avant de
réutiliser le mode Autonettoyage.
72

CE QU’IL NE FAUT PAS FAIRE
MISE EN GARDE
MISE EN GARDE
NE placez AUCUN récipient
sur la base de la cavité du
four et ne recouvrez jamais
les parois latérales de papier
aluminium ou autre matériau.
Le non-respect de cette consigne
entraînera des dommages de la
porcelaine et annulera la garantie.
Ne placez aucun récipient sur la
base de la cavité du four.
Ne réparez ou ne remplacez aucune
pièce du four, sauf si cela est
expressément recommandé dans
la documentation fournie avec
l’appareil. Tout dépannage doit
être confié à une antenne de
service Wolf agréée.
Ne vous servez pas du four pour
chauffer la pièce.
Ne laissez pas d’enfant seul ou sans
surveillance à proximité du four en
fonctionnement. N’autorisez jamais
les enfants à s’asseoir ou à se tenir
debout sur le four. Ne les laissez
pas jouer avec le four.
Ne jetez pas de l’eau sur les feux de
graisse. Etouffez les flammes avec
un couvercle, une plaque à pâtisserie ou un plateau lisse. Les feux de
graisse peuvent être éteints avec
une plaque à pâtisserie ou un
extincteur multifonctionnel
chimique ou à mousse.
Ne chauffez pas de contenants de
nourriture fermés car ils pourraient
exploser et causer des blessures.
N’entreposez pas de matières
combustibles, inflammables ou
explosives à proximité du four ou
des éléments de cuisine adjacents.
Vous ne devez utiliser les produits
nettoyants pour four que l’on
trouve dans le commerce ou les
revêtements de protection tels
que les feuilles d’aluminium sur
aucune partie du four.
N’utilisez pas de produits abrasifs
ou caustiques, ou des détergents,
pour nettoyer cet appareil ménager
car ils pourraient l’endommager de
façon permanente. N’utilisez pas de
produits nettoyants en aérosol car
ils pourraient s’enflammer ou
rouiller les pièces métalliques.
Ne nettoyez pas le joint du four ; en
le frottant ou en le déplaçant, vous
pourriez altérer l’étanchéité requise.
N’utilisez pas de vêtements amples
ou qui pendent lorsque vous utilisez
le four.
Ne touchez pas les éléments
chauffants ou les surfaces intérieures
du four. Les éléments chauffants
peuvent être chauds, même si leur
couleur est foncée. Les surfaces
intérieures du four pourraient être
suffisamment chaudes pour vous
brûler. Pendant et après l’utilisation
du four, ne touchez pas les éléments
chauffants ou les surfaces intérieures
du four et veillez à ce que vos
vêtements ou autres matériaux
inflammables ne les contactent pas
tant qu’ils n’ont pas refroidi. D’autres
surfaces de l’appareil pourraient
devenir suffisamment chaudes pour
vous brûler, notamment l’orifice de
ventilation et la zone environnante
ou même la porte et la vitre du four.
NE placez PAS d’objets qui
présentent un intérêt pour les
enfants sur le four. Les enfants
pourraient grimper sur l’appareil
pour les atteindre et se blesser.
73

CARACTERISTIQUES DES FOURS ENCASTRABLES WOLF SERIE E
CARACTERISTIQUES DES FOURS
SERIE E SIMPLES
Modèle ICBSO30-2F/S
Avec cadre
Modèle ICBSO30-2U/S
Sans cadre
Modèles de porte avec cadre et sans
cadre disponibles
Finition acier inoxydable Classique
uniquement
Système de commande logique de
convection double
Dix modes de cuisson — four traditionnel,
rôtissoire, gril, four à convection, rôtissoire à
convection, gril à convection, convection, four
en briques (accessoire requis), levée de pâte et
déshydratation (accessoire requis)
Panneau des commandes à effleurement à
affichage LCD
Intérieur de four en porcelaine bleu de cobalt
Trois grilles amovibles dont la grille inférieure
qui s’extrait complètement et deux guides de
grille à six niveaux également amovibles
Grande vitre panoramique à double épaisseur
FOUR ENCASTRABLE SIMPLE SERIE E
Modèles ICBSO30-2F/S et ICBSO30-2U/S (illustrés)
Eclairage halogène intérieur double
Résistance chauffante dissimulée pour la
cuisson au four traditionnel et gril encastré
Sonde de température avec boîtier
Fonction Mise en marche différée, modes
Autonettoyant et Sabbat (certifié par Star-K)
Charnière de porte équilibrée qui assure une
ouverture et une fermeture de porte sans effort
Cet appareil électroménager a reçu
la certification Star-K. Il répond aux
strictes exigences religieuses établies et
aux instructions spécifiques
que vous pouvez consulter à
www.star-k.org.
Composants électroniques
et orifices de
refroidissement
de la porte
Gril encastré
Thermostat
Joint du four
Trois grilles
amovibles
Résistance
chauffante dissimulée
pour la cuisson au
four traditionnel
Ventilation aspirante
Panneau des
commandes
électroniques
Interrupteur
d’éclairage de la
porte du four
Emplacement de
la plaque des
caractéristiques
Boîtier de la sonde
Eclairage halogène
Guides de grilles
amovibles à six
positions
Vitre à double
épaisseur
74

CARACTERISTIQUES DES FOURS ENCASTRABLES WOLF SERIE E
CARACTERISTIQUES DES FOURS
DOUBLES
SERIE E
Modèles de porte avec cadre et sans cadre
disponibles
Finition acier inoxydable Classique uniquement
Système de commande logique de convection
double dans le four supérieur avec dix modes
de cuisson — four traditionnel, rôtissoire, gril,
four à convection, rôtissoire à convection,
gril à convection, convection, four en
briques (accessoire requis), levée de pâte
et déshydratation (accessoire requis)
Four inférieur sans système de convection,
quatre modes de cuisson standard — four
traditionnel, rôtissoire, gril et levée de pâte
Intérieurs de four en porcelaine bleu de cobalt
Trois grilles amovibles dont la grille inférieure
qui s’extrait complètement et deux guides de
grille à six positions également amovibles
(par four)
Grandes vitres panoramiques à double
épaisseur
Eclairage halogène intérieur double dans
chaque four
FOUR ENCASTRABLE DOUBLE SERIE E
Modèles ICBDO30-2F/S et ICBDO30-2U/S (illustrés)
Résistance chauffante dissimulée
pour la
cuisson au four traditionnel et gril encastré
dans chaque four
Sonde de température avec boîtier dans le
four supérieur
Fonction Mise en marche différée, modes
Autonettoyant et Sabbat (certifié par Star-K)
Charnières de porte équilibrées qui assurent
une ouverture et une fermeture des portes
sans effort
Cet appareil électroménager a reçu la
certification Star-K. Il répond aux strictes
exigences religieuses établies et aux
instructions spécifiques que vous
pouvez consulter à www.star-k.org.
Modèle ICBDO30-2F/S
Avec cadre
Modèle ICBDO30-2U/S
Sans cadre
Composants électroniques
et orifices de
refroidissement
de la porte
Gril encastré
Thermostat
Joint du four
Trois grilles
amovibles par four
Résistance chauffante
dissimulée pour la
cuisson au four
traditionnel
Ventilation aspirante
Panneau des
commandes
électroniques
Interrupteur
d’éclairage de
la porte du four
Emplacement de
la plaque des
caractéristiques
Boîtier de la sonde
Eclairage halogène
Guides de grilles
amovibles à six
positions par four
Vitre à double
épaisseur
75

CARACTERISTIQUES DES FOURS ENCASTRABLES WOLF SERIE E
MISE EN GARDE
CARACTERISTIQUES DES FOURS
MODES DE CUISSON ET FONCTIONS
NE placez AUCUN récipient sur la base de
la cavité du four et ne recouvrez jamais
les parois latérales de papier aluminium
ou autre matériau. Le non-respect de
cette consigne entraînera des dommages
de la porcelaine et annulera la garantie.
Nombreux modes de cuisson,
été conçu pour fournir les meilleurs résultats
pour le type de cuisson spécifique. Votre four
vous garantit le nec plus ultra en matière de
performance ; il a été mis au point pour
répondre à vos propres goûts culinaires.
Les grands graphiques sont faciles à voir
et à lire sur le panneau des commandes.
Les réponses et les instructions
électroniques indiquées sur le panneau
des commandes
La grande cavité
utilisable du four pour les plats de cuisson
volumineux et les grosses pièces de volaille.
L’emplacement la résistance chauffante
pour la cuisson au four traditionnel, sous la
base de la cavité du four,
en cas de déversements.
La grille inférieure est complètement
extractible
d’accéder plus facilement et en toute
sécurité aux denrées lorsque le four
est chaud.
sont claires et concises.
augmente la capacité
, ce qui vous permet
chacun ayant
facilite le nettoyage
Fonction Durée – page 78
Mode Four traditionnel – page 81
Mode Four en briques – page 82
(accessoires de four en briques requis)
Mode Gril – page 84
Mode Rôtissoire – page 85
Mode Convection – page 86
Mode Four à convection – page 87
Mode Gril à convection – page 88
Mode Rôtissoire à convection – page 89
Mode Levée de pâte – page 90
Fonction Mise en marche différée – page 91
Mode Déshydratation – page 92
(accessoire de déshydratation requis)
Fonction Sonde de température – page 94
Mode Sabbat – page 96
Mode Autonettoyage – page 97
REMARQUE IMPORTANTE :
cuisson et les fonctions du four décrits dans les
pages suivantes se rapportent au modèle de four
simple. Avec un four double, les étapes à suivre
sont les mêmes, sauf que les modes de cuisson
ne peuvent être utilisés que dans le four
supérieur.
REMARQUE IMPORTANTE :
doubles, pour passer du four supérieur au four
inférieur et vice versa, il suffit d’effleurer la
touche SUPERIEUR/INFERIEUR du panneau
des commandes. L’icône du four sélectionné
s’allume alors dans l’afficheur LCD.
Les modes de
Avec les fours
76

CARACTERISTIQUES DES FOURS ENCASTRABLES WOLF SERIE E
FONCTIONNEMENT
DU FOUR
AVANT LA PREMIERE UTILISATION
Avant de l’utiliser pour la première fois, nettoyez
minutieusement votre four encastrable avec de
l’eau chaude et un détergent doux. Ensuite,
rincez-le et séchez-le à l’aide d’un torchon
doux. Reportez-vous à la rubrique Consignes
d’entretien, page 100.
A l’invite, mettez le four sous tension en effleurant
la touche 1 pour Anglais, 2 pour Allemand, 3 pour
Français, 4 pour Espagnol ou 5 pour Italien.
Ensuite, mettez le four simple ou la cavité
supérieure du four double en mode ROTISSOIRE
A CONVECTION en appuyant sur la touche et
réglez-le 260°C pour une heure. Dans le cas du four
double, après que le four supérieur a terminé le
cycle Rôtissoire à convection d’une heure, mettez
le four inférieur en mode ROTISSOIRE en appuyant
sur la touche et réglez-le à 260°C pour une
heure. Reportez-vous aux pages 89 ou 85 pour
consulter les instructions relatives au mode
Rôtissoire à convection ou Rôtissoire, respectivement. Laissez le(s) four(s) refroidir progressivement avec la/les porte(s) fermée(s).
Ceci permet de brûler toute huile et graisse
résiduelles utilisées pendant le processus de
fabrication. Un peu de fumée et une légère odeur
pourraient se dégager du four au cours de cette
mise en route. Vous pouvez ouvrir la/les porte(s)
lorsque le(s) four(s) a/ont bien refroidi.
Lors du premier autonettoyage du four, des
substances brûleront et dégageront à nouveau
de la fumée et une odeur.
SELECTION DU FOUR
Avec un four simple, pour lancer un mode de
cuisson, il vous suffit d’effleurer la touche du
mode souhaité sur le panneau des commandes.
Avec les fours doubles, le fait d’effleurer la touche
du mode souhaité met automatiquement en
marche le four supérieur. Pour mettre en marche
le four inférieur, effleurez d’abord la touche
SUPERIEUR/INFERIEUR pour sélectionner
l’icône du four inférieur dans l’afficheur LCD.
Ensuite, effleurez le mode souhaité pour mettre
en marche le four inférieur.
CHANGEMENT DE LA TEMPERATURE
DU FOUR
Vous pouvez changer en tout temps la
température du four après avoir sélectionné
le mode de cuisson.
1)
Effleurez les touches numériques pour entrer
la nouvelle température.
2)
Effleurez ENTRER .
Ceci a pour effet de changer immédiatement la
température du four. Si vous n’effleurez pas
ENTRER, le four passe automatiquement à la
nouvelle température en cinq secondes.
CHANGEMENT DE MODE RAPIDE
Le four a la capacité de changer rapidement de
mode de cuisson. Il peut ainsi passer d’un mode
à l’autre sans que vous ayez à éteindre et à
rallumer le four. Si un mode est déjà activé, au
lieu d’éteindre le four pour changer de mode de
cuisson, il vous suffit d’effleurer la touche du
mode de cuisson souhaité.
Panneau des commandes
de four simple
Panneau des commandes
de four double
77

FONCTIONNEMENT DES FOURS ENCASTRABLES WOLF SERIE E
FONCTIONNEMENT DU FOUR
PRECHAUFFAGE DU FOUR
REMARQUE IMPORTANTE :
préchauffage, la façon dont le four chauffe n’est
pas adaptée à la cuisson.
La fonction de préchauffage est utilisée pour tous
les modes de cuisson, sauf pour la cuisson au gril
et au gril à convection. Pour préserver les denrées,
le préchauffage ne s’active plus dès que le four a
atteint la température que vous avez définie. Si
vous augmentez la température du four pendant
la cuisson, le four nécessite beaucoup plus de
temps pour atteindre la nouvelle température.
Pour atteindre rapidement une nouvelle
température, effleurez la touche ARRET pour
quitter le mode actuel. Effleurez ensuite la touche
du mode de cuisson souhaité et entrez une
nouvelle température de plus de 10°C au
moins que la température actuelle.
Pendant le
HORLOGE - HEURE DU JOUR
Dès que votre four est installé, réglez l’horloge de
12 heures à l’heure du jour. Vous devrez peut-être
la régler de nouveau après une coupure de courant
prolongée. L’horloge apparaît sur le panneau des
commandes à tous les modes de cuisson. Si la
minuterie du four supérieur est réglée, l’horloge
de l’heure du jour n’apparaît pas dans la fenêtre
d’affichage du four supérieur.
MINUTERIE DU FOUR
Chaque four est pourvu d’une minuterie qui
fonctionne distinctement des commandes et l’une
de l’autre. Une fois que vous avez réglé une durée
en heure et en minutes, vous pouvez voir le compte
à rebours dans la fenêtre d’affichage. Pendant la
dernière minute, le compte à rebours s’effectue en
secondes.
Le four émet un signal sonore pour vous rappeler
que la durée est écoulée. Pour désactiver ce signal,
effleurez la touche EFFACER . La durée maximum
qui peut être définie est 9 heures 59 minutes.
REGLAGE DE LA MINUTERIE
1)
Effleurez la touche REGLER LA MINUTERIE .
2)
Effleurez les touches numériques pour régler les
heures et les minutes.
3)
Effleurez la touche ENTRER ou REGLER LA
MINUTERIE pour lancer le compte à rebours.
(Effleurez la touche EFFACER en tout temps
pour arrêter la minuterie et quitter ce mode.)
4)
Effleurez la touche REGLER LA MINUTERIE
tandis que la minuterie est toujours active pour
la réinitialiser et définir une nouvelle durée.
5)
Pour effacer la minuterie : si le four est éteint,
effleurez la touche EFFACER . Si le four est
allumé, effleurez la touche REGLER LA
MINUTERIE , puis EFFACER .
FONCTION DUREE
78
REGLAGE DE L’HORLOGE
1)
Effleurez REGLER L’HORLOGE .
2)
Effleurez les touches numériques pour régler
l’heure du jour. Une période d’inactivité de
10 secondes fait revenir le four à l’heure
initiale.
3)
Effleurez la touche ENTRER et à l’invite,
effleurez 1 pour matin ou 2 pour après-midi.
4)
Effleurez de nouveau la touche ENTRER
pour mettre l’horloge en marche.
REGLAGE DES COMMANDES
1)
Effleurez la touche du mode de cuisson, par
exemple FOUR TRADITIONNEL . Au besoin,
modifiez la température prédéfinie.
Pour les fours doubles, ceci aura pour effet
de mettre en marche le four supérieur. Pour
mettre en marche le four inférieur, effleurez tout
d’abord la touche SUPERIEUR/INFERIEUR
afin de sélectionner l’icône du four inférieur
dans l’afficheur LCD. Ensuite, effleurez la
touche du mode de cuisson souhaité.
2)
Effleurez la touche DUREE . Utilisez les
touches numériques pour définir le nombre
d’heures/minutes pendant lesquelles le four
doit rester en marche.
3)
Effleurez la touche ENTRER . Le four
commence à chauffer après cinq secondes.
L’heure de fin de cuisson s’ajoutera automatiquement aux données affichées. Lorsque la durée de
cuisson définie est écoulée, le four s’éteint.
4)
Effleurez la touche ARRET ou EFFACER du
four pour effacer les données affichées.

FONCTIONNEMENT DES FOURS ENCASTRABLES WOLF SERIE E
OPTIONS ENRICHIES
L’écran défile dans l’ordre suivant : Langue,
Echelle des températures, Ecart de température,
Horloge 12/24 heures, Luminosité du
rétroéclairage, Tonalité de la sonnerie,
Réglage du contraste.
1)
Maintenez pendant 5 secondes votre doigt sur
la touche REGLER L’HORLOGE du
panneau des commandes pour accéder aux
écrans des options enrichies.
2)
Effleurez la touche ENTRER pour faire
défiler les différents écrans d’option.
3)
Lorsque vous avez sélectionné toutes les
options, effleurez la touche EFFACER
pour revenir à l’affichage principal.
DÉFINITION DE LA LANGUE
1)
A l’invite, effleurez 1 pour Anglais, 2 pour
Allemand, 3 pour Français, 4 pour Espagnol
ou 5 pour Italien.
REGLAGE DE L’ECHELLE DES
TEMPERATURES
Vous pouvez faire passer l’échelle des températures du four des degrés Fahrenheit (°F) aux
degrés Celsius (°C) et inversement.
1)
A l’invite, effleurez 1 pour Fahrenheit (°F)
ou 2 pour Celsius (°C).
HORLOGE 12/24 HEURES
1)
A l’invite, effleurez 1 pour afficher l’horloge
dans le format de 12 heures ou 2 pour
l’afficher dans le format de 24 heures.
OPTIONS DE RETROECLAIRAGE
1)
A l’invite, effleurez 1 si vous souhaitez une
luminosité faible, 2 pour une luminosité
moyenne ou 3 pour une luminosité vive.
OPTIONS DE SONNERIE
Vous avez le choix entre trois différentes tonalités
de sonnerie du four.
1)
A l’invite, effleurez 1 pour une tonalité basse
fréquence, 2 pour une tonalité moyenne
fréquence ou 3 pour une tonalité haute
fréquence.
REGLAGE DU CONTRASTE
Vous pouvez régler le contraste pour assurer
une lecture nette et précise de l’afficheur LCD.
1)
A l’invite, effleurez les touches numériques
1à 9
pour régler le contraste à votre goût.
ECART DE TEMPERATURE
L’écart de température permet de maintenir le
centre de la cavité du four à la valeur définie. Les
valeurs négatives généreront des températures de
cavité plus basses tandis que les écarts positifs
généreront des températures de cavité plus
élevées.
1)
A l’invite, entrez l’écart de température.
2)
Sélectionnez l’écart négatif ou positif en
effleurant la touche REGLER LA MINUTERIE
. Les écarts de température maximum
sont +/- 19°C.
79

FONCTIONNEMENT DES FOURS ENCASTRABLES WOLF SERIE E
Pattes de
fixation de
guide de grille
Guide de grille
6
5
4
3
2
1
Guide de grille
Système
antibasculement
MISE EN GARDE
GRILLES
ET GUIDES DE GRILLE
DU FOUR
GUIDES DE GRILLE DU FOUR
Pour insérer les guides de grille dans le four,
repérez les vis sur les parois latérales du four.
Placez les pattes de fixation des guides de grille
sur les têtes de vis et faites-les glisser jusqu’à ce
que les vis soient bien en place dans les pattes.
Reportez-vous à la figure ci-après.
Pour retirer les guides de grille,
tirez-les tout
droit et dégagez-les de sorte que les pattes de
fixation s’enlèvent des têtes de vis. Ensuite,
retirez les guides de grille du four.
REMARQUE IMPORTANTE :
Retirez toutes les
grilles et tous les guides de grille du four avant
de lancer le
mode Autonettoyage
. Ils se décoloreront si vous les laissez dans le four alors que
ce mode est activé.
GRILLES DU FOUR
Pour insérer une grille dans le four,
placez le
dispositif antibasculement de grille sous les rails
de guides de grille latéraux. Poussez la grille vers
l’arrière du four et soulevez-la pour dégager les
butées de grille. Continuez de faire glisser la grille
jusqu’à ce qu’elle soit complètement insérée dans
le four.
Pour enlever une grille du four,
tirez la grille vers
l’avant, soulevez-la et enlevez-la afin de dégager
les butées de grille des rails de guides de grille
latéraux. Reportez-vous à la figure ci-après.
La grille inférieure du four peut s’extraire
complètement. Lorsque la grille se trouve dans la
position 1 du guide de grille, faites-la glisser sur
les guides de porte en acier inoxydable. Reportezvous à la figure ci-après pour repérer les positions
de guide de grille. La grille sera ainsi plus stable
lorsque vous utiliserez un récipient lourd pour
faire cuire de grosses pièces de viande ou de
volaille. De plus, lorsque la grille est complètement extraite, il est plus facile d’accéder aux
denrées chaudes.
DISPOSITION DES GRILLES DANS
LE FOUR
L’emplacement des grilles à l’intérieur du four est
l’un des facteurs qui influent le plus sur les résultats de cuisson. La position de grille 1 est la plus
basse, la position 6 est la plus haute.
Si vous utilisez une seule grille, placez-la au
centre du four.
Si vous utilisez une seule grille pour faire rôtir
la viande, placez la grille à la position de guide
de grille 1, 2 ou 3.
Si vous utilisez deux ou trois grilles, placez-les
de façon à ce qu’elles soient espacées d’au
moins une position de grille.
Utilisez des poignées sèches lorsque vous
manipulez les grilles du four. Les grilles
deviennent très chaudes lorsque le four
est en marche et le demeurent après qu’il
a été éteint.
80
Retrait des guides de grille
Positions des guides de grille et
grille inférieure complètement
extraite

FONCTIONNEMENT DES FOURS ENCASTRABLES WOLF SERIE E
MISE EN GARDE
MODE FOUR TRADITIONNEL
Description du mode Four traditionnel :
de la résistance chauffante dissimulée pour la
cuisson au four traditionnel et la résistance
chauffante du gril chauffent l’air par cycles de
façon à maintenir la température. Ce mode est celui
qui convient le mieux à la cuisson sur une seule
grille des denrées à cuire au four essentiellement.
Utilisez toujours le
vos recettes de base. Vous pouvez utiliser la sonde
de température avec ce mode.
mode Four traditionnel
L’élément
pour
CONSEILS DE WOLF POUR OBTENIR
LES MEILLEURS RESULTATS
Mode Four traditionnel :
Préchauffez toujours le four lorsque vous utilisez
le
mode Four traditionnel
Pendant le préchauffage, les ventilateurs à
convection (s’il y a lieu) et les résistances
chauffantes sont utilisés pour chauffer
rapidement et uniformément le four.
Utilisez une seule grille.
Le bord du récipient doit se trouver à 25 mm
minimum des parois du four.
La taille, la forme et le fini de la batterie de
cuisine influent sur la durée de cuisson au four
traditionnel.
La cuisson s’effectue un peu plus rapidement
dans des récipients métalliques de couleur
foncée que dans des récipients brillants.
Les revêtements antiadhésifs foncés dorent
davantage les aliments que les revêtements
antiadhésifs de couleur claire.
Eclairez l’intérieur du four pour surveiller
le roussissement des aliments par la vitre
surdimensionnée. N’ouvrez pas la porte du
four trop souvent afin d’éviter les pertes de
chaleur et de prolonger le délai de cuisson.
NE placez AUCUN récipient sur la base
de la cavité du four et n’utilisez pas de
papier aluminium ou autre matériau
pour recouvrir les parois latérales. Le
non-respect de cette consigne entraînera
des dommages de la porcelaine et
annulera la garantie.
.
REGLAGE DES COMMANDES
Mode Four traditionnel :
1)
Effleurez la touche FOUR TRADITIONNEL .
Dans le cas d’un four double, ceci a pour effet
de mettre le four supérieur en marche. Pour
mettre en marche le four inférieur, effleurez
tout d’abord la touche SUPERIEUR/INFERIEUR
afin de sélectionner l’icône du four
inférieur dans l’afficheur LCD. Ensuite, appuyez
sur la touche FOUR TRADITIONNEL .
2)
La température est prédéfinie à 175°C. Le four
commence à chauffer après dix secondes. Pour
changer la température par défaut de 175°C,
entrez immédiatement une autre température
à l’aide des touches numériques.
3)
Effleurez une fois la touche EFFACER pour
effacer la température actuelle du four et deux
fois pour faire revenir le four à l’affichage de
l’heure.
4)
Effleurez la touche ENTRER pour lancer
immédiatement le mode de cuisson ; le four
se met automatiquement en marche après
10 secondes si aucune action n’a été prise.
5)
Enfournez la nourriture lorsque la sonnerie
signale que le four a atteint la température
de préchauffage.
6)
Si vous utilisez la sonde de température (four
supérieur seulement), suivez les instructions
fournies dans la section
température pages
7)
Si la minuterie a été réglée, le four émet une
sonnerie lorsque le temps de cuisson est
écoulé. Si vous n’arrêtez pas la sonnerie, elle
continue à sonner toutes les 10 secondes.
8)
Sortez la nourriture du four. Utilisez toujours
des poignées sèches lorsque vous retirez les
récipients chauds du four.
9)
Effleurez la touche ARRET du four pour
désactiver ce mode.
Fonction Sonde de
94 – 95.
81

FONCTIONNEMENT DES FOURS ENCASTRABLES WOLF SERIE E
Position 1
de guide
de grille
Pierre de cuisson
au four en briques
MISE EN GARDE
MODE FOUR EN BRIQUES
REMARQUE
IMPORTANTE
La pierre Wolf est
un accessoire
requis pour utiliser
le mode Four en
briques.
Description du mode Four en briques :
devez utiliser une grille et une pierre spécialement
conçues pour ce mode afin d’assurer la qualité
de nourriture que l’on attend de ce type de
cuisson. La chaleur intense requise pour la
cuisson sur une pierre de céramique est fournie
par toutes les résistances chauffantes qui créent
un réel effet de « four en briques ». Dans la cavité
du four, les deux ventilateurs du système de
convection facilitent la circulation de l’air de
façon à atteindre des températures uniformes.
Vous pouvez utiliser la sonde de température
avec ce mode.
Préparation du four :
four. Faites glisser la grille de cuisson au four en
briques à la position 1 du guide de grille et placez
la pierre sur la grille, de sorte que le rebord soit
en suspens devant le bord avant de la grille.
Reportez-vous à la figure ci-après. Vous devez
préchauffer le four pendant 35 minutes environ
lorsque vous utilisez le
REMARQUE IMPORTANTE :
prudence lorsque vous manipulez la pierre. Elle
s’ébréchera ou se cassera si vous la faites tomber.
Evitez de cuire des aliments trop
graisseux sur la pierre de cuisson au
four en briques. La céramique est un
matériau poreux qui absorbera la
graisse et décolorera la pierre. De
plus, elle pourrait s’enflammer.
Retirez toutes les grilles du
mode Four en briques
Faites preuve de
Vous
.
CONSEILS DE WOLF POUR OBTENIR
LES MEILLEURS RESULTATS
Mode Four en briques :
Lorsque vous utilisez le
briques
avoir mis en place la grille du four et la pierre
en céramique. Ce mode nécessite un
préchauffage de 35 minutes environ pour
atteindre la température définie. Pour de
meilleurs résultats, préchauffez le four une
heure avant d’enfourner les denrées.
Pendant le préchauffage, les ventilateurs
à convection et toutes les résistances
chauffantes sont utilisés pour chauffer
rapidement et uniformément le four.
Utilisez uniquement la pierre Wolf en
Four en briques
Utilisez uniquement une grille de four en
briques par four.
Généralement, les denrées cuisent directement
sur la pierre. Pour éviter qu’elles adhèrent,
appliquez une grande quantité de semoule de
maïs ou de farine sur la base des denrées.
Lorsque vous cuisez une rangée de pains ou
de pizzas, prévoyez un délai de 5 minutes en
fin de cuisson pour qu’ils reviennent à la
température normale.
La pierre et la grille de cuisson au four en
briques doivent être retirées du four après la
cuisson. Elles ne doivent être laissées dans le
four dans aucun autre mode de cuisson.
, préchauffez toujours le four après
.
mode Four en
mode
82
Installation de la pierre pour la
cuisson au four en briques

FONCTIONNEMENT DES FOURS ENCASTRABLES WOLF SERIE E
MISE EN GARDE
MODE FOUR EN BRIQUES
REGLAGE DES COMMANDES
Mode Four en briques :
1)
Effleurez la touche BRIQUE .
2)
La température du four est prédéfinie à 205°C.
Le four commence à chauffer après cinq
secondes. Pour changer la température par
défaut de 205°C, entrez immédiatement une
autre température à l’aide des touches
numériques.
3)
Effleurez la touche ENTRER pour lancer
immédiatement le mode de cuisson ; si
aucune action n’est prise, le four se met
automatiquement en marche après
10 secondes.
4)
Enfournez la nourriture lorsque la sonnerie
signale que le four a atteint la température
de préchauffage.
5)
Si vous utilisez la sonde de température,
suivez les instructions fournies dans la section
Fonction Sonde de température pages
94 – 95.
6)
Si la minuterie a été réglée, le four émet une
sonnerie lorsque le temps de cuisson est
écoulé. Si vous n’arrêtez pas la sonnerie, elle
continue à sonner toutes les 10 secondes.
7)
Sortez la nourriture du four. Utilisez toujours
des poignées sèches lorsque vous retirez les
récipients chauds du four.
8)
Effleurez la touche ARRET du four pour
désactiver ce mode.
ACCESSOIRE DE CUISSON AU FOUR
EN BRIQUES
Vous pouvez vous procurer la pierre pour la
cuisson au four en briques chez votre revendeur
Wolf. Des informations supplémentaires sont
fournies sur cet accessoire dans le Guide
d’utilisation et d’entretien.
BAKESTONE30
(807143)
ENTRETIEN DE LA PIERRE
Enlevez l’excès de nourriture avec un grattoir.
Brossez pour enlever les miettes. Laissez la pierre
refroidir complètement avant de l’essuyer avec
un chiffon mouillé. Sur une surface très chaude,
les chiffons mouillés peuvent provoquer des
brûlures. Ne faites pas tremper ou ne plongez pas
la pierre dans l’eau et n’utilisez pas de savon ou
de détergent. La pierre en céramique pourrait en
absorber le goût et les transmettre à la nourriture.
Des taches peuvent persister sur la pierre.
Toutefois, elle n’altéreront pas le goût des
aliments que vous faites cuire au four.
Laissez refroidir la pierre complètement avant de
la sortir du four.
REMARQUE IMPORTANTE :
prudence lorsque vous manipulez la pierre. Elle
s’ébréchera ou se cassera si vous la faites tomber.
Laissez la pierre refroidir complètement
avant de l’essuyer avec un chiffon
mouillé. Sur une surface très chaude,
les chiffons mouillés peuvent provoquer
des brûlures dues à la vapeur.
Faites preuve de
ACCESSOIRES
Vous pouvez
vous procurer
les accessoires
optionnels
auprès de votre
revendeur Wolf.
83

FONCTIONNEMENT DES FOURS ENCASTRABLES WOLF SERIE E
MISE EN GARDE
MODE GRIL
Description du mode Gril :
chauffante supérieure est destinée à produire
une chaleur intense par rayonnement qui
roussit un côté des denrées à la fois.
Généralement, les grillades doivent être
retournées pour pouvoir roussir de l’autre côté
et finir de cuire. La chaleur très élevée cuit
rapidement et dore les aliments, ce qui leur
donne une apparence extérieure savoureuse.
Ce mode est celui qui convient le mieux aux
morceaux de viande, de poisson et de volaille
d’une épaisseur égale ou inférieure à 25 mm. La
sonde de température ne peut pas être utilisée
avec ce mode.
La résistance
CONSEILS DE WOLF POUR OBTENIR
LES MEILLEURS RESULTATS
Mode Gril :
Ne préchauffez pas le four lorsque vous utilisez
le
mode Gril
Grillez les aliments avec la porte du four
fermée.
Ce mode de cuisson est celui qui convient
le mieux pour les morceaux de viande, de
poisson et de volaille d’une épaisseur égale
ou inférieure à 25 mm.
Utilisez toujours le gril lèche-frites en deux
parties fourni avec votre four ainsi que la grille
supérieure à fente du gril lèche-frites. La
graisse peut ainsi s’égoutter des aliments
sans être exposée à la chaleur intense par
rayonnement. De plus, les éclaboussures,
la fumée et les risques d’incendie sont
minimisés.
Tournez la pièce à griller à mi-cuisson.
Avant de commencer la grillade, enduisez la
viande maigre ou le poisson d’huile d’arachide
afin d’éviter toute adhérence.
Si vous faites griller de la volaille, placez
d’abord la pièce de sorte que le côté peau
se trouve en bas.
Commencez la cuisson tandis que la nourriture
est froide, dès que vous la sortez du
réfrigérateur.
.
REGLAGE DES COMMANDES
Mode Gril :
1)
Enfournez la nourriture à la position de grille
voulue. Fermez la porte.
2)
Effleurez la touche GRIL . Dans le cas d’un
four double, ceci a pour effet de mettre le four
supérieur en marche. Pour mettre en marche
le four inférieur, effleurez tout d’abord la touche
SUPERIEUR/INFERIEUR afin de sélectionner
l’icône du four inférieur dans l’afficheur LCD.
Effleurez ensuite la touche GRIL .
3)
La température du four est prédéfinie à 1, soit
290°C (gril à température élevée). Le four
commence à griller après cinq secondes. Pour
modifier le réglage, effleurez immédiatement la
touche numérique
température moyenne) ou
(gril à faible température).
4)
Effleurez la touche ENTRER pour lancer
immédiatement le mode de cuisson ; si
aucune action n’est prise, le four se met
automatiquement en marche après
10 secondes.
5)
Si la minuterie a été réglée, le four émet une
sonnerie lorsque le temps de cuisson est
écoulé. Si vous n’arrêtez pas la sonnerie, elle
continue à sonner toutes les 10 secondes.
6)
Sortez la nourriture du four. Utilisez toujours
des poignées sèches lorsque vous retirez les
récipients chauds du four.
7)
Effleurez la touche ARRET du four pour
désactiver ce mode.
Lorsque vous tournez la nourriture ou
vérifiez la cuisson, ouvrez la porte du four
avec précaution. La fumée et la vapeur
pourraient s’être accumulées. N’utilisez
jamais de plats en verre ou en poterie
résistant à la chaleur. Ils pourraient se
briser en éclats.
2
pour griller à 230°C (gril à
3
pour griller à 175°C
84

FONCTIONNEMENT DES FOURS ENCASTRABLES WOLF SERIE E
MODE ROTISSOIRE
Description du mode Rôtissoire :
chauffantes de cuisson au four traditionnel et au
gril chauffent l’air par cycles de façon à maintenir
la température. Ce mode de cuisson est spécialement destiné à rôtir les morceaux de viande
moins tendres qui devraient être couverts, notamment les morceaux de paleron, les jarrets
d’agneau, le bœuf braisé et la viande pour les
ragoûts. Vous pouvez utiliser la sonde de
température avec ce mode.
Les résistances
CONSEILS DE WOLF POUR OBTENIR
LES MEILLEURS RESULTATS
Mode Rôtissoire :
Préchauffez toujours le four lorsque vous
utilisez le
Pendant le préchauffage, les ventilateurs
à convection et les résistances chauffantes
chauffent rapidement et uniformément
le four.
Vous pouvez utiliser des sacs pour rôtissoire.
Lorsque vous faites rôtir une grosse pièce, par
exemple une dinde, le plat ne doit pas couvrir
toute la grille car il empêcherait la chaleur de
circuler naturellement.
Vous pouvez utiliser le
cuire des dindes farcies de plus de 6,8 kg.
Cuisez toujours la farce à une température
interne de 75°C.
mode Rôtissoire
mode Rôtissoire
.
pour
REGLAGE DES COMMANDES
Mode Rôtissoire :
1)
Effleurez la touche ROTISSOIRE . Dans le
cas d’un four double, ceci a pour effet de
mettre le four supérieur en marche. Pour
mettre en marche le four inférieur, effleurez
tout d’abord la touche SUPERIEUR/INFERIEUR
afin de sélectionner l’icône du four
inférieur dans l’afficheur LCD. Effleurez ensuite
la touche ROTISSOIRE .
2)
La température est prédéfinie à 175°C. Le four
commence à chauffer après dix secondes. Pour
changer la température par défaut de 175°C,
entrez immédiatement une autre température
à l’aide des touches numériques.
3)
Effleurez la touche ENTRER pour lancer
immédiatement le mode de cuisson ; si
aucune action n’est prise, le four se met
automatiquement en marche après
10 secondes.
4)
Enfournez la nourriture lorsque la sonnerie
signale que le four a atteint la température
de préchauffage.
5)
Si vous utilisez la sonde de température,
suivez les instructions fournies dans la section
Fonction Sonde de température pages
94 – 95.
6)
Si la minuterie a été réglée, le four émet une
sonnerie lorsque le temps de cuisson est
écoulé. Si vous n’arrêtez pas la sonnerie, elle
continue à sonner toutes les 10 secondes.
7)
Sortez la nourriture du four. Utilisez toujours
des poignées sèches lorsque vous retirez les
récipients chauds du four.
8)
Effleurez la touche ARRET du four pour
désactiver ce mode.
85

FONCTIONNEMENT DES FOURS ENCASTRABLES WOLF SERIE E
MODE CONVECTION
REMARQUE IMPORTANTE :
doubles, le mode Convection peut être utilisé
uniquement dans le four supérieur.
Description du mode Convection :
du four, les ventilateurs du système de convection
double, chacun associé à une résistance
chauffante, font circuler l’air chauffé dans
toute la cavité du four. Dans ce mode, c’est
le mouvement uniforme de l’air qui autorise
la cuisson sur plusieurs hauteurs de grille.
L’application de la chaleur modulée permet
de maintenir la température et de dorer les
denrées uniformément. Vous pouvez utiliser
la sonde de température avec ce mode.
Avec les fours
De l’arrière
CONSEILS DE WOLF POUR OBTENIR
LES MEILLEURS RESULTATS
Mode Convection :
Préchauffez toujours le four lorsque vous
utilisez le
Utilisez des récipients peu profonds et non
couverts pour cuire les denrées.
Une plaque à pâtisserie de 356 mm x 406 mm
représente la taille optimale. Le bord du
récipient doit se trouver à 25 mm minimum
des parois du four.
Dans ce mode, réduisez de 4°C la température
standard recommandée pour votre recette.
Les récipients n’ont pas besoin d’être empilés
lorsque vous utilisez plus d’une grille.
Le temps de cuisson pourrait être moins
long que prévu ; vérifiez la cuisson 5 à
10 minutes plus tôt.
mode Convection
.
REGLAGE DES COMMANDES
Mode Convection :
1)
Effleurez la touche CONVECTION .
2)
La température du four est prédéfinie à 165°C.
Le four commence à chauffer après cinq
secondes. Pour changer la température par
défaut de 165°C, entrez immédiatement une
autre température à l’aide des touches
numériques.
3)
Effleurez la touche ENTRER pour lancer
immédiatement le mode de cuisson ; si
aucune action n’est prise, le four se met
automatiquement en marche après
10 secondes.
4)
Enfournez la nourriture lorsque la sonnerie
signale que le four a atteint la température
de préchauffage.
5)
Si vous utilisez la sonde de température,
suivez les instructions fournies dans la
section
pages
6)
Si la minuterie a été réglée, le four émet une
sonnerie lorsque le temps de cuisson est
écoulé. Si vous n’arrêtez pas la sonnerie, elle
continue à sonner toutes les 10 secondes.
7)
Sortez la nourriture du four. Utilisez toujours
des poignées sèches lorsque vous retirez les
récipients chauds du four.
8)
Effleurez la touche ARRET du four pour
désactiver ce mode.
Fonction Sonde de température
94 – 95.
86

FONCTIONNEMENT DES FOURS ENCASTRABLES WOLF SERIE E
MODE FOUR A CONVECTION
REMARQUE IMPORTANTE :
four double, le mode Four à convection peut être
utilisé uniquement dans le four supérieur.
Description du mode Four à convection :
ce mode, la chaleur est fournie par les deux
résistances chauffantes du système à convection
et par la résistance chauffante pour la cuisson au
four située sous la base de la cavité du four. Les
deux ventilateurs à convection font circuler cette
chaleur dans la cavité du four. Grâce à la source
de chaleur supplémentaire provenant du bas, ce
mode est idéal pour la pâtisserie. Vous pouvez
utiliser la sonde de température avec ce mode.
Dans le cas d’un
Dans
CONSEILS DE WOLF POUR OBTENIR
LES MEILLEURS RESULTATS
Mode Four à convection :
Préchauffez toujours le four lorsque vous
utilisez le
Dans ce mode, réduisez de 4°C la température
standard recommandée pour votre recette.
Vous pouvez placer plusieurs gâteaux sur
la même grille afin d’éviter d’utiliser
différentes grilles.
Ce mode est idéal pour la cuisson sur une
seule grille.
mode Four à convection
.
REGLAGE DES COMMANDES
Mode Four à convection :
1)
Effleurez la touche FOUR A CONVECTION .
2)
La température du four est prédéfinie à 190°C.
Le four commence à chauffer après cinq
secondes. Pour changer la température par
défaut de 190°C, entrez immédiatement une
autre température à l’aide des touches
numériques.
3)
Effleurez la touche ENTRER pour lancer
immédiatement le mode de cuisson ; si aucune
action n’est prise, le four se met automatiquement en marche après 10 secondes.
4)
Enfournez la nourriture lorsque la sonnerie
signale que le four a atteint la température de
préchauffage.
5)
Si vous utilisez la sonde de température,
suivez les instructions fournies dans la
section
pages
6)
Si la minuterie a été réglée, le four émet une
sonnerie lorsque le temps de cuisson est
écoulé. Si vous n’arrêtez pas la sonnerie,
elle continue à sonner toutes les 10 secondes.
7)
Sortez la nourriture du four. Utilisez toujours
des poignées sèches lorsque vous retirez les
récipients chauds du four.
8)
Effleurez la touche ARRET du four pour
désactiver ce mode.
Fonction Sonde de température
94 – 95.
87

FONCTIONNEMENT DES FOURS ENCASTRABLES WOLF SERIE E
MISE EN GARDE
MODE GRIL A CONVECTION
REMARQUE IMPORTANTE :
fours doubles, le mode Gril à convection peut
être utilisé uniquement dans le four supérieur.
Description du mode Gril à convection :
chaleur intense par rayonnement de la résistance
chauffante supérieure dore et grille l’extérieur des
aliments tandis que les deux ventilateurs à
convection font circuler l’air chaud sur le pourtour.
Ce mode raccourcit le temps de cuisson au gril
des morceaux de viande, de poisson ou de volaille
de grosse épaisseur. La chaleur du gril dore
l’extérieur, tandis que l’intérieur demeure
tendre et juteux sous l’action des ventilateurs
à convection. La sonde de température ne
peut pas être utilisée avec ce mode.
Dans le cas des
La
CONSEILS DE WOLF POUR OBTENIR
LES MEILLEURS RESULTATS
Mode Gril à convection :
Ne préchauffez pas le four lorsque vous utilisez
le
mode Gril à convection
Utilisez le mode Gril à convection avec la porte
du four fermée.
Ce mode de cuisson est idéal pour les
morceaux de viande, de poisson et de volaille
de plus de 25 mm d’épaisseur.
Utilisez toujours le gril lèche-frites en deux
parties fourni avec votre four ainsi que la
grille supérieure à fente du gril lèche-frites.
La graisse peut ainsi s’égoutter des aliments
sans être exposée à la chaleur intense par
rayonnement. De plus, les éclaboussures,
la fumée et les risques d’incendie sont
minimisés.
Tournez la pièce à griller à mi-cuisson.
Avant de commencer la grillade, enduisez
la viande maigre ou le poisson d’huile
d’arachide afin d’éviter toute adhérence.
Si vous faites griller de la volaille, placez
d’abord la pièce de sorte que le côté peau
se trouve en bas.
Commencez la cuisson tandis que la nourriture
est froide, dès que vous la sortez du
réfrigérateur.
.
REGLAGE DES COMMANDES
Mode Gril à convection :
1)
Enfournez la nourriture à la position de grille
souhaitée. Fermez la porte.
2)
Effleurez la touche GRIL A CONVECTION .
La température du four est prédéfinie à
à 290°C (gril à température élevée). Le four
commence à griller après cinq secondes. Pour
modifier le réglage, effleurez immédiatement
la touche numérique
température moyenne (230°C) ou
à faible température (175°C).
3)
Effleurez la touche ENTRER pour lancer
immédiatement le mode de cuisson ; si
aucune action n’est prise, le four se met
automatiquement en marche après
10 secondes.
4)
Si la minuterie a été réglée, le four émet une
sonnerie lorsque le temps de cuisson est
écoulé. Si vous n’arrêtez pas la sonnerie, elle
continue à sonner toutes les 10 secondes.
5)
Sortez la nourriture du four. Utilisez toujours
des poignées sèches lorsque vous retirez les
récipients chauds du four.
6)
Effleurez la touche ARRET du four pour
désactiver ce mode.
Lorsque vous tournez la nourriture ou
vérifiez la cuisson, ouvrez la porte du four
avec précaution. La fumée et la vapeur
pourraient s’être accumulées. N’utilisez
jamais de plats en verre ou en poterie
résistant à la chaleur. Ils pourraient se
briser en éclats.
2
pour griller à une
3
pour griller
1
, soit
88

FONCTIONNEMENT DES FOURS ENCASTRABLES WOLF SERIE E
MODE ROTISSOIRE A
CONVECTION
REMARQUE IMPORTANTE :
four double, le mode Rôtissoire à convection peut
être utilisé uniquement dans le four supérieur.
Description du mode Rôtissoire à convection :
Dans ce mode, la chaleur des deux ventilateurs
à convection, combinée à celle de la résistance
chauffante du gril, intensifie la chaleur convective
par rayonnement. Les aliments dorent doucement
tout en demeurant juteux. Ce mode de cuisson
est parfait pour rôtir les morceaux tendres de
bœuf, d’agneau, de porc et de volaille. Vous
pouvez utiliser la sonde de température avec
ce mode.
Dans le cas d’un
CONSEILS DE WOLF POUR OBTENIR
LES MEILLEURS RESULTATS
Mode Rôtissoire à convection :
Préchauffez toujours le four lorsque vous
utilisez le
Utilisez des plats de cuisson peu profonds
et non couverts sur une grille de rôtissoire.
Dans ce mode, réduisez de 4°C la température
standard recommandée pour votre recette.
La partie inférieure du gril lèche-frites et la
grille à viande constituent une excellente
rôtissoire.
Le temps de cuisson à la rôtissoire pourrait
être moins long que prévu ; vérifiez la cuisson
plus tôt.
Choisissez des denrées qui doivent être rôties
sans être couvertes.
Commencez la cuisson tandis que la nourriture
est froide, dès que vous la sortez du
réfrigérateur.
Vous pouvez utiliser le
faire cuire des dindes farcies de plus de 6,8 kg.
Cuisez toujours la farce à une température
interne de 75°C.
mode Rôtissoire à convection
mode Rôtissoire
.
pour
REGLAGE DES COMMANDES
Mode Rôtissoire à convection :
1)
Effleurez la touche ROTISSOIRE A
CONVECTION . La température du four
est prédéfinie à 165°C. Le four commence à
chauffer après cinq secondes. Pour changer
la température par défaut de 165°C, entrez
immédiatement une autre température à
l’aide des touches numériques.
2)
Effleurez la touche ENTRER pour lancer
immédiatement le mode de cuisson ; si
aucune action n’est prise, le four se met
automatiquement en marche après
10 secondes.
3)
Enfournez la nourriture lorsque la sonnerie
signale que le four a atteint la température
de préchauffage.
4)
Si vous utilisez la sonde de température,
suivez les instructions fournies dans la
section
pages
5)
Si la minuterie a été réglée, le four émet
une sonnerie lorsque le temps de cuisson est
écoulé. Si vous n’arrêtez pas la sonnerie, elle
continue à sonner toutes les 10 secondes.
6)
Sortez la nourriture du four. Utilisez toujours
des poignées sèches lorsque vous retirez les
récipients chauds du four.
7)
Effleurez la touche ARRET du four pour
désactiver ce mode.
Fonction Sonde de température
94 – 95.
89

FONCTIONNEMENT DES FOURS ENCASTRABLES WOLF SERIE E
MISE EN GARDE
MODE LEVEE DE PATE
REMARQUE IMPORTANTE :
doubles, le mode Levée de pâte peut être
utilisé uniquement dans le four supérieur.
Description du mode Levée de pâte :
utilise la chaleur combinée des résistances
chauffantes du gril et du four traditionnel pour
chauffer et répartir l’air équitablement afin de
maintenir la température. Ce mode est idéal
pour la levée de pâte, à pâtisserie ou à pain.
Avec les fours
Le four
CONSEILS DE WOLF POUR OBTENIR
LES MEILLEURS RESULTATS
Mode Levée de pâte :
Nul besoin de préchauffer le four pour ce mode.
Faites lever la pâte à pain jusqu’à ce qu’elle ait
doublé de volume.
Pour obtenir les meilleurs résultats, placez un
plat peu profond contenant 0,2 – 0,7 L d’eau
bouillante sur la position de grille 1 afin de
maintenir l’humidité de l’air dans la cavité
du four.
En mode
pas être définie au-dessus de 45°C. Si le four est
trop chaud, vous devriez ouvrir la porte afin
d’abaisser la température au-dessous de 50°C
et d’éviter de détruire la levure.
Le bord du récipient doit se trouver à 25 mm
minimum des parois du four.
N’ouvrez pas la porte du four trop souvent afin
d’éviter les pertes de chaleur et de prolonger
le délai de cuisson.
Levée de pâte
, la température ne peut
REGLAGE DES COMMANDES
Mode Levée de pâte :
1)
Enfournez la pâte dans un plat pouvant
aller au four.
2)
Effleurez la touche LEVEE DE PATE .
3)
La température du four est prédéfinie à 30°C.
Effleurez la touche ENTRER du panneau
des commandes. Pour changer la température
par défaut de 30°C, entrez immédiatement
une autre température à l’aide des touches
numériques. La température maximum
du
mode Levée de pâte
4)
Si la minuterie a été réglée, le four émet une
sonnerie lorsque le temps de cuisson est
écoulé. Si vous n’arrêtez pas la sonnerie, elle
continue à sonner toutes les 10 secondes.
5)
Sortez la pâte du four. Utilisez toujours des
poignées sèches lorsque vous retirez les
récipients chauds du four.
6)
Effleurez la touche ARRET du four pour
désactiver ce mode.
est de 45°C.
90
NE placez AUCUN récipient sur la base
de la cavité du four et n’utilisez pas de
papier aluminium ou autre matériau
pour recouvrir les parois latérales. Le
non-respect de cette consigne entraînera
des dommages de la porcelaine et
annulera la garantie.

FONCTIONNEMENT DES FOURS ENCASTRABLES WOLF SERIE E
FONCTION MISE EN MARCHE
DIFFEREE
Description de la fonction Mise en marche
différée :
déclenchement automatique de la mise en
MARCHE
de lancer un mode de cuisson plus tard dans la
journée et d’arrêter le four à la fin de la cuisson
ou à une heure prédéfinie. Vous pouvez l’utiliser
avec n’importe quel mode de cuisson sauf avec les
modes
Cette fonction commande le
et de l’
ARRET
Gril, Gril à convection
du four. Elle vous permet
et
Four en briques
CONSEILS DE WOLF POUR OBTENIR
LES MEILLEURS RESULTATS
Mise en marche différée :
Les fours peuvent être réglés distinctement.
Ne différez pas la mise en marche lorsque
le préchauffage est essentiel aux résultats
de cuisson.
Lorsque vous utilisez la
marche différée
de suite après l’avoir sortie du réfrigérateur.
Avant de programmer une activité différée,
assurez-vous que l’horloge affiche l’heure
exacte.
, enfournez la nourriture tout
fonction Mise en
REGLAGE DES COMMANDES
Fonction Mise en marche différée – pour
commencer la cuisson plus tard et arrêter
le four lorsqu’elle est terminée :
1)
Effleurez la touche du mode de cuisson voulu,
sauf GRIL
.
FOUR EN BRIQUES . Dans le cas d’un four
double, ceci a pour effet de mettre le four
supérieur en marche. Pour mettre en marche
le four inférieur, effleurez tout d’abord la
touche SUPERIEUR/INFERIEUR afin de
sélectionner l’icône du four inférieur dans
l’afficheur LCD. Ensuite, effleurez la touche
du mode de cuisson souhaité. Notez que
certains modes de cuisson ne sont pas
disponibles dans le four inférieur. Au besoin,
modifiez la température prédéfinie.
2)
Effleurez la touche DUREE . Utilisez les
touches numériques pour définir le nombre
d’heures/minutes pendant lesquelles le four
doit rester en marche. (DUREE DE LA
CUISSON). Exemple : Entrez 3:30 si vous
souhaitez que le four demeure en marche
pendant 3 heures et demie.
3)
A l’invite, utilisez les touches numériques pour
définir l’heure à laquelle le four doit s’éteindre
(HEURE D’ARRET). Exemple : entrez 6:00 pour
éteindre le four à cette heure de la journée.
4)
Effleurez la touche ENTRER . L’afficheur se
présente comme si le four était en marche.
Selon l’exemple ci-dessus, le four commencera
à chauffer 3 heures et demie avant 6 h, soit à
2 h 30 à l’horloge indiquant l’heure du jour.
5)
Le four émettra une sonnerie lorsque la durée
de la cuisson sera écoulée. Si vous n’arrêtez
pas la sonnerie, elle continue à sonner toutes
les 10 secondes.
6)
Le four s’éteindra à l’HEURE D’ARRET.
7)
Sortez la nourriture du four. Utilisez toujours
des poignées sèches lorsque vous retirez les
récipients chauds du four.
8)
Effleurez la touche ARRET du four pour
effacer l’afficheur et désactiver le signal de
la sonnerie.
, GRIL A CONVECTION
et
91

FONCTIONNEMENT DES FOURS ENCASTRABLES WOLF SERIE E
MODE DESHYDRATATION
REMARQUE
IMPORTANTE
Le mode
Déshydratation
requiert
l’utilisation de
grilles spécifiques.
Il s’agit
d’accessoires
que vous devez
vous procurer
auprès de votre
revendeur Wolf.
REMARQUE IMPORTANTE :
Dans le cas des
fours doubles, le mode Déshydratation peut
être utilisé uniquement dans le four supérieur.
Description du mode Déshydratation :
Cette fonction permet de sécher lentement
la nourriture pour la conserver et l’incorporer
dans certaines recettes.
Les grilles requises pour le mode Déshydratation
sont des accessoires Wolf qui ne sont pas inclus
avec le four. Ce mode convient pour sécher toute
une variété de fruits, de légumes, d’herbes et de
lanières de viande.
CONSEILS DE WOLF POUR OBTENIR
LES MEILLEURS RESULTATS
Pour le mode Déshydratation :
Ne préchauffez pas le four lorsque vous
utilisez le
mode Déshydratation
.
Ce mode autorise l’utilisation de
plusieurs grilles.
Certains aliments nécessitent 14 à 15 heures
pour se déshydrater complètement.
Consultez un guide de conservation des
denrées alimentaires pour vous renseigner
sur les délais et le traitement spécifiques
aux différentes denrées.
92

FONCTIONNEMENT DES FOURS ENCASTRABLES WOLF SERIE E
MISE EN GARDE
MODE DESHYDRATATION
REGLAGE DES COMMANDES
Pour le mode Déshydratration :
1)
Enfournez les denrées sur les grilles de
déshydratation.
2)
Placez l’arrêt de porte fourni avec l’ensemble
d’accessoires à la position qui permet de
maintenir la porte du four ouverte.
Reportez-vous aux instructions fournies
avec le kit d’accessoires.
3)
Effleurez la touche DESHYDRATATION .
4)
La température du four est prédéfinie à 55°C.
Pour changer la température par défaut, entrez
immédiatement une autre température (de
45°C à 70°C) à l’aide des touches numériques.
5)
Laissez les denrées dans le four jusqu’à ce
qu’elles soient complètement sèches au
toucher.
6)
Pour plus de facilité, retirez les denrées de sur
les grilles avant qu’elles soient complètement
refroidies. Si elles ont excessivement adhéré,
replacez les plateaux de déshydratation dans le
four et faites chauffer légèrement pour faciliter
le retrait.
7)
Effleurez la touche ARRET du four pour
désactiver ce mode.
ACCESSOIRE POUR LE MODE
DESHYDRATATION
Vous pouvez vous procurer les grilles requises
pour le mode Déshydratation auprès de votre
revendeur Wolf. Des instructions supplémentaires
sont fournies avec cet accessoire.
DEHY/OVEN-30
(804683)
Les denrées doivent sécher de façon à
atteindre une teneur en eau inférieure à
0,60 ou à pouvoir être conservées en
toute sécurité, sans risque de formation
de levure ou de bactéries. En cas de
doute, déshydratez pendant la durée
maximum indiquée.
93

FONCTIONNEMENT DES FOURS ENCASTRABLES WOLF SERIE E
FONCTION SONDE DE
TEMPERATURE
REMARQUE IMPORTANTE :
double, la fonction Sonde de température peut être
utilisée uniquement dans le four supérieur.
Description de la fonction Sonde de température
La sonde évalue la cuisson en mesurant la température interne des denrées sans qu’il ne soit besoin
d’ouvrir la porte. Il s’agit d’un moyen pratique et
précis d’atteindre une cuisson parfaite, quel que soit
le type, la coupe ou le poids des denrées. Grâce à
cette fonction, il n’est plus nécessaire de calculer le
temps de cuisson en fonction du poids. Vous pouvez
l’utiliser avec tous les modes de cuisson sauf avec les
modes
Gril
et
Gril à convection
Dans le cas d’un four
.
CONSEILS DE WOLF POUR OBTENIR
LES MEILLEURS RESULTATS
Pour la fonction Sonde de température :
:
Insérez la sonde dans la partie la plus épaisse
de la viande avant d’enfourner celle-ci.
Pour déterminer le centre, tenez la sonde à
l’extérieur de la viande, en pointant vers le
centre de la coupe. Marquez la longueur de
l’insertion en plaçant vos doigts sur la sonde,
sur le dessus de la viande. Déplacez la sonde
vers la partie la plus épaisse de la viande et
insérez-la jusqu’à l’emplacement de vos doigts.
Le temps de repos se rapporte aux 10 à
15 minutes qui précèdent la découpe de la
viande. Il permet à la viande de conserver
ses jus.
Dans le cas de la volaille, insérez la sonde
dans la partie la plus épaisse de la cuisse.
Pendant le temps de repos, recouvrez la viande
d’une feuille d’aluminium pour la maintenir
chaude avant de la découper.
Lavez la sonde à la main ; ne la faites pas
tremper et ne la lavez pas au lave-vaisselle.
REMARQUE IMPORTANTE :
sonde diminue avec des températures inférieures
à 40°C. Les denrées qui viennent d’être sorties du
réfrigérateur pourraient afficher une température
inexacte tant qu’elles n’ont pas atteint 40°C.
L’exactitude de la
94

FONCTIONNEMENT DES FOURS ENCASTRABLES WOLF SERIE E
MISE EN GARDE
FONCTION SONDE DE
TEMPERATURE
REGLAGE DES COMMANDES
Pour utiliser la fonction Sonde de température
avec les viandes :
1)
Préchauffez le four à la température et au
mode voulus.
2)
Placez la viande sur une grille, dans la
rôtissoire. Insérez la sonde de température
dans la partie la plus épaisse de la viande,
tel qu’indiqué dans la section Conseils pour
obtenir les meilleurs résultats page 94.
3)
Lorsque le four signale la fin du préchauffage,
utilisez une poignée sèche pour soulever le
couvercle de la sonde de température. Faites
glisser le connecteur de la sonde dans le boîtier
de sonde situé sur la paroi du four jusqu’à ce
qu’il s’enclenche en place. Fermez la porte
du four.
4)
Effleurez la touche SONDE DE TEMP. .
Effleurez les touches numériques pour définir la
température de découpe de la viande. Il est
recommandé de laisser reposer la viande avant
de la découper.
5)
Effleurez la touche ENTRER . Si vous
n’effleurez pas la touche ENTRER , le four
exécute la fonction de température dans les
8 secondes. L’afficheur indique la température
du four et montre le décompte de la
température de la sonde qui augmente
jusqu’à la température de cuisson.
6)
Lorsque la température de découpe est atteinte,
le four émet deux sonneries. Retirez la sonde de
son boîtier. Le four continue à sonner toutes les
10 secondes jusqu’à ce que vous débranchiez
la sonde ou que vous effleuriez la touche
EFFACER .
7)
Pour quitter cette fonction et éteindre le four,
effleurez la touche ARRET du four.
REMARQUE IMPORTANTE :
sonde n’est pas complètement inséré dans son
boîtier, vous percevez un signal audio et les mots
PROBE SHORTED
Reportez-vous au Guide de dépistage des pannes
page 101.
apparaissent dans l’afficheur.
Si le connecteur de
REGLAGE DES COMMANDES
Pour utiliser la fonction Sonde de température
avec le pain :
1)
Préchauffez le four à la température voulue en
mode
Four traditionnel
2)
Placez le pain sur la pierre ou dans le four,
dans un moule à pain.
3)
Faites cuire le pain pendant 10 minutes à la
température du four voulue.
4)
Insérez la sonde dans la partie la plus épaisse
du pain.
5)
En utilisant un gant sec, soulevez le couvercle
de la sonde. Faites glisser le connecteur de la
sonde dans le boîtier de sonde situé sur la
paroi du four jusqu’à ce qu’il s’enclenche en
place. Fermez la porte du four.
6)
Effleurez la touche SONDE DE TEMP. .
Effleurez les touches numériques pour définir
la température de cuisson interne entre 90°C
et 100°C.
7)
Effleurez la touche ENTRER . L’afficheur
indique la température du four et montre le
décompte de la température de la sonde
jusqu’à la température de cuisson définie.
8)
Lorsque la température de découpe est
atteinte, le four émet deux sonneries. Retirez la
sonde de son boîtier. Le four continue à sonner
toutes les 10 secondes jusqu’à ce que vous
débranchiez la sonde ou que vous effleuriez la
touche EFFACER .
9)
Pour quitter cette fonction et éteindre le four,
effleurez la touche ARRET du four. La
température du four demeure la même lorsque
la sonde est débranchée.
La sonde et le couvercle de sonde
deviennent très chauds. Manipulez-les
avec un gant sec.
ou
Four en briques
.
95

FONCTIONNEMENT DES FOURS ENCASTRABLES WOLF SERIE E
MODE SABBAT
Cet appareil
électroménager
a reçu la
certification
Star-K. Il répond
aux strictes
exigences
religieuses
établies et aux
instructions
spécifiques que
vous pouvez
consulter à
www.star-k.org.
96
Certification Star-K
Description du mode Sabbat :
Ce mode permet de
faire cuire la nourriture et de la garder au chaud
tout en observant le repos les jours de Sabbat. Il
fournit une source de chaleur identique pendant
une période de temps prolongée ininterrompue.
Une fois que le four atteint la température
souhaitée, il la maintient. Utilisez le mode Sabbat
uniquement avec les modes de cuisson
traditionnel
et
Rôtissoire
.
Four
CONSEILS DE WOLF POUR OBTENIR
LES MEILLEURS RESULTATS
Les fours peuvent être réglés indépendamment,
même s’ils sont tous les deux en
mode Sabbat
Le mode Sabbat peut être utilisé simultanément
dans les deux fours d’un four double.
Chaque four peut avoir ses options définies
distinctement, par exemple la température et
l’éclairage.
L’éclairage demeure allumé ou éteint.
Toutes les tonalités sont désactivées pendant
l’utilisation du four.
Les cycles de chauffage ne sont pas interrompus
par l’ouverture des portes.
Les fours demeurent en marche tant qu’ils ne
sont pas arrêtés manuellement.
Pendant les jours de fête, la température du four
peut être réglée, mais l’afficheur demeure
inchangé. La température du four ne changera
pas immédiatement.
REGLAGE DES COMMANDES
Pour le mode Sabbat :
1)
Effleurez la touche ECLAIRAGE DU FOUR ,
allumez l’éclairage dans un ou les deux fours
(optionnel).
2)
Effleurez la touche FOUR TRADITIONNEL ou
ROTISSOIRE . La température du four est
prédéfinie à 175°C. Pour la changer, entrez
immédiatement une autre température à l’aide
des touches numériques.
3)
Effleurez la touche ENTRER . Vous pouvez
répéter les étapes ci-dessus avec l’autre four.
4)
Effleurez et maintenez votre doigt sur la touche
ENTRER pendant cinq secondes pour définir
le mode Sabbat.
SABBATH
apparaît dans la
fenêtre d’affichage.
5)
Effleurez la touche ARRET du four pour
désactiver ce mode. Le(s) four(s) demeure(nt) en
marche jusqu’à ce que ce mode soit annulé.
Exemple :
double avec le four supérieur en
Réglage du mode Sabbat dans un four
mode Rôtissoire
une température de 115°C et le four inférieur en
Cuisson traditionnelle
Pour régler le four supérieur :
ROTISSOIRE . Entrez
à une température de 95°C.
Effleurez la touche
2-4-0
à l’aide des touches
numériques. Effleurez la touche ENTRER .
Pour régler le four inférieur :
Effleurez la touche
SUPERIEUR/INFERIEUR pour sélectionner le four
inférieur. Effleurez la touche FOUR TRADITIONNEL
. Entrez
2-0-0
à l’aide des touches numériques.
Effleurez la touche ENTRER .
Effleurez et maintenez votre doigt sur la touche
.
ENTRER pendant cinq secondes pour entrer le
mode Sabbat.
Effleurez la touche ARRET pour désactiver ce
mode. Le(s) four(s) demeure(nt) en marche jusqu’à
ce que ce mode soit annulé.
RÉGLAGE DES COMMANDES
Pour utiliser la fonction Durée en mode Sabbat :
1)
Enfournez les denrées.
2)
Effleurez la touche FOUR TRADITIONNEL ou
la touche ROTISSOIRE (température prédéfinie
à 175°C).
3)
Vous pouvez si vous le voulez modifier la
température prédéfinie. Pour changer la température
du four, entrez immédiatement une autre
température à l’aide des touches numériques.
4)
Effleurez la touche DUREE . Utilisez les touches
numériques pour définir le nombre
d’heures/minutes pendant lesquelles le four doit
rester en marche.
5)
Effleurez la touche HEURE D’ARRET. Utilisez les
touches numériques pour définir l’heure à laquelle
le four doit s’arrêter.
6)
Effleurez la touche ECLAIRAGE DU FOUR pour
éteindre ou allumer, selon le cas.
7)
Touchez et maintenez votre doigt sur la touche
ENTRER pendant cinq secondes.
SABBATH
apparaît dans la fenêtre d’affichage.
8)
A la fin de la cuisson, sortez les denrées du four.
(Le four ne peut pas être réinitialisé tant que le
mode Sabbat est activé.)
9)
A la fin de la période de Sabbat ou de l’absence
prolongée, effleurez la touche du four ARRET
pour désactiver ce mode.
REMARQUE IMPORTANTE :
courant, le four ne revient pas au
Après une interruption de
mode Sabbat
à
mode
.

FONCTIONNEMENT DES FOURS ENCASTRABLES WOLF SERIE E
MISE EN GARDE
MISE EN GARDE
ATTENTION
MODE AUTONETTOYAGE
Description du mode Autonettoyage :
chauffe graduellement jusqu’à une température
élevée et prédéfinie. Pendant ce processus, les
taches de nourriture brûlent, laissant un résidu de
cendre blanc. Réglé en combinaison avec la
fonction Mise en marche différée
du four peut être programmé pour commencer et
s’arrêter pendant que vous dormez. Reportez-vous
à la section
Pour des raisons de sécurité, la porte se verrouille
automatiquement pendant le nettoyage et se
déverrouille lorsque la cavité a complètement
refroidi. Si vous devez arrêter le
toyage
jusqu’à ce que la température de l’intérieur du
four ait refroidi au-dessous de 150°C. L’éclairage
du four est toujours désactivé dans ce mode.
REMARQUE IMPORTANTE :
double, un seul four peut être en
Autonettoyage
pas être utilisé pour la cuisson.
REMARQUE IMPORTANTE :
grilles et tous les guides de grille du four avant
de lancer le
décoloreront si vous les laissez dans le four
alors que ce mode est activé. Reportez-vous
à la section Grilles du four page 80.
Si vous enlevez une tache manuellement, utilisez
uniquement des produits nettoyants abrasifs doux
ou des grattoirs en plastique.
REMARQUE IMPORTANTE :
les dépôts d’aliments à forte teneur de sucre
ou très acides tels que les jus de fruits, le lait
et les tomates sur la surface en émail vitrifié.
Essuyez-les immédiatement avec une serviette
sèche. Ils pourraient laisser une tache
matte permanente.
REMARQUE IMPORTANTE :
de produit nettoyant pour four. Ils sont inutiles
avec le
REMARQUE IMPORTANTE :
cycle d’autonettoyage, de la fumée et une odeur
peuvent se dégager. Ce phénomène est normal ;
il s’agit des huiles que la mise en route initiale
n’a pas éliminées et qui finissent de brûler.
Mise en marche différée
mode Autonet-
avant la fin, la porte demeure verrouillée
Avec un four
à la fois, et l’autre ne peut
Retirez toutes les
mode Autonettoyage
Ne laissez pas
N’utilisez jamais
mode Autonettoyage
.
Pendant le premier
Le four
, le nettoyage
page 91.
mode
. Ils se
REMARQUE IMPORTANTE :
entendre des claquements ou des crépitations
pendant le fonctionnement du/des four(s).
Ces bruits sont normaux. Ils proviennent de
l’extension et de la contraction des surfaces
métalliques pendant le chauffage et le
refroidissement du/des four(s). L’exécution
d’un cycle d’autonettoyage du/des four(s)
permettra de minimiser ces bruits.
Les produits nettoyants pour four que
l’on trouve dans le commerce ou les
revêtements de protection ne doivent être
utilisés sur aucune partie du four.
Le joint du four est essentiel pour assurer
une bonne étanchéité. Ne le nettoyez pas
à la main, ne le frottez pas, ne le perforez
pas et ne le retirez pas.
Pendant le mode Autonettoyage, les
surfaces extérieures pourraient devenir
plus chaudes que d’habitude. Vous devez
donc tenir les enfants à l’écart.
Vous pourriez
97

FONCTIONNEMENT DES FOURS ENCASTRABLES WOLF SERIE E
MISE EN GARDE
MODE AUTONETTOYAGE
CONSEILS DE WOLF POUR OBTENIR
LES MEILLEURS RESULTATS
Mode Autonettoyage :
Retirez toutes les grilles et tous les guides
de grille du four avant de lancer le
Autonettoyage. Ils se décoloreront si vous
les laissez dans le four alors que ce mode
est activé.
Enlevez le gril lèche-frites et tout autre
ustensile se trouvant à l’intérieur du four.
Avant de lancer ce mode, enlevez la
nourriture encore humide ou la graisse
résultant de déversements éventuels.
Selon leur quantité et leur teneur, les saletés
pourraient brièvement s’enflammer.
Utilisez ce mode aussi souvent que
possible. N’attendez pas que la saleté
s’accumule.
Lorsque ce mode est terminé et que la
cavité du four a refroidi, utilisez une éponge
humide ou de l’essuie-tout pour essuyer les
dépôts de cendre éventuels.
Vous pourriez entendre un bruit de
claquement ou d’éclatement pendant le
fonctionnement du four. Ces bruits sont
normaux. Ils proviennent de l’extension et
de la contraction des surfaces métalliques
qui chauffent puis se refroidissent.
mode
REGLAGE DES COMMANDES
Mode Autonettoyage :
1)
Retirez toutes les grilles et tous les guides
de grille du four avant de lancer le mode
Autonettoyage.
2)
Effleurez la touche AUTONETTOYAGE .
Dans le cas d’un four double, ceci a pour
effet de lancer l’autonettoyage dans le four
supérieur. Pour lancer l’autonettoyage dans
le four inférieur, effleurez d’abord la touche
SUPERIEUR/INFERIEUR pour sélectionner
l’icône du four inférieur dans l’afficheur
LCD. Effleurez ensuite la touche AUTONETTOY-
AGE . Le panneau des commandes fait
automatiquement défiler le message suivant :
REMOVE ALL RACKS AND RACK GUIDES
(RETIREZ TOUTES LES GRILLES ET LES
GUIDES DE GRILLE) PRESS ENTER.
(APPUYEZ SUR ENTRER)
3)
Appuyez sur ENTRER pour lancer le
nettoyage par défaut d’une durée totale de
4 heures — 3 heures pour l’autonettoyage
et 1 heure pour le refroidissement.
4)
Vous pouvez régler la durée de l’autonettoyage
à n’importe quelle durée entre 2 heures et
demie et 4 heures. Effleurez la touche DUREE
, puis entrez la durée du nettoyage. Pour
obtenir les meilleurs résultats, la durée du
nettoyage devrait être définie à 4 heures.
5)
Entrez l’heure d’arrêt souhaitée et effleurez la
touche ENTRER . Le four se mettra en
marche et s’arrêtera automatiquement aux
heures définies.
6)
Effleurez la touche ARRET du four pour
effacer l’afficheur lorsque le nettoyage est
terminé.
98
N’essuyez jamais une surface en
porcelaine tiède ou chaude avec
une éponge humide, elle pourrait
s’ébrécher ou se fendiller (fissures
extrêmement fines).

ENTRETIEN DES FOURS ENCASTRABLES WOLF SERIE E
ATTENTION
Ampoule
Protège-lampe
MISE EN GARDE
REMPLACEMENT DE L’AMPOULE
DU FOUR
Coupez l’alimentation électrique du four
avant de remplacer l’ampoule.
REMARQUE IMPORTANTE :
refroidir suffisamment avant de remplacer
l’ampoule.
Le four utilise une ampoule halogène de 20 watts
(numéro de pièce de rechange 803816).
Pour enlever l’ampoule du four,
guides de grille, tel qu’indiqué page 80. Placez un
tampon chaud contre la paroi du four. Pressez un
tournevis à tête plate contre le tampon chaud et
sous le bord du protège-lampe. Veillez à ne pas
rayer l’intérieur en porcelaine du four. En vous
servant du tournevis comme d’un levier, soulevez
avec précaution le protège-lampe pour le dégager
de la paroi du réfrigérateur et l’enlever. Utilisez de
l’essuie-tout pour manipuler l’ampoule et la retirer
de la douille.
Lorsque vous remplacez l’ampoule du four,
évitez le contact direct avec l’ampoule de
rechange. Tenez la nouvelle ampoule dans de
l’essuie-tout pour ne pas la toucher directement
si vos doigts sont graisseux. Sinon, elle se
grillera dès la première utilisation. Insérez les
broches de l’ampoule dans la douille jusqu’à
ce qu’elles s’encliquettent en place. Remettez
le protège-lampe en place ainsi que les guides
de grille. Rétablissez l’alimentation électrique
et réglez l’horloge.
Laissez le four
retirez les
Manipulez les ampoules avec précaution.
Les ampoules halogènes deviennent
instantanément très chaudes et les pièces
adjacentes pourraient retenir la chaleur.
Remplacement des ampoules
99

ENTRETIEN DES FOURS ENCASTRABLES WOLF SERIE E
CONSIGNES D’ENTRETIEN
COMPOSANT CONSIGNE D’ENTRETIEN
Extérieur du four,
poignée et moulure
Acier inoxydable
Classique
Cavité et porte
intérieure du four
Email vitrifié
Vitre de la porte
du four
Verre trempé
Protège-lampe
du four
Verre trempé
N’utilisez pas de nettoyants abrasifs, ils érafleraient la surface de façon permanente.
Nettoyage extérieur :
appliquerez à l’aide d’un chiffon doux non pelucheux. Afin de mettre en valeur le lustre naturel,
essuyez légèrement la surface avec un chiffon en microfibre humide, puis avec une peau de
chamois. Allez toujours dans le sens du grain de la finition. Vous obtiendrez les meilleurs résultats
en maintenant le chiffon en contact permanent avec le métal.
N’essuyez jamais une surface en porcelaine tiède ou chaude avec une éponge mouillée au
risque d’ébrécher ou de fendiller (fissures extrêmement fines) la surface.
Entretien régulier :
laissez pas les dépôts d’aliments à forte teneur de sucre ou très acides, tels que les jus de fruits,
le lait, les tomates, la choucroute ou les garnitures pour tartes sur la surface en émail vitrifié. Ils
pourraient laisser une tache matte permanente. Si vous enlevez une tache manuellement, utilisez
uniquement des produits non abrasifs ou des grattoirs.
Vous pouvez utiliser le mode Autonettoyage
Lorsque la vitre est froide, soulevez avec précaution les aliments qui ont cuit dans le four à l’aide
d’une lame de rasoir et d’un nettoyant multi-surfaces.
Lorsque le four est froid, suivez les instructions page 99 pour retirer le protège-lampe. Lavez avec
un produit nettoyant abrasif doux. Rincez et séchez complètement. Replacez le protège-lampe du
four. Pour remplacer l’ampoule existante, utilisez une ampoule halogène de four de 20 watts
(numéro de pièce 803816).
Utilisez un nettoyant doux et non abrasif pour acier inoxydable que vous
Dès qu’ils ont refroidi, enlevez les éclaboussures et les déversements. Ne
.
Grilles et guides
de grille
Acier nickelé
Joint du four
Filet en fibre de
verre/fil inox
Gril lèche-frites
Email vitrifié,
fini brillant
Pierre pour la
cuisson au four
en briques
Céramique
Panneau des
commandes
Acier inoxydable
Classique / Plastique
polycarbonate
Retirez les grilles et les guides de grille du four avant de lancer le
décoloreront si vous les laissez dans le four alors que ce mode est activé. Nettoyez-les avec un
tampon savonneux en laine d’acier et de l’eau chaude. Rincez et séchez.
Ne nettoyez pas à la main, ne frottez pas, ne perforez pas et ne retirez pas le joint du four au risque
d’altérer l’étanchéité de la porte.
Dessus :
vaisselle. Versez de l’eau très chaude sur les torchons pour permettre à la vapeur de ramollir les
résidus cuits. Lavez à l’eau chaude avec un détergent doux. Rincez et séchez.
Bas :
un détergent doux. Rincez et séchez.
Faites preuve de prudence lorsque vous manipulez la pierre. Elle pourrait s’ébrécher ou se
casser en tombant.
savon ou de détergent. Reportez-vous aux instructions de la section Entretien de la pierre page 83.
N’utilisez pas de nettoyants abrasifs, de tampons en laine d’acier, de torchons granuleux ou certains
essuie-tout. Ils pourraient endommager le panneau.
Utilisez des produits nettoyants pour verre ou multi-usages (sans huile) et un chiffon doux ou une
éponge. Appliquez le produit nettoyant de façon à assouplir le torchon ou l’éponge, et non pas
directement sur le panneau.
Tant qu’il est encore tiède, placez-le dans l’évier et recouvrez le dessus de torchons à
Versez la graisse dans un contenant jetable. Lorsqu’il a refroidi, lavez-le à l’eau chaude avec
Ne faites pas tremper ou ne plongez pas la pierre dans l’eau et n’utilisez pas de
mode Autonettoyage
. Ils se
100
 Loading...