

Page 1

INDUCTION AND ELECTRIC COOKTOPS
USE & CARE GUIDE
Page 2

2 | English
Contents
2 Safety Precautions
5 Induction Cooktop Features
5 Electric Cooktop Features
6 Cooktop Operation
10 Care Recommendations
10 Tips for Saving Energy
11 Troubleshooting
INDUCTION AND ELECTRIC COOKTOPS
Customer Care
The model and serial number are listed on the product rating
plate. Refer to page 5 for rating plate location. For warranty
purposes, you will also need the date of installation and
name of your authorized Wolf dealer. Record this information below for future reference.
If your product ever needs attention, be sure to use a Wolf
factory certied service provider.
SERVICE INFORMATION
Model Number
Serial Number
Date of Installation
Certied Service Name
Certied Service Number
Authorized Dealer
Dealer Number
Important Note
To ensure this product is installed and operated as safely
and efciently as possible, take note of the following types
of highlighted information throughout this guide:
IMPORTANT NOTE highlights information that is especially
important.
CAUTION indicates a situation where minor injury or product
damage may occur if instructions are not followed.
WARNING states a hazard that may cause serious injury or
death if precautions are not followed.
SAFETY PRECAUTIONS
IMPORTANT INSTRUCTIONS
IMPORTANT NOTE: Read all safety instructions before using this
appliance.
• Read this use & care guide carefully before using your new
cooktop to reduce the risk of re, electric shock or injury to
persons.
• Ensure proper installation and servicing. This appliance must
be properly installed and grounded (earthed) by a qualied
technician. Have the installer show you the location of the circuit breaker or fuse so that you know where to turn off power.
• Warranty service must be performed by Wolf
factory certied service.
• Before performing any service, disconnect the power supply to
the cooktop by switching off the circuit breaker or removing the
fuse.
Page 3

wolfappliance.com | 3
SAFETY PRECAUTIONS
IMPORTANT INSTRUCTIONS
GENERAL SAFETY PRECAUTIONS
WARNING
This appliance can be used by children aged from 8 years
and above and persons with reduced physical, sensory or
mental capabilities or lack of experience and knowledge if
they have been given supervision or instruction concerning
use of the appliance in a safe way and understand the hazards involved. Children shall not play with the appliance.
Cleaning and user maintenance shall not be made by children without supervision.
•
Do not operate by means of an external timer or separate remotecontrol system.
• Wear proper apparel. Never let loose clothing or other am-
mable materials come in contact with the elements while in
operation. Fabric may ignite and result in personal injury.
• Use only dry pot holders when removing pans from the
cooktop. Wet or damp pot holders on hot surfaces may result
in burns from steam. Do not let pot holders touch hot heating
elements.
• Select cookware of the proper size, material and construc-
tion for the particular type of cooking being done. This unit
is equipped with heating elements of different size. Refer to
heating zones on page 5.
• Always turn pan handles inward so they do not extend over
adjacent work areas, heating elements or edges of cooktop to
reduce the risk of burns, ignition of ammable materials and
spillage due to unintentional contact with pan. Do not turn
handles toward the room, where they may be bumped or easily
hit.
•
Never heat an empty pan. It may damage the cooktop or cookware and overheat the unit.
•
Do not heat cookware with water droplets on the outside of
the pan. The droplets may begin to boil and splatter. Cookware
should always be dry.
• Never use the cooktop to warm or heat a room.
•
Do not use aluminum foil on the surface of the cooktop.
• When using the cooktop, do not touch the glass surface
directly above or adjacent to the heating elements or induction
zones. The glass surface may become hot enough to cause
burns.
Page 4

4 | English
SAFETY PRECAUTIONS
IMPORTANT INSTRUCTIONS
GENERAL SAFETY PRECAUTIONS
•
Do not leave children alone or unattended in the area where the
cooktop is in use. Never allow children to sit or stand on the
appliance. Do not let children play with the cooktop.
• Do not store items of interest to children above or at the back
of the cooktop, as they could climb on the appliance to reach
items and be injured.
• Do not repair or replace any part of the appliance unless it is
specically recommended in literature you received. All service
should be referred to Wolf factory certied service.
WARNING
Unattended cooking on a cooktop with fat or oil can be dangerous and may result in fire. NEVER try to extinguish a fire
with water, but switch off the appliance and then cover flame
e.g. with a lid or a fire blanket.
WARNING
If the surface is cracked, switch off the appliance to avoid the
possibility of electric shock. Call Wolf factory certified service
to repair the cooktop.
WARNING
Danger of fire: do not store items on the cooking surfaces.
Do not store flammable materials near hot components or
let grease or other flammable substances accumulate on the
cooktop.
•
Metallic objects such as knives, forks, spoons and lids should not
be placed on the cooktop surface since they can get hot.
• Do not clean the cooktop while it is still hot. If using a damp
sponge or cloth, wait until the cooktop has cooled sufciently
to prevent steam burns. A steam cleaner shall not be used.
Also, some cleaners give off noxious fumes when applied to
hot surfaces. Refer to care recommendations on page 10.
• Do not use a griddle, open roaster or sh poacher across
two heating elements unless the bridge element is turned on.
This type of use without the bridge element turned on could
damage or crack the glass. Refer to bridge element on page 8.
• Do not block the cooling fan exhaust or intake vents. The
cooling fan automatically turns on to cool internal parts. It may
continue to run even after the cooktop has been turned off.
Page 5
wolfappliance.com | 5
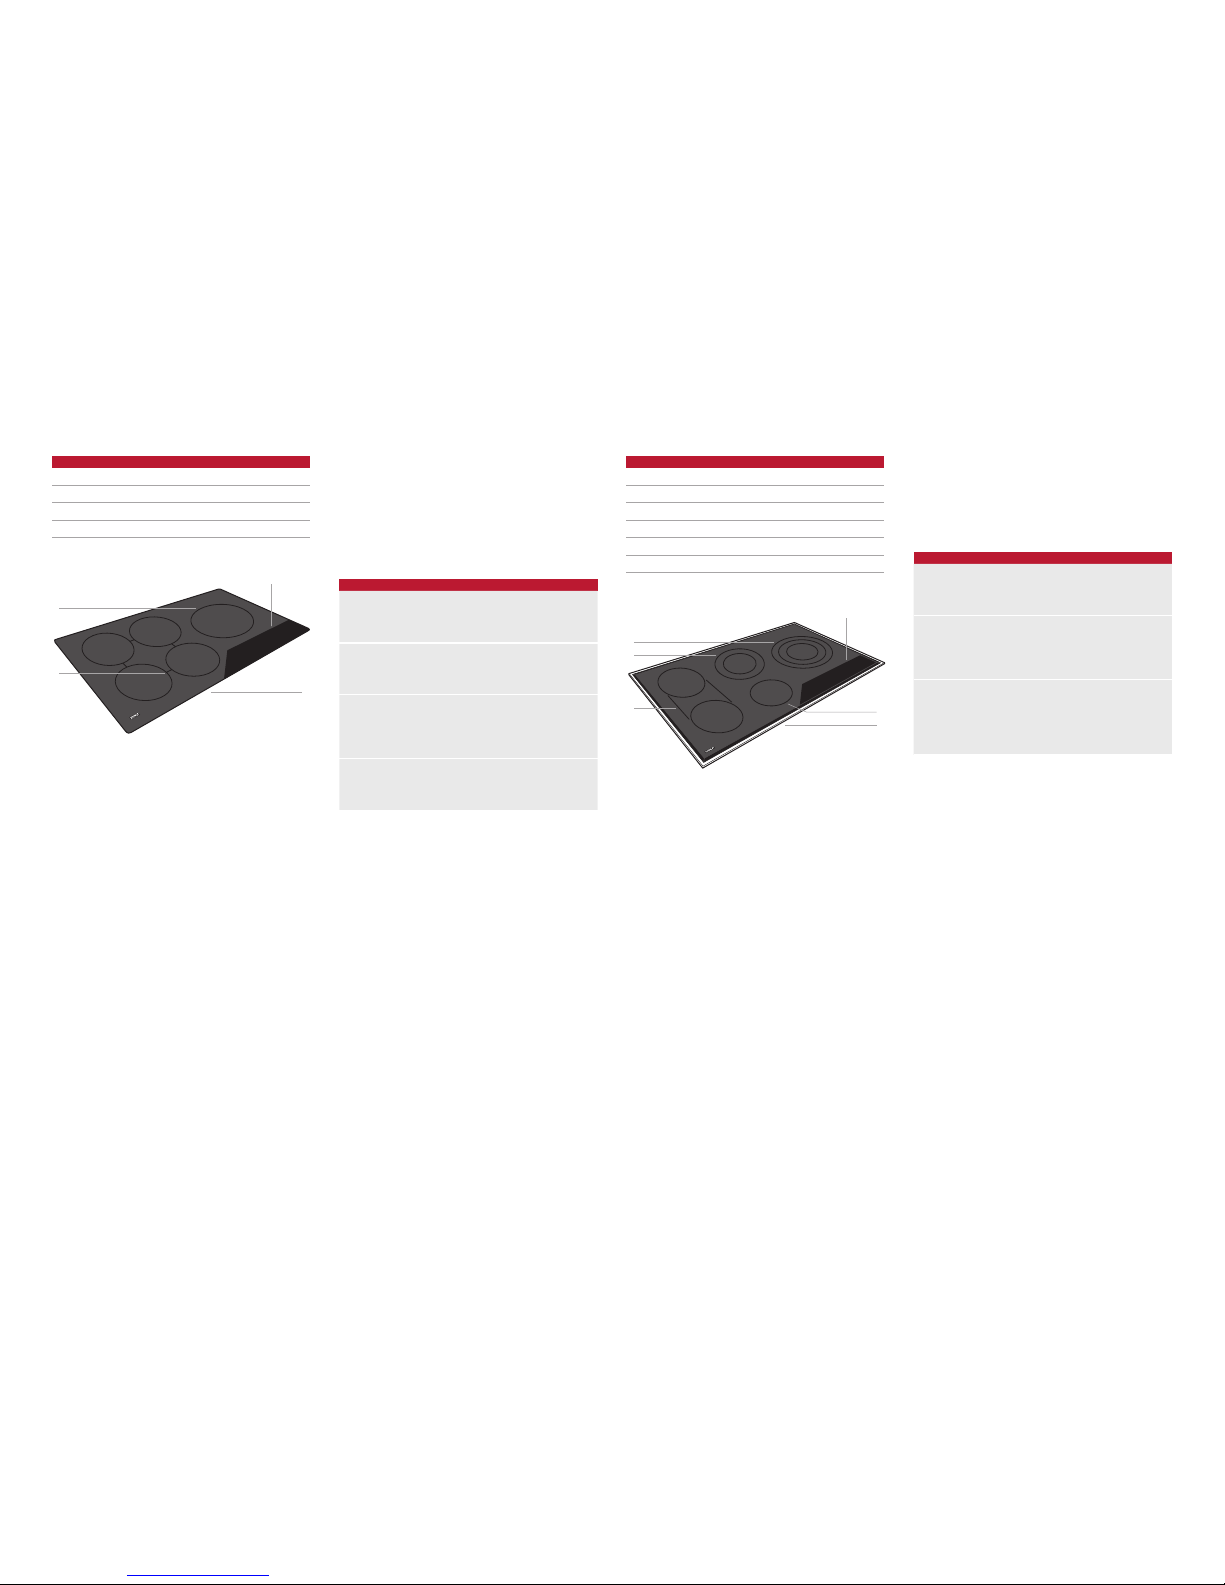
ELECTRIC COOKTOP
Wolf electric cooktops operate by using high-frequency
pulsation, cycling the heating elements between zero power
and full power. As the heat is increased on the control panel,
the element will stay at full power for longer periods and
have shorter periods of zero power.
ELECTRIC COOKTOP HEATING ZONES
381 mm ICBCE152 COOKING HOB
203 mm Dual 189.6 Wh/kg
140 mm Single 205.2 Wh/kg
Average 194.8 Wh/kg
762 mm ICBCE304 COOKING HOB
267 mm Triple 192.0 Wh/kg
(2) 140 mm Singles 205.2 Wh/kg
165 mm Single with Oval 195.0 Wh/kg
Average 196.5 Wh/kg
914 mm ICBCE365 COOKING HOB
267 mm Triple 192.0 Wh/kg
203 mm Dual 189.6 Wh/kg
140 mm Single 205.2 Wh/kg
(2) 178 mm Singles with Bridge 198.6 Wh/kg
Average 195.0 Wh/kg
The performance of this product has been veried according
to EN 60350-2.
INDUCTION COOKTOP
In induction cooking, the electricity ows through a coil to
produce a magnetic eld under the glass-ceramic surface.
When an induction-compatible pan is placed on the
cooktop, currents are induced in the pan and instant heat is
generated. Cookware made of magnetic materials, such as
cast iron or magnetic stainless steel is required for induction
cooking.
INDUCTION COOKTOP HEATING ZONES
381 mm ICBCI152 COOKING HOB
216 mm 179.3 Wh/kg
152 mm 176.9 Wh/kg
Average 178.3 Wh/kg
610 mm ICBCI243 COOKING HOB
267 mm 176.1 Wh/kg
(2) 203 mm 171.8 Wh/kg
Average 173.8 Wh/kg
762 mm ICBCI304 COOKING HOB
267 mm 176.1 Wh/kg
(2) 203 mm 171.8 Wh/kg
152 mm 176.9 Wh/kg
Average 174.3 Wh/kg
914 mm ICBCI365 COOKING HOB
267 mm 176.1 Wh/kg
(4) 203 mm 171.8 Wh/kg
Average 173.1 Wh/kg
The performance of this product has been veried according
to EN 60350-2.
COOKTOP FEATURES
Electric Cooktop Features
FEATURE
1
Product Rating Plate (bottom of cooktop)
2
Control Panel
3
Single Element
4
Dual-Zone Element
5
Triple-Zone Element
6
Bridge Element
Induction Cooktop Features
FEATURE
1
Product Rating Plate (bottom of cooktop)
2
Control Panel
3
Induction Element
4
Bridge Element
914 mm Electric Cooktop (ICBCE365T shown).
6
1
2
5
4
3
914 mm Induction Cooktop (ICBCI365C shown).
4
1
2
3
Page 6
6 | English
Getting Started
We know you are eager to start cooking, but before you
do, please take some time to read this use & care guide.
Whether you are an occasional cook or an expert chef, it
will be to your benet to familiarize yourself with the safety
practices, features, operation and care recommendations of
your Wolf induction or electric cooktop.
To ensure all residual oil from the manufacturing process
has been removed, clean the cooktop thoroughly with hot
water and a mild detergent prior to use. Rinse and dry with
a soft cloth. Refer to care recommendations on page 10.
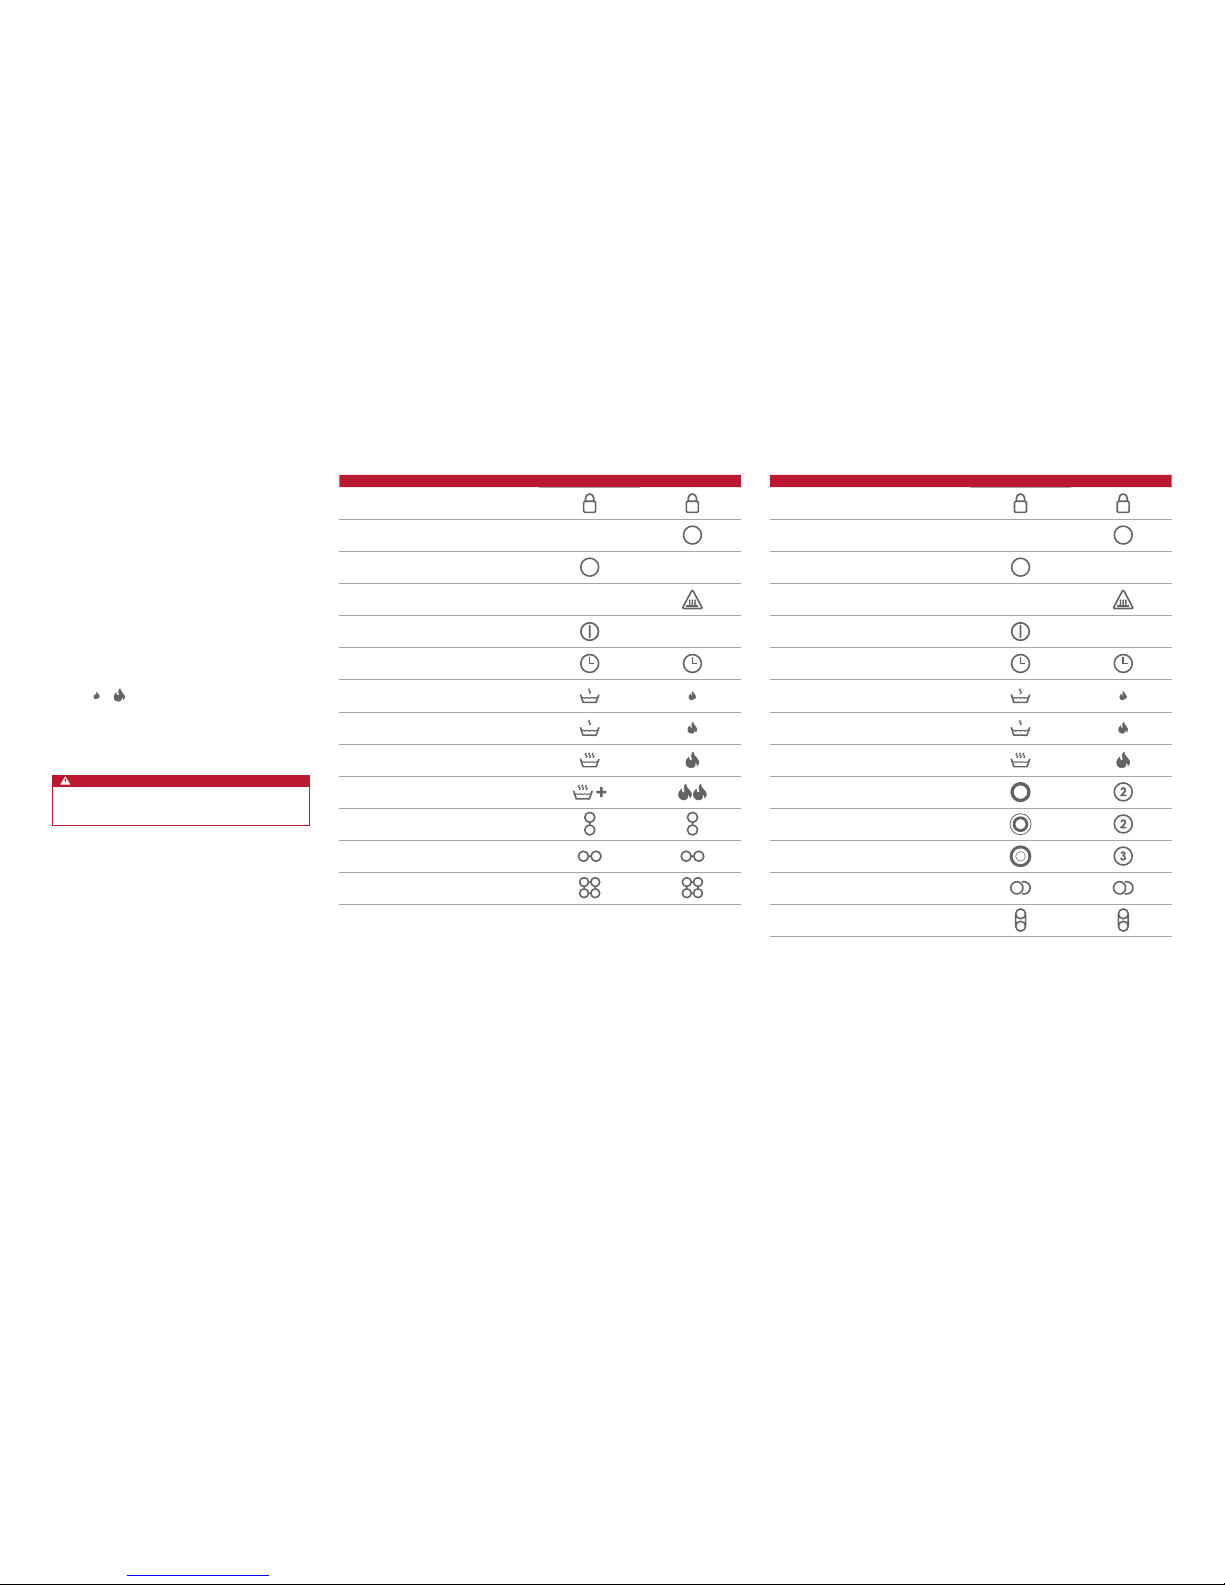
Cooktop Operation
CONTROL PANEL
The control panel features illuminated touch controls. A
power level indicator for each control displays the heat setting from
to . Each control is positioned to the corre-
sponding heating element.
Indicators on the control panel will illuminate to indicate
specic cooktop operation. Some indicators are unique to
either induction or electric cooktops.
CAUTION
Do not place hot cookware directly over the control
panel.
COOKTOP OPERATION
INDUCTION COOKTOP CONTROL PANEL
TOUCH PAD INDICATOR
Control Panel Lock
Element(s) On
All Elements Off
Hot Surface
On/Off
Timer Set
Melt
Simmer
High
Boost Mode
Front-to-Back Bridge
Side-to-Side Bridge
All Bridge
ELECTRIC COOKTOP CONTROL PANEL
TOUCH PAD INDICATOR
Control Panel Lock
Element(s) On
All Elements Off
Hot Surface
On/Off
Timer Set
Melt
Simmer
High
Zone 2 (burner with two zones)
Zone 2 (burner with three zones)
Zone 3
Oval Element
Bridge
Page 7

wolfappliance.com | 7
BOOST MODE (INDUCTION)
For induction cooktops, boost mode boosts power on one
element by diverting power from an adjacent element. If
the adjacent element is on high, the power output will be
reduced. The reduction in power will be displayed on the
power level indicator of the adjacent element.
will
illuminate when an element is in boost mode.
Boost mode will deactivate automatically after 30 minutes of
continuous operation and can be reactivated if desired.
SINGLE ELEMENT AND INNER ZONE
Setting controls:
1 To activate a heating element, touch for desired
single element on the control panel. Power level indicator
will ash and all indicators for that zone will ash.
2 To complete the activation, touch for highest heat,
for lowest heat, (induction) to activate boost
mode, or touch desired power level indicator.
3 To change heat setting while the element is on, touch or
slide to desired power level.
4 To turn element off, touch .
IMPORTANT NOTE: For induction cooktops only, if no
cookware or an incompatible pan is placed on an induction
element after activation, the control will ash for 30 seconds, then the element will turn off automatically.
Cooktop Operation
CONTROL PANEL LOCK
The control panel lock feature prevents unwanted cooktop
operation. Touch and hold
for three seconds to lock and
unlock the control panel.
will illuminate when the control
panel is locked.
The control panel will automatically lock after 10 minutes
of inactivity. This automatic lock feature can be disabled
through the extended options menu. Refer to page 10.
When the cooktop is powered up for the rst time and after
a power outage, the cooktop will default to lock mode.
COOKTOP OPERATION
POWER LEVEL INDICATOR
When an element is activated, a power level indicator will
illuminate above the corresponding control indicating the
level of heat. The lowest heat is represented by the small
ame, varying levels of heat by additional indicators (dots),
and the highest heat by all indicators including the large
ame. Refer to the chart below.
SETTING POWER LEVEL USES
Melt 1 (small ame)
indicator
Melting butter, holding
chocolate and sauces.
Simmer 2–6 indicators Simmering sauces and
steaming rice.
Medium 6–7 indicators Making French toast and
pancakes, heating milk, cream
sauces, soups and gravies.
Medium
High
7-8 indicators Sauteing, browning and
frying.
High 8–10 (large ame)
indicators
Boiling water, searing meat
and canning.
Page 8

8 | English
BRIDGE ELEMENT (ELECTRIC)
Setting controls:
1 To activate bridge element, select desired power level on
one of the single elements.
2 Touch . will illuminate.
3 To change power level, adjust the power level on either
active bridged element.
4 To turn off, touch on either active bridged element.
Cooktop Operation
DUAL-ZONE OR OVAL ELEMENT (ELECTRIC)
Setting controls:
1 To activate dual-zone or oval element, touch on the
control panel. Power level indicator will ash and all
indicators for that zone will ash.
2 Set desired heat level for inner zone as described
on page 7. Outer zones cannot be turned on independently of inner zone.
3 Touch or . Outer zone will be set to the same
heat setting as inner zone.
or will illuminate to
indicate outer zone is on.
4 Change heat setting for entire dual-zone or oval element
the same as for a single element. Both zones maintain
the same heat setting.
5 To turn outer zone off, touch or . To turn entire
element off, touch
.
TRIPLE-ZONE ELEMENT (ELECTRIC)
Setting controls:
1 To activate triple-zone element, touch on the control
panel. Power level indicator will ash and all indicators
for that zone will ash.
2 Set desired heat level for inner zone as described
on page 7. Outer zones cannot be turned on independently of inner zone.
3 Touch . Middle zone will be set to the same heat set-
ting as inner zone.
will illuminate to indicate middle
zone is on.
4 Touch . Outer zone will be set to the same heat set-
ting as inner and middle zones.
will illuminate to
indicate outer zone is on.
5 Change heat setting for entire triple-zone element the
same as for a single element. All three zones maintain
the same heat setting.
6 To turn outer zone off, touch . To turn middle zone off,
touch
. To turn entire element off, touch .
BRIDGE ELEMENT (INDUCTION)
Setting controls:
1 To activate bridge, select desired power level on one of
the single elements.
2 Touch between corresponding element controls to
bridge elements front to back,
to bridge elements
side to side, or
to bridge all elements. ,
or
will illuminate respectively.
3 To change power level, adjust the power level on any
active bridged element.
4 To turn off, touch on any active bridged
element.
For 914 mm induction cooktops,
should be used for
cookware larger than 305 mm in diameter. For smaller cookware, use the right rear element.
COOKTOP OPERATION
Page 9

wolfappliance.com | 9
Cooktop Operation
GRIDDLE USE
The bridge element provides an oblong heating area for use
with a griddle, open roaster or sh poacher.
To preheat a griddle, set the bridge element power level to
high for ve minutes, then reduce for cooking.
CAUTION
A griddle, open roaster or fish poacher should not be
used when the bridge element is off or with any other
combination of heating elements.
COOKTOP OPERATION
TIMER
The timer can be set in one-minute increments up to 99
minutes. Once a time is set,
will illuminate on the control
panel and the countdown is visible on the timer display. The
timer is independent from the cooktop.
Setting timer:
1 Touch .
2 Touch and hold + or – until desired time is shown in the
timer display. Timer will begin countdown in minutes.
3 Timer will chime with one minute left and completes the
countdown in seconds.
4 When complete, timer will chime and continue to chime
until
is touched.
HOT SURFACE INDICATOR
A hot-surface indicator will illuminate when the surface temperature of any heating element rises above 65°C.
will
illuminate on the control panel and remains illuminated until
the entire surface reaches a safe temperature.
ALL OFF
When one or more heating elements are on, will illuminate on the control panel. To turn off all elements at the
same time, touch
.
Sabbath
(ELECTRIC COOKTOP)
This appliance is certied by Star-K to meet strict religious
regulations in conjunction with specic instructions found
on www.star-k.org.
Page 10

10 | English
Cooktop Operation
EXTENDED OPTIONS
The extended options feature allows the user to set preferences for volume, tone, control panel lock and Sabbath
feature.
Setting adjustment:
1 While unit is off and unlocked, touch and hold for
ve seconds.
2 Power level 1 on the rear element control will be dis-
played and ‘VO’ will appear on the timer display.
Touch
or on the front element control to adjust
volume.
3 Touch + on the timer control to adjust tone. Power level
2 on the rear element control will be displayed and ‘Fr’
will appear on the timer display.
Touch
or on the front element control to adjust
tone.
4 Touch + on the timer control to adjust the automatic
control panel lock. Power level 3 on the rear element
control will be displayed and ‘Lo’ will appear on the timer
display.
Touch
or on the front element control to turn the
automatic lock feature off or on respectively.
COOKTOP OPERATION CARE RECOMMENDATIONS
Care Recommendations
CLEANING
Stainless steel Use a nonabrasive stainless steel cleaner and
apply with a soft lint-free cloth. To bring out
the natural luster, lightly wipe surface with a
water-dampened microber cloth followed by
a dry polishing chamois. Always follow the
grain of stainless steel.
Control panel Use spray degreaser to remove ngerprints
and food soil. Spray on a cloth before wiping
panel.
IMPORTANT NOTE: Do not spray cleaners
directly on the control panel.
Glass-ceramic
surface
Allow to cool. Use spray degreaser to remove
ngerprints and a non-abrasive cooktop
cleaner for food soil. Do not allow any item
that could melt to come in contact with the
glass-ceramic surface when hot. If this occurs,
use the razor blade scraper provided with the
cooktop to remove.
5 Touch + on the timer control to enter Sabbath mode
(electric cooktop only). Power level 4 on the rear element
control will be displayed. Touch
on the front element
control to initiate Sabbath feature. ‘SA’ will appear on the
timer display.
Touch
on the front element control to activate or
deactivate the feature.
6 Touch at any time while in extended options to con-
rm settings and return cooktop to idle.
Tips for Saving Energy
• Use only the necessary amount of water for the
application.
• When boiling water, use the lowest power setting that
will maintain the boil.
• Turn off the cooking zone when your food is done.
Page 11

wolfappliance.com | 11
Wolf, Wolf & Design, Wolf Gourmet, W & Design and the color red as applied to knobs are registered trademarks and service marks of Wolf Appliance, Inc. Sub-Zero, Sub-Zero
& Design, Dual Refrigeration, The Living Kitchen, Great American Kitchens The Fine Art of Kitchen Design, and Ingredients are registered trademarks and service marks of
Sub-Zero, Inc. (collectively, the “Company Marks.”) All other trademarks or registered trademarks are property of their respective owners in the United States and other countries.
TROUBLESHOOTING
Troubleshooting
OPERATION
Cooktop does not operate.
• Verify power is on.
• Verify electrical power to cooktop and home circuit
breaker is on.
• Cooktop is in lock mode. Touch and hold
for three
seconds to unlock control panel.
• Cooktop will automatically turn off after 2 hours of con-
tinual use (high), 6 hours (medium) and 8 hours (simmer),
except in Sabbath mode.
Cooktop temperature issue.
• Contact your local Wolf Appliance servicer for
recommendations.
SERVICE
• Maintain the quality built into your product by contacting
Wolf factory certied service.
• When contacting service, you will need the model and
serial number of your product. Both numbers are listed
on the product rating plate. Refer to page 5 for rating
plate location.
• For warranty purposes, you will also need the date of
installation and name of your authorized Wolf dealer. This
information should be recorded on page 2 of this guide.
Page 12

824294 REV-A 8/2014
 Loading...