

Page 1
Wolf Design Guide
REVISED 9/ 2015
Page 2
Contents
3 Ovens / Warming Drawers
56 Cooktops / Coffee Systems
88 Ranges / Rangetops
104 Outdoor Grills
112 Ventilation
134 Shipping Weights
136 Wolf Warranties
Features and specications are subject to change at any
time without notice. Visit wolfappliance.com/specs for the
most up-to-date information.
IMPORTANT NOTE: Throughout this guide, dimensions may
1
vary by ±
/8" (3). Dimensions in parentheses are millimeters
unless otherwise specied.
Page 3

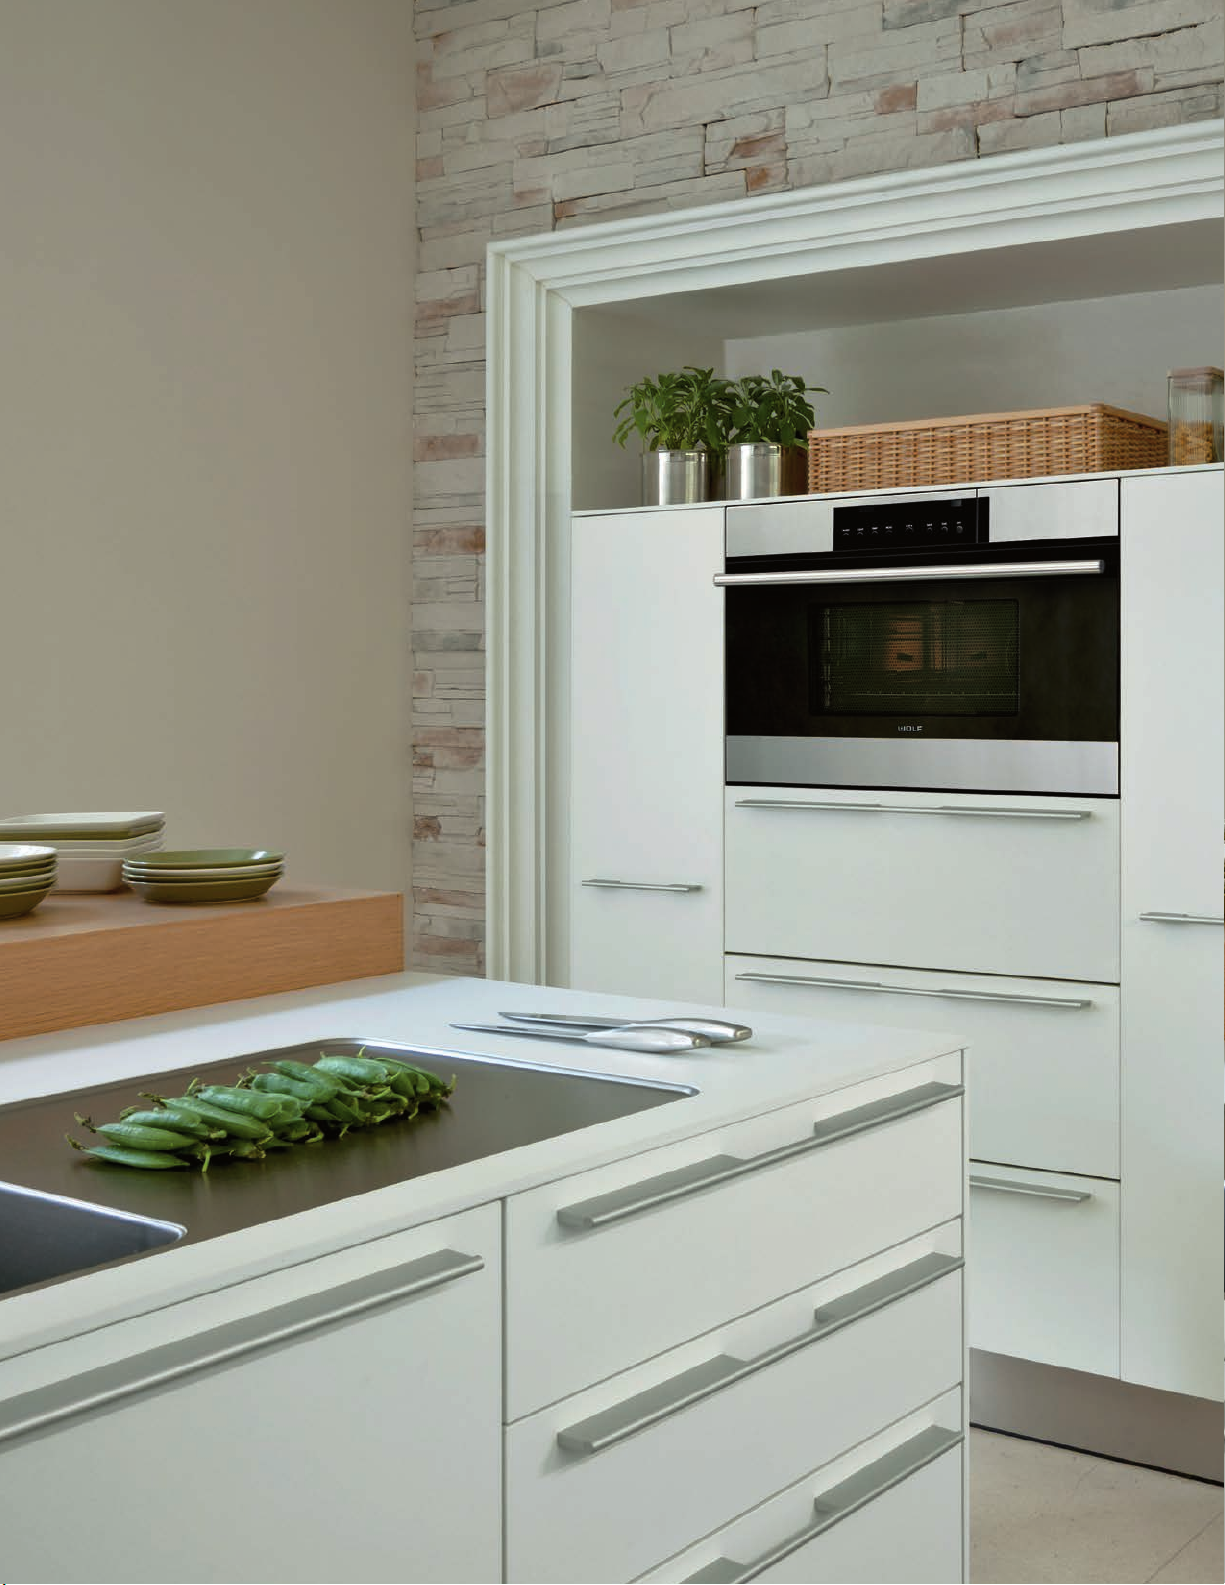
UPPER OVEN LOWER OVEN
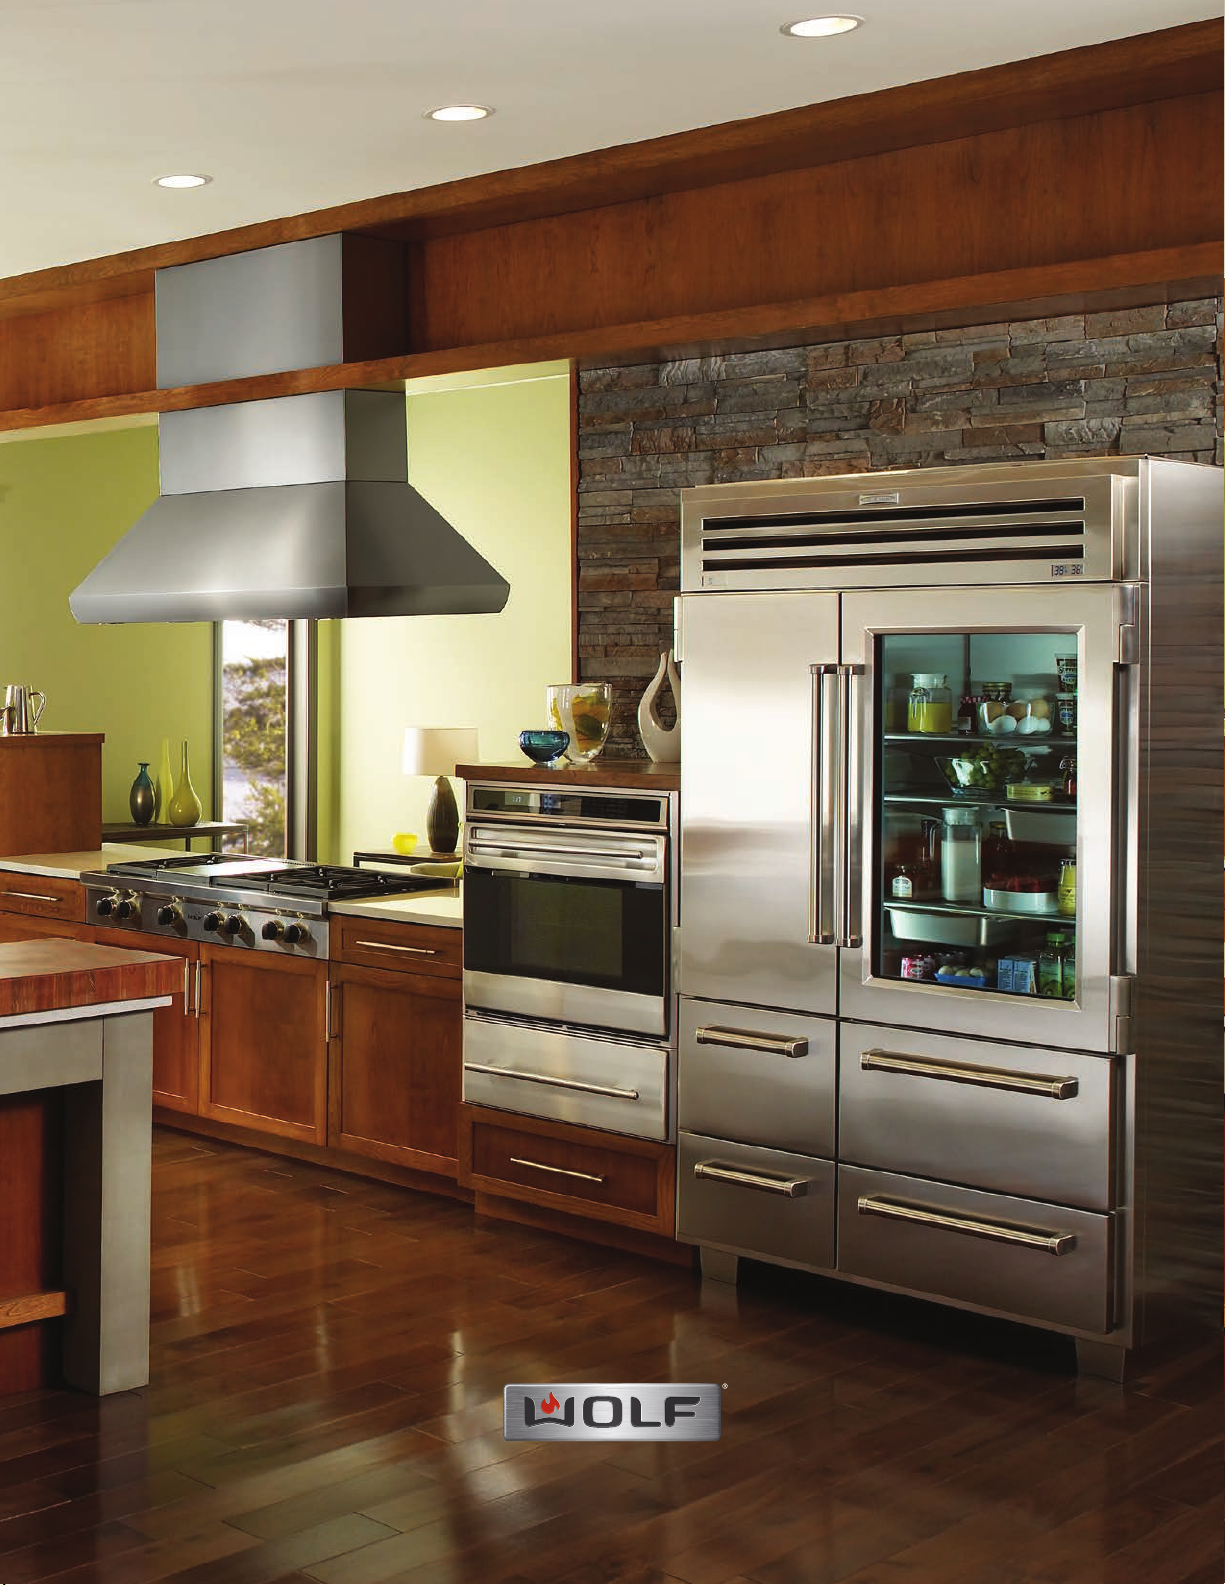
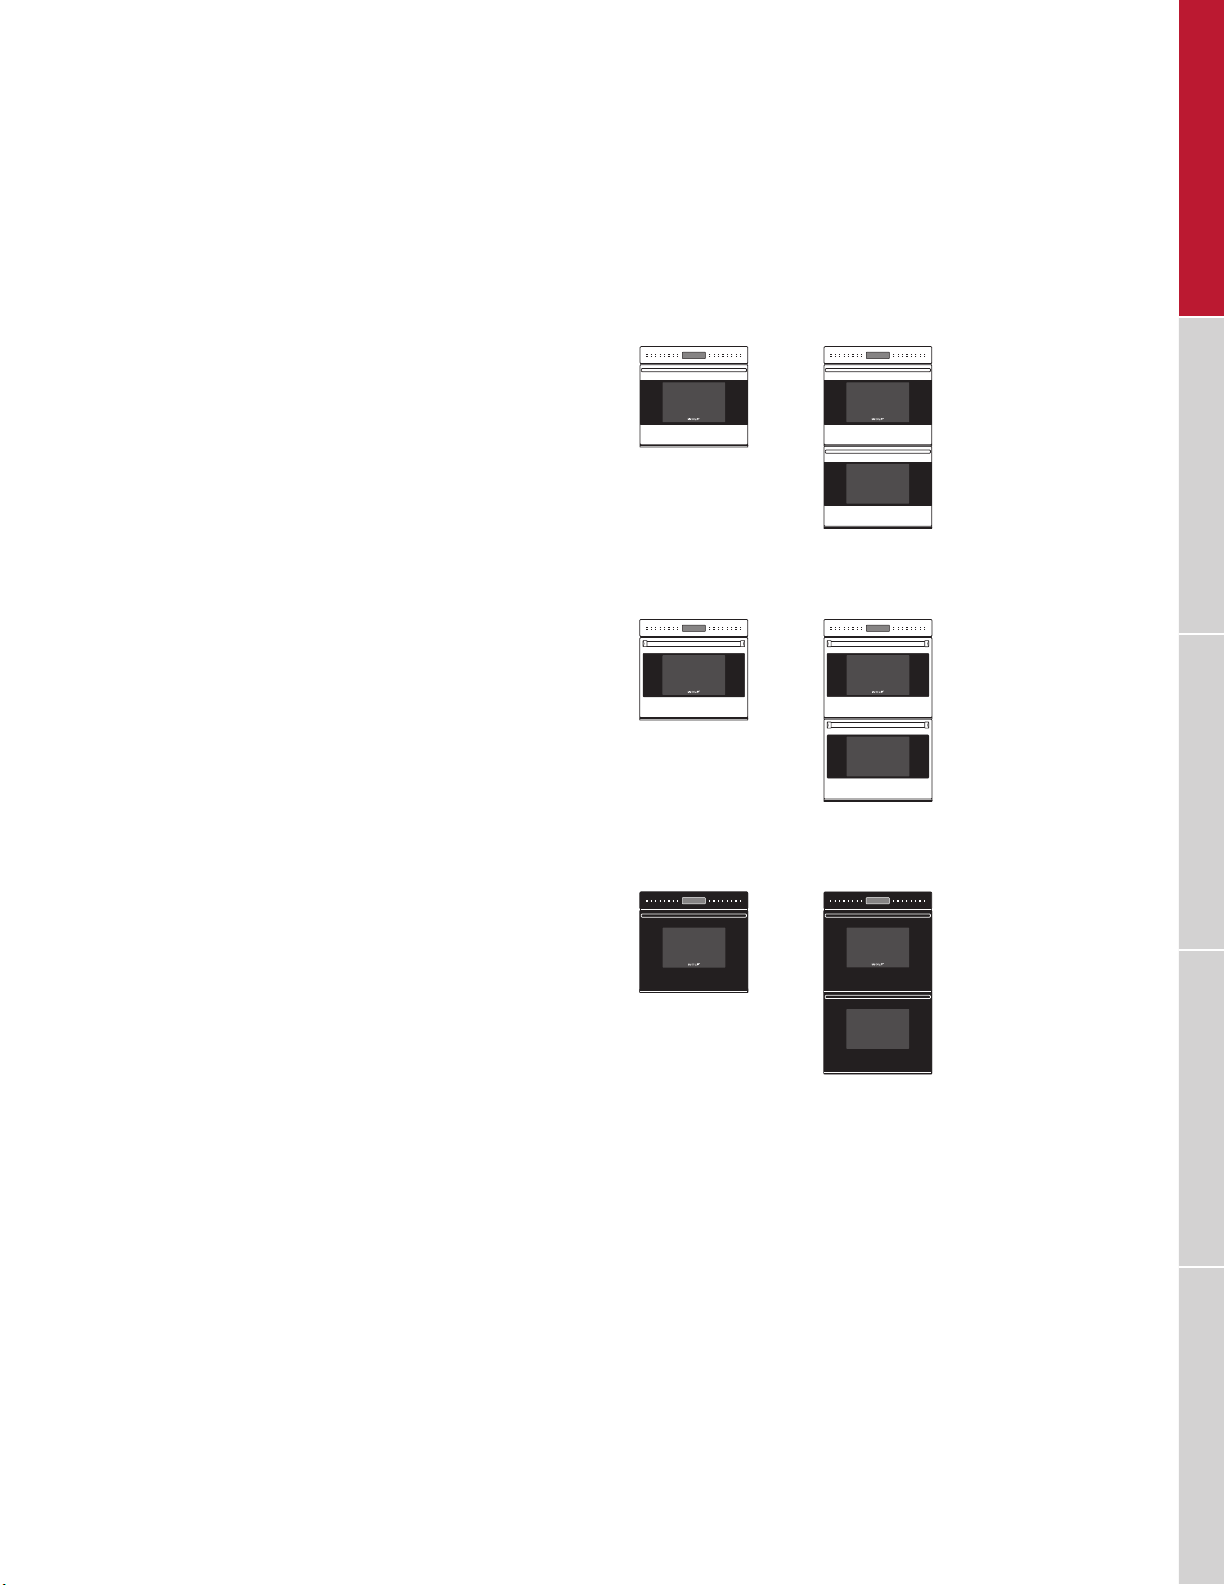
WOLF BUILT-IN OVENS
M Series Ovens
OVENS / WARMING DRAWERS COOKTOPS / COFFEE SYSTEMS RANGES / RANGETOPS OUTDOOR GRILLS VENTILATION
Three striking new looks are just the beginning. Superior
performance features include an even more advanced dual
vertical convection fan system, touchscreen controls, convenient new preset cooking programs and improved interior
lighting. There is more usable space inside for deliciousness
on a grand scale. M series ovens can be installed in a standard or ush inset application.
KEY FEATURES
• Advanced Dual VertiCross convection system for faster
preheats and consistent cooking across all racks.
• Ten cooking modes for predictably delicious results
(convection, roast, bake, broil, convection roast, baking
stone, Gourmet, warm, proof and dehydration).
• Gourmet feature has menu of presets that automatically
controls cooking of popular meals.
• Interactive color touchscreen for advanced cooking
control.
• Cobalt blue porcelain oven interiors.
M SERIES OVENS
TRANSITIONAL
SO27TM/S/TH
DO27TM/S/TH
PROFESSIONAL
SO30TM/S/TH
DO30TM/S/TH
SO36TM/S/TH
SO30PM/S/PH
DO30PM/S/PH
CONTEMPORARY
SO30CM/B
DO30CM/B
wolfappliance.com | 3
Page 4
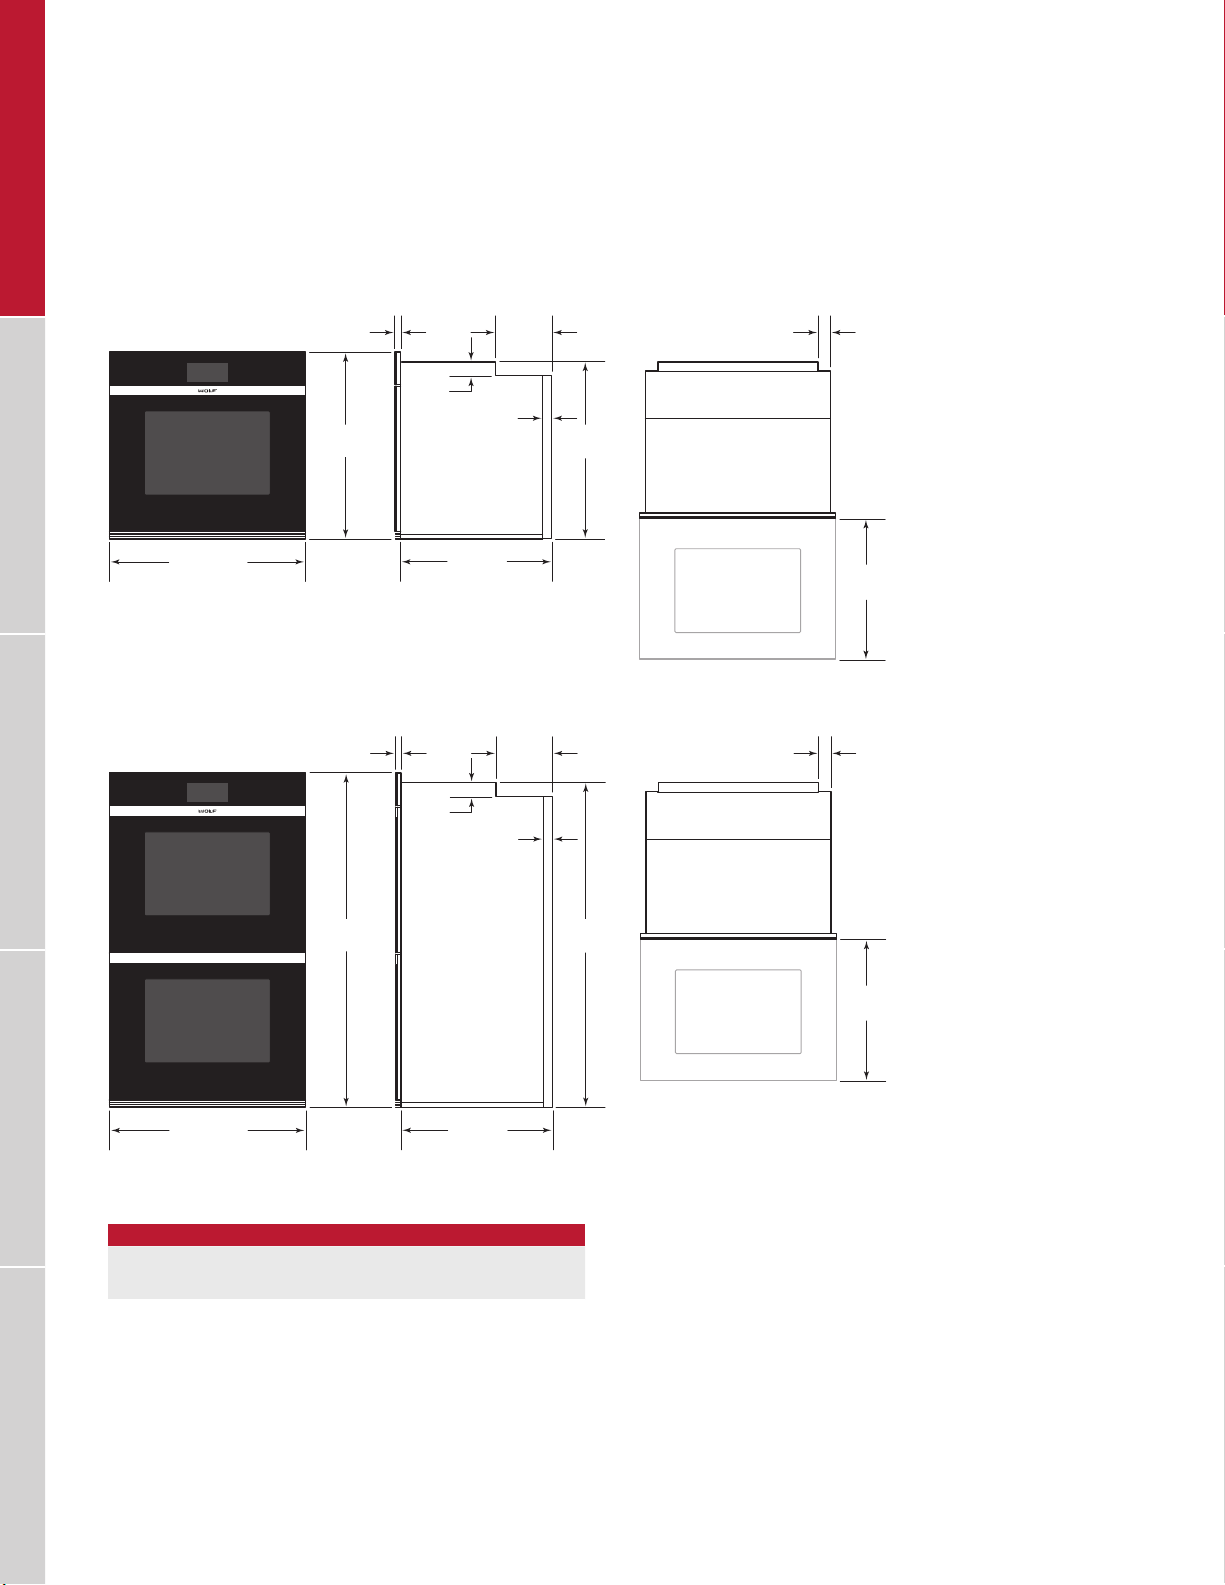
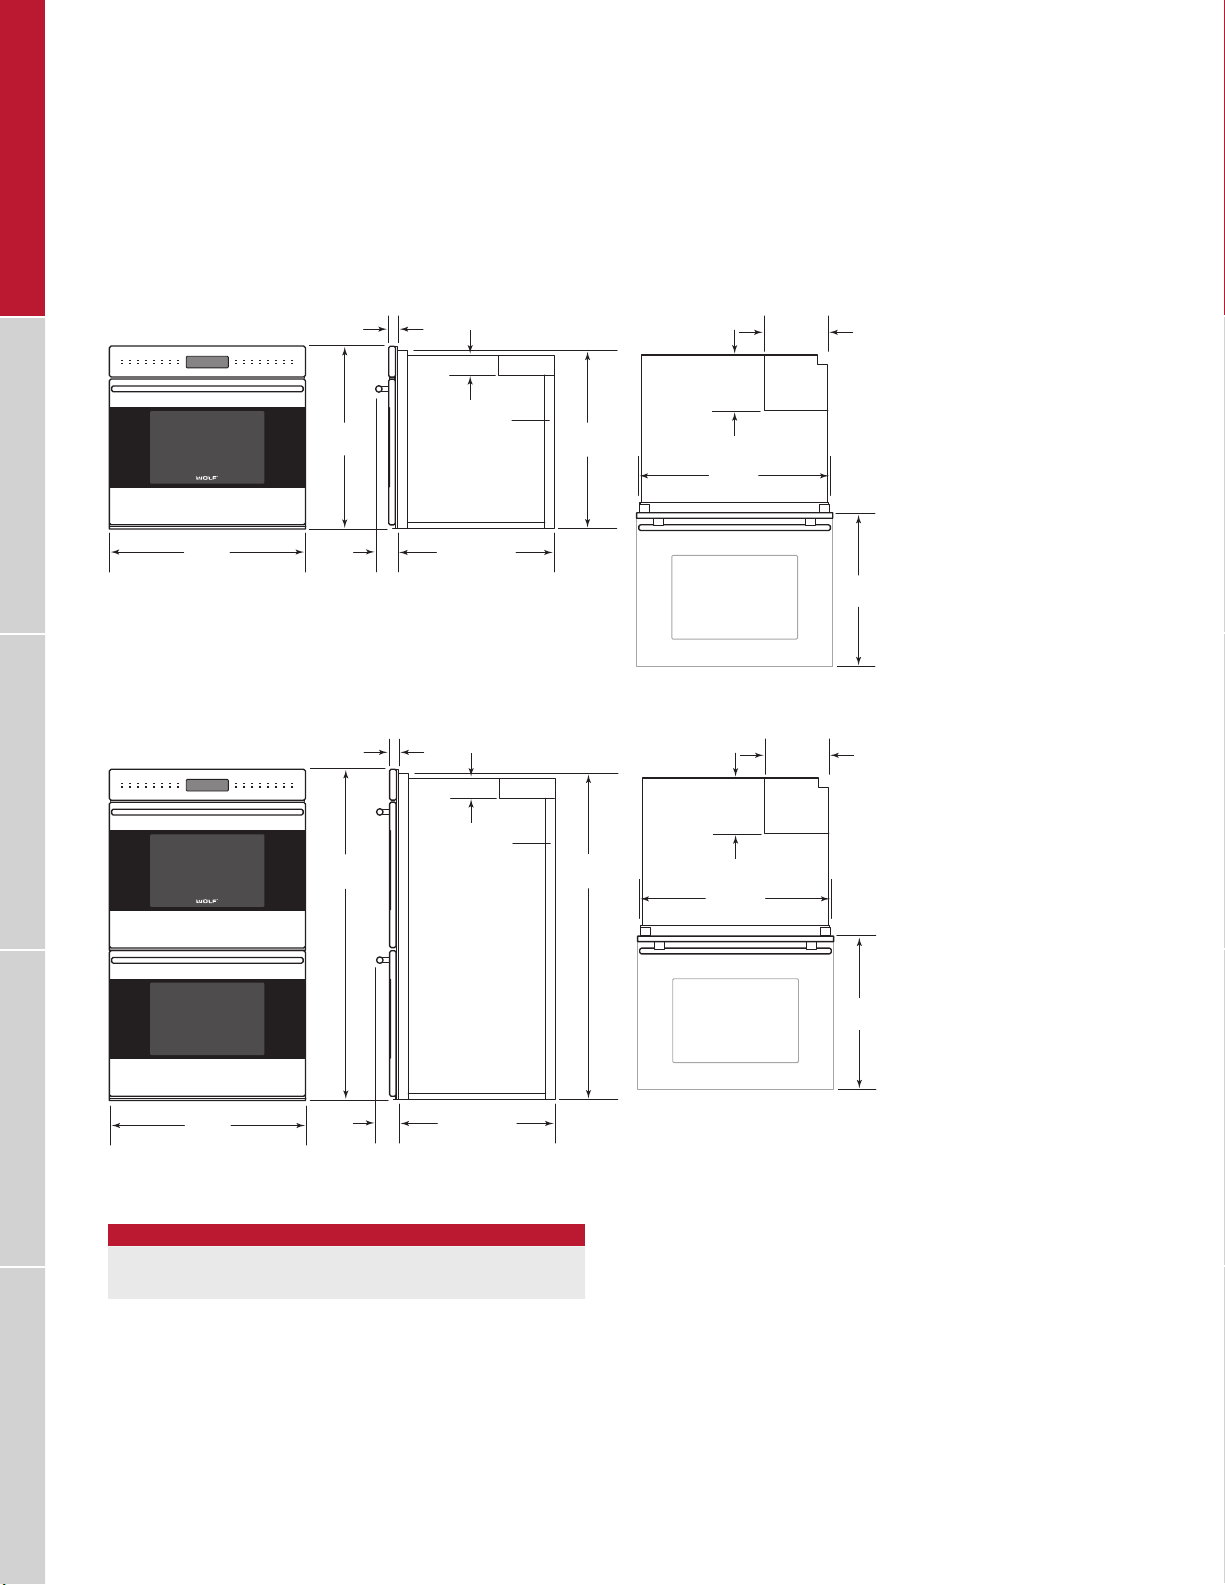
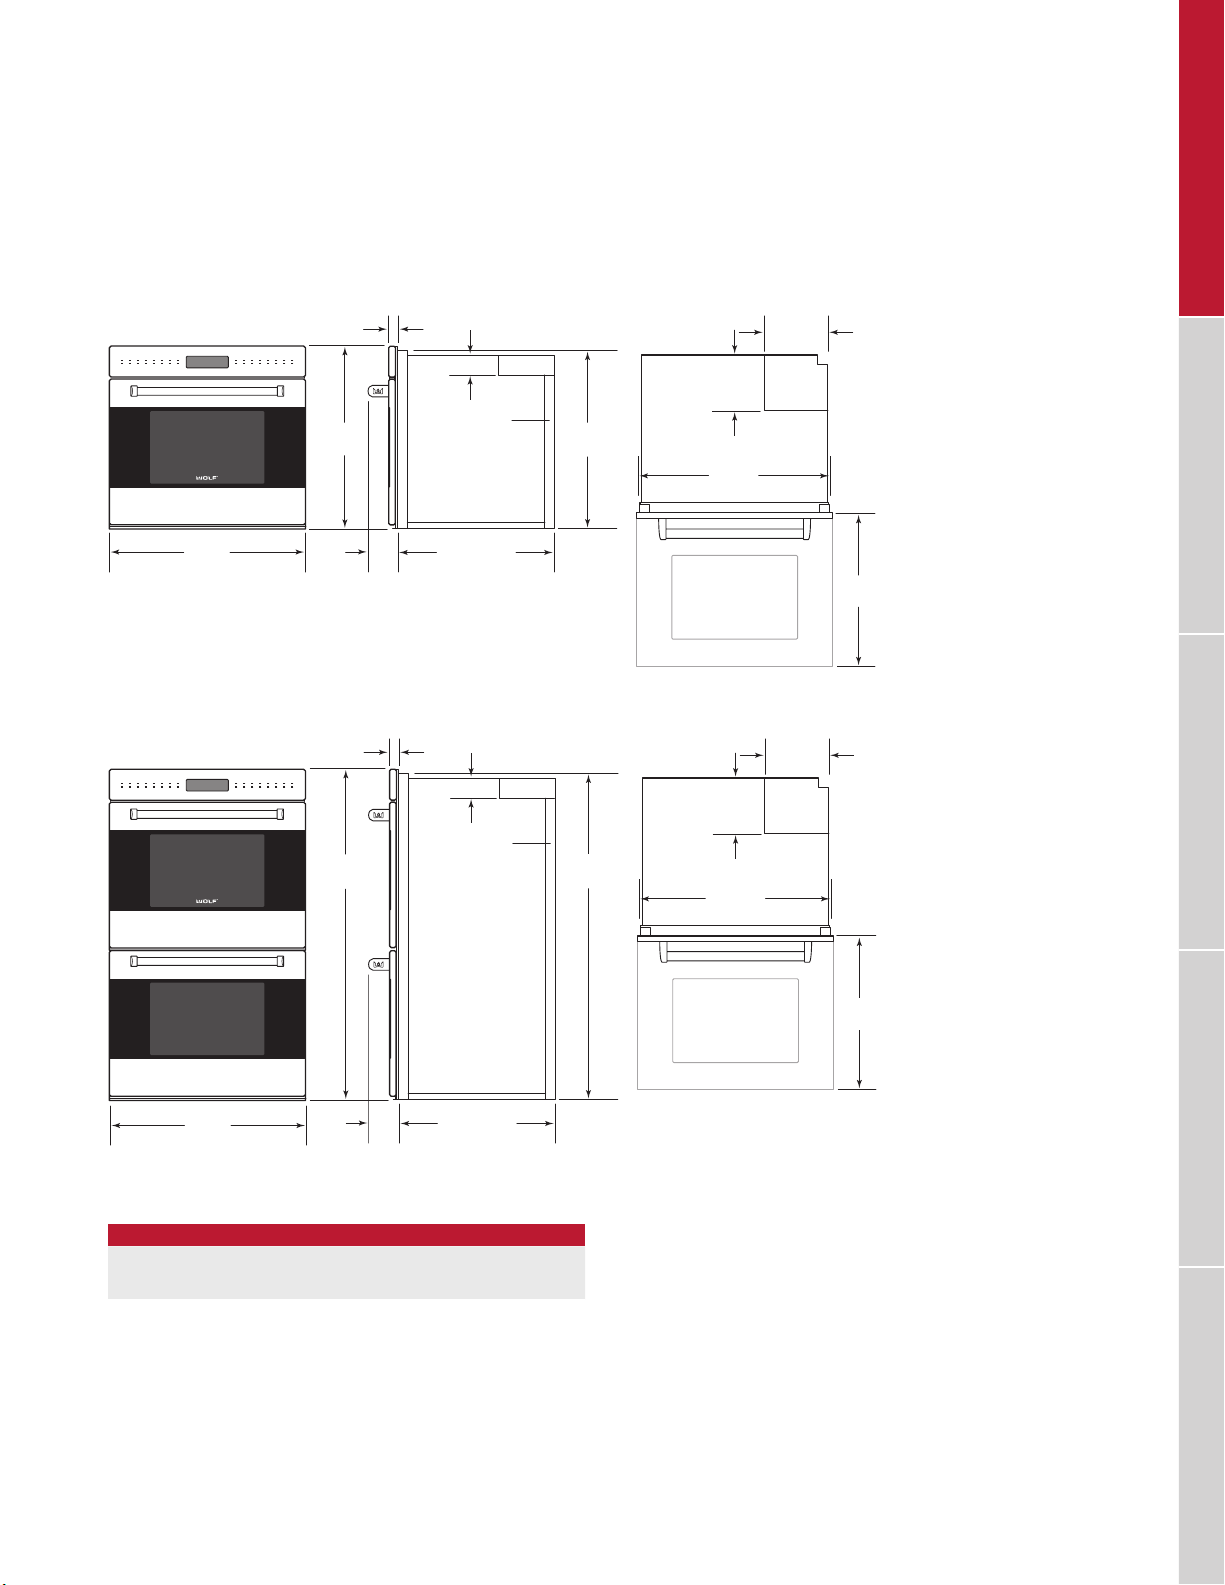
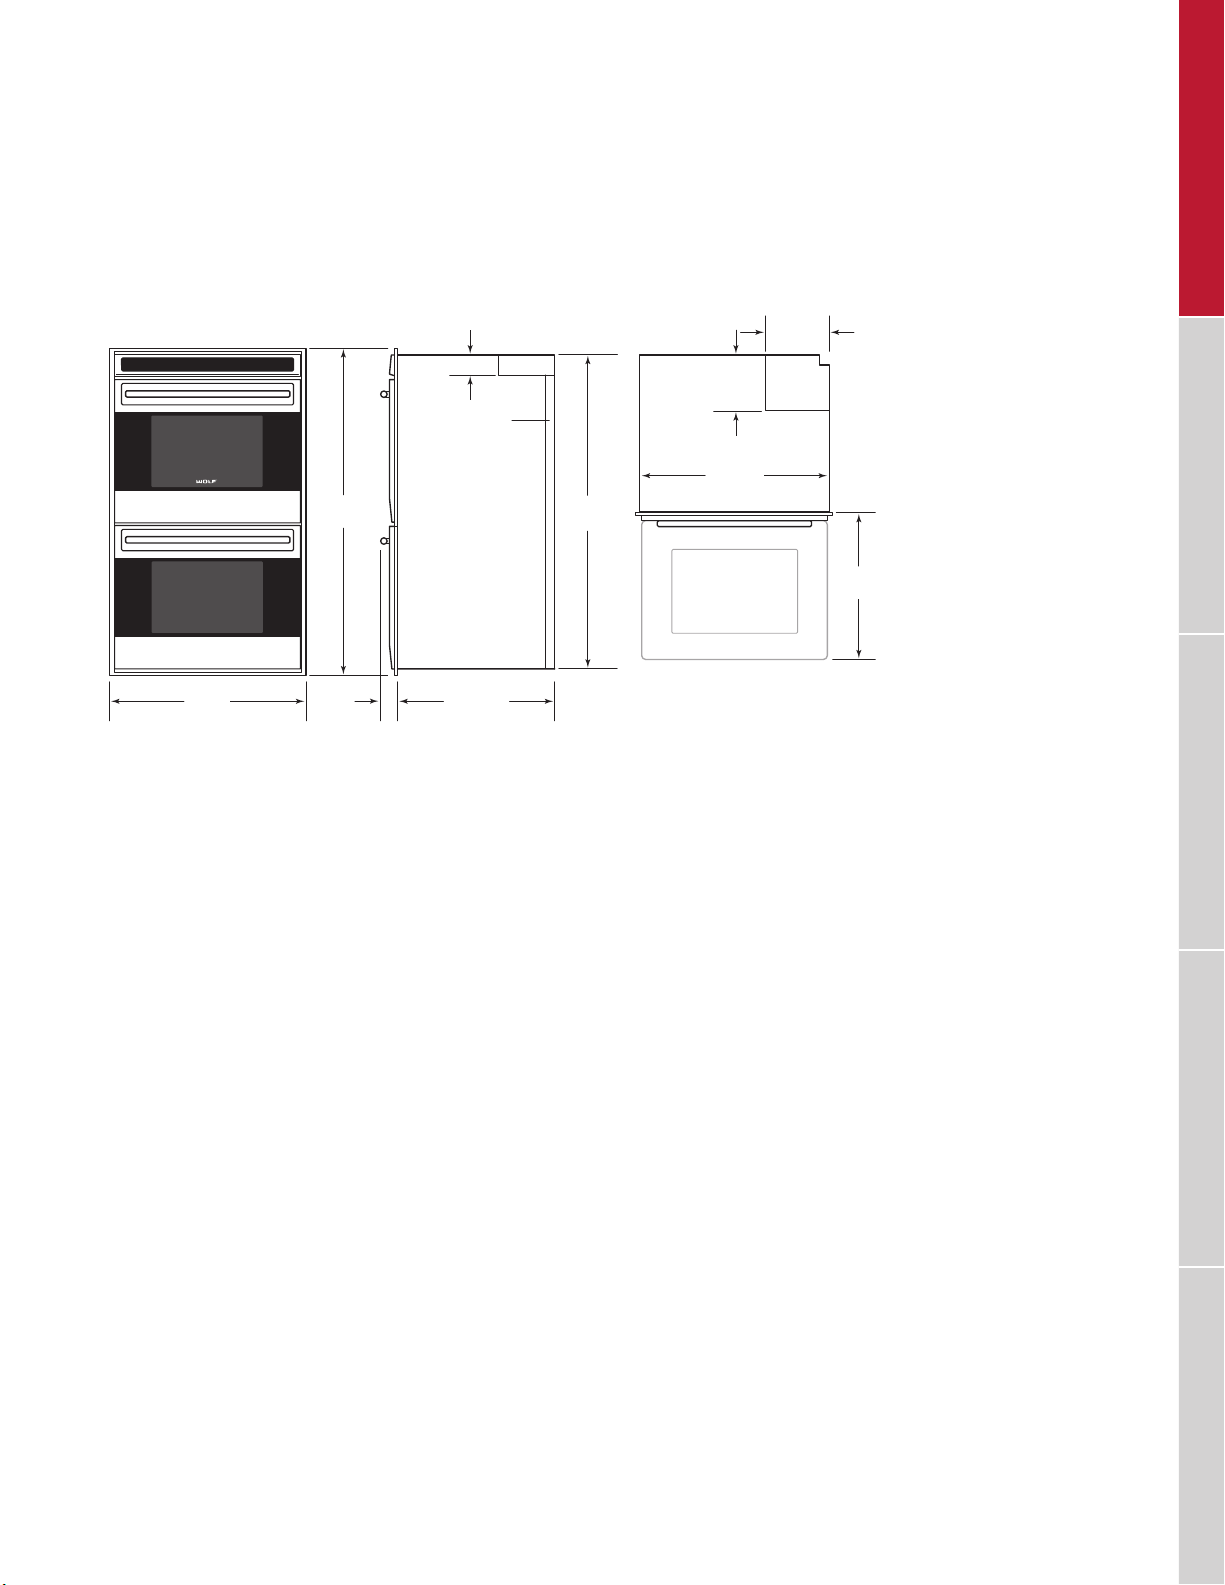
WOLF BUILT-IN OVENS
M Series Ovens
TRANSITIONAL SINGLE OVEN
281/2"
(723)
W
WIDTH
21/2"
(65)
TRANSITIONAL DOUBLE OVEN
7
/8"
(22)
2" (51)
13/8"
CONDUIT
CHANNEL
23" (584)
BEHIND FRAME
7
/8"
(22)
2" (51)
13/8"
CONDUIT
CHANNEL
(36)
(36)
85/8"
(218)
85/8"
(218)
27"
(686)
17/8"
(46)
OPEN OVEN DOOR
17/8"
(46)
213/8"
(543)
VENTILATION OUTDOOR GRILLS RANGES / RANGETOPS COOKTOPS / COFFEE SYSTEMS OVENS / WARMING DRAWERS
507/8"
(1291)
W
WIDTH
21/2"
(65)
23" (584)
BEHIND FRAME
WIDTH
TRANSITIONAL W
27" Model 267/8" (683)
30" Model 297/8" (759)
36" Model (single oven only) 357/8" (911)
493/8"
(1254)
OPEN OVEN DOOR
213/8"
(543)
4 | Wolf Customer Care 800.222.7820
Page 5
WOLF BUILT-IN OVENS
M Series Ovens
PROFESSIONAL SINGLE OVEN
OVENS / WARMING DRAWERS COOKTOPS / COFFEE SYSTEMS RANGES / RANGETOPS OUTDOOR GRILLS VENTILATION
281/2"
(723)
297/8" (759)
31/4"
(83)
PROFESSIONAL DOUBLE OVEN
UPPER OVEN LOWER OVEN
7
/8"
(22)
2" (51)
13/8"
CONDUIT
CHANNEL
23" (584)
BEHIND FRAME
7
/8"
(22)
2" (51)
13/8"
CONDUIT
CHANNEL
(36)
(36)
85/8"
(218)
85/8"
(218)
27"
(686)
17/8"
(46)
OPEN OVEN DOOR
17/8"
(46)
213/8"
(543)
507/8"
(1291)
297/8" (759)
31/4"
(83)
23" (584)
BEHIND FRAME
WIDTH
PROFESSIONAL W
30" Model 297/8" (759)
493/8"
(1254)
OPEN OVEN DOOR
213/8"
(543)
wolfappliance.com | 5
Page 6
WOLF BUILT-IN OVENS
M Series Ovens
CONTEMPORARY SINGLE OVEN
281/2"
(723)
297/8" (759)
CONTEMPORARY DOUBLE OVEN
1"
(25)
2" (51)
13/8"
CONDUIT
CHANNEL
23" (584)
BEHIND FRAME
1"
(25)
2" (51)
13/8"
CONDUIT
CHANNEL
(36)
(36)
85/8"
(218)
85/8"
(218)
27"
(686)
17/8"
(46)
OPEN OVEN DOOR
17/8"
(46)
213/8"
(543)
VENTILATION OUTDOOR GRILLS RANGES / RANGETOPS COOKTOPS / COFFEE SYSTEMS OVENS / WARMING DRAWERS
507/8"
(1291)
297/8" (759)
23" (584)
BEHIND FRAME
WIDTH
CONTEMPORARY W
30" Model 297/8" (759)
493/8"
(1254)
OPEN OVEN DOOR
213/8"
(543)
6 | Wolf Customer Care 800.222.7820
Page 7

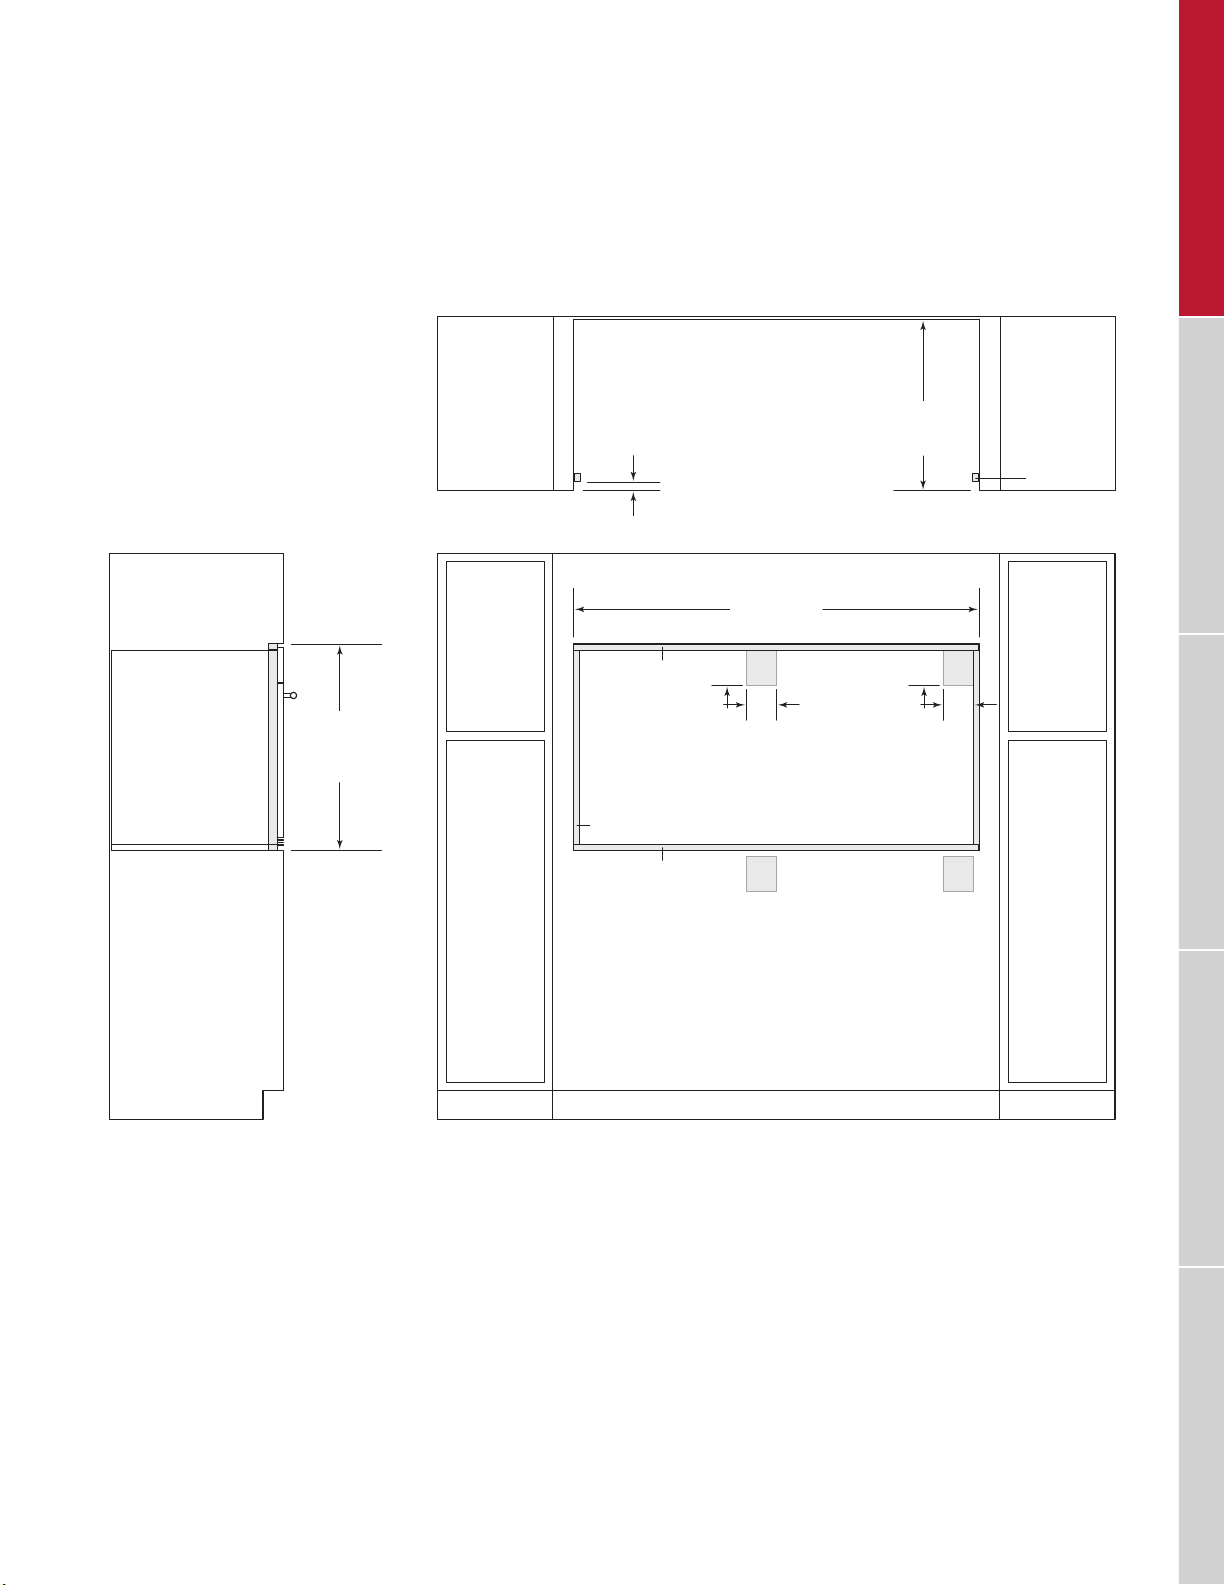
WOLF BUILT-IN OVENS
Planning Information
OVENS / WARMING DRAWERS COOKTOPS / COFFEE SYSTEMS RANGES / RANGETOPS OUTDOOR GRILLS VENTILATION
The M series oven can be installed in a standard or ush
inset application. If a cooktop is being installed above an
1
oven, a minimum of
/4" (6) is required between units. Location of the electrical supply within the oven opening may
require additional cabinet depth.
Finish the edges of the opening. They may be visible when
the door is open.
For standard installations, face trim will overlap stiles and
rails. Refer to the chart below.
1
For ush inset installations, a minimum
/8" (3) reveal is
required on all sides. To ensure consistent reveals, each
corner of the opening must be exactly 90°.
INSTALLATION REQUIREMENTS
BASE SUPPORT MIN
Single Oven 250 lb (115 kg)
Double Oven 400 lb (181 kg)
TRIM OVERLAP
Top 1" (25)
Bottom 0" (0)
Sides
11
/16" (18)
DUAL INSTALLATION
Two 30" single M series ovens can be installed side by side
in a standard or ush inset application. A dual installation kit
is required. To maintain appropriate airow, the ovens must
be installed into one opening. Any cosmetic or structural
material placed between the ovens will impede airow and
is not recommended. Refer to illustrations on the following
pages.
ELECTRICAL
Installation must comply with all applicable electrical codes.
Locate the electrical supply ush with the back wall and
within the shaded area shown in the illustrations on the
following pages. For ease of installation, the electrical
supply for the oven can be placed in an adjacent cabinet
within reach of the conduit.
Performance may be compromised if the electrical supply is
less than 240 volts.
The oven is supplied with a conduit consisting of two
insulated hot lead conductors and a bare ground conductor.
The wiring diagram covering the control circuit is provided
with the oven.
ELECTRICAL REQUIREMENTS
SINGLE OVEN
Electrical Supply grounded, 240/208 VAC, 60 Hz
Service 30 amp dedicated circuit
Conduit 4'
Total Amps 22
Max Connected Load 5.4 kW
Min Supply Wire L1, L2, ground—10 AWG
DOUBLE OVEN
Electrical Supply grounded, 240/208 VAC, 60 Hz
Service 50 amp dedicated circuit
Conduit 5'
Total Amps 45
Max Connected Load 10.8 kW
Min Supply Wire L1, L2, ground—8 AWG
(1.2 m)
(1.5 m)
The dual installation kit is available through an authorized
Wolf dealer. For local dealer information, visit the nd a
showroom section of our website, wolfappliance.com.
wolfappliance.com | 7
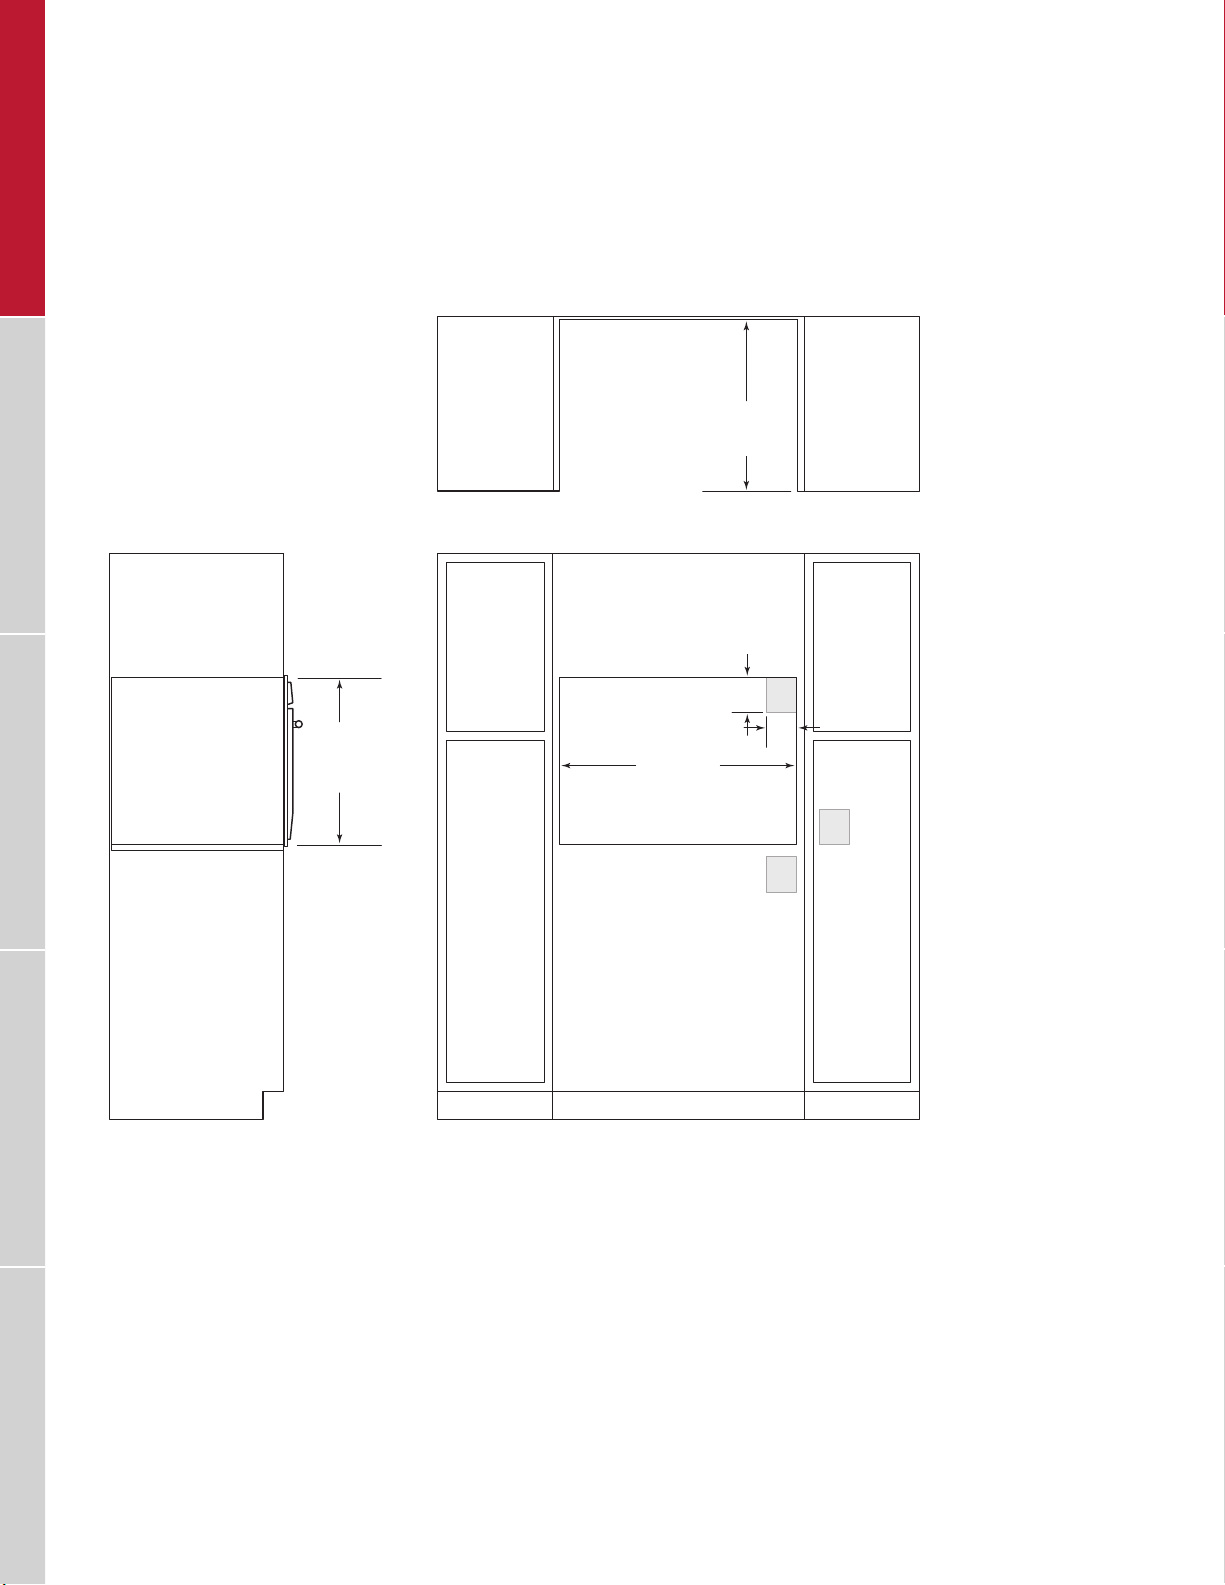
Page 8
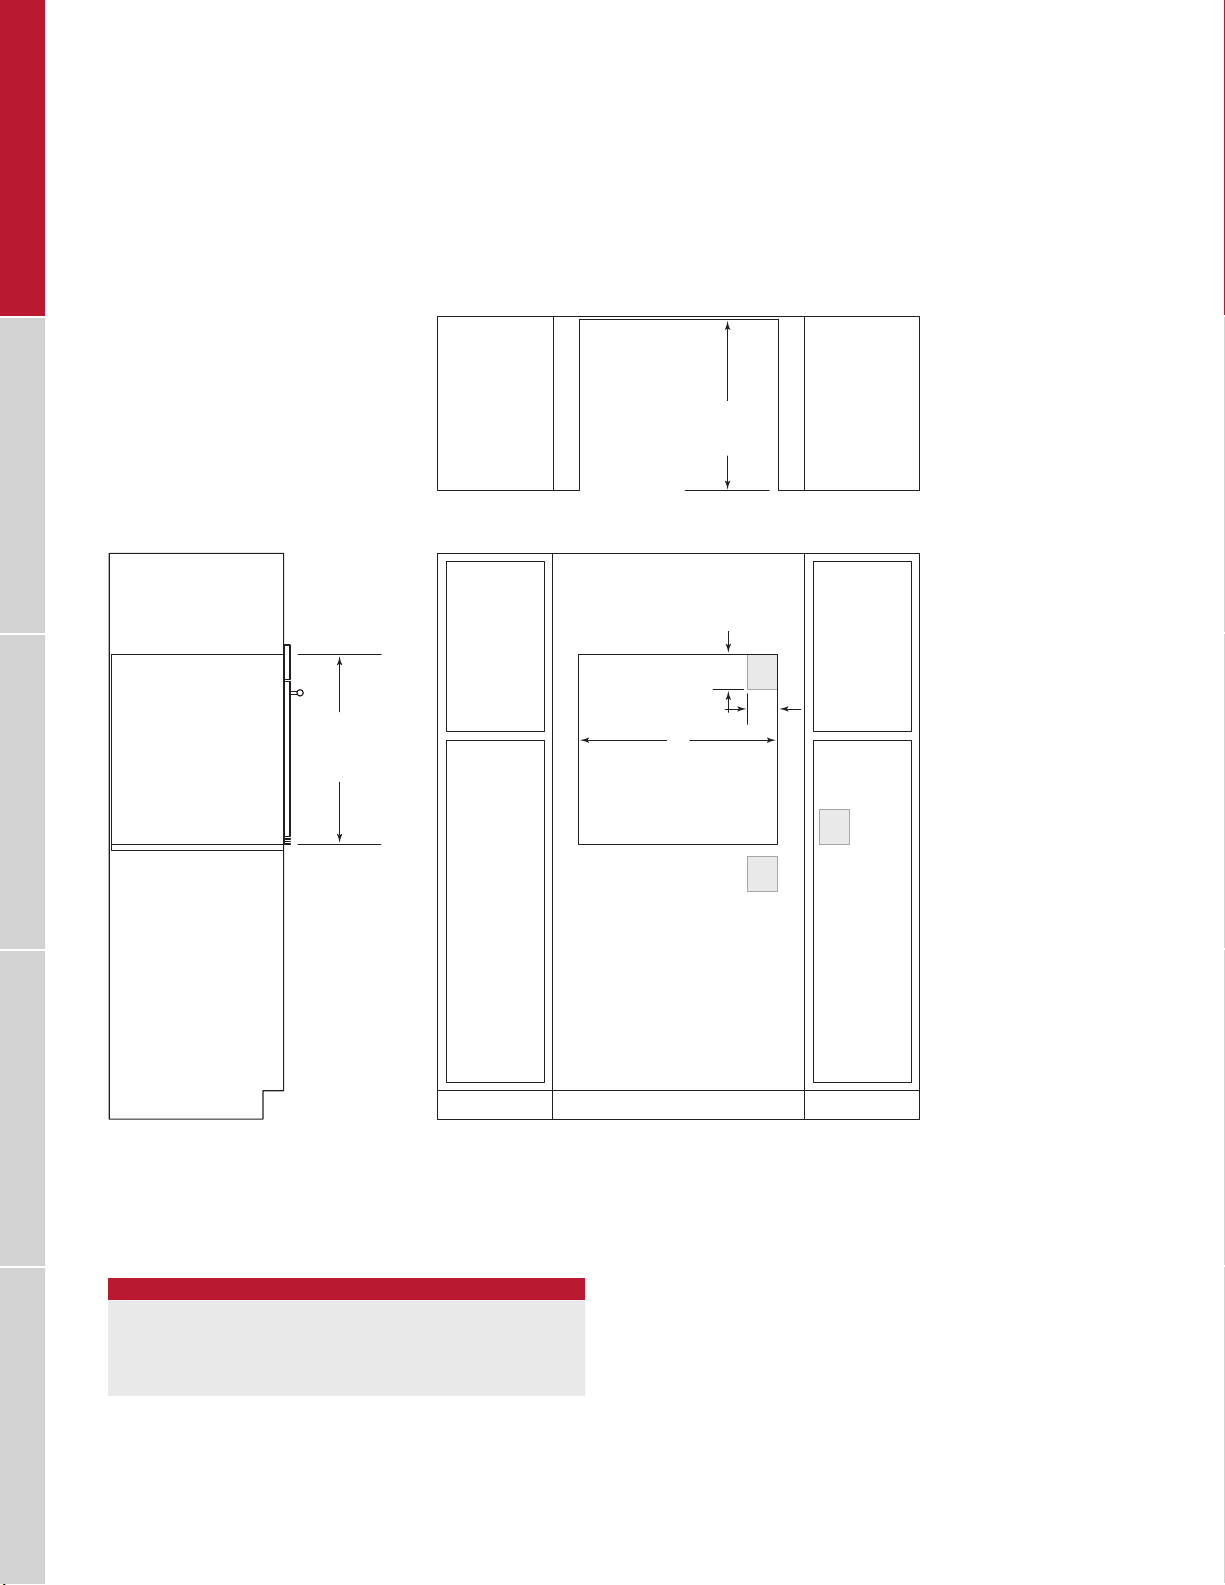
SIDE
NOTE: Location of electrical supply within opening may require additional cabinet depth.
WOLF BUILT-IN OVENS
M Series Single Oven
STANDARD INSTALLATION
231/4" (591)
TOP VIEW
OPENING
DEPTH
VIEW
271/2"
(699)
OPENING
HEIGHT
W
OPENING WIDTH
FRONT VIEW
5"
(127)
E
4"
(102)
E
E
OPENING WIDTH
SINGLE OVEN W
27" Model 251/2" (648)
30" Model 281/2" (724)
36" Model 341/2" (876)
VENTILATION OUTDOOR GRILLS RANGES / RANGETOPS COOKTOPS / COFFEE SYSTEMS OVENS / WARMING DRAWERS
8 | Wolf Customer Care 800.222.7820
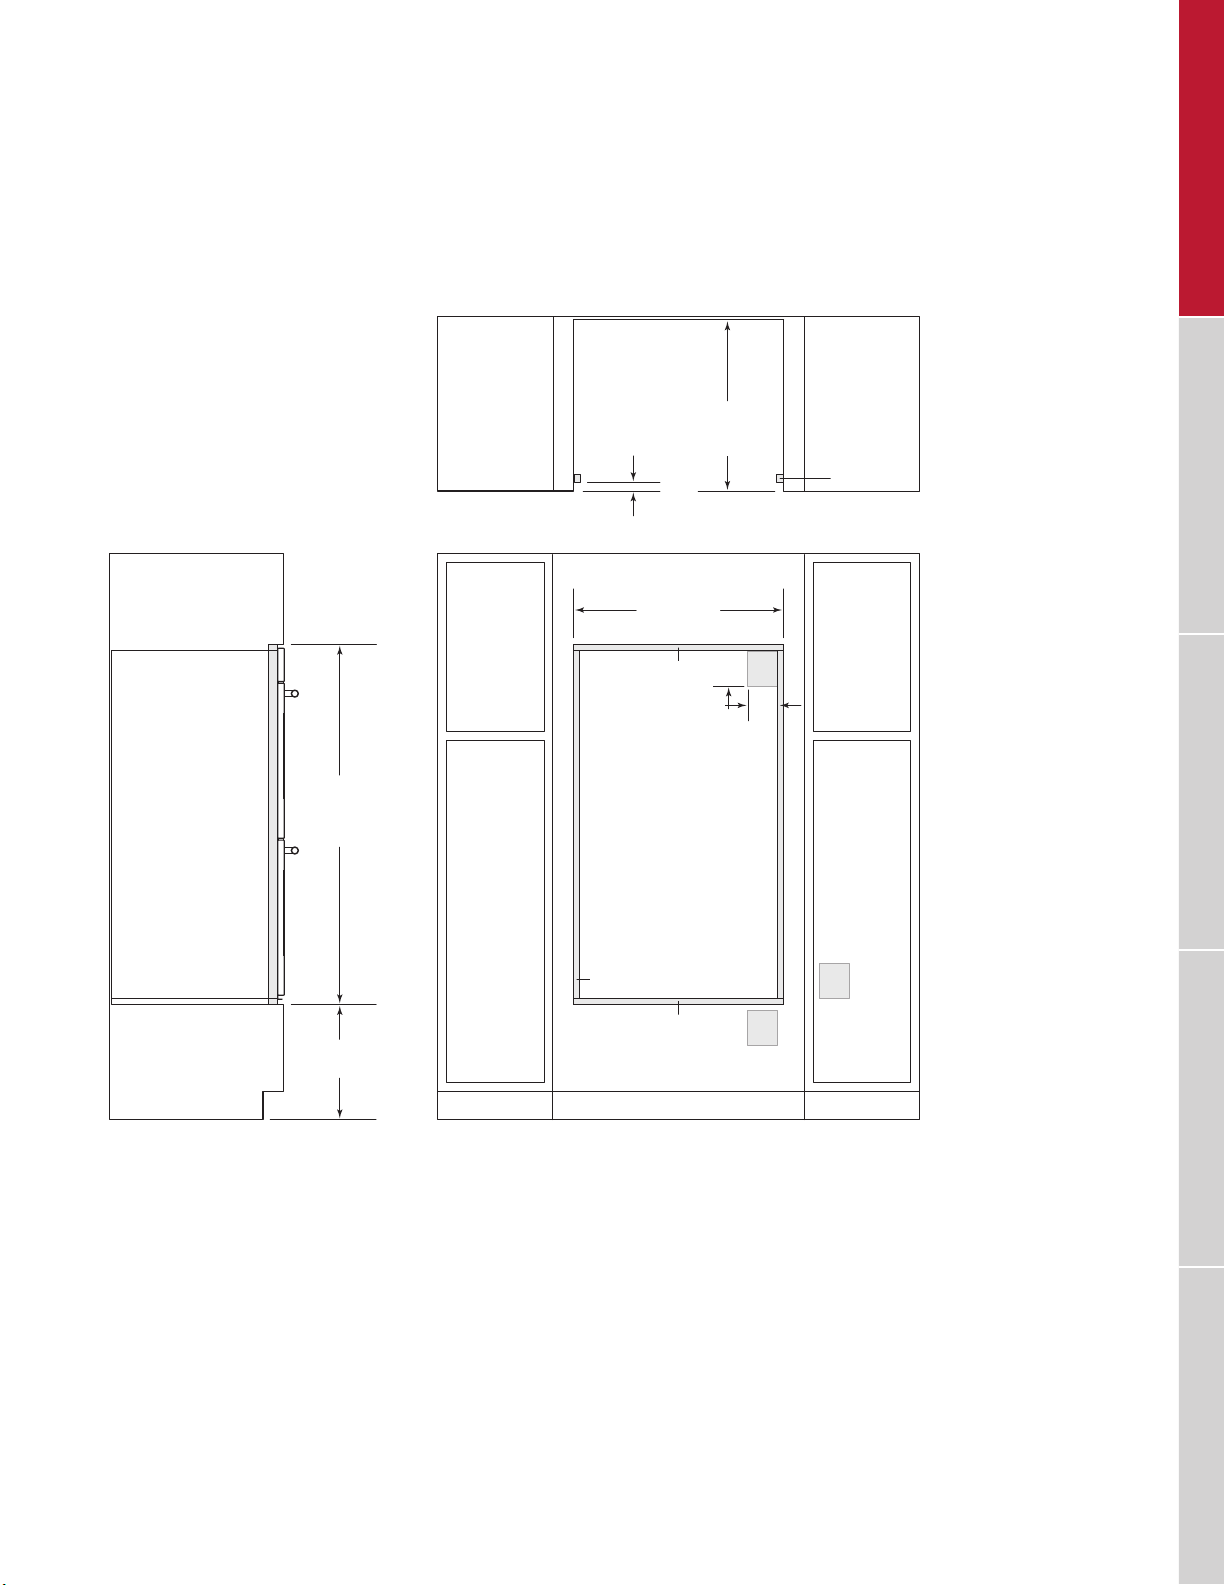
Page 9
*1
**
**
NOTE: Location of electrical supply within opening may require additional cabinet depth.
SIDE
WOLF BUILT-IN OVENS
M Series Single Oven
FLUSH INSET INSTALLATION
OVENS / WARMING DRAWERS COOKTOPS / COFFEE SYSTEMS RANGES / RANGETOPS OUTDOOR GRILLS VENTILATION
283/4"
(730)
FLUSH INSET
HEIGHT***
7
(22)
/8"
OR
(25)**
1"
FLUSH INSET WIDTH***
FLUSH INSET
TOP VIEW
W
24" (610)
11/8" (29)
13
/16" (21)
1
/8" (3)
DEPTH
5"
(127)
E
4"
(102)
E
FINISHED
CLEATS*
E
VIEW
" (25) minimum depth. Shaded areas will be visible and should be finished to match cabinetry.
7
/8" (22) for professional and transitional models and 1" (25) for contemporary model.
*Dimension provides minimum reveals.
FLUSH INSET WIDTH
SINGLE OVEN W
27" Model 271/8" (689)
30" Model 301/8" (765)
36" Model 361/8" (918)
FRONT VIEW
wolfappliance.com | 9
Page 10
SIDE
NOTE: Location of electrical supply within opening may require additional cabinet depth.
WOLF BUILT-IN OVENS
M Series Double Oven
STANDARD INSTALLATION
231/4" (591)
TOP VIEW
OPENING
DEPTH
VIEW
497/8"
(1267)
OPENING
HEIGHT
(432)
17"
TYPICAL
W
OPENING WIDTH
FRONT VIEW
5"
(127)
E
4"
(102)
E
E
OPENING WIDTH
DOUBLE OVEN W
27" Model 251/2" (648)
30" Model 281/2" (724)
VENTILATION OUTDOOR GRILLS RANGES / RANGETOPS COOKTOPS / COFFEE SYSTEMS OVENS / WARMING DRAWERS
10 | Wolf Customer Care 800.222.7820
Page 11

*1
**
**
NOTE: Location of electrical supply within opening may require additional cabinet depth.
SIDE
WOLF BUILT-IN OVENS
M Series Double Oven
FLUSH INSET INSTALLATION
OVENS / WARMING DRAWERS COOKTOPS / COFFEE SYSTEMS RANGES / RANGETOPS OUTDOOR GRILLS VENTILATION
511/8"
(1299)
FLUSH INSET
HEIGHT***
7
(22)
/8"
OR
(25)**
1"
FLUSH INSET WIDTH***
FLUSH INSET
TOP VIEW
W
24" (610)
11/8" (29)
13
/16" (21)
DEPTH
5"
(127)
E
4"
(102)
FINISHED
CLEATS*
E
17" (432)
TYPICAL
VIEW
" (25) minimum depth. Shaded areas will be visible and should be finished to match cabinetry.
7
/8" (22) for professional and transitional models and 1" (25) for contemporary model.
*Dimension provides minimum reveals.
FLUSH INSET WIDTH
DOUBLE OVEN W
27" Model 271/8" (689)
30" Model 301/8" (765)
1
/8" (3)
FRONT VIEW
E
wolfappliance.com | 11
Page 12

SIDE
NOTE: Location of electrical supply within opening may require additional cabinet depth.
WOLF BUILT-IN OVENS
Dual M Series Ovens
STANDARD INSTALLATION
TOP VIEW
231/4" (591)
OPENING
DEPTH
VIEW
271/2"
(699)
OPENING
HEIGHT
5"
E
(127)
4"
(102)
581/2" (1486)
OPENING WIDTH
E E
FRONT VIEW
5"
(127)
E
4"
(102)
VENTILATION OUTDOOR GRILLS RANGES / RANGETOPS COOKTOPS / COFFEE SYSTEMS OVENS / WARMING DRAWERS
12 | Wolf Customer Care 800.222.7820
Page 13
SIDE
*1
**
**
NOTE: Location of electrical supply within opening may require additional cabinet depth.
WOLF BUILT-IN OVENS
Dual M Series Ovens
FLUSH INSET INSTALLATION
OVENS / WARMING DRAWERS COOKTOPS / COFFEE SYSTEMS RANGES / RANGETOPS OUTDOOR GRILLS VENTILATION
283/4"
(730)
FLUSH INSET
HEIGHT***
7
1"
13
/16" (21)
(22)
/8"
OR
(25)**
11/8" (29)
1
/8" (3)
TOP VIEW
(1527)
601/8"
FLUSH INSET WIDTH***
5"
E
(127)
4"
(102)
24" (610)
FLUSH INSET
DEPTH
5"
(127)
(102)
FINISHED
CLEATS*
E
4"
EE
VIEW
" (25) minimum depth. Shaded areas will be visible and should be finished to match cabinetry.
7
/8" (22) for professional and transitional models and 1" (25) for contemporary model.
*Dimension provides minimum reveals.
FRONT VIEW
wolfappliance.com | 13
Page 14
14 | Wolf Customer Care 800.222.7820
Page 15
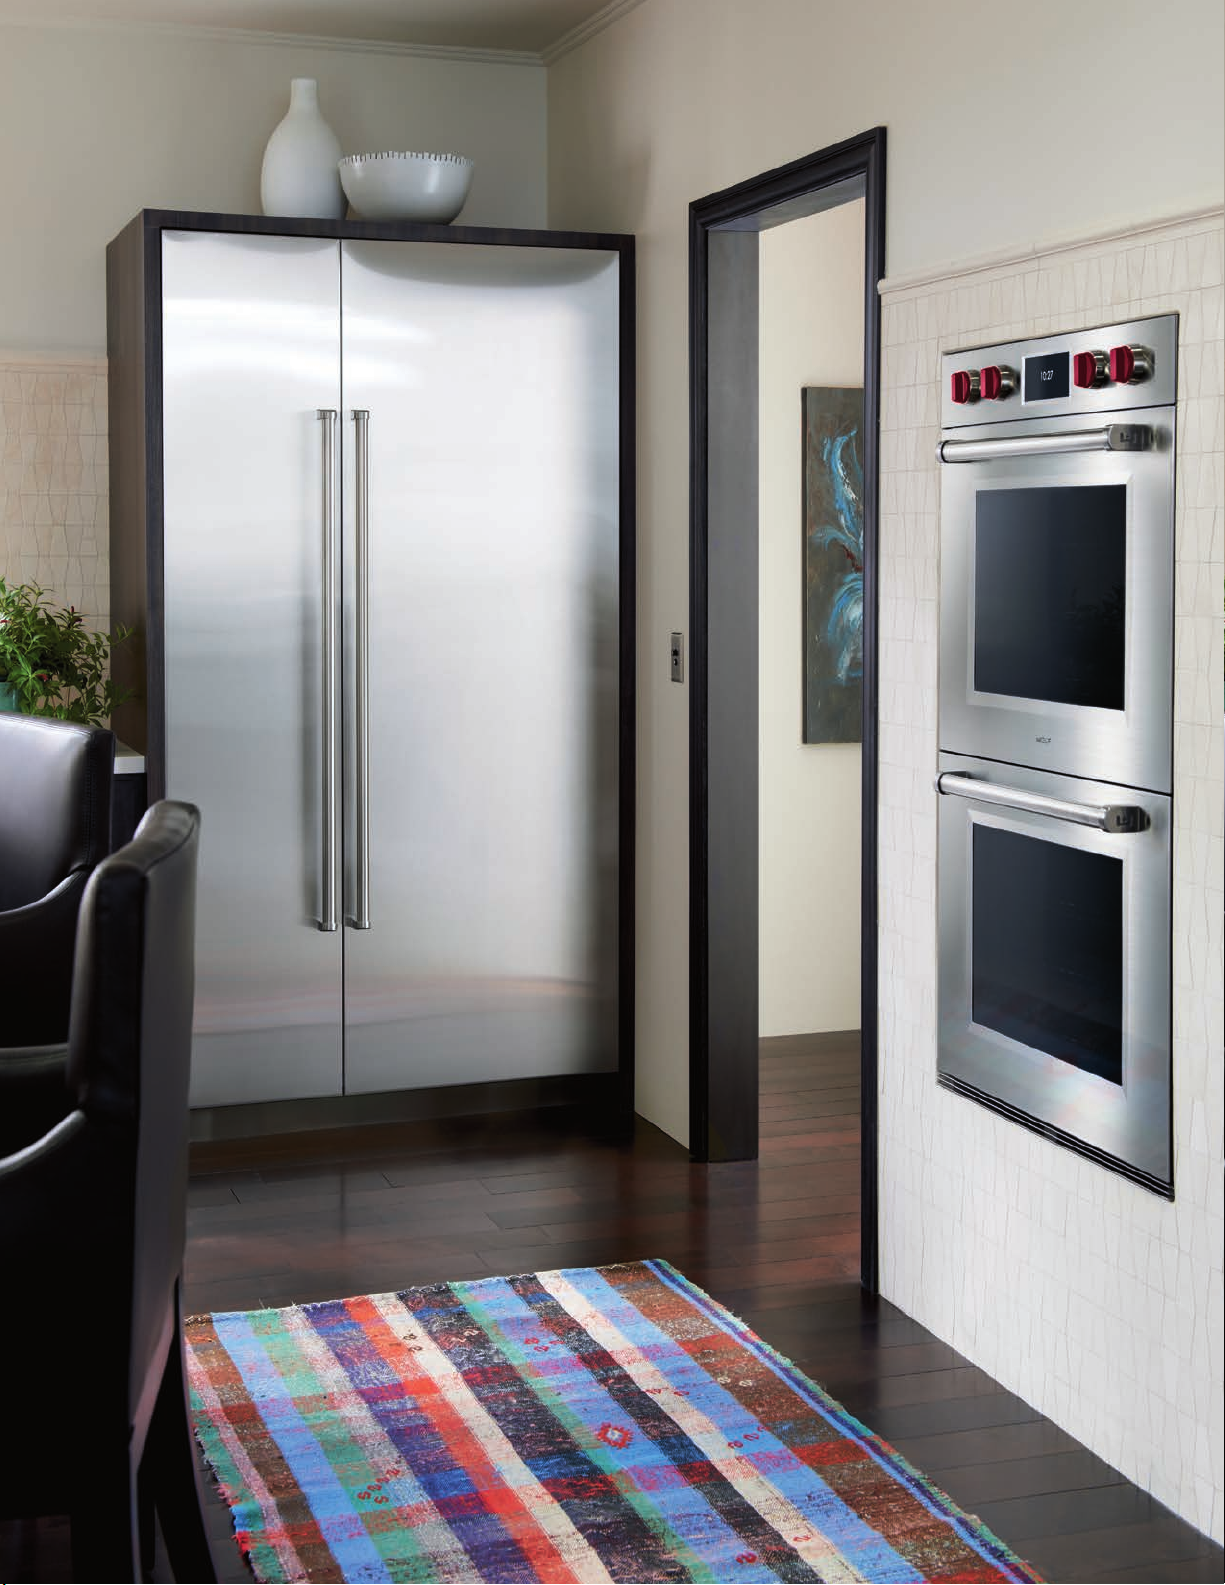
WOLF BUILT-IN OVENS
E Series Ovens
OVENS / WARMING DRAWERS COOKTOPS / COFFEE SYSTEMS RANGES / RANGETOPS OUTDOOR GRILLS VENTILATION
Stainless models now feature a redesigned stainless steel
touch-action control panel, helping to create great meals
with ease, as well as adding a striking design feature to the
kitchen. Smart technology gives the E series ten cooking
modes, with Wolf’s innovative dual convection in single
ovens and in the upper unit of double ovens. Wolf E series
ovens are crafted of stainless steel. Tubular handles have
been updated to match the rest of the new Wolf cooking
appliance offering, providing a more cohesive family look.
E series ovens can be installed in a standard or ush inset
application.
KEY FEATURES
• Stainless steel touch control panel.
• Dual convection—two fans for even heat distribution.
• Ten cooking modes, including the bake stone and
dehydration kits for precise, easy-to-use control.
• Self-cleaning ovens.
• Full-extension bottom rack for easier access to foods.
• Balanced door hinge system for smooth opening and
closing of the door.
E SERIES OVENS
TRANSITIONAL
SO30TE/S/TH
DO30TE/S/TH
PROFESSIONAL
SO30PE/S/PH
DO30PE/S/PH
CONTEMPORARY
SO30CE/B/TH
DO30CE/B/TH
wolfappliance.com | 15
Page 16
WOLF BUILT-IN OVENS
E Series Ovens
TRANSITIONAL SINGLE OVEN
1" (25)
277/8"
(708)
297/8"
(759)
23/4"
(70)
TRANSITIONAL DOUBLE OVEN
1" (25)
503/8"
(1280)
(76)
3"
CONDUIT
CHANNEL
233/4" (603)
BEHIND FRAME
(76)
3"
CONDUIT
CHANNEL
271/8"
(689)
495/8"
(1261)
87/8"
(225)
281/4"
(718)
OPEN OVEN DOOR
87/8"
(225)
281/4"
(718)
95/8"
(244)
95/8"
(244)
22"
(559)
VENTILATION OUTDOOR GRILLS RANGES / RANGETOPS COOKTOPS / COFFEE SYSTEMS OVENS / WARMING DRAWERS
297/8"
(759)
23/4"
(70)
233/4" (603)
BEHIND FRAME
WIDTH
TRANSITIONAL W
30" Model 297/8" (759)
16 | Wolf Customer Care 800.222.7820
OPEN OVEN DOOR
22"
(559)
Page 17
WOLF BUILT-IN OVENS
E Series Ovens
PROFESSIONAL SINGLE OVEN
OVENS / WARMING DRAWERS COOKTOPS / COFFEE SYSTEMS RANGES / RANGETOPS OUTDOOR GRILLS VENTILATION
1" (25)
277/8"
(708)
297/8"
(759)
33/8"
(86)
PROFESSIONAL DOUBLE OVEN
(25)
1"
503/8"
(1280)
(76)
3"
CONDUIT
CHANNEL
233/4" (603)
BEHIND FRAME
(76)
3"
CONDUIT
CHANNEL
271/8"
(689)
495/8"
(1261)
87/8"
(225)
281/4"
(718)
OPEN OVEN DOOR
87/8"
(225)
281/4"
(718)
95/8"
(244)
95/8"
(244)
22"
(559)
297/8"
(759)
33/8"
(86)
233/4" (603)
BEHIND FRAME
WIDTH
PROFESSIONAL W
30" Model 297/8" (759)
OPEN OVEN DOOR
22"
(559)
wolfappliance.com | 17
Page 18
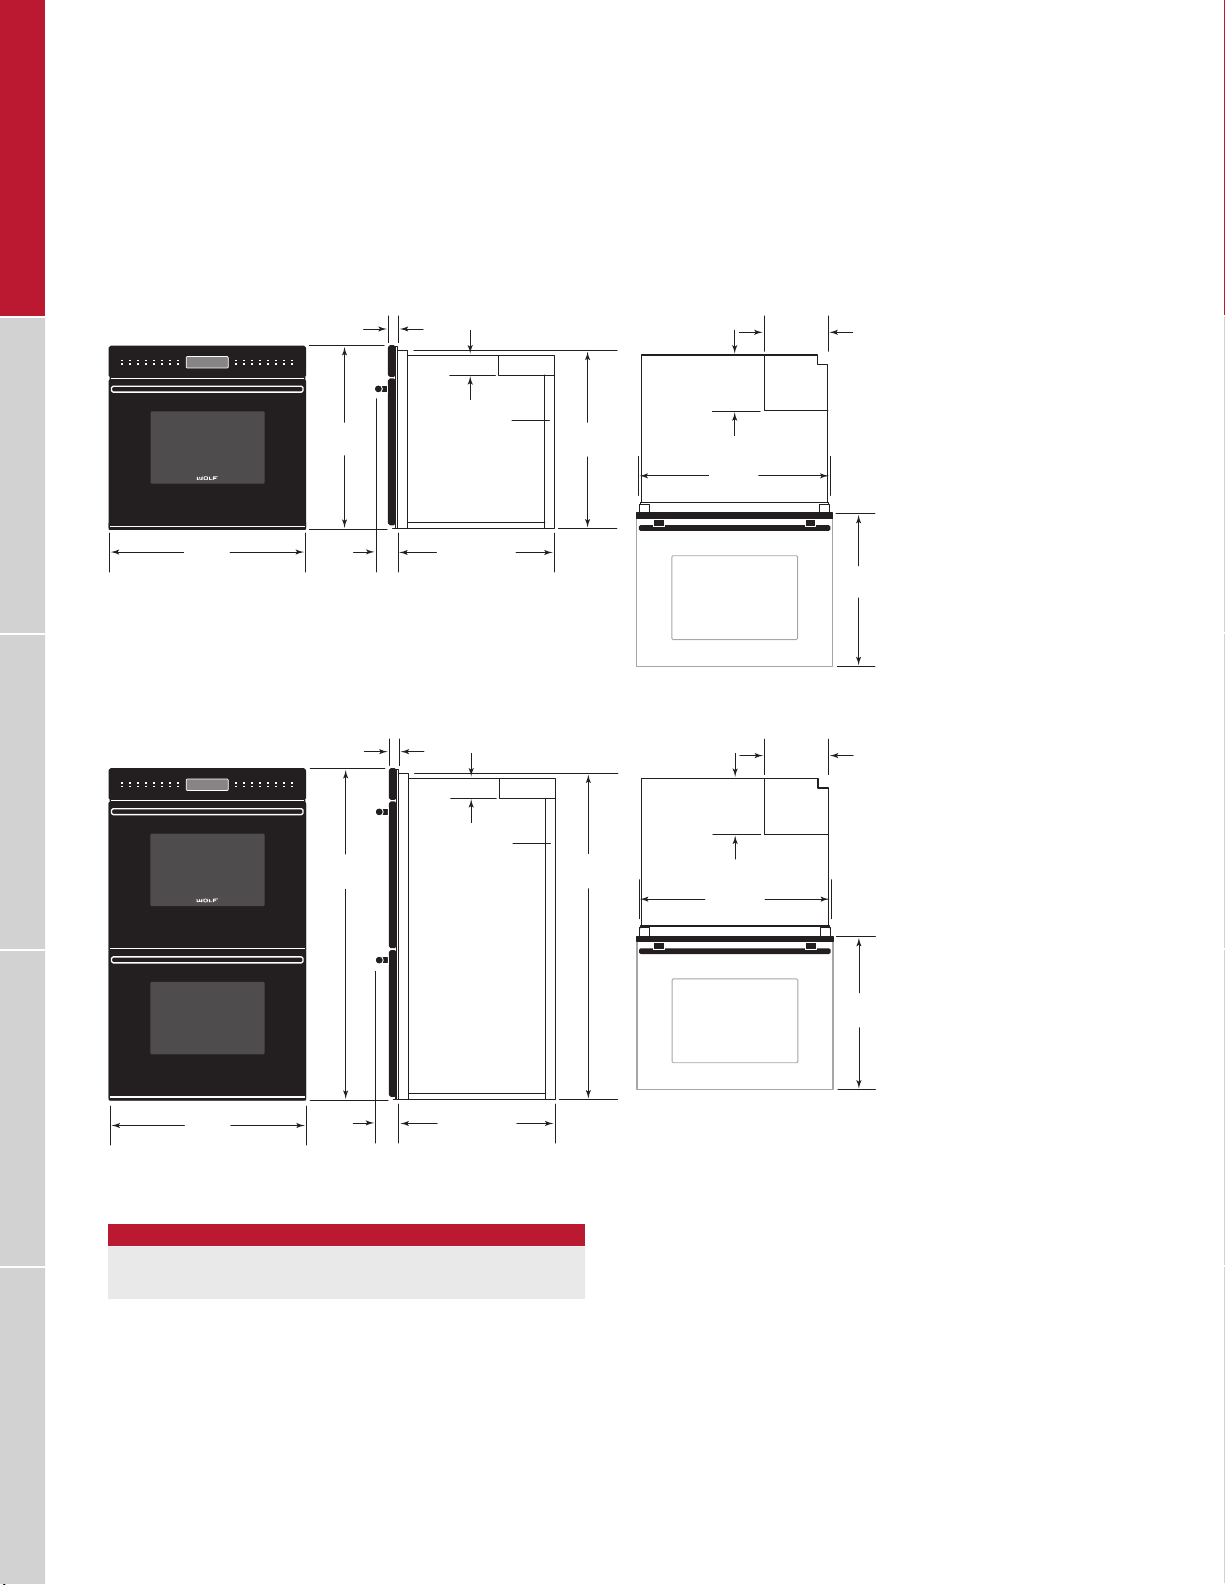
WOLF BUILT-IN OVENS
E Series Ovens
CONTEMPORARY SINGLE OVEN
11/4" (32)
277/8"
(708)
297/8"
(759)
3"
(76)
CONTEMPORARY DOUBLE OVEN
(32)
11/4"
503/8"
(1280)
(76)
3"
CONDUIT
CHANNEL
(603)
233/4"
BEHIND FRAME
(76)
3"
CONDUIT
CHANNEL
271/16"
(687)
491/2"
(1257)
87/8"
(225)
281/4"
(718)
OPEN OVEN DOOR
87/8"
(225)
281/4"
(718)
95/8"
(244)
95/8"
(244)
22"
(559)
VENTILATION OUTDOOR GRILLS RANGES / RANGETOPS COOKTOPS / COFFEE SYSTEMS OVENS / WARMING DRAWERS
297/8"
(759)
3"
(76)
233/4" (603)
BEHIND FRAME
WIDTH
CONTEMPORARY W
30" Model 297/8" (759)
18 | Wolf Customer Care 800.222.7820
OPEN OVEN DOOR
22"
(559)
Page 19
WOLF BUILT-IN OVENS
WOLF BUILT-IN OVENS
L Series Ovens
OVENS / WARMING DRAWERS COOKTOPS / COFFEE SYSTEMS RANGES / RANGETOPS OUTDOOR GRILLS VENTILATION
Since their introduction a few short years ago, Wolf L series
electric ovens have taken the culinary world by storm—and
not just for their stylish cobalt blue interior and 10 cooking
modes. Thanks to a Wolf innovation called dual convection, the L series delivers faster, more consistent results for
baking, roasting, broiling—even drying fruits. Wolf L series
ovens are crafted of stainless steel in framed and unframed
door styles with tubular handles.
KEY FEATURES
• Dual convection—two fans for even heat distribution.
• Ten cooking modes, including the bake stone and
dehydration kits for precise, easy-to-use control.
• Rotating control panel.
• Self-cleaning ovens.
• Full-extension bottom rack for easier access to foods.
• Spring and damper door hinge for quiet, effortless
opening and closing of the door.
L SERIES OVENS
SO30F
30" Single Framed
DO30F
30" Double Framed
SO30U
30" Single Unframed
DO30U
30" Double Unframed
SO36U
36" Single Unframed
wolfappliance.com | 19
Page 20
WOLF BUILT-IN OVENS
L Series Ovens
30" SINGLE OVEN
271/2"
(699)
(76)
3"
CONDUIT
CHANNEL
261/16"
(662)
87/8"
(225)
283/16"
(716)
95/8"
(244)
297/8"
(759)
36" SINGLE OVEN
355/8"
(905)
3"
(76)
243/8"
(619)
3"
(76)
24" (610)
BEHIND FRAME
(76)
3"
CONDUIT
CHANNEL
24" (610)
BEHIND FRAME
23"
(584)
OPEN OVEN DOOR
341/8"
(867)
OPEN OVEN DOOR
87/8"
(225)
203/4"
(527)
95/8"
(244)
173/4"
(451)
VENTILATION OUTDOOR GRILLS RANGES / RANGETOPS COOKTOPS / COFFEE SYSTEMS OVENS / WARMING DRAWERS
20 | Wolf Customer Care 800.222.7820
Page 21
WOLF BUILT-IN OVENS
(76)
L Series Ovens
30" DOUBLE OVEN
50"
(1270)
(76)
3"
CONDUIT
CHANNEL
481/2"
(1232)
87/8"
(225)
283/16"
(716)
95/8"
(244)
OVENS / WARMING DRAWERS COOKTOPS / COFFEE SYSTEMS RANGES / RANGETOPS OUTDOOR GRILLS VENTILATION
297/8"
(759)
3"
OPEN OVEN DOOR
24" (610)
BEHIND FRAME
203/4"
(527)
wolfappliance.com | 21
Page 22

WOLF BUILT-IN OVENS
Planning Information
E AND L SERIES OVENS
E series ovens can be installed in a standard or ush inset
application (standard installation only for L series ovens).
If a cooktop is being installed above an oven, a minimum
1
/4" (6) is required between units. Location of the elec-
of
trical supply within the oven opening may require additional
cabinet depth.
Finish the edges of the opening. They may be visible when
the door is open.
For standard installations, face trim will overlap stiles and
rails. Refer to the chart below.
1
For ush inset installations, a minimum
/4" (6) reveal is
required on all sides. To ensure consistent reveals, each
corner of the opening must be exactly 90°.
INSTALLATION REQUIREMENTS
BASE SUPPORT MIN
Single Oven 250 lb (113 kg)
Double Oven 400 lb (181 kg)
TRIM OVERLAP TOP BOTTOM SIDES
30" E Series Oven
30" L Series Oven
36" L Series Oven
1
/2" (13)
1
/8" (3)
3
/16" (5)
1
/8" (3)
1
/8" (3)
1
/8" (3)
11
/16" (17)
11
/16" (17)
9
/16" (14)
ELECTRICAL
Installation must comply with all applicable electrical codes.
Locate the electrical supply for E and L series ovens ush
with the back wall and within the shaded area shown in the
illustrations on the following pages. For ease of installation,
the electrical supply for the oven can be placed in an adjacent cabinet within reach of the conduit.
Performance may be compromised if the electrical supply is
less than 240 volts.
The oven is supplied with a conduit consisting of two
insulated hot lead conductors and a bare ground conductor.
The wiring diagram covering the control circuit is provided
with the oven.
ELECTRICAL REQUIREMENTS
SINGLE OVEN
Electrical Supply grounded, 240/ 208 VAC, 60 Hz
Service 30 amp dedicated circuit
Conduit 4'
Total Amps 21
Max Connected Load 5.1 kW
Min Supply Wire L1, L2, ground—10 AWG
DOUBLE OVEN
Electrical Supply grounded, 240/ 208 VAC, 60 Hz
Service 50 amp dedicated circuit
Conduit 5'
Total Amps 37
Max Connected Load 8.9 kW
Min Supply Wire L1, L2, ground—10 AWG
(1.2 m), 3' (.9 m) for SO36U
(1.5 m)
VENTILATION OUTDOOR GRILLS RANGES / RANGETOPS COOKTOPS / COFFEE SYSTEMS OVENS / WARMING DRAWERS
22 | Wolf Customer Care 800.222.7820
Page 23
WOLF BUILT-IN OVENS
SIDE
NOTE: Location of electrical supply within opening may require additional cabinet depth.
30" E and L Series Single Oven
STANDARD INSTALLATION
TOP VIEW
24" (610)
OPENING
DEPTH
OVENS / WARMING DRAWERS COOKTOPS / COFFEE SYSTEMS RANGES / RANGETOPS OUTDOOR GRILLS VENTILATION
VIEW
271/4"
(692)
OPENING
HEIGHT
281/2" (724)
OPENING WIDTH
FRONT VIEW
5"
(127)
E
4"
(102)
E
E
wolfappliance.com | 23
Page 24
WOLF BUILT-IN OVENS
SIDE
NOTE: Location of electrical supply within opening may require additional cabinet depth.
36" L Series Single Oven
STANDARD INSTALLATION
TOP VIEW
24" (610)
OPENING
DEPTH
VIEW
241/16"
(611)
OPENING
HEIGHT
341/2" (876)
OPENING WIDTH
FRONT VIEW
5"
(127)
E
4"
(102)
E
E
VENTILATION OUTDOOR GRILLS RANGES / RANGETOPS COOKTOPS / COFFEE SYSTEMS OVENS / WARMING DRAWERS
24 | Wolf Customer Care 800.222.7820
Page 25

WOLF BUILT-IN OVENS
SIDE
NOTE: Location of electrical supply within opening may require additional cabinet depth.
30" E and L Series Double Oven
STANDARD INSTALLATION
TOP VIEW
24" (610)
OPENING
DEPTH
OVENS / WARMING DRAWERS COOKTOPS / COFFEE SYSTEMS RANGES / RANGETOPS OUTDOOR GRILLS VENTILATION
VIEW
493/4"
(1264)
OPENING
HEIGHT
17" (432)
TYPICAL
281/2" (724)
OPENING WIDTH
FRONT VIEW
5"
(127)
E
4"
(102)
E
E
wolfappliance.com | 25
Page 26

WOLF BUILT-IN OVENS
SIDE
*W
**
**
NOTE: Location of electrical supply within opening may require additional cabinet depth.
30" E Series Single Oven
FLUSH INSET INSTALLATION
283/8"
(721)
FLUSH INSET
HEIGHT***
39" (981)
TYPICAL
TOP VIEW
303/8"
3
/4"(19)
3
/8" (10)
25" (635)
FLUSH INSET
(772)
1" (25)
OR
(32)**
11/4"
FLUSH INSET WIDTH***
15
/16" (24)
DEPTH
5"
(127)
E
4"
(102)
E
FINISHED
CLEATS*
E
VIEW
ill be visible and should be finished to match cabinetry.
1" (25) for professional and transitional models and 11/4" (32) for contemporary model.
*Dimension provides minimum reveals.
VENTILATION OUTDOOR GRILLS RANGES / RANGETOPS COOKTOPS / COFFEE SYSTEMS OVENS / WARMING DRAWERS
26 | Wolf Customer Care 800.222.7820
FRONT VIEW
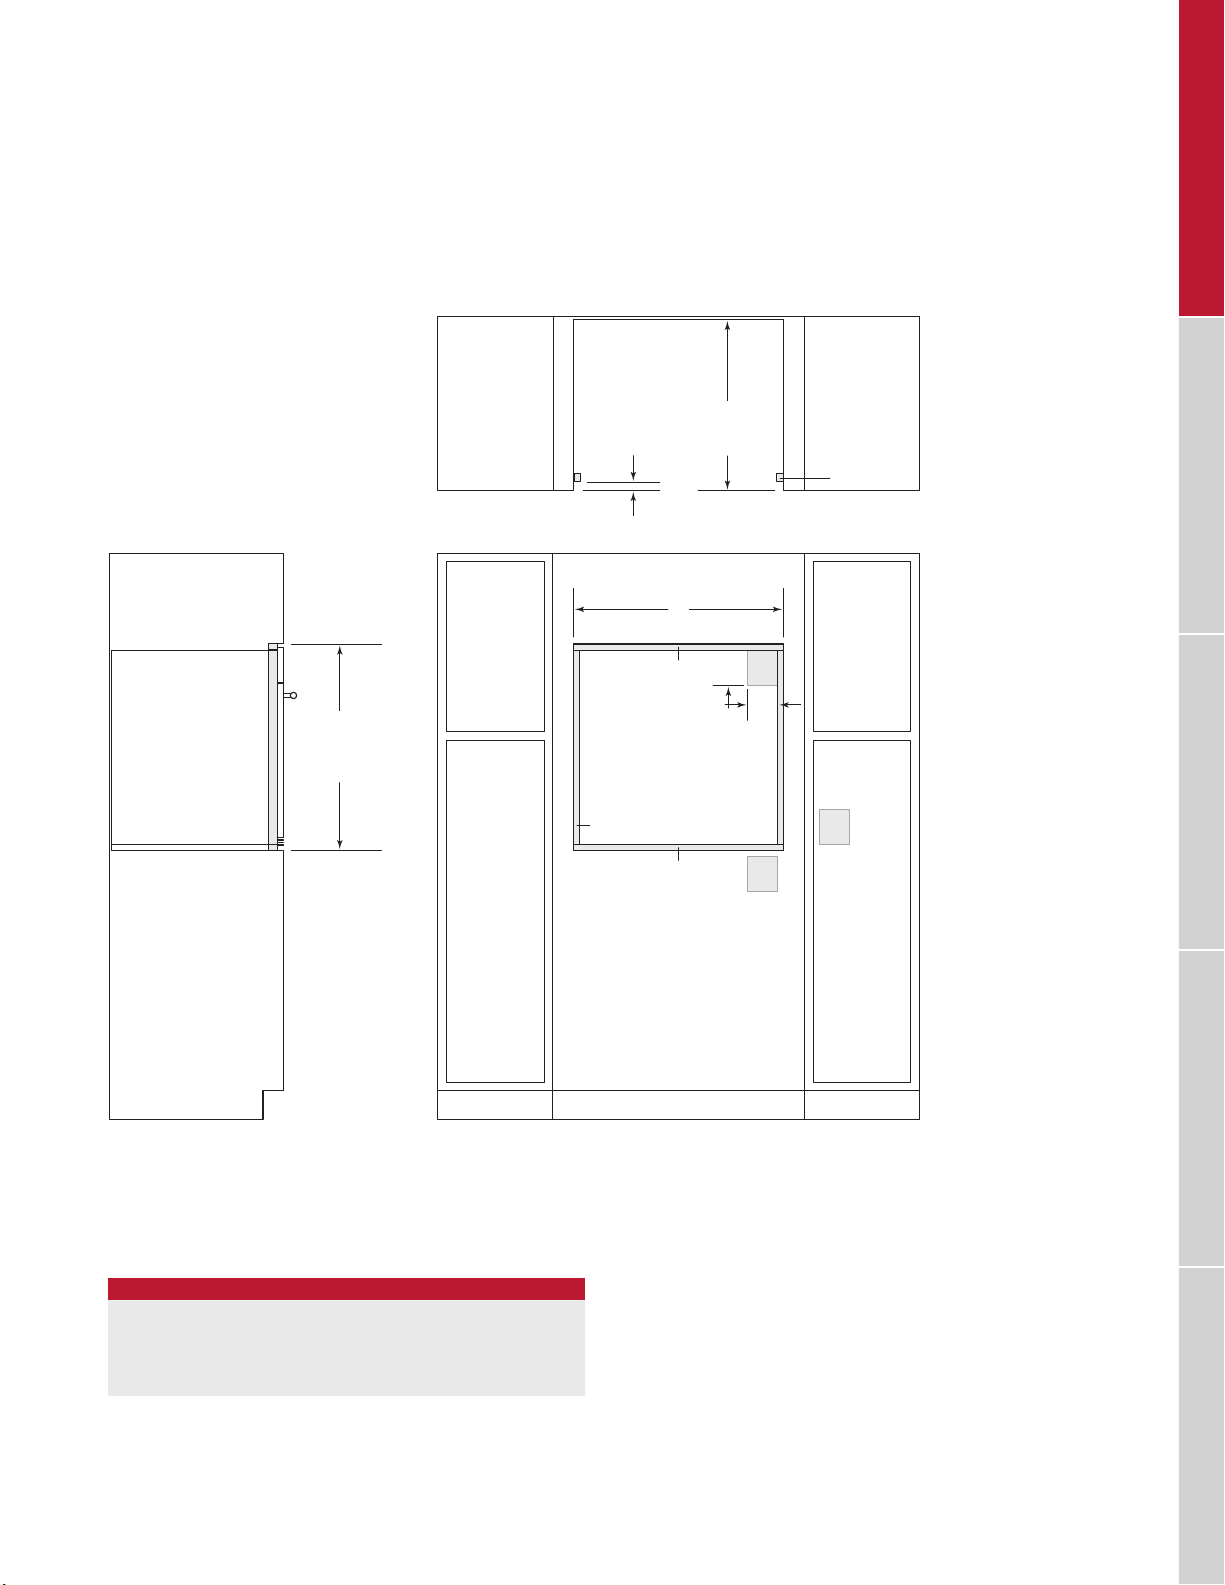
Page 27
WOLF BUILT-IN OVENS
SIDE
*W
**
**
NOTE: Location of electrical supply within opening may require additional cabinet depth.
30" E Series Double Oven
FLUSH INSET INSTALLATION
OVENS / WARMING DRAWERS COOKTOPS / COFFEE SYSTEMS RANGES / RANGETOPS OUTDOOR GRILLS VENTILATION
507/8"
(1292)
FLUSH INSET
HEIGHT***
1" (25)
OR
11/4" (32)**
FLUSH INSET WIDTH***
15
/16" (24)
FLUSH INSET
TOP VIEW
303/8" (772)
3
/4"(19)
25" (635)
DEPTH
5"
(127)
E
4"
(102)
FINISHED
CLEATS*
E
17" (432)
TYPICAL
VIEW
ill be visible and should be finished to match cabinetry.
1" (25) for professional and transitional models and 11/4" (32) for contemporary model.
*Dimension provides minimum reveals.
3
/8" (10)
FRONT VIEW
E
wolfappliance.com | 27
Page 28
28 | Wolf Customer Care 800.222.7820
Page 29

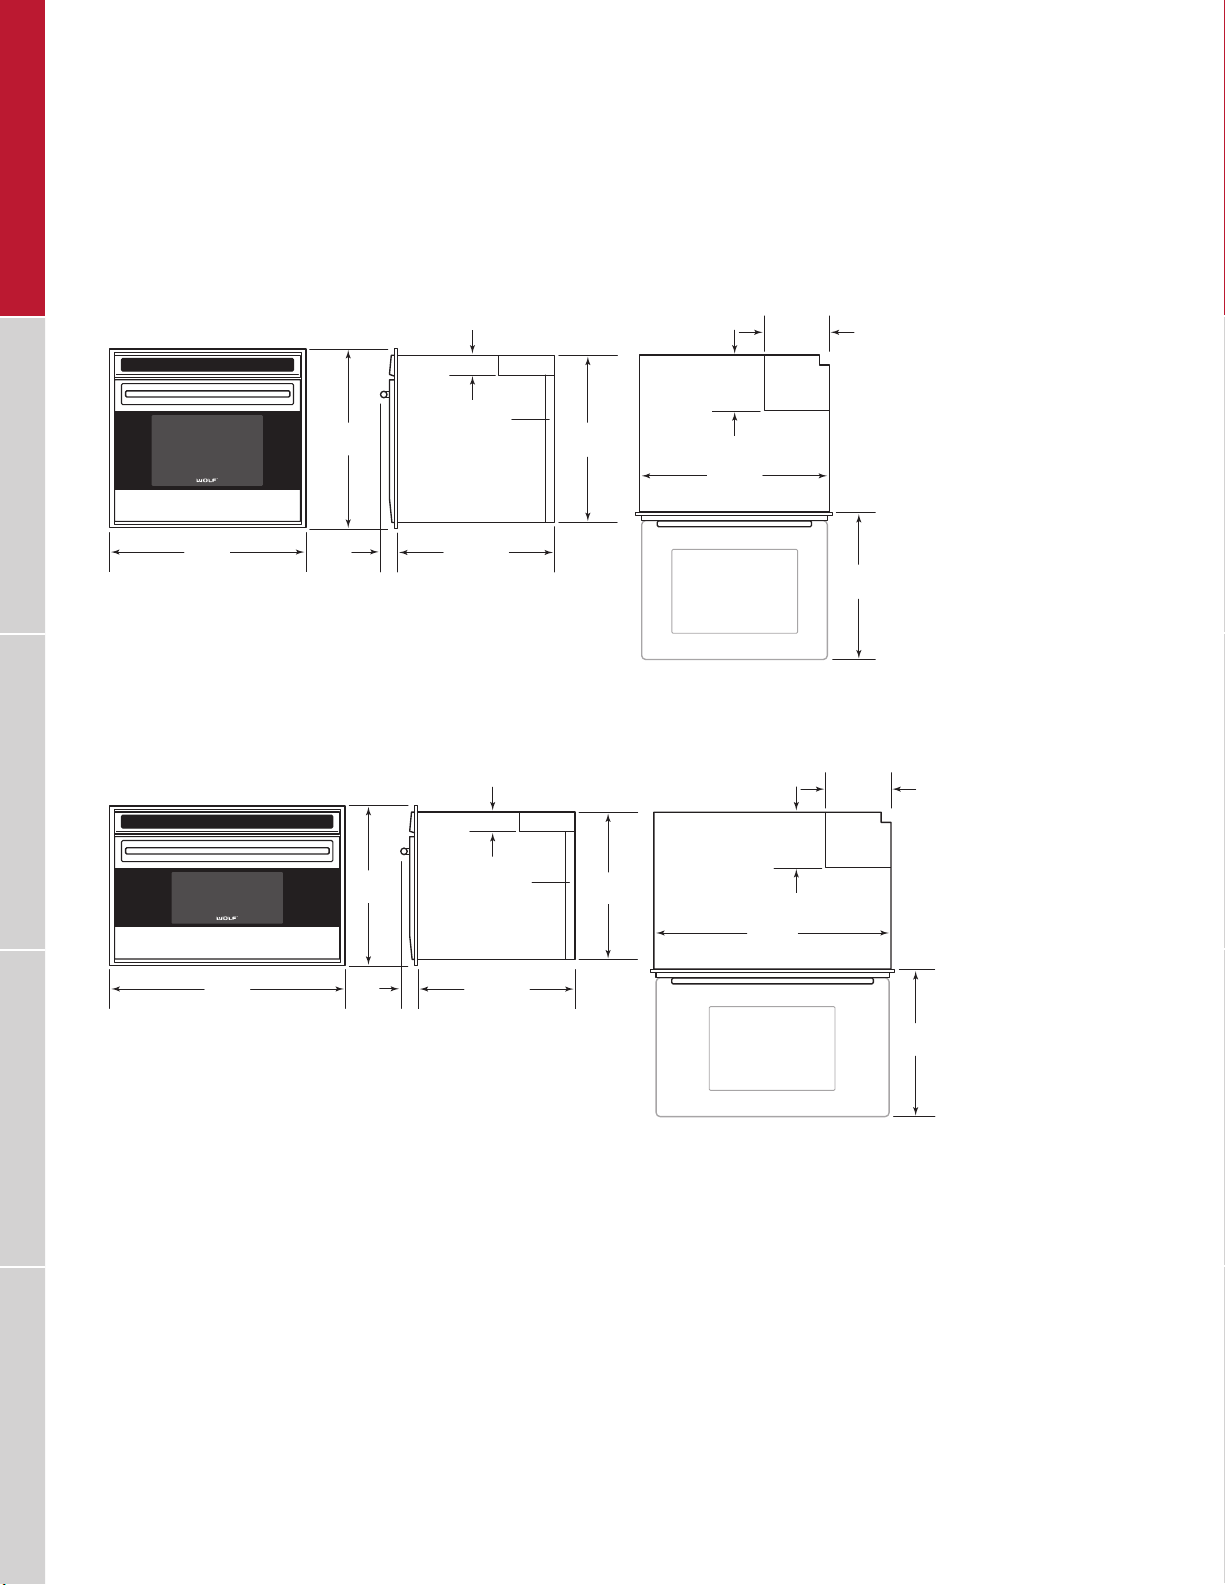
WOLF CONVECTION STEAM OVENS
Convection Steam Ovens
OVENS / WARMING DRAWERS COOKTOPS / COFFEE SYSTEMS RANGES / RANGETOPS OUTDOOR GRILLS VENTILATION
The legacy of the “combination oven” goes back decades,
to innovative chefs in America and Europe who embraced
the combination of air movement with superheated steam to
achieve superior results—from breads and roasts to delicate
shes, seafood and vegetables. Wolf combines the benets
of convection and steam for the most innovative steam oven
on the market today. Virtually any dish prepared in a conventional oven, range or microwave can also be prepared
in the Wolf convection steam oven—with more control. Two
widths and three distinct styles compliment the look of Wolf
ovens, ranges and cooktops. Convection steam ovens can
be installed in a standard or ush inset application.
KEY FEATURES
• Designed to match Wolf transitional, professional and
contemporary products.
• Convection and steam heat with ten cooking modes for
superior control.
• Gourmet and Recipes modes for quick and convenient
meal preparation.
• Temperature probe, perforated and solid stainless
steel pans.
CONVECTION STEAM OVENS
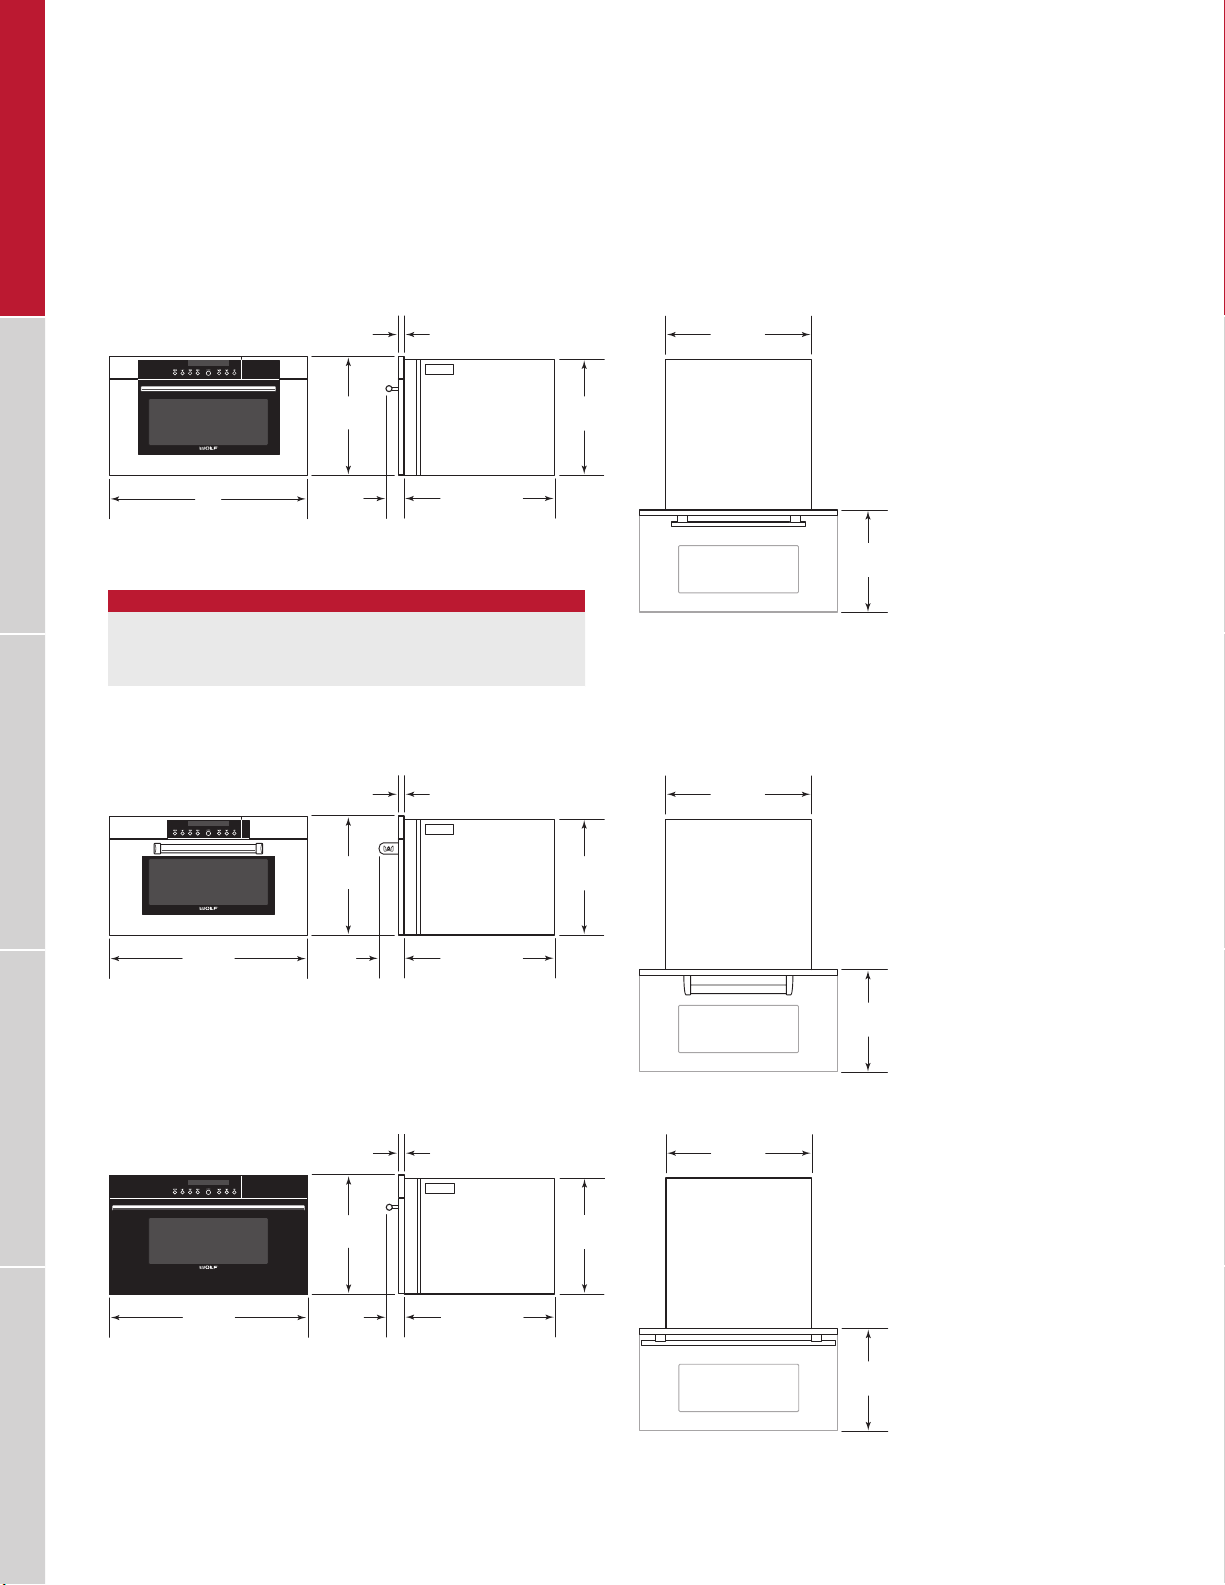
TRANSITIONAL
OK
WATERLIGHT TEMP MODE TIMERTIMEOFF
CSO24TE/S/TH
PROFESSIONAL
CSO30PM/S/PH
CONTEMPORARY
CSO30CM/B/TH
CSO30TM/S/TH
CSO30PE/S/PH
CSO30TE/S/TH
• Operating time, delayed start and descaling features.
wolfappliance.com | 29
Page 30
WOLF CONVECTION STEAM OVENS
Convection Steam Ovens
TRANSITIONAL
7
/8"
(22)
177/8"
(454)
W
WIDTH
21/2"
(64)
211/2" (546)
BEHIND FRAME
WIDTH
TRANSITIONAL W
24" Model 231/2" (597)
30" Model 297/8" (759)
PROFESSIONAL
7
/8"
(22)
177/8"
(454)
171/2"
(446)
171/2"
(446)
213/16"
(538)
OPEN OVEN DOOR
213/16"
(538)
143/16"
(360)
VENTILATION OUTDOOR GRILLS RANGES / RANGETOPS COOKTOPS / COFFEE SYSTEMS OVENS / WARMING DRAWERS
297/8"
(759)
31/4"
(83)
CONTEMPORARY
177/8"
(454)
297/8"
(759)
21/2"
(64)
30 | Wolf Customer Care 800.222.7820
211/2" (546)
BEHIND FRAME
7
/8"
(22)
211/2" (546)
BEHIND FRAME
171/2"
(446)
OPEN OVEN DOOR
213/16"
(538)
OPEN OVEN DOOR
143/16"
(360)
143/16"
(360)
Page 31

WOLF CONVECTION STEAM OVENS
Planning Information
OVENS / WARMING DRAWERS COOKTOPS / COFFEE SYSTEMS RANGES / RANGETOPS OUTDOOR GRILLS VENTILATION
The convection steam oven can be installed in a standard
or ush inset application. The electrical supply for the oven
must be located in an adjacent cabinet.
Finish the edges of the opening. They may be visible when
the door is open.
For standard installations, face trim will overlap stiles and
rails. Refer to the chart below.
1
For ush inset installations, a minimum
/8" (3) reveal is
required on all sides. To ensure consistent reveals, each
corner of the opening must be exactly 90°.
INSTALLATION REQUIREMENTS
BASE SUPPORT MIN
Convection Steam Oven 100 lb (45 kg)
TRIM OVERLAP 24" MODEL 30" MODEL
Top
Bottom 0" (0) 0" (0)
Sides
3
/16" (5)
11
/16" (18) 37/8" (98)
3
/16" (5)
ELECTRICAL
Installation must comply with all applicable electrical codes.
Locate the electrical supply as shown in the illustrations
on the following pages. A separate circuit, servicing only
this appliance is required. A ground fault circuit interrupter
(GFCI) is not recommended and may cause interruption of
operation. Refer to the illustration below for minimum power
cord plug clearance.
Performance may be compromised if the electrical supply is
less than 240 volts.
ELECTRICAL REQUIREMENTS
Electrical Supply grounded, 240/ 208 VAC, 60 Hz
Service 20 amp dedicated circuit
Receptacle NEMA 6-20R grounding-type
Power Cord 6'
(1.8 m)
MINIMUM CORD
CLEARANCE
Power cord clearance.
3"
(76)
wolfappliance.com | 31
Page 32

SIDE
NOTE: 24"
Electrical supply must be located in adjacent cabinet within 3'
WOLF CONVECTION STEAM OVENS
Convection Steam Oven
STANDARD INSTALLATION
OPENING
TOP VIEW
219/16"
(548)
DEPTH
1711/16"
(449)
OPENING
HEIGHT
VIEW
(610) and 30" (762) models require the same opening dimensions.
(.9 m) of opening.
W
OPENING WIDTH
FRONT VIEW
EE
OPENING WIDTH
CONVECTION STEAM OVEN W
24" Model 221/8" (562)
30" Model 221/8" (562)
VENTILATION OUTDOOR GRILLS RANGES / RANGETOPS COOKTOPS / COFFEE SYSTEMS OVENS / WARMING DRAWERS
32 | Wolf Customer Care 800.222.7820
Page 33

SIDE
*W
**
NOTE: Electrical supply must be located in adjacent cabinet within 3'
WOLF CONVECTION STEAM OVENS
Convection Steam Oven
FLUSH INSET INSTALLATION
7
/8" (22)
FLUSH INSET
TOP VIEW
23" (584)
DEPTH
FINISHED
CLEATS*
OVENS / WARMING DRAWERS COOKTOPS / COFFEE SYSTEMS RANGES / RANGETOPS OUTDOOR GRILLS VENTILATION
181/8"
(460)
FLUSH INSET
HEIGHT**
VIEW
ill be visible and should be finished to match cabinetry.
Dimension provides minimum reveals.
A
(.9 m) of opening.
5
/16"(8)
1
/8" (3)
FLUSH INSET WIDTH**
W
FRONT VIEW
EE
FLUSH INSET WIDTH
CONVECTION STEAM OVEN W A
24" Model 233/4" (603)
30" Model 301/8" (765) 4" (102)
13
/16" (21)
wolfappliance.com | 33
Page 34

Page 35

WOLF MICROWAVE OVENS
Microwave Ovens
OVENS / WARMING DRAWERS COOKTOPS / COFFEE SYSTEMS RANGES / RANGETOPS OUTDOOR GRILLS VENTILATION
As true cooking instruments, Wolf microwave ovens have
features that make fast meals better meals. New drop down
door microwaves feature a door that hinges at the bottom
for easier access to foods. Available in 24" and 30" widths,
they are designed to match Wolf transitional, professional
and contemporary products. Drawer microwave ovens can
be conveniently located undercounter, in a corner or below
an oven. Wolf also offers both a roomy, powerful standard
microwave and a convection model that can microwave,
broil and cook in three convection modes. Trim kits to match
Wolf ovens are available through an authorized Wolf dealer.
Microwave ovens can be installed in a standard or ush
inset application.
KEY FEATURES
• Distinct styles or trim compliment the look of Wolf ovens.
• Drop down door microwaves feature a bottom-hinged
door.
• Large-capacity interior.
• Sensor cooking to monitor and adjust settings.
• Warming feature for gentle heating.
DROP DOWN DOOR MICROWAVES
TRANSITIONAL
MDD24TE/S/TH
PROFESSIONAL
MDD30PM/S/PH
CONTEMPORARY
MDD30CM/B/TH
MDD30TM/S/TH
MDD30PE/S/PH
DRAWER MICROWAVE
TRANSITIONAL
MDD30TE/S/TH
• Reheat setting is perfect for leftovers.
• Freestanding option for convection and standard
microwave ovens.
MD24TE/S
PROFESSIONAL
MD30PE/S
MD30TE/S
CONVECTION MICROWAVE
MC24 (M / E Series Trim)
MC24 (L Series Trim)
STANDARD MICROWAVE
MS24 (M / E Series Trim)
MS24 (L Series Trim)
wolfappliance.com | 35
Page 36

WOLF MICROWAVE OVENS
Drop Down Door Microwave Ovens
TRANSITIONAL
7
/8"
(22)
213/16"
(538)
177/8"
(454)
W
WIDTH
21/2"
(64)
20" (508)
BEHIND FRAME
WIDTH
TRANSITIONAL W
24" Model 231/2" (597)
30" Model 297/8" (759)
PROFESSIONAL
7
/8"
(22)
177/8"
(454)
297/8"
(759)
31/4"
(83)
20" (508)
BEHIND FRAME
171/2"
(446)
171/2"
(446)
OPEN OVEN DOOR
213/16"
(538)
143/16"
(360)
VENTILATION OUTDOOR GRILLS RANGES / RANGETOPS COOKTOPS / COFFEE SYSTEMS OVENS / WARMING DRAWERS
CONTEMPORARY
177/8"
(454)
297/8"
(759)
21/2"
(64)
36 | Wolf Customer Care 800.222.7820
7
/8"
(22)
20" (508)
BEHIND FRAME
171/2"
(446)
OPEN OVEN DOOR
213/16"
(538)
OPEN OVEN DOOR
143/16"
(360)
143/16"
(360)
Page 37

WOLF MICROWAVE OVENS
Drawer Microwave Ovens
OVENS / WARMING DRAWERS COOKTOPS / COFFEE SYSTEMS RANGES / RANGETOPS OUTDOOR GRILLS VENTILATION
TRANSITIONAL / PROFESSIONAL
W
WIDTH
151/8"
(384)
11/4"
(32)
217/8" (556)
BEHIND FRAME
13/4"
(45)
WIDTH
DRAWER MICROWAVE W
24" Model 237/8" (606)
30" Model 297/8" (759)
POWER CORD
CHANNEL
145/8"
(372)
215/8" (549)
45/8"
(118)
OPEN DRAWER
161/2"
(419)
wolfappliance.com | 37
Page 38

WOLF MICROWAVE OVENS
*1
147/8"
(378)
FREE-
STANDING
243/4" (629)
FREESTANDING
197/8"
(505)
WITH
TRIM
TRIM WIDTH
18"
(457)
BEHIND TRIM
*11/4" (32) for contemporary E series trim only.
1" (25) OR
11/4" (32)*
Convection Microwave Oven
M / E SERIES TRIM
243/4" (629)
FREESTANDING
197/8"
(505)
WITH
TRIM
TRIM WIDTH
1
/4" (32) for contemporary E series trim only.
1" (25) OR
11/4" (32)*
(457)
18"
BEHIND TRIM
147/8"
(378)
FREE-
STANDING
TRIM WIDTH
CONVECTION M SERIES E SERIES L SERIES
27" Trim NA 267/8" (683) NA
7
30" Trim 29
/8" (759) 297/8" (759) 297/8" (759)
36" Trim NA NA 355/8" (905)
L SERIES TRIM
243/4" (629)
FREESTANDING
TRIM WIDTH
197/8"
(505)
WITH
TRIM
13/8"
(35)
(448)
175/8"
BEHIND TRIM
147/8"
(378)
FREE-
STANDING
VENTILATION OUTDOOR GRILLS RANGES / RANGETOPS COOKTOPS / COFFEE SYSTEMS OVENS / WARMING DRAWERS
38 | Wolf Customer Care 800.222.7820
Page 39

WOLF MICROWAVE OVENS
*1
TRIM WIDTH
133/8"
(340)
FREE-
STANDING
24" (610)
FREESTANDING
181/4"
(464)
WITH
TRIM
18" (457)
BEHIND TRIM
*11/4" (32) for contemporary E series trim only.
1" (25) OR
11/4" (32)*
Standard Microwave Oven
OVENS / WARMING DRAWERS COOKTOPS / COFFEE SYSTEMS RANGES / RANGETOPS OUTDOOR GRILLS VENTILATION
M / E SERIES TRIM
24" (610)
FREESTANDING
181/4"
WITH
TRIM WIDTH
1
/4" (32) for contemporary E series trim only.
(464)
TRIM
1" (25) OR
11/4" (32)*
18" (457)
BEHIND TRIM
133/8"
(340)
FREE-
STANDING
TRIM WIDTH
STANDARD M SERIES E SERIES L SERIES
27" Trim NA 267/8" (683) NA
7
30" Trim 29
/8" (759) 297/8" (759) 297/8" (759)
L SERIES TRIM
24" (610)
FREESTANDING
TRIM WIDTH
181/4"
(464)
WITH
TRIM
13/8"
(35)
175/8" (448)
BEHIND TRIM
133/8"
(340)
FREE-
STANDING
wolfappliance.com | 39
Page 40

WOLF MICROWAVE OVENS
Planning Information
DROP DOWN DOOR MICROWAVE
The drop down door microwave oven can be installed in a
standard or ush inset application.
Finish the edges of the opening. They may be visible when
the door is open.
For standard installations, face trim will overlap stiles and
rails. Refer to the chart below.
1
For ush inset installations, a minimum
/8" (3) reveal is
required on all sides. To ensure consistent reveals, each
corner of the opening must be exactly 90°.
INSTALLATION REQUIREMENTS
BASE SUPPORT MIN
Drop Down Door Microwave 125 lb (57 kg)
TRIM OVERLAP 24" MODEL 30" MODEL
Top
Bottom 0" (0) 0" (0)
Sides
3
/16" (5)
11
/16" (18) 37/8" (98)
3
/16" (5)
DRAWER MICROWAVE
The drawer microwave oven can be installed in a standard
or ush inset application. Location of the electrical supply
within the oven opening may require additional cabinet
depth.
Finish the edges of the opening. They may be visible when
the drawer is open.
For standard installations, face trim will overlap stiles and
rails. Refer to the chart below.
1
For ush inset installations, a minimum
required on the top and sides and
/8" (3) reveal is
11
/16" (18) on the bottom.
To ensure consistent reveals, each corner of the opening
must be exactly 90°. A sales accessory is required to direct
air away from the unit. Accessories are available through an
authorized Wolf dealer. For local dealer information, visit the
nd a showroom section of our website, wolfappliance.com.
INSTALLATION REQUIREMENTS
BASE SUPPORT MIN
24" Model 125 lb (57 kg)
30" Model 125 lb (57 kg)
TRIM OVERLAP 24" MODEL 30" MODEL
Top
Bottom
Sides
5
/16" (8)
1
/16" (2)
7
/8" (22) 37/8" (98)
5
/16" (8)
1
/16" (2)
VENTILATION OUTDOOR GRILLS RANGES / RANGETOPS COOKTOPS / COFFEE SYSTEMS OVENS / WARMING DRAWERS
40 | Wolf Customer Care 800.222.7820
Page 41

WOLF MICROWAVE OVENS
Planning Information
OVENS / WARMING DRAWERS COOKTOPS / COFFEE SYSTEMS RANGES / RANGETOPS OUTDOOR GRILLS VENTILATION
CONVECTION AND STANDARD MICROWAVES
Convection and standard microwave ovens can be installed
in a standard or ush inset application using accessory
trim to match Wolf ovens. Trim kits are avail able through an
authorized Wolf dealer. For local dealer information, visit the
nd a showroom section of our website, wolfappliance.com.
For standard installations, face trim will overlap stiles and
rails. Refer to the chart below.
Convection and standard microwave ovens can also be
used freestanding. For freestanding applications, a minimum
(51) space is required at the top, rear and sides of the
2"
microwave oven for air circulation.
INSTALLATION REQUIREMENTS
BASE SUPPORT MIN
Convection Microwave 125 lb (57 kg)
Standard Microwave 125 lb (57 kg)
27" E SERIES TRIM OVERLAP CONVECTION STANDARD
Top
Bottom
Sides
30" M/E/L TRIM OVERLAP CONVECTION STANDARD
Top
Bottom
Sides 13/16" (30) 13/16" (30)
36" L SERIES TRIM OVERLAP CONVECTION STANDARD
Top
Bottom
Sides 1
1
/4" (6)
3
/4" (19)
13
/16" (21)
1
/4" (6)
3
/4" (19)
3
/16" (5) NA
13
/16" (21) NA
1
/4" (32) NA
9
/16" (14)
11
/16" (17)
13
/16" (21)
9
/16" (14)
11
/16" (17)
ELECTRICAL
Installation must comply with all applicable electrical codes.
Locate the electrical supply as shown in the illustrations on
the following pages. The receptacle may also be located
in an adjacent cabinet within reach of the power cord. A
separate circuit, servicing only this appliance is required. A
ground fault circuit interrupter (GFCI) is not recommended
and may cause interruption of operation. Refer to the illustration below for minimum power cord plug clearance.
ELECTRICAL REQUIREMENTS
Electrical Supply grounded, 120 VAC, 60 Hz
Service 15 amp dedicated circuit
Receptacle 3-prong grounding-type
Power Cord 4'
3"
(76)
MINIMUM CORD
CLEARANCE
(1.2 m)
Power cord clearance.
wolfappliance.com | 41
Page 42

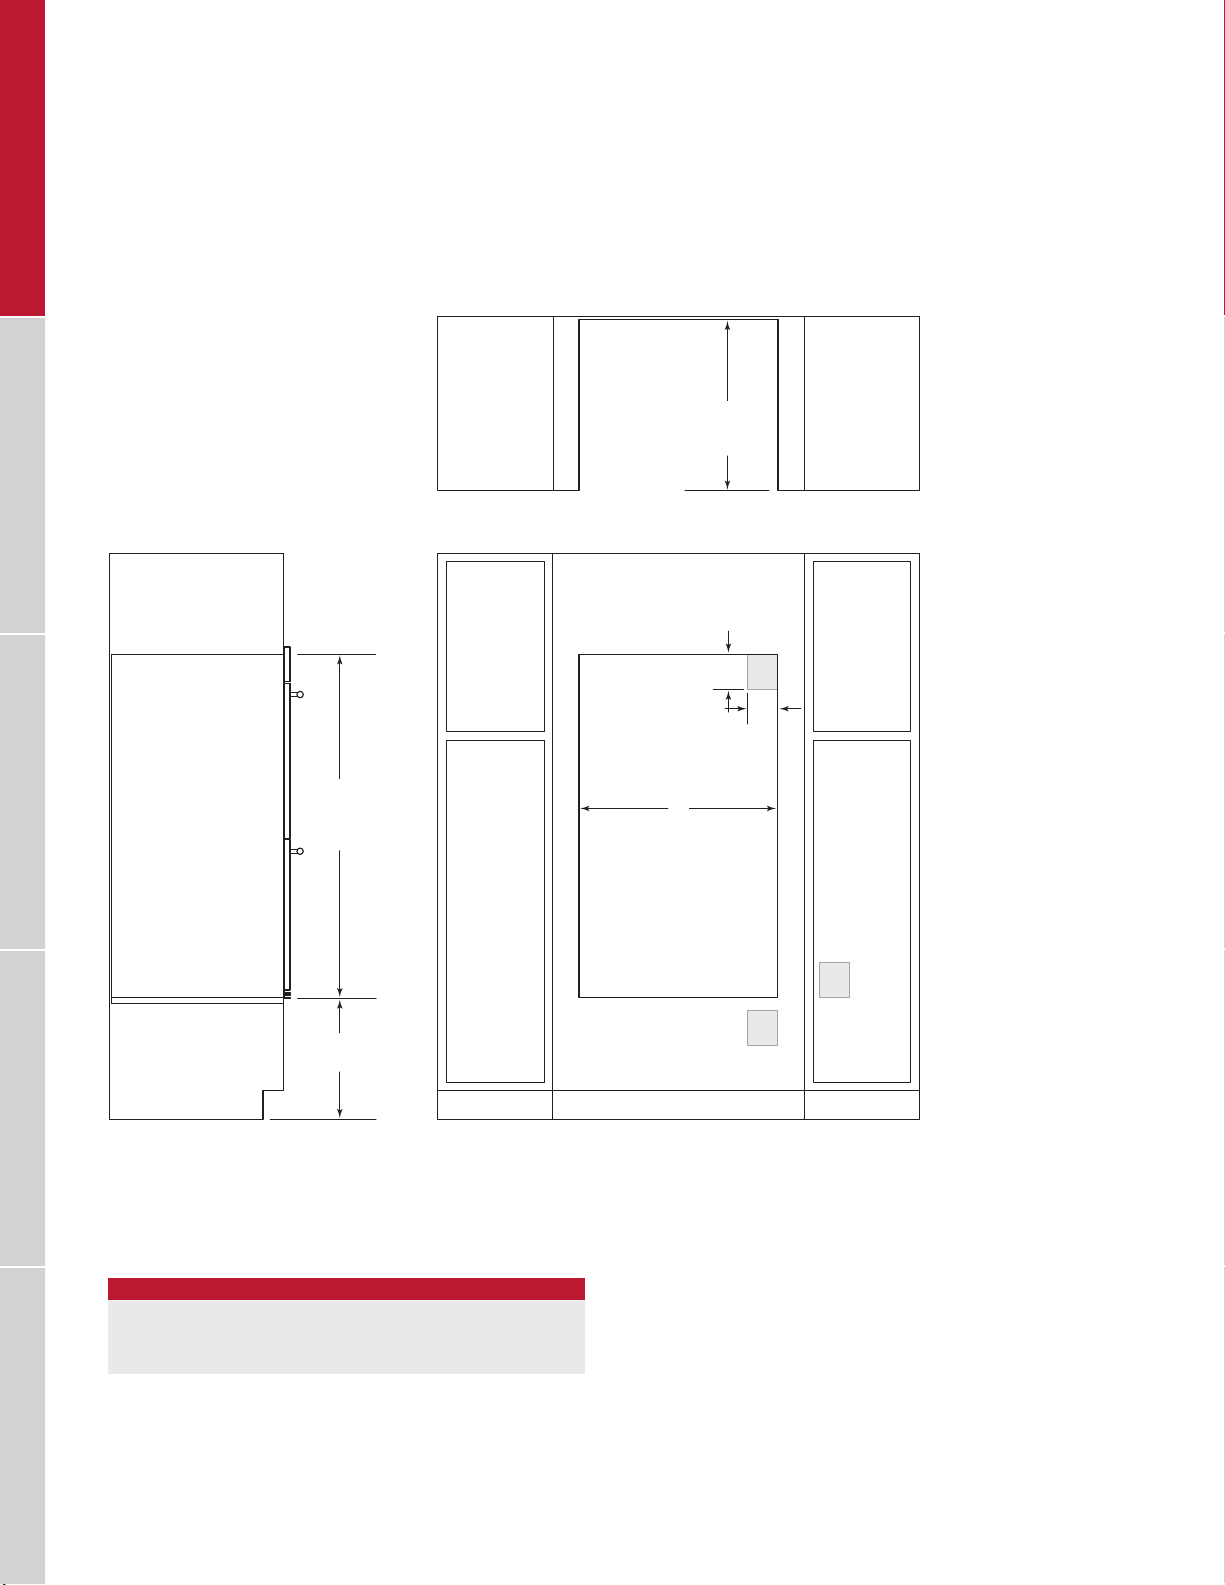
WOLF MICROWAVE OVENS
SIDE
NOTE: 24"
Drop Down Door Microwave Oven
STANDARD INSTALLATION
OPENING
TOP VIEW
219/16"
(548)
DEPTH
1711/16"
(449)
OPENING
HEIGHT
VIEW
(610) and 30" (762) models require the same opening dimensions.
OPENING WIDTH
DROP DOWN DOOR MICROWAVE W
24" Model 221/8" (562)
30" Model 221/8" (562)
E
OPENING WIDTH
FRONT VIEW
W
VENTILATION OUTDOOR GRILLS RANGES / RANGETOPS COOKTOPS / COFFEE SYSTEMS OVENS / WARMING DRAWERS
42 | Wolf Customer Care 800.222.7820
Page 43

WOLF MICROWAVE OVENS
SIDE
*W
**
Drop Down Door Microwave Oven
FLUSH INSET INSTALLATION
7
/8" (22)
FLUSH INSET
TOP VIEW
23" (584)
DEPTH
FINISHED
CLEATS*
OVENS / WARMING DRAWERS COOKTOPS / COFFEE SYSTEMS RANGES / RANGETOPS OUTDOOR GRILLS VENTILATION
181/8"
(460)
FLUSH INSET
HEIGHT**
VIEW
ill be visible and should be finished to match cabinetry.
Dimension provides minimum reveals.
FLUSH INSET WIDTH
DROP DOWN DOOR MICROWAVE W A
24" Model 233/4" (603)
13
/16" (21)
30" Model 301/8" (765) 4" (102)
5
E
/16"(8)
A
1
/8" (3)
FLUSH INSET WIDTH**
W
FRONT VIEW
wolfappliance.com | 43
Page 44

WOLF MICROWAVE OVENS
SIDE
NOTE: All dr
Drawer Microwave Oven
STANDARD INSTALLATION
22" (559)
OPENING
DEPTH
TOP VIEW
ANTI-TIP BLOCK
(375)
143/4"
OPENING
HEIGHT
VIEW
awer microwave ovens require the same opening dimensions.
OPENING WIDTH
DRAWER MICROWAVE W
24" Model 221/8" (562)
30" Model 221/8" (562)
E
W
OPENING WIDTH
FRONT VIEW
VENTILATION OUTDOOR GRILLS RANGES / RANGETOPS COOKTOPS / COFFEE SYSTEMS OVENS / WARMING DRAWERS
44 | Wolf Customer Care 800.222.7820
Page 45

WOLF MICROWAVE OVENS
SIDE
*W
**
Drawer Microwave Oven
FLUSH INSET INSTALLATION
11/4" (32)
231/4"
FLUSH INSET
TOP VIEW
DEPTH
(591)
FINISHED
CLEATS*
OVENS / WARMING DRAWERS COOKTOPS / COFFEE SYSTEMS RANGES / RANGETOPS OUTDOOR GRILLS VENTILATION
ANTI-TIP BLOCK
1515/16"
VIEW
ill be visible and should be finished to match cabinetry.
Dimension provides minimum reveals.
(405)
FLUSH INSET
HEIGHT**
FLUSH INSET WIDTH
DRAWER MICROWAVE W A
24" Model 241/8" (613) 1" (25)
30" Model 301/8" (765) 4" (102)
7
E
/16"(11)
A
3
/4" (19)
FLUSH INSET WIDTH**
W
FRONT VIEW
wolfappliance.com | 45
Page 46

WOLF MICROWAVE OVENS
SIDE
Convection Microwave Oven
STANDARD INSTALLATION WITH TRIM
201/8" (511)
TOP VIEW
OPENING
DEPTH
187/8" (479)
OPENING
HEIGHT
VIEW
OPENING WIDTH
CONVECTION MICROWAVE W
27" Trim 251/4" (641)
30" Trim 271/2" (699)
36" Trim 333/8" (854)
E
OPENING WIDTH
FRONT VIEW
W
VENTILATION OUTDOOR GRILLS RANGES / RANGETOPS COOKTOPS / COFFEE SYSTEMS OVENS / WARMING DRAWERS
46 | Wolf Customer Care 800.222.7820
Page 47

WOLF MICROWAVE OVENS
*W
**
**
SIDE
Convection Microwave Oven
FLUSH INSET INSTALLATION WITH TRIM
OVENS / WARMING DRAWERS COOKTOPS / COFFEE SYSTEMS RANGES / RANGETOPS OUTDOOR GRILLS VENTILATION
201/8" (511)
FLUSH INSET
HEIGHT***
(25)
1"
OR
11/4" (32)**
TOP VIEW
3
E
/8"
A
7
/8" (22)
FLUSH INSET WIDTH***
231/4"
FLUSH INSET
DEPTH
(10)
W
(591)
FINISHED
CLEATS*
VIEW
ill be visible and should be finished to match cabinetry.
11/4" (32) for contemporary E series trim only.
*Dimension provides minimum reveals.
FLUSH INSET WIDTH
CONVECTION MICROWAVE W A
27" Trim 271/8" (689)
15
/16" (24)
30" Trim 301/8" (765) 13/16" (30)
FRONT VIEW
wolfappliance.com | 47
Page 48

WOLF MICROWAVE OVENS
SIDE
Standard Microwave Oven
STANDARD INSTALLATION WITH TRIM
TOP VIEW
20" (508)
OPENING
DEPTH
17" (432)
OPENING
HEIGHT
VIEW
OPENING WIDTH
STANDARD MICROWAVE W
27" Trim 251/4" (641)
30" Trim 271/2" (699)
E
OPENING WIDTH
FRONT VIEW
W
VENTILATION OUTDOOR GRILLS RANGES / RANGETOPS COOKTOPS / COFFEE SYSTEMS OVENS / WARMING DRAWERS
48 | Wolf Customer Care 800.222.7820
Page 49

WOLF MICROWAVE OVENS
SIDE
*W
**
**
Standard Microwave Oven
FLUSH INSET INSTALLATION WITH TRIM
OVENS / WARMING DRAWERS COOKTOPS / COFFEE SYSTEMS RANGES / RANGETOPS OUTDOOR GRILLS VENTILATION
181/2" (470)
FLUSH INSET
HEIGHT***
(25)
1"
OR
11/4" (32)**
TOP VIEW
11
E
/16"
A
13
/16" (21)
FLUSH INSET WIDTH***
231/4"
FLUSH INSET
DEPTH
(17)
W
(591)
FINISHED
CLEATS*
VIEW
ill be visible and should be finished to match cabinetry.
11/4" (32) for contemporary E series trim only.
*Dimension provides minimum reveals.
FLUSH INSET WIDTH
STANDARD MICROWAVE W A
27" Trim 271/8" (689)
15
/16" (24)
30" Trim 301/8" (765) 13/16" (30)
FRONT VIEW
wolfappliance.com | 49
Page 50

Page 51

WOLF WARMING DRAWERS
Warming Drawers
OVENS / WARMING DRAWERS COOKTOPS / COFFEE SYSTEMS RANGES / RANGETOPS OUTDOOR GRILLS VENTILATION
Wolf warming drawers are designed to take care of prepared foods until it’s time to serve them. You can adjust the
temperature, keeping moist foods moist and crisp foods
crisp. Warming drawers are ideal for proong dough. Drawer
fronts are available to match the look of Wolf ovens, sealed
burner rangetops and outdoor grills. The integrated drawer
front allows for a custom wood panel and handle. Model
WWD30O, approved for outdoor installations, is ideal for
any outdoor kitchen.
KEY FEATURES
• Model WWD30O is CSA approved for outdoor
applications.
• 850-watt heating element with temperature control range
(25°C) to 200°F (95°C).
of 80°F
• Spacious 1.5 cu ft
(42 L) interior capacity.
• Preset, four-hour automatic shutoff.
• Hidden electronic touch controls for sleek appearance.
• Ball-bearing drawer glides for smooth, full extension.
• UL approved for warming towels.
WARMING DRAWER FRONTS
M / E SERIES
Transitional
L SERIES
Tubular Handle
INTEGRATED
Custom Panel
Professional
Contemporary
• Accessory six-piece container set available.
wolfappliance.com | 51
Page 52

WOLF WARMING DRAWERS
Warming Drawers
DRAWER FRONT OPTIONS
Wolf warming drawer fronts allow for many design options,
but the warming drawer itself will be the same for all applications. A panel mounting kit is required when installing a
custom panel. The panel mounting kit is available through
an authorized Wolf dealer. For local dealer information,
visit the nd a showroom section of our website,
wolfappliance.com.
(51) thick drawer front, in 30" and 36" widths, is
The 2"
designed to be installed below a sealed burner rangetop or
outdoor gas grill, so the panel aligns properly with the front
of the rangetop or grill. Dimensions for the warming drawer
remain the same, even though the drawer front may be
wider to match a Wolf 36" oven, sealed burner rangetop or
outdoor grill.
DIMENSIONS
WIDTH
281/4" (718)
OPEN DRAWER
A
103/8"
(264)
W
211/2"
(546)
B
223/4" (578)
9"
(229)
VENTILATION OUTDOOR GRILLS RANGES / RANGETOPS COOKTOPS / COFFEE SYSTEMS OVENS / WARMING DRAWERS
DRAWER FRONT
MODEL W
30" Drawer Front 297/8" (759)
36" Drawer Front 357/8" (911)
M SERIES A B
Transitional / Professional
7
/8" (22) 31/4" (83)
Contemporary 1" (25) 33/8" (86)
E SERIES A B
Transitional / Professional 11/8" (29) 31/2" (89)
Professional (2" thick) 21/8" (54) 41/2" (114)
Contemporary 13/8" (35) 33/4" (95)
L SERIES A B
Transitional
7
/8" (22) 31/2" (89)
INTEGRATED DRAWER FRONT
CUSTOM PANEL W H D
Typical Dimensions 297/8" (759) 103/8" (264)
Min Thickness
3
/4" (19)
5
/8" (16)
52 | Wolf Customer Care 800.222.7820
Page 53

WOLF WARMING DRAWERS
Planning Information
OVENS / WARMING DRAWERS COOKTOPS / COFFEE SYSTEMS RANGES / RANGETOPS OUTDOOR GRILLS VENTILATION
The warming drawer must be installed with a Wolf drawer
front, avail able through an authorized Wolf dealer. For local
dealer information, visit the nd a showroom section of our
website, wolfappliance.com. Specic installation instructions are included with the drawer front.
The warming drawer can be installed in a standard or ush
inset application (excludes L series drawer front).
For a standard installation, the drawer collar and front panel
sit proud of the cabinet face frame. A recessed installation
3
requires the cabinetry be recessed by
/16" (5) so the collar
is ush with the cabinet face frame but the drawer front
will sit proud. A ush inset installation (excludes L series)
requires the drawer collar and front panel be recessed to be
ush with surrounding cabinetry. Refer to illustrations on the
following pages for minimum cabinet dimensions for your
specic installation.
Finish the edges of the opening. They may be visible when
the drawer is open.
For standard installations, face trim will overlap stiles and
rails. Refer to the chart below.
1
For ush inset installations, a minimum
/8" (3) reveal is
required on all sides. To ensure consistent reveals, each
corner of the opening must be exactly 90°.
ELECTRICAL
Installation must comply with all applicable electrical codes.
Locate the electrical supply ush with the back wall and
within the shaded area shown in the illustrations on the
following pages. For ease of installation, the electrical
supply for the warming drawer can be placed in an adjacent
cabinet within reach of the power cord.
IMPORTANT NOTE: When installed outdoors, a ground fault
circuit interrupter (GFCI) is required to reduce the risk of
electrical shock.
ELECTRICAL REQUIREMENTS
Electrical Supply grounded, 120 VAC, 60 Hz
Service 15 amp dedicated circuit
Receptacle 3-prong grounding-type
Power Cord 3'
(.9 m)
Model WWD30O is CSA approved for outdoor installations.
INSTALLATION REQUIREMENTS
BASE SUPPORT MIN
Warming Drawer 200 lbs (90 kg)
TRIM OVERLAP
Top, Bottom and Sides
5
/8" (16)
wolfappliance.com | 53
Page 54

WOLF WARMING DRAWERS
SIDE
NOTE: Location of electrical supply within opening may require additional cabinet depth.
Warming Drawer
STANDARD INSTALLATION
TOP VIEW
23" (584)
OPENING
DEPTH
ANTI-TIP BLOCK
91/8" (232)
OPENING
HEIGHT
VIEW
285/8" (727)
OPENING WIDTH
FRONT VIEW
E
VENTILATION OUTDOOR GRILLS RANGES / RANGETOPS COOKTOPS / COFFEE SYSTEMS OVENS / WARMING DRAWERS
54 | Wolf Customer Care 800.222.7820
Page 55

SIDE
*W
**
NOTE: Location of electrical supply within opening may require additional cabinet depth.
WOLF WARMING DRAWERS
Warming Drawer
FLUSH INSET INSTALLATION
A
DRAWER
FRONT
DEPTH
FLUSH INSET
TOP VIEW
24" (610)
DEPTH
FINISHED
CLEATS*
OVENS / WARMING DRAWERS COOKTOPS / COFFEE SYSTEMS RANGES / RANGETOPS OUTDOOR GRILLS VENTILATION
ANTI-TIP BLOCK
105/8"
(270)
FLUSH INSET
HEIGHT**
VIEW
ill be visible and should be finished to match cabinetry.
Dimension provides minimum reveals.
DRAWER FRONT DEPTH
A M SERIES E SERIES
Transitional / Professional
7
/8" (22) 11/8" (29)
Professional (2" thick) NA 21/8" (54)
Contemporary 1" (25) 13/8" (35)
Custom front panel depth is dependent on panel thickness.
3
/4"(19)
3
/4"(19)
3
/4"(19)
301/8" (765)
FLUSH INSET WIDTH**
FRONT VIEW
E
E
wolfappliance.com | 55
Page 56

Page 57

WOLF INDUCTION COOKTOPS
Induction Cooktops
OVENS / WARMING DRAWERS COOKTOPS / COFFEE SYSTEMS RANGES / RANGETOPS OUTDOOR GRILLS VENTILATION
Ultrafast. Exceptionally energy efcient. Induction cooking
has been popular among European chefs and homeowners for decades. Now Wolf leads the way in bringing
this remarkable technology to North American kitchens.
Its secret is magnetism. Electromagnetic elements cause
iron and magnetic stainless cookware to heat up instantly
and with perfectly distributed heat. Heat generation stops
the instant you turn off the element or remove the pan. The
cooktop’s surface remains cool. Your kitchen stays cooler
too. Transitional models have stainless steel trim. Contemporary models can be mounted ush with the countertop.
KEY FEATURES
• Ceran glass-ceramic surface for scratch resistance
and easy cleaning.
• Induction elements heat cookware, not the glass, for
a cooler, safer cooking surface.
• Cookware sensing—elements will not be energized
without an induction-compatible pan on the surface.
• Touch controls, invisible when the cooktop is off, display
an intuitive power scale for precise control.
INDUCTION COOKTOPS
TRANSITIONAL
CI152T/S
CONTEMPORARY
CI243C/B
CI304T/S
CI304C/B
CI365T/S
CI365C/B
• Boost mode boosts power by diverting power from an
adjacent element.
• Bridge zone connects elements to create a larger
cooking area.
wolfappliance.com | 57
Page 58

WOLF INDUCTION COOKTOPS
Induction Cooktops
15" TRANSITIONAL
21"
(533)
15"
(381)
11/4"
(32)
CONDUIT
7
/8"
(22)
2" (51)
24" CONTEMPORARY
235/8" (600)
21"
(533)
30" TRANSITIONAL
30" (762)
CONDUIT
11/4" (32)
30" CONTEMPORARY
30" (762)
7
(22)
36" TRANSITIONAL
21"
(533)
36" (914)
11/4" (32)
CONDUIT
7
/8"
(22)
2" (51)
/8"
21"
(533)
2" (51)
36" CONTEMPORARY
21"
(533)
36" (914)
21"
(533)
VENTILATION OUTDOOR GRILLS RANGES / RANGETOPS COOKTOPS / COFFEE SYSTEMS OVENS / WARMING DRAWERS
21/2" (64)
/8"
11/4" (32)
11/4" (32)
CONDUIT
7
(22)
ELEMENT RATING
15" INDUCTION COOKTOP W
81/2" (216) 2300 / 3150 boost
6" (152) 1400
24" INDUCTION COOKTOP W
101/2" (267) 2600 / 3150 boost
(203) 2100 / 3000 boost
(2) 8"
30" INDUCTION COOKTOP W
101/2" (267) 2600 / 3150 boost
(203) 2100 / 3000 boost
(2) 8"
(152) 1400
6"
36" INDUCTION COOKTOP W
101/2" (267) 2600 / 3700 boost
(203) 2100 / 3000 boost
(4) 8"
CONDUIT
7
/8"
(22)
21/2" (64)
11/4" (32)
CONDUIT
7
/8"
(22)
21/2" (64)
58 | Wolf Customer Care 800.222.7820
Page 59

WOLF ELECTRIC COOKTOPS
Electric Cooktops
OVENS / WARMING DRAWERS COOKTOPS / COFFEE SYSTEMS RANGES / RANGETOPS OUTDOOR GRILLS VENTILATION
New generation electric cooktops utilize high-frequency
pulsation technology for the most exceptional performance
and control ever in a Wolf electric cooktop, with blazing hot
sears at the high end and steady simmers and melts at the
low end—a low-end nesse that is unusual in an electric
cooktop. Updated element conguration accommodates a
wide variety of cooking vessels and dish preparation.
KEY FEATURES
• High-frequency pulsation technology creates superior
cooktop performance and control, at both the high end
and low end.
• True Simmer setting provides the consistent low heat
you need for extended, even all-day simmering of soups
and sauces, and for condent preparation of more delicate dishes.
• One-touch melt setting allows you to melt even ne
chocolate and other delicate foods without scorching.
• Updated element conguration on the 36" model
includes a bridge zone that creates a large 7" x 16"
cooking area, perfect for larger pots and griddles.
ELECTRIC COOKTOPS
TRANSITIONAL
CE152T/S
CONTEMPORARY
CE304C/B
CE304T/S
CE365T/S
CE365C/B
• Sliding touch controls with white LED lighting are easy
to read and easy to use.
• Hot surface indicator illuminates as a convenient safety
reminder and can remain on, even after the cooktop
controls are turned off.
• Black ceramic glass is resistant to scratching, staining,
impact and heat.
wolfappliance.com | 59
Page 60

WOLF ELECTRIC COOKTOPS
Electric Cooktops
15" TRANSITIONAL
21"
(533)
15"
(381)
11/4"
(32)
CONDUIT
7
(22)
31/2" (89)
/8"
30" TRANSITIONAL 36" TRANSITIONAL
21"
(533)
30" (762)
CONDUIT
7
11/4" (32)
(22)
31/2" (89)
/8"
30" CONTEMPORARY 36" CONTEMPORARY
21"
(533)
30" (762)
36" (914)
21"
(533)
36" (914)
11/4" (32)
CONDUIT
7
/8"
(22)
21"
(533)
31/2" (89)
VENTILATION OUTDOOR GRILLS RANGES / RANGETOPS COOKTOPS / COFFEE SYSTEMS OVENS / WARMING DRAWERS
4" (102)
11/4" (32)
CONDUIT
7
/8"
(22)
ELEMENT RATING
15" ELECTRIC COOKTOP W
8" (203) Dual 700 / 2200
51/2" (140) Single 1200
30" ELECTRIC COOKTOP W
101/2" (267) Triple 1050 / 1950 / 2700
1
/2" (140) Singles 1200
(2) 5
1
/2" (165) Single with Oval 2400
6
36" ELECTRIC COOKTOP W
101/2" (267) Triple 1050 / 1950 / 2700
(203) Dual 700 / 2200
8"
1
/2" (140) Single 1200
5
(178) Singles with Bridge 4400
(2) 7"
11/4" (32)
CONDUIT
7
/8"
(22)
4" (102)
60 | Wolf Customer Care 800.222.7820
Page 61

WOLF INDUCTION AND ELECTRIC COOKTOPS
Planning Information
OVENS / WARMING DRAWERS COOKTOPS / COFFEE SYSTEMS RANGES / RANGETOPS OUTDOOR GRILLS VENTILATION
A minimum 2" (51) is required from the bottom of the
cooktop to combustible materials.
Contemporary induction and electric cooktops can be
mounted ush with the top of the countertop, or as a frameless standard installation sitting on top of the countertop
surface. If the cooktop is to be mounted ush with the countertop, a recessed area surrounding the cooktop cut-out
must be provided. Wolf downdraft systems cannot be used
with contemporary induction and electric cooktops.
IMPORTANT NOTE: Flush mount installations are intended
for granite, solid surface or stone countertop surfaces only.
ELECTRICAL
Installation must comply with all applicable electrical codes.
Locate the electrical supply as shown in the illustrations on
the following pages. A separate circuit, servicing only this
appliance is required.
ELECTRICAL REQUIREMENTS
INDUCTION
Electrical Supply 3-wire, 240/208 VAC, 60 Hz
Conduit exible 4'
ELECTRIC
Electrical Supply 3-wire, 240 VAC, 60 Hz
Conduit exible 4'
SERVICE
15" Induction / Electric 20 amp dedicated circuit
24" Induction 30 amp dedicated circuit
30" Induction / Electric 40 amp dedicated circuit
36" Induction / Electric 50 amp dedicated circuit
(1.2 m)
(1.2 m)
wolfappliance.com | 61
Page 62

WOLF INDUCTION AND ELECTRIC COOKTOPS
SIDE
NO
combus
15" Cooktops
STANDARD INSTALLATION
21/2" (64)
13"
(330)
18"
(457)
14"
(356)
COUNTERTOP CUT-OUT
30"
(762)
2"
(51)
191/2"
(495)
21/2" (64)
E
VENTILATION OUTDOOR GRILLS RANGES / RANGETOPS COOKTOPS / COFFEE SYSTEMS OVENS / WARMING DRAWERS
36" (914) min
FLOOR TO
COUNTERTOP
VIEW
TE: Shaded area above countertop indicates minimum clearance to combustible surfaces,
tible materials cannot be located within this area.
FRONT VIEW
62 | Wolf Customer Care 800.222.7820
Page 63

WOLF INDUCTION AND ELECTRIC COOKTOPS
SIDE
NO
combus
El
24", 30" and 36" Cooktops
STANDARD INSTALLATION
21/2"
OVENS / WARMING DRAWERS COOKTOPS / COFFEE SYSTEMS RANGES / RANGETOPS OUTDOOR GRILLS VENTILATION
(64)
13"
(330)
36" (914) min
FLOOR TO
COUNTERTOP
18"
(457)
2"
(51)
W
WIDTH
COUNTERTOP CUT-OUT
30"
(762)
41/2" (114)
31/2" (89)
10" (254)
191/2"
(495)
21/2" (64)
E
VIEW
TE: Shaded area above countertop indicates minimum clearance to combustible surfaces,
tible materials cannot be located within this area.
ectrical supply location only applies to installations with built-in oven.
FRONT VIEW
CUT-OUT WIDTH
INDUCTION / ELECTRIC COOKTOP W
24" Induction 221/8" (562)
30" Induction / Electric 29" (737)
36" Induction / Electric 35" (889)
wolfappliance.com | 63
Page 64

WOLF INDUCTION AND ELECTRIC COOKTOPS
SIDE
NO
combus
El
Outsid
24", 30" and 36" Cooktops
FLUSH INSTALLATION
13"
(330)
COUNTERTOP
7
/8"
(22) MAX
PROFILE
5
(8)
/16"
36" (914) min
FLOOR TO
COUNTERTOP
211/8"
(537)
RECESS
19/16" (40) min
18"
(457)
2"
(51)
W
CUT-OUT WIDTH
A
RECESS
COUNTERTOP CUT-OUT
30"
(762)
41/2" (114)
31/2" (89)
10" (254)
21/2" (64)
191/2"
(495)
21/2" (64)
E
VENTILATION OUTDOOR GRILLS RANGES / RANGETOPS COOKTOPS / COFFEE SYSTEMS OVENS / WARMING DRAWERS
VIEW
TE: Shaded area above countertop indicates minimum clearance to combustible surfaces,
tible materials cannot be located within this area.
ectrical supply location only applies to installations with built-in oven.
e corner radius 7/16" (11).
CUT-OUT WIDTH
INDUCTION / ELECTRIC COOKTOP W A
24" Induction 221/8" (562) 233/4" (603)
30" Induction / Electric 29" (737) 301/8" (765)
36" Induction / Electric 35" (889) 361/8" (918)
64 | Wolf Customer Care 800.222.7820
FRONT VIEW
Page 65

WOLF GAS COOKTOPS
Gas Cooktops
OVENS / WARMING DRAWERS COOKTOPS / COFFEE SYSTEMS RANGES / RANGETOPS OUTDOOR GRILLS VENTILATION
Like their built-in oven counterparts, the new generation of
Wolf gas cooktops features three new looks—transitional,
professional and contemporary. New performance enhancements make delicious results even more of a certainty than
ever. Multiple sizes, choice of knob colors, distinctly different grates, and even a new way to integrate with custom
cabinetry—the new gas cooktops offer exceptional design
exibility.
KEY FEATURES
• Dual-stacked, sealed burners for precise control and
easy cleanup.
• Flame recognition and automatic reignition for safety and
ease of use.
• True simmer setting on all burners prevents scorching.
• Push-to-activate backlit controls on transitional models
are invisible when the cooktop is off.
• Choice of knob colors for professional models.
GAS COOKTOPS
TRANSITIONAL
CG304T/S
PROFESSIONAL
CG304P/S
CONTEMPORARY—COMING SOON!
CG365C/S
CG365T/S
CG365P/S
wolfappliance.com | 65
Page 66

WOLF GAS COOKTOPS
Gas Cooktops
30" TRANSITIONAL 36" TRANSITIONAL
21"
(533)
30" (762)
36" (914)
4" (102)
7
/8"
(22)
30" PROFESSIONAL 36" PROFESSIONAL
21"
(533)
30" (762)
7
(22)
4" (102)
/8"
36" (914)
7
(22)
7
(22)
21"
(533)
4" (102)
/8"
21"
(533)
4" (102)
/8"
VENTILATION OUTDOOR GRILLS RANGES / RANGETOPS COOKTOPS / COFFEE SYSTEMS OVENS / WARMING DRAWERS
BURNER RATING—Btu (kW)
30" GAS COOKTOP QTY
18,000 (5.3) 1
12,000 (3.5) 1
(2.7) 2
9,200
36" GAS COOKTOP QTY
18,000 (5.3) 1
(3.5) 1
12,000
(2.7) 3
9,200
66 | Wolf Customer Care 800.222.7820
Page 67

WOLF GAS COOKTOPS
Planning Information
OVENS / WARMING DRAWERS COOKTOPS / COFFEE SYSTEMS RANGES / RANGETOPS OUTDOOR GRILLS VENTILATION
A minimum 2" (51) is required from the bottom of the
cooktop to combustible materials. If a cooktop is installed
1
above an oven, a minimum of
/4" (6) is required between
units.
ELECTRICAL
Installation must comply with all applicable electrical codes.
Locate the electrical supply as shown in the illustrations
on the following pages. A separate circuit, servicing only
this appliance is required. A ground fault circuit interrupter
(GFCI) is not recommended and may cause interruption of
operation.
ELECTRICAL REQUIREMENTS
Electrical Supply grounded, 120 VAC, 60 Hz
Service 15 amp dedicated circuit
Receptacle 3-prong grounding-type
Power Cord 6'
(1.8 m)
GAS SUPPLY
Installation must conform with all applicable gas codes.
3
A gas supply line of
to the cooktop. If local codes permit, a certied, 3'
1
/2" (13) or 3/4" (19) ID exible metal appliance con-
long,
nector is recommended to connect the units
/4" (19) rigid pipe must be provided
(.9 m)
1
/2" NPT male
inlet to the gas supply line.
Wolf natural gas cooktops will function up to 10,250'
(3124 m)
will function up to 8,600'
in altitude without adjustment and LP gas cooktops
(2621 m). If the installation exceeds
these elevations, contact an authorized Wolf dealer for a
high altitude conversion kit.
GAS REQUIREMENTS
NATURAL GAS WC
Supply Pressure 5" (12.5 mb)
Min Line Pressure 7" (17.5 mb)
Max Regulator Pressure 14" (34.9 mb), .5 psi (3.5 kPa)
LP GAS WC
Supply Pressure 10" (25 mb)
Min Line Pressure 11" (27.4 mb)
Max Regulator Pressure 14" (34.9 mb), .5 psi (3.5 kPa)
wolfappliance.com | 67
Page 68

WOLF GAS COOKTOPS
SIDE
NO
combus
El
30" and 36" Gas Cooktops
STANDARD INSTALLATION
21/2" (64)
13"
(330)
18"
(457)
9"
(229)
W
WIDTH
COUNTERTOP CUT-OUT
30"
(762)
4" (102)
31/2" (89)
E G
10"
(254)
191/2"
(495)
21/2"
(64)
VENTILATION OUTDOOR GRILLS RANGES / RANGETOPS COOKTOPS / COFFEE SYSTEMS OVENS / WARMING DRAWERS
VIEW
TE: Shaded area above countertop indicates minimum clearance to combustible surfaces,
tible materials cannot be located within this area.
ectrical and gas supply location only applies to installations with built-in oven.
CUT-OUT WIDTH
GAS COOKTOP W
30" Model 29" (737)
36" Model 35" (889)
68 | Wolf Customer Care 800.222.7820
FRONT VIEW
Page 69

WOLF INTEGRATED MODULES
Integrated Modules
OVENS / WARMING DRAWERS COOKTOPS / COFFEE SYSTEMS RANGES / RANGETOPS OUTDOOR GRILLS VENTILATION
Passion for cooking reaches new dimensions with our 15"
integrated modules. Seven models cover the gamut of
cooking, from searing to deep frying to induction. Combine
modules à la carte–style to create a custom cooktop, or add
specialty functions alongside an existing cooktop. Lowprole grates, dual-stacked burners and illuminated controls
allow them to integrate perfectly with their larger counterparts and deliver equal performance. Integrated modules
are crafted of stainless steel or have stainless steel trim.
KEY FEATURES
• Induction cooktop | Iron and other magnetic cookware
heat instantly, while the cooktop surface stays cool.
• Electric cooktop | Elements operate with high-fre-
quency pulsation technology for consistent heating.
• Electric grill | Dual elements ensure precise control in
front and rear zones for year-round grilling.
• Electric steamer | Powerful heating element steam
cooks meats, vegetables and grains beautifully.
• Electric fryer | Fried foods emerge crisp and light, due
to precise temperature control.
INTEGRATED MODULES
CT15I/S
Induction
IF15/S
Fryer
CT15E/S
Electric
CT15G/S
Gas
IG15/S
Grill
IM15/S
Multi-Function
IS15/S
Steamer
• Gas cooktop | Equipped with the same dual-stacked
burners as our larger cooktops.
• Multi-function cooktop | High-output burner concen-
trates its ame in precisely the right spot for stir-frying.
wolfappliance.com | 69
Page 70

1
1
WOLF INTEGRATED MODULES
Integrated Modules
INDUCTION ELECTRIC GRILL
21" (533)
1
/4" (32)
GAS
15"
(381)
CONDUIT
15"
(381)
1
/4" (32)
CONDUIT
21/2" (64)
7
/8" (22)
ALL SIDES
FRYER MULTI-FUNCTION
21" (533)
21" (533)
33/4" (96)
7
/8" (22)
ALL SIDES
21" (533)
15"
(381)
1
/2" (13)
SIDES
(25)
FRONT / BACK
21" (533)
61/4" (159)
21" (533)
STEAMER
15"
(381)
6"
(152)
DRAIN
OUTLET
21" (533)
71/2" (191)
1
/2" (13)
SIDES
1" (25)
FRONT / BACK
6"
(152)
15"
(381)
DRAIN
OUTLET
71/2" (191)
1
/2" (13)
SIDES
1" (25)
FRONT / BACK
15"
(381)
7
/8" (22)
ALL SIDES
4" (102)
15"
(381)
1
/2" (13)
SIDES
(25)
FRONT / BACK
5" (127)
VENTILATION OUTDOOR GRILLS RANGES / RANGETOPS COOKTOPS / COFFEE SYSTEMS OVENS / WARMING DRAWERS
70 | Wolf Customer Care 800.222.7820
Page 71

WOLF INTEGRATED MODULES
Integrated Modules
OVENS / WARMING DRAWERS COOKTOPS / COFFEE SYSTEMS RANGES / RANGETOPS OUTDOOR GRILLS VENTILATION
HEATING ZONES
INDUCTION W
83/4" (220) 1800 / 3000 boost
3
/4" (171) 1200
6
ELECTRIC W
10" (254) Triple 900 / 1800 / 2500
1
/2" (165) Single 1200
6
GRILL W
(2) Elements 1400 each
STEAMER W
Element 2600
FRYER W
Element 2600
BURNER RATING—Btu (kW)
GAS QTY
12,000 (3.5) 1
(2.7) 1
9,200
MULTI-FUNCTION QTY
22,000 (6.5) 1
wolfappliance.com | 71
Page 72

WOLF INTEGRATED MODULES
Planning Information
When multiple cooktops or modules are installed side
by side, the countertop cut-out dimension is determined by
1
adding the width of each product plus
strip, then subtracting 1"
(25). Refer to the chart and illustra-
/4" (6) for each ller
tion below for typical congurations.
For example, the countertop cut-out for a 30" cooktop and
1
15" module with one ller strip: 30" + 15" +
/4" – 1" = 441/4".
The optional ller strip is avail able through an authorized
Wolf dealer. For local dealer information, visit the nd a
showroom section of our website, wolfappliance.com.
IMPORTANT NOTE: Wolf does not recommend the use
of downdraft ventilation with the grill, steamer or fryer
modules.
MULTIPLE COOKTOPS
COUNTERTOP CUT-OUT W
(2) 15" Modules 291/4" (743)
(3) 15" Modules 441/2" (1130)
(4) 15" Modules 593/4" (1518)
30" Cooktop / 15" Module 441/4" (1124)
30" Cooktop / (2) 15" Modules 591/2" (1511)
36" Cooktop / 15" Module 501/4" (1276)
Refer to the illustrations on the following pages for installation of integrated modules. For additional induction and
electric modules, refer to the previous cooktop sections.
VENTILATION OUTDOOR GRILLS RANGES / RANGETOPS COOKTOPS / COFFEE SYSTEMS OVENS / WARMING DRAWERS
2" (51) min
21/2"
(64) min
Countertop cut-out.
W
CUT-OUT
WIDTH
FRONT OF COUNTERTOP
191/4"
(489)
CUT- OUT
DEPTH
72 | Wolf Customer Care 800.222.7820
Page 73

WOLF INTEGRATED MODULES
Planning Information
OVENS / WARMING DRAWERS COOKTOPS / COFFEE SYSTEMS RANGES / RANGETOPS OUTDOOR GRILLS VENTILATION
ELECTRICAL
Installation must comply with all applicable electrical codes.
Locate the electrical supply as shown in the illustrations on
the following pages. A separate circuit, servicing only this
appliance is required.
When multiple cooktops or modules are installed side by
side, each must have its own separate electrical supply.
ELECTRICAL REQUIREMENTS
ELECTRIC MODULES
Electrical Supply grounded 3-wire, 240/208 VAC, 60 Hz
Steamer, Fryer 15 amp dedicated circuit
Induction, Electric, Grill 20 amp dedicated circuit
Conduit exible 4'
GAS MODULES
Electrical Supply grounded, 120 VAC, 60 Hz
Service 15 amp dedicated circuit
Receptacle 3-prong grounding-type
Power Cord 6'
(1.2 m)
(1.8 m)
DRAIN OUTLET
Steamer and fryer modules require a method for draining
hot water and oil. For the steamer module, options include
5
connecting a drain hose from the
/8" (16) outlet tied into
an existing drain, a separate drain with freefall or placing a
heat-resistant receptacle under the drain outlet. For the fryer
module, the drain outlet must be accessible to drain oil into
heat-resistant receptacle.
GAS SUPPLY
Installation must conform with all applicable gas codes.
3
A gas supply line of
to the gas module. If local codes permit, a certied, 3'
1
/2" (13) or 3/4" (19) ID exible metal appliance con-
long,
nector is recommended to connect the units
/4" (19) rigid pipe must be provided
(.9 m)
1
/2" NPT
female inlet to the gas supply line.
When multiple gas cooktops or modules are installed side
by side, they can receive their gas supply from a common
line. However, each unit must have its own regulator
installed between the mainline and the cooktop or module.
Wolf natural gas modules will function up to 10,250'
(3124 m)
in altitude without adjustment and LP gas modules will
function up to 8,600'
(2621 m). If the installation exceeds
these elevations, contact an authorized Wolf dealer for a
high altitude conversion kit.
GAS REQUIREMENTS
NATURAL GAS WC
Supply Pressure 5" (12.5 mb)
Min Line Pressure 7" (17.5 mb)
Max Regulator Pressure 14" (34.9 mb), .5 psi (3.5 kPa)
LP GAS WC
Supply Pressure 10" (25 mb)
Min Line Pressure 11" (27.4 mb)
Max Regulator Pressure 14" (34.9 mb), .5 psi (3.5 kPa)
wolfappliance.com | 73
Page 74

WOLF INTEGRATED MODULES
191/2"
(495)
21/2" (64) min
21/2" (64) min
FRONT VIEWSIDE VIEW
COUNTERTOP CUT-OUT
NOTE: Shaded area above countertop indicates minimum clearance to combustible surfaces,
combustible materials cannot be located within this area.
13"
(330)
18"
(457)
7"
(178)
30"
(762)
E
14"
(356)
Grill Module
STANDARD INSTALLATION
VENTILATION OUTDOOR GRILLS RANGES / RANGETOPS COOKTOPS / COFFEE SYSTEMS OVENS / WARMING DRAWERS
74 | Wolf Customer Care 800.222.7820
Page 75

WOLF INTEGRATED MODULES
NOTE: Shaded area above countertop indicates minimum clearance to combustible surfaces,
combustible materials cannot be located within this area.
FRONT VIEWSIDE VIEW
COUNTERTOP CUT-OUT
13"
(330)
18"
(457)
7"
(178)
E
30"
(762)
75/8"
(194)
6"
(152)
123/8"
(314)
DRAIN
OUTLET
191/2"
(495)
21/2" (64) min
21/2" (64) min
14"
(356)
Steamer Module
STANDARD INSTALLATION
OVENS / WARMING DRAWERS COOKTOPS / COFFEE SYSTEMS RANGES / RANGETOPS OUTDOOR GRILLS VENTILATION
WARNING
The steamer module must be installed at least 15" (381)
from a fryer module.
wolfappliance.com | 75
Page 76

FRONT VIEWSIDE VIEW
COUNTERTOP CUT-OUT
NOTE: Shaded area above countertop indicates minimum clearance to combustible surfaces,
combustible materials cannot be located within this area.
13"
(330)
18"
(457)
7"
(178)
E
30"
(762)
75/8"
(194)
6"
(152)
123/8"
(314)
DRAIN
OUTLET
191/2"
(495)
21/2"
(64) min
21/2"
(64) min
14"
(356)
WOLF INTEGRATED MODULES
Fryer Module
STANDARD INSTALLATION
WARNING
The fryer module must be installed at least 15" (381)
from any open-ame cooking device or a steamer
module.
VENTILATION OUTDOOR GRILLS RANGES / RANGETOPS COOKTOPS / COFFEE SYSTEMS OVENS / WARMING DRAWERS
76 | Wolf Customer Care 800.222.7820
Page 77

WOLF INTEGRATED MODULES
Gas and Multi-Function Cooktops
STANDARD INSTALLATION
OVENS / WARMING DRAWERS COOKTOPS / COFFEE SYSTEMS RANGES / RANGETOPS OUTDOOR GRILLS VENTILATION
21/2" (64) min
13"
(330)
18"
(457)
14"
(356)
COUNTERTOP CUT-OUT
30"
(762)
7"
(178)
E G
191/2"
(495)
21/2" (64) min
ELECTRICAL
AND GAS FLOOR
5"
(127)
NOTE: Shaded area above countertop indicates minimum clearance to combustible surfaces,
combustible materials cannot be located within this area.
LOCATION
FRONT VIEWSIDE VIEW
wolfappliance.com | 77
Page 78

Page 79

WOLF COFFEE SYSTEMS
Coffee Systems
OVENS / WARMING DRAWERS COOKTOPS / COFFEE SYSTEMS RANGES / RANGETOPS OUTDOOR GRILLS VENTILATION
Make professional-quality brewed coffee, espresso,
cappuccino, latte and more. The Wolf coffee system
automatically steams and foams the milk perfectly. Water
temperature and brew strength are adjustable. Uses either
whole-bean or ground coffee. The design pairs beautifully,
either side-by-side or in a tower application, with other
Wolf products such as the convection steam oven. Coffee
systems can be installed in a standard or ush inset
application. All 30" trim options are based on model
EC24/B.
KEY FEATURES
• Create perfectly brewed coffee, espresso, cappuccino,
macchiato and latte at home.
• Separate hot water dispenser for tea.
• Mounted glide system provides easy access to the unit,
no direct water line is needed.
• Milk frothing pitcher with adjustable settings, detaches
for refrigerated storage and easy cleaning.
• Built-in coffee mill with adjustable grind settings.
• Auto on, auto off and descaling features.
COFFEE SYSTEMS
24" MODELS
EC24/B
TRANSITIONAL
With 30" M Series Trim
PROFESSIONAL
With 30" M Series Trim
CONTEMPORARY
EC24/S
With 30" E Series Trim
With 30" E Series Trim
With 30" M / E Series Trim
wolfappliance.com | 79
Page 80

WOLF COFFEE SYSTEMS
Coffee System
DIMENSIONS
177/8"
(454)
7
(22)
/8"
W
WIDTH
151/2" (394)
BEHIND FRAME
WIDTH
COFFEE SYSTEM W
24" Model 231/2" (597)
30" Trim 297/8" (759)
UNIT
FULL EXTENSION
181/4"
(464)
VENTILATION OUTDOOR GRILLS RANGES / RANGETOPS COOKTOPS / COFFEE SYSTEMS OVENS / WARMING DRAWERS
80 | Wolf Customer Care 800.222.7820
Page 81

WOLF COFFEE SYSTEMS
Planning Information
OVENS / WARMING DRAWERS COOKTOPS / COFFEE SYSTEMS RANGES / RANGETOPS OUTDOOR GRILLS VENTILATION
The coffee system can be installed in a standard or ush
inset application. All 30" trim options are based on model
EC24/B. The sides of the cabinetry opening must be adequate to support installation of the mounting slides. Refer to
the illustration below.
Finish the edges of the opening. They may be visible when
the unit is slid forward.
For standard installations, face trim will overlap stiles and
rails. Refer to the chart below.
1
For ush inset installations, a minimum
/8" (3) reveal is
required on all sides. To ensure consistent reveals, each
corner of the opening must be exactly 90°.
INSTALLATION REQUIREMENTS
BASE SUPPORT MIN
Coffee System 100 lb (45 kg)
TRIM OVERLAP 24" MODEL 30" TRIM
Top
Bottom 0" (0) 0" (0)
Sides
3
/16" (5)
11
/16" (18) 37/8" (98)
3
/16" (5)
COMBINATION INSTALLATION
ELECTRICAL
Installation must comply with all applicable electrical codes.
Locate the electrical supply as shown in the illustrations
on the following pages. A separate circuit, servicing only
this appliance is required. A ground fault circuit interrupter
(GFCI) is not recommended and may cause interruption of
operation.
ELECTRICAL REQUIREMENTS
Electrical Supply grounded, 120 VAC, 60 Hz
Service 15 amp dedicated circuit
Receptacle 3-prong grounding-type
Power Cord 6'
(1.8 m)
To install a coffee system above a cup warming drawer,
one opening for both units must be specied. To achieve
the minimum reveal between units, place the coffee system
support rails on top of the cup warming drawer, then secure
the rails to the sides of the cabinet. Any material between
the units will increase the horizontal reveal.
14"
(356)
3
/4" (19)
TYPICAL
Side support.
10"
(254)
wolfappliance.com | 81
Page 82

SIDE
NOTE: 24"
WOLF COFFEE SYSTEMS
Coffee System
STANDARD INSTALLATION
SLIDE
SUPPORT
OPENING
TOP VIEW
219/16"
(548)
DEPTH
1711/16" (449)
SLIDE
SUPPORT
VIEW
(610) model and model with 30" (762) trim require the same opening dimensions.
OPENING
HEIGHT
OPENING WIDTH
COFFEE SYSTEM W
24" Model 221/8" (562)
30" Trim 221/8" (562)
E
W
OPENING WIDTH
FRONT VIEW
VENTILATION OUTDOOR GRILLS RANGES / RANGETOPS COOKTOPS / COFFEE SYSTEMS OVENS / WARMING DRAWERS
82 | Wolf Customer Care 800.222.7820
Page 83

SIDE
*W
**
WOLF COFFEE SYSTEMS
Coffee System
FLUSH INSET INSTALLATION
OVENS / WARMING DRAWERS COOKTOPS / COFFEE SYSTEMS RANGES / RANGETOPS OUTDOOR GRILLS VENTILATION
SLIDE
SUPPORT
(460)
181/8"
FLUSH INSET
HEIGHT**
SLIDE
SUPPORT
7
/8" (22)
TOP VIEW
5
/16"(8)
A
FLUSH INSET WIDTH**
1
/8" (3)
E
W
23" (584)
FLUSH
INSET
DEPTH
FINISHED
CLEATS*
VIEW
ill be visible and should be finished to match cabinetry.
Dimension provides minimum reveals.
FLUSH INSET WIDTH
COFFEE SYSTEM W A
24" Model 233/4" (603)
13
/16" (21)
30" Trim 301/8" (765) 4" (102)
FRONT VIEW
wolfappliance.com | 83
Page 84

WOLF CUP WARMING DRAWER
Cup Warming Drawers
Wolf cup warming drawers preheat cups so hot beverages
stay hot longer. The temperature is adjustable. Two model
options match the look of Wolf stainless and black coffee
systems. Cup warming drawers can be installed in a standard or ush inset application.
KEY FEATURES
• Hidden electronic touch controls.
• 420-watt heating element with temperature control range
(30°C) to 175°F (80°C).
of 85°F
• Automatic shut off and delayed start features.
• Push-pull drawer opening.
• Full extension, ball-bearing drawer glides.
• Removable, non-slip drawer liner.
CUP WARMING DRAWERS
CW24/S
Stainless
CW24/B
Black
DIMENSIONS
231/2" (597)
DRAWER
FULL EXTENSION
51/2"
(140)
19"
(483)
7
(22)
/8"
21" (533)
BEHIND FRAME
VENTILATION OUTDOOR GRILLS RANGES / RANGETOPS COOKTOPS / COFFEE SYSTEMS OVENS / WARMING DRAWERS
84 | Wolf Customer Care 800.222.7820
Page 85

WOLF CUP WARMING DRAWER
Planning Information
OVENS / WARMING DRAWERS COOKTOPS / COFFEE SYSTEMS RANGES / RANGETOPS OUTDOOR GRILLS VENTILATION
The cup warming drawer can be installed in a standard or
ush inset application. Finish the edges of the opening.
They may be visible when the drawer is open.
For standard installations, face trim will overlap stiles and
rails. Refer to the chart below.
1
For ush inset installations, a minimum
/8" (3) reveal is
required on all sides. To ensure consistent reveals, each
corner of the opening must be exactly 90°.
INSTALLATION REQUIREMENTS
BASE SUPPORT MIN
Cup Warming Drawer 75 lb (34 kg)
TRIM OVERLAP
Top 0" (0)
Bottom 0" (0)
Sides
11
/16" (18)
COMBINATION INSTALLATION
To install a cup warming drawer below a coffee system,
one opening for both units must be specied. To achieve
the minimum reveal between units, place the coffee system
support rails on top of the cup warming drawer, then secure
the rails to the sides of the cabinet. Any material between
the units will increase the horizontal reveal.
ELECTRICAL
Installation must comply with all applicable electrical codes.
Locate the electrical supply as shown in the illustrations
on the following pages. A separate circuit, servicing only
this appliance is required. A ground fault circuit interrupter
(GFCI) is not recommended and may cause interruption of
operation.
ELECTRICAL REQUIREMENTS
Electrical Supply grounded, 120 VAC, 60 Hz
Service 10 amp dedicated circuit
Receptacle 3-prong grounding-type
Power Cord 3'
(.9 m)
wolfappliance.com | 85
Page 86

SIDE
WOLF CUP WARMING DRAWER
Cup Warming Drawer
STANDARD INSTALLATION
OPENING
TOP VIEW
221/2"
(572)
DEPTH
ANTI-TIP BLOCK
VIEW
51/2" (140)
OPENING HEIGHT
E
221/8" (562)
OPENING WIDTH
FRONT VIEW
VENTILATION OUTDOOR GRILLS RANGES / RANGETOPS COOKTOPS / COFFEE SYSTEMS OVENS / WARMING DRAWERS
86 | Wolf Customer Care 800.222.7820
Page 87

SIDE
*W
**
WOLF CUP WARMING DRAWER
Cup Warming Drawer
FLUSH INSET INSTALLATION
7
/8" (22)
231/2" (597)
TOP VIEW
FLUSH
INSET
DEPTH
FINISHED
CLEATS*
OVENS / WARMING DRAWERS COOKTOPS / COFFEE SYSTEMS RANGES / RANGETOPS OUTDOOR GRILLS VENTILATION
ANTI-TIP BLOCK
53/4" (146)
FLUSH INSET
VIEW
ill be visible and should be finished to match cabinetry.
Dimension provides minimum reveals.
HEIGHT**
1
/8" (3)
13
/16"
(21)
233/4" (603)
FLUSH INSET WIDTH**
FRONT VIEW
1
/8" (3)
E
wolfappliance.com | 87
Page 88

Page 89

WOLF DUAL FUEL RANGES
Dual Fuel Ranges
OVENS / WARMING DRAWERS COOKTOPS / COFFEE SYSTEMS RANGES / RANGETOPS OUTDOOR GRILLS VENTILATION
Discover a new world of cooking—the best of two worlds,
actually—with a Wolf dual fuel range. Topside, gas cooking
in all its glory, with the ne control of dual-stacked, sealed
burners and options that include the remarkable French top.
Below, that marvel of culinary technology, the Wolf convection electric oven. Its two fans and four heating elements let
you select from 10 cooking modes so you can choose the
one precisely suited to the dish you’re preparing. Ovens are
self-cleaning. With a variety of range widths to choose from,
kitchens large and small become gateways to the exciting
new world of dual fuel cooking. All models are constructed
of stainless steel and can be ordered in natural or LP gas.
KEY FEATURES
• Dual-stacked, sealed burners for precise control and
easy cleanup.
• Patented digital oven control knob.
• Dual convection—two fans for even heat distribution.
• Ten cooking modes, including the bake stone and
dehydration kits for precise, easy-to-use control.
• Flame recognition and automatic reignition for safety and
ease of use.
• Full-extension bottom rack for easier access to foods.
CONFIGURATIONS
DF304
36" RANGE
DF366
DF364C
DF364G
48" RANGE30" RANGE 60" RANGE
DF486C
DF486G
DF484CG
DF484DG
DF484F
DF606DG
DF606F
DF606CG
DF604CF
DF604GF
• Spring and damper door hinge for quiet, effortless
opening and closing.
wolfappliance.com | 89
Page 90

WOLF DUAL FUEL RANGES
91/4"
(235)
367/8"
(937)*
457/8" (1165)
557/8" (1419)
407/8" (1038)
47" (1194)
261/8" (664)
25" (635)
241/8" (613)
271/2" (699)
291/2" (749)
*367/8" (937) MIN TO 39" (991) MAX.
357/8"
(911)
91/4"
(235)
367/8"
(937)*
457/8" (1165)
557/8" (1419)
407/8" (1038)
47" (1194)
261/8" (664)
25" (635)
241/8" (613)
271/2" (699)
291/2" (749)
*367/8" (937) MIN TO 39" (991) MAX.
357/8"
(911)
91/4"
(235)
367/8"
(937)*
457/8" (1165)
557/8" (1419)
407/8" (1038)
47" (1194)
261/8" (664)
25" (635)
241/8" (613)
271/2" (699)
291/2" (749)
*367/8" (937) MIN TO 39" (991) MAX.
357/8"
(911)
Dual Fuel Ranges
30" RANGE 36" RANGE
367/8"
(937)*
297/8" (759)
60" RANGE
357/8" (911)
367/8"
(937)*
48" RANGE
291/2" (749)
271/2" (699)
241/8" (613)
477/8" (1216)
91/4"
(235)
557/8" (1419)
457/8" (1165)
407/8" (1038)
367/8"
(937)*
VENTILATION OUTDOOR GRILLS RANGES / RANGETOPS COOKTOPS / COFFEE SYSTEMS OVENS / WARMING DRAWERS
601/8" (1527)
367/8"
(937)*
25" (635)
357/8"
(911)
261/8" (664)
47" (1194)
SIDE VIEW—ALL RANGES
*367/8" (937) MIN TO 39" (991) MAX.
367/8"
(937)*
90 | Wolf Customer Care 800.222.7820
Page 91

WOLF DUAL FUEL RANGES
Dual Fuel Ranges
BURNER RATING—Btu (kW)
SURFACE BURNER QTY
20,000 (5.9) 1
(5.3) 1 / 2
18,000
(4.4) 1 / 2
15,000
(2.7) 1
9,200
FEATURE NATURAL LP
Charbroiler 16,000 (4.7) 16,000 (4.7)
Griddle 15,000 (4.4) 13,000 (3.8)
Double Griddle 30,000 (8.8) 26,000 (7.6)
French Top 15,000 (4.4) 15,000 (4.4)
OVENS / WARMING DRAWERS COOKTOPS / COFFEE SYSTEMS RANGES / RANGETOPS OUTDOOR GRILLS VENTILATION
wolfappliance.com | 91
Page 92

WOLF DUAL FUEL RANGES
Planning Information
When installing against a combustible surface, a minimum
(254) riser is required for a 36" dual fuel range with
10"
charbroiler or griddle and all 48" and 60" models. Follow all
minimum clearances to combustible surfaces shown in the
illustration on the following page.
A Wolf pro ventilation hood is recommended with the dual
fuel range. If the range is to be installed without ventilation,
(914) minimum clearance, 44" (1118) for charbroiler,
a 36"
from countertop to combustible materials above the range is
required. Refer to page 124 for pro ventilation.
ELECTRICAL
Installation must comply with all applicable electrical codes.
Locate the electrical supply ush with the wall or oor and
within the shaded area shown in the illustration on the following page. A separate circuit, servicing only this appliance
is required.
Wolf dual fuel ranges have a terminal block that allows for a
3-wire or 4-wire installation.
ELECTRICAL REQUIREMENTS
SINGLE OVEN RANGE
Electrical Supply grounded, 240/ 208 VAC, 60 Hz
Service 30 amp dedicated circuit
Total Amps 21
DOUBLE OVEN RANGE
Electrical Supply grounded, 240/ 208 VAC, 60 Hz
Service 50 amp dedicated circuit
Total Amps 42.5
GAS SUPPLY
Installation must conform with all applicable gas codes.
3
A gas supply line of
the range. If local codes permit, a certied, 3'
1
/2" (13) or 3/4" (19) ID exible metal appliance connector is
recommended to connect the units
/4" (19) rigid pipe must be provided to
(.9 m) long,
1
/2" NPT female inlet to
the gas supply line.
Wolf natural gas ranges will function up to 10,250'
(3124 m)
in altitude without adjustment and LP gas ranges will function up to 8,600'
(2621 m). If the installation exceeds these
elevations, contact an authorized Wolf dealer for a high
altitude conversion kit.
GAS REQUIREMENTS
NATURAL GAS WC
Supply Pressure 5" (12.5 mb)
Min Line Pressure 7" (17.5 mb)
Max Regulator Pressure 14" (34.9 mb), .5 psi (3.5 kPa)
LP GAS WC
Supply Pressure 10" (25 mb)
Min Line Pressure 11" (27.4 mb)
Max Regulator Pressure 14" (34.9 mb), .5 psi (3.5 kPa)
VENTILATION OUTDOOR GRILLS RANGES / RANGETOPS COOKTOPS / COFFEE SYSTEMS OVENS / WARMING DRAWERS
92 | Wolf Customer Care 800.222.7820
Page 93

WOLF DUAL FUEL RANGES
Dual Fuel Range
INSTALLATION
OVENS / WARMING DRAWERS COOKTOPS / COFFEE SYSTEMS RANGES / RANGETOPS OUTDOOR GRILLS VENTILATION
13"
(330)
367/8" (937)
TO COOKING
SURFACE
LOCATION OF GAS AND
ELECTRICAL EXTENDS
ON FLOOR
21/4"
(57)
*Without ventilation hood, 36" (914) minimum clearance countertop to combustible materials, 44" (118) for charbroiler.
NOTE: Shaded area above countertop indicates minimum clearance to combustible surfaces,
combustible materials cannot be located within this area.
For island installation, 12"
(305) minimum clearance back of range to combustible rear wall above countertop.
18"
(457)
6"
(152)
A
FRONT VIEWSIDE VIEW
30" (762) TO 36" (914)
TO BOTTOM OF
VENTILATION HOOD
W
OPENING WIDTH
10" (254)
GAS
G E
13" (330)
ELECTRICAL
31/4" (83)
OPENING WIDTH
DUAL FUEL RANGE W A
30" Model 30" (762) 81/2" (216)
36" Model 36" (914) 131/2" (343)
48" Model 48" (1219) 24" (610)
60" Model 601/4" (1530) 31" (787)
*
wolfappliance.com | 93
Page 94

Page 95

WOLF GAS RANGES
Gas Ranges
OVENS / WARMING DRAWERS COOKTOPS / COFFEE SYSTEMS RANGES / RANGETOPS OUTDOOR GRILLS VENTILATION
Our gas ranges offer the same function, durability and
exhilarating performance our ranges have become famous
for. Now add the ne control of dual-stacked, sealed
burners for gas cooking with superior results. Choose from
a multitude of sizes and features to t your cooking style.
Standard features include an infrared broiler and convection
baking. Options include infrared griddle, charbroiler and the
innovative French top. All gas range models are constructed
of stainless steel and can be ordered in natural or LP gas.
KEY FEATURES
• Gas convection oven for even heat distribution.
• Dual-stacked, sealed burners for precise control and
easy cleanup.
• Infrared broiler with ultrafast preheating.
• Flame recognition and automatic reignition for safety and
ease of use.
• Porcelain-coated, cast-iron grates for easy cleaning and
durability.
• Signature red, stainless steel or black control knobs with
innite control.
CONFIGURATIONS
GR304
36" RANGE
GR366
GR364C
GR364G
48" RANGE30" RANGE 60" RANGE
GR488
GR486C
GR486G
GR484CG
GR484DG
GR606DG
GR606F
GR606CG
wolfappliance.com | 95
Page 96

WOLF GAS RANGES
433/8" (1102)
253/8" (645)
27" (686)
91/4"
(235)
283/8" (721)
*37" (940) MIN TO 38" (965) MAX.
21/2"
(64)
37"
(940)*
36"
(914)
46" (1168)
56" (1422)
41" (1041)
433/8" (1102)
253/8" (645)
27" (686)
91/4"
(235)
283/8" (721)
*37" (940) MIN TO 38" (965) MAX.
21/2"
(64)
37"
(940)*
36"
(914)
46" (1168)
56" (1422)
41" (1041)
477/8" (1216)
433/8" (1102)
253/8" (645)
27" (686)
91/4"
(235)
283/8" (721)
*37" (940) MIN TO 38" (965) MAX.
21/2"
(64)
37"
(940)*
36"
(914)
37"
(940)*
46" (1168)
56" (1422)
41" (1041)
Gas Ranges
30" RANGE 36" RANGE 48" RANGE
297/8" (759)
60" RANGE
37"
(940)*
357/8" (911)
37"
(940)*
36"
(914)
37"
(940)*
283/8" (721)
27" (686)
253/8" (645)
91/4"
(235)
56" (1422)
46" (1168)
41" (1041)
37"
(940)*
VENTILATION OUTDOOR GRILLS RANGES / RANGETOPS COOKTOPS / COFFEE SYSTEMS OVENS / WARMING DRAWERS
601/8" (1527)
96 | Wolf Customer Care 800.222.7820
21/2"
SIDE VIEW—ALL RANGES
(64)
*37" (940) MIN TO 38" (965) MAX.
433/8" (1102)
Page 97

WOLF GAS RANGES
Gas Ranges
BURNER RATING—Btu (kW)
SURFACE BURNER QTY
15,000 (4.4) 3 / 5 / 7
(2.7) 1
9,200
FEATURE NATURAL LP
Charbroiler 16,000 (4.7) 16,000 (4.7)
Griddle 15,000 (4.4) 13,000 (3.8)
Double Griddle 30,000 (8.8) 26,000 (7.6)
French Top 15,000 (4.4) 15,000 (4.4)
OVEN BURNER
18" Oven 18,000 (4.7)
30" Oven 30,000 (8.8)
36" Oven 30,000 (8.8)
Infrared Broiler 18,000 (4.7)
OVENS / WARMING DRAWERS COOKTOPS / COFFEE SYSTEMS RANGES / RANGETOPS OUTDOOR GRILLS VENTILATION
wolfappliance.com | 97
Page 98

WOLF GAS RANGES
Planning Information
When installing against a combustible surface, a minimum
(508) riser is required. Follow all minimum clearances
20"
to combustible surfaces shown in the illustration on the
following page.
A Wolf pro ventilation hood is recommended with the gas
range. If the range is to be installed without ventilation, a
(914) minimum clearance, 44" (1118) for charbroiler, from
36"
countertop to combustible materials above the range is
required. Refer to page 124 for pro ventilation.
ELECTRICAL
Installation must comply with all applicable electrical codes.
Locate the electrical supply ush with the wall or oor and
within the shaded area shown in the illustration on the following page. A separate circuit, servicing only this appliance
is required.
ELECTRICAL REQUIREMENTS
Electrical Supply grounded, 110/ 120 VAC, 60 Hz
Service 15 amp dedicated circuit
Receptacle 3-prong grounding-type
Power Cord 6'
(1.8 m)
GAS SUPPLY
Installation must conform with all applicable gas codes.
3
A gas supply line of
the range. If local codes permit, a certied, 3'
1
/2" (13) or 3/4" (19) ID exible metal appliance connector is
recommended to connect the units
/4" (19) rigid pipe must be provided to
(.9 m) long,
1
/2" NPT female inlet to
the gas supply line.
Wolf natural gas ranges will function up to 8,600'
(2621 m) in
altitude without adjustment. If the installation exceeds this
elevation, contact an authorized Wolf dealer for a high altitude conversion kit. LP models do not require conversion.
GAS REQUIREMENTS
NATURAL GAS WC
Supply Pressure 5" (12.5 mb)
Min Line Pressure 7" (17.5 mb)
Max Regulator Pressure 14" (34.9 mb), .5 psi (3.5 kPa)
LP GAS WC
Supply Pressure 10" (25 mb)
Min Line Pressure 11" (27.4 mb)
Max Regulator Pressure 14" (34.9 mb), .5 psi (3.5 kPa)
VENTILATION OUTDOOR GRILLS RANGES / RANGETOPS COOKTOPS / COFFEE SYSTEMS OVENS / WARMING DRAWERS
98 | Wolf Customer Care 800.222.7820
Page 99

WOLF GAS RANGES
Gas Range
INSTALLATION
OVENS / WARMING DRAWERS COOKTOPS / COFFEE SYSTEMS RANGES / RANGETOPS OUTDOOR GRILLS VENTILATION
13"
(330)
LOCATION OF GAS AND
ELECTRICAL EXTENDS
ON FLOOR
37" (940)
TO COOKING
SURFACE
18"
(457)
6"
(152)
OPENING WIDTH
53/4"
(146)
73/4" (197)
30" (762) TO 36" (914)
TO BOTTOM OF
VENTILATION HOOD
W
12"
(305)
10" (254)
E
2" (51)
*
G
3"
(76)
*Without ventilation hood, 42" (1067) minimum clearance countertop to combustible materials, charbroiler and GR488 require non-combustible materials.
NOTE: Shaded area above countertop indicates minimum clearance to combustible surfaces,
combustible materials cannot be located within this area.
For island installation, 12"
(305) minimum clearance back of range to combustible rear wall above countertop.
FRONT VIEWSIDE VIEW
12"
(305) GAS5"(127)
OPENING WIDTH
GAS RANGE W
30" Model 30" (762)
36" Model 36" (914)
48" Model 48" (1219)
60" Model 601/4" (1530)
wolfappliance.com | 99
Page 100

WOLF SEALED BURNER RANGETOPS
Sealed Burner Rangetops
Wolf sealed burner rangetops incorporate all the gas
cooking features of a Wolf dual fuel range. Customize your
rangetop with your preferred combination of burners (from
four to six), infrared griddle or charbroiler, or the remarkable
French top. Compared with conventional electric elements,
the infrared elements of the charbroiler and griddle are a
revelation. They preheat almost instantly, distribute heat
more evenly and deliver fast temperature recovery after food
is placed on the surface. All sealed burner rangetop models
are constructed of stainless steel and can be ordered in
natural or LP gas.
KEY FEATURES
• Dual-stacked, sealed burners for precise control and
easy cleanup.
• Optional congurations including infrared charbroiler,
griddle and French top.
• Flame recognition and automatic reignition for safety and
ease of use.
• Signature red or black control knobs with innite control.
CONFIGURATIONS
SRT304
36" RANGETOP30" RANGETOP 48" RANGETOP
SRT366
SRT364C
SRT364G
SRT486C
SRT486G
SRT484CG
SRT484DG
SRT484F
VENTILATION OUTDOOR GRILLS RANGES / RANGETOPS COOKTOPS / COFFEE SYSTEMS OVENS / WARMING DRAWERS
100 | Wolf Customer Care 800.222.7820
 Loading...