

Page 1
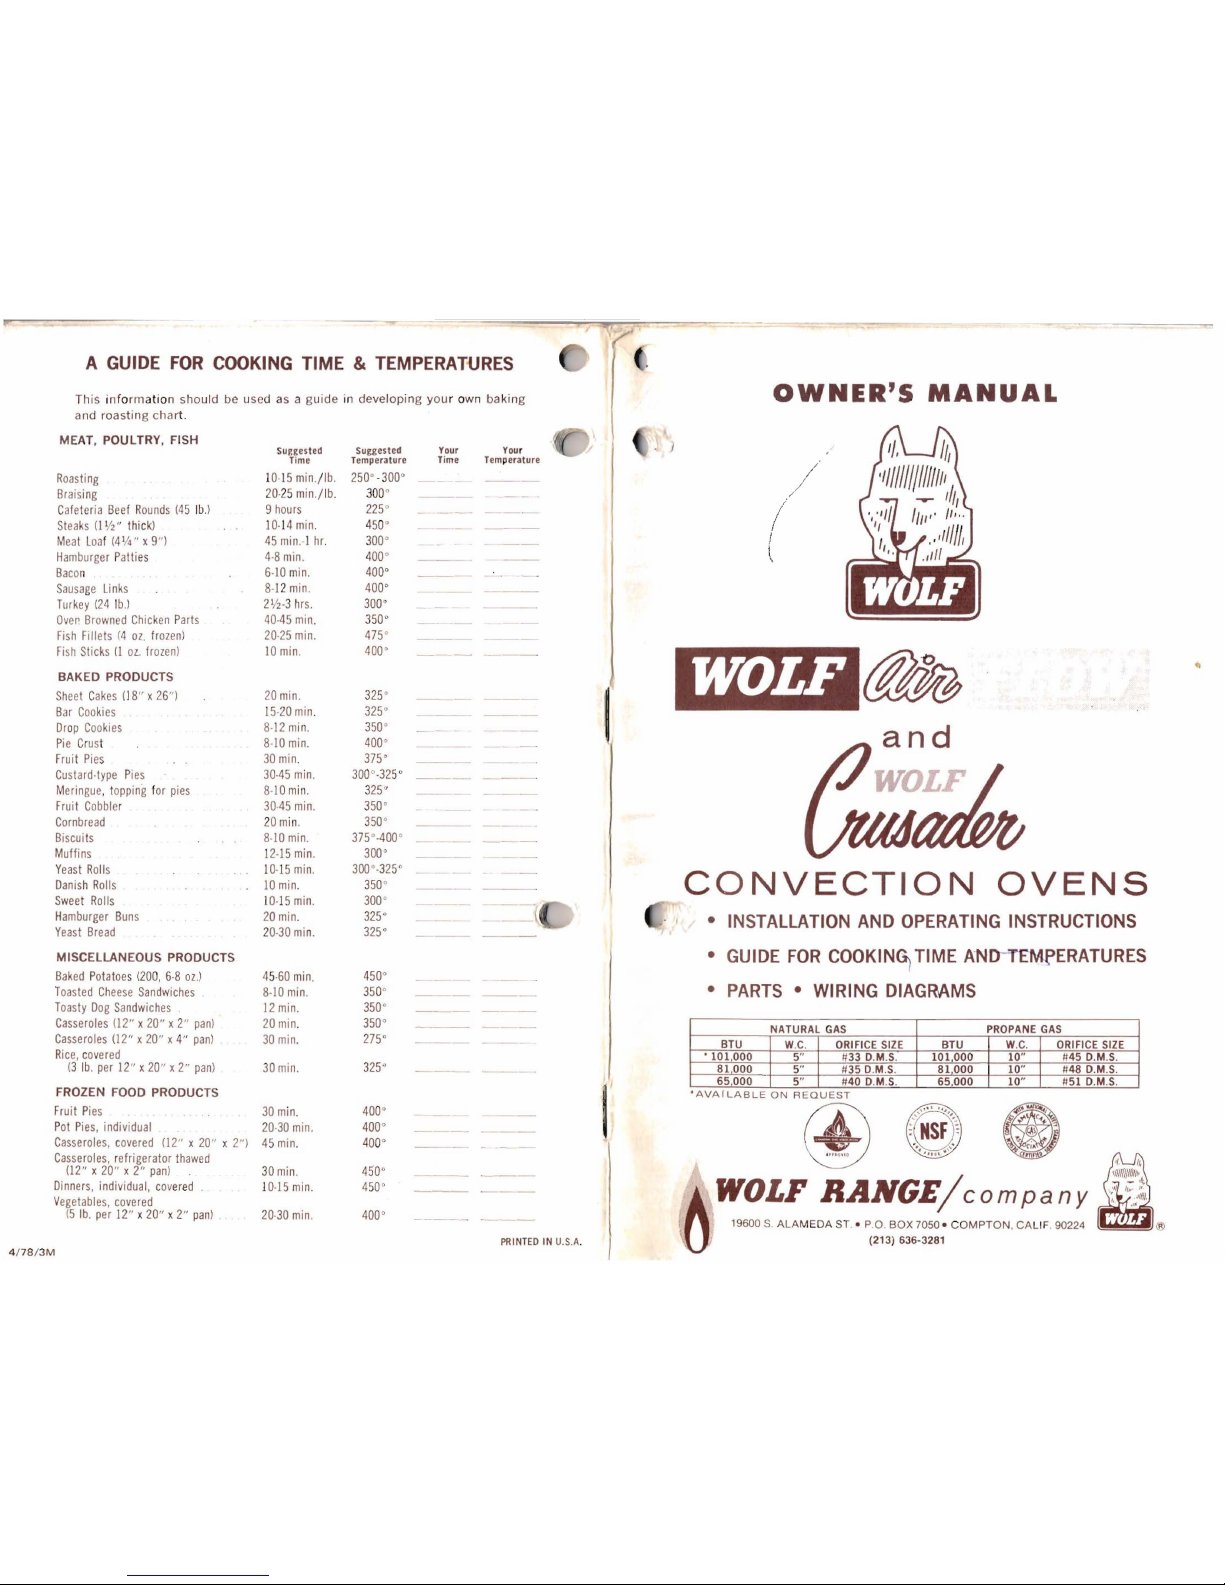
A
GUIDE
FOR
COOKING
TIME &
TEMPERATURES
This
information
should
be used as a
guide
in developing
your
own
baking
and
roasting
chart.
MEAT, POULTRY, FISH
Suggested Suggested
Your Your
Time
Temperature Time Temperature
Roasting
10·15
min.llb.
250'.300°
Braising
20·25
min./lb.
300°
Cafeteria
Beef
Rounds
(45
Ibl
9
hours
225°
Steaks
(I
V2"
thick)
10·14
min.
450°
Meat
Loaf
(41/4" X
9")
45
min.·1
hI.
300°
Hamburger
Patties
4·8
min.
400°
Bacon
6·10
min.
400'
Sausage
Links
8·12
min.
400°
Turkey
(24
Ibl 2
1
/2-3
hrs.
300°
Ovel~
Browned
Chicken
Parts
40·45
min.
350°
Fish
Fillets
(4
oz.
frozen)
20·25
min.
475°
Fish
Sticks
II
oz.
frozen)
10
min.
400
0
BAKED PRODUCTS
OWNER'S
MANUAL
. }
//.
I
/
~
•
GUIDE
FOR
COOKIN~
TIME
ANo-TEMPERATURES
•
PARTS • WIRING
DIAGRAMS
NATURAL
GAS
PROPANE
GAS
BTU
W.C.
ORIFICE
SIZE
BTU
W.C.
ORIFICE
SIZE
•
101,000
5"
1/33D.M.S.
101000
10"
1145D.M.S.
81000
5"
1135D.M.S.
81000
10"
1148D.M.S.
65000
5"
1140D.M.S.
65,000
10"
1/51D.M.S.
AVAILABLE
ON
REQUEST
@
~:~=
~
~
''''0''0
••
,.....
WOLF
BANGE/company
~"nl
19600
S.
ALAMEDA ST.•
PO.
BOX
7050.
COMPTON.
CALIF. 90224
l"6??'J®
(213)
636-3281
Sheet
Cakes
(18" x 26")
Bar
Cookies
Drop
Cookies
Pie
Crust
Fruit
Pies
Custard·type
Pies
Meringue,
topping
for
pies
Fruit
Cobbler
Cornbread
Biscuits
Muffins
Yeast
Rolls
Danish
Rolls
Sweet
Rolls
Hamburger
Buns
Yeast
Bread
20
min.
15·20
min.
8·12
min.
8-10
min.
30
min.
30·45
min.
8-10min.
30·45
min.
20
min.
8·10
min.
12-15
min.
10-15
min.
10
min.
10·15
min.
20
min.
20·30
min.
325
0
325°
350°
400°
375'
300°-325°
325"
350'
350
0
375°·400°
300'
300°.325' -
350°
300'
325°
325'
MISCELLANEOUS PRODUCTS
Baked
Potatoes
(200,
6·8
Oz.)
Toasted
Cheese
Sandwiches
45·60
min.
8·10
min.
450°
350°
-
---
Toasty
Dog
Sandwiches
Casseroles
(12" x20"
x2"
pan)
Casseroles
(12" x20"
x4"
pan)
Rice,
covered
(3
lb.
per
12" x20"
x2"
pan)
30
min.
12
min.
20
min.
30
min.
350°
350°
275'
325°
-----
-_._-
---
FROZEN FOOD PRODUCTS
Fruit
Pies
Pot
Pies,
individual
Casseroles,
covered
(12" x 20"
x 2")
Casseroles,
refrigerator
thawed
(12" x 20"
x 2"
pan)
Dinners,
individual,
covered
Vegetables,
covered
(5
lb.
per
12" x 20"
x 2"
pan)
30
min.
20·30
min.
45
min.
20·30
min.
30
min.
10·15
min.
400°
400°
400°
450'
450'
400'
- -
-
---.
---
--
..
---
---
----
---
I
4178i3M
PRINTED
IN
U.S.A.
Page 2
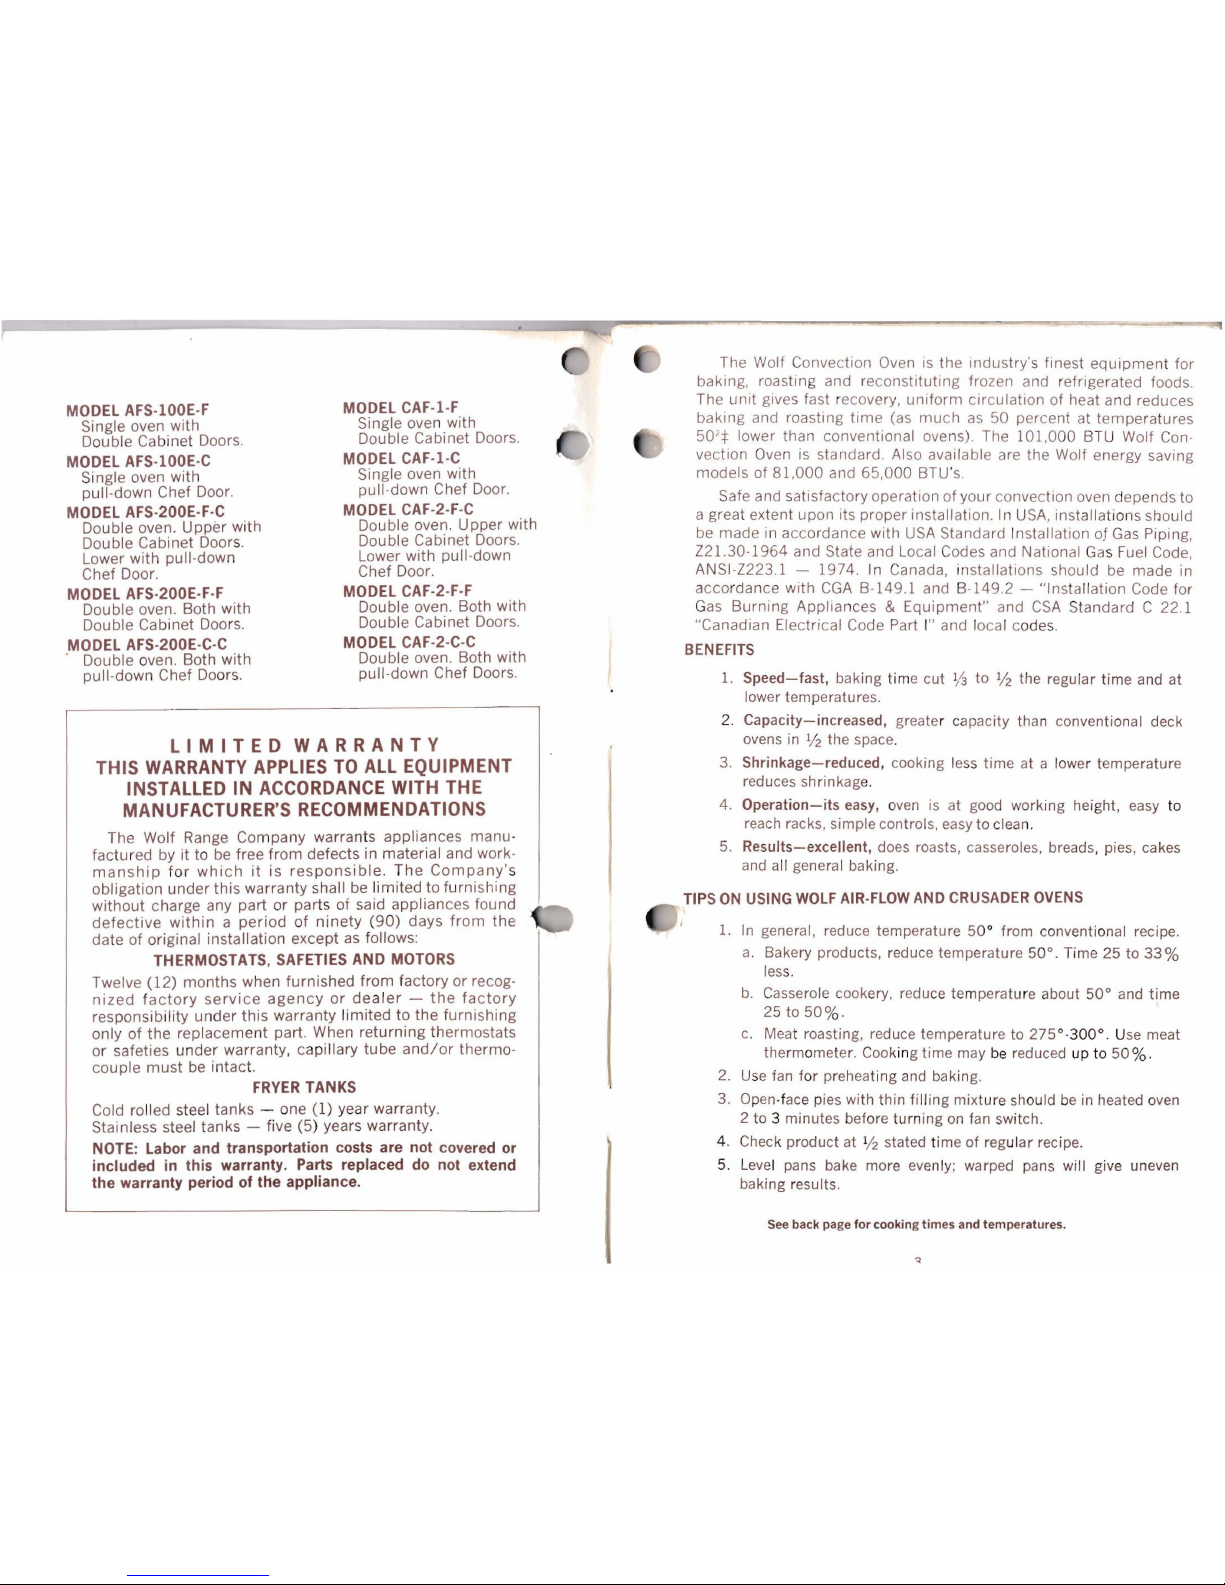
MODEl
CAF-l·F
Single oven with
Single oven with
Double Cabinet Doors.
MODEl
AFS·I00E·F
Double Cabinet Doors.
MODEl
CAF-I-C
Si
ngle oven with
Single oven with
pull-down Chef Door.
pull-down Chef Door.
MODEl
AFS-200E·F-C
MODEl
CAF-2·F-C
Double oven.
Upper
with
Double oven. Upper with
Double Cabinet Doors.
Double Cabinet Doors.
Lower with pull-down
Lower with pull-down
Chef Door.
MODEl
AFS-I00E·C
Chef Door.
MODEl
AFS-200E-F-F
MODEl
CAF-2-F·F
Double oven. Both with
Double oven. Both with
Double Cabinet Doors.
Double Cabinet Doors.
MODEl
AFS·200E-C-C
MODEl
CAF-2-C-C
Double oven. Both with
Double oven. Both with
pull-down Chef Doors.
pull-down Chef Doors.
LIMITED
WARRANTY
THIS WARRANTY APPLIES
TO
ALL EQUIPMENT
INSTALLED
IN
ACCORDANCE WITH THE
MANUFACTURER'S RECOMMENDATIONS
The Wolf Range Company warrants appliances manu-
factured by it to
be
free
from
defects in material and work-
manship
for
which
it
is
responsible.
The
Company's
obligation
under
this
warranty shall
be
limited
to furnishing
without
charge any part or parts of said appliances found
0'
.
defective
within a period
of
ninety
(90)
days
from
the
date of original installation except
as
follows: I
THERMOSTATS, SAFETIES AND MOTORS
Twelve (12) months when furnished from factory or recognized
factory
service
agency
or
dealer -the
factory
responsibility
under
this
warranty
limited
to the furnishing
only
of
the replacement part. When returning thermostats
or safeties
under
warranty, capillary tube
and/or
thermo-
couple
must
be
intact.
FRYER
TANKS
Cold rolled steel tanks - one
(1) year warranty.
Stainless steel tanks - five (5) years warranty.
NOTE: Labor and
transportation
costs are not covered or
included
in
this warranty. Parts replaced do not extend
the
warranty period
of
the
appliance.
The Wolf Convection Oven
is
the industry's finest
equipment
for
baking, roasting and reconstituting frozen and refrigerated foods.
The
unit
gives fast recovery,
uniform
circulation of heat and reduces
baking and roasting
time
(as
much
as
50 percent at temperatures
50
2
:j:
lower than conventional ovens). The 101,000 BTU Wolf Con-
vection Oven
is
standard. Also available are the Wolf energy saving
models of
81,000
and 65,000 BTU's.
Safe and satisfactory operation of your convection oven depends to
a great extent upon its proper installation.
In
USA,
installations should
be
made in accordance with
USA
Standard Installation
oJ
Gas
Piping,
Z21.30-1964 and State and Local Codes and National Gas Fuel Code,
ANSI-Z223.1 - 1974. In Canada, installations should
be
made in
accordance with
CGA
B-149.1 and B-149.2 - "Installation Code for
Gas
Burning Appliances &
Equipment"
and
CSA
Standard C 22.1
"Canadian Electrical Code Part I" and local codes.
BENEFITS
1.
Speed-fast,
baking time cut
~-3
to
1/
2
the regular time and at
lower temperatures.
2.
Capacity-increased, greater capacity than conventional deck
ovens
in
1/
2
the space.
3.
Shrinkage-reduced, cooking less time at a lower temperature
reduces shrinkage.
4.
Operation-its
easy,
oven
is
at
good
working height,
easy
to
reach
racks. simple controls,
easy
to clean.
5.
Results-excellent,
does
roasts, casseroles, breads, pies, cakes
and
all general baking.
TIPS
ON
USING
WOLF
AIR-FLOW
AND
CRUSADER
OVENS
1.
In
general, reduce temperature 50° from conventional recipe.
a.
Bakery products, reduce temperature 50°. Time 25 to
33%
less.
b.
Casserole cookery, reduce temperature about
50°
and
time
25 to
50%.
c.
Meat roasting, reduce temperature to
275°·300°.
Use
meat
thermometer. Cooking time may
be
reduced up to 50
%.
2.
Use
fan
for preheating
and
baking.
3. Open·face pies with thin filling mixture should
be
in
heated
oven
2 to 3 minutes before turning
on
fan
switch.
4.
Check product at
1/
2
stated time of regular recipe.
5.
Level
pans bake more evenly; warped pans will give uneven
baking results.
See back page
for
cooking
times
and
temperatures.
'l
Page 3

INSTALLATION
For
maximum
efficiency
and
proper
operation, all Convection Ovens
must
be
installed according
to
applicable state, local and national codes
and ordinances.
DO NOT USE DOORS TO LIFT
OR
MOVE OVEN!
This
appliance
IS
designed
for
installatIOn
In
"Fire-Resistive"
locations.
When
the
oven
IS
"built-In",
adequate
air
space
for
proper
venting
of
the
motor
must
be
provided
at
the
bottom
and
back
of
the
unit.
Allow
6"
clearance
at
side
and
back
from
combustible
materials.
INFORMATION
FOR
ElECTRICAN
Be
sure
that
the
electric
line
IS
not
overloaded
and
that
the
electric
service
corresponds
with
the
wIfing
diagram
located
on
the
back
of
the
appliance
(Figure
I).
The
rating
plate
IS
located
on
the
InSide
of
the
burner
box
louver
panel
(Figure
3Ar·1
or
3CAr-I)
and
Will
show
the
voltage.
phase,
cycle,
full
load
amperes,
BTU,
as
well
as
the
type
of
gas,
CAUTION:
Always
check
your
line
potential
on
all
three
phase
circUits.
The
blower
fan
must
be
running
clockWise
from
the
front
of
the
oven.
Please
note
arrow
on
the
fan
baffle,
(Figure
2).
Note:
Never
attempt
to
make
gas
or
electrical adjustments
when
the
gas
and
electric
service
are
turned
on.
Always
check
your
breaker
panel.
Should
equipment
be
added
to
an
eXISting
Installation,
be
sure
that
the
gas
meter,
gas
pressure,
and
proper
pipe
sIZIng
have
been
thoroughly
checked
by a competent
service
agency
or
your
local
Gas
company
representative.
GAS
PRESSURES:
When
natural
gas
is
specified. a gas
pressure
regulator
set
at
5"
WC
(water
column)
IS
supplied
With
each
unit
of
the
WOlf
Air
Flow
Oven.
ThiS
Insures
constant
gas
pressure.
When
ordered
for
propane
gas,
standard
orifices
are
Sized
lor
10"
we
pressure,
NOTE:
In
U.S.A
..
when a gas
appliance
is
installed
at
altitude
above
2,000
feet,
decrease
the
BTU
input
4%
for
each
1.000
feet
above
sea
level.
Any
orifice
change
should
be
made
by a com·
oetent
gas
service
man.
Always
check
the
unit rating
plate
for
the
particular
type
of
gas
used.
FIGURE 1
4
FIGURE 2
--
----------
FIGURE 3
AFS
WOLF CRUSADER OVEN
WOLF AIR
flOW
OVEN
FIGURE 3
CAF
5
Page 4
I...
_.
=~
• -- i
ASSEMBLY
AND
INSTALLATION
(Gas
Connections)
Single
deck
oven requires
one
gas connection
Double deck oven requires
two
gas
connections
DO
NOT USE DOORS TO LIFT
OR
MOVE OVEN!
ALL OVENS MUST BE INSTALLED ON PIPE
LEGS
OR STAND.
A.
Single Deck
units
are
shipped
with
the
pipe leg
"stand."
Set the oven on the
stand
(Figure
4)
and
anchor
oven
to
stand
with
bolts supplied. Oven
must
be
flush
at
rear and sides
of
stand.
B.
The leveling
adjustment
is in
the
FOOT
of
the
pipe leg (Figure 4-1).
DO
NOT
ATIEMPT
TO LEVEL
BY
TURNING THE LARGE DIAMETER PIPE.
C.
When proper gas
connections
have been made,
the
unit
must
be
"leveled"
by
placing a spirit
level on
the
oven rack,
left
to
right
and
front
to
back.
D.
A separate Gas
Shut
Off
Valve
must
be
installed
for
each oven and be located
in
an
accessible area.
E.
Connect each oven separately
using
%"
pipe
or
larger.
If
flexible
or
semi·
flexible connectors are used,
it
is recommended
that
commercial
type, heavy·
duty,
non·kink
flexible hose
with
an I.D. equal
to
%"
I.D. pipe be used. Avoid
sharp
bends
or
kinks
with
flexible hose. All flex.ible connectors used
must
be
A.G.A.
or
C.G.A.-listed.
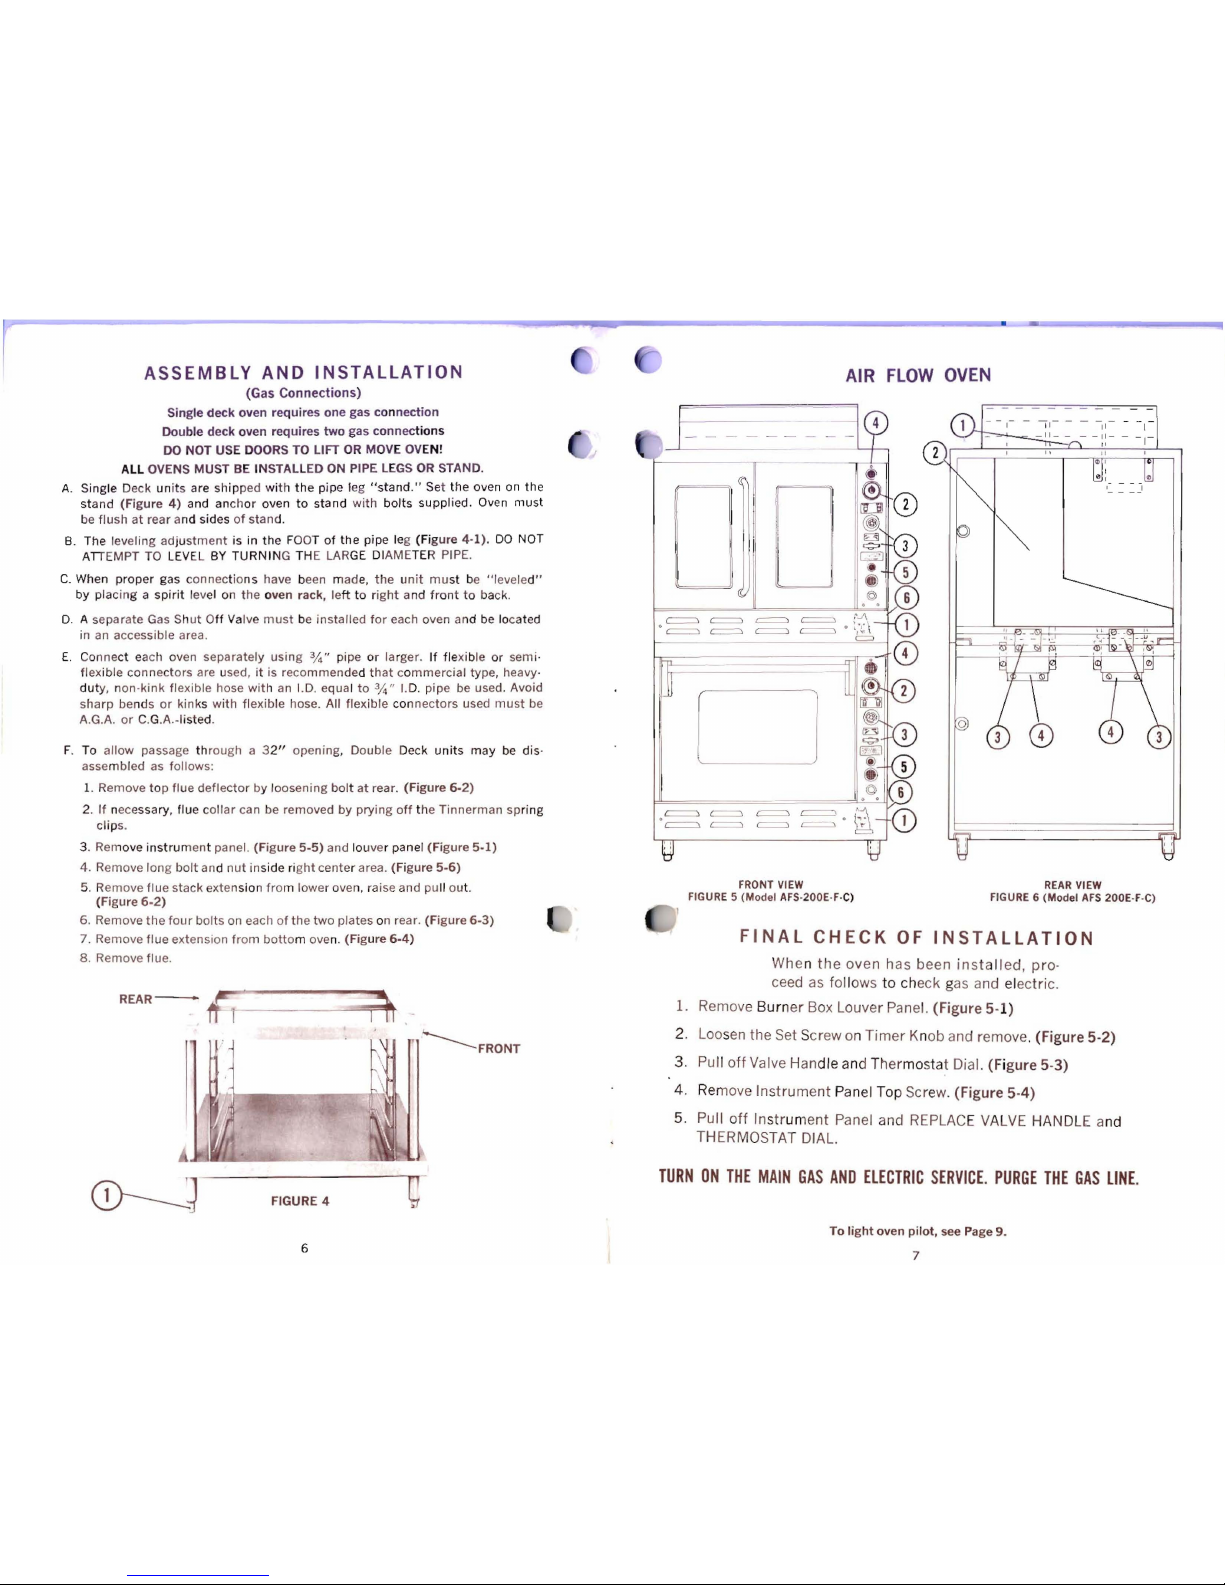
F.
To allow passage
through
a
32"
opening, Double Deck
units
may
be dis·
assembled as follows:
1. Remove
top
flue
deflector
by loosening
bolt
at
rear. (Figure
6·2)
2.
If
necessary, flue
collar
can be removed
by
prying
off
the
Tinnerman
spring
clips.
3. Remove
instrument
panel.
(Figure
5-5)
and louver panel (Figure
5-1)
4. Remove
long
bolt
and
nut
inside
right
center
area. (Figure
5.6)
5.
Remove flue stack extension
from
lower
oven, raise and pull out.
(Figure
6.2)
6. Remove
the
four
bolts on each
of
the
two
plates on rear. (Figure
6-3)
7. Remove flue extension
from
bottom
oven. (Figure
6·4)
8. Remove flue.
REAR-
~
I ,
~
'-------
FRONT
CD------~
C-
FIGURE 4
AIR
FLOW
OVEN
~
REAR
VIEW
::1'
,:~
,
==
=
====
====
FRONT
VIEW
FIGURE 5
(Model
AFS·200E·F·C)
, ,
, .
==
'==
FIGURE 6
(Model
AFS
200E·F·C)
FINAL
CHECK
OF
INSTALLATION
When
the
oven has been
installed,
pro·
ceed as follows
to
check gas and electric.
1. Remove Burner Box Louver Panel. (Figure 5-1)
2. Loosen the Set Screw on
Timer
Knob and remove. (Figure 5-2)
3. Pull
off
Valve Handle and Thermostat Dial. (Figure 5-3)
4. Remove Instrument Panel Top Screw. (Figure 5-4)
5. Pull
off
Instrument Panel and
REPLACE
VALVE
HANDLE and
THERMOSTAT DIAL,
TURN
ON
THE
MAIN
GAS
AND
ElECTRIC
SERVICE.
PURGE
THE
GAS
LINE.
To
light
oven
pilot,
see Page
9.
6
7
Page 5

CRUSADER
OVEN
TO
LIGHT
OVEN
PILOT
•
©
~
=
!VI
==
==
~"
~;'t
CD
=
--
~
= =
=---="
~
===<=........=1
FRONT
VIEW
FIGURE 5 (CAF)
CAF2·F·C
CAF2·F·C
FINAL
CHECK
OF
INSTALLATION
When
the
oven has been
installed,
pro·
ceed
as
follows
to
check
gas
and electric.
1. Remove Burner Box Louver Panel (Figure 5-1)
2. Pull
off
Valve Handle and Thermostat Dial. (Figure 5-3)
3. Remove Instrument Panel Top Screw. (Figure 5-4)
4. Pull
off
Instrument Panel and
REPLACE
VALVE
HANDLE and
THERMOSTAT DIAL.
TURN
ON
THE
MAIN
GAS
AND
ElECTRIC
SERVICE.
PURGE
THE
GAS
LINE.
To
light
oven
pilot,
see
Page
9.
8
I'
,
'f
,.
1
,
REAR
VIEW
FIGURE 6 (CAF)
Model
CAF
200·F·C
\
Model
CAF 2·F·C
Push
in
RED
"Gas Safety Valve" Button (Figure
8-1)
and light
the
oven
pilot (Figure 7-1). Hold
RED
BUTTON in
for
at
least
30
seconds
or
longer.
When the oven pilot has
been
lighted, allow the capillary
tip
(Figure 7-2)
to become cherry red, then release
RED
BUTTON and the oven pilot should
remain lighted.
If
the oven pilot becomes extinguished, wait 5 minutes
or
longer and repeat the pilot lighting instruction.
The pilot flame must
fully
envelop the Capillary Tip (Figure 7-2).
To
adjust
burner
trailer
pilot (Figure 7-4)
turn
adjusting screws
on
brass
fitting
(Figure
7·3)
until desired flame is obtained .
Check all connections
for
gas leaks
by
using a soapy solution
or
equivalent.
Do
not
use
an
open flame.
FIGURE 7
NEW
ALUMINIZED
STEEL
OVEN
BURNER
INTERCHANGEABLE
WITH
CAST
IRON
OVEN
BURNER
9
FIGURE 8
Page 6

TO
OPERATE
AIR-FLOW
OVEN
1. Turn
Gas
Valve
to
"on"
position.
(Figure
9·1)
2.
Dial desired temperature
on
ther-
mostat.
(Figure 9-2)
3. Press fan switch
to
"on"
position.
(Figure 9-3)
4. Pre-heat oven 12-15 minutes or
until oven ready light (Figure 9-4)
comes on.
5.
Place
food
in oven,
balancing
loads
as
evenly
as
possible.
6.
Always bake with fan on.
Fan
may
be
"off"
for
short periods
of
time
to solidify meringue and special
bake products.
7.
To
set Electric Timer to desired
cook time, always turn
timer
coun-
ter
- clock - wise
to
set to desired
cooking time.
When
warning buz-
zer sounds, turn
timer
%"
to left
to stop buzzing. (Figure
9·6)
TOSHUT
DOWN
THE
OVEN
FOR
THE
DAY,
be
sure fan and oven lights
are turned
off
- then turn "Gas
Shut-Off Valve" (Figure 9-1)
to
the
"off"
position.
NOTE:
The oven lights (Figure 9-5)
should
be
used only to check your
products and then turned off.
10
TO
OPF-RATE
OVEN
BLOwER MUST
BE
ON DURINC
PREHEATINC AFTER OVEN
HAS REACHED DESIREO
TEMPERATURE.
BLOWER
CAN
BE
TURNED
Ofr
FOR J TO 5
MINUTE
PERIODS.
"11)
(fJ0
'.-.
FIGURE 9
TO
OPERATE
CRUSADER
OVEN
1. Turn gas valve to
"on"
position.
(Figure 10-1)
2.
Dial desired temperature
on
thermostat.
(Figure 10-2)
3. Push toggle switch (Figure 10-3)
to
"on"
position
to
tu
rn
on
fan.
4. Pre-
heat
ove n
15
min
utes
or
longer.
5.
Turn
off
fan by switching toggle
switch to
"off"
position.
(Figure 10-3)
6.
Place
food
in
oven
balancing
loads
as
evenly
as
possible. Close
doors and turn fan switch
to
"on"
position.
7.
Always bake with fan on.
Fan
may
be
"off"
for short periods of time
to
solidify meringue and special
bake products.
I
,.) shut
off
oven
for
the day,
be
sure fan
is
turned
off
with toggle
switch
in
"off"
position.
(Figure 10-3)
Turn "gas shut·off valve"
to
"off"
position.
(Figure 10-1)
rIPs
ON
CLEANING
Interior surfaces will stay clean
if
an accepted
oven cleaner
IS
used frequently.
To
clean
GLASS
WINDOW;
Use
vinegar
or
commercial glass cleaner. Care must be taken
when
cleaning
around
electric
components.
The ELECTRIC SERVICE
MUST
BE TURNED
OFF.
Keep liqUids away from wires and light
sockets.
11
FIGURE
10
Page 7

TO
ADJUST CABINET
DOOR
ALIGNMENT
ON
AIR
FLOW
OVEN
ONLY,
PROCEED
AS
FOLLOWS:
1. Remove header cover (Figure 3-4) above doors by removing
the screws from under header cover and
on
top of header
cover.
"\
2.
Tighten left
turnbuckle
(Figure 11-1) to pull left door in-
ward and
right
turnbuckle
(Figure 11-2) to pull right door
inward.
Caution-turnbuckle
adjustment must not
be
too
tight, causing undue strain
on
entire assembly.
3.
Wolf
Air
Flow Doors will open a full
185°.
If oven doors are
opening too far, a stop (Figure 11-3)
is
provided near the
left turnbuckle. Simply loosen the stop and slide the stop
to the desired location and tighten. Replace header cover.
4. To adjust door spacing use adj. (Figure 11-4).
~1
1
TO
ADJUST CHEF
DOORS:
AIR
FLOW
AND CRUSADER
OVENS
Adjust spring tension by
turni
ng the center
turnbuckle
as
desired.
1. Remove
burner
box louver panel (Figure 5-1)
2.
Tighten
turnbuckle
to give door more tension and loosen
for
less tension (Figure 12-1)
<'
~;:~~.ft-~~~~~
,
FIGURE
12
)
1
PARTS
LIST
(See
Illustrations
Pages 14, 15, 16,
17)
ELECTRICAL PARTS _
18165
Pressure
Switch.
115
Volt -AFS
18161
Thermostat
KX
18171
Transformer. 3 Phase
(Op!.)
18192
AFS
Oven
Light
Switch
18394
AFS
Fan
Switch. 3 Phase
18194
AFS
Fan
Switch
208-230V
1
Phase
18194J
AFS
Fan
Switch.
115
Volt. I Phase
13723
Crusader
Fan
Switch·
1151208
V-I
Phase
18393
Crusader
Fan
Switch·
2081230
V - 3
Phase
18321
Door
Switch 3 Phase -AFS
18163
AFS
Door
Switch -Single
Pole
18321
AFS
Door
Switch -Double
Pole
18166
Door
Switch
Lever
Arm.
Chef
Door -AFS
18223
Door
Switch
Lever
Arm
-
Cabinet
Door -AFS
18189
AFS
Oven
Lite
Bulb
18190
AFS
Oven
Lite
Socket
18147
AFS
Oven
Ready
Light
18386
Doerr
Motor
Only -115V
-
Single
Phase
18387
Doerr
Motor
Only -208V
-
Single
Phase
18388
Doerr
Motor
Only·
208V
.
Three
Phase
8567A
Motor & Fan
Ass·y.
-
115V
-
UJ
8568A
Motor & Fan
Ass·y. -2081230
-
L8'
8569A
Motor & Fan
Ass·y. -2081230
-
38'
18319
AFS
Timer & Buzzer
18323
AFS
Timer
Dial
Plate
18324
AFS
Timer
Knob
- BURNERS. VALVES & CONTROLS
19137
8552A
19737
8558A
19951
19291
19954
18224
Shut
Off
Valve.
Brass
Oven
Burner -Cast
Iron
Oven
Burner -Tubular
Precision
Fabricated
Trailer
Pilot
Assy
Orifice
Hood -Specify
Type
of
Gas & Pressure
Gas
Regulator-5"
Propane
Gas
Regulator-l0"
Dial.
KX
Thermostat
19252
Handle.
Shut
Off
Valve
18326
Gas
Safety
Valve·
BASO
18328
Thermocouple
18327
Pilot
Burner
-BAKING
COMPONENT PARTS
18156
18341
18198
18204
8541A
8543A
18184
8536A
19621
19622
18150
8585A
8599A
8586A
8593A
18361
19344
18186
18187
8547A
8540A
8587A
8594A
Blower
Fan
Standard
Oven
Rack
Oven
Rack
Guide.
5 Position
Potato
Rack
AFS
Cabinet
Door.
Left.
W/Handle
AFS
Cabinet
Door.
Right
AFS
Cabinet
Door
Handle
AFS
Chef
Door
Complete
AFS
Chef
Door
Handle
Bracket.
.
Left
AFS
Chef
Door
Handle
Bracket.
Right
AFS
Chef
Door
Handle
Bracket
Tubing
Crusader
Cabinet
Door.
Complete
Crusader
Chef
Door
Complete
Crusader
Cabinet
Door
Handle
Crusader
Chef
Door
Handle
Chef
Door
Spring
Chef
Door
"S"
Hook
Linkage
Chef
Door
Rocker
Arm.
Left
Chef
Door
Rocker
Arm.
Right
SIS
Lo~ver
Panel.
Cabinet
Doors
SIS louver
Panel,
Chef
Enamel
louver
Panel.
Cabinet
Doors
Enamel
Louver
Panel.
Chef
- GENERAL PARTS
855A
AFS
Instrument
Panel
18155
AFS
Window.
Chef
Door
18154
AFS
Window
Cabinet
Door
18195
Trunion
Bolt.
Chef
Door
19287
Hinge
Pin.
Chef
Door
18297
Bushing.
Cabinet
Door
18282
Chef
Door
Clevis
Pin
18314
Trunion
Block.
Cabinet
8560A
Chain
Mechanism
AFS -Cabinet
Door
Page 8

parts
parts
~
~
19621
Chef Door Handle
Bracket
(R)
18190
Oven
Light
Socket
19622
Chef Door Handle
Bracket
(L)
~
19951
Orifice Hood
(Specify Gas)
18156
18192
Oven Light Switch
18163
Door Switch, 1 0
.-
,
,I
18321
Door Switch,
3 0
}))
,
18194
Blower Fan Switch
(Specify Voltage)
~
8552A
Oven
Burner
Assembly
18147
Oven-ready
Light
Bulb
(Cast Iron)
18223
Door Switch Lever
Arm
(Cabinet Door)
19291
Gas Regulator
(Natural
Gas
Only)
19737
- Oven
Burner
- Tubular -
Alum. Steel - Precision Fabricated
~
/
I
:A
------=:;-
'r-;-"
Vi~
,:' ~ JI
---';::;;;'~I
'-
-
18166
Door Switch Lever Arm
,1A
Air
Flow Cabinet Door, Left
(Chef Door)
8543A
Air
Flow
Cabinet
Door, Right
18184
Cabinet Door Handle Only
19137
Gas
Shut-off
Valve
®
18186
Chef Door Rocker
Arm
(L)
18187
Chef Door Rocker
Arm
(R)
(3 Phase Only)
18171
Transformer
~m(lff()
18195
Trunioll
Bolt
for
Chef Door
8536A
Air
Flow Chef Door, Complete
18150
1"
Tubing
Handle
26"
Long
(J)~G
I~
AIRFLOW
18165
Fressure Switch
18275
Trunion
Bolt
for
Cabinet Door
18161
K X
Thermostat
18224
Thermostat
Dial
14
19252
15
Page 9

----=
n
~
8585A Crusader Cabinet Door
-
---~
l.-
8599A
Crusader Chef Door
18319
Timer
and Buzzer
18326
Safety Valve. Oven
parts
18386
115V-Single
Phase
18387
208V-230V-Single
Phase
18388
208V-230V-
Three Phase
18324
Timer
Knob
.,
,
.~'
cf[)
~.
19252
GasShutOff
Valve Handle
13723
Crusader
Fan
Switch
16
parts
~
~
19287
Oven Door Hinge Pin
C:;,==
==
,~
;
~===~
~
8547A
Louver Panel
5.5.
(Cabinet)
8540A
Louver Panel 5.5. (Chef)
18282
Clevis Pin
:Ya" x 2%"
8587A
Louver Panel Painted (Cabinet)
8594A
Louver Panel Painted (Chef)
~
19331
Eye
Bolt
for
Oven Door Spring
(Chef)
18198
Guide
(5
Position)
~
19344
Chef Door
"5"
Linkage Hook
~
19339
Spring
~~
~
~
18272
Chain (Cabinet Door)
18204
Potato Rack
17
Page 10

......
00
I-::::::::=...t--t-_
I
I
I
BLtk
RED":-
WHITE
BLACK~~
BINATION
3ASOTROL
~g~ENOID
VALVE
SAFETY
AND
Page 11

rRANSrgRM£'!.
CREEN
TO
GROUND
ISCONNECTS
120
v
Y'lHITE
110 V
8LuE~_1~=========S~mc=--====~----~
J
WOl1-
IANQI
COlI
DAn:
2-/0
-7
7
Z08-Z10/115V-30-S0-60
eye
E
WI
rl-/our
ELEC
rRIC
IGN!
TlON
AIR
FLOW
OVEN
G •
TO
GROUND
BLACK
/ \
WHITE
~L
,
I
, /
1-1;
\ /
I
\/
I
WHITE-
-
I
I
I
I
L
_-1
BLUE
, /
C
-/,
WllITE
BASOTROL
COMBINATION SAFETY
AND
SOLENOID
VALVE
RED~C-
-_/\
~~
RED
Page 12

DRAWN
BV/( rDATE
2-
3-77
NEXl~Y.
I(?~ELSADE~
-.!1a$
~H1~'TSt
MAlltRIAL
L£'
I
Cr-lANGE
I
O,AlE
CHItC~
I
I
$CAL.E
I
R(a'O
S~~ET
I
GAGE
I
I
"TITLE:
CRUSADER
OWG
NC)
WOLF RANGE CO.
208
-230-//5
VOL
TS
I---
COMPTON.
CALIf.
1810/
$HItAR
Size
3/i!)
60
CYCLE
GREEN
TO
GRD_
I3LA
CK.
BLACK
ElL
4CK
,-
--
--I
BLACK
I
I(~
I
REO
J(.a;"
BLACK
I
{
MOTOR
REO
208-230V
rd
&~
I
\
SO/60
HERTZ
2:0
Ilf/~5
:
REO
I
I
TRANSFORMER
wHim
1-
1
-
_
E!.LAC~_
_
~-
--
BLACK
_
n I
f----,
r---
1'--
REO
0
- C
- 0
-
I---
!r4ERMOsrATI
~
: C
0
---.
~
.
0
-
I---;
J~~"
BLA
K
'"
0
L
~
0
..
~
0
REO
~
BLACK
BLU
~
-r----
I
o -
0
REO
~
BLUE
I
GAS
I
VALVE
o
Ii
'"
0
WHITE
JlVI-l/TE
r--
-
RED
RED
~
~
" 0
-
:
61
'---
0
'"
0
~
r-'"1
r--
REO
---
0
0
0
I----'
+--
~
REO
-
FOAM
NO.
9Q}()S-l
~
1
BLACX
-,
-
WHITE
-~~
r
I
•
BLUE
~'-
SOLENOID
VALVE
BASOTROL
COMBINATION SAFETY
AND
SOLENOID
VALVE
RE
SW
TCH
 Loading...