

Page 1
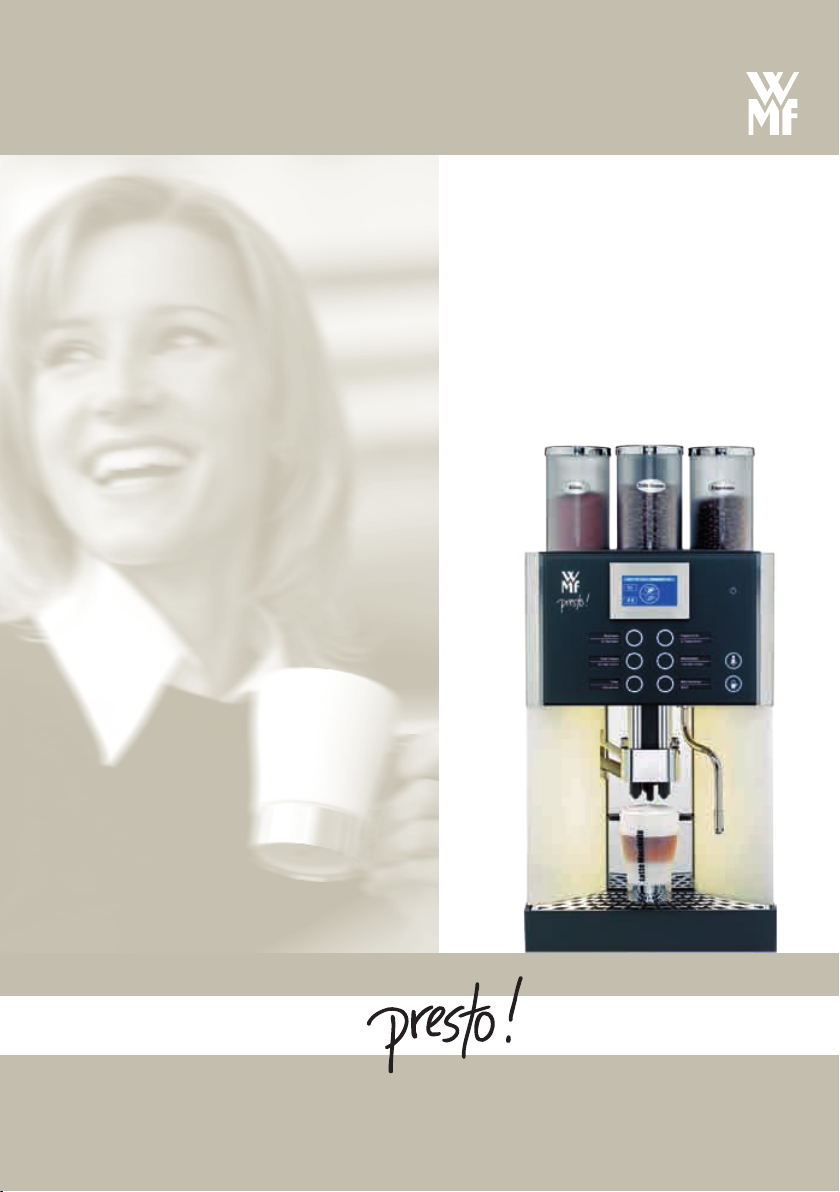
USER MANUA L
COFFEE MACH INE
ORDER NR. 33 0914 7010 EDITION 10.05
e n g l i s h
01.02.001
MODEL SERIES 1400
Page 2
Introduction and General
Congratulations on the purchase of your
WMF Coffee Machine
You will be impressed by technical design, durability,
economy of use and first and foremost the quality of the
coffee.
The WMF presto coffee machine is a
fully automatic single-cup machine for espresso,
café crème, cappuccino, milk coffee,
foamed milk and hot water. Optionally also hot chocolate
beverage and steam dispensing is possible.
Each beverage is freshly brewed at the press of a button
which guarantees high quality beverage.
Operator control of the machine is possible via a graphic
touch-pad display.
Keep these instructions near the coffee machine so that
you and your operating staff have the right information
handy and can take the correct action in the event of any
technical problems.
The coffee machine is designed to prepare up to 15,000
coffees and 6,000 chocolate beverages a year. After
every 10,000 brews, customer check-up by the user
is necessary and a full service is required after every
30,000 servings.
Please be sure to follow the instructions in the Software
- Settings - Water Hardness and Range Chapter and to
make the necessary settings.
Please read the
User Manual prior to using the
coffee machine!
Ensure staff access to User
Manual!
Important!
Chapter 1 I ntroduction
Observe User Manual‘s signs
and symbols!
See Safety chapter!
In the event of failure to comply
with Servicing Information
(see Maintenance chapter) no
liability is accepted for any
resultant damage.
Similarly in that event all
guarantee/warranty obligations
cease to apply.
2
User Manual WMF presto
Page 3
Table of Contents
Chapter 1 Introduction
1.1 Designation of Coffee Machine Parts 6
User Manuals Signs and Symbols . . . . . . . . . . . . . . . . . . . . . . 8
Glossary . . . . . . . . . . . . . . . . . . . . . . . . . . . . . . . . . . . . . . . . . 9
Chapter 2 Operating
2.1 Switch On Coffee Machine 10
2.2 Dispense Beverage 10
2.3 Dispense Milk or Foamed Milk (optional) 10
2.4 Dispense Hot Water 10
2.5 Steam Outlet (optional) 11
2.6 Adjust Combi Spout Height 12
2.7 Bean Hopper/Product Hopper 12
2.8 Manual Insert/Tablet Insert 12
2.9 Coffee Grounds Container 13
2.10 Countertop Coffee Grounds Container (optional) 13
2.11 Drip Tray 14
2.12 Switch Off Coffee Machine 14
Warming Beverage . . . . . . . . . . . . . . . . . . . . . . . . . . . . . . . . .11
Foaming Milk . . . . . . . . . . . . . . . . . . . . . . . . . . . . . . . . . . . . .11
Chapter 3 Software
3.1 Overview 15
3.2 Readiness State 17
3.2.1 Hot Rinse . . . . . . . . . . . . . . . . . . . . . . . . . . . . . . . . . . . . . . . . . .17
3.2.2 Barista Pad . . . . . . . . . . . . . . . . . . . . . . . . . . . . . . . . . . . . . . . .17
3.2.3 Information . . . . . . . . . . . . . . . . . . . . . . . . . . . . . . . . . . . . . . . . .17
3.2.4 Toggle Pad (optional). . . . . . . . . . . . . . . . . . . . . . . . . . . . . . . . . .18
3.2.6 Main Menu . . . . . . . . . . . . . . . . . . . . . . . . . . . . . . . . . . . . . . . . .18
3.3 Main Menu 19
3.3.1 Milk and Foam
3.3.2
3.3.3 Customer Care . . . . . . . . . . . . . . . . . . . . . . . . . . . . . . . . . . . . . .23
Service. . . . . . . . . . . . . . . . . . . . . . . . . . . . . . . . . . . . . . . . . .17
Customer Care . . . . . . . . . . . . . . . . . . . . . . . . . . . . . . . . . . . .17
Brew Times . . . . . . . . . . . . . . . . . . . . . . . . . . . . . . . . . . . . . .18
Journal . . . . . . . . . . . . . . . . . . . . . . . . . . . . . . . . . . . . . . . . . .18
Timer . . . . . . . . . . . . . . . . . . . . . . . . . . . . . . . . . . . . . . . . . . .18
Milk Foam Quality . . . . . . . . . . . . . . . . . . . . . . . . . . . . . . . . . .19
Latte Macchiato Pause Interval . . . . . . . . . . . . . . . . . . . . . . . .19
Timer Program . . . . . . . . . . . . . . . . . . . . . . . . . . . . . . . . . .19
Timer State . . . . . . . . . . . . . . . . . . . . . . . . . . . . . . . . . . . . . 20
Set Timer . . . . . . . . . . . . . . . . . . . . . . . . . . . . . . . . . . . . . . . 20
Copy Day . . . . . . . . . . . . . . . . . . . . . . . . . . . . . . . . . . . . . . . 21
Timer Overview . . . . . . . . . . . . . . . . . . . . . . . . . . . . . . . . . . . 21
Timer Delete . . . . . . . . . . . . . . . . . . . . . . . . . . . . . . . . . . . . . 21
Timer Info . . . . . . . . . . . . . . . . . . . . . . . . . . . . . . . . . . . . . . . 22
Cleaning program . . . . . . . . . . . . . . . . . . . . . . . . . . . . . . . . . 23
Foamer Cleaning. . . . . . . . . . . . . . . . . . . . . . . . . . . . . . . . . . 24
Mixer Rinsing . . . . . . . . . . . . . . . . . . . . . . . . . . . . . . . . . . . . 24
. . . . . . . . . . . . . . . . . . . . . . . . . . . . . . .
19
User Manual WMF presto
3
Page 4

Table of Contents
Descaling . . . . . . . . . . . . . . . . . . . . . . . . . . . . . . . . . . . . . . . 24
Descaling with Water Tank
Descaling with Constant Water Supply
Filter Change . . . . . . . . . . . . . . . . . . . . . . . . . . . . . . . . . . . . 27
Rinse Filter . . . . . . . . . . . . . . . . . . . . . . . . . . . . . . . . . . . . . . 27
Customer Check-up. . . . . . . . . . . . . . . . . . . . . . . . . . . . . . . . 27
3.3.4 Setting . . . . . . . . . . . . . . . . . . . . . . . . . . . . . . . . . . . . . . . .28
3.3.5 Enter PIN . . . . . . . . . . . . . . . . . . . . . . . . . . . . . . . . . . . . . . . . . .31
3.3.6 PIN Rights Access Control . . . . . . . . . . . . . . . . . . . . . . . . . . . . . .31
3.3.7 Accounting Unit Statistic . . . . . . . . . . . . . . . . . . . . . . . . . . . . . . .33
Recipes and Beverage But ton . . . . . . . . . . . . . . . . . . . . . . . . 28
Cup Volumes
Change Recipes
Button Allocation
Weigh Grounds
Boiler Temperature . . . . . . . . . . . . . . . . . . . . . . . . . . . . . . . . 29
Reset . . . . . . . . . . . . . . . . . . . . . . . . . . . . . . . . . . . . . . . . . . 29
Clock and Date . . . . . . . . . . . . . . . . . . . . . . . . . . . . . . . . . . . 29
Language . . . . . . . . . . . . . . . . . . . . . . . . . . . . . . . . . . . . . . . 29
Display Contrast . . . . . . . . . . . . . . . . . . . . . . . . . . . . . . . . . . 30
Filter/Softener Fitted. . . . . . . . . . . . . . . . . . . . . . . . . . . . . . . 30
Water Hardness/Capacity . . . . . . . . . . . . . . . . . . . . . . . . . . . 30
Warm-Up Rinse . . . . . . . . . . . . . . . . . . . . . . . . . . . . . . . . . . . 30
Warm Up button . . . . . . . . . . . . . . . . . . . . . . . . . . . . . . . . . . 30
Introduction . . . . . . . . . . . . . . . . . . . . . . . . . . . . . . . . . . . . . 30
Level Cleaning . . . . . . . . . . . . . . . . . . . . . . . . . . . . . . . . . . . 31
Level Set tings. . . . . . . . . . . . . . . . . . . . . . . . . . . . . . . . . . . . 31
Level Accounting. . . . . . . . . . . . . . . . . . . . . . . . . . . . . . . . . . 32
Delete PIN . . . . . . . . . . . . . . . . . . . . . . . . . . . . . . . . . . . . . . 32
Chapter 4 Other Settings
4.1 Mechanical Settings 34
4.1.1 Set Grind Fineness
4.2 Beverage Buttons Labelling 34
. . . . . . . . . . . . . . . . . . . . . . . . . . . . . . .34
Chapter 5 Customer Care
5.1 Daily Cleaning 36
5.1.1 Cleaning program . . . . . . . . . . . . . . . . . . . . . . . . . . . . . . . . . . . .36
5.1.2 Foamer Cleaning. . . . . . . . . . . . . . . . . . . . . . . . . . . . . . . . . . . . .36
5.1.3 Mixer Rinsing . . . . . . . . . . . . . . . . . . . . . . . . . . . . . . . . . . . . . . .36
5.1.4 Combi Spout Cleaning . . . . . . . . . . . . . . . . . . . . . . . . . . . . . . . . .36
5.1.5 General Cleaning . . . . . . . . . . . . . . . . . . . . . . . . . . . . . . . . . . . .36
5.2 Weekly Cleaning 37
5.2.1 Brewing unit cleaning . . . . . . . . . . . . . . . . . . . . . . . . . . . . . . . . .37
5.2.2 Choc/Topping Mixer Cleaning (optional) . . . . . . . . . . . . . . . . . . . .39
5.2.3 Milk Compartment Cleaning . . . . . . . . . . . . . . . . . . . . . . . . . . . . .39
5.2.4 Water Tank Cleaning . . . . . . . . . . . . . . . . . . . . . . . . . . . . . . . . . .40
4
User Manual WMF presto
Page 5

Table of Contents
5.3 Regular Cleaning 40
5.3.1 Bean Hoppers Cleaning . . . . . . . . . . . . . . . . . . . . . . . . . . . . . . . .40
5.3.2 Product Hopper CleaningChoc/Topping (optional) . . . . . . . . . . . . .41
5.4 Filter Changing 41
5.5 Descaling 41
Chapter 6 HACCP Cleaning Schedule
Recommendation for Choc/Topping (optional) . . . . . . . . . . . . 43
Chapter 7 Maintenance
7.1 Coffee Machine Maintenance 45
7.2 Mixer Maintenance (Choc) 46
7.3 Mixer Maintenance (Topping) 46
7.4 WMF Customer Service 46
Chapter 8 Messages and Tips
8.1 Operating Messages 47
8.2 Error/Fault Messages 48
8.3 Faults with no Display 51
Chapter 9 Safety
9.1 Hazards for the User 52
9.2 Danger to the Machine
9.3 Responsibilities of the Operator
9.4 Warranty Claims 54
No Warranty is provided: . . . . . . . . . . . . . . . . . . . . . . . . . . . . 55
53
54
Appendix A: Quick Reference Overview
Appendix B: Technical Data
Coffee Machine Technical Data 58
Terms and Conditions of Use and Installation 58
Appendix C: Accessories and Spares
User Manual WMF presto
5
Page 6
Introduction and General
Chapter 1 Introduction
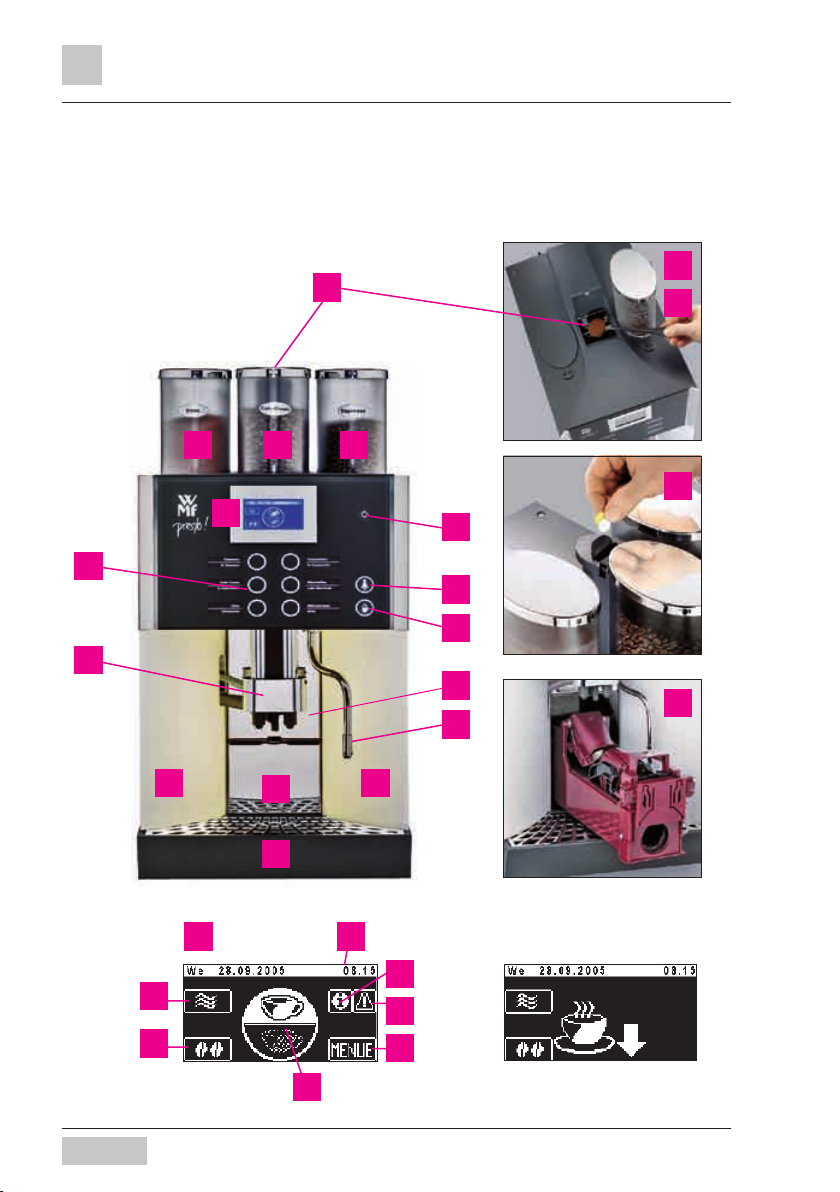
1.1 Designation of Coffee Machine Parts
2
1 14
5
6
7
11
12
13
14
16
2
3
3
15
8
5
18
19
6
9
10
24
20
17
One Level Display
21
22
23
User Manual WMF presto
Page 7
Introduction and General
1
Bean Hopper (optional 1 or 2)
2
Manual Insert (model-dependent)
3
Tablet Insert (model-dependent)
4
Choc-Container/Topping-Container (optional)
5
Touch-Screen-Display
6
Beverage Button
7
Height-adjustable Combi Spout with integral Milk Foamer
8
Removable Milk Cover (optional integral milk cooler)
9
Coffee Grounds Container
10
Removable Drip Tray with Drip Tray Grid
11
ON/OFF Button
12
Steam Button (optional)
13
Hot Water Button
14
Adjustable Screen
15
Brewing Unit
16
Steam Outlet (optional) or Hot Water Dispenser
17
Water Tank (unplumbed coffee machines)
18
Warm Rinse Button
19
Barista Pad
20
Timer and Clock Display
21
Info Pad
22
Instruction/Error Message Display Pad
23
Menu Pad (opens Main Menu)
24
Second Level Toggle Pad (option)
User Manual WMF presto
7
Page 8

Introduction and General
User Manuals Signs and Symbols
Attention!
Risk to Machine!
Attention!
Hot Liquid!
Attention!
Hot Steam!
Tip
Instruction
Advanced User!
Start Position
Main Menu
Display of this symbol starts User Manual description in
Main Menu.
Attention!
Risk to User!
Attention!
Hot Surface!
Attention!
Risk of Crushing!
Cross Reference
Readiness State Display
Call Up Main Menu:
On the Readiness State display touch clear touch pad.
Additional pads are activated.
Press
.
Main Menu is displayed.
8
... with additional touch pads
Main Menu
User Manual WMF presto
Page 9

Introduction and General
Glossary
Term Meaning
• Listings, selection options•
Individual steps
Italics Description of coffee machine state and/or explanation of
automatic steps
sec Seconds
min Minutes
Barista Professional Coffee Server
Choc Hot chocolate
Beverage Dispensing Dispensing of coffee, hot water or choc beverage
Main Tap Water on/off valve, angle valve.
Carbonate hardness Indication in °dCH: Water hardness is an indicator of calcium
dissolved in the water.
Milk System Combi spout, milk nozzle and flexible milk tube.
Mixer System Complete module, mixer with portion controller for choc/
topping
O-Rings Seals
Pre-infusion Prior to brewing, coffee is briefly infused in order to ensure
a more intense release of its aromatic substances.
Press Automatic pressing of coffee grounds prior to brewing
Range For example: Anti-scale filter capacity in litres
PIN Personal identity number
Coffee Grounds
Chute
Rinse Intermediate cleansing
Topping Milk powder
See coffee grounds container; chapter 2.10
User Manual WMF presto
9
Page 10
Operation
Chapter 2 Operating
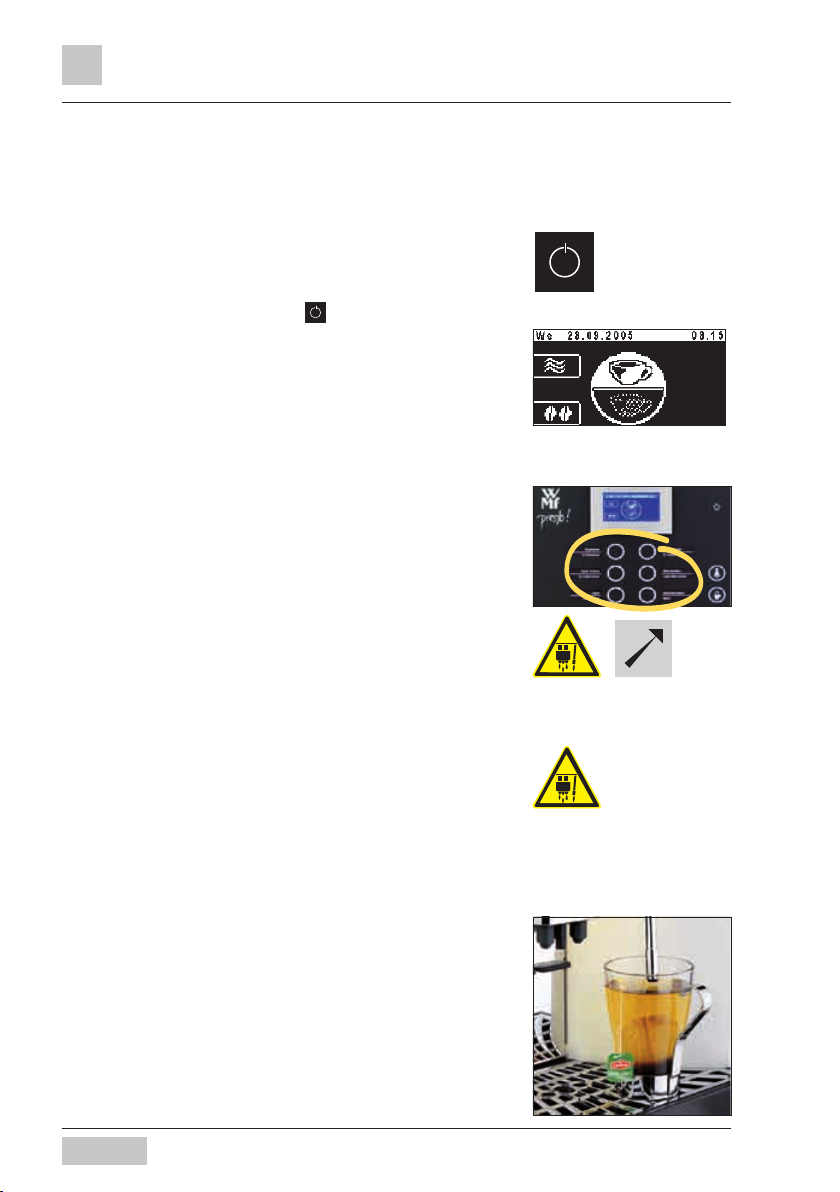
Initial startup on delivery from the manufacturer is via a
display-led Installation Program.
2.1 Switch On Coffee Machine
For Initial Startup see
Installation Instructions
Press and hold ON/OFF button for longer than
2 seconds.
Coffee machine switches on and heats up.
When the machine is ready to dispense beverage, the
Ready Display appears.
2.2 Dispense Beverage
Pressing the beverage button triggers dispensing of the
beverage selected.
Illuminated ring round button
•
= Dispenser ready
Flashing ring round button
•
= Dispensing Beverage
Place suitably sized receptacle below dispenser
Press desired beverage button
Desired beverage and progress of dispensing indicated
in display.
2.3 Dispense Milk or Foamed Milk
(optional)
Pressing a beverage button showing milk or foamed milk
starts dispensing .
Dispensing continues for as long as the button is held.
Readiness State Display
For Button Allocations see
setting recipes and beverage
buttons chapter.
2.4 Dispense Hot Water
Pressing the hot water button starts dispensing. If less
water is required than is set to dispense, dispensing can
be stopped by repeatedly pressing the button.
10
User Manual WMF presto
Page 11

2.5 Steam Outlet (optional)
Steam is dispensed for as long as the button is held.
Steam
warms beverage
•
manually foams milk
•
Warming Beverage
Use as tall and slim as possible cromargan jug with
handle.
Fill jug to no more than half way.
Immerse steam nozzle deeply into jug.
Press and hold steam button until desired
temperature is reached.
Release steam button.
Swing steam outlet over to drip tray.
Briefly press steam button.
Residues in steam dispenser tube are rinsed out.
Wipe steam outlet with damp cloth.
Foaming Milk
Use as tall and slim as possible cromargan jug with
handle.
Fill jug to no more than half way.
Immerse steam nozzle into jug to just under the
surface.
Press and hold steam button whilst rotating jug in a
clockwise direction.
A thick creamy milk froth results.
Release steam button.
Swing steam outlet over to drip tray.
Briefly press steam button.
Residues in steam outlet tube are rinsed out.
Wipe steam outlet with damp cloth.
Operation
Attention! Hot Steam!
See Safety chapter!
For example cromargan jug
WMF Order Code 06.3417.6040
Do not overheat milk when
foaming, otherwise foam volume
decreases.
User Manual WMF presto
11
Page 12
Operation
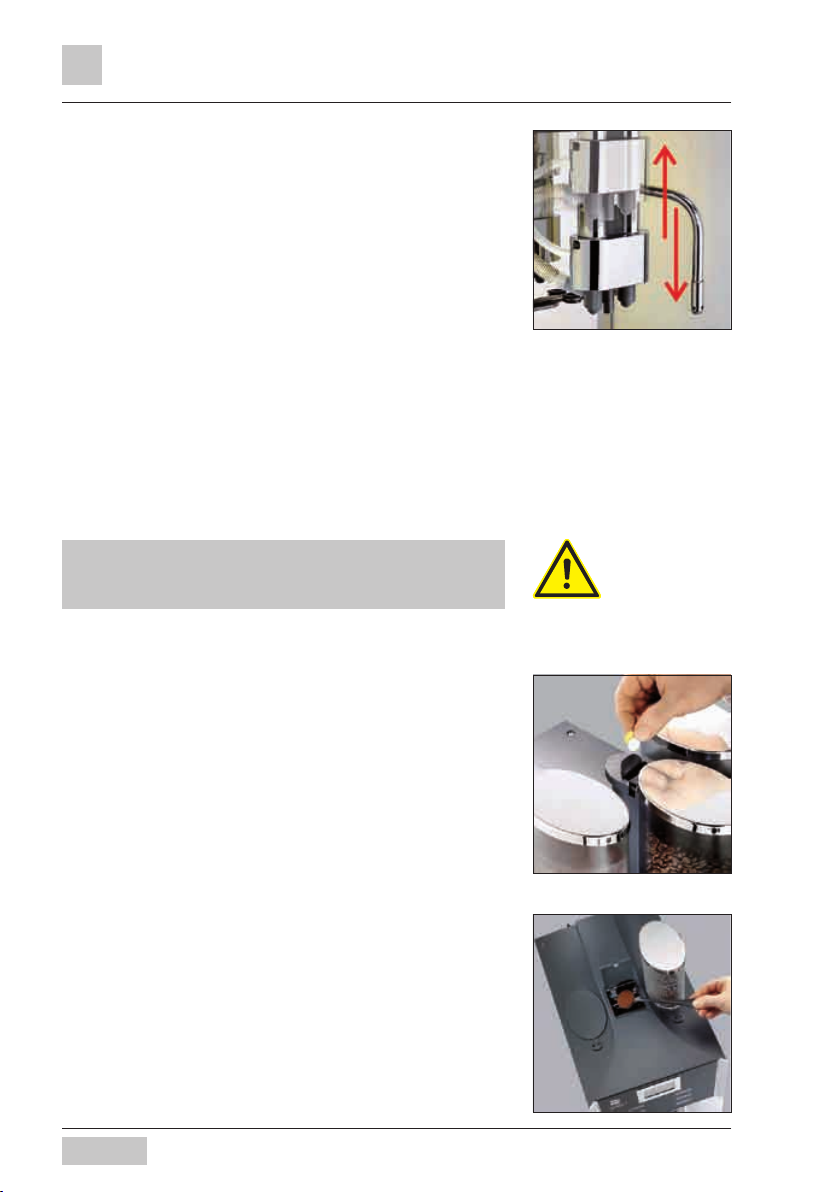
2.6 Adjust Combi Spout Height
The combi spout height is adjustable.
To adjust height:
Take hold of outlet from the front and push to desired
height.
Combi spout clearance height range: 70 - 190 mm
2.7 Bean Hopper/Product Hopper
If possible replenish product hopper well before.
It is best to fill to the maximum daily quantity in order to
retain product freshness.
2.8 Manual Insert/Tablet Insert
Coffee machines with three coffee containers have only
a tablet insert but no manual insert for ground coffee.
Ground coffee must not be inserted into the tablet insert.
The manual/tablet insert is located in the centre of the
coffee machine lid.
Tablet insert is used:
to insert cleaning tablet
•
Manual insert is used:
to insert cleaning tablet
•
when using an additional coffee variety, for example
•
decaffeinated
for coffee trial
•
Ground Coffee Manual Insert Sequence
If a Level 2 beverage is desired the Level must be selected prior to opening the manual insert lid.
Open manual insert lid.
Insert coffee grounds (max. 15 g).
Close manual insert lid.
Press desired beverage button.
Coffee beans into bean hopper,
choc powder into choc hopper
topping powder into topping
hopper
Tablet Insert
Manual Insert
12
User Manual WMF presto
Page 13
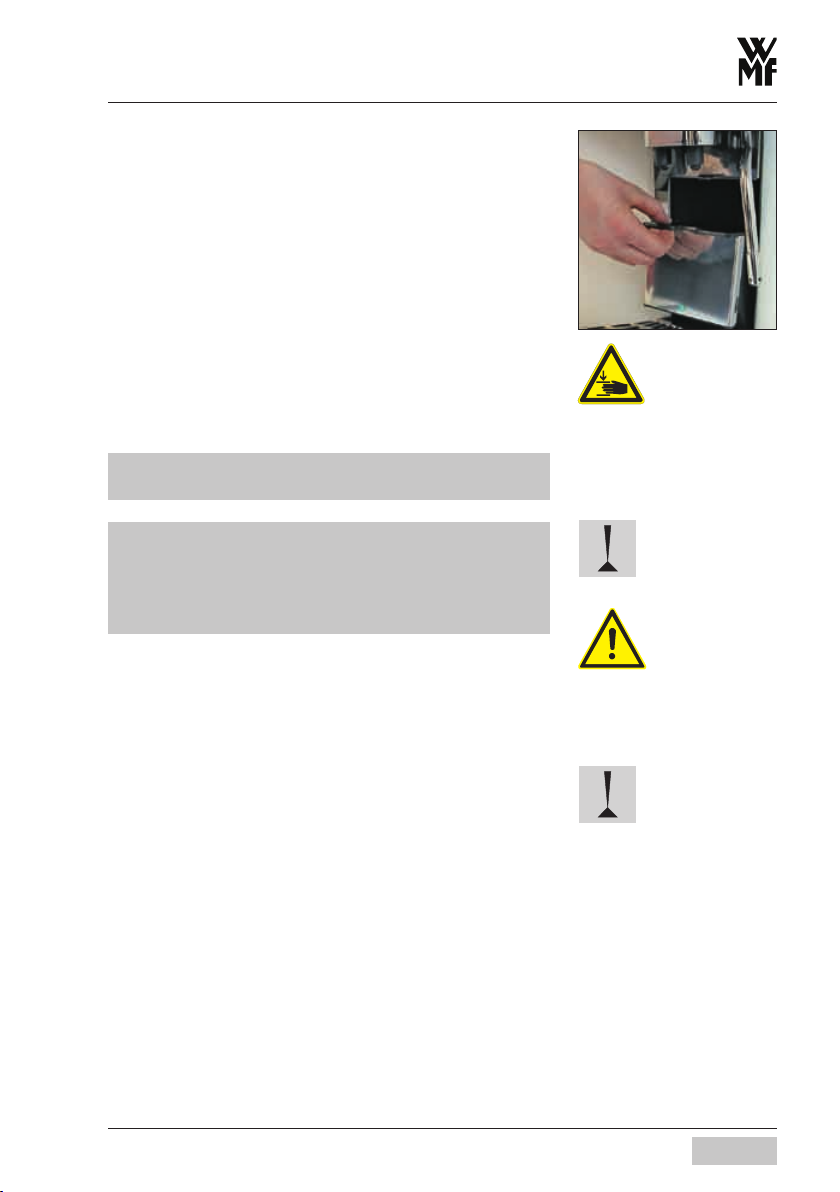
2.9 Coffee Grounds Container
Coffee grounds collect in the coffee grounds container.
The display indicator shows as soon as the coffee
grounds container needs to be emptied.
Beverage dispensing is blocked for as long as the coffee
grounds container is removed.
Push combi spout up as far as it will go.
Push up lid over coffee grounds container.
Withdraw coffee grounds container.
Empty and replace coffee grounds container.
Cancel procedure on display.
If coffee grounds container cannot be replaced check
chute for coffee residues and remove.
Always empty coffee grounds container before reinserting! Replacing without emptying results in coffee
grounds container being overfilled. Coffee machine will
be soiled. This may cause subsequent damage to the
machine.
Operation
Attention!
Danger of crushing!
See Safety chapter!
Clean daily!
See Customer Care chapter
2.10 Countertop Coffee Grounds Container (optional)
The coffee machine can be optionally supplied with a
counter-fitting coffee grounds container. In this model
both the coffee grounds container and the coffee
machine base are provided with an opening. This is continued through the existing countertop. The spent coffee
grounds are therefore collected in a large reservoir
under the countertop.
User Manual WMF presto
Countertop cannot be fitted
subsequent to supply of new
machine!
Clean coffee grounds chute
daily!
13
Page 14
Operation
2.11 Drip Tray
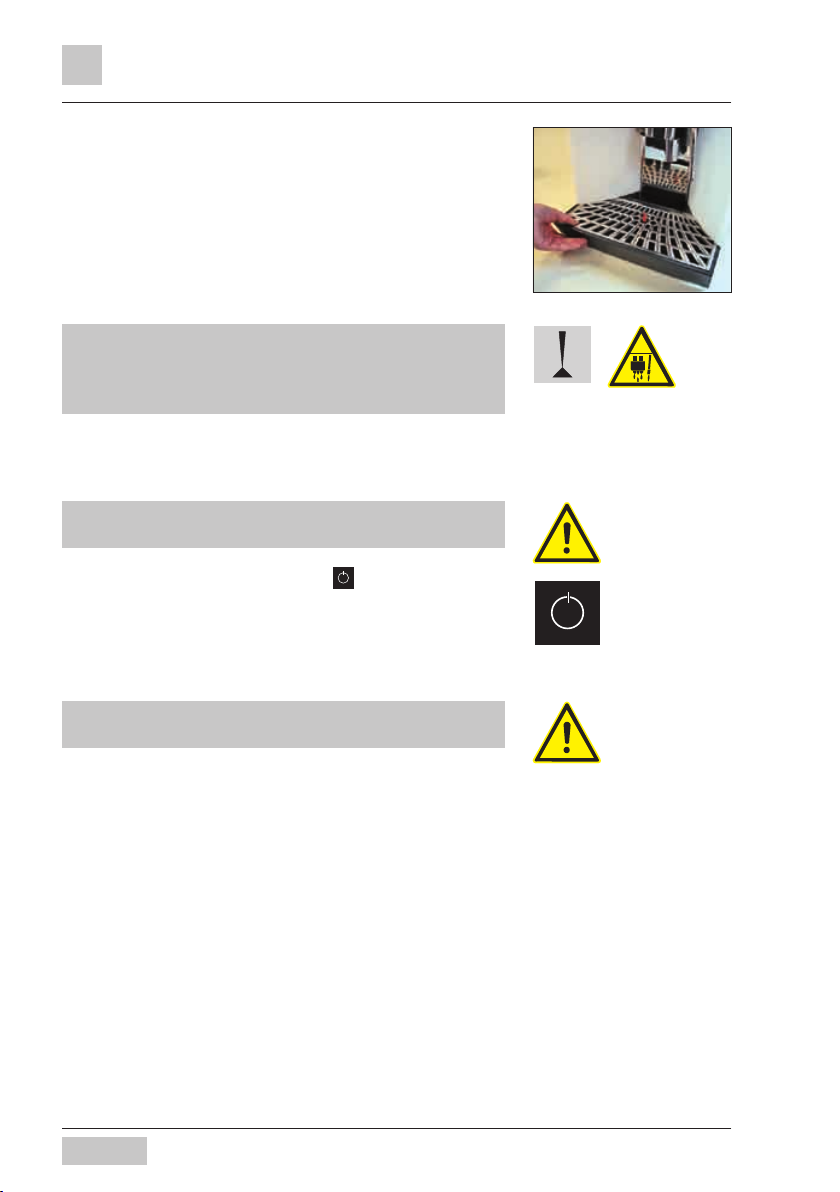
On coffee machines without plumbed waste water drainage the drip tray must be emptied at regular intervals
and no later than when the red float indicating full
becomes visible.
Carefully remove drip tray, empty and replace.
On coffee machines with plumbed waste water drain the
drip tray may also be removed (e.g. for cleaning).
Replace carefully, otherwise inadequate sealing and
slight leakage of water may result.
2.12 Switch Off Coffee Machine
Daily cleaning must be carried out prior to switching off
coffee machine.
Press and hold ON/OFF button until coffee ma-
chine switches off. Remove mains plug!
Plumbed-in coffee machines:
Turn off mains water tap.
Clean drip tray daily!
See Maintenance chapter
If not observed, guarantee/warranty is invalidated in the
event of any resultant damage.
14
See Safety chapter
User Manual WMF presto
Page 15
Chapter 3 Software
3.1 Overview
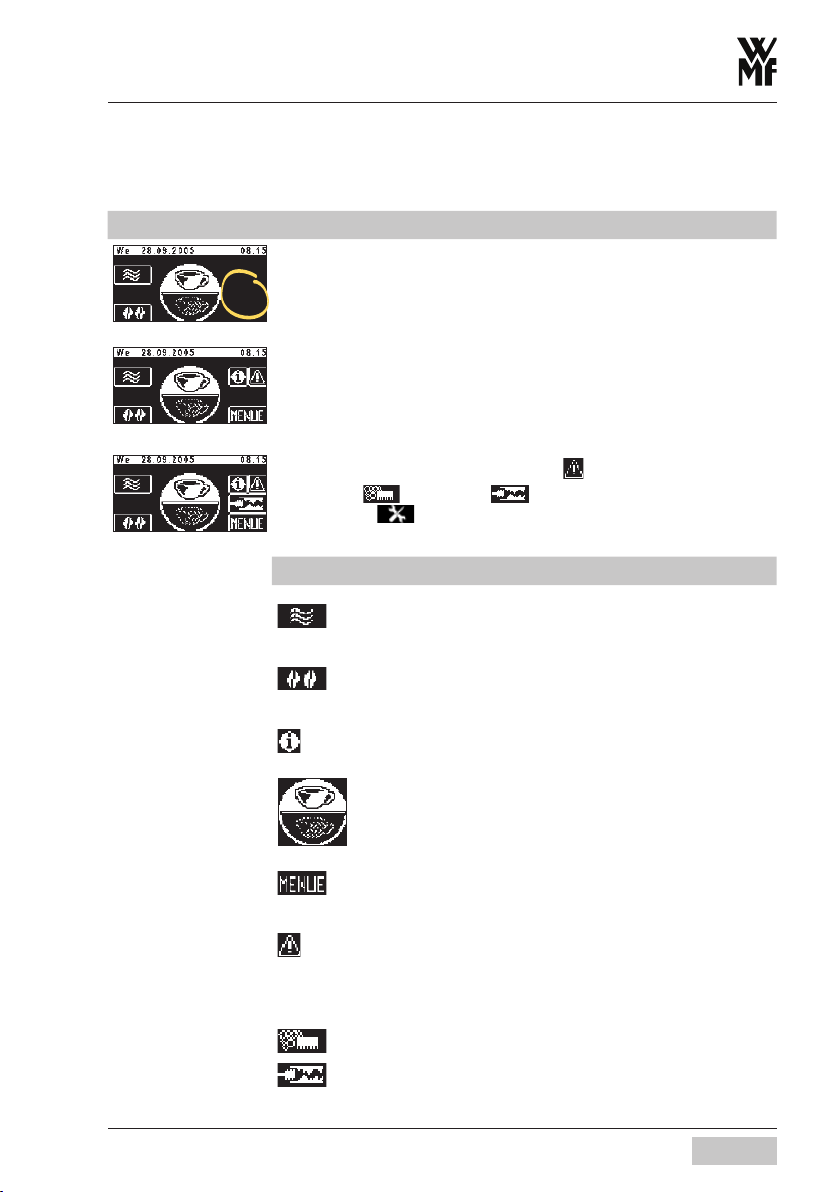
Readiness State
WMF presto coffee machine readiness state
Touch readiness state display clear touch pad. Further pads
are activated.
If there are errors the relevant touch pad is displayed!
If Cleaning , Descaling
are required
Readiness State Display Touch Pads Cha pt er 3.2
this is displayed!
Warm Rinse
Cha pter 3.2.1
Software
, Filter Change or Maintenance
User Manual WMF presto
Barista (Coffee Strength)
Cha pter 3.2.2
Info
Cha pter 3.2.3
Toggle Switch (optional)
Cha pter 3.2.4
Main Menu
Cha pter 3.2.5
Error Message
Touching this pad calls up error message.
Customer Care Message
Touching this pad leads directly to the access the menu.
Cleaning necessary.
Decalcification necessary.
15
Page 16

Software
Functions (Touch Pads) Main Menu Chap ter 3.3
Milk and Foam
Cha pter 3.3.1
Timer Program
Cha pter 3.3.2
Customer Care
Cha pter 3.3.3
Settings
Cha pter 3.3.4
Enter PIN
Cha pter 3.3.5
PIN Access control
Cha pter 3.3.6
Accounting
Cha pter 3.3.7
Menu Control Pads
16
Star t
N ex t
save settings
start or
confirm ctep
back to higher menu level
abort / leave without saving (Exit)
clear or reset
start test brew
grounds check
increase and reduce settings values
forward or back one step in listings
User Manual WMF presto
Page 17
3.2 Readiness State
Software
3.2.1 Hot Rinse
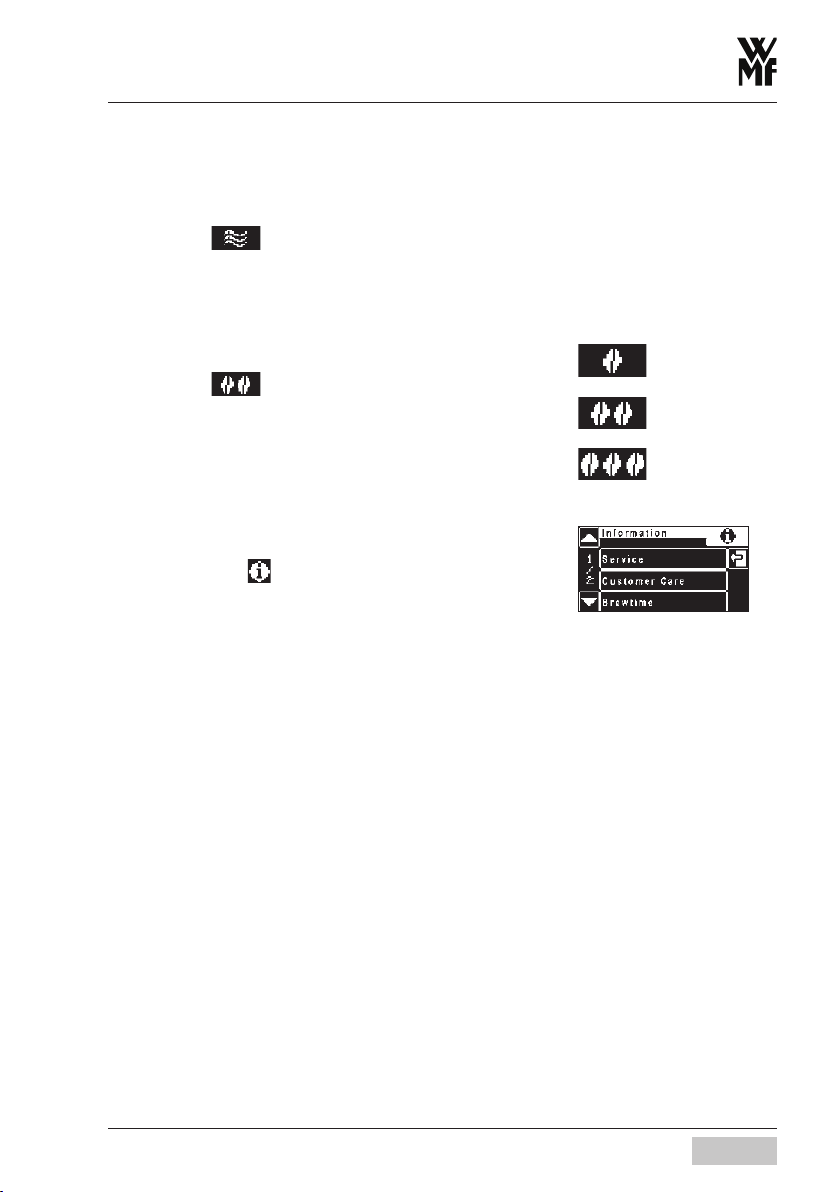
Touching the
Water warms the lines up after a lengthy brewing pause
and guarantees optimum coffee temperature.
pad starts a hot water line rinse.
3.2.2 Barista Pad
Touching the
once for the next brew.
pad alters the strength of the coffee
3.2.3 Information
Touching this pad on the ”Readiness State” display
accesses menu Information.
The main ”Info” menu contains the following selection
options:
Service
service contact
•
setup data
•
next maintenance
•
software version
•
Recommended after 30 min
brewing pause, especially before
dispensing a cup of espresso.
weaker (-15%)
normal, as per setting
stronger (+15%)
Customer Care
journal
•
log of last cleaning
cleaning info
•
info on last cleaning
descaling info
•
info on last/next decalcification
softener info (optional)
•
remaining range info
User Manual WMF presto
17
Page 18
Software
Brew Times
brew times of last beverage dispensed
•
Journal
list of logged error and status messages
•
(for telephone support)
Timer
timer status display (on/off)
•
next event display
•
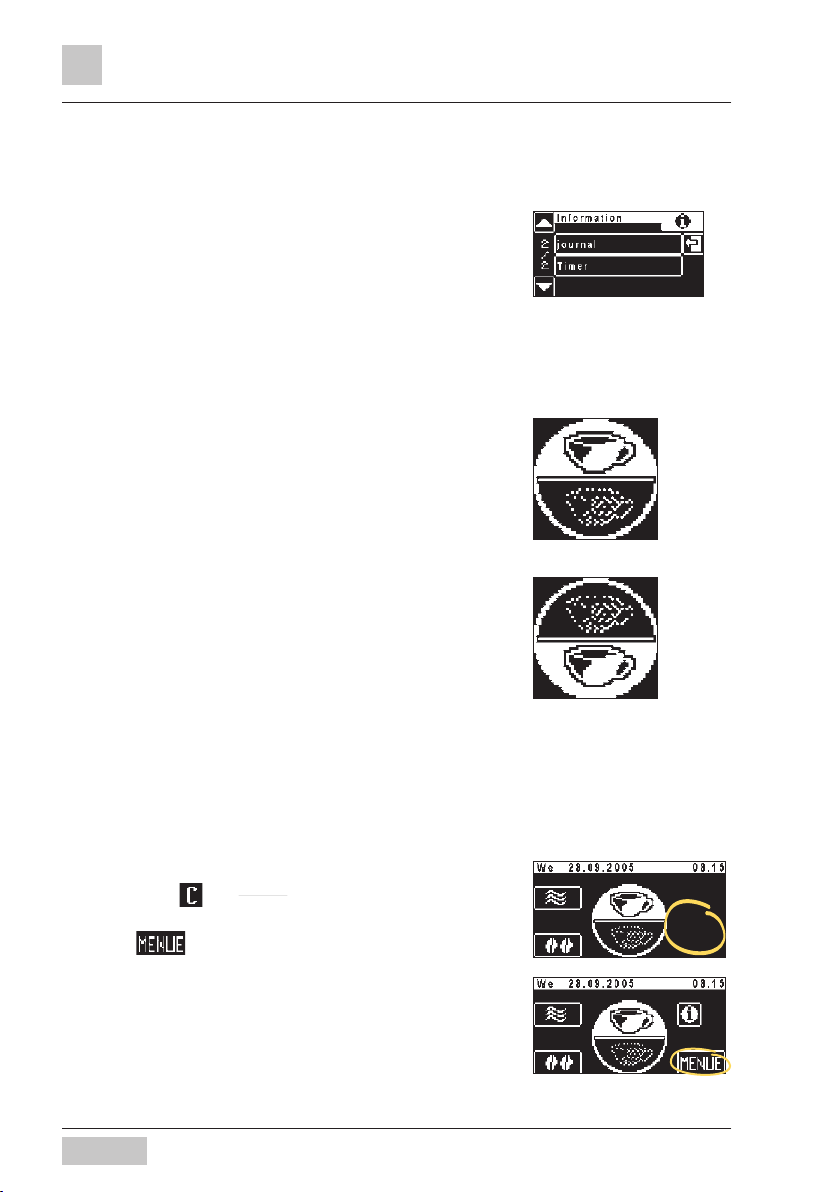
3.2.4 Toggle Pad (optional)
Each beverages button may be doubly assigned.
This is possible using a secondary beverages button
level.
Level 1 active
Level 1 activated
Touch toggle pad.
Level 2 activated
A repeat touch switches back to level 1.
3.2.6 Main Menu
Access Main Menu:
Touch clear
Additional pads are activated.
Touch
Main Menu is displayed.
pad on Readiness State display.
.
Level 2 active
Readiness State Display
... with additional touch pads
18
User Manual WMF presto
Page 19
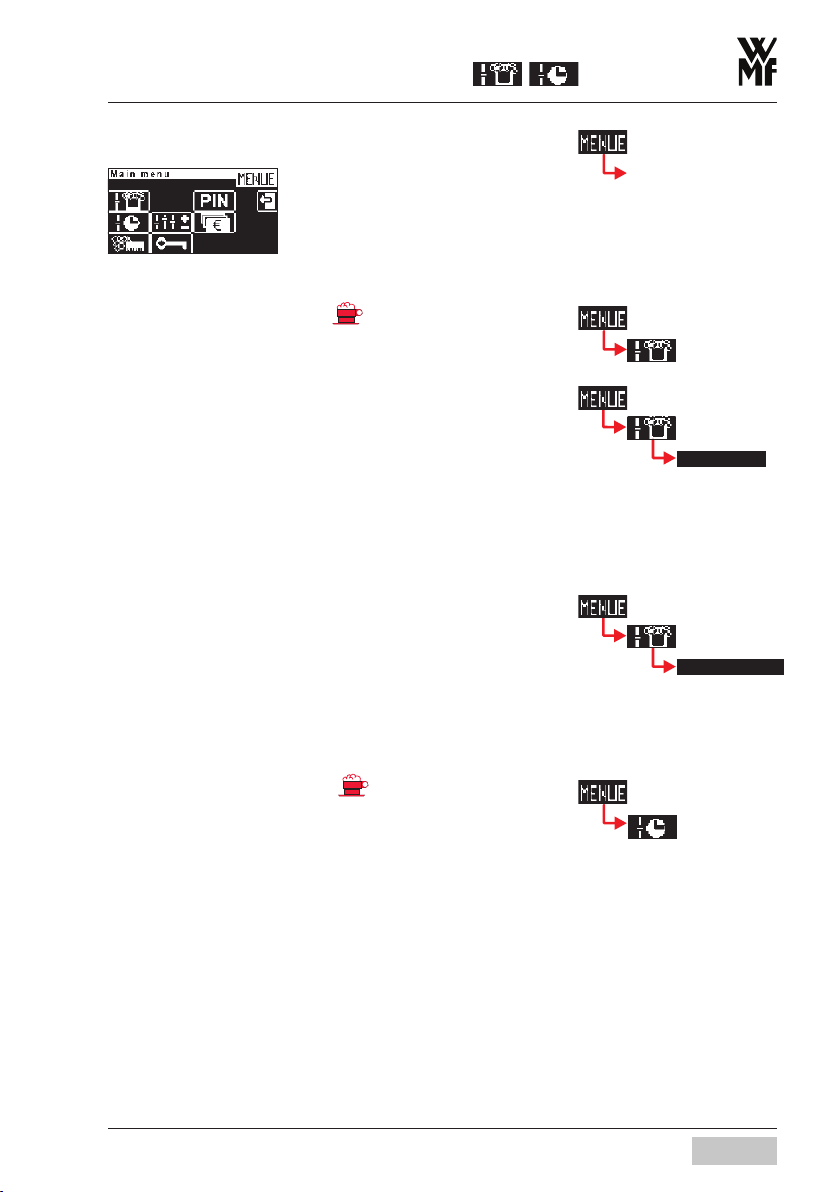
3.3 Main Menu
3.3.1 Milk and Foam
Milk Foam Quality
Milk foam quality is set here.
This setting will apply to all drinks with milk foam. Variations in milk characteristics are compensated.
Reduce setting value -> finer
Increase the value -> coarser
Latte Macchiato Pause Interval
Latte Macchiato is usually more successful if the interval
between milk and milk foam dispensing is lengthened.
Reduce value -> shorter interval
Increase value -> longer interval
Software
See
PIN Access- control chapter
Main Menu protected level
Illustrations.
Foa m Q ua lit y
ma cch.i nt er rup t
3.3.2 Timer Program
The Timer Program sets on/off times.
Main ”Timer Program” menu contains the following selection options:
Timer State
•
Set Timer
•
Timer Overview
•
Timer Delete
•
Timer Info
•
User Manual WMF presto
19
Page 20
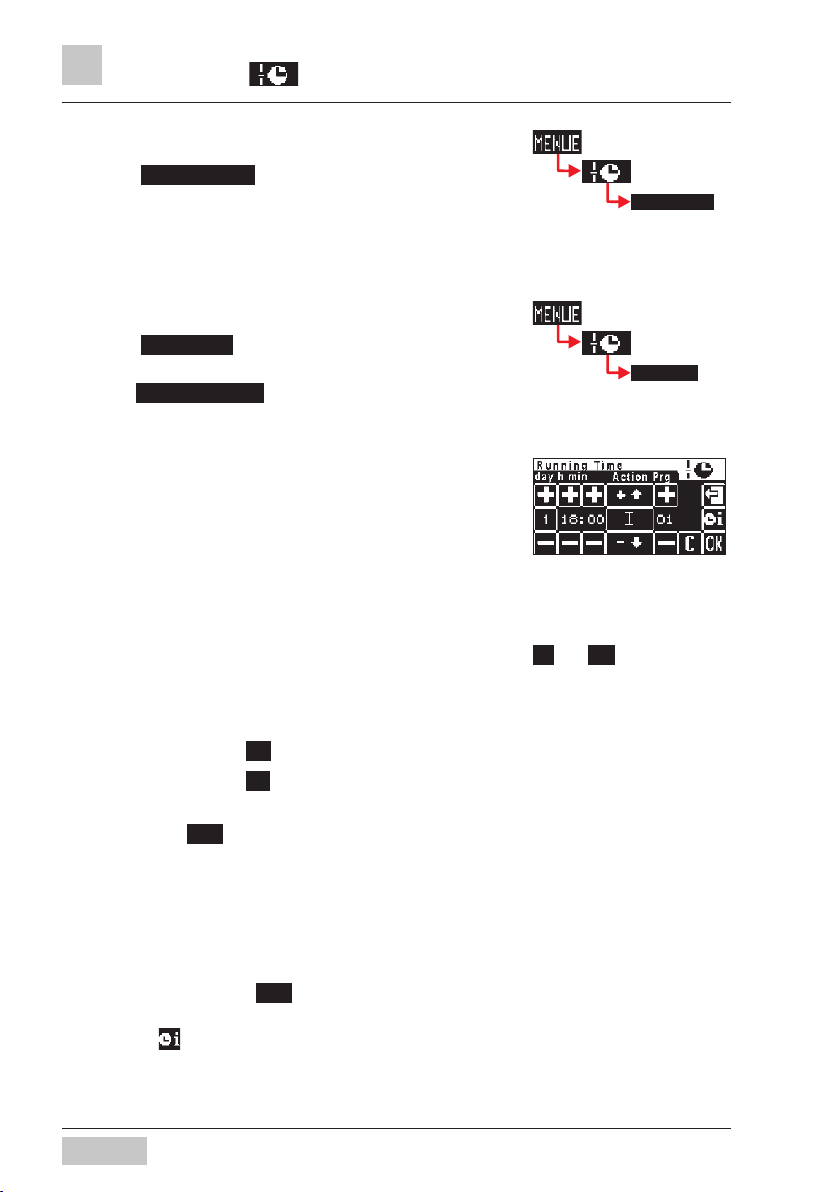
Software
Timer State
Touch Ti m er Stat e .
Activate/deactivate timer.
Set Timer
Touch Set T i mer .
To set on/off times.
Touch Ru nnin g Time .
Running Time display appears.
Here the day, time and desired operation is set.
Set day (Day).
1 = Monday
•
2 = Tuesday, etc, up to 7 = Sunday
•
1-5 = Monday to Friday (weekdays)
•
1-7 = Entire week (Monday to Sunday)
•
Set time: (hr, min).
Set desired on/off times.
Set desired event (Action).
“On” Time • =
“Off” time• =
I
O
(on display)
(on display)
Ti mer St at e
When Timer is activated the
Timer symbol, a little clock,
appears in the display.
Se t time r
Example:
For day 1-5 or day 1-7 timer
events may be copied to the
day set.
Adjust settings with pads:
+ and -
Updated selection is inversely
displayed!
Confirm with OK
Display programmed event times: Prg
Programmed event times are displayed here. Up to 16
event times per day are possible.
Programmed times are listed chronologically.
Any new time is chronologically sorted immediately on
input and confirmed with OK .
Touching directly accesses Timer Overview.
20
User Manual WMF presto
Page 21
Software
Copy Day
Any day may be copied complete with its switching
events to other days.
Touch pad 1 under Da y .
Day of the week selection is again displayed.
Scroll through to page 4.
Touch Copy Day .
Day of the week selection is again displayed.
Select desired target day.
Touch Ins er t Day .
The day is now copied.
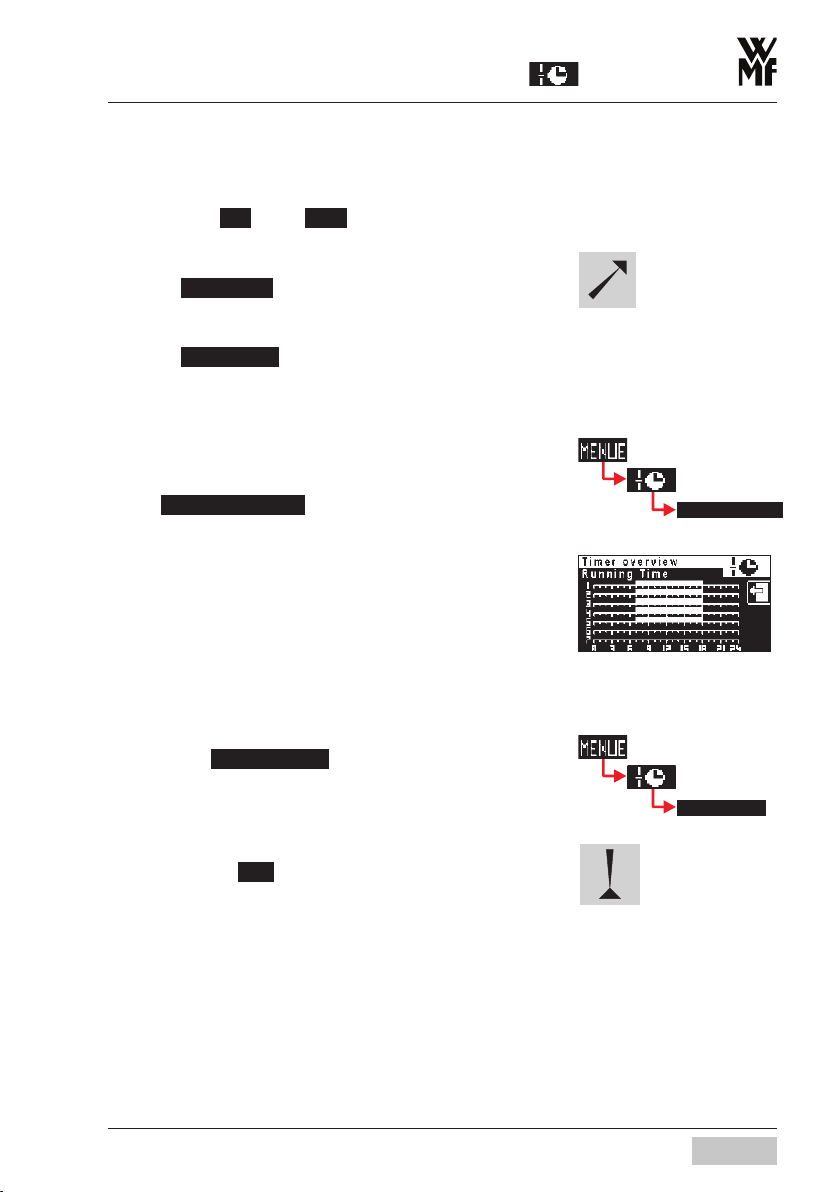
Timer Overview
To check programmed timer events
touch Ti m er Ove r view .
The week overview is graphically displayed. Timer
events are indicated by white bars.
Timer Delete
In day 1-5 or day 1-7, the switching times are copied on the
indicated days.
Individual days 1,2,3 ... 7 are
displayed.
To check times see
Timer Overview.
Ti mer Ov er vi ew
Example:
Timer events Monday to Friday
(1-5).
On time 7:00 hrs
Off time 18:00 hrs
Touch the T imer D e lete pad on page 2 of the timer
main program menu.
Scroll to desired day and touch select.
A security dialogue now appears querying whether deletion is actually intended .
Confirm with O K
The day is deleted with all its timer events.
User Manual WMF presto
Ti mer De le te
This action cannot be retrospectively cancelled.
21
Page 22
Software
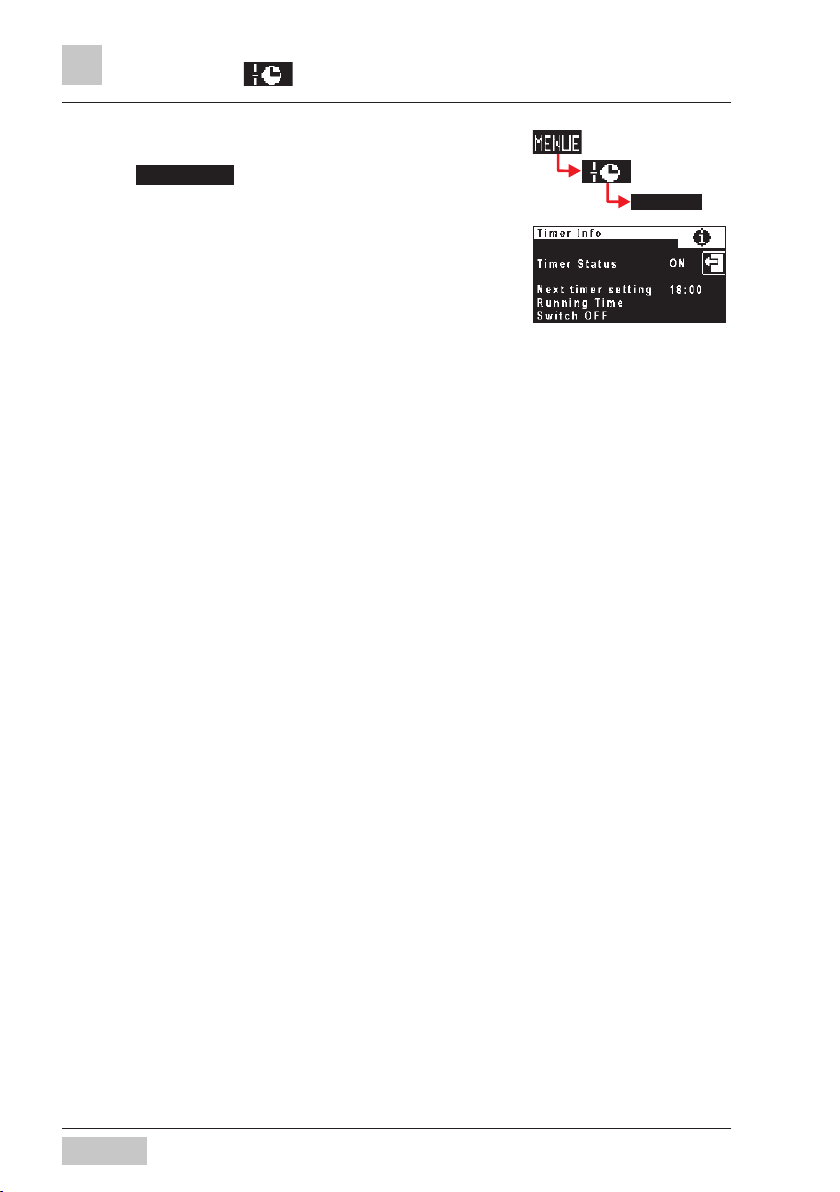
Timer Info
Touching T imer In fo accesses a display with the next
timer event.
Ti mer In fo
22
User Manual WMF presto
Page 23

3.3.3 Customer Care
Cleaning and descaling programs are started from the
Customer Care main menu. Filter change (optional) and
maintenance actions are confirmed here.
The Customer Care main menu contains the following
selection options:
Cleaning program
•
Foam cleaning
•
Mixer rinsing
•
Descale
•
Filter change
•
Filter rinse
•
Maintenance
•
Cleaning program
Clea nin g p rog.
Touching the Cl e ani n g prog . pad starts an automatic
sequence of actions for daily cleaning of the coffee
machine.
The user is automatically taken through foam cleaning
when milk beverages are dispensed. On the WMF presto
with mixer system, the mixer rinsing follows.
The cleaning program sequence is described under in
the quick reference Daily Cleaning.
Software
In the Software/Maintenance
chapter display-led sequences
are described in detail.
Physical cleaning actions are
described in detail in the Maintenance chapter.
Cl ean in g pr og .
See
Quick Reference
Daily Cleaning
In the interests of your own safety and to ensure long life
of your WMF presto prior to carrying out cleaning, please
note the heat warnings in the chapter on safety.
User Manual WMF presto
= More
= Less
= Leave without change
= Save values
= Start test
23
Page 24

Software
Foamer Cleaning
Touch the Foa m er Cle anin g pad
Foamer cleaning starts.
Foamer cleaning is carried out automatically as an
integral part of the full Cleaning Mode
Mixer Rinsing
Touch the M ixe r r insi ng pad
Mixer rinsing starts.
Mixer rinsing is carried out automatically at the end of
the full Cleaning Mode.
Descaling
Hardness of the water, water throughput and whether
a softener is fitted or not determine the point at which
descaling is required. This point in time is calculated by
the WMF presto and displayed.
Foa me rc lea ni ng
Mi xer Ri nse
De scali ng
Descaling is in three stages:
Preparation
•
Descaling
•
Rinsing
•
Use only WMF Descaling Agent for descaling. Any other
descaling product may cause damage to the coffee
machine. No liability is accepted for damage caused by
the use of any other descaling products and
guarantee/warranty claims are not entertained.
24
Total duration of descaling
procedure is approx. 80 min
The procedure may be interrupted nowhere.
Attention!
Descaler is caustic!
Always fol low the instructions on
the package!
See Safety chapter!
User Manual WMF presto
Page 25
Descaling with Water Tank
Preparation Stage
The following is needed for descaling:
2 bottles of WMF Liquid Descaling Agent (per 0.75 l)
•
3 bottles water (2.25 l)
•
•
5-litre collection container
If the coffee machine is still hot a cooling routine initially
starts, duration 5-10 mins.
Remove water tank.
Stir descaler solution in water tank.
Insert water tank with descaler solution.
Place a 5-litre capacity collection container under-
neath the coffee and hot water dispenser outlet.
Descaling Stage
Descaling commences. Duration approx. 40 mins.
On completion of descaling carefully empty the collec-
tion container and replace beneath dispenser outlet.
Empty remaining descaler solution from water tank.
Rinse water tank and fill to maximum.
Replace water tank.
Software
De scali ng
Displays lead step by step
through the program.
Follow instructions!
Attention!
Hot steam and hot
water!
Burn hazard!
Scald hazard!
See Safety chapter!
For parts product codes see
Appendix C
Delivery and accessories
Rinse Stage
Rinsing commences. Duration approx. 40 mins.
When requested refill with fresh cold water.
(after approx. 16 min and 32 min)
Empty collection container.
After the final rinse the steam boiler is heated. The hot
water expands and finally exits briefly as steam.
Descaling is complete. Completion is indicated on the
display.
User Manual WMF presto
Attention! Hot steam!
See Safety chapter!
25
Page 26
Software
Descaling with Constant Water Supply
Preparation Stage
2 bottles of WMF Liquid Descaling Agent (per 0.75 l)
•
3 bottles water (2.25 l)
•
5-litre collection container
•
If the coffee machine is still hot a cooling routine initially
starts, duration 5-10 mins.
De scali ng
Displays lead step by step
through the program.
Follow instructions!
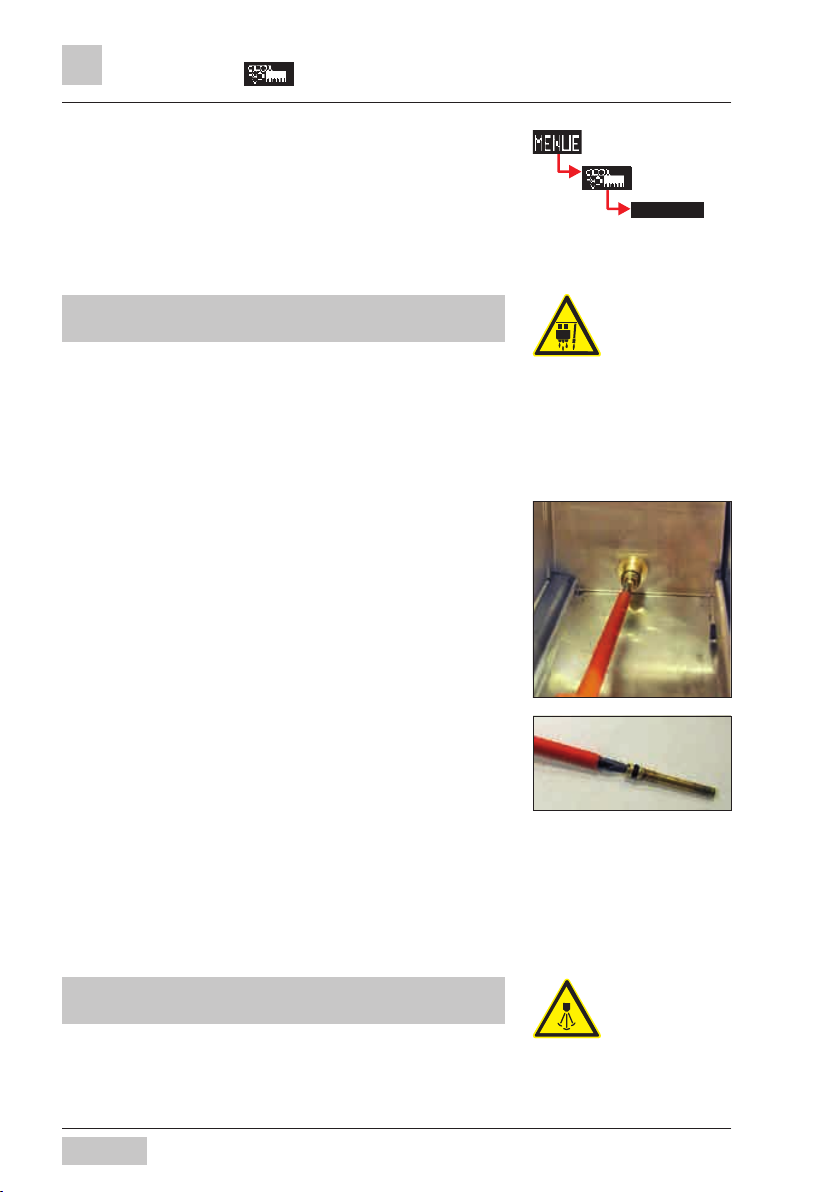
Remove water tank.
Close main water supply tap.
Turn seal plug on water tank connector in an anti-
clockwise direction (crosscut screwdriver)
Stir descaler solution in water tank.
Insert water tank with descaler solution.
Descaling Stage
Descaling starts. Duration approx. 40 mins.
Remove water tank and empty out remaining descaler
solution.
Rinse water tank and fill to maximum.
Replace water tank.
Rinse Stage
Rinsing commences. After the initial rinse is emptied
from the water tank the display requests that the water
supply be turned on again.
Turn on mains water tap.
Leave the water tank in place. The water tank connector
is rinsed for approximately 10 seconds from the mains
supply.
Remove water tank and dry.
Tighten seal plug on water tank connector in an clock-
wise direction (crosscut screwdriver).
Replace water tank.
Subsequent rinses are from the mains supply.
Attention!
Hot steam and hot
water!
Burn hazardr!
Scald hazard
Observe Safety chapter!
After the final rinse the steam boiler is heated. The hot
water expands and finally exits briefly as steam.
Descaling is complete. Completion is indicated on the
display.
26
Attention! Hot steam!
See Safety chapter!
User Manual WMF presto
Page 27
Filter Change
If the filter capacity is exceeded there will be a message
once per day that a filter change is due.
The filter must be changed within one week otherwise
the message will be displayed after every brew.
Change filter.
Confirm filter change.
After filter change there is an automatic program sequence to rinse and bleed the anti-scale filter and water
system.
Rinse Filter
The Filter Rinse option enables water system and filter
rinsing and bleeding following long intervals in operation.
Touch Filt e r Rin s e .
Customer Check-up
After every 10,000 coffees there is a daily message to
the effect that customer attention is due.
This must be carried out within one week, otherwise the
message is displayed after every brew.
Carry out Customer Check-up operation 1/10.000.
Software
Fil te r C han ge
Observe anti-scale filter
instruction!
Displays lead step by step
through the program.
Follow instructions!
Attention! Scald hazard!
Ri nse Filte r
Attention! Scald hazard!
User Manual WMF presto
See Customer Check-up
Instruction 1/10.000
See Warranty chapter!
27
Page 28

Software
3.3.4 Setting
Recipes and Beverage Button
Touch Re c ipes / But t ons pad.
Reci pes/ Butto ns menu shows the options:
Cup Volumes
•
Change Recipes
•
Button Allocation
•
Weigh Grounds
•
Cup Volumes
Cup volumes are matched to the cups used.
Individual Beverage ingredients are matched to the new
cup volumes with no effect on composition and quality.
Touch the beverage button for the desired beverage.
Test dispensing by touching
Change cup volume as required
Save with
Change Recipes
All Beverages:
Ground coffee quantity / Choc powder quantity
Water volume
Re cip es /B ut ton s
= More
= Less
= Leave without change
= Save values
= Start test
Change Recipe Display
Example: Ground coffee qua ntity
Milk Beverage:
Milk foam quantity
Milk volume
Coffee Beverage:
Quality
The five available quality levels affect the coffee brew.
The higher the quality level the more intensive the
release of the taste and aromatic substances in the
coffee.
28
Qualitity Level
User Manual WMF presto
Page 29
Quality 1 After pressing the coffee, grounds are
given time to expand.
Quality 2 After pressing coffee is immediately
brewed.
Quality 3 After pressing a pre-infusion follows.
Quality 4 After pressing and pre-infusion a second
wet pressing follows.
Quality 5 After pressing a pre-infusion follows. In
addition the brew time is automatically
extended.
Button Allocation
Each beverage is allocated to a beverage button.
This button allocation is set here.
Weigh Grounds
The We igh Gr oun d s process dispenses ground coffee
directly into the grounds container. The grounds may
then be weighed.
Empty grounds container prior to this procedure!
Software
Attention!
Excessively high quality setting
may lead to a brew water error.
Boiler Temperature
Set desired boiler temperature.
(Change brewing water temperature).
(Setting range 94° - 99° C)
Reset
Coffee machine software is restarted.
Clock and Date
Clock time and date are set here.
Language
Language used in the display is set here.
User Manual WMF presto
Bo ile r t em p.
R es et
Cl oc k / D at e
L angua ge
29
Page 30
Software
Display Contrast
Contrast of the display is set here.
(Default value is 70)
Filter/Softener Fitted
Whether filter is fitted or not is entered here.
This affects the descaling intervals.
Water Hardness/Capacity
On plumbed coffee machines with a constant water
supply (without anti-scale filter, optional) and coffee machines with a water tank the water hardness (carbonate
hardness) is set here.
With fitted filter and constant water supply:
Filter capacity is set here.
(Filter capacity can be found in the anti-scale filter documentation.)
C ont ra st
Fil te r/Sof te ne r
Wa te r Ha rd n.
Ca pa city
Warm-Up Rinse
Here enter the setting as to whether the coffee machine
should rinse out the brewing unit with hot water after
heating up.
Recommended setting: active.
Warm Up button
Here enter the setting as to whether the Warm Up Button
is to show on the Readiness State display.
Introduction
The Introduction program is started here.
30
Warm-U p Ri ns .
Warm U p b ut to n
If customers are to operate the
coffee machine themselves the
Warm Rinse Button should be
set to ”inactive”.
In tr od uctio n
User Manual WMF presto
Page 31

3.3.5 Enter PIN
Individual levels may be protected with a PIN to prevent
unauthorised access.
For access to a PIN-protected level the PIN must be
entered via the pad.
Software
Touch
in the Main Menu.
A numerical keyboard display appears.
Enter required 4-figure PIN
Confirm with
Following entry of a valid PIN the assigned functions are
available.
3.3.6 PIN Rights Access Control
If a PIN has been assigned for a particular access level
no access will be granted without a PIN.
Level Cleaning
On entering valid PIN access to:
=
Set milk foam quality
=
Timer program
=
Customer Care
Level Settings
On entering valid PIN access to:
=
Set milk foam quality
=
Timer program
=
Customer Care
= Settings
(Beverage, General, Other)
PIN- Entry Display
Cleaning Level Access
Settings Level Access
User Manual WMF presto
31
Page 32

Software
Level Accounting
On entering valid PIN access to:
=
Set milk foam quality
=
Timer program
=
Customer Care
= Settings
(Beverage, General, Other)
=
Assign PIN Rights, Access Control
=
Accounting unit statistics
A PIN may be assigned to any level. The levels are
hierarchical.
Example: The PIN for the Set t ing level is valid
for C lean ing and Se t tin g Levels, but not for
the Ac coun tin g level
Touch the pad in the Main Menu.
Select desired level
Example: Clea ning .
Numerical keyboard display appears.
Enter desired 4-figure number
Number entered is displayed.
Confirm with
This level is now PIN-protected.
Accounting Level Access
= More
= Less
= Leave without change
= Save values
PIN Assignment Display
Example:
Enter PIN: 1234 for Cleaning
level
This PIN is assumed
for superior levels.
When a PIN is assigned to a subordinate level that PIN is
automatically assumed for superior levels if the latter are
not already PIN-protected.
Delete PIN
Entering 0000 will delete access control for the given
level.
The delete of one level automatically deletes the
subordinate levels.
32
Example:
PIN entered fore
Cleaning level: 1234
Setting level: 9876
Accounting level: 7777
User Manual WMF presto
Page 33

3.3.7 Accounting Unit Statistic
The day counter menu displays the counter for each
beverage.
Read Counter:
Touch desired beverage on the display.
Delete Counter:
Touch clear pad .
If no beverage is selected, on touching the clear pad
a dialogue appears in the display querying whether the
counter readings for all drinks should be zeroed.
The “Accounting Statistics” function should be protected
with a PIN to prevent unauthorised access.
Software
User Manual WMF presto
33
Page 34
Other Settings
Chapter 4 Other Settings
4.1 Mechanical Settings
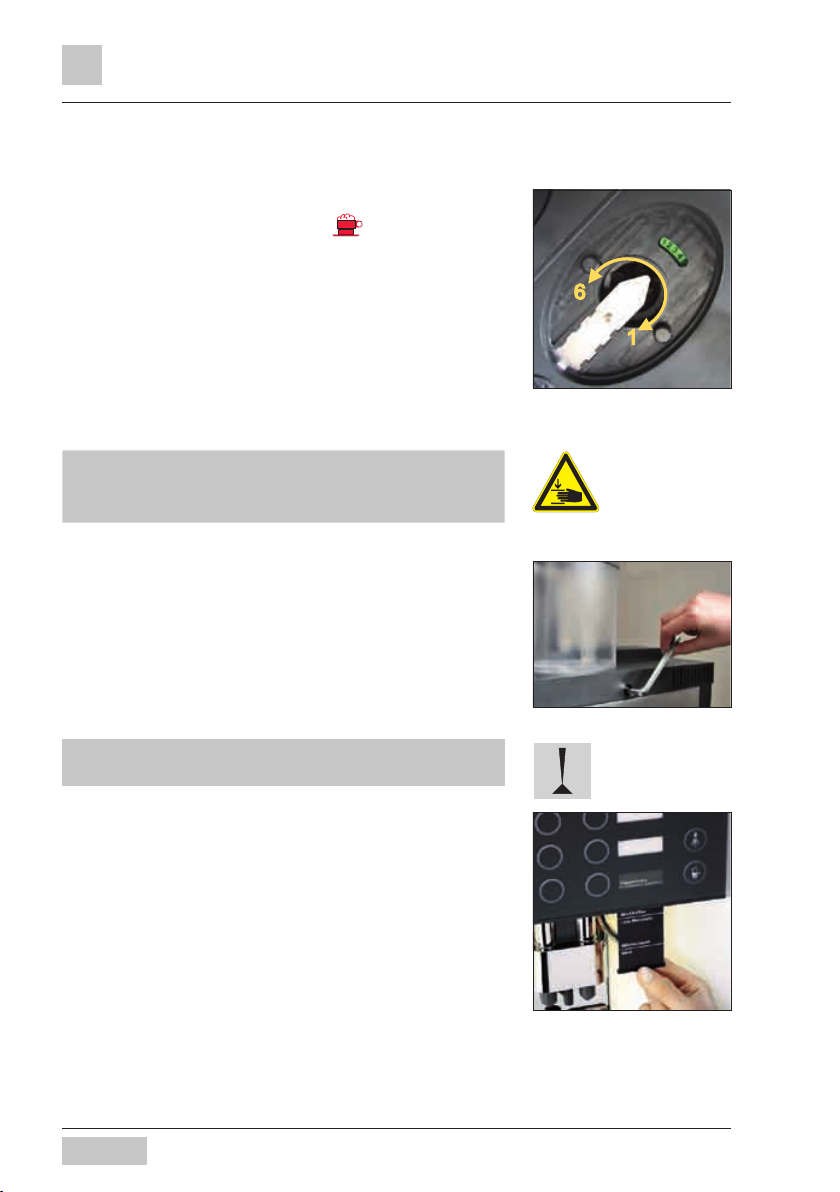
4.1.1 Set Grind Fineness
Remove product hopper.
Preset grind level now visible.
Release coffee dispenser and wait until grinder starts
up.
With grinder running alter grind fineness on the side of
the machine using the allen key as desired.
Grind level 1 = fine (turn clockwise)
Grind level 6 = coarse (turn counter-clockwise)
Crushing or bruising hazard!
Never reach into the grinder mechanism with coffee
machine running and product hopper removed.
Attention! Risk of crushing!
See Safety chapter!
4.2 Beverage Buttons Labelling
First switch off coffee machine in order not to trigger
dispensing inadvertently.
Withdraw existing labelling behind front glass in a
downwards direction.
Label sticker foils as desired using WMF template
supplied.
Stick on label mount and re-insert behind front glass
panel.
Print-out of the template is possible on adhesive labels or
paper. Stick paper to label mount using adhesive.
34
Free download of WMF label
template from www.wmf.de
Suitable adhesive labels:
Avery Serial No. 3659
User Manual WMF presto
Page 35
Chapter 5 Customer Care
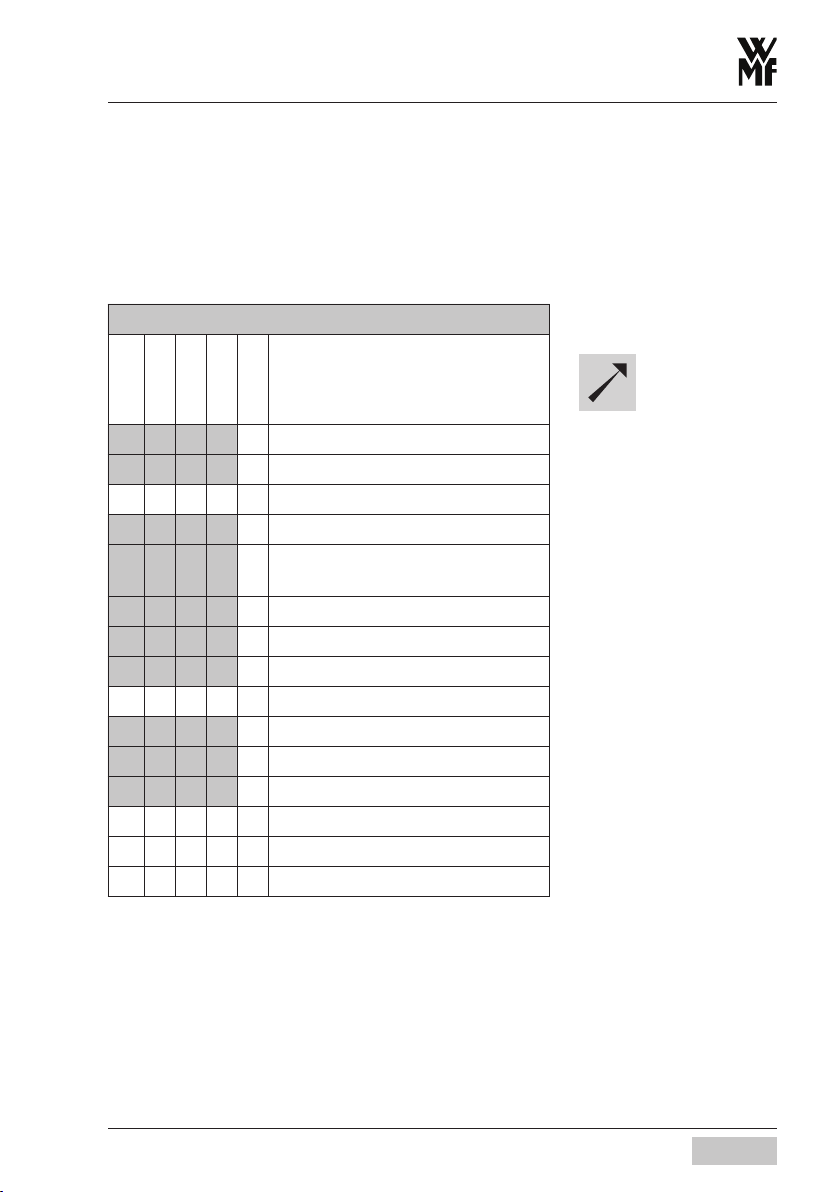
Regular cleaning is essential in order to ensure
problem free operation of the coffee machine and to
ensure optimum coffee quality.
Cleaning Interval Schedule
Customer Care
Daily
Weekl y
Regula r
Requi red
Optional
x Cleaning prog.
x Foamer Cleaning
x O Mixer rinsing
x Combi spout cleaning
x
x Drip tray cleaning
x Housing cleaning
x Brewing unit cleaning
(x) x Mixer cleaning
x Milk Compartment cleaning
x Water Tank cleaning
x Bean hopper(s) cleaning
x O Product Container cleaning
x O Filter changing
x Descaling
Coffee Grounds container
cleaning
Customer Care
See Quick Reference
“Daily Cleaning”
See
“General Cleaning”
See
“Weekly Cleaning”
See
“Regular Cleaning”
See
Software -> Customer Care
Daily = at least once daily and when required
Weekly = weekly cleaning
Regular = regularly and when required
Required = when required
Optional = optional (depending on model)
(x) = as required daily
User Manual WMF presto
35
Page 36
Customer Care
5.1 Daily Cleaning
The milk system must be thoroughly cleaned at least
once a day.
Milk tube should be changed at regular intervals.
5.1.1 Cleaning program
The cleaning mode leads step by step through foamer
cleaning via software.
On coffee machines with mixer system this is followed by
a mixer rinsing.
5.1.2 Foamer Cleaning
Foamer cleaning is a milk system interim cleaning.
Foamer cleaning is an integral part of the cleaning mode.
5.1.3 Mixer Rinsing
Mixer rinsing is a mixer interim cleaning.
Mixer rinsing is an integral part of the cleaning mode.
See
HACCP cleaning schedule
chapter
Cleaning Mode
see Quick Reference
“Daily Cleaning”
Foamer cleaning
See Quick Reference
“Daily Cleaning”
Milk System:
- Combi Spout
- Milk Nozzle
- Milk Hose
Mixer Rinsing
see Quick Reference
“Daily Cleaning”
5.1.4 Combi Spout Cleaning
Thorough cleaning of the milk system.
5.1.5 General Cleaning
Coffee Grounds Container cleaning
(optional grounds chute)
Empty, rinse under running water and clean using a damp
cloth.
36
Cleaning Combi Spout
see Quick Reference
“Daily Cleaning”
User Manual WMF presto
Page 37

Customer Care
Drip Tray, Housing and Front Panel cleaning:
Clean the cold machine using a damp cloth. Finally wipe
dry using a fine woolen cloth or chamois leather.
Metal surfaces cleaning:
For cleaning metal housing parts (matt surface) we
recommend WMF Purargan® forte cleaner.
Do not clean with scouring powders or similar!
There is a risk of causing scratches or scores. Do not
use any sharp cleaning materials or implements!
5.2 Weekly Cleaning
5.2.1 Brewing unit cleaning
Switch off the coffee machine with the
ON/OFF button. Remove mains plug.
Push combi spout fully upwards.
Remove grounds container towards the front of the
machine.
Brewing unit is now fully accessible.
With one hand reach into the chute under the brewing
unit (picture 1) and release the retaining catch.
Remove brewing unit and hold firmly!
For Order Codes for
WMF Maintenance Program
see appendix: Accessories
Prior to cleaning front panel
switch off machine to avoid triggering beverage inadvertently
Attention! Risk of crushing!
Picture 1
Hold firmly, as the brewing unit can slip downwards.
Slowly guide the brewing unit downwards, tilt and pull
forward . (Pictures 2 and 3)
Never use force! Danger of breakage!
Use the Multitool from the accessory kit.
Turn the thread on the brewing unit head counterclockwise until the wiper is in the forward position
(picture 4).
Push the spring outwards over the edge and unlock
(picture 5).
Swing the insertion chute upwards.
Clean the brewer sieve under running water or using
a cloth.
User Manual WMF presto
Picture 2
37
Page 38
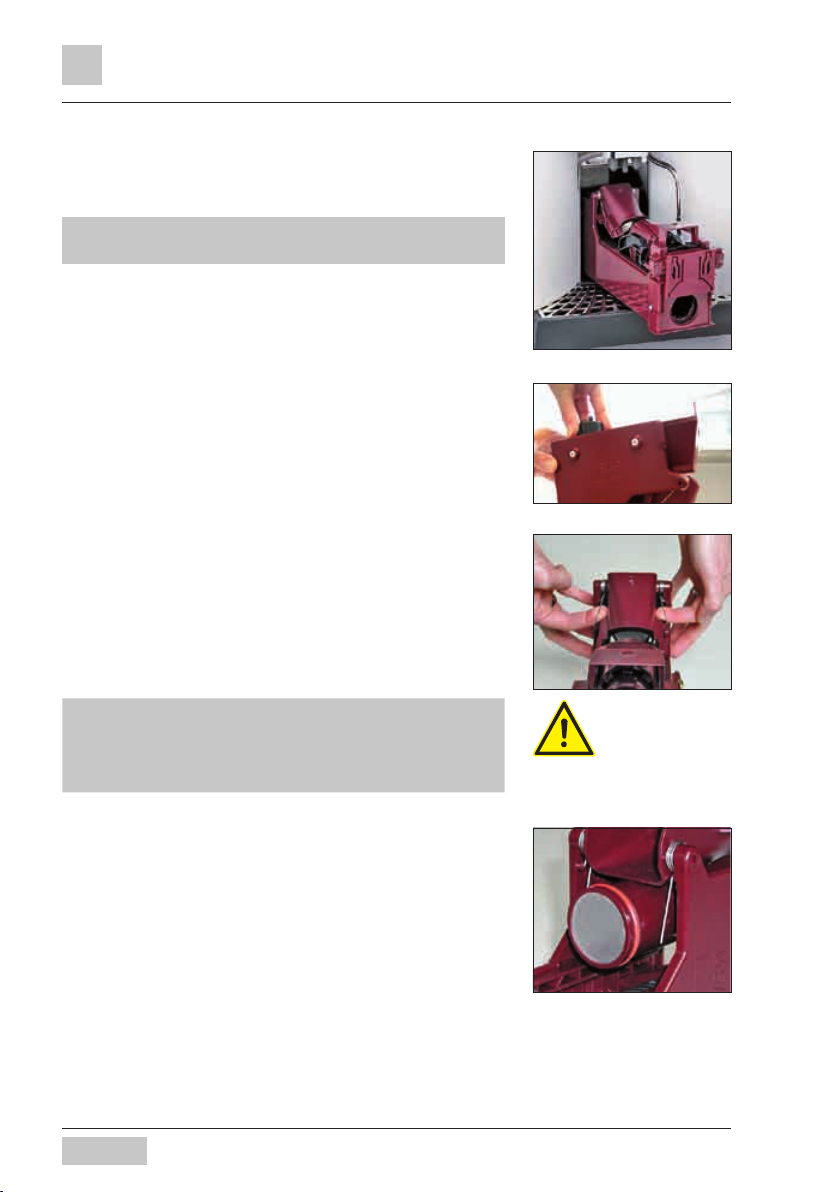
Customer Care
Remove residual coffee grounds using a paint-brush
or scrubber.
Rinse brewing unit under running water.
Never clean the brewing unit in a dishwasher and never
use any cleaner additives.
Dry off brewing unit with a cloth. Allow to dry
completely before replacing in the coffee machine.
Remove coffee ground residues in the chute. For this
withdraw drip tray and wipe out the coffee grounds
towards the front or suck out using a vacuum cleaner.
Reinstall the dry brewing unit.
Replace springs in insertion unit (Picture 5).
Hold the pusher compressed and replace the brewing
unit in the chute against rear wall.
Push brewing unit upwards until it engages in the lock.
Replace coffee grounds container and close chute
cover.
If the brewing unit cannot be replaced without resistance: turn thread on brewing unit head slightly to the left
or right until the brewing unit slides into the guide.
Never use force!
Picture 3
Picture 4
Picture 5
38
Brewer sieve
User Manual WMF presto
Page 39

Customer Care
5.2.2 Choc/Topping Mixer Cleaning (optional)
Choc Mixer/Topping Mixer
Depending on powder used cleaning will be more/less
frequent!
Switch off the coffee machine with the ON/OFF but-
ton. Remove mains plug.
Remove milk compartment lid.
Pull off mixer tube from mixer to combi spout.
Turn the bayonet fixing underneath the mixer jug coun-
ter-clockwise. Mixer jug is released from the arrester
lock.
The propeller of the mixer is now visible and can be
cleaned with a cloth.
Dismantle two-piece mixer jug.
Clean both parts of mixer jug and mixer tubing under
warm running water.
Allow all parts to dry completely.
Re-assemble all components.
On re-assembly all openings must face in the same direction.
Replace mixer jug.
Turn the bayonet fixing underneath mixer jug back in
clockwise direction.
Push mixer tube on mixer jug pipe and combi spout
pipe intakes.
Replace milk compartment lid.
closed open
2-piece mixer jug
All openings facing into same
direction..
Ensure that the spiral guide is
on and that the tubing is not
pinched.
Ensure that mixer tubing is replaced securely.
This is important as otherwise on the next dosage hot
water or hot choc may escape.
5.2.3 Milk Compartment Cleaning
Wipe weekly or as required with a damp cleaning cloth.
User Manual WMF presto
Attention! Hot liquid!
39
Page 40
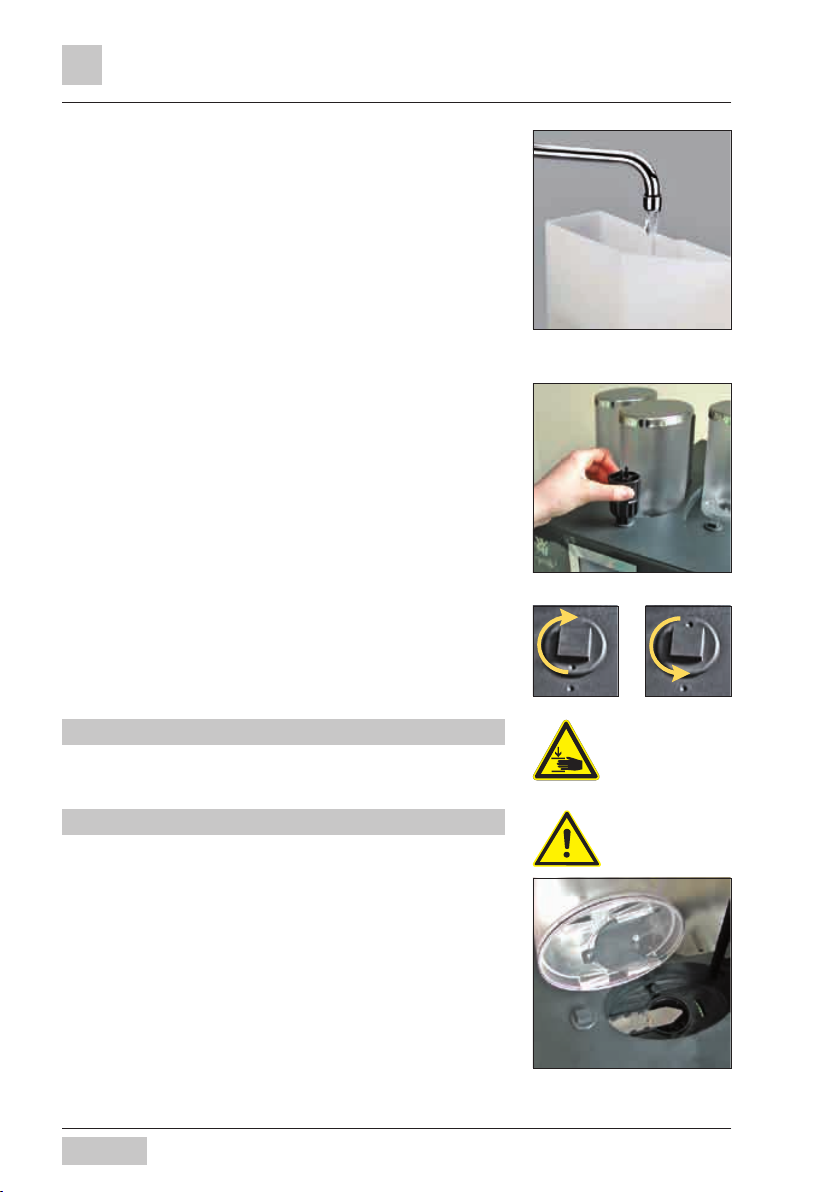
Customer Care
5.2.4 Water Tank Cleaning
Thoroughly rinse out water tank weekly with clear water.
5.3 Regular Cleaning
5.3.1 Bean Hoppers Cleaning
The bean hoppers should be cleaned as required and at
regular intervals (at least monthly).
Switch off the coffee machine with the ON/OFF but-
ton. Remove mains plug.
Release bean hopper lock using multitool by turning in
a clockwise direction.
Lift bean hoppers out.
Completely empty bean hoppers and wipe thoroughly
with a damp cloth.
Allow bean hoppers to dry completely.
Refill and replace bean hoppers.
Lock bean hoppers with the multitool by turning coun-
ter-clockwise.
Unlock Lock
Never reach into the coffee grinders!
Never wash the bean hoppers in a dishwasher.
40
Attention! Risk of crushing!
User Manual WMF presto
Page 41
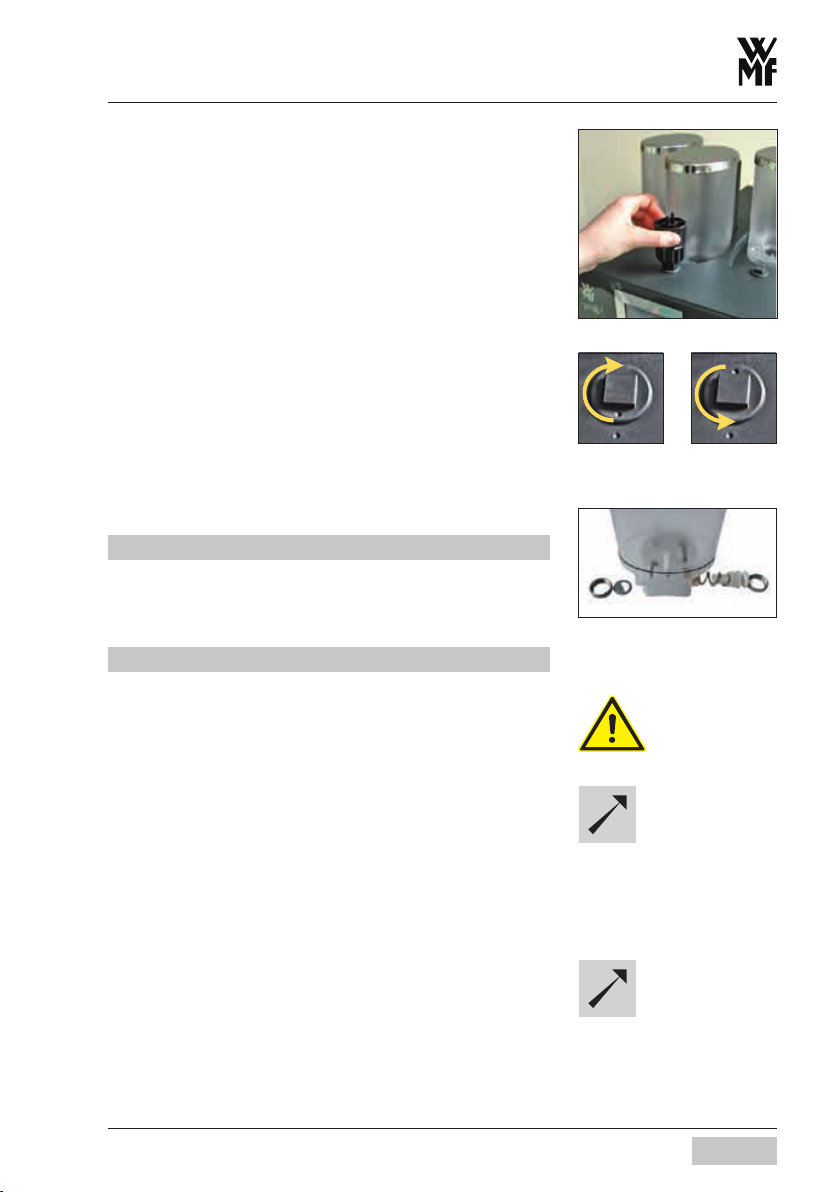
5.3.2 Product Hopper Cleaning Choc/Topping (optional)
Depending on powder used cleaning will be more/less
frequent!
Switch off the coffee machine with the ON/OFF but-
ton. Remove mains plug.
Unlock product hoppers with multitiool by turning in a
clockwise direction.
Lift product hopper out and empty completely.
Unscrew union nuts front and rear.
Remove screw feeder.
Thoroughly clean out reservoir with a damp cloth.
Thoroughly clean individual screw feeder components.
Allow product hopper and individual components to
dry completely.
Re-assemble and replace screw feeder and replace
union screws.
Ensure correct orientation of discharge!
Refill and replace product hopper.
Lock with the multitool by turning counter-clockwise.
Customer Care
Unlock Lock
Portion controller with individual
components; portion controller
dosing auger
Never clean product hoppers in the dishwasher
5.4 Filter Changing
When changing filters follow the anti-scale filter instructions for use.
After a filter change run a display-led rinse.
5.5 Descaling
Descaling is display-led.
User Manual WMF presto
For Filter Change
see Software chapter
Decalcification
see Software chapter
41
Page 42
HACCP Cleaning Schedule
Chapter 6 HACCP Cleaning Schedule
You are required by law to ensure that your customers
are subject to no health risks as a consequence of consumption of food substances you serve.
An HACCP Schedule (Hazard Analysis Critical Control
Points) for risk identification and assessment is required.
You should carry out a risk analysis on your premises.
The aim of the analysis is to recognize and preempt food
hygiene hazard points. For this purpose monitoring and
where necessary test procedures must be established
and implemented. With correct installation,
cutomer care, servicing and cleaning WMF coffee
machines meet the requirements described above. If
customer care of the coffee machines are not carried
out properly dispensing milk beverages will constitute a
food hygiene hazard point.
Please observe the following points in order to comply
with the HACCP Schedule:
Sterilize the Milk System daily
Adhere to the cleaning instructions for the milk
•
system contained in the User Manual. This will ensure
that your system contains minimal bacteria at commencement of operation.
“Food Hygiene Ordinance”
of 05.08.1997“
Use our
HACCP Cleaning Schedule for
monitoring of regular cleaning.
You can call up the history of the most recent cleaning
operations via the information pad.
Always commence operation with a freshly opened
pre-refrigerated milk pack
Original packaged UHT milk is usually free from harm-
•
ful bacteria. Always open a new pre-refrigerated pack
at commencement of operation.
Ensure absolute cleanliness on opening the milk
•
pack. Dirty hands or implements when opening may
introduce germs.
Keep milk cool!
Always have a new pre-refrigerated milk pack handy.
•
42
Recommendation:
Use only UHT milk with a 1.5 %
fat content.
User Manual WMF presto
Page 43

HACCP Cleaning Schedule
If a pre-refrigerated freshly opened pack is used
•
within a period not exceeding 3 hours, refrigeration
during use is not necessary.
If little milk is being used, pre-refrigerated milk must
•
be replaced in the refrigerator again during operation.
Recommendation for Choc/Topping (optional)
Regularly clean the product reservoir. See the instructions in the Customer Care chapter.
See chocolate/topping manufacturer‘s instructions.
At commencement of
operation milk should be at
approx. 6 – 8 °C.
Depending on setting
one litre of milk is sufficent for
approx. 20 cappuccinos.
WMF AG offers a range of refri geration options
(e.g. WMF Countertop Coolers or
WMF Milk Coolers).
Observe cleaning instructions in
the Maintenance Chapter.
User Manual WMF presto
43
Page 44

HACCP Cleaning Schedule
HACCP Cleaning Routine
Use only coo led UHT mi lk as otherwise health risks due to microbacteria can not be excluded!
For Choc and Topping use only products which are not past their sell-by da te.
Cleaning steps:
Date
Cleaning steps
Signature
Date
Cleaning steps
SignatureTime Time
1 2 3 4 1 2 3 4
1. 17.
2. 18.
3. 19.
4. 20.
5. 21.
6. 22.
7. 23.
8. 24.
9. 25.
10. 26.
11. 27.
12. 28.
13. 29.
14. 30.
15. 31.
16.
11. Perform Maintenance Mode.
Brief Guide “Daily Cleaning”.
2a.Cleaning Milk Foamer (combi spout)
Brief guide “Daily Cleaning”.
2b.Daily Mixer Cleaning. Brief guide “Daily Cleaning”.
3a.Foamer Cleaning or change of combi spout after 4 hours operation.
(Absolutely essential with low throughput and with uncooled milk).
3b.Weekly Mixer Cleaning and regular cleaning of product reservoir.
Maintenance chapter
4. General machine cleaning.
Month Year
44
User Manual WMF presto
Page 45

Chapter 7 Maintenance
Please note that this is a professional coffee machine
which needs regular maintenence and descaling.
Timing of descaling is calculated by the machine and
depends on the degree of hardness of the local mains
water and whether or not a filter is fitted.
Customer Care and Maintenance intervals depend on the
machine workload and are notified to you on the display.
The coffee machine may continue to be operated after
the message but Customer Care or contract maintenance should be carried out promptly to ensure correct
functioning and so as to avoid any consequent damage.
7.1 Coffee Machine Maintenance
The following Customer Care or maintenance stages are
provided:
Servicing
Descaling
see
Software chapter - Maintenance
Descaling: may be undertaken by the user/operator.
•
Customer Check-up every 10,000 coffees or annu-
•
ally, whichever is sooner: may be undertaken by the
user/operator.
Servicing every 30,000 coffees or every 2 years,
•
whichever is sooner: may only be undertaken by
trained personnel or by WMF Service, as in this
instance safety checks must be carried out.
Servicing every 90,000 coffees or every 6 years,
•
whichever is sooner: may only be undertaken by
trained personnel or by WMF Service, as in this
instance components affecting safety must be
exchanged.
User Manual WMF presto
Descaling
see
Software chapter - Maintenance
Care after 10,000 brews see
Customer Check-up
Instructions in Customer
Check-up Kit 1/10.000
Order number 33 2828 7000
See
Error Messages and Notes
For other maintenance work and
repairs contact your local WMF
Customer Check-up Technician.
The telephone number can be
found on the address sticker on
the coffee machine and on the
Delivery Note.
45
Page 46

Servicing
7.2 Mixer Maintenance (Choc)
Maintenance every 6,000 Choc servings or every
2 years, whichever is sooner: trained personnel or
WMF-Service only.
7.3 Mixer Maintenance (Topping)
Maintenance every 18,000 Choc servings or every
2 years, whichever is sooner: trained personnel or
WMF-Service only.
7.4 WMF Customer Service
Please contact your local service partner.
Service Desk UK:
Phone: 01895 816100
Fax: 01895 816101
E-Mail: [email protected]
46
User Manual WMF presto
Page 47
Chapter 8 Messages and Tips
Messages and Tips
8.1 Operating Messages
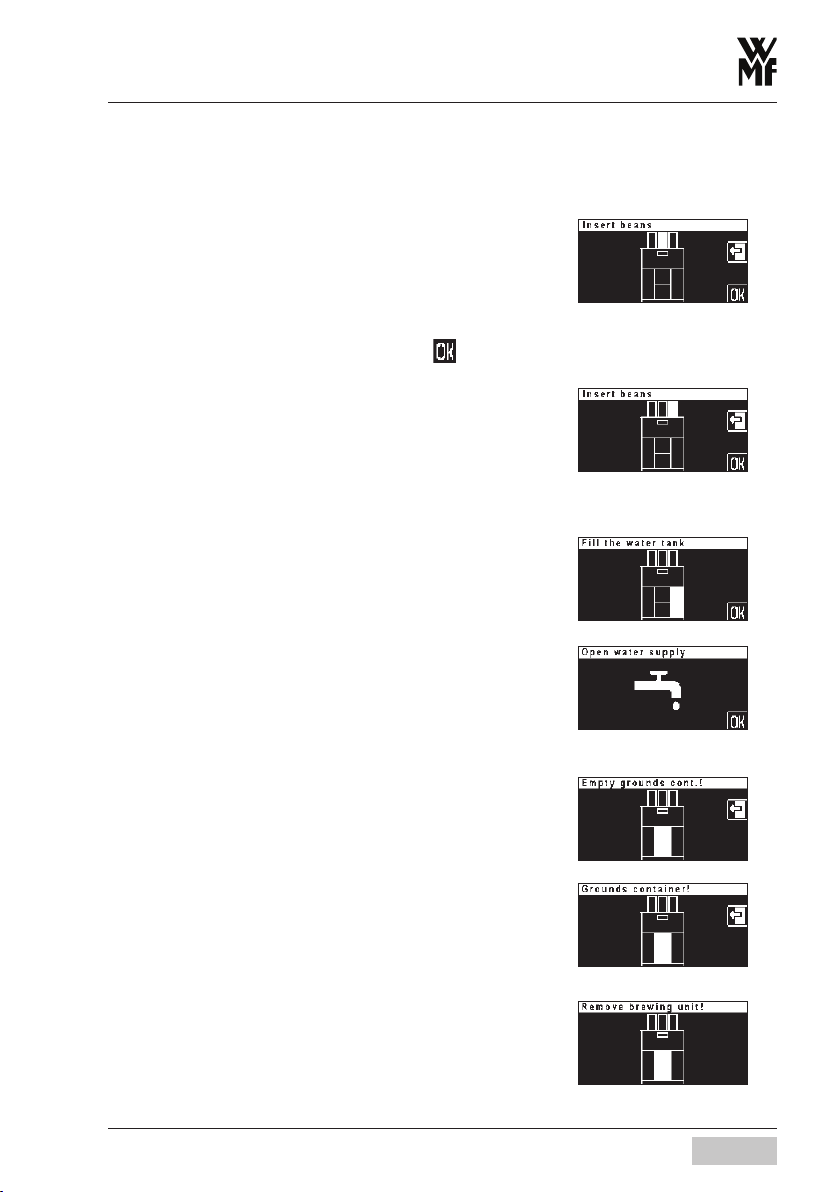
Top Up Beans
Top up (middle) bean hopper!
Check:
Product Reservoir lock open?
•
See Care Chapter.
Beans do not feed through.
•
Stir with large spoon and confirm with
Top Up Beans
Top up (right) bean hopper!
See ”Top (middle) bean hopper.”
Coffee machines without mains water supply only:
Fill Water Tank
Fill water tank and replace until stop.
Coffee machines with mains water supply only
Open water supply!
Turn on mains tap and confirm.
Empty coffee grounds container!
Empty coffee grounds container.
.
See quick installation manual
See quick installation manual
See Daily Cleaning
No coffee grounds container!
Replace coffee grounds container and close lid.
Brew Fault
Remove brewing unit.
Clean brewer sieve.
Replace brewing unit and ensure that it engages correctly in the lock.
User Manual WMF presto
See Chapter Customer Care
47
Page 48

Messages and Tips
Coffee machines with water tank:
Change anti-scale filter
Change filter within one week and confirm in
”Customer Care” menu.
Follow anti-scale filter instructions!
Coffee machines with constant water supply:
Change anti-scale filter
Change filter within one week and confirm in
”Customer Care” menu.
Follow anti-scale filter instructions!!
Please check in User Manual!
Error message number display,
See Error/Fault Messages.
Descaling Message
Descale within one week.
See Software/Customer Care chapter.
Customer check-up message 1/10.000
Carry out customer check up within one week and
confirm in ”Customer Care” menu.
Servicing message 30,000 servings
Call WMF Service.
Revison message 90,000 servings
Call WMF Service.
8.2 Error/Fault Messages
Basic procedure on display of error or fault messages:
Switch coffee machine off and then on again after a
few seconds.
Repeat the process which led to the fault.
In many cases the fault is rectified and you can carry on
working.
48
User Manual WMF presto
Page 49
Messages and Tips
If this does not work: Find the error message or error
code in the following list and follow the sequence of
actions indicated.
If this does not rectify the fault or if the error indicated is
not listed please call WMF Customer Service!
Some messages lead to blocking of individual functions.
You will notice this by the fact that the beverage button
light goes out. The beverage buttons that are still
illuminated can continue to be served.
Your WMF presto is provided with a diagnostics program.
Any faults occurring are shown in the display. The faults
listed may also be caused by an interruption to the mains
electricity supply.
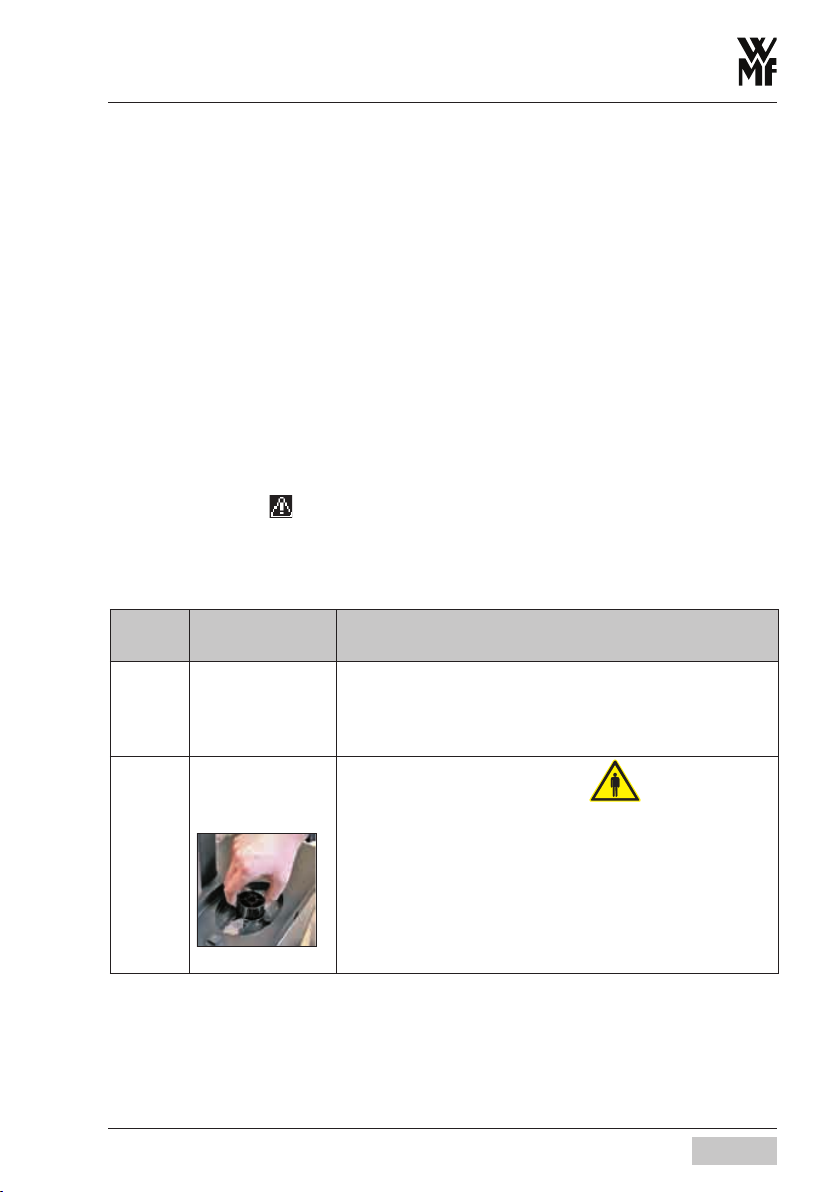
If there is a current fault or instruction to the operator
this pad is displayed
Touch pad.
.
Fault numbers are displayed.
Error
Display
Error Description
6 Brewing unit
Block Circuit /
Brewing unit
sluggish
26
Right Mill blocked
36
User Manual WMF presto
Left Mill blocked
Action
Switch off coffee machine
Clean Brewing unit
See Customer Care Chapter, Clean Brewer
Switch off coffee machine
Remove bean hopper
Turn grinder disk counter-clockwise using only Multi-
tool (square button) (see illustration).
Replace reservoir
Switch machine on
See Customer Care Chapter, Cleaning, Product Containerr
If frequent occurrence:
Set grind fineness one stage coarser
See Other Settings Chapter, Set Grind Fineness
49
Page 50

Messages and Tips
Error
Error Description Action
Display
88 Boiler
overheating
89 Boiler
heat-up time fault
161 Brewer water
fault
163 Warm rinse water
fault
186 Steam boiler level
188 Steam boiler
overheating
189 Steam boiler
heat-up time
failure
Beverage dispenser temporarily blocked.
Check that mains tap is on or that the water
tank is filled and correctly inserted
If subsequently no OK:
Switch off coffee machine
Clean brewing unit
See Customer Care Chapter, Cleaning, Brewing unit
Switch on and try again
(Release follows when cooled down to normal temperature).
Switch off coffee machine, allow to cool and
switch on again
Switch machine off and on again.
Between each of the folloing steps switch the machine off and on
again. If fault not remedied carry out the next step.
Check that main tap is on or water tank
correctly filled and inserted.
Clean brewing unit.
See Customer Care Chapter, Cleaning, Brewing unit
Set grind fineness one grade coarser.
See Other Settings chapter
Reduce Quality.
See Settings, Recipe.
Between each of the folloing steps switch the machine off and on
again. If fault not remedied carry out the next step.
Check that main tap on or water tank correctly
filled and inserted
Clean brewing unit
See Customer Care Chapter, Cleaning, Brewing unit
Outlet temporarily blocked.
Check that coffee grounds container correctly
inserted.
Switch machine off and on again.
Outlet temporarily blocked.
After releasing check milk foam and steam
outlet.
Switch off machine, allow to cool and switch on
again.
Switch machine off and on again.
50
User Manual WMF presto
Page 51
8.3 Faults with no Display
Fault Action
No hot water output but
water in coffee grounds
container
No Choc output but water in
coffee grounds container
Choc portion controller
blocked,
Choc dispensed only with
water
Coffee dispensing varies
left/right
No milk foam/milk output,
but milk in reservoir
Milk foam incorrect,
temperature too cold
Pump runs permanently,
water in coffee grounds
container
Milk foamer and water tank
assembly/disassembly stiff
Choc/Topping hopper cannot be inserted.
Clean hot water outlet.
Call WMF Customer Service
(coffee dispensing possible).
Do not use Choc dispenser.
Call WMF Customer Service
(coffee dispensing possible).
Clean portion controller.
See Maintenance Chapter
Empty powder.
Turn screw feeder manually until all powder
removed.
If necessary rinse with water.
(Allow to) dry completely.
Clean combi spout.
See Quick Reference, Daily Cleaning
Check that milk tube is not kinked or crimped.
Re-route tube correctly.
Clean combi spout.
See Quick Reference, Daily Cleaning
Change milk nozzle,
green nozzle for cooled milk
white nozzle for uncooled milk.
Clean combi spout.
See Quick Reference, Daily Cleaning
Unplug machine and reconnect.
If not remedied call WMF Customer Service.
Lightly smear O-rings with WMF Sealing Grease.
The drive the auger at portioner can be adjusted
slightly in a clockwise direction by hand.
Messages and Tips
User Manual WMF presto
51
Page 52
Safety
Chapter 9 Safety
9.1 Hazards for the User
At WMF safety is one of the most essential product features. The effectiveness of safety devices is only
warranted if the following points are observed:
Read the User Manuals carefully prior to use.
•
Do not touch hot machine components.
•
Protect the machine from the elements
•
(frost, humidity, etc).
Do not use the machine if it is not working properly or
•
if it is damaged.
Do not allow children near the machine.
•
Built-in safety devices must under no circumstances
•
be altered.
Despite safety devices every machine remains fraught
with hazards if incorrectly used. Please observe the
following notes when using the coffee machine so as to
prevent injury and health hazards:
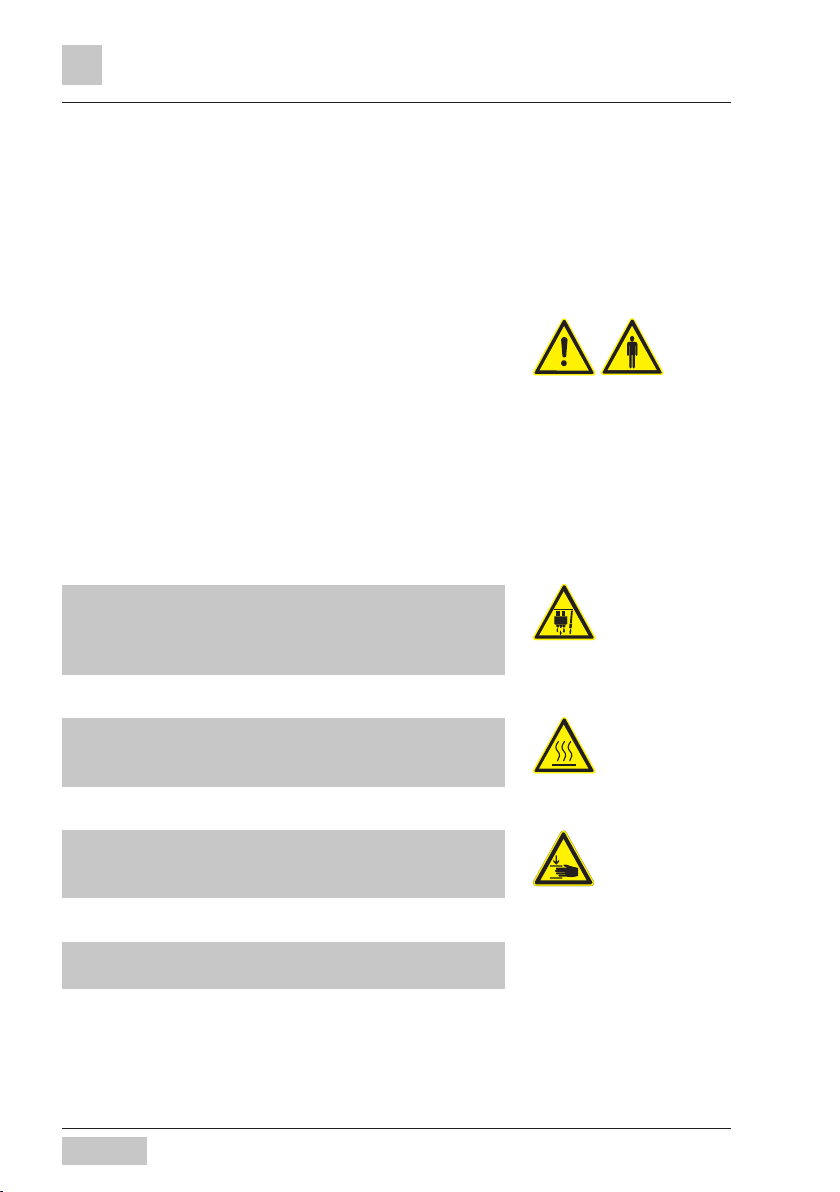
Scald Hazard!
When dispensing coffee or Choc, hot water and steam
there is a danger of scalding. Ensure that when dispensing drinks there is always a receptacle under the outlet.
Failure to observe hazard
instructions can lead to serious
injury.
Attention! Scald Hazard
Near outlet!
Burn Hazard!
The brewing unit must only be cleaned when the machine
is cold. The brewing unit can get hot.
Bruising or Crushing hazard!
There is a danger of bruising or crushing when handling
all moving parts!
When the coffee machine is switched on do not reach
into the bean hopper or the brewing unit opening.
52
Attention! Burn Hazard !
Hot Surfaces!
Attention! Risk of Crushing!
User Manual WMF presto
Page 53

Health hazard!
Product container (coffee beans, choc powder and
topping powder) and manual insert may only be filled with
materials for the use intended!
Health Hazard!
When handling cleaning tablets and descalers please
observe the protective measures on the packaging.
Cleaning tablets and descalers are caustic. Only put the
cleaning tablet and descaler solution in when requested
on the display.
Irritation and Scald Hazard!
Never reach under the outlets during cleaning or decalcification!
There is slight leakage of cleaner fluid descaler from the
combi spout during cleaning/decalcification.
9.2 Danger to the Machine
Please observe the following points so as to prevent
problems with and damage to the coffee machine:
With water with a carbonate hardness in excess of
•
5°dCH a WMF anti-scale filter should be fitted otherwise the machine can be damaged due to build-up of
scale.
For insurance reasons always ensure that, at the end
•
of operation, the mains water tap for water supply
(plumbed machines) is turned off and the mains power
is switched off or the machine unplugged.
We recommend damage prevention measures:
•
- e.g. installation of a suitable water monitor in the
mains water supply
- fitting smoke detectors.
•
After lenghty periods out of use cleaning must be
carried out prior to putting into operation.
Safety
Attention! Health Hazard!
Attention! Health Hazard!
Attention! Danger of irritation or
scalding near outlet !
User Manual WMF presto
53
Page 54

Safety
Do not expose the coffee machine to frost.
•
After a break in operation of several weeks we recom-
•
mend running the cleaning mode at least twice.
9.3 Responsibilities of the Operator
The coffee machine meets the requirements of EC Low
Voltage Directive (LVD) and EMC Directive and bears the
CE mark.
The pressure containers are not subject to the EC PED
Directive (see Article 1 Paragraph 3.6) as they conform
with Article 3 Paragraph 3 of the PED.
The hot water/steam generator is liable to neither
notifiable nor approval.
Calculations conform to AD 2000.
Each machine is subjected to a pressure test.
To countries outside of the European Union the currently
valid national rules apply.
The operator of such equipment must ensure regular
servicing by WMF Customer Service technicians, their
agents or other authorised persons and check the safety
devices.
The operator shall ensure that electrical equipment and
operating facilities are in a fit state - e.g. to BGV 2
[German Accident Prevention Association or equivalent]
In order to ensure operational safety of your coffee
machine replacement of safety valves after 2 years is
advised and boiler replacement after no longer than 6
years. These measures are routinely carried out in the
course of servicing by WMF Customer Service.
See
Quick Reference
Daily Cleaning
See
Chapter Servicing
9.4 Warranty Claims
During the warranty period of 12 months from transfer of
risk, the purchaser has statutory warranty entitlement.
WMF shall always be afforded the opportunity ro rectify
faults within an appropriate period.
Claims above and beyond the above, in particular damage claims as a result of consequential damage are - to
the extent that this is legally permissible - excluded.
54
User Manual WMF presto
Page 55

Material defects shall be reported to WMF immediately
and in writing.
Warranty
No Warranty is provided:
In respect of all parts subject to natural wear and tear.
•
This includes, inter alia, seals, mixers and brewing
unit.
In respect of faults due to the effect of the elements,
•
scale build-up, chemical, electrochemical or electrical
effects unless attributable to fault on the part of WMF.
If an anti-scale filter is not fitted even though the local
•
water supply requires use of an anti-scale filter and if
faults occur as a consequence.
In respect of faults which occur as a result of failure
•
to follow handling instructions, maintenance and care
of the unit
(e.g. User Manuals and Servicing Instructions).
In respect of faults which occur as the result of failure
•
to use orignial WMF replacement parts or incorrect
assembly by the purchaser or by third parties or by
faulty or negligent treatment.
In respect of the consequences of improper modifica-
•
tions undertaken without our consent or by repair or
reconditioning work on the part of the purchaser or by
third parties.
In respect of faults caused by inappropriate or impro-
•
per use.
Inappropriate use of the coffee machine shall be dee-
•
med to have taken place if within the 12-month
warranty period (from date of purchase) the
customer exceeds the annual number of coffee or
Choc mixer /topping mixer servings prescribed.
Annual maximum volume is 15,000 coffee servings
and a maximum of 6,000 Choc drinks.
Warranty Period 12 months
The Customer is advised in the
order confirmation whether or
not use of an anti-scale filter is
required.
See
Maintenance chapter
User Manual WMF presto
55
Page 56
Appendix: Quick Reference Overview
Order Number 33 2319 9010
Edition 1.02 - 10.05
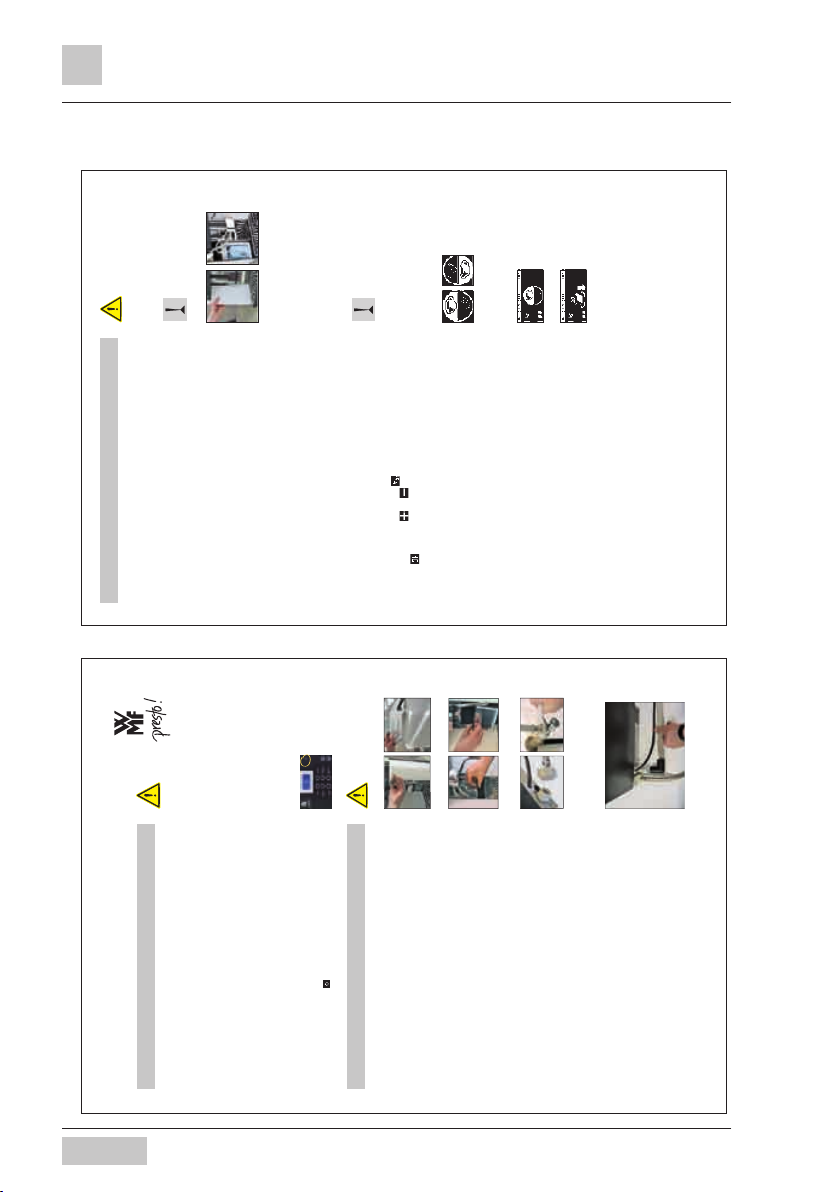
Quick Reference Installat ion Instructions
For initial star tup on delivery ex works.
Please refer to WM F presto User Manual. Pay spe cial attention to t he hazard
notices and Saf ety chapter.
Unpacking
Unpack the WMF pres to and place it on a fi rm horizontal su rface.
Mains Connect ion
Connect mains cabl e to a fused three-pin power po int.
Mains Required:
(Kindly note the req uired Mains Power and Voltage as shown o n the type label of the
machine)
230V/50Hz, fuse 10A minimum!
Japan- 200V/50/60Hz, (2000W) fus e 15A minimum!
USA - 120V/50Hz, (1700W) fuse 15A minumum!
Switch On
Press and hold ON/OFF b utton for 2 sec min..
WMF presto switches on an d startup program commen ces.
The WMF presto t akes you using step by step di alogues through the
installat ion routine. Perfor m each step only when ins tructed on the displ ay!
Removing Water Tank
Remove water tank, remov e lid.
Take out accessory componen ts contained.
Water tank option only!
Rinse out water tank a nd fi ll with clean cold mains wat er.
Place lid on water tan k and replace until it meets th e stop.
Removing Coffee G rounds Container
Push combi spout ful ly upwards.
Push up adjustabl e screen over coffee grounds conta iner.
Remove coffee grounds co ntainer and remove accessori es.
Replace coffee groun ds container until it meet s the stop.
Close adjustable sc reen.
Constant Water Su pply (optional)
Carefully inser t seals attached to connect ing tube.
Using hose connect uni on on rear of machine to existing wa ter tap or anti-scale fi lter
as appropriate.
If using WMF AquaQue ll 1.5 Filter System follow its User Manual.
Turn on water.
Check unions for leaks a nd tighten if necessary!
Drain Outlet (opt ional)
Push drain tube wit h angle onto water drain conne ctor on rear of machine.
Connect drain tub e to mains drain via an S-tra p
Tube must not sag. Shorten tu be if necessary!
Packaging material in box co ntains accessories!
Do not throw away!
For accessories and identi fi action of machi ne
components see User M anual!
Make sure that the coffee m achine is in perfect
condition. In th e event of doubt do not star t up
and inform WMF Serv ice.
Keep original packagin g in the event of any
subsequent return !
For installation terms a nd conditions see
User Manual!
Do not loosen any screws an d do not remove
any housing parts - t here is danger to life insid e
the machine due to ma ins voltage!
Siphon = S-ben d (odour trap)
(as on dishwahers)
Recipe setting ad justed to new cup volume s!
Coffee machine is rin sed out on dispensin g
the first three beverages. Dis pose of the first
three beverages dispens ed!
Readiness State displ ay
with one button le vel
Readiness State displ ay
with two button le vels
Level 1 active Level 2 active
Do not jam milk hose a nd if fitted choc hose!
Do not confuse beans an d powder containers!
The WMF presto t akes you using step by step di alogues through the
installat ion routine. Perfor m each step only when ins tructed on the displ ay!
Set Water Hardness
Request water hardne ss reading from water supplier o r determine using
WMF Carbonate Hardn ess Test Kit (complete with Instr uctions) in the accesssories.
Labelled “Deutsche Karbonat härte” = ° dKH
Fill Product Reser voir
Fill Product Reser voir when requested by display.
Connect Fresh Milk (opt ional)
Open milk lid full y to the front.
Open fresh milk pack so t hat it is lying on the thin side a nd no milk runs out.
Push preassembled mi lk hose into the milk pack. Shor ten hose as required.
Place milk pack carefu lly in the chute.
When adjusting height of co mbi spout, hose must not be stretched.
Replace milk lid.
Cooler (optional)
Punch pre-sta mped knock-out on milk lid.
Feed tube through and pus h into cooler.
When adjusting height o f Combi spout, hose must not be stretched.
green Milk nozzle =• cold milk
white Milk nozzle =• milk at roo m temperature
Set Cup Volumes
Decide beverage receptacl es for beverage dispensing and keep recept acles ready.
This point can be skipped if be verage receptacles are not available.
Touch beverage button for th e desired beverage.
Activate test disp ensing by touching .Adjust cup volumes w ith an d pads.
Save with
.
Second Button Leve l (optional)
If your WMF presto has a s econd button level you can also s et the cup volumes for the
beverages of the second bu tton level. If the second leve l is available the toggle pad will
be displayed.
Activate the respe ctive inactive butto n level by touching the toggle pad.
The selected set tings may now be adjusted at any tim e in the Setting Menu.
Setup Complet e
The dialogue is now ende d. Your WMF presto is now ready for operat ion.
Please find out how to set, o perate, clean and program your cof fee machine in your User
Manual..
Beverage Despensing
Pressing the beverage bu ttons triggers dispensing of t he beverage set.
Illuminated ring ro und button
= ready
Flashing ring round bu tton
= dispensing
Place receptacle unde rneath
Press desired beverage bu tton
Chosen beverage and progress of dispensing a re shown in the display.
We wish you every succe ss with your WMF presto !
••
Appendix A: Quick Reference Overview
56
User Manual WMF presto
Page 57
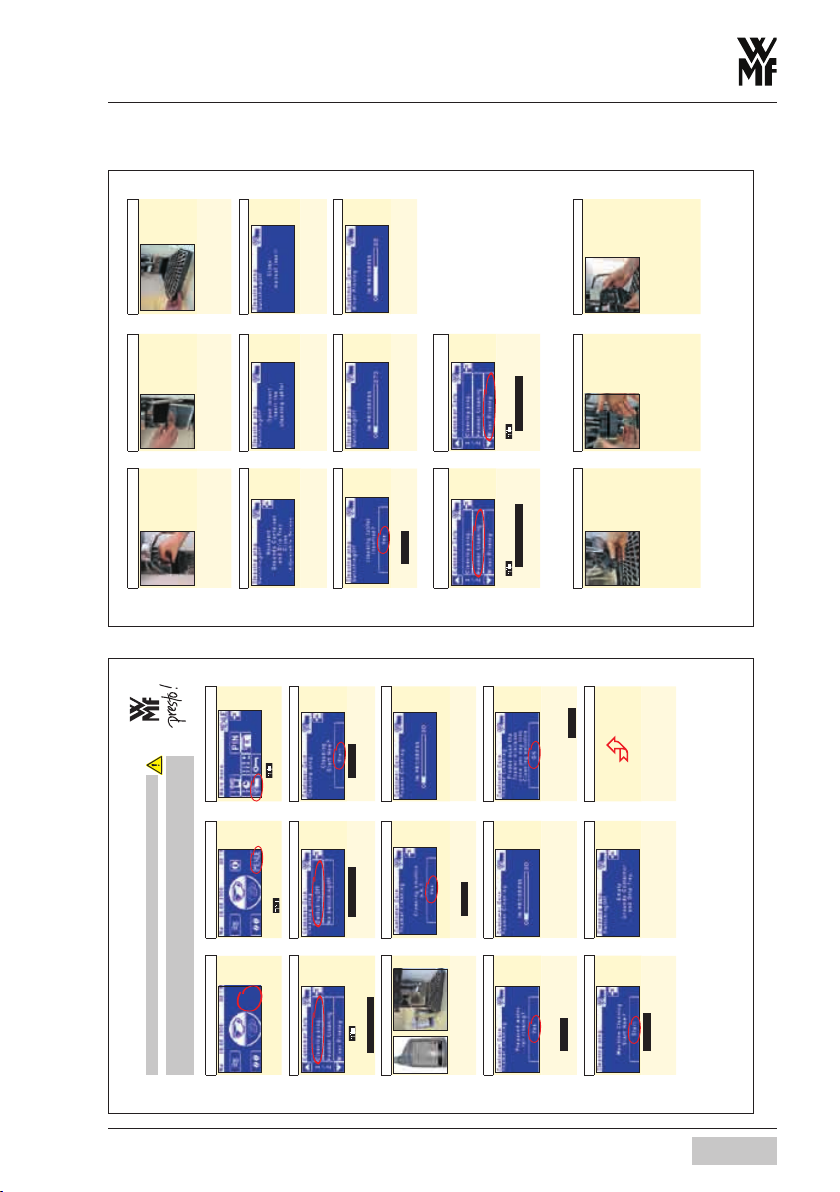
Appendix: Quick Reference Overview
Order number 33 2319 8010
Edition 1.03 - 10.05
1
2 3
Touch clear pad. Additional pads are activated .
Touch
pad.
Touch
(Customer Care).
4 5 6
The Menu (Customer Care) ap-
pears with three options.
Touch
Clean ing Prog. .
Touch switch ing off Touch St art
Cleaning Program sequence begins.
7 7.1 8
Open bottle of Spe cial Cleaner.
Mix 5 ml cleaner wit h 0.3l w arm water
in a container. Insert mi lk hose.
When Step 7 complete d
touch
Yes .
Cleaning runs for 30 secs.
9 10 11
For water rinse fill wit h 0.3l of c lear,
cold water. Insert milk hose.
Touch
Yes .
Rinse runs for 30 secs.
Display with foamer clean ing
reminder appears.
For foamer cleaning see nex t page,
steps A to C. Touch
OK .
12 13
Touch Start
Machine cleaning sta rts.
Empty grounds cont ainer and drip
tray. See s teps 14to 17.
If not connected to mai ns drainage
place receptacle (2 lit res) underneath.
Continue on reverse si de.
Quick Reference “Daily Cleaning”
This Quick Refe rence does not replace the Use r Manual!
Consider the O verview of Cleaning In terval Schedule in chap ter “Customer care” in t he User
Manual. Prior to t he first cleaning read t he User Manual, Custom er Care chapter under sub -
heading: “Gene ral Cleaning”, “Weekly Cleani ng” “Regular Cleaning” an d “Descaling”.
14 15 16
Push combi spout ful ly upwards and
lift the adjus table screen.
Remove and empty
grounds container.
Pull drip tray out an d empty. Then
replace drip tray. Obligatory wi th
machines witho ut mains drain
connection!
17 18 19
Replace grounds contai ner and close
adjustable scree n.
Manual insert is eith er in the centre
between the product contai ners or in
the centre behind the contai ners.
Close manual insert .
20 21 22
Cleaning tablet inser ted?
Touch
Yes
Cleaning runs for approx. 5 -8 mins Mixer rinse runs for 30 secs then
machine switches off. Clean ing
routine ended.
Foamer Cleaning Mixer Rinsing
Foamer Cleaning on ly
On
submenu (Customer Care)
touch
Foamer Cleaning .
See steps 6 to 11.
Mixer Rinsing o nly
On
submenu (Customer Care)
touch
Mixer Rinsing
Mixer rinse runs for 30 secs.
Combi spout cleaning 1 x daily Prior to cleaning switch of f at ON/OFF button . Pull out mains plug.
A B C
Pull forward the l ittle lever behind the
combi spout. Remove combi spou t,
remove milk hose from mi lk container
and release from combi sp out.
If a mixer hose is fitted re move it too.
Mix 5 ml Cleaner wit h 0.5 lwa rm
water in a receptacle. Dis mantle
combi spout and soak to gether with
milk hose for a minimu m of 5 hrs
in the cleaner fluid. Parts m ust be
completely imme rsed. Finall y clean
all parts thoro ughly with a brush.
Rinse combi spout and m ilk hose
very thoroughly w ith clear water
so that no cleaner flui d remains.
Replace combi spout and h oses after
rinsing.
User Manual WMF presto
57
Page 58

Appendix: Technical Data
Appendix B: Technical Data
Coffee Machine Technical Data
Power rating * 2.2 kW
Daily capacity
Espresso, Café Crème
Hot water output, total 10 l/h
Coffee bean hopper each approx. 500 g
Choc hopper/
Topping hopper
Mains power * 1/N/PE 50 Hz/230 V
External dimensions
Weight empty ca. 30-40 kg
Continuous sound pressure level
(Lpa) **
Right to technical modifications is reserved.
100 cups
approx. 500 g
width 325 mm
height incl. bean hopper 675 mm
depth 550 mm
< 70 dB (A)
* For special models see model label, values given above are for basic model.
** A-evaluated sound pressure level Lpa (slow) and Lpa (impu lses) at operating personnel workplace is
under 70 dB(A) in any working mode.
Terms and Conditions of Use and Installation
Necessary preparatory work at the customers premises are to be arranged by the
machine operator themselves. The work must be carried out by registered installers
in compliance with general - including local - regulations. WMF Customer Service may
only connect the machine to existing prepared connection points. WMF Customer
Service is neither authorised nor responsible for carrying out any work prior to connection!
58
User Manual WMF presto
Page 59

Appendix: Technical Data
Mains voltage tolerance 230 V + 6 % - 10 %, mains outage < 50 ms no
interruption of function
Water supply
(optional constant water
connection)
3/8 inch flexihose connector with mains tap and
filter on customer supply side, water temperature
max. 35 °C.
min. 2 bar flow pressure ati 2 l/min., max. 6 bar
Water quality For drinking water over 5° dCH (carbonate hard-
ness) a WMF anti-scale filter should be included.
Drain outlet
Flexihose to DN 19, min. gradient 2 cm/m
(optional)
Ambient temperature + 5°C to max. + 35°C
(Do not expose the coffee machine to frost).
Maximum humidity
80 % relative humidity without condensation,
no water spray, do not use unit outdoors!
Protection
IP X0
Inbuilt clearances For operating, service and safety reasons the
machine should be installed with clearance of not
less than 50 mm at the back and sides from the
building or non-WMF components.
A clear height of 100 mm from the top of the supporting surface should be ensured. Recommended height of the working surface is a minimum of
850 mm from floor level.
If the machine connections are to be routed down
through the counter, remember also to allow
space for the connections. These may restrict the
available space below the machine.
Anti-scale filter installed
dimensions (03.9314.0001)
490 mm (height) x 118,8 mm (diameter)
plus space requirement for the connection tubes
* The existing electricity supply must conform to the currently valid national rules (for Germany, VDE 0100).
To improve safety the coffee machine should be fitted with an FI 30 mA earth leakage current circuit breaker
to EN 61008 standards. A plug top wal l socket should be fitted near the machine. If the mains con nection
lead of this coffee machine is damaged it must be replaced by WMF Customer Services or a similarly qualified
person.
If the coffee machine is permanently connected to the mains then an all-pole disconnecti ng separator (mains
switch) to EN 60947 standards with a minimum 3 mm contact gap must be included. For flexible connection a
separator switch is recommended.
Mains cable must not come into contact with hot surfaces.
Mains switch and plug top are part of the customer‘s on-site instal lation.
The machine may not have a fixed permanent mai ns connection if installed on any mobile furniture item.
User Manual WMF presto
59
Page 60

Appendix: Accessories and Spares
Number Unit Designation Order number Position number Fitting
Combi spout compl wit h Choc/ Topping
1 pc milk foamer top section 33 2259 8000 7 all
1 pc milk foamer bottom section 33 2259 7000 7 all
1 pc mixer spout addition 33 2296 2000 7 Choc / Topping
0,5 meter milk hose 00 0048 4948 7 fresh milk
1 pc
milk nozzle for cold milk (green) 33 2317 8000 7 fresh milk
1 pc milk nozzle for warm milk (white) 33 9516 9000 7 fresh milk
0,18 meter mixer hose 00 0048 0064 7 Choc / Topping
1 pc spring for mi xer hose 33 2292 6000 7 Choc / Topping
1 pc mixer bowl 33 2318 0000 7 mixer bowl
Constant water supply, outlet
1 pc connecting tube at constant water supply 33 2292 1000 installation manual constant water supply
1 pc angle for drain tube 33 2165 8000 installation manual with outlet
1,5 meter drain tube 00 0048 0042 installation manual with out let
Accessories / tools
1 pc 8 mm allen key 33 2315 7000 1 all
1 pc multitool 33 7006 2985 1 all
1 pc test strip carbonate hardness 33 2315 6000 installation manual all
Document ation / instructions
1 pc user manual presto 33 0914 7010 all
1 pc quick reference dayly cleaning WMF presto 33 2319 8010 all
1 pc quick reference installation WMF presto 33 2319 9010 all
Bean hopper compl.
1 pc bean hopper 33 2253 1000 1 all
1 pc stopper slider 33 2265 5000 1 all
1 pc intervening protection 33 2292 7000 1 all
2 pcs screwed intervening protection 00 0047 3105 1 all
1 pc O-Ring container 33 2291 1000 1 all
Appendix C: Accessories and Spares
60
User Manual WMF presto
Page 61
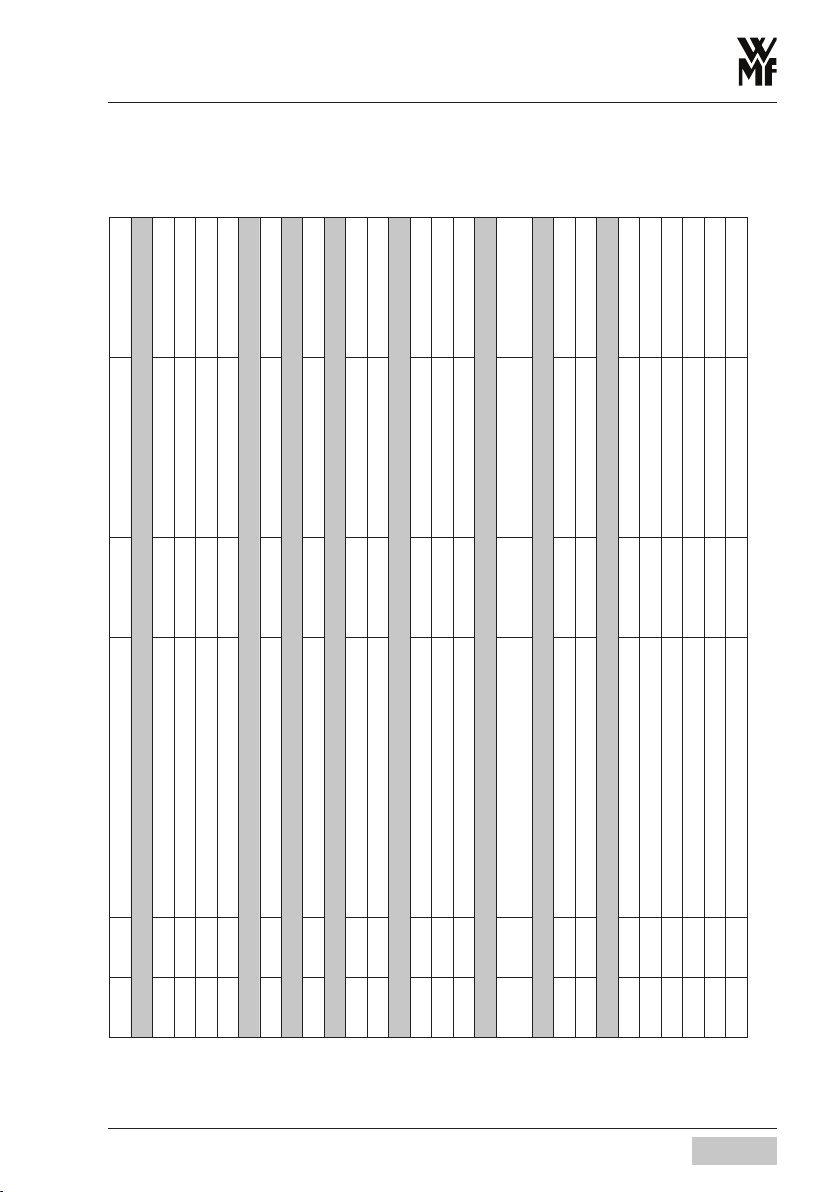
Appendix: Accessories and Spares
Number Unit Designation Order number Position number Fitting
Portioner
1 pc choc hopper 33 2823 5000 4 Choc
1 pc topping hopper 33 2824 8000 4 Topping
1 pc portioner lid 33 2268 9000 1 and 4 all
1 sheet signs labelling hopper 33 2315 3000 4 all
Coffee grounds container
1 ps Coffee grounds container 33 2272 4000 9 all
Brewing unit
1 p brewing unit 33 2823 6099 15 all
Drip tray / drip tray grid
1 p drip tray 33 2254 9000 10 all
1 p drip tray grid 33 2257 2000 10 all
Water tank
1 p water tank 33 2254 1000 17 all
1 p water tank lid 33 2296 1000 17 all
1 p sieve water tank 33 7006 2608 17 all
Customer service-kit 1/10.000
1 pc customer service-kit 1/10.000
(with fresh milk and choc)
33 2828 7000 all
Deliming filter
1 pc AquaQuell 1.5 filtersystem (compl.kit) 03 9314 0001 constant water supply
1 pc replacement cartridge for AquaQuell 1.5 33 2169 2000 constant water supply
Article numbers for the WMF maintenance program:
1 WMF cleaner cream milk 33 0683 6000
1 cleaning tablet 33 7006 2531
2 liquid deliming agent (0,75 l) 33 7006 2869
1 pipe cleaner 33 0350 0000
1 cleaning brush 33 1521 9000
1 valve lubricating and sealing grease 5gr 33 2179 9000
User Manual WMF presto
61
Page 62
Index
Index
A
Adjus t Combi Spou t Heig ht 12
B
Baris ta Pad 17
Bean Hopper 12
Beverage But ton 28
Boiler Temperature 29
Brew Ti mes 18
But ton Al loca tion 2 9
C
Call Up Main Menu 8
Change Re cipes 28
Choc po wder quantity 28
Clean ing Mo de 23
Clock a nd Date 2 9
Coff ee Grounds Co ntainer 13
Combi Spout Heigh t 12
Copy Day 21
Countert op Cof fee Grounds Cont aine r 13
Cup Volu mes 28
Custo mer Check-up 27
D
Decal cific ation 24
Decal cific ation wit h Cons tant Water Su pply 26
Decal cific ation wit h Water Tank 25
Dispe nse Bev erage 10
Dispe nse Foam ed Mil k 10
Dispe nse Hot Water 10
Dispe nse Milk 10
Drip Tray 14
E
F
Filter Change 27
Foamer Cleaning 24
Foaming Milk 11
Functions Ma in Men u 16
G
Ground cof fee quanti ty 28
I
Information 17
Introduction 6
J
Journal 18
K
L
Langu age 29
Latte Macchiato Pause Inter val 19
M
Main Menu 18
Maintenan ce 23
Manua l Inse rt 12
Milk a nd Foam 19
Milk foam qua nti ty 28
Milk volume 28
Mixer Rinsing 24
N
O
Opera ting 10
P
Produ ct Hop per 12
Q
Quality 28
R
Readi ness State 15, 17
Readi ness State D ispla y Touch Pads 15
Recipes and Be verage But ton 28
Reset 29
Rinse F ilte r 27
S
Set Timer 20
Setting 28
Signs 8
Soft war e 15
Star t Position Main Me nu 8
Steam Outl et 11
Switch Off Coff ee Machine 14
Switch On Cof fee Machin e 10
Symbols 8
62
User Manual WMF presto
Page 63

T
Table of Contents 3
Tablet Insert 12
Timer Delete 21
Timer Info 22
Timer Over view 21
Timer Progra m 19
Timer Stat e 20
Toggle Pad 18
U
User Manuals S igns an d Symb ols 8
V
W
Warmi ng Beve rage 11
Warm Ri nse 17
Water vo lume 28
Weigh Gr ounds 29
X
Y
Z
Index
User Manual WMF presto
63
Page 64

Your nearest WMF Customer Service Centre:
© 2005 WMF Aktiengesellschaft
Coffee Machines Division
Postfach 1401, D-73309 Geislingen/Steige, Germany.
All rights reserved, in particular duplication, distribution and translation
rights. No part of this Manual may be reproduced in any form or processed, duplicated or distributed using electronic systems without written
consent.
Design and production / typesetting and print presentation:
TecDoc GmbH; Geislingen, [email protected]
Printed in Germany.
Subject to technical modification.
11.10.2005
 Loading...