

Page 1
LINEO
Milchaufschäumer
Gebrauchsanweisung 4
de
Operating Manual 12
en
Mode d’emploi 20
fr
Istruzioni per l’uso 28
it
Instrucciones de uso 36
es
nl
Gebruiksaanwijzing 44
da
Brugsanvisning 52
sv
Användarguide 60
Käyttöohje 68
no
Bruksanvisning 76
Page 2
1
2
3
4
5
6
Page 3

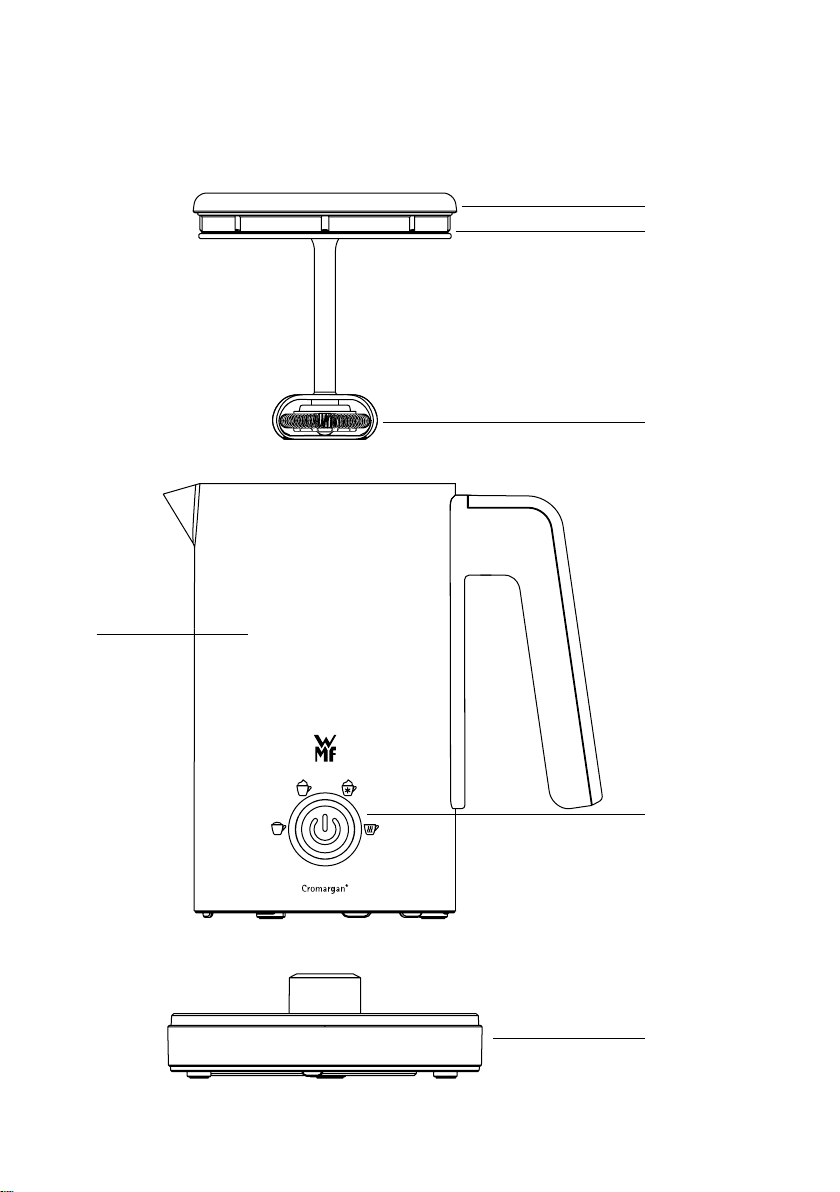
Aufbau Milchaufschäumer
1 - Deckel
2 - Dichtungsring
3 - WMF Milchschaum-DISC
4 - Krug
5 - Start-/Stopptaste mit Kontrollleuchte
6 - Gerätesockel mit Kabelaufwicklung
Milk frother components
1 - Lid
2 - Sealing ring
3 - WMF milk froth DISC
4 - Jug
5 - Start/stop button with control lamp
6 - Appliance base with cable wrap
Montage du moussoir à
lait
1 - Couvercle
2 - Joint d’étanchéité
3 - Disque moussoir à lait WMF
4 - Pot
5 - Touche marche/arrêt avec témoin de contrôle
6 - Socle de l’appareil avec cordon d’alimentation
Componenti schiumatore
1 - Coperchio
2 - Anello guarnizione
3 - DISCO per la formazione di schiuma di latte
WMF
4 - Bricco
5 - Tasto di avvio/arresto con spia
6 - Base del dispositivo con avvolgicavo
Montaje del espumador
de leche
1- Tapa
2 - Anillo de junta
3 - Espumador de leche DISC de WMF
4 - Jarra
5 - Tecla inicio/parada con luz de control
6- Zócalo del aparato con bobinado de cable
Onderdelen
melkopschuimer
1 - Deksel
2 - Afdichtring
3 - WMF melkschuim-DISC
4 - Kan
5 - Start/stop-knop met controlelampje
6 - Apparaatvoet met kabelvak
Opbygning af
mælkeskummer
1 - Låg
2 - Plombering
3 - WMF Mælkeskummer-DISC
4 - Kande
5 - Start-/Stoptast med kontrollampe
6 - Apparatsokkel med kabelopvikling
Mjölkskummarens
konstruktion
1 - Lock
2 - Tätningsring
3 - WMF-mjölkskums-DISC
4 - Kanna
5 - Start- och stoppknapp med kontrollampa
6 - Apparatsockel med sladdförvaring
Maidonvaahdottimen osat
1 - Kansi
2 - Tiivisterengas
3 - WMF-vaahdotuslevy
4 - Kannu
5 - Käynnistys-/pysäytysnäppäin merkkivalolla
6 - Laitteen jalusta, johon laitteen johdon voi
keriä
Oppbygging
melkeskummer
1 - Lokk
2 - Tetningsring
3 - WMF-melkeskum-DISC
4 - Kanne
5 - Start-/stoppknapp med indikatorlampe
6 - Apparatsokkel med kabeloppbevaring
Page 4

Gebrauchsanweisung
Wichtige Sicherheitshinweise
▪ Diese Geräte können von Kindern ab 8 Jahren sowie
▪ Bewahren Sie das Gerät und seine Zuleitung außer-
▪ Den Milchaufschäumer nur mit dem dazugehörigen
▪ Das Gerät nicht in Wasser tauchen.
▪ Wenn die Anschlussleitung dieses Gerätes beschädigt
▪ Reinigen Sie nach dem Gebrauch alle Oberflächen,
von Personen mit reduzierten physischen, sensorischen oder mentalen Fähigkeiten oder Mangel an
Erfahrung und/oder Wissen benutzt werden, wenn sie
beaufsichtigt oder bezüglich des sicheren Gebrauchs
des Gerätes unterwiesen wurden und die daraus
resultierenden Gefahren verstanden haben. Kinder
dürfen nicht mit dem Gerät spielen. Reinigung und
Benutzer-Wartung dürfen nicht durch Kinder durchgeführt werden, es sei denn, sie sind älter als 8 Jahre
und beaufsichtigt.
halb der Reichweite von Kindern unter 8 Jahren auf.
Sockel betreiben.
wird, muss sie durch den zentralen Kundendienst
des Herstellers oder eine ähnlich qualifizierte Person
ersetzt werden. Durch unsachgemäße Reparaturen
können erhebliche Gefahren für den Benutzer entstehen.
die mit Lebensmitteln in Kontakt gekommen sind.
Beachten Sie die Hinweise im Kapitel „Reinigung und
Pflege“.
Vor dem Benutzen
Die Gebrauchsanweisung aufmerksam lesen. Sie enthält wichtige Hinweise für
den Gebrauch, die Sicherheit und die Wartung des Gerätes.
Sie soll sorgfältig aufbewahrt und gegebenenfalls an Nachbenutzer weitergegeben werden.
Das Gerät darf nur für den vorgesehenen Zweck, gemäß dieser Gebrauchsanweisung, verwendet werden.
4
Page 5

Dieses Gerät ist dafür bestimmt, im Haushalt und ähnlichen Anwendungen
verwendet zu werden, wie beispielsweise:
⋅ in Küchen für Mitarbeiter in Läden, Büros und anderen
gewerblichen Bereichen;
⋅ in landwirtschaftlichen Anwesen;
⋅ von Kunden in Hotels, Motels und anderen Wohneinrichtungen;
⋅ in Frühstückspensionen.
Das Gerät ist nicht für den rein gewerblichen Gebrauch bestimmt.
Beim Gebrauch die Sicherheitshinweise beachten.
Technische Daten
Nennspannung: 220 - 240 V~ 50/60 Hz
Leistungsaufnahme: 450 W
Schutzklasse: I
Sicherheitshinweise
▪ Gerät nur an eine vorschriftsmäßig installierte Schutzkontaktsteckdose
anschließen. Zuleitung und Stecker müssen trocken sein.
▪ Die Anschlussleitung nicht über scharfe Kanten ziehen oder einklemmen, nicht
herunterhängen lassen sowie vor Hitze und Öl schützen.
▪ Den Netzstecker nicht an der Leitung oder mit nassen Händen aus der Steck-
dose ziehen.
▪ Das Gerät nicht in Betrieb nehmen bzw. sofort Netzstecker ziehen, wenn:
⋅ Gerät oder Netzkabel beschädigt ist;
⋅ das Gerät undicht ist;
⋅ der Verdacht auf einen Defekt nach einem Sturz o. Ä. besteht.
In diesen Fällen das Gerät zur Reparatur geben.
▪ Das Gerät nicht auf heiße Oberflächen z. B. Herdplatten o. Ä. oder in der Nähe
der offenen Gasflamme abstellen, er könnte dabei anschmelzen.
▪ Das Gerät nicht auf wasserempfindliche Oberflächen abstellen. Spritzer
könnten diese beschädigen.
▪ Das Gerät niemals ohne Aufsicht betreiben.
▪ Das Gerät nicht ohne Milch einschalten.
▪ Den Krug zum Füllen vom Sockel nehmen.
▪ Verwenden Sie das Gerät nur zum Erhitzen oder Aufschäumen von Milch.
Verwenden Sie es nicht für andere Zutaten.
▪ Das Gerät während des Betriebes nicht verrücken und nicht am Netzkabel
ziehen.
▪ Die Unterseite des Krugs muss trocken sein, bevor das Gerät genutzt wird.
▪ Vorsicht, das Gerät wird heiß.
▪ Der Netzstecker ist zu ziehen:
⋅ bei Störungen während des Betriebes,
⋅ vor jeder Reinigung und Pflege,
⋅ nach dem Gebrauch.
▪ Bei Zweckentfremdung, falscher Bedienung oder nicht fachgerechter Repara-
tur wird keine Haftung für eventuelle Schäden übernommen.
Ebenso sind Garantieleistungen in solchen Fällen ausgeschlossen.
▪ Verpackungsmaterial, wie z. B. Folienbeutel gehören nicht in Kinderhände.
dede
5
Page 6
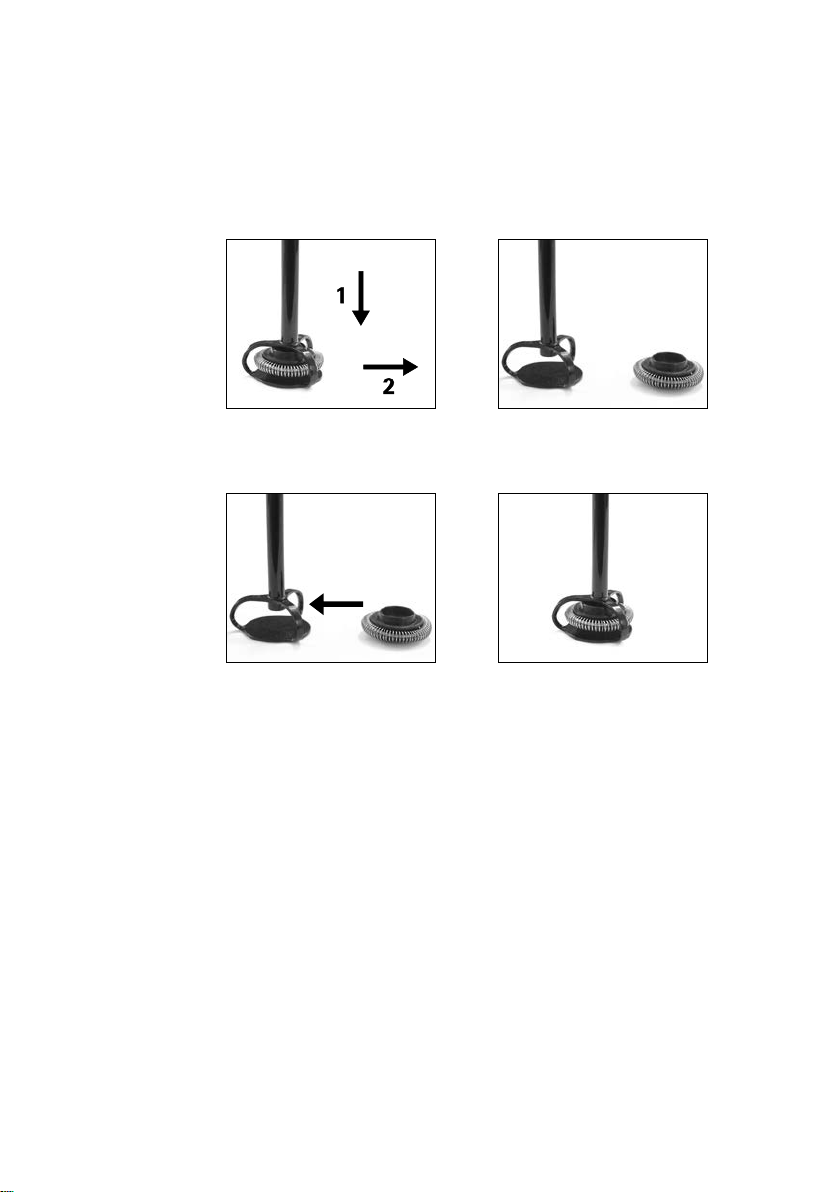
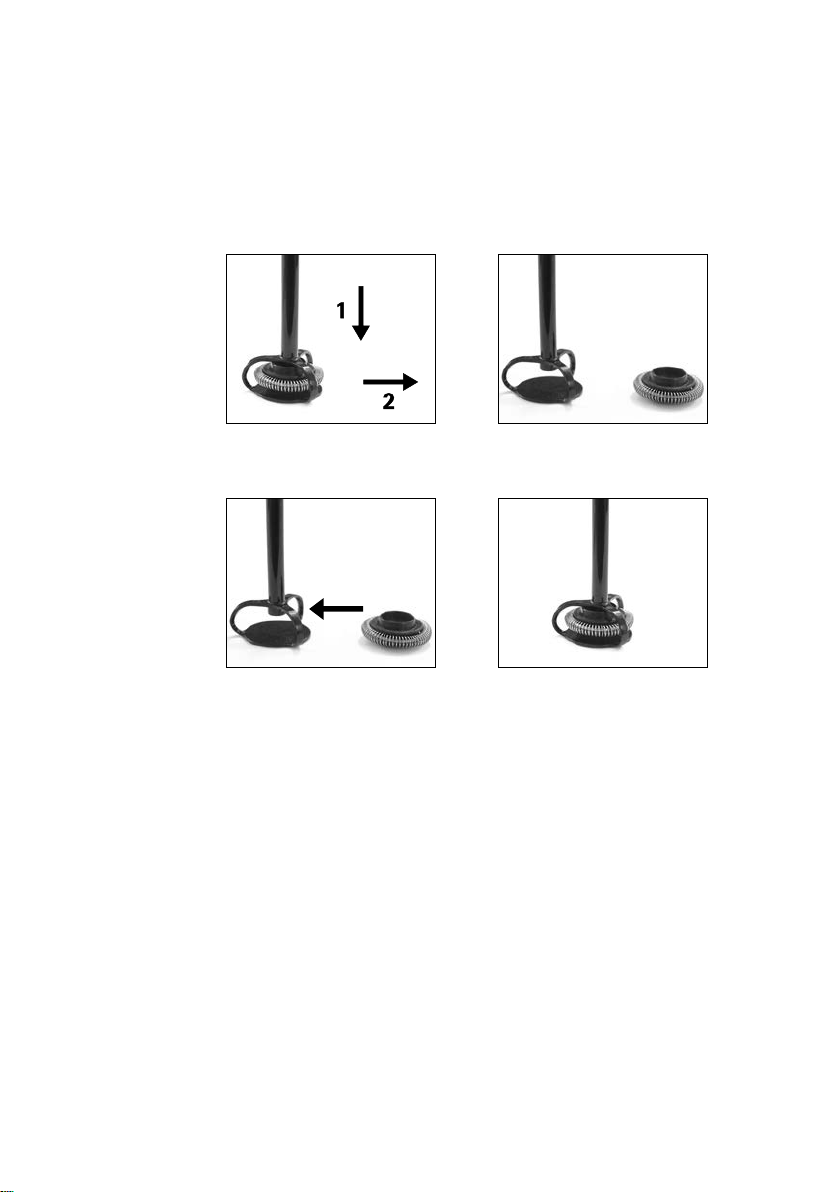
WMF Milchschaum-DISC
Die WMF Milchschaum-DISC (3) kann zur leichteren Reinigung von der Aufnahme
herausgenommen werden. Schieben Sie hierzu die WMF Milchschaum-DISC (3)
seitlich mit leichtem Druck nach unten von der Aufnahme herunter.
Zur Montage gehen Sie wie folgt vor:
Schieben Sie die WMF Milchschaum-DISC (3) einfach seitlich in die Aufnahme,
ein Magnet im Inneren sorgt für den sicheren Halt.
Inbetriebnahme
Reinigen Sie das Gerät vor der ersten Verwendung wie im Kapitel „Reinigung und
Pflege“ beschrieben.
Die nicht benötigte Länge der Anschlussleitung kann am Boden des Gerätesockels
(6) aufgewickelt werden. Schließen Sie den Netzstecker an eine Schutzkontaktsteckdose an.
6
Page 7
Bedienung und Betrieb
1. Füllen Sie die benötigte Menge Milch in den Krug (4) und verschließen Sie
diesen mit dem Deckel (1).
2. Setzen Sie erst jetzt den Krug (4) auf den Gerätesockel (6).
Achtung:
Setzen Sie immer erst den Deckel (1) auf das Gerät bevor Sie es einschalten.
Nehmen Sie niemals den Deckel (1) ab, während das Gerät eingeschaltet ist.
Ansonsten kann die WMF Milchschaum-DISC (3), auch bei Wiederaufsetzen des
Deckels (1), nicht mehr korrekt arbeiten.
Hinweis:
Die Zubereitung kann jederzeit durch Betätigung der Start-/Stopptaste (5) oder
durch Abheben des Krugs (4) von dem Gerätesockel (6) unterbrochen werden.
Lassen Sie zwischen zwei Verwendungen das Gerät abkühlen.
Beschaffenheit und Volumen des Milchschaums hängen von der jeweiligen
verwendeten Milch (u. a. Fett-, Proteingehalt, Temperatur) ab.
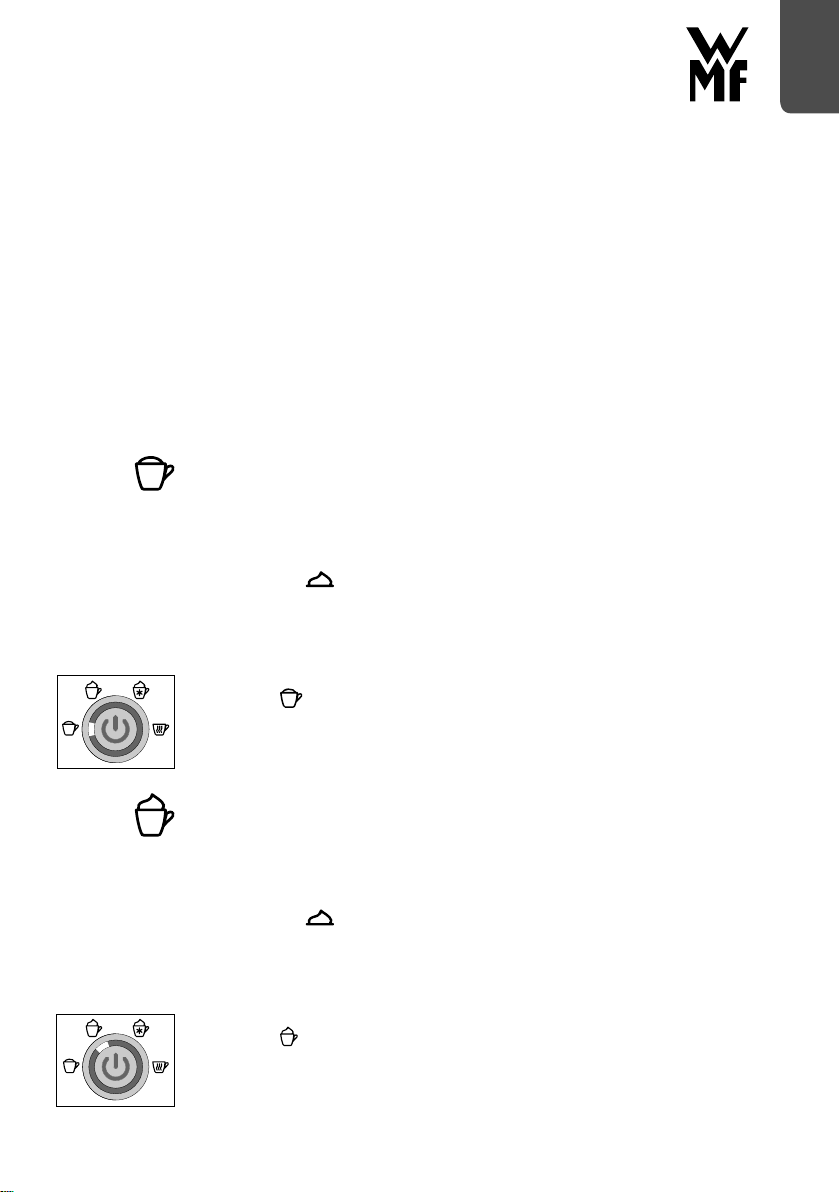
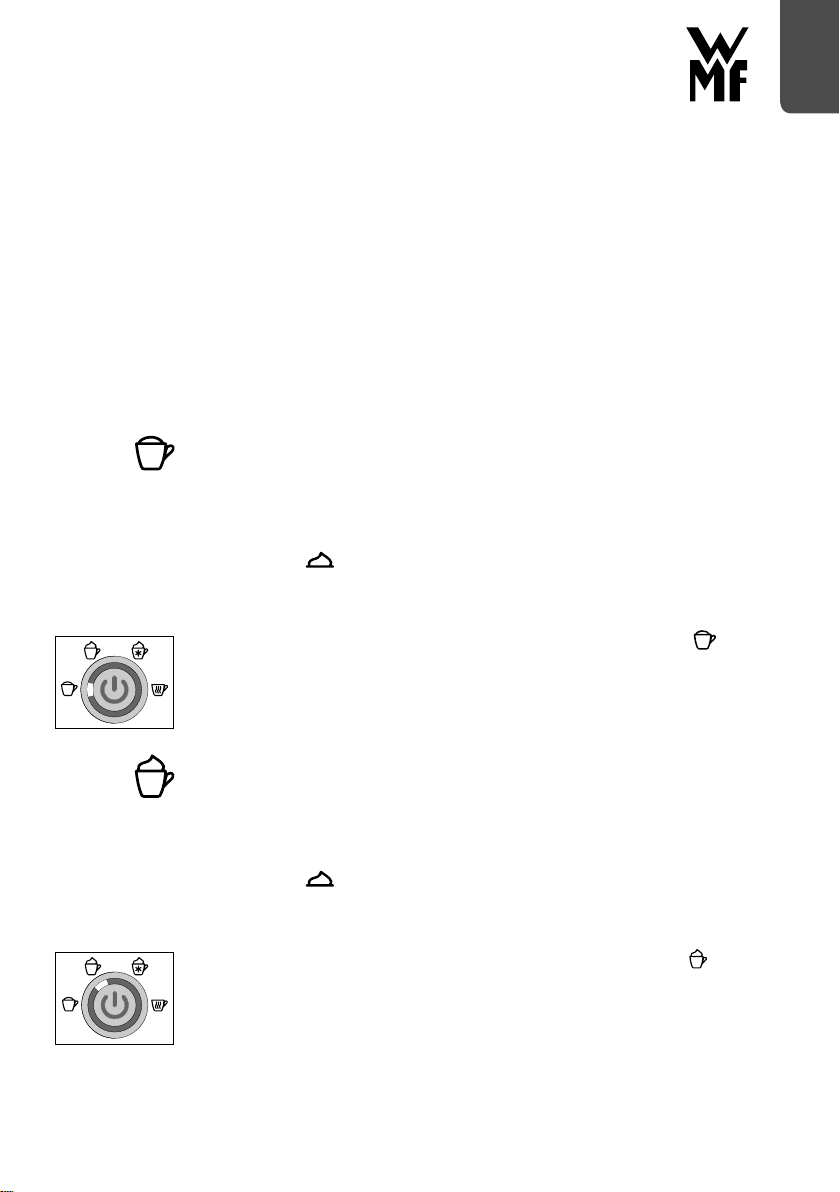
Cremig weicher Milchschaum
Wählen Sie dieses Programm, um warmen, cremigen, feinporigen Milchschaum zu
erhalten. Dieser eignet sich besonders für Cappuccino oder Latte Art.
▪ Füllen Sie den Krug (4) mit 100 bis 150 ml gekühlter Milch.
Die Füllmarkierungen finden Sie im Krug (4):
100 ml MIN
150 ml MAX
Füllen Sie keinesfalls mehr ein, da ansonsten Milchschaum überläuft und das
Gerät verunreinigt wird.
▪ Setzen Sie den Deckel (1) auf den Krug (4) und drücken Sie diesen leicht an,
damit dieser abdichtet.
▪ Drücken Sie nun die Start-/Stopptaste (5) so oft, bis das Leuchtsegment des
Symbols
matisch, die Kontrollleuchte der Start-/Stopptaste (5) leuchtet.
▪ Nach Programmende schaltet sich das Gerät automatisch ab, die Kontroll-
leuchte erlischt. Öffnen Sie den Deckel (1) und schöpfen Sie den Milchschaum
separat ab oder gießen Sie diesen mit der verbliebenen Milch aus.
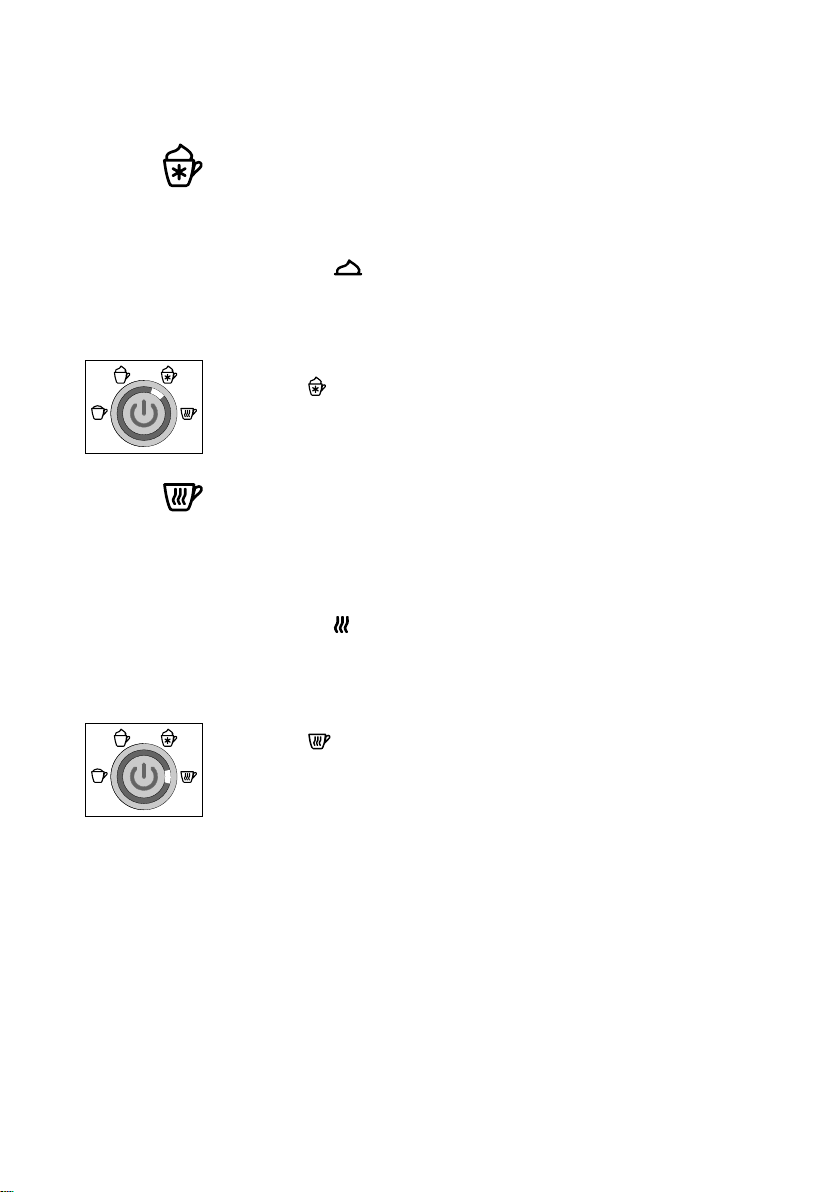
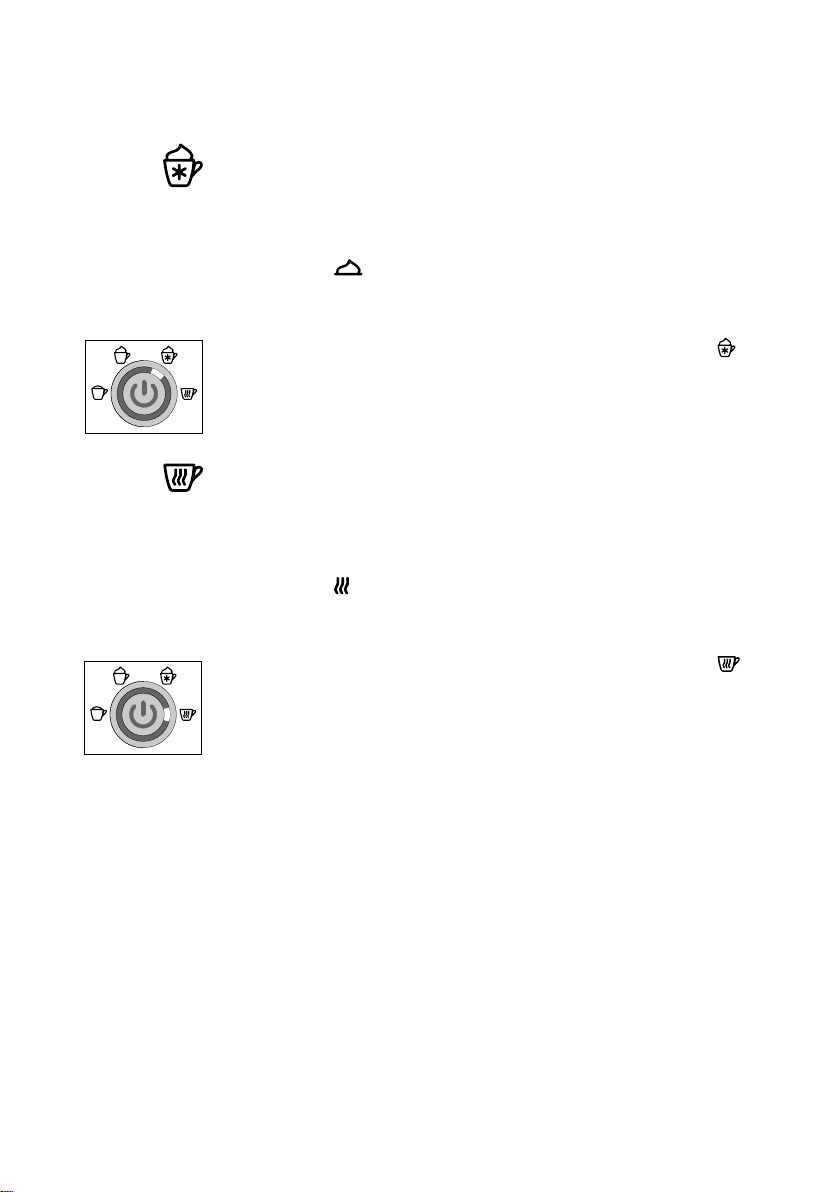
Fester Milchschaum
Wählen Sie dieses Programm, um warmen, in der Konsistenz festen Milchschaum
zu erhalten. Dieser eignet sich besonders für Cappuccino oder Latte Macchiatto.
▪ Füllen Sie den Krug (4) mit 100 bis 150 ml gekühlter Milch.
Die Füllmarkierungen finden Sie im Krug (4):
100 ml MIN
150 ml MAX
Füllen Sie keinesfalls mehr ein, da ansonsten Milchschaum überläuft und das
Gerät verunreinigt wird.
▪ Setzen Sie den Deckel (1) auf den Krug (4) und drücken Sie diesen leicht an,
damit dieser abdichtet.
▪ Drücken Sie nun die Start-/Stopptaste (5) so oft, bis das Leuchtsegment des
Symbols
tisch, die Kontrollleuchte der Start-/Stopptaste (5) leuchtet.
▪ Nach Programmende schaltet sich das Gerät automatisch ab, die Kontroll-
leuchte erlischt. Öffnen Sie den Deckel (1) und schöpfen Sie den Milchschaum
separat ab oder gießen Sie diesen mit der verbliebenen Milch aus.
aufleuchtet. Nach ca. 3 Sekunden startet die Zubereitung auto-
aufleuchtet. Nach ca. 3 Sekunden startet die Zubereitung automa-
de
7
Page 8
Kalter Milchschaum
Wählen Sie dieses Programm, um kalten, cremigen Milchschaum zu erhalten.
Dieser eignet sich besonders für Frappé, Cocktails, Eiskaffee oder Desserts.
▪ Füllen Sie den Krug (4) mit 100 bis 150 ml gekühlter Milch.
Die Füllmarkierungen finden Sie im Krug (4):
100 ml MIN
150 ml MAX
Füllen Sie keinesfalls mehr ein, da ansonsten Milchschaum überläuft und das
Gerät verunreinigt wird.
▪ Setzen Sie den Deckel (1) auf den Krug (4) und drücken Sie diesen leicht an,
damit dieser abdichtet.
▪ Drücken Sie nun die Start-/Stopptaste (5) so oft, bis das Leuchtsegment des
Symbols
tisch, die Kontrollleuchte der Start-/Stopptaste (5) leuchtet.
▪ Nach Programmende schaltet sich das Gerät automatisch ab, die Kontroll-
leuchte erlischt. Öffnen Sie den Deckel (1) und schöpfen Sie den Milchschaum
separat ab oder gießen Sie diesen mit der verbliebenen Milch aus.
aufleuchtet. Nach ca. 3 Sekunden startet die Zubereitung automa-
Heiße Milch
Wählen Sie dieses Programm, um Milch zu erhitzen und diese leicht
aufzuschäumen . Die heiße Milch eignet sich besonders für Milchkaffee, heiße
Schokolade oder Kakao.
▪ Füllen Sie den Krug (4) mit 100 bis 250 ml gekühlter Milch.
Die Füllmarkierungen finden Sie im Krug (4):
100 ml MIN
250 ml MAX
Füllen Sie keinesfalls mehr ein, da ansonsten Milch überläuft und das Gerät
verunreinigt wird.
▪ Setzen Sie den Deckel (1) auf den Krug (4) und drücken Sie diesen leicht an,
damit dieser abdichtet.
▪ Drücken Sie nun die Start-/Stopptaste (5) so oft, bis das Leuchtsegment des
Symbols
matisch, die Kontrollleuchte der Start-/Stopptaste (5) leuchtet.
▪ Nach Programmende schaltet sich das Gerät automatisch ab, die Kontroll-
leuchte erlischt. Öffnen Sie den Deckel (1) und gießen Sie die Milch aus.
aufleuchtet. Nach ca. 3 Sekunden startet die Zubereitung auto-
8
Page 9
Reinigung und Pflege
▪ Reinigen Sie das Gerät nach jedem Gebrauch.
▪ Netzstecker ziehen und das Gerät abkühlen lassen.
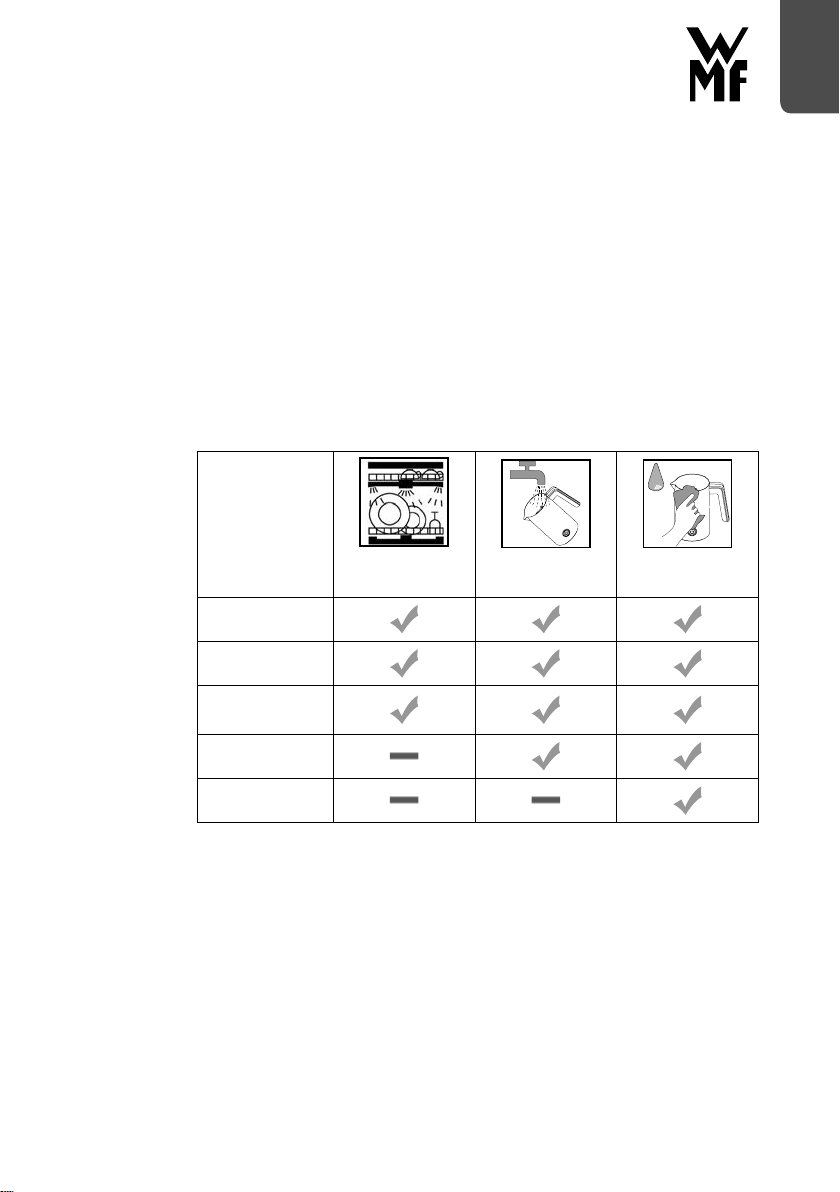
▪ Deckel (1) und WMF Milchschaum-DISC (3) sind spülmaschinengeeignet. Zur
leichteren Reinigung kann der sich am Deckel (1) befindende Dichtungsring (2)
abgenommen werden.
Hinweis: Krug (4) und Gerätesockel (6) dürfen nicht in Spülmaschine gegeben
werden.
▪ Der Krug (4) kann unter fließendem Wasser abgespült werden.
Der Krug (4) ist innen mit einer Antihaftbeschichtung ausgestattet. Benutzen
Sie keine aggressiven oder scheuernden Reinigungsmittel und Lösungsmittel.
Den Krug (4) mit einem weichem Tuch abtrocknen.
Achtung: Die Unterseite des Krugs (4) muss trocken sein, bevor das Gerät
genutzt wird.
▪ Den Gerätesockel (6) nur mit einem leicht feuchtem Tuch abwischen.
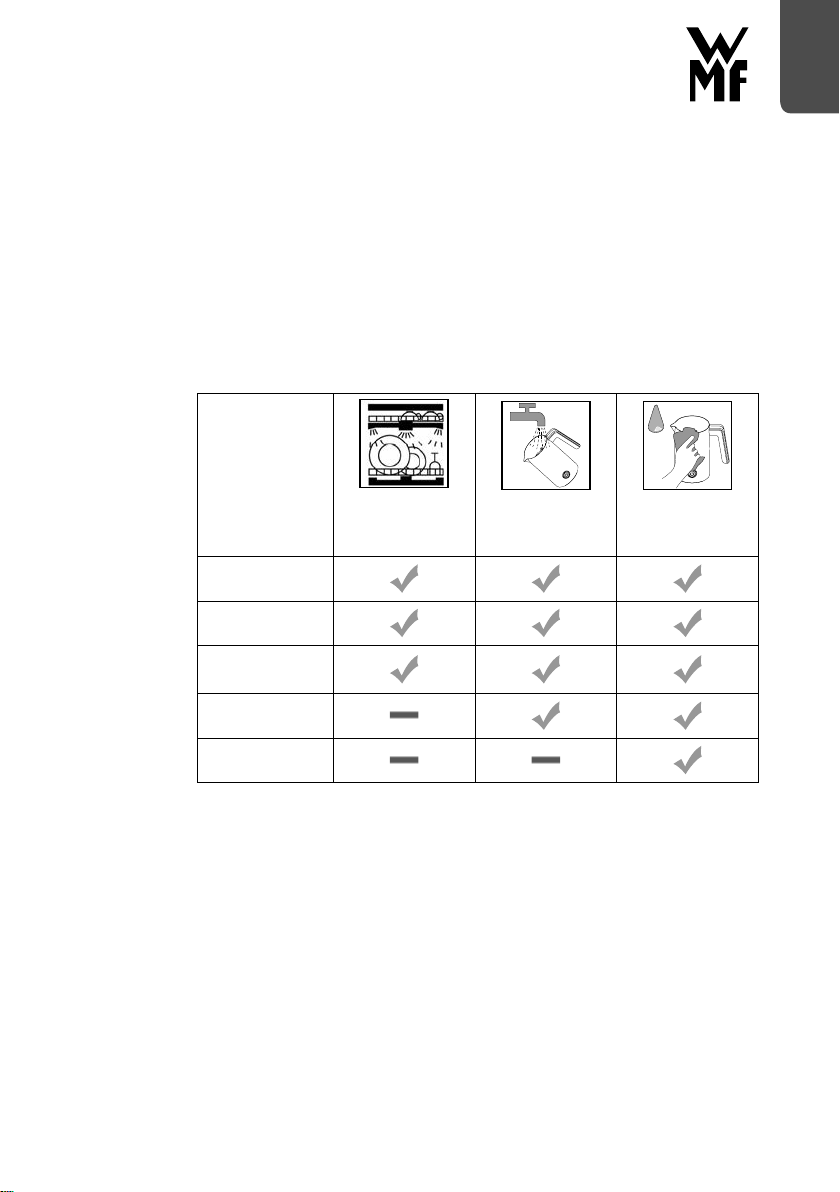
spülmaschinen-
geeignet
Deckel (1)
unter fließendem
Wasser abspülbar
feucht abwischen
de
Dichtungsring (2)
WMF Milchschaum-DISC (3)
Krug (4)
Gerätesockel (6)
9
Page 10

Hilfe bei Störungen
Die folgenden Hinweise sollen Ihnen helfen, Störungen zu beseitigen. Sollte dies
nicht gelingen, wenden Sie sich an unseren zentralen Kundendienst. Beachten Sie
die Garantiehinweise.
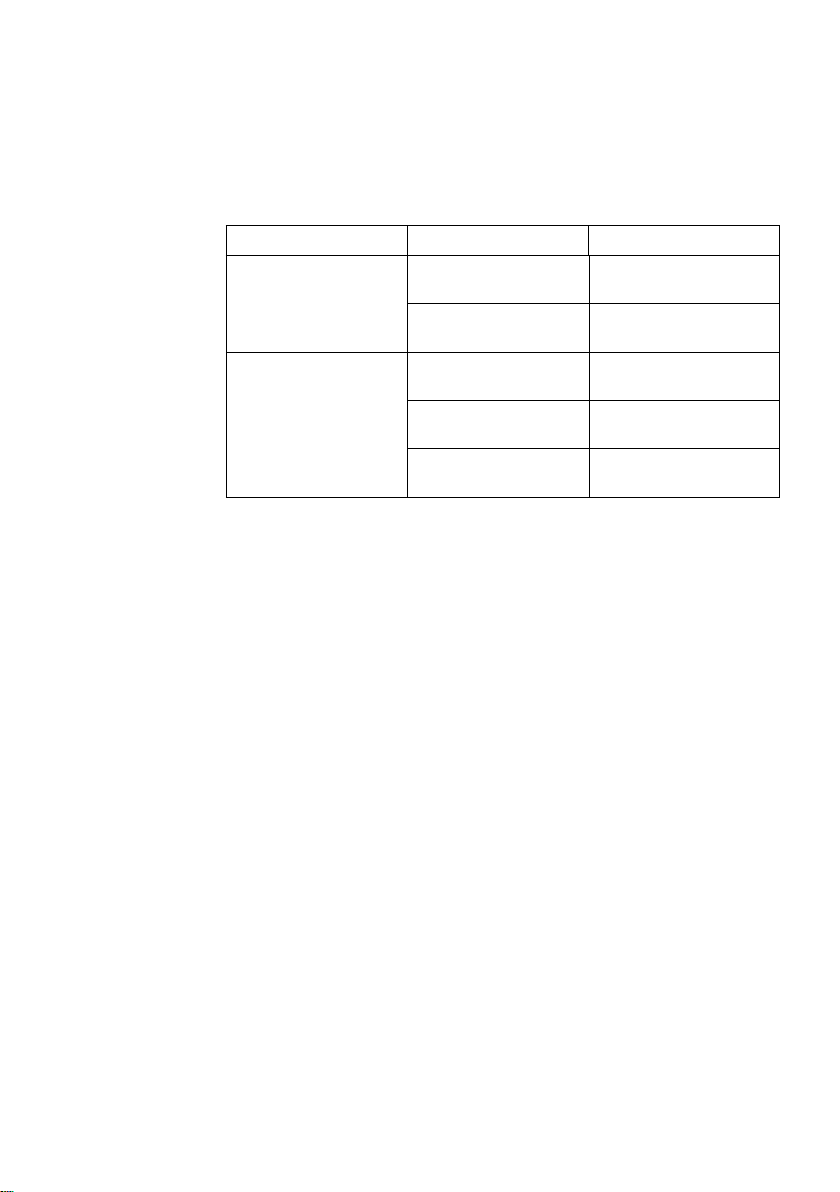
Problem Mögliche Ursache Behebung
Die Kontrollleuchte
leuchtet nicht, das
Gerät startet nicht
Milch tritt am Deckel
aus
Stecker nicht eingesteckt
Überhitzungsschutz
aktiv
Füllmenge zu groß Füllmenge reduzieren
Deckel nicht richtig
aufgesetzt
Dichtungsring fehlt
oder ist verschmutz
Stecker einstecken
Gerät abkühlen lassen
Deckel mit leichtem
Druck aufsetzen
Dichtungsring reinigen
und einsetzen
Garantie-Information
Für unsere Geräte übernehmen wir gegenüber dem Endkunden eine 24-monatige
Haltbarkeitsgarantie. Sie beginnt mit dem Kauf des Gerätes durch den Endkunden
und gilt im Gebiet der Bundesrepublik Deutschland.
Ansprüche aus dieser Garantie sind unter Vorlage des Kaufbelegs direkt gegenüber unserem zentralen Kundendienst geltend zu machen.
Von der Garantie ausgeschlossen sind Schäden durch normalen Verschleiß,
unsachgemäßen Gebrauch, Nichteinhaltung der Entkalkungsanweisung sowie
unterbliebene Pflege.
Der Endkunde besitzt zusätzlich zu den Ansprüchen aus dieser Garantie gesetzliche Ansprüche wegen Mängeln des Gerätes gegenüber seinem direkten Verkäufer/Händler, die durch diese Garantie nicht eingeschränkt werden.
10
Page 11

Das Gerät entspricht den Europäischen Richtlinien 2014/35/EG, 2014/30/EG und
2009/125/EG.
Dieses Produkt darf am Ende seiner Lebensdauer nicht über den normalen
Haushaltsabfall entsorgt werden, sondern muss an einem Sammelpunkt für das
Recycling von elektrischen und elektronischen Geräten abgegeben werden.
Die Werkstoffe sind gemäß ihrer Kennzeichnung wiederverwertbar. Mit der Wiederverwendung, der stofflichen Verwertung oder anderen Formen der Verwertung
von Altgeräten leisten Sie einen wichtigen Beitrag zum Schutze unserer Umwelt.
Bitte erfragen Sie bei der Gemeindeverwaltung die zuständige Entsorgungsstelle.
Änderungen vorbehalten
de
11
Page 12

Operating Manual
Important safety instructions
▪ These devices can be used by children older than
eight years old as well as by persons with limited
physical, sensory or mental capabilities, persons lacking experience and/or lacking knowledge if they are
supervised or have received instructions regarding
how the device is to be used safely and have understood the resulting risks. Children must not play with
the device. Children must not perform the cleaning
and user maintenance, unless they are older than
eight years old and are supervised.
▪ Keep the device and its cable out of the reach of
children under eight years old.
▪ Only operate the appliance with the appropriate
base.
▪ Never immerse the appliance in water.
▪ If the appliance’s connection cable is damaged then
it must be replaced by the manufacturer’s central
customer service department or by a similarly quali-
fied person. Improper repairs may constitute a seri-
ous threat for users.
▪ Clean after use all surfaces, which have got in con-
tact with food.
Follow the notes in chapter „Cleaning and care“.
12
Prior to use
Read the operating manual carefully. It contains important information about the
use, safety and maintenance of the appliance.
It should be kept in a safe place and passed on to further users if appropriate.
The device may only be used for the intended purpose according to these operating instructions.
Page 13

This device is meant to be used in the household and for similar applications, such
as:
⋅ in kitchens, for employees in shops, offices and other
commercial areas;
⋅ on agricultural property;
⋅ from customers in hotels, motels and other residential facilities;
⋅ in bed and breakfasts establishments.
The appliance is not designed for sole commercial use.
Observe the safety instructions during use.
Technical Data
Rated voltage: 220 - 240 V~ 50/60 Hz
Power consumption: 450 W
Protection class: I
Safety instructions
▪ Only connect the device to properly installed earthed sockets. The wire and
plug must be dry.
▪ Do not pull the connecting cable over sharp edges or clamp it. Do not let it
hang down and protect it from heat and oil.
▪ Never disconnect the mains plug from the socket by the cord or with wet
hands.
▪ Stop using the appliance and/or connect it from the mains plug immediately
if:
⋅ The appliance or mains cable is damaged;
⋅ the device is not leak-proof;
⋅ there is any suspicion of a fault after dropping the appliance or similar.
In such cases, send the appliance to be repaired.
▪ Do not place the appliance on hot surfaces, such as hot plates or similar, or
near open flames. It could melt.
▪ Do not place the device on water-sensitive surfaces. Spray may damage them.
▪ Never operate the appliance unattended.
▪ Do not switch on the device without milk.
▪ Take the pot for filling from the base.
▪ Only use the appliance to heat up or froth milk. Do not use it to process any
other ingredients.
▪ Do not move the device during operation and do not pull on the mains cable.
▪ Underside of the jug must be dry before using the appliance.
▪ Caution: the device is hot.
▪ The mains plug is to be pulled:
⋅ if malfunctions occur during use,
⋅ before cleaning and care,
⋅ after use.
▪ No liability is accepted for any damages resulting from misuse, incorrect
operation or improper repairs.
Claims under warranty are likewise excluded in such cases.
▪ Packaging material, such as plastic film bags, do not belong in the hands of
children.
enen
13
Page 14

WMF milk froth DISC
The WMF milk froth DISC (3) can be removed from the appliance for easy
cleaning. To do this, gently push down the WMF milk froth DISC (3) and slide it to
one side.
To assemble the appliance, proceed as follows:
Simply slide the WMF milk froth DISC (3) sideways into the appliance, an internal
magnet holds the DISC firmly in place.
Using the appliance
Before using for the first time, ensure the appliance is thoroughly cleaned, as
detailed in the “cleaning and care” section.
Any surplus cable can be wound into the bottom of the base unit (6). Connect the
mains plug to an earthed socket.
14
Page 15
Use and operation
1. Fill the jug (4) with the required quantity of milk and then close the lid (1).
2. Now place the jug (4) on the base unit (6).
Caution:
Always put the lid (1) on the gadget first before switching it on.
Never remove the lid (1) while the gadget is switched on.
Otherwise, the WMF milk froth DISC (3) may no longer function correctly even
when the lid (1) is replaced.
Note:
preparation can be stopped at any time by pressing the start/stop button (5) or by
removing the jug (4) from the base unit (6).
Allow the appliance to cool down before using again.
The texture and volume of the milk froth depend on the type of milk used
(including fat content, protein content, temperature).
Soft creamy milk froth
Select this program for warm, creamy, fine-pored milk froth. This is particularly
suitable for cappuccino or latte style coffee.
▪ Fill the jug (4) with 100 to 150ml of cold milk.
The jug (4) is marked with the following measures:
100 ml MIN
150 ml MAX
DO NOT overfill the jug, otherwise the milk froth will overflow and spill over
the appliance.
▪ Place the lid (1) on the jug (4) and push down gently to seal.
▪ Now press the start/stop button (5) repeatedly until the lamp for the
symbol illuminates. After approximately 3 seconds, the appliance starts
automatically, the control lamp for the start/stop button (5) is illuminated.
▪ After the program has finished, the appliance automatically switches itself off,
the control lamp is no longer illuminated. Lift the lid (1) and skim off the milk
froth separately or pour it out with the rest of the milk.
Firm milk froth
Select this program if you require a warm, firmer consistency of milk froth. This is
particularly suitable for cappuccino or latte macchiato style coffee.
▪ Fill the jug (4) with 100 to 150ml of cold milk.
The jug (4) is marked with the following measures:
100 ml MIN
150 ml MAX
DO NOT overfill the jug, otherwise the milk froth will overflow and spill over
the appliance.
▪ Place the lid (1) on the jug (4) and push down gently to seal.
▪ Now press the start/stop button (5) repeatedly until the lamp for the
symbol illuminates. After approximately 3 seconds, the appliance starts
automatically, the control lamp for the start/stop button (5) is illuminated.
▪ After the program has finished, the appliance automatically switches itself off,
the control lamp is no longer illuminated. Lift the lid (1) and skim off the milk
froth separately or pour it out with the rest of the milk.
en
15
Page 16
Cold milk froth
Select this program for cold, creamy milk froth. This is ideal for frappés, cocktails,
iced coffee or deserts.
▪ Fill the jug (4) with 100 to 150ml of cold milk.
The jug (4) is marked with the following measures:
100 ml MIN
150 ml MAX
DO NOT overfill the jug, otherwise the milk froth will overflow and spill over
the appliance.
▪ Place the lid (1) on the jug (4) and push down gently to seal.
▪ Now press the start/stop button (5) repeatedly until the lamp for the
symbol illuminates. After approximately 3 seconds, the appliance starts
automatically, the control lamp for the start/stop button (5) is illuminated.
▪ After the program has finished, the appliance automatically switches itself off,
the control lamp is no longer illuminated. Lift the lid (1) and skim off the milk
froth separately or pour it out with the rest of the milk.
Hot milk
Select this program to heat and lightly froth the milk. The hot milk is ideal for
milky coffee, hot chocolate or cocoa.
▪ Fill the jug (4) with 100 to 250 ml of cold milk.
The jug (4) is marked with the following measures:
100 ml MIN
250 ml MAX
DO NOT overfill the jug, otherwise the milk froth will overflow and spill over
the appliance.
▪ Place the lid (1) on the jug (4) and push down gently to seal.
▪ Now press the start/stop button (5) repeatedly until the lamp for the
symbol illuminates. After approximately 3 seconds, the appliance starts
automatically, the control lamp for the start/stop button (5) is illuminated.
▪ After the program has finished, the appliance automatically switches itself off,
the control lamp is no longer illuminated. Lift the lid (1) and pour the milk.
16
Page 17
Cleaning and care
▪ Clean the appliance after each use.
▪ Unplug at the mains and allow the device to cool down.
▪ The lid (1) and WMF milk froth DISC (3) are dishwasher-safe. for easy cleaning,
the sealing ring (2) in the lid (1) can be removed.
Note: the jug (4) and base unit (6) should not be placed in the dishwasher.
▪ The jug (4) can be rinsed under running water.
The inside of the jug (4) is lined with a non-stick coating. Do not use any
harsh or abrasive detergents or solvents. Dry the jug (4) with a soft cloth.
Attention: before using the appliance, ensure that the jug (4) is dry
underneath.
▪ Only use a soft, damp cloth to wipe the base unit (6).
Dishwasher-safe
Lid (1)
Sealing ring (2)
Can be rinsed
under running
water
Wipe with a
damp cloth
en
WMF milk froth
DISC (3)
Jug (4)
Base unit (6)
17
Page 18
Troubleshooting
The following tips should help you to solve any problems. If the problem persists,
please contact our central customer service department. Please note the warranty
information.
Problem Possible cause Action
The control lamp is not
illuminated, the appliance does not start
Milk is leaking from
the lid
The plug is not plugged
in.
Overheating protection
active
Too much milk in the
appliance
The lid is not fitted
properly
The sealing ring is missing or is dirty
Connect the plug
Allow the appliance to
cool
Pour out some of the
milk
Gently push the lid down
Clean and insert the
sealing ring
18
Page 19
For UK use only
▪ This product is supplied with a 13 A plug conforming to BS 1363 fitted to the
mains lead. If the plug is unsuitable for your socket outlets or needs to be
replaced, please note the following. If the plug is a non-rewireable one, cut
it from the mains lead and immediately dispose of it. Never insert it into a
socket outlet as there is a very great risk of an electric shock.
▪ The replacement of the plug at the mains lead has to be done according to
the following instructions:
Warning - This appliance must be earthed!
Important: The wires in this mains lead are coloured in accordance with the
following code:
green/yellow Earth
blue Neutral
brown Live
As the colours of the wires in the mains lead of this appliance may not
correspond with the coloured markings identifying the terminals in your plug,
proceed as follows:
⋅ the wire which is coloured green and yellow must be connected to the
terminal which is marked with the letter E or by the earth symbol
coloured green or green and yellow,
⋅ the wire which is coloured blue must be connected to the terminal which
is marked with the letter N or coloured black,
⋅ the wire which is coloured brown must be connected to the terminal
which is marked with the letter L or coloured red.
▪ If a 13 A (BS 1363) plug is used it must be fitted with a 3 A fuse conforming
to BS 1362 and be ASTA approved. If any other type of plug is used, the
appliance must be protected by a 5 A fuse either in the plug or adapter or at
the distribution board. If in doubt - consult a qualified electrician.
▪ Never use the plug without closing the fuse cover.
en
, or
The appliance complies with the European directives 2014/35/EC,2014/30/EC and
2009/125/EC.
This product may not be disposed of with the normal household waste at the
end of its service life but must be delivered to a collecting point for recycling
electrical and electronic appliances. The materials are reusable in accordance with
their identification. You will make an important contribution to the protection of
our environment by recycling used appliances.
Please ask about the responsible disposal point at your community offices.
Subject to change
19
Page 20

Mode d’emploi
Consignes de sécurité importantes
▪ Des enfants à partir de 8 ans ainsi des personnes
ayant des capacités physiques, sensorielles ou men-
tales restreintes ou ayant un manque d’expérience
et/ou de connaissance peuvent utiliser ces appareils,
s’ils sont surveillés et s’ils ont été instruits pour
utiliser cet appareil en toute sécurité et s’ils ont
compris les dangers pouvant résulter de l’usage de
l’appareil. Les enfants n’ont pas le droit de jouer avec
cet appareil. Les enfants n’ont pas le droit d’effectuer
le nettoyage et la maintenance sauf s’ils sont âgés de
plus de 8 ans et sous surveillance.
▪ Conservez l’appareil et son câble d’alimentation en
dehors de la portée des enfants de moins de 8 ans.
▪ Ne faire fonctionner l’appareil qu’uniquement sur le
socle correspondant.
▪ Ne jamais plonger l’appareil dans l’eau.
▪ Si le câble d’alimentation de l’appareil est endom-
magé, il doit être remplacé par le SAV central du
fabricant ou par une personne qualifiée. Des répa-
rations non conformes peuvent engendrer de graves
dangers pour l’utilisateur.
▪ Après utilisation, nettoyez toutes les surfaces qui
sont entrées en contact avec des aliments. Veillez aux
remarques du chapitre «Nettoyage et entretien».
20
Avant l’utilisation
Lire attentivement le mode d’emploi. Il contient des consignes importants pour
l’utilisation, la sécurité et l’entretien de l’appareil.
Il doit être conservé soigneusement et transmis en cas de remise à une tierce
personne.
L’appareil ne doit être utilisé que pour l’usage prévu conformément à ce mode
d’emploi.
Page 21

L’appareil est conçu pour un usage domestique ou pour des applications similaires
telles que :
⋅ dans des cuisines pour le personnel dans des boutiques, des bureaux ou
d’autres
secteurs professionnels;
⋅ dans des exploitations agricoles;
⋅ par des clients dans des hôtels, des motels et d’autres établissements;
⋅ dans des chambres d’hôtes.
L’appareil n’est pas conçu pour un usage purement commercial.
Respecter les consignes de sécurité lors de l’utilisation.
Caractéristiques techniques
Tension du secteur : 220 - 240 V~ 50/60 Hz
Puissance : 450 W
Catégorie de protection : I
Consignes de sécurité
▪ Branchez l’appareil uniquement à une prise électrique sécurisée. Le câble
d’alimentation et la prise doivent être secs.
▪ Ne pas tirer le cordon d’alimentation sur des bords tranchants, ne pas le
coincer, ne pas le laisser pendre et le protéger de la chaleur et d’huile.
▪ Ne pas débrancher l’appareil en tirant sur le câble ou avec de mains mouillées.
▪ Ne pas mettre l’appareil en service ou débrancher immédiatement la fiche
secteur si :
⋅ l’appareil ou le câble d’alimentation sont endommagés;
⋅ l’appareil fuit;
⋅ une défaillance est soupçonnée suite à une chute ou équivalent.
Dans ces cas emmener l’appareil en réparation.
▪ Ne pas poser l’appareil sur des surfaces chaudes, p. ex. plaques de cuisson ou
équivalent ou à proximité d’une flamme de gaz ouverte, elle pourrait fondre.
▪ Ne pas déposer l’appareil sur des surfaces sensibles à l’eau. Des projections
pourraient les endommager.
▪ Ne jamais faire fonctionner l’appareil sans surveillance.
▪ Ne pas mettre l’appareil en service sans lait.
▪ Retirer le réservoir du socle avant de le remplir.
▪ Vous pouvez utiliser l’appareil pour faire de la mousse de lait chaud ou froid,
ou réchauffer du lait sans le faire mousser.
▪ Ne pas déplacer l’appareil durant le fonctionnement et ne pas tirer sur le câble
d’alimentation.
▪ La douille située en dessous du pot à lait doit être sèche avant utilisation.
▪ Attention, l’appareil chauffe.
▪ Il faut débrancher la fiche secteur :
⋅ en cas de dysfonctionnements durant l’utilisation,
⋅ avant chaque nettoyage et entretien,
⋅ après l’utilisation.
▪ Nous déclinons toute responsabilité pour des dommages éventuels en cas
d’utilisation détournée, de mauvaise utilisation, de réparation inappropriée.
Des réparations sous garantie sont également exclues dans des tels cas.
▪ Le matériel d’emballage, comme p.ex. les sachets en plastiques ne sont pas
destinés aux enfants.
fr
21
Page 22
Disque du moussoir à lait WMF
Pour un nettoyage plus facile, il est possible de retirer le disque du moussoir à lait
WMF (3) de son logement. Pour cela, faites glisser latéralement le disque du
moussoir à lait WMF (3) hors de son logement à l’aide d’une légère pression vers
le bas.
Pour le montage, procédez comme suit:
Faites simplement glisser latéralement le disque du moussoir à lait WMF (3) dans
son logement, un aimant intégré assure son maintien en place.
Mise en service
Avant la première utilisation, nettoyez l’appareil comme décrit dans le chapitre
«Nettoyage et entretien».
La surlongueur du câble peut être enroulée au fond du socle de l’appareil (6).
Branchez l’appareil dans une prise électrique sécurisée.
22
Page 23
Utilisation et fonctionnement
1. Versez la quantité de lait désirée dans le pot (4) et refermez-le à l’aide du
couvercle (1).
2. Positionnez ensuite le pot (4) sur le socle de l’appareil (6).
Attention :
Ne posez le couvercle (1) sur l’appareil, qu’avant l’avoir mis sous tension.
Ne retirez jamais le couvercle (1), quand l’appareil est sous tension.
Sinon le DISC pour la mousse de lait WMF (3) ne pourra fonctionner correctement, même si on remet le couvercle (1).
Consigne :
Pour interrompre la préparation à tout moment, il suffit d‘actionner la touche
marche/arrêt (5) ou de retirer le pot (4) du socle de l‘appareil (6).
Laissez l’appareil refroidir entre deux utilisations.
La consistance et le volume de la mousse de lait dépendent du lait utilisé (teneur
en matières grasses, en protéines, température, etc.).
Mousse de lait crémeuse veloutée
Sélectionnez ce programme pour obtenir une mousse de lait chaude, crémeuse et
veloutée. Cette mousse est particulièrement adaptée pour le Cappuccino ou les
Latte.
▪ Versez dans le pot (4) 100 à 150 ml de lait froid.
Le pot (4) comprend les marquages de remplissage suivants :
100 ml MIN
150 ml MAX
Veillez à ne jamais dépasser ces quantités car la mousse de lait pourrait
déborder et salir l‘appareil.
▪ Placez le couvercle (1) sur le pot (4) puis effectuez une légère pression afin de
s’assurer qu’il est bien enclenché.
▪ Appuyez ensuite sur la touche marche/arrêt (5) jusqu’à ce que le témoin
lumineux du symbole
préparation démarre automatiquement, le voyant de contrôle de la touche
marche/arrêt (5) est allumé.
▪ À la fin du programme, l’appareil s’arrête automatiquement, le voyant de
contrôle s’éteint. Ouvrez le couvercle (1) et retirez la mousse séparément ou
versez-la avec le lait restant.
Mousse de lait dense
Sélectionnez ce programme pour obtenir une mousse de lait chaude et plus
dense. Cette mousse est particulièrement adaptée pour le Cappuccino ou le Latte
Macchiatto.
▪ Versez dans le pot (4) 100 à 150 ml de lait froid.
Le pot (4) comprend les marquages de remplissage suivants :
100 ml MIN
150 ml MAX
Veillez à ne jamais dépasser ces quantités car la mousse de lait pourrait
déborder et salir l‘appareil.
▪ Placez le couvercle (1) sur le pot (4) puis effectuez une légère pression afin de
s’assurer qu’il est bien enclenché.
s’allume. Au bout de 3 secondes environ, la
fr
23
Page 24

▪ Appuyez ensuite sur la touche marche/arrêt (5) jusqu’à ce que le témoin
lumineux du symbole
préparation démarre automatiquement, le voyant de contrôle de la touche
marche/arrêt (5) est allumé.
▪ À la fin du programme, l’appareil s’arrête automatiquement, le voyant de
contrôle s’éteint. Ouvrez le couvercle (1) et retirez la mousse séparément ou
versez-la avec le lait restant.
s’allume. Au bout de 3 secondes environ, la
Mousse de lait froide
Sélectionnez ce programme pour obtenir une mousse de lait froide et crémeuse.
Cette mousse est particulièrement adaptée pour les frappés, les cocktails, le café
glacé ou les desserts.
▪ Versez dans le pot (4) 100 à 150 ml de lait froid.
Le pot (4) comprend les marquages de remplissage suivants :
100 ml MIN
150 ml MAX
Veillez à ne jamais dépasser ces quantités car la mousse de lait pourrait
déborder et salir l‘appareil.
▪ Placez le couvercle (1) sur le pot (4) puis effectuez une légère pression afin de
s’assurer qu’il est bien enclenché.
▪ Appuyez ensuite sur la touche marche/arrêt (5) jusqu’à ce que le témoin
lumineux du symbole
préparation démarre automatiquement, le voyant de contrôle de la touche
marche/arrêt (5) est allumé.
▪ À la fin du programme, l’appareil s’arrête automatiquement, le voyant de
contrôle s’éteint. Ouvrez le couvercle (1) et retirez la mousse séparément ou
versez-la avec le lait restant.
s’allume. Au bout de 3 secondes environ, la
Lait chaud
Sélectionnez ce programme pour réchauffer du lait et le faire légèrement
mousser. Le lait chaud est particulièrement adapté pour le café au lait, le chocolat
chaud ou le cacao.
▪ Versez dans le pot (4) 100 à 250 ml de lait froid.
Le pot (4) comprend les marquages de remplissage suivants :):
100 ml MIN
250 ml MAX
Veillez à ne jamais dépasser ces quantités car la mousse de lait pourrait
déborder et salir l‘appareil.
▪ Placez le couvercle (1) sur le pot (4) puis effectuez une légère pression afin de
s’assurer qu’il est bien enclenché.
▪ Appuyez ensuite sur la touche marche/arrêt (5) jusqu’à ce que le témoin
lumineux du symbole
préparation démarre automatiquement, le voyant de contrôle de la touche
marche/arrêt (5) est allumé.
▪ À la fin du programme, l’appareil s’arrête automatiquement, le voyant de
contrôle s’éteint. Ouvrez le couvercle (1) puis versez le lait.
s’allume. Au bout de 3 secondes environ, la
24
Page 25

Nettoyage et entretien
▪ Nettoyez l’appareil après chaque utilisation.
▪ Débrancher l’appareil et le laisser refroidir.
▪ Le couvercle (1) et le disque du moussoir à lait WMF (3) sont lavables au
lave-vaisselle. Pour faciliter le nettoyage, il est possible de retirer le joint
d’étanchéité (2) du couvercle (1).
Consigne: le pot (4) et le socle de l’appareil (6) ne sont pas lavables au lave-
vaisselle.
▪ Rincer le pot (4) sous l’eau courante.
Le pot (4) comprend un revêtement antiadhésif à l‘intérieur. N‘utilisez pas de
nettoyants ou solvants agressifs ou abrasifs. Sécher le pot (4) à l‘aide d‘un
chiffon doux.
Attention: le dessous du pot (4) doit être sec avant toute utilisation de
l’appareil.
▪ Essuyer le socle de l’appareil (6) à l’aide d’un chiffon légèrement humide.
Lavable au lave-
vaisselle
Couvercle (1)
Rincer sous l’eau
courante
Essuyer avec un
chiffon humide
fr
Joint d’étanchéité (2)
Disque moussoir
à lait WMF (3)
Pot (4)
Socle de l’appareil (6)
25
Page 26

Aide en cas de dysfonctionnements
Les consignes suivantes devraient vous aider à résoudre les problèmes de
dysfonctionnement. Si ce n’était pas le cas, adressez-vous à notre SAV central.
Veuillez consulter les informations de garantie.
Problème Cause probable Correction
Le voyant de contrôle
ne s’allume pas,
l’appareil ne démarre
pas.
Le lait déborde du
couvercle.
Prise non branchée Brancher la prise
Protection de
surchauffe activée
Quantité de remplissage
trop élevée
Couvercle mal
positionné
Joint d’étanchéité
manquant ou sale
Laisser refroidir l’appareil
Réduire la quantité de
remplissage
Enclencher le couvercle
avec une légère pression
Nettoyer et replacer le
joint d’étanchéité
26
Page 27

L’appareil est conforme aux Directives Européennes 2014/35/CE, 2014/30/CE et
2009/125/CE.
Au terme de son utilisation ce produit ne doit pas être éliminé avec les déchets
ménagers habituels, mais il doit être déposé dans un point de collecte pour le
recyclage d’appareils électriques et électroniques.
Les matériaux sont recyclables conformément à leur identification. Grâce à la
réutilisation, le recyclage de matériaux ou d’autres formes de recyclage des
vieux appareils vous contribuez de manière significative à la protection de notre
environnement.
Veuillez contacter votre municipalité pour connaître le centre de traitement
compétent.
Sous réserve de modifications
fr
27
Page 28

Istruzioni per l’uso
Importanti istruzioni di sicurezza
▪ Questi apparecchi possono essere utilizzati da bam-
bini a partire dagli 8 anni di età e da persone con
ridotte capacità fisiche, sensoriali o mentali o che
mancano di esperienza e/o di conoscenza, solo se
sono sorvegliate o se sono state istruite riguardo
all’utilizzo sicuro dell’apparecchio e se ne hanno
compreso i pericoli risultanti. I bambini non devono
giocare con l’apparecchio. La pulizia e la manutenzione a carico dell’utente non devono essere eseguiti
da bambini, eccetto nel caso in cui essi abbiano più
di 8 anni e siano sorvegliati.
▪ Conservare l’apparecchio e il suo cavo di alimen-
tazione al di fuori della portata di bambini di età
inferiore a 8 anni.
▪ Azionare l’apparecchio soltanto con la relativa base.
▪ Non immergere l’apparecchio nell’acqua.
▪ Se il cavo di collegamento di questo apparecchio è
guasto, bisogna farlo sostituire dal servizio clientela
centrale del fabbricante o da un’altra persona com-
petente del settore. Le riparazioni improprie recano
un grande pericolo per l’utente.
▪ Dopo l’uso lavare tutte le superfici, che sono venute
a contatto con gli alimenti. Seguire i consigli presenti
nel Capitolo “Pulizia e manutenzione”.
28
Prima dell’uso
Leggere attentamente le istruzioni per l’uso. Danno indicazioni importanti riguardanti l’uso, la sicurezza e la manutenzione dell’apparecchio.
Vanno conservate con cura ed eventualmente trasmesse all’utente successivo.
L’apparecchio va adoperato per l’uso previsto, seguendo le istruzioni per l’uso.
Page 29

Questo apparecchio può essere utilizzato solo in ambito domestico e in applicazioni simili, come ad esempio:
⋅ in cucine per i dipendenti di negozi, uffici e altri
settori commerciali;
⋅ in tenute agricole;
⋅ da clienti in hotel, motel e altri impianti di soggiorno;
⋅ in bed & breakfast.
Questo apparecchio non è destinato ad un uso puramente commerciale.
Le istruzioni di sicurezza vanno seguite durante l’uso.
Dati tecnici
Tensione nominale: 220 - 240 V~ 50/60 Hz
Potenza assorbita: 450 W
Classe di protezione: I
Istruzioni di sicurezza
▪ Collegare l’apparecchio soltanto a una presa schuko installata a norma. Il cavo
di alimentazione e il connettore devono essere asciutti.
▪ Non tirare o incastrare il cavo di collegamento sopra spigoli acuminati, non
lasciarlo sospeso e proteggerlo dal calore e dall’olio.
▪ Non staccare la spina dalla presa tenendola per il cavo o con mani bagnate.
▪ Non usare l’apparecchio e staccare subito la spina, se:
⋅ l’apparecchio o il cavo d’alimentazione sono guasti;
⋅ l’apparecchio non è ermetico;
⋅ si sospetta un difetto dopo una caduta o un evento simile.
In questi casi far riparare l’apparecchio.
▪ Non disporre l’apparecchio su superfici calde, ad esempio su copri piastra o
simili o in prossimità di fiamme di gas aperte, in tal caso potrebbe fondersi.
▪ Non disporre l’apparecchio su superfici sensibili all’acqua. Gli spruzzi potreb-
bero danneggiarlo.
▪ Non far funzionare l’apparecchio incustodito.
▪ Non accendere l’apparecchio senza latte.
▪ Staccare la pentola dalla base per il riempimento.
▪ Potete usare l’apparecchio per ottenere una schiuma di latte calda o fredda
oppure per riscaldare il latte senza montarlo.
▪ Non spostare l’apparecchio durante il funzionamento e non tirare il cavo di
rete.
▪ La base del bricco deve essere asciutta prima dell’utilizzo.
▪ Attenzione, l’apparecchio diventa caldo.
▪ Il connettore di rete deve essere estratto:
⋅ in caso di guasti nel funzionamento,
⋅ prima di ogni pulizia e manutenzione,
⋅ dopo l’uso.
▪ Si declina qualsiasi responsabilità in caso di uso improprio o di riparazione non
fatta da un professionista.
In questi casi sono escluse anche le richieste di garanzia.
▪ Tenere fuori dalla portata dei bambini il materiale da imballaggio, come ad
esempio i sacchetti di pellicola.
itit
29
Page 30

DISCO per la formazione di schiuma di
latte WMF
Per poterlo pulire con maggiore facilità, il DISCO (3) per la formazione di schiuma
di latte WMF può essere estratto dal corpo. Per farlo, spingere il DISCO WMF (3)
lateralmente con una leggera pressione verso il basso.
Per il montaggio fare come segue:
Far semplicemente scorrere lateralmente il DISCO WMF (3) nel corpo. C’è un
magnete all’interno che rende il tutto molto stabile.
Messa in servizio
Pulire l’apparecchio prima del primo utilizzo come descritto nel capitolo “Pulizia e
manutenzione”.
La lunghezza non necessaria del cavo di collegamento può essere avvolta alla
base del dispositivo (6). Collegare il connettore di rete ad una presa schuko.
30
Page 31

Utilizzo e funzionamento
1. Aggiungere la necessaria quantità di latte nel bricco (4) e chiuderlo con il suo
coperchio (1).
2. A questo punto per prima cosa mettere il bricco (4) sulla base del dispositivo
(6).
Attenzione:
Disporre sempre il coperchio (1) sull’apparecchio prima di attivarlo.
Non rimuovere mai il coperchio (1) durante il funzionamento dell’apparecchio.
Altrimenti DISC per la schiuma di latte di WMF (3) potrebbe non funzionare più in
modo corretto, nemmeno riapplicando il coperchio (1).
Nota:
E‘ possibile interrompere il funzionamento in qualsiasi momento tramite il tasto
di avvio-/arresto (5) o sollevando il bricco (4) dalla base del dispositivo (6).
Fra un utilizzo e l’altro far raffreddare l’apparecchio.
La qualità ed il volume della schiuma di latte dipendono dal tipo di latte usato
(tra l’altro dal contenuto di grassi, proteine, temperatura).
Schiuma di latte cremosa più morbida
Selezionare questo programma per ottenere una schiuma di latte calda, cremosa,
a scarsa porosità. E‘ particolarmente adatto per cappuccino o creazioni a base di
latte.
▪ Riempire il bricco (4) con 100 - 150 ml di latte a temperatura ambiente.
Nel bricco (4) ci sono delle linee di misurazione:
100 ml MIN
150 ml MAX
Non superare in nessun caso il limite massimo, altrimenti la schiuma di latte
fuoriesce, sporcando il dispositivo.
▪ Riposizionare il coperchio (1) sul bricco (4) e premere delicatamente per
chiudere bene.
▪ Premere il tasto di Avvio-/Arresto (5) finché non si accende la spia del simbolo
. Dopo circa 3 secondi il dispositivo inizia a funzionare automaticamente e
si accende la spia del tasto di Avvio-/Arresto (5).
▪ Alla fine del programma il dispositivo si spegne automaticamente e scompare
la spia. Aprire il coperchio (1) e scremare oppure versare la schiuma con il latte
rimanente.
Schiuma di latte più consistente
Selezionare questo programma per ottenere una schiuma di latte calda, con una
maggior consistenza. E‘ particolarmente adatto per cappuccino o latte macchiato.
▪ Riempire il bricco (4) con 100 - 150 ml di latte a temperatura ambiente.
Nel bricco (4) ci sono delle linee di misurazione:
100 ml MIN
150 ml MAX
Non superare in nessun caso il limite massimo, altrimenti la schiuma di latte
fuoriesce, sporcando il dispositivo.
▪ Riposizionare il coperchio (1) sul bricco (4) e premere delicatamente per
chiudere bene.
it
31
Page 32

▪ A questo punto premere il tasto di Avvio-/Arresto (5) finché non si accende
la spia del simbolo
automaticamente e si accende la spia del tasto di Avvio-/Arresto (5).
▪ Alla fine del programma il dispositivo si spegne automaticamente e scompare
la spia. Aprire il coperchio (1) e scremare oppure versare la schiuma con il latte
rimanente.
. Dopo circa 3 secondi il dispositivo inizia a funzionare
Schiuma di latte fredda
Selezionare questo programma per ottenere una schiuma di latte fredda e
cremosa. E‘ adatto particolarmente per frappé, cocktail, eiscaffè o dessert.
▪ Riempire il bricco (4) con 100 - 150 ml di latte a temperatura ambiente.
Nel bricco (4) ci sono delle linee di misurazione:
100 ml MIN
150 ml MAX
Non superare in nessun caso il limite massimo, altrimenti la schiuma di latte
fuoriesce sporcando il dispositivo.
▪ Riposizionare il coperchio (1) sul bricco (4) e premere delicatamente per
chiudere bene.
▪ A questo punto premere il tasto di Avvio-/Arresto (5) finché non si accende
la spia del simbolo
automaticamente e si accende la spia del tasto di Avvio-/Arresto (5).
▪ Alla fine del programma il dispositivo si spegne automaticamente e scompare
la spia. Aprire il coperchio (1) e scremare oppure versare la schiuma con il latte
rimanente.
. Dopo circa 3 secondi il dispositivo inizia a funzionare
Latte caldo
Selezionare questo programma per riscaldare il latte e schiumarlo leggermente. Il
latte caldo è particolarmente adatto per caffellatte, cioccolato caldo o bevanda
al cacao.
▪ Riempire il bricco (4) con 100 - 250 ml di latte a temperatura ambiente.
Nel bricco (4) ci sono delle linee di misurazione:
100 ml MIN
250 ml MAX
Non superare in nessun caso il limite massimo, altrimenti il latte fuoriesce
sporcando il dispositivo.
▪ Riposizionare il coperchio (1) sul bricco (4) e premere delicatamente per
chiudere bene.
▪ A questo punto premere il tasto di Avvio-/Arresto (5) finché non si accende
la spia del simbolo
automaticamente e si accende la spia del tasto di Avvio-/Arresto (5).
▪ Alla fine del programma il dispositivo si spegne automaticamente e scompare
la spia. Aprire il coperchio (1) e versare il latte.
. Dopo circa 3 secondi il dispositivo inizia a funzionare
32
Page 33

Pulizia e manutenzione
▪ Pulire il dispositivo dopo ogni uso.
▪ Estrarre il connettore di rete e far raffreddare l’apparecchio.
▪ Il coperchio (1) ed il disco per fare la schiuma di latte WMF (3) sono lavabili
in lavastoviglie. Per poter pulire più facilmente si può togliere l’anello di
guarnizione (2) che si trova sul coperchio (1).
Nota: Il bricco (4) e la base del dispositivo (6) non sono lavabili in
lavastoviglie.
▪ Il bricco (4) può essere risciacquato sotto acqua corrente.
Il bricco (4) è dotato all‘interno di un rivestimento antiaderente. Non usare
detergenti o solventi aggressivi o corrosivi. Asciugare il bricco (4) con un
panno morbido.
Attenzione: La base del bricco (4) deve essere asciutta prima di usare il
dispositivo.
▪ Pulire la base del dispositivo (6) solo con un panno leggermente umido.
lavabile in
lavastoviglie
Coperchio (1)
sciacquabile
sotto acqua
corrente
pulire con un
panno umido
it
Anello di guarnizione (2)
DISCO per la
formazione di
schiuma di latte
WMF (3)
Bricco (4)
Base del dispositivo (6)
33
Page 34

Risoluzione problemi
Le seguenti note dovrebbero aiutare a risolvere i problemi. Se non dovessero
funzionare, contattare il Servizio Clienti centrale. Seguire le istruzioni per la
garanzia.
Problema Possibile causa Risoluzione
La spia non si accende
ed il dispositivo non si
avvia
Il latte fuoriesce dal
coperchio
Spina non inserita Inserire la spina
Protezione da surriscal-
damento attiva
Quantità eccessiva Ridurre la quantità
Il coperchio non
si alloggia bene in
posizione
Manca l’anello di
guarnizione oppure è
sporco
Lasciar raffreddare il
dispositivo
Alloggiare il coperchio
esercitando una leggera
pressione
Pulire l’anello di guarnizione e montarlo
34
Page 35

L’apparecchio è conforme alle direttive europee 2014/35/CE, 2014/30/CE e
2009/125/CE.
Alla fine del suo ciclo di vita non buttare il prodotto nella spazzatura domestica,
ma consegnarlo in un centro di riciclaggio di apparecchi elettrici o elettronici.
I materiali possono essere riciclati in conformità con la loro etichettatura. Grazie
al riciclaggio, al recupero e ad altre forme di recupero di vecchi apparecchi, si
riesce a contribuire in modo significativo alla protezione dell’ambiente.
Per informazioni relative al centro di smaltimento, si prega di contattare
l’amministrazione comunale.
Con riserva di modifiche
it
35
Page 36

Instrucciones de uso
Advertencias de seguridad importantes
▪ Este aparato no deben utilizarlo niños menores de
▪ Mantenga el aparato y el cable de alimentación lejos
▪ Utilice únicamente el aparato con su base correspon-
▪ No sumerja el aparato en agua.
▪ Si el cable de conexión del aparato está dañado
▪ Limpie todas las superficies que hayan estado en
8 años, ni personas con alguna discapacidad física,
psíquica o sensorial ni aquellas que carezcan de la
experiencia y/o conocimientos necesarios para usarlo
si no cuentan con la instrucción necesaria para una
utilización segura del aparato, ya que podría representar un peligro para su seguridad. Los niños no
deben jugar con el aparato. Asimismo, los niños no
deben realizar su limpieza ni mantenimiento, a no ser
que sean mayores de 8 años y lo hagan vigilados.
del alcance de los niños menores de 8 años.
diente.
deberá ser sustituido por el departamento de atención al cliente central del fabricante o por una
persona cualificada. Las reparaciones inadecuadas
podrían suponer un serio peligro para el usuario.
contacto con alimentos después de su uso. Tenga en
cuenta las advertencias contenidas en el capítulo
“Limpieza y cuidados”.
36
Antes de usar
Lea detenidamente las instrucciones de funcionamiento. Contienen información
importante sobre el uso, la seguridad y el mantenimiento del aparato.
Guárdelas en un lugar seguro y déselas a futuros usuarios cuando corresponda.
Utilice el aparato solo para el fin para el que se ha diseñado y siempre siguiendo
las instrucciones de uso de este manual.
Page 37

Este aparato está diseñado para uso doméstico u otras aplicaciones similares, tales
como:
⋅ en cocinas para el personal de tiendas, oficinas y otros
ámbitos comerciales;
⋅ en fincas agrícolas;
⋅ por clientes de hoteles, moteles y otros establecimientos;
⋅ en pensiones con desayuno.
No está diseñado para uso comercial.
Respete siempre las precauciones de seguridad.
Datos técnicos
Tensión nominal: 220 - 240 V~ 50/60 Hz
Consumo de energía: 450 W
Clase de protección: I
Advertencias de seguridad
▪ Conecte el aparato solamente en una caja de enchufe con puesta a tierra que
esté instalada correctamente y según las normativas al respecto. El cable y el
enchufe deben estar secos.
▪ No coloque ni pegue el cable de conexión sobre bordes afilados, ni lo deje
colgando. Protéjalo del calor y el aceite.
▪ No desenchufe nunca el aparato tirando del cable o con las manos mojadas.
▪ Deje de usar inmediatamente el aparato y/o desconéctelo a la red si:
⋅ El aparato o cable de red esté dañado
⋅ El aparato no es hermético
⋅ Tiene la sospecha de que se haya podido producir algún fallo después de
una caída del aparato o similar.
En estos casos, envíe el aparato para que sea reparado.
▪ No coloque el aparato sobre superficies calientes, como fuegos de cocina y
similares, ni cerca de llamas de gas abierto, podría derretirse.
▪ No lo ponga sobre superficies sensibles al agua. Las salpicaduras podrían
dañarlo.
▪ No ponga jamás a funcionar el aparato sin vigilancia.
▪ Nunca lo ponga en funcionamiento sin leche.
▪ Para llenar el recipiente, retire la tapa.
▪ Puede utilizar el aparato para preparar espuma de leche caliente o fría, o para
calentar leche sin preparar espuma.
▪ No mueva el aparato mientras esté funcionando ni tire del cable de red.
▪ La parte de debajo de la jarra debe estar seca antes de la utilización del
aparato.
▪ Cuidado: el aparato se calienta.
▪ Retire el cable de red:
⋅ Si se ha producido un fallo durante su uso
⋅ Antes de su limpieza y cuidados.
⋅ Después de usarlo
▪ No nos responsabilizamos de posibles daños ocasionados por un uso indebido,
erróneo o una reparación no realizada por el técnico.
En esos casos, la garantía también queda excluida.
▪ El material de embalaje, como las bolsas de plástico, no debe caer en manos de
los niños.
eses
37
Page 38

Espumador de leche DISC de WMF
El espumador de leche DISC (3) de WMF puede extraerse para limpiarlo antes de
su colocación. Para ello, presione ligeramente hacia abajo el espumador DISC (3)
de WMF antes de la colocación.
Para su montaje proceda como sigue:
Desplace sencillamente el espumador DISC (3) de WMF lateralmente hacia la
colocación. Su imán interior se proporciona una fijación segura.
Puesta en marcha
Limpie el aparato antes del primer uso tal y como se describe en el capítulo
„Limpieza y cuidados“.
El cable sobrante puede guardarse enrollado en el suelo del zócalo del aparato (6).
Conecte el enchufe de red a una caja de enchufe con toma de puesta a tierra.
38
Page 39

Manejo y funcionamiento
1. Llene la jarra con la cantidad de leche que necesite (4) y ciérrela con la tapa (1).
2. Coloque primero la jarra (4) en el zócalo del aparato (6).
Atención:
Coloque la tapa (1) en el aparato antes de encenderlo.
No retire nunca la tapa (1) mientras el aparato esté encendido.
De lo contrario, el espumador de leche DISC (3) de WMF no podrá funcionar
correctamente, aunque vuelva a colocar la tapa (1).
Nota:
Puede para la preparación cuando lo desee, simplemente accionando la tecla de
inicio/parada (5) o extrayendo la jarra (4) del zócalo (6).
Si lo va a utilizar dos veces, deje que el aparato se enfríe antes.
La calidad y el volumen de la espuma de leche depende de la clase de leche
utilizada (contenido de grasa, de proteína, o temperatura, entre otras cosas).
Espuma de leche cremosa y suave
Seleccione este programa para conseguir una espuma de leche caliente, cremosa y
de finos poros. Especialmente apta para capuccinos o tipo latte.
▪ Llene la jarra (4) con 100 a 150 ml de leche fría.
La señal de llenado se halla en la jarra (4):
100 ml MIN
150 ml MAX
Nunca lo llene más, ya que podría hacer que la espuma se derramara y
ensuciara el aparato.
▪ Coloque la tapa (1) en la jarra (4) y presiónela ligeramente, para que quede
bien hermética.
▪ Pulse la tecla de inicio/parada (5) hasta que la parte luminosa del símbolo
se ilumine. Tras aproximadamente 3 segundos, se inicia automáticamente
la preparación de espuma y la luz de control de la tecla de inicio/parada se
ilumina.
▪ Una vez finalizado el programa, el aparato se desconecta de forma automática
y la luz de control se apaga. Abra la tapa (1) y saque separadamente la espuma
de leche o viértala en la leche deseada.
Espuma de leche sólida
Seleccione este programa para conseguir una espuma de leche caliente, de
consistencia sólida Especialmente apta para capuccinos o latte machiatto.
▪ Llene la jarra (4) con 100 a 150 ml de leche fría.
La señal de llenado se halla en la jarra (4):
100 ml MIN
150 ml MAX
Nunca lo llene más, ya que podría hacer que la espuma se derramara y
ensuciara el aparato.
▪ Coloque la tapa (1) en la jarra (4) y presiónela ligeramente, para que quede
bien hermética.
es
39
Page 40

▪ Pulse la tecla de inicio/parada (5) hasta que la parte luminosa del símbolo
se ilumine. Tras aproximadamente 3 segundos, se inicia automáticamente
la preparación de espuma y la luz de control de la tecla de inicio/parada se
ilumina.
▪ Una vez finalizado el programa, el aparato se desconecta de forma automática
y la luz de control se apaga. Abra la tapa (1) y saque separadamente la espuma
de leche o viértala en la leche deseada.
Espuma de leche fría
Seleccione este programa para conseguir una espuma de leche fría y cremosa.
Especialmente apta para frappés, cócteles, cafés con hielo o postres.
▪ Llene la jarra (4) con 100 a 150 ml de leche fría.
La señal de llenado se halla en la jarra (4):
100 ml MIN
150 ml MAX
Nunca lo llene más, ya que podría hacer que la espuma se derramara y
ensuciara el aparato.
▪ Coloque la tapa (1) en la jarra (4) y presiónela ligeramente, para que quede
bien hermética.
▪ Pulse la tecla de inicio/parada (5) hasta que la parte luminosa del símbolo
se ilumine. Tras aproximadamente 3 segundos, se inicia automáticamente
la preparación de espuma y la luz de control de la tecla de inicio/parada se
ilumina.
▪ Una vez finalizado el programa, el aparato se desconecta de forma automática
y la luz de control se apaga. Abra la tapa (1) y saque separadamente la espuma
de leche o viértala en la leche deseada.
Leche caliente
Seleccione este programa para calentar la leche y espumarla ligeramente. La
leche caliente es especialmente apta para cafés con leche, chocolates o cacaos
calientes.
▪ Llene la jarra (4) con 100 a 250 ml de leche fría.
La señal de llenado se halla en la jarra (4):
100 ml MIN
250 ml MAX
Nunca lo llene más, ya que podría hacer que la espuma se derramara y
ensuciara el aparato.
▪ Coloque la tapa (1) en la jarra (4) y presiónela ligeramente, para que quede
bien hermética.
▪ Pulse la tecla de inicio/parada (5) hasta que la parte luminosa del símbolo
se ilumine. Tras aproximadamente 3 segundos, se inicia automáticamente
la preparación de espuma y la luz de control de la tecla de inicio/parada se
ilumina.
▪ Una vez finalizado el programa, el aparato se desconecta de forma automática
y la luz de control se apaga. Abra la tapa (1) y vierta la leche.
40
Page 41

Limpieza y cuidados
▪ Limpie el aparato después de cada uso.
▪ Desconecte el enchufe de red y deje enfriar el aparato.
▪ La tapa (1) y el espumador de leche DISC (3) de WMF son aptos para el
lavavajillas. Para una fácil limpieza, puede extraerse el anillo de junta (2) que
se halla en la tapa (1).
Advertencia: la jarra (4) y el zócalo (6) no son aptos para el lavavajillas.
▪ Puede lavar la jarra (4) bajo el chorro de agua.
La jarra (4) lleva una capa antiadherente en su interior. No utilice detergentes
o disolventes agresivos ni abrasivos. Seque la jarra (4) con un paño suave.
Atención: la parte inferior de la jarra (4) debe estar bien seca antes de
utilizar el aparato.
▪ Limpie el zócalo (6) solo con un paño ligeramente húmedo.
es
Tapa (1)
Anillo de junta
(2)
Espumador de
leche DISC (3) de
WMF
Jarra (4)
Zócalo del
aparato (6)
apto para el
lavavajillas
se puede limpiar
bajo el chorro
del agua
secar la humedad
41
Page 42

Ayuda en caso de fallos
Las siguientes indicaciones le ayudarán a solventar los fallos. Si aún así
persistieran, póngase en contacto con nuestro servicio central de ayuda al cliente.
Tenga en cuenta las advertencias de la garantía.
Problema Posible causa Solución
La luz de control no se
ilumina, el aparato no
arranca
La leche sale por la tapa Demasiada cantidad
El enchufe no está
conectado
La protección contra un
sobrecalentamiento está
activa
introducida
La tapa no está bien
colocada
Falta el anillo de junta o
está sucio
Stecker einstecken
Deje enfriar el aparato
Reduzca la cantidad de
llenado
Coloque la tapa
ejerciendo una ligera
presión
Limpie y coloque bien el
anillo de junta
42
Page 43

El aparato cumple con las directivas europeas 2014/35/CE, 2014/30/CE y
2009/125/CE.
Al finalizar su ciclo de vida, el producto no debe tirarse al cubo de basura doméstico, sino que debe llevarse a un punto limpio de recogida de aparatos eléctricos
y electrónicos.
Los materiales se reciclan conforme a su etiquetado. Volver a usar, reciclar o
utilizar con otro fin aparatos viejos ayuda a proteger el medio ambiente.
Pregunte a las autoridades locales por el punto limpio correspondiente.
Sujeto a modificaciones
es
43
Page 44

Gebruiksaanwijzing
Belangrijke veiligheidsinstructie
▪ Deze apparaten mogen door kinderen vanaf 8 jaar en
door personen met verminderde fysieke, sensorische
of mentale vaardigheden of gebruik en ervaring
en/of kennis worden gebruikt, wanneer ze onder
toezicht staan of over het veilige gebruik van het
apparaat zijn geïnstrueerd en de daaruit resulterende
risico’s hebben begrepen. Kinderen mogen niet met
het apparaat spelen. Reiniging en gebruikersonderhoud mogen niet door kinderen worden uitgevoerd,
behalve wanneer ze ouder zijn dan 8 jaar en onder
toezicht staan.
▪ Bewaar het apparaat en de stroomkabel buiten bereik
van kinderen onder de 8 jaar.
▪ U mag het apparaat alleen gebruiken met de bijbe-
horende voet.
▪ Het apparaat mag niet onder water worden gedom-
peld.
▪ Wanneer de stroomkabel van dit apparaat
beschadigd is, mag deze alleen door de centrale klantenservice van de fabrikant of door een vergelijkbaar
gekwalificeerde persoon worden vervangen. Door
onvakkundige reparaties kunnen aanzienlijke gevaren
ontstaan voor de gebruiker.
▪ Reinig na gebruik alle oppervlakken die in contact
zijn gekomen met levensmiddelen. Neem daarbij de
aanwijzingen in het hoofdstuk „Reiniging en onderhoud“ in acht.
44
Voordat u het gebruikt
Lees de gebruiksaanwijzing zorgvuldig door. Deze bevat belangrijke aanwijzingen
voor het gebruik, de veiligheid en het onderhoud van het apparaat.
U moet hem zorgvuldig bewaren en eventueel aan een volgende gebruiker
doorgeven.
Het apparaat mag alleen voor het beoogde doel en overeenkomstig deze gebruiksaanwijzing worden gebruikt.
Page 45

Dit apparaat is bedoeld voor huishoudelijk en vergelijkbaar gebruik, zoals bijvoorbeeld:
⋅ in de keuken door medewerkers van winkels, kantoren en andere
zakelijke omgevingen;
⋅ bij agrarische bedrijven;
⋅ door klanten van hotels, motels en andere verblijfsomgevingen;
⋅ in pensions.
Het apparaat is niet bedoeld voor puur zakelijk gebruik.
Neem bij gebruik de veiligheidsinstructies in acht.
Technische gegevens
Nominale spanning: 220 - 240 V~ 50/60 Hz
Vermogen: 450 W
Veiligheidsklasse: I
Veiligheidsinstructies
▪ U mag het apparaat alleen op een correct geplaatst en geaard stopcontact
aansluiten. Kabel en stekker moeten droog zijn.
▪ Zorg ervoor dat de stroomkabel niet langs scherpen randen loopt of verklemd
raakt, laat hem niet naar beneden hangen en bescherm hem tegen hitte en
olie.
▪ U mag de stekker niet aan de kabel en niet met natte handen uit het stopcon-
tact trekken.
▪ Neem het apparaat niet in gebruik of trek direct de stekker uit het stopcontact
wanneer:
⋅ het apparaat of de stroomkabel is beschadigd;
⋅ het apparaat lekt;
⋅ na een val etc. het vermoeden bestaat dat het apparaat defect is.
In dat geval moet u het apparaat ter reparatie afgeven.
▪ Plaats het apparaat niet op hete oppervlakken zoals bijv. fornuizen of in de
buurt van een open gasvlam, het kan daardoor smelten.
▪ Plaats het apparaat niet op oppervlakken die niet tegen water bestand zijn.
Spatten kan deze oppervlakken beschadigen.
▪ Laat het apparaat nooit onbeheerd achter.
▪ U mag het apparaat niet zonder melk aanzetten.
▪ Haal de pot van de voet voordat u hem vult.
▪ U kunt het apparaat gebruiken om warm of koud melkschuim te maken of om
melk op te warmen zonder de melk op te schuimen.
▪ Trek tijdens het gebruik niet aan het apparaat en niet aan de stroomkabel.
▪ De onderzijde van het reservoir dient droog te zijn voor gebruik van het
apparaat.
▪ Voorzichtig, het apparaat wordt heet.
▪ U moet de stekker uit het stopcontact trekken wanneer:
⋅ er tijdens gebruik storingen optreden,
⋅ u het apparaat reinigt of onderhoud pleegt,
⋅ na gebruik.
▪ Bij onjuist gebruik, verkeerde bediening of onvakkundige reparaties stellen wij
ons niet aansprakelijk voor eventuele schade.
Ook komt in dergelijke gevallen de garantie te vervallen.
▪ Verpakkingsmaterialen, zoals bijv. plastic zakken, horen niet in kinderhanden.
nlnl
45
Page 46

WMF melkschuim-DISC
De WMF melkschuim-DISC (3) kan uit de houder genomen worden en gemakkelijk
worden schoongemaakt. Schuif daarvoor de WMF melkschuim-DISC (3) vanaf de
zijkant met lichte druk naar onderen uit de houder.
Voor de montage gaat u als volgt te werk:
Schuif de WMF melkschuim-DISC (3) vanaf de zijkant in de houder, een magneet
aan de binnenkant zorgt ervoor dat hij stevig vast zit.
Ingebruikname
Reinig het apparaat voor het eerste gebruik zoals is beschreven in het hoofdstuk
„Reiniging en onderhoud“.
Het niet benodigde gedeelte van de stroomkabel kan in de bodem van de
apparaatvoet (6) worden gewikkeld. Sluit de stekker aan op een stopcontact.
46
Page 47

Bediening en gebruik
1. Doe de benodigde hoeveelheid melk in de kan (4) en sluit de kan met het
deksel (1).
2. Zet de kan (4) dan pas op de apparaatvoet (6).
Let op:
zet altijd eerst het deksel (1) op het apparaat voordat u het inschakelt.
Haal nooit het deksel (1) van het apparaat terwijl het is ingeschakeld.
Anders kan het gebeuren dat de WMF melkschuim-DISC (3), ook nadat u het
deksel (1) hebt teruggezet, niet meer correct werkt.
Aanwijzing:
De bereiding van het melkschuim kan op ieder moment worden onderbroken door
de start/stop-knop (5) in te drukken of door de kan (4) van de apparaatvoet (6) te
tillen.
Laat het apparaat wanneer u het twee keer achter elkaar gebruikt eerst afkoelen.
De consistentie en het volume van het melkschuim hangen af van de gebruikte
melk (o.a. vet- en eiwitgehalte, temperatuur).
Romig zacht melkschuim
Kies dit programma om warm, romig, fijn melkschuim te maken. Dit is bijzonder
geschikt voor cappuccino of caffe latte.
▪ Vul de kan (4) met 100 tot 150 ml gekoelde melk.
De schaalverdeling voor de inhoud vindt u in de kan (4):
100 ml MIN
150 ml MAX
Vul de kan nooit boven deze markering, omdat het melkschuim dan kan
overlopen en het apparaat vies wordt.
▪ Plaats het deksel (1) op de kan (4) en druk hem licht aan zodat de kan goed
wordt afgesloten.
▪ Druk nu zo vaak op de start/stop-knop (5), totdat het lampje van het symbool
gaat branden. Na ong. 3 seconden start de bereiding automatisch, het
controlelampje van de start/stop-knop (5) brandt.
▪ Na afloop van het programma schakelt het apparaat automatisch uit en het
controlelampje gaat uit. Open het deksel (1) en schep het melkschuim af of
schenk dit met de overgebleven melk uit.
Vast melkschuim
Kies dit programma om warm melkschuim met een vaste consistentie te maken.
Dit is bijzonder geschikt voor cappuccino of latte macchiato.
▪ Vul de kan (4) met 100 tot 150 ml gekoelde melk.
De schaalverdeling voor de inhoud vindt u in de kan (4):
100 ml MIN
150 ml MAX
Vul de kan nooit boven deze markering, omdat het melkschuim dan kan
overlopen en het apparaat vies wordt.
▪ Plaats het deksel (1) op de kan (4) en druk hem licht aan zodat de kan goed
wordt afgesloten.
nl
47
Page 48

▪ Druk nu zo vaak op de start/stop-knop (5), totdat het lampje van het symbool
gaat branden. Na ong. 3 seconden start de bereiding automatisch, het
controlelampje van de start/stop-knop (5) brandt.
▪ Na afloop van het programma schakelt het apparaat automatisch uit en het
controlelampje gaat uit. Open het deksel (1) en schep het melkschuim af of
schenk dit met de overgebleven melk uit.
Koud melkschuim
Kies dit programma om koud, romig melkschuim te maken. Dit is bijzonder
geschikt voor frappé, cocktails, ijskoffie en toetjes.
▪ Vul de kan (4) met 100 tot 150 ml gekoelde melk.
De schaalverdeling voor de inhoud vindt u in de kan (4):
100 ml MIN
150 ml MAX
Vul de kan nooit boven deze markering, omdat het melkschuim dan kan
overlopen en het apparaat vies wordt.
▪ Plaats het deksel (1) op de kan (4) en druk hem licht aan zodat de kan goed
wordt afgesloten.
▪ Druk nu zo vaak op de start/stop-knop (5), totdat het lampje van het symbool
gaat branden. Na ong. 3 seconden start de bereiding automatisch, het
controlelampje van de start/stop-knop (5) brandt.
▪ Na afloop van het programma schakelt het apparaat automatisch uit en het
controlelampje gaat uit. Open het deksel (1) en schep het melkschuim af of
schenk dit met de overgebleven melk uit.
Hete melk
Kies dit programma om melk te verwarmen en licht op te schuimen. De hete melk
is zeer geschikt voor koffie verkeerd of warme chocolademelk.
▪ Vul de kan (4) met 100 tot 250 ml gekoelde melk.
De schaalverdeling voor de inhoud vindt u in de kan (4):
100 ml MIN
250 ml MAX
Vul de kan nooit boven deze markering, omdat de melk dan kan overlopen en
het apparaat vies wordt.
▪ Plaats het deksel (1) op de kan (4) en druk hem licht aan zodat de kan goed
wordt afgesloten.
▪ Druk nu zo vaak op de start/stop-knop (5), totdat het lampje van het symbool
gaat branden. Na ong. 3 seconden start de bereiding automatisch, het
controlelampje van de start/stop-knop (5) brandt.
▪ Na afloop van het programma schakelt het apparaat automatisch uit en het
controlelampje gaat uit. Open het deksel (1) en schenk de melk uit.
48
Page 49

Reiniging en onderhoud
▪ Maak het apparaat na ieder gebruik schoon.
▪ Trek de stekker uit het stopcontact en laat het apparaat afkoelen.
▪ Het deksel (1) en de WMF melkschuim-DISC (3) mogen in de vaatwasmachine.
Voor eenvoudige reiniging kan de afdichtring (2) uit het deksel (1) worden
genomen.
Aanwijzing: kan (4) en apparaatvoet (6) mogen niet in de vaatwasmachine
worden afgewassen.
▪ De kan (4) kan onder stromend water worden afgespoeld.
De kan (4) is aan de binnenkant voorzien van een antikleeflaag. Gebruik geen
agressieve of schurende schoonmaakmiddelen en oplosmiddelen. Droog de kan
(4) af met een zachte doek.
Let op: de onderkant van de kan (4) moet droog zijn voordat het apparaat kan
worden gebruikt.
▪ De apparaatvoet (6) alleen afvegen met een licht vochtige doek.
geschikt voor de
vaatwasmachine
Deksel (1)
onder stromend
water afspoelen
vochtig afvegen
nl
Afdichtring (2)
WMF melkschuim-DISC (3)
Kan (4)
Apparaatvoet (6)
49
Page 50

Hulp bij storingen
De volgende aanwijzingen kunnen u helpen bij het verhelpen van storingen.
Wanneer dit niet lukt, kunt u contact opnemen met onze centrale klantenservice.
Neem de garantie-instructies in acht.
Probleem Mogelijke oorzaak Oplossing
Het controlelampje
brandt niet, het
apparaat start niet
Er komt melk uit het
deksel
Stekker zit niet in het
stopcontact
De oververhittingsbeveiliging is geactiveerd
Teveel melk in de kan Doe minder melk in de
Deksel is niet goed dicht Druk het deksel licht aan
De afdichtring ont-
breekt of is vuil
Steek de stekker in het
stopcontact
Apparaat laten afkoelen
kan
Afdichtring schoonmaken
en plaatsen
50
Page 51

Het apparaat voldoet aan de Europese richtlijnen 2014/35/EG, 2014/30/EG en
2009/125/EG.
Dit product mag aan het einde van zijn levensduur niet met het normale huishoudelijke afval worden weggegooid, maar moet bij een verzamelpunt voor de
recycling van elektrische en elektronische apparaten worden ingeleverd.
De grondstoffen zijn conform hun markering opnieuw te gebruiken. Door hergebruik, recycling of andere vormen van verwerking van oude apparaten levert u een
belangrijke bijdrage aan de bescherming van ons milieu.
U kunt bij uw gemeente informatie opvragen over het afvalverzamelpunt bij u in
de buurt.
Wijzigingen voorbehouden
nl
51
Page 52

Brugsanvisning
Vigtige sikkerhedsanvisninger
▪ Dette apparat kan benyttes af børn fra 8 år og perso-
ner med indskrænkede fysiske, berøringsmæssige eller
sjælelige evner eller mangel på erfaringer og/eller
mangel på viden, når de er under opsyn af en person eller instrueret i sikker brug af apparatet og har
forstået de eventuelle farlige konsekvenser ved denne
brug. Børn må ikke lege med apparatet. Rengøring og
vedligeholdelse må ikke udføres af børn, medmindre
de er fyldt 8 år og er under opsyn.
▪ Opbevar apparatet og dets tilførsel uden for børn
under 8 års rækkevidde.
▪ Brug kun apparatet med den dertilhørende sokkel.
▪ Dyp ikke apparatet i vand.
▪ Hvis apparatets ledning skulle blive beskadiget, skal
kan den skiftes gennem fabrikantens kundeservice
eller en tilsvarende kvalificeret person. Ufaglige
reparationer kan resultere i meget farlige situationer
for brugeren.
▪ Efter brug rengøres alle overflader, der kommer i
kontakt med levnedsmiddel. Følg anvisningerne i
afsnittet ”Rengøring og vedligeholdelse”.
52
Inden brug
Læs brugsanvisningen omhyggeligt. Den indeholder vigtige anvisninger om
brugen, sikkerheden og vedligeholdelsen af apparatet.
De skal opbevares omhyggeligt og ligeledes gives videre til en eventuel ny bruger.
Apparatet må kun anvendes til det planmæssige formål som anført i denne
brugsanvisning.
Dette apparat er egnet til at blive anvendt i husholdningen og lignende brug
såsom:
⋅ i køkkenet for ansatte i butikker, på kontorer og i andre
erhvervsmæssige funktioner;
⋅ på en økonomisk ejendom;
⋅ af gæster på hoteller, moteller og andre boligindretninger;
⋅ på morgenmadspensionater.
Apparatet er ikke udelukkende bestemt til erhvervsmæssig brug.
Bemærk sikkerhedsanvisningerne ved brug.
Page 53

Tekniske data
Driftsspænding: 220 - 240 V~ 50/60 Hz
Strømforbrug: 450 W
Beskyttelsesklasse: I
Sikkerhedsanvisninger
▪ Sæt kun apparatet i den efter forskrifterne installerede sikkerhedsstikkontakt.
Ledningen og stikket skal være tørt.
▪ Træk ikke ledningen over skarpe kanter eller gennem snævre sprækker, lad den
ikke hænge løst ned, og udsæt den ikke for varme og olie.
▪ Træk ikke i stikkets ledning eller med våde hænder ud af stikkontakten.
▪ Tag ikke apparatet i brug, eller træk straks stikket ud, hvis:
⋅ apparatet eller ledningen er beskadiget;
⋅ apparatet er utæt;
⋅ man mistænker en defekt efter et fald eller lignende.
I disse tilfælde skal man sende apparatet til reparation.
▪ Stil ikke apparatet på varme overflader såsom kogeplader eller lignende eller i
nærheden af den åbne gasflamme, hvorved den kan smelte.
▪ Stil ikke apparatet på overflader, som ikke kan tåle vand. Sprøjt kunne beska-
dige disse overflader.
▪ Brug aldrig apparatet uden opsyn.
▪ Tænd ikke apparatet uden mælk.
▪ Løft kanden af soklen ved påfyldning.
▪ Du kan bruge apparatet til at lave varmt eller koldt mælkeskum eller til at
opvarme mælk uden at opskumme det.
▪ Flyt ikke apparatet i brug, og træk ikke stikket ud.
▪ Undersiden af kanden skal være tør før brug.
▪ Pas på, apparatet bliver varmt.
▪ Træk stikket ud:
⋅ ved forstyrrelser i brug,
⋅ før hver rengøring og vedligeholdelse,
⋅ efter brug.
▪ Ved anden brug, forkert brug eller uautoriseret reparation påtages intet ansvar
for eventuelle skader.
Ligeledes gælder garantien i sådanne tilfælde ikke.
▪ Emballage, såsom plastikposer, er ikke legetøj for børn.
dada
53
Page 54

WMF Mælkeskummer-DISC
WMF Mælkeskummer-DISC (3) kan tages ud af holderen for at gøre rengøring
nemmere. Skub til dette WMF-Mælkeskummer DISC (3) fra siden med et let tryk
nedad ud af holderen.
Under montering bedes du gøre følgende:
Skub ganske enkelt WMF Mælkeskummer-DISC (3) fra siden ind i holderen; en
indvendig magnet sørger for et sikkert hold.
Ibrugtagning
Rengør apparatet før den første anvendelse som beskrevet i kapitlet „Rengøring
og vedligeholdelse“.
Du kan rulle den overskydende tilslutningsledning op på bunden af apparatsoklen
(6). Tilslut netstikket til en stikdåse med beskyttelseskontakt.
54
Page 55

Betjening og drift
1. Fyld den fornødne mængde mælk i kanden (4) og luk denne med låget (1).
2. Kanden (4) anbringes nu på apparatsoklen (6).
OBS:
Sæt altid først dækslet (1) på apparatet, før du tænder det.
Fjern aldrig dækslet (1), mens apparatet er tændt.
Ellers kan WMF mælkeskum-DISC (3) ikke længere fungere korrekt, heller ikke når
dækslet (1) igen påsættes.
Bemærk:
Tilberedningen kan til enhver tid afbrydes ved aktivering af start-/stoptasten (5)
eller ved at man løfter kanden (4) fra apparatsoklen (6).
Lad apparatet afkøle mellem to anvendelser.
Mælkeskummets beskaffenhed og volumen afhænger af den pågældende,
anvendte mælk (bl.a. fedt- og proteinindhold, temperatur).
Cremet blødt mælkeskum
Vælg dette program for at opnå varmt, cremet og fintporet mælkeskum. Dette er
særligt egnet til cappuccino- eller latte-typer.
▪ Fyld kanden (4) med 100 til 150 ml afkølet mælk.
Du finder påfyldningsmarkeringerne i kanden (4):
100 ml MIN
150 ml MAX
Påfyld aldrig mere, da mælkeskummet ellers kan løbe over og tilsmudse
apparatet.
▪ Sæt låget (1) på kanden (4) og tryk det let til, så det slutter tæt.
▪ Tryk nu på start-/stoptasten (5) indtil det lysende segment på symbolet
tændes. Efter ca. 3 sekunder starter tilberedningen automatisk, og
kontrollampen på start-/stoptasten (5) lyser.
▪ Efter programmets afslutning afbrydes apparatet automatisk, og kontrollam-
pen slukker. Åbn låget (1) og hæld mælkeskummet separat fra, eller hæld det
sammen med den resterende mælk.
Fast mælkeskum
Vælg dette program for at opnå varmt mælkeskum med en fast konsistens. Dette
er særligt egnet til cappuccino- eller latte macchiatto.
▪ Fyld kanden (4) med 100 til 150 ml afkølet mælk.
Du finder påfyldningsmarkeringerne i kanden (4):
100 ml MIN
150 ml MAX
Påfyld aldrig mere, da mælkeskummet ellers kan løbe over og tilsmudse
apparatet.
▪ Sæt låget (1) på kanden (4) og tryk det let til, så det slutter tæt.
▪ Tryk nu på start-/stoptasten (5) indtil det lysende segment på symbolet
lyser er kort øjeblik. Efter ca. 3 sekunder starter tilberedningen automatisk, og
kontrollampen på start-/stoptasten (5) lyser.
▪ Efter programmets afslutning afbrydes apparatet automatisk, og kontrollam-
pen slukker. Åbn låget (1) og hæld mælkeskummet separat fra, eller hæld det
sammen med den resterende mælk.
da
55
Page 56

Koldt mælkeskum
Vælg dette program for at opnå koldt, cremet mælkeskum. Dette er særligt egnet
til frappé, cocktails, iskaffe eller desserter.
▪ Fyld kanden (4) med 100 til 150 ml afkølet mælk.
Du finder påfyldningsmarkeringerne i kanden (4):
100 ml MIN
150 ml MAX
Füllen Sie keinesfalls mehr ein, da ansonsten Milchschaum überläuft und das
Gerät verunreinigt wird.
▪ Påfyld aldrig mere, da mælkeskummet ellers kan løbe over og tilsmudse
apparatet.
▪ Sæt låget (1) på kanden (4) og tryk det let til, så det slutter tæt.
▪ Tryk nu på start-/stoptasten (5) indtil det lysende segment på symbolet
lyser op et kort øjeblik. Efter ca. 3 sekunder starter tilberedningen automatisk,
og kontrollampen på start-/stoptasten (5) lyser.
▪ Efter programmets afslutning afbrydes apparatet automatisk, og
kontrollampen slukker. Åbn låget (1) og hæld mælkeskummet separat fra, eller
hæld det sammen med den resterende mælk.
Varm mælk
Vælg dette program for at varme mælk og opskumme den let. Den varme mælk er
særligt egnet til kaffe med mælk, varm chokolade eller kakao.
▪ Fyld kanden (4) med 100 til 250 ml afkølet mælk.
Du finder påfyldningsmarkeringerne i kanden (4):
100 ml MIN
250 ml MAX
Påfyld aldrig mere, da mælken ellers kan løbe over og tilsmudse apparatet.
▪ Sæt låget (1) på kanden (4) og tryk det let til, så det slutter tæt.
▪ Tryk nu på start-/stoptasten (5) indtil det lysende segment på symbolet
lyser op. Efter ca. 3 sekunder starter tilberedningen automatisk, og
kontrollampen på start-/stoptasten (5) lyser.
▪ Efter programmets afslutning afbrydes apparatet automatisk, og kontrollam-
pen slukker. Åbn låget (1) og hæld mælken ud.
56
Page 57

Rengøring og vedligeholdelse
▪ Rengør apparatet efter hver brug.
▪ Træk netstikket ud og lad apparatet afkøle.
▪ Låget (1) og WMF Mælkeskummer-DISC (3) kan vaskes i opvaskemaskinen. For
at gøre rengøring nemmere kan plomberingen (2) i låget (1) tages ud.
Bemærk: Kanden (4) og apparatsoklen (6) må ikke komme i opvaskemaskinen.
▪ Kanden (4) kan skylles af under rindende vand.
Kanden (4) er udstyret indvendigt med en klæbehindrende belægning. Anvend
ikke kraftige eller skurende rengøringsmidler og opløsningsmidler. Tør kanden
(4) af med en blød klud.
Forsigtig: Undersiden af kanden (4) skal være tør, før apparatet bruges.
▪ Aftør kun apparatsoklen (6) med en let fugtig klud.
egnet til opva-
skemaskine
Låg (1)
Plombering (2)
WMF Mælkeskummer-DISC
(3)
Kande (4)
kan skylles under
rindende vand
aftør med en
fugtig klud
da
Apparatsokkel (6)
57
Page 58

Fejlretning
De følgende anvisninger skal hjælpe dig med at afhjælpe fejl. Skulle dette ikke
række, bedes du henvende dig til vores centrale kundeserviceafdeling. Overhold
garantianvisningerne.
Problem Mulig årsag Udbedring
Kontrollampen lyser
ikke, apparatet starter
ikke
Der løber mælk ud af
låget
Stikket er ikke isat Isæt stikket
Overophedningsbeskyt-
telsen er aktiv
Påfyldningsmængden er
for stor
Låget er ikke sat rigtigt påSæt låget på med et let
Plomberingen mangler
eller er snavset
Lad apparatet afkøle
Reducér påfyldningsmængden
tryk
Rengør plomberingen og
sæt den i
58
Page 59

Apparatet opfylder de europæiske retningslinjer 2014/35/EF, 2014/30/EF og
2009/125/EF.
Dette produkt må ved slutningen af dets levetid ikke bortskaffes i den almindelige
husholdningsaffald, men skal afgives på et opsamlingssted for genbrug af elektriske og elektroniske apparater.
Materialerne kan genanvendes ifølge deres typebetegnelse. Ved aflevering af
brugte apparater på et genbrugssted bidrager du til beskyttelse af vores miljø.
Spørg din kommune om det nærmeste genbrugssted.
Ret til ændringer forbeholdes
da
59
Page 60

Användarguide
Viktiga säkerhetsanvisningar
▪ Denna apparat är inte avsedd att användas av barn
under 8 år eller av personer med nedsatt fysisk,
psykisk eller sensorisk förmåga eller av personer som
saknar erforderliga kunskaper eller erfarenhet såvida
dessa personer inte först får instruktioner hur man
använder apparaten på ett säkert sätt och förstår de
risker som finns. Barn får inte leka med apparaten.
Rengöring och användarunderhåll bör inte utföras av
barn, såvida de inte övervakas och är över 8 år.
▪ Håll apparaten och tillhörande kabel oåtkomliga för
barn under 8 år.
▪ Apparaten fungerar bara med den medföljande
sockeln.
▪ Sänk inte apparaten i vatten.
▪ Om strömkabeln skulle skadas måste ersättning ske
via tillverkarens centrala kundtjänst eller av en av
tillverkaren godkänd person. Om apparaten inte lagas
på ett fackmannamässigt och korrekt sätt kan detta
innebära stor fara för användaren.
▪ Efter användning ska du rengöra alla ytor som kom-
mit i kontakt med livsmedel. Läs anvisningarna i
kapitlet ”Rengöring och skötsel”.
60
Före användning
Läs alltid användarguiden noga. Den innehåller viktig information om hur du ska
använda och sköta apparaten så att den fungerar säkert och länge.
Förvara användarguiden på ett säkert ställe så att du vid behov kan ge den vidare
till näste ägare.
Apparaten får användas endast för det ändamål som beskrivs i den här användarguiden.
Apparaten är avsedd att användas i hushåll och liknande tillämpningar som:
⋅ i kök för personal i butiker, kontor och andra kommersiella
miljöer
⋅ i jord- och lantbruksmiljö
⋅ av kunder i hotell, motell och liknande logier
⋅ Bed & Breakfast
Page 61

Apparaten är inte avsedd att användas i rent kommersiellt syfte.
Beakta alltid säkerhetsanvisningarna om hur apparaten ska användas.
Tekniska data
Nominell spänning: 220 - 240V~ 50/60Hz
Effekt: 450 W
Skyddsklass: I
Säkerhetsanvisningar
▪ Anslut apparaten bara till korrekt installerat jordat uttag. Strömkabel och
kontakt måste vara torra.
▪ Dra eller kläm inte in anslutningskabeln runt skarpa kanter. Låt den inte hänga
fritt och skydda den från värme och olja.
▪ Dra inte ur nätkontakten från vägguttaget om du har våta händer och inte
heller genom att dra direkt i strömkabeln.
▪ Om följande skulle inträffa, ska du inte använda apparaten och genast dra ur
kontakten:
⋅ Apparaten eller strömkabeln är skadad
⋅ Apparaten läcker
⋅ Du misstänker att apparaten kan ha tagit skada när den fallit i golvet
eller liknande.
I sådana fall ska du alltid lämna in apparaten för lagning.
▪ Ställ inte apparaten på heta ytor som plattor och liknande eller nära öppen
gaslåga eftersom vattenkokaren kan smälta.
▪ Ställ inte apparaten på vattenkänsliga ytor. Stänk kan skada dem.
▪ Kör alltid apparaten under uppsikt.
▪ Använd apparaten bara om det finns mjölk i den.
▪ Innan du fyller kannan tar du bort den från sockeln.
▪ Du kan använda apparaten för att skumma varm eller kall mjölk eller för att
värma mjölk utan att skumma den.
▪ När apparaten används får man inte skaka den, inte heller dra i sladden.
▪ Undersidan av kannan måste vara torr innan användning av apparaten.
▪ Varning, apparaten blir varm.
▪ Ta ur kontakten:
⋅ om det vid användning skulle uppstå problem
⋅ före varje rengöringstillfälle
⋅ efter användning
▪ I händelse av missbruk, felaktig användning eller reparation tas inget ansvar
för eventuella skador.
Inte heller gäller garantin i sådana fall.
▪ Förpackningsmaterial som plastpåsar hör inte hemma i händerna på barn.
svsv
61
Page 62

WMF-mjölkskums-DISC
WMF-mjölkskums-DISC (3) kan tas bort ur hållaren för lätt rengöring. Skjut
WMF-mjölkskums-DISC (3) sidledes nedåt mot hållaren med ett lätt tryck.
Så här monterar du apparaten:
Skjut WMF-mjölkskums-DISC (3) sidledes in i hållaren där en magnet ser till att
den sitter säkert på plats.
Användning
Rengör apparaten före första användning som beskrivs i kapitlet ”Rengöring och
skötsel”.
62
Page 63

Om anslutningskabeln är för lång kan man linda den överblivna delen nedtill på
sockeln (6). Anslut nätkontakten till ett jordat uttag.
Drift och användning
1. Häll i önskad mängd mjölk i kannan (4) och stäng med locket (1).
2. Placera kannan (4) på sockeln (6).
Varning:
Sätt först på locket (1) på apparaten innan du startar den.
Ta inte bort locket (1) när apparaten är påslagen.
Då fungerar inte WMF mjölkskums-DISC (3) som den ska, även om locket (1) sätts
tillbaka.
Anmärkning:
Processen kan avbrytas när som helst genom att man trycker på start- och
stoppknappen (5) eller genom att man tar bort kannan (4) från sockeln (6).
Låt apparaten svalna mellan två körningar.
Mängden mjölkskum och konsistensen hos den beror på vilken typ av mjölk som
används (t.ex. fett- och proteinhalt, temperatur).
Krämigt, mjukt mjölkskum
Välj det här programmet för att få varmt, krämigt, finfördelat mjölkskum. Passar
perfekt för Cappuccino och Latte Art.
▪ Fyll kannan (4) med 100 till 150 ml kyld mjölk.
Fyllningsmarkeringarna finns på kannan (4):
100 ml MIN
150 ml MAX
Fyll inte på mer för då finns risk att mjölkskummet svämmar över och smutsar
ned apparaten.
▪ Sätt tillbaka locket (1) på kannan (4) och tryck fast det med ett lätt tryck så
att det tätar.
▪ Tryck på start- och stoppknappen (5) tills lampan i symbolen
cirka 3 sekunder startar processen automatiskt och start- och stoppknappens
(5) lampa lyser.
▪ När programmet gått klart, stängs apparaten av automatiskt och kontroll-
lampan släcks. Öppna locket (1) och skopa upp mjölkskummet eller häll ut det
tillsammans med den kvarblivna mjölken.
Fast mjölkskum
Välj det här programmet för att få varmt mjölkskum som är fast till konsistensen.
Passar perfekt för Cappuccino och Latte Macchiatto.
▪ Fyll kannan (4) med 100 till 150 ml kyld mjölk.
Fyllningsmarkeringarna finns på kannan (4):
100 ml MIN
150 ml MAX
Fyll inte på mer för då finns risk att mjölkskummet svämmar över och smutsar
ned apparaten.
▪ Sätt tillbaka locket (1) på kannan (4) och tryck fast det med ett lätt tryck så
att det tätar.
▪ Tryck på start- och stoppknappen (5) tills lampan i symbolen
cirka 3 sekunder startar processen automatiskt och start- och stoppknappens
(5) lampa lyser.
▪ När programmet gått klart, stängs apparaten av automatiskt och kontroll-
lyser. Efter
lyser. Efter
63
sv
Page 64

lampan släcks. Öppna locket (1) och skopa upp mjölkskummet eller häll ut det
tillsammans med den kvarblivna mjölken.
Kalt mjölkskum
Välj det här programmet för att få ett kallt, krämigt mjölkskum. Det passar främst
för frappé, cocktails, iskaffe och desserter.
▪ Fyll kannan (4) med 100 till 150 ml kyld mjölk.
Fyllningsmarkeringarna finns på kannan (4):
100 ml MIN
150 ml MAX
Fyll inte på mer för då finns risk att mjölkskummet svämmar över och smutsar
ned apparaten.
▪ Sätt tillbaka locket (1) på kannan (4) och tryck fast det med ett lätt tryck så
att det tätar.
▪ Tryck på start- och stoppknappen (5) tills lampan i symbolen
cirka 3 sekunder startar processen automatiskt och start- och stoppknappens
(5) lampa lyser.
▪ När programmet gått klart, stängs apparaten av automatiskt och kontroll-
lampan släcks. Öppna locket (1) och skopa upp mjölkskummet eller häll ut det
tillsammans med den kvarblivna mjölken.
lyser. Efter
Varm mjölk
Välj det här programmet för att värma upp mjölken för bara ett lätt skum. Den
varma mjölken är särskilt lämplig för latte, varm choklad och kakao.
▪ Fyll kannan (4) med 100 till 250 ml kyld mjölk.
Fyllningsmarkeringarna finns på kannan (4):
100 ml MIN
250 ml MAX
Fyll inte på mer för då finns risk att mjölken svämmar över och smutsar ned
apparaten.
▪ Sätt tillbaka locket (1) på kannan (4) och tryck fast det med lätt tryck så att
det tätar.
▪ Tryck på start- och stoppknappen (5) tills lampan i symbolen
cirka 3 sekunder startar processen automatiskt och start- och stoppknappens
(5) lampa lyser.
lyser. Efter
64
Page 65

▪ När programmet gått klart, stängs apparaten av automatiskt och
kontrollampan släcks. Öppna locket (1) och häll ut mjölken.
Rengöring och skötsel
▪ Rengör ugnen efter användning.
▪ Dra ur kontakten och låt apparaten svalna.
▪ Locket (1) och WMF-mjölkskums-DISC (3) klarar maskindisk. För lättare
rengöring kan man ta bort lockets (1) tätningsring (2).
Anmärkning: Vare sig kanna (4) eller sockel (6) får placeras i diskmaskin.
▪ Kannan (4) får sköljas i rinnande vatten.
Kannan (4) har nonstick-beläggning på insidan. Använd inte starka eller
slipande rengöringsmedel och lösningsmedel. Torka kanna (4) med en mjuk
trasa.
Varning: Kannans (4) botten måste vara torr innan apparaten får användas.
▪ Torka av sockeln (6) med en lätt fuktad trasa.
avsedd för
diskmaskin
Lock (1)
kan sköljas i rin-
nande vatten
torka med fuktig
trasa
sv
Tätningsring (2)
WMF-mjölkskums-DISC (3)
Kanna (4)
Sockel (6)
65
Page 66

Felsökning
Följande tips bör hjälpa dig att åtgärd felen. Om det inte fungerar, kontaktar du
vår centrala kundtjänst. Notera garantiupplysningarna.
Fel Möjlig orsak Åtgärd
Kontrollampan tänds
inte, apparaten startar
inte
Mjölk tränger ut via
locket
Kontakt är inte isatt Sätt i kontakten
Överhettningsskyddet
aktiverat
För mycket mjölk Minska mängden mjölk
Locket är inte ordentligt
fastsatt
Tätningsring saknas
eller är smutsig
Låt apparaten svalna
Sätt fast locket med ett
lätt tryck
Rengör och sätt tillbaka
tätningsringen
66
Page 67

Apparaten motsvarar de europeiska riktlinjerna 2014/35/EG, 2014/30/EG och
2009/125/EG.
Den här produkten får inte kastas tillsammans med hushållsavfall utan ska lämnas
in på en återvinningsstation för elektriskt och elektroniskt avfall.
Hur de olika materialen ska återvinnas ser du på märkningen. Genom att återvinnagamla hushållsapparater bidrar du till att skydda miljön.
Du kan fråga på kommunen var den närmaste återvinningsstationen ligger.
Ändringar förbehållna
sv
67
Page 68

Käyttöohje
Tärkeitä turvallisuusohjeita
▪ Yli 8-vuotiaat lapset sekä fyysisiltä, aistillisilta tai
henkisiltä kyvyiltään rajoittuneet tai kokemattomat
ja/tai taitamattomat henkilöt saavat käyttää laitetta
vain siinä tapauksessa, että käyttöä valvotaan tai
heitä on opastettu käyttämään laitetta turvallisesti
ja he ovat ymmärtäneet laitteen käyttöön liittyvät
vaarat. Lapset eivät saa leikkiä laitteella. Lapset eivät
saa puhdistaa tai huoltaa laitetta, elleivät he ole yli
8-vuotiaita ja aikuisen valvonnassa.
▪ Säilytä laite ja sen liitäntäjohto alle 8-vuotiaiden
lasten ulottumattomissa.
▪ Käytä laitetta ainoastaan siihen kuuluvalla jalustalla.
▪ Älä upota laitetta veteen.
▪ Jos laitteen verkkojohto vahingoittuu, tulee sen
vaihtaminen antaa valmistajan, valmistajan asiakas-
palvelun tai vastaavan ammattitaitoisen henkilön
tehtäväksi. Epäasianmukaiset korjaukset voivat
saattaa käyttäjän huomattavaan vaaraan.
▪ Puhdista käytön jälkeen kaikki ulkopinnat, jotka
ovat joutuneet kosketuksiin elintarvikkeiden kanssa.
Noudata kappaleen ”Puhdistus ja huolto” ohjeita.
68
Ennen käyttöä
Lue käyttöohje huolellisesti. Se sisältää tärkeää tietoa laitteen käytöstä, turvallisuudesta ja huollosta.
Säilytä ohje huolellisesti ja anna se eteenpäin laitteen mahdolliselle seuraavalle
käyttäjälle.
Käytä laitetta vain tässä käyttöohjeessa kuvatulla tavalla ja vain siihen tarkoitukseen, johon se on suunniteltu.
Laite on tarkoitettu käytettäväksi kotitalouksissa ja muissa vastaavissa käyttötilanteissa, kuten
⋅ työpaikkakeittiöissä kaupoissa, toimistoissa ja muissa
kaupallisissa ympäristöissä;
⋅ maatalousalueilla;
⋅ asiakastiloissa hotelleissa, motelleissa ja muissa majoituspaikoissa;
⋅ aamiaismajoitusta tarjoavissa majataloissa.
Laitetta ei ole tarkoitettu puhtaasti kaupalliseen käyttöön.
Noudata laitteen käytössä turvallisuusohjeita.
Page 69

Tekniset tiedot
Nimellisjännite: 220 - 240 V~ 50/60 Hz
Ottoteho: 450 W
Suojaluokka: I
Turvallisuusohjeet
▪ Kytke laite vain määräysten mukaisesti asennettuun maadoitettuun pistorasi-
aan. Liitäntäjohdon ja pistotulpan tulee olla kuivia.
▪ Älä vedä liitäntäjohtoa terävien reunojen yli tai ympäri äläkä anna johdon
roikkua reunan yli. Suojaa johto kuumuudelta ja öljyltä.
▪ Kun irrotat laitteen pistotulpan pistorasiasta, älä vedä johdosta tai koske
märin käsin pistotulppaan.
▪ Älä käytä laitetta ja irrota pistotulppa heti pistorasiasta, jos
⋅ laite tai liitäntäjohto on vahingoittunut;
⋅ laite vuotaa;
⋅ on syytä epäillä laitteen vioittuneen putoamisen tms. jälkeen.
Näissä tapauksissa laite tulee toimittaa korjattavaksi.
▪ Älä aseta laitetta kuumille pinnoille, kuten liedelle tai kaasuliekin lähettyville,
koska se voi sulaa.
▪ Älä aseta laitetta pinnoille, jotka ovat arkoja kosteudelle. Roiskeet voivat
vahingoittaa pintoja.
▪ Älä koskaan jätä laitetta päälle valvomatta.
▪ Älä kytke laitetta päälle, ellei siinä ole maitoa.
▪ Irota pannu jalustalta, kun täytät siihen veden.
▪ Voit tehdä laitteella kuumaa tai kylmää maitovaahtoa tai kuumentaa maitoa
ilman vaahdottamista.
▪ Älä siirrä laitetta käytön aikana tai irrota sen johtoa pistorasiasta.
▪ Kannun pohjan tulee olla kuiva, kun alat käyttää laitetta.
▪ Varo, laite kuumenee.
▪ Irrota pistotulppa pistorasiasta aina
⋅ jos laitteessa on käyttöhäiriöitä,
⋅ ennen laitteen puhdistusta ja huoltoa,
⋅ käytön jälkeen.
▪ Jos laitetta käytetään väärin tai sille suoritetaan epäasianmukaisia korjauksia,
valmistaja ei vastaa mahdollisista vahingoista.
Myöskään laitteen takuu ei ole tällaisissa tilanteissa voimassa.
▪ Pidä pakkausmateriaalit, kuten muovipussit, poissa lasten ulottuvilta.
fifi
69
Page 70

WMF-vaahdotuslevy
WMF-vaahdotuslevyn (3) voi irrottaa puhdistamisen helpottamiseksi. Tehdäksesi
sen työnnä WMF-vaahdotuslevyä (3) sivusuunnassa kevyesti aukosta alaspäin.
Kiinnittääksesi sen toimi seuraavasti:
Työnnä WMF-vaahdotuslevy (3) sivuttain aukkoon. Sisällä oleva magneetti pitää
sen varmasti paikallaan.
Käyttöönotto
Puhdista laite ennen ensimmäistä käyttökertaa kappaleessa ”Puhdistus ja huolto”
kuvatulla tavalla.
Liitäntäjohdon ylimääräinen osa voidaan keriä laitteen jalustan (6) pohjaan. Liitä
pistotulppa maadoitettuun pistorasiaan.
70
Page 71

Käyttö
1. Täytä tarvittava määrä maitoa kannuun (4) ja sulje se kannella (1).
2. Aseta vasta nyt kannu (4) jalustalle (6).
HUOM:
Laita aina kansi (1) laitteen päälle ennen sen käynnistämistä.
Älä koskaan poista kantta (1), kun laitteeseen on kytketty virta.
Muutoin WMF maidonvaahdottimen DISC (3) ei ehkä toimi enää oikein, vaikka
kansi (1) vaihdettaisiin.
Vinkki:
Voit keskeyttää maitovaahdon valmistamisen milloin tahansa painamalla
käynnistys-/pysäytysnäppäintä (5) tai nostamalla kannun (4) pois jalustalta (6).
Anna laitteen jäähtyä jokaisen käyttökerran jälkeen ennen uutta käyttöä.
Maitovaahdon koostumus ja määrä riippuvat kulloinkin käytetystä maidosta (mm.
sen rasva- ja proteiinipitoisuudesta ja lämpötilasta).
Kermamaisen pehmeä maitovaahto
Valitse tämä ohjelma, kun haluat valmistaa lämmintä, kermamaista ja
pienikuplaista maitovaahtoa. Se soveltuu erityisesti cappuccinoihin ja latte art
-kuvioihin.
▪ Täytä kannuun (4) 100 - 150 ml jäähdytettyä maitoa.
Kannussa (4) näet seuraavat täyttömäärän merkit:
100 ml MIN
150 ml MAX
Älä missään tapauksessa täytä kannuun tätä enempää maitoa, sillä muuten
maitovaahto tulvii yli ja laite likaantuu.
▪ Aseta kansi (1) kannun (4) päälle ja paina sitä kevyesti, jotta se sulkeutuu
tiiviisti.
▪ Paina nyt käynnistys-/pysäytysnäppäintä (5) niin monta kertaa, kunnes
symbolin
sekunnin kuluttua. Käynnistys-/pysäytysnäppäimen (5) merkkivalo palaa.
▪ Ohjelman päätyttyä laite sammuu automaattisesti. Merkkivalo sammuu.
Avaa kansi (1) ja kuori maitovaahto pois erikseen tai kaada se yhdessä jäljelle
jääneen maidon kanssa pois kannusta.
Kiinteä maitovaahto
Valitse tämä ohjelma, kun haluat valmistaa lämmintä, koostumukseltaan kiinteää
maitovaahtoa. Se soveltuu erityisesti cappuccinoihin tai latte macchiatoihin.
▪ Älä missään tapauksessa täytä kannuun tätä enempää maitoa, sillä muuten
maitovaahto tulvii yli ja laite likaantuu.
▪ Aseta kansi (1) kannun (4) päälle ja paina sitä kevyesti, jotta se sulkeutuu
tiiviisti.
▪ Paina nyt käynnistys-/pysäytysnäppäintä (5) niin monta kertaa, kunnes
symbolin
sekunnin kuluttua. Käynnistys-/pysäytysnäppäimen (5) merkkivalo palaa.
▪ Ohjelman päätyttyä laite sammuu automaattisesti. Merkkivalo sammuu.
Avaa kansi (1) ja kuori maitovaahto pois erikseen tai kaada se yhdessä jäljelle
jääneen maidon kanssa pois kannusta.
valolohko syttyy. Vaahdon valmistus alkaa automaattisesti n. 3
valolohko syttyy. Vaahdon valmistus alkaa automaattisesti n. 3
fi
71
Page 72

Kylmä maitovaahto
Valitse tämä ohjelma, kun haluat valmistaa kylmää, kermamaista maitovaahtoa.
Se soveltuu erityisesti frappé-kahveihin, cocktaileihin, jääkahviin ja jälkiruokiin.
▪ Täytä kannuun (4) 100 - 150 ml jäähdytettyä maitoa.
Kannussa (4) näet seuraavat täyttömäärän merkit:
100 ml MIN
150 ml MAX
Älä missään tapauksessa täytä kannuun tätä enempää maitoa, sillä muuten
maitovaahto tulvii yli ja laite likaantuu.
▪ Aseta kansi (1) kannun (4) päälle ja paina sitä kevyesti, jotta se sulkeutuu
tiiviisti.
▪ Paina nyt käynnistys-/pysäytysnäppäintä (5) niin monta kertaa, kunnes
symbolin
sekunnin kuluttua. Käynnistys-/pysäytysnäppäimen (5) merkkivalo palaa.
▪ Ohjelman päätyttyä laite sammuu automaattisesti. Merkkivalo sammuu.
Avaa kansi (1) ja kuori maitovaahto pois erikseen tai kaada se yhdessä jäljelle
jääneen maidon kanssa pois kannusta.
valolohko syttyy. Vaahdon valmistus alkaa automaattisesti n. 3
Kuuma maito
Valitse tämä ohjelma, kun haluat lämmittää maidon ja vaahdottaa sitä kevyesti.
Kuuma maito soveltuu erityisesti maitokahviin ja kaakaoon.
▪ Täytä kannuun (4) 100 - 250 ml jäähdytettyä maitoa.
Kannussa (4) näet seuraavat täyttömäärän merkinnät:
100 ml MIN
250 ml MAX
Älä missään tapauksessa täytä kannuun tätä enempää maitoa, sillä muuten
maitovaahto tulvii yli ja laite likaantuu.
▪ Aseta kansi (1) kannun (4) päälle ja paina sitä kevyesti, jotta se sulkeutuu
tiiviisti.
▪ Paina nyt käynnistys-/pysäytysnäppäintä (5) niin monta kertaa, kunnes
symbolin
sekunnin kuluttua. Käynnistys-/pysäytysnäppäimen (5) merkkivalo palaa.
▪ Ohjelman päätyttyä laite sammuu automaattisesti. Merkkivalo sammuu. Avaa
kansi (1) ja kaada maito pois kannusta.
valolohko syttyy. Vaahdon valmistus alkaa automaattisesti n. 3
72
Page 73

Puhdistus ja huolto
▪ Puhdista laite jokaisen käyttökerran jälkeen.
▪ Irrota pistotulppa pistorasiasta ja anna laitteen jäähtyä.
▪ Kannen (1) ja WMF-vaahdotuslevyn (3) voi pestä astianpesukoneessa.
Puhdistamisen helpottamiseksi kannessa (1) olevan tiivisterenkaan (2) voi
irrottaa.
Vinkki: Kannua (4) ja laitteen jalustaa (6) ei saa laittaa astianpesukoneeseen.
▪ Kannun (4) voi huuhdella juoksevan veden alla.
Kannun (4) sisällä on tarttumisenestopinnoite. Älä käytä voimakkaita tai
hankaavia puhdistusaineita tai liuotinaineita. Kuivaa kannu (4) pehmeällä
liinalla.
Huomio: Kannun (4) alapuolen on oltava kuiva ennen kuin laitetta käytetään.
▪ Pyyhi laitteen jalusta (6) vain kevyesti kostutetulla liinalla.
fi
Kansi (1)
Tiivisterengas (2)
WMF-vaahdotuslevy (3)
Kannu (4)
Laitteen jalusta
(6)
konepestävä
huuhtele juokse-
valla vedellä
pyyhi kostealla
73
Page 74

Apua häiriöihin
Seuraavien ohjeiden tarkoituksena on auttaa sinua ratkaisemaan häiriötilanteet.
Mikäli se ei onnistu, käänny keskitetyn asiakaspalvelumme puoleen. Huomioi
takuuta koskevat ohjeet.
Ongelma Mahdollinen syy Ratkaisu
Merkkivalo ei pala, laite
ei käynnisty
Kannesta vuotaa maitoa Täyttömäärä on liian
Pistotulppa ei ole
kiinnitetty
Ylikuumenemissuoja on
aktiivinen
suuri
Kansi ei ole asetettu
kunnolla
Tiivisterengas puuttuu
tai on likainen
Liitä pistotulppa pistorasiaan
Anna laitteen jäähtyä
Pienennä täyttömäärää
Aseta kansi paikalleen
painamalla sitä kevyesti
Puhdista tiivisterengas ja
aseta se paikalleen
74
Page 75

Laite vastaa EU:n direktiivien 2014/35/EY, 2014/30/EY ja 2009/125/EY määräyksiä.
Tätä tuotetta ei saa hävittää sen elinkaaren päätyttyä tavallisten kotitalousjätteiden mukana, vaan se tulee toimittaa sähkökäyttöisten ja elektronisten laitteiden
keräyspisteeseen kierrätystä varten.
Valmistusaineet soveltuvat uusiokäyttöön tunnusmerkintänsä mukaisesti. Uusiokäytön, raaka-aineiden hyödyntämisen tai muunlaisten käytettyjen laitteiden
hyödyntämisen avulla autat omalta osaltasi ympäristön suojelua.
Ole hyvä ja tiedustele kuntasi hallinnolta, missä ovat tähän tarkoitetut kierrätyspisteet.
Oikeudet muutoksiin pidätetään
fi
75
Page 76

Bruksanvisning
Viktige sikkerhetsanvisninger
▪ Disse enhetene kan brukes av barn fra de er 8 år og
personer med begrensede fysiske, sensoriske eller
mentale evner eller som mangler erfaring og/eller
kunnskaper, hvis de er under tilsyn eller har fått
opplæring i sikker bruk av enheten og forstår farene
tilknyttet enheten. Barn må ikke leke med enheten.
Rengjøring og vedlikehold må ikke utføres av barn,
med mindre de er eldre enn 8 år og under tilsyn.
▪ Oppbevar enheten og kabelen utilgjengelig for barn
under 8 år.
▪ Enheten må kun brukes sammen med tilhørende
sokkelen.
▪ Aldri dypp apparatet ned i vann eller annen væske.
▪ Hvis apparatets strømledning er skadet, må den byt-
tes av produsentens kundeserviceavdeling eller av en
person med tilsvarende kvalifikasjon. Feilaktige repa-
rasjoner kan utgjøre en alvorlig fare for brukerne.
▪ Rengjør alle flater som har kommet i kontakt med
næringsmidler etter bruk. Følg anvisningene i avsnit-
tet ”Rengjøring og vedlikehold”.
76
Før bruk
Les bruksanvisningen nøye. Der vil du finne viktig informasjon om bruk, sikkerhet
og vedlikehold for apparatet.
Det skal oppbevares på et trygt sted og leveres videre til andre brukere der dette
er aktuelt.
Enheten må bare brukes til det beregnede formålet og i overensstemmelse med
denne bruksanvisningen.
Denne enheten er beregnet til å brukes i husholdninger og på lignende bruksområder, for eksempel:
⋅ i kjøkkener for personalet i butikker, kontorer og andre
næringsområder
⋅ i landbruksvirksomheter
⋅ av kunder i hoteller, moteller og andre boinnretninger
⋅ i frokostpensjonater.
Enheten er ikke beregnet til kommersiell bruk.
Respekter sikkerhetsanvisningene når du bruker apparatet.
Page 77

Tekniske data
Merkespenning: 220 - 240 V~ 50/60 Hz
Strømforbruk: 450 W
Beskyttelsesklasse: I
Sikkerhetsanvisninger
▪ Koble enheten kun til forskriftsmessig installert, jordet stikkontakt. Ledningen
og kontakten må være tørre.
▪ Tilkoblingskabelen må ikke trekkes over skarpe kanter eller klemmes fast og
må ikke henge ned og må beskyttes mot varme og olje.
▪ Du må ikke ta ut stikkontakten ved å dra i ledningen eller dersom hendene
dine er våte.
▪ Stopp bruken av enheten og/eller koble fra strømmen dersom:
⋅ enheten eller strømkabelen er skadet
⋅ enheten lekker
⋅ du mistenker at det har skjedd en skade etter at enheten har falt i bakken
eller tilsvarende.
Send apparatet til reparasjon i slike tilfeller.
▪ Enheten må ikke plasseres på varme overflater, f.eks. varmeplater eller
lignende eller nær åpen gassflamme, da den kan smelte.
▪ Plasser ikke enheten på vannfølsomme overflater. Sprut kan skade dem.
▪ Bruk aldri enheten uten tilsyn.
▪ Slå ikke på enheten uten melk.
▪ Ta kjelen av sokkelen når du fyller den.
▪ Apparatet kan brukes til å lage varm eller kald skummet melk, eller til å varme
opp melk uten å skumme den.
▪ Enheten må ikke flyttes under bruk og ikke dras i kabelen.
▪ Pass på at undersiden av muggen er tørr før du begynner å bruke den.
▪ Forsiktig: enheten blir varm.
▪ Støpselet må trekkes ut:
⋅ hvis det oppstår feil under bruk
⋅ før rengjøring og vedlikehold
⋅ etter bruk
▪ Ved misbruk, feil bruk eller feil utførte reparasjoner påtar vi oss ikke noe
ansvar for eventuelle skader.
Garantien bortfaller også i slike tilfeller.
▪ Emballasjematerialer, f.eks. plastposer, hører ikke hjemme i barnehender.
nono
77
Page 78

WMF-melkeskum-DISC
WMF-melkeskum-DISC (3) kan fjernes for å lette rengjøringen av holderen. Skyv
WMF-melkeskum-DISC (3) til side ned fra holderen med et lett trykk.
Gjør som følger for å montere:
Skyv WMF-melkeskum-DISC (3) sideveis inn i holderen, en magnet på innsiden
sørger for at den sitter godt fast.
Ta enheten i bruk
Rengjør apparatet før første gangs bruk som beskrevet i kapittelet ”Rengjøring og
pleie”.
Lengden på strømkabelen som ikke trengs, kan vikles opp på undersiden av
sokkelen (6) på apparatet. Koble støpselet til en stikkontakt.
78
Page 79

Betjening og drift
1. Fyll ønsket mengde melk i kannen (4) og lukk den med lokket (1).
2. Deretter setter du kannen (4) på sokkelen på apparatet (6).
OBS:
Sett alltid først på dekselet (1) på apparatet før du slår det på.
Ta aldri av dekselet (1) mens apparatet er påslått.
Da kan WMF melkeskum-DISC (3) ikke arbeide riktig lenger, selv hvis dekselet (1)
settes på igjen.
Merknad:
Tilberedningen kan avbrytes når som helst ved å trykke på start-/stoppknappen
(5) eller ved å fjerne kannen (4) fra sokkelen på apparatet (6).
La apparatet avkjøles før det brukes på nytt.
Type og volum på melkeskummet avhenger av melken som brukes (for eksempel
fett- og proteininnhold samt temperatur).
Kremaktig, mykt melkeskum
Velg dette programmet for å lage varmt, kremet, finporet melkeskum. Dette egner
seg spesielt til Cappuccino eller Latte Art.
▪ Fyll kannen (4) med 100-150 ml avkjølt melk.
Påfyllingsmerkene finner du i kannen (4):
100 ml MIN
150 ml MAX
Fyll aldri på mer, ellers kan melkeskummet renne over og skitne til apparatet.
▪ Sett lokket (1) på kannen (4) og trykk det lett fast, slik at det tetter godt.
▪ Trykk deretter på start-/stoppknappen (5) til lyssegmentet i symbolet
tennes. Etter ca. tre sekunder starter tilberedningen automatisk og
indikatorlampen for start-/stoppknappen (5) tennes.
▪ Etter programslutt vil enheten slå seg av automatisk og indikatorlampen sluk-
kes. Åpne lokket (1) og hell ut melkeskummet separat eller hell det ut sammen
med resten av melken.
Fast melkeskum
Velg dette programmet for å lage varmt melkeskum med fast konsistens. Dette
egner seg spesielt til Cappuccino eller Latte Macchiatto.
▪ Fyll kannen (4) med 100-150 ml avkjølt melk.
Påfyllingsmerkene finner du i kannen (4):
100 ml MIN
150 ml MAX
Fyll aldri på mer, ellers kan melkeskummet renne over og skitne til apparatet.
▪ Sett lokket (1) på kannen (4) og trykk det lett fast, slik at det tetter godt.
▪ Trykk deretter på start-/stoppknappen (5) til lyssegmentet i symbolet
tennes. Etter ca. tre sekunder starter tilberedningen automatisk og
indikatorlampen for start-/stoppknappen (5) tennes.
▪ Etter programslutt vil enheten slå seg av automatisk og indikatorlampen sluk-
kes. Åpne lokket (1) og hell ut melkeskummet separat eller hell det ut sammen
med resten av melken.
no
79
Page 80

Kaldt melkeskum
Velg dette programmet for å lage kaldt, kremet melkeskum. Dette egner seg
spesielt til Frappé, Cocktails, Iskaffe eller desserter.
▪ Fyll kannen (4) med 100-150 ml avkjølt melk.
Påfyllingsmerkene finner du i kannen (4):
100 ml MIN
150 ml MAX
Fyll aldri på mer, ellers kan melkeskummet renne over og skitne til apparatet.
▪ Sett lokket (1) på kannen (4) og trykk det lett fast, slik at det tetter godt.
▪ Trykk deretter på start-/stoppknappen (5) til lyssegmentet i symbolet
tennes. Etter ca. tre sekunder starter tilberedningen automatisk og
indikatorlampen for start-/stoppknappen (5) tennes.
▪ Etter programslutt vil enheten slå seg av automatisk og indikatorlampen
slukkes. Åpne lokket (1) og hell ut melkeskummet separat eller hell det ut
sammen med resten av melken.
Varm melk
Velg dette programmet for å varme melk og skumme det opp lett. Den varme
melken er spesielt egnet til kaffe med melk, varm sjokolade eller kakao.
▪ Fyll kannen (4) med 100-250 ml avkjølt melk.
Påfyllingsmerkene finner du i kannen (4):
100 ml MIN
250 ml MAX
Fyll aldri på mer, ellers kan melkeskummet renne over og skitne til apparatet.
▪ Sett lokket (1) på kannen (4) og trykk det lett fast, slik at det tetter godt.
▪ Trykk deretter på start-/stoppknappen (5) til lyssegmentet i symbolet
tennes. Etter ca. tre sekunder starter tilberedningen automatisk og
indikatorlampen for start-/stoppknappen (5) tennes.
▪ Etter programslutt vil enheten slå seg av automatisk og indikatorlampen sluk-
kes. Åpne lokket (1) og hell ut melken.
80
Page 81

Rengjøring og pleie
▪ Rengjør apparatet etter hver gangs bruk.
▪ Trekk ut støpselet fra kontakten og la apparatet avkjøles.
▪ Lokk (1) og WMF-melkeskum-DISC (3) kan vaskes i oppvaskmaskin. For å lette
rengjøringen kan tetningsringen (2) på lokket (1) fjernes.
Merknad: Kanne (4) og apparatsokkel (6) må ikke vaskes i oppvaskmaskin.
▪ Kannen (4) kan skylles under rennende vann.
Kannen (4) er utstyrt innvendig med et slippbelegg. Ikke bruk sterke eller
slipende rengjøringsmidler og løsemidler. Tørk av kannen (4) med en myk klut.
Viktig: Undersiden av kannen (4) må være tørr før apparatet brukes.
▪ Tørk av sokkelen (6) på apparatet med en lett fuktet klut.
kan vaskes i
oppvaskmaskin
Lokk (1)
Tetningsring (2)
WMF-melkeskum-DISC (3)
Kanne (4)
kan skylles under
rennende vann
tørkes av med
fuktig klut
no
Apparatsokkel (6)
81
Page 82

Hjelp hvis det oppstår feil
Følgende anvisninger skal hjelpe deg til å utbedre feil. Dersom dette ikke
hjelper, kan du kontakt vår sentrale kundeservice. Vær oppmerksom på
garantiinformasjonen.
Problem Mulig årsak Utbedring
Indikatorlampen lyser
ikke, apparatet starter
ikke
Melk kommer ut ved
lokket
Apparatet overholder kravene i EU-direktivene 2014/35/EF, 2014/30/EF og
2009/125/EF.
Dette produktet må ikke kastes sammen med vanlig husholdningsavfall etter
endt levetid, men må bringes til et returpunkt for resirkulering av elektrisk og
elektronisk utstyr.
Materialene kan resirkuleres som merket. Ved gjenbruk, resirkulering eller andre
former for utnyttelse av gamle apparater, kan du yte et viktig bidrag til å verne
om miljøet. Spør i kommunen etter et godkjent innleveringssted.
Støpsel ikke plugget i
stikkontakten.
Overopphetingsvern
aktivt
Det er fylt på for mye Reduser fyllmengden
Lokket er ikke riktig
satt på
Tetningsring mangler
eller er skitten
Plugg inn støpselet
La apparatet avkjøles.
Sett på lokket med et lett
trykk
Rengjør tetningsring og
sett inn igjen
82
Det tas forbehold om endringer
Page 83

no
83
Page 84

Kundendienst-Adresse:
wmf consumer electric GmbH
Standort Trepesch
Steinstraße 19
D-90419 Nürnberg
Germany
Tel.: +49 (0) 7331 256 256
eMail: service-wmf@wmf-ce.de
Hersteller:
wmf consumer electric GmbH
Messerschmittstraße 4
D-89343 Jettingen-Scheppach
Germany
www.wmf-ce.de
Änderungen vorbehalten - IB-13120011-04-1702
type: 0413120011
 Loading...