

Page 1
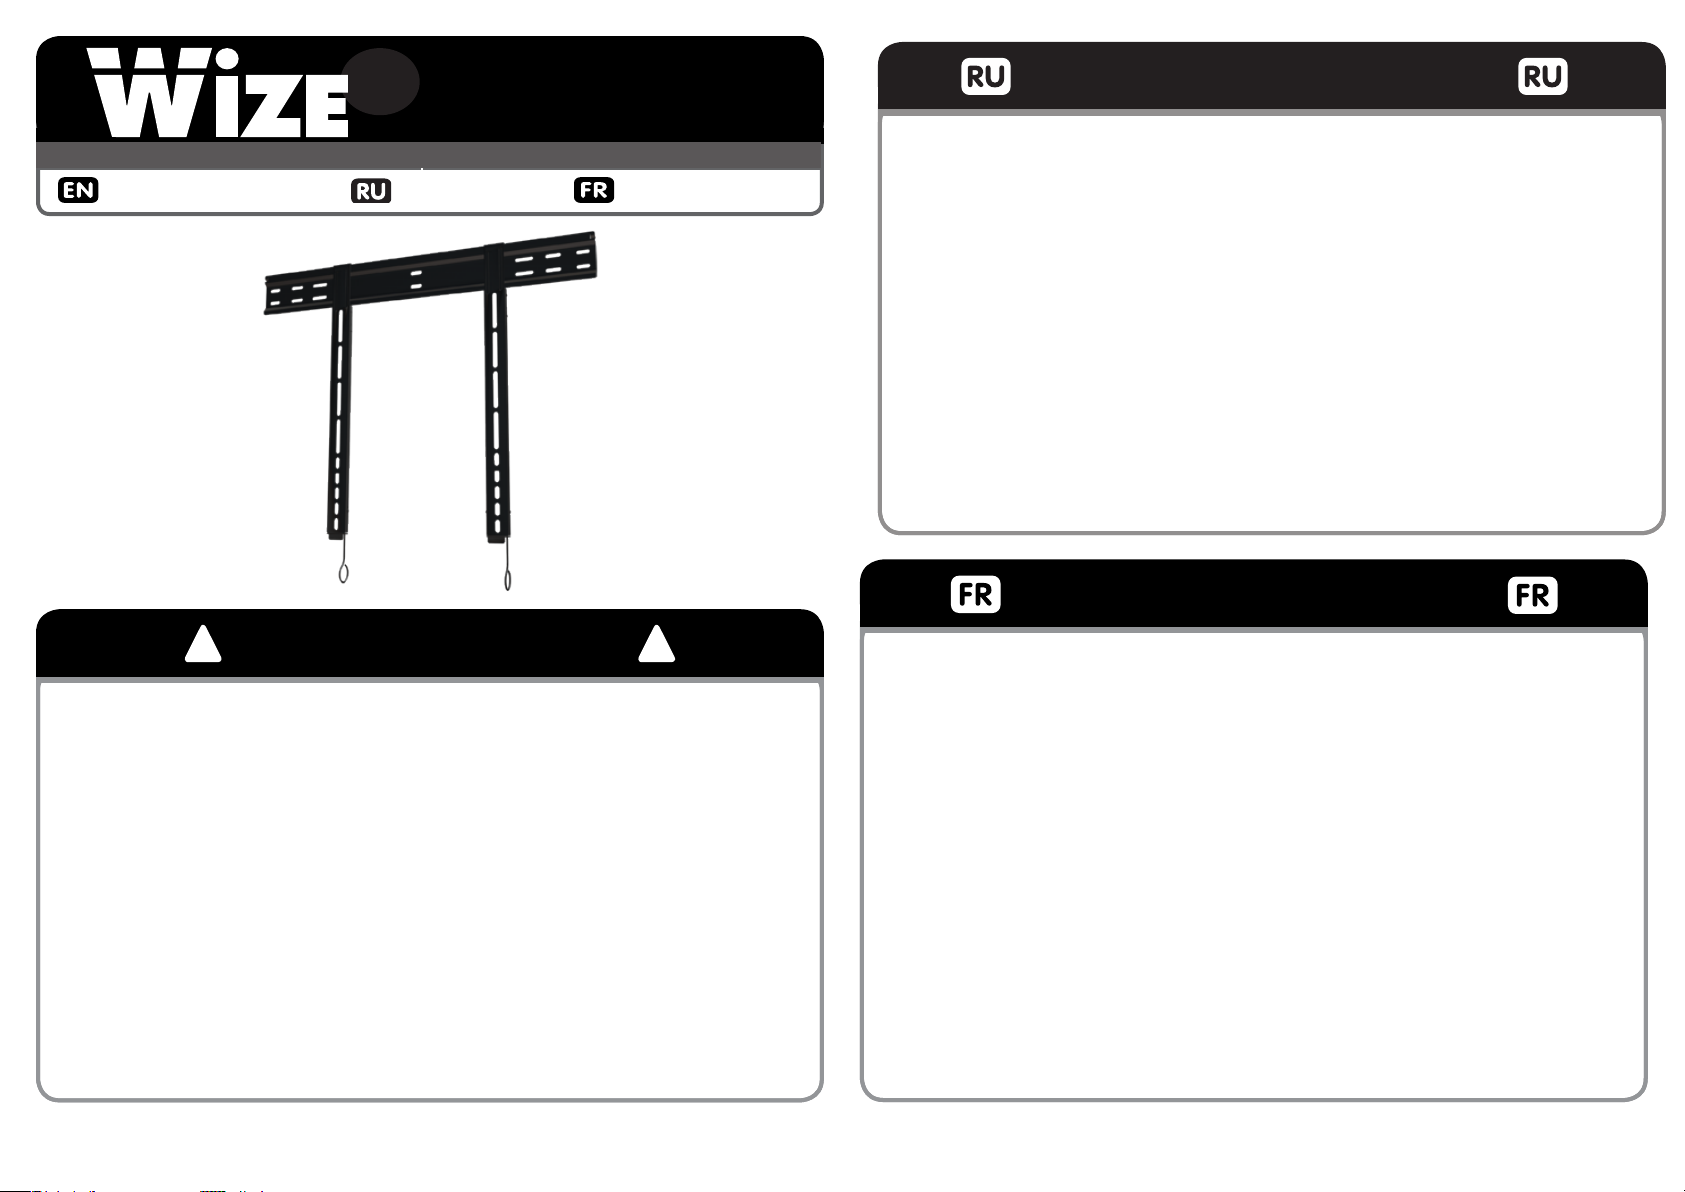
Для панелей 30”-55”/ Макс. нагрузка: 45
www.wize-av.com info@wize-av.com
www.wize-av.com info@wize-av.com
Instruction Manual
Инструкция
FU55
Ультра-тонкое настенное крепление
кг
Manuel D’instructions
ВНИМАНИЕ!
ВНИМАНИЕ! ТРАВМА И ПОВРЕЖДЕНИЕ ОБОРУДОВАНИЯ МОЖЕТ ПРОИЗОЙТИ ОТ
НЕПРАВИЛЬНОЙ УСТАНОВКИ ИЛИ СБОРКИ. ОЗНАКОМЬТЕСЬ СО СЛЕДУЮЩИМИ
ПРЕДУПРЕЖДЕНИЯМИ ПЕРЕД НАЧАЛОМ.
Компоненты, входящие в этот продукт, предназначен для установки на стенах из цельного
дерева, бетона или бетонных блоков. Для стен из других материалов, таких как кирпич,
пожалуйста, проконсультируйтесь с вашим инсталлятором и / или специалистом поставщика.
НЕ ПРЕВЫШАЙТЕ МАКСИМАЛЬНЫЙ ВЕС, УКАЗАННЫЙ В ИНСТРУКЦИИ
AVERTISSEMENT
! !
WARNING! SEVERE PERSONAL INJURY AND PROPERTY DAMAGE CAN RESULT FROM IMPROP-
ER INSTALLATION OR ASSEMBLY. READ THE FOLLOWING WARNINGS BEFORE BEGINNING.
Do not use this product for any purpose not explicitly specied by Wize AV. Improper installation
may cause property damage or personal injury. If you do not understand these directions, or
have doubts about the safety of the installation, contact Wize AV Customer Service or call a
qualied contractor. Wize AV is not liable for damage or injury caused by incorrect mounting,
assembly, or use.
The hardware provided with this product, is exclusively intended for installation on walls made
of solid wood, concrete, cinder block or solid wood columns with a maximum of 5/8” of drywall.
For walls made of other materials, for example hollow bricks, please consult your installer and/
or specialist supplier.
DO NOT EXCEED THE MAXIMUM WEIGHT CAPACITY FOR THIS PRODUCT
WARNING!
AVERTISSEMENT! SI CE PRODUIT N’EST PAS CORRECTEMENT INSTALLÉ OU ASSEMBLÉ, IL
RISQUE DE CAUSER DES BLESSURES RAVES, VOIRE MORTELLES, AINSI QUE DES DOM-
MAGES MATÉRIELS IMPORTANTS. AVANT DE COMMENCER, LISEZ LES AVERTISSEMENTS
SUIVANTS.
N’utilisez pas ce produit à une n non spéciée expressément par Wize AV. Une installation
incorrecte peut entraîner des préjudices corporels ou des dommages matériels. Si vous ne comprenez pas ces instructions ou si vous avez des doutes quant à la sécurité de l’installation, veuillez
contacter le service clientèle de Wize AV ou un installateur qualié. Wize AV n’est pas re-sponsable des dommages ou des préjudices causés par un montage, un assemblage ou une
utilisation incorrects.
Le matériel fourni avec ce produit, est exclusivement destiné à être installé sur des murs en bois
massif, en béton, blocs de béton ou des colonnes en bois massif avec un maximum de 16 mm de
plaques de plâtre. Pour les murs faits d’autres matériaux, comme la brique creuse, s’il vous plaît
consulter votre installateur et / ou fournisseur spécialisé.
NE DÉPASSEZ JAMAIS LA CAPACITÉ DE CHARGE MAXIMALE DE CE PRODUIT.
1
FU55
Page 2
WEIGHT CAPACITY
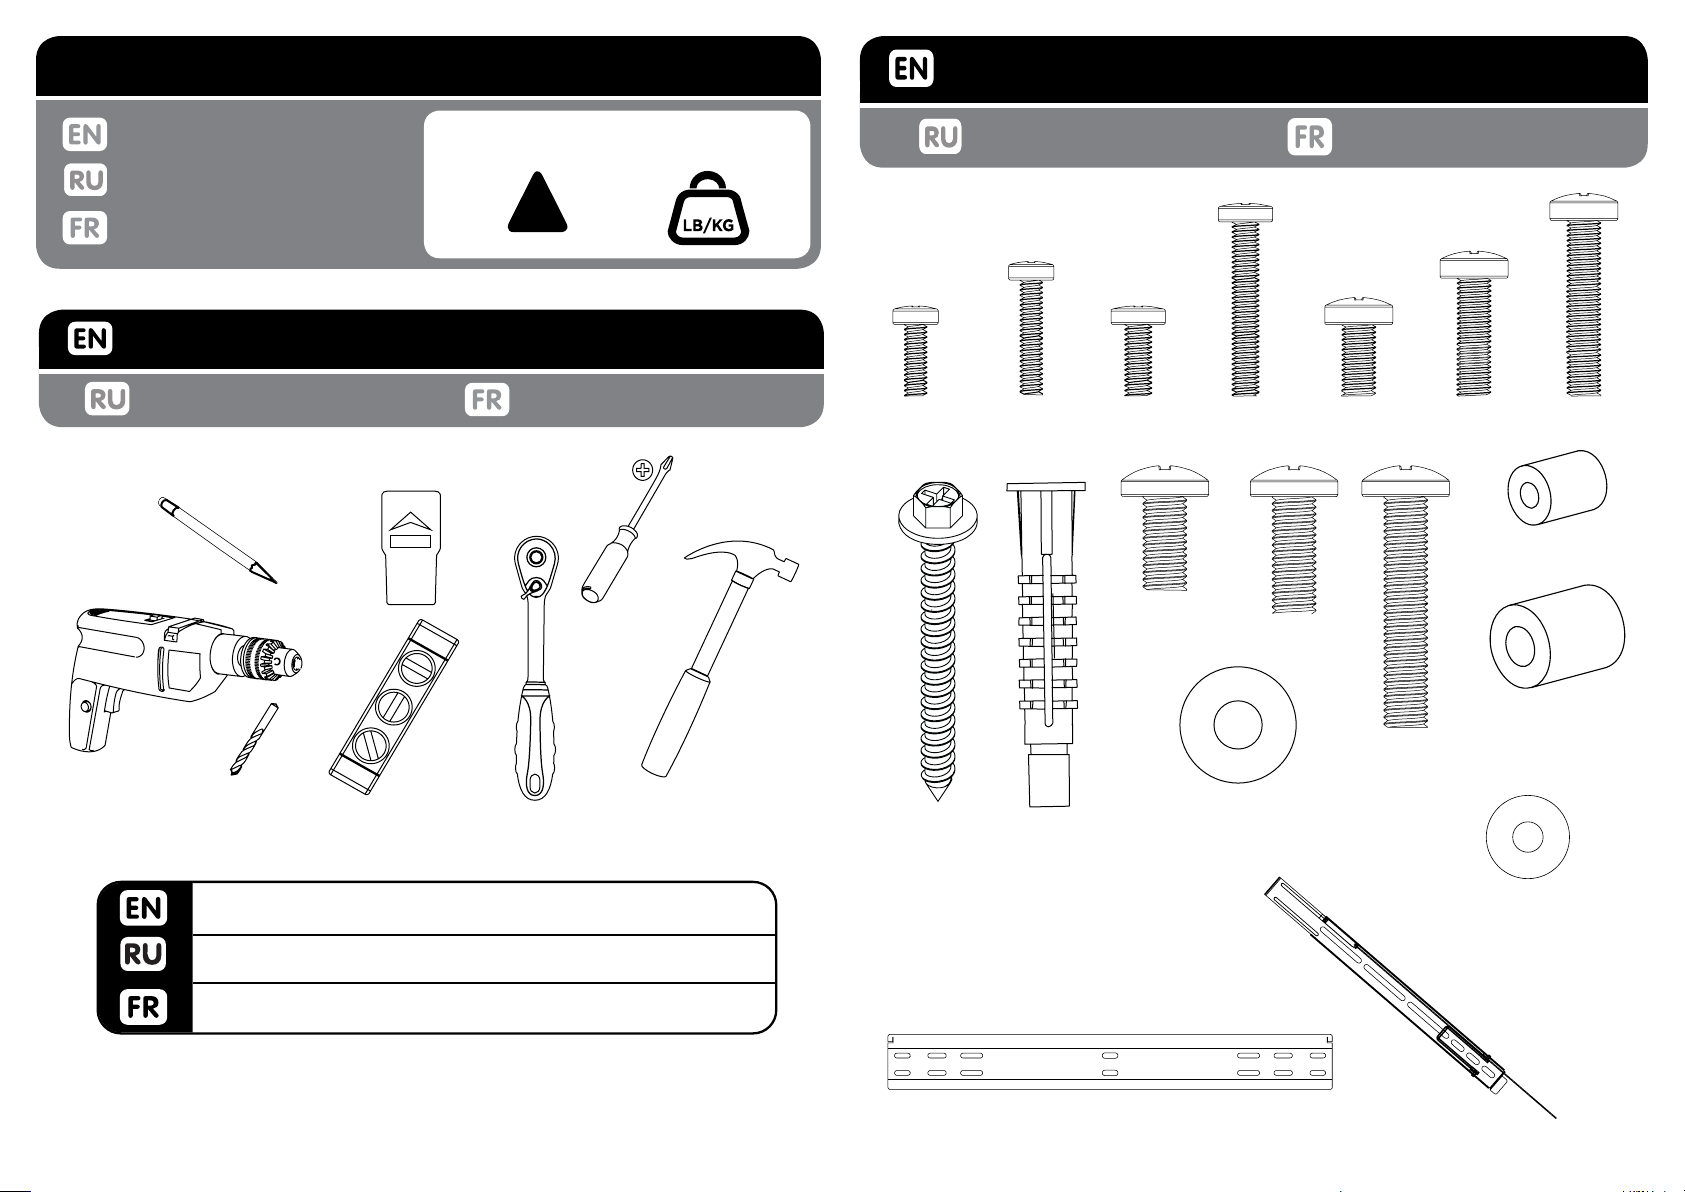
PACKAGE CONTENTS
Maximum Weight Capacity
Максимальный вес
maximal de l’écran
TOOLS REQUIRED
Необходимые Ҳнструменты
100lb / 45kg
!
CAUTION!
Outils nécessaires
M4 x 12mm
F (4)
Комплектация
M4 x 20mm
G(4)
M5 x 12mm
H (4)
M8 x 16mm
N (4)
M5 x 30mm
I (4)
M8 x 20mm
O (4)
Contenu de l’emballage
M6 x 12mm
J (4)
M8 x 40mm
P (4)
M6 x 20mm
K (4)
M4 / M5 Spacer
M6 / M8 Spacer
M6 x 30mm
L(4)
R (4)
S (4)
Wood bit 4mm - 5/32”. Masonary bit 10mm - 3/8”. Socket
wrench 3/8”. Hammer if necessary.
Сверло для дерева 4 мм - 5 / 32 “. Сверло для бетона 8 мм - 5/16 “.
Сверло для бетона 3/8”. Молоток при необходимости.
Peu de bois de 4 mm - 5/32”. peu maçonnerie 10mm - 3/8”.
3/8” Clé à douille. Marteau si nécessaire.
M8 Шайба
#14 x 2.5”
A (6)
B (6)
U (8)
M5 Washer
V (4)
C(1)
D(2)
2
FU55
Page 3
INSTALL INSTRUCTIONS
!
WARNING!
!
Инструкция по монтажу
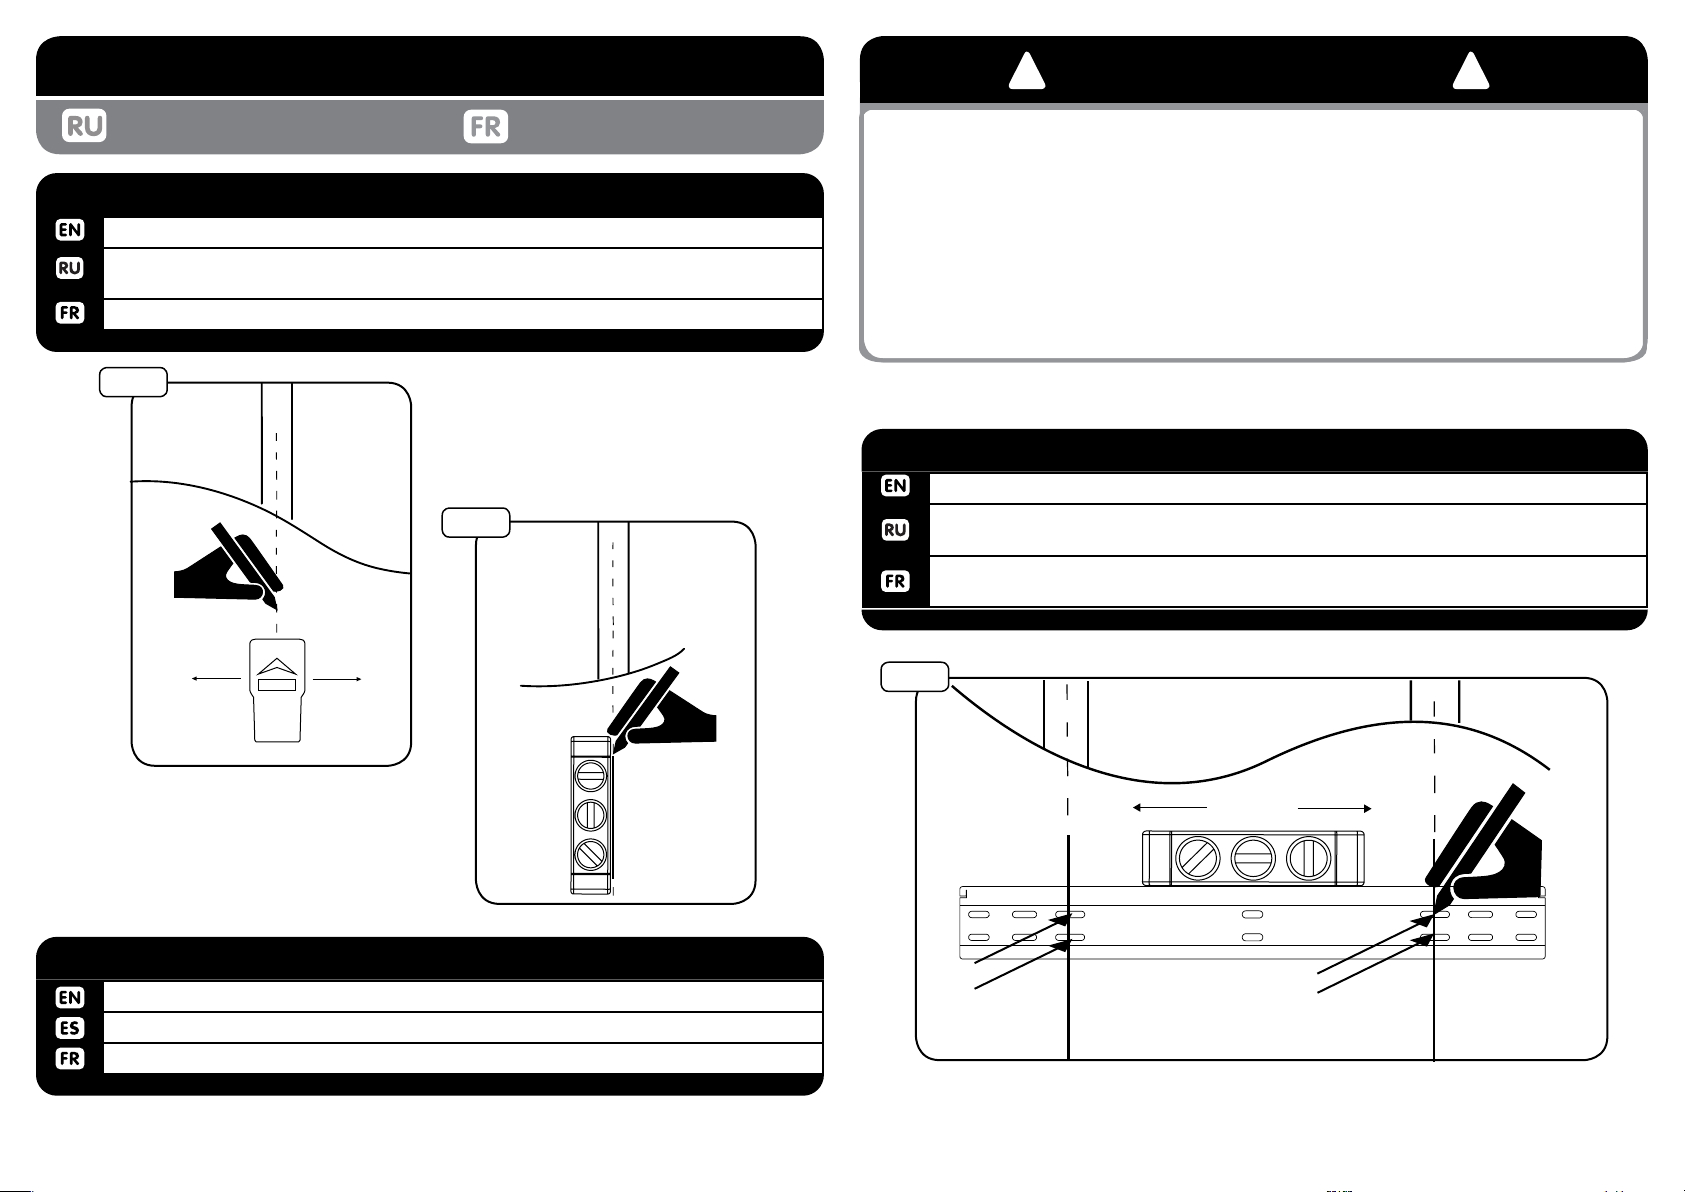
1a-1
Using stud nder locate centers of 2 studs.
Используя электронный распознаватель, найдите центр бруса.
Utilisez localisateur de montants pour localiser les centres de deux piliers structurels.
1a-1
МОНТАЖ НА ДЕРЕВЯННЫЙ БРУС
1a-2
Instructions d’installation
Install only to wood studs or wood joists that are a minimum of 2”x4”, the wall or ceiling
where the mount is being attached may have a maximum drywall thickness of 5/8”.
Установка возможна на брус с минимальными размерами 50х100 мм. Толщина
гибсокартона в устанавливаемом месте стены или потолка должна быть максимум 16 мм.
Installez uniquement les montants ou des poutres qui sont un minimum de 2“x4”, mur
ou au plafond où il rencontre la montagne peuvent avoir une épaisseur de plaques de
plâtre maximum de 5/8“.
1a-3
Use wall plate (C) to mark hole location on center line.
Используйте настенную пластину, чтобы отметить положения отверстий на
центральной линии.
Utilisez la plaque murale (C) pour marquer l’emplacement des trous dans la ligne
médiane.
1a-3
МОНТАЖ НА ДЕРЕВЯННЫЙ БРУС
1a-2
Using level draw a vertical line at stud center.
Используйте уровень, чтобы провести вертикальную черту по центру бруса
Utilisez un niveau et tracez une ligne verticale au centre du montant.
МОНТАЖ НА ДЕРЕВЯННЫЙ БРУС
3
FU55
Page 4
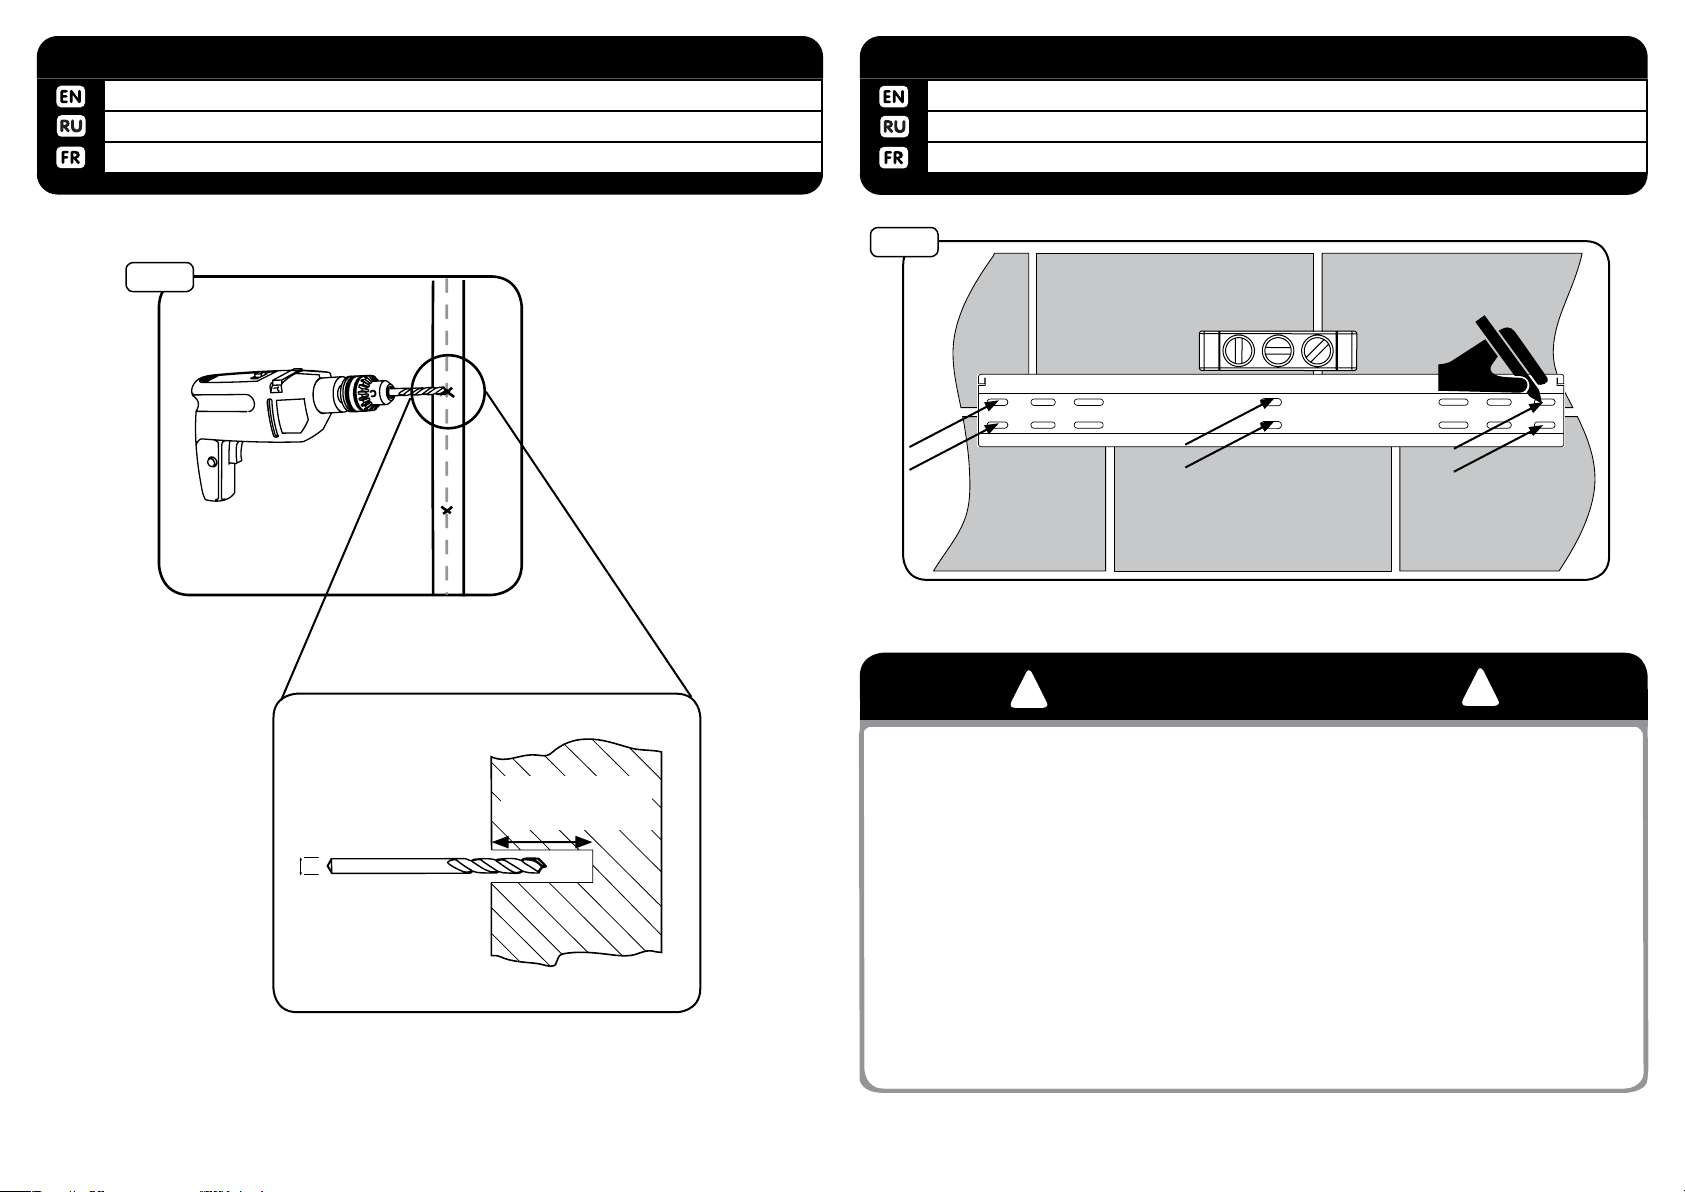
1a-4
Use a 4mm - 5/32” wood bit to make a 65mm - 2.5” hole on marks.
Используйте 4 мм - 5 / 32 “ сверло для дерева, чтобы высверлить отверстие 65 мм / 2.5” глубины по
меткам.
Utilisez un 4mm - 5/32 bits de perçage pour percer des trous 65mm - 2.5”.
МОНТАЖ НА ДЕРЕВЯННЫЙ БРУС
1a-4
1b-1
Level wall plate, then mark 6 hole locations.
Выровняйте крепление по уровню и отметьте положения 6 отверстий
Niveau de la plaque murale, puis marquer l’emplacement des 6 trous.
МОНТАЖ НА БЕТОН И ШЛАКОБЛОК
1b-1
диаметр сверла
4 мм
глубина сверла
65 мм
! ВНИМАНИЕ!
Mounts are designed to be installed to a concrete wall with a minimum thickness of 8” and
minimum density of 2000psi and 8”x8”x16” cinder block which meets ASTM C-90 specifications. Do not drill into mortar joints. Do not install to a concrete wall or cinder block that
has any type drywall or other finishing.
Крепление рассчитано на установку на бетонную стену толщиной минимум 20 см и
плотностью не менее 2000 фунтов на квадратный дюйм, а также шлакоблок размерами
20х20х40 см отвечающим стандарту ASTM C-90. Не устанавливать на стыки конструкций.
Не устанавливать на стены из бетона и шлакоблока, имеющие любой вид отделки,
включая гибсокартон.
Montures sont conçus pour être installés sur un mur en béton d’une épaisseur minimale de
8 “et la densité supérieure à 2000 psi et 8” x8 “x16” en blocs de béton qui rencontre la
norme ASTM C-90 du cahier des charges. Ne percez pas dans les joints de mortier. Ne pas
installer sur un mur ou cendre bloc de béton qui a une cloison sèche de type ou d’un autre
finition.
!
4
FU55
Page 5
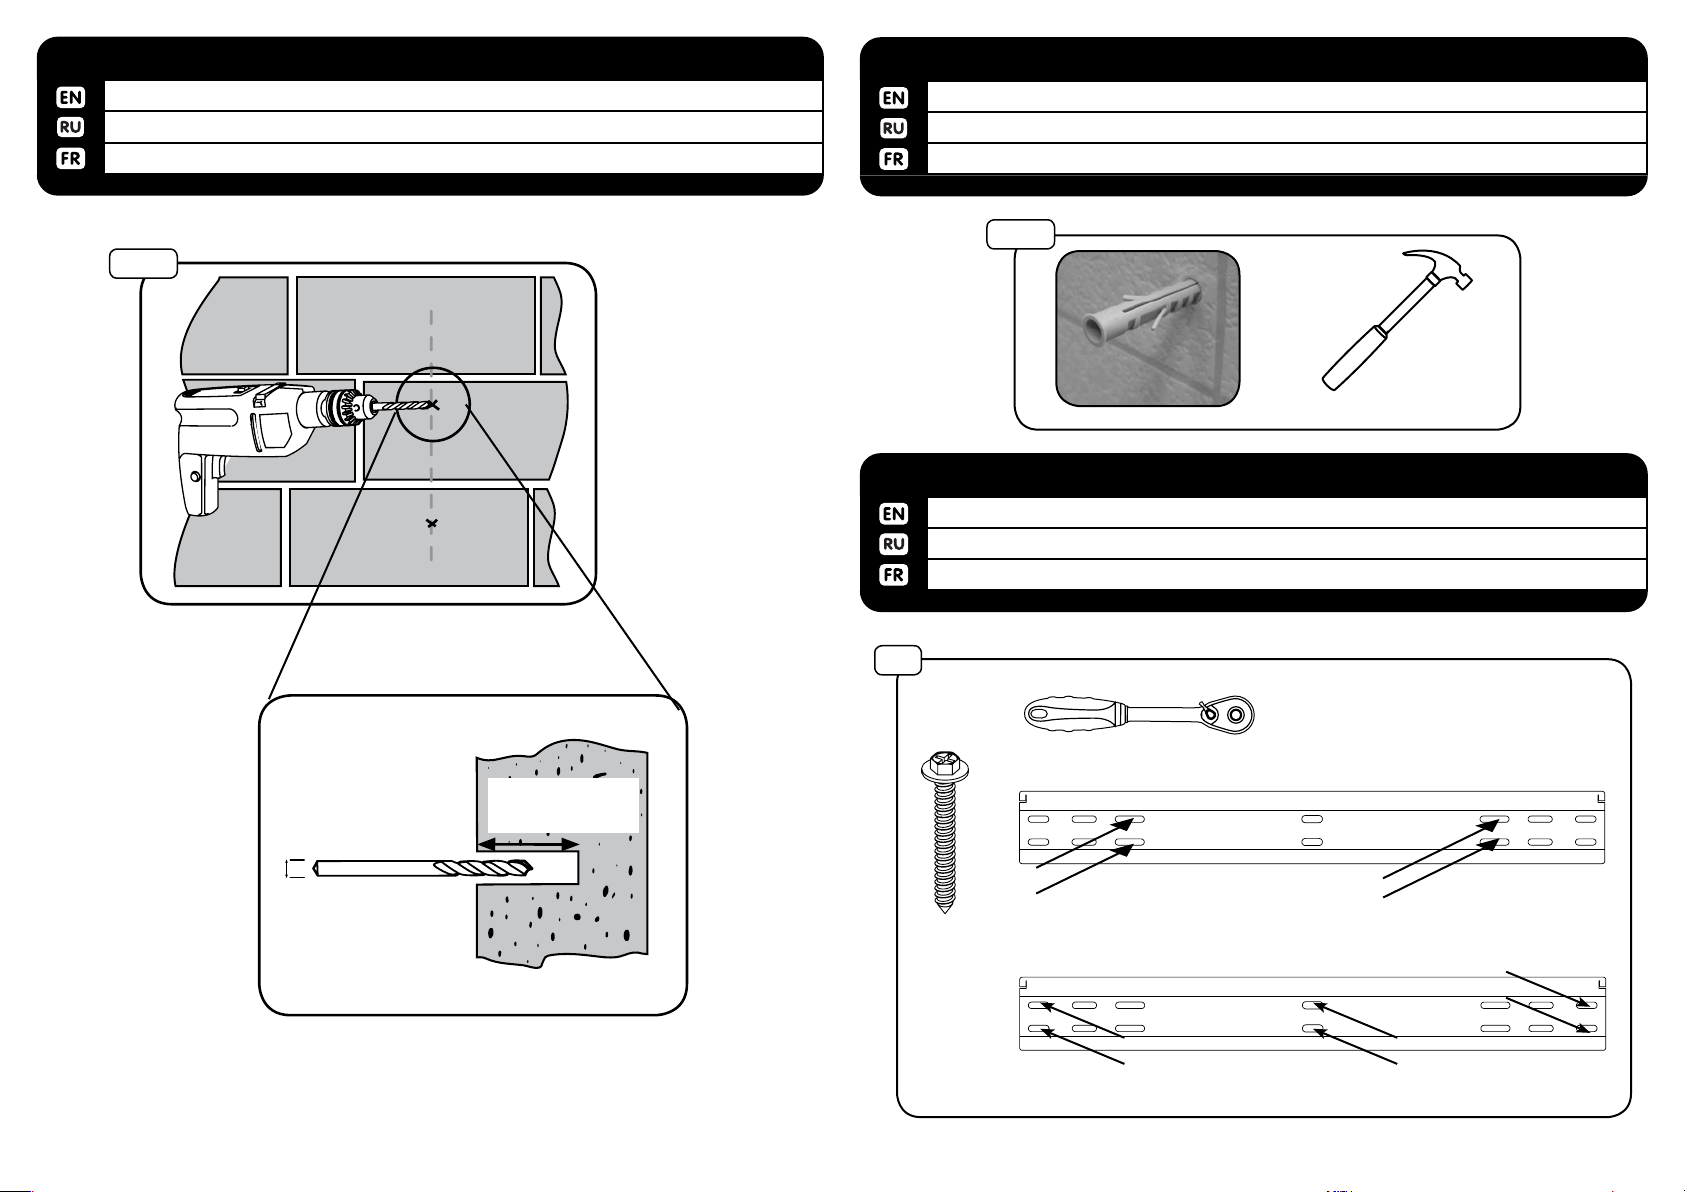
1b-2
Use 10 mm-3/8“ drill bit to drill 65mm - 2.5” holes on marks.
Используйте 10 мм сверло, чтобы просверлить отверстие глубиной 65 мм в отмеченных
местах
Utilisez un 10 mm-3/8“ bits de forage pour percer 65mm - 2.5” po.
1b-2
МОНТАЖ НА БЕТОН И ШЛАКОБЛОК
1b-3
Insert (B) into both holes. Use a hammer to tap in if necessary.
Вставьте распорные дюбели (B) в отверстия. При необходимости используйте молоток.
Insérer (B) dans les deux trous. Utilisez un marteau pour enfoncer dans le cas échéant.
МОНТАЖ НА БЕТОН И ШЛАКОБЛОК
1b-3
B
диаметр
сверла 10 мм
глубина
отверстия
65 мм
2
Fasten wall plate to wall using screw (A) and washer.
Затяните винты (А), чтобы зафиксировать настенную пластину
Fixer la plaque murale au mur avec la vis (A) et la rondelle.
2
МОНТАЖ НАСТЕ
ННОЙ ПЛАСТИНЫ
C
ДЕРЕВО
A
C
ШЛАКОБЛОК И БЕТОН
5
FU55
Page 6
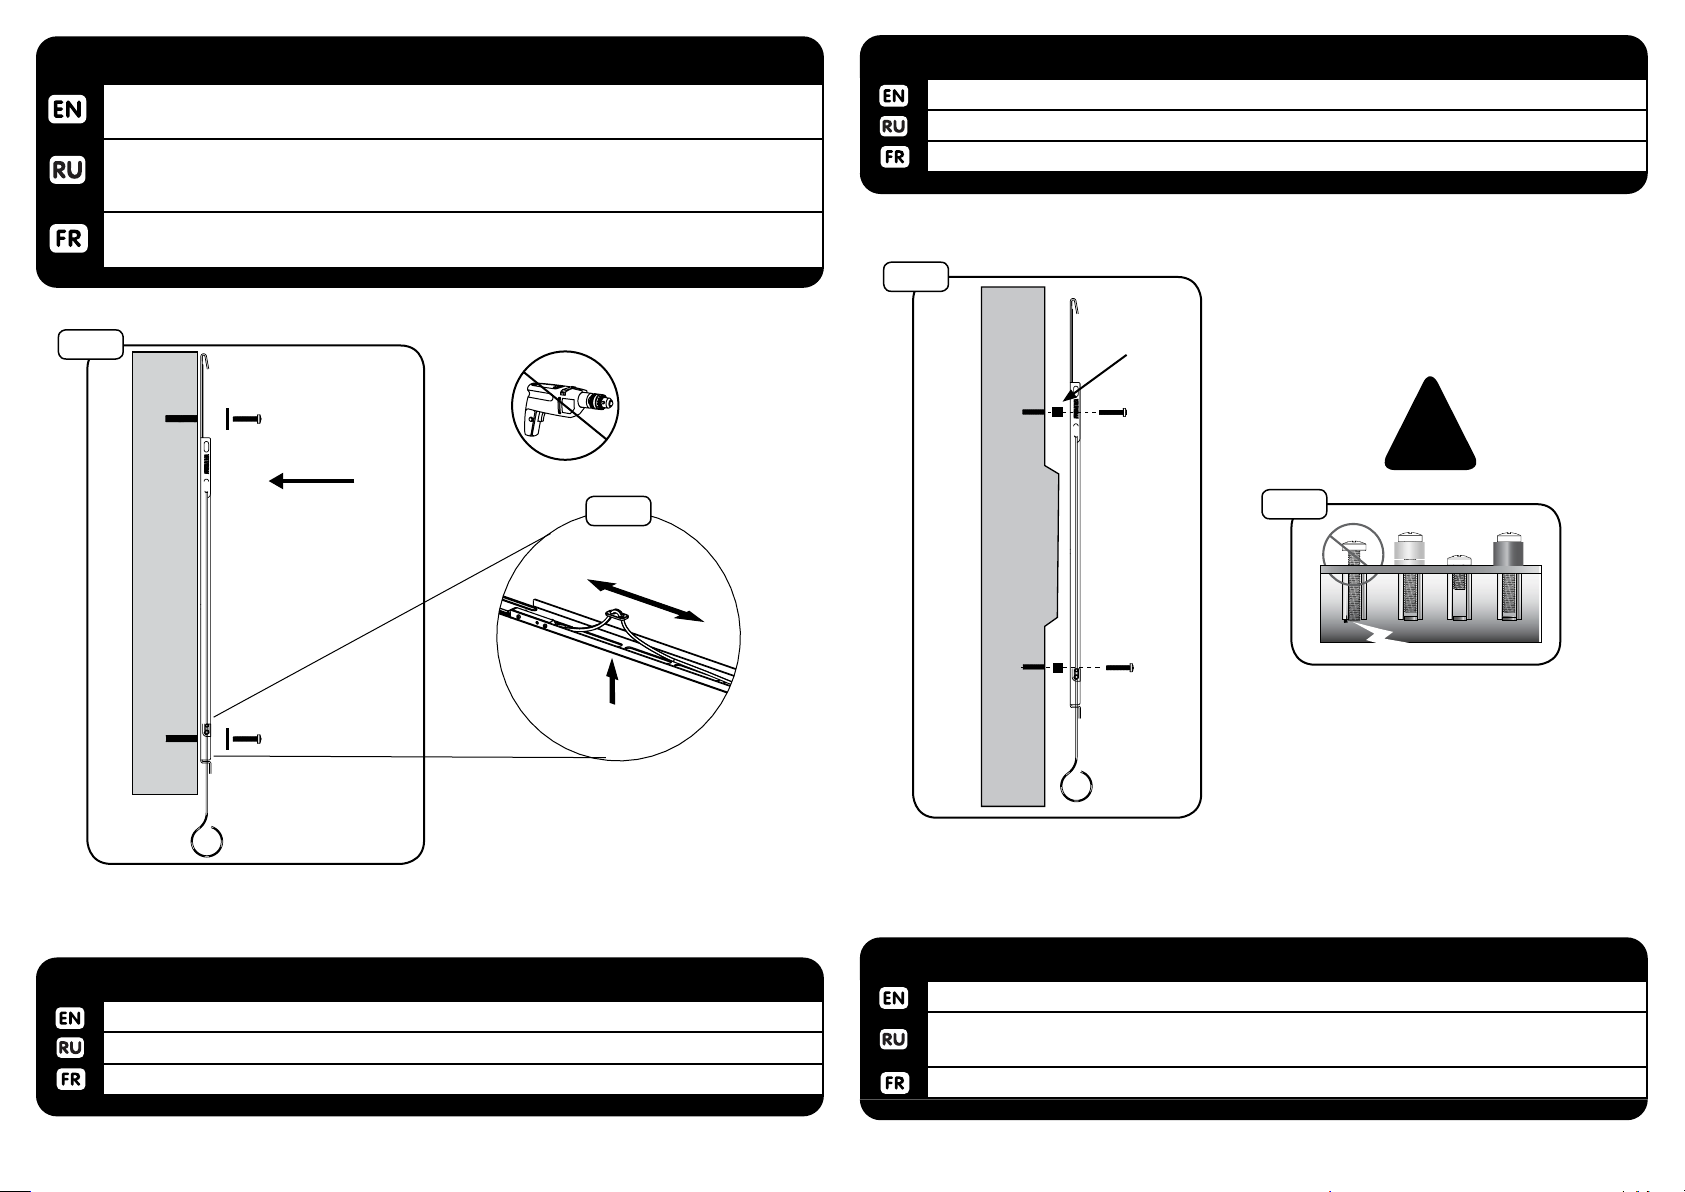
3-1a
3-1a
МОНТАЖ ДИСПЛЕЙНЫХ КРОНШТЕЙНОВ
Align mount bracket (D) to holes on back of TV. Fasten using supplied hardware with
a screwdriver. Hand tools only.
Выровняйте кронштейн по отверстиям на задней крышке дисплея. Закрепите,
используя крепежный набор, идущий в комплекте. Запрещается использование
электроинструмента.
Aligner le support de montage (D) dans les trous à l’arrière du téléviseur. Fixer à l’aide
de matériel fourni avec un tournevis. Outils à main seulement..
Шайбы
(U-V)
Винты
(F-P)
3-1c
3-1c
МОНТАЖ ДИСПЛЕЙНЫХ КРОНШТЕЙНОВ
Use spacers (R / S) between TV and mount if needed.
При необходимости используйте распорные втулки (R / S) между дисплеем и креплением.
Utiliser des cales (R / S) entre la télévision et de montage si nécessaire.
Втулка
R or S
!
3-1b
3-1b
Adjust the cord length according to the screen height if needed.
При необходимости настройте длину шнура в зависимости от высоты дисплея.
Ajuster la longueur du cordon en fonction de la hauteur de l’écran si nécessaire.
НАСТРОЙКА ДЛИНЫ ШНУРА
3-1d
3-1d
МОНТАЖ ДИСПЛЕЙНЫХ КРОНШТЕЙНОВ
If screws bottom out use washers (not included) to eliminate slack.
При необходимости используйте шайбы (не включены в комплект) в качестве распорных
элементов, чтобы компенсировать расстояние между головкой винта и дисплеем.
Si les vis touché le fond, puis utiliser des rondelles (non inclus) an d’éliminer mou.
6
FU55
Page 7
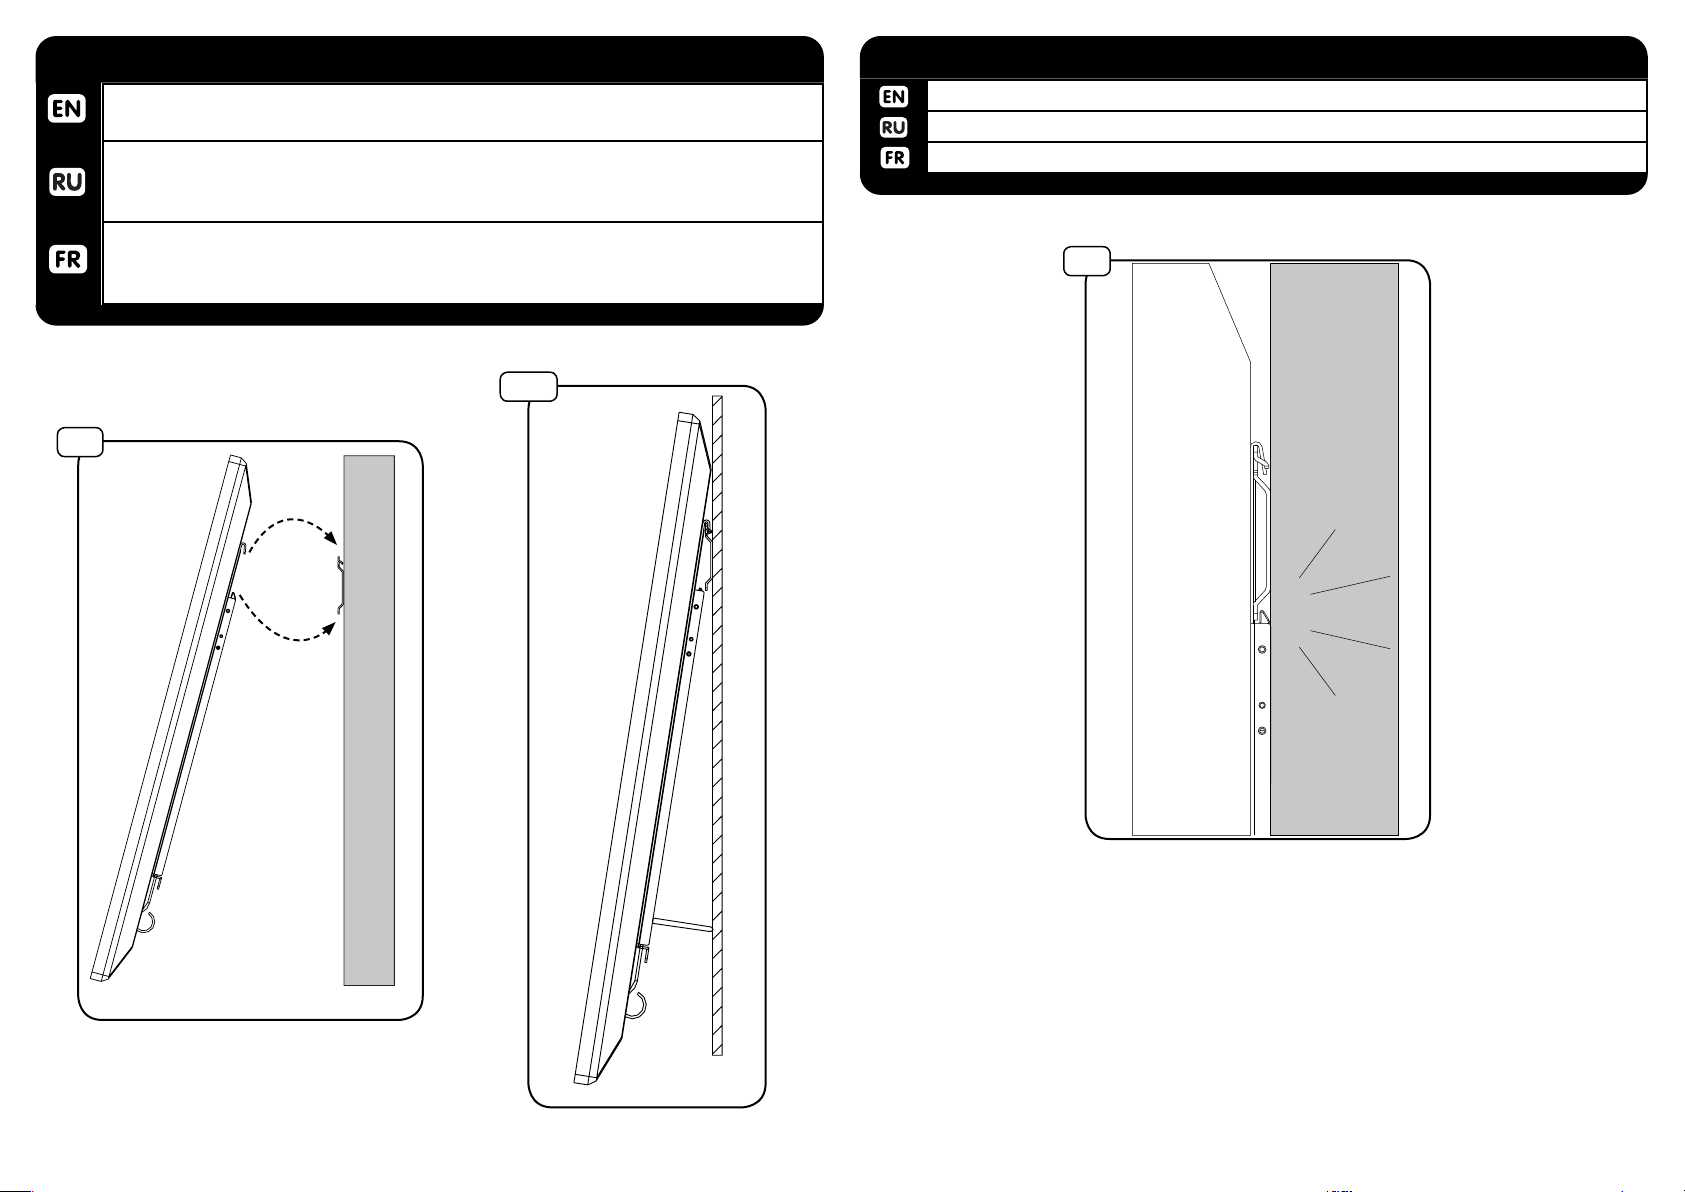
4
Hook top of bracket over the top of wall mount then lower down and tilt toward wall.
Engage kickstand to angle TV from the wall and allow access to inputs on back of TV.
Зацепите верхний край дисплейного кронштейна за верхнюю часть настенной
пластины. Опустите нижний край дисплея и защелкните крепление. Для
подключения кабеля с задней части дисплея предусмотрены распорные подставки.
Accrocher le haut du support sur le support mural, puis plus bas et l’inclinaison vers
le mur. Engager béquille an de permettre l’accès aux intrants à l’arrière du téléviseur.
4
МОНТАЖ ДИСПЛЕЯ
4-1
5
You will hear a click when the mechanism locks in place.
Когда механизм крепления окончательно заблокируется, раздастся щелчок замка.
Vous entendrez un déclic lorsque le mécanisme de verrouillage en place.
БЛОКИРОВКА КРЕПЛЕНИЯ
5
7
FU55
Page 8
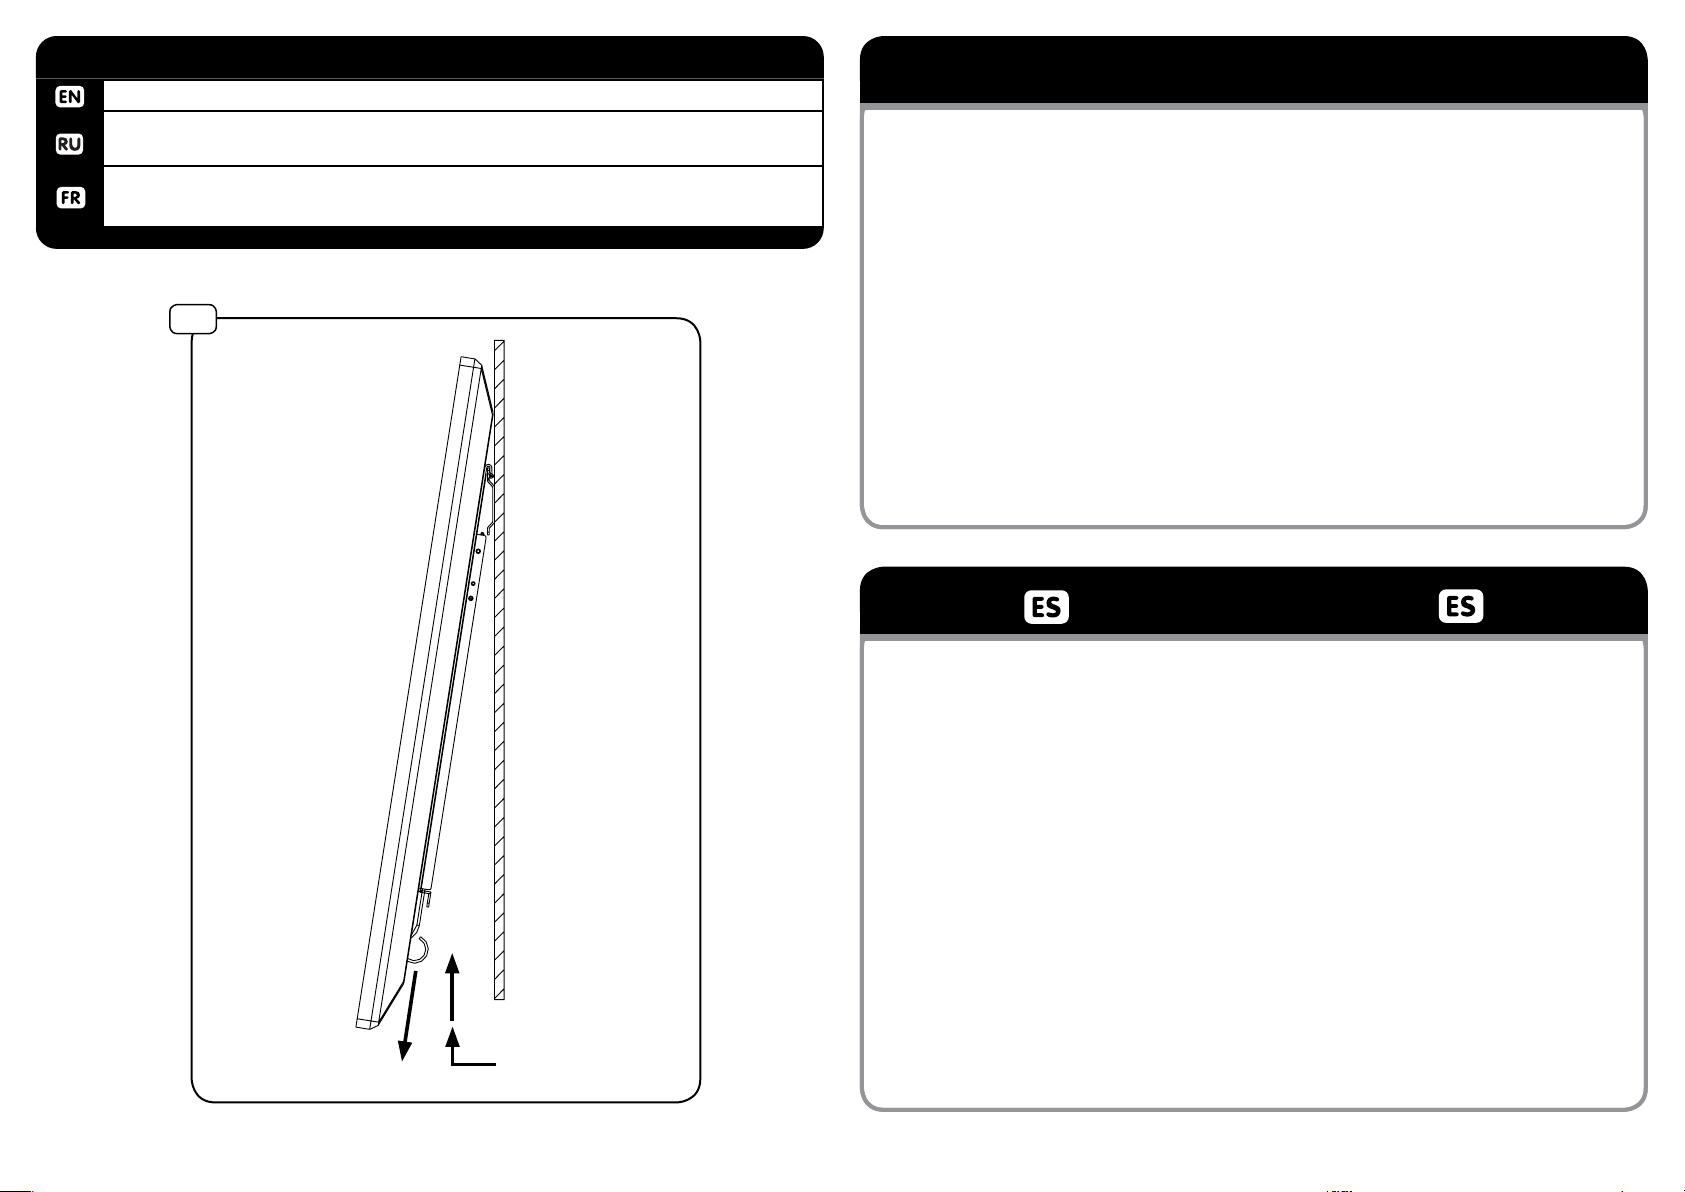
6
To remove, pull the cord coil down, then pull tv out, then lift up.
Для того, чтобы снять дисплей, потяните вниз шнуры блокировочного
механизма, отодвиньте нижнюю часть дисплея от стены и поднимите его.
Pour le retirer, tirez le cordon vers le bas la bobine, puis tirez sur la télévision, puis
soulevez-le.
6
ДЕМОНТАЖ ДИСПЛЕЯ
WARRANTY
Congratulations on the purchase of this Wize product! The product you now have in your possession
is made of durable materials and is based on a design, every detail of which has been meticulously
thought-out. That is why Wize AV products are covered by a 10-year warranty against defects in
materials or manufacturing.
Wize AV disclaims any liability for modications, improper installations, or installations over the
specied weight range. To the maximum extent permitted by law, Wize AV disclaims any other
warranties, expressed or implied, including warranties of tness for a particular purpose and
warranties of merchantability. Wize AV will not be liable for any damages arising out of the use of,
or inability to use, Wize AV products. Wize AV bears no responsibility for incidental or
consequential damages. This includes, but is not limited to, any labor charges for the repair of
Wize AV products performed by anyone other than Wize AV .
Specications are subject to change without prior notice.
GARANTÍA
¡Felicitaciones por su compra de este producto Wize! Ahora tiene en su poder un pro-
ducto fabricado con materiales resistentes, basado en un diseño muy bien meditado. Por
ello, Wize AV responde de los posibles defectos de material o fabricación con una
garantía de 10 años.
Wize AV no se hace responsable de modicaciones, instalaciones inadecuadas o
instalaciones que superen el rango de peso especicado. En la medida en que la ley lo
permita, Wize AV no se hace responsable de ninguna otra garantía, expresa o implícita,
incluso las garantías de aptitud para un n determinado o de comercialización. Wize AV
no se hace responsable de ningún tipo de daños causados por el uso de los productos
Wize AV o por el uso inapropiado de dichos productos. Wize AV no es responsable de los
daños incidentales o emergentes. Dentro de éstos se in-cluyen todo tipo de gastos que
pudieran surgir de las reparaciones de productos Wize AV que no se hayan realizado en
Wize AV.
Las especicaciones están sujetas a cambios sin previo aviso.
1
2
8
FU55
Page 9
GARANTIE
ГАРАНТИЯ
Nous vous félicitons pour l’achat de ce produit Wize! Vous venez d’acquérir un produit
réalisé à partir de matériaux durables et d’une conception ingénieuse jusque dans les
moindres détails. Wize AV est ainsi en mesure de garantir ses produits pendant 10 ans
contre les défauts de matériaux et de fabrication.
Wize AV rejette toute responsabilité relativement à quelque problème pouvant être
associé à une modication d’un produit, à une mauvaise installation ou à une installation
ne respectant pas les limites de charge. Sous réserve des lois en vigueur, Wize AV réfute
toute autre garantie expresse ou implicite, notamment toute garantie de
commercialisation ou de convenance à un usage quelconque. Wize AV réfute toute
responsabilité pour des dommages résultant de l’utilisation ou de l’impossibilité d’utiliser
des produits Wize AV. Wize AV réfute également toute responsabilité pour quelque
dommage accessoire ou indirect. Ceci s’applique notamment aux frais de main d’oeuvre
pour la réparation de produits Wize AV par une personne ne travaillant pas pour Wize AV.
Les spécications sont sujettes à changement sans préavis.
Благодарим вас за покупку данного продукта Wize! Этот продукт изготовлен из
прочных материалов и основан на дизайне, каждая деталь которого была
тщательно продумана. Продукты Wize обеспечены 10-летней гарантией от
дефектов в производстве.
ТЕХНИЧЕСКИЕ ХАРАКТЕРИСТИКИ МОГУТ БЫТЬ
ИЗМЕНЕНЫ БЕЗ ПРЕДВАРИТЕЛЬНОГО УВЕДОМЛЕНИЯ.
wize-av.com
9
FU55
Page 10
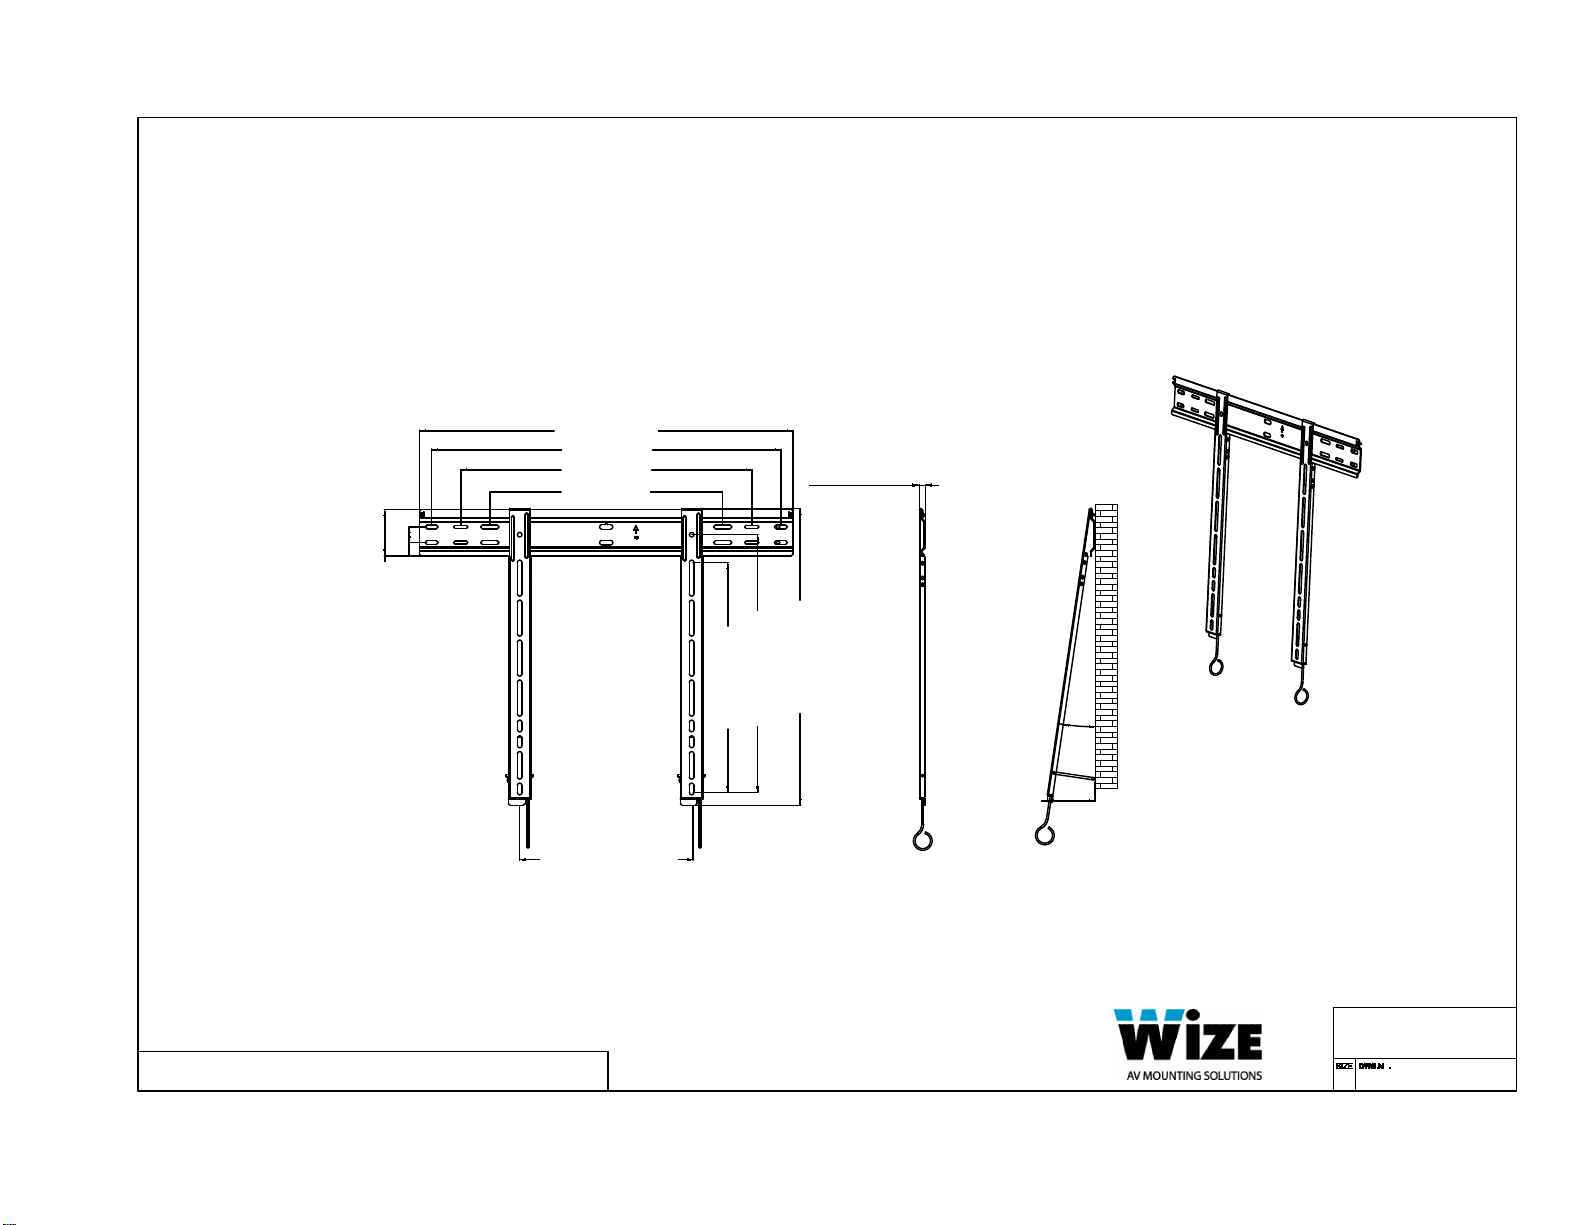
3.2" [80.5mm]
1.1" [27.4mm]
17.7" [450.2mm]
25.7" [652mm]
24" [610mm]
20" [508mm]
16" [406mm]
15.8" [402mm]
20.4"[518.5mm]
MAX:23.7"[602mm]
MIN:1.42"[36mm]
0.4" [10.2mm]
3.3" [83.1mm]
8°"
Maximum load rating: 100 lbs
B
The information in this drawing is the sole property of Wize AV. Any reproduction
in part or as a whole without the written permission of Wize AV is prohibited.
Wize Pro FU55
www.wize-av.com | [email protected]
FU55
 Loading...