

Page 1

UserGuide
MachineTypes:20JD,20JE,20JF,and20JG
Page 2

Note:Beforeusingthisinformationandtheproductitsupports,besuretoreadandunderstandthefollowing:
•Safety,Warranty,andSetupGuide
•“Importantsafetyinformation”onpagev
ThelatestSafety,Warranty,andSetupGuideandtheRegulatoryNoticeareavailableontheLenovoSupport
Websiteat:
http://www.lenovo.com/support
FirstEdition(February2017)
©CopyrightLenovo2017.
LIMITEDANDRESTRICTEDRIGHTSNOTICE:IfdataorsoftwareisdeliveredpursuanttoaGeneralServices
Administration“GSA”contract,use,reproduction,ordisclosureissubjecttorestrictionssetforthinContractNo.
GS-35F-05925.
Page 3

Contents
Importantsafetyinformation......v
Readthisfirst................v
Importantinformationaboutusingyourcomputer..v
Conditionsthatrequireimmediateaction....vii
Serviceandupgrades............vii
Powercordsandpoweradapters.......viii
Extensioncordsandrelateddevices.......ix
Plugsandoutlets...............ix
Powersupplystatement............ix
Externaldevices...............x
Generalbatterynotice.............x
Noticeforbuilt-inrechargeablebattery......xi
Noticefornon-rechargeablecoin-cellbattery...xi
Heatandproductventilation..........xi
Electricalcurrentsafetyinformation......xii
Lasersafetyinformation...........xiii
Liquidcrystaldisplay(LCD)notice.......xiii
Usingheadphonesorearphones.......xiii
Plasticbagnotice.............xiv
Glasspartsnotice.............xiv
Chokinghazardnotice...........xiv
Chapter1.Productoverview......1
Computercontrols,connectors,andindicators...1
Frontview................1
Left-sideview..............3
Right-sideview..............4
Rearview................5
Bottomview...............6
Statusindicators.............7
Importantproductinformationlabels.......8
Machinetypeandmodellabel........8
FCCIDandICCertificationnumber.....9
LabelsfortheWindowsoperatingsystems..10
Computerfeatures.............11
Computerspecifications...........12
Operatingenvironment...........12
Lenovoprograms.............13
AccessingLenovoprograms.......13
AnintroductiontoLenovoprograms....13
Chapter2.Usingyourcomputer...15
Registeringyourcomputer..........15
Frequentlyaskedquestions.........15
ThinkPadPenPro.............16
Operatingmodes..............18
Usingthemulti-touchscreen.........19
Usingthespecialkeys...........21
UsingtheThinkPadpointingdevice......23
ThinkPadpointingdeviceoverview.....23
UsingtheT rackPointpointingdevice....23
Usingthetrackpad...........24
Usingthetrackpadtouchgestures.....25
CustomizingtheThinkPadpointingdevice..26
Replacingthecaponthepointingstick...26
Powermanagement............27
Usingtheacpoweradapter........27
Usingthebattery............27
Managingthebatterypower.......28
Power-savingmodes..........29
CabledEthernetconnections.........29
Wirelessconnections............30
Usingthewireless-LANconnection.....30
Usingthewireless-WANconnection....31
UsingtheBluetoothconnection......31
UsingtheNFCdevices.........32
UsingtheAirplanemode.........33
Usingthecamera.............33
Usinganexternaldisplay..........34
Travelingwithyourcomputer.........35
Chapter3.Enhancingyour
computer...............37
FindingThinkPadoptions..........37
ThinkPadWiGigDock............37
ThinkPadWiGigDockoverview......37
SettinguptheThinkPadWiGigDock....39
UsingtheThinkPadWiGigDock......40
Chapter4.Accessibility,ergonomic,
andmaintenanceinformation....43
Accessibilityinformation...........43
Ergonomicinformation...........45
Cleaningandmaintenance..........46
Chapter5.Security..........49
Usingpasswords..............49
Passwordsintroduction.........49
Setting,changing,orremovingapassword.50
M.2solid-statedrivesecurity.........50
Settingthesecuritychip...........51
Usingthefingerprintreader..........52
Deletingdatafromyourstoragedrive......54
©CopyrightLenovo2017
i
Page 4

Usingfirewalls...............54
Protectingdataagainstviruses........55
Chapter6.Advancedconfiguration..57
InstallingtheWindows10operatingsystem...57
Installingdevicedrivers...........57
UsingtheThinkPadSetupprogram......58
ConfiguringThinkPadSetup.......58
Changingthestartupsequence......59
UpdatingtheUEFIBIOS.........59
BIOSmenu..............60
Usingsystemmanagement..........70
Chapter7.Troubleshootingcomputer
problems...............73
Generaltipsforpreventingproblems......73
DiagnosingproblemswithLenovoCompanion..73
Troubleshooting..............74
Computerstopsresponding.......74
Spillsonthekeyboard..........74
Errormessages............74
Beeperrors..............76
Ethernetproblems...........77
Wireless-LANproblem..........78
Awireless-WANproblem.........78
Bluetoothproblem...........79
ThinkPadpointingdeviceproblems.....79
Keyboardproblems...........79
Computerscreenproblems........80
Externalmonitorproblems........81
Audioproblems............82
Fingerprintreaderproblems........83
Batteryproblems............84
Poweradapterproblem.........84
Powerproblems............84
Powerbuttonproblem..........85
Bootproblems.............85
Sleepandhibernationproblems......85
ThinkPadPenProproblem........86
Softwareproblem............86
USBproblem.............87
Chapter8.Recoveryinformation...89
Resettingyourcomputer...........89
Usingadvancedstartupoptions........89
RecoveringyouroperatingsystemifWindows10
failstostart................89
CreatingandusingarecoveryUSBdrive....89
Chapter9.Replacingdevices.....91
Staticelectricityprevention..........91
Disablingthebuilt-inbattery.........91
ReplacingthemicroSIMcard.........92
Replacingthebasecoverassembly......92
Replacingthewireless-WANcard.......93
ReplacingtheM.2solid-statedrive......95
Replacingthecoin-cellbattery........97
Replacingthespeakerassembly.......98
Replacingthepowerbuttoncard.......100
Chapter10.Gettingsupport....103
BeforeyoucontactLenovo..........103
Gettinghelpandservice...........103
Usingdiagnosticprograms........104
LenovoSupportWebsite.........104
CallingLenovo.............104
Purchasingadditionalservices........105
AppendixA.Supplemental
informationabouttheUbuntu
operatingsystem..........107
AppendixB.Regulatory
information.............109
Certification-relatedinformation........109
Wireless-relatedinformation.........109
Wirelessinteroperability.........109
Usageenvironmentandyourhealth....109
LocatingtheUltraConnectwireless
antennas...............110
Wireless-radiocomplianceinformation...110
Locatingwirelessregulatorynotices....110
Exportclassificationnotice..........111
Electronicemissionnotices..........111
FederalCommunicationsCommission
DeclarationofConformity........111
IndustryCanadaClassBemissioncompliance
statement...............111
EuropeanUnion-Compliancetothe
ElectromagneticCompatibility(EMC)Directive
orRadioEquipmentDirective.......111
GermanClassBcompliancestatement...112
KoreaClassBcompliancestatement....113
JapanVCCIClassBcompliancestatement..113
Japancompliancestatementforproducts
whichconnecttothepowermainswith
ratedcurrentlessthanorequalto20Aper
phase................113
Japannoticeforacpowercord......113
Lenovoproductserviceinformationfor
Taiwan................113
Eurasiancompliancemark..........113
Brazilaudionotice.............113
iiUserGuide
Page 5

AppendixC.WEEEandrecycling
statements.............115
Generalrecyclinginformation.........115
ImportantWEEEinformation.........115
Japanrecyclingstatements.........116
RecyclinginformationforBrazil........116
BatteryrecyclinginformationfortheEuropean
Union..................117
BatteryrecyclinginformationforTaiwan.....118
BatteryrecyclinginformationfortheUnitedStates
andCanada................118
RecyclinginformationforChina........118
AppendixD.RestrictionofHazardous
Substances(RoHS)Directive....119
AppendixE.ENERGYST ARmodel
information.............123
AppendixF.Notices.........125
AppendixG.Trademarks......127
©CopyrightLenovo2017
iii
Page 6

ivUserGuide
Page 7

Importantsafetyinformation
Note:Readtheimportantsafetyinformationfirst.
Readthisfirst
Thisinformationcanhelpyousafelyuseyournotebookcomputer.Followandretainallinformationincluded
withyourcomputer.Theinformationinthisdocumentdoesnotalterthetermsofyourpurchaseagreement
ortheLimitedWarranty.Formoreinformation,see"WarrantyInformation"intheSafety,Warranty,andSetup
Guidethatcomeswithyourcomputer.
Customersafetyisimportant.Ourproductsaredevelopedtobesafeandeffective.However,personal
computersareelectronicdevices.Powercords,poweradapters,andotherfeaturescancreatepotential
safetyrisksthatcanresultinphysicalinjuryorpropertydamage,especiallyifmisused.Toreducethese
risks,followtheinstructionsincludedwithyourproduct,observeallwarningsontheproductandinthe
operatinginstructions,andreviewtheinformationincludedinthisdocumentcarefully.Bycarefullyfollowing
theinformationcontainedinthisdocumentandprovidedwithyourproduct,youcanhelpprotectyourself
fromhazardsandcreateasafercomputerworkenvironment.
Note:Thisinformationincludesreferencestopoweradaptersandbatteries.Inadditiontonotebook
computers,someproducts(suchasspeakersandmonitors)shipwithexternalpoweradapters.Ifyouhave
suchaproduct,thisinformationappliestoyourproduct.Inaddition,computerproductscontainacoin-sized
internalbatterythatprovidespowertothesystemclockevenwhenthecomputerisunplugged,sothe
batterysafetyinformationappliestoallcomputerproducts.
Importantinformationaboutusingyourcomputer
Ensurethatyoufollowtheimportanttipsgivenheretogetthemostuseandenjoymentoutofyourcomputer.
Failuretodosomightleadtodiscomfortorinjury,orcausethecomputertofail.
Protectyourselffromtheheatthatyourcomputergenerates.
Whenyourcomputeristurnedonorthebatteryischarging,thebase,thepalm
rest,andsomeotherpartsmaybecomehot.Thetemperaturetheyreach
dependsontheamountofsystemactivityandthelevelofchargeinthebattery.
Extendedcontactwithyourbody,eventhroughclothing,couldcause
discomfortorevenaskinburn.
•Avoidkeepingyourhands,yourlap,oranyotherpartofyourbodyin
contactwithahotsectionofthecomputerforanyextendedtime.
•Periodicallytakehandsfromusingthekeyboardbyliftingyourhandsfrom
thepalmrest.
Protectyourselffromtheheatgeneratedbytheacpoweradapter.
Whentheacpoweradapterisconnectedtoanelectricaloutletandyour
computer,itgeneratesheat.
Extendedcontactwithyourbody,eventhroughclothing,maycauseaskin
burn.
•Donotplacetheacpoweradapterincontactwithanypartofyourbody
whileitisinuse.
•Neveruseittowarmyourbody.
©CopyrightLenovo2017
v
Page 8
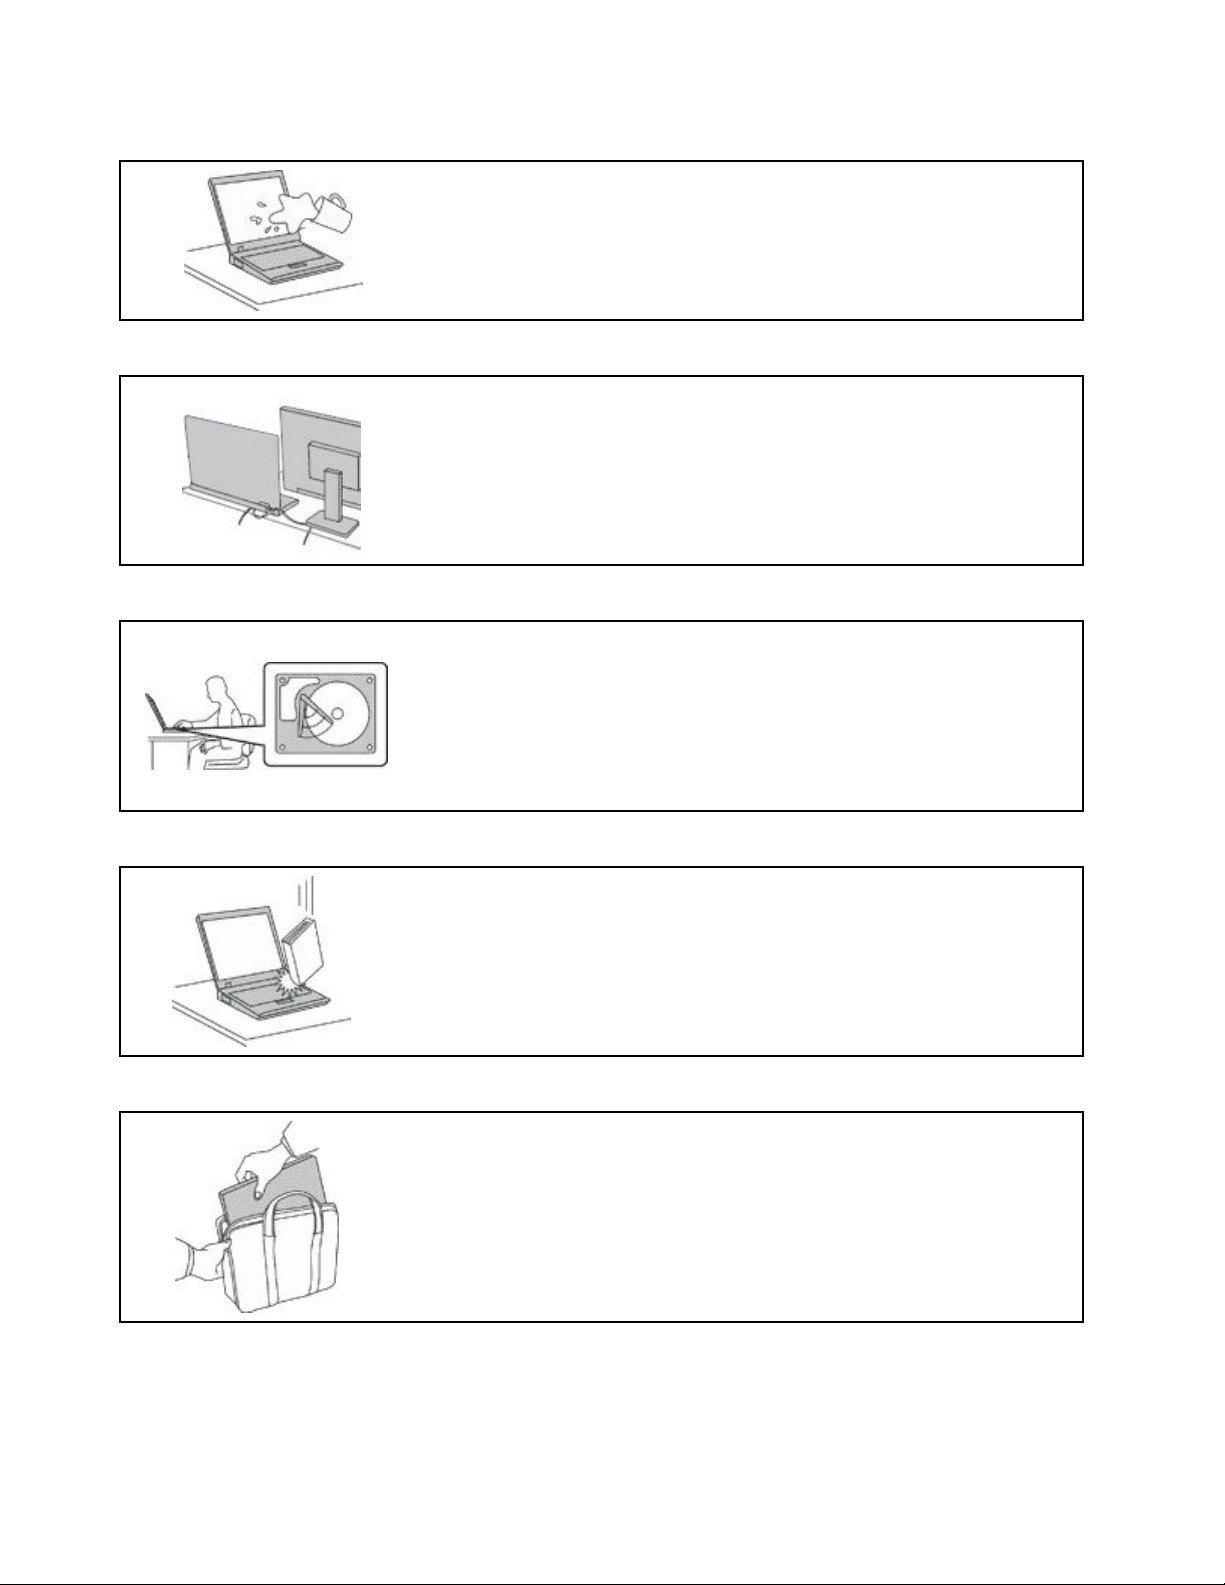
Preventyourcomputerfromgettingwet.
Toavoidspillsandthedangerofelectricalshock,keepliquidsawayfromyour
computer.
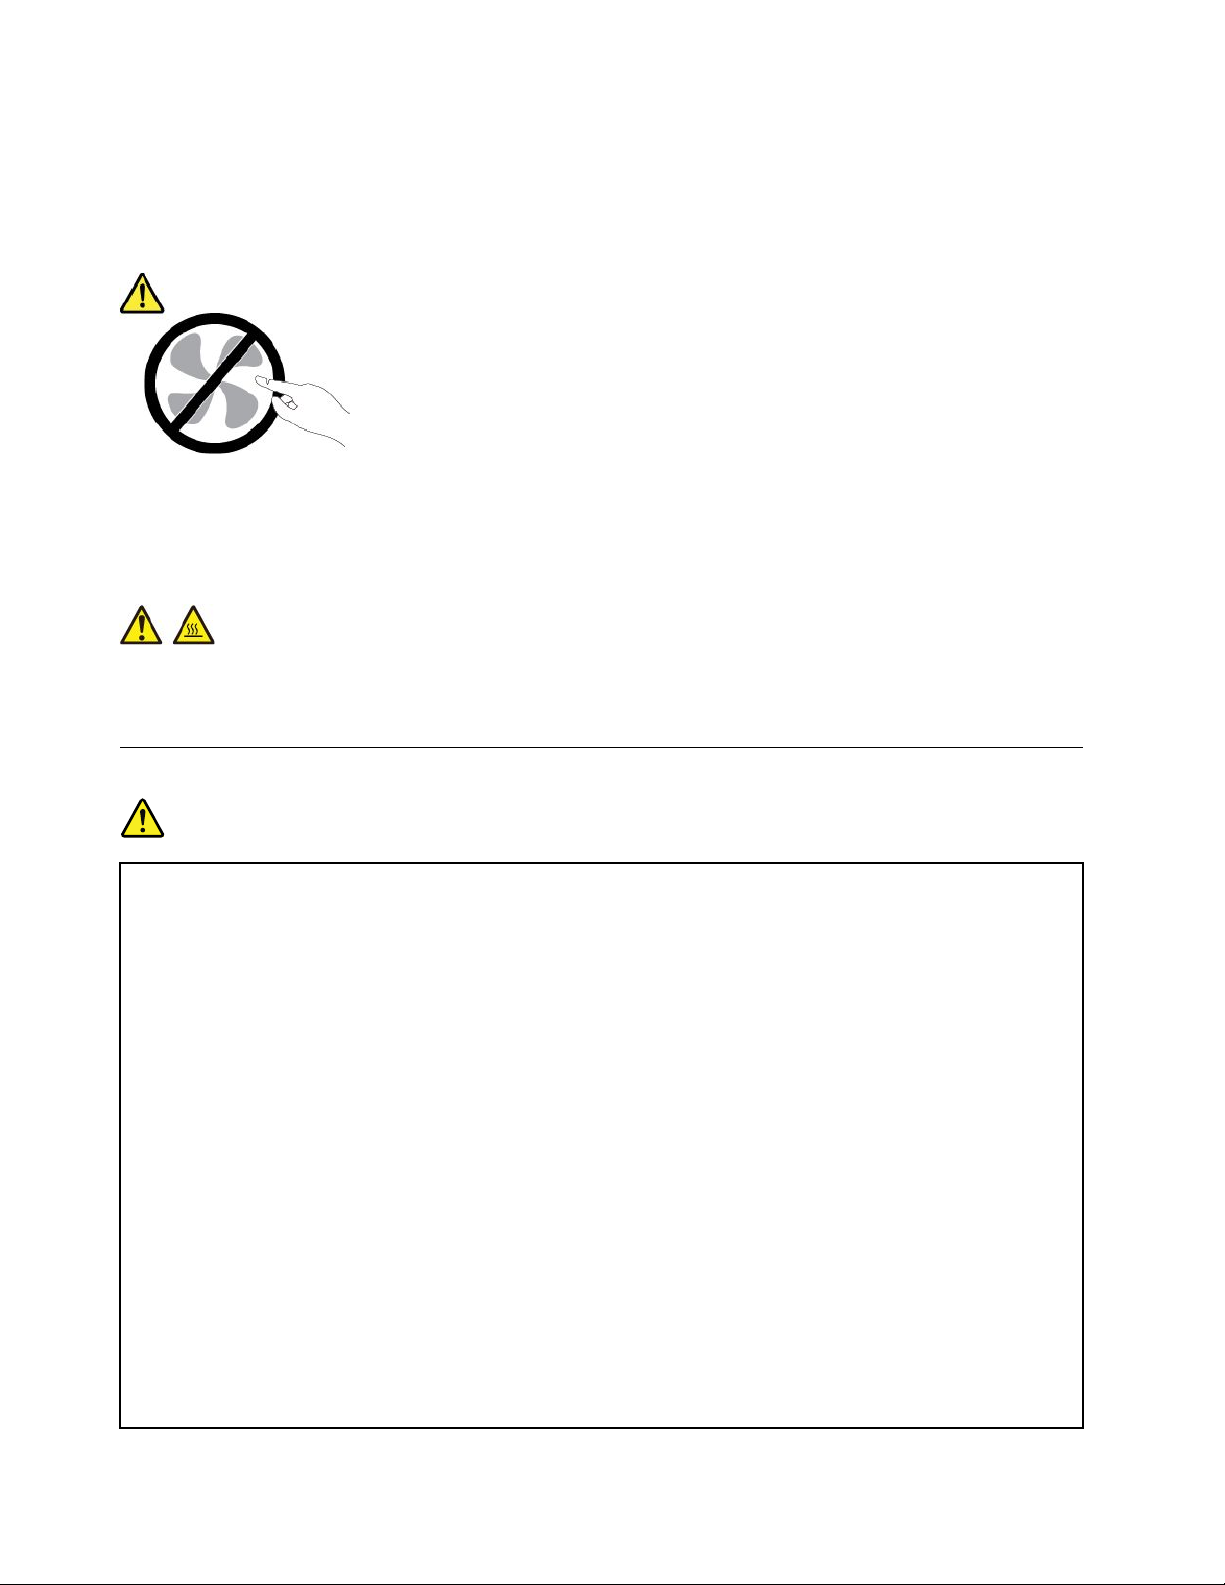
Protectthecablesfrombeingdamaged.
Applyingstrongforcetocablesmaydamageorbreakthem.
Routecommunicationlines,orthecablesofanacpoweradapter,amouse,a
keyboard,aprinter,oranyotherelectronicdevice,sothattheycannotbewalked
on,trippedover,pinchedbyyourcomputerorotherobjects,orinanyway
subjecttotreatmentthatcouldinterferewiththeoperationofyourcomputer.
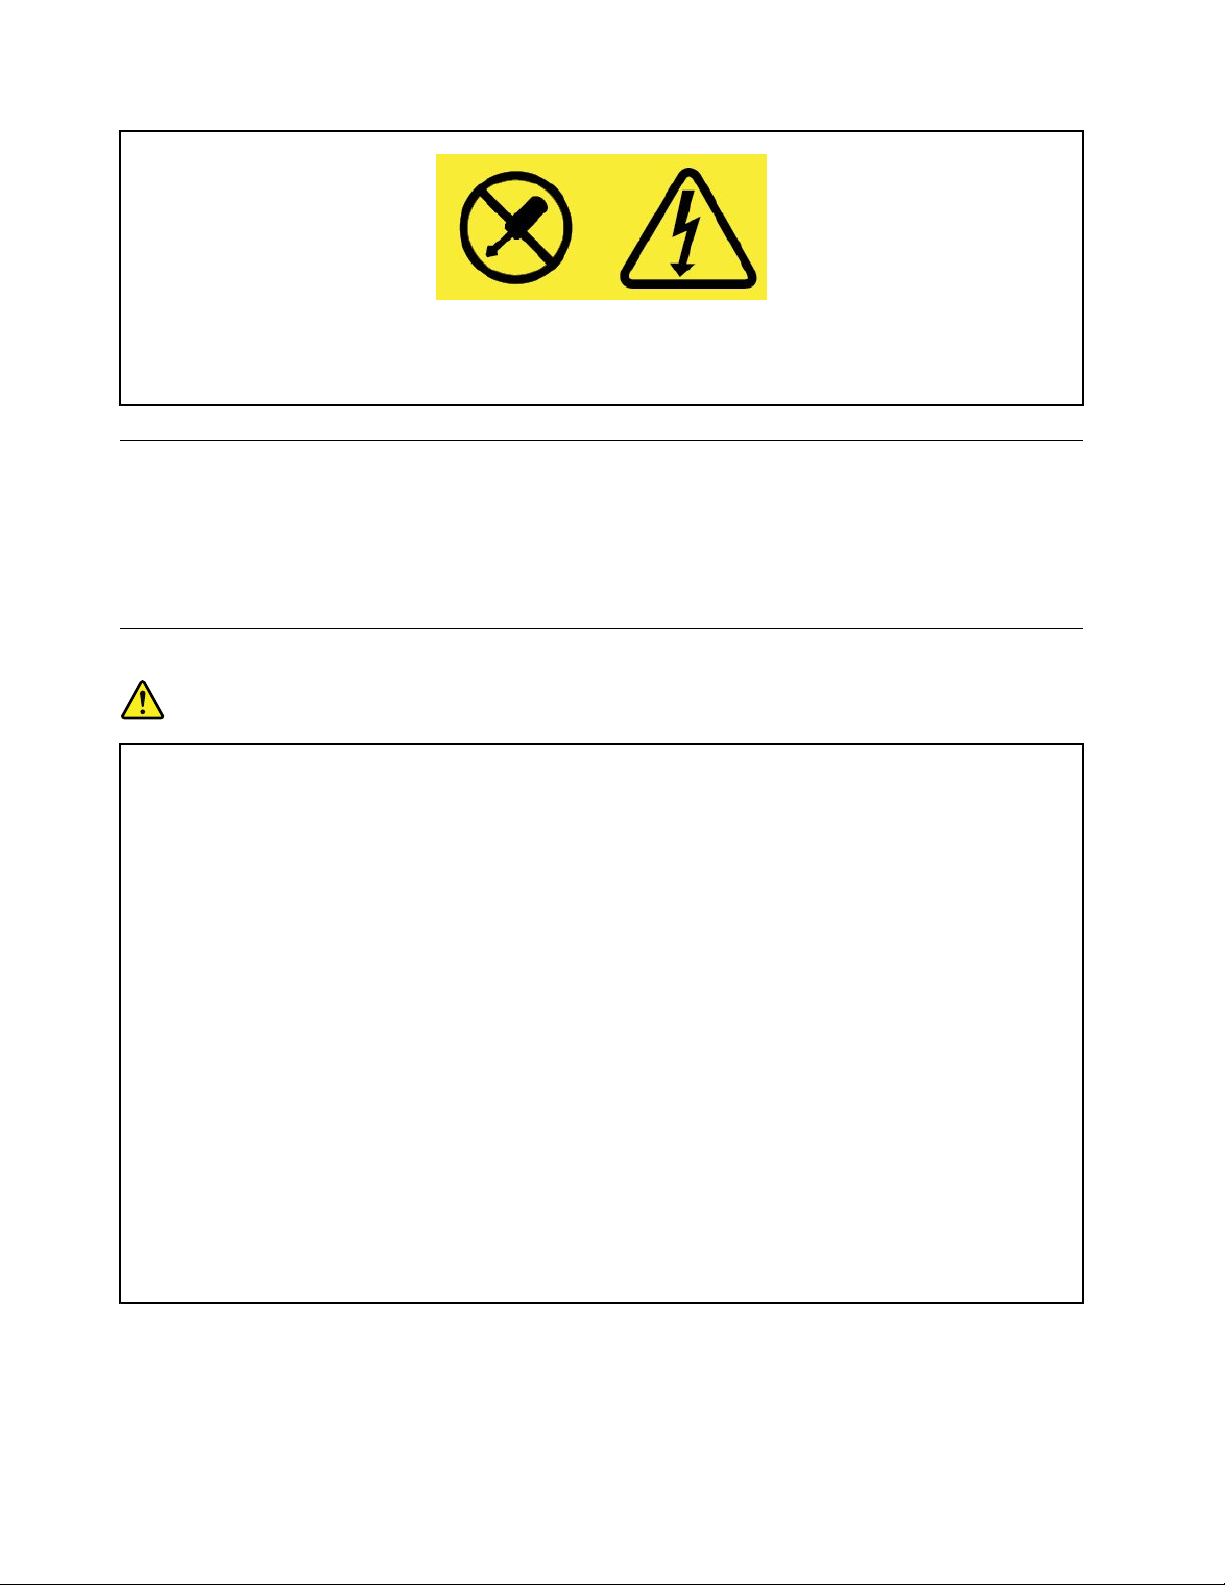
Protectyourcomputeranddatawhenmovingit.
Beforemovingacomputerequippedwithaharddiskdrive,dooneofthe
following:
•Turnitoff.
•Putitinsleepmode.
•Putitinhibernationmode.
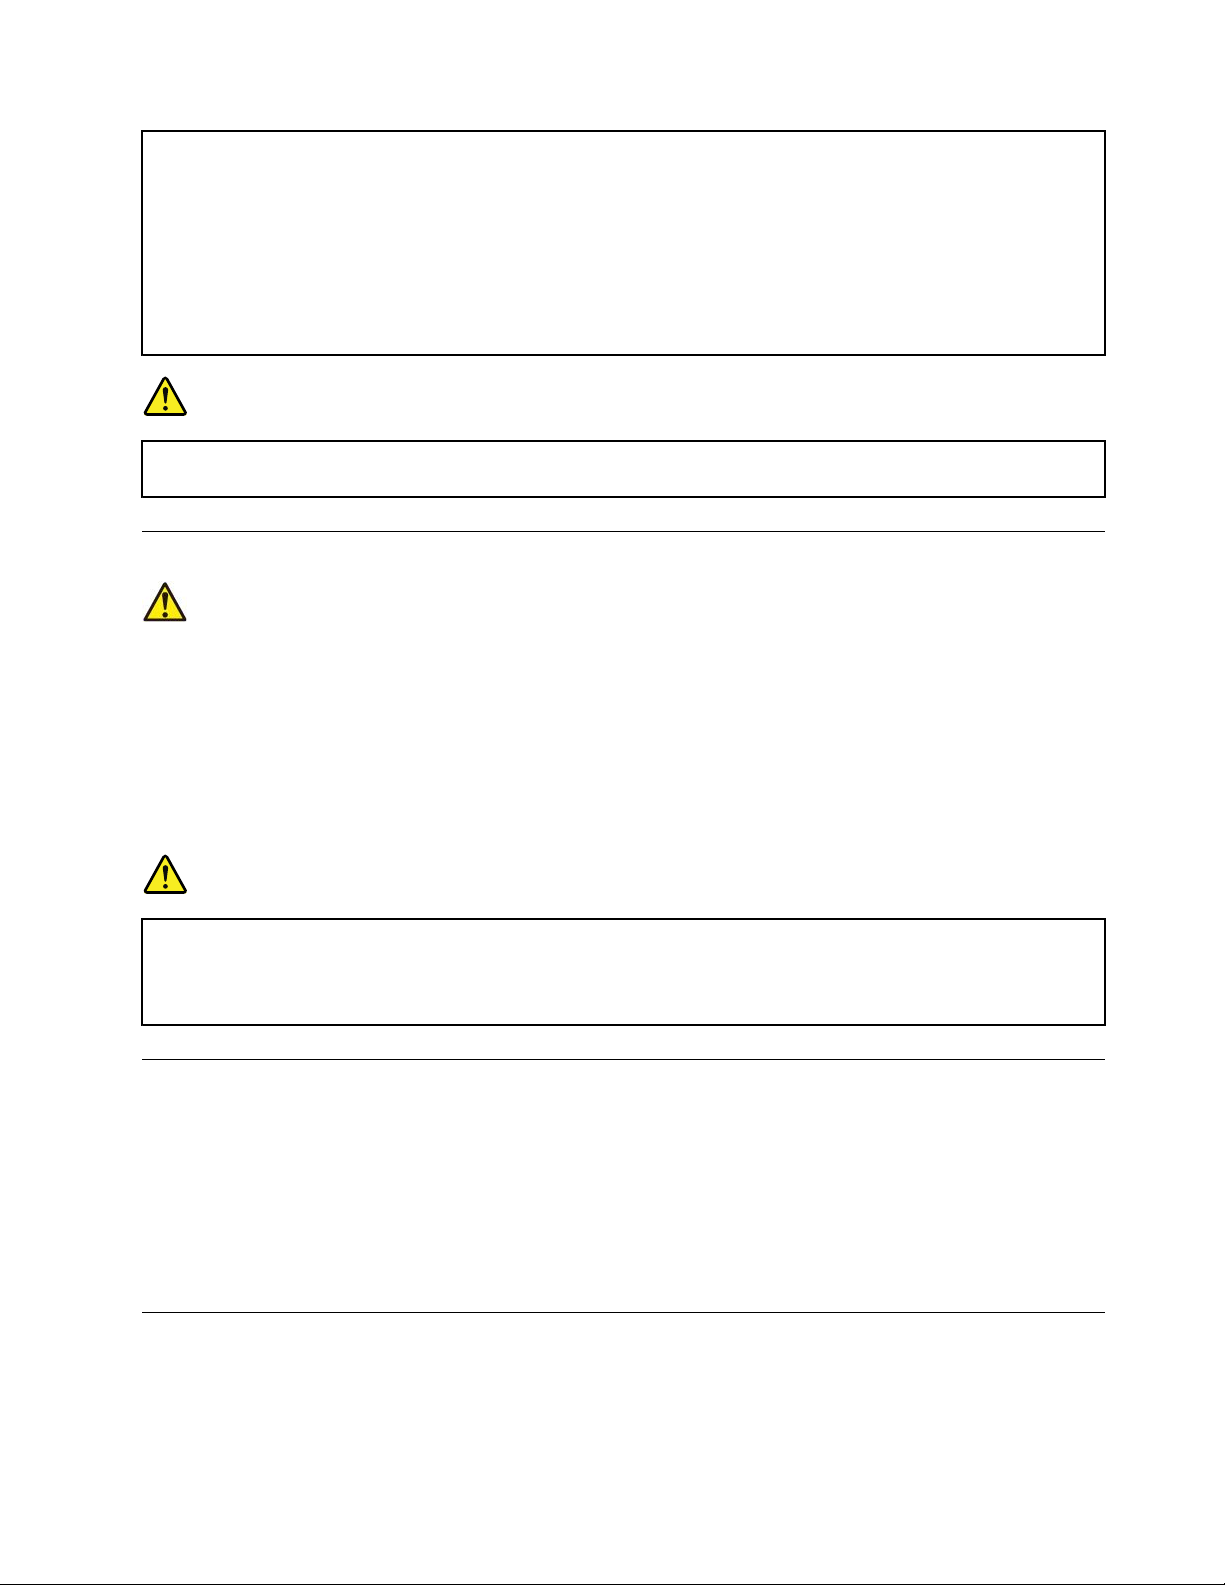
Handleyourcomputergently.
Carryyourcomputercarefully.
Thishelpstopreventdamagetothecomputer,andpossiblelossofdata.
Donotdrop,bump,scratch,twist,hit,vibrate,push,orplaceheavyobjectson
yourcomputer,display,orexternaldevices.
•Useaqualitycarryingcasethatprovidesadequatecushioningandprotection.
•Donotpackyourcomputerinatightlypackedsuitcaseorbag.
•Beforeputtingyourcomputerinacarryingcase,makesurethatitisoff,insleep
mode,orinhibernationmode.Donotputacomputerinacarryingcasewhileit
isturnedon.
viUserGuide
Page 9

Conditionsthatrequireimmediateaction
Productscanbecomedamagedduetomisuseorneglect.Someproductdamageisseriousenough
thattheproductshouldnotbeusedagainuntilithasbeeninspectedand,ifnecessary,repairedby
anauthorizedservicer.
Aswithanyelectronicdevice,paycloseattentiontotheproductwhenitisturnedon.Onveryrare
occasions,youmightnoticeanodororseeapuffofsmokeorsparksventfromyourproduct.Oryou
mighthearsoundslikepopping,cracking,orhissing.Theseconditionsmightmerelymeanthatan
internalelectroniccomponenthasfailedinasafeandcontrolledmanner .Or,theymightindicate
apotentialsafetyissue.However,donottakerisksorattempttodiagnosethesituationyourself.
ContacttheCustomerSupportCenterforfurtherguidance.ForalistofServiceandSupportphone
numbers,seethefollowingWebsite:
http://www.lenovo.com/support/phone
Frequentlyinspectyourcomputeranditscomponentsfordamageorwearorsignsofdanger.
Ifyouhaveanyquestionabouttheconditionofacomponent,donotusetheproduct.Contact
theCustomerSupportCenterortheproductmanufacturerforinstructionsonhowtoinspectthe
productandhaveitrepaired,ifnecessary.
Intheunlikelyeventthatyounoticeanyofthefollowingconditions,orifyouhaveanysafety
concernswithyourproduct,stopusingtheproductandunplugitfromthepowersourceand
telecommunicationlinesuntilyoucanspeaktotheCustomerSupportCenterforfurtherguidance.
•Powercords,plugs,poweradapters,extensioncords,surgeprotectors,orpowersuppliesthatare
cracked,broken,ordamaged.
•Signsofoverheating,smoke,sparks,orfire.
•Damagetoabattery(suchascracks,dents,orcreases),dischargefromabattery,orabuildupofforeign
substancesonthebattery.
•Acracking,hissing,orpoppingsound,orstrongodorthatcomesfromtheproduct.
•Signsthatliquidhasbeenspilledoranobjecthasfallenontothecomputerproduct,thepowercord,or
poweradapter.
•Thecomputerproduct,powercord,orpoweradapterhasbeenexposedtowater.
•Theproducthasbeendroppedordamagedinanyway.
•Theproductdoesnotoperatenormallywhenyoufollowtheoperatinginstructions.
Note:Ifyounoticetheseconditionswithaproduct(suchasanextensioncord)thatisnotmanufactured
fororbyLenovo
instructions,oruntilyougetasuitablereplacement.
®
,stopusingthatproductuntilyoucancontacttheproductmanufacturerforfurther
Serviceandupgrades
DonotattempttoserviceaproductyourselfunlessinstructedtodosobytheCustomerSupportCenteror
yourdocumentation.OnlyuseaServiceProviderwhoisapprovedtorepairyourparticularproduct.
Note:Somecomputerpartscanbeupgradedorreplacedbythecustomer.Upgradestypicallyare
referredtoasoptions.ReplacementpartsapprovedforcustomerinstallationarereferredtoasCustomer
ReplaceableUnits,orCRUs.Lenovoprovidesdocumentationwithinstructionswhenitisappropriatefor
customerstoinstalloptionsorreplaceCRUs.Youmustcloselyfollowallinstructionswheninstallingor
replacingparts.TheOffstateofapowerindicatordoesnotnecessarilymeanthatvoltagelevelsinsidea
productarezero.Beforeyouremovethecoversfromaproductequippedwithapowercord,alwaysmake
©CopyrightLenovo2017
vii
Page 10
surethatthepoweristurnedoffandthattheproductisunpluggedfromanypowersource.Ifyouhave
anyquestionsorconcerns,contacttheCustomerSupportCenter.
Althoughtherearenomovingpartsinyourcomputerafterthepowercordhasbeendisconnected,the
followingwarningsarerequiredforyoursafety.
CAUTION:
Hazardousmovingparts.Keepfingersandotherbodypartsaway.
CAUTION:
Beforeyouopenthecomputercover,turnoffthecomputerandwaitseveralminutesuntilthe
computeriscool.
Powercordsandpoweradapters
DANGER
Useonlythepowercordsandpoweradapterssuppliedbytheproductmanufacturer.
Thepowercordsshallbesafetyapproved.ForGermany,itshallbeH03VV-F ,3G,0.75mm
better.Forothercountries,thesuitabletypesshallbeusedaccordingly.
Neverwrapapowercordaroundapoweradapterorotherobject.Doingsocanstressthecordin
waysthatcancausethecordtofray,crack,orcrimp.Thiscanpresentasafetyhazard.
Alwaysroutepowercordssothattheywillnotbewalkedon,trippedover,orpinchedbyobjects.
Protectpowercordsandpoweradaptersfromliquids.Forinstance,donotleaveyourpowercord
orpoweradapternearsinks,tubs,toilets,oronfloorsthatarecleanedwithliquidcleansers.
Liquidscancauseashortcircuit,particularlyifthepowercordorpoweradapterhasbeenstressed
bymisuse.Liquidsalsocancausegradualcorrosionofpowercordterminalsand/ortheconnector
terminalsonapoweradapter,whichcaneventuallyresultinoverheating.
Ensurethatallpowercordconnectorsaresecurelyandcompletelypluggedintoreceptacles.
Donotuseanypoweradapterthatshowscorrosionattheacinputpinsorshowssignsof
overheating(suchasdeformedplastic)attheacinputpinsoranywhereonthepoweradapter .
2
,or
Donotuseanypowercordswheretheelectricalcontactsoneitherendshowsignsofcorrosionor
overheatingorwherethepowercordappearstohavebeendamagedinanyway.
viiiUserGuide
Page 11

Topreventpossibleoverheating,donotcoverthepoweradapterwithclothingorotherobjects
whenthepoweradapterispluggedintoanelectricaloutlet.
Extensioncordsandrelateddevices
Ensurethatextensioncords,surgeprotectors,uninterruptiblepowersupplies,andpowerstripsthatyouuse
areratedtohandletheelectricalrequirementsoftheproduct.Neveroverloadthesedevices.Ifpowerstrips
areused,theloadshouldnotexceedthepowerstripinputrating.Consultanelectricianformoreinformation
ifyouhavequestionsaboutpowerloads,powerrequirements,andinputratings.
Plugsandoutlets
DANGER
Ifareceptacle(poweroutlet)thatyouintendtousewithyourcomputerequipmentappearstobe
damagedorcorroded,donotusetheoutletuntilitisreplacedbyaqualifiedelectrician.
Donotbendormodifytheplug.Iftheplugisdamaged,contactthemanufacturertoobtain
areplacement.
Donotshareanelectricaloutletwithotherhomeorcommercialappliancesthatdrawlargeamounts
ofelectricity;otherwise,unstablevoltagemightdamageyourcomputer,data,orattacheddevices.
Someproductsareequippedwithathree-prongedplug.Thisplugfitsonlyintoagrounded
electricaloutlet.Thisisasafetyfeature.Donotdefeatthissafetyfeaturebytryingtoinsertitinto
anon-groundedoutlet.Ifyoucannotinserttheplugintotheoutlet,contactanelectricianforan
approvedoutletadapterortoreplacetheoutletwithonethatenablesthissafetyfeature.Never
overloadanelectricaloutlet.Theoverallsystemloadshouldnotexceed80percentofthebranch
circuitrating.Consultanelectricianformoreinformationifyouhavequestionsaboutpowerloads
andbranchcircuitratings.
Besurethatthepoweroutletyouareusingisproperlywired,easilyaccessible,andlocatedclose
totheequipment.Donotfullyextendpowercordsinawaythatwillstressthecords.
Besurethatthepoweroutletprovidesthecorrectvoltageandcurrentfortheproductyouare
installing.
Carefullyconnectanddisconnecttheequipmentfromtheelectricaloutlet.
Powersupplystatement
DANGER
Neverremovethecoveronapowersupplyoranypartthathasthefollowinglabelattached.
©CopyrightLenovo2017
ix
Page 12
Hazardousvoltage,current,andenergylevelsarepresentinsideanycomponentthathasthislabel
attached.Therearenoserviceablepartsinsidethesecomponents.Ifyoususpectaproblemwith
oneoftheseparts,contactaservicetechnician.
Externaldevices
CAUTION:
DonotconnectordisconnectanyexternaldevicecablesotherthanUniversalSerialBus(USB)and
1394cableswhilethecomputerpowerison;otherwise,youmightdamageyourcomputer.Toavoid
possibledamagetoattacheddevices,waitatleastfivesecondsafterthecomputerisshutdownto
disconnectexternaldevices.
Generalbatterynotice
DANGER
BatteriessuppliedbyLenovoforusewithyourproducthavebeentestedforcompatibilityand
shouldonlybereplacedwithapprovedparts.AbatteryotherthantheonespecifiedbyLenovo,ora
disassembledormodifiedbatteryisnotcoveredbythewarranty.
Batteryabuseormishandlingcancauseoverheat,liquidleakage,oranexplosion.Toavoidpossible
injury,dothefollowing:
•Donotopen,dissemble,orserviceanybattery.
•Donotcrushorpuncturethebattery.
•Donotshort-circuitthebattery,orexposeittowaterorotherliquids.
•Keepthebatteryawayfromchildren.
•Keepthebatteryawayfromfire.
Stopusingthebatteryifitisdamaged,orifyounoticeanydischargeorthebuildupofforeign
materialsonthebatteryleads.
Storetherechargeablebatteriesorproductscontainingtherechargeablebatteriesatroom
temperature,chargedtoapproximately30to50%ofcapacity.Werecommendthatthebatteriesbe
chargedaboutonceperyeartopreventoverdischarge.
Donotputthebatteryintrashthatisdisposedofinlandfills.Whendisposingofthebattery,comply
withlocalordinancesorregulations.
xUserGuide
Page 13

Noticeforbuilt-inrechargeablebattery
DANGER
Donotattempttoreplacethebuilt-inrechargeablebattery.Replacementofthebatterymustbe
donebyaLenovo-authorizedrepairfacilityortechnician.
Onlyrechargethebatterystrictlyaccordingtoinstructionsincludedintheproductdocumentation.
TheLenovo-authorizedrepairfacilitiesortechniciansrecycleLenovobatteriesaccordingtolocal
lawsandregulations.
Noticefornon-rechargeablecoin-cellbattery
DANGER
Ifthecoin-cellbatteryisincorrectlyreplaced,thereisdangerofanexplosion.Thebatterycontains
asmallamountofharmfulsubstance.
Donotheattomorethan100°C(212°F).
ThefollowingstatementappliestousersinthestateofCalifornia,U.S.A.
CaliforniaPerchlorateInformation:
Productscontainingmanganesedioxidelithiumcoin-cellbatteriesmaycontainperchlorate.
PerchlorateMaterial-specialhandlingmayapply,See
www.dtsc.ca.gov/hazardouswaste/perchlorate
Heatandproductventilation
DANGER
Computers,acpoweradapters,andmanyaccessoriescangenerateheatwhenturnedonandwhen
batteriesarecharging.Notebookcomputerscangenerateasignificantamountofheatduetotheir
compactsize.Alwaysfollowthesebasicprecautions:
•Whenyourcomputeristurnedonorthebatteryischarging,thebase,thepalmrest,andsome
otherpartsmaybecomehot.Avoidkeepingyourhands,yourlap,oranyotherpartofyour
bodyincontactwithahotsectionofthecomputerforanyextendedlengthoftime.Whenyou
usethekeyboard,avoidkeepingyourpalmsonthepalmrestforaprolongedperiodoftime.
Yourcomputergeneratessomeheatduringnormaloperation.Theamountofheatdependson
theamountofsystemactivityandthebatterychargelevel.Extendedcontactwithyourbody,
eventhroughclothing,couldcausediscomfortorevenaskinburn.Periodicallytakebreaks
fromusingthekeyboardbyliftingyourhandsfromthepalmrest;andbecarefulnottouse
thekeyboardforanyextendedlengthoftime.
•Donotoperateyourcomputerorchargethebatterynearflammablematerialsorinexplosive
environments.
©CopyrightLenovo2017
xi
Page 14

•Ventilationslots,fansand/orheatsinksareprovidedwiththeproductforsafety,comfort,and
reliableoperation.Thesefeaturesmightinadvertentlybecomeblockedbyplacingtheproducton
abed,sofa,carpet,orotherflexiblesurface.Neverblock,cover,ordisablethesefeatures.
•Whentheacpoweradapterisconnectedtoanelectricaloutletandyourcomputer,itgenerates
heat.Donotplacetheadapterincontactwithanypartofyourbodywhileusingit.Neverusethe
acpoweradaptertowarmyourbody.Extendedcontactwithyourbody,eventhroughclothing,
maycauseaskinburn.
Foryoursafety,alwaysfollowthesebasicprecautionswithyourcomputer:
•Keepthecoverclosedwheneverthecomputerispluggedin.
•Regularlyinspecttheoutsideofthecomputerfordustaccumulation.
•Removedustfromventsandanyperforationsinthebezel.Morefrequentcleaningsmightbe
requiredforcomputersindustyorhigh-trafficareas.
•Donotrestrictorblockanyventilationopenings.
•Donotoperateyourcomputerinsidefurniture,asthismightincreasetheriskofoverheating.
•Airflowtemperaturesintothecomputershouldnotexceed35°C(95°F).
Electricalcurrentsafetyinformation
DANGER
Electriccurrentfrompower,telephone,andcommunicationcablesishazardous.
Toavoidashockhazard:
•Donotuseyourcomputerduringalightningstorm.
•Donotconnectordisconnectanycablesorperforminstallation,maintenance,orreconfiguration
ofthisproductduringanelectricalstorm.
•Connectallpowercordstoaproperlywiredandgroundedelectricaloutlet.
•Connecttoproperlywiredoutletsanyequipmentthatwillbeattachedtothisproduct.
•Wheneverpossible,useonehandonlytoconnectordisconnectsignalcables.
•Neverturnonanyequipmentwhenthereisevidenceoffire,water,orstructuraldamage.
•Disconnecttheattachedpowercords,battery,andallthecablesbeforeyouopenthedevice
covers,unlessinstructedotherwiseintheinstallationandconfigurationprocedures.
•Donotuseyourcomputeruntilallinternalpartsenclosuresarefastenedintoplace.Neveruse
thecomputerwheninternalpartsandcircuitsareexposed.
DANGER
Connectanddisconnectcablesasdescribedinthefollowingprocedureswheninstalling,moving,
oropeningcoversonthisproductorattacheddevices.
Toconnect:
1.TurneverythingOFF.
2.First,attachallcablestodevices.
3.Attachsignalcablestoconnectors.
Todisconnect:
1.TurneverythingOFF.
2.First,removepowercordsfromoutlets.
3.Removesignalcablesfromconnectors.
xiiUserGuide
Page 15
4.Attachpowercordstooutlets.
5.TurndevicesON.
Thepowercordmustbedisconnectedfromthewalloutletorreceptaclebeforeinstallingallother
electricalcablesconnectedtothecomputer.
Thepowercordmaybereconnectedtothewalloutletorreceptacleonlyafterallotherelectrical
cableshavebeenconnectedtothecomputer.
DANGER
Duringelectricalstorms,donotperformanyreplacementanddonotconnectthetelephonecable
toordisconnectitfromthetelephoneoutletonthewall.
4.Removeallcablesfromdevices.
Lasersafetyinformation
CAUTION:
Whenlaserproducts(suchasCD-ROMs,DVDdrives,fiberopticdevices,ortransmitters)are
installed,notethefollowing:
•Donotremovethecovers.Removingthecoversofthelaserproductcouldresultinexposureto
hazardouslaserradiation.Therearenoserviceablepartsinsidethedevice.
•Useofcontrolsoradjustmentsorperformanceofproceduresotherthanthosespecifiedherein
mightresultinhazardousradiationexposure.
DANGER
SomelaserproductscontainanembeddedClass3Blaserdiode.Notethefollowing:
Laserradiationwhenopen.Donotstareintothebeam,donotviewdirectlywithoptical
instruments,andavoiddirectexposuretothebeam.
Liquidcrystaldisplay(LCD)notice
CAUTION:
Theliquidcrystaldisplay(LCD)ismadeofglass,androughhandlingordroppingthecomputercan
causetheLCDtobreak.IftheLCDbreaksandtheinternalfluidgetsintoyoureyesoronyour
hands,immediatelywashtheaffectedareaswithwaterforatleast15minutes;ifanysymptomsare
presentafterwashing,getmedicalcare.
Note:Forproductswithmercury-containingfluorescentlamps(forexample,non-LED),thefluorescentlamp
intheliquidcrystaldisplay(LCD)containsmercury;disposeofaccordingtolocal,state,orfederallaws.
Usingheadphonesorearphones
CAUTION:
Excessivesoundpressurefromearphonesandheadphonescancausehearingloss.Adjustmentof
theequalizertomaximumincreasestheearphoneandheadphoneoutputvoltageandthesound
pressurelevel.Therefore,toprotectyourhearing,adjusttheequalizertoanappropriatelevel.
©CopyrightLenovo2017
xiii
Page 16

Excessiveuseofheadphonesorearphonesforalongperiodoftimeathighvolumecanbedangerousifthe
outputoftheheadphoneorearphoneconnectorsdonotcomplywithspecificationsofEN50332-2.The
headphoneoutputconnectorofyourcomputercomplieswithEN50332-2Subclause7.Thisspecification
limitsthecomputer’smaximumwidebandtrueRMSoutputvoltageto150mV.Tohelpprotectagainst
hearingloss,ensurethattheheadphonesorearphonesyouusealsocomplywithEN50332-2(Clause7
limits)forawidebandcharacteristicvoltageof75mV.UsingheadphonesthatdonotcomplywithEN
50332-2canbedangerousduetoexcessivesoundpressurelevels.
IfyourLenovocomputercamewithheadphonesorearphonesinthepackage,asaset,thecombinationof
theheadphonesorearphonesandthecomputeralreadycomplieswiththespecificationsofEN50332-1.
Ifdifferentheadphonesorearphonesareused,ensurethattheycomplywithEN50332-1(Clause6.5
LimitationValues).UsingheadphonesthatdonotcomplywithEN50332-1canbedangerousdueto
excessivesoundpressurelevels.
Plasticbagnotice
DANGER
Plasticbagscanbedangerous.Keepplasticbagsawayfrombabiesandchildrentoavoiddanger
ofsuffocation.
Glasspartsnotice
CAUTION:
Somepartsofyourproductmaybemadeofglass.Thisglasscouldbreakiftheproductisdropped
onahardsurfaceorreceivesasubstantialimpact.Ifglassbreaks,donottouchorattempttoremove
it.Stopusingyourproductuntiltheglassisreplacedbytrainedservicepersonnel.
Chokinghazardnotice
CHOKINGHAZARD–Productcontainssmallparts.
Keepawayfromchildrenunderthreeyears.
xivUserGuide
Page 17
Chapter1.Productoverview
Thischapterprovidesbasicinformationtohelpyougetfamiliarwithyourcomputer.
Computercontrols,connectors,andindicators
Thissectionintroduceshardwarefeaturesofthecomputer.
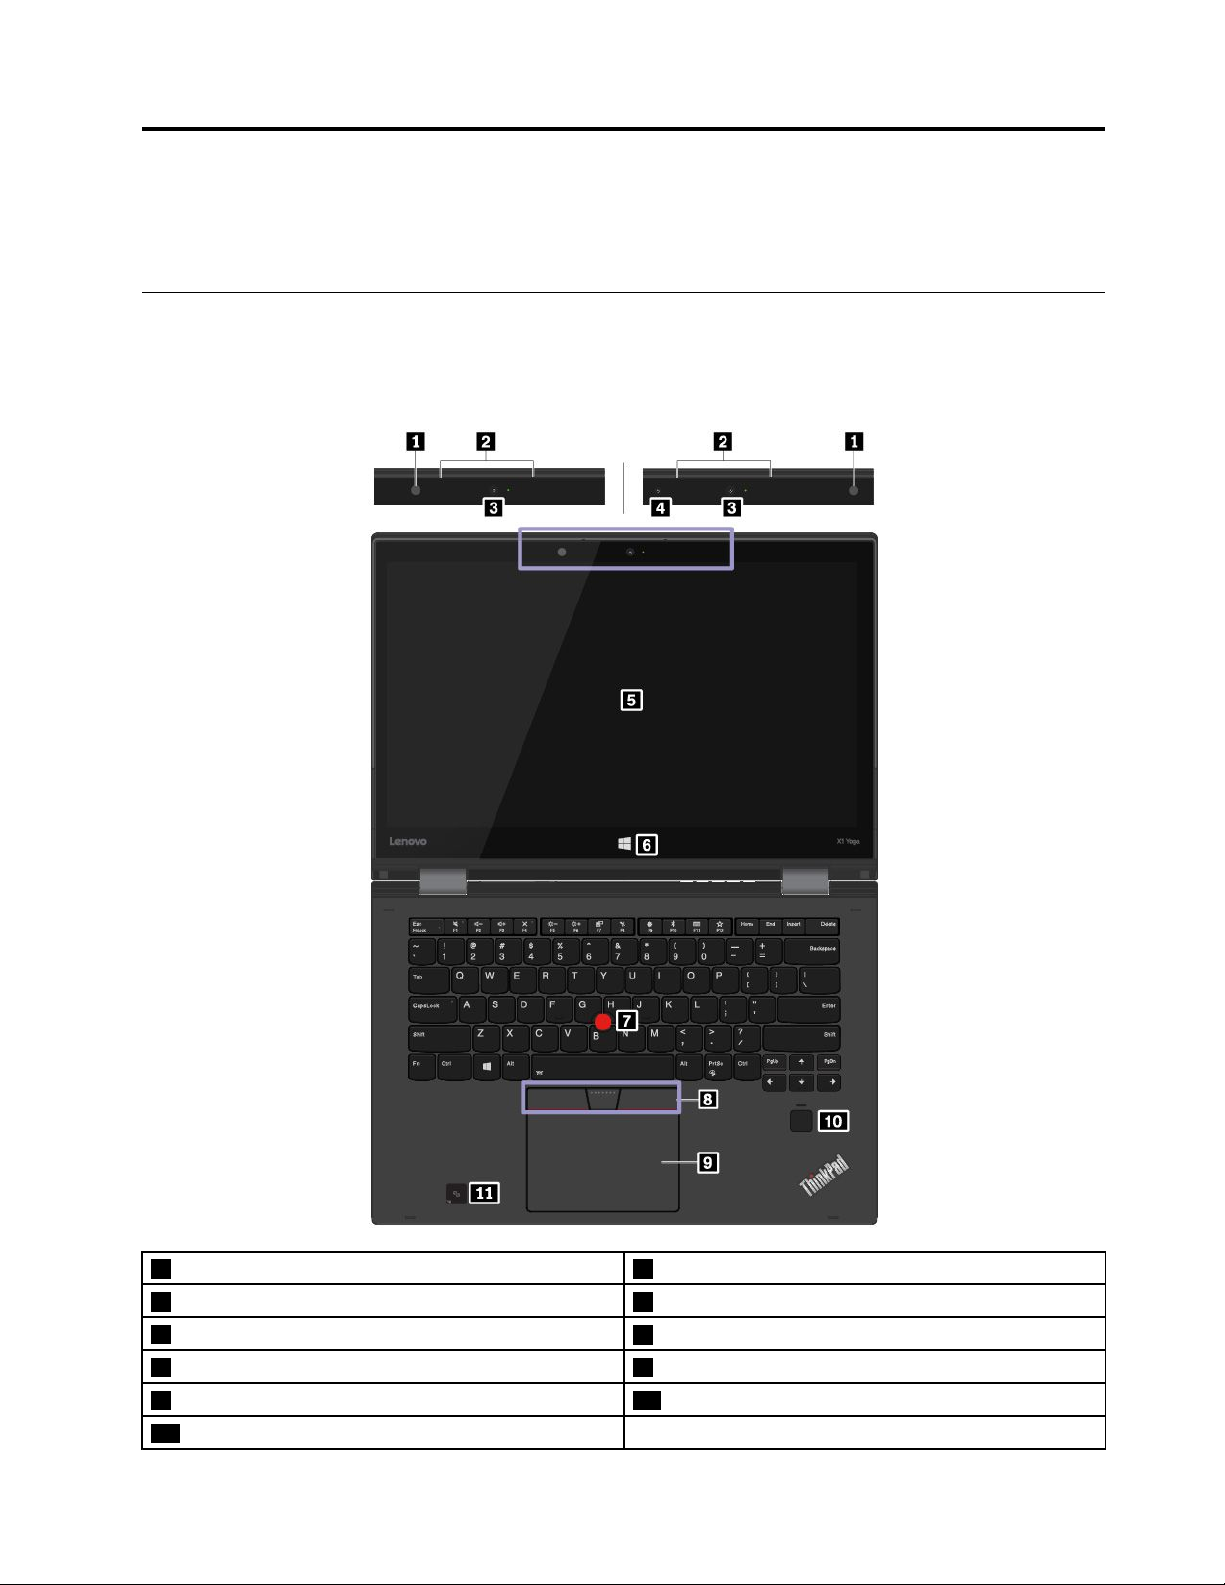
Frontview
1Ambientlightsensor2Microphones
3Conventionalcamera4Infraredcamera(availableonsomemodels)
5Multi-touchscreen
7TrackPoint
9Trackpad10Fingerprintreader
11NFClabel(availableonsomemodels)
©CopyrightLenovo2017
®
pointingstick8T rackPointbuttons
6Windowsbuttons(availableonsomemodels)
1
Page 18

1Ambientlightsensor
Theambientlightsensordetectsthesurroundinglightconditions.Thenthecomputeradjuststhescreen
brightnessandthekeyboardbacklightmodeaccordingly.
2Microphones
Themicrophonescapturesoundandvoicewhenusedwithaprogramcapableofhandlingaudio.
3Conventionalcamera
Usetheconventionalcameratotakepicturesorholdavideoconference.
4Infraredcamera(availableonsomemodels)
Theinfraredcameraprovidesapersonalandsecurewayforyoutosignintoyourcomputerwithface
authentication.Afteryousettheinfraredcameraforfaceauthentication,youcanuseyourfacetounlock
yourcomputerinsteadofusingapassword.Formoreinformation,see“Usingthecamera”onpage33
5Multi-touchscreen
Themulti-touchscreenenablesyoutouseyourcomputerwithsimpletouchgestures.Formoreinformation,
see“Usingthemulti-touchscreen”onpage19.
6Windowsbutton(availableonsomemodels)
PresstheWindowsbuttontoopentheStartmenu;orpresstheWindowsbuttontowakeupthecomputer
fromsleepmode.
.
ThinkPad
®
pointingdevice
7TrackPointpointingstick
8TrackPointbuttons
9Trackpad
YourcomputerisequippedwiththeLenovo-uniqueThinkPadpointingdevice.Formoreinformation,see
“UsingtheThinkPadpointingdevice”onpage23.
10Fingerprintreader
Fingerprintauthenticationprovidessimpleandsecureuseraccessbyassociatingyourfingerprintwitha
password.Formoreinformation,see“Usingthefingerprintreader”onpage52
11NFClabel(availableonsomemodels)
.
Ifyoufindanearfieldcommunication(NFC)labelnearthetrackpad,itindicatesthatyourcomputercomes
withanNFCcard.NFCisahigh-frequencyandshort-rangewirelesscommunicationtechnology.Youcan
useNFCtechnologytotransferdatafromonedevicetoanotherbytouchingthemorputtingthemclose
together.FormoreinformationabouttheNFCfeature,see“UsingtheNFCdevices”onpage32
.
2UserGuide
Page 19
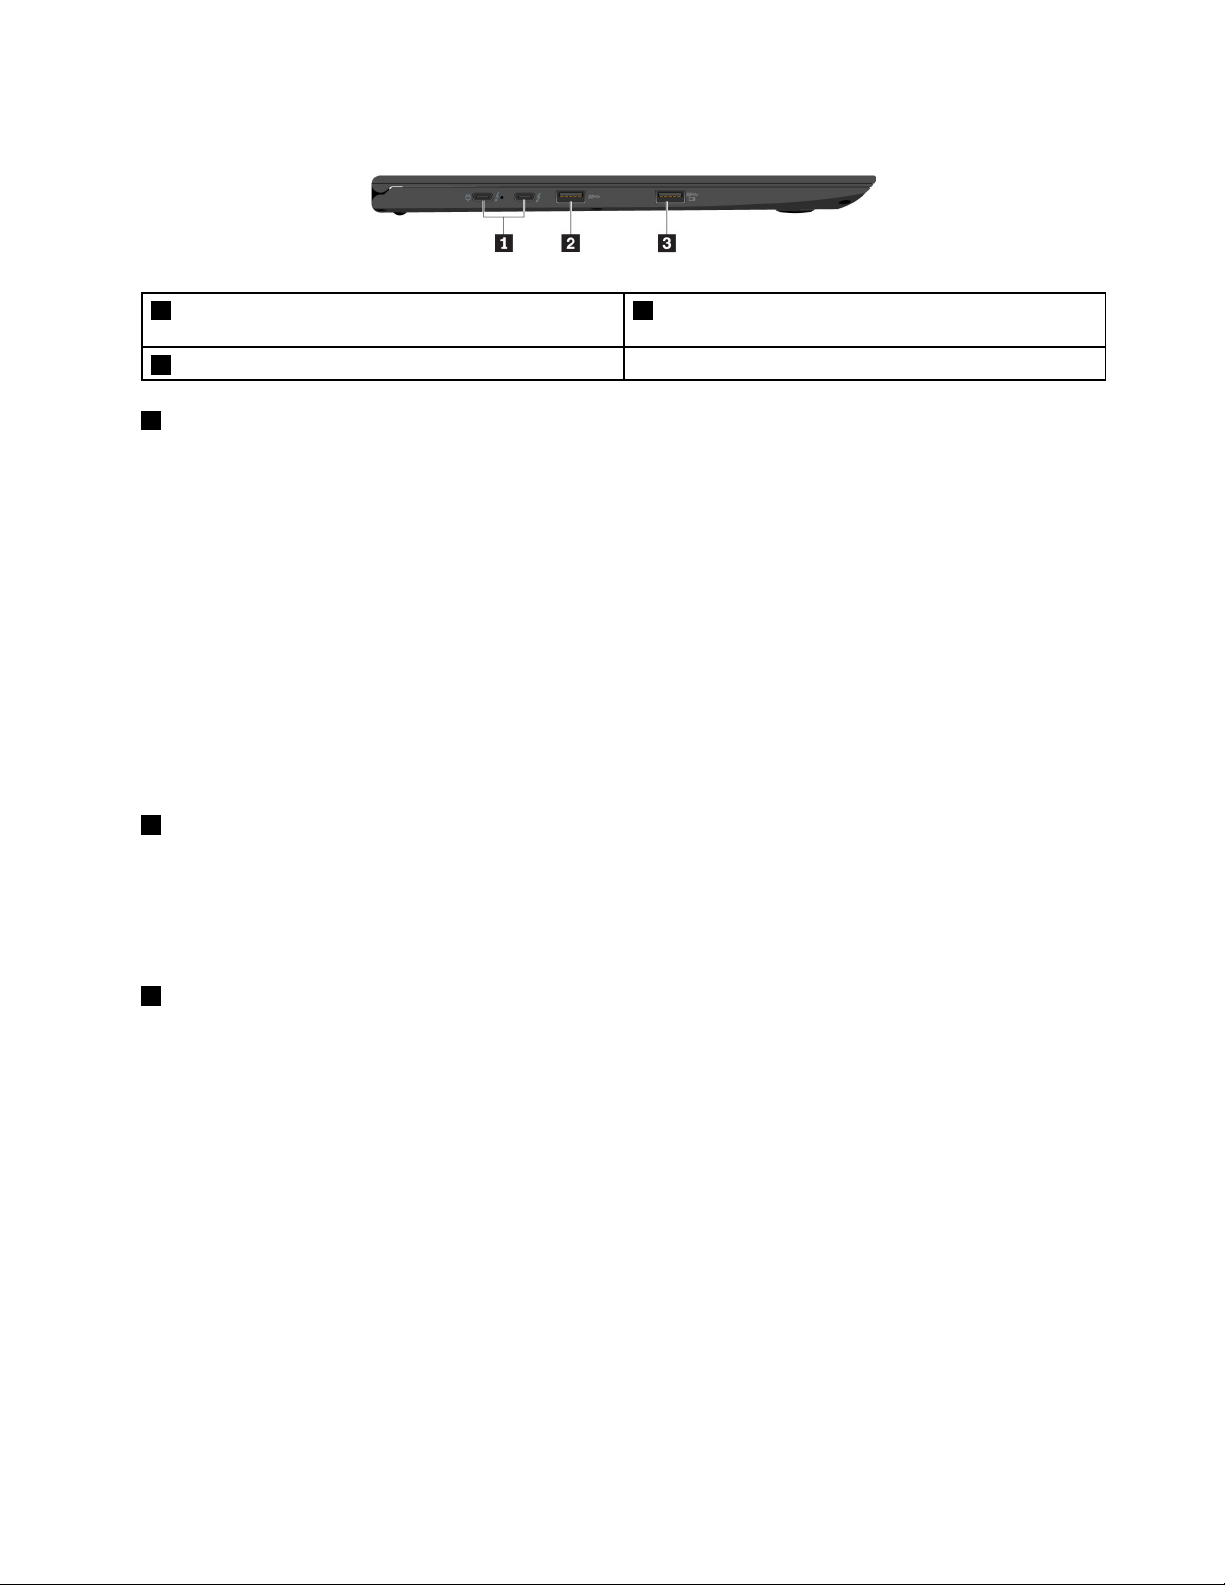
Left-sideview
1USB-Cconnectors(Thunderbolt™3compatible)/
powerconnectors
3AlwaysOnUSB3.0connector
1USB-Cconnectors(Thunderbolt™3compatible)/powerconnectors
2USB3.0connector
TheUSB-CconnectorsonyourcomputersupportthelatestUSB3.1standardandarefullycompatiblewith
Thunderbolt3technology.WithaproperUSB-Ccableconnected,youcan:
•Transferdatabetweenyourcomputerandperipheraldevices.
•Chargeyourcomputer.
•Chargeyourperipheraldevices.
•Connectyourcomputertoexternaldisplaysforvideooutput.
ThetwoUSB-Cconnectorsalsoworkaspowerconnectors.Theacpoweradaptershippedwithyour
computerisaUSB-Cpoweradapter.Usetheshippedpoweradapterandpowercordtoconnectthe
computertoacpowerthrougheitherofthetwoUSB-Cconnectors.
LenovoprovidesvariousUSB-Caccessoriestohelpyouexpandyourcomputerfunctionality.Formore
information,gotohttp://www.lenovo.com/essentials.
2USB3.0connector
ConnectUSB-compatibledevices,suchasaUSBkeyboard,USBmouse,USBstoragedevice,orUSB
printer.
Attention:WhenyouattachaUSBcabletothisconnector,ensurethattheUSBmarkisfacingupward.
Otherwisetheconnectormightgetdamaged.
3AlwaysOnUSB3.0connector
Bydefault,theAlwaysOnUSB3.0connectorenablesyoutochargeUSB-compatibledevicesinthe
followingsituations:
•Whenyourcomputerisonorinsleepmode
•Whenyourcomputerisofforinhibernationmode,butconnectedtoacpower
Attention:WhenyouattachaUSBcabletothisconnector,ensurethattheUSBmarkisfacingupward.
Otherwisetheconnectormightgetdamaged.
Tochargethesedeviceswhenthecomputerisofforinhibernationmode,andthecomputerisnotconnected
toacpower,dothefollowing:
1.StarttheLenovoSettingsprogram.See“AccessingLenovoprograms”onpage13.
2.ClickPOWER.
3.Followtheinstructionsonthescreentomakeyourpreferredsetting.
Chapter1.Productoverview3
Page 20

Right-sideview
1ThinkPadPenPro2Powerbutton
3Audioconnector4MiniEthernetconnector
5USB3.0connector
7Security-lockslot
1ThinkPadPenPro
TheThinkPadPenProissimilarinsizeandshapetoanactualinkpen,sotouchactionsandon-screen
writingfeelcomfortable.Itshigh-levelpressuresensitivityprovidesprecisecontentcreation.Clickand
eraserbuttonsarebuiltintothepenandprovideadditionalfunctionalitytointeractwithdata.
Additionally,whenusedwithLenovo’sfreeappWRITEit,youcanwritedirectlyintoanyapplication.T o
downloadWRITEit,gotohttp://www.lenovo.com/writeit.
6HDMI™connector
Formoreinformation,see“ThinkPadPenPro”onpage16
2Powerbutton
.
Pressthepowerbuttontoturnonthecomputerorputthecomputerintosleepmode.
Toturnoffthecomputer,opentheStartmenu,click
Power,andthenclickShutdown.
Ifyourcomputerisunresponsive,youcanturnoffthecomputerbypressingandholdingthepowerbuttonfor
fourormoreseconds.Ifthecomputercannotbeturnedoff,see“Computerstopsresponding”onpage74
Youalsocandefinewhatthepowerbuttondoes.Forexample,bypressingthepowerbutton,youcanturn
offthecomputerorputthecomputerintosleeporhibernationmode.Tochangewhatthepowerbutton
does,dothefollowing:
1.GotoControlPanel,andthenchangetheviewofControlPanelfromCategorytoLargeiconsorSmall
icons.
2.ClickPowerOptions➙Choosewhatthepowerbuttonsdo.
3.Followtheinstructionsonthescreen.
3Audioconnector
Youcanconnectheadphonesoraheadsetwitha3.5-mm(0.14-inch),4-poleplugtotheaudioconnectorto
listentothesoundfromthecomputer.
Ifyouareusingaheadsetwithafunctionswitch,donotpressthisswitchwhileusingtheheadset.Ifyou
presstheswitch,theheadsetmicrophoneisdisabled,andtheintegratedmicrophonesonthecomputeris
enabledinstead.
.
Note:Theaudioconnectordoesnotsupportaconventionalmicrophone.
4MiniEthernetconnector
TheminiEthernetconnectormakesyourcomputerthinnerthantheoneswithastandardEthernetconnector.
Toconnectyourcomputertoalocalareanetwork(LAN)throughtheminiEthernetconnector,youneedan
Ethernetextensionadapter.TheEthernetextensionadapterisavailableasanoptionandshippedwith
4UserGuide
Page 21
somecomputermodels.ForinformationaboutusingandpurchasingtheEthernetextensionadapter,
see“CabledEthernetconnections”onpage29
.
DANGER
Toavoidtheriskofelectricalshock,donotconnectthetelephonecabletotheEthernetextension
adapter.
5USB3.0connector
ConnectUSB-compatibledevices,suchasaUSBkeyboard,USBmouse,USBstoragedevice,orUSB
printer.
Attention:WhenyouattachaUSBcabletothisconnector,ensurethattheUSBmarkisfacingupward.
Otherwisetheconnectormightgetdamaged.
6HDMI™connector
TheHDMIconnectorisadigitalaudioandvideointerface.Itenablesyoutoconnectyourcomputertoa
compatibledigitalaudiodeviceorvideomonitor,suchasaDVDplayeroranahigh-definitiontelevision
(HDTV).
7Security-lockslot
Toprotectyourcomputerfromtheft,lockyourcomputertoadesk,table,orotherfixturesthroughasecurity
cablelockthatfitsthissecurity-lockslot.
Note:Y ouareresponsibleforevaluating,selecting,andimplementingthelockingdeviceandsecurity
feature.Lenovomakesnocomments,judgments,orwarrantiesaboutthefunction,quality,orperformance
ofthelockingdeviceandsecurityfeature.
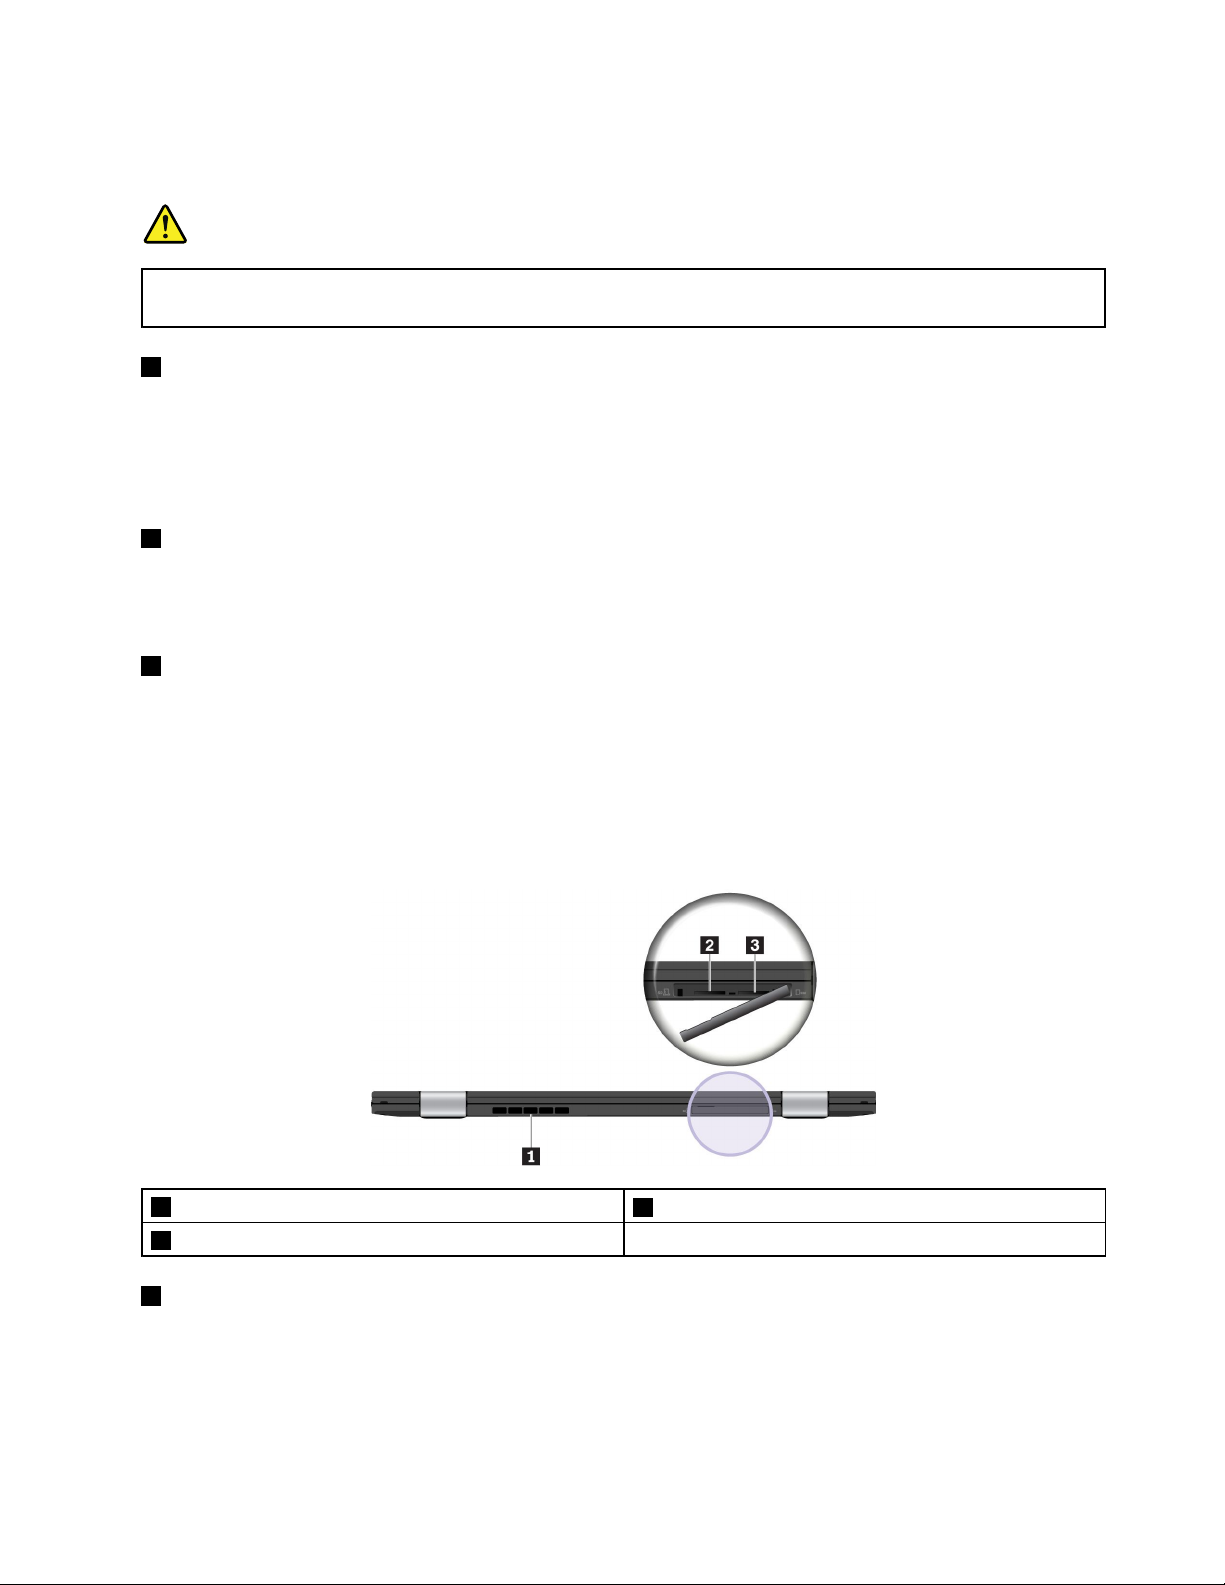
Rearview
1Fanlouvers
3Micro-SIM-cardslot
1Fanlouvers
Thefanlouversandinternalfanenableairtocirculateinthecomputertoensurepropercooling,especially
thecoolingofthemicroprocessor.
2MicroSDcardslot
Note:Toensureproperairflow,donotplaceanyobstaclesinfrontofthefanlouvers.
Chapter1.Productoverview5
Page 22
2MicroSDcardslot
YoucaninsertamicroSDcardintothemicroSDcardslotfordataaccessorstorage.
Attention:WhiletransferringdatatoorfromamicroSDcard,donotputyourcomputerintosleepor
hibernationmodebeforethedatatransferiscompleted.Otherwise,yourdatacouldgetdamaged.
ToremoveamicroSDcard,dothefollowing:
1.ClickthetriangulariconintheWindowsnotificationareatoshowhiddenicons.
2.Right-clicktheSafelyRemoveHardwareandEjectMediaicon.
3.SelectthecorrespondingitemtoejectthecardfromtheWindowsoperatingsystem.
4.Pressthecardtoejectitfromyourcomputer.
5.Removethecardandstoreitsafelyforfutureuse.
Note:IfyoudonotremovethecardfromyourcomputerafteryouejectthecardfromtheWindows
operatingsystem,thecardcannolongerbeaccessed.Toaccessthecard,youmustremoveitfirst,
andtheninsertitagain.
3Micro-SIM-cardslot
Ifyourcomputersupportsthewirelesswideareanetwork(WAN)feature,amicroSubscriberIdentification
Module(SIM)cardmightberequiredtoestablishwireless-WANconnections.Dependingonthecountryor
regionofdelivery,amicroSIMcardmightbeshippedwiththecomputer.
ToinstallorreplacethemicroSIMcard,see“ReplacingthemicroSIMcard”onpage92.
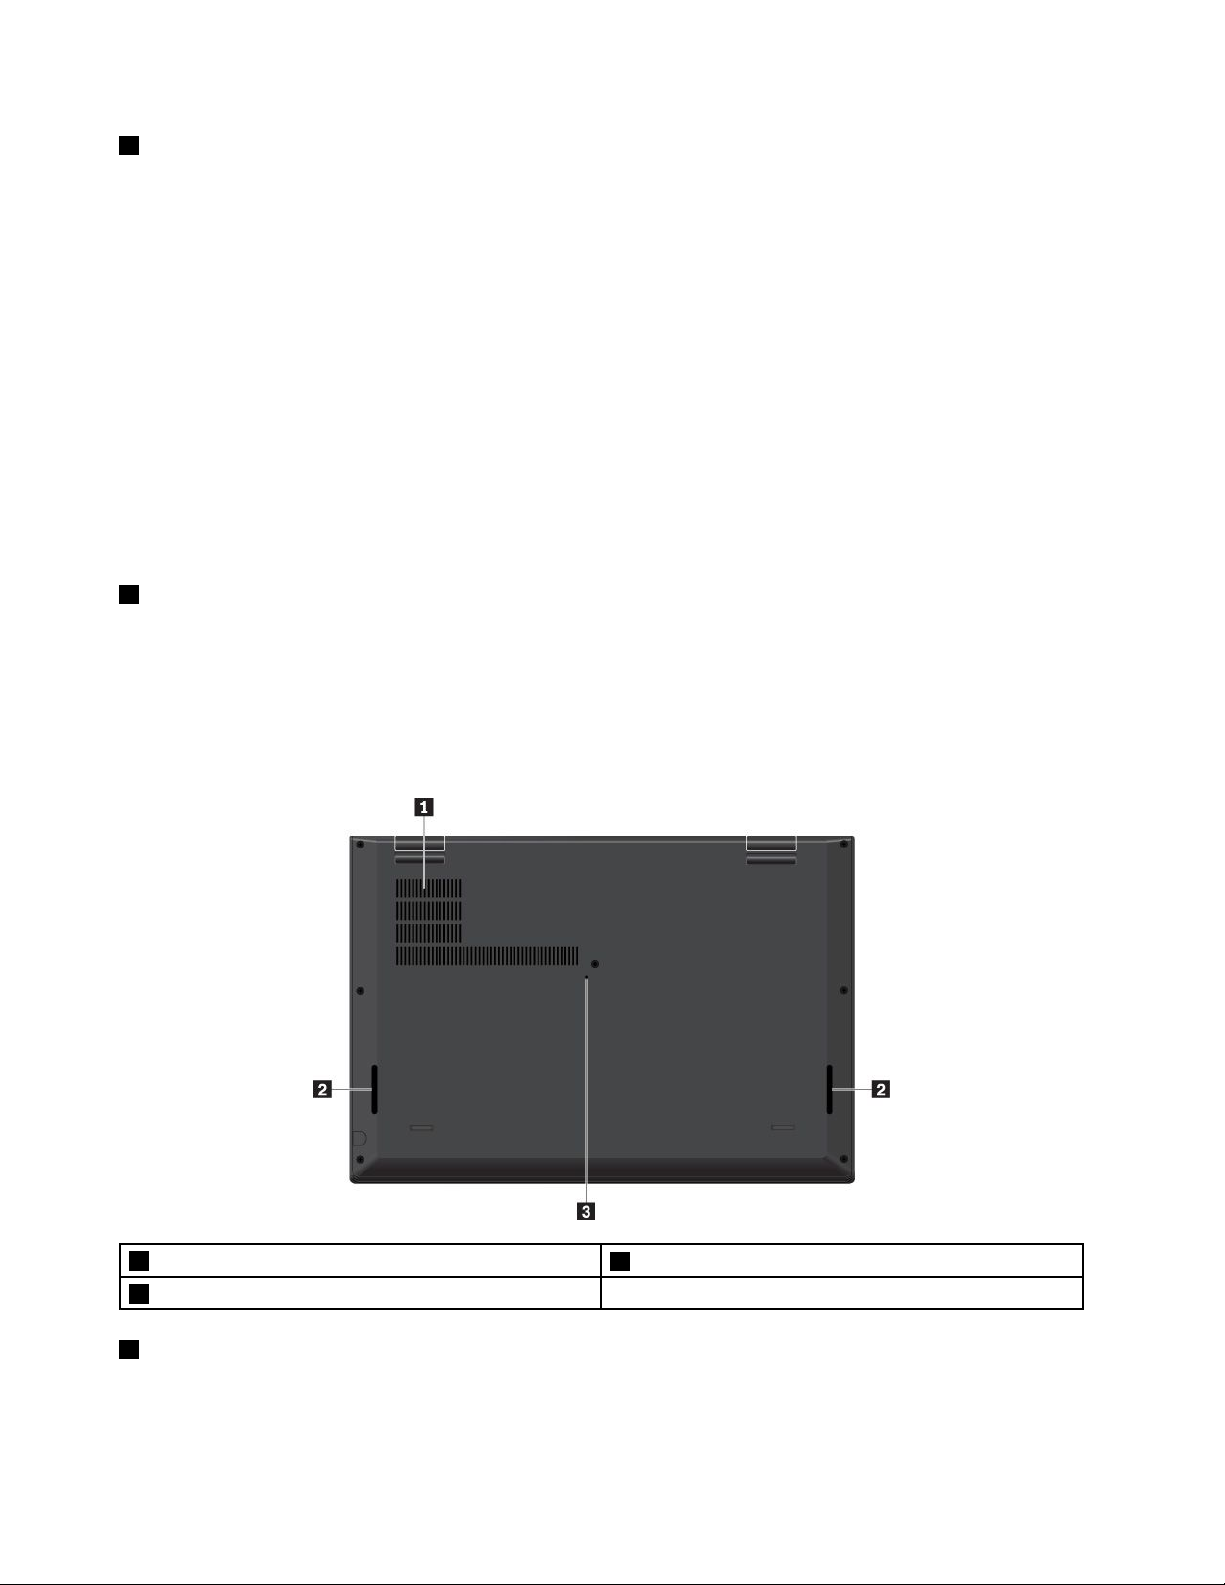
Bottomview
1Fanlouvers
3Emergency-resethole
1Fanlouvers
Thefanlouversandinternalfanenableairtocirculateinthecomputertoensurepropercooling,especially
thecoolingofthemicroprocessor.
2Speakers
6UserGuide
Page 23
2Speakers
Yourcomputerisequippedwithapairofstereospeakers.
3Emergency-resethole
Ifthecomputerstopsrespondingandyoucannotturnitoffbypressingthepowerbutton,removetheac
poweradapterandinsertastraightenedpaperclipintotheemergency-resetholetoresetthecomputer.
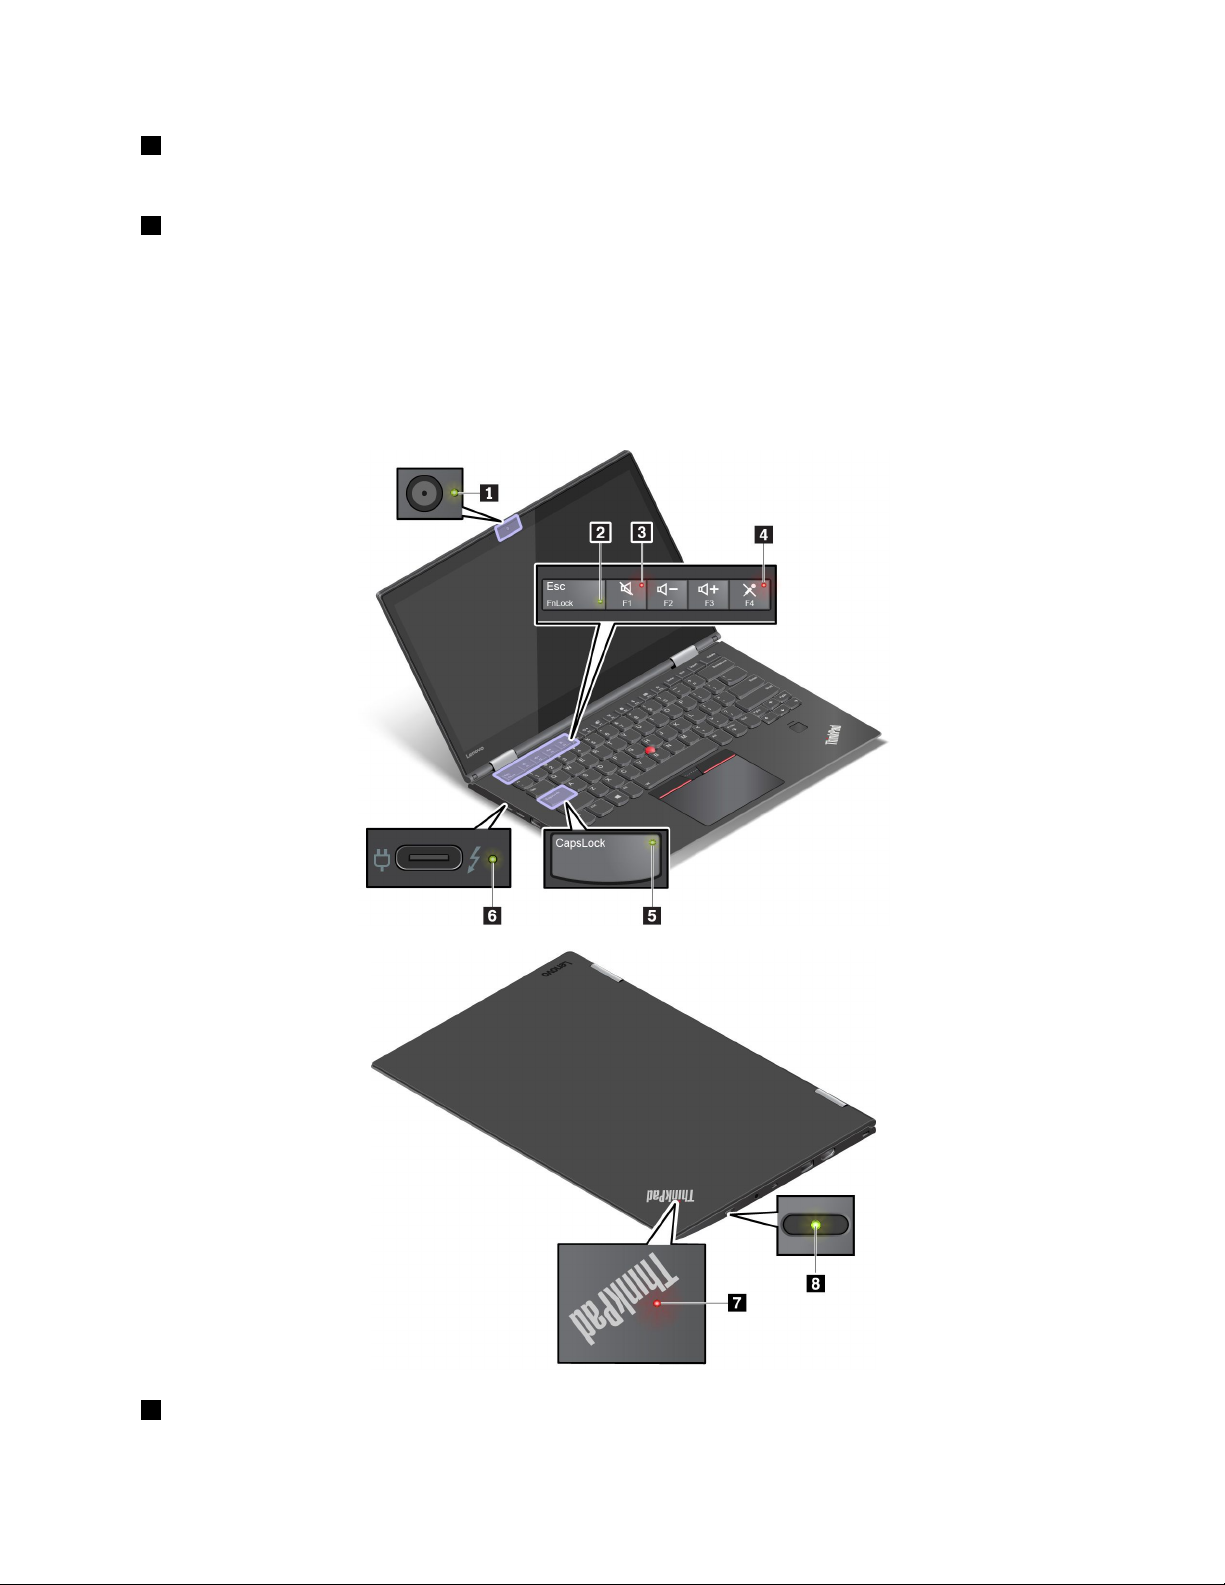
Statusindicators
Thistopicprovidesinformationaboutlocatingandidentifyingthevariousstatusindicatorsonyourcomputer.
Note:Dependingonthemodel,yourcomputermightlookdifferentfromthefollowingillustrations.
1Camerastatusindicator
Whenthisindicatorison,thecameraisinuse.
Chapter1.Productoverview7
Page 24

2FnLockindicator
ThisindicatorshowsthestatusofFnLockfunction.Formoreinformation,see“Usingthespecialkeys”
onpage21
3Speaker-muteindicator
.
Whenthisindicatorison,thespeakersaremuted.
4Microphone-muteindicator
Whenthisindicatorison,themicrophonesaremuted.
5CapsLockindicator
Whenthisindicatorison,youcantypeuppercaselettersbydirectlypressingtheletterkeys.
6acpowerstatusindicator
Thisindicatorshowstheacpowerandchargingstatusofthecomputer.
•Green:connectedtoacpower(charging90%–100%)
•Amber:connectedtoacpower(charging1%–90%)
•Off:notconnectedtoacpower(nocharging)
78Systemstatusindicators
TheindicatorintheThinkPadlogoonthecomputerlidandtheindicatorinthepowerbuttonshowthe
systemstatusofyourcomputer.
•Blinksforthreetimes:Thecomputerisinitiallyconnectedtopower.
•On:Thecomputerison(innormalmode).
•Off:Thecomputerisofforinhibernationmode.
•Blinksquickly:Thecomputerisenteringsleeporhibernationmode.
•Blinksslowly:Thecomputerisinsleepmode.
Importantproductinformationlabels
Thissectionprovidesinformationtohelpyoulocatethefollowinglabels:
•Machinetypeandmodellabel
•FCCIDandICCertificationlabel
•LabelsfortheWindowsoperatingsystems
Machinetypeandmodellabel
WhenyoucontactLenovoforhelp,themachinetypeandmodelinformationhelpsthetechniciansto
identifyyourcomputerandprovidefasterservice.
8UserGuide
Page 25
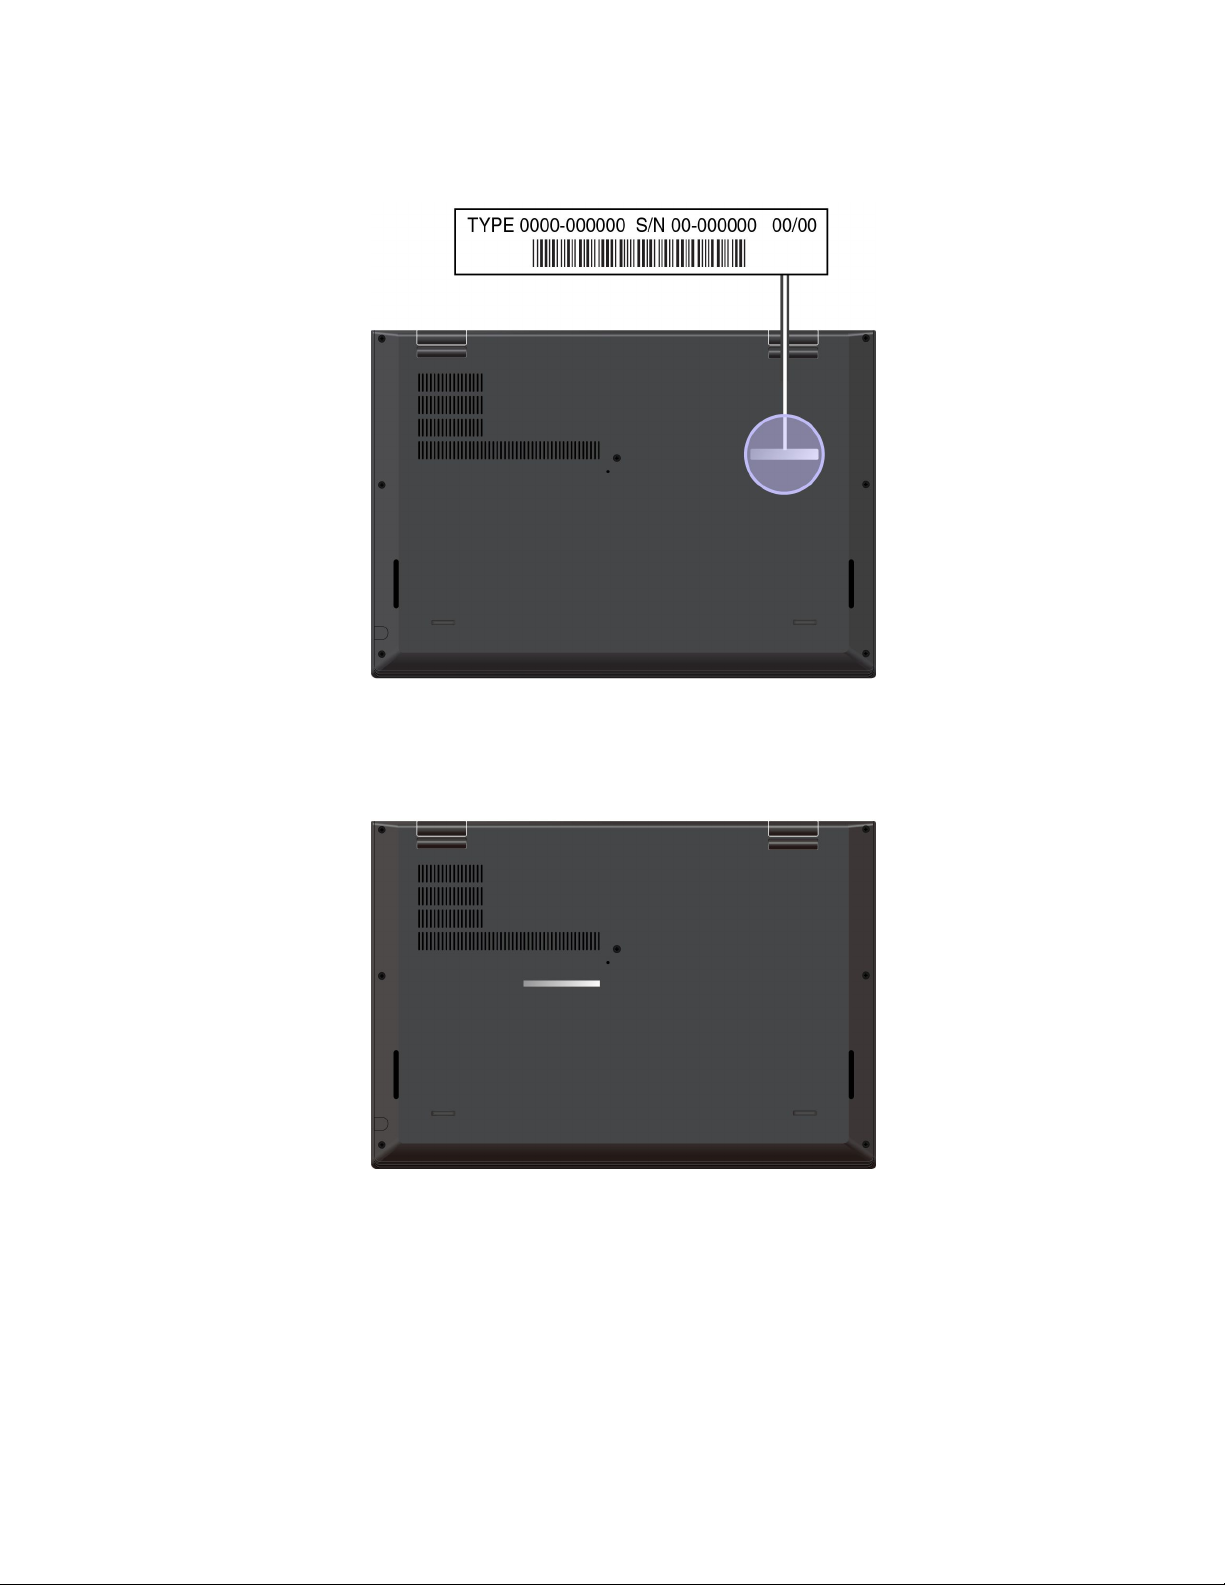
Thefollowingillustrationshowswheretofindthelabelthatcontainsthemachinetypeandmodelinformation
ofyourcomputer.
FCCIDandICCertificationnumber
TheFCCandICCertificationinformationisidentifiedbyalabelonthecomputerasshowninthefollowing
illustration.
Thecontentofthislabeldiffersdependingonthewirelessmodulesthatcomewithyourcomputer:
•Forapreinstalledwirelessmodule,thislabelidentifiestheactualFCCIDandICcertificationnumberfor
thewirelessmoduleinstalledbyLenovo.
Note:Donotremoveorreplaceapreinstalledwirelessmodulebyyourself.Forreplacement,youmust
contacttheLenovoservicefirst.Lenovoisnotresponsibleforanydamagecausedbyunauthorized
replacement.
•Forauser-installablewireless-WANmodule,thislabeldirectsyoutoconsultthisuserguidefortheactual
FCCIDandICcertificationnumber.
Chapter1.Productoverview9
Page 26
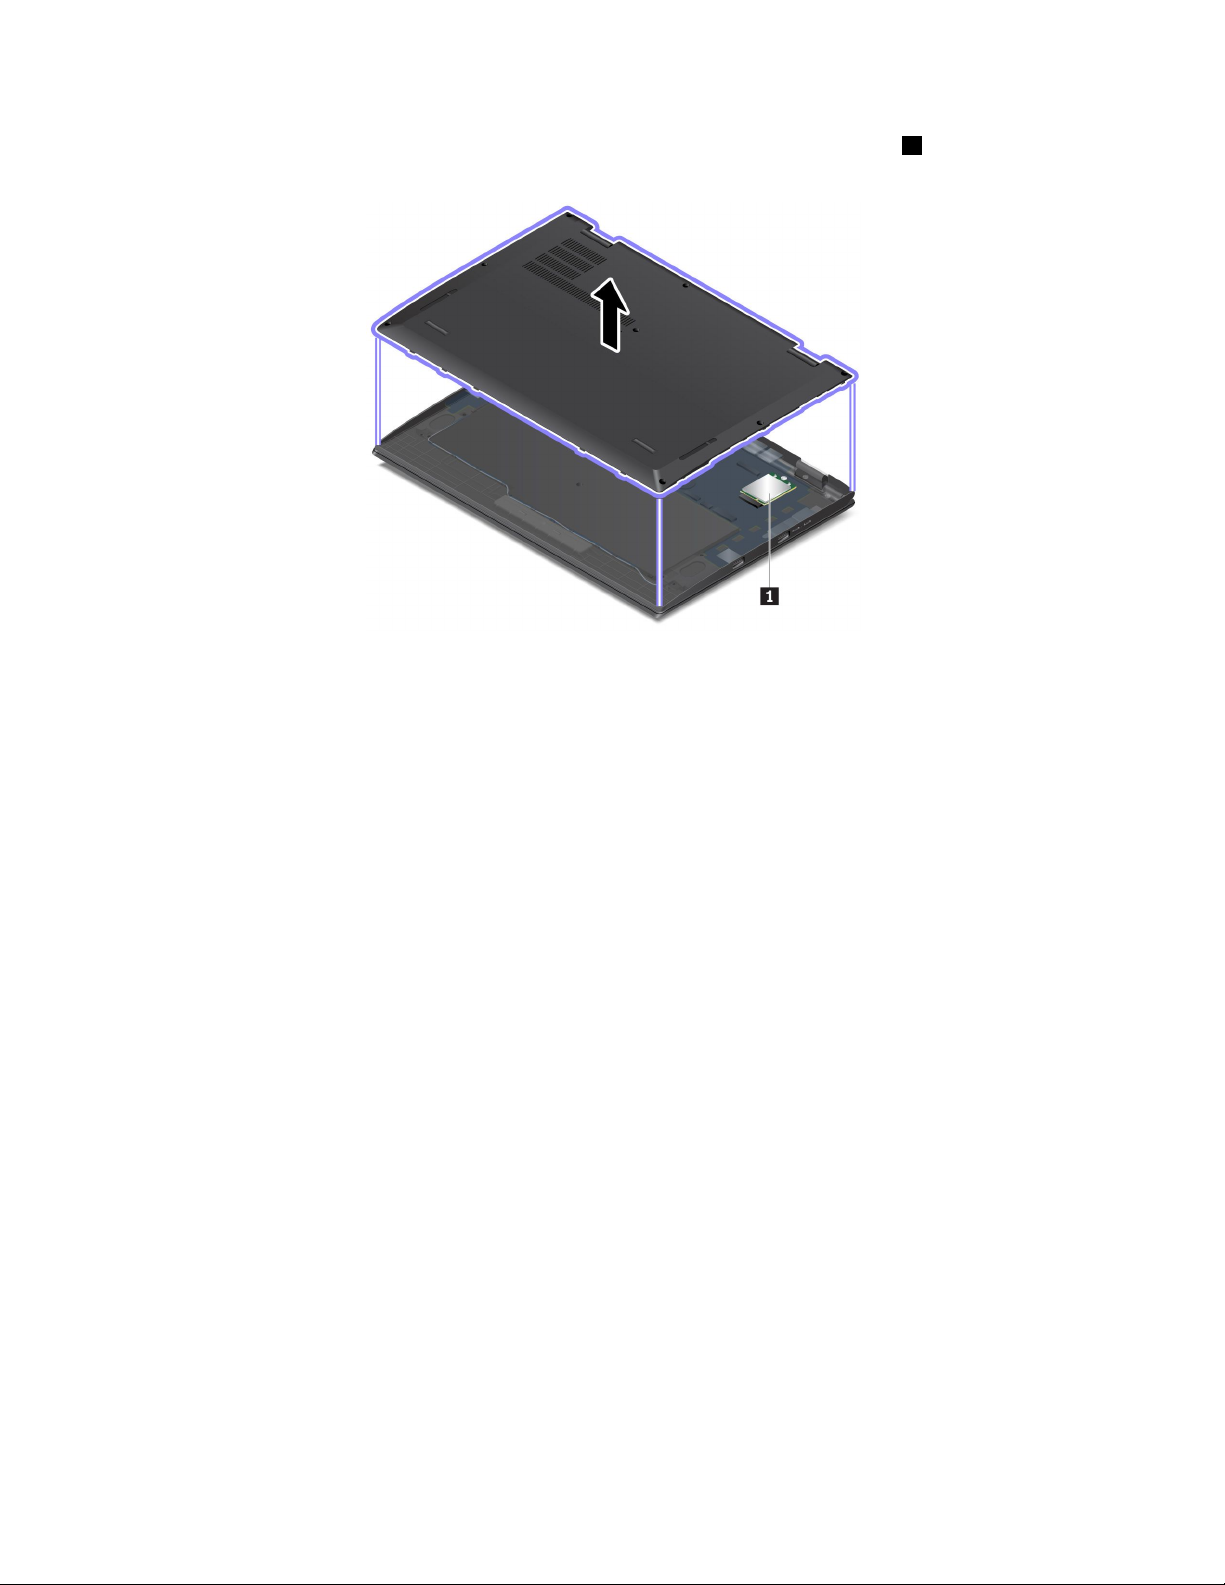
TheFCCIDandICCertificationnumberlabelisaffixedtothewireless-WANmodule1(availableon
somemodels)installedinthecomputer.
Note:Fortheuser-installablewirelessmodule,ensurethatyouuseonlyaLenovo-authorizedwireless
modulesforthecomputer.Otherwise,anerrormessagewillbedisplayedandthecomputerwillbeep
whenyouturnonthecomputer.
LabelsfortheWindowsoperatingsystems
Windows
®
10GenuineMicrosoft
coverdependingonthefollowingfactors:
•Yourgeographiclocation
•Datewhenyourcomputerwasmanufactured
•VersionofWindows10thatispreinstalled
Gottohttps://www.microsoft.com/en-us/howtotell/Hardware.aspxforillustrationsofthevarioustypes
ofGenuineMicrosoftlabels.
•InthePeople’sRepublicofChina,theGenuineMicrosoftlabelisrequiredonallcomputermodels
preinstalledwithanyversionofWindows10.
•Inothercountriesandregions,theGenuineMicrosoftlabelisrequiredonlyoncomputermodelslicensed
forWindows10Pro.
TheabsenceofaGenuineMicrosoftlabeldoesnotindicatethatthepreinstalledWindowsversionisnot
genuine.FordetailsonhowtotellwhetheryourpreinstalledWindowsproductisgenuine,refertothe
informationprovidedbyMicrosoftat:
https://www.microsoft.com/en-us/howtotell/default.aspx
Therearenoexternal,visualindicatorsoftheProductIDorWindowsversionforwhichthecomputeris
licensed.Instead,theProductIDisrecordedinthecomputerfirmware.WheneveraWindows10product
isinstalled,theinstallationprogramchecksthecomputerfirmwareforavalid,matchingProductIDto
completetheactivation.
®
label:YourcomputermighthaveaGenuineMicrosoftlabelaffixedtoits
10UserGuide
Page 27

Insomecases,anearlierWindowsversionmightbepreinstalledunderthetermsoftheWindows10Pro
licensedowngraderights.
Computerfeatures
Thecomputerfeaturesintroducedinthistopiccovervariousmodels.Somecomputerfeaturesmight
beavailableonlyonspecificmodels.
Computercolor
•Blackorsilver
Microprocessor
Toviewthemicroprocessorinformationofyourcomputer,right-clicktheStartbuttonandthenselect
System.
Memory
•Type:lowpowerdoubledatarate3(DDR3)synchronousdynamicrandomaccessmemory(SDRAM),
solderedonthesystemboard
•Maximumsize:16GB
Storagedevice
•M.2solid-statedrive
Display
•Brightnesscontrol
•In-PlaneSwitching(IPS)technology
•Displaysize:355.6mm(14inches)
•Displayresolution:1920x1080pixelsor2560x1440pixels
•Multi-touchtechnology
Keyboard
•Six-rowbacklitkeyboard
•Functionkeys
•ThinkPadpointingdevice
Connectorsandslots
•Audioconnector
•MiniEthernetconnector
•HDMIconnector
•TwoUSB-Cconnectors(Thunderbolt3compatible;alsoworkaspowerconnectors)
•USB3.0connector
•AlwaysOnUSB3.0connector
•Micro-SIM-cardslot
•MicroSDcardslot
Securityfeatures
•Fingerprintreader
Chapter1.Productoverview11
Page 28

•Security-lockslot
•TrustedPlatformModule(TPM)
Wirelessfeatures
•Bluetooth
•Miracast®technology
•NFC(availableonsomemodels)
•WirelessLAN
•WiGig(availableonsomemodels)
•WirelessWAN(availableonsomemodels)
Others
•Conventionalcamera
•Infraredcamera(availableonsomemodels)
•Microphones
•Ambientlightsensor
•Windowsbuttononthedisplay(availableonsomemodels)
•ThinkPadPenPro
Computerspecifications
Size
•Width:333mm(13.1inches)
•Depth:229mm(9.0inches)
•Thickness(dependingonthemodel):
–15.35mm(0.6inches)to17.05mm(0.67inches)
–15.7mm(0.62inches)to17.4mm(0.69inches)
Maximumheatoutput(dependingonthemodel)
•45W(154Btu/hr)
•65W(222Btu/hr)
Powersource(acpoweradapter)
•Sine-waveinputat50Hzto60Hz
•Inputratingoftheacpoweradapter:100Vto240Vac,50Hzto60Hz
Operatingenvironment
Maximumaltitude(withoutpressurization)
•3048m(10000ft)
Temperature
•Ataltitudesupto2438m(8000ft)
12UserGuide
Page 29

–Operating:5°Cto35°C(41°Fto95°F)
–Storage:5°Cto43°C(41°Fto109°F)
•Ataltitudesabove2438m(8000ft)
–Maximumtemperaturewhenoperatingundertheunpressurizedcondition:31.3°C(88°F)
Note:Whenyouchargethebattery,itstemperaturemustbeatleast10°C(50°F).
Relativehumidity
•Operating:8%to95%atwet-bulbtemperature23°C(73°F)
•Storage:5%to95%atwet-bulbtemperature27°C(81°F)
Ifpossible,placeyourcomputerinawell-ventilatedanddryareawithoutdirectexposuretosunshine.
Attention:
•Keepelectricalappliancessuchaselectricfans,radio,airconditioners,andmicrowaveovensaway
fromthecomputer.Thestrongmagneticfieldsgeneratedbytheseappliancescandamagethemonitor
anddataontheinternalstoragedrive.
•Donotplaceanybeveragesontopoforbesidethecomputerorotherattacheddevices.Ifliquidisspilled
onorinthecomputeroranattacheddevice,ashortcircuitorotherdamagemightoccur.
•Donoteatorsmokeoveryourkeyboard.Particlesthatfallintoyourkeyboardcancausedamage.
Lenovoprograms
YourcomputercomeswithLenovoprogramstohelpyouworkeasilyandsecurely.
AccessingLenovoprograms
ToaccessLenovoprogramsonyourcomputer,dothefollowing:
1.OpentheStartmenuandlocateaprogrambytheprogramname.
2.Ifyoudonotfindtheprogramintheprogramlist,searchfortheprograminthesearchbox.
AnintroductiontoLenovoprograms
ThistopicprovidesabriefintroductiontoLenovoprograms.Dependingonyourcomputermodel,someof
theprogramsmightnotbeavailable.
Theavailableprogramsaresubjecttochangewithoutnotice.Tolearnmoreabouttheprogramsandother
computingsolutionsofferedbyLenovo,goto:
http://www.lenovo.com/support
LenovoCompanion
Yourcomputer’sbestfeaturesandcapabilitiesshouldbeeasytoaccessand
understand.WithLenovoCompanion,theyare.
UseLenovoCompaniontodothefollowing:
•Optimizeyourcomputerperformance,monitoryourcomputerhealth,and
manageupdates.
•Accessyouruserguide,checkwarrantystatus,andviewaccessories
customizedforyourcomputer.
•Readhow-toarticles,exploreLenovoforums,andstayup-to-dateon
technologynewswitharticlesandblogsfromtrustedsources.
Chapter1.Productoverview13
Page 30

TheLenovoCompanionprogramisfilledwithexclusiveLenovocontenttohelp
youlearnmoreaboutwhatyoucandowithyourLenovocomputer.
LenovoIDThisprogramenablesyoutocreateandmanageyourLenovoID.WithaLenovo
ID,youcanconnecttoeverythingLenovothroughasingleaccount.Useyour
LenovoIDforquickandsimpleauthenticationandthenenjoythevarious
servicesprovidedbyLenovo.Suchservicesincludeonlineshopping,app
download,personalizeddevicesupport,specialpromotionaloffers,Lenovo
forums,andsoon.
LenovoSettings
Thisprogramenhancesyourcomputingexperiencebyprovidingthefollowing
features:
•Turningyourcomputerintoaportablehotspot
•Configuringcameraandaudiosettings
•Optimizingyourpowersettings
•Creatingandmanagingmultiplenetworkprofiles
14UserGuide
Page 31

Chapter2.Usingyourcomputer
Thischapterprovidesinformationtohelpyouusethevariousfeaturesprovidedbyyourcomputer.
Registeringyourcomputer
Whenyouregisteryourcomputer,informationisenteredintoadatabase,whichenablesLenovotocontact
youifthereisarecallorothersevereproblem.Inaddition,somelocationsofferextendedprivilegesand
servicestoregisteredusers.
WhenyouregisteryourcomputerwithLenovo,youalsowillreceivethefollowingbenefits:
•QuickerservicewhenyoucallLenovoforhelp
•Automaticnotificationoffreesoftwareandspecialpromotionaloffers
ToregisteryourcomputerwithLenovo,gotohttp://www.lenovo.com/registerandfollowtheinstructionson
thescreen.
Frequentlyaskedquestions
ThistopicprovidesafewtipstohelpyouoptimizetheuseofyourThinkPadnotebookcomputers.
Toensurethebestcomputerperformance,gotothefollowingWebsitetofindinformationsuchasaidsfor
troubleshootingandanswerstofrequentlyaskedquestions:
http://www.lenovo.com/support/faq
CanIgetmyuserguideinanotherlanguage?
Todownloadtheuserguideinanotherlanguage,gotohttp://www.lenovo.com/support.Thenfollowthe
instructionsonthescreen.
HowdoIaccessControlPanel?
Right-clicktheStartbutton,andthenclickControlPanel.
HowdoIgethelpabouttheWindowsoperatingsystem
UsetheCortana
HowdoIusebatterypowermoreeffectivelywhenIamonthego?
•Toconservepower,ortosuspendoperationwithoutexitingprogramsorsavingfiles,see“Power-saving
modes”onpage29.
•Toachievethebestbalancebetweenperformanceandpowersaving,createandapplyanappropriate
powerplan.See“Managingthebatterypower”onpage28.
•Ifyourcomputerwillbeturnedoffforanextendedperiodoftime,youcanpreventbatterypowerfrom
drainingbyremovingthebattery.
HowdoIsecurelydisposeofdatastoredontheinternalstoragedrive?
•Study“Security”onpage49tofindouthowyoucanprotectyourcomputerfromtheftandunauthorized
use.
®
personalassistanttosearchforhelp,apps,files,settings,andsoon.
©CopyrightLenovo2017
15
Page 32

•Beforeyoudisposeofthedataontheinternalstoragedrive,ensurethatyouread“Deletingdatafrom
yourstoragedrive”onpage54
HowdoIattachanexternaldisplay?
•Referto“Usinganexternaldisplay”onpage34.
•WiththeExtenddesktopfunction,youcandisplayoutputonboththecomputerdisplayandanexternal
display.
HowdoIattachorreplaceadevice?
Refertotheappropriatetopicin“Replacingdevices”onpage91.
Ihavebeenusingthecomputerforsometimealready,andisgettingslower .WhatshouldIdo?
•Followthe“Generaltipsforpreventingproblems”onpage73.
•Diagnoseproblemsyourselfbyusingthepreinstalleddiagnosticsoftware.See“Diagnosingproblems
withLenovoCompanion”onpage73.
•Checkforrecoverysolutionsin“Recoveryinformation”onpage89.
Printthefollowingtopicsandkeepthemwithyourcomputerincaseyouareunabletoaccessthis
electronicuserguidewhennecessary.
•“InstallingtheWindows10operatingsystem”onpage57
•“Computerstopsresponding”onpage74
•“Powerproblems”onpage84
.
ThinkPadPenPro
TheThinkPadPenProisstoredinthepenslot.Toremovethepenfromtheslot,slidethetabofthepena
littlebitout,andthencompletelypulloutthepen.
Note:TheThinkPadPenProisnotwaterproof.Takecarenottosoakitordipitinwater.
WiththeThinkPadPenPro,inputtingtextiseasierinanaturalmannerwhenyouare:
16UserGuide
Page 33

•Takingnotes
•AnnotatingPortableDocumentFormat(PDF)files
•Drawinggraphicswithapplicationscapableofeditingandsketching
WhenyoudraworwritewiththeThinkPadPenPro,keepitperpendiculartothecomputerdisplayto
achievethebestlinequality.
UsetheThinkPadPenProinsteadofyourfingerinconditionssuchasthefollowing:
•Youneedpreciseanddetailedinput,suchasdrawingapictureorusingthehandwritingmode.
•Toomanyelementsarecrowdedonthescreen,forexample,whenyouareplayinggames.
•Youwanttokeepyourscreenfreefromsmudges.
•Youhavelongfingernailsanditisdifficultforyoutotype.
UsingtheThinkPadPenPro
1Tip
2Eraserbutton
3Clickbutton
YoucanperformthefollowingoperationswiththeThinkPadPenPro:
•Toclickormakeaselection,tapthedisplayoncewiththepen.
•Todouble-click,taptwicewithoutpausing.
•Toright-click,tapthetip1onthedisplayandholdthepenthereforonesecond.Alternatively,youcan
pressandholdtheclickbutton
•Toeraseink,pressandholdtheeraserbutton
3whiletappingthetip1onthedisplay.
2,tapthetip1onthedisplay,anddragthepenacross
theinkyouwanttoerase.
ChargingtheThinkPadPenPro
Tochargethepen,insertthepenintotheslotuntilitsnapsintoposition.Thepenwillbe80%chargedin
about15secondsand100%chargedinaboutfiveminutes.
Note:Ensurethatyourcomputerisonorinsleepmode.Otherwise,thepenwillnotbecharged.
TheThinkPadPenProisalsoavailableasanoptionfromLenovo.TopurchasetheThinkPadPenPro,goto:
http://www.lenovo.com/accessories
Chapter2.Usingyourcomputer17
Page 34

Operatingmodes
Thecomputerdisplaycanbeopenedtoanyanglewithinarangeofupto360degreesasshownin
thefollowingillustration.
Note:Dependingonthemodel,yourcomputermightlookdifferentfromtheillustrationsinthistopic.
Attention:Donotrotatethecomputerdisplaywithtoomuchforce,otherwisethecomputerdisplay
orhingesmightgetdamaged.Donotapplytoomuchforcetotheupper-rightorupper-leftcornerof
thecomputerdisplay.
18UserGuide
Page 35

Byrotatingthedisplaytodifferentangle,yourcomputerfeaturesthefollowingfouroperatingmodes.You
canswitchbetweendifferentmodesaccordingtoyourpreferenceandworkingconvenience.
Note:Thekeyboardandthepointingdevicesareautomaticallydisabledinthestandmode,tentmode,and
tabletmode.Youcanusethetouchscreentocontrolyourcomputerinstead.
Notebookmode
TentmodeTabletmode
Standmode
Usingthemulti-touchscreen
Thistopicprovidesinstructionsonhowtousethemulti-touchscreenthatisavailableonsomemodels.
Notes:
•Yourcomputerscreenmightlookdifferentfromthefollowingillustrations.
•Dependingontheprogramyouuse,somegesturesmightnotbeavailable.
Thefollowingtableintroducessomefrequentlyusedgestures.
Chapter2.Usingyourcomputer19
Page 36

Touchgesture(touchmodels
only)
Description
Touch:Tap.
Mouseaction:Click.
Function:Openanapporperformanactiononanopenapp,suchasCopy,
Save,andDelete,dependingontheapp.
Touch:Tapandhold.
Mouseaction:Right-click.
Function:Openamenuwithmultipleoptions.
Touch:Slide.
Mouseaction:Scrollthemousewheel,movethescrollbar,orclickthescroll
arrow.
Function:Scrollthroughitems,suchaslists,pages,andphotos.
Touch:Draganitemtothelocationyouwant.
Mouseaction:Click,hold,anddraganitem.
Function:Moveanobject.
Touch:Movetwofingersclosertogether.
Mouseaction:PresstheCtrlkeywhilescrollingthemousewheelbackward.
Function:Zoomout.
Touch:Movetwofingersfartherapart.
Mouseaction:PresstheCtrlkeywhilescrollingthemousewheelforward.
Function:Zoomin.
Touch:Puttwoormorefingersonanitemandthenrotateyourfingersclockwise
orcounterclockwise.
Mouseaction:Iftheappsupportsrotation,clicktherotationicon.
Function:Rotateanitem.
Touch:Swipeinfromtherightedge.
Mouseaction:ClicktheactioncentericonintheWindowsnotificationarea.
Function:Opentheactioncentertoseeyournotificationsandquickactions.
20UserGuide
Page 37

Touchgesture(touchmodels
only)
Description
Touch:Swipeinfromtheleftedge.
Mouseaction:Clickthetask-viewicononthetaskbar.
Function:Viewallyouropenwindowsintaskview.
•Shortswipeforfull-screenedapporwhenyourcomputerisinthetablet
mode
Touch:Swipedownwardsshortlyfromthetopedge.
Mouseaction:Moveyourpointertothetopedgeofthescreen.
Function:Showahiddentitlebar.
•Longswipewhenyourcomputerisinthetabletmode
Touch:Swipeinfromthetopedgetothebottomedge.
Mouseaction:Fromthetopedgeofthescreen,clickandhold,movethe
pointertothebottomofthescreen,andthenrelease.
Function:Closethecurrentapp.
Tipsonusingthemulti-touchscreen
•Themulti-touchscreenisaglasspanelcoveredwithaplasticfilm.Donotapplypressureorplaceany
metallicobjectonthescreen,whichmightdamagethetouchpanelorcauseittomalfunction.
•Donotusefingernails,glovedfingers,orinanimateobjectsforinputonthescreen.
•Regularlycalibratetheaccuracyofthefingerinputtoavoidadiscrepancy.
Tipsoncleaningthemulti-touchscreen
•Turnoffthecomputerbeforecleaningthemulti-touchscreen.
•Useadry,soft,andlint-freeclothorapieceofabsorbentcottontoremovefingerprintsordustfromthe
multi-touchscreen.Donotapplysolventstothecloth.
•Gentlywipethescreenusingatop-downmotion.Donotapplyanypressureonthescreen.
Usingthespecialkeys
Yourcomputerhasseveralspecialkeystohelpyouworkmoreeasilyandeffectively.
1Windowslogokey
PresstheWindowslogokeytoopentheStartmenu.ForinformationaboutusingtheWindowslogokeywith
otherkeys,seethehelpinformationsystemoftheWindowsoperatingsystem.
Chapter2.Usingyourcomputer21
Page 38

23Fnkeyandfunctionalkeys
YoucanconfiguretheFnkeyandfunctionkeysintheKeyboardPropertieswindowbydoingthefollowing:
1.GotoControlPanel,andthenchangetheviewofControlPanelfromCategorytoLargeiconsorSmall
icons.
2.ClickKeyboard.IntheKeyboardPropertieswindow,clicktheFnandfunctionkeysorThinkPad
F1–F12keystab.
3.Selecttheoptionsofyourpreference.
•+SwitchthekeyfunctionbetweenthestandardF1–F12functionandthespecialfunction
printedasanicononeachkey.WhentheFnLockindicatorisoff,youcanusethedefaultfunction.You
canchangethedefaultfunctionintheKeyboardPropertieswindow.
•
Muteorunmutethespeakers.
Ifyoumutethesoundandturnoffyourcomputer,thesoundwillremainmutedwhenyouturnonyour
computer.Toturnonthesound,press
•
Decreasethespeakervolume.
or.
•Increasethespeakervolume.
•Muteorunmutethemicrophones.
•Darkenthecomputerdisplay.
•
Brightenthecomputerdisplay.
•Manageexternaldisplays.
•Enableordisablethebuilt-inwirelessfeatures.
•OpentheSettingswindow.
•Enableordisablethebuilt-inBluetoothfeatures.
•
Openakeyboardsettingspage.
•Thiskeyinvokesthefunctiondefinedbyyourself.Ifnofunctionisdefined,pressthiskeytoopenthe
Cortanapersonalassistant.
TodefineorchangetheactionfortheF12key,dothefollowing:
1.OpentheLenovoSettingsprogram.
2.Clicktheinputicon.
3.LocatetheKEYBOARD:USER-DEFINEDKEYsectionandfollowtheinstructionsonthescreento
completethesetting.
OntheInputpage,youcanalsodefinedifferentfunctionsforthekeycombinationswithF12,suchas
Shift+F12,Alt+F12,orCtrl+F12.
Hiddenkeycombinations
•Fn+B:ThiskeycombinationhasthesamefunctionastheBreakkeyonaconventionalexternalkeyboard.
•Fn+K:ThiskeycombinationhasthesamefunctionastheScrLKorScrollLockkeyonaconventional
externalkeyboard.
•Fn+P:ThiskeycombinationhasthesamefunctionasthePausekeyonaconventionalexternalkeyboard.
22UserGuide
Page 39

•Fn+S:ThiskeycombinationhasthesamefunctionastheSysRqkeyonaconventionalexternalkeyboard.
•Fn+4:PressFn+4toputthecomputerintosleepmode.Towakeupthecomputer,pressFnkeyor
thepowerbutton.
•Fn+PrtSc:OpentheSnippingToolprogram.
•Fn+Spacebar:Ifyourcomputersupportskeyboardbacklight,pressFn+Spacebartoswitchbetweenthe
differentkeyboardbacklightstatus(off,low,orhigh).
•Fn+T ab:OpentheLenovoScalingUtilityprogram.
UsingtheThinkPadpointingdevice
ThissectionprovidesinformationaboutusingtheThinkPadpointingdevice.
ThinkPadpointingdeviceoverview
TheThinkPadpointingdeviceenablesyoutoperformallthefunctionsofatraditionalmouse,suchas
pointing,clicking,andscrolling.WiththeThinkPadpointingdevice,youalsocanperformvarioustouch
gestures,suchasrotatingandzoominginorout.
TheThinkPadpointingdeviceconsistsofthefollowingdevices:
1TrackPointpointingdevice
2Trackpad
Note:Dependingonthemodel,yourTrackPointpointingdeviceandthetrackpadmightlookdifferent
fromtheillustrationinthistopic.
Bydefault,boththeTrackPointpointingdeviceandthetrackpadareactivewiththetouchgesturesenabled.
Tochangethesettings,see“CustomizingtheThinkPadpointingdevice”onpage26
.
UsingtheTrackPointpointingdevice
TheTrackPointpointingdeviceenablesyoutoperformallthefunctionsofatraditionalmouse,suchas
pointing,clicking,andscrolling.
TheT rackPointpointingdeviceconsistsofthefollowingcomponents:
Chapter2.Usingyourcomputer23
Page 40

1Pointingstick
2Left-clickbutton(primary-clickbutton)
3Right-clickbutton(secondary-clickbutton)
4Scrollbar
TousetheTrackPointpointingdevice,seethefollowinginstructions:
Note:Placeyourhandsinthetypingpositionanduseyourindexfingerormiddlefingertoapplypressureto
thepointing-sticknonslipcap.Useeitherthumbtopresstheleft-clickbuttonorright-clickbutton.
•Point
Usethepointingstick
1tomovethepointeronthescreen.Tousethepointingstick,applypressureto
thepointing-sticknonslipcapinanydirectionparalleltothekeyboard.Thepointermovesaccordingly
butthepointingstickitselfdoesnotmove.Thespeedatwhichthepointermovesdependsonthe
amountofpressureyouapplytothepointingstick.
•Left-click
Presstheleft-clickbutton
2toselectoropenanitem.
•Right-click
Presstheright-clickbutton
3todisplayashortcutmenu.
•Scroll
Pressandholdthedottedscrollbar4whileapplyingpressuretothepointingstickintheverticalor
horizontaldirection.Thenyoucanscrollthroughthedocument,Website,orapps.
Usingthetrackpad
Theentiretrackpadsurfaceissensitivetofingertouchandmovement.Youcanusethetrackpadtoperform
allthepointing,clicking,andscrollingfunctionsofatraditionalmouse.
Thetrackpadcanbedividedintotwozones:
1Left-clickzone(primary-clickzone)
24UserGuide
Page 41

2Right-clickzone(secondary-clickzone)
Tousethetrackpad,seethefollowinginstructions:
•Point
Slideonefingeracrossthesurfaceofthetrackpadtomovethepointeraccordingly.
•Left-click
Presstheleft-clickzone1toselectoropenanitem.
Youalsocantapanywhereonthesurfaceofthetrackpadwithonefingertoperformtheleft-clickaction.
•Right-click
Presstheright-clickzone
2todisplayashortcutmenu.
Youalsocantapanywhereonthesurfaceofthetrackpadwithtwofingerstoperformtheright-clickaction.
•Scroll
Puttwofingersonthetrackpadandmovethemintheverticalorhorizontaldirection.Thisactionenables
youtoscrollthroughthedocument,Website,orapps.Ensurethatyoupositionyourtwofingersslightly
apartfromeachother.
Withthetrackpad,youalsocanperformavarietyoftouchgestures.Forinformationaboutusingthetouch
gestures,see“Usingthetrackpadtouchgestures”onpage25.
Ifthetrackpadsurfaceisstainedwithoil,turnoffthecomputerfirst.Thengentlywipethetrackpadsurface
withasoftandlint-freeclothmoistenedwithlukewarmwaterorcomputercleaner.
Usingthetrackpadtouchgestures
Theentiretrackpadsurfaceissensitivetofingertouchandmovement.Youcanusethetrackpadtoperform
thesamepointandclickactionsasyouwoulduseatraditionalmouse.Y oualsocanusethetrackpadto
performvarioustouchgestures.
Thefollowingsectionintroducessomefrequentlyusedtouchgesturessuchastapping,dragging,and
scrolling.Formoregestures,seethehelpinformationsystemoftheThinkPadpointingdevice.
Notes:
•Whenusingtwoormorefingers,ensurethatyoupositionyourfingersslightlyapart.
•SomegesturesarenotavailableifthelastactionwasdonefromtheTrackPointpointingdevice.
Chapter2.Usingyourcomputer25
Page 42

•Somegesturesareonlyavailablewhenyouareusingcertainapps.
•Dependingonthemodel,thetrackpadonyourcomputermightlookdifferentfromtheillustrationsin
thistopic.
Tap
Tapanywhereonthetrackpad
withonefingertoselectoropen
anitem.
Two-fingerscroll
Puttwofingersonthetrackpad
andmovethemintheverticalor
horizontaldirection.Thisaction
enablesyoutoscrollthroughthe
document,Website,orapps.
Two-fingerzoomin
Puttwofingersonthetrackpad
andmovethemfartherapartto
zoomin.
Swipethreefingersdown
Putthreefingersonthetrackpad
andmovethemdowntoshow
thedesktop.
Two-fingertap
Tapanywhereonthetrackpadwith
twofingerstodisplayashortcut
menu.
Two-fingerzoomout
Puttwofingersonthetrackpadand
movethemclosertogethertozoom
out.
Swipethreefingersup
Putthreefingersonthetrackpad
andmovethemuptoopenthetask
viewtoseeallyouropenwindows.
CustomizingtheThinkPadpointingdevice
YoucancustomizetheThinkPadpointingdevicesoyoucanuseitmorecomfortablyandefficiently.For
example,youcanchoosetoenabletheTrackPointpointingdevice,thetrackpad,orboth.Youalsocan
disableorenablethetouchgestures.
TocustomizetheThinkPadpointingdevice,dothefollowing:
1.GotoControlPanel.
2.ViewControlPanelbyLargeiconsorSmallicons.ClickMouse.TheMousePropertieswindowis
displayed.
3.IntheMousePropertieswindow,followtheinstructionsonthescreentocompletethecustomization.
Replacingthecaponthepointingstick
Thecap1ontheendofthepointingstickisremovable.Afteryouusethecapforaperiodoftime,you
mightconsiderreplacingthecapwithanewone.
Notes:
•Ensurethatyouuseacapwithgroovesaasshowninthefollowingillustration.
•Dependingonthemodel,yourkeyboardmightlookdifferentfromtheillustrationinthistopic.
26UserGuide
Page 43

Powermanagement
Thissectionprovidesinformationabouthowtouseacpowerandbatterypowertoachievethebestbalance
betweenperformanceandpowermanagement.
Usingtheacpoweradapter
Thepowertorunyourcomputercancomeeitherfromthebatteryorfromacpower.Whileyouuseac
power,thebatterychargesautomatically.
YourcomputercomeswithanUSB-Ctypeacpoweradapterandapowercord.
•acpoweradapter:Convertsacpowerfornotebookcomputeruse.
•Powercord:Connectstheacoutletandtheacpoweradapter.
Connectingtheacpoweradapter
Toconnectthecomputertoacpower,ensurethatyoufollowthestepsinorder:
Attention:Usinganimproperpowercordmightseverelydamageyourcomputer.
1.Connectthepowercordtotheacpoweradapter.
2.ConnecttheacpoweradaptertooneoftheUSB-Cconnectorofthecomputer.
3.Connectthepowercordtoanelectricaloutlet.
Tipsonusingtheacpoweradapter
•Whentheacpoweradapterisnotinuse,disconnectitfromtheelectricaloutlet.
•Donotbindthepowercordtightlyaroundtheacpoweradaptertransformerpackwhenitisconnectedto
thetransformer.
Usingthebattery
Whenyouuseyourcomputerawayfromelectricaloutlets,youdependonbatterypowertokeepyour
computerrunning.Differentcomputercomponentsconsumepoweratdifferentrates.Themoreyouusethe
power-intensivecomponents,thefasteryouconsumebatterypower.
SpendmoretimeunpluggedwithThinkPadbatteries.Mobilityhasrevolutionizedbusinessbyenablingyou
totakeyourworkwhereveryougo.WithThinkPadbatteries,youareabletoworklongerwithoutbeingtied
toanelectricaloutlet.
Chapter2.Usingyourcomputer27
Page 44

Checkingthebatterystatus
Moveyourpointertothebattery-statusiconintheWindowsnotificationareatocheckthebatterystatus.
Thebattery-statusicondisplaysthepercentageofbatterypowerremainingandhowlongyoucanuse
yourcomputerbeforeyoumustchargethebattery.
Therateatwhichyouusebatterypowerdetermineshowlongyoucanusethebatteryofyourcomputer
betweencharges.Becauseeverycomputeruserhasindividualhabitsandneeds,itisdifficulttopredicthow
longabatterychargelasts.Therearetwomainfactors:
•Howmuchenergyisstoredinthebatterywhenyoubegintowork
•Thewayyouuseyourcomputer,forexample:
–Howoftenyouaccessthestoragedrive
–Howbrightyoumakethecomputerdisplay
–Howoftenyouusethewirelessfeature
Chargingthebattery
Whenyoufindthattheremainingbatterypowerislow,chargeyourbattery.
Ifanacoutletisconvenient,connectthecomputertoacpower.Thebatteryisfullychargedinabout
threetosixhours.Theactualchargingtimedependsonthebatterysize,thephysicalenvironment,and
whetheryouareusingthecomputer.Youcancheckthebatterychargingstatusatanytimethroughthe
battery-statusiconintheWindowsnotificationarea.
Note:Tomaximizethelifeofthebattery,thecomputerdoesnotstartrechargingthebatteryiftheremaining
powerisgreaterthan95%.
Tipsonchargingthebattery
•Beforeyouchargethebattery,ensurethatthebatterytemperatureislowerthan10°C(50°F).
•Chargethebatteryinanyofthefollowingconditions:
–Thepercentageofpowerremainingislow.
–Thebatteryhasnotbeenusedforalongtime.
Maximizingthebatterylife
Tomaximizethelifeofthebattery,dothefollowing:
•Usethebatteryuntilthechargeisdepleted.
•Rechargethebatterycompletelybeforeusingit.Youcanseewhetherthebatteryisfullychargedfromthe
battery-statusiconintheWindowsnotificationarea.
•Alwaysusepowermanagementfeaturessuchaspower-savingmodes.
Managingthebatterypower
Toachievethebestbalancebetweenperformanceandpowersaving,adjustyourpowerplansettings.
Toadjustpowerplansettings,dothefollowing:
1.GotoControlPanel,andthenchangetheviewofControlPanelfromCategorytoLargeiconsorSmall
icons.
2.ClickPowerOptions.
3.Followtheinstructionsonthescreen.
Formoreinformation,seetheWindowshelpinformationsystem.
28UserGuide
Page 45

Power-savingmodes
Thereareseveralmodesthatyoucanuseatanytimetoconservepower.Thissectionintroduceseach
modeandgivestipsontheeffectiveuseofbatterypower.
•Sleepmode
Insleepmode,yourworkissavedtomemory,andthenthestoragedriveandthecomputerdisplayare
turnedoff.Whenyourcomputerwakesup,yourworkisrestoredwithinseconds.
Toputyourcomputerintosleepmode,opentheStartmenu,click
•Hibernationmode
Byusingthismode,youcanturnoffyourcomputercompletelywithoutsavingfilesorexitingany
programsthatarerunning.Whenthecomputerentershibernationmode,allopenprograms,folders,and
filesaresavedtothestoragedrive,andthenthecomputerturnsoff.
Toputthecomputerintohibernationmode,definewhatthepowerbuttondoesfirst,andthenpressthe
powerbuttontoputthecomputerintohibernationmode.
Ifyouputyourcomputerintohibernationmodewiththewake-upfunctiondisabled,thecomputerdoes
notconsumeanypower.Thewake-upfunctionisdisabledbydefault.Ifyouputyourcomputerinto
hibernationmodewiththewake-upfunctionenabled,thecomputerconsumesasmallamountofpower.
Toenablethewake-upfunction,dothefollowing:
1.OpenControlPanel,viewControlPanelbyCategory,andthenclickSystemandSecurity.
2.ClickAdministrativeT ools.
3.Double-clickT askScheduler.Ifyouarepromptedforanadministratorpasswordorconfirmation,
typethepasswordorprovideconfirmation.
4.Fromtheleftpane,selectthetaskfolderforwhichyouwanttoenablethewake-upfunction.The
scheduledtasksaredisplayed.
5.Clickascheduledtask,andthenclicktheConditionstab.
6.UnderPower,selectWakethecomputertorunthistask.
•Wirelessoff
Whenyouarenotusingthewirelessfeatures,suchasBluetoothorwirelessLAN,turnthemofftohelp
conservepower.
Power,andthenclickSleep.
CabledEthernetconnections
WithanEthernetcable,youcanconnectyourcomputertoalocalnetworkthroughtheminiEthernet
connectoronyourcomputer.
ToattachanEthernetcabletoyourcomputer,youneedanEthernetextensionadapter.
TheEthernetextensionadapterisavailableasanoptionandshippedwithsomecomputermodels.Youcan
purchaseanEthernetextensionadapterfromLenovoathttp://www.lenovo.com/essentials.
DANGER
Toavoidtheriskofelectricalshock,donotconnectthetelephonecabletotheEthernetextension
adapter.
ToconnecttoalocalnetworkthroughanEthernetcable,dothefollowing:
Chapter2.Usingyourcomputer29
Page 46

1.RemovetheconnectorcoverfromtheEthernetextensionadapter1andstorethecoverinthecover
slotasshownbyarrow
2.ConnectoneendoftheEthernetextensionadaptertotheminiEthernetconnectoronyourcomputer.
ThenconnecttheotherendtoanEthernetcable.
2.
TheEthernetconnectorhastwoindicatorsthatshowthestatusofthenetworkconnection.Whenthe
greenindicatorison,thecomputerisconnectedtoaLAN.Whentheyellowindicatorblinks,data
isbeingtransmitted.
Wirelessconnections
Wirelessconnectionisthetransferofdatawithouttheuseofcablesbutbymeansofradiowavesonly.
Usingthewireless-LANconnection
Awirelesslocalareanetwork(LAN)coversarelativelysmallgeographicarea,suchasanofficebuildingora
house.Devicesbasedonthe802.11standardscanconnecttothistypeofnetwork.
Yourcomputercomeswithabuilt-inwirelessnetworkcardtohelpyouestablishwirelessconnectionsand
monitortheconnectionstatus.
Toestablishawireless-LANconnection,dothefollowing:
30UserGuide
Page 47

1.Turnonthewirelessfeature.
2.Clickthewireless-network-connection-statusiconintheWindowsnotificationarea.Alistofavailable
wirelessnetworksisdisplayed.
3.Double-clickanetworktoconnecttoit.Providerequiredinformationifneeded.
Thecomputerautomaticallyconnectstoanavailableandrememberedwirelessnetworkwhenthelocation
changes.Iftheavailablewirelessnetworkissecured,providethepasswordasrequired.Formore
information,seetheWindowshelpinformationsystem.
Tipsonusingthewireless-LANfeature
Toachievethebestconnection,usethefollowingguidelines:
•Placeyourcomputersothatthereareasfewobstaclesaspossiblebetweenthewireless-LANaccess
pointandthecomputer.
•Openyourcomputercovertoanangleofslightlymorethan90degrees.
Checkingthewireless-LANconnectionstatus
Youcancheckthewireless-LANconnectionstatusthroughthewireless-network-connection-statusiconin
theWindowsnotificationarea.Themorebarsencompassed,thebetterthesignalis.
Usingthewireless-WANconnection
Wirelesswideareanetwork(WAN),whichusescellularnetworksfordatatransmission,enablesyou
toestablishwirelessconnectionsoverremotepublicorprivatenetworks.Theseconnectionscanbe
maintainedoveralargegeographicalareabyuseofmultipleantennasitesorsatellitesystemsmaintained
bywirelessserviceproviders.
SomeThinkPadnotebookcomputerscomewithawireless-WANcardinstalled,whichprovidessome
wireless-WANtechnologies,suchas1xEV-DO,HSPA,3G,GPRS,orLTE.Byusingthewireless-WAN
card,youcanestablishwireless-WANconnections.
Note:Thewireless-WANserviceisprovidedbyauthorizedserviceprovidersinsomecountriesorregions.
Tipsforusingthewireless-WANfeature
Toachievethebestconnection,usethefollowingguidelines:
•Keepyourcomputerawayfromyourbody.
•Placeyourcomputeronaflatsurfaceandopenyourcomputerdisplaytoanangleofslightlymore
than90degrees.
•Placeyourcomputerawayfromconcreteorbrickwallsthatmightdampencellularsignals.
•Bestreceptionisavailablenearwindowsandotherlocationswherecellularphonereceptionisthe
strongest.
Checkingthewireless-WANconnectionstatus
Youcancheckthewireless-WANconnectionstatusthroughthewireless-network-connection-statusiconin
theWindowsnotificationarea.Themorebarsencompassed,thebetterthesignalis.
UsingtheBluetoothconnection
Bluetoothcanconnectdevicesthatarewithinashortdistancefromoneanother.Bluetoothiscommonly
usedinthefollowingscenarios:
•Connectingperipheraldevicestoacomputer
Chapter2.Usingyourcomputer31
Page 48

•Transferringdatabetweenhand-helddevicesandapersonalcomputer
•Remotelycontrollingandcommunicatingwithdevicessuchasmobilephones
Dependingonthemodel,yourcomputermightsupporttheBluetoothfeature.Totransferdatathrough
theBluetoothfeature,dothefollowing:
Note:Itisnotrecommendedtousethewirelessfeature(the802.11standards)ofyourcomputer
simultaneouslywithaBluetoothoption.Thedatatransmissionspeedcanbedelayedandtheperformance
ofthewirelessfeaturecanbedegraded.
1.Dooneofthefollowing:
•PresstheBluetooth-controlkeyandturnontheBluetoothfeature.
•OpentheStartmenu,andthenclickSettings➙Network&Internet➙Airplanemode.The
Bluetoothfeatureisenabled.
2.Right-clickthedatathatyouwanttosend.
3.SelectSendT o➙BluetoothDevices.
4.SelectaBluetoothdevice,andthenfollowtheinstructionsonthescreen.
Formoreinformation,seetheWindowshelpinformationsystemandthehelpinformationsystemofthe
Bluetoothdevice.
UsingtheNFCdevices
Dependingonthemodel,yourcomputermightcomewiththenearfieldcommunication(NFC)feature.NFC
isahigh-frequencyandshort-rangewirelesscommunicationtechnology.ByusingNFC,youcanestablish
radiocommunicationsbetweenyourcomputerandanotherNFC-enableddeviceoverafewcentimeters
orinches.
ThissectionprovidesinstructionsonhowtopairyourcomputerwithanNFCdevice.Formoreinformation
aboutdatatransfer,seethedocumentationoftheNFCdevice.
Attention:
•BeforehandlingtheNFCcard,touchametaltableoragroundedmetalobject.Otherwisethecardmight
getdamagedbythestaticelectricityfromyourbody.
•Duringthedatatransfer,donotputyourcomputerorNFC-enabledsmartphoneintosleepmode;
otherwise,yourdatamightgetdamaged.
EnablingtheNFCfeature
Bydefault,theNFCfeatureisenabled.IftheNFCfeatureofyourcomputerisdisabled,dothefollowingto
enabletheNFCfeature:
1.OpentheStartmenuandthenclickSettings➙Network&Internet➙Airplanemode.
2.TurnofftheAirplanemode.
3.TurnontheNFCfunction.
PairingyourcomputerwithanNFCcardoranNFC-enabledsmartphone
Beforeyoustart,ensurethatthecardisinNFCDataExchangeFormat(NDEF)orthesmartphonescreenis
facingupward,otherwisethecardorthephonecannotbedetected.Thendothefollowing:
1.PositiontheNFCcardorthephonecloselyabovetheNFClabelasshown.
2.Slowlymovethecardorthephoneadistancewithin10mm(0.39inches)verticallyand30mm(1.18
inches)horizontally.Y ouwillbepromptedwhenthecardorthephoneisdetected.
32UserGuide
Page 49

UsingtheAirplanemode
TheAirplanemodeissupportedontheWindows10operatingsystem.IftheAirplanemodeisenabled,all
wirelessfeaturesaredisabled.
ToenableordisabletheAirplanemode,dothefollowing:
1.OpentheStartmenu.
2.ClickSettings➙Network&Internet➙Airplanemode.
3.SlidethecontrolforAirplanemodetoturnitonoroff.
Usingthecamera
Yourcomputercomeswithaconventionalcamera.Dependingonthemodel,somecomputersmightalso
supportaninfraredcamera.
Usingtheconventionalcamera
Tostartthecamera,opentheStartmenuandclickCamera.
Whenthecameraisstarted,theindicatoristurnedoningreen,indicatingthatthecameraisinuse.
Youalsocanusetheintegratedcamerawithotherprogramsthatprovidefeaturessuchasphotographing,
videocapturing,andvideoconferencing.Tousetheintegratedcamerawithotherprograms,openoneofthe
programsandstartthephotographing,videocapturing,orvideoconferencingfunction.Then,thecamera
startsautomaticallyandthegreencamerastatusindicatorturnson.
Youcanconfigurethecamerasettingstomeetyourneeds,suchasadjustingthequalityofthevideooutput.
Toconfigurethecamerasettings,dooneofthefollowing:
•OpentheCameraapp,andclickthesettingsiconintheupper-rightcorner.Followtheinstructionsonthe
screentoconfigurethecamerasettingsasdesired.
•OpentheStartmenuandthenclickLenovoSettings➙Camera.Followtheinstructionsonthescreento
configurethecamerasettings.
Usingtheinfraredcamera
Theinfraredcameraprovidesapersonalandsecurewayforyoutosignintoyourcomputerwithface
authentication.Afteryousettheinfraredcameraforfaceauthentication,youcanuseyourfacetounlock
yourcomputerinsteadofusingapassword.
Tosettheinfraredcameraforfaceauthentication,dothefollowing:
1.OpentheStartmenuandclickSettings➙Accounts➙Sign-inoptions.
Chapter2.Usingyourcomputer33
Page 50

2.FollowtheinstructionsonthescreentocreateaPersonalIdentificationNumber(PIN).
3.ClicktheSetupbuttonunderFaceRecognition.ThenclickGetStarted.
4.EnterthePINyouhavesetearlier.Thecamerapreviewstarts.
5.Facetheinfraredcamera.Keepadistanceofabout30cmto75cm(11.8inchesto29.5inches)away
fromthefrontoftheinfraredcameraduringthescanning.Thebarunderthepreviewimageindicates
theprocess.
Tousetheinfraredcameratounlockyourcomputer,dothefollowing:
1.Facetheinfraredcamera.Keepadistanceofabout30cmto75cm(11.8inchesto29.5inches)away
fromthefrontoftheinfraredcamera.
2.Followtheinstructionsonthescreenandensurethatyouarecenteredandlookingdirectlyatthe
camera.Whenyourfaceisrecognized,theWindowsoperatingsystemunlocksandandsignsyou
inautomatically.
Usinganexternaldisplay
Thissectionprovidesinstructionsonhowtoconnectanexternaldisplay,choosedisplaymodes,and
changedisplaysettings.
Youcanuseanexternaldisplaysuchasaprojectororamonitortogivepresentationsortoexpandyour
workspace.
Yourcomputersupportsthefollowingvideoresolution,iftheexternaldisplayalsosupportsthatresolution.
•Upto4096x2304pixels/60Hz,withanexternaldisplayconnectedtotheUSB-Cconnector
•Upto3840x2160pixels/30Hz,withanexternaldisplayconnectedtotheHDMIconnector
Formoreinformationabouttheexternaldisplay,seethemanualsthatcomewithit.
Connectinganexternaldisplay
Youcanuseeitherawireddisplayorawirelessdisplay.Thewireddisplaycanbeconnectedtoavideo
connectorsuchastheHDMIconnectorandUSB-Cconnector(compatiblewithThunderbolt3)byacable.
ThewirelessdisplaycanbeaddedthroughtheMiracastfunction.
•Connectingawireddisplay
Note:Whenyouconnectanexternalmonitor,avideointerfacecablewithaferritecoreisrequired.
1.Connecttheexternaldisplaytoanappropriatevideoconnectoronyourcomputer.
2.Connecttheexternaldisplaytoanelectricaloutlet.
3.Turnontheexternaldisplay.
Ifyourcomputercannotdetecttheexternaldisplay,right-clickonthedesktop,andthenclickScreen
resolution/Displaysettings➙Detect.
•Connectingawirelessdisplay
Note:Touseawirelessdisplay,ensurethatbothyourcomputerandtheexternaldisplaysupportthe
Miracastfeature.
Dooneofthefollowing:
–OpentheStartmenu,andthenclickSettings➙Devices➙Connecteddevices➙Addadevice.
–Clicktheactioncentericon
displayandfollowtheinstructionsonthescreen.
34UserGuide
intheWindowsnotificationarea.ClickConnect.Selectthewireless
Page 51

Formoreinformation,seetheWindowshelpinformationsystem.
Choosingadisplaymode
Youcandisplayyourdesktopandappsonthecomputerdisplay,theexternaldisplay,orboth.Tochoose
howtodisplaythevideooutput,pressthedisplay-modeswitchingkey
andthenselectadisplay
modeyouprefer.
Therearefourdisplaymodes:
•Disconnect:Displaysthevideooutputonlyonyourcomputerscreen.
Note:Dependingonthesituation,youmightseeDisconnect,PCscreenonly,Computeronly,or
Disconnectprojector.
•Duplicate:Displaysthesamevideooutputonbothyourcomputerscreenandanexternaldisplay.
•Extend:Extendsthevideooutputfromyourcomputerdisplaytoanexternaldisplay.Youcandragand
moveitemsbetweenthetwodisplays.
•Projectoronly:Showsthevideooutputonlyonanexternaldisplay.
Note:Dependingonthesituation,youmightseeProjectoronlyorSecondscreenonly.
IfyoushowprogramsusingDirectDraworDirect3D
®
infull-screenmode,onlythemaindisplayshows
thevideooutput.
Changingdisplaysettings
Youcanchangethesettingsforboththecomputerdisplayandtheexternaldisplay.Forexample,you
candefinewhichoneisthemaindisplayandwhichoneisthesecondarydisplay.Y oualsocanchange
theresolutionandorientation.
Tochangedisplaysettings,dothefollowing:
1.Right-clickonthedesktopandselectDisplaysettings.
2.Selectthedisplaythatyouwanttoconfigure.
3.Changedisplaysettingsasyouwant.
Note:Ifyousetahigherresolutionforthecomputerdisplaythantheexternaldisplay,onlypartofthescreen
canbeshownontheexternaldisplay.
Travelingwithyourcomputer
Thistopicprovidesinformationtohelpyouworkwithyourcomputerwhenyouaretraveling.
Usethefollowingtraveltipstotravelmoreconfidentlyandefficientlywithyourcomputer.
•Whenyourcomputergoesthroughthex-raymachinesatairportsecuritystations,itisimportanttokeep
youreyesonthecomputeratalltimestopreventtheft.
•Considerbringinganelectricaladapterforuseonanairplaneorautomobile.
•Ifyoucarryanacpoweradapter,detachtheaccordfromittoavoiddamagingthecord.
Traveltipsonairplanes
Ifyoucarryyourcomputerontoanairplane,observethefollowingtips:
•Becarefulabouttheseatinfrontofyouonairplanes.Angleyourcomputerdisplaysothatitdoesnotget
caughtwhenthepersoninfrontofyouleansback.
•Whentakingoff,remembertoturnoffyourcomputerorputitintohibernationmode.
Chapter2.Usingyourcomputer35
Page 52

•Someairplanesprovideacpoweroutletsthatdonotsupportthewattagenormallyrequiredtocharge
yourcomputer.Ifyouarehavingtroublewithchargingyourcomputeronanairplane,useAirplanePower
Modetoreducethepowerconsumptionofyourcomputer.
ToenableAirplanePowerMode,dothefollowing:
1.StarttheLenovoSettingsprogram.
2.ClickPOWER.
3.LocatetheAirplanePowerModefeatureandfollowtheinstructionsonthescreen.
•Ifyouintendtouseyourcomputerorwirelessservices(suchasInternetandBluetooth),checkwiththe
airlineforrestrictionsandavailabilityofservicesbeforeboardingtheairplane.Iftherearerestrictionson
theuseofcomputerswithwirelessfeaturesontheairplane,youmustabidebythoserestrictions.
TheAirplanemodeissupportedontheWindows10operatingsystem.IntheAirplanemode,allwireless
featuresaredisabled.
ToenabletheAirplanemode,dothefollowing:
1.OpentheStartmenu,andthenclickSettings➙Network&Internet➙Airplanemode.
2.SlidetheAirplanemodecontroltoturniton.
Travelaccessories
Ifyouaretravelingtoanothercountryorregion,youmightwanttoconsideranappropriateacpoweradapter
forthecountryorregiontowhichyouaretraveling.
Topurchasetravelaccessories,goto:
http://www.lenovo.com/accessories
36UserGuide
Page 53
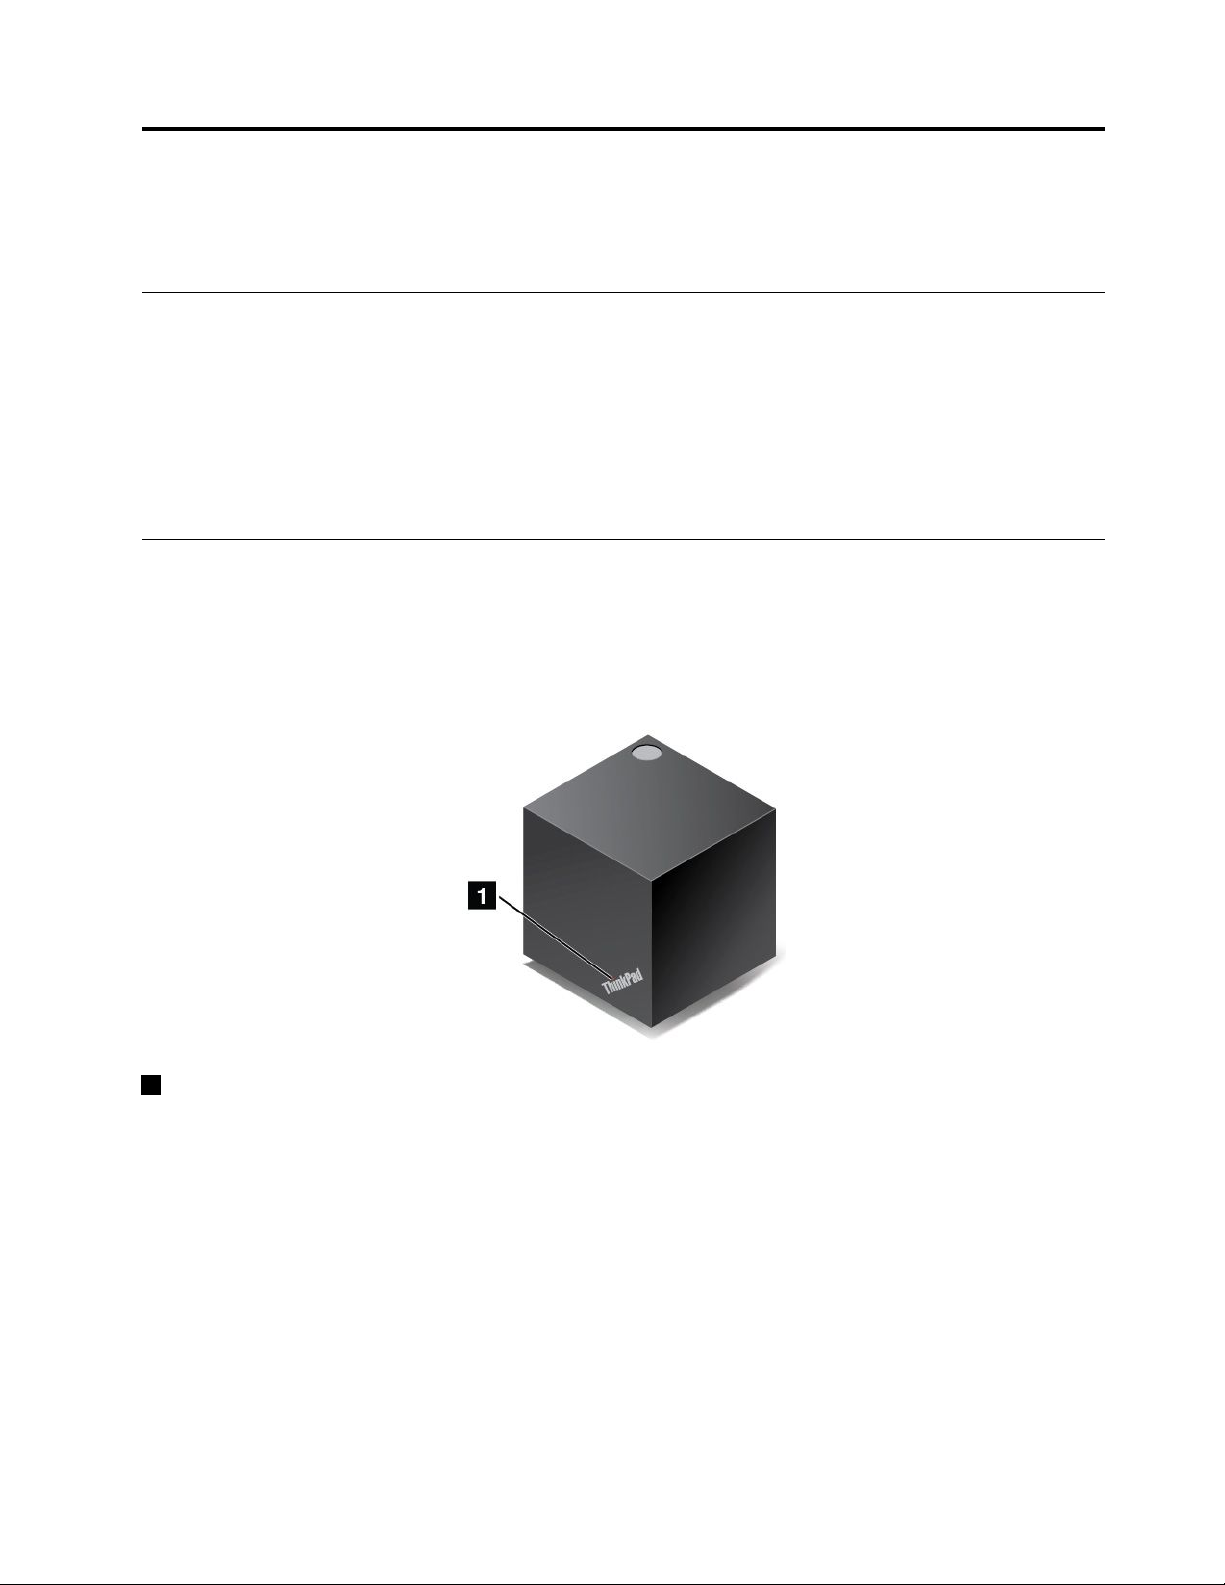
Chapter3.Enhancingyourcomputer
Thischapterprovidesinstructionsonhowtousehardwaredevicestoexpandyourcomputercapabilities.
FindingThinkPadoptions
Ifyouwanttoexpandthecapabilitiesofyourcomputer,Lenovohasanumberofhardwareaccessories
andupgradestomeetyourneeds.Optionsincludememorymodules,storagedevices,networkcards,port
replicatorsordockingstations,batteries,poweradapters,keyboards,mice,andmore.
ToshopatLenovo,goto:
http://www.lenovo.com/essentials
ThinkPadWiGigDock
TheWirelessGigabit(WiGig)technologyenableswirelesscommunicationsbetweennearbydevicesat
multi-gigabitspeeds.SomecomputermodelshaveawirelessLANcardwithbuilt-inWiGigfeature.These
computermodelscanworkwiththeThinkPadWiGigDockwirelesslytoexpandcomputingcapabilities.
ThinkPadWiGigDockoverview
1Statusindicator:TheindicatorintheThinkPadlogoshowsthestatusofthedock.Theindicatorissolid
onwhenthedockison(innormalmode).
©CopyrightLenovo2017
37
Page 54

12USB2.0connectors
5USB3.0connector
ConnectUSB-compatibledevices,suchasaUSBkeyboard,aUSBmouse,aUSBstoragedevice,ora
USBprinter.
3Audioconnector:Connectheadphonesoraheadsetwitha3.5-mm(0.14-inch),4-poleplug.
4Power/Connectionbutton:Turnonorturnoffthedock.Youcanalsopressthebuttontoconfirm
theconnection.
68AlwaysOnUSB3.0connector:ConnectUSB-compatibledevicesorchargesomemobiledigital
devicesandsmartphones.
7Security-lockslot:Toprotectyourdockfromtheft,lockyourdocktoadesk,table,orother
non-permanentfixture.Useasecuritycablelockthatfitsthissecurity-lockslot.
9acpowerconnector:Connecttheacpoweradapter.
10HDMIconnector:Connectacompatibledigitalaudiodeviceorvideomonitor,suchasaDVDplayer
oranHDTV.
11DisplayPortconnector:Connectahigh-performancemonitor,adirect-drivemonitor,orotherdevices
thatuseaDisplayPortconnector.
12Ethernetconnector:ConnectthedocktoanEthernetLAN.
38UserGuide
Page 55

1Emergency-resethole
Ifyourdockstopsresponding,holddownthepowerbuttonforseveralsecondstoturnoffthedock.Ifthe
dockstillcannotbeturnedoff,dothefollowingtoresetthedock:
1.Removetheacpoweradapter.
2.Insertastraightenedpaperclipintotheemergency-resethole.
SettinguptheThinkPadWiGigDock
TosetupyourThinkPadWiGigDock,dothefollowing:
1.Connectthepowercordtotheacpoweradapter.
2.Connecttheacpoweradaptertothepowerconnectorofthedock.
3.Connectthepowercordtoanelectricaloutlet.
4.Turnonthedockbypressingthepowerbutton.
Chapter3.Enhancingyourcomputer39
Page 56

5.Ifanexternaldisplayisavailable,connecttheexternaldisplaytotheappropriateconnector(HDMIor
DisplayPortconnector)onthedock.Theexternaldisplayshowssomewirelesspairinginstructions
whenyouconnectyourcomputertothedock.
6.Positionyourcomputerclosetothedock,within120cm(47.2inches).Togetthebestperformance,
ensurethat:
•Thedockisplacedwithina60cm(23.6inches)distanceanda120-degreesectorregionrelatively
totherearofthecomputerdisplay.
•Noobjectsarebetweenthedockandthecomputer.
Note:EnsurethattheWiGigdockandyourcomputerareplacedintherecommendedposition.Ifyou
noticeanyofthefollowingconditions,pivotthecomputerdisplayforwardorbackwardslightlyto
achievebetterperformance:
•AmessageisdisplayedindicatingthatthewirelessconnectiontotheWiGigdockisweak.
•ThepointerdriftsontheexternaldisplayconnectedtotheWiGigdock.
•ThecomputerisunexpectedlydisconnectedfromtheWiGigdock.
UsingtheThinkPadWiGigDock
Thissectionintroduceshowtouseandmanagethedock.
ConnectingtotheThinkPadWiGigDock
ToconnectyourcomputertotheThinkPadWiGigdock,dothefollowing:
1.Afterthesetupandpreparation,turnonyourcomputerandthedock.
2.ClicktheactioncentericonintheWindowsnotificationarea.ThenclickConnecttoopenthe
devicelist.
3.Selectyourdockfromthelistofavailabledevices.
4.Whenprompted,pressthepower/connectionbuttononthedocktoconfirmthepairing.
5.Followtheinstructionsonthescreentocompletetheconnection.
Afterestablishingtheinitialconnection,youcanmakefurtherconfigurations.Therefore,wheneverthe
computercomeswithintherequiredrange,itwillautomaticallygetconnectedtothedock.
40UserGuide
Page 57

DisconnectingfromtheThinkPadWiGigDock
TodisconnectyourcomputerfromtheThinkPadWiGigDock,dothefollowing:
1.ClicktheactioncentericonintheWindowsnotificationarea.ThenclickConnecttoopenthe
devicelist.
2.LocatetheThinkPadWiGigDockandclickDisconnect.
3.Holddownthepowerbuttononthedockforseveralsecondsuntilthedockisturnedoff.
ManagingtheThinkPadWiGigDock
TheWirelessDockManagerprogramenablesyoutomanagethedock.Youcanchangethenameofthe
dock,changetheradiochanneltooptimizethesignalstrength,andsetapasswordtomanagethedock
settings.
TomanagetheThinkPadWiGigDock,dothefollowing:
1.ClicktheStartbuttontoopentheStartmenu.
2.ClickIntel➙IntelWirelessDockManagertostarttheWirelessDockManagerprogram.
3.ClickDockManagement.
4.Followtheinstructionsonthescreentoconfigurethesettings.
Formoreinformation,refertothemanualsthatcomewiththedockandthehelpinformationsystemof
theWirelessDockManagerprogram.
Chapter3.Enhancingyourcomputer41
Page 58

42UserGuide
Page 59

Chapter4.Accessibility,ergonomic,andmaintenance information
Thischapterprovidesinformationaboutaccessibility,ergonomic,andcleaningandmaintenance.
Accessibilityinformation
Lenovoiscommittedtoprovidinguserswhohavehearing,vision,andmobilitylimitationswithgreater
accesstoinformationandtechnology.Thissectionprovidesinformationaboutthewaystheseuserscanget
themostoutoftheircomputerexperience.Y oualsocangetthemostup-to-dateaccessibilityinformation
fromthefollowingWebsite:
https://www.lenovo.com/accessibility
Keyboardshortcuts
Thefollowingtablecontainskeyboardshortcutsthatcanhelpmakeyourcomputereasiertouse.
Note:Dependingonyourkeyboard,someofthefollowingkeyboardshortcutsmightnotbeavailable.
KeyboardshortcutFunction
Windowslogokey+U
RightShiftforeightseconds
ShiftfivetimesTurnonorturnoffStickyKeys
NumLockforfivesecondsTurnonorturnoffT oggleKeys
LeftAlt+LeftShift+NumLock
LeftAlt+LeftShift+PrtScn(orPrtSc)TurnonorturnoffHighContrast
OpenEaseofAccessCenter
TurnonorturnoffFilterKeys
TurnonorturnoffMouseKeys
Formoreinformation,gotohttp://windows.microsoft.com/,andthensearchusinganyofthefollowing
keywords:keyboardshortcuts,keycombinations,shortcutkeys.
EaseofAccessCenter
EaseofAccessCenterontheWindowsoperatingsystemenablesyoutoconfigureyourcomputersto
suittheirphysicalandcognitiveneeds.
ToaccessEaseofAccessCenter,dothefollowing:
1.GotoControlPanel,andensurethatyouviewControlPanelusingCategory.
2.ClickEaseofAccess➙EaseofAccessCenter.
3.Choosetheappropriatetoolbyfollowingtheinstructionsonthescreen.
EaseofAccessCentermainlyincludesthefollowingtools:
•Magnifier
Magnifierisausefulutilitythatenlargestheentirescreenorpartofthescreensothatyoucansee
theitemsbetter.
•Narrator
Narratorisascreenreaderthatreadswhatisdisplayedonthescreenaloudanddescribeseventssuchas
errormessages.
©CopyrightLenovo2017
43
Page 60

•On-ScreenKeyboard
Ifyouprefertotypeorenterdataintoyourcomputerusingamouse,joystick,orotherpointingdevice
insteadofaphysicalkeyboard,youcanuseOn-ScreenKeyboard.On-ScreenKeyboarddisplaysavisual
keyboardwithallthestandardkeys.Y oucanselectkeysusingthemouseoranotherpointingdevice,or
youcantaptoselectthekeysifyourcomputersupportsmulti-touchscreen.
•HighContrast
HighContrastisafeaturethatheightensthecolorcontrastofsometextandimagesonyourscreen.Asa
result,thoseitemsaremoredistinctandeasiertoidentify.
•Personalizedkeyboard
Adjustkeyboardsettingstomakeyourkeyboardeasiertouse.Forexample,youcanuseyourkeyboard
tocontrolthepointerandmakethekeyboardeasiertotypecertainkeycombinations.
•Personalizedmouse
Adjustmousesettingstomakeyourmouseeasiertouse.Forexample,youcanchangethepointer
appearanceandmakeyourmouseeasiertomanagewindows.
SpeechRecognition
SpeechRecognitionenablesyoutocontrolyourcomputerbyvoice.
Usingonlyyourvoice,youcanstartprograms,openmenus,clickobjectsonthescreen,dictatetextinto
documents,andwriteandsende-mails.Everythingyoudowiththekeyboardandmousecanbedonewith
onlyyourvoice.
TouseSpeechRecognition,dothefollowing:
1.GotoControlPanel,andensurethatyouviewControlPanelbyCategory.
2.ClickEaseofAccess➙SpeechRecognition.
3.Followtheinstructionsonthescreen.
Screen-readertechnologies
Screen-readertechnologiesareprimarilyfocusedonsoftwareprograminterfaces,helpsystems,andvarious
onlinedocuments.Foradditionalinformationaboutscreenreaders,seethefollowing:
•UsingPDFswithscreenreaders:
https://www.adobe.com/accessibility.html?promoid=DJGVE
•UsingtheJAWSscreenreader:
http://www.freedomscientific.com/jaws-hq.asp
•UsingtheNVDAscreenreader:
https://www.nvaccess.org/
Screenresolution
Youcanmakethetextandimagesonyourscreeneasiertoreadbyadjustingthescreenresolutionofyour
computer.
Toadjustthescreenresolution,dothefollowing:
1.Right-clickanemptyareaofthedesktopandselectScreenresolution.
2.Followtheinstructionsonthescreen.
Note:Settingaresolutiontoolowmightpreventsomeitemsfromfittingonthescreen.
44UserGuide
Page 61

Customizableitemsize
Youcanmaketheitemsonyourscreeneasiertoreadbychangingtheitemsize.
•Tochangetheitemsizetemporarily,usetheMagnifiertoolinEaseofAccessCenter.
•Tochangetheitemsizepermanently,dothefollowing:
–Changethesizeofalltheitemsonyourscreen.
1.GotoControlPanel,andensurethatyouviewControlPanelbyCategory.
2.ClickAppearanceandPersonalization➙Display.
3.Changetheitemsizebyfollowingtheinstructionsonthescreen.
4.ClickApply.Thischangewilltakeeffectthenexttimeyoulogintotheoperatingsystem.
–ChangethesizeoftheitemsonaWebpage.
PressandholdCtrl,andthenpresstheplus-signkey(+)toenlargeortheminus-signkey(–)to
reducethetextsize.
–Changethesizeoftheitemsonthedesktoporawindow.
Note:Thisfunctionmightnotworkonsomewindows.
Ifyourmousehasawheel,pressandholdCtrl,andthenscrollthewheeltochangetheitemsize.
Industry-standardconnectors
Yourcomputerprovidesindustry-standardconnectorsthatenableyoutoconnectassistivedevices.
Documentationinaccessibleformats
Lenovoprovideselectronicdocumentationinaccessibleformats,suchasproperlytaggedPDFfilesor
HyperTextMarkupLanguage(HTML)files.Lenovoelectronicdocumentationisdevelopedtoensure
thatvisuallyimpaireduserscanreadthedocumentationthroughascreenreader.Eachimageinthe
documentationalsoincludesadequatealternativetextsothatvisuallyimpaireduserscanunderstandthe
imagewhentheyuseascreenreader.
Ergonomicinformation
Goodergonomicpracticeisimportanttogetthemostfromyourpersonalcomputerandtoavoiddiscomfort.
Arrangeyourworkplaceandtheequipmentyouusetosuityourindividualneedsandthekindofwork
thatyouperform.Inaddition,usehealthyworkhabitstomaximizeyourperformanceandcomfortwhen
usingyourcomputer.
Workinginthevirtualofficemightmeanadaptingtofrequentchangesinyourenvironment.Adaptingto
thesurroundinglightsources,activeseating,andtheplacementofyourcomputerhardware,canhelpyou
improveyourperformanceandachievegreatercomfort.
Thisexampleshowssomeoneinaconventionalsetting.Evenwhennotinsuchasetting,youcanfollow
manyofthesetips.Developgoodhabits,andtheywillserveyouwell.
Chapter4.Accessibility,ergonomic,andmaintenanceinformation45
Page 62

Generalposture:Makeminormodificationsinyourworkingposturetodetertheonsetofdiscomfort
causedbylongperiodsofworkinginthesameposition.Frequentshortbreaksfromyourworkalsohelp
topreventminordiscomfortassociatedwithyourworkingposture.
Display:Positionthedisplaytomaintainacomfortableviewingdistanceof510mmto760mm(20inchesto
30inches).Avoidglareorreflectionsonthedisplayfromoverheadlightingoroutsidesourcesoflight.Keep
thedisplayscreencleanandsetthebrightnesstolevelsthatenableyoutoseethescreenclearly.Pressthe
brightnesscontrolkeystoadjustdisplaybrightness.
Headposition:Keepyourheadandneckinacomfortableandneutral(vertical,orupright)position.
Chair:Useachairthatgivesyougoodbacksupportandseatheightadjustment.Usechairadjustmentsto
bestsuityourcomfortposture.
Armandhandposition:Ifavailable,usechairarmrestsoranareaonyourworkingsurfacetoprovide
weightsupportforyourarms.Keepyourforearms,wrists,andhandsinarelaxedandneutral(horizontal)
position.Typewithasofttouchwithoutpoundingthekeys.
Legposition:Keepyourthighsparalleltothefloorandyourfeetflatonthefloororonafootrest.
Whatifyouaretraveling?
Itmightnotbepossibletoobservethebestergonomicpracticeswhenyouareusingyourcomputer
whileonthemoveorinacasualsetting.Regardlessofthesetting,trytoobserveasmanyofthetipsas
possible.Sittingproperlyandusingadequatelighting,forexample,helpsyoumaintaindesirablelevels
ofcomfortandperformance.Ifyourworkareaisnotinanofficesetting,ensuretotakespecialnoteof
employingactivesittingandtakingworkbreaks.ManyThinkPadproductsolutionsareavailabletohelp
youmodifyandexpandyourcomputertobestsuityourneeds.Y oucanfindsomeoftheseoptionsat
http://www.lenovo.com/essentials.Exploreyouroptionsfordockingsolutionsandexternalproductsthat
providetheadjustabilityandfeaturesthatyouwant.
Questionsaboutvision?
ThevisualdisplayscreensofThinkPadnotebookcomputersaredesignedtomeetthehigheststandards.
Thesevisualdisplayscreensprovideyouwithclear,crispimagesandlarge,brightdisplaysthatareeasyto
see,yeteasyontheeyes.Anyconcentratedandsustainedvisualactivitycanbetiring.Ifyouhavequestions
oneyefatigueorvisualdiscomfort,consultavision-carespecialistforadvice.
Cleaningandmaintenance
Withappropriatecareandmaintenanceyourcomputerwillserveyoureliably.Thefollowingtopicsoffer
informationtohelpyoukeepyourcomputerintopworkingorder.
Basicmaintenancetips
Herearesomebasicpointsaboutkeepingyourcomputerfunctioningproperly:
•Storepackingmaterialssafelyoutofthereachofchildrentopreventtheriskofsuffocationfromplastic
bags.
•Keepyourcomputerawayfrommagnets,activatedcellularphones,electricalappliances,orspeakers
(morethan13cmor5inches).
•Avoidsubjectingyourcomputertoextremetemperatures(below5°C/41°Forabove35°C/95°F).
•Avoidplacinganyobjects(includingpaper)betweenthedisplayandthekeyboardorthepalmrest.
•Donotturnyourcomputeroverwhentheacpoweradapterispluggedin,otherwise,itcouldbreak
theadapterplug.
46UserGuide
Page 63

•Beforemovingyourcomputer,besuretoremoveanymedia,turnoffattacheddevices,anddisconnect
cordsandcables.
•Whenpickingupyouropencomputer,holditbythebottom.Donotpickuporholdyourcomputerby
thedisplay.
•OnlyanauthorizedThinkPadrepairtechnicianshoulddisassembleandrepairyourcomputer.
•Donotmodifyortapethelatchestokeepthedisplayopenorclosed.
•Avoiddirectlyexposingyourcomputerandperipheralstotheairfromanappliancethatcanproduce
negativeions.Whereverpossible,groundyourcomputertofacilitatesafeelectrostaticdischarge.
Cleaningyourcomputer
Itisagoodpracticetocleanyourcomputerperiodicallytoprotectthesurfacesandensuretrouble-free
operation.
Cleaningthecomputercover:Wipeitwithalint-freeclothdampenedinmildsoapandwater.Avoid
applyingliquidsdirectlytothecover.
Cleaningthekeyboard:Wipethekeysonebyonewithalint-freeclothdampenedinmildsoapandwater.
Ifyouwipeseveralkeysatatime,theclothmighthookontoanadjacentkeyandpossiblydamageit.Avoid
sprayingcleanerdirectlyontothekeyboard.Toremoveanycrumbsordustfrombeneaththekeys,youcan
useacamerablowerwithabrushorusecoolairfromahairdryer.
Cleaningthecomputerscreen:Scratches,oil,dust,chemicals,andultravioletlightcanaffectthe
performanceofyourcomputerscreen.Useadry,softlint-freeclothtowipethescreengently.Ifyouseea
scratchlikemarkonyourscreen,itmightbeastain.Wipeordustthestaingentlywithasoft,drycloth.Ifthe
stainremains,moistenasoft,lint-freeclothwithwateroreyeglasscleaner,butdonotapplyliquidsdirectly
toyourcomputerscreen.Ensurethatthecomputerscreenisdrybeforeclosingit.
Chapter4.Accessibility,ergonomic,andmaintenanceinformation47
Page 64

48UserGuide
Page 65

Chapter5.Security
Thischapterprovidesinformationabouthowtoprotectyourcomputerfromunauthorizeduse.
Usingpasswords
Youcanhelppreventyourcomputerfromunauthorizedusebyusingpasswords.Afteryousetapassword,a
promptisdisplayedonthescreeneachtimeyouturnonthecomputer.Enteryourpasswordattheprompt.
Youcannotusethecomputerunlessyoutypethecorrectpassword.
Ifyouhavesetapower-onpassword,asupervisorpassword,oraharddiskpassword,itunlocks
automaticallywhenthecomputerresumesfromsleepmode.
Note:IfaWindowspasswordhasbeenset,youarepromptedtoenteritwhenthecomputerresumes
fromsleepmode.
Passwordsintroduction
Power-onpassword
Youcansetapower-onpasswordtohelpprotectyourcomputeragainstunauthorizedaccess.
Ifyousetapower-onpassword,thepasswordpromptisdisplayedonthescreenwheneveryouturnonthe
computer.Youmustenterthecorrectpasswordtostartusingthecomputer.
Whenthisiconisdisplayed,typeapower-onpasswordorasupervisorpassword.
Supervisorpassword
ThesupervisorpasswordprotectsthesysteminformationstoredintheThinkPadSetupprogram.Ifyouhave
setasupervisorpassword,noonecanchangetheconfigurationofthecomputerwithoutthepassword.It
providesthefollowingsecurityfeatures:
•Ifonlyasupervisorpasswordisset,apasswordpromptisdisplayedwhenyoutrytostarttheThinkPad
Setupprogram.UnauthorizeduserscannotaccesstheThinkPadSetupprogramwithoutthepassword.
•Thesystemadministratorcanusethesupervisorpasswordtoaccessacomputereveniftheuserofthat
computerhassetapower-onpassword.Thesupervisorpasswordoverridesthepower-onpassword.
•ThesystemadministratorcansetthesamesupervisorpasswordonmanyThinkPadnotebookcomputers
tomakeadministrationeasier.
Harddiskpasswords
Settingaharddiskpasswordpreventsunauthorizedaccesstothedataontheharddiskdrive.When
aharddiskpasswordisset,youarepromptedtotypeavalidpasswordeachtimeyoutrytoaccessthe
harddiskdrive.
Thefollowingtwotypesofharddiskpasswordscanhelpprotecttheinformationstoredonthestoragedrive:
•Userharddiskpassword
Ifauserharddiskpasswordhasbeenset,butnomasterharddiskpasswordhasbeen,theusermust
entertheuserharddiskpasswordtoaccessfilesandapplicationsonthestoragedrive.
•Masterharddiskpassword
©CopyrightLenovo2017
49
Page 66

Themasterharddiskpasswordalsorequiresauserharddiskpassword.Themasterharddiskpassword
issetandusedbyasystemadministrator.Itenablestheadministratortoaccessanystoragedrivein
asystemlikeamasterkey.Theadministratorsetsthemasterpassword;thenassignauserpassword
foreachcomputerinthenetwork.Theusercanthenchangetheuserpasswordasdesired,butthe
administratorstillcangetaccessbyusingthemasterpassword.
Whenamasterharddiskpasswordisset,onlytheadministratorcanremovetheuserharddiskpassword.
Whenthisiconisdisplayed,typeauserharddiskpassword.Totypeamasterharddiskpassword,
pressF1.Whentheiconchangesto,typethemasterharddiskpassword.Toreturntotheicon
,pressF1again.
Tipsonusingtheharddiskpasswords:
•Youcansettheminimumlengthofaharddiskpassword.
•Ifyousetaharddiskpasswordofoversevencharacters,thestoragedrivecanbeusedonlywitha
computerthatcanrecognizeaharddiskpasswordofoversevencharacters.Ifyoutheninstallthe
storagedriveinacomputerthatcannotrecognizeaharddiskpasswordthatcontainsmorethanseven
characters,youcannotaccessthedrive.
•Recordyourpasswordandstoreitinasafeplace.Ifyouforgettheuserharddiskpassword,orbothuser
andmasterharddiskpasswords,Lenovocannotresetyourpasswordsorrecoverdatafromthestorage
drive.YoumusttakeyourcomputertoaLenovoreselleroramarketingrepresentativetohavethestorage
drivereplaced.Proofofpurchaseisrequired,andafeewillbechargedforpartsandservice.
Notes:TheeDrivestoragedrivesorTrustedComputingGroup(TCG)Opal-compliantstoragedrivesprovide
self-encryptioncapabilitiestosecureyourdata.
•IfaTCGOpal-compliantstoragedriveandaTCGOpalmanagementsoftwareprogramareinstalled,and
theTCGOpalmanagementsoftwareprogramisactivated,theharddiskpasswordisnotavailable.
•IfaneDrivestoragedriveisinstalledinyourcomputer,andyourcomputerispreinstalledwiththe
Windows10operatingsystem,theharddiskpasswordisnotavailable.
Setting,changing,orremovingapassword
Beforeyoustart,printtheseinstructions.
Toset,change,orremoveapassword,dothefollowing:
1.Restartthecomputer.Whenthelogoscreenisdisplayed,pressF1tostarttheThinkPadSetupprogram.
2.SelectSecurity➙Passwordbyusingthedirectionalkeys.
3.Dependingonthepasswordtype,selectPower-onPassword,SupervisorPassword,orHarddiskx
Password.
4.Followtheinstructionsonthescreentoset,change,orremoveapassword.
Youmightwanttorecordyourpasswordandstoreitinasafeplace.Otherwise,ifyouforgetthepassword,
youhavetotakeyourcomputertoaLenovoreselleroramarketingrepresentativetohavethepassword
canceled.
M.2solid-statedrivesecurity
Toprotectthecomputerfromunauthorizedsecurityattacks,refertothefollowingtipstoenhancesecurity:
50UserGuide
Page 67

•Setapower-onpasswordaswellasaharddiskpassword.Forsecurity,alongerpasswordis
recommended.
•TheM.2solid-statedrivebuiltintoyourcomputercanbeprotectedbyUEFIBIOS.Toprovidereliable
security,usethesecuritychipandasecurityprogramwiththeT rustedPlatformModule(TPM)
managementfeature.See“Settingthesecuritychip”onpage51
.
•IfaDiskEncryptionstoragedriveisinstalledinyourcomputer,ensuretoprotectthecontentsofyour
computerfromunauthorizedaccessbyuseofdriveencryptionsoftware,suchasMicrosoftWindows
BitLocker
®
DriveEncryption.
•Beforeyoudisposeof,sell,orhandoveryourcomputer,deletethedatastoredonit.Formoreinformation,
see“Deletingdatafromyourstoragedrive”onpage54
.
UsingWindowsBitLockerDriveEncryption
Tohelpprotectyourcomputeragainstunauthorizedaccess,usethedriveencryptionsoftware,suchas
WindowsBitLockerDriveEncryption.
WindowsBitLockerDriveEncryption(referredtoasBitLocker)isanintegralsecurityfeatureofsomeeditions
oftheWindowsoperatingsystem.Itcanhelpyouprotecttheoperatingsystemanddatastoredonyour
computer,evenifyourcomputerislostorstolen.BitLockercanencryptalluserandsystemfiles,including
theswapandhibernationfiles.
BitLockerusestheTPMtoprovideenhancedprotectionforyourdataandtoensureearlybootcomponent
integrity.AcompatibleTPMisdefinedasaV2.0TPM.
TochecktheBitLockerstatus,gotoControlPanel,viewControlPanelbyCategory,andclickSystemand
Security➙BitLockerDriveEncryption.
Formoreinformation,seethehelpsystemoftheWindowsoperatingsystem,orsearchfor“Microsoft
WindowsBitLockerDriveEncryptionStep-by-StepGuide”ontheMicrosoftWebsite.
DiskEncryptionsolid-statedrive
SomemodelsmightcontaintheDiskEncryptionsolid-statedrive.Thisencryptiontechnologyhelpsto
protectyourcomputeragainstsecurityattacksonmedia,NANDflash,ordevicecontrollersbyuseofa
hardwareencryptionchip.Fortheefficientuseoftheencryptionfeature,setaharddiskpasswordforthe
internalstoragedrive.
Settingthesecuritychip
Strictsecurityrequirementsareimposedonnetworkclientcomputersthattransferconfidentialinformation
electronically.Dependingontheoptionsyouordered,yourcomputermighthaveanembeddedsecuritychip
(acryptographicmicroprocessor).Withthesecuritychip,youcandothefollowing:
•Protectyourdataandsystem
•Strengthenaccesscontrols
•Securecommunications
Beforeyoustart,printtheseinstructions.
TosetanitemontheSecurityChipsubmenu,dothefollowing:
1.Restartthecomputer.Whenthelogoscreenisdisplayed,pressF1tostarttheThinkPadSetupprogram.
2.SelectSecurity➙SecurityChipbyusingthedirectionalkeys.
3.PressEnter.TheSecurityChipsubmenuopens.
Chapter5.Security51
Page 68

4.Movetoanitemyouwanttosetbyusingthedirectionalkeys.Whentheitemishighlighted,pressEnter.
5.Setotheritemsthatyouwanttoset.
6.PressF10.ASetupConfirmationwindowisdisplayed.SelectYestosavetheconfigurationchanges
andexit.
Notes:
•EnsurethatthesupervisorpasswordhasbeensetinThinkPadSetup.Otherwiseanyonecanchangethe
settingsforthesecuritychip.
•Whenyouclearthesecuritychip,turnoffyourcomputerandthenturnitonagainafteryousetthe
securitychiptoActive.Otherwise,theClearSecurityChipoptionisnotdisplayed.
Usingthefingerprintreader
Dependingonthemodel,yourcomputermighthaveafingerprintreader.Fingerprintauthenticationcan
replaceyourpasswords,suchastheWindowspassword,power-onpassword,andharddiskpassword.In
thisway,youcanlogintoyourcomputersimplyandsecurely.
Youcansetthefingerprintreaderinthefingerprintprogramifavailable.Youalsocanchangethesettings
intheThinkPadSetupprogram.TochangethesettingsintheThinkPadSetupprogram,see“Configuring
ThinkPadSetup”onpage58
Enrollingyourfingerprints
Toenablefingerprintauthentication,enrollyourfingerprintsfirst.Duringtheenrollment,thefingerprintsare
associatedwiththeWindowspasswordautomatically.Itisrecommendedthatyouenrollmorethanone
fingerprintincaseofanyinjuriestoyourfingers.
.
Toenrollyourfingerprints,dothefollowing:
1.OpentheStartmenuandthenclickSettings➙Accounts➙Sign-inoptions.
2.Followtheinstructionsonthescreentofinishtheenrollment.
Scanningyourfinger
Toscanyourfinger,tapthefingerprintreaderwiththetopjointofyourfingerandholdyourfingertherefor
oneortwosecondswithalittlepressure.Thenliftthefingertocompleteonescan.
52UserGuide
Page 69

Fingerprintreaderindicator
1Off:Thefingerprintreaderisnotreadyfortapping.
2Solidgreen:Thefingerprintreaderisreadyfortapping.
3Amber,blinking:Thefingerprintcannotbeauthenticated.
Associatingyourfingerprintswithyourpower-onpasswordandharddiskpassword
Toassociateyourfingerprintswithyourpower-onpasswordandharddiskpassword,manuallycreatea
connectionbydoingthefollowing:
1.Turnoffandthenturnonthecomputer.
2.Whenprompted,scanyourfingeronthefingerprintreader.
3.Enteryourpower-onpassword,harddiskpassword,orbothasrequired.Theconnectioniscreated.
Whenyoustartthecomputeragain,youcanuseyourfingerprintstologintothecomputerwithnoneedto
enteryourWindowspassword,power-onpassword,andharddiskpassword.
Attention:Ifyoualwaysuseyourfingerprinttologintothecomputer,youmightforgetyourpasswords.
Writedownyourpasswords,andkeeptheminasafeplace.Ifyouforgetyourpower-onpassword,
youmusttakeyourcomputertoaLenovo-authorizedserviceroramarketingrepresentativetohavethe
passwordcanceled.Ifyouforgetyourharddiskpassword,Lenovocannotresetyourpasswordorrecover
datafromthestoragedrive.YoumusttakeyourcomputertoaLenovo-authorizedserviceroramarketing
representativetohavethestoragedrivereplaced.Proofofpurchaseisrequired,andafeewillbecharged
forpartsandservice.
Maintainingthefingerprintreader
Thefollowingactionscoulddamagethefingerprintreaderorcauseitnottoworkproperly:
•Scratchingthesurfaceofthereaderwithahard,pointedobject
•Scrapingthesurfaceofthereaderwithyourfingernailoranythinghard
•Usingortouchingthereaderwithadirtyfinger
Ifyounoticeanyofthefollowingconditions,gentlycleanthesurfaceofthereaderwithadry,soft,lint-free
cloth:
•Thesurfaceofthereaderisdirtyorstained.
•Thesurfaceofthereaderiswet.
•Thereaderoftenfailstoenrollorauthenticateyourfingerprint.
Chapter5.Security53
Page 70

Ifyourfingerhasanyofthefollowingconditions,youmightnotbeabletoregisterorauthenticateit:
•Yourfingeriswrinkled.
•Yourfingerisrough,dry,orinjured.
•Yourfingerisstainedwithdirt,mud,oroil.
•Thesurfaceofyourfingerisdifferentfromtheonewhenyouenrolledyourfingerprint.
•Yourfingeriswet.
•Yourfingerthatyouarecurrentlyusinghasnotbeenenrolledbefore.
Toimprovethesituation,trythefollowing:
•Cleanorwipeyourhandstoremoveanyexcessdirtormoisturefromthefingers.
•Enrollanduseadifferentfingerforauthentication.
Deletingdatafromyourstoragedrive
Someofthedatastoredonthestoragedrivemightbesensitive.Handingyourcomputerovertosomeone
elsewithoutdeletingtheinstalledsoftware,suchasoperatingsystemsandprograms,mightevenviolate
thelicenseagreements.Besuretodeletedatastoredonthestoragedrivebeforeyoudisposeof,sell,
orhandoveryourcomputer.
Youcanusethefollowingmethodstodeletedatafromthestoragedrive:
•MovethedatatotheRecycleBin,andthenemptytheRecycleBin.
•Formatyourstoragedrive,usingthesoftwaretoinitializeit.
•UsetherecoveryprogramprovidedbyLenovotobringthestoragedrivebacktothefactorydefault
settings.
Theseoperations,however,onlychangethefilelocationofthedata;theydonotdeletethedataitself.The
dataisstillthere,eventhoughitseemstobelost.Thus,itissometimespossibletoreadthedatabyuseof
specialsoftwarefordatarecovery.Thereisariskthatpeopleofbadfaithmightreadandmisusethecritical
dataonstoragedrivesforunexpectedpurposes.
Topreventleakageofdata,itisimportantthatyoudeleteallthedatafromtheharddiskdrivewhenyou
disposeof,sell,orhandoveryourcomputer.Youcandestroythedataphysicallybysmashingtheharddisk
drivewithahammer,ormagneticallybymeansofstrongmagneticpower,thusmakingthedataunreadable.
Butitisrecommendedthatyouusethesoftware(payware)orservice(payservice)developedforthat
purpose.Theprocessmighttakeseveralhours.
Fordisposingofdataonthesolid-statedrive,LenovoprovidestheDriveEraseUtilityforResettingthe
CryptographicKeyandErasingtheSolidStateDrivetool.
SomecomputersmightsupportaDiskEncryptionharddiskdriveorEncryptionsolid-statedriveandhave
suchadriveinstalled.Youcanlogicallydisposeofallthedataonthedriveinashorttimebyerasingthe
cryptographickey.Thedataencryptedwiththeoldkeyisnotphysicallyerasedbutremainsonthedrive;
however,itcannotbedecryptedwithouttheoldkey.ThisfeatureisalsoavailablewiththeDriveEraseUtility
forResettingtheCryptographicKeyandErasingtheSolidStateDrivetool.
Usingfirewalls
Ifyoursystemispreinstalledwithafirewallprogram,itprotectsagainstcomputerInternetsecuritythreats,
unauthorizedaccess,intrusions,andInternetattacks.Italsoprotectsyourprivacy.
54UserGuide
Page 71

Formoreinformationabouthowtousethefirewallprogram,seethehelpsystemthatcomeswiththe
program.
Protectingdataagainstviruses
Lenovoprovidesafullversionofantivirussoftwareonyourcomputerwithafree30-daysubscription.After
30days,youmustrenewthelicensetocontinuereceivingtheantivirussoftwareupdates.
Formoreinformationaboutyourantivirussoftware,seethehelpsystemofyourantivirussoftware.
Chapter5.Security55
Page 72

56UserGuide
Page 73

Chapter6.Advancedconfiguration
Thischapterprovidesinformationtohelpyoufurtherconfigurethecomputer:
InstallingtheWindows10operatingsystem
Insomesituations,youmightneedtoinstallanewoperatingsystem.Thistopicprovidesinstructions
onhowtoinstallaWindows10operatingsystem.
Beforeyoustart,printtheseinstructions.
Attention:Theprocessofinstallinganewoperatingsystemdeletesallthedataonyourinternalstorage
drive,includingthedatathatwerestoredinahiddenfolder.
ToinstalltheWindows10operatingsystem,dothefollowing:
1.Connectthedrivethatcontainstheoperatingsysteminstallationprogramtothecomputer.
2.StarttheThinkPadSetupprogram.See“UsingtheThinkPadSetupprogram”onpage58.
3.SelectStartup➙BoottodisplaytheBootPriorityOrdersubmenu.
4.Selectthedrivethatcontainstheoperatingsysteminstallationprogram,forexample,USBHDD.
ThenpressEsc.
5.SelectRestartandensurethatOSOptimizedDefaultsisenabled.ThenpressF10tosavethesettings
andexittheThinkPadSetupprogram.
6.Followtheon-screeninstructionstoinstallthedevicedriversandnecessaryprograms.See“Installing
devicedrivers”onpage57.
7.Afterinstallingthedevicedrivers,applyWindowsUpdatetogetthelatestmodules,forexamplethe
securitypatches.
8.Dependingonyourpreference,installLenovoprograms.
Note:Afterinstallingtheoperatingsystem,donotchangetheinitialUEFI/LegacyBootsettinginthe
ThinkPadSetupprogram.Otherwise,theoperatingsystemwillnotstartcorrectly.
WhenyouinstalltheWindows10operatingsystem,youmightneedoneofthefollowingcountryorregion
codes:
CountryorregionCodeCountryorregionCode
ChinaSC
DenmarkDKNorway
FinlandFI
FranceFR
GermanyGR
ItalyIT
JapanJP
NetherlandsNL
SpainSP
SwedenSV
TaiwanandHongKong
UnitedStatesUS
NO
TC
Installingdevicedrivers
Devicedriversareprogramsthatcontaininstructionsfortheoperatingsystemabouthowtooperateor
“drive”acertainpieceofhardware.Eachhardwarecomponentonyourcomputerhasitsownspecific
©CopyrightLenovo2017
57
Page 74

driver.Ifyouaddacomponent,theoperatingsystemmustbeinstructedonhowtooperatethatpieceof
hardware.Afteryouinstallthedriver,theoperatingsystemcanrecognizethehardwarecomponentand
understandhowtouseit.
Note:Becausedriversareprograms,likeanyotherfileonyourcomputer,theyaresusceptibletocorruption
andmightnotperformproperlyifcorruptionoccurs.
Itisnotalwaysnecessarytodownloadthelatestdrivers.However,youshoulddownloadthelatestdriverfor
acomponentwhenyounoticepoorperformancefromthatcomponentorwhenyouaddedacomponent.
Thisactionmighteliminatethedriverasthepotentialcauseofaproblem.
GettingthelatestdriversfromtheWebsite
YoucandownloadandinstallupdateddevicedriversfromtheLenovoSupportWebsitebydoingthe
following:
1.Gotohttp://www.lenovo.com/support.
2.Selecttheentryforyourcomputerandthenfollowtheinstructionsonthescreentodownloadand
installnecessarysoftware.
GettingthelatestdriversusingLenovoCompanion
ThesystemupdatefunctionofLenovoCompanionhelpsyoukeepthesoftwareonyourcomputer
up-to-date.UpdatepackagesarestoredonLenovoserversandcanbedownloadedfromtheLenovo
SupportWebsite.Updatepackagescancontainapplications,devicedrivers,UEFIBIOSflashes,orsoftware
updates.WhenLenovoCompanionconnectstotheLenovoSupportWebsite,theprogramautomatically
recognizesthefollowinginformationanddetermineswhatupdatesareavailableforyourcomputer:
•Machinetypeandmodelofyourcomputer
•Installedoperatingsystem
•Languageoftheoperatingsystem
LenovoCompanionthendisplaysalistofupdatepackagesandcategorizeseachupdateascritical,
recommended,oroptionaltohelpyouunderstandtheimportance.Youhavecompletecontrolofwhich
updatestodownloadandinstall.Afteryouselecttheupdatepackagesyouwant,LenovoCompanion
automaticallydownloadsandinstallstheupdates.
LenovoCompanionispreinstalledonyourcomputerandisreadytorun.Theonlyprerequisiteisanactive
Internetconnection.Youcanstarttheprogrammanually,oryoucanusetheschedulefeaturetoenable
theprogramtosearchforupdatesautomaticallyatspecifiedintervals.Youalsocanpredefinescheduled
updatestosearchbythecriticalseveritylevelsothelistyouchoosefromcontainsonlythoseupdate
typesthatyouneed.
FormoreinformationabouthowtouseLenovoCompanion,seethehelpsystemoftheprogram.
UsingtheThinkPadSetupprogram
TheThinkPadSetupprogramenablesyoutoselectthepreferredsettingsforyourcomputerthrough
configuringtheBIOS.
ConfiguringThinkPadSetup
TheThinkPadSetupprogrammenulistsvariousitemsaboutsystemconfiguration.
Attention:Thedefaultconfigurationsarealreadyoptimizedforyou.Improperchangeoftheconfigurations
mightcauseunexpectedresults.
58UserGuide
Page 75

ToconfigureThinkPadSetup,dothefollowing:
1.Restartthecomputer.Whenthelogoscreenisdisplayed,pressF1.TheThinkPadSetupprogramstarts.
Note:Ifyouarerequiredtoenterthesupervisorpassword,enterthecorrectpassword.Youalsocan
pressEntertoskipthepasswordpromptandstarttheThinkPadSetupprogram.Ifyoudonotenterthe
password,youcannotchangetheconfigurationsthatareprotectedbythesupervisorpassword.
2.Usethearrowkeystoselectatab;orusethearrowkeystolocateanitemandpressEntertoselect
it.Thenthesupportedsubmenuisdisplayed.
3.Defaultvaluesareinboldface.Setthevalueofanitembydoingoneofthefollowing:
•PressF6tochangetoahighervalue.
•PressF5tochangetoalowervalue.
4.PresstheEsckeytoexitthesubmenuandreturntotheparentmenu.Thenusethesamemethod
mentionedabovetochangeotherconfigurations.
5.Whenyoucompletetheconfiguration,pressF10tosaveandexit.YoualsocanselecttheRestarttabin
theThinkPadSetupmenu,andrestartyourcomputerwithoneoftheprovidedoptions.
YoucanpressF9torestoretothedefaultsettings.
Changingthestartupsequence
Insomecases,youmighthavetochangethestartupsequencesothatthecomputerstartsfromadesired
devicewhenpoweredon.Readthistopictolearnhowtochangethecomputerstartupsequence.
Attention:
•Afteryouchangethestartupsequence,ensurethatyouselectthecorrectdeviceduringacopy,asave,or
aformatoperation.Ifyouselectthewrongdevice,thedataonthatdevicemightbeerasedoroverwritten.
•IfyouareusingtheWindowsBitLockerDriveEncryptionfeatureandyourcomputerhasaTrusted
PlatformModule,donotchangethestartupsequence.BitLockerDriveEncryptionlocksthecomputer
whenitdetectsthechangeofstartupsequence.
Tochangethestartupsequence,dothefollowing:
1.AccesstheThinkPadSetupprogramandselectStartup➙Boot.ThenpressEnter.Thedefaultdevice
orderlistisdisplayed.
2.Setthestartupsequenceasyoudesired.
3.PressF10tosavethechangesandrestartthesystem.
Youalsocanchangethestartupsequencetemporarilybydoingthefollowing:
1.Turnoffthecomputer.
2.Turnonthecomputer.Whenthelogoscreenisdisplayed,presstheF12key.
3.Selectthedevicethatyouwantthecomputertostartfrom.ThenpressEnter.
Note:TheBootmenuwillbedisplayedifthecomputercannotstartfromanydevicesortheoperating
systemcannotbefound.
UpdatingtheUEFIBIOS
TheUEFIBIOSisthefirstprogramthatthecomputerrunswhenthecomputeristurnedon.TheUEFIBIOS
initializesthehardwarecomponents,andloadstheoperatingsystemandotherprograms.
Chapter6.Advancedconfiguration59
Page 76

Whenyouinstallanewprogram,devicedriver,orhardwarecomponent,youmightbeinformedtoupdate
theUEFIBIOS.Y oucanupdatetheUEFIBIOSbystartingyourcomputerfromaflashupdatediscoraflash
updateprogramrunningintheWindowsenvironment.
Therequirementsforflashupdateareasfollows:
•ThecomputermustbestartedoverLAN.
•ThecomputermustbeengagedinthePrebooteXecutionEnvironment(PXE).
•Anetwork-managementprogrammustbeinstalledonthecomputerofthenetworkadministrator.
ForinstructionsonhowtoupdatetheUEFIBIOS,gotohttp://www.lenovo.com/support.
BIOSmenu
ThistopicintroducesthefollowingBIOSmenusofyourcomputer:
•Mainmenu
•Configmenu
•Date/Timemenu
•Securitymenu
•Startupmenu
•Restartmenu
Note:Dependingonthemodelandoperatingsystem,themenuitemsandthedefaultvaluemightchange
withoutnotice.
Mainmenu
WhenyouentertheThinkPadSetupprogram,youfirstseetheMainmenuasfollows:
Note:TheBIOSmenuitemsmightchangewithoutnotice.Dependingonthemodel,thedefaultvalue
mightvary.
•UEFIBIOSVersion
•UEFIBIOSDate
•EmbeddedControllerVersion
•MEFirmwareVersion
•MachineT ypeModel
•System-unitserialnumber
•Systemboardserialnumber
•AssetT ag
•CPUT ype
•CPUSpeed
•InstalledMemory
•UUID
•MACAddress(InternalLAN)
•Preinstalledoperatingsystemlicense
•UEFISecureBoot
•OA3ID
•OA2
60UserGuide
Page 77

Configmenu
Note:TheBIOSmenuitemsmightchangewithoutnotice.Dependingonthemodelandoperatingsystem,
themenuitemsandthedefaultvaluemightvary.
Network
•WakeOnLAN
Values:Disabled,AConly,ACandBattery
Descriptions:Thenetworkadministratorcanturnonacomputerfromamanagementconsolebyusing
theWakeonLANfeature.IfyouselectACOnly,theWakeonLANfeatureisenabledonlywhentheac
poweradapterisattached.IfyouselectACandBattery,theWakeonLANfeatureisenabledwithany
powersources.
Notes:
–ThemagicpackettypeWakeonLANrequiresthattheacpowerisattached.
–TheWakeonLANfeaturedoesnotworkwhentheharddiskpasswordisset.
•EthernetLANOptionROM
Values:Disabled,Enabled
Descriptions:TheEthernetLANOptionROMenablesthestartupfromanintegratednetworkdevice.This
menuisdisplayedonlyinLegacyOnlybootmodeorBothbootmodewithLegacyfirst.
•UEFIIPv4NetworkStack
Values:Disabled,Enabled
Descriptions:EnableordisableInternetProtocolVersion4(IPv4)networkstackforUEFIenvironment.
ThismenuisdisplayedonlyinUEFIOnlybootmodeorBothbootmodewithUEFIfirst.
•UEFIIPv6NetworkStack
Values:Disabled,Enabled
Descriptions:EnableordisableInternetProtocolVersion6(IPv6)networkstackforUEFIenvironment.
ThismenuisdisplayedonlyinUEFIOnlybootmodeorBothbootmodewithUEFIfirst.
•UEFIPXEBootPriority
Values:IPv6First,IPv4First
Descriptions:SelectnetworkstackpriorityforUEFIPXEboot.ThismenuisdisplayedonlyinUEFIOnly
bootmodeorBothbootmodewithUEFIfirst,whenIPv6andIPv4stacksarebothenabled.
•WakebyWiGigDock
Values:Disabled,Enabled
Descriptions:Enableordisablethewake-upfunctionoftheThinkPadWiGigDock.
•WirelessAutoDisconnection
Values:Disabled,Enabled
Descriptions:EnableordisabletheWirelessAutoDisconnectionfeaturewhentheEthernetcableis
attached.IfyouselectEnabled,theWirelessLANandWiGigfunctionsareautomaticallyturnedoff
whentheEthernetcableisattached.
Note:TheWirelessAutoDisconnectionfeatureisnotsupportedfortheEthernetconnectionthrougha
USBport.
•MACaddressPassThrough
Values:Disabled,Enabled
Descriptions:EnableordisabletheMACAddressPassThroughfunctionwhenadockisattached.Ifyou
selectEnabled,thedockEthernetwillusethesameMACaddressastheinternalEthernetLAN.
Chapter6.Advancedconfiguration61
Page 78

USB
•USBUEFIBIOSSupport
Values:Disabled,Enabled
Descriptions:EnableordisablethebootsupportforUSBstoragedevices.
•AlwaysOnUSB
Values:Disabled,Enabled
Descriptions:SelectEnabledtochargedevicesthroughtheAlwaysOnUSBconnectorsevenwhenthe
computeristurnedoff,insleepmode,orinhibernationmode.
Note:USB-wake-upfunctionisnotsupportedonAlwaysOnUSBconnectors.
•–ChargeinBatteryMode
Values:Disabled,Enabled
Descriptions:SelectEnabledtochargedevicesthroughtheAlwaysOnUSBconnectorsevenwhenthe
computerisinhibernateorshutdownstateandinbatterymode.
Keyboard/Mouse
•TrackPoint
Values:Disabled,Enabled
Descriptions:Enableordisablethebuilt-inTrackPointpointingdevice.
Note:Ifyouwanttouseanexternalmouse,selectDisabled.
•Trackpad
Values:Disabled,Enabled
Descriptions:Enableordisablethebuilt-intrackpad.
Note:Ifyouwanttouseanexternalmouse,selectDisabled.
•FnandCtrlKeyswap
Values:Disabled,Enabled
Descriptions:IfyouselectEnabled,theFnkeyworksastheCtrlkeyandtheCtrlkeyworksastheFnkey.
•FnStickykey
Values:Disabled,Enabled
Descriptions:IfyouselectEnabled,youcanpresstheFnkey(insteadofpressandhold)tokeepit
inapressedcondition.Thenpressthefunctionkeyyouwant.Theactionisequivalenttopressing
thefunctionkeysimultaneouslywiththeFnkey.
•F1–F12asprimaryfunction
Values:Disabled,Enabled
Descriptions:IfyouselectEnabled,pressingthefunctionkeysdirectlyinputsF1–F12.Ifyouselect
Disabled,pressingthefunctionkeysdirectlyinitiatesthespecialfunctionprintedasanicononeach
key.Totemporarilyswitchtheabovetwofunctions,pressFn+Esc.
Display
•BootDisplayDevice
Values:ThinkPadLCD,ExternalDisplay
62UserGuide
Page 79

Descriptions:Selectthedisplaydevicethatyouwanttoactivateatboottime.Thisselectioniseffective
forboottime,passwordprompt,andThinkPadSetup.YoucanattachanexternaldisplaytotheUSB-C
connectororHDMIconnectoronyourcomputer.Ifmultipledisplaysareattached,thefirstrecognized
onewillbeactivatedatboottime.
•T otalGraphicsMemory
Values:256MB,512MB
Descriptions:AllocatethetotalmemorywhichIntelinternalgraphicsshares.
Note:Ifyouselect512MB,themaximumusablememorymightbereducedonthe32–bitoperating
system.
•BootTimeExtension
Values:Disabled,1second,2seconds,3seconds,5seconds,10seconds,
Descriptions:Duringthebootprocess,thecomputermightnotdetecttheexternalmonitorsthatneed
moretimetogetready.Selecthowlongyouwanttoextendthebootprocess.
Power
•IntelSpeedStep
®
technology
Values:Disabled,Enabled
Descriptions:SelectthemodeofIntelSpeedSteptechnologyatruntime.
–ModeforAC
Values:MaximumPerformance,BatteryOptimized
Descriptions:MaximumPerformance:Alwayshighestspeed
–ModeforBattery
Values:MaximumPerformance,BatteryOptimized
Descriptions:BatteryOptimized:Alwayslowestspeed
•AdaptiveThermalManagement
Values:MaximizePerformance,Balanced
Descriptions:Selectathermalmanagementschemetouse.Theschemeaffectsfansound,temperature,
andperformance.
•CPUPowerManagement
Values:Disabled,Enabled
Descriptions:Enableordisablethepower-savingfeaturethatstopsthemicroprocessorclock
automaticallywhentherearenosystemactivities.Normally,itisnotnecessarytochangethesetting.
•PowerOnwithACAttach
Values:Disabled,Enabled
Descriptions:Enableordisableafeaturethatturnsonthecomputerwhentheacpoweradapteris
attached.
•DisableBuilt-inBattery
Values:Y es,No
Descriptions:Temporarilydisablethebuilt-inbatteryforservicingthesystem.Afterselectingthisitem,
thesystemwillbeautomaticallypoweredoff,thenreadytobeserviced.
Note:Thebuilt-inbatterywillbeautomaticallyenabledwhentheacpoweradapterisreconnected.
Chapter6.Advancedconfiguration63
Page 80

BeepandAlarm
•PasswordBeep
Values:Disabled,Enabled
Descriptions:Enableordisableabeepwhenthecomputeriswaitingforapower-on,harddisk,or
supervisorpassword.Differentbeepsremindyouthatthepasswordyouenteredisrightorwrong.
•KeyboardBeep
Values:Disabled,Enabled
Descriptions:Enableordisableabeepwhenunmanageablekeycombinationsarepressed.
Thunderbolt(TM)3
•WakebyThunderbolt(TM)3
Values:Disabled,Enabled
Descriptions:EnableordisableWakeFeaturewithThunderbolt(TM)3Port.IfyouselectEnabled,the
batterylifeduringthelowpowerstatusmightbecomeshorter.
•Securitylevel
Values:NoSecurity,UserAuthorization,SecureConnect,DisplayPortandUSB
Descriptions:Selectthesecuritylevel.
•Thunderbolt(TM)device
Values:Disabled,Enabled
Descriptions:Enableordisablepre-OSsupportforThunderbolt(TM)devicesattachedtotheThunderbolt
(TM)3port.T ouseadeviceinthepre-bootenvironment,authorizeitintheoperatingsystemorsetthe
SecurityleveltoNoSecurity.Tobootfromadevice,configureitbyselectingStartup➙Boot.
•USBdevice
Values:Disabled,Enabled
Descriptions:Enableordisablepre-OSsupportforUSBdevicesattachedtotheThunderbolt(TM)3port.
Touseadeviceinthepre-bootenvironment,authorizeitintheoperatingsystemorsettheSecuritylevel
toNoSecurity.T obootfromadevice,configureitbyselectingStartup➙Boot.
IntelAMT
•Intel(R)AMTControl
Values:Disabled,Enabled,PermanentlyDisabled
Descriptions:IfyouselectEnabled,IntelAMT(ActiveManagementTechnology)isconfiguredand
additionalsetupitemsareprovidedinMEBx(ManagementEngineBIOSExtension)Setup.Ifyouselect
PermanentlyDisabled,youcanneverenableitagain.Becautiouswhenyoumaketheselection.
Note:YoucanentertheMEBxSetupmenubypressingCtrl+PintheStartupInterruptMenuwindow.To
displaytheStartupInterruptMenuwindow,pressEnterduringthepower-onself-test(POST).
•USBKeyProvisioning
Values:Disabled,Enabled
Descriptions:ThisoptionenablesordisablesUSBkeyprovisioning.
•CIRATimeout
Values:0–255
Descriptions:SetthetimeoutoptionfortheCIRAconnectiontobeestablished.Selectablevaluesare
from1to255.Ifyouselect0,use60secondsasthedefaulttimeoutvalue.Ifyouselect255,thewaiting
timeforestablishingaconnectionisunlimited.
64UserGuide
Page 81

Note:Thedefaultvalueis60seconds.
•ConsoleT ype
Values:PC-ANSI,VT100,VT100+,VT-UTF8
Descriptions:SelecttheconsoletypeforAMT.ThisconsoletypemustmatchtheIntelAMTremote
console.
Date/Timemenu
Note:TheBIOSmenuitemsmightchangewithoutnotice.Dependingonthemodel,thedefaultvalue
mightvary.
•SystemDate
Descriptions:Setorchangethedateofthesystem.
•SystemTime
Descriptions:Setorchangethetimeofthesystem.
Securitymenu
Note:TheBIOSmenuitemsmightchangewithoutnotice.Dependingonthemodelandoperatingsystem,
themenuitemsandthedefaultvaluemightvary.
Password
•SupervisorPassword
Values:Disabled,Enabled
Descriptions:Setasupervisorpasswordtopreventunauthorizedusersfromchangingthestartup
sequence,network-relatedsettings,andsystemdateandtime.
•LockUEFIBIOSSettings
Values:Disabled,Enabled
Descriptions:EnablethisoptiontopreventunauthorizedusersfromchanginganysettingsinThinkPad
Setup.Tousethisfunction,asupervisorpasswordisrequired.
•PasswordatUnattendedBoot
Values:Disabled,Enabled
Descriptions:Whenthisoptionisenabled,apasswordpromptisdisplayedwhenthecomputeristurned
onbyanunattendedeventsuchasaWakeonLANattempt.Topreventunauthorizedaccess,settheuser
authenticationontheoperatingsystem.
•PasswordatRestart
Values:Disabled,Enabled
Descriptions:Whenthisoptionisenabled,apasswordpromptisdisplayedwhenyourestartthe
computer.Topreventunauthorizedaccess,settheuserauthenticationontheoperatingsystem.
•PasswordatBootDeviceList
Values:Disabled,Enabled
Descriptions:Ifyouenablethisoption,thesupervisorpasswordisrequiredwhenyoutrytoenterthe
BootmenubyrepeatedlypressingF12.T ousethisfunction,asupervisorpasswordmustbeset.
•PasswordCountExceededError
Values:Disabled,Enabled
Descriptions:EnablethisoptiontodisplaythePOST0199errormessagewhenyouenterawrong
supervisorpasswordmorethanthreetimes.
•SetMinimumLength
Chapter6.Advancedconfiguration65
Page 82

Values:Disabled,xcharacters(4≤x≤12)
Descriptions:Specifyaminimumlengthforpower-onpasswordsandharddiskpasswords.Ifasupervisor
passwordisset,youcannotchangetheminimumlengthuntilyouloginasasupervisor.
•Power-OnPassword
Values:Disabled,Enabled
Descriptions:Setapower-onpasswordtoprotectthecomputerfromunauthorizedaccess.
•HardDisk1Password
Values:Disabled,Enabled
Descriptions:Setaharddiskpasswordtopreventunauthorizedusersfromaccessingdataonthe
internalstoragedrive.
Fingerprint
•PredesktopAuthentication
Values:Disabled,Enabled
Descriptions:Enableordisablefingerprintauthenticationbeforetheoperatingsystemisloaded.
•ReaderPriority
Values:External➙Internal,InternalOnly
Descriptions:Ifyourcomputerhasaninternalfingerprintreaderandanattachedexternalfingerprint
reader,usethisoptiontospecifythefingerprintreaderpriority.
•SecurityMode
Values:Normal,High
Descriptions:Ifthefingerprintisnotauthenticated,youcanenterapasswordinstead.Ifyouhave
selectedNormal,entereitherthepower-onpasswordorthesupervisorpassword;ifyouhaveselected
High,supervisorpasswordmustbeentered.
•PasswordAuthentication
Values:Disabled,Enabled
Descriptions:Enablethisoptiontousepasswordauthenticationwhenfingerprintsarenotavailable.This
itemisdisplayedifSecurityModeissettoHigh.
•ResetFingerprintData
Descriptions:Usethisoptiontoeraseallfingerprintdatastoredinthefingerprintreaderandresetthe
settingstothefactorydefaultstate.Asaresult,anypower-onsecurityfeaturespreviouslyenabledwillnot
workuntiltheyarere-enabledinthefingerprintsoftware.
SecurityChip
•SecurityChipT ype
Values:TPM2.0
Descriptions:YoucanuseadiscreteTrustedPlatformModule(TPM)chipwithTPM2.0mode.
•SecurityChip
Values:Disabled,Enabled
Descriptions:Enableordisablethesecuritychip.
•SecurityReportingOptions
–SMBIOSReporting
Values:Disabled,Enabled
66UserGuide
Page 83

Descriptions:EnableordisablethefeaturethatreportstheSMBOSdata.Thisoptionisdisplayedonly
ifSecurityChipisEnabled.
•ClearSecurityChip
Descriptions:Usethisoptiontocleartheencryptionkey.
•Intel(R)TXTFeature:
Values:Disabled,Enabled
Descriptions:EnableordisabletheIntelT rustedExecutionTechnology.
•PhysicalPresenceforClear
Values:Disabled,Enabled
Descriptions:Ifthisoptionisenabled,aconfirmationmessageisdisplayedwhenyouclearthesecurity
chip.
UEFIBIOSUpdateOption
•FlashBIOSUpdatingbyEnd-Users
Values:Disabled,Enabled
Descriptions:Whenthisoptionisenabled,alluserscanupdatetheUEFIBIOS.Ifyoudisablethisoption,
onlythepersonwhoknowsthesupervisorpasswordcanupdatetheUEFIBIOS.
•SecureRollBackPrevention
Values:Disabled,Enabled
Descriptions:Whenthisoptionisdisabled,youcanflashtheUEFIBIOStoearlierversion.
Note:ThisitemissetasDisabledbydefaultwhentheOSOptimizedDefaultsontheRestartmenuisset
asDisabled.ThisitemissetasEnabledbydefaultwhentheOSOptimizedDefaultsissetasEnabled.
•WindowsUEFIFirmwareUpdate
Values:Disabled,Enabled
Descriptions:ThisoptionenablesordisablestheWindowsUEFIFirmwareUpdatefeature.SelectEnabled
toallowWindowsUEFIFirmwareUpdate.SelectDisabledtoskiptheWindowsUEFIFirmwareUpdate.
MemoryProtection
•ExecutionPrevention
Values:Disabled,Enabled
Descriptions:Somecomputervirusesandwormscausememorybufferstooverflow.Byenablingthis
option,youcanprotectyourcomputeragainstattacksfromsuchvirusesandworms.Iftheoptionis
enabledbutyoufindthataprogramdoesnotrunproperly,disablethisoptionfirstandthenresetthe
settings.
Virtualization
•Intel(R)VirtualizationTechnology
Values:Disabled,Enabled
Descriptions:Ifthisoptionisenabled,aVirtualMachineMonitor(VMM)canutilizetheadditionalhardware
capabilitiesprovidedbyIntelVirtualizationTechnology.
•Intel(R)VT-dFeature
Values:Disabled,Enabled
Descriptions:IntelVT-dstandsforIntelVirtualizationT echnologyforDirectedI/O.Whenenabled,aVMM
canutilizetheplatforminfrastructureforI/Ovirtualization.
Chapter6.Advancedconfiguration67
Page 84

I/OPortAccess
Descriptions:Usethissubmenutoenableordisablethefollowinghardwarefeatures:
•EthernetLAN
•WirelessLAN
•WirelessWAN
•Bluetooth
•USBPort
•MemoryCardSlot
•Integratedcamera
•Microphone
•Fingerprintreader
•Thunderbolt
•NFCDevice
•WiGig
InternalDeviceAccess
•BottomCoverTamperDetection
Values:Disabled,Enabled
Descriptions:Whenthisoptionisenabled,supervisorpasswordisrequiredwhenabottomcovertamper
isdetected.Thisoptionisnotfunctionaluntilasupervisorpasswordisset.
•InternalStorageTamperDetection
Values:Disabled,Enabled
Descriptions:Whenthisoptionisenabled,removinganyinternalstoragedevicewhenyourcomputerisin
sleepmodewillbedetected.Ifyouremovetheinternalstoragedevicewhilethecomputerisinsleep
mode,thecomputerwillshutdownwhenyouwakeitup,andanyunsaveddatawillbelost.
Anti-Theft
•ComputraceModuleActivation
Values:Disabled,Enabled,PermanentlyDisabled
Descriptions:EnabletheUEFIBIOSinterfacetoactivatethecomputracemodule.Computraceisan
optionalmonitoringservicefromAbsoluteSoftware.IfyouselectPermanentlyDisabled,youcannot
enablethissettingagain.
SecureBoot
•SecureBoot
Values:Disabled,Enabled
Descriptions:Enablethisoptiontopreventunauthorizedoperatingsystemsfromloadingwhenyouturn
onthecomputer.Toenablethisoption,setthestartupsettingasUEFIOnlyandsetCSMSupport
asNofirst.
Note:ThisitemissetasDisabledbydefaultwhentheOSOptimizedDefaultsontheRestartmenuisset
asDisabled.ThisitemissetasEnabledbydefaultwhentheOSOptimizedDefaultsissetasEnabled.
•PlatformMode
Values:SetupMode,UserMode
Descriptions:Specifythesystemoperatingmode.
68UserGuide
Page 85

•SecureBootMode
Values:StandardMode,CustomMode
Descriptions:SpecifytheSecureBootmode.
•ResettoSetupMode
Descriptions:UsethisoptiontoclearthecurrentplatformkeyandresetPlatformModetoSetupMode.
YoucaninstallyourownplatformkeyandcustomizetheSecureBootsignaturedatabasesinSetup
Mode.SecureBootModewillbesettoCustomMode.
•RestoreFactoryKeys
Descriptions:UsethisoptiontorestoreallkeysandcertificatesinSecureBootdatabasestothe
factorydefaults.
•ClearAllSecureBootKeys
Descriptions:UsethisoptiontoclearallkeysandcertificatesinSecureBootdatabasesandinstall
yourownkeysandcertificates.
Intel(R)SGX
•Intel(R)SGXControl
Values:Disabled,Enabled,SoftwareControlled
Descriptions:EnableordisabletheIntelSoftwareGuardExtensions(SGX)function.Ifyouselect
SoftwareControlled,SGXwillbecontrolledbytheoperatingsystem.
•ChangeOwnerEPOCH
Descriptions:ChangeOwnerEPOCHtoarandomvalue.UsethisoptiontoclearSGXuserdata.
DeviceGuard
•DeviceGuard
Values:Disabled,Enabled
Descriptions:ThisoptionisusedtosupportMicrosoftDeviceGuard.
Whenthisoptionisenabled,IntelVirtualizationTechnology,IntelVT-dFeature,SecureBoot,andOS
OptimizedDefaultsareautomaticallyenabled.Bootorderisnotselectable.T ocompletetheconfiguration
ofDeviceGuard,youhavetosetasupervisorpassword.
Whenthisoptionisdisabled,thesetupoptionsareconfigurableandyoucanchooseanybootoptions
tostartthecomputer.
Startupmenu
Note:TheBIOSmenuitemsmightchangewithoutnotice.Dependingonthemodel,thedefaultvalue
mightvary.
•Boot
Descriptions:Definethestartupsequence.
•NetworkBoot
Descriptions:SelectthebootdevicewhenthesystemwakesfromLAN.IfWakeOnLANisenabled,the
networkadministratorcanturnonallofthecomputersinaLANremotelythroughnetworkmanagement
software.
•UEFI/LegacyBoot
Values:Both,UEFIOnly,LegacyOnly
Descriptions:Definethesystembootcapability.
•BootMode
Chapter6.Advancedconfiguration69
Page 86

Values:Quick,Diagnostics
Descriptions:DefinewhichscreenisdisplayedduringthePOST,thelogoscreenorthetextmessage
screen.
•OptionKeyDisplay
Values:Disabled,Enabled
Descriptions:Ifyoudisablethisoption,the“Tointerruptnormalstartup,pressEnter.”messagewillnotbe
displayedduringthePOST.
•BootDeviceListF12Option
Values:Disabled,Enabled
Descriptions:Ifyouenablethisoption,youcanopentheBootMenuwindowbycontinuouslypressing
F12whenthecomputerispoweredon.
•BootOrderLock
Values:Disabled,Enabled
Descriptions:Enablethisoptiontolockthebootdevicepriorityorder.
Restartmenu
Note:TheBIOSmenuitemsmightchangewithoutnotice.Dependingonthemodel,thedefaultvalue
mightvary.
•ExitSavingChanges
Descriptions:Savethechangesandrestartthecomputer.
•ExitDiscardingChanges
Descriptions:Discardthechangesandrestartthecomputer.
•LoadSetupDefaults
Descriptions:Restoretothefactorydefaultsettings.
•DiscardChanges
Descriptions:Discardthechanges.
•SaveChanges
Descriptions:Savethechanges.
Usingsystemmanagement
Thistopicisprimarilyintendedforthenetworkadministrators.
Yourcomputerisdesignedformanageability,sothatyoucanredirectmoreresourcestobettermeet
yourbusinessobjectives.
Thismanageability,knownastotalcostofownership(TCO),enablesyoutoremotelyoperateclient
computersinthesamewayasyouoperateyourowncomputer,suchasturningonaclientcomputer,
formattingastoragedrive,andinstallingaprogram.
Oncethecomputerisconfiguredandoperational,youcanmanageitbyusingthesoftwareandthe
manageabilityfeaturesthatarealreadyintegratedintotheclientcomputerandthenetwork.
DesktopManagementInterface
TheUEFIBIOSofyourcomputersupportsaninterfacecalledSystemManagementBIOS(SMBIOS)
ReferenceSpecification,version2.8orlater.SMBIOSprovidesinformationaboutthehardwarecomponents
70UserGuide
Page 87

ofyourcomputer.ItistheresponsibilityoftheUEFIBIOStoprovideinformationaboutitselfandthedevices
onthesystemboard.ThisspecificationdocumentsthestandardsforgettingaccesstothisBIOSinformation.
PrebooteXecutionEnvironment
ThePrebooteXecutionEnvironment(PXE)technologymakesthecomputermoremanageablebyenabling
thecomputertostartfromaserver.YourcomputersupportsthepersonalcomputerfunctionsthatPXE
requires.Forexample,withtheappropriateLANcard,yourcomputercanbestartedfromthePXEserver.
Note:TheRemoteInitialProgramLoad(RIPLorRPL)functioncannotbeusedwithyourcomputer.
WakeonLAN
ThenetworkadministratorcanturnonacomputerfromamanagementconsolebyusingtheWakeon
LANfeature.
WhentheWakeonLANfeatureisenabled,manyoperations,suchasdatatransfer,softwareupdates,and
flashupdatesoftheUEFIBIOS,canbedoneremotelywithoutremoteattendance.Theupdatingprocess
canperformafternormalworkinghoursandonweekends,sothattheusersarenotinterruptedduringwork,
andtheLANtrafficiskepttoaminimum.Itsavestimeandincreasesproductivity.
IfthecomputeristurnedonthroughWakeonLAN,thecomputerstartsfollowtheNetworkBootsequence.
AssetIDEEPROM
TheAssetIDEEPROMcontainsinformationaboutthecomputerconfigurationandtheserialnumbersof
thekeycomponents.Italsoincludesanumberofblankfieldswhereyoucanrecordinformationabout
theendusersinyournetwork.
Toenableanetworkadministratortoremotelycontrolyourcomputer,setthefollowingsystem-management
featuresintheThinkPadSetupprogram:
•WakeonLAN
•NetworkBootsequence
Note:Ifasupervisorpasswordhasbeenset,youarerequiredtoenterthesupervisorpasswordwhen
youstarttheThinkPadSetupprogram.
EnablingordisablingtheWakeonLANfeature
WhentheWakeonLANfeatureisenabledandthecomputerisconnectedtoaLAN,thenetworkadministrator
canstartthecomputerremotelyfromamanagementconsole,usingaremotenetwork-managementprogram.
ToenableordisabletheWakeonLANfeature,dothefollowing:
1.Restartthecomputer.Whenthelogoscreenisdisplayed,pressF1tostarttheThinkPadSetupprogram.
2.SelectConfig➙Network.TheNetworksubmenuisdisplayed.
3.SelectacorrespondingoptionfortheWakeonLANfeature.
4.PressF10tosavethesettingsandexit.
DefiningaNetworkBootsequence
WhenthecomputerwakesonLAN,thecomputerbootsfromthedeviceasspecifiedontheNetworkBoot
menu,andthenfollowthebootorderlistontheBootmenu.
TodefineaNetworkBootsequence,dothefollowing:
1.Restartthecomputer.Whenthelogoscreenisdisplayed,pressF1tostarttheThinkPadSetupprogram.
2.SelectStartup➙NetworkBoot.Thebootdevicelistisdisplayed.
Chapter6.Advancedconfiguration71
Page 88

3.Selectabootdevicetomakeitasthetopbootpriority.
4.PressF10tosavethesettingsandexit.
YoucanpressF9torestoretothefactorydefaultsettings.
72UserGuide
Page 89

Chapter7.Troubleshootingcomputerproblems
Thischapterprovidesinformationaboutwhattodoifyouexperienceaproblemwithyourcomputer.
Generaltipsforpreventingproblems
Thistopicprovidesthefollowingtipstohelpyoupreventcomputingproblems:
•Emptyyourrecyclebinonaregularbasis.
•Usediskdefragmenttoolregularlyonyourstoragedrivetoimprovedataseekandreadtimes.
•Tofreeupdiskspace,uninstallunusedprograms.Youalsomightwanttolookforprogramduplicationor
overlappingversions.
•CleanoutyourInbox,Sent,andTrashfoldersfromyoure-mailclientprogram.
•Backupyourdataatleastonceaweek.Ifcriticaldataispresent,itisagoodideatobackupthedata
daily.Lenovohasmanybackupoptionsavailableforyourcomputer.
•Schedulesystemrestoreoperationstotakeasystemsnapshotperiodically.Forinformationaboutsystem
restore,see“Recoveryinformation”onpage89
•Gotohttp://www.lenovo.com/supporttodownloadandinstallupdatesforthedevicedriversandUEFI
BIOSwhenneeded.
•Keepuptodatefordevicedriversonothernon-Lenovohardware.Beforeupdatingdevicedrivers,read
thedevicedriverinformationreleasenotesforcompatibilityorknownissues.
•Keepalogbook.Entriesmightincludemajorhardwareorsoftwarechanges,driverupdates,minorissues
youhaveexperienced,andhowyouresolvedtheminorissues.
•Ifyoueverneedtorunarecoveryonyourcomputertoreturnthepreinstalledcontentsontothemachine,
thefollowingtipsmighthelpalongtheway:
1.Removeallexternaldevicessuchastheprinterandkeyboard.
2.Ensurethatyourbatteryischargedandyourcomputerhastheacpowerconnected.
3.AccessThinkPadSetupandloadthedefaultsettings.
4.Restartthecomputerandstarttherecoveryoperation.
5.Ifyourcomputerusesdiscsastherecoverymedia,donotremovethediscfromthedriveuntil
promptedtodoso.
.
DiagnosingproblemswithLenovoCompanion
Manycomputerproblemscanbesolvedwithoutoutsideassistance.Ifyouexperienceaproblemwithyour
computer,thefirstplacetostartisthetroubleshootinginformationinyourcomputerdocumentation.Ifyou
suspectasoftwareproblem,seethedocumentation,includingreadmefilesandhelpinformationsystems,
thatcomewiththeoperatingsystemorprogram.
ThinkPadnotebookcomputerscomewithasetofdiagnosticprogramsthatyoucanusetohelpyou
identifyhardwareproblems.LenovoCompanionispreinstalledonyourcomputerandalsoisavailable
fordownloadat:
https://shop.lenovo.com/us/en/accessories/software/apps/lenovo-apps/companion/
Note:IfyouareunabletoisolateandrepairtheproblemyourselfafterrunningLenovoCompanion,save
andprintthelogfilescreatedbytheprogram.YouneedthelogfileswhenyouspeaktoaLenovotechnical
supportrepresentative.
©CopyrightLenovo2017
73
Page 90

LenovoCompanionsupportsthehardwarescanfunction.Itcombinesdiagnostictests,systeminformation
collection,securitystatus,andsupportinformation,alongwithhintsandtipsforoptimalsystem
performance.TorunLenovoCompanion,see“AccessingLenovoprograms”onpage13
Thetroubleshootinginformationorthediagnosticprogramsmighttellyouthatyouneedadditionalor
updateddevicedriversorothersoftware.Y oucangetthelatesttechnicalinformationanddownloaddevice
driversandupdatesfromtheLenovoSupportWebsiteat:
http://www.lenovo.com/support
Foradditionalinformation,seethehelpsystemoftheprogram.
.
Troubleshooting
Ifyourcomputerhasanerror,ittypicallydisplaysamessageoranerrorcode,ormakesabeepwhenyou
turniton.Whenyouexperienceaproblem,seethecorrespondingsymptomandsolutioninthistopic
totrytosolvetheproblembyyourself.
Computerstopsresponding
Printtheseinstructionsnowandkeepthemwithyourcomputerforreferencelater.
Problem:Mycomputerisunresponsive(IcannotusetheThinkPadpointingdeviceorthekeyboard).
Solution:Dothefollowing:
1.Removeallpowersourcesfromthecomputerandresetthesystembyinsertingastraightenedpaper
clipintotheemergency-resetholeinthebottomofthecomputer.
2.Reattachtheacpoweradapterandrestartthecomputer.Ifthecomputerdoesnotstartup,continue
withstep3.
3.Whilethecomputeristurnedoff,removeallpowersourcesfromthecomputerandremoveallexternal
devicesthatareattachedtothecomputer(keyboard,mouse,printer,scanner,andsoon).Reattachthe
acpoweradapterandrestartthecomputer.Ifthecomputerstilldoesnotstartup,calltheCustomer
SupportCenter.
Spillsonthekeyboard
Problem:Ispillsomethingonthecomputer.
Solution:Becausemostliquidsconductelectricity,liquidspilledonthekeyboardcouldcreatenumerous
shortcircuitsanddamageyourcomputer.Tosolvetheproblem,dothefollowing:
1.Ensurethatnoliquidcreatesashortcircuitbetweenyouandtheacpoweradapter(ifinuse).
2.Carefullyunplugtheacpoweradapterimmediately.
3.Turnoffthecomputerimmediately.Themorequicklyyoustopthecurrentfrompassingthroughthe
computerthemorelikelyyouwillreducedamagefromshortcircuits.
Attention:Althoughyoumightlosesomedataorworkbyturningoffthecomputerimmediately,leaving
thecomputeronmightmakeyourcomputerunusable.
4.Waituntilyouarecertainthatalltheliquidisdrybeforeturningonyourcomputer.
Errormessages
•Message:0177:BadSVPdata,stopPOSTtask.
74UserGuide
Page 91

Solution:ChecksumofthesupervisorpasswordintheEEPROMisnotcorrect.Thesystemboard
shouldbereplaced.Havethecomputerserviced.
•Message:0183:BadCRCofSecuritySettingsinEFIVariable.EnterThinkPadSetup.
Solution:ChecksumoftheSecuritysettingsintheEFIVariableisnotcorrect.EnterThinkPadSetup
tochecksecuritysettings,pressF10,andthenpressEntertorestartthesystem.Ifyoustillhavea
problem,havethecomputerserviced.
•Message:0187:EAIAdataaccesserror
Solution:TheaccesstoEEPROMisfailed.Havethecomputerserviced.
•Message:0188:InvalidRFIDSerializationInformationArea
Solution:TheEEPROMchecksumisnotcorrect(block#0and1).Thesystemboardshouldbereplaced,
andtheboxserialnumbermustbereinstalled.Havethecomputerserviced.
•Message:0189:InvalidRFIDconfigurationinformationarea
Solution:TheEEPROMchecksumisnotcorrect(block#4and5).Thesystemboardshouldbereplaced,
andtheuniversallyuniqueidentifier(UUID)mustbereinstalled.Havethecomputerserviced.
•Message:0190:Criticallow-batteryerror
Solution:Thecomputerturnedoffbecausethebatterypowerislow.Connecttheacpoweradapterto
thecomputerandchargethebatteries.
•Message:0191:SystemSecurity-Invalidremotechangerequested
Solution:Thesystemconfigurationchangehasfailed.Confirmtheoperationandtryagain.Toclearthe
error,enterThinkPadSetup.
•Message:0199:SystemSecurity-Securitypasswordretrycountexceeded.
Solution:Thismessageisdisplayedifyouenterawrongsupervisorpasswordmorethanthreetimes.
Confirmthesupervisorpasswordandtryagain.Tocleartheerror,enterThinkPadSetup.
•Message:0270:RealTimeClockError.
Solution:SystemRealTimeClockisnotfunctional.Havethecomputerserviced.
•Message:0271:CheckDateandTimesettings.
Solution:Thedateorthetimeisnotsetinthecomputer.EnterThinkPadSetupandsetthedateandtime.
•Message:1802:Unauthorizednetworkcardispluggedin-Poweroffandremovethenetworkcard.
Solution:Thewirelessnetworkcardisnotsupportedonthiscomputer.Removeit.
•Message:1820:Morethanoneexternalfingerprintreadersareattached.
Solution:Turnoffandremoveallbutthereaderthatyousetupwithinyourmainoperatingsystem.
•Message:2100:Detectionerroronstoragedevice(M.2)
Solution:TheM.2solid-statedriveisnotworking.HavetheM.2solid-statedriveserviced.
•Message:2101:Detectionerroronstoragedevice(M.2)
Solution:TheM.2solid-statedriveisnotworking.HavetheM.2solid-statedriveserviced.
•Message:2102:Detectionerroronstoragedevice(M.2)
Solution:TheM.2solid-statedriveisnotworking.HavetheM.2solid-statedriveserviced.
•Message:2111:ReaderroronSSD1(M.2)
Solution:TheM.2solid-statedriveisnotworking.HavetheM.2solid-statedriveserviced.
•Message:2112:ReaderroronSSD2(M.2)
Solution:TheM.2solid-statedriveisnotworking.HavetheM.2solid-statedriveserviced.
•Message:2200:MachineT ypeandSerialNumberareinvalid.
Solution:MachineTypeandSerialNumberareinvalid.Havethecomputerserviced.
Chapter7.Troubleshootingcomputerproblems75
Page 92

•Message:2201:MachineUUIDisinvalid.
Solution:MachineUUIDisinvalid.Havethecomputerserviced.
•Message:Fanerror
Solution:Coolingfanhasfailed.Shutdownthecomputerimmediatelyandhavethecomputerserviced.
•Message:Thermalsensingerror
Solution:Thethermalsensorhasaproblem.Shutdownthecomputerimmediatelyandhavethe
computerserviced.
•Message:Bottomcovertamperdetectionerror
Solution:Thebottomcovertamperswitchisnotworking.Havethecomputerserviced.
•Message:Error:Thenon-volatilesystemUEFIvariablestorageisnearlyfull.
Note:Thiserrorindicatesthattheoperatingsystemorprogramscannotcreate,modify,ordeletedatain
thenon-volatilesystemUEFIvariablestorageduetoinsufficientstoragespaceafterPOST.
Thenon-volatilesystemUEFIvariablestorageisusedbytheUEFIBIOSandbytheoperatingsystem
orprograms.Thiserroroccurswhentheoperatingsystemorprogramsstorelargeamountsofdata
inthevariablestorage.AlldataneededforPOST,suchasBIOSsetupsettings,chipset,orplatform
configurationdata,arestoredinaseparateUEFIvariablestorage.
Solution:PressF1aftertheerrormessageisdisplayedtoenterThinkPadSetup.Adialogaskstheuser
forconfirmationtocleanupthestorage.Iftheuserselects“Yes”,alldatathatwerecreatedbythe
operatingsystemorprogramswillbedeletedexceptglobalvariablesdefinedbytheUnifiedExtensible
FirmwareInterfaceSpecification.Iftheuserselects“No” ,alldatawillbekept,buttheoperatingsystemor
programswillnotbeabletocreate,modify,ordeletedatainthestorage.
Ifthiserrorhappensataservicecenter,Lenovoauthorizedservicepersonnelwillcleanupthenon-volatile
systemUEFIvariablestorageusingtheprecedingsolution.
Beeperrors
LenovoSmartBeeptechnologyenablesyoutodecodebeeperrorswithyoursmartphonewhenablack
screenoccurswithbeepsfromyourcomputer.TodecodethebeeperrorwithLenovoSmartBeep
technology,dothefollowing:
1.Gotohttp://www.support.lenovo.com/smartbeeporscanthefollowingQRCode.
2.Downloadtheproperdiagnosticappandinstallitonyoursmartphone.
3.Runthediagnosticappandplacethesmartphonenearthecomputer.
4.PresstheFnkeyonyourcomputertoemitthebeepagain.Thediagnosticappdecodesthebeeperror
andshowspossiblesolutionsonthesmartphone.
Thefollowingsectiondescribessomebeeperrorsandthecorrespondingsolutions.
76UserGuide
Page 93

Note:DonotattempttoserviceaproductyourselfunlessinstructedtodosobytheCustomerSupport
Centerorproductdocumentation.OnlyuseaLenovo-authorizedserviceprovidertorepairyourproduct.
Errorcodes
0001:Reseterror(platformresetnotde-asserted)1.Removeallpowerresources(theacpoweradapter,
0002:Internalbuserror
0281:GeneralembeddedcontrollererrorReplacethesystemboard(serviceprovideronly).
0282:Memorymoduleerror1.Reinstallorreplacethememorymodule.
0283:PCIresourceerror1.RemovePCIedevices(theM.2card,PCIecard,
0284:TCG-compliantfunctionality-relatederror(mightbe
theBIOScodevalidationfailure)
0285:TCG-compliantfunctionality-relatederror(mightbe
theTPMinitializationfailure)
0286:Integratedgraphicserror
0287:Discretegraphicserror1.Reinstallorreplacethediscretegraphicscard
0288:Computerdisplayerror
Solutions
removablebattery,andcoin-cellbattery).Ifyour
computerhasabuilt-inbattery,resetthecomputer
byinsertingastraightenedpaperclipintothe
emergency-resethole.Waitforoneminute.Then
reconnectallpowerresources.
2.Replacethesystemboard(serviceprovideronly).
Replacethesystemboard(serviceprovideronly).
2.Replacethesystemboard(serviceprovideronly).
andsoon)(serviceprovideronly).
2.Replacethesystemboard(serviceprovideronly).
Replacethesystemboard(serviceprovideronly).
Replacethesystemboard(serviceprovideronly).
Replacethesystemboard(serviceprovideronly).
(serviceprovideronly).
2.Replacethesystemboard(serviceprovideronly).
1.Reconnectthedisplaycableonboththesystem
boardsideandthecomputerdisplayside(service
provideronly).
2.Replacethesystemboard(serviceprovideronly).
Ethernetproblems
•Problem:Mycomputercannotconnecttothenetwork.
Solution:
Ensurethat:
–TheEthernetextensionadapterisconnectedcorrectly.
ThenetworkcablemustbesecurelyconnectedbothtotheEthernetextensionadapterandtotheRJ45
connectorofthehub.Themaximumallowabledistancefromthecomputertohubis100meters.If
thecableisconnectedandthedistanceiswithinacceptablelimitsbuttheproblempersists,trya
differentcable.
–Youareusingthecorrectdevicedriver.Toinstallthecorrectdriver,dothefollowing:
1.GotoControlPanel,andensurethatyouviewControlPanelbyCategory.
2.ClickHardwareandSound➙DeviceManager.Ifyouarepromptedforanadministrator
passwordorconfirmation,typethepasswordorprovideconfirmation.
3.Double-clickNetworkadapterstoviewallnetworkadapters.Ifanexclamationmark!is
displayednexttotheadaptername,youmightnotbeusingthecorrectdriverorthedrivermight
havebeendisabled.
Chapter7.Troubleshootingcomputerproblems77
Page 94

4.Right-clickthehighlightedadapter,clickUpdateDriverSoftware,andthenfollowtheinstructions
onthescreentoupdatethedriver.
–Theswitchportandtheadapterhavethesameduplexsetting.
Ifyouconfiguredtheadapterforfullduplex,ensurethattheswitchportalsoisconfiguredforfullduplex.
Settingawrongduplexmodecandegradeperformance,causedataloss,orresultinlostconnections.
–Youhaveinstalledallnetworkingsoftwarethatisnecessaryforyournetworkenvironment.
CheckwithyourLANadministratorforthenecessarynetworkingsoftware.
•Problem:Theadapterstopsworkingfornoapparentreason.
Solution:Thenetworkdriverfilesmightbecorruptormissing.
•Problem:MycomputerisaGigabitEthernetmodelandIuseaspeedof1000Mbps,theconnectionfails
orerrorsoccur.
Solution:
–UseCategory5wiringandensurethatthenetworkcableissecurelyconnected.
–Connecttoa1000BASE-Thub/switch(not1000BASE-X).
•Problem:TheWakeonLANfeatureisnotworking.
Solution:EnsurethatWakeonLANisenabledinThinkPadSetup.Ifitis,checkwithyourLAN
administratorforthenecessarysettings.
•Problem:MycomputerisaGigabitEthernetmodel,butitcannotconnecttothenetworkat1000Mbps.
Instead,itconnectsat100Mbps.
Solution:
–TryanotherEthernetcable.
–Ensurethatthelinkpartnerissettoauto-negotiate.
–Ensurethattheswitchis802.3ab-compliant(gigabitovercopper).
Wireless-LANproblem
Problem:Icannotconnecttothenetworkusingthebuilt-inwirelessnetworkcard.
Solution:
Ensurethat:
•TheAirplanemodeisoff.
•Yourwireless-LANdriveristhelatestversion.
•Yourcomputeriswithintherangeofawirelessaccesspoint.
•Thewirelessradioisenabled.
Awireless-WANproblem
Problem:AmessageisdisplayedindicatingthatanunauthorizedWANcardisinstalled.
Solution:TheWANcardisnotsupportedonthiscomputer.RemovetheWANcard.Formoreinformation,
see“Replacingthewireless-WANcard”onpage93.
Note:Somemodelsdonothaveawireless-WANcard.
78UserGuide
Page 95

Bluetoothproblem
Note:CheckyourconnectionanytimeandensurethatnootherBluetooth-enableddeviceissearchingfor
thedevicetowhichyouwanttoconnect.SimultaneoussearchingisnotallowedintheBluetoothconnection.
Problem:SounddoesnotcomefromtheBluetoothheadset/headphonesbutcomesfromthelocalspeaker
eventhoughtheBluetoothheadset/headphonesisconnectedusingaHeadsetprofileorAVprofile.
Solution:Dothefollowing:
1.Exittheprogramthatusesthesounddevice(forexample,WindowsMediaPlayer).
2.GotoControlPanel,andensurethatyouviewControlPanelbyCategory.
3.ClickHardwareandSound➙Sound➙Playback.
4.IfyouareusingaHeadsetprofile,selectBluetoothHands-freeAudioandclicktheSetDefaultbutton.
IfyouareusinganAVprofile,selectStereoAudioandclicktheSetDefaultbutton.
5.ClickOKtoclosetheSoundwindow.
ThinkPadpointingdeviceproblems
•Problem:Thepointerdriftswhenthecomputeristurnedonorafteritresumesnormaloperation.
Solution:ThepointermightdriftwhenyouarenotusingtheTrackPointpointingdeviceduringnormal
operation.ThisisanormalcharacteristicoftheTrackPointpointingdeviceandisnotadefect.Pointer
driftingmightoccurforseveralsecondsunderthefollowingconditions:
–Whenthecomputeristurnedon
–Whenthecomputerresumesnormaloperation
–WhentheTrackPointpointingdeviceiskeptpressedforalongtime
–Whenthetemperaturechanges
•Problem:TheTrackPointpointingdeviceortrackpaddoesnotwork.
Solution:EnsurethattheTrackPointpointingdeviceortrackpadisenabledintheMouseProperties
window.Formoreinformation,see“CustomizingtheThinkPadpointingdevice”onpage26.
Keyboardproblems
•Problem:Allorsomekeysonthekeyboarddonotwork.
Solution:Ifanexternalnumerickeypadisconnected:
1.Turnoffthecomputer.
2.Removetheexternalnumerickeypad.
3.Turnonthecomputerandtryusingthekeyboardagain.
Ifthekeyboardproblemisresolved,carefullyreconnecttheexternalnumerickeypad.
Iftheproblempersists,ensurethatthecorrectdevicedriverisinstalledbydoingthefollowing:
1.GotoControlPanel,andthenchangetheviewofControlPanelfromCategorytoLargeiconsor
Smallicons.
2.ClickKeyboard.
3.SelecttheHardwaretab.IntheDevicePropertiespane,makesurethatyouseethismessage:
DeviceStatus:Thisdeviceisworkingproperly.
Ifkeysonthekeyboardstilldonotwork,havethecomputerserviced.
•Problem:Allorsomekeysontheexternalnumerickeypaddonotwork.
Solution:Ensurethattheexternalnumerickeypadiscorrectlyconnectedtothecomputer.
Chapter7.Troubleshootingcomputerproblems79
Page 96

Computerscreenproblems
•Problem:MyscreenkeepsblankingwhenIdonotwantitto.
Solution:Dothefollowing:
1.GotoControlPanel,andensurethatyouviewControlPanelbyCategory.
2.ClickHardwareandSound➙PowerOptions.
3.Showtheadditionalplans,andthenselectHighperformance.
•Problem:WhenIturnonthecomputer,nothingisdisplayedonthescreenandthecomputerdoesnot
beepwhilestartingup.
Note:Ifyouarenotsurewhetheryouheardanybeeps,turnoffthecomputerbypressingandholdingthe
powerbuttonforfoursecondsormore.Thenturnonthecomputerandlistenagain.
Solution:Ensurethat:
–Theacpoweradapterisconnectedtothecomputerandthepowercordispluggedintoaworking
electricaloutlet.
–Thecomputeristurnedon.(Pressthepowerbuttonagainforconfirmation.)
–Thebrightnesslevelofthescreenisappropriatelyset.
Ifapower-onpasswordisset,pressanykeytodisplaythepromptforthepower-onpasswordand
thentypethecorrectpasswordandpressEnter.
Iftheseitemsarecorrectlyset,andthescreenremainsblank,havethecomputerserviced.
•Problem:WhenIturnonthecomputer,onlyawhitecursorisdisplayedonablankscreen.
Solution:Ifyouhavemodifiedapartitiononyourharddiskdrivebyusingpartitionsoftware,information
aboutthatpartition,orthemasterbootrecordmighthavebeendestroyed.
Dothefollowingtotrytosolvetheproblem:
1.Turnoffthecomputer,andthenturnitonagain.
2.Ifyoustillseeonlythecursoronthescreen,dothefollowing:
–Ifyouhaveusedpartitionsoftware,examinethepartitionontheharddiskdrivebyusingthe
software,andrecoverthepartitionifrequired.
–Usetherecoverysolutionstorestorethesystemtothefactorydefaultstate.Formoreinformation,
seeChapter8“Recoveryinformation”onpage89
Iftheproblempersists,havethecomputerserviced.
•Problem:Thescreengoesblankwhilethecomputerison.
Solution:Yourscreensaverorpowermanagementmighthavebeenenabled.Dooneofthefollowing:
–TouchtheTrackPointpointingdeviceorthetrackpad,orpressakeytoexitthescreensaver.
–Pressthepowerbuttontoresumethecomputerfromsleeporhibernationmode.
•Problem:Thescreenisblank.
Solution:Dothefollowing:
1.Pressthedisplay-modeswitchingkeytobringuptheimage.
2.Ifyouareusingtheacpoweradapter,orusingthebatteryandthebatterygaugeshowsthatthe
batteryisnotdepleted,pressthebrightness-upkey
3.Ifyourcomputerisinsleepmode,pressFntoresumethecomputerfromsleepmode.
4.Iftheproblempersists,followthesolutionforthefollowingproblem.
•Problem:Thescreenisunreadableordistorted.
.
tomakethescreenbrighter.
80UserGuide
Page 97

Solution:Ensurethat:
–Thedisplaydevicedriverisinstalledcorrectly.
–Thescreenresolutionandcolorqualityarecorrectlyset.
–Themonitortypeiscorrect.
Tocheckthesesettings,dothefollowing:
1.Right-clickonthedesktop,andclickDisplaysettings➙Advanceddisplaysettings.
Note:Ifyourcomputercannotdetecttheexternalmonitor,clickDetectintheDisplaywindow.
2.SelecttheexternalmonitorandsetResolution.
3.ClickDisplayadapterproperties.
4.ClicktheMonitortab.Checkthemonitorinformationtomakesurethatthemonitortypeiscorrect.If
itis,clickOKtoclosethewindow;otherwiseproceedwiththefollowingsteps.
5.Ifmorethantwomonitortypesaredisplayed,selectGenericPnPMonitororGenericNon-PnP
Monitor.
6.ClickProperties.Ifyouarepromptedforanadministratorpasswordorconfirmation,typethe
passwordorprovideconfirmation.
7.ClicktheDrivertab.
8.ClickUpdateDriver.
9.ClickBrowsemycomputerfordriversoftware,andthenclickLetmepickfromalistofdevice
driversonmycomputer.
10.CleartheShowcompatiblehardwarecheckbox.
11.Selectthecorrectmanufacturerandmodelfortheexternalmonitor.Ifyoucannotfindyourmonitor
onthelist,stoptheinstallationofthisdriverandusethedrivershippedwithyourmonitor.
12.Afterupdatingthedriver,clickClose.
•Problem:Incorrectcharactersaredisplayedonthescreen.
Solution:Ensurethatyouinstalltheoperatingsystemandprogramcorrectly.Iftheproblempersists,
havethecomputerserviced.
•Problem:ItrytoturnoffmycomputerbutthescreenstaysonandIcannotcompletelyturnoffmy
computer.
Solution:Pressandholdthepowerbuttonforfoursecondsormoretoturnoffthecomputer.
•Problem:Missing,discolored,orbrightdotsappearonthescreeneverytimeIturnonmycomputer.
Solution:ThisisanintrinsiccharacteristicoftheTFTtechnology.Yourcomputerdisplaycontains
multiplethin-filmtransistors(TFTs).Onlyaverysmallnumberofmissing,discolored,orbrightdots
onthescreenmightexistallthetime.
Externalmonitorproblems
•Problem:Theexternalmonitorisblank.
Solution:Tobringuptheimage,pressthedisplay-modeswitchingkeyandselectthemonitoryou
want.Iftheproblempersists,dothefollowing:
1.Connecttheexternalmonitortoanothercomputertoensurethatitworks.
2.Reconnecttheexternalmonitortoyourcomputer.
3.Seethemanualshippedwiththeexternalmonitortochecktheresolutionsandrefreshratesthat
aresupported.
Chapter7.Troubleshootingcomputerproblems81
Page 98

–Iftheexternalmonitorsupportsthesameresolutionasthecomputerdisplayorahigherresolution,
viewoutputontheexternalmonitororonboththeexternalmonitorandthecomputerdisplay.
–Iftheexternalmonitorsupportsalowerresolutionthanthecomputerdisplay,viewoutputonthe
externalmonitoronly.(Ifyouviewoutputonboththecomputerdisplayandtheexternalmonitor,
theexternalmonitorscreenwillbeblankordistorted.)
•Problem:Icannotsetahigherresolutionthanthepresentoneonmyexternalmonitor.
Solution:Ensurethatthemonitorinformationiscorrect.Ifnecessary,updatethemonitordriver.
•Problem:Thescreenisunreadableordistorted.
Solution:Ensurethat:
–Themonitorinformationiscorrectandtheappropriatemonitortypeisselected.Ifnecessary,update
themonitordriver.
–Ensurethatanappropriaterefreshrateisselectedbydoingthefollowing:
1.Connecttheexternalmonitortothemonitorconnector,andthenconnectthemonitortoan
electricaloutlet.
2.Turnontheexternalmonitorandthecomputer.
3.Right-clickonthedesktop,andclickDisplaysettings➙Advanceddisplaysettings.
Note:Ifyourcomputercannotdetecttheexternalmonitor,clickDetectintheDisplaywindow.
4.Clicktheiconfortheappropriatemonitor(Monitor-2iconisfortheexternalmonitor).
5.ClickDisplayadapterproperties.
6.ClicktheMonitortab.
7.Selectthecorrectscreenrefreshrate.
•Problem:Wrongcharactersaredisplayedonthescreen.
Solution:Ensurethatyoufollowthecorrectprocedurewheninstallingtheoperatingsystemand
program.Iftheyareinstalledandconfiguredcorrectly,buttheproblemstillpersists,havetheexternal
monitorserviced.
•Problem:TheExtenddesktopfunctiondoesnotwork.
Solution:EnabletheExtenddesktopfunction.
•Problem:IamusingtheExtenddesktopfunction,butIcannotsetahigherresolutionorhigherrefresh
rateonthesecondarydisplay.
Solution:Changetheresolutionandthecolordepthtolowersettingsfortheprimarydisplay.
•Problem:Displayswitchingdoesnotwork.
Solution:IfyouusetheExtenddesktopfunction,disableit,andchangethedisplayoutputlocation.If
aDVDmovieoravideoclipisplaying,stoptheplayback,closetheprogram,andthenchangethe
displayoutputlocation.
•Problem:Thescreenpositionontheexternalmonitorisincorrectwhenthatmonitorissetforahigh
resolution.
Solution:Sometimes,whenyouuseahighresolutionsuchas1600x1200pixels,theimageisshiftedto
theleftorrightonthescreen.Tocorrectthis,firstensurethatyourexternalmonitorsupportsthedisplay
mode(theresolutionandtherefreshrate)thatyouhaveset.Ifitdoesnot,setadisplaymodethatthe
monitorsupports.Ifitdoessupportthedisplaymodeyouhaveset,gotothesetupmenuforthemonitor
itselfandadjustthesettingsthere.Usuallytheexternalmonitorhasbuttonsforaccesstothesetupmenu.
Formoreinformation,seethedocumentationthatcomeswiththemonitor.
Audioproblems
•Problem:WaveorMIDIsounddoesnotplayproperly.
82UserGuide
Page 99

Solution:Ensurethatthebuilt-inaudiodeviceisconfiguredcorrectly.
1.GotoControlPanel,andensurethatyouviewControlPanelbyCategory.
2.ClickHardwareandSound.
3.ClickDeviceManager.Ifyouarepromptedforanadministratorpasswordorconfirmation,typethe
passwordorprovideconfirmation.
4.Double-clickSound,videoandgamecontrollers.
5.EnsurethatthedevicefollowingSound,videoandgamecontrollersisenabledandconfigured
correctly.
•Problem:Recordingsmadebyusingthemicrophoneinputarenotloudenough.
Solution:EnsurethattheMicrophoneBoostfunctionisturnedonandsetbydoingthefollowing:
1.GotoControlPanel,andensurethatyouviewControlPanelbyCategory.
2.ClickHardwareandSound.
3.ClickSound.
4.ClicktheRecordingtabintheSoundwindow.
5.SelectMicrophone,andclickthePropertiesbutton.
6.ClicktheLevelstab,andmovetheMicrophoneBoostsliderupwards.
7.ClickOK.
Note:Formoreinformationaboutcontrollingvolume,seeyourWindowsonlinehelp.
•Problem:Icannotmovethevolumesliderorbalanceslider.
Solution:Theslidermightbegrayedout.Thismeansthatitspositionisfixedbythehardwareand
cannotbechanged.
•Problem:Thevolumeslidersdonotstayinplacewhensomeaudioprogramsareused.
Solution:Itisnormalforthesliderstochangepositionwhencertainsoundprogramsareused.The
programsareawareofthesettingsintheVolumeMixerwindowandareenabledtochangethesettings
themselves.AnexampleistheWindowsMediaPlayerprogram.Usuallytheprogramhasslidersavailable
tocontrolthesoundfromwithintheprogram.
•Problem:Thebalanceslidercannotcompletelymuteonechannel.
Solution:Thecontrolisdesignedtocompensateforminordifferencesinbalanceanddoesnot
completelymuteeitherchannel.
•Problem:ThereisnovolumecontrolforMIDIsoundintheVolumeMixerwindow.
Solution:Usethehardwarevolumecontrol.Thisisbecausethebuilt-insynthesizersoftwaredoes
notsupportthecontrol.
•Problem:ThesoundcannotbeturnedoffevenifIsettheMastervolumecontrolatminimum.
Solution:YoustillcanhearsomesoundeventhoughyouhavesettheMastervolumecontrolatminimum.
Toturnoffthesoundcompletely,gototheMastervolumecontrolandselectMutespeakers.
•Problem:WhenIconnectheadphonestomycomputerwhileplayingsound,aspeakerdoesnot
producesound.
Solution:Whentheheadphonesareattached,thestreamingisautomaticallyredirectedtoit.Ifyouwant
tolistentosoundfromthespeakersagain,ensurethatyousetthosespeakersasthedefaultdevice.For
moreinformation,seethehelpinformationsystemforRealtekHDAudioManager.
Fingerprintreaderproblems
•Problem:Thesurfaceofthereaderisdirty,stained,orwet.
Solution:Gentlycleanthesurfaceofthereaderwithadry,soft,lint-freecloth.
Chapter7.Troubleshootingcomputerproblems83
Page 100

•Problem:Thereaderoftenfailstoenrollorauthenticateyourfingerprint.
Solution:Ifthesurfaceofthereaderisdirty,stained,orwet,gentlycleanthesurfaceofthereader
withadry,soft,lint-freecloth.
Fortipsonhowtomaintainthefingerprintreader,see“Usingthefingerprintreader”onpage52.
Batteryproblems
•Problem:Thebatterycannotbefullychargedinthestandardchargetimewhenthecomputerispowered
off.
Solution:Thebatterymightbeover-discharged.Connecttheacpoweradaptertothecomputerandletit
charge.Ifthebatterycannotbefullychargedin24hours,contactLenovotoreplacethebattery.
•Problem:Thecomputershutsdownbeforethebatterystatusiconshowsthatthebatteryisempty.
Solution:Dischargeandrechargethebattery.
•Problem:Thecomputeroperatesafterthebatterystatusiconshowsthatthebatteryisempty.
Solution:Dischargeandrechargethebattery.
•Problem:Theoperatingtimeforafullychargedbatteryisshort.
Solution:Dischargeandrechargethebattery.Ifyourbatteryoperatingtimeisstillshort,contactLenovo
toreplacethebattery.
•Problem:Thecomputerdoesnotoperatewithafullychargedbattery.
Solution:Thesurgeprotectorinthebatterymightbeactive.Turnoffthecomputerforoneminutetoreset
theprotector;thenturnonthecomputeragain.
•Problem:Thebatterycannotgetcharged.
Solution:Youcannotchargethebatterywhenitistoohot.Turnoffthecomputerandwaitforawhileto
letthebatterycooltoroomtemperature.Afteritcools,rechargethebattery.Ifitstillcannotbecharged,
haveitserviced.
Poweradapterproblem
Problem:Theacpoweradapterisconnectedtothecomputerandtheworkingelectricaloutlet,butthe
poweradapter(powerplug)iconisnotdisplayedintheWindowsnotificationarea.Theacpowerindicator
alsodoesnotlightup.
Solution:Dothefollowing:
1.Ensurethattheconnectionoftheacpoweradapteriscorrect.
2.Iftheconnectionoftheacpoweradapteriscorrect,turnoffthecomputer,andthendisconnecttheac
poweradapter.
3.Reconnecttheacpoweradapter,andthenturnonthecomputer.
4.IfthepoweradaptericonstillisnotdisplayedintheWindowsnotificationarea,havetheacpower
adapterandyourcomputerserviced.
Powerproblems
Printtheseinstructionsnowandkeepthemwithyourcomputerforreferencelater.
•Problem:Mycomputerisgettingnopoweratall.
Solution:Checkthefollowingitems:
1.Verifythepowerbutton.Thepowerbuttonisilluminatedwheneverthecomputerison.
84UserGuide
 Loading...