

Page 1

1 Getting to know your TravelMate16
Features
Below is a brief summary of the computer’s many features:
Performance
• Mobile Intel® Pentium® III Processor-M with 512 KB level 2 cache
featuring the new Enhanced Intel® SpeedStep™ technology
• Memory expandable up to 256 MB
• High-capacity , Enhanced-IDE hard disk
• Li-Ion main battery pack
• Power management system with ACPI (Advanced Configuration
Power Interface)
• Smart Card interface with pre-boot authentication system for
added security
Display
• 10.4"Thin-Film Tr ansistor (TFT) liquid-crystal display (LCD)
displaying 16M color at 1024x768 eXtended Graphics Array (XGA)
resolution
• 8 MB Video DRAM
• 3D capabilities
• Simultaneous LCD and CRT display support
• "Automatic LCD dim" feature that automatically decides the best
settings for your display and conserves power
• Dual display capability
• Tablet mode for LCD panel (Rotatable display)
Multimedia
• 16-bit high-fidelity AC’97 PCI stereo audio with wavetable
synthesizer
• Built-in speaker and microphone
• High-speed optical (CD-ROM) drive
Connectivity
• High-speed fax/data modem port
Page 2

• Fast infrared wireless communication
• USB (Universal Serial Bus) ports
• Ethernet/Fast Ethernet port
• IEEE 1394 port
• 802.11b wireless LAN (Available on select model)
Human-centric design and ergonomics
• Sleek, smooth and stylish design
• Acer Finetouch keyboard
• Ergonomically-centered touchpad pointing device
• Internet scroll key
• Support pen input via EMR stylus
Expansion
• Type II CardBus PC Card (formerly PCMCIA) slot
• Upgradeable memory
17
Page 3
1 Getting to know your TravelMate18
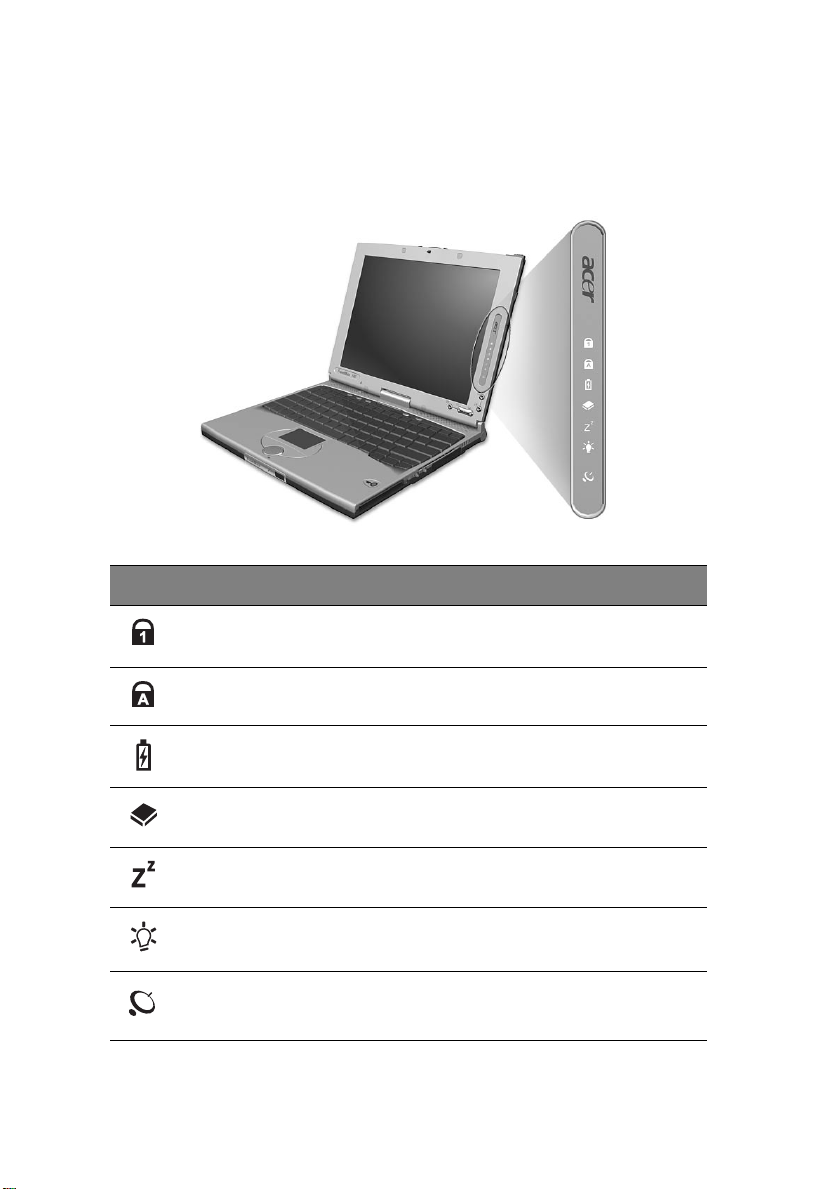
Indicators
The computer has seven easy-to-read status icons below the display
screen.
Icon Function Description
Num Lock Lights when Num Lock is activated.
Caps Lock Lights when Caps Lock is activated.
Battery Charge Lights when the battery is being charged.
Media Activity Lights when the floppy drive, hard disk or
optical drive is active.
Sleep Lights when the computer enters Sleep mode.
Power Lights when the computer is on.
Wireless
Communication
Lights when the Wireless LAN capabilities are
enabled.
Page 4

19
The Power, Sleep and InviLink status icons are visible even when you
close the display cover so you can see the status of the computer while
the cover is closed.
Page 5
1 Getting to know your TravelMate20
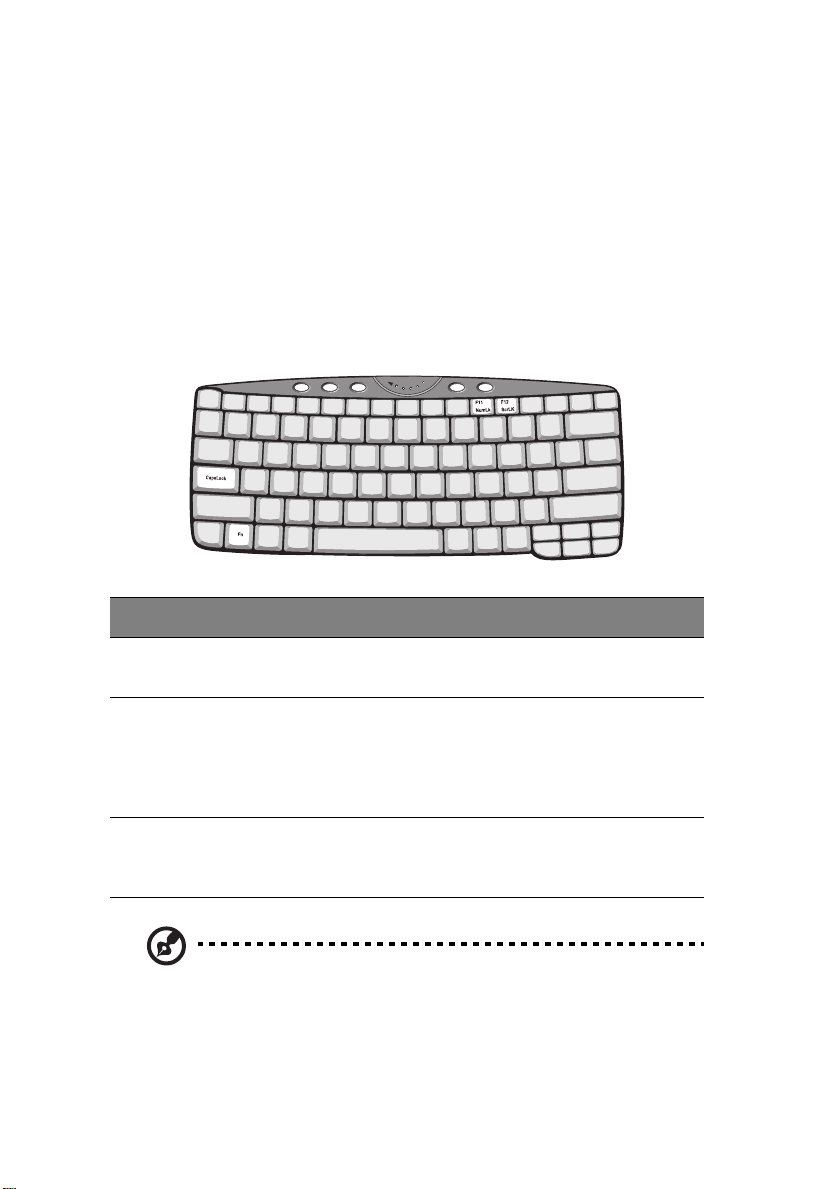
Using the keyboard
The keyboard has full-sized keys and an embedded keypad, separate
cursor keys, two Windows keys and twelve function keys.
Special keys
Lock keys
The keyboard has three lock keys which you can toggle on and off.
Lock key Description
Caps Lock When Caps Lock is on, all alphabetic characters typed are in
uppercase.
Num Lock
(Fn-F11)
Scroll Lock
(Fn-F12)
When Num Lock is on, the embedded keypad is in numeric
mode. The keys function as a calculator (complete with the
arithmetic operators +, -, *, and /). Use this mode when you
need to do a lot of numeric data entry. A better solution
would be to connect an external keypad.
When Scroll Lock is on, the screen moves one line up or down
when you press the up or down arrow keys respectively.
Scroll Lock does not work with some applications.
Note: To access the Num Lock and Scroll Lock functions, hold the
Fn key down while pressing the F11 and F12 keys respectively.
Page 6
21
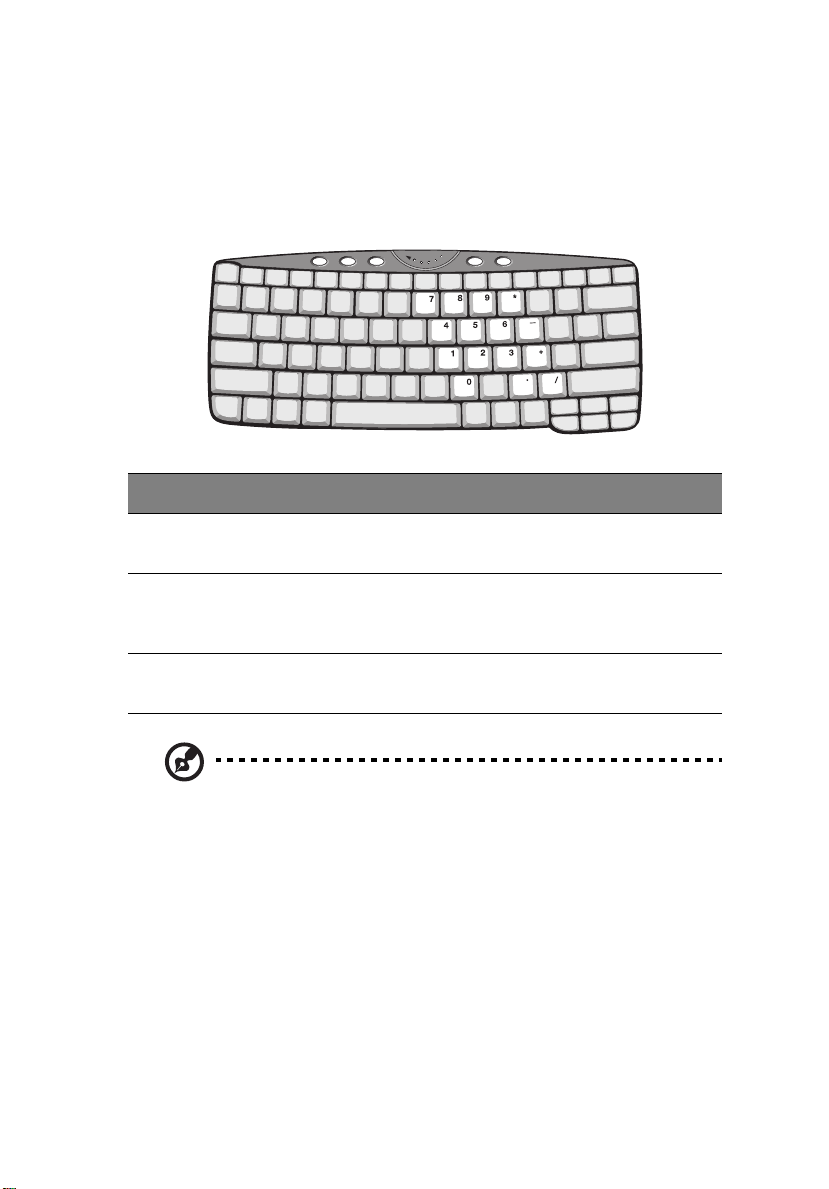
Embedded numeric keypad
The embedded numeric keypad functions like a desktop numeric
keypad. It is indicated by small characters located on the upper right
corner of the keycaps. To simplify the keyboard legend, cursor-control
key symbols are not printed on the keys.
Desired access Num lock on Num lock off
Number keys on
embedded keypad
Cursor-control keys
on embedded
keypad
Main keyboard keys Hold Fn while typing letters
Note: If an external USB keyboard is connected to the computer,
the internal keyboard is not disabled and can still be used.
Type numbers in a normal
manner.
Hold Shift while using
cursor-control keys.
on embedded keypad.
Hold Fn while using
cursor-control keys.
Type the letters in a
normal manner.
Page 7
1 Getting to know your TravelMate22
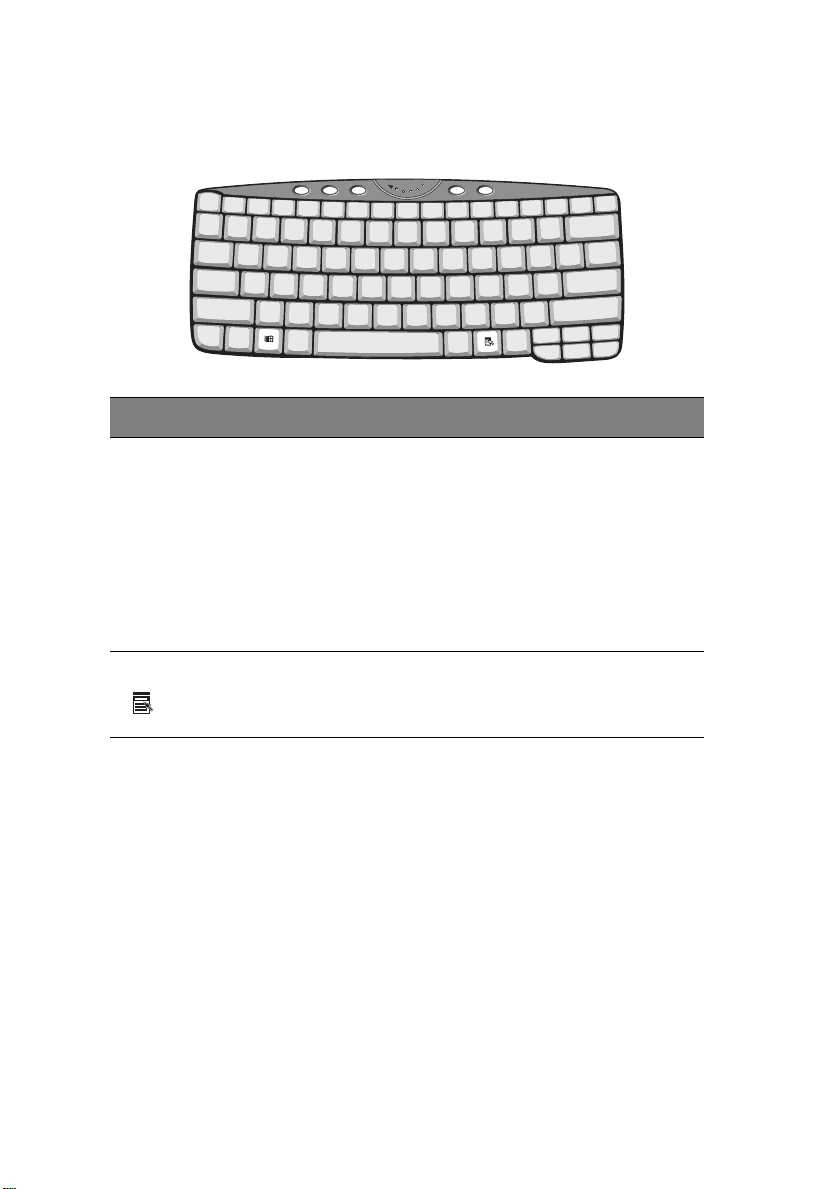
Windows keys
The keyboard has two keys that perform Windows-specific functions.
Key Description
Windows logo
key
Application key Opens a context menu (same as a right-click).
Start button. Combinations with this key perform
shortcut functions. Below are a few examples:
+ Tab (Activates next taskbar button)
+ E (Explores My Computer)
+ F (Finds Document)
+ M (Minimizes All)
Shift + + M (Undoes Minimize All)
+ R (Displays the Run... dialog box)
Hot keys
The computer employs hot keys or key combinations to access most of
the computer’s controls like screen brightness, volume output and the
BIOS Utility .
To activate hot keys, press and hold the Fn key before pressing the
other key in the hot key combination.
Page 8
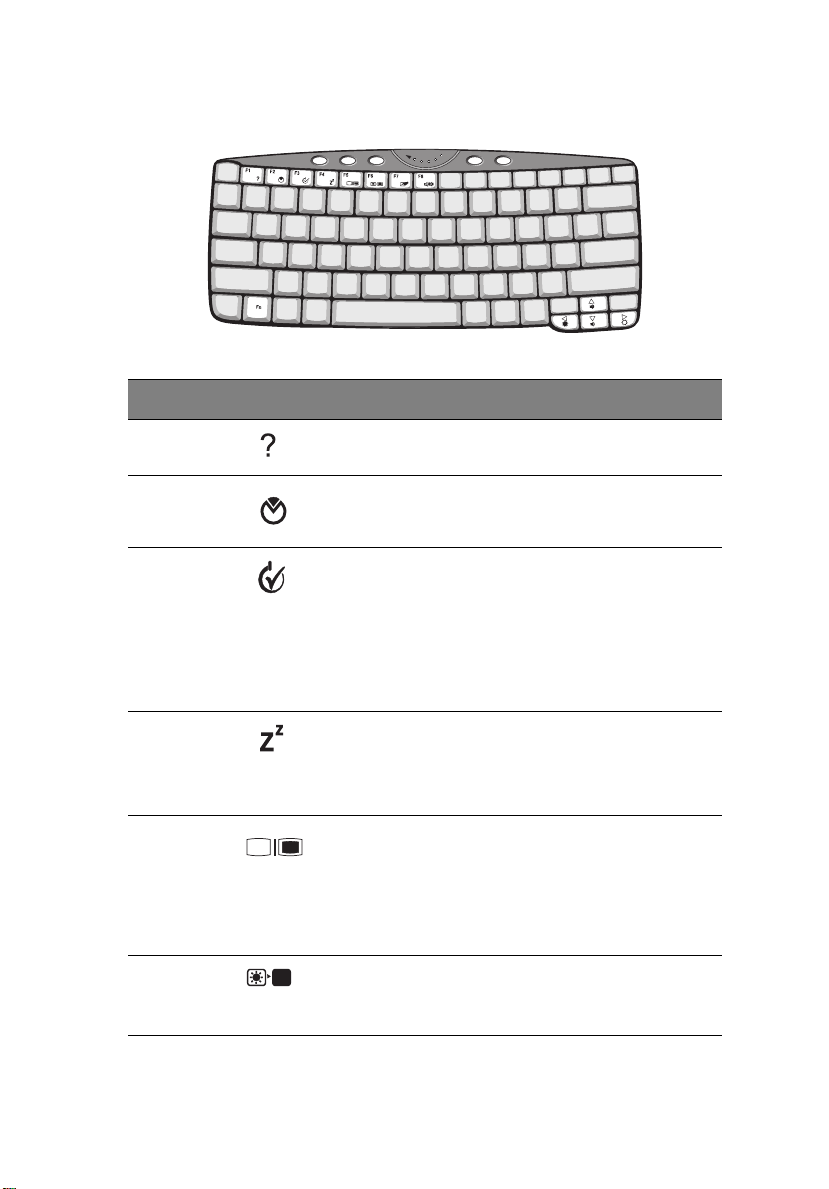
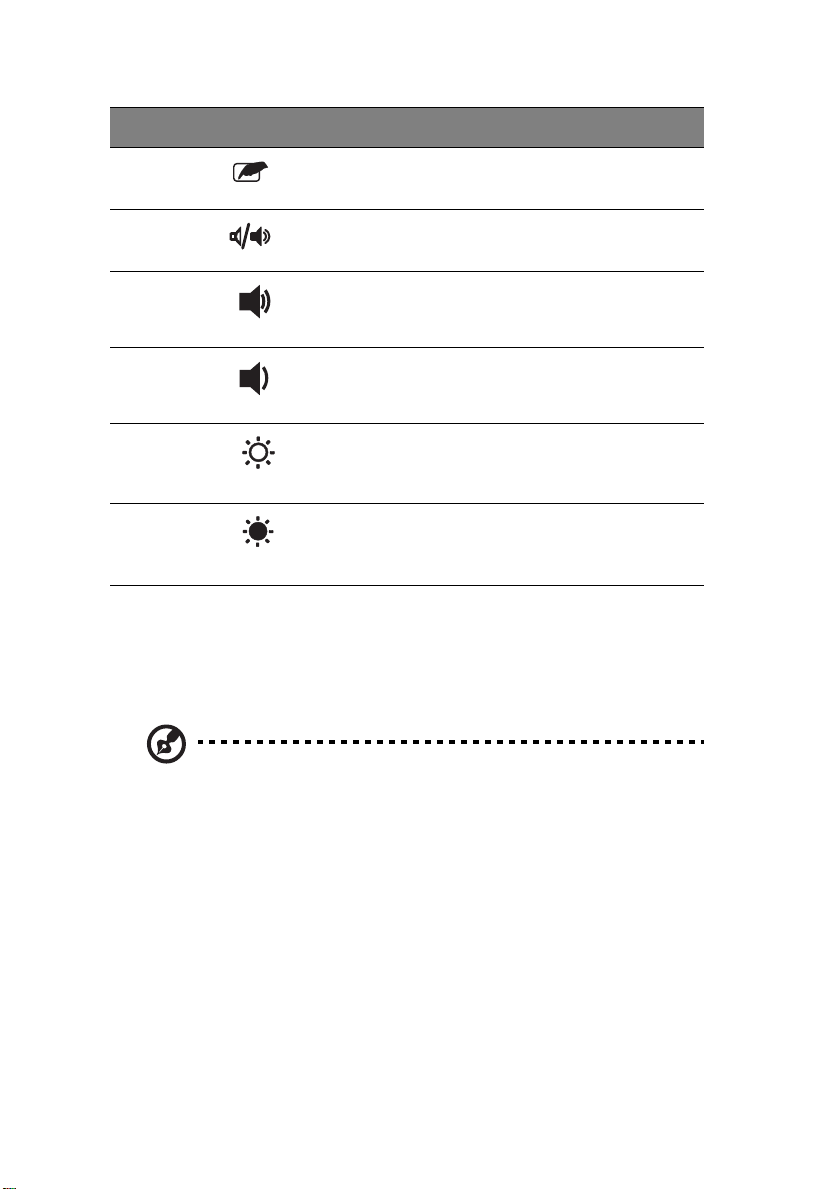
Hot key Icon Function Description
Fn-F1 Hot Key Help Displays help on hot keys.
Fn-F2 Setup Accesses the computer’s
configuration utility.
23
Fn-F3 Power
Management
Scheme Toggle
Fn-F4 Sleep Puts the computer in Sleep
Fn-F5 Display Toggle Switches display output
Fn-F6 Screen Blank Turns the display screen
Switches the power
management scheme used by
the computer (function
available if supported by
operating system).
See the online guide for more
information.
mode.
See the online guide for more
information.
between the display screen,
external monitor (if
connected) and both the
display screen and external
monitor.
backlight off to save power.
Press any key to return.
Page 9
1 Getting to know your TravelMate24
Hot key Icon Function Description
Fn-F7 Touchpad Toggle Turns the internal touchpad
on and off.
Fn-F8 Speaker Toggle Turns the speakers on and off.
Fn-↑ Volume up Increases the speaker volume.
Fn-↓ Volume down Decreases the speaker
volume.
Fn-→ Brightness up Increases the screen
brightness.
Fn-
←
Brightness down Decreases the screen
brightness.
The Euro symbol
If your keyboard layout is set to United States-International or United
Kingdom or if you have a keyboard with a European layout, you can
type the Euro symbol on your keyboard.
Note for US keyboard users: The keyboard layout is set when
you first set up Windows. For the Euro symbol to work, the
keyboard layout has to be set to United States-International.
To verify the keyboard type:
1 Click on Start, Control Panel.
2 Double-click on Regional and Language Options.
3 Click on the Language tab and click on Details.
4 Verify that the keyboard layout used for "En English (United
States)" is set to United States-International.
5 If not, select and click on ADD; then select United States-
International and click on OK.
Page 10
25
6 Click on OK.
To type the Euro symbol:
1 Locate the Euro symbol on your keyboard.
2 Open a text editor or word processor.
3 Hold Alt Gr and press the Euro symbol.
Some fonts and software do not support the Euro symbol. Please
refer to http://www.microsoft.com/typography/faq/faq12.htm
more information.
for
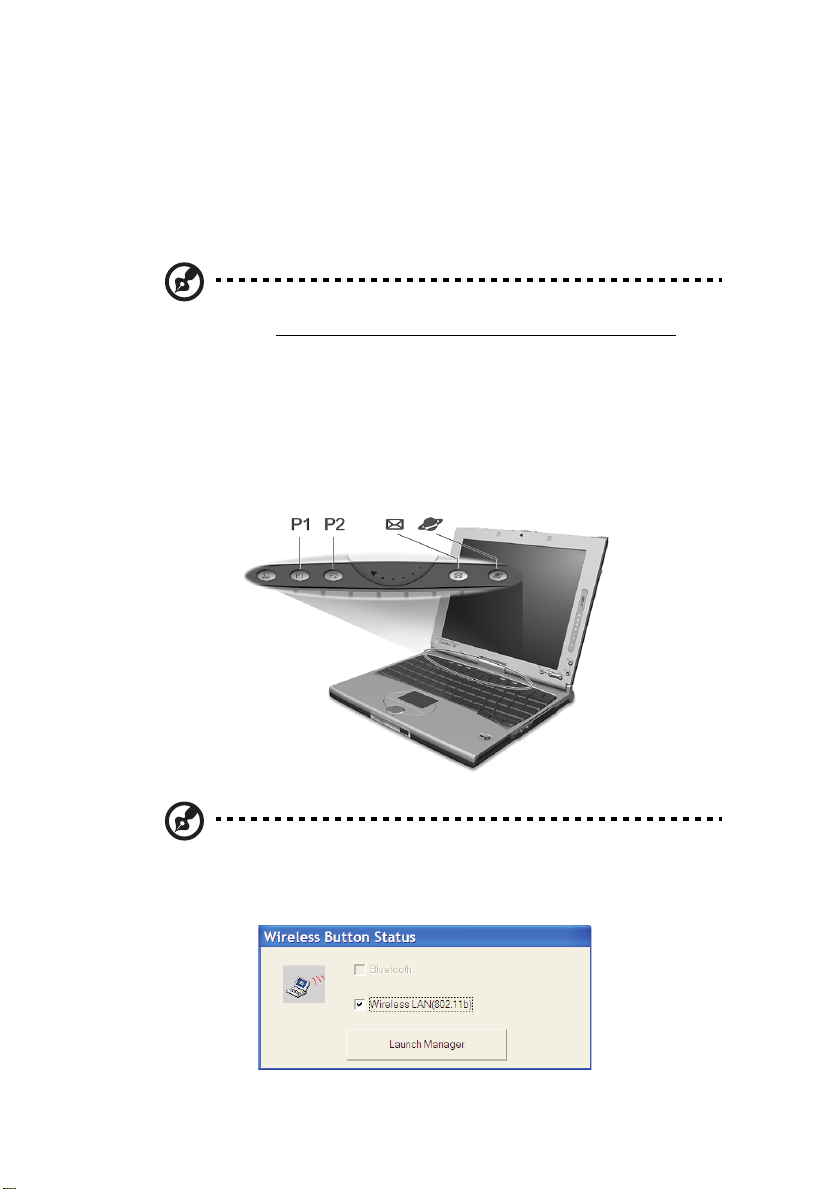
Launch Keys
Located at the top of the keyboard are four buttons. These buttons
are called launch keys. They are designated as P1, P2, mail button and
Web browser button.
Note: To the left of these four launch keys is the InviLink button.
This feature is available on select model. To activate the InviLink
feature press the InviLink button and a dialog box will be
displayed showing the current status of the wireless feature.
Page 11

1 Getting to know your TravelMate26
For more information on this feature, please refer to the InviLink
manual.
Launch key Default application
P1 User-programmable
P2 User-programmable
Mail Email application. The mail button LED will flash
when the user has incoming email
Web browser Internet browser application
Email checking function
When you first start up your system, a Mail Checking dialog box will be
displayed. In this dialog box, you have the option to launch the
program at startup or not, set the time for mail checking, etc. If you
already have an email account, you can fill in the Mail Properties in the
dialog box.
=
The Mail Server is the server name where you get your email, for
example: pop.mail.yahoo.com.tw.
Page 12

27
Aside from the email checking function, there is a mail button that is
used to launch the email application. It is located above the keyboard
right below the LCD. The mail button
LED will flash when the user has
received an incoming email.
You can also access the Mail Checking dialog box by clicking on Start,
Programs, Launch Manager, then click on E-Mail checking setting.
Page 13

1 Getting to know your TravelMate28
Touchpad
The built-in touchpad is a PS/2-compatible pointing device that senses
movement on its surface. This means the cursor responds as you move
your finger on the surface of the touchpad. The central location on
the palm rest provides optimum comfort and support.
Note: When using an external USB or serial mouse, you can press
Fn-F7 to disable the touchpad. .
Touchpad basics
The following items teach you how to use the touchpad:
• Move your finger across the touchpad to move the cursor.
• Press the left (1) and right (3) buttons located on the edge of the
touchpad to do selection and execution functions. These two
buttons are similar to the left and right buttons on a mouse.
Tapping on the touchpad produces similar results.
• Use the 4-way scroll (2) key (top/bottom/left/right) to scroll a page
up, down, left or right. This button mimics your cursor pressing on
the vertical and horizontal scroll bars of Windows applications.
Page 14

29
Function Left button
Execute Click twice
quickly
Right
button
4-way
scroll key
Tap
Tap twice (at the
same speed as
double-clicking a
mouse button)
Select Click once Tap once
Drag Click and
hold, then
use finger to
drag the
cursor on the
touchpad
Tap twice (at the
same speed as
double-clicking a
mouse button)
then hold finger
to the touchpad
on the second tap
and drag the
cursor
Access
context
Click
once
menu
Scroll Click and
hold the
button in
the desired
direction
(up/down/
left/right)
Note: Keep your fingers dry and clean when using the touchpad.
Also keep the touchpad dry and clean. The touchpad is sensitive
to finger movements. Hence, the lighter the touch, the better the
response. Tapping harder will not increase the touchpad’s
responsiveness.
Page 15

1 Getting to know your TravelMate30
Storage
This computer supplies you the following media storage:
• High-capacity Enhanced-IDE hard disk
• High-speed USB optical drive
Hard disk
The high-capacity hard disk is the answer to your storage needs.
Optical drive
The computer comes standard with a USB CD-ROM.
Page 16

Audio
The computer comes with 16-bit high-fidelity PCI stereo audio, and
includes a built-in sensitive microphone and stereo speaker.
There are audio ports on the right panel of the computer. See “Right
view” on page 7 for more information on connecting external audio
devices.
31
Adjusting the volume
Adjusting the volume on the computer is as easy as pressing some
buttons. See “Hot keys” on page 22 for more informations on
adjusting the speaker volume.
Page 17

1 Getting to know your TravelMate32
Power management
This computer has a built-in power management unit that monitors
system activity. System activity refers to any activity involving one or
more of the following devices: keyboard, mouse, floppy drive, hard
disk, and video memory. If no activity is detected for a period of time
(called an inactivity timeout), the computer stops some or all of these
devices in order to conserve energy.
This computer employs a power management scheme that supports
ACPI (Advanced Configuration and Power Interface) which allows for
maximum power conservation and maximum performance at the same
time. Windows handles all power-saving chores for your computer.
Refer to your online guide and Windows help for more information.
Page 18

33
Moving around with your TravelMate
This section gives you tips and hints on things to consider when moving
around or traveling with your computer.
Disconnecting from the desktop
Follow these steps to disconnect your computer from external
accessories:
1 Save your work in progress.
2 Remove any media, diskette or compact disc, from the drive(s).
3 Shut down the operating system.
4 Turn off the computer.
5 Close the display cover.
6 Disconnect the cord from the AC adapter.
7 Disconnect the keyboard, pointing device, printer, external
monitor, and other external devices.
8 Disconnect the Kensington lock if you are using one to secure the
computer.
Moving around
“when you are just moving within short distances, for example, from
your office desk to a meeting room”
Preparing the computer
Before moving the computer, close and latch the display cover to place
it in Sleep mode. Y ou can now safely take the computer anywhere you
go within the building. To bring the computer out of Sleep mode,
open the display; then press, slide and release the power switch.
If you are taking the computer to a client's office or a different
building, you may choose to shut down the computer:
1 Click on Start, Shut Down....
2 Select Shut down and click on OK.
- or -
Page 19

1 Getting to know your TravelMate34
you can put the computer in Sleep mode by pressing Fn-F4. Then close
and latch the display.
When you are ready to use the computer again, unlatch and open the
display; then press, slide and release the power switch.
Note: If the sleep indicator is off, the computer has entered
Hibernation mode and turned off. If the power indicator is off
but the sleep indicator is on, the computer has entered Sleep
mode. In both cases, press, slide and release the power switch to
turn the computer back on. Note that the computer may enter
Hibernation mode after it is in Sleep mode for a period of time.
What to bring to short meetings
A fully charged battery runs the computer for about 3 hours under
most circumstances. If your meeting is shorter than that, you probably
do not need to bring anything with you other than the computer.
What to bring to long meetings
If your meeting will last longer than 3 hours or if your battery is not
fully charged, you may want to bring the AC adapter with you to plug
in your computer in the meeting room.
If the meeting room does not have an electrical outlet, reduce the
drain on the battery by putting the computer in Sleep mode. Press Fn-
F4 or close the display cover whenever you are not actively using the
computer. To resume, open the display (if closed); then press, slide,
and release the power switch.
Taking the computer home
“when you are moving from your office to your home or vice versa”
Preparing the computer
After disconnecting the computer from your desktop, follow these
steps to prepare the computer for the trip home:
• Make sure that you have removed any media, diskette and
compact disc, in the drive(s). Failure to remove the media can
damage the drive head.
Page 20

35
• Pack the computer in a protective case that can prevent the
computer from sliding around and cushion it if it should fall.
Caution: Avoid packing items next to the top cover of the
computer. Pressure against the top cover can damage the screen.
What to bring with you
Unless you already have some items at home, bring the following items
with you:
• AC adapter and power cord
• The printed user’s manual
Special considerations
Follow these guidelines to protect your computer while traveling to
and from work:
• Minimize the effect of temperature changes by keeping the
computer with you.
• If you need to stop for an extended period of time and cannot
bring the computer with you, leave the computer in the trunk of
the car to avoid exposing the computer to excessive heat.
• Changes in temperature and humidity can cause condensation.
Allow the computer to return to room temperature, and inspect
the screen for condensation before turning on the computer. If
the temperature change is greater than 18°F (10°C), allow the
computer to come to room temperature slowly. If possible, leave
the computer for 30 minutes in an environment with a
temperature between outside and room temperature.
Setting up a home office
If you frequently work on your computer at home, it may be
worthwhile to purchase a second AC adapter for use at home. With a
second AC adapter , you can avoid transporting the extra weight to and
from home.
If you use your computer at home for significant periods of time, you
might also want to add an external keyboard, monitor, or mouse.
Page 21

1 Getting to know your TravelMate36
Traveling with the computer
“when you are moving within a larger distance, for instance, from your
office building to a client’s office building or traveling locally”
Preparing the computer
Prepare the computer as if you were taking it home. Make sure that
the battery in the computer is charged. Airport security may require
you to turn on your computer when bringing it into the gate area.
What to bring with you
Bring the following items with you:
• AC adapter
• Spare, fully-charged battery pack(s)
• Additional printer driver files if you plan to use another printer
Special considerations
In addition to the guidelines for taking the computer home, follow
these guidelines to protect your computer while traveling:
• Always take the computer as carry-on luggage.
• If possible, have the computer inspected by hand. Airport security
X-ray machines are safe, but do not put the computer through a
metal detector.
• Avoid exposing floppy disks to hand-held metal detectors.
Traveling internationally with the computer
“when you are moving from country to country”
Preparing the computer
Prepare the computer as you would normally prepare it for traveling.
What to bring with you
Bring the following items with you:
Page 22

37
• AC adapter
• Power cords that are appropriate to the country to which you are
traveling
• Spare, fully-charged battery packs
• Additional printer driver files if you plan to use another printer
• Proof of purchase, in case you need to show it to customs officials
• International Traveler’s Warranty passport
Special considerations
Follow the same special considerations as when traveling with the
computer. In addition, these tips are useful when traveling
internationally:
• When traveling in another country, check that the local AC voltage
and the AC adapter power cord specifications are compatible. If
not, purchase a power cord that is compatible with the local AC
voltage. Do not use converter kits sold for appliances to power
the computer.
• If you are using the modem, check if the modem and connector is
compatible with the telecommunications system of the country
you are traveling in.
Page 23

1 Getting to know your TravelMate38
Securing your computer
Your computer is a valuable investment that you need to take care of.
Learn how to protect and take care of your computer.
Security features include hardware and software locks — a security
notch, Smart Card and passwords.
Using a computer security lock
A security keylock notch located on the rear panel of the computer lets
you connect a Kensington-compatible key-based computer security
lock.
Wrap a computer security lock cable around an immovable object such
as a table or locked drawer handle. Insert the lock into the notch and
turn the key to secure the lock. Some keyless models are also available.
Using the Smart Card
This software includes the following components: PlatinumPAS™,
PlatinumSecure™ and PlatinumKey™. Together, they provide you with
multiple levels of security .
• PlatinumPAS implements the first security measure at the BIOS
level and runs during the BIOS routine check when a computer is
powered up or rebooting. If no Smart Card or Emergency Card is
detected, the computer will stop booting up to prevent any illegal
access to the system.
• PlatinumSecure enhances the secure logon procedure for Windows
Page 24

39
XP at the Windows operating system level. It provides user
authentication through its encryption/decryption function using
the Smart Card. If your Smart Card is unavailable, you can use the
Emergency Card as a temporary replacement card.
• PlatinumKey auto-authenticate and auto cache with one-click
logons to all password-required websites (patent pending),
eliminates the overhead costs associated with memorizing and
typing user IDs and passwords when surfing the Internet with
Microsoft or Netscape web browsers.
A card slot for your Smart Card is located on the right panel of the
computer. This new security feature helps you boot up your computer
with all your settings built right into your Smart Card. You don’t have
to remember your password to access your computer.
Page 25

1 Getting to know your TravelMate40
To remove the Smart Card press the Smart Card eject button (a) and
remove the Smart Card (b) as shown in the illustration below.
For more details consult your Smart Card documentation.
Registering your Smart Card
Important! Your Acer notebook is equipped with a Smart Card
security feature that protects the computer from unauthorized
access. If you enable this feature, please make sure that your
warranty card is completed and sent back to Acer. This
information will be used by Acer service centers to confirm
ownership in case your Smart Card "key" is lost or damaged.
Registering your notebook with Acer's service center is extremely
important when replacing your lost Smart Card "key".
If you have already bypassed the Smart Card registration, please
reinstall the application as follows:
1 Insert your System CD and reinstall from it.
2 Follow the onscreen instructions.
To enable the Smart Card security feature, please refer to your Smart
Card user manual.
Running PlatinumSecure
After installation, the PlatinumSecure icon appears on the Windows
desktop. Double-click on it or click the right mouse button, then select
Page 26

41
Open from the pop-up menu (or launch it from the PlatinumSecret
program group). From the menu that appears, you can directly access
three operations: PlatinumSecure Options, Smart Card Manager, and
Change Password.
PlatinumSecure Options
Click on the PlatinumSecure Options button to open the Smart Card
Options window. It provides great flexibility to meet the various
privacy protection needs of many different users.
• Disable Smart Card Authentication
When Disable PlatinumPAS is selected, the PlatinumPAS Preboot
Authentication System will be disabled.
When Disable PlatinumSecure is selected, the PlatinumSecure
Windows Logon Authentication with the Smart Card will be
Page 27

1 Getting to know your TravelMate42
disabled, which means that the protection of your PC as well as
other options under System Lock Option and Password Option
will be disabled, too. The Smart Card password is required for this
selection.
• System Lock Option
When Lock system when the Smart Card is not in use
(default) is selected, if the Smart Card is removed, the
PlatinumSecure screensaver comes up and access to the system is
locked. When Never lock the system after bootup is selected,
there is no protection for the PC after boot up, and Password
Option is disabled.
• Password Option
When Always enter password when the Smart Card is in use
(default) is selected, the password is required whenever you need
to regain access to the system while the Smart Card is inserted.
When Auto authenticate when Smart Card is in use is
selected, no password is required. All you need to do is insert the
Smart Card.
Smart Card Manager
The Multiple user support is implemented and managed in Smart Card
Manager. Please note that five users can be registered on one PC. If
you registered as the Primary User, ONLY you can add/remove other
users. If you registered as a regular user, other registered users could
add/remove you. All registered users will be able to use the View Smart
Card users option.
Change Password
Click the Change Password button, fill in the three fields in the
Change Password dialog box, and then close the dialog box by clicking
the OK button to change the Smart Card password.
Encrypt/Decrypt
PlatinumSecure can also be used to encrypt/decrypt files except for
system files or files that are already encrypted with other applications.
Double-click on a file to automatically encrypt/decrypt it. However, if
the file is associated with an application, it will be opened with that
application instead of being encrypted. Note that the encryption is not
recursive. That is, when you encrypt a folder , only the files immediately
under that folder are encrypted, other files under subfolders are not.
Page 28

43
To find the Encrypt/Decrypt commands:
• Right-click on the Start menu,
• Right-click on a folder or icon on your Windows desktop, or
• In Windows Explorer, right-click on a selected folder, file, or group
of files.
Running PlatinumKey
PlatinumKey provides one-click logon to all password-required
websites. With its unique Smart Card caching technology, you can
greatly extend the limited card memory size to unlimited use by
storing your private data in an encrypted file either on the Smart Card,
or on the 360 Degree Web secure website server.
Information in PlatinumKey, like the ones in My Info and Credit Cards,
can be transferred to other applications using the "drag-and-drop"
method: simply point the cursor to the field containing the
information, press and hold the left mouse button, then drag the
cursor to the application and drop the information there.
PlatinumKey also makes it convenient to change your password. There
is always a PWD button available, which is equivalent to the Change
Password button in PlatinumSecure.
Follow these steps to use PlatinumKey:
1 Open your browser to connect to the Internet.
Page 29

1 Getting to know your TravelMate44
2 Double-click on the PlatinumKey icon on your Windows desktop.
3 Enter your Smart Card password and click OK.
4 If PlatinumKey is being used for the very first time, it will ask
"Would you like to link to 360 Degree Web secure website server
to backup the information on your Smart Card?" The default
answer is Yes, and it will enable you to store your information
(excluding the Credit Cards) on the 360 Degree Web secure
website server for backup purposes in case the card is lost/stolen. If
you choose No, you will only be able to save My Info, Credit Cards
and 5 Websites on your Smart Card.
5 Log in to a website where you are already registered.
6 PlatinumKey automatically stores your login data and asks for your
confirmation to automatically log you in the next time you access
the site. Click Yes and continue browsing.
7 To close PlatinumKey when you are finished browsing, right-click
on the PlatinumKey icon on your Windows taskbar and select
Close PlatinumKey .
PlatinumKey provides a list of all the logon pages that you have stored.
To go directly to any site on the list either double-click it or select it and
click the Go button. Also, you can click the View button to view the
selected website information including Web Name, User Name,
Password, and Web URL. Similarly , type the first letter(s) of a site on the
list, and the site will be searched and selected.
You can Edit and Delete the sites as well as other information, and
Save or Cancel the changes you made, by selecting the button
corresponding to each command.
Using passwords
Three password types protect your computer from unauthorized
access. Setting these passwords creates several different levels of
protection for your computer and data:
• Setup Password prevents unauthorized entry into the BIOS Utility.
Once set, you must key-in this password to gain access to the BIOS
Utility. See “BIOS Utility” on page 57 and your online guide for
more details.
• Power-On Password secures your computer against unauthorized
use. Combine the use of this password with password checkpoints
on boot-up and resume from hibernation for maximum security.
Page 30

45
• Hard Disk Password protects your data by preventing
unauthorized access to your hard disk. Even if the hard disk is
removed from the computer and moved to another computer, it
cannot be accessed without the Hard Disk Password.
Important! Do not forget your Setup and Hard Disk Password! If
you forget your password, please get in touch with your dealer or
an authorized service center.
Entering passwords
When a password is set, a password prompt appears in the left-hand
corner of the display screen.
• When the Setup Password is set, the following prompt appears
when you press F2 to enter the BIOS Utility at boot-up.
Type the Setup Password and press Enter to access the BIOS Utility.
• When the Power-on Password is set, the following prompt appears
at boot-up.
Type the Power-on Password (a . symbol appears for each
character you type) and press Enter to use the computer. If you
enter the password incorrectly , an x symbol appears. Try again
and press Enter.
• When the Hard Disk Password is set, the following prompt appears
at boot-up.
Type the Hard Disk Password (a . symbol appears for each
character you type) and press Enter to use the computer. If you
enter the password incorrectly , an x symbol appears. Try again
and press Enter.
Page 31

Important! You have three chances to enter a password. If you
successfully entered the password, you are presented with a
correct entry symbol.
If you fail to enter the password correctly after three tries, the
following message or symbol appears.
Slide and hold the power switch for four seconds to shut down the
computer . Then turn on the computer again, and try again. If you
fail to enter the Hard Disk Password, please contact your dealer or
an authorized service center.
Setting passwords
You can set passwords using:
• Notebook Manager
• BIOS Utility
See your online guide for more details.
1 Getting to know your TravelMate46
Page 32

2 Customizing your
computer
Page 33

After learning the basics of your TravelMate
computer, let’s get acquainted with the
advanced features of your computer. In this
chapter, you will learn how to add options,
upgrade components for better
performance, and customize your computer.
 Loading...