

Page 1
Page 2

Copyright
©1994-2003 Wise Solutions, Inc. All Rights Reserved. This documentation and the accompanying
software are copyrighted materials. Making unauthorized copies is prohibited by law. No part of the
software or documentation may be reproduced, transmitted, transcribed, stored in a retrieval
system or translated into any human or computer language without prior written permission of
Wise Solutions, Inc. Wise Solutions, Inc. asserts its “Moral Right” to be identified as the author of
this work, in all jurisdictions which recognize the “Moral Right.”
Notice
UNLESS OTHERWISE PROVIDED BY WRITTEN AGREEMENT WITH WISE SOLUTIONS, INC., THIS
PUBLICATION, AND THE SOFTWARE SOLD WITH THIS PUBLICATION, ARE PROVIDED “AS IS”
WITHOUT WARRANTY OF ANY KIND EITHER EXPRESS OR IMPLIED, INCLUDING BUT NOT LIMITED
TO THE IMPLIED WARRANTIES OF MERCHANTABILITY AND FITNESS FOR A PARTICULAR PURPOSE.
THE ENTIRE RISK ARISING OUT OF THE USE OR PERFORMANCE OF THIS PUBLICATION AND
SOFTWARE REMAINS WITH YOU. IN NO EVENT WILL WISE SOLUTIONS, INC., OR ANY OF ITS
SUPPLIERS, BE LIABLE FOR ANY LOST PROFITS, LOST SAVINGS, DIRECT, INCIDENTAL OR
INDIRECT DAMAGES OR OTHER ECONOMIC OR CONSEQUENTIAL DAMAGES, EVEN IF WISE
SOLUTIONS, INC., OR ITS SUPPLIERS, HAVE BEEN ADVISED OF THE POSSIBILITY OF SUCH
DAMAGES. WISE SOLUTIONS, INC. RESERVES THE RIGHT TO MODIFY THIS DOCUMENT AT ANY
TIME WITHOUT OBLIGATION TO NOTIFY ANYONE. IN NO EVENT SHALL WISE SOLUTIONS, INC.’S
OR ITS SUPPLIERS’ LIABILITY UNDER THIS AGREEMENT EXCEED THE SUM OF ANY AMOUNTS PAID
HEREUNDER BY THE CUSTOMER TO WISE OR THE SUPPLIER.
Trademarks
Wise Solutions, Inc. owns a number of registered and unregistered Trademarks and Service Marks
(the “Marks”). These Marks are extremely valuable to Wise Solutions, Inc. and shall not be used by
you, or any other person, without Wise Solutions, Inc.’s express written permission. The Marks
include, but are not necessarily limited to the following: A
A
PPLICATIONWATCH™; CONFLICTMANAGER®; INSTALLATION DEVELOPMENT LIFE CYCLE™; INSTALLBUILDER®;
I
NSTALLMAKER®; INSTALLMANAGER®; INSTALLTAILOR™; MSI DEBUGGER™; MSI SCRIPT™;
P
ACKAGEMANAGER™; SETUPCAPTURE®; SMARTMONITOR™; SMARTPATCH®; SOFTWARE DISTRIBUTION MADE
E
ASY™; SOFTWARE INSTALLATIONS MADE EASY®; VISUAL MSIDIFF™; VIRTUAL CAPTURE™; WEBDEPLOY™;
W
S
OLUTIONS®; WISESCRIPT™; WISESCRIPT EXPRESS™; WISEUPDATE®; WISEUSER®; and the Wise
Solutions logo.
In addition to Wise Solutions, Inc.’s Marks, some Wise Products may include Trademarks or Service
Marks owned by other corporations. These other Marks include, but are not necessarily limited to
M
Microsoft Corporation.
You shall not use any of the Trademarks or Service Marks of Wise Solutions, Inc., Microsoft
Corporation, or any other entity, without the express written permission of such Trademark or
Service Mark owner.
PPLICATION ISOLATION WIZARD™;
ISE INSTALLATION SYSTEM®; WISE PACKAGE STUDIO®; WISE SOFTWARE REPOSITORY™; WISE
ICROSOFT® WINDOWS® and MICROSOFT® VISUAL STUDIO® .NET, which are registered Trademarks of
Wise Solutions, Inc.
47911 Halyard Drive
Plymouth, Michigan 48170 USA
Phone: 734-456-2100 • Fax: 734-456-2456
E-mail: [email protected] • Web: www.wise.com
2
5.0
Page 3

Contents
1 Welcome . . . . . . . . . . . . . . . . . . . . . . . . . . . . . . . . . . 15
Documentation Roadmap . . . . . . . . . . . . . . . . . . . . . . . . . . . . . . . .16
Getting Help and Product Support . . . . . . . . . . . . . . . . . . . . . . . . . .18
Getting Updates Over the Web . . . . . . . . . . . . . . . . . . . . . . . . . . . .20
2 Wise for Windows Installer Basics . . . . . . . . . . . . . . 21
Wise for Windows Installer Editions . . . . . . . . . . . . . . . . . . . . . . . . .22
Options for New Installations. . . . . . . . . . . . . . . . . . . . . . . . . . . . . .24
File Types . . . . . . . . . . . . . . . . . . . . . . . . . . . . . . . . . . . . . . . . . . .26
Project Files and Database Files. . . . . . . . . . . . . . . . . . . . . . . . . . . .28
Specifying the Target Platform. . . . . . . . . . . . . . . . . . . . . . . . . . . . .30
What’s Different in a 64-Bit Installation? . . . . . . . . . . . . . . . . . . .30
Using Installation Expert. . . . . . . . . . . . . . . . . . . . . . . . . . . . . . . . .32
Customizing Installation Expert Page Groups . . . . . . . . . . . . . . . .33
Using the Current Feature Drop-Down List . . . . . . . . . . . . . . . . . .34
Using the Current Release Drop-Down List . . . . . . . . . . . . . . . . . .36
Compiling, Testing, and Running Your Installation . . . . . . . . . . . . . . .37
Compiling Your Installation. . . . . . . . . . . . . . . . . . . . . . . . . . . . .37
Testing Your Installation . . . . . . . . . . . . . . . . . . . . . . . . . . . . . .38
Running Your Installation . . . . . . . . . . . . . . . . . . . . . . . . . . . . . .39
Using the Task List . . . . . . . . . . . . . . . . . . . . . . . . . . . . . . . . . . . . .40
Filtering the Task List . . . . . . . . . . . . . . . . . . . . . . . . . . . . . . . .41
Finding Table Errors From the Task List . . . . . . . . . . . . . . . . . . . .42
Adding User-Defined Tasks. . . . . . . . . . . . . . . . . . . . . . . . . . . . .43
Creating and Editing Installation Templates . . . . . . . . . . . . . . . . . . . .44
Setting Preferences . . . . . . . . . . . . . . . . . . . . . . . . . . . . . . . . . . . .46
Setting General Preferences . . . . . . . . . . . . . . . . . . . . . . . . . . . .46
Setting .NET Preferences . . . . . . . . . . . . . . . . . . . . . . . . . . . . . .49
Setting Digital Signature Preferences. . . . . . . . . . . . . . . . . . . . . .50
Setting Installation Expert Options . . . . . . . . . . . . . . . . . . . . . . .51
Setting Merge Module Directories . . . . . . . . . . . . . . . . . . . . . . . .52
Activating Suppressed Prompts . . . . . . . . . . . . . . . . . . . . . . . . . .53
3
Page 4

CONTENTS
Setting Repository Preferences. . . . . . . . . . . . . . . . . . . . . . . . . . 53
Setting Source Control Preferences . . . . . . . . . . . . . . . . . . . . . . . 55
Setting the Target Platform . . . . . . . . . . . . . . . . . . . . . . . . . . . . 56
Component Rules . . . . . . . . . . . . . . . . . . . . . . . . . . . . . . . . . . . . . 58
About Component Rules . . . . . . . . . . . . . . . . . . . . . . . . . . . . . . 58
Selecting a Component Rule Set. . . . . . . . . . . . . . . . . . . . . . . . . 59
Using Component Rules to Align GUIDs in an Upgrade . . . . . . . . . 61
Customizing Component Rules . . . . . . . . . . . . . . . . . . . . . . . . . . 62
Microsoft Best Practices Component Rule Set . . . . . . . . . . . . . . . . 65
One File Per Component Rule Set . . . . . . . . . . . . . . . . . . . . . . . . 66
Where are Installation Resources Stored? . . . . . . . . . . . . . . . . . . . . 68
Using the Enterprise Edition . . . . . . . . . . . . . . . . . . . . . . . . . . . . . . 70
Sharing Installation Resources . . . . . . . . . . . . . . . . . . . . . . . . . . 70
About the Share Point Directory in Wise for Windows Installer . . . . 72
Sharing the Wise Software Repository With Wise Package Studio . . 73
Generating Shared Resource Reports . . . . . . . . . . . . . . . . . . . . . 75
Downloading Redistributable Files . . . . . . . . . . . . . . . . . . . . . . . . . . 77
Downloading Redistributables From the Wise Web Site or Product CD .
78
Downloading Redistributables From Other Vendors’ Web Sites . . . . 79
Command Line Options . . . . . . . . . . . . . . . . . . . . . . . . . . . . . . . . . 81
Command Line Option Example . . . . . . . . . . . . . . . . . . . . . . . . . 82
Automating the Build Process. . . . . . . . . . . . . . . . . . . . . . . . . . . 82
3 Setting Up Your Project . . . . . . . . . . . . . . . . . . . . . . . 83
Before You Start . . . . . . . . . . . . . . . . . . . . . . . . . . . . . . . . . . . . . . 84
Starting a New Installation . . . . . . . . . . . . . . . . . . . . . . . . . . . . . . . 85
Product Details Page . . . . . . . . . . . . . . . . . . . . . . . . . . . . . . . . . . . 86
Incrementing the Version . . . . . . . . . . . . . . . . . . . . . . . . . . . . . 88
Setting the Default Installation Directory . . . . . . . . . . . . . . . . . . . 88
General Information Page. . . . . . . . . . . . . . . . . . . . . . . . . . . . . . . . 90
Add/Remove Programs Page . . . . . . . . . . . . . . . . . . . . . . . . . . . . . . 91
Features Page. . . . . . . . . . . . . . . . . . . . . . . . . . . . . . . . . . . . . . . . 92
Strategies for Organizing Files Into Features . . . . . . . . . . . . . . . . 94
Adding a New Feature . . . . . . . . . . . . . . . . . . . . . . . . . . . . . . . . 96
Configuring a Feature Using Its Drop-Down List . . . . . . . . . . . . . . 97
Configuring a Feature Using the Feature Details Dialog . . . . . . . . . 98
Using Conditions With Features . . . . . . . . . . . . . . . . . . . . . . . . 102
Adding and Deleting Feature Conditions . . . . . . . . . . . . . . . . . . 103
Managing Binary Resources . . . . . . . . . . . . . . . . . . . . . . . . . . . . . 105
4
Page 5

CONTENTS
Adding Binary Resources . . . . . . . . . . . . . . . . . . . . . . . . . . . . .106
Refreshing Binary Resources. . . . . . . . . . . . . . . . . . . . . . . . . . . 107
4 Building Your Installation . . . . . . . . . . . . . . . . . . . . 109
Files Page . . . . . . . . . . . . . . . . . . . . . . . . . . . . . . . . . . . . . . . . . . 110
Files Page Directories. . . . . . . . . . . . . . . . . . . . . . . . . . . . . . . .111
Files Page Icons . . . . . . . . . . . . . . . . . . . . . . . . . . . . . . . . . . .112
Adding a File to the Installation. . . . . . . . . . . . . . . . . . . . . . . . .112
Adding Merge Modules Instead of Files. . . . . . . . . . . . . . . . . . . .114
Adding Contents of Directories to the Installation . . . . . . . . . . . .115
Wildcard Examples . . . . . . . . . . . . . . . . . . . . . . . . . . . . . . . . .117
Adding .NET Assemblies to the Installation . . . . . . . . . . . . . . . . .118
Editing Settings for Automatic Updating . . . . . . . . . . . . . . . . . . . 119
Removing a File From the Destination Computer . . . . . . . . . . . . .121
Copying and Moving Files on the Destination Computer . . . . . . . .123
Editing File Details. . . . . . . . . . . . . . . . . . . . . . . . . . . . . . . . . . 124
How Self-Registration Information is Captured . . . . . . . . . . . . . .132
Registry Page . . . . . . . . . . . . . . . . . . . . . . . . . . . . . . . . . . . . . . .135
Creating or Editing Registry Key Settings . . . . . . . . . . . . . . . . . .136
Removing Registry Entries From the Destination Computer . . . . .137
Importing and Exporting Registry Entries . . . . . . . . . . . . . . . . . . 139
Configuring General Registry Settings . . . . . . . . . . . . . . . . . . . . 139
Configuring Permissions for Registry Keys . . . . . . . . . . . . . . . . .141
Viewing Shared Registry Resources . . . . . . . . . . . . . . . . . . . . . . 142
Special Registry Keys. . . . . . . . . . . . . . . . . . . . . . . . . . . . . . . . 142
INI Files Page . . . . . . . . . . . . . . . . . . . . . . . . . . . . . . . . . . . . . . .143
Creating or Editing .INI Files. . . . . . . . . . . . . . . . . . . . . . . . . . .143
Tips for Creating and Editing .INI Files . . . . . . . . . . . . . . . . . . . . 145
Shortcuts Page . . . . . . . . . . . . . . . . . . . . . . . . . . . . . . . . . . . . . . 146
Adding a Shortcut to Your Installation . . . . . . . . . . . . . . . . . . . . 146
Editing a Shortcut Configuration . . . . . . . . . . . . . . . . . . . . . . . .148
Environment Variables Page . . . . . . . . . . . . . . . . . . . . . . . . . . . . .150
File Associations Page. . . . . . . . . . . . . . . . . . . . . . . . . . . . . . . . . . 151
Determining Extension Settings . . . . . . . . . . . . . . . . . . . . . . . .152
Adding Command Verbs . . . . . . . . . . . . . . . . . . . . . . . . . . . . . .153
Selecting MIME Types . . . . . . . . . . . . . . . . . . . . . . . . . . . . . . .153
Services Page . . . . . . . . . . . . . . . . . . . . . . . . . . . . . . . . . . . . . . . 154
Adding a Service to the Destination Computer . . . . . . . . . . . . . .154
Controlling Services on the Destination Computer . . . . . . . . . . . . 156
ODBC Page . . . . . . . . . . . . . . . . . . . . . . . . . . . . . . . . . . . . . . . . .158
5
Page 6

CONTENTS
Setting ODBC Data Source Details . . . . . . . . . . . . . . . . . . . . . . 158
Setting ODBC Driver Details. . . . . . . . . . . . . . . . . . . . . . . . . . . 159
Setting ODBC Translator Details . . . . . . . . . . . . . . . . . . . . . . . . 159
5 Your Installation on the Destination Computer . . . . 161
About System Requirements. . . . . . . . . . . . . . . . . . . . . . . . . . . . . 162
Setting a Requirement on the System Requirements Page. . . . . . 162
Setting a Requirement by Creating a Launch Condition . . . . . . . . 164
Performing a System Search. . . . . . . . . . . . . . . . . . . . . . . . . . . . . 166
Searching For Files or Directories . . . . . . . . . . . . . . . . . . . . . . . 166
Searching For Items in .INI Files . . . . . . . . . . . . . . . . . . . . . . . 169
Searching For a Registry Value. . . . . . . . . . . . . . . . . . . . . . . . . 171
Searching For a Previously-Installed Component . . . . . . . . . . . . 172
Setting Features for Installation Types . . . . . . . . . . . . . . . . . . . . . . 174
6 Organizing Your Installation Into Releases . . . . . . . 177
About Releases . . . . . . . . . . . . . . . . . . . . . . . . . . . . . . . . . . . . . . 178
Creating a New Release. . . . . . . . . . . . . . . . . . . . . . . . . . . . . . 178
Outputting a Multiple-Language Release . . . . . . . . . . . . . . . . . . 180
Customizing a Release . . . . . . . . . . . . . . . . . . . . . . . . . . . . . . . . . 182
Customizing Properties for a Particular Release . . . . . . . . . . . . . 182
Customizing Summary Items for a Particular Release . . . . . . . . . 183
Defining a Feature Set for a Release . . . . . . . . . . . . . . . . . . . . . 184
Sharing Settings Between Releases . . . . . . . . . . . . . . . . . . . . . 184
Creating a Demo Release: An Example . . . . . . . . . . . . . . . . . . . 185
Setting Build Options for a Release . . . . . . . . . . . . . . . . . . . . . . . . 187
Creating a Clean Build . . . . . . . . . . . . . . . . . . . . . . . . . . . . . . . . . 190
Creating Web-Based Installations With WebDeploy . . . . . . . . . . . . . 193
The WebDeploy Process . . . . . . . . . . . . . . . . . . . . . . . . . . . . . 195
Tips for Creating an Efficient WebDeploy Installation . . . . . . . . . 196
Creating a WebDeploy Installation . . . . . . . . . . . . . . . . . . . . . . 196
Uploading a WebDeploy Installation to the Web . . . . . . . . . . . . . 198
Setting Up Media for Distribution. . . . . . . . . . . . . . . . . . . . . . . . . . 201
Adding a Media Item . . . . . . . . . . . . . . . . . . . . . . . . . . . . . . . . 202
Adding a Media Destination . . . . . . . . . . . . . . . . . . . . . . . . . . . 204
Including Features and Components in Media Items . . . . . . . . . . 206
Sharing Media Settings Between Releases . . . . . . . . . . . . . . . . . 207
Spanning an Installation Across Media and Sharing Media Size
Information: An Example. . . . . . . . . . . . . . . . . . . . . . . . . . . . . 208
6
Page 7

CONTENTS
7 Advanced Installations . . . . . . . . . . . . . . . . . . . . . . 211
Adding a Digital Signature to Your Installation. . . . . . . . . . . . . . . . . 212
Creating an Installation for Microsoft SMS. . . . . . . . . . . . . . . . . . . .213
Creating a .NET Installation When You Have the .NET Framework . . .214
Creating a .NET Installation Without the .NET Framework. . . . . . . . .215
Installing a Web Application . . . . . . . . . . . . . . . . . . . . . . . . . . . . . 217
Setting Up a Web Application Installation . . . . . . . . . . . . . . . . . .218
Setting Up a Virtual Directory . . . . . . . . . . . . . . . . . . . . . . . . . .219
Configuring a Microsoft SQL Server During Installation . . . . . . . . . . . 223
Setting SQL Connection Strings. . . . . . . . . . . . . . . . . . . . . . . . .224
Specifying SQL Statements . . . . . . . . . . . . . . . . . . . . . . . . . . . 225
Specifying Replacements in SQL Statements . . . . . . . . . . . . . . .226
Importing .NET Framework Security Settings . . . . . . . . . . . . . . . . . 228
MTS/COM+ Page . . . . . . . . . . . . . . . . . . . . . . . . . . . . . . . . . . . . . 231
Adding an MTS or COM+ Application . . . . . . . . . . . . . . . . . . . . .231
8 Mobile Devices . . . . . . . . . . . . . . . . . . . . . . . . . . . . . 235
Pocket PC and Smartphone Installations . . . . . . . . . . . . . . . . . . . . .236
How a Pocket PC or Smartphone Installation Works. . . . . . . . . . . 236
Processor and Platform Support for Pocket PC . . . . . . . . . . . . . . 237
Compiling a Pocket PC or Smartphone Installation. . . . . . . . . . . .238
Creating a Pocket PC or Smartphone Installation. . . . . . . . . . . . . 238
Palm OS Installations . . . . . . . . . . . . . . . . . . . . . . . . . . . . . . . . . .249
9 Translating an Installation . . . . . . . . . . . . . . . . . . . 253
About the Languages Page . . . . . . . . . . . . . . . . . . . . . . . . . . . . . . 254
Translating Your Installation Into Another Language. . . . . . . . . . . . . 255
Creating a Translated .MSI . . . . . . . . . . . . . . . . . . . . . . . . . . . .256
Creating a Language Transform . . . . . . . . . . . . . . . . . . . . . . . .257
Sharing Language Settings Between Releases. . . . . . . . . . . . . . .259
Removing a Language from Your Installation . . . . . . . . . . . . . . .260
Defining and Translating Into Additional Languages . . . . . . . . . . . . .262
About the New Language Wizard. . . . . . . . . . . . . . . . . . . . . . . .263
Defining a New Language and Exporting All Text for Translation . . 264
Importing All Text Strings After Translation . . . . . . . . . . . . . . . .265
Importing All Text Strings With the New Language Wizard . . . . . .267
Translating Text Strings You’ve Added or Changed . . . . . . . . . . . . . .269
Translating Text Strings by Exporting to a File . . . . . . . . . . . . . .269
Translating Text Directly Without Exporting It. . . . . . . . . . . . . . .273
Resizing Buttons and Text Boxes After Translation . . . . . . . . . . . . . .276
7
Page 8

CONTENTS
Using the Language Menu . . . . . . . . . . . . . . . . . . . . . . . . . . . . . . 277
Changing the Default Language . . . . . . . . . . . . . . . . . . . . . . . . 277
About the Default Release Language . . . . . . . . . . . . . . . . . . . . . 279
About the Language Strings Dialog . . . . . . . . . . . . . . . . . . . . . . . . 280
Keeping Track of Changed Text Strings . . . . . . . . . . . . . . . . . . . 280
What Pre-Translated Languages Are Available? . . . . . . . . . . . . . . . . 282
Language IDs . . . . . . . . . . . . . . . . . . . . . . . . . . . . . . . . . . . . . . . 283
10Distributing Your Installation . . . . . . . . . . . . . . . . . 285
Package Distribution . . . . . . . . . . . . . . . . . . . . . . . . . . . . . . . . . . 286
Copying an Installation to the Share Point Directory . . . . . . . . . . 286
Copying a Compiled Setup Program to the Network . . . . . . . . . . 288
Copying a Compiled Setup Program to an FTP Server . . . . . . . . . 288
Performing an Administrative Installation of a Windows Installer
Installation . . . . . . . . . . . . . . . . . . . . . . . . . . . . . . . . . . . . . . 290
Copying a Setup Program to Removable Media. . . . . . . . . . . . . . 290
WiseUpdate . . . . . . . . . . . . . . . . . . . . . . . . . . . . . . . . . . . . . . . . 293
The WiseUpdate Process . . . . . . . . . . . . . . . . . . . . . . . . . . . . . 294
Using WiseUpdate in Your Installation . . . . . . . . . . . . . . . . . . . . 295
Using the WiseUpdate Client . . . . . . . . . . . . . . . . . . . . . . . . . . 303
WiseUpdate Tips. . . . . . . . . . . . . . . . . . . . . . . . . . . . . . . . . . . 304
Troubleshooting WiseUpdate . . . . . . . . . . . . . . . . . . . . . . . . . . 306
11Upgrading Applications . . . . . . . . . . . . . . . . . . . . . . 307
Preparing for Software Updates . . . . . . . . . . . . . . . . . . . . . . . . . . 308
Step 1: Archive Shipping Version of .MSIs . . . . . . . . . . . . . . . . . 308
Step 2: Determine the Form of the Update . . . . . . . . . . . . . . . . 308
Step 3: Determine the Product Code and Product Version . . . . . . 310
Step 4: Check Installation With UpgradeSync . . . . . . . . . . . . . . 310
Using UpgradeSync . . . . . . . . . . . . . . . . . . . . . . . . . . . . . . . . . . . 312
Patches . . . . . . . . . . . . . . . . . . . . . . . . . . . . . . . . . . . . . . . . . . . 315
What You Need to Create a Patch . . . . . . . . . . . . . . . . . . . . . . . 315
Creating a Patch File . . . . . . . . . . . . . . . . . . . . . . . . . . . . . . . . 316
Specifying Previous Versions for Patches . . . . . . . . . . . . . . . . . . 320
Advanced Upgrade Version Settings . . . . . . . . . . . . . . . . . . . . . 321
Upgrades . . . . . . . . . . . . . . . . . . . . . . . . . . . . . . . . . . . . . . . . . . 323
What You Need to Create an Upgrade . . . . . . . . . . . . . . . . . . . . 323
What is the Upgrade Code? . . . . . . . . . . . . . . . . . . . . . . . . . . . 323
Creating an Upgrade . . . . . . . . . . . . . . . . . . . . . . . . . . . . . . . . 324
8
Page 9

CONTENTS
12Working With Source Paths . . . . . . . . . . . . . . . . . . . 327
Using Source Control . . . . . . . . . . . . . . . . . . . . . . . . . . . . . . . . . . 328
Adding a Project to Source Control . . . . . . . . . . . . . . . . . . . . . .329
Adding Files to Source Control . . . . . . . . . . . . . . . . . . . . . . . . . 331
Checking Files In. . . . . . . . . . . . . . . . . . . . . . . . . . . . . . . . . . . 332
Checking Files Out. . . . . . . . . . . . . . . . . . . . . . . . . . . . . . . . . .332
Getting Latest Version of Files. . . . . . . . . . . . . . . . . . . . . . . . . .333
Removing Files from Source Control . . . . . . . . . . . . . . . . . . . . .333
Undoing Check Out . . . . . . . . . . . . . . . . . . . . . . . . . . . . . . . . .333
Showing History of the Project File . . . . . . . . . . . . . . . . . . . . . . 334
Showing the Differences Between Project Files . . . . . . . . . . . . . . 334
Comparing to Latest Installation in Source Control . . . . . . . . . . . 335
Defining Path Variables . . . . . . . . . . . . . . . . . . . . . . . . . . . . . . . . . 337
Turning Path Variable Substitution On and Off . . . . . . . . . . . . . .338
Creating a User-Defined Path Variable . . . . . . . . . . . . . . . . . . . .338
Creating a Path Variable Based on an Environment Variable . . . . . 339
Creating a Path Variable Based on a Registry Value. . . . . . . . . . .340
Changing Source Paths in an Installation . . . . . . . . . . . . . . . . . . . . 342
Changing One Source Directory . . . . . . . . . . . . . . . . . . . . . . . .342
Changing Multiple Source Directories . . . . . . . . . . . . . . . . . . . . .343
Converting to Relative Source File Paths . . . . . . . . . . . . . . . . . .344
Converting to UNC-Based Source File Paths . . . . . . . . . . . . . . . . 345
Changing the Source Directory Dynamically During Compile. . . . .346
Converting an .MSI to a .WSI File . . . . . . . . . . . . . . . . . . . . . . . . . 349
Using the .MSI to .WSI Conversion Tool . . . . . . . . . . . . . . . . . . .349
Specifying Merge Module Source Directories . . . . . . . . . . . . . . . . 351
Specifying File Source Directories . . . . . . . . . . . . . . . . . . . . . . . 353
13Merge Modules and Transforms. . . . . . . . . . . . . . . . 357
About Merge Modules . . . . . . . . . . . . . . . . . . . . . . . . . . . . . . . . . .358
Available Tabs and Pages in Merge Modules . . . . . . . . . . . . . . . .359
Creating a Merge Module by Creating a New Installation . . . . . . .359
Creating a Merge Module From Existing Components . . . . . . . . . . 365
Creating a Configurable Merge Module . . . . . . . . . . . . . . . . . . . . 366
About the Merge Modules Page . . . . . . . . . . . . . . . . . . . . . . . . .374
About Transforms. . . . . . . . . . . . . . . . . . . . . . . . . . . . . . . . . . . . .380
Creating a Transform . . . . . . . . . . . . . . . . . . . . . . . . . . . . . . . .380
Setting Transform Details. . . . . . . . . . . . . . . . . . . . . . . . . . . . . 382
Applying a Transform to an Installation . . . . . . . . . . . . . . . . . . .383
9
Page 10

CONTENTS
14Tools. . . . . . . . . . . . . . . . . . . . . . . . . . . . . . . . . . . . . 385
ApplicationWatch. . . . . . . . . . . . . . . . . . . . . . . . . . . . . . . . . . . . . 388
Convert InstallShield Professional . . . . . . . . . . . . . . . . . . . . . . . . . 390
Convert SMS Installer or WiseScript Installation . . . . . . . . . . . . . . . 392
Import Visual Studio Projects . . . . . . . . . . . . . . . . . . . . . . . . . . . . 394
Importing an Installation From a Visual Studio Project . . . . . . . . 394
Package Validation . . . . . . . . . . . . . . . . . . . . . . . . . . . . . . . . . . . 398
Validating a Package . . . . . . . . . . . . . . . . . . . . . . . . . . . . . . . . 399
Customizing Validation Modules . . . . . . . . . . . . . . . . . . . . . . . . 402
Predefined Validation Modules . . . . . . . . . . . . . . . . . . . . . . . . . 413
15Setup Editor . . . . . . . . . . . . . . . . . . . . . . . . . . . . . . . 415
About Setup Editor . . . . . . . . . . . . . . . . . . . . . . . . . . . . . . . . . . . 416
Product Tab . . . . . . . . . . . . . . . . . . . . . . . . . . . . . . . . . . . . . . . . 418
Specifying Summary Information . . . . . . . . . . . . . . . . . . . . . . . 418
Features Tab. . . . . . . . . . . . . . . . . . . . . . . . . . . . . . . . . . . . . . . . 420
About the Features Tree . . . . . . . . . . . . . . . . . . . . . . . . . . . . . 420
Working With Features . . . . . . . . . . . . . . . . . . . . . . . . . . . . . . 421
Components Icon . . . . . . . . . . . . . . . . . . . . . . . . . . . . . . . . . . 422
Modules Icon . . . . . . . . . . . . . . . . . . . . . . . . . . . . . . . . . . . . . 423
Working With Items in the Combined Folder . . . . . . . . . . . . . . . 423
Components Tab . . . . . . . . . . . . . . . . . . . . . . . . . . . . . . . . . . . . . 434
About the Component Tree . . . . . . . . . . . . . . . . . . . . . . . . . . . 434
Component Errors . . . . . . . . . . . . . . . . . . . . . . . . . . . . . . . . . 435
Adding a Component. . . . . . . . . . . . . . . . . . . . . . . . . . . . . . . . 436
Editing a Component. . . . . . . . . . . . . . . . . . . . . . . . . . . . . . . . 438
Moving Items Between Components . . . . . . . . . . . . . . . . . . . . . 439
About the Key Path . . . . . . . . . . . . . . . . . . . . . . . . . . . . . . . . . 440
Isolating a .DLL With an .EXE. . . . . . . . . . . . . . . . . . . . . . . . . . 440
Adding Published Components . . . . . . . . . . . . . . . . . . . . . . . . . 441
10
Tables Tab . . . . . . . . . . . . . . . . . . . . . . . . . . . . . . . . . . . . . . . . . 443
Working With Tables . . . . . . . . . . . . . . . . . . . . . . . . . . . . . . . . 444
Editing Binary Data in the Icon Table . . . . . . . . . . . . . . . . . . . . 449
Comparing Windows Installer Files . . . . . . . . . . . . . . . . . . . . . . 450
About Wise Tables . . . . . . . . . . . . . . . . . . . . . . . . . . . . . . . . . 451
Page 11

CONTENTS
16Using Conditions and Properties . . . . . . . . . . . . . . . 455
Conditions. . . . . . . . . . . . . . . . . . . . . . . . . . . . . . . . . . . . . . . . . .456
Where Can You Use Conditions? . . . . . . . . . . . . . . . . . . . . . . . . 456
Condition Guidelines . . . . . . . . . . . . . . . . . . . . . . . . . . . . . . . . 459
Examples of Conditions . . . . . . . . . . . . . . . . . . . . . . . . . . . . . .460
Creating Conditions Using Condition Builder . . . . . . . . . . . . . . . . 461
Properties . . . . . . . . . . . . . . . . . . . . . . . . . . . . . . . . . . . . . . . . . . 468
How Do You Use Properties? . . . . . . . . . . . . . . . . . . . . . . . . . . .469
Creating a New Property . . . . . . . . . . . . . . . . . . . . . . . . . . . . .469
Build Properties. . . . . . . . . . . . . . . . . . . . . . . . . . . . . . . . . . . .471
INI File Properties . . . . . . . . . . . . . . . . . . . . . . . . . . . . . . . . . .476
Runtime Properties . . . . . . . . . . . . . . . . . . . . . . . . . . . . . . . . .479
17Working With Dialogs . . . . . . . . . . . . . . . . . . . . . . . 481
About Dialogs . . . . . . . . . . . . . . . . . . . . . . . . . . . . . . . . . . . . . . .482
About the Wizard Dialogs . . . . . . . . . . . . . . . . . . . . . . . . . . . . .482
Choosing Dialogs on the Dialogs Page . . . . . . . . . . . . . . . . . . . . . .485
Changing the Theme of Your Dialogs . . . . . . . . . . . . . . . . . . . . .485
Adding and Editing Dialog Themes. . . . . . . . . . . . . . . . . . . . . . .486
Importing Text into License and Readme Dialogs . . . . . . . . . . . .487
About the Dialogs Tab. . . . . . . . . . . . . . . . . . . . . . . . . . . . . . . . . . 489
Turning Dialogs On or Off. . . . . . . . . . . . . . . . . . . . . . . . . . . . . 489
Adding Controls to Dialogs . . . . . . . . . . . . . . . . . . . . . . . . . . . .489
Editing Dialog Settings . . . . . . . . . . . . . . . . . . . . . . . . . . . . . . .490
Creating a New Dialog . . . . . . . . . . . . . . . . . . . . . . . . . . . . . . .491
Organizing and Aligning Controls in Dialogs . . . . . . . . . . . . . . . .492
About Dialog Controls. . . . . . . . . . . . . . . . . . . . . . . . . . . . . . . . . .495
Types of Controls . . . . . . . . . . . . . . . . . . . . . . . . . . . . . . . . . .495
Basic Control Settings . . . . . . . . . . . . . . . . . . . . . . . . . . . . . . .497
Setting an Event on a Control . . . . . . . . . . . . . . . . . . . . . . . . . .500
Assigning Help to a Control. . . . . . . . . . . . . . . . . . . . . . . . . . . . 501
Assigning Conditions to a Control . . . . . . . . . . . . . . . . . . . . . . . 502
Setting the Graphic for a Control. . . . . . . . . . . . . . . . . . . . . . . . 502
Setting the Items in a Control. . . . . . . . . . . . . . . . . . . . . . . . . . 502
Adding Billboards to a Dialog. . . . . . . . . . . . . . . . . . . . . . . . . . . . .504
How Billboards Work . . . . . . . . . . . . . . . . . . . . . . . . . . . . . . . .504
Creating a Billboard . . . . . . . . . . . . . . . . . . . . . . . . . . . . . . . . . 505
Obtaining Logon Information From a Dialog . . . . . . . . . . . . . . . . . . 508
Adding the Logon Information Dialog . . . . . . . . . . . . . . . . . . . . . 508
11
Page 12

CONTENTS
18Macro Editor and OLE Automation . . . . . . . . . . . . . . 511
About Macro Files . . . . . . . . . . . . . . . . . . . . . . . . . . . . . . . . . . . . 512
Manually Run Macros . . . . . . . . . . . . . . . . . . . . . . . . . . . . . . . . . . 513
Wise for Windows Installer Event Macros . . . . . . . . . . . . . . . . . . . . 515
Writing and Editing a Macro for a Wise for Windows Installer Event . .
515
About the Macro Editor Window . . . . . . . . . . . . . . . . . . . . . . . . . . 517
Macro Editor Tools . . . . . . . . . . . . . . . . . . . . . . . . . . . . . . . . . 518
Macro Editor Right-Click Menu . . . . . . . . . . . . . . . . . . . . . . . . . 519
OLE Automation for Wise for Windows Installer Functions . . . . . . . . 521
About Visual Basic Functions . . . . . . . . . . . . . . . . . . . . . . . . . . 521
Function Reference . . . . . . . . . . . . . . . . . . . . . . . . . . . . . . . . . 522
Object Reference . . . . . . . . . . . . . . . . . . . . . . . . . . . . . . . . . . 541
19Debugger for Windows Installer . . . . . . . . . . . . . . . 547
About the Debugger . . . . . . . . . . . . . . . . . . . . . . . . . . . . . . . . . . 548
Parts of the Debugger Window . . . . . . . . . . . . . . . . . . . . . . . . . 549
Rearranging the Debugger Window . . . . . . . . . . . . . . . . . . . . . . 550
Running the Debugger . . . . . . . . . . . . . . . . . . . . . . . . . . . . . . . . . 551
Setting and Clearing Debugger Breakpoints . . . . . . . . . . . . . . . . 552
Evaluating Conditions . . . . . . . . . . . . . . . . . . . . . . . . . . . . . . . 552
Working With Temporary Tables and Columns . . . . . . . . . . . . . . 553
Searching For Text in Tables . . . . . . . . . . . . . . . . . . . . . . . . . . 553
20Using MSI Script. . . . . . . . . . . . . . . . . . . . . . . . . . . . 555
The MSI Script Window . . . . . . . . . . . . . . . . . . . . . . . . . . . . . . . . 556
About MSI Script . . . . . . . . . . . . . . . . . . . . . . . . . . . . . . . . . . . . . 557
About Installation Modes . . . . . . . . . . . . . . . . . . . . . . . . . . . . . 557
About Installation Sequences . . . . . . . . . . . . . . . . . . . . . . . . . . 561
Finding Text in MSI Script . . . . . . . . . . . . . . . . . . . . . . . . . . . . 562
Editing Sequences . . . . . . . . . . . . . . . . . . . . . . . . . . . . . . . . . . . . 564
Types of Actions in Sequences . . . . . . . . . . . . . . . . . . . . . . . . . 564
About the Standard and Custom Tabs . . . . . . . . . . . . . . . . . . . . 565
Adding and Editing Actions . . . . . . . . . . . . . . . . . . . . . . . . . . . 565
Commenting Out Script Lines. . . . . . . . . . . . . . . . . . . . . . . . . . 566
Calling WiseScripts with Custom Actions . . . . . . . . . . . . . . . . . . . . 567
WiseScript Editing Tools . . . . . . . . . . . . . . . . . . . . . . . . . . . . . 567
Examples of WiseScripts You Run From an .MSI . . . . . . . . . . . . . 568
12
Page 13

CONTENTS
Guidelines for Using Custom Actions . . . . . . . . . . . . . . . . . . . . . . .574
Tips on Custom Action Location. . . . . . . . . . . . . . . . . . . . . . . . . 574
Tips on Custom Action Conditions . . . . . . . . . . . . . . . . . . . . . . . 575
Tips for Running Install MSI Custom Actions. . . . . . . . . . . . . . . .576
Tips for Calling VBScripts and JScripts . . . . . . . . . . . . . . . . . . . .578
Tips on Calling .DLLs . . . . . . . . . . . . . . . . . . . . . . . . . . . . . . . . 578
Launching a Custom Action from a Dialog . . . . . . . . . . . . . . . . . . . .581
Custom Actions That Are Added Automatically. . . . . . . . . . . . . . . . . 582
Troubleshooting: When Custom Actions Don’t Work . . . . . . . . . . . . .584
21Custom Action Reference. . . . . . . . . . . . . . . . . . . . . 585
Call Custom DLL From Destination . . . . . . . . . . . . . . . . . . . . . . . . . 585
Call Custom DLL From Installation . . . . . . . . . . . . . . . . . . . . . . . . .587
Call Custom DLL From Installed Files . . . . . . . . . . . . . . . . . . . . . . .588
Configuring .DLL Parameter Settings . . . . . . . . . . . . . . . . . . . . . . .589
Call DLL From Installation . . . . . . . . . . . . . . . . . . . . . . . . . . . . . . . 590
Call DLL From Installed Files . . . . . . . . . . . . . . . . . . . . . . . . . . . . .591
Call JScript From Embedded Code . . . . . . . . . . . . . . . . . . . . . . . . .592
Call JScript From Installation. . . . . . . . . . . . . . . . . . . . . . . . . . . . .593
Call JScript From Installed Files . . . . . . . . . . . . . . . . . . . . . . . . . . . 594
Call JScript From Property. . . . . . . . . . . . . . . . . . . . . . . . . . . . . . .595
Call VBScript From Embedded Code . . . . . . . . . . . . . . . . . . . . . . . .596
Call VBScript From Installation . . . . . . . . . . . . . . . . . . . . . . . . . . . 597
Call VBScript From Installed Files. . . . . . . . . . . . . . . . . . . . . . . . . . 598
Call VBScript From Property . . . . . . . . . . . . . . . . . . . . . . . . . . . . .599
Display Message . . . . . . . . . . . . . . . . . . . . . . . . . . . . . . . . . . . . . 600
Download File From Internet . . . . . . . . . . . . . . . . . . . . . . . . . . . . . 601
End Statement . . . . . . . . . . . . . . . . . . . . . . . . . . . . . . . . . . . . . .602
Execute Program From Destination . . . . . . . . . . . . . . . . . . . . . . . .602
Execute Program From Installation . . . . . . . . . . . . . . . . . . . . . . . .603
Execute Program From Installed Files. . . . . . . . . . . . . . . . . . . . . . . 604
Execute Program From Path . . . . . . . . . . . . . . . . . . . . . . . . . . . . . 605
If Statement . . . . . . . . . . . . . . . . . . . . . . . . . . . . . . . . . . . . . . . . 605
Install MSI From Destination . . . . . . . . . . . . . . . . . . . . . . . . . . . . .606
Install MSI From Installation . . . . . . . . . . . . . . . . . . . . . . . . . . . . . 607
Install MSI From Relative Path. . . . . . . . . . . . . . . . . . . . . . . . . . . . 608
Launch Web Page . . . . . . . . . . . . . . . . . . . . . . . . . . . . . . . . . . . .610
Open Document From Installed Files . . . . . . . . . . . . . . . . . . . . . . . 610
Pause Installation . . . . . . . . . . . . . . . . . . . . . . . . . . . . . . . . . . . .610
13
Page 14

CONTENTS
Post Data to HTTP Server . . . . . . . . . . . . . . . . . . . . . . . . . . . . . . . 611
Remark . . . . . . . . . . . . . . . . . . . . . . . . . . . . . . . . . . . . . . . . . . . 612
Run WiseScript From Destination . . . . . . . . . . . . . . . . . . . . . . . . . 612
Run WiseScript From Installation . . . . . . . . . . . . . . . . . . . . . . . . . 613
Run WiseScript From Installed Files. . . . . . . . . . . . . . . . . . . . . . . . 615
Set Directory . . . . . . . . . . . . . . . . . . . . . . . . . . . . . . . . . . . . . . . 616
Set Feature State . . . . . . . . . . . . . . . . . . . . . . . . . . . . . . . . . . . . 617
Set Property . . . . . . . . . . . . . . . . . . . . . . . . . . . . . . . . . . . . . . . . 618
Terminate Installation . . . . . . . . . . . . . . . . . . . . . . . . . . . . . . . . . 618
Using the Custom Action Location Tab . . . . . . . . . . . . . . . . . . . . . . 620
Using the Custom Action Location Tab for Merge Modules. . . . . . . . . 621
Using the Custom Action Properties Tab . . . . . . . . . . . . . . . . . . . . . 623
22Windows Installer and .NET Technologies. . . . . . . . 627
About Microsoft Windows Installer. . . . . . . . . . . . . . . . . . . . . . . . . 628
Frequently Asked Questions About Microsoft Windows Installer . . 628
Working With Components and Features . . . . . . . . . . . . . . . . . . 631
About GUIDs . . . . . . . . . . . . . . . . . . . . . . . . . . . . . . . . . . . . . 631
About Microsoft .NET Technology. . . . . . . . . . . . . . . . . . . . . . . . . . 633
Microsoft .NET FAQs . . . . . . . . . . . . . . . . . . . . . . . . . . . . . . . . 633
Requirements for Creating a .NET Installation . . . . . . . . . . . . . . 636
Index . . . . . . . . . . . . . . . . . . . . . . . . . . . . . . . . . . . . . . 639
14
Page 15

Chapter 1
Welcome
Wise for Windows Installer is an installation development system for
creating and editing Windows® Installer (.MSI) installation packages. It is
a complete and user-friendly front end for generating Windows Installer
database files, which are executed by the Windows Installer engine. With
Wise for Windows Installer, you can create installations that are compliant
with Microsoft’s Windows 2000 logo program. Use Wise for Windows
Installer to edit and refine installations that you’ve converted from other
formats, and use it to import development projects.
Microsoft® Windows® Installer is a Microsoft technology that provides a
standard installation engine that can be used for the installation of any 32bit or 64-bit Windows software product. It resides on the destination
computer and performs the installation of applications. Windows Installer
technology provides developers with features not currently available in
traditional installation-building products.
Topics in this section cover:
! Documentation Roadmap.
! Getting Help and Product Support.
! How to Check Online Help.
! Getting Updates Over the Web.
15
Page 16

1: WELCOME
Documentation Roadmap
The Wise for Windows Installer Reference Manual, online help, and Getting
Started Guide assume that you are proficient in the use of the Windows
operating system. If you need help using the operating system, consult its
user documentation.
Wise for Windows Installer often provides multiple ways to accomplish a
task. In some cases, you can use the main menu, the right-click menu, or
a toolbar, or you can press a key combination, but instructions in this
documentation generally include only the most convenient method. If you
are most comfortable with a particular method, check the right-click menu,
the main menu, and the toolbar to learn the options available to you.
To learn about Wise for Windows Installer, see the following:
! Reference Manual. The reference manual is available in .PDF format
from the Help menu. It contains detailed technical information and stepby-step instructions for performing common tasks. The Wise for
Windows Installer reference material consists of two reference manuals:
Wise for Windows Installer and WiseScript Editor. The Enterprise Edition
also includes a Software Manager reference manual. They contain
detailed technical information and step-by-step instructions for
performing common tasks. Each reference manual is available in .PDF
format from the individual product’s Help menu; select Reference
Manual. Printed manuals are available from Wise Solutions for a fee; see
Contact Wise Solutions Sales on page 19.
! Online Help. All the material in the reference manual is also available
in the online help system. To access the contents, index, and search
functions, select Help Topics from the Help menu. To access contextsensitive help, press the F1 key from any place in the product, and you
will see help that describes the part of the product that you are in.
! Getting Started Guide. The printed Getting Started Guide contains
system requirements, installation instructions, and a tutorial. You can
access a .PDF copy of the Getting Started Guide from the Help menu in
Wise for Windows Installer.
! Windows Installer SDK Help. You can access the online help for
Windows Installer by selecting Windows Installer SDK Help from the
Help menu within Wise for Windows Installer. This gives you access to
the developer documentation for Windows Installer, which is written by
Microsoft. Because Wise for Windows Installer is a front end for
Windows Installer, you can get more technical details about the way
Windows Installer works from its own help system. Also, the reference
manual and online help for Wise for Windows Installer often refer you to
the Windows Installer SDK Help for more details.
16
Page 17

DOCUMENTATION ROADMAP
! Release Notes. You can access the product release notes by selecting
Release Notes from the Help menu. The release notes document, which
is in HTML format, lists new features, enhancements, bug fixes, and
known issues for the current version. It also links you to release notes
for previous product versions.
17
Page 18

1: WELCOME
Getting Help and Product Support
Wise Solutions offers many resources to help you use our products. You
can search the product help or reference manual .PDF for answers, or you
can use one of the many support resources available to you as a registered
Wise Solutions customer.
Check Online Help
Press the F1 key to display a help window for the active page or dialog. You
can get help on most windows and dialogs in the product. Select Help
Topics from the Help menu to see all the information in the Reference
Manual presented on-screen.
Select other commands from the Help menu to view information on using
help, to view the Windows Installer SDK Help, to view the .PDF-format
Reference Manual, to view resources on the Web, or to upgrade to the
latest point release.
If you need help and cannot find the answer in the documentation, read
about our technical support options below.
Use the Wise Solutions Technical Support Center
Registered Wise customers can use the Technical Support Center, located
at support.wise.com, to access a wide array of technical support services.
At this Web site, you can submit online support requests, register products,
manage customer information, download updates, or search the
Knowledgebase. The Knowledgebase contains how-to procedures, answers
to common support questions, and workarounds.
Visit Our Newsgroups
Visit Wise Newsgroups by visiting www.wise.com/newsgroups.asp.
Newsgroup postings by fellow administrators contain answers, tips,
analysis, and other comments. Contribute your own expertise to help
others.
Subscribe to TechInfo
TechInfo is a free monthly e-mail newsletter that contains technical tips,
product updates, and other important technical information. To subscribe
or to read back issues, check the Support section at www.wise.com.
Ask Our Support Team
18
If you can’t find an answer in our online resources, Wise Solutions offers
flexible payment options to meet your support needs. You can obtain
support by phone or online at support.wise.com. For additional details
about our support services, see www.wise.com/supportoptions.asp or call
Page 19

GETTING HELP AND PRODUCT SUPPORT
1-734-456-2600. Before you contact technical support, make sure you
have the following:
! Serial number and product version, which you can find by selecting
About... from the Help menu.
! Operating system version and service pack version if applicable.
! A description of what you do before the problem occurs.
! Your name, company name, and how to contact you.
! Contract number or payment information, if applicable.
Take Advantage of our Consulting and Training Services
When you have a challenging repackaging or installation problem, turn to
Wise Solutions for help. We put our expertise to work for you with script
writing, repackaging, installation development, and more. Upgrade your
personnel’s skills with one of our many training classes; check our Web site
(www.wise.com) for the schedule in your area. Our Web site also lists
consulting services that you can obtain for your company. Our solutions are
fully customizable to fit your project and budget.
Contact Wise Solutions Sales
Contact Wise Solutions’ Sales department to purchase additional products,
upgrades, support services, or consulting and training services.
U.S.: 1-800-554-8565
Europe/Netherlands: +31 70 392 72 20
Other International: 734-456-2100 (in U.S.)
Web Site: http://www.wise.com/ordercentermain.asp
19
Page 20

1: WELCOME
Getting Updates Over the Web
The Check for Updates command on the Help menu provides an easy way
to get the latest version of Wise for Windows Installer using your active
Internet connection. Minor point releases (x.01, x.02, and so on) are
generally free, while major number releases generally incur an upgrade
fee. Point releases generally contain maintenance updates such as bug
fixes and minor feature additions.
To check for updates:
1. Connect to the Internet.
2. In Wise for Windows Installer, select Check for Updates from the Help
menu.
You are connected to the Product Updates page of the Wise Solutions
Web site.
• If you have not registered this product, follow the screen prompts to
register. After you complete the registration, go to the Support page,
click the link to the Download Center, and click the link to the
Updates page.
• If you have registered this product, you are connected to the
Updates page.
3. Follow the instructions on the Web page to download the appropriate
update.
" Note:
Wise for Windows Installer can remind you to check for updates. On the General
tab of the Preferences dialog, select an option in the Check for Updates dropdown list. This sets the frequency at which you want to be reminded to check for
updates.
20
Page 21

Chapter 2
Wise for Windows Installer Basics
Read this overview before creating your first installation. It contains
information on getting started with Wise for Windows Installer. Topics
cover:
! Wise for Windows Installer Editions.
! Options for New Installations.
! File Types.
! Project Files and Database Files.
! Specifying the Target Platform.
! Using Installation Expert.
! Compiling, Testing, and Running Your Installation.
! Using the Task List.
! Creating and Editing Installation Templates.
! Setting Preferences.
! Component Rules.
! Where are Installation Resources Stored?
! Using the Enterprise Edition.
! Downloading Redistributable Files such as merge modules and Windows
Installer and .NET runtimes.
! Command Line Options.
! Automating the Build Process.
21
Page 22
2: WISE FOR WINDOWS INSTALLER BASICS
Wise for Windows Installer Editions
Wise for Windows Installer is available in three editions, each designed to
fulfill the needs of a particular type of user. The version you purchase
determines what features are available to you.
! Enterprise Edition is a Windows Installer® and .NET authoring tool that
supports organizations that develop multiple software applications
which share common resources. It helps professional developers create
installations that adhere to their organization’s standards, thereby
decreasing the risk of deployment errors.
! Professional Edition is a Windows Installer® and .NET authoring tool
designed for professional software developers who want to create
installations for the next generation of applications, including desktop,
server, Web, and mobile devices.
! Standard Edition is an installation authoring tool designed for
professional software developers who want basic but robust support for
creating Windows Installer® and .NET installations.
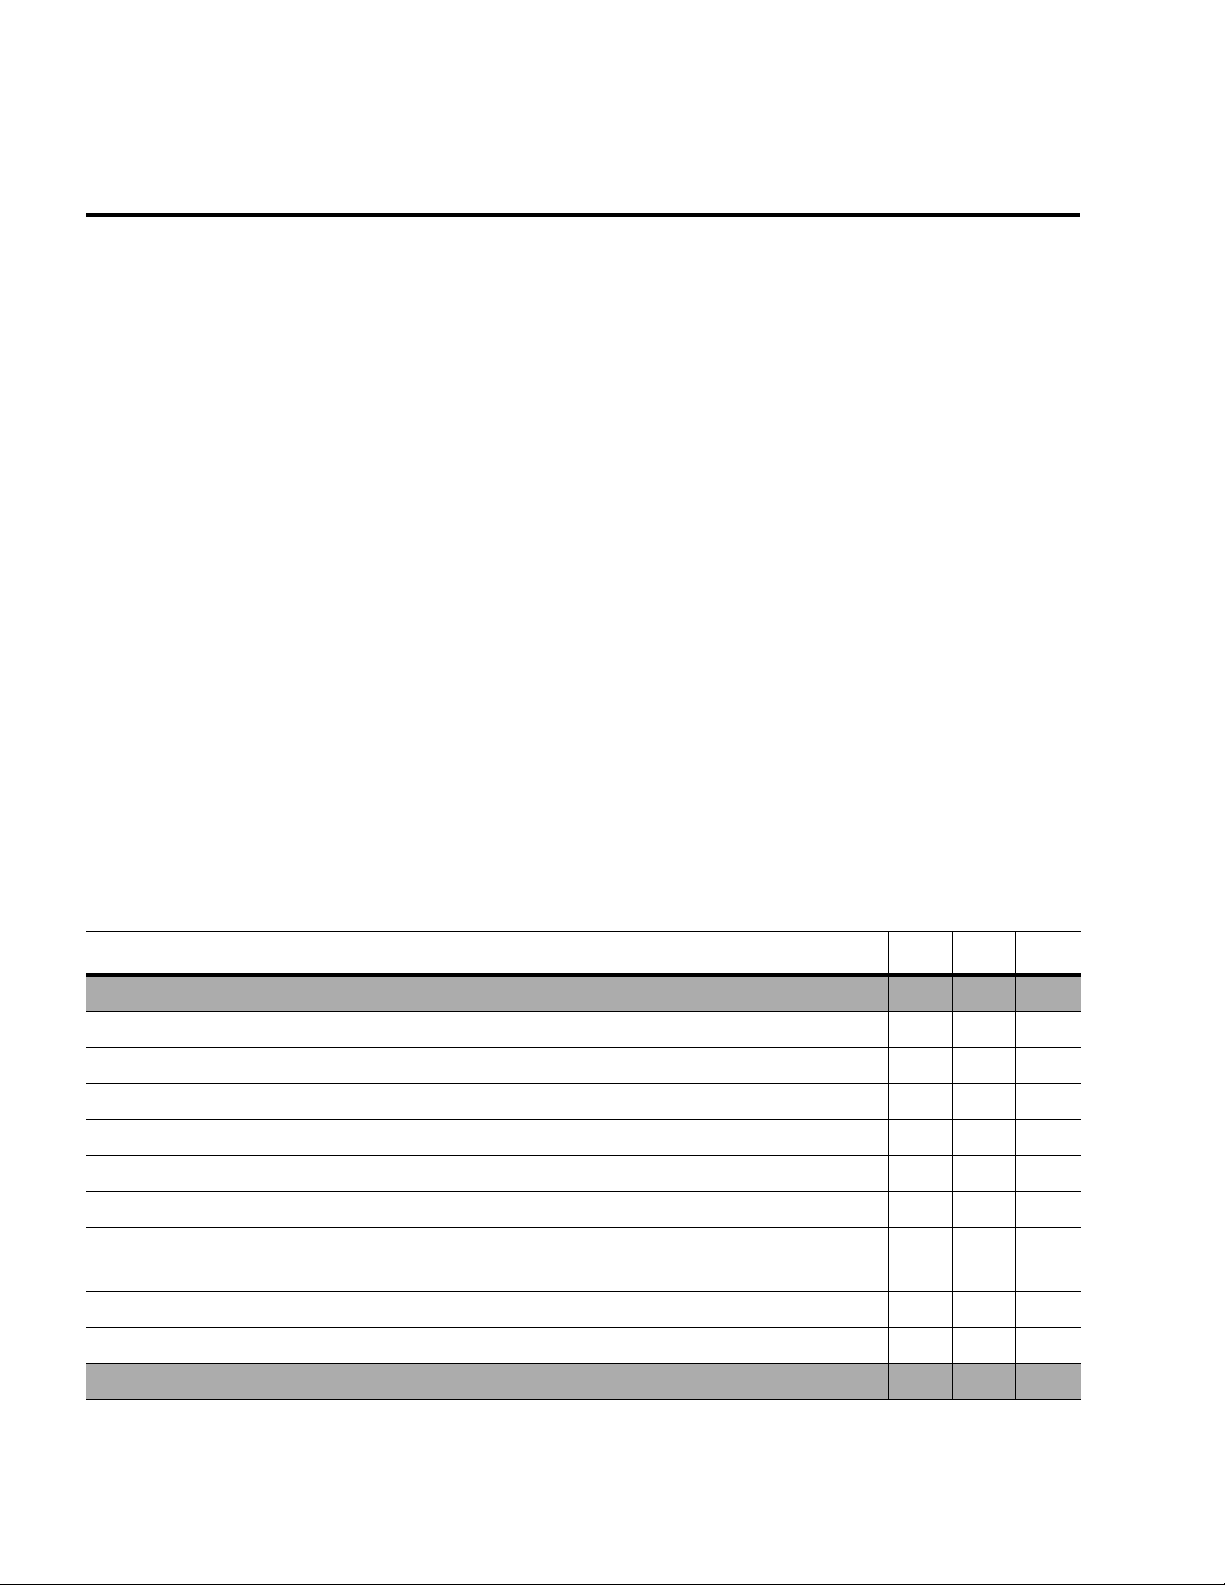
The following table, which intentionally does not mention all features, only
summarizes the differences between each edition. If a particular feature is
not listed, then it is included in all product editions. For a more
comprehensive list of all features, refer to the Products section of the Wise
Solutions Web site (www.wise.com). For a list of new features and
enhancements in the current release, refer to the Release Notes, which are
in an HTML file available from the Help menu.
Feature Std Pro Ent
General
Specify the target platform for an installation X X
Create configurable merge modules X X
Macro Editor XX
OLE Automation XX
User-defined tasks X
Use merge modules from the Wise Software Repository X
Enable the Logon Information dialog to configure server software after
installation to run under a particular user
XX
Debugger for Windows Installer X X
WiseScript Express XXX
Preferences
22
Page 23

WISE FOR WINDOWS INSTALLER EDITIONS
Feature Std Pro Ent
Repository settings X
Sharing Installation Resources
Share installation resources in the share point directory X
Distribute to the share point directory X
View resources shared by other applications X
Shared Resource Reports in Wise for Windows Installer X
Installation Expert Pages
.NET Framework Security page X X
Clean Build page XX
Mobile Devices page XX
MTS/COM+ page XX
SQL Server Scripts page X X
Virtual Directories page and ability to install Web applications X X
WebDeploy page XX
WiseUpdate page XX
Tools
Patch Creation tool and patch support X X X
Software Manager X
Upgrade Sync XXX
Package Validation tool
Turn individual rules on and off X X
Create a new validation module (.CUB file) X
Create new validation rules X
23
Page 24

2: WISE FOR WINDOWS INSTALLER BASICS
Options for New Installations
When you create a new installation, you first choose what kind of
installation you want to create. The New Installation File dialog shows
several options, each of which starts an installation in a different way. You
can create new files either in Windows Installer database format (.MSI/
.MSM) or in Wise’s project format (.WSI/.WSM). Some options let you start
a new installation by using a tool, such as Palm Application, and some let
you create different kinds of Windows Installer installations from
templates.
! Predefined Templates. Templates created by Wise Solutions.
• Windows Application. See Starting a New Installation on page 85.
• Web Application. See Setting Up a Web Application Installation on
page 218.
• Server Application. See Obtaining Logon Information From a
Dialog on page 508. Installations created from this template work
only on Windows NT, Windows 2000, or Windows XP.
• Pocket PC Application. See Creating a Pocket PC or Smartphone
Installation on page 238.
• Palm Application. See Palm OS Installations on page 249.
• Smartphone Application. See Creating a Pocket PC or
Smartphone Installation on page 238.
! Custom Templates. If you make your own templates, they appear
under this category. See Creating and Editing Installation Templates on
page 44.
! Other Templates.
• Merge Module. See Creating a Merge Module by Creating a New
Installation on page 359.
• Transform. See Creating a Transform Based on an Existing .MSI on
page 381.
! Conversion Tools. Templates that open wizards to convert installations
from other formats.
• SMS Installer or WiseScript Installation. See Convert SMS
Installer or WiseScript Installation on page 392.
• InstallShield Professional. See Convert InstallShield Professional
on page 390.
24
Page 25

OPTIONS FOR NEW INSTALLATIONS
! Import Tools. The following tools import a development project file
into an installation. Target file information is extracted from the project
file and added to the installation. See Import Visual Studio Projects on
page 394.
• Visual Basic.
• Visual C#.
• Visual J#.
When you choose an option above, you can also choose the format of the
file:
! Create standard .MSI or .MSM file that contains all binary and
cabinet files. Mark this option to create a new Windows Installer
installation file. Because the installation file generally encapsulates all
the files of the installation, an .MSI is usually larger in size and takes
longer to save. Also, some options that determine the output of an .MSI
file are not available if you choose to work with the .MSI file itself. To
create a project file that contains instructions for compiling the .MSI or
.MSM file, select the option below.
! Create .WSI or .WSM project file that can be compiled into an
.MSI or .MSM. Mark this option to create a project file instead of a
installation file. Unlike .MSI files, project files are NOT installation files
that can be distributed; they describe and compile to a distributable
.MSI file. Working in a project file lets you edit and save the .WSI file
quickly and gives you more options for outputting the .MSI file. A .WSI
file compiles to an .MSI file, and a .WSM file compiles a .MSM file
(merge module).
The Target Platform section appears if the Prompt for target platform
option is marked in the Target Platform tab of the Preferences dialog. For
information about 64-bit installations, see What’s Different in a 64-Bit
Installation? on page 30.
! Create installation for 32-bit platform enables the installation for
32-bit platforms.
! Create installation for 64-bit platform enables the installation for
64-bit platforms.
25
Page 26

2: WISE FOR WINDOWS INSTALLER BASICS
File Types
Wise for Windows Installer lets you create and edit different types of
Windows Installer database files, which can be executed by the Windows
Installer software. You can either create and edit the actual Windows
Installer database file, or create and edit a project file that contains
instructions for compiling the Windows Installer database file; see Project
Files and Database Files on page 28. There are distinct file types for
standard installation database files, merge modules, patch files, and
transforms. Each extension is described below.
Extension Description
.MSI Windows Installer file. An .MSI is a distributable Windows Installer
installation package file. The .MSI file extension is associated with the
Windows Installer executable, MSIExec.EXE. When a file with this
extension is opened on a destination computer, the Windows Installer
software executes it, thereby installing an application. You can open and
edit .MSI files in Wise for Windows Installer; however, because you are
already working in an .MSI file, options that have to do with creating an
.MSI file, such as those on the Releases, Release Settings, and Media
page, are disabled. You can convert an .MSI to a project file (.WSI); see
Converting an .MSI to a .WSI File on page 349.
.WSI Wise for Windows Installer project file. A project file stores a description
of a Windows Installer installation package (.MSI file), and is in the same
format as an .MSI file. The .WSI file extension is unique to Wise for
Windows Installer. You can open the .WSI file in Wise for Windows
Installer and click the Compile button to create the corresponding .MSI
file. The advantages of working in a .WSI file instead of directly editing an
.MSI file are that the .WSI file is smaller in size, and that you can set
multiple options for the output of the .MSI file.
.MSM Windows Installer merge module. Merge modules are pre-compiled
libraries of components (files, registry changes, and other system
changes) that install a discrete portion of your application. They cannot
be run alone, but must be merged with a Windows Installer database
(.MSI). Merge modules give you flexibility in developing installations
because you can break the installation of your application into logical
parts and share merge modules between projects. See About Merge
Modules on page 358.
26
Page 27

FILE TYPES
Extension Description
.WSM Windows Installer merge module project file. This file extension is unique
to Wise for Windows Installer. It is a project file that stores a description
of a Windows Installer merge module (.MSM), but does not store the
merge module contents. You can open the .WSM file in Wise for Windows
Installer and click the Compile button to create the corresponding .MSM
file. See About Merge Modules on page 358.
.MST Windows Installer transform file. A transform changes a Windows
Installer package at runtime, and must be applied from the command
line. See About Transforms on page 380.
.MSP Windows Installer patch. A patch is a small update that only updates an
existing installed application. Patch installations contain only the
differences between the old and new versions of an application. You
create a patch installation by using the Patch Creation tool. This creates
an .MSP file that you distribute to end users. See Patches on page 315.
.PCP Windows Installer patch creation project file. Contains the settings and
other information necessary to compile a Windows Installer patch. When
you use the Patch Creation tool to create a patch, a patch creation project
file is created for you automatically. See Patches on page 315.
.EXE You can choose to have the .MSI file wrapped inside an .EXE file. Doing so
gives you the option of pre-installing the Windows Installer database
engine before performing your own installation. If there is a possibility
that the Windows Installer database engine is not on the destination
computer, then use this option because your .MSI file cannot run if the
Windows Installer database engine is not installed. See Setting Build
Options for a Release on page 187 for more information.
27
Page 28

2: WISE FOR WINDOWS INSTALLER BASICS
Project Files and Database Files
In most cases, the setup program that you distribute will be an .MSI file.
Windows Installer operates on .MSI files, which are a type of relational
database that stores installation information and files in tables. See About
Microsoft Windows Installer on page 628.
On the Build Options page (see Setting Build Options for a Release on
page 187) or on the Media page (see Setting Up Media for Distribution on
page 201), you can specify to output an installation in different ways:
! As a single-file .MSI, which contains compressed installation files.
! As an .MSI file that has external compressed .CAB files.
! As an .MSI file that has external uncompressed files.
! As an .EXE file that contains the .MSI and installation files. This method
provides the ability to pre-install Windows Installer or other runtimes.
When you create an installation, you can choose to work either in a .WSI
(project) file or an .MSI file. The same applies to merge modules; work in a
merge module (.MSM) file or a Wise merge module project (.WSM) file.
How are
installation files/
paths stored?
Can you create
releases?
If you work in .WSI or .WSM
(Wise project)
Externally. The project contains
paths to the installation files. During
compile, they are compiled into the
resulting .MSI or .EXE.
Yes. Use the Releases page and
other pages under Release Definition
in Installation Expert.
If you work in .MSI or .MSM
(Windows Installer database)
Inside the database file. Files are
refreshed from disk unless you
mark the Don’t update or
recompress files ... option on the
Product Details page
No. Because you are already
working in the final output file,
options for multiple output files are
disabled, which includes all pages
under the Release Definitions page
group in Installation Expert.
28
Page 29

PROJECT FILES AND DATABASE FILES
Compiling does
what?
Can you switch
from working on
one file type to
the other?
If you work in .WSI or .WSM
(Wise project)
Reads the project information and
compiles a database file, which
contains installation files.
You can switch from working in a
project file to working in a database
file by compiling the project,
opening the resulting database file,
and continuing further development
in the database file. However, an
.MSI file created by compiling a
.WSI does not contain file paths; it
contains only the files themselves.
Therefore, any files added prior to
the switch will not be refreshed from
disk because they have no file path.
Only those files you add after the
switch contain file paths and are
refreshed from disk.
If you work in .MSI or .MSM
(Windows Installer database)
Refreshes installation files from disk
unless the Don’t update or
recompress files ... option is
marked on the Product Details
page.
Use the MSI to WSI Conversion tool
(see Converting an .MSI to a .WSI
File on page 349) to convert an
.MSI to a .WSI. It extracts
installation files from an .MSI,
saves them to disk at the locations
you specify, and creates a .WSI file
that points to those files.
29
Page 30

2: WISE FOR WINDOWS INSTALLER BASICS
Specifying the Target Platform
Professional and Enterprise Editions only.
#
By default, installations you create are for 32-bit platforms. You can also
create an installation for a 64-bit installation using the Preferences dialog;
see Setting the Target Platform on page 56.
" Note:
64-bit installations are supported only by Windows Installer 2.0 or higher.
To create a 64-bit installation:
1. Select Preferences from the Edit menu. The Preferences dialog appears.
2. On the Target Platform tab, do one of the following:
• If you want all future installations to be 64-bit, mark the Default to
64-bit... option.
• If you want to determine the target platform for each new
installation you create, mark the Select platform in New
Installation File dialog option.
3. Close the Preferences dialog.
4. From the File menu, select New. The New Installation File dialog
appears. It contains a Target Platform section if you marked the Select
platform... checkbox.
5. If you see a Target Platform section, mark the 64-bit... option and click
OK. Otherwise a 64-bit installation is created automatically.
What’s Different in a 64-Bit Installation?
# Professional and Enterprise Editions only.
A 64-bit installation file differs from a 32-bit installation in the following
ways:
! The minimum version of Windows Installer is set to 2.00. This is located
in the Installer Version field on the General Information page in
Installation Expert. You should not change this value in a 64-bit
installation, because 64-bit installations are not supported by Windows
Installer versions lower than 2.0.
30
Page 31

SPECIFYING THE TARGET PLATFORM
" Note:
Installations with an Installer Version of 2.0 or higher cannot run on Windows
NT 4.0, Service Pack 5 or lower. This is a Microsoft restriction.
The value Intel64 is added to the Template Summary summary item,
!
which indicates the platform and language versions supported by the
installation. To see this value, click the Product tab in Setup Editor, then
click the Summary icon. You should not change this value in a 64-bit
installation, however, you can change the language ID.
! The Condition Builder contains two additional property values:
VersionNT64 and Intel64.
! The Directory table contains these additional folder properties:
• CommonFiles64Folder
• ProgramFiles64Folder
• System64Folder
! The Files page contains an additional pre-created directory, Program
Files (x86), with the information for installing 32-bit applications. It
contains a subdirectory named Common Files.
! You can designate a component as a 64-bit component by marking the
64-bit component checkbox in the Component Details dialog. See
Adding a Component on page 436. To designate multiple components as
64-bit components, mark the 64-bit component checkbox in the MultiComponent Details dialog. See Editing a Component on page 438.
! The Read Registry Value dialog contains a checkbox that lets you include
64-bit components in a registry value search. See Searching For a
Registry Value on page 171.
! When you create a custom action that calls a JScript or VBScript file, a
checkbox lets you call a 64-bit script.
! The Target Platform field on the Product Details page provides a quick
way to determine for which platform an installation is enabled. See
Product Details Page on page 86.
31
Page 32
2: WISE FOR WINDOWS INSTALLER BASICS
C
t Feat
Using Installation Expert
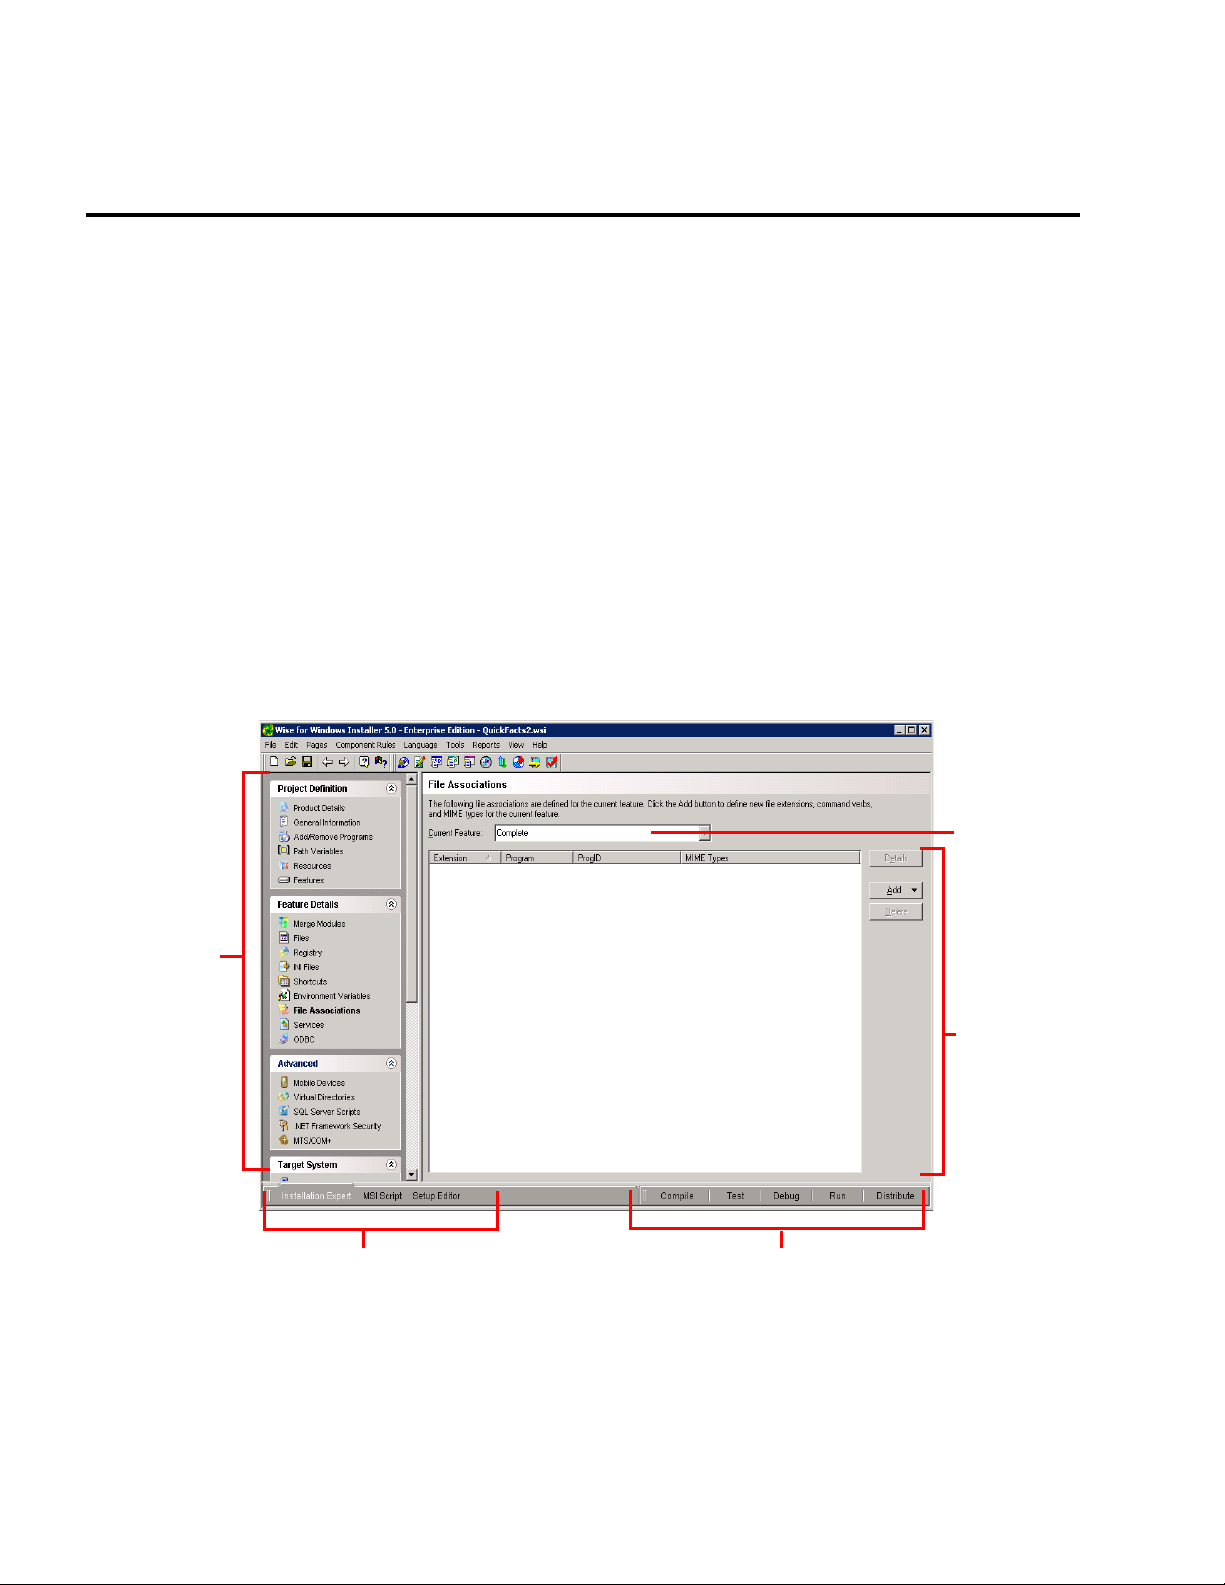
To work in Installation Expert, click the Installation Expert button at the
lower left of the Wise for Windows Installer main window.
Each page of Installation Expert lets you determine a specific aspect of
your installation. For example, on the Files page, you determine what files
are included in your installation, and on the Registry page, you determine
what registry keys and values are created on the destination computer. To
see help on a page, press the F1 key while the page is displayed. To return
a page to its last saved state, select Reset Page from the Edit menu.
Installation Expert pages are organized into groups, listed in the order in
which you’ll usually fill them out. However, you do not have to work with
the pages in this particular order, nor must you fill out every available
page. Instead, you can fill out just the pages that are pertinent to your
particular installation, in any order. If any required information is missing,
Wise for Windows Installer alerts you to the problem when you compile.
You can create your own customized view of page groups and pages as
described in Customizing Installation Expert Page Groups on page 33.
Page groups with
pages. Click the
group name to
hide or view the
page names.
Click the page
name to go to
the page. Make
your own groups
by selecting
Customize from
the Pages menu.
urren
list. Feature
Details pages
let you select
different
options for
different
features. For
such pages, use
this list to pick a
feature to edit.
Page area. As
you click
different page
names, this
area changes
to display the
page’s options.
ure
32
View Navigation.
Click these tabs to
change views.
Testing and distribution. Compile, Test, Debug, and Run buttons let you
test and compile your installation. The Distribute button copies the
installation package to removable disks, an FTP server, or a network
directory. Also use it to perform an administrative installation.
Page 33
USING INSTALLATION EXPERT
Customizing Installation Expert Page Groups
You can customize the pages and page groups that you see at the left of
the Installation Expert window. You use the Pages menu to choose a set of
page groups, or to customize page groups. Two sets of page groups are
available by default, All and Merge Module. You can select All from the
Pages menu only when you are not editing a merge module, and you can
select Merge Module only if you are editing a merge module.
You can also add your own sets of page groups to the Pages menu. Doing
so lets you customize your work environment so that you see only the
pages that you use most frequently. When you customize your view, you
specify how many page groups appear, what the group names are, and
what pages appear under each group. Page groups are listed at the left of
the Installation Expert window; they can be expanded or collapsed to show
or hide the associated pages. Once you’ve added a set of page groups, you
can edit it any time, adding or removing page groups and pages, or
changing the order in which they appear.
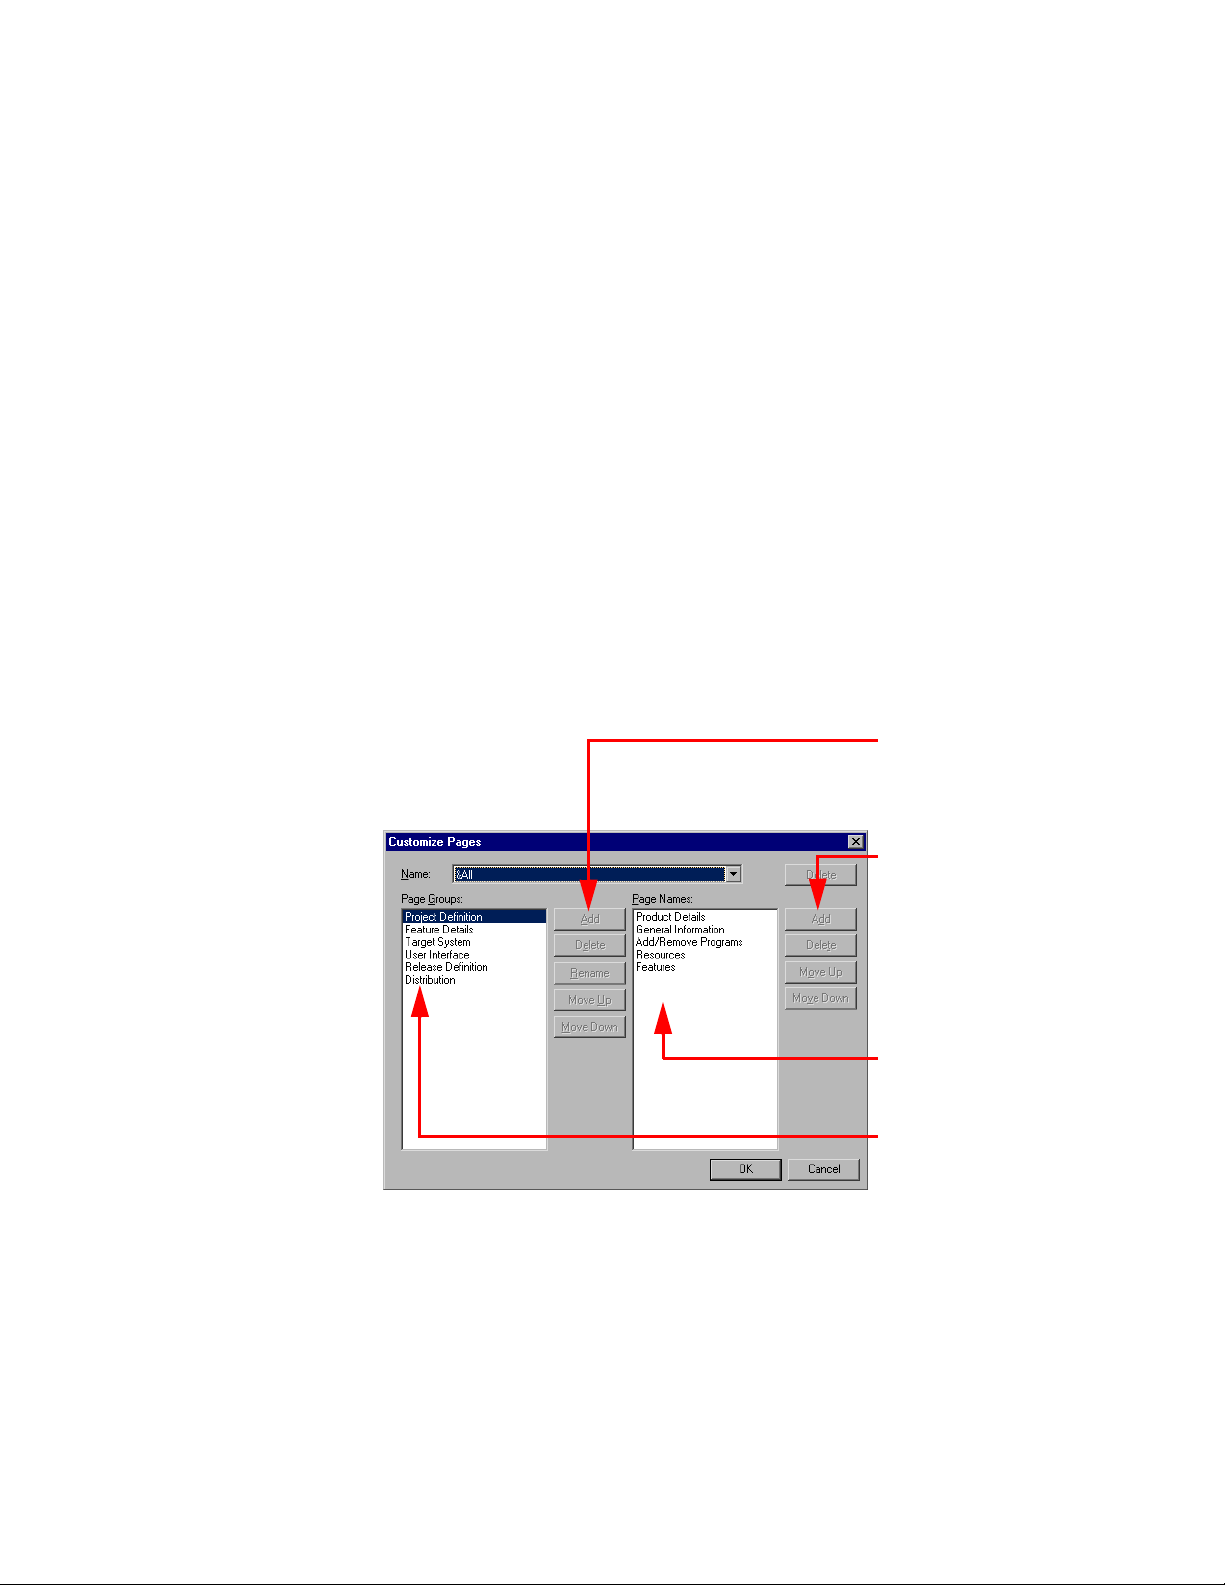
The Customize Pages dialog appears when you select Customize from the
Pages menu.
Buttons to edit page
groups are disabled when
All
selected from the Name
drop-down list.
Buttons to edit pages are
disabled when
Merge Module
from the Name drop-down
list.
All pages in this list box
appear under the expanded
page group name.
Defined page groups; your
customized page groups
appear here and along the
left side of Installation Expert
To add a set of page groups to the Pages menu:
1. From the Pages menu, select Customize.
The Customize Pages dialog appears.
or
Merge Module
is
All
or
is selected
2. From the Name drop-down list, select <new>.
33
Page 34

2: WISE FOR WINDOWS INSTALLER BASICS
3. In the dialog that appears, type a name for your new set of page
groups. Include an ampersand (&) before a letter if you want to be able
to select your set from the Pages menu using the keyboard.
4. Click OK.
The Customize Pages dialog returns, with your new set of page groups
selected in the Name drop-down list.
5. To add a new page group, click the Add button on the left and enter a
name for the page group in the Enter Name dialog that appears.
The name appears in the Page Groups list on the left.
6. To add a page to a page group, do the following:
• Click the page group.
• Click the Add button on the right. The Select Pages to Add dialog
appears.
• Select the page or pages you want to add to the group. Use C
click or S
7. Click OK.
The Customize Pages dialog returns, showing the selected pages in the
Page Names box on the right.
8. Add more page groups and pages as appropriate.
9. Click OK. Your new set of page groups appears under the Pages menu.
The name of your set has an underlined letter for keyboard selection, if
you indicated a letter by an ampersand when you named your set of
page groups.
To edit a set of page groups, follow the steps above, except choose the set
you want to edit instead of choosing <New>. You can only edit those sets
of page groups you’ve added.
HIFT-click to add multiple pages.
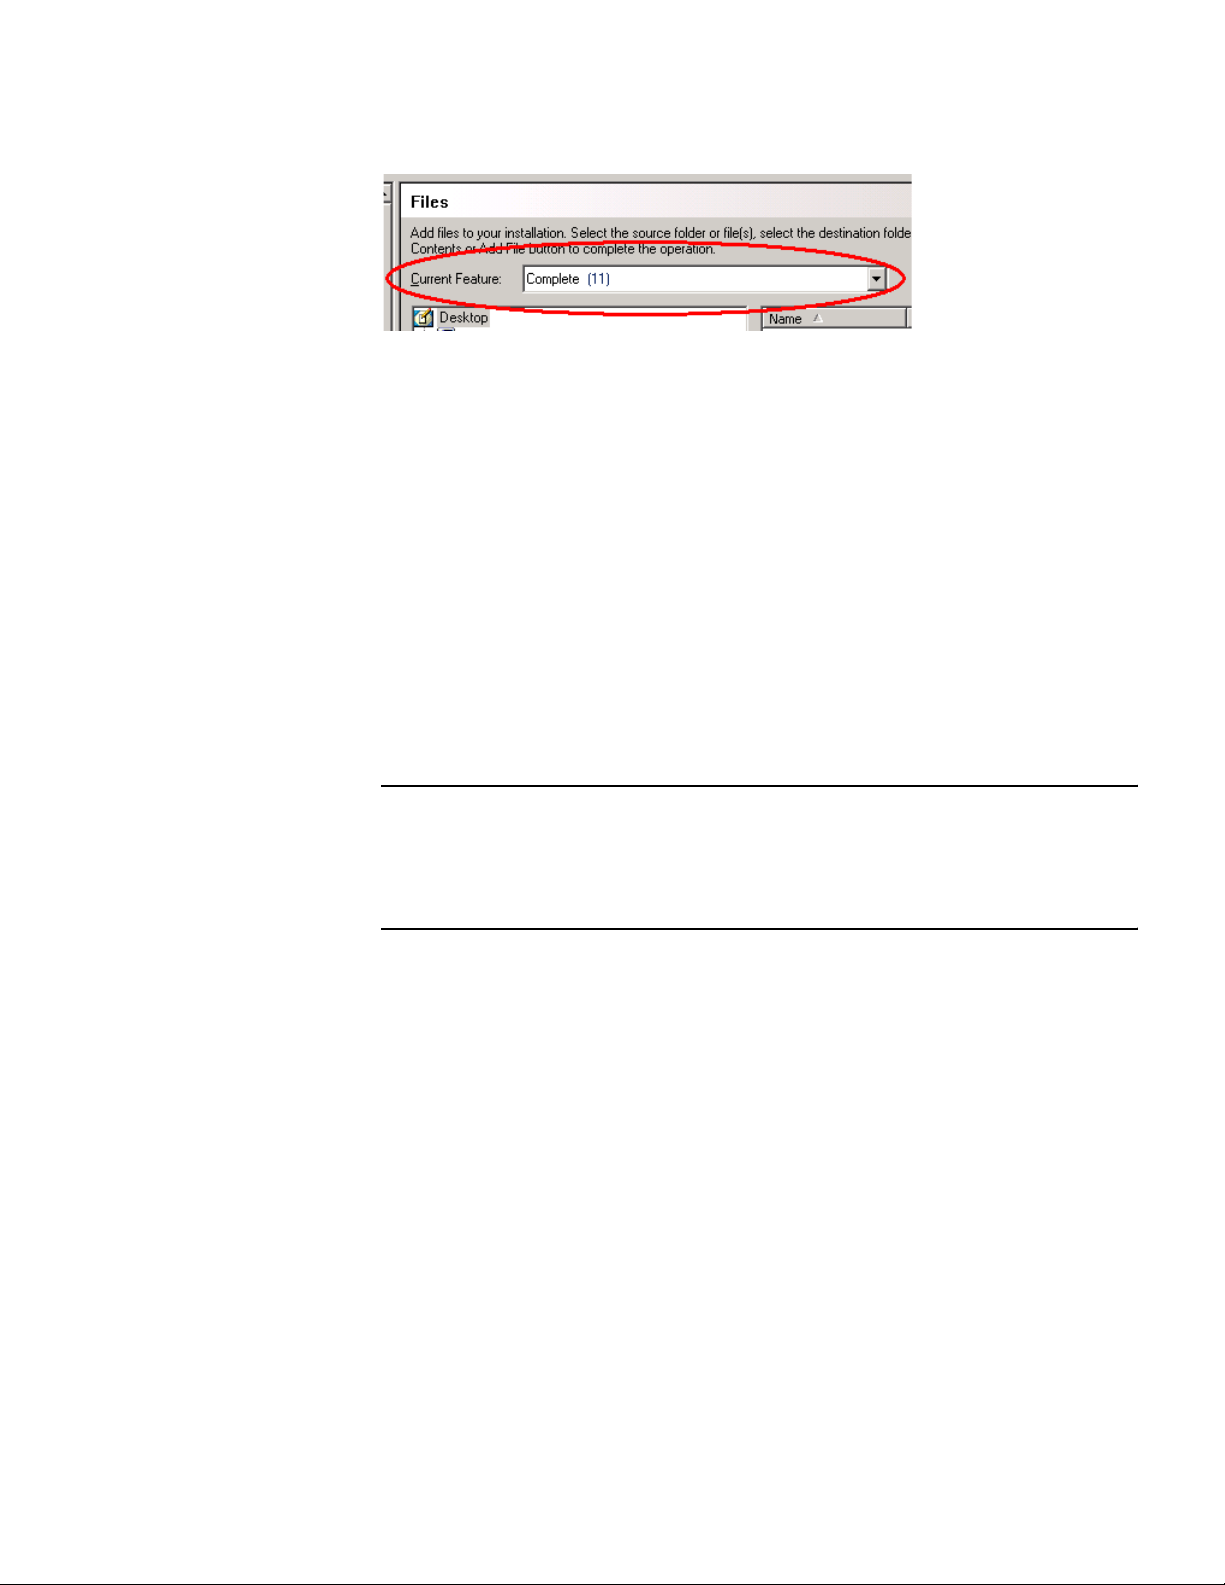
Using the Current Feature Drop-Down List
The Current Feature drop-down list appears on pages in the Feature
Details page group in Installation Expert. On these pages, you can set
options on a per-feature or per-condition basis. You add features and
conditions on the Features page in Installation Expert, then choose a
feature from the Current Feature drop-down list before setting options on
other pages.
TRL-
34
Page 35
USING INSTALLATION EXPERT
For instance, suppose you have three features, and each feature requires
different registry entries. On the Registry page, you select the first feature
from the Current Feature drop-down list, create its registry entries,
select the second feature in the list, create its registry entries, and so on.
You follow the same steps on the Files page: you choose a feature from the
Current Feature drop-down list, then add files for that feature.
During installation, files, registry entries, and other system changes are
installed only if the feature they belong to is installed. You can do the same
with conditions; add files, registry entries, and other changes to a
condition, and during installation, those files and registry entries are
installed only if the condition is true and the feature is installed.
When you go to pages in Installation Expert, first check to see if the
Current Feature drop-down list is available. If it is available, choose a
condition or feature before setting options on the page.
" Note:
Filling out pages with the wrong feature selected can cause installation problems.
When you fill out a new page, always check the Current Feature drop-down list to
make sure the correct feature is selected.
The Current Feature drop-down list contains an option named All
Features (Modify/Delete only). This lets you display information for all
features at once. On the Files page, for example, selecting this option
displays all folders and files for all features in the installation. You cannot
use the Add button while you have all features displayed; select a single
feature to add items.
On some pages, the Current Feature drop-down list has additional
functionality. It shows a number in parentheses, which represents the
number of that page’s items (files or registry keys) that are assigned to
each feature or condition.
35
Page 36
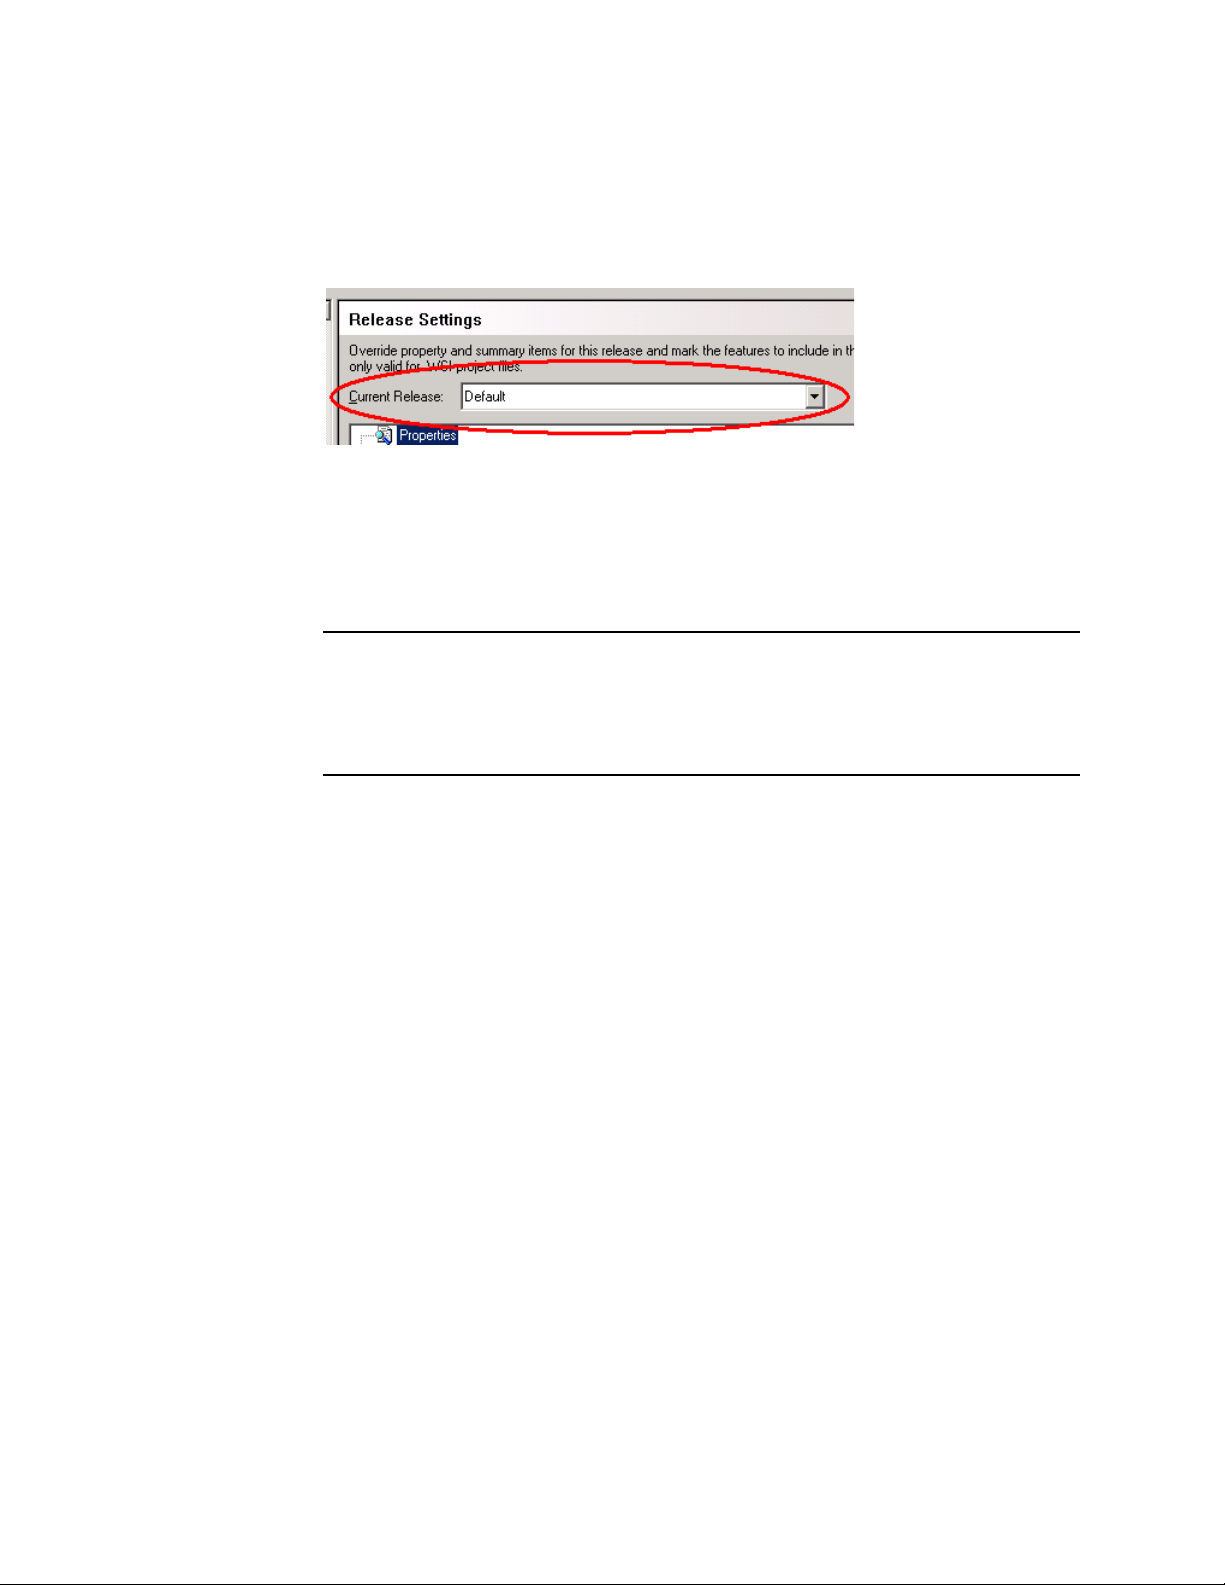
2: WISE FOR WINDOWS INSTALLER BASICS
Using the Current Release Drop-Down List
On the pages under the Release Definition page group in Installation
Expert, a Current Release drop-down list is displayed.
A release is a special version of your product that you plan to distribute to
a specific group of end users. For instance, you can distribute a 30-day
evaluation release to end users who want to learn about your product
before they purchase. You use the Current Release drop-down list to
configure separate build, media, and language options for each release.
" Note:
Filling out pages with the wrong release selected can cause installation problems.
When you fill out pages under the Release Definition page group, always check the
Current Release drop-down list to make sure the correct release is selected.
36
Page 37

COMPILING, TESTING, AND RUNNING YOUR INSTALLATION
Compiling, Testing, and Running Your
Installation
Once you have created or modified an installation, you can test it using the
Compile, Test, Debug, and Run buttons at the lower right edge of the main
window. These buttons let you:
! Compile your installation, which creates the setup program. See
Compiling Your Installation. To speed up the compile process for project
files, use Quick Compile. See the description of Enable Quick Compile
in Setting General Preferences on page 46.
! Test the setup program, which appears to run but does not make any
modifications on your system. See Testing Your Installation on page 38.
! Debug your installation in an .MSI debugger, which lets you step
through your installation while viewing the property values and other
table data. This actually runs your installation, and lets you see exactly
what it is doing at any time. See Running the Debugger on page 551.
The Debugger for Windows Installer is available in the Professional and
Enterprise Editions only.
! Run your compiled setup program, which is either an .MSI file or an
.EXE file. See Running Your Installation on page 39.
" Note:
When working in a .WSI file, you can set your installation to generate more than
one setup program by adding releases to the Releases page. If you click Test,
Debug, or Run, you are prompted to choose a release if your installation contains
more than one.
Compiling Your Installation
Click the Compile button at the lower right edge of the window to build an
installation package that installs your application. The number and type of
files generated depends on the settings you select on the Build Options and
Media pages. If the installation contains multiple releases, all releases in
the installation are compiled. To select one or more specific releases to
compile, go to the Releases page in Installation Expert, click one or more
releases, then click the Compile button on the Releases page.
If you are working in a .WSI or .WSM file, you can speed the compile
process by marking the Enable Quick Compile checkbox in the General
tab in the Preferences dialog. Quick Compile compresses only previously
37
Page 38

2: WISE FOR WINDOWS INSTALLER BASICS
uncompressed or changed files. If a file or media has changed, a full
compile occurs instead.
If you are working in an .MSI or .MSM file, clicking the Compile button
simply saves the file. If file paths are stored in the .MSI, however, it first
refreshes the files with the latest version. If any files cannot be read, or if
other errors are encountered, the errors are listed in a Task List pane at the
end of the compile. Use the Task List to determine the source of the errors;
see Using the Task List on page 40.
If you get messages that files are missing, you can suppress the file
refresh by marking the Don’t update or recompress files when saving
(.MSI/.MSM only) checkbox on the Product Details page in Installation
Expert. If you get a message that a merge module is missing, you have the
option to download it.
Testing Your Installation
To test your installation:
Click the Test button, which is located at the lower right of the main
window. You might be prompted to choose a release to test. This compiles
and runs your installation in test mode, which lets you run through the
setup program as an end user does. In test mode, no files are actually
installed or modified, and no changes are made to the system, although
the installation otherwise performs all the tasks indicated in the
installation.
You cannot test a transform or a merge module by itself. It can only be run
in conjunction with an .MSI file. To run a transform or merge module, run
the base .MSI from the command line with the appropriate command line
options, which are documented in the Windows Installer SDK Help.
" Note:
If you make a change in the installation and click Test, but the change is not
apparent in the setup program, exit the setup program and click Compile. Then
click Test again.
38
Page 39

COMPILING, TESTING, AND RUNNING YOUR INSTALLATION
Running Your Installation
To run your installation:
Click the Run button, which is located at the lower right of the main
window. You might be prompted to choose a release to run. This compiles
and executes your installation. The entire installation is executed just as it
would be on the destination computer, actually installing files and
modifying the system. After you run an installation once, you must
uninstall before you can run the installation again because Windows
Installer detects when a product is installed, and runs the subsequent
installation in maintenance mode.
You cannot run a transform or a merge module by itself. It can only be run
in conjunction with an .MSI file. To run a transform or merge module, run
the base .MSI from the command line with the appropriate command line
options, which are documented in the Windows Installer SDK Help.
" Note:
If you make a change and then click Run, but the change is not apparent in the
setup program, exit the setup program and click Compile. Then click Run again.
39
Page 40

2: WISE FOR WINDOWS INSTALLER BASICS
Using the Task List
When Wise for Windows Installer encounters installation issues, it displays
the Task List, if it is not displayed, and adds a task to the list for each issue.
These tasks represent issues that could cause problems with your
installation. You can manually display or hide the Task List from the View
menu. In the Enterprise Edition, you can add user-defined tasks to the Task
List.
The Task List gathers all installation issues into one place, and makes it
easy to analyze the cause of each issue. If the issue is caused by an error
in a table, you can quickly jump from the Task List to the row in the table
that caused the error; see Finding Table Errors From the Task List on
page 42.
Tasks get added to the Task List in the following ways:
! Save or Compile. A progress bar appears while your installation is
saved or compiled, and if errors occur, each error becomes a task in the
Tas k L i st .
! Package Validation. When you run the Package Validation tool and
encounter validation issues, the issues appear in the View / Correct
dialog. If you mark the Add to Task List checkbox on the View /
Correct dialog, each issue becomes a task in the Task List when you click
Finish. If the Package Validation tool encounters save or compile errors,
the package validation process ends and the errors are added to the
Task List; see Package Validation on page 398.
! Check Tables. When you right-click on the Task List and select Check
Tables, a progress bar appears while your installation is searched for
component and table errors. If errors are encountered, each error
becomes a task in the Task List. The Check Tables option on the Tables
tab in Setup Editor produces the same result; see Finding Validation
Errors on page 448.
! User-Defined. If you have the Enterprise Edition, you also can add
user-defined tasks to the task list. See Adding User-Defined Tasks on
page 43.
" Note:
When you close an installation, all tasks, except user-defined tasks, are removed
from the Task List.
40
The Task List has a Description and Table column. The Description column
provides details about each task and the Table column contains the name
of the table, if any, associated with the task. Each task is preceded by a
Page 41
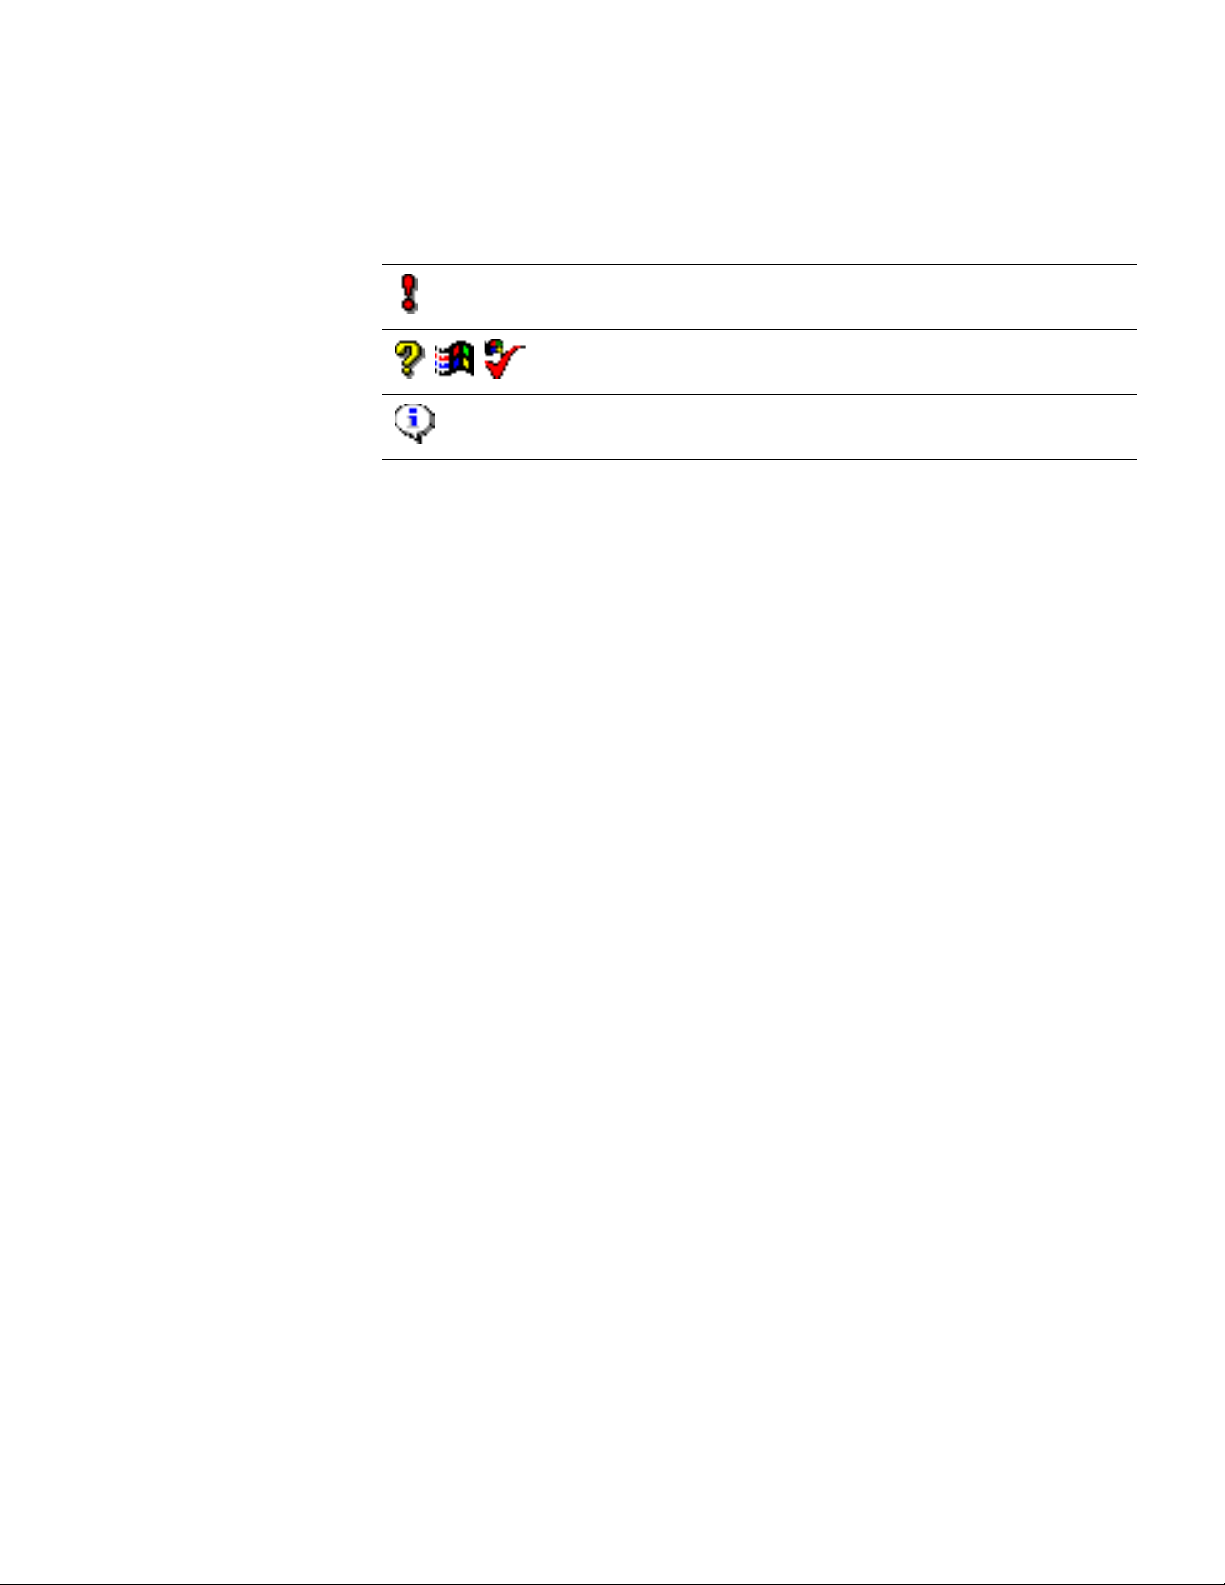
USING THE TASK LIST
checkbox and an icon. Use the checkbox to mark tasks that you have
completed. The icons differentiate the types of tasks as described below:
Indicates an error that will cause incorrect behavior and
must be fixed.
Indicate validation issues found by the Package
When you resolve the issue that caused a task to be added to the Task List,
the task is removed from the list the next time you run the procedure that
generated the task. For example, if a task was added to the Task List
because of a compile error and you have resolved that error, the next time
you compile the installation that task is removed from the list.
You can perform the following operations on tasks in the Task List:
Validation tool; see Validating a Package on page 399.
Indicates a task you created.
! Filter tasks by type; see Filtering the Task List on page 41.
! Sort a Task List’s column by clicking its header.
! Copy a task’s description by highlighting the description and selecting
Copy from its right-click menu.
! Delete a task by highlighting its description and selecting Delete from its
right-click menu.
Filtering the Task List
You can filter the tasks that appear in the Task List. For example, if you
only want to see Save/Compile errors, you can filter out all the other tasks.
To filter tasks in the Task List:
1. Right-click in the Task List and select Show Tasks.
The Show Tasks submenu appears.
2. To display all tasks, click All.
3. To display a specific type of task, click on that task. You can filter by the
following types of tasks:
• Save/Compile. Tasks that correspond to errors generated when
you save or compile.
• Validation. Tasks that correspond to issues generated when you run
the Package Validation tool.
41
Page 42

2: WISE FOR WINDOWS INSTALLER BASICS
• Component. Tasks that correspond to component errors generated
when you run Check Tables. For information on how to run Check
Tables, see Using the Task List on page 40.
• Table. Tasks that correspond to table validation errors generated
when you run Check Tables. For information on how to run Check
Tables, see Using the Task List on page 40.
• User-Defined. Tasks that you have created. User-defined tasks are
only available in the Enterprise Edition.
When you set options for filtering, they remain intact until you change
them. However, when you encounter installation issues, the filtering option
resets to All to ensure that the issues can be displayed.
Finding Table Errors From the Task List
If a task has a table listed in the Table column, you can access that table
directly from the Task List. Accessing a table associated with a task can
help you determine the specific problem that caused the installation issue.
For example, if a source file for your installation has been moved or
deleted, you get a WiseSourcePath table error when you compile the
installation. When you double-click this task, the WiseSourcePath table
displays in Setup Editor, and the row in the table that is the cause of the
problem is highlighted. Use the source path information in the row to
ascertain and resolve the problem.
⌧ Caution:
Editing table data directly is not recommended unless you are an experienced
Windows Installer developer with a clear understanding of Windows Installer
database technology. Deleting, adding, or editing raw table data using this interface
might result in unexpected, undesirable results, including damage to your
installation. Wise Solutions provides access to this information for its advanced
users, but cannot provide answers for questions related to the Windows Installer
database that do not specifically involve this Wise Solutions application itself.
Therefore, technical support for direct table editing is not available.
To find table errors from the Task List:
If the task has a table listed in the Table column, double-click the task.
42
The table is displayed on the Tables tab of Setup Editor, and the row in the
table associated with the task is highlighted.
If you need more information to understand the cause of a table error,
check the task’s description or press F1 to display the help topic for that
table in the Windows Installer SDK Help.
Page 43

Adding User-Defined Tasks
# Enterprise edition only.
You can add your own tasks to the Task List. For example, you can add
user-defined tasks to remind yourself or coworkers of things you still need
to complete for this installation. Any tasks that you add to the Task List are
saved when you save and close your installation.
To add user-defined tasks to the task list:
1. On the first line of the Task List, click Click here to add a new item
twice and then type your task.
2. Click anywhere outside the box that contains your new task.
The task is added to the Task List and appears in the Description
column. User-defined tasks do not use the Tables column.
USING THE TASK LIST
43
Page 44

2: WISE FOR WINDOWS INSTALLER BASICS
Creating and Editing Installation Templates
By default, when you create a new installation or merge module, it gets its
configuration from a template file. Templates contain logical defaults and
commonly used settings. Some template files are pre-created for you and
appear when you create a new installation. You can edit the pre-created
templates and create your own templates. The location of the Templates
subdirectory varies; see Where are Installation Resources Stored? on
page 68.
For example, suppose that all the installations you build have the same
system configuration requirements and the same dialogs. You can create a
new template that has those changes pre-configured for you. To do this,
create a new installation, make the necessary changes in Installation
Expert to the System Requirements and Dialogs pages, and then save the
installation (.MSI or .MSM only) to the Templates directory. Thereafter,
every time you create a new installation, the file you saved is available in
the New Installation File dialog that appears when you select New from the
File menu.
In the Enterprise Edition, you can share installation templates with other
developers by storing them in the share point directory. This lets all
developers in your organization create installations with common settings
and a consistent look and feel. For more information, see Sharing
Installation Resources on page 70.
Of the items that appear in the New Installation File dialog, you can only
edit the Windows Application, Web Application, and Server Application
templates; however, it is not recommended that you do so. Make copies of
the templates and edit the copies. Otherwise your changes may get
overwritten if you upgrade. You cannot edit any other templates.
To create a custom template:
1. Select New from the File menu.
The New Installation File dialog appears.
2. Select a template file on which to base your new template and click OK.
Only icons that have a corresponding file in the Templates directory are
templates; other icons cannot be used to create or edit templates.
A new installation or merge module opens.
3. Make all desired changes to the installation.
44
4. To include a description that will appear in the New Installation File
dialog when you click this template:
• Go to Setup Editor and click the Product tab.
• Click the Summary icon.
Page 45

CREATING AND EDITING INSTALLATION TEMPLATES
• In the upper right pane, double-click Comments.
• In the Summary Details dialog that appears, enter a description of
this template in the Value field and then click OK.
5. When you are finished editing the installation so that it fits your needs,
select Save As from the File menu. In the Save As dialog, name the file
and save it in the Templates directory as an .MSI or .MSM file.
6. To test your new template, select New from the File menu.
The New Installation File dialog appears and the file you just created is
listed in the Custom Templates category. If the New Installation File
dialog does not contain the new template, check to make sure you
saved the installation as an .MSI or .MSM file, and that you saved it in
the Templates directory.
7. Select the template you just created and click OK.
8. Check that the changes you made in the installation template file are
present in this new installation file.
45
Page 46

2: WISE FOR WINDOWS INSTALLER BASICS
Setting Preferences
You can set preferences by selecting Preferences from the Edit menu.
Some preferences let you customize the behavior of Wise for Windows
Installer and Installation Expert, and other preferences let you specify
digital signature, source control, and .NET information, and file sharing
settings. The options you set in the Preferences dialog are global; they are
set for all files you open with Wise for Windows Installer, including files
you’ve created previously, files you will create, and the current file.
Setting General Preferences
Use the General tab in the Preferences dialog to set general preferences.
Select Preferences from the Edit menu to display the Preferences dialog.
Automatic Options:
! Create backup copy during save. Mark this checkbox if you want a
new backup file created every time you save. The names of the backups
are the current file name plus a number. For example, if the current file
name is Widget.wsi, the backups are Widget1.wsi, Widget2.wsi, and so
on. Use caution with this option if you are working with a large .MSI file;
if you save often, your disk space will quickly become depleted.
! Add default remarks to installation sequences. While all Wise
project (.WSI) files have remarks that explain the actions in the
sequences, compiled .MSI files do not. Mark this checkbox to add
remarks to the current .MSI and all .MSIs that you subsequently open.
Remarks are added to .WSI files only if no remarks already exist.
Advertising Options:
Use the options in this section to determine how to gather self-registration
and advertising information for files you add to your installation. Windows
Installer considers some kinds of registry entries, such as file extension
definitions, to be advertising information. For information on what kinds of
registry entries are considered to be advertising information, see the topic
titled Platform Support of Advertisement in the Windows Installer SDK
Help.
The following options are default settings for all new components.
Changing these settings will not affect existing components.
! Advertising Setting. Select one of the “scan” options from this drop-
down list if you want Wise for Windows Installer to inspect your
computer’s registry and the files in the installation and automatically
add Windows Installer advertising information for the files that you add
to your installation.
46
Page 47

SETTING PREFERENCES
The different scan options let you determine whether the advertising
information is added to the advertising tables (AppId, Class, Extension,
Mime, ProgId, TypeLib, Verb), to the registry, or both. The scan options
also cause AppPath registry information to be added to your installation
automatically, although it is not related to advertising. Only AppPath
information at
HKEY_LOCAL_MACHINE\Software\Microsoft\Windows\CurrentVersion\A
pp Paths\ is added.
This system of registration is more robust than letting the file selfregister at installation time because it does not depend on the presence
of other files on the destination computer, nor does it depend on how
well the .OCX or .DLL file adheres to self-registration conventions.
However, to use the scan option, the .OCX or .DLL files must already be
registered correctly on your computer. If you prefer not to register
installation files on your computer, you can run the scan routine as a
stand-alone utility on a different computer; see Using
WiseComCapture.exe on page 133.
• Do not scan advertising information. Select this option when you
want to use self-registration for components that support it. Wise for
Windows Installer will not scan files or the registry.
• Scan advertising information into registry keys. Add
advertising information to the installation as registry keys only; do
not create entries in advertising tables. This results in an installation
that does not support advertising through COM.
• Scan advertising information into advertising tables. Place
registry entries that are considered to be advertising information
into advertising tables. Create registry entries for any information
that cannot be placed in the advertising tables. This results in an
installation that supports advertising. For all keys that can be placed
into advertising tables. For all other information that cannot be
placed into the advertising tables, create registry keys.
• Scan advertising into both advertising tables and registry.
Place registry entries that are considered to be advertising
information into advertising tables AND into registry keys. This way,
all advertising information is included in the installation; none is lost.
⌧ Caution:
When registry entries are created for any information that cannot be placed in
the advertising tables, your installation is more accurate because no
information is lost. However, this might cause an error or warning when you run
the Application Specification Logo test in the Package Validation tool.
47
Page 48

2: WISE FOR WINDOWS INSTALLER BASICS
! Automatically add self-registration. Mark this checkbox if you want
self-registration information automatically added to your installation
when you add an .OCX or .DLL file that supports self-registration.
Typically, .OCX and .DLL files are self-registered dynamically on the
destination computer by calling self-registration functions. If you mark
this checkbox, Windows Installer registers your .OCX and .DLL files. The
.DLL or .OCX may require certain files to be installed already in order to
self-register properly.
! Default to rescan advertising for components with advertising
information. If the advertising information contained in your files
might change during the development process, mark this checkbox. The
scan options in the Advertising Setting field above only read the
advertising information that’s present in the file when you first add it to
your installation. If you mark this checkbox, the advertising information
is scanned and the installation is updated every time you compile. This
field simply sets the default for new components; if you change it,
existing components are not affected. The Rescan advertising
information during compile checkbox in the Component Details
dialog can override this setting for individual components.
Compiler Options:
! Add custom actions for predefined folders in merge modules.
This affects the merging of merge modules that place files in predefined
directories, such as \Windows, \System32, and so on. Mark this
checkbox if you want the merge to emulate the behavior of Microsoft’s
merge tool, mergemod.dll, which uses custom actions to handle
predefined directories. Clearing this checkbox can fix potential problems
with directory name capitalization inconsistencies.
" Note:
Wise for Windows Installer has its own code for merging a module into an .MSI,
but this checkbox causes your merge to follow the Microsoft conventions for
merging. Microsoft’s merging code adds a custom action to your installation for
each predefined directory referenced in each included merge module. The
custom action uses a Set Property action to set the predefined directory name,
whereas the Wise for Windows Installer code simply sets the predefined
directory name by adding an item to the Directory table of the Windows
Installer database.
Display error if merge modules conflict with main installation
!
rows. Merge module errors occur if a merge module contains a row that
has the same key as a row in the main installation. Clear this checkbox
48
Page 49

SETTING PREFERENCES
to ignore such errors and let the merge module row overwrite the row in
the main installation.
! Enable Quick Compile. Mark this checkbox to speed up the compile
process by compressing only previously uncompressed or changed files.
Quick Compile writes the .MSI table information. If a file or media has
changed, a full compile will occur instead. Quick Compile is for project
files only.
Startup Options:
! Reload last project at startup. Mark this checkbox if you want the
last project you worked on to open automatically each time you launch
Wise for Windows Installer.
! Check for Updates. Select an option to set the frequency at which you
want to be reminded to check for updates to Wise for Windows Installer.
Update reminders occur only when Wise for Windows Installer is
launched.
Setting .NET Preferences
Use the .NET Assemblies tab in the Preferences dialog to specify whether
you create standard Win32 or .NET installations, and to customize how
Wise for Windows Installer handles the .NET assemblies added to an
installation. Select Preferences from the Edit menu to display the
Preferences dialog. Click the .NET Assemblies tab.
" Note:
The ability to create .NET installations is supported only by Windows Installer 2.0 or
higher.
COM Interop Options:
! Default Application Type. This field determines the default setting for
the Application Type field on the Product Details page for new
installations.
• Win 32 (non .NET). This is the default. Select this option if you
typically create standard Win32 installations without .NET
assemblies.
• .NET Application. Select this option if you typically create .NET
installations with only .NET elements.
• Mixed (.NET and Win32). Select this option if you typically create
installations containing both Win32 and .NET elements. When this
option is selected, .NET assemblies you add to an installation are
49
Page 50

2: WISE FOR WINDOWS INSTALLER BASICS
registered so that they can be called as though they were COM
components. For more information on COM interoperability, see the
topic titled Interoperating with Unmanaged Code in the MSDN
Library (msdn.microsoft.com/library/).
! Rescan COM interop registry keys on compile. Mark this checkbox
to scan and update interop registry keys for .NET assemblies each time
you compile. This checkbox is available only if the .NET Framework is
installed on your computer.
Assembly Scanning Options:
The scanning options are available only if the .NET Framework is installed
on your computer.
! Scan Dependencies. Select an option to determine how dependency
assemblies are added to an installation. You can add them manually or
have Wise for Windows Installer scan the assembly manifest for
dependencies and add them automatically.
• Never scan dependencies. If you select this option, you must add
dependency assemblies to your installations manually on the Files
page.
• Prompt to scan dependencies. Each time you add a .NET
assembly to an installation, Wise for Windows Installer scans its
manifest for dependencies and prompts you to select which ones to
add to the installation.
• Always scan dependencies. Each time you add a .NET assembly
to an installation, Wise for Windows Installer scans its manifest for
dependencies and adds them to the installation.
! Rescan assembly dependencies on compile. Mark this checkbox to
scan for new assembly dependencies each time you compile.
! Rescan assembly attributes on compile. Mark this checkbox to
rescan and update assembly attributes each time you compile. This
checkbox is marked by default.
Setting Digital Signature Preferences
You can add a digital signature to your installation on the Digital Signature
page in Installation Expert. If your installation includes a digital signature,
you use the signcode.exe utility to (1) create a hash of the code, using an
algorithm such as MD5 or SHA; (2) encrypt the hash using your private
key; and (3) create a package containing the code, the encrypted hash,
and the publisher’s certificate. For more information on digital signatures,
visit www.verisign.com.
50
Page 51

SETTING PREFERENCES
To set global preferences for digital signatures, configure the digital signing
options on the Digital Signing tab in the Preferences dialog. These
preferences apply to all future installations you create. Select Preferences
from the Edit menu to display the Preferences dialog. Click the Digital
Signing tab.
Enter the appropriate information in the following fields.
! Signcode.exe Location. Enter the pathname of the signcode.exe file
that performs the signing tasks. For more information, refer to the
ActiveX SDK.
! Credentials File. Enter the pathname of the credentials file that
contains your Digital ID; the path can be relative to the .WSI you’re
compiling. Your credentials file is provided by Verisign or another
certificate authority. You must use the same machine to apply for and
obtain your Digital ID. You can then use the private key and Digital ID to
sign files on a different machine.
! Private Key File. Enter the pathname of the private key file generated
by your browser during the process of applying for a Software
Publisher’s ID; the path can be relative to the .WSI you’re compiling. A
private key file has the extension .PVK. It’s a good idea to store a copy
of your private key file on a floppy disk in a safe deposit box. This key is
never sent to your certificate authority, so if you lose this private key,
you will be unable to sign your installer. If this key is lost or stolen,
please contact Verisign or your certificate authority immediately.
Setting Installation Expert Options
Use the Installation Expert tab in the Preferences dialog to set general
preferences for Wise for Windows Installer. Select Preferences from the
Edit menu to display the Preferences dialog.
! View directories for all features on Files page. Mark this checkbox
to see all directories on the Files page in Installation Expert, regardless
of what feature the directory was created for.
Clear this checkbox to see only the directories that were created for the
currently selected feature (the feature selected in the Current Feature
drop-down list.) For instance, if you create a directory for FeatureA,
then use the Current Feature drop-down list to go to FeatureB, you no
longer see the directory you made for FeatureA.
! View registry keys for all features on Registry page. If you mark
this checkbox, any registry key that is created for one feature displays
when other features are active, enabling you to see a composite view of
all registry keys created for all features. If this checkbox is not marked,
51
Page 52

2: WISE FOR WINDOWS INSTALLER BASICS
only keys created for the currently selected feature (in the Current
Feature drop-down list) are displayed.
! Show merge module components. Mark this checkbox to view the
files and registry entries from merge modules in Installation Expert. You
can only view merge module components in an .MSI. By default, these
items are hidden.
! Listbox Compatibility Mode. If your computer has certain video
drivers, you might have problems selecting items from list boxes within
Wise for Windows Installer. If items you choose from list boxes are
continually misinterpreted by Wise for Windows Installer, mark this
checkbox to eliminate list box problems.
The following three checkboxes determine how features are shown on the
Features page. You can override these settings using the right-click menu
on that page.
! Expand all features on Features page
! Display Feature title instead of name of Features page
! Display hidden features on Features page
Setting Merge Module Directories
On the Merge Modules tab in the Preferences dialog, you set default
directories for storing your merge modules. You can store merge modules
on a local drive or a shared network drive. When you add a merge module
to your installation, you can select from the merge modules in the
directories you specify here. When you use the Download Redistributables
wizard, you can download merge modules to any of the directories you
specify here.
In the Enterprise Edition, you can use merge modules that are stored in
the Wise Software Repository, which helps ensure that developers always
access approved versions of merge modules.
Select Preferences from the Edit menu to display the Preferences dialog.
Click the Merge Modules tab.
You also can access these options when you add a merge module to an
installation; click the Directories button in the Select Merge Module dialog.
See Adding a Merge Module to an Installation on page 375.
! The Default Merge Module Directory field shows the path to the
default merge module directory, which is C:\Program Files\Common
Files\Merge Modules\Wise Solutions. All merge modules that are in this
directory—along with the merge modules in other locations specified
below—are listed in the Select Merge Module dialog that appears when
you click the Add button on the Merge Modules page. To exclude the
merge modules in the default directory from the list, mark the Do not
52
Page 53

SETTING PREFERENCES
show merge modules from the Default Merge Module Directory
checkbox.
! Read Merge Modules List From Wise Software Repository. This
checkbox appears in the Enterprise Edition only. Mark this checkbox to
include merge modules from the Wise Software Repository in the Select
Merge Module dialog that appears when you click the Add button on the
Merge Modules page.
! In the Directory list, you enter additional directories where merge
modules are stored. Merge modules in these directories are listed in the
Select Merge Modules dialog. For example, if you save your company’s
user-created merge modules in the shared network directory
V:\Modules, and you add V:\Modules to the Directory list, the merge
modules in that directory will appear in the Select Merge Module dialog.
To add a directory to the list, click the Add button, browse for the
directory you want to add, and click OK. To include subdirectories in the
search, mark the checkbox in the Include Subdirs column. The next
time you click the Add button on the Merge Modules page, modules in
that directory appear in the Select Merge Module dialog.
To delete a directory from the list, click the directory you want to
remove and click the Delete button. Merge modules in that directory will
no longer appear in the Select Merge Module dialog.
Activating Suppressed Prompts
Some of the prompts that appear in Wise for Windows Installer contain a
Don’t show this message again checkbox that lets you suppress the
prompt in the future. You can use the Prompts tab in the Preferences dialog
to reactivate prompts that you previously chose to suppress. Select
Preferences from the Edit menu to display the Preferences dialog.
The Prompts tab lists the prompts you have suppressed and shows your
last response to each prompt. If you have not suppressed any Wise for
Windows Installer prompts, nothing is listed in the Prompts tab.
To reactivate a prompt, click the prompt message line, then click the
Activate button. The prompt is removed from the list. The next time you
encounter a situation in which that prompt applies, the prompt will appear.
Setting Repository Preferences
# Enterprise Edition only.
Use the Repository tab in the Preferences dialog to specify the directories
that contain shared resources you will use in your installations. For more
53
Page 54

2: WISE FOR WINDOWS INSTALLER BASICS
information about sharing resources, see Sharing Installation Resources on
page 70. You also can change the share point directory and Wise Software
Repository database from this dialog.
" Note:
Changing the share point directory or a specific path does NOT copy resources to
the new location. The new location you specify must already contain resources.
Typically, you will specify a share point or path that is already in use by another
team.
Select Preferences from the Edit menu to display the Preferences dialog.
Click the Repository tab.
! Share Point. This field, which is read-only, displays the share point
directory that contains the shared resources. You cannot edit this field,
however, you can use the Configure button to connect to a different
share point directory. When you click the Configure button, the Share
Point Directory dialog appears. Browse to an existing share point
directory and click Next. If the share point you chose was created in an
older version of Wise software, then you might also be prompted to
enter the repository’s database name and the server where it resides.
When the share point has been changed, click Finish to end the wizard.
! Data Source. This field, which is read-only, displays the Wise Software
Repository data source that is associated with the share point directory
above. The database displayed here is used as the default in the
Package Distribution tool when you distribute to the share point
directory.
Default locations are set for specific types of resources based on the share
point directory above. Typically, you will use the default locations. If you
want to set individual share locations for specific resources, click the
Advanced button. The Repository Advanced Settings dialog appears. To
change a default location, double-click one of the following items in the list
box and browse to a new path.
You can use the variable [WiseSharePoint] to represent the share point
directory in the following paths. You also can use the predefined variables
that appear on the Path Variables page. However, you cannot use other
user-defined path variables because they are specific to a single
installation and the following paths are global options.
! Component Rules. Specify the location of ComponentRules.ini, which
contains the rules that govern how components are created in
installations.
54
Page 55

SETTING PREFERENCES
⌧ Caution:
If you are sharing component rules in the Enterprise Edition, be careful when
editing existing rule sets because your changes will overwrite rule sets used by
other members of the development team.
Custom Actions. Specify the location in which you will save files used
!
in custom actions, such as WiseScripts, .DLL files, JScript files, and
VBScript files, that can be added to your installations. This is the default
location whenever you browse for a file in a custom action dialog.
! Default Project Directory. Specify the default directory in which all
new installations will be saved.
! Dialogs. Specify the location of the Wise Standard.msi file that contains
information used by the New Dialog Wizard to add a new dialog to an
installation.
! Languages. Specify the location of language resource files.
! Resources. Specify the location of the icon and bitmap resources that
are used in installations.
! Templates. Specify the location of installation templates and WfWI
macros.
! Themes. Specify the location of the installation themes that are used to
customize installation dialogs.
! Validation Modules. Specify the location of the validation modules
(.CUB files) and settings used in the Package Validation tool.
Setting Source Control Preferences
The Source Control tab in the Preferences dialog lets you enable source
control functionality for the current installation project and all future
projects. The following global options apply to all installation projects you
create. These options set preferences for the levels of interaction Wise for
Windows Installer has with your source code control system (SCCS). See
Using Source Control on page 328 for more information on using source
control.
" Note:
If the following options do not appear on the Source Control tab, you probably don’t
have a source code control system on your computer. It could also be that your
SCCS is unrecognized or that there are communications problems between the
SCCS server and your machine.
55
Page 56

2: WISE FOR WINDOWS INSTALLER BASICS
! Enable source control. Mark this checkbox to enable all source control
functionality both in the current project and all future projects. When
you mark this checkbox, the three following checkboxes that follow are
enabled, and also, the items in the source control menu. When source
control is enabled, you can add files to source control, check files in and
out, get the latest version of files, track history, and view differences.
! Check out file when it is opened. If this is marked, each time you
open a file that has been previously checked in, the file will be
automatically checked out for you. If your source code control system is
not available, you can cancel attempts to connect and work on the local
copy of the file.
! Check in file when it is closed. If this is marked, each time you open
a file that has been previously checked out, the file will be automatically
checked in for you.
! Add new files to source control. If you mark this checkbox, each
time you create a new installation file and save it, you will be prompted
to add it to your source code control system.
Just enabling the source control options above does not implement source
control into your installation. It merely enables you to add and remove files
from the source code control system, and to check them in and out. Use
the options on the Source Control menu to perform these tasks.
Setting the Target Platform
You can determine the default platform for new installations and set
preferences for converting existing 32-bit installations to 64-bit.
Select Preferences from the Edit menu to display the Preferences dialog.
Click the Target Platform tab.
" Note:
64-bit installations are supported only by Windows Installer 2.0 or higher.
Target Platform Selection. The preferences in this section determine
!
whether new installations you create are enabled for 64-bit or 32-bit
platforms.
• Default to 64-bit .MSI/.WSI files. If you mark this option, all new
.MSI and .WSI files that you create are 64-bit enabled.
56
• Default to 32-bit .MSI/.WSI files. If you mark this option, all new
.MSI and .WSI files that you create are 32-bit enabled.
Page 57

SETTING PREFERENCES
• Select platform in New Installation File dialog. If you mark this
option, you can select the platform for each new installation in the
Target Platform section of the New Installation File dialog.
! Convert 32-bit .MSI/.WSI files to 64-bit. Mark this checkbox to
convert 32-bit .MSI and .WSI files to 64-bit when you open them.
⌧ Caution:
If you mark this checkbox but not the next two checkboxes, then every 32-bit
installation file you open is converted to and saved as 64-bit.
When you mark this checkbox, the following checkboxes are available:
• Prompt before converting 32-bit files to 64-bit. Mark this
checkbox to display a warning message each time you are about to
convert a 32-bit file to 64-bit.
• Preserve original 32-bit .MSI/.WSI files when converting to
64-bit. Mark this checkbox to leave the original 32-bit installation
file intact and create a 64-bit-enabled copy. When you save the 64bit file, its file name defaults to the original file name with “(64-bit)”
appended to the end. For example, if your original file is named
MyApp.wsi, the file name for the new 64-bit installation file will be
MyApp (64-bit).wsi.
" Note:
You cannot convert 64-bit installations to 32-bit.
57
Page 58

2: WISE FOR WINDOWS INSTALLER BASICS
Component Rules
You can select or create rules that help you manage the creation of
components in an installation. Using component rules eliminates the need
to specify component information for every individual resource you add to
your installation and ensures that components are created consistently
across all your installations. Component rules can also help you align
component GUIDs in an upgrade with component GUIDs in previous
versions of the installation.
When you first set up an installation, you select a component rule set to
use to manage components you add to that installation. If necessary, you
can modify the existing rule sets or create a new one. Then, whenever you
add a resource, such as a file, registry key, shortcut, or anything else that
can be installed, components are created for those resources in accordance
with the rule set you selected. For example, you can always create a new
component for each new file added to the installation, or you can group
related resources, such as help files, into one component.
In the Enterprise Edition, you can share component rules with other
developers in your organizations via a share point directory. Sharing
component rules ensures that you always use the most current set of rules
and that your installations always adhere to company standards for
creating components. To share component rules, make sure a shared
directory is specified for the Component Rules path on the Repository tab
of the Preferences dialog; see Setting Repository Preferences on page 53.
Also see:
About Component Rules
Selecting a Component Rule Set on page 59
Using Component Rules to Align GUIDs in an Upgrade on page 61
Customizing Component Rules on page 62
Microsoft Best Practices Component Rule Set on page 65
One File Per Component Rule Set on page 66
About Component Rules
When you set up an installation, you can select a component rule set to use
to manage components you add to that installation. A rule set is simply a
collection of rules. A rule consists of one or more conditions and one or
more actions.
58
! A condition determines the criteria that a resource must meet in order
for an action to be performed. For example, if you select the condition
Added resource is a Shortcut, the action is only performed for
shortcut resources.
Page 59

COMPONENT RULES
! An action determines how a resource will be assigned to a component.
Two predefined rule sets are provided. You can use the predefined rule sets
as is, modify the predefined rule sets, or create your own rule sets to
reflect your company’s standards. Before you create your own rule sets,
review the predefined rule sets. You might find that they manage your
components satisfactorily and you don’t have to create your own. For
descriptions of the predefined rule sets, see Microsoft Best Practices
Component Rule Set on page 65 and One File Per Component Rule Set on
page 66.
In the Standard and Professional Editions, rule sets are stored in the
registry. In the Enterprise Edition, rule sets are stored in an .I NI file located
in the share point directory specified in the Repository tab of the
Preferences dialog; see Setting Repository Preferences on page 53. Do not
attempt to edit the .INI file outside of the Component Rules dialogs.
⌧ Caution:
If you are sharing component rules in the Enterprise Edition, be careful when
editing existing rule sets because your changes will overwrite rule sets used by
other members of the development team.
How Component Rules Are Applied
Component rules are applied in the order they appear from top to bottom
in the list of rules in the Customize Component Rules dialog. When a rule
has more than one condition, only resources that meet all of the conditions
have the rule applied to them. Once an added resource matches the
conditions in a rule, the action is applied and no subsequent rules are
evaluated for that resource. If you add a resource that does not meet any
of the conditions in the rule set, then the Microsoft Best Practices rule set is
used for that resource.
Selecting a Component Rule Set
Use the Component Rule Selection dialog to select a rule set and
component naming conventions for the current installation or to set the
default rule options for all future installations.
The component key values you enter in the Component Rule Selection
dialog can be overridden by specific rules. For example, if you use a rule
set that contains rules for naming certain types of components, then only
the components that do not meet the conditions in the rule set will be
named using the component key value options you specify here.
59
Page 60

2: WISE FOR WINDOWS INSTALLER BASICS
To select a component rule set:
1. From the Component Rules menu, select Select Rule Set.
The Component Rule Selection dialog appears.
2. In the Rule Set Name drop-down list, select the rule set you want to
use for this installation.
3. To make the specified rule set the default for all future installations,
mark the Make this the default rule set for all Windows Installer
files checkbox.
4. In the Component Key Values section, select an option from the
Default drop-down list to determine the naming convention for new
components. If the rule set you use specifies the component naming
under certain conditions, the naming convention you specify here will
be overridden when those conditions are met.
• Set component key to a named Base. Select this option to name
new components with specified text plus an incremental number.
Selecting this option enables the Base field. Enter text to serve as a
base for the component name, for example, Component. Component
names will be incremented from this base, as in Component1,
Component2, and so on.
• Set component key to key of keypath or first resource. Select
this option to name components as follows:
% If the resource is a file, registry key, or ODBC data source, give
the component the same name as the key of the keypath.
% For any other type of resource, give the component the same
name as the key of the first resource in the component.
• Set component key to table name of keypath or first
resource. Select this option to give new components the name of
the table in which the keypath or first resource reside. If multiple
components are named for the same table, an incremental number
is added to the component name, for example, File1, File2, and so
on.
5. The Files drop-down list lets you specify a different naming convention
for components that are based on file resources. You can use the long
filename of the keypath file, the short file name of the keypath file, or
the naming convention specified in the Default field above.
6. To make the options in the Component Key Values section the
defaults for all future installations, mark the Make this the default
key naming convention for all installations checkbox.
60
7. Click OK in the Component Rule Selection dialog.
Page 61

COMPONENT RULES
Using Component Rules to Align GUIDs in an Upgrade
Component rules can help you align component GUIDs in an upgrade with
component GUIDs in previous versions of the installation. If GUIDS or key
paths for the same component don’t match between the new and old .MSI,
the component could inadvertently get deleted because Windows Installer
does not recognize the components as being the same. Aligning
component GUIDs for matching components prevents upgrades from
deleting necessary files in the newer version.
If you are working on an upgrade installation, you specify the previous
versions of the installation in the Previous Installation Versions dialog.
Then, make sure you use a component rule set that contains a rule for
aligning component GUIDs with previous versions. For example, the two
predefined rule sets contain a rule in which, if the keypath resource
matches a resource in the previous .MSI list, the component layout of the
previous .MSI is matched and the component key is set to match the
previous version. All new resources you add to the upgrade installation will
be checked against the previous installations.
To ensure that all resources you add to an upgrade installation are aligned
with previous versions, specify the previous installation versions before
adding any resources to the installation. If you have already added
resources to the installation, as is the case when you use a copy of a
previous .WSI as a starting point for creating an upgrade installation, you
must run UpgradeSync to align GUIDs for existing components.
To use component rules to align GUIDs in an upgrade:
1. Create or open the upgrade installation.
2. If you have already added resources to the upgrade installation, run
UpgradeSync to align GUIDs for existing components. See Using
UpgradeSync on page 312.
3. Select a rule set to use for this upgrade; see Selecting a Component
Rule Set on page 59. Make sure the rule set you select contains a rule
for aligning component GUIDs with previous versions; this should be
the first rule in the rule set.
For best results, use the same rule set, if any, that was used in the
previous versions. That way, component creation in the upgrade will be
consistent with the previous versions.
4. From the Component Rules menu, select Previous Versions.
The Previous Installation Versions dialog appears.
5. In the Previous Installation Versions dialog, specify the previous
versions of this installation.
61
Page 62

2: WISE FOR WINDOWS INSTALLER BASICS
• To add a previous version .MSI to the list, click the Add button and
then click the Browse button ( ) to browse for the .MSI you want
to add. Navigate to the .MSI and click Open. The .MSI is added to
the list.
• To delete an .MSI from the list, click the .MSI you want to remove
and click the Delete button.
• The previous versions will be checked in the order they appear in
this list. To reorganize the .MSIs in the list, click an .MSI and use the
Move Up or Move Down button.
6. When you’ve added all previous versions, click OK in the Previous
Installation Versions dialog.
All new resources you add to the upgrade installation will be checked
against and aligned with the previous installations you specified.
Customizing Component Rules
If the predefined component rule sets do not meet your needs, you can
modify a predefined rule set or create a new rule set based on your
organization’s standards.
When you create new rules, you might want to refer to Microsoft’s rules for
creating components; see the topics titled Organizing Applications into
Components and Changing the Component Code in the Windows Installer
SDK Help.
⌧ Caution:
If you are sharing component rules in the Enterprise Edition, be careful when
editing existing rule sets because your changes will overwrite rule sets used by
other members of the development team.
To add a new component rule set:
1. From the Component Rules menu, select Customize.
The Customize Component Rules dialog appears. The upper list box
shows the rules contained in the selected rule set. Click a rule to
display its details in the lower list box (the Rule description list).
2. From the Rule Set Name drop-down list, select <new>.
The Enter Rule Set Name dialog opens.
3. Enter a unique Rule Set Name to identify this rule set and click OK.
62
4. In the Customize Component Rules dialog, click the Add button to add
the first rule for this rule set.
Page 63

COMPONENT RULES
This starts the Component Rule Wizard, which you can step through to
add the conditions and actions that comprise the rule. For details on
using the Component Rule Wizard, see Adding and Editing Component
Rules on page 63.
5. When you have finished adding rules to the rule set, click OK in the
Customize Component Rules dialog.
To change an existing component rule set:
1. From the Component Rules menu, select Customize.
The Customize Component Rules dialog appears.
2. From the Rule Set Name drop-down list, select the rule set you want
to change.
• To delete the rule set, click the Delete button to the right of the rule
set name.
• To rename the rule set, click the Rename button, type the new name
in the Enter Rule Set Name dialog, and click OK.
• To add a rule, click the Add button and follow the steps in Adding
and Editing Component Rules on page 63.
• To edit a rule, click the rule in the rules list and click the Details
button. This starts the Component Rule Wizard, which you can step
through to change the rule name or change any of the conditions or
actions. For details on using this wizard, see Adding and Editing
Component Rules on page 63.
• To delete a rule, click the rule in the rules list and click the Delete
button to the right of the rules list.
3. Click OK in the Customize Component Rules dialog.
Adding and Editing Component Rules
The Component Rule Wizard lets you add component rules to a rule set and
edit existing component rules. To access the Component Rule Wizard, you
select Customize from the Component Rules menu, and then either click
the Add button or click an existing rule and click the Details button. See
Customizing Component Rules on page 62.
⌧ Caution:
If you are sharing component rules in the Enterprise Edition, be careful when
editing existing rule sets because your changes will overwrite rule sets used by
other members of the development team.
63
Page 64

2: WISE FOR WINDOWS INSTALLER BASICS
To add or edit a component rule:
1. In the Name dialog of the Component Rule Wizard, enter a name for
the new rule and click Next. If this is an existing rule, the name is
already entered and you can accept or change it.
The Conditions dialog appears.
2. In the Which condition(s) do you want to check? list, mark the
checkbox next to each condition you want to check.
" Note:
When there are no conditions for performing the action(s) in this rule, select
the condition Always perform associated action.
As you mark checkboxes, the conditions appear in the Rule
description list. If you select a condition that is incompatible with a
condition you’ve already selected, the first condition you selected is
removed from the list.
3. If a condition contains underlined text, click the underlined text to open
a Rule Details dialog. There you can select a value for the underlined
text.
For example, if you selected the condition Added resource is a file
with name any
name. Wildcards are allowed.
4. When you’ve added all conditions that comprise the rule, click Next in
the Conditions dialog.
The Actions dialog appears.
5. In the Which action(s) do you want to perform? list, mark the
checkbox next to the action or actions you want to perform.
The actions you mark appear in the Rule description list. If you select
an action that is incompatible with an action you’ve already selected,
the first action you selected is removed from the list.
6. If an action contains underlined text, click the underlined text to open a
Rule Details dialog. There you can specify a value for the underlined
text.
For example, if you selected the action Set component key to
Component
text.
, you would click the word any and enter a specific file
, you would click the word Component and enter specific
64
7. When you’ve added all actions to the rule, click Finish in the Actions
dialog.
Page 65

COMPONENT RULES
You are returned to the Customize Component Rules dialog. The rule is
displayed in the upper list box and its details are displayed in the Rule
description list.
8. You can continue to add and edit rules. When you are finished, click OK
in the Customize Component Rules dialog.
Microsoft Best Practices Component Rule Set
When you use this predefined rule set, components are created using
Microsoft’s component creation guidelines. For more information on
Microsoft’s rules for creating components, see the topics titled Organizing
Applications into Components and Changing the Component Code in the
Windows Installer SDK Help.
If an added resource does no t meet the conditions in a rule, the next rule is
evaluated for that resource. If the resource does not meet the conditions in
any of the rules, the component is created according to the final rule.
! Match components in previous versions of the .MSI. If the keypath
resource matches a resource in the previous .MSI list, match the
component layout of the previous .MSI and set the component key to
match the previous version.
! Add all executable files to their own components. If the added
resource is a 32-bit executable file (.DLL, .OCX, or .EXE), create a new
component.
! Add all .TLB files to their own components. If the added resource is
a .TLB file, create a new component.
! Group Matching .HLP and .CNT files together. If resource file
names are the same and their file extensions are .HLP or .CNT, add
them to the same component. The .HLP file will be the keypath file.
! Group matching .CHM and .CHI files together. If resource file
names are the same and their extensions are .CHM or .CHI, add them to
the same component. The .CHM file will be the keypath file.
! Put registry keys associated with files or components in
matching components. If the added resource is a registry key, and
the registry value name or value refers to a file or component, add the
resource to an existing component that contains the same type of
resource.
! Put Current User registry keys in their own component. If the
added resource is a registry key under HKEY_CURRENT_USER, add the
resource to the component matching the conditions and set the
component key base to CurrentUser. The component key base will be
incremented for each new component matching this condition. For
example, CurrentUser1, CurrentUser2, and so on.
65
Page 66

2: WISE FOR WINDOWS INSTALLER BASICS
! Put non-Current User registry keys in their own component. If
the added resource is a registry key NOT under HKEY_CURRENT_USER,
add the resource to an existing component that contains the same type
of resource.
! Group all non-executable files to their own component. If the
added resource is not a 32-bit executable file (.DLL, .OCX, or .EXE), add
the resource to an existing component that contains the same type of
resource.
! Name new non-advertised shortcuts by destination directory. If
the added resource is a shortcut, add it to an existing component
containing non-advertised shortcuts in the same destination directory.
! Group non-keypath resources by resource type. If the added
resource cannot be set to the keypath, that is, if it is not a file, registry
key, or ODBC data source, add the resource to an existing component
that contains the same type of resource.
! Create new components for resources not matching other
criteria. For all other resources that do not match the criteria above,
create a new component for the resource and set the component key to
the table name of the keypath or the first resource. If multiple
components are named for the same table, an incremental number is
added to the component name, for example, File1, File2, and so on.
One File Per Component Rule Set
When you use this predefined rule set, each file you add to the installation
becomes its own component.
If an added resource does not meet the conditions in a rule, the next rule is
evaluated for that resource. If the resource does not meet the conditions in
any of the rules, the component is created according to the final rule.
! Match components in previous versions of the .MSI. If the keypath
resource matches a resource in the previous .MSI list, match the
component layout of the previous .MSI and set the component key to
match the previous version.
! Add all files to their own components. If the added resource is a
file, create a new component.
! Put registry keys associated with files or components in
matching components. If the added resource is a registry key, and
the registry value name or value refers to a file or component, add the
resource to an existing component that contains the same type of
resource.
! Put Current User registry keys in their own component. If the
added resource is a registry key under HKEY_CURRENT_USER, add the
66
Page 67

COMPONENT RULES
resource to the component matching the conditions and set the
component key base to CurrentUser. The component key base will be
incremented for each new component matching this condition. For
example, CurrentUser1, CurrentUser2, and so on.
! Put non-Current user registry keys in their own component. If
the added resource is a registry key NOT under HKEY_CURRENT_USER,
add the resource to an existing component that contains the same type
of resource.
! Name new non-advertised shortcuts by destination directory. If
the added resource is a shortcut, add it to an existing component
containing non-advertised shortcuts in the same destination directory.
! Group non-keypath resources by resource type. If the added
resource cannot be set to the keypath, that is, if it is not a file, registry
key, or ODBC data source, add the resource to an existing component
that contains the same type of resource.
! Create new components for resources not matching other
criteria. For all other resources that do not match the criteria above,
create a new component for the resource and set the component key to
the table name of the keypath or the first resource. If multiple
components are named for the same table, an incremental number is
added to the component name, for example, File1, File2, and so on.
67
Page 68

2: WISE FOR WINDOWS INSTALLER BASICS
Where are Installation Resources Stored?
Wise for Windows Installer uses resources such as installation templates,
component rules, language files, and so on, to create installations. In the
Standard and Professional Editions, these resources are stored in
subdirectories of the Wise for Windows Installer application directory, for
example, C:\Program Files\Wise for Windows Installer.
In the Enterprise Edition, resources are stored by default in subdirectories
of the share point directory. In the Repository tab of the Preferences
dialog, you can specify alternate locations for storing resources; see
Setting Repository Preferences on page 53.
The following table lists the resource subdirectories and describes their
contents.
Directory Contents
000, 001, and so on Enterprise Edition only. Contains source files associated with each
package’s installation. The subdirectories are numbered sequentially, as
in 000\001, and so on. They are created when someone uses the
Package Distribution tool to distribute to the share point. For more
information, see the topic titled Indexing Source Files With wamdb.idx in
the Software Manager Help.
Custom Actions Enterprise Edition only. Provides a shared location in which you can
place files used in custom actions, such as WiseScripts, VBScripts,
.DLLs, and so on, that you use in Windows Installer installations.
Languages Contains the language resource files used to change the language of
installations.
Reports Enterprise Edition only. Contains the predefined reports (.RPT) that are
used in Software Manager. Also contains the Report.ini file, which stores
information about the predefined reports and about any report
customizations.
Resources Contains installation resources such as bitmap and icon files.
Scripts Enterprise Edition only. Contains temporary files (.QUE) representing
packages that have been distributed to but not yet imported into the
Wise Software Repository. The Scripts directory is created the first time
someone uses the Package Distribution tool to distribute to the share
point. For more information, see the topic titled QUE Files and Automatic
Importing in the Software Manager Help.
The Scripts directory also stores information about package
subscriptions.
68
Page 69

WHERE ARE INSTALLATION RESOURCES STORED?
Directory Contents
Templates Contains installation templates, WfWI macros, and additional template
files used by Package Distribution.
Templates\Dialogs Contains the Wise Standard.msi file that provides information used by
the New Dialog Wizard to add a new dialog to an installation.
Templates\Reports Enterprise Edition only. Contains the template files that are used to
format the shared resources reports in Wise for Windows Installer.
Themes Contains Themes.ini, which stores information about themes you’ve
added or customized. Also contains subdirectories that store the images
for each theme.
Validation Contains the predefined validation modules (.CUB files) that are used by
the Package Validation tool.
Virtual OS Enterprise Edition only. Provides a shared location in which you can
place Virtual OS files (.WOS) that are used by the Universal Import
feature of Software Manager.
Also see About the Share Point Directory in Wise for Windows Installer on
page 72.
69
Page 70

2: WISE FOR WINDOWS INSTALLER BASICS
Using the Enterprise Edition
Enterprise Edition only.
#
With the Enterprise Edition of Wise for Windows Installer, you can develop
consistent, accurate, and high quality installations based on corporate
standards. The Enterprise Edition ensures that you use the correct versions
of resources, such as files and registry keys, that are shared across
multiple applications. For example, a developer who adds or updates a
.DLL in an installation can instantly view a list of other applications that use
that .DLL and the versions used. The developer can use this information to
ensure that the new application uses the correct version of the .DLL and
therefore will not break existing applications.
The Enterprise Edition lets you share commonly used templates, dialog
themes, translations, and other installation resources within a single
development team or among multiple development teams. This lets
developers throughout the organization create installations with common
settings and a consistent look and feel. See Sharing Installation Resources.
The Enterprise Edition also helps organizations that use Wise Package
Studio. It eliminates the need to repackage internally developed
applications, because the organization’s developers can create installations
that adhere to corporate standards. It also reduces rework of internally
developed installations by the development team and reduces end-user
downtime, because the developers who create installations can be sure to
use the correct versions of files and other resources before giving
installations to the IT deployment team. See Sharing the Wise Software
Repository With Wise Package Studio on page 73.
Sharing Installation Resources
# Enterprise Edition only.
A key feature of the Enterprise Edition is the ability to develop and enforce
standards for how installations are created. You enforce standards by
storing all installation-related resources in a common location and making
sure all developers use those resources in their installations.
Use the Repository tab in the Preferences dialog to specify the directories
that contain shared resources you will use in your installations. See Setting
Repository Preferences on page 53.
70
You can share the following resources:
Page 71

USING THE ENTERPRISE EDITION
! Component rules. Ensure that every installation will be organized the
same way, which greatly simplifies the management of multiple product
installations
! Custom actions, such as .DLL files, JScript files, and VBScript files,
that can be added to your installations.
! Installation templates, dialogs, dialog themes, languages, and
resources, such as bitmaps and icons, that are used in installations.
Create installations with common settings and a consistent look and
feel.
! Merge modules. Ensure that developers always access approved
versions of merge modules by storing merge modules in a central
location, or by using merge modules that are in the Wise Software
Repository.
! Validation modules (.CUB files). Simplify the quality assurance
process by ensuring every installation passes the same validation tests.
! Reports. Share customized report menus and custom reports.
Sharing installation resources is accomplished through the share point
directory, the Wise Software Repository, and the Software Manager tool.
! The share point directory is typically installed on a shared network
drive. Use the share point directory to store resources, such as
templates, dialogs, and themes, used to create installations as well as
the source files used in the application itself. The share point directory
can also contain information about applications that are waiting to be
imported to the Wise Software Repository database and the source files
used by those applications. See About the Share Point Directory in Wise
for Windows Installer on page 72 and Where are Installation Resources
Stored? on page 68. In order to take advantage of the Enterprise
Edition’s resource sharing features, you must specify a share point
directory on the Repository tab in the Preferences dialog.
! The Wise Software Repository database contains information about
every resource used by every application your organization develops.
This lets developers see what resources are used by other applications
so they can be sure to use the correct versions of resources in
applications they develop. Geographically dispersed development teams
can maintain multiple repository databases and use a publish/subscribe
model to pass information between repositories. For more information,
see the topic titled About the Wise Software Repository in the Software
Manager Help.
! The Software Manager tool lets you manage the information and
resources stored in the Wise Software Repository. Use it to import
applications into the Wise Software Repository database, subscribe to
71
Page 72

2: WISE FOR WINDOWS INSTALLER BASICS
applications in other repository databases, and view information about
the resources used by applications in the database.
In addition to importing Windows Installer installations and merge
modules, Software Manager can import other installation formats such
as WiseScripts, SMS Installer files, InstallShield® Developer
executables, and any other installation format. This lets you import
legacy installations without converting them to Windows Installer
format.
For more information on Software Manager, see the topic titled Software
Manager Basics in the Software Manager Help.
About the Share Point Directory in Wise for Windows Installer
# Enterprise Edition only.
During the Wise for Windows Installer installation, you specify a share
point directory. The default directory name is Wise Share Point, however,
you can change the name at installation time.
For recommendations on where to locate the share point directory, see the
topic titled Choosing the Location for the Share Point Directory in the Wise
for Windows Installer Getting Started Guide.
The share point directory and its subdirectories contain the following
information:
! Resources, such as installation templates, component rules, language
files, and so on, that are used to create Windows Installer installations.
! Predefined reports.
! Temporary files (.QUE) representing packages that have been
distributed to but not yet imported into the Wise Software Repository.
! Source files of installations you import to the Wise Software Repository.
! The default Microsoft Access-based Wise Software Repository database
and the sample Repository database, if you choose to install them.
If your organization uses Wise Package Studio, the share point directory
might contain additional information that is unique to that product.
For a list of the share point subdirectories and their contents, see Where
are Installation Resources Stored? on page 68.
72
Page 73

USING THE ENTERPRISE EDITION
⌧ Caution:
Do not edit or delete the contents of the share point directory or its subdirectories
outside of Wise for Windows Installer or other Wise Solutions tools. Doing so will
cause problems in Software Manager and can result in loss of data.
A common question is “Can I clean up the share point by deleting unused
source files?” The answer is no. It is too difficult to know which files are
safe to delete. The only recommended way to delete files from the share
point directory is to delete the entire package from the Wise Software
Repository database. Software Manager’s Delete Package dialog contains
an option to also delete the package’s source files from the share point
subdirectories (000, 001, and so on), provided those files are not
referenced by any other application. See the topic titled Deleting a Package
From the Wise Software Repository Database in the Software Manager
Help.
Sharing the Wise Software Repository With Wise Package Studio
# Enterprise Edition only.
Developers can use the Wise Software Repository solely to store
information about applications they develop. This situation is typical of
developers in an independent software vendor (ISV) environment.
However, developers who create applications for internal, corporate use
might also want to obtain information about external applications that have
been tested and deployed throughout their organization. If the deployment
team in their organization uses Wise Package Studio, the developers can
access the information in the deployment team’s Wise Software Repository.
Why share information in the deployment Repository? Because the
Repository used by Package Studio contains approved versions of
applications that have been deployed, developers can use this information
to build installations that adhere to corporate standards. For instance, by
checking the Repository when building an installation, a developer can be
sure to use the correct versions of critical files, such as the Visual Basic
runtime or MDAC.
The result is that developers produce more reliable installations that will
not conflict with applications already deployed to end-users’ desktops. This
eliminates the need for the repackaging team to repackage internally
developed applications and lets them focus on other activities. It also
73
Page 74

2: WISE FOR WINDOWS INSTALLER BASICS
assures the deployment team that applications will perform as expected
and reduces calls to the help desk.
There are two methods for developers to access information in the
deployment Repository:
! The development and deployment teams maintain separate Wise
Software Repository databases and use subscription to share
information across the databases.
! The development and deployment teams share the same Wise Software
Repository database.
Each method has its advantages and disadvantages, as described below.
Separate Wise Software Repository databases
In this situation, the development team maintains a Wise Software
Repository database that is separate from the one used by the deployment
team. Developers access information about deployed applications by
subscribing to the deployment team’s Repository. This is the most common
way to share information between the two departments.
The advantage to using this method is that applications that are still in
development are kept separate from those that have been tested and
deployed. The disadvantage to using this method is that additional steps
are required to hand off completed applications from development to
deployment.
In order to share information about applications, the teams follow this
process:
1. The development team uses Software Manager to subscribe to
applications in the deployment team’s Wise Software Repository.
2. During development, the developer distributes and imports a new
application to the development team’s Wise Software Repository. The
developer can view resources used by applications in both the
development and the deployment repositories.
3. When development is finished, the developer distributes the completed
application to a network directory.
4. A member of the deployment team imports the new application from
the network directory to the deployment team’s Wise Software
Repository.
5. The deployment process begins.
74
Shared Wise Software Repository database
In this situation, the development team uses the same Wise Software
Repository as the deployment team.
Page 75

USING THE ENTERPRISE EDITION
This method has two advantages: it saves bandwidth because applications
are not duplicated in two databases, and it does not require additional
steps to hand off applications from one database to another. The
disadvantage to using this method is that applications that are still in
development are mixed with those that have been tested and deployed.
Members of the deployment team must be careful not to deploy
applications that are still in development.
In order to share information about applications, the teams follow this
process:
1. During development, the developer distributes and imports a new
application to the shared Wise Software Repository. The developer can
view resources used by applications that are in development and those
that have been deployed.
2. When development is finished, the developer notifies a member of the
deployment team.
3. The deployment process begins.
Generating Shared Resource Reports
# Enterprise Edition only.
You can generate shared resource reports in Wise for Windows Installer.
These reports provide a quick way to review the resources that are shared
by the current installation and other packages in the Wise Software
Repository. Two reports are available:
! Shared Files Report. Lists the files that are shared by the current
installation and applications in the Wise Software Repository. For each
file, the report lists each application that uses the file and shows
detailed file information, such as version, date/time, path, and so on.
! Shared Registry Report. Lists the registry keys that are shared by the
current installation and applications in the Wise Software Repository. For
each registry key, the report lists each application that uses the registry
key and shows the key value.
In order to generate the shared resources reports, you must specify a Wise
Software Repository data source on the Repository tab in the Preferences
dialog; see Setting Repository Preferences on page 53.
The reports are displayed in HTML format. The .XSL templates used to
format these reports are located in the Templates\Reports subdirectory of
the share point directory. You can customize the .XSL templates to supply
branding information, to filter data, or to transform the data to another
format.
75
Page 76

2: WISE FOR WINDOWS INSTALLER BASICS
You also can generate resource reports in Software Manager. The Software
Manager reports contain similar information. See the topic titled Predefined
Software Manager Reports in the Software Manager Help.
To generate a shared resource report:
1. From the Reports menu, select either Shared Files Report or Shared
Registry Report.
The Welcome dialog appears.
2. In the Data Source field, specify the Wise Software Repository
database that contains the resources you want to review. This field
defaults to the Wise Software Repository specified on the Repository
tab in the Preferences dialog. To generate the report from a different
repository database, click the Open button to select a different data
source.
3. From the Group drop-down list, select the group that contains the
packages you want to compare.
4. Click Next.
The report is generated and displayed in the Shared Files Report or
Shared Registry Report dialog.
5. To save the report to a file, click the Save As button and specify a file
name and extension. You can save the report in either of two formats:
• HTML (*.html). Save the report as an HTML file, which you can
open later in your browser, print, or e-mail to a coworker. This option
is available only on computers that contain MSXML.DLL, which is
included in Internet Explorer 5.x and higher.
• Data (*.xml). Save the report data without formatting. This is
useful for importing the report into other applications.
6. Click the Print button to print the report.
7. When you are finished reviewing, saving, or printing the report, click
Finish.
76
Page 77

DOWNLOADING REDISTRIBUTABLE FILES
Downloading Redistributable Files
The Download Redistributables wizard, available from the Help menu, lets
you obtain merge modules, Windows Installer runtime installers, and .NET
Framework runtime installers. You need the Windows Installer runtimes if
you decide to pre-install Windows Installer with your installation. You need
.NET Framework if you are creating an installation that utilizes .NET.
" Note:
This wizard appears any time Wise detects a dependency on other merge modules
or other redistributables. For instance, if you run ApplicationWatch and a file gets
added that must be installed with a certain merge module, the Download
Redistributables wizard appears and prompts you to download the necessary merge
module. This wizard might also appear if you choose to install runtimes with your
installation, or if you add files on the Files page that have dependencies.
Because of size and obsolescence considerations, these files are distributed
via the Internet or product CD. Download them from the following
locations:
! Wise Solutions’ Web Site. Select and download one or more
redistributables from Wise Solutions’ Web site. Available redistributables
are authored by Wise Solutions or are authored by third-party vendors
and redistributed by Wise Solutions. See Downloading Redistributables
From the Wise Web Site or Product CD on page 78.
! Other Vendors’ Web Sites. Select and download a redistributable
from a third-party vendor’s Web site. Available redistributables are
authored by the respective vendor, and you need to contact the vendor
for information or help on a redistributable. See Downloading
Redistributables From Other Vendors’ Web Sites on page 79.
" Note:
If you need to go through a firewall or proxy server to get to the Internet, use
the link at the bottom of the Source Location dialog to modify your Internet
connection settings; the Source Location dialog is the first dialog that appears
when you use the Download Redistributables wizard. An Advanced Settings
dialog appears, where you can specify information for your proxy server. Check
with your network administrator for help with these options.
Product CD. Select and download one or more redistributables from
!
the CD that was used to install the product. Merge modules available
from the product CD are authored by Wise Solutions or are authored by
77
Page 78

2: WISE FOR WINDOWS INSTALLER BASICS
third-party vendors and redistributed by Wise Solutions. See
Downloading Redistributables From the Wise Web Site or Product CD on
page 78.
Downloading Redistributables From the Wise Web Site or Product CD
You must be in an active Wise project to follow this procedure.
To download redistributables from Wise Solutions’ Web site or
from the Product CD:
1. From the Help menu, select Download Redistributables. The Source
Location dialog appears.
2. Mark the Wise Solutions’ Web Site or the Product CD option and
click Next.
3. If you clicked Product CD, you must now specify the location of the CD
in the Product CD Location dialog. Then click Next.
When all available redistributables are retrieved, the Available
Redistributable Files dialog appears.
4. From the Redistributable Type drop-down list, select the type of
redistributable you want to download.
5. The dialog changes depending on what type of redistributable you
chose.
If you chose Merge Modules, you see the following lists:
• Modules Installed. This list contains merge modules in the
directories specified in the Merge Modules tab of the Preferences
dialog, which you access by selecting Preferences from the Edit
menu; see
• Available Modules. This list contains merge modules available on
Wise Solutions’ Web site or the product CD that are:
% Not in your list of current modules.
% In your list of current modules but are a newer version of those
merge modules.
If you chose Windows Installer Runtimes, .NET Framework, or
.NET Compact Framework, you see the following lists:
• Versions Installed. This list contains redistributables that are
located in Wise’s Stub directory
Setting Merge Module Directories on page 52.
.
78
• Versions Available. This list contains the versions of
redistributables that are available on the Wise Web site
.
Page 79

DOWNLOADING REDISTRIBUTABLE FILES
6. In the Available Modules or Versions Available list, mark one or
more checkboxes for those redistributables you want to download. You
can change the Redistributable Type and choose additional files.
7. Click Next. If you chose to download any merge modules, the Target
Location dialog appears, where you specify merge modules’ download
location; otherwise the download starts and you can skip the next step.
Runtimes are automatically downloaded to private directories where
they are accessed as needed by Wise.
8. From the Target Location drop-down list, select the directory to which
you want to download the selected merge modules, then click Next.
The drop-down list shows all merge module directories specified in the
Merge Modules tab of the Preferences dialog; see Setting Merge Module
Directories on page 52.
Wise downloads the selected redistributables from the Internet or CD. A
message box alerts you if you’re downloading a newer version of an
existing merge module, and you can choose whether or not to
overwrite existing merge modules.
9. Click Finish to exit the wizard.
The merge modules you selected are now in the directory you specified as
the target location and other runtimes are located in their required
directories. If any merge modules you specified had dependencies on other
merge modules, those merge modules were also downloaded
automatically.
Downloading Redistributables From Other Vendors’ Web Sites
You must be in an active Wise project to follow this procedure. Wise
Solutions has no control over other vendor’s redistributable files. Check
with the vendor for product support.
To download a redistributable from another vendor’s Web site:
1. From the Help menu, select Download Redistributables. The Source
Location dialog appears.
2. Mark the Other Vendors’ Web Sites option and click Next. When all
available redistributables are retrieved, the Available Redistributable
Files dialog appears.
3. In the list box, select the redistributable you want to download, then
click the link to launch your Internet browser, if necessary, and connect
to the corresponding vendor’s Web site.
79
Page 80

2: WISE FOR WINDOWS INSTALLER BASICS
4. Follow the links and prompts on the Web site to download the
redistributable. Be sure to download merge modules to a directory
specified on the Wise Options > Directories page in the Options dialog.
5. When the download is complete, return to the Download
Redistributables window and click Finish to exit the wizard.
The merge modules you selected are now in the directory you specified as
the target location and other runtimes are located in their required
directories. If any merge modules you specified had dependencies on other
merge modules, those merge modules were also downloaded
automatically.
80
Page 81

Command Line Options
You can invoke Wise for Windows Installer (WfWI.exe) with command line
options, either as part of a shortcut or when you launch the program from
the command line. These options let you change properties from the
command line.
Do not confuse this list of command line options with the command line
options that you can apply at runtime to your .MSI via the executable
msiexec.exe. The Windows Installer SDK Help lists these command line
options in the topic Command Line Options.
Use the following command line options with the Wise for Windows
Installer executable, WfWI.exe.
Command line option Description
/c Compile only and exit. This must be the first
COMMAND LINE OPTIONS
option in the command line statement.
/c=“release name” Compile only the specified release from an
installation containing multiple releases.
/p name=value Set property values. The property name/
value must immediately follow the /p. You
can use as many property name/value
switches as you like in a command line. Do
not enter any spaces in the name=value
construction, unless they are enclosed in
double quotes.
/o path Sets output file to the specified path. You
cannot specify a relative path; specify an
absolute path. The path must immediately
follow the /o.
/F Has the same effect as clearing the Don’t
update or recompress files when
saving (.MSI/.MSM only) checkbox on
the Product Details Page on page 86.
/s Causes the compile to be silent. If you don’t
include this, error or informational dialogs
might appear that require user intervention.
/l log file name The /l followed by a log file name makes an
additional compile log file, in addition to
compile.log, which is created automatically.
81
Page 82

2: WISE FOR WINDOWS INSTALLER BASICS
Command Line Option Example
The following example shows how to compile.
"C:\Program Files\Wise for Windows Installer\Wfwi.exe" C:\Installers\MyApp.wsi /c
/s /p CURRENT_FILES="E:\Test Development" /o C:\MyAppInstaller.msi
The preceding command line does this:
! It invokes the executable.
! Specifies the .WSI file to compile (
! Sets it to compile (/c).
! Sets all error messages to be suppressed (/s).
! Sets the property CURRENT_FILES (/p CURRENT_FILES="E:\Test
Development").
! Sets the output file name (/o C:\MyAppInstaller.msi).
If you set multiple properties, separate property value pairs with spaces.
Enclose values with double quotes.
Automating the Build Process
You can use command line options in conjunction with other processes to
create an automated build process. Command line options let you compile
as well as set properties.
To create an automated build process:
! Enter the following command line statement into a batch file or any
other program that has the ability to run command line statements,
such as Scheduled Tasks in the Control Panel:
C:\Installers\MyApp.wsi
).
"C:\Program Files\Wise for Windows Installer\WfWI.exe"
"C:\Development\WidgetWare.wsi" /c /o "C:\WidgetWare.msi" /s
where "C:\Program Files\Wise for Windows
Installer\WfWI.exe"
"C:\Development\WidgetWare.wsi" is the path to the project file
you want to compile, and
the output file that will be compiled.
82
is the path to the Wise executable,
"C:\WidgetWare.msi" is the pathname for
Page 83

Chapter 3
Setting Up Your Project
This section describes the tasks you perform when you get ready for a new
installation. Topics cover:
! Before You Start (preparing for a new installation).
! Starting a New Installation.
! Product Details Page (identifying the product to the end user and
specifying default directories).
! General Information Page (providing general information to appear
when the end user looks at the installation file’s properties).
! Add/Remove Programs Page (determining how your product appears in
the Add/Remove Programs control panel).
! Features Page (creating the structure of your installation).
! Managing Binary Resources.
83
Page 84

3: SETTING UP YOUR PROJECT
Before You Start
To avoid interruptions during the installation development process,
assemble all the information you need before you begin building an
installation in Wise for Windows Installer. Having this information on hand
lets you focus on the actual installation process, instead of constantly
having to gather more information. Here’s the kind of information you
might need.
! You need to know all the files you’ll be installing on the destination
computer, including program files, files necessary for optional features,
related .DLLs, drivers, and other support files. You’ll need any thirdparty installations, such as the Adobe Acrobat installation, that your
installation will provide.
! You need to know which files and other system changes comprise which
features. (In Windows Installer, a feature is a distinct part of your
application’s functionality, such as a spell-checker, a thesaurus, or a
group of clip art.) If your installation lets end users choose optional
components, such as a spell-checker, you must organize files into
features when you build the installation.
! You need a list of the changes that must be made to system information
files—.INI files, the registry, and so forth—for your software to run
properly.
! You need to know the software’s system requirements in as much detail
as possible. Consider not just memory and disk requirements, but also
the minimum screen depth and resolution, and the minimum required
version of the operating system.
! You need any custom graphics—referred to as billboards—you want to
display during the installation.
! You need to know any changes you want to make to the dialogs to be
displayed during installation. See Choosing Dialogs on the Dialogs Page
on page 485 for a list of dialogs.
! You might need a Readme file and a copy of the license agreement that
applies to the software being installed.
84
Page 85

Starting a New Installation
Follow the steps below to create a new standard Windows Installer
installation. To create a new transform, see Creating a Transform on
page 380, and to create a new merge module, see Creating a Merge
Module by Creating a New Installation on page 359.
To start a new installation:
1. From the Windows Start menu, select Programs > Wise Solutions >
Wise for Windows Installer.
The New Installation File dialog appears. If it doesn’t appear, select
New from the File menu. For details on options in the New Installation
File dialog, see:
• Options for New Installations on page 24
• File Types on page 26
• Project Files and Database Files on page 28
STARTING A NEW INSTALLATION
2. Click the Windows Application icon (under the Predefined Templates
category).
The Windows Application icon lets you create a standard installation.
Next, you select the file type of your project. Because you are creating
a standard installation, you have the option to create either a standard
Windows Installer file (.MSI) or a Wise project file (.WSI).
3. Choose to create a Windows Installer package directly by marking
Create standard .MSI or .MSM file..., which lets you work directly in
an .MSI or .MSM database. Choose to create a project file, which
compiles to a Windows Installer package, by marking Create .WSI or
.WSM project file...
4. Select a target platform if necessary. The Target Platform section
appears if the Select platform in New Installation File dialog
option is marked in the Target Platform tab of the Preferences dialog.
Mark Create installation for 32-bit platform or Create installation
for 64-bit platform to enable the installation you are creating for
either 32-bit or 64-bit platforms. For information about 64-bit
installations, see What’s Different in a 64-Bit Installation? on page 30.
5. Click OK. The new installation opens.
85
Page 86

3: SETTING UP YOUR PROJECT
Product Details Page
Use the Product Details page to enter information about your project. The
name and version that you enter here are used in the installation dialogs to
identify the product to the end user who is installing it. Also, the name you
enter here appears in the Add/Remove Programs control panel. The
product name and version are tightly integrated with Windows Installer.
! Name. Enter the name of the application or software package. The end
user sees this name in the setup program during installation.
! Version. The version number of the application or software package.
Windows Installers uses this version number to identify this product
when subsequent patches or upgrades are applied. The product version
should be in the format AA.BB.CCCC.DDDD, where AA is the major
version, BB is the minor version, CCCC is the build version, and DDDD is
optional and ignored. It is stored as a string data type.
" Note:
If you are releasing a newer version of your software but are not using the
Upgrades page, it is very important that you enter a new version on the Product
Details page in Installation Expert. Not doing so can cause the installation
program to open in maintenance mode instead of in normal installation mode.
If the end user chooses to reinstall in maintenance mode, it can result in an
invalid installation that is a mixture of old and new files, causing errors in your
product. The only exception to this rule is if your installation contains no new
files, no deletion of files, and no other system changes, which means that only
the contents of files are changed.
Manufacturer. Enter the manufacturer or publisher of the software.
!
! Default Directory. During installation, this directory is displayed to the
end user in the Destination Folder dialog, and the end user can change
the default location for the application. (The Destination Folder dialog is
called the Single Feature Destination dialog in Wise for Windows
Installer.) The first directory you create on the Files page is
automatically set to the default directory. To change the default
directory, click the Change button and choose a new directory. See
Setting the Default Installation Directory on page 88.
! Don’t update or recompress files when saving (.MSI/.MSM only).
This checkbox is enabled only if you are working in an .MSI file. Files are
stored in .MSI files in two ways: with a hard-coded pathname to the
original, or without a pathname. For files with pathnames, Wise for
Windows Installer gets the latest copy of the file from your drive when
you save or compile your .MSI file. Mark this checkbox to prevent Wise
86
Page 87

PRODUCT DETAILS PAGE
for Windows Installer from going out to your drive and getting the latest
copy of files that have pathnames. If you turn this off, any media
settings you created on the Media page are not re-compressed into
those media configurations when you save or compile.
! Product Identification. Every Windows Installer installation must
have a unique product code. This is used as the principal identification
for the product. Wise for Windows Installer automatically generates a
product code of the data type GUID, which ensures that no two products
ever have the same product code. To change the product ID, you must
click the Generate button—typing or editing a GUID does not generate a
valid GUID. For more information about the product code, see the topics
titled ProductCode Property, Package Codes, and Product Codes in the
Windows Installer SDK Help. Also see About GUIDs on page 631.
! Target Platform. This field provides a quick way to determine the
platform for which this installation is enabled. Its value is either Intel
64-bit or Intel 32-bit, and is set when you create the installation. You
cannot change this field. To change the target platform for future
installations, see Setting the Target Platform on page 56.
! Application Type. This field specifies whether this is a standard Win32
or a .NET installation. It also determines how Wise for Windows Installer
handles COM interoperability registry entries. The default for this field is
obtained from the Default Application Type field in the .NET
Assemblies tab of the Preferences dialog. For more information, see
Setting .NET Preferences on page 49.
The ability to create .NET installations is supported only by Windows
Installer 2.0 or higher.
• Win 32 (non .NET). Select this option if this is a standard Win32
installation without .NET assemblies.
• .NET Application. Select this option if this is a .NET installation with
only .NET elements.
• Mixed (.NET and Win32). Select this option if this installation
contains both Win32 and .NET elements. When this option is
selected, the Generate COM interop registry keys for .NET
Assembly checkbox on the Self-registration tab of the File Details
dialog is marked by default for all .NET assemblies you add to this
installation. The assemblies will be registered so that they can be
called as though they were COM elements.
When the .NET Application or Mixed option is selected, entries are
created in the MsiAssembly and MsiAssemblyName tables for each
assembly you add to the installation. Also, the Global Assembly
Cache and WinSxS directories appear on the Files page in
Installation Expert.
87
Page 88

3: SETTING UP YOUR PROJECT
! Installation Target. This field appears in the Professional and
Enterprise Editions only. Use it to specify whether this installation is
configured to install a Web service to an IIS server.
• Windows-based desktop/server PC. Choose this option if this
installation does not install a Web service to an IIS server. This is the
standard setting.
• Windows-based IIS Web server. Choose this option if this
installation installs a Web application to an IIS server. This
designates the installation as a Web service installation, adds a
custom action that obtains information about the IIS server, and
causes the wwwroot folder to appear on the Files page.
Incrementing the Version
When should you increment your version field?
! If you’ve added or deleted files from this installation.
! If you’ve created, removed, or edited any other items besides files, such
as services, ODBC, runtimes, registry, and so on.
! If you plan to create a patch for earlier versions that updates them to
this version.
! When you’re including upgrade entries on the upgrade page of versions
that this installation will upgrade.
When can you leave the version field the same?
! If you are creating an update that has all the same files, and only the
contents of files have changed.
Setting the Default Installation Directory
Clicking the Change button on the Product Details page displays the Set
Default Install Directory dialog, which contains a list of all the directories
accessed by this installation. It includes Windows predefined directories
and all the directories that you’ve created while working on this
installation. This dialog lets you change the default directory and reset the
default directories for features that use this directory. You can also create a
new directory as a child, or subdirectory, of an existing directory. To add a
new parent directory, use the New Folder button on the Files page.
88
Page 89

PRODUCT DETAILS PAGE
" Note:
You might notice that when end users install your application, sometimes the
default directory defaults to the C:\ drive, and other times it defaults to another
drive. This happens because Windows Installer automatically determines which
drive has the most free space.
!
Default Directory. This drop-down list contains all the directories that
you’ve created plus predefined Windows directories. Select a new
default destination directory, which displays to end users during
installation in the Destination Folder dialog (also called the Single
Feature Destination dialog).
To create a new directory as a child of an existing directory, select a
directory from the drop-down list, then click the New Folder button. The
Create New Folder dialog appears. Enter a name for the new
subdirectory.
! Change Feature configurable directories. If you mark this
checkbox, any features that explicitly reference the default directory
automatically change when you choose a new default directory. To see if
a feature explicitly references a directory, double-click the feature name
on the Features page. If the Directory field does not contain <none>,
then the feature explicitly references a directory.
89
Page 90

3: SETTING UP YOUR PROJECT
General Information Page
Use the General Information page to set the information that appears when
the end user looks at properties for the installation file on the destination
computer.
The fields below, except for the Installer Version field, correspond to
items in the Properties dialog that appears for files in Windows Explorer.
End users see the Properties dialog in Windows Explorer by right-clicking
on the compiled .MSI or .EXE file and selecting Properties from the rightclick menu.
! Title. Enter the name of the application or the software package. This
field often includes a version number.
! Subject. Enter a brief description of the software.
! Author. Enter the author or publisher of the software. This field often
includes a copyright notice.
! Keywords. Enter a list of keywords that can be used when searching
for this setup program in Windows Explorer.
! Installer Version. This is NOT the version of your application. This field
contains the minimum version of Windows Installer required on the
destination computer to run this installation. This installation will
compile into a format that is compatible with the version indicated here.
If the destination computer has an earlier version of Windows Installer,
the installation fails. If the destination computer has a later version of
Windows Installer, Windows Installer runs in a backward compatible
mode. To change this version, go to the Product tab of Setup Editor, click
the Summary icon, and double-click the item named Minimum Installer
Version.
If this is a 64-bit installation, the minimum version of Windows Installer
is set to 2.00 or higher. You should not change this value in a 64-bit
installation.
" Note:
Installations with an Installer Version of 2.0 or higher cannot run on Windows
NT 4.0, Service Pack 5 or lower. This is a Microsoft restriction.
Comments. Enter comments about the software.
!
90
Page 91

Add/Remove Programs Page
Windows 2000 and Windows XP have an Add/Remove Programs applet that
supports a rich display of applications. The Add/Remove Programs page
lets you enter the information necessary to support these capabilities.
! Do not display in Add/Remove Programs list. Mark this option if
you do not want your application to appear in Add/Remove Programs.
! Display in Add/Remove Programs list. Mark this option to include
your application in Add/Remove Programs and to set the following:
• Display Icon. The icon you choose here will display next to the
application name in the Add/Remove Programs window. If you leave
this blank, a generic icon is used. Click Browse to select a file from
the installation. If the file exists on disk, you also see an icon
selection dialog where you pick the icon you want to display.
• Icon Number. Enter the icon resource ID (preceded by -) or the
icon number for the icon you want. Because a file can contain
multiple icons, icons in a file are numbered, starting from zero. This
field is pre-filled in if you chose an icon from an icon selection dialog.
ADD/REMOVE PROGRAMS PAGE
• Hide modify button. Mark this checkbox to disable the Change
button for your application in the Add/Remove Programs window.
This prevents anyone from directly making changes to the
installation database.
• Hide remove button. Mark this checkbox to disable the Remove
button for your application in the Add/Remove Programs window.
End users will not be able to remove this program using the Add/
Remove Programs control panel.
! Support Information Page. The following information will appear
under Support Information in the Add/Remove Programs control panel.
• Online Info URL. Enter a URL where end users can get online
support for the product.
• Contact Person. Enter the name of a particular person, such as a
support technician, that end users can contact if they have
questions.
• Phone Number. Enter the phone number for the contact person
listed above.
• Help URL. Enter the path to either a standard help file or to an
HTML help file that will be installed on the destination computer.
• Comments. Enter any additional comments to the end user.
• Hide repair button. Mark this checkbox to disable the installation
repair option on the Support Information page..
91
Page 92

3: SETTING UP YOUR PROJECT
Features Page
The Features page lets you create the structure of your installation. Here
you determine what features make up the application, how those features
are presented to the end user during installation, and what conditions must
be met for portions of features to be installed. You should determine your
application’s features and conditions before configuring other aspects of
your installation, because many of the pages in Installation Expert have a
Current Feature drop-down list that lets you set options on a per-feature
and per-condition basis. To learn more about what features are and how
they are used, see Working With Components and Features on page 631.
" Note:
The Wise Installation System and WiseScript Editor refer to features as
“components.”
The tree structure on the Features page displays features and conditions,
and their hierarchical relationships. The buttons on the right let you add,
delete, edit, and arrange features, add conditions to resources assigned to
features, and configure features. You can configure common options for a
feature by clicking its icon and selecting options from its drop-down list, or
configure it completely by clicking its name and clicking the Details button.
Use the right-click menu to determine which features are expanded or
collapsed. You can choose to collapse or expand all features or child
features of selected parents only, and you can display hidden features.
Further, you can display the features’ titles as they appear in the setup
program’s Select Feature dialog during installation rather than the features’
names, which are used by the Windows Installer. Any display option you
choose from the right-click menu overrides the settings on the Preferences
dialog’s General tab. For information on setting preferences, see Setting
Preferences on page 46.
When you create a new installation, the Features page already contains a
feature named Complete, because every installation must contain at least
one feature. You can rename Complete by double-clicking it. You can delete
it, but only after you create a second feature, because there must always
be at least one feature. For ideas on organizing your application into
features, see Strategies for Organizing Files Into Features on page 94.
92
Page 93
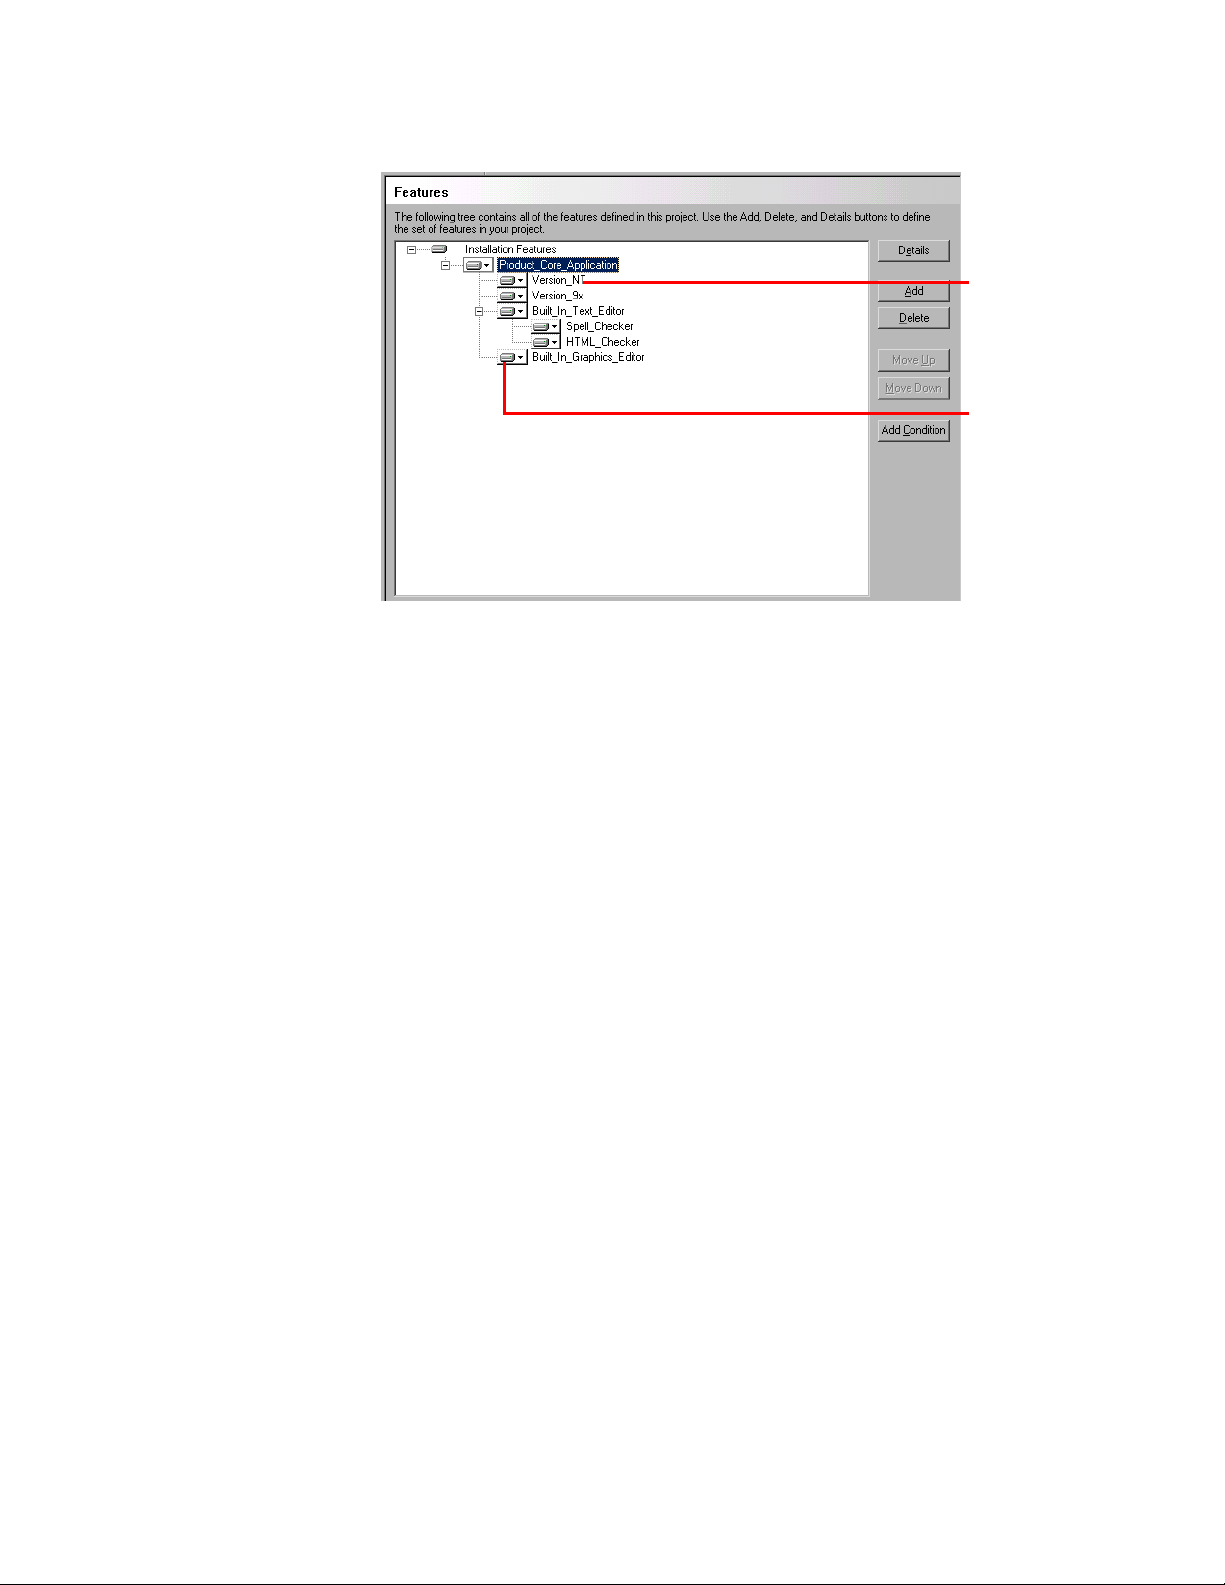
FEATURES PAGE
Condition. Files and
other installation
options set for a
condition are installed
only if the condition is
true.
Feature icon list. Use
to set common
options.
! Details button. Use to edit the currently-selected feature. See
Configuring a Feature Using the Feature Details Dialog on page 98. Also
see Configuring a Feature Using Its Drop-Down List.
! Add button. Use to add a new feature underneath the selected feature.
See Adding a New Feature on page 96.
! Delete button. Use to delete the selected feature or condition. When
you delete a feature, all its child features and conditions are deleted
also.
! Move Up/Move Down buttons. Use to rearrange features. You can
move features up and down within their current level only, in their
current sibling group. You cannot move features to their parent or child
levels.
! Add Condition button. Use to add a condition to the currently-selected
feature. See Using Conditions With Features on page 102 and Adding
and Deleting Feature Conditions on page 103.
How you configure features on this page determines how the feature set
appears to the end user during installation. To get a quick idea of how your
changes affect the user interface of the setup program, go to the Dialogs
page, clear the checkbox for Installation Type Dialog, mark the
checkbox for Select Feature Dialog, and click the Test button in the lower
right corner of the main window. Run the installation program until you see
the Select Feature dialog. The Select Feature dialog in the installation
program reflects the options that you set on the Features page in
Installation Expert.
To set which features are installed by default if the end user chooses a
Complete, Typical, or Custom installation type on the Installation Type
93
Page 94

3: SETTING UP YOUR PROJECT
Dialog, use the Installation Types page. See Setting Features for
Installation Types on page 174.
Strategies for Organizing Files Into Features
It is important to create and organize features and define conditions in a
logical way; not doing so can result in non-functional versions of your
application being installed.Create features and conditions before adding
resources such as files, .INI files, or registry entries. When you add such
resources, you must choose the feature or condition with which the
resource gets installed.
The Features page lets you place features in hierarchical relationships to
other features by using a tree structure. You can add a feature at the same
level as another feature (sibling level) or as a child of a feature. Sibling
features can be installed independently of each other, while child features
can be installed only if their parent feature is installed. You can reorganize
the feature tree structure by dragging features up and down. You also can
drag a feature to a new parent.
The core resources for your application should always be contained in a
top-level feature. Installing just the core feature should install a
functioning version of your application; it should have no dependencies on
resources that are within optional features.
When Windows Installer repairs an installation due to corruption or
deletion of a resource, it repairs the entire feature. Because of this, if an
advertised shortcut is part of the top level feature, and that advertised
shortcut gets deleted, the entire application will be reinstalled during a
repair. Therefore, isolate advertised shortcuts and their .EXEs into their
own sub-features to avoid complete reinstallation, which will result in more
efficient repairs.
Below are some strategies and scenarios for organizing your resources into
features.
Place dependent features below required core files.
In the illustration below, the features Built_in_Text_Editor and
Built_in_Graphics_Editor, which are built into the application, are
dependent on the core application’s presence. By placing them as children
to the core application files, which are stored in the
Web_Creator_Core_App feature, you ensure that they are never
installed independently of the parent feature. An end user can choose to
install a child feature only if the parent feature is set to be installed.
94
Page 95
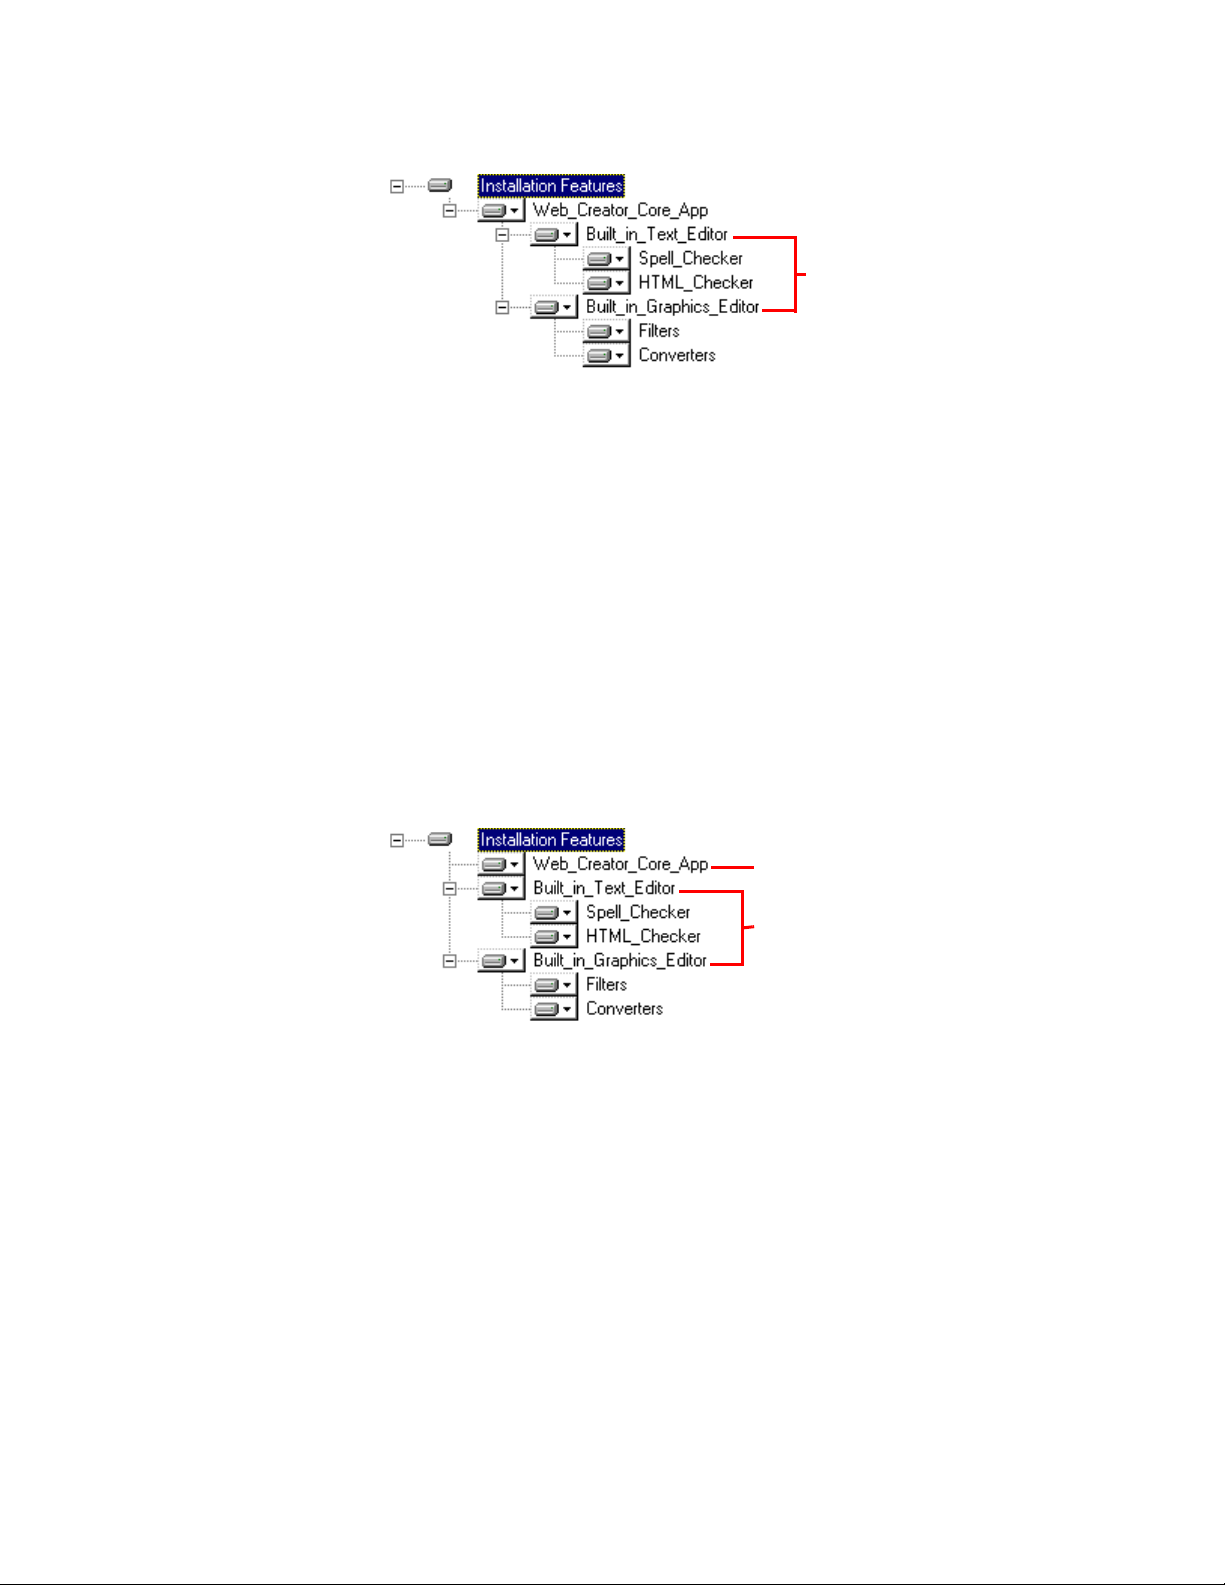
FEATURES PAGE
Because the dependent features are child
features of the core application, they cannot
be installed without the core application.
Place dependent features as siblings to core files, but require core
files.
In the illustration below, the features Built_in_Text_Editor and
Built_in_Graphics_Editor, which are built into the application, are
dependent on the core application’s presence. Because they are placed on
the same level as the main application, an end user installing the
application might choose to install the text editor feature or the graphics
editor feature without installing the core application, which would result in
a broken installation. To avoid this problem, you can require the
Web_Creator_Core_App feature by marking its Required Feature
checkbox, located in the Feature Details dialog. Required features cannot
be turned off in the setup program during installation. The main advantage
to this strategy is that in the setup program, the end user sees the optional
features at the top level instead of buried in the tree structure.
To prevent users from installing a dependent feature
without the core application, set the core application
to required.
Dependent on core application.
Place stand-alone features as siblings.
In the illustration below, the features External_Text_Editor and
External_Graphics_Editor are stand-alone applications, which can run
independently of the core application. Therefore, you can place them on
the same level as the feature that installs the main application,
Web_Creator_Core_App. An end user installing your application can
choose to install the text editor or the graphics editor independently of the
core application.
95
Page 96
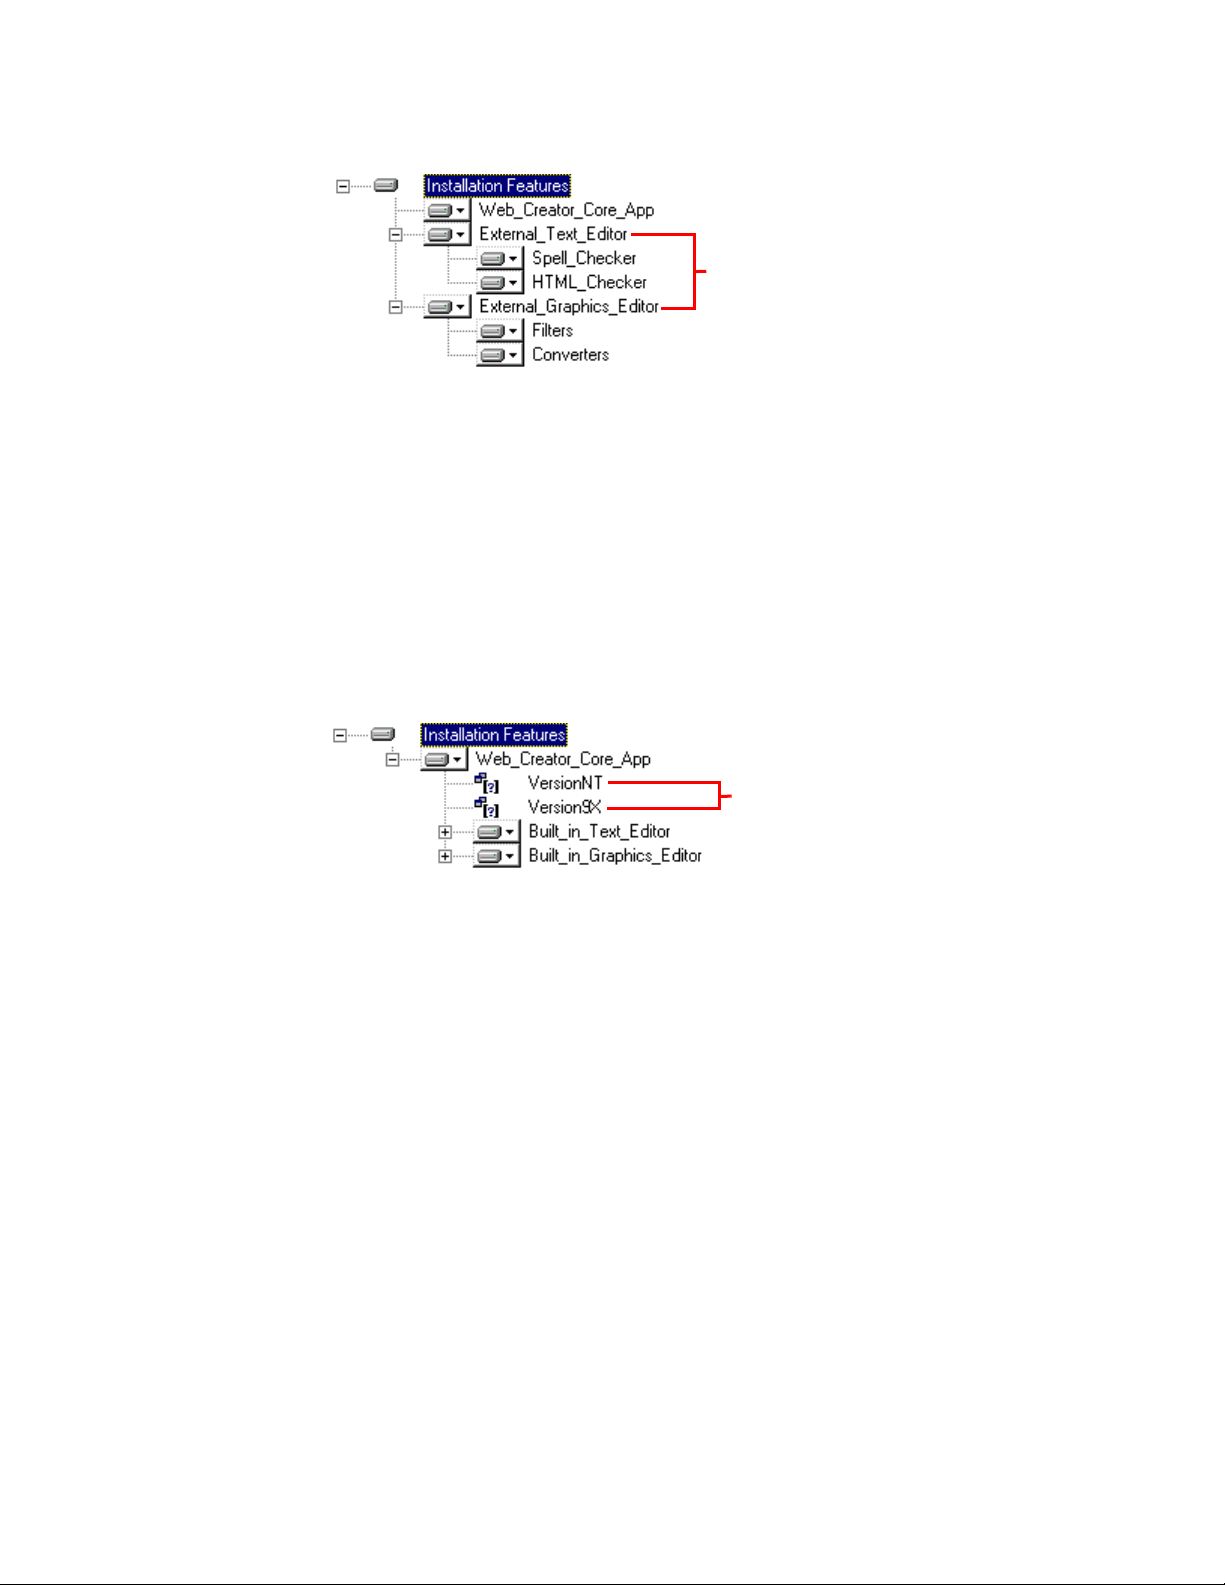
3: SETTING UP YOUR PROJECT
Use conditions with features.
In the illustration below, the Web_Creator_Core_App feature has two
conditions under it. VersionNT specifies that the operating system must
be Windows NT, 2000, or XP, and Version9X specifies that the operating
system must be Windows 95, 98, or Me. Any items that you associate with
either condition get installed only if the condition is true. Because
conditions appear in the Current Feature drop-down list, which appears
on most pages in Installation Expert, you can associate the same kinds of
items with a condition that you can with a feature, including files, registry
entries, shortcuts, services, and so on.
Because these features are external to
(independent of) the core application, they can be
set as siblings to the core application, and can be
installed independently.
Adding a New Feature
To add a feature:
1. On the Features page in Installation Expert, click the feature name in
the tree structure under which you want the new feature to appear.
For instance, to create a feature under Complete, first click Complete.
To create a feature on the same level as Complete, first click
Installation Features.
2. Click the Add button.
The Feature Details dialog appears.
3. Configure the feature by filling in the Feature Details dialog. See
Configuring a Feature Using the Feature Details Dialog on page 98.
4. Click OK in the Feature Details dialog.
The items you associate with a condition are
installed only if the feature is installed AND the
condition is true. You associate items with
conditions the same way you associate items
with features, by using the
drop-down list that appears on Installation
Expert pages.
Current Feature
96
The new feature is created as a child feature to the feature you selected
in the first step.
Page 97
FEATURES PAGE
The order in which you arrange features on the Features page determines
the order of the features on the Select Features dialog that appears during
installation. To move a feature up or down, click its name and then use the
Move Up and Move Down buttons.
Configuring a Feature Using Its Drop-Down List
When you click the icon next to a feature name, a menu that contains
options for installing the feature appears. The options you set in this dropdown list determine the default state of the feature in the setup program
during installation. These five options are a subset of the options available
in the Feature Details dialog (accessed by clicking the Details button)—the
drop-down simply provides you with a way to set common options quickly.
The icon itself provides a visual cue indicating which options have been set
for the feature.
" Note:
The first four options in the feature’s drop-down list set the default only; the end
user can change the default during installation. To prevent the end user from being
able to change the defaults you set here, you can turn off the Select Feature dialog
on the Dialogs page, use the Feature Details dialog to set features to be required,
or set features to be hidden from the end user.
To set options on a feature, click the feature’s icon, and choose from the
following list of options. You can choose only one of the first four menu
commands, but you can set the fifth menu command, Hidden from user, in
combination with any of the first four commands.
! Will be installed on local hard drive. Select this option if the
feature should default to being installed on the local hard drive. (This
option corresponds to setting Favor Local in the Attributes drop-down
list in the Feature Details dialog.)
! Will be installed to run from source. Select this option if the
feature should default to being run from source. If a feature is installed
to run from source, it is available to the application and visible to the
end user, but is not actually installed on the local hard drive. When the
feature is invoked, your application must call Windows Installer
functions, such as MsiGetComponentPath, to locate and read the
necessary files from the installation source, which might be a CD-ROM
or shared network directory. A typical use of this option would be to
specify a clip art library to run from the source. Then you must code
your application to attempt to read from the installation source when
the end user tries to use the clip art library. (This option corresponds to
97
Page 98

3: SETTING UP YOUR PROJECT
setting Favor Source in the Attributes drop-down list in the Feature
Details dialog.)
! Feature will be installed when required. Select this option if
the feature should default to being advertised. If a feature is advertised,
it is available to the application and visible to the end user, but is not
actually installed on the hard drive. If the installation source, such as a
CD-ROM or shared network directory, is available to the destination
computer, the feature is installed automatically when the end user
invokes the feature. If the installation source is not available, the end
user is prompted for the installation source. (This option corresponds to
setting Favor Advertising in the Advertising drop-down list in the
Feature Details dialog.)
! Entire feature will be unavailable. If you select this option, this
feature does not appear in the setup program during installation, and is
not installed. (This option corresponds to setting Never Install This
Feature in the Level drop-down list in the Feature Details dialog.)
! Hidden from user. Select this option if you do not want this
feature to appear to the end user in the setup program’s Select Features
dialog. You can set this option in combination with the other options in
this drop-down list. (This option corresponds to setting Hidden in the
Display drop-down list in the Feature Details dialog.)
Configuring a Feature Using the Feature Details Dialog
On the Features page, you can create a new feature or edit an existing
feature. In either case, you can configure all aspects of the feature using
the Feature Details dialog, which you access by clicking the Add button (for
a new feature) or the Details button (to edit an existing feature). For
detailed technical information on the fields in this dialog, see the topic
titled Feature Table in the Windows Installer SDK Help.
" Note:
Some options in this dialog set the default only; the end user can change the
default during installation. To prevent the end user from being able to change the
defaults you set here, you can turn off the Select Feature dialog on the Dialogs
page, set features to be required, or set features to be hidden.
Name. Enter the name of the feature, which is used internally by the
!
Windows Installer.
98
Page 99

FEATURES PAGE
! Title. Enter the title of the feature, which is displayed in the setup
program’s Select Features dialog during installation.
! Parent. Select the feature’s parent. To change the parent, and
therefore the feature tree, select from the drop-down list, which shows
all features in your installation, except the current feature. This field lets
you change the feature tree in Installation Expert or in Setup Editor
without having to go into tables.
! Description. Enter a multi-line description of the feature. If the end
user selects a feature in the Select Features dialog in the setup program
during installation, this description appears. The text you enter here
must fit in the Feature Description area of the Select Features dialog.
! Level. If you are using the Installation Types page in Installation Expert
to determine which features to install for a Typical or Complete
installation, you can ignore this field. If not, use the Level field to
determine what features get installed for a Typical or Complete
installation. The end user chooses Typical, Complete, or Custom in the
Installation Type dialog (also called Select Installation Type). If the end
user chooses a Custom installation, the end user can turn features on or
off individually.
Each installation has an installation level, stored in the property
INSTALLLEVEL. Each feature, in turn, has its own installation level value,
which you can set in the Feature Details dialog using the Level field. If a
feature’s level is less than or equal to the installation’s INSTALLLEVEL
property, then the feature gets installed. By default, INSTALLLEVEL is
set to 3 for a Typical installation, and to 1000 for a Complete
installation.
• Normal. The feature’s level value is set to 3, which means that it
gets installed by default for either Typical or Complete.
• Never install this feature. The feature’s level value is set to 0,
which means that it won’t show up in the setup program during
installation, and won’t be installed.
• Always install this feature. The feature’s level value is set to 1,
which means that it gets installed by default for either Typical or
Complete.
• Custom. Use this option if you want to enter the feature’s
installation level value yourself. For instance, if you want a feature to
be installed for a Complete installation, but not for a Typical
installation, set a custom level value that’s greater than 3 and less
than or equal to 1000. The Custom Value field becomes available
for you to type the integer value.
99
Page 100

3: SETTING UP YOUR PROJECT
! Custom Value. If Custom is selected in the Level drop-down list,
enter the level value for the feature in this field. Read the description of
Level, above, for more details.
" Note:
The end user’s action in the Installation Type dialog determines the
INSTALLLEVEL property. To see how this works, go to the Dialogs tab in Setup
Editor and click the Installation Type Dialog in the list. Double-click the Typical/
Complete/Custom radio button, and you see that the end user’s choice in this
radio group sets the property InstallMode. If you then double-click the Next
button on the Installation Type dialog and view the Events tab, you see that,
based on the InstallMode value, the installation property INSTALLLEVEL is set
to either 3 or 1000.
Display. Determines how and if the feature displays to the end user in
!
the Select Feature dialog that appears during installation. Expanded and
collapsed refer to whether the item’s children are visible or not, just like
in a Windows Explorer window. Set this to Hidden if you don’t want the
feature to appear, set it to Visible and Expanded if you want it and its
contents to appear, or set it to Visible and Collapsed if you want the
feature, but not its contents, to appear.
Use the General tab in the Preferences dialog or the right-click menu on
the Features page to determine whether or not to display hidden
features and whether to expand or collapse a parent feature to show or
hide its children; see Setting General Preferences on page 46 and
Features Page on page 92.
! Attributes. Determines the default for the feature in the installation
program. The end user can change the default. Select Favor Local if
the feature should be installed on the destination computer, Favor
Source if it should be run from the source CD or network directory, or
Favor Parent if it should use the same attribute setting as its parent
feature. If you set Favor Source, you must also set the installation to
generate uncompressed external files that can run from the source. See
the description of the Media Type drop-down list in Adding a Media
Item on page 202.
If a feature is installed to run from source, it is available to the
application, but is not actually installed on the local hard drive. When
the feature is invoked, your application must call Windows Installer
functions, such as MsiGetComponentPath, to locate and read the
necessary files from the installation source, which might be a CD-ROM
or shared network directory. A typical use of this option would be to
specify a clip art library to run from the source. Then you must code
100
 Loading...