

Page 1

NETWORK CAMERA
Quick Guide
XNB-H6280B
Bandit Barrier
mera
Ca
Page 2
1. Read these instructions.
2. Keep these instructions.
3. Heed all warnings.
4. Follow all instructions.
5. Do not use this apparatus near water.
6. Clean the contaminated area on the product surface with a soft, dry cloth or a damp
cloth.
(Do not use a detergent or cosmetic products that contain alcohol, solvents or
surfactants or oil constituents as they may deform or cause damage to the product.)
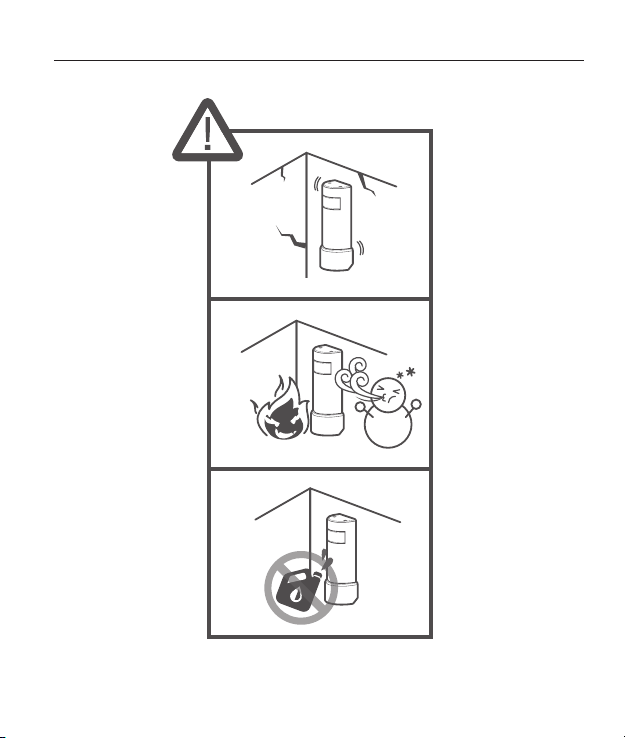
7. Do not block any ventilation openings, Install in accordance with the manufacturer’s
instructions.
8. Do not install near any heat sources such as radiators, heat registers, stoves, or other
apparatus (including amplifiers) that produce heat.
9. Do not defeat the safety purpose of the polarized or grounding-type plug. A polarized
plug has two blades with one wider than the other. A grounding type plug has two
blades and a third grounding prong. The wide blade or the third prong are provided for
your safety. If the provided plug does not fit into your outlet, consult an electrician for
replacement of the obsolete outlet.
10. Protect the power cord from being walked on or pinched particularly at plugs,
convenience receptacles, and the point where they exit from the apparatus.
11. Only use attachments/ accessories specified by the manufacturer.
12. Use only with the cart, stand, tripod, bracket, or table specified by
the manufacturer, or sold with the apparatus. When a cart is used,
use caution when moving the cart/apparatus combination to avoid
injury from tip-over.
Page 3
13. Unplug this apparatus during lighting storms or when unused for long periods of time.
14. Refer all servicing to qualified service personnel. Servicing is required when the apparatus
has been damaged in any way, such as power-supply cord or plug is damaged, liquid has
been spilled or objects have fallen into the apparatus, the apparatus has been exposed to
rain or moisture, does not operate normally, or has been dropped.
15. This Lens module has to be connected with equipment, which supplied by a power supply
unit marked “Class 2” or “LPS”.
Any changes or modifications in construction of this device which are not expressly approved by
the party responsible for compliance could void the user's authority to operate the equipment.
This device complies with part 15 of the FCC Rules. Operation is subject to the following two
conditions: (1) This device may not cause harmful interference, and (2) this device must accept
any interference received, including interference that may cause undesired operation.
This equipment has been tested and found to comply with the limits for a Class A digital device,
pursuant to part 15 of the FCC Rules. These limits are designed to provide reasonable protection
against harmful interference when the equipment is operated in a commercial environment.
This equipment generates, uses, and can radiate radio frequency energy and, if not installed
and used in accordance with the instruction manual, may cause harmful interference to radio
communications. Operation of this equipment in a residential area is likely to cause harmful
interference in which case the user will be required to correct the interference at his own expense.
Page 4
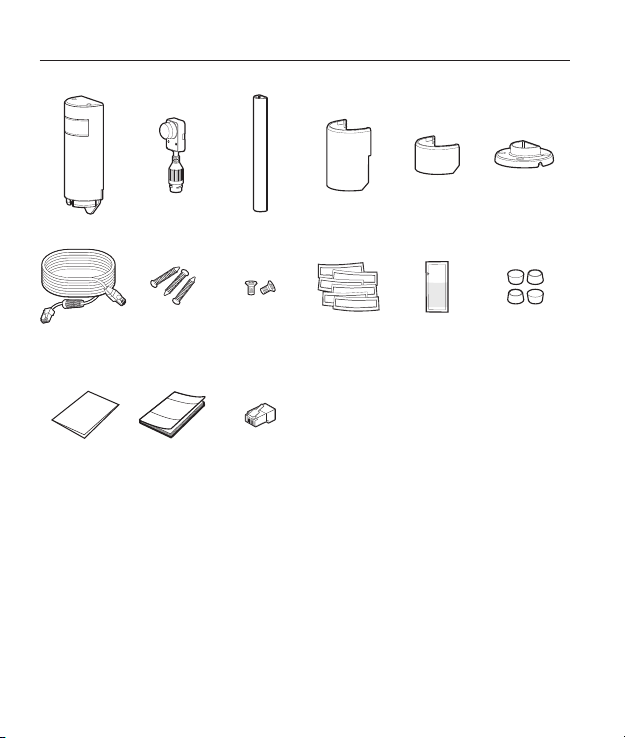
COMPONENT
As for each sales country, accessories are not the same.
Lens Housing
Cable (1.5m
RJ45 to RJ12)
Quick Guide
Lens
Assembly
Screws
Manual
Tower
Assembly
Machine
Screws
RJ12
Connector
Long Cover
Double-sided
Tape
4
Short Cover
Cleaning Pad
Base
Plugs
Page 5
InstallatIon
5
Page 6
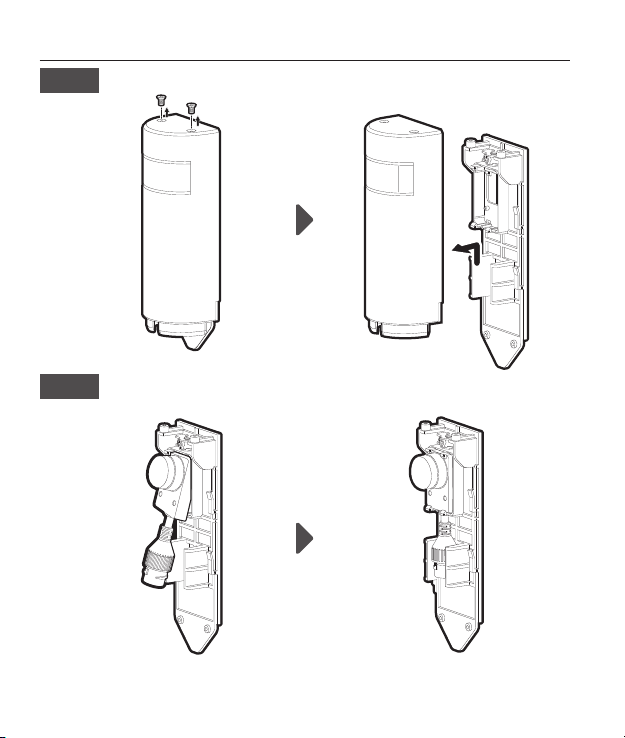
InstallatIon
1
2
6
Page 7

InstallatIon
3
~Connect lens module cable to lens module.
4
7
Page 8
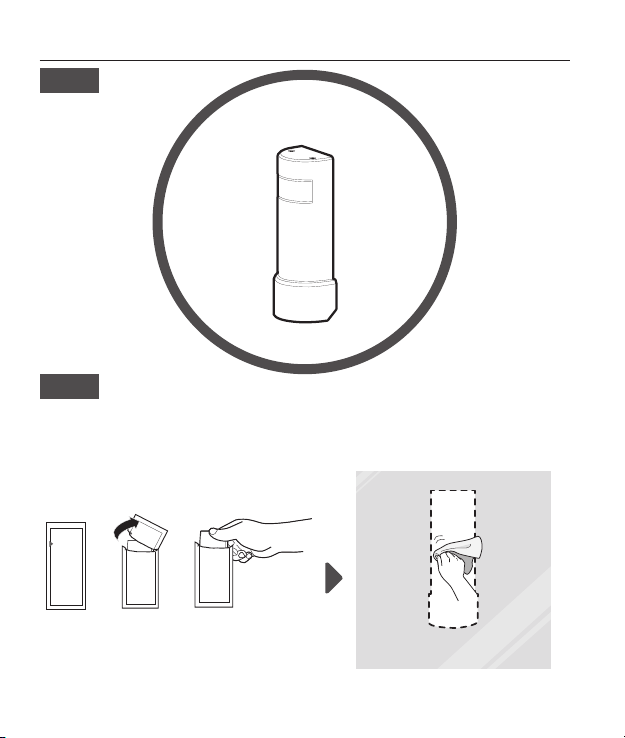
InstallatIon
Type A
A-1
~The adhesive strength of the double-sided tape is strong, so once installed, it is difficult to re-install. Please
check the position and size of the mounting surface in advance.
8
Page 9
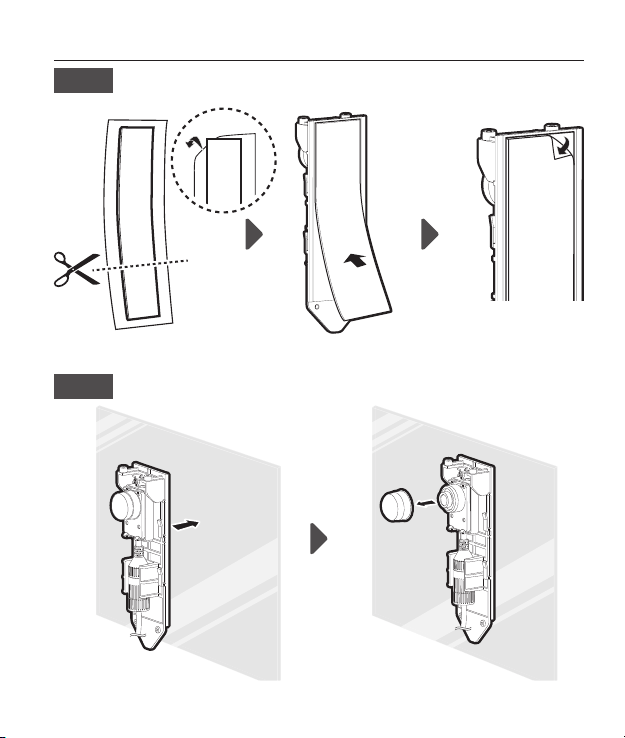
InstallatIon
A-2
A-3
9
Page 10

InstallatIon
A-4
A-5
10
Page 11

InstallatIon
A-6
OR
11
Page 12

InstallatIon
Type B
B-1
12
Page 13

InstallatIon
B-2
~The adhesive strength of the double-sided tape is strong, so once installed, it is difficult to re-install. Please
check the position and size of the mounting surface in advance.
B-3
13
Page 14

InstallatIon
B-4
B-5
14
Page 15

InstallatIon
B-6
B-7
OR
15
Page 16

InstallatIon
Type C
C-1
16
Page 17

InstallatIon
C-2
C-3
17
Page 18

InstallatIon
C-4
(Not supplied)
C-5
18
Page 19

InstallatIon
C-6
C-7
19
Page 20

Adjust the length of the cAble for connecting the
lens module
1
2
20
Page 21

Adjust the length of the cAble for connecting the
lens module
3
4
1
6
Number Color
1 Black
2 Red
3 Bule
4 Orange
5 White
6 Green
21
Page 22

Adjust the length of the cAble for connecting the
lens module
5
6
22
Page 23

NETWORK CAMERA
Quick Guide
XNB-6001
Main Unit
Page 24

COMPONENT
As for each sales country, accessories are not the same.
Main Unit
Installation
Bracket
Instruction
book,
IP Installer CD
Power
Terminal
Block
~Not Included : SD CARD
AUDIO
CAM
OUT IN
Manual
Alarm
Terminal
Block
2
Quick
Guide
Video Out
Cable
Screws
RESETPOWER
Page 25

InstallatIon
3
Page 26

InstallatIon
1
2
4
Page 27

InstallatIon
3
4
DC 12V
4 3 2 1
GND : 1, 2
ALARM OUT : 3
ALARM IN : 4
'&9
CAM
NETWORK
LINK ACT
AUDIO
OUT IN
MICRO
USB
micro USB
VIDEO
RESETPOWER
5
Page 28

InstallatIon
5
6
IP Installer
Installation
8
6
Page 29

InstallatIon
7
Page 30

PASSWORD SETTING
When you access the product for the first time, you
must register the login password.
When the “Password change” window appears,
enter the new password.
For a new password with 8 to 9 digits, you
`
J
must use at least 3 of the following: uppercase/
lowercase letters, numbers and special
characters. For a password with 10 to 15
digits, you must use at least 2 types of those
mentioned.
- Special characters that are allowed. :
~`!@#$%^*()_-+=|{}[].?/
For higher security, you are not recommended
`
to repeat the same characters or consecutive
keyboard inputs for your passwords.
If you lost your password, you can press the
`
[RESET] button to initialize the product. So,
don’t lose your password by using a memo pad
or memorizing it.
LOGIN
Whenever you access the camera, the login
window appears.
Enter the User ID and password to access the
camera.
a Enter “admin” in the <User Name> input
box.
b Enter the password in the <Password>
input field.
c Click [OK].
CONNECTING TO WIFI
Camera setting
a Connect OTG adapter (5-pin) and WiFi
dongle to the micro USB terminal.
Smartphone setting
a Install the Wisenet Installation application.
b Select the camera SSID after tur ning on
the WiFi.
c Run the Wisenet Installation application.
d When you log in to the camera, the video
will be connected. (initial password: 4321)
The video will be played without being logged in
`
during the initial connection.
e You can adjust angle of view while
watching the video through smartphone.
8
Page 31

Hanwha Techwin cares for the environment at all product manufacturing stages, and is taking measures to
provide customers with more environmentally friendly products.
The Eco mark represents Hanwha Techwin’s devotion to creating environmentally friendly products, and
indicates that the product satisfies the EU RoHS Directive.
Correct Disposal of This Product (Waste Electrical & Electronic Equipment)
(Applicable in the European Union and other European countries with separate collection systems)
This marking on the product, accessories or literature indicates that the product and its electronic accessories
(e.g. charger, headset, USB cable) should not be disposed of with other household waste at the end of
their working life. To prevent possible harm to the environment or human health from uncontrolled waste
disposal, please separate these items from other types of waste and recycle them responsibly to promote the
sustainable reuse of material resources.
Household users should contact either the retailer where they purchased this product, or their local
government office, for details of where and how they can take these items for environmentally safe recycling.
Business users should contact their supplier and check the terms and conditions of the purchase contract.
This product and its electronic accessories should not be mixed with other commercial wastes for disposal.
Correct disposal of batteries in this product
(Applicable in the European Union and other European countries with separate battery return systems.)
This marking on the battery, manual or packaging indicates that the batteries in this product should not be disposed of with other
household waste at the end of their working life. Where marked, the chemical symbols Hg, Cd or Pb indicate that the battery contains
mercury, cadmium or lead above the reference levels in EC Directive 2006/66. If batteries are not properly disposed of, these
substances can cause harm to human health or the environment.
To protect natural resources and to promote material reuse, please separate batteries from other types of waste and recycle them
through your local, free battery return system.
Page 32

Hanwha Techwin America
500 Frank W. Burr Blvd. Suite 43 Teaneck, NJ 07666
Toll Free : 1.877.213.1222 Direct : 201.325.6920
Fax : 201.373.0124
www.hanwhasecurity.com
PT01-005401A
 Loading...