

Wisco 630 Installation Manual

DELI WRAPPER
MODEL 630
FEATURES:
- INCLUDES ADAPTER DISC FOR 10”-12” PIZZAS.
- High watt density heating element shrink wraps
pizzas in seconds.
- Thermostatically controlled heating element
provides controlled hea t for continuous or
intermittent operation.
- (3) thumb screws remove protection shroud for
cleaning.
- Heat shroud and stainless steel clean-out tray add
to ease of maintenance and cleanability.
- Heat shroud reduces temperatures to prevent film
sticking and provides extra measure of safety to
prevent burns.
- Adjustable pedestal accommodates various sizes of
product for shrink wrapping.
A VAILABLE ACCESSORIES:
ELECTRICAL:
- 120 volts, 1150, 12.5 amps
- 6 foot power cord
- We recommend usage on an individual
branch circuit
DIMENSIONS:
- 7”H x 12”W x 12”D with adjustable supporting surface
- 14” diameter protective shield
SHIPPING DIMENSIONS: 17”L x 16”W x 10”H
SHIPPING WEIGHT: 13 lbs.
- Model 650-BW: 2 tier dispenser (photo shown)
- Model 650-1-BW: Single tier dispenser
- 14” - 16” pizza adapter disc (#0016239)
- 6” - 8” pizza adapter disc (#0016240)
- SHRINK FILM:
Part Sheet Recommended # of Sheets
Number Size For: Per Roll:
FP140022-M
REV. 01/14
P.O. BOX #10
OREGON, WI 53575
PHONE: 608-835-3106
FAX: 608-835-8273
www .wiscoind.com
0017011 16 X 16 8” Pizza 1100
0017018 18 X 18 10” Pizza 600
0017008 20 X 20 12” Pizza 500
0017010 22 X 22 14” Pizza 500
0017009 24 X 24 16” Pizza 500
LIMITED WARRANTY:
Wisco Industries, Inc. expressly warrants the product will be free from defects in workmanship and materials for a period of
1 year from the date of shipment. WISCO DISCLAIMS AND EXCLUDES ANY AND ALL OTHER EXPRESS OR IMPLIED
WARRANTIES, INCLUDING WITHOUT LIMITATION, ANY AND ALL WARRANTIES OF MERCHANTABILITY OR FITNESS
FOR A PARTICULAR PURPOSE.
Buyer agrees that its SOLE AND EXCLUSIVE REMEDY against Wisco and Wisco’s SOLE AND EXCLUSIVE LIABILITY arising
out of any defect or nonconformity in the product shall be replacement/exchange of such nonconforming countertop food service
equipment at Wisco’s expense. No countertop food service equipment shall be returned without Wisco’s consent. IT IS AGREED
THAT WISCO’S MAXIMUM LIABILITY SHALL NOT IN ANY CASE EXCEED THE SALE PRICE FOR THE COUNTERTOP
EQUIPMENT CLAIMED TO BE DEFECTIVE OR NONCONFORMING.

MODEL 630-1 DELI WRAP INSTRUCTIONS
UNP ACKING AND ASSEMBLY :
- Remove Deli-Wrap from carton
- Remove cardboard from bottom of unit and heating element.
(CAUTION: DO NOT PLUG UNIT IN WITH CARDBOARD HEATING ELEMENT SUPPORT IN PLACE).
- Screw threaded rod into disc.
- Thread wing nut on the opposite end of r od so the wings of the nut face jam nut.
- Thread disc and r od assembl y into grille assembly until the height is approx. 4-1/2” to 5”.
- Lock wing nut against grille assembly. (The 4-1/2” to 5” dimension given is only a starting place. Due
to the differences in wrapping mediums, you may have to adjust your pedestal height to attain
best wrapping results.)
- Place grille with pedestal assembly on the brackets riveted to the inner shroud.
- Clean out tray can then be put in place. Clean out tray should be centered between shroud
support brackets and resting on the base of the unit.
* You are now ready to plug the unit into a 15amp 115 volt outlet.
CAUTION: THE CARDBOARD SUPPORT MUST BE REMOVED FROM THE HEATING ELEMENT
BEFORE ENERGIZING UNIT.
OPERATION:
Plug unit in and turn the thermostat switch to the Medium to High position. Pre-heat Deli Wrap
machine for approximately 3 minutes.
Place the product being wrapped on the center of the pedestal, immediately tear off a sheet of
shrink wrap material from the Deli-Wrap dispenser and place over product paying special
attention to the symmetry. Best results will be achieved if the wrapping material is evenly laid
over the product.
In approximately 10 to 20 seconds your product will be enveloped and sealed. Remove from
pedestal and allow to cool. CAUTION: DO NOT LEAVE PRODUCT UNATTENDED WHEN WRAPPING.
MAINTENANCE:
Unplug unit before any cleaning, servicing or maintenance is performed.
The outer shroud, inner shroud, clean out tray and grille assembly with pedestal can be removed
for daily cleaning.
IMMERSE BASE ASSEMBLY OF THE DELI WRAP IN WATER.
CAUTION: ALLOW UNIT TO COOL BEFORE REMOVING ANY PARTS. DO NOT
Replace all parts after cleaning.
The Deli-Wrap has been tested and approved by Underwriters Laboratories, to be a safe and
durable product when used and maintained in the manner in which it was intended.
Pizzawrap
Perforation
and Capper
FAST and EFFICIENT
1
2
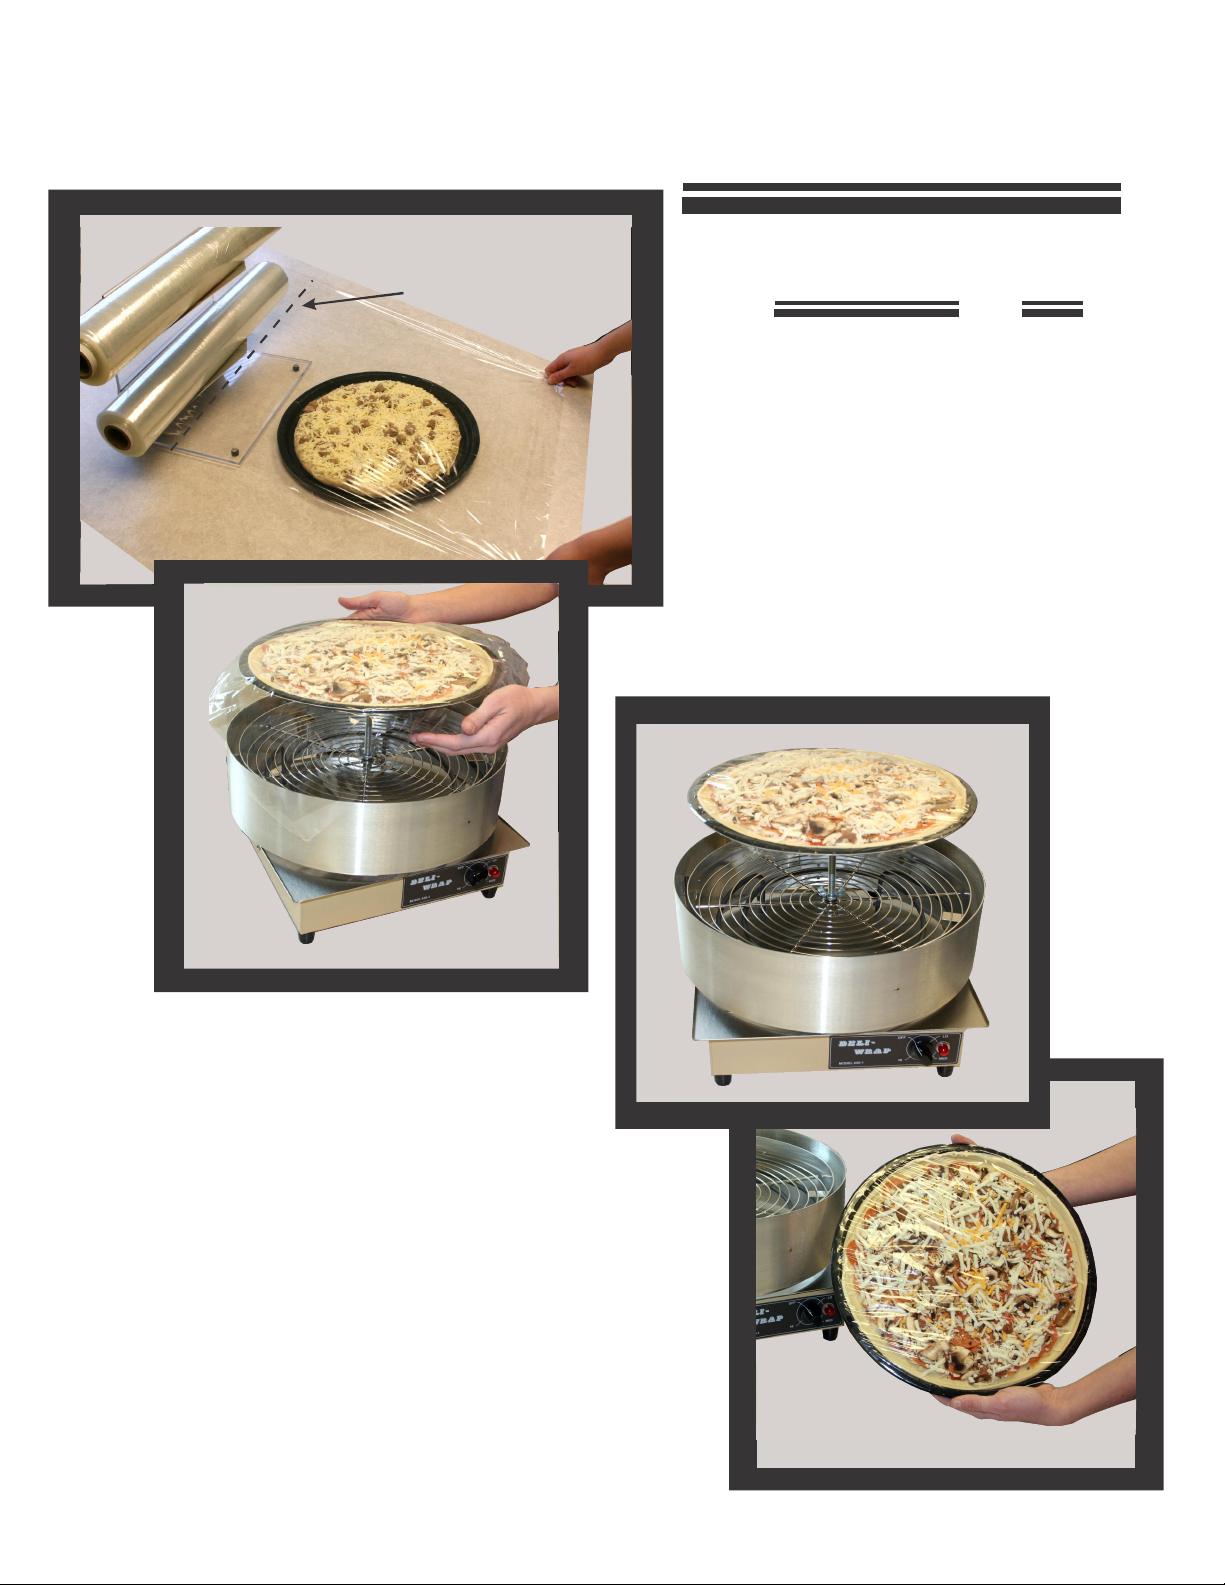
Step 1:
*Be sure t o place film on dispenser so it feeds
from the bottom. If you pull film from “over” the roll
tearing could occur.
Step 2:
Place shrink film on top of pizza
Step 3:
Step 4:
Tear shrink film at the perforation
Place cardboard round w/pizza on heated deli wrapper;
Allow deli wrapper to shrink film around pizza.
Professionally wrapped pizza is now ready for sale.
SIMPLE
STEPS
4
3
4
 Loading...