


616-B
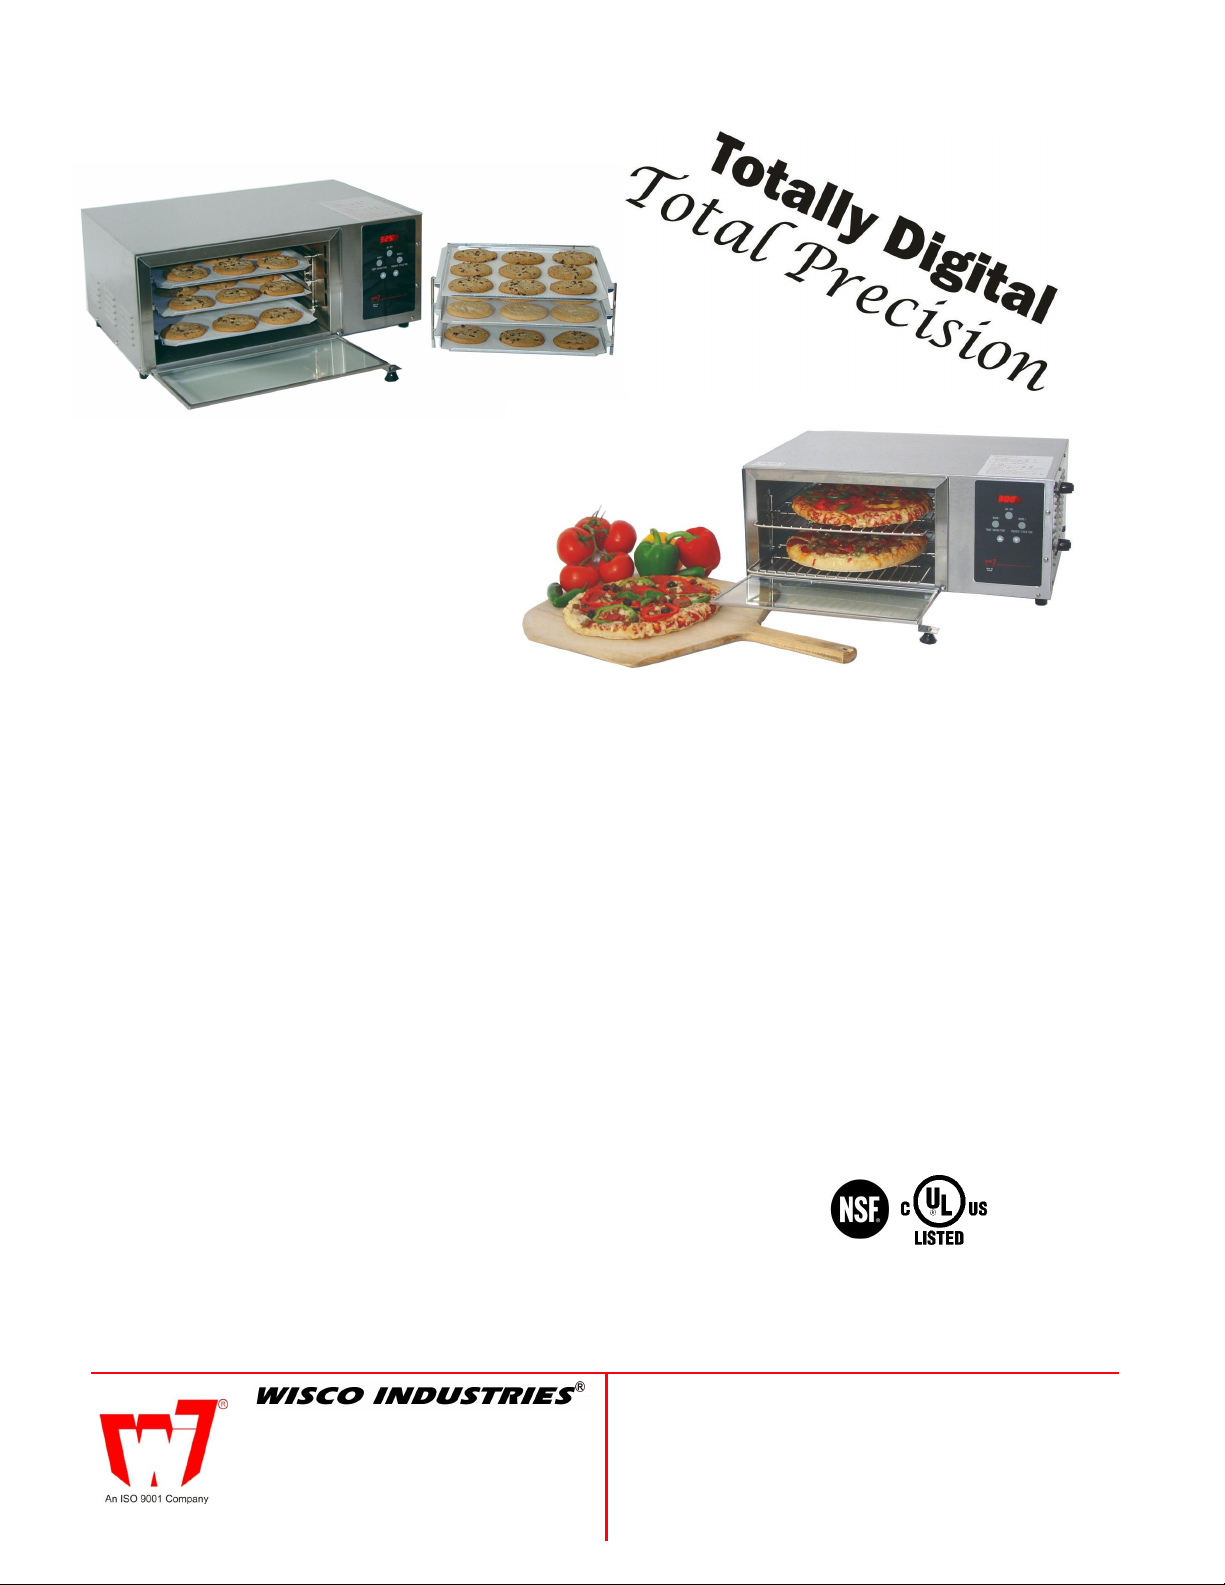
DIGITAL CONVECTION OVEN
MODEL 616
Precision baking at its best! This compact
convection oven can bake it all. From cookies,
muffins and biscuits to frozen snacks,
hors d’oeuvres and even pizza. Heated,
circulatingair throughout the oven provides
even baking while a digital control provides a
precise baking temperature for a perfect turnout
every time.
MODEL 616-WG
FEATURES:
- Digital display that is user friendly
- Precise,adjustable time and temperature control
-Temperatures ranging from 150 - 450 deg.F
- Preheat & Memory cycle mode with“hold” feature
-All stainless steel enclosure
-Tempered glass,spring loaded door
- 3 aluminum pans (13” x 13”) incl.w/cookie oven
- 2 wire grills (13” x 13”) incl. w/pizza oven
AVAILABLE ACCESSORIES:
- Coolingrack;holds both styles of racks (#616CR)
- Boxed set of (3) cookie pans (616PS#)
- Parchment paper: 500 sheets (#18167-1)
1000 sheets (#18167-2)
Conversion Kits:
- Cookie oven to Pizza oven:(#18052) Incl.2 wire grills
and internal side support rack
- Pizza oven to Cookie oven:(#18017) Incl.3 cookie pans
and internal side support rack
ELECTRICAL DATA:
- 120 volts,12.7amps,1470 watts
- Best when operated on an individual branch circuit
- 6’ power cord length
DIMENSIONS: (May not reflect shipping dimensions)
9”H x 22-1/2”W x 15”D
Inside dimension:7”H x 13-1/2”W x 14-1/2”D
WEIGHT:
Approx.44 lbs.(May not reflect shipping weight)
FP140114-M
02/10
P.O. BOX #10
OREGON,WI 53575
PHONE:608-835-3106
FAX:608-835-8273
www.thepizzaoven.biz
LIMITED WARRANTY:
WiscoIndustries, Inc. expresslywarrantsthe product willbe free fromdefects in workmanship andmaterials for a period of
1 year fromthe dateof shipment. WISCO DISCLAIMSAND EXCLUDESANYAND ALL OTHER EXPRESS ORIMPLIED
WARRANTIES, INCLUDINGWITHOUTLIMITATION,ANYAND ALL WARRANTIESOF MERCHANTABILITY OR FITNESS
FORA PARTICULAR PURPOSE.
Buyer agrees thatits SOLE AND EXCLUSIVEREMEDYagainst Wisco andWisco’sSOLEAND EXCLUSIVE LIABILITY arising
out of any defector nonconformity in theproductshall be replacement/exchangeofsuch nonconforming countertop food service
equipment at Wisco’s expense. Nocountertop food service equipmentshall be returnedwithout Wisco’sconsent. IT IS AGREED
THATWISCO’S MAXIMUM LIABILITYSHALL NOT INANYCASE EXCEEDTHE SALEPRICE FORTHE COUNTERTOP
EQUIPMENT CLAIMEDTO BE DEFECTIVE OR NONCONFORMING.
IMPORTANT: Read the following safety and operation instructions to avoid injury and to avoid
damage to equipment or property.
Plug unit into a properly grounded electrical outlet of the correct voltage, size and plug configuration for this unit. We recommend usage
!
on an individual branch circuit of at least 15 amps for best results. Failuretodo somay result in decreased performance of the warmer.
Unplug unit from power source and allow to cool completely before performing any maintenance orcleaning.
!
Unit is not waterproof. Do Not submerge in water. Do not operate if unit has been submerged in water.
!
Exterior surfaces on unit may get hot. Usecaution when touching these areas to avoid injury.
!
TEMPERATURE
Most products require lower temperatures than suggested for deck or range ovens. Astandard temperature reduction of
25 F - 30 F is recommended as a starting point, actual baking will vary pending product weight and consistency. If the
edges of the product are done and the center is still raw, or if there is extensive color variation, reduce the thermostat
setting by 15-25 F until the desired results are achieved. Excessive temperatures will not reduce baking time.
TIME
Convection ovens generally bake 20% (or more) faster than deck or range ovens even though lower temperatures are used.
Most recipes can be converted by having shorter cooking times and/or reducing your cooking temperatures.
- Frozen food products will require more time than refrigerated products
- 3 trays of food product will take more cook time than 1 tray of food
CLEANING INSTRUCTIONS:
Do not steam clean or use excessive water on unit to avoid personal injury or electrical shock.
!
Unplug unit from power source and allow to cool completely before performing any maintenance orcleaning.
!
Unit is not waterproof. Do Not submerge in water. Do not operate if unit has been submerged in water.
!
DO NOT USE ACIDS OR CAUSTIC PRODUCTS SUCHAS FOAMING OVEN CLEANERS ON OR IN THIS OVEN.
A VOIDUSING ABRASIVE/SCOURING PADSAS SOME MAYCAUSE SCRATCHMARKS ON YOUR OVEN.
The outside of the unit can be cleanedby using a stainless steel cleaner or by usingwarm water,mild detergent and a
soft cloth. Be sureto dry oven thoroughly. Avoid getting any water inside the mechanicalarea of the unit.
The inside of the oven is NOT made of stainless steel. Use onlywarm water and a mild detergent when cleaningthis area.
Pans,racks and side supports are easilyremoved for cleaningwitha mild detergent and water. Theycan also be placed
in the dishwasher. To removesidesupports simply lift up and pull straight out.
The door ofthe unitmay be cleanedwith a glass cleaner or warm water and a mild detergent.
Be sure that the side ventsinside of the unit are kept cleanand free ofall debris.
Page 2

OPERATINGINSTRUCTIONS - A more basicversioncan alsobe found on a decal located on the top of the unit
Activating the Controller
When power is first applied to the controller several diagnostictestsareautomaticallyperformedincluding lighting all the display segments and
displaying the current firmware revision level (r1.4). Ifa fault is detected the controller will remain inactive and an appropriate errorcode willbe
displayed. After correcting the fault - power mustbe cycled Off and On to clear the error.
Press the On/Off button to activate the controller. The prompt “SEL 1 or 2” will scroll across the display.
Mode 1 Operation
1. Press andrelease the MODE 1 button.
2. The last usedbaking will be displayed
3. Press the MODE 1 button to accept the displayed value or use the UPandDOWNarrowbuttons to change the value in 5 deg. Steps - then press the
the MODE 1 button to accept the new value.
4. Now the last used baking will be displayed.
5. Press the
then press the MODE1buttontoacceptthenewvalue.
6. If no buttons are pressed within 3 seconds the baking cycle will begin using the values currently in memory. The heater and fan relays will
energize, the countdown timer will start and the display will showthetimeremaining.
7. During the baking cycle the heater relay will cycle on and off as required to maintain the oven at the selectedtemperature. The fan relay will remain
energized continuously.
8. When the timer reaches “0” the heater relay will de-energize, the beeper will beep 5 one-second bursts and the fan will continue to run for a 5 minute
cool down period.
9. During cool down“Heat oFF CoolinG” will scroll across the display.
10. Pressing the On/Off button once while in cool down mode will re-start the controller. Pressing the On/Off button a second time will bypassthecool
cycle and cause the controller and fan to turn off immediately.
11.If no action is taken the fan relay will de-energize and the controller willshutoffafter5 minutes.
MODE 1 button again to accept the displayed value or use the UP and DOWN arrow buttons to change the baking time in 1 minute steps
temperature
time
Mode 2 Operation
1. Press andrelease MODE 2 button.
2. The last usedbaking will be displayed.
3. Press the MODE 2 button to accept this value or use the UP and DOWN arrow buttons to change the value in 5 deg. Steps - then press the
MODE 2 button to accept the new value.
4. Now the last used baking will be displayed. Pressthe MODE2 button again to accept the displayed value or use the UP and DOWN arrow
buttons to change the baking time in 1 minute steps then press the MODE 2button to accept the new value.
5. After 3 seconds, if no buttons are pressed, the heater and fan relays will energize and the oven will begin heating to the set point temperature.
The display will alternate between the set point temperature and the word “PrHE” (preheat).
6. When the ovenreachesthe set point temperature the beeper will beep 5 one second bursts and the display will show “rdY”.
7. Pressing the MODE 2 button will start the countdown timer and the display will show the time remaining.
8. During the baking cycle the heater relay will cycle on and off as required to maintain the oven at the selectedtemperature. The fan relay will remain
energized continuously.
9. When the timer reaches “0” the beeper will beep 5 one second bursts but the oven will bemaintained at the set point temperature with the fan
running and the display will show “rdY”.
10. Pressing the MODE 2 button again will start the countdowntimerforanotherbaking cycle. This can repeated as many times as desired.
11.PressingtheON/OFF button will de-energize the heater relay but the fan will continue to run for a5 minute cool down period.
12. During cool down “Heat oFF CoolinG” will scroll across the display.
13. Pressing the On/Off button once while in cool down mode will re-start the controller. Pressing the On/Off button a second time will bypass the
cool cycle and cause the controller and fan to turn off immediately .
14. If no action is taken the fan relay will de-energize and the controller will shut off after 5 minutes.
temperature
time
Changing Baking Time “On the Fly”
The time remaining in a baking cycle can be increasedor decreased during a baking cycle by pressing and holding an UPorDOWNarrowbutton
for 3 seconds. This new time willremainineffectforthecurrent baking cycle. When a new baking cycle is initiated the baking time will begin
with the original programmed time.
Aborting a Baking Cycle
Pressing the OFF button at any time will abort the current operation. If the oven has not yet begun to heat the controller & fan will shut offimmediately
otherwise the fan will continue to run for the 5 minute cool down period after which the controller & fan will shut off. PressingtheOn/Offbuttonwill
re-activate the controller and pressing it a second time will bypass the cool down cycle and cause the controller and fan to turn off immediately.
Page 3
 Loading...