

Page 1

78-560-505
16.10.2014
Innova
Betriebsanleitung
Operating manual
Notice d‘instructions
Návod k obsluze
Page 2

Page 3

Inhaltsverzeichnis ..............................................................................5
Table of contents .............................................................................25
Table des matières ..........................................................................45
Obsah ..............................................................................................65
Innova 3
Page 4

4 Innova
Page 5

Inhaltsverzeichnis
1 Vorwort ................................................................................................................................................................................. 6
1.1 Bestimmungsgemäße Verwendung ........................................................................................................................... 6
2 Allgemeine Hinweise ........................................................................................................................................................... 7
2.1 Sicherheitsvorschriften ............................................................................................................................................... 7
2.2 Warnhinweise ............................................................................................................................................................ 7
2.3 Schutzvorrichtungen .................................................................................................................................................. 7
2.4 Verwendungszweck ................................................................................................................................................... 7
3 Montageanleitung ................................................................................................................................................................ 8
4 Funktion .............................................................................................................................................................................. 10
5 Technische Daten .............................................................................................................................................................. 11
6 Transport, Lagerung und Veränderung des Standortes ................................................................................................ 15
6.1 Transportbedingungen des Geräts .......................................................................................................................... 15
6.2 Lagerung des Geräts ............................................................................................................................................... 15
6.3 Entfernen der Verpackung und Standortwahl .......................................................................................................... 15
6.4 Aufstellort ................................................................................................................................................................. 15
7 Beschreibung der Bedienelemente .................................................................................................................................. 16
7.1 Standard-Variante .................................................................................................................................................... 16
7.2 Edelstahl-Variante .................................................................................................................................................... 16
7.3 Einstellen der Zeitschaltuhr - Automatikbetrieb ....................................................................................................... 17
7.4 Einschalten des 4-Stunden-Timers - Automatikbetrieb ............................................................................................ 17
8 Inbetriebnahme .................................................................................................................................................................. 18
8.1 Positionieren des Schuhs ........................................................................................................................................ 18
8.2 Betrieb ...................................................................................................................................................................... 19
9 Wartung .............................................................................................................................................................................. 20
9.1 Duftmittel wechseln .................................................................................................................................................. 20
9.2 Reinigung ................................................................................................................................................................. 20
9.3 Ozonerzeuger .......................................................................................................................................................... 21
10 Fehlerbehebung ............................................................................................................................................................... 22
11 Stilllegung und Entsorgung ............................................................................................................................................ 23
Innova 5
Page 6

© Copyright 2009 by
WINTERSTEIGER AG ::: A-4910 Ried/I Dimmelstrasse 9
Autor und Grafik: Franz Badegruber
Tel. +43 7752 919-0
E-mail: [email protected]
Design: Maria Marek-Pollhammer
Originalbetriebsanleitung
1 Vorwort
Diese Betriebsanleitung muss vor der ersten Inbetriebnahme vom Bedienpersonal und von den für die Maschinenhaltung
Verantwortlichen gelesen werden und dient als Ergänzung zu den Schulungsunterlagen.
Schäden, die durch Nichtbeachtung der darin enthaltenen Hinweise entstehen, werden durch die Garantie nicht gedeckt.
Der Verwender der Maschine ist gesetzlich verpflichtet, die Unfallvorschriften für das betreffende Land zu beachten.
Weiters ist diese Betriebsanleitung vertraulich zu behandeln. Sie darf nur befugten Personen zugänglich gemacht werden.
Eine Überlassung an Dritte darf nur mit schriftlicher Zustimmung der Firma WINTERSTEIGER erfolgen.
Alle Unterlagen sind im Sinne des Urheberrechtes geschützt. Die Weitergabe und Vervielfältigung von Unterlagen, auch auszugsweise, sowie eine Verwertung und Mitteilung ihres Inhaltes sind nicht gestattet, soweit nicht ausdrücklich schriftlich zugestanden.
Zuwiderhandlungen sind strafbar und verpflichten zu Schadenersatz. Alle Rechte zur Ausübung von gewerblichen Schutzrechten sind der Firma WINTERSTEIGER vorbehalten.
1.1 Bestimmungsgemäße Verwendung
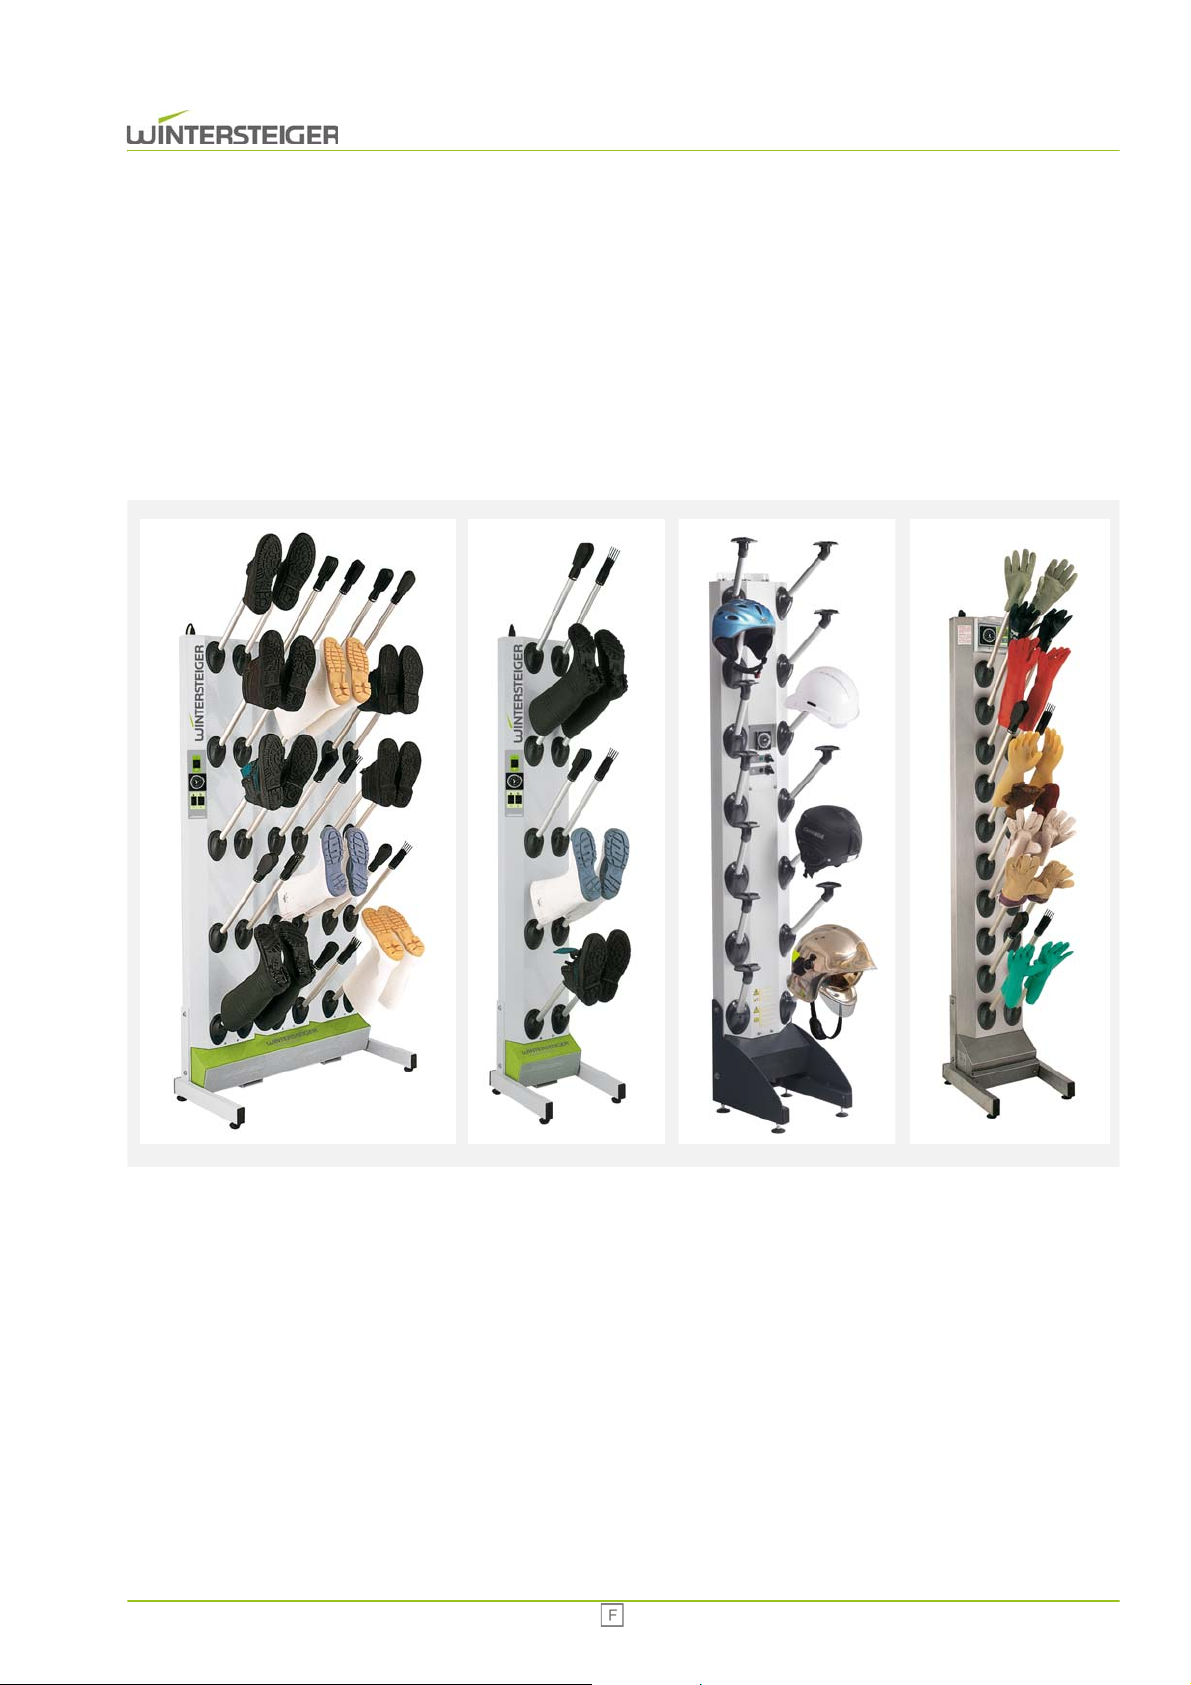
Der Trockner Innova ist je nach Ausführung ausschließlich für das Trocknen und Aufbewahren von Schuhen und Stiefeln,
Handschuhen oder Helmen gebaut (bestimmungsgemäßer Gebrauch). Jeder darüber hinausgehende Gebrauch gilt als
nicht bestimmungsgemäß. Für hieraus resultierende Schäden haftet der Hersteller nicht. Das Risiko hierfür trägt allein der
Benutzer.
Zur bestimmungsgemäßen Verwendung gehört auch die Einhaltung der vom Hersteller vorgeschriebenen Betriebs-, Wartungs- und Instandhaltungsbestimmungen. Die einschlägigen Unfallverhütungsvorschriften sowie die sonstigen allgemein
anerkannten sicherheitstechnischen, und arbeitsmedizinischen Regeln sind einzuhalten.
Eigenmächtige Veränderungen an der Maschine schließen eine Haftung des Herstellers für daraus resultierende Schäden
aus.
Wir sind stets bemüht, unsere Erzeugnisse zu verbessern und behalten uns darum das Recht vor, alle Änderungen und Verbesserungen anzubringen, die wir für zweckmäßig halten. Eine Verpflichtung, diese auf früher gelieferte Maschinen und Geräte auszudehnen, ist damit jedoch nicht verbunden.
Alle Abbildungen, Maße und Gewichtsangaben in der Bedienungsanleitung sind unverbindlich.
6 Innova
Page 7
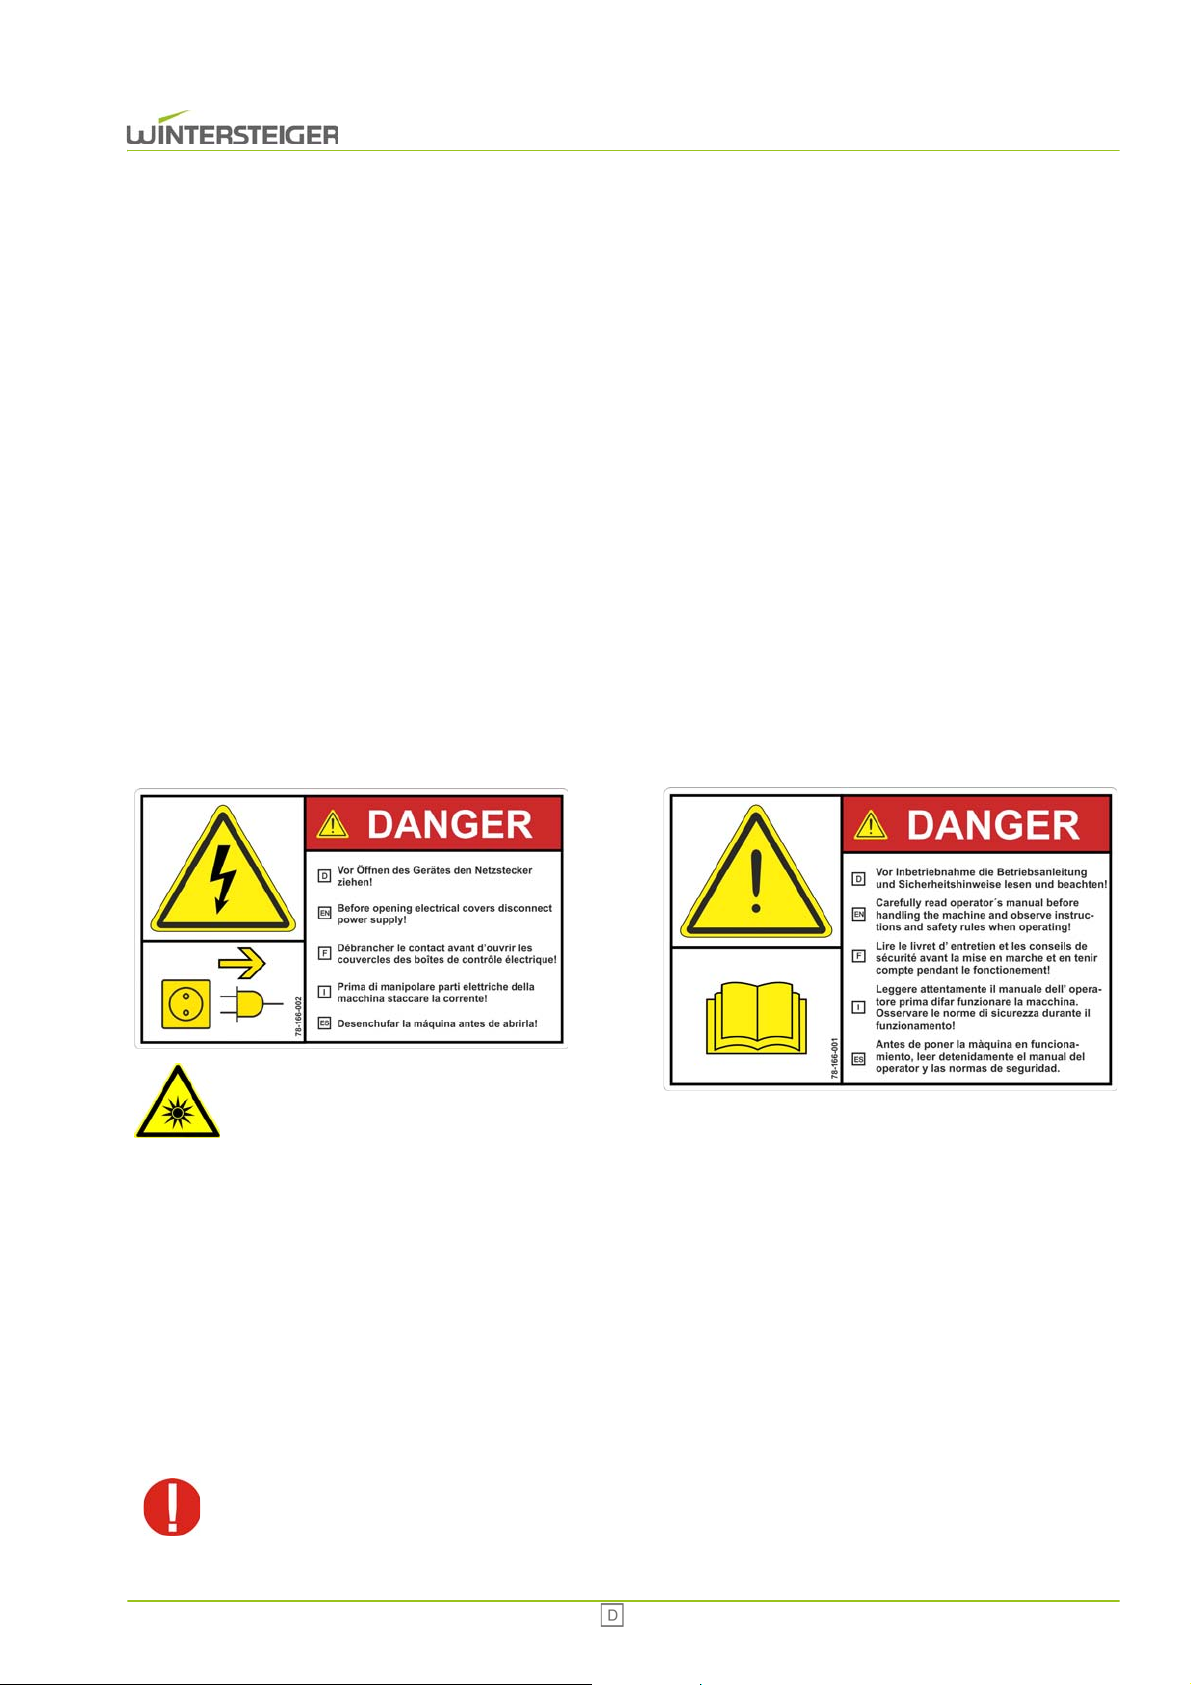
2 Allgemeine Hinweise
Warnung vor dem UV-Licht der Ozonlampe!
Nicht direkt in die Ozonlampe blicken!
2.1 Sicherheitsvorschriften
Mit dem Anschluss des Gerätes an das Elektronetz beauftragen Sie bitte eine Elektrofachkraft, die die landesüblichen
Vorschriften der örtlichen Elektroversorgungsunternehmen genau kennt und sorgfältig einhält.
Richtige Anschlussspannung beachten!
Die Anschlusswerte sind auf dem Typenschild an der Oberseite des Gerätes ersichtlich.
Prüfen Sie, ob diese Angaben mit der Spannung des Netzes übereinstimmen.
Der Schuhtrockner darf nur mit vollständig montierten Schutzen und Abdeckungen betrieben werden!
Vor jeder Standortverschiebung oder bei Maschineneingriffen Netzstecker ziehen!
Das Gerät darf nur mit Original WINTERSTEIGER Ersatzteilen bzw. Verbrauchsmaterial betrieben werden. Wird
Fremdmaterial verwendet, geschieht dies auf eigene Gefahr und Verantwortung des Betreibers, die Garantie erlischt
dadurch!
Für gute Belüftung des Arbeitsraumes sorgen!
2.2 Warnhinweise
2.3 Schutzvorrichtungen
Sämtliche Schutzvorrichtungen dürfen während des Betriebes nicht entfernt werden.
2.4 Verwendungszweck
Der Schuhtrockner Innova ist ausschließlich zum Trocknen und Aufbewahren von Schuhen oder Stiefeln gebaut. Der
Handschuhtrockner Innova ist ausschließlich zum Trocknen und Aufbewahren von Handschuhen gebaut. Der Helmtrockner Innova ist ausschließlich zum Trocknen und Aufbewahren von Helmen gebaut.
Bei Nichtbeachtung dieser Hinweise entfällt jede Haftung für entstandene Schäden seitens der Fa. WINTERSTEIGER!
Innova 7
Page 8

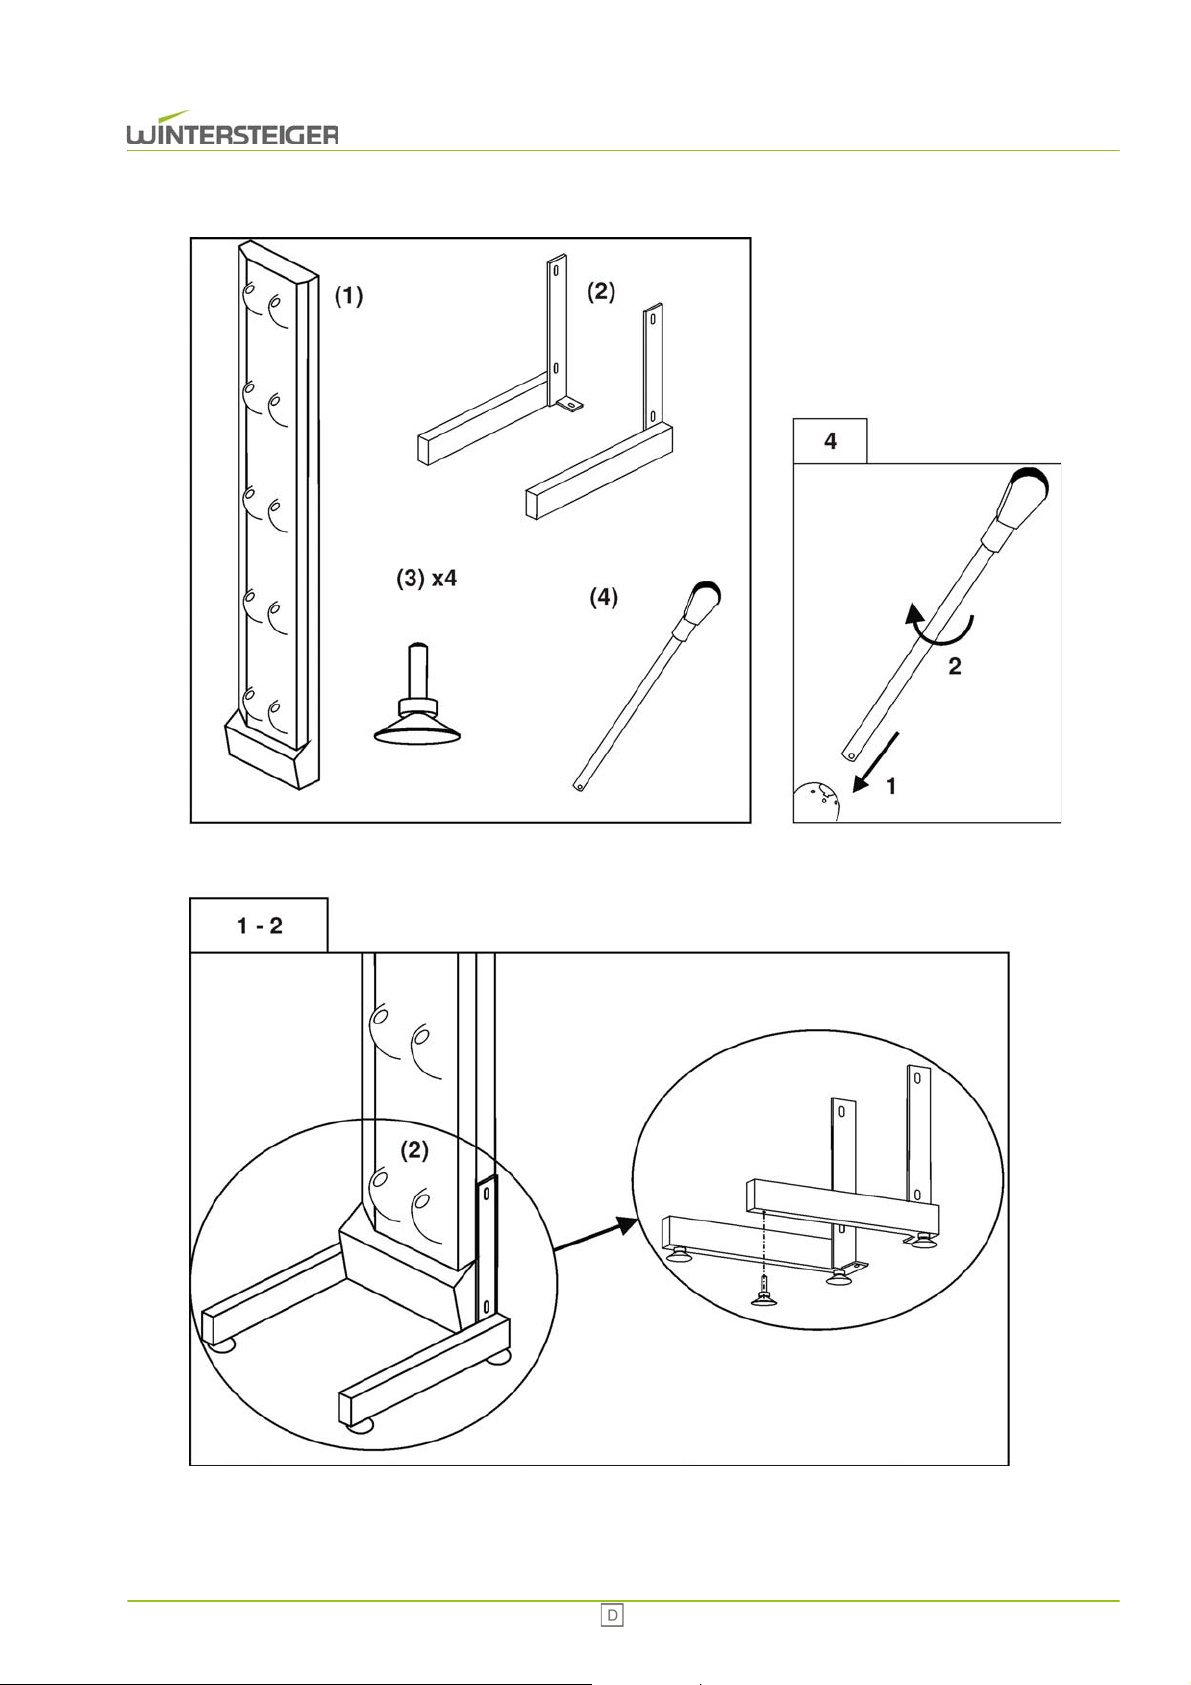
3 Montageanleitung
Die Lieferung besteht aus:
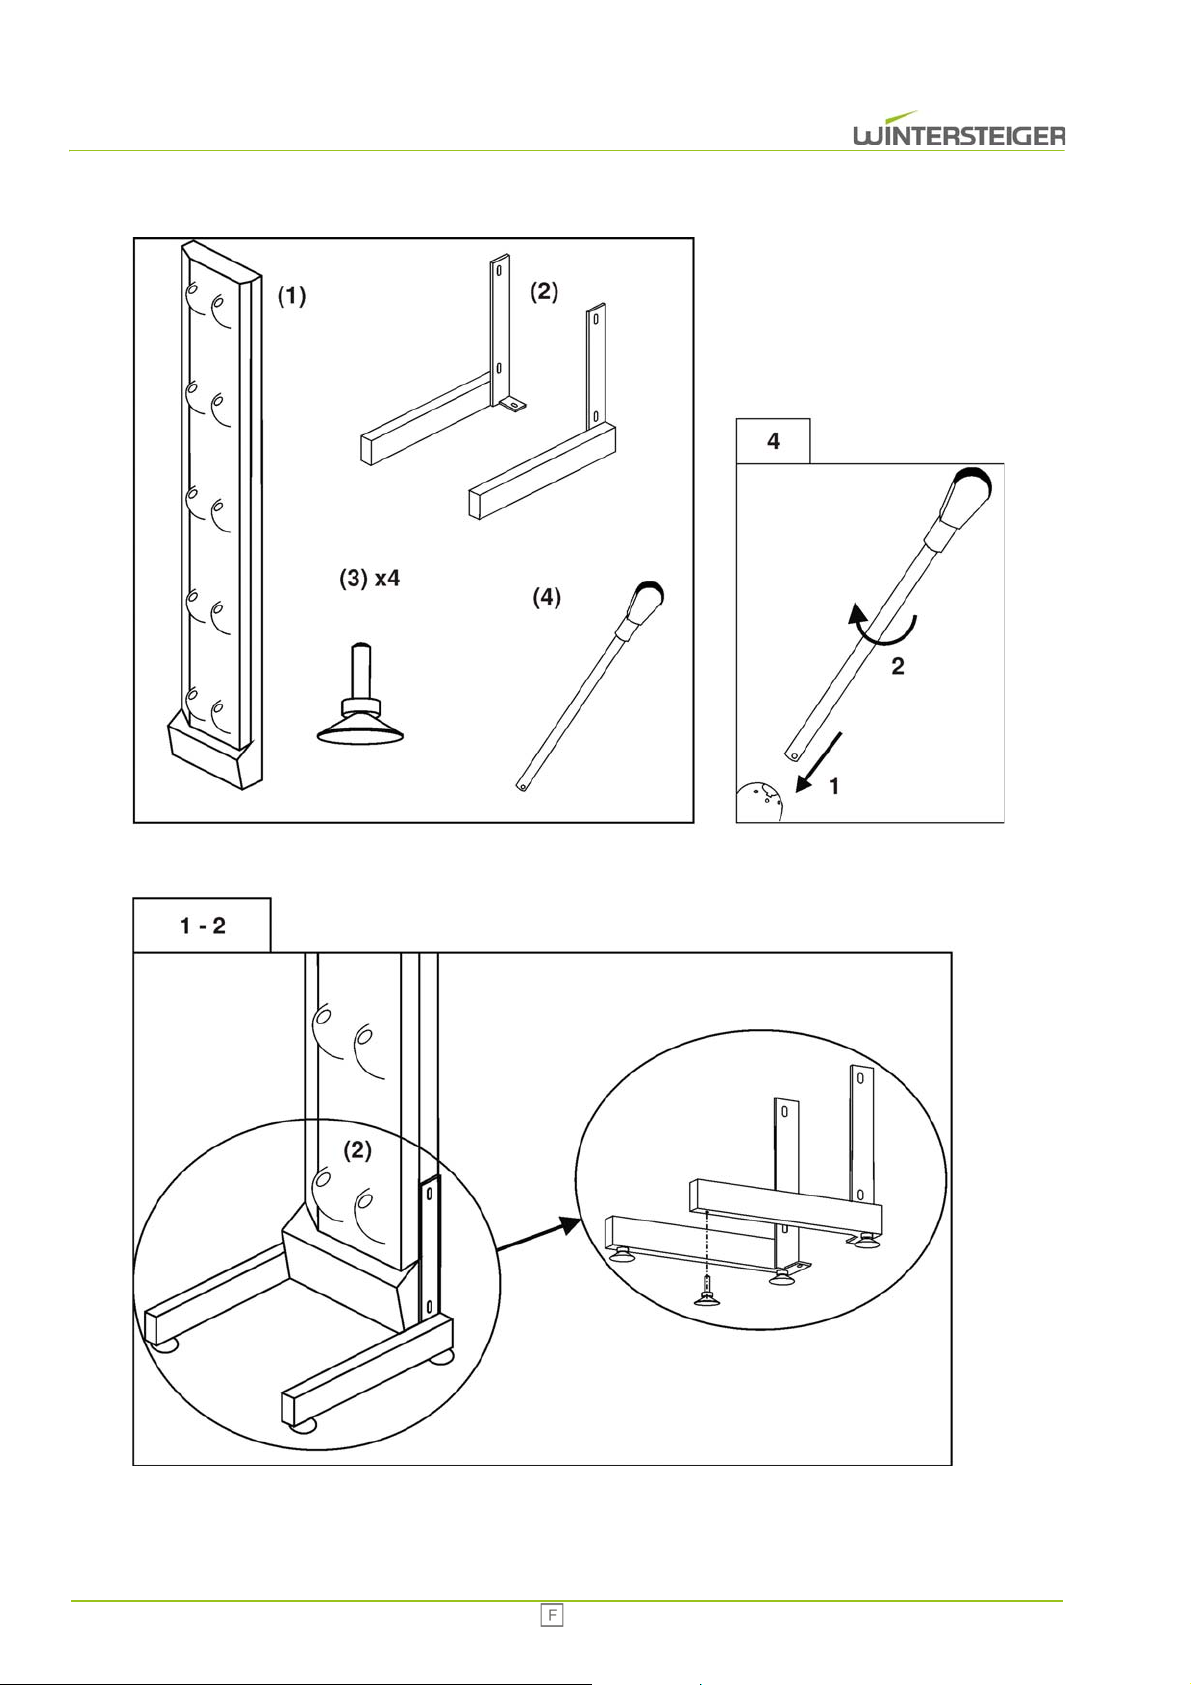
1 Trocknereinheit [1]
1 Garnitur Luftrohre für die Schuhtrocknung [4]
1 Netzkabel
Option Fußgestell:
2 Metallwinkeln [2] als Fußgestell
4 Schraubfüße [3]
1 Schraubenpaket
Fußgestell (Option)
Legen Sie die Trocknereinheit flach auf den Boden.
Die zwei Metallwinkel des Fußgestells mit dem Trockner verschrauben - 4 Schrauben M 8 x 16 + 4 Unterlegscheiben
Seitlich am Trockner - 2 Schrauben
M 6 x 16 + 2 Unterlegscheiben an der Trocknerunterseite.
Die 4 Schraubfüße an der Unterseite des Fußgestells fixieren, jedoch die Muttern noch nicht festschrauben.
Wandfixierung
Verwenden Sie dazu die Befestigungswinkel (befestigt mit 4 Schrauben), welche sich an der Oberseite und an der Unterseite
des Trockners befinden. Dazu die Schrauben lösen, den Winkel für die Wandbefestigung positionieren und wieder festschrauben.
2 Trocknereinheiten verbinden
Verwenden Sie dazu je 1 Befestigungswinkel zum Verbinden von 2 Trocknereinheiten und gehen Sie dazu wie bei der Wandfixierung vor.
Trockner aufstellen
Den Trockner aufstellen, die Schraubfüße in der Höhe entsprechend anpassen und mit der Mutter festschrauben.
Die Luftrohre in die Trocknungseinheit stecken und mit einer Vierteldrehung im Uhrzeigersinn fixieren.
Das Netzkabel an der Oberseite der Trocknereinheit anschließen.
8 Innova
Page 9
Innova 9
Page 10
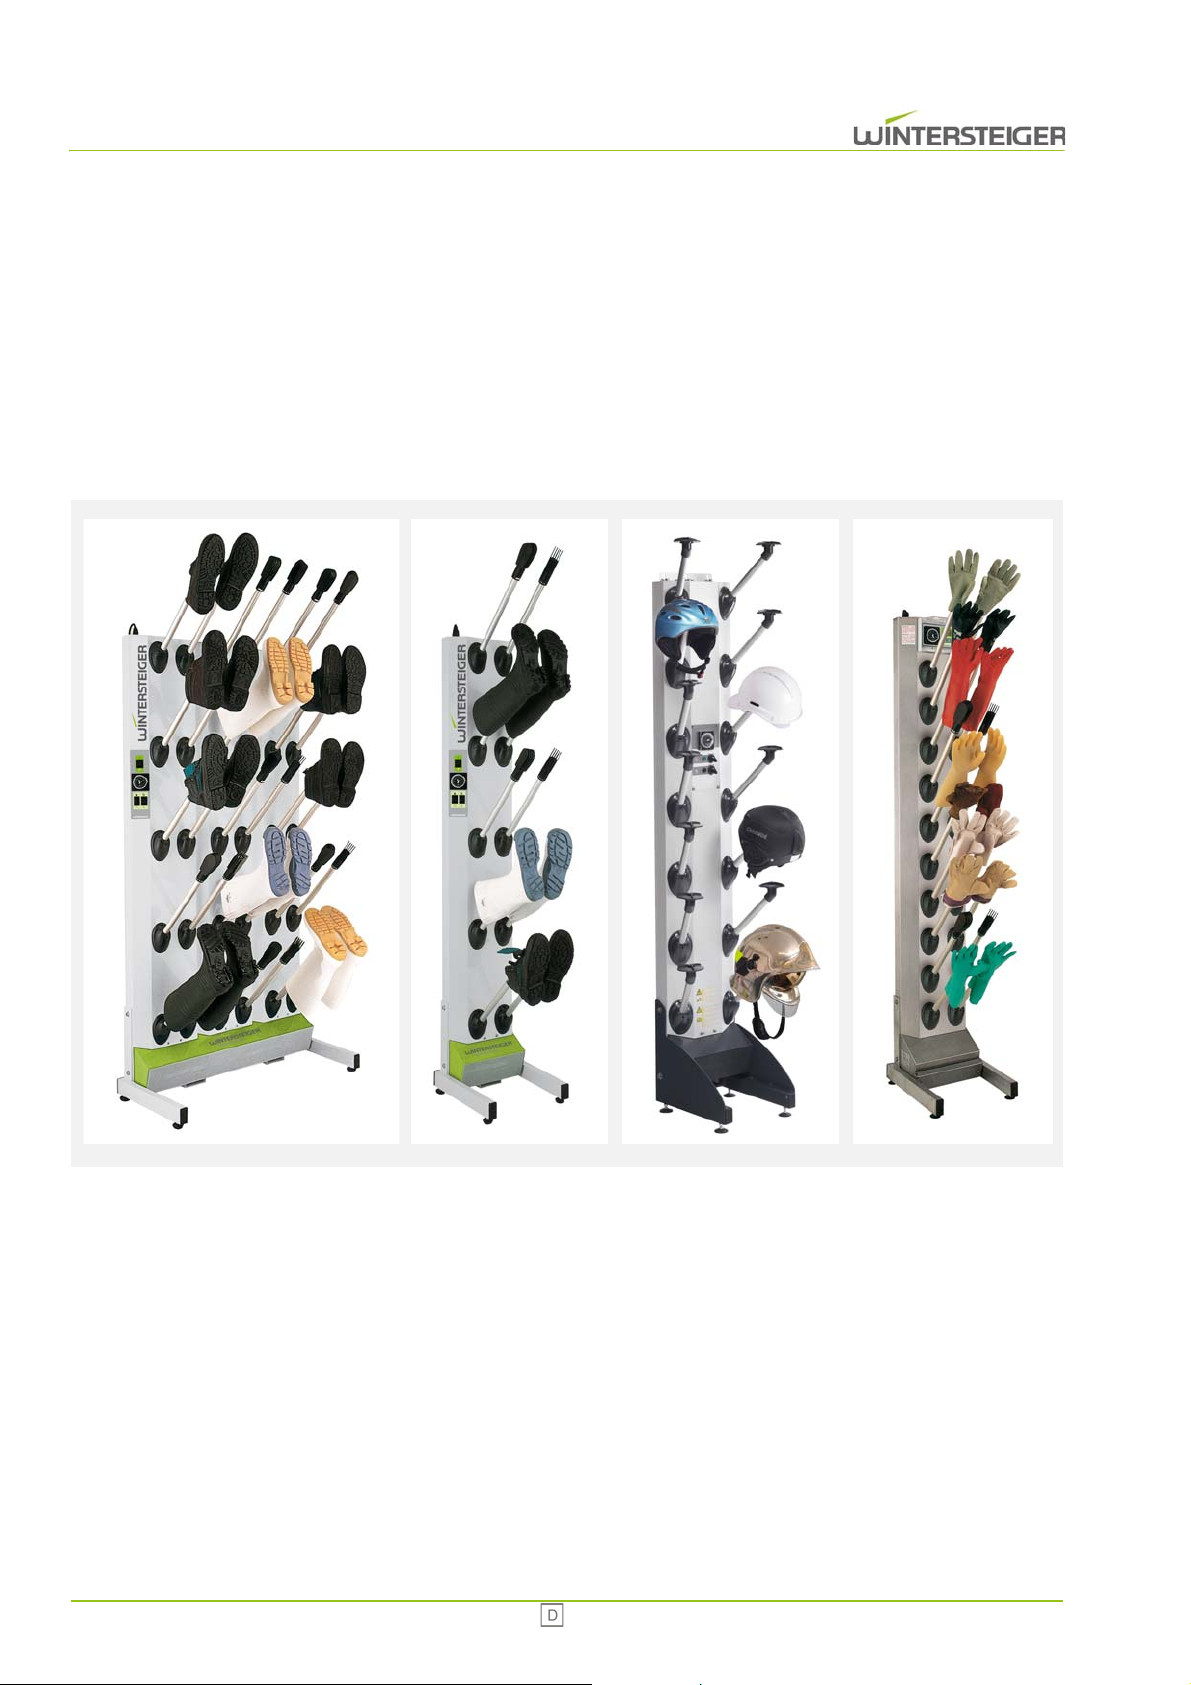
4 Funktion
Einfache Bedienung über analoge Zeitschaltuhr
Heizung zentral, in 2 Stufen schaltbar (Edelstahl-Variante: 1 Heizstufe)
Luftaustritt nur bei Düsen, die mit Schuhen bestückt sind
Luftdesinfektion/Entkeimung durch keimtötende Ozonlampe
Desodorierung mit Duftmittel
Das Gerät kann an die Wand montiert werden oder mit Stellfüßen an eine Wand gestellt werden.
10 Innova
Page 11
5 Technische Daten
Type
Nennspannung, Frequenz, Leistung, Nennstrom,
Absicherung min.-max:
Leistung Heizung:
INNOVA
Schuh- und Stiefeltrockner
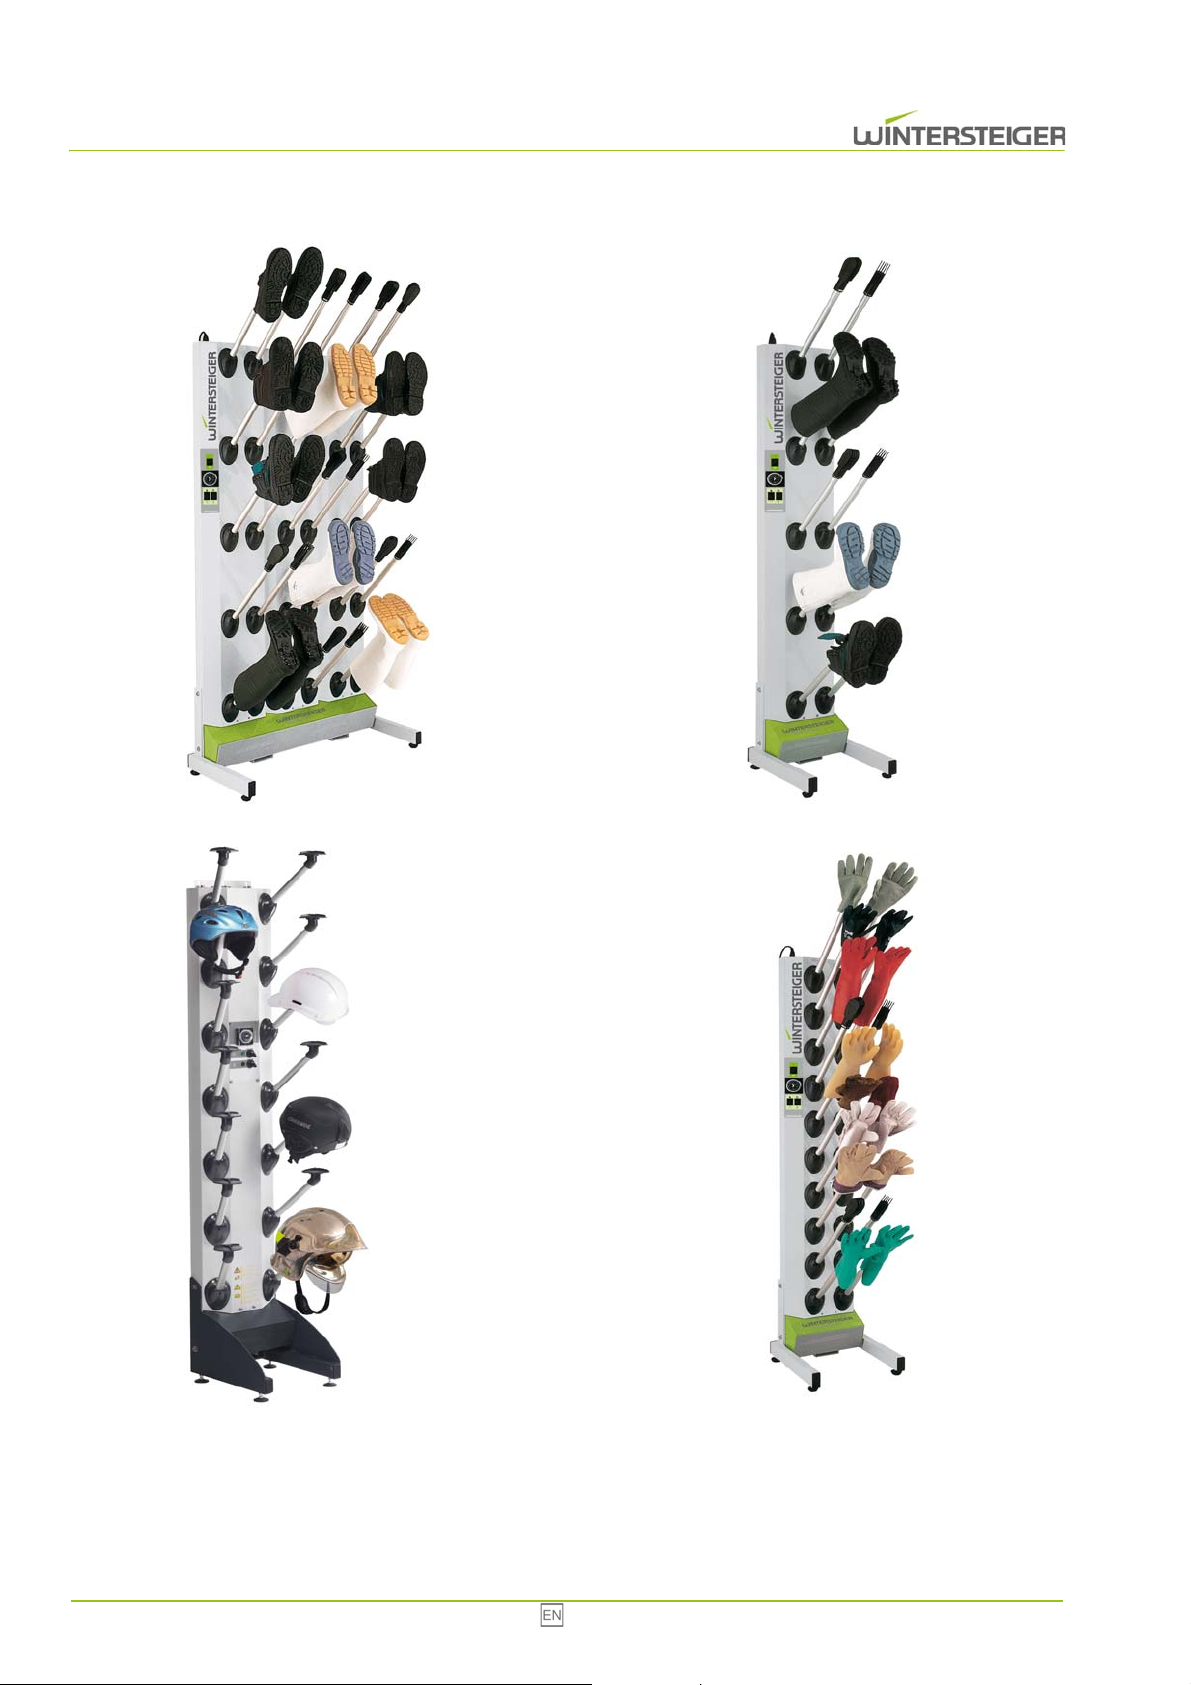
Innova 5 Paar Schuhe oder Stiefel
Stufe 1: 1AC 208-230V 50/60Hz; 1,1 kW; 5A; 10/16A oder
Stufe 2: 1AC 208-230V 50/60Hz; 0,55kW; 2,5A; 10/16A oder
Edelstahl: 1AC 208-230V 50/60Hz; 1,1 kW; 5A; 10/16A
Innova 10 Paar Schuhe oder Stiefel
Stufe 1: 1AC 208-230V 50/60Hz; 2,2kW; 10A; 10/16A
Stufe 2: 1AC 208-230V 50/60Hz; 1,1kW; 5A; 10/16A
Innova 15 Paar Schuhe oder Stiefel
Stufe 1: 1AC 208-230V 50/60Hz; 2,2kW; 10A; 10/16A oder
Stufe 2: 1AC 208-230V 50/60Hz; 1,1kW; 5A; 10/16A oder
Edelstahl: 1 AC 208-230V 50/60Hz; 2,2 kW; 10A; 10/16A
Innova 20 Paar Schuhe oder Stiefel
Stufe 1: 1AC 208-230V 50/60Hz; 3,3kW; 10A; 10/16A
Stufe 2: 1AC 208-230V 50/60Hz; 1,75kW; 5A; 10/16A
Innova 5 Paare
Stufe 1: 1050 W
Stufe 2: 550W
Edelstahl: 1100 W
Innova 10 Paare
Stufe 1 : 2100W
Stufe 2 : 1050W
Innova 15 Paare
Stufe 1: 2200W
Stufe 2: 1050W
Edelstahl: 2200W
Innova 20 Paare
Stufe 1 : 3150W
Stufe 2 : 1575W
Die richtige Anschlussspannung ist am Typenschild ersichtlich!
Umgebungstemperatur: +15 bis 40°C
Luftfeuchtigkeit: 30% - 80%
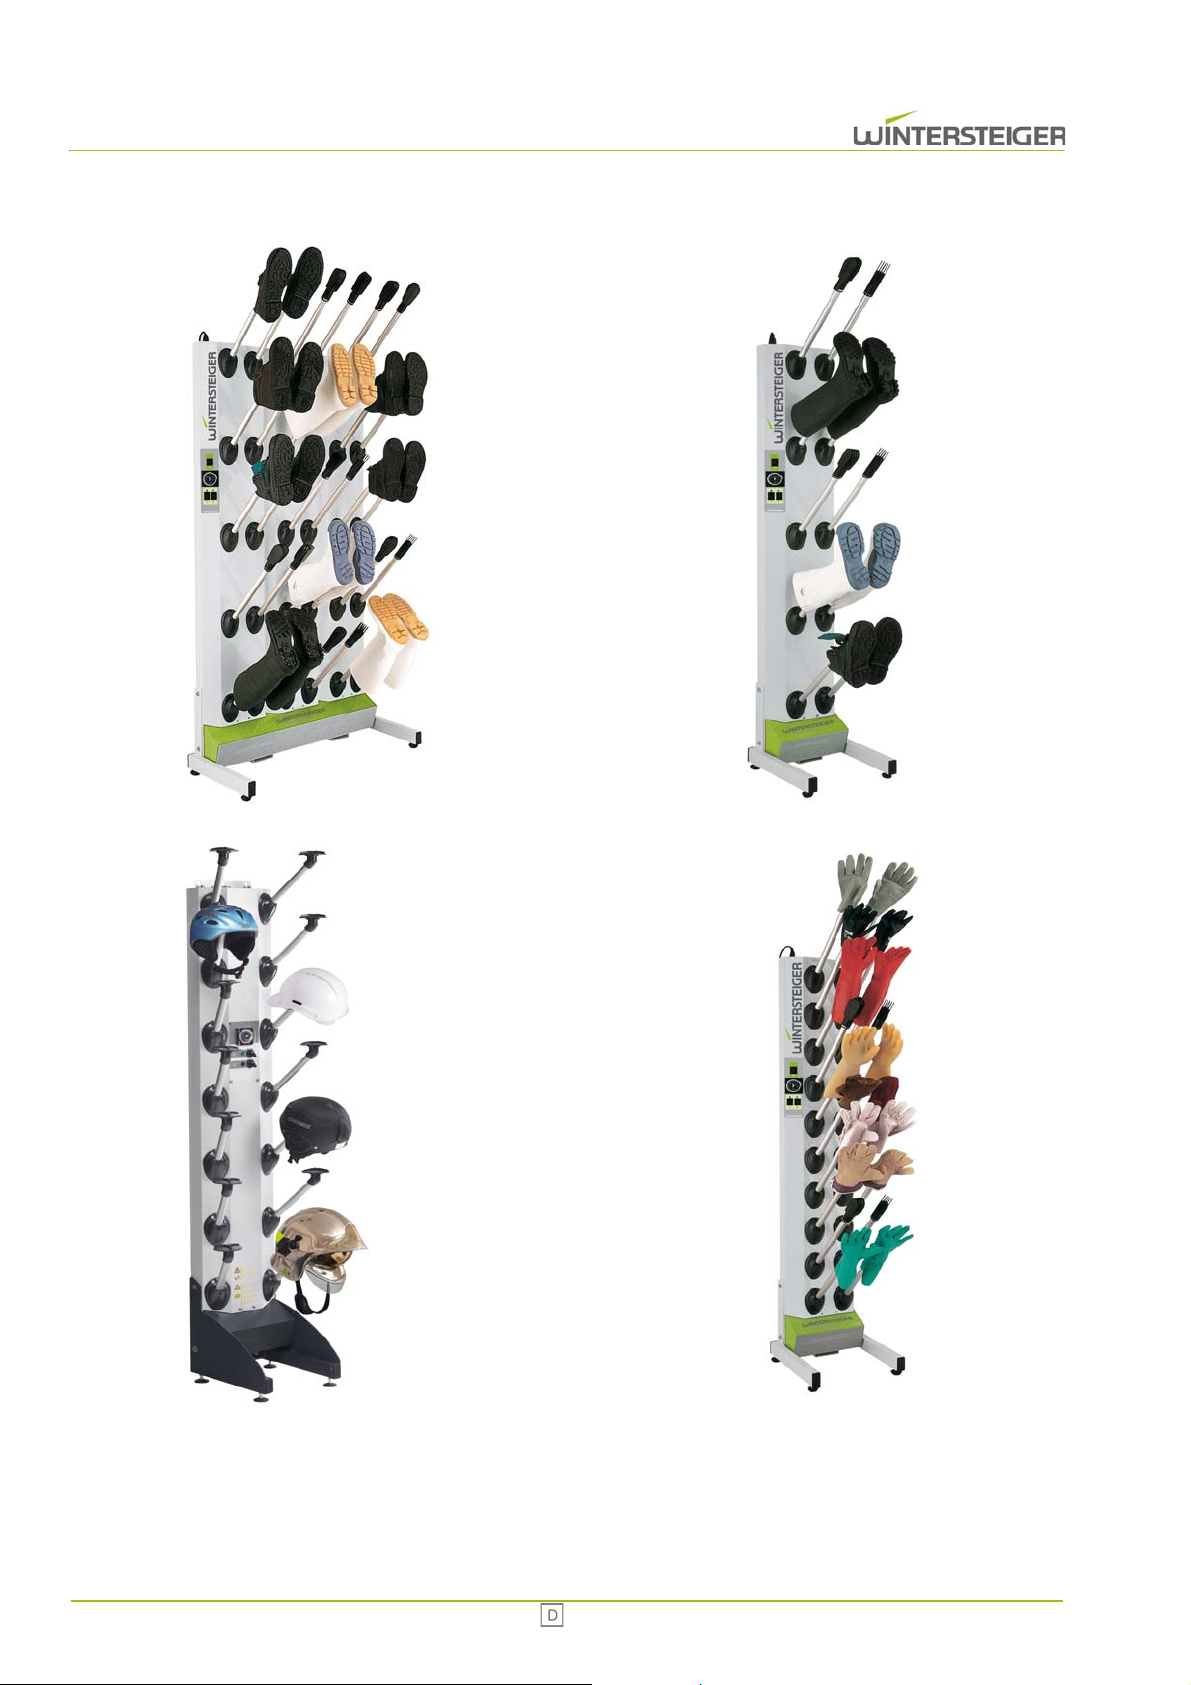
Abmessungen: siehe folgende Tabelle und Grafik
Trocknungsdauer:
Desinfektion:
Wirkungsdauer Duftmittel: im 5-Stundenbetrieb ca. 2 Monate
Geräuschemission: ca. 65 dB(A)
Innova 11
1,5 bis 2,5 Stunden, abhängig von Durchnässung,
Temperatur,...
Luftdesinfektion/Entkeimung durch keimtötende Ozon-Lampe!
Dauer ca. 2 Stunden
Page 12
INNOVA (Stan-
dard)
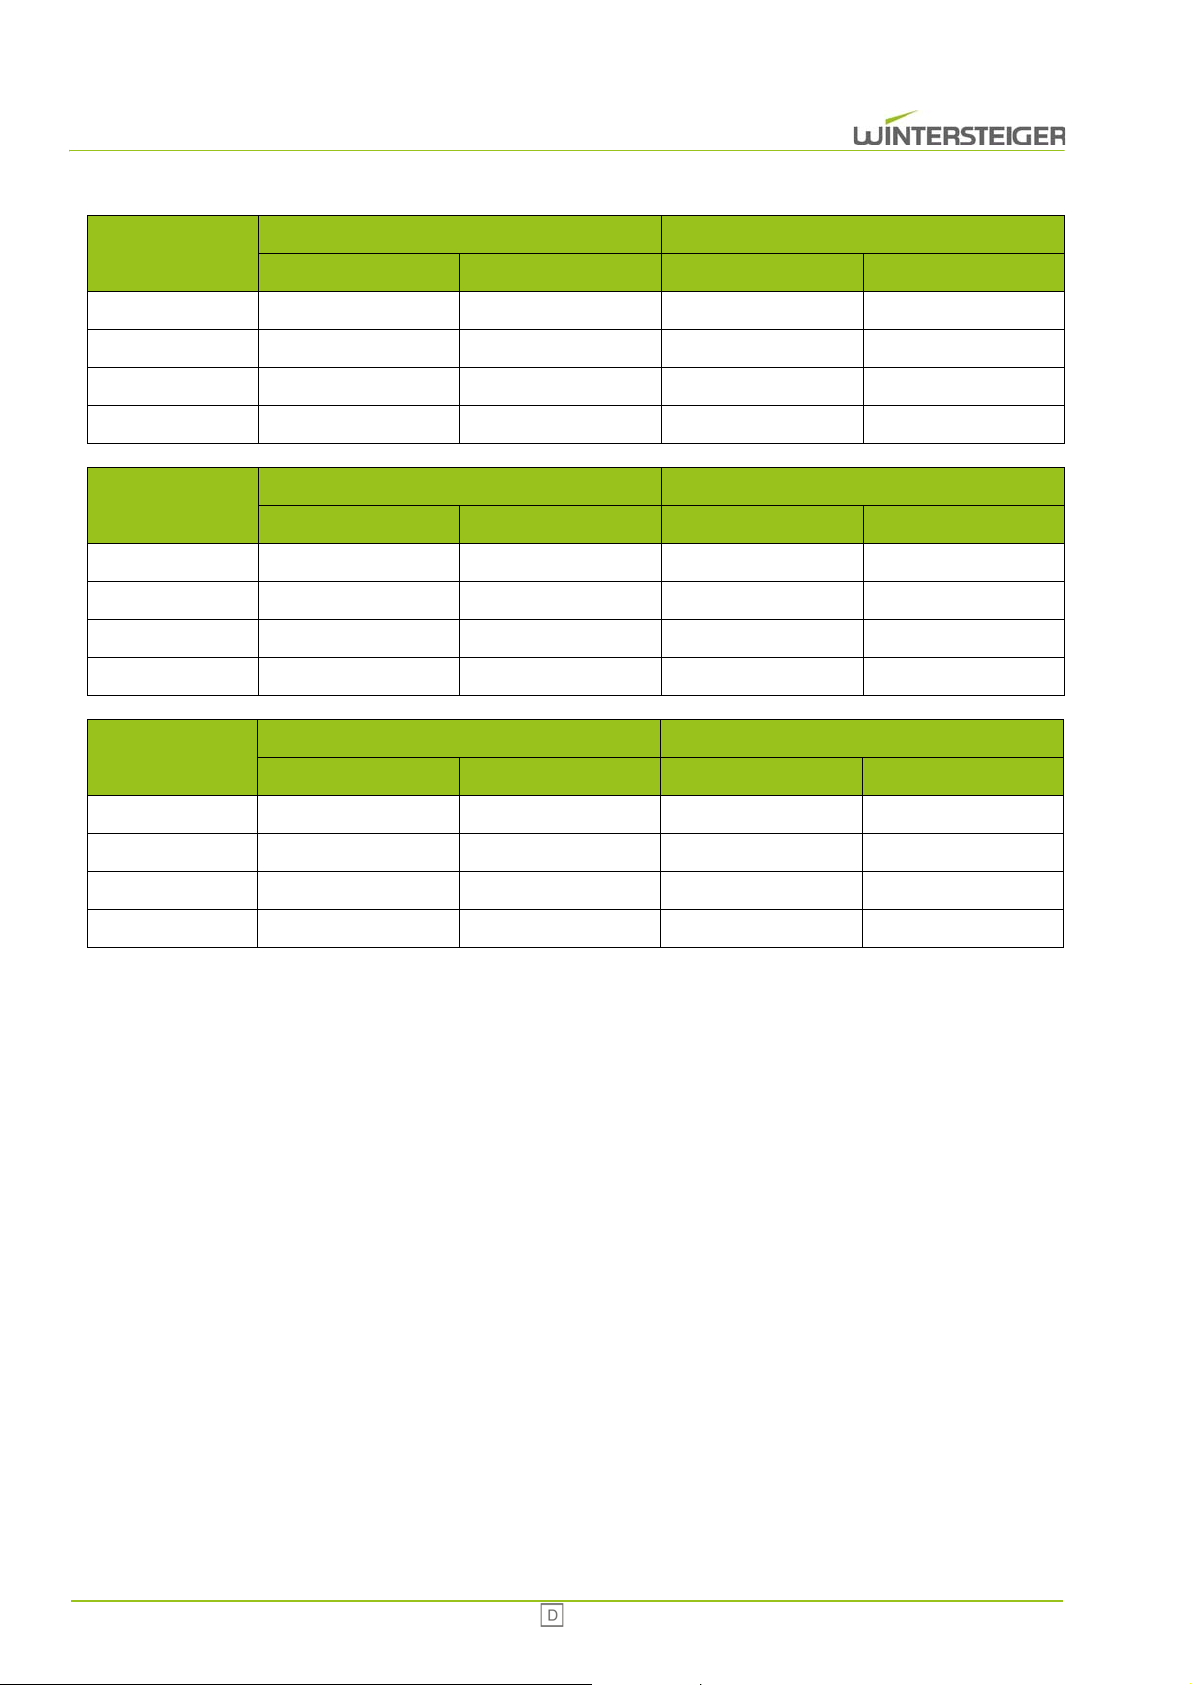
Höhe 2150 mm 2150 mm 2150 mm 2150 mm
Breite 300 mm 300 mm 605 mm 605 mm
Tiefe 540 mm 620 mm 540 mm 620 mm
Gewicht 23 kg 26 kg 36 kg 39 kg
ohne Fußgestell mit Fußgestell ohne Fußgestell mit Fußgestell
Schuhe - 5 Paare Schuhe - 10 Paare
INNOVA (Stan-
dard)
Höhe 2150 mm 2150 mm 2150 mm 2150 mm
Breite 900 mm 900 mm 1205 mm 1205 mm
Tiefe 540 mm 620 mm 540 mm 620 mm
Gewicht 53 kg 56 kg 78 kg 81 kg
INNOVA (Edel-
stahl)
Höhe 2150 mm 2150 mm 2150 mm 2150 mm
Breite 300 mm 300 mm 900 mm 900 mm
Tiefe 540 mm 620 mm 540 mm 620 mm
Gewicht 33 kg 36 kg 80 kg 83 kg
ohne Fußgestell mit Fußgestell ohne Fußgestell mit Fußgestell
ohne Fußgestell mit Fußgestell ohne Fußgestell mit Fußgestell
Schuhe - 15 Paare Schuhe - 20 Paare
Schuhe - 5 Paare Schuhe - 15 Paare
12 Innova
Page 13
Type
Nennspannung, Frequenz, Leistung, Nennstrom,
Absicherung min.-max:
Leistung Heizung:
Die richtige Anschlussspannung ist am Typenschild ersichtlich!
Umgebungstemperatur: +15 bis 40°C
Luftfeuchtigkeit: 30% - 80%
Abmessungen: siehe folgende Tabelle und Grafik
INNOVA
Helm- /Handschuhtrockner
Innova 10 Paar Handschuhe
Stufe 1: 1AC 208-230V 50/60Hz; 1,1kW; 4,78A; 10/16A oder
Stufe 2: 1AC 208-230V 50/60Hz; 0,55W; 2,5A; 10/16A
Edelstahl: 1AC 208-230V 50/60Hz; 1,2kW; 5,22A; 10/16A
Innova 14 Helme
Stufe 1: 1AC 208-230V 50/60Hz; 1,1kW; 4,78A; 10/16A oder
Stufe 2: 1AC 208-230V 50/60Hz; 0,55W; 2,5A; 10/16A
Innova 10 Paar Handschuhe 230V
Stufe 1: 550W
Stufe 2: 1050W
Edelstahl 1200W
Innova 14 Helme 230V
Stufe 1: 500W
Stufe 2: 1000W
Trocknungsdauer:
Desinfektion:
Wirkungsdauer Duftmittel: im 5-Stundenbetrieb ca. 2 Monate
Geräuschemission: ca. 65 dB(A)
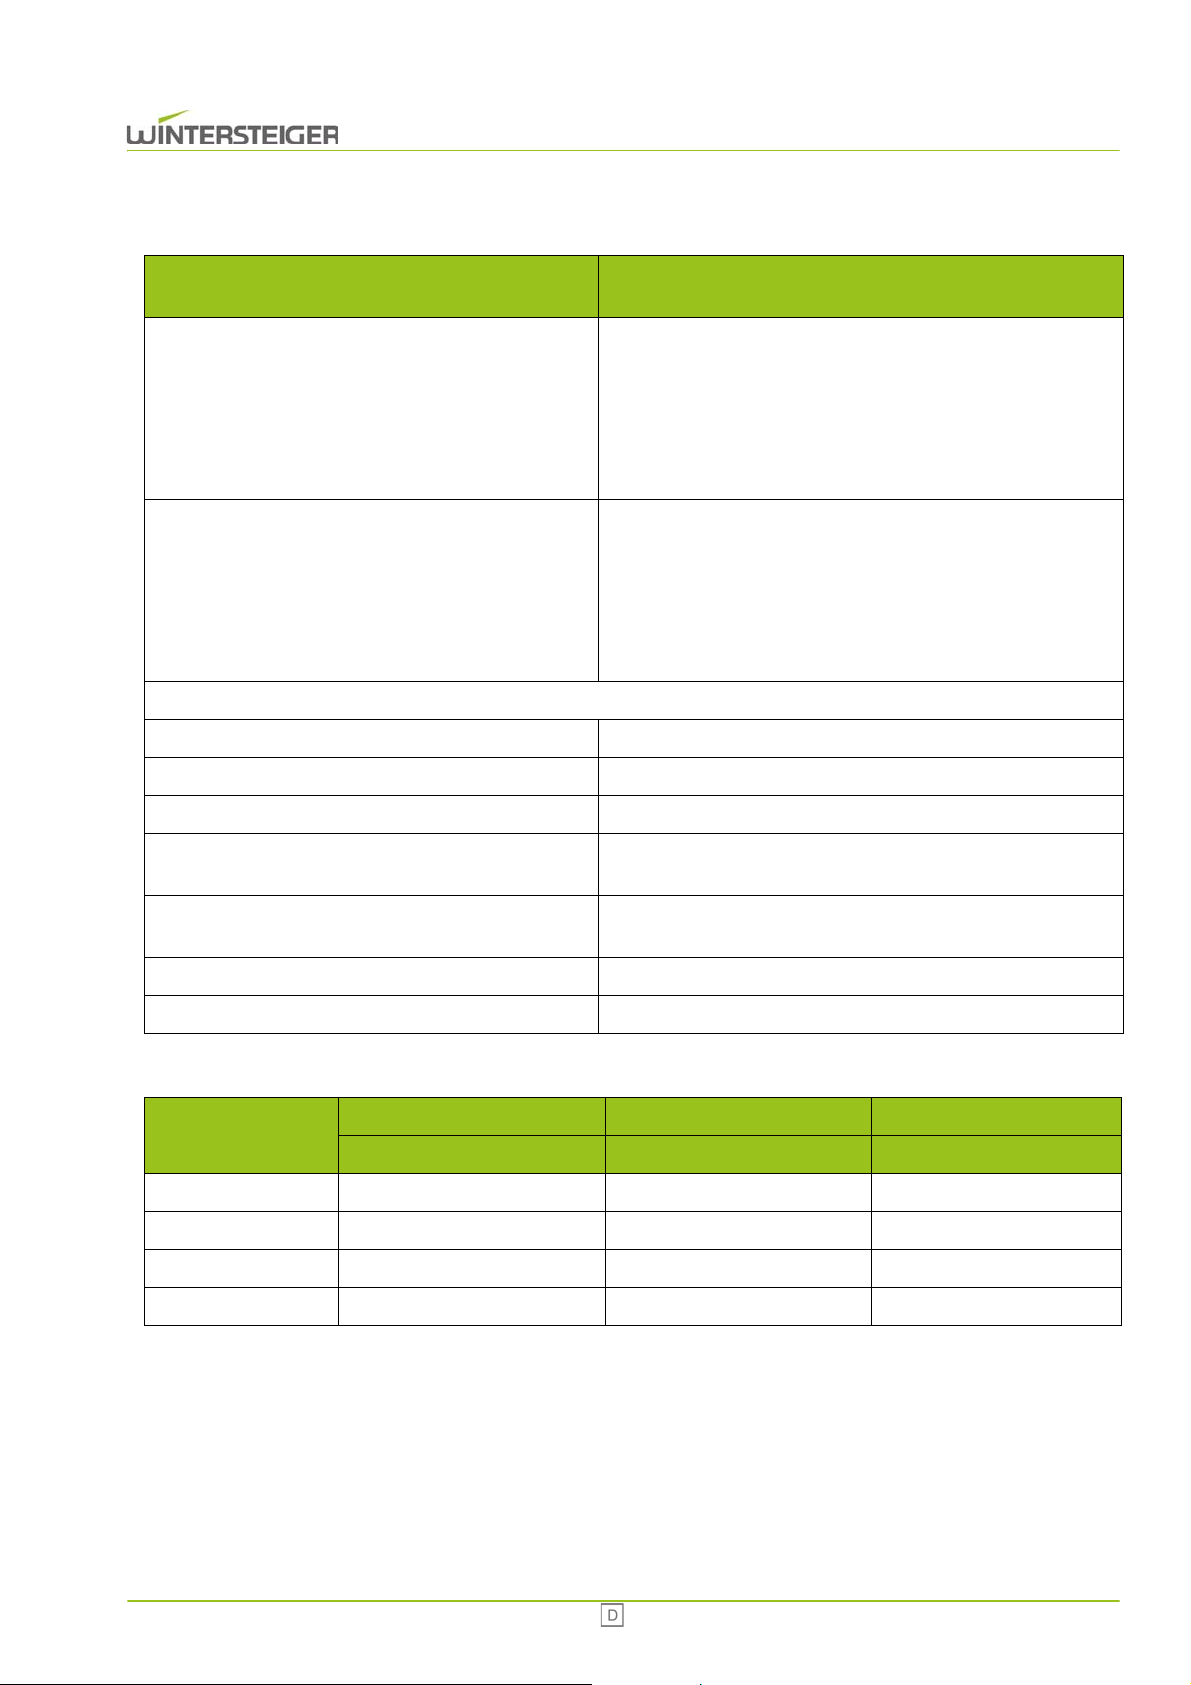
10 Paar Handschuhe 10 Paar Handschuhe 14 Helme
INNOVA
Standard Edelstahl Standard
Höhe 2150 mm 2150 mm 2060 mm
Breite 300 mm 300 mm 465 mm
Tiefe 540 mm 520 mm 410 mm
Gewicht 30 kg 80 kg 50 kg
1,5 bis 2,5 Stunden, abhängig von Durchnässung,
Temperatur,...
Luftdesinfektion/Entkeimung durch keimtötende Ozon-Lampe!
Dauer ca. 2 Stunden
Innova 13
Page 14
14 Innova
Page 15

6 Transport, Lagerung und Veränderung des Standortes
6.1 Transportbedingungen des Geräts
Das Gerät muss in der Originalverpackung und in der darauf angegebenen Position transportiert werden.
6.2 Lagerung des Geräts
Temperatur: 0° bis +40°C.
Um Schaden zu vermeiden legen Sie keine anderen Pakete oder Kisten auf die Verpackung des Geräts!
6.3 Entfernen der Verpackung und Standortwahl
Führen Sie diese Vorgänge aufmerksam durch, da eine Unterlassung den Betrieb und die Sicherheit des Geräts beeinträchtigen können.
6.4 Aufstellort
Bei der Wahl eines Standortes sollte man die Funktionalität in den Vordergrund stellen – beachten Sie besonders Arbeitsintensität und genügend Platz zur einfachen Handhabung. Bitte beachten Sie, dass durch die Stiefel, Schuhe oder Helme der
Platzbedarf des Gerätes möglicherweise erhöht wird. Die Raumhöhe muss mindestens 2,35 m betragen. Wenn möglich sollte das Gerät in einem gut belüfteten Raum in direkter Nähe der Stromquelle eingesetzt werden.
Bei der Wahl eines Standortes sind besonders die Richtlinien und Gesetze betreffend die Sicherheit am
Arbeitsplatz zu beachten!
Achten Sie darauf, dass die Luftzufuhr niemals ganz oder teilweise blockiert wird (Gerät nicht verbauen!)
Um ein fehlerfreies und optimales Funktionieren von INNOVA zu garantieren, möchten wir noch einmal darauf hinweisen, dass darauf geachtet werden soll, dass die Umgebungs- bzw. Raumtemperatur niemals
unter 15° C liegt.
Stecken Sie keine Gegenstände in das Ansaugluftgitter oder das Schutzgitter. Verschließen Sie diese Öffnungen auch nicht
teilweise. Niemals Flüssigkeiten in den Luftkreislauf gießen oder sprühen, da die Gefahr eines Stromschlages und der Beschädigung des Gerätes besteht.
Innova 15
Page 16
A
B
C
D
E
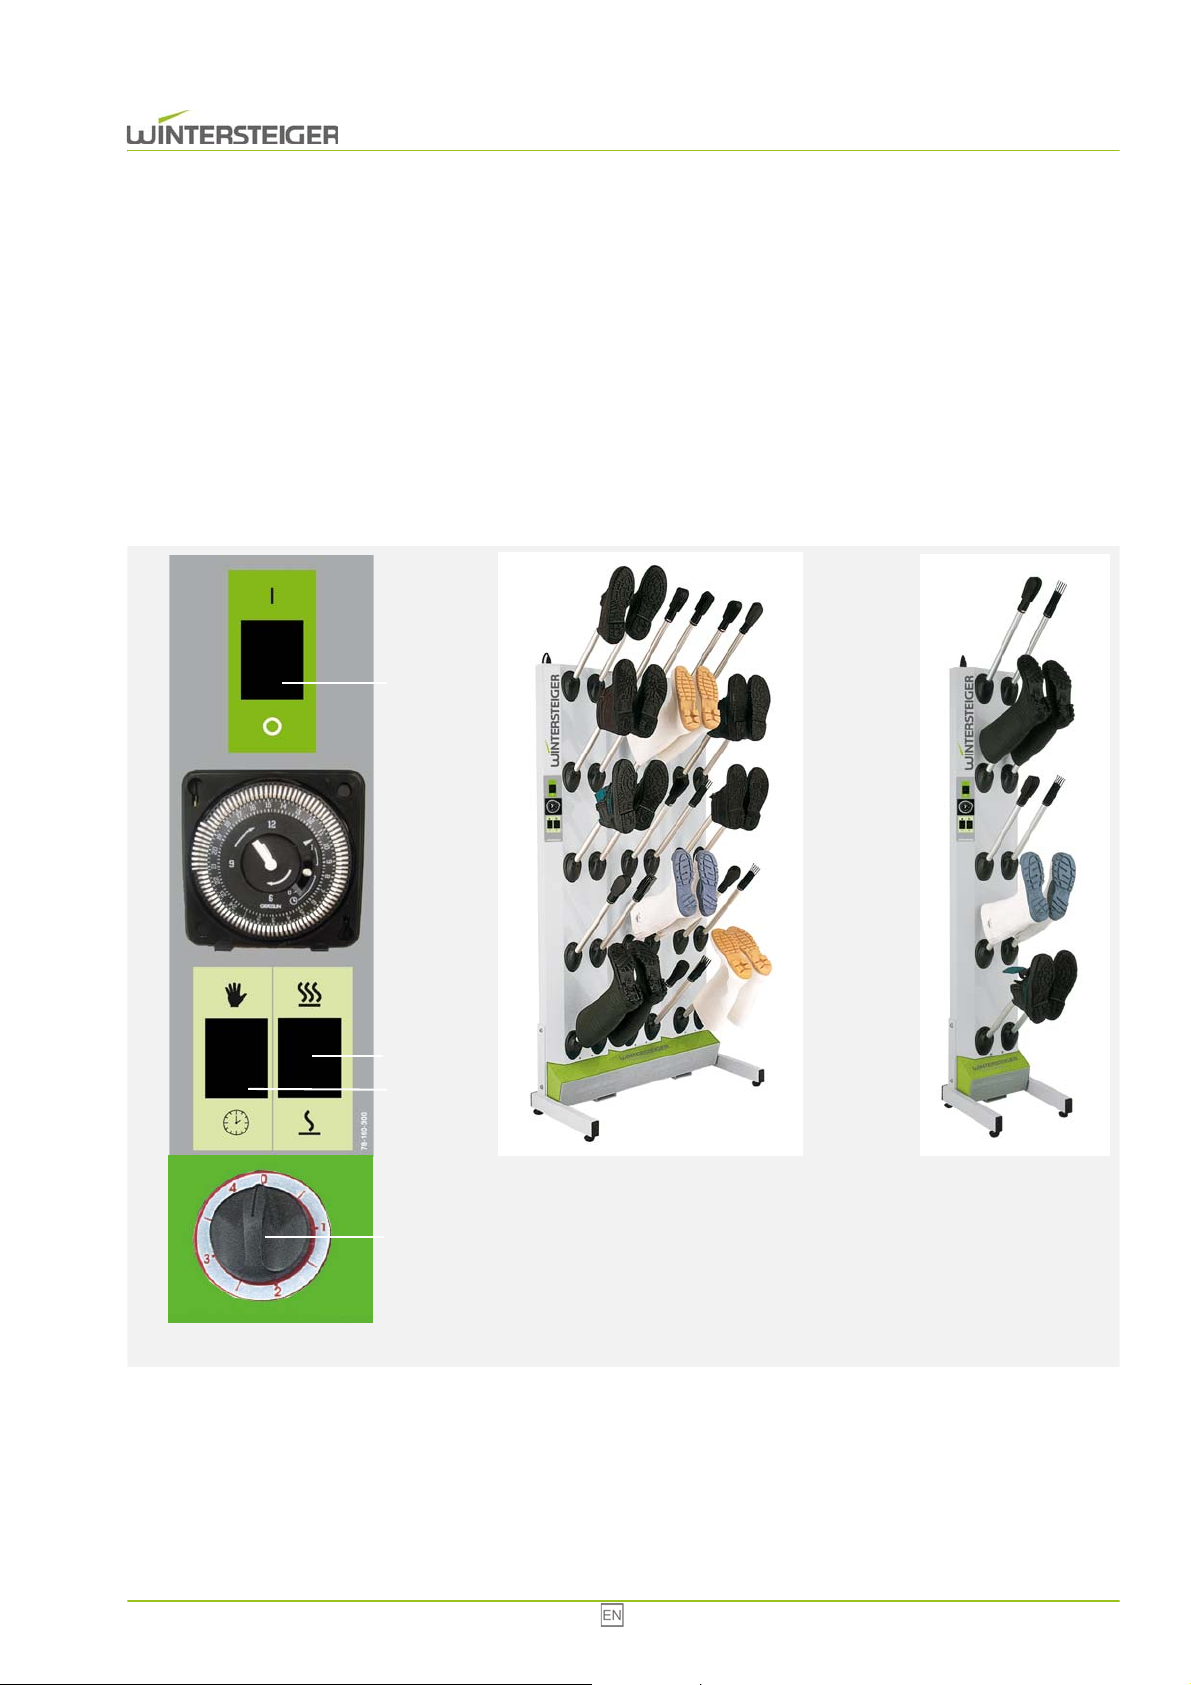
7 Beschreibung der Bedienelemente
0
I
7.1 Standard-Variante
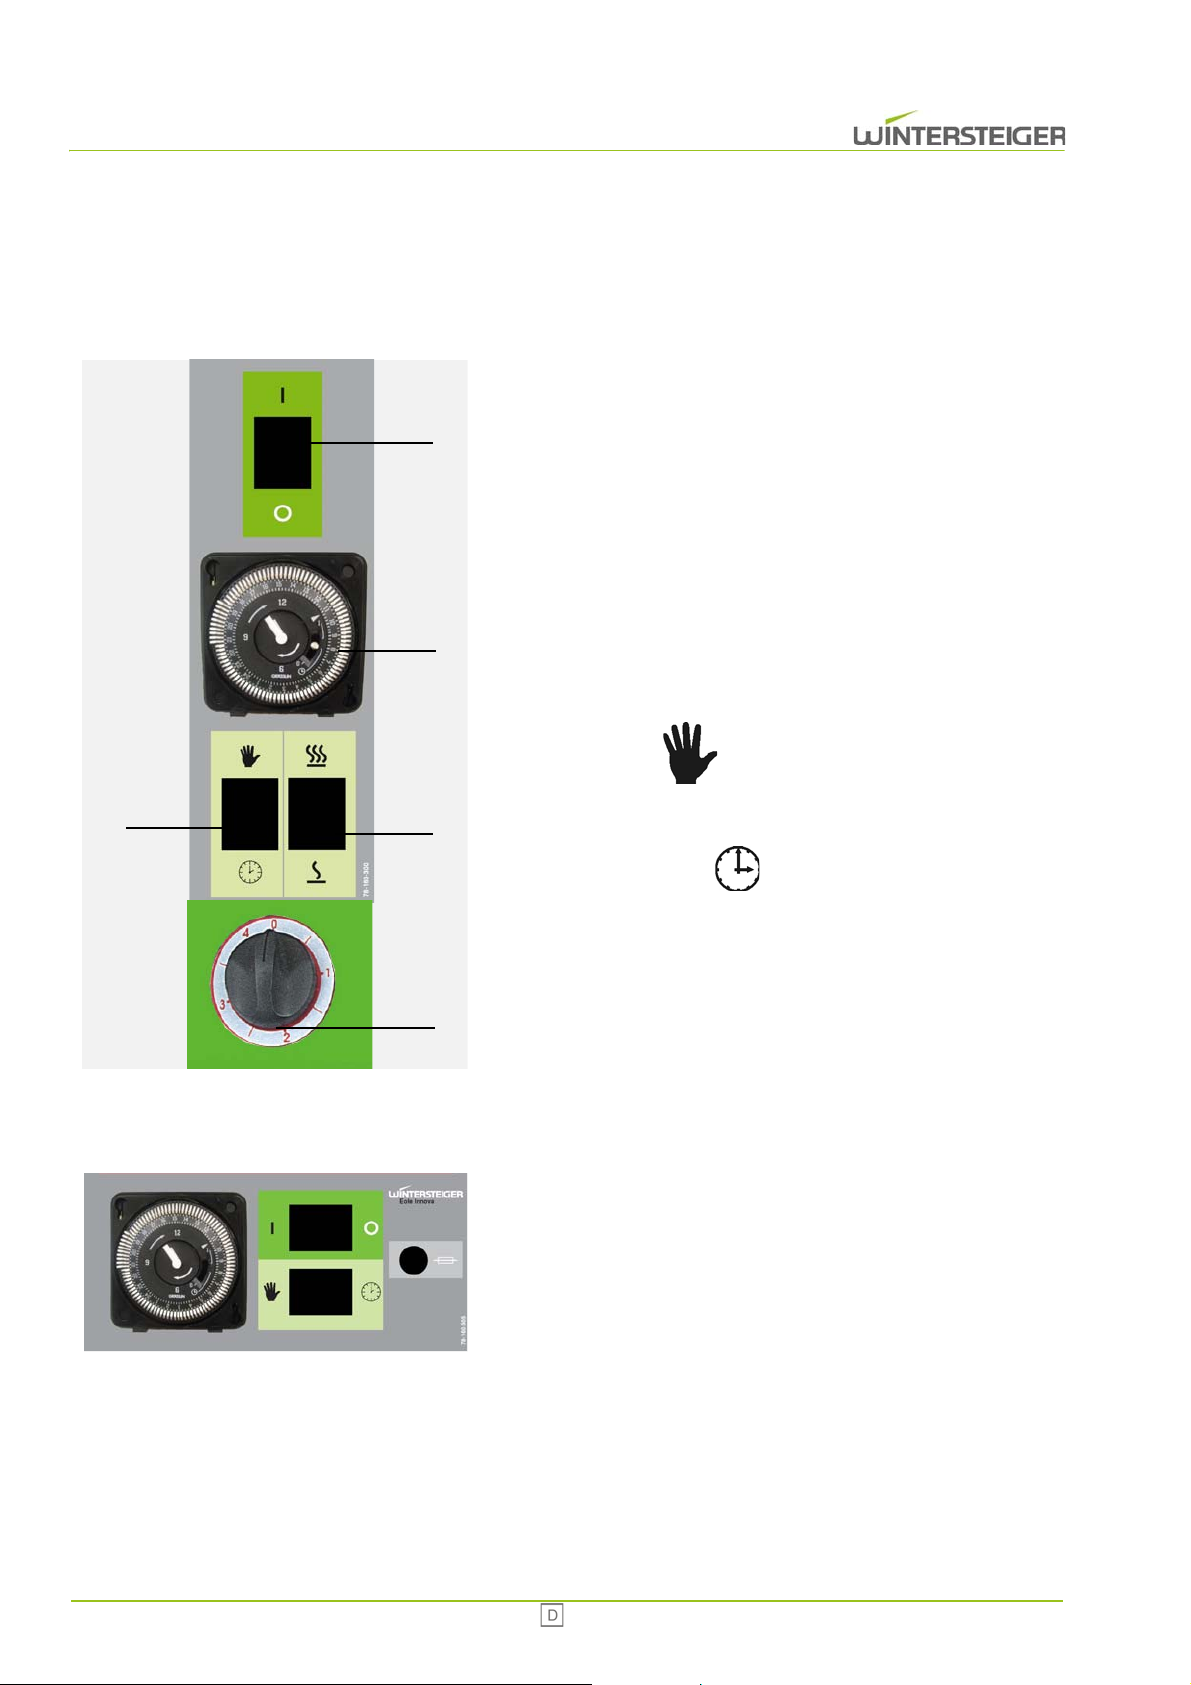
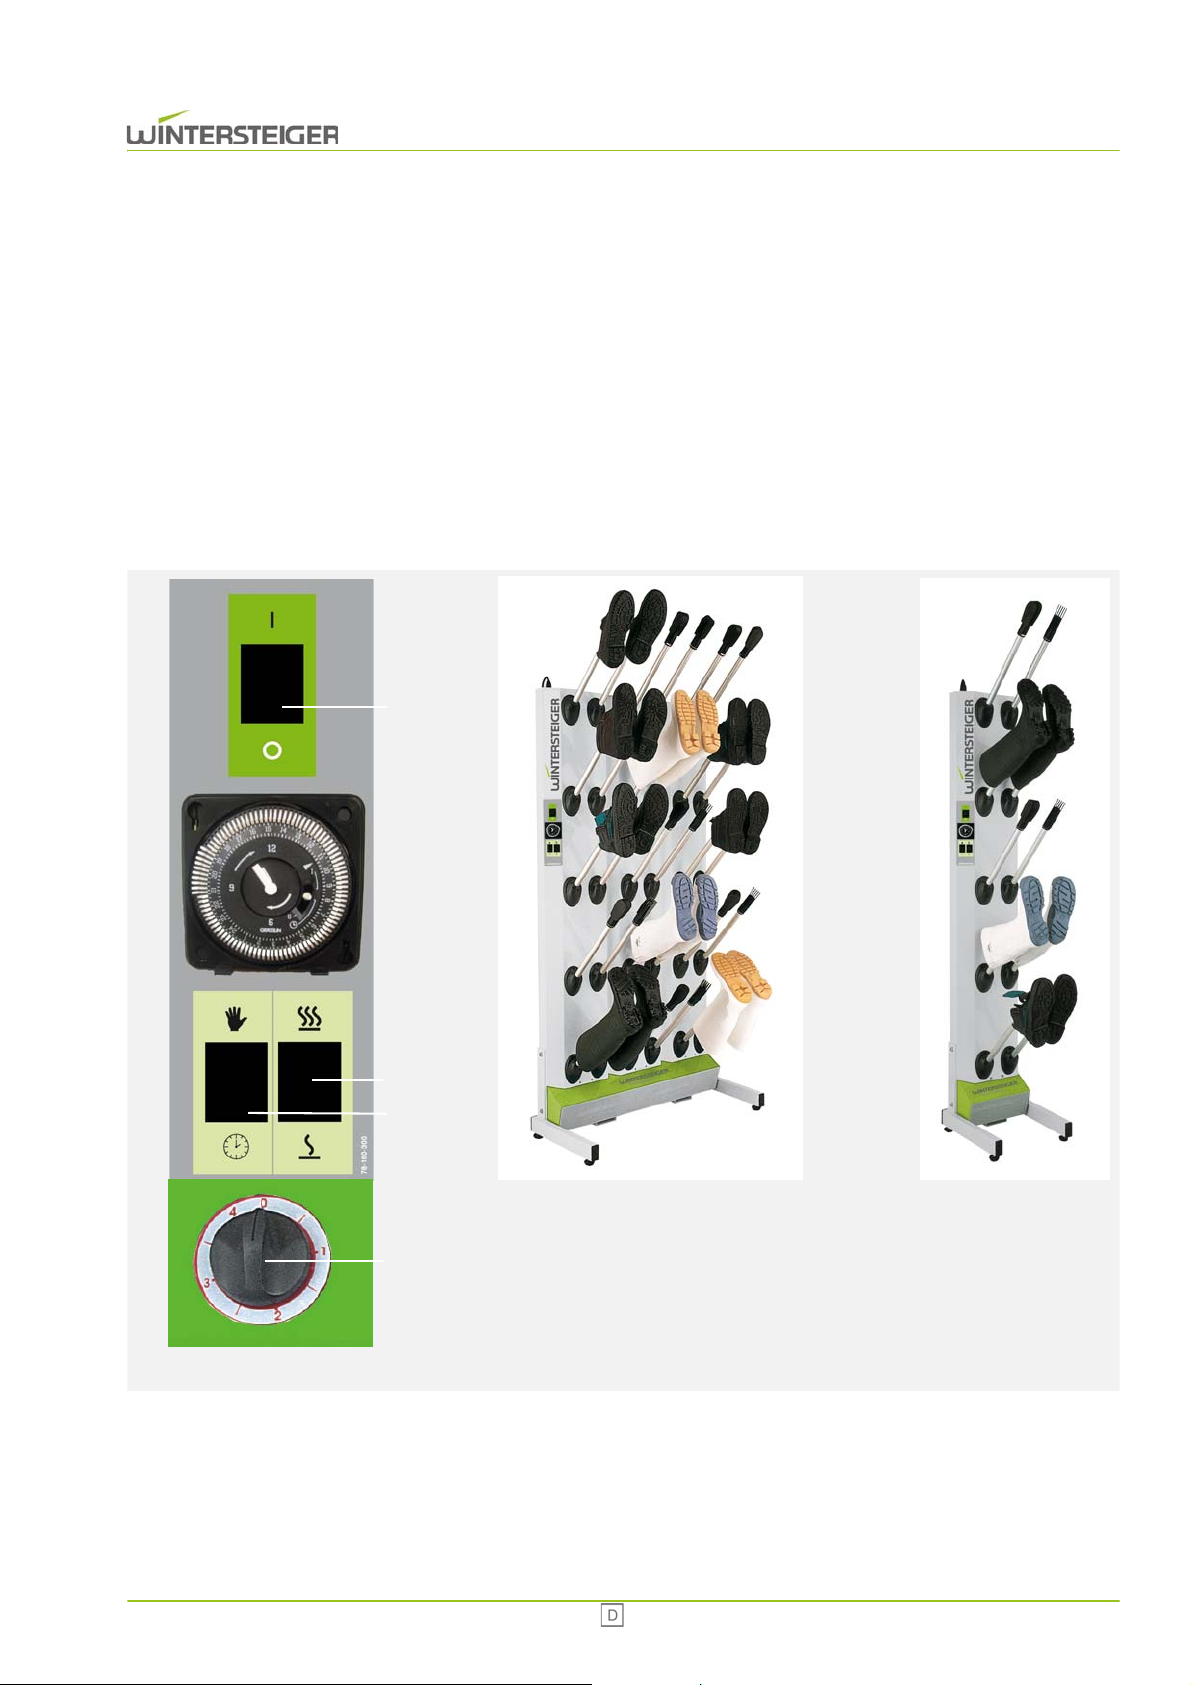
A: Hauptschalter:
Aus
Ausschalten des Trockners
Ein
Einschalten des Trockners
B: Schalter Warmluft
Stufe 1 oder Stufe 2
C: Zeitschaltuhr für den Automatikbetrieb
D: Betriebsart
Handbetrieb
Im Handbetrieb wird das Umluftgebläse und die Desinfektion aktiviert.
7.2 Edelstahl-Variante
Automatikbetrieb
Im Automatikbetrieb erfolgen Trocknung und Desinfektion der
Schuhe über die voreingestellte Zeit an der Schaltuhr.
E: 4-Stunden-Timer
Im Automatikbetrieb kann die Trocknungs- und Entkeimungsdauer mit dem 4-Stunden-Timer auf bis zu 4 Stunden begrenzt wer-
In der Edelstahlausführung existiert nur eine Leistungsstufe für die Heizung.
Die Sicherung ist direkt am Bedienpanel angebracht.
den.
16 Innova
Page 17
G
I
F
H
7.3 Einstellen der Zeitschaltuhr - Automatikbetrieb
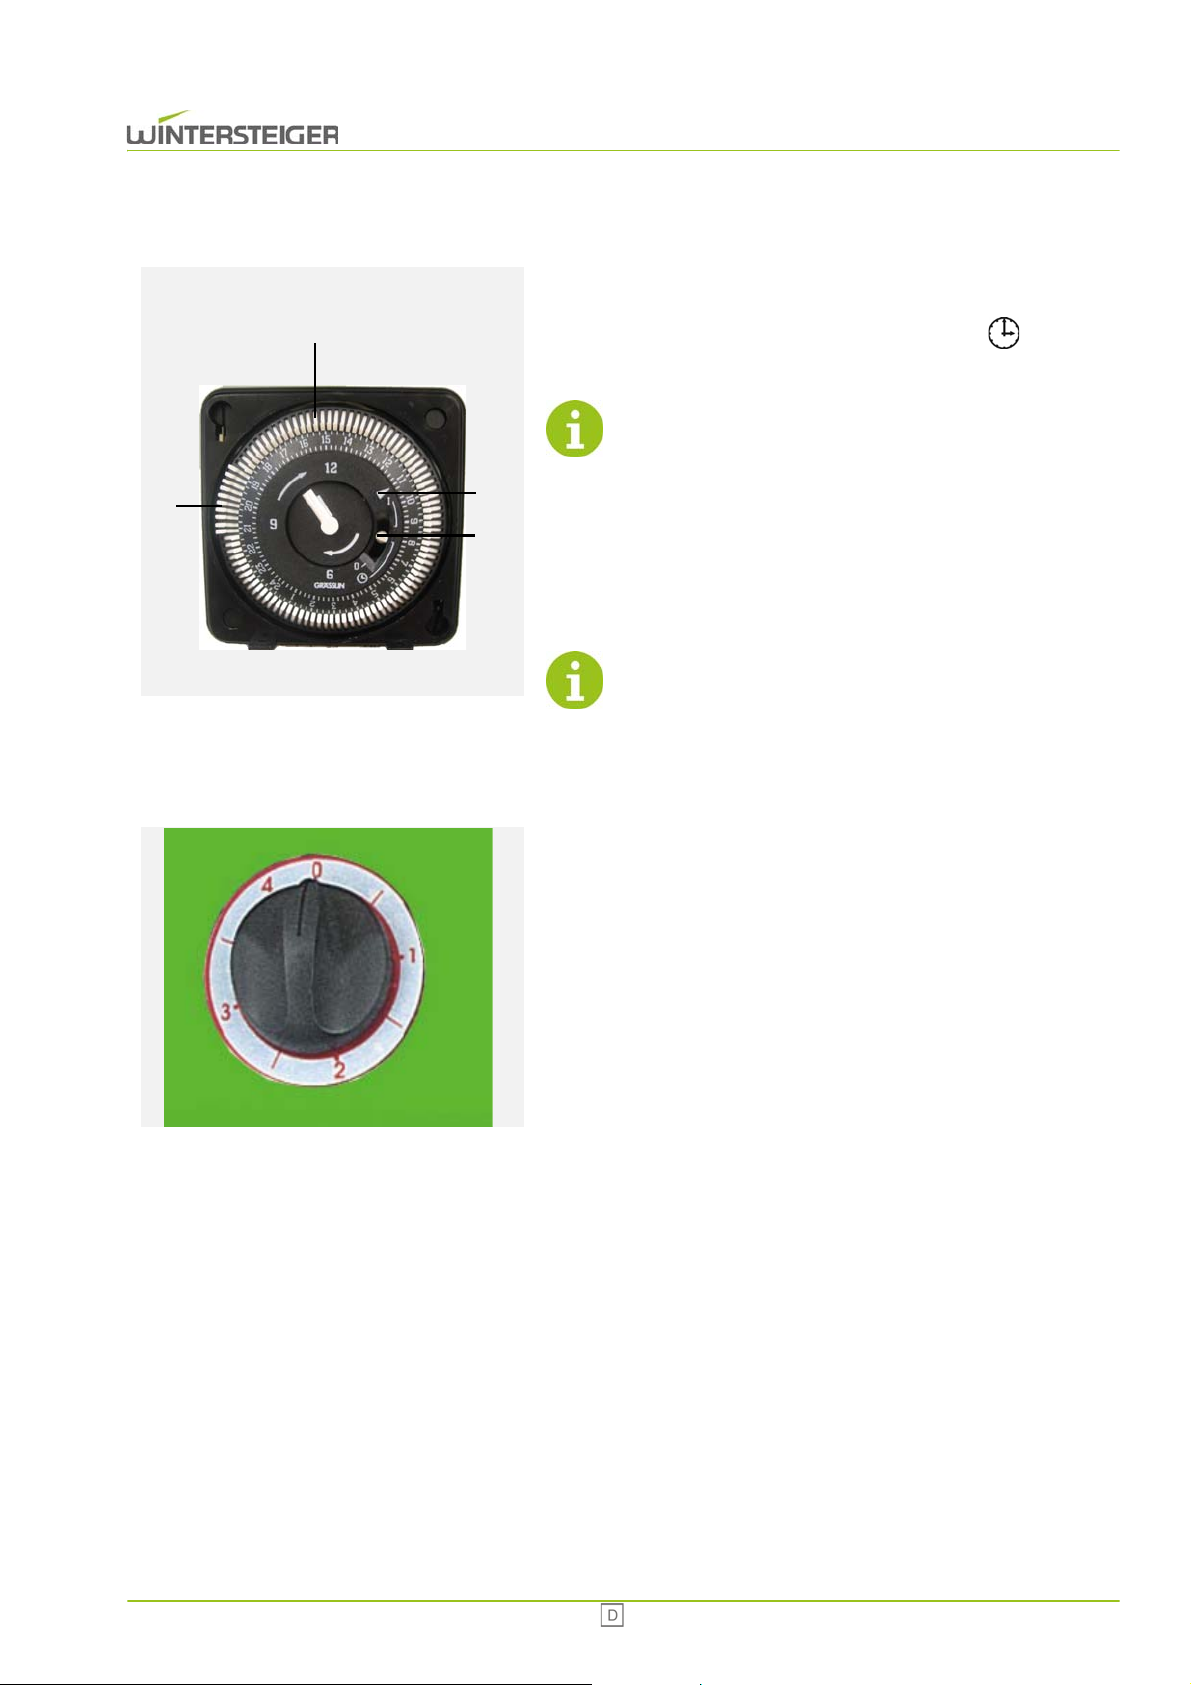
Zum Einstellen der Zeit drehen Sie den äußeren Ring [I] der Zeitschaltuhr so, dass die kleine Markierung [F] auf die aktuelle Zeit
zeigt. Der Einstellknopf [H] muss auf Mittestellung gestellt sein
und darf nicht verstellt werden.
Die Zeitschaltuhr ist mit einem Akku (Ladedauer: 70 Stunden) ausgerüstet, wodurch sie bei einem Stromausfall oder
kurzzeitige Trennung vom Netz die Uhrzeit beibehält. Bei
längerer Stromunterbrechung ist jedoch die aktuelle Uhrzeit wieder einzustellen.
Schieben Sie nun die Segmente der Uhr [G], welche der Dauer der
Trocknung entsprechen, nach außen: Das Gerät wird sich zum gewählten Zeitpunkt einschalten.
Im Automatikbetrieb muss der Schalter [H] auf die mittlere
Position gestellt werden.
7.4 Einschalten des 4-Stunden-Timers - Automatikbetrieb
Im Automatikbetrieb kann die Trocknungsdauer mithilfe des 4-StundenTimers unter dem Bedienpanel eingestellt werden. Es kann stufenlos
eine Trocknungs- und Entkeimungsdauer von bis zu 4 Stunden eingestellt werden.
Innova 17
Page 18
8 Inbetriebnahme
Bild 1
Bild 2
8.1 Positionieren des Schuhs
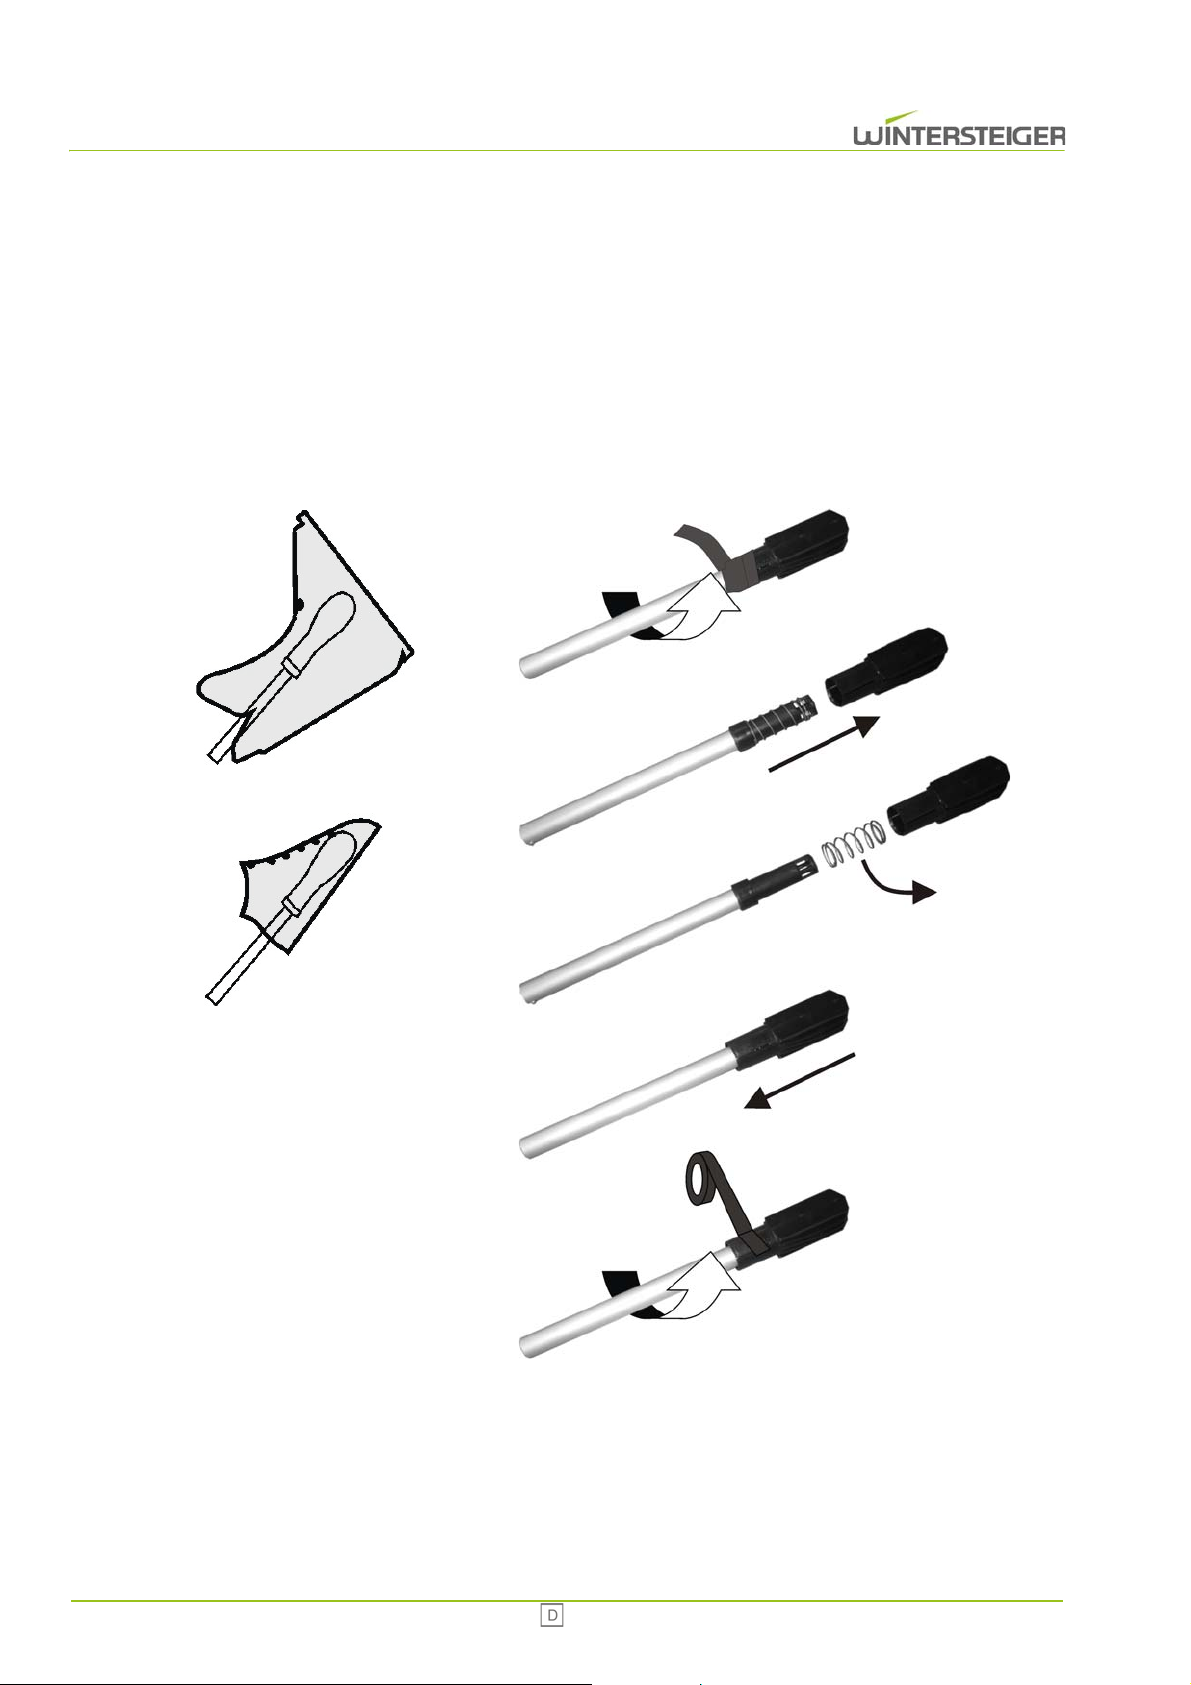
Um eine wirksame Trocknung des Schuhs zu erreichen, hohe Schuhe oder Stiefel mit der Spitze nach oben positionieren. Halbschuhe mit der Spitze nach unten positionieren.
Bei Benutzung des Geräts für Schuhe oder Handschuhe, die kein ausreichendes Gewicht haben um das Trockenventil
zu öffnen, Feder gemäß Bild [2] ausbauen. Entfernen Sie als erstes das schwarze Klebeband. Nach dem Ausbau der
Feder muss das Trocknungsventil wieder mit Klebeband am Luftrohr zusätzlich fixiert werden.
18 Innova
Page 19
A
B
C
D
8.2 Betrieb
Falls notwendig erneuern Sie das Duftmittel.
Stecken Sie das Gerät ein.
Schalten Sie das Gerät mit dem Schalter [A] ein. Wählen Sie die Handbetrieb bzw. den Automatikbetrieb mit dem Kippschalter [C]. Bei Automatikbetrieb kontrollieren Sie die Einstellung der Zeitschaltuhr. Im Automatikbetrieb kann die
Trocknungsdauer mit dem 4-Stunden-Timer [D] unter dem Bedienpanel begrenzt werden. Wählen Sie mit dem Schalter
[B] bei der Standard-Variante die gewünschte Heizleistung (Stufe 1 oder 2). Die Edelstahl-Variante besitzt nur eine
Heizstufe.
Nehmen Sie nach dem Trocken- und Entkeimungszyklus die Schuhe, Handschuhe oder Helme ab.
Der nächste Zyklus kann beginnen.
Innova 19
Page 20
A
E
D
C
9 Wartung
Vor sämtlichen Wartungsarbeiten Gerät ausschalten und Netzstecker ziehen!
9.1 Duftmittel wechseln
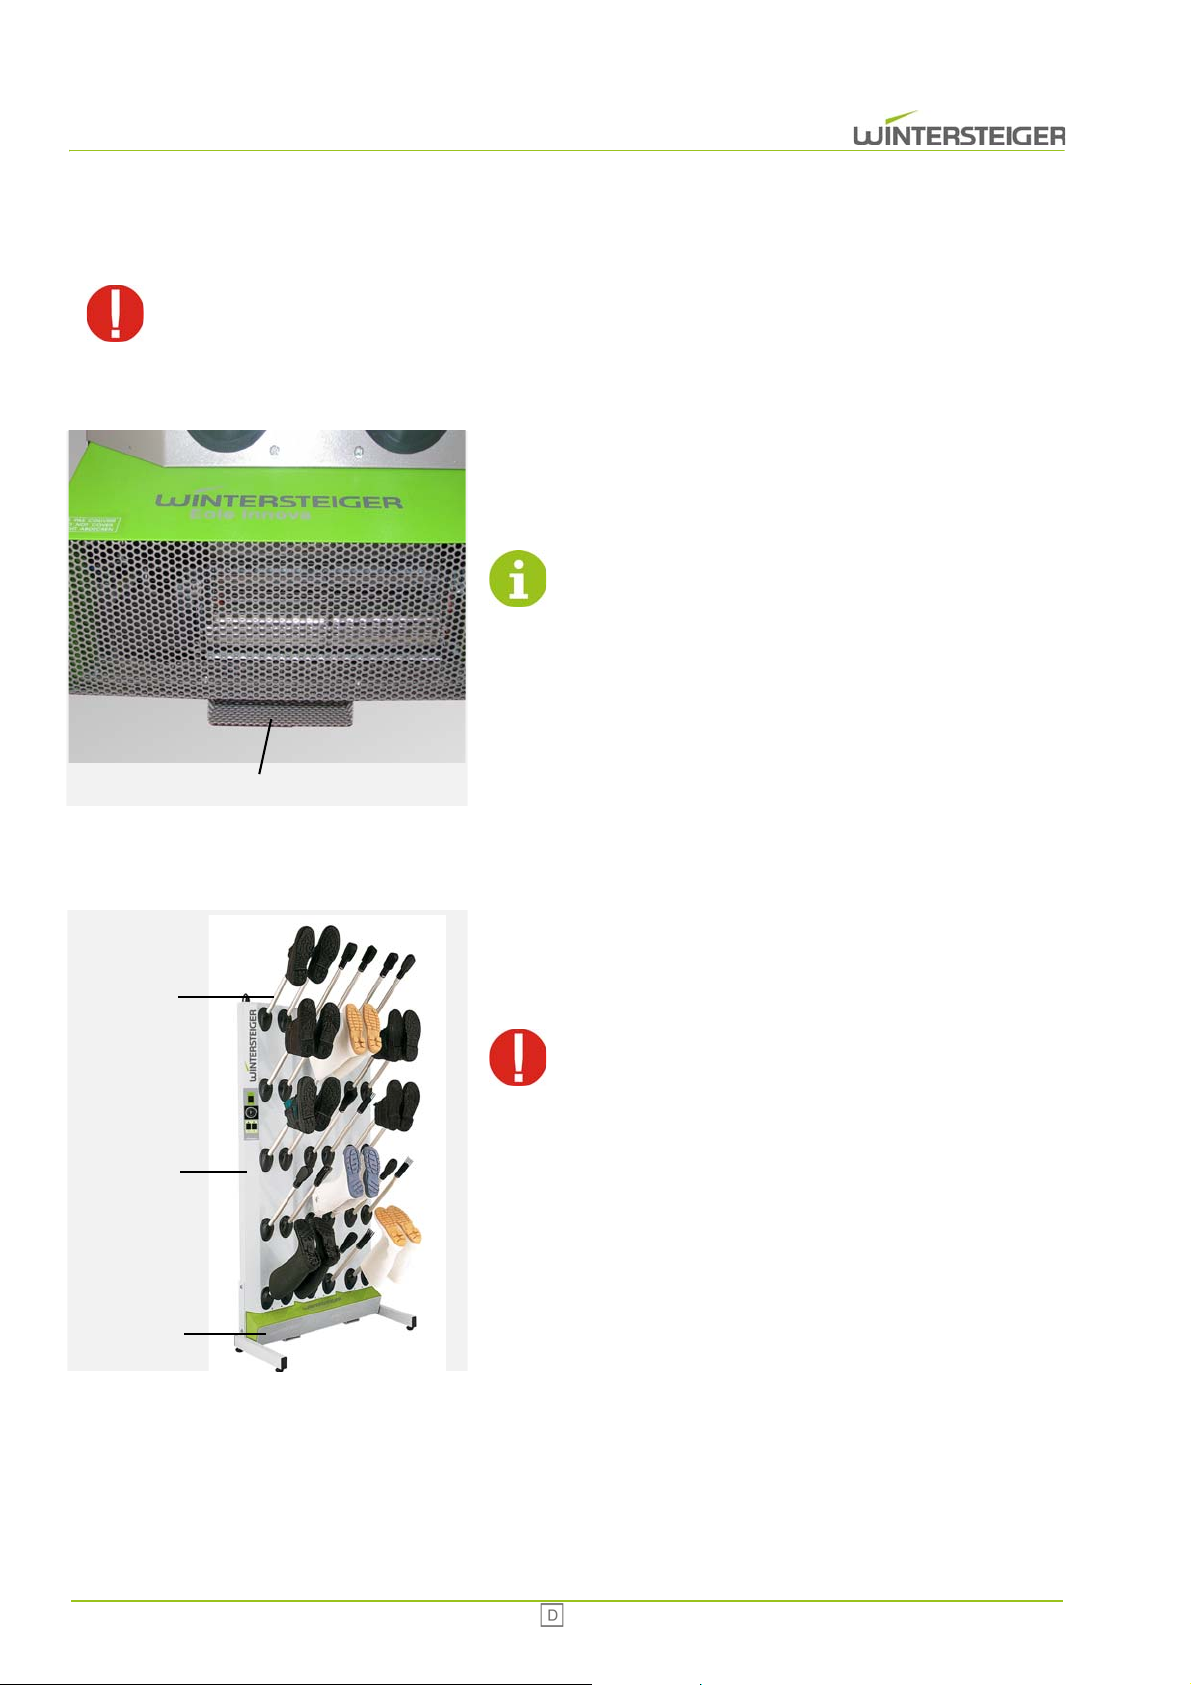
An der Unterseite der Front befindet sich eine Ablage für das Duftmittel [A].
Das Duftmittelsäckchen herausnehmen und daran riechen. Falls
das Säckchen nicht mehr duftet, Säckchen erneuern.
Wirksamkeit des Duftmittels im 5-Stundenbetrieb ca. 2
Monate!
9.2 Reinigung
Gestell [C] und Ventile [D] regelmäßig mit feuchtem Putzlappen reinigen.
Jährlich durch Öffnen der vorderen Abdeckung [E] Gerätinnenseite
entstauben.
Das Reinigen des Gerätes mit einem Hochdruckreiniger ist
nur für die Edelstahlausführung zulässig! Die Standardausführung darf nicht mit einem Hochdruckreiniger gereinigt
werden. Im Falle einer Nichtbeachtung wird für Folgeschäden keine Haftung sowie Gewährleistung übernommen.
20 Innova
Page 21

9.3 Ozonerzeuger
Die benutzten Ozonerzeuger erlauben eine wirksame Entkeimung für eine Betriebszeit von 3000 Stunden, danach müssen
die Ozonlampen ersetzt werden. Führen Sie einmal im Monat eine Sichtkontrolle des Ozonerzeugers im Betrieb durch (bläuliches Licht). Durch das Belüftungsgitter sieht man Reflektionen des UV-Lichtes, wenn man mit einem Abstand von 2 Metern
vor der Maschine steht.
Verletzungsgefahr!
Blicken Sie nicht direkt in den Ozonerzeuger! Die UV-Strahlen können die Augen schädigen!
Innova 21
Page 22
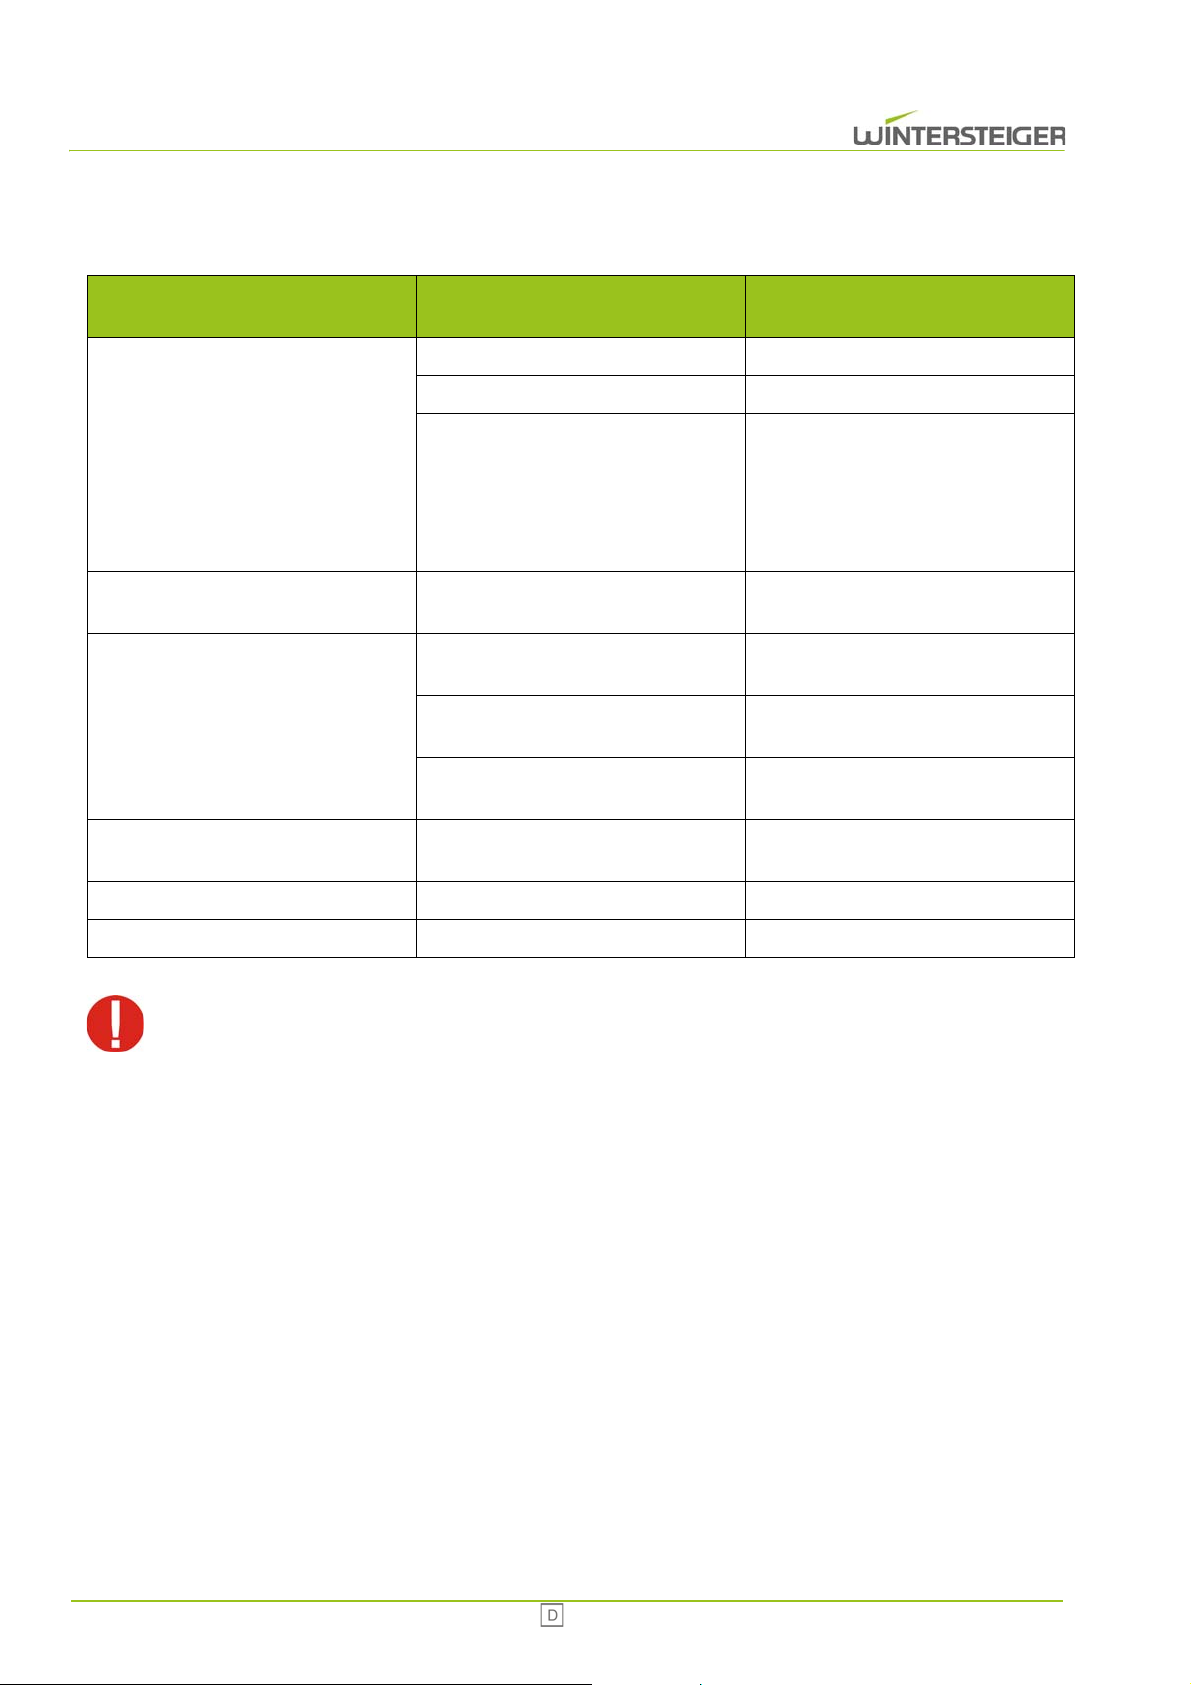
10 Fehlerbehebung
Fehler
Problem
Das Gerät funktioniert nicht
Gerät schaltet sich nicht zur richtigen
Zeit im Automatikbetrieb ein
Das Gerät trocknet nicht
Trockenleistung des Geräts nimmt ab
oder Gerät heizt nicht
Ursache Behebung
Das Gerät ist nicht eingesteckt Stecken Sie das Gerät ein
Der Hauptschalter steht auf „0“ Hauptschalter einschalten
Kontrollieren Sie die Sicherung am
Stromanschluss. Eine Ersatzsicherung
Die Sicherung ist defekt
Zeitschaltuhr nicht richtig eingestellt
Ungenügende Luftzufuhr
Luftfeuchtigkeit > 80%
Raumtemperatur < 15°C
Gebläse defekt Gebläse kontrollieren
befindet sich im Sicherungshalter.
Sicherung 5x20 mm 10A. Beim Ersetzen muss der Netzstecker gezogen
sein.
Drehen Sie die Markierung [F] auf die
aktuelle Zeit
Kontrollieren Sie die Luftzufuhr am Gerät oder im Raum
Je geringer die Luftfeuchtigkeit, desto
besser die Trocknung.
Je höher die Raumtemperatur, desto
besser die Trocknung
Ausbleiben des Duftes Duftmittelsäckchen sind verbraucht Duftmittelsäckchen erneuern
Ozonlampe defekt Ozonlampe wechseln
Bei Geräteeingriffen Netzstecker ziehen! Das Gerät darf nur mit vollständig montierten Schutzen und
Abdeckungen betrieben werden.
22 Innova
Page 23
11 Stilllegung und Entsorgung
Verletzungsgefahr!
Trennen Sie vor dem Stilllegen und Demontieren die Maschine von der Stromversorgung oder jeglichem externen
Antrieb. Verwenden Sie für die Demontage nur geeignetes Werkzeug.
Zerlegen und entsorgen Sie bei der Stilllegung der Maschine alle Bestandteile fachgerecht. Reinigen Sie
alle öl- und fetthaltigen Teile vor der Entsorgung.
Öl und Fett dürfen keinesfalls in die Umwelt gelangen.
Halten Sie bei der Entsorgung der Bestandteile die landesspezifischen Vorschriften ein!
Maschine fachgerecht demontieren und in einzelne Bestandteile zerlegen.
Öl- und fetthaltige Bestandteile reinigen.
Bestandteile nach Materialgruppen (Stahl, Kunststoff, Elektro- und Elektronikbauteile u.s.w.) entsorgen.
Öl und Fett umweltgerecht entsorgen, auch biologisch abbaubare Öle und Fette.
Innova 23
Page 24

24 Innova
Page 25

Table of contents
1 Preface ................................................................................................................................................................................ 26
1.1 Regulations for use .................................................................................................................................................. 26
2 General hints ...................................................................................................................................................................... 27
2.1 Safety instructions .................................................................................................................................................... 27
2.2 Warning signs .......................................................................................................................................................... 27
2.3 Safety devices .......................................................................................................................................................... 27
2.4 Purpose .................................................................................................................................................................... 27
3 Assembly instructions ...................................................................................................................................................... 28
4 Function .............................................................................................................................................................................. 30
5 Technical data .................................................................................................................................................................... 31
6 Transport, storage and moving ........................................................................................................................................ 35
6.1 Transport of the unit ................................................................................................................................................. 35
6.2 Storage of the unit .................................................................................................................................................... 35
6.3 Unwrapping and positioning ..................................................................................................................................... 35
6.4 Setting up ................................................................................................................................................................. 35
7 Description of the operating elements ............................................................................................................................ 36
7.1 Standard variante ..................................................................................................................................................... 36
7.2 Stainless steel variante ............................................................................................................................................ 36
7.3 Adjustment of the timer - automatic mode ............................................................................................................... 37
7.4 Adjustment of the 4-hours-timer - automatic mode .................................................................................................. 37
8 Starting up .......................................................................................................................................................................... 38
8.1 Placing the boot ....................................................................................................................................................... 38
8.2 Operation ................................................................................................................................................................. 39
9 Maintenance ....................................................................................................................................................................... 40
9.1 Changing the air deodorant ..................................................................................................................................... 40
9.2 Cleaning ................................................................................................................................................................... 40
9.3 Ozone generator ...................................................................................................................................................... 41
10 Trouble shooting .............................................................................................................................................................. 42
11 Shut-down and disposal ................................................................................................................................................. 43
Innova 25
Page 26

© Copyright 2009 by
WINTERSTEIGER AG ::: A-4910 Ried/I Dimmelstrasse 9
Auhor and graphics: Franz Badegruber
Tel. +43 7752 919-0
E-mail: [email protected]
Design: Maria Marek-Pollhammer
Original operating manual
1 Preface
These operating instructions must be read by the operators and by the persons responsible for the machine maintenance
before initial use and serves as a supplement to the training documentation.
Damage caused by failure to follow the instructions herein will not be covered by the warranty. The user of this machine is
legally bound to the casualty regulations of the country in question.
In addition, these operating instructions are confidential. It must only be accessible to authorized persons. Making it available
to third parties requires the written approval of WINTERSTEIGER.
All documents are protected in accordance with copyright protection. The transfer and copying of these documents, even
excerpts, and the utilization and communication of its content are not permitted, except if this was explicitly authorized in
writing.
Noncompliance is punishable and establishes a compensation claim. All rights for the execution of commercial property
rights are reserved by WINTERSTEIGER.
1.1 Regulations for use
The dryer Innova is designed depending on construction solely for drying and storing shoes and boots, gloves or helmets
(appropriate usage). The manufacturer accepts no responsibility for damage caused as a result of unconventional usage,
and the latter is entirely at the risk of the user.
In order to comply with conventional usage, the manufacturer’s regulations concerning operation, maintenance and servicing
of the machine should be strictly adhered to. The relevant accident prevention regulations as well as other generally recognized legal safety standards must be respected.
Any alterations made to the machine by the user automatically removes any responsibility on the part of the manufacturer
for any damage resulting there of.
As we are constantly striving to improve our products, we reserve the right to make any alterations or improvements we deem
to be necessary. However, we are not obliged to carry out these alterations or improvements on machines or equipment already delivered by us.
All illustrations, measurements and weights quoted in the operating manual are not binding.
26 Innova
Page 27
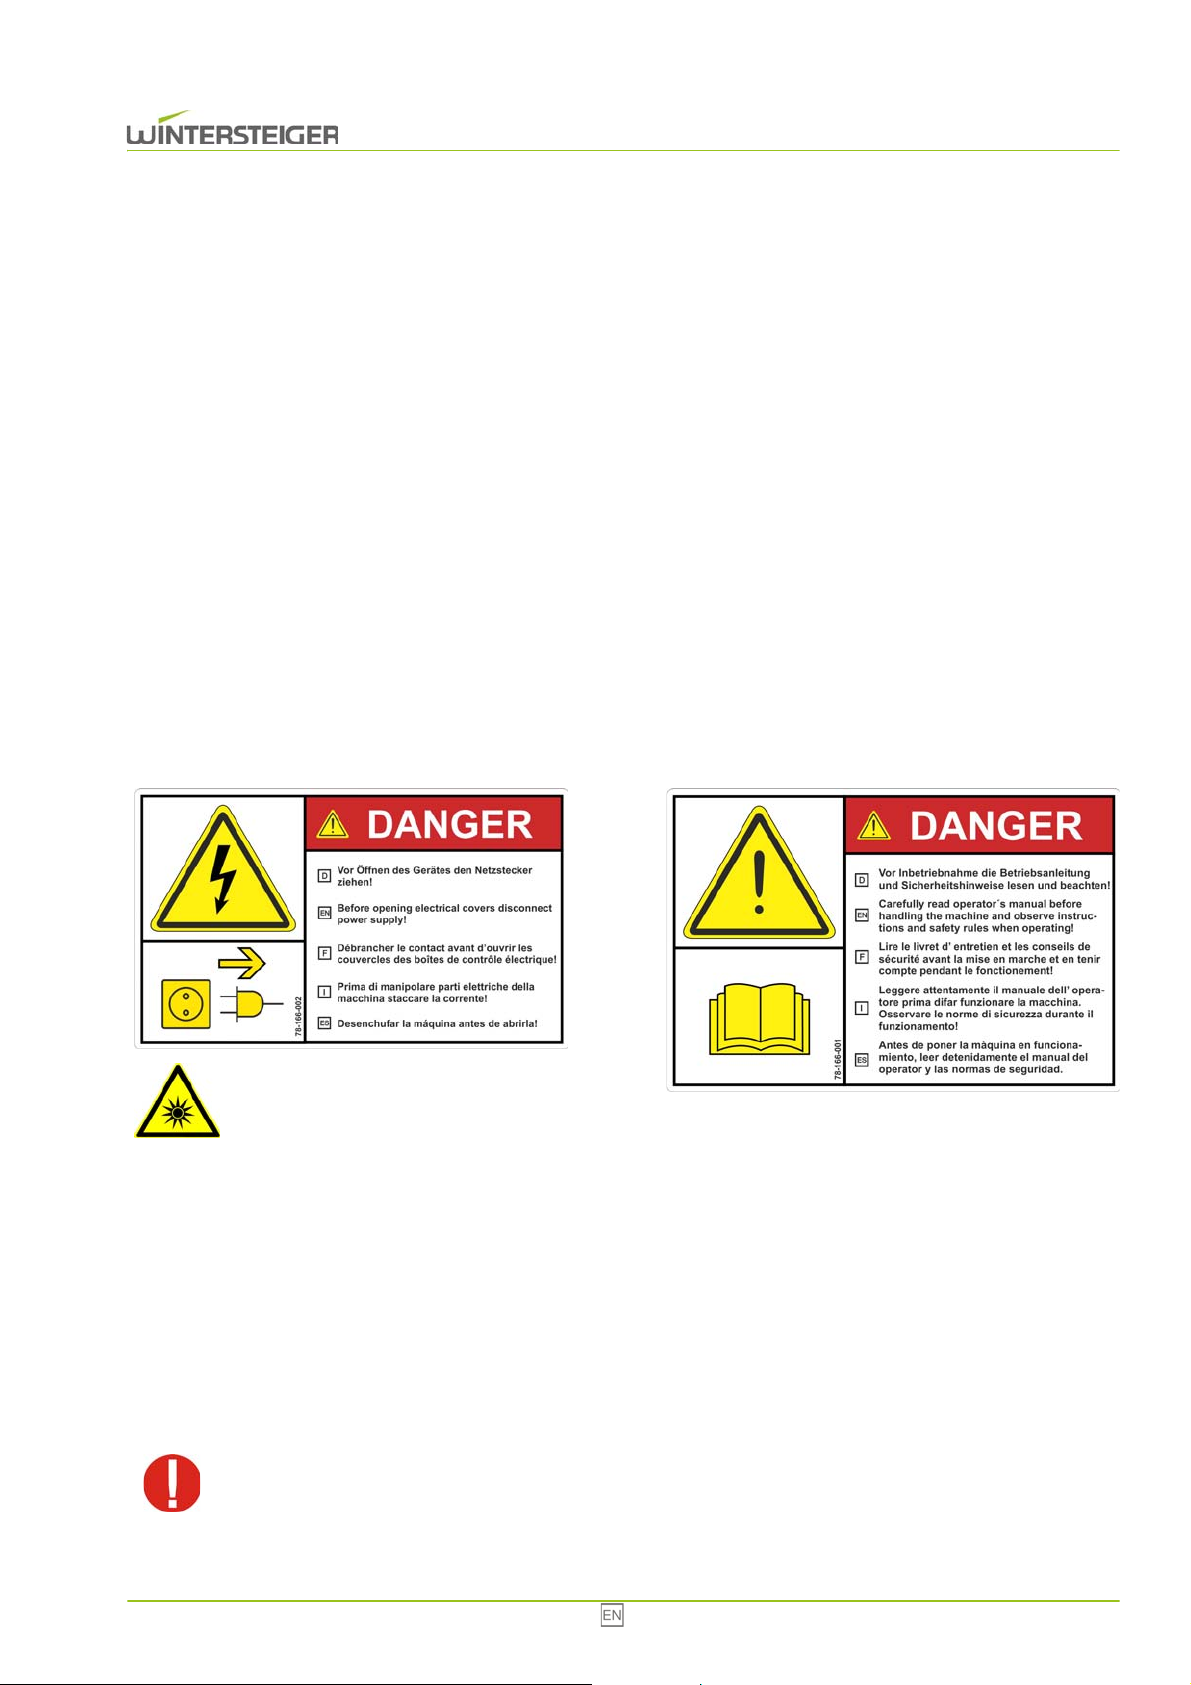
2 General hints
Beware of the uv-light from the ozone lamp!
Avoid looking directly at an operating ozone lamp!
2.1 Safety instructions
The installation may only be carried out by a skilled electrician who knows and adheres precisely to the local regulations
and additional provisions as issued by local code.
Observe correct AC voltage!
The voltage ratings are shown on the rating plate on the top of the machine.
Please check whether this data conincide with your voltage.
The boot dryer may only be operated with fully mounted protective covers and safeguards.
Before moving the device or making any changes in the machine, disconnect mains plug!
The appliance should only be operated with original "WINTERSTEIGER" spare parts or materials subject to wear and
tear. If materials of other vendors are used, then this is at your own risk and on the operator´s responsibility, the garantee expires because of that.
Ensure sufficient ventilation in the work room!
2.2 Warning signs
2.3 Safety devices
All safety devices must be in place during operation.
2.4 Purpose
The boot dryer Innova is only intended for drying and storing shoes or boots. The gloves dryer Innova is only intended
for drying and storing gloves. The helmet dryer Innova is only intended for drying and storing helmets.
In the event that any of the above instructions are not adhered to, WINTERSTEIGER will refuse any liability
for any damage caused!
Innova 27
Page 28

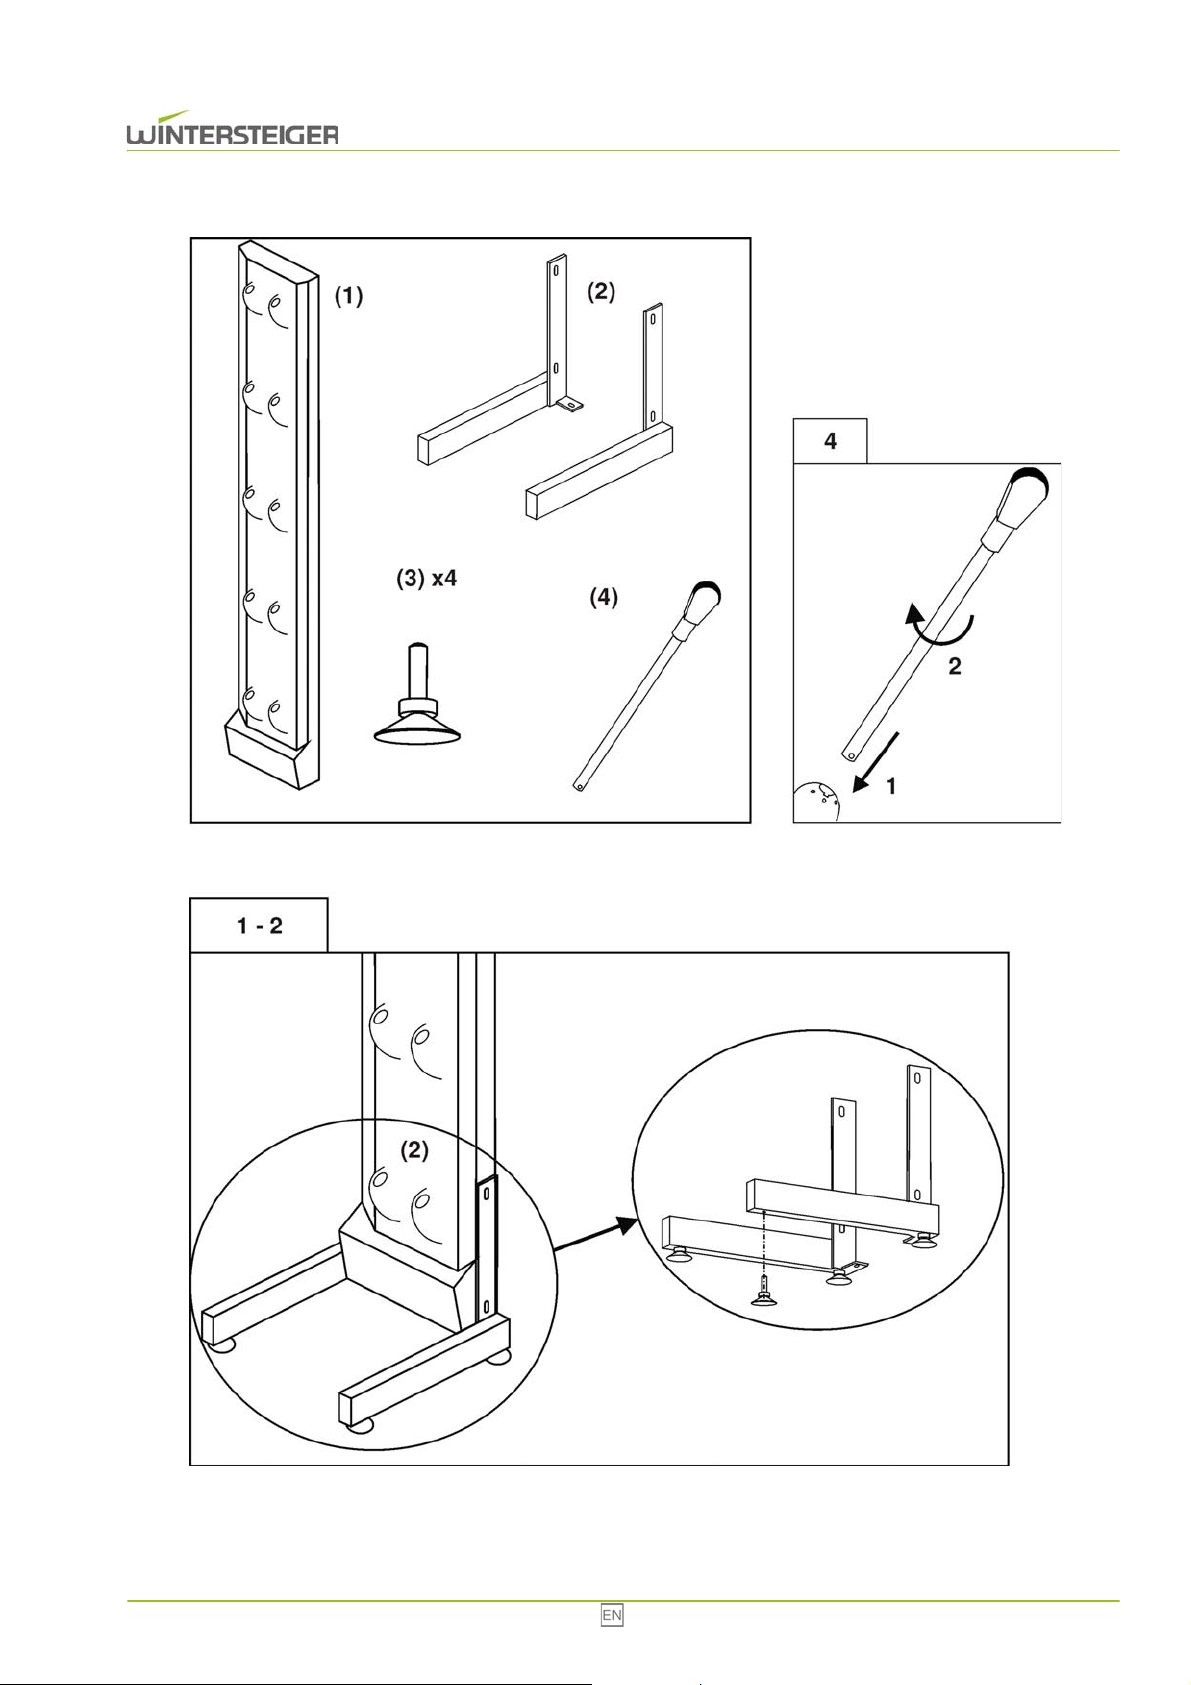
3 Assembly instructions
The package is made of:
1 drying unit [1]
1 set of shoe holder tubes [4]
1 power supply cable
Option stand:
2 foot-holders [2] (option)
4 feet [3] (option)
1 bag of screws and bolts (option)
Stand (Option)
Put the drying unit in flat position.
Fix the 2 foot-holders on the unit - 4 screws 8 x 16 + 4 flat washers
on the side - 2 screws
6 x 16 + 2 flat washers under the unit
Fix the 4 feet under the foot-holders without blocking the nuts.
Wall fixing
Use the fixing plates (fixed by 4 screws) located on the top and under the drying unit. Loose the screws, position the angle
for the wall fixing and tighten again.
Joining 2 drying units
Use 1 of the fixing plates to join 2 units together and carry on as when fixing to a wall.
Setup the dryer
Raise the assembly, adjust the height of the feet and block the nuts.
Insert the shoe holder tubes in the drying unit (clockwise quarter turn).
Connect the power supply cable on the top of the drying unit.
28 Innova
Page 29
Innova 29
Page 30
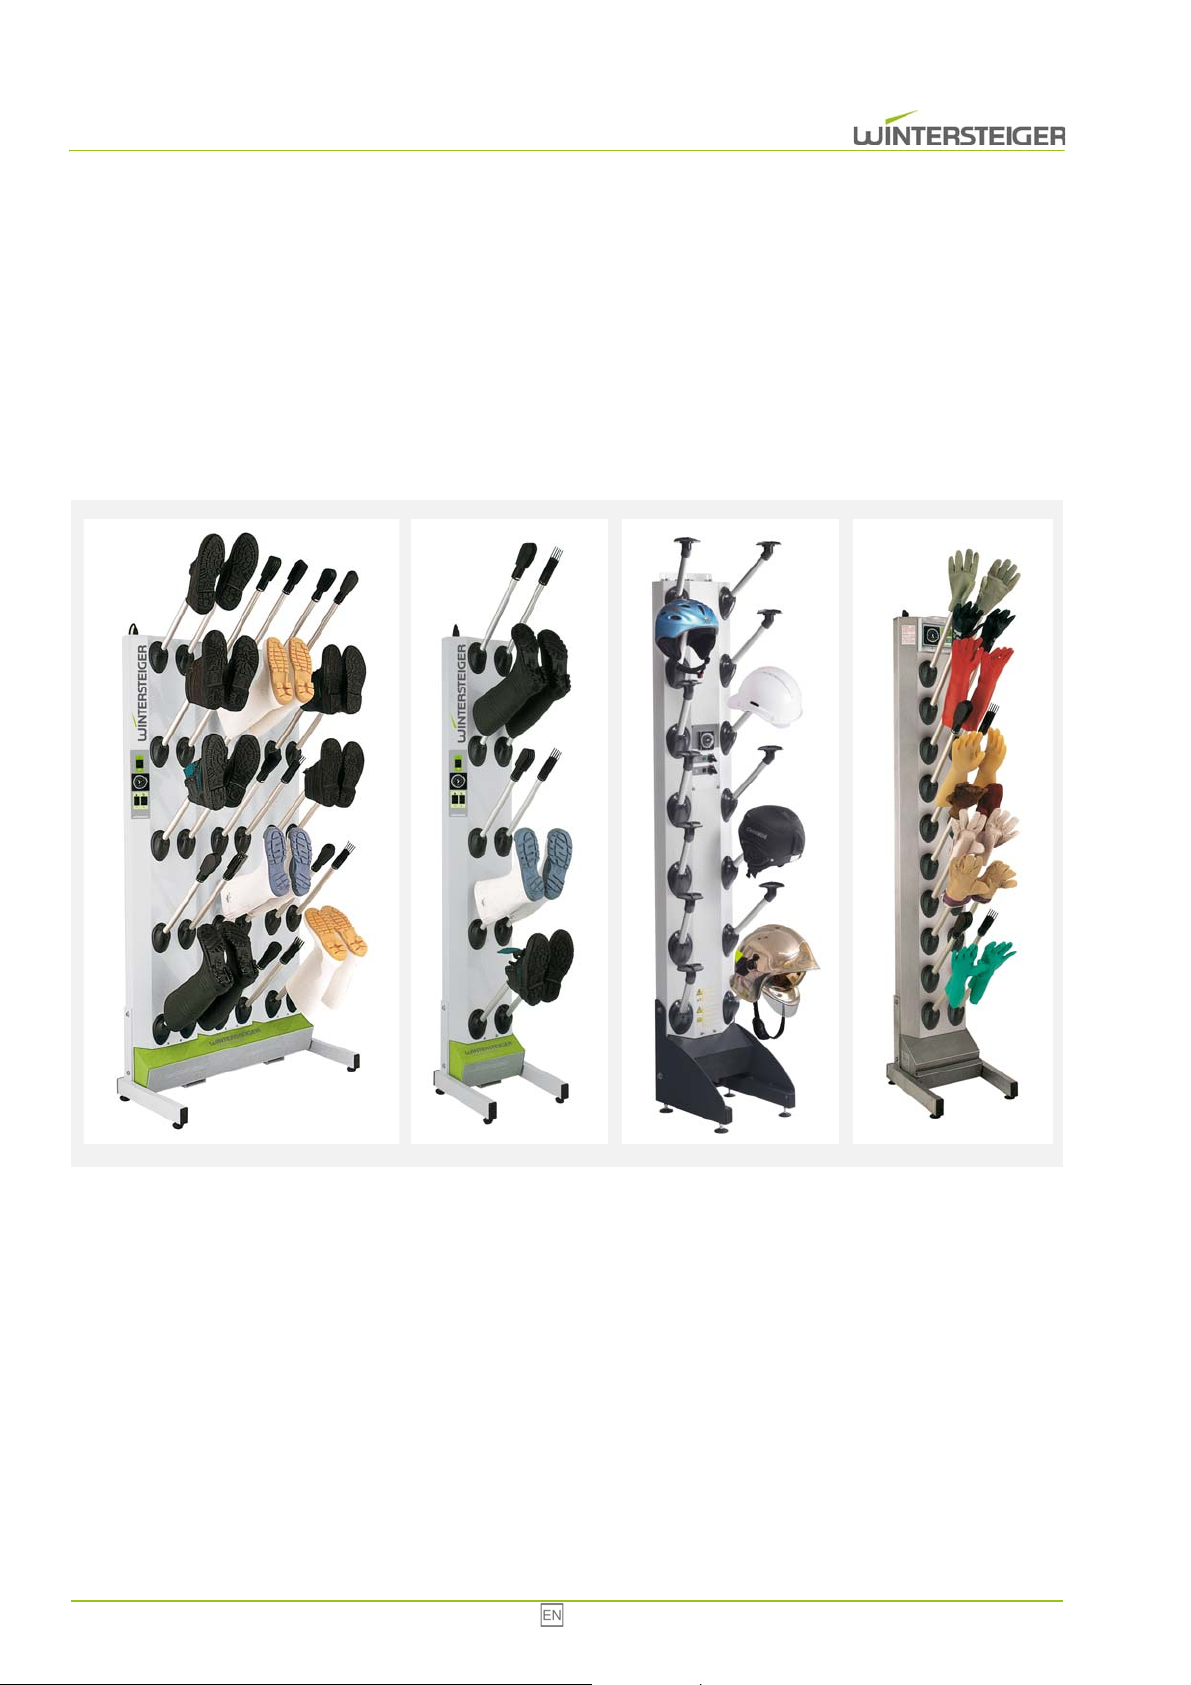
4 Function
Easy operation with analog timer
Central heating, adjustable in 2 steps (Stainless steel: 1 heating step)
Air outlet only for occupied tubes
Sanitation through germicidal ozone lamp
Deodorizing through air deodorant
The appliance can be mounted onto the wall or positioned to a wall on supports.
30 Innova
Page 31
5 Technical data
Type
Nominal voltage, frequency, nominal connected
wattage, fuse min.-max.:
Power heating:
INNOVA
Shoe and boot dryer
Innova 5 pairs shoes or boots
Step 1: 1AC 208-230V 50/60Hz; 1.1 kW; 5A; 10/16A or
Step 2: 1AC 208-230V 50/60Hz; 0.55kW; 2.5A; 10/16A or
Stainless steel: 1AC 208-230V 50/60Hz; 1.1 kW; 5A; 10/16A
Innova 10 pairs of shoes or boots
Step 1: 1AC 208-230V 50/60Hz; 2,2kW; 10A; 10/16A
Step 2: 1AC 208-230V 50/60Hz; 1,1kW; 5A; 10/16A
Innova 15 pairs shoes or boots
Step 1: 1AC 208-230V 50/60Hz; 2.2kW; 10A; 10/16A or
Step 2: 1AC 208-230V 50/60Hz; 1.1kW; 5A; 10/16A or
Stainless steel: 1 AC 208-230V 50/60Hz; 2.2 kW; 10A; 10/16A
Innova 20 pairs of shoes or boots
Step 1: 1AC 208-230V 50/60Hz; 3,3kW; 10A; 10/16A
Step 2: 1AC 208-230V 50/60Hz; 1,75kW; 5A; 10/16A
Innova 5 pairs
Step 1: 1050 W
Step 2: 550W
Stainless steel: 1100 W
Innova 10 pairs
Step 1 : 2100W
Step 2 : 1050W
Innova 15 pairs
Step 1: 2200W
Step 2: 1050W
Stainless steel: 2200W
Innova 20 pairs
Step 1 : 3150W
Step 2 : 1575W
The correct connecting voltage is shown on the type plate!
Ambient temperature: +15 to 40°C
Air humidity: 30% - 80%
Dimensions: see following table and drawing
Drying time:
Sanitation:
Persistency of deodorant: in 5-hours-operation approx. 2 months
Noise emission: approx. 65 dB(A)
Innova 31
1.5 to 2.5 hours, depending on wettness of shoes, temperature,...
Sanitation achieved using germ-killing Ozone lamps
Sanitation time about 2 hours
Page 32
INNOVA (Stan-
dard)
Height 2150 mm 2150 mm 2150 mm 2150 mm
Width 300 mm 300 mm 605 mm 605 mm
Depth 540 mm 620 mm 540 mm 620 mm
Weight 23 kg 26 kg 36 kg 39 kg
without stand with stand without stand with stand
Shoes - 5 pairs Shoes - 10 pairs
INNOVA (Stan-
dard)
Height 2150 mm 2150 mm 2150 mm 2150 mm
Width 900 mm 900 mm 1205 mm 1205 mm
Depth 540 mm 620 mm 540 mm 620 mm
Weight 53 kg 56 kg 78 kg 81 kg
INNOVA (Stain-
less steel)
Height 2150 mm 2150 mm 2150 mm 2150 mm
Width 300 mm 300 mm 900 mm 900 mm
Depth 540 mm 620 mm 540 mm 620 mm
Weight 33 kg 36 kg 80 kg 83 kg
without stand with stand without stand with stand
without stand with stand without stand with stand
Shoes - 15 pairs Shoes - 20 pairs
Shoes - 5 pairs Shoes - 15 pairs
32 Innova
Page 33
Type
Nominal voltage, frequency, nominal connected
wattage, fuse min.-max.:
Power heating:
The correct connecting voltage is shown on the type plate!
Ambient temperature: +15 to 40°C
Air humidity: 30% - 80%
Dimensions: see following table and drawing
INNOVA
Helmet- /Gloves dryer
Innova 10 pairs gloves
Step 1: 1AC 208-230V 50/60Hz; 1.1kW; 4.78A; 10/16A oder
Step 2: 1AC 208-230V 50/60Hz; 0.55W; 2.5A; 10/16A
Stainless steel: 1AC 208-230V 50/60Hz; 1.2kW; 5.22A; 10/16A
Innova 14 helmets
Step 1: 1AC 208-230V 50/60Hz; 1.1kW; 4.78A; 10/16A oder
Step 2: 1AC 208-230V 50/60Hz; 0.55W; 2.5A; 10/16A
Innova 10 pairs gloves
Step 1: 550W
Step 2: 1050W
Stainless steel 1200W
Innova 14 helmets
Step 1: 500W
Step 2: 1000W
Drying time:
Sanitation:
Persistency of deodorant: in 5-hours-operation approx. 2 months
Noise emission: approx. 65 dB(A)
10 pairs gloves 10 pairs gloves 14 Helmets
INNOVA
Standard Stainless steel Standard
Height 2150 mm 2150 mm 2060 mm
Width 300 mm 300 mm 465 mm
Depth 540 mm 520 mm 410 mm
Weight 30 kg 80 kg 50 kg
1.5 to 2.5 hours, depending on wettness of gloves and helmets,
temperature,...
Sanitation achieved using germ-killing Ozone lamps
Sanitation time about 2 hours
Innova 33
Page 34
34 Innova
Page 35

6 Transport, storage and moving
6.1 Transport of the unit
The product has to be transported in the original packing and in the position shown on the packing.
6.2 Storage of the unit
Temperature: 0° to +40°C.
To avoid damage of the unit, please do not stack anything on the crate!
6.3 Unwrapping and positioning
Follow all instructions carefully, in order to avoid any injuries, or damages to the machines.
6.4 Setting up
When choosing the position of the boot dryer you should bear in mind the intensity of work and the space needed for easy
handling (working and walking areas). Please note, that the boots, shoes or helmets may increase the required place. The
ceiling height has to be up from 2.35 m. Whenever possible, the boot dryer should be mounted in a well ventilated room close
to a power source.
When choosing the position of the unit, do not forget to follow the working safety regulations in force.
Never push any object into the extractor fan grid of the boot dryer or even cover it up in any way (do not
obstruct the dryer)!
To ensure that INNOVA operates properly, it must be put in a place where ambient temperature never falls
under 15°C.
Never push any object into the extractor fan grid of the boot dryer or even cover it up in any way. Do not pour any liquid down
the extractor fan pipe or even spray it. This could result in an electrical shock or damage to the device.
Innova 35
Page 36
A
B
C
D
E
7 Description of the operating elements
0
I
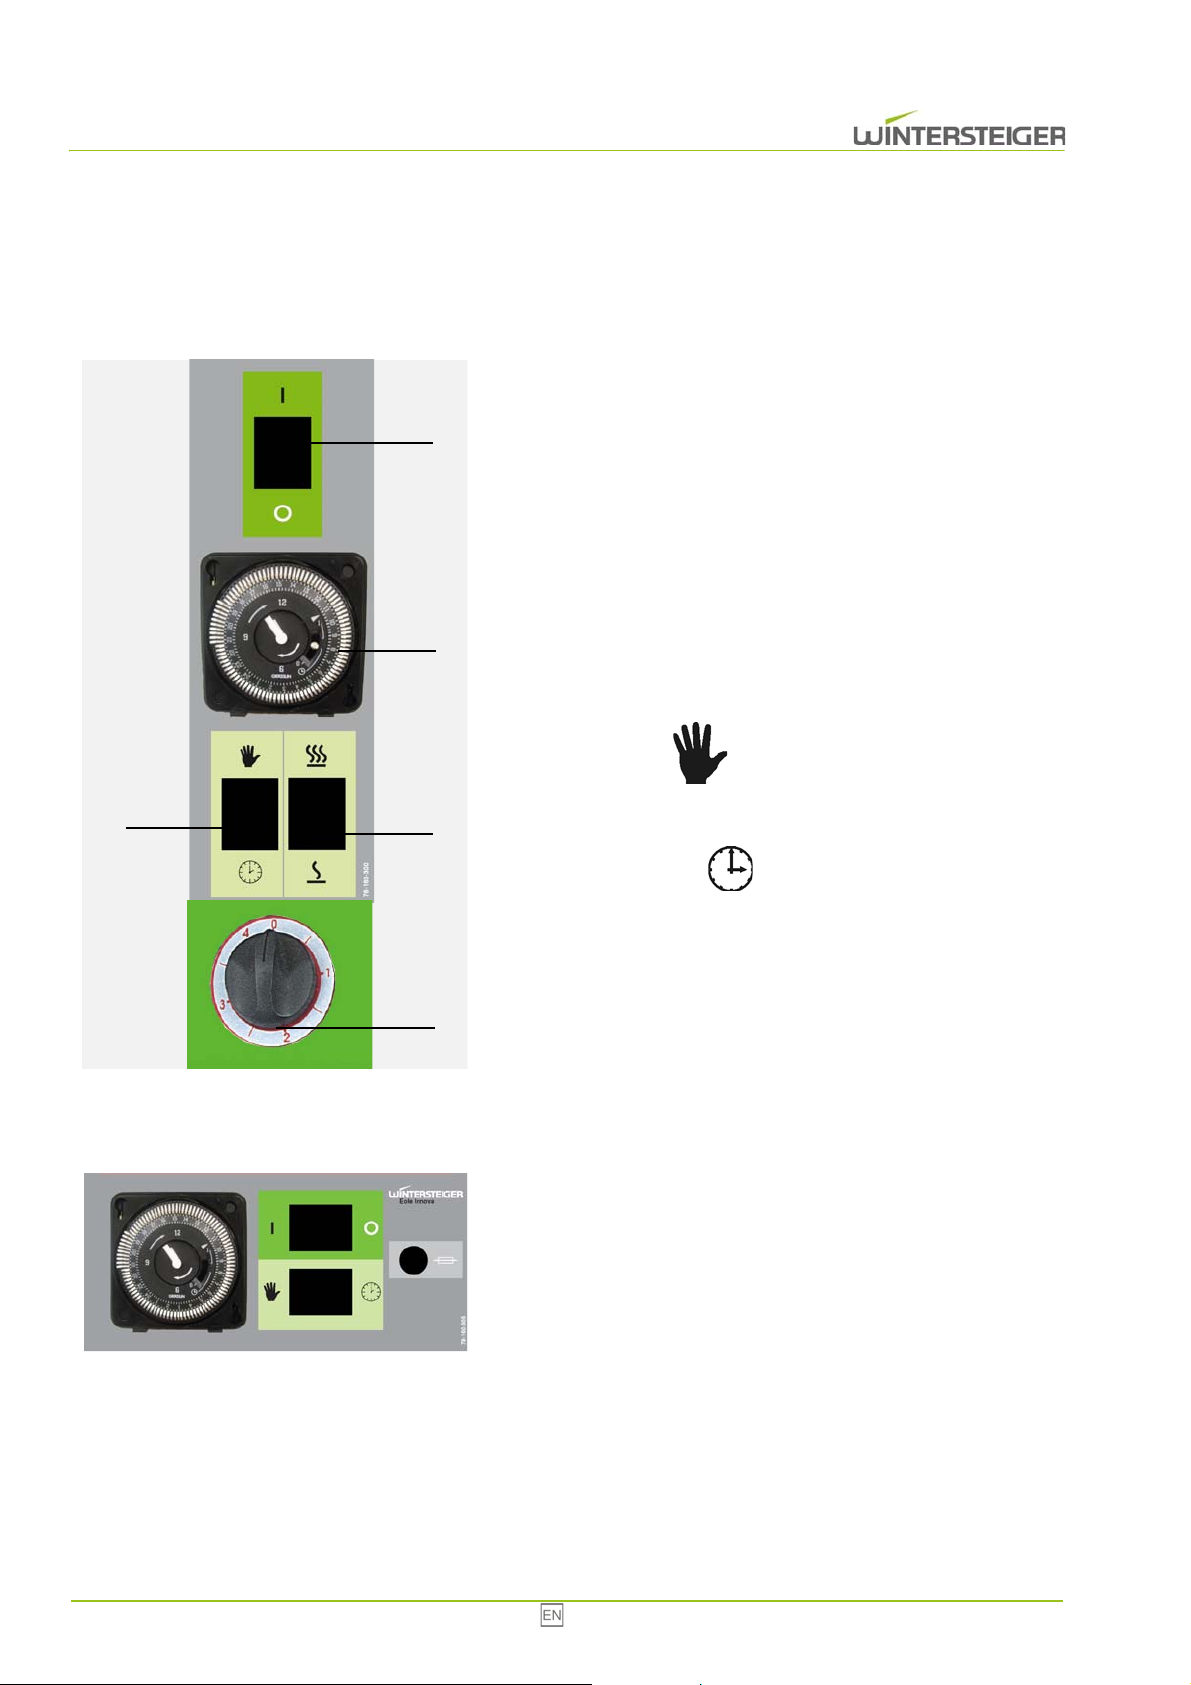
7.1 Standard variante
A: Main switch:
Off
Switching off the dryer
On
Switching on the dryer
B: Switch warm air
Step 1 or step 2
C: Timer for automatic mode
D: Operating mode
Manual mode
In the manual mode the circulating fan and the sanitation are activated.
7.2 Stainless steel variante
Automatic mode
The drying and sanitation of the boots are done by the preset time
on the timer.
E: 4-hours-timer
In automatic mode the drying and sanitation time can be limited
with the 4-hours-timer up to 4 hours.
At the stainless steel model there is only one step for the heating power.
The fuse is directly on the operating panel.
36 Innova
Page 37
G
I
F
H
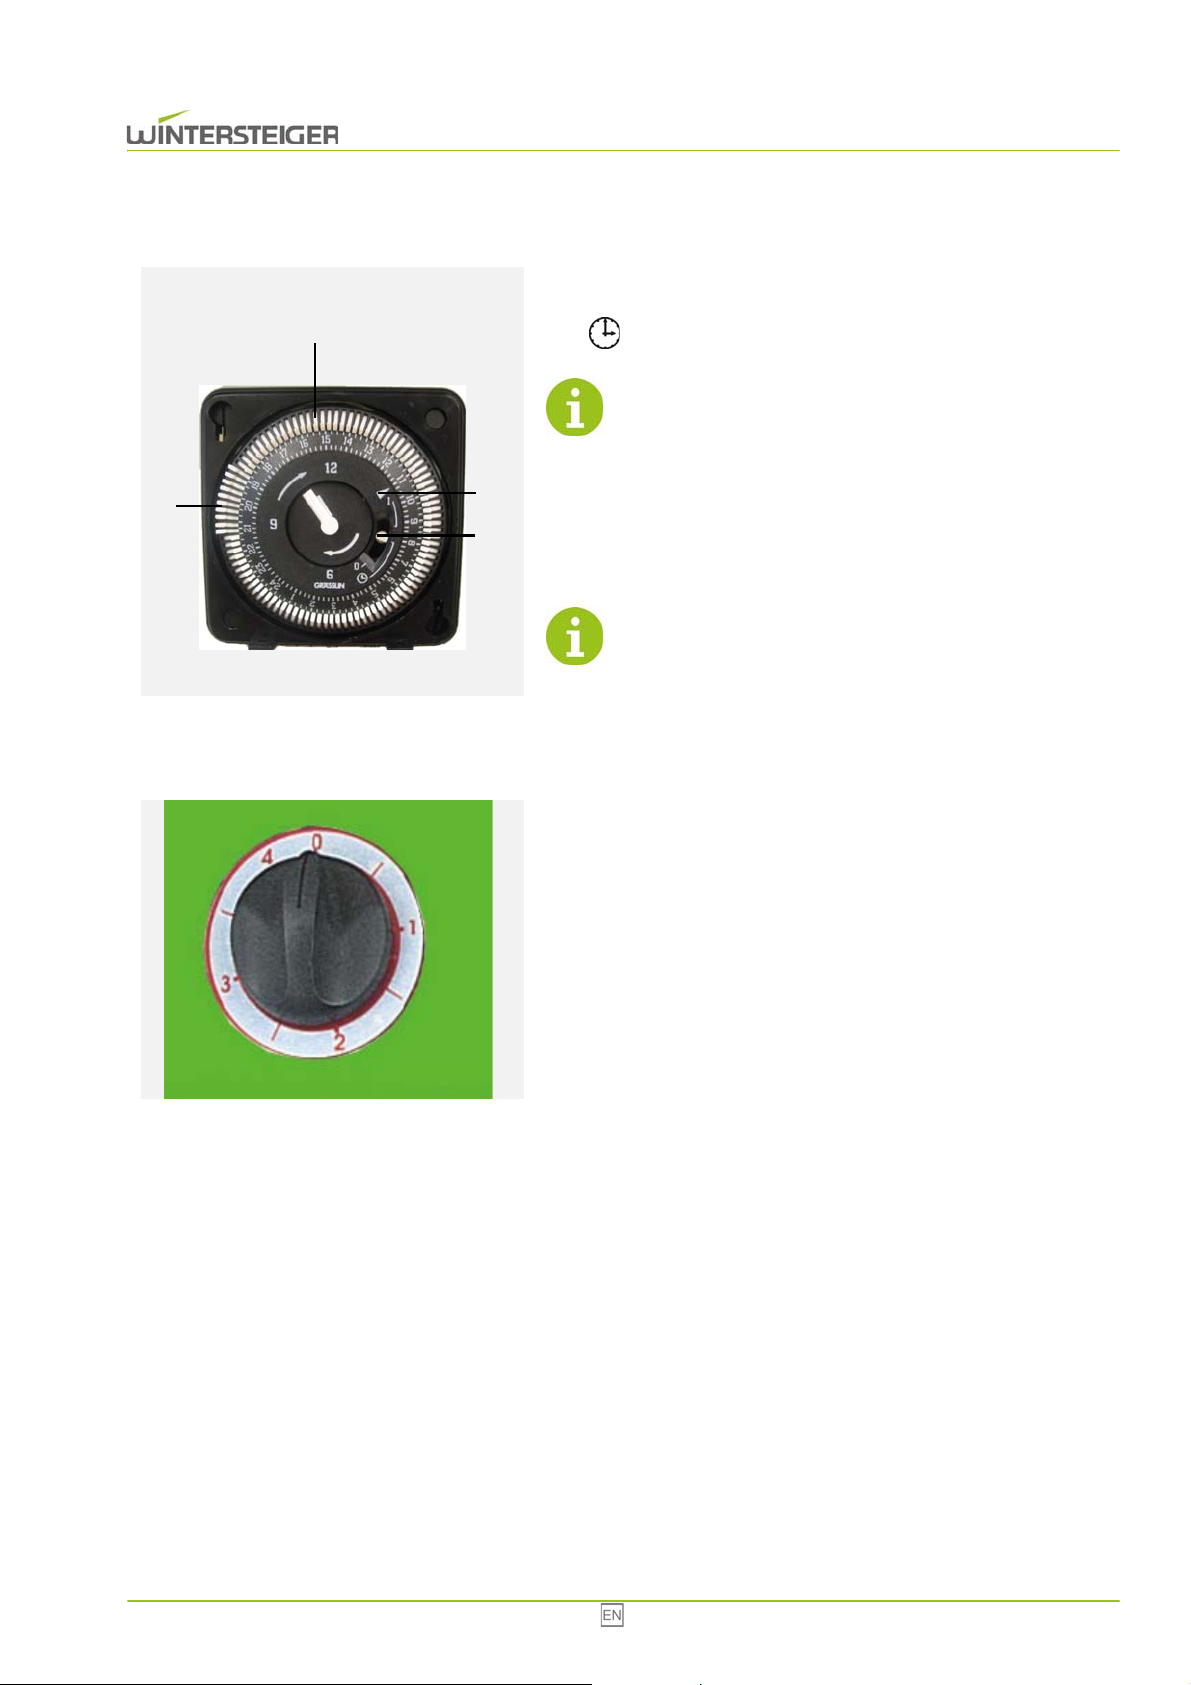
7.3 Adjustment of the timer - automatic mode
Turn the marking [F] of the outer ring [I] to the present hour for adjustment of the time. Position of the knob [H] has to be in the center
and must not be adjusted.
The timer is equipped with a battery (chaging time: 70
hours) so time will be kept, should there be a power failure
or a short-time disconnection from the power supply. But
the time has to be adjusted after a longer current interruption.
Move programming segments [G] towards the outside of the clockface to the required drying length of time: cycle starts at the set time.
Set the switch [H] to the middle position for automatic
mode.
7.4 Adjustment of the 4-hours-timer - automatic mode
In automatic mode the drying time can be set with the 4-hours-timer located below the operating panel. The drying and sanitation time can be set
stepless up to 4 hours.
Innova 37
Page 38
Pic 1
Pic 2
8 Starting up
8.1 Placing the boot
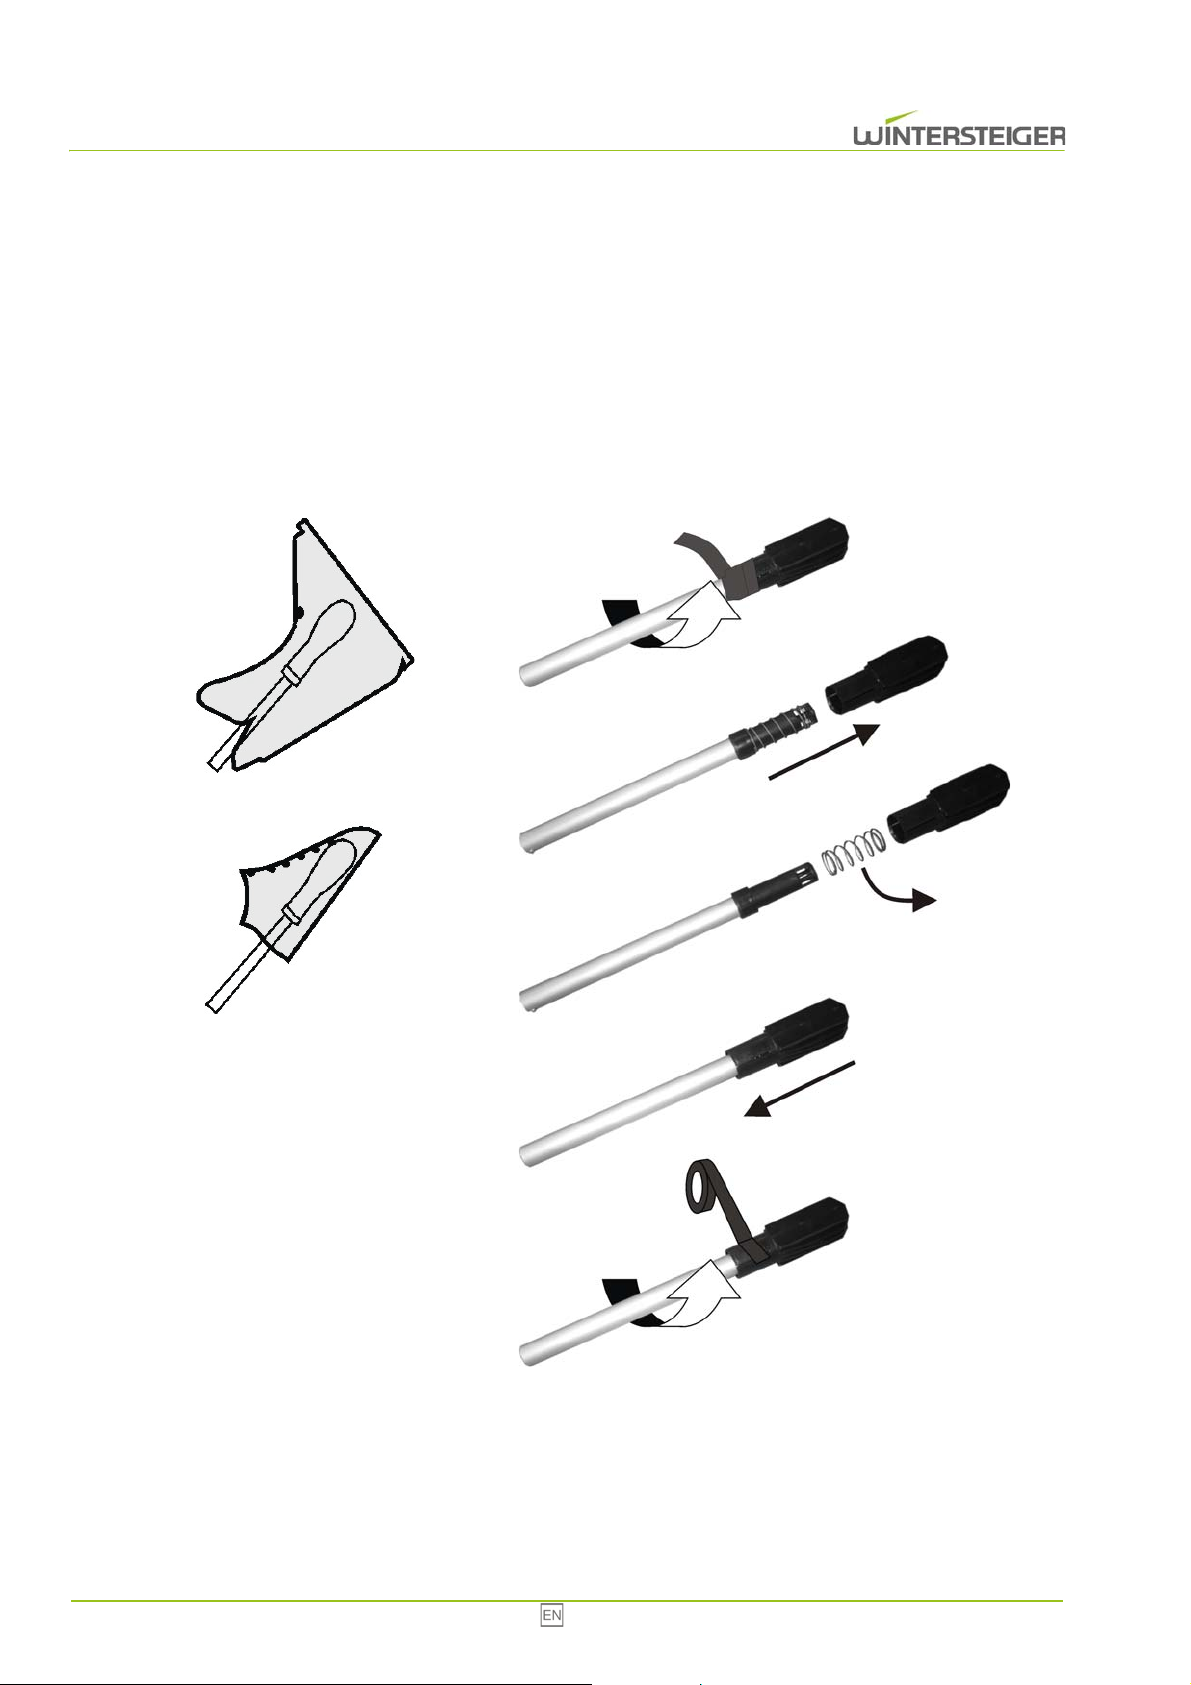
To dry the shoe place higher shoes or boots with the tip of the shoe upwards. Place low shoes with the tip downwards.
If the boot dryer is being used for boots whose weight is not enough to activate the nozzle on the dryer head, undo the
spring as shown in picture [2]. First remove the black tape. Fix the nozzle on the dryer head after removing the spring
again with tape on the tube.
38 Innova
Page 39
A
B
C
D
8.2 Operation
If necessary, renew the deodorant.
Plug in the appliance.
Switch on the power to the dryer by means of the switch [A]. Select the manual mode or automatic mode with the toggle
switch [C]. Check the adjustment of the timer when automatic mode was selected. In automatic mode, drying duration
can be limited up to 4 hours via the 4-hours-timer [D] located underneath the control panel. Select the desired heating
power (step 1 or 2) using switch [B]. The stainless steel version only has one heating step.
Remove the boots, gloves or helmets after the drying and sanitation cycle.
The next cycle can be started.
Innova 39
Page 40
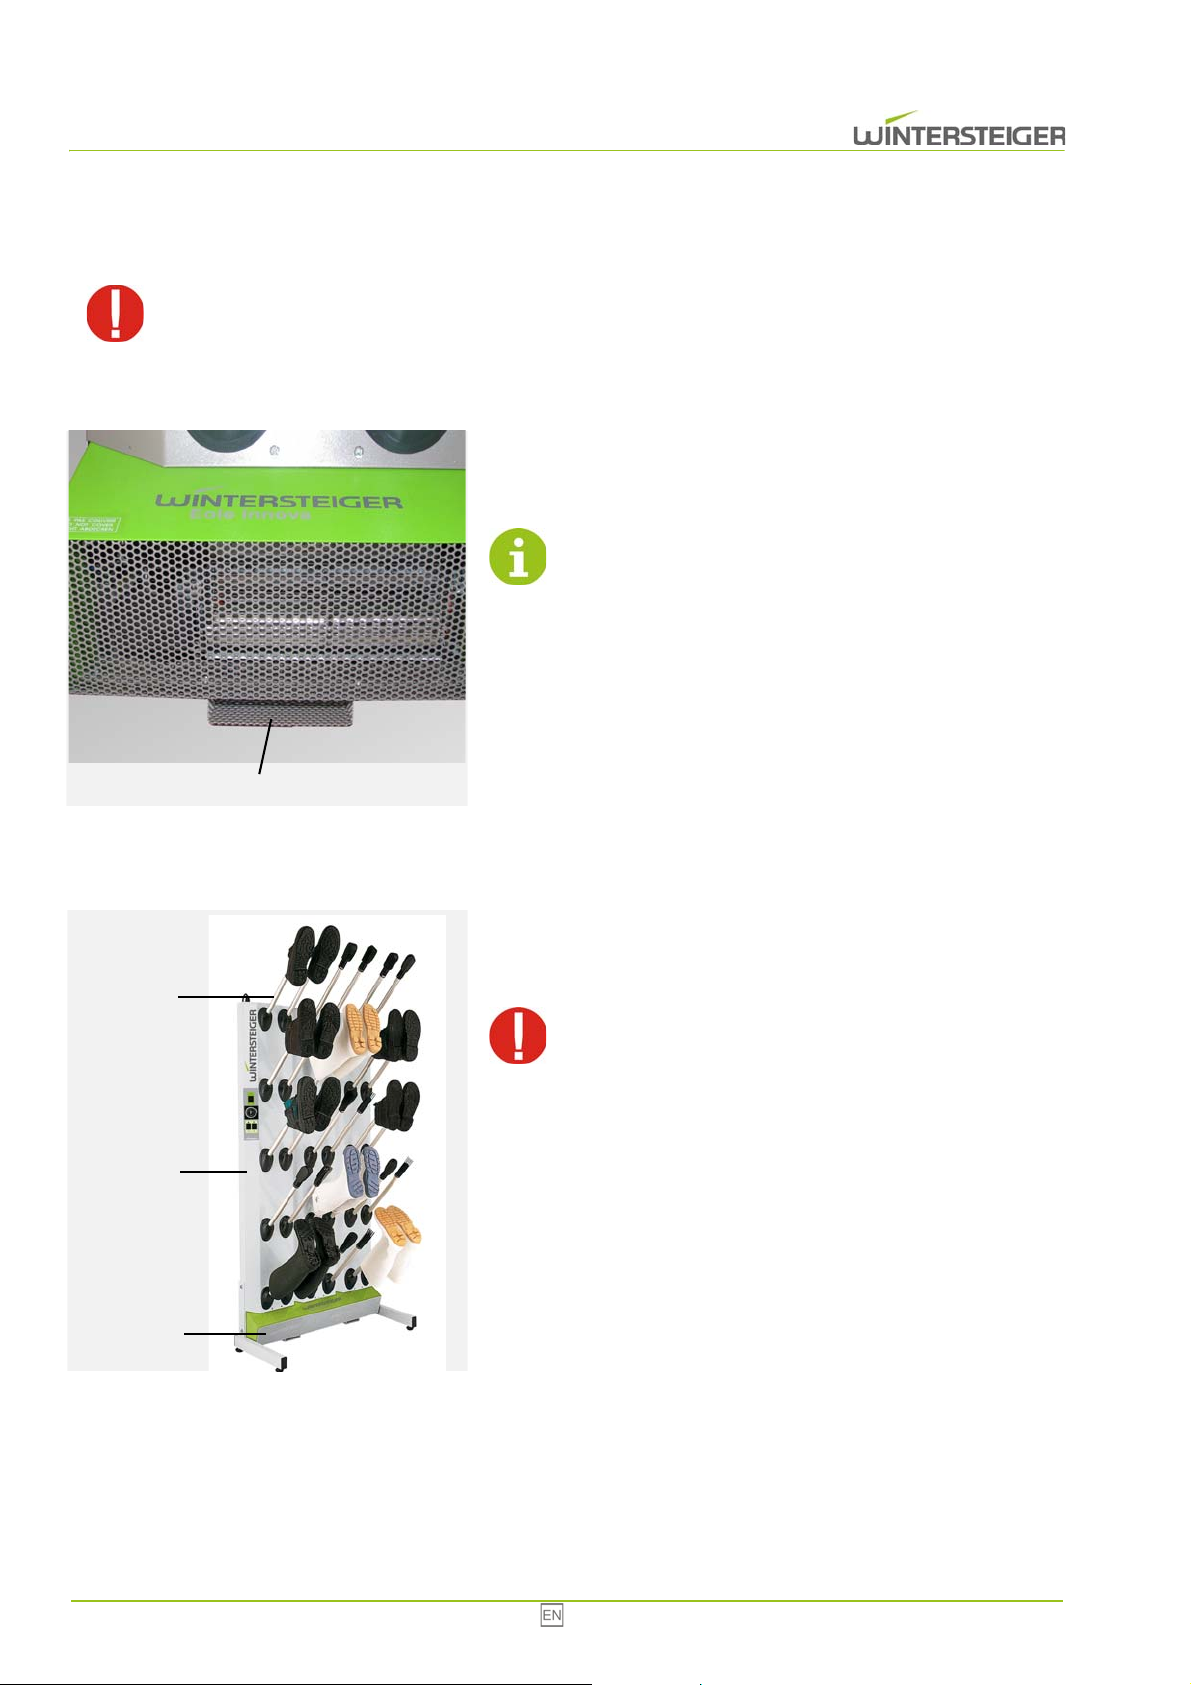
A
E
D
C
9 Maintenance
Switch off the appliance and disconnect mains plug before cleaning!
9.1 Changing the air deodorant
On the bottom of the front there is a shelf [A] for the air deodorant.
Remove the deodorant bag and take a smell at it. If the bag does not
smell anymore, renew it.
Persistency of the deodorant in 5-hours-operation approx.
2 months!
9.2 Cleaning
Clean the frame [C] and the valves [D] regularly with a damp cloth.
Remove the dust from the inside of the ventilators yearly by opening
of the front cover [E].
Do not clean the appliance with a high-pressure cleaner! In
the event that this instruction is not adhered, WINTERSTEIGER will refuse any liability and guarantee for any damage
caused.
40 Innova
Page 41

9.3 Ozone generator
The used ozone generators allow an efficient sanitation for an operating time of 3000 hours, afterwards the ozone lamps
have to be renewed. Carry out a visual control of the ozone producer regularly, that is once a month (blue-tinged light). Reflections of the uv light are visible through the ventilation grille, when standing 2 meters foreward the machine.
Risk of injury!
Do not look directly to the ozone generator! The UV rays can injury your eyes!
Innova 41
Page 42
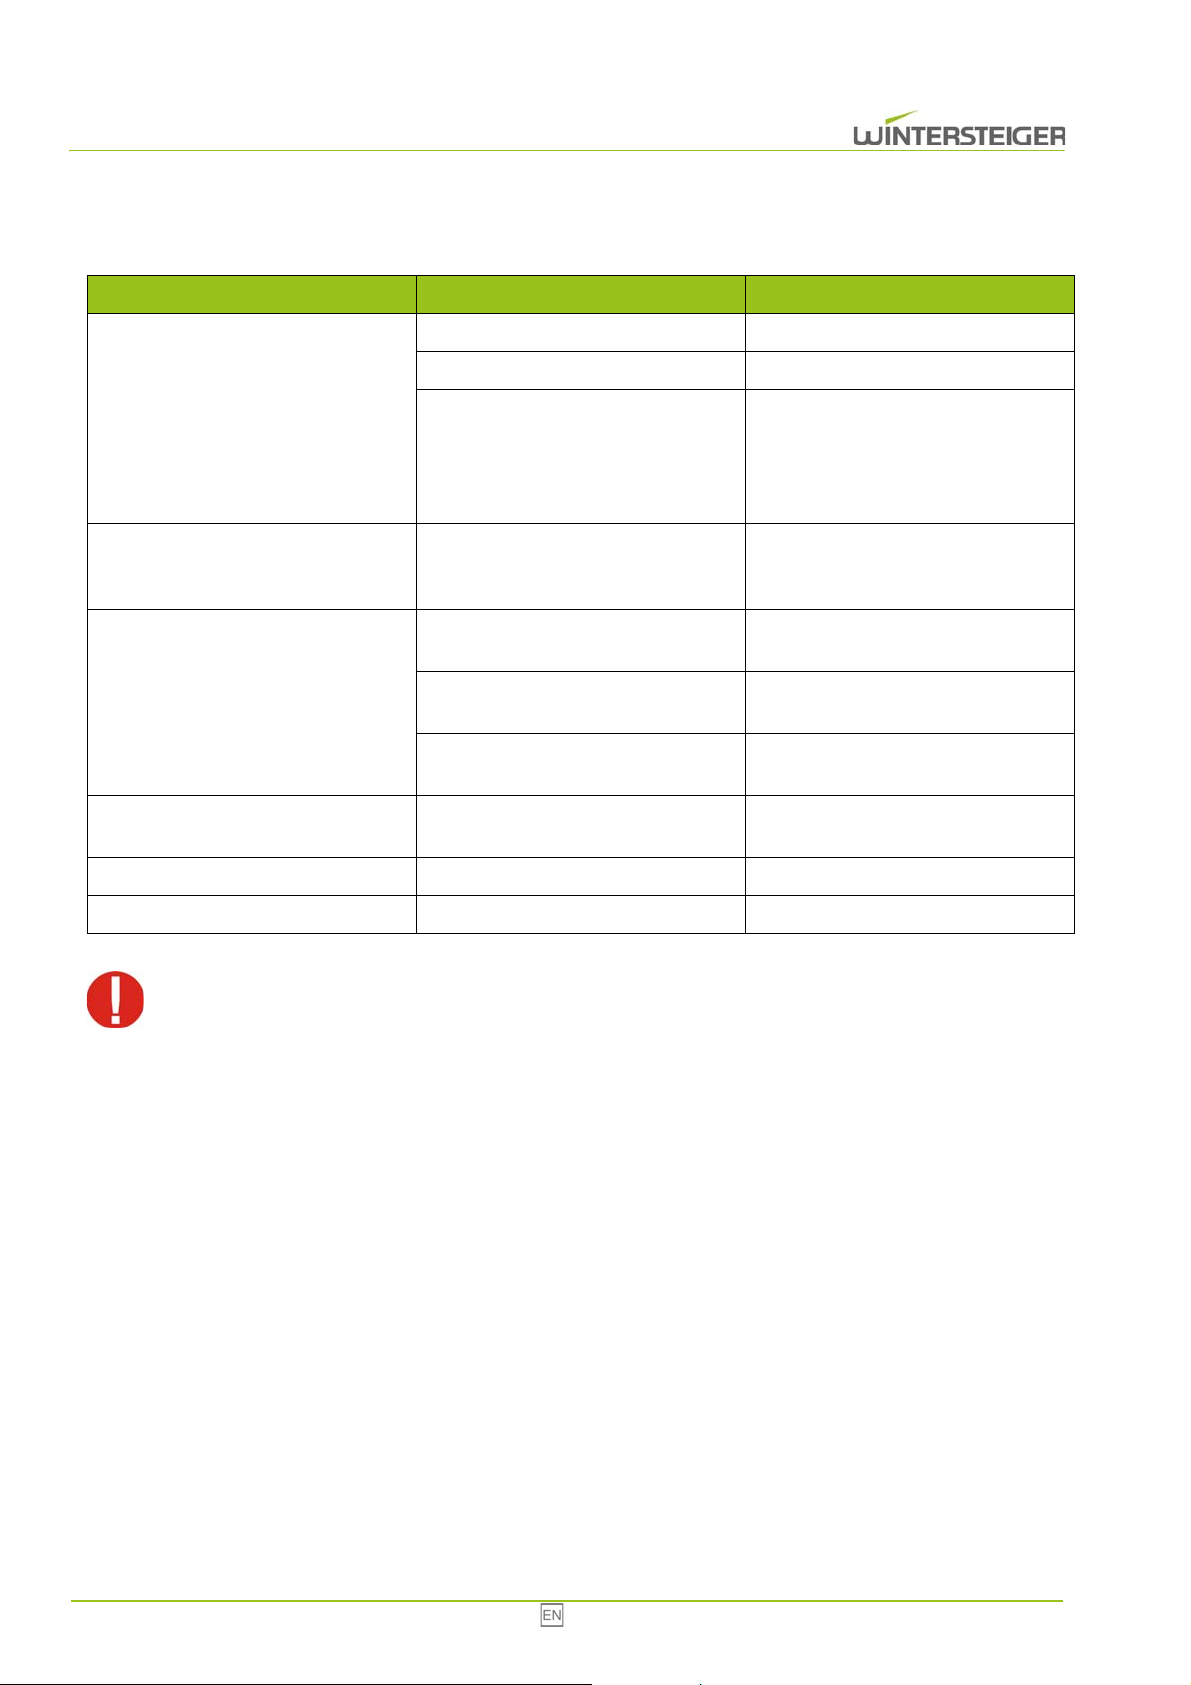
10 Trouble shooting
Error Cause Remedy
The dryer is not connected. Plug in the plug for the power supply
The main switch was adjusted to „0“ Switch on the main switch
The appliance does not work
Fuse is defective
The machine does not switch on at the
time desired when automatic mode
was selected
The appliance does not dry
Dryer function decreases or heating
does not work
No deodorization Deodorant bag is exhausted Renew deodorant
Defective ozone lamp Change ozone lamp
When working on the machine disconnect electricity! The machine may only be operated with all covers
and safeguards mounted!
Timer is not adjusted Set the marking [F] to the preset time
Not enough air supply
Air humidity > 80 %
Room temperature < 15 °C
Defective fan Check the fan
Check the fuse which is on the electrical supply connector of the device. 1
spare fuse is available on the fuse holder. Before changing the fuse remove
power supply.
Check the air supply of the dryer and
the room
The less the room humidity, the better
the drying.
The higher the temperature of the
room, the better the drying.
42 Innova
Page 43

11 Shut-down and disposal
Risk of injury!
Disconnect the machine from the mains supply or any external drive prior to shutting down and dismantling. Use
only suitable tools for dismantling.
When shutting down the machine dismantle and dispose of all machine parts properly. Clean all oily and
greasy components prior to disposal.
Oil and grease should never be allowed to pollute the environment.
Ensure that all disposal regulations specific to your country are adhered to!
Dismantle the machine properly into its individual components.
Clean oily and greasy components.
Dispose of components by material group (steel, plastic, electrical and electronic components, etc.).
Dispose of oil and grease in an environmentally friendly manner.
Innova 43
Page 44

44 Innova
Page 45

Table des matières
1 Preface ................................................................................................................................................................................ 46
1.1 Usage conforme ....................................................................................................................................................... 46
2 Généralités ......................................................................................................................................................................... 47
2.1 Consignes de sécurité ............................................................................................................................................. 47
2.2 Avertissements ........................................................................................................................................................ 47
2.3 Dispositifs de protection ........................................................................................................................................... 47
2.4 Conseils d'utilisation ................................................................................................................................................ 48
3 Notice de montage ............................................................................................................................................................. 49
4 Fonctionnement ................................................................................................................................................................. 51
5 Données techniques .......................................................................................................................................................... 52
6 Transport, stockage et changement de site .................................................................................................................... 56
6.1 Conditions de transport de l'appareil ....................................................................................................................... 56
6.2 Stockage de l'appareil .............................................................................................................................................. 56
6.3 Comment enlever l'emballage, comment choisir l'endroit où poser l'appareil ......................................................... 56
6.4 Lieu d'installation ..................................................................................................................................................... 56
7 Description du tableau de commande ............................................................................................................................. 57
7.1 Variante standard ..................................................................................................................................................... 57
7.2 Variante acier inoxydable ......................................................................................................................................... 57
7.3 Réglage de l'horloge en mode automatique ............................................................................................................ 58
7.4 Mise en marche de la minuterie 4 heures - mode automatique ............................................................................... 58
8 Mise en service .................................................................................................................................................................. 59
8.1 Position de la chaussure .......................................................................................................................................... 59
8.2 Fonctionnement ....................................................................................................................................................... 60
9 Maintenance ....................................................................................................................................................................... 61
9.1 Renouvellement du déodorant ................................................................................................................................. 61
9.2 Nettoyage ................................................................................................................................................................. 61
9.3 Générateur d'ozone ................................................................................................................................................. 62
10 Correction des erreurs .................................................................................................................................................... 63
11 Mise à l'arrêt définitive et élimination ............................................................................................................................ 64
Innova 45
Page 46

© Copyright 2009 by
WINTERSTEIGER AG ::: A-4910 Ried/I Dimmelstrasse 9
Auteur et realisation graphique : Franz Badegruber
Tel. +43 7752 919-0
E-mail: [email protected]
Conception : Maria Marek-Pollhammer
Traduction des instructions de service originales
1 Preface
Ce manuel de service doit avoir été lu par les opérateurs et le personnel d'entretien de la machine avant la première mise
en service et est un complément au dossier de formation.
Les dommages résultant d'une non-observation des consignes du manuel ne sont pas couverts par la garantie. L'utilisateur
de l'appareil est tenu par la loi de respecter la réglementation nationale respective en matière de prévention d'accidents.
Par ailleurs, ce manuel de service doit être traité confidentiellement. Seules les personnes autorisées y ont accès. Il ne peut
être cédé à des tiers qu'après consentement écrit de la part de la société WINTERSTEIGER.
Toute la documentation est protégée par des droits d'auteur. La transmission et la reproduction des textes ou d'une partie
de ceux-ci ainsi que l'utilisation et la communication de leur contenu sont illicites, sauf autorisation expresse par écrit.
Toute contravention est punissable et entraîne des dommages-intérêts. Tous les droits de propriété industrielle sont réservés à la société WINTERSTEIGER.
1.1 Usage conforme
Le séchoir Innova est conçu uniquement, selon la version, pour sécher les chaussures et les bottes, les gants ou les casques
(utilisation conforme) et pour que ceux-ci soient rangés dessus. Toute utilisation non limitée à ce domaine est considérée
comme non conforme. Le fabricant ne peut être considéré comme responsable et ne se porte pas garant dans le cas de
dégâts survenus au cours d´une manipulation non conforme. L´usager en assume seul la responsabilité.
Il est primordial de suivre exactement les instructions se rapportant au mode de fonctionnement ainsi que les conseils d´entretien et de maintenance. La réglementation pour la prévention d´accidents et les consignes de sécurité se doivent également d´être entièrement respectées.
Les éventuels dégâts survenant dans le cas d´une modification apportée sur la machine par l´usager ne portent d´aucune
façon atteinte à la responsabilité du fabricant.
Nous nous efforçons d´améliorer en permanence nos produits, et nous nous réservons le droit d´apporter des modifications
considérées comme avantageuses. Cependant nous ne sommes pas dans l´obligation d´apporter les dîtes modifications sur
des machines ou appareils déjà livrés.
Toutes illustrations, mesures et données de poids figurant dans notre notice d´utilisation sont sans engagement de notre
part.
46 Innova
Page 47
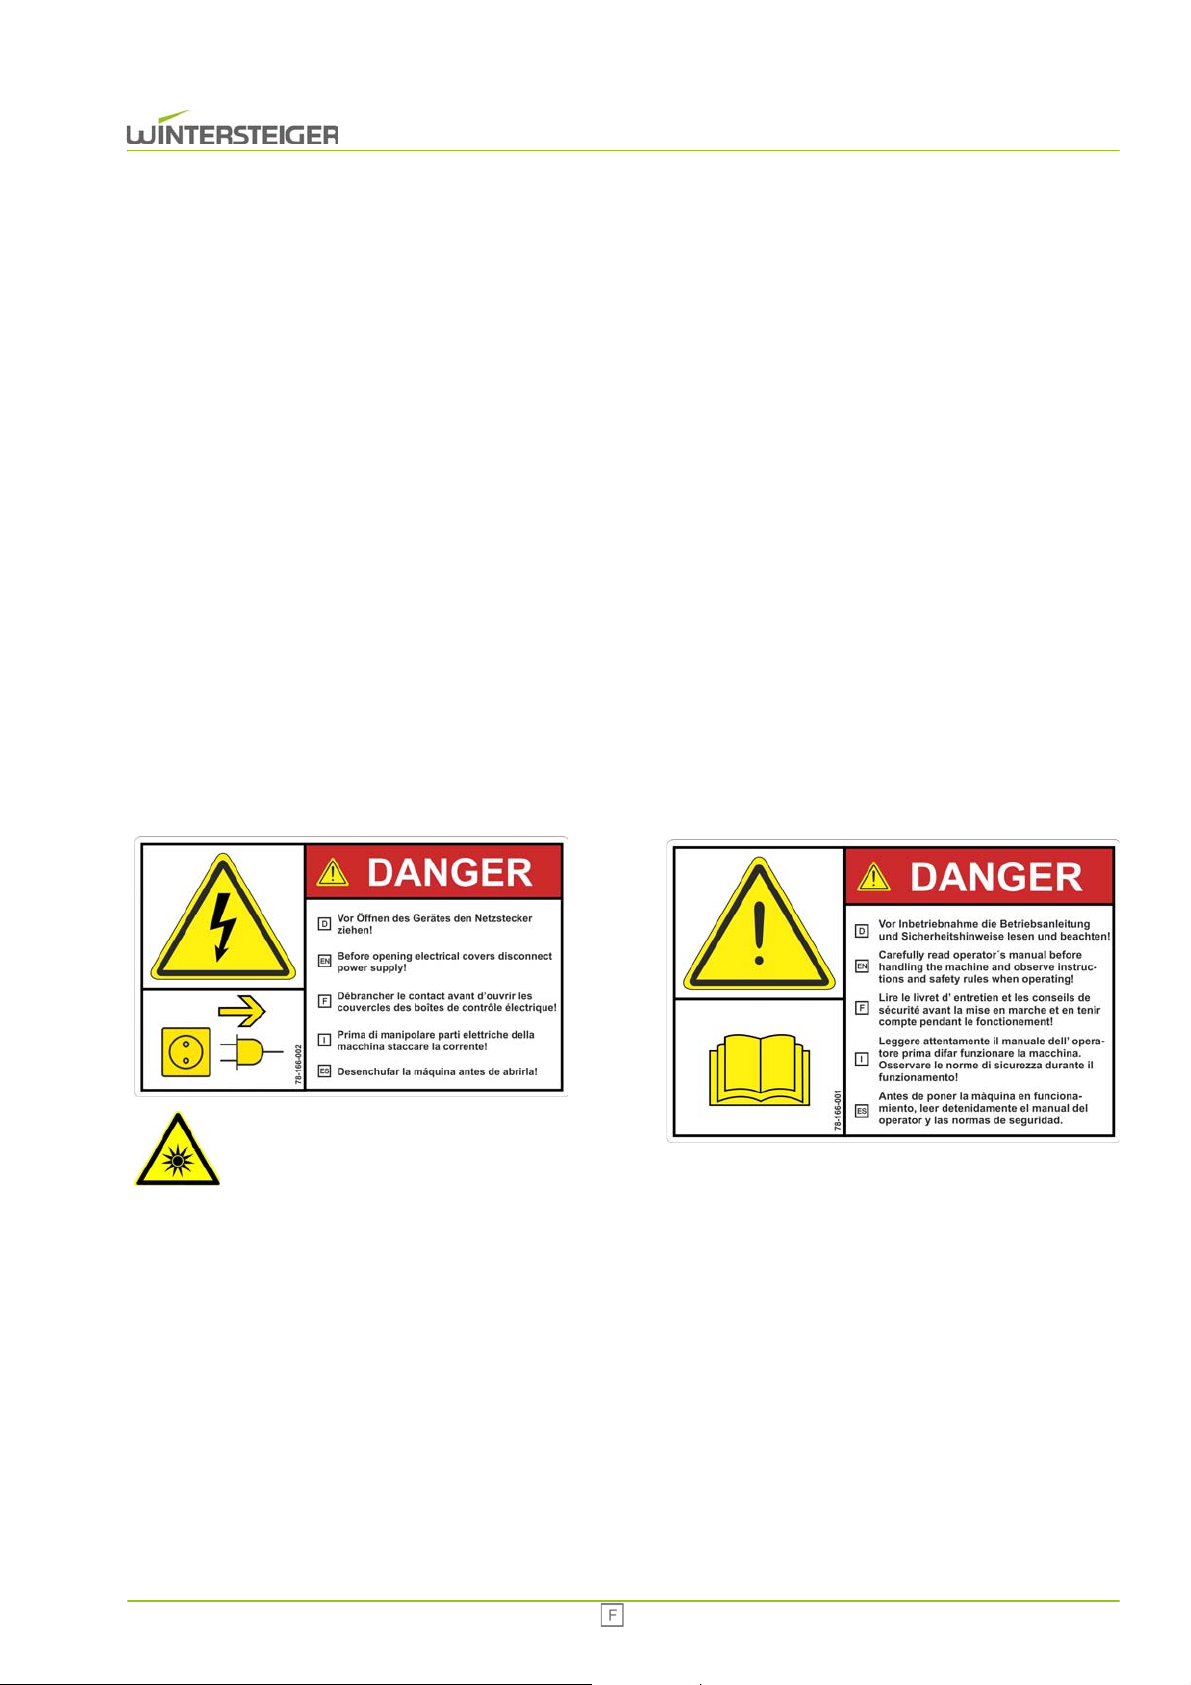
2 Généralités
Attention à la lumière UV de la lampe à ozone !
Ne pas regarder directement dans la lampe à ozone !
2.1 Consignes de sécurité
Pour le branchement de l'appareil sur le secteur, veuillez faire appel à un électricien qui connaît bien les consignes de
sécurité en vigueur dans le pays ainsi que celles des compagnies locales d'électricité et qui les respecte scrupuleusement.
Respectez la tension du réseau !
Les indications de branchement sont notées sur la plaque signalétique située à face supérieure de l’appareil.
Vérifiez si elles correspondent à la tension du réseau en présence.
Le séchoir à chaussures sera mis en service uniquement si tous les fusibles, tous les panneaux de protection sont montés.
Débranchez l'appareil avant de le déplacer ou de le manipuler !
La machine peut uniquement être mise en service avec des consommables et pièces de rechange d'origine WINTERSTEIGER. L'utilisation de matériel de marque étrangère se fait aux risques et sous la responsabilité de l'exploitant ; elle
entraîne en outre la perte de la garantie !
Veillez à ce que la pièce soit suffisamment aérée !
2.2 Avertissements
2.3 Dispositifs de protection
Il est interdit d'enlever les dispositifs de protection, quels qu'ils soient, lorsque l'appareil est en marche.
Innova 47
Page 48

2.4 Conseils d'utilisation
Le séchoir à chaussures Innova est conçu uniquement pour sécher les chaussures et les bottes et pour que celles-ci
soient rangées dessus. Le séchoir à gants Innova est conçu uniquement pour sécher les gants et pour que ceux-ci soient rangés dessus. Le séchoir à casques Innova est conçu uniquement pour sécher les casques et pour que ceux-ci
soient rangés dessus.
En cas de non respect de ces conseils d'utilisation, la responsabilité de la société WINTERSTEIGER n'est
pas engagée.
48 Innova
Page 49

3 Notice de montage
Matériel fourni :
1 séchoir [1]
1 jeu de tubes de ventilation pour le séchage des chaussures [4]
1 câble secteur
Support en option :
2 équerres métalliques [2] comme support
4 pieds à visser [3]
1 paquet de vis
Support (option)
Posez le séchoir à plat sur le sol.
Vissez les deux équerres métalliques du support sur le séchoir - 4 vis M 8 x 16 + 4 rondelles
Sur le côté du séchoir - 2 vis
M 6 x 16 + 2 rondelles sur la face inférieure du séchoir.
Fixez les 4 pieds à visser sur la face inférieure du support mais ne serrez pas encore à fond les écrous.
Fixation au mur
Utilisez pour ceci les équerres de fixation (fixées avec 4 vis) disposées sur les faces supérieure et inférieure du séchoir. Pour
cela, desserrez les vis, positionnez l'équerre de fixation au mur et resserrez les vis à fond.
2 Relier des séchoirs entre eux
Utilisez pour ceci 1 équerre de fixation à chaque fois pour relier 2 séchoirs et procédez ensuite comme pour la fixation au
mur.
Installation du séchoir
Installez le séchoir, ajustez la hauteur des pieds à visser en conséquence et vissez fermement à l'aide de l'écrou.
Enfichez les tubes de ventilation dans le séchoir et fixez-les en effectuant un quart de tour dans le sens des aiguilles
d'une montre.
Branchez le câble secteur sur la face supérieure du séchoir.
Innova 49
Page 50
50 Innova
Page 51
4 Fonctionnement
Manipulation simple grâce à un minuteur analogique
Chauffage central réglable en 2 positions (variante acier inoxydable : 1 vitesse de chauffage)
L'air sort uniquement par les perforations où sont posées chaussures.
Assainissement par lampe à ozone germicide
Désodorisation au moyen d'un déodorant
L'appareil peut être fixé au mur, ou posé sur pieds contre un mur.
Innova 51
Page 52
5 Données techniques
Type
Tension nominale, fréquence, puissance, courant
nominal, protection par fusibles minimum, maximum:
Puissance de chauffage:
INNOVA
Séchoir de chaussures et de bottes
Innova 5 paires de chaussures ou de bottes
Vitesse 1 : 1AC 208-230V 50/60Hz; 1,1 kW; 5A; 10/16A ou
Vitesse 2 : 1AC 208-230V 50/60Hz; 0,55kW; 2,5A; 10/16A ou
Acier inoxydable : 1AC 208-230V 50/60Hz; 1,1 kW; 5A; 10/16A
Innova 10 paires de chaussures ou de bottes
Vitesse 1: 1AC 208-230V 50/60Hz; 2,2kW; 10A; 10/16A
Vitesse 2: 1AC 208-230V 50/60Hz; 1,1kW; 5A; 10/16A
Innova 15 paires de chaussures ou de bottes
Vitesse 1 : 1AC 208-230V 50/60Hz; 2,2kW; 10A; 10/16A ou
Vitesse 2: 1AC 208-230V 50/60Hz; 1,1kW; 5A; 10/16A ou
Acier inoxydable : 1 AC 208-230V 50/60Hz; 2,2 kW; 10A; 10/
16A
Innova 20 paires de chaussures ou de bottes
Vitesse 1: 1AC 208-230V 50/60Hz; 3,3kW; 10A; 10/16A
Vitesse 2: 1AC 208-230V 50/60Hz; 1,75kW; 5A; 10/16A
Innova 5 paires
Vitesse 1 : 1050 W
Vitesse 2 : 550W
Acier inoxydable : 1100 W
Innova 10 paires
Vitesse 1 : 2100W
Vitesse 2 : 1050W
Innova 15 paires
Vitesse 1 : 2200W
Vitesse 2 : 1050W
Acier inoxydable : 2200W
Innova 20 paires
Vitesse 1 : 3150W
Vitesse 2 : 1575W
La tension de branchement est indiquée sur la plaque signalétique!
Température ambiante: +15 à 40°C
Humidité de l'air: 30% - 80%
Dimensions: voir la table et l’illustration suivants
Durée du séchage:
Assainissement:
Durée de l’effet du déodorant: en service de 5 heures environ 2 mois
Emission de bruits: ca. 65 dB(A)
52 Innova
1,5 à 2,5 heures en fonction de l'humidité des chaussures/bottes, de la température, etc.
Assainissement par lampe à ozone germicide !
Durée env. 2 heures
Page 53
INNOVA (Stan-
dard)
Hauteur 2150 mm 2150 mm 2150 mm 2150 mm
Largeur 300 mm 300 mm 605 mm 605 mm
Profondeur 540 mm 620 mm 540 mm 620 mm
Poids 23 kg 26 kg 36 kg 39 kg
sans supports avec supports sans supports avec supports
Chaussures - 5 paires Chaussures - 10 paires
INNOVA (Stan-
dard)
Hauteur 2150 mm 2150 mm 2150 mm 2150 mm
Largeur 900 mm 900 mm 1205 mm 1205 mm
Profondeur 540 mm 620 mm 540 mm 620 mm
Poids 53 kg 56 kg 78 kg 81 kg
INNOVA (Acier in-
oxydable)
Hauteur 2150 mm 2150 mm 2150 mm 2150 mm
Largeur 300 mm 300 mm 900 mm 900 mm
Profondeur 540 mm 620 mm 540 mm 620 mm
Chaussures - 15 paires Chaussures - 20 paires
sans supports avec supports sans supports avec supports
Chaussures - 5 paires Chaussures - 15 paires
sans supports avec supports sans supports avec supports
Poids 33 kg 36 kg 80 kg 83 kg
Innova 53
Page 54
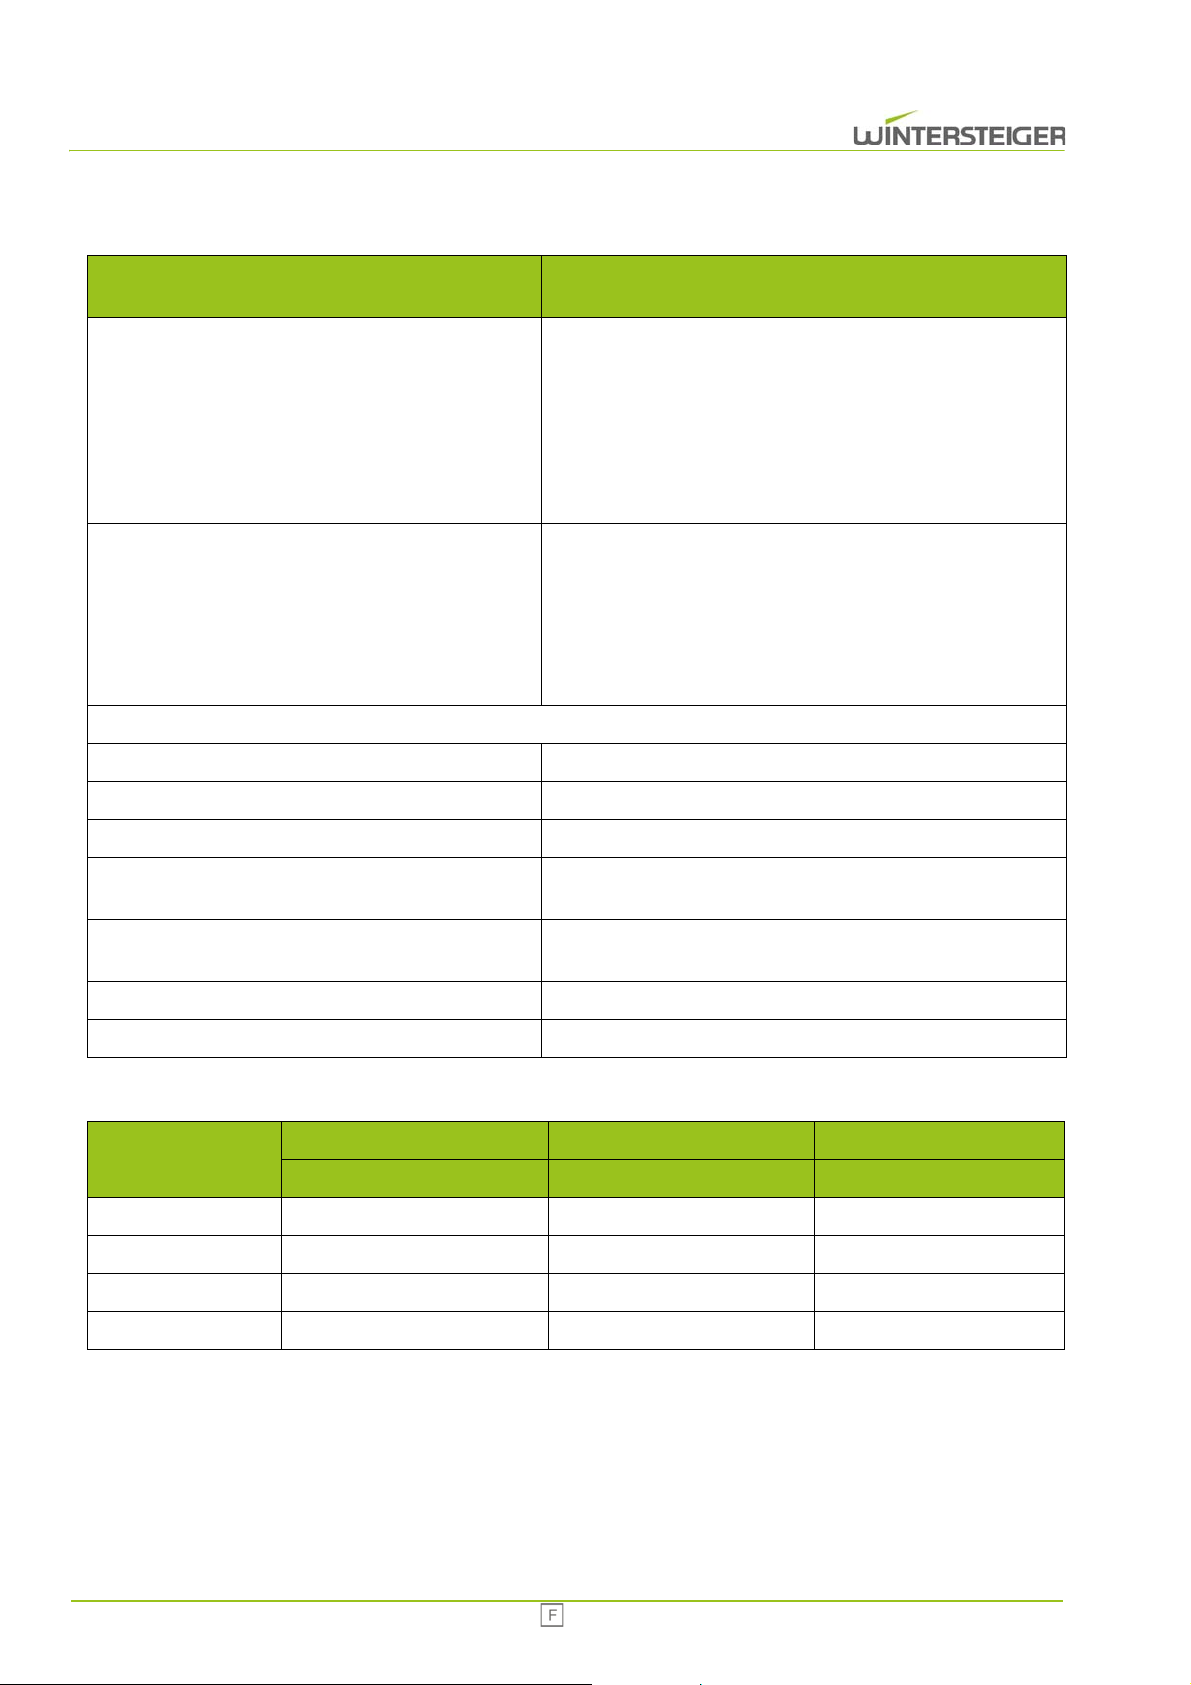
Type
Tension nominale, fréquence, puissance, courant
nominal, protection par fusibles minimum, maximum:
Puissance de chauffage:
La tension de branchement est indiquée sur la plaque signalétique!
Température ambiante: +15 à 40°C
Humidité de l'air: 30% - 80%
Dimensions: voir la table et l’illustration suivants
INNOVA
Séchoir de casques/de gants
Innova 10 paires de gants
Vitesse 1 : 1AC 208-230V 50/60Hz; 1,1kW; 4,78A; 10/16A oder
Vitesse 2 : 1AC 208-230V 50/60Hz; 0,55W; 2,5A; 10/16A
Acier inoxydable : 1AC 208-230V 50/60Hz; 1,2kW; 5,22A; 10/
16A
Innova 14 casques
Vitesse 1 : 1AC 208-230V 50/60Hz; 1,1kW; 4,78A; 10/16A oder
Vitesse 2 : 1AC 208-230V 50/60Hz; 0,55W; 2,5A; 10/16A
Innova 10 paires de gants
Vitesse 1 : 550W
Vitesse 2 : 1050W
Acier inoxydable : 1200W
Innova 14 casques
Vitesse 1 : 500W
Vitesse 2 : 1000W
Durée du séchage:
Assainissement
Durée de l’effet du déodorant: en service de 5 heures environ 2 mois
Emission de bruits: ca. 65 dB(A)
INNOVA
Hauteur 2150 mm 2150 mm 2060 mm
Largeur 300 mm 300 mm 465 mm
Profondeur 540 mm 520 mm 410 mm
Poids 30 kg 80 kg 50 kg
:
10 paires de gants 10 paires de gants 14 casques
Standard Acier inoxydable Standard
1,5 à 2,5 heures en fonction de l'humidité des casques/gants, de
la température, etc.
Assainissement par lampe à ozone germicide !
Durée env. 2 heures
54 Innova
Page 55
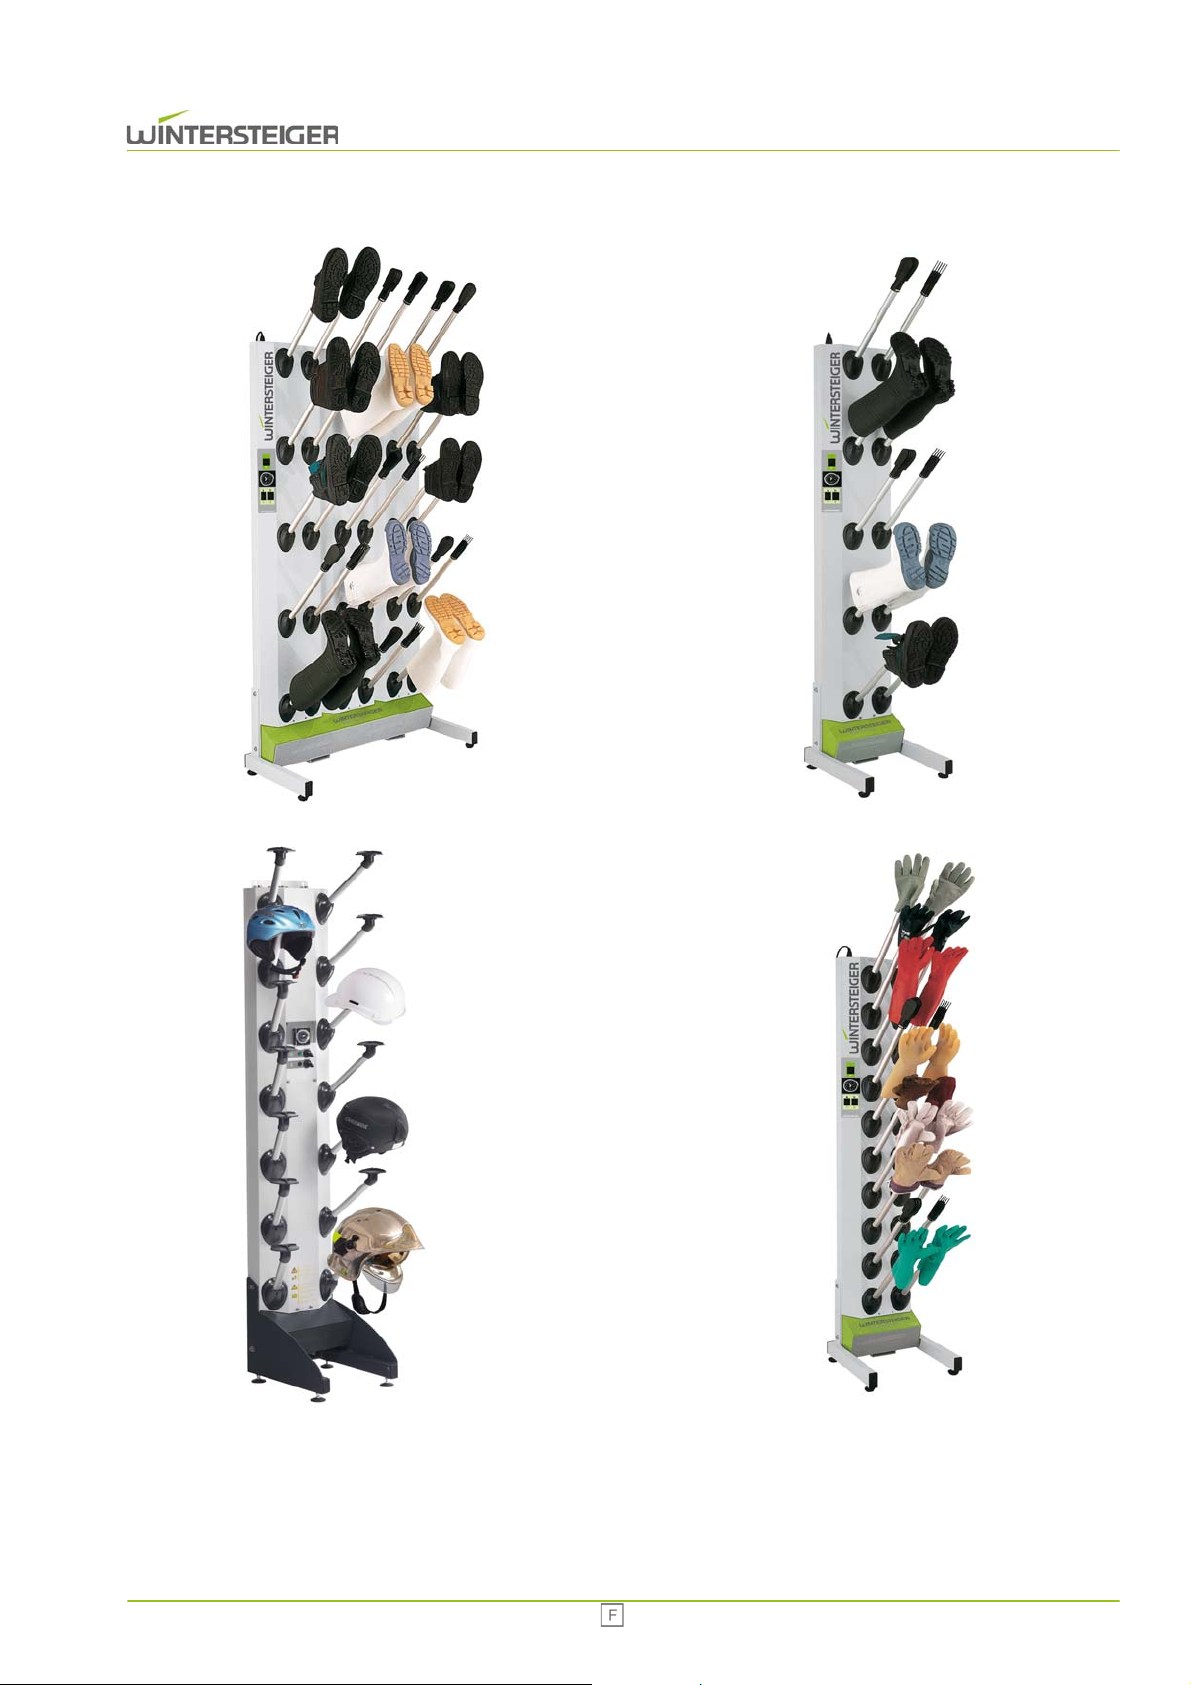
Innova 55
Page 56

6 Transport, stockage et changement de site
6.1 Conditions de transport de l'appareil
L'appareil devra être transporté dans son emballage d'origine et dans la position indiquée sur celui-ci.
6.2 Stockage de l'appareil
Température: entre 0° et +40°C.
Afin de prévenir toute détérioration, évitez de poser un autre paquet ou une caisse sur l'emballage de
l'appareil!
6.3 Comment enlever l'emballage, comment choisir l'endroit où poser l'appareil
Procédez scrupuleusement étape par étape, étant donné que toute omission pourrait nuire au bon fonctionnement, voire à
la sécurité de l'appareil.
6.4 Lieu d'installation
Lors du choix du lieu d'installation de l'appareil, il s'agira de donner la préférence à la fonctionnalité, de tenir compte en particulier de la quantité de chaussures à sécher et de prévoir suffisamment d'espace autour de l'appareil pour en faciliter la
manipulation. Du fait des bottes, chaussure ou casques, l'encombrement de l'appareil est plus important et ceci doit être pris
en compte avant l'installation. La pièce doit posséder une hauteur de plafond d'au moins 2,35 m. Installez l'appareil si possible dans une pièce bien aérée, à proximité immédiate d'une prise de courant.
Lors du choix du lieu d'installation de l'appareil il s'agira en particulier de respecter les directives et consignes de sécurité applicables sur le lieu de travail!
Veiller à ce que les arrivées d'air ne soient jamais obstruées, même partiellement!
Afin de garantir le parfait fonctionnement de l'appareil INNOVA, nous aimerions une fois de plus signaler
qu'il faut impérativement veiller à ce que la température de la pièce ne soit jamais inférieure à 15° C.
Ne placez aucun objet sur la grille d'aspiration d'air ou sur la grille protectrice. N'obstruez pas ces orifices, ne serait-ce que
partiellement. Ne versez ou ne vaporisez jamais de liquide dans le circuit d'air car ceci représente un risque d'électrocution
et d'endommagement de l'appareil.
56 Innova
Page 57
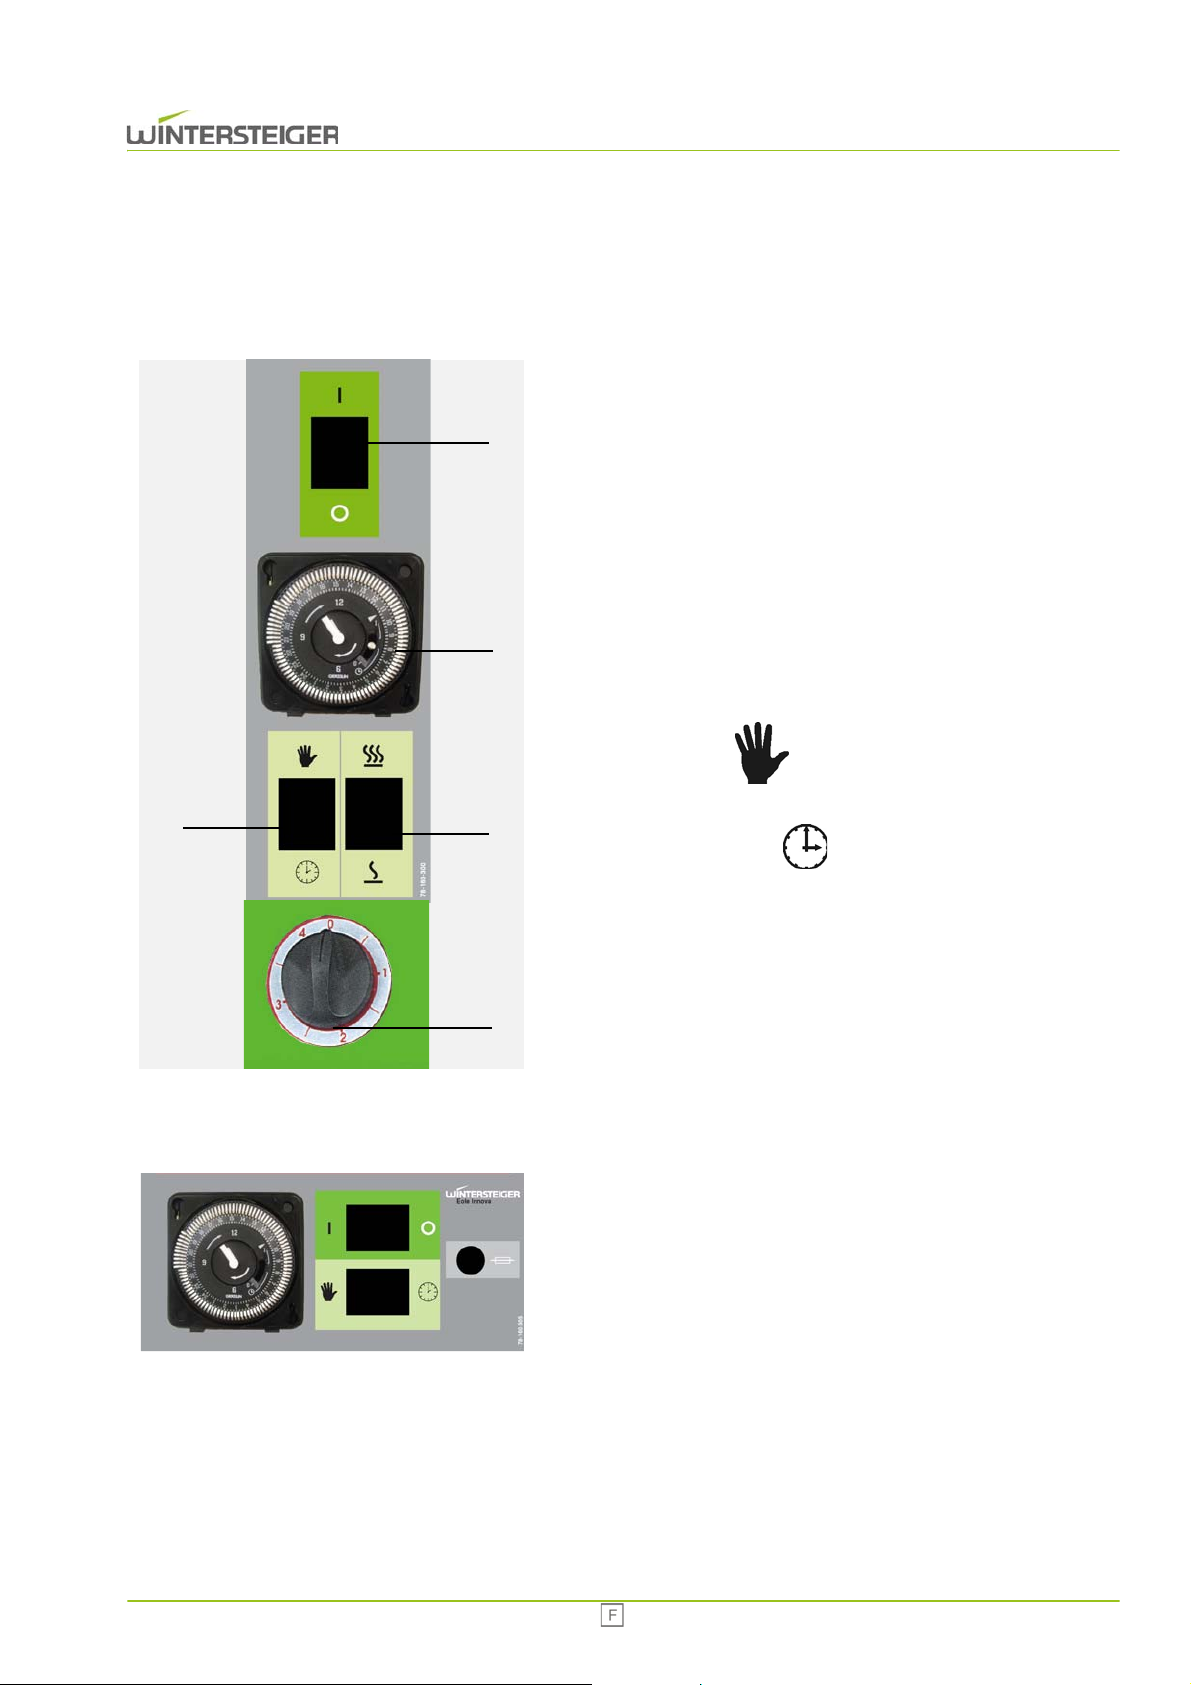
A
B
C
D
E
7 Description du tableau de commande
0
I
7.1 Variante standard
A: Le commutateur principal:
Arrêt
Arrêter le séchoir
Marche
Mise en marche du séchoir
B: Le commutateur d'air chaud
Position 1 ou 2
C: Horloge pour le fonctionnement automatique
D: Mode de fonctionnement
Mode manuel
Le séchage et l'assainissement sont activés en mode manuel
7.2 Variante acier inoxydable
Mode automatique
En mode automatique, le séchage et l'assainissement sont activés par l'horloge.
E: Minuterie 4 heures
En mode automatique, la durée de séchage et de assainissement peut être définie jusqu'à une durée totale de 4 heures à
l'aide de la minuterie 4 heures.
La version acier inoxydable présente une seule vitesse de chauffage.
Le fusible est disposé directement sur le tableau de commande.
Innova 57
Page 58
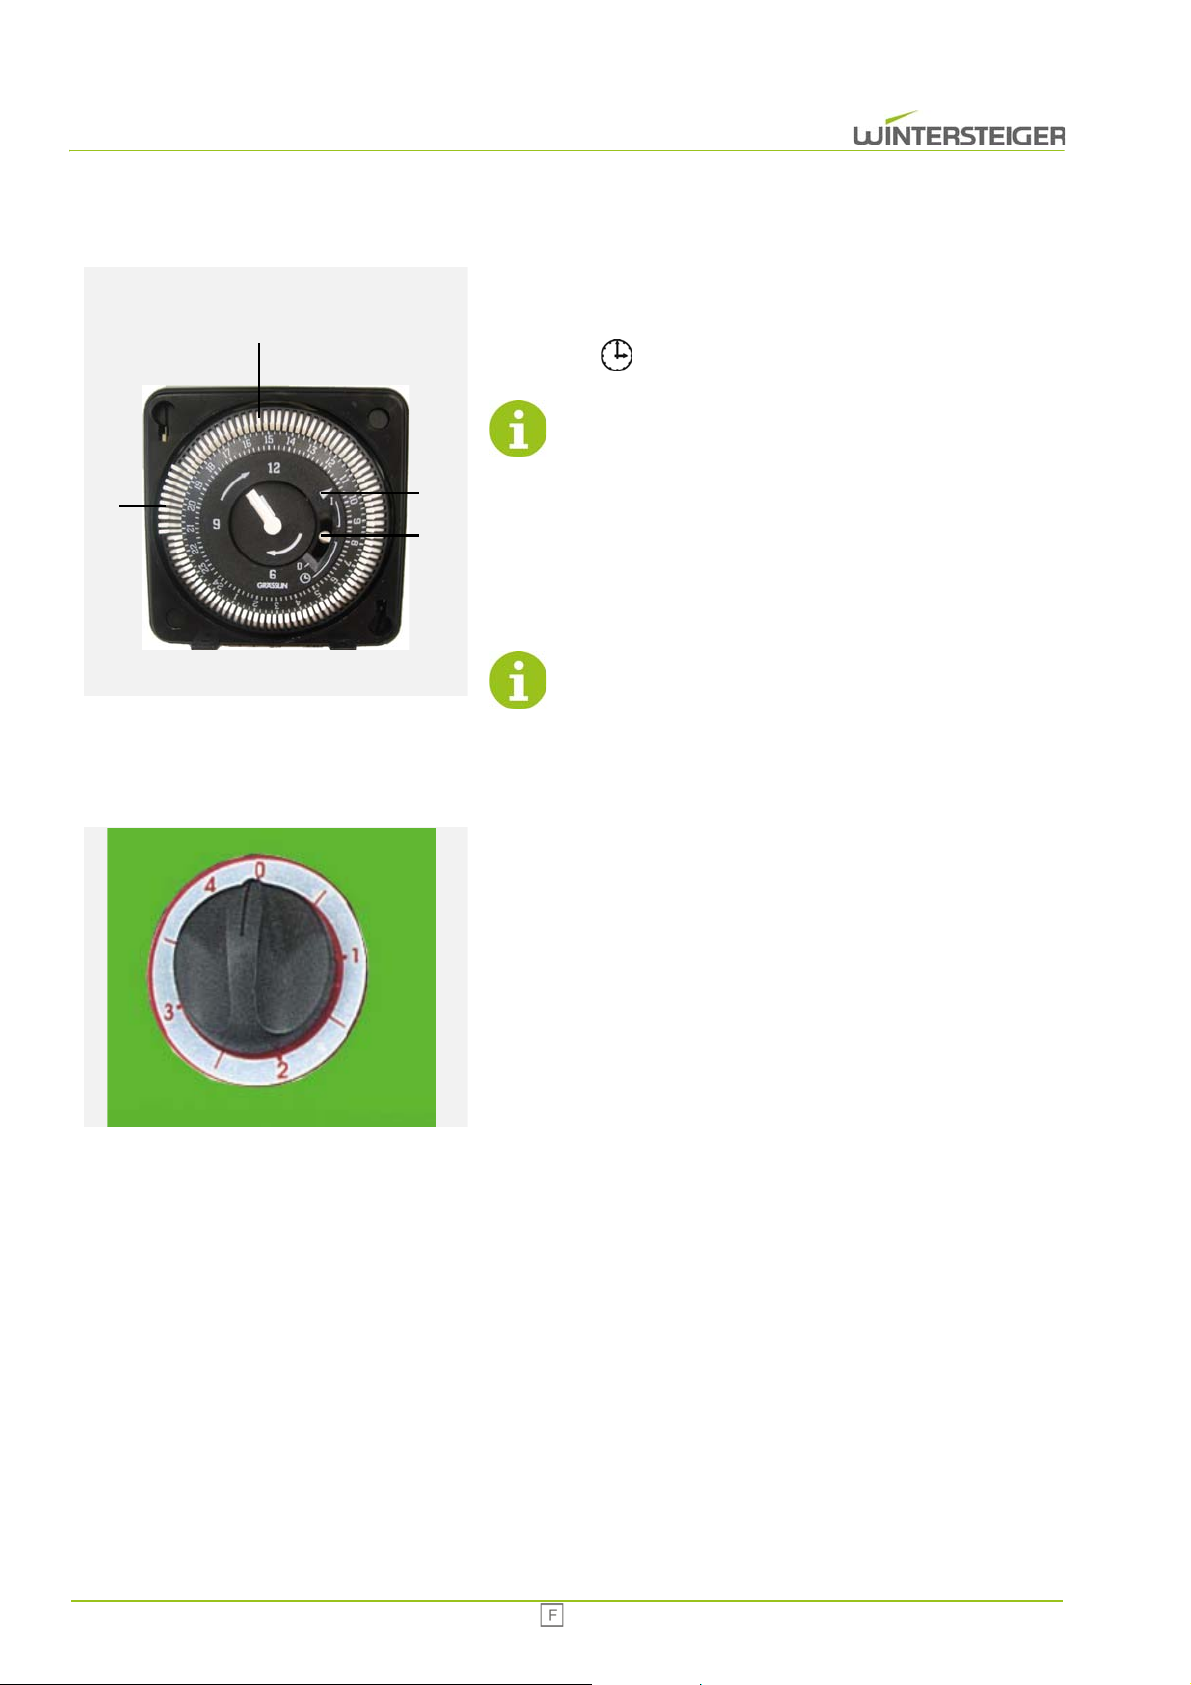
G
I
F
H
7.3 Réglage de l'horloge en mode automatique
Pour régler le temps de séchage, tournez l'anneau extérieur [G] de
l'horloge de telle manière que la petite flèche [F] indique l'heure actuelle. Ne touchez en aucun cas le bouton [H] qui reste en position
centrale .
L'horloge est muni d'une pile (durée de charge: 70 heures)
si bien qu'en cas de panne ou de coupure instantanée de
courant l'heure qui a été programmée n'est pas modifiée.
Toutefois, en cas de coupure de courant prolongée, il est
conseillé de remettre le minuteur à l'heure.
Tournez le cadran [G] vers la droite, segment par segment, en fonction de la durée de séchage souhaitée pour que l'appareil se mette
automatiquement en marche à l'heure indiquée.
En mode automatique, le commutateur [H] sera placé en
position médiane.
7.4 Mise en marche de la minuterie 4 heures - mode automatique
En mode automatique, la durée de séchage peut être réglée à l'aide de
la minuterie 4 heures située sous le tableau de commande. Celle-ci permet de régler une durée de séchage et de assainissement pouvant atteindre jusqu'à 4 heures.
58 Innova
Page 59
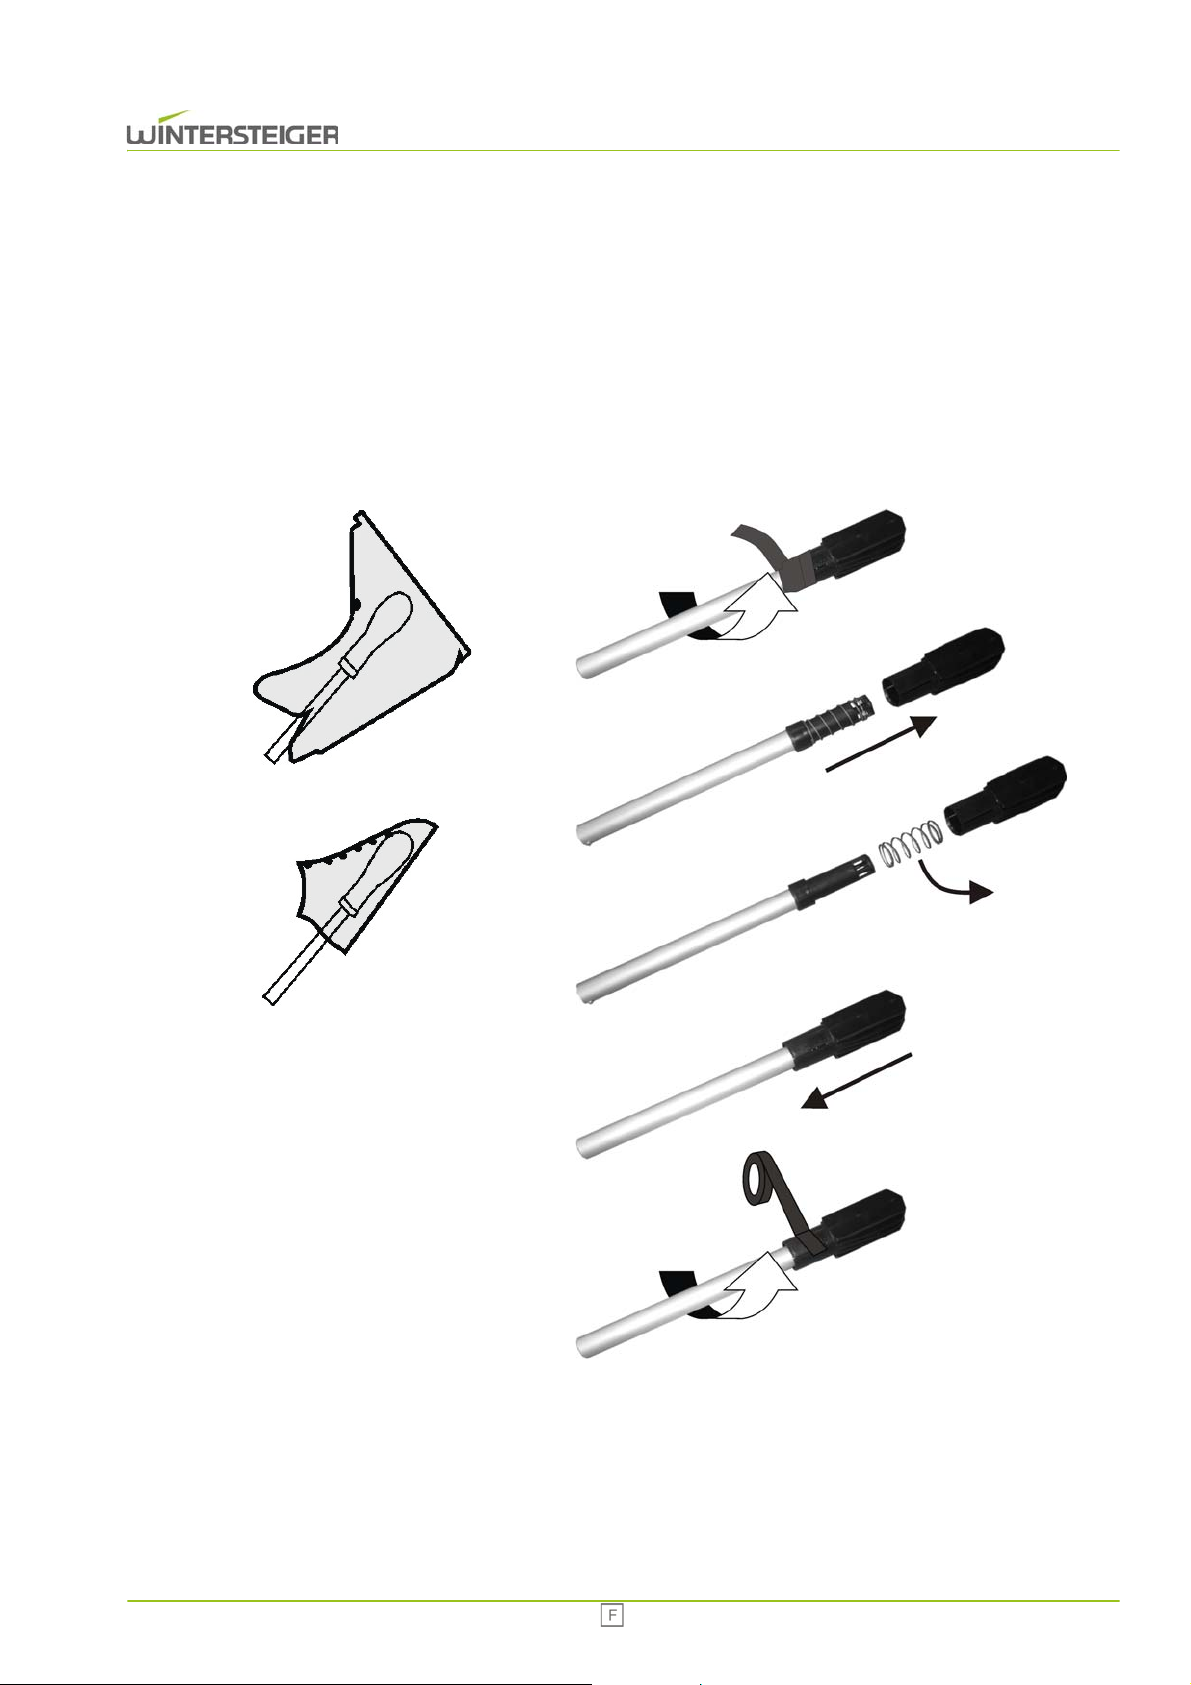
8 Mise en service
Figure 1
Figure 2
8.1 Position de la chaussure
Afin d'obtenir un séchage efficace des chaussures, il convient de positionner les chaussures montantes ou les bottes
avec la pointe vers le haut. Positionnez les chaussures basses avec la pointe vers le bas.
En cas d'utilisation de l'appareil avec des chaussures dont le poids n'est pas suffisant pour ouvrir le volet d'aération,
démontez le ressort tel qu'indiqué sur la figure [2]. Retirez en premier lieu le ruban adhésif noir. Après le démontage du
ressort, le volet d'aération doit de nouveau être fixé sur le tube de ventilation à l'aide de ruban adhésif.
Innova 59
Page 60
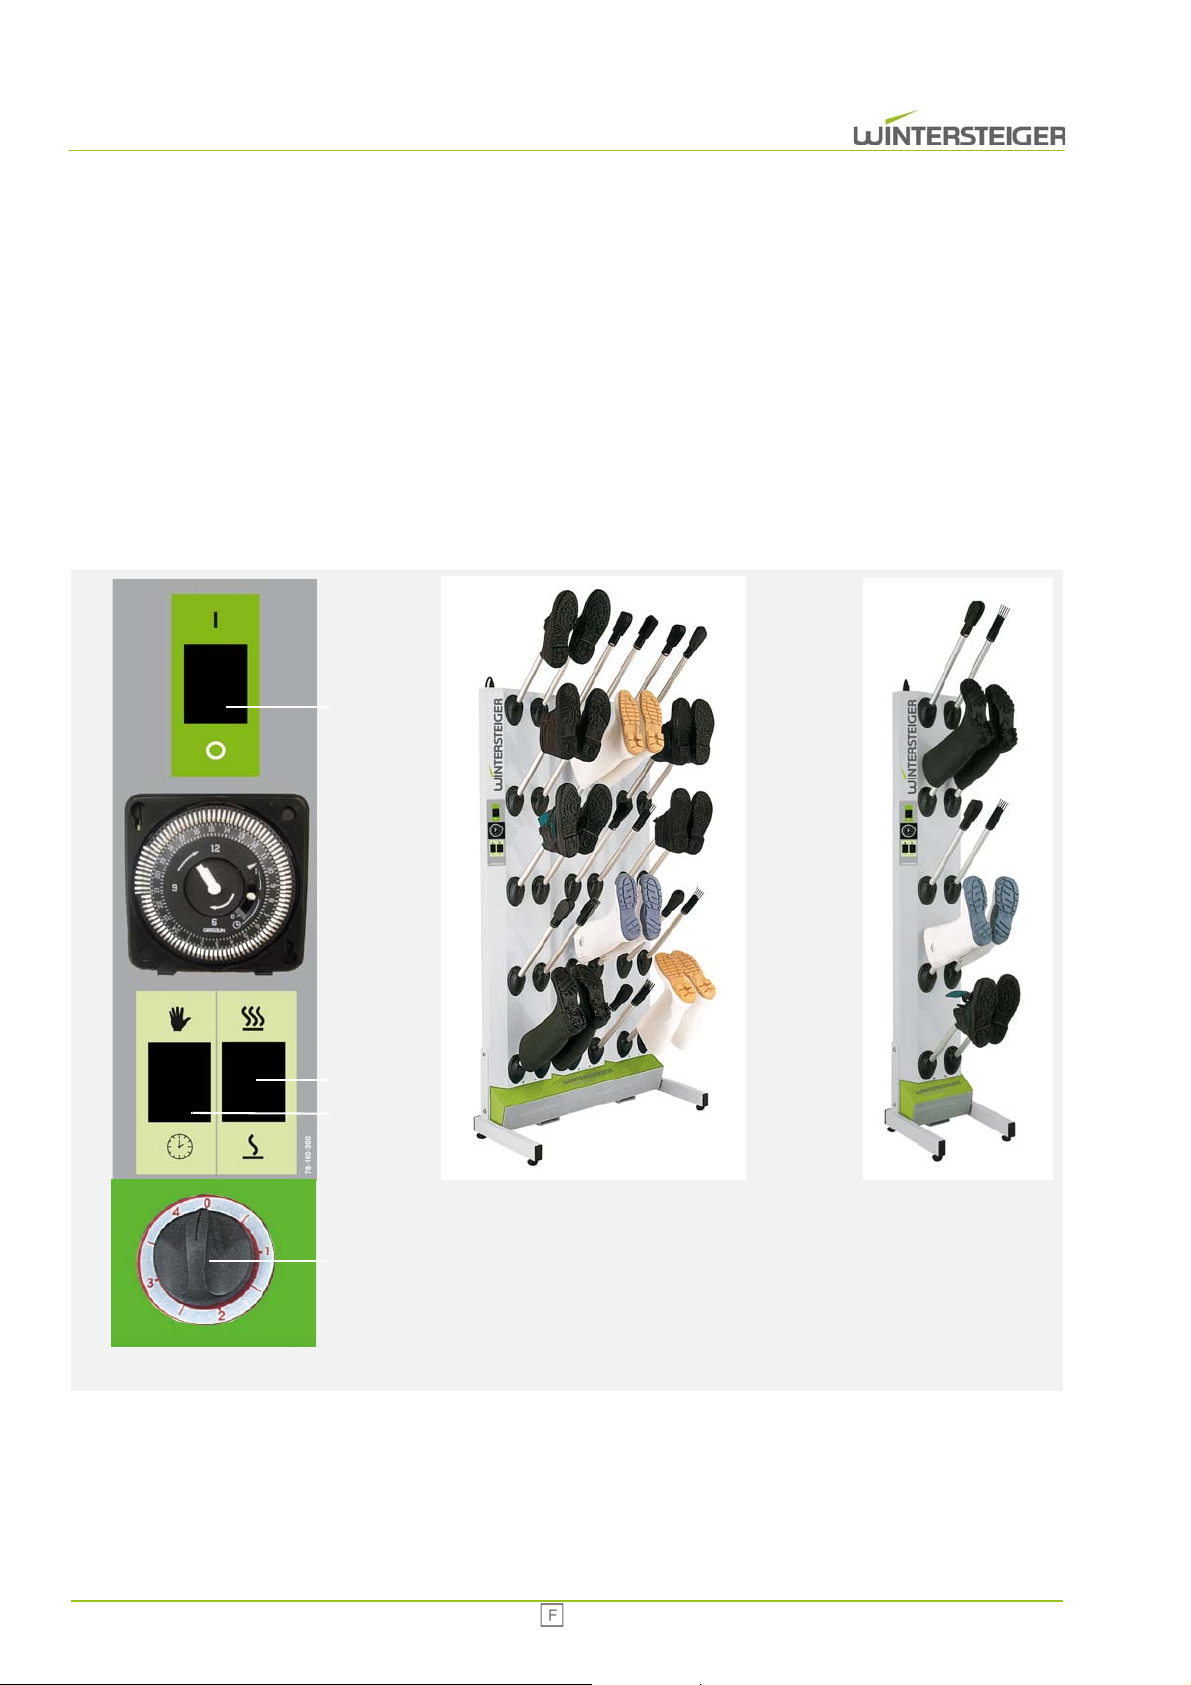
A
B
C
D
8.2 Fonctionnement
Renouvelez le déodorant si nécessaire.
Branchez l'appareil.
Mettez l'appareil en marche à l'aide du commutateur [A]. Sélectionnez le mode manuel ou le mode automatique à l'aide
de l'interrupteur à bascule [C]. En mode automatique, contrôlez le réglage du minuteur. En mode automatique, la durée
de séchage peut être limitée à l'aide de la minuterie de 15 min à 4 heures [D] située sous le tableau de commande. Sur
la version acier epoxy, sélectionnez la puissance de chauffage souhaitée (vitesse 1 ou 2) à l'aide du commutateur [B].
La version inox ne possède qu'une seule vitesse de chauffage.
Une fois le cycle de séchage et de assainissement terminé, retirez les chaussures, gants ou casques.
Le prochain cycle peut commencer.
60 Innova
Page 61
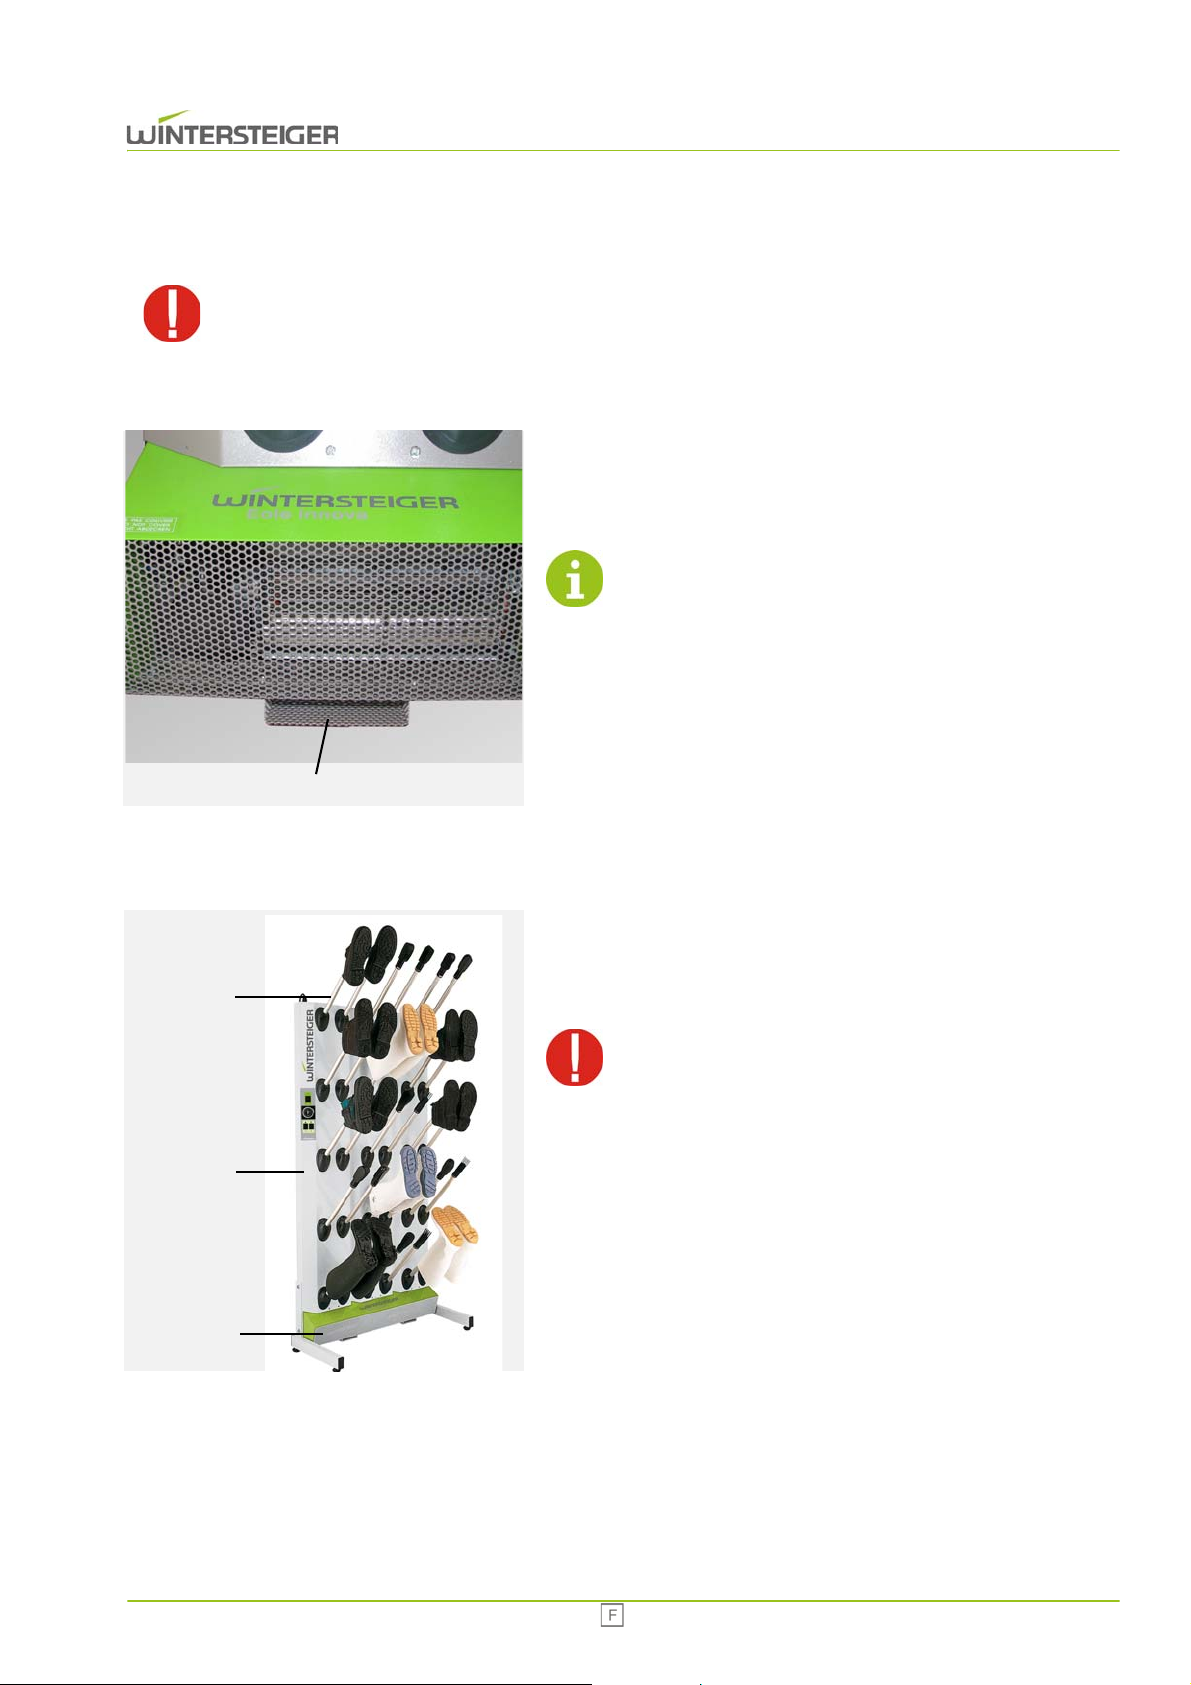
A
E
D
C
9 Maintenance
Débranchez l'appareil avant toute intervention!
9.1 Renouvellement du déodorant
Le réceptacle pour le déodorant se trouve en dessous de l'appareil
[A].
Retirez le sachet de désodorisant et sentez-le. Si le sachet ne sent
plus le frais, remplacez-le.
Durée de l’effet du déodorant en service de 5 heures: environ 2 mois!
9.2 Nettoyage
Nettoyez régulièrement le cadre et les soupapes [D] avec un tissu
humide.
Une fois par an, dépoussiérez l'intérieur de l'appareil en ouvrant le
panneau avant [E].
Le nettoyage à haute pression de l'appareil n'est pas autorisé! En cas de dommage dû au non respect de cette
clause, la responsabilité du constructeur n'est pas engagée, la garantie n'entre pas en jeu.
Innova 61
Page 62

9.3 Générateur d'ozone
Les générateurs d'ozone utilisés permettent une assainissement efficace pendant une durée de fonctionnement de 3000
heures, après quoi les lampes à ozone doivent être remplacées. Effectuez une fois par mois un contrôle visuel du générateur
d'ozone pendant le fonctionnement (lumière bleutée). On voit, à travers la grille d'aération, des reflets de la lumière UV lorsque l'on se tient à une distance de 2 mètres devant la machine.
Risque de blessures !
Ne regardez pas directement dans le générateur d'ozone ! Les rayons UV risqueraient d'abîmer vos yeux !
62 Innova
Page 63
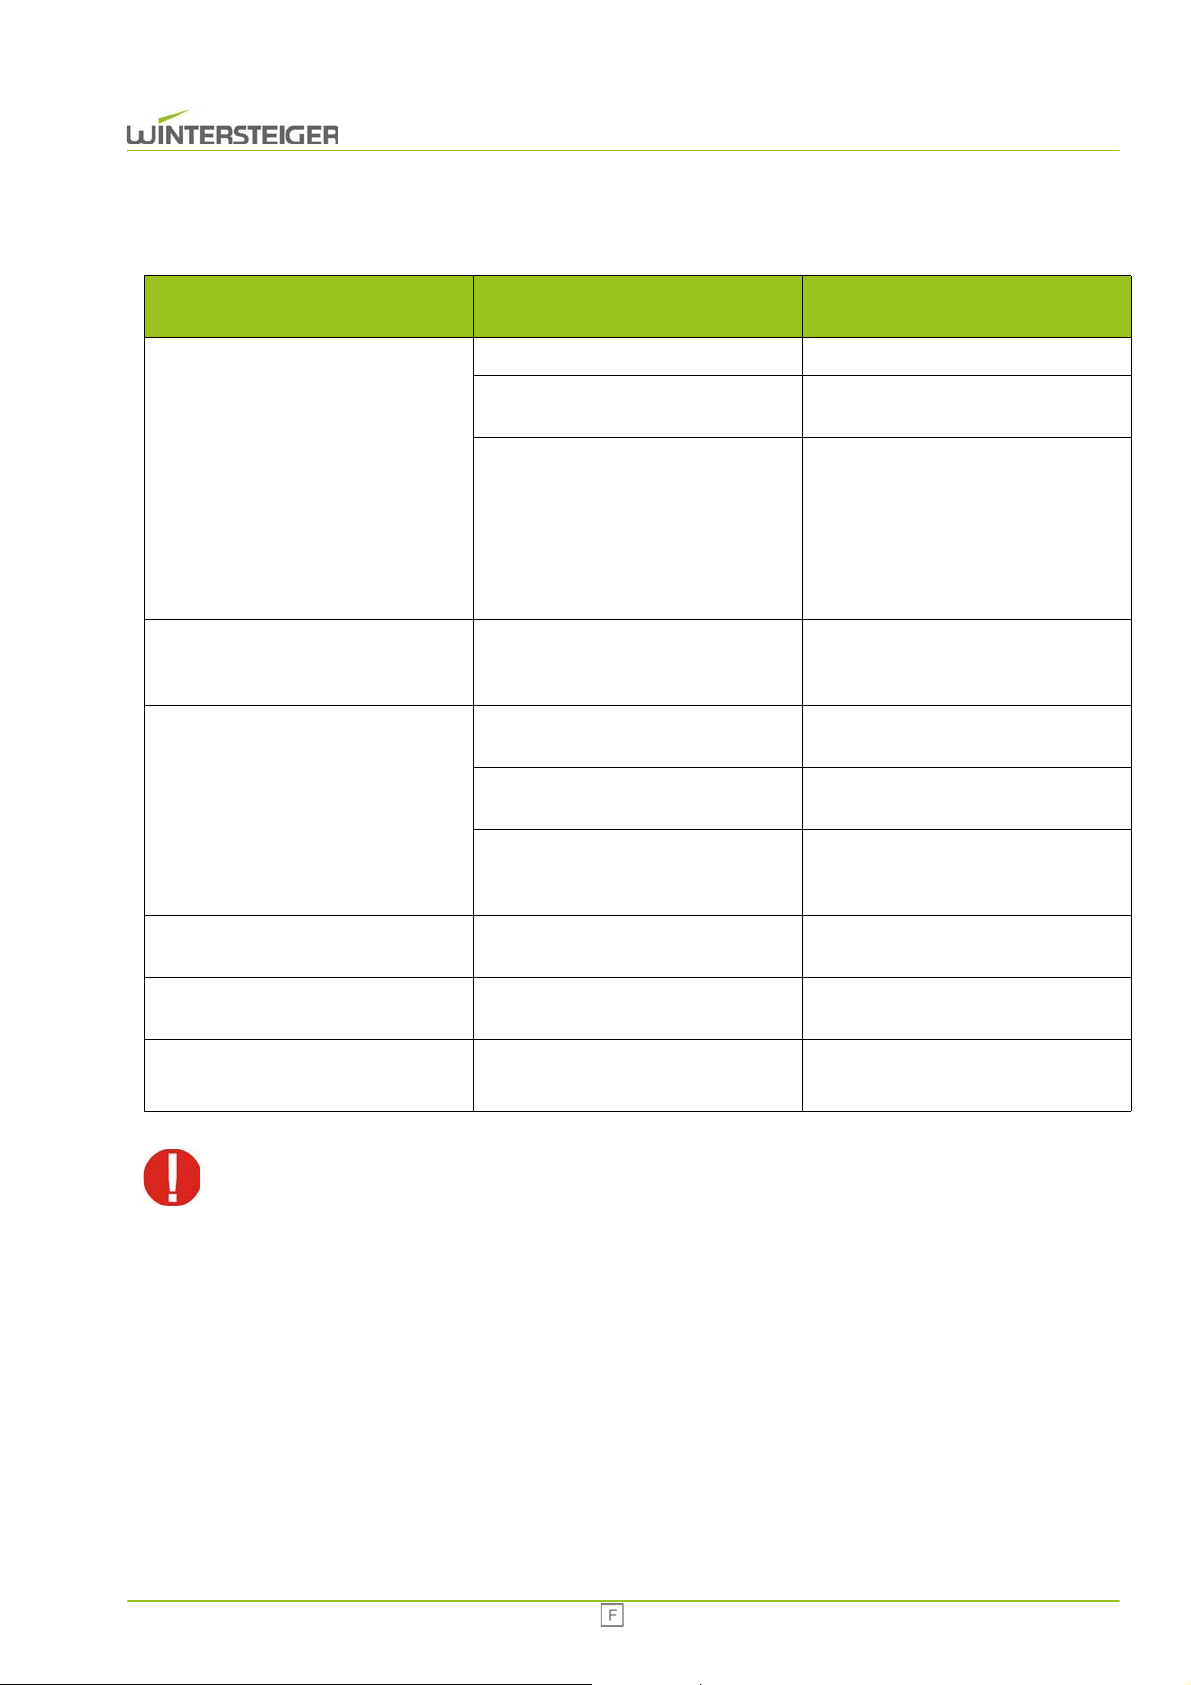
10 Correction des erreurs
Erreur
Problème
L'appareil ne fonctionne pas
En mode automatique, l'appareil ne se
met pas en marche à l'heure programmée.
L'appareil ne sèche pas.
Cause Correction
L'appareil n'est pas branché. Branchez l'appareil
Le commutateur principal est en position "0"
Le fusible est défectueux
Le minuteur est mal programmé.
La pièce n'est pas suffisamment aérée.
L'humidité de l'air est > 80%
La température de la pièce est < 15°C
Mettez l'interrupteur principal sur la position Marche.
Contrôlez le fusible au niveau du branchement électrique. Un fusible de rechange se trouve dans le portefusibles.
Fusible 5x20 mm 10 A. Veillez à ce que
le câble secteur soit débranché lorsque vous remplacez le fusible.
Tournez le bouton de manière à ce que
le trait [F] indique l'heure actuelle.
Vérifiez l'aération de l’appareil et de la
pièce.
Plus l'humidité de l'air est faible, plus la
qualité de séchage augmente.
Plus la température de la pièce est élevée, plus la qualité de séchage augmente.
L'appareil ne sèche pas très efficace
ou l’appareil ne chauffe pas
Plus de déodorant Les sachets de désodorisant sont usés
Lampe à ozone défectueuse
Débranchez l'appareil avant toute intervention! L'appareil sera mis en service uniquement si tous les fusibles, tous les panneaux de protection sont montés.
Ventilateur defecteux Vérifiez le ventilateur
Remplacez les sachets de désodorisant
Changer la lampe à ozone
Innova 63
Page 64

11 Mise à l'arrêt définitive et élimination
Risque de blessure !
Avant la mise à l'arrêt définitive et le démontage de la machine, déconnectez la machine de l'alimentation électrique
et de tout entraînement externe. Pour le démontage, utilisez uniquement un outillage approprié.
Lors de la mise à l'arrêt définitive, démontez et éliminez correctement tous les composants de la machine.
Nettoyez tous les composants contenant de l'huile ou de la graisse avant de les éliminer.
La graisse et l'huile doivent être éliminés à part et ne peuvent en aucun cas polluer l'environnement
Pour l'élimination des composants, respectez les prescriptions nationales en la matière.
Démontez correctement la machine en ses différents composants.
Nettoyez les composants contenant de la graisse ou de l'huile.
Éliminez les composants par type de matériau (acier, matière plastique, composants électriques et électroniques, etc.).
Eliminez l'huile et la graisse, y compris les huiles et graisses biodégradables, dans le respect de l'environnement.
64 Innova
Page 65

Obsah
1 Úvod .................................................................................................................................................................................... 66
1.1 Stanovený způsob použití ........................................................................................................................................ 66
2 Všeobecná upozornění ...................................................................................................................................................... 67
2.1 Bezpečnostní předpisy ............................................................................................................................................. 67
2.2 Výstrahy ................................................................................................................................................................... 67
2.3 Ochranná zařízení ................................................................................................................................................... 67
2.4 Účel použití .............................................................................................................................................................. 67
3 Návod k montáži ................................................................................................................................................................ 68
4 Funkce ................................................................................................................................................................................ 70
5 Technické údaje ................................................................................................................................................................. 71
6 Přeprava, skladování a přemístění ................................................................................................................................... 75
6.1 Přepravní podmínky přístroje ................................................................................................................................... 75
6.2 Skladování přístroje ................................................................................................................................................. 75
6.3 Odstranění obalu a výběr umístění .......................................................................................................................... 75
6.4 Umístění ................................................................................................................................................................... 75
7 Popis ovládacích prvků ..................................................................................................................................................... 76
7.1 Standardní varianta .................................................................................................................................................. 76
7.2 Nerezová varianta .................................................................................................................................................... 76
7.3 Nastavení časovače – automatický režim ................................................................................................................ 77
7.4 Zapnutí 4hodinového časovače – automatický režim .............................................................................................. 77
8 Uvedení do provozu ........................................................................................................................................................... 78
8.1 Umístění obuvi ......................................................................................................................................................... 78
8.2 Provoz ...................................................................................................................................................................... 79
9 Údržba ................................................................................................................................................................................. 80
9.1 Výměna deodorantu ................................................................................................................................................. 80
9.2 Čištění ...................................................................................................................................................................... 80
9.3 Generátor ozónu ...................................................................................................................................................... 81
10 Odstranění závad ............................................................................................................................................................. 82
Innova 65
Page 66

© Copyright 2009 by
WINTERSTEIGER AG ::: A-4910 Ried/I Dimmelstrasse 9
Autor a grafické zpracování: Franz Badegruber
Tel. +43 7752 919-0
E-mail: [email protected]
Design: Maria Marek-Pollhammer
Originál návodu k obsluze
1 Úvod
Před prvním uvedením stroje do provozu se musí operátor a osoba, odpovědná za stroj, s obsahem tohoto návodu k obsluze,
který doplňuje doklady školení, seznámit.
Na škody, ke kterým dojde následkem nedbalosti pokynů a upozornění v návodu k použití, se záruka nevztahuje. Uživatel
stroje je zákonně povinen dodržovat předpisy příslušné země pro úrazovou prevenci.
Kromě toho se s tímto návodem k obsluze musí zacházet důvěrně. Smí být poskytnut k dispozici pouze oprávněným
osobám. Přenechání třetím je povoleno pouze po písemném souhlasu firmy WINTERSTEIGER.
Všechny doklady jsou chráněny ve smyslu autorského práva. Předávání a rozmnožování těchto dokladů, i pouze ve
výňatcích, jakož i zužitkování a sdělování jejich obsahu je zakázáno, pokud není výslovně písemně povoleno.
Nezachování předpisů je trestné a zavazuje k náhradě způsobené škody. Firma WINTERSTEIGER si vyhrazuje všechna
práva k uplatnění ochranných živnostenských práv.
1.1 Stanovený způsob použití
Vysoušeč Innova je v závislosti na provedení určen výhradně k vysoušení a ukládání obuvi, holínek, rukavic a helem (určené
použití). Jakékoli jiné použití je neúčelové použití. Za škody z toho plynoucí výrobce neručí. Riziko neúčelového použití
spočívá na samotném uživateli.
Účelové použití zahrnuje také dodržování ustanovení pro provoz, údržbu a péči, předepsaných výrobcem. Musí se dodržovat
příslušné předpisy na ochranu zdraví a bezpečnost při práci, stejně jako ostatní obecně uznávaná bezpečnostně technická
pravidla a pravidla pracovní hygieny.
Svévolné změny na stroji vylučují záruku výrobce za škody, které z nich vyplývají.
Neustále se snažíme naše výrobky vylepšovat a z toho důvodu si vyhrazujeme právo provést všechny změny a vylepšení,
jež považujeme za účelné. Povinnost, zahrnout rovněž dříve dodané stroje a zařízení, s tím však není spojena.
Všechny ilustrace, rozměry a hmotnostní údaje v návodu k obsluze jsou nezávazné.
66 Innova
Page 67
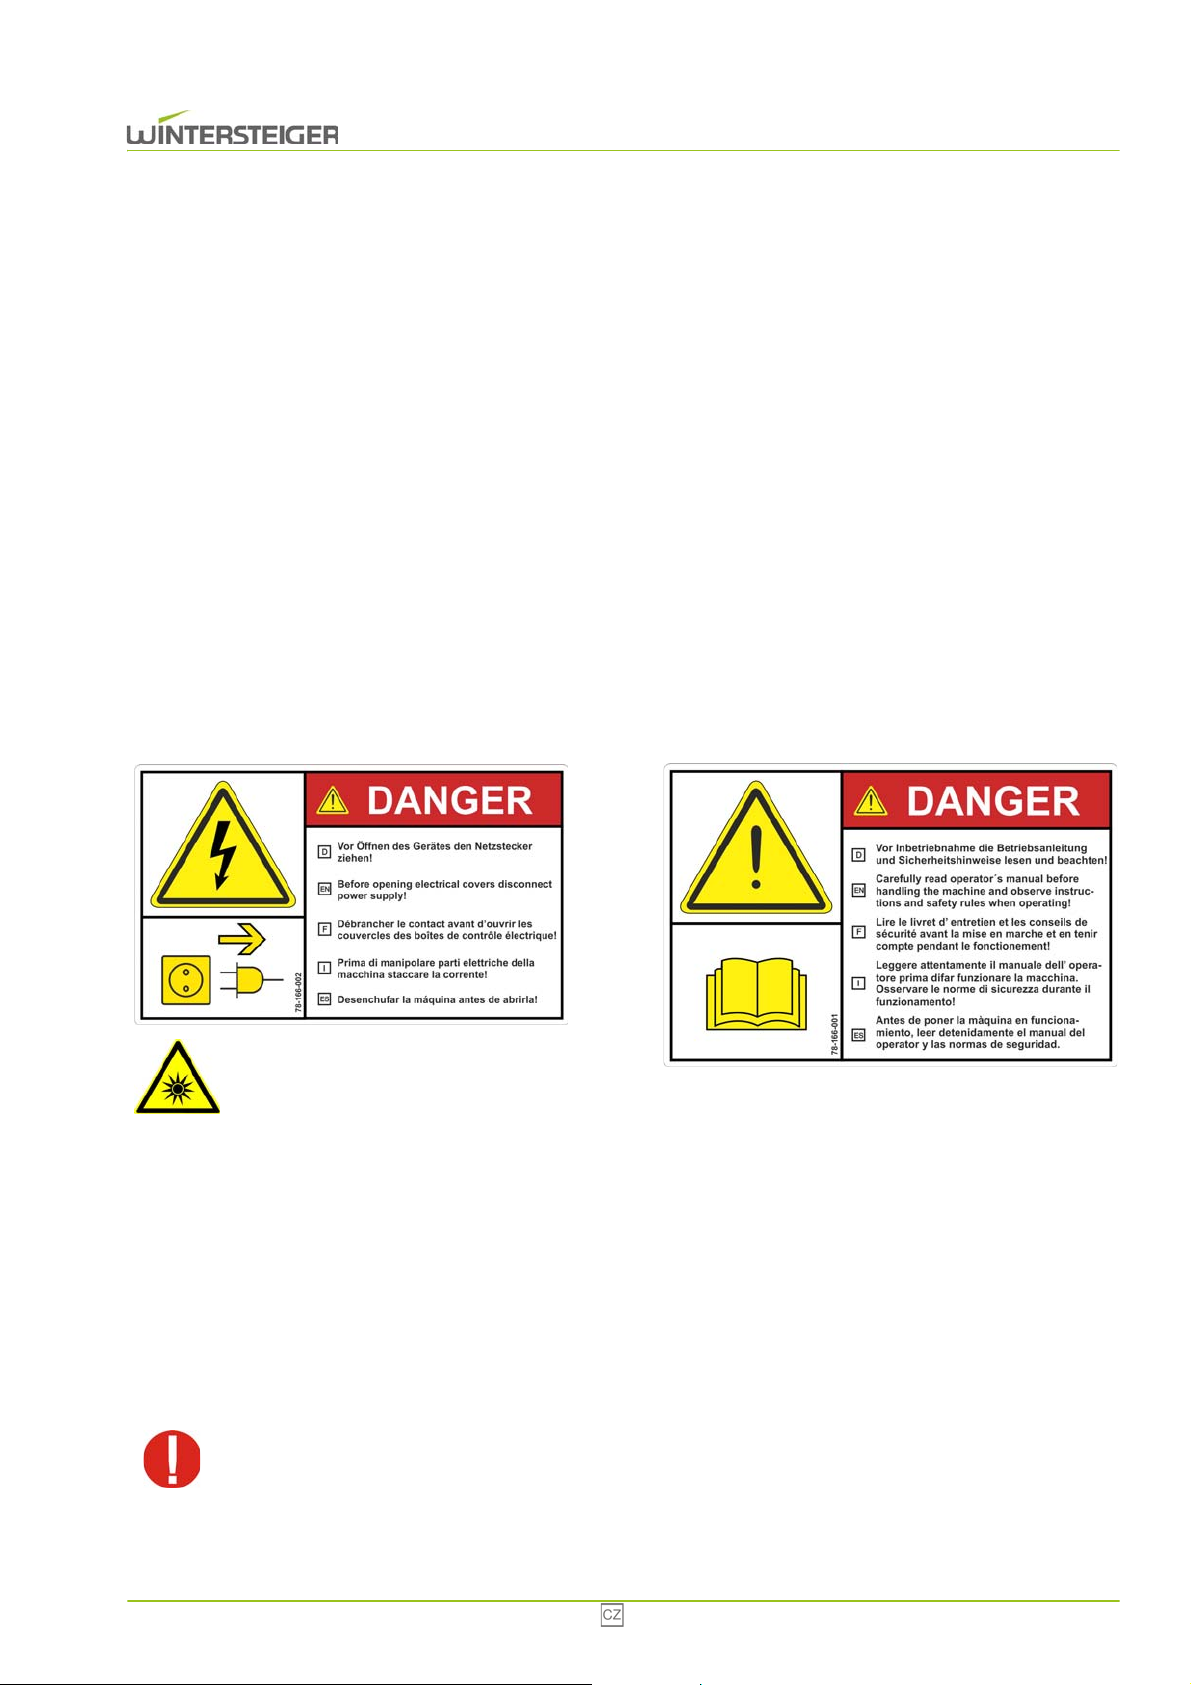
2 Všeobecná upozornění
Výstraha před UV světlem ozónové lampy!
Nedívejte se přímo do ozónové lampy!
2.1 Bezpečnostní předpisy
Připojením přístroje k elektrické síti pověřte prosím elektrikáře, který je přesně obeznámen s obvyklými předpisy
místních energetických závodů, jež svědomitě dodrží.
Dbejte na správné přípojné napětí!
Připojovací hodnoty najdete na typovém štítku na horní části přístroje.
Překontrolujte, zda tyto údaje odpovídají napětí sítě.
Vysoušeč se smí používat pouze s kompletně namontovanými ochrannými zařízeními a kryty!
Před každou změnou stanoviště nebo při zásazích do stroje vytáhněte síťovou zástrčku!
Na zařízení se smí používat pouze originální náhradní díly a spotřební materiál firmy WINTERSTEIGER. Použití cizích
komponent je na vlastní nebezpečí a odpovědnost provozovatele, záruka tím zaniká!
Zajistěte dobré větrání pracoviště!
2.2 Výstrahy
2.3 Ochranná zařízení
Během provozu se nesmí odstraňovat žádná ochranná zařízení ani kryty.
2.4 Účel použití
Vysoušeč obuvi Innova je určen výhradně k vysoušení a úschově obuvi nebo holínek. Vysoušeč rukavic Innova je určen
výhradně k vysoušení a úschově rukavic. Vysoušeč helem Innova je určen výhradně k vysoušení a úschově helem.
V případě nedodržení těchto upozornění zanikají ze strany firmy WINTERSTEIGER veškeré nároky na
náhradu vzniklých škod!
Innova 67
Page 68

3 Návod k montáži
Dodávka obsahuje:
1 vysoušecí jednotku [1]
1 sada vysoušecích trubek na vysoušení obuvi [4]
1 napájecí kabel
Doplňkový podstavec:
2 kovové konzoly [2] jako podstavec
4 šroubovací nohy [3]
1 sada šroubů
Podstavec (doplňková možnost)
Vysoušecí jednotku položte na zem.
Dvě kovové konzoly podstavce přišroubujte k vysoušeči – 4 šrouby M 8 x 16 + 4 podložky
Na bočních dílech vysoušeče – 2 šrouby
M 6 x 16 + 2 podložky na spodní straně vysoušeče.
Na spodní stranu podstavce připevněte 4 šroubovací nohy, matice však ještě pevně nedotahujte.
Připevnění na zeď
Použijte k tomu upevňovací konzoly (upevněné 4 šrouby), které se nacházejí na horní a spodní straně vysoušeče. Šrouby
povolte, konzoly umístěte pro připevnění na zeď a znovu zašroubujte.
Spojení 2 vysoušecích jednotek
Ke spojení 2 vysoušecích jednotek použijte 1 upevňovací konzolu a postupujte jako u připevnění na zeď.
Instalace vysoušeče
Vysoušeč postavte, odpovídajícím způsobem upravte výšku šroubovacích noh a dotáhněte maticemi.
Vysoušecí trubky zasuňte do vysoušecí jednotky a upevněte je otočením o čtvrtinu otáčky doprava.
Síťový kabel připojte do horní části vysoušecí jednotky.
68 Innova
Page 69
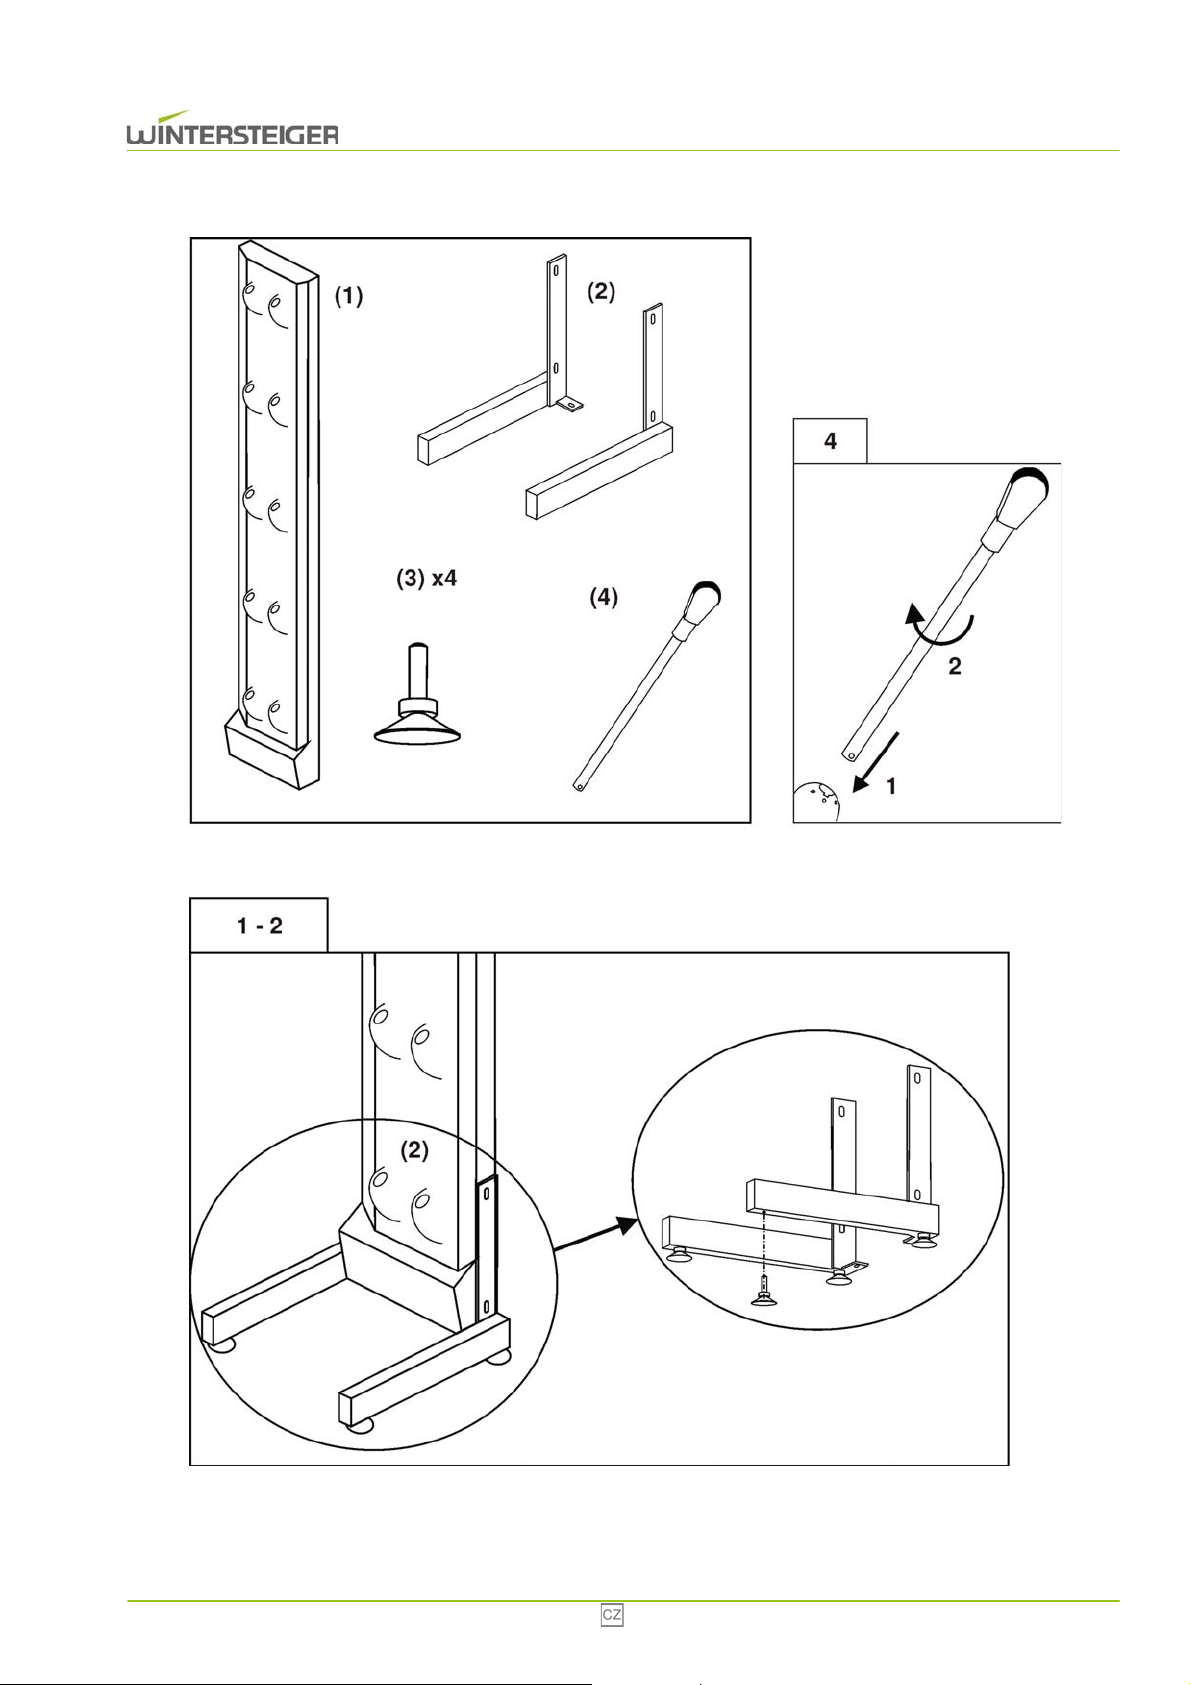
Innova 69
Page 70
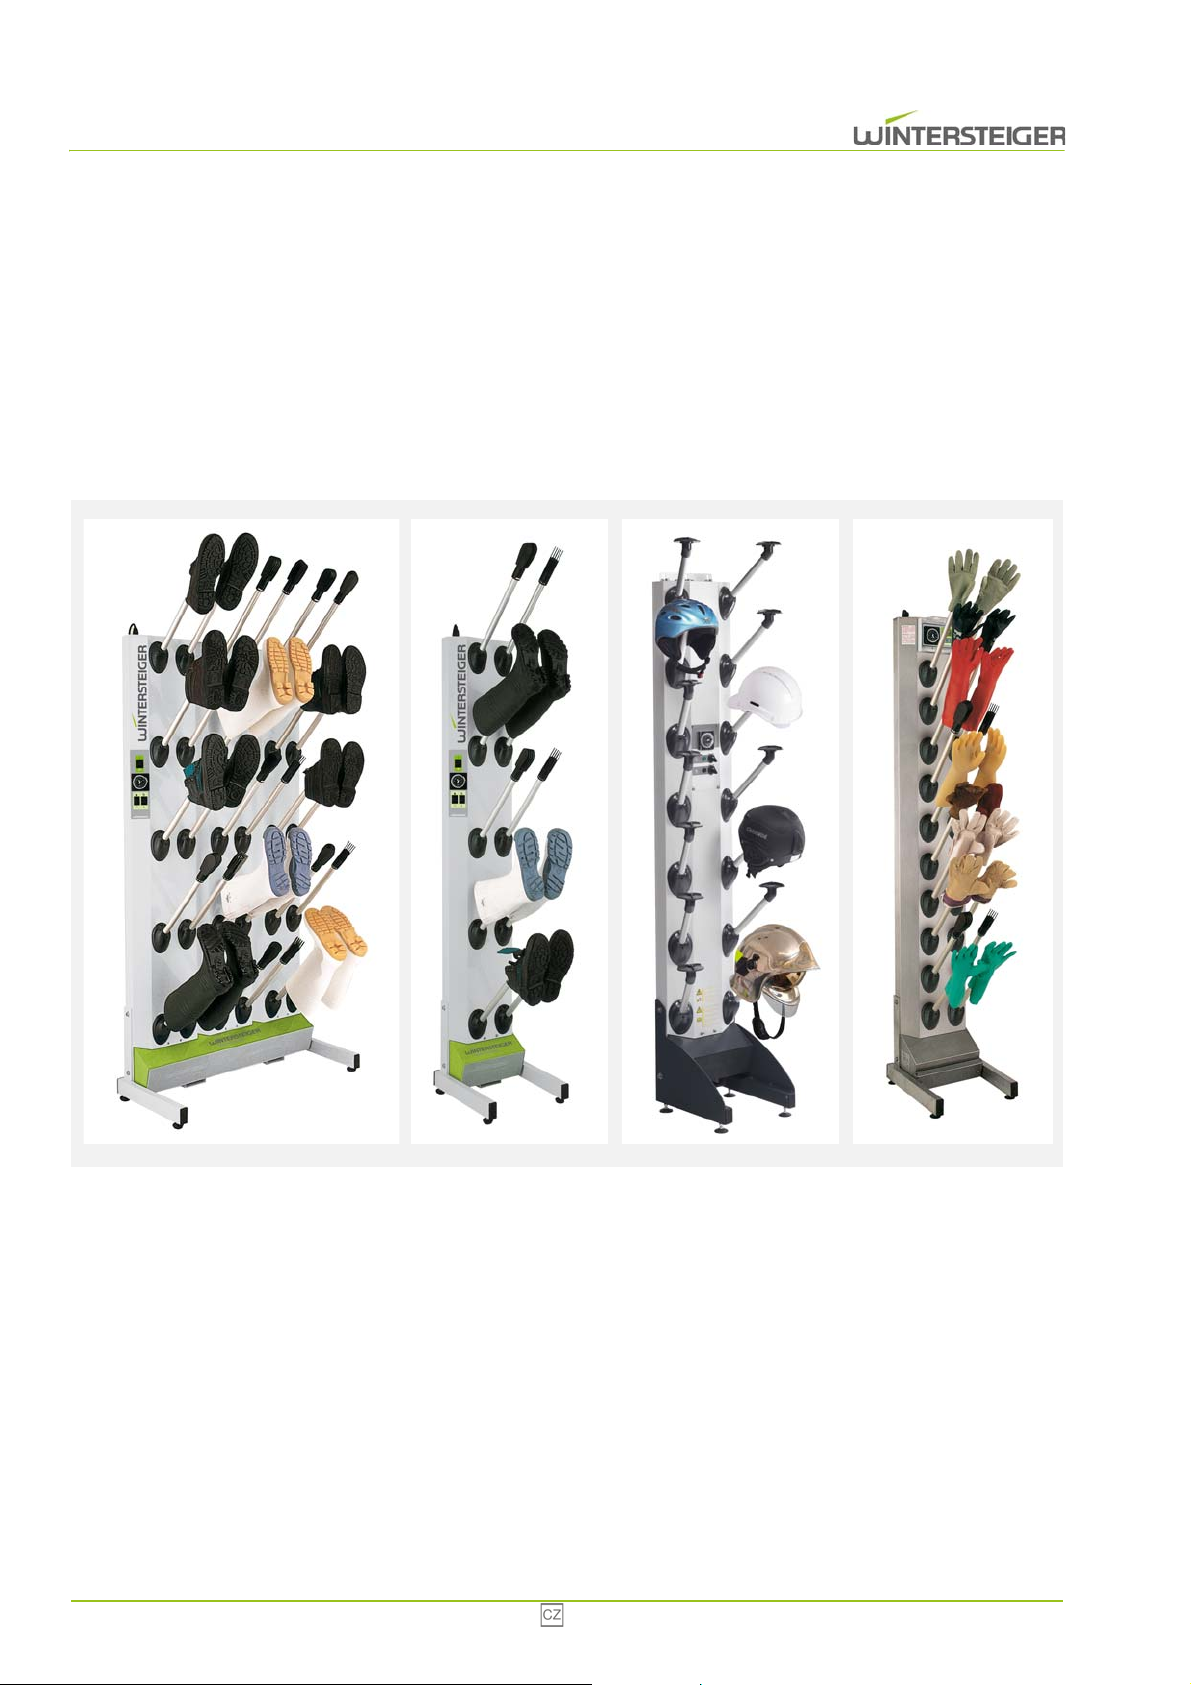
4 Funkce
Snadná obsluha pomocí analogického časovače
Centrální vytápění, přepínání na 2 stupně (nerezová varianta: 1 stupeň vytápění)
Vzduch proudí pouze u trysek, na kterých je umístěna obuv
Dezinfekce vzduchem/zničení zárodků dezinfekční ozónovou lampou
Dezodorizace s deodorantem
Přístroj lze připevnit na zeď nebo postavit na podstavec ke zdi.
70 Innova
Page 71
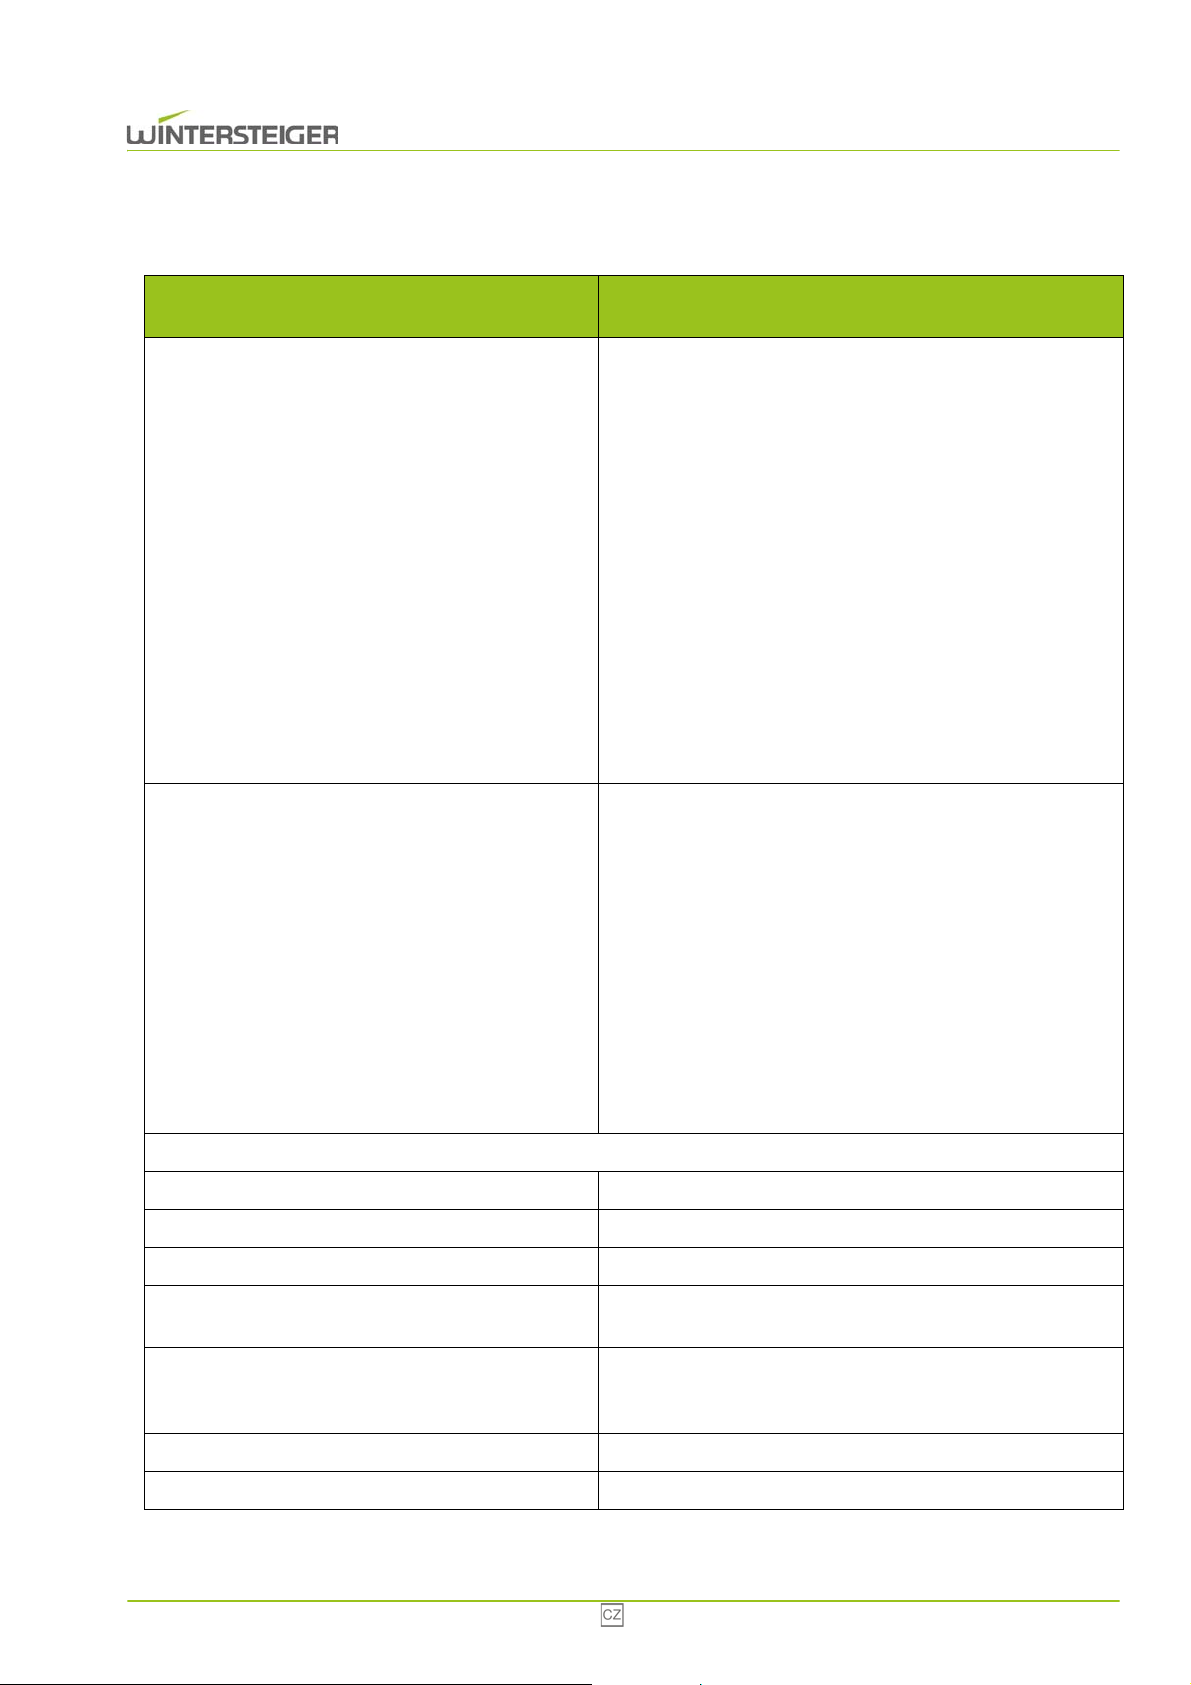
5 Technické údaje
Typ
Jmenovité napětí, kmitočet, výkon, jmenovitý
proud, pojistkové hodnoty min. - max.:
Výkon vytápění:
INNOVA
vysoušeč obuvi a holínek
Innova 5 párů obuvi nebo holínek
stupeň 1: 1 AC 208–230 V 50/60 Hz; 1,1 kW; 5 A; 10/16 A nebo
stupeň 2: 1 AC 208–230 V 50/60 Hz; 0,55 kW; 2,5 A; 10/16 A
nebo
nerezové provedení: 1 AC 208–230 V 50/60 Hz; 1,1 kW; 5 A;
10/16 A
Innova 10 párů obuvi nebo holínek
stupeň 1: 1 AC 208–230 V 50/60 Hz; 2,2 kW; 10 A; 10/16 A
stupeň 2: 1 AC 208–230 V 50/60 Hz; 1,1 kW; 5 A; 10/16 A
Innova 15 párů obuvi nebo holínek
stupeň 1: 1 AC 208–230 V 50/60 Hz; 2,2 kW; 10 A; 10/16 A
nebo
stupeň 2: 1 AC 208–230 V 50/60 Hz; 1,1 kW; 5 A; 10/16 A nebo
nerezové provedení: 1 AC 208–230 V 50/60 Hz; 2,2 kW; 10 A;
10/16 A
Innova 20 párů obuvi nebo holínek
stupeň 1: 1 AC 208–230 V 50/60 Hz; 3,3 kW; 10 A; 10/16 A
stupeň 2: 1 AC 208–230 V 50/60 Hz; 1,75 kW; 5 A; 10/16 A
Innova 5 párů
stupeň 1: 1050 W
stupeň 2: 550 W
nerezové provedení: 1100 W
Innova 10 párů
stupeň 1 : 2100 W
stupeň 2 : 1050 W
Innova 15 párů
stupeň 1: 2200 W
stupeň 2: 1050 W
nerezové provedení: 2200 W
Innova 20 párů
stupeň 1: 3150 W
stupeň 2: 1575 W
Správné připojovací napětí najdete na typovém štítku!
Okolní teplota: +15 až 40 °C
Vlhkost vzduchu: 30% - 80%
Rozměry: viz následující tabulka a grafika
Doba sušení
Dezinfekce:
Doba působení deodorantu: při 5hodinovém provozu cca 2 měsíce
Emise hluku: cca 65 dB(A)
Innova 71
1,5 až 2,5 hodiny, závisí na promočení,
teplotě atd.
Dezinfekce vzduchem/zničení zárodků dezinfekční ozónovou
lampou!
doba trvání cca 2 hodiny
Page 72
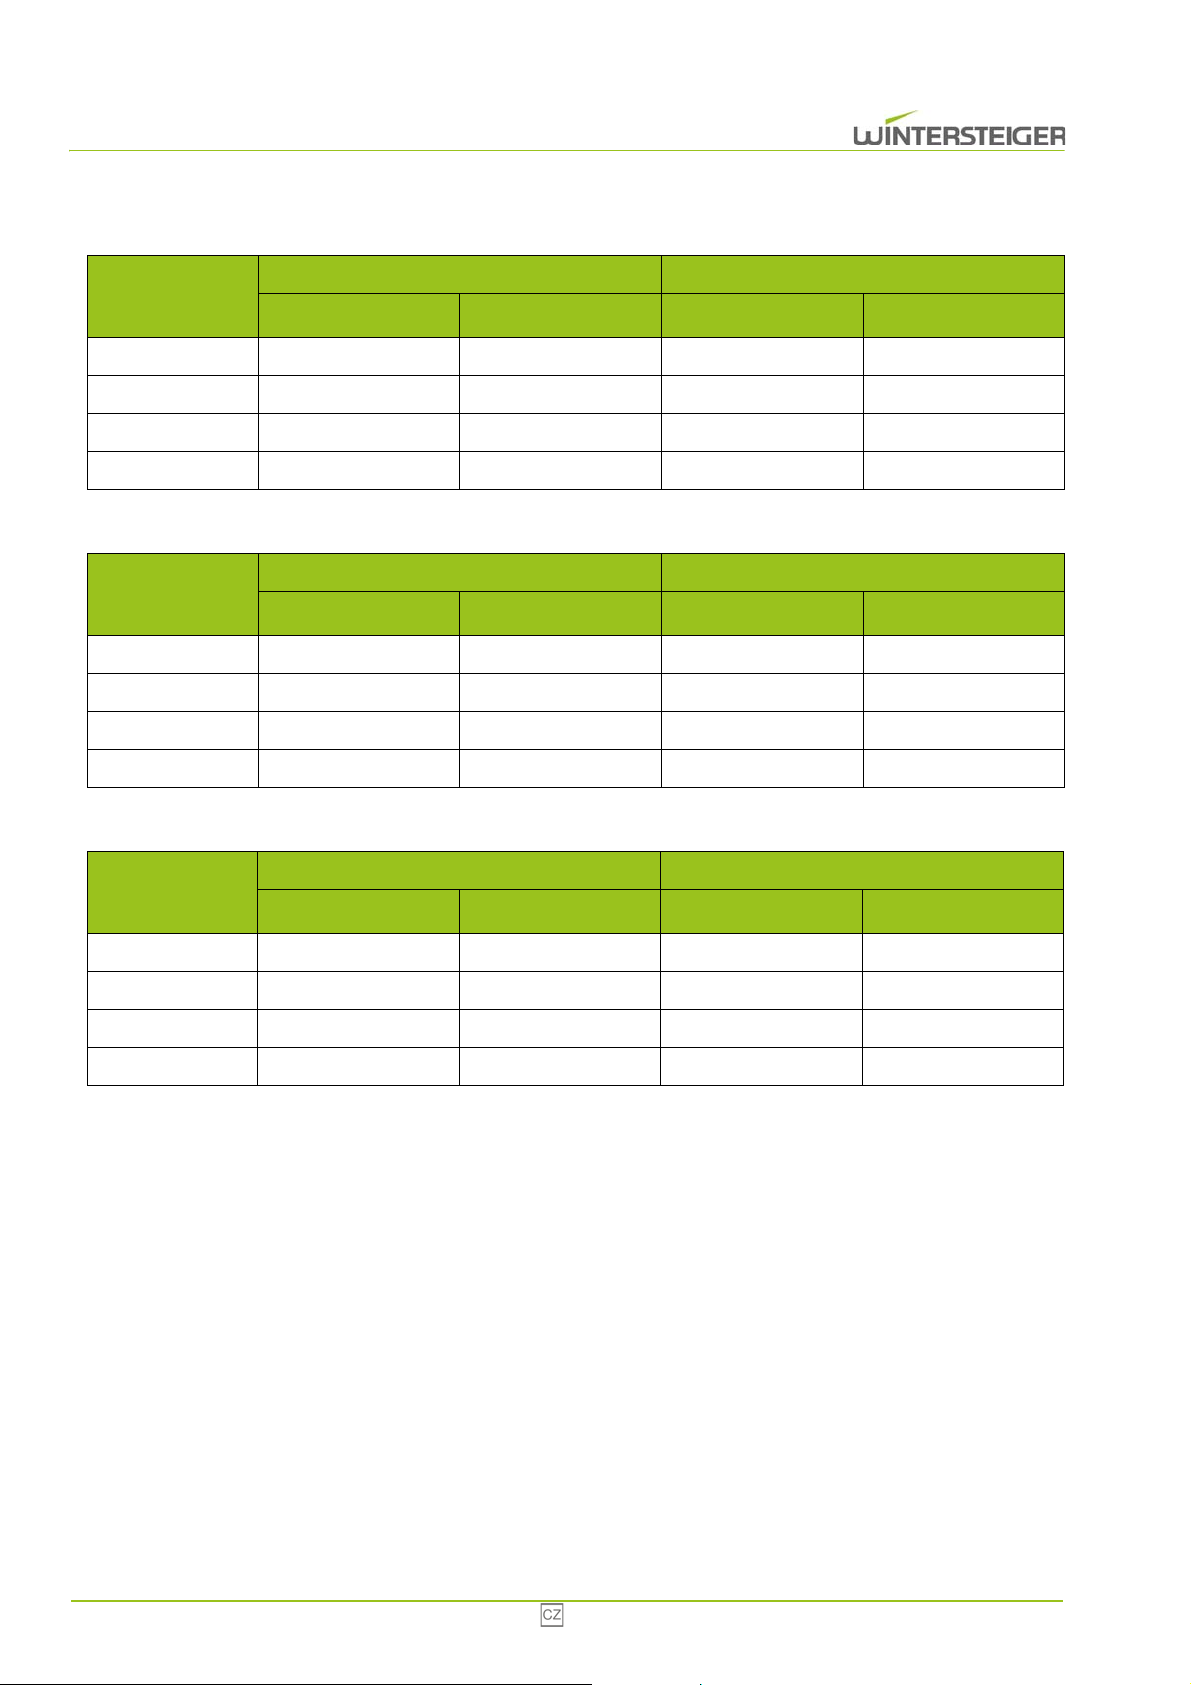
INNOVA
(stan-dardní
provedení)
Výška 2150 mm 2150 mm 2150 mm 2150 mm
Šířka 300 mm 300 mm 605 mm 605 mm
Hloubka 540 mm 620 mm 540 mm 620 mm
Hmotnost 23 kg 26 kg 36 kg 39 kg
bez podstavce s podstavcem bez podstavce s podstavcem
obuv – 5 párů obuv – 10 párů
INNOVA
(stan-dardní
provedení)
Výška 2150 mm 2150 mm 2150 mm 2150 mm
Šířka 900 mm 900 mm 1205 mm 1205 mm
Hloubka 540 mm 620 mm 540 mm 620 mm
Hmotnost 53 kg 56 kg 78 kg 81 kg
INNOVA
(nerezové
provedení)
Výška 2150 mm 2150 mm 2150 mm 2150 mm
Šířka 300 mm 300 mm 900 mm 900 mm
Hloubka 540 mm 620 mm 540 mm 620 mm
Hmotnost 33 kg 36 kg 80 kg 83 kg
bez podstavce s podstavcem bez podstavce s podstavcem
bez podstavce s podstavcem bez podstavce s podstavcem
obuv – 15 párů obuv – 20 párů
obuv – 5 párů obuv – 15 párů
72 Innova
Page 73
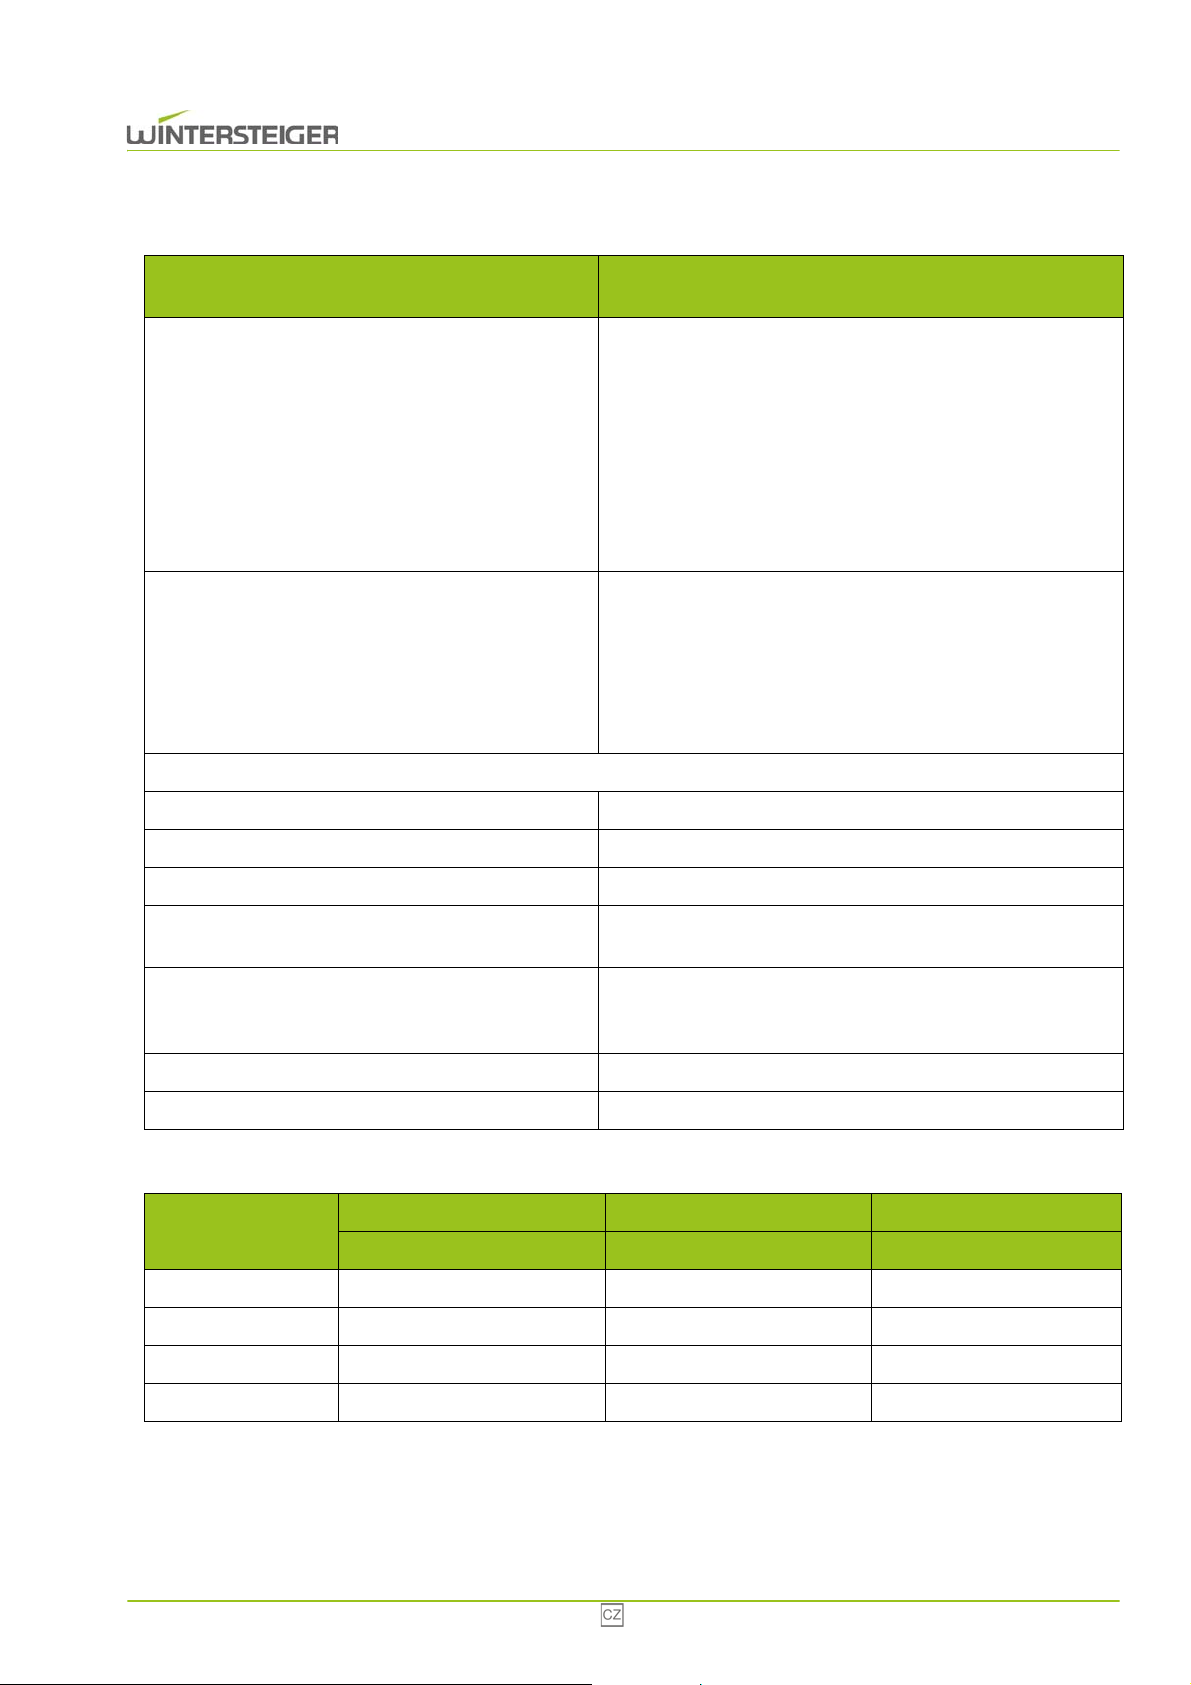
Typ
Jmenovité napětí, kmitočet, výkon, jmenovitý
proud, pojistkové hodnoty min. - max.:
Výkon vytápění:
Správné připojovací napětí najdete na typovém štítku!
Okolní teplota: +15 až 40 °C
Vlhkost vzduchu: 30% - 80%
INNOVA
vysoušeč helem/rukavic
Innova 10 párů rukavic
stupeň 1: 1 AC 208–230 V 50/60 Hz; 1,1 kW; 4,78 A; 10/16 A
nebo
stupeň 2: 1 AC 208–230 V 50/60 Hz; 0,55 W; 2,5 A; 10/16 A
nerezové provedení: 1 AC 208–230 V 50/60 Hz; 1,2 kW;
5,22 A; 10/16 A
Innova 14 helem
stupeň 1: 1 AC 208–230 V 50/60 Hz; 1,1 kW; 4,78 A; 10/16 A
nebo
stupeň 2: 1 AC 208–230 V 50/60 Hz; 0,55 W; 2,5 A; 10/16 A
Innova 10 párů rukavic 230 V
stupeň 1: 550 W
stupeň 2: 1050 W
nerezové provedení 1200 W
Innova 14 helem 230 V
stupeň 1: 500 W
stupeň 2: 1000 W
Rozměry: viz následující tabulka a grafika
Doba sušení
Dezinfekce:
Doba působení deodorantu: při 5hodinovém provozu cca 2 měsíce
Emise hluku: cca 65 dB(A)
10 párů rukavic 10 párů rukavic 14 helem
INNOVA
Standardní Nerezové provedení Standardní
Výška 2150 mm 2150 mm 2060 mm
Šířka 300 mm 300 mm 465 mm
Hloubka 540 mm 520 mm 410 mm
Hmotnost 30 kg 80 kg 50 kg
1,5 až 2,5 hodiny, závisí na promočení,
teplotě atd.
Dezinfekce vzduchem/zničení zárodků dezinfekční ozónovou
lampou!
doba trvání cca 2 hodiny
Innova 73
Page 74
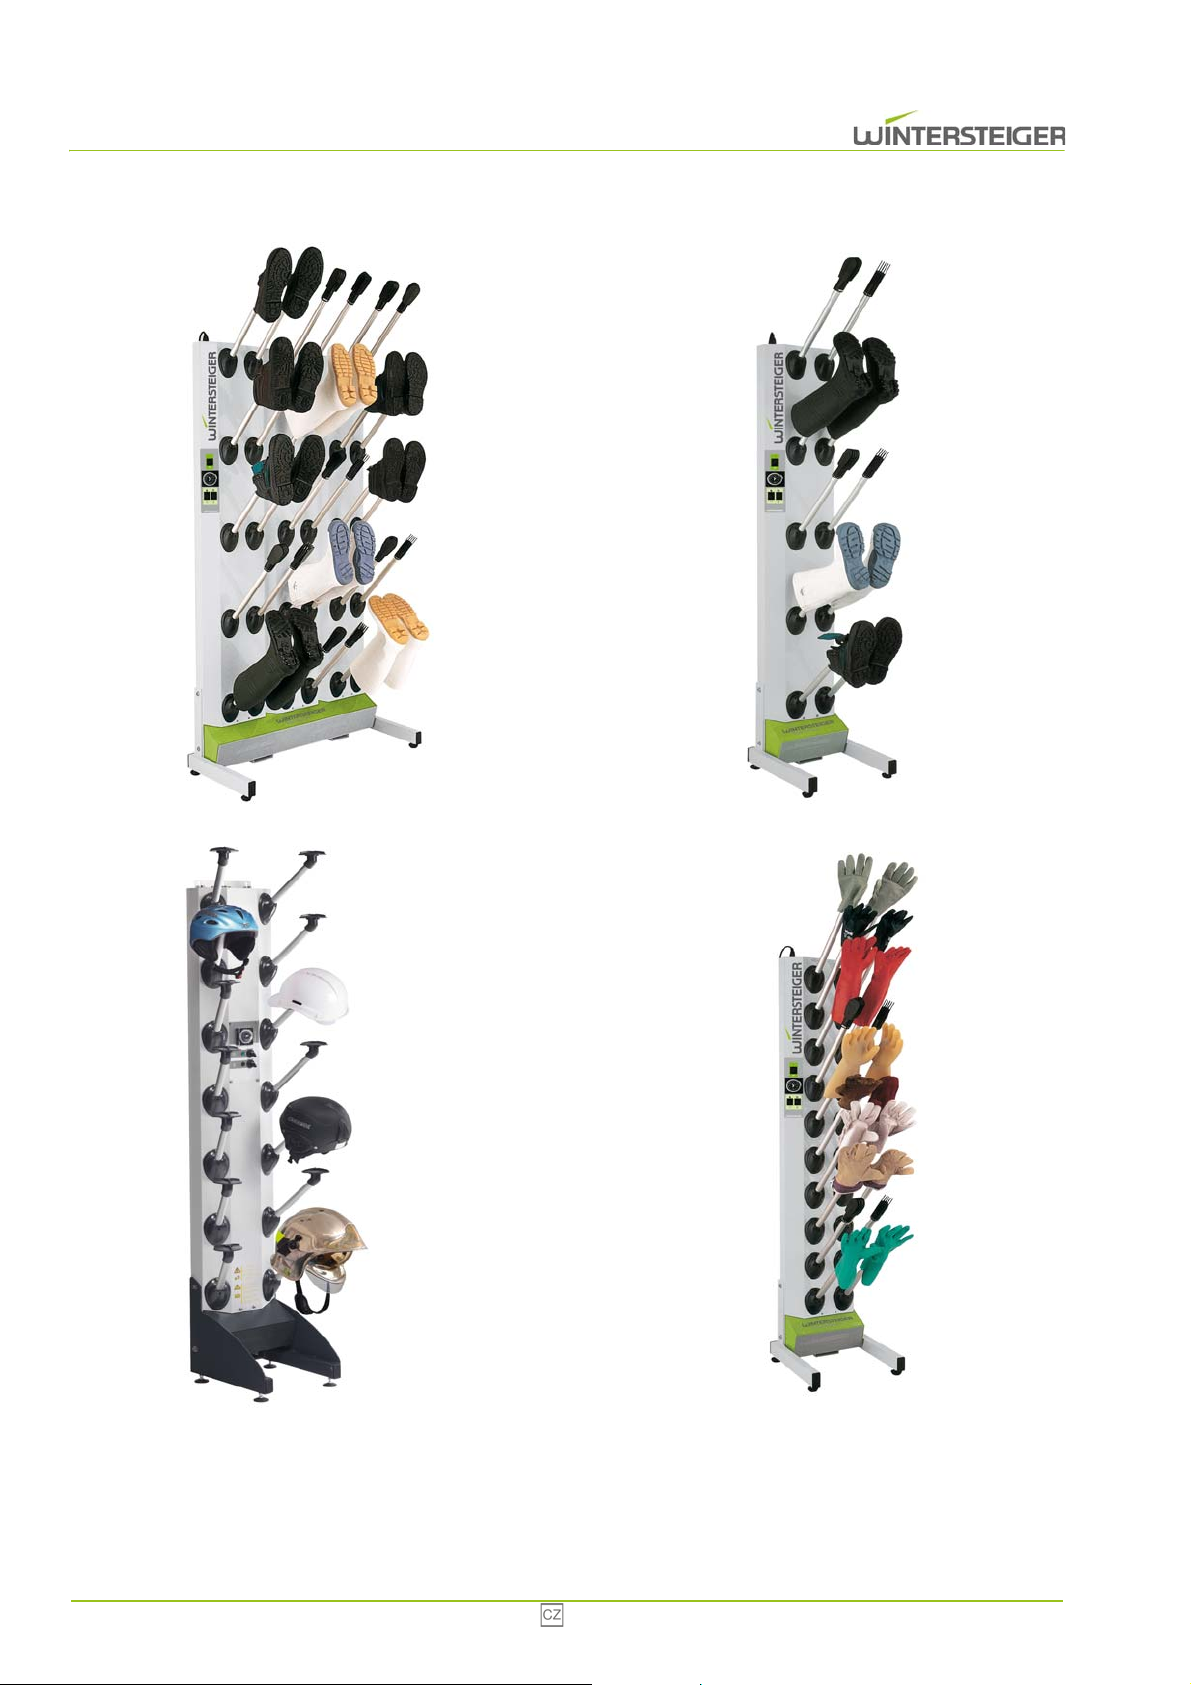
74 Innova
Page 75

6 Přeprava, skladování a přemístění
6.1 Přepravní podmínky přístroje
Přístroj musí být přepravován v původním balení a v poloze uvedené na obalu.
6.2 Skladování přístroje
Teplota: 0 ° až +40 °C.
Jako prevenci před poškozením nepokládejte na obal přístroje žádné jiné balíky nebo krabice!
6.3 Odstranění obalu a výběr umístění
Tyto operace provádějte opatrně, protože zanedbání může narušit provoz a bezpečnost přístroje.
6.4 Umístění
Při výběru stanoviště je třeba v prvé řadě zohlednit funkčnost – především náročnost práce a dostatek místa pro snadnou
manipulaci. Upozorňujeme vás, že kvůli holínkám, obuvi nebo helmám se může potřeba místa pro přístroj ještě zvýšit. Výška
místnosti musí být minimálně 2,35 m. Pokud je to možné, používejte přístroj v dobře větrané místnosti v přímé blízkosti zdroje
napájení.
Při výběru stanoviště dodržuje především směrnice a zákony týkající se bezpečnosti na pracovišti!
Dávejte pozor, aby přívod vzduchu nebyl nikdy zcela ani částečně blokován (přístroj nesmí být zastavěn!).
Aby bylo zaručeno bezchybné a optimální fungování přístroje INNOVA, ještě jednou vás upozorňujeme, že
je třeba dbát na to, aby okolní teplota, příp. pokojová teplota nikdy neklesla pod 15 °C.
Do nasávací mřížky nebo ochranné mřížky nikdy nezasunujte žádné předměty. Tyto otvory nezakrývejte ani částečně. Do
vzduchového okruhu nikdy nenalévejte ani nestříkejte žádné tekutiny, jinak vzniká nebezpečí úrazu elektrickým proudem a
poškození přístroje.
Innova 75
Page 76
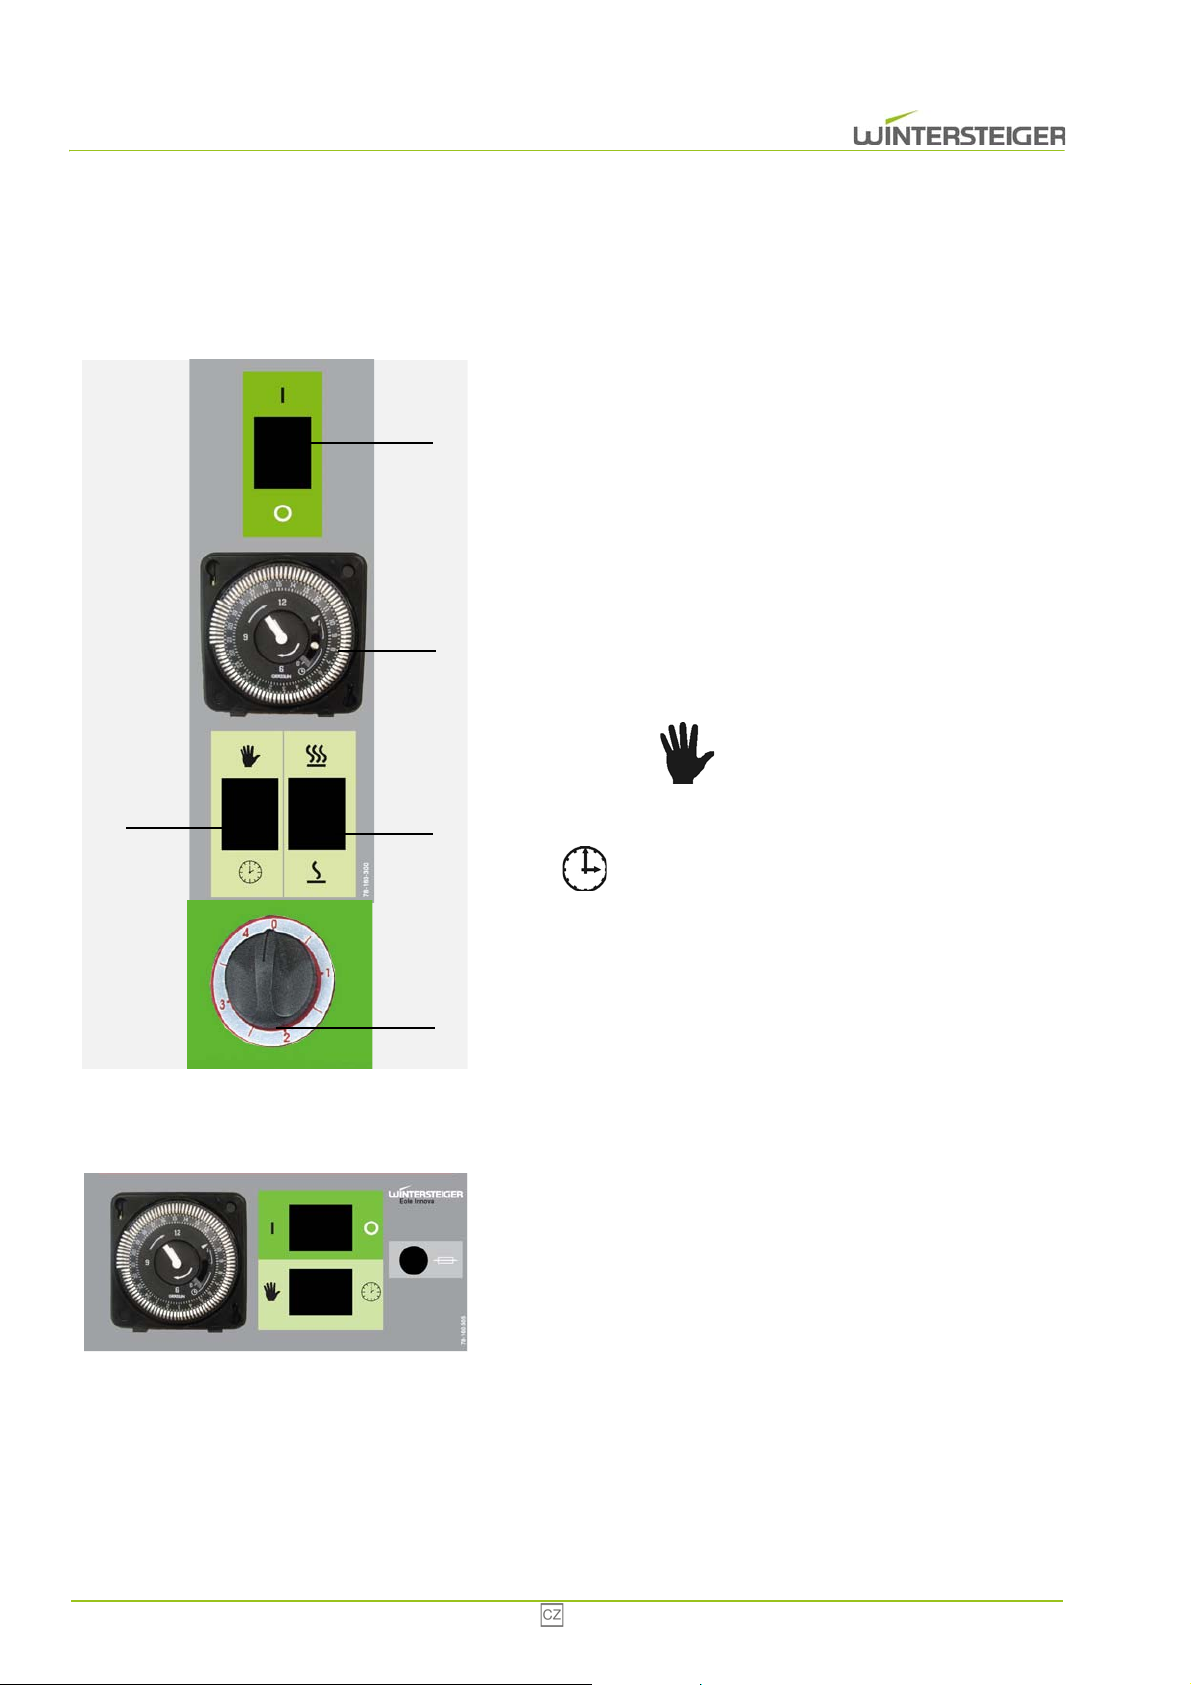
A
B
C
D
E
7 Popis ovládacích prvků
0
I
7.1 Standardní varianta
A: Hlavní vypínač:
Vypnuto
Vypnutí vysoušeče
Zapnuto
Zapnutí vysoušeče
B: Vypínač teplý vzduch
Stupeň 1 nebo stupeň 2
C: Časovač pro automatický režim
D: Provozní režimy
Ruční režim
V ručním režimu se aktivují ventilátor cirkulujícího vzduchu a
dezinfekce.
7.2 Nerezová varianta
V automatickém režimu probíhá vysoušení a dezinfekce obuvi po
dobu předem nastavenou na časovači.
E: 4hodinový časovač
V automatickém režimu lze dobu sušení a dezinfekce nastavit
pomocí 4hodinového časovače až na dobu 4 hodin.
Automatický režim
V nerezovém provedení je k dispozici pouze jeden stupeň výkonu
vytápění.
Pojistka je umístěna přímo na ovládacím panelu.
76 Innova
Page 77
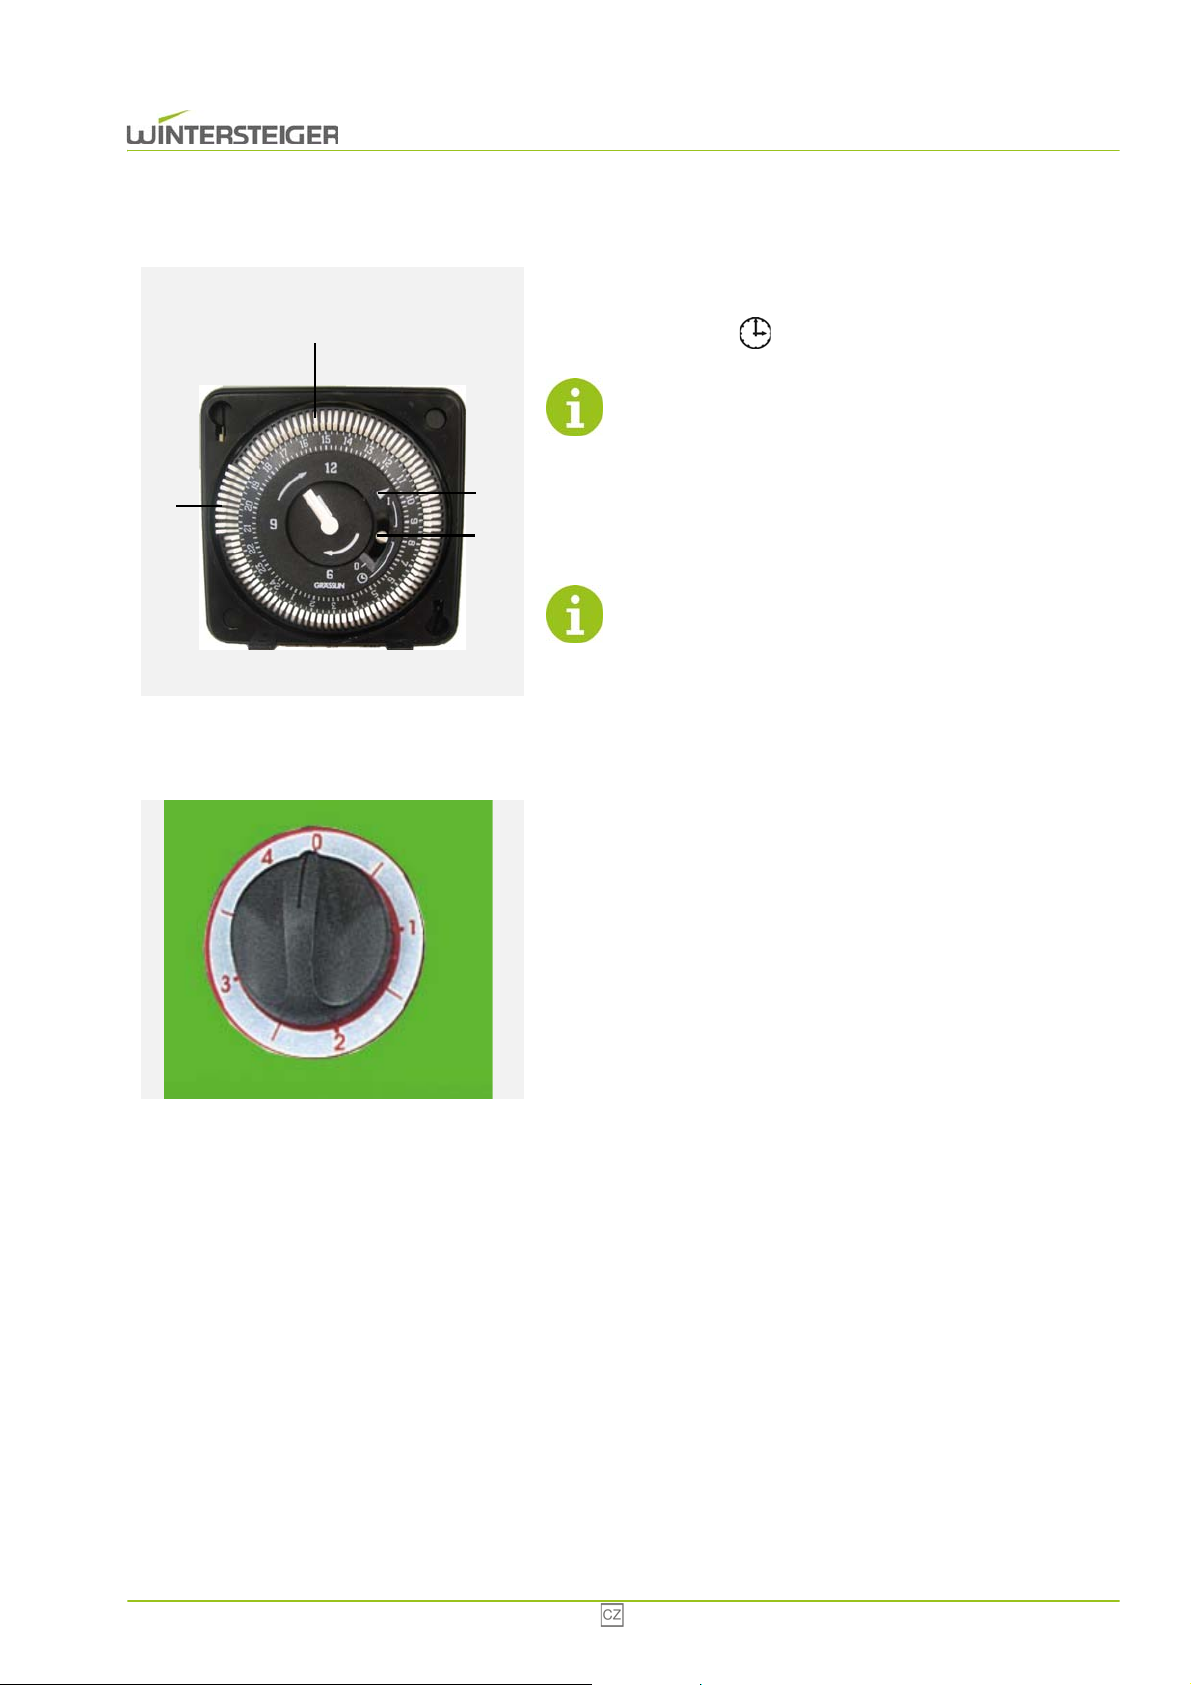
G
I
F
H
7.3 Nastavení časovače – automatický režim
K nastavení času otočte vnějším kroužkem [I] časovače tak, aby
malá značka [F] ukazovala na aktuální čas. Nastavovací knoflík [H]
musí být nastaven na střední polohu a nesmí být změněn.
Časovač má baterii (doba nabíjení: 70 hodin), takže při
výpadku proudu nebo krátkodobém odpojení od sítě
zůstává čas zachován. Při delším přerušení napájení je
však nutné aktuální čas nastavit znovu.
Posuňte nyní články hodin [G], které odpovídají délce sušení,
směrem ven: přístroj se v nastavenou dobu zapne.
V automatickém režimu musí být vypínač [H] nastaven na
středovou polohu.
7.4 Zapnutí 4hodinového časovače – automatický režim
V automatickém režimu lze dobu sušení nastavit pomocí 4hodinového
časovače pod ovládacím panelem. Dobu sušení a dezinfekce lze plynule
nastavit až na 4 hodiny.
Innova 77
Page 78
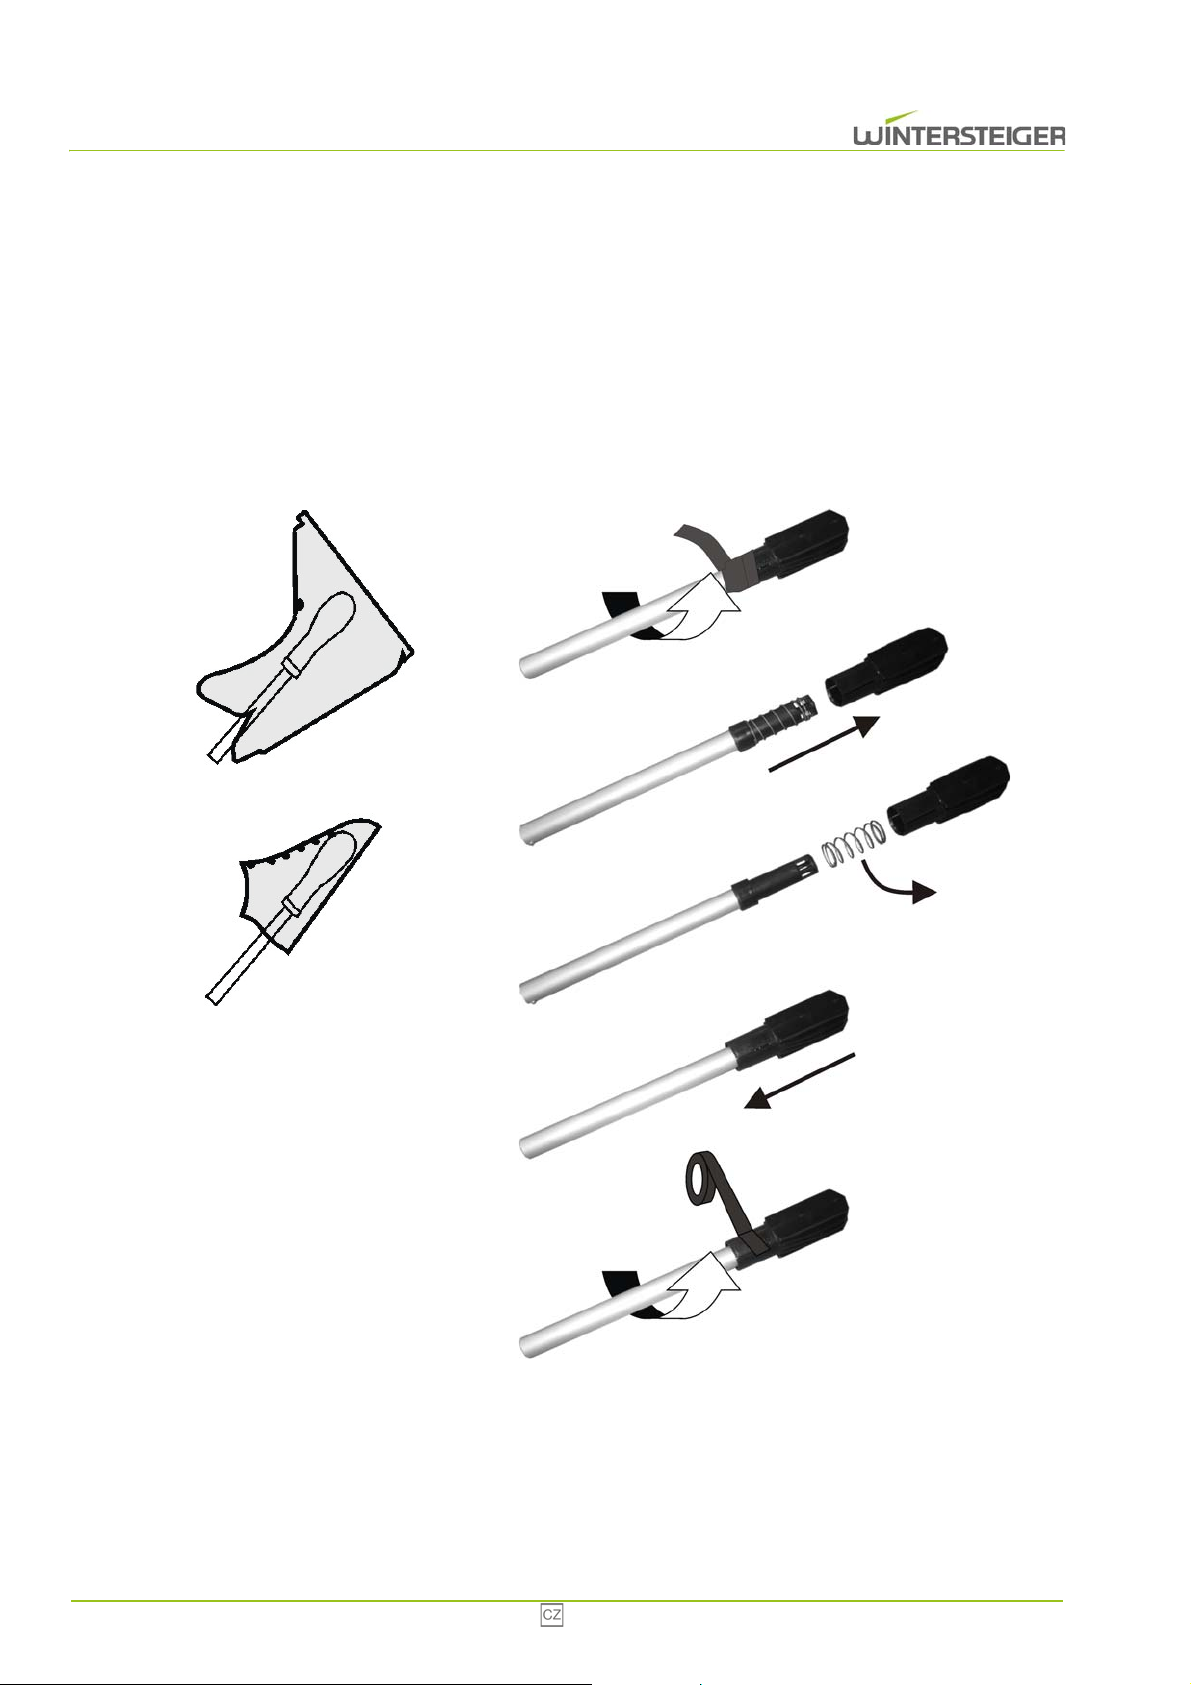
8 Uvedení do provozu
Obrázek 1
Obrázek 2
8.1 Umístění obuvi
Pro účinné vysoušení obuvi umístěte vysokou botu nebo holínku špičkou nahoru. Polobotky umístěte špičkou směrem
dolů.
Při používání přístroje pro obuv nebo rukavice, které nemají dostatečnou hmotnost na otevření sušicího ventilu,
demontujte pružinu podle obrázku [2]. Nejprve odstraňte černou lepicí pásku. Po demontáži pružiny je třeba sušicí ventil
opět připevnit lepicí páskou na vysoušecí trubku.
78 Innova
Page 79
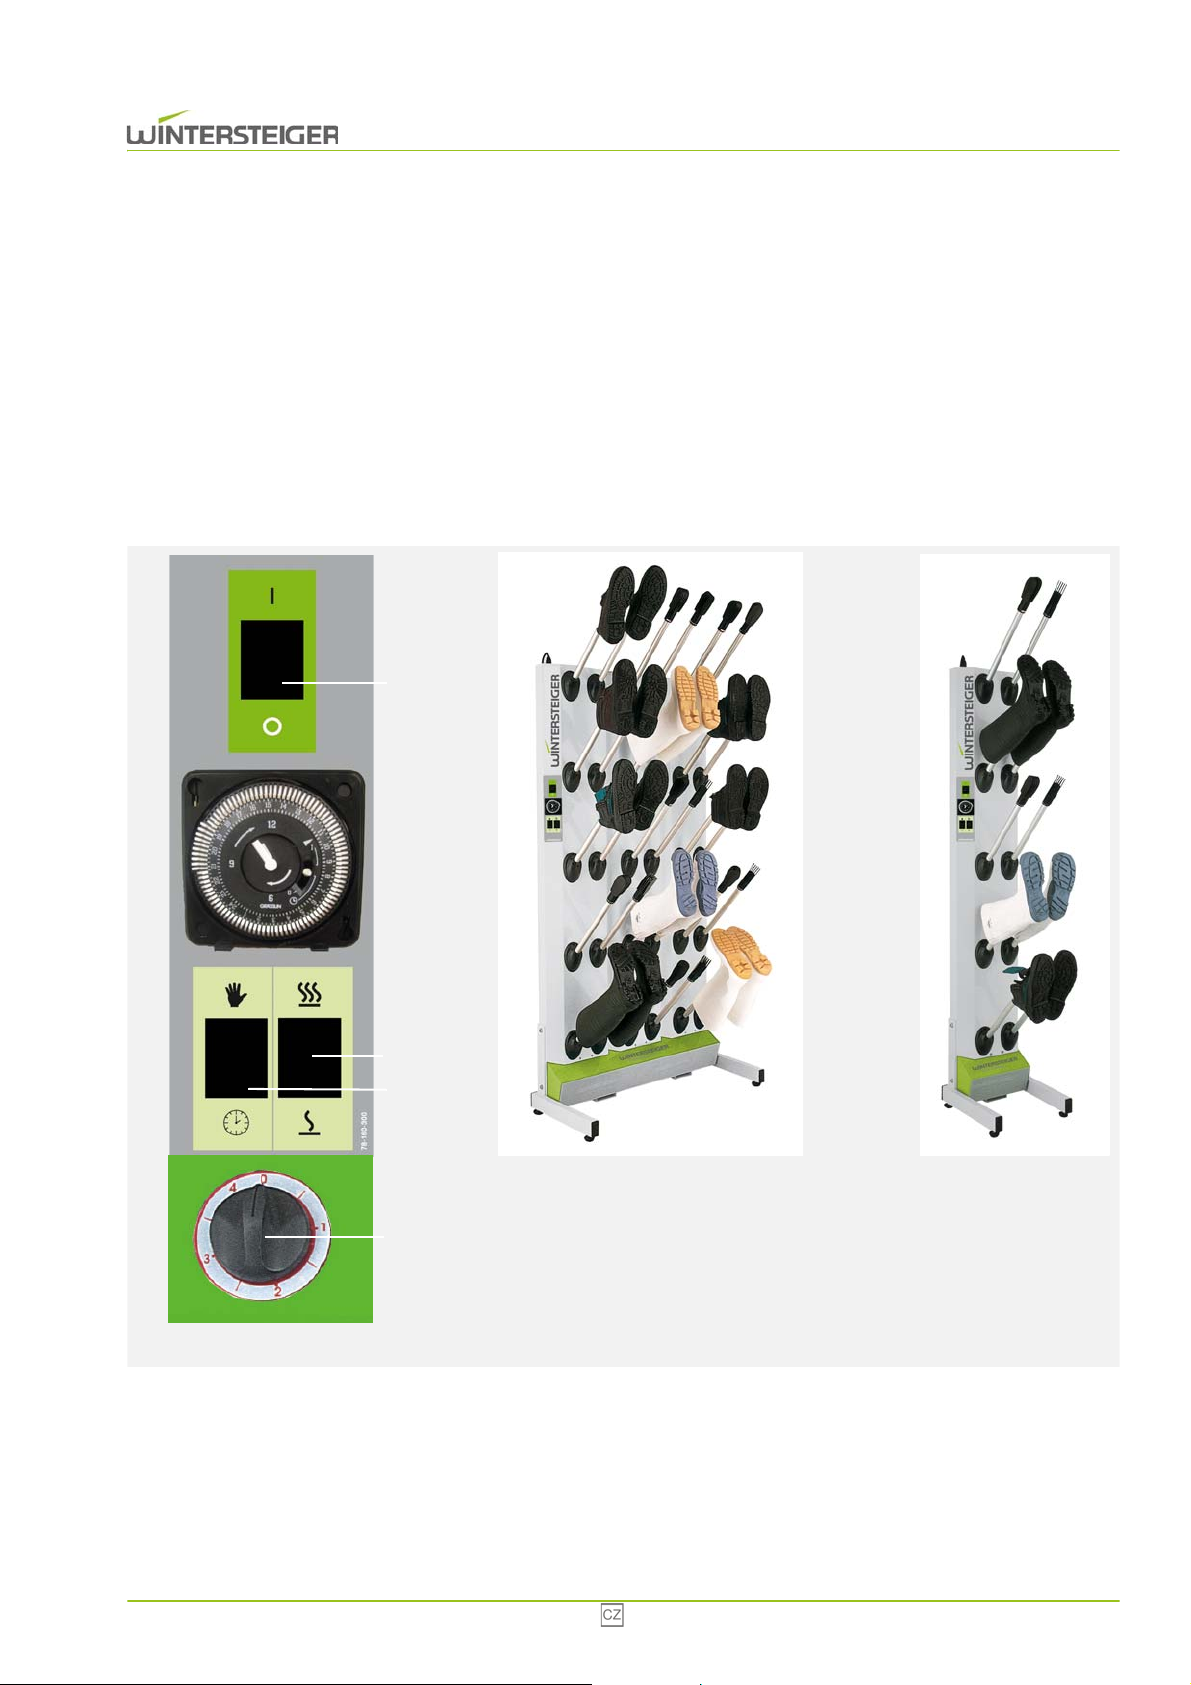
A
B
C
D
8.2 Provoz
Pokud je to třeba, použijte nový deodorant.
Přístroj zapojte.
Vypínačem [A] přístroj zapněte. Na pákovém přepínači [C] vyberte ruční nebo automatický režim. V automatickém
režimu zkontrolujte nastavení časovače. V automatickém režimu lze nastavit dobu vysoušení pomocí 4hodinového
časovače [D] pod ovládacím panelem. Ve standardní variantě přístroje vyberte pomocí vypínače [B] požadovaný výkon
vytápění (stupeň 1 nebo 2). Nerezová varianta má pouze jeden stupeň vytápění.
Po skončení cyklu vysoušení a dezinfekce obuv, rukavice nebo helmy odstraňte.
Další cyklus může začít.
Innova 79
Page 80
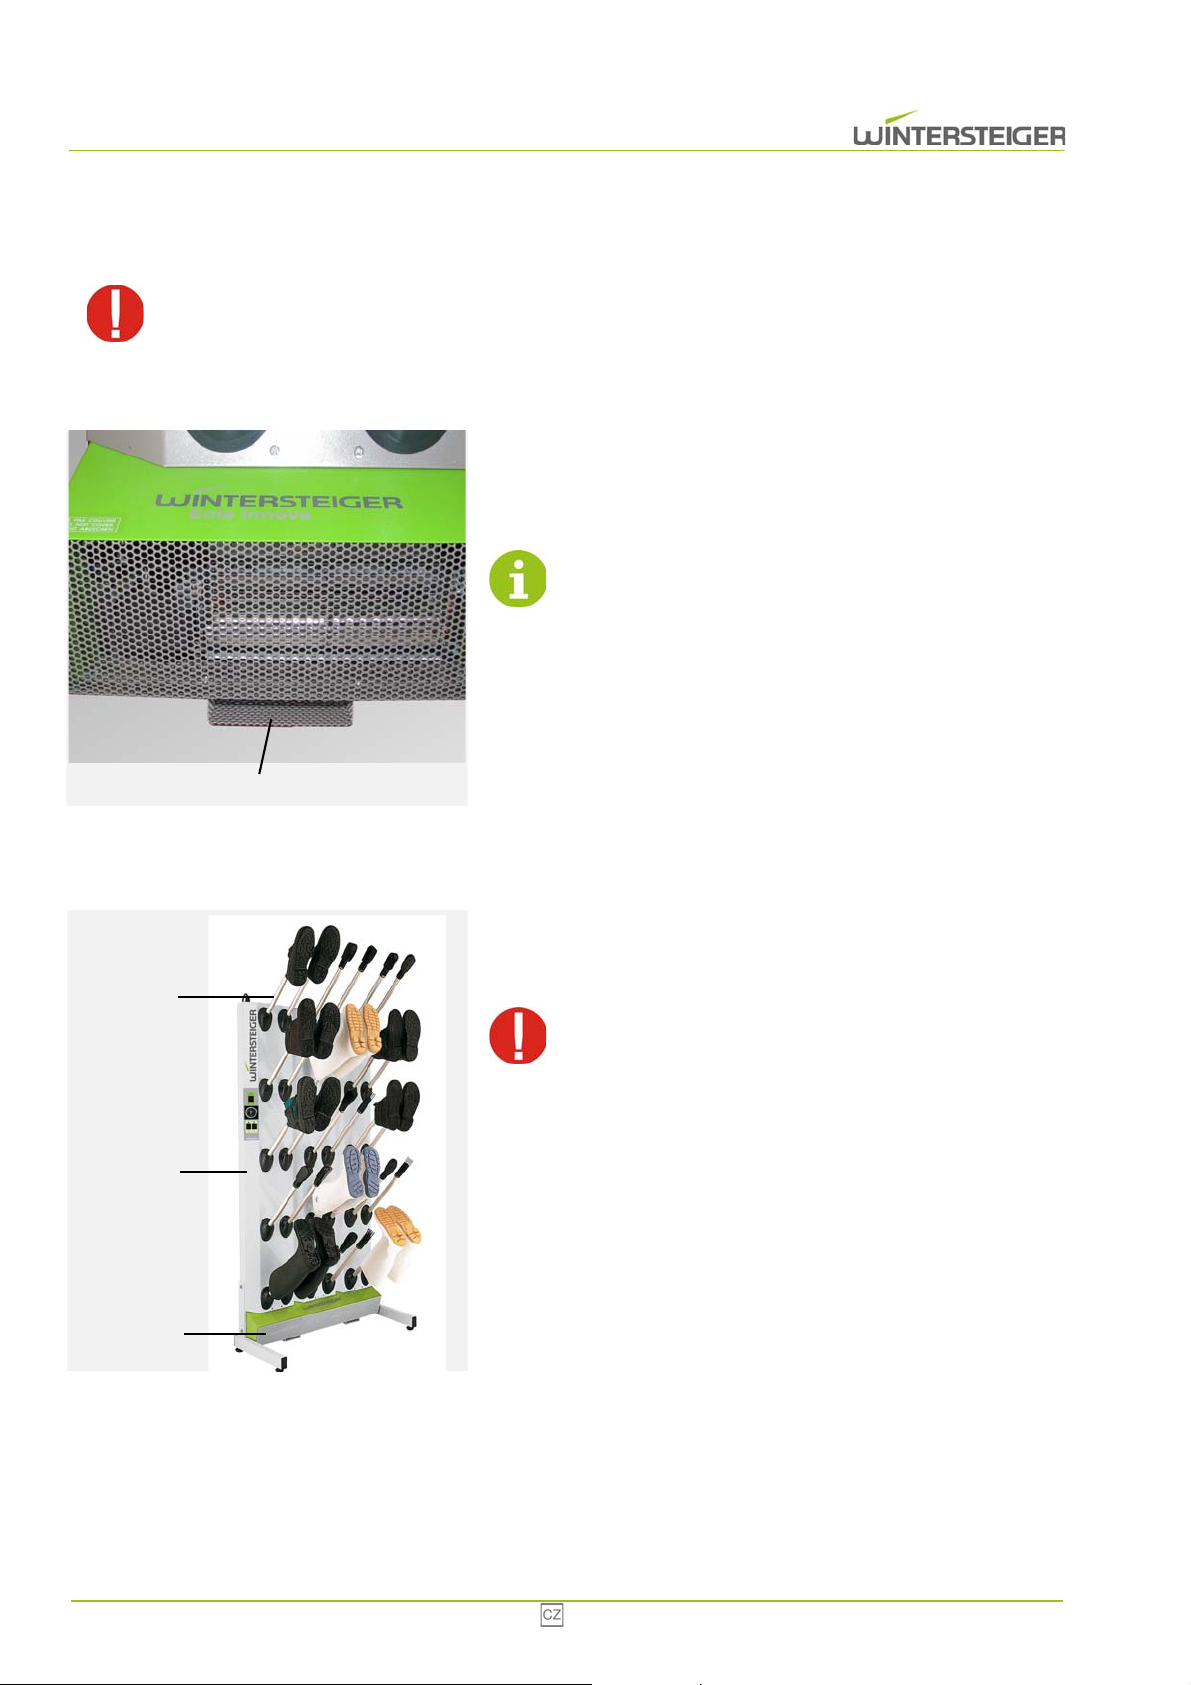
A
E
D
C
9 Údržba
Před veškerými činnostmi údržby přístroj vypněte a zástrčku vytáhněte ze zásuvky!
9.1 Výměna deodorantu
Na spodní straně přední části se nachází zásobník na deodorant
[A].
Pytlíček s deodorantem vyjměte a poté k němu přivoňte. Pokud již
nevoní, použijte nový pytlíček.
Při 5hodinovém provozu působí deodorant cca 2 měsíce!
9.2 Čištění
Rám [C] a ventily [D] pravidelně čistěte vlhkým hadříkem.
Jednou za rok odstraňte po otevření předního krytu [E] prach z
vnitřní strany přístroje.
Čištění pomocí vysokotlakého čističe lze provádět pouze u
přístroje v nerezovém provedení! Přístroj ve standardním
provedení se vysokotlakým čističem čistit nesmí. V případě
nedbalosti zaniká veškeré ručení a nároky na záruku za
následné škody.
80 Innova
Page 81
9.3 Generátor ozónu
Použité generátory ozónu umožňují účinnou dezinfekci po dobu 3000 provozních hodin, pak je třeba ozónové lampy vyměnit.
Jednou měsíčně proveďte vizuální kontrolu generátorů ozónu během provozu (namodralé světlo). Odrazy UV světla lze vidět
větrací mřížkou, když stojíte ve vzdálenosti cca 2 metry od přístroje.
Nebezpečí úrazu!
Nedívejte se přímo do generátorů ozónu! UV záření může poškodit oči!
Innova 81
Page 82
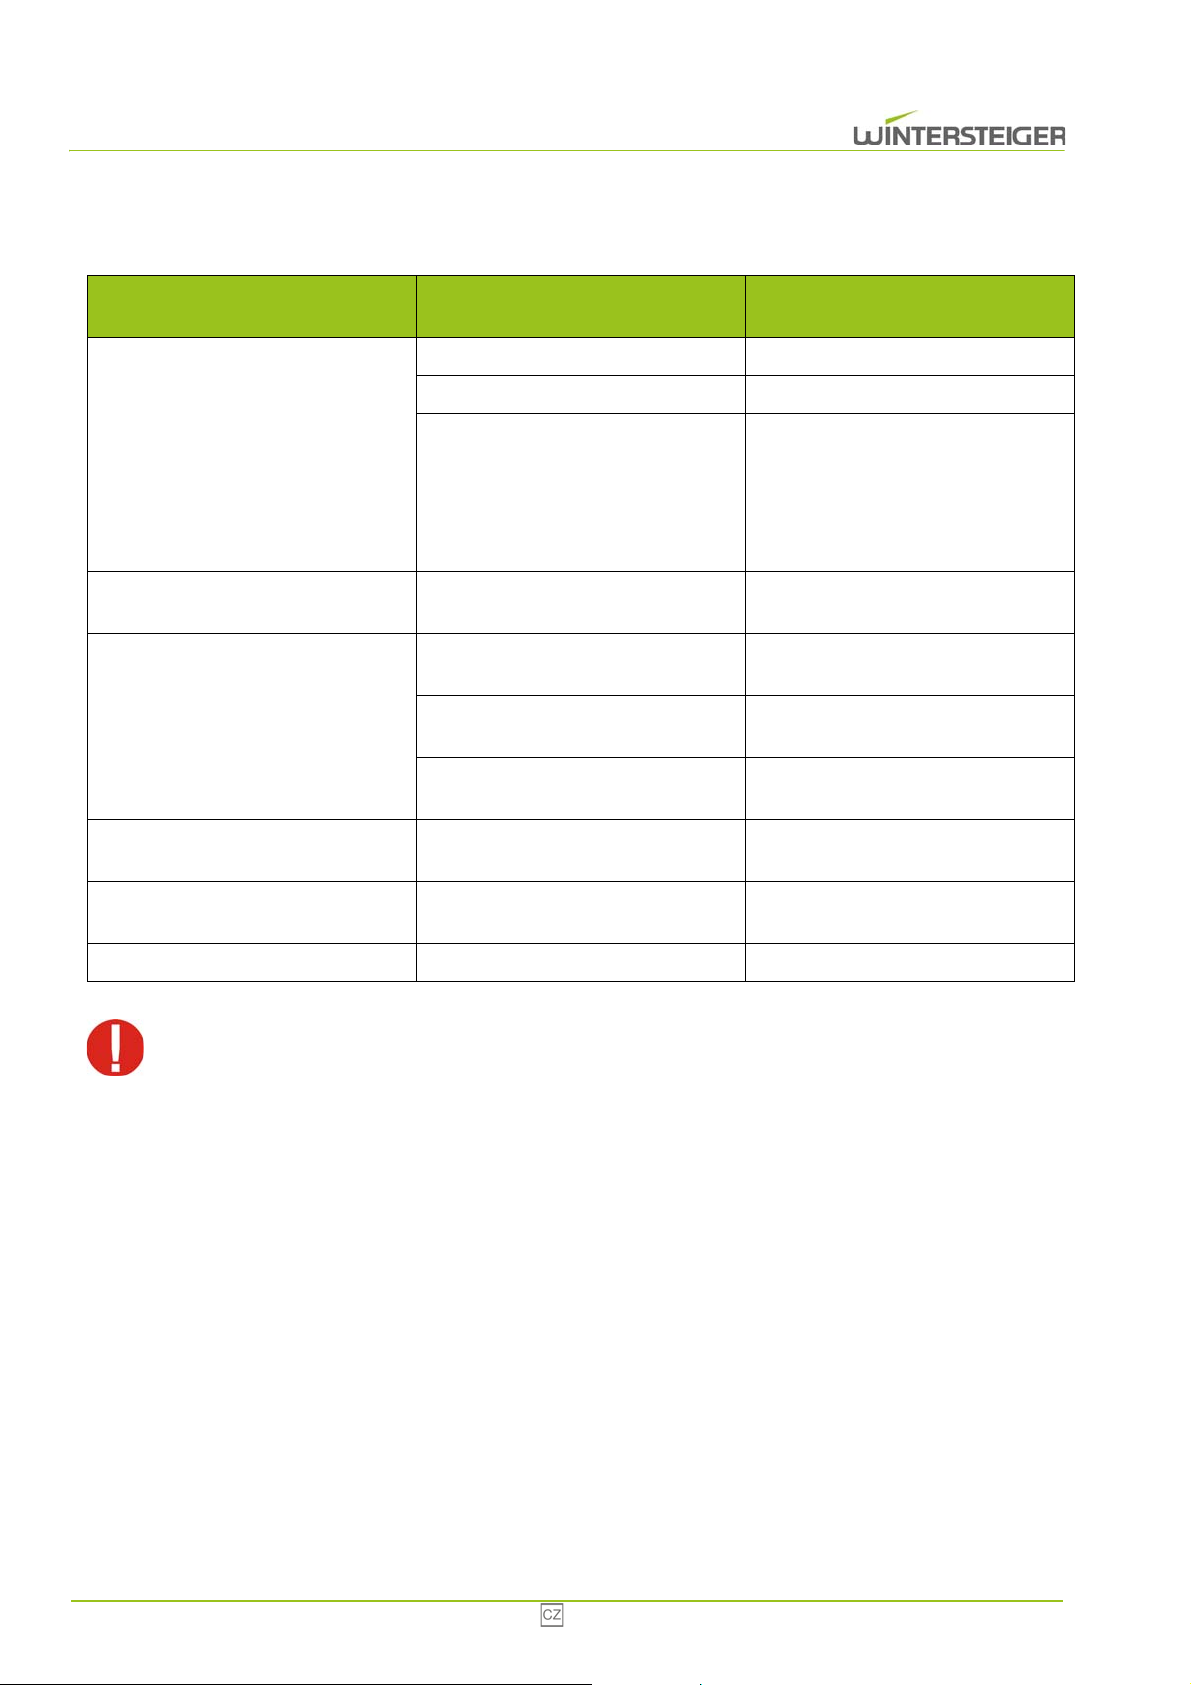
10 Odstranění závad
Závada
Problém
Přístroj nefunguje.
Přístroj se v automatickém režimu
nezapíná ve správnou dobu.
Přístroj nesuší.
Vysoušecí výkon přístroje se snižuje
nebo přístroj netopí.
Příčina Odstranění
Přístroj není zapojený do zásuvky. Zapojte přístroj do zásuvky.
Hlavní vypínač je nastaven na „0“. Zapnout hlavní vypínač
Zkontrolujte pojistku na napájecím
zdroji. Náhradní pojistka je umístěna v
Pojistka je vadná.
Nebyl správně nastaven časovač. Značku [F] natočte na aktuální čas.
Nedostatečný přívod vzduchu.
Vlhkost vzduchu > 80 %.
Pokojová teplota <15 °C.
Vadný ventilátor. Ventilátor zkontrolujte.
držáku pojistky.
Pojistka 5x20 mm 10 A. Při výměně
musí být síťová zástrčka vytažená ze
zásuvky.
Zkontrolujte přívod vzduchu v přístroji
nebo v místnosti.
Čím je vlhkost vzduchu nižší, tím je
vysoušení lepší.
Čím je pokojová teplota vyšší, tím je
vysoušení lepší.
Nevychází vůně.
Vadná ozónová lampa. Ozónovou lampu vyměňte.
Při zásahu do přístroje vytáhněte síťovou zástrčku ze zásuvky! Přístroj se smí provozovat pouze s
kompletně namontovanými ochrannými zařízeními a kryty.
Pytlíček s deodorantem je
spotřebován.
Vložte nový pytlíček s deodorantem.
82 Innova
 Loading...