

Page 1

Combi - Multi - Eco
Betriebsanleitung
Operating manual
Manuel der service
Istruzioni per l‘uso
Gebruiksaanwijzing
Návod k obsluze
78-560-601
12.01.2017
Руководство по эксплуатации
Page 2

Page 3

Inhaltsverzeichnis..............................................................................4
Table of contents.............................................................................19
Sommaire ........................................................................................33
Indice...............................................................................................47
Inhoudsopgave................................................................................60
Obsah..............................................................................................74
Содержание ...................................................................................88
Combi/ Multi Eco 3
Page 4

Inhaltsverzeichnis
1 Vorwort ................................................................................................................................................................................. 5
1.1 Bestimmungsgemäße Verwendung ........................................................................................................................... 5
2 Allgemeine Hinweise ........................................................................................................................................................... 6
2.1 Sicherheitsvorschriften ............................................................................................................................................... 6
2.2 Warnhinweise ............................................................................................................................................................ 6
2.3 Schutzvorrichtungen .................................................................................................................................................. 7
3 Funktion ................................................................................................................................................................................ 7
4 Technische Daten ................................................................................................................................................................ 8
5 Transport, Lagerung und Veränderung des Standortes .................................................................................................. 8
5.1 Transportbedingungen des Geräts ............................................................................................................................ 8
5.2 Lagerung des Geräts ................................................................................................................................................. 8
5.3 Entfernen der Verpackung und Standortwahl ............................................................................................................ 8
6 Beschreibung der Bedienelemente .................................................................................................................................... 9
6.1 Zeitschaltuhr für 24 Stunden / 7 Tage ........................................................................................................................ 9
6.2 Betrieb mit der Zeitschaltuhr für 24 Stunden / 7 Tage ............................................................................................... 9
6.2.1 Aktuelle Uhrzeit und aktuellen Wochentag einstellen .................................................................................. 10
6.2.2 Zeitplan erstellen ......................................................................................................................................... 10
6.2.3 Außerplanmäßiges Trocknen ...................................................................................................................... 11
6.3 Betrieb der Ozonlampe mit der Zeitschaltuhr für 24 Stunden (Option) .................................................................... 11
6.3.1 Aktuelle Uhrzeit einstellen ........................................................................................................................... 12
6.3.2 Zeitplan erstellen ......................................................................................................................................... 12
6.4 Trocknungsschrank optimal bestücken .................................................................................................................... 12
7 Wartung .............................................................................................................................................................................. 13
7.1 Reinigung ................................................................................................................................................................. 13
7.2 Ozonlampe (Option) ................................................................................................................................................. 13
7.3 Wassertank leeren ................................................................................................................................................... 14
7.4 Übertemperaturschalter ........................................................................................................................................... 15
8 Fehlerbehebung ................................................................................................................................................................. 16
9 Stilllegung und Entsorgung .............................................................................................................................................. 17
10 Schaltplan Combi / Multi Eco .......................................................................................................................................... 18
Combi/ Multi Eco 4
Page 5

1 Vorwort
© Copyright 2014 by
WINTERSTEIGER AG ::: A-4910 Ried/I Dimmelstrasse 9
Autor und Grafik: Maria Marek-Pollhammer
Tel. +43 7752 919-0
E-mail: [email protected]
Diese Betriebsanleitung muss vor der ersten Inbetriebnahme vom Bedienpersonal und von den für die Erhaltung des Trocknungsschrankes Verantwortlichen gelesen werden.
Schäden, die durch Nichtbeachtung der darin enthaltenen Hinweise entstehen, werden durch die Garantie nicht gedeckt.
Der Verwender des Trocknungsschrankes ist gesetzlich verpflichtet, die Unfallvorschriften für das betreffende Land zu beachten.
Weiters ist diese Betriebsanleitung vertraulich zu behandeln. Sie darf nur befugten Personen zugänglich gemacht werden.
Eine Überlassung an Dritte darf nur mit schriftlicher Zustimmung der Firma WINTERSTEIGER erfolgen.
Alle Unterlagen sind im Sinne des Urheberrechtes geschützt. Die Weitergabe und Vervielfältigung von Unterlagen, auch auszugsweise, sowie eine Verwertung und Mitteilung ihres Inhaltes sind nicht gestattet, soweit nicht ausdrücklich schriftlich zugestanden.
Zuwiderhandlungen sind strafbar und verpflichten zu Schadenersatz. Alle Rechte zur Ausübung von gewerblichen Schutzrechten sind der Firma WINTERSTEIGER vorbehalten.
1.1 Bestimmungsgemäße Verwendung
Der Trocknungsschrank Combi/ Multi Eco ist ausschließlich für das Trocknen und Aufbewahren von Kleidung, Schuhen,
Stiefeln, Handschuhen und Helmen gebaut (bestimmungsgemäßer Gebrauch). Jeder darüber hinausgehende Gebrauch gilt
als nicht bestimmungsgemäß. Der Hersteller haftet nicht für daraus resultierende Schäden. Das Risiko hierfür trägt allein der
Benutzer.
Zur bestimmungsgemäßen Verwendung gehört auch die Einhaltung der vom Hersteller vorgeschriebenen Betriebs-, Wartungs- und Instandhaltungsbestimmungen. Die einschlägigen Unfallverhütungsvorschriften sowie die sonstigen allgemein
anerkannten sicherheitstechnischen, und arbeitsmedizinischen Regeln sind einzuhalten.
Eigenmächtige Veränderungen am Trocknungsschrank schließen eine Haftung des Herstellers für daraus resultierende
Schäden aus.
Wir sind stets bemüht, unsere Erzeugnisse zu verbessern und behalten uns darum das Recht vor, alle Änderungen und Verbesserungen anzubringen, die wir für zweckmäßig halten. Eine Verpflichtung, diese auf früher gelieferte Maschinen und Geräte auszudehnen, ist damit jedoch nicht verbunden.
Alle Abbildungen, Maße und Gewichtsangaben in der Bedienungsanleitung sind unverbindlich.
Originalbetriebsanleitung
5 Combi/ Multi Eco
Page 6
2 Allgemeine Hinweise
2.1 Sicherheitsvorschriften
Schließen Sie das Gerät nur an Steckdosen an, die von einer Elektrofachkraft überprüft wurden. Beachten Sie dabei
die richtige Anschlussspannung! Die Anschlusswerte sind auf dem Typenschild ersichtlich. Prüfen Sie, ob diese Angaben mit der Spannung des Netzes übereinstimmen.
Der Trocknungsschrank darf nur mit vollständig montierten Schutzen und Abdeckungen betrieben werden!
Vor jeder Standortverschiebung oder bei Geräteeingriffen Netzstecker ziehen!
Das Gerät darf nur mit Original WINTERSTEIGER Ersatzteilen bzw. Verbrauchsmaterial betrieben werden. Wird
Fremdmaterial verwendet, geschieht dies auf eigene Gefahr und Verantwortung des Betreibers, die Garantie erlischt
dadurch!
Sorgen Sie für eine gute Belüftung des Arbeitsraumes!
2.2 Warnhinweise
Verletzungsgefahr!
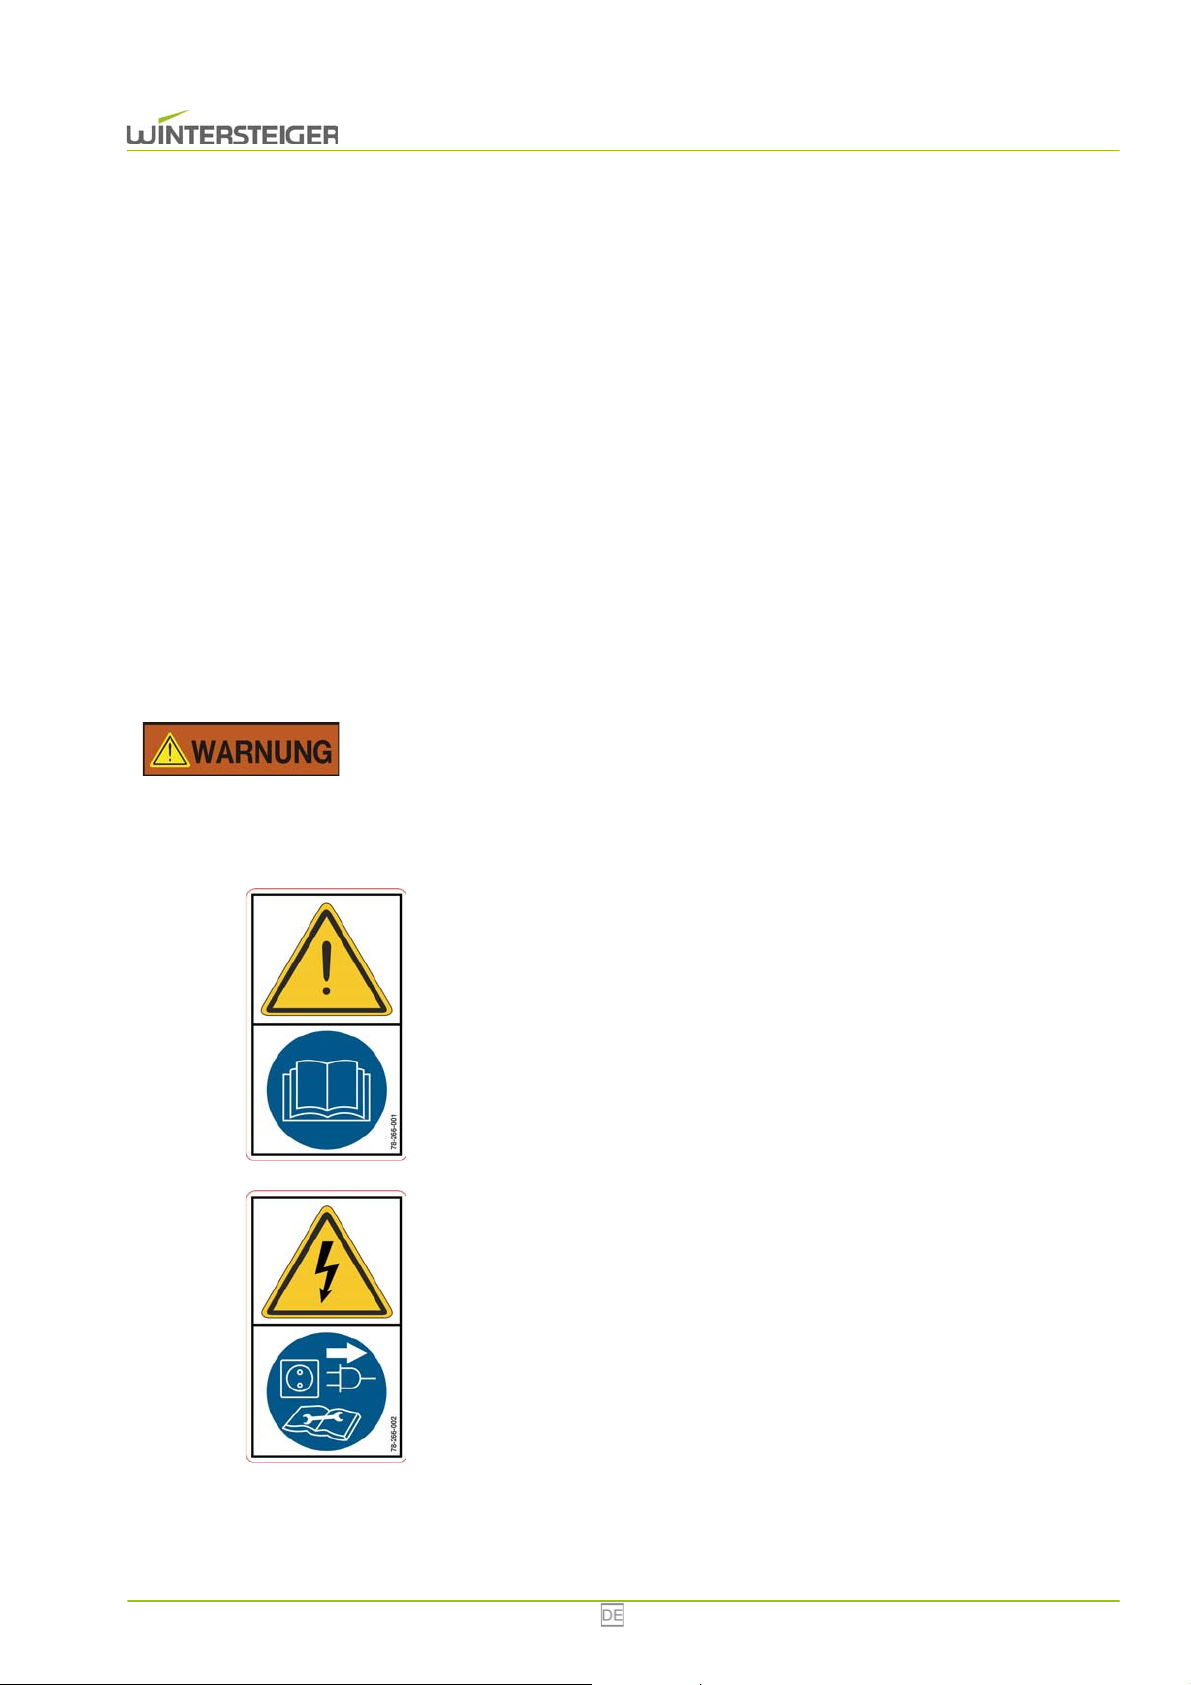
Es muss regelmäßig kontrolliert werden, ob sich diese Warnaufkleber noch auf der Maschine befinden. Unleserliche oder fehlende Warnaufkleber müssen sofort erneuert werden. Die Aufkleber befinden sich an der linken Innenwand des Gerätes.
Vor Inbetriebnahme die Betriebsanleitung und Sicherheitshinweise lesen
und beachten!
Bestellnummer: 78-266-001
Vor Öffnen des Gerätes Netzstecker ziehen!
Bestellnummer: 78-266-002
Combi/ Multi Eco 6
Page 7

Dieser Aufkleber ist nur vorhanden, wenn die Maschine über die Option
Ozonlampe verfügt.
Bestellnummer: 78-150-120
2.3 Schutzvorrichtungen
Sämtliche Schutzvorrichtungen dürfen während des Betriebes nicht entfernt werden.
Der Trocknungsschrank Combi/ Multi Eco erfüllt die Niederspannungsrichtlinie und die EMV-Richtlinie.
3 Funktion
Typ Combi Eco Multi Eco
Bedienung Zeitschaltuhr für 24 Stunden / 7 Tage sowie analoge Zeitschaltuhr (schaltbar bis 6 Stunden)
Trocknung
Leistungsfähige Warmlufttrocknung
Energiesparende Trocknung von hochwertiger Arbeits- und Einsatzkleidung
Hygiene Keimreduktion in der Luft durch Ozonlampe (Option)
Innenbelüftete Trocknungsdüsen für:
8 Paar Schuhe
8 Paar Handschuhe
Raum
Integrierte Halterung für (Türeninnenseitig)
2 Kleiderstangen
Integrierter Wassertank (bei Bedarf leeren)
Combi Eco
12 Paar Handschuhe
2 Kleiderstangen
Multi Eco
7 Combi/ Multi Eco
Page 8
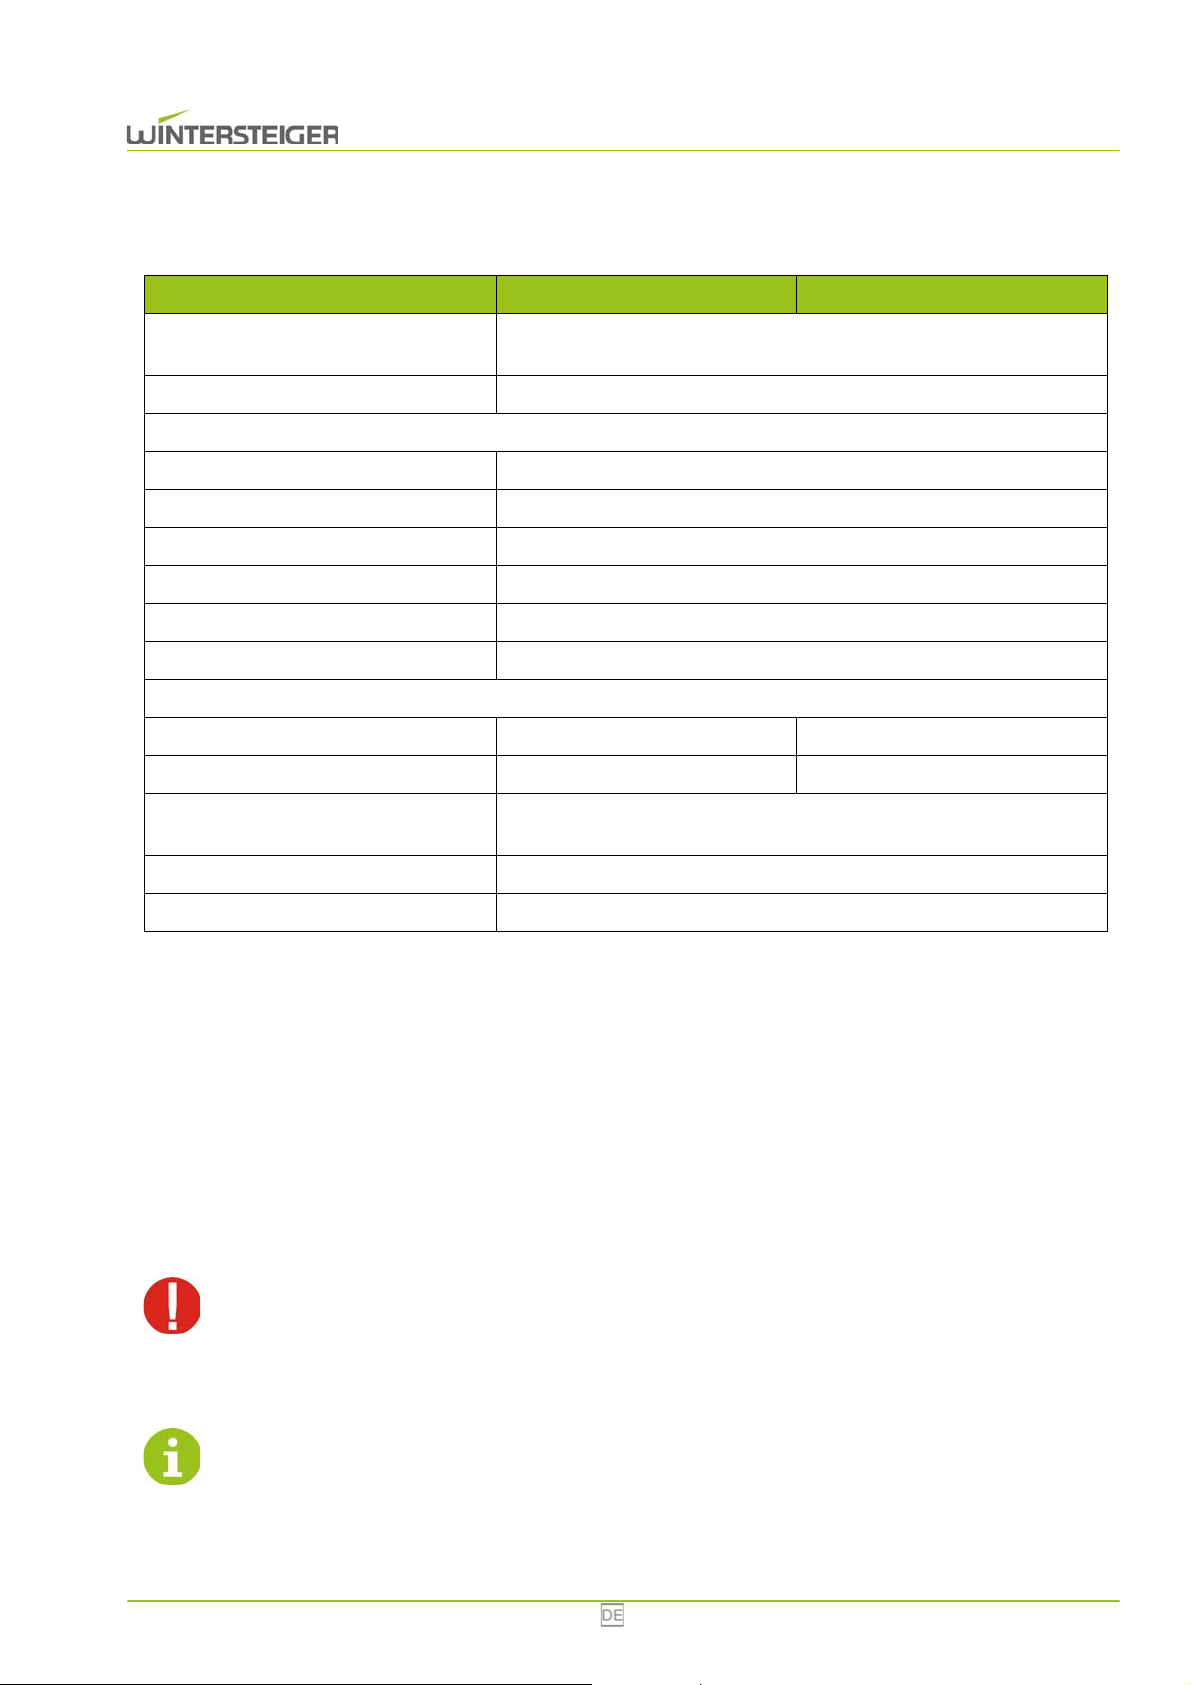
4 Technische Daten
Typ Combi Eco Multi Eco
Nennspannung, Frequenz, Leistung,
Absicherung:
Nennstrom 6,2 A
Die richtige Anschlussspannung ist zusätzlich am Typenschild ersichtlich!
Leistung Heizung: 1 x 800 W
Leistung Gebläse: 1 x 100 W
Leistung Kompressor: 1 x 400 W
Ozonlampe (Option): 1 Stück
Umgebungstemperatur: +5 bis 40°C
Luftfeuchtigkeit: 30% - 80%
Die Verwendung des Gerätes ist nur in gut belüfteten, trockenen Innenräumen gestattet!
Abmessungen (HxBxT): 2100 mm x 1300 mm x 850 mm 2100 mm x 1300 mm x 900 mm
Gewicht: 195 kg 180 kg
Trocknungsdauer:
Keimreduktion: Keimreduktion in der Luft durch Ozonlampe (Option)
Geräuschemission: unter 70 dB(A)
1 AC 230V 50 Hz; 1,4 kW; 12/16 A
ab 1 Stunde. Abhängig von der Durchnässung, der Temperatur und dem
Material ist eine längere Trocknungsdauer möglich.
5 Transport, Lagerung und Veränderung des Standortes
5.1 Transportbedingungen des Geräts
Das Gerät muss in der Originalverpackung und in der darauf angegebenen Position transportiert werden.
5.2 Lagerung des Geräts
Temperatur: 0° bis +40°C.
Um Schäden zu vermeiden, legen Sie keine anderen Pakete oder Kisten auf die Verpackung des Geräts!
5.3 Entfernen der Verpackung und Standortwahl
Achten Sie beim Entfernen der Verpackung darauf, dass das Gerät nicht beschädigt wird.
Bei der Wahl des Standortes muss die Funktionalität im Vordergrund stehen. Das Gerät muss in einem möglichst trockenen,
gut belüfteten Raum aufgestellt werden. Die Raumhöhe muss mindestens 2,3 m betragen. Die Steckdose soll sich unmittelbar neben dem Gerät befinden.
Combi/ Multi Eco 8
Page 9

Beachten Sie bei der Wahl des Standortes besonders die Richtlinien und Gesetze betreffend der Sicherheit
C
A
B
am Arbeitsplatz!
Achten Sie darauf, dass die Luftzufuhr niemals ganz oder teilweise blockiert wird (Gerät nicht verbauen!).
Damit die Trocknung und Keimreduktion optimal funktioniert, darf die Raumtemperatur nicht unter 5°C liegen.
Stecken Sie keine Gegenstände in das Ansaugluftgitter oder das Schutzgitter. Verschließen Sie diese Öffnungen auch nicht
teilweise. Niemals Flüssigkeiten in den Luftkreislauf gießen oder sprühen, da die Gefahr eines Stromschlages und der Beschädigung des Gerätes besteht.
6 Beschreibung der Bedienelemente
Schalten Sie den Trocknungsschrank nicht vorzeitig mit dem Hauptschalter aus. Nach Ablauf der eingestellten Trocknungsdauer läuft die Lüftung noch 10 bis 15 Minuten nach, damit die Heizung nicht überhitzt
(siehe Kap. 7.4 Übertemperaturschalter, Seite 15)
6.1 Zeitschaltuhr für 24 Stunden / 7 Tage
.
A: Hauptschalter
Einschalten und Ausschalten des Gerätes
B: automatische Zeitschaltuhr
C: manuelle Zeitschaltuhr
Einstellen der Trocknungsdauer zwischen 0 und 6 Stunden
6.2 Betrieb mit der Zeitschaltuhr für 24 Stunden / 7 Tage
Die automatische Zeitschaltuhr ermöglicht die Trocknung nach einem fixen Plan für 24 Stunden und 7 Tage.
9 Combi/ Multi Eco
Page 10
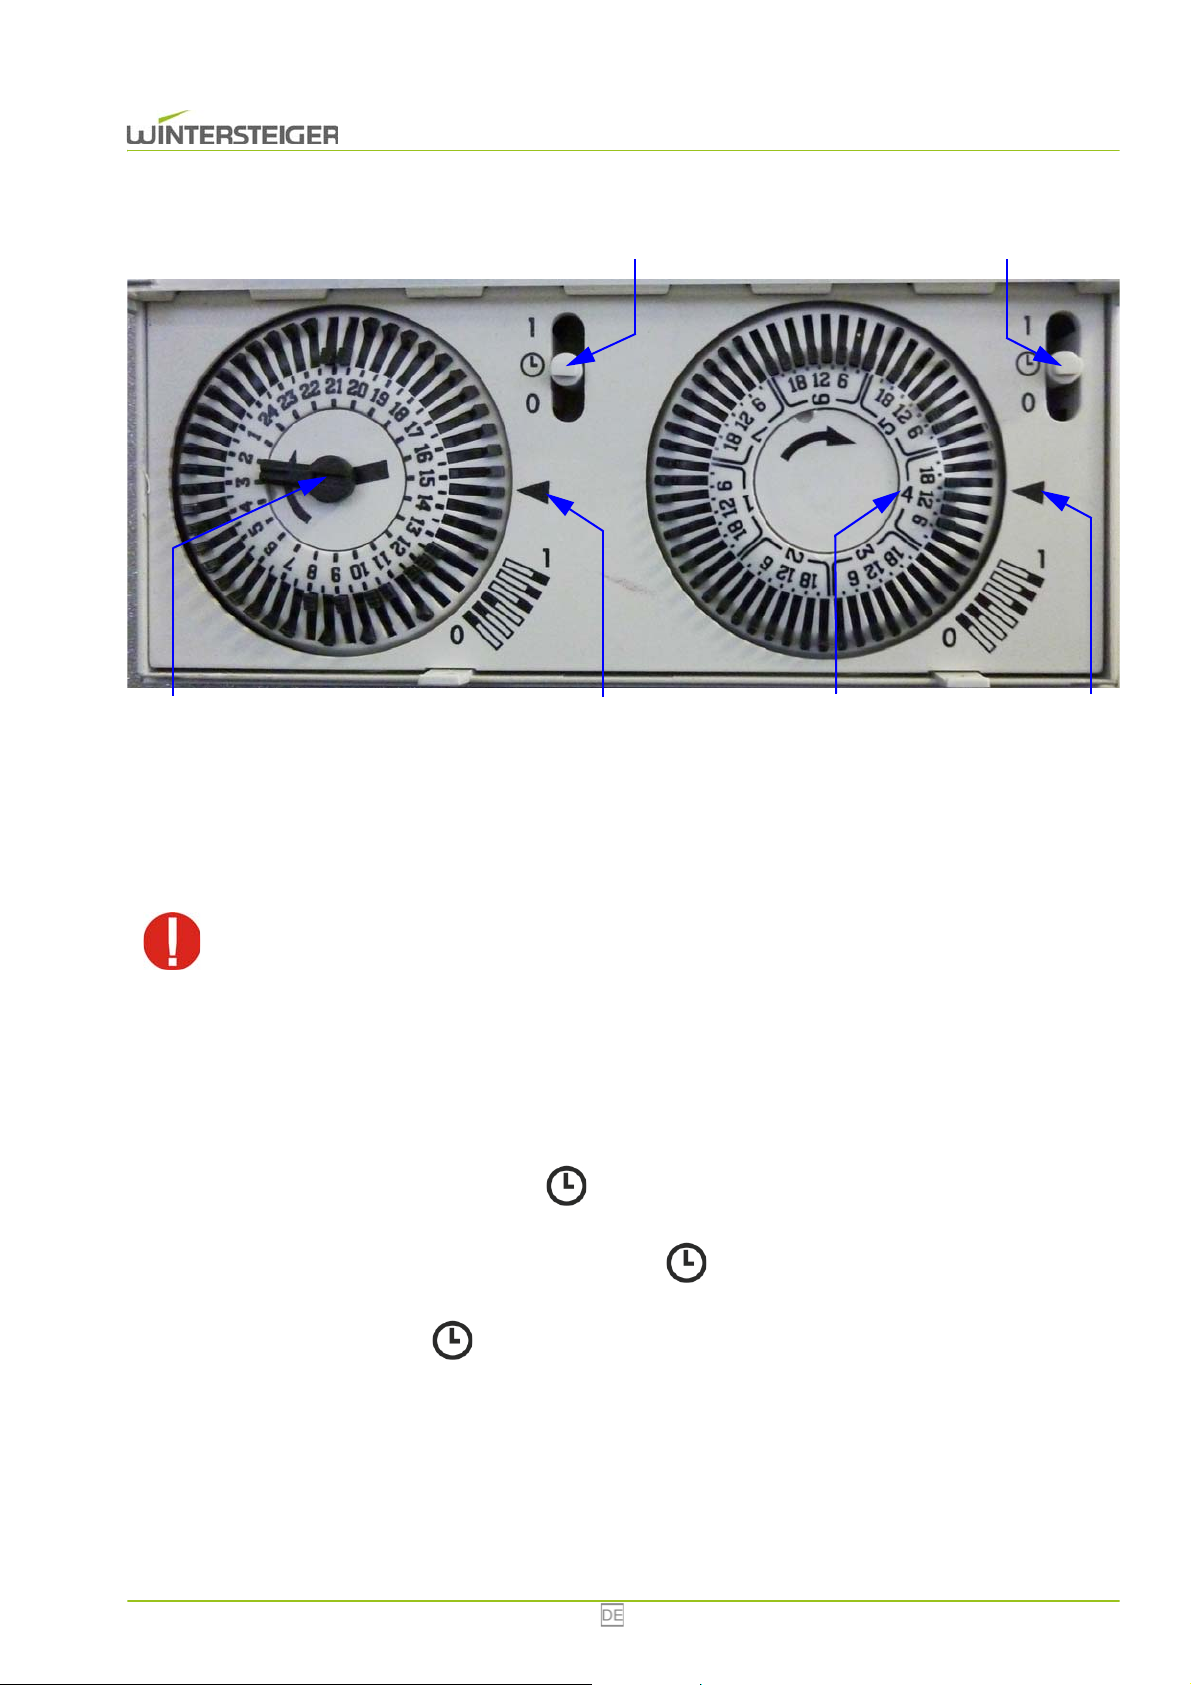
Links befindet sich der Tageszähler, rechts der Wochenzähler.
A
C
B
D
F
E
6.2.1 Aktuelle Uhrzeit und aktuellen Wochentag einstellen
Minutenzeiger [A] mit einem kleinen Schlitzschraubendreher drehen.
Die rechte Zeitschaltuhr für die Einstellung des aktuellen Wochentages dreht sich mit.
Drehen Sie niemals die Zeitschaltuhr für den Wochentag. Die Zeitschaltuhr kann dadurch defekt werden.
Der Pfeil [B] zeigt die ungefähre Uhrzeit an. Dadurch kann unterschieden werden ob es 02:48 oder 14:48 ist.
Die Ziffer [C] zeigt den Wochentag, durchnummeriert von 1-7. In dieser Anleitung ist der erste Tag der Woche der Montag.
Der Pfeil [D] zeigt den aktuellen Wochentag an (Es ist Donnerstag.).
Mit den beiden Schaltern [E+F] wird die automatische Zeitschaltuhr aktiviert bzw. deaktiviert.
Steht einer der beiden Schalter auf „0“ ist die automatische Zeitschaltuhr deaktiviert.
Stehen beide Schalter auf dem Symbol „ “ wird die Trocknung laut Zeitplan durchgeführt.
Stehen beide Schalter auf „1“ wird der Trocknungsschrank dauerhaft (24 Stunden/7 Tage) eingeschaltet.
Steht der Schalter [E] auf „1“ und der Schalter [F] auf „ “, wird nur nach dem Wochenplan getrocknet. Es
stehen damit nur Zeitintervalle von 3 Stunden zur Verfügung.
Steht der Schalter [E] auf „ “ und der Schalter [F] auf „1“ wird nur nach dem Tagesplan (Gleiches Programm
für jeden Tag der Woche) getrocknet.
6.2.2 Zeitplan erstellen
Steht das Segment eines Zeitabschnittes außen, schaltet der Trocknungsschrank für diese Zeitdauer ein. Grundsätzlich
muss sowohl das Zeitsegment für den Tag als auch das Zeitsegment für die Woche außen stehen, damit die Trocknung aktiviert wird.
Combi/ Multi Eco 10
Page 11
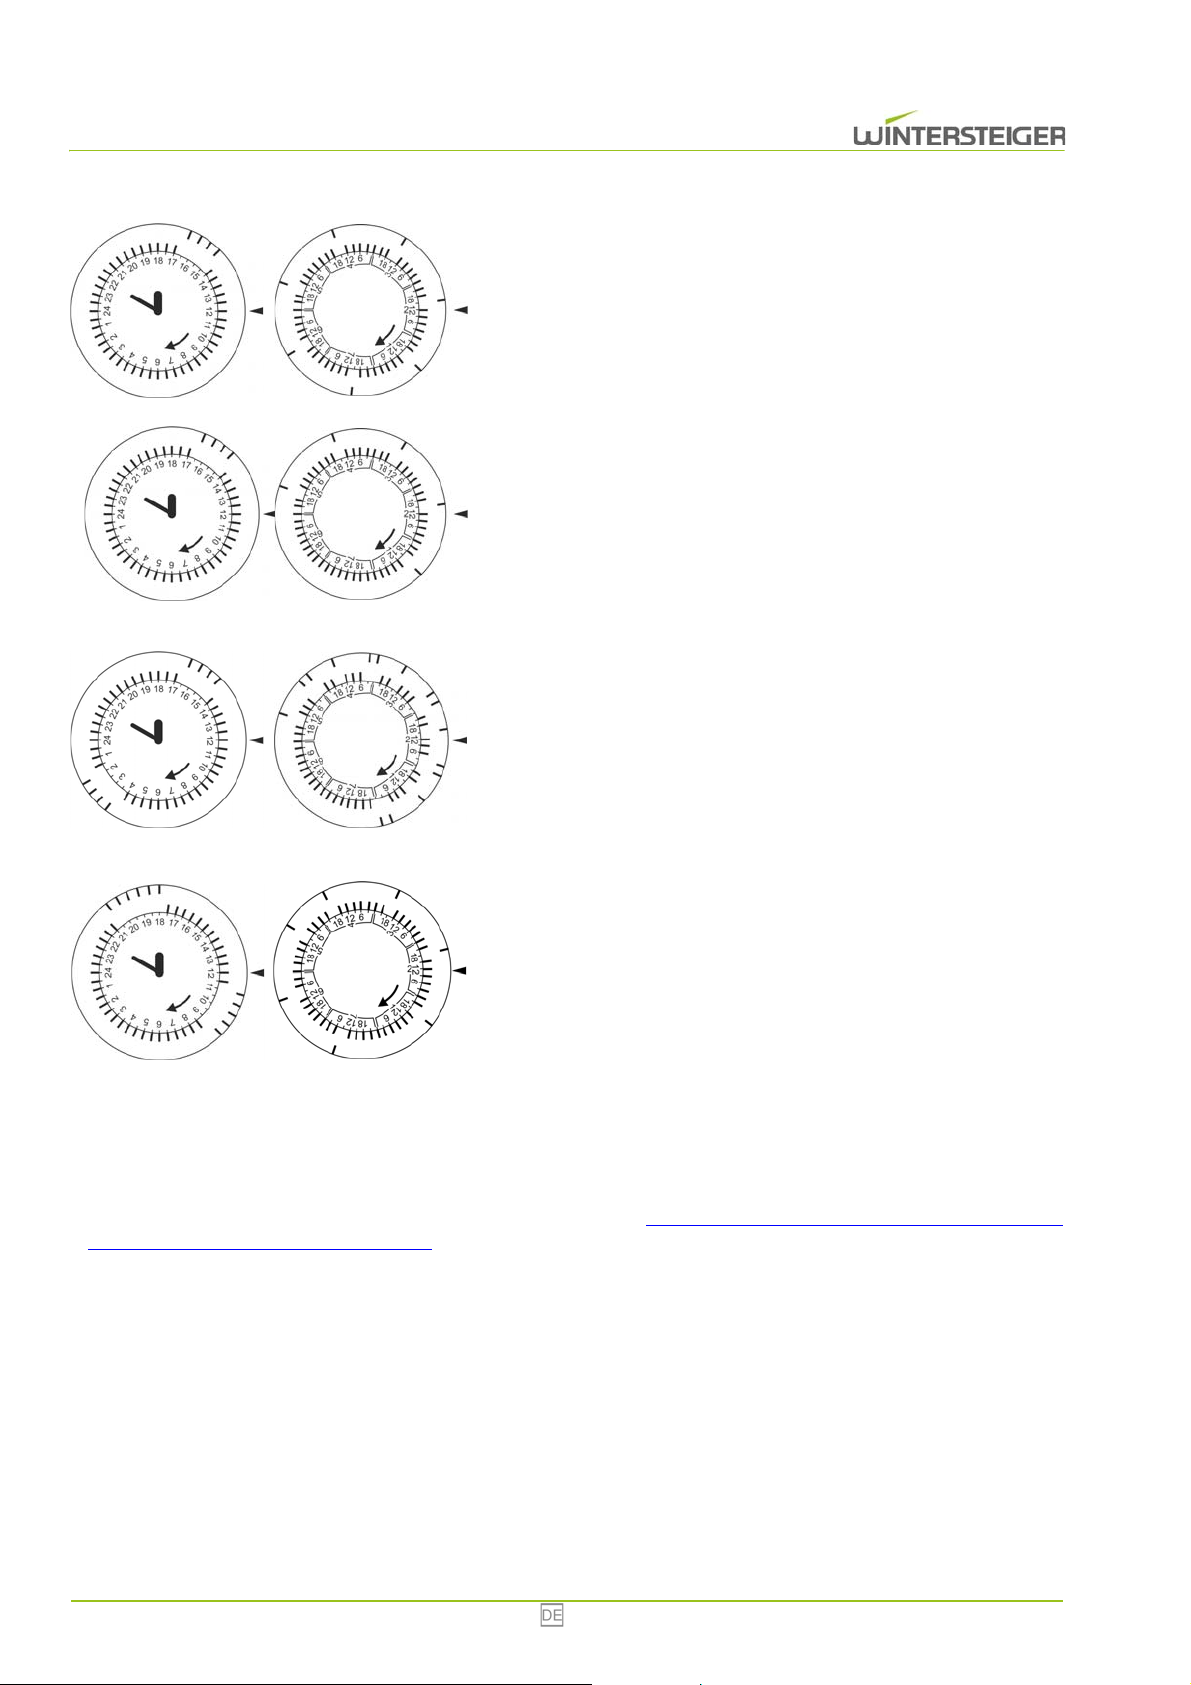
Beispiel: Zu folgenden Zeiten soll das Gerät trocknen:
Täglich von 15:00 bis 17:00
Dazu müssen folgende Segmente am Tageszähler außen stehen: 15:00,
15:30, 16:00, 16:30
Dazu müssen folgende Segmente am Wochenzähler außen stehen: jeden Tag 15:00
Beispiel: Zu folgenden Zeiten soll das Gerät trocknen:
Montag {1} bis Freitag {5} von 15:00 bis 17:00
Samstag {6} und Sonntag {7} soll keine Trocknung stattfinden.
Dazu müssen folgende Segmente am Tageszähler außen stehen: 15:00,
15:30, 16:00, 16:30
Dazu müssen folgende Segmente am Wochenzähler außen stehen:
Montag {1} bis Freitag {5} 15:00
Beispiel: Zu folgenden Zeiten soll das Gerät trocknen:
Montag {1} bis Freitag {5} von 02:00 bis 04:00 und von 15:00 bis 17:00
Samstag {6} und Sonntag {7} soll keine Trocknung stattfinden.
Dazu müssen folgende Segmente am Tageszähler außen stehen: 02:00,
02:30, 03:00, 03:30 und 15:00, 15:30, 16:00, 16:30
Dazu müssen folgende Segmente am Wochenzähler außen stehen:
Montag {1} bis Freitag {5} 00:00, 03:00, 15:00
Beispiel: Zu folgenden Zeiten soll das Gerät trocknen:
Montag {1} bis Donnerstag {4} von 18:00 bis 21:00
Freitag {5} bis Sonntag {7} von 09:00 bis 11:30
Dazu müssen folgende Segmente am Tageszähler außen stehen: 09:00,
09:30, 10:00, 10:30, 11:00 und 18:00, 18:30, 19:00, 19:30, 20:00, 20:30
Dazu müssen folgende Segmente am Wochenzähler außen stehen:
Montag {1} bis Donnerstag {4} 15:00
Freitag {5} bis Sonntag {7} 09:00
6.2.3 Außerplanmäßiges Trocknen
Soll die bei einem Trocknungsschrank mit der Zeitschaltuhr für 24 Stunden / 7 Tage ein außerplanmäßiger Trocknungsvorgang stattfinden, kann die Trocknung mittels 6-Stunden Zeitschaltuhr (siehe Kap. 6.3 Betrieb der Ozonlampe mit der Zeit-
schaltuhr für 24 Stunden (Option), Seite 11) durchgeführt werden. Die 6-Stunden Zeitschaltuhr übersteuert die Zeitschaltuhr
für 24 Stunden / 7 Tage.
6.3 Betrieb der Ozonlampe mit der Zeitschaltuhr für 24 Stunden (Option)
Die automatische Zeitschaltuhr ermöglicht die Trocknung nach einem fixen Plan für 24 Stunden.
11 Combi/ Multi Eco
Page 12
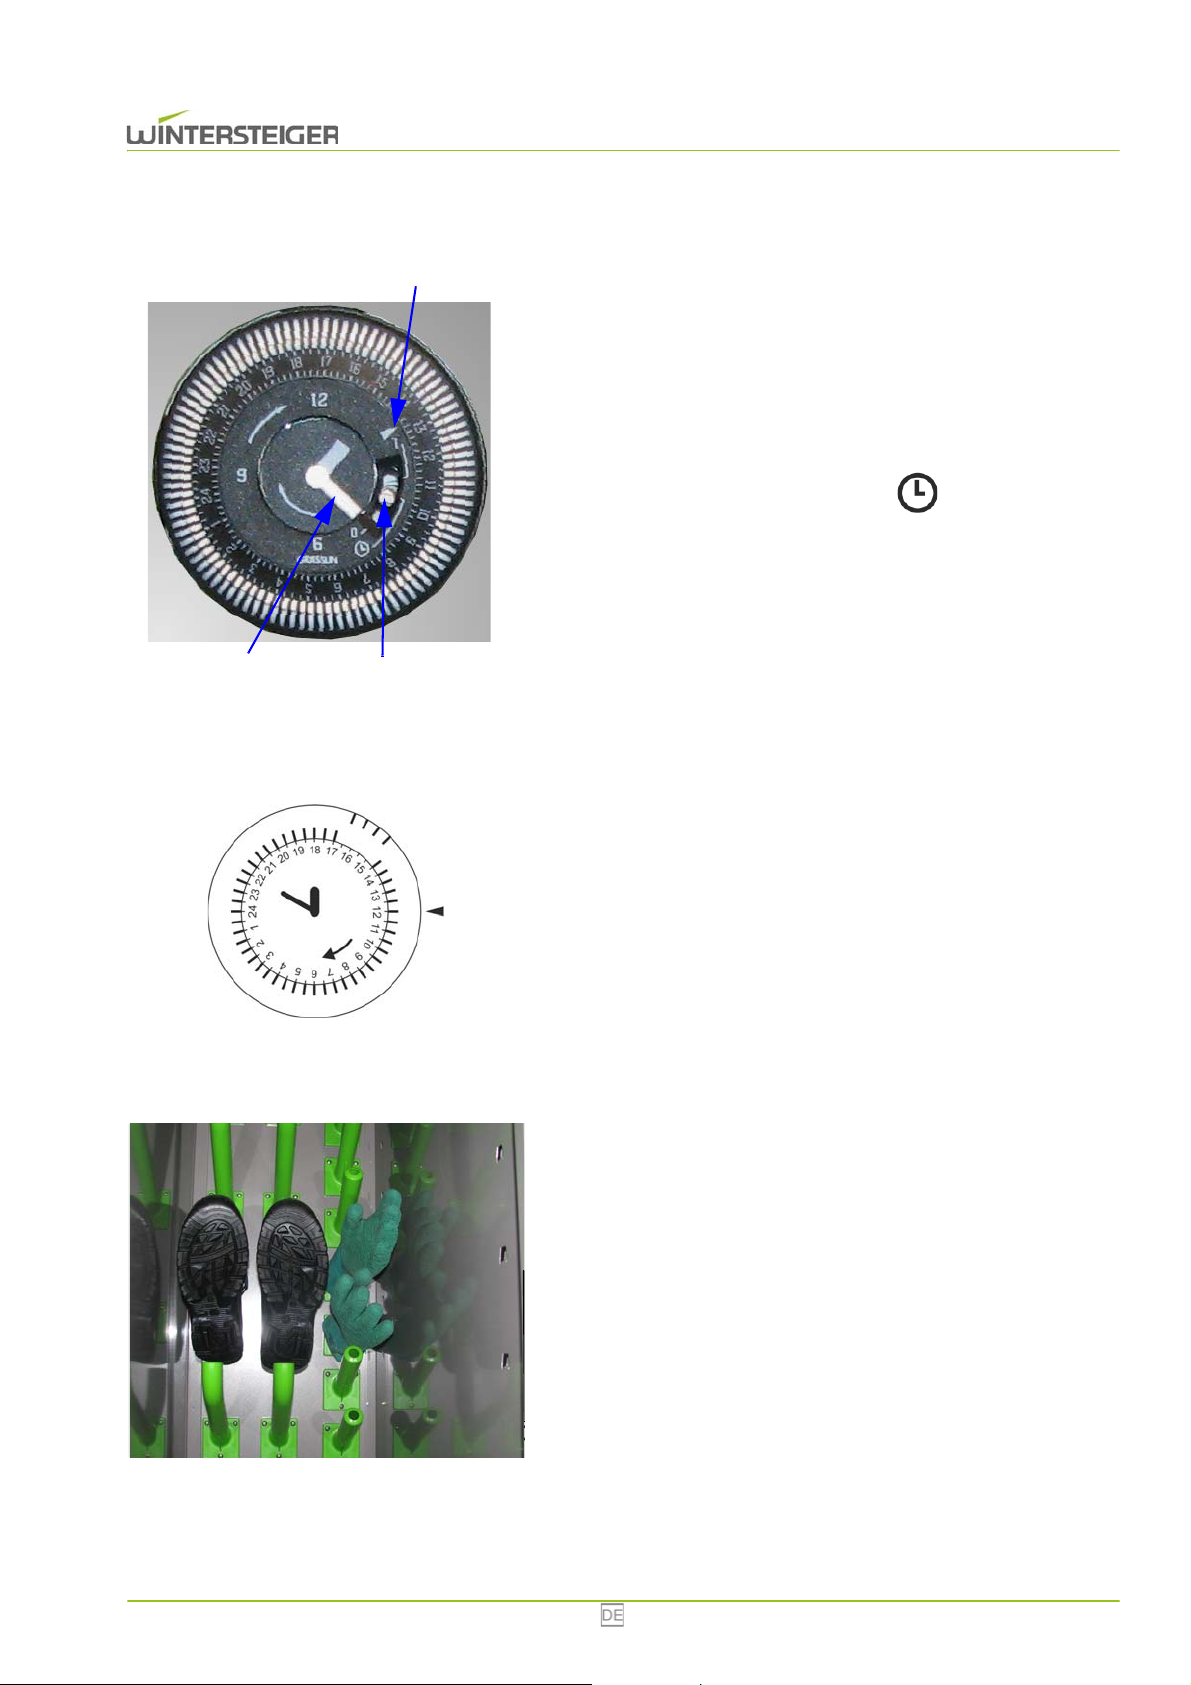
6.3.1 Aktuelle Uhrzeit einstellen
A
C
B
C
Minutenzeiger [A] mit einem kleinen Schlitzschraubendreher drehen.
Der Pfeil [B] zeigt die ungefähre Uhrzeit an. Dadurch kann unterschieden werden ob es 01:25 oder 13:25 ist.
Mit dem Schalter [C] wird die automatische Zeitschaltuhr aktiviert bzw.
deaktiviert.
Steht der Schalter auf „0“ ist die automatische Zeitschaltuhr deaktiviert.
Steht der Schalter auf dem Symbol „ “ wird die Trocknung
laut Zeitplan durchgeführt.
Steht der Schalter auf „1“ wird der Trocknungsschrank dauerhaft
eingeschaltet.
6.3.2 Zeitplan erstellen
Steht das Segment eines Zeitabschnittes außen, schaltet der Trocknungsschrank für diese Zeitdauer ein.
Beispiel: Zu folgenden Zeiten soll das Gerät trocknen:
Täglich von 15:00 bis 17:00
Dazu müssen folgende Segmente am Tageszähler außen stehen: 15:00,
15:30, 16:00, 16:30
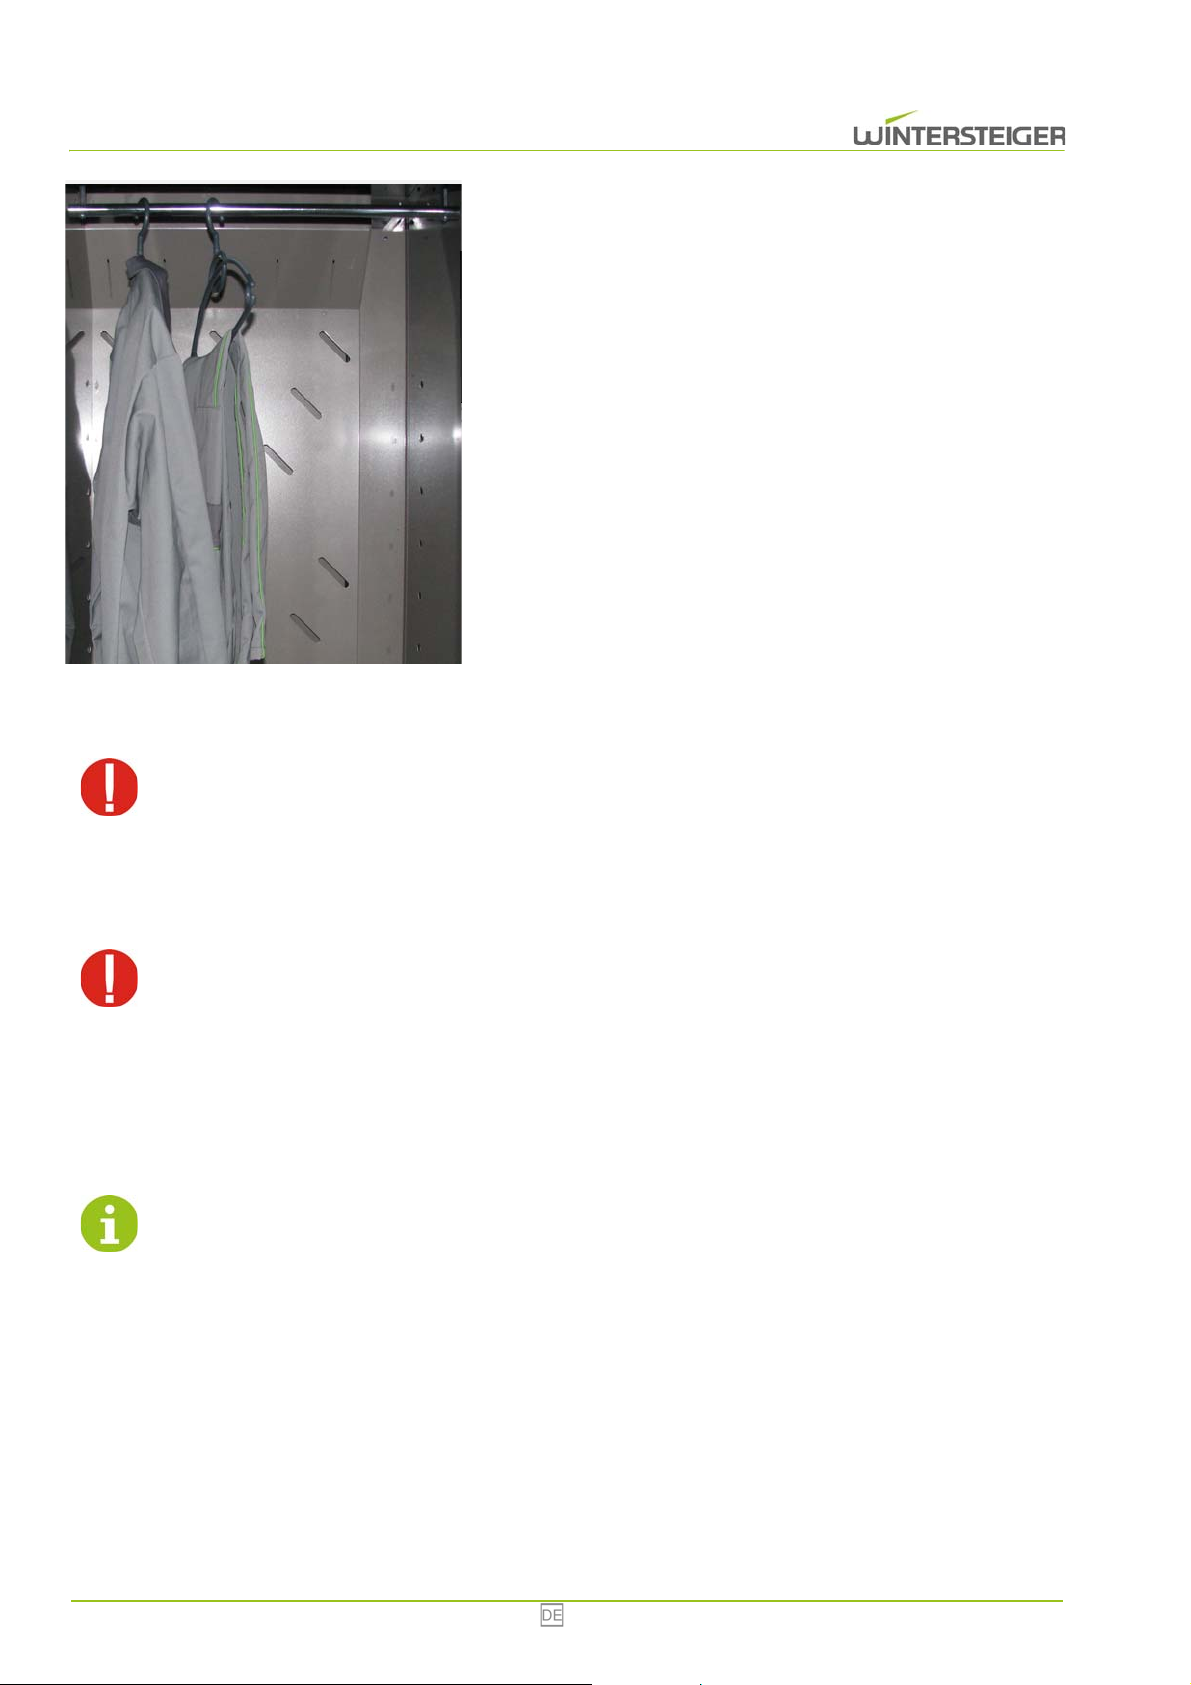
6.4 Trocknungsschrank optimal bestücken
Beachten Sie folgende Hinweise bei der Trocknung ihrer Arbeitskleidung:
Handschuhe auf die integrierten Handschuhdüsen stecken.
Schuhe auf die integrierten Schuhdüsen stecken.
Combi/ Multi Eco 12
Page 13
7 Wartung
C
Arbeitskleidung mit einem Kleiderhaken auf die montierten Kleiderstangen hängen.
Die Trocknungsschränke haben unterschiedliche Kapazitäten von Ausrüstungen. Zwischen der Ausrüstung muss etwas Luft bleiben, damit eine
optimale Luftzirkulation möglich ist.
Nach dem Ausschalten der Heizung läuft die Lüftung noch 10 bis 15 Minuten nach.
Vor sämtlichen Wartungsarbeiten Gerät ausschalten und Netzstecker ziehen!
7.1 Reinigung
Gerät innen und außen regelmäßig mit einem feuchten Putzlappen reinigen.
Reinigen Sie das Gerät niemals mit Wasser, da dadurch elektrische Bauteile zerstört werden! Im Falle einer
Nichtbeachtung wird für Folgeschäden keine Haftung sowie Gewährleistung übernommen.
7.2 Ozonlampe (Option)
Die Ozonlampe kann nach einem fixen Plan (15 Min. Betrieb - 30 Min. Pause - 15 Min. Betrieb) für 24 Stunden über die
Zeitschaltuhr eingestellt werden. Diese ist nur aktiv wenn die Hauptzeitschaltuhr aktiviert ist.
Die Ozondosierung ist Werksseitig voreingestellt.
Es wird empfohlen, die Ozonlampe nicht umzustellen!
13 Combi/ Multi Eco
Page 14
Die verwendete Ozonlampe erlaubt eine wirksame Keimreduktion für
A
C
B
A
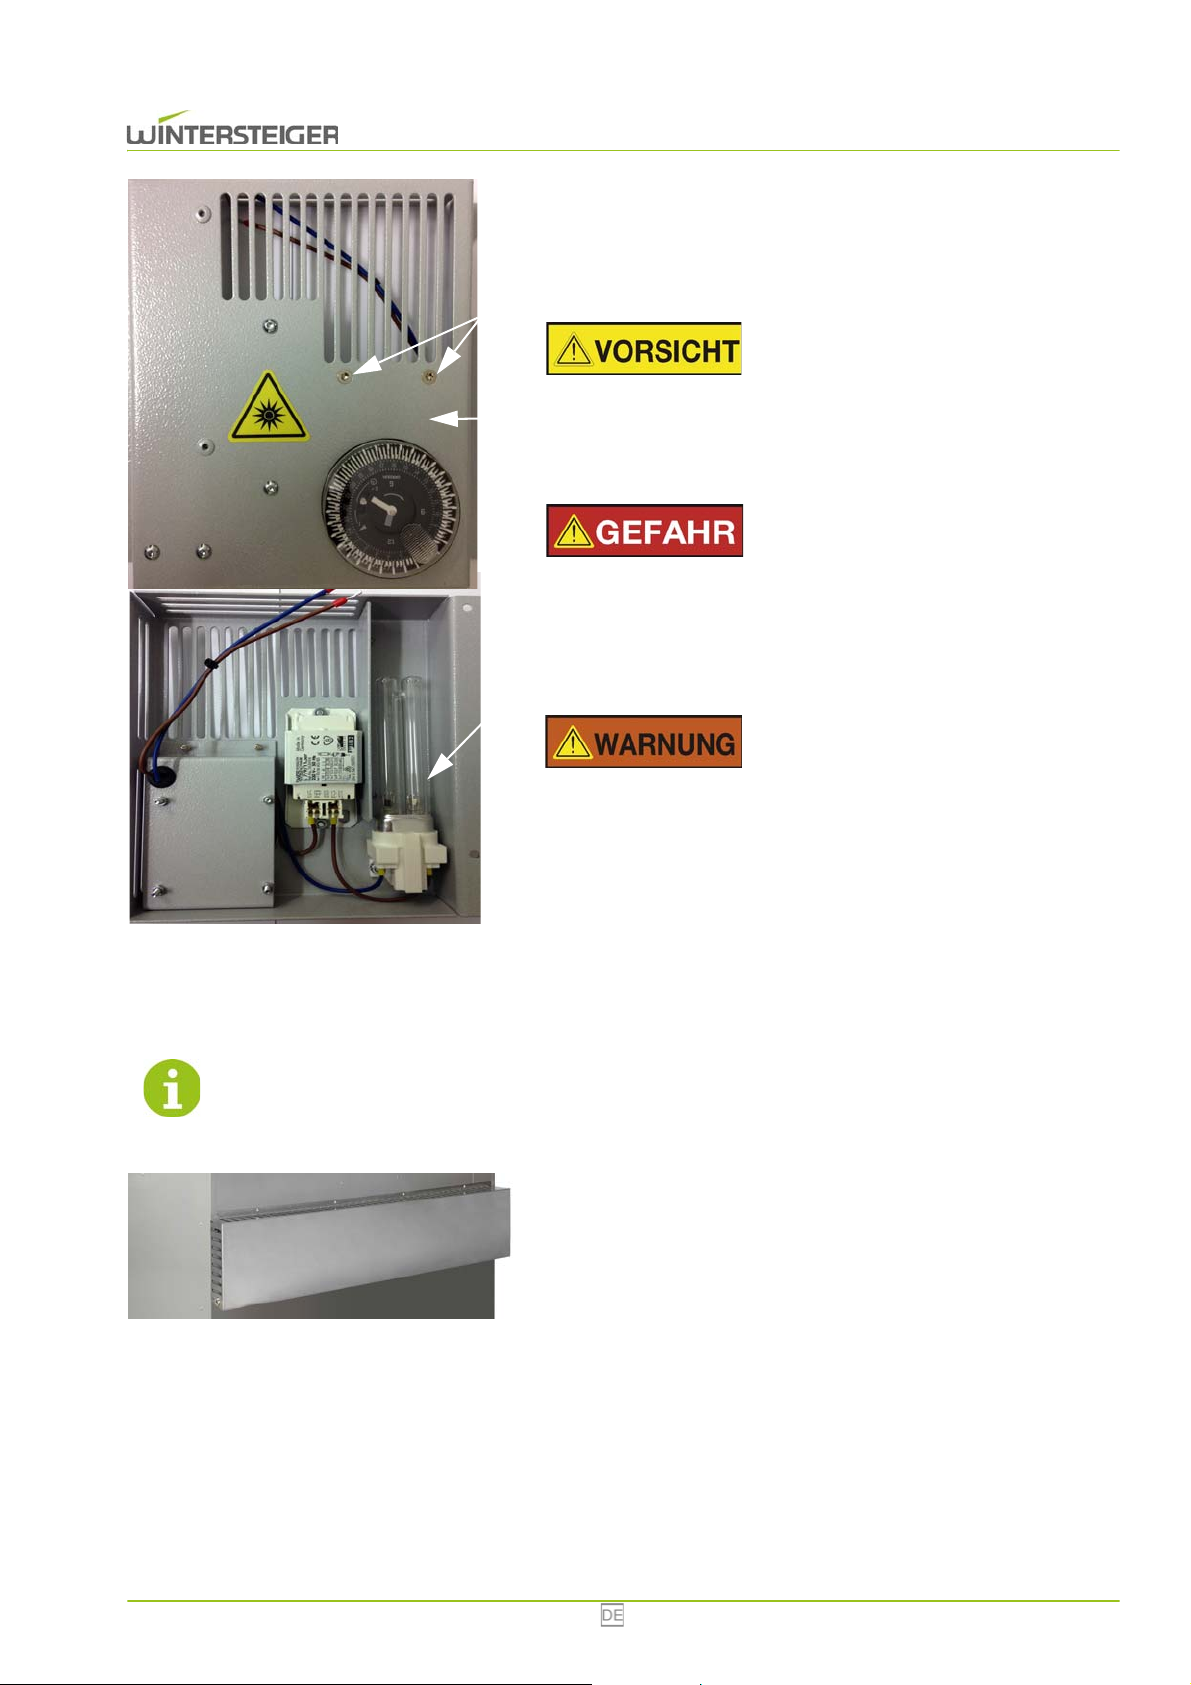
eine Betriebszeit von 2000 Stunden, danach muss die Ozonlampe ersetzt werden. Führen Sie einmal im Monat eine Sichtkontrolle der Ozonlampe im Betrieb durch. Sie sehen an der Rückwand des Schrankes
bläuliches Licht durchschimmern.
Verletzungsgefahr!
Blicken Sie nicht direkt in die Ozonlampe! Die UV-Strahlen können
die Augen schädigen!
Wechseln der Ozonlampe
Verletzungsgefahr!
Gerät von der Spannungsversorgung trennen!
Alle Schrauben [A] entfernen.
Deckel [B] entfernen. Ozonlampe [C] vorsichtig entfernen.
Verletzungsgefahr!
7.3 Wassertank leeren
Leeren Sie den Wassertank falls notwendig!
Die Ozonlampe enthält giftiges Quecksilber. Entsorgen Sie die
Ozonlampe entsprechend den landesüblichen Vorschriften!
Neue Lampe [C] einsetzen und Deckel [B] mit den Schrauben [A]
wieder fixieren.
Schrauben lösen.
Abdeckung entfernen.
Wassertank entnehmen und entleeren.
Combi/ Multi Eco 14
Page 15
7.4 Übertemperaturschalter
A
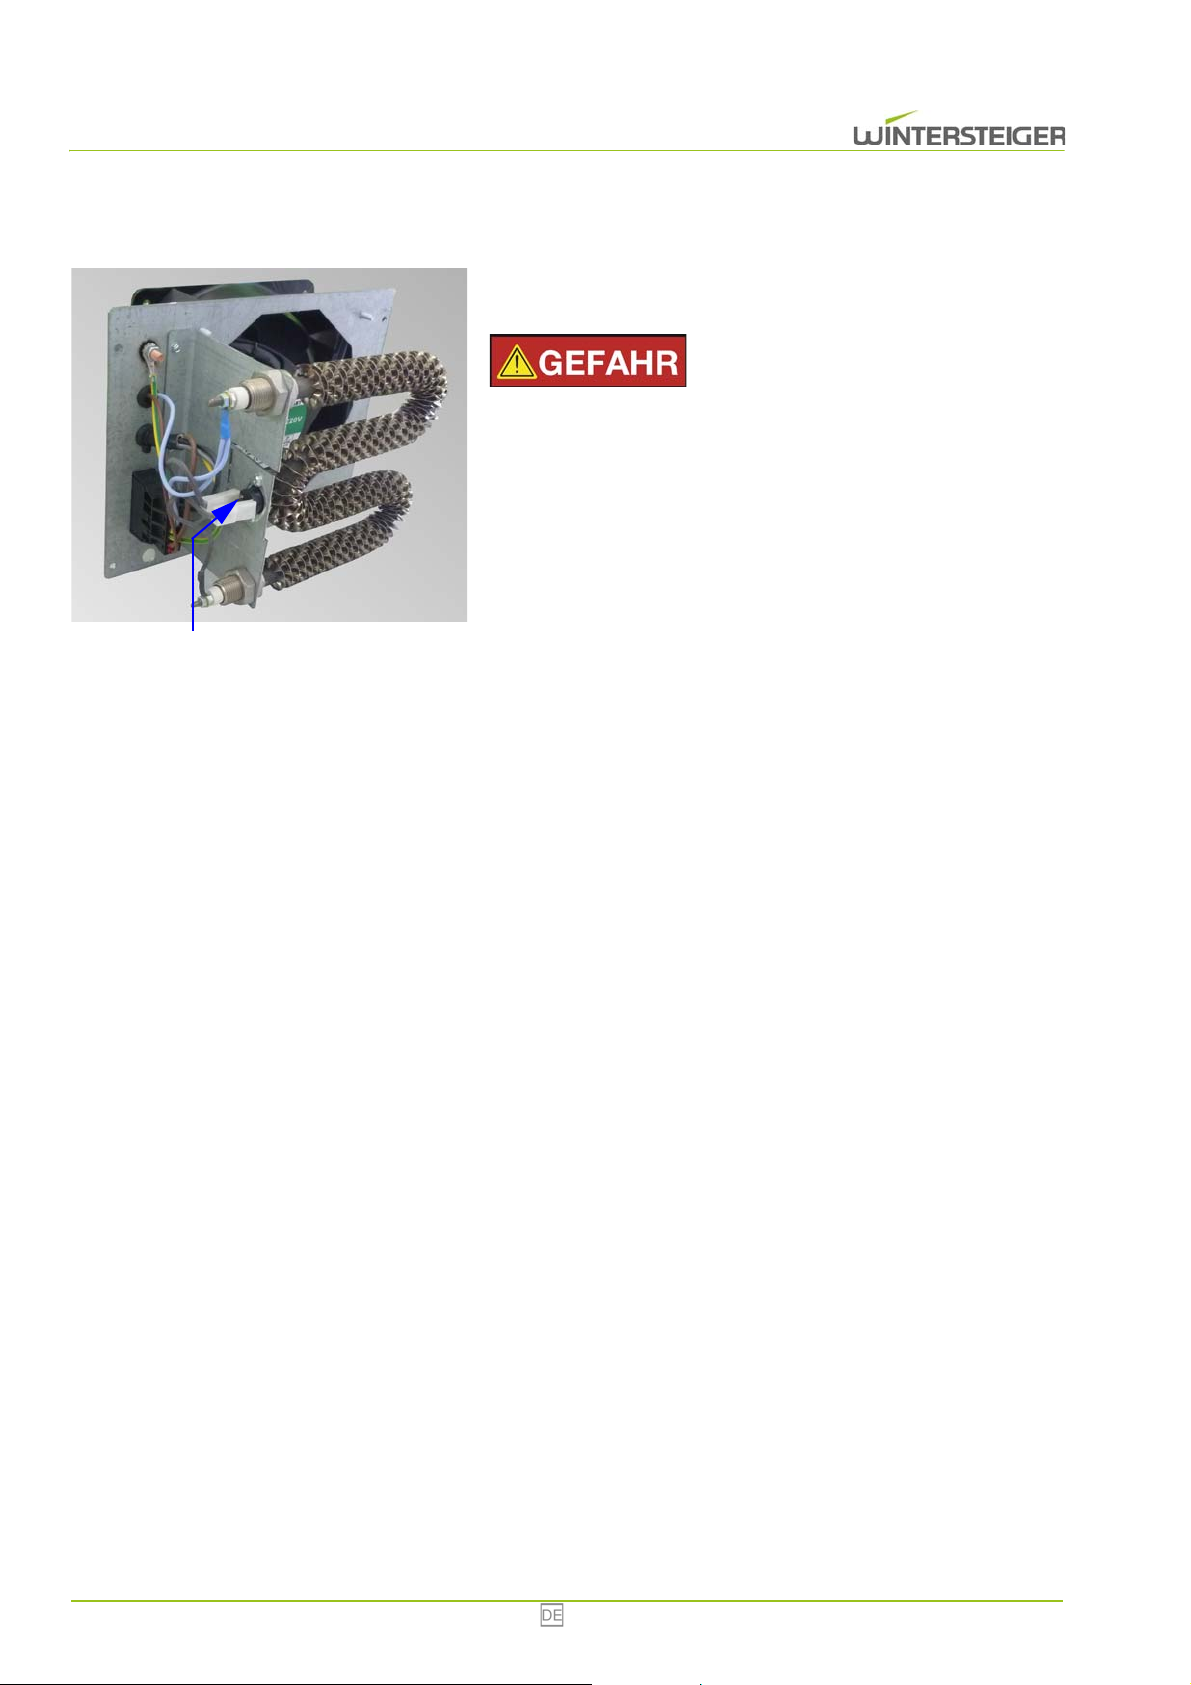
Löst der Übertemperaturschalter der Heizung aus, muss der Schal-
ter zurückgesetzt werden.
Verletzungsgefahr!
Gerät von der Spannungsversorgung trennen! Nur eine Elektrofachkraft darf die Störung beheben!
Betroffenen Heizlüfter ausbauen.
Taste [A] drücken.
Heizlüfter wieder einbauen.
15 Combi/ Multi Eco
Page 16
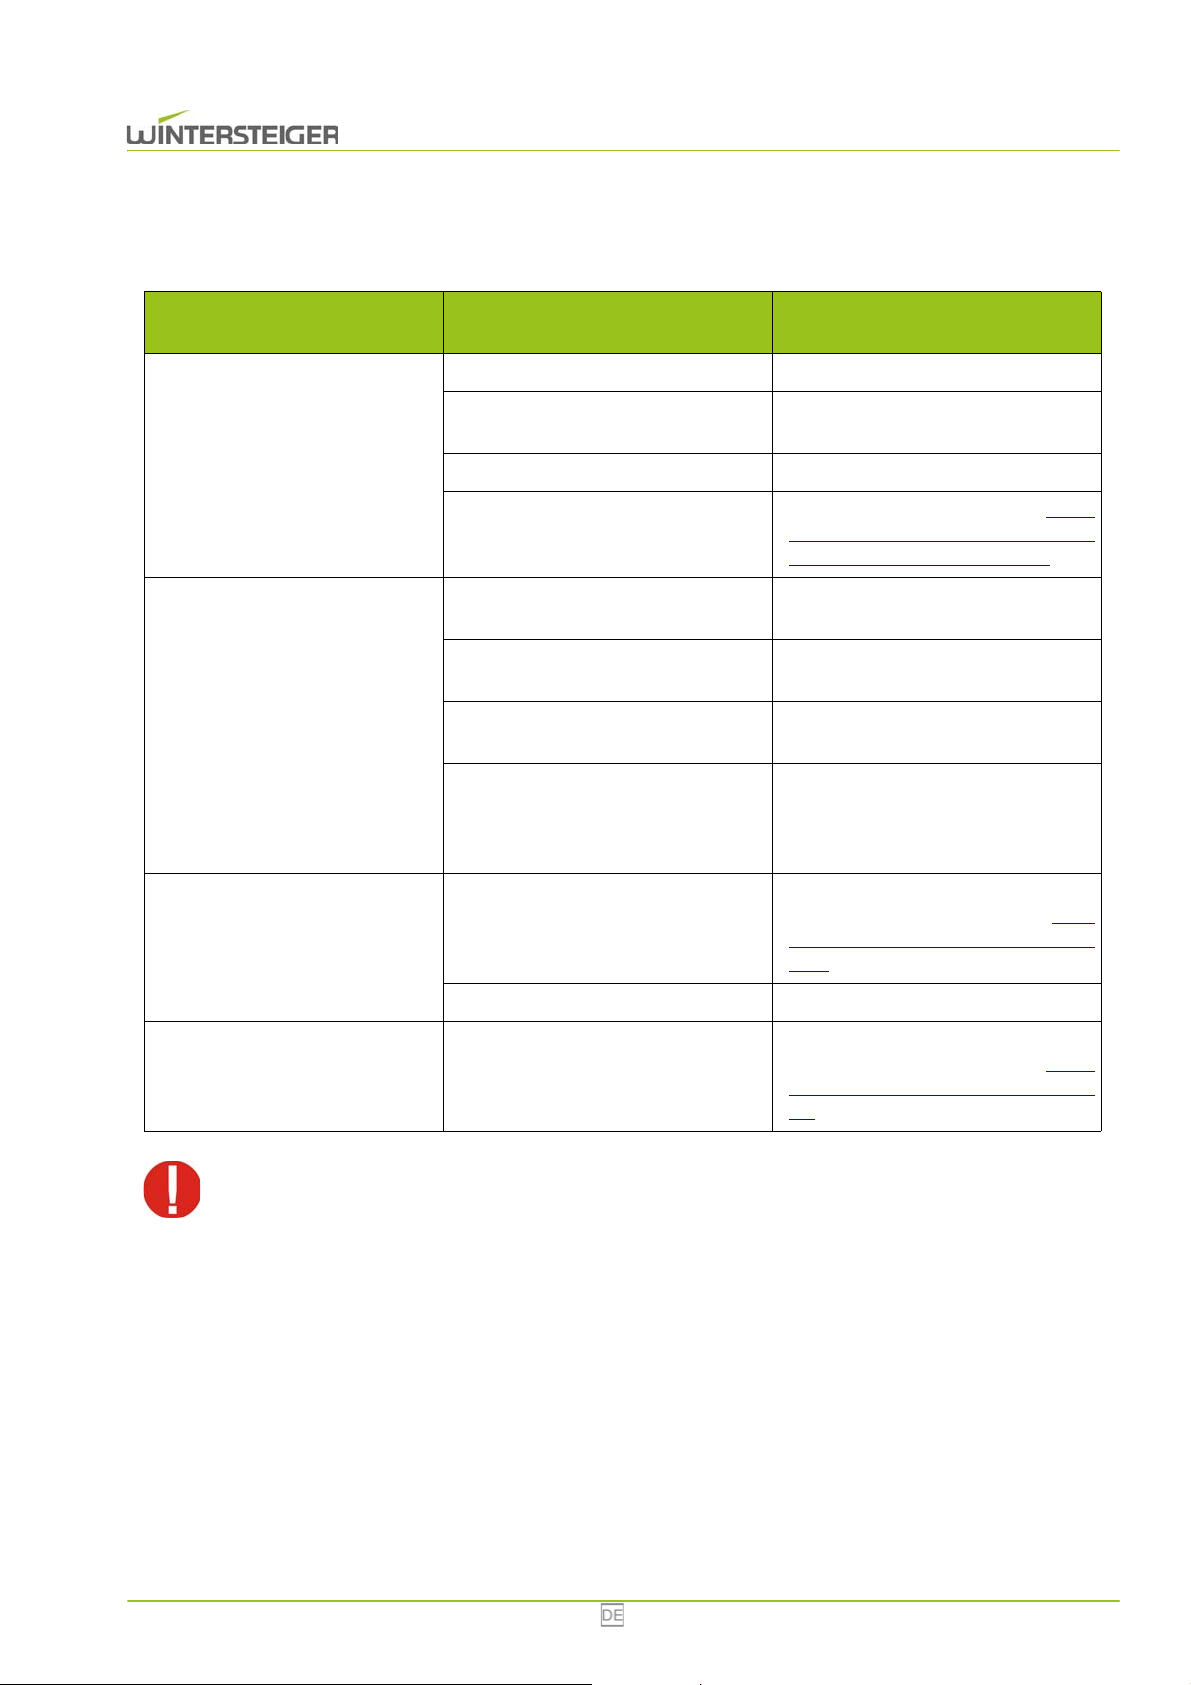
8 Fehlerbehebung
Fehler
Problem
Das Gerät funktioniert nicht
Das Gerät trocknet nicht
Ursache Behebung
Das Gerät ist nicht eingesteckt. Gerät einstecken.
Spannungsversorgung funktioniert
nicht.
Der Hauptschalter steht auf „0“ Hauptschalter einschalten
Keine Trocknungsdauer eingestellt
Ungenügende Luftzufuhr
Luftfeuchtigkeit > 80%
Raumtemperatur < 5°C
Option: Ozon mit Zeitrelais
Elektrofachkraft kontaktieren.
Trocknungsdauer einstellen (siehe
Kap. 6.2 Betrieb mit der Zeitschaltuhr
für 24 Stunden / 7 Tage, Seite 9)
Kontrollieren Sie die Luftzufuhr am Gerät oder im Raum
Je geringer die Luftfeuchtigkeit, desto
besser die Trocknung.
Je höher die Raumtemperatur, desto
besser die Trocknung
Beim Start der Trocknung wird die
Ozonlampe für ca. 10 Minuten eingeschaltet, anschließend startet der
Trocknungsvorgang
Übertemperaturschalter der Heizung
Trockenleistung des Geräts nimmt
ab oder Gerät heizt nicht
Ozonlampe funktioniert nicht
Bei Geräteeingriffen Netzstecker ziehen! Das Gerät darf nur mit vollständig montierten Schutzen und
Abdeckungen betrieben werden.
hat ausgelöst, da eine Temperatur von
80°C überschritten wurde
Gebläse defekt Gebläse kontrollieren
Kontrollieren, ob innen oder außen
Lüftungsschlitze verdeckt sind.siehe
Kap. 7.4 Übertemperaturschalter, Seite 15
Kontrollieren, ob die Ozonlampe eingesteckt und eingeschaltet ist (siehe
Kap. 7.2 Ozonlampe (Option), Seite
13) bzw. Ozonlampe wechseln
Combi/ Multi Eco 16
Page 17

9 Stilllegung und Entsorgung
Verletzungsgefahr!
Trennen Sie vor dem Stilllegen und Demontieren die Maschine von der Stromversorgung oder jeglichem externen
Antrieb. Verwenden Sie für die Demontage nur geeignetes Werkzeug.
Zerlegen und entsorgen Sie bei der Stilllegung der Maschine alle Bestandteile fachgerecht. Reinigen Sie
alle öl- und fetthaltigen Teile vor der Entsorgung.
Öl und Fett dürfen keinesfalls in die Umwelt gelangen.
Halten Sie bei der Entsorgung der Bestandteile die landesspezifischen Vorschriften ein!
Maschine fachgerecht demontieren und in einzelne Bestandteile zerlegen.
Öl- und fetthaltige Bestandteile reinigen.
Bestandteile nach Materialgruppen (Stahl, Kunststoff, Elektro- und Elektronikbauteile u.s.w.) entsorgen.
Öl und Fett umweltgerecht entsorgen, auch biologisch abbaubare Öle und Fette.
17 Combi/ Multi Eco
Page 18
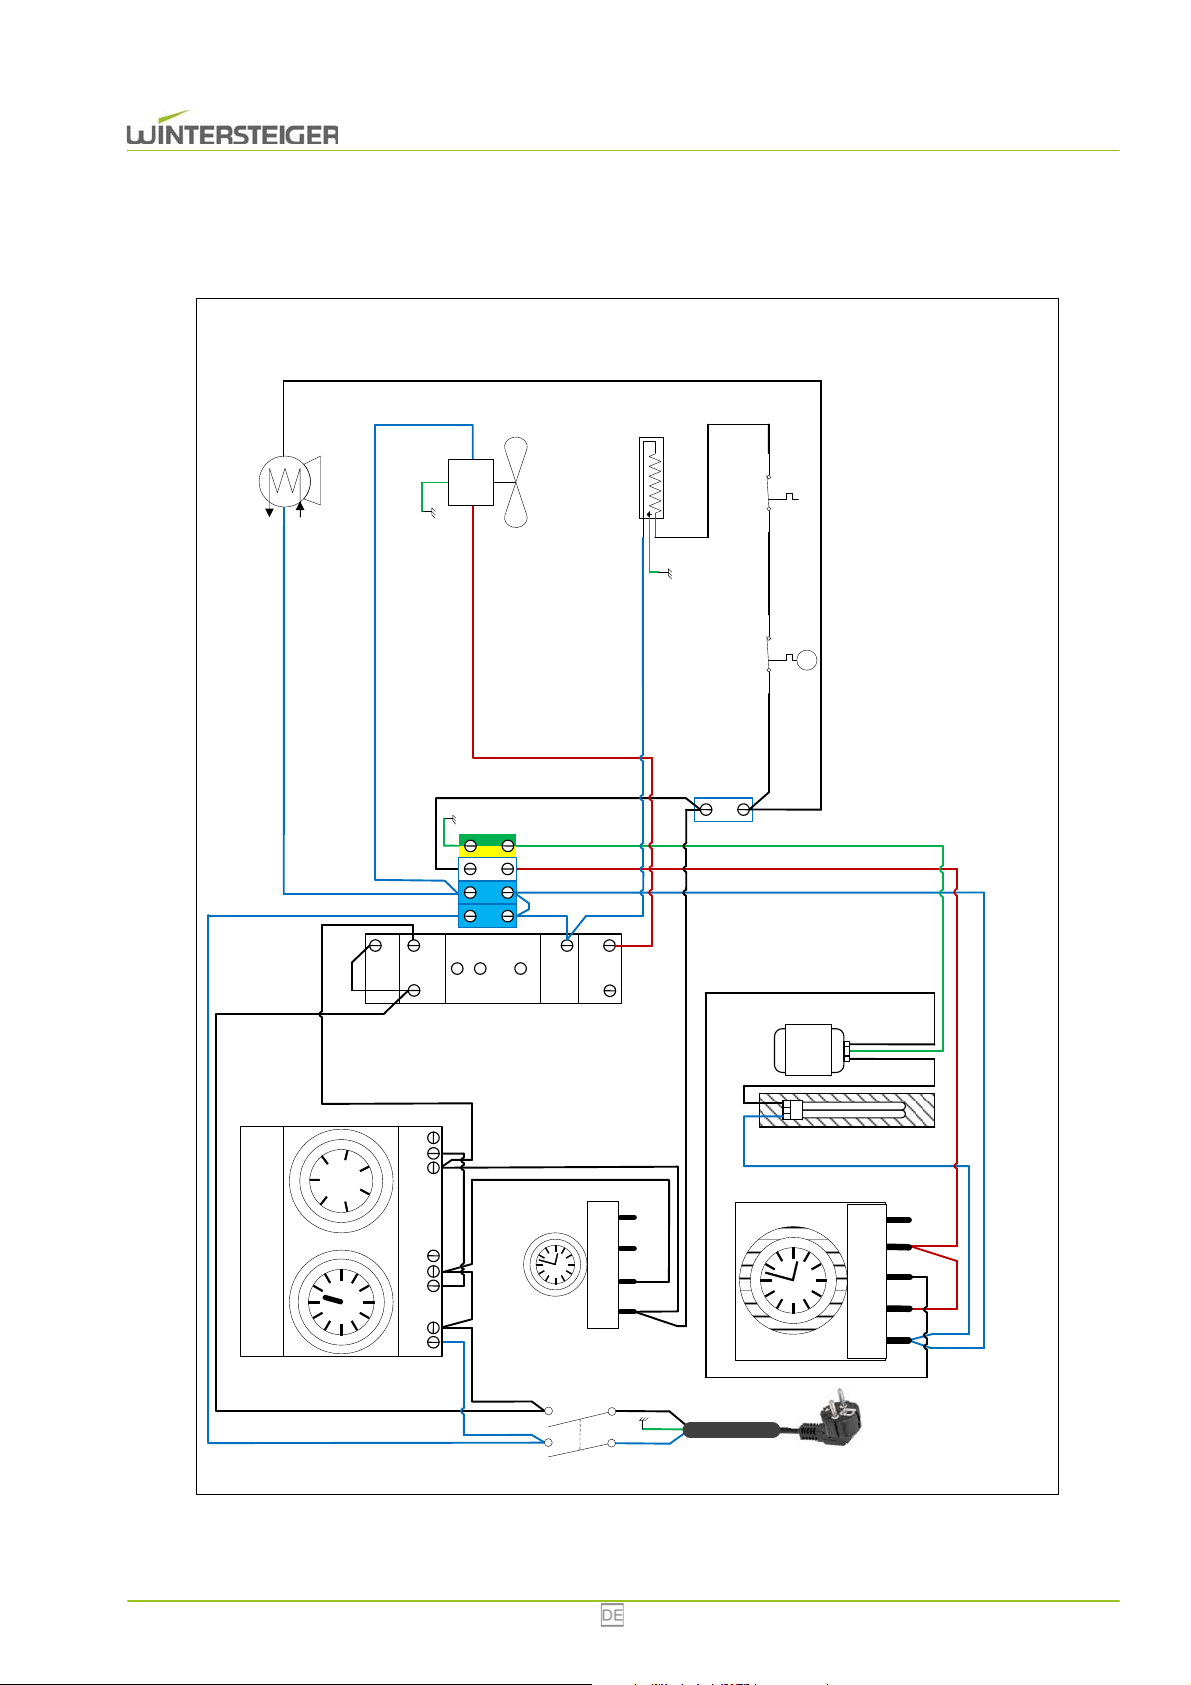
10 Schaltplan Combi / Multi Eco
Heater
800W
Thermostat #2
Fan
15
B1
A1
A2
18
16
ZR5ER011
Compressor
400W
1 C
Timer #2/
Control relay
220V/50Hz
Main switch
12
3
4 567 8
Timer (6h)
4512
2
14
3
4
21
3
5
L 7/9/
11.307
7d / 24h Zeitschaltuhr
Thermostat #1
0
°C - 70°C
24h (Ozonlampe)
Combi/ Multi Eco 18
Page 19

Table of contents
1 Preface ............................................................................................................................................................................... 20
1.1 Proper use ............................................................................................................................................................... 20
2 General information .......................................................................................................................................................... 21
2.1 Safety information ................................................................................................................................................... 21
2.2 Warnings ................................................................................................................................................................. 21
2.3 Safety devices ......................................................................................................................................................... 22
3 Function ............................................................................................................................................................................. 22
4 Technical data ................................................................................................................................................................... 23
5 Transport, storage and relocation ................................................................................................................................... 23
5.1 Transport conditions for the equipment ................................................................................................................... 23
5.2 Storing the equipment ............................................................................................................................................. 23
5.3 Removing the packaging and choosing a site ......................................................................................................... 23
6 Description of controls ..................................................................................................................................................... 24
6.1 Timer clock for 24 hours / 7 days ............................................................................................................................ 24
6.2 Operation using the automatic timer clock .............................................................................................................. 24
6.2.1 Set current time and weekday ..................................................................................................................... 25
6.2.2 Create schedule .......................................................................................................................................... 25
6.2.3 Unscheduled drying .................................................................................................................................... 26
6.3 Operation of the ozone lamp with timer clock for 24 hours (optional) ..................................................................... 26
6.3.1 Set current time ........................................................................................................................................... 27
6.3.2 Create schedule .......................................................................................................................................... 27
6.4 Maintenance ............................................................................................................................................................ 28
7 Maintenance ....................................................................................................................................................................... 28
7.1 Cleaning .................................................................................................................................................................. 28
7.2 Ozone lamp (optional) ............................................................................................................................................. 28
7.3 Empty water tank .................................................................................................................................................... 29
7.4 Excess temperature switch ..................................................................................................................................... 30
8 Troubleshooting ................................................................................................................................................................ 31
9 Circuit diagram (page 16) ................................................................................................................................................. 31
10 Shut-down and disposal ................................................................................................................................................. 32
19 Combi / Multi Eco
Page 20

1 Preface
© Copyright 2014 by
WINTERSTEIGER AG ::: A-4910 Ried/I Dimmelstrasse 9
Author and illustrations: Maria Marek-Pollhammer
Tel. +43 7752 919-0
Email: [email protected]
Original operating manual
This operating manual must be read by operating personnel and those responsible for maintenance of the drying locker before initial use.
Damage caused by failure to follow the instructions herein will not be covered by the warranty. The user of this drying locker
is legally bound to observe the accident prevention regulations of the country in question.
Furthermore, this operating manual shall be treated confidentially. Only authorized persons shall be allowed access to it. It
shall only be entrusted to third parties on written permission from WINTERSTEIGER.
All documents are protected under copyright. Distribution, reproduction and utilization of documents and parts thereof, as
well as communication of its contents, are not permitted unless authorized expressly and in writing.
Infringements are liable to prosecution and will result in damage claims. WINTERSTEIGER shall retain all rights to exercise
industrial property rights.
1.1 Proper use
The Combi / Multi Eco drying locker is designed exclusively for drying and storing clothes, shoes, boots, gloves and helmets
(intended use). Any other use is considered inappropriate. The manufacturer shall not be liable for damage occurring from
inappropriate use. The user takes full responsibility in such cases.
Appropriate usage also includes following the operating, maintenance and service stipulations set out by the manufacturer.
You must also observe applicable accident prevention regulations and other generally accepted safety and occupational
health regulations.
In case of unauthorized changes to the drying locker, the manufacturer will not be liable for any resulting damage.
We constantly try to improve our products and therefore reserve the right to make any changes or improvements we feel are
appropriate. We are, however, not obligated to extend these changes or improvements to already delivered machines or devices.
All images, dimensions and weight specifications in the instructions are non-binding.
Combi / Multi Eco 20
Page 21
2 General information
2.1 Safety information
Only connect the unit to power outlets, which have been tested by an electrician. Be sure you are using the right connection voltage! See the type label for the connected load. Check whether these specifications match the power supply
voltage.
The drying locker may be operated only with all safeguards and covers attached.
Disconnect the power if you need to relocate or work on the equipment.
Use only original WINTERSTEIGER spare parts / consumables when operating the equipment. Any use of foreign material shall be at the risk of the operator and will invalidate the warranty!
Make sure the room has good supply of fresh air.
2.2 Warnings
Risk of injury!
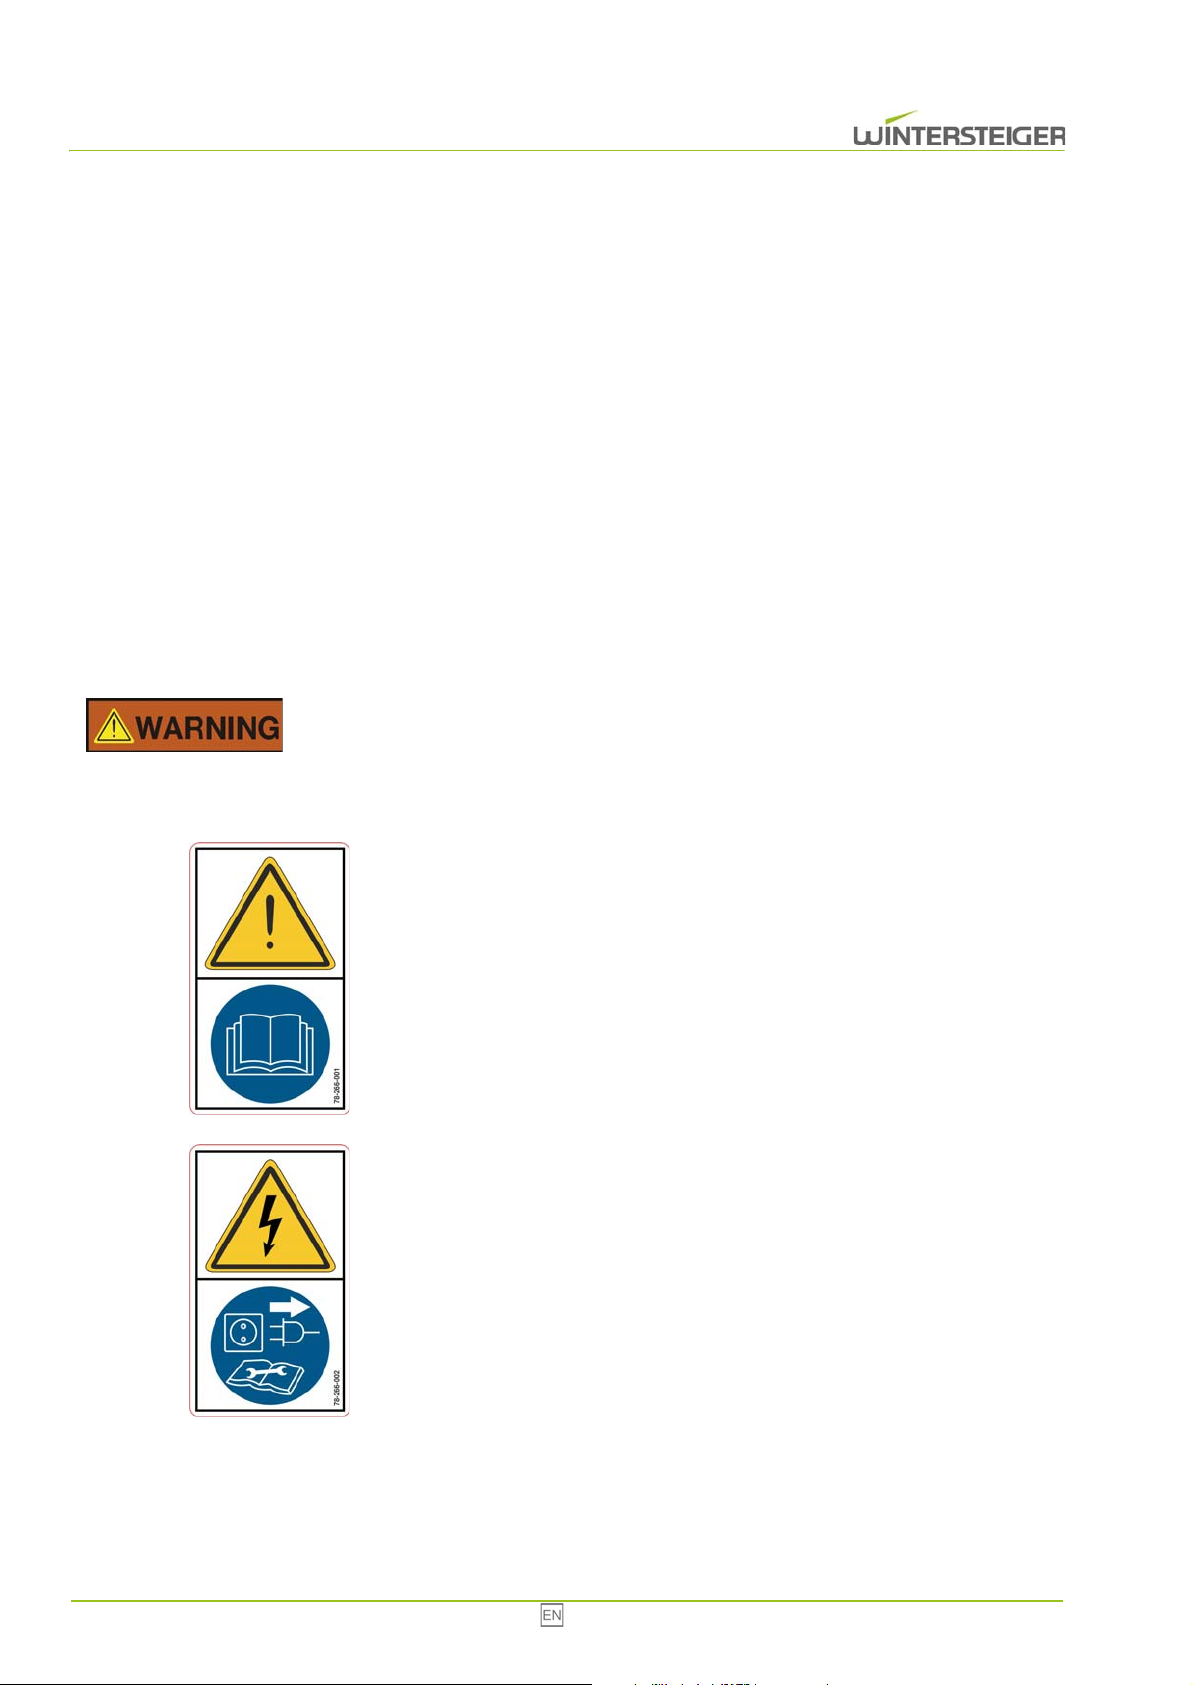
Regular checks must be made to ensure that the warning labels are still attached to the machine. Illegible or missing warning labels must be replaced immediately. The labels are located on the left inside panel of the unit.
The operating manual and the safety information must be read and observed before commissioning the machine.
Order number: 78-266-001
Disconnect the power before opening the device.
Order number: 78-266-002
21 Combi / Multi Eco
Page 22
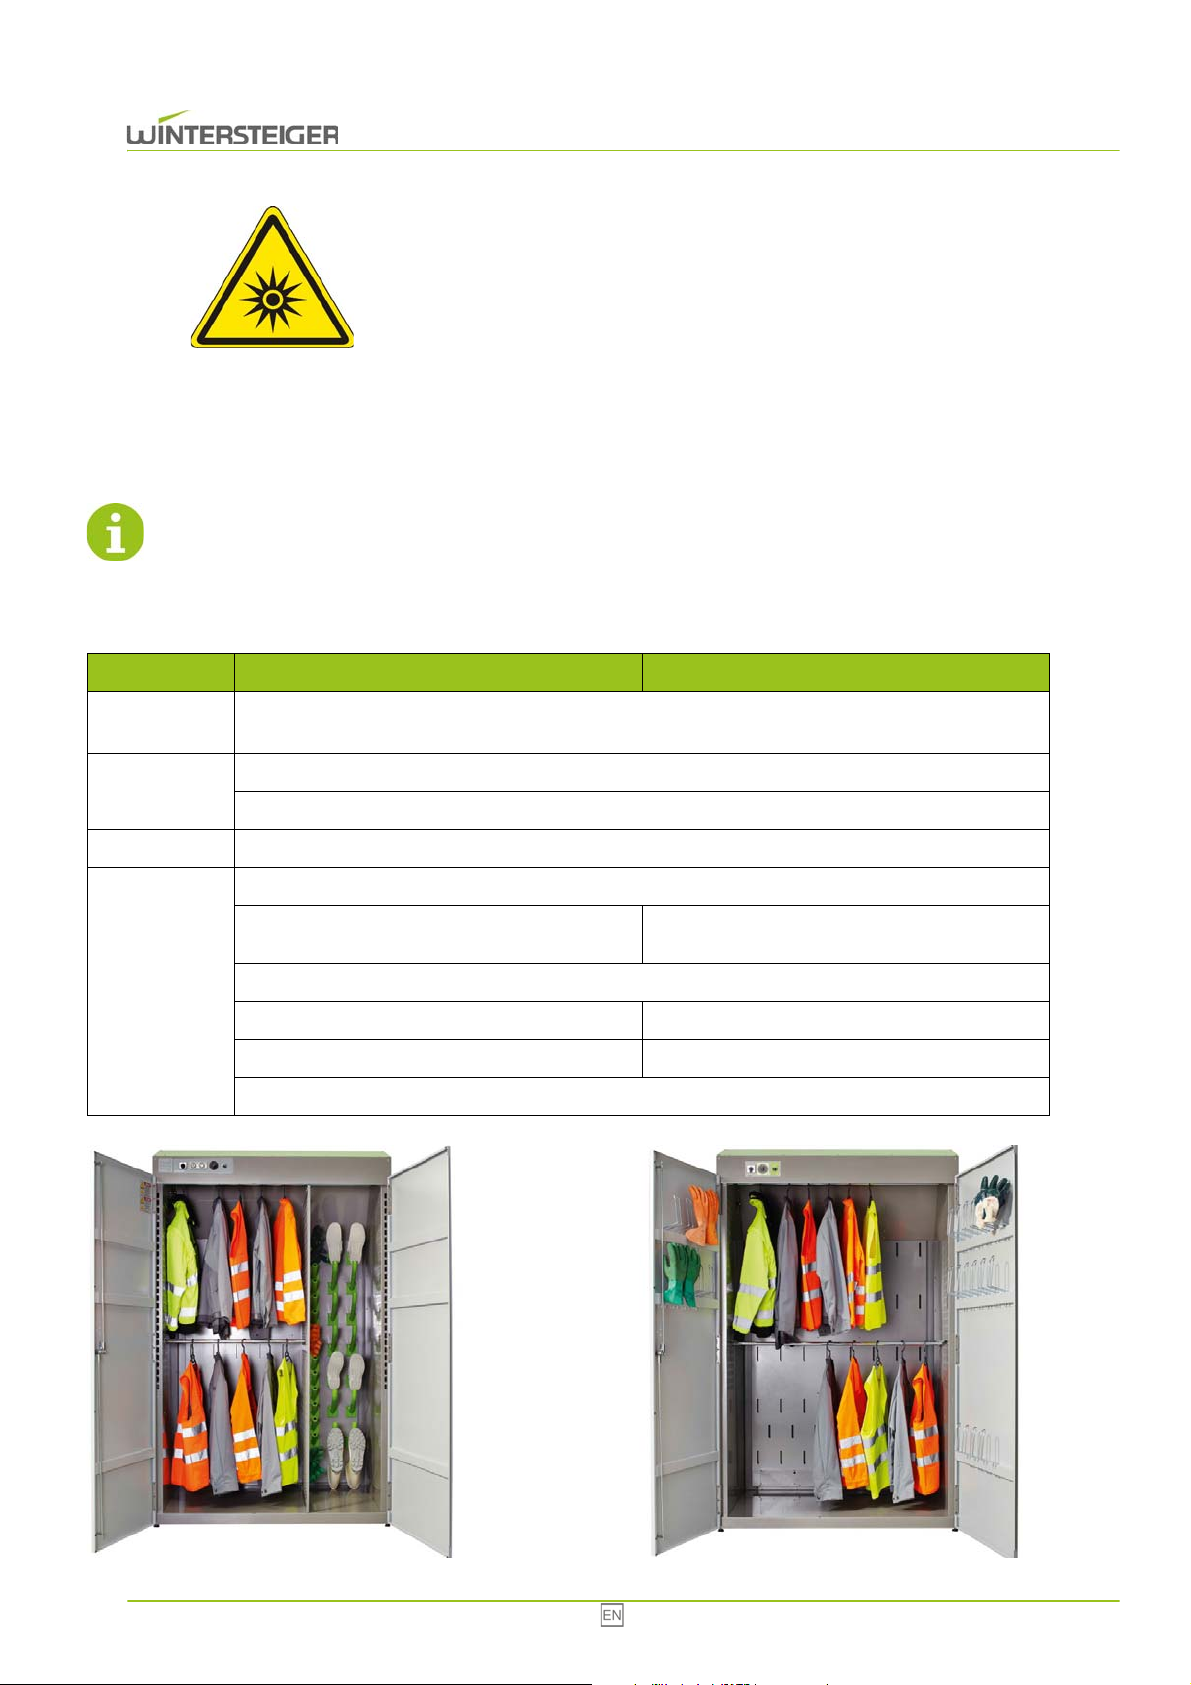
This label is only to be found if the unit is equipped with the optional ozone lamp.
Order number: 78-150-120
2.3 Safety devices
Do not remove any safety devices during operation.
The Combi / Multi Eco drying locker meets the low voltage and EMC guidelines.
3 Function
Typ Combi Eco Multi Eco
Operation
Simple operation using a timer clock for 24 hours / 7 days as well as an analog timer clock (switchable
up to 6 hours).
High-performance warm-air drying
Drying
Energy saving drying of quality work clothes and gear
Hygiene An ozone lamp (optional) reduces germs in the air
Ventilated drying nozzles for:
8 pairs of shoes
8 pairs of gloves
Room
Integrated holder for (inside of door):
2 bars for hangers
Integral water tank (empty if required)
Combi Eco Multi Eco
12 pairs of gloves
2 bars for hangers
Combi / Multi Eco 22
Page 23
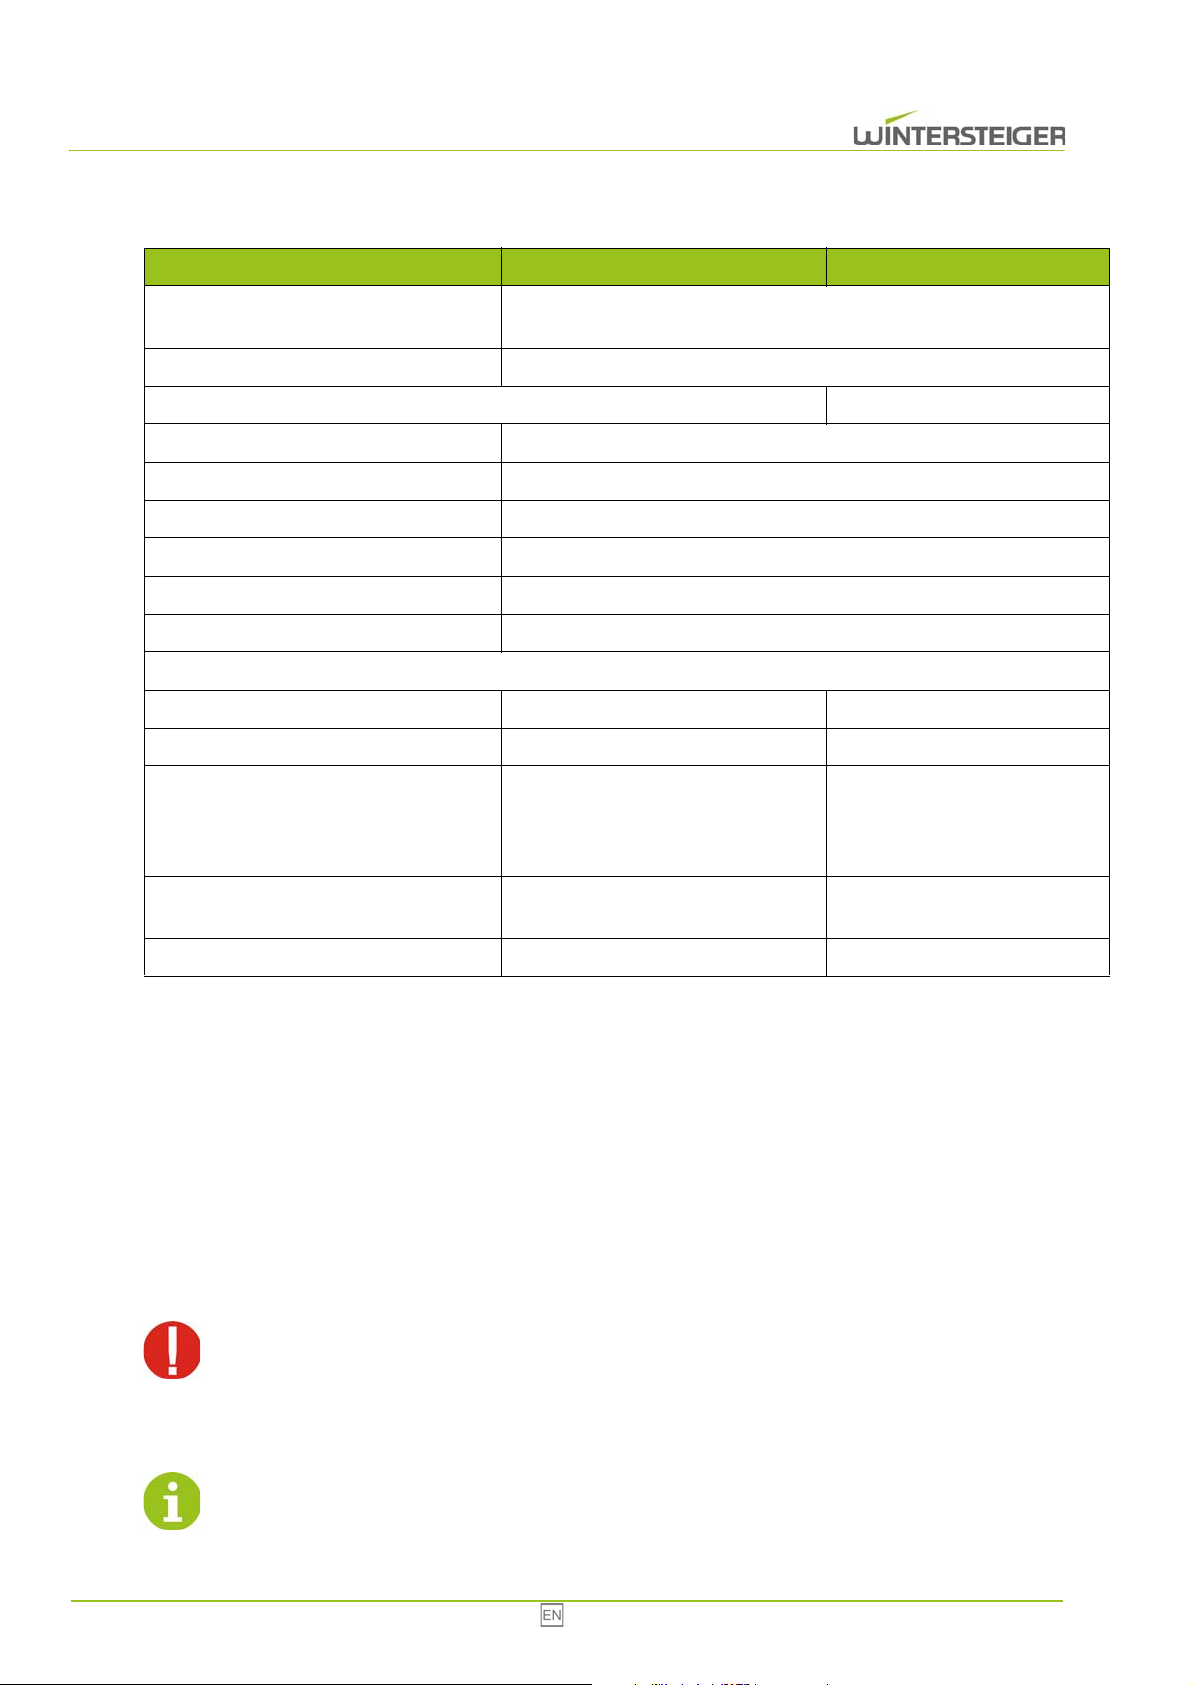
4 Technical data
Typ Combi Eco Multi Eco
Rated voltage, frequency, power, fuses:
Rated courrent: 6,2 A
The correct connection voltage is displayed on the type label!
Heater output: 1 x 800 W
Air circulation fan output: 1 x 100 W
Compressor output: 1 x 400 W
Ozone lamp (option): 1 piece
Ambient temperature: +5 to 40°C
Humidity: 30% - 80%
The equipment may only be used in well ventilated indoor rooms!
Dimensions (HxWxD): 2100 mm x 1300 mm x 850 mm 2100 mm x 1300 mm x 900 mm
Weight: 195 kg 180 kg
Drying time:
1 AC 230V 50 Hz; 1,4 kW; 12/16 A
From 1 hour. A longer drying time is
possible depending on dampness,
temperature and material.
From 1 hour. A longer drying
time is possible depending on
dampness, temperature and material.
Germ reduction:
Noise emission: below 70 dB(A) below 70 dB(A)
A ozone lamp (optional) reduces
germs in the air.
A ozone lamp (optional) reduces
germs in the air.
5 Transport, storage and relocation
5.1 Transport conditions for the equipment
Always use the original packaging and the position shown when transporting the equipment.
5.2 Storing the equipment
Temperature: 0° to +40°C.
To avoid damage, do not place any other packages or boxes on the packaging for the equipment!
5.3 Removing the packaging and choosing a site
Ensure that the unit is not damaged when removing the packing material.
23 Combi / Multi Eco
Page 24
When choosing a location, functionality should be your foremost concern. The unit must be set up in a dry-as-possible, well-
C
A
B
ventilated room. The room height must be at least 2.3 m. The power outlet should be located directly next to the unit.
When choosing a site, pay special attention to best practices and legal requirements for health and safety
at work!
Ensure that the air supply is never completely or partially blocked (do not obstruct the unit).
In order for the drying and the germ reduction to function optimally, the room temperature must never fall
below 5°C.
Do not insert any objects into the air intake or protective grid. Never block, or partially block, these openings. Never pour or
spray liquids into the air circuit - danger of electric shock and damage to the equipment.
6 Description of controls
Do not switch off the drying locker prematurely with the main switch. After the set drying time has passed,
the ventilation will continue to run for 10 to 15 minutes so that the heater does not overheat (see chapt. 7.1
Cleaning, page 28).
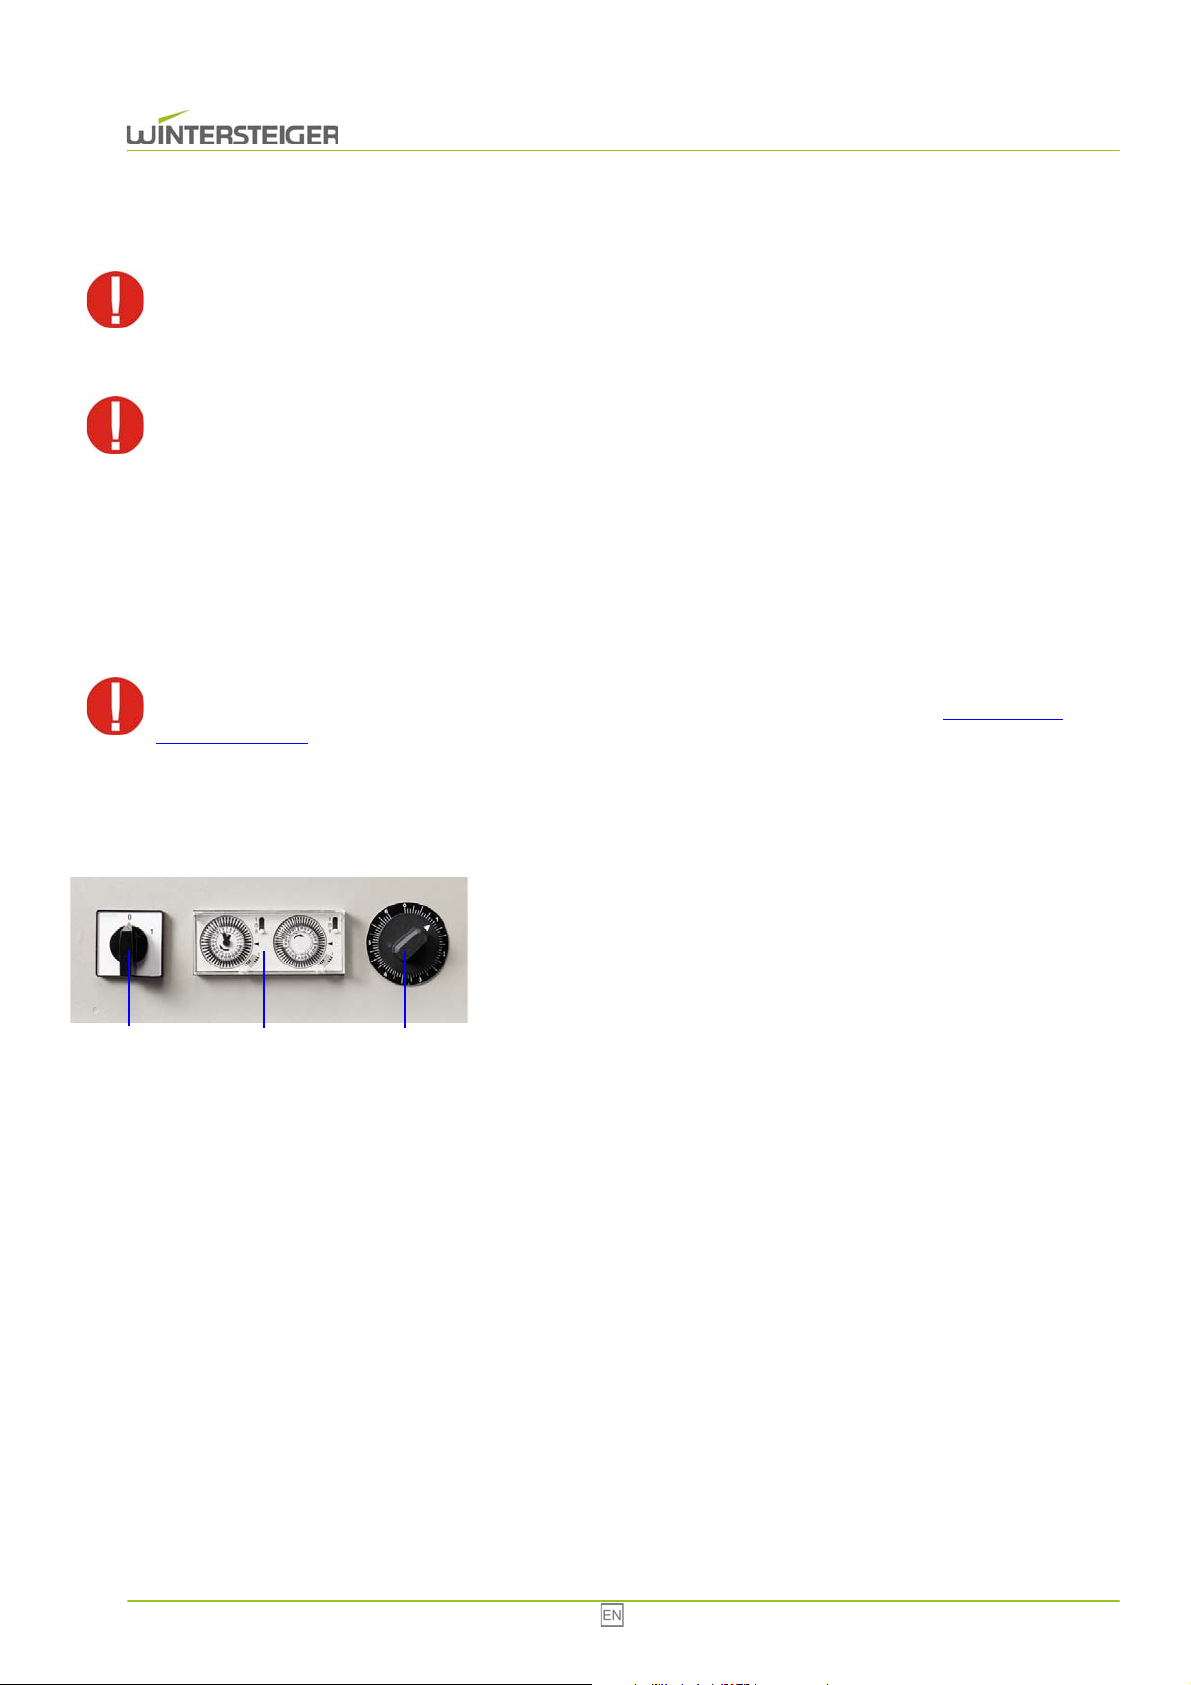
6.1 Timer clock for 24 hours / 7 days
A: Main switch
Switches the equipment on and off
B: Automatic timer clock
C: Manual timer clock
Setting the drying time to between 0 and 6 hours
6.2 Operation using the automatic timer clock
The automatic timer clock enables you to dry according to a fixed plan for 24 hours and 7 days.
Combi / Multi Eco 24
Page 25
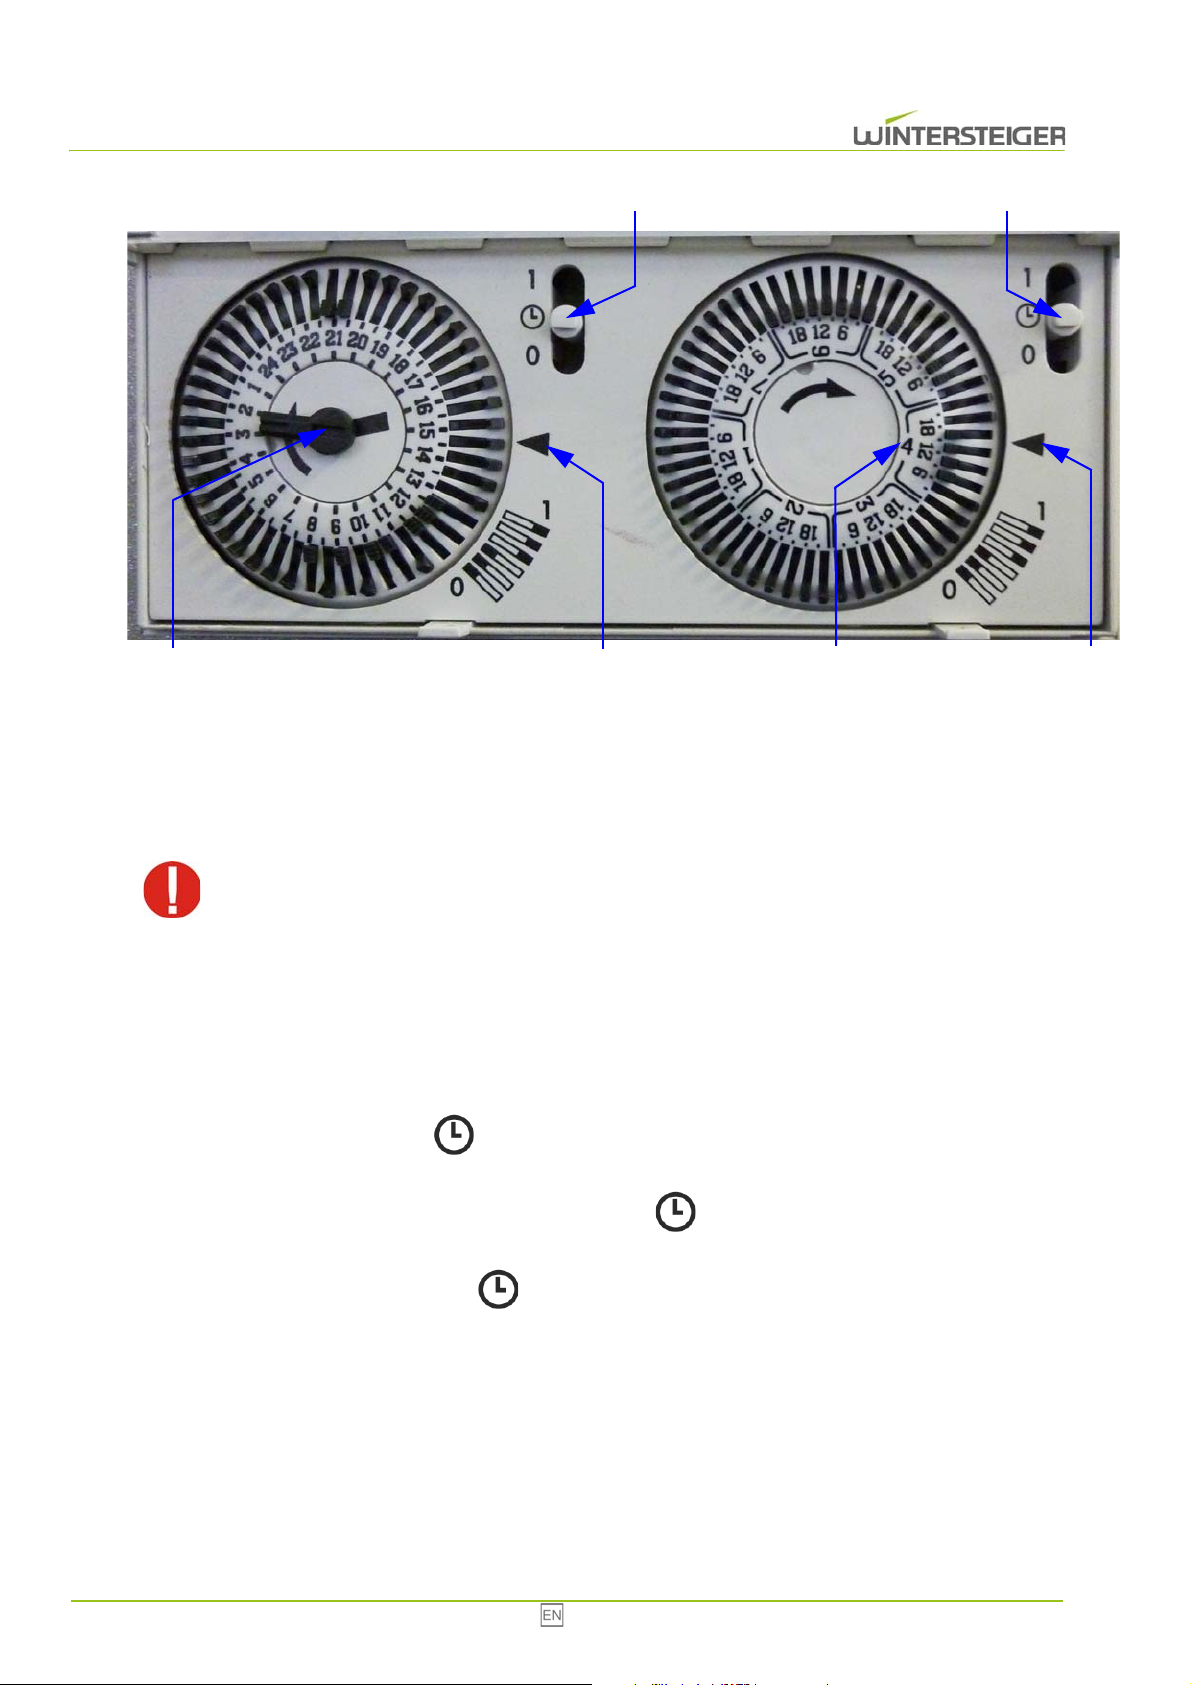
The day counter is located on the left side, the week counter on the right side.
A
C
B
D
F
E
6.2.1 Set current time and weekday
Turn the minute hand [A] using a small slotted screw driver.
The right timer clock for setting the weekday turns along with the left one.
Never turn the timer clock for the weekday. This can damage the timer clock.
The arrow [B] shows the approximate time. This way you can distinguish between 02:48 or 14:48.
The number [C] shows the weekday and is numbered from 1-7. In these instructions, the first day of the week is Monday.
The arrow [D] shows the current weekday (it is Thursday).
The automatic timer clock is activated or deactivated using the two switches [E+F].
If one of the two switches is set to "0", the automatic timer clock is deactivated.
If both switches are set to " ", the drying will take place according to the time schedule.
If both switches are set to "1" the drying locker is permanently (24 hours / 7 days) switched on.
If the switch [E] is switched to "1" and the switch [F] to " " the unit dries only according to the week schedule.
Thus only time intervals of 3 hours are available.
If the switch [E] is switched to " " and the switch [F] to "1" the unit dries only according to the day (same
program for every day of the week) schedule.
6.2.2 Create schedule
If the tab for a time period is pushed out, the drying locker will switch on for this time duration. Principally, both the tab for the
time period for the day, as well as for the week must be pushed out for the drying to be activated.
25 Combi / Multi Eco
Page 26
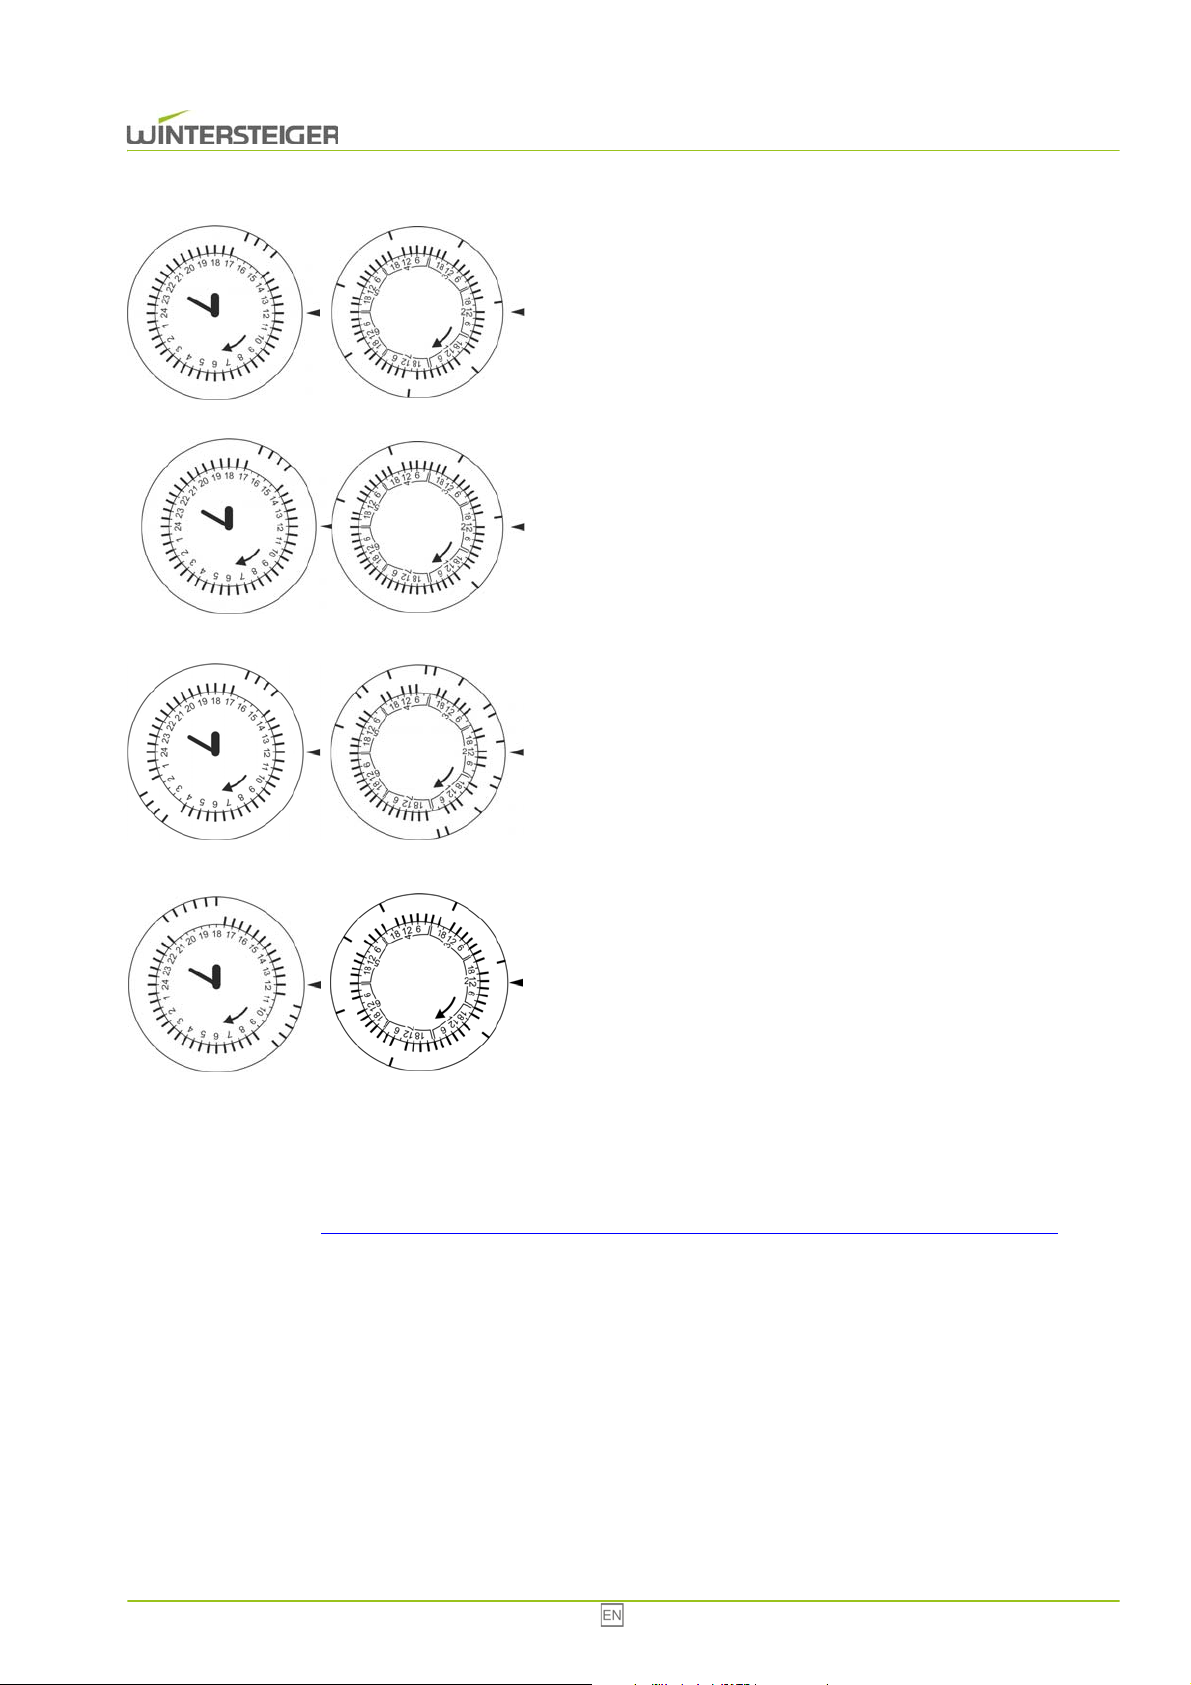
Example: The unit is to operate during these times:
Daily from 15:00 to 17:00
The following tabs on the day counter must be pushed out: 15:00, 15:30,
16:00, 16:30
The following tabs on the week counter must be pushed out: every day
15:00
Example: The unit is to operate during these times:
Monday {1} to Friday {5} from 15:00 to 17:00
No drying is to take place on Saturday {6} and Sunday {7}.
The following tabs on the day counter must be pushed out: 15:00, 15:30,
16:00, 16:30
The following tabs on the week counter must be pushed out: Monday {1}
to Friday {5} 15:00
Example: The unit is to operate during these times:
Monday {1} to Friday {5} from 02:00 to 04:00 and from 15:00 to 17:00
No drying is to take place on Saturday {6} and Sunday {7}.
The following tabs on the day counter must be pushed out: 02:00, 02:30,
03:00, 03:30 and 15:00, 15:30, 16:00, 16:30
The following tabs on the week counter must be pushed out: Monday {1}
to Friday {5} 00:00, 03:00, 15:00
Example: The unit is to operate during these times:
Monday {1} to Thursday {4} from 18:00 to 21:00
Friday {5} to Sunday {7} from 09:00 to 11:30
The following tabs on the day counter must be pushed out: 09:00, 09:30,
10:00, 10:30, 11:00 and 18:00, 18:30, 19:00, 19:30, 20:00, 20:30
The following tabs on the week counter must be pushed out: Monday {1}
to Thursday {4} 15:00
Friday {5} to Sunday {7} 09:00
6.2.3 Unscheduled drying
If unscheduled drying takes places in a drying locker with timer clock for 24 hours / 7 days, the drying can be carried out using
the 6-hour timer clock (see chapt. 6.3 Operation of the ozone lamp with timer clock for 24 hours (optional), page 26)
hour timer clock overrides the timer clock for 24 hours / 7 days.
. The 6-
6.3 Operation of the ozone lamp with timer clock for 24 hours (optional)
The automatic timer clock enables you to dry according to a fixed schedule for 24 hours.
Combi / Multi Eco 26
Page 27
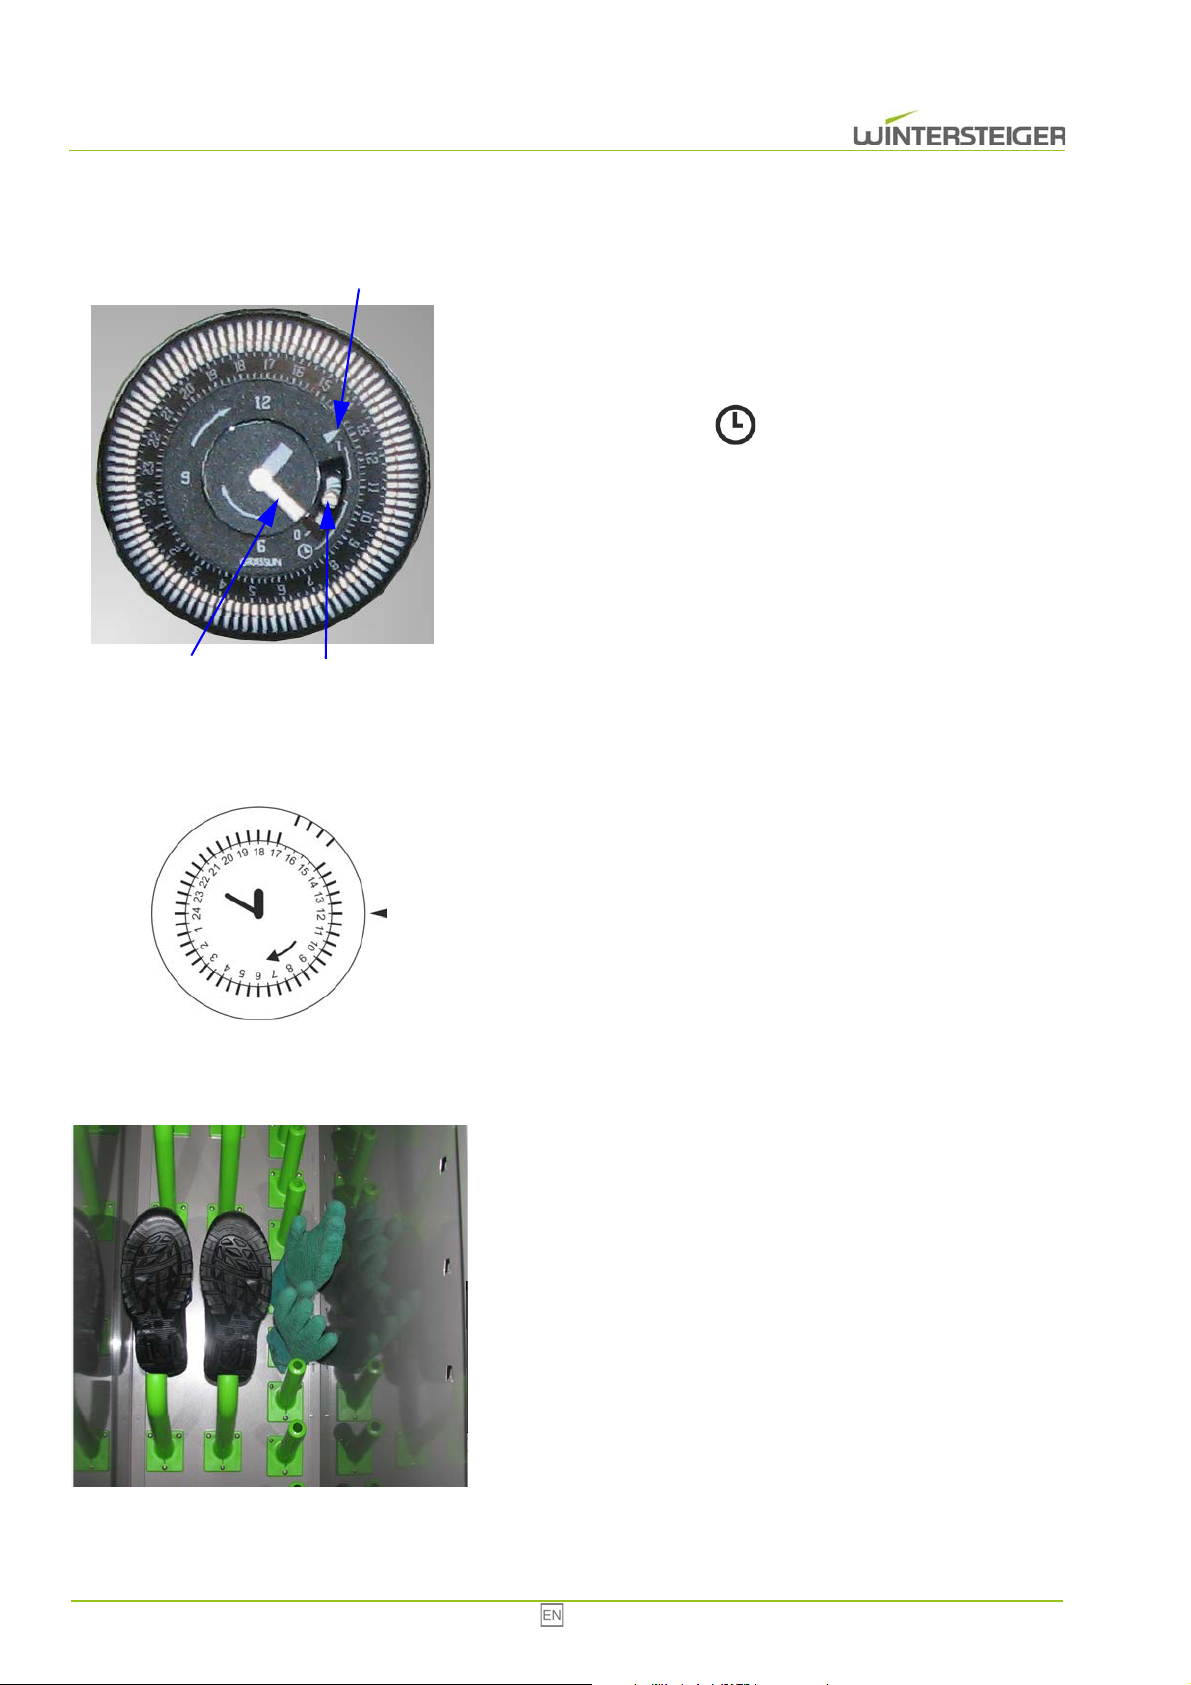
6.3.1 Set current time
A
C
B
C
Turn the minute hand [A] using a small slotted screw driver.
The arrow [B] shows the approximate time. This way you can distin-
guish between 01:25 or 13:25.
The automatic timer clock is activated or deactivated using the switch [C].
If the switch is set to "0", the automatic timer clock is deactivated.
If the switch is set to " ", the drying will take place according
to the time schedule.
If the switch is set to "1" the drying locker is permanently switched
on.
6.3.2 Create schedule
If the tab for a time period is pushed out, the drying locker will switch on for this time duration.
Example: The unit is to operate during these times:
Daily from 15:00 to 17:00
The following tabs on the day counter must be pushed out: 15:00, 15:30,
16:00, 16:30
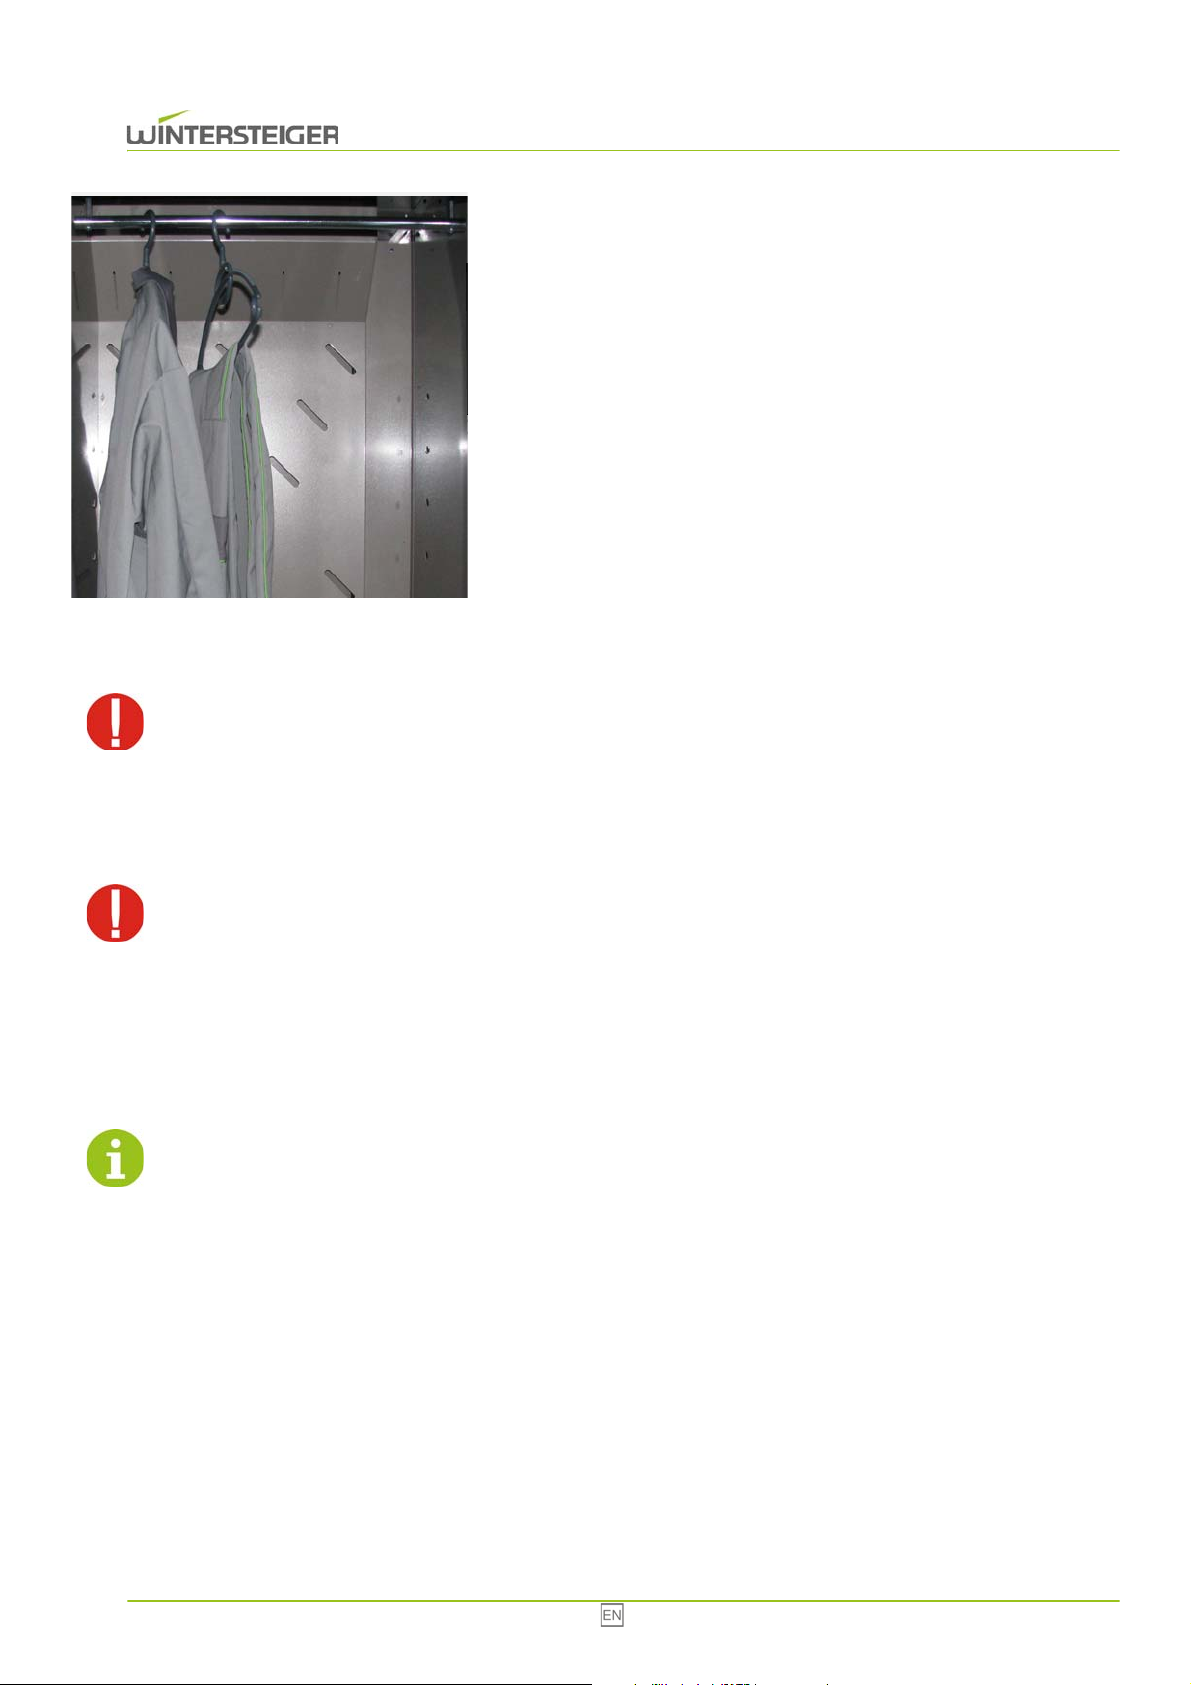
6.4 Optimally equipping the drying locker
When drying work clothes, observe the following instructions:
Place gloves on the integrated glove nozzles.
Place shoes on the integrated shoe nozzles.
27 Combi / Multi Eco
Page 28
7 Maintenance
C
Switch off the equipment and pull the power plug before commencing maintenance work!
Hang work clothes on hangers and then on the integrated bar for
hangers.
The drying lockers have different capacities of equipment. An air gap
must be kept between the equipment to allow best possible circulation of
air.
After switching off the heater, the ventilation will continue to run for about
10 - 15 minutes.
7.1 Cleaning
Clean the inside and outside of the equipment at regular intervals using a moist cloth.
Never clean the unit with water, since this could damage the electrical components! No liability or warranty
will be assumed for consequential damage if you fail to observe this.
7.2 Ozone lamp (optional)
The ozone lamp is preset according to a fixed plan (15 min. operation - 30 min. break - 15 min. operation) for 24 hours via
the timer clock. It is only active when the main timer clock is on.
The ozone dosage is factory set.
We recommend that you do not adjust the ozone lamp!
Combi / Multi Eco 28
Page 29
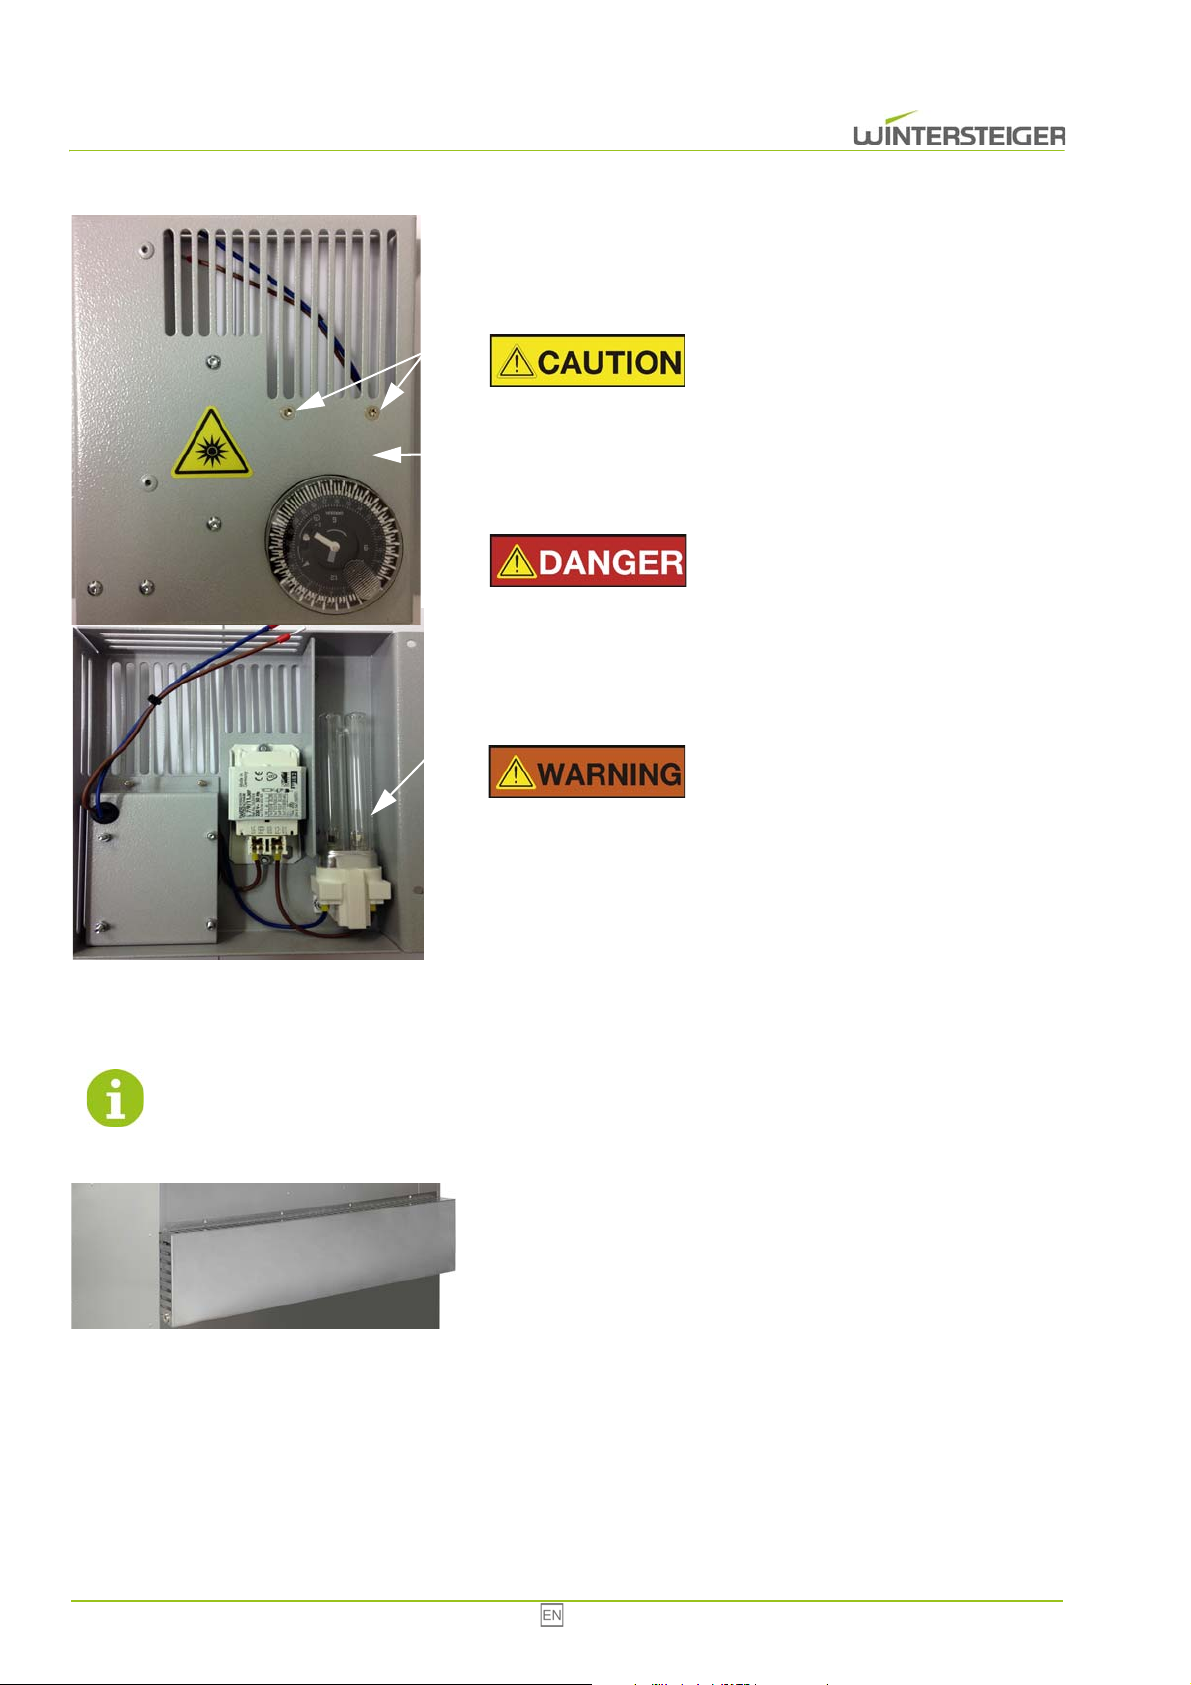
The ozone lamp used ensures effective germ reduction for an operating
A
C
B
A
period of 2000 hours. After this the ozone lamp must be replaced. Perform a monthly visual check of the ozone lamp during operation. You will
see a bluish light glowing on the back side of the locker.
Risk of injury!
Do not look directly into the ozone lamp! The UV rays can damage
your eyes!
Replacing the ozone lamp
Risk of injury!
Disconnect the unit from the power supply!
Remove all screws [A].
Remove lid [B]. Carefully remove the ozone lamp [C].
Risk of injury!
7.3 Empty water tank
Empty the water tank if necessary!
The ozone lamp contains poisonous mercury. Dispose of the ozone
lamp according to national regulations!
Insert a new lamp [C] and secure lid with the screws [A].
Loosen screws.
Remove cover.
Remove water tank and empty.
29 Combi / Multi Eco
Page 30
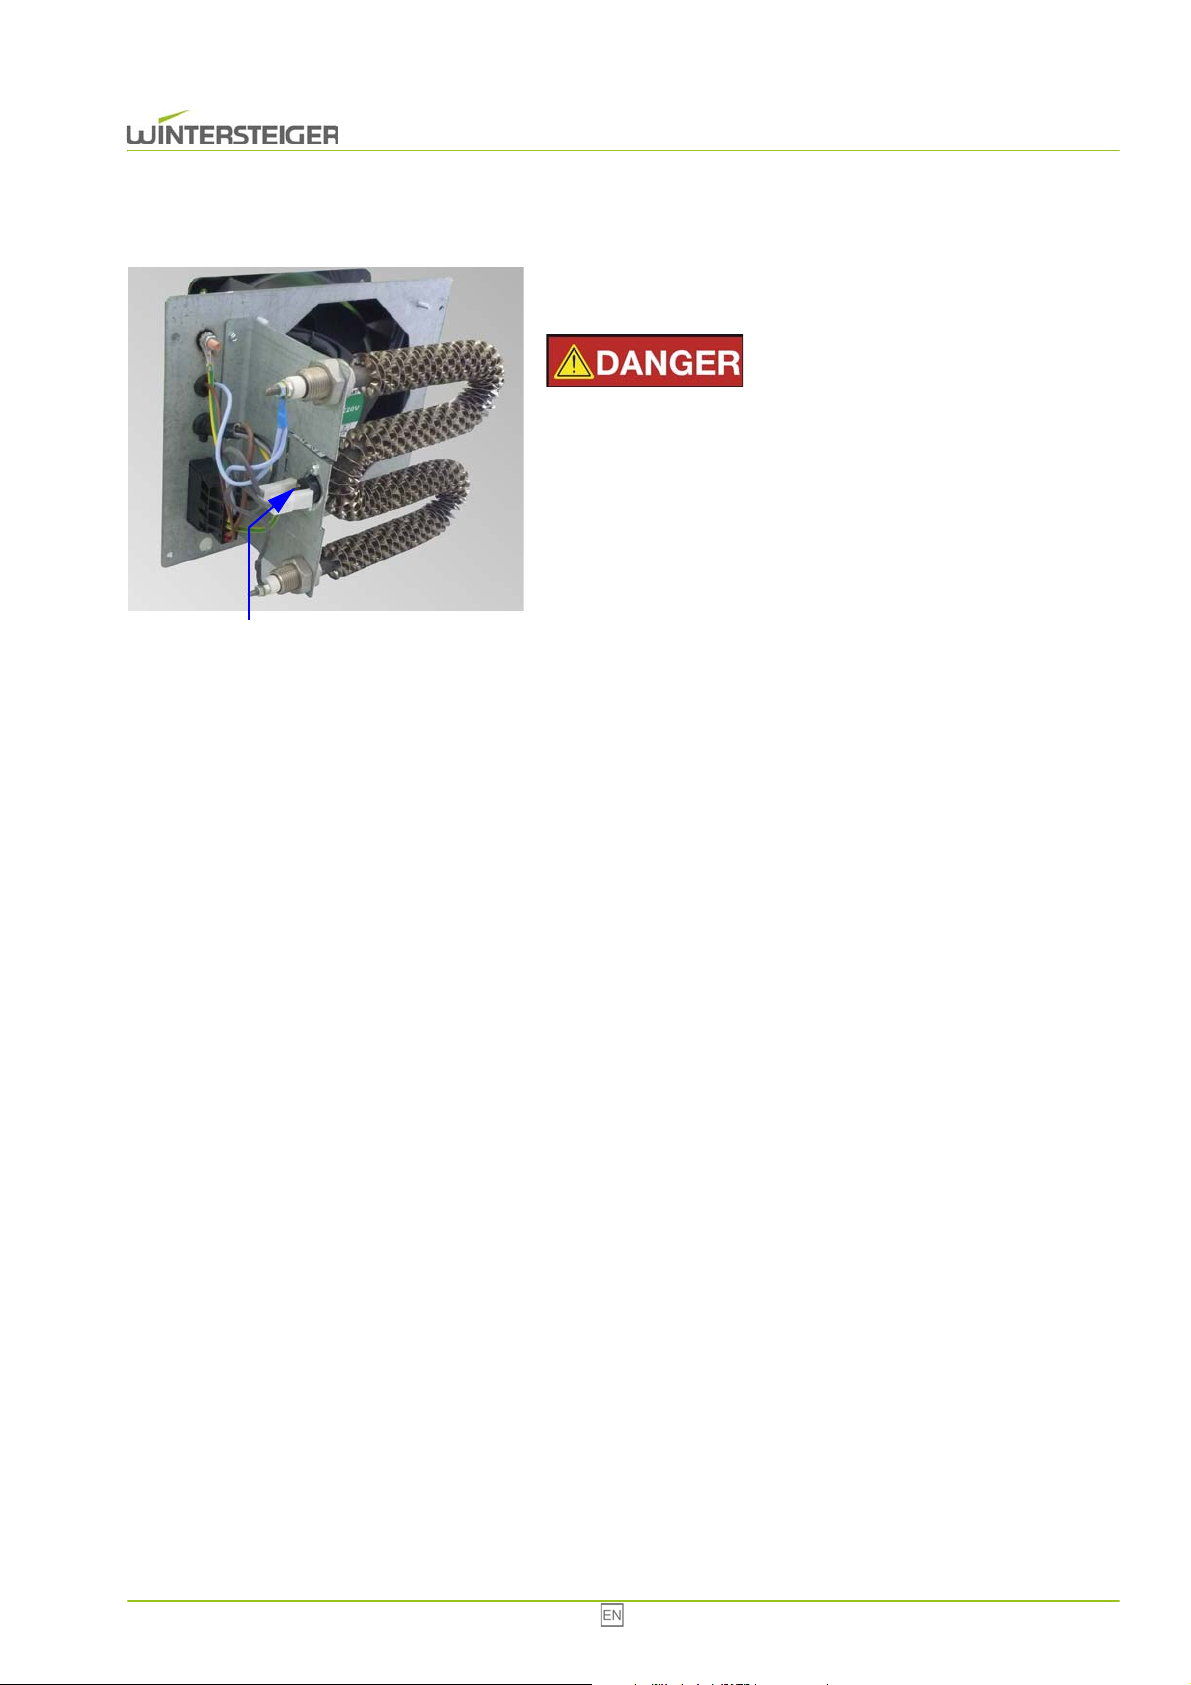
7.4 Excess temperature switch
A
The excess temperature switch of the heater must be reset if it has
been triggered.
Risk of injury!
Disconnect the unit from the power supply! Only an electrician may
do the repair!
Uninstall the concerned heater.
Press button [A].
Reinstall the heater
Combi / Multi Eco 30
Page 31
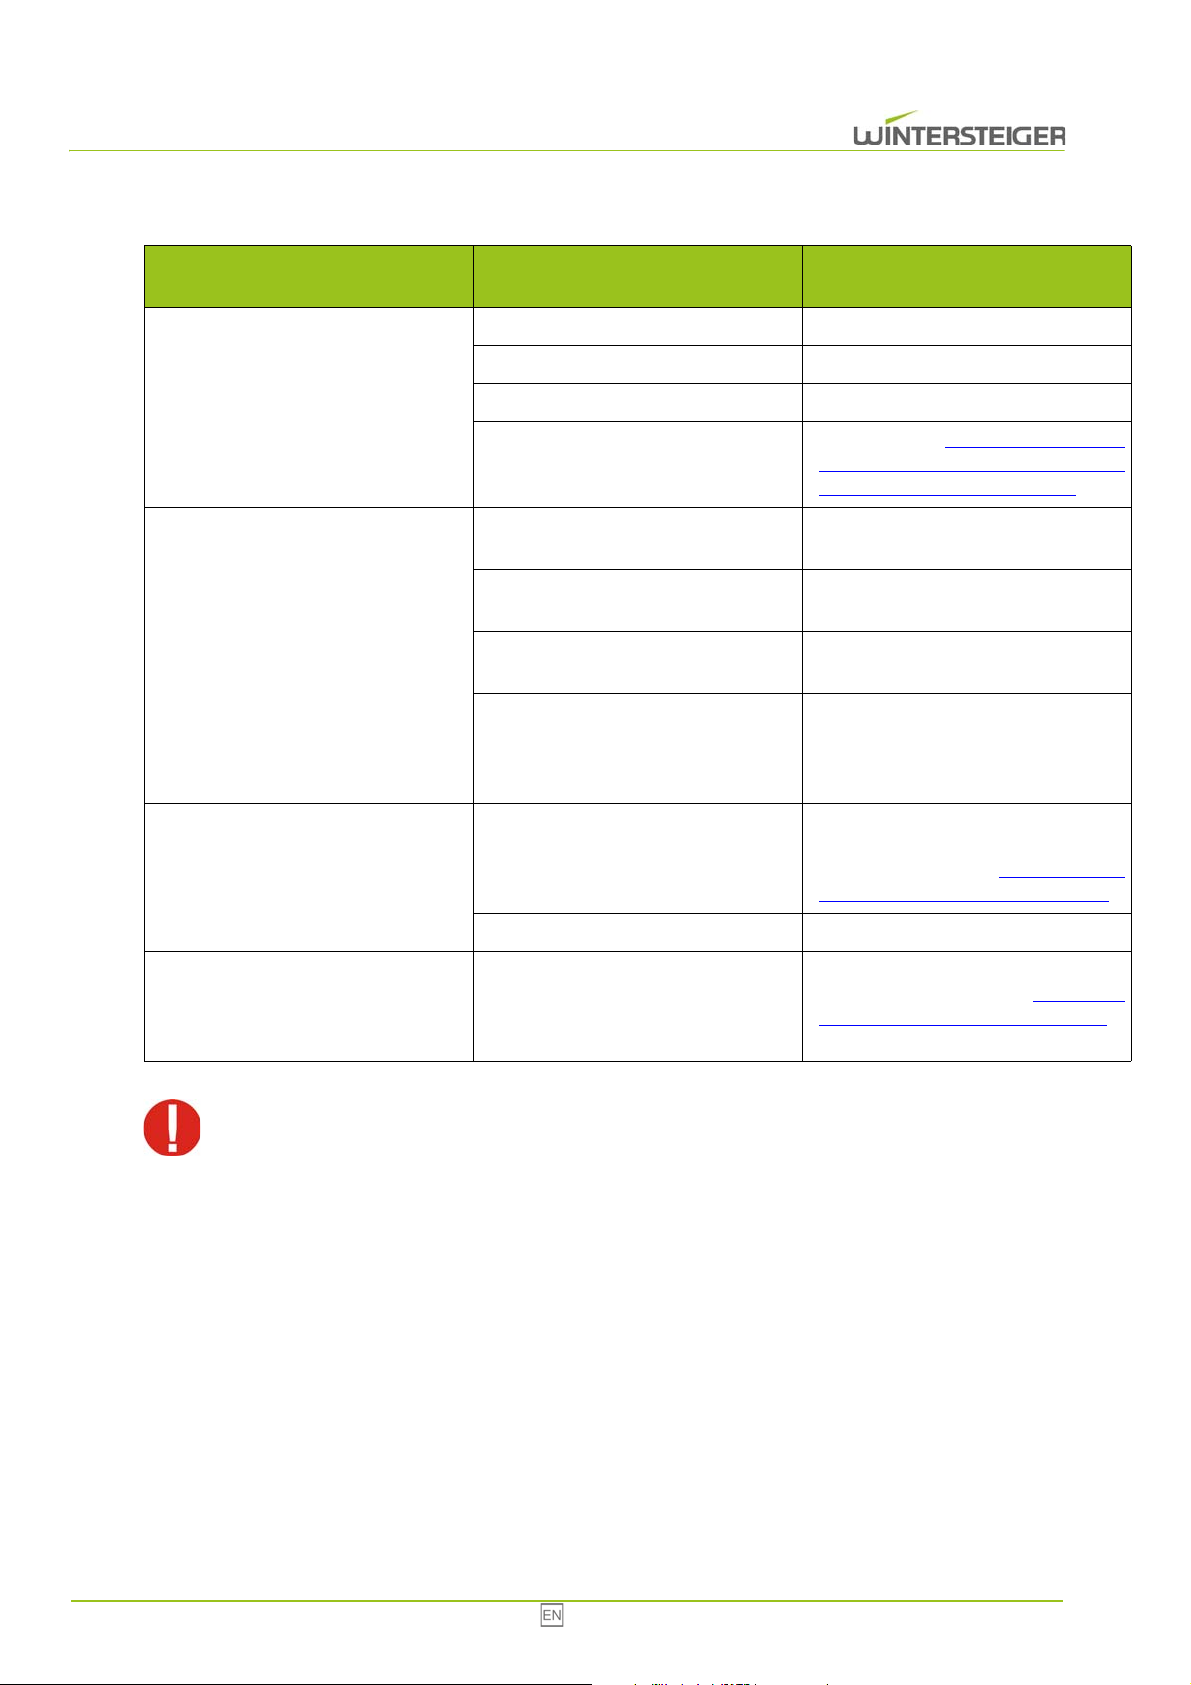
8 Troubleshooting
Error
Problem
The equipment is not working
The equipment is not drying
The equipment's drying performance
has deteriorated, or the equipment is
not heating
Cause Elimination
The unit is not plugged in Plug in unit
Power supply not working Contact electrician
The main switch is set to "0" Switch on the main switch
Set drying time (see chapt. 6.3 Opera-
No drying time set
Insufficient air supply
Humidity > 80%
Ambient temperature < 5°C
Option: Ozone with time relay
The excess temperature switch on the
heater has been triggered because the
temperature exceeded 80°C
Air circulation fan defective Check the air circulation fan
tion of the ozone lamp with timer clock
for 24 hours (optional), page 26)
Check the air supply to the equipment
or room
The lower the humidity, the better the
drying effect.
The higher the ambient temperature,
the better the drying effect.
When starting the drying, the ozone
lamp is switched on for about
10 minutes, after which the drying
starts
Check the inside and outside of the
drying locker to see if the ventilation
louvers are blocked see chapt. 7.4
Excess temperature switch, page 30
Ozone lamp not working
Disconnect the power whenever you work on the equipment! The drying locker may be operated only with
all safeguards and covers attached.
9 Circuit diagram (page 16)
Check to see if the ozone lamp is
inserted and switched on (see chapt.
7.2 Ozone lamp (optional), page 28)
or replace it if necessary
31 Combi / Multi Eco
Page 32
10 Shut-down and disposal
Risk of injury!
Disconnect the machine from the mains supply or any external drive prior to shutting down and dismantling. Use
only suitable tools for dismantling.
When shutting down the machine dismantle and dispose of all machine parts properly. Clean all oily and
greasy components prior to disposal.
Oil and grease should never be allowed to pollute the environment.
Ensure that all disposal regulations specific to your country are adhered to!
Dismantle the machine properly into its individual components.
Clean oily and greasy components.
Dispose of components by material group (steel, plastic, electrical and electronic components, etc.).
Dispose of oil and grease in an environmentally friendly manner.
Combi / Multi Eco 32
Page 33

Sommaire
1 Préface ............................................................................................................................................................................... 34
1.1 Utilisation conforme ................................................................................................................................................. 34
2 Remarques générales ....................................................................................................................................................... 35
2.1 Prescriptions de sécurité ......................................................................................................................................... 35
2.2 Signalisation des dangers ....................................................................................................................................... 35
2.3 Dispositifs de protection .......................................................................................................................................... 36
3 Fonctionnement ................................................................................................................................................................ 36
4 Caractéristiques techniques ............................................................................................................................................ 37
5 Transport, entreposage et changement d'emplacement ............................................................................................... 37
5.1 Conditions de transport de l'appareil ....................................................................................................................... 37
5.2 Entreposage de l'appareil ........................................................................................................................................ 37
5.3 Déballage et choix de l'emplacement ...................................................................................................................... 37
6 Description des organes de commande ......................................................................................................................... 38
6.1 Minuteur pour un fonctionnement 24h/24 et 7j/7 ..................................................................................................... 38
6.2 Fonctionnement avec le minuteur automatique ...................................................................................................... 38
6.2.1 Réglage de l'heure et du jour de la semaine ............................................................................................... 39
6.2.2 Création d'un planning ................................................................................................................................ 39
6.2.3 Séchage non planifié ................................................................................................................................... 40
6.3 Fonctionnement de la lampe à ozone avec le minuteur sur 24 heures (en option) ................................................ 40
6.3.1 Réglage de l'heure ...................................................................................................................................... 41
6.3.2 Création d'un planning ................................................................................................................................ 41
6.4 Équiper au mieux l'armoire de séchage .................................................................................................................. 41
7 Maintenance ....................................................................................................................................................................... 42
7.1 Nettoyage ................................................................................................................................................................ 42
7.2 Lampe à ozone (en option) ..................................................................................................................................... 42
7.3 Purge du réservoir d'eau ......................................................................................................................................... 43
7.4 Interrupteur de température excessive ......................................................................................
8 Élimination des erreurs .................................................................................................................................................... 45
9 Schéma électrique (page 16) ............................................................................................................................................ 45
10 Mise à l'arrêt définitive et élimination ........................................................................................................................... 46
33 Combi / Multi Eco
............................. 44
Page 34

1 Préface
© Copyright 2014
WINTERSTEIGER AG ::: A-4910 Ried/I Dimmelstrasse 9
Rédaction et mise en page : Maria Marek-Pollhammer
Tél. +43 7752 919-0
E-mail : [email protected]
Manuel de service original
Avant la première mise en service, la présente notice d'utilisation doit être lue par le personnel opérateur et par les personnes
responsables de la préservation de l'armoire de séchage.
Les dommages résultant d'une non-observation des consignes du manuel ne sont pas couverts par la garantie. L'utilisateur
de l'armoire de séchage est tenu par la loi de respecter la réglementation nationale respective en matière de prévention des
accidents.
Par ailleurs, ce manuel de service doit être traité confidentiellement. Seules les personnes autorisées y ont accès. Il ne peut
être cédé à des tiers qu'après consentement écrit de la part de la société WINTERSTEIGER.
Toute la documentation est protégée par des droits d'auteur. La transmission et la reproduction des textes ou d'une partie
de ceux-ci ainsi que l'utilisation et la communication de leur contenu sont illicites, sauf autorisation expresse par écrit.
Toute contravention est punissable et entraîne des dommages-intérêts. Tous les droits de propriété industrielle sont
réservés à la société WINTERSTEIGER.
1.1 Utilisation conforme
L'armoire de séchage Combi / Multi Eco est conçue exclusivement pour le séchage et le rangement de vêtements,
chaussures, bottes, gants et casques (utilisation conforme). Toute autre utilisation est considérée comme non conforme à
l'usage prévu. Le fabricant décline toute responsabilité pour les dommages qui en résulteraient. L'utilisateur en assume seul
le risque.
L'utilisation conforme englobe également l'observation des consignes de fonctionnement, d'entretien et de maintenance
prescrites par le fabricant. La réglementation en matière de prévention des accidents ainsi que les autres réglementations
généralement reconnues en matière de sécurité et de médecine du travail doivent être appliquées.
La responsabilité du fabricant n'est pas engagée en cas de dommages survenant suite à des modifications apportées à
l'armoire de séchage sans concertation préalable.
Nous nous efforçons d'améliorer nos produits en permanence, c'est pourquoi nous nous réservons le droit d'y apporter des
modifications ou améliorations jugées utiles. Ceci n'implique pas que nous sommes tenus d'opérer les mêmes modifications
sur des machines ou appareils déjà livrés.
Toutes les illustrations, mesures et poids figurant dans le manuel de service sont sans garantie.
Combi / Multi Eco 34
Page 35
2 Remarques générales
2.1 Prescriptions de sécurité
Ne raccordez l'appareil qu'à des prises secteur ayant été contrôlées par un électricien qualifié. Veiller à une tension
d'alimentation correcte ! La tension requise pour l'appareil figure sur la plaque signalétique. Vérifier si la tension secteur
correspond bien aux indications de la plaque.
L'armoire de séchage peut uniquement être mise en service lorsque toutes les protections et tous les capots sont
montés !
Toujours retirer la prise secteur avant tout déplacement de l'appareil ou toute intervention sur celui-ci !
L'appareil peut uniquement être mis en service avec des consommables et pièces de rechange d'origine WINTERSTEIGER ! L'utilisation de matériel de marque étrangère se fait aux risques et sous la responsabilité de l'exploitant ;
elle entraîne en outre la perte de la garantie !
Veillez à ce que la pièce de travail soit bien aérée !
2.2 Signalisation des dangers
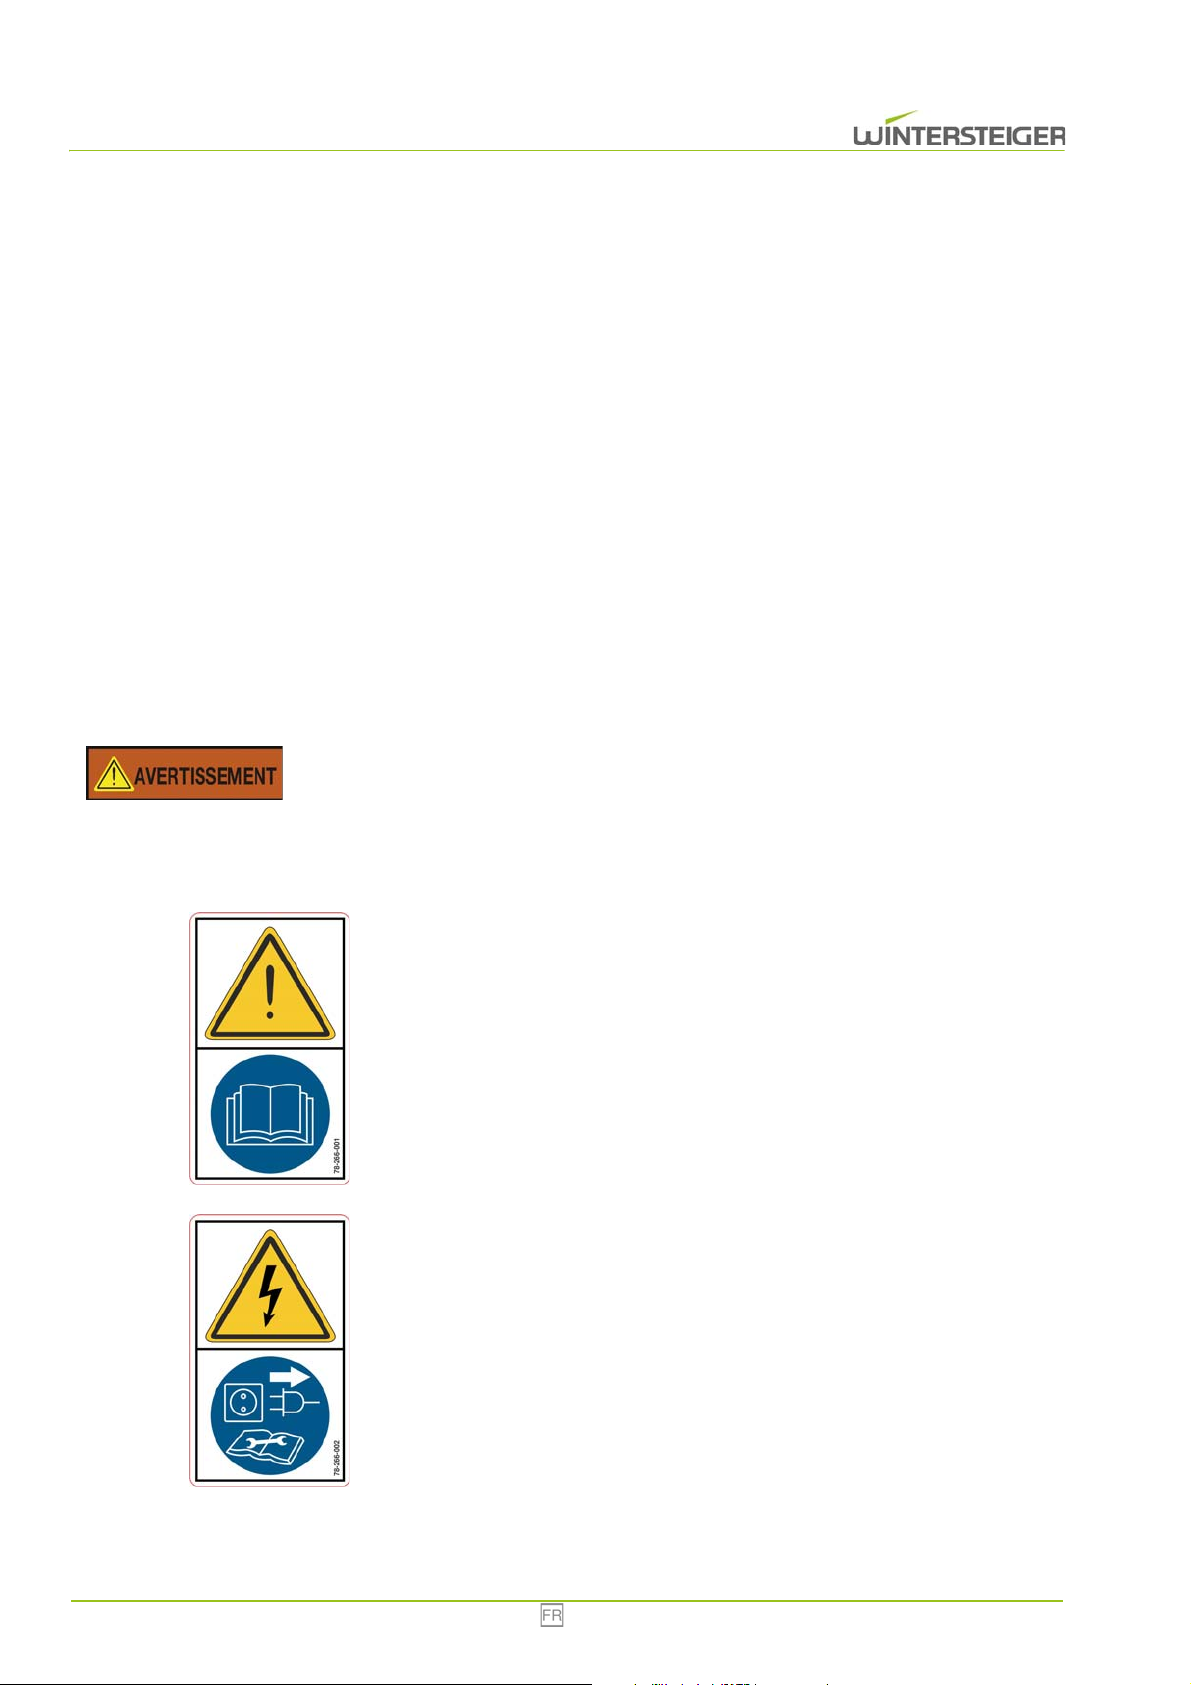
Risque de blessures !
Vous devez contrôler régulièrement si ces étiquettes d'avertissement se trouvent encore sur la machine. Les
étiquettes illisibles ou manquantes doivent immédiatement être renouvelées. Les étiquettes se trouvent sur la paroi
gauche interne de l'appareil.
Avant la mise en service, lisez le manuel de service et les consignes de
sécurité et respectez-les.
Numéro de commande : 78-266-001
Retirez la fiche secteur avant d'ouvrir l'appareil !
Numéro de commande : 78-266-002
35 Combi / Multi Eco
Page 36
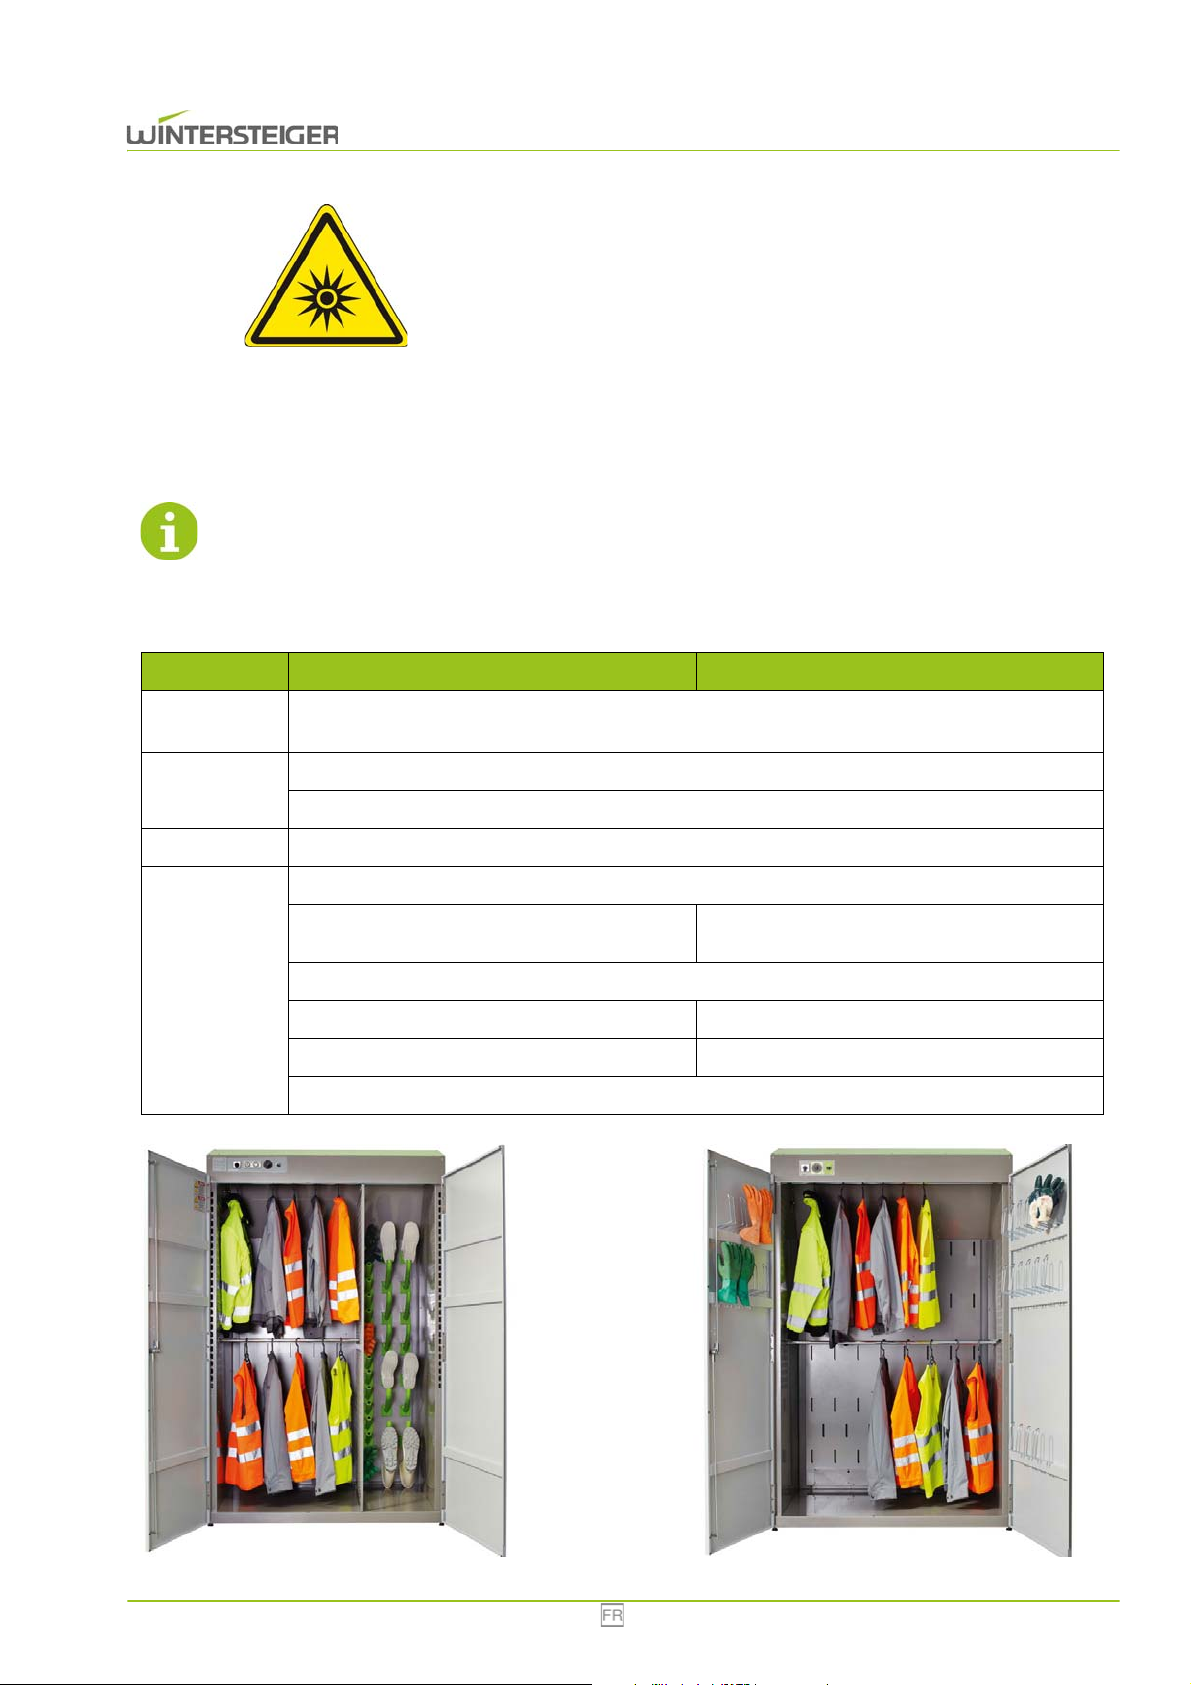
Cet autocollant n'est présent que lorsque la machine dispose de l'option
lampe à ozone.
Numéro de commande : 78-150-120
2.3 Dispositifs de protection
Aucun dispositif de protection ne doit être enlevé durant le fonctionnement de la machine.
L'armoire de séchage Combi / Multi Eco est conforme à la directive basse tension et à la directive CEM.
3 Fonctionnement
Typ Combi Eco Multi Eco
Commande
Minuteur pour un fonctionnement 24h/24 et 7j/7 ainsi qu'un minuteur analogique
(commutable jusqu'à 6 heures)
Séchage à l'air chaud performant
Séchage
Séchage économique des vêtements de travail et d'intervention de haute qualité
Hygiène Réduction des bactéries de l'air par la lampe à ozone (en option)
Buses de séchage ventilées par l'intérieur pour:
8 paires de chaussures
8 paires de gants
Espace
Fixation intégrée (à l'intérieur de la porte)?:
2 barres porte-cintres
12 paires de gants
2 barres porte-cintres
Réservoir d'eau intégré (purger, si besoin)
Combi Eco
Multi Eco
Combi / Multi Eco 36
Page 37
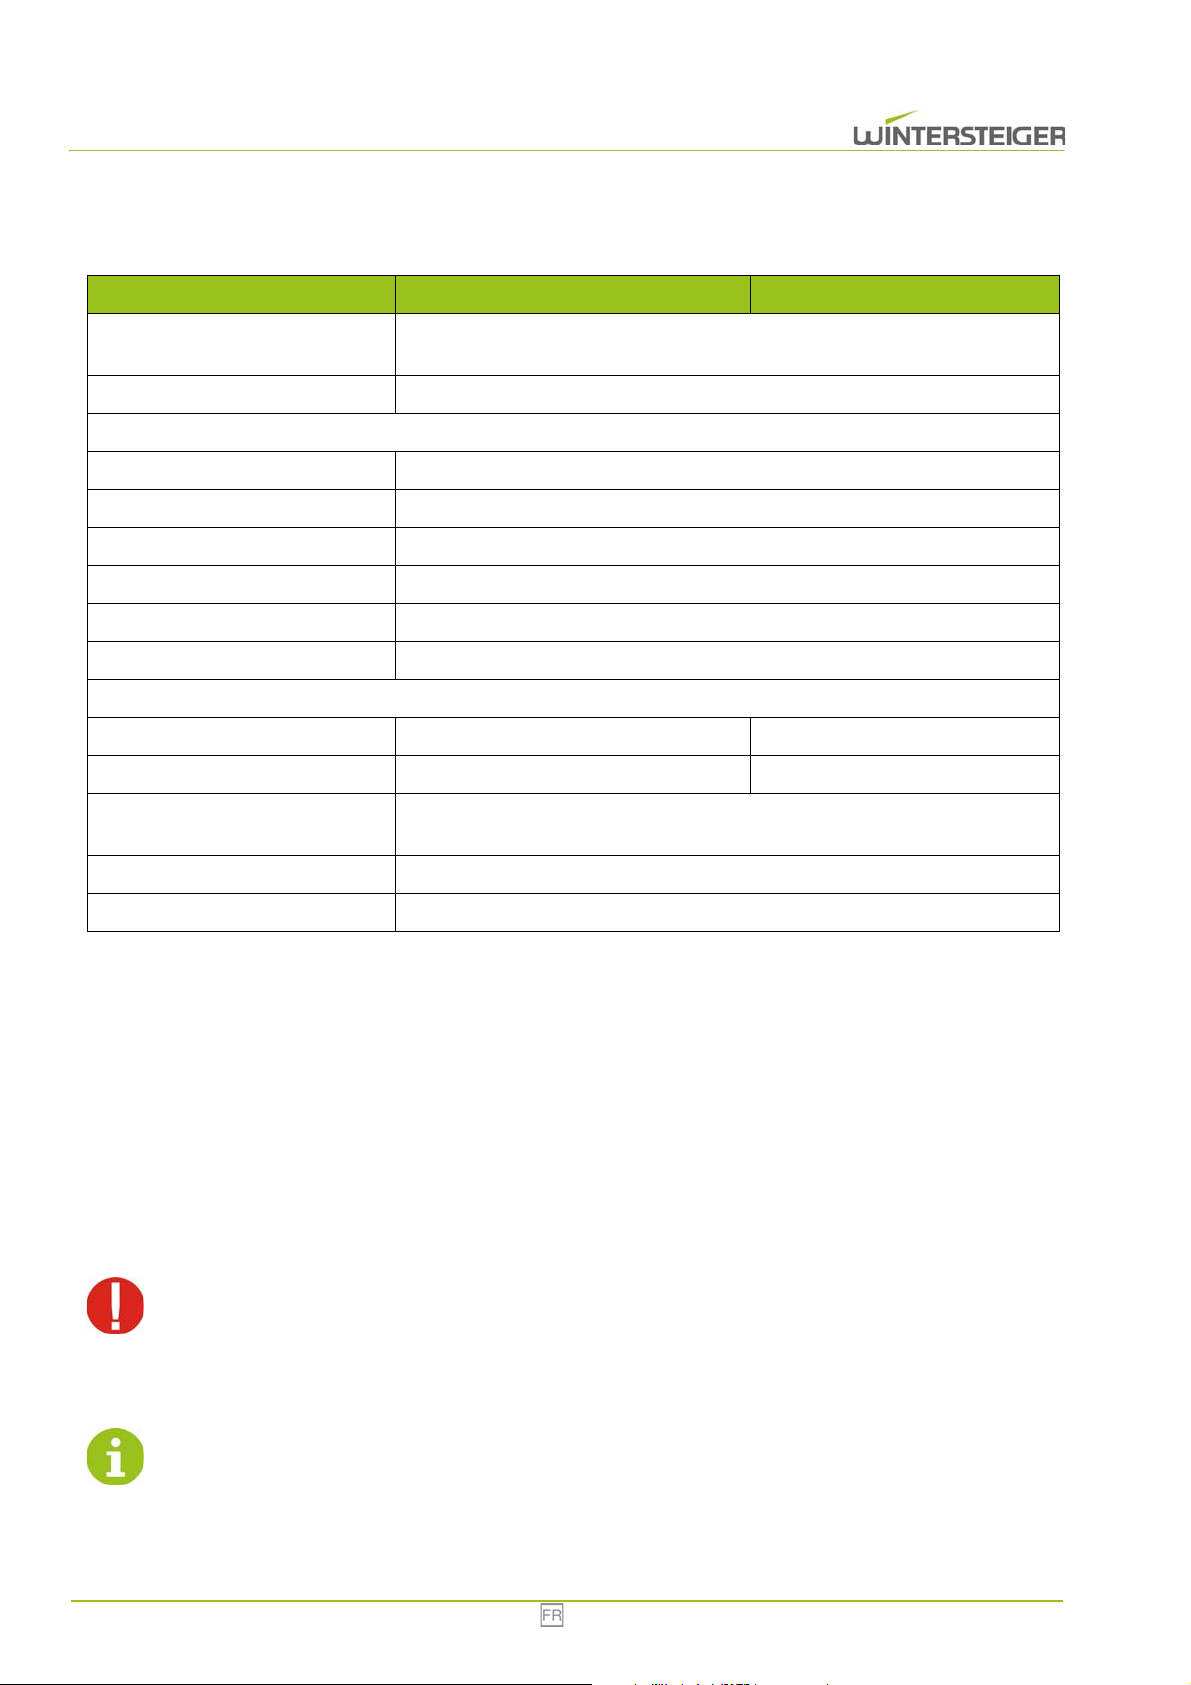
4 Caractéristiques techniques
Typ Combi Eco Multi Eco
Tension nominale, fréquence,
puissance, fusible :
Courant nominal: 6,2 A
La tension requise figure sur la plaque signalétique !
Puissance de chauffage : 1 x 800 W
Puissance de ventilateur : 1 x 100 W
Puissance compresseur : 1 x 400 W
Lampe à ozone (en option) : 1 pièce
Température ambiante : +5 à 40°C
Humidité de l'air : 30% - 80%
L'appareil ne doit être utilisé que dans des pièces bien aérées !
Dimensions (h x l x p) : 2100 mm x 1300 mm x 850 mm 2100 mm x 1300 mm x 900 mm
Poids : 195 kg 180 kg
Durée du séchage :
Réduction des bactéries : Réduction des bactéries dans l'air par lampe à ozone (en option)
Émissions sonores : Inférieures à 70 dB(A)
1 AC 230V 50 Hz; 1,4 kW; 12/16 A
À partir d'1 heure. En fonction de l'humidité, de la température et du matériau, une
durée de séchage supérieure est possible.
5 Transport, entreposage et changement d'emplacement
5.1 Conditions de transport de l'appareil
L'appareil doit être transporté dans son emballage d'origine et dans la position indiquée dessus.
5.2 Entreposage de l'appareil
Température : 0 °C à +40 °C.
Afin d'éviter un endommagement de l'appareil, ne posez aucun autre paquet ou caisse sur son emballage !
5.3 Déballage et choix de l'emplacement
Faites attention lors du retrait de l'emballage à ne pas endommager l'appareil.
37 Combi / Multi Eco
Page 38
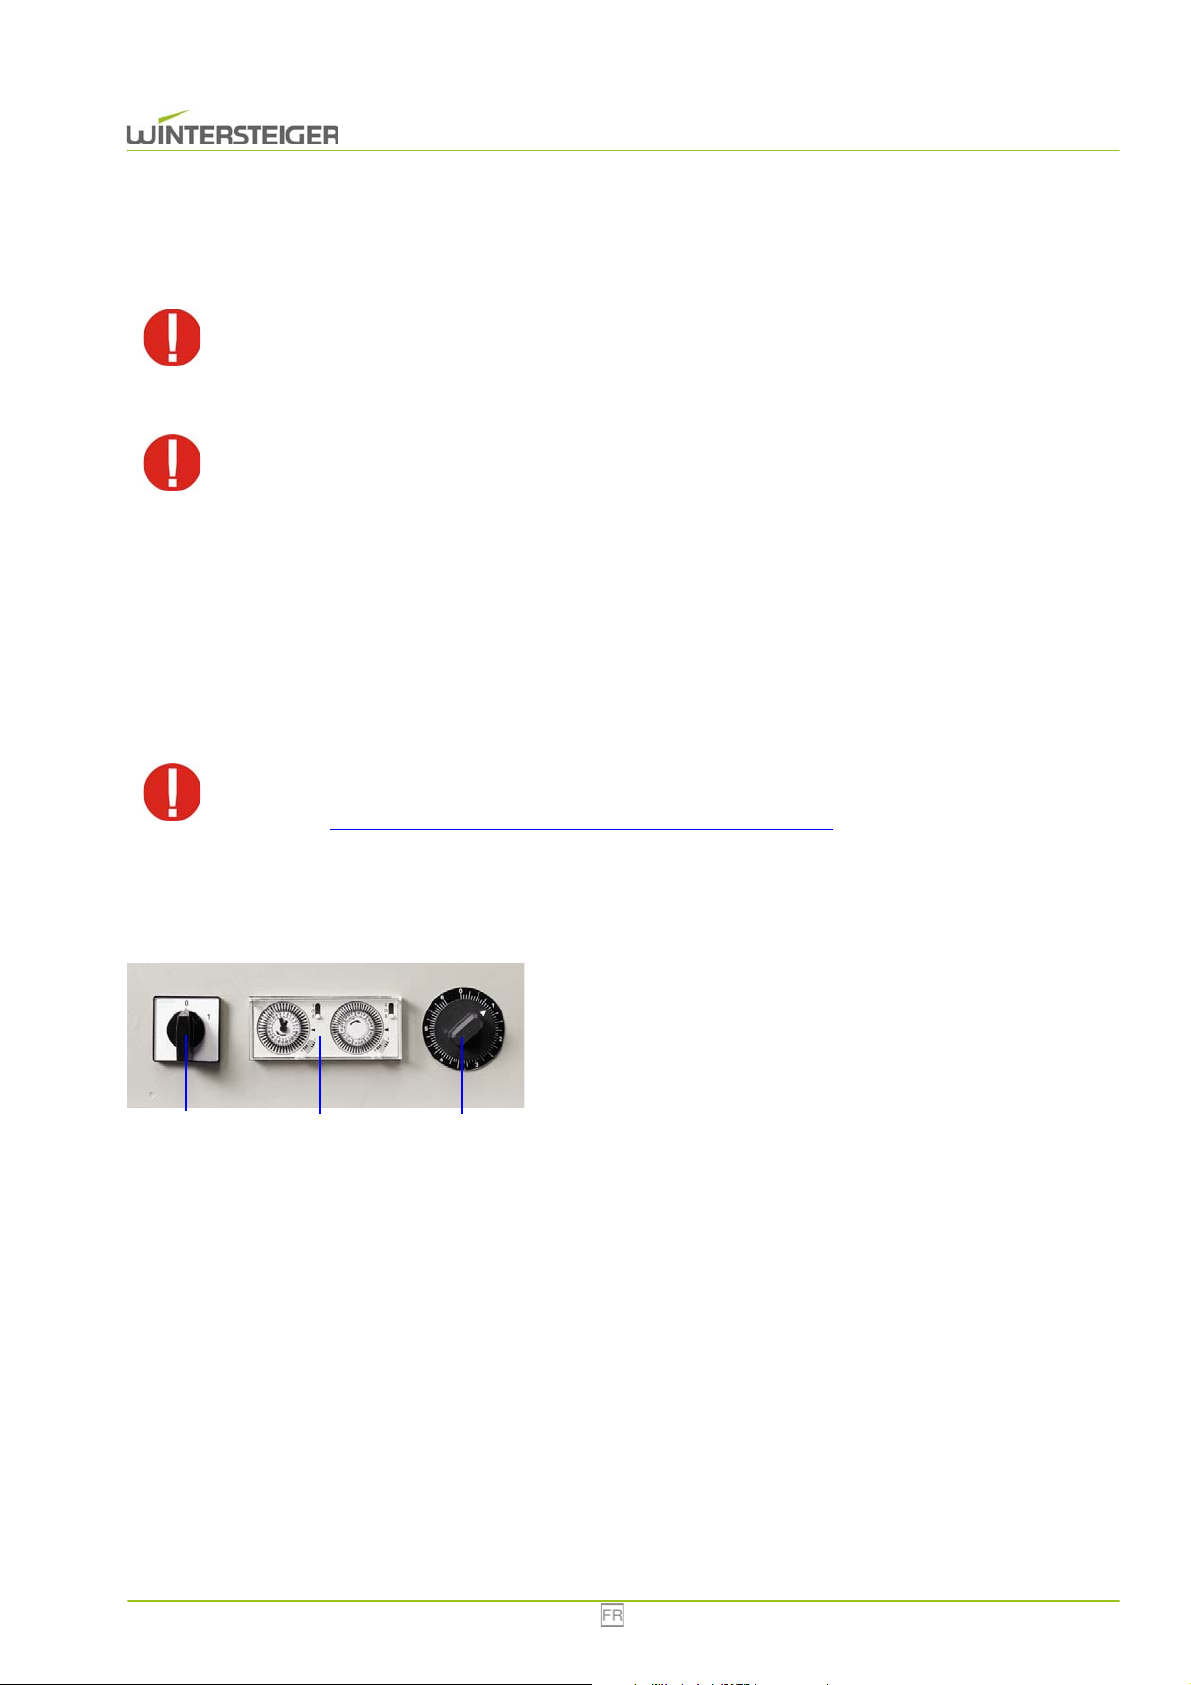
Lors du choix du lieu d'installation, la fonctionnalité est le critère le plus important. L'appareil doit être mis en place dans une
C
A
B
pièce bien ventilée et sèche. La pièce doit posséder une hauteur de plafond d'au moins 2,3 m. La prise secteur doit se trouver
juste à côté de l'appareil.
Lors du choix du lieu d'installation, respectez tout particulièrement les directives et régulations
concernant la sécurité sur le lieu de travail !
Veillez à ce que l'arrivée d'air ne soit pas bloquée, que ce soit totalement ou en partie (ne pas cadrer
l'appareil !).
Pour que le séchage et la réduction des bactéries fonctionnent de manière optimale, la température de la
pièce ne doit pas être inférieure à 5°C.
Ne placez aucun objet sur la grille d'aspiration d'air ou sur la grille de protection. N'obstruez pas ces orifices, ne serait-ce
que partiellement. Ne versez ou ne vaporisez jamais de liquide dans le circuit d'air car ceci représente un risque d'électrocution et d'endommagement de l'appareil.
6 Description des organes de commande
N'arrêtez pas l'armoire de séchage prématurément à l'aide de l'interrupteur principal. Lorsque le temps de
séchage s'est écoulé, la ventilation fonctionne encore pendant 10 à 15 minutes, pour éviter la surchauffe
du chauffage (voir chap. 7.4 Interrupteur de température excessive, page 44)
.
6.1 Minuteur pour un fonctionnement 24h/24 et 7j/7
A: Interrupteur principal
Mise en marche et arrêt de l'appareil
B: Minuteur automatique
C: Minuteur manuel
Réglage de la durée de séchage entre 0 et 6 heures
6.2 Fonctionnement avec le minuteur automatique
Le minuteur automatique permet le séchage selon une planification déterminée 24h/24h et 7j/7j.
Combi / Multi Eco 38
Page 39
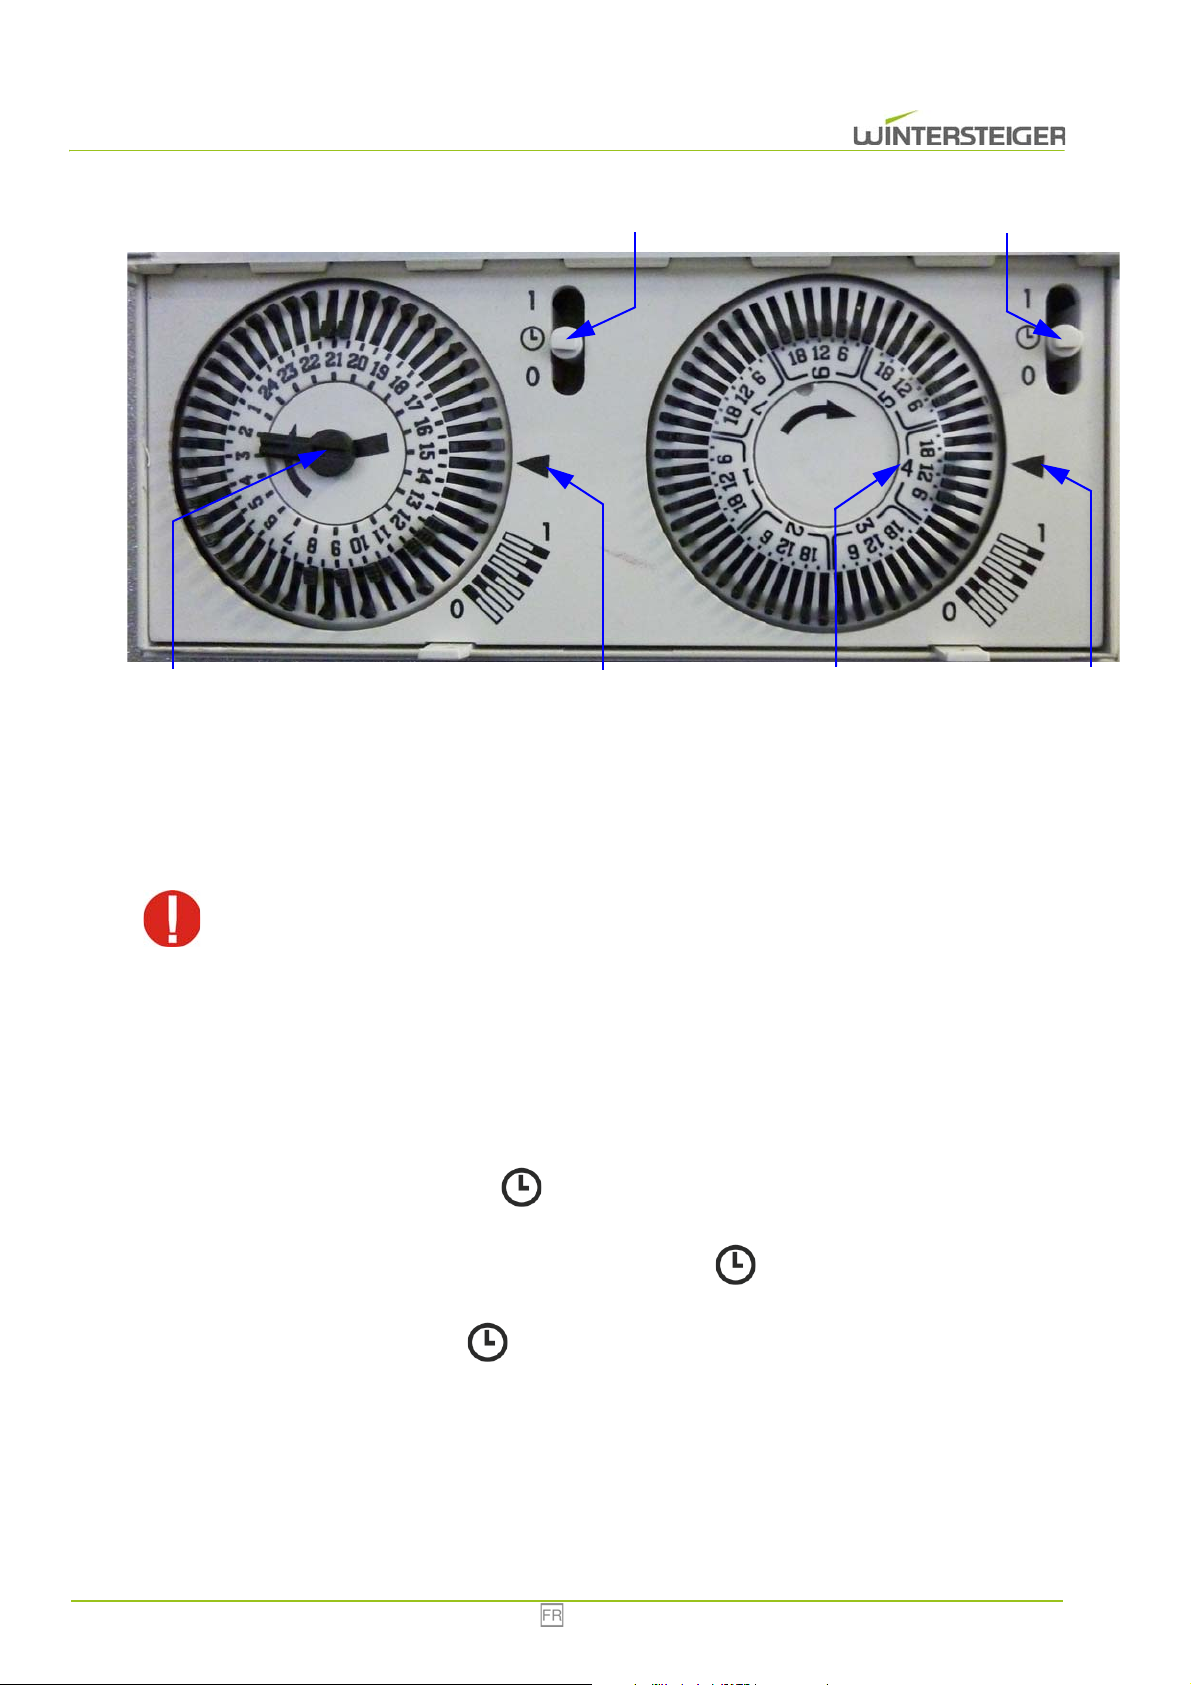
À gauche se trouve le compteur journalier et à droite le compteur hebdomadaire.
A
C
B
D
F
E
6.2.1 Réglage de l'heure et du jour de la semaine
Tourner l'indicateur des minutes [A] avec un petit tournevis pour vis à fente.
Le minuteur de droite tourne en même temps pour le réglage du jour de la semaine.
Ne tournez jamais le minuteur des jours de la semaine. Le minuteur pourrait alors être endommagé.
La flèche [B] indique l'heure approximative. Il est possible de différencier 2h48 et 14h48.
Le chiffre [C] indique les jours de la semaine, numérotés de 1 à 7. Dans les présentes instructions, le premier jour de la
semaine est le lundi.
La flèche [D] indique le jour de la semaine actuel (jeudi).
Avec les deux interrupteurs [E+F], le minuteur automatique est activé ou désactivé.
Si l'un des deux interrupteurs est sur « 0 », le minuteur automatique est désactivé.
Si les deux interrupteurs sont sur « », le séchage s'effectue selon la planification.
Si les deux interrupteurs sont sur « 1 », l'armoire de séchage est activée en permanence (24h/24h et 7j/7j).
Si l'interrupteur [E] est sur « 1 » et l'interrupteur [F] sur « », le séchage ne s'effectue que selon la
planification hebdomadaire. Seuls des intervalles de 3 heures sont disponibles.
Si l'interrupteur [E] est sur « » et l'interrupteur [F] sur « 1 », le séchage ne s'effectue que selon la
planification journalière (même programme pour chaque jour de la semaine).
6.2.2 Création d'un planning
Si le segment d'une phase est sélectionné, l'armoire de séchage s'active pour cette durée. En principe, les segments de
temps journalier et hebdomadaire doivent être sélectionnés pour que le séchage soit activé.
39 Combi / Multi Eco
Page 40
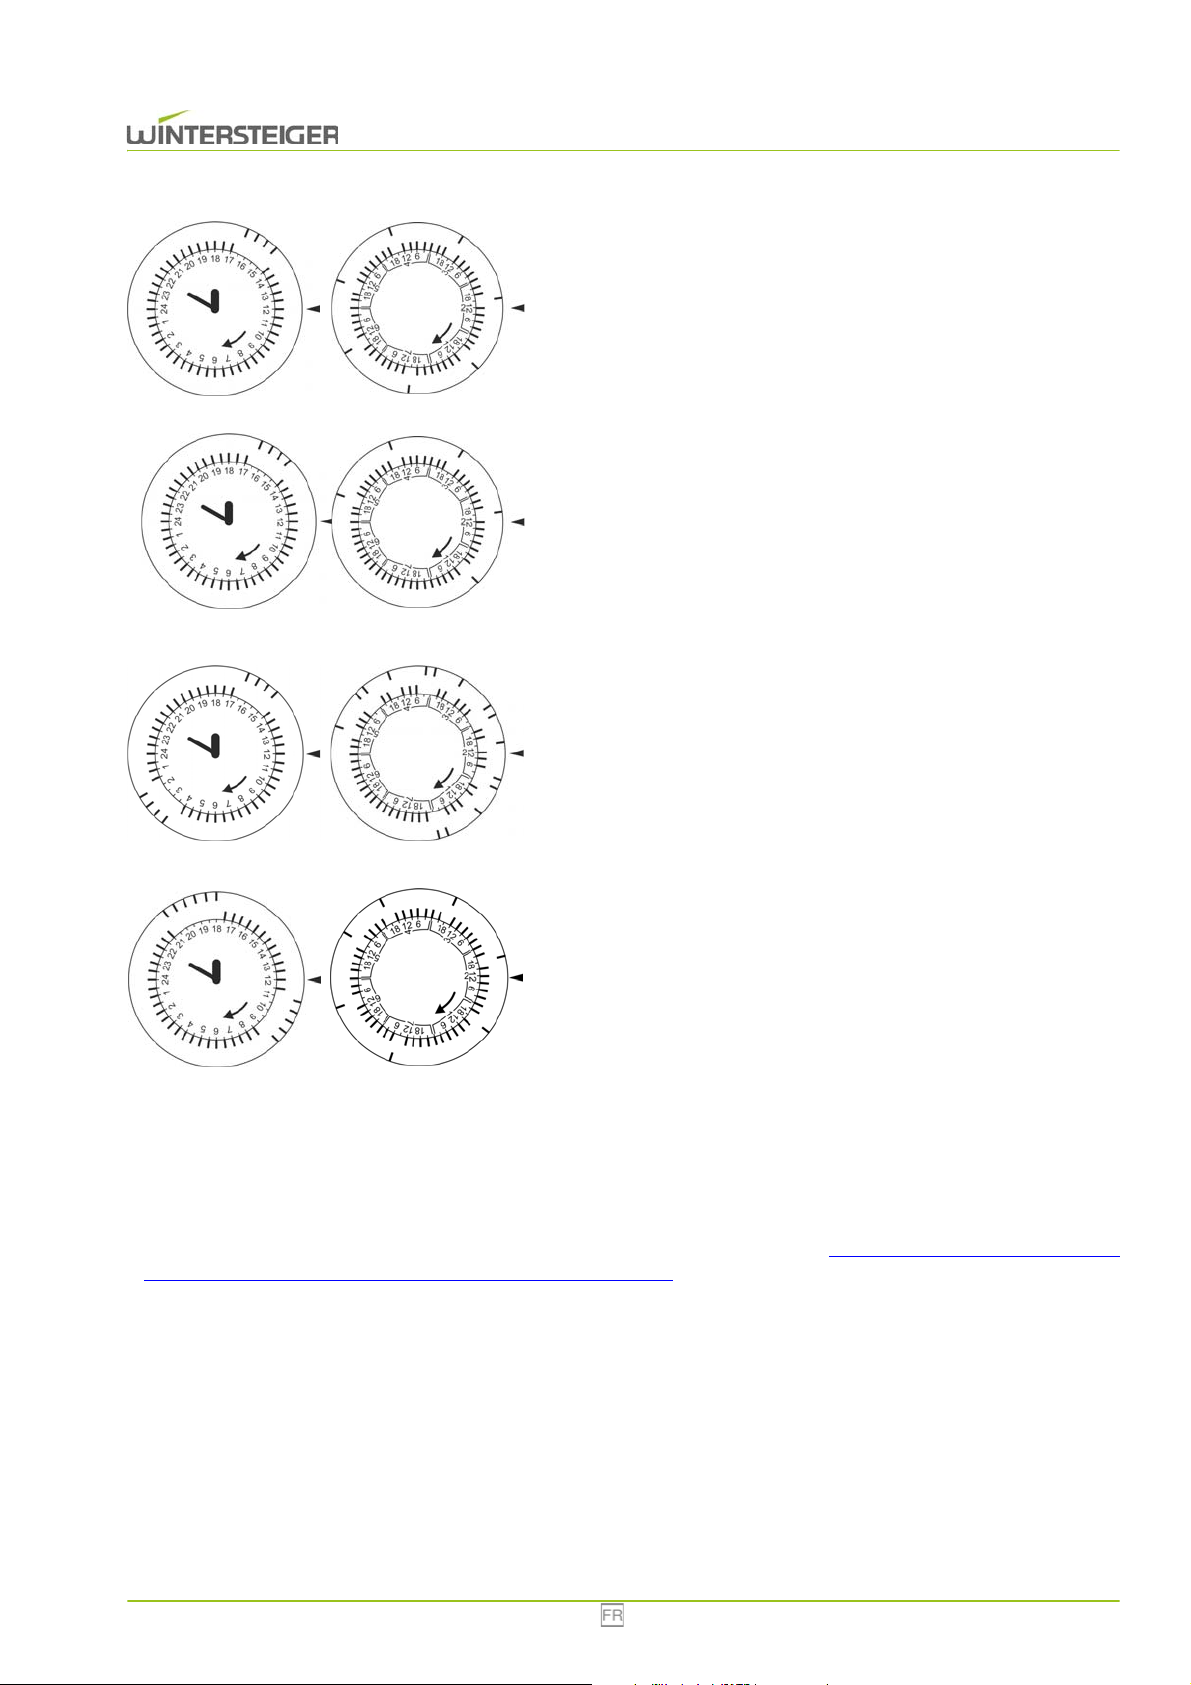
Exemple : l'appareil sèche comme suit :
Tous les jours de 15h00 à 17h00
Pour cela, les segments 15h00, 15h30, 16h00, 16h30 doivent être
choisis sur le compteur journalier
Pour cela, les segments "Tous les jours à 15h00" doivent être
sélectionnés sur le compteur hebdomadaire.
Exemple : l'appareil sèche comme suit :
Du lundi {1} au vendredi {5} de 15h00 à 17h00
Samedi {6} et dimanche {7}, pas de séchage.
Pour cela, les segments 15h00, 15h30, 16h00, 16h30 doivent être
choisis sur le compteur journalier
Pour cela, les segments Lundi {1} à Vendredi {5} 15h00 doivent être
sélectionnés sur le compteur hebdomadaire
Exemple : l'appareil sèche comme suit :
Lundi {1} à vendredi {5} de 02h00 à 04h00 et de 15h00 à 17h00
Samedi {6} et dimanche {7}, pas de séchage.
Pour cela, les segments 02h00, 02h30, 03h00, 03h30 et 15h00, 15h30,
16h00, 16h30 doivent être sélectionnés sur le compteur journalier.
Pour cela, les segments lundi {1} à vendredi {5} 00h00, 03h00, 15h00
doivent être sélectionnés sur le compteur hebdomadaire
Exemple : l'appareil sèche comme suit :
Lundi {1} à jeudi {4} de 18h00 à 21h00
Vendredi {5} à dimanche {7} de 09h00 à 11h30
Pour cela, les segments 09h00, 09h30, 10h00, 10h30, 11h00 et 18h00,
18h30, 19h00, 19h30, 20h00, 20h30 doivent être sélectionnés sur le
compteur journalier
Pour cela les segments lundi {1} à jeudi {4} 15h00 doivent être
sélectionnés sur le compteur hebdomadaire
Vendredi {5} à dimanche {7} 09h00
6.2.3 Séchage non planifié
Si une opération de séchage non planifiée devait avoir lieu sur l'armoire de séchage, avec le minuteur pour un fonctionnement de 24h/24 et 7j/7, le séchage peut être effectué à l'aide du minuteur de 6 heures (voir chap. 6.3 Fonctionnement de la
lampe à ozone avec le minuteur sur 24 heures (en option), page 40). Le minuteur de 6 heures prend la priorité sur le minuteur
pour un fonctionnement 24h/24 et 7j/7.
6.3 Fonctionnement de la lampe à ozone avec le minuteur sur 24 heures (en option)
Le minuteur automatique permet le séchage selon une planification fixée sur 24 heures.
Combi / Multi Eco 40
Page 41
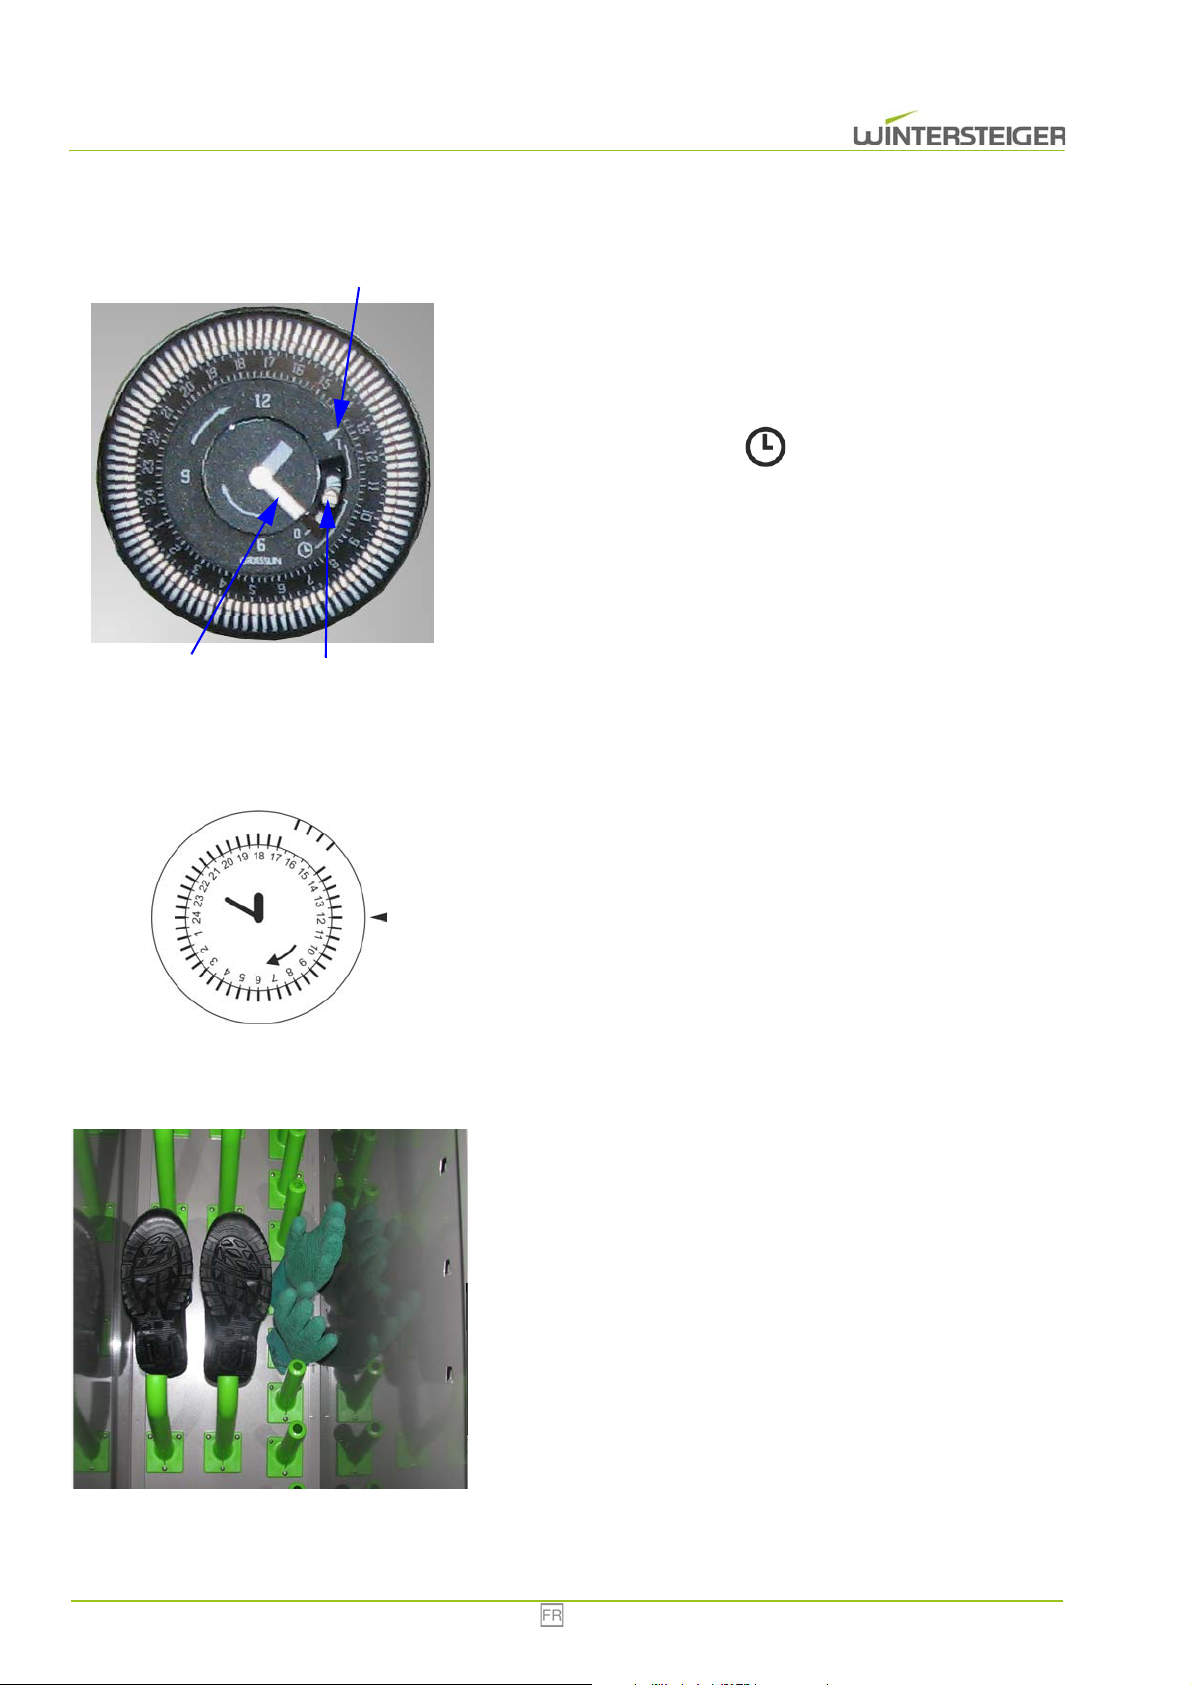
6.3.1 Réglage de l'heure
A
C
B
C
Tourner l'indicateur des minutes [A] avec un petit tournevis pour vis
à fente.
La flèche [B] indique l'heure approximative. On peut donc différencier 01:25 et 13:25.
Avec l'interrupteur [C], le minuteur automatique est activé ou désactivé.
Si l'interrupteur est sur « 0 », le minuteur automatique est désactivé.
Si l'interrupteur est sur « », le séchage s'effectue selon la
planification.
Si l'interrupteur est sur « 1 », l'armoire de séchage est activée en
permanence (24h/24 et 7j/7).
6.3.2 Création d'un planning
Si le segment d'une phase est sélectionné, l'armoire de séchage s'active pour cette durée.
Exemple : l'appareil sèche comme suit :
Tous les jours de 15h00 à 17h00
Pour cela, les segments 15h00, 15h30, 16h00, 16h30 doivent être
sélectionnés sur le compteur journalier
6.4 Équiper au mieux l'armoire de séchage
Respectez les remarques suivantes lors du séchage de vos vêtements de travail :
Placer les gants sur les supports de gants intégrés.
Placer les chaussures sur les supports de chaussures intégrés.
41 Combi / Multi Eco
Page 42
7 Maintenance
C
Avant tous travaux de maintenance sur l'appareil, éteignez l'appareil et débranchez-le !
7.1 Nettoyage
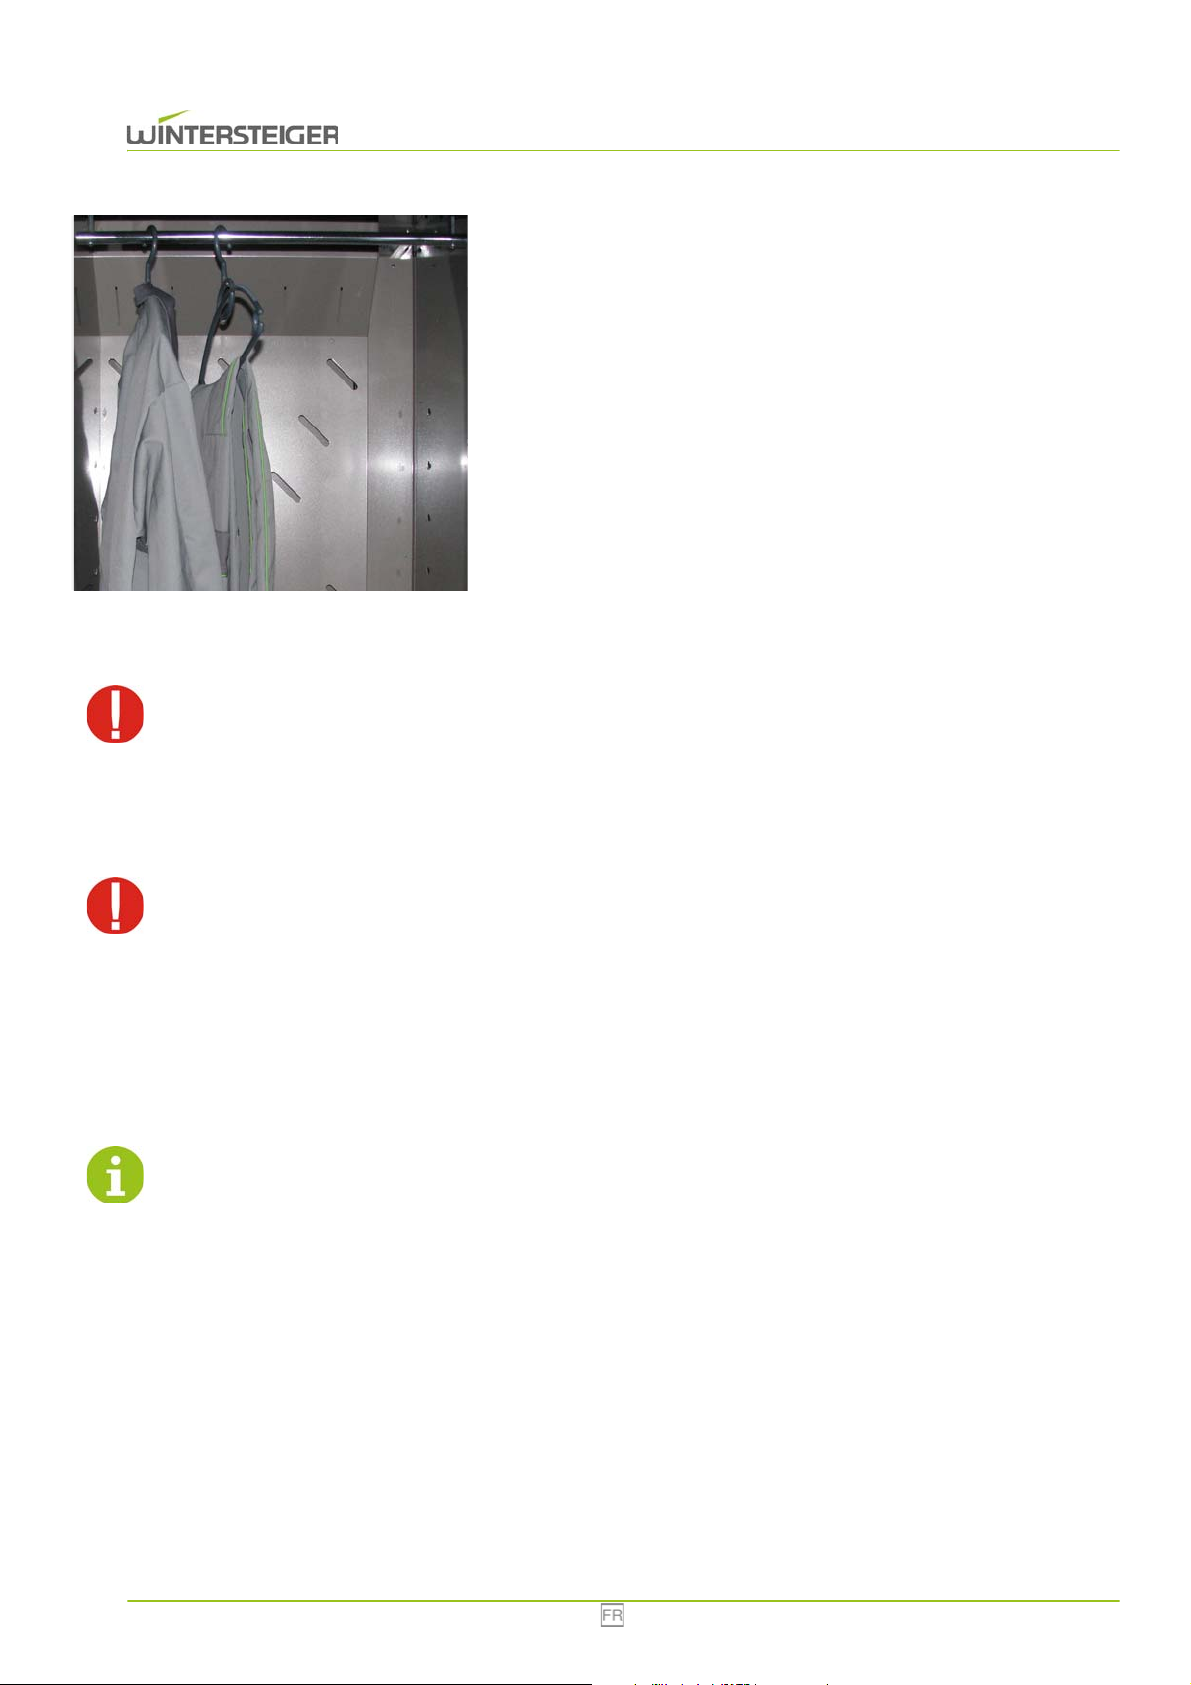
Accrocher les vêtements de travail, après les avoir placés sur le
cintre, sur les barres porte-cintres montées.
Les armoires de séchage présentent des capacités différentes en
fonction de leur équipement. Les équipements de travail doivent être
légèrement espacés les uns des autres afin de permettre une circulation
de l'air optimale.
Après avoir éteint le chauffage, la ventilation fonctionne encore pendant
10 à 15 minutes.
Nettoyez régulièrement l'intérieur et l'extérieur de l'appareil à l'aide d'un chiffon humide.
Ne nettoyez jamais l'appareil avec de l'eau car les composants électriques pourraient être endommagés !
Aucune responsabilité ni aucune garantie ne peuvent être assumées en cas de non-observation de ce
point.
7.2 Lampe à ozone (en option)
La lampe à ozone est préréglée via le minuteur selon un schéma fixe (15 min. de fonctionnement - 30 min. de pause 15 min. de fonctionnement) sur 24 heures. Elle n'est active que lorsque le minuteur principal est activé.
Le dosage d'ozone est préréglé en usine.
Il est recommandé de ne pas modifier les réglages de la lampe à ozone !
Combi / Multi Eco 42
Page 43
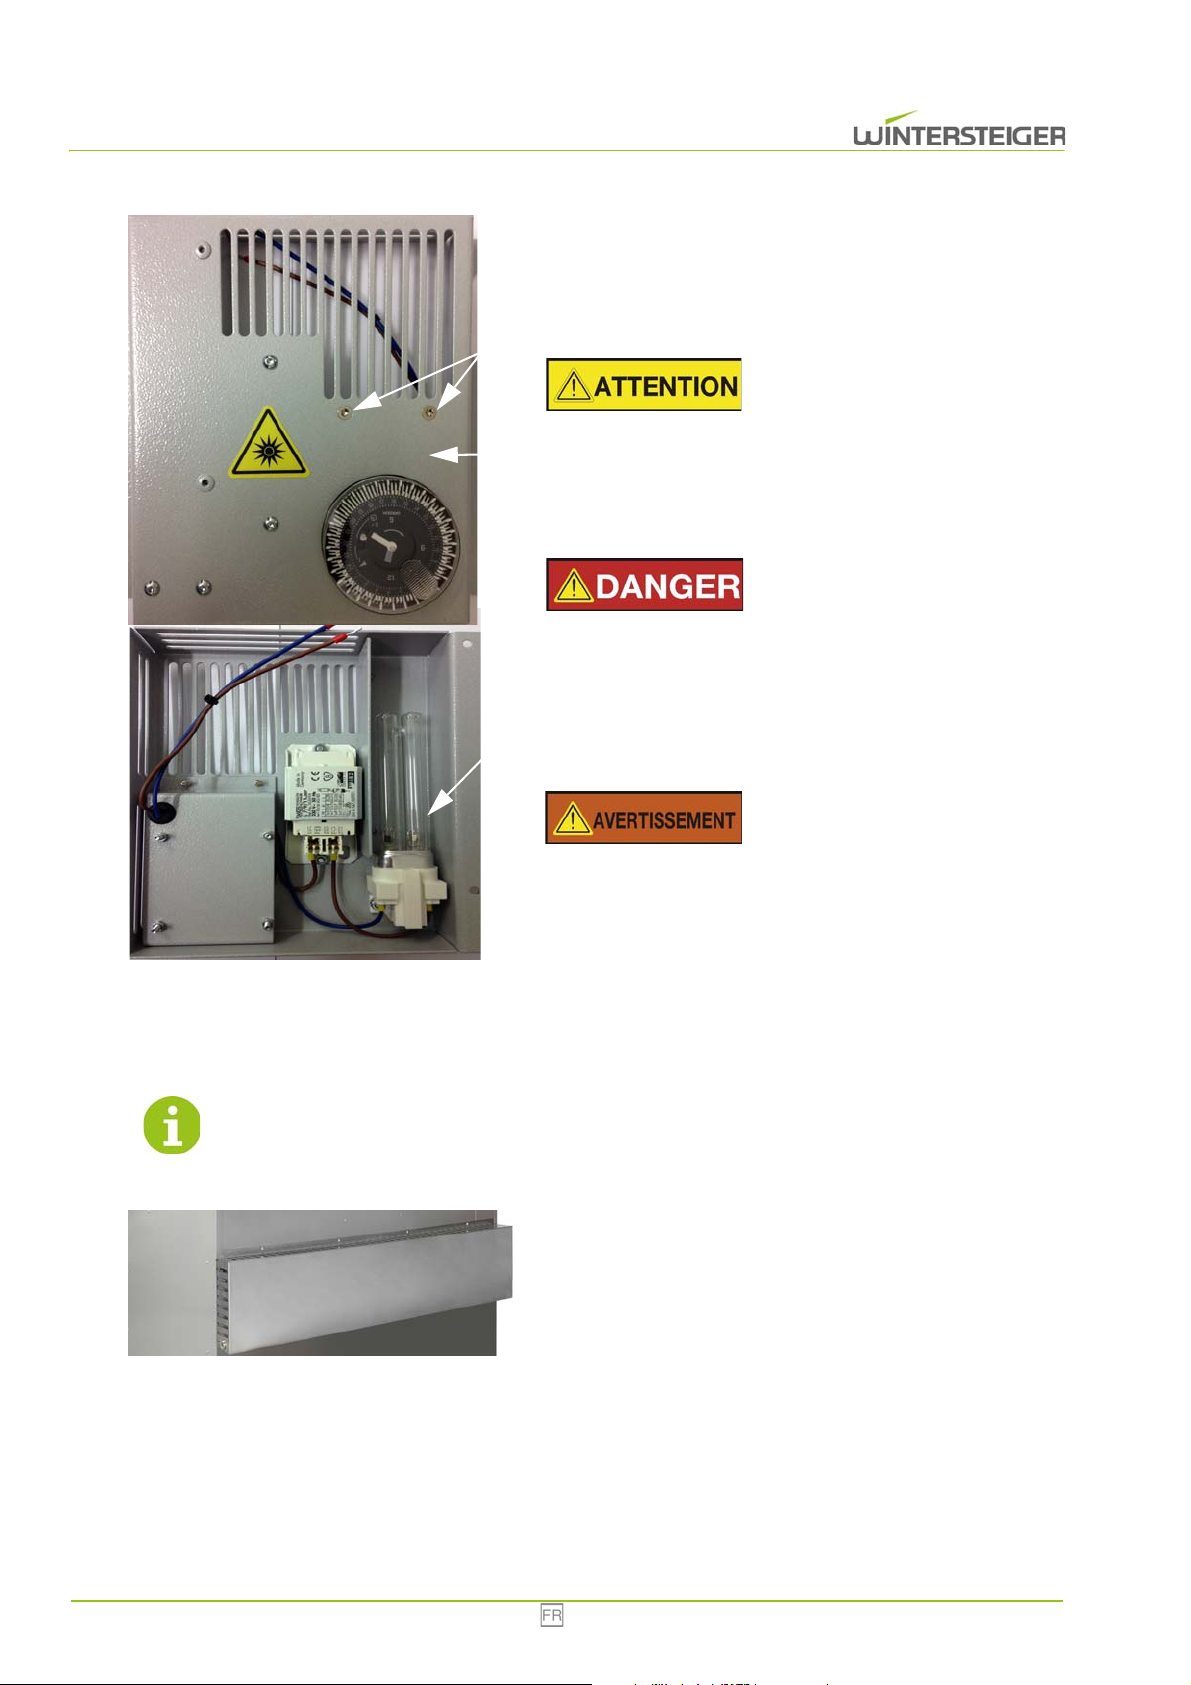
La lampe à ozone utilisée permet la réduction efficace des bactéries pour
A
C
B
A
une durée de fonctionnement de 2 000 heures, après quoi la lampe à
ozone doit être remplacée. Effectuez une fois par mois un contrôle
visuel de la lampe à ozone pendant le fonctionnement. Vous voyez une
lumière bleutée sur la paroi arrière de l'armoire.
Risque de blessures !
Ne pas regarder directement dans la lampe à ozone ! Les rayons UV
risqueraient d'abîmer vos yeux !
Remplacer la lampe à ozone
Risque de blessures !
Séparer l'appareil de l'alimentation en tension !
Retirer toutes les vis [A].
Retirer le couvercle [B]. Retirer la lampe à ozone [C] avec précau-
tion.
7.3 Purge du réservoir d'eau
Purgez le réservoir d'eau si cela s'avère nécessaire !
Risque de blessures !
La lampe à ozone contient du mercure nocif. Éliminez la lampe à
ozone dans le respect des prescriptions spécifiques nationales !
Installer une nouvelle lampe [C] et fixer à nouveau le couvercle [B]
avec les vis [A].
Desserrer les vis.
Enlever le capot.
Retirer le réservoir d'eau et le purger.
43 Combi / Multi Eco
Page 44
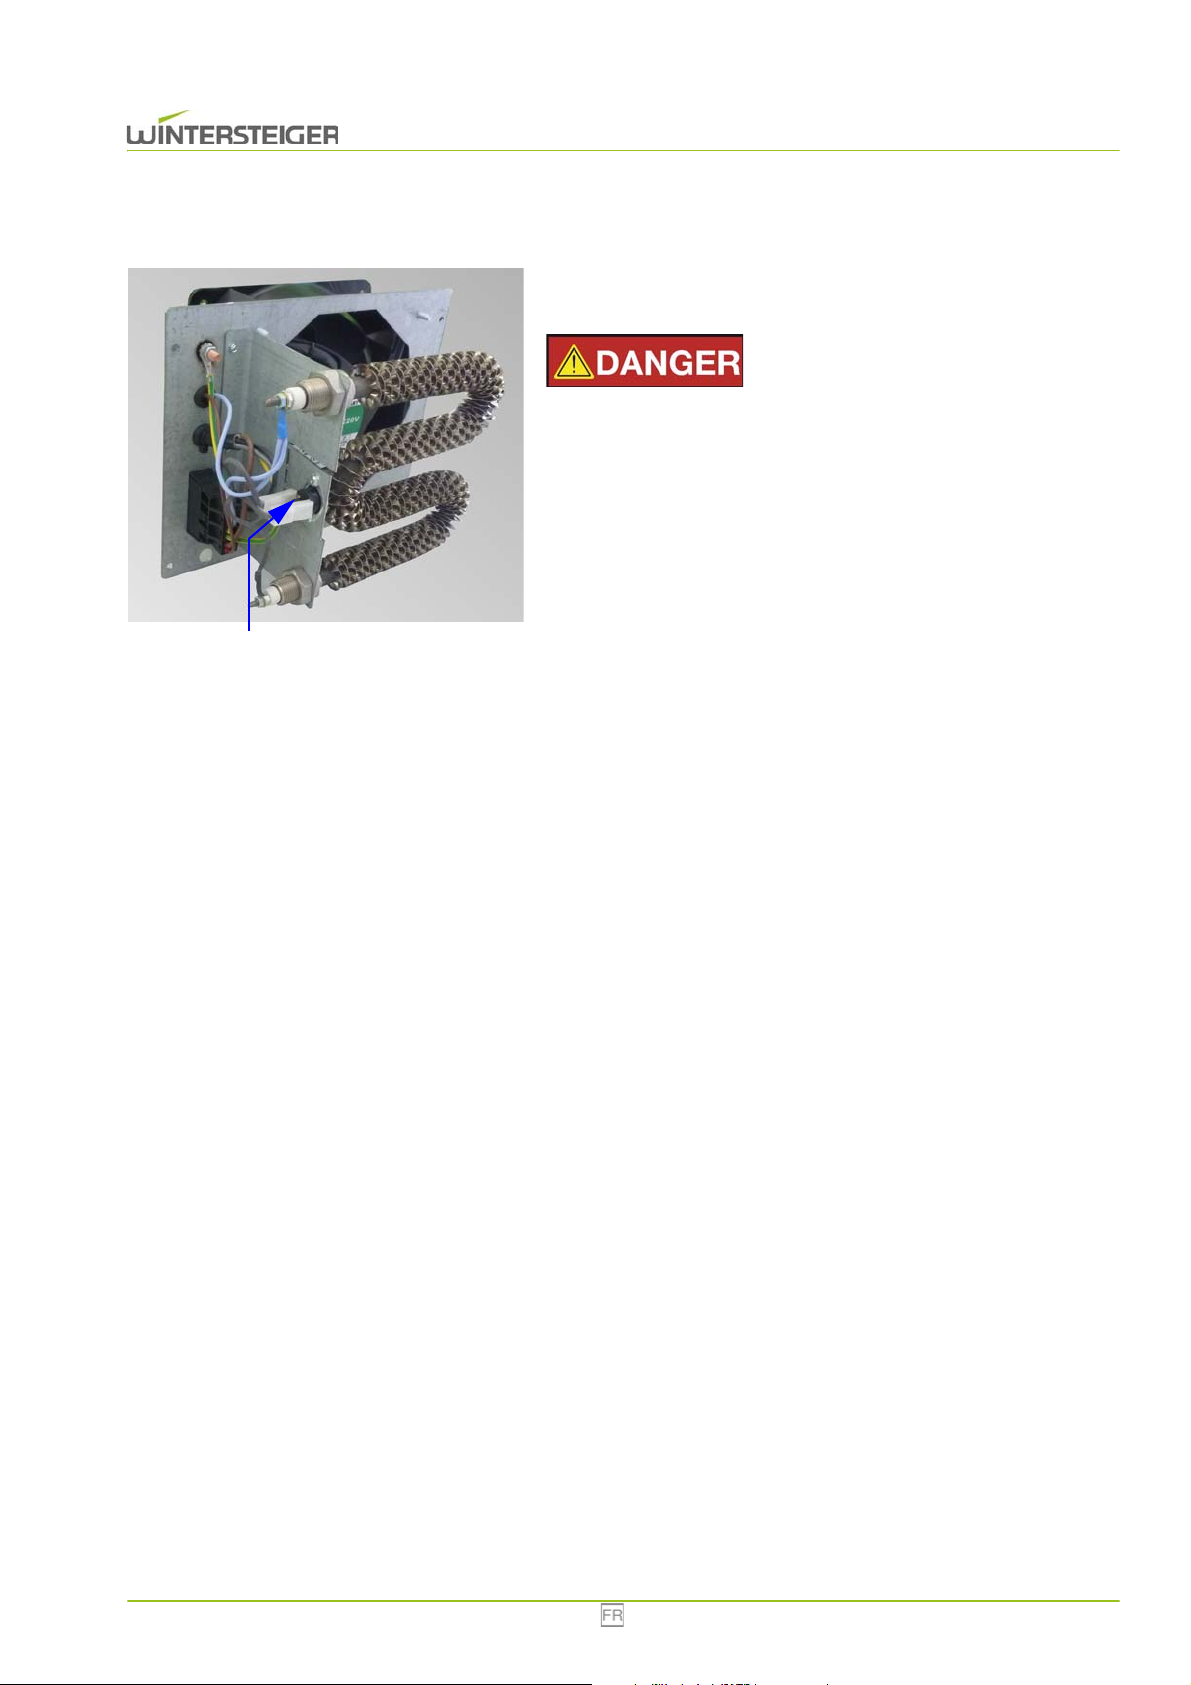
7.4 Interrupteur de température excessive
A
Si l'interrupteur de température excessive du chauffage se
déclenche, l'interrupteur doit être réinitialisé.
Séparer l'appareil de l'alimentation en tension ! Seul un électricien
est autorisé à éliminer le dysfonctionnement !
Démonter les ventilateurs de chauffage concernés.
Appuyer sur la touche [A].
Remonter les ventilateurs de chauffage.
Risque de blessures !
Combi / Multi Eco 44
Page 45
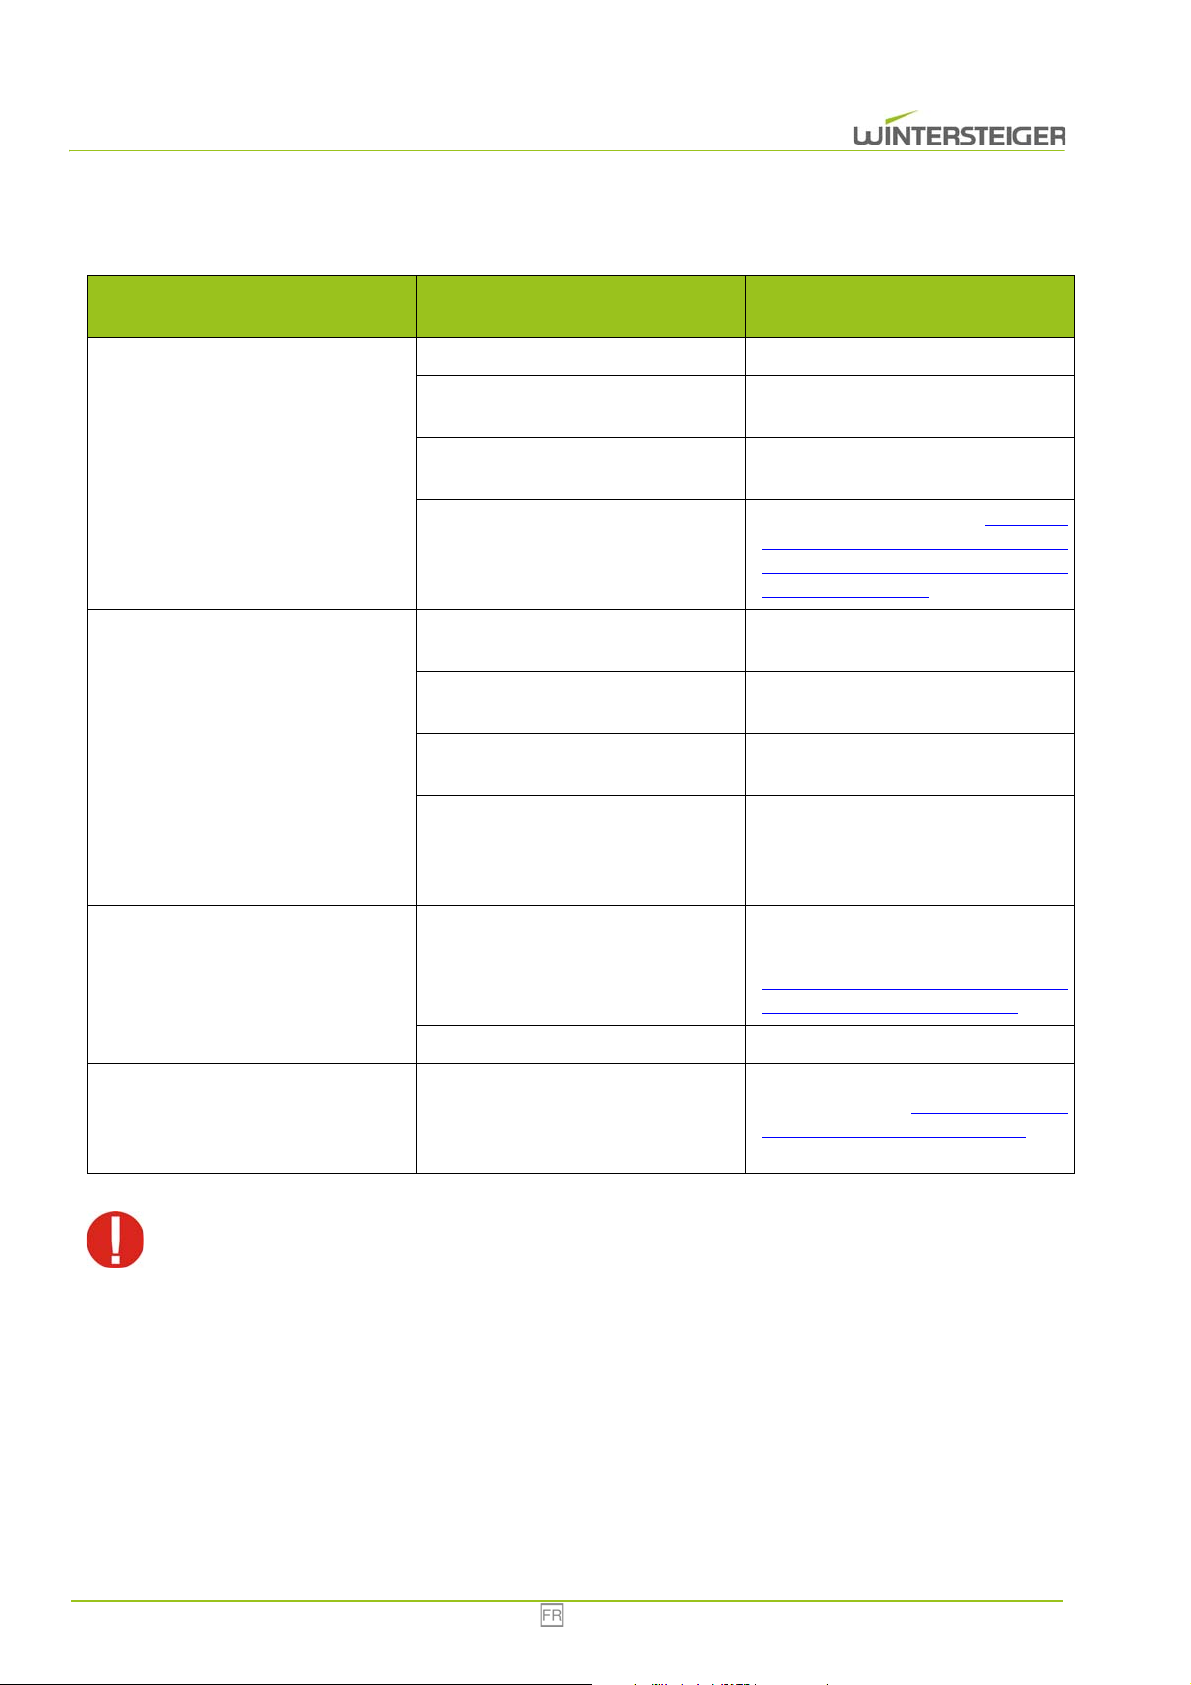
8 Élimination des erreurs
Erreur,
problème
L'appareil ne fonctionne pas
L'appareil ne sèche pas
Cause Remède
L'appareil n'est pas branché Brancher l'appareil
L'alimentation en tension ne
fonctionne pas
L'interrupteur principal est sur « 0 »
Aucun séchage réglé
Arrivée d'air insuffisante
Humidité de l'air > 80%
Température de la pièce < 5 °C
Option : ozone avec temporisation
Contacter un électricien
Mettez l'interrupteur principal sur la
position Marche
Régler la durée du séchage (voir chap.
6.3 Fonctionnement de la lampe à
ozone avec le minuteur sur 24 heures
(en option), page 40)
Contrôlez l'arrivée d'air au niveau de
l'appareil ou dans la pièce
Plus l'air est sec, plus le séchage est
efficace
Plus la température ambiante est
élevée, plus le séchage est efficace
Lorsque le séchage commence, la
lampe à ozone est allumée pendant
10 minutes env., ce n'est qu'alors que
l'opération de séchage commence
L'interrupteur de température
La puissance de séchage de l'appareil
diminue ou l'appareil ne chauffe pas
La lampe à ozone ne fonctionne pas
En cas d'intervention sur l'appareil, débrancher la fiche secteur ! L'appareil peut uniquement être mis en
service lorsque toutes les protections et tous les capots sont montés.
excessive du chauffage a réagi, la
température de 80 °C ayant été
dépassée
Ventilateur défectueux Contrôler le ventilateur
9 Schéma électrique (page 16)
Contrôler si les fentes d'aération sont
recouvertes à l'intérieur ou à l'extérieur
voir chap. 7.4 Interrupteur de
température excessive, page 44
Contrôler si la lampe à ozone est
insérée et activée, (voir chap. 7.2 Lam-
pe à ozone (en option), page 42) rem-
placer la lampe à ozone si nécessaire
45 Combi / Multi Eco
Page 46
10 Mise à l'arrêt définitive et élimination
Risque de blessure !
Avant la mise à l'arrêt définitive et le démontage de la machine, déconnectez la machine de l'alimentation électrique
et de tout entraînement externe. Pour le démontage, utilisez uniquement un outillage approprié.
Lors de la mise à l'arrêt définitive, démontez et éliminez correctement tous les composants de la machine.
Nettoyez tous les composants contenant de l'huile ou de la graisse avant de les éliminer.
La graisse et l'huile doivent être éliminés à part et ne peuvent en aucun cas polluer l'environnement
Pour l'élimination des composants, respectez les prescriptions nationales en la matière.
Démontez correctement la machine en ses différents composants.
Nettoyez les composants contenant de la graisse ou de l'huile.
Éliminez les composants par type de matériau (acier, matière plastique, composants électriques et électroniques, etc.).
Eliminez l'huile et la graisse, y compris les huiles et graisses biodégradables, dans le respect de l'environnement.
Combi / Multi Eco 46
Page 47

Indice
1 Premessa ........................................................................................................................................................................... 48
1.1 Utilizzo conforme al fine previsto ............................................................................................................................ 48
2 Indicazioni generali ........................................................................................................................................................... 49
2.1 Norme di sicurezza ................................................................................................................................................. 49
2.2 Avvertimenti ............................................................................................................................................................ 49
2.3 Dispositivi di protezione .......................................................................................................................................... 50
3 Funzioni .............................................................................................................................................................................. 50
4 Dati tecnici ......................................................................................................................................................................... 51
5 Trasporto, immagazzinamento e variazione di ubicazione ........................................................................................... 51
5.1 Condizioni di trasporto del dispositivo ..................................................................................................................... 51
5.2 Immagazzinamento del dispositivo ......................................................................................................................... 51
5.3 Rimozione dell'imballaggio e scelta dell'ubicazione ................................................................................................ 52
6 Descrizione degli elementi di comando .......................................................................................................................... 52
6.1 Timer per 24 ore / 7 giorni ....................................................................................................................................... 52
6.2 Funzionamento con il timer automatico .................................................................................................................. 52
6.2.1 Impostazione dell'ora e del giorno della settimana ..................................................................................... 53
6.2.2 Programmazione ......................................................................................................................................... 54
6.2.3 Asciugatura non programmata .................................................................................................................... 54
6.3 Funzionamento del generatore di ozono con il timer per 24 ore (opzionale) .......................................................... 54
6.3.1 Impostazione dell'ora .................................................................................................................................. 55
6.3.2 Programmazione ......................................................................................................................................... 55
6.4 Manutenzione .......................................................................................................................................................... 56
7 Manutenzione .................................................................................................................................................................... 56
7.1 Pulizia ...................................................................................................................................................................... 56
7.2 Generatore di ozono (opzionale) ............................................................................................................................. 56
7.3 Svuotamento del serbatoio dell'acqua .................................................................................................................... 57
7.4 Interruttore di sovratemperatura .............................................................................................................................. 58
8 Eliminazione del guasto ................................................................................................................................................... 58
9 Schema elettrico (pagina 16) ............................................................................................................................................ 59
10 Messa a riposo e smaltimento ....................................................................................................................................... 59
47 Combi Eco
Page 48

1 Premessa
© Copyright 2014 by
WINTERSTEIGER AG ::: A-4910 Ried/I Dimmelstrasse 9
Autore e progetto grafico: Maria Marek-Pollhammer
Tel. +43 7752 919-0
E-mail: [email protected]
Istruzioni per l'uso originali
Prima di procedere con la prima messa in funzione, il personale preposto al comando e alla manutenzione dell'armadio d'asciugatura deve leggere attentamente le presenti istruzioni per l'uso.
Eventuali danni provocati dal mancato rispetto delle presenti indicazioni non sono coperti dalla garanzia. L'utilizzatore dell'armadio d'asciugatura è tenuto per legge a rispettare le norme antinfortunistiche vigenti nel paese di utilizzo del dispositivo.
Inoltre, le presenti istruzioni per l'uso devono essere trattate in maniera confidenziale. La documentazione può essere consegnata esclusivamente alle persone addette e autorizzate. Non è consentita una cessione a terzi senza la previa autorizzazione scritta della ditta WINTERSTEIGER.
Tutti i documenti sono tutelati ai sensi dei diritti di autore. La trasmissione cosiccome la riproduzione delle documentazioni
consegnate, il loro uso e la comunicazione del loro contenuto a terzi sono vietati, anche parzialmente, se non espressamente
consentito per iscritto.
Le violazioni sono punibili ai sensi di legge e comportano l'obbligo di risarcimento danni. Tutti i diritti avanzabili per la tutela
dei diritti di protezione industriali sono riservati alla ditta WINTERSTEIGER.
1.1 Utilizzo conforme al fine previsto
L'armadio d'asciugatura Combi Eco è concepito esclusivamente per l'asciugatura e la conservazione di indumenti, scarpe,
stivali, guanti e caschi (uso conforme al fine previsto). Qualsiasi impiego che esuli da quest'ambito viene considerato come
utilizzo improprio. Il costruttore non si assume alcuna responsabilità per eventuali danni conseguenti. Il rischio è interamente
a carico dell'utente.
L'impiego conforme al fine previsto implica anche il rispetto delle istruzioni operative, di manutenzione e di manutenzione
preventiva fornite dal costruttore. Vanno altresì rispettate le norme antinfortunistiche generali nonché le norme tecniche di
sicurezza generalmente riconosciute e le regole in materia di medicina del lavoro.
In caso di manomissione dell'armadio d'asciugatura, il costruttore non risponde dei danni che potrebbero prodursi.
Nell'ambito del costante sviluppo e miglioramento dei nostri prodotti, ci riserviamo il diritto di apportare eventuali modifiche
e migliorie che dovessimo ritenere necessarie. Ciò non implica alcun obbligo da parte nostra di modificare le macchine e le
apparecchiature fornite in passato.
Le immagini, le dimensioni e i pesi indicati nelle istruzioni per l'uso sono dati puramente indicativi.
Combi Eco 48
Page 49
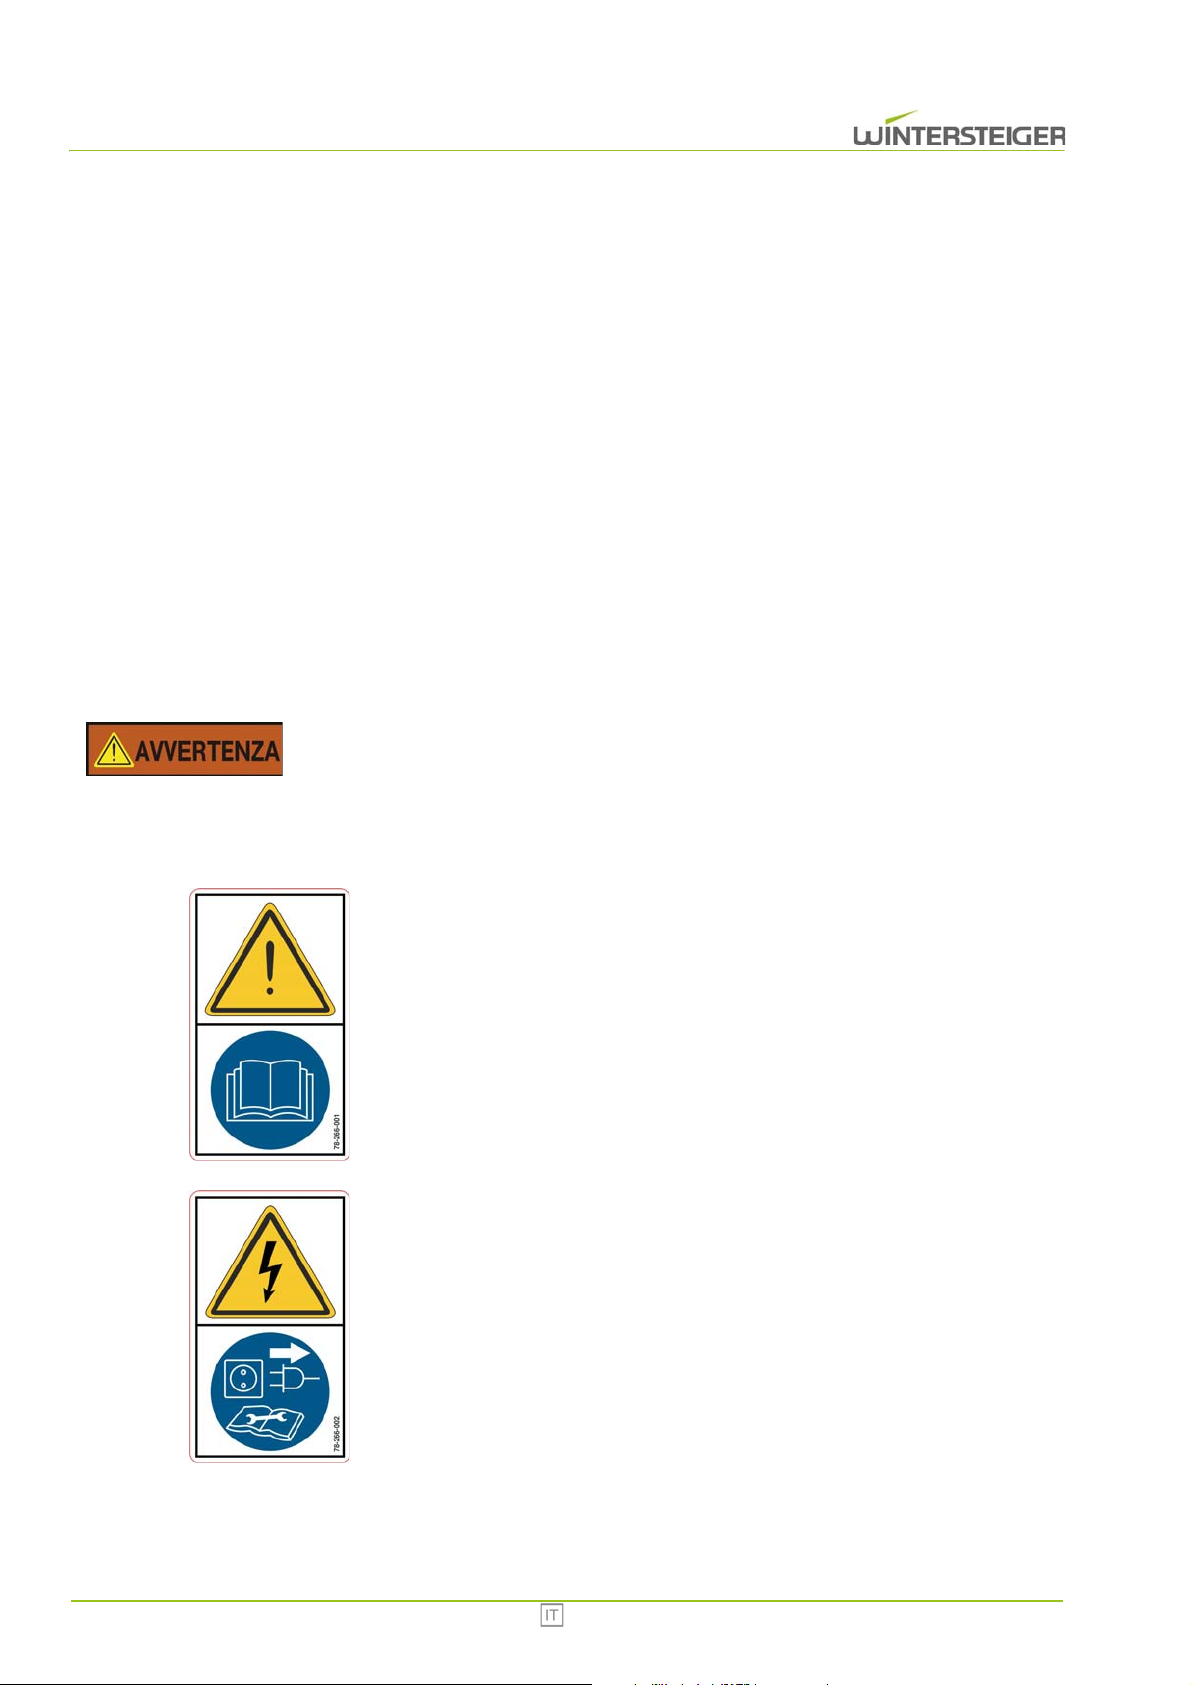
2 Indicazioni generali
2.1 Norme di sicurezza
Collegare il dispositivo a prese di corrente che siano state preventivamente controllate da un tecnico elettricista. Rispettare il corretto valore della tensione di alimentazione! I valori sono riportati sulla targhetta. Verificare la corrispondenza dei dati con quelli della tensione di rete.
L'armadio d'asciugatura deve essere utilizzato con tutte le coperture e i dispositivi di protezione montati!
Prima di spostare il dispositivo o di intervenire su di esso, staccare sempre la spina di alimentazione!
Utilizzare il dispositivo solo con i pezzi di ricambio e il materiale di consumo originali WINTERSTEIGER. L'utilizzo di
pezzi e materiali non originali avviene a proprio rischio e pericolo e sotto la responsabilità del gestore; ciò comporta il
decadimento della garanzia per il dispositivo!
Assicurare una buona aerazione dell'ambiente.
2.2 Avvertimenti
Pericolo di lesioni!
Controllare regolarmente se questi adesivi di avvertimento sono ancora sulla macchina. Gli adesivi non leggibili o
mancanti devono essere immediatamente sostituiti. Gli adesivi si trovano sulla parete interna sinistra del dispositivo.
Prima di effettuare la messa in funzione, leggere ed osservare le istruzioni per l'uso e le indicazioni di sicurezza!
Codice ordine: 78-266-001
Staccare la spina dalla presa di corrente prima di aprire l'apparecchio!
Codice ordine: 78-266-002
49 Combi Eco
Page 50
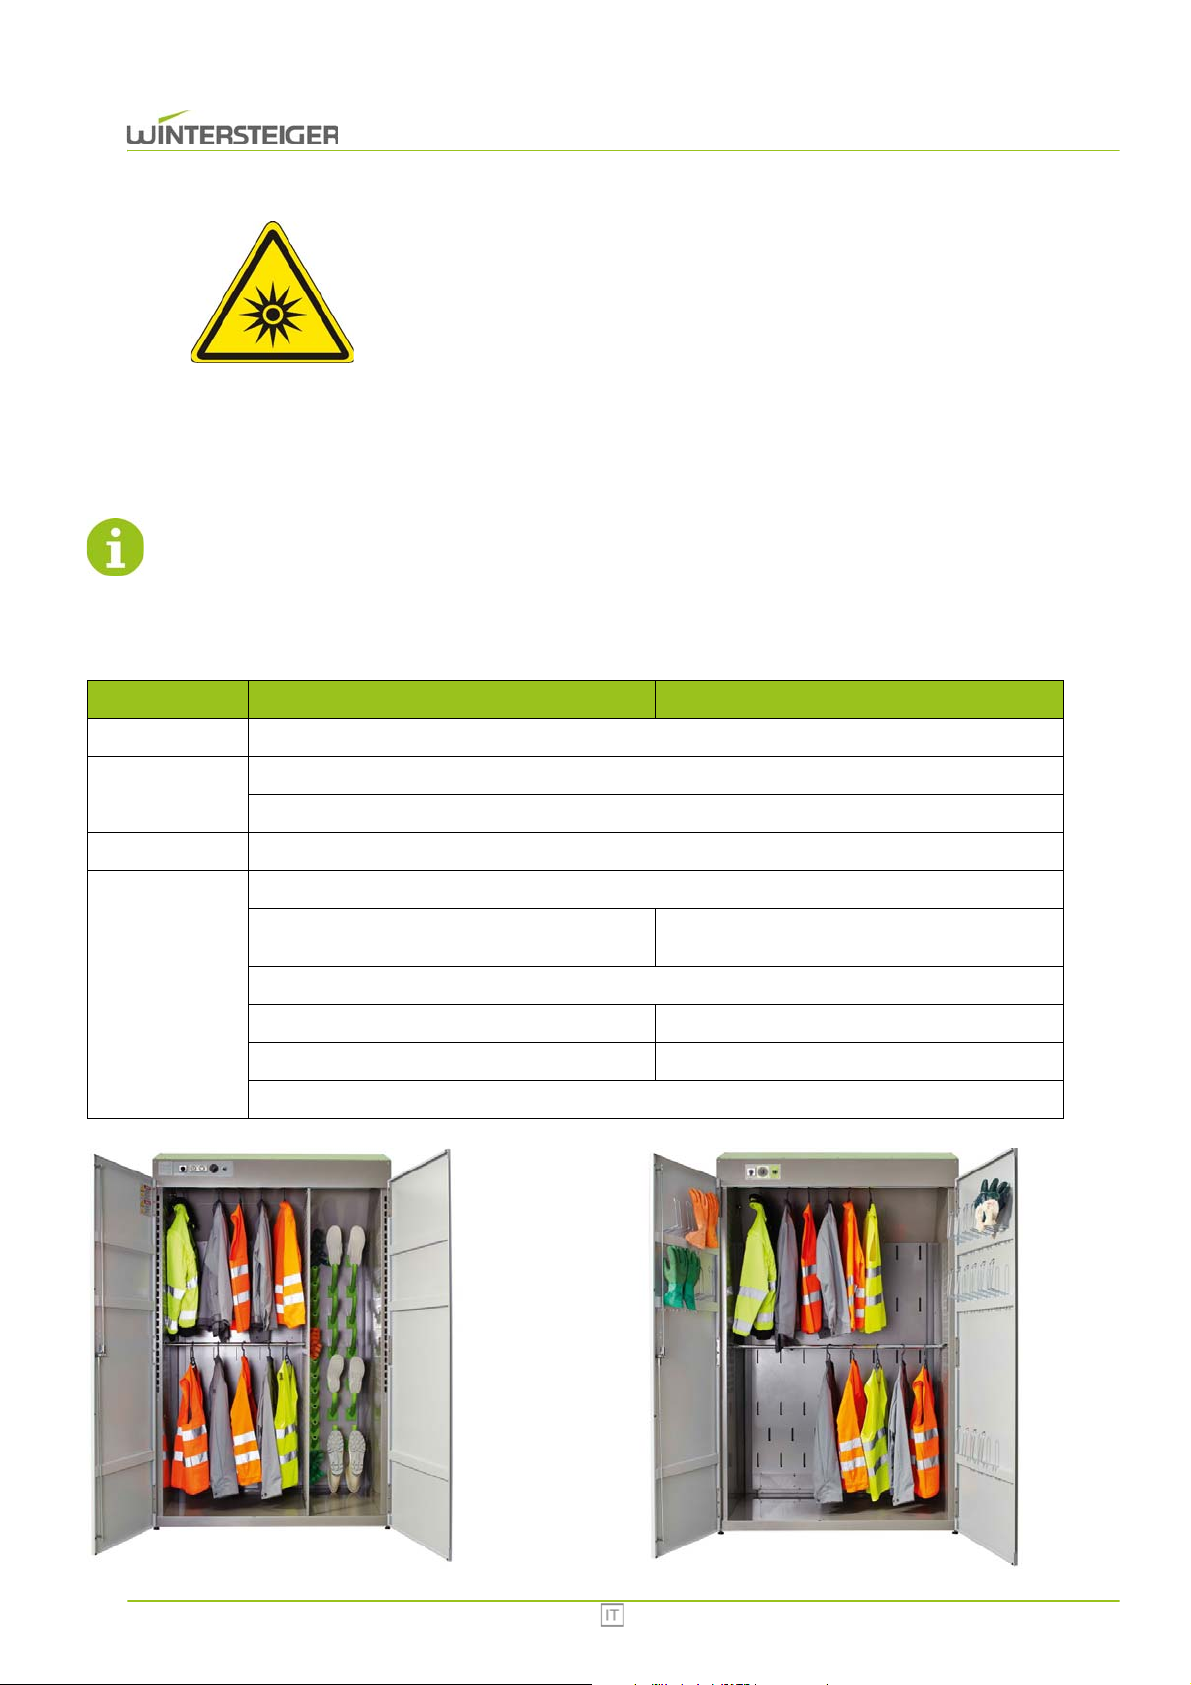
Questo adesivo è presente solamente se la macchina dispone del generatore di ozono opzionale.
Codice ordine: 78-150-120
2.3 Dispositivi di protezione
Durante il funzionamento non è consentito rimuovere nessuno dei dispositivi di protezione.
L'armadio d'asciugatura Combi Eco è conforme agli standard previsti dalla Direttiva Bassa Tensione e dalla
Direttiva Compatibilità Elettromagnetica.
3 Funzioni
Typ Combi Eco Multi Eco
Funzionamento
Semplicità d'uso con timer per 24 ore / 7 giomi, e analogico (consente fino a 6 ore di accensione)
Potente asciugatura ad aria calda
Asciugatura
Asciugatura a basso consumo energetico di abbigliamento professionale e da pronto intervento
Igiene Riduzione dei germi presenti nell'aria mediante generatore di ozono (opzionale)
Ugelli d'asciugatura ventilati internamente per:
8 paia di scarpe
8 paia di guanti
Spazio
Supporto integrato per (lato interno della porta):
2 aste appendiabiti
12 paia di guanti
2 aste appendiabiti
Serbatoio dell'acqua integrato (da svuotare all'occorrenza)
Combi Eco
Multi Eco
Combi Eco 50
Page 51
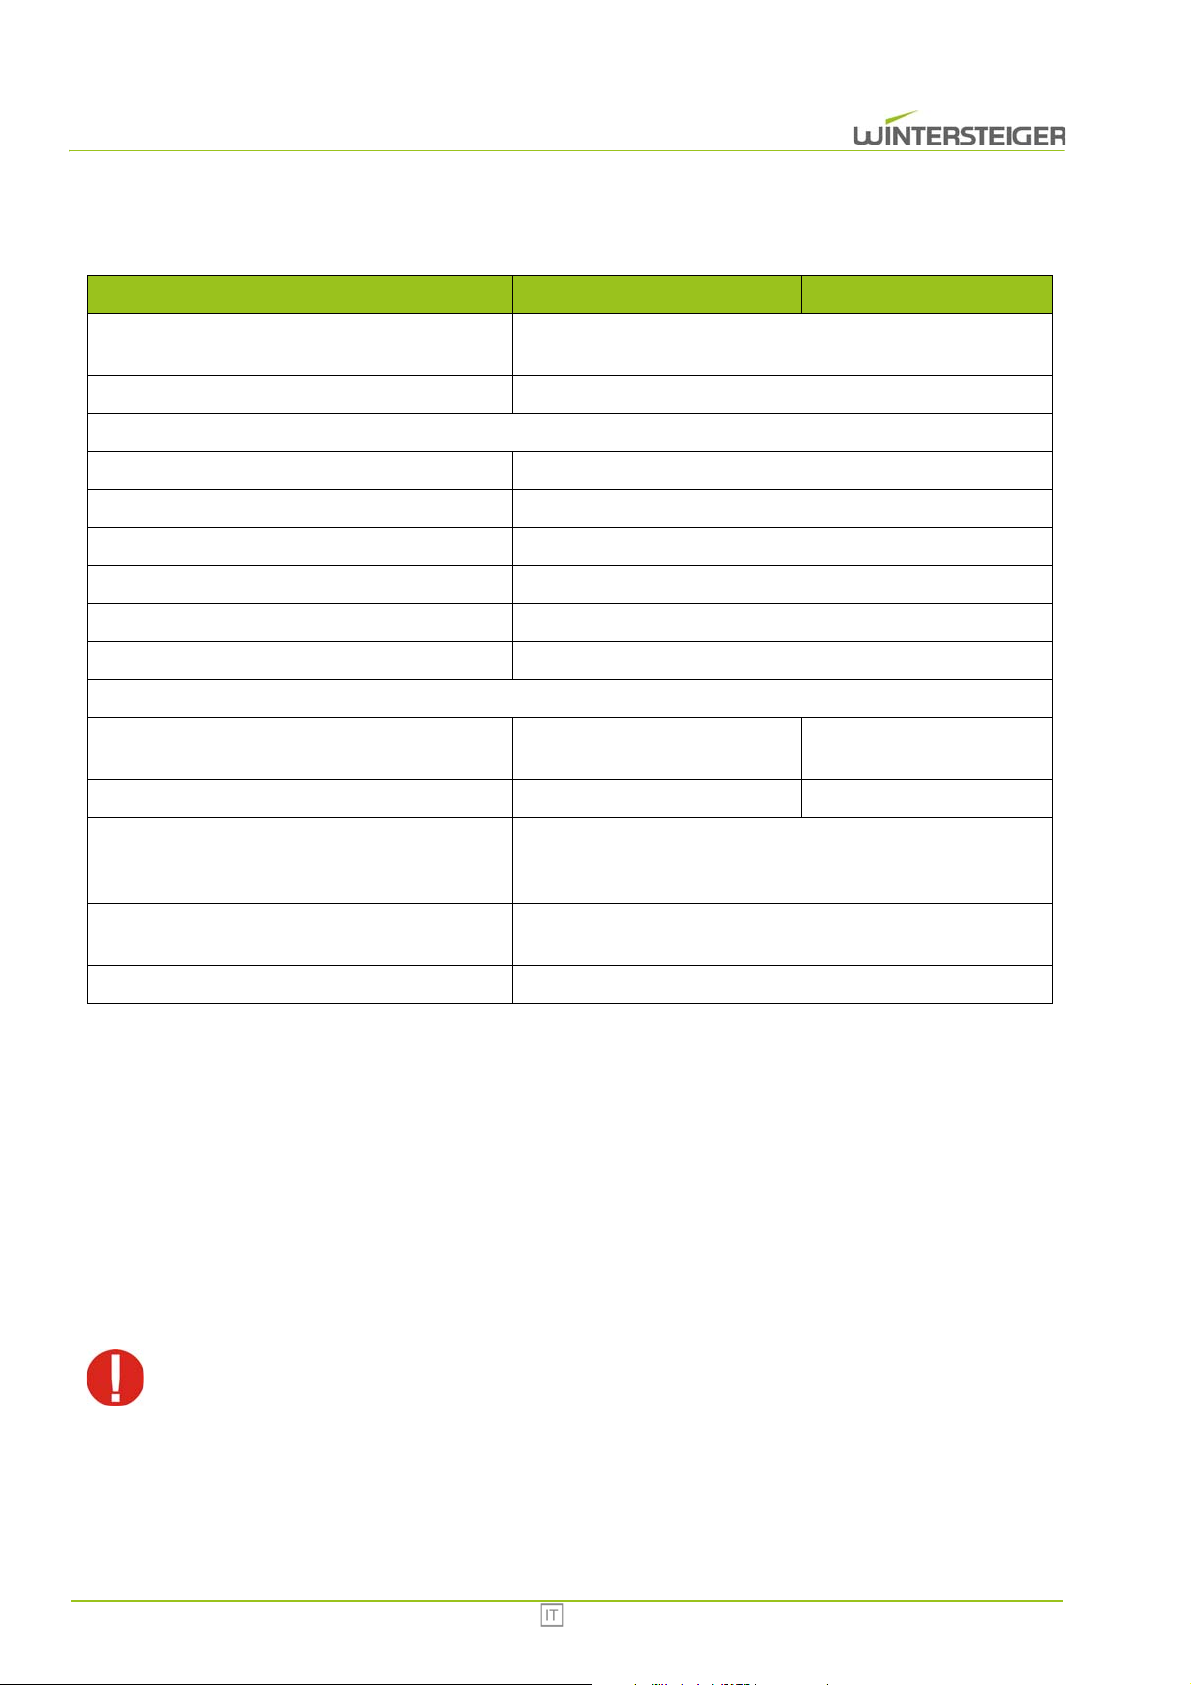
4 Dati tecnici
Typ Combi Eco Multi Eco
Tensione nominale, frequenza, potenza, protezione:
Corrente nominale 6,2 A
Il corretto valore della tensione è riportato sulla targhetta!
Potenza riscaldamento: 1 x 800 W
Potenza ventilatore: 1 x 100 W
Potenza compressore: 1 x 400 W
Generatore di ozono (opzionale): 1 pz
Temperatura ambiente: Da +5 a 40°C
Umidità dell'aria: 30% - 80%
L'utilizzo del dispositivo è consentito solo all'interno di locali ben aerati!
Dimensioni (HxLxP): 2100 mm x 1300 mm x 850 mm
Peso: 195 kg 180 kg
Tempi d'asciugatura:
1 AC 230V 50 Hz; 1,4 kW; 12/16 A
2100 mm x 1300 mm x 900
mm
A partire da 1 ora. Ci può volere anche più tempo in relazione a
quanto sono bagnati gli indumenti, alla temperatura e al
materiale.
Riduzione dei germi:
Emissione sonora: Inferiore a 70 dB(A)
Riduzione dei germi presenti nell'aria mediante generatore di ozono (opzionale)
5 Trasporto, immagazzinamento e variazione di ubicazione
5.1 Condizioni di trasporto del dispositivo
Il dispositivo deve essere trasportato nell'imballaggio originale e nella posizione indicata sull'imballaggio stesso.
5.2 Immagazzinamento del dispositivo
Temperatura: da 0° a +40°C.
Per evitare danni, non collocare alcun altro pacco o cassa sopra l'imballaggio del dispositivo!
51 Combi Eco
Page 52
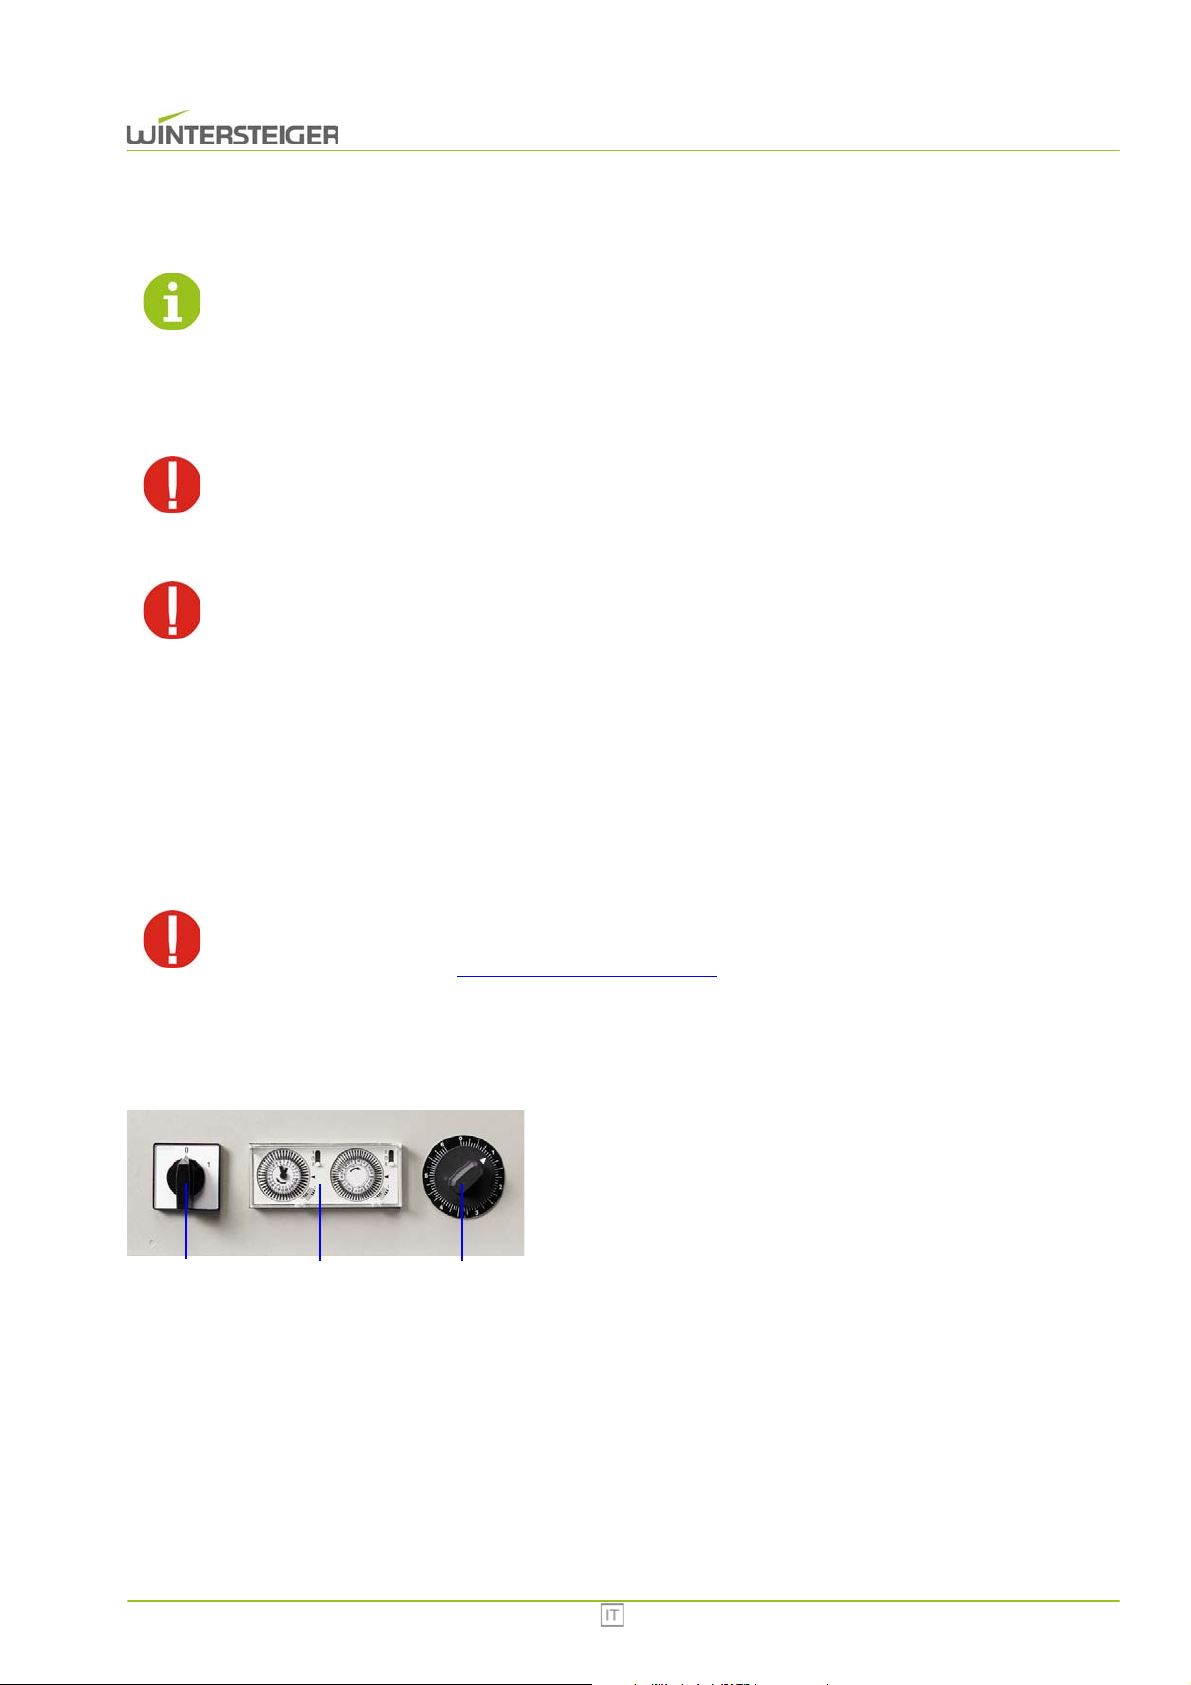
5.3 Rimozione dell'imballaggio e scelta dell'ubicazione
C
A
B
Prestare attenzione a non danneggiare il dispositivo nel rimuovere l'imballaggio.
Nella scelta dell'ubicazione ciò che importa innanzitutto è la funzionalità. Il dispositivo deve essere installato in un locale ben
aerato e asciutto. Il locale deve avere un'altezza di almeno 2,3 m. Deve essere disponibile una presa di corrente nelle immediate vicinanze del dispositivo.
Scegliere l'ubicazione rispettando in particolare le direttive e le leggi in materia di sicurezza sul posto di
lavoro!
Assicurarsi che la fornitura dell'aria non sia mai bloccata nemmeno parzialmente (non ostruire in alcun
modo il dispositivo!).
Affinché l'asciugatura e la riduzione dei germi funzionino in maniera ottimale, la temperatura ambiente non
deve scendere sotto i 5°C.
Non infilare alcun oggetto nella griglia d'aspirazione o nella griglia di protezione. Non chiudere queste aperture nemmeno
parzialmente. Non versare e non spruzzare mai liquidi nel circuito dell'aria, perché si rischia di subire una scossa elettrica e
di danneggiare il dispositivo.
6 Descrizione degli elementi di comando
Non disattivare l'armadio d'asciugatura anticipatamente mediante l'interruttore principale. Terminato il
periodo di riscaldamento impostato, la ventilazione continua a funzionare per ulteriori 10-15 minuti per
evitare un surriscaldamento (vedi cap. 7.1 Pulizia, pagina 56)
6.1 Timer per 24 ore / 7 giorni
A: Interruttore principale
Inserimento e disinserimento del dispositivo
B: Timer automatico
C: Timer manuale
Impostazione del tempo d'asciugatura tra 0 e 6 ore
6.2 Funzionamento con il timer automatico
Il timer automatico permette di programmare l'asciugatura secondo un piano prestabilito per 24 ore e 7 giorni.
.
Combi Eco 52
Page 53
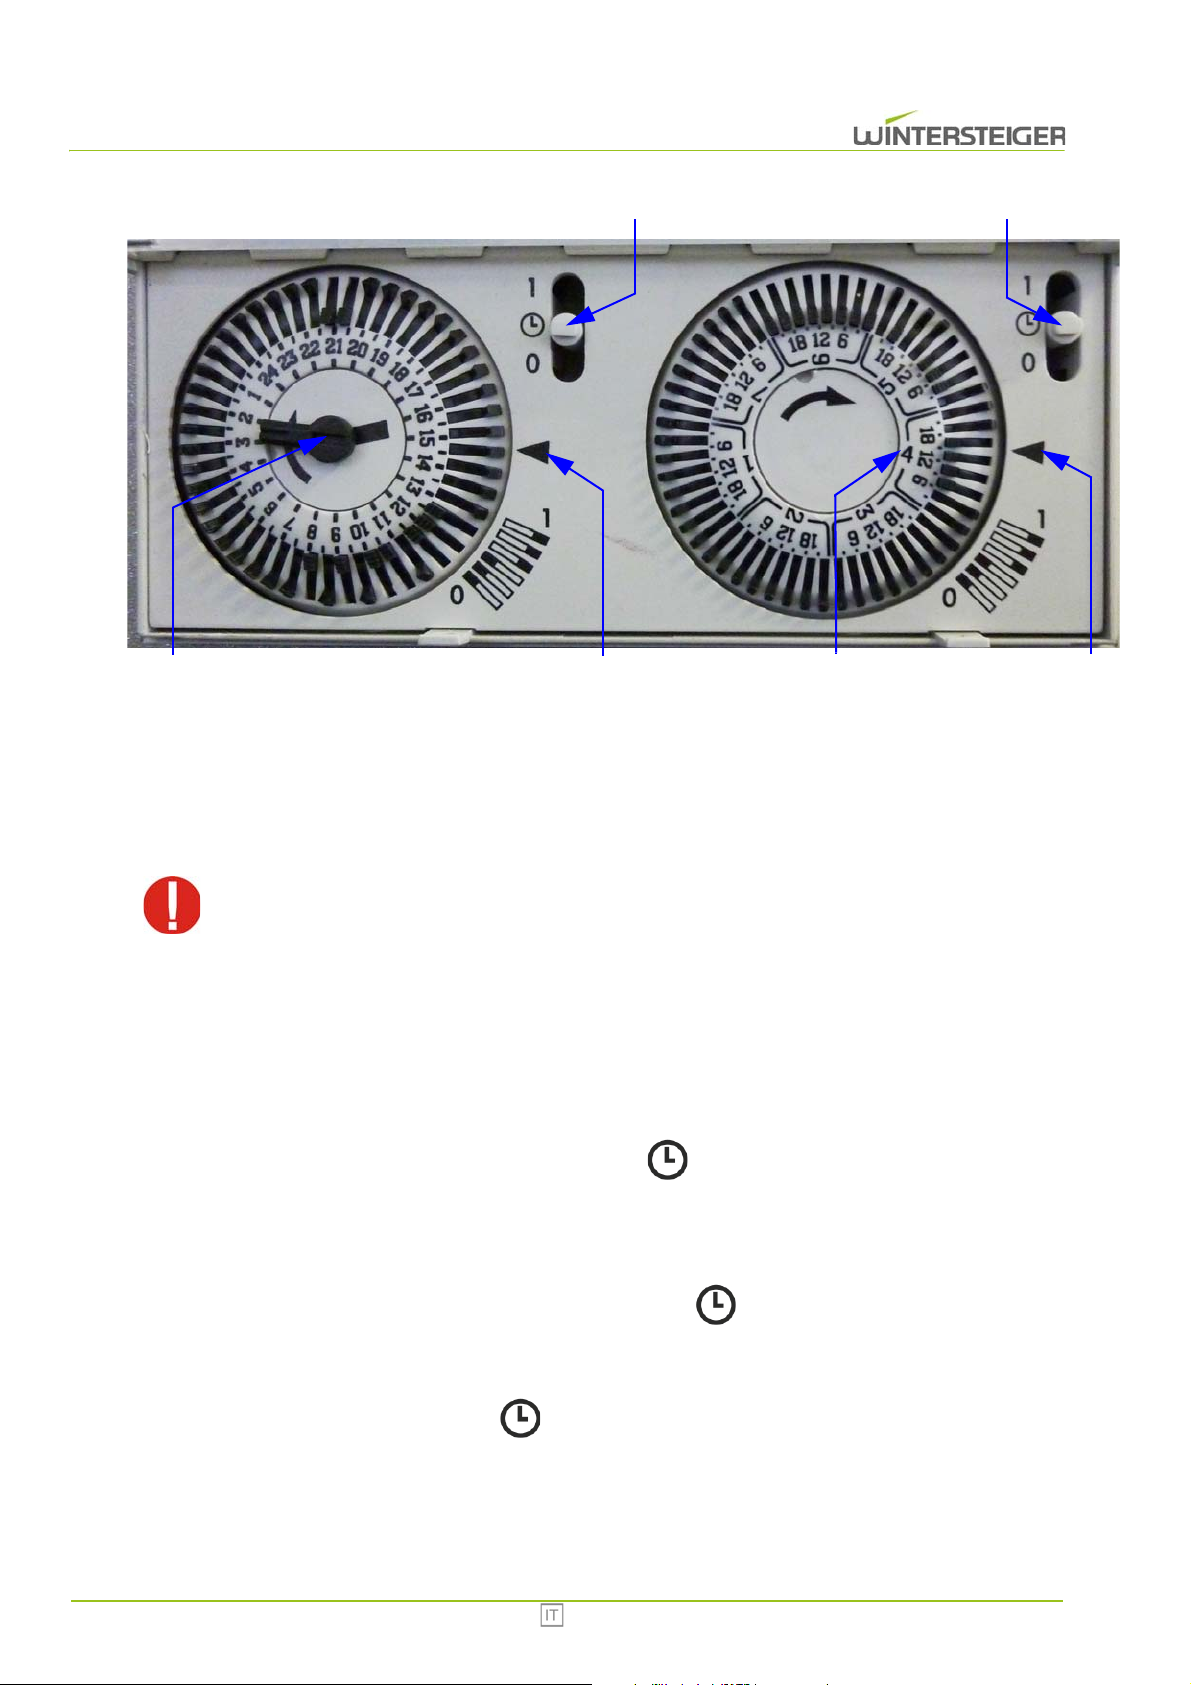
A sinistra si trova il timer giornaliero, a destra il timer settimanale.
A
C
B
D
F
E
6.2.1 Impostazione dell'ora e del giorno della settimana
Con un piccolo cacciavite a taglio girare la lancetta dei minuti [A].
Allo stesso tempo gira anche il timer di destra per l'impostazione del giorno del settimana.
Non girare mai il timer per il giorno della settimana. Il timer potrebbe guastarsi.
La freccia [B] indica l'ora approssimativa. In questo modo è possibile distinguere se sono le 02:48 o le 14:48.
La cifra [C] indica il giorno della settimana, numerato da 1 a 7. Nelle presenti istruzioni il primo giorno della settimana è lunedì.
La freccia [D] indica il giorno corrente della settimana (cioè giovedì).
I due interruttori [E+F] servono ad attivare e disattivare il timer automatico.
Se uno dei due interruttori è posizionato su "0", il timer automatico è disattivato.
Se entrambi gli interruttori sono posizionati sul simbolo " ", l'asciugatura viene effettuata secondo la programmazione prestabilita.
Se entrambi gli interruttori sono posizionati su "1", l'armadio d'asciugatura rimane acceso continuativamente (24 ore/7
giorni).
Se l'interruttore [E] è posizionato su "1" e l'interruttore [F] su " ", l'asciugatura viene effettuata solamente secondo la programmazione settimanale. In questo modo saranno solamente disponibili intervalli di tempo di 3 ore.
Se l'interruttore [E] è posizionato su " " e l'interruttore [F] su "1", l'asciugatura avviene solamente secondo la
programmazione giornaliera (stesso programma per ogni giorno della settimana).
53 Combi Eco
Page 54
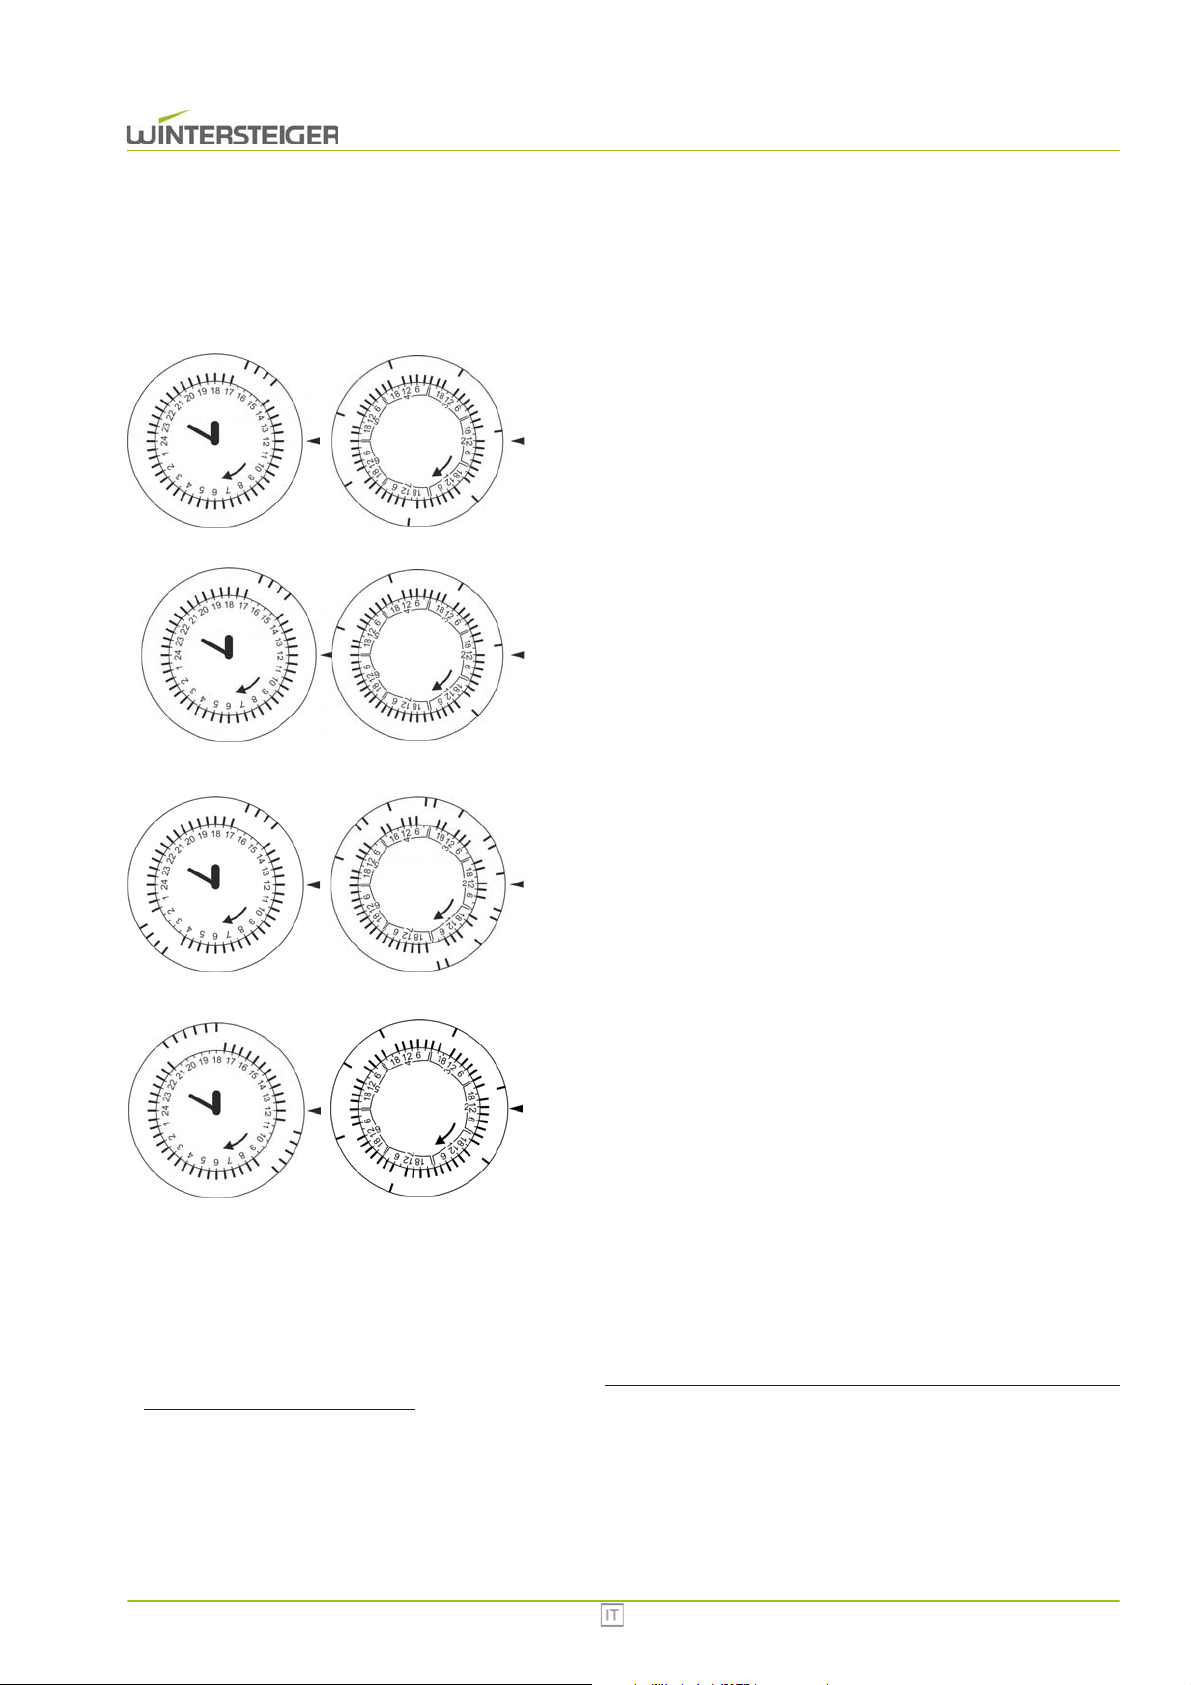
6.2.2 Programmazione
Se il segmento di un lasso di tempo rimane fuori, l'armadio d'asciugatura si accende per questo periodo di tempo. In linea di
massima, affinché si attivi l'asciugatura, devono rimanere fuori sia il segmento di tempo per il giorno sia il segmento di tempo
per la settimana.
Esempio: il dispositivo deve asciugare ai seguenti orari:
tutti i giorni dalle 15:00 alle 17:00
A questo scopo devono rimanere fuori i seguenti segmenti del timer giornaliero: 15:00, 15:30, 16:00, 16:30
A tale scopo devono rimanere fuori i seguenti segmenti del timer settimanale: ogni giorno 15:00
Esempio: il dispositivo deve asciugare ai seguenti orari:
da lunedì {1} a venerdì {5} dalle 15:00 alle 17:00
sabato {6} e domenica {7} l'asciugatura viene sospesa.
A questo scopo devono rimanere fuori i seguenti segmenti del timer giornaliero: 15:00, 15:30, 16:00, 16:30
A questo scopo devono rimanere fuori i seguenti segmenti del timer settimanale: da lunedì {1} a venerdì {5} 15:00
Esempio: il dispositivo deve asciugare ai seguenti orari:
da lunedì {1} a venerdì {5} dalle 02:00 alle 04:00 e dalle 15:00 alle 17:00
sabato {6} e domenica {7} l'asciugatura viene sospesa.
A questo scopo devono rimanere fuori i seguenti segmenti del timer giornaliero: 02:00, 02:30, 03:00, 03:30 e 15:00, 15:30, 16:00, 16:30
A questo scopo devono rimanere fuori i seguenti segmenti del timer settimanale: da lunedì {1} a venerdì {5} 00:00, 03:00, 15:00
Esempio: il dispositivo deve asciugare ai seguenti orari:
da lunedì {1} a giovedì {4} dalle 18:00 alle 21:00
da venerdì {5} a domenica {7} dalle 09:00 alle 11:30
A questo scopo devono rimanere fuori i seguenti segmenti del timer giornaliero: 09:00, 09:30, 10:00, 10:30, 11:00 e 18:00, 18:30, 19:00, 19:30,
20:00, 20:30
A questo scopo devono rimanere fuori i seguenti segmenti del timer settimanale: da lunedì {1} a giovedì {4} 15:00
da venerdì {5} a domenica {7} 09:00
6.2.3 Asciugatura non programmata
Se si volesse eseguire un ciclo di asciugatura non programmato con un armadio d'asciugatura con timer per 24 ore/7 giorni,
è possibile eseguire l'asciugatura usando il timer per 6 ore (vedi cap. 6.3 Funzionamento del generatore di ozono con il timer
per 24 ore (opzionale), pagina 54). Il timer per 6 ore prende il sopravvento sul timer per 24 ore/7 giorni.
6.3 Funzionamento del generatore di ozono con il timer per 24 ore (opzionale)
Il timer automatico permette di programmare l'asciugatura secondo un piano prestabilito per 24 ore.
Combi Eco 54
Page 55
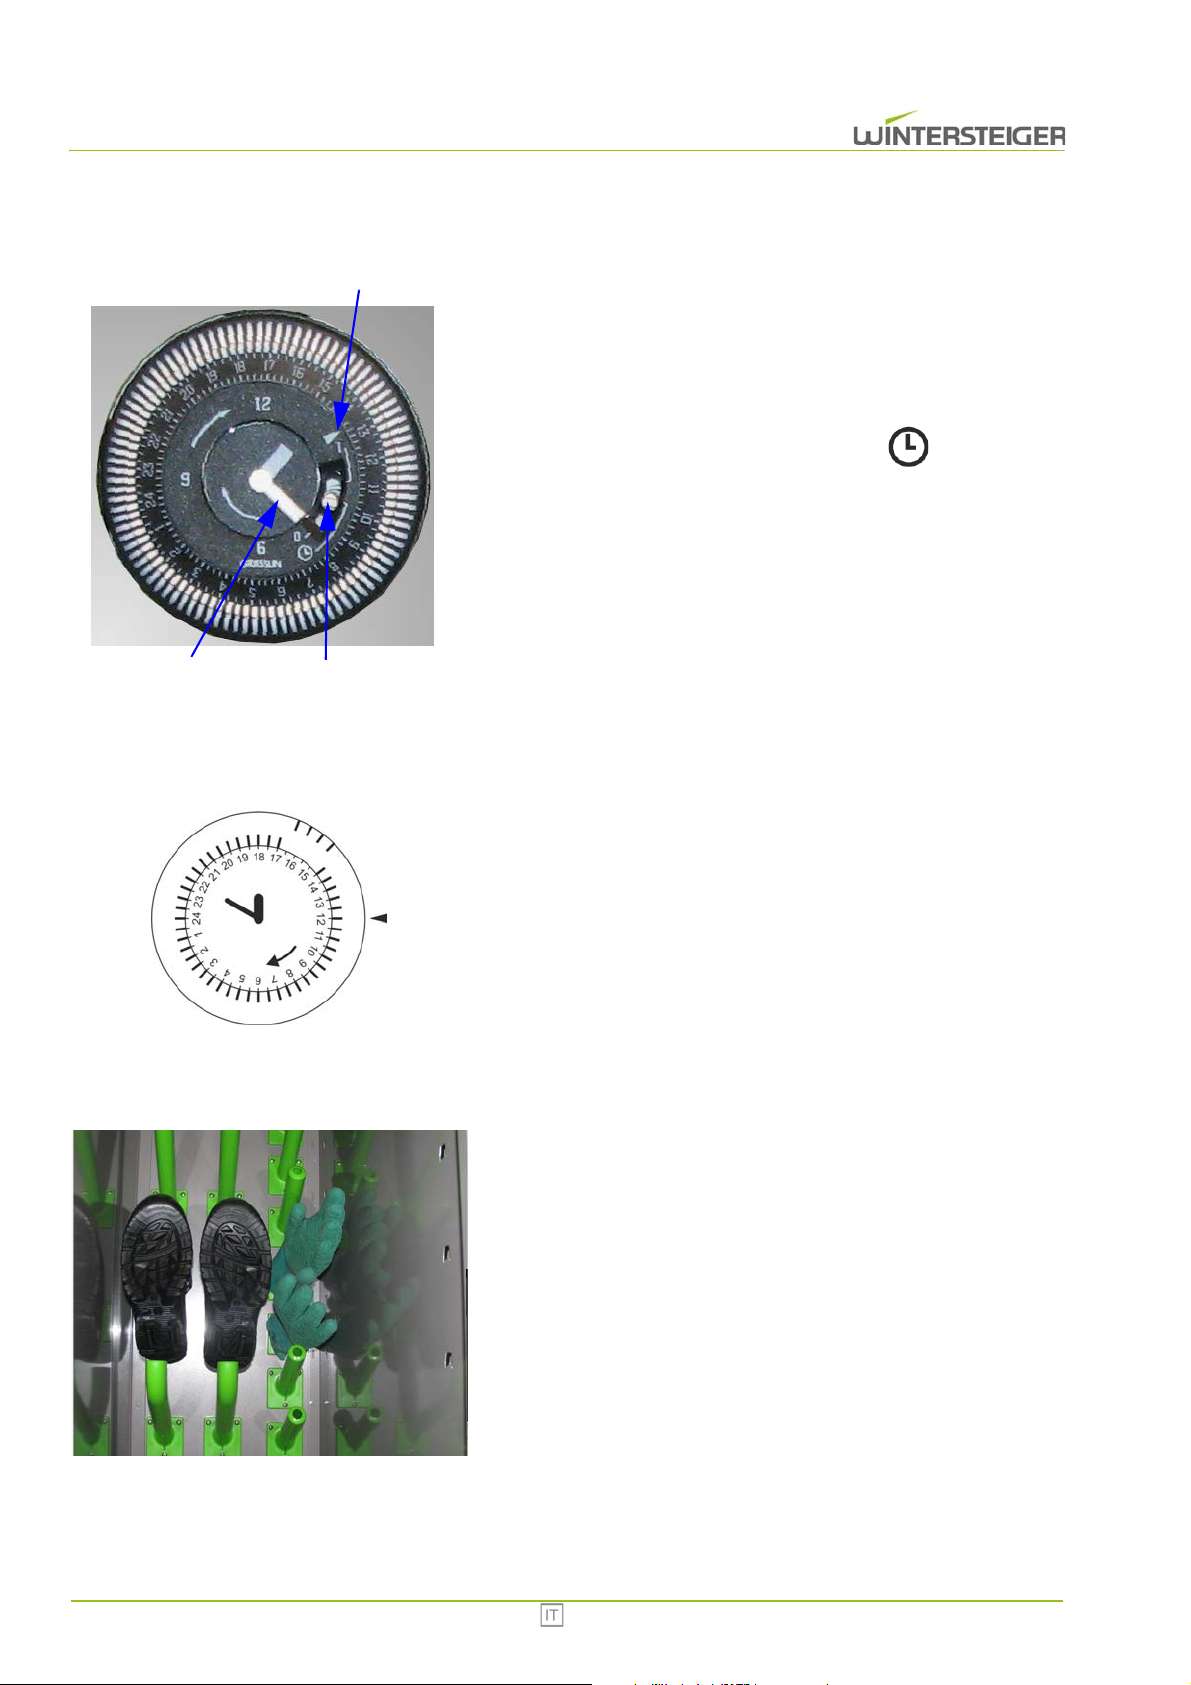
6.3.1 Impostazione dell'ora
A
C
B
C
Con un piccolo cacciavite a taglio girare la lancetta dei minuti [A].
La freccia [B] indica l'ora approssimativa. In questo modo è possibile
distinguere se sono le 01:25 o le 13:25.
L'interruttore [C] serve ad attivare e disattivare il timer automatico.
Se l'interruttore è posizionato su "0", il timer automatico è disattivato.
Se l'interruttore è posizionato sul simbolo " ", l'asciugatura
viene effettuata secondo la programmazione prestabilita.
Se l'interruttore è posizionato su "1", l'armadio d'asciugatura rimane
acceso continuativamente.
6.3.2 Programmazione
Se il segmento di un lasso di tempo rimane fuori, l'armadio d'asciugatura si accende per questo periodo di tempo.
Esempio: il dispositivo deve asciugare ai seguenti orari:
tutti i giorni dalle 15:00 alle 17:00
A questo scopo devono rimanere fuori i seguenti segmenti del timer
giornaliero: 15:00, 15:30, 16:00, 16:30
6.4 Attrezzatura ottimale per l'armadio d'asciugatura
Seguire le seguenti istruzioni per l'asciugatura dell'abbigliamento
professionale:
Infilare i guanti sugli ugelli incorporati per i guanti.
Infilare le scarpe sugli ugelli incorporati per le scarpe.
55 Combi Eco
Page 56
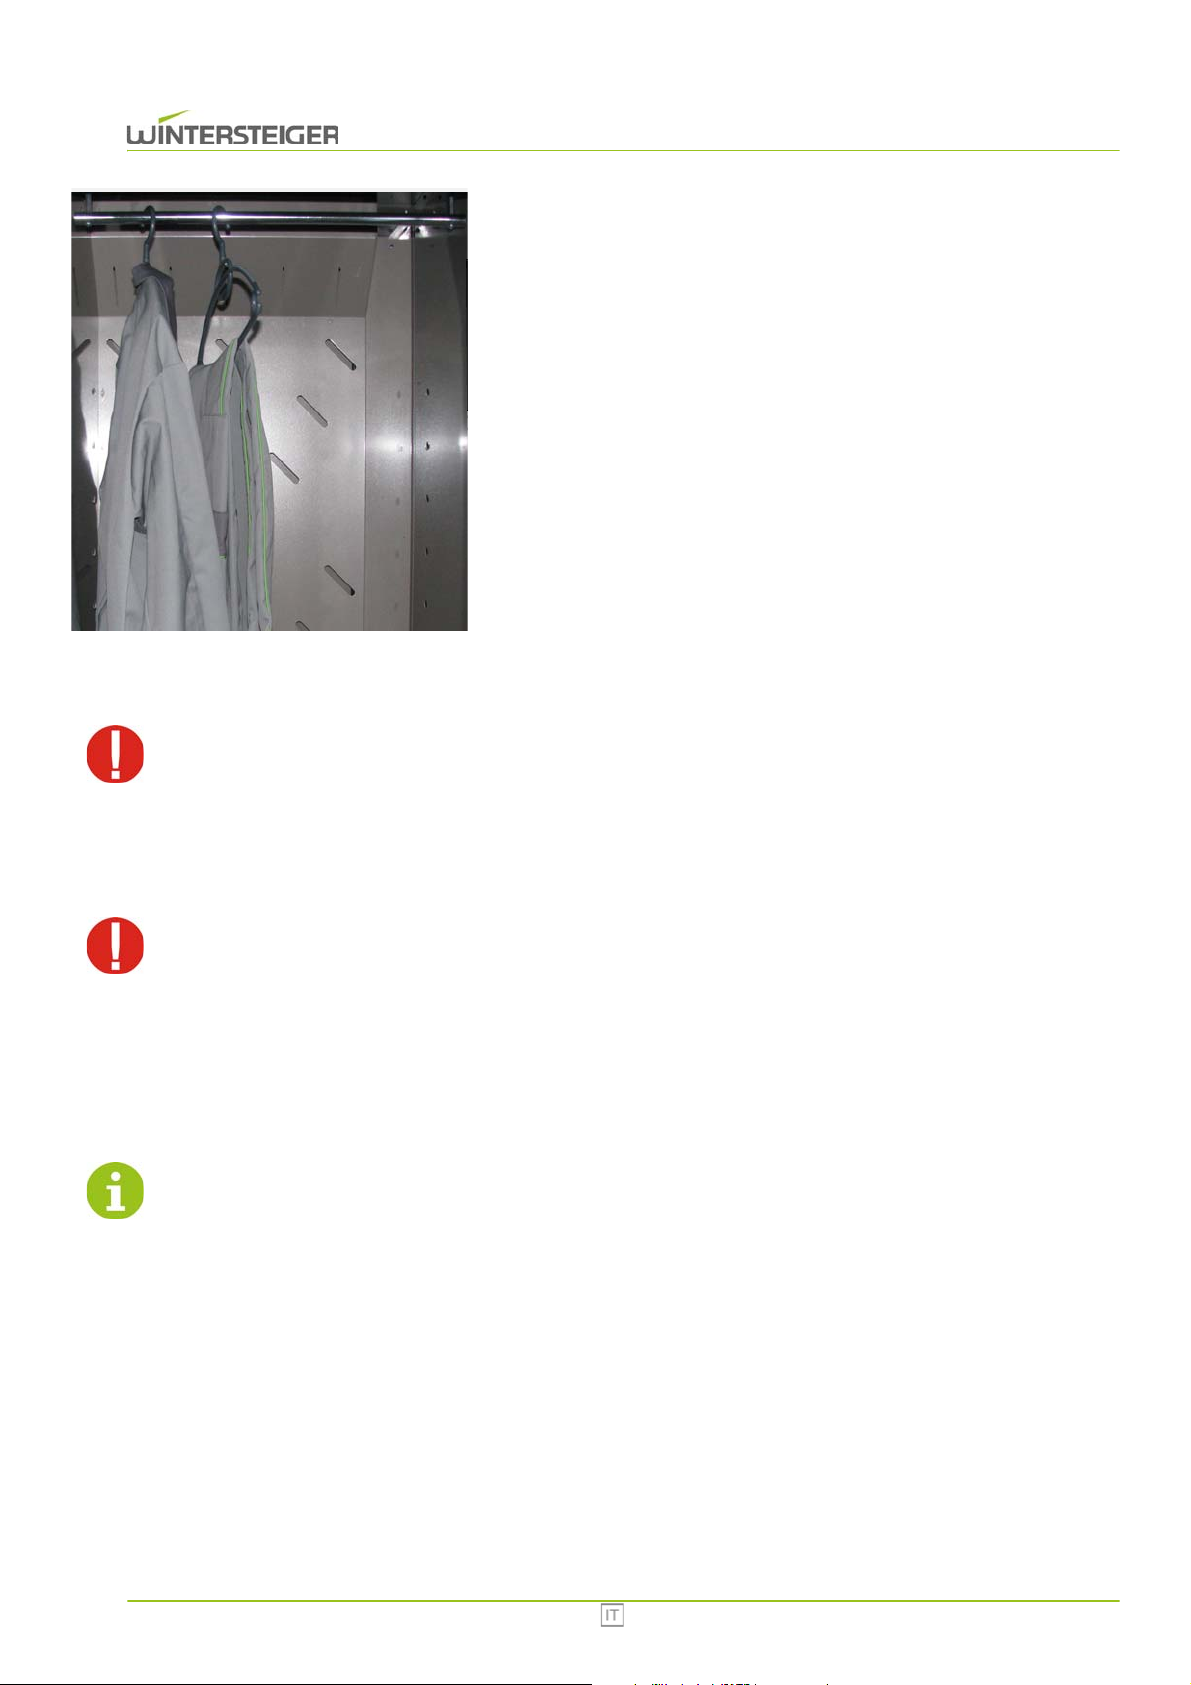
7 Manutenzione
C
Prima di qualsiasi intervento di manutenzione spegnere il dispositivo e staccare la spina!
Appendere l'abbigliamento professionale con un appendiabiti sulle
aste appendiabiti montate.
Gli armadi di asciugatura hanno diverse capacità di contenimento delle
attrezzature. Tra gli equipaggiamenti si deve lasciare un po' d'aria per
consentire una circolazione ottimale dell'aria.
Dopo il disinserimento del riscaldamento la ventilazione continua a
funzionare per ulteriori 10-15 minuti.
7.1 Pulizia
Pulire periodicamente l'interno e l'esterno del dispositivo con uno straccio inumidito.
Non pulire mai il dispositivo con acqua. Si rovinerebbero irreparabilmente i componenti elettrici! La mancata osservanza di questo divieto annulla i diritti di garanzia.
7.2 Generatore di ozono (opzionale)
Il generatore di ozono funziona secondo un programma prefissato tramite timer sull'arco delle 24 ore (15 min. di funzionamento - 30 min. di pausa - 15 min. di funzionamento). Questo timer è attivo solo se è stato attivato il timer principale.
Il dosaggio dell'ozono è preimpostato dalla fabbrica.
Si sconsiglia di modificare le impostazione del generatore di ozono!
Combi Eco 56
Page 57
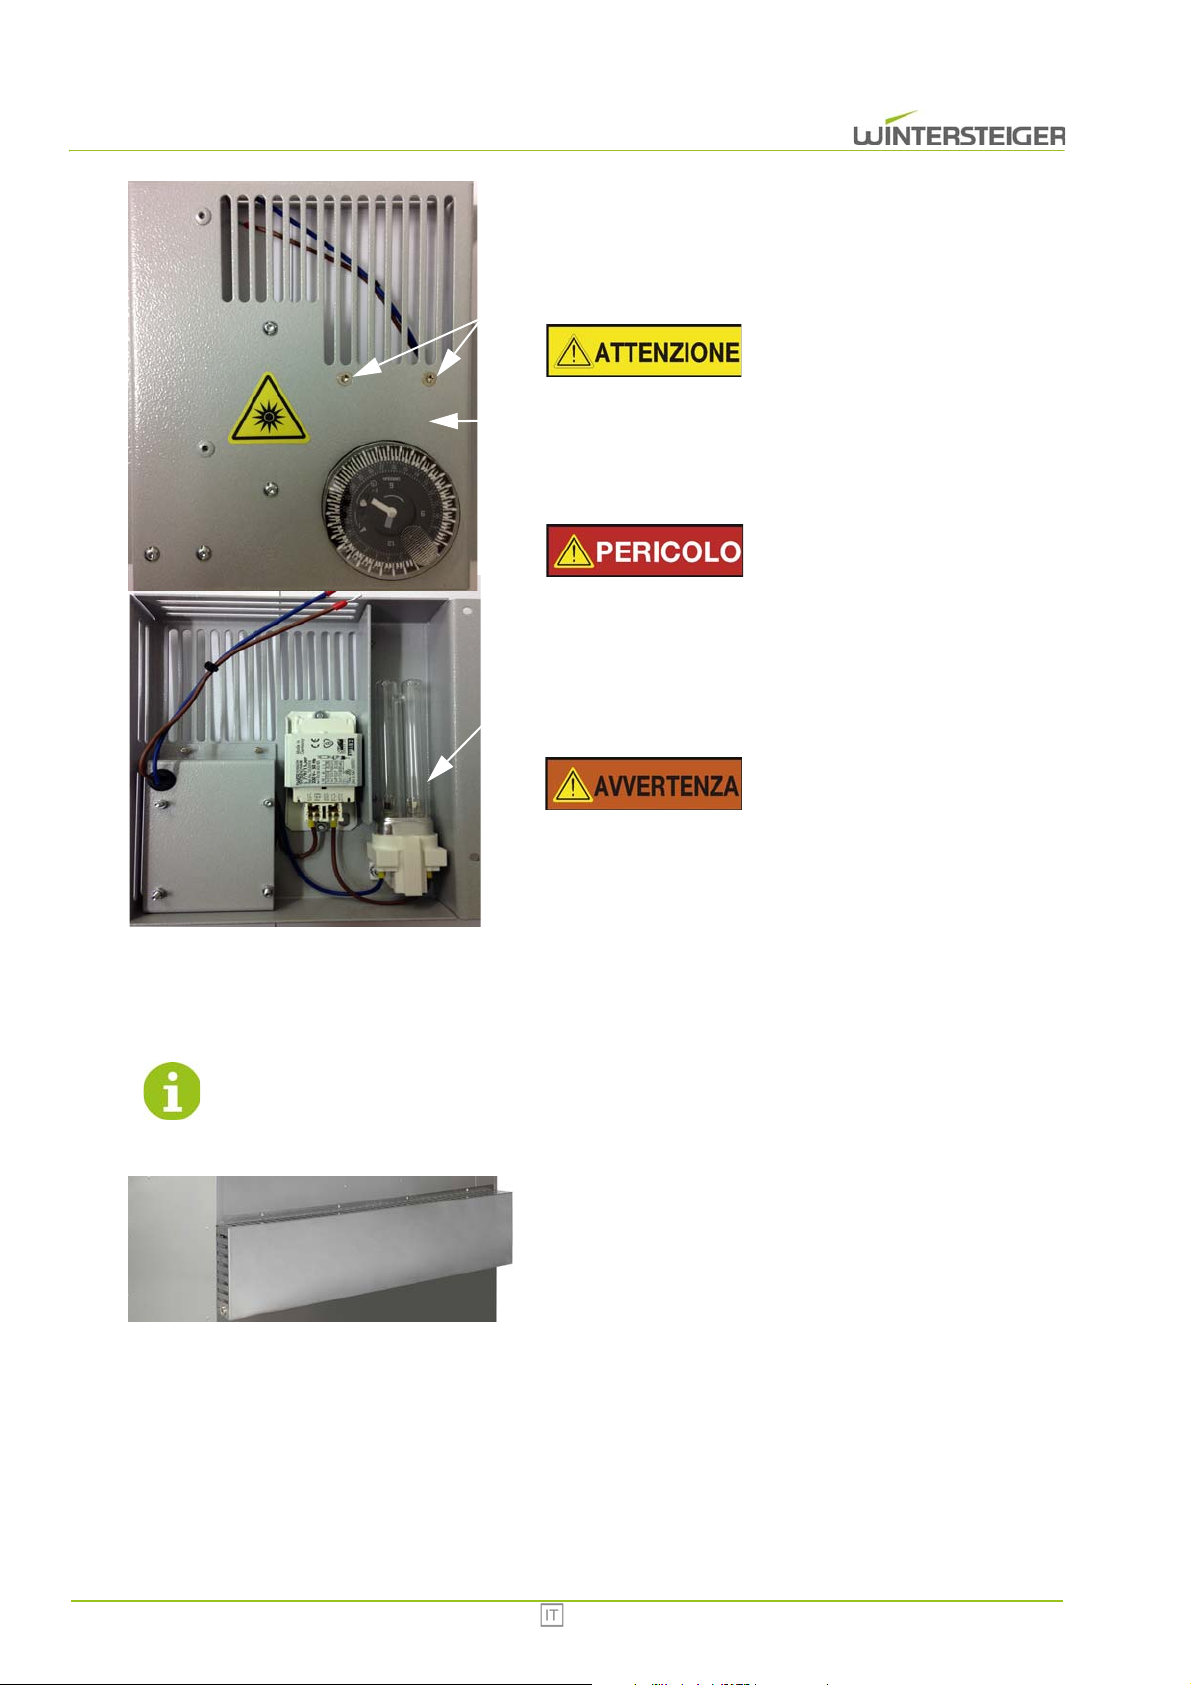
Il generatore di ozono utilizzato consente un'efficace disinfezione per
A
C
B
A
2000 ore di funzionamento, dopo di che il generatore di ozono va
sostituito. Una volta al mese eseguire un controllo visivo del generatore
di ozono durante il funzionamento. Sulla parete posteriore dell'armadio si
intravede una luce azzurrina.
Pericolo di lesioni!
Non rivolgere lo sguardo direttamente verso il generatore di ozono!
I raggi ultravioletti possono danneggiare gli occhi!
Sostituzione del generatore di ozono
Pericolo di lesioni!
Staccare il dispositivo dall'alimentazione elettrica!
Rimuovere tutte le viti [A].
Rimuovere il coperchio [B]. Rimuovere con cautela il generatore di
ozono [C].
Il generatore di ozono contiene mercurio tossico. Smaltire il generatore di ozono nel rispetto delle normative locali!
7.3 Svuotamento del serbatoio dell'acqua
Svuotare il serbatoio dell'acqua, se necessario!
Pericolo di lesioni!
Inserire una nuova lampada [C] e fissare nuovamente il coperchio
[B] con le viti [A].
Allentare le viti.
Rimuovere la copertura.
Prelevare e svuotare il serbatoio dell'acqua.
57 Combi Eco
Page 58
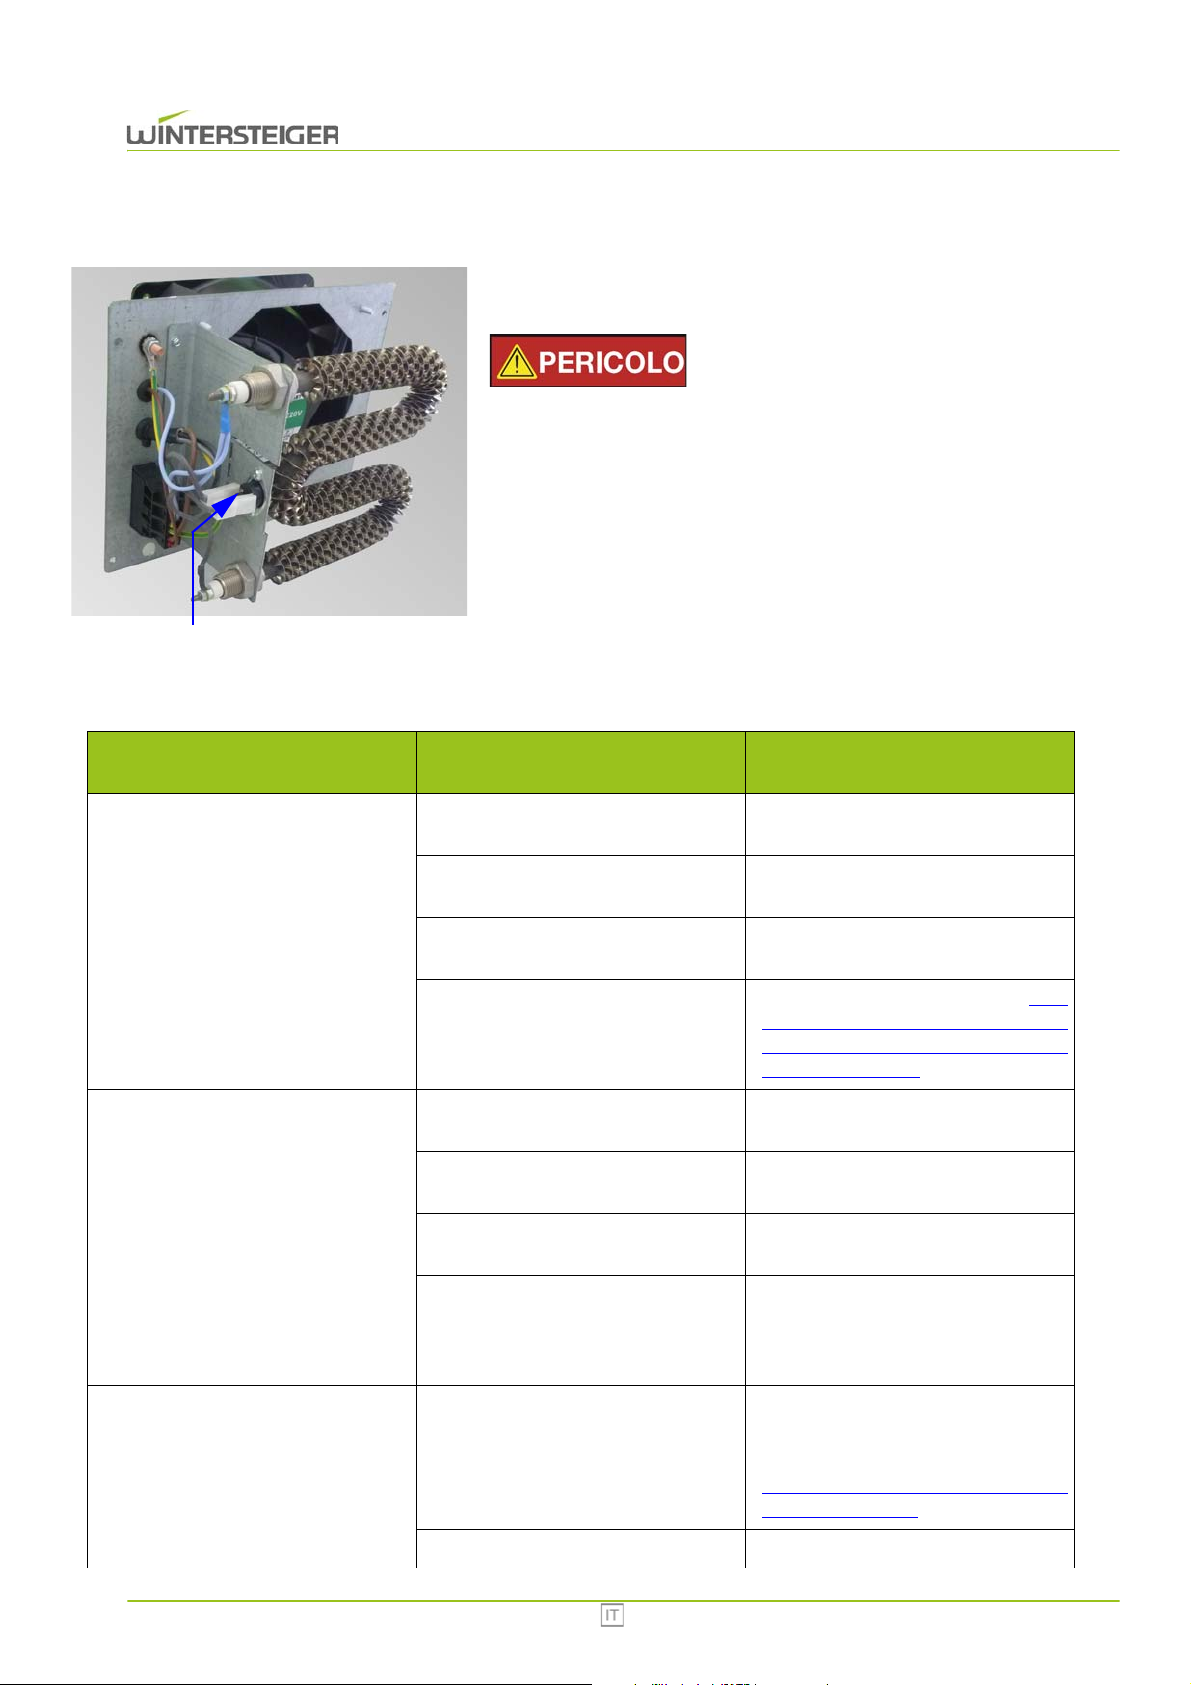
7.4 Interruttore di sovratemperatura
A
8 Eliminazione del guasto
Se scatta l'interruttore di sovratemperatura del riscaldamento, l'interruttore deve essere resettato.
Pericolo di lesioni!
Staccare il dispositivo dall'alimentazione elettrica! Solo un elettricista può eliminare il guasto!
Smontare il termoventilatore interessato.
Premere il pulsante [A].
Rimontare il termoventilatore.
Errore
Problema
Il dispositivo non funziona
Il dispositivo non asciuga
Causa Rimedio
Il dispositivo non è collegato alla corrente
L'alimentazione di tensione non funziona
L'interruttore principale è posizionato
su "0"
Collegare il dispositivo
Rivolgersi ad un elettricista
Inserire l'interruttore principale
Impostare il tempo d'asciugatura (vedi
Non è stato impostato il tempo d'asciugatura
cap. 6.3 Funzionamento del generato-
re di ozono con il timer per 24 ore (op-
zionale), pagina 54)
Fornitura dell'aria insufficiente
Umidità dell'aria > 80%
Temperatura ambiente < 5°C
Controllare la fornitura dell'aria sul dis-
positivo e nel locale
Tanto più bassa è l'umidità dell'aria,
tanto migliore è l'asciugatura
Tanto più alta è la temperatura ambi-
ente, tanto migliore è l'asciugatura
All'avvio dell'asciugatura il generatore
Opzionale: ozono con relè
temporizzato
di ozono si attiva per circa 10 minuti, al
termine dei quali ha inizio il ciclo di as-
ciugatura
Controllare internamente ed esterna-
mente che le feritoie di ventilazione
non siano ostruite
vedi cap. 7.4 Interruttore di sovratem-
peratura, pagina 58
L'efficienza d'asciugatura del dis-positivo diminuisce o il dispositivo non
riscalda
È scattato l'interruttore di sovra-temperatura perché è stata superata una
temperatura di 80°C
Il ventilatore è guasto Controllare il ventilatore
Combi Eco 58
Page 59
Errore
Problema
Non viene emanato il profumo L'agente profumante è esaurito Sostituire l'agente profumante
Il generatore di ozono non funziona
Staccare la spina prima di qualsiasi intervento sul dispositivo! Mettere in funzione il dispositivo con tutte le
coperture e i dispositivi di protezione montati.
Causa Rimedio
Controllare che il generatore di ozono
sia collegato alla corrente e sia
acceso; (vedi cap. 7.2 Generatore di
ozono (opzionale), pagina 56) se
necessario, sostituire il generatore di
ozono
9 Schema elettrico (pagina 16)
10 Messa a riposo e smaltimento
Pericolo di lesioni!
Prima della messa a riposo e dello smontaggio, staccare la macchina dall'alimentazione elettrica o da qualsiasi
azionamento esterno. Per lo smontaggio utilizzare solo attrezzi adeguati.
Per la messa a riposo della macchina, smontare e smaltire tutti i componenti a regola d'arte. Prima dello
smaltimento pulire tutti i componenti da olio e grasso.
Olio e grasso non devono essere versati nell'ambiente.
Per lo smaltimento dei componenti, osservare le normative specifiche del paese!
Smontare la macchina secondo le istruzioni e smontare i singoli componenti.
Pulire i componenti dai residui di olio e grasso.
Smaltire i componenti suddividendoli in gruppi secondo il materiale (acciaio, plastica, componenti elettrici ed elettronici
e così via).
Smaltire olio e grasso a norma di legge, inclusi olio e grasso biologici.
59 Combi Eco
Page 60

Inhoudsopgave
1 Vorwoord ............................................................................................................................................................................ 61
1.1 Reglementaire toepassing ....................................................................................................................................... 61
2 Algemene aanwijzingen .................................................................................................................................................... 62
2.1 Veiligheidsvoorschriften ........................................................................................................................................... 62
2.2 Waarschuwingen ..................................................................................................................................................... 62
2.3 Veiligheidsvoorzieningen ......................................................................................................................................... 63
3 Werking ............................................................................................................................................................................... 63
4 Technische gegevens ........................................................................................................................................................ 64
5 Transport, opslag en verplaatsing ................................................................................................................................... 64
5.1 Transport van het apparaat ...................................................................................................................................... 64
5.2 Opslag van de apparaat ........................................................................................................................................... 64
5.3 Verwijderen van de verpakking en het kiezen van een opstelplek .......................................................................... 64
6 Beschrijving van de bedieningselementen ..................................................................................................................... 65
6.1 Tijdschakelklok voor 24 uur / 7 dagen ..................................................................................................................... 65
6.2 Werking met de tijdschakelklok voor 6 uur / 7 dagen .............................................................................................. 65
6.2.1 Actuele tijd en actuele weekdag instellen .................................................................................................... 66
6.2.2 Tijdschema opstellen ................................................................................................................................... 66
6.2.3 Buiten het schema om drogen ..................................................................................................................... 67
6.3 Werking van de ozonlamp met de tijdschakelklok gedurende 24 uur (optie) ........................................................... 67
6.3.1 Actuele tijd instellen ..................................................................................................................................... 68
6.3.2 Tijdschema opstellen ................................................................................................................................... 68
6.4 Droogkast optimaal vullen ........................................................................................................................................ 68
7 Onderhoud .......................................................................................................................................................................... 69
7.1 Reiniging .................................................................................................................................................................. 69
7.2 Ozonlamp (optie) ..................................................................................................................................................... 69
7.3 Watertank legen ....................................................................................................................................................... 70
7.4 Overtemperatuurschakelaar .................................................................................................................................... 71
8 Storingsopheffing .............................................................................................................................................................. 72
9 Schakelschema voor (pag 16) .......................................................................................................................................... 72
10 Buitengebruikstelling en afvalverwerking ..................................................................................................................... 73
Combi Eco 60
Page 61

1 Vorwoord
© Copyright 2014 by
WINTERSTEIGER AG ::: A-4910 Ried/I Dimmelstrasse 9
Auteur en afbeeldingen: Maria Marek-Pollhammer
Tel. +43 7752 919-0
e-mail: [email protected]
Oorspronkelijke gebruiksaanwijzing
Deze gebruikshandleiding moet vóór de eerste inbedrijfstelling door het bedieningspersoneel en door degenen die voor het
onderhoud aan de machine verantwoordelijk zijn worden gelezen en dient als aanvulling op de opleidingsdocumentatie.
Schade, die ontstaat als gevolg van het niet naleven van de daarin gegeven aanwijzingen, wordt niet gedekt door de garantie. De gebruiker van de machine is wettelijk verplicht de ongevalpreventievoorschriften van het betreffende land na te leven.
Verder moet deze gebruikshandleiding vertrouwelijk worden behandeld. Deze mag alleen voor bevoegde personen toegankelijk gemaakt worden. Het overdragen aan derden mag alleen na schriftelijke toestemming van de firma WINTERSTEIGER
plaatsvinden.
Alle documenten zijn in het kader van het auteursrecht beschermd. Het doorgeven en vermenigvuldigen van documenten,
ook delen daarvan en hergebruik of mededelingen uit de inhoud hiervan zijn niet toegestaan, voor zover hiervoor geen nadrukkelijk schriftelijke toestemming is gegeven.
Handelingen in strijd hiermee zijn strafbaar en verplichten tot schadevergoeding. Alle rechten met betrekking tot de uitoefening van octrooien zijn voorbehouden aan de firma WINTERSTEIGER
1.1 Reglementaire toepassing
De droogkast Combi 1300 is uitsluitend geconstrueerd voor het drogen en bewaren van kleding, schoenen, laarzen, handschoenen en helmen (gebruik volgens de voorschriften).
Voor hieruit voortvloeiende schade is de fabrikant niet aansprakelijk; het risico hiervoor draagt uitsluitend de gebruiker.
Tot de reglementaire toepassing behoort ook de naleving van de door de fabrikant voorgeschreven bedrijfs-, onderhoudsen reparatiebepalingen.
De desbetreffende ongevallenpreventievoorschriften alsook de overige algemeen gewettigde veiligheidstechnische en arbeidsgeneeskundige regels dienen te worden opgevolgd.
Eigenmachtige veranderingen aan de machine sluiten een aansprakelijkheid van de fabrikant voor hieruit resulterende beschadigingen uit.
Wij doen steeds ons best onze produkten te verbeteren en behouden ons vandaar het recht voor alle veranderingen en verbeteringen aan te brengen die wij voor doelmatig achten. Een verplichting deze veranderingen of wijzigingen op vroeger geleverde machines en toestellen uit te breiden, is hiermee echter niet verbonden.
Alle afbeeldingen, afmetingen en gewichtsgegevens in de gebruiksaanwijzing zijn niet bindend.
61 Combi Eco
Page 62
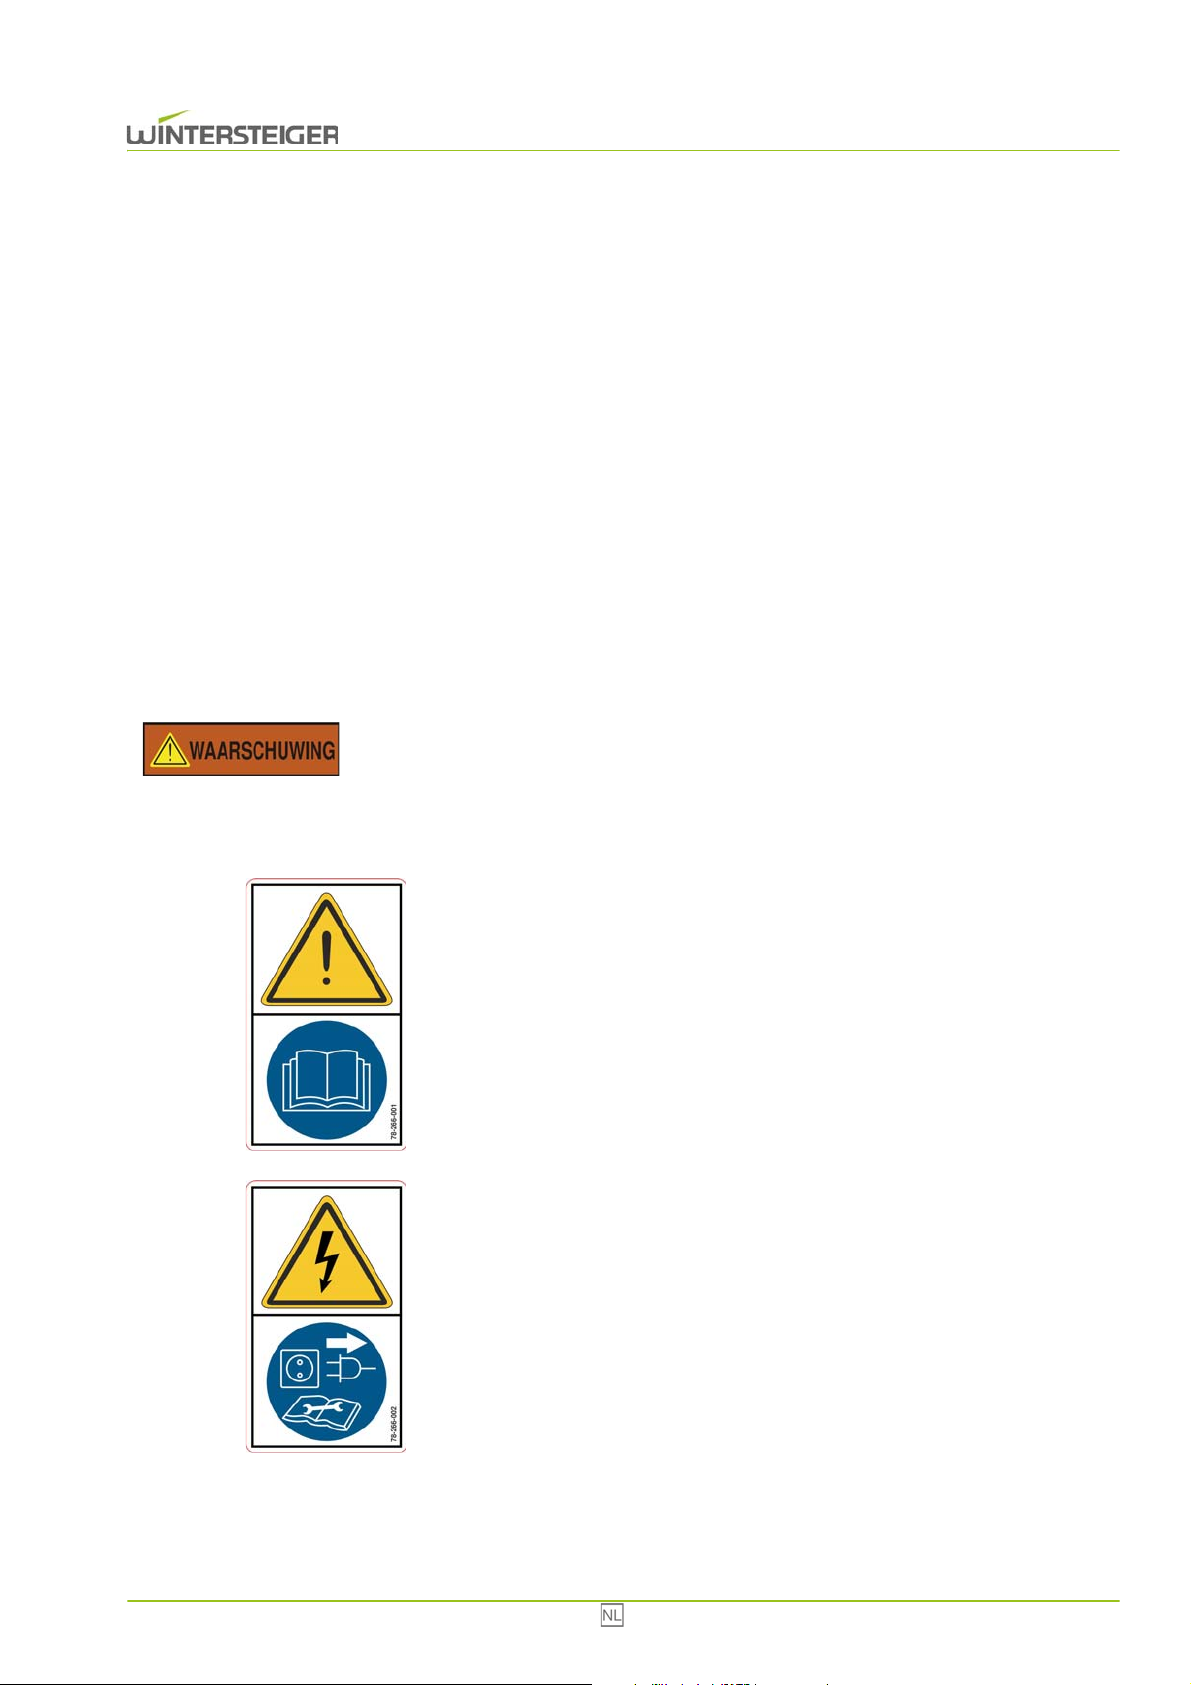
2 Algemene aanwijzingen
2.1 Veiligheidsvoorschriften
Sluit het apparaat alleen aan op stopcontacten die door een erkend elektricien werden gecontroleerd. Let daarbij op de
juiste aansluitspanning! De aansluitwaarden zijn af te lezen van het typeplaatje. Controleer of deze waarden overeenkomen met de spanning van het net.
De droogkast mag uitsluitend met volledig gemonteerde veiligheidsvoorzieningen en afdekkingen worden gebruikt!
Trek vóór elke locatiewijziging of ingrepen in het apparaat de netstekker uit het stopcontact!
Voor het apparaat mogen alleen originele WINTERSTEIGER reserveonderdelen en verbruiksmaterialen worden gebruikt. Worden door gebruiker materialen van derden gebruikt, dan doet hij dat op eigen verantwoordelijkheid en voor
eigen risico.
Zorg voor een goede ventilatie van de opstelruimte!
2.2 Waarschuwingen
Letselgevaar!
Er moet regelmatig worden gecontroleerd of deze waarschuwingen zich nog op de machine bevinden. Onleesbare
of ontbrekende waarschuwingsstickers moeten onmiddellijk worden vernieuwd. Die Aufkleber befinden sich an der
linken Innenwand des Gerätes
U moet voor inbedrijfstelling de gebruikshandleiding en veiligheidsvoorschriften lezen en u dient deze altijd in acht te nemen!
Bestelnummer: 78-266-001
Alvorens de machine te openen, moet de spanningstoevoer worden
onderbroken!
Bestelnummer: 78-266-002
Combi Eco 62
Page 63
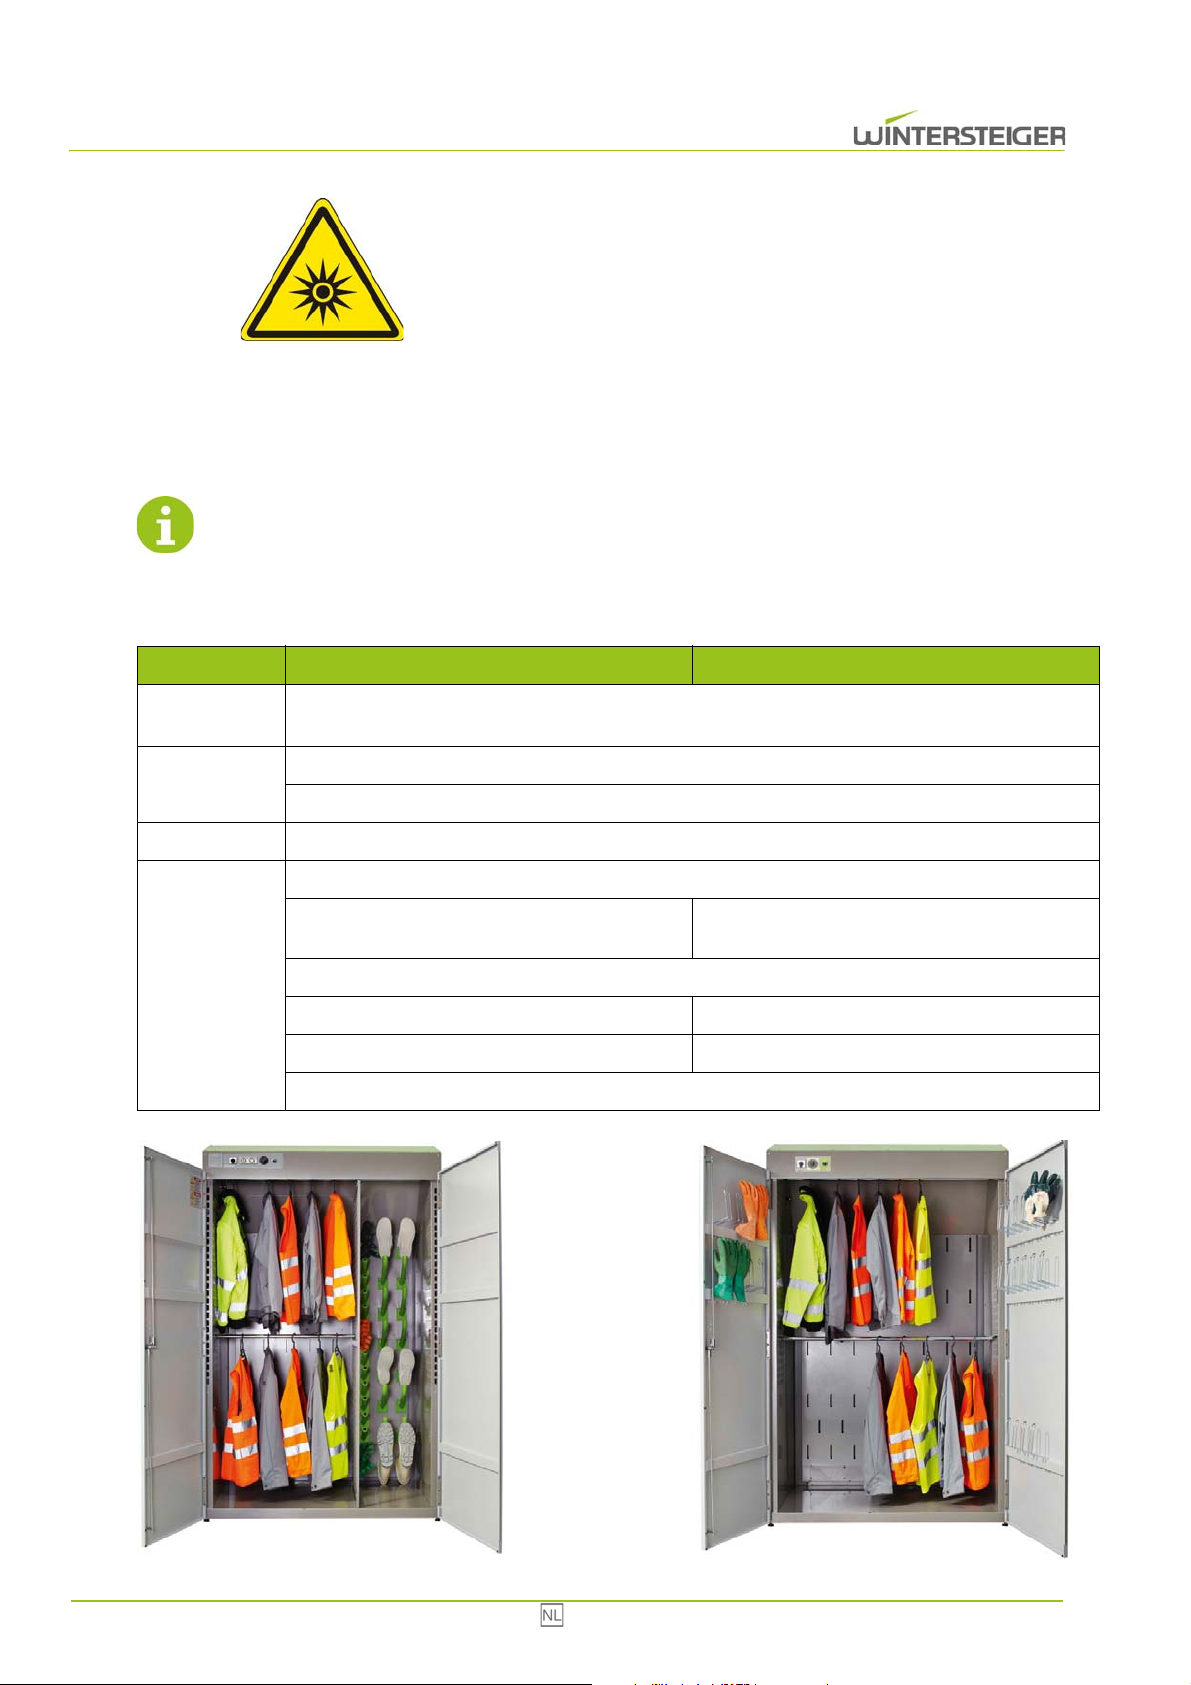
Deze sticker is alleen aanwezig, wanneer de machine beschikt over de
optie uv-lamp of ozonlamp.
Bestelnummer: 78-150-120
2.3 Veiligheidsvoorzieningen
Geen van de veiligheidsvoorzieningen mag tijdens het bedrijf worden verwijderd.
De droogkast Combi Eco voldoet aan de laagspanningsrichtlijn en aan de EMC-richtlijn.
3 Werking
Typ Combi Eco Multi Eco
Bediening
Eenvoudige bediening d.m.v. tijdschakelklok voor 24 uur / 7 dagen evenals analoge tijdschakelklok
(schakelbaar tot 6 uur).
Krachtige ruimteluchtdroging of warmeluchtdroging, vrij schakelbaar
Droging
Energiezuinige droging van hoogwaardige werk- en gebruikskleding
Hygiëne Vermindering van ziektekiemen in de lucht door ozonlamp (optie)
Intern beluchte drogingsmondstukken voor:
8 paar schoenen
8 paar handschoenen
Ruimte
Ingebouwde houder voor (binnenkant van de deur):
2 kledingstangen
12 paar handschoenen
2 kledingstangen
Ingebouwde watertank (legen indien nodig)
Combi Eco
Multi Eco
63 Combi Eco
Page 64
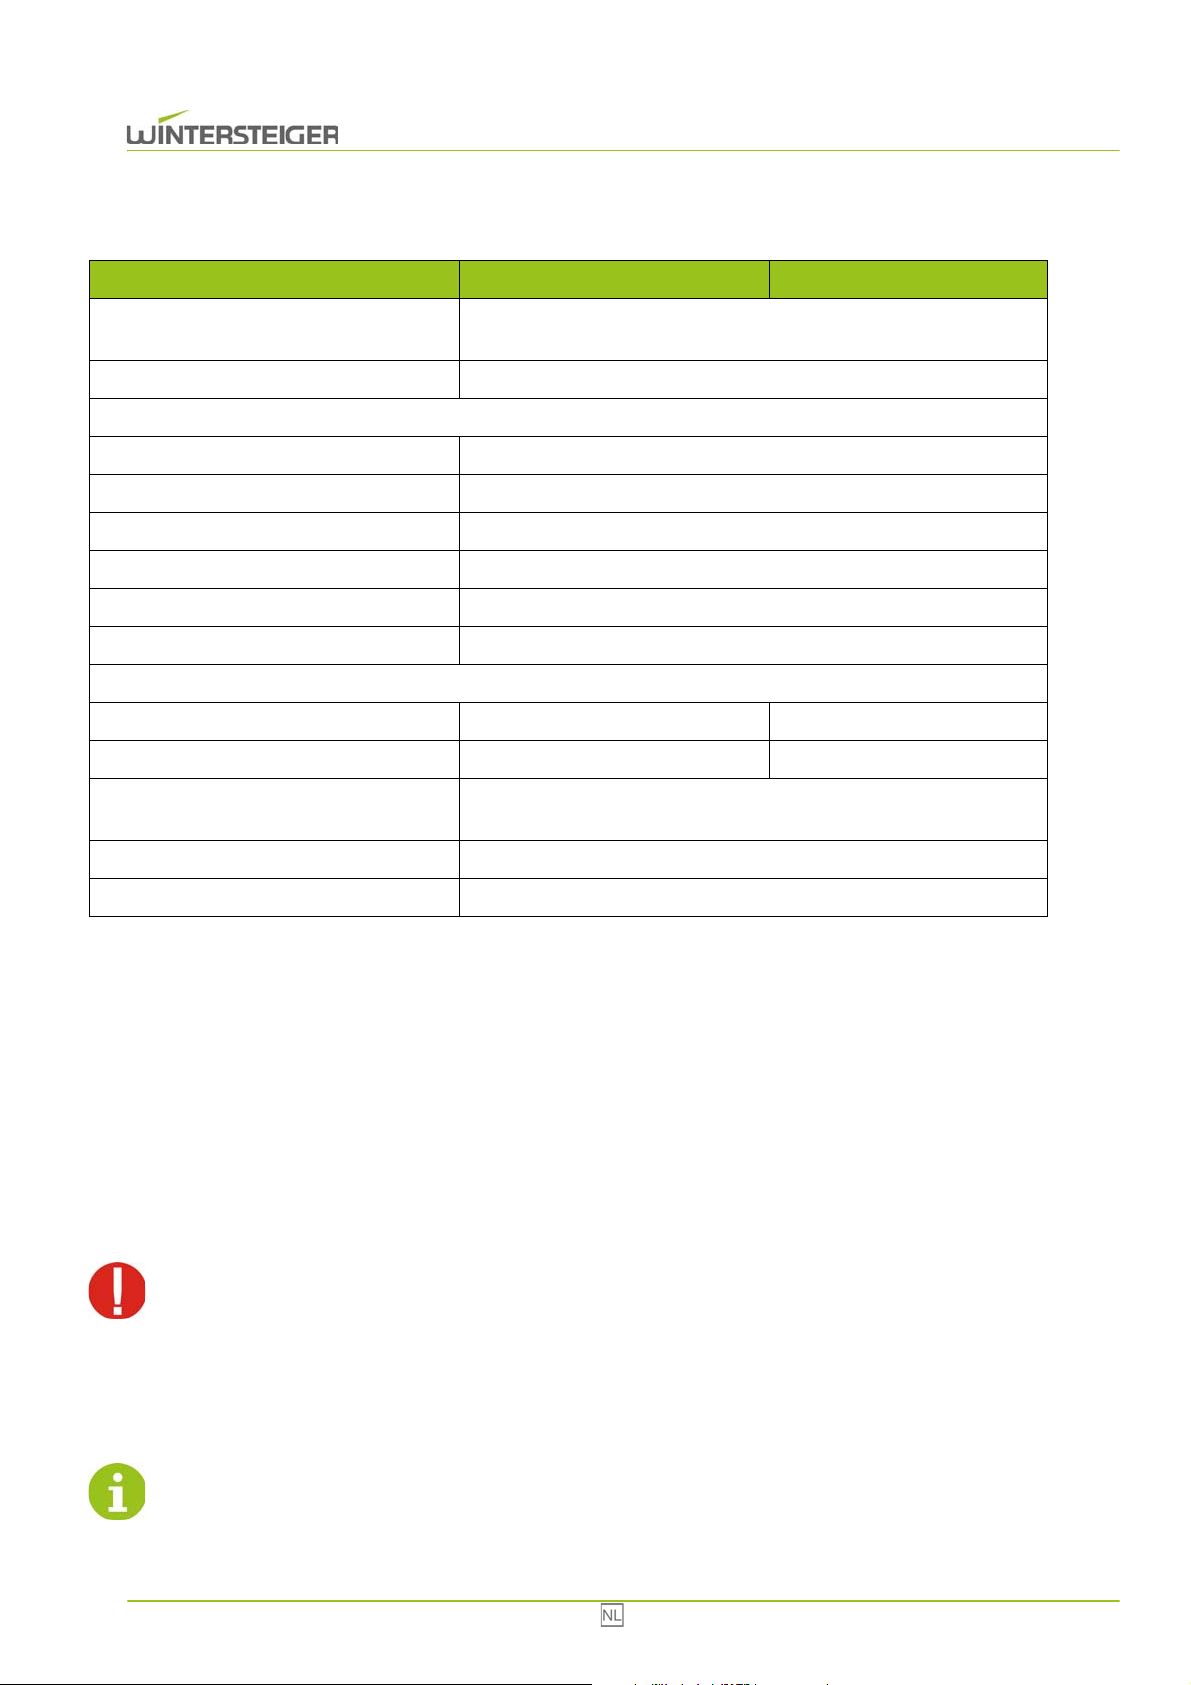
4 Technische gegevens
Typ Combi Eco Multi Eco
Nominale spanning, frequentie, vermogen, zekeringen
Nominale stroomsterkte 6,2 A
De juiste aansluitspanning staat vermeldt op de typeplaat!
Vermogen verwarming: 1 x 800 W
Vermogen ventilator: 1 x 100 W
Vermogen compressor: 1 x 400 W
Ozonlamp (optie): 1 exemplaar
Omgevingstemperatuur: +5 ... 40°C
Luchtvochtigheid: 30% - 80%
Het is uitsluitend toegestaan het apparaat in goed geventileerde, droge binnenruimtes te gebruiken!
Afmetingen (HxBxT): 2100 mm x 1300 mm x 850 mm 2100 mm x 1300 mm x 900 mm
Gewicht: 195 kg 180 kg
Droogduur:
Vermindering van ziektekiemen: Vermindering van ziektekiemen in de lucht door ozonlamp (optie)
Geluidsemissie: onder 70 dB(A)
1 AC 230V 50 Hz; 1,4 kW; 12/16 A
Vanaf 1,5 uur. Afhankelijk van de doorweking, de temperatuur en het
materiaal is een langere drogingsperiode mogelijk.
5 Transport, opslag en verplaatsing
5.1 Transport van het apparaat
Het apparaat moet in de originele verpakking en in de daarop aangegeven stand worden getransporteerd.
5.2 Opslag van de apparaat
Temperatuur: 0° tot +40°C.
Zet om schades te voorkomen geen andere pakketten of kisten op de verpakking van het apparaat!
5.3 Verwijderen van de verpakking en het kiezen van een opstelplek
Let er bij het verwijderen van de verpakking op, dat het apparaat niet wordt beschadigd.
Combi Eco 64
Page 65
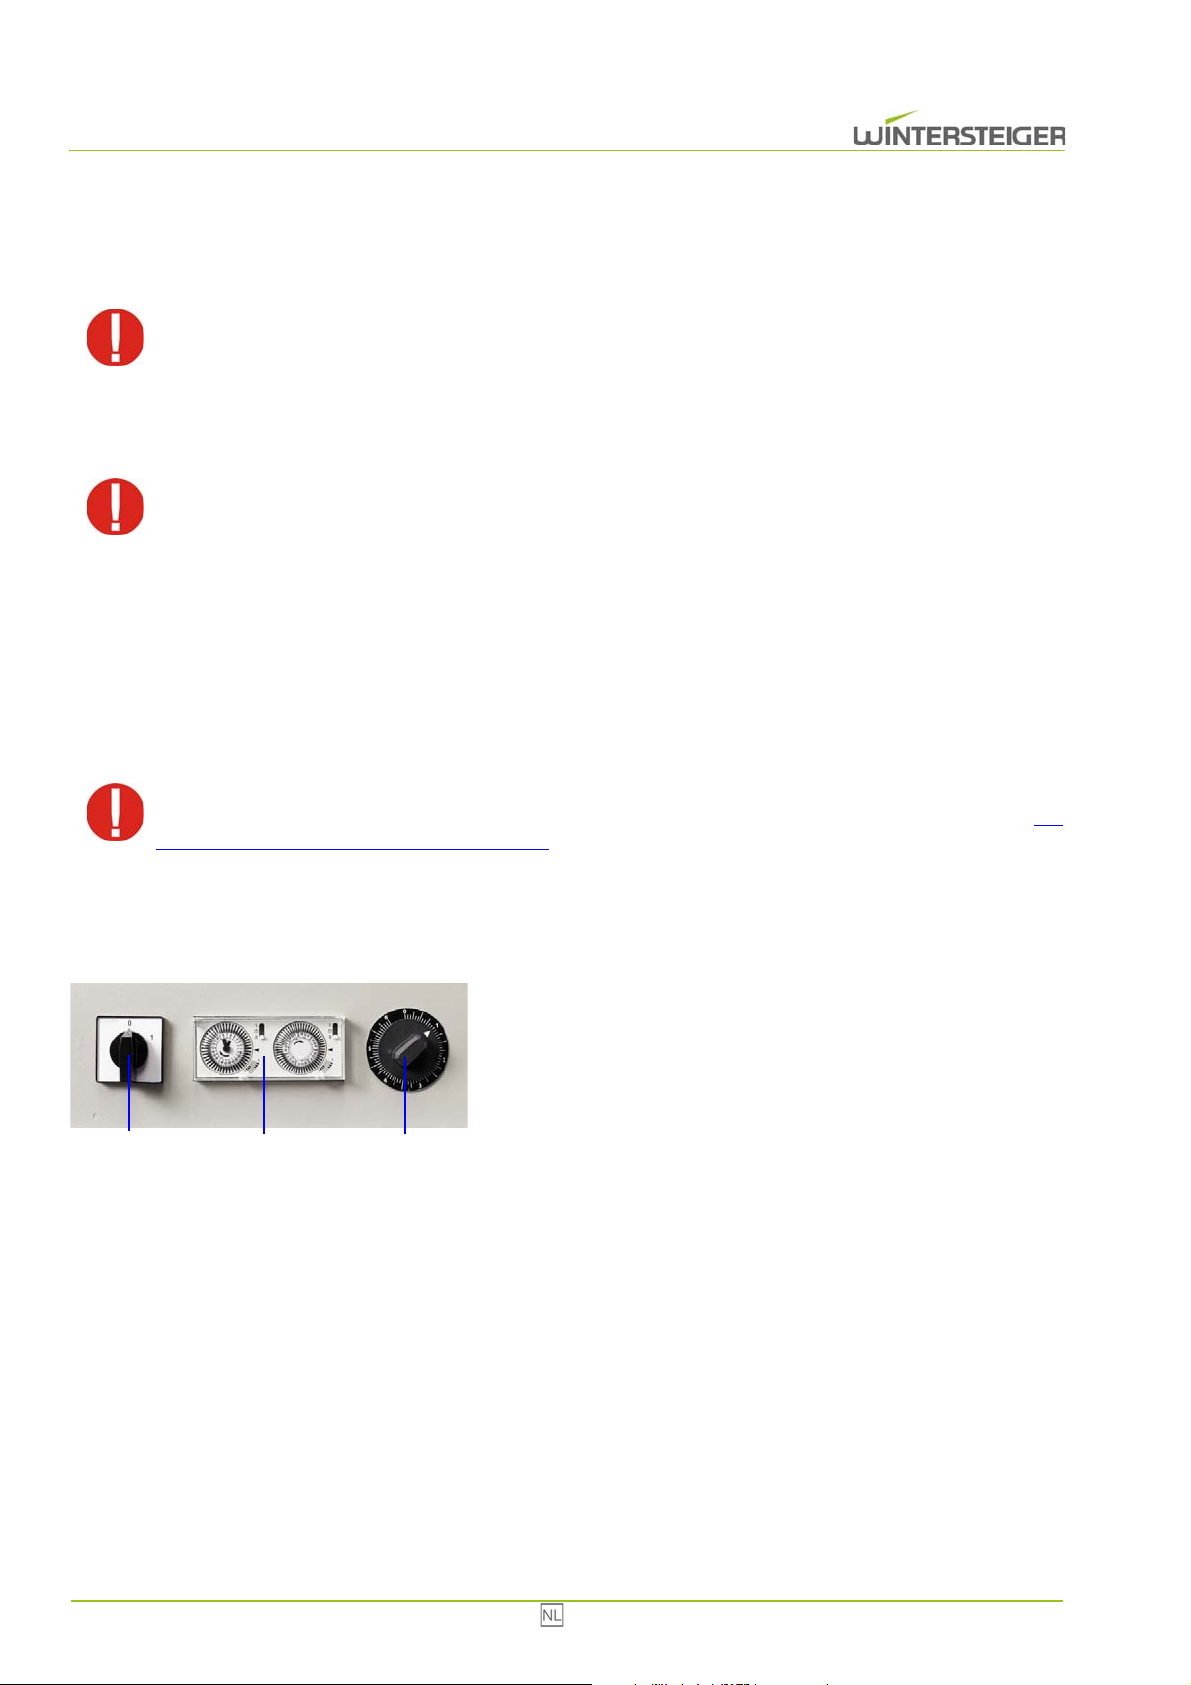
Bij de keuze van de opstellingsplek moet de functionaliteit op de voorgrond staan. Het apparaat moet in een zo droog mo-
C
A
B
gelijke, goed geventileerde ruimte worden geplaatst. De hoogte van de ruimte moet ten minste 2,3 m bedragen. Het stopcontact moet zich direct naast het apparaat bevinden.
Bij de keuze van de opstellocatie dient u met name rekening te houden met de richtlijnen en wet- en regelgevingen met betrekking tot de veiligheid op de werkplek.
Let erop dat de luchttoevoer nooit geheel of ten dele wordt geblokkeerd!
Om een probleemloze en optimale werking van de PREMIA te garanderen, willen wij u er nogmaals op wijzen, dat erop gelet moet worden dat de omgevings- of ruimtetemperatuur nooit lager mag zijn dan 18° C.
Steek geen voorwerpen in het aanzuigluchtrooster of in het beschermrooster. Sluit deze openingen ook niet gedeeltelijk af.
Giet of sproei nooit vloeistoffen in de luchtkringloop, omdat het risico op een elektrische schok en beschadiging van het apparaat bestaat.
6 Beschrijving van de bedieningselementen
Schakel de droogkast niet voortijdig uit met de hoofdschakelaar. Na het verstrijken van de ingestelde drogingsperiode loopt de ventilatie nog 10 tot 15 minuten uit, zodat de verwarming niet oververhit raakt (zie
hoofdst. 7.4 Overtemperatuurschakelaar, pag 71).
6.1 Tijdschakelklok voor 24 uur / 7 dagen
A: Hoofdschakelaar
Apparaat in- en uitschakelen
B: Automatische tijdschakelklok
C: Handmatige tijdschakelklok
Instellen van de drogingsperiode tussen van 0 tot 6 uur
6.2 Werking met de tijdschakelklok voor 6 uur / 7 dagen
Met de automatische tijdschakelklok kan een droging volgens een vast schema gedurende 24 uur plaatsvinden en het 7 dagen.
65 Combi Eco
Page 66
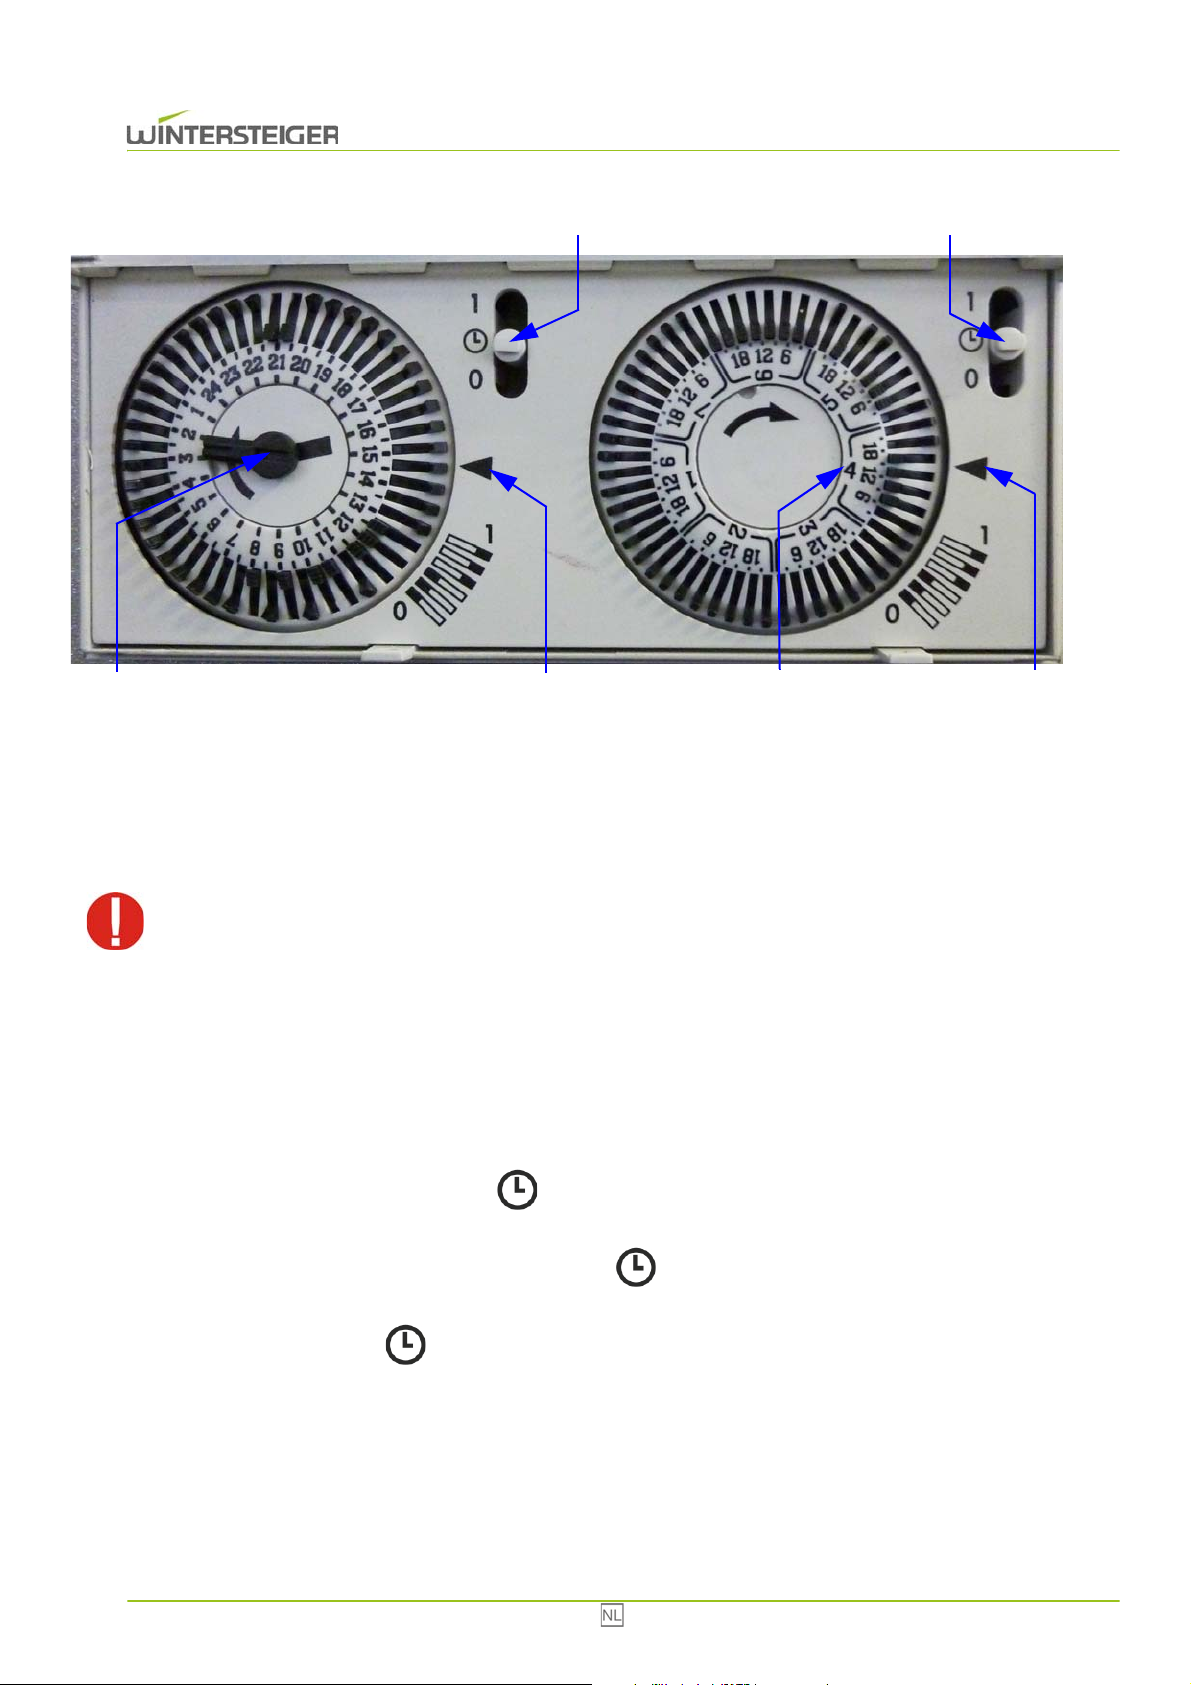
Links bevindt zich de dagteller, rechts de weekteller.
A
C
B
D
F
E
6.2.1 Actuele tijd en actuele weekdag instellen
Draai de minutenwijzer [A] met een kleine gleufschroevendraaier.
De rechter tijdschakelklok voor de instelling van de actuele weekdag draait mee.
Draai nooit aan de tijdschakelklok voor de weekdag. Daardoor kan de tijdschakelklok defect raken.
De pijl [B] geeft de tijd bij benadering aan. Daardoor kan men onderscheiden of het 02:48 of 14:48 uur is.
Het cijfer [C] geeft de weekdag weer, doorlopend genummerd van 1-7. In deze handleiding is de eerste dag van de week de
maandag.
De pijl [D] geeft de actuele weekdag aan (het is donderdag).
Met de beide schakelaars [E+F] wordt de automatische tijdschakelklok geactiveerd of gedeactiveerd.
Staat één van de twee schakelaars op "0" dan is de automatische tijdschakelklok gedeactiveerd.
Staan beide schakelaars op het symbool " " dan wordt de droging uitgevoerd volgens het tijdschema.
Staan beide schakelaars op "1" dan wordt de droogkast permanent (24 uur/7 dagen) ingeschakeld.
Staat de schakelaar [E] op "1" en de schakelaar [F] op " ", dan wordt alleen volgens het weekschema gedroogd. Daarmee staan alleen tijdsintervallen van 3 uur ter beschikking.
Staat de schakelaar [E] op " " en de schakelaar [F] op "1" dan wordt alleen volgens het dagschema (hetzelfde programma voor elke dag van de week) gedroogd.
6.2.2 Tijdschema opstellen
Wanneer het segment van een periode buiten staat, schakelt de droogkast gedurende deze periode in. In principe moet zowel het tijdsegment voor de dag als het tijdsegment voor de week buiten staan, zodat de droging wordt geactiveerd.
Combi Eco 66
Page 67
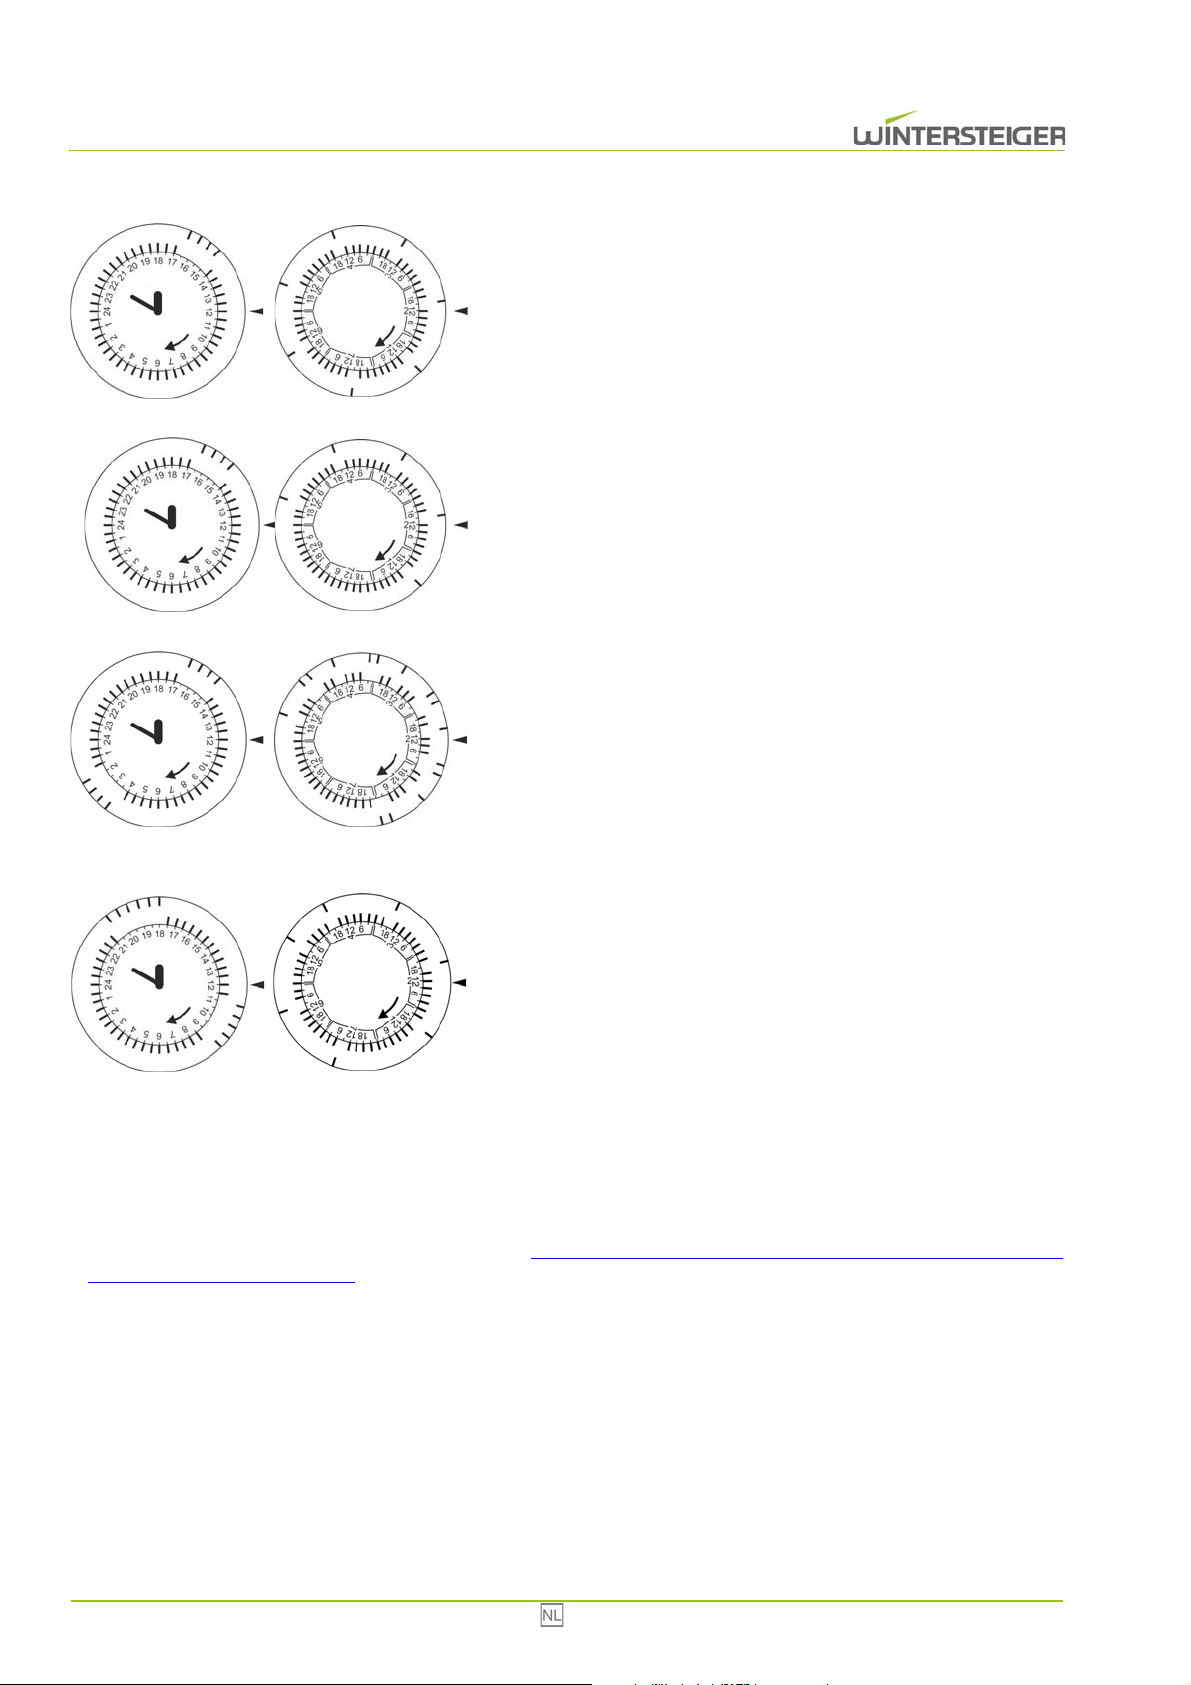
Voorbeeld: Het apparaat moet op de volgende tijden drogen:
elke dag van 15:00 tot 17:00 uur
Daarvoor moeten de volgende segmenten op de dagteller buiten staan:
15:00, 15:30, 16:00 en 16:30 uur
Daarvoor moeten de volgende segmenten op de weekteller buiten staan:
elke dag 15:00 uur
Voorbeeld: Het apparaat moet op de volgende tijden drogen:
maandag {1} t/m vrijdag {5} van 15:00 tot 17:00 uur
Op zaterdag {6} en zondag {7} moet er geen droging plaatsvinden.
Daarvoor moeten de volgende segmenten op de weekteller buiten staan:
15:00, 15:30, 16:00, 16:30 uur
Daarvoor moeten de volgende segmenten op de weekteller buiten staan:
maandag {1} t/m vrijdag {5} 15:00 uur
Voorbeeld: Het apparaat moet op de volgende tijden drogen:
maandag {1} t/m vrijdag {5} van 02:00 tot 04:00 en van 15:00 tot 17:00
uur
Op zaterdag {6} en zondag {7} moet er geen droging plaatsvinden.
Daarvoor moeten de volgende segmenten op de weekteller buiten staan:
02:00, 02:30, 03:00, 03:30, 15:00, 15:30, 16:00, 16:30 uur
Daarvoor moeten de volgende segmenten op de weekteller buiten staan:
maandag {1} t/m vrijdag {5} 00:00, 03:00, 15:00 uur
Voorbeeld: Het apparaat moet op de volgende tijden drogen:
maandag {1} t/m donderdag {4} van 18:00 tot 21:00 uur
vrijdag {5} t/m zondag {7} van 09:00 tot 11:30 uur
Daarvoor moeten de volgende segmenten op de weekteller buiten staan:
09:00, 09:30, 10:00, 10:30, 11:00, 18:00, 18:30, 19:00, 19:30, 20:00,
20:30 uur
Daarvoor moeten de volgende segmenten op de weekteller buiten staan:
maandag {1} t/m donderdag {4} 15:00 uur
vrijdag {5} t/m zondag {7} 09:00 uur
6.2.3 Buiten het schema om drogen
Wanneer in de droogkast met de tijdschakelklok voor 24 uur / 7 dagen een droogproces buiten het schema om plaats moet
vinden, kan de droging met een 6 uurs-tijdschakelklok (zie hoofdst. 6.3 Werking van de ozonlamp met de tijdschakelklok
gedurende 24 uur (optie), pag 67) worden uitgevoerd. De 6 uurs-tijdschakelklok overbrugt de tijdschakelklok voor 24 uur / 7
dagen.
6.3 Werking van de ozonlamp met de tijdschakelklok gedurende 24 uur (optie)
Met de automatische tijdschakelklok kan een droging volgens een vast schema gedurende 24 uur plaatsvinden.
67 Combi Eco
Page 68
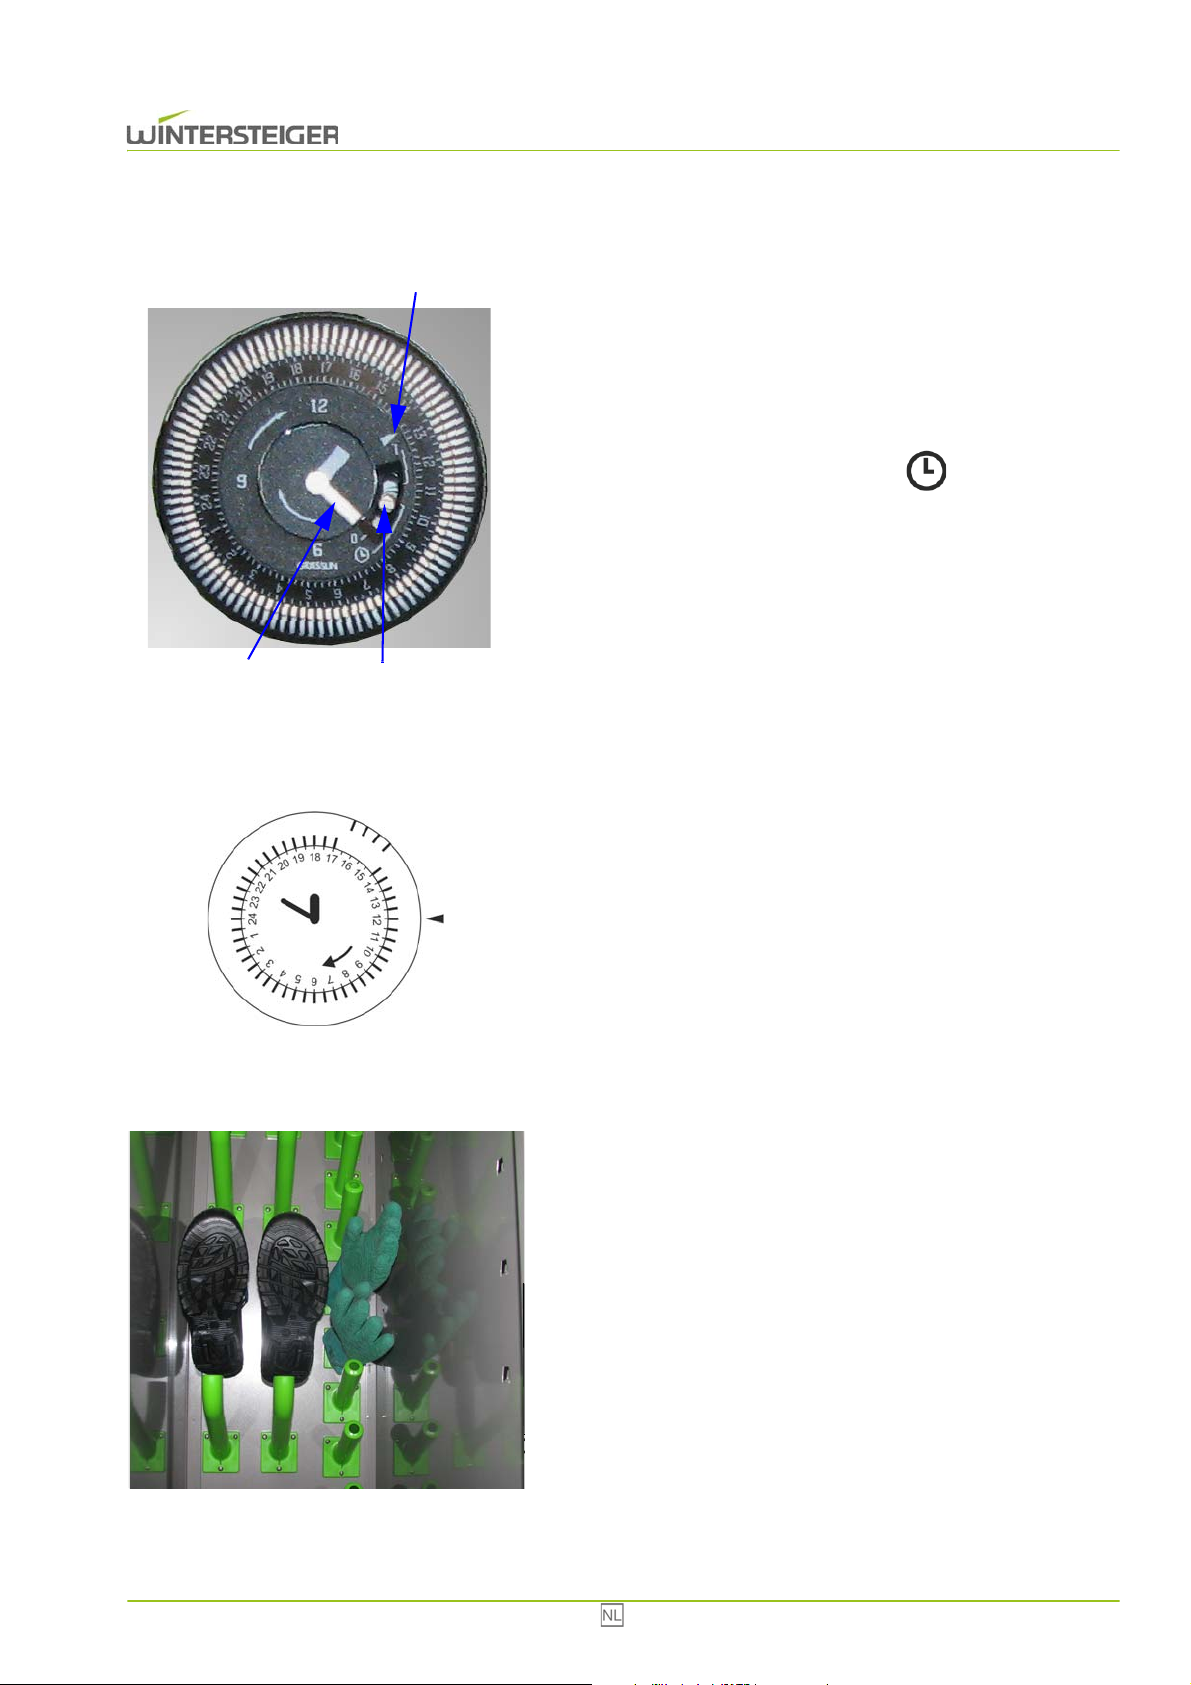
6.3.1 Actuele tijd instellen
A
C
B
C
Draai de minutenwijzer [A] met een kleine gleufschroevendraaier.
De pijl [B] geeft de tijd bij benadering aan. Daardoor kan men onderscheiden of het 01:25 of 13:25 uur is.
Met de schakelaar [C] wordt de automatische tijdschakelklok geactiveerd
of gedeactiveerd.
Staat de schakelaar op "0" dan is de automatische tijdschakelklok
gedeactiveerd.
Staat de schakelaar op het symbool " " dan wordt de droging uitgevoerd volgens het tijdschema.
Staat de schakelaar op "1" dan wordt de droogkast permanent ingeschakeld.
6.3.2 Tijdschema opstellen
Wanneer het segment van een periode buiten staat, schakelt de droogkast gedurende deze periode in.
6.4 Droogkast optimaal vullen
Voorbeeld: Het apparaat moet op de volgende tijden drogen:
elke dag van 15:00 tot 17:00 uur
Daarvoor moeten de volgende segmenten op de dagteller buiten staan:
15:00, 15:30, 16:00 en 16:30 uur
Neem de volgende aanwijzingen bij het drogen van uw werkkleding
in acht:
Steek de handschoenen op de ingebouwde handschoenhouders in
de deur.
Hang werkkleding op een kledinghanger aan de gemonteerde kledingstangen.
Combi Eco 68
Page 69
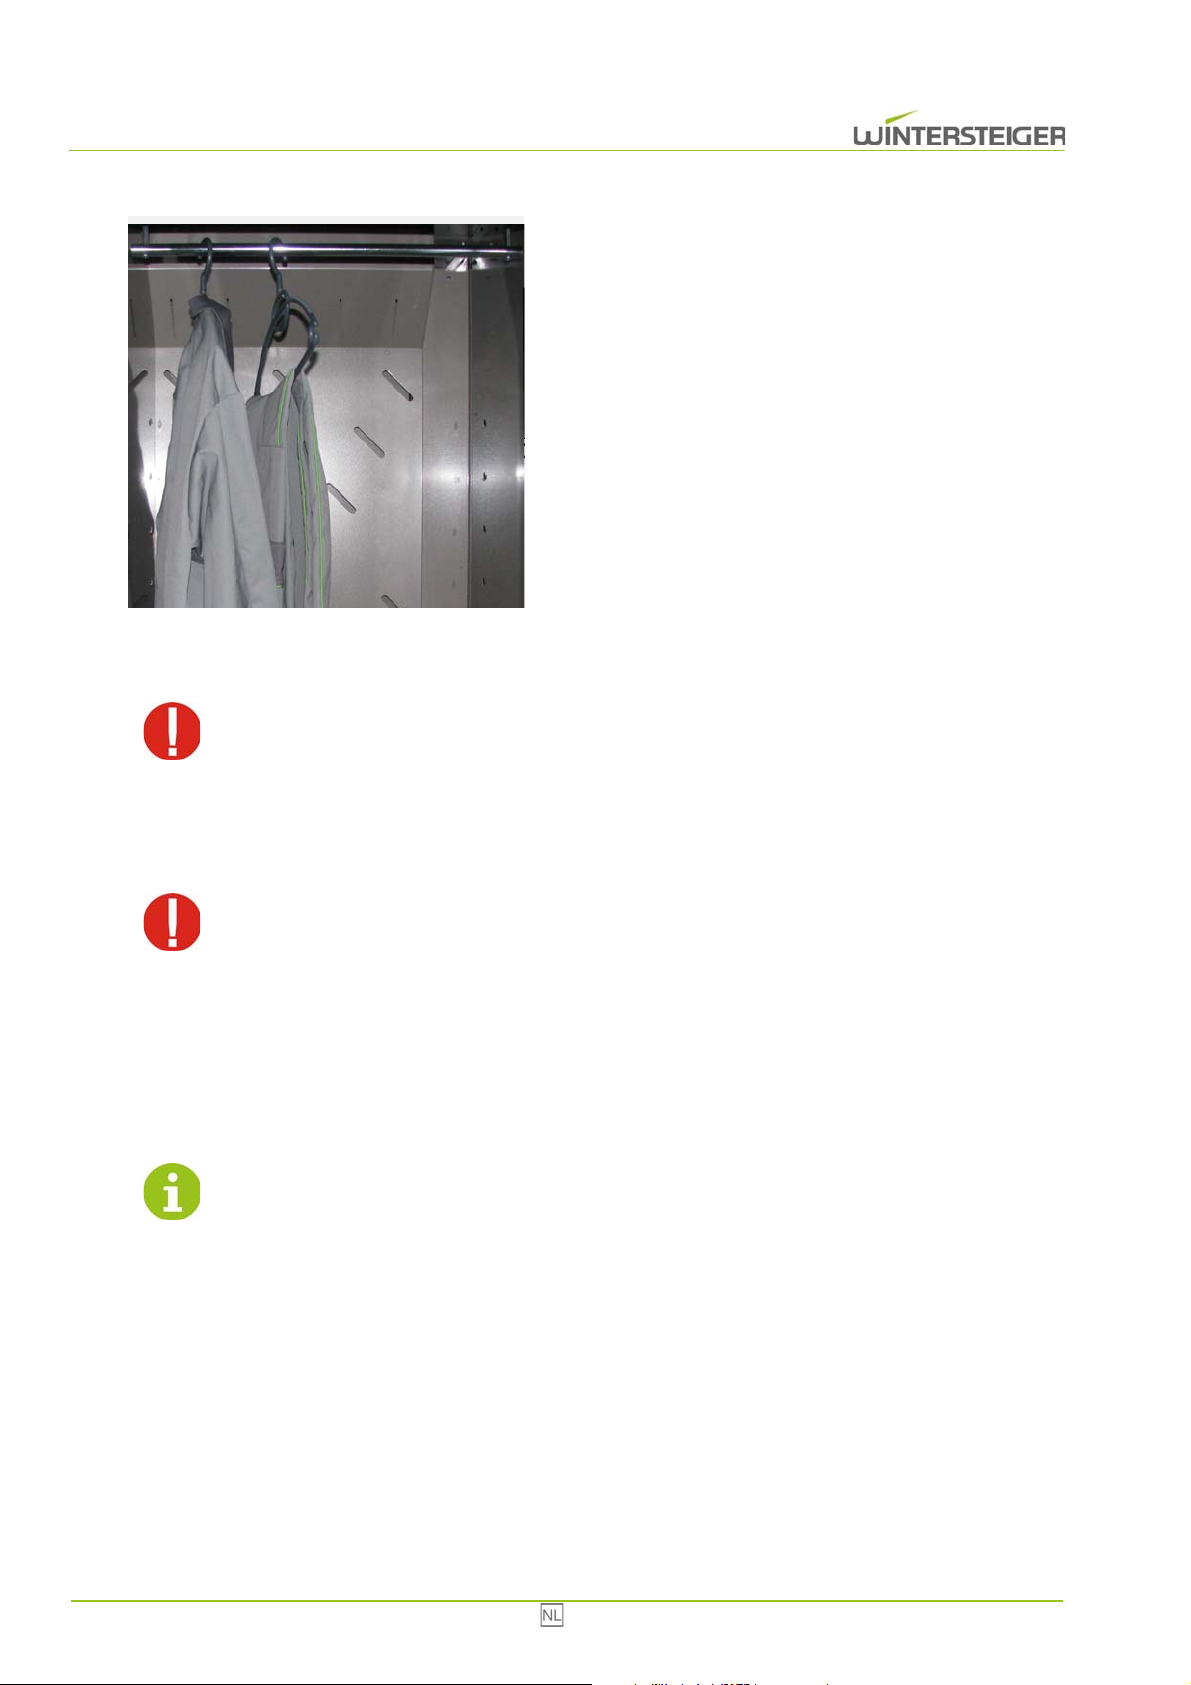
7 Onderhoud
C
Schakel vóór alle onderhoudswerkzaamheden het apparaat uit en trek de stekker uit het stopcontact!
Hang werkkleding op een kledinghanger aan de gemonteerde kledingstangen.
De droogkasten hebben verschillende capaciteiten van uitrustingen. Tussen de uitrustingen moet enige vrije ruimte blijven, zodat een optimale
luchtcirculatie mogelijk is.
Na het uitschakelen van de verwarming loopt de ventilatie nog 10 tot 15
minuten uit.
7.1 Reiniging
Reinig het frame en de pijpen regelmatig met een bochtige poetsdoek.
Het reinigen van het apparaat met een hogedrukreiniger is niet toegestaan! Wordt geen gehoor gegeven
aan deze aanwijzing, dan aanvaardt de producent geen enkele aansprakelijkheid voor daaruit voortvloeiende schades en de garantie komt te vervallen.
7.2 Ozonlamp (optie)
De ozonlamp is volgens een vast schema (15 min. werking - 30 min. pauze - 15 min. werking) gedurende 24 uur vooraf ingesteld via de tijdschakelklok. Deze is alleen actief wanneer de hoofdtijdschakelklok geactiveerd is.
De ozondosering is vooraf ingesteld in de fabriek.
Er wordt aangeraden de instellingen van de ozonlamp niet te wijzigen!
69 Combi Eco
Page 70
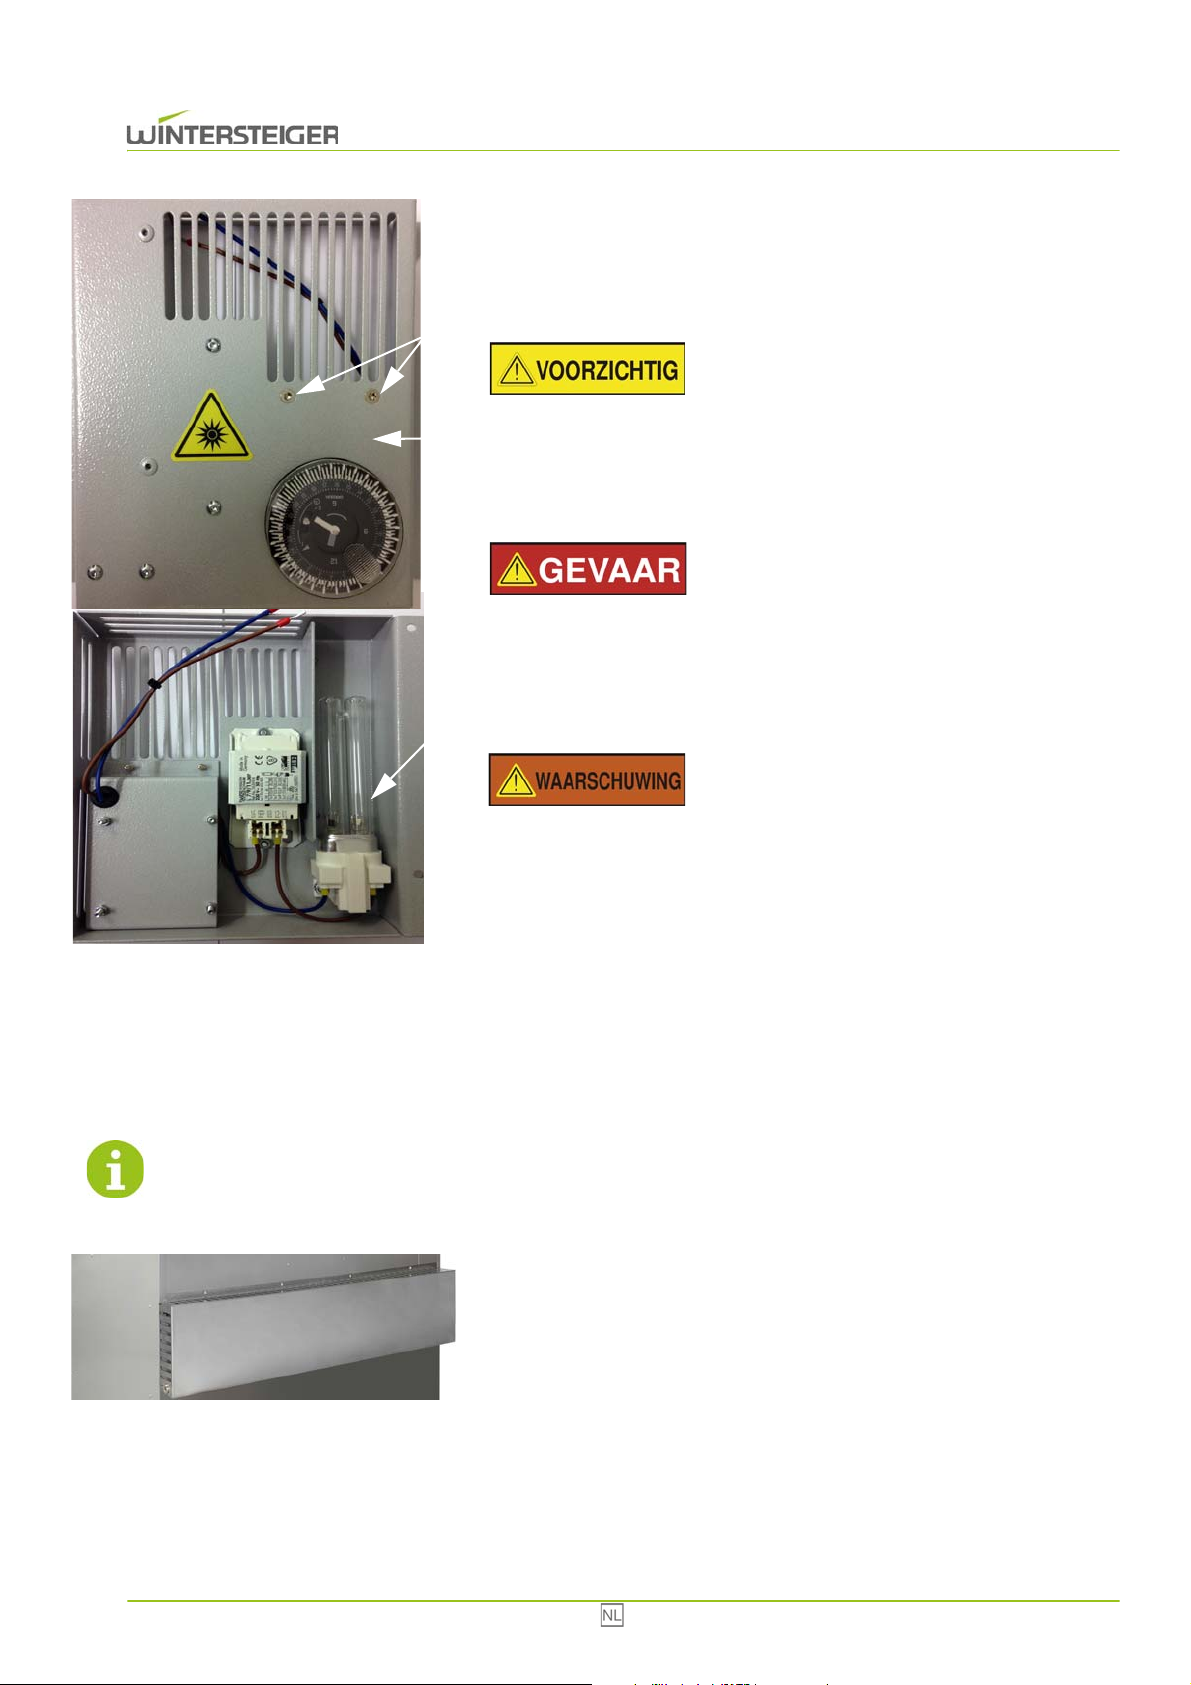
De gebruikte ozonlamp maakt een effectieve vermindering van ziektekie-
A
C
B
A
men mogelijk gedurende een gebruiksperiode van 2000 uur, daarna
moet de ozonlamp worden vervangen. Voer eenmaal per maand een visuele controle van de ozonlamp uit tijdens het gebruik. U ziet aan de
achterwand van de kast blauwachtig licht doorschijnen.
Letselgevaar!
Kijk niet rechtstreeks in de ozonlamp! De uv-stralen kunnen uw
ogen beschadigen!
Ozonlamp vervangen
Letselgevaar!
Onderbreek de spanningsvoorziening naar het apparaat!
Verwijder alle schroeven [A].
Verwijder deksel [B]. Verwijder de ozonlamp [C] voorzichtig.
Letselgevaar!
7.3 Watertank legen
Leeg de watertank indien nodig!
De ozonlamp bevat giftig kwikzilver. Voer de ozonlamp af volgens
de gebruikelijke nationale voorschriften!
Plaats een nieuwe lamp en zet het deksel [B] weer vast met de
schroeven [A].
Draai de schroeven los.
Verwijder afdekking.
Verwijder de watertank en maak deze leeg.
Combi Eco 70
Page 71
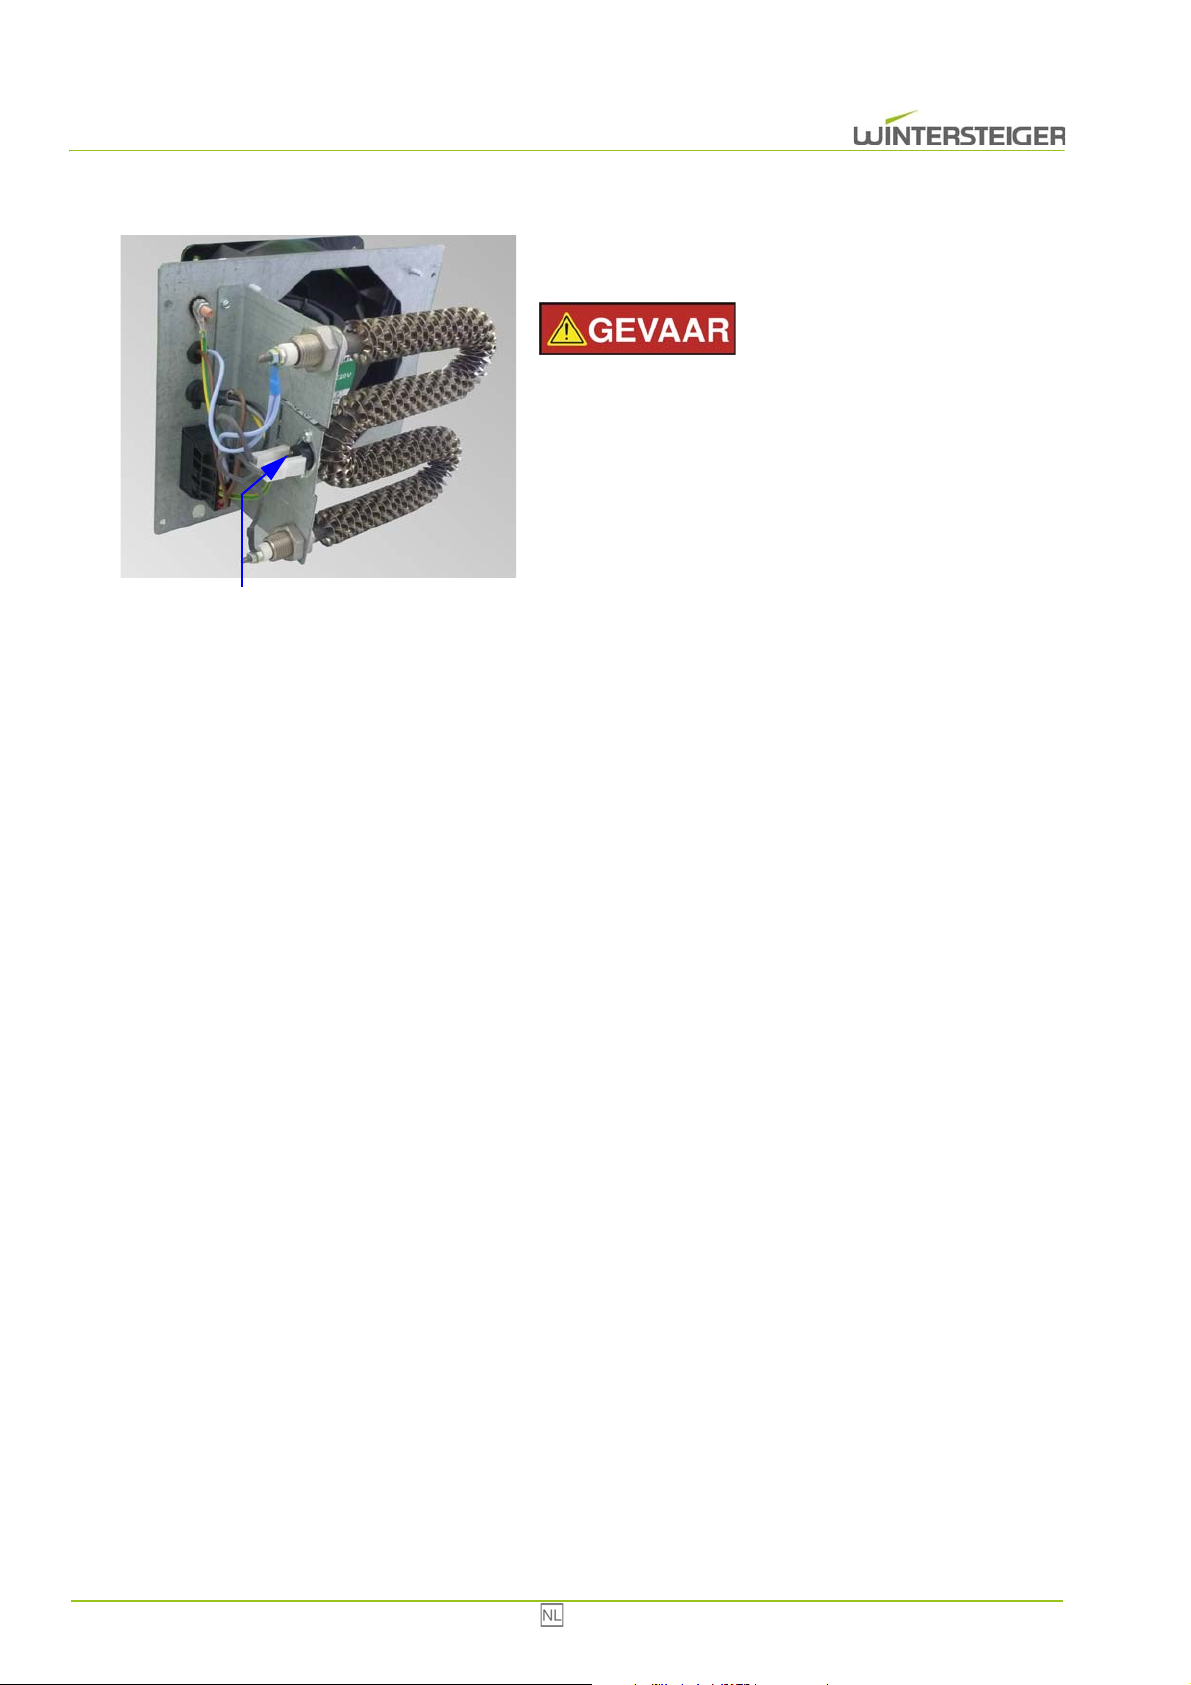
7.4 Overtemperatuurschakelaar
A
Wanneer de overtemperatuurschakelaar van de verwarming wordt
geactiveerd, moet de schakelaar worden teruggezet.
Letselgevaar!
Onderbreek de spanningsvoorziening naar het apparaat! Laat
alleen een erkend elektricien de storing verhelpen!
Demonteer de desbetreffende verwarmingsventilator.
Druk op toets [A].
Monteer de verwarmingsventilator weer.
71 Combi Eco
Page 72
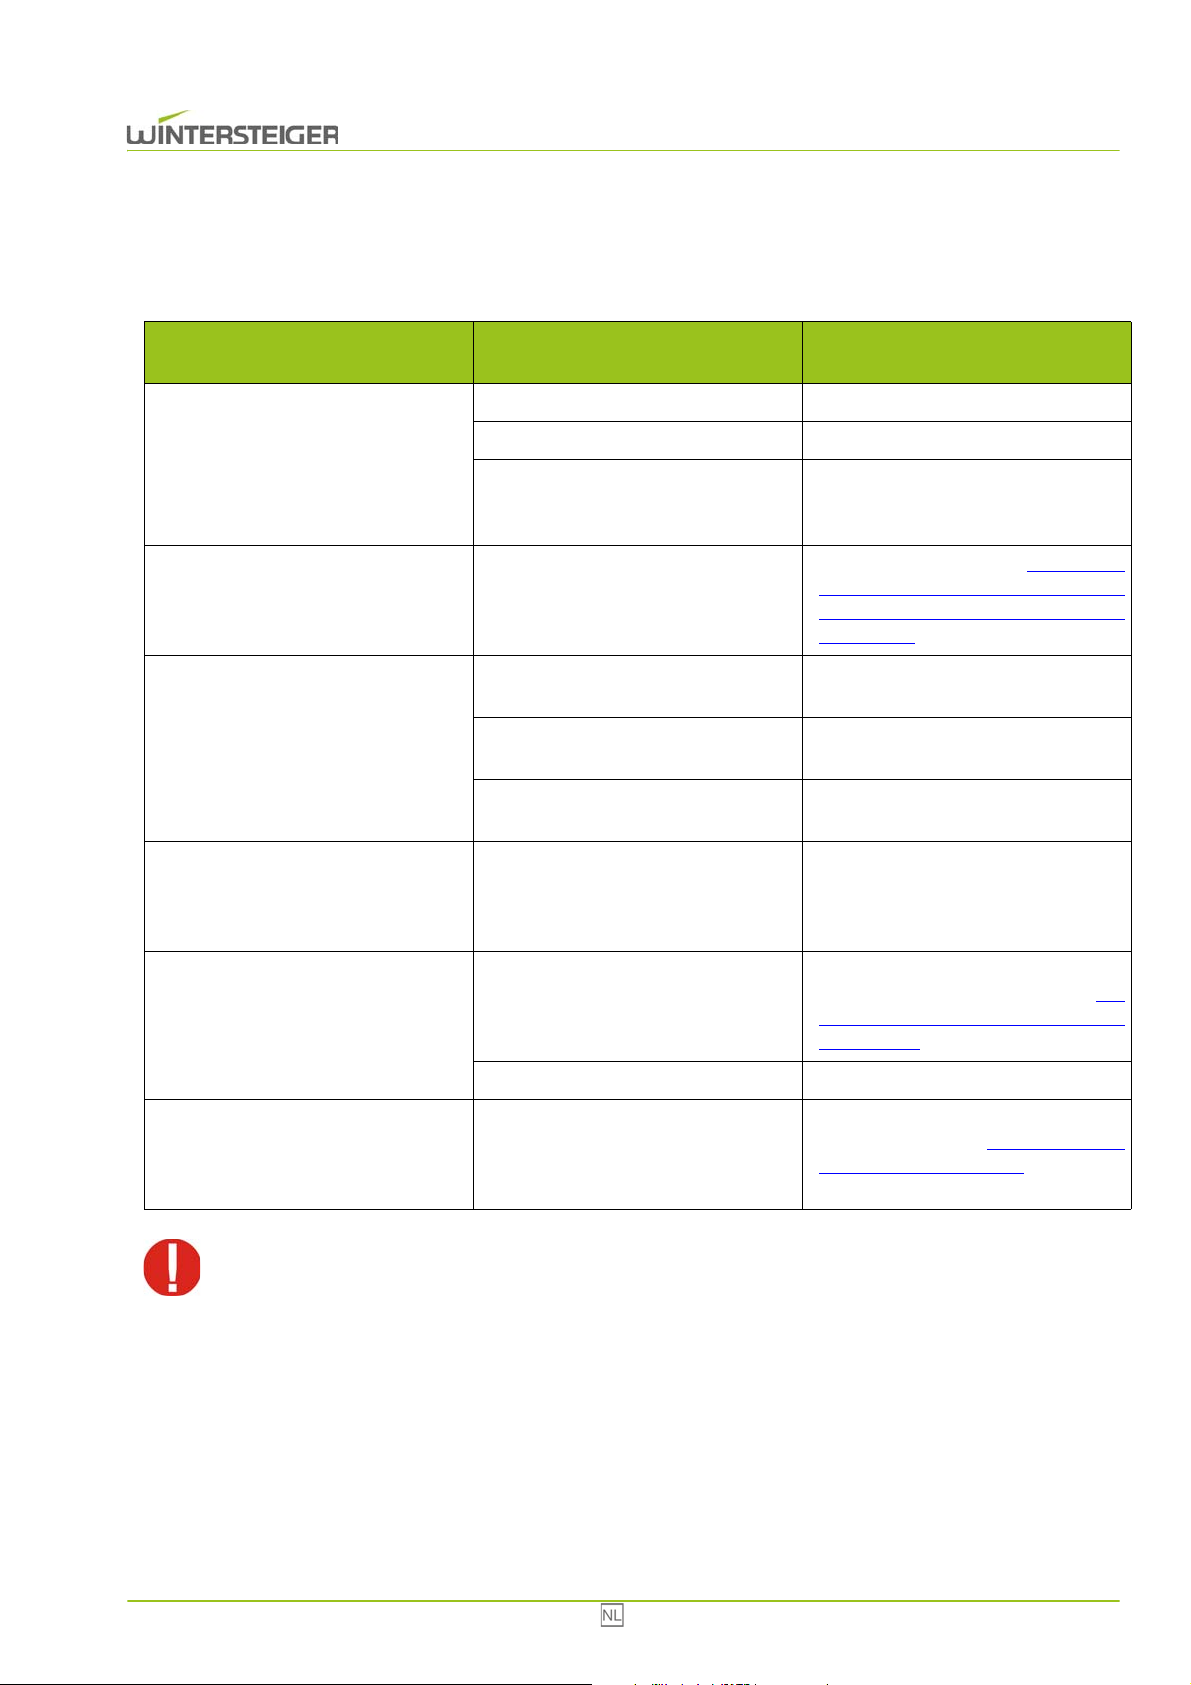
8 Storingsopheffing
Storing
Probleem
Het apparaat werkt niet
Het apparaat droogt niet
Oorzaak Opheffing
De stekker zit niet in het stopcontact Steek de stekker in het stopcontact
De hoofdschakelaar staat op "0" Hoofdschakelaar inschakelen
Schakelaar handbediening/automatische bedrijfsmodus staat op „0“
Geen drogingsperiode ingesteld
Onvoldoende luchttoevoer
Luchtvochtigheid > 80%
Ruimtetemperatuur < 5°C
Optie: ozon met tijdrelais
Schakel de hoofdschakelaar in handbediening of automatische bedrijfsmodus
Drogingsperiode instellen (zie hoofdst.
6.3 Werking van de ozonlamp met de
tijdschakelklok gedurende 24 uur (optie), pag 67)
Controleer de luchttoevoer op het toestel en in de werkruimte
Hoe lager de luchtvochtigheid, des te
beter de droging.
Hoe hoger de ruimtetemperatuur, des
te beter de droging
Bij het starten van de droging wordt de
ozonlamp gedurende ca. 10 minuten
ingeschakeld, vervolgens start het
droogproces.
Droogvermogen het apparaat vermindert of het apparaat droogt niet
Ozonlamp doet het niet
Trek bij ingrepen in het apparaat de stekker uit het stopcontact! Het apparaat mag alleen worden gebruikt
wanneer alle beveiligingen en afdekkingen gemonteerd zijn.
Overtemperatuurschakelaar van de
verwarming is geactiveerd, omdat een
temperatuur van 80°C werd overschreden
Ventilator defect Ventilator controleren
9 Schakelschema voor (pag 16)
Controleer of de ventilatiegleuven binnen of buiten afgedekt zijn. (zie
hoofdst. 7.4 Overtemperatuurschakelaar, pag 71)
Controleer of de ozonlamp ingestoken
en ingeschakeld is (zie hoofdst. 7.2
Ozonlamp (optie), pag 69) of ozonlamp
vervangen
Combi Eco 72
Page 73

10 Buitengebruikstelling en afvalverwerking
Letselgevaar!
Onderbreek de stroomtoevoer naar de machine en de verbinding tussen elke externe aandrijving alvorens de
machine buiten gebruik te stellen en te demonteren. Gebruik voor de demontage uitsluitend geschikt gereedschap.
Demonteer bij de buitengebruikstelling alle onderdelen op vakkundige wijze en voer deze op verantwoorde
wijze af. Reinig alle olie- en vethoudende onderdelen alvorens deze af te voeren.
Olie en vet mogen in geen geval in het milieu terechtkomen.
Neem bij het afvoeren van de onderdelen de voor het land specifieke voorschriften in acht!
Machine op vakkundige wijze demonteren en in afzonderlijke onderdelen uit elkaar nemen.
Olie- en vethoudende onderdelen reinigen.
Onderdelen afvoeren naar materiaalgroepen (staal, kunststof, elektrische en elektronische onderdelen enz.).
Olie en vet op milieuvriendelijke wijze afvoeren, ook biologisch afbreekbare oliën en vetten.
73 Combi Eco
Page 74

Obsah
1 Úvod .................................................................................................................................................................................... 75
1.1 Stanovený způsob použití ........................................................................................................................................ 75
2 Všeobecná upozornění ...................................................................................................................................................... 76
2.1 Bezpečnostní předpisy ............................................................................................................................................. 76
2.2 Výstrahy ................................................................................................................................................................... 76
2.3 Ochranná zařízení ................................................................................................................................................... 77
3 Funkce ................................................................................................................................................................................ 77
4 Technické údaje ................................................................................................................................................................. 78
5 Přeprava, skladování a přemístění ................................................................................................................................... 78
5.1 Přepravní podmínky přístroje ................................................................................................................................... 78
5.2 Skladování přístroje ................................................................................................................................................. 78
5.3 Odstranění obalu a výběr umístění .......................................................................................................................... 78
6 Popis ovládacích prvků ..................................................................................................................................................... 79
6.1 Časový spínač na 24 hodin/ 7 dny ........................................................................................................................... 79
6.2 Provoz s časovačem na 24 hodin / 7 dny ................................................................................................................ 79
6.2.1 Nastavení aktuálního času a aktuálního dne v týdnu .................................................................................. 80
6.2.2 Nastavení časového plánu .......................................................................................................................... 80
6.2.3 Sušení mimo plán ........................................................................................................................................ 81
6.3 Provoz ozónové lampy s časovým spínačem na 24 hodin (volitelná možnost) ....................................................... 81
6.3.1 Nastavení aktuálního času .......................................................................................................................... 82
6.3.2 Nastavení časového plánu .......................................................................................................................... 82
6.4 Optimální naplnění sušicí skříně .............................................................................................................................. 82
7 Údržba ................................................................................................................................................................................. 83
7.1 Čištění ...................................................................................................................................................................... 83
7.2 Ozonová lampa (volitelná možnost) ......................................................................................................................... 83
7.3 Vyprázdnění nádrže na vodu ................................................................................................................................... 84
7.4
8 Odstranění závad ............................................................................................................................................................... 86
9 Schéma zapojení (strana 16) ............................................................................................................................................. 86
10 Odstavení a likvidace ...................................................................................................................................................... 87
Combi Eco 74
Page 75

1 Úvod
© Copyright 2014 by
WINTERSTEIGER AG ::: A-4910 Ried/I Dimmelstrasse 9
Autor a grafické zpracován: Maria Marek-Pollhammer
Tel. +43 7752 919-0
E-mail: [email protected]
Originál návodu k obsluze
Před prvním uvedením stroje do provozu se musí operátor a osoba, odpovědná za stroj, s obsahem tohoto návodu k obsluze,
který doplňuje doklady školení, seznámit.
Na škody, ke kterým dojde následkem nedbalosti pokynů a upozornění v návodu k použití, se záruka nevztahuje. Uživatel
stroje je zákonně povinen dodržovat předpisy příslušné země pro úrazovou prevenci.
Kromě toho se s tímto návodem k obsluze musí zacházet důvěrně. Smí být poskytnut k dispozici pouze oprávněným
osobám. Přenechání třetím je povoleno pouze po písemném souhlasu firmy WINTERSTEIGER.
Všechny doklady jsou chráněny ve smyslu autorského práva. Předávání a rozmnožování těchto dokladů, i pouze ve
výňatcích, jakož i zužitkování a sdělování jejich obsahu je zakázáno, pokud není výslovně písemně povoleno.
Nezachování předpisů je trestné a zavazuje k náhradě způsobené škody. Firma WINTERSTEIGER si vyhrazuje všechna
práva k uplatnění ochranných živnostenských práv.
1.1 Stanovený způsob použití
Vysoušeč Combi Eco je v závislosti na provedení určen výhradně k vysoušení a ukládání obuvi, holínek, rukavic a helem
(určené použití). Jakékoli jiné použití je neúčelové použití. Za škody z toho plynoucí výrobce neručí. Riziko neúčelového
použití spočívá na samotném uživateli.
Účelové použití zahrnuje také dodržování ustanovení pro provoz, údržbu a péči, předepsaných výrobcem. Musí se dodržovat
příslušné předpisy na ochranu zdraví a bezpečnost při práci, stejně jako ostatní obecně uznávaná bezpečnostně technická
pravidla a pravidla pracovní hygieny.
Svévolné změny na stroji vylučují záruku výrobce za škody, které z nich vyplývají.
Neustále se snažíme naše výrobky vylepšovat a z toho důvodu si vyhrazujeme právo provést všechny změny a vylepšení,
jež považujeme za účelné. Povinnost, zahrnout rovněž dříve dodané stroje a zařízení, s tím však není spojena.
Všechny ilustrace, rozměry a hmotnostní údaje v návodu k obsluze jsou nezávazné.
75 Combi Eco
Page 76
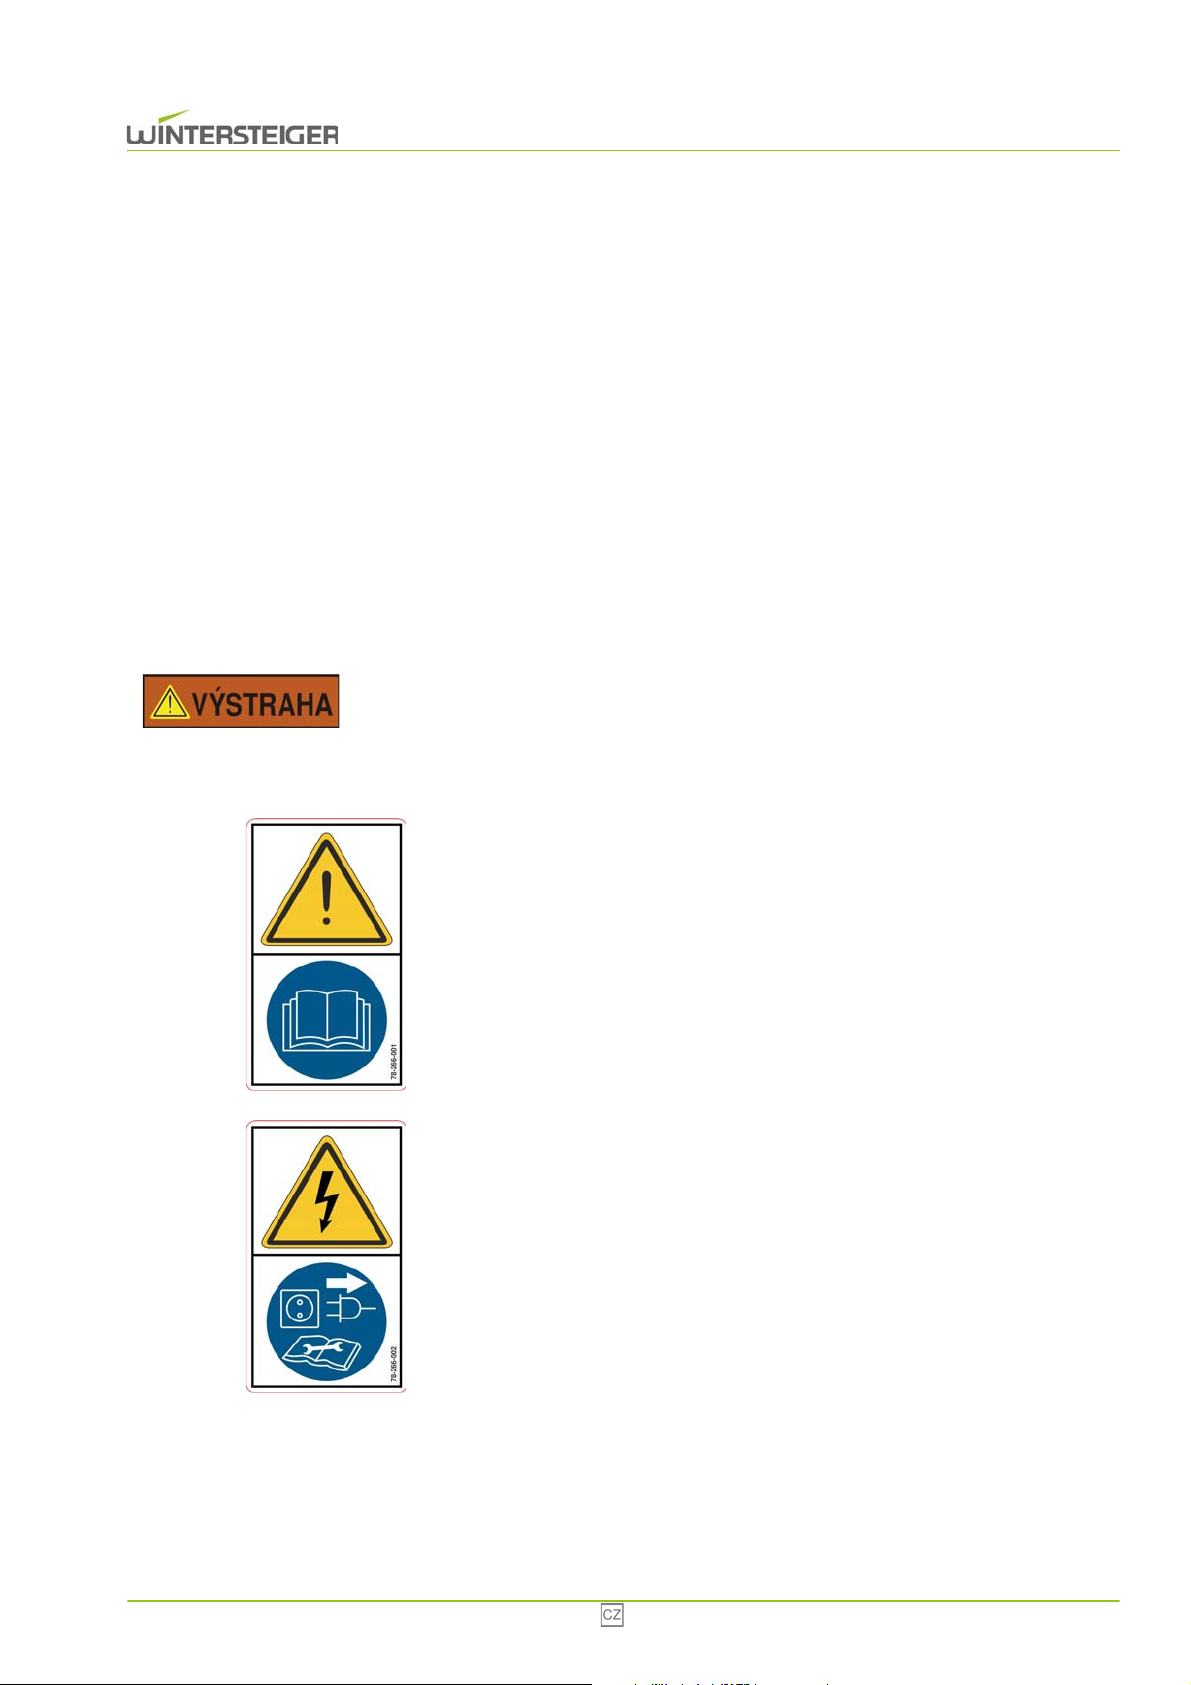
2 Všeobecná upozornění
2.1 Bezpečnostní předpisy
Přístroj připojujte pouze k zásuvkám, které byly zkontrolovány elektrikářem. Dbejte přitom na správné připojovací
napětí! Připojovací hodnoty najdete na typovém štítku. Zkontrolujte, zda tyto údaje odpovídají napětí sítě.
Sušicí skříň se smí provozovat pouze s kompletně namontovanými ochrannými zařízeními a kryty!
Před každou změnou stanoviště nebo při zásazích do přístroje vytáhněte síťovou zástrčku!
Na zařízení se smí používat pouze originální náhradní díly a spotřební materiál firmy WINTERSTEIGER. Použití cizích
komponent je na vlastní nebezpečí a odpovědnost provozovatele, záruka tím zaniká!
Zajistěte dobré větrání pracoviště!
2.2 Výstrahy
Nebezpečí úrazu!
Je třeba pravidelně kontrolovat, zda se tyto výstražné nálepky na stroji ještě nacházejí. Nečitelné nebo chybějící
výstražné nálepky musí být okamžitě nahrazeny. Nálepky se nacházejí na levé vnitřní stěně přístroje.
Před uvedením do provozu si přečtěte a dodržujte návod k obsluze a
bezpečnostní pokyny!
Objednací číslo: 78-266-001
Před otevřením stroje vytáhněte síťovou zástrčku!
Objednací číslo: 78-266-002
Combi Eco 76
Page 77
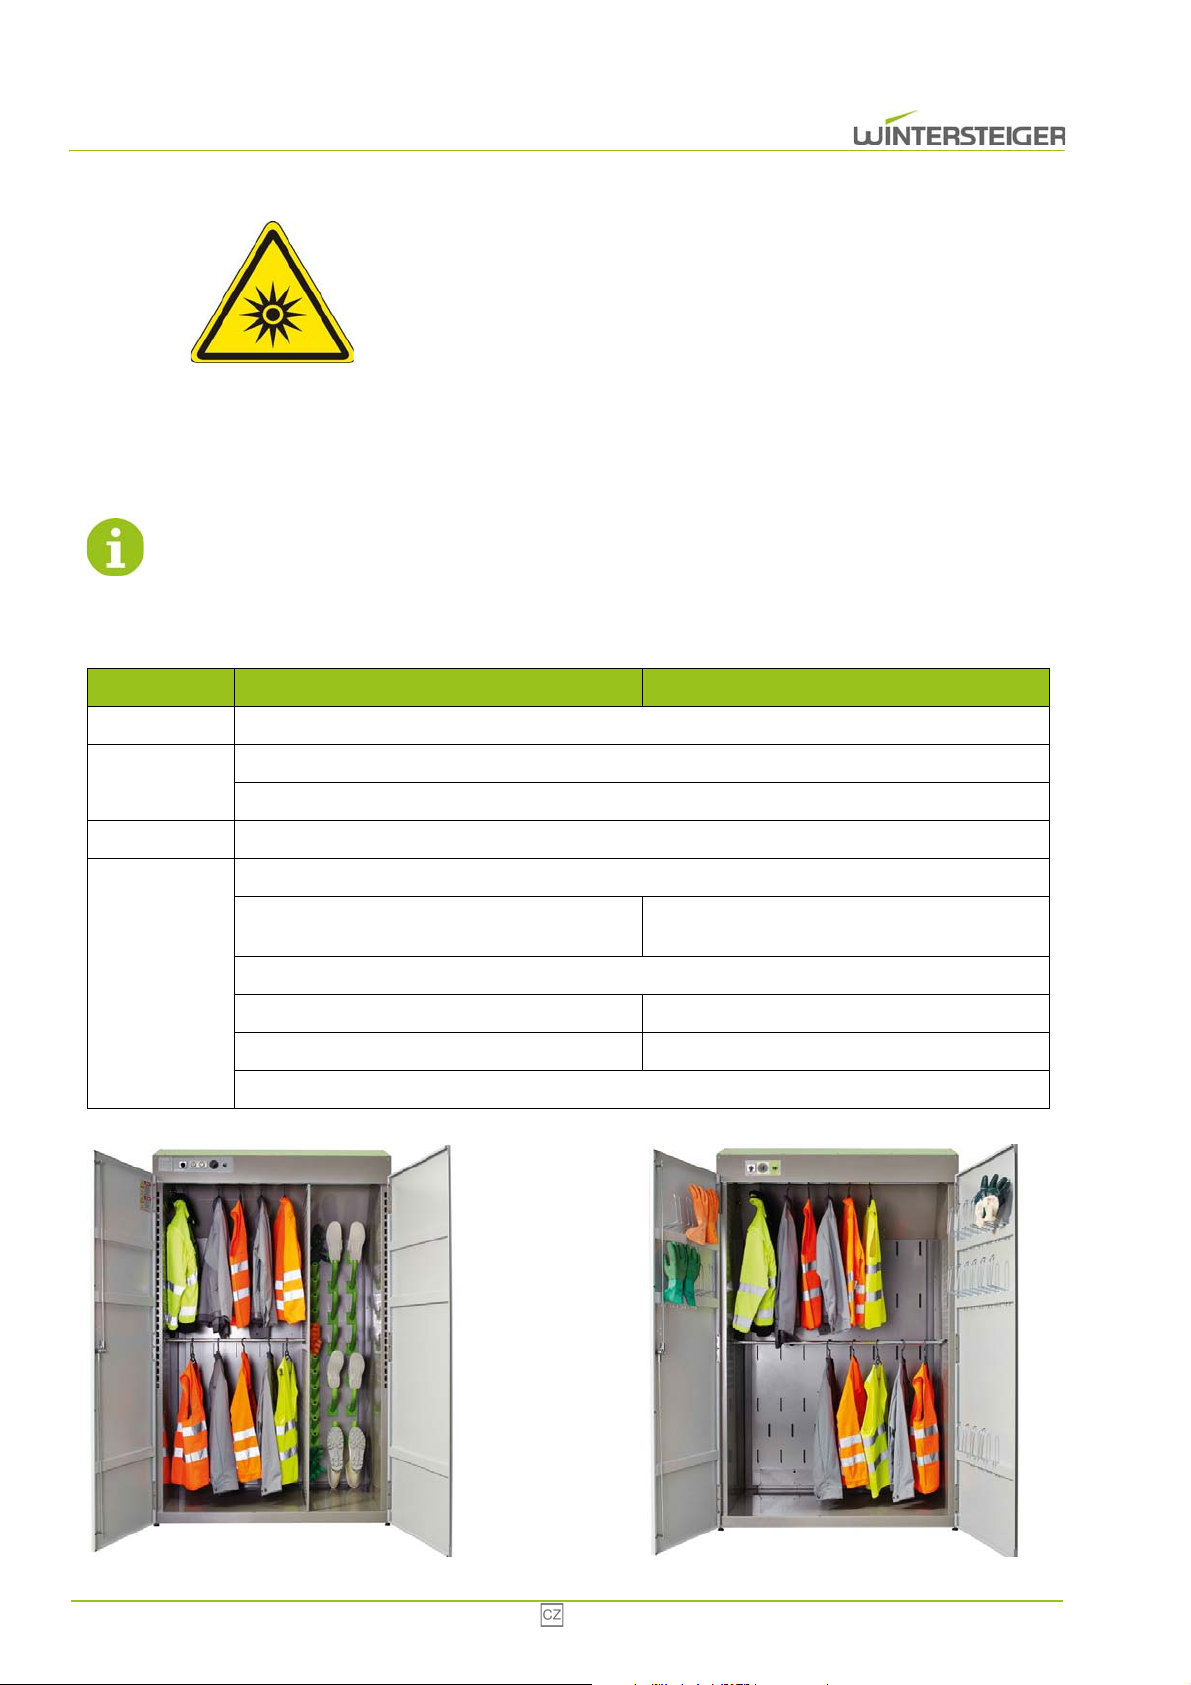
Tato nálepka je použita pouze v případě, pokud je přístroj vybaven
volitelnou ozónovou lampou.
Objednací číslo: 78-150-120
2.3 Ochranná zařízení
Během provozu se nesmí odstraňovat žádná ochranná zařízení ani kryty.
Sušicí skříň Combi Eco splňuje směrnici o nízkém napětí a směrnici o EMC.
3 Funkce
Typ Combi Eco Multi Eco
Obsluha Snadná obsluha pomocí analogového časovače (přepínatelný až 6 hodin).
Sušení
Výkonné sušení vzduchem v místnosti nebo sušení horkým vzduchem, volně nastavitelné
Energeticky úsporné sušení cenných pracovních a zásahových oděvů
Hygiena Redukce bakterií ve vzduchu prostřednictvím ozónové lampy (volitelná možnost)
Sušicí trysky s vnitřním větráním pro
8 páry obuvi
8 páry rukavice
Prostor
Integrovaný držák pro (vnitřní strana dveří):
2 šatní tyče
12 páry rukavice
2 šatní tyče
Integrovaná nádrž na vodu (v případě potřeby vyprázdněte)
Combi Eco
Multi Eco
77 Combi Eco
Page 78
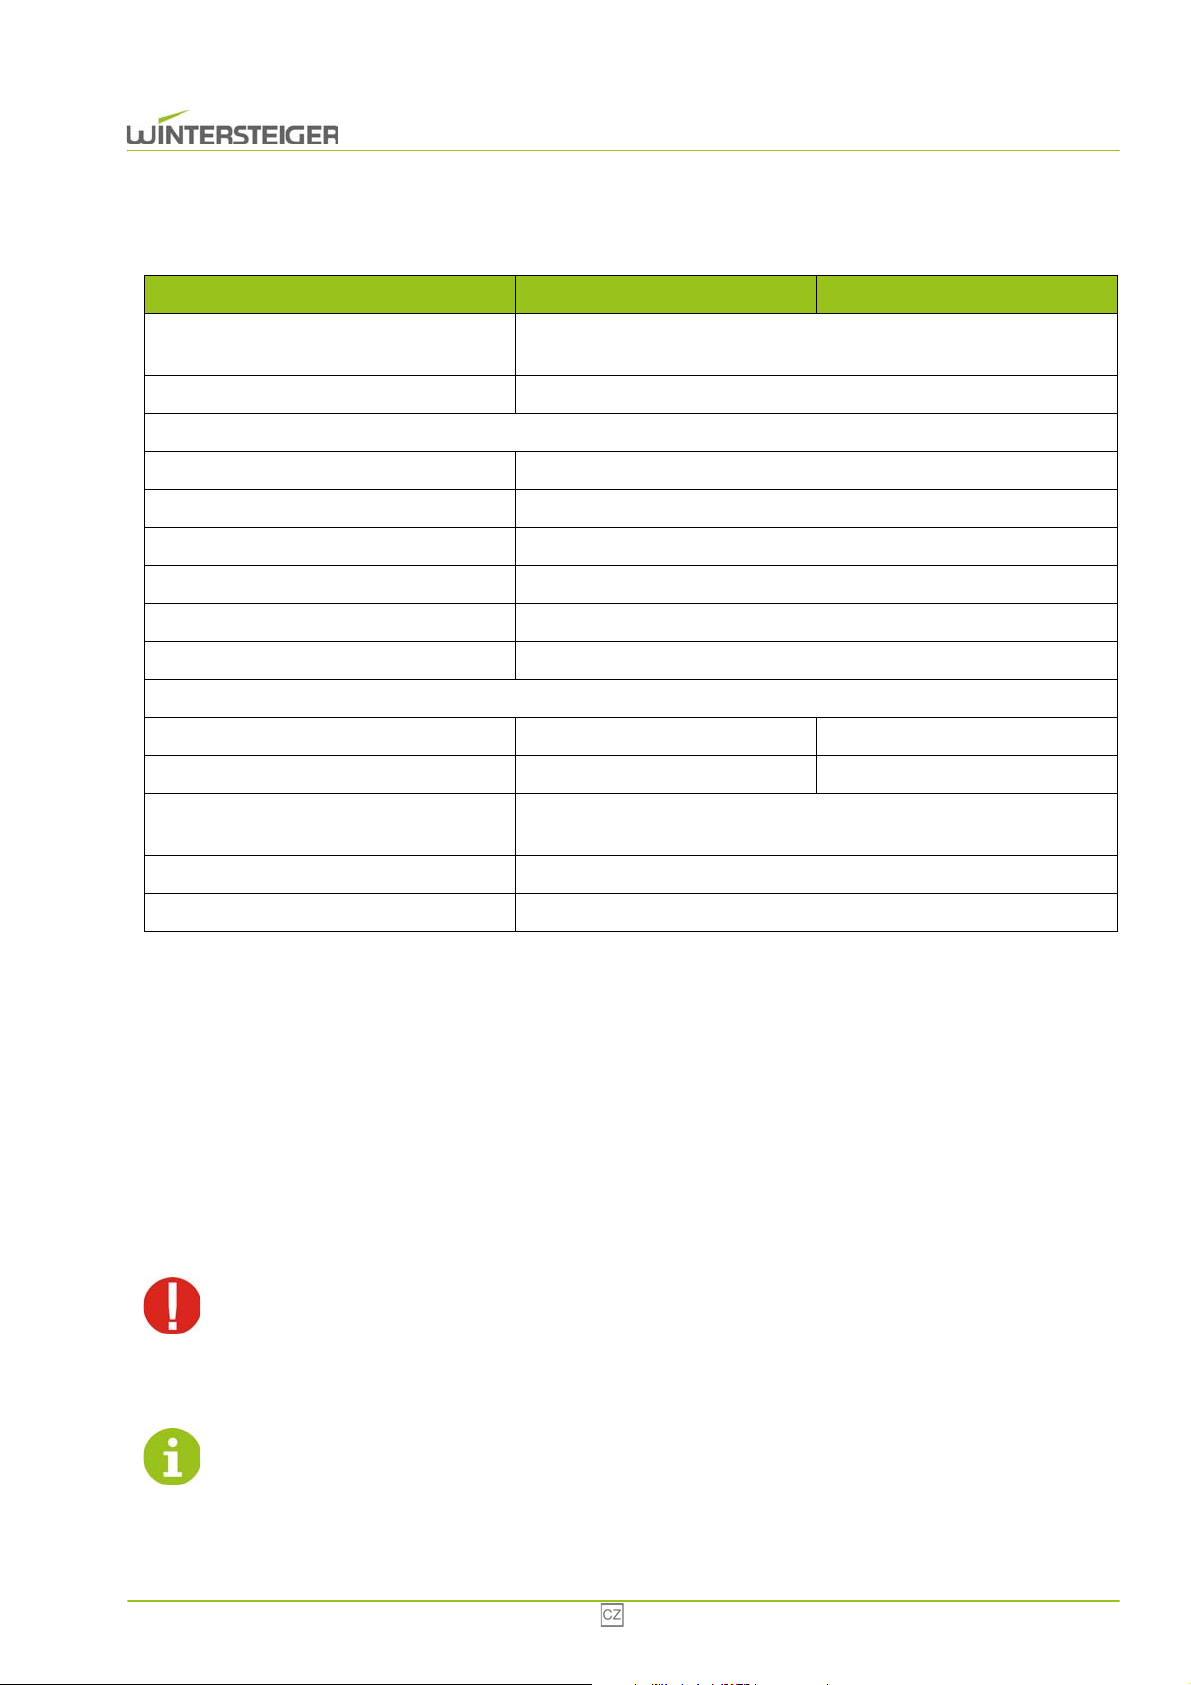
4 Technické údaje
Typ Combi Eco Multi Eco
Jmenovité napětí, kmitočet, výkon,
hodnoty pojistek:
Jmenovitý proud 6,2 A
Správné připojovací napětí najdete navíc na typovém štítku!
Výkon vytápění: 1 x 800 W
Výkon ventilátoru: 1 x 100 W
Výkon kompresoru: 1 x 400 W
Ozónová lampa (volitelná možnost): 1 kus
Okolní teplota: +5 ... 40°C
Vlhkost vzduchu: 30% - 80%
Použivani přistroje je povoleno pouze v dobře větranych, suchych vnitřnich prostorach!
Rozměry (VxŠxH): 2100 mm x 1300 mm x 850 mm 2100 mm x 1300 mm x 900 mm
Hmotnost: 195 kg 180 kg
Doba sušení:
Redukce bakterií: Redukce bakterií ve vzduchu ozónovou lampou (volitelná možnost)
Emise hluku: méně než 70 dB(A)
1 AC 230V 50 Hz; 1,4 kW; 12/16 A
od 1,5 hodiny. V závislosti na promočení, teplotě a materiálu může být
doba sušení delší.
5 Přeprava, skladování a přemístění
5.1 Přepravní podmínky přístroje
Přístroj musí být přepravován v původním balení a v poloze uvedené na obalu.
5.2 Skladování přístroje
Teplota: 0 ° až +40 °C.
Jako prevenci před poškozením nepokládejte na obal přístroje žádné jiné balíky nebo krabice!
5.3 Odstranění obalu a výběr umístění
Při odstraňování obalových materiálů dávejte pozor, abyste přístroj nepoškodili.
Combi Eco 78
Page 79
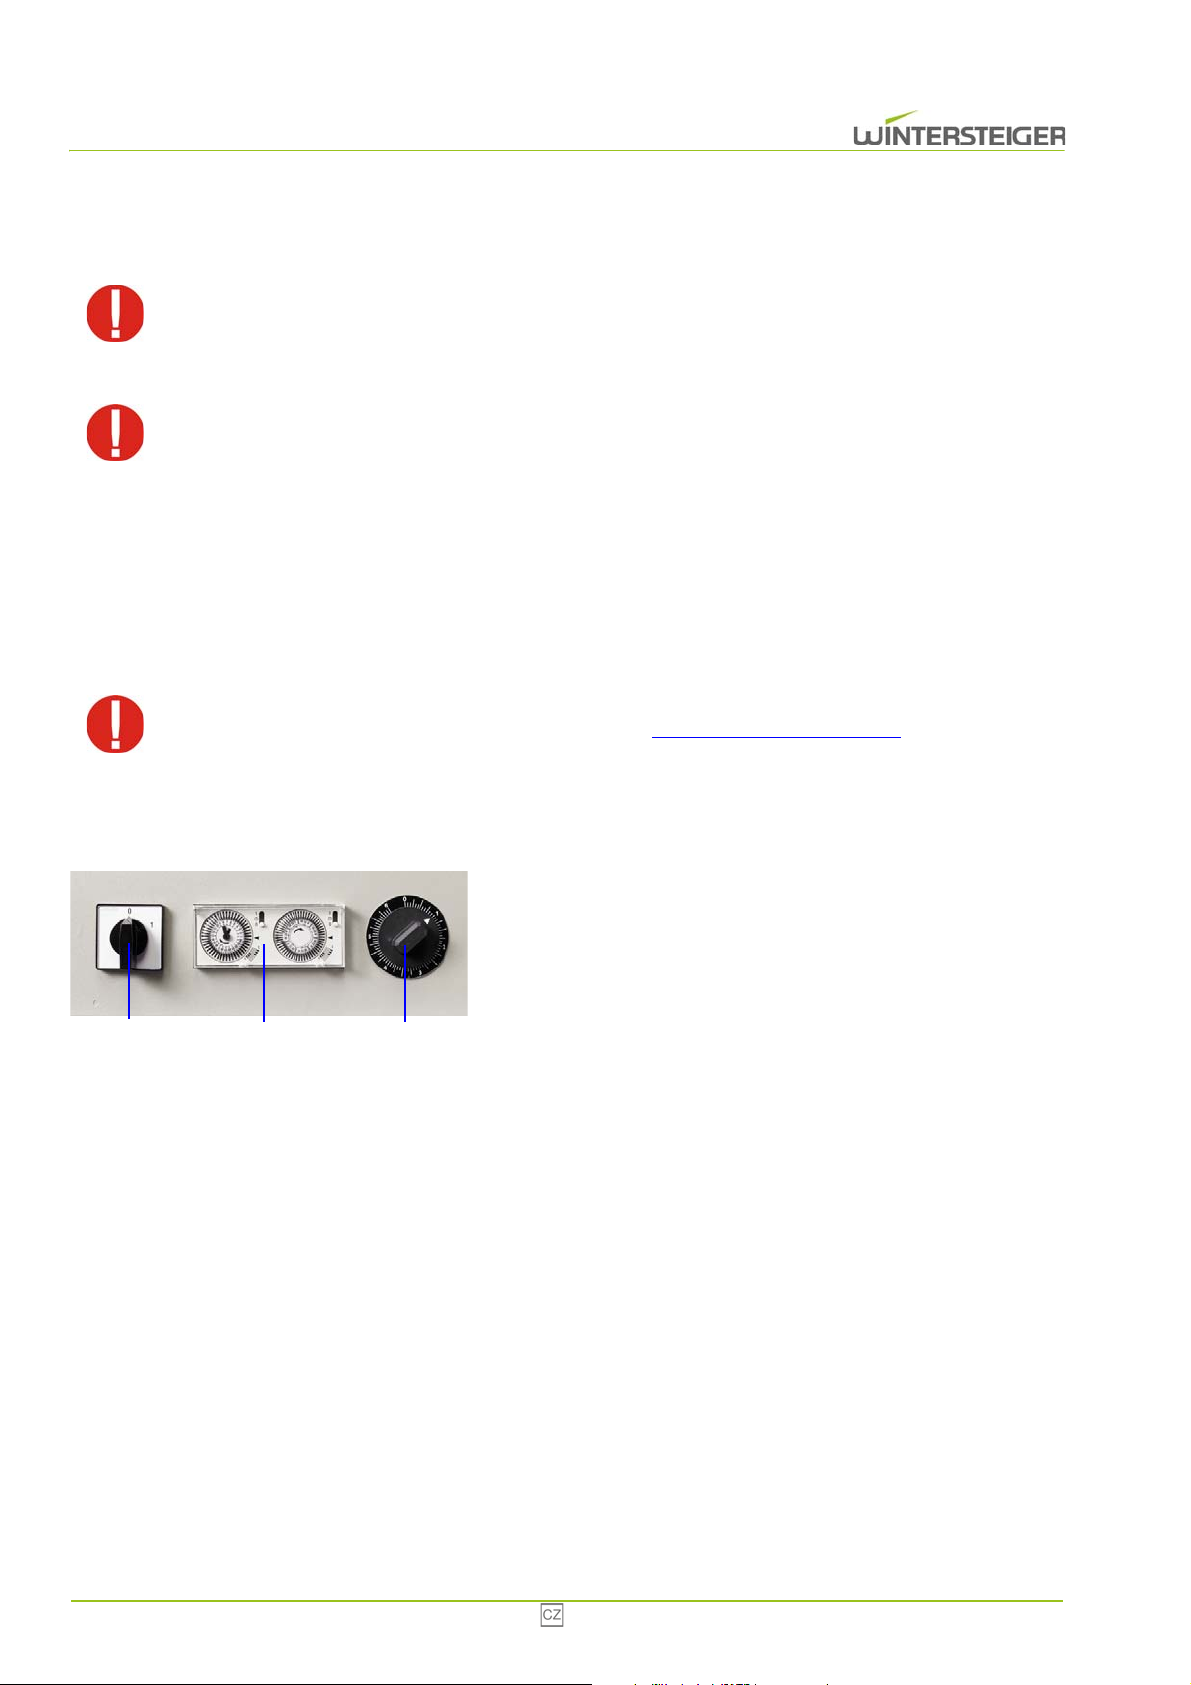
Při výběru stanoviště je nejdůležitější zvážit funkčnost přístroje. Přístroj musí být umístěn v maximálně suché, dobře větrané
C
A
B
místnosti! Výška místnosti musí být minimálně 2,3 m. Zásuvka se má nacházet v bezprostřední blízkosti přístroje.
Při výběru stanoviště dodržuje především směrnice a zákony týkající se bezpečnosti na pracovišti!
Dávejte pozor, aby přívod vzduchu nebyl nikdy zcela ani částečně zablokovaný (přístroj nevestavujte!).
Aby sušení a redukce bakterií fungovaly optimálně, nesmí teplota okolí poklesnout pod 18 °C.
Nevkládejte předměty do Ansaugluftgitter nebo stráže. Neblokujte tyto otvory také částečně. Nikdy vylít tekutinu do cirkulace
vzduchu nalít nebo sprej z důvodu nebezpečí úrazu elektrickým proudem a poškození zařízení se skládá.
6 Popis ovládacích prvků
Sušicí skříň nevypínejte pomocí hlavního vypínače předčasně. Po uplynutí nastavené doby sušení, dobíhá
větrání ještě 10 až 15 minut, aby nedošlo k přehřátí topení (viz kap. 7.1 Čištění, strana 83)
.
6.1 Časový spínač na 24 hodin/ 7 dny
A: Hlavní vypínač
zapnutí a vypnutí přístroje
B: Automatický časový spínač
C: Časovací spínač
nastavení doby sušení mezi 0 a 6 hodi
6.2 Provoz s časovačem na 24 hodin / 7 dny
Automatický časovač umožňuje sušení podle pevného plánu na 24 hodin a 7 dny.
79 Combi Eco
Page 80
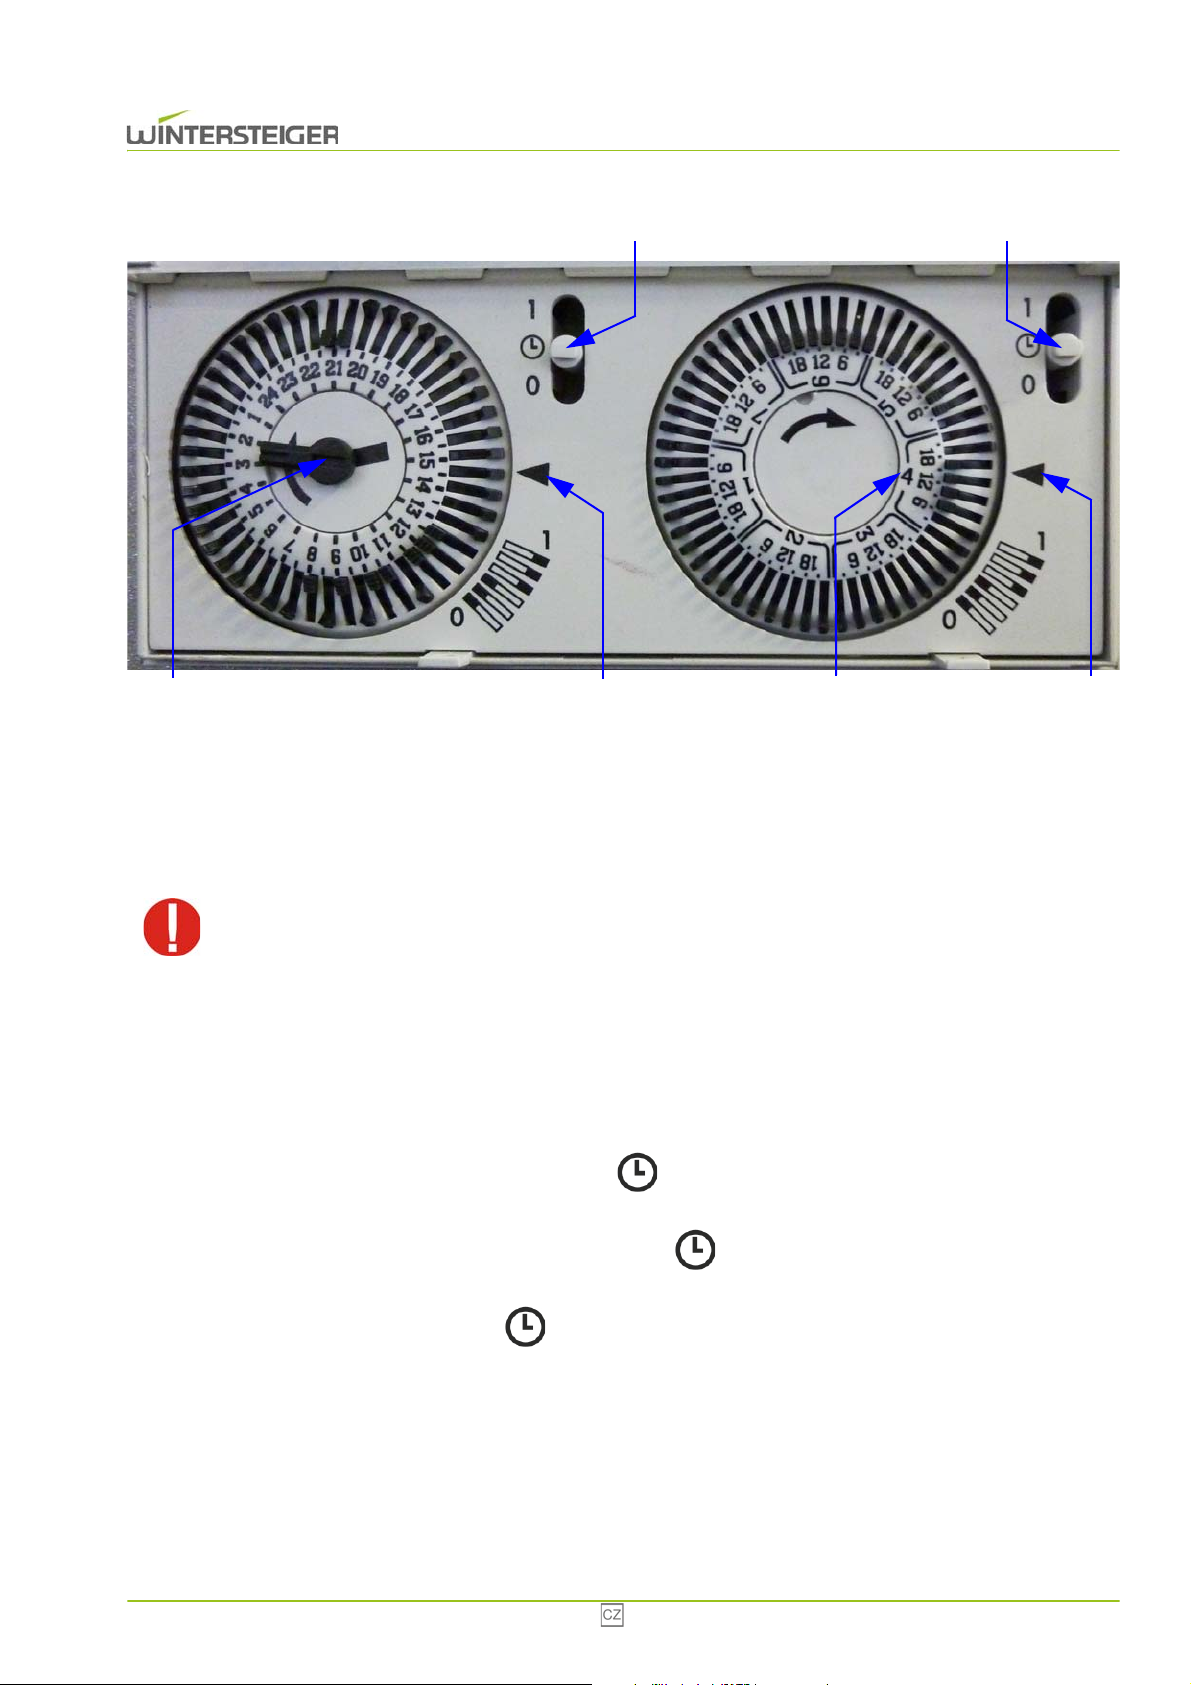
Vlevo se nachází denní počítadlo, vpravo týdenní.
A
C
B
D
F
E
6.2.1 Nastavení aktuálního času a aktuálního dne v týdnu
Minutovou ručičku [A] otočte malým plochým šroubovákem.
Pravý časovač pro nastavení aktuálního dne v týdnu se také současně otáčí.
Časovačem pro dny v týdnu nikdy neotáčejte. Mohl by se tím pokazit.
Šipka [B] ukazuje přibližný čas. Lze tak rozlišit, zda je 2:48 nebo 14:48.
Číslice [C] ukazuje den v týdnu, očíslovaný 1–7. V tomto návodu je prvním dnem v týdnu pondělí.
Šipka [D] ukazuje na aktuální den v týdnu (je čtvrtek).
Se dvéma přepínači [E + F] automatické časovač ize aktivovat nebo deaktivovat.
Pokud jeden ze dvou přepínačů na "0" automatické časovač je deaktivován.
Pokud jsou oba přepínače nastaveny na symbol „ “, sušení proběhne podle časového plánu.
Pokud jsou oba přepínače nastaveny na „1“, sušicí skříň je trvale zapnutá (24 hodin / 7 dnů).
Pokud je přepínač [E] nastaven na „1“ a přepínač [F] na „ “, probíhá sušení podle týdenního plánu. Jsou tak
k dispozici pouze časové intervaly o délce 3 hodin.
Pokud je přepínač [E] nastaven na „ “ a přepínač [F] na „1“, probíhá sušení podle denního plánu (stejný program pro každý den v týdnu).
6.2.2 Nastavení časového plánu
Pokud je segment časového úseku vně, zapne se sušicí skříň na toto časové období. Aby se sušení aktivovalo, musí být
časový segment pro den i časový segment pro týden umístěn vně.
Combi Eco 80
Page 81
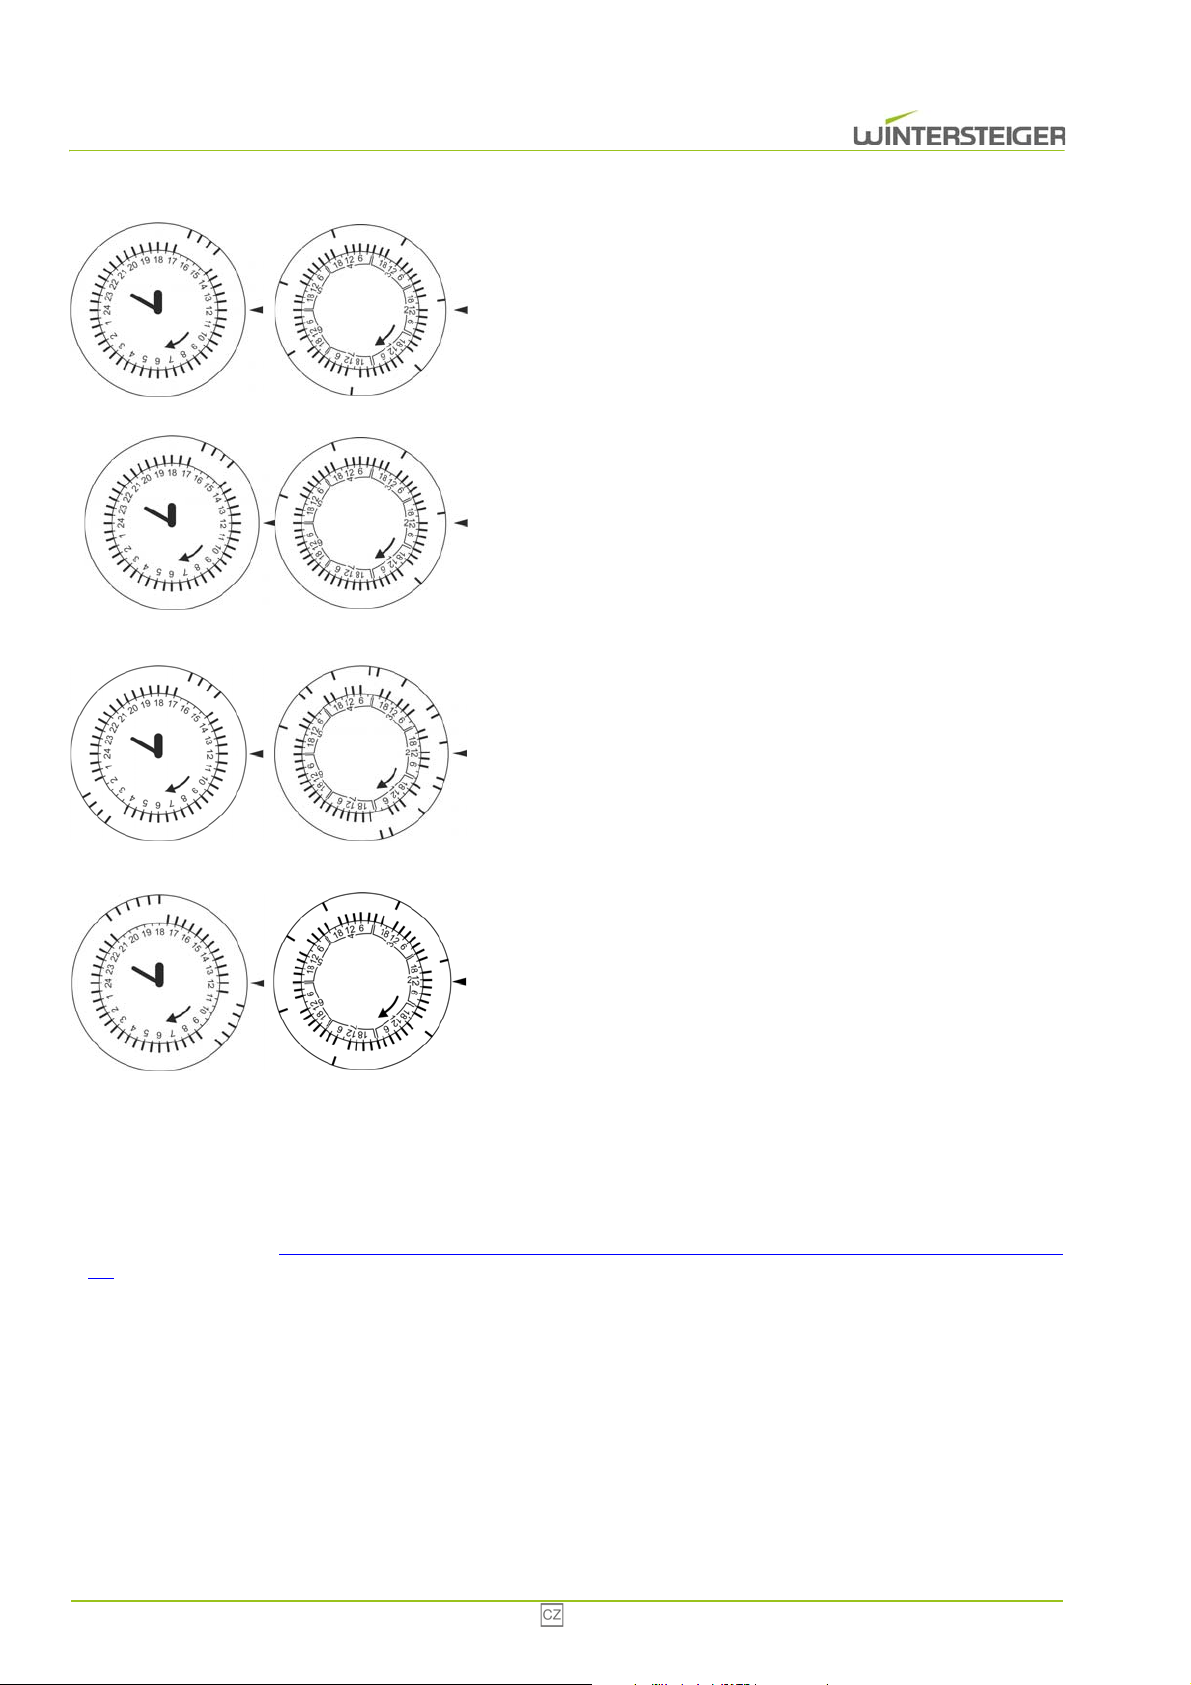
Příklad: Přístroj má sušit během této doby:
denně od 15:00 do 17:00 h
Na týdenním počítadle musí být nastavené vně tyto segmenty:
15:00, 15:30, 16:00, 16:30
Na týdenním počítadle musí být nastavené vně tyto segmenty:
každý den 15:00
Příklad: Přístroj má sušit během této doby:
pondělí {1} až pátek {5} od 15:00 do 17:00
sobota {6} a neděle {7} – sušení neprobíhá.
Na týdenním počítadle musí být nastavené vně tyto segmenty:
15:00, 15:30, 16:00, 16:30
Na týdenním počítadle musí být nastavené vně tyto segmenty:
pondělí {1} až pátek {5}: 15:00
Příklad: Přístroj má sušit během této doby:
pondělí {1} až pátek {5} od 02:00 do 04:00 a od 15:00 do 17:00
sobota {6} a neděle {7} – sušení neprobíhá.
Na týdenním počítadle musí být nastavené vně tyto segmenty:
02:00, 02:30, 03:00, 03:30, 15:00, 15:30, 16:00, 16:30
Na týdenním počítadle musí být nastavené vně tyto segmenty:
pondělí {1} až pátek {5} 00:00, 03:00, 15:00
Příklad: Přístroj má sušit během této doby:
pondělí {1} až čtvrtek {4} od 18:00 do 21:00
pátek {5} až neděle {7} od 09:00 do11:30
Na týdenním počítadle musí být nastavené vně tyto segmenty:
09:00, 09:30, 10:00, 10:30, 11:00, 18:00, 18:30, 19:00, 19:30, 20:00,
20:30
Na týdenním počítadle musí být nastavené vně tyto segmenty:
pondělí {1} až čtvrtek {4}: 15:00
pátek {5} až neděle {7}: 09:00
6.2.3 Sušení mimo plán
Pokud by mělo u sušicí skříně s časovačem na 24 hodin / 7 dnů dojít k sušení mimo plán, lze toto sušení provést pomocí
6hodinového časovače (viz kap. 6.3 Provoz ozónové lampy s časovým spínačem na 24 hodin (volitelná možnost), strana
81). 6hodinový časovač přepíše časovač pro 24 hodin / 7 dnů.
6.3 Provoz ozónové lampy s časovým spínačem na 24 hodin (volitelná možnost)
Automatický časovač umožňuje sušení podle pevného plánu na 24 hodin.
81 Combi Eco
Page 82
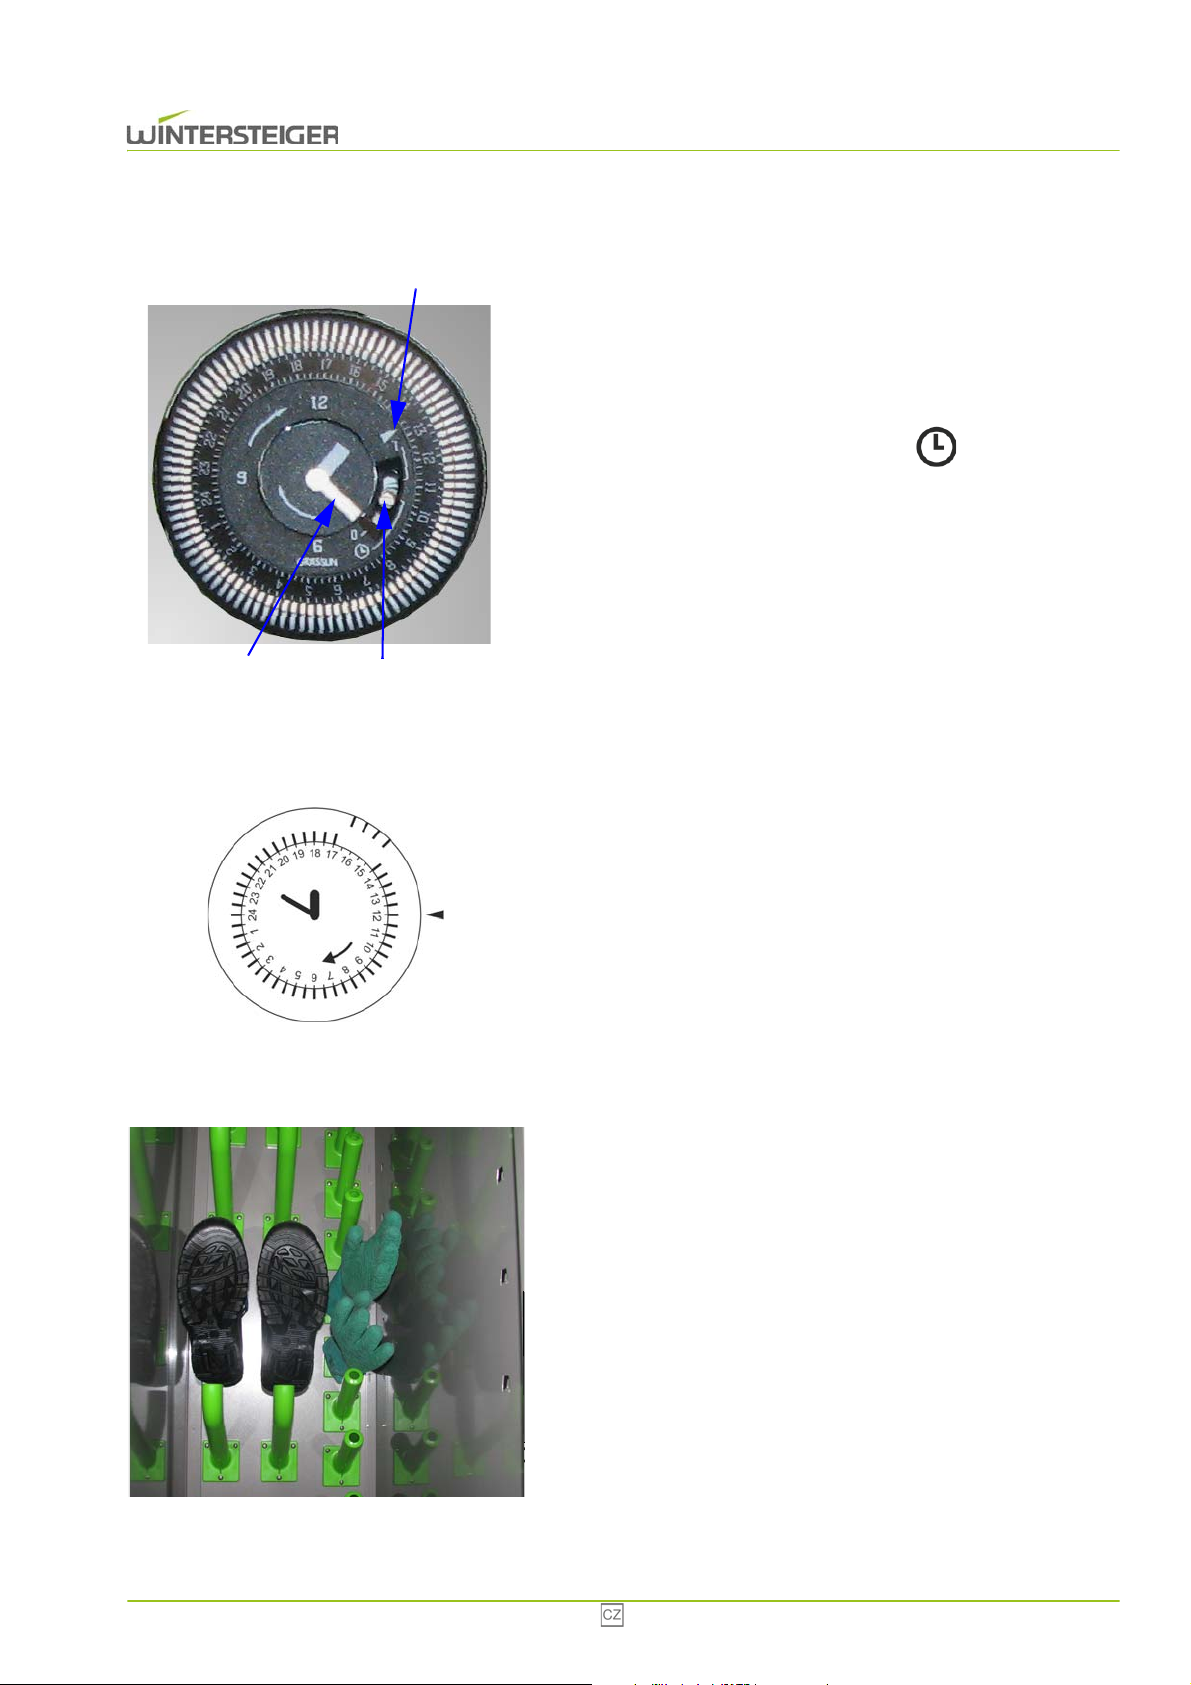
6.3.1 Nastavení aktuálního času
A
C
B
C
Minutovou ručičku [A] otočte malým plochým šroubovákem.
Šipka [B] ukazuje přibližný čas. Lze tak rozlišit, zda je 01:25 nebo
13:25.
Přepínačem [C] se aktivuje, příp. deaktivuje automatický časovač.
Pokud je přepínač nastaven na „0“, automatický časovač je
deaktivován.
Pokud je přepínač nastaven na symbol „ “, sušení proběhne
podle časového plánu.
Pokud je přepínač nastaven na „1“, sušicí skříň je trvale zapnutá
6.3.2 Nastavení časového plánu
Pokud je segment časového úseku vně, zapne se sušicí skříň na toto časové období.
6.4 Optimální naplnění sušicí skříně
Příklad: Přístroj má sušit během této doby:
denně od 15:00 do 17:00 h
Na týdenním počítadle musí být nastavené vně tyto segmenty:
15:00, 15:30, 16:00, 16:30
Při sušení pracovních oděvů dodržujte tyto pokyny:
Rukavice nasuňte na integrované držáky rukavic ve dveřích.
Boty nasuňte na integrované trysky.
Combi Eco 82
Page 83
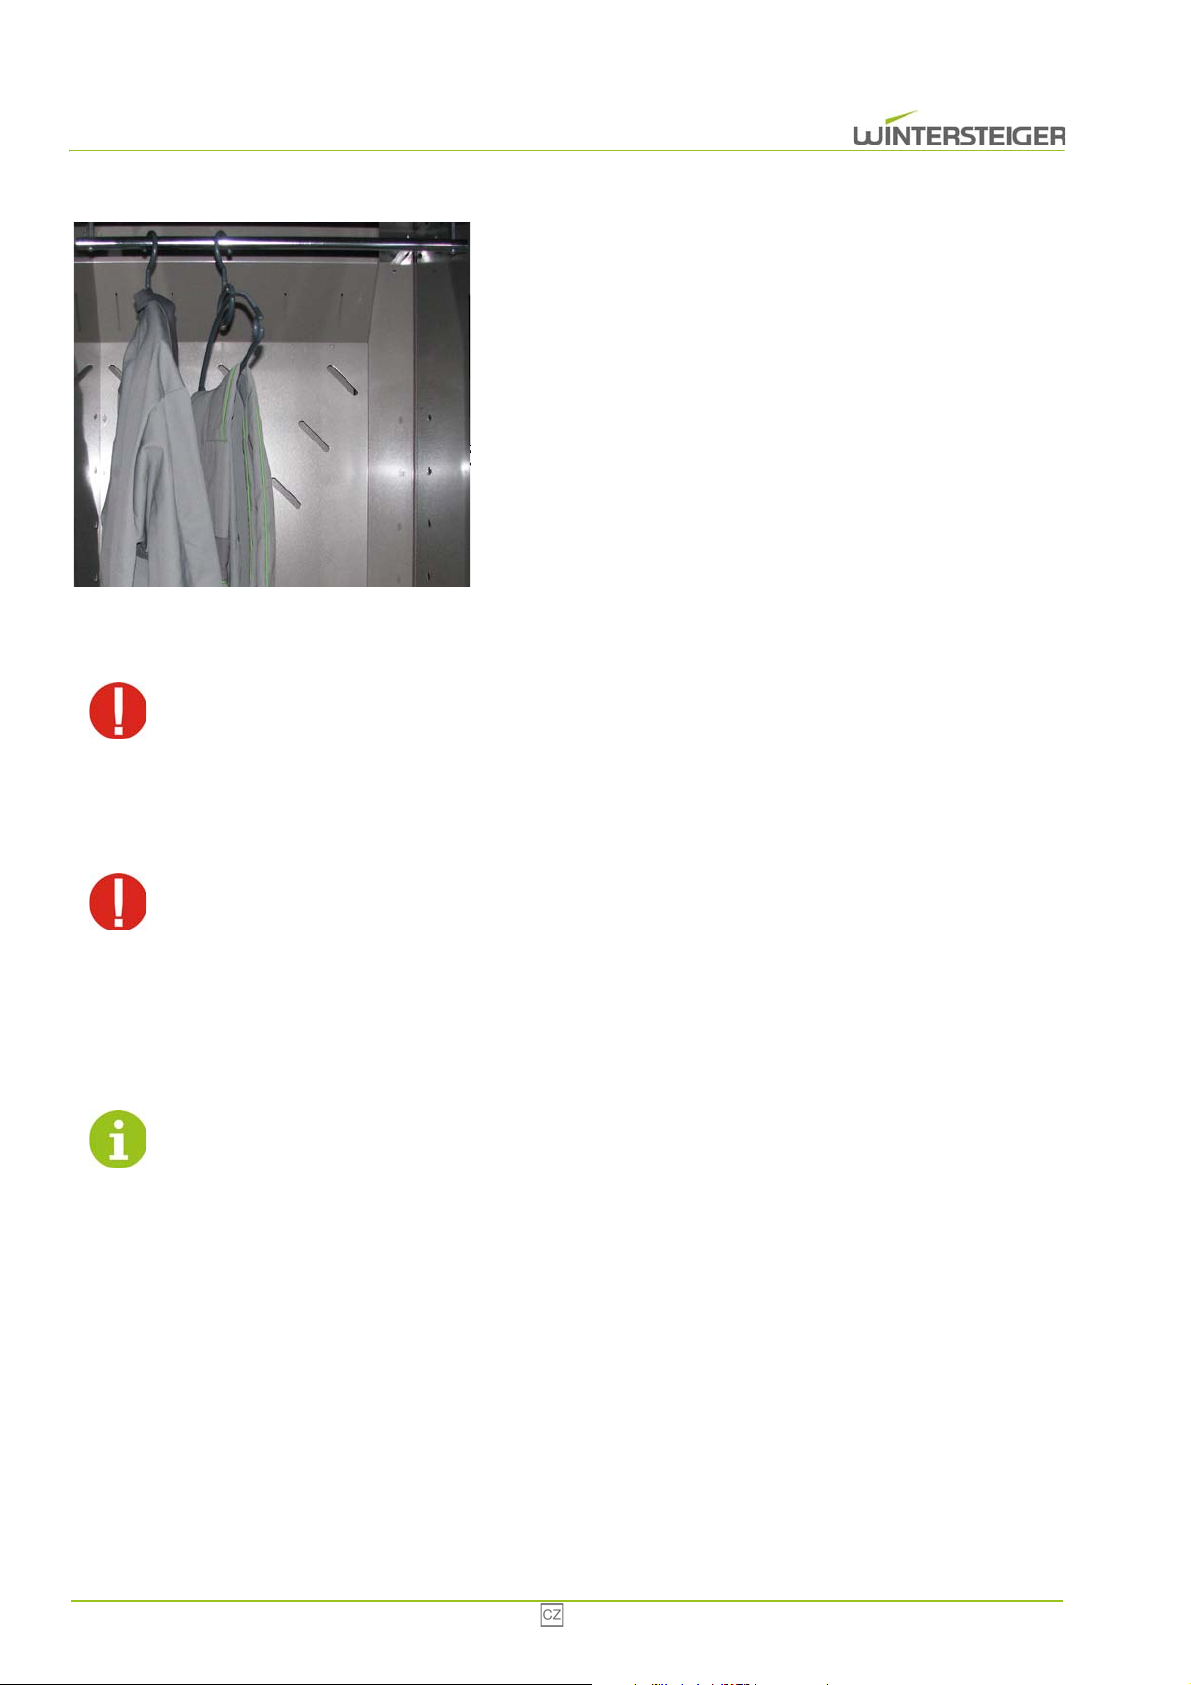
7 Údržba
C
Před veškerými činnostmi údržby přístroj vypněte a zástrčku vytáhněte ze zásuvky!
7.1 Čištění
Pracovní oděvy zavěste na věšácích na namontované šatní tyče.
Sušicí skříně mají různé vybavení. Mezi výstrojemi musí zůstat trochu
vzduchu, aby mohl optimálně cirkulovat.
Po vypnutí vytápění dobíhá větrání ještě 10 až 15 minut.
Přístroj pravidelně čistěte zvenku i zevnitř vlhkým hadříkem.
Přístroj nikdy nečistěte vodou, zničí se tak elektrické součásti! V případě nedbalosti zaniká veškeré ručení
a nároky na záruku za následné škody.
7.2 Ozonová lampa (volitelná možnost)
Ozónovou lampu lze časovým spínačem předem nastavit podle fixního plánu (15 min. provoz – 30 min. přestávka – 15 min.
provoz) na 24 hodin. Tento spínač je aktivní, pouze pokud je aktivní hlavní časový spínač.
Dávkování ozónu je předem nastaveno z výroby.
Nedoporučujeme vám měnit nastavení ozónové lampy!
83 Combi Eco
Page 84
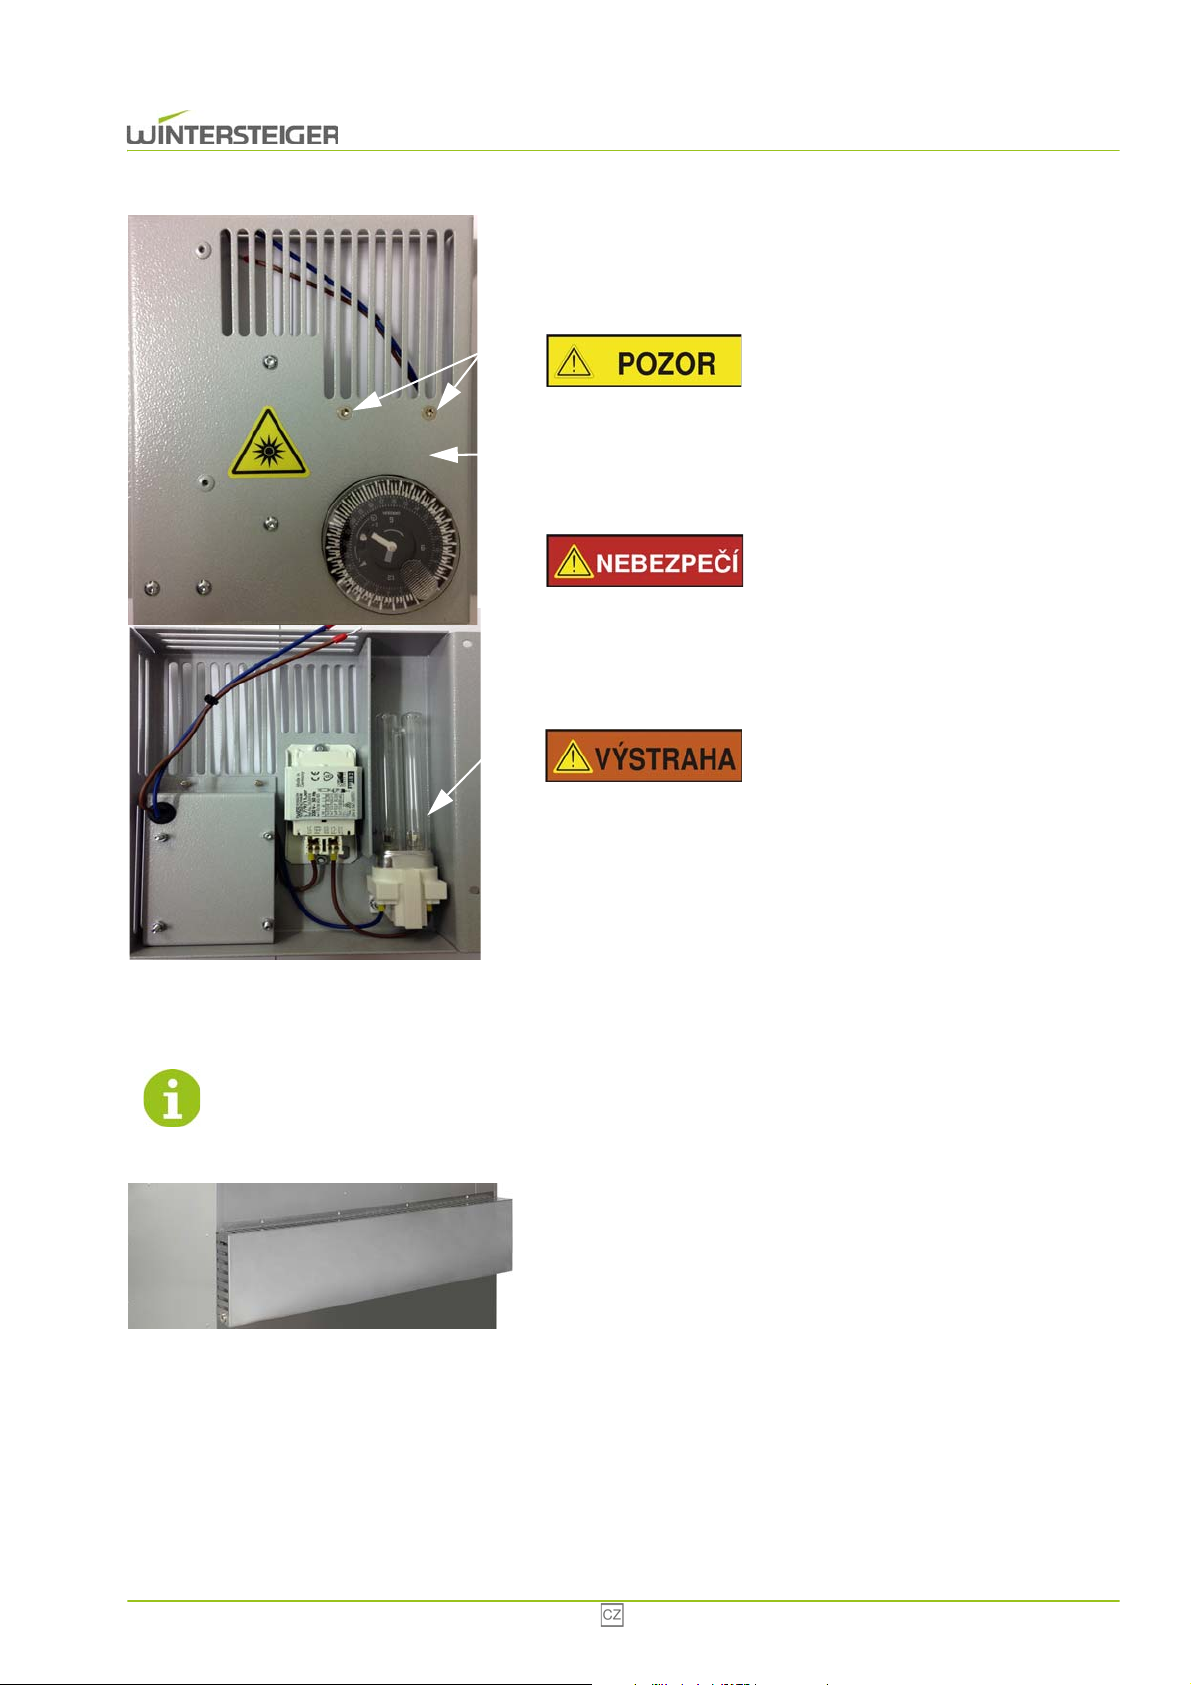
Použitá ozónová lampa umožňuje účinnou redukci bakterií po dobu 2000
A
C
B
A
provozních hodin, pak je třeba ozónovou lampu vyměnit. Jednou
měsíčně proveďte vizuální kontrolu ozónové lampy během provozu. Na
zadní stěně skříně vidíte prosvítat namodralé světlo.
Nebezpečí úrazu!
Nedívejte se přímo do ozónové lampy! UV záření může poškodit
oči!
Výměna ozónové lampy
Nebezpečí úrazu!
Přístroj odpojte od napájení elektrickým proudem!
Odstraňte všechny šrouby [A].
Odstraňte kryt [B]. Opatrně vyjměte ozónovou lampu [C].
Nebezpečí úrazu!
7.3 Vyprázdnění nádrže na vodu
Pokud je to třeba, nádrž na vodu vyprázdněte!
Ozónová lampa obsahuje jedovatou rtuť. Ozónovou lampu likvidujte
podle místních předpisů!
Vložte novou lampu [C] a kryt [B] opět připevněte šrouby [A].
Povolte šrouby.
Odstraňte kryt.
Nádrž na vodu vyjměte a vyprázdněte.
Combi Eco 84
Page 85
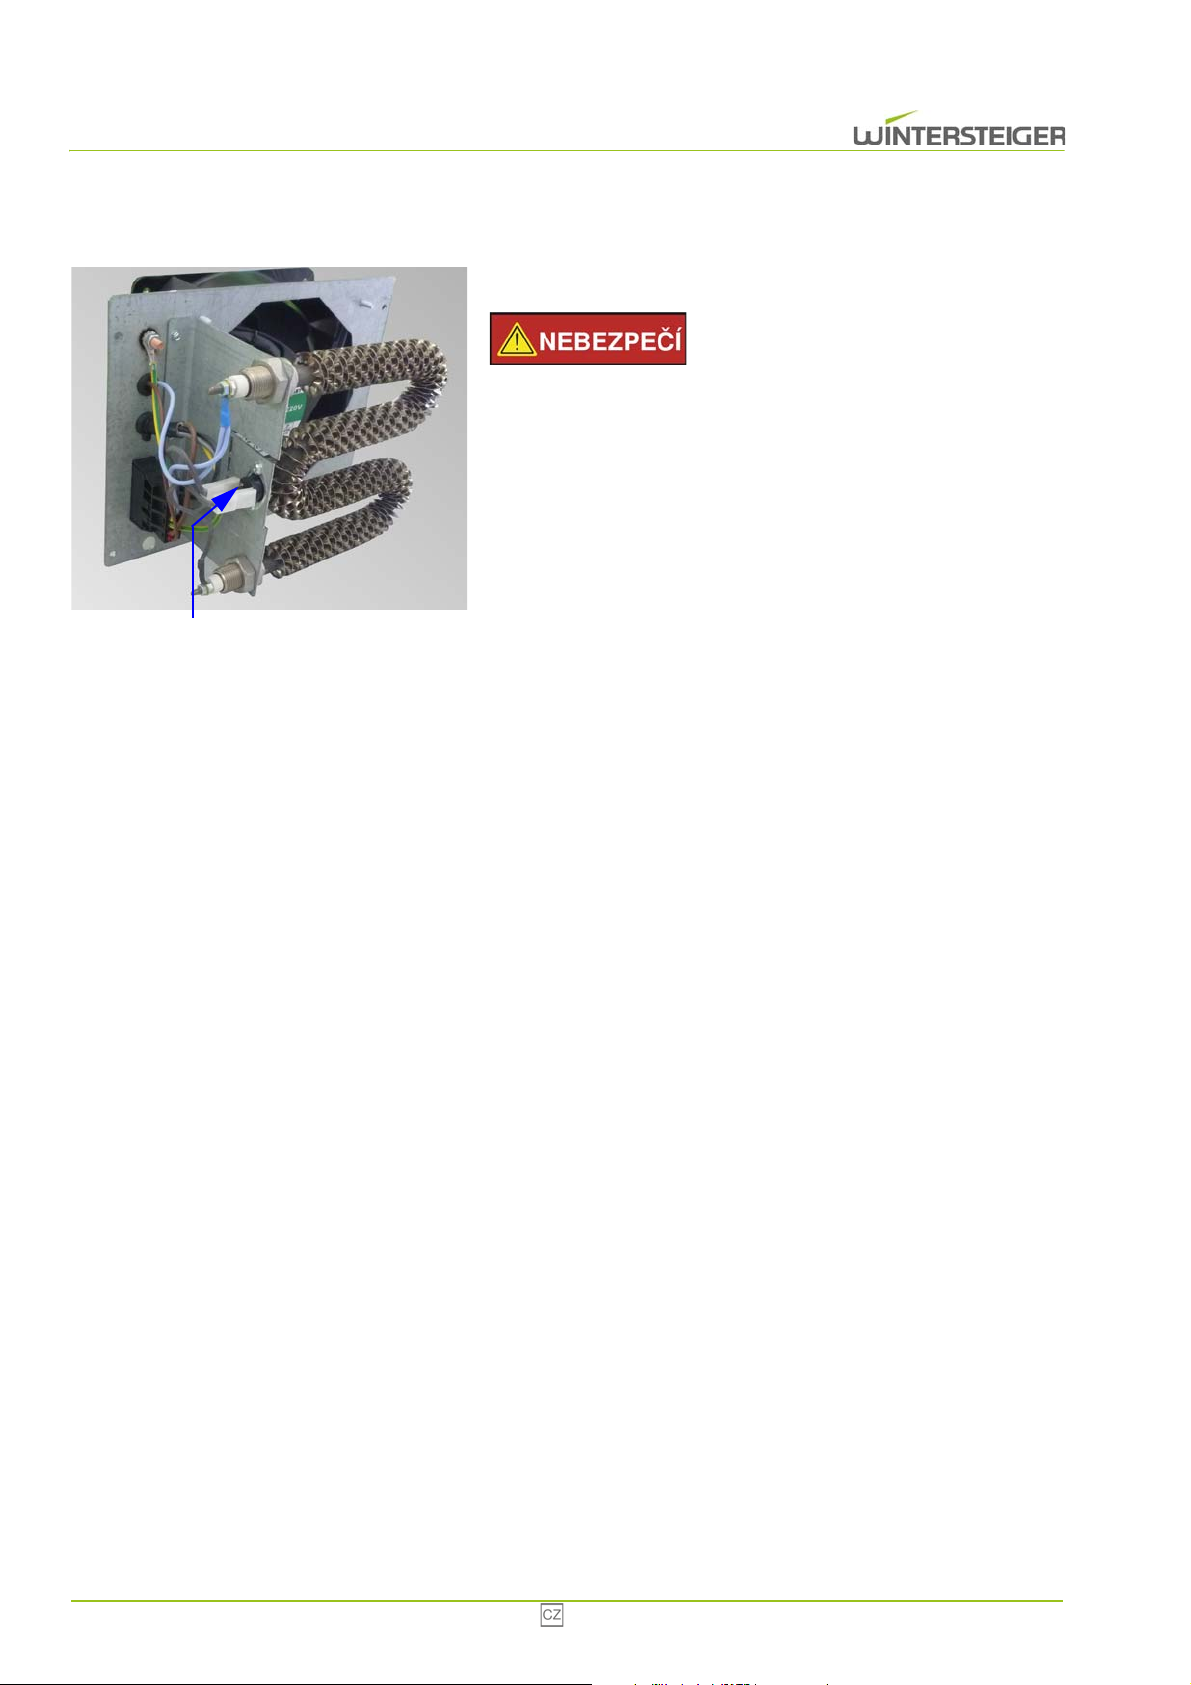
7.4 Spínač přehřátí
A
Pokud se aktivuje spínač přehřátí topení, je třeba jej resetovat.
Nebezpečí úrazu!
Přístroj odpojte od napájení elektrickým proudem! Poruchu může
odstranit pouze elektrikář!
Příslušný topný ventilátor demontujte.
Stiskněte tlačítko [A].
Topný ventilátor namontujte zpět.
85 Combi Eco
Page 86
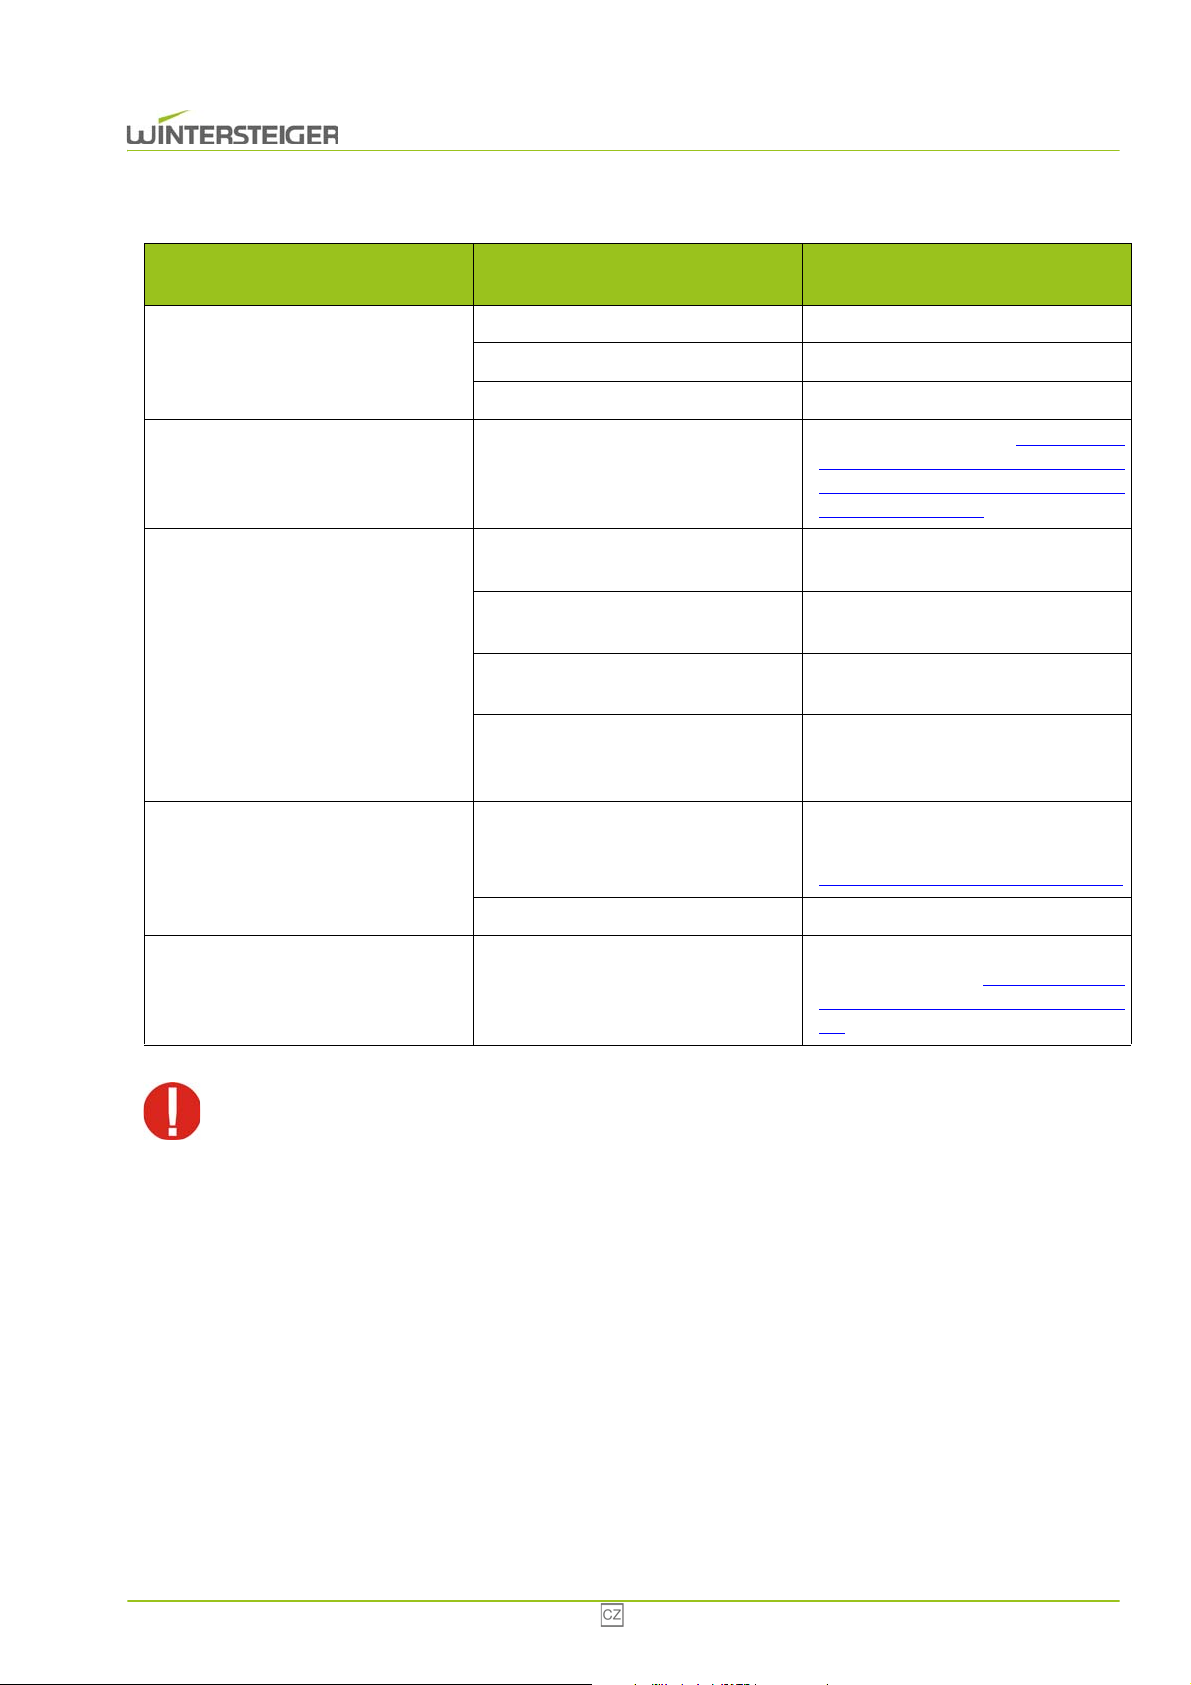
8 Odstranění závad
Závada
Problém
Přístroj nefunguje
Přístroj nesuší
Vysoušecí výkon přístroje se snižuje
nebo přístroj netopí
Příčina Odstranění
Přístroj není zapojený do zásuvky. Přístroj zapojte do zásuvky.
Napájení el. proudem nefunguje. Kontaktujte elektrikáře.
Hlavní vypínač je nastaven na „0“ Zapnout hlavní vypínač
Nastavte dobu sušení (viz kap. 6.3
Není nastavena doba sušení
Nedostatečný přívod vzduchu
Vlhkost vzduchu >80 %
Pokojová teplota <5 °C
Doplňková možnost: ozón s časovým
relé
Aktivoval se spínač přehřátí topení,
protože teplota překročila 80 °C
Provoz ozónové lampy s časovým
spínačem na 24 hodin (volitelná
možnost), strana 81)
Zkontrolujte přívod vzduchu v přístroji
nebo v místnosti
Čím je vlhkost vzduchu nižší, tím je
vysoušení lepší.
Čím je pokojová teplota vyšší, tím je
vysoušení lepší
Při spuštění sušení se na cca 10 minut
zapne ozónová lampa, poté se spustí
proces sušení.
Zkontrolujte, zda jsou větrací otvory
jsou skryty uvnitř i vně.
viz kap. 7.4 Spínač přehřátí, strana 85
Vadný ventilátor Zkontrolujte vadný
Ozonová lampa nefunguje
Při zásahu do přístroje vytáhněte síťovou zástrčku ze zásuvky! Přístroj se smí provozovat pouze s
kompletně namontovanými ochrannými zařízeními a kryty.
9 Schéma zapojení (strana 16)
Zkontrolujte, zda je ozonová lampa
zasunutá a zapnutá (viz kap. 7.2 Ozo-
nová lampa (volitelná možnost), strana
83) příp. ozónovou lampu vyměňte.
Combi Eco 86
Page 87

10 Odstavení a likvidace
Nebezpečí úrazu!
Před odstavením a demontáží stroje jej odpojte od napájení elektrickou energií a všech externích pohonů. Pro
demontáž používejte pouze vhodné nástroje.
Při odstavení stroje demontujte a likvidujte všechny součástky odborným způsobem. Před likvidací
vyčistěte všechny díly, které obsahují olej nebo tuky.
Olej a tuky se nesmí v žádném případě dostat do životního prostředí.
Při likvidaci součástek dodržujte místní předpisy!
Stroj demontujte odborným způsobem a rozložte jej na jednotlivé součástky.
Součástky, obsahující olej nebo tuky, vyčistěte.
Součástky likvidujte podle materiálových skupin (ocel, umělá hmota, elektrické a elektronické součástky atd.).
Olej a tuky likvidujte ekologicky, a to i biologicky odbouratelné oleje a tuky.
87 Combi Eco
Page 88

Содержание
1 Предисловие ..................................................................................................................................................................... 89
1.1 Применение по назначению .................................................................................................................................. 89
2 Общие указания ............................................................................................................................................................... 90
2.1 Предписания по технике безопасности ................................................................................................................ 90
2.2 Предупреждения .................................................................................................................................................... 90
2.3 Защитные устройства ............................................................................................................................................. 91
3 Принцип работы ............................................................................................................................................................... 91
4 Технические характеристики ........................................................................................................................................ 92
5 Транспортировка, хранение и изменение место-положения .................................................................................. 92
5.1 Условия для транспортировки устройства ........................................................................................................... 92
5.2 Хранение устройства ............................................................................................................................................. 92
5.3 Снятие упаковки и выбор местоположения ......................................................................................................... 93
6 Описание элементов управления ................................................................................................................................. 93
6.1 Таймер на 24 часа и 7 дней недели ..................................................................................................................... 93
6.2 Работа с таймером на 24 часа и 7 дней недели .................................................................................................. 93
6.2.1 Настройка текущего времени и дня недели ............................................................................................ 94
6.2.2 Задать режим ............................................................................................................................................. 94
6.2.3 Внеплановая сушка ................................................................................................................................... 95
6.3 Работа озоновой лампы с таймером на 24 часа (опция) .................................................................................... 95
6.3.1 Задать текущее время ............................................................................................................................... 96
6.3.2 Задать режим ............................................................................................................................................. 96
6.4 Оптимальная загрузка сушильного шкафа .......................................................................................................... 96
7 Техническое обслуживание ........................................................................................................................................... 97
7.1 Чистка ..................................................................................................................................................................... 97
7.2 Озоновая лампа (опция) ........................................................................................................................................ 97
7.3 Опорожнение бака для воды ................................................................................................................................ 98
7.4 Предохранительный выключатель перегрева ..................................................................................................... 99
8 Устранение неисправностей ........................................................................................................................................ 100
9 Схема электрических соединений (стр. 16) .............................................................................................................. 100
10 Прекращение эксплуатации и утилизация .............................................................................................................. 101
Combi Eco 88
Page 89

1 Предисловие
© Copyright 2014 by
WINTERSTEIGER AG ::: A-4910 Ried/I Dimmelstrasse 9
Автор и графика: Maria Marek-Pollhammer
Тел. +43 7752 919-0
Эл. почта: [email protected]
Оригинальное руководство по эксплуатации
Данное руководство по эксплуатации перед первым использованием должен прочитать эксплуатационный
персонал и сотрудники, ответственные за содержание сушильного шкафа.
Ущерб, возникший в результате несоблюдения содержащихся в нем указаний, не подлежит возмещению за счет
гарантии. Пользователь сушильного шкафа обязан по закону соблюдать правила техники безопасности
соответствующей страны.
В дальнейшем с данным руководством по эксплуатации следует обращаться как с конфиденциальной информацией.
Оно должно быть доступно только уполномоченным лицам. Передача третьей стороне может производиться только
с письменного разрешения компании WINTERSTEIGER.
Вся информация защищена в соответствии с законом об авторском праве. Передача и тиражирование всей
документации или ее частей, а также использование и распространение ее содержания без специального
письменного разрешения правообладателя запрещены.
Нарушения преследуются по закону и обязывают возместить связанный с ними ущерб. Все права по использованию
правовых норм, направленных на защиту результатов умственного труда, сохраняются за компанией WINTER-STEIGER.
1.1 Применение по назначению
Сушильный шкаф Combi Eco предназначен только для сушки и хранения одежды, ботинок, сапог, перчаток и шлемов
(применение по назначению).
Любое иное применение рассматривается как применение не по назначению. Производитель не несет
ответственности за возникшие вследствие такого применения неисправности. Ответственность за это несет только
сам пользователь.
В понятие применения по назначению входит также соблюдение предписаний завода-изготовителя в отношении
эксплуатации, технического обслуживания и профилактического ремонта. Следует соблюдать соответствующие
предписания по предотвращению несчастных случаев, а также общепринятые правила техники безопасности и
производственной медицины.
Самовольные изменения конструкции сушильного шкафа исключают любую ответственность изготовителя за
возникший в результате этого ущерб.
Мы стремимся постоянно совершенствовать выпускаемую нами продукцию, и поэтому оставляем за собой право
внесения необходимых изменений и целесообразной модернизации оборудования. Обязательства, которые
распространяются на ранее поставленные машины и приборы, в данном случае не имеют силы.
Все иллюстрации, размеры и массы, приведенные в руководстве по эксплуатации, не являются обязательными.
89 Combi Eco
Page 90
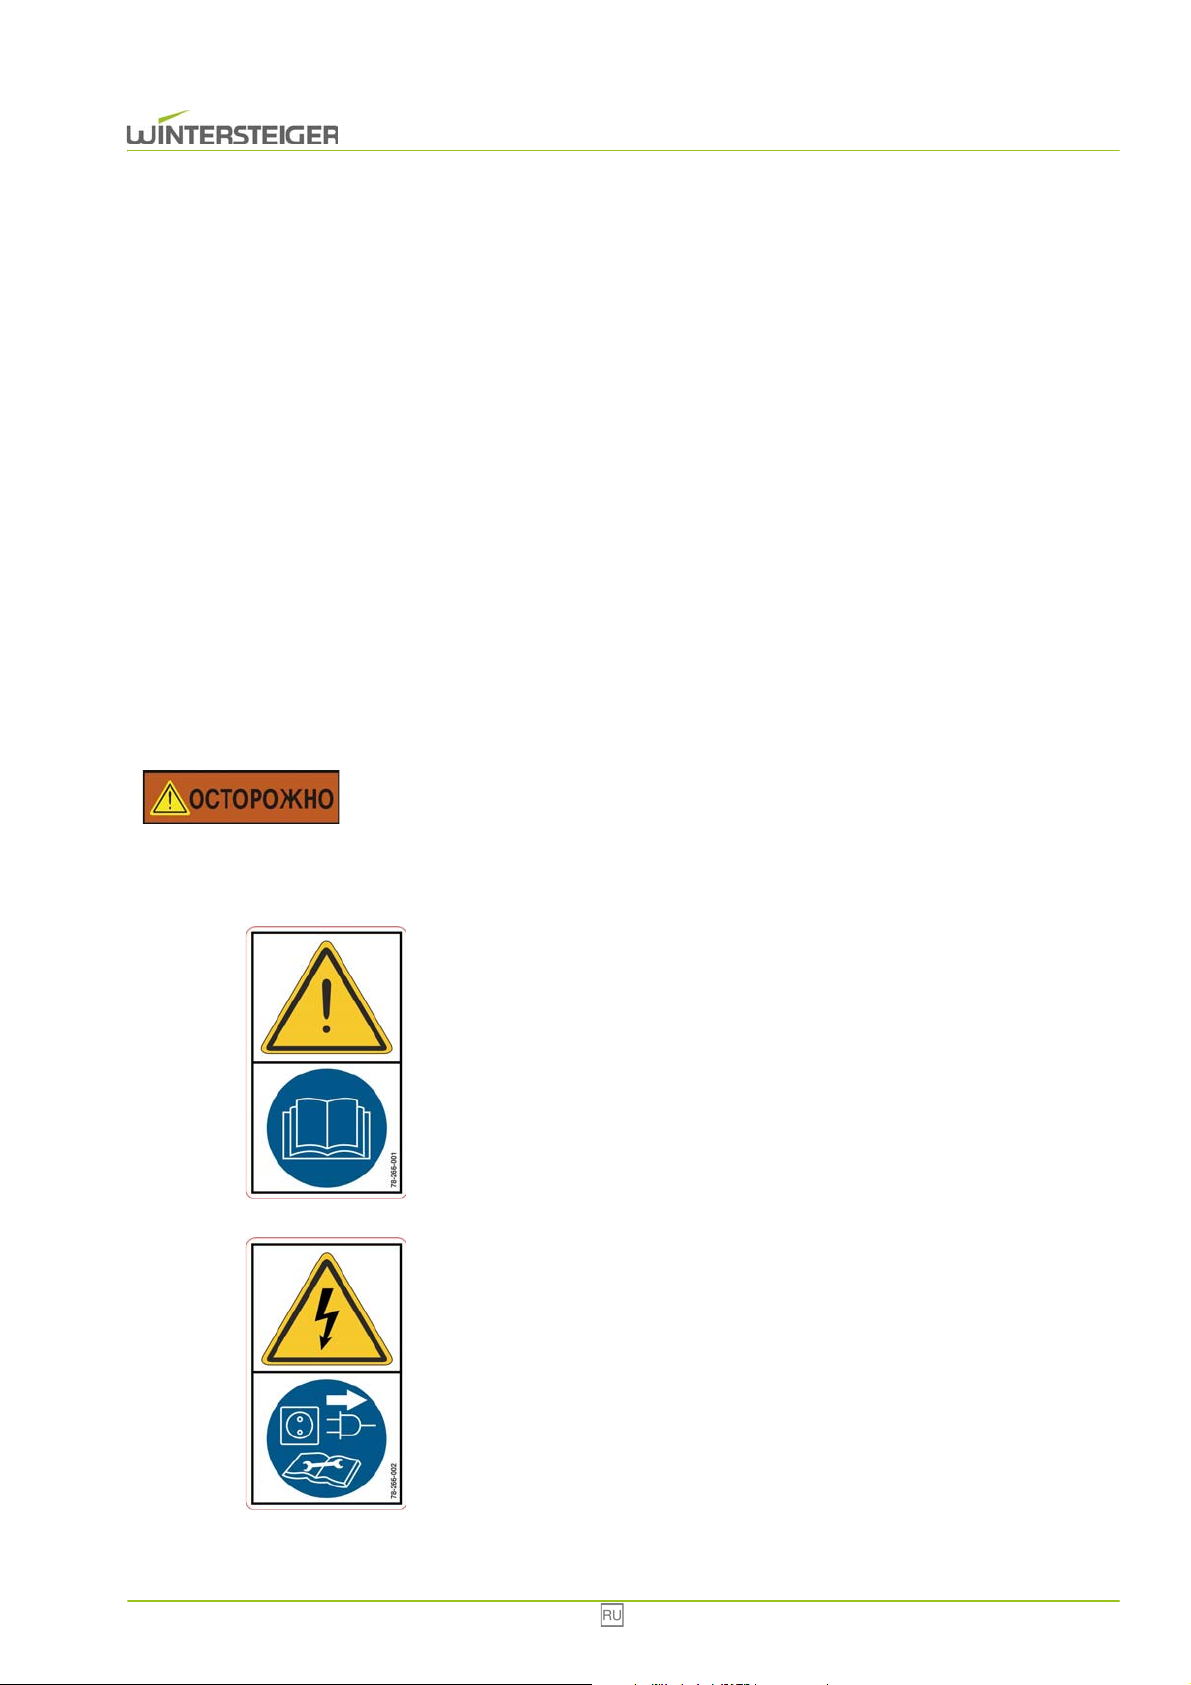
2 Общие указания
2.1 Предписания по технике безопасности
Устройство разрешается подключать только к розеткам, проверенным квалифицированным электриком. При
этом необходимо соблюдать правильное напряжение питающей сети! Электрические характеристики указаны
на заводской табличке. Необходимо проверить, совпадают ли эти сведения с напряжением сети.
Эксплуатация сушильного шкафа разрешается только с полным комплектом установленных защитных крышек
и кожухов!
Перед любым изменением местоположения или работе внутри устройства необходимо вынуть вилку из розетки
электросети!
Устройство разрешается эксплуатировать только с оригинальными запасными частями и расходными
материалами компании WINTERSTEIGER. Применяя материалы других производителей, эксплуатирующая
сторона действует на свой страх и риск, при этом гарантия производителя устройства аннулируется.
Необходимо обеспечить хорошую вентиляцию рабочего помещения!
2.2 Предупреждения
Опасность травмирования!
Следует регулярно проверять сохранность предупреждающих наклеек на машине. Нечитаемые или
отсутствующие предупреждающие наклейки следует немедленно восстановить. Наклейки находятся на
левой внутренней стенке устройства.
Перед вводом в эксплуатацию внимательно прочитать предписания
по технике безопасности и соблюдать их!
Номер для заказа: 78-266-001
Перед открыванием устройства извлечь сетевой штекерный
разъем!
Номер для заказа: 78-266-002
Combi Eco 90
Page 91
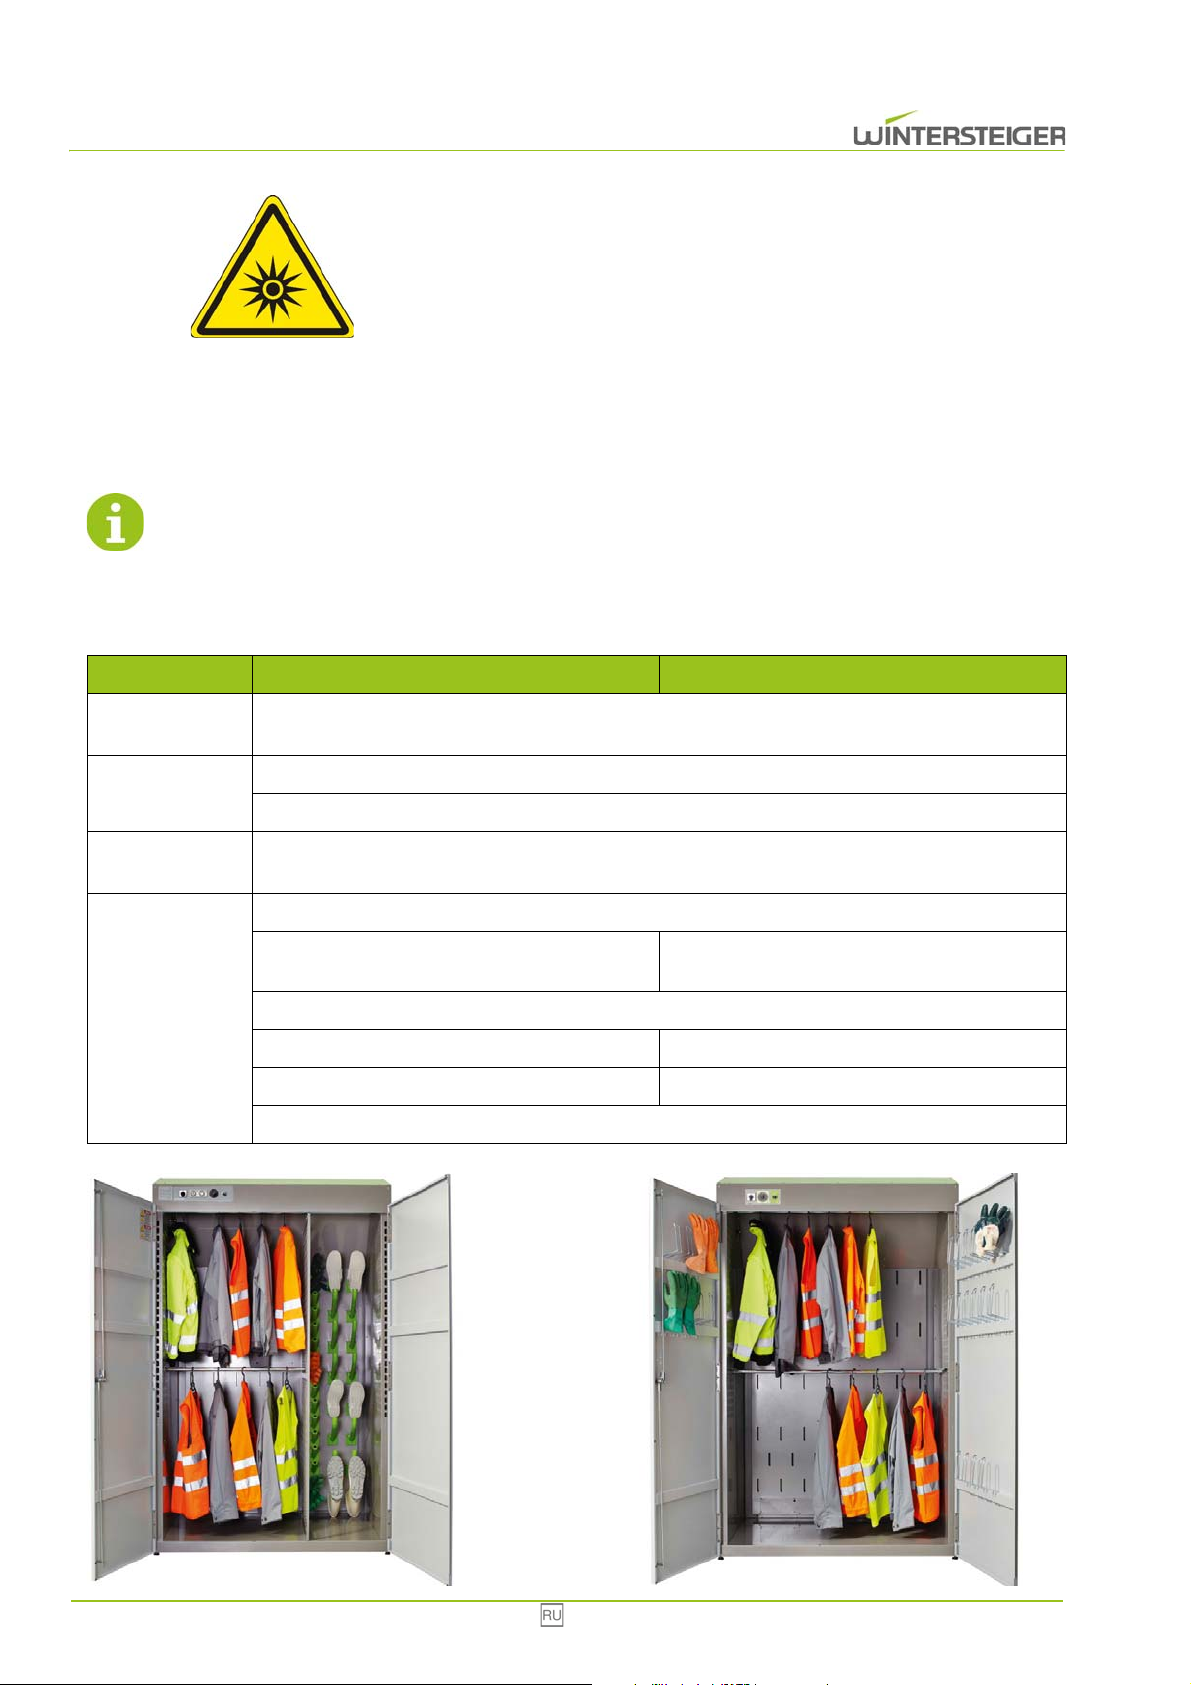
Эта наклейка имеется в том случае, если в устройстве установлена
опциональная озоновая лампа.
Номер для заказа: 78-150-120
2.3 Защитные устройства
Во время эксплуатации запрещается демонтировать какие-либо защитные устройства.
Сушильный шкаф Combi Eco соответствует требованиям Директивы о низковольтном
оборудовании и Директивы об электромагнитной совместимости.
3 Принцип работы
Typ Combi Eco Multi Eco
Обслуживание
Сушка
Гигиена
Пространство
Combi Eco
Удобное управление с помощью таймера на 24 часа и 7 дней недели, а также с помощью
аналогового таймера (время включения до 6 часов).
Эффективная сушка воздухом из помещения или горячим воздухом, произвольное включение
Энергосберегающая сушка качественной рабочей и иной одежды
Уменьшение количества микроорганизмов в воздухе благодаря применению озоновой лампы
(опция)
Сопла с внутренней вентиляцией для сушки :
8 пар обуви
8 пар перчаток
Встроенный держатель для (с внутренней стороны дверцы):
12 пар перчаток
2 штанги для одежды
2 штанги для одежды
Встроенный бак для воды (при необходимости опорожнить)
Multi Eco
91 Combi Eco
Page 92
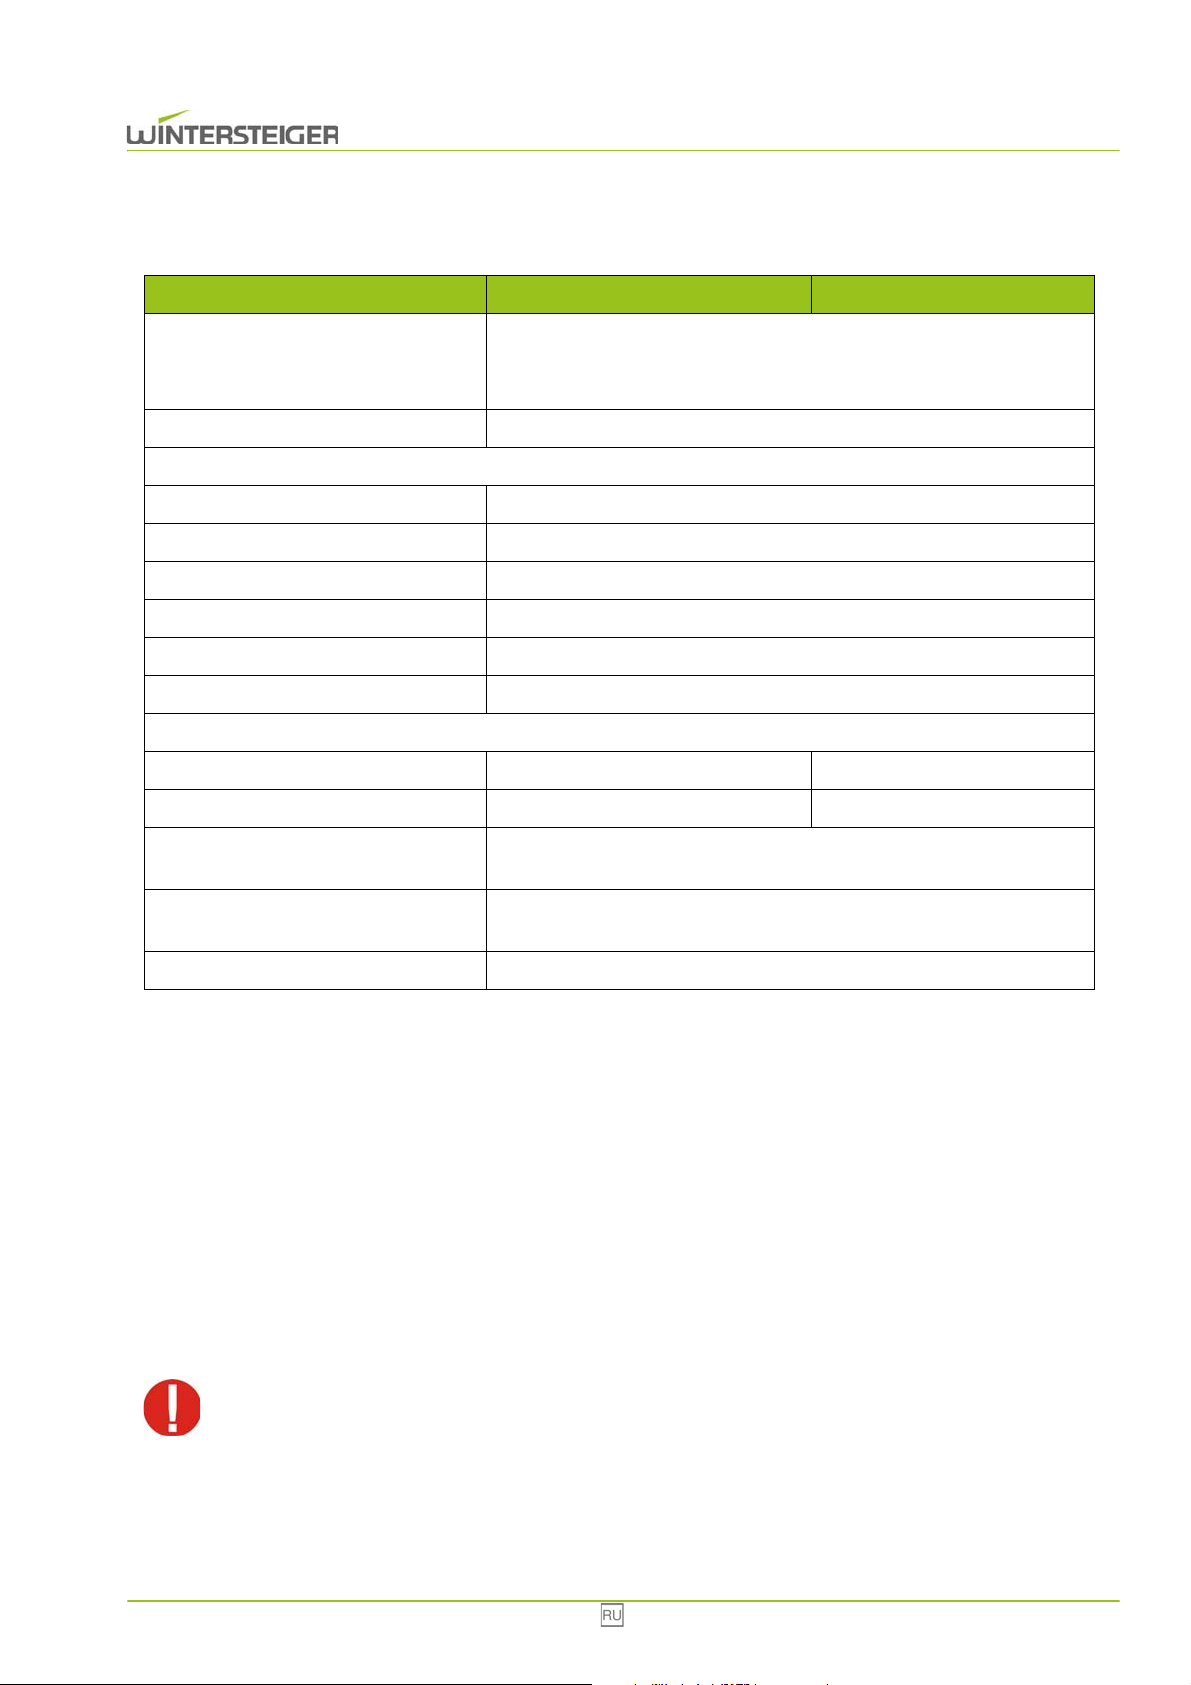
4 Технические характеристики
Typ Combi Eco Multi Eco
Номинальное напряжение,
частота, мощность,
предохранитель:
Номинальный ток 6,2 A
Сведения о правильном напряжении питающей сети см. в прилагаемой технической документации!
Мощность нагревателя: 1 x 800 B
Мощность вентилятора: 1 x 100 B
Мощность компрессора: 1 x 400 B
Озоновая лампа (опция): 1 шт
Температура окружающей среды: +5 ... 40°C
Влажность воздуха: 30% - 80%
Эксплуатация устройства допускается только в хорошо вентилируемых внутренних помещениях!
Размеры (ВxШxГ): 2100 мм x 1300 мм x 850 мм 2100 мм x 1300 мм x 900 мм
Вес: 195 кг 180 кг
1 AC 230V 50 Гц; 1,4 kB; 12/16 A
Длительность сушки:
Уменьшение количества
микроорганизмов:
Уровень шумов: Менее 70 дБ(A)
от 1 часов. В зависимости от влажности, температуры и материала
возможна более длительная сушка.
Уменьшение количества микроорганизмов в воздухе благодаря
применению ультрафиолетовой или озоновой лампы (опция)
5 Транспортировка, хранение и изменение
место-положения
5.1 Условия для транспортировки устройства
Устройство должно транспортироваться в оригинальной упаковке и в положении, указанном на этой упаковке.
5.2 Хранение устройства
Температура: 0° ... +40 °C.
Во избежание повреждений запрещается класть другие коробки или ящики на упаковку устройства!
Combi Eco 92
Page 93
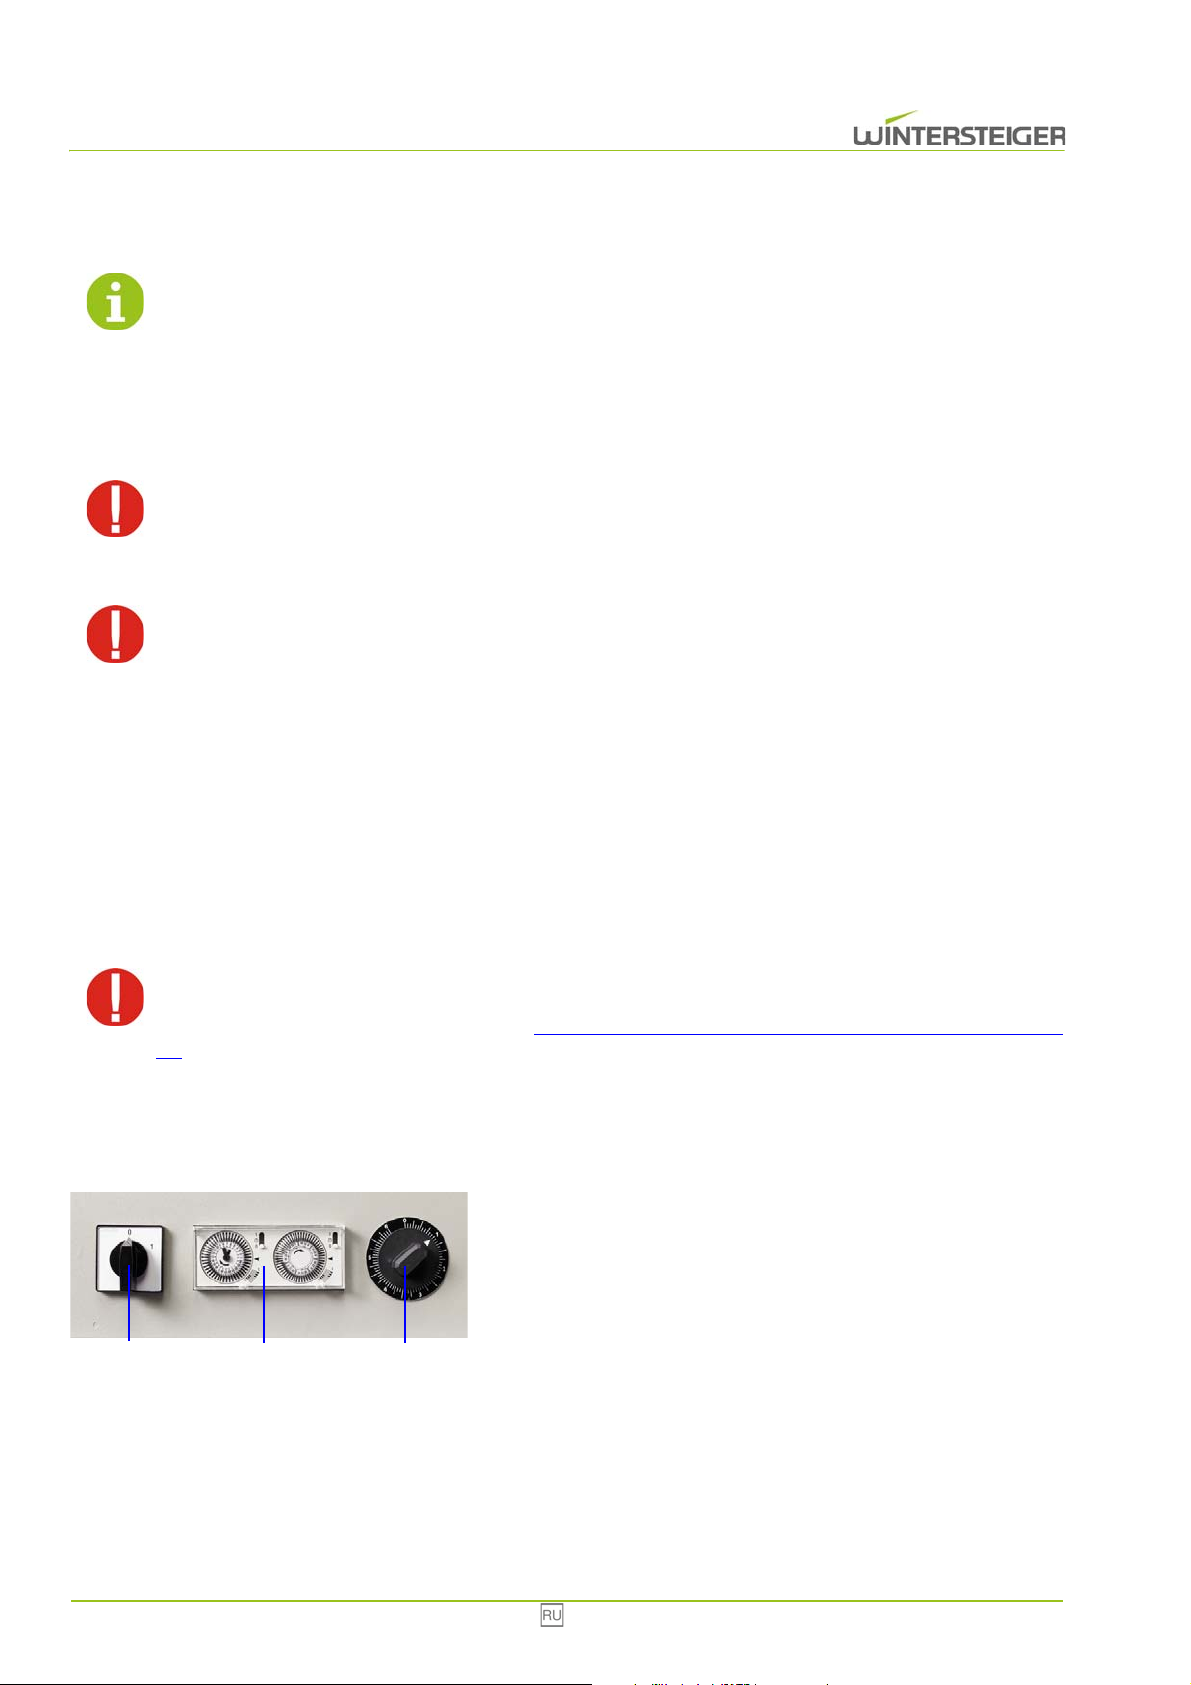
5.3 Снятие упаковки и выбор местоположения
C
A
B
При снятии упаковки необходимо проследить за тем, чтобы устройство не было повреждено.
При выборе местоположения в первую очередь требуется учитывать функциональное назначение устройства.
Устройство должно быть установлено в сухом помещении с хорошей вентиляцией. Высота потолка в помещении
должна быть не менее 2,3 м. Электрическая розетка должна находиться в непосредственной близости от
устройства.
При выборе местоположения необходимо обратить особое внимание на соблюдение директив и
законодательства, относящихся к обеспечению безопасности на рабочем месте!
Необходимо обеспечить отсутствие полной или частичной блокировки притока воздуха (не
загораживать устройство другими предметами!).
Для оптимальной сушки и уменьшения количества микроорганизмов температура воздуха
в помещении не должна быть ниже 5 °C.
Запрещается вставлять какие-либо предметы в решетку всасываемого воздуха или защитную решетку.
Запрещается даже частично закрывать эти отверстия. Категорически запрещается выливать или разбрызгивать
жидкости в воздушный контур, так как при этом возникает опасность удара током и повреждения устройства.
6 Описание элементов управления
Не выключайте сушильный шкаф преждевременно с помощью главного выключателя. По
истечении заданного времени сушки в течение 10 – 15 минут продолжает работать вентиляция в
целях защиты нагревателя от перегрева (см. гл. 7.4 Предохранительный выключатель перегрева, стр.
99).
6.1 Таймер на 24 часа и 7 дней недели
A: Главный выключатель
Включение и выключение устройства
B: Автоматический таймер
C: Ручной таймер
Настройка длительности сушки от 0 до 6 часов
6.2 Работа с таймером на 24 часа и 7 дней недели
Автоматический таймер позволяет выполнять сушку согласно жесткому графику на 24 часа и 7 дней недели.
93 Combi Eco
Page 94
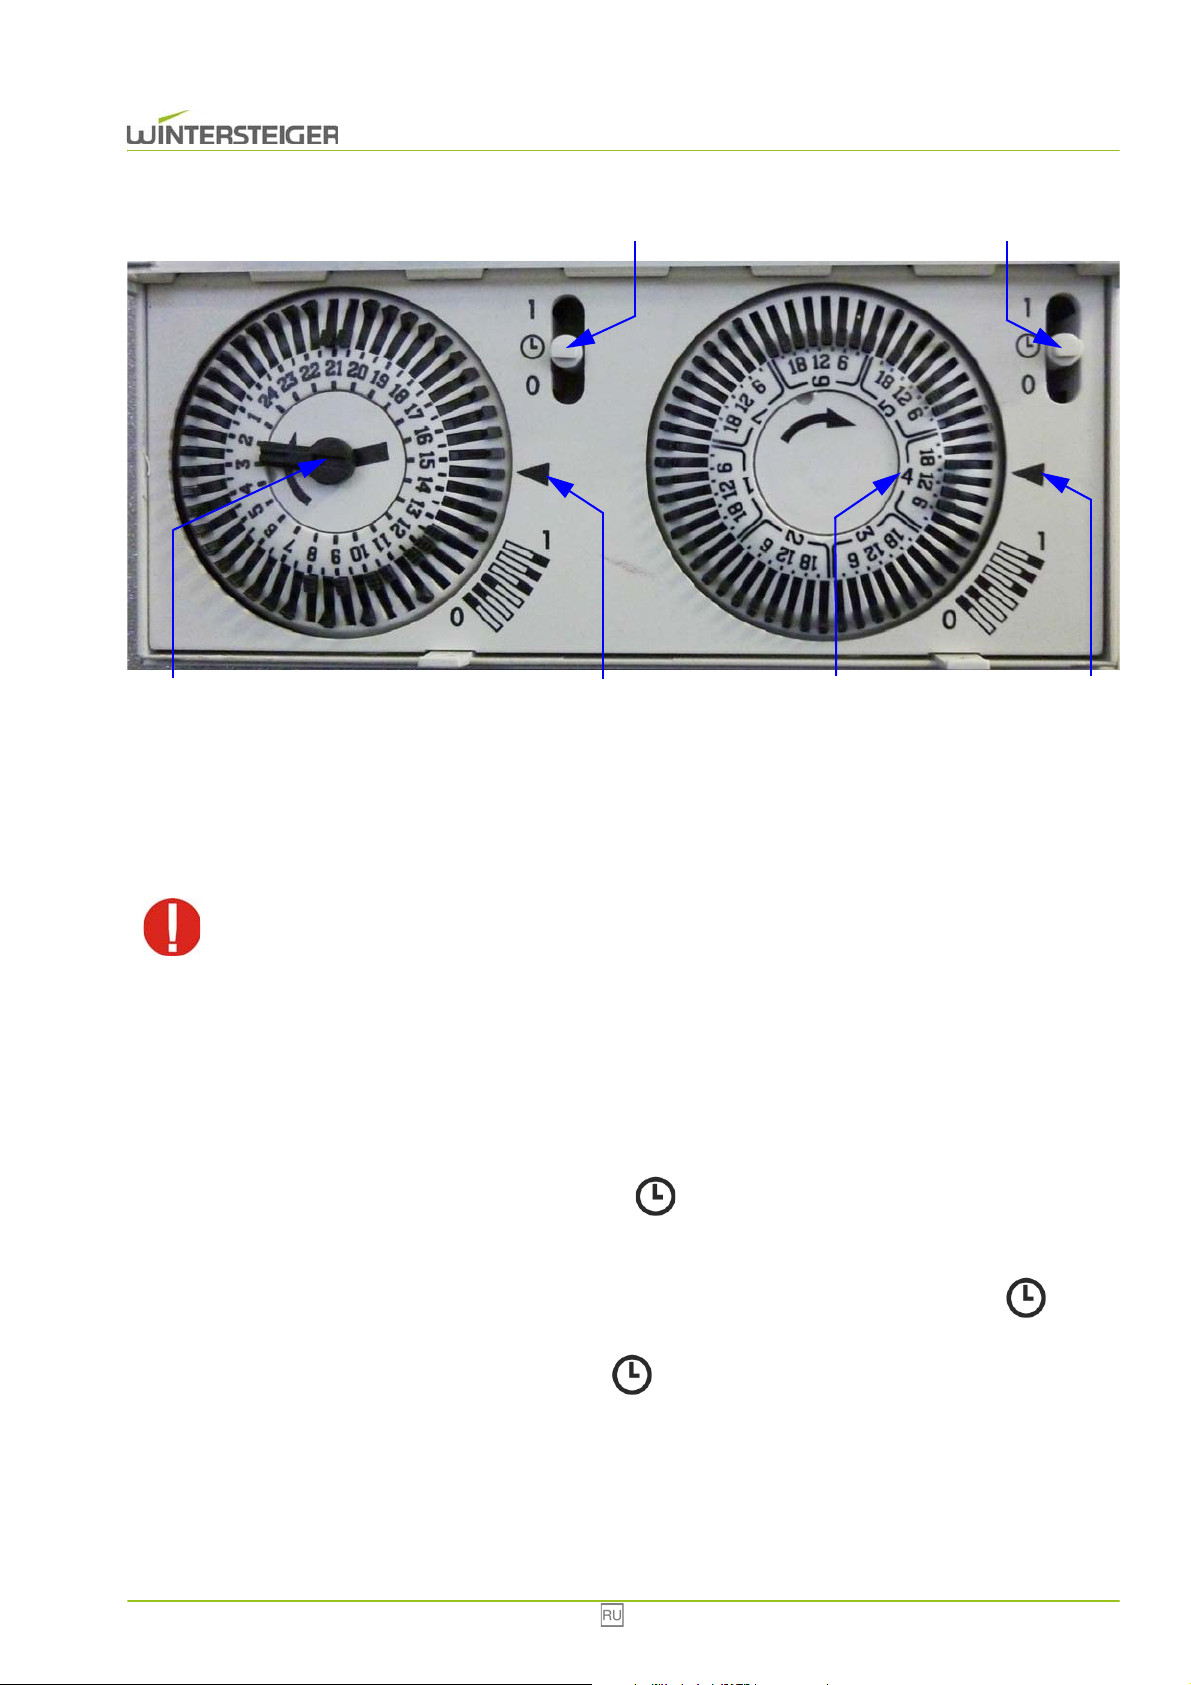
Слева находится суточный счетчик, справа – недельный счетчик.
A
C
B
D
F
E
6.2.1 Настройка текущего времени и дня недели
Используя маленькую шлицевую отвертку, поверните минутную стрелку [A].
Правый таймер для настройки текущего дня недели также поворачивается.
Ни в коем случае не поворачивайте таймер дня недели. Это может привести к повреждению
таймера.
Стрелка [B] показывает приблизительное время. Она позволяет отличить, например, 02:48 от 14:48.
Цифра [C] показывает день недели: от 1 до 7. В данной инструкции первым днем недели считается понедельник.
Стрелка [D] показывает текущий день недели (здесь: четверг).
Выключатели [E+F] предназначены для включения или выключения автоматического таймера.
Если один из выключателей переведен в положение "0", автоматический таймер выключен.
Если оба выключателя переведены в положение , выполняется сушка согласно режиму.
Если оба выключателя переведены в положение "1", сушильный шкаф постоянно включен (24 часа, 7 дней в
неделю).
Если выключатель [E] переведен в положение "1", а выключатель [F] переведен в положение , сушка
выполняется только по недельному графику. Здесь используются только 3-часовые интервалы.
Если выключатель [E] переведен в положение , а выключатель [F] переведен в положение "1", сушка
выполняется только по суточному графику (одинаковая программа для всех дней недели).
6.2.2 Задать режим
Если сегмент какого-либо отрезка времени расположен на внешней окружности, происходит включение сушильного
шкафа на это время. Как правило, сегмент суток и сегмент недели должны находиться на внешней окружности –
только в этом случае происходит запуск сушки.
Combi Eco 94
Page 95
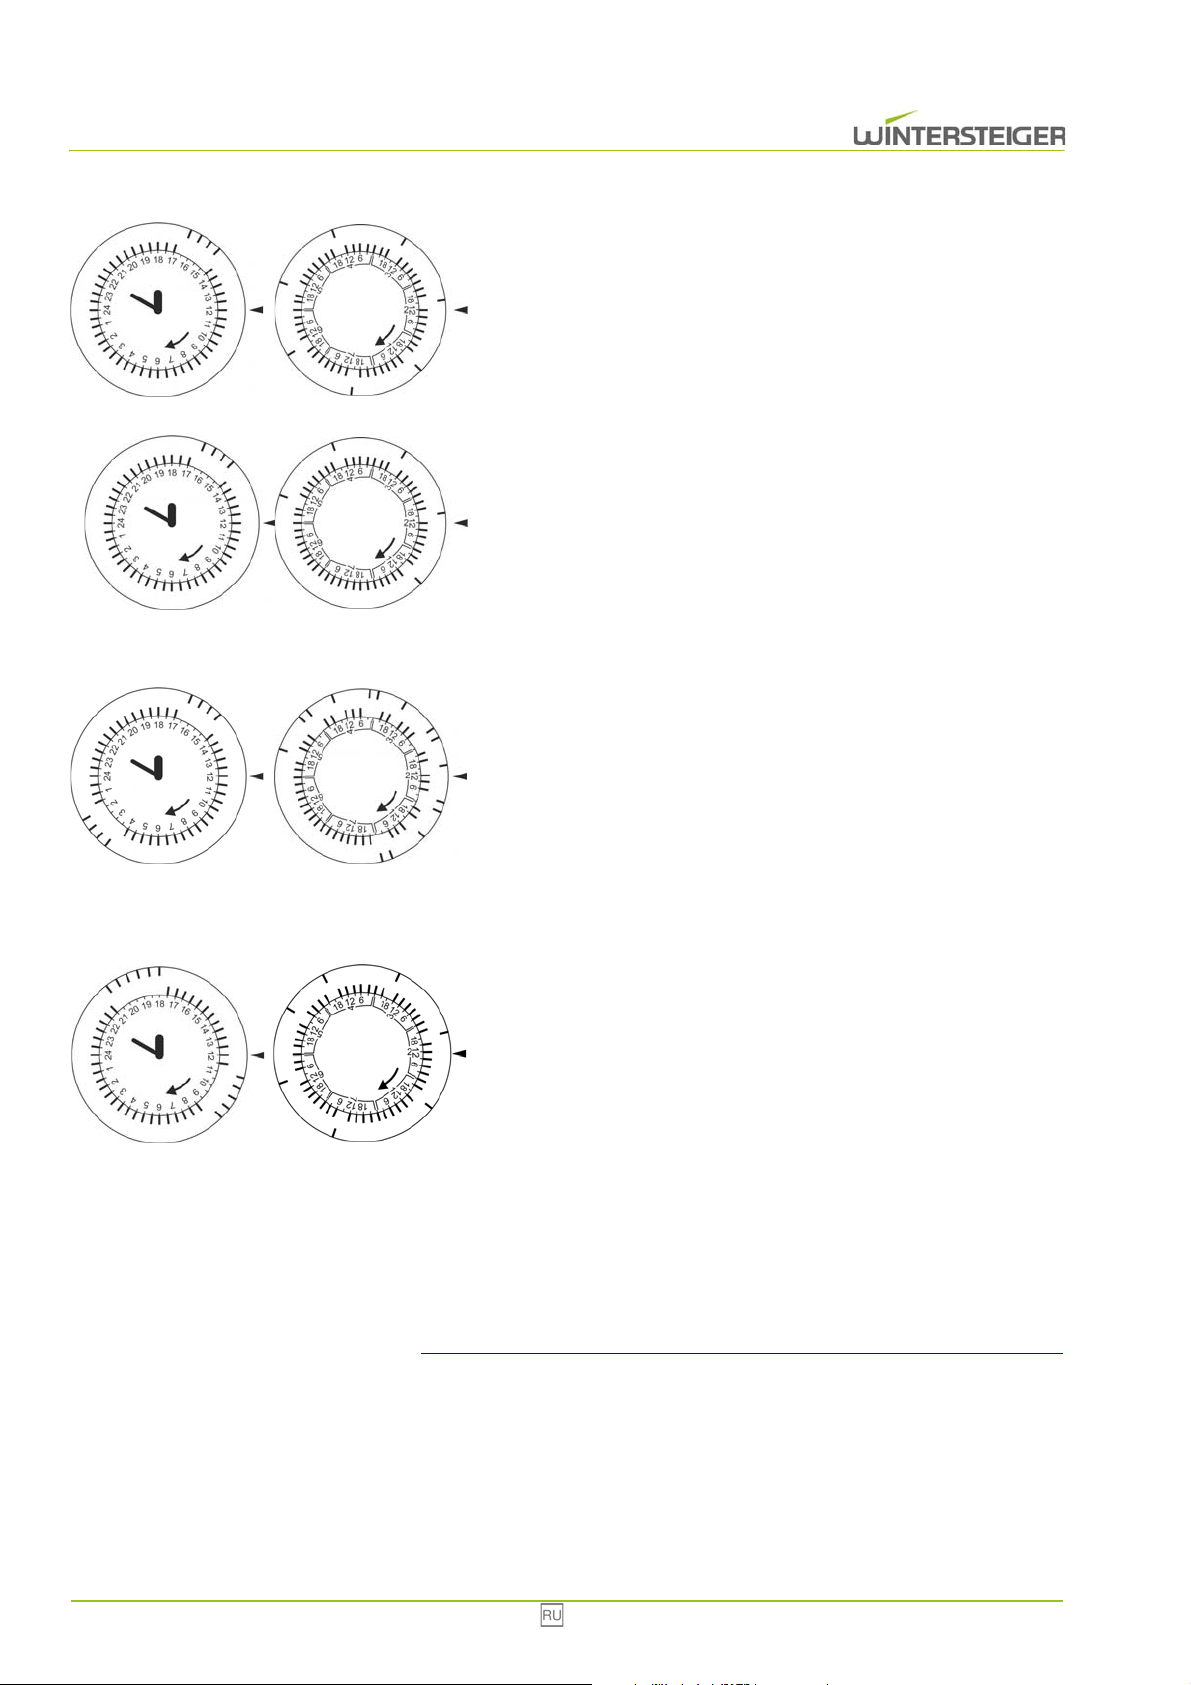
Пример: работа сушилки требуется в следующее время суток:
ежедневно с 15:00 до 17:00
Для этого на внешней окружности суточного счетчика должны быть
расположены следующие сегменты: 15:00, 15:30, 16:00, 16:30
Для этого на внешней окружности недельного счетчика должны
быть расположены следующие сегменты: ежедневно 15:00
Пример: работа сушилки требуется в следующее время суток:
с понедельника {1} по пятницу {5} с 15:00 до 17:00
в субботу {6} и воскресенье {7} сушка не требуется.
Для этого на внешней окружности суточного счетчика должны быть
расположены следующие сегменты: 15:00, 15:30, 16:00, 16:30
Для этого на внешней окружности недельного счетчика должны
быть расположены следующие сегменты: с понедельника {1} по
пятницу {5} 15:00
Пример: работа сушилки требуется в следующее время суток:
с понедельника {1} по пятницу {5} с 02:00 до 04:00 и с 15:00 до 17:00
в субботу {6} и воскресенье {7} сушка не требуется.
Для этого на внешней окружности суточного счетчика должны быть
расположены следующие сегменты: 02:00, 02:30, 03:00, 03:30 и
15:00, 15:30, 16:00, 16:30
Для этого на внешней окружности недельного счетчика должны
быть расположены следующие сегменты: с понедельника {1} по
пятницу {5} 00:00, 03:00, 15:00
Пример: работа сушилки требуется в следующее время суток:
с понедельника {1} по четверг {4} с 18:00 до 21:00
с пятницы {5} по воскресенье {7} с 09:00 до 11:30
Для этого на внешней окружности суточного счетчика должны быть
расположены следующие сегменты: 09:00, 09:30, 10:00, 10:30, 11:00
и 18:00, 18:30, 19:00, 19:30, 20:00, 20:30
Для этого на внешней окружности недельного счетчика должны
быть расположены следующие сегменты: с понедельника {1} по
четверг {4} 15:00
с пятницы {5} по воскресенье {7} 09:00
6.2.3 Внеплановая сушка
Если в сушильном шкафу с таймером на 24 часа и 7 дней недели требуется внеплановая сушка, можно
воспользоваться таймером на 6 часов (см. гл. 6.3 Работа озоновой лампы с таймером на 24 часа (опция), стр. 95)
Таймер на 6 часов включается вместо таймера на 24 часа и 7 дней недели.
6.3 Работа озоновой лампы с таймером на 24 часа (опция)
Автоматический таймер позволяет выполнять сушку согласно жесткому графику на 24 часа.
95 Combi Eco
Page 96
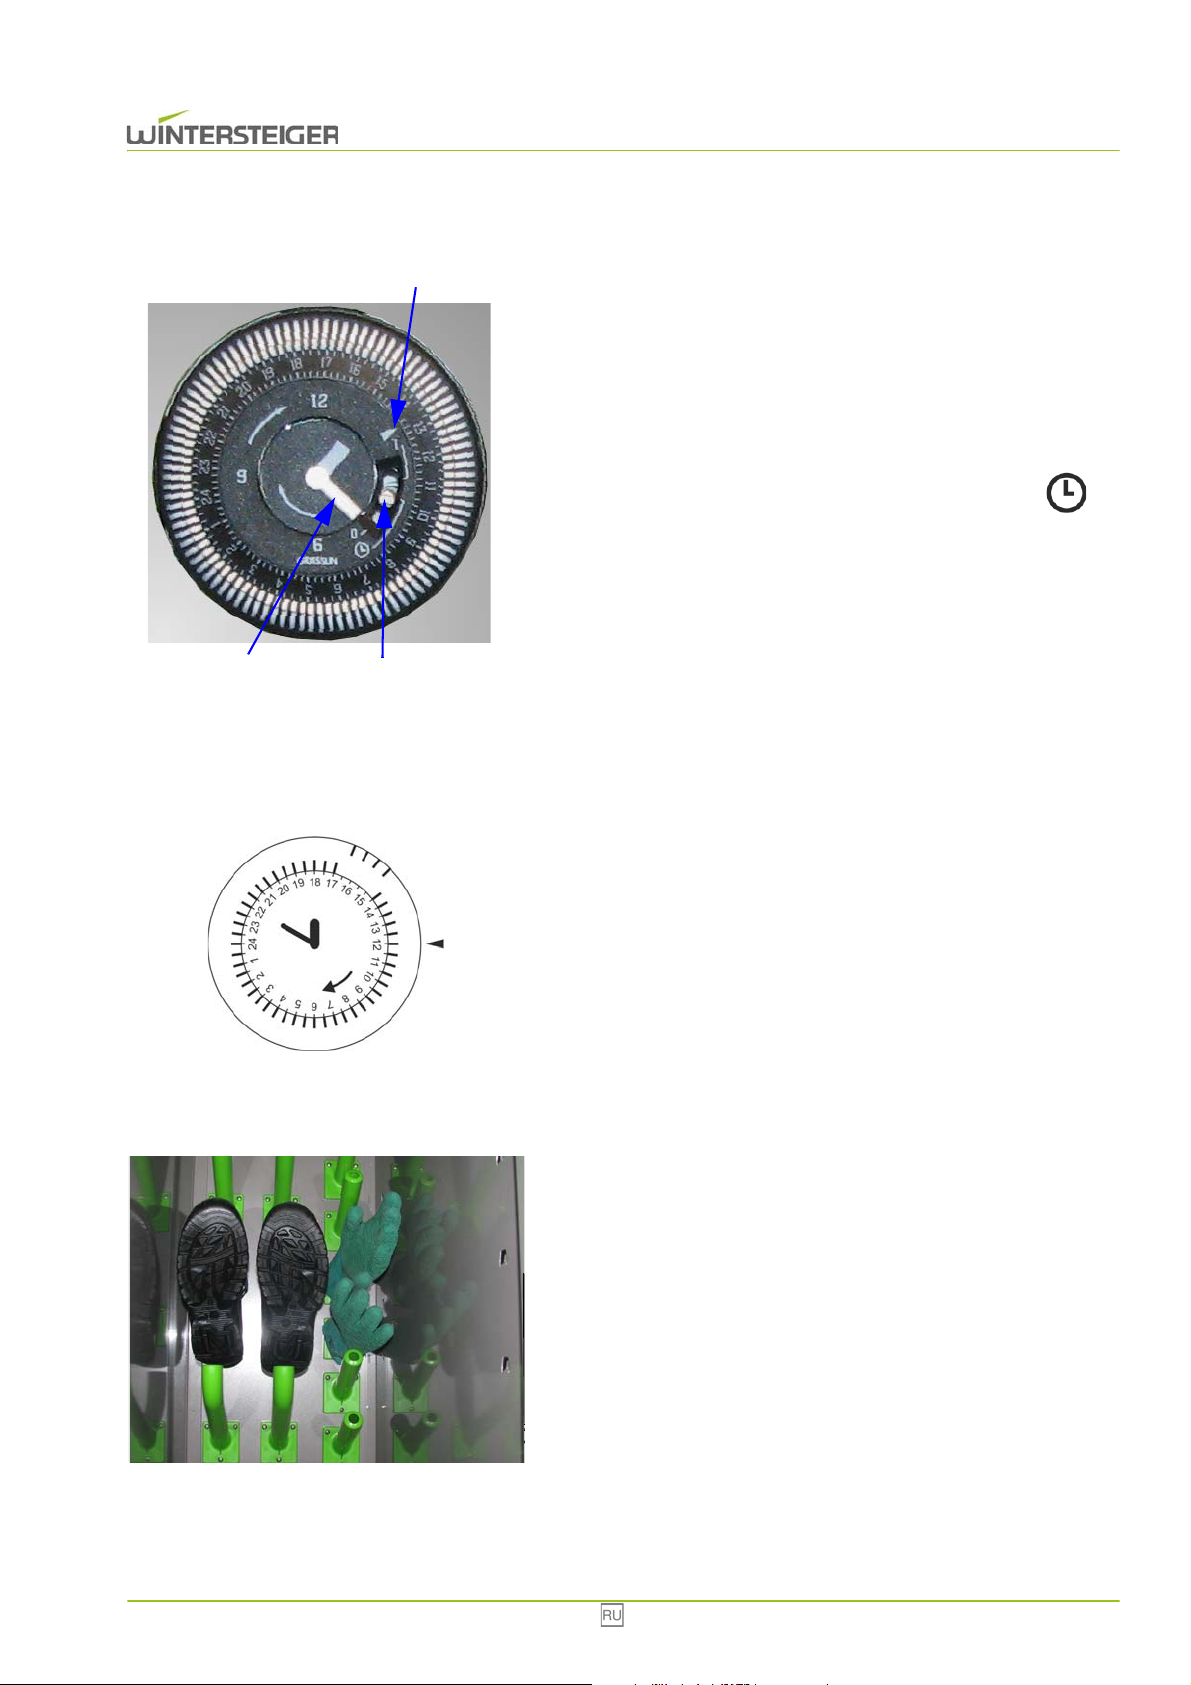
6.3.1 Задать текущее время
A
C
B
C
Используя маленькую шлицевую отвертку, поверните
минутную стрелку [A].
Стрелка [B] показывает приблизительное время. Она позволяет
отличить, например, 01:25 от 13:25.
Выключатель [C] предназначен для включения или выключения
таймера.
Если выключатель переведен в положение "0", автоматический
таймер выключен.
Если выключатель переведен в положение „ ,
выполняется сушка согласно режиму.
Если выключатель переведен в положение "1", сушильный
шкаф постоянно включен.
6.3.2 Задать режим
Если сегмент какого-либо отрезка времени расположен на внешней окружности, происходит включение сушильного
шкафа на это время.
Пример: работа сушилки требуется в следующее время суток:
ежедневно с 15:00 до 17:00
Для этого на внешней окружности суточного счетчика должны быть
расположены следующие сегменты: 15:00, 15:30, 16:00, 16:30
6.4 Оптимальная загрузка сушильного шкафа
При сушке рабочей одежды требуется соблюдать следующие
указания:
Надеть перчатки на встроенные сопла для перчаток.
Надеть обувь на встроенные сопла для обуви.
Combi Eco 96
Page 97
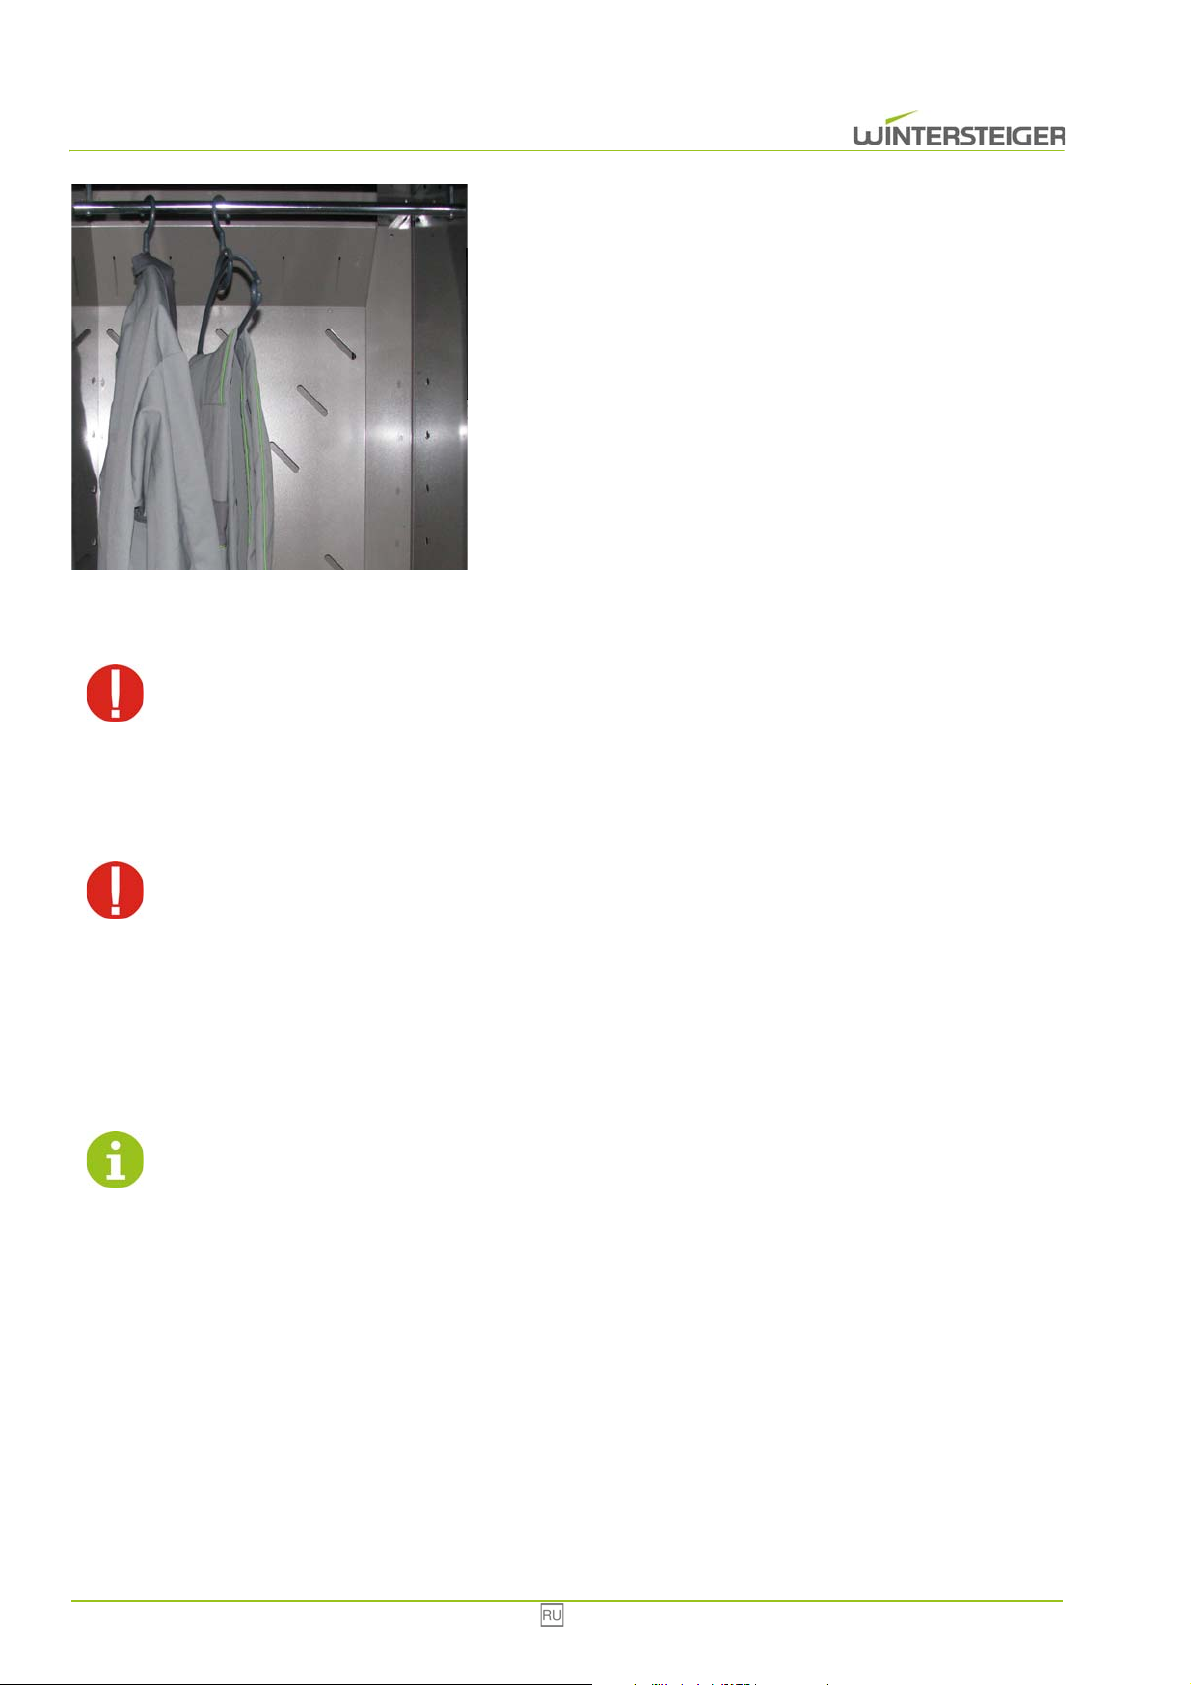
C
Повесить рабочую одежду с крючком для одежды на
установленную штангу для одежды.
Сушильный шкаф Combi Eco рассчитан на сушку 10 комплектов
рабочего снаряжения. Комплекты следует располагать свободно,
чтобы обеспечить оптимальную циркуляцию воздуха между ними.
После выключения нагревателя в течение 10 – 15 минут продолжает
работать вентиляция.
7 Техническое обслуживание
Перед выполнением любых работ по техническому обслуживанию необходимо выключить
устройство и вынуть вилку из розетки!
7.1 Чистка
Следует регулярно протирать устройство внутри и снаружи влажной чистящей салфеткой.
Категорически запрещается мыть устройство водой, так как это ведет к поломке электрических
компонентов! В случае несоблюдения этого условия исключается любая ответственность за ущерб
и аннулируется любое право на гарантию.
7.2 Озоновая лампа (опция)
Для озоновой лампы задан определенный график работы (15 минут работа – 30 минут перерыв – работа 15 минут)
посредством таймера на 24 часа. Лампа активирована только в то время, когда включен главный таймер.
Дозировка озона настраивается на заводе.
Не рекомендуется изменять настройки озоновой лампы!
97 Combi Eco
Page 98
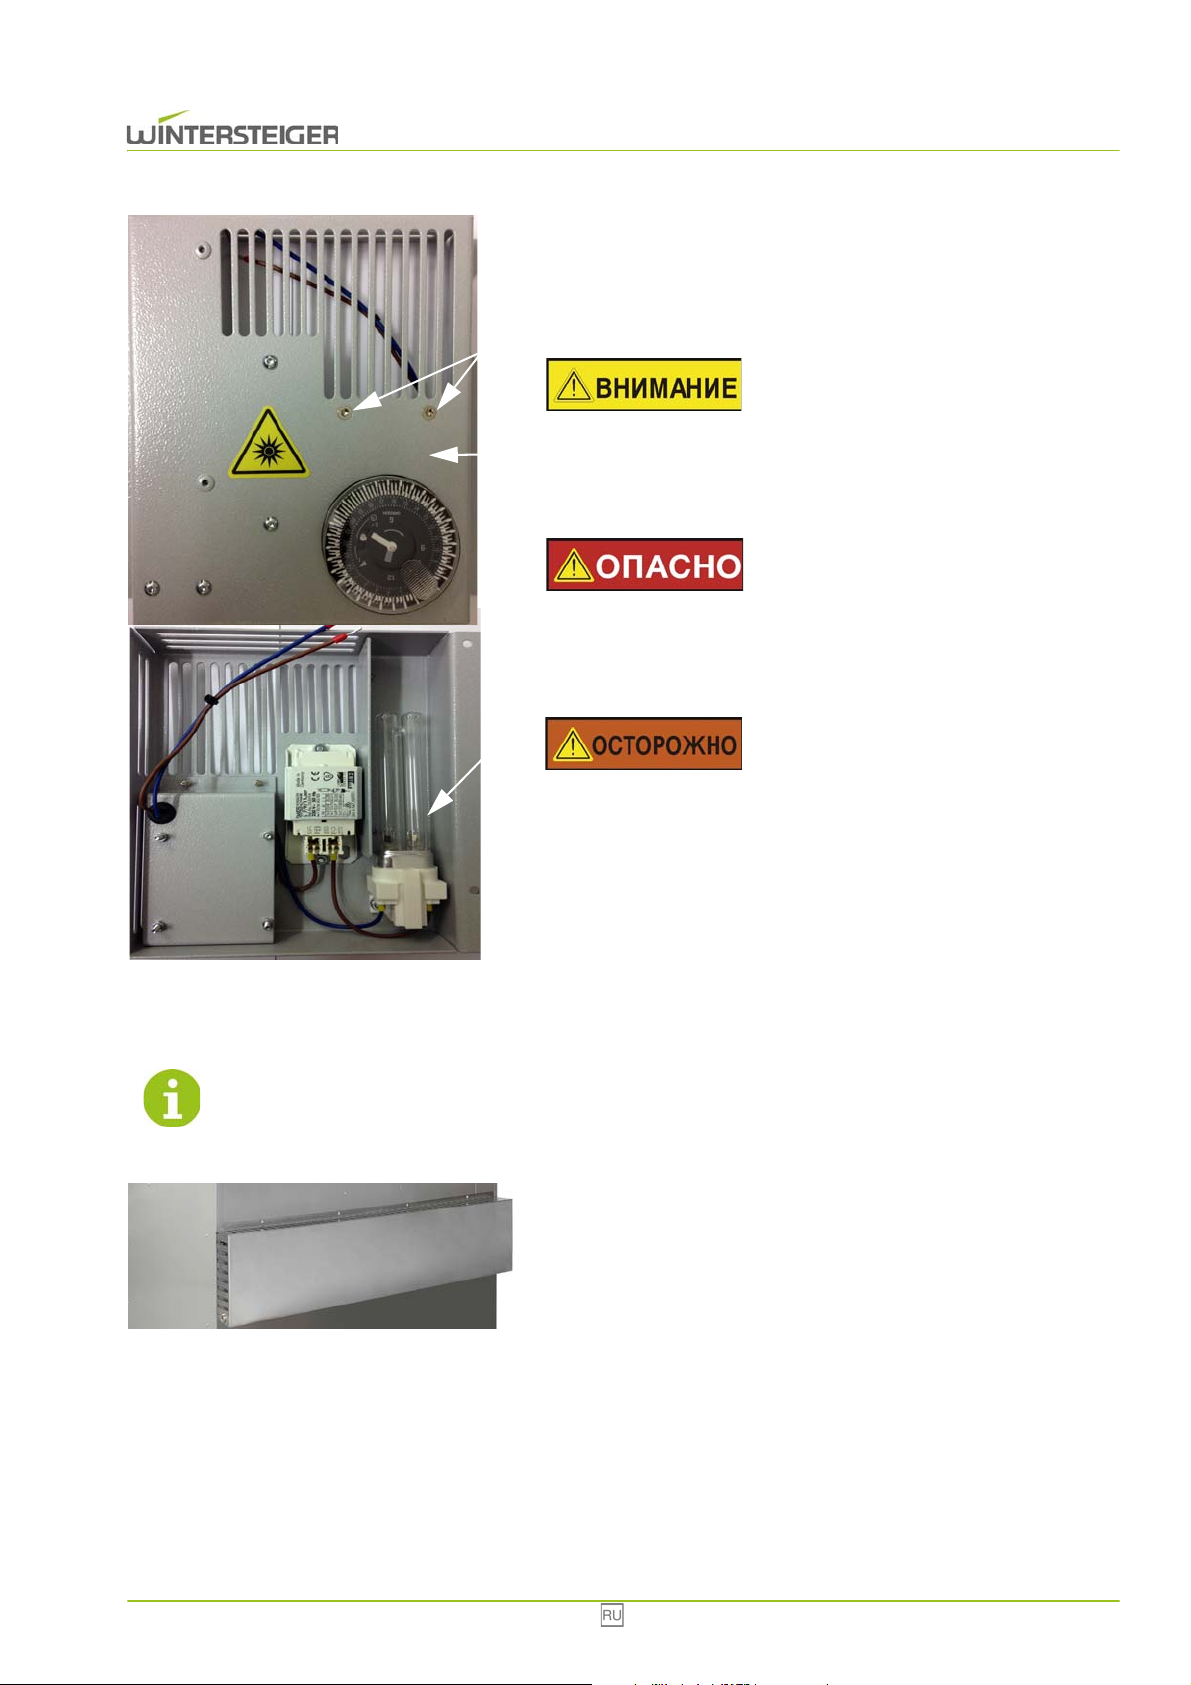
Используемая озоновая лампа эффективно уменьшает количество
A
C
B
A
микроорганизмов при сроке работы 2000 часов, после чего
озоновую лампу требуется заменить. Следует ежемесячно
осматривать озоновую лампу во время работы. При этом на задней
стенке шкафа виден голубоватый свет.
Опасность травмирования!
Запрещается смотреть непосредственно на озоновую лампу!
Ультрафиолетовое излучение может привести к травме глаз!
Замена озоновой лампы
Опасность травмирования!
Отсоединить устройство от электрической сети!
Открутить все винты [A].
Снять крышку [B]. Осторожно снять озоновую лампу [C].
Опасность травмирования!
Озоновая лампа содержит токсичную ртуть. Озоновая лампа
должна быть утилизирована в соответствии с требованиями
национальных предписаний!
7.3 Опорожнение бака для воды
При необходимости опорожните бак для воды!
Установить новую лампу [C] и закрепить крышку [B] винтами [A].
Выкрутить винты.
Снять крышку.
Извлечь и опорожнить бак для воды.
Combi Eco 98
Page 99
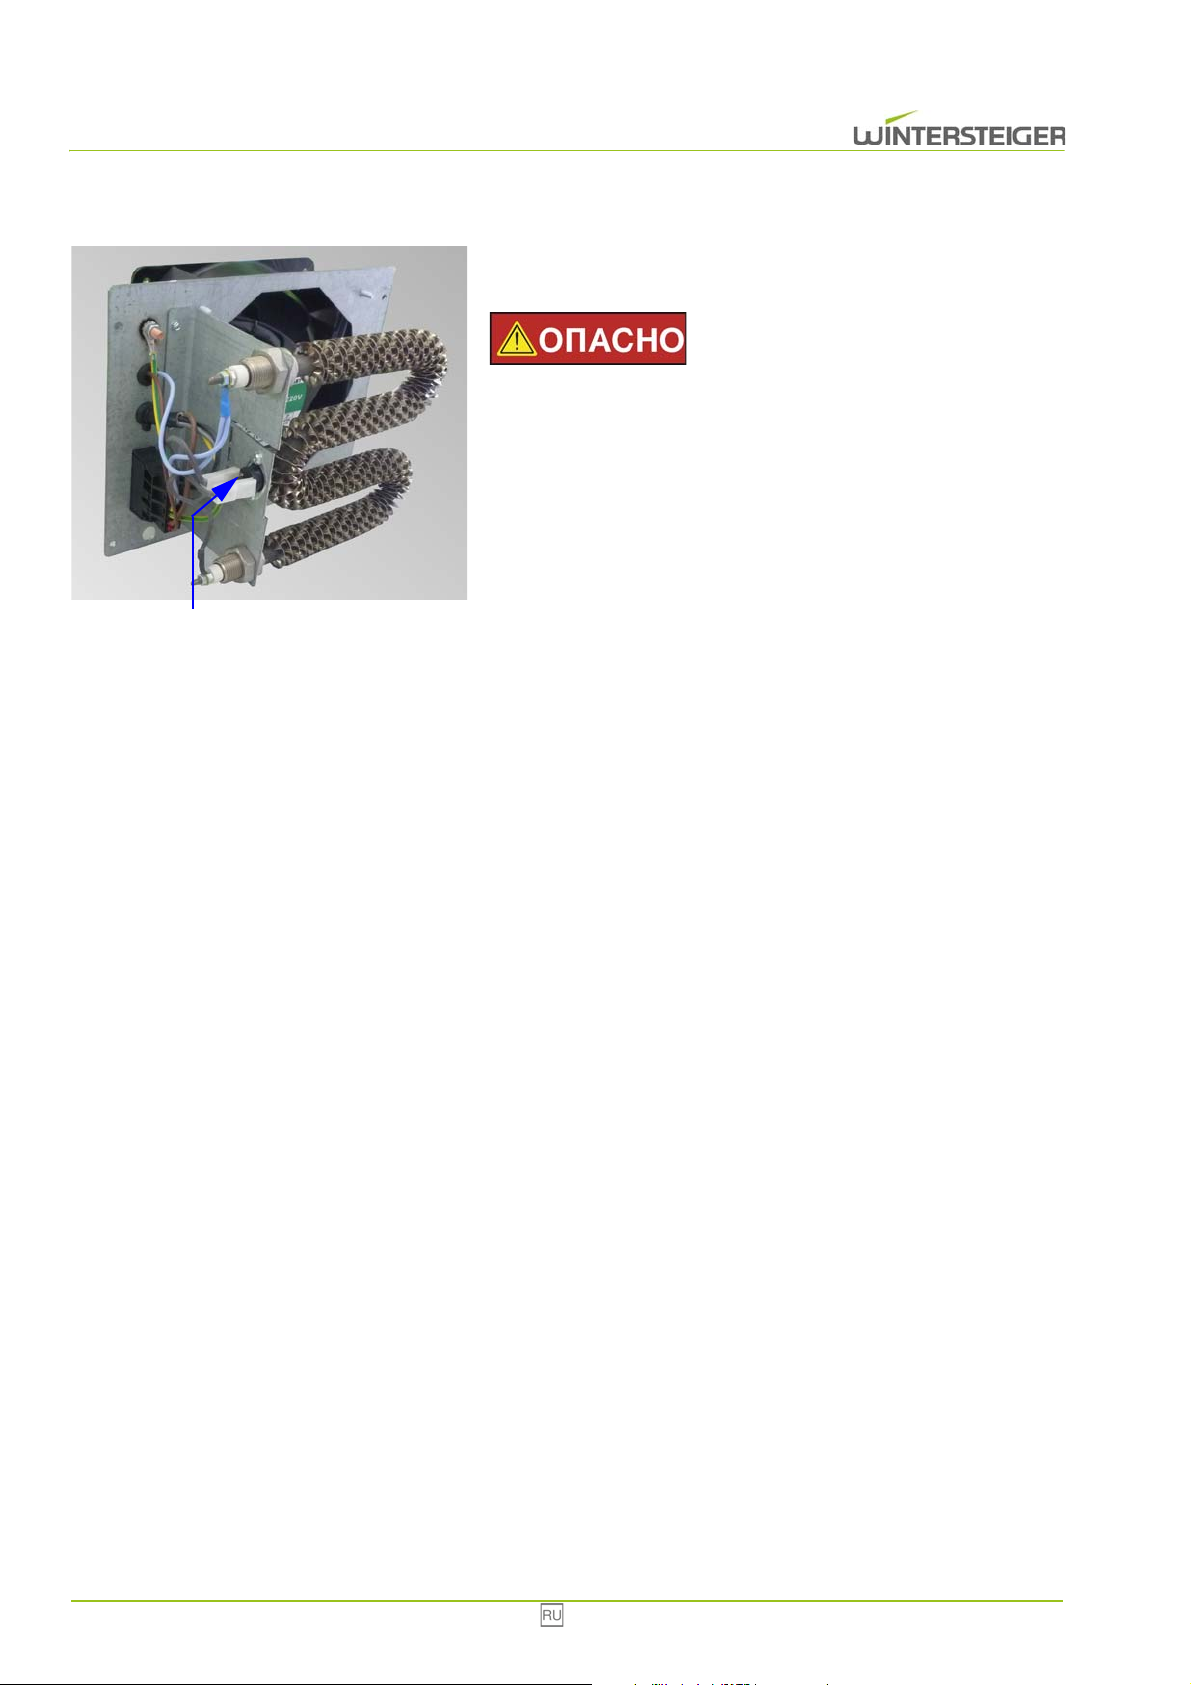
7.4 Предохранительный выключатель перегрева
A
Если сработал предохранительный выключатель перегрева,
выключатель необходимо перевести в исходное положение.
Отсоединить устройство от электрической сети! Неполадку
должен устранять только квалифицированный электрик!
Демонтировать соответствующий тепловентилятор.
Нажать кнопку [A].
Установить тепловентилятор.
Опасность травмирования!
99 Combi Eco
Page 100
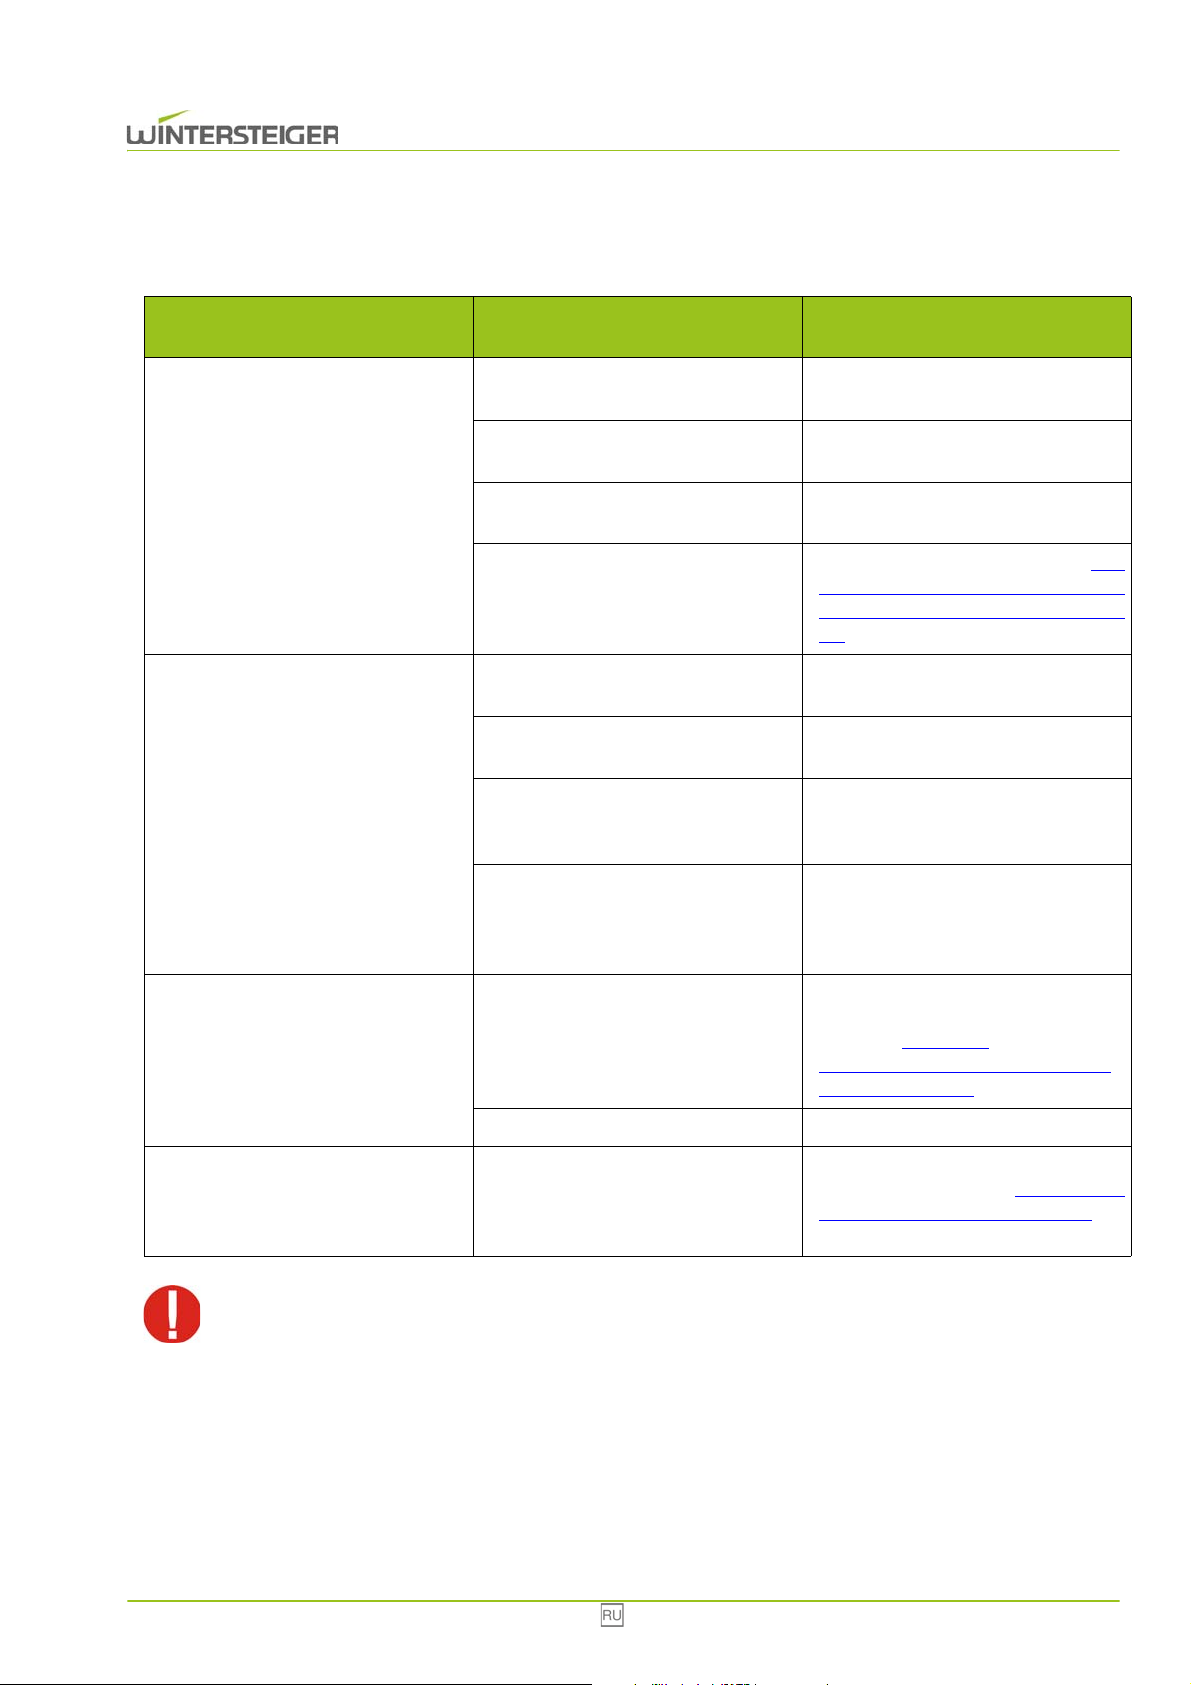
8 Устранение неисправностей
Fehler
Problem
Устройство не работает
Устройство не выполняет сушку
Ursache Behebung
Устройство не подключено
к электрической сети
Не работает источник питания
Главный выключатель установлен
в положение «0»
Не установлена длительность сушки
Недостаточный приток воздуха
Влажность воздуха > 80%
Температура воздуха в помещении
< 5°C
Опция: озон с реле времени
Подключить устройство
к электрической сети
Обратиться к квалифицированному
электрику
Включить главный выключатель
Установить длительность сушки (см.
гл. 6.3 Работа озоновой лампы с
таймером на 24 часа (опция), стр.
95)
Проверить приток воздуха
к устройству и в помещении
Чем меньше влажность воздуха,
тем лучше выполняется сушка.
Чем выше температура воздуха
в помещении, тем лучше
выполняется сушка.
При запуске сушилки озоновая
лампа включается приблизительно
на 10 минут, после чего начинается
процесс сушки.
Проверить, не закрыты ли
Уменьшается эффективность сушки
устройством или устройство не
выполняет нагрев
Озоновая лампа не работает
При действиях внутри устройства необходимо вынуть вилку из розетки! Эксплуатировать
устройство только с полным комплектом установленных защитных крышек и кожухов.
Сработал предохранительный
выключатель перегрева, так как
была превышена температура 80°C
Неисправен вентилятор Проверить вентилятор
вентиляционные прорези внутри и
снаружи. см. гл. 7.4
Предохранительный выключатель
перегрева, стр. 99
Проверить, вставлена и включена
ли озоновая лампа (см. гл. 7.2
Озоновая лампа (опция), стр. 97) или
заменить озоновую лампу.
9 Схема электрических соединений (стр. 16)
Combi Eco 100
 Loading...