

Page 1
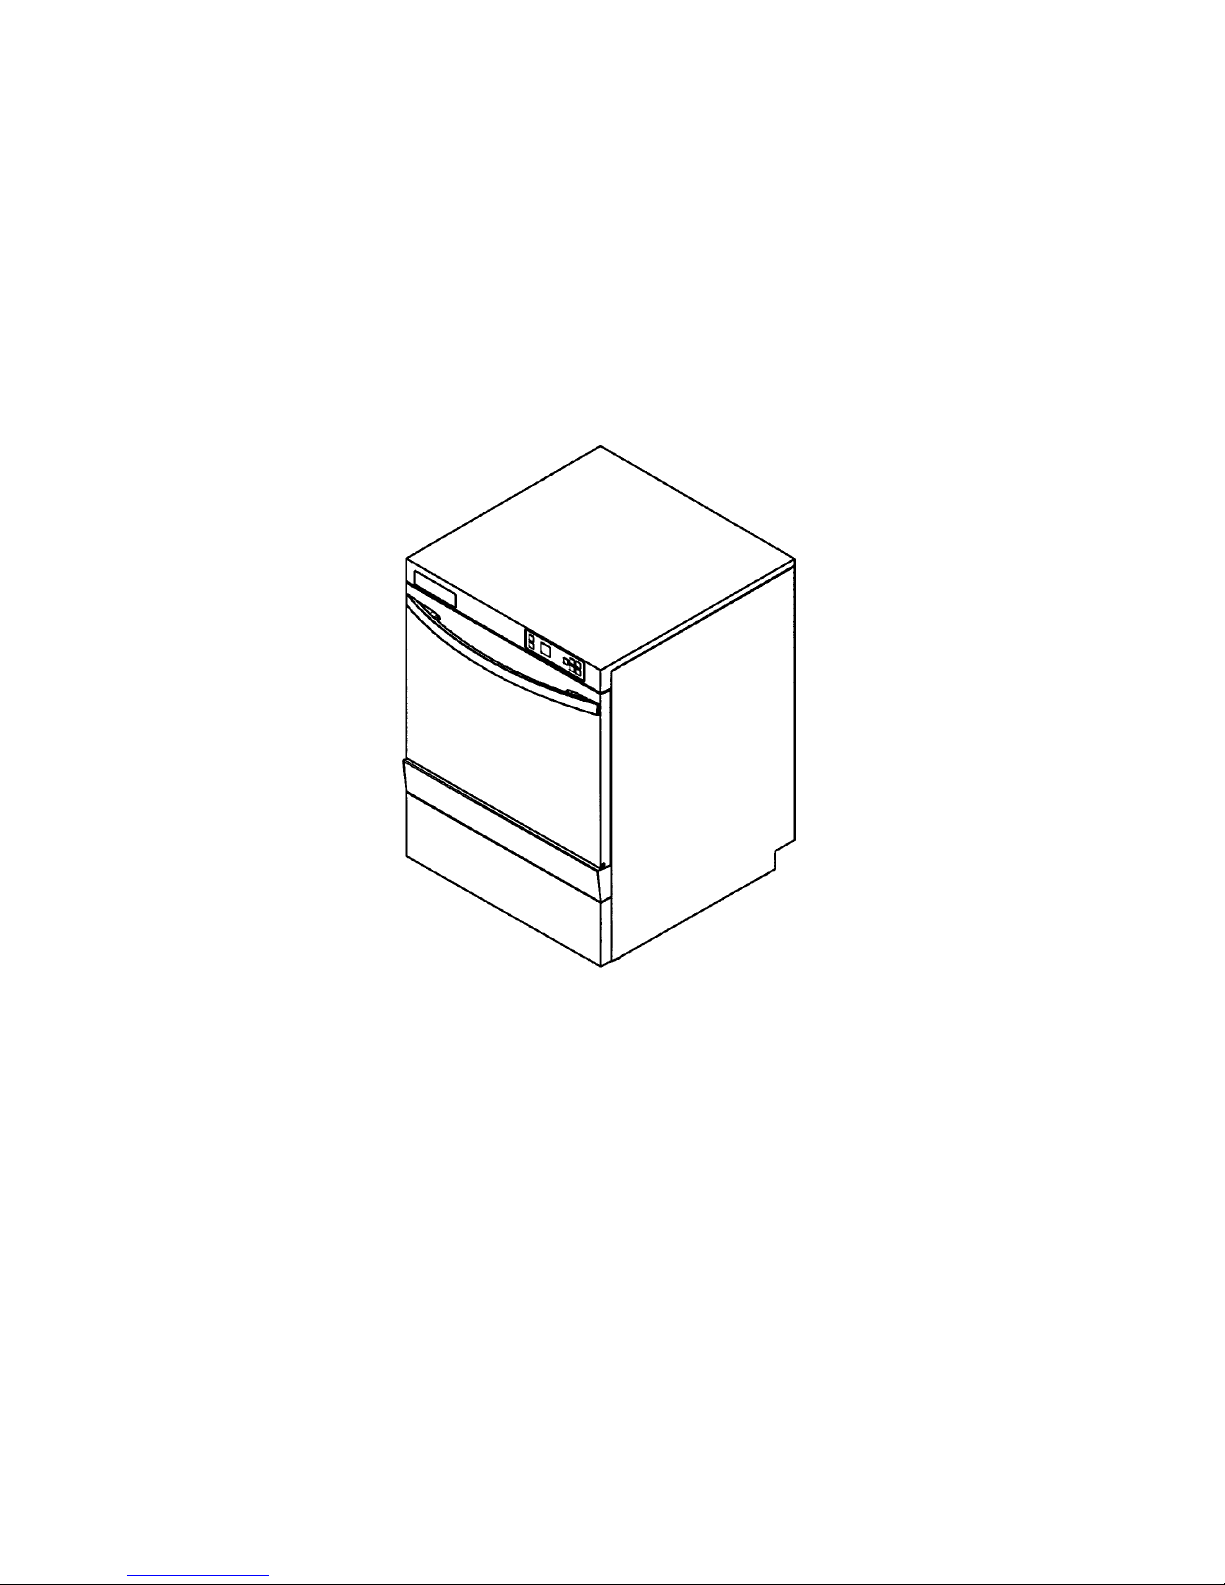
Operating manual 4P GDR
Page 2

Introduction
The 4P GDR is developed specifically for the optical disc industry as an answer to the
complex and expensive existing industrial cleaning machines. It is based on the
standard dishwasher from Winterhalter but has been modified to support the specific
demands for recycling glass substrates.
The development is the result of the cooperation between Winterhalter, 4PICO and
Symcon.
Warranty
The 4P GDR comes with a 1 year warranty on the parts. Warranty parts can be
claimed through Winterhalter BV in the Netherlands or through the local Winterhalter
representatives.
Winterhalter Gastronom Nederland BV
Tel: +31 161 220520
Email: [email protected]
Winterhalter, 4PICO and Symcon cannot give on site support. On site
support must be performed by your local dealer. For telephonic support
you can contact 4PICO at +31 413 490708.
2 Version 1.0
Page 3
Loading the substrates
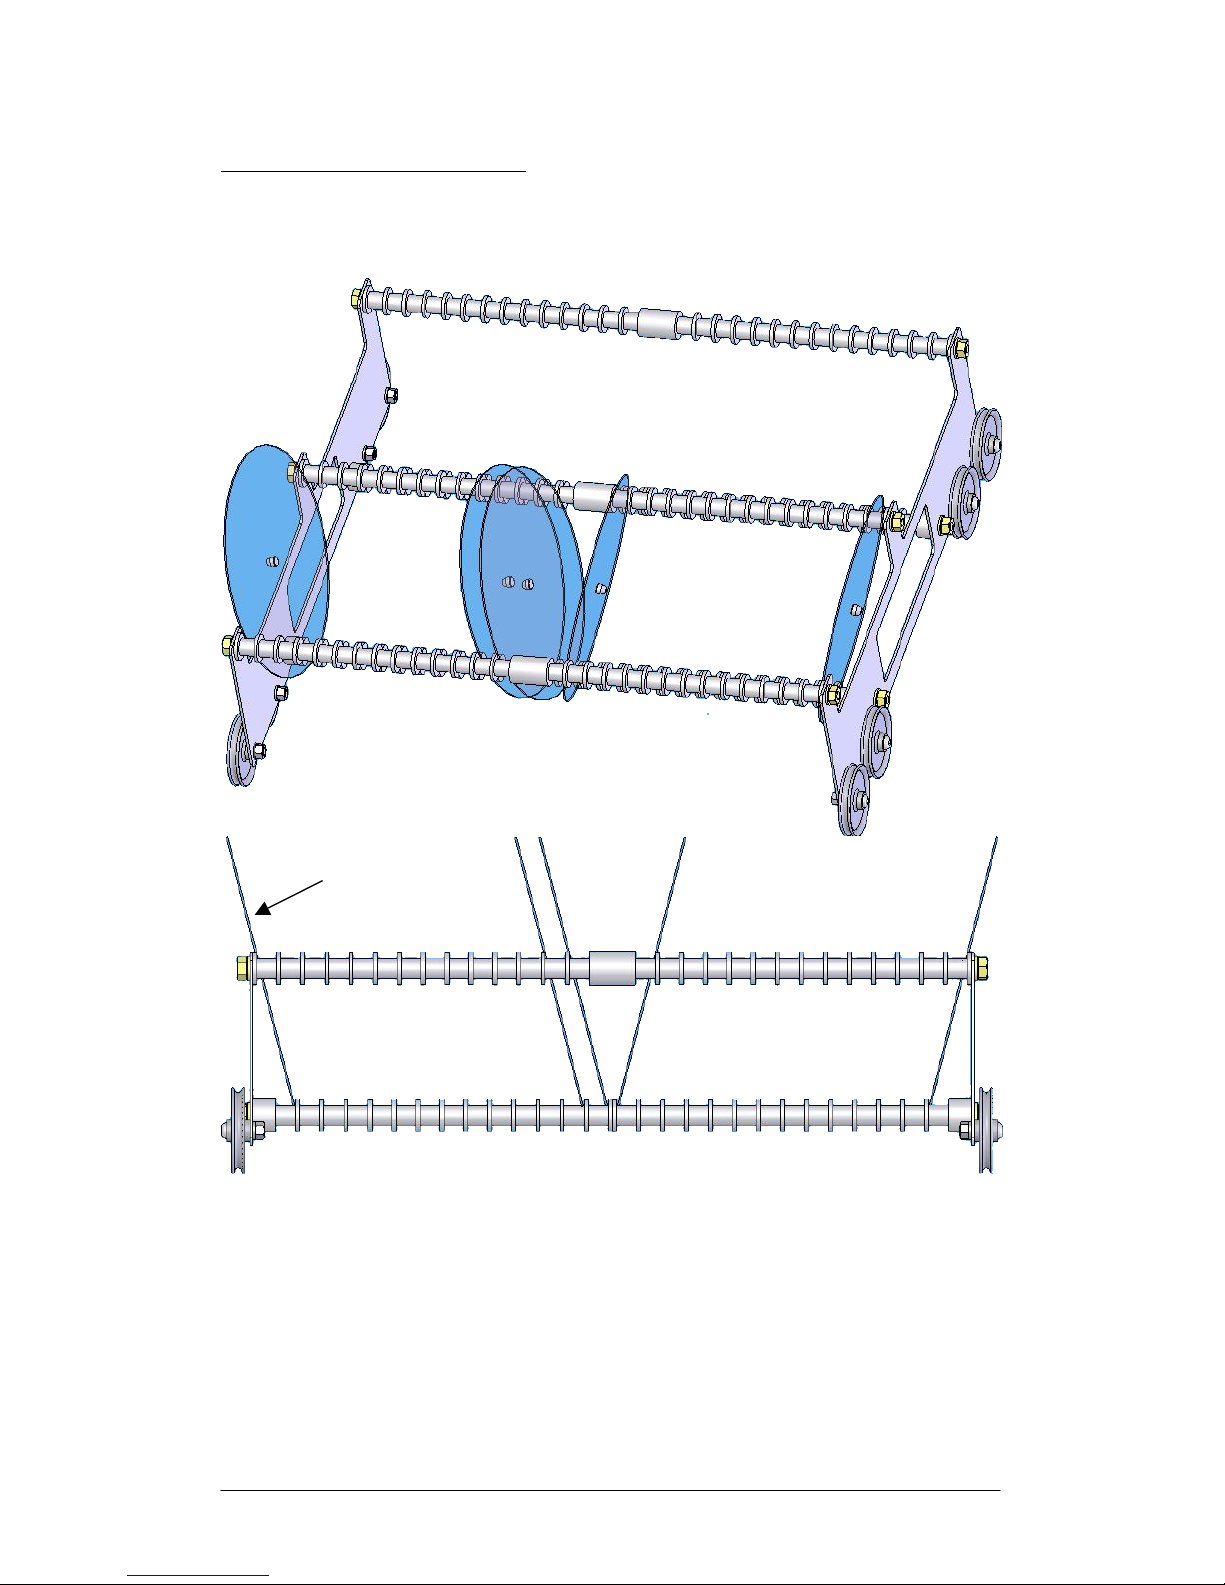
The substrates are loaded under a small angle with the recorded surface facing up.
Recorded surface
Part of the washing process is the mechanical force the spraying water has when it hits
the glass substrates. Placing the substrates in a way where the spray bars can not spray
the water on the polluted surface will reduce the washing effect and might result in
particles remaining on the substrates surface.
3 Version 1.0
Page 4
Description of the machine
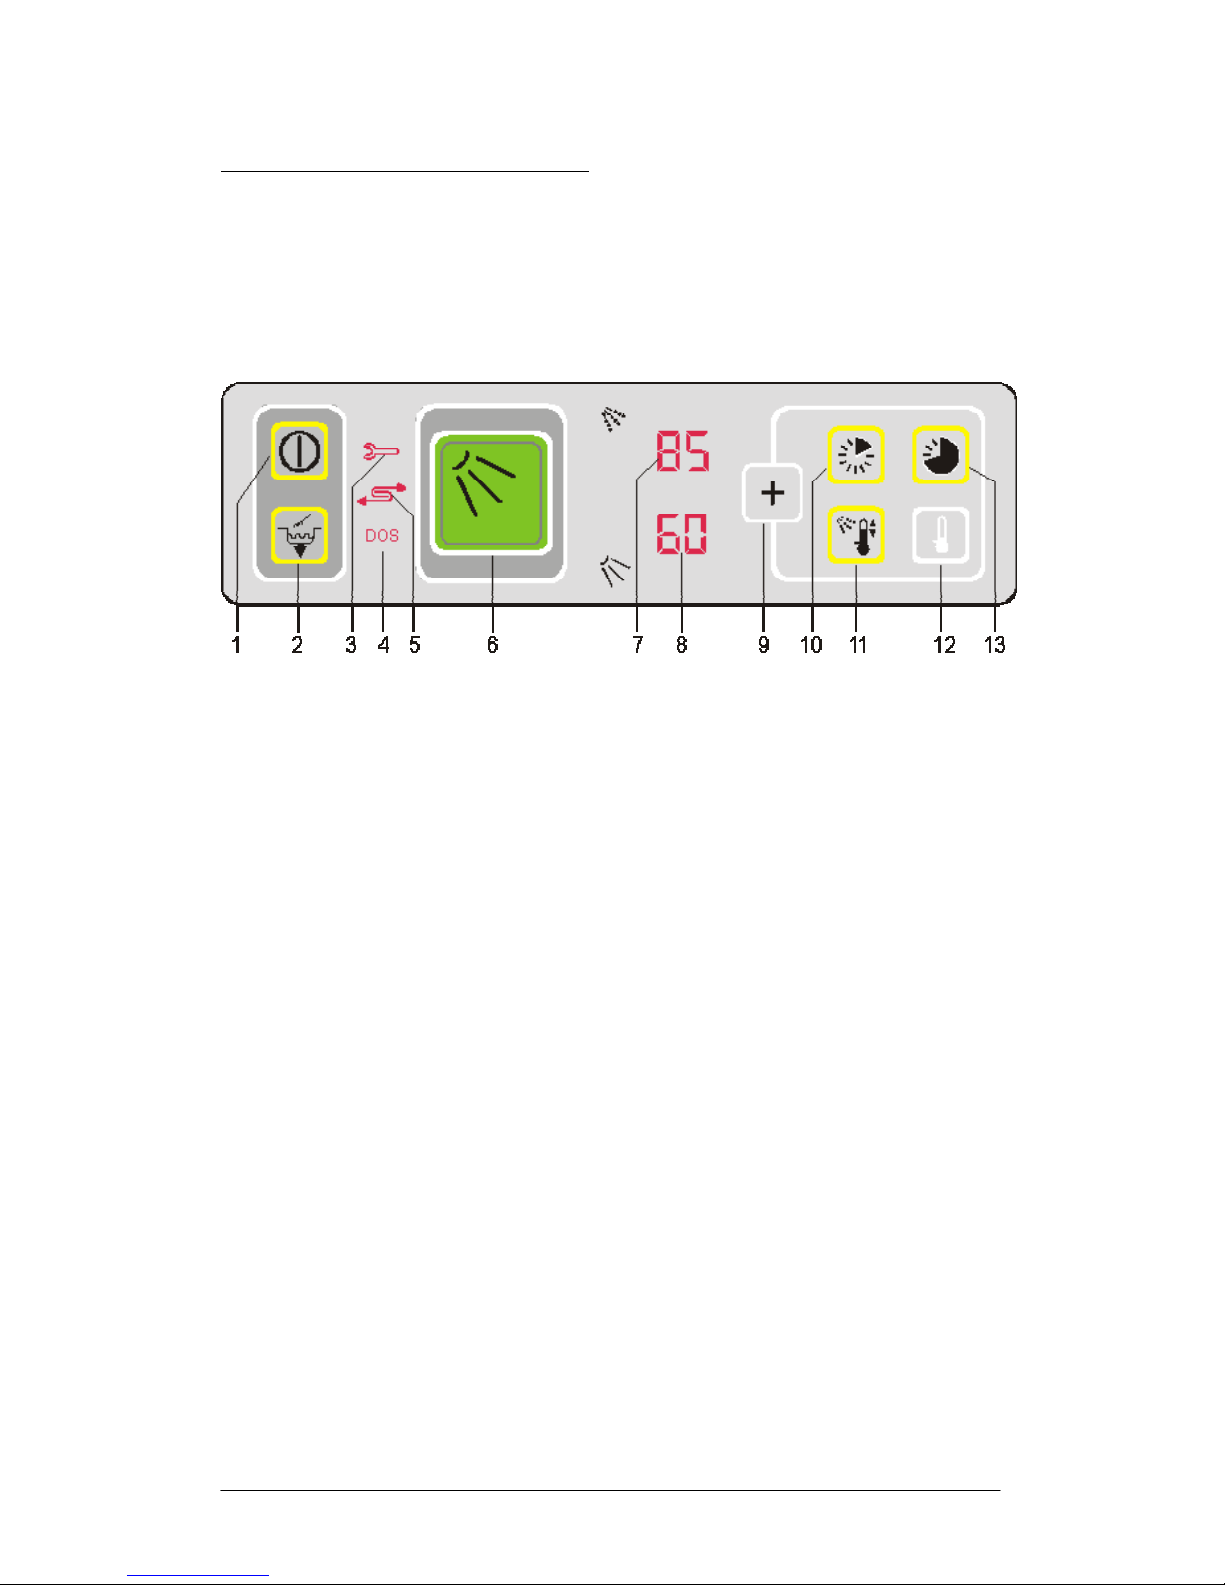
Operating panel
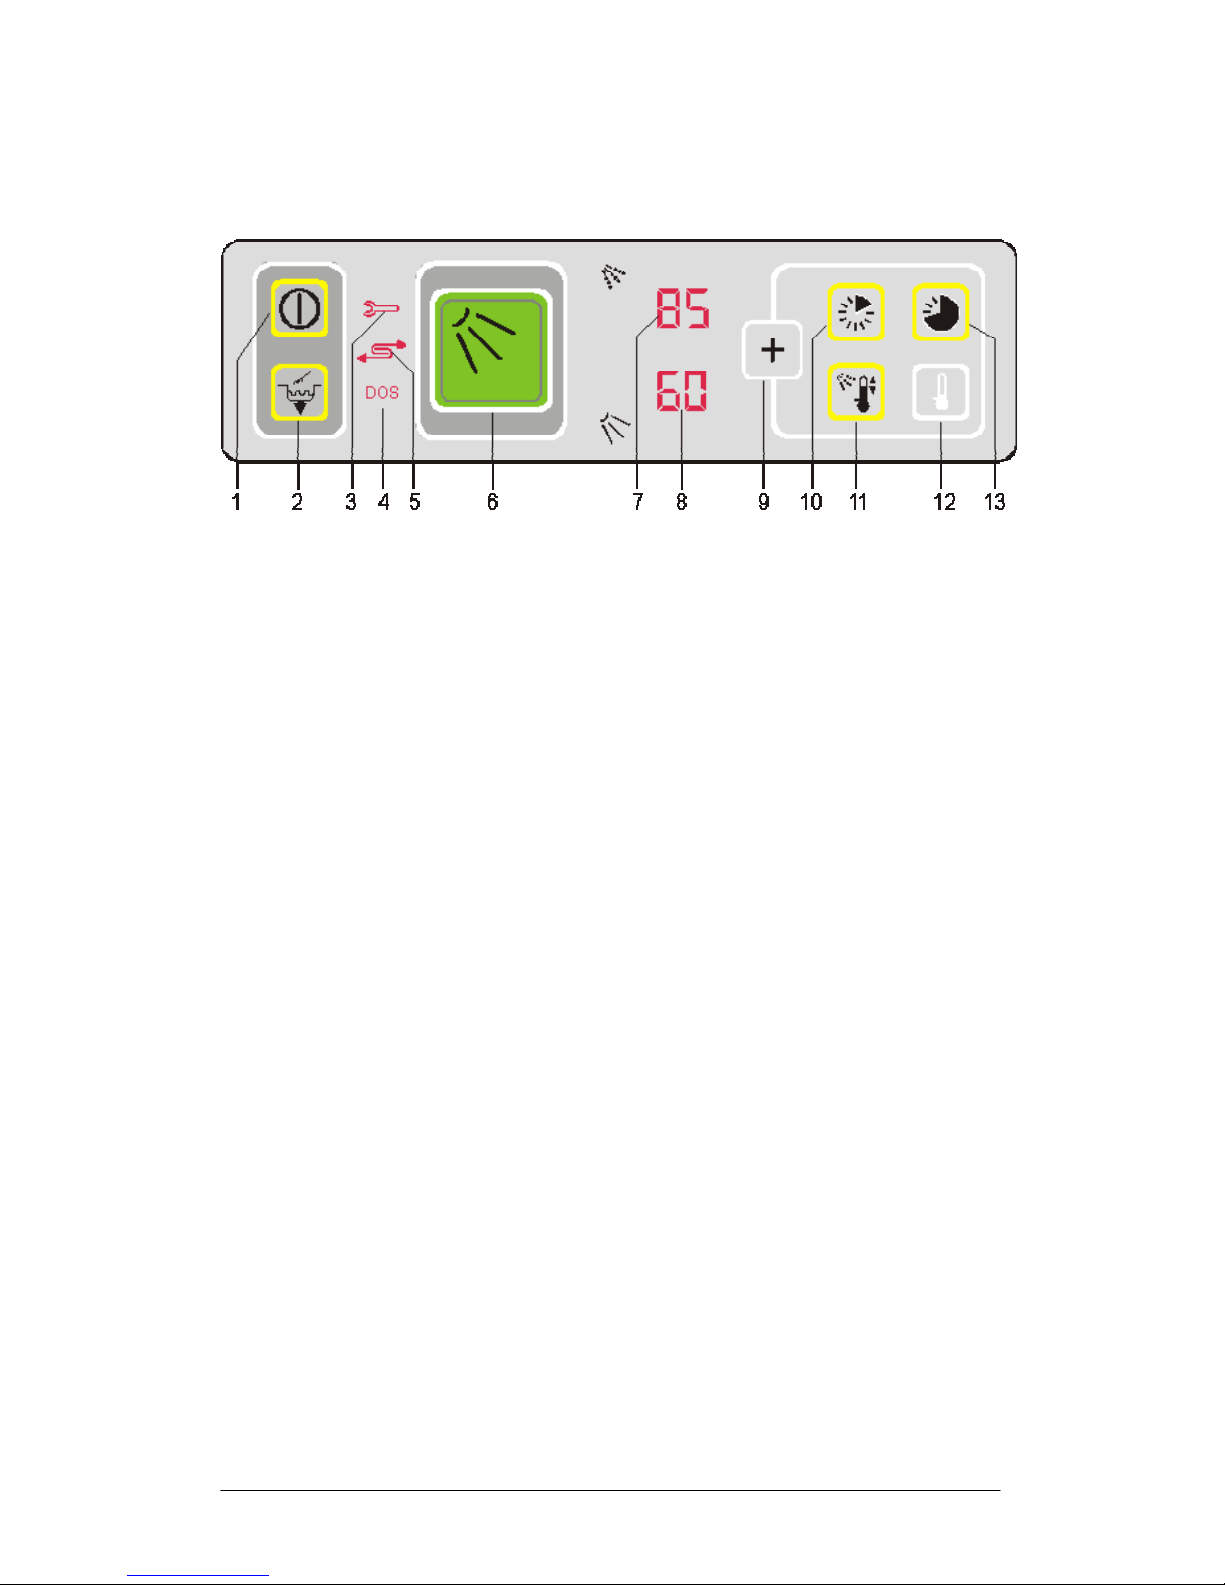
The operating panel is situated in the upper part of the machine.
1 On/Off switch
2 Tank drainage / self-cleaning
3 Control lamp for fault
4 Control lamp for lack of chemicals
5 Not used
6 Start wash button
7 Temperature display – Boiler
8 Temperature display – Tank
9 Store button – Stores changed parameters
10 View program step and time to go while washing
11 View temperatures while washing
12 Not used
13 Not used
4 Version 1.0
Page 5

How the 4P GDR works
Do not open the door while the program is running. There is a risk of
hot water spraying out of the machine. Opening the door while the
program is running will abort the program.
Do not sit or stand on the open door.
After you start the 4P GDR, it will cycle through 6 washing steps. In each of these 6
steps you can program the whether the step is active, the water temperature, the length
of the wash cycle and the kind and amount of chemicals that you want to use. After
each of these wash cycles, the machine is completely drained to prevent chemical
interference between each step.
After 6 cycles a dry cycle is activated. The length of the dry cycle is programmable as
well.
Start wash cycle
Read wash
parameters
No
Is step active?
Fill tank with
heated water
Dispense selected
chemicals
Run wash
cycle
Increase step
counter
6 steps done?
Run dry cycle
Done
No
5 Version 1.0
Page 6

First step, removing nickel.
To be able to remove nickel from the substrates, a dilution of 2% nitric acid (20ml/L)
is required. Together with 35°C water the nickel remains will be removed within 40
minutes of washing. Nitric acid will be dispensed by pump 1.
Second step, removing the photo resist.
Photo resist (S18xx) is easily removed with OPC glass cleaner. The second step in the
cleaning process is to mix this OPC glass cleaner with 35°C water and wash the
substrates for 40 minutes. A dilution of 8ml/liter OPC glass cleaner is used. OPC
Glass Cleaner will be dispensed by pump 2.
Third step, rinsing.
To make sure no chemicals remain in the 4P GDR or on the substrates, a clean water
rinse step at 50°C of 5 minutes is applied.
Fourth step, drying.
In the fourth step, the substrates are dried by means of hot air. This step is required to
prevent drying stains on the cleaned substrates.
Spare steps.
The standard wash program contains only 4 steps including the dry step. But the 4P
GDR can run up to 7 steps including drying. 3 steps are reserved for special purposes,
such as washing programmes with a neutralization step or extra rinse steps each step
that contains chemicals.
Starting the machine.
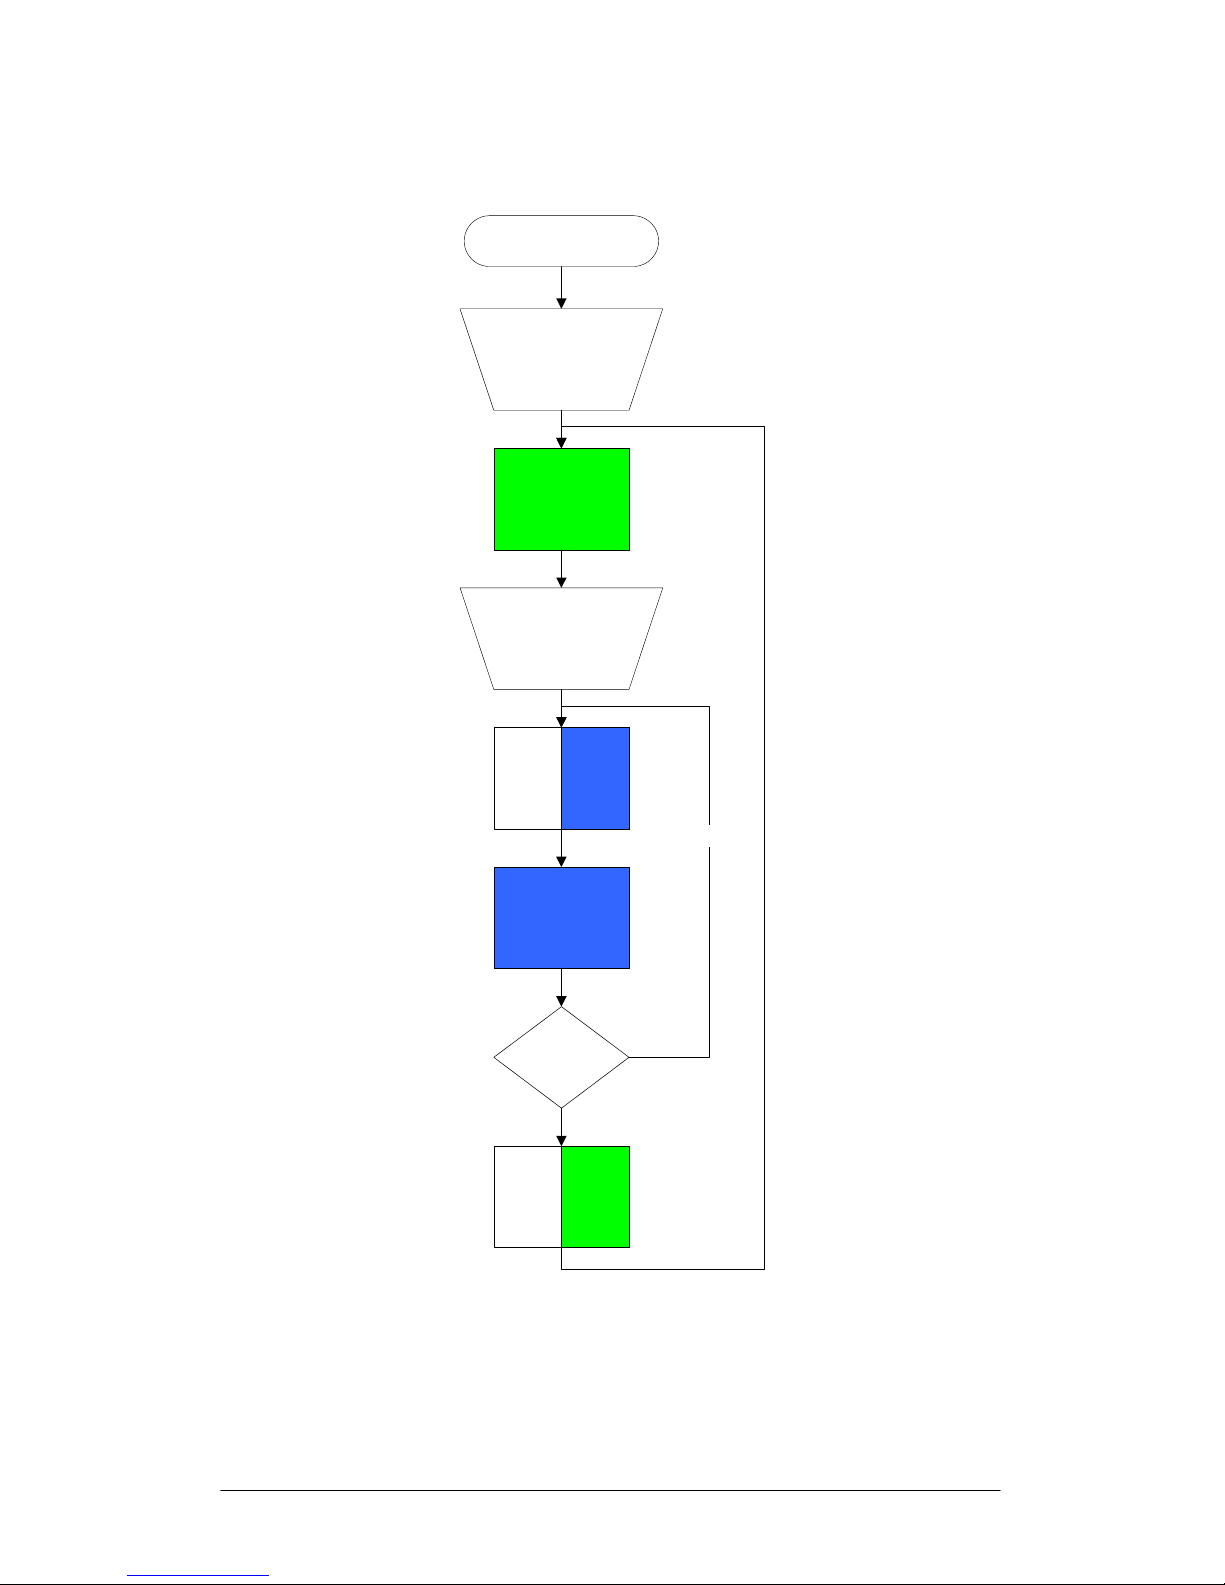
After turning on the machine with button (1), button (6) will light up green. This
indicates that the GDR is ready to start. Press button (6) to start the machine. Button
(6) will start flashing blue to indicate that the GDR is heating up. Once the tank is
fully filled and the actual wash cycle starts, button (6) will be blue continuously.
Once the GDR is finished it’s complete washing cycle a acoustic signal will be
generated for a few seconds and button (6) will flash green until the operator opens
the door. After opening the door, the GDR will switch to it’s starting state and button
(6) will light up green.
Stopping the machine while it is running.
The 4P GDR can be stopped at all times by turning the machine off with button (1).
Once the GDR is turned off, the GDR will reset to its starting state. This means that
washing cycles that were aborted half way cannot continue from that point.
It is also possible to stop the machine by opening the front door.
Be careful when opening the door. Hot water may spray out.
6 Version 1.0
Page 7
Button (6) colors during normal operation
GDR is turned OFF
Machine is turned
on by pressing
button (1)
Button (6) is
continuous green
Machine is started
by pressing button
(6)
Button (6) flashes
blue while heating
up
Button (6) is
continues blue
while running a
wash step
Washing cycles
done?
Button (6) flashes
green when
finished
No
7 Version 1.0
Page 8
Programming wash parameters
To enter the programming mode, first turn the machine on (1). Then keep buttons (10)
and (13) pressed simultaneously for more then 3 seconds.
Once in the programming mode, display (7) will indicate the parameter number and
display 8 indicates the value.
To change the value of the selected parameter, use button (11) to decrease the value
and button (12) to increase the value. Once you have reached the desired value, press
button (9) to store the value.
To browse to another parameter, use button (10) to decrease the parameter number or
button (13) to increase the parameter menu.
To exit the programming mode, turn the machine off (1).
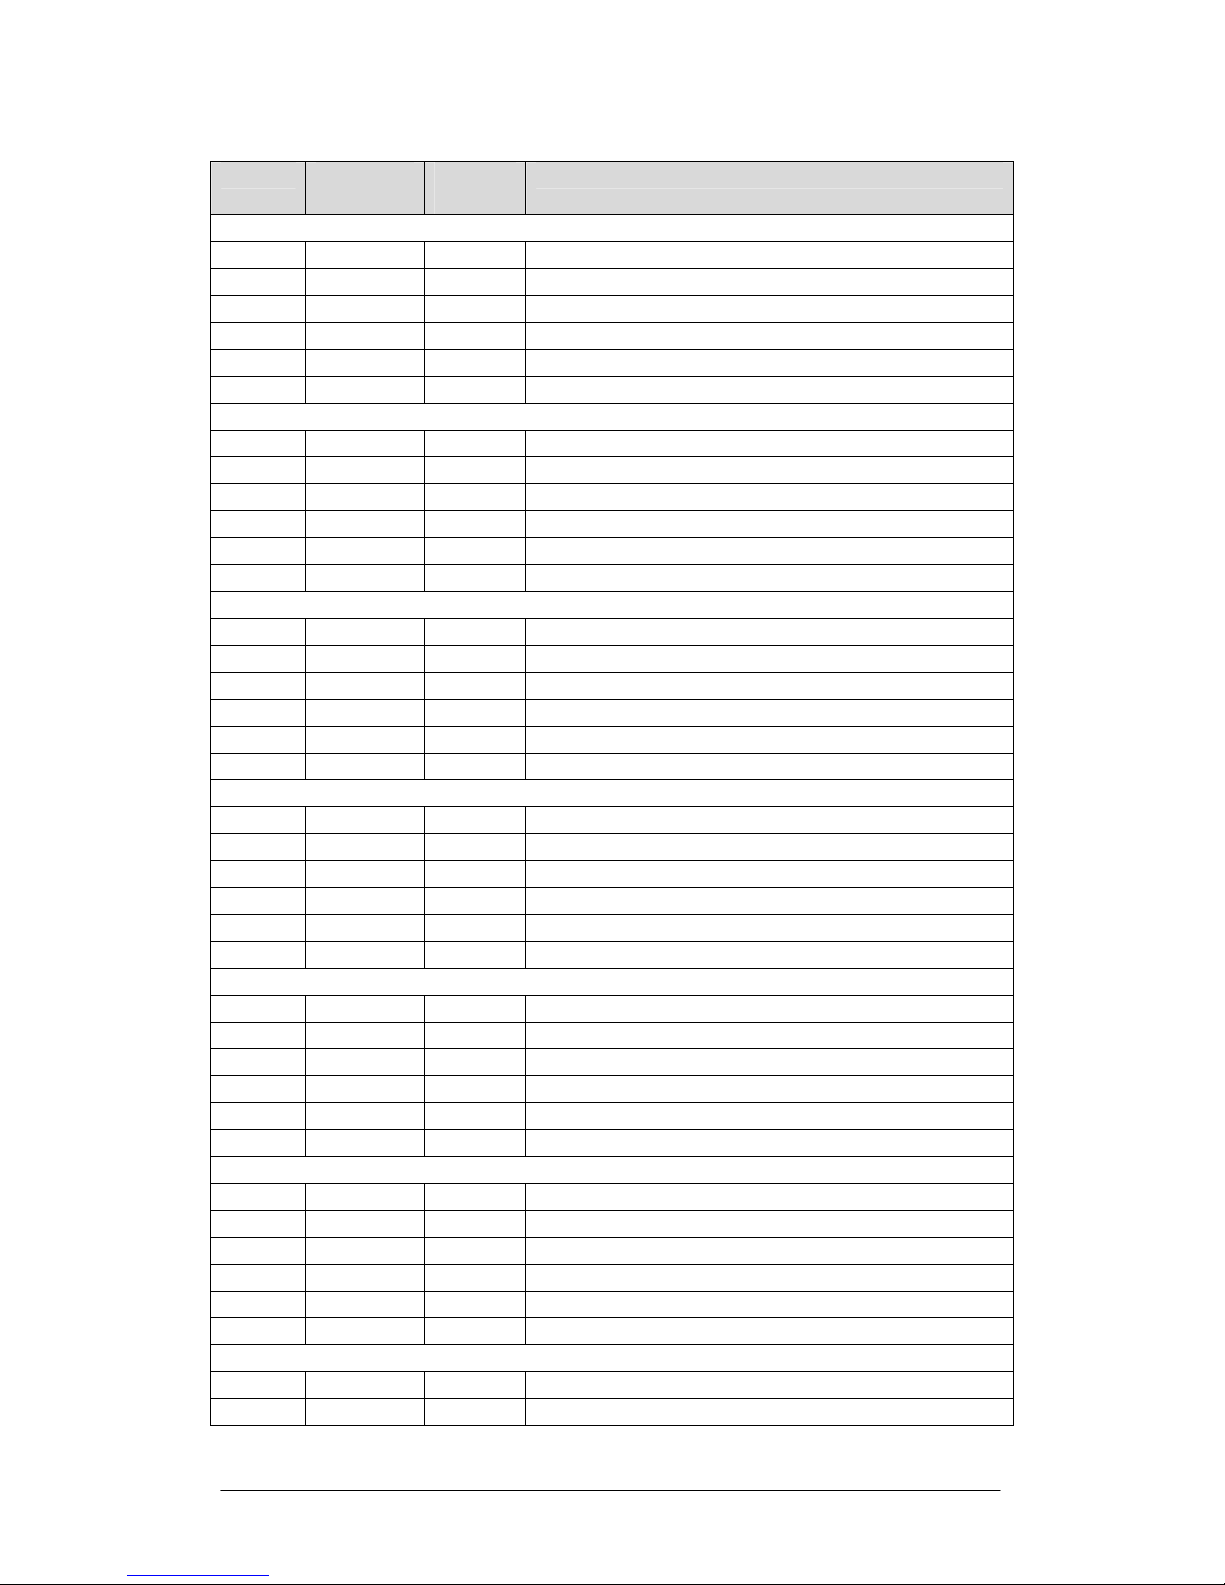
See also table ‘Parameter menu’ on page 8 for details on the parameters.
8 Version 1.0
Page 9
Parameter Menu
Param. Possible
Values
Default
value
Description
Washing step 1: Nickel removing with Nitric acid
P11 On/Off On Wash step active.
P12 15…20 15 Water level in liters
P13 20…60 35 Water temperature while washing in Celsius.
P14 0,1,2,3 1 Dosing pump. 0 indicates no dosing (rinse step)
P15 0…50 20 Dosing level in ml/Liter
P16 1...99 40 Circulation time in minutes
Washing step 2: Resist stripping with Alka 220
P21 On/Off On Wash step active.
P22 15…20 15 Water level in liters
P23 20…60 35 Water temperature while washing in Celsius.
P24 0,1,2,3 2 Dosing pump. 0 indicates no dosing (rinse step)
P25 0…50 6 Dosing level in ml/Liter
P26 1...99 40 Circulation time in minutes
Washing step 3: Rinsing at 50 degrees
P31 On/Off On Wash step active.
P32 15…20 15 Water level in liters
P33 20…60 50 Water temperature while washing in Celsius.
P34 0,1,2,3 0 Dosing pump. 0 indicates no dosing (rinse step)
P35 0…50 3 Dosing level in ml/Liter
P36 1...99 5 Circulation time in minutes
Washing step 4: Rinsing at 60 degrees
P41 On/Off On Wash step active.
P42 15…20 15 Water level in liters
P43 20…60 60 Water temperature while washing in Celsius.
P44 0,1,2,3 0 Dosing pump. 0 indicates no dosing (rinse step)
P45 0…50 3 Dosing level in ml/Liter
P46 1...99 5 Circulation time in minutes
Washing step 5: spare
P51 On/Off Off Wash step active.
P52 15…20 15 Water level in liters
P53 20…60 35 Water temperature while washing in Celsius.
P54 0,1,2,3 1 Dosing pump. 0 indicates no dosing (rinse step)
P55 0…50 3 Dosing level in ml/Liter
P56 1...99 15 Circulation time in minutes
Washing step 6: spare
P61 On/Off Off Wash step active.
P62 15…20 15 Water level in liters
P63 20…60 35 Water temperature while washing in Celsius.
P64 0,1,2,3 1 Dosing pump. 0 indicates no dosing (rinse step)
P65 0…50 3 Dosing level in ml/Liter
P66 1...99 15 Circulation time in minutes
Washing step 7: Drying
P71 On/Off On Dry step active.
P76 1...99 30 Dry time in minutes
9 Version 1.0
Page 10
Rinsing the machine
To be able to drain and clean the 4P GDR, there is also a clean/drain program. To
activate this program, hold the drain button (2) for more then 1 second while the 4P
GDR is turned on, but not while running a wash cycle.
The drain program will drain all remaining water from the 4P GDR and rinse the 4P
GDR with clean water.
Resetting the 4P GDR.
To reset the 4P GDR, all that is required to turn the machine off with button (1). This
will immediately stop any running program and resets the machine to the start state.
Please note that after a reset, there might be water remaining in the tank. You must
drain the tank before starting a new wash cycle.
Troubleshooting
The 4P GDR indicates an error message
The 4P GDR can generate a number of errors depending on the situation. If an error is
encountered, display (7) will indicate Err and display 8 the error code.
See also the service manual for more info.
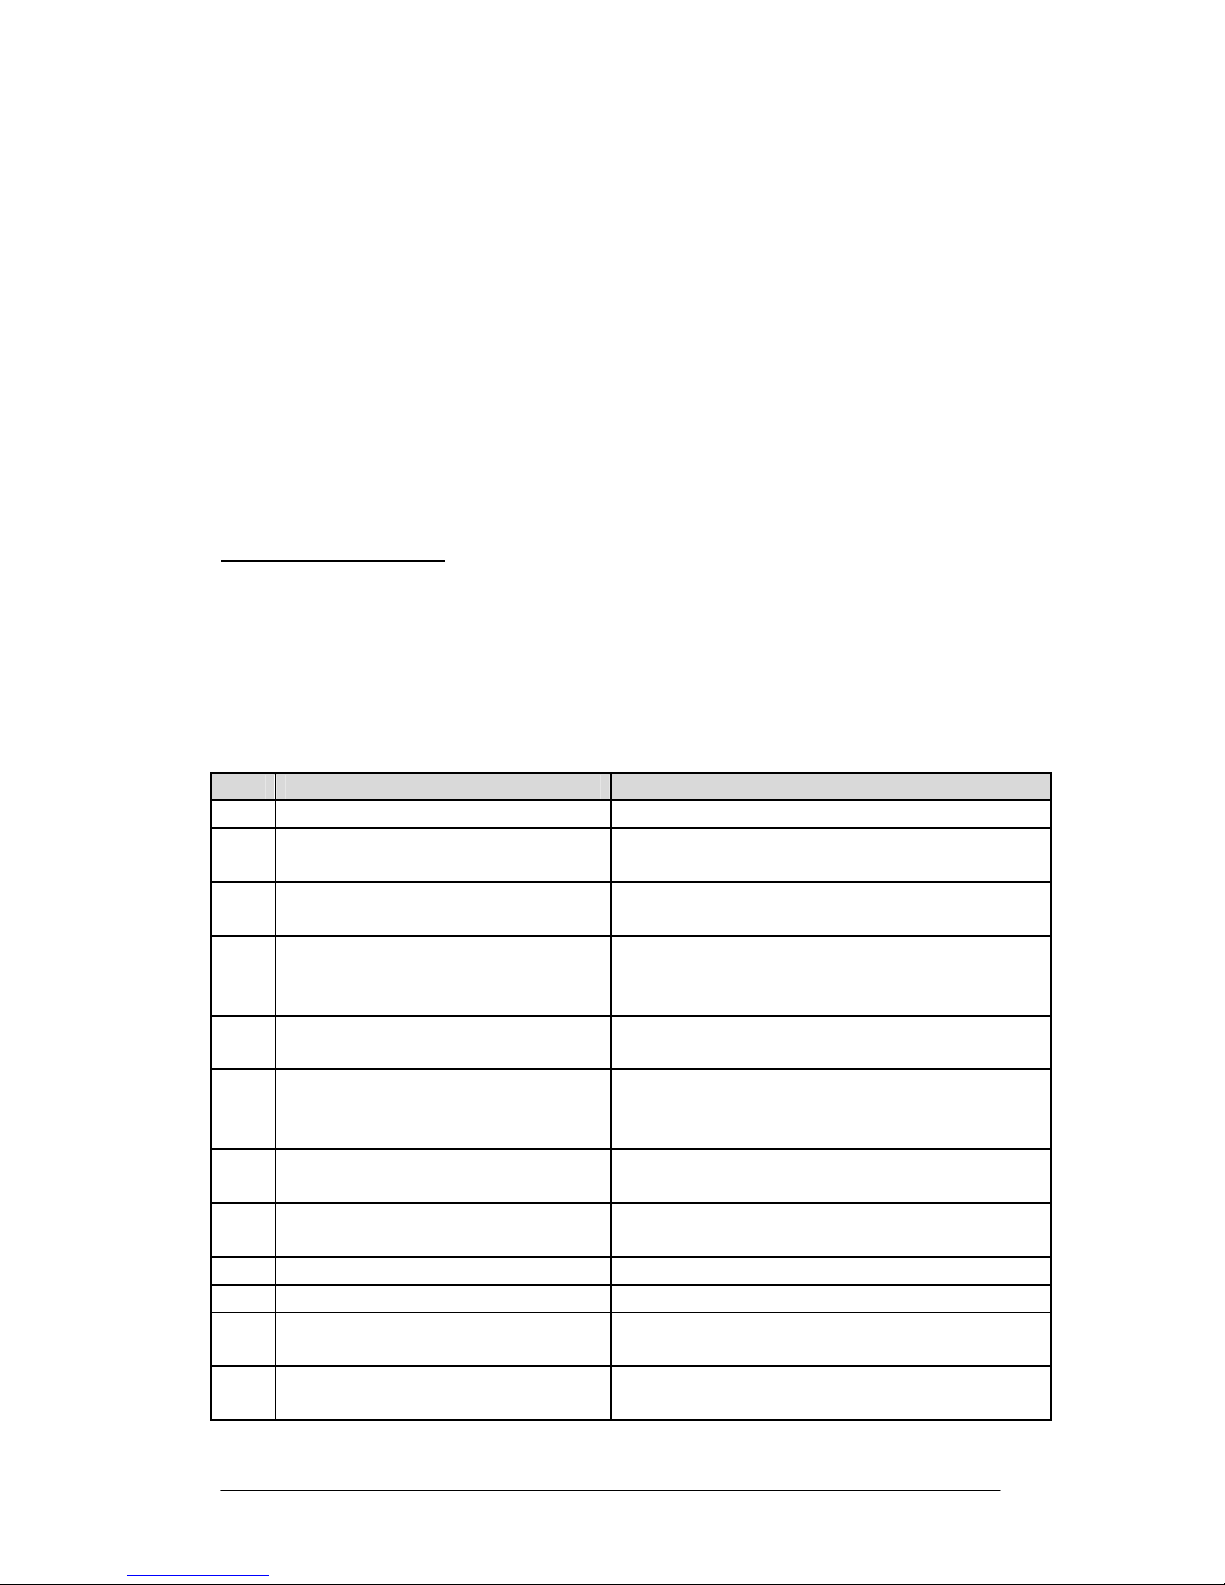
A table describing the cause of the error can be found here:
Err Description How to resolve
1 Wash tank level sensor error Check connections or replace sensor (E3)
2 Wash tank temperature sensor
error
3 Boiler tank temperature sensor
error
4 No change in Tank level after
circulation pump is running
5 One of the chemical containers is
empty.
6 No change in Tank level after
drain pump is running
7 No change in boiler tank
temperature within 2 minutes
8 No change in Tank temperature
within 4 minutes
10 Door opened while washing Keep door closed.
14 Boiler tank still full after transfer Check transfer pump (M3)
15 Boiler tank fill time to long. Not
full within 2 minutes
16 Water in tank before starting wash
cycle.
Check connections or replace sensor (E1)
Check connections or replace sensor (E2)
Make sure the flat filter is properly mounted.
Check if nothing is blocking the circulation
pump.
Refill empty chemical container
Make sure drain pump (M2) is running.
Make sure nothing is obstructing the drain
outlet.
Check boiler heating element
Check relays (K2)
Check tank heating element
Check clickson (B2)
Check inlet water pressure.
Check water inlet valve (Y3).
Drain the machine before washing.
10 Version 1.0
Page 11

References
Advised chemicals
Chemical Supplier Order code
OPC glass cleaner Symcon 80046
Nitric acid 25% Symcon 80039
Symcon Europe
Lodewijkstraat 40
5652 AC Eindhoven
The Netherlands
Phone: +31 40 - 250 79 40
Fax: +31 40 - 250 79 51
Web: www.symcongroup.com
Spare parts
Winterhalter Gastronom Nederland BV
Ericssonstraat 32
5121 ML Rijen
The Netherlands
Tel: +31 161 220520
Email: [email protected]
Service
4PICO
Normandielaan 68
5627 HT Eindhoven
The Netherlands
Tel: +31 413 490708
11 Version 1.0
 Loading...