


Instruction Manual
www.winegard.com/carryout For receivers and programming, call 1-866-609-9374
For up-to-date information on receiver compatibility and programming, visit www.winegard.com/receivers
For help, email help@winegard.com or call 1-800-788-4417
Do not return antenna to place of purchase
Quick Setup
1. Make sure the Carryout® G2 antenna is in a location with a clear view of the southern sky.
2. Connect the provided coaxial cable from the primary receiver to the “MAIN” port on the base.
3. Connect one end of the provided power cable to the power socket and the other end to a 12V power source.
4. Follow the receiver setup instructions on pages 3–4 for your programming provider.
5. Watch TV!
2452321

Specifications
Compatible with DIRECTV®, DISH®, & Bell TV™ programming Supports up to two receivers For stationary use only Includes 50 ft coaxial cable Includes 50 ft power cable Unit weight: 10 lbs
Unit height (no feet): 13.5 in Diameter: 14.3 in
Elevation range: 18–65°
|
|
|
|
|
Dome |
|
|
|
|
|
|
Base |
|
|
|
|
Eyelet |
|
|
|
Handle |
||
|
|
|
|
||
|
|
|
|
|
|
Azimuth: 0–416° Max amperage: 2.0 A
Unit operating voltage: 9–16 V Supply voltage: 12–13.8 V UV-protected plastic dome
Compatible Receivers
Receiver models change frequently. For an up-to-date list of compatible receivers, visit www.winegard.com/receivers.
DIRECTV Receiver Compatibility
The Carryout G2 antenna is not compatible with DIRECTV SWM-only receivers (e.g. H25 or HR34). If you have a SWMonly technology receiver, Winegard Model SWM-840 kit is available. This SWM kit will allow for proper SWM technology operation with Winegard mobile satellite TV antennas.
DISH Receiver Compatibility
Satellite 129° requires an HD receiver. The antenna is not compatible with DISH Hopper™ or Joey™ receivers. Dual tuner receivers will require two coax connections from the antenna. In order to simultaneously watch or record two different programs, each program must be broadcast from the same satellite.
Compatible Satellites
DIRECTV:101° or 119° (will not receive HD on 110° or any KAband HD on 99° and 103°)
DISH (Western Arc): 110°, 119°, 129° Bell TV: 91° or 82°
Refer to maps* to determine coverage in areas of the U.S.
Good |
Signal Strength |
Best |
DIRECTV Sat. 101°
DIRECTV Sat. 119°
DISH Sat. 110°
DISH Sat. 119°
DISH Sat. 129°
1 *Source: www.satbeams.com. Coverage maps are approximate and do not guarantee coverage.
Warnings
!Do not place the unit in water greater than one inch deep, or water may damage the electronics.
!Do not install or operate the antenna in winds of 35 mph or greater. The antenna will roll in winds ≥35 mph.
!Care should be taken when transporting and setting up the antenna. Do not toss or drop the antenna.
!Do not paint the antenna. Painting the antenna may cause signal degradation and will void your warranty.
!The antenna is not meant for use with the Carryout® ladder mount. Installing the antenna on the Carryout ladder mount may lead to serious injury and/or equipment and property damage.
1. Switch Settings
The Carryout antenna switch settings are preset for DIRECTV programming. To set the antenna for any other programming provider, complete the following steps:
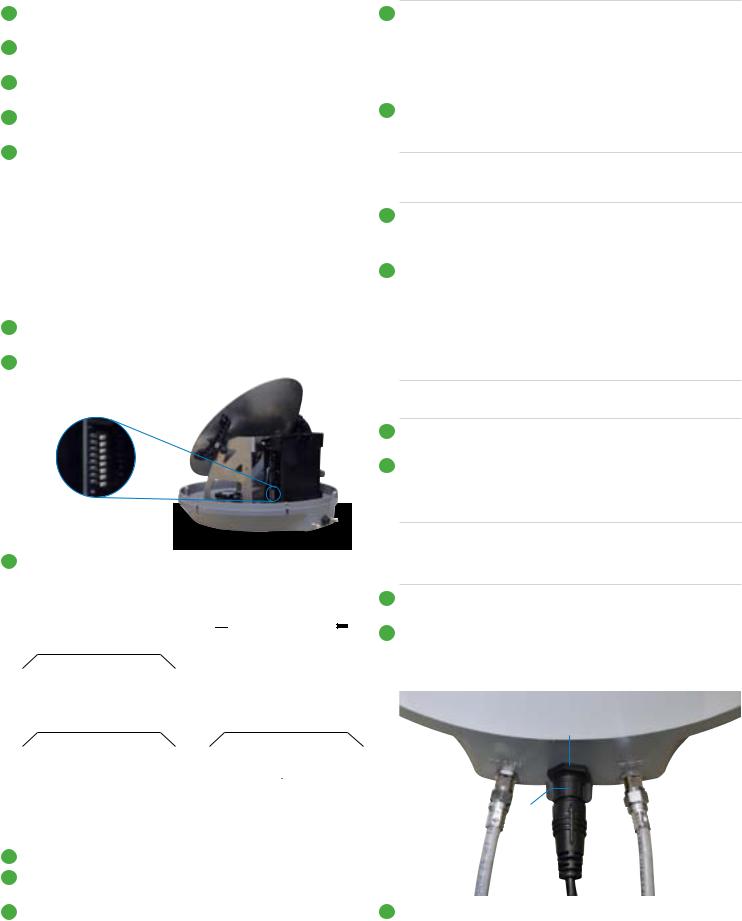
1.Remove the dome screws with a Phillips screwdriver, and remove the dome.
2.Locate the switches on the side of the electronics housing.
+
Switches on side of electronics housing
3.Set the switches for your programming provider according to the diagram below.
Switch Settings—Up (  ) or Down (
 )
)
|
|
|
|
|
DIRECTV |
|
|
|
|
|
The Carryout G2 is preset |
||||||
1 |
2 |
3 |
4 |
5 |
6 |
7 |
8 |
|
for DIRECTV programming. |
||||||||
|
The switch settings must be |
||||||||||||||||
|
|
|
|
|
|
|
|
|
|
|
|
|
|
|
|
|
|
|
|
|
|
|
|
|
|
|
|
|
|
|
|
|
|
|
changed to receive DISH or |
|
|
|
|
|
|
|
|
|
|
|
|
|
|
|
|
|
|
|
|
|
|
|
|
|
|
|
|
|
|
|
|
|
|
|
Bell TV programming. |
|
|
|
|
|
|
|
|
|
|
|
|
|
|
|
|
|
|
|
|
|
|
|
|
|
DISH |
|
|
|
|
|
|
|
|
|
|
|
|
|
Bell TV |
|
|
|
|
|
|
|||||||
1 |
2 |
3 |
4 |
5 |
|
6 |
7 |
8 |
|
1 |
2 |
3 |
4 |
5 |
|
6 |
7 |
8 |
|
|||||||||||||||
|
|
|
|
|
|
|
|
|
|
|
|
|
|
|
|
|
|
|
|
|
|
|
|
|
|
|
|
|
|
|
|
|
|
|
|
|
|
|
|
|
|
|
|
|
|
|
|
|
|
|
|
|
|
|
|
|
|
|
|
|
|
|
|
|
|
|
|
|
|
|
|
|
|
|
|
|
|
|
|
|
|
|
|
|
|
|
|
|
|
|
|
|
|
|
|
|
|
|
|
|
|
|
|
|
2. Installing the Handle
1.Locate the two holes in the base.
2.With “WINEGARD” on the handle facing upwards, align the two holes in the handle with the two holes in the base.
3.Thread two screws through the two aligned holes in the bottom of the handle.
NOTE The two holes for the handle are located between the cable connections and eyelet.
4.Tighten the two screws using a Phillips screwdriver. Do not overtighten.
3. Choosing a Location
1.Choose a location with a clear, unobstructed view of the southern sky. Avoid obstructions such as trees, hills, vehicles, or buildings—these can block the signal from the satellite.
NOTE Satellite signal will not pass through solid objects. For this reason, it is vital to select a location with a clear,
unobstructed view of the southern sky.
2.Make sure the antenna is not placed in the path of people or vehicles; otherwise, the antenna may be knocked off of the signal if run into, or cables may be disconnected from the unit.
3.Select a location that will enable the Carryout G2 antenna to sit within three degrees of level. The antenna may take longer to lock onto signal if the antenna is not level.
4. Wiring the Antenna
TIP Run the coaxial cable directly from the satellite receiver to the Carryout G2 antenna when searching for signal.
1.Connect a coax cable from the main port to the “Sat In” port on the back of the receiver that will be used most often.
2.If hooking up the Carryout G2 antenna to two receivers, remove the cap from the secondary port, and run a second coaxial cable from the secondary port on the base to the “Sat In” port on the secondary receiver.
NOTE A 50 foot coaxial cable is included and recommended for use with the antenna. Longer coax runs could potentially cause intermittent problems. Maximum cable length should never
exceed 50 feet.
3.Tighten coax connections until fingertight, and then tighten a quarter turn more with a wrench. Do not overtighten.
4.Align the arrow on the antenna end of the power cable with the top of the power socket. Connect the end of the power cable to the power socket, and rotate the collar of the power cable clockwise a half turn until tight.
Power socket
MAIN port |
|
|
|
SEC port |
|
|
Collar
5.Connect the opposite end of the power cable to a 12 V power source.
2
5. Receiver Setup
Connect the receiver to a power source, and complete receiver setup. Receiver setup for the primary receiver follows; if your receiver differs from the options shown, you may need to consult your receiver manual. The wording and display used in your receiver may differ slightly.
Check out online receiver setup guides for your antenna at www.winegard.com/receivers/setupguide.php.
For more information on receiver compatibility and programming, visit www.winegard.com/receivers.
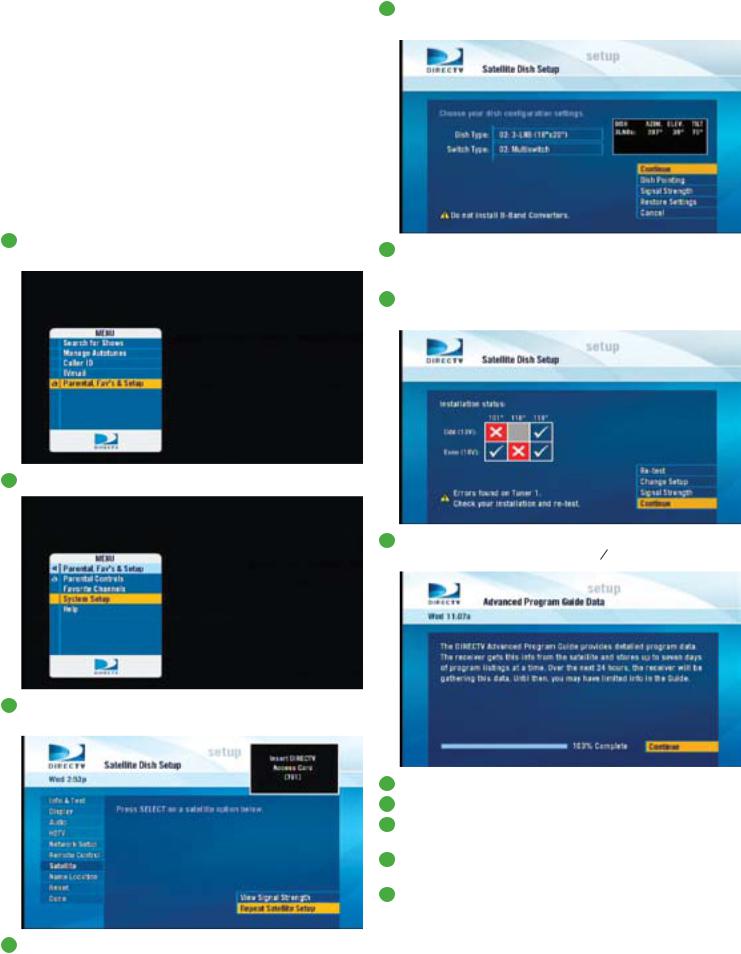
DIRECTV Receiver Setup
1. Press Menu on your remote. Select Parental, Fav’s & Setup.
2. Select System Setup.
3.In your receiver menu, you will need to identify the Satellite menu. Once there, find the option for Satellite Setup.
4.You may be required to press the DASH (-) before proceeding (underneath #7 on the remote).
5.Select 3-LNB (18”x20”) or 3 Satellites. If given the option of SWM or Multiswitch, select Multiswitch.
6.Power on the antenna, and allow the antenna a few minutes to acquire signal. Once the antenna has finished acquiring signal, the antenna will be silent.
7.After the antenna has acquired signal, press Continue; the receiver will automatically verify the setup.
8.Errors may be displayed on the screen. It is normal to see one or two boxes with an X instead of a  . Select Continue.
9. Select Continue again. The program guide will download.
10.When the status bar reaches 100%, press Continue.
11.The receiver will run Data Feed and Guide Feed Tests for a few moments.
12.When prompted to set up the remote, select Setup Remote Later to do this at a later time.
13.Select Watch DIRECTV. Receiver setup is now complete.
3 Receiver setup instructions are accurate at time of printing and may change without notice.
DISH Receiver Setup
If using two DISH receivers with the Carryout G2
antenna, both receivers must be configured off of the primary port by following the steps below.
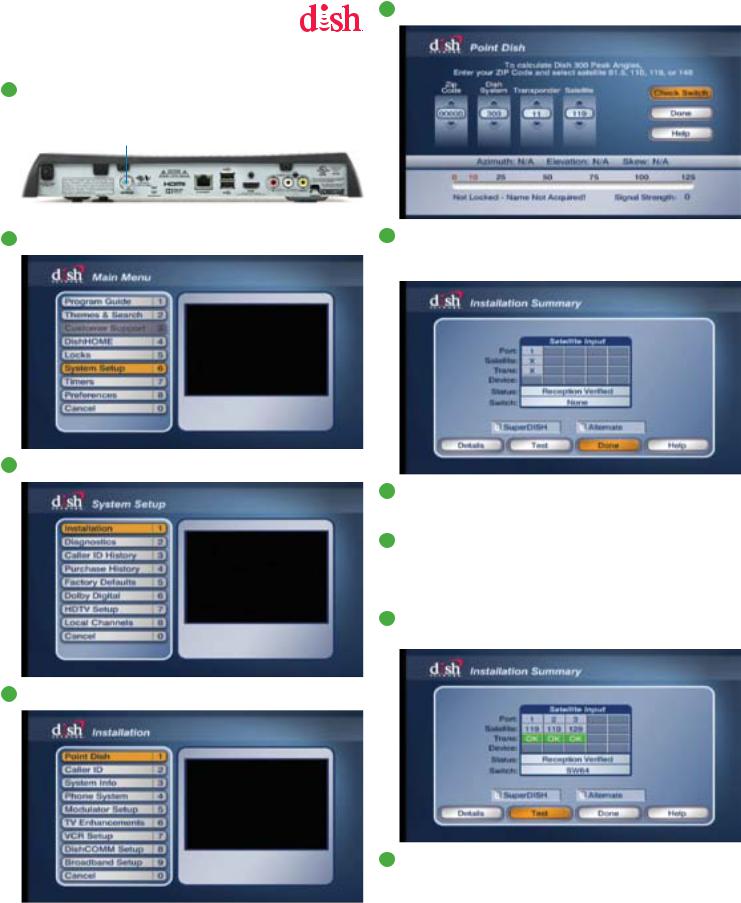
1.Disconnect coax cable from the Satellite In port on the back of the receiver.
Satellite In
port
Back of 211z receiver shown
2. Press Menu on your remote. Select option 6, System Setup.
3. Select option 1, Installation.
4. Select option 1, Point Dish.
5. Select Check Switch.
6.Select Test. It will go through a number of steps, then return to the screen shown here with previous information cleared. If at any point it asks you to save, select Save or Yes.
7.Reconnect coax cable to “Sat In” port on back of receiver. Power on the antenna. Allow the antenna 3–4 minutes to acquire satellites.
8.Check that there are no checkmarks by SuperDISH or Alternate. If setting up a DISH 311, 301, or 500 series receiver, in some cases you may need to check the boxes next to Superdish and Alternate before running the Check Switch test.
9.Next, select Test again to install the SW64 switch. This SW64 switch is a DISH receiver setting, not a physical part.
10.When you see the SW64 as the installed switch, the antenna is ready for use.
4
Troubleshooting
Issue |
Possible Cause |
Solution |
The antenna does not |
• There is no communication |
• Verify power source is providing +12 VDC to the antenna. |
attempt to find a satellite or |
between the power supply |
• Try an additional power source. Verify the power supply |
never moves. |
and satellite antenna. |
meets alternative power supply specifications at the bottom |
|
|
of the page. |
|
|
• Ensure that the power plug is fully seated and locked into |
|
|
the power socket on the antenna. |
The antenna continuously |
• Possible obstructions are |
• Check to see if the southern sky is clear. Trees, buildings, |
searches and eventuallly stops |
blocking signal from the |
large signs, or an overpass can block the signal. |
without ever acquiring any |
satellite. |
• Rain, snow, or excessive dew on the dome can interrupt the |
satellites. |
|
signal. Brush any snow or dew off of the dome. If heavy rain |
|
|
or snowfall is blocking the signal, it may be necessary to |
|
|
wait until the weather clears. |
|
• There is no communication |
• Verify the main coax cable from the antenna is connected to |
|
between the receiver and |
the “Satellite In” port on the back of the receiver. |
|
satellite antenna. |
• Verify all coax cables are properly terminated and that there |
|
|
are no loose connections. |
The antenna appears to lock |
• Receiver improperly |
• Verify the switch settings are set correctly for the desired |
onto signal, but my receiver |
configured for the Carryout |
provider. See switch settings on page 2. |
does not show a picture or |
G2 antenna. |
• Reconfigure the receiver according to steps on page 3 or 4. |
signal reading. |
|
|
I have switched satellite service |
• Switches are not set for the |
• Remove the dome, and set the switches to the correct |
providers, and the antenna is |
correct provider. |
programming provider. See switch settings on page 2. |
no longer working properly. |
|
|
If a problem persists, contact Winegard Technical Services at help@winegard.com or 1-800-788-4417.
Transporting & Maintenance
Before transporting the antenna, disconnect the power cable, and disconnect coax cables from the MAIN and SEC ports.
The Carryout G2 antenna is designed to be maintenance free. However, it is a good idea to periodically clean the dome with a soft cloth, water, and dish soap.
Optional Accessories
TR-1518 Tripod Mount
The tripod mount has adjustable height and leveling settings of 14.5”–22” and quickly disassembles for compact storage.
RK-2000 Roof Mount Kit
With the optional roof mount kit, the Carryout G2 antenna can be permanently mounted to a vehicle roof. The roof mount kit includes everything needed to make the Carryout G2 a roof mount antenna.
Alt. Power Supply Specs.
DC Voltage (nominal): 13.8 V
Rated Current: 4 Amp
Rated Power: 50W
Ripple & Noise (max.): 120 mVp-p
Voltage Tolerance: ±5%
Protection: OverLoad, Over Temperature
Using Outside Receptacle
If your outside TV receptacle is wired for satellite, you’ll need to locate where that receptacle leads and connect that directly to your satellite receiver.
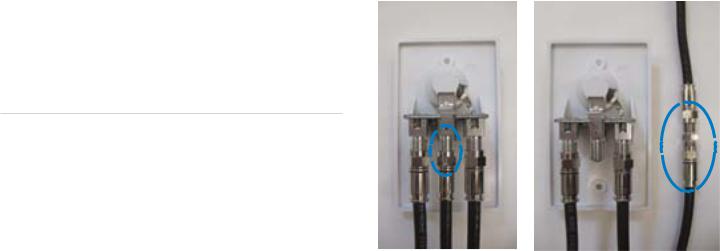
If the outside TV receptacle is wired for cable, the wiring will have to be modified for use with satellite. The coaxial cable cannot run through any other devices or switches before the satellite receiver.
Typically, if wired for cable, the wiring will either run through a Winegard power supply or video switch. The easiest way to fix this is to disconnect the cable from that device, use a barrel connector, and connect a new cable that runs directly to the receiver, bypassing the power supply or video switch.
5
 Loading...