

Page 1
BY
Model FV-HD30 Antenna
(Designed for use with U.S. DTV frequencies.)
U.S. Patent D612,370 and Patent Pending
For help, call 1-800-788-4417 or email offairtechhelp@winegard.com
DO NOT RETURN ANTENNA TO PLACE OF PURCHASE.
2452195
Page 2
Digital Television Facts
Parts
Your Winegard antenna is digital and HD ready. This means that the antenna
receives all available digital and HD local programming in your area.*
A commonly unknown but key feature with over-the-air (OTA) antennas is
they deliver the highest quality digital and HD signals to your television—even
better than satellite and cable! With the signal being received directly from the
broadcast tower and transmitted to your television, it is in its uncompressed and
purest form.
As more and more local networks are broadcasting their programs in HD, you
can experience reception of your favorite shows in crisp, clear FREE HD! You also
have the ability to receive programming that cable and satellite companies may
not provide. It doesn’t get any better than that!
*Antenna reception may vary based on transmitting antenna tower height, lobe pattern of the
transmitter, height of the receiving antenna, weather conditions and terrain on receiving path
including trees, buildings, hills, mountains, etc.
Receiving HD
Your antenna is HD ready. However, in order to receive HD programming, you
also need a quality coaxial cable and a digital TV with an ATSC HDTV tuner. If the
TV was sold as an “HDTV” or “DTV”, the TV is supposed to have a built-in ATSC
tuner. “HD ready” TVs do not have a digital tuner.
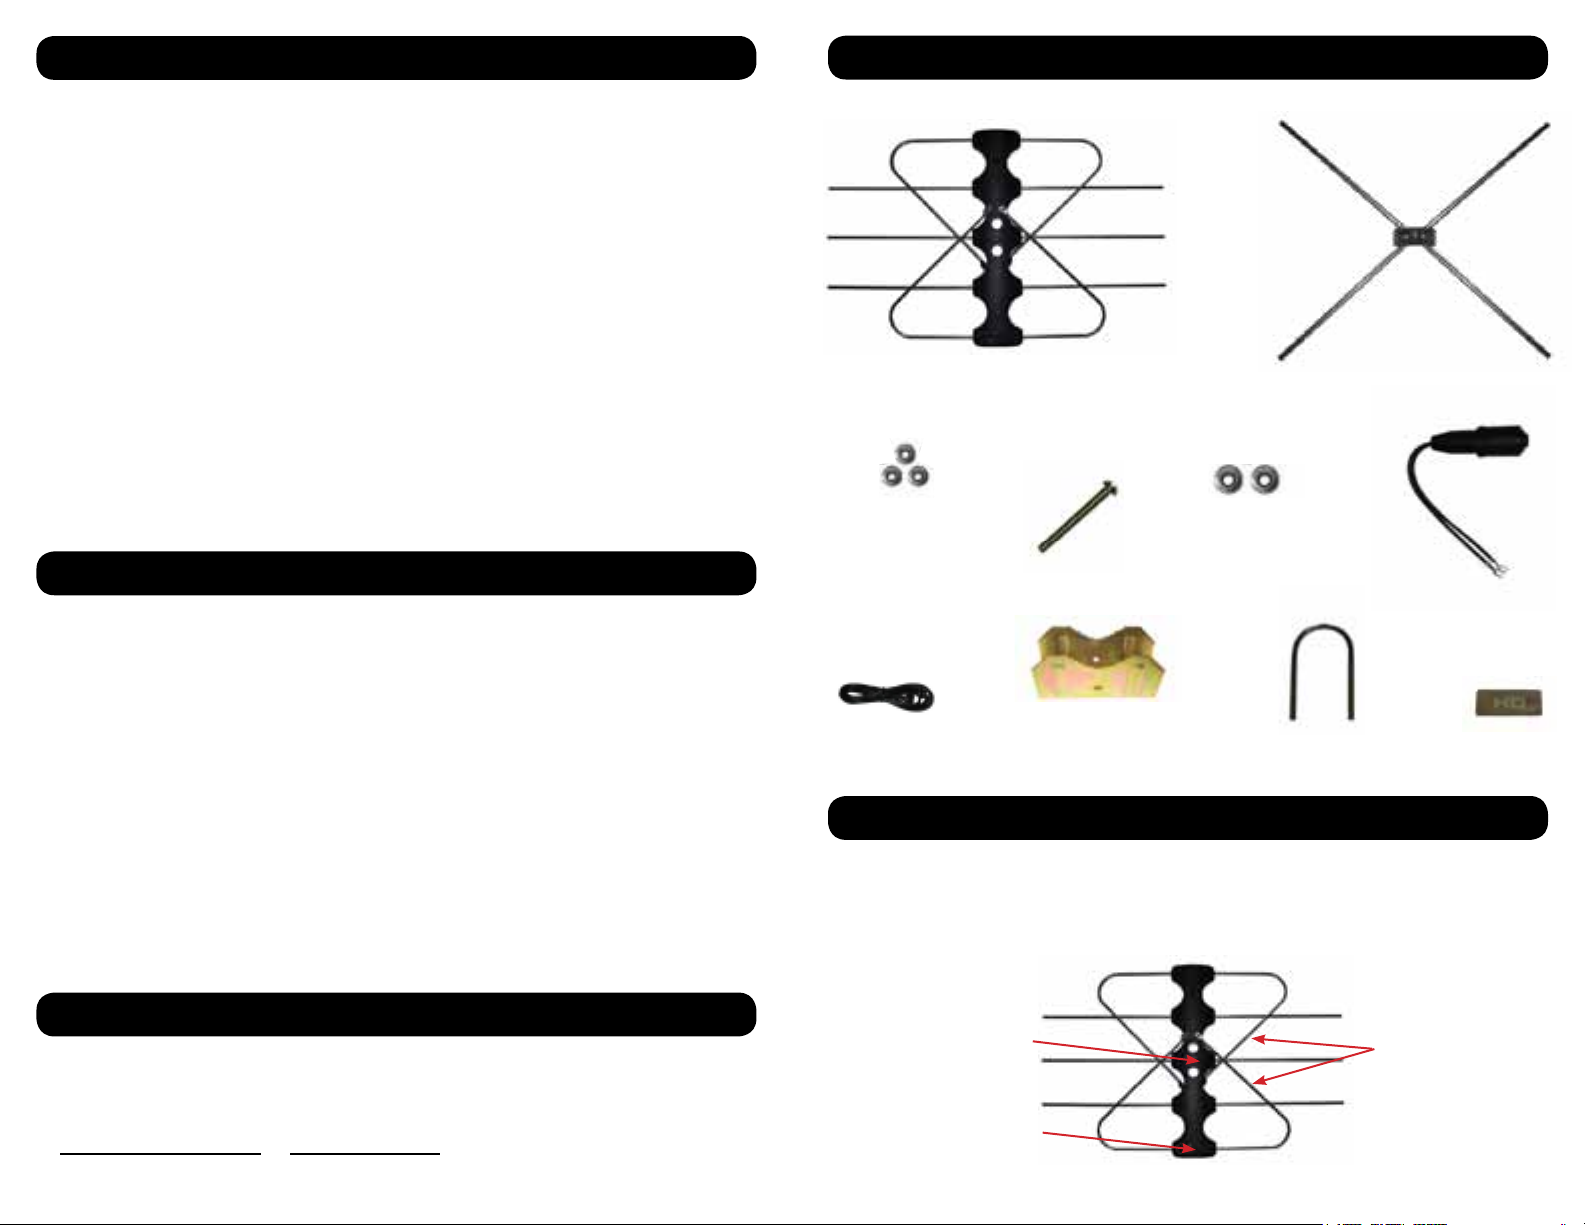
FREEVISION Antenna
10-32 Hex
Flange Nuts (3)
Mini Coax
Cable
1-3/4” Screw
Mounting Bracket
UHF Element
Matching Transformer
1/4-20 Hex
Flange Nuts (2)
U-Bolt
HD Label
How do you know if your TV has a built-in tuner? Most televisions sold as an
“HDTV” or “DTV” that were manufactured after 2007 will have a built-in tuner. You
can also check the specs in the TV owner’s manual, or search online for the make
and model of the TV to see if it has an ATSC tuner. If your TV menu has an option
for scanning for digital channels, then it has an ATSC tuner.
If your television is not digital ready, you will need a digital tuner or set top box.
This will ‘decode’ the signal for your television.
Start by placing the FREEVISION antenna on a flat surface so that the Winegard
FREEVISION logo on the front of the unit is facing up (Figure 1).
Antenna Assembly
Figure 1
Before Assembling the Antenna
Check that you are within a 30 mile range of the stations that you want to
receive. The FREEVISION antenna has an approximate range of 30 miles when
installed outside. For a listing of likely channels available in your area, go online
to www.antennaweb.org or www.tvfool.com.
1 2
Front Side
of Antenna
Logo
Forward
Elements
Page 3
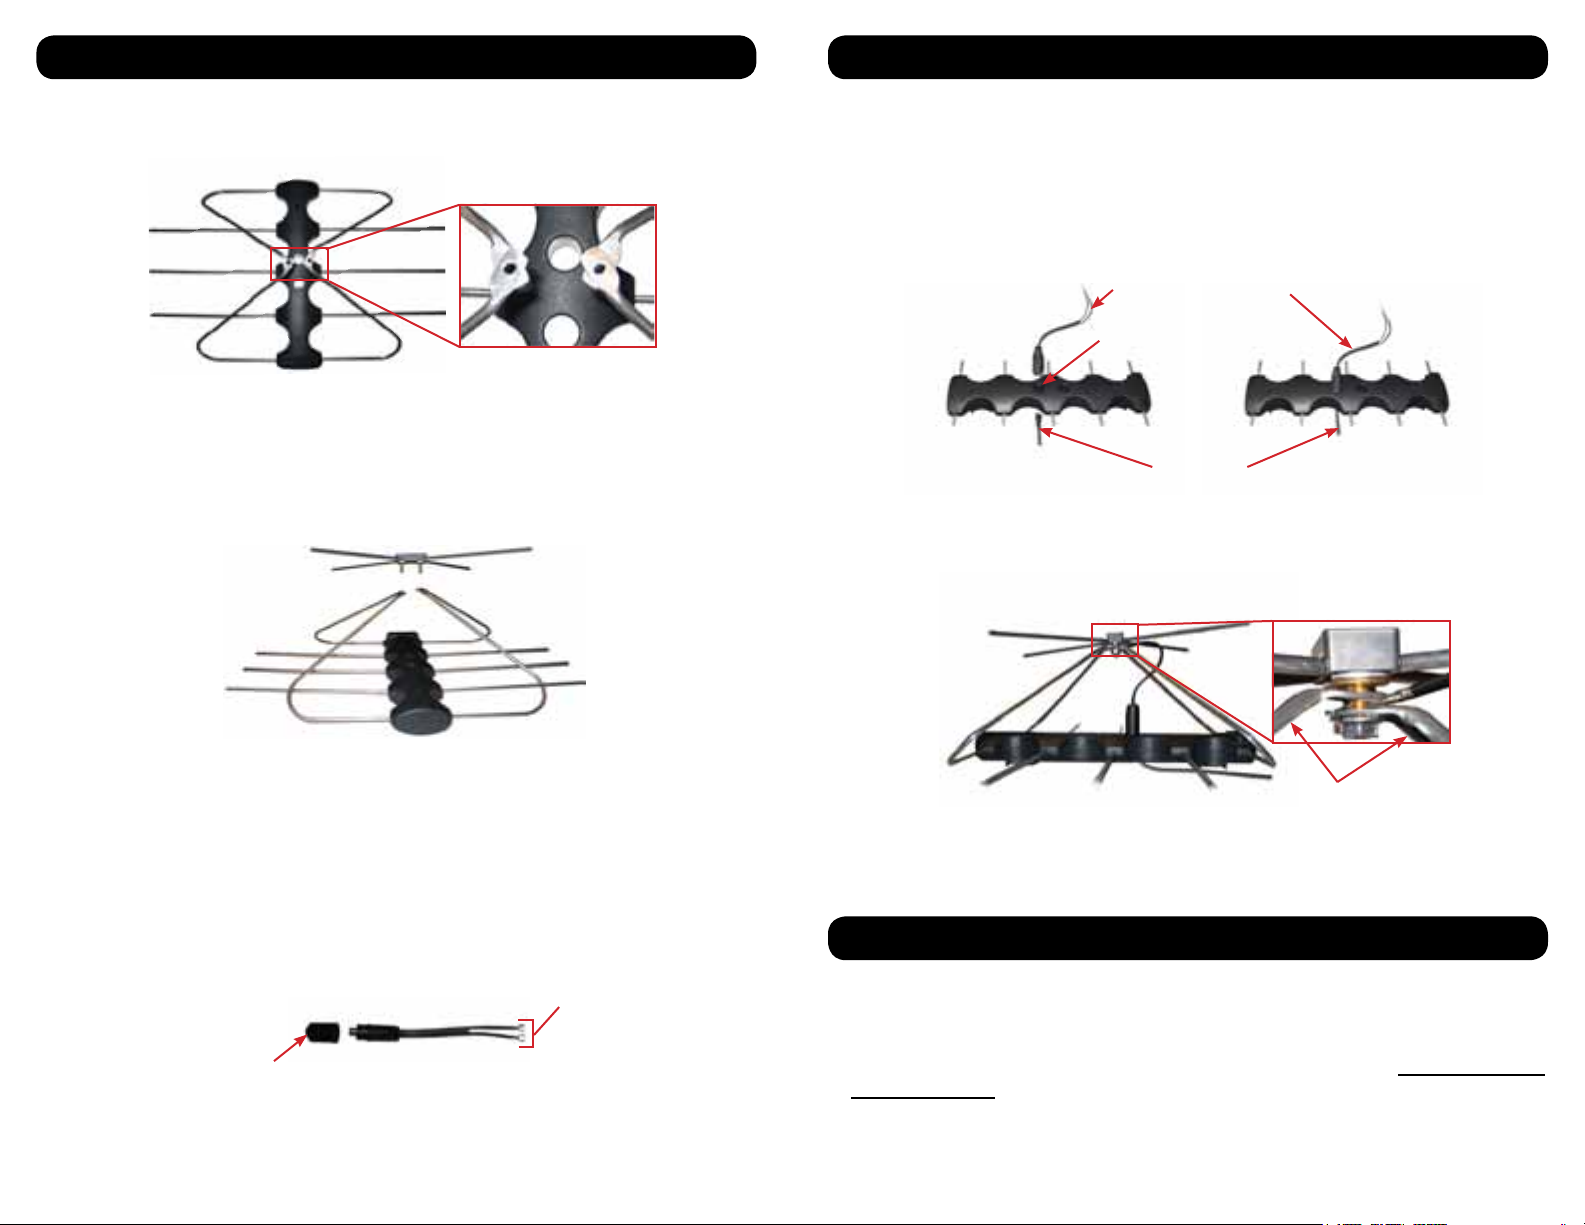
Antenna Assembly, Cont’d Antenna Assembly, Cont’d
Lift the forward elements until the holes in the elements line up (Figure 2).
Figure 2
With the holes lined up, install the UHF element by inserting the threaded posts
into the holes in the forward elements. The threaded posts should extend down
towards the body of the FREEVISION antenna as in Figure 3.
Figure 3
With the logo facing up, thread the coax cable through the bottom of the
FreeVision antenna. Connect the coax cable to the matching transformer. See
Figure 5. For an indoor installation, use the provided 6’ mini coax cable. (If longer
cable is desired, you can use or add a standard RG59/U or RG6/U coax cable to
the mini coax cable as needed with an FS-8100 cable to cable connector.) For
an outdoor installation, connect the cable that will run from the antenna into the
building.
Figure 5
Insert the coax and matching transformer into the installation place. Then, slide
one of the forks of the matching transformer between the two forward elements
on the threaded post. Repeat this process for the other post. See Figure 6.
Matching Transformer
Installation Place for
Matching Transformer
Mini
Coax Cable
Figure 6
Thread the supplied 10-32 hex flange nuts on the back of the threaded posts. DO
NOT tighten at this time.
Remove and dispose of the rubber boot on the matching transformer as shown in
Figure 4.
Figure 4
Rubber boot
Continue to page 4 to complete antenna assembly.
3 4
Forks
Tighten the nuts, making sure the matching transformer is still connected.
Mounting the Antenna: Location Selection
Check that you are within a 30 mile range of the stations that you want to
receive. The antenna has an approximate range of 30 miles when installed outside.
For a listing of likely channels available in your area, go online to www.tvfool.com
or antennaweb.org. On each of these sites, you can enter your address and get a
listing of likely channels available in your area along with the compass heading for
each station’s tower. For most locations, stations will only come from one or two
directions. If the compass headings are similar (<30° apart), the FREEVISION can be
aimed between the two areas and receive signals from each location.
Forward Elements
Page 4
Mounting the Antenna: Location Selection, Cont’d
Mounting the Antenna: Mounting Options
Consider using an existing satellite or cable coax connection. At the point where
cables enter your home (the grounding box), the antenna can be hooked up to an
existing coax connection. From the grounding box, a coax cable should run to the
tv or power supply (if using an amplifier).
If replacing an existing antenna with the FREEVISION antenna, simply disconnect
the coax cable from the existing antenna, and connect the coax cable to the
FREEVISION antenna.
If there is a weak or intermittent signal when using an existing coax cable, there
may be a problem with the existing coax cable. Connect one end of the provided
coax cable to the antenna and the other end directly to the tv (if not using an
amplifier). If the signal improves, there may be a problem with the existing coax
cable. If you have any questions, please contact Winegard Technical Services at
1-800-788-4417 or offairtechhelp@winegard.com.
Determine the best mounting location for the antenna—keep in mind that
the higher the antenna is mounted, the better signal you will receive. The
FREEVISION antenna is intended as either an indoor or an outdoor antenna.
GOOD BEST
INDOOR
Barriers (like walls) will
minimize reception. Test
different locations in your home
for optimal reception. Keep
azimuth (direction) in mind,
and try to mount the antenna
so that it can look out a
window on the wall facing the
broadcast tower.
BETTER
ATTIC
This is the next best mounting
option when you want
the antenna to be out of
sight. Signal loss may be
experienced.
OUTDOOR
(roof, side of house, deck)
Direct line of sight from the
antenna to the broadcast tower
provides the strongest signal
strength and maximum channel
reception.
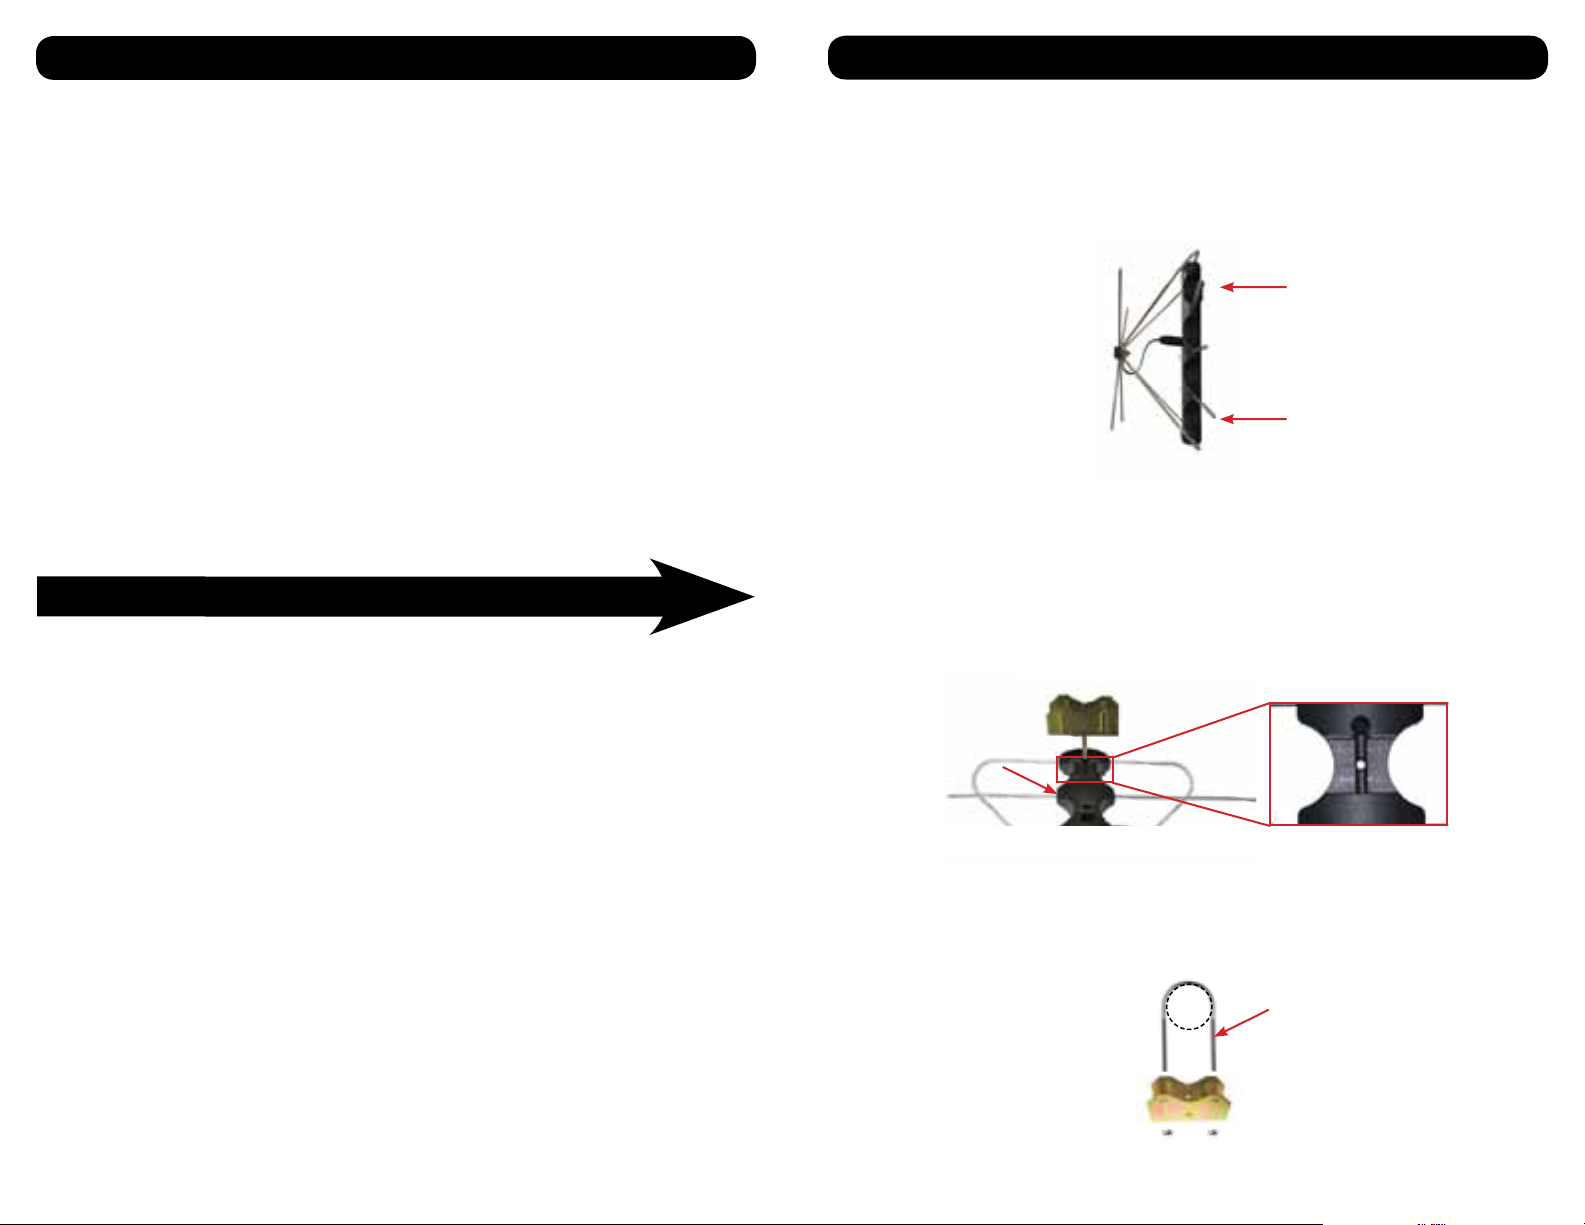
The FREEVISION antenna is designed to be mounted either of two ways:
Wall Mounting - The FREEVISION has been designed with holes to allow it to
hang on a wall from a nail. See Figure 7.
Figure 7
Hole for Nail
Hole for Nail
Mast Mounting - The FreeVision antenna comes with a bracket and U-bolt to
allow for mounting to a pipe or mast. For mounting to a pipe or mast, first insert
the (yellow) 1-3/4” screw into the bracket and through the mounting hole (Figure
8). Attach the bracket to the back of the FreeVision antenna. Thread a 10-32 hex
flange nut onto the screw, and tighten it.
Figure 8
Back Side
of Antenna
Avoid obstructions (such as buildings, trees or hills) between the antenna and the
broadcast tower—these can block signal. Electronics, including the television itself,
can interfere with the reception of the antenna, so select a location at least three
feet away from other electronic devices.
Distance, obstructions and compass heading all play a role in deciding on a location
to permanently mount the antenna. For this reason, try the antenna in several
locations, checking signal on multiple channels to determine the location that
will provide the best signal. If having trouble locating a signal, try mounting the
antenna on a window so that it faces the broadcast tower. Moving the antenna
three feet in one direction is often enough to change the reception.
5 6
Once the clamp is attached, assemble the U-bolt around the mast or pipe as
shown in Figure 9, and install the nuts securely to keep the antenna in place.
Figure 9
Mast
U-Bolt
Page 5

Attaching the ‘HD’ Label
Questions & Answers
Remove the backing from the ‘HD’ label, and carefully place the label over the
front of the UHF element so that it covers the center block of the elements
(Figure 10).
Figure 10
HD Label
Painting the FREEVISION Antenna
The FREEVISION can be painted as long as the metal prongs of the forward
elements and the matching transformer forks are not painted. If you choose to
paint the antenna, cover the two circled areas with tape before painting (Figure
11). If these areas are painted, your antenna will NOT work, and you will void
your warranty.
Figure 11
Forward
Elements
To prevent paint from easily flaking, use a primer when painting the antenna.
Matching
Transformer
Q. Can I use my existing coax connection with the FREEVISION antenna?
A. Yes. The antenna can be hooked up to an existing coax connection. See the top
of page 5 for more details.
Q. How do I set up the FREEVISION antenna with my existing cable or satellite package?
A. Refer to wiring diagrams at www.winegard.com/freevision for details on
how to wire the FREEVISION antenna so that it enhances your existing cable
or satellite package.
Troubleshooting
Issue Possible Cause
There is static or snow
in the picture.
I am not getting
channels.
One channel is
missing.
The picture or sound
freezes while I am
watching a channel, or
there are boxes in the
picture.
Digital television is all or nothing; the picture is great,
or there isn’t one. Static means there is interference
between the digital tuner and the television screen. If
you use a digital converter, one of the connections or
the cable between the converter and television may be
bad.
Several things can cause this:
• A faulty connection between the antenna and the
converter box;
• The matching transformer may have come loose
from the antenna.
Try running a new channel scan on the TV or converter
box. Try the antenna in a new location. Something
may be obstructing the signal.
Try turning the antenna 10 or 20 degrees in either
direction to avoid reflection or to better optimize the
signal.
Try running a new channel scan on the TV. Refer to the
channel scan insert for more information.
This is often caused by a weak or intermittent signal.
Try moving the antenna to a better location or aiming
it directly at the tower for this channel.
For Help, Call 1-800-788-4417
7 8
Page 6

90 DAY LIMITED WARRANTY
Winegard Company warrants this Winegard product against any defects
in materials or workmanship within 90 (ninety) days from date of purchase.
No warranty claim will be honored unless at the time the claim is made, you
present proof of purchase to an authorized Winegard dealer (if unknown, please
contact Winegard Company, 3000 Kirkwood Street, Burlington, IA 52601-2000,
Telephone 800-288-8094).
Winegard Company (at its option) will either repair or replace the defective
product at no charge to you. This warranty covers parts, but does not cover any
costs incurred in removal, shipping or reinstallation of the product. This limited
warranty does not apply if the product is damaged, deteriorates, malfunctions
or fails from: misuse, improper installation, abuse, neglect, accident, tampering,
modification of the product as originally manufactured by Winegard, usage not
in accordance with product instructions or acts of nature such as damage caused
by wind, lightning, ice or corrosive environments such as salt spray and acid rain.
The 90 Day Warranty is provided on the condition that the equipment is properly
delivered with all handling and freight charges prepaid to your Winegard dealer
for return to our factory for repair or replacement. Winegard dealers will arrange
for the replacement or repair and return to you without charge the product which
failed due to defective material or workmanship.
WINEGARD COMPANY WILL NOT ASSUME ANY LIABILITIES FOR ANY OTHER
WARRANTIES, EXPRESS OR IMPLIED, MADE BY ANY OTHER PERSON.
ALL OTHER WARRANTIES WHETHER EXPRESS, IMPLIED OR STATUTORY
INCLUDING WARRANTIES OF FITNESS FOR A PARTICULAR PURPOSE AND
MERCHANTABILITY ARE LIMITED TO THE 90-DAY PERIOD OF THIS WARRANTY.
The foregoing shall be the sole and exclusive remedy of any person, whether
in contract, tort or otherwise, and Winegard shall not be liable for incidental or
consequential damage or commercial loss, or from any other loss or damage
except as set forth above.
Some states do not allow limitations on how long an implied warranty lasts,
or the exclusion of limitation of incidental or consequential damages, so the
above limitations or exclusions may not apply to you.
This warranty gives you specific legal rights and you may also have other
rights which vary from state to state.
WinegardCompany•3000KirkwoodStreet•Burlington,IA52601
800-288-8094•Fax319-754-0787•www.winegard.com
Printed in U.S.A. ©2011 Winegard Company Rev5 09/11 2452195
Winegard and FREEVISION are registered trademarks of Winegard Company.
All trademarks are property of their respective owners.
Page 7

DE
Modelo FV-HD30
(Diseñada para uso con frecuencias DTV de EE.UU.)
Para solicitar ayuda, llame al 1-800-788-4417 o envíe un correo electrónico
a offairtechhelp@winegard.com
NO REGRESE LA ANTENA AL LUGAR EN DONDE LA ADQUIRIÓ.
(U.S.A. Patente D612,370
y patente pendiente)
HECHO EN EE.UU.
2452195
Page 8

Hechos de la televisión digital
Listado de Piezas
Su antena Winegard es digital y lista para HD. Esto significa que la antena recibe
todas las señales digitales y programación local en HD disponibles en su área.*
Una característica poco conocida pero muy importante de las antenas aéreas
(OTA por sus siglas en inglés) es que proporcionan la mejor calidad de las
señales digitales y en HD a su televisión ¡aún mejor que la señal por satélite o
cable! Como la señal se recibe directamente desde la torre de transmisión y se
transmite a su televisión, está en su forma más pura y descomprimida.
Ya que más y más cadenas locales están transmitiendo sus programas en HD,
usted puede experimentar la recepción de sus programas favoritos, ¡en HD claro,
vibrante y GRATIS! También puede recibir programación que las compañías de
cable y satélite tal vez no proporcionen. ¡No puede ser mejor!
*La recepción de la antena puede variar por la altura de la antena de la torre de transmisión, patrón
del lóbulo del transmisor, la altura de la antena receptora, condiciones de clima y del terreno en la
ruta de recepción, incluyendo árboles, edificios, terrenos elevados, montañas, etc.
Recepción de HD
Su antena está lista para HD. Sin embargo, para recibir programación HD, también
necesita un cable coaxial de buena calidad y una TV digital con sintonizador HDTV
ATSC. Si le vendieron la TV como una “HDTV” o “DTV”, se supone que la TV tiene
un sintonizador ATSC incorporado. Las TV que dicen “Lista para HD(HD ready)”
no tienen un sintonizador digital.
Antena FREEVISION
Tuercas hexagonal
de 10-32 (3)
Cable Mini
Coaxial
Tornillo 1-3/4”
Soporte de Instalación
Elementos UHF
Transformador adaptador
Tuercas hexagonal
de 1/4-20 (2)
Sujetador en “U”
Etiqueta HD
¿Cómo puede saber si su TV tiene un sintonizador incorporado? La mayoría
de los televisores antiguos llamados “HDTV” o “DTV” que fueron fabricados
después del 2007 tendrán un sintonizador incorporado. También puede revisar
las características en el manual del propietario de la TV, o buscar en línea la
manufactura y el modelo de la TV para ver si tiene un sintonizador ATSC. Si el
menú de su TV tiene una opción para buscar canales digitales, entonces tiene un
sintonizador ATSC.
Si su televisor no está listo para la señal digital, necesitará un sintonizador digital
o caja decodificadora. Esto “decodificará” la señal para su televisión.
Empiece por ubicar la antena FreeVission en una superficie plana de modo que
el logo moldeado “Winegard FreeVision” que está al frente de la unidad esté
mirando hacia arriba, Figura 1.
El ensamble de la antena
Figura 1
Antes de ensamblar la antena
Lado frontal
Asegúrese de estar dentro del alcance de 50 kilómetros de las estaciones que
desea recibir. La antena FREEVISION tiene aproximadamente un alcance de 50
kilómetros cuando se instala en el exterior. Para una lista de los canales disponibles
en su área, vaya al sitio www.antennaweb.org o www.tvfool.com en línea.
1 2
de la Antena
Logotipo
Elementos
Frontales
Page 9

El ensamble de la antena, Cont
El ensamble de la antena, Cont
Levante los elementos hacia adelante hasta que los agujeros estén alineados
(Figura 2).
Figura 2
Con los agujeros alineados, instale el elemento UHF insertando los postes
roscados en los agujeros de los elementos delanteros. Los postes roscados deben
extenderse hacia abajo en dirección de la estructura de la antena FreeVision,
Figura 3.
Figura 3
Con el logotipo viendo hacia arriba, atraviese el cable coaxial a través del fondo
de la antena FreeVision. Conecte el cable coaxial al transformador adaptador. Vea
la Figura 5. Para una instalación de interiores, use el cable mini-coaxial (incluido).
(Si un cable mas largo es deseado, usted puede usar un cable standard RG59/U o
RG6/U coaxial cable, hacia el pequeno cable coaxial segun sea necesario usando
un conector FS-8100 cable a cable. Para una instalación exterior, conecte el cable
que irá de la antena al edificio.
Figura 5
Inserte el coaxial y el transformador correspondiente en el lugar de instalación.
Entonces, deslice uno de los tridentes del transformador adaptador entre los dos
elementos delanteros del poste roscado. Repita este proceso para el otro poste. Vea
la Figura 6.
Transformador adaptador
Lugar de instalación para el
transformador adaptador
Cable mini coaxial
Figura 6
Enrosque las tuercas hexagonal 10-32, que se incluyen para su ensamblaje, en la
parte trasera de los postes roscados. NO los apriete en este momento.
Quite y elimine el protector de goma en el transformador adaptador. Vea la Figura 4.
Ajuste las tuercas, asegurándose de que el transformador adaptador todavía esté
conectado.
Elementos Frontales
Montaje de la antena: Selección local
Figura 4
Bota de goma
3 4
Trídentes
Asegúrese de estar dentro del alcance de 50 kilómetros de las estaciones que
desea recibir. (Para una lista de los canales disponibles en su área, vaya al sitio
www.antennaweb.org o www.tvfool.com en línea.) En la mayoría de lugares, las
estaciones de transmisión únicamente provienen en una o dos direcciones. Si los
rumbos son similares (<30 ° de diferencia), la FreeVision puede apuntar entre las
dos áreas y recibir señales de cada estación.
Ejecute la búsqueda de canales. Si no está recibiendo los canales que desea,
intente reubicar su antena, y vuelva a ejecutar la búsqueda de canales.
Page 10

Instalación de la antena: Selección de la Ubicación
Instalación de la antena: Opciones de Montaje
Considere usar una conexión de cable coaxial o de satélite existente. En el punto
en que los cables entren a su hogar, la antena puede ser conectada a una conexión
coaxial existente. Desde la caja de conexión a tierra, se debe tender un cable
coaxial a la TV o suministro de energía (si se usa un amplificador).
Si va a reemplazar una antena existente con la antena FREEVISION, solamente
desconecte el cable coaxial de la antena actual, y conecte el cable coaxial a la
antena FREEVISION.
Si hay una señal débil o intermitente cuando use un cable coaxial existente,
puede haber algún problema con el cable coaxial actual. Conecte una punta del
cable coaxial proporcionado a la antena y la otra punta directamente a la TV. Si
la señal mejora, puede haber un problema con el cable coaxial existente. Si tiene
preguntas, póngase en contacto con Winegard Technical Services al 1-800-7884417 o offairtechhelp@winegard.com.
Determine la mejor ubicación para montar la antena, tenga en cuenta que entre
más alta sea montada la antena, mejor señal recibirá. La antena FreeVision puede
usarse tanto en interiores como en el exterior.
BUENO EXCELENTE
INTERIOR
Las barreras (como paredes)
empeorarán la recepción. Pruebe
en diferentes ubicaciones de su
hogar hasta obtener la mejor
recepción. Tenga en cuenta el
azimut (dirección) y trate de
montar la antena de manera
que vea hacia una ventana que
de al exterior hacia la torre de
transmisión.
Evite las obstrucciones (como edificios, árboles o colinas) entre la antena y la torre
de transmisión, ya que pueden bloquear la señal.
MEJOR
ÁTICO
Esta es la siguiente mejor
opción de montaje cuando
desea que la antena quede
oculta. Se puede experimentar
pérdida de la señal.
EXTERIOR
(techo, a un lado de la casa,
terraza)
Alinear directamente la antena
con la torre de transmisión
proporcionará la señal más
fuerte y la recepción del máximo
de canales.
La antena FreeVision ha sido diseñada para instalarse en dos formas:
Instalación en Pared – La FreeVision ha sido diseñada con agujeros que permiten
colgarla en una pared utilizando un clavo. Ver la Figura 7.
Figura 7
Agujero para el clavo
Agujero para el clavo
Instalación del mástil—La antena FreeVision viene con un sujetador en “U” que
le permite instalarla en un tubo o asta.
Para montar a un tubo o mástil, primero
inserte el tornillo (amarillo) 1-3/4” en el soporte de instalación y a través del
hoyo de montura (Figura 8). Una el soporte de instalación a la parte trasera de
la antena FreeVision. Enrosque la tuerca hexagonal de 10-32 en el tornillo, y
apriétela.
Figura 8
Lado trasero de
la of Antena
Una vez que se sujete la abrazadera, arme el sujetador en “U” alrededor del asta o
tubo así como se muestra en la Figura 9 e instale las tuercas firmemente para que
la antena se mantenga en su lugar.
La distancia, obstrucciones y rumbo juegan un papel importante al decidir la
ubicación en la cual fijará la antena permanentemente. Por esta razón puede
que se necesite probar la antena en varias ubicaciones, verificando la señal en
múltiples canales para determinar la ubicación que proporcionará la mejor señal.
Si experimenta problemas ubicando la señal, intente montar la antena en una
ventana de manera que esté de cara a la torre de transmisión. Usualmente al mover
la antena tres pies en una dirección es suficiente para cambiar la recepción.
5 6
Figura 9
Mast
Sujetador
en “U”
Page 11

Coloque la etiqueta ‘HD’
Preguntas y respuestas
Quite el respaldo de la etiqueta ‘HD’ y cuidadosamente ubíquela sobre el frente
del elemento UHF de forma que cubra el bloque central de los elementos
(Figura 10).
Figure 10
Etiqueta HD
Pintar la antena FREEVISION
La FreeVision puede ser pintada mientras los dientes de metal de los elementos
delanteros y los tridentes del transformador adaptador no sean pintados. Si usted
decide pintar la antena, cubra las dos áreas marcadas con círculo con cinta antes
de pintar (Figura 11). Si las áreas son pintadas, su antena no funcionará, y habrá
invalidado su garantía.
Figure 11
Elementos
Frontales
Para prevenir que la pintura se descarapele fácilmente, use pintura base cuando
pinte la antena.
Transformador
adaptador
P. ¿Puedo usar una conexión coaxial existente con la antena FREEVISION?
R. Sí. La antena puede ser conectada a un cable coaxial existente. Vea la parte
superior de la página 5 para más detalles.
P. ¿Cómo configuro la antena FREEVISION con mi paquete existente de cable o
satélite?
R. Consulte los diagramas de cableado en www.winegard.com/freevision para
ver detalles sobre cómo cablear la antena FREEVISION para que mejore su
paquete existente de cable o satélite.
Solución de problemas
Problema Causa Posible
Hay estática o nieve en
la imagen.
No tengo canales. Esto puede causarse por varias situaciones:
Falta un canal. Pruebe girar la antena 10 ó 20 grados en cualquier
La imagen o el sonido
se congelan mientras
estoy viendo un canal
o aparecen cuadros en
la imagen.
Para solicitar ayuda, llame al 1-800-788-4417 o envíe
un correo electrónico a offairtechhelp@winegard.com.
La televisión digital es todo o nada: la imagen es
perfecta o no hay ninguna. La estática quiere decir que
hay interferencia entre el sintonizador digital y la pantalla del televisor. Si usted usa un convertidor digital,
una de las conexiones o el cable entre el convertidor y
el televisor pueden estar mal.
- Trate de realizar un recorrido de canales en la TV o
la caja convertidora.
- Una conexión defectuosa entre la antena y la TV o
la caja convertidora
- Puede que el transformador adaptador se haya
soltado de la antena.
- Pruebe la antena en una ubicación diferente. Puede
que algo esté obstruyendo la señal.
dirección para evitar reflejos o para obtener una mejor
señal.
Esto ocurre frecuentemente debido a una señal débil
o intermitente. Pruebe mover la antena a una mejor
ubicación o diríjala directamente a la torre de ese
canal.
7 8
Page 12

GARANTÍA LIMITADA DE 90 DÍAS
Winegard Company garantiza que este producto Winegard está libre de
cualquier defecto en los materiales o fabricación del mismo durante 90 (noventa)
días a partir de la fecha de compra. No se aceptarán reclamos salvo que al
momento del mismo, presente prueba de compra a un distribuidor autorizado
de Winegard (si lo desconoce, por favor contacte a Winegard Company, 3000
Kirkwood Street, Burlington, IA 52601-2000, Teléfono 800-288-8094).
Winegard Company (a su discreción) reparará o reemplazara el producto
defectuoso sin costo alguno. Esta garantía cubre las piezas, pero no cubre los
costos relacionados con quitar las piezas, el envío o reinstalación del producto.
Esta garantía limitada no es aplicable si el producto está dañado, deteriorado,
mal funcionando o falla debido a: mal uso, instalación inadecuada, abuso,
negligencia, accidente, alteración, modificación del producto que originalmente
fue fabricado por Winegard, uso que no está acorde con las instrucciones del
producto o actos de la naturaleza tales como el daño causado por el viento,
relámpagos, hielo o ambientes corrosivos tales como la sal o lluvia ácida.
La Garantía de 90 Días se otorga bajo condición que el equipo sea entregado
en forma adecuada a su distribuidor autorizado de Winegard con los cargos
de manejo y envío prepagados para que sea devuelto a nuestra fábrica para su
reparación o reemplazo. Los distribuidores autorizados de Winegard harán los
arreglos para el reemplazo o reparación y devolución sin costo para usted del
producto que haya fallado debido a material o mano de obra defectiva.
WINDEGARD COMPANY NO ASUMIRÁ RESPONSABILIDAD ALGUNA POR
CUALQUIER OTRA GARANTÍA, EXPRESA O IMPLÍCITA, REALIZADA POR
CUALQUIER PERSONA.
TODAS LAS OTRAS GARANTÍAS, INDEPENDIENTEMENTE DE SI SON
EXPRESAS, IMPLÍCITAS O ESTABLECIDAS POR LA LEY, INCLUYENDO LAS
GARANTÍAS ACERCA DE SU IDONEIDAD PARA UN PROPÓSITO EN ESPECÍFICO
Y SU COMERCIALIZACIÓN ESTÁ LIMITADO AL PERÍODO DE 90 DÍAS DE ESTA
GARANTÍA.
Lo anterior será el único reparo exclusivo para cualquier persona, sea a través
de contrato, responsabilidad extracontractual o de naturaleza distinta, y Winegard
no será responsable por daños fortuitos o consecuentes ni pérdida comercial, o
cualquier otra pérdida o daño excepto los que se establecieron anteriormente.
Algunos estados no permiten limitaciones respecto a la duración de
una garantía implícita, o la exclusión de limitaciones por daños fortuitos o
consecuentes, así que podría ser que las limitaciones o exclusiones mencionadas
anteriormente no sean aplicables en su caso.
Esta garantía establece sus derechos legales específicos y usted podría
también tener otros derechos que variarán de estado a estado.
Winegard Company • 3000 Kirkwood Street • Burlington, IA 52601
800-288-8094 • Fax 319-754-0787 • www.winegard.com
Impreso en EE.UU. ©2011 Winegard Company Rev5 09/11 2452195
Winegard y FREEVISION son marcas registradas de Winegard Company.
Todas las marcas son propiedad de sus respectivos propietarios.
 Loading...