

Page 1
Instruction Manual
www.winegard.com/pathway
For receivers and programming, call 1-866-609-9374
For up-to-date information on receiver compatibility and programming,
visit www.winegard.com/receivers
For help, email help@winegard.com or call 1-800-788-4417
Do not return antenna to place of purchase
2452314
Page 2
Quick Setup for One Receiver
1.
Make sure the Pathway™ X1 antenna is in a location with a
clear view of the southern sky.
2.
Connect the primary receiver to the “MAIN” port on the base.
3.
After connecting the receiver to a power source, complete
receiver setup. Select the state that you are currently in.
Then, press “Scan” to start scanning for satellites.
Watch TV!
4.
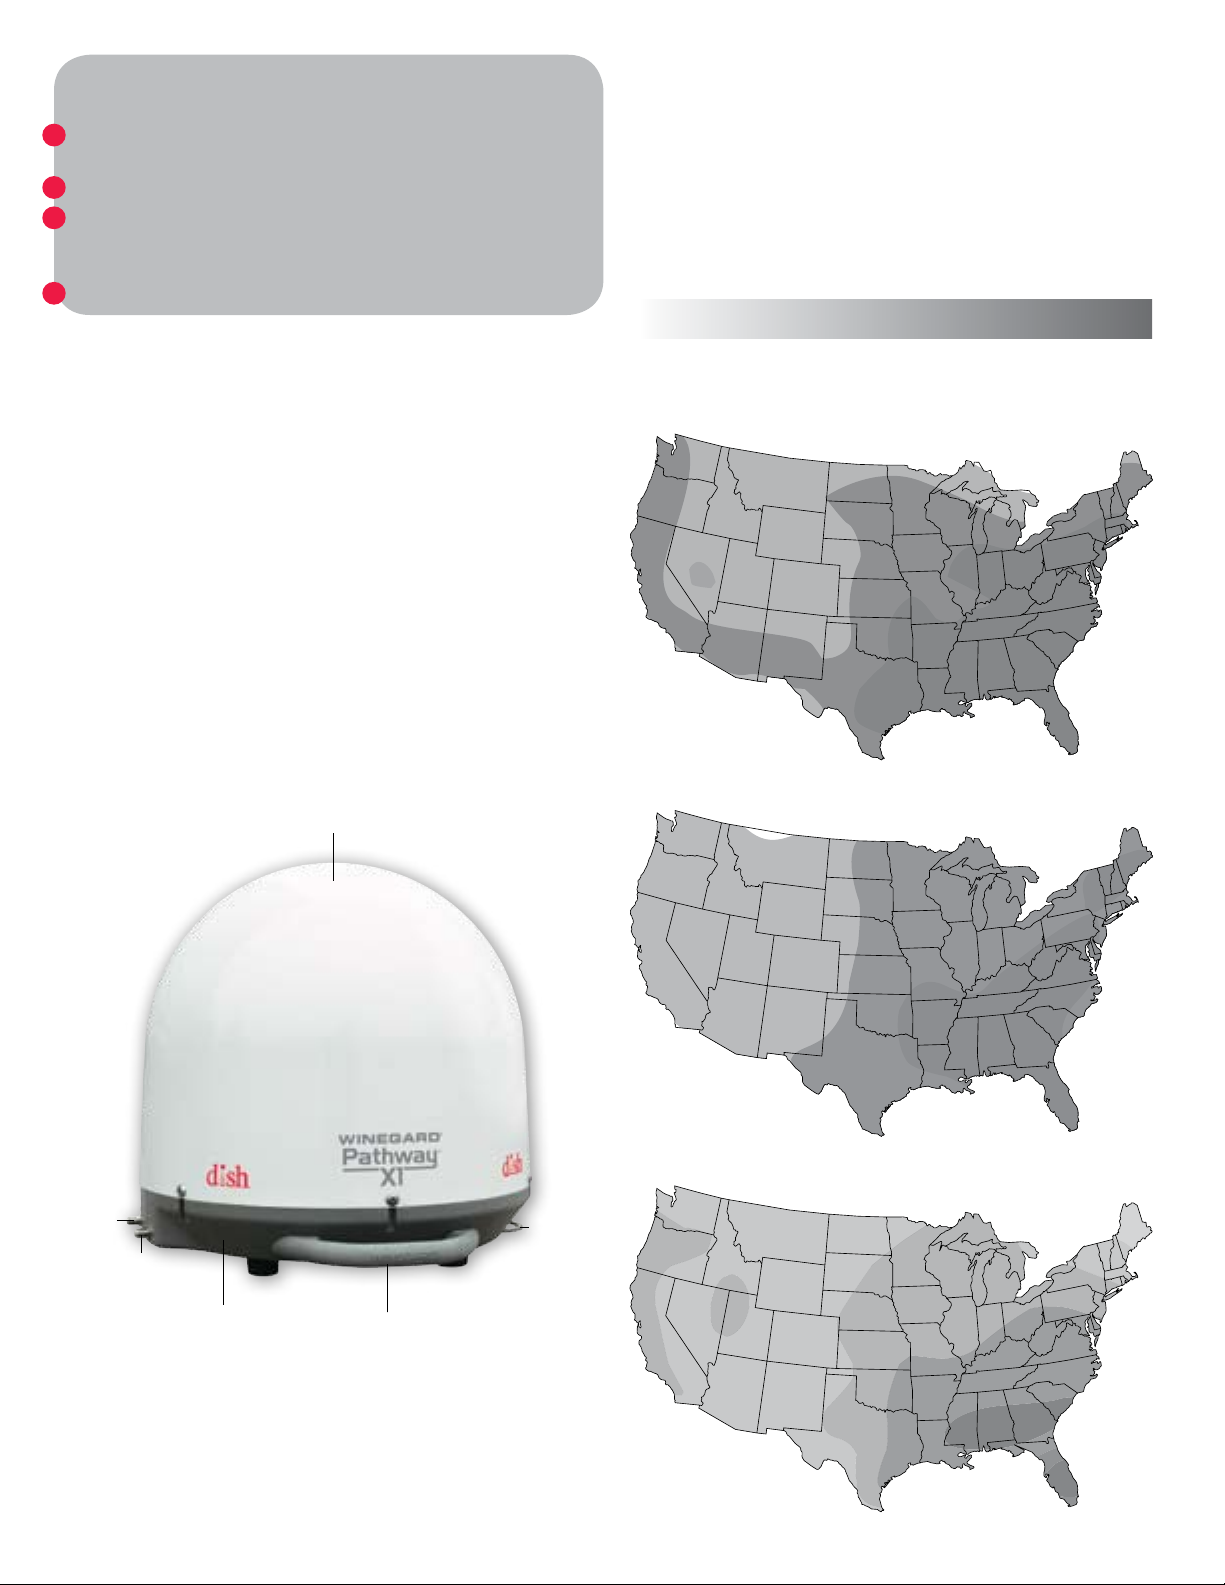
Specifications
Compatible Satellites
The Pathway X1 antenna can receive programming from DISH
western arc, which includes satellites 110°, 119°, and 129°.
See maps below to determine coverage in various areas of
the United States. Coverage maps are approximate and do
not guarantee coverage.
Low
Signal Strength
High
Compatible with DISH programming
Compatible with DISH Solo HD receivers
Supports up to two receivers
For stationary use only
Includes 25 ft coaxial cable
Unit weight: 10 lbs
Unit height (without feet): 13.5 in
Unit height (with feet): 14.2 in
Diameter: 14.3 in
Elevation range: 18–65°
UV-protected plastic dome
Gray plastic base
Made in USA
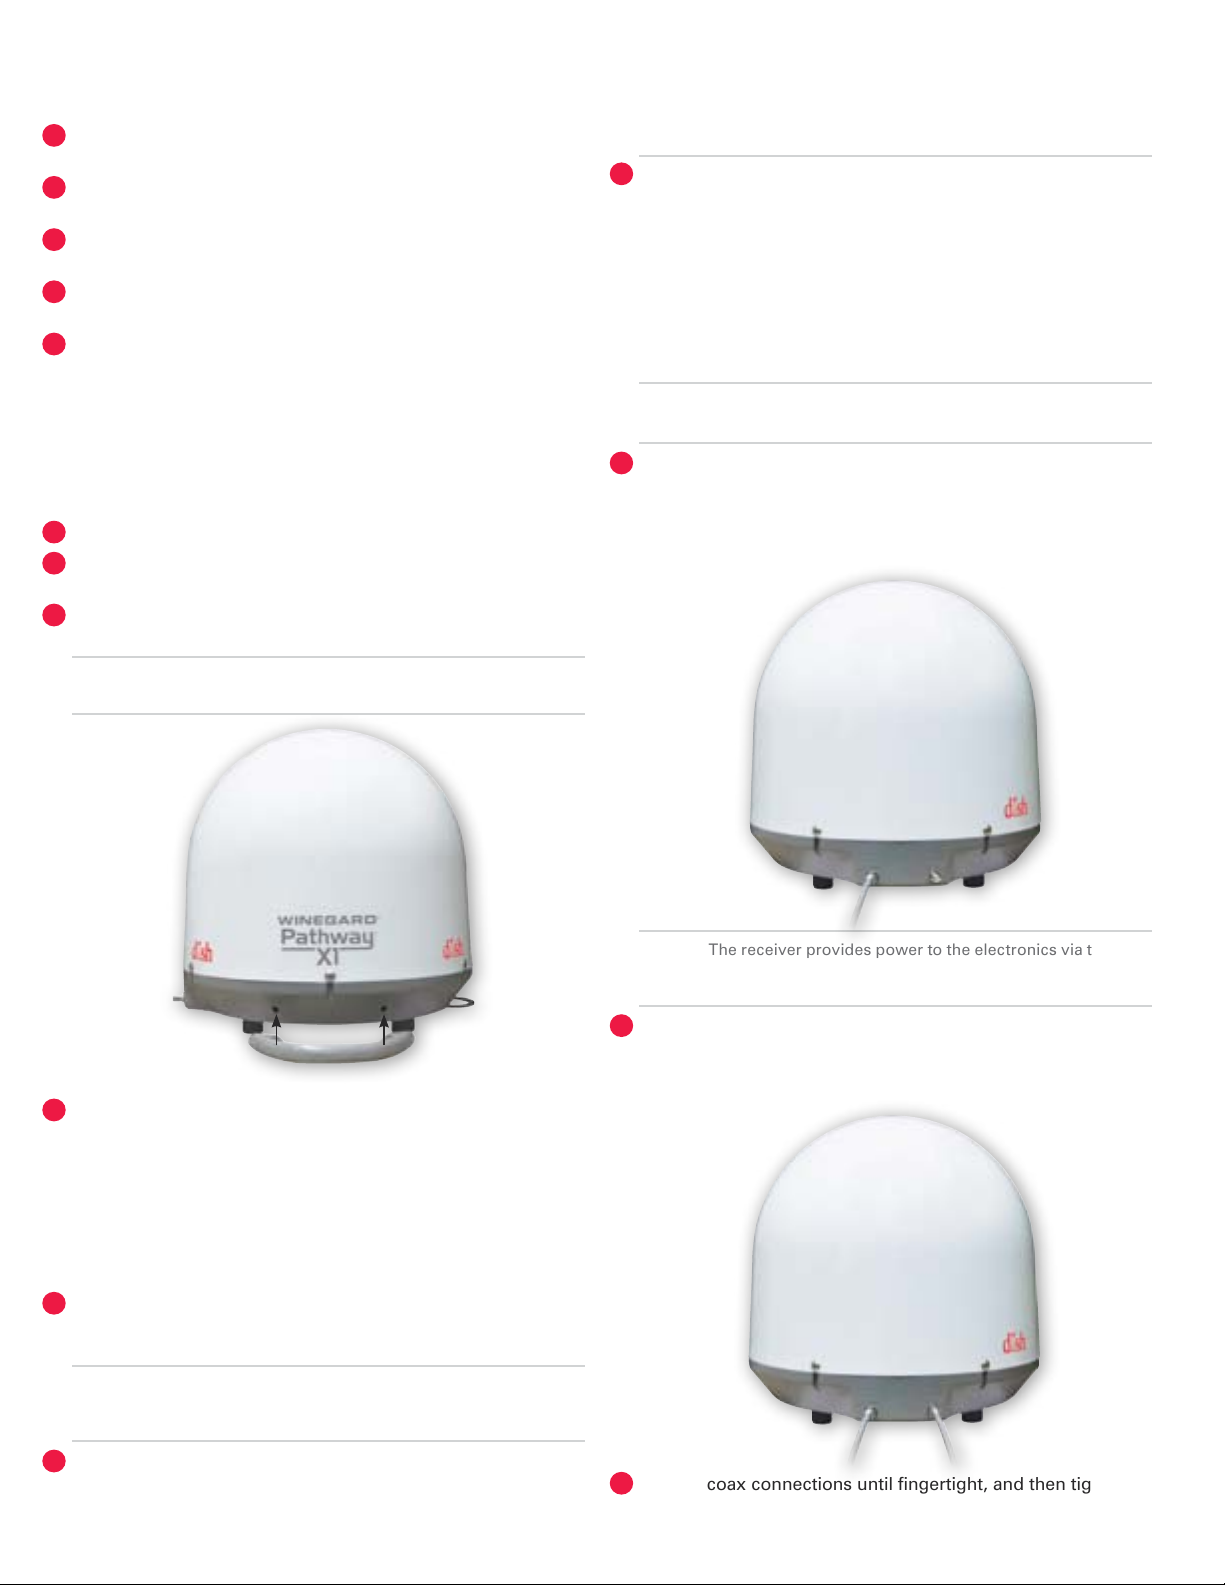
Dome
Satellite 110°
Satellite 119°
Main
port
Sec.
port
Base
(“WINEGARD” facing up)
Handle
Compatible Receivers
The Pathway X1 antenna must be used with DISH Solo HD
receivers. Examples of DISH Solo HD receivers include DISH
211z, 211k, 211, and 411 receivers.
1
Satellite 129°
Eyelet
Page 3
Warnings
Do not place the unit in water greater than one inch deep, or
!
water may damage the electronics.
Do not install or operate the antenna in winds of 35 mph or
!
greater. The antenna will roll in winds ≥35 mph.
Care should be taken when transporting and setting up the
!
antenna. Do not toss or drop the antenna.
Do not paint the antenna. Painting the antenna may cause
!
signal degradation and will void your warranty.
The antenna is not meant for use with the Carryout® ladder
!
mount. Installing the antenna on the Carryout ladder
mount may lead to serious injury and/or equipment and
property damage.
1.
Installing the Handle
1.
Locate the two holes in the base.
2.
With “WINEGARD” on the handle facing upwards, align the
two holes in the handle with the two holes in the base.
3.
Thread two screws through the two aligned holes in the
bottom of the handle.
A 25 foot coaxial cable is included and recommended for
NOTE
cause intermittent problems. Maximum cable length should never
exceed 50 feet.
3.
Select a location that will enable the Pathway X1 antenna to
sit within three degrees of level. The antenna may take longer
to lock onto signal if the antenna is not level.
Connecting the Antenna to
3.
use with the antenna. Longer coax runs could potentially
the Receiver(s)
Run the coaxial cable directly from the satellite receiver to
the Pathway X1 antenna when searching for signal.
TIP
1.
Connect a coax cable from the main port to the “Sat In” port
on the back of the receiver that will be used most often.
The main port should always be connected to the primary
receiver when the antenna is in use, or there will be no power
to the electronics.
The two holes for the handle are located between the
NOTE
4.
Tighten the two screws using a Phillips screwdriver.
Do not overtighten.
2.
Selecting a Location for the
cable connections and eyelet.
The receiver provides power to the electronics via the main
NOTE
cable is connected to the secondar y por t but not the main port.
2.
If hooking up the Pathway X1 antenna to two receivers,
remove the cap from the secondary port, and run a second
coaxial cable from the secondary port on the base to the “Sat
In” port on the secondary receiver.
port. There will be no power to the electronics if a coaxial
Pathway X1 Antenna
1.
Choose a location with a clear, unobstructed view of the
southern sky. Avoid obstructions such as trees, hills, vehicles,
or buildings—these can block the signal from the satellite.
Satellite signal will not pass through solid objects. For
NOTE
unobstructed view of the southern sky.
2.
Make sure the antenna is not placed in the path of people or
vehicles; otherwise, the antenna may be knocked off of the
signal if run into, or cables may be disconnected from the unit.
this reason, it is vital to select a location with a clear,
3.
Tighten coax connections until fingertight, and then tighten a
quarter turn more with a wrench. Do not overtighten.
2
Page 4

DISH Receiver Setup
4.
After connecting the antenna to the receiver(s), connect the
receiver to a power source, and complete receiver setup.
Receiver setup for the primary receiver follows; if setting
up with a secondary receiver, see “Receiver Setup for a
Secondary Receiver” on page 5.
Check out online receiver setup guides for your antenna at
www.winegard.com/receivers/setupguide.php.
If using a brand new receiver, follow the steps under
“Receiver Setup for New Receivers.” If using a receiver that is
currently active or has been previously used, follow the steps
under “Receiver Setup for Currently Active or Previously
Used Receivers.”
Receiver Setup for New Receivers
If using a new receiver with the Pathway X1 antenna, the
receiver will go through an Installation Wizard to help with the
setup process.
1.
Follow the on-screen instructions to program the remote control.
2.
During step 2 of the Installation Wizard, the unit will need to
acquire satellites and update the receiver (see fig. 1).
The receiver may reboot automatically as part of the update
4.
process. If so, select the state of your current location on the
Mobile Antenna Setup screen as in figure 2. Press “Scan” to
begin the search routine.
The satellite will search for and acquire satellites.
5.
6.
If not already activated, the receiver will need to be activated
(see fig. 3). To activate the receiver, call Winegard Company at
1-866-609-9374.
Figure 3
7.
After the receiver has been activated, the receiver will begin
acquiring signal (see fig. 4) and downloading the Electronic
Programming Guide (see fig. 5). Once the download is
complete, you can start watching TV.
Figure 1
This step will require a search initiated by the Mobile Setup
screen. Fill in the required information, and then select “Scan”
to begin the search routine (see fig. 2).
Figure 2
During the search routine, the antenna will scan for
3.
satellites. The antenna may make a slight grinding sound
when searching for satellites; this is normal and does not
harm the unit. Once the search routine is complete, the
receiver will update.
3
Figure 4
Figure 5
Receiver setup instructions are accurate at time of printing and may
change without notice.
Page 5

Receiver Setup for Currently Active or
Previously Used Receivers
If the receiver you will be using with the Pathway X1 antenna
is an older receiver that has not been used in several years,
you may need to connect the receiver to a home satellite dish
to be updated before proceeding with the mobile setup.
After the receiver has been powered on, the receiver will
1.
enter the Mobile Setup menu.
Select the state of your current location, and then select
2.
“Scan” to begin the search routine (see fig. 6).
Figure 6
3.
The satellite will begin searching and will locate the desired
satellites (see fig. 7).
Updating Receiver Software
For optimal performance, update receiver software
occasionally. To allow the software to update, leave the satellite
on signal, and press the Power button on the remote or front
panel of the receiver; this will put the receiver in Standby
mode (see fig. 9). Do not unplug the receiver at this time.
If the receiver is in Standby mode for more than five minutes,
no sof tware update is necessary. Turn the receiver back on to
TIP
resume normal operation.
Figure 9
After being in Standby mode for a few minutes, the software
will automatically begin to update (see fig. 10). Upon
completion of the update, the receiver will reboot. Return to
step 1 of “Receiver Setup for Currently Active or Previously
Used Receivers” to re-acquire satellites and complete setup.
Figure 7
4.
After the satellites have been acquired, the Electronic
Programming Guide will download (see fig. 8).
Figure 8
Figure 10
Operation of Secondary Receiver
When using a secondary receiver with the Pathway X1
antenna, the secondary receiver does not have the full
function of the primary receiver. The primary receiver will
determine which satellite is viewed, and the secondary
receiver will need to be set up for that satellite.
If the primary receiver changes to a channel on a different
satellite, the secondary receiver will lose reception and need
to complete setup again on the new satellite. For steps on
setting up the secondary receiver, see section “Receiver
Setup for a Secondary Receiver” on page 5.
The secondar y receiver’s program guide will only
NoTe
installed satellite.
download and display available channels from the
4
Page 6

Receiver Setup for a Secondary Receiver
After completing setup on the main receiver, power on the
secondary receiver. If using a new receiver, you will be guided
through the setup by the Installation Wizard; turn the primary
receiver to channel 101, and follow the on-screen steps on
the secondary receiver. The primary receiver should remain
on channel 101 for the duration of the initial setup. If using a
receiver that is currently active or has been used previously,
complete setup by doing a Check Switch test.
Every time the primar y receiver toggles to a dif ferent
Note
1.
Press “Menu” on your remote. Select option 6, “System Setup.”
Select option 1, “Installation” (see fig. 11).
2.
satellite, a Check Switch test must be repeated.
5.
Select “Test” (see fig. 14). The receiver will then run through
a series of tests to install the proper satellite. The Check
Switch test will install the satellite that the primary receiver is
receiving signal from.
Do not change channels on the primary receiver when
configuring the secondar y receiver. Changing channels on
tIP
the primary satellite when configuring the secondary receiver may
inter fere with the setup of the secondary receiver setup.
Figure 14
6.
If a warning appears that fewer satellites have been found,
select “Save”; then, select “Save” again (see fig. 15).
Figure 11
Then, select option 1, “Point Dish” (see fig. 12).
3.
Figure 12
Select “Check Switch” (see fig. 13).
4.
Figure 15
7.
The test should result in a green ‘OK’ status for the satellite
that has been installed (see fig. 16).
5
Figure 13
Figure 16
8.
Then, exit out of the Point Dish menu. The receiver will begin
downloading the Electronic Programming Guide.
9.
Every time the primary receiver toggles to a different satellite,
the steps above must be repeated.
Page 7

Troubleshooting
On Screen Possible Cause Solution
Mobile Antenna Setup does not appear • No communication between receiver
and satellite dish
• Receiver software not compatible • Ensure a compatible DISH Solo HD
Error Code 150, “All Satellites Not Found” • Possible obstructions blocking satellite
• Satellite coverage issues in extreme
Northeast or Northwest
Error Code 151, “No Satellites Found” • Possible obstructions blocking satellite
• Intermittent coax connection
If the above steps do not resolve the error, re-boot the receiver and start the Mobile Antenna Setup again; often, this will
resolve the problem. If the problem persists, contact Winegard Technical Services at help@winegard.com or 1-800-788-4417.
• Check wiring. Verify connection to
Main port. Verify good coax.
receiver is being used.
• Connect receiver to fixed/home
satellite dish for software update.
• Attempt to move the antenna from
any blockages or obstructions.
• Attempt a re-scan on the receiver.
• Try scanning on a different arc.
• Attempt to move the antenna from
any blockages or obstructions.
• Re-check coax connections to make
sure coax did not become loose
during scan.
• Attempt a re-scan on the receiver.
Transporting
Before transporting the antenna, disconnect coax cables from
the main and secondary ports.
Maintenance
The Pathway X1 antenna is designed to be maintenance free.
However, it is a good idea to periodically clean the dome with
a soft cloth, water, and dish soap.
Tripod Accessory
Model TR-1518 tripod mount (sold separately) is available as an
accessory for the Pathway X1 antenna. The tripod mount has
adjustable height and leveling settings of 14.5”–22” and quickly
disassembles for compact storage.
Using Outside Receptacle
If your outside TV receptacle is wired for satellite, you’ll need
to locate where that receptacle leads and connect that directly
to your satellite receiver.
If the outside TV receptacle is wired for cable, the wiring will
have to be modified for use with satellite. The coaxial cable
cannot run through any other devices or switches before the
satellite receiver.
Typically, if wired for cable, the wiring will either run through
a Winegard power supply or video switch. The easiest way
to fix this is to disconnect the cable from that device, use a
barrel connector, and connect a new cable that runs directly
to the receiver, bypassing the power supply or video switch.
FCC Guidelines
This device complies with Part 15 of the FCC Rules. Operation
is subject to the following two conditions: (1) this device
may not cause harmful interference, and (2) this device must
accept any interference received, including interference that
may cause undesired operation.
Disc laime r: Alt hough e very e ff ort h as bee n made to e nsur e that t he inf orma tion in
this manual i s corr ect an d compl ete, n o compa ny shal l be hel d liab le for an y error s or
omissions i n this m anual . Informat ion provided in this m anual w as acc urat e at tim e of
printing. I f the an tenn a does not func tion a s expe cted, plea se con tac t Wine gard C ompany
at hel p@wi nega rd.co m or 1-8 00 -788- 4417, or vi sit our w ebsi te at w ww.wi nega rd.co m.
6
Page 8

WINEGARD MOBILE PRODUCTS LIMITED WARRANTY
(2 YEARS PARTS; 1 YEAR LABOR)
Winegard Company warrants this product against defects in materials or workmanship for a period of two (2) years from the
date of original purchase. During year one (1) of such warranty, Winegard Company will also pay authorized labor costs to
an authorized Winegard dealer to repair or replace defective products. No warranty claim will be honored unless at the time
the claim is made, Customer presents proof of purchase to an authorized Winegard dealer (to locate the nearest authorized
Winegard dealer, contact Winegard Company, 3000 Kirkwood Street, Burlington, Iowa 52601, Telephone 800-288-8094 or visit
www.winegard.com). Customer must provide proof of purchase with a dated sales receipt for the Winegard product to verify
the product is under warranty. If the date of purchase cannot be verified, the warranty period shall be considered to begin
thirty (30) days after the date of manufacture.
If a defect in material or workmanship is discovered, Customer may take the product to an authorized Winegard dealer for
service. Customer must provide proof of purchase to verify the product is under warranty. If the product is brought to an
authorized Winegard dealer for service prior to expiration of year one (1) of the warranty period and a defect in material or
workmanship is verified by Winegard Technical Services, Winegard Company will cover the Winegard dealer’s labor charges
for warranty service. The Winegard dealer must contact Winegard Technical Services in advance for pre-approval of the
service. Approval of the service is at the sole discretion of Winegard Company.
Alternatively, Customer may ship the product prepaid to Winegard Technical Services (located at 3111 Kirkwood Street,
Burlington, Iowa 52601, Telephone 800-788-4417). Customer must return the product along with a brief description of the
problem and provide Winegard Technical Services with Customer’s name, address, and phone number. Customer must
also provide proof of purchase to verify the product is under warranty. If the product is returned before the expiration of the
warranty period, Winegard Company will (at its option) either repair or replace the product.
This Limited Warranty does not apply if the product has been damaged, deteriorates, malfunctions or fails from: improper
installation, misuse, abuse, neglect, accident, tampering, modification of the product as originally manufactured by Winegard
in any manner whatsoever, removing or defacing any serial number, usage not in accordance with product instructions or
acts of nature such as damage caused by wind, lightning, ice or corrosive environments such as salt spray and acid rain. This
Limited Warranty also does not apply if the product becomes unable to perform its' intended function in any way as a result of
the television signal provider making any changes in technology or service.
RETURN AUTHORIZATION POLICY
A Return Material Authorization (RMA) is required prior to returning any product to Winegard Company or Winegard
Warranty Services under this warranty policy. Please call our Technical Services Department at 800-788-4417 or send an email
to warranty@winegard.com to obtain the RMA number. Please furnish the date of purchase when requesting an RMA number.
Enclose the product in a prepaid package and write the RMA number in large, clear letters on the outside of the package. To
avoid confusion or misunderstanding, a shipment(s) without an RMA number(s) or an unauthorized return(s) will be refused
and returned to Customer freight collect.
WINEGARD COMPANY DOES NOT ASSUME ANY LIABILITIES FOR ANY OTHER WARRANTIES, EXPRESS OR IMPLIED,
MADE BY ANY OTHER PERSON.
ALL OTHER WARRANTIES WHETHER EXPRESS, IMPLIED OR STATUTORY INCLUDING WARRANTIES OF FITNESS FOR A
PARTICULAR PURPOSE AND MERCHANTABILITY ARE LIMITED TO THE TWO YEAR PERIOD OF THIS WARRANTY.
In states that do not allow limitations on implied warranties, or the exclusion of limitation of incidental or consequential
damages, the above limitations or exclusions do not apply.
Some states do not allow limitations on how long an implied warranty lasts, or the exclusion of limitation of incidental or
consequential damages, so the above limitations or exclusions may not apply to you.
This warranty gives Customer specific legal rights. Customer may also have other rights that may vary from state to state.
SATELLITE RECEIVER WARRANTY:
See manufacturer’s limited warranty policy.
WS-MOBWARREV2
Rev. 1/10
WinegardCompany•3000KirkwoodStreet•Burlington,IA52601•1-800-288-8094•Fax319-754-0787•www.winegard.com
Printed in U.S.A. ©2013 Winegard Company Rev1 12/13 2452314
Winegard and Carryout are registered trademarks of Winegard Company, and Pathway is a trademark of Winegard Company.
DISH is a registered trademark of DISH Network L.L.C.
 Loading...