

Page 1
CANISTER VACUUM CLEANER (Pages 1-8)
ASPIRADORA (Páginas 9-17)
ASPIRADOR (Pagina 18-26)
SAVE THIS USE AND CARE BOOK
CONSERVE ESTE INSTRUCTIVO
GUARDE ESTAS INSTRUÇÕES
HOUSEHOLD USE ONLY
PARA USO DOMESTICO SOLAMENTE
SOMENTE PARA USO DOMÉSTICO
MODEL / MODELO/MODELO V1000
™
99/11-19-106E/S.LAT.GEN.VAC.UC 4/25/00 3:40 PM Page 1
Page 2
2
1
■ READ THIS MANUAL BEFORE ASSEMBLING OR USING YOUR VACUUM CLEANER.
■ Use your cleaner only as described in this manual. Use only with SMC
recommended attachments.
■ To reduce the risk of electric shock, do not use it outdoors or on wet surfaces.
■ Disconnect electrical supply before servicing or cleaning out brush area. Failure to
do so could result in electrical shock or cause brush to start suddenly.
■ Always turn cleaner off before connecting or disconnecting the hose or power
brush.
■ Always turn cleaner off before unplugging.
■ Do not unplug by pulling on cord. To unplug, grasp the plug, not the cord.
■ Hold plug when rewinding into cord reel. Do not allow plug to swing when
rewinding.
■ Do not use with damaged cord or plug. If cleaner is not working as it should, has
been dropped, damaged, left outdoors, or dropped into water, have it serviced
immediately.
■ Do not use cord as a handle, or pull cord around sharp edges or corners.
■ Do not run cleaner over cord. Keep cord away from heated surfaces.
■ Do not allow to be used as a toy. Close attention is necessary when used by or near
children.
■ Do not handle plug or cleaner with wet hands.
■ Do not operate cleaner with a punctured hose. Replace if cut or worn.
■ Keep free of dust, lint, hair and anything that may reduce airflow.
■ Keep hair, loose clothing, fingers, and all parts of body away from openings and
moving parts.
■ Do not use cleaner without dust bag and filter in place. Always clean the dust bag
after vacuuming carpet cleaners or fresheners powders and fine dust. These
products clog the bag, reduce airflow and can cause the bag to burst. Failure to
change could cause permanent damage to the cleaner.
■ Do not use the cleaner to pick up sharp, hard objects, small toys, pins, paper, etc.
They may damage the cleaner or dust bag.
■ Do not pick up anything that is burning or smoking, such as cigarettes, matches,
or hot ashes.
■ Do not use cleaner to pick up flammable or combustibles liquids (gasoline, cleaning
fluids, perfumes, etc.), or use in areas where they may be present. The fumes from
these substances can create a fire hazard or explosion.
■ Use extra care when cleaning on stairs. Do not put it on chairs, tables, etc. Keep it
on floor.
■ You are responsible for making sure that your vacuum cleaner is not used by anyone
unable to operate it properly.
IMPORTANT SAFEGUARDS
SAVE THESE INSTRUCTIONS
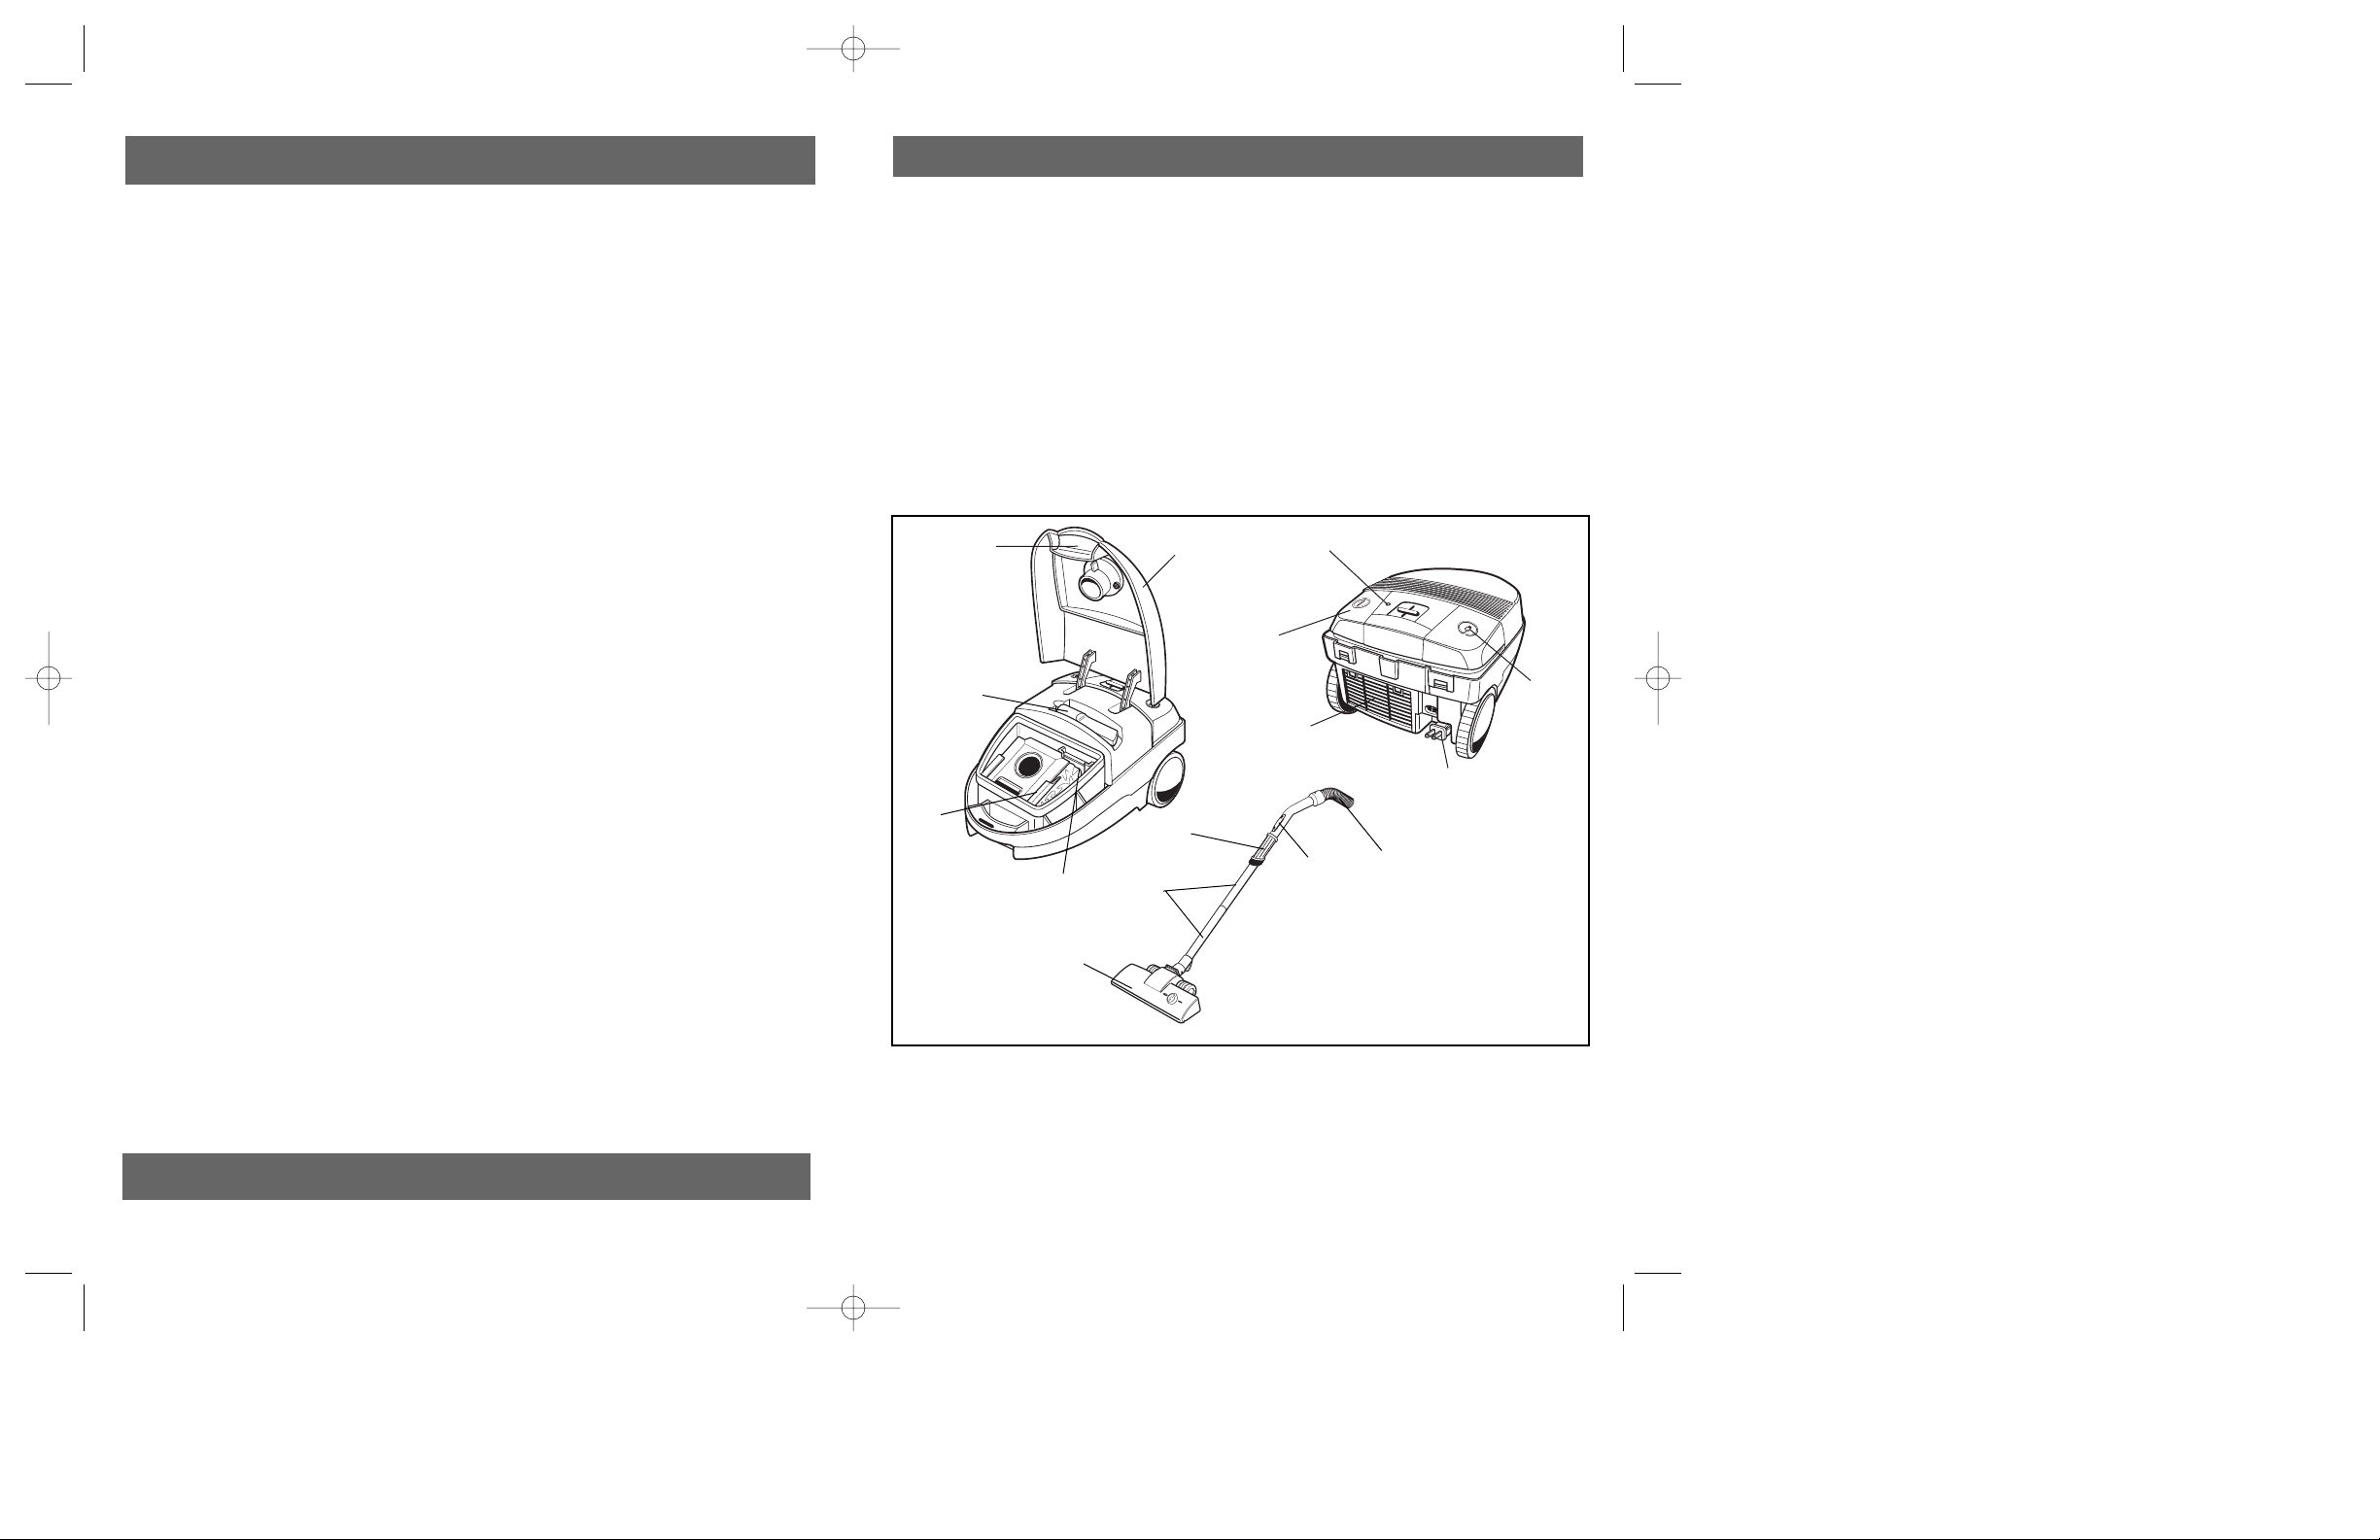
PARTS AND FEATURES
NOTE: REVIEW THIS MANUAL BEFORE USING VACUUM CLEANER.
CHECKLIST:
❑ Canister
❑ Hose with nozzle handle
❑ 2 metal extension tubes
❑ Carpet/Floor nozzle
❑ 1 cloth dust bag
❑ 2 double filters
❑ Crevice tool attachment
❑ Dusting brush attachment
❑ Shoulder strap
❑ Warranty card and mail order form
B
A
D
E
F
G
H
I
J
K
L
M
N
O
C
1. Hood Release
2. Canister Cover
3. Crevice Tool
4. Dust Bag Holder
5. Double Filter
6. Carpet/Floor Nozzle
7. Metal Extension Tubes
8. Dusting Brush
9. Suction Regulator
10. Hose Connected to Nozzle Handle
11. Power Cord & Plug
12. Automatic Cord Rewinder
13. Power On/Off Switch/Pedal
14. Dust Bag Full Indicator
15. Double Filter (Inside)
99/11-19-106E/S.LAT.GEN.VAC.UC 4/25/00 3:40 PM Page 2
Page 3
4
3
This appliance is for HOUSEHOLD USE ONLY and may be plugged into any electrical
outlet (ordinary household current) of the appropriate configuration.
LINE CORD SAFETY TIPS
1. Never pull or yank on cord or the appliance.
2. To insert plug, grasp it firmly and guide it into outlet.
3. To disconnect appliance, grasp plug and remove it from outlet.
4. Before each use, inspect the line cord for cuts and/or abrasion marks. If any are
found, this indicates that the appliance should be serviced and the line cord
replaced. Please return it to our Service Department or to an authorized service
representative.
5. Never wrap the cord tightly around the appliance, as this could place undue stress
on the cord where it enters the appliance and cause it to fray and break.
DO NOT OPERATE APPLIANCE IF THE LINE CORD SHOWS ANY DAMAGE, OR IF
APPLIANCE WORKS INTERMITTENTLY OR STOPS WORKING ENTIRELY.
If the supply cord is damaged, it must be replaced by the manufacturer or its service
agent or similarly qualified person in order to avoid a hazard.
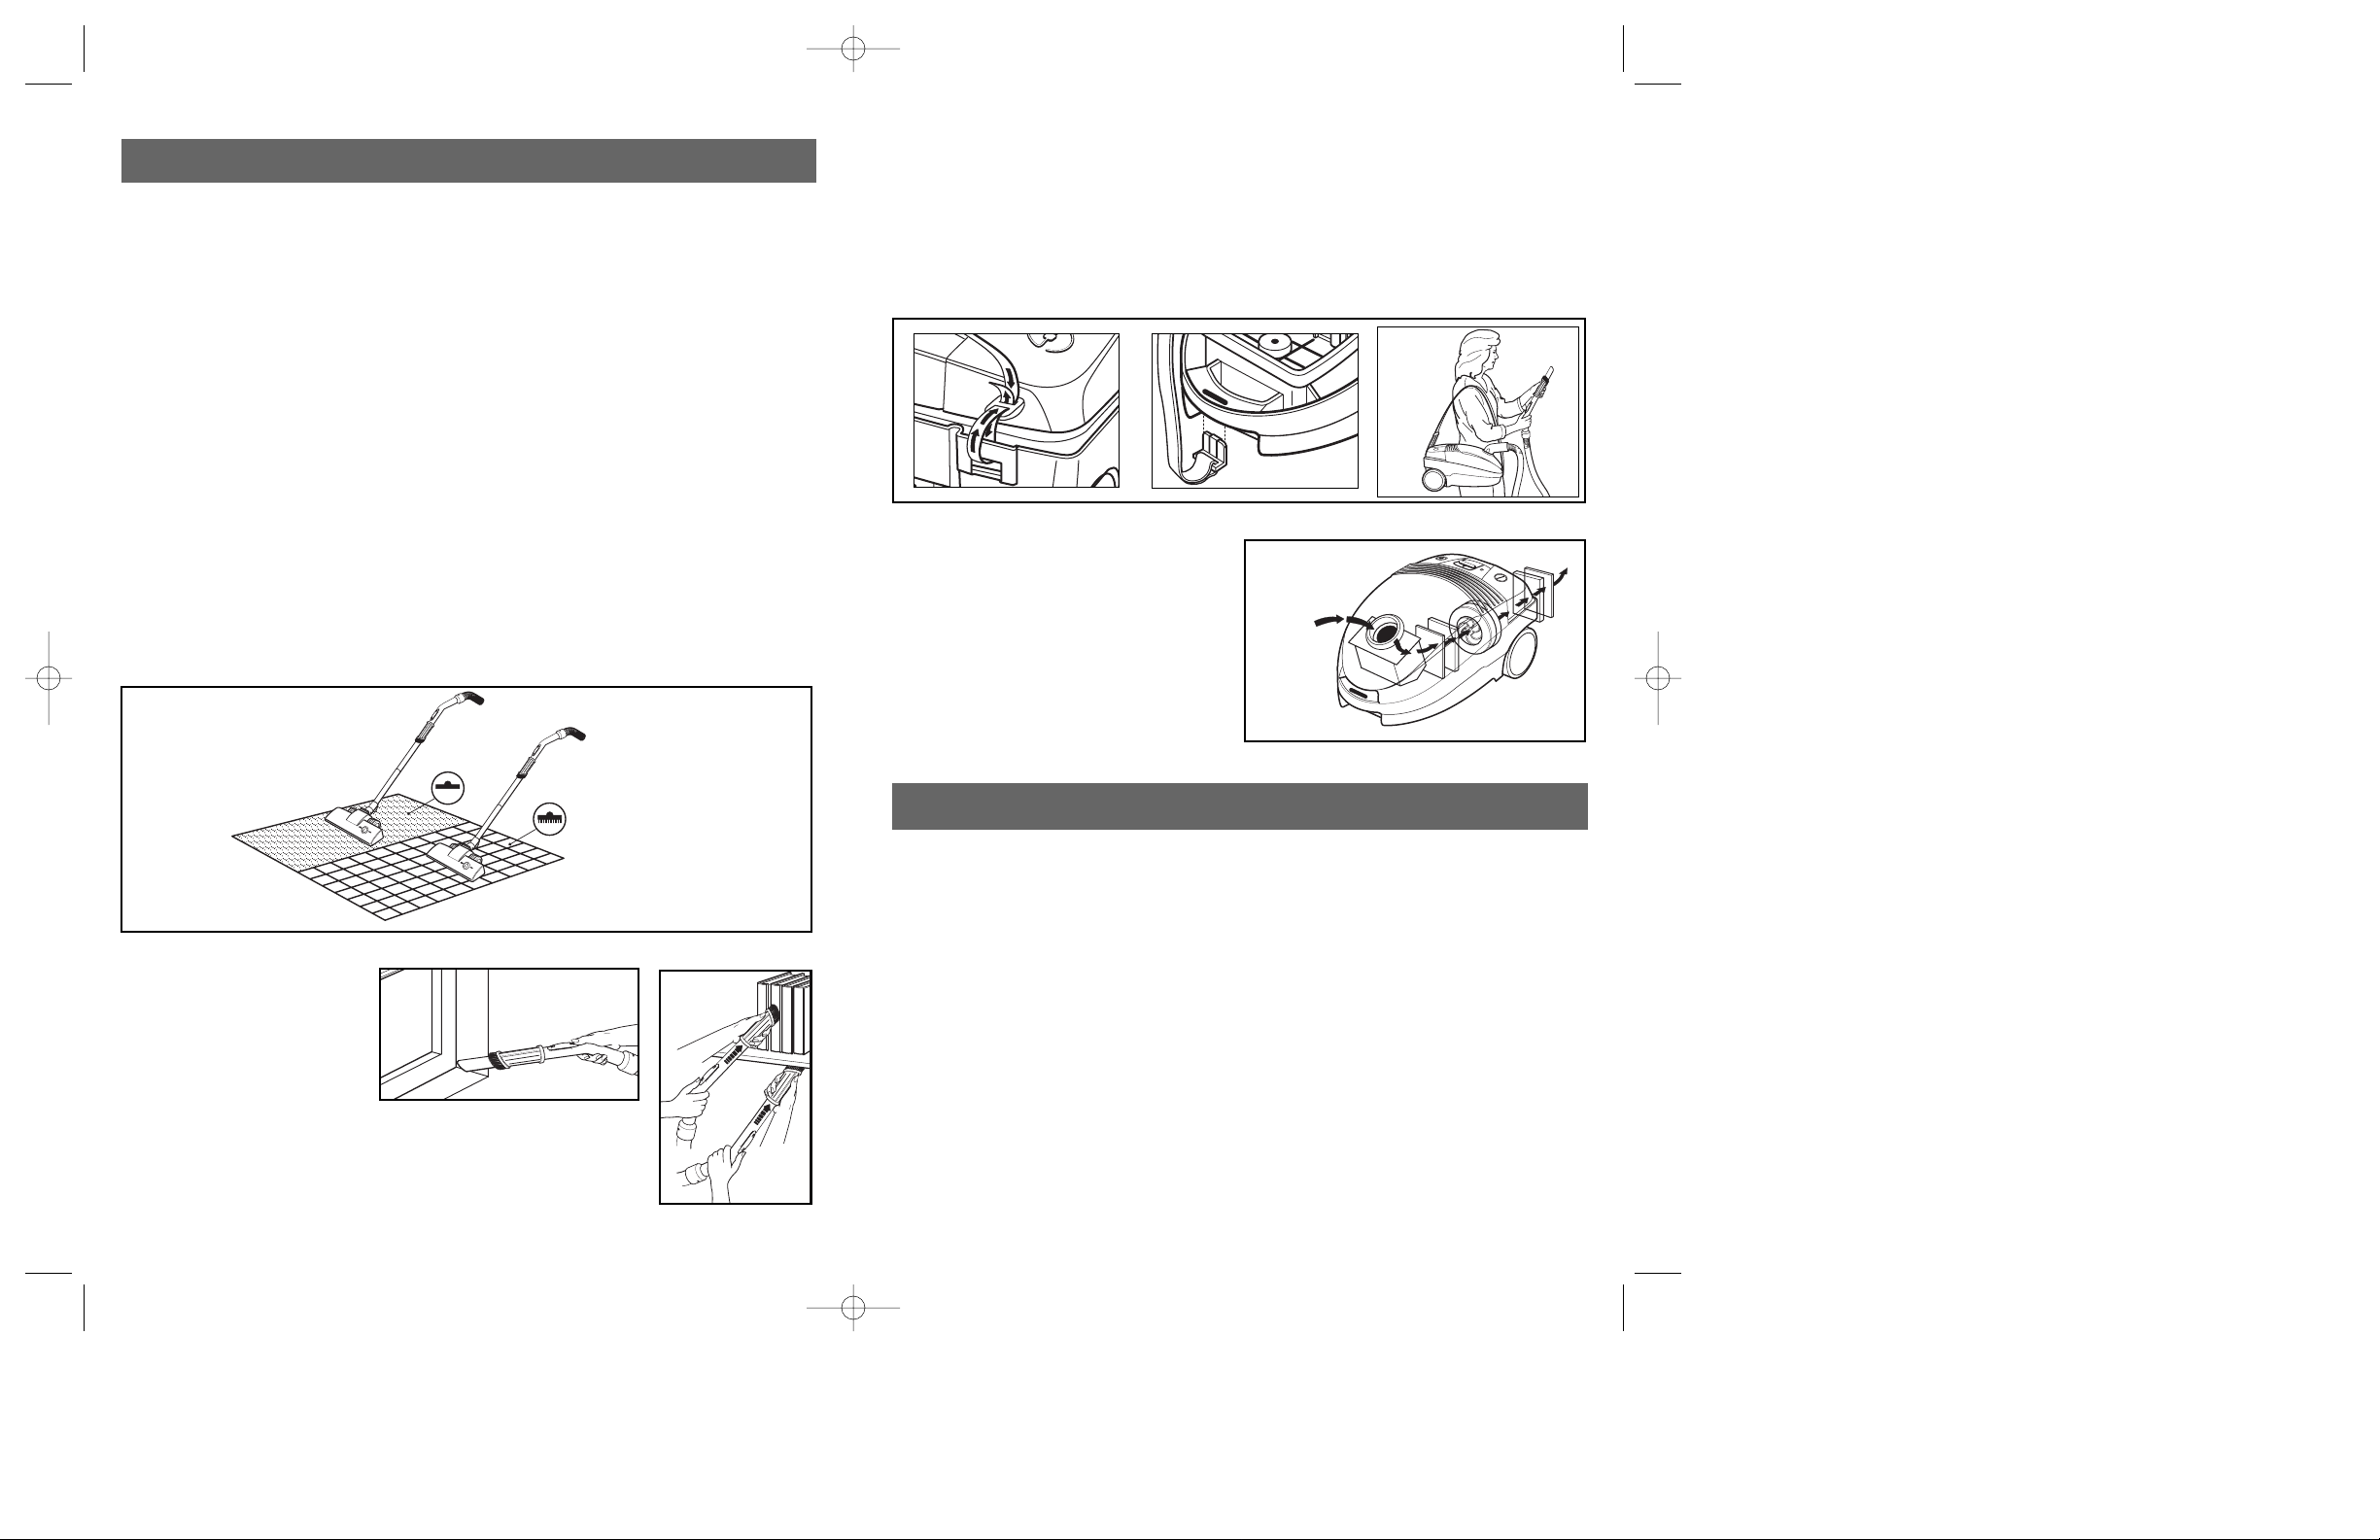
USING CARPET/FLOOR NOZZLE
The carpet/floor nozzle is constructed to allow constant contact with surfaces to be
vacuumed and for easy cleaning under furniture. Press the switch on the carpet/floor
nozzle for cleaning between smooth surfaces and carpeted floor.
HOW TO USE
USING DUSTING BRUSH ATTACHMENT
1. Install dusting brush onto the
nozzle handle by sliding
it back until the locking tab
locks into position.
2. To vacuum with nozzle
handle, pull back the dusting
brush. Use the nozzle handle
for vacuuming baseboards, radiators and other hard to
reach areas.
3. To vacuum with the dusting brush, slide the brush down and
turn it to the appropriate position for vacuuming armchairs,
chairs and bookshelves.
FILTRATION SYSTEM
The 5-stage filtration system includes:
a cloth dust bag (that serves as a filter),
1 double filter inside the compartment in the
cloth dust bag area, and 1 double filter
inside the back grille of the canister. The
filters protect the motor so that dust does
not get into it.
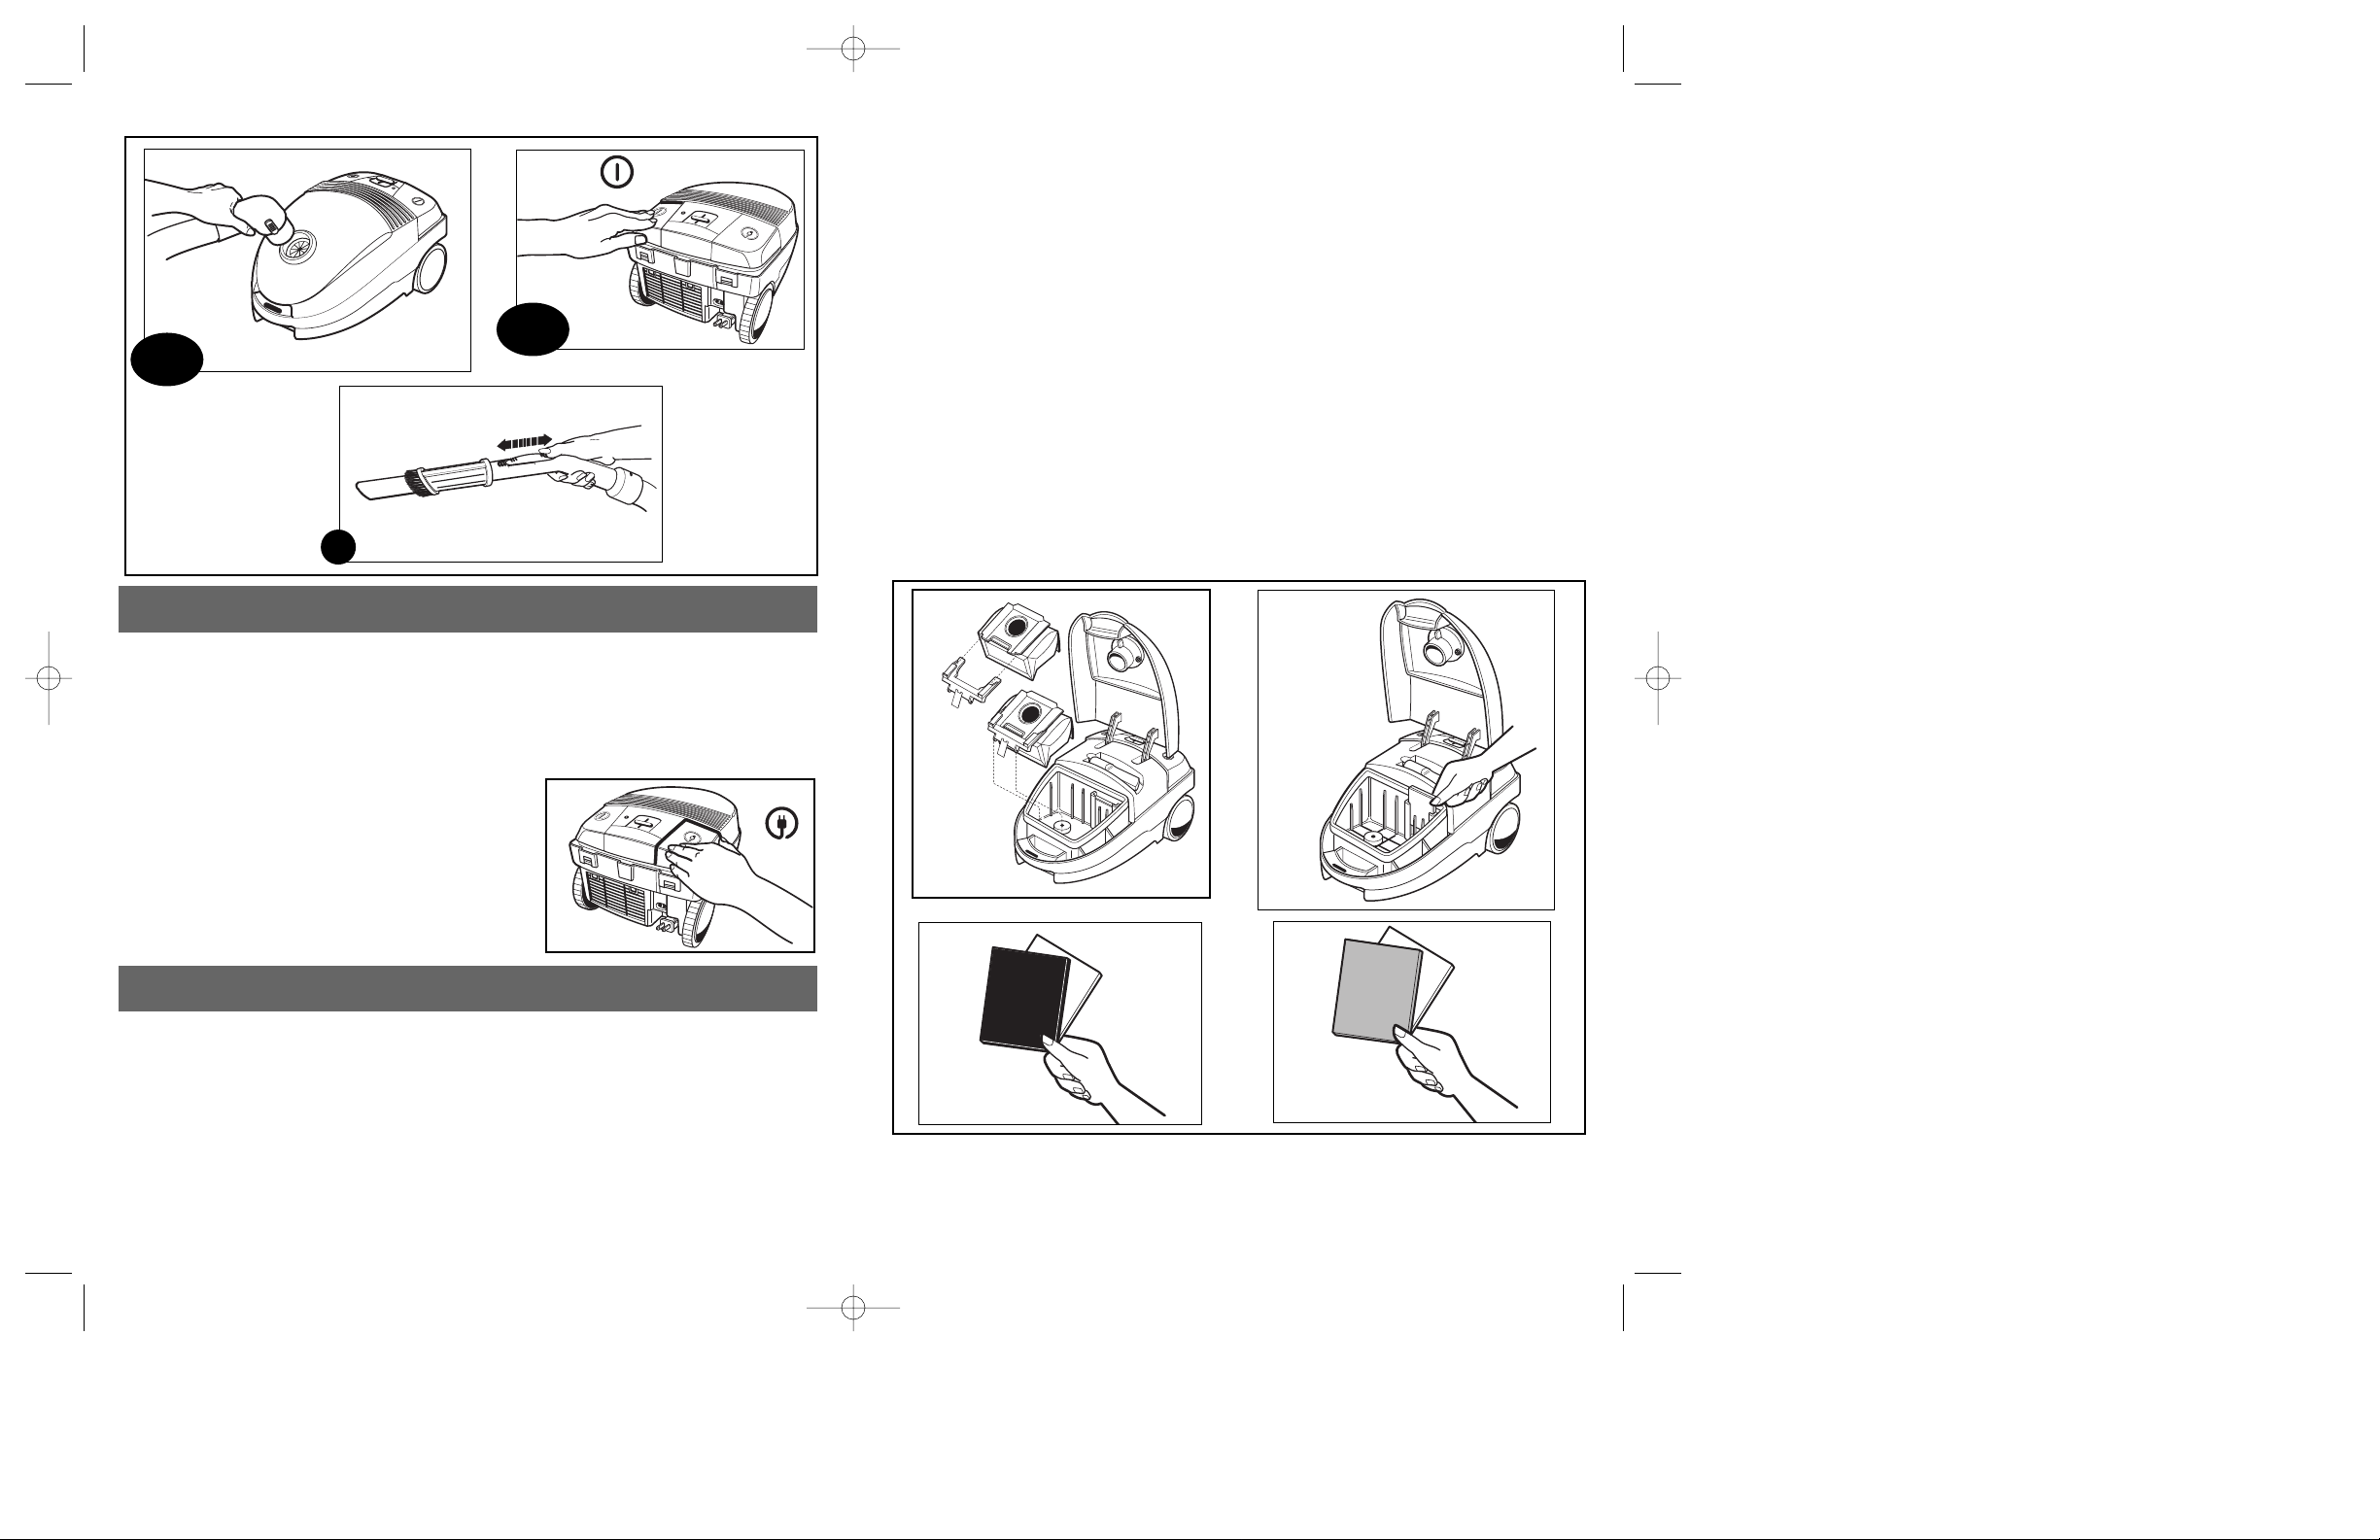
1. Connect the metal extension tubes, the floor nozzle and the hose.
2. To connect the hose to the canister, line up the hose and push in the latch tab. Insert
hose into canister until it snaps into place. To remove, press hose latch tabs inward
and pull up on hose. See figures 1 & 2 on page 5.
3. After assembling all parts, make sure dust bag and filters are properly installed.
See Maintenance Instructions section.
4. Pull out the power cord and plug it into the power outlet.
5. Press the power switch/pedal and start to vacuum. See figures 5 & 7 on page 5.
6. Adjust the desired suction level for different surfaces by using the suction regulator,
see figure 6 on page 5.
7. Press de power switch/pedal to turn off the vacuum cleaner; press it again to
resume power.
ASSEMBLY AND OPERATION
USING CREVICE TOOL ATTACHMENT
Insert the nozzle handle into the crevice tool. Use the crevice tool for vacuuming sliding
door tracks.
USING SHOULDER STRAP
The canister can also be carried around by using the shoulder strap and securing the
clips of the strap around the body. To avoid dropping the unit, it is important to carry the
vacuum cleaner in a horizontal position.
99/11-19-106E/S.LAT.GEN.VAC.UC 4/25/00 3:40 PM Page 4
Page 4
6
5
This appliance requires little maintenance. It contains no user-serviceable parts. Do not
try to repair it yourself. Refer it to qualified personnel if servicing is needed.
Always switch off and unplug unit after using. Rewind the cord by pressing the
automatic cord rewinder switch/pedal.
WARNING:
• The cord moves rapidly when rewinding. Keep children away, and provide a clear
path when rewinding the card to prevent
personal injury.
• DO NOT use outlets above counters. Damage to
items in surrounding area could occur.
• Disconnect electrical supply before servicing
or cleaning the unit. Failure to do so could result
in electric shock or personal injury.
MAINTENANCE INSTRUCTIONS
CLEANING INSTRUCTIONS
1 & 2
5 & 7
6
CLEANING DUST BAG
Whenever the dust bag full indicator light glows, check whether airflow is blocked or
whether the bag is full and needs cleaning. For the best cleaning performance, clean
the dust bag regularly.
1. Switch off and unplug unit from wall outlet.
2. Press hood release and lift canister cover.
3. Disengage dust bag from mounting bracket by pulling up the plastic frame to release
it from the locking tabs then slide it out.
4. Remove plastic clip at the top end of the bag.
5. After cleaning, install the dust bag. Make sure the 2 holes on the plastic frame are
facing down and slide the plastic frame until it locks in place. Tuck the back end
of the bag down.
6. Close the canister cover.
CAUTION
• Fine materials, such as carpet freshener, face powder, fine dust and plaster can clog
the bag and cause it to burst before it is full. Clean the bag more often when
vacuuming these materials.
CLEANING UNIT
Clean the casing, the metal extension tubes and the accessories with a damp cloth, and
wipe dry. Clean the dust bag whenever is full. The motor protection and exhaust air
filters should be checked, cleaned and replaced regularly.
CHANGING FILTERS
1. Turn off the power and remove the dust bag.
2. Grasp filters gently, and pull them out.
3. Wash filters in warm, soapy water; then rinse and air dry. (Replace the foam after a
few washes, as it will lose its dust-trapping ability.)
4. Replace filter in canister.
5. Insert dust bag.
WARNING: Do not operate the cleaner without properly installed filters and dust bag.
STORING UNIT:
Stand the canister upright and slide the spur of the carpet/floor nozzle into the nozzle
holder. Now the unit can be carried to a dry, cool, safe place where it can be stored
easily. DO NOT place it directly under the sun.
99/11-19-106E/S.LAT.GEN.VAC.UC 4/25/00 3:40 PM Page 6
Page 5

8
7
TROUBLESHOOTING
PROBLEM POSSIBLE CAUSE POSSIBLE SOLUTION
Cleaner won’t start Not plugged Plug in firmly, press
On/Off switch/pedal.
Poor dirt pick up 1. Full or clogged dust bag 1. Clean dust bag.
2. Clogged airflow passages 2. Clean airflow passages.
3. Dirty motor safety filter 3. Clean filter.
4. Open suction control 4. Adjust control.
5. Hole in hose 5. Replace hose.
6. Canister cover open 6. Close and latch hood.
Cleaner starts Loss of electrical connections Check electrical
but cuts off connection and plug in.
Dust bag full 1. Full or clogged dust bag 1. Clean dust bag.
2. Dirty motor safety filter 2. Clean filter.
3. Blocked airflow passage 3. Clear blockage.
Cord won’t rewind 1. Dirty power cord 1. Clean the power cord.
2. Cord jammed 2. Pull out cord and
rewind.
indicator glows
NEED HELP?
Service, if necessary, must be performed by Household Products, Inc. or Authorized Household
Appliance Service Center. The Service Center nearest you can be found in the yellow pages of
your phone book under “Appliances – Small.”
If mailing or shipping your unit, pack it carefully in a sturdy carton with enough packing material
to prevent damage. Include a note describing the problem to our Service Center and be sure to
give your return address. We also suggest that you insure the package for your protection.
ONE-YEAR WARRANTY
Household Products, Inc. warrants this product against any defects that are due to faulty material
or workmanship for a one-year period after the original date of consumer purchase. This warranty
does not include damage to the product resulting from accident or misuse, or repairs performed
by non-authorized repair shops. If the product should become defective within the warranty
period, we will repair it or elect to replace it free of charge. To honor this warranty, the product
with the corresponding registration card and/or receipt/proof of purchase are required. This
warranty gives you specific legal rights and you may also have other rights which vary from state
to state or province to province. For answers to any questions, contact your nearest Household
Products, Inc. or Authorized Household Appliance Service Center.
For the nearest service center, please see the appropriate address below.
ARGENTINA
Avenida Maipu 3850
1636 Olivos, Buenos Aires
Tel.: 0-800-8-1221
COLOMBIA
Carrera 38 No. 166-64
Santa Fe de Bogota
Tel.: 571-677-7496
COSTA RICA
Calle 20 entre Avenida 1 y 3
San José
Tel.: 506-221-6100
CHILE
Agustinas 2718
Santiago
Tel.: 562-687-1700
ECUADOR
Manuel Larrea 726 y Bogota
Quito
Tel.: 593-256-8551
EL SALVADOR
27 Calle Poniente y 25 Ave.
Norte No. 1510
San Salvador
Tel.: 503-226-0022
GUATEMALA
6 Ave. 12-27 Zona 9
Ciudad de Guatemala
Tel.: 502-232-5705
MÉXICO
Lázaro Cárdenas #18
Col. Obrera
Delegación Cuatémoc
06800 México, D.F.
Tel.: 91-800-50-833
588-93-77
• VERACRUZ
Prolongación Días Mirón #4280
(entre Violetas y Magnolias)
Col. Remes
91920 Veracruz, Ver.
Tel.: (91-29) 21-70-16
• PUEBLA
17 Norte #205
72000 Puebla, Pue
Tel.: (91-22) 46-37-26
• TORREÓN
Blvd. Independencia 95 Pte.
27000 Torreón, Coal
Tel.: (91-17) 16-52-65
• MÉRIDA
Calle 63 #459-A
(entre 50 y 52)
97000 Mérida, Yuc.
Tel.: (91-99) 23-54-90
• COATZACOALCOS
Corregidora #406
96400 Coatzacoalcos, Ver.
Tel.: (91-92) 12-13-80
• GUADALAJARA
Av. Vallarta #4901-A
Col. Prados Vallarta
45020 Zapopan, Jal.
Tel.: (91-36) 73-28-15
• QUARÉTARO
Av. Madero 139, Pte.
76000 Querétaro, Qro.
Tel.: (91-42) 14-16-60
• SAN LUÍS POTOSÍ
Pedro Moreno #100
Col. Centro
78000 San Luís Potosí, S.L.P.
Tel.: (91-48) 14-25-67
• VILLAHERMOSA
Av. Constitución #516-A
86000 Villahermosa, Tabasco
Tel.: (91-93) 12-51-11
• MONTERREY
Av. Fco. I. Madero Pte. 1820-AA
Zona Centro
64000. Monterrey, N.L.
Tel.: (91-83) 72-14-76
• CULIACÁN
Av. Nicolás Bravo #1063
80000 Culiacén, Sin.
Tel.: (91-57) 12-42-10
PANAMA
Via Brazil y Ave.
Samuel Lewis #31
Ciudad de Panama
Tel.: 507-264-2243
PERU
Calle Omega 225-231
Parque Industrial Caltao 1
Lima
Tel.: 511-451-9505
PUERTO RICO
Calle C#14
Rexco Industrial Park
Caparra Heights Station
San Juan, P.R. 00334
Tel.: 1-800-347-5117
VENEZUELA
Edif. Xerox, Piso 6
Av. Libertador, Urb. Bello Campo
Caracas
Tel.: 582-267-0590
99/11-19-106E/S.LAT.GEN.VAC.UC 4/25/00 3:40 PM Page 8
Page 6

10
9
■ LEA ESTE MANUAL ANTES DE ENSAMBLAR O UTILIZAR SU MÁQUINA
ASPIRADORA.
■ Utilice su aspiradora solamente cómo se describe en este manual. Utilice
únicamente los aditamentos recomendados por SMC.
■ Para reducir el riesgo de choques eléctricos - no deberá utilizarse la máquina a la
intemperie o sobre superficies mojadas.
■ Siempre debería desconectarse de la energía eléctrica antes de darle servicio o de
limpiar la zona de los cepillos. De lo contrario, se corre el riesgo de choques
eléctricos o de que los cepillos arrancasen por sí solos repentinamente.
■ Siempre apague la aspiradora antes de conectar o desconectar la manguera o el
cepillo de potencia.
■ Siempre apague la máquina antes de desconectarla.
■ Nunca desconecte la máquina tirando del cable de conexión de la energía eléctrica.
Para desconectar, tire de la clavija tomacorriente más no del cable.
■ Detenga la clavija tomacorriente cuándo se está enrollando el cable en el carrete
para el cable. No permita que la clavija tomacorriente se balancee al estar
enrollando el cable.
■ Nunca utilice la máquina si estuviera dañado el cable o el tomacorriente. Sí la
máquina no trabajase debidamente, se hubiese caído o dañado o se hubiese dejado
a la intemperie o se hubiese mojado, deberá dársele servicio mecánico calificado
inmediatamente.
■ Nunca utilice el cable de conexión como asa ni tire del cable alrededor de bordes
afilados o esquinas.
■ No permita que la aspiradora pase por encima del cable de conexión. Mantenga el
cable alejado de las superficies calientes.
■ No permita que se use la máquina como un juguete. Se deberá prestar mucha
atención cuándo los niños estuviesen cerca de la máquina o la estuvieran utilizando.
■ No debería manejarse la clavija tomacorriente o la aspiradora con las manos
mojadas.
■ Nunca utilice su aspiradora si la manguera estuviera perforada. La manguera
pudiese incluir cables eléctricos. Siempre reemplacen si es que tuviese alguna
cortadura o si se hubiese desgastado.
■ Conserve la manguera libre de polvo, hilachas, pelos o de cualquiera otra cosa que
pudiese reducir el flujo de aire.
■ Mantenga el pelo, la ropa suelta, los dedos y todas las partes del cuerpo alejadas de
las aperturas o de las piezas movibles.
■ Nunca utilice la aspiradora sin haber instalado los filtros o la bolsa de basura.
Siempre limpie la bolsa después de haber aspirado limpiadores de alfombras
o desodorantes, polvo o basuras muy finas. Esto productos obstruyen a la bolsa de
basura, reducen el flujo de aire y pueden hacer que la bolsa se reviente. Se pueden
causar daños permanentes a la aspiradora si es que no se reemplazara la bolsa
de basura.
■ Nunca utilice la aspiradora para absorber objetos afilados duros, juguetes pequeños,
alfileres, papel, etc. Estos pudiesen dañar a la aspiradora o a la bolsa de basura.
INSTRUCCIONES DE SEGURIDAD
■ Nunca absorba cosas que estén ardiendo o humeando, como serían los cigarrillos,
fósforos o cenizas calientes.
■ Nunca utilice la aspiradora para absorber líquidos combustibles o inflamables
(gasolina, líquidos limpiadores, perfumes, etc.) y nunca la utilice en lugares dónde
esos productos pudiesen estar presentes. Los humos de estas sustancias pueden
crear peligro de incendio o de explosión.
■ Tenga mucho cuidado al estar limpiando en escaleras. No coloque la aspiradora
sobre sillas, mesas, etc. Siempre deposítela en el suelo.
■ Usted es responsable de asegurarse que su máquina no sería utilizada por nadie que
estuviese imposibilitado de manejarla correctamente.
CONSERVE ESTAS INSTRUCCIONES
99/11-19-106E/S.LAT.GEN.VAC.UC 4/25/00 3:40 PM Page 10
Page 7

11
12
PARTES Y CARACTERÍSTICAS
NOTA: REVISE ESTE MANUAL ANTES DE USAR LA ASPIRADORA.
LISTA DE VERIFICACIÓN:
❑ Tanque
❑ Manguera con mango y boquilla
❑ 2 tubos de extensión de metal
❑ Boquilla para la alfombra y piso
❑ 1 bolsa de tela para el polvo
❑ 2 filtros dobles
❑ Aditamento para limpiar los rincones
❑ Cepillo como aditamento
❑ Correa para el hombro
❑ Tarjeta de la garantía y formulario para ordenar
B
A
D
E
F
G
H
I
J
K
L
M
N
O
C
1. Gancho liberador de la cubierta
2. La cubierta
3. Aditamento para limpiar
los rincones
4. Montura para la bolsa
5. Filtro doble
6. Boquilla para pisos
7. Tubos de extensión de metal
8. Cepillo
9. Control de succión
10. Manguera conectada al mango
de la boquilla
11. Cordón y enchufe
12. Eurollador automático del cordón
13. Interruptor/Pedal de Encendido/Apagado
14. Punto que indica que la bolsa está llena
15. Filtro doble (adentro)
Este artefacto es para uso doméstico solamente y puede ser enchufado en cualquier
tomacorriente de corriente alterna de 230V de la configuración apropiada.
SUGERENCIAS PARA SEGURIDAD CON EL CORDON
1. Nunca hale o tire del cordón o del artefacto.
2. Para introducir el enchufe, sujételo firmemente y guíelo hacia el tomacorriente.
3. Para desconectar el artefacto, sujete el enchufe y retírelo del tomacorriente.
4. Antes de cada uso, inspeccione el cordón si tiene cortes y/o raspaduras. Si algo
fuera encontrado, esto indica que el artefacto deberá ser revisado y el cordón
deberá ser reemplazado. Por favor, devuélvalo a nuestro Departamento de Servicio
o a un representante de servicio autorizado.
5. Nunca enrolle el cordón ajustadamente alrededor del artefacto, ya que esto podría
causar una presión excesiva en el cordón donde éste entra al artefacto y causar
desgaste y rotura.
NO HAGA FUNCIONAR EL ARTEFACTO SI EL CORDON MUESTRA CUALQUIER DAÑO, O
SI EL ARTEFACTO FUNCIONA INTERMITENTEMENTE O DEJA DE FUNCIONAR
COMPLETAMENTE.
Si el cordón estuviera dañado, deberá ser reemplazado por el fabricante o su agente de
servicio o por una persona calificada para evitar un peligro.
COMO USAR LA BOQUILLA PARA LA ALFOMBRA Y PISO
La boquilla para la alfombra y el piso está hecha para permitir el constante contacto con
superficies que son aspiradas y para limpiar fácilmente debajo de los muebles. Presione
el interruptor en la boquilla para la alfombra y el piso para limpiar entre las superficies
suaves y pisos alfombrados.
COMO USAR
COMO USAR EL CEPILLO
1. Instale el cepillo para el polvo
en la boquilla del mango
deslizándolo hasta que las
lengüetas para asegurar
encajen en posición.
2. Para aspirar con la boquilla,
saque el cepillo. Use la boquilla para aspirar los zócalos,
radiadores y otras áreas difíciles de alcanzar.
3. Para aspirar con el cepillo, deslícelo hacia abajo y dele vuelta
hasta la posición apropiada para aspirar los brazos de las sillas,
sillas y libreros.
99/11-19-106E/S.LAT.GEN.VAC.UC 4/25/00 3:40 PM Page 12
Page 8

13
14
1. Conecte los tubos de extensión, la boquilla para el piso y la manguera.
2. Para conectar la manguera al tanque, alinee la manguera y empújela dentro de la
lengüeta de seguridad. Introduzca la manguera en el tanque hasta que encaje en su
lugar. Para retirarla, presione las lengüetas de seguridad de la manguera hacia
adentro y hálela. Vea las figuras 1 y 2 en la página 14.
3. Después de haber ensamblado todas las partes, asegúrese que la bolsa y los filtros
estén debidamente instalados. Vea la Sección de Instrucciones de Mantenimiento.
4. Hale el cordón y enchúfelo en el tomacorriente.
5. Presione el interruptor/pedal de Encendido/Apagado y comience a aspirar. Vea las
figuras 5 y 7 en la página 14.
6. Ajuste el nivel deseado de succión para las diferentes superficies usando el
regulador de succión. Vea la figura 6 en la página 14.
7. Presione el interruptor/pedal de Encendido/Apagado para apagar la aspiradora;
presiónelo nuevamente para reasumir el funcionamiento.
ENSAMBLAJE Y OPERACION
SISTEMA DE FILTRACION
El sistema de filtración de 5 etapas incluye:
una bolsa de tela (que sirve como filtro),
1 filtro doble dentro del compartimento en
el área de la bolsa de tela, y 1 filtro doble
dentro de la parrilla de la parte de atrás del
tanque. Los filtros protegen el motor de
manera que no le entre polvo.
COMO USAR EL ADITAMENTO PARA LIMPIAR EN LOS RINCONES
Introduzca la manguera con boquilla en el aditamento para limpiar en los rincones.
Use este aditamento para aspirar en los carriles de las puertas corredizas.
COMO USAR LA CORREA PARA EL HOMBRO
El recipiente metálico puede ser transportado mediante la correa para el hombro. Para
evitar que la máquina se fuese a caer, es importante cargarlo en posición horizontal.
1 & 2
5 & 7
6
INSTRUCCIONES DE MANTENIMIENTO
INSTRUCCIONES DE LIMPIEZA
Este artefacto requiere un pequeño mantenimiento. No contiene piezas que puedan ser
reparadas por el usuario. No trate de repararlo usted mismo. Remítalo a personal
calificado si fuera necesario servicio.
Siempre apague y desenchufe la unidad después de usarla. Enrolle el cordón
presionando el interruptor/pedal del enrollador automático del cordón.
ADVERTENCIA:
• El cordón se mueve rápidamente cuando se está
enrollando. Mantenga a los niños alejados y para
evitar lesiones personales provéase de un
espacioso lugar cuando lo esté enrollando.
• NO use los tomacorrientes de arriba del
mostrador. Podría dañar los artículos que se
encuentran alrededor.
• Desconecte los suministros eléctricos antes de
darle servicio o limpiar la unidad. El no hacerlo
podría resultar en un choque eléctrico o lesiones personales.
COMO LIMPIAR LA BOLSA
Cuando la bolsa se llena, la luz indicadora se ilumina; verifique si la circulación de
aire está bloqueada o si la bolsa está llena y necesita ser limpiada. Para mejores
resultados en la limpieza, limpie la bolsa regularmente.
1. Apague y desenchufe la unidad del tomacorriente.
2. Presione y luego levante la cubierta de la caja.
3. Desenganche la bolsa de los anaqueles de montura halando el marco de plástico
para soltarlo de las lengüetas de seguridad y deslizarla hacia afuera.
4. Retire el clip de plástico en la parte de arriba de la bolsa.
99/11-19-106E/S.LAT.GEN.VAC.UC 4/25/00 3:40 PM Page 14
Page 9

15
16
5. Después de limpiarla, instale la bolsa. Asegúrese que los 2 agujeros en el marco de
plástico estén hacia abajo y luego deslice el marco de plástico hasta que se asegure
en su lugar. Meta hacia abajo el extremo posterior de la bolsa.
6. Cierre la cubierta de la caja.
PRECAUCION
Materiales finos, tales como ambientadores para las alfombras, polvos para la cara,
polvos finos o yeso pueden obstruir la bolsa y pueden hacer que ésta reviente antes
de que se llene. Cambie la bolsa más a menudo cuando aspire estos materiales.
COMO LIMPIAR LA UNIDAD:
Limpie la caja, los tubos de extensión de metal y los accesorios con un paño húmedo y
séquelos. Limpie la bolsa cuando esté llena. La protección del motor y los filtros de la
salida de aire deben ser revisados, limpiados y reemplazados regularmente.
COMO CAMBIAR LOS FILTROS
1. Apague la aspiradora y retire la bolsa de basura.
2. Apriete los filtros suavemente y hálelos hacia afuera.
3. Lávelos en agua tibia jabonosa, luego enjuáguelos y déjelos secarse al aire. Se
debería reemplazar la goma espuma después de algunos lavados ya que pierde su
habilidad para atrapar el polvo.
4. Nuevamente coloque los filtros en el recipiente metálico.
5. Inserte la bolsa de basura.
ADVERTENCIA: Nunca se debe funcionar la aspiradora sin que los filtros y la bolsa de
basura estén correctamente instalados.
COMO GUARDAR LA UNIDAD:
Pare el tanque y deslice la boquilla para la alfombra y el piso en el sujetador de la
boquilla. Ahora la unidad puede ser guardada en un lugar seco, fresco y seguro. NO
coloque la unidad directamente bajo los rayos solares.
PROBLEMA CAUSAS POSIBLES SOLUCIONES POSIBLES
La aspiradora No está enchufada Enchufarla con firmeza y
no arranca oprimir el interruptor del
encendido/apagado
para encenderla.
No aspira el polvo 1. Bolsa de basura llena 1. Limpie la bolsa
con eficacia u obstruida de basura.
2. El pasaje del aire se 2. Limpie el pasaje
encuentra obstruido del aire.
3. El filtro de seguridad del 3. Limpie el filtro.
motor está sucio
4. El control de succión 4. Ajuste el control
está abierto de succión.
5. Algún agujero en 5. Reemplace
la manguera la manguera.
6. La cubierta del recipiente 6. Cierre y asegure
metálico está abierta la cubierta.
La aspiradora se Las conexiones eléctricas Compruebe las
enciende se se han aflojado conexiones eléctricas y
interrumpe asegurese que la
máquina está bien
enchufada.
Centellea el indicador 1. Bolsa de basura llena 1. Limpe la bolsa
de la bolsa llena u obstruida de basura.
2. El filtro de seguridad del 2. Limpie el filtro.
motor está sucio
3. El pasaje del aire está 3. Elimine la obstrucción
obstruido del pasaje del aire.
El cable no se puede 1. El cable de conexión 1. Limpie el cable
enrollar está sucio de conexión.
2. El cable se atoró 2. Tire de todo el cable de
conexión hacia afuera
y vuelva a enrollarlo.
LOCALIZACIÓN DE PROBLEMAS Y AVERÍAS
99/11-19-106E/S.LAT.GEN.VAC.UC 4/25/00 3:40 PM Page 16
Page 10

17
18
¿NECESITA AYUDA?
Cualquier servicio de ser necesario, deberá realizarse por un centro de servicio autorizado o
propio de Household Products, Inc. Puede encontrar el centro de servicio más cercano a usted,
buscando en las páginas amarillas de la guía telefónica.
Si envía por correo la arepera, empáquela con cuidado en un cartón resistente con suficiente
material de empaque para evitar cualquier daño. Por favor incluya una nota para nuestro centro de
servicio describiendo el problema. No se olvide de anotar su dirección y su número telefónico. Para
su propia protección le sugerimos enviar el paquete asegurado.
UN AÑO DE GARANTIA
Household Products, Inc. garantiza este producto contra cualquier defecto originado por fallas en
los materiales o en la mano de obra por un período de un año a partir de la fecha original de compra. Esta garantía no incluye daños al producto ocasionados por accidentes, mal uso, ni como
resultado de reparaciones efectuadas por personas no autorizadas. Si el producto resulta con
defectos dentro del período de garantía, conforme sea necesario, lo repararemos o reemplazaremos libre de cargo. Para que esta garantía sea válida debe presentar el producto con su recibo
de compra y la tarjeta de garantía. Esta garantía le otorga derechos específicos, y usted podría
tener otros que pueden variar en su país. Si tiene alguna pregunta, comuníquese con una sucursal o centro de servicio más cercano autorizado por Household Products, Inc.
Favor consultar la dirección de su servicentro más cercano
ARGENTINA
Avenida Maipu 3850
1636 Olivos, Buenos Aires
Tel.: 0-800-8-1221
COLOMBIA
Carrera 38 No. 166-64
Santa Fe de Bogota
Tel.: 571-677-7496
COSTA RICA
Calle 20 entre Avenida 1 y 3
San José
Tel.: 506-221-6100
CHILE
Agustinas 2718
Santiago
Tel.: 562-687-1700
ECUADOR
Manuel Larrea 726 y Bogota
Quito
Tel.: 593-256-8551
EL SALVADOR
27 Calle Poniente y 25 Ave.
Norte No. 1510
San Salvador
Tel.: 503-226-0022
GUATEMALA
6 Ave. 12-27 Zona 9
Ciudad de Guatemala
Tel.: 502-232-5705
MÉXICO
Lázaro Cárdenas #18
Col. Obrera
Delegación Cuatémoc
06800 México, D.F.
Tel.: 91-800-50-833
588-93-77
• VERACRUZ
Prolongación Días Mirón #4280
(entre Violetas y Magnolias)
Col. Remes
91920 Veracruz, Ver.
Tel.: (91-29) 21-70-16
• PUEBLA
17 Norte #205
72000 Puebla, Pue
Tel.: (91-22) 46-37-26
• TORREÓN
Blvd. Independencia 95 Pte.
27000 Torreón, Coal
Tel.: (91-17) 16-52-65
• MÉRIDA
Calle 63 #459-A
(entre 50 y 52)
97000 Mérida, Yuc.
Tel.: (91-99) 23-54-90
• COATZACOALCOS
Corregidora #406
96400 Coatzacoalcos, Ver.
Tel.: (91-92) 12-13-80
• GUADALAJARA
Av. Vallarta #4901-A
Col. Prados Vallarta
45020 Zapopan, Jal.
Tel.: (91-36) 73-28-15
• QUARÉTARO
Av. Madero 139, Pte.
76000 Querétaro, Qro.
Tel.: (91-42) 14-16-60
• SAN LUÍS POTOSÍ
Pedro Moreno #100
Col. Centro
78000 San Luís Potosí, S.L.P.
Tel.: (91-48) 14-25-67
• VILLAHERMOSA
Av. Constitución #516-A
86000 Villahermosa, Tabasco
Tel.: (91-93) 12-51-11
• MONTERREY
Av. Fco. I. Madero Pte. 1820-AA
Zona Centro
64000. Monterrey, N.L.
Tel.: (91-83) 72-14-76
• CULIACÁN
Av. Nicolás Bravo #1063
80000 Culiacén, Sin.
Tel.: (91-57) 12-42-10
PANAMA
Via Brazil y Ave.
Samuel Lewis #31
Ciudad de Panama
Tel.: 507-264-2243
PERU
Calle Omega 225-231
Parque Industrial Caltao 1
Lima
Tel.: 511-451-9505
PUERTO RICO
Calle C#14
Rexco Industrial Park
Caparra Heights Station
San Juan, P.R. 00334
Tel.: 1-800-347-5117
VENEZUELA
Edif. Xerox, Piso 6
Av. Libertador, Urb. Bello Campo
Caracas
Tel.: 582-267-0590
■ LEIA ESTE MANUAL ANTES DE MONTAR OU USAR O ASPIRADOR DE PÓ.
■ Use o aspirador só da maneira como está descrito neste manual. Use só acessórios
recomendados pela SMC.
■ A fim de reduzir riscos de choques elétricos, não use-o ao ar livre, ou em superfícies
molhadas.
■ Desconecte o aparelho da tomada antes de abri-lo ou de limpar a área das escovas.
A omissão desta providência pode resultar em choque elétrico ou na ativação
repentina das escovas.
■ Desligue sempre o aparelho antes de conectar ou desconectar a mangueira ou a
escova elétrica.
■ Desligue sempre o aspirador antes de removê-lo da tomada.
■ Não tire-o da tomada puxando pelo cabo. Para removê-lo da tomada, segure pelo
plugue, não pelo cabo.
■ Segure pelo plugue quando recolher o cabo, rebobinando-o no carretel. Não deixe
que o plugue fique solto quando estiver enrolando o cabo.
■ Não use o aparelho se estiver com o cabo ou o plugue danificados. Se o aspirador
não estiver funcionando como deve, se ele caiu, foi danificado, deixado fora de casa,
ou caiu dentro da água, leve-o imediatamente para manutenção.
■ Não use o cabo para puxar o aparelho e não arraste o cabo em lugares cortantes
ou cantos vivos.
■ Não passe o limpador funcionando em cima do cabo. Mantenha o cabo afastado
de superfícies quentes.
■ Não deixe que o aparelho seja usado como brinquedo. É preciso cuidado quando
o aparelho for usado por crianças ou perto delas.
■ Não manuseie o plugue ou o aspirador com mãos molhadas.
■ Não opere o aspirador com a mangueira furada. Substitua a mesma se estiver
cortada ou gasta.
■ Conserve o aparelho livre de pó, fios, cabelo, ou qualquer coisa que possa reduzir
a entrada de ar.
■ Mantenha o cabelo, roupas soltas, os dedos e todas as partes do corpo afastadas
das aberturas e dos componentes móveis.
■ Não use o aspirador sem saco para pó e sem os filtros no lugar. Sempre limpe
o saco para pó após aspirar tapetes e carpetes tratados com produtos de limpeza
ou pós restauradores e poeiras finas. Esses produtos entopem o saco para pó,
reduzem o fluxo de ar e podem fazer o saco se romper. A falta de substituição do
saco pode causar dano permanente ao aspirador.
■ Não use o aparelho para aspirar objetos pontiagudos, duros, pequenos brinquedos,
alfinetes, papel, etc. Eles podem danificar o aspirador ou o saco para pó.
■ Não aspire nada que esteja queimando ou com fumaça, como cigarros, fósforos ou
cinzas quentes.
IMPORTANTES MEDIDAS
DE SEGURANÇA
99/11-19-106E/S.LAT.GEN.VAC.UC 4/25/00 3:40 PM Page 18
Page 11

19
20
■ Não use o aparelho para aspirar líquidos inflamáveis ou combustíveis (gasolina,
fluídos de limpeza, perfumes, etc.), ou o use em áreas onde esses produtos podem
estar presentes. Os gases dessas substâncias podem criar perigo de fogo
ou explosão.
■ Tome um cuidado extra quando estiver aspirando em escadas. Não coloque o
aparelho sobre cadeiras, mesas, etc. Mantenha-o no chão.
■ Você é responsável por certificar-se que seu aspirador não vai ser usado por alguém
incapaz de operá-lo devidamente.
GUARDE ESTAS INSTRUÇÕES
PEÇAS E CARACTERÍSTICAS
NOTA: LEIA ESTE MANUAL ANTES DE USAR O ASPIRADOR DE PÓ
LISTA DE VERIFICAÇÃO:
❑ Tanque
❑ Mangueira com cabo do bocal
❑ 2 tubos metálicos, de extensão
❑ Bocal aspirador para carpete/chão
❑ 1 saco para pó, de pano
❑ 2 filtros duplos
❑ Acessório para aspiração em fendas
❑ Acessório para aspiração com escova
❑ Tira de ombro
❑ Cartão de garantia e formulário de pedido por correio
B
A
D
E
F
G
H
I
J
K
L
M
N
O
C
1. Desengate da tampa
2. Tampa do tanque
3. Acessório para aspiração em fendas
4. Suporte do saco para pó
5. Filtro duplo (interior)
6. Bocal aspirador para carpete/chão
7. Tubos metálicos, de extensão
8. Escova de remoção de pó
9. Regulador de aspiração
10. Mangueira conectada ao
cabo do bocal
11. Cabo e plugue de força
12. Rebobinador automático do cabo
13. PPedal do interruptor do motor,
liga/desliga (On/Off)
14. Lâmpada indicadora de saco para pó cheio
15. Filtro duplo (dentro)
99/11-19-106E/S.LAT.GEN.VAC.UC 4/25/00 3:40 PM Page 20
Page 12

21
22
Este aparelho é SOMENTE PARA USO DOMÉSTICO e deve ser ligado a uma tomada
elétrica de de corrente alternada (tomada normal de residência), conforme o caso.
DICAS DE SEGURANÇA COM O CABO DE FORÇA
1. 1. Nunca estique ou puxe o cabo do aparelho.
2. Para colocar na tomada, pegue firmemente no plugue e insira na tomada.
3. Para desconectar o aparelho, pegue pelo plugue e retire da tomada.
4. Antes de cada uso, verifique se o cabo tem cortes e/ou marcas de desgaste.
Se houver, o aparelho deve ser levado para troca do cabo, entregando-o ao nosso
Departamento de Atendimento ou a um representante de serviço autorizado.
5. Nunca enrole o cabo apertado ao redor do aparelho, pois isto pode forçar o cabo
onde ele entra no aparelho a esgaçar e quebrar
NÃO OPERE O APARELHO SE O CABO DE FORÇA APRESENTAR QUALQUER DANO, OU
SE O APARELHO FUNCIONA INTERMITENTEMENTE OU PÁRA SEM TER SIDO
DESLIGADO.
Se o cabo que acompanha estiver danificado, deve ser substituído pelo fabricante ou
pelo seu agente representante, ou por pessoa qualificada, a fim de evitar riscos.
COMO USAR O BOCAL DE CARPETE/CHÃO
O bocal de carpete/chão é feito para estar em constante contado com as superfícies a
serem aspiradas e para facilitar a limpeza por baixo dos móveis. Aperte o interruptor do
bocal de carpete/chão para limpeza em superfícies lisas ou em assoalhos com carpete.
MODO DE USAR
COMO USAR O ACESSÓRIO ESCOVA REMOVEDORA DE PÓ
1. Instale a escova no cabo do
bocal, enfiando-a até que
o engate a prenda na posição.
2. Para aspirar com o cabo do
bocal, puxe de volta a escova
removedora de pó. Use o
cabo do bocal para aspirar
rodapés, radiadores e outras lugares de difícil acesso.
3. Para aspirar com a escova removedora de pó, deslize a escova
para baixo e direcione-a na posição apropriada para aspirar
poltronas, cadeiras e prateleiras.
SISTEMA DE FILTRAGEM
O sistema de filtragem de 5 estágios inclui:
um saco de pano para pó (que serve como
filtro), 1 filtro duplo interior, na área do saco
de pano para pó e um filtro duplo dentro
da grade posterior do tanque. Os filtros
protegem o motor para que não entre
poeira nele.
1. Conectar os tubos de extensão de metal, o bocal de chão e a mangueira.
2. Para ligar a mangueira ao tanque, coloque-a na posição e aperte o fecho. Empurre
a mangueira para dentro do tanque, até que ele se encaixe no lugar. Para remover,
aperte os fechos da mangueira para dentro e puxe a mangueira para fora. Ver figuras
1 e 2 na página 23.
3. Após montar todas as partes, certifique-se que o saco para pó e os filtros estejam
bem instalados. Consulte a seção Instruções de Manutenção.
4. Puxe o cabo de força para fora e plugue-o a uma tomada.
5. Aperte o interruptor / pedal de força e comece a aspirar o pó. Ver figuras 5 e 7 na
página 23.
6. Ajuste o nível de aspiração desejado para os diferentes tipos de superfície, usando
o regulador de sucção. Ver figura 6 na página 23.
7. Aperte o interruptor / pedal para desligar o aspirador de pó; aperte-o novamente para
recomeçar.
MONTAGEM E OPERAÇÃO
COMO USAR O ACESSÓRIO PARA FENDAS
Inserir o cabo do bocal no acessório para fendas. Use este acessório para aspirar
canaletas de portas de correr.
COMO USAR A TIRA DE OMBRO
O tanque do aspirador pode também ser carregado usando-se a tira de ombro,
ajustando os grampos da tira ao redor do corpo. Para evitar que a unidade caia, é
importante carregar o aspirador de pó numa posição horizontal
99/11-19-106E/S.LAT.GEN.VAC.UC 4/25/00 3:40 PM Page 22
Page 13

23
24
Este aparelho exige pouca manutenção. Não contém peças que devam ser consertadas
pelo usuário. Não tente consertar o aparelho você mesmo. Se necessitar de reparos,
leve-o a pessoa qualificada
Desligue sempre e remova da tomada após o uso. Rebobine o cabo, pressionando o
interruptor / pedal rebobinador de cabo
ADVERTÊNCIA:
• TO cabo se move rapidamente quando está
rebobinando. Mantenha as crianças afastadas
e verifique que o caminho percorrido pelo cabo
esteja livre quando está rebobinando, para evitar
que alguém seja ferido.
• NÃO use tomadas que estão acima dos balcões.
Os itens ao redor delas podem ser danificados.
• Desligue a unidade da tomada antes de abri-la
ou limpá-la. Se não o fizer, pode resultar em
choque elétrico ou ferimento
INSTRUÇÕES DE MANUTENÇÃO
INSTRUÇÕES DE LIMPEZA
1 & 2
5 & 7
6
COMO LIMPAR O SACO PARA PÓ
Sempre que acender a lâmpada indicadora de que o saco para pó está cheio, verifique
se o fluxo de ar está bloqueado, ou se ele está cheio e precisa ser limpo. Para melhor
desempenho na aspiração, limpe o saco para pó regularmente.
1. Desligue o aparelho e remova-o da tomada.
2. Solte o engate e levante a tampa do tanque.
3. Desencaixe o saco para pó do suporte, puxando para cima a armação de plástico,
para soltá-lo do encaixe, e puxe-o para fora.
4. Tire o grampo de plástico do topo do saco para pó.
5. Após a limpeza, instale o saco para pó. Certifique-se que os dois furos na armação de
plástico estão virados para baixo e empurre a armação de plástico para dentro, até
que ela se encaixe no lugar. Enfie a parte posterior do saco para pó para baixo.
6. Feche a tampa do tanquer.
ATENÇÃO
• Materiais finos, como produtos de limpeza de carpete, pós restauradores e gesso
podem entupir o saco para pó e estourá-lo antes que esteja cheio. Limpe o saco com
mais freqüência quando estiver aspirando esses materiais.
COMO LIMPAR O APARELHO:
Limpe o exterior do aparelho, os tubos metálicos de extensão e os acessórios com um
pano úmido e seque-os. Limpe e remova a poeira do saco para pó, sempre que estiver
cheio. A proteção do motor e os filtros de saída de ar devem ser verificados, limpos e
recolocados regularmente.
COMO TROCAR FILTROS
1. Desligue o aparelho e remova o saco para pó.
2. Segure os filtros gentilmente e puxe-os para fora.
3. Lave os filtros em água morna e sabão, em seguida enxágüe e seque. (Substitua a
espuma após umas quantas lavadas, pois ela perde a habilidade de atrair poeira.)
4. Substitua o filtro no tanque.
5. Instale o saco para pó.
ADVERTÊNCIA: Não opere a unidade sem antes instalar devidamente os filtros e o
saco para pó.
99/11-19-106E/S.LAT.GEN.VAC.UC 4/25/00 3:40 PM Page 24
Page 14

25
26
GUARDA DO APARELHO:
Coloque o tanque virado para cima e enfie a ponta do bocal para carpete / chão no
encaixe correspondente. Agora, o aparelho pode ser levado a um local seco, fresco e
seguro, para ser guardado. NÃO o deixe sob a luz direta do sol.
PROBLEMA POSSÍVEL CAUSA SOLUÇÃO POSSÍVEL
O aspirador não liga Não está ligado na tomada Coloque-o na tomada
e aperte o interruptor /
pedal (On/Off).
Pouca força 1. Saco para pó está 1. Limpar o saco para pó.
de sucção cheio ou entupido
2. Passagens do fluxo 2. Limpar as passagens
de ar estão entupidas do fluxo de ar.
3. Filtro de segurança 3. Limpar o filtro.
do motor está sujo
4. Controle de sucção 4. Ajustar o controle.
está aberto
5. Mangueira está furada 5. Substituir a mangueira.
6. Tampa do tanque 6. Fechar e trancar
está aberta a tampa.
O Aspirador começa Há perda da ligação elétrica Verifique as ligações
a funcionar, mas pára elétricas e enfie o plugue
na tomada.
A lâmpada indicadora 1. Saco para pó está 1. Limpar saco para pó.
de saco para pó cheio ou entupido
2. Filtro de segurança 2. Limpar o filtro.
do motor está sujo
3. Passagens do fluxo 3. Limpar bloqueios.
de ar estão bloqueadas
O cabo não rebobina. 1. Cabo de força está sujo 1. Limpar o cabo de força.
2. O cabo está enroscado 2. Puxar o cabo para fora
e rebobinar.
LOCALIZAÇÃO DE DEFEITOS
cheio acende.
PRECISA DE AJUDA?
O serviço técnico, se necess·rio, deve ser feito por Household Products, Inc., ou pelo Centro
Autorizado de Serviços Técnicos de Aparelhos Domésticos. O Centro de Serviços mais perto de
você pode ser encontrado nas páginas amarelas de se guia telefônico, sob o título "Aparelhos
Domésticos - Pequenos".
Se você enviar seu aparelho por correio ou por frete, embale-o com cuidado em papelão forte
com bastante enchimento para prevenir danos. Inclua um bilhete descrevendo o problema para
nosso Centro de Serviços Técnicos e certifique-se que colocou seu endereço para retorno.
Sugerimos que você faça seguro do pacote, para sua proteção.
UM ANO DE GARANTIA
A Household Products garante este produto contra quaisquer defeitos devidos a falhas de
material ou mão de obra, pelo período de um ano a partir da data original da compra pelo cliente.
Esta garantia não inclui danos ao produto resultantes de acidente ou uso impróprio, ou reparos
feitos por oficinas não autorizadas. Se o produto ficar defeituoso dentro do período de garantia,
nós faremos o conserto ou substituiremos a unidade, a nosso critério, sem custo. Para honrar esta
garantia, exige-se que o produto venha acompanhado do respetivo cartão de registro e a nota de
compra. Esta garantia lhe dá direitos legais específicos e talvez você tenha direito a outros
direitos, que podem variar de estado para estado. Para maiores informações, contate a Household
Products, Inc. mais próxima, ou o Centro Autorizado de Serviços Técnicos de Aparelhos
Domésticos.
Para informações sobre o centro de serviços técnicos mais próximo, favor consultar
o endereço abaixo.
ARGENTINA
Avenida Maipu 3850
1636 Olivos, Buenos Aires
Tel.: 0-800-8-1221
COLOMBIA
Carrera 38 No. 166-64
Santa Fe de Bogota
Tel.: 571-677-7496
COSTA RICA
Calle 20 entre Avenida 1 y 3
San José
Tel.: 506-221-6100
CHILE
Agustinas 2718
Santiago
Tel.: 562-687-1700
ECUADOR
Manuel Larrea 726 y Bogota
Quito
Tel.: 593-256-8551
EL SALVADOR
27 Calle Poniente y 25 Ave.
Norte No. 1510
San Salvador
Tel.: 503-226-0022
GUATEMALA
6 Ave. 12-27 Zona 9
Ciudad de Guatemala
Tel.: 502-232-5705
MÉXICO
Lázaro Cárdenas #18
Col. Obrera
Delegación Cuatémoc
06800 México, D.F.
Tel.: 91-800-50-833
588-93-77
• VERACRUZ
Prolongación Días Mirón #4280
(entre Violetas y Magnolias)
Col. Remes
91920 Veracruz, Ver.
Tel.: (91-29) 21-70-16
• PUEBLA
17 Norte #205
72000 Puebla, Pue
Tel.: (91-22) 46-37-26
• TORREÓN
Blvd. Independencia 95 Pte.
27000 Torreón, Coal
Tel.: (91-17) 16-52-65
• MÉRIDA
Calle 63 #459-A
(entre 50 y 52)
97000 Mérida, Yuc.
Tel.: (91-99) 23-54-90
• COATZACOALCOS
Corregidora #406
96400 Coatzacoalcos, Ver.
Tel.: (91-92) 12-13-80
• GUADALAJARA
Av. Vallarta #4901-A
Col. Prados Vallarta
45020 Zapopan, Jal.
Tel.: (91-36) 73-28-15
• QUARÉTARO
Av. Madero 139, Pte.
76000 Querétaro, Qro.
Tel.: (91-42) 14-16-60
• SAN LUÍS POTOSÍ
Pedro Moreno #100
Col. Centro
78000 San Luís Potosí, S.L.P.
Tel.: (91-48) 14-25-67
• VILLAHERMOSA
Av. Constitución #516-A
86000 Villahermosa, Tabasco
Tel.: (91-93) 12-51-11
• MONTERREY
Av. Fco. I. Madero Pte. 1820-AA
Zona Centro
64000. Monterrey, N.L.
Tel.: (91-83) 72-14-76
• CULIACÁN
Av. Nicolás Bravo #1063
80000 Culiacén, Sin.
Tel.: (91-57) 12-42-10
PANAMA
Via Brazil y Ave.
Samuel Lewis #31
Ciudad de Panama
Tel.: 507-264-2243
PERU
Calle Omega 225-231
Parque Industrial Caltao 1
Lima
Tel.: 511-451-9505
PUERTO RICO
Calle C#14
Rexco Industrial Park
Caparra Heights Station
San Juan, P.R. 00334
Tel.: 1-800-347-5117
VENEZUELA
Edif. Xerox, Piso 6
Av. Libertador, Urb. Bello Campo
Caracas
Tel.: 582-267-0590
99/11-19-106E/S.LAT.GEN.VAC.UC 4/25/00 3:40 PM Page 26
Page 15

Printed in/Impreso en/Impresso em Hong Kong
99/11-19-106E/S/P C112M (LAT/SPE)
Listed by Underwriters Laboratories, Inc.
NOM Approved
Copyright © 2000 Household Products, Inc.
Pub. No. 175312-01-RV00
Enlistado por Underwriters Laboratories, Inc.
Aprobado por NOM
Copyright © 2000 Household Products, Inc.
Pub. No. 175312-01-RV00
Listado por Underwriters Laboratories, Inc.
Aprovado por NOM
Copyright © 2000 Household Products, Inc.
Pub. No. 175312-01-RV00
99/11-19-106E/S.LAT.GEN.VAC.UC 4/25/00 3:40 PM Page 28
 Loading...