

Page 1
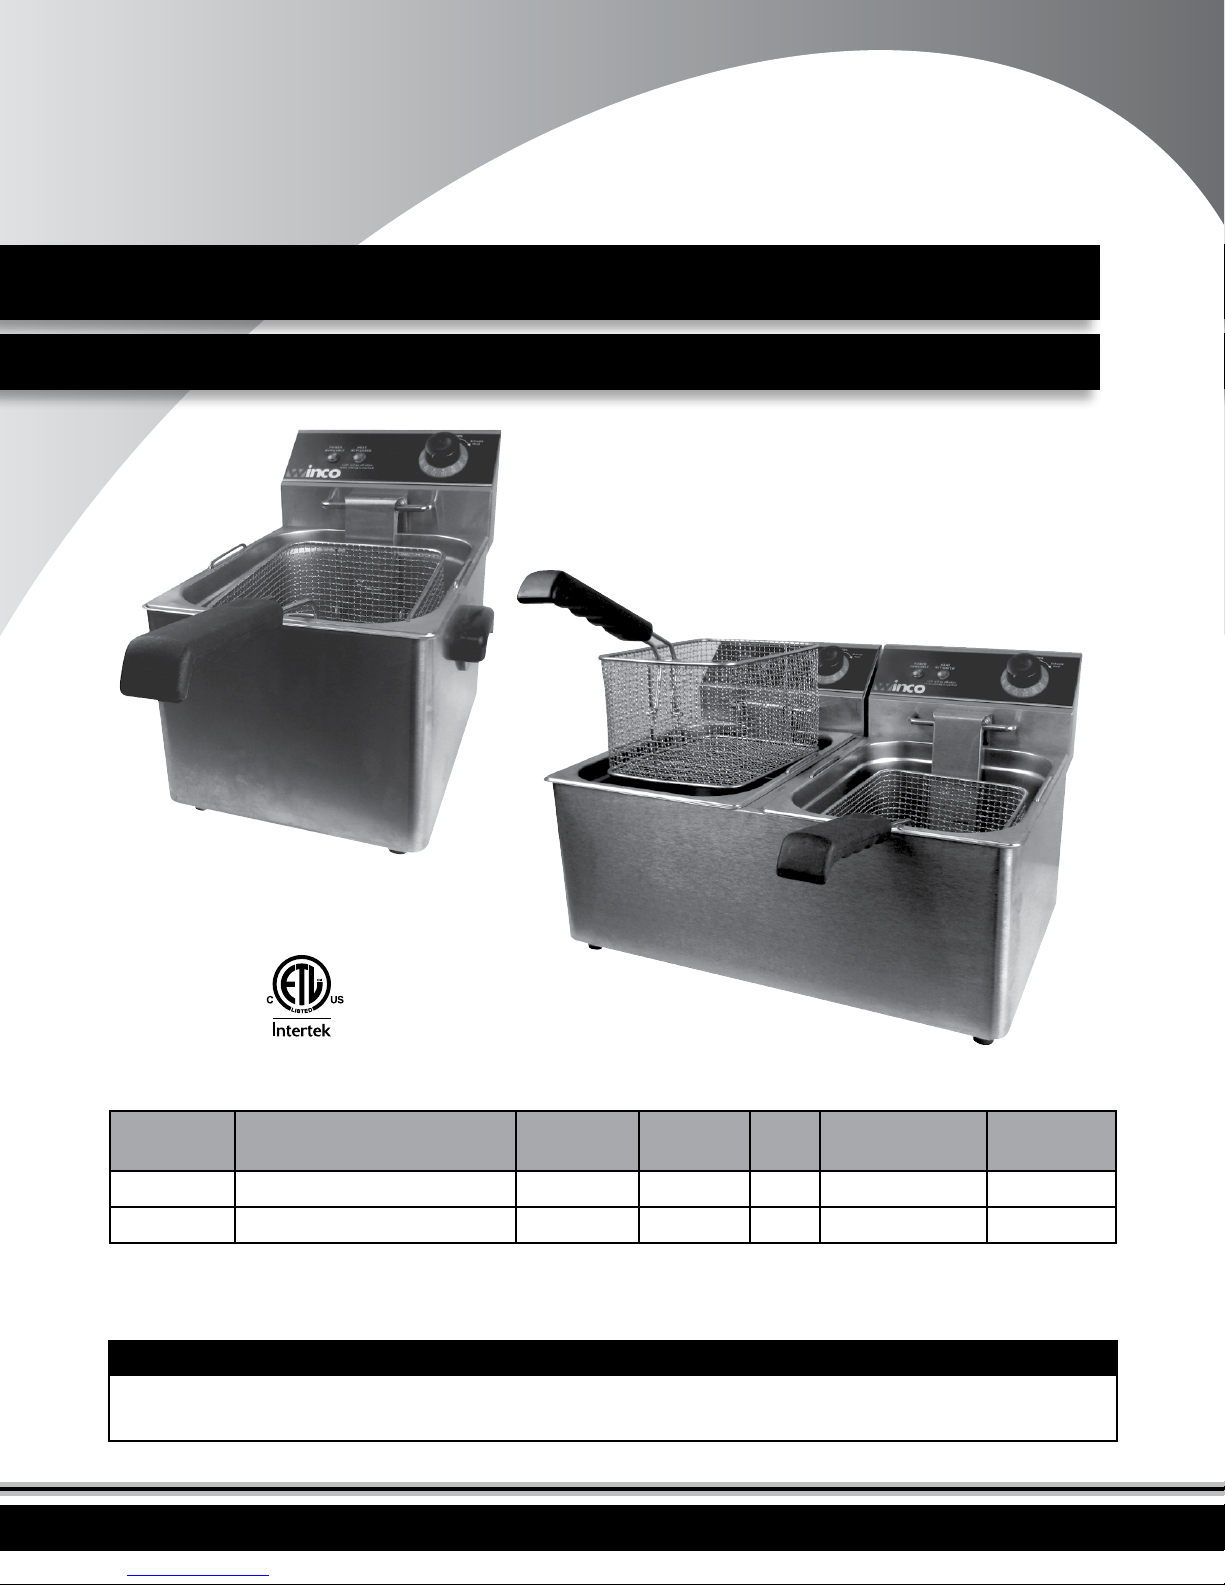
COUNTERTOP DEEP FRYERS
Use & Care Manual
EFS-16
Conforms to:UL STD: 197
Model Description
EFS-16 Countertop Fryer 16 lbs. 120V 60 15* 1800
EFT-32 Counter top Fryer 32 lbs. 120V 60 2 x 15** 1800
* One (1) dedicated 20 Amp circuit with a single outlet is required for each fryer head.
** Two separate dedicated 20 Amp circuits with a single outlet for each fryer head is required.
BEFORE OPERATING ANY EQUIPMENT, READ AND FAMILIARIZE YOURSELF WITH THE USE AND SAFETY INSTRUCTIONS
WINCO would like to thank you for purchasing this equipment. It’s important to save these instructions for future reference.
Save the original box and packaging for use in packaging and shipping the equipment if services are needed.
EFT-32
Oil
Capacity
Voltage Hz Amp Wattage
Page 2

Table of Contents
Package Contents ....................................................................... 3
Unpacking the Equipment ........................................................ 4
Function and Purpose ................................................................ 4
Warning Labels ........................................................................... 4
Installation Guidelines ............................................................... 5
Safety Precautions ..................................................................... 5
Features and Controls ................................................................ 6
Operation ..................................................................................... 7
Oil Tips .......................................................................................... 7
Safety Reset Switch .................................................................... 7
Counter top Deep FryerCounter top Deep Fryer
Cleaning the Unit ........................................................................ 8
Troubleshooting ......................................................................... 9
Wiring Diagram ........................................................................ 10
Warranty ......................................................................................11
Fire Safety Information ............................................................ 12
Package Contents
All units come with a Use & Care Manual, warranty registration card and the following as noted:
EFS16
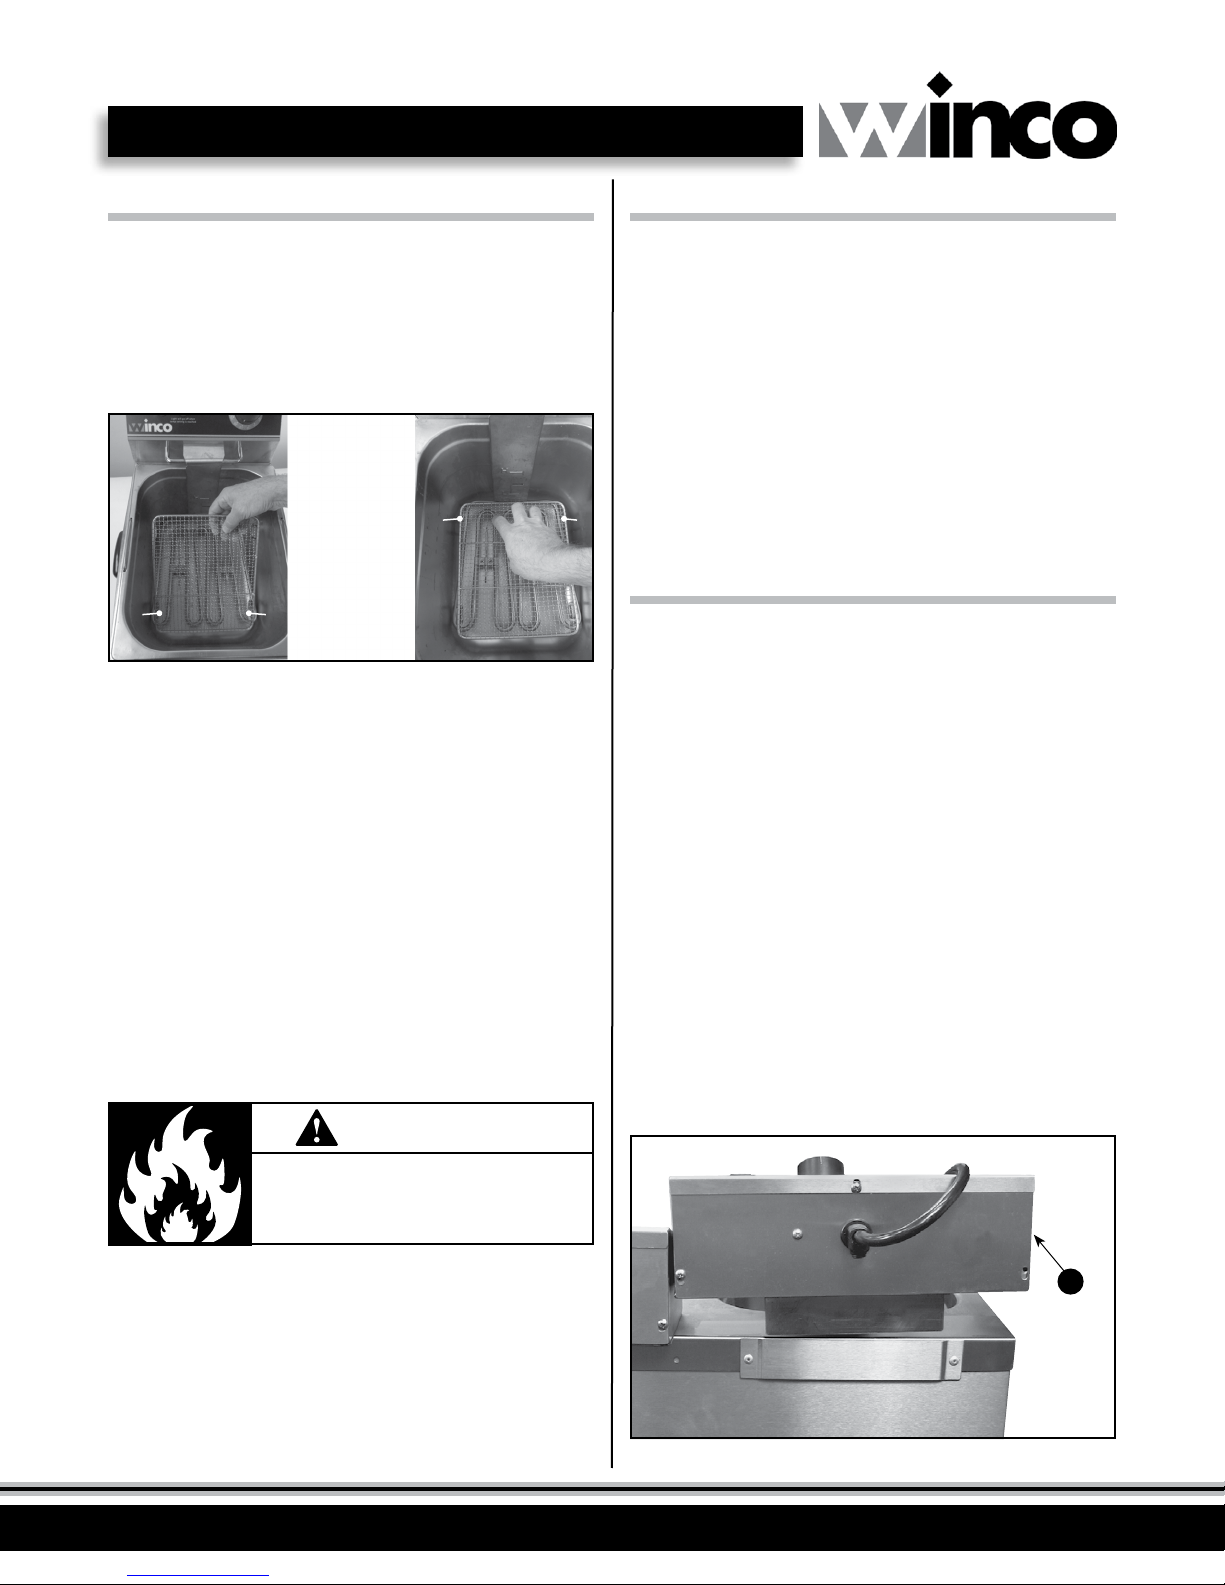
• EFS-16 unit (includes base and removable electrical power head with heating element and wire mesh heating element cover)
• Removable well with well cover
• Fry basket with with removable handle
• Handle for lifting fry basket
EFS32
• EFS-32 unit (includes base and 2 removable electrical power heads, each with a heating element and wire mesh heating element cover)
• 2 removable wells each with a well cover
• 2 fry baskets each with removable handle
• 2 handles for lifting fry baskets
WINCO / DWL Industries Co.2
Page 3
Safety Rules & Information for Deep Fryer
To ensure safe installation and operation, please
carefully read and understand the following
statements.
Unless the operator is adequately trained and
supervised there is a possibility of serious injury.
Owners of this equipment bear the responsibility
to make certain that this equipment is used
properly and safely, and to strictly follow all of
the instructions contained in this manual and the
requirements of local, state or federal law.
Owners should not permit anyone to touch this
equipment unless they are over 18 years old, are
adequately trained and supervised, and have read
and understood this manual.
Owners should also ensure that no customers,
visitors or other unauthorized personnel come in
contact with this equipment. It is the responsibility
of the owner and the operator to remain alert to any
hazards posed by the function of this equipment.
If there is ever uncertainty about a particular task or
the proper method of operating this equipment, ask
an experienced supervisor.
Warning Labels
This manual contains a number of precautions to
follow to help promote safe use of this equipment.
Throughout the manual you will see additional
warnings to help alert you to potential hazards.
Warnings aecting your personal safety are indicated by:
WARNING
CAUTION
⚠ CAUTION
Hot surface.
Do not touch.
Disco nnect powe r
supply and allow
surface to c ool
befo re servic ing.
Warnings related to possible damage to equipment are indicated by:
CAUTION
HOT
⚠ ATTENTION
Surface chaude.
Ne pas toucher.
La pui ssance de
décon nexion éle ctrique
et laisser refro idir la
surface avant l'ent retien.
Unpacking the Equipment
DISPOSE OF ALL PACKAGING MATERIALS IN AN
ENVIRONMENTALLY RESPONSIBLE MANNER.
1. Remove all packing materials and tape, as well as any protective
plastic and cardboard, from the unit.
2. Clean any glue residue left over from the plastic or tape.
3. Place the unit in the desired position and height.
SAVE THE ORIGINAL BOX AND PACKAGING FOR USE IN
PACKAGING AND SHIPPING THE EQUIPMENT IF SERVICES
ARENEEDED.
Function and Purpose
This unit is intended to be used for deep frying foods in commercial
food-service operations only. It is not intended for household,
industrial or laboratory use.
Before using this equipment it must be cleaned and dried
thoroughly (see "Cleaning" section on page 8). Clean all surfaces
before use. Failure to clean surfaces before using the unit could cause
food contamination.
This fryer is a medium duty appliance capable of a wide variety of
frying applications.
WARNING
CAUTION
NOTE
Note is used to notify users of installation, operation, or maintenance
information that is important but not hazard-related.
Please remember that this manual and the warning
labels do not replace the need to be alert, to properly
train and supervise operators, and to use common
sense when using this equipment.
Proper Grounding
This machine is provided with a
three-pronged grounding plug.
The outlet to which this plug
is connected must be properly
grounded. If the receptacle is not
the proper grounding type, contact
an electrician. DO NOT, under any
circumstances, cut or remove the
third ground prong from the power
cord or use any adapter plug.
USE A GROUNDED OUTLET
DO NOT ADD AN ADAPTOR
TO THE PLUG
WINCO / DWL Industries Co. 3
Page 4
Installation Guidelines
1. The fryer must not be installed under combustible materials
and the minimum clearance from combustible construction
must be 6” (15cm) from the sides and back of the fryer. The
area surrounding the fryer should be kept free and clear of
combustible materials.
2. All deep fryers must be installed with at least 16” (40.6cm)
space between the fryer and surface ames from adjacent
cooking equipment.
3. Equipment must be installed by qualied persons in accordance
with federal, state and local codes.
4. The fryer should be installed under a hood in accordance with
the latest edition of the Standard for Ventilation Control and Fire
Protection of Commercial Cooking Operations, NFPA 96.
5. If a re extinguisher is used for a ame-up of oil, be sure to keep
extinguisher at a distance of two feet from the fry well to avoid
splashing the oil.
6. Place the deep fryer so the front feet are at least 4 inches from
the edge of the counter top. This will reduce the chance for the
fryer to be accidentally pushed o the counter top.
7. Keep the area at the front of the fryer clear for unobstructed
access during operation.
8. Keep unit and power cord away from open ames, electric
burners or excessive heat.
9. Use only grounded electrical outlets matching the nameplate
rated voltage.
10. Do not use an extension cord with this equipment.
11. Do not spray controls or outside of unit with liquids or
leaning agents.
12. CAUTION: To reduce the risk of electric shock, cook only in
removable fryer container.
13. CAUTION: Use supply wire suitable for 75°C
14. CAUTION: A suitable grease-collecting means must be in place
before operating appliance.
15. CAUTION: Risk of re or electric shock. Only operate this appliance
with the oil pot in place.
16. Use copper aluminum wire for power supply connections.
NOTE
In the case of the appliance malfunctioning, you must disconnect the
power supply prior to service by qualied technician.
The EFS-32 must always have both cords plugged in for proper
operation, or both cords unplugged prior to any maintenance or
service of the equipment.
Safety Precautions
x
CAUTION
WARNING
x Burn Hazard.
Do not touch hot liquid or heated sur faces while unit is
heating or operating.
HOT
Hot liquids and food can burn skin. Allow the hot liquid to cool before handling.
Do not drop or spill water into hot oil as it will spray or splatter the hot oil out
of the tank.
x
WARNING
x Fire Hazard.
Overheated oil or oil vapors can ignite causing a re.
Monitor oil temperature, quality and level. Use and
maintain oil vapor removal system.
Heat oil carefully. If oil smokes, reduce heat. Do not leave unit unattended. If re
occurs, turn unit o, cover until cool. Do not put water on hot or aming oil. Do
not operate with oil below low oil mark. Dirty oil has a lower ash point. Replace
oil on a regular basis. Maintain correct oil level. Use an oil vapor removal system
(hood) to reduce oil and grease buildup on wall or ceiling surfaces.
1. Unit must only be used in a at, level position.
2. Change oil regularly or as necessary. (see "Operation" section on
page 7) Old dirty oil has a lower ash point than clean oil.
3. Fill to correct level with oil. Do not overll. (see items C & D in the
"Features and Controls" section on page 5)
4. Do not overll basket. Do not ll basket more than half full.
5. Hot oil is ammable - keep open ames away from hot oil and
oil vapors.
6. Unplug unit, turn o and let it cool before cleaning or moving.
7. Do not operate unattended.
8. Do not operate unit in public areas and/or around children.
9. The unit and/or oil may be hot even though the Power Light or
Temperature Ready Light is not on.
10. Do not operate if unit has been damaged or is malfunctioning
in any way.
11. Do not use with a damaged cord.
12. Do not access the Safety Reset Switch (see "Safety Reset Switch"
section on page 7) unless the fryer has overheated (oil reaches
430°F).
13. Do not clean the unit with steel wool.
14. Dispose of oil in an environmentally responsible manner.
NEVER leave one cord plugged in and one cord unplugged.
WINCO / DWL Industries Co.4
Page 5
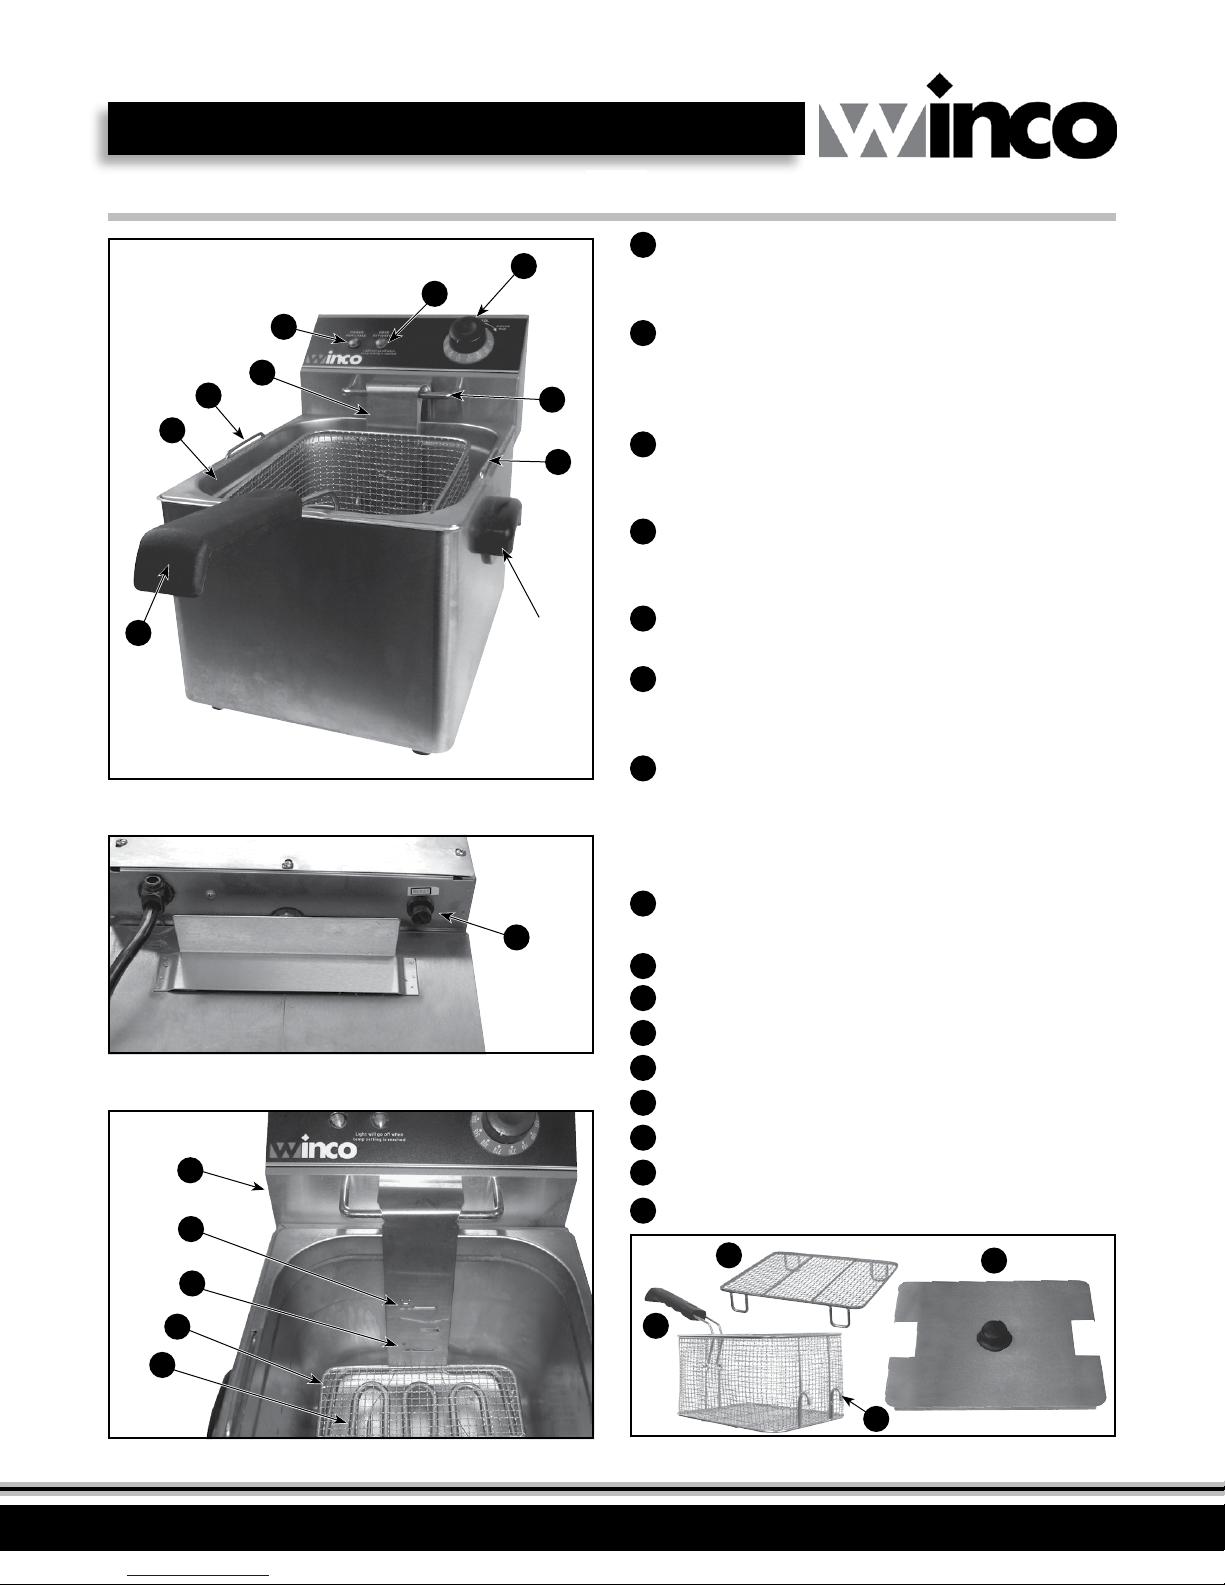
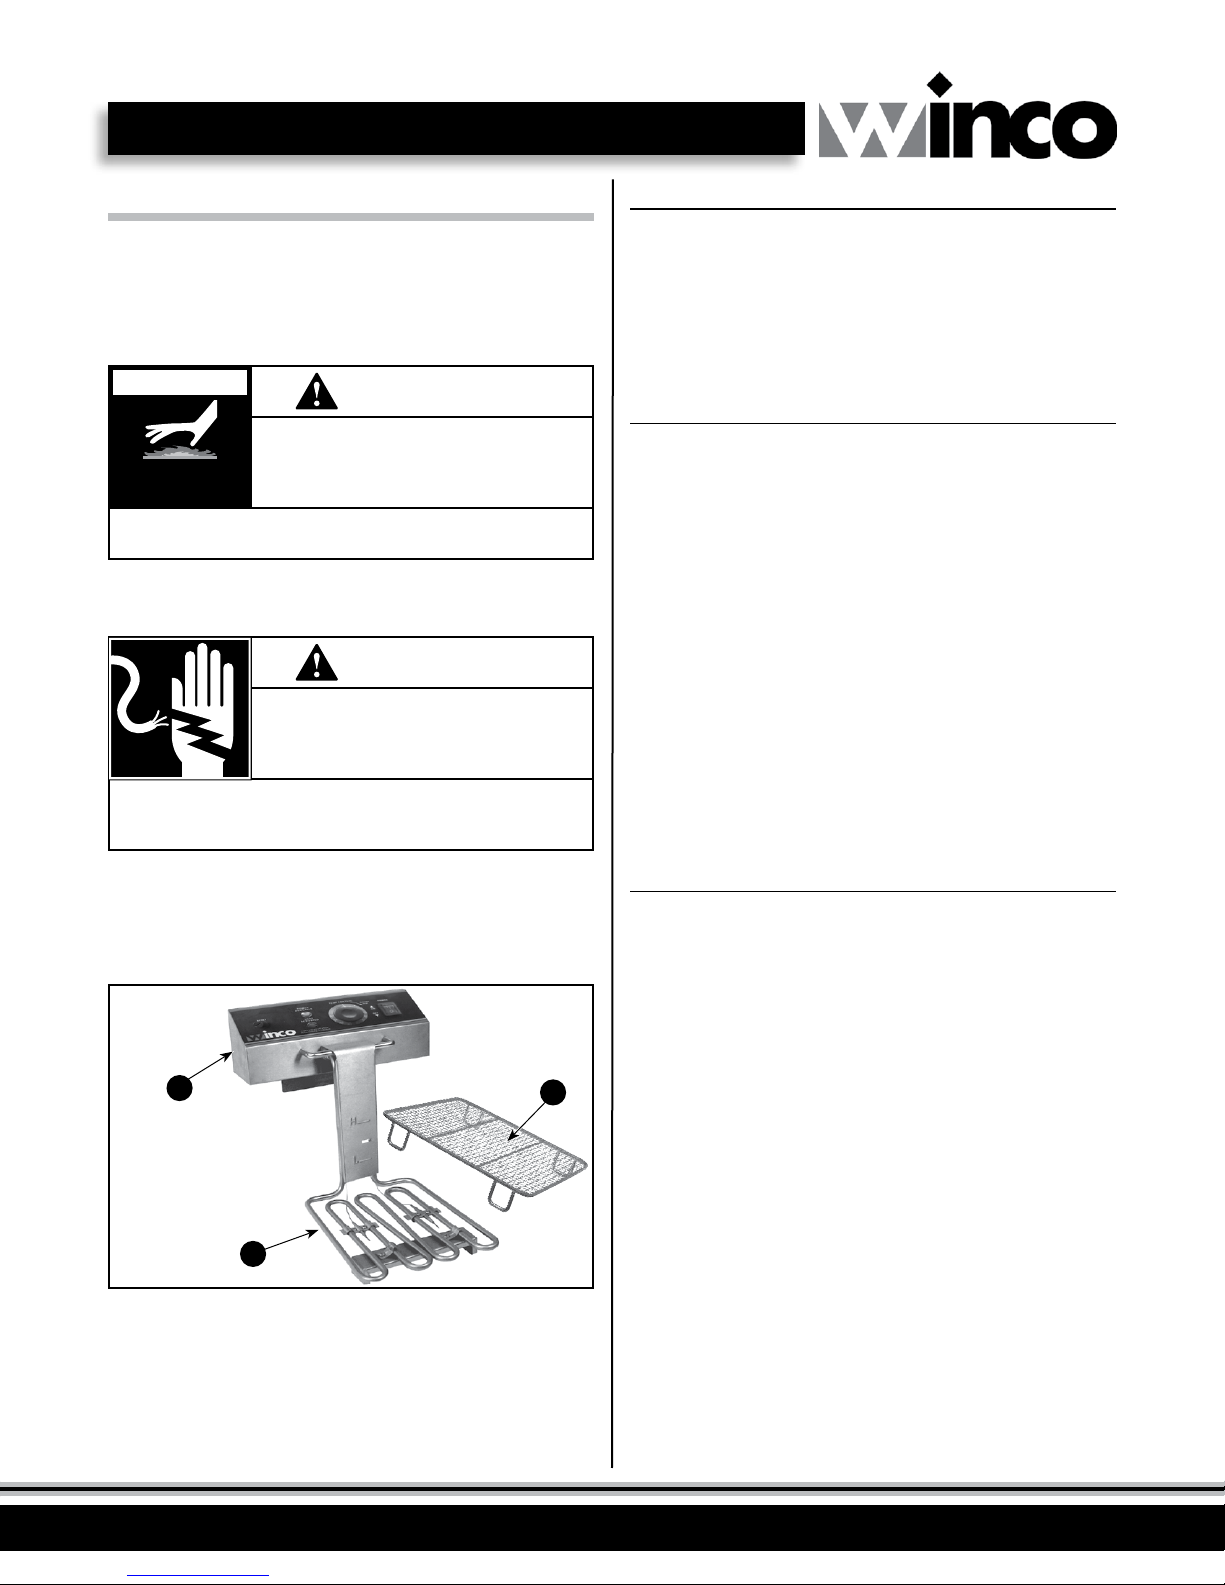
Features and Controls for Counter top Deep Fryer (EFS-16 & EFT-32)
THERMOSTAT CONTROL DIAL (Figure 1) Used to set or adjust
A
G
H
J
E
F
I
EFS16
Figure 1. Features and Controls of EFS-16 & EFS-32
A
K
E
Carrying
Handle
the temperature of the oil. The numbers on the dial correspond
with the oil temperature. The “0” position is o.
SAFETY RESET SWITCH & COVER (Figure 2) Remove cover to
b
access the reset switch. If the oil reaches a temperature of 430°F
(221°C) this switch cuts power to the unit. (Switch is on the back
side of EFS-16, EFT-32) (see "Safety Reset Switch" on page 7)
HIGH OIL LEVEL (Figure 3) This is the maximum level mark for
c
the well. Do not ll with oil above this mark because it may cause
oil to overow the well after the basket of food has been added.
LOW OIL LEVEL (Figure 3) This is the minimum level mark for
D
the well. Do not operate with oil below this level as the oil may
overheat and start a re.
WELL LIFTING HANDLES (Figure 1) Used to lift the well in and
E
out of the unit for oil disposal and cleaning.
REMOVABLE WELL (Figure 1) Holds the oil and is where the
F
cooking takes place. The heating element is suspended in this
component.
TEMPERATURE READY LIGHT (Figure 1) This light indicates
G
that the element is heating. Once the temperature has been
reached the light will go out. Unit will continue to maintain heat
and temperature with light cycling on and o.
This is not an “ON/OFF” light.
Figure 2. Safety Reset Switch for EFS-16 & EFT-32
O
c
D
M
P
Heating El ement
will be und er
ELEMENT COVER
b
Safety Reset
Switch is on
the back of
the unit.
H
POWER INDICATOR LIGHT (Figure 1) Indicates unit is plugged in
and power is on.
FRY BASKET ASSEMBLY (Figures 1/4) with removeable handle
I
J
ELEMENT HOLDER VERTICAL SUPPORT BRACKET (Figure 1)
K
BASKET SUPPORT BAR (Figure 1)
L
BASKET HOOKS (Figure 4)
M
WIRE MESH HEATING ELEMENT COVER (Figure 3/4)
N
WELL COVER (Figure 4)
O
REMOVABLE ELECTRICAL POWER HEAD (Figures 3/6/7)
P
HEATING ELEMENT (Figures 3/7)
M
I
L
N
Figure 4. Basket and AccessoriesFigure 3. Oil Level Indicator Inside Well
WINCO / DWL Industries Co. 5
Page 6
Operation
Oil Tips
Follow these same instructions for each well of a two well unit. Each well
operates independently and may be operated at dierent temperatures.
1. The EFT-32 requires the use of two cords. Be sure to unplug both
cords prior to moving, testing or repairing this product.
2. Remove basket(s) (I) from fryer.
3. Insert Wire Mesh Heating Element Cover (M) (Figure 5)
1. Place two rear
wire feet inside
heating element in
spot A.
2. Push two front
wire feet over
heating element at
the front, s o feet
A
1. 2.
are just out side
A
the heating
element in spot B.
B
B
Figure 5. Insert Wire Mesh Heating Element Cover (M)
4. Fill or add oil/solid shortening to the Well (F). Always maintain oil
level between High Oil Level (C) and Low Oil Level (D) as indicated
on the Element Holder Vertical Support Bracket (J).
(See Figure 1) DO NOT under-ll or over-ll.
5. Adjust the Thermostat Control Dial (A) to the desired temperature;
the Temperature Ready Light (G) indicates when the elements
are energized. If solid shortening is used, pack the fat around the
heating element and set the temperature between 200~250°F
so the fat will melt slowly as it covers the heating elements. The
melted fat should not exceed the high level mark nor should it drop
below the low level mark found on the Element Holder Vertical
Support Bracket (J). This will reduce smoking and risk of re.
6. Allow the oil to preheat and come up to recommended cooking
temperature. The Temperature Ready Light (G) will cycle o when
the oil has reached the set temperature.
x
WARNING
x Fire Hazard.
Overheated oil or oil vapors can ignite causing a re.
Monitor oil temperature, quality and level. Use and
maintain oil vapor removal system.
1. Use oil that is recommended for frying foods.
2. Cook at temperatures that are recommended by food manufacturer.
3. Change oil when oil becomes noticeably darkened from food
particles that burn when subjected to prolonged heat.
4. Change oil when there is a noticeable foul odor or when the oil
smells like the food cooked in it.
5. To re-use oil, use a few layers of cheese cloth to lter excess
particles only after oil has cooled.
6. Cover oil overnight using the Well Cover (M) provided.
Safety Reset Switch
The units are equipped with a switch that cuts o power if the oil
temperature reaches 430°F (221°C). This switch has a manual reset.
The reset switch is located on the back of the unit (Figure 2).
The switch will activate if the oil temperature reaches 430°F. Before
resetting the safety switch, check for these causes.
Possible causes for the safety reset switch to activate are:
• Dirty oil
• Too little oil in fry well
• Heating elements not in proper lowered position
TO RESET THE TEMPERATURE SAFETY SWITCH:
1. Wait until the oil has cooled to 300°F (149°C) or below.
2. Remove the switch cover by unscrewing counterclockwise.
3. Use a pen or similar narrow tool and press the reset button down.
The button should stay in the depressed position.
4. Replace the switch cover and secure by screwing clockwise.
If unable to reset the safety reset switch or the safety reset
switch continues to trip, contact WINCO Technical Service.
7. Dry food product or remove ice crystals from food prior to frying.
8. Load each basket; NEVER more than half way full.
9. Carefully lower the basket into the cooking oil. Food should
remain in fryer as per manufacturers recommended cooking time.
10. When food is nished, hook the basket on the Basket Support Bar
(K) using the Basket Hooks (L).
This will allow the excess oil to drain back into the well. Prepare
as directed by food manufacturer.
O
Removeabl e
Elect rical Power
Head slips ea sily
into and out o f
the holde r on the
back of the u nit
Figure 6. Removing / Replacing Electrical Power Head
WINCO / DWL Industries Co.6
Page 7
Cleaning
NOTE
To maintain the appearance and increase the service
life, clean your unit daily.
1. Unplug the unit
2. Allow the unit and oil to cool completely before cleaning.
x
CAUTION
WARNING
x Burn Hazard.
Do not touch hot liquid or heating sur faces while unit is
heating or operating.
HOT
Hot liquids and food can burn skin. Allow the hot liquid to cool before handling. Do
not drop or spill water into hot oil as it will spray or splatter the hot oil out of the tank.
3. Do not immerse the cord, plug or Removeable Electrical Power Head
(O) in water or any other liquid.
x
WARNING
x Electrical Shock Hazard.
Keep water and other liquids from entering the inside
of the unit. Liquid inside the unit could cause an
electrical shock.
Do not spray water or cleaning products. Liquid could contact the electrical
components and cause a short circuit or an electrical shock. Do not use unit if
power cord is damaged or has been modied.
BUCKET MUST BE LARGE ENOUGH TO HOLD ALL OF THE OIL
IN WELL. BE SURE THE OIL HAS COOLED. DO NOT REMOVE OR
CLEAN HOT OIL.
8. Strain oil through cheesecloth into the bucket.
NOTE
DO NOT CLEAN THE UNIT WITH STEEL WOOL
9. Use a damp cloth or sponge dipped in soapy water to clean the
unit and Well(s) (F); rinse and dry thoroughly. May also ll the
Well(s) (F) with water and dish washing liquid. Lower Electrical
Power Head (O) to the down position. The soapy water mixture
can then be heated to approximately 200~250°F for a few
minutes, to clean unit. It’s important that the unit doesn’t run dry
as it will cause the element to burn out.
10. Make sure Electrical Power Head (O) and cords do not come in
contact with water. Spray cleaning solution onto soft cloth and
wipe unit clean.
11. Rinse thoroughly.
12. Dry thoroughly after cleaning.
4. Remove the Electrical Power Head (O) and Wire Mesh Heating
Element Cover (M) . (Figure 7)
5. Remove any large food particles from the well using a slotted
spoon or spatula.
DO NOT imme rse the
Removeab le Electric al
Power Head in w ater
O
For easy cl eaning, the
Removeabl e Electrical Pow er
Head and Heat ing Element
can be comp letely separate d
from the b ase unit
P
M
Figure 7. Preparation for Cleaning the Unit
6. Carefully remove the Well(s) (F) from the unit to lter or discard
used oil.
7. Tie 2 or 3 layers of cheesecloth over the top of an empty bucket,
leaving slack in cheesecloth to keep oil from over owing the
edges of bucket when draining the well.
NOTE
A VERY SMALL AMOUNT OF SOAP LEFT IN THE WELL CAN RUIN
THE OIL. ANY WATER REMAINING IN THE WELL WILL CAUSE
VIOLENT BOILING AND SPUTTERING WHEN OIL IS HOT.
13. Cleaning the Heating Element (P): If considerable carbon
has collected on the Heating Element(s) (P), it can be burned
o by operating the unit with a dry well at a temperature
setting of 250°F (121.1°C) for a few minutes. The deep fryer
will automatically shut down, which will also serve as a test of
the Safety Reset Switch (B). (Refer to "Safety Reset Switch" on
page6) Turn the Thermostat Control Dial (A) back to the "OFF"
position and brush o loose carbon and clean and dry the well
thoroughly.
14. Cleaning the exterior surfaces: Keep all surfaces of the unit free
of splashed shortening or other foreign particles by washing with
hot water and soap. Rinse and wipe o excess water. Polish with
a dry, soft cloth.
WINCO / DWL Industries Co. 7
Page 8
Troubleshooting Chart
ISSUE MIGHT BE CAUSE BY RECOMMENDED SOLUTION
Unit is not plugged in Check power source; plug unit in
Power switch has not been turned on Check that the unit is correctly plugged in and
Power On/O switch has been turned on
Plug/cord damaged Call for service
Food debris stuck on or between heating element Unplug the unit, let unit cool, then clean on or
Deep fryer not working
Safety Reset Switch activated Possible causes are: dirty oil, too little oil in fry well,
None of the above Call for service
Thermostat or heating element has failed Call for service
Safety Reset Switch has activated Possible causes are: dirty oil, too little oil in fry well,
Oil is not heating up and
Temperature Ready Light is ON
around elements to remove food debris
or heating elements not in proper lowered position.
or
Refer to "Safety Reset Switch" (see page 7) section
of this manual. If problem persists, call for service
or heating elements not in proper lowered position.
or
Oil gets too hot
Temperature Ready Light
does not cycle ON, but fryer is
operating normally
Oil boils over top when frying
Service and Repair
Refer to "Safety Reset Switch" section of this
manual. If problem persists, call for service
Oil level low Turn unit o, allow to cool, then add oil until it is
above the low oil line.
Thermostat control malfunction Call for service
Faulty indicator light Call for service
Oil has reached the desired/ set temperature
It is advisable to use a fryer thermometer to check
desired temperature
Too much oil in well Reduce the amount of oil in well
Too much food in basket Reduce the amount of food in basket
Too much water in food Dry food product or remove ice crystals from food
Use fryer normally
prior to frying
There are no user serviceable parts within this appliance.
To avoid serious injury or damage, never attempt to repair the unit
or replace a damaged power cord yourself.
DO NOT send unit to WINCO without rst contacting our customer
service department.
See "Limited Equipment Warranty" section on page 11 for details.
WINCO / DWL Industries Co.8
Page 9

Wiring Diagram
THERMOSTAT
122~374°F (50~190°C) 16A 250Vac
POWER SUPPLY
120V AC 60Hz
EFS-16 & EFT-32
GROUND
LIMIT SWITCH
20.5A 125V T125
POWER
INDICATOR
LAMP
120V
(GREEN)
TEMPERATURE
REA DY
LIGHT
120V
(RED)
SAFETY RESET SWITCH
446°F (230°C) 16A 250V T125
HEATING
ELEMENT
1800W \ 120V
WINCO / DWL Industries Co. 9
Page 10

Limited Equipment Warranty
WINCO
commercial appliances are warranted when installed in
accordance with instructions in this manual and subjected to normal use.
WINCO commercial appliances are warranted only to the rst
purchaser from the dealer/distributor.
WINCO equipment(parts and labor) are warranted for a period of
one(1)year from the date of purchase, provided that the product
warranty registration has been received by WINCO within 30 days
from the date of purchase.
Examples of circumstances NOT covered under WINCO’s warranty, but
not limited to these circumstances are:
• Acts of God, re, water damage, burglary, accident, theft.
• Freight damage.
• Improper alteration or installation of equipment.
• Use of after market or generic parts.
• Services made by anyone other than an authorized service agent.
• Unauthorized lubricants.
• Normal wear of parts, including feet, fuses, switches, lamps, etc.
• Improper cleaning or use of improper cleaning agents on appliance
• Misuse or abuse (this includes but is not limited to dropping the
unit or any of it's components).
Procedure To Submit
A Warranty Claim
Warranty may not be honored if warranty registration has not
been previously submitted to WINCO within 30 days of purchase.
Attempts to service appliance by unauthorized personnel may
void the warranty.
1. Warranty registration must have been received within 30 days
from the date of purchase.
2. RETURN AUTHORIZATION MUST BE ISSUED
from WINCO customer service. For warranty service
West of the Mississippi River, contact
Customer Service @ WINCO
12765 166th Street, Cerritos, CA, 90703
Phone: 1-888-946-2652
East of the Mississippi River, contact
Customer Service @ WINCO
65 Industrial Road, Lodi, NJ, 07644
Phone: 1-888-946-2682
E-mail: warranty@wincous.com
3. You will be asked to provide item #, date of purchase, receipt
of purchase, company/dealer item was purchased from and a
detailed description of the issue you are having.
4. The customer service rep will determine the best course of
action. If it is determined item needs to be returned, a return
authorization will be issued. You will be given complete details on
how to complete the return process.
5. If item is to be returned to WINCO, it must be packaged in its
original carton. This ensures there will be no freight damage of
item coming back to WINCO. Freight damage will not be covered
by the warranty.
NOTE:
• Freight to our repair centers must be prepaid. We strongly
recommend that you SAVE THE ORIGINAL PACKAGING for the
duration of this warranty. WINCO will not be responsible for any
claims for damages that may occur during inbound transportation
to our service facility.
• Freight on return services or replacements will be prepaid by
WINCO, the manufacturer.
• This warranty does not cover product failures caused by: improper
maintenance as outlined in our operations manuals, neglect,
abuse, damage due to excess water, re, improper set up, or use
of inadequate or faulty electrical systems.
• WINCO reserves the right to inspect returns and determine if
product received shows any of the signs of misuse or abuse
as listed above.
THE FOREGOING WARRANTY PROVISIONS ARE A COMPLETE
AND EXCLUSIVE STATEMENT BETWEEN BUYER AND WINCO.
WINCO NEITHER ASSUMES NOR AUTHORIZES ANY PERSONS
TO ASSUME FOR THEM ANY OTHER OBLIGATION OF LIABILITY
IN CONNECTION WITH SAID EQUIPMENT.
WINCO / DWL Industries Co.10
Page 11

In Case of Fire
Contact the local fire department!
Disconnect power to unit!
This will cut o power to the heating elements and allow the oil to
cool, reducing the ash point temperature and making it easier to
stop the re.
Immediately cover the well with the well cover and/or
heavy non-flammable blanket or canvas.
This will cut o oxygen to the re.
CAUTION!
DO NOT attempt to ght a grease re by spraying the
re extinguisher directly on the burning shortening.
The force will cause the burning shortening to be sprayed
on adjoining equipment making it dicult to contain the re.
Spray the fire extinguisher over the well cover or
non-flammable blanket.
This will seal o additional oxygen thus smothering the re.
IMPORTANT
DO NOT remove the blanket or cover until the fire
department arrives. The oil may re-ignite.
This is high voltage equipment - be sure main
disconnect is "OFF" before proceeding.
Only use a re extinguisher lled with CO
2
or Halon for ammable
liquids and oils and suitable for electric powered equipment.
DO NOT use water or water based extinguisher on a grease re.
WINCO / DWL Industries Co. 11
Page 12

WINCO / DWL Industries Co.12
Page 13

FRITEUSE A COMPTOIR PROFOND
COUNTERTOP DEEP FRYERS
Manuel d’utilisation et d’entretien
EFS-16
Conforme à:
Conforme à:
UL STD: 1026
UL
STD: 197
Modèle Description
EFS-16 Friteuse à comptoir profond 16 lbs. 120V 60 15* 1800
EFT-32 Friteuse à comptoir profond 32 lbs. 120V 60 2 x 15** 1800
* Un (1) circuit spécial de 20 ampères avec une seule prise est nécessaire pour chaque tête de friteuse.
** Deux distincts circuits spéciaux de 20 ampères avec une prise unique pour chaque tête de friteuse est nécessaire.
AVANT DE FAIRE FONCTIONNER UN ÉQUIPEMENT,
LISEZ ET VOUS FAMILIARISEZ AVEC LES INSTRUCTIONS D’UTILISATION ET DE SECURITE
WINCO voudrais de vous remerci pour l'achat de cet équipement. Il est important de conserver ces instructions pour
référence ultérieure. Gardez la boîte originale et l'emballage pour une utilisation de l'emballage et l'expédition de
l'équipement si vous avez besoin des services.
WINCO / DWL Industries Co. 13
EFT-32
Oil
Capacité
Voltage Hz Amp Wattage
Page 14

Table des matières
Contenus dans le package ...................................................... 14
Déballage d'équipement ........................................................ 15
Fonction et objet ...................................................................... 15
Etiquettes d'avertissement ..................................................... 15
Guide d'Installation .................................................................. 16
Précautions de sécurité ........................................................... 16
Caractéristiques et commandes ............................................. 17
Opération ................................................................................... 18
Conseils pour huile ................................................................... 17
Interrupteur Reset de sécurité ............................................... 18
Counter top Deep FryerFriteuse à comptoir profond
Nettoyage d'équipement ........................................................ 19
Dépannage ................................................................................ 20
Schéma de câblage .................................................................. 21
Garantie ..................................................................................... 22
Informations de sécurité pour incendie ............................... 23
Contenus dans le package
Toutes les unités sont équipées d'un manuel d'utilisation et d’entretien, une carte d’enregistrement de garantie et la suivante comme indiqué:
EFS16
• Unité EFS-16 (Comprend une base et une tête électrique amovible avec élément chauant et couvert pour élément chauant)
• Amovible puits avec couvercle
• Panier de friteuse avec poignée amovible
• Poignée pour soulever le panier de friture
EFS32
• Unité EFS-32 (Comprend une base et deux têtes électriques amovibles, chacune avec un élément chauant et deux couvert).
• 2 amovibles puits avec couvercle.
• 2 paniers à friture avec poignées amovibles.
• 2 poignées pour soulever le panier de friture.
WINCO / DWL Industries Co.14
Page 15

Règles de sécurité & Information pour friteuse profonde
Pour assurer la sécurité de l'installation et de
l'opération, s'il vous plaît lire attentivement et
comprendre les instructions suivantes.
À moins que les opérateurs sont suffisamment
formés et supervisés il y a un risque de blessure
grave. Les propriétaires de ce matériel ont la
responsabilité de s'assurer que cet équipement est
utilisé correctement et en toute sécurité, et de suivre
strictement toutes les instructions contenues dans ce
manuel et les exigences de la loi locale, provinciale et
fédérale.
Les propriétaires devraient ne pas permettre à
quiconque de toucher cet équipement sauf s’ils
sont plus de 18 ans, soient correctement formés et
supervisés, et avoir lu et compris ce manuel.
Les propriétaires doivent aussi veiller à ce qu'aucun
clients, visiteurs ou d'autres personnes non
autorisées d'entrer en contact avec cet équipement.
Il est de la responsabilité du propriétaire et de
l'opérateur de rester alerte à tous les dangers posés
par le fonctionnement de cet équipement.
S’il y a incertitude quant à une tâche particulière ou
la méthode appropriée d'utiliser cet équipement,
demandez à un superviseur expérimenté.
Déballage d’Equipment
JETEZ TOUS LES MATERIAUX D'EMBALLAGE EN RESPECTANT
L'ENVIRONNEMENT.
1. Retirer tout le matériel et la bande d'emballage, ainsi que tout
plastique de protection et de carton, à partir de l'unité.
2. Nettoyer les résidus de colle laissés par le plastique ou ruban.
3. Place the unit in the desired position and height. Placer l'appareil
dans la position et à la hauteur souhaitées.
GARDEZ LA BOITE ORIGINALE ET L’EMBALLAGE POUR UNE
UTILISATION D’EN EMBALLAGE ET DE TRANSPORT DE
L'APPAREIL SI VOUS AVEZ BESOIN DES SERVICES.
Fonction et Objet
Fonction et Objet
Cet appareil est destiné à être utilisé seulement pour des aliments de
friture en services alimentaires commerciaux. Il n'est pas destiné à
usage domestique, industriel ou de laboratoire.
Avant d'utiliser cet équipementn il faut le nettoyer et sécher
complètement (voir la Section "Nettoyage" à la page 8). Nettoyez
toutes les surfaces avant de l’utiliser. Si vous ne nettoyez les surfaces
avant d'utiliser l'appareil, il pourrait causer la contamination des
aliments.
Cette friteuse est un appareil à moyen capacité avec une grande
variété d'applications de friture.
Etiquettes d'avertissement
Ce manuel contient un certain nombre de
précautions à suivre pour aider à promouvoir une
utilisation sûre de cet appareil.
Tout au long de ce manuel, vous verrez les
supplémentaires avertissements pour vous aider à
alerter sur les dangers potentiels.
Les avertissements concernant votre sécurité personnelle sont
indiqués par:
AVERTISSEMENT
ATTENTION
CAUTION
HOT
⚠ CAUTION
Hot surface.
Do not touch.
Disconne ct power
supply and a llow
surface t o cool
before ser vicing.
⚠ ATTENTION
Surface chaude.
Ne pas toucher.
La puissa nce de
déconnex ion électr ique
et laisser r efroidir la
surface avant l'en tretien.
Avertissements relatifs à l’endommagement éventuel de l'équipement
sont indiquées par:
AVERTISSEMENT
ATTENTION
NOTE
La note est utilisée pour informer les utilisateurs des informations
importantes concernées à l'installation, à l'opération ou l’entretien,
mais pas de danger.
S'il vous plaît rappelez-vous que ce manuel et les
étiquettes d'avertissement ne remplacent pas la
nécessité d'être vigilant, de bien former et superviser
les opérateurs, et d'utiliser le bon sens lors de
l'utilisation de cet équipement.
Mise à la terre correcte
Cette machine est équipée d'une che à trois
broches. La prise sur laquelle cette che est
branchée doit être correctement mise à la
terre. Si la prise n'est pas le type de mise
à la terre, contactez avec un électricien.
NE PAS, en aucun cas couper ou enlever la
troisième broche de terre à partir du cordon
d'alimentation ou utiliser un adaptateur.
UTILISER UNE PRISE AVEC MIS E
À LA TERRE NE PAS AJOU TER UN
ADAPTATEUR SUR LA FICHE
WINCO / DWL Industries Co. 15
Page 16

Guide d’installation
1. La friteuse ne doit pas êtreinstallée sous les matières
combustibles et la distance minimale à partir desmatériaux
combustibles doit être de 6 "(15cm) sur les côtés et l'arrièrede
la friteuse. Les alentours de la friteuse doivent être maintenus à
l'écartdes matières combustibles.
2. Toutes les friteuses doivent être installées avec au moins 16
"(40,6cm) d'espace entre la friteuse et les surface des ammes à
partir de matérielde cuisson adjacent.
3. L'équipement doit être installé par personne qualiée
conformément aux lois fédérales, provinciales etlocales
4. La friteuse doit êtreinstallée sous une hotte en conformité avec
la dernière édition de laNorme Pour le Contrôle de Ventilation
et laProtection contre l'Incendie des Opérations de Cuisson
Commerciaux, lanorme NFPA 96.
5. Si un extincteur est utilisé pour une amme de l'huile, assurezvous degarder extincteur à une distance de deux pieds de la
friture pour éviter leséclaboussures d'huile.
6. Placez la friteuse de sorte que les pieds avant sont au moins 4
pouces dubord du comptoir. Cela permettra de réduire la possibilité
de la friteuse àêtre accidentellement poussé hors du comptoir.
7. Gardez la zone à l'avant de la friteuse pour un accès libre pendant
l’opération.
8. Eloignezl’appareil et le cordon d’alimentation desammes, des
brûleurs électriques ou de chaleur excessive.
9. Utilisez uniquement des prises de terre correspondant à la tension
nominale.
10. Ne pas utiliser de rallonge avec cetappareil.
11. Ne vaporisez pas le liquide ou agent sur l’appareil ou à l’extérieur
de l'appareil.
12. ATTENTION: Pour réduire le risquede choc électrique, cuisez
seulement dans le contenant amovible de la friteuse.
13. ATTENTION: Utilisez un ld'alimentation adapté à 750C.
14. ATTENTION: Un moyen decollecte de graisse approprié doit être
mis en place avant l’opération.
15. ATTENTION: Risque d'incendieou de choc électrique. Seulement
faites fonctionner cet appareil avec le potd'huile en place.
16. Utilisez le l en cuivre etaluminium pour les connexions d'alimentation.
NOTE
Si l'appareil est en panne, vous devez débrancher l'alimentation
électrique avant le service eectué par technicien qualié. EFS-32 doit
toujours avoir deux cordons branchés pour un bon fonctionnement, et
les deux cordons doivent être débranchés avant toute maintenance ou
entretien de l'équipement.
NE LAISSEZ JAMAIS UNE CORDON BRANCHE ET UN CORDON DEBRANCHE.
ATTENTION
x Risque de b rûlure.
AVERTISSEMENT
Ne touchez p as les surfaces ch audes ou chauées
liguid tout a ppareil chaue ou en fo nctionnement.
HOT
Les liquide s chauds et les aliment s peuvent brûler la peau . Laisser le liquide
chaud ref roidir avant de le manipu ler. Ne laiss ez pas tomber ou renver ser de
l'eau dans l'huile cha ude car elle peut provoq uer l’éclaboussement d'h uile
chaude sor tante de la cuve.
x
x
Faire chau er l'huile ave c précauti on. Si l'huile fu me, réduire l e feu. Ne pas lais ser l'apparei l sans
survei llance. Si le feu s e produit, é teindre l'appa reil, couvr ir jusqu'à ref roidissem ent. Ne pas
mettr e l'eau dans l'huil e chaude ou ena mmée. Ne fait es pas fonc tionner avec d e l'huile sous la
barre d'h uile. L’huile sale a u n point d'éclair p lus bas. Remp lacer l'huile s ur une base rég ulière.
Mainten ir le niveau d'hu ile correc t. Utiliser u n système d'éva cuation de la v apeur d'huile (c apot)
pour réd uire l'accumu lation de grai sse et d'huile s ur les surf aces de paroi o u de plafond.
Précautions de sécurité
1. L'appareil doit être utilisé uniquement dans une position plate et
horizontale.
2. Changez l'huile régulièrement ou selon le besoin (voir la Section
«Opération» à la page 7) la Vieuse huile sale a un point d'éclair
plus bas que l'huile propre.
3. Remplissez jusqu'au niveau d'huile correct. Ne remplissez
pas trop, (voir les points C et D dans la Section «Fonctions et
commandes» à la page 5)
4. Ne pas remplir le panier plus qu'à moitié plein.
5. L'huile chaude est inammable - éloignez les ammes nues de
l'huile chaude et des vapeurs d'huile.
6. Débranchez l'appareil, éteignez-le et laissez-le refroidir avant de
le nettoyer ou de déplacer.
7. Ne pas faire fonctionner sans surveillance.
8. N'utilisez pas l'appareil dans les lieux publics et/ou autour des
enfants.
9. L'appareil et/ou l'huile peut être chaud même si le voyant
d'alimentation ou le voyant Prêt de température n'est pas allumé.
10. Ne pas faire fonctionner si l'appareil a été endommagé ou ne
fonctionne pas correctement en tout cas.
11. Ne pas utiliser avec un cordon endommagé.
12. Ne pas accéder à l'interrupteur Reset de sécurité (voir
"Interrupteur Reset de sécurité» à la page 7) à moins que la
friteuse est en surchaue (la température de l’huile atteit 430 ° F).
13. Ne pas nettoyer l'appareil avec la laine d'acier.
14. Jetez l'huile d'une manière écologiquement responsable.
AVERTISSEMENT
Risque d 'incendie
La surch aue des vap eurs d'huile o u de l'huile peu t s'enammer et
provoqu er un incendi e. Surveille z la températu re, la qualité e t le
niveau d’ huile. Utili sez et entre tenez le sys tème d'éliminat ion des
vapeur s d'huile.
WINCO / DWL Industries Co.16
Page 17

Caractéristiques et commandes pour Friteuse à comptoir profonde (EFS-16 & EFT-32)
MOLETTE DE CONTROLE DE THERMOSTAT (Figure 1) Utilisé pour
A
A
G
H
J
E
F
I
EFS16
Poignée de
transpor t
Figure 1. Caractéristiques et commandes pour EFS-16 & EFS-32
K
E
régler ou ajuster la température de l'huile. Les chires surle cadran
correspondent à la température de l'huile.La position"0" pour s’éteindre.
b
INTERRUPTEURRESET DE SECURITE & COUVERCLE (Figure 2)
Retirez le couvercle pour accéder aubouton de Reset. Si l'huile atteint une
température de 430 ° F (221° C), ce commutateur coupe l'alimentationde
l'appareil. (L’interrupteur est surla face arrière de l'EFS-16, EFT-32) (Voir
lasection «Interrupteur Reset de sécurité» à la page 7).
HAUT NIVEAU D’HUILE (Figure 3) C'est le repèrede niveau maximum
c
pour le puits. Ne pas remplir avec l'huile au-dessus de cettemarque car il
peut causer l’débordement de l'huile après que le panier estrempli par les
aliments.
D
BAS NIVEAU D’HUILE (Figure 3) C'est le repère de niveauminimum
pour le bien. Ne faites pas fonctionner avec l'huile en dessous de ceniveau,
sinon l'huile peut être surchauée et provoquer un incendie.
E
POIGNEE DE LEVAGE DEPUITS (Figure 1) Utilisée pour soulever le puits
dans et hors de l'unité d'élimination deshuiles et de nettoyage.
F
PUITS AMOVIBLE (Figure 1) C’est la placepour contenir l’huile et réaliser
la cuisson. L'élément chauant est suspendudans cette composante.
G
VOYANT DE PRET DE TEMPERATURE (Figure 1) Ce voyant indiqueque
l'élément est chaué. Une fois la température atteinte, le voyants'éteint.
L’appareil continuera à maintenir la chaleur et la la températureavec le
cycle ON/OFF. Ce n'est pas un voyant "ON / OFF".
H
VOYANTD’ALIMENTATION (Figure 1) IlIndique que l'appareil est
branchéet mis sous tension.
b
L’interrupteur
Reset de
sécurité s e situe
à l'arrière de
l'appareil
Figure 2. Interrupteur Reset de sécurité pour EFS-16 & EFT-32
O
c
D
M
P
L’éléme nt chauant
sera sou s
couvercl e
de l'élément
ASSEMBLAGE DEPANIER DE FRITURE (Figures 1/4)) Avec la poignée
I
amovible.
J
SUPPORTVERTICAL D’ELEMENT (Figure 1)
K
BARRE DE SUPPORT DE PANIER (Figure 1)
L
CROCHETES DE PANIER (Figure 4)
COUVERT D’ÉLÉMENT EN TREILLIS MÉTALLIQUE (Figure 3/4)
M
COUVERCLE DE PUITS (Figure 4)
N
O
TETE D’ALIMENTATION ELECTRIQUE (Figures 3/6/7)
P
TETE D’ALIMENTATION ELECTRIQUE (Figures 3/7)
M
I
L
N
Figure 4. Panier et AccessoriesFigure 3. Indicateur du niveau d'huile à l’intérieur du puits
WINCO / DWL Industries Co. 17
Page 18

Opération Conseils pour huile
Suivez les mêmes instructions pour chaque puits d'une unité à deux puits.
L’opération de chaque puits est indépendante et peut fonctionner
à des températures diérentes.
1. EFT-32 nécessite l'utilisation de deux cordons. Veillez à débrancher les
deux cordons avant de déplacer, tester ou réparer ce produit
2. Retirez le(s) panier(s) (I) de la friteuse.
3. Insérez le couvert d’élément en treillis métallique
1. Insérez les deux
prises arrière
intérieure de
l'élément chauant
à la position A.
2. Poussez les deux
prises sur l'élément
chauant à l'avant,
de sorte que les
A
1. 2.
prises soient juste
A
à l'extérieur de
l'élément chauant
à la position B.
B
(M). (Figure 5)
B
Figure 5. Insérez le couvert d’élément en treillis métallique (M)
4. Remplir ou ajouter de l'huile / le shortening solide pour le puits (F).
Toujours maintenir le niveau d'huile entre le Haut niveau d'huile (C) et le
Bas niveau d'huile (D) comme indiqué sur le support vertical d'élément (J).
(Voir Figure 1) Ne pas remplir trop ou pas assez.
5. Réglez la Molette de contrôle de thermostat (A) à la température désirée;
le Voyant de Prêt de Température (G) indique lorsque les éléments sont
mis sous tension. Si la graisse végétale solide est utilisé, enveloppez
l'élément chauant autour de la graisse et réglez la température entre
200 ~ 250 ° F pour que la graisse puisse fondre lentement car il couvre
les éléments chauants. La graisse fondue ne doit pas dépasser le repère
de haut niveau, ni devrait pas descendre en dessous du repère de niveau
bas trouvé sur le support vertical d'élément (J). Cela permettra de réduire
la fumée et le risque d'incendie.
6. Préchauez l’huile pour atteindre la température de cuisson
recommandée. Lorsque le Voyant de Prêt de Température (G) réalise un
cycle, l'huile atteint la température de consigne.
x
x
Risque d 'incendie
La surch aue des vape urs d'huile ou d e l'huile peut s'en ammer et provo quer un
incendi e. Surveille z la températu re, la qualité et le n iveau d’huil e. Utilisez et e ntretenez
le syst ème d'éliminati on des vapeur s d'huile.
AVERTISSEMENT
1. Utilisez l'huile qui est recommandée pour la friture des aliments.
2. Faites cuire à des températures qui sont recommandées par le fabricant
de nourriture.
3. Change oil when oil becomes noticeably darkened from food particles
that burn when subjected to prolonged heat. Changez l'huile lorsque
l'huile devient nettement assombrie par les particules alimentaires qui
brûlent lorsqu'ils sont soumis à un échauement prolongé.
4. Changez l'huile quand il y a une forte odeur nauséabonde ou lorsque
l'huile sent la nourriture cuite dans celui-ci.
5. Pour réutiliser l'huile, utiliser quelques couches de gaze pour ltrer les
particules en excès qu'après l'huile a refroidi.
6. Couvrir l'huile durant la nuit en utilisant le couvercle de puits (M) fourni.
Interrupteur Reset de sécurité
Les unités sont équipées d'un interrupteur qui coupe l'alimentation si
la température de l'huile atteint 430 ° F (221 ° C). Cet interrupteur a un
réarmement manuel. L’interrupteur Reset de sécurité est situé à l'arrière de
l'appareil (Figure 2).
L'interrupteur sera activé si la température de l'huile atteint 430 ° F. Avant
de réinitialiser l'interrupteur de sécurité, vérier ces causes.
Les causes possibles pour que l'interrupteur est activé sont les suivantes:
• Huile sale
• Trop peu d’huile dans le puits de friture
• Éléments chauants ne sont pas en position basse correcte
POUR RESET L’INTERRUPTEUR DE SECURITE DE TEMPERATURE:
1. Attendez jusqu'à ce que l'huile ait été refroidie à 300 ° F (149 ° C) ou
au-dessous.
2. Retirez le couvercle de l'interrupteur en dévissant dans le sens
antihoraire.
3. Utilisez un stylo ou similaire outil et appuyez sur le bouton RESET. Le
bouton doit rester dans la position enfoncée.
4. Replacez le couvercle du commutateur et xez-le en vissant dans le
sens horaire
S'il est impossible de reset l’interrupteur Reset de sécurité ou le
bouton Reset de sécurité continue à se déclencher, contactez avec le
Service technique WINCO.
7. Sécher les aliments ou enlever les glaces dans les aliments avant la friture.
8. Remplissez chaque panier, JAMAIS plus de la moitié pleine.
9. Abaisser avec précaution le panier dans l'huile de cuisson. Les
aliments doivent rester dans la friteuse respectant le temps de cuisson
recommandé par les fabricants de nourriture.
10. Lorsque la friture d’aliments est terminée, accrochez le panier sur la
barre de support de panier (K) à l'aide des crochets de panier (L). Cela
permettra à l'excès d'huile de s'écouler dans le puits. Préparez comme
indiqué par le fabricant de nourriture.
O
La tête d’alie mntation
élect rique amovible se
glisse fa cilement dans et
hors du po rteur à l'arrière
de l'appareil .
Figure 6. Retrait / remplacement de la tête d’aliemntation électrique
WINCO / DWL Industries Co.18
Page 19

Nettoyage
NOTE
Pour conserver l'apparence et augmenter la durée de
vie, nettoyez votre unité tous les jours.
1. Débranchez l’appareil.
2. Laissez refroidir l’appareil et l’huile complètement avant le nettoyage.
ATTENTION
x Risque de brûlure.
AVERTISSEMENT
Ne touchez pas les surfaces chaudes ou chauées liguid
tout appareil chaue ou en fonc tionnement.
HOT
Ne touchez pas le liquide chaud ou les surfaces de chauage lorsque l’appareil
chaue ou en fonctionnement.
3. Ne pas immerger le cordon, la che ou la tête électriqueamovible (0)
dans l'eau ou tout autre liquide.
x
x
Ne pas pulv ériser de l'eau ou de s produits de ne ttoyage. Le liq uide pourrai t contacter ave c les
compos ants électr iques et caus er un court-ci rcuit ou un choc é lectrique . Ne pas utiliser l'ap pareil si
le cordon d 'alimentation e st endommagé. ou a é té modié.
4. Retirez la tête d'alimentation électrique (O) et le couvert d’élément
en treillis métallique
5. Retirez les grosses particules de nourriture du puits à l'aide d'une
écumoire ou d'une spatule.
O
Pour facil iter le nettoyag e,
la tête d’alimen tation
élect rique amovible et
l’élément de ch auage
peuvent êt re complètement
séparés d e l’unité de base
P
Figure 7. Préparation au nettoyage de l'unité
6. Retirez soigneusement le(s) puits (F) de l'unité pour lter ou jeter
l'huile usée.
7. Attacher 2 ou 3 couches de gaze sur le dessus d'un bucket vide,
laissant du mou dans la gaze pour garder l'huile de déborder les
bords du bucket lors de la vidange du puits.
AVERTISSEMENT
Risque de c hoc électri que
Conser ver l'eau et d'autres li quides de péné trer à l'intérieu r de
l'apparei l. Liquide à l'intér ieur de l'apparei l pourrait prov oquer un
choc éle ctrique.
(M)
. (Figure 7)
NE PAS immerg er la tête
d’aliment ation électr ique
amovibl e dans l’eau
M
LE BUCKET DOIT ETRE ASSEZ GRAND POUR CONTENIR TOUTE
L'HUILE DANS LE PUITS. ASSUREZ QUE L'HUILE AIT REFROIDI. NE
PAS ENLEVER OU NETTOYER L’HUILE CHAUDE.
8. Egouttez l'huile à travers une étamine dans le bucket.
NOTE
NE PAS NETTOYER L'APPAREIL AVEC LAINE D'ACIER
9. Utilisez un chion humide ou une éponge imbibée d'eau
savonneuse pour nettoyer l'appareil et le(s) puits (F); rincez et
séchez soigneusement. Peut aussi remplir le(s) puits (F) avec l'eau
et le liquide vaisselle. Abaissez la tête d’alimentation électrique
(0) à la position basse. Le mélange de l'eau savonneuse peut alors
être chaué à environ 200 ~ 250 ° C pendant quelques minutes,
pour nettoyer l'appareil. Il est important : si l'appareil n’est pas
séché sec, cela fera l'élément de brûler.
10. Assurez-vous que la tête d’alimentation électrique (0) et les
cordons ne sont pas en contact avec de l'eau. Pulvérisez la
solution de nettoyage sur un chion doux et essuyez l'appareil.
11. Rincez complètement.
12. Après le nettoyage, séchez complètement.
NOTE
UNE TRES PETITE QUANTITE D’EAU SAVONNEUSE DANS LE
PUITS PEUT RUINER L'HUILE. L'EAU RESTANT DANS LE PUITS
CAUSE LA VIOLENTE BOUILLANTE ET LA PULVERISATION
QUAND L'HUILE EST CHAUDE
13. Nettoyage d’élément chauffant (P):
Si le carbone considérable accumulée sur l'élément chauant
(s) (P), il peut être brûlé en actionnant l'appareil avec un puits
sec à 250 ° F (121.1 ° C) pendant quelques minutes. La friteuse
s'arrête automatiquement, qui servira également comme un
test de l'interrupteur Reset de sécurité (B). (Reportez-vous à
«Interrupteur Reset de sécurité» à la page 6). Tournez la molette
de commande du thermostat (A) vers la position "OFF" et brossez
le carbone et nettoyez et séchez le puits complètement.
14. Nettoyage des surfaces extérieures:
Gardez toutes les surfaces de l'appareil sans raccourcissement
éclaboussé ou d'autres particules étrangères par lavage à l'eau
chaude et savonneuse. Rincez et essuyez l'excès d'eau. Polissez
avec un chion sec et doux.
WINCO / DWL Industries Co. 19
Page 20

Tableau de dépannage
QUESTION PEUT ETRE CAUSEE PAR RECOMMENDED SOLUTION
L'appareil n'est pas branché Vériez la source d'alimentation, branchez l’appareil.
L’interrupteur d'alimentation n'a pas été activé Vériez que l'appareil est correctement branché et
Power On/O est allumé.
Fiche/cordon endommagé Appelez le service
Friteuse ne fonctionne pas
L'huile n'est pas chauée et le
voyant Prêt de température est
allumé
L’huile est trop chaude
Le voyant Prêt de température
ne s’allume pas, mais la friteuse
fonctionne normalement
Les débris d'aliments coincés sur ou entre l'élément
de chauage
L’interrupteur Reset de sécurité est activé
Aucune de ces réponses ci-dessus. Appelez le service
Le thermostat ou élément chauant est en panne. Appelez le service
L’interrupteur Reset de sécurité est activé.
Le niveau d’huile est bas. Éteignez l'appareil, laissez refroidir, puis ajoutez l'huile
Défaillance de la commande du thermostat Appelez le service.
Voyant défectueux Appelez le service
L’huile a atteint la température désirée/prévue
Il est recommandé d'utiliser un thermomètre pour
vérier la température désirée.
Trop d’huile dans le puits Réduire la quantité d'huile dans le puits.
Débranchez l'appareil, laissez l'unité refroidir,
puis nettoyez l’élément pour éliminer les débris.
alimentaires
Les causes possibles sont: l'huile sale, trop peu d'huile
dans le puits de friture, ou les éléments de chauage
ne sont pas en position correcte.
ou
Reportez-vous à «Interrupteur Reset de sécurité" de
ce manuel. Si le problème persiste, contactez le service
Les causes possibles sont: l'huile sale, trop peu d'huile
dans le puits de friture, ou les éléments de chauage
ne sont pas en position correcte.
ou
Reportez-vous à «Interrupteur Reset de sécurité" de
ce manuel. Si le problème persiste, contactez le service
jusqu'à ce qu'il soit au-dessus du bas niveau d'huile.
Utilisez la friteuse normalement.
L’huile est bouillonnée sur le
dessus lors de la friture
Trop d’aliments dans le panier Réduire la quantité d'aliments dans le panier.
Trop d’eau dans les aliments Sécher les aliments ou enlever les glaces dans les
Entretien et réparation
Voici aucune pièce réparable dans cet appareil.
Pour éviter des blessures graves ou des dommages, ne tentez jamais
de réparer l'appareil ou de remplacer le cordon d'alimentation
endommagé par vous-même. NE PAS envoyer de l'unité chez WINCO
aliments avant la friture.
sans avoir contacté avec notre service de clientèle.
Voir la Section «Garantie limite d’équipement» à la page 11 pour plus
de détails.
WINCO / DWL Industries Co.20
Page 21

Schéma de câblage
THERMOSTAT
122~374°F (50~190°C) 16A 250Vac
ALIMENTATION
ELECTRIQUE
120V CA 60Hz
EFS-16 & EFT-32
TERR E
INTERRUPTEUR DE FIN DE COURSE
20.5A 125V T125
VOYANT
D’ALIMENTATION
ÉLECTRIQUE
120V
VERT
VOYANT DE
PRÊT DE
TEMPÉRATURE
120V
ROUGE
INTERRUPTEUR RESET DE SÉCURITÉ
446°F (230°C) 16A 250V T125
ELEMENT DE
CHAUFFAGE
1800W \ 120V
WINCO / DWL Industries Co. 21
Page 22

Garantie Limite d’Equipement
Les appareils commerciaux WINCO sont garantis lorsqu'ils sont
installés conformément aux instructions de ce manuel et soumis à des
conditions normales d'utilisation.
Les appareils commerciaux WINCO ne sont garantis que pour le
premier acheteur du détaillant/distributeur.
Les équipements WINCO (pièces et main-d'œuvre) sont garantis pour
une période d'un (1) an à compter de la date d'achat, à condition que
l'enregistrement de la garantie de produit a été reçu par WINCO dans
les 30 jours à compter de la date d'achat.
Des exemples de circonstances non couvertes par la garantie WINCO,
mais ne se limite pas à ces conditions sont les suivantes:
• Cas de force majeure, d’incendie, de dégâts par eau, de
cambriolage, d’accident et de vol.
• Dommage par transport.
• Modication ou installation incorrecte d’équipement
• Utilisation de pièce d’après-vente ou générique
• Services eectués par une personne autre qu'un technicien agréé.
• Lubriants non autorisés.
• Usure normale des pièces, y compris les pieds, fusibles,
interrupteurs, lampes, etc.
• Nettoyage inapproprié ou utilisation de produits de nettoyage
inappropriés sur appareil
• Mauvaise utilisation ou abus (ce qui inclut mais ne se limite pas à
faire tomber l'appareil ou l'un de ses composants).
PROCÉDURE POUR PRÉSENTER
UNE DEMANDE DE GARANTIE
La garantie ne peut être honorée si l’enregistrement de la
garantie n'a pas été préalablement soumis à WINCO dans les 30
jours suivant l'achat.
Les tentatives pour appareil par personnel non autorisé peut
annuler la garantie.
1. L’enregistrement de la garantie doit être reçu dans les 30 jours à
compter de la date d'achat.
2. L’AUTORISATION DE RETOUR DOIT ETRE DELIVREE
par le Service de clientèle WINCO. Pour service de garantie
Ouest de la Rivière Mississippi, contactez avec le
Service de clientèle @ WINCO
12765, 166ème Rue,
Cerritos, CA, 90703
Est de la Rivière Mississippi, contactez avec le
Service de clientèle @ WINCO
65, Rue Industrielle,
Lodi, NJ, 07644
Tél: 1-888-946-2682
E-mail: warranty@wincous.com
3. Il vous sera demandé de fournir les informations telles que # item,
date d'achat, ticket de caisse, société/revendeur, article acheté et
une description détaillée du problème que vous rencontrez.
4. Le représentant du Service de clientèle déterminera le meilleur
plan d'action. S'il est déterminé que l’article doit être retourné,
une autorisation de retour sera émise. On vous donnera plus de
détails sur la façon de procéder au retour.
5. Si l'article doit être retourné à WINCO, il doit être emballé dans
son carton d'origine. Cela garantit qu'il n'y aura pas endommagé
durant le transport de l'article de revenir à WINCO. Les dégâts
causés ne seront pas couverts par la garantie
NOTE:
• Le Fret à nos centres de réparation doit être prépayé. Nous
vous recommandons fortement de CONSERVER L'EMBALLAGE
ORIGINAL pour la durée de cette garantie. WINCO ne sera pas
responsable pour toute réclamation de dommages-intérêts qui
peuvent survenir pendant le transport entrant à notre centre de
service.
• Le fret sur les services de retour ou les remplacements seront
prépayés par WINCO, le fabricant.
• Cette garantie ne couvre pas les pannes causées par: un
mauvais entretien tel que décrit dans nos manuels d'opération,
la négligence, l'abus, les dommages dus à l'excès d'eau, le
feu, l’installation incorrecte, ou l'utilisation incorrecte ou les
défectueux systèmes électriques.
• WINCO se réserve le droit d'inspecter les retours et de
déterminer si le produit reçu présente l'un des signes de
mauvais usage ou d'abus comme indiqué ci-dessus.
LES DISPOSITIONS DE LA GARANTIE CIDESSUS SONT UNE
DÉCLARATION COMPLÈTE ET EXCLUSIVE ENTRE L'ACHETEUR ET
WINCO. WINCO N'ASSUME NI N'AUTORISE TOUTE PERSONNE À
ASSUMER QUELQUE AUTRE OBLIGATION DE RESPONSABILITÉ
EN RELATION AVEC CE MATÉRIEL.
Tél: 1-888-946-2652
WINCO / DWL Industries Co.22
Page 23

En cas d'incendie
Contactez avec le service d'incendie local !
Déconnectez l’unité de l’alimentation électrique !
Cela permettra de couper l'alimentation électrique des éléments
chauants et laisser l'huile refroidir, réduire la température de point
d'éclair et le rendre plus facile d'arrêter le feu.
Couvrez immédiatement le puits avec le couvercle
de puits et/ou la couverture ou toile lourd non
inflammable.
Cela permettra de faire isoler l'oxygène au feu.
ATTENTION!
NE PAS tenter decombattre un feu de graisse par la
pulvérisation de l'extincteur directementsur
le raccourcissement de brûlure.
Vaporisez l'extincteur sur le couvercle de puits ou la
couverture non-inflammable.
Cela permettra de sceller l'oxygène supplémentaire ainsi d’étouer
le feu.
IMPORTANT
NE PAS enlever la couverture ou le couvercle jusqu'à
l'arrivée des pompiers. L'huile peut se rallumer.
C’est un équipement à haute tension, assurez-vous
que la déconnexion principale est sur "OFF" avant de
procéder.
La force peut provoquer le raccourcissement de combustion à pulvériser
surles équipements avoisinants ce qui rend dicile de contenir le feu.
Utilisez uniquement un extincteur rempli avec CO2ou Halon
pour les liquides inammables et huiles appropriées pour
l'équipementélectrique alimenté.
NE PAS utiliser l'eau ou l'extincteur à base d’eau sur un feu de graisse.
WINCO / DWL Industries Co. 23
Page 24

 Loading...