

Page 1
Page 1 of 8
DO NOT
LIFT OR CHANGE CHAIR POSITION BY USING THE LEGREST.
PLEASE READ AND FAMILIARIZE YOURSELF WITH ALL INSTRUCTIONS BEFORE USING THIS PRODUCT.
before attempting to use this product; otherwise injury may occur.
5900 Weight Capacity = 275 lbs. (124.7 kg)
PLEASE READ AND FAMILIARIZE YOURSELF WITH ALL INSTRUCTIONS BEFORE PROCEEDING WITH ASSEMBLY
Winco assumes no responsibility for damage or injury caused by the improper assembly, installation
5900
Comfort Care, Elite Recliner
CUSTOMER INSTRUCTIONS
If you have trouble understanding these instructions contact your dealer or Winco customer support, (800) 237-3377
or use of these products; or during assembly or maintenance of these products.
1. READ AND FOLLOW ALL DIRECTIONS.
2. NEVER use side table as a seat.
3. DO NOT put hands, feet or clothing into any openings when changing positions on recliner. Attendant
MUST confirm that users hands and feet are safe while changing recliner positions or SERIOUS
INJURY MAY RESULT.
4. Stay clear of the recline mechanisms.
5. Periodically, recheck tightness of all nuts, bolts and screws.
6. Never use the chair arms or backrest as a seat; SERIOUS INJURY MAY OCCUR.
7. Lock casters at all times, except when transporting chair.
8. Chair must ALWAYS be positioned on a level surface.
9. DO NOT use recliner for Transporting in or with ANY type of vehicle or trailer. Winco recliners have not
been tested or approved for use by an occupant in any type of vehicle or trailer.
10. Immediately remove from service; Any recliner with broken recline mechanisms, torn upholstery, or
other mechanical or visible damage.
11. USE ONLY WINCO AUTHORIZED REPLACEMENT PARTS.
12. NEVER EXCEED the recommended weight capacity of 275 lbs. (124.7 kg).
13. SAVE THESE INSTRUCTIONS for future reference and training.
TO REDUCE THE RISK OF INJURY TO PERSONS:
THIS COULD CAUSE INJURY TO USER OR DAMAGE TO THE RECLINE MECHANISM AND WILL VOID WARRANTY.
ALWAYS CHANGE POSITION FROM BACK OF CHAIR.
Assembly Instructions - NO TOOLS REQUIRED
Install the Back:
1. After checking your product for any shipping damage, chair needs to be positioned upright on level surface.
Remove all packing material and hardware that was secured for shipping. Remove tape and plastic. If using
scissors or knife, please be careful not to damage upholstery.
2. Make sure footrest is in closed postion & LOCK ALL CASTERS before installing chair back.
006275 Rev I Date 06-27-13 JWC
Page 2
Page 2 of 8
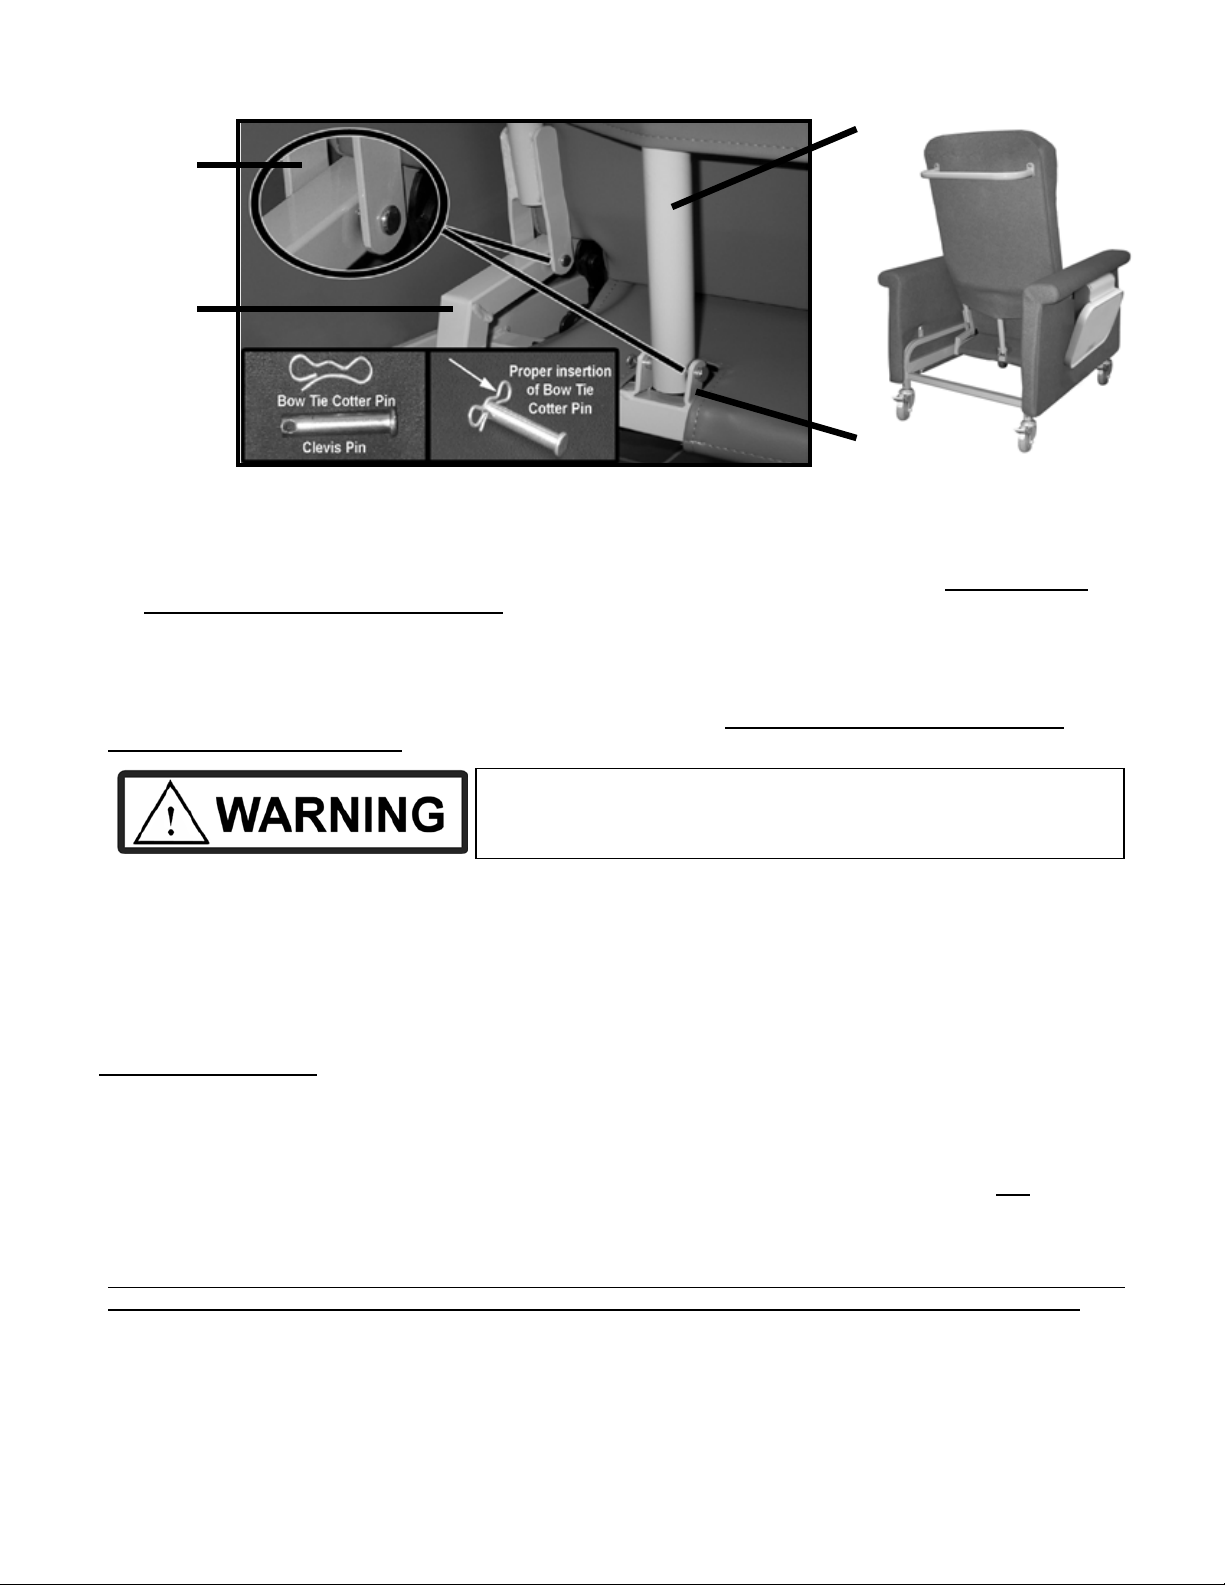
Failure to correctly install clevis pins connecting Back Frame fork holes
Back Support
Strut
Angled
Bracket
Seat
Frame
Back Frame
Forks
REAR of Chair
3. Remove the (2) Bow Tie Cotter Pins and the (2) Clevis Pins from the lower Back Frame Forks. DO NOT
LOOSE THESE PARTS, YOU WILL NEED THEM AGAIN!
4. Using a second person to help; Position the Back Frame Forks over the Seat Frame and align Backframe
Fork holes with holes in Seat Frame Rail.
HINT: If you do not have a helper; Rest the bottom of the Upholstered Back on the rear portion of the seat and
push the Back Assembly slightly forward to help steady the chair back.
5. Use (1) one of the Clevis Pins (with tapered end) and insert it THROUGH the aligned holes on Back
Frame Fork and Seat Rail Tube. REPEAT FOR OPPOSITE SIDE OF CHAIR. (see above Clevis Pin Install photo)
6. Insert (2) two Bow Tie Cotter Pins, into the small holes on ends of the (2) two Clevis Pins you just installed.
7. Remove Bow Tie Cotter Pin and Clevis Pin from the loose end of the Back Support Strut (Strut is attached
to center of backframe).
8. Align the holes on the loose end of the Back Support Strut with the holes in the Angle Brackets (on chair
frame) and insert the Clevis Pin into these aligned holes and secure with the Bow Tie Cotter Pin.
and Seat Frame Rail holes, will cause back to operate poorly and may
cause injury to the user or damage the chair and void warranty.
Operation of the Chair:
9. This recliner has three (3) pos itions; UPRIGHT, SEMI-RECLINE, and R ECLINE, which can be achieved by
user or attendant.
10. This chair is equip ped with T otal Lock caster s. Steppin g on the brak e tab will l ock the whe el and the swiv el
mechanism of the caster for added safety and security.
NOTE: Optional Rigid Caster s do not lock.
To ensure proper operat ion of the reclining mec hanism, lubricate all pivot points with a silicone type lubric ant (or
lubricant approved by your facility) at least twice yearly. Periodically recheck tightness of all screws and bolts.
Wrinkles in Vinyl – Storage and shi pping can cause wrinkles of the vinyl on your W inco chair. This is normal.
Please allow 1-2 weeks at room temperature (approx. 70 degrees) to allow for vinyl to expand back to original
appearance
006275 Rev I Date 06-27-13 JWC
Page 3
HEAT
MASSAGE
-OR-
HEAT ONLY
NOTE:
HEAT & MASSAGE OPTIONS
Control is located on the inside of right arm of chair.
Heating:
3 Lights
2 Lights
1 Lights
No Light
Allow 5-8 minutes for back and seat to warm to desired TEMP. setting.
Heat will automatically shut off after approximately 60 minutes.
(Timer resets when switch is pressed)
Massage (optional):
1X
2X
3X
4X
5X = Alternating Upper & Lower Back / High Intensity
6X
Massage will automatically shut off after approximately 15 minutes. (Timer resets when switch is pressed)
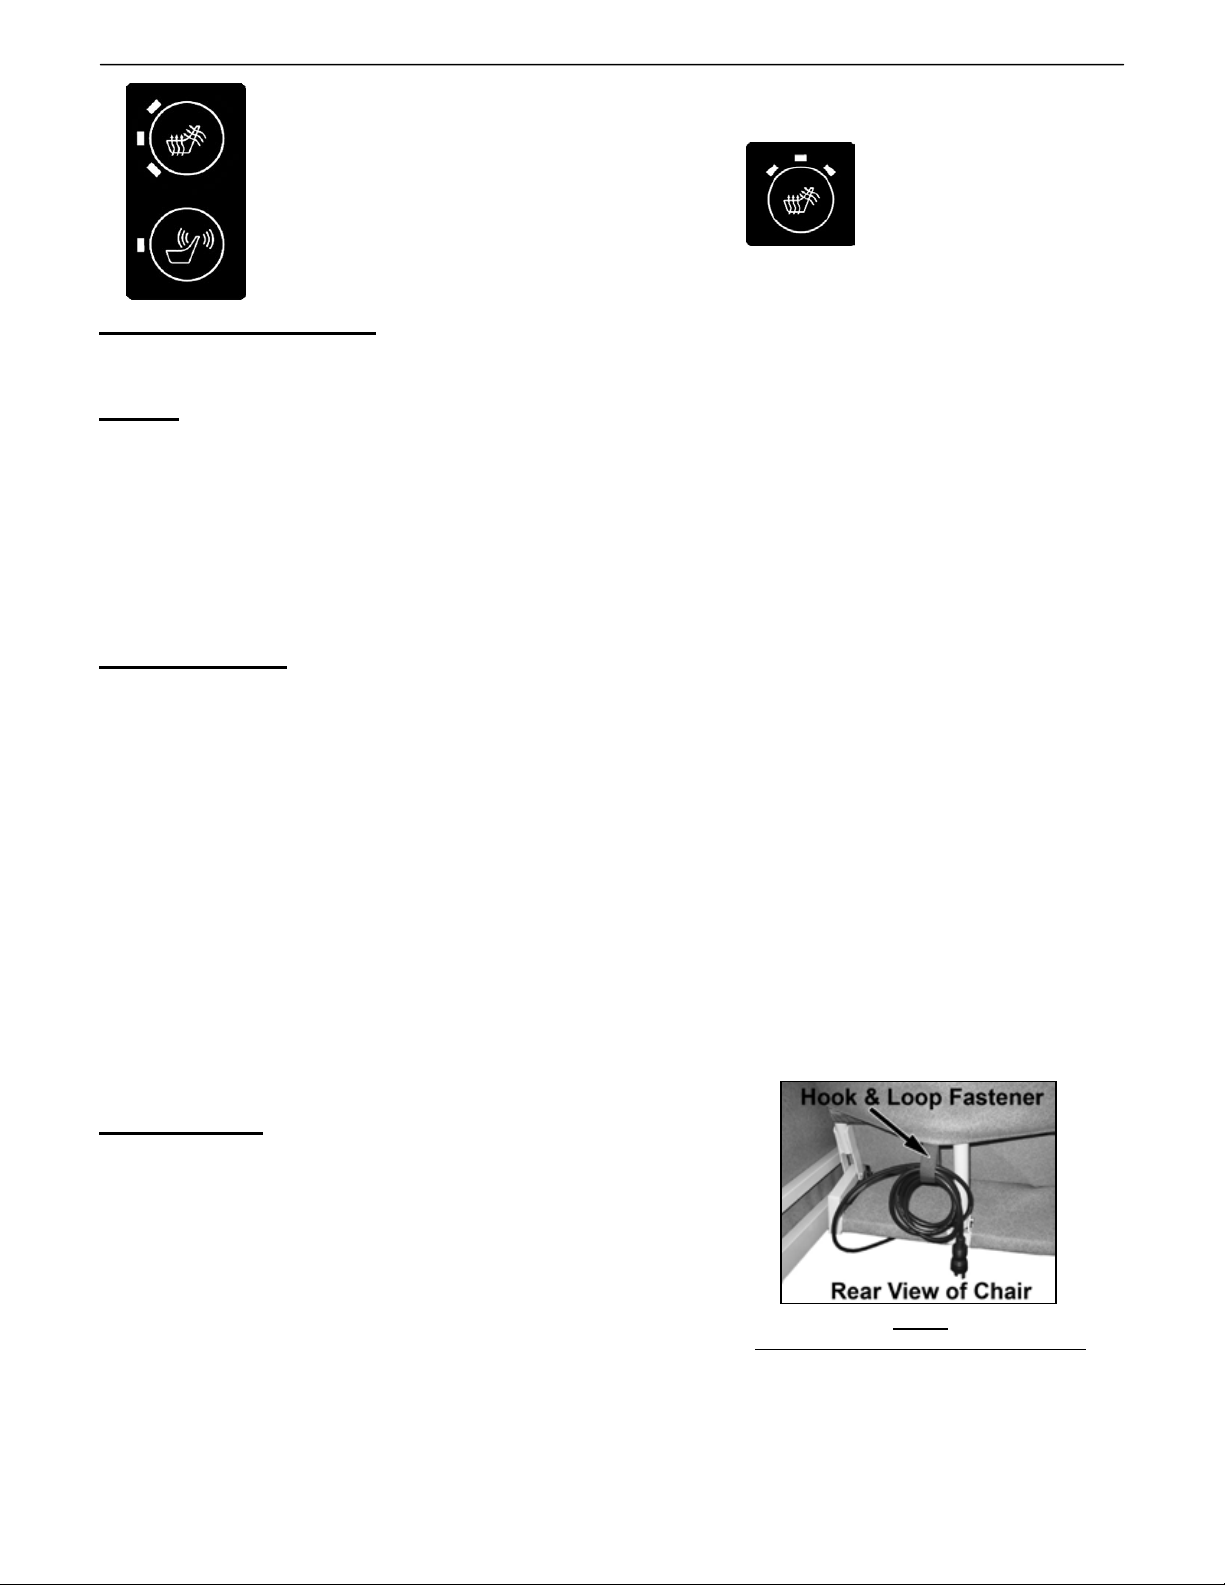
CORD STORAGE
(Models with Heat-HT or Heat & Massage-HM)
1. Before transporting chair, or when heat & massage is
not in use, power cord should be coiled and stored in
the "Hook & Loop" fastener provided as shown, to
prevent tripping on cord, damage to cord, damage to recliner, etc.
006275 Rev I Date 06-27-13 JWC
Push
= High Heat
= Medium Heat
= Low Heat
= HEAT OFF
= Lower Back / Low Intensity
= Lower Back / High Intensity
= Upper & Lower Back / Low Intensity
= Upper & Lower Back / High Intensity
= MASSAGE OFF
Use a DAMP CLOTH ONLY to clean switch, wiring or power pack (located under seat frame).
•
If there is no heat or massage or flashing light on switch - check power cord connections to wall outlet AND
•
connection of power cord to power pack unit under chair.
If switch displays a flashing light; Check all accessible wire connectors under chair for possible loose
•
connections, then contact Winco customer service: 1-800-237-3377.
Models with Heat-HT or Heat & Massage-HM)
- (
button – See indicator light on switch
HEAT
Push
MASSAGE
button
Page 3 of 8
Keep cord CLEAR of any moving parts
Page 4

Page 4 of 8
FOR PRODUCTS WITH POWERED OPTIONS (Heat, Massage, etc...)
Read all instructions before using this product.
IMPORTANT SAFETY INSTRUCTIONS - SAVE THESE INSTRUCTIONS
To reduce the risk of electric shock when using an electrical appliance, basic precautions should always
be followed, including the followi n g :
DANGER - Always unplug this product from the electrical outlet before cleaning, maintenance or when putting on or taking
off parts.
WARNING:
1. Unplug this product from the electrical outlet if this product is not to be used for extended periods of time.
2. Supervision should be provided when this product is used by, on, or near children, invalids, or disabled persons.
3. Use this product only for its intended use as described in this manual. Do not use attachments not recommended
by the manufacturer.
4. Never operate this product if it has a damaged cord or plug, if it is not working properly, if it has been dropped or
damaged, or dropped into water. Return the product to an authorized Winco service center.
5. DO NOT carry or pull this product by power supply cord or use the cord as a handle.
6. Keep the cord away from heated surfaces.
7. Do not use outdoors.
8. To disconnect, turn all controls to the "off" position, then remove plug from outlet. Do not "yank" cord.
9. Clean switch with a damp cloth only – Warranty will be VOID if liquid is introduced into switch mechanism.
10. Use only a certified extension cord that is rated at 15 amperes; extension cords rated for less amperage may
over heat. Care should be taken to arrange the cord so that the cord cannot be pulled or tripped over.
11. DO NOT run recliner or other equipment over cord.
12. Recliner comes with a grounded three blade plug, if the plug does not fit into the outlet; contact a certified
electrician to install the proper outlet. DO NOT MODIFY THE PLUG IN ANY WAY.
DANGER:
i) Never insert pins, or attach other metallic fasteners into/onto the upholstery of this chair.
ii) Do not use this product if the covering shows signs of deterioration, such as checking, blistering, or cracking.
iii) KEEP DRY - Do not operate in a wet condition or environment.
WARNING:
i) Long term, continuous exposure to heat may cause burns. It is recommended that skin in contact with heated area be
checked for redness and blistering during long term usage. Do not use on an infant, invalid or unconscious person. Do not
use on insensitive skin or on a person with poor blood circulation. If you are uncertain if you should use this product, please
consult your physician about the use of heat and massage.
ii) Do Not Crush/Pinch heating elements or wiring.
WARNING: Connect this product to a properly grounded outlet only.
GROUNDING INSTRUCTIONS:
This product must be grounded. If it should malfunction or breakdown, grounding provides a path of least resistance for electric
current to reduce the risk of electric shock. This product is equipped with a cord having an equipment-grounding conduc t or
and a grounding plug. The plug must be plugged into an appropriate outlet that is properly installed and grounded in
accordance with all local codes and ordinances.
DANGER - Improper connection of the equipment-grounding conductor can result in a risk of electric shock. Check with a
qualified electrician or serviceman if you are in doubt as to whether the product is properly grounded. Do not modify the plug
provided with the product - if it will not fit the outlet, have a proper outlet installed by a qualified electrician.
This product is for use on a nominal 120-volt circuit and has a grounding plug. Make sure that the product is connected to an
outlet having the same configuration as the plug. No adapter should be used with this product.
For an added level of safety; Winco recommends the use of a 120 volt GFCI (ground fault circuit interrupter) outlet.
006275 Rev I Date 06-27-13 JWC
Page 5

(MDD 93/42/ECC
Visit our website www.wincomfg.com/product-documents/parts-lists for a complete parts list catalog of your chair or
006275 Rev I Date 06-27-13 JWC
Products with the following markings are intended for commercial use only.
MDSS GmbH
Burckhardtstr. 1
D-30163 Hannover
Germany
SYMBOLS
call Customer Service @ 1-800-237-3377 to request it by mail.
Page 5 of 8
Page 6

Page 6 of 8
Other Quality Winco Medical Furnishings You May Be Interested In:
Visit us online at www.wincomfg.com
006275 Rev I Date 06-27-13 JWC
Page 7

Page 7 of 8
006275 Rev I Date 06-27-13 JWC
Page 8

Page 8 of 8
Design, appearance, parts, & construction are subject to change without notice
006275 Rev I Date 06-27-13 JWC
 Loading...