

Page 1

Licensee
Winchester Supreme Over/Under Shotgun Owner’s Manual
Page 2

Important instructions for
Winchester Supreme
Over/Under Shotgun
Customer Service Department (United States)
U. S. Repeating Arms Company, Inc.
275 Winchester Avenue
Morgan, Utah 84050-9333
Phone: 1-800-945-5237
If you have any questions or comments regarding your new
firearm, please feel free to write or call us.
below to record information about your new firearm.
Model _________________________________________
Serial Number __________________________________
Purchased From _________________________________
Date of Purchase ________________________________
Winchester trademarks licensed from Olin Corporation.
PRINTED IN U.S.A. EP01021/00445
Use the space
Contents Page
Gun safety warnings . . . . . . . . . . . . . . . . . . . . . . . . . .1
General description . . . . . . . . . . . . . . . . . . . . . . . . . . .2
General operation . . . . . . . . . . . . . . . . . . . . . . . . . . . .3
Terminology and descriptions . . . . . . . . . . . . . . . . . . .5
Serial number . . . . . . . . . . . . . . . . . . . . . . . . . . . . . . .8
Ammunition . . . . . . . . . . . . . . . . . . . . . . . . . . . . . . . .8
Initial cleaning/oiling . . . . . . . . . . . . . . . . . . . . . . . . .9
Operation of the safety . . . . . . . . . . . . . . . . . . . . . . .10
Barrel selector . . . . . . . . . . . . . . . . . . . . . . . . . . . . . .11
Assembly . . . . . . . . . . . . . . . . . . . . . . . . . . . . . . . . . .12
Disassembly . . . . . . . . . . . . . . . . . . . . . . . . . . . . . . . .14
Loading procedures . . . . . . . . . . . . . . . . . . . . . . . . . .16
Unloading procedures . . . . . . . . . . . . . . . . . . . . . . .18
Firing procedures . . . . . . . . . . . . . . . . . . . . . . . . . . . .20
In the case of a misfire . . . . . . . . . . . . . . . . . . . . . . .21
Invector®Plus choke system . . . . . . . . . . . . . . . . . . .21
Changing length of pull (special models) . . . . . . . . .24
Cleaning and maintenance suggestions . . . . . . . . . .25
Parts, service, repair and questions . . . . . . . . . . . . . .28
Winchester-guns.com . . . . . . . . . . . . . . . . . . . . . . . .28
Page 3

GUN SAFETY WARNINGS
IT IS ESSENTIAL THAT THESE OPERATING
INSTRUCTIONS BE THOROUGHLY STUDIED BEFORE
USING THIS FIREARM TO ASSURE PROPER AND
SAFE GUN HANDLING. FAILURE TO FOLLOW THESE
INSTRUCTIONS OR FAILURE TO OBEY ANY SAFETY
WARNING MAY RESULT IN INJURY TO YOURSELF OR
OTHERS, OR CAUSE DAMAGE TO YOUR GUN.
As a gun owner, you accept a set of demanding responsibilities. How seriously you take these responsibilities can
be the difference between life and death. There is no
excuse for careless or abusive handling of any firearm.
At all times handle your Supreme shotgun and any other
firearm with intense respect for its power and potential
danger.
PLEASE READ AND UNDERSTAND ALL OF THE
CAUTIONS, PROPER HANDLING PROCEDURES AND
INSTRUCTIONS OUTLINED IN THIS BOOKLET
BEFORE USING YOUR NEW FIREARM.
1. Do not carry a loaded gun with a live round in the
chamber while walking, running, climbing a tree, crossing
a fence or anywhere you might slip or fall, drop the gun
or otherwise bump or jar the gun. A gun that is dropped,
bumped, or jarred with a chambered round might accidentally discharge even with the safety on, causing serious
injury to you or someone else. When a round is chambered
keep the safety on until you are ready to shoot.
2. Do not rely on the safety to prevent accidental
discharge. Many safeties merely block the trigger and
prevent firing by pulling the trigger. The safety may not
prevent an accidental discharge due to dropping, jarring,
or bumping a gun.
3. Use only ammunition for which the gun is chambered
as indicated on the barrel, to prevent excessive pressure
and possible serious personal injury.
4. Incorrectly reloaded ammunition can cause serious
personal injury and damage to the firearm due to excessive
pressure. Reload only after proper instruction and in strict
compliance with instruction and data contained in current
reloading manuals.
5. Never point a gun at anything you do not intend to
shoot. Always keep it pointed in a safe direction in case
of accidental discharge.
6. Always check to ensure that the barrel is free of
obstructions before loading and using the gun. If you
experience light recoil or off sound, check the barrel for
an obstruction.
1
Page 4

7. Before firing, clean any grease or oil out of barrel with
cleaning rod and patch. Grease or heavy accumulation of
oil can cause excessive pressure and result in serious
personal injury.
8. Keep barrel, chamber and action free of rust. Rust in
the barrel and chamber can cause excessive pressures
resulting in serious injury. A rusted, pitted or eroded
barrel should be replaced.
9. Use hearing protection to prevent ear damage from
repeated exposure to gunfire.
10. Always use proper shooting glasses to prevent eye
injury from flying particles.
11. Never carry a loaded gun in a motor vehicle or carry
one into a dwelling. Always carefully unload the gun
before entering a motor vehicle, a dwelling or an area
such as a camp. Always point a gun in a safe direction
while loading or unloading to prevent serious injury in
case of an accidental discharge. Never load in the house
or in your vehicle.
12. Never shoot at a hard, flat surface or at the surface
of water to avoid a ricochet and possible serious personal
injury to yourself or a bystander.
13. Store gun in a clean dry place out of reach of children
and separated from stored ammunition.
14. Never alter any parts of your gun. Any alterations or
adjustments that may become necessary to the operating
mechanism should be performed by a qualified gunsmith.
15. Hunting from elevated surfaces such as tree stands is
dangerous. Doing so may increase the risk of handling any
firearm. Always make certain that the stand being used is
safe, sturdy and stable. Always make certain your firearm
is unloaded when it is being taken up and down from the
stand. Always make certain that your firearm is not
dropped from the stand or dropped while it is being taken
up or down from the stand.
16. Discharging firearms in poorly ventilated areas, cleaning
firearms, or handling ammunition may result in exposure
to lead and other substances known to cause birth defects,
reproductive harm and other serious physical injury. Have
adequate ventilation at all times. Wash hands thoroughly
after exposure.
GENERAL DESCRIPTION/OPERATION
Balance. Pointability. Reliability. Handling. These are
what you expect in an over/under, and they’re what you
get with your new Winchester Supreme. It’s superbly
designed, combining the best traditions of American
hunting guns and European competition guns. Supreme
Field models are ready for many years of brisk Nebraska
pheasant hunts to dusty Texas quail hunts to New
England grouse hunts accented by bright fall colors.
2
Page 5

Handling is its key advantage with a lively feel and
dimensions designed so you can quickly acquire and move
to target.
Sporting models are true competition over/unders from
Winchester. A great sporting clays shotgun begins at the
receiver. The Supreme’s low-profile receiver with dual,
between-the-barrel lockup is the foundation. This, combined with stock dimensions designed to put you on target
consistently, brings the package together. It’s the right
design. The right dimensions. The right balance. The
right shotgun for serious sporting clays competitors.
A few things to take notice of are:
• Low-profile receiver. The perfect receiver design for the
optimal combination of action strength, pointability and
balance.
• Strength is important. The Supreme features dual locking pins — made to stay tight under years of heavy use.
• Invector-Plus. This is the same choke system found on
today’s leading sporting and hunting guns world-wide.
The longer tubes, combined with back-bored barrels,
reduce shot deformation and produce consistent, tight
patterns across the entire choke spectrum. (Your choke
tubes may be marked “Win-Plus.” However, there is no
difference.
• Barrel selector. The selector is integrated into the top
tang safety. You can select which barrel fires first and the
other barrel fires with the next pull of the trigger.
In order to keep your new shotgun in top condition and
operating at its peak performance you must read, understand and follow all of the instructions in this manual.
GENERAL OPERATION
The Supreme is an over and under shotgun design made
to fire two successive shots by pulling the trigger twice —
once for each shot. Each time the action is broken open
the hammers are cocked automatically. Each time the
action is opened empty shells (one or two) are ejected
clear of the chamber(s) automatically. Unfired shells are
elevated in the chamber. They can be left in place or
removed with your fingers. The action is broken open
with a lever mounted on the top of the receiver just forward of the safety switch. The Supreme breaks down into
three pieces in just seconds for cleaning or storage.
Prior to using live ammunition, familiarize yourself
thoroughly with all the operating instructions in this manual. Get accustomed to the feel of your new gun. Know
the forces required to operate the action. Understand how
to select the firing order of the barrels. Learn how to pull
the trigger correctly, and above all, know the location and
operation of the safety. Procedures for disassembly and
operation of various components are outlined in the sections below. Please read and study them thoroughly.
3
Page 6
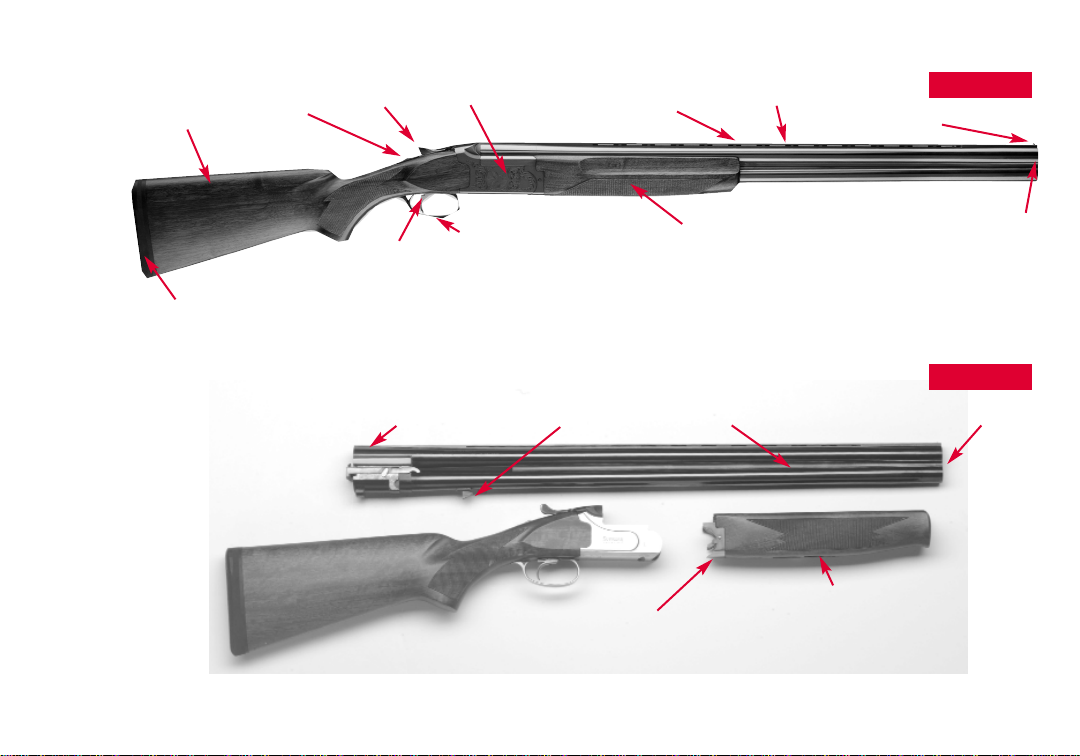
Buttstock
Safety/Barrel Selector
Top Lever
Receiver
Mid Sight Bead (found
on some models)
Vent Rib
FIGURE 1-A
Front Sight Bead
Trigger
Recoil Pad
Fully Disassembled Forearm Release Latch Lug
Chambers
Trigger
Guard
Forearm Extension
4
Forearm
Side ribs
Forearm Release Latch
Muzzle
FIGURE 1-B
Invector Plus Choke System
®
Page 7
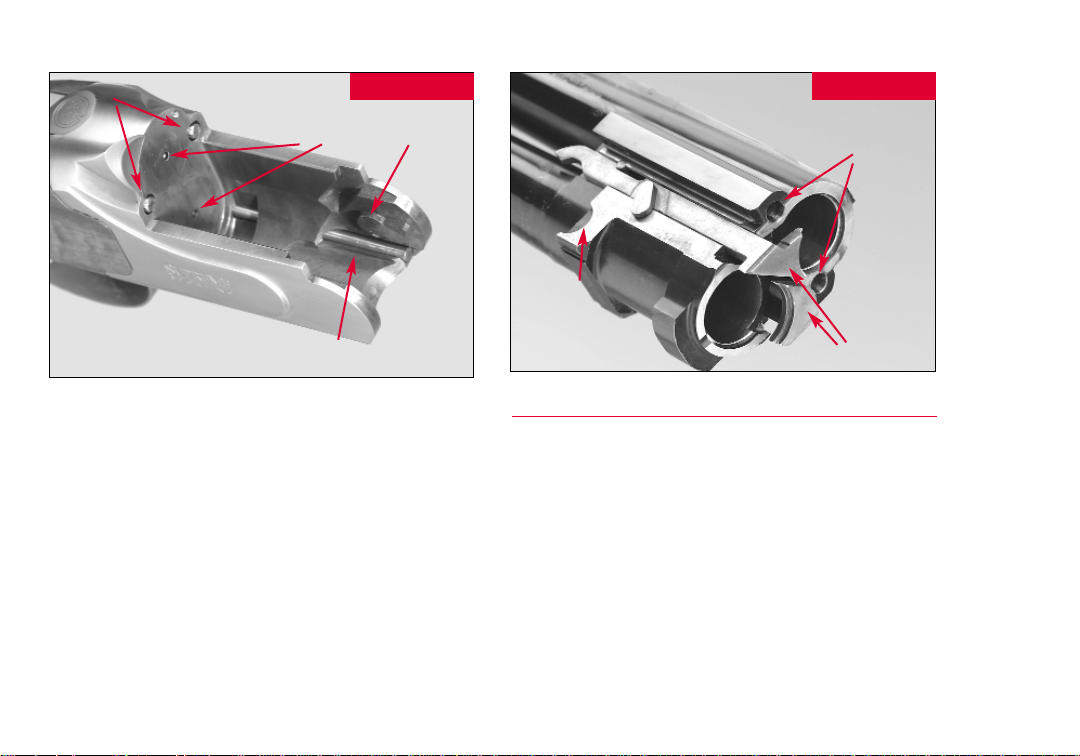
Locking Pins
FIGURE 1-C
FIGURE 1-D
Firing Pins
Cocking Lever
Hinge Pin
In addition, always remember:
IMPORTANT: ALWAYS KEEP THE MUZZLE POINTED IN
A SAFE DIRECTION.
USE THE CORRECT AMMUNITION AS REFERENCED BY
THE INSCRIPTION ON THE BARREL.
BEFORE LOADING YOUR GUN BE SURE ALL
GREASE AND OIL HAVE BEEN REMOVED FROM
THE BARREL AND CHAMBERS, AND THERE ARE NO
OBSTRUCTIONS.
Locking Pin Recesses
Hinge Bearing surface
Ejectors/extractors
TERMINOLOGY AND DESCRIPTIONS
Descriptions in this manual generally refer to the gun in
the horizontal position. That is, in the normal firing
position. For example, the muzzles are forward or front;
the butt stock is rearward or rear; the trigger is downward
or underneath; the sight plane is upward or on top. For
general parts terminology, refer to Figure 1-A.
The Winchester Supreme is also shown disassembled to
the extent necessary in order to follow instructions
contained in this book (See Figure 1-B). Details of the
action are also shown (See Figures 1-C and 1-D).
(Continued on page 8)
5
Page 8
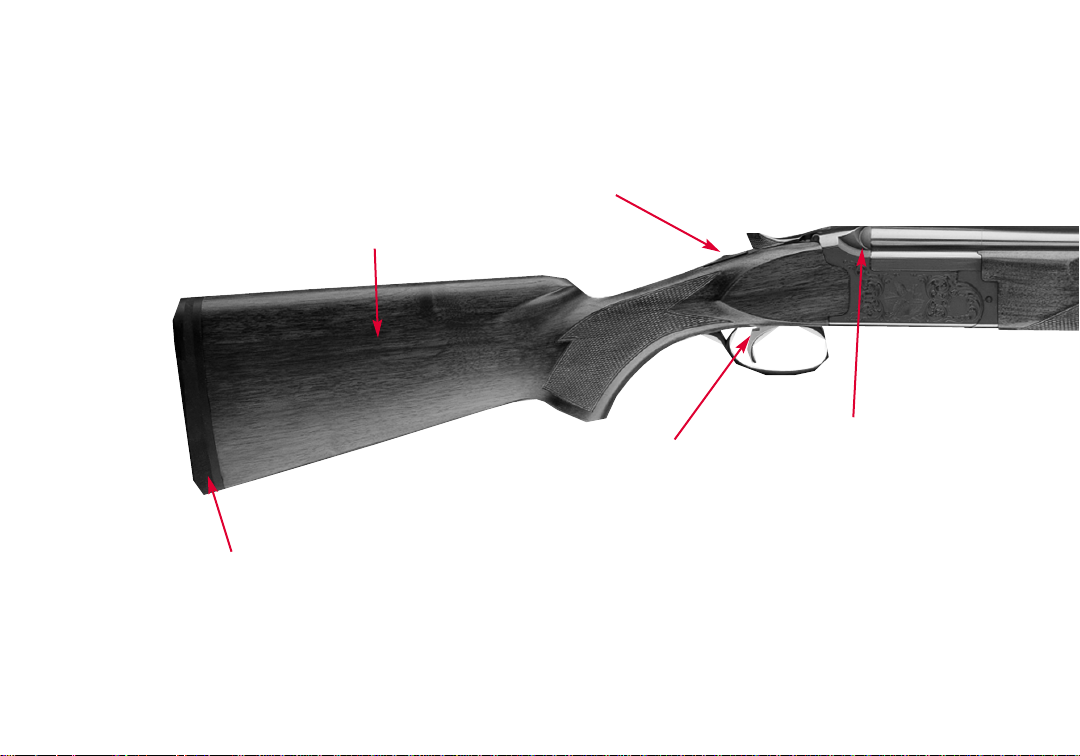
SUPREME FEATURES
Stocks are profiled for ideal fit, fast handling
and lower recoil on the face.
Deluxe recoil pad for
maximum comfort.
The top tang safety offers excellent convenience
with both gloved and ungloved fingers. Plus, it is
ambidextrous for right or left-handed shooters.
On sporting models the trigger is
adjustable for length of pull.
The Supreme has a very compact, low-profile receiver with an
ideal combination of action strength and balance. The receiver is
quick and lively, not too small and not too bulky.
The dual locking pins are located high,
between the barrels, one on each side —
made to stay tight under years of heavy
use. The pins are larger and sturdier than
some competitive models. This optimizes
strength of the action while allowing an
overall lower profile of the receiver than
found on some other over/unders.
6
Page 9
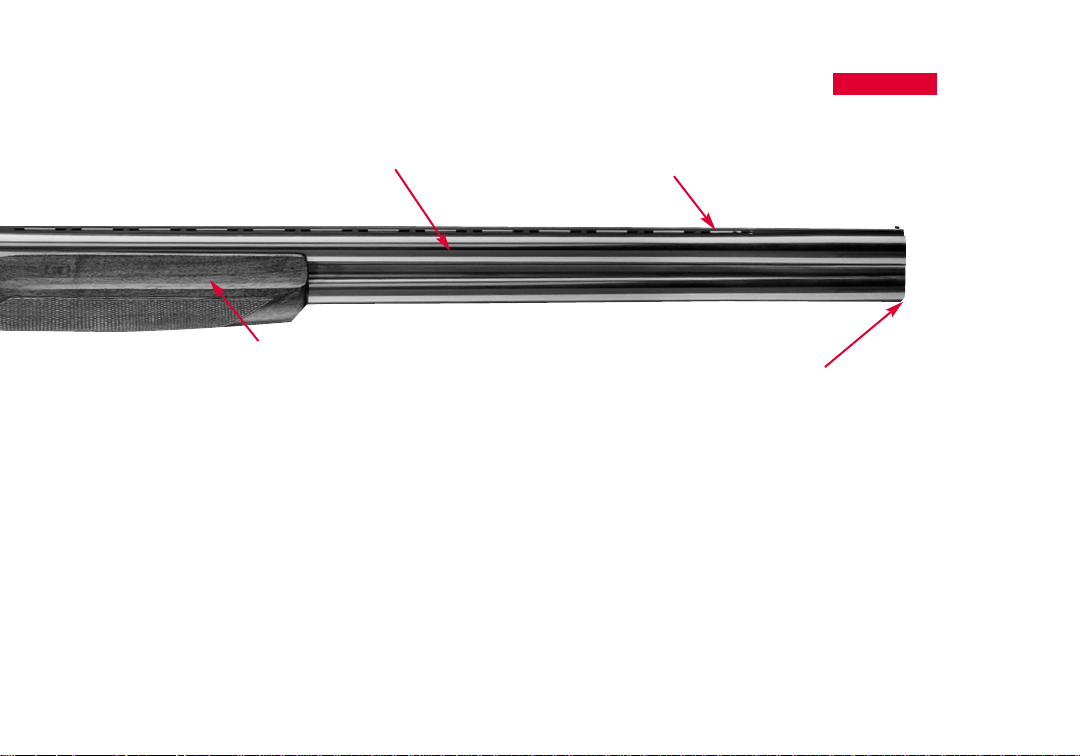
The barrel is back-bored for improved pattern performance. Back-boring means
that the barrels are made with a slightly larger inner bore diameter than
traditional dimensions. This results in less resistance to the shot column as it
moves down the bore and less deformation of pellets as they move through the
forcing cone. There is also a slight decrease in perceived recoil.
The barrels and forearm remove
for easy cleaning and storage.
When empty shells are ejected from a Supreme they leave the
chambers at virtually the same time, flying side-by-side through
the air. This is a sign of a very well timed mechanism.
FIGURE 2
Supremes feature a durable, traditional rib
design in both field and sporting widths.
Supreme models are fitted with the proven Invector Plus choke system.
These longer tubes have special tapers for optimum patterning — plus they
are specially designed for back-bored barrels. It allows you to change choke
constrictions to meet the demands of the game being hunted or target shot.
Extra-full choke tubes are available for hunting turkey or other game requiring
extremely tight patterns with lead shot loads.
7
Page 10

Figure 2 covers the general features and benefits of the
Supreme design.
Throughout this manual the “action” refers to the mechanism of this shotgun that secures the shell in the chamber.
SERIAL NUMBER
The serial number is located on the top tang of the receiver under the top lever. A duplicate number is located on
the bottom of the barrels (when removed) on the flat surface crossing the barrels below the hinge bearing surface.
Record the serial number at the front of this manual for
future reference.
AMMUNITION
There are several different versions of the Supreme. The
gauge and chamber length are inscribed on the side of the
barrel, forward of the receiver. They are inscribed as follows on the receiver:
• 2 3/4" and 3" Magnum. These models are designed to
shoot all factory loads from 2 3/4" up to 3" Magnums.
The chamber is designed to accept up to 3" factory loads.
(It is not designed to shoot 3 1/2" shells.)
• 2 3/4". Supreme shotguns with this designation are
usually target models. They are specifically configured to
be able to handle all factory 2 3/4" loads including the
lightest target loads up to heavy 2 3/4" hunting field loads.
(2 3/4" Target models are NOT designed to shoot 3" or
3 1/2" shells.)
Take extreme care to note the gauge of your shotgun as
inscribed on the side of the barrel. You must shoot only
shells of the correct gauge. For example, inadvertently
placing a 20 gauge shell in a 12 gauge gun is extremely
hazardous. The 20 gauge shell can slide forward through
the chamber. The rim of a 20 gauge shell will stop when it
comes in contact with the end of the 12 gauge chamber
(an area called the forcing cone). It is possible for the
shooter to think that the chamber simply is not loaded
and then insert a 12 gauge shell over the top of the 20
gauge shell. When the 12 gauge shell is fired this will
cause the barrel to burst, destroying your gun and possibly
causing serious injury to yourself or others.
Never mix shells of different gauges in hunting clothes or
other gear. Train young shooters about the importance of
using the correct ammunition for any gun.
MAKE SURE YOU USE ONLY THE EXACT AMMUNITION/GAUGE AS LISTED ON THE LEFT SIDE OF
THE BARREL.
U.S. REPEATING ARMS COMPANY, INC., CAN ASSUME
NO RESPONSIBILITY FOR INCIDENTS WHICH
OCCUR THROUGH THE USE OF CARTRIDGES OF
NONSTANDARD DIMENSION OR THOSE THAT WHEN
8
Page 11
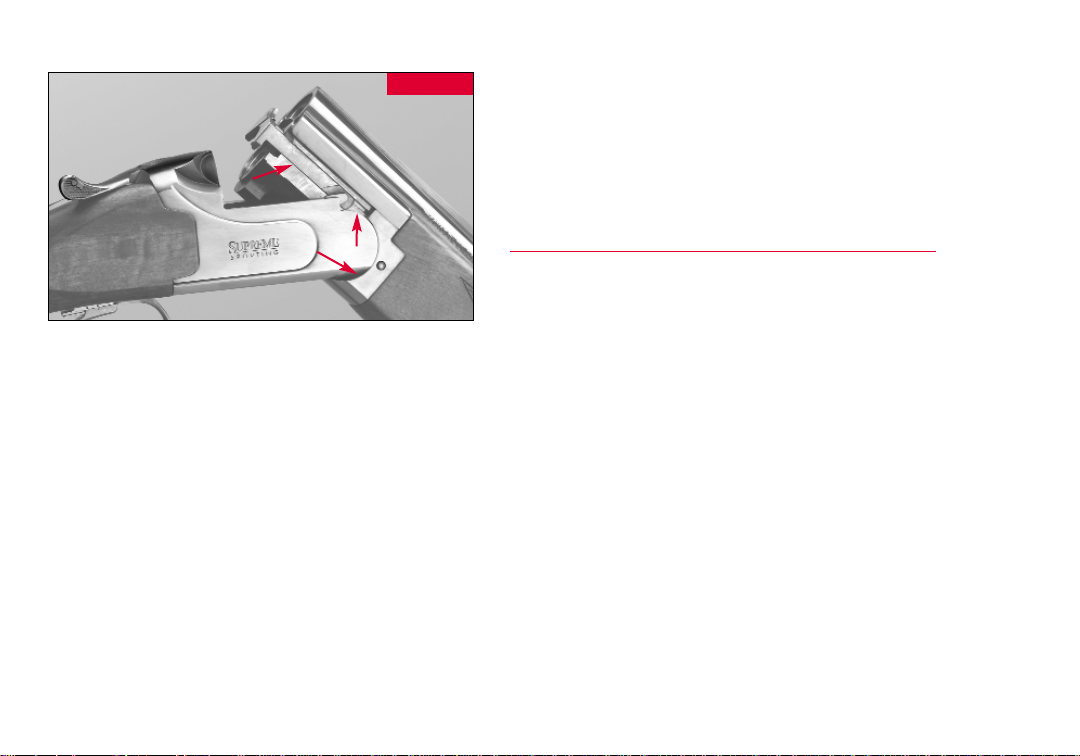
Be sure you lightly oil your
Supreme at these points.
FIGURE 3
SHOT, DEVELOP PRESSURES IN EXCESS OF
INDUSTRY STANDARDS ESTABLISHED BY THE
SPORTING ARMS AND AMMUNITION
MANUFACTURERS’ INSTITUTE (SAAMI).
DISCHARGING FIREARMS IN POORLY VENTILATED
AREAS, CLEANING FIREARMS, OR HANDLING
AMMUNITION MAY RESULT IN EXPOSURE TO LEAD
AND OTHER SUBSTANCES KNOWN TO CAUSE BIRTH
DEFECTS, REPRODUCTIVE HARM AND OTHER
SERIOUS PHYSICAL INJURY. HAVE ADEQUATE
VENTILATION AT ALL TIMES. WASH HANDS
THOROUGHLY AFTER EXPOSURE.
Incorrectly reloaded ammunition can cause serious
personal injury and damage to the firearm due to excessive
pressure. Reload only after proper instruction and in strict
compliance with instructions and data contained in
current reloading manuals.
Winchester ammunition is always an excellent choice for
your new Winchester firearm, delivering the unmatched
performance and dependability you want.
INITIAL CLEANING / OILING
Some metal parts of your new Supreme have been coated
at the factory with a rust preventative compound. Before
using your Supreme, clean the anti-rust compound from
the inside of the barrels, receiver area, locking pin mechanism, extractors/ejectors, hinge surfaces and the chamber
areas. A high quality, lightweight gun oil should be used
to remove this compound and to give your new gun its
first lubrication. Clean the barrels using a cleaning rod
and patch as explained under “Cleaning and Maintenance
Suggestions” found later in this manual.
If your new Supreme is to be stored for an extended period
of time, it is permissible to leave the rust preventative
compound in place and keep your Supreme in its box for
maximum protection during long-term storage.
Before beginning assembly of your Supreme you should
first wipe the mechanism clean and apply a few drops of
quality oil on the surfaces shown (see Figure 3).
Avoid applying too much oil. Only a light film is
9
Page 12
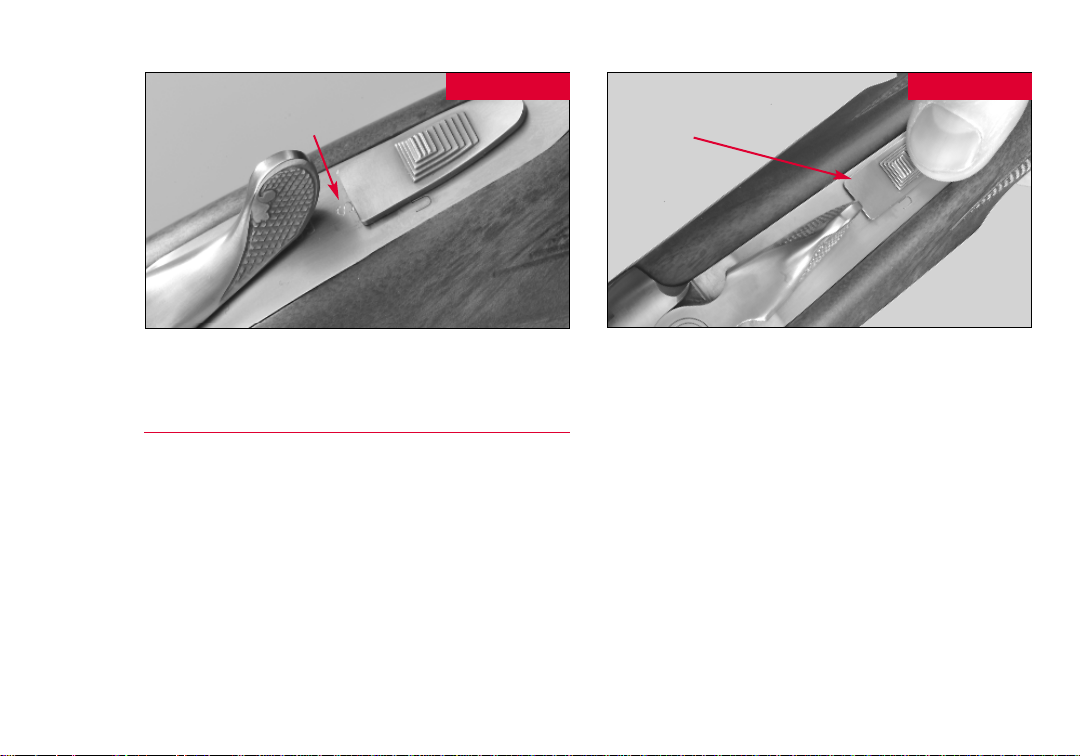
“On Safe” position. Safety pulled
fully to the rear. “S” showing above
safety switch.
FIGURE 4-A
“Off Safe” position. Safety
pushed fully forward. “S”
covered.
FIGURE 4-B
necessary. Excessive oil should be wiped off, especially
in cold weather.
OPERATION OF THE SAFETY
Your new Supreme shotgun is designed with a top tangmounted safety. It is located just rearward of the top lever
on the top tang, convenient for gloved or ungloved
fingers. It is operated with the thumb of your rearward
hand when holding the gun in shooting position.
• ON SAFE: When pulled fully to the rear with your
thumb an “S” is exposed at the front of the safety switch.
This shows you visually that the safety is in the “safe”
position (See Figure 4-A).
• OFF SAFE: When the safety switch is pushed fully
forward the “S” is covered by the safety switch. This
indicates to you that the safety is in the “off safe” position
(See Figure 4-B).
With the safety in the “on safe” position the trigger and
hammer are blocked and the shotgun cannot be fired.
In the “off safe” position — if your gun is loaded with a
round in the chamber — the chambered round can be
fired by simply pulling the trigger.
Never rely totally on your gun’s safety switch/button. It is
merely an aid to safe gun handling. Like any mechanical
device the safety can possibly fail: it can be bumped off or
inadvertently manipulated into an unsafe condition.
Always keep your shotgun pointed in a safe direction.
10
Page 13
At all times in the field keep the safety in the “ON SAFE”
position and the barrel pointed in a safe direction. It is a
good idea never to load your shotgun until you are in the
field and shooting is imminent or until you are at your
station and it is your turn to shoot when you are shooting
at a range. For extra safety, and as a courtesy to others,
fully unload and place the action in the open position
at all times other than when shooting is immediately
imminent.
Note: Do not depend on the exposed “S” alone to indicate
your gun’s safety status, as time, exposure to the elements,
and the abrasive action of cleaning agents may obscure it.
It is essential that you become very familiar with the feel,
look and operation of the safety on this shotgun before
attempting to load and shoot.
BARREL SELECTOR
The safety switch on the top tang of your gun also serves
as the barrel selector. The barrel selector allows you to
choose which barrel will fire with the first pull of the
trigger. The other barrel will then fire with the second
pull of the trigger. The safety must be in the “on safe”
rearward position to operate the barrel selector.
On the left side of the safety switch is the letter “U” which
stands for UNDER. On the right side is the letter “O”
which stands for OVER. The safety itself can be moved to
the right or left covering and uncovering the letters.
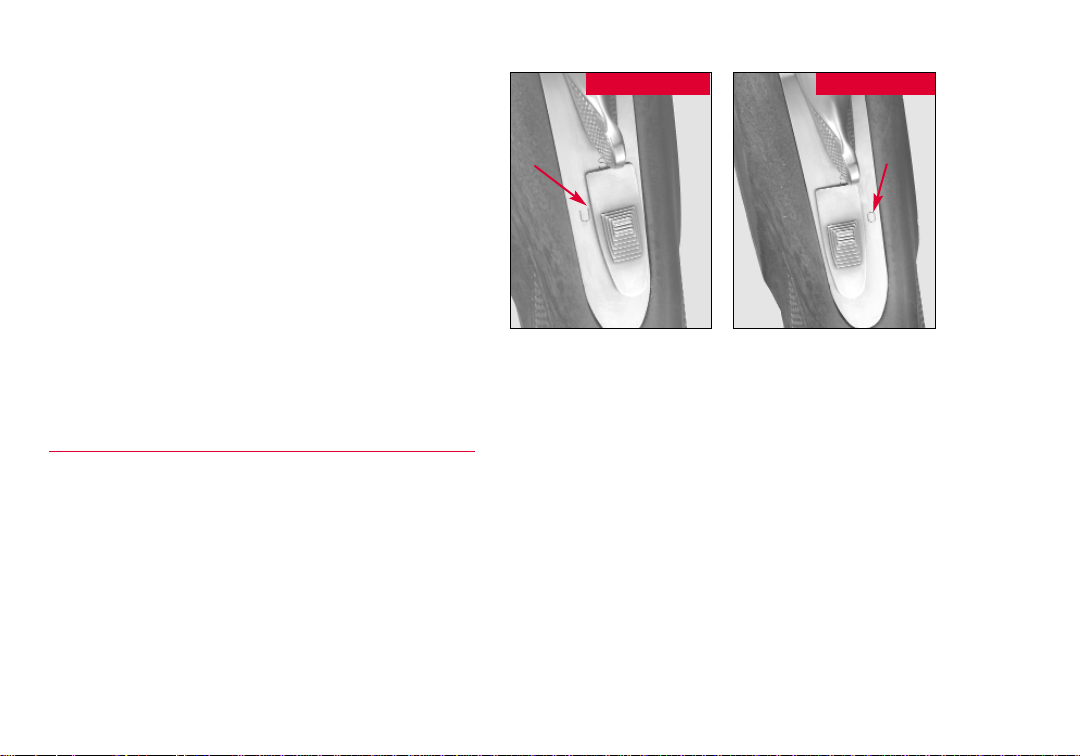
FIGURE 5-A
Selector in “Under” position
FIGURE 5-B
Selector in “Over” position
• If the letter “U” is exposed, the under (lower) barrel will
fire first (See Figure 5-A).
• If the letter “O” is exposed, the over (top) barrel will
fire first (See Figure 5-B).
Often different chokes are installed in each barrel which
have different constrictions. This may make one choke
more preferable for a certain shot. Also there is slightly
less muzzle jump when the lower barrel is shot first, making it easier to pick up your target for a follow-up shot.
The barrel selector allows you to choose the best choke
and firing order combination for whatever conditions you
are hunting under or to adapt to the layout of the sporting
clays station.
11
Page 14
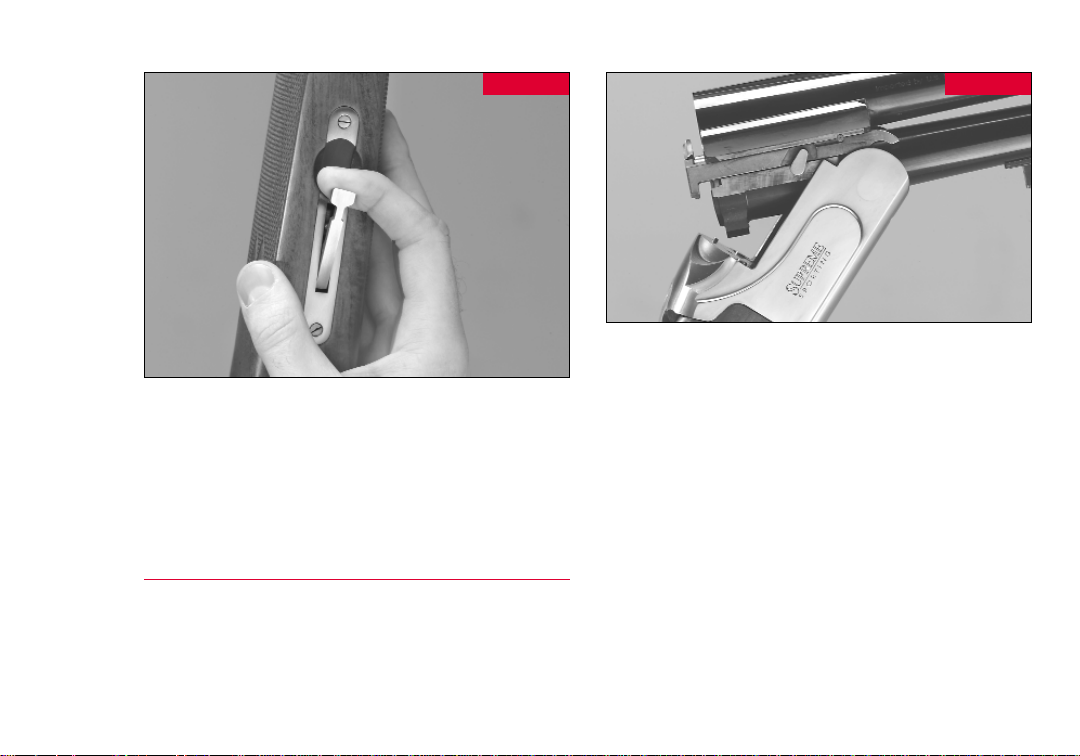
FIGURE 6 FIGURE 7
Pull downward on
the forearm’s
release latch and
angle the forearm
down and off.
Always make sure that the switch is completely to one
side or the other. If the switch is inadvertently positioned
directly between “O” and “U” the safety switch may be
more difficult to move forward to the “off safe” position.
Not only is this aggravating but it may cause you to miss
your chance at a bird.
ASSEMBLY
Your new Supreme shotgun will come from the factory
partially disassembled in a special box. Remove the barrel
assembly (with forearm attached) and receiver/stock
Angle the
two halves
as shown.
Attach the barrels by
aligning the bearing
surfaces on the barrels
with the hinge pin
surfaces on the receiver.
section from the carton. Wipe them clean and lightly oil
component parts as explained under “Initial
Cleaning/Oiling.”
It is important to carefully follow the assembly instructions below to assure the proper assembly of your shotgun.
Important: These instructions assume you are assembling
your Supreme from its disassembled form, exactly as it comes
from the factory. The forearm should come attached to the
barrels. The buttstock/receiver section and the barrel/forearm
section should be two separate components.
BEFORE BEGINNING THE ASSEMBLY PROCESS,
ALWAYS MAKE CERTAIN THERE ARE NO SHELLS IN
THE CHAMBERS.
12
Page 15
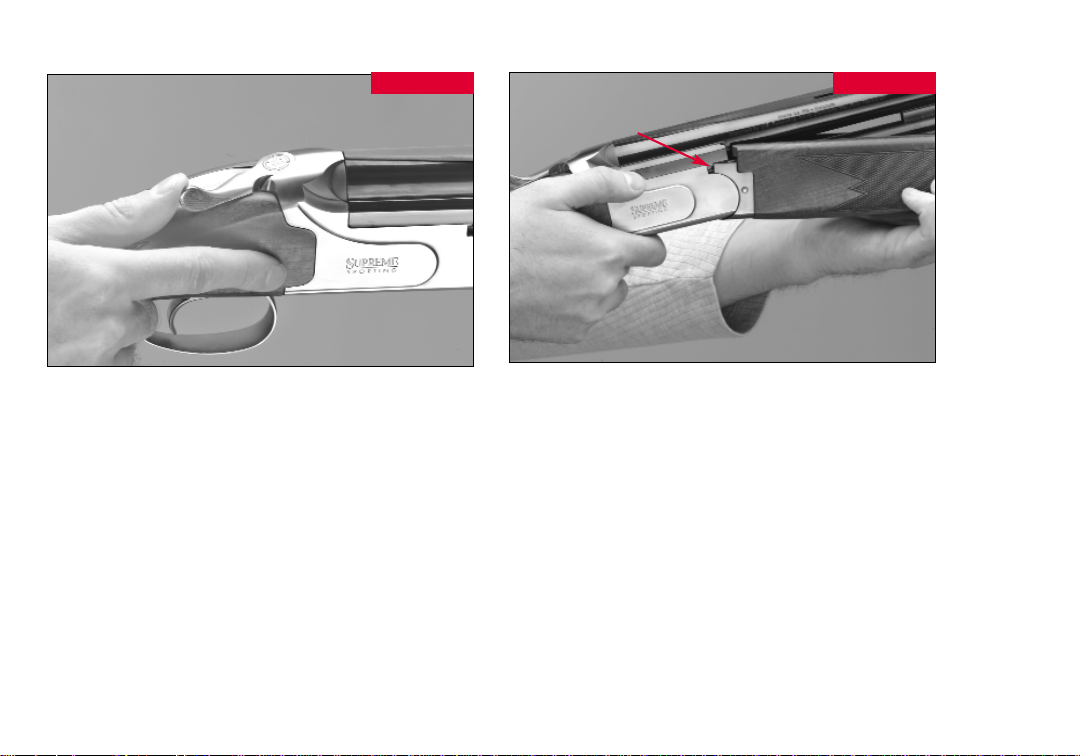
Close the action. Release the top lever
when the action is fully closed.
FIGURE 8
Reattach the forearm by lining up the
forearm extension with the receiver.
Hold at an angle.
FIGURE 9
1. Inspect the chambers and action areas, and clean dirt
and/or excess oil from them as explained in the manual.
2. Remove the forearm from the barrels. To do this hold the
barrels with one hand and pull out on the forearm release
latch with the other (See Figure 6). Pull the forearm away
from the action and entirely off of the barrels. You may need
to push it away from the barrels with your fingers on your
other hand.
3. Attach the barrels (without the forearm attached to them)
to the action by first holding the barrels with the muzzle at a
downward angle with respect to the receiver. Then push the
top lever to the right. Carefully engage the bearing surfaces
of the trunnion-type pins (located inside the forward portion
of the receiver) with the curved bearing surfaces on each side
of the bottom barrel (See Figure 7).
4. Once the bearings are properly seated, lift up on the barrels
and close the action. Make sure the hinge pins and hinge bearing surfaces remain in proper alignment. When performing
assembly procedures it also helps to keep the top lever pushed
fully to the right with your thumb until the action is closed
(See Figure 8). When the action is fully closed release the top
lever and the action will be locked in the closed position.
CAUTION: WHEN CLOSING THE ACTION DO NOT USE
UNDUE FORCE.
13
Page 16
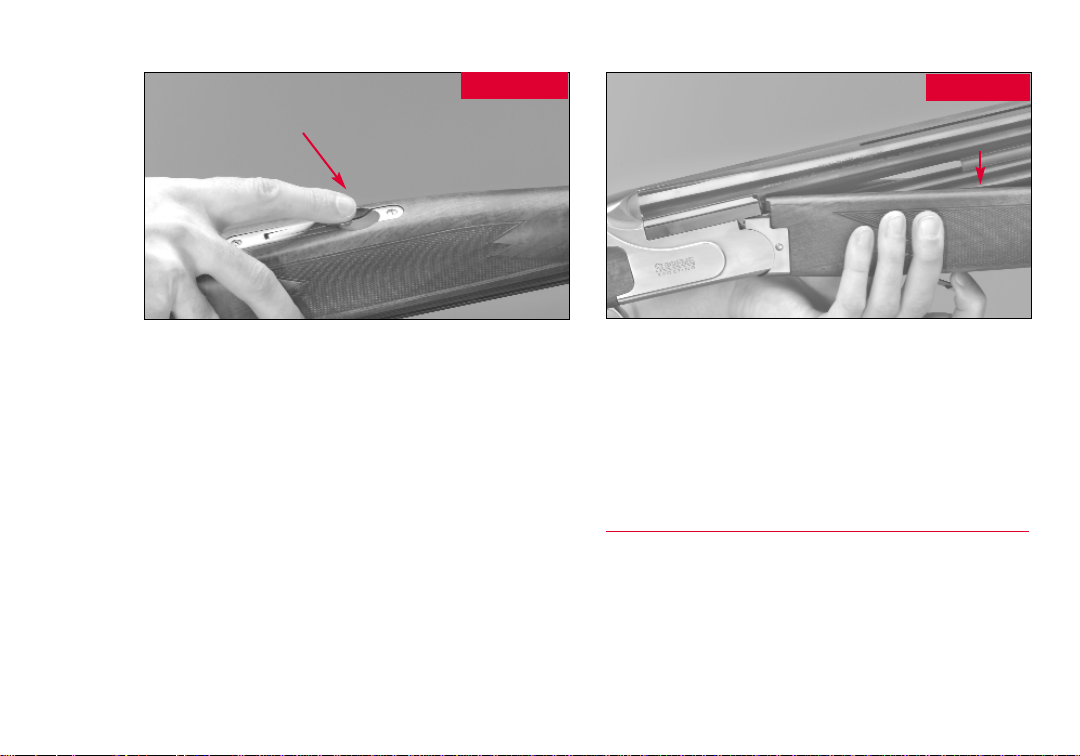
Gently push the forearm release latch into
place once if it protrudes slightly.
FIGURE 10
Gently pry the forearm away from the
barrels. Start with the front of the forearm,
angling back toward the receiver.
FIGURE 11
If the action seems difficult to close, the hinge pins and bearing surfaces may not be properly engaged. Release the
upward pressure and carefully separate the barrels from the
action again. If forced you may mar and damage the fine fit
of your shotgun’s action.
5. Once the barrels are installed and the action closed,
replace the forearm on the gun by sliding the radiused rear
surface of the forearm extension at an angle into radiused
front edge of the receiver. The shape of the rear of the forearm should match the shape of the front of the receiver (See
Figure 9). When it does, lift the front of the forearm until it
engages with the barrels with an audible click. If it does not
click, gently slap the forearm just above the latch with the
palm of your hand. If the forearm release latch protrudes
after the click, carefully push it into place (See Figure 10).
Your Supreme is now fully assembled and the action is
closed. Make sure the safety is in the “on safe” position
before proceeding.
DISASSEMBLY
Disassembling your Supreme into its two assembly components is an ideal way to ready your shotgun for storage
and cleaning. Many luggage-style cases actually require
doing this. It is also a way to add an extra measure of safety when storing your gun around the home.
14
Page 17
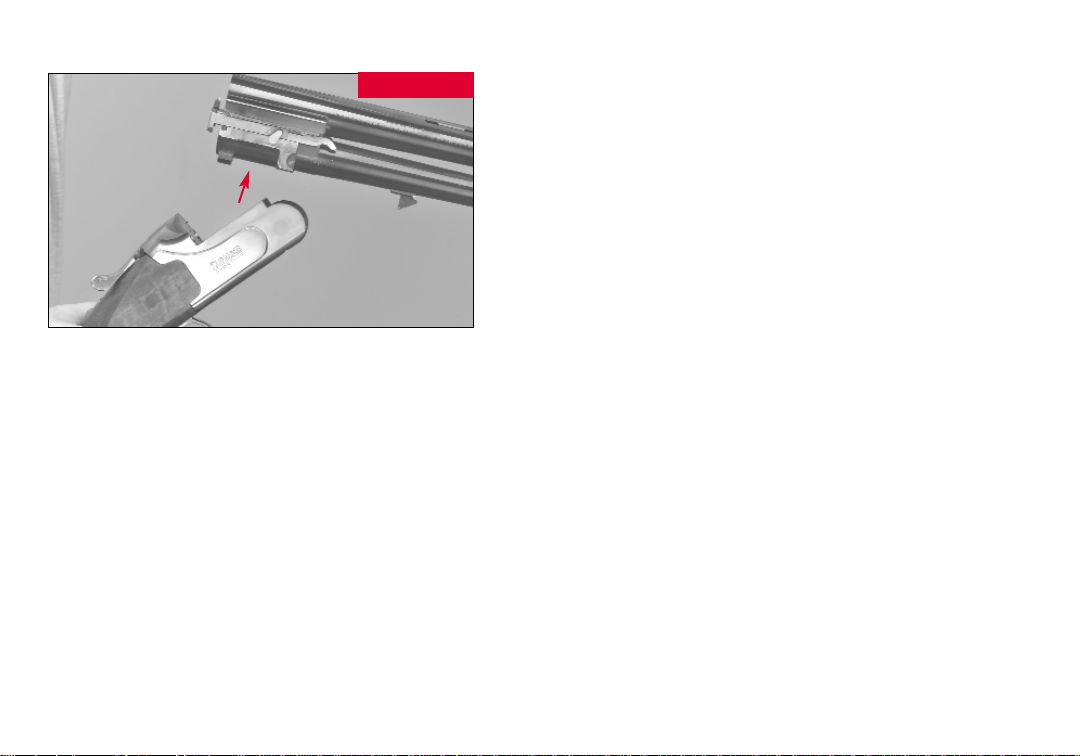
Lift up and out to
separate the barrels
from the receiver.
FIGURE 12
BEFORE STARTING TO DISASSEMBLE YOUR SHOTGUN, ALWAYS MAKE CERTAIN THERE ARE NO SHELLS
IN THE CHAMBERS AND THE SAFETY IS IN THE “ON
SAFE” POSITION.
1. Open the action by pushing the top lever all the way to
the right and pulling the barrels downward to visually
make sure the chambers are empty. Once you are sure
your shotgun is unloaded, close the action and make sure
that the safety is still in the “on safe” position. If not,
move it there immediately.
2. Place the butt of your shotgun on your thigh for support. Remove the forearm by pulling outward on the forearm release latch and pushing the forearm away from the
barrels with the fingers of your other hand (See Figure
11). Pull the front-most end of the forearm away until the
forearm can be pulled slightly forward and completely
detached from the barrels and the front of the receiver.
3. Separate the barrels from the receiver by holding the
stock of the gun securely in your right hand and the barrels in your left. Push the top lever to the right with your
thumb. Allow the muzzle of the barrel to drop — the barrels hinging downward from the receiver. Be sure to support the barrels and buttstock carefully while doing this.
When the barrels are fully down carefully lift the hinge
portion of the barrels (at the receiver) upward out of the
receiver, separating the barrels from the receiver (See
Figure 12).
4. If your are cleaning your Supreme this is the ideal level
of disassembly. You will have three separate components:
1) the receiver/stock, 2) the barrels, and 3) the forearm.
Perform cleaning and maintenance as explained later in
this manual.
5. When cleaning is completed, reattach the forearm to
the barrels for storage. This is done very easily when the
barrels are detached. Simply align the forearm extension
along the bottom of the barrel so that the forearm extension aligns with the rails on each side of the chambers.
15
Page 18
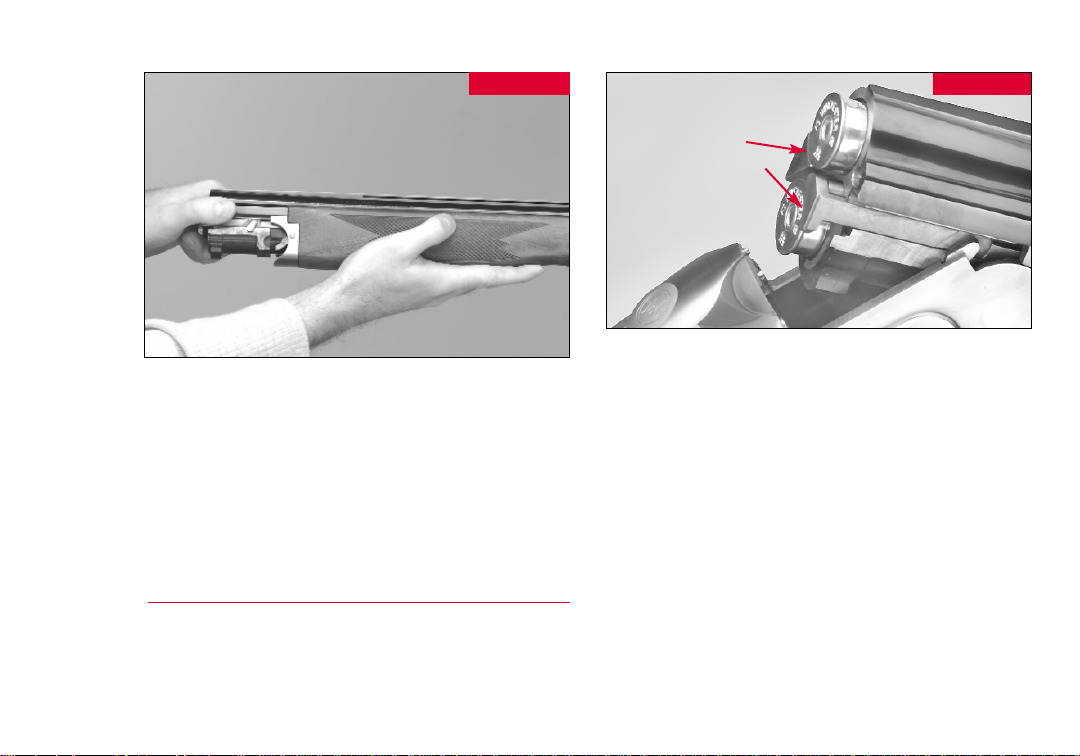
Line up the forearm with the
receiver and snap into place.
FIGURE 13
Make sure the ends of the rails line up with the rear top
edge of the forearm (See Figure 13). The forearm can be
angled slightly or positioned parallel with the barrels.
Press with even pressure using both hands, front to back,
along the forearm. As the forearm snaps into position, the
release latch will briefly protrude out from the bottom of
the forearm then snap down flush with the forearm when
it is secured in position correctly.
LOADING PROCEDURES
Before loading your gun, be sure all grease and oil has
been removed from the barrel and chamber and there are
no obstructions. Use the correct ammunition referenced
by the inscription on the barrel. There is only one basic
Insert the loaded shells
FIGURE 14
into the chambers.
Push them fully in
against the edge of the
extractors/ejectors.
way to load the chamber of your Supreme.
Before loading the chambers, make sure of the following:
1) Your shotgun is pointed in a safe direction.
2) The safety is in the “on safe” position.
3) You are in an appropriate location for shooting.
4) Shooting will be imminent.
5) You have the correct gauge and type of ammunition
for your gun.
1. Place the safety in the “ON SAFE” position.
2. Open the action by pushing the top lever to the right
with the thumb of your right hand. (This is assuming your
are shooting right handed. Left-handed shooters usually
push the lever reaching across with their left thumb.)
16
Page 19
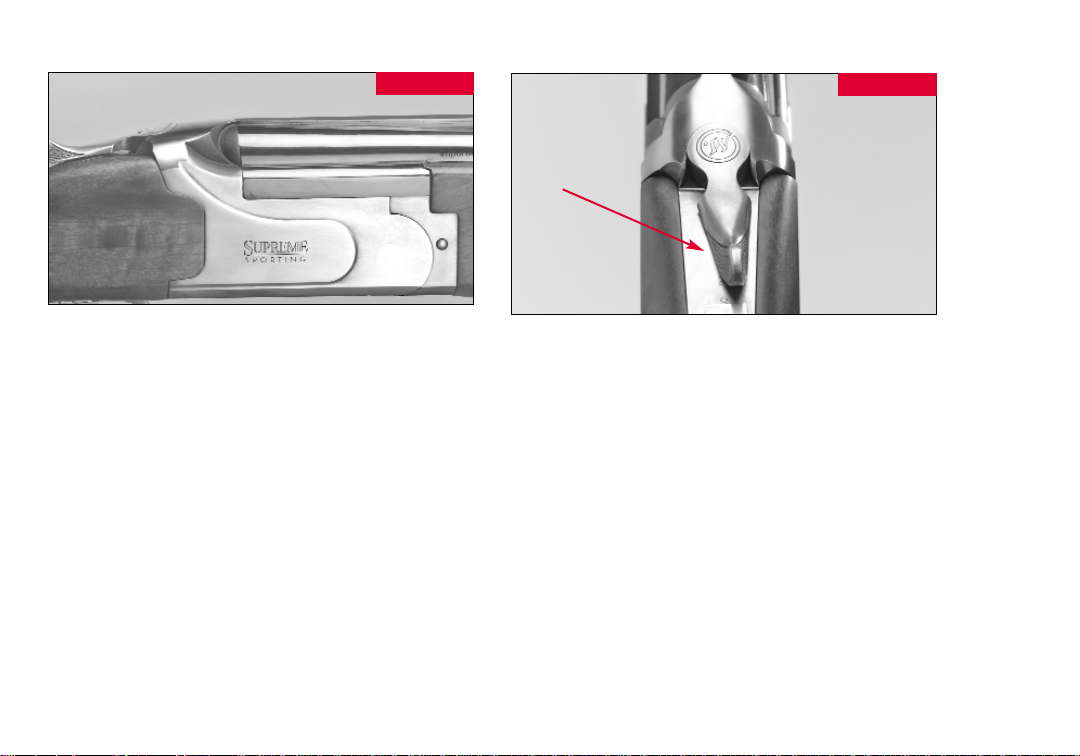
Make sure the action is fully closed. The barrels should
be tight with the receiver at the breech.
FIGURE 15
When closed, the
top lever may
still be slightly
to the right.
FIGURE 16
3. Visually check to make sure there are not obstructions,
grit, grime, oil, cleaning patches or other materials in or
around the action area or in the chambers or bores of the
barrels.
CAUTION: EVEN THE SMALLEST OBSTRUCTION CAN
INCREASE BARREL PRESSURE. THIS MAY RESULT IN
BARREL DAMAGE AND SERIOUS INJURY TO THE
SHOOTER AND OTHERS IN THE VICINITY.
4. Insert a shell in the chamber or chambers you plan to
fire. Make sure they are fully forward in the chamber(s),
with the rims in direct contact with the edge of the
extractors/ejectors (See Figure 14).
CAUTION: MAKE SURE THE SHELLS ARE OF THE
PROPER GAUGE AND CHAMBER LENGTH FOR YOUR
GUN. CHECK THE AMMUNITION DESIGNATION ON THE
BARREL AND CHECK THE DESIGNATION ON YOUR
AMMUNITION. FAILURE TO FOLLOW THESE INSTRUCTIONS CAN RESULT IN SEVERE DAMAGE TO YOUR
GUN AND POSSIBLE SERIOUS INJURY TO YOURSELF
OR OTHERS.
5. Close the action by lifting up on the forearm, hinging
the barrels upward into position, until the action is fully
closed. When closed the top lever will snap back into the
center position. There should be no space between the
face of the barrels and the face of the receiver when the
action is fully closed (See Figure 15).
It is common, because of the tight tolerances and craftsmanship of your shotgun, that the top lever will be just
slightly right of center, even when the action is fully
closed (See Figure 16). This is the result of tight
17
Page 20

tolerances which assure your gun of good receiver-tobarrel fit for many years to come and is the sign of a finely
crafted firearm.
If the action of your shotgun resists closing, do not force it
closed. Small pieces of shell plastic, grit or other obstructions can make it difficult to close the action. Make sure
all surfaces are clean if an unusual resistance is felt. Then
try again. If it still resists closing, fully disassemble and
perform a thorough cleaning, then reassemble. If you still
have a problem, take your Supreme to a qualified gunsmith or to one of the many Winchester Authorized
Repair Centers.
6. Select the barrel you want to fire first by operating the
barrel selector which is an integral part of the safety
switch. The safety must be in the rearward, “on safe” position to be able to select the firing order of your barrels.
Refer to the instructions under “Barrel Selector.”
IMPORTANT: THE GUN IS NOW READY TO FIRE BY
MOVING THE SAFETY TO THE “OFF SAFE” POSITION
AND PULLING THE TRIGGER. AFTER FIRING THE
FIRST BARREL, THE SECOND BARREL FIRES WITH
JUST THE PULL OF THE TRIGGER. IMMEDIATELY
PLACE THE SAFETY IN THE “ON SAFE” POSITION IF
THE SECOND BARREL WILL NOT BE IMMEDIATELY
FIRED.
TO AVOID ACCIDENTAL DISCHARGE: DO NOT CARRY A
GUN WITH A SHELL IN THE CHAMBER UNLESS
SHOOTING IS IMMINENT. IN ALL CASES, WHEN
FIRING IS NO LONGER IMMINENT, MAKE SURE THE
SAFETY IS IN THE “ON SAFE” POSITION.
UNLOADING PROCEDURES
One of the convenient features of an over and under
shotgun is how convenient it is to load, unload and
determine the safety status of your shotgun. With the
action open it is visually easy to know for certain whether
your shotgun is loaded or unloaded. Several easy steps will
assure that you maintain a safe status when unloading
your Supreme shotgun.
Before opening the action to unload make sure that the
muzzle end of the barrels is in a safe direction and make
sure that the safety is in the “on safe” position. Move it
to the “on safe,” fully rearward position, if it is not
already there.
CAUTION: WHENEVER UNLOADING, ALWAYS BE
CERTAIN THAT THE MUZZLE IS POINTED IN A SAFE
DIRECTION AND THAT THE SAFETY IS IN T HE “ON
SAFE” POSITION.
On the Supreme over and under the ejector/extractor
mechanism mechanically adapts to whether there is a
fired shell in a chamber or a loaded shell. With loaded
shells the mechanism acts as an extractor, elevating the
18
Page 21
shells in the chamber. With fired shells it acts as an ejector, forcefully ejecting the empty shell clear of the
chamber and onto the ground.
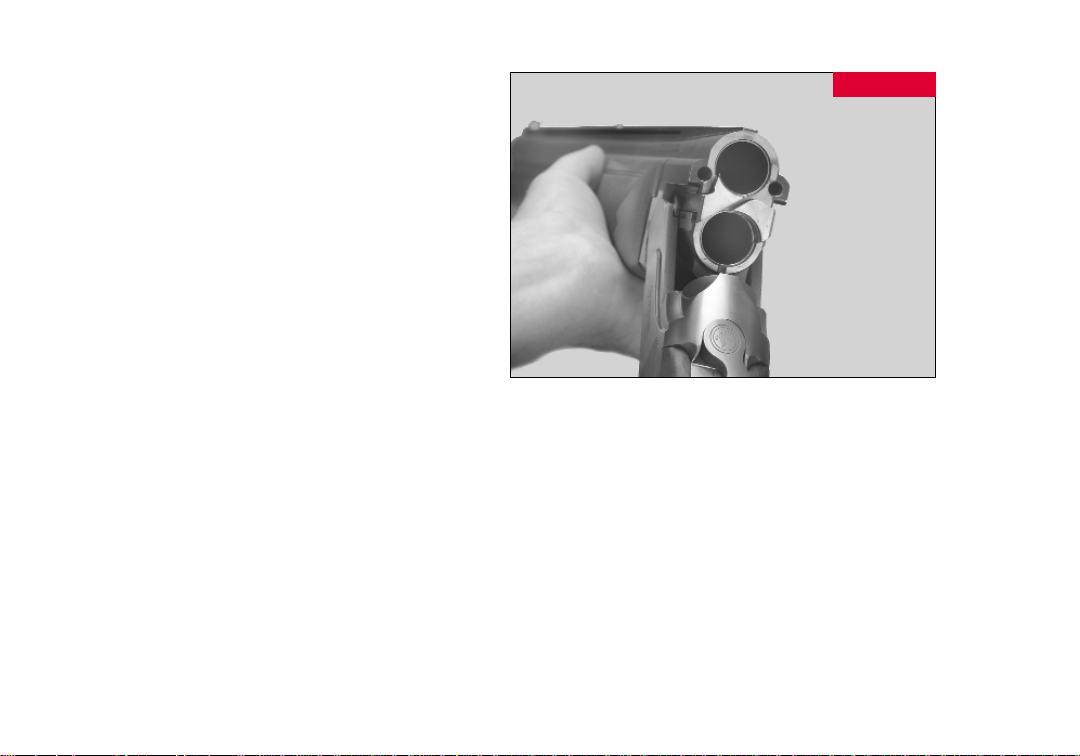
1. To unload after firing, open the action by pushing and
then holding the top lever fully to the right while you pull
(or push) down on the barrels with your left hand.
Depending on your strength, it may be very helpful to
brace the buttstock between your right arm (at the elbow)
and the side of your torso. (Tilt the angle of your gun
slightly to the right, away from your body if you are right
handed.) Push down until the barrels hinge downward
fully and the rear of the chambers — and the bases of the
shells — are fully exposed. You must tilt the chambers
slightly to the right to have the empties eject to the right
— well clear of your face (See Figure 17). Right-handed
shooters tip to the right and left-handed shooters tip to
the left.
BE CAREFUL: EMPTY SHELLS WILL EJECT OUT OF
THE CHAMBERS RAPIDLY AND DIRECTLY IN LINE
WITH THE CHAMBERS. IF YOU FAIL TO TIP THE
CHAMBERS AWAY FROM YOUR FACE AND BODY
THEY MAY STRIKE YOU IN THE FACE OR BODY
CAUSING INJURY.
FIGURE 17
Always tilt the
chambers away
from your face
when opening the
action.
Whenever possible be sure to pick up all of your empties
after they are ejected so as to not to cause litter.
NOTE: With practice, it is possible to catch ejecting
shells in your hand. If you open the action with the buttstock braced between your arm and torso, it is possible —
when the action is almost fully opened — to remove the
thumb of your right hand from the top lever and immediately cup your hand over the bases of the shells in the
chambers. Continue to open the action, using your body
and arm as leverage. As the action reaches the fully open
19
Page 22

position the shells will eject and be stopped by your
cupped hand. You can then simply remove them from the
chambers and place them into your empty shell carrier.
2. Unfired shells will be elevated in the chambers by the
extractors. They can be unloaded from your shotgun by
simply pulling the unfired shell(s) out of the chambers
with your fingers.
If only one barrel has been fired, only the empty shell will
be ejected upon opening of the action. If you will be continuing to hunt or shoot, a loaded round can be inserted
in its place. You are now fully loaded again.
MAKE SURE THE SAFETY IS IN THE “ON SAFE” POSITION AT ALL TIMES EXCEPT WHEN SHOOTING IS
IMMINENT.
ALWAYS VISUALLY INSPECT THE CHAMBER VERY
CAREFULLY AFTER UNLOADING TO BE SURE LIVE
ROUNDS ARE CLEARED FROM THE GUN.
FIRING PROCEDURES
The Supreme will fire two shots — one with each with
each pull of the trigger.
1. At all times except immediately preceding shooting,
keep the safety in the rearward “on safe” position.
2. Load the chambers and close the action as explained
under “Loading Procedures.”
3. When shooting is imminent, and with a loaded shell in
the chamber, the safety “on safe”, and your finger off the
trigger, push the safety to the “off safe” position (with the
“S” fully covered by the safety switch). Your shotgun is
now ready to fire with a pull of the trigger.
CAUTION: YOUR SHOTGUN IS NOW READY TO FIRE.
REMEMBER, THE RECOIL FROM A SHOTGUN,
ESPECIALLY MAGNUM LOADS, WILL BE SOMEWHAT
HEAVIER THAN MOST OTHER GUNS, SO FIRMLY
SHOULDER YOUR SUPREME, MOVE YOUR GUN TO
ALIGN WITH THE TARGET AND — WHEN ON TARGET
— SQUEEZE THE TRIGGER.
For training purposes or in some target situations your gun
can be shot “single shot” by loading one shell at a time in
only one of the chambers. For training new shooters, the
bottom barrel is often used because of its slightly lower
perceived recoil. Make sure the barrel selector is set for
the barrel you will be firing.
If your gun fails to fire on the first pull of the trigger
(because the selected barrel did not fire due to misfire,
malfunction or simply because it was unloaded) the second barrel cannot be fired. Open the action and properly
load the chambers before proceeding.
20
Page 23

It is important to treat your gun as though it is loaded
whenever the action is closed.
After you have completed firing you should either reload
the chamber(s) with unfired shells (if hunting/shooting is
going to continue) or fully unload your shotgun (if shooting is completed). Either way, always first place the safety
in the “on safe” position.
WHEN FIRING IS COMPLETED OR WHEN SHOOTING IS
NO LONGER IMMINENT, IMMEDIATELY RETURN THE
SAFETY TO THE “ON SAFE” POSITION.
IMPORTANT: UNDER NO CIRCUMSTANCES SHOULD
YOU MOVE ON OR CONTINUE TO HUNT WITH YOUR
SAFETY IN THE FIRE POSITION.
IN THE CASE OF A MISFIRE
Only rarely will modern factory ammunition experience
a misfire. If this ever happens to you when shooting your
Supreme, please follow these instructions carefully.
CAUTION: IN CASE OF MISFIRE, KEEP THE BARREL
POINTED IN A SAFE DIRECTION, CAREFULLY OPEN
THE ACTION WHILE AVOIDING DIRECT EXPOSURE TO
THE BREECH BY YOURSELF AND OTHERS. REMOVE
THE SHELL FROM THE CHAMBER. FULLY UNLOAD
YOUR SHOTGUN, REMOVING THE OTHER SHELL.
Carefully inspect the shell removed from the chamber you
intended to fire. If the primer is indented, the shell should
be disposed of in a manner that would prevent accidental
injury to you, others, or the environment. If there is no
indentation, your gun may have malfunctioned. Make
certain you are following all firing procedures correctly.
If it fails to indent the firing pin again your shotgun has
malfunctioned and should be serviced by a qualified gunsmith, or by a U.S. Repeating Arms Co. Authorized
Repair Center (ARC).
INVECTOR®PLUS CHOKE TUBE SYSTEM
The Supreme is fitted with one of the most popular and
universally accepted choke tube systems on the market:
Invector-Plus. Your Supreme shotgun is specially designed
for this system only. Your choke tubes may be marked
“Win-Plus.” There is no difference This means:
• It has a back-bored barrel.
• It is threaded to accept Invector-Plus choke tubes only.
The Invector-Plus system allows you to configure your
Supreme for the patterns and/or choke constrictions your
hunt or target situation demands. The system gives you
the most highly engineered choke tapers — designed to
produce the best possible patterns for target and field situations. Plus, it is extremely easy to switch choke constrictions to match your shooting conditions. Invector-Plus
21
Page 24
tubes are fully steel and lead shot compatible. Most
Invector-Plus choke tubes fit flush with the muzzle when
installed. A special choke tube wrench is provided to
remove and tighten these tubes.
Invector-Plus (Win-Plus) choke tubes are NOT interchangeable with any other choke tubes on the market
including chokes listed as "Standard Invector" or
Winchester’s current line of "WinChoke" choke tubes.
USE ONLY CHOKE TUBES MARKED INVECTOR PLUS IN
YOUR SUPREME. USE ONLY THE APPROPRIATE
GAUGE OF INVECTOR PLUS CHOKE TUBES AS
MARKED ON YOUR SUPREME SHOTGUN.
Failure to follow these warnings may damage your gun
and cause injury to yourself and others. A special "Plus"
choke tube wrench is provided to remove and tighten
Invector-Plus choke tubes.
DO NOT FIRE THIS SHOTGUN WITHOUT HAVING AN
INVECTOR PLUS CHOKE TUBE INSTALLED. PERMANENT DAMAGE MAY RESULT TO THE THREADS.
CAUTION: WHENEVER HANDLING ANY SHOTGUN FOR
THE PURPOSE OF REMOVING OR INSTALLING A
CHOKING DEVICE, MAKE ABSOLUTELY CERTAIN THE
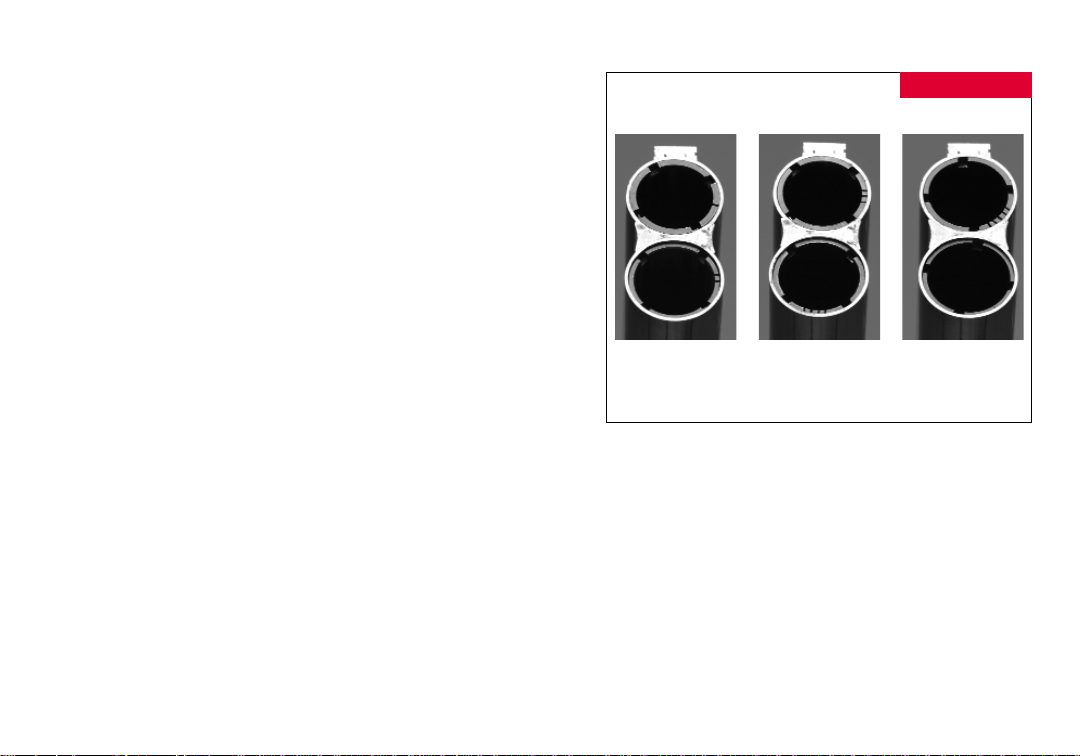
FIGURE 18
1 Notch: Full
2 Notches: Improved
Modified
Small notches are the choke code.
Large notches are for the choke tube wrench.
3 Notches: Modified
4 Notches:
Improved Cylinder
Tube Notch Codes (Lead shot designations)
5 Notches: Skeet
No Notches: Cylinder
GUN IS FULLY UNLOADED, AND THE ACTION IS OPEN!
NEVER ATTEMPT TO REMOVE OR INSTALL A SHOTGUN CHOKING DEVICE ON A LOADED FIREARM!
TUBE REMOVAL —
1. UNLOAD YOUR SUPREME SHOTGUN FULLY.
INSPECT THE CHAMBERS TO MAKE SURE THEY DO
22
Page 25

NOT CONTAIN ANY SHELLS.
2. Open the action fully downward, and place the “safety”
in the “on safe” position.
3. Use the Invector Plus wrench to loosen the tube,
turning it counterclockwise. Finger twist the tube the
rest of the way out of the barrel.
TUBE INSTALLATION —
1. UNLOAD YOUR SUPREME SHOTGUN FULLY.
INSPECT THE CHAMBERS TO MAKE SURE THEY DO
NOT CONTAIN ANY SHELLS.
2. Open the action fully downward, and place the “safety”
in the “on safe” position.
3. Before installing a tube, check the internal choke tube
threads in the muzzle, as well as the threads on the
Invector-Plus choke tube to be sure they are clean.
Lightly oil the threads with a high quality light weight oil.
4. Using your fingers, screw the appropriate tube into the
muzzle end of the barrel, tapered end first, notched end
outward. When it becomes finger tight, use the InvectorPlus choke tube wrench to firmly seat the tube.
THE INVECTOR PLUS CHOKE TUBES SHOULD BE PERIODICALLY CHECKED TO ASSURE THAT THEY ARE
TIGHT AND FIRMLY SEATED. BEFORE CHECKING,
FOLLOW THE SAFETY GUIDELINES OUTLINED ABOVE.
SELECTING THE CORRECT INVECTOR-PLUS TUBE —
The Invector-Plus choke system is fully compatible with
factory lead, tungsten, bismuth or steel shot loads. The
conversion chart includes lead, tungsten, bismuth and
steel shot information. Lead and steel shot perform differently in tubes with the same choke constriction. For this
reason, both lead and steel designations have proven
necessary. In fact, even larger steel shot diameters result
in different patterns than smaller steel shot sizes. Each
designation is inscribed on each choke tube.
To help you choose the correct choke tube for each target
shooting and hunting situation, all Invector-Plus choke
tubes are inscribed on the side with abbreviations for the
patterns they produce with both lead and steel shot.
Each tube also features identification notches located on
the top rim of each tube (see Figure 18). These notches
are a code to allow you to determine the choke designation while the tube is installed. Rim notches refer specifically to lead shot. You will need to use the chart below to
cross-reference from lead to steel, and determine the
appropriate tubes for your ammunition and
hunting/shooting situation.
It is helpful to note that Bismuth shot responds similarly
to lead shot and tungsten shot responds more like steel
shot.
23
Page 26

CHOKE TUBE RIM CODES AND PATTERNING —
Rim Pattern With Pattern With
Notches Lead Shot Steel Shot
Extended** X-Full Turkey **
I Full *
II Imp. Modified Full
III Modified Full
1
1
IIII Imp. Cylinder Modified
IIIII Skeet Imp. Cylinder
No Notches Cylinder Cylinder
•
Not for use with steel shot. Using an over-tight choke constriction with steel
shot will result in an ineffective “blown” pattern.
** Extra Full Special , extended with ports. Do not use with steel shot.
1
When more than one choke designation is listed for a given steel shot pattern,
use the more open choke listed for high velocity, larger shot size steel loads.
CHANGING LENGTH OF PULL
(SPECIAL MODELS)
Some Winchester Supreme shotguns are fitted with a
special trigger shoe system that allows you to make small
adjustments to the length of pull. This feature is usually
found on target models where shooters benefit from
highly customized settings.
It is easy to change the length of pull using the 1.5 mm
allen (hex head) wrench included with your gun.
BEFORE PERFORMING THIS ADJUSTMENT,
ALWAYS MAKE CERTAIN THERE ARE NO SHELLS
IN THE CHAMBERS AND THE SAFETY IS IN THE
“ON SAFE” POSITION.
1. Place your gun on its side on a secure, padded surface to
prevent marring the finish.
2. Using the allen wrench provided (any good 5/64" hex
wrench will work) loosen the trigger shoe from the trigger
plate by inserting the wrench from the bottom into the
set screw head (See Figure 19). Turn in a counterclockwise direction to loosen.
3. When the screw is sufficiently loose you will be able to
move the trigger shoe along the trigger plate with your
fingers. There are indexing dots on the trigger shoe and
on the plate. Line up the dots to make length of pull
longer or shorter as desired (See Figure 20).
4. Tighten the allen screw to secure the trigger shoe to
the plate (turn in a clockwise direction to tighten).
Make sure you have aligned the indexing dots in order to
prevent marring the bottom of the trigger plate with the
set screw.
5. With your gun unloaded, and pointed in a safe direction, shoulder your gun several times to see how the
24
Page 27
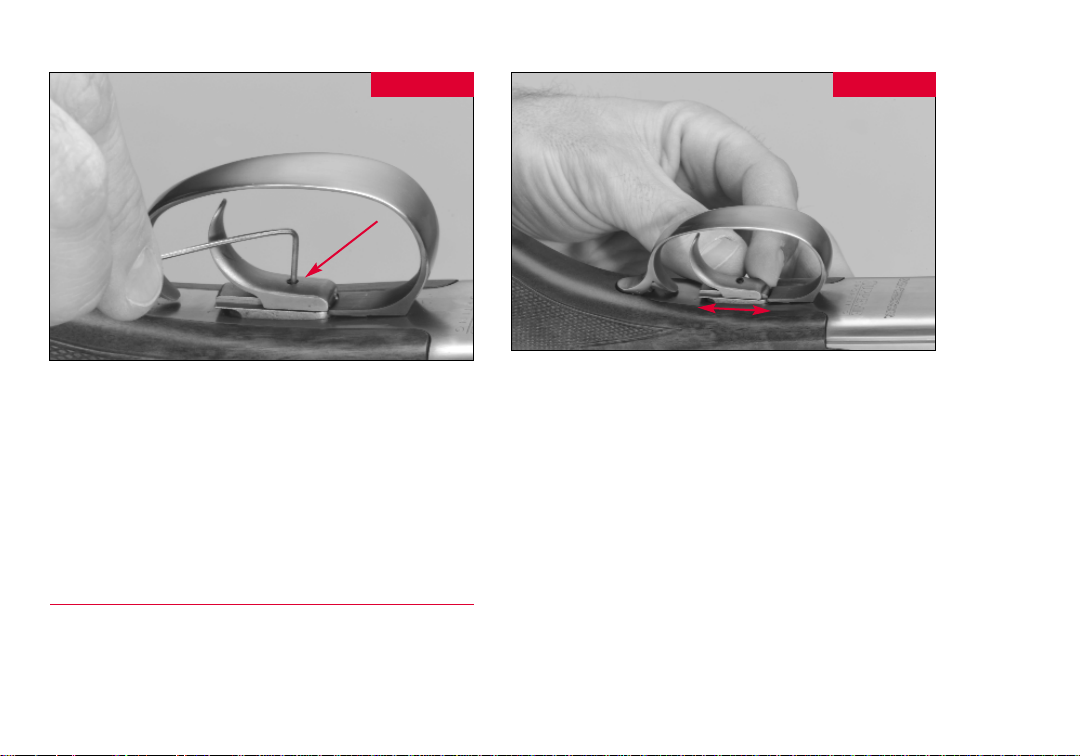
Insert the allen wrench in the set
screw and loosen the screw.
FIGURE 19
FIGURE 20
Move the trigger
shoe to the desired
setting. Fully tighten
the set screw before
shooting.
adjustment changes fit you. Increase or decrease the
length of pull following the instructions above if necessary. Do not adjust more than allowed by the “dot” index
marks on the plate and trigger shoe. When you have
found the adjustment you prefer, tighten the set screw.
Always make sure the trigger shoe is totally secure before
firing. Checking the tightness of the set screw should be
part of your regular maintenance.
CLEANING AND MAINTENANCE SUGGESTIONS
Your Supreme will function better and more reliably over
a longer period of time if it is properly maintained and
kept clean.
BEFORE PERFORMING ANY CLEANING
PROCEDURES, ALWAYS MAKE CERTAIN THERE ARE
NO SHELLS IN THE CHAMBERS.
You should clean your Supreme after every day of
shooting and more often if it becomes excessively dirty.
A minimum cleaning includes wiping down the action
and oiling key parts. Most regular maintenance will also
include cleaning the barrels. If you encounter a function
problem (tightness when breaking open or closing the
action) be sure to give your gun a thorough cleaning to
see if it solves the problem before seeking the services of
our service facility or a competent gunsmith. To clean
your firearm, adhere to the following general guidelines.
25
Page 28

CLEANING PROCEDURES —
BE CERTAIN YOUR GUN’S CHAMBERS ARE
UNLOADED. ALWAYS WEAR PROTECTIVE SAFETY
GLASSES DURING ALL CLEANING PROCEDURES. KEEP
AMMUNITION AWAY FROM THE CLEANING AREA. DO
NOT TEST THE FUNCTION OF YOUR FIREARM WITH
LIVE AMMUNITION.
ALWAYS PLACE THE SAFETY IN THE “ON SAFE”
POSITION BEFORE BEGINNING ANY CLEANING
PROCEDURE.
1. Use a cleaning rod with a tip and patch suitable for the
size of your Supreme’s bores. Make sure the patch is large
enough for a snug fit in the bore. Insert the rod and patch
into the barrel at the receiver end and run it back and
forth several times.
2. Inspect the chamber and bore for lead and powder
fouling. A normal amount of powder residue can be
expected and is not serious. It can usually be removed by
repeating step one, using a patch saturated with solvent.
If or when fouling should become heavy, it can be
removed with a brass bore brush. Dip or spray the brush
with solvent and scrub the chamber and bore until the
fouling is removed. To prevent brass bristles from breaking
off, the brush should be pushed completely through the
bore before being withdrawn.
3. After fouling has been removed the bore should be
wiped dry. Then pass a lightly oiled patch through the
bore, for preservation. A fine, light gun oil is recommended.
4. Wipe all exposed metal surfaces of the receiver, forearm
and barrels with a clean rag. Finger marks should be
removed because they provide a place where moisture can
accumulate. Any dried oil in the receiver area should also
be removed.
5. Lightly oil your gun at the points described under
“Oiling the Action” explained earlier in this manual.
Ordinary good judgment will, of course, indicate that the
metal of the gun should receive a light film of oil any time
the gun has been exposed to weather or handling. This
is very important and must be done with every gun.
Remember, the polished, finely fitted surfaces of the
receiver and action mechanisms must always have a thin
film of oil. Make sure that the surfaces of the locking pin
system and the hinge components are especially clean and
lightly oiled with a high quality gun oil.
6. INSPECT THE BARRELS AND CHAMBERS. MAKE
CERTAIN THAT NO PATCHES HAVE BEEN INADVERTENTLY LEFT IN THEM. REMOVE ANY THAT REMAIN.
26
Page 29

7. Wipe all wood surfaces with a soft cloth.
8. When transporting only, store your Supreme in a quality
protective case to prevent scratches and dents. Store in a
dry place to prevent corrosion. Store away from children.
MAKE SURE YOUR SHOTGUN IS UNLOADED AND
ALWAYS STORE AMMUNITION SEPARATELY.
DO NOT TAKE YOUR GUN’S ACTION APART BEYOND
WHAT IS EXPLAINED IN THIS MANUAL.
This is a specialized, finely fitted mechanism; any attempt
to disassemble the trigger group or bolt mechanism may
mar it for life. It is unnecessary, and may do damage to
the inner mechanism, to disassemble these components
for routine cleaning and oiling. Of course, misfortunes
(such as dropping your gun in water) require appropriate
attention, and in such circumstances we recommend you
immediately take your gun to a competent gunsmith.
CLEANING THE INVECTOR-PLUS CHOKE SYSTEM —
1. Do not use a brass brush to clean your barrels unless
choke tubes are installed in the barrels. Bristles could
break off and lodge in the threads, making installation
and removal difficult.
2. Regularly remove your gun’s tubes in order to clean and
oil the threads inside the barrel, as well as on the choke
tube itself. This will protect the threads from being
damaged and also prevent a dirt build-up that would cause
the choke tube to become difficult to remove from the
barrel. Clean the threads with solvent and a small, soft
brush like a toothbrush. Wipe completely clean and leave
a thin film of clean oil on the threads: both on the tube
and in the barrel. The threads of the choke tube and the
internal threads of the barrel should be cleaned after each
use and before the installation of a tube.
3. Be careful when removing/installing a tube. Use the
specially designed wrench. Damage can result to both
choke tube and barrel when attempting to remove sticky
choke tubes.
4. Never fire your shotgun or run cleaning tools through
the barrel of any choke-tubed gun without having the
choke tubes installed.
OTHER CLEANING SUGGESTIONS —
• Never pour large quantities of oil into the receiver or
other parts. It can drain down to the wood and soften it
— and cause permanent damage and loosening of the
stock.
• After extended periods of heavy use, your shotgun
should be taken to a qualified gunsmith to have the action
disassembled for professional cleaning and lubrication.
27
Page 30

PARTS, SERVICE, REPAIR AND QUESTIONS
If your Winchester firearm should ever need repair or service, please utilize one of the world-wide network of U.S.
Repeating Arms Company A
(ARC) for Winchester firearms. A list of ARCs is packaged with your new gun. Never send your gun directly to
our parts department or to our customer service facility in
Morgan, Utah without direct authorization. This will
delay service significantly. It is much faster to have your
gun serviced by a local ARC. If you have any questions
about how to obtain service, or to locate the ARC nearest
you, call us at:
If you have other questions (concerning general information, how to obtain parts, etc.), call or write our Customer
Service Department. For questions about parts, you will
be directed to the specific parts location for your
Winchester firearm.
Customer Service
U. S. Repeating Arms Company, Inc.
275 Winchester Avenue
Morgan, Utah 84050-9333
Phone: 1-800-945-5237
1-800-945-5237
uthorized Repair Centers
CAUTION: PARTS ARE MADE FOR WINCHESTER
BRAND GUNS MANUFACTURED BY OR FOR U.S.
REPEATING ARMS COMPANY, INC., AND SHOULD NOT
BE USED IN OTHER GUNS EVEN THOUGH
MODELS MAY BE SIMILAR. IMPROPERLY FITTED
PARTS MAY BE DANGEROUS.
WINCHESTER-GUNS.COM
U.S. Repeating Arms Company offers an information
resource for you on the world wide web.
• List of authorized repair centers.
• Customer service information.
• Answers to many technical and historical questions.
• Links to helpful sites.
www.winchester-guns.com
Go to:
28
Page 31

You Are Responsible For Firearms Safety.
As a gun owner, you accept a set of demanding responsibilities. How seriously you take these
responsibilities can mean the difference between life and death. Failure to follow any of these
instructions can cause extensive damage to your gun and/or possible serious injury or death to
yourself and others. There is no excuse for careless or abusive handling of any firearm. At all
times handle any firearm with intense respect for its power and potential danger. READ AND
UNDERSTAND all of THE CAUTIONS AND PROPER HANDLING PROCEDURES
OUTLINED IN THIS BOOKLET BEFORE USING YOUR NEW FIREARM.
1.
ALWAYS KEEP THE MUZZLE OF ANY FIREARM POINTED IN A SAFE DIRECTION.
Do this even though you are certain the firearm is unloaded. Never point any firearm at
anything you do not intend to shoot. Be extremely alert and aware of all persons and property
within the range of your ammunition.
2.
NEVER RELY TOTALLY ON YOUR SHOTGUN'S MECHANICAL "SAFETY" DEVICE.
Always assume that your gun can be fired at any time, even with all the safety mechanism
engaged. The word "safety" describes a gun's trigger block mechanism, sear block mechanism,
hammer block mechanism or firing pin block mechanism. These mechanical devices are
designed to place your gun in a SAFER status. No guarantee can be made that the gun will not
fire even if the "safety" is in the "on safe" position. See "Operation of the Safety" in your
owner’s manual for instructions on operation of your gun's "safety."
3. LIKE ANY MECHANICAL DEVICE, A "SAFETY" CAN SOMETIMES FAIL; IT CAN BE
JARRED OR INADVERTENTLY MANIPULATED INTO AN UNSAFE CONDITION.
Mechanical "safeties" merely aid safe gun handling and are no excuse for pointing your
shotgun's muzzle in an unsafe direction.
While it is a good idea to "test" your shotgun's mechanical "safeties" periodically for proper
function, never test them while your firearm is loaded or pointed in an unsafe direction. Safe
gun handling does not stop with your gun's mechanical "safety" devices -- it starts there.
Always treat this shotgun with the respect a loaded, ready-to-fire firearm.
MECHANISM OF ANY FIREARM WHILE IT IS LOADED OR POINTED IN AN UNSAFE DIRECTION.
4. WHENEVER YOU HANDLE A FIREARM, OR HAND IT TO SOMEONE MAKE SURE IT IS
COMPLETELY UNLOADED.
NEVER TEST THE
Always open the action immediately and visually check the chamber magazine. Make certain
the chamber does not inadvertently contain any ammunition. Always keep the chamber empty
and the "safety" in the "on safe" position unless shooting is imminent.
5. DO NOT TRANSPORT ANY FIREARM LOADED. KEEP ALL FIREARMS UNLOADED
DURING TRANSPORT, WHETHER IN A SCABBARD, GUN CASE, OR OTHER CONTAINER.
6. HUNTING FROM ELEVATED SURFACES SUCH AS TREE STANDS IS DANGEROUS.
Doing so may increase the risk of handling a firearm. The following rules should always be
observed by you and those you hunt with: Always make certain that the stand being used is
safe and stable. Always make certain that your firearm is unloaded when it is being taken up
and down from the stand. Always make certain that your firearm is not dropped from the stand,
or dropped while it is being taken up or down from the stand. Remember, a loaded firearm
may discharge when dropped, even with the safety in the "on safe" position.
Page 32

7. BEWARE OF BARREL OBSTRUCTION.
Do this for the safety of both your gun and yourself. Mud, snow, and an infinite variety of
other objects may inadvertently lodge in a barrel bore. It takes only one small obstruction to
cause dangerously increased pressures that can ruin (swell or rupture) the finest shotgun barrel.
BEFORE CHECKING FOR A BARREL OBSTRUCTION, BE CERTAIN YOUR FIREARM IS FULLY
UNLOADED.
Make sure no live rounds are in the chamber. Place the safety in the "on safe" position, open
the breech or action and look through the barrel to be sure it is clear of any obstruction. If an
obstruction is seen, no matter how small it may be, clean the bore with a cleaning rod and
patch as instructed for your particular firearm. Before the first firing, clean the bore with a
cleaning rod and patch, and wipe away any anti-rust compounds in the action/chamber areas.
8. ALWAYS UNLOAD ALL FIREARMS WHEN NOT IN USE.
As a safety precaution, it is preferable to disassemble your gun for storage. Your
responsibilities do not end when your firearm is unattended. Store your gun and ammunition
separately -- well beyond the reach of children. Take all safeguards to ensure your firearm does
not become available to untrained, inexperienced or unwelcome hands.
9. USE THE PROPER AMMUNITION.
The barrel and action of all Browning firearms have been made with substantial safety margins
over the pressures developed by established American commercial loads. Nevertheless,
Browning assumes no liability for incidents which occur through the use of cartridges of
nonstandard dimensions which develop pressures in excess of commercially available
ammunition with standards established by the Sporting Arms and Ammunitions Manufacturers'
Institute (SAAMI).
BE ALERT TO THE SIGNS OF AMMUNITION MALFUNCTION.
If you detect an off sound or light recoil when ammunition is fired, DO NOT LOAD MORE
AMMUNITION INTO THE CHAMBER.
Open the action and remove all ammunition from the
chamber. With the action open, glance down the barrel to make sure that a wad or other
obstruction does not remain in the barrel. If there is an obstruction, completely clear the barrel
before loading and firing again. Failure to follow these instructions can cause extensive
damage to your gun and possible serious injury to yourself and others.
10.
DISCHARGE A FIREARM. WASH HANDS THOROUGHLY AFTER EXPOSURE TO AMMUNITION
OR CLEANING A FIREARM.
MAKE SURE OF ADEQUATE VENTILATION IN THE AREA THAT YOU
Lead exposure can be obtained from discharging firearms in poorly ventilated areas,
cleaning firearms or handling ammunition. Lead is
a substance that has been known to cause birth defects, reproductive harm and other serious
injury.
11.
NEVER INSERT A SHELL OF THE INCORRECT GAUGE IN ANY SHOTGUN. The gauge of
your shotgun is marked on the side of the barrel. Store all shells of different gauges in
completely separate and well-marked containers. Never store shells of mixed gauges in a
common container or in your pockets.
12 GAUGE GUN.
EXAMINE EVERY SHELL YOU PUT IN YOUR GUN. NEVER PUT A 20 GAUGE SHELL IN A
The most common way to bulge or rupture a shotgun barrel is to drop a 20
gauge shell into a 12 gauge chamber. The 20 gauge shell, unfortunately, will not fall
completely through the barrel; its rim is caught by the front of a 12 gauge chamber. Your gun
will misfire (with the chamber appearing to be empty). It is then possible to load a 12 gauge
shell behind the 20 gauge shell. If the 12 gauge shell is then fired, the result will be a so-called
“12-20 burst” which can cause extensive damage to your gun and possible serious injury to
you and others.
Page 33

12. USE SHELLS OF CORRECT LENGTH.
The size of the chamber is inscribed, along with gauge and choke designations, on the side of
the barrel. Do not use 31/2" shotgun shells in a shotgun or barrel with a 2 3/4" chamber or 3"
chamber. Do not use 3" shells in a shotgun chambered for a 2 3/4" shells. Doing so can result
in a build-up of dangerously high pressures that may damage your gun and possibly cause
serious injury to yourself or others.
13.
BE EMPTY!
DO NOT SNAP THE FIRING PIN ON AN EMPTY CHAMBER -- THE CHAMBER MAY NOT
Treat every gun with the respect due a loaded gun, even though you are certain the gun is
unloaded.
14.
UNTIL YOU ARE READY TO SHOOT.
KEEP YOUR FINGERS AWAY FROM THE TRIGGER WHILE LOADING AND UNLOADING
15. BE SURE OF YOUR TARGET AND BACKSTOP. Particularly during low light periods.
Know the range of your ammunition. Never shoot at water or hard objects.
16.
CROSSING A FENCE, CLIMBING A TREE, JUMPING A DITCH OR NEGOTIATING OTHER
OBSTACLES.
ALWAYS UNLOAD THE CHAMBER AND MAGAZINE OF ANY FIREARM BEFORE
Never lean or place your loaded shotgun on or against a fence, tree, car or other similar object.
17.
WEAR EYE AND EAR PROTECTION WHEN SHOOTING. Unprotected, repeated exposure
to gunfire can cause hearing damage. Wear ear protectors (shooting earplugs or muffs) to
guard against such damage. Wear shooting glasses to protect your eyes from flying particles.
Always keep a safe distance between the muzzle of your firearm and any persons nearby, as
muzzle blast, debris and ejecting shells could inflict serious injury. Also, wear eye protection
when disassembling and cleaning all firearms to prevent the possibility of springs, springtensioned parts, solvents or other agents from contacting your eyes.
18. DROPPING A LOADED GUN CAN CAUSE AN ACCIDENTAL DISCHARGE.
This can occur even with the "safety" in the "on safe" position. Be extremely careful while
hunting or during any shooting activity to avoid dropping any firearm.
19. IF ANY FIREARM FAILS TO FIRE, KEEP THE MUZZLE POINTED IN A SAFE DIRECTION.
Hold this position for a minimum of 30 seconds. Carefully open the action and remove the
shell. If the primer is indented, the shell should be disposed of in a way that cannot cause harm.
If the primer is not indented, your firearm should be examined by a qualified gunsmith and the
cause of the malfunction should be corrected before further use.
20. BE DEFENSIVE AND ON GUARD AGAINST UNSAFE GUN HANDLING AROUND YOU
AND OTHERS
. Don’t be timid when it comes to gun safety. If you observe other shooters
violating any of these safety precautions, politely suggest safer handling practices.
21. BE CERTAIN YOUR SHOTGUN IS UNLOADED BEFORE CLEANING.
Because so many accidents occur when a firearm is being cleaned, special and extreme care
should be taken to be sure your gun is unloaded before disassembly, cleaning and reassembly.
Keep ammunition away from the cleaning location. Never test the mechanical function of any
firearm with live ammunition.
Page 34

22. SUPERVISE AND TEACH FIREARMS SAFETY TO ALL MEMBERS OF YOUR FAMILY --
ESPECIALLY TO CHILDREN AND NONSHOOTERS.
Closely supervise newcomers to the shooting sports. Encourage enrollment in hunting/shooting
safety courses.
23. NEVER DRINK ALCOHOLIC BEVERAGES OR TAKE ANY TYPE OF DRUGS BEFORE OR
DURING SHOOTING.
Your vision and judgment could be dangerously impaired, making your gun handling unsafe to
you and to others.
24. PERFORM PERIODIC MAINTENANCE -- AVOID UNAUTHORIZED SERVICING.
Your firearm is a mechanical device which will not last forever, and as such, is subject to wear
and requires periodic inspection, adjustment and service. Browning firearms should be
serviced by a Browning Recommended Service Center or by Browning's service facility in
Arnold, Missouri. Browning cannot assume any responsibility for injuries suffered or caused
by unauthorized servicing, alterations or modifications of Browning firearms.
25.
READ AND HEED ALL WARNINGS in these instructions, on ammunition boxes and with
all accessories that you install on your firearm. It is your responsibility to secure the most upto-date information on the safe handling procedures of your Browning gun. Browning assumes
no liability for incidents which occur when unsafe or improper gun accessories or ammunition
combinations are used.
26. Browning reserves the right to refuse service on firearms that have been altered, added
to or substantially changed. Removal of metal from barrel(s), or modification of the firing
mechanism and/or operating parts may lead to Browning’s refusal of service on such firearms.
Browning will charge the owner for parts and labor to return the firearm to original Browning
specifications.
DO NOT, UNDER ANY CIRCUMSTANCES, ALTER THE TRIGGER, SAFETY OR
OTHER PARTS OF THE FIRING MECHANISM OF THIS OR ANY OTHER
FIREARM. FAILURE TO OBEY THIS WARNING MAY RESULT IN INJURY OR
DEATH TO YOURSELF OR OTHERS.
BE CAREFUL!
Page 35
U.S. Repeating Arms Company, Inc.
Licensee
275 Winchester Avenue
Morgan, Utah, U. S. A. 84050-9333
www.winchester-guns.com
Winchester trademarks licensed from Olin Corporation.
 Loading...