

Page 1
IMPORTANT INSTRUCTIONS FOR
MODEL 1892
LEVER-ACTION AND
LEVER-ACTION
TAKEDOWN RIFLES
This owner’s manual is for Winchester®
Model 1892™ lever-action rifles only.
Supplemental instructions for special edition
Model 1892 rifles must be used in conjunction
with the instructions found in this owner’s
manual. If your supplemental instructions are
missing, contact us immediately for a free copy
or download one online at: winchesterguns.com.
Winchester Repeating Arms
275 Winchester Avenue
Morgan, UT 84050-9333
(800) 945-5237
winchesterguns.com
Winchester is a registered trademark of Olin Corporation.
Page 2
Important instructions for the
Winchester® Model 1892
™
Lever-Action Rifle
Winchester Repeating Arms
Customer Service Department (United States)
275 Winchester Avenue
Morgan, Utah 84050-9333
Phone: (800) 945-5237
If you have any questions or comments regarding
your new firearm, please feel free to write or call us.
Use the space below to record information about
your new firearm.
Model __________________________________________
Serial Number ____________________________________
Caliber __________________________________________
Grade ___________________________________________
Content s Page
You Are Responsible for Firearm Safety ................................2
General Description and Operation ...................................... 9
Nomenclature ........................................................................ 9
Serial Number ........................................................................ 9
Initial Cleaning and Oiling ................................................. 13
Operation of the “Safety” ....................................................14
Rebounding Hammer ...........................................................16
Ammunition ........................................................................ 18
Loading ................................................................................19
Firing .................................................................................... 23
Unloading ............................................................................ 25
Sight Adjustment .................................................................26
Takedown Models ................................................................28
Cleaning and Maintenance Suggestions ............................. 36
Parts, Service, Repair and Questions ................................... 39
Website Information ............................................................ 41
Purchase Price ____________________________________
Purchased From ___________________________________
Date of Purchase __________________________________
AO1006/10289
The Model 1892 was born from the incredible success
of the Model 1886 when it became obvious that a
smaller caliber version would be an extremely useful
addition. Like its predecessor, the Model 1892 features
dual, vertical locking lugs for impressive strength in a
more compact, even faster handling size.
The popularity of the Model 1892 is legendary.
Admiral Peary carried one on his quest for the North
Pole. It was a favorite of Annie Oakley, and the first
choice for the legendary actor John Wayne. Hundreds
of thousands of ranchers and hunters have chosen the
Model 1892 over the competition for over a century.
1
Page 3
You Are responsible For
FireArm sAFetY
FAILURE TO FOLLOW ANY OF THE FOLLOWING
WARNINGS COULD RESULT IN SERIOUS INJURY
OR DEATH.
As a firearm owner, you accept a set of demanding
responsibilities. How seriously you take these
responsibilities can be the difference between life
and death.
There is no excuse for careless or abusive handling of
any firearm. At all times handle this firearm and all
other firearms with intense respect for their power and
potential danger.
Please read and understand all of the cautions,
warnings, notices, proper handling procedures and
instructions outlined in this owner’s manual before
using your new firearm.
1 ALWAYS KEEP THE MUZZLE OF YOUR FIREARM
POINTED IN A SAFE DIRECTION EV EN THOUGH
YOU ARE CERTAIN IT IS UNLOADED.
Never point any firearm at anything you do not
intend to shoot. Be extremely alert and aware of
all persons and property within the range of
your ammunition.
2 NEVER RELY TOTALLY ON YOUR FIREARM’S
MECHANICAL “SAFETY” DEVICE. LIKE ANY
MECHANICAL DEVICE, A “SAFETY” CAN
SOMETIME S FAIL; IT CAN BE JARRED OR
INADVERTENTLY MANIPULATED INTO AN
UNSAFE CONDITION.
The word “safety” describes a firearm’s trigger
block mechanism, sear block mechanism, hammer
block mechanism or firing pin block mechanism.
Mechanical “safeties” are designed to place your
firearm in a safer status, and no guarantee can be
made that the firearm will not fire even if the
“safety” is in the on safe position. Mechanical
“safeties” merely aid safe gun handling and are no
excuse for pointing your firearm’s muzzle in an
unsafe direction. See “Operation of the “Safety”
on page 14 for instructions on the operation of
this firearm’s “safety.”
Remember, safe gun handling does not stop with
your firearm’s mechanical “safety” devices, it starts
there. Always treat this firearm with the respect
due a loaded, ready-to-fire firearm.
Some firearms do not have a mechanical “safety.”
Many target firearms, lever-action firearms and
pistols do not have manual “safety” mechanisms.
Therefore it is critical to read and understand the
owner’s manual for every firearm which explains
the safe operation of the firearm.
While it is a good idea to test your firearm’s
mechanical “safety” periodically for proper
function, never test the “safety” while your firearm
is loaded or pointed in an unsafe direction.
3 WHENEVER YOU HANDLE ANY FIREARM, OR
HAND IT TO SOMEONE , A LWAYS OPEN THE
ACTION IMMEDIATELY AND VISUALLY CHECK
THE FIREARM’S CHAMBER TO MAKE CERTAIN
THAT THE FIRE ARM IS COMPLET ELY U NLOADED.
Make certain the firearm does not inadvertently
contain any ammunition. Remember, merely
removing the magazine does not mean the
chamber is unloaded. Always keep the chamber
empty and the “safety” in the on safe position
unless shooting is imminent.
4 ALWAYS WE AR EAR AND EYE PROTECTION
WHEN SHOOTING.
Unprotected, repeated exposure to gunfire can
cause hearing damage. Wear hearing protection
(shooting ear plugs or muffs) to guard against
such damage.
Wear shooting glasses to protect your eyes from
flying particles. Allow proper distance (eye relief)
between a scope and your eye when firing a scoped
pistol, rifle or shotgun. Do not use unorthodox
shooting methods that could cause the rearward
travel of the slide or bolt of a firearm to contact
2
3
Page 4
your eyes, face or hands. Always keep a safe
distance between the muzzle of your firearm and
any persons nearby, as muzzle blast, debris and
ejecting cartridges could inflict serious injury.
Always wear eye protection when disassembling
and cleaning any firearm to prevent the possibility
of springs, spring-tensioned parts, solvents or other
agents from contacting your eyes.
5 KEEP ALL FIREARMS UNLOADED DURING
TRANSPORT, E VEN WHEN STORED IN A HOLSTER,
GUN CASE, SCABBARD OR OTHER CONTAINER.
6 DROPPING OR JARRING A LOADED FIREA RM CAN
CAUSE ACCIDENTAL DISCHARGE.
This can occur even with the “safety” in the
on safe position. Be extremely careful while
hunting or during any shooting activity to avoid
dropping any firearm.
7 HUNTING FROM ELEVATED SURFACE S SUCH AS
TREESTANDS IS DANGEROUS.
Doing so may increase the risk of mishandling a
firearm. The following rules should always be
observed by you and those you hunt with. Always
make certain that the stand being used is safe and
stable. Always make certain that your firearm is
unloaded when it is being taken up and down from
the stand. Always make certain that your firearm is
not dropped from the stand, or dropped while it is
being taken up or down from the stand. Remember,
a loaded firearm may discharge when dropped, even
with the “safety” in the on safe position.
8 STORE YOUR FIRE ARM AND AMMUNITION
SEPARATELY, WELL BEYOND THE REACH
OF CHILDREN.
Take prudent safeguards to ensure your firearm does
not become available to untrained, inexperienced
or unwelcome hands. Store all firearms in secure,
locked cases or a gun safe. Keep your firearm
unloaded when not in use.
9 BEWARE OF BARREL OBSTRUCTIONS.
Mud, snow and an infinite variety of other objects
may inadvertently lodge in a barrel bore. It only
4 5
takes a small obstruction to cause dangerously
increased pressures that can damage your firearm
and cause serious injury to yourself and others.
BEFORE CHECK ING FOR A BARREL
OBSTRUCTION, BE CERTAIN YOUR FIREARM IS
COMPLETELY UNLOADED, THERE IS NOT A LIVE
CARTRIDGE IN THE CHAMBER AND THE
“SA FETY” IS IN THE ON SAFE POSITION.
After assuring yourself that the firearm is
completely unloaded, open the breech or action
and look through the barrel to be sure it is clear of
obstructions. If an obstruction is seen, no matter
how small it may be, clean the bore with a
cleaning rod and patch as described on page 36 of
this owner’s manual.
10 BE ALERT TO THE SIGNS OF AMMUNITION
MALFUNCTION. IF YOU DETECT AN OFF SOUND
OR LIGHT RECOIL WHEN A CARTRIDGE IS FIRED,
DO NOT LOA D ANOTHER CARTRIDGE INTO
THE CHAMBER.
If your firearm fails to fire, keep the muzzle pointed
in a safe direction for a minimum of 30 seconds.
Carefully open the action and remove the
cartridge from the chamber. If the primer is
indented, the defective cartridge should be
disposed of in a way that cannot cause harm. If the
primer is not indented, your firearm should be
examined by a qualified gunsmith and the cause of
the malfunction corrected before further use.
Glance down the barrel to make sure that no
obstructions remain in the barrel. Completely
clear the barrel before loading and firing again.
Failure to follow these instructions can cause
extensive damage to your firearm and possible
serious injury to yourself and others.
11 NEVER INSERT A CARTRIDGE OF THE INCORRECT
CALIBER INTO AN Y FIRE ARM.
The caliber of your firearm is marked on the
barrel. Store all cartridges of different calibers in
completely separate and well-marked containers.
Never store cartridges of mixed calibers in a
Page 5
common container or in your pockets. See page 18
for more information on the correct ammunition
for your firearm.
12 E XAMINE EVERY CARTRIDGE YOU PUT IN
YOUR FIRE ARM.
We assume no responsibility for the use of unsafe
or improper firearm and ammunition
combinations or damage or injury caused by
damaged ammunition. It is your responsibility
to read and heed all warnings in this owner’s
manual and on ammunition boxes. See page 18
for more information on the correct ammunition
for your firearm.
13 USE ONLY SAAMI APPROVED AMMUNITION.
The barrel and action of this firearm have been
made with substantial safety margins beyond the
pressures developed by established American
commercial loads. Nevertheless, we can assume no
liability for incidents which occur through the use
of cartridges of nonstandard dimensions or which
develop pressures in excess of commercially
available ammunition which has been loaded in
accordance with standards established by the
Sporting Arms and Ammunition Manufacturers’
Institute (SAAMI).
14 MAKE SURE OF ADEQUATE V ENTIL ATION
IN THE AREA THAT YOU DISCHARGE A FIREARM.
LEAD EXPOSURE CAN OCCUR FROM
DISCHARGING FIREA RMS IN POORLY
VENTILATED A RE AS, CL EA NING FIREARMS
OR HANDLING AMMUNITION.
Lead is a substance that has been known to cause
birth defects, reproductive harm and other serious
injury. Wash hands thoroughly after exposure to
ammunition or after cleaning a firearm.
15 DO NOT SNAP THE FIRING PIN ON AN EMPTY
CHAMBER; THE CHAMBER MAY NOT BE EMPT Y!
Treat every firearm with the respect due a loaded
firearm, even though you are certain the firearm
is unloaded.
16 K EEP YOUR FINGERS AWAY FROM THE TRIGGER
WHILE LOADING AND UNLOADING UNTIL
SHOOTING IS IMMINENT.
17 BE SURE OF YOUR TARGET AND BACKSTOP,
PARTICULARLY DURING LOW LIGHT PERIODS.
Know the range of your ammunition. Never shoot
at water or hard objects.
18 ALWAYS UNLOAD YOUR FIRE ARM’S CHAMBER
BEFORE CROSSING A FENCE, CLIMBING A
TREE, JUMPING A DITCH OR NEGOTI ATING
OTHER OBSTACL ES.
Never place your firearm on or against a fence,
tree, car or other similar object.
19 BE DEFENSIVE AND ON GUARD AGAINST UNSAFE
GUN HANDLING AROUND YOU AND OTHERS.
Don’t be timid when it comes to firearm safety.
If you observe other shooters violating any of
these safety precautions, politely suggest safer
handling practices.
20 BE CERTAIN YOUR FIREARM IS UNLOADED
BEFORE CLEANING.
Because so many firearm accidents occur when a
firearm is being cleaned, special and extreme care
should be taken to be sure your firearm is unloaded
before disassembly, cleaning and reassembly.
Keep ammunition away from the cleaning
location. Never test the mechanical function of
any firearm with live ammunition.
21 TEACH A ND SUPERVISE FIRE ARMS SAF ET Y TO
ALL MEMBERS OF YOUR FAMILY, ESPECIALLY
TO CHILDREN AND NON-SHOOTERS.
Closely supervise newcomers to the shooting
sports. Encourage enrollment in hunting and
shooting safety courses.
22 NEVER DRINK A LCOHOLIC BEVERAGES OR
TAKE ANY TYPE OF DRUGS BEFORE OR
DURING SHOOTING.
Your vision, motor skills and judgment could be
dangerously impaired, making your gun handling
unsafe to you and to others.
6 7
Page 6
23 READ AND HEED ALL WARNINGS IN THIS
OWNER’S MANUAL, ON AMMUNITION BOXES
AND WITH ALL ACCESSORIE S T HAT YOU INSTALL
ON YOUR FIREARM.
It is your responsibility to secure the most up-todate information on the safe handling procedures
of your Winchester firearm. We assume no liability
for incidents which occur when unsafe or improper
firearm accessories or ammunition combinations
are used.
24 PRACTICE PERIODIC MAINTENANCE , AVOID
UNAUTHORIZED SERVICING.
Your firearm is a mechanical device which will
not last forever, and as such, is subject to wear
and requires periodic inspection, adjustment and
service. Winchester firearms should be serviced
by a Winchester Repeating Arms Authorized
Repair Center or by our Service Facility in
Arnold, Missouri. We assume no responsibility
for injuries suffered or caused by unauthorized
servicing, alterations or modifications of
Winchester firearms.
25 WE RESERVE THE RIGHT TO REFUSE SERVICE ON
FIREA RMS THAT HAVE BEEN ALTERED, ADDED
TO OR S UBSTAN TIALLY CHANGED.
Removal of metal from the barrel, or modifications
of the firing mechanism and/or operating parts,
may lead to a refusal of service on such firearms.
We will charge you for parts and labor to return
the firearm to original specifications.
DO NOT, UNDER ANY CIRCUMSTANCE S, ALTER
THE TRIGGER, “SAFETY” OR OTHER PA RTS OF
THE FIRING MECHANISM OF THIS OR AN Y OTHER
FIREA RM. FAILURE TO OBEY THIS WARNING MAY
RESULT IN INJURY OR DEATH TO YOURSELF
OR OTHERS.
B E C A R E F U L !
GenerAl Description AnD operAtion
The Model 1892 rifle is one of the firearms that
changed the face of America during the late 1800s.
Conceived from the genius of John M. Browning, the
lever-action Model 1892 is a scaled-down version of
the powerful Model 1886. Cowboys and frontiersmen
preferred a rifle that fired the same ammunition as
their sidearms, and a smaller version of the rugged,
reliable Model 1886 design was a natural choice. The
Model 1892 features dual, vertical locking lugs for
strength in a compact, faster handling size.
nomenclAture
Descriptions in this owner’s manual generally refer to
the firearm in the horizontal, normal firing position.
For example, the muzzle is forward or front; the
buttstock is rearward or rear; the trigger is downward
or underneath; the sights are upward or on top.
Throughout this owner’s manual the action refers to
the mechanism of this rifle which loads and secures
the cartridge in the chamber.
Figure 1 (pages 10-11) covers the general features and
benefits of the Model 1892 design. The appearance of
your rifle may be slightly different, depending on the
version you purchased. Refer to Figures 2, 3 and 4
(pages 12-13) for general part descriptions regarding
your new rifle.
You must become familiar with all the part names
listed before proceeding with the rest of the
instructions in this owner’s manual.
seriAl number
The serial number of your Model 1892 can be found
stamped on the bottom of the receiver, toward the
front. Record the serial number at the front of this
owner’s manual for future reference.
8 9
(Continued on page 13.)
Page 7
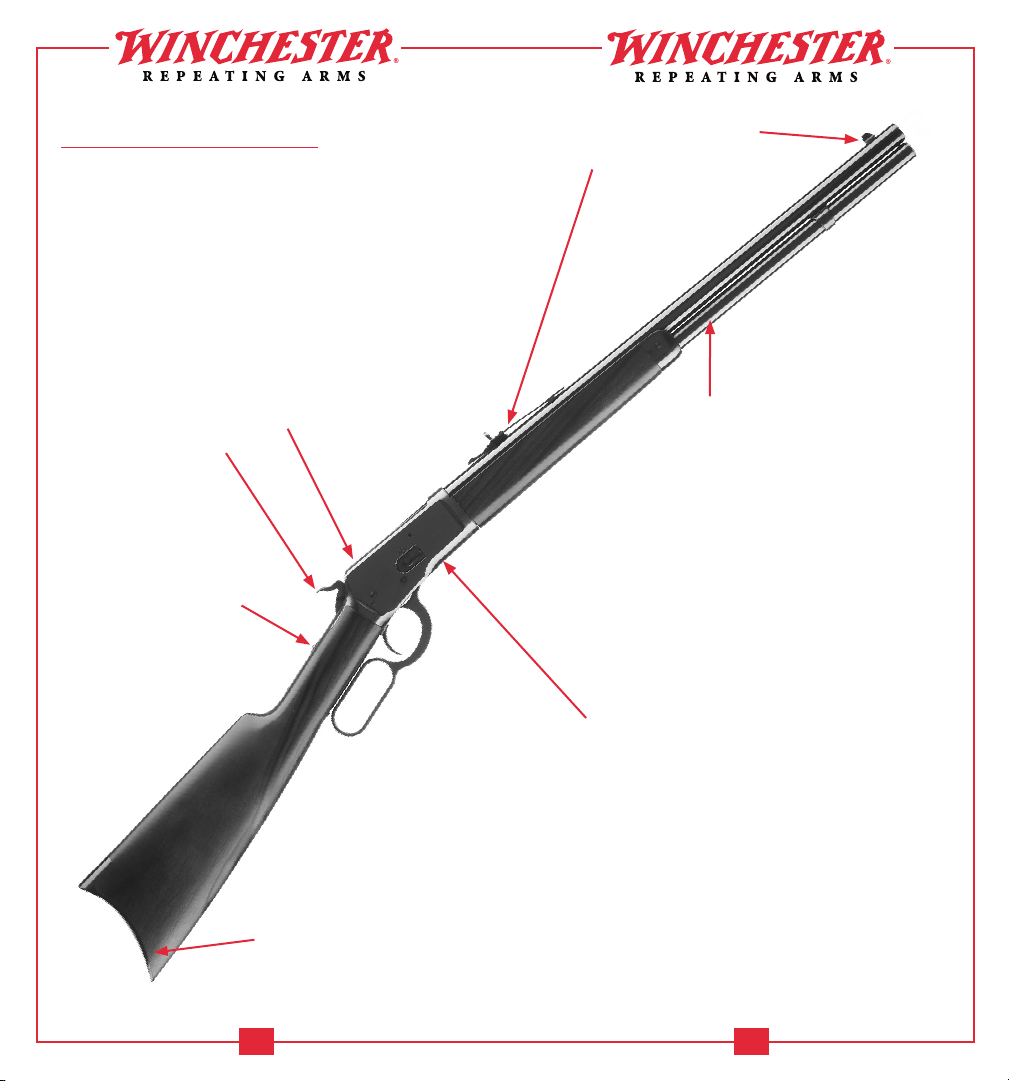
FIGURE 1
moDel 1892 FeAtures
The Model 1892 of today is a careful reproduction of one
of the original configurations made over 100 years ago.
The Model 1892 design is visually exciting with its
complex machining and hand finishing. These qualities
are uncommon in most of today’s mass produced guns.
They are qualities that take more effort to build, something
you will appreciate for years to come.
Traditional open sights are easily
adjustable for elevation and drift
adjustable for windage.
Innovative rebounding
hammer.
The convenient top-tang
“safety” is easy to reach
with the shooting hand.
The two vertical locking lugs lock
into matching recesses in the
breech bolt for secure lockup.
Your Model 1892 has a beautiful
stock and buttplate design
patterned after classic versions
popular more than a century ago.
The tubular magazine loads
through a loading port in the
right side of the receiver.
The Model 1892 is a compact version of the revered
Model 1886. Smaller, lighter and faster handling than the
Model 1886, the Model 1892 shared the same cartridges as
popular revolvers of the day. That meant the shooter had to
carry only one caliber of ammunition to serve both the rifle
and revolver. The design of the lever and link mechanisms are
both clever and unique. These attributes made the compact
Model 1892 a handy, fast-handling favorite.
11 10
Page 8
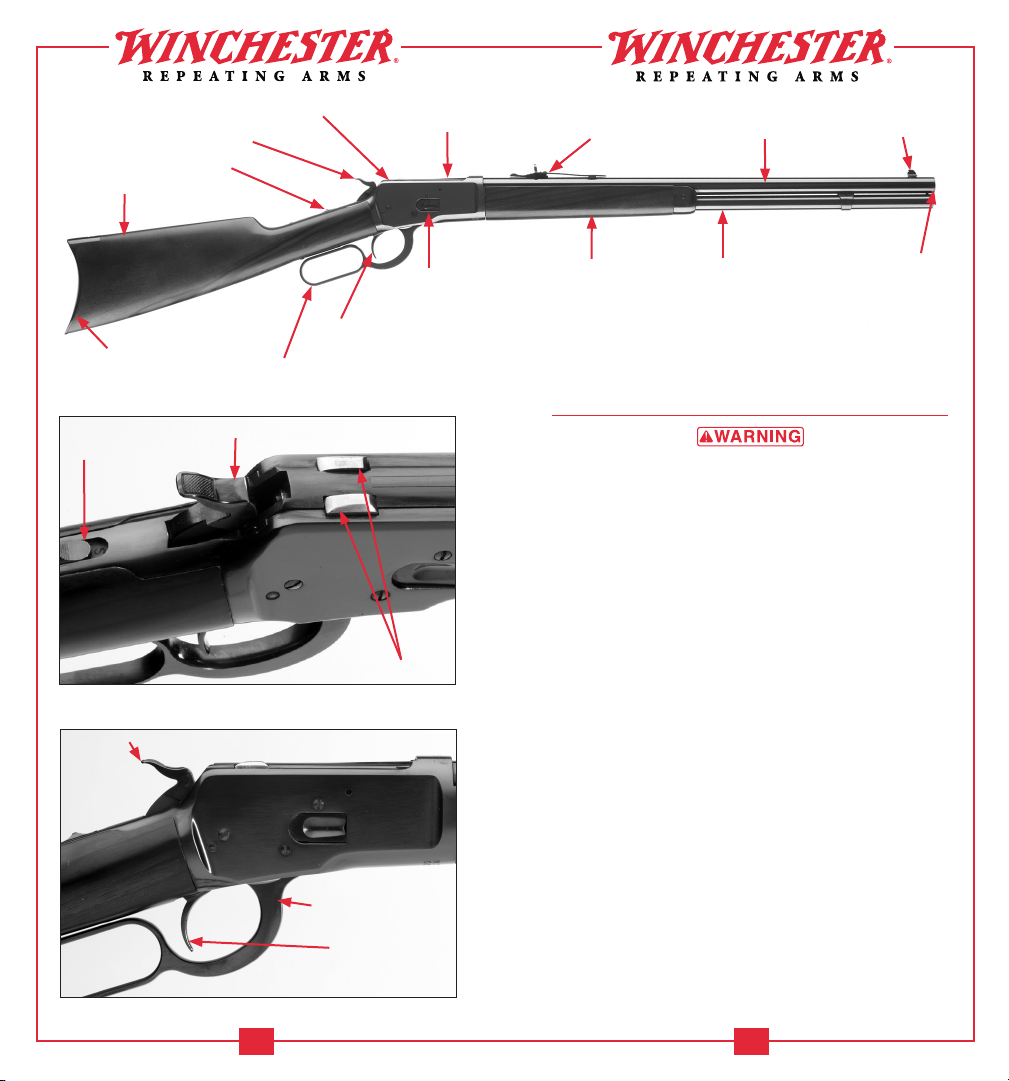
FIGURE 2
Buttstock
Rebounding Hammer
Top-Tang
“Safety”
Receiver
Ejection Port
Rear Sight
Barrel
Front Sight
Buttplate
FIGURE 3
Top-Tang Safety
(Manual Hammer Stop)
FIGURE 4
Hammer
Trigger
Finger Lever
Rebounding Hammer
Vertical Locking Lugs
Finger Lever
Trigger
Loading Port
Forearm
Magazine Tube
Muzzle
initiAl cleAninG AnD oilinG
WEAR EYE PROTECTION WHEN ASSEMBLING A ND
DISASSEMBLING YOUR RIFLE TO PREVENT SPRINGS,
SPRING-LOADED PA RTS, SOLVENTS OR OTHER
AGENTS FROM CONTACTING YOUR E YE S, RESULTING
IN INJURY.
Various exposed metal parts of your new firearm have
been coated at the factory with a rust preventative
compound. Before firing your rifle, clean the anti-rust
compound from the inside of the barrel, receiver and
the action-chamber areas. A fine, light gun oil is ideal
for removing this compound and for giving your new
firearm its first lubrication. However, any quality
firearm oil may be used. Clean the barrel using a
cleaning rod and patch as explained under “Cleaning
and Maintenance Suggestions” on page 36. If your
rifle is to be stored, it is acceptable to leave the rust
preventative compound on the rifle and keep it in its
original packaging.
Before beginning the first firing of your Model 1892
you should first wipe the mechanism completely
clean. Clean the bore and apply a few drops of quality
oil on the following surfaces (Figure 5, page 14):
13 12
Page 9
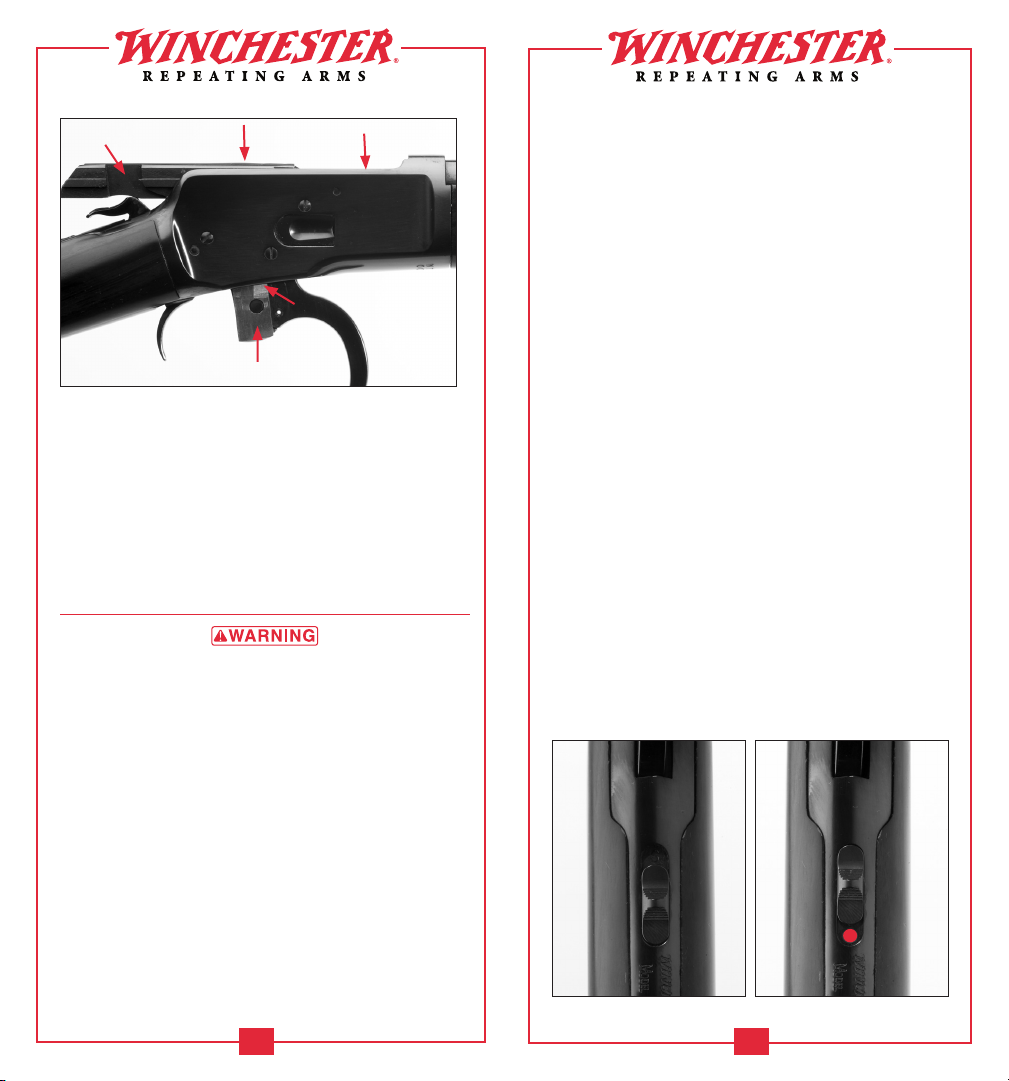
FIGURE 5
Lightly oil the rifle at these points.
• Along the breech bolt surface.
• Along the breech bolt rail surfaces.
• On all pivot points and bearing surfaces on the
finger lever mechanism.
Avoid applying too much oil. Only a light film is
necessary. Cleaning and Maintenance Suggestions
should be followed before each oiling.
operAtion oF the “sAFetY”
ALWAYS KEEP THE “SAFETY” IN THE ON SAFE
POSITION AND THE H AMMER IN THE REBOU ND
POSITION UNLESS SHOOTING IS IMMINENT. ALWAYS
KEEP THE MUZZLE POINTED IN A SAFE DIRECTION.
FAILURE TO FOLLOW THESE WARNINGS COULD
RESULT IN SERIOUS INJURY OR DEATH.
The Model 1892 features a top-tang hammer block
“safety.” When the “safety” has been placed in the on
safe position it blocks the hammer from striking the
firing pin. However, the “safety” does not prevent the
hammer from falling when the trigger is pulled, even if
the “safety” is in the on safe position. When the trigger
is pulled, with the “safety” in the on safe position, the
hammer drops to the rebound position without striking
the firing pin. The “safety” has two positions:
• On Safe — This is the recommended position
of the “safety” for all times except when firing
is imminent.
To place the “safety” in the on safe position,
point your rifle in a safe direction, then slide the
“safety” fully to the rear with your thumb until
the red warning dot is covered by the “safety”
and the “S” is visible (Figure 6, page 15).
Moving the “safety” fully rearward and exposing
the “S” blocks the hammer from striking the
firing pin.
• Off Safe — When the “safety” is pushed all
the way forward it is in the off safe position
(Figure 7, page 15). In this position, when the
trigger is pulled, the cocked hammer will fall
and strike the firing pin. If a cartridge is in the
chamber the firing pin will strike the primer
and fire the cartridge.
To place the “safety” in the off safe position,
point your rifle in a safe direction, then slide the
“safety” fully forward, covering the “S” inscribed
on the rifle, and exposing the red warning dot.
When the red warning dot is visible the “safety”
is in the off safe position.
The “safety” can be actuated with the hammer
in the rebound or cocked position.
FIGURE 6
The “safety” in the
on safe position.
FIGURE 7
The “safety” in the
off safe position.
14
15
Page 10
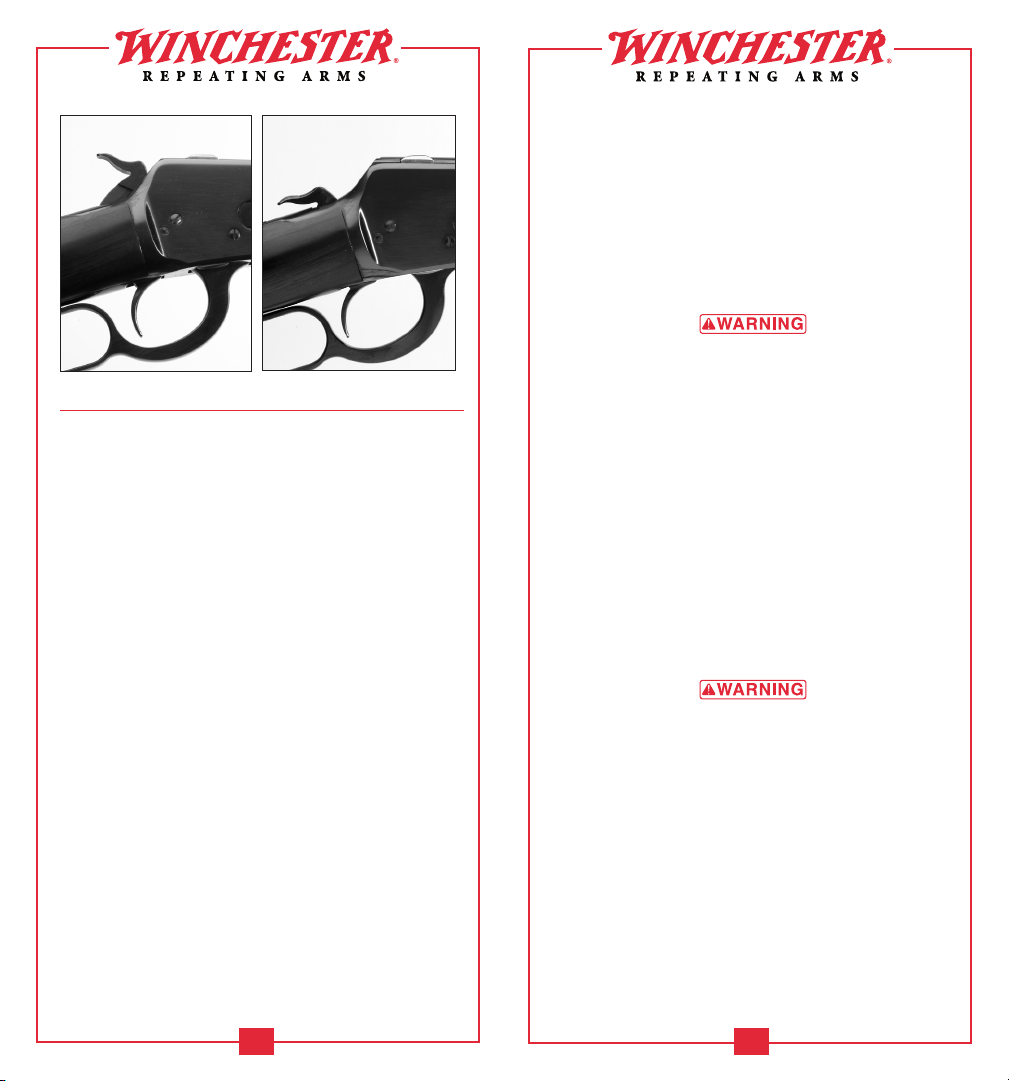
FIGURE 8
The hammer in the
rebound position.
FIGURE 9
The hammer in the
fully-cocked position.
rebounDinG hAmmer
The Model 1892 features a rebounding hammer
designed to prevent the hammer from moving forward
and striking the firing pin unless the trigger is pulled.
After firing your rifle the hammer immediately moves
to the rebound position. The hammer can also be
manually lowered from full-cock to the rebound
position as detailed on page 17 under “Lowering
the Hammer.”
hAmm er positi ons
The rebounding hammer on the Model 1892 has
two positions:
• Rebound Position — This position (Figure 8,
page 16) takes the place of the dropped and
half-cock positions found on the original
Model 1892 rifles.
The rebounding feature of the hammer essentially
eliminates the dropped hammer position. The
hammer only travels to the dropped position
momentarily after the trigger has been pulled
with the hammer fully-cocked. The hammer then
automatically moves to the rebound position.
The rebound position is the recommended
position of the hammer at all times and should
be in that position except (1) when firing is
imminent (2) or immediately after the action
has been cycled.
• Full-Cock Position — This is the position that
the hammer is moved to when firing is imminent
(Figure 9, page 16). It is also the position the
hammer moves to when the action is cycled using
the finger lever.
ALWAYS KEEP THE “SAFETY” IN THE ON SAFE
POSITION WHEN THE HAMMER IS IN THE FULL- COCK
POSITION UNLESS FIRING IS IMMINENT. ALWAYS
KEEP THE MUZZLE POINTED IN A SAFE DIRECTION.
FAILURE TO FOLLOW THESE WARNINGS COULD
RESULT IN SERIOUS INJURY OR DEATH.
lowerinG t he hAmmer
At any time the hammer can be moved to the
full-cock position either manually or by cycling the
finger lever fully. Unless shooting is imminent it is
important to keep the hammer in the rebound
position. To lower the hammer from the full-cock
position to the rebound position, perform the
following operation.
WHEN LOWERING THE HAMMER TO THE REBOUND
POSITION, ALWAYS K EEP THE MUZZLE POINT ED IN
A SAFE DIRECTION. ALWAYS KEEP THE “SAFETY”
IN THE ON SAFE POSITION. FAILURE TO FOLLOW
THESE WARNINGS COULD RESULT IN SERIOUS
INJ URY OR DEATH.
1. Place the “safety” in the on safe position.
2. Place your thumb on the hammer spur and firmly
hold the hammer back slightly with your thumb.
16 17
Page 11
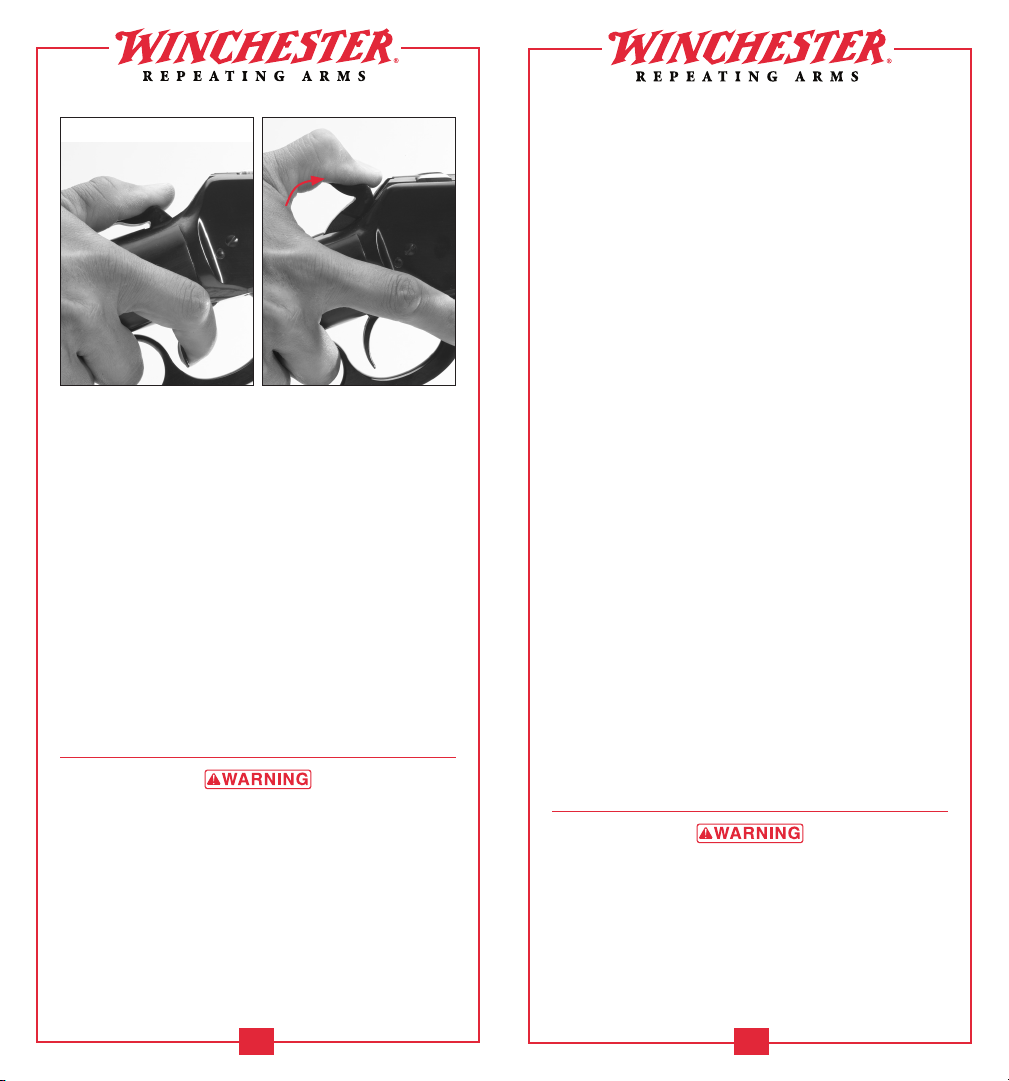
FIGURE 10
Hold the hammer firmly
and pull the trigger.
FIGURE 11
Carefully lower
the hammer to the
rebound position.
3. While holding the hammer back, apply just
enough pressure on the trigger to release the
hammer from the full-cock position (Figure 10,
page 18). Immediately remove your finger from
the trigger, then slowly and carefully allow the
hammer to lower into the rebound position
(Figure 11, page 18).
ADDi tionAl in FormAtion
• Keep the action open (finger lever down) when
your rifle is laying on a bench or table at a
shooting range or other facility, and at all other
times except when you are in the field and
shooting is imminent or the rifle is completely
unloaded and to be securely stored.
Ammunition
DISCHARGING FIREA RMS IN POORLY VENTILATED
AREAS, CLEANING FIREARMS OR HA NDLING
AMMUNITION MAY RESULT IN EXPOSURE TO LEAD
AND OTHER SUBSTANCES KNOWN TO CAUSE BIRTH
DEFECTS, REPRODUCTIV E H ARM AND OTHER
SERIOUS PHYSICAL INJURY. H AVE ADEQUATE
VENTILATION AT ALL TIMES. WASH HANDS
THOROUGHLY AF TER HANDLING AMMUNITION.
USE ONLY AMMUNITION SUITABLE FOR USE IN A
CENTERFIRE RIFLE W ITH A TUBUL AR MAGAZINE.
USE ONLY FL AT NOSE, HOLLOW POINT, ROUND NOSE
FLAT POINT OR SIMIL AR BULLE TS. NEVER U SE
POINTED OR CONICAL POINT BULLETS IN A
CENTERFIRE RIFLE W ITH A TUBUL AR MAGAZINE.
FAILURE TO FOLLOW THESE INSTRU CTIONS COULD
RESULT IN INJURY TO YOURSELF OR OTHERS, AND
CAUSE DAMAGE TO YOUR FIRE ARM.
The Model 1892 is designed to shoot modern factory
cartridges only. The caliber of your new Model 1892 is
inscribed on the top of the barrel, just in front of the
receiver. Make sure you use only the exact
ammunition/caliber as listed on the barrel.
The barrel and action of this rifle have been made
with substantial safety margins over the pressures
developed by established American loads. However,
we assume no responsibility for incidents which occur
through the use of cartridges of nonstandard
dimension or those developing pressures in excess of
SAAMI (Sporting Arms and Ammunition
Manufacturers’ Institute) established standards.
DO NOT USE AMMUNITION OTHER THAN WHAT
IS INSCRIBED ON THE LEFT SIDE OF THE BARREL.
EX AMINE EVERY CARTRIDGE YOU PUT IN
YOUR FIRE ARM.
18 19
loADinG
WHEN LOADING YOUR RIFL E ALWAYS KEEP THE
MUZ ZLE POINTED IN A SAFE DIRECTION, ALWAYS
PLACE THE “SAFETY” IN THE ON SAFE P OSITION
AND PL ACE THE H AMMER IN THE REBOU ND
POSITION. KEEP YOUR FINGERS AWAY FROM THE
TRIGGER. FAILURE TO FOLLOW THESE WARNINGS
COULD RESULT IN SERIOUS INJURY OR DEATH.
Page 12
DO NOT CARRY YOUR RIFLE WITH A CARTRIDGE IN
THE CHAMBER TO AVOID ACCIDENTAL DISCHARGE.
WHEN FIRING IS NO LONGER IMMINENT, MAKE
SURE THE “SAFETY” IS IN THE ON SA FE POSITION,
UNLOAD THE CHAMBER AND M AK E SURE THE
HAMMER IS IN THE REBOUND POSITION. FAILURE
TO FOLLOW THESE WARNINGS COULD RESULT IN
SERIOUS INJURY OR DEATH.
loAD inG the mAGAzine
The magazine is loaded through a port on the right
side of the receiver.
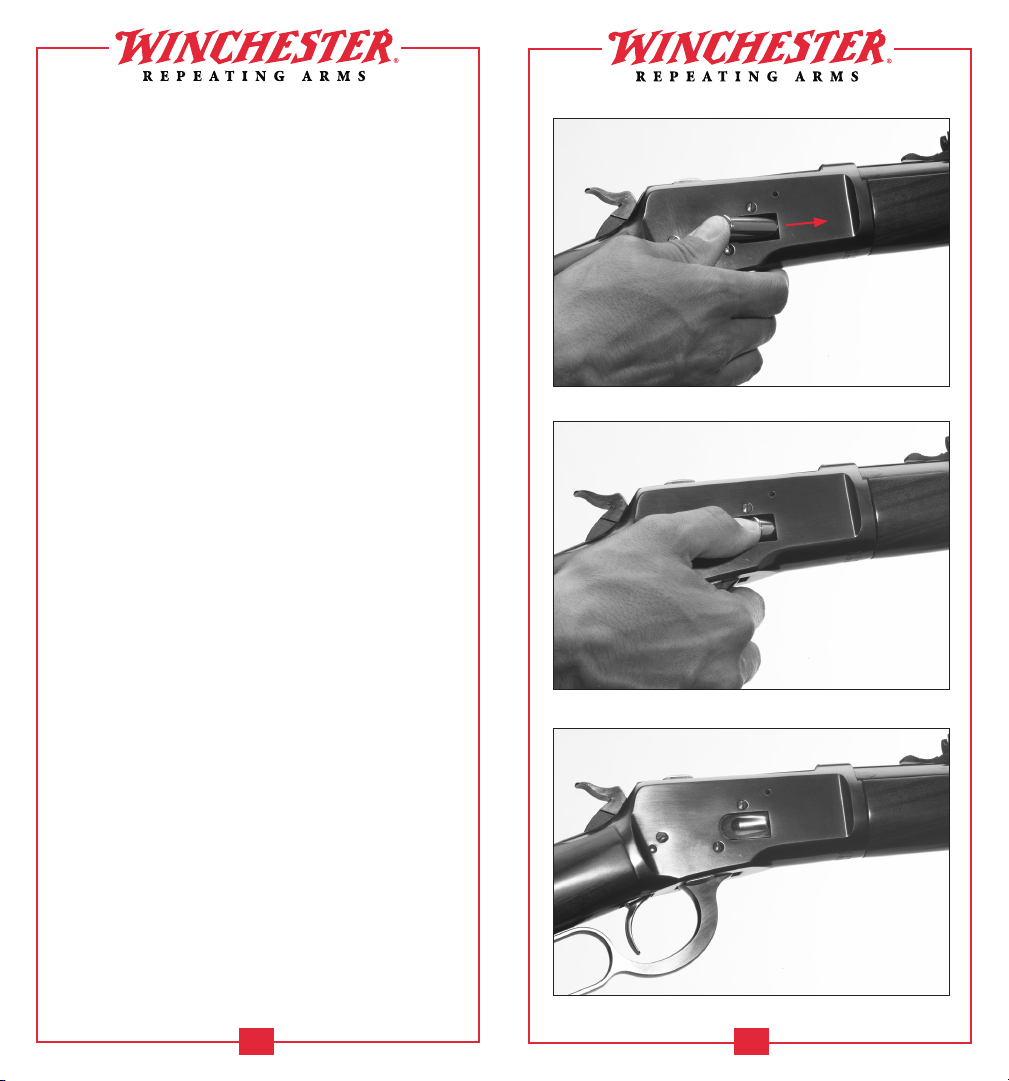
1. With the action closed and the “safety” in the
on safe position and the hammer in the rebound
position, press the spring cover inward with the
bullet tip of the first cartridge until all but the
rim has entered the loading port (Figures 12
and 13, page 21).
2. Insert the next cartridge in the same manner, using
it to push the preceding cartridge into the magazine.
3. Repeat this procedure with each cartridge, pushing
the last cartridge past the end of the spring cover
and allowing the cover to snap closed (Figure 14,
page 21). Do not exceed the recommended
capacity of the magazine.
loAD inG Direc tlY to the ch Amber
The chamber of your rifle may be loaded by placing a
cartridge directly into the chamber through the
opened action, or by transferring a cartridge that was
previously loaded into the magazine to the chamber by
operating the finger lever.
1. Place the “safety” in the on safe position.
2. To load a cartridge directly into the chamber, open
the action by pulling the finger lever downward
and fully forward.
3. Insert a cartridge directly into the chamber.
4. Close the action by pulling the finger lever upward.
Keep your fingers away from the trigger.
FIGURE 12
Carefully start the
cartridge into the
loading port with
the tip of the bullet.
FIGURE 13
Push the cartridge in until
it is almost fully inside the
loading gate, then insert
another cartridge and use it
to push the preceding
cartridge into the magazine.
FIGURE 14
Push the last cartridge
in until the loading port
cover closes.
20 21
Page 13
THE RIFLE IS NOW RE ADY TO FIRE BY SIMPLY
MOVING THE “SAFET Y” TO THE OFF SAFE POSITION
AND PULLING THE TRIGGER.
Immediately move the hammer to the rebound
position as explained on page 17.
5. Load the magazine as previously explained.
loAD inG the chAmber Fr om the mA GAzine
1. Place the “safety” in the on safe position.
2. Load the magazine as explained on page 20.
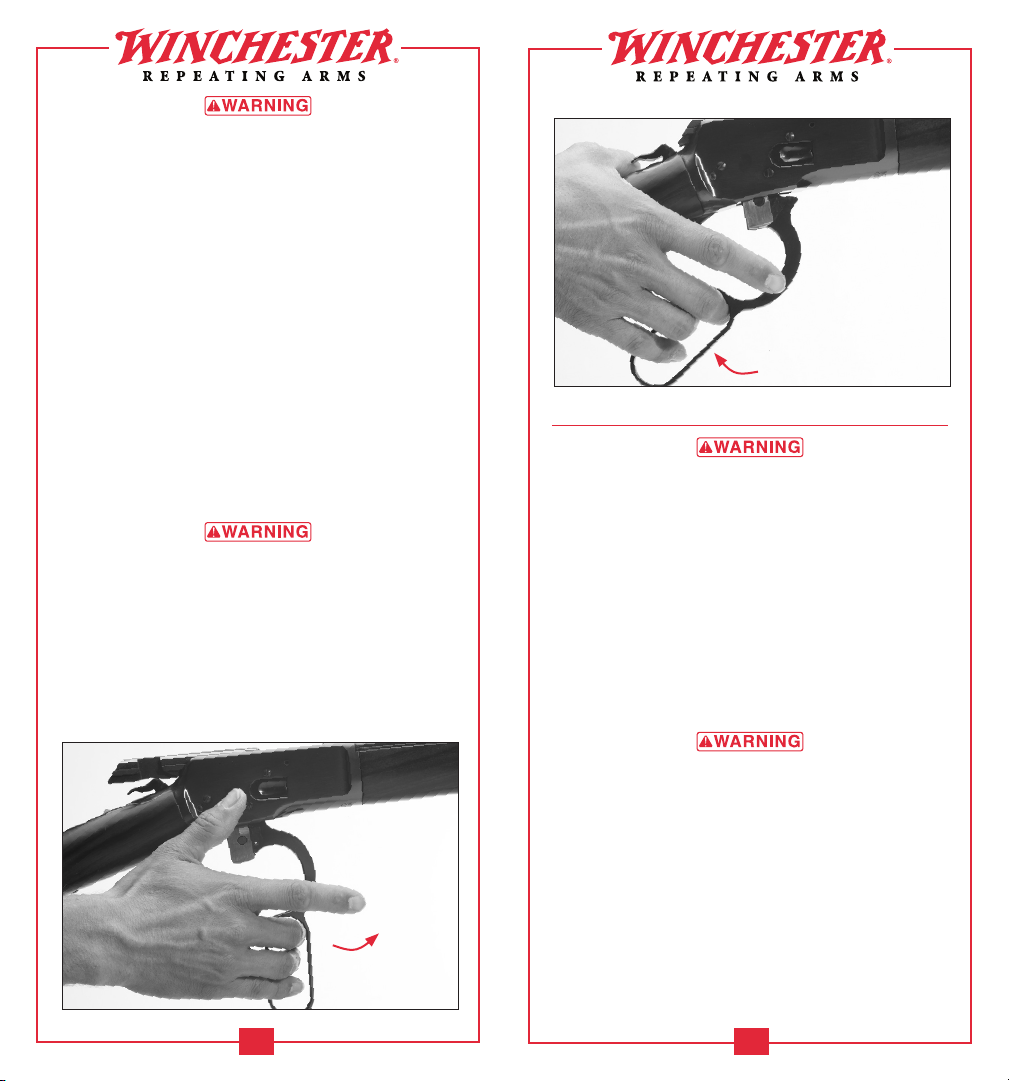
3. Open the action by pulling the finger lever
downward and fully forward (Figure 15, page 22).
4. Close the action by pulling the finger lever back
and upward (Figure 16, page 23). This transfers a
cartridge from the magazine into the chamber.
Keep your fingers away from the trigger.
THE RIFLE IS NOW RE ADY TO FIRE BY SIMPLY
MOVING THE “SAFET Y” TO THE OFF SAFE POSITION
AND PULLING THE TRIGGER.
Immediately move the hammer to the rebound
position as explained on page 17.
5. You may now load a single cartridge into the
magazine to refill it to maximum capacity.
FIGURE 15
FIGURE 16
Return the action to
the closed position by
working the finger lever
back and upward. Keep
your fingers away from
the trigger.
FirinG
NEVER CHAMBER A CARTRIDGE, MOVE THE
“SA FETY” FROM THE ON SAFE POSITION OR COCK
THE HAMMER UNLESS SHOOTING IS IMMINENT.
ALWAYS KEEP THE MUZZLE POINTED IN A SAFE
DIRECTION. FAILURE TO FOLLOW THESE WARNINGS
COULD RESULT IN SERIOUS INJURY OR DEATH.
1. Load the chamber of the rifle as explained
previously.
2. Firmly position your thumb on the hammer and
draw the hammer back to the full-cock position
(Figure 17, page 24).
THE RIFLE IS NOW RE ADY TO FIRE BY SIMPLY
MOVING THE “SAFET Y” TO THE OFF SAFE POSITION
Cycle the finger
lever downward and
fully forward to open
the action.
AND PULLING THE TRIGGER.
3. Place the “safety” in the off safe position.
4. Take aim, and when on target, squeeze the
trigger. After firing, release the trigger to the
fully forward position.
5. Swing the finger lever fully down, extracting and
ejecting the fired cartridge case from the chamber.
22 23
Page 14
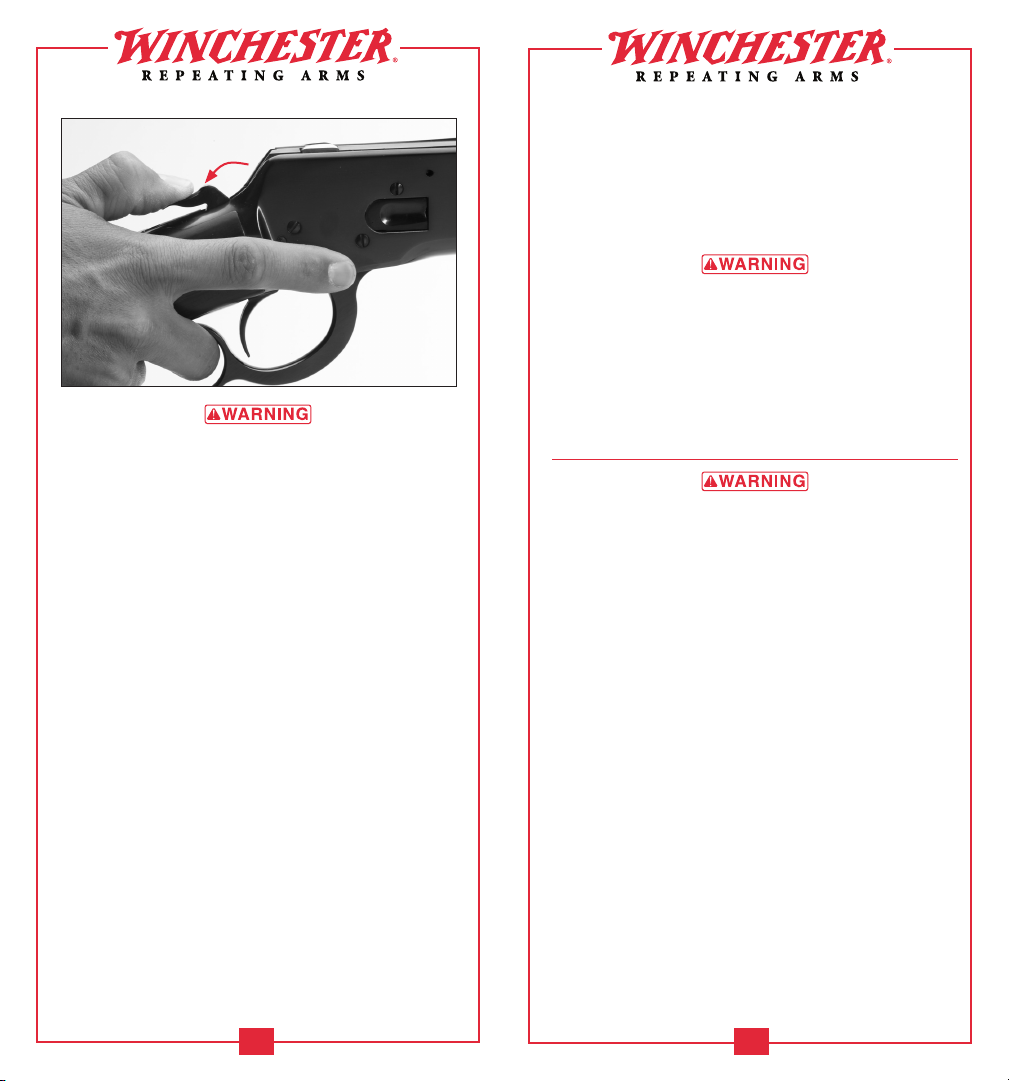
FIGURE 17
When firing is imminent pull the hammer
back to the full-cock position.
7. When firing is completed or when shooting is no
longer imminent, immediately place the “safety”
in the on safe position and move the hammer to the
rebound position. Under no circumstances should
you move on or continue to hunt with the hammer
in the full-cock position or the “safety” in the
off safe position.
AFTER FIRING, OR W HEN SHOOTING IS NO LONGER
IMMINENT, IMMEDIATELY PLACE THE “SAFE TY”
IN THE ON SAFE POSITION AND MOVE THE HAMMER
TO THE REBOUND POSITION. FAILURE TO FOLLOW
THESE WARNINGS COULD RESULT IN SERIOUS
INJ URY OR DEATH.
ALWAYS KEEP YOUR RIFLE SHOULDERED WHEN
EJECTING AN EMPTY CARTRIDGE CASE. EJECTION
IS UP A ND SLIGHTLY TO THE RIGHT. IF YOU EJECT A
CARTRIDGE CA SE WITH THE RIFLE LOWERED AND
THE ACTION DIRECTLY IN F RONT OF YO UR FACE, IT
IS POS SIBLE THAT THE EJECTED CARTRIDGE CASE
COULD STRIKE YOU IN THE FACE, OR STRIKE A
BYSTANDER. FAILURE TO FOLLOW THIS WARNING
COULD RESULT IN SERIOUS INJURY.
When an empty cartridge case is correctly ejected
it will fall to the ground in an area behind and to
the right of the shooter.
6. Close the action by returning the finger lever
upward. The closing of the action will transfer
a new cartridge from the magazine to the
chamber, leaving the hammer in the full-cock,
ready-to-fire position.
If you wish to continue shooting, repeat steps 3-5.
If you are finished shooting go immediately to
step 7.
You may continue shooting until the magazine
is empty, at which time you will need to either
reload the magazine with cartridges (if shooting
is imminent), or fully unload your rifle (if shooting
is completed).
unloADinG
WHEN UNLOADING YOUR RIFLE ALWAYS PLACE
THE “SAFETY” IN THE ON SAFE POSITION. KEEP
THE MUZZLE P OINTED IN A SAFE DIRECTION AND
YOUR FINGERS AWAY FROM THE TRIGGER. FAILURE
TO FOLLOW THESE WARNINGS COULD RESULT IN
SERIOUS INJURY OR DEATH.
ALWAYS INSPECT THE CHAMBER, BA RREL, FEED
MECHANISM AND MAGAZINE CAREFULLY AF TER
UNLOADING TO BE SURE ALL LIVE CARTRIDGES ARE
CLE ARED FROM THE FIREARM.
Completely unloading your rifle during storage and
other appropriate situations is essential to safe gun
handling. The “safety” on the Model 1892 is of utmost
importance during unloading. When the “safety” is in
the on safe position, it allows you to cycle the action
and eject loaded cartridges from the magazine with the
hammer blocked and unable to strike the firing pin.
1. Place the “safety” in the on safe position.
2. Swing the finger lever completely downward. This
will extract any cartridge from the chamber and
eject it. Capture the cartridge and return the finger
lever fully upward.
24 25
Page 15
3. Continue to operate the finger lever in the same
manner transferring all the remaining cartridges
from the magazine to the chamber and then
ejecting them out.
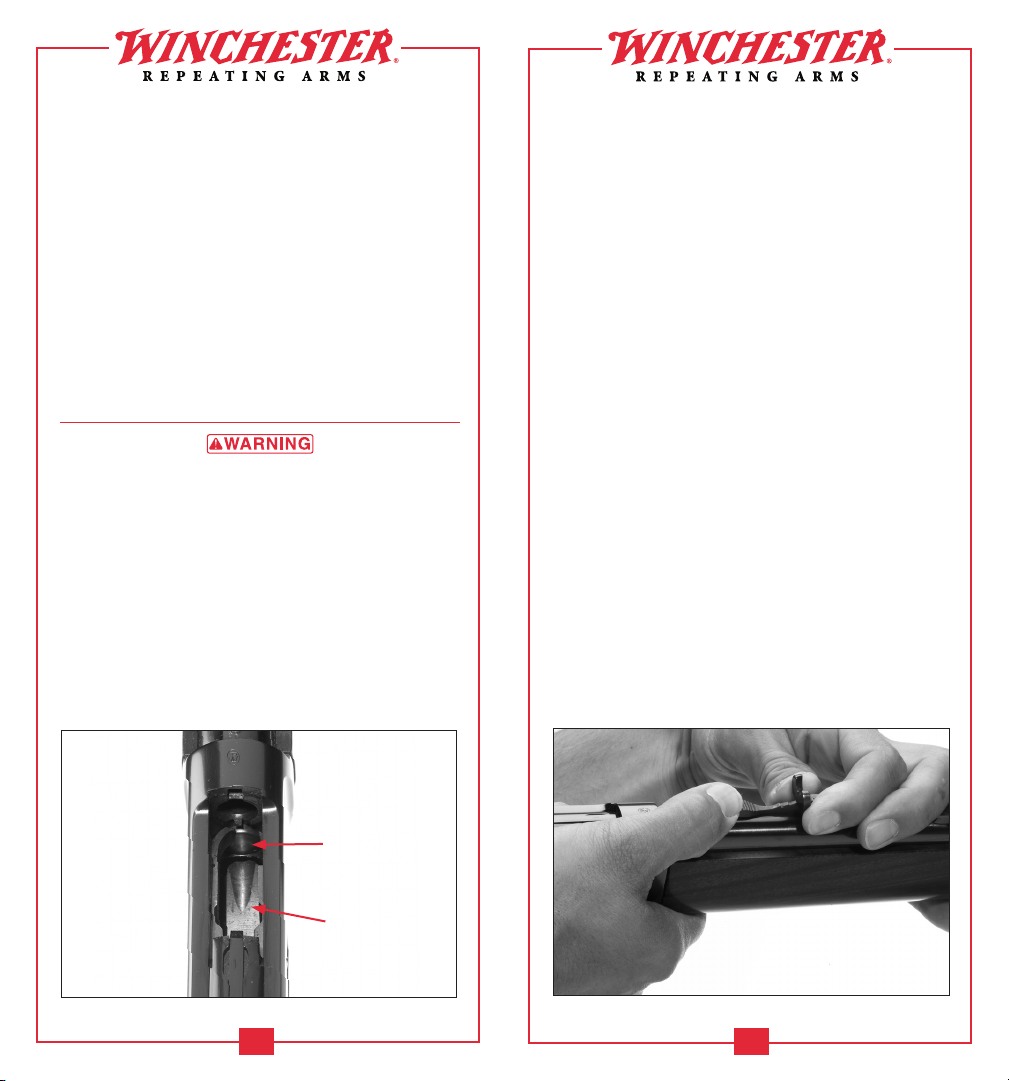
4. When cartridges no longer eject when you cycle
the action, further assure that no cartridges remain
by opening the action, depressing the carrier and
visually checking the chamber, feed mechanism
and magazine follower to be certain that the rifle is
completely unloaded (Figure 18, page 26). After
the last live cartridge is moved out of the magazine
and ejected, immediately lower the hammer to the
rebound position as explained previously.
siGht ADjustment
BEFORE ADJUSTING THE SIGHTS, PLACE THE
“SA FETY” IN THE ON SAFE PO SITION. OPEN
THE ACTION AND MAKE CERTAIN YOUR RIFLE
IS COMPLE TELY UNLOADED. KEEP THE MUZZLE
POINTED IN A SAFE DIRECTION. FAILURE TO FOLLOW
THESE WARNINGS COULD RESULT IN SERIOUS
INJ URY OR DEATH.
The Model 1892 is fitted with adjustable open sights.
The proper procedure is to shoot a group with the
sights set as they come from the factory (intermediate
position on both elevation and windage), and then
make incremental adjustments to move the sight
blade and blade holder to position the group on
your target.
up o r Down elevAtion ADju stments
Adjusting elevation on most Model 1892 sights
requires you to lift up the rear blade on your rifle’s rear
sight with your fingers and move the notched elevator
either forward or backward (Figure 19, page 27).
To raise point of impact, use your fingers to lift up on
the blade and slide the elevator rearward. Adjusting
the sight to make your gun shoot lower is just the
opposite, move the elevator forward.
• Move the rear sight blade and elevator up to
shoot higher on the target.
• Move the rear sight blade and elevator down to
shoot lower on the target.
riGh t or leFt winDAGe ADjustments
On most Model 1892 sights, the rear sight base is
dovetailed in the rear of the barrel. To adjust for
windage, gently move the rear sight base to the right
or left by tapping the sight base at the dovetail using a
wood or fiber dowel or hammer that will not mar the
sight (Figure 20, page 28).
FIGURE 18
FIGURE 19
Depress the carrier
and ensure the
magazine follower
is visible.
Magazine Follower
Carrier
(Shown Depressed)
26 27
Lift up on the notch holder and move
the elevator forward or rearward with
your fingers.
Page 16
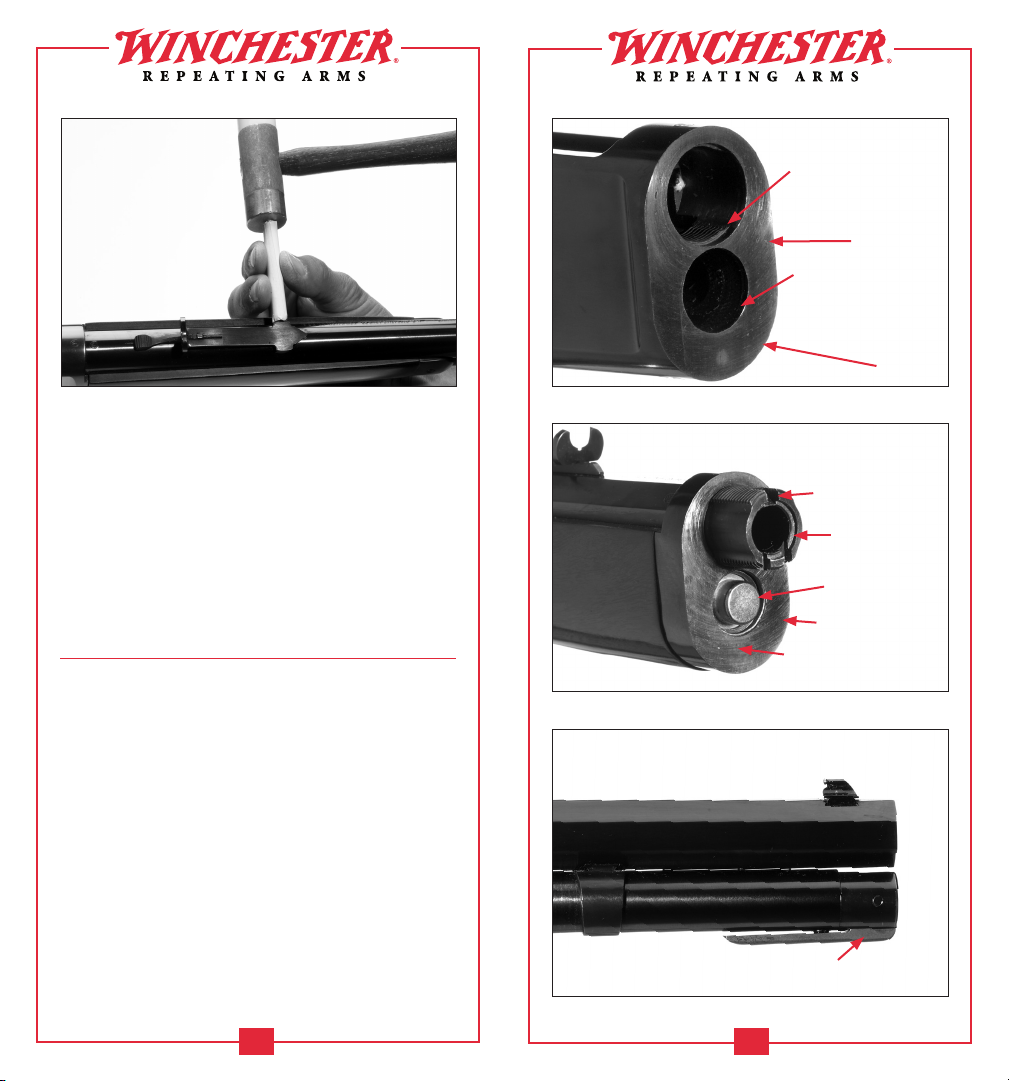
FIGURE 20
Tap carefully on the
rear sight base to
adjust the sights.
FIGURE 21
Receiver half of the rifle.
Internal Interrupted
Threads
Receiver Face
Magazine Tube Opening
Receiver
• Move the rear sight base to the right to shoot
farther to the right on the target.
• Move the rear sight base to the left to shoot
farther to the left on the target.
Care should be taken not to mar the finish or bend
sight components when adjustments are made.
All sight adjustments are a matter of trial and error.
Remember, it is usually necessary to adjust your sights
when you change type or even brand of ammunition.
tAkeDown moDels
The Model 1892 rifle is also available as a takedown
model. These rifles have a mechanism that allows you
to separate the barrel/forearm half of the rifle from the
receiver half of the rifle. The takedown design utilizes
an interrupted thread system on the barrel extension
and receiver, and a special mechanism on the end of
the magazine tube which allows you to disengage the
barrel from the receiver. For terminology related to
the Model 1892 Takedown rifle refer to Figures 21-23
(page 29).
The full serial number of the rifle is located on the
receiver half of the rifle, on the bottom of the
receiver, toward the front. The last four digits of the
FIGURE 22
Barrel/forearm half of the rifle.
Interrupted Threads
Barrel Extension
Magazine Follower
Receiver Extension
Receiver Extension Face
FIGURE 23
Takedown lever shown in the
closed position.
Barrel
Magazine Tube
Takedown Lever
28 29
Page 17
number portion of the serial number are also on
the receiver extension just forward of where it meets
the receiver. Record the full serial number on the
receiver at the front of this owner’s manual for
future reference.
NOTICE! THE BARREL/FORE ARM HALF OF THE RIFLE
MUST ONLY BE USED WITH THE RECEIVER HALF OF
THE RIFLE IT WAS SOLD WITH. BARREL S A RE NOT
INT ERCHANGE ABLE WITH A NY OTHER CURRENT OR
OLDER MODEL 1892 RIFLE .
tAke Down proceDure
FIGURE 24
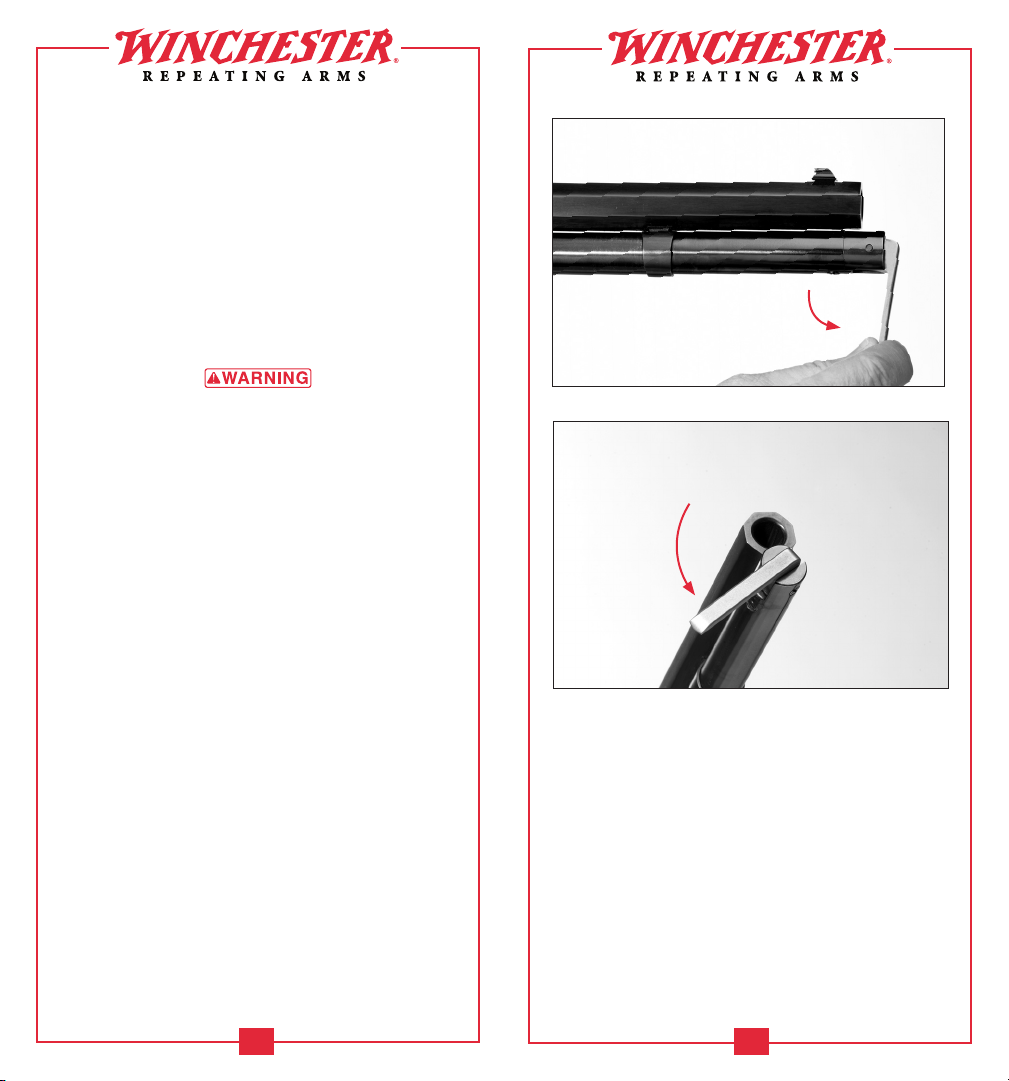
Pull the takedown lever
completely outward.
BEFORE PERFORMING DISASSEMBLY PROCEDURES,
PLACE THE “SAFETY” IN THE ON SAFE P OSITION.
COMPLETELY UNLOAD T HE RIFLE BY REMOVING
ALL CA RTRIDGES FROM THE CHAMBER, MAGAZINE
AND ACTION-FEED AREAS. KEEP THE MUZZLE
POINTED IN A SAFE DIRECTION.
FAILURE TO
FOLLOW THESE WARNINGS COULD RE SULT IN
SERIOUS INJURY OR DEATH, AND CAUSE DAMAGE
TO YOUR FIREARM.
With the rifle fully assembled use the following
procedure to take it down into two parts.
1 Completely unload the rifle as explained
previously.
NOTICE! THE RIFLE CANNOT BE TAKEN DOWN
IF THERE IS A CARTRIDGE IN THE MAGAZINE.
DAM AGE CAN OCCUR TO THE RIFLE IF YOU
ATTEMPT TO TAKE DOWN THE RIFLE WITH A
CARTRIDGE IN THE MAGA ZINE.
2. Open the action completely by working the finger
lever completely downward.
NOTICE! THE RIFLE CANNOT BE TAKEN DOWN
UNLES S THE ACTION IS OPEN. DAMAGE CAN OCCUR
TO THE BOLT COMPONENTS IF YOU ATTEMP T TO
TAKE DOWN THE RIFLE WITH THE ACTION CLOSED.
FIGURE 25
Turn the takedown lever counterclockwise at least
five turns as shown.
3. Lift the takedown lever on the end of the
magazine tube fully outward, away from the
magazine (Figure 24, page 31).
4. Rotate the takedown lever counterclockwise at
least five full turns to disengage the magazine
tube and magazine follower from the receiver
(Figure 25
, page 31
).
5. With one hand grasp the pistol grip of the rifle,
and with the other hand grasp the barrel/forearm
half of the rifle.
6. While securely holding the pistol grip, rotate the
barrel/forearm half clockwise 90˚ to unlock the
barrel/forearm from the receiver (Figure 26
, page 32
).
30 31
Page 18
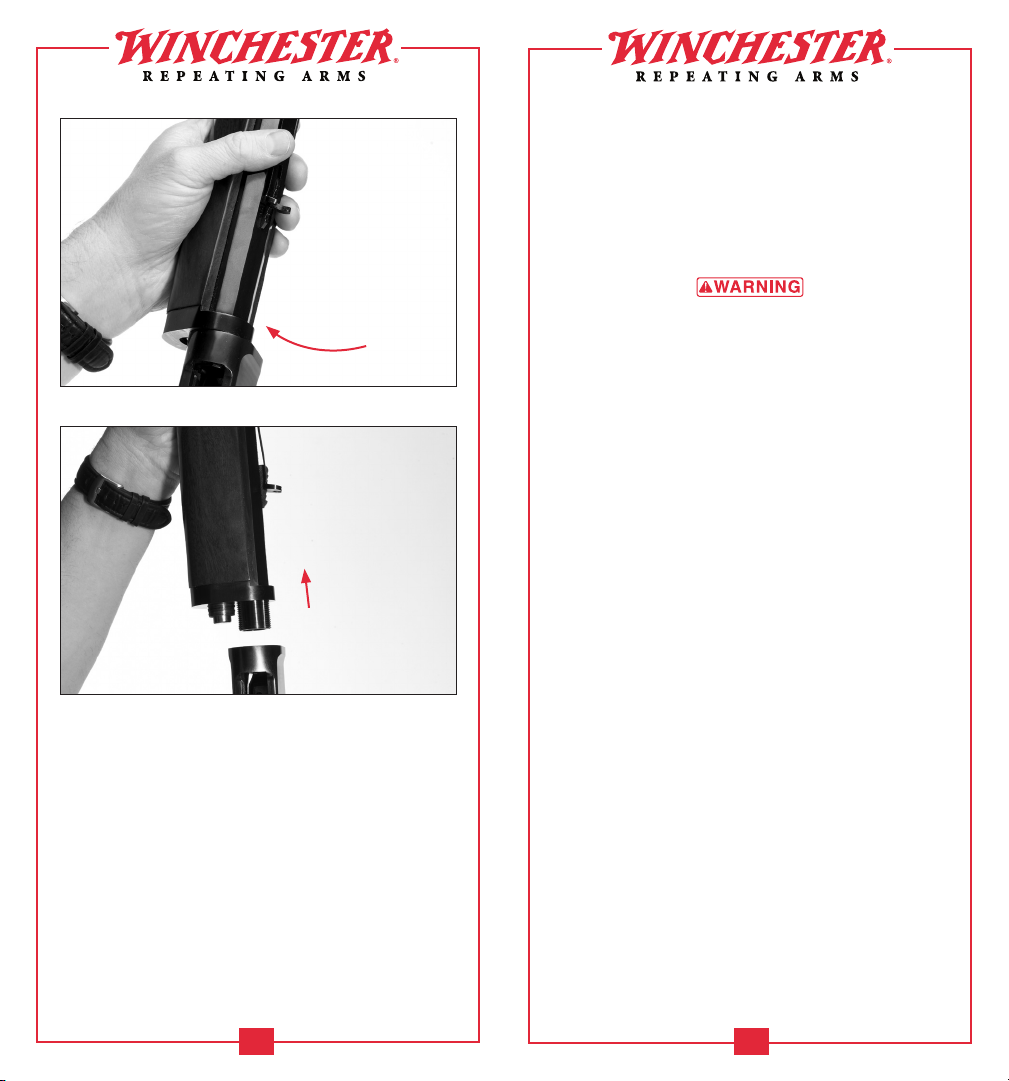
FIGURE 26
Rotate the barrel/
forearm half of the
rifle 90˚ clockwise
to release it from
the receiver.
FIGURE 27
Carefully pull the
barrel/forearm half
of the rifle away
from the receiver.
NOTICE! IF THE BARREL/ FOREARM WILL NOT
ROTATE WITH RESPECT TO THE RECEIV ER DO NOT
APPLY EXTRA FORCE UNTIL YOU CONFIRM THE
ACTION IS OPEN A ND THE TAK EDOWN LEVER HAS
BEEN TURNED SUF FICIENTLY TO DISENGAGE THE
MAG AZINE TUBE AND MAGAZINE FOLLOWER FROM
THE RECEIVER. APPLYING UNDUE FORCE WITH THE
ACTION CLOSED COULD DAMAGE THE RIFLE.
7. Carefully pull the barrel/forearm half of the rifle
away from the receiver
(Figure 27
, page 32
)
.
Your rifle is now taken down. To case or store the
two halves of your rifle, return the finger lever to
the closed position, return the takedown lever to
the folded-down position flush with the bottom
of the magazine, centered on the bottom of the
magazine tube.
A
ssem blY proce Dure
BEFORE PERFORMING ASSEMBLY PROCEDURES,
PLACE THE “SAFETY” IN THE ON SAFE P OSITION.
COMPLETELY UNLOAD T HE RIFLE BY REMOVING
ALL CA RTRIDGES FROM THE CHAMBER, MAGAZINE
AND ACTION-FEED AREAS. KEEP THE MUZZLE
POINTED IN A SAFE DIRECTION.
FAILURE TO
FOLLOW THESE WARNINGS COULD RE SULT IN
SERIOUS INJURY OR DEATH, AND CAUSE DAMAGE
TO YOUR FIREARM.
Perform the following procedure to assemble the rifle.
1.
Open the action completely by working the finger
lever completely downward.
NOTICE! THE RIFLE CANNOT BE ASSEMBL ED
UNLES S THE ACTION IS OPEN. DAMAGE CAN OCCUR
TO THE BOLT COMPONENTS IF YOU ATTEMP T TO
ASSEMBLE THE RIFLE WITH THE ACTION CLOSED.
2. Lift the takedown lever on the end of the
magazine tube fully outward, away from the
magazine. Make certain the magazine tube and
magazine follower are not protruding from the
receiver extension
(Figure 28
, page 34
)
by rotating
the takedown lever counterclockwise.
3. With one hand grasp the pistol grip of the rifle,
and with the other hand grasp the barrel/forearm
half of the rifle.
32 33
Page 19
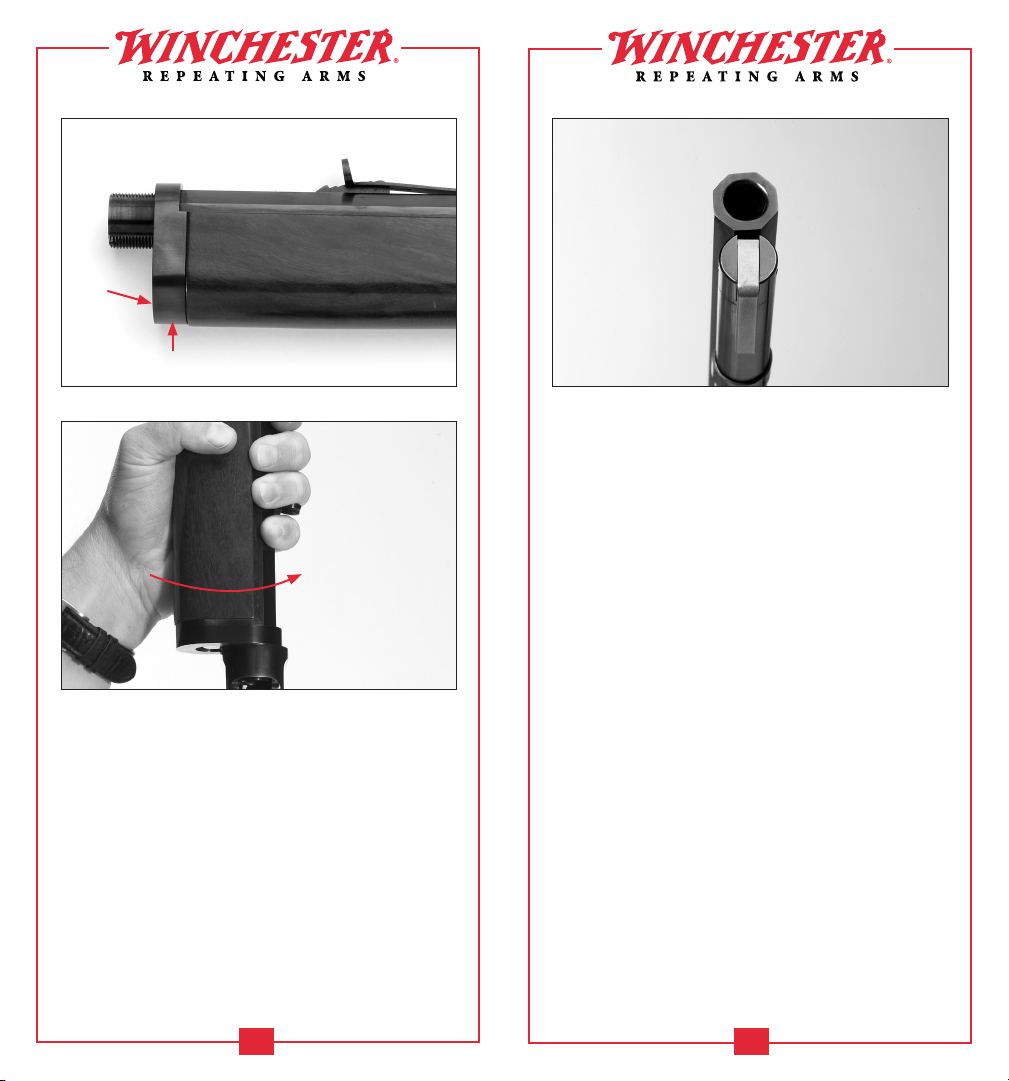
FIGURE 28
Be certain the magazine tube and
magazine follower are completely
retracted into the receiver extension.
Magazine
Follower
Receiver Extension
FIGURE 30
Completely tighten the locking lever and return it to the
folded up position under the magazine tube.
FIGURE 29
Turn the barrel/forearm
half of the rifle 90˚
counterclockwise to
attach it to the receiver.
4. While securely holding the pistol grip, position
the barrel/forearm half of the rifle 90˚ to the left
of the receiver (Figure 29, page 34).
5. Insert the threaded barrel extension into the
receiver. Verify the receiver extension and
receiver are lightly making contact. The barrel
extension is now fully inserted.
6. With the barrel extension fully inserted, rotate
the barrel/forearm half clockwise 90˚ to secure
the halves of the rifle. Very little force should
be required to rotate the barrel/receiver into
this position.
NOTICE! IF THE BARREL/ FOREARM WILL NOT ROTATE
WITH RESPECT TO THE RECEIVER DO NOT A PPLY
EX TR A FORCE UNTIL YOU CONFIRM THE ACTION IS
OPEN AND THE TAK EDOWN LEVER HA S BEEN TURNED
SUFFICIENTLY TO ALLOW THE MAGAZINE TUBE AND
MAG AZINE FOLLOWER TO CLEAR THE RECEIVER.
APPLYING UNDUE FORCE CO ULD DAMAGE THE RIFLE.
If the barrel/forearm will still not rotate, ensure
there is no foreign matter (dirt, grit, etc.) between
the faces on the receiver extension and receiver.
Clean both surfaces and lightly oil them.
7. Once the barrel/forearm are rotated into position,
extend the takedown lever and secure the magazine
tube into the receiver by turning the takedown
lever clockwise. Tighten the magazine tube until it
is snug. Do not overtighten.
8. When the takedown lever is secured, fold the
takedown lever over until it lays along the
bottom of the magazine tube
(Figure 30
, page 35).
If the takedown lever is not centered on the
magazine tube, rotate it into alignment. Your
rifle is now assembled.
34 35
Page 20

cleAninG AnD
mAintenAnce suGGestions
BEFORE PERFORMING CLE ANING PROCEDURES,
PLACE THE “SAFETY” IN THE ON SAFE P OSITION.
OPEN THE ACTION AND MAKE CERTAIN YOUR RIFLE
IS COMPLE TELY UNLOADED. KEEP THE MUZZLE
POINTED IN A SAFE DIRECTION. FAILURE TO
FOLLOW THESE WARNINGS COULD RE SULT IN
SERIOUS INJURY OR DEATH.
WEAR EYE PROTECTION WHEN DISASSEMBLING
AND CLEANING YOUR RIF LE TO PRE VENT SPRINGS,
SPRING-LOADED PA RTS, SOLVENTS OR OTHER
AGENTS FROM CONTACTING YOUR E YE S, RESULTING
IN INJURY.
KEEP ALL AMMUNITION AWAY FROM THE CLEANING
AREA. NEVER TEST THE MECHANICA L FUNCTION OF
YOUR RIFLE WITH LIVE AMMUNITION. FAILURE TO
FOLLOW THESE WARNINGS COULD RE SULT IN
SERIOUS INJURY OR DEATH.
cleA ninG proc eDures
Your Model 1892 will function better and more
reliably over a longer period of time if it is properly
maintained and kept clean. Clean your firearm after
each day of shooting and more often if it becomes
excessively dirty. A minimum cleaning includes
wiping down the action and oiling key parts. Regular
maintenance will also include cleaning the barrel.
If you encounter a function problem be sure to
give your firearm a thorough cleaning to see if it
solves the problem before seeking the services of a
Winchester Repeating Arms Authorized Repair
Center or our Service Facility in Arnold, Missouri,
or a qualified gunsmith.
1. Open the action by completely lowering the lever.
2. Use a cleaning rod with a tip and patch large
enough for a snug fit in the bore. Insert the rod and
patch into the barrel at the muzzle end and run it
back and forth several times. Care should be
exercised to ensure that neither the cleaning rod
nor the handle strikes the crown of the muzzle, as
damage to this area can adversely affect the
accuracy of the rifle. A muzzle protector can be
purchased separately from your local firearms
dealer to help protect the muzzle crown while
cleaning the barrel of your rifle.
If your rifle is a takedown model you may
disassemble it, as explained on page 30, for cleaning
and maintenance through step 7 on page 38
3. Inspect the chamber and bore for brass, copper and
powder fouling. A normal amount of powder
residue can be expected and is not serious. It can
usually be removed by repeating step 2, using a
patch saturated with solvent. If, or when, fouling
should become heavy, it can be removed with a
brass bore brush. Dip or spray the brush with
solvent and scrub the chamber and bore until
the fouling is removed. To prevent brass bristles
from breaking off, the brush should be pushed
completely through the bore before being
withdrawn. Your rifle will operate more smoothly
and reliably with a clean bore and chamber.
4. To maintain the utmost accuracy of your rifle it is
recommended you clean the bore with a copper
solvent. Modern bullet jackets are made mainly
of copper and zinc. Copper and zinc residue sticks
to the bore and require more frequent cleaning.
Swab the bore of your rifle with a good copper
solvent using the product manufacturer’s
recommended procedure.
5. After fouling has been removed, wipe the bore dry.
Then pass a lightly oiled patch through the barrel
for preservation. A fine, light gun oil is
recommended. The barrel and action should be
inspected thoroughly to be certain no cleaning
patches have been inadvertently left in them.
36 37
Page 21
6. The interior of the receiver and the bolt
should periodically be wiped with a clean rag.
Any dried oil in these areas or on the magazine
follower should be removed. Follow this
cleaning by applying a very light film of oil on
the affected parts.
7. Lightly oil your firearm at the points described
under “Initial Cleaning and Oiling” on page 13.
Ordinary good judgment will, of course, indicate
that the metal of the gun should receive a light
film of oil any time the rifle has been exposed to
weather or handling. Remember, the polished,
finely fitted surfaces of the receiver and action
mechanisms must always have a thin film of oil.
Make sure that the surfaces of the breech block,
lever components and feed mechanism parts
are especially clean and lightly oiled with a
high quality gun oil.
If your rifle is a takedown model and was taken
down for cleaning and maintenance, you may now
assemble it as explained on page 33.
NOTICE! DO NOT POUR LARGE QUA NTITIES OF OIL
INTO THE RECEIVER OR OTHER PART S. IT CAN
DRAIN DOWN TO THE WOOD AND SOFTEN IT,
CAUSING PERMANENT DAMAGE AND LOOSENING
OF THE STOCK .
8. Wipe all exposed metal surfaces of the receiver,
forearm and barrel with a clean rag. Finger marks
should be removed because they provide a place
where moisture can accumulate. Any dried oil in
the receiver area should also be removed.
9. Inspect the barrel and chamber. Make certain that
no patches have been inadvertently left in them.
Remove any that remain.
10. The wood surfaces of your rifle can also be wiped
lightly with fine oil, or you can apply a quality
wood or furniture polish to the stock and forearm.
Using one of these methods (not both), will
enhance the beauty and durability of your rifle.
ADDi tionAl su GGestions
• When transporting your rifle, store it in a quality
protective case to prevent scratches and dents.
Store your rifle in a cool, dry place to prevent
corrosion. Store your rifle and ammunition
separately, away from children.
• After extended periods of heavy use, your gun
should be taken to a qualified gunsmith to have
the action disassembled for professional cleaning
and lubrication.
NOTICE! NEVER ATTEMPT TO TAKE YOU R FIRE ARM
APART FURTHER T HAN E XPLAINED IN THIS
OWNER’S MANUAL. YO UR FIREA RM IS A
SPECIALIZED, FINELY FIT TED MECHANISM. YOU
MAY PERMANENTLY DAMAGE IT BY ATTEMPTING
TO DISASSEMBLE THE INNER MECHANISM. IF
FURTHER DISASSEMBLY FOR SERV ICE OR
CLE ANING IS REQUIRED, TAK E YOUR FIREARM
TO A QUALIFIED GUNSMITH, OR CONTACT OUR
ARNOLD, MISS OURI SERVICE FACILITY AS
EXPLAINED ON PAGE 39 UNDER “PARTS, SERVICE,
REPAIR AND QU ESTIONS.”
pArts, service, repAir AnD Questions
If your Winchester rifle or shotgun should ever need
service or repair, it is often best to contact a
Winchester Repeating Arms Authorized Repair
Center. To locate an Authorized Repair Center visit
winchesterguns.com or contact our customer service
department. In some cases it is appropriate to use the
Winchester Repeating Arms Service Center in
Arnold, Missouri. If you have any questions contact
our customer service department and we can help you
determine the best place to service your firearm.
Parts listings, Authorized Repair Center lists, service
procedures, service/repair form and general product
information are also found on the Web at:
winchesterguns.com.
38 39
Page 22
Parts listings, Authorized Repair Center lists, service
procedures, service/repair form and general product
information are also found on the Web at:
winchesterguns.com.
When returning your firearm for servicing, you must do
the following:
1. Be sure it is completely unloaded.
2. Remove the scope or other optics.
3. Package it securely in a cardboard container.
4. When sending your firearm, enclose the service/
repair form available at winchesterguns.com or a
letter that clearly describes the trouble experienced,
the ammunition used and the repairs desired. Also
include your name and a daytime phone number
where you can be reached.
5. If convenient, send a copy of the service/repair
form or letter to us separately.
6. Never return ammunition with your firearm. It is
against postal and most commerce regulations.
pArt s, servic e, repAir stAtus
AnD technicAl Question s
Winchester Repeating Arms Parts and Service
3005 Arnold Tenbrook Road
Arnold, MO 63010-9406
(800) 322-4626
PARTS ARE MADE FOR WINCHESTER BRAND
FIREA RMS MANUFACTURED BY OR FOR
WINCHESTER REPEATING ARMS, AND SHOULD NOT
BE USED IN OTHER FIREARMS, EVEN T HOUGH
MODELS MAY BE SIMILAR. IMPROPERLY FITTED
PARTS MAY BE DANGEROUS.
website inFormAtion
Winchester Repeating Arms offers you an information
resource on the World Wide Web.
• List of Authorized Repair Centers.
• Customer Service information.
• Firearm Service/Repair Form.
• Answers to many technical and
historical questions.
• Links to helpful sites.
Go to: winchesterguns.com
Gene rAl proDu ct AnD hi storicAl Questions
Winchester Repeating Arms Customer Service
275 Winchester Avenue
Morgan, UT 84050-9333
(800) 945-5237
40 41
Page 23
notes notes
42 43
Page 24
44
Winchester Repeating Arms
275 Winchester Avenue
Morgan, UT 84050-9333
(800) 945-5237
winchesterguns.com
Winchester is a registered trademark of Olin Corporation.
 Loading...