

Page 1
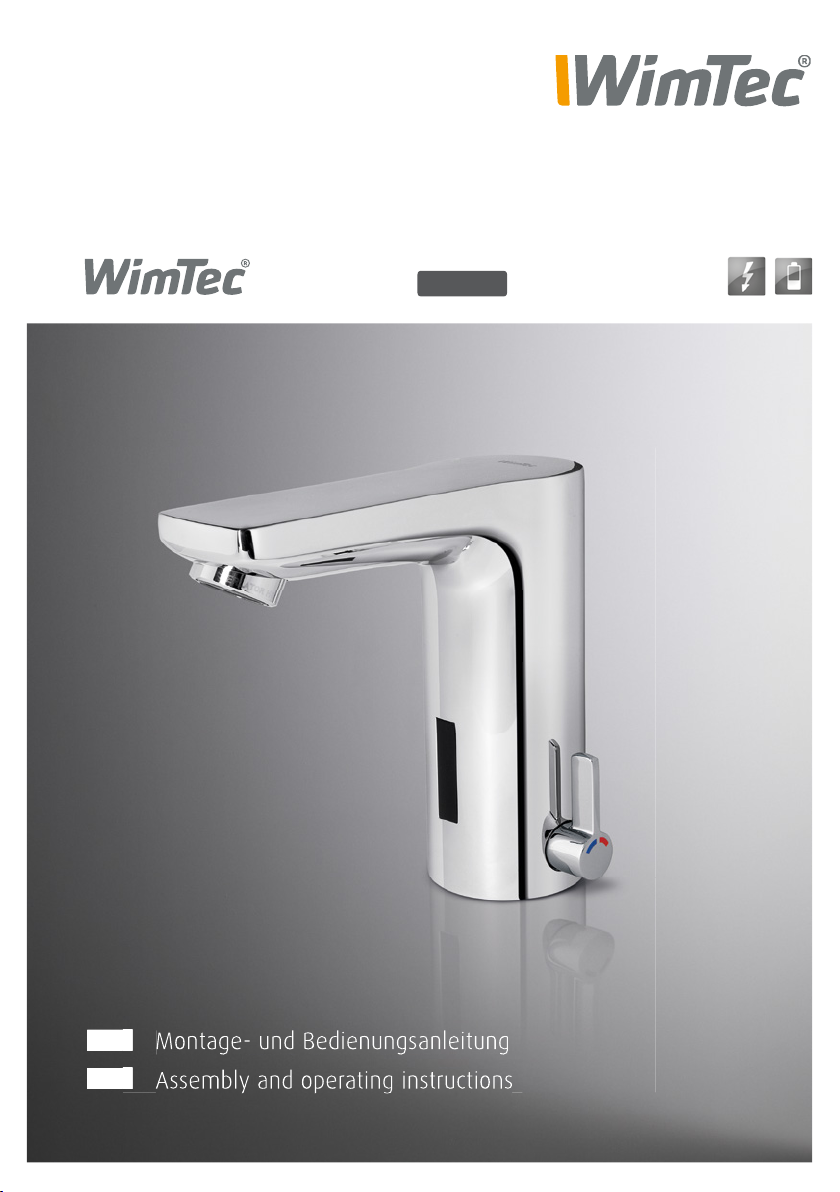
SMART
HyPlus
DE
Montage- und Bedienungsanleitung
EN
Assembly and operating instructions
Page 2

DE
SMART
HyPlus
Allgemeine Hinweise
Gratulation zum Kauf Ihrer Waschtischarmatur WimTec SMART
in HyPlus Ausführung.
Damit Sie jahrelang Freude mit dieser hochwertigen Armatur
haben, empfehlen wir Ihnen folgende Punkte bei der Reinigung
und Pflege zu beachten:
Reinigungs- oder Desinfektionsmittel verwenden
Diese Anleitung ist gültig für folgende Produkte:
WimTec SMART HDM:
Art.Nr. 122 473, 122 480
WimTec SMART HDK:
Art.Nr. 122 459, 122 466
milde, seifenhaltige Reinigungsmittel verwenden
keine kratzenden, scheuernden oder säurehaltigen
nur mit weichem Schwamm oder Tuch behandeln
keine Reinigung mit Dampfstrahlgeräten
Lieferumfang:
Armaturengehäuse mit Elektronikmodul, 230 V Netzteil oder
Batteriemodul inkl. 9 V Batterie, Magnetventil, Anschlussschläuche,
Schmutzsiebaufsätze für Eckventil, Befestigungsmaterial und Rückflussverhinderer bei Mischwasserausführung.
Wichtige Installationshinweise:
Die Montage und Installation darf nur durch einen konzessionierten
Fachbetrieb gemäß DIN 1988, ÖVE/ÖNORM E 8001 sowie VDE 0100
Teil 701 erfolgen. Bei der Planung und Errichtung von Sanitäranla-
!
gen sind die entsprechenden örtlichen, nationalen und internatio-
Es gelten die „Allgemeinen
Installationsbedingungen“
unter www.wimtec.com.
nalen Normen und Vorschriften zu beachten! Netzteil 230 V / 12 V
nicht in Schutzbereichen anbringen.
Wartung der Rückflussverhinderer gemäß EN 806-5.
2 Waschtischarmatur WimTec SMART
HyPlus
Page 3

DE
Inhalt
SMART
HyPlus
Seite
Technische Daten .........................................................................4
Legende .........................................................................................5
Maße ..........................................................................................5
Elektronikmodul .........................................................................5
Funktionseinstellung ...................................................................6
Einstellregler ..............................................................................6
DIP-Schalter ...............................................................................6
Montage .........................................................................................7
Funktion .........................................................................................8
Funktions-Beschreibung .............................................................8
Reichweite .................................................................................8
Reinigungsstopp ........................................................................9
Dauerlauf ................................................................................ 10
Intelligente Freispül-Automatik ............................................. 11
Spülstoppzeit .......................................................................... 12
Nachlaufzeit ............................................................................ 12
Visualisierung der Mindestspüldauer .................................... 13
LED-Signale ................................................................................. 14
Ersatzteile ................................................................................... 15
Waschtischarmatur WimTec SMART
HyPlus
3
Page 4

DE
SMART
HyPlus
Technische Daten
WimTec SMART - HyPlus 9 V:
Batterie: 9 V Alkali 6LR22 oder 6LF22 (Lieferumfang) optional 6 V Lithium CR-P2
Batterielebensdauer: 9 V Alkali – ca. 100.000 Auslösungen (max. 2 Jahre)
6 V Lithium – ca. 200.000 Auslösungen (max. 4 Jahre)
WimTec SMART - HyPlus 230 V:
Betriebsspannung: 230 V 50 Hz
Leistungsaufnahme: max. 0,2 W
HyPlus Produktausführung:
Spülstoppzeit: 1 min oder 10 min einstellbar
Intelligente
Freispül-Automatik: aktivierbar / deaktivierbar,
Spülintervall: nach 0,5 h bis 24 h,
Mindestspüldauer: 10 s bis 180 s im eingestellten Spülintervall,
max. Spülleistung bei Nichtbenutzung:
Strahlregler: laminar (ohne Luftbeimischung)
864 l/Tag
Weitere technische Daten:
Magnetventil: Kartusche 6 V
Ansprechbereich: automatisch
Nah-Ansprechbereich: ca. 3 cm
Dauerlauf: aktivierbar / deaktivierbar, für die Dauer der Spülstoppzeit
Reinigungsstopp: aktivierbar / deaktivierbar, für 3 min
Fließdruck: 0,05 bis 0,6 MPa (0,5 bis 6 bar)
Statischer Druck: max. 0,8 MPa (8 bar)
Wassertemperatur: max. 70 °C (max. 80 °C für max. 10 min)
Durchflussmenge: ca. 6 l/min (druckunabhängig)
Wasseranschluss: G 3/8” IG
Anschlussschläuche: zugelassen nach DVGW W 270 und DVGW W 543
Geräuschklasse: I
4 Waschtischarmatur WimTec SMART
HyPlus
Page 5

DE
Legende
Maße:
Alle Maße in mm
SMART
HyPlus
Ø 50
134
127
max. 45
Ø 33
100
Rückflussverhinderer
mit Vorfilter
30°
100
Elektronikmodul:
Mischergriff und Sicherungsschraube entfernen. Danach
Armaturenhaube abnehmen
um Einstellregler des Elektronik-Moduls freizulegen.
1 3
123456
ON
OFF
2
1
Intervall-Regler
2
Mindestspüldauer-Regler
3
Dip-Schalter
4
Kontroll-LED
Waschtischarmatur WimTec SMART
4
HyPlus
5
Page 6
DE
SMART
HyPlus
Funktionseinstellung
Einstellregler
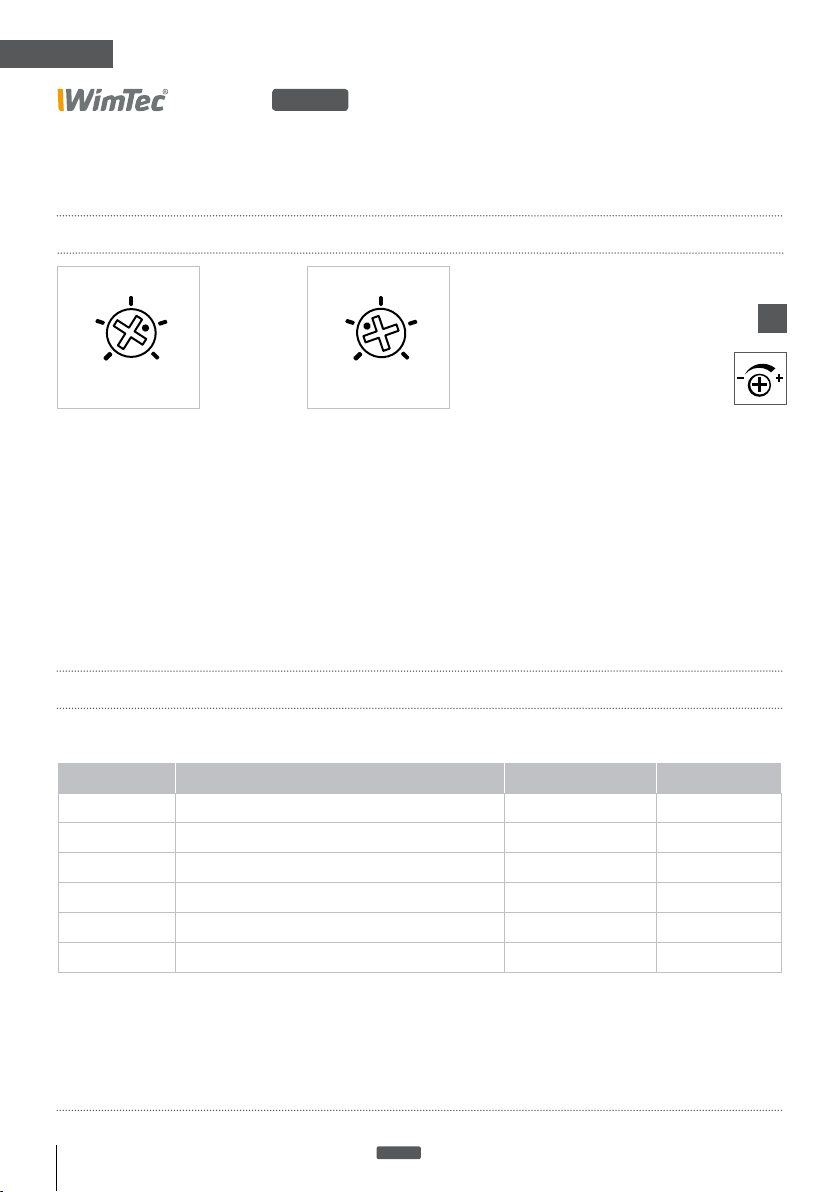
6
3 12
0,5 24
h
1. Intervall-Regler
für die intelligente Freispül-Automatik, 12 h voreingestellt (0,5 h bis 24 h
einstellbar).
60
30 120
10 180
s
2. Mindestpüldauer-Regler
für die Dauer der FreispülAutomatik, 30 s voreingestellt
(10 s bis 180 s einstellbar).
Im Uhrzeigersinn zum Erhöhen.
Generell gilt für alle Regler:
Gegen den Uhrzeigersinn
zum Reduzieren.
!
DIP-Schalter:
Funktionsaktivierung – Dip-Schalter 1 - 6:
DIP-Schalter Funktion Werkseinstellung Beschreibung
1
2
3
4
5
6
6 Waschtischarmatur WimTec SMART
Reichweite (ON = 15 cm, OFF = 12 cm) ON Seite 8
Reinigungsstopp OFF Seite 9
Dauerlauf OFF Seite 10
Intelligente Freispül-Automatik ON Seite 11
Spülstoppzeit (ON = 10 min, OFF = 1 min) OFF Seite 12
Nachlaufzeit (ON = 3 s, OFF = 1 s) OFF Seite 12
HyPlus
Page 7

DE
SMART
HyPlus
Montage
1 3a
3b 4
2
!
ACHTUNG!
Folgende Schritte unbedingt in beschriebener
Reihenfolge ausführen!
1. Armatur auf Waschtisch befestigen.
2. Bei Mischwasserausführung Rückflussverhinderer mit Vorfilter
bzw. generell Eckventil mit Vorfilter verwenden.
3a. Bei Netzvariante: Steckverbindung zwischen Armatur und
Netzteil herstellen - Wasserzufluss öffnen.
3b. Bei Batterievariante: Batterie in Batteriemodul einsetzen und
Steckverbindung zwischen Armatur und Modul herstellen Wasserzufluss öffnen.
4. Automatischer Reichweitenabgleich.
Nach ca. 5 s blinkt die LED 3 mal und die Armatur ist betriebsbereit. Während des Reichweitenabgleichs nicht in den
Sensorbereich fassen!
Waschtischarmatur WimTec SMART
OPEN - CLOSE
Luft- und wasserdichtes Gehäuse
HyPlus
7
Page 8
DE
SMART
Funktion
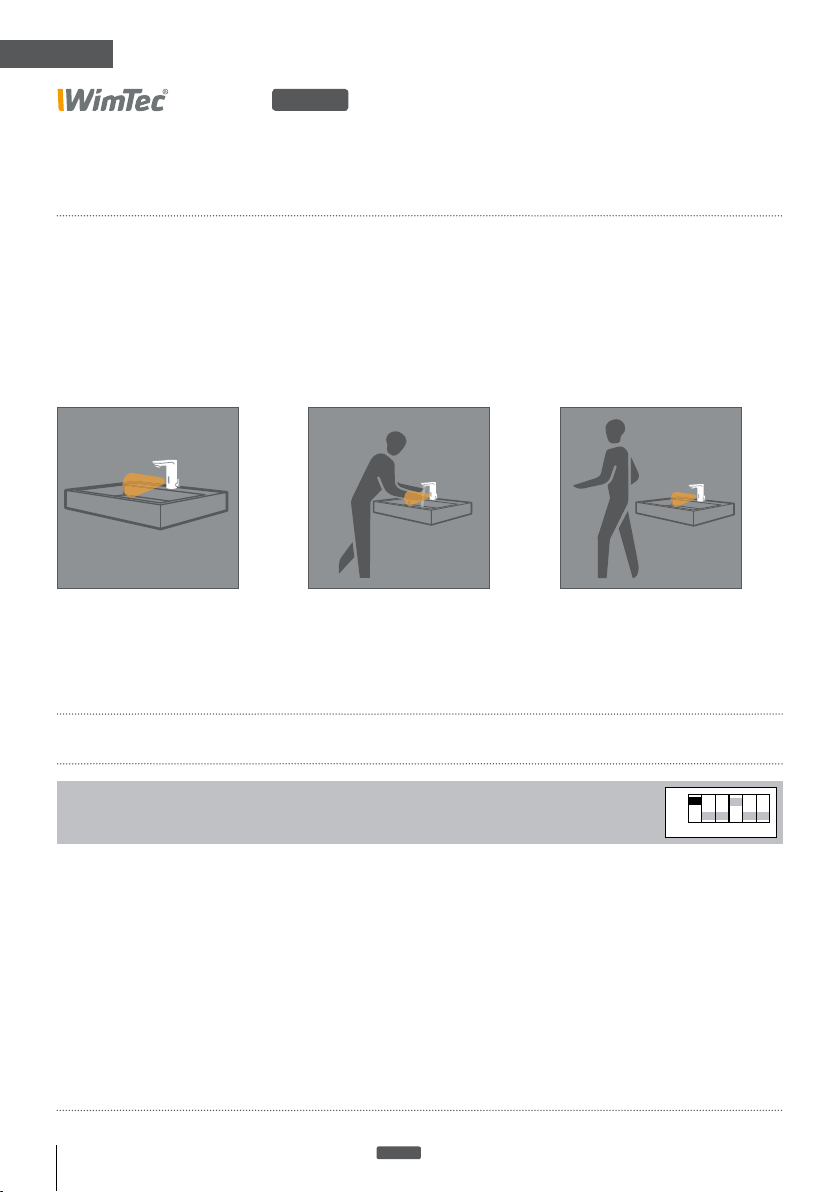
Automatischer
Reichweitenabgleich
Nach Inbetriebnahme
der Stromversorgung.
Dauer ca. 5 s.
HyPlus
Wasserfluss startet
Sobald der Benutzer vom
Ansprechbereich der Infrarotsensorik erfasst wird.
Wasserfluss stoppt
Wenn der Benutzer den
Ansprechbereich wieder
verlässt oder nach Ablauf der
eingestellten Spülstoppzeit.
Funktions-Beschreibung
Reichweite:
DIP Schalter 1
Dient zum Anpassen der Reichweite an kleinere Waschtische.
Stellung „ON“ = Standardreichweite (ca. 15 cm, voreingestellt).
Stellung „OFF“= kurze Reichweite (ca. 12 cm, für kleine Waschbecken).
8 Waschtischarmatur WimTec SMART
HyPlus
ON
OFF
1
2
3 4 5 6
Page 9

DE
SMART
HyPlus
Funktions-Beschreibung
Reinigungsstopp:
DIP Schalter 2
Dient zum Deaktivieren der Armatur zur Reinigung.
Stellung „ON“ = Reinigungsstopp-Funktion aktiviert.
Stellung „OFF“= Reinigungsstopp-Funktion deaktiviert (voreingestellt).
Reinigungsstopp aktivieren:
1. Heranführen der Hand an den Infrarotsensor
(ca. 3 cm) und verweilen - der Wasserfl uss startet.
2. Nach 5-maligem Blinken der Kontroll-LED
stoppt der Wasserfl uss und der Reinigungsstopp
ist für 3 min aktiviert.
Während des Reinigungsstopps blinkt die
5x
Kontroll-LED 2-mal alle 3 s.
OFF
ON
2
1
3 4 5 6
Reinigungsstopp deaktivieren:
Automatisch:
Die Armatur geht 3 min nach dem Aktivieren des Reinigungsstopps automatisch wieder in den Normalbetrieb über.
Manuell:
1. Zum vorzeitigen Beenden die Hand erneut an den
Infrarotsensor (ca. 3 cm) heranführen und verweilen.
3 min |
3x
2. Nach 3-maligem Blinken ist der Reinigungsstopp beendet
und die Armatur geht wieder in den Normalbetrieb über.
Waschtischarmatur WimTec SMART
HyPlus
9
Page 10
DE
SMART
HyPlus
Funktions-Beschreibung
Dauerlauf:
DIP Schalter 3
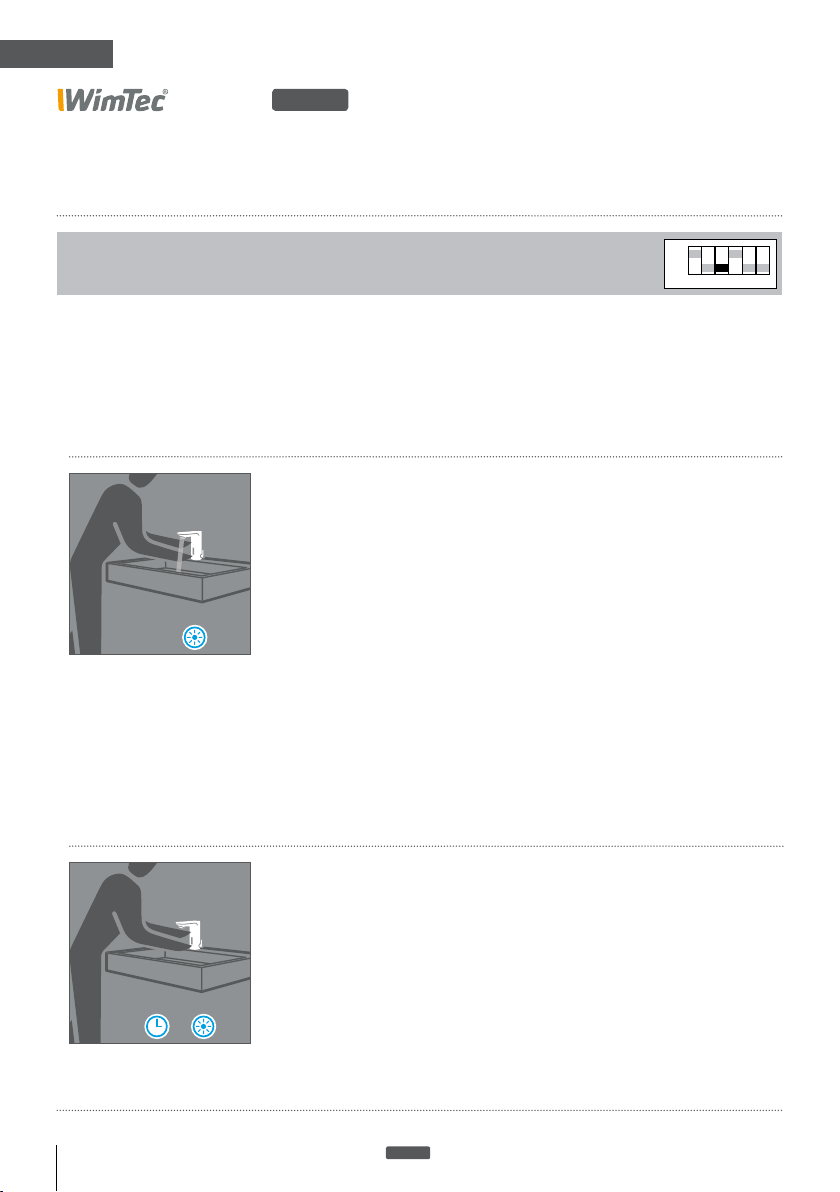
Zum Füllen des Beckens oder eines Behälters kann der Dauerlauf aktiviert werden.
Stellung „ON“ = Dauerlauf-Funktion aktiviert.
Stellung „OFF“= Dauerlauf-Funktion deaktiviert (voreingestellt).
Dauerlauf aktivieren:
1. Heranführen der Hand an den Infrarotsensor
(ca. 3 cm) und verweilen - der Wasserfluss startet.
2. Nach 3-maligem Blinken der Kontroll-LED ist der
Dauerlauf für die eingestellte Spülstoppzeit aktiviert.
Bei aktiviertem Reinigungsstopp:
3 x
1. Heranführen der Hand an den Infrarotsensor
(ca. 3 cm) und verweilen - der Wasserfluss startet.
2. Nach 5-maligem Blinken der Kontroll-LED stoppt der Wasser-
fluss und der Reinigungsstopp ist für 3 min aktiviert.
3. Nach weiterem 3-maligen Blinken der Kontroll-LED
startet der Wasserfluss erneut und der Dauerlauf ist
für die eingestellte Spülstoppzeit aktiviert.
ON
OFF
1
2
3 4 5 6
Dauerlauf deaktivieren:
Automatisch:
Nach Ablauf der eingestellten Spülstoppzeit
(DIP-Schalter 5, siehe Seite 12).
Manuell:
1. Zum vorzeitigen Beenden die Hand erneut an den
Infrarotsensor (ca. 3 cm) heranführen und verweilen.
|
3x
2. Nach 3-maligem Blinken ist der Dauerlauf beendet und
die Armatur geht wieder in den Normalbetrieb über.
10 Waschtischarmatur WimTec SMART
HyPlus
Page 11
DE
SMART
HyPlus
Funktions-Beschreibung
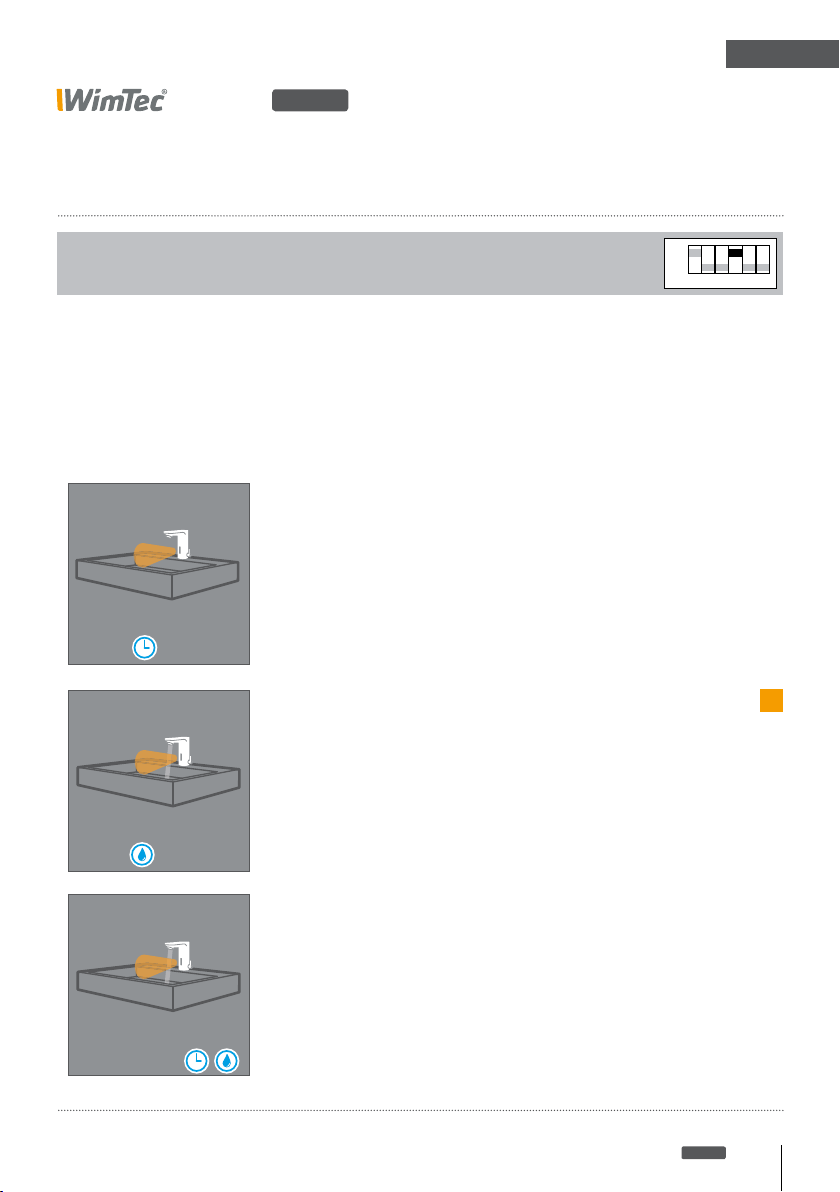
Intelligente Freispül-Automatik:
DIP Schalter 4
Dient zum Freispülen der Wasserzuleitungen, um Stagnationswasser
bei längerer Nichtbenutzung zu vermeiden.
Stellung „ON“
Stellung „OFF“
= Intelligente Freispül-Automatik aktiviert (voreingestellt).
= Intelligente Freispül-Automatik deaktiviert.
Zeitintervall
Gibt die Zeit zwischen den
automatischen Freispülungen an.
Einstellbar von 0,5 bis 24 h über den
Intervall-Regler (siehe Seite 6).
0,5 - 24 h
ON
OFF
1
2
3 4 5 6
10 - 180 s
Mindestspüldauer
Gibt die Mindestspülzeit im
eingestellten Zeitintervall an.
Einstellbar von 10 bis 180 s über
den Mindestspüldauer-Regler
(siehe Seite 6).
Intelligente Freispül-Automatik
Wird die Armatur im eingestellten Intervall
nicht zumindest für die eingestellte Spüldauer
benützt, wird eine automatische Spülung für
die verbleibende Dauer ausgelöst.
Andernfalls wird keine automatische
Spülung durchgeführt.
Waschtischarmatur WimTec SMART
Hinweis
i
Visualisierung der
Mindestspül-Dauer
siehe Seite 13!
HyPlus
11
Page 12
DE
SMART
HyPlus
Funktions-Beschreibung
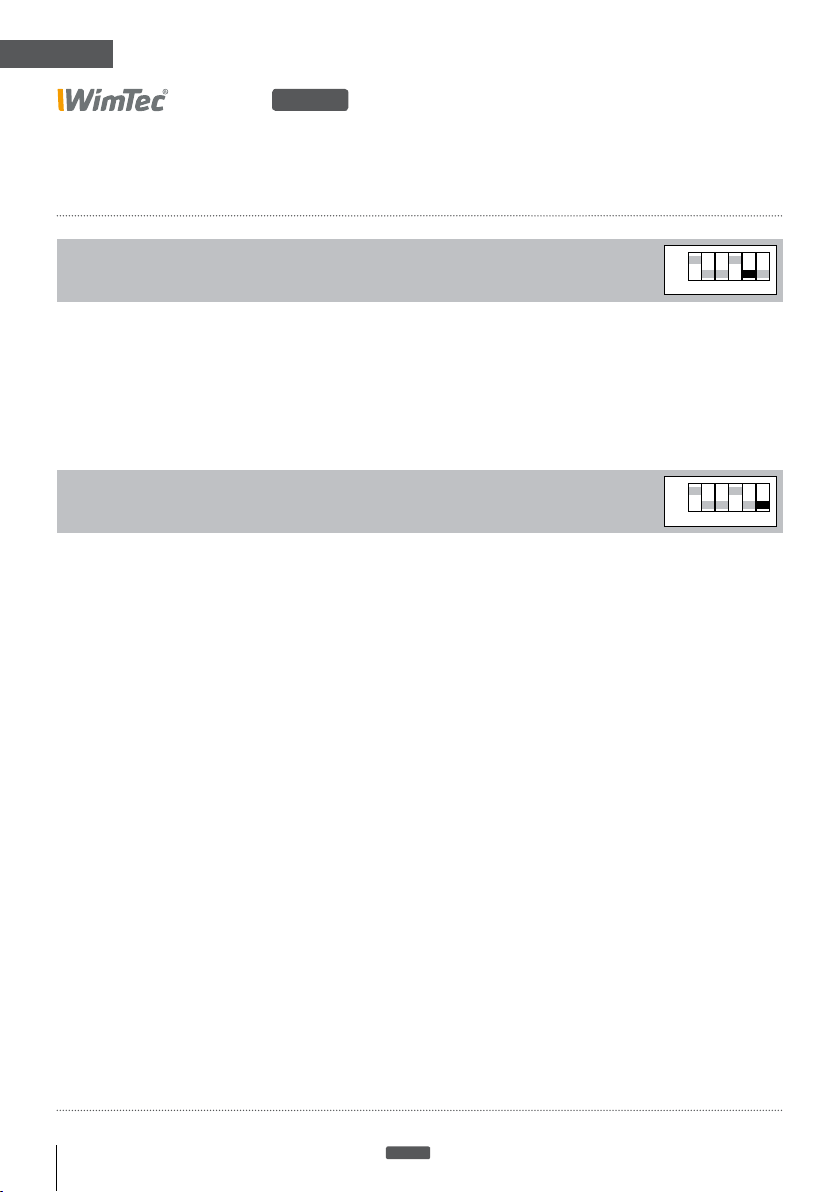
Spülstoppzeit:
DIP Schalter 5
Es kann zwischen 2 vordefinierten Spülstoppzeiten (1 min bzw. 10 min) gewählt werden.
Stellung „ON“ = Die Spülstoppzeit beträgt 10 min.
Stellung „OFF“ = Die Spülstoppzeit beträgt 1 min (voreingestellt).
Nachlaufzeit:
DIP Schalter 6
Es kann zwischen 2 vordefinierten Nachlaufzeiten (1 s bzw. 3 s) gewählt werden.
Stellung „ON“ = Nachlaufzeit beträgt 3 s.
Stellung „OFF“ = Nachlaufzeit beträgt 1 s (voreingestellt).
ON
OFF
ON
OFF
1
1
2
3 4 5 6
2
3 4 5 6
12 Waschtischarmatur WimTec SMART
HyPlus
Page 13
DE
SMART
HyPlus
Funktions-Beschreibung
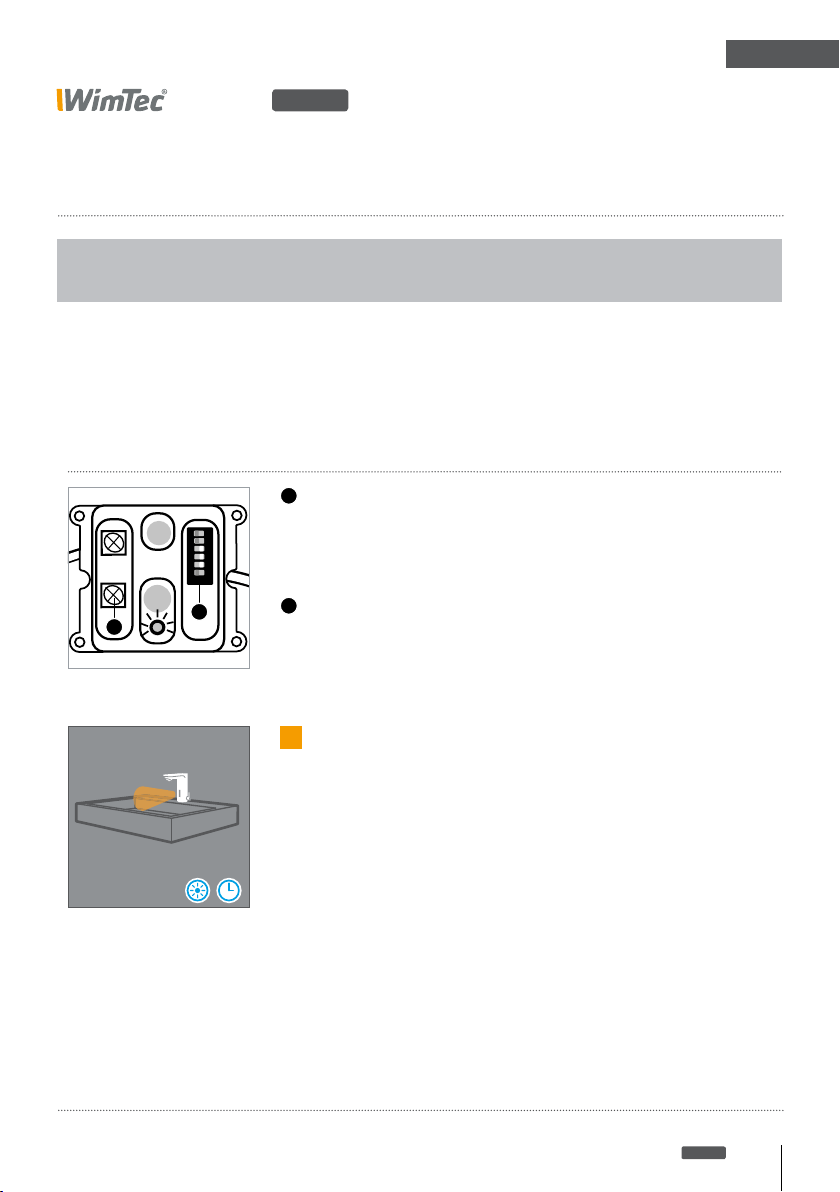
Visualisierung der Mindestspüldauer:
Durch Blinken der Kontroll-LED im Infrarot-Sensor kann die am Mindestspüldauer
Regler eingestellte Zeit (siehe Seite 6) kontrolliert werden.
Visualisierung der Mindestspüldauer aktivieren:
1
DIP-Schalter 4
Durch ändern der DIP-Schalter Stellung auf „ON“ beginnt die
Kontroll-LED für die am Mindestspüldauer Regler eingestellte
123456
ON
OFF
2
1
Zeit im Sekundentakt zu blinken.
2
Mindestspüldauer Regler (wenn DIP Schalter 4 = „ON“)
Wird durch Drehen am Regler für die Mindestspüldauer die
Zeit geändert, beginnt die Kontroll-LED 5 s nach der Änderung
für die eingestellte Dauer im Sekundentakt zu blinken.
i
Hinweis:
Während die eingestellte Mindestspüldauer durch Blinken
der Kontroll-LED symbolisiert wird, geht die Armatur außer
Betrieb. Erst nach der Visualisierung geht die Armatur wieder in den Normal-Betrieb über.
Durch Ändern der Stellung des DIP-Schalter 4
auf „OFF“ wird die Freispül-Automatik deaktiviert
und die Visualisierung der eingestellten Mindestspüldauer abgebrochen.
Waschtischarmatur WimTec SMART
HyPlus
13
Page 14
EN
SMART
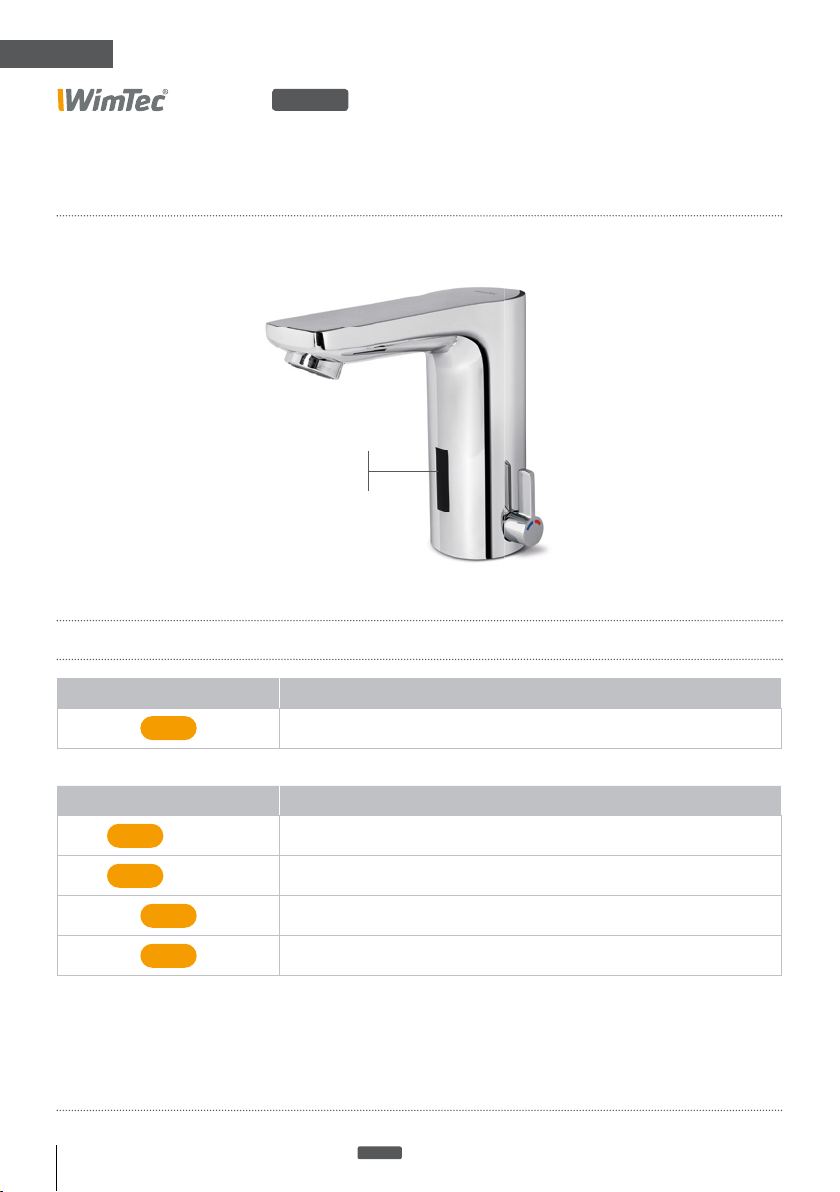
LED Signale
Infrarotsensor
mit Kontroll-LED
Beschreibung der Signal-Typen:
HyPlus
Blinksignal Bedeutung
Nx
Blinkcode Bedeutung
alle 4 s
1x
alle 3 s
2x
1x
2x
14 Washbasin fi tting WimTec SMART
N mal kurzes Blinken
Batterie wechseln! Niedriger Batterie-Ladestand, keine Funktion
Reinigungsstopp aktiv
Magnetventil wird geöffnet
Magnetventil wird geschlossen
HyPlus
Page 15
DE
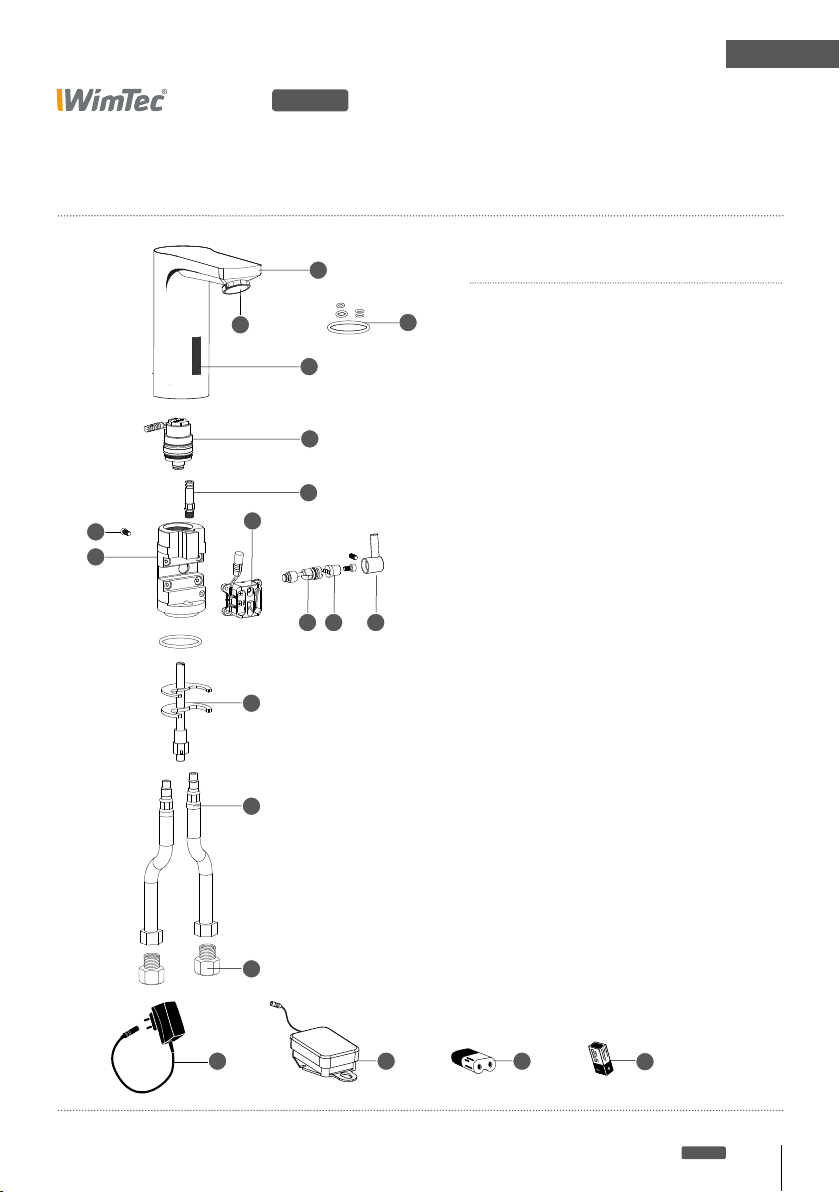
Ersatzteile
7
8
SMART
4
9
13
14
HyPlus
1
3
5
6
10 11 12
Nr. Bezeichnung Art.Nr.:
2
1 Armaturenoberteil inkl.
Sichtfenster u. Strahlregler laminar
Ausführung HDM 109 092
Ausführung HDK / HDVM 109 269
2 O-Ring Set 109 108
3 Sichtfenster 109 047
4 Strahlregler laminar 120 714
5 Magnetventil 6 V 231 205
6 Verbindungsrohr 109 061
7 Senkschraube 109 115
8 Armaturenunterteil
Mischwasser 109 122
Kaltwasser 109 221
9 Elektronikmodul HyPlus 118 209
10 Mischerwelle 109 139
11 Adapter 109 146
12 Mischergriff 109 153
13 Befestigungsset 109 160
14 Anschlussschlauch
350 mm Länge 230 291
500 mm Länge 230 307
15 Rückflussverhinderer 230 314
inkl. Vorfilter
16 Netzteil 230 V 101 065
17 Batteriemodul
inkl. 9 V Batterie 231 380
inkl. 6 V Batterie 230 987
18 6 V Lithium Batterie 230 741
19 9 V Alkaline Batterie 230 086
15
1716 18
Waschtischarmatur WimTec SMART
19
HyPlus
15
Page 16

EN
SMART
General notes
HyPlus
Congratulations on purchasing the WimTec SMART fitting in
HyPlus version.
In order to ensure that you will be able to enjoy this high-quality
product for many years, please take note of the following cleaning
and maintenance recommendations:
Use mild cleaning agents containing soap
Do not use abrasive, scrubbing, sealing or acidic
cleaning agents or disinfectants
Clean the fitting with a soft sponge or cloth only
Do not use steam cleaners
This manual is valid for the following products:
WimTec SMART HDM - with mixer:
Art.no. 122 473, 122 480
WimTec SMART HDK - without mixer:
Art.no. 122 459, 122 466
Delivery scope:
Tap housing with electronic module, 230 V power unit or battery
modul incl. 9 V battery, magnetic valve, connnection hoses,
dirt-filter attachment for corner valve, mounting material and
reflux preventers at variant with mixer.
Important installation notes:
Mounting and installation may only be performed by a qualified
service provider in accordance with DIN 1988, ÖVE/ÖNORM E 8001
!
and VDE 0100 Part 701. When planning and installing sanitary
The “General installation
terms and conditions”
provided at
www.wimtec.com apply.
facilities, all relevant local, national and international standards and
provisions must be observed! Provide for 230 V / 12 V power unit
outside of the protected zone. Maintenance of return flow valves
according to EN 806-5.
16 Washbasin fitting WimTec SMART
HyPlus
Page 17

EN
Contents
SMART
HyPlus
Page
Specifications ............................................................................. 18
Legend ........................................................................................ 19
Dimensions ............................................................................. 19
Electronics module ................................................................. 19
Configuring the functions ........................................................ 20
Setting controls....................................................................... 20
DIP switches ........................................................................... 20
Assembly .................................................................................... 21
Function ...................................................................................... 22
Function description ................................................................. 22
Active range ........................................................................... 22
Cleaning stop .......................................................................... 23
Continuous flow ...................................................................... 24
Intelligent stagnation flush .................................................... 25
Flushing stop time.................................................................. 26
Shut-off delay ......................................................................... 26
Minimum flushing duration visualisation ............................. 27
LED signals .................................................................................. 28
Spare parts ................................................................................. 29
Washbasin fitting WimTec SMART
HyPlus
17
Page 18

EN
SMART
HyPlus
Specifications
WimTec SMART - HyPlus 9 V:
Battery: 9 V Alkali 6LR22 or 6LF22 (in scope of supply) optional 6 V Lithium CR-P2
Battery life: 9 V Alkali – approx. 100.000 flushings (max. 2 years)
6 V Lithium – approx. 200.000 flushings (max. 4 years)
WimTec SMART - HyPlus 230 V:
Operating voltage: 230 V 50 Hz
Power consumption: max. 0,2 W
HyPlus specifications:
Flushing stop: 1 min or 10 min, adjustable
Intelligent
stagnation flush: activatable / deactivatable,
flushing interval: after 0,5 h to 24 h,
minimum flushing duration: 10 s to 180 s in set flushing interval,
max. flushing capacity at none-usage:
Stream regulator: laminar (without aeration)
864 l/day
Further technical specifications:
Magnetic valve: cartridge 6 V
Active range: automatic
Close active range: approx. 3 cm
Continuous flow: activatable / deactivatable, for the flushing stop time
Cleaning stopp: activatable / deactivatable, for 3 min
Flow rate: 0,05 - 0,6 MPa (0,5 - 6 bar)
Static pressure: max. 0,8 MPa (8 bar)
Water temperature: max. 70 °C (max. 80 °C for max. 10 min)
Flow rate: 6 l/min (independent of pressure)
Water connection: G 3/8” IT
Connection hoses: approved by DVGW W 270 and DVGW W 543
Noise class: I
18 Washbasin fitting WimTec SMART
HyPlus
Page 19
EN
SMART
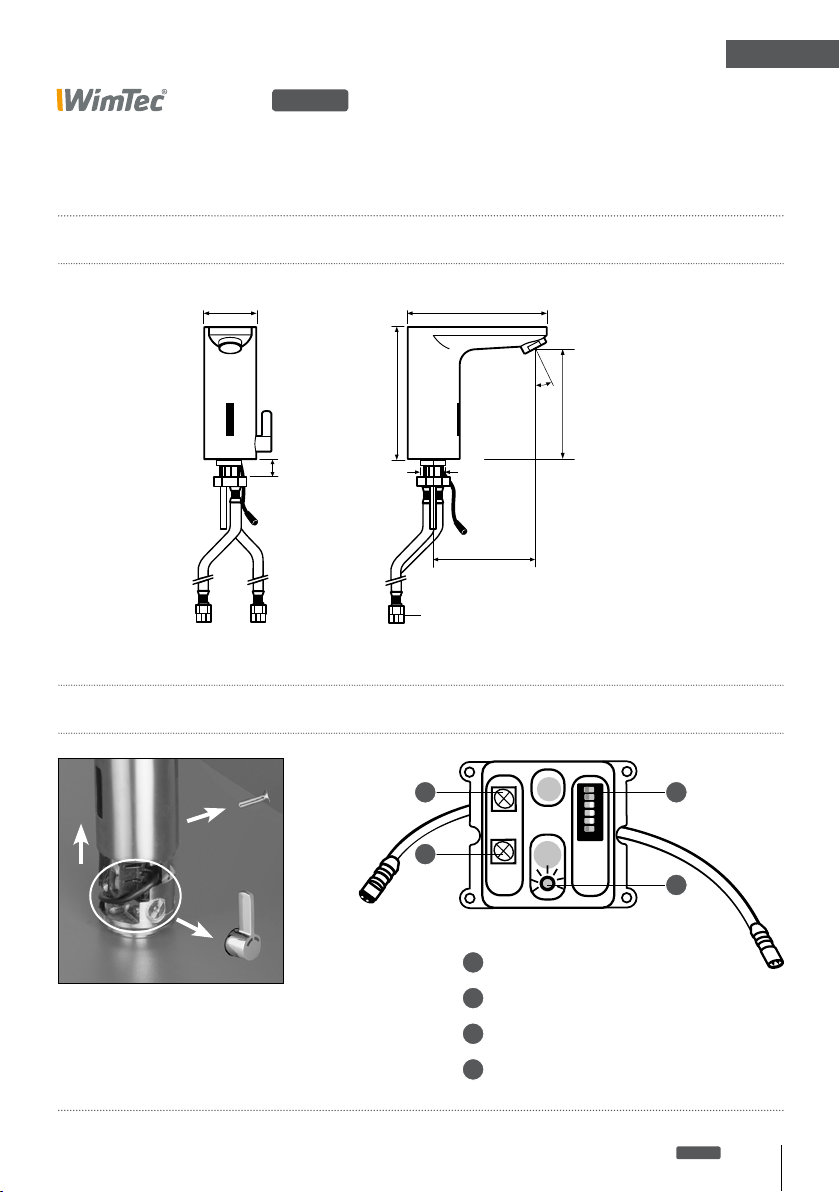
Legend
Dimensions:
Dimensions in mm
Ø 50
HyPlus
max. 45
127
134
Ø 33
Reflux preventer
with prefilter
30°
100
100
Electronics module:
Remove mixing handle and
lock screw. Afterwards remove
upper fitting to access the electronics setting elements.
1 3
123456
ON
OFF
2
1
Interval control
2
Minimum flushing duration control
3
DIP switches
4
Control LED
Washbasin fitting WimTec SMART
4
HyPlus
19
Page 20
EN
SMART
HyPlus
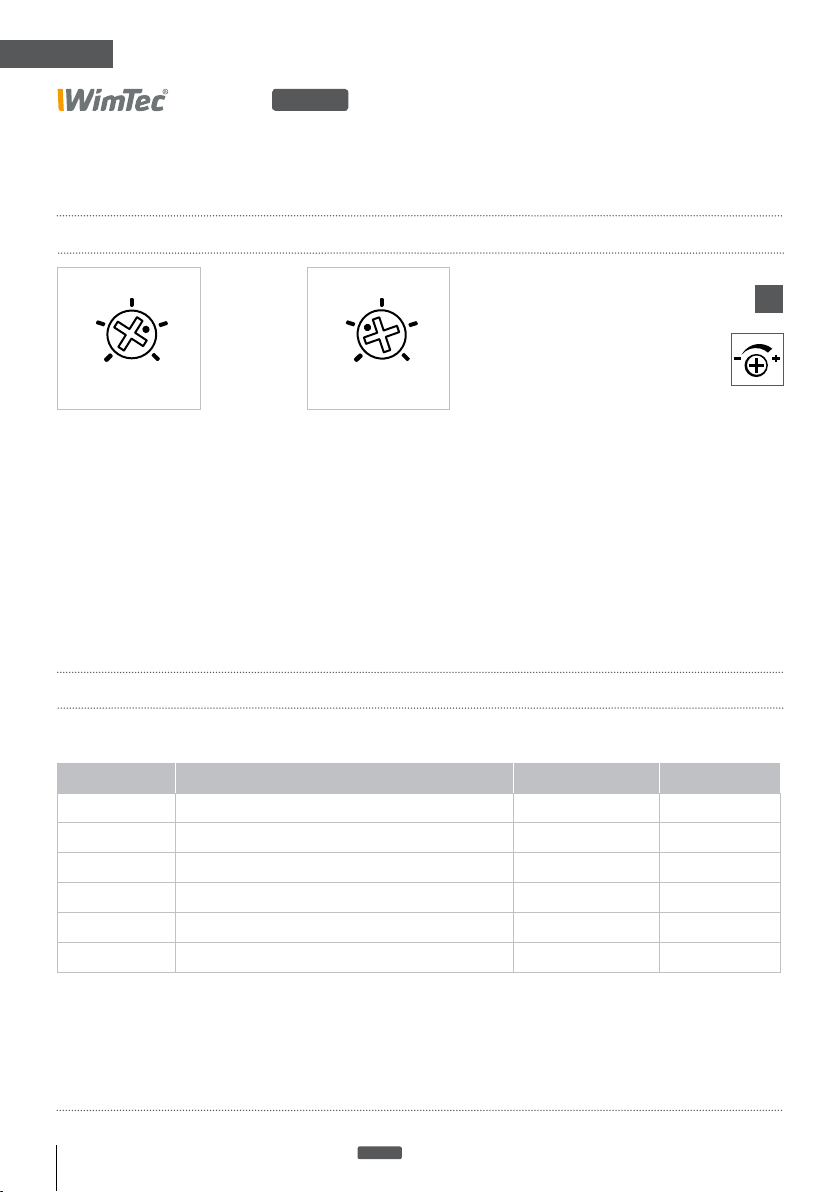
Configuring the functions
Setting controls
6
3 12
0,5 24
h
1. Interval control
for the interval of the stagnation flush, default 12 h
(setting range 0,5 h - 24 h).
30 120
10 180
2. Minimum flushing
duration control
for the duration of the
stagnation flush, default 30 s
(setting range 10 s - 180 s).
60
Rule applies to all controls:
Move counterclockwise to
decrease the setting.
s
Move clockwise to
increase the setting.
!
DIP switches:
Function activation – DIP switch 1–6:
DIP switch Function Factory setting Description
1
2
3
4
5
6
20 Washbasin fitting WimTec SMART
Active range (ON = 15 cm, OFF = 12 cm) ON Page 22
Cleaning stop OFF Page 23
Continuous flow OFF Page 24
Intelligent stagnation flush ON Page 25
Flushing stop (ON = 10 min, OFF = 1 min) OFF Page 26
Shut-off delay (ON = 3 s, OFF = 1 s) OFF Page 26
HyPlus
Page 21
EN
SMART
HyPlus
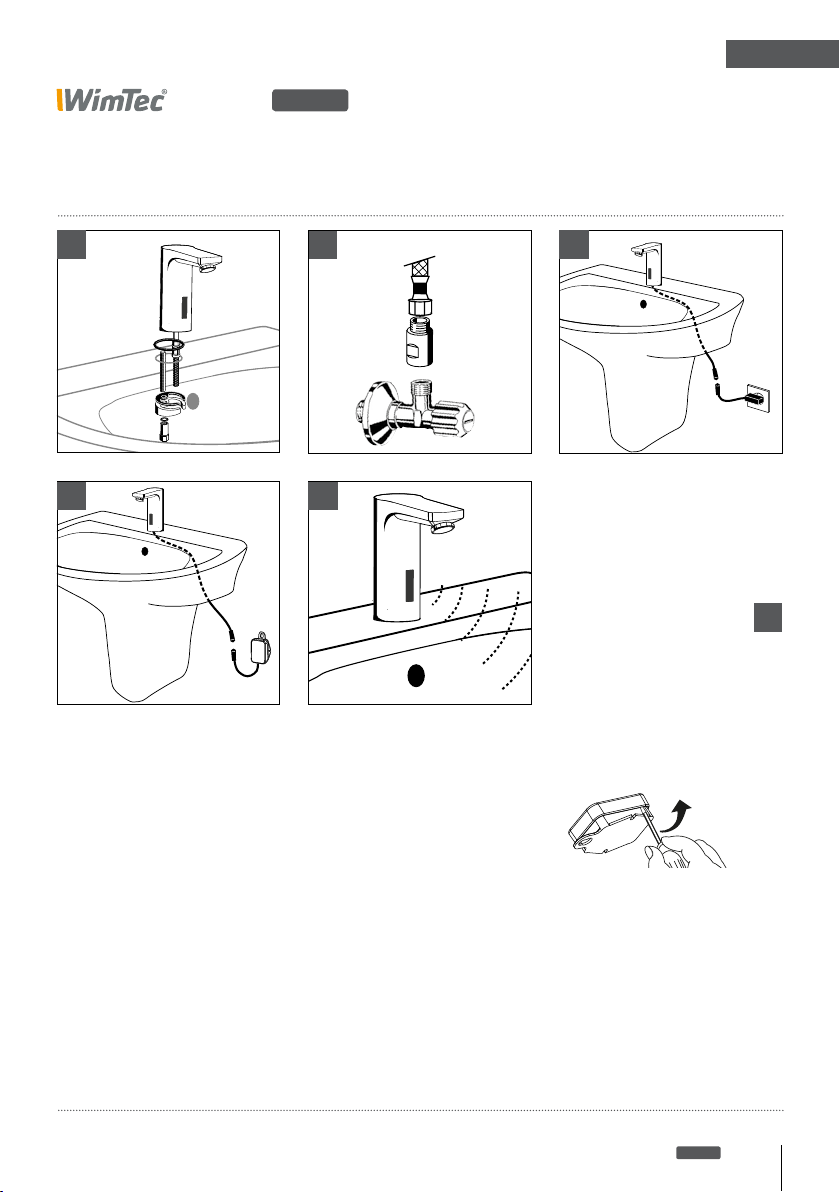
Assembly
1 3a
3b 4
2
!
ATTENTION!
Perform the following steps
in the order indicated!
1. Fasten the fitting to the washbasin.
2. When installing the mixed water version, use a return
flow valve with prefilter or generally use an angle valve
with prefilter.
3a. Mains version: Connect the power supply to the fitting –
open the water valve.
3b. Battery version: Place the battery into the battery module
and connect the battery to the fitting – open the water valve.
4. Automatic range adjustment.
After approx. 5 s the LED flashes 3 times and the fitting is
operational. Do not trigger the sensor when performing
the range adjustment!
Washbasin fitting WimTec SMART
OPEN - CLOSE
Air- and water-tight housing
HyPlus
21
Page 22
EN
SMART
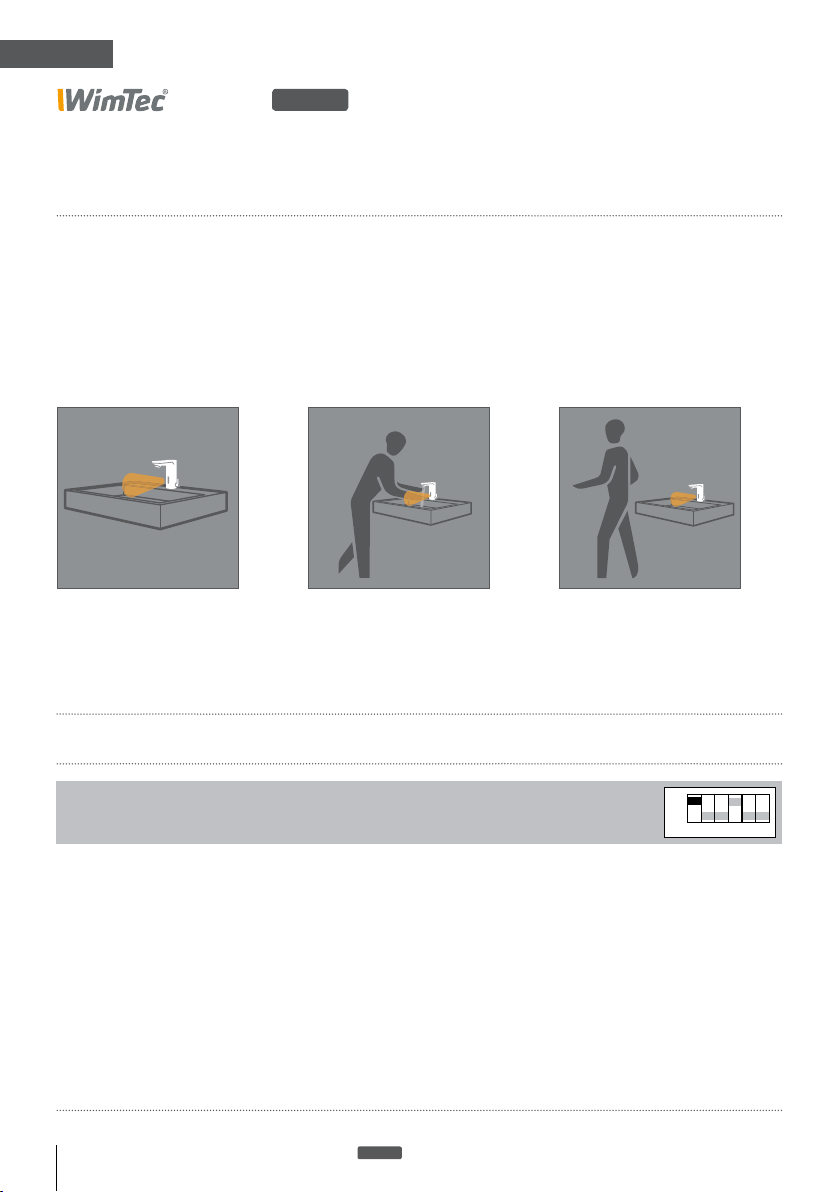
Function
Automatic range adjustment
After connection to a power
supply. Duration approx. 5 s.
HyPlus
Water starts flowing
As soon as the infrared sensor detects the user within
the sensor range.
Water stops flowing
Once the user clears the
sensor range or after the
configured water arrest time
has elapsed.
Function description
Active range:
DIP switch 1
Serves to adjust the fittings active range to smaller washbasins.
‚ON‘ position = Standard active range (approx. 15 cm, default setting).
‚OFF‘ position = Short active range (approx. 12 cm, for smaller washbasins).
22 Washbasin fitting WimTec SMART
HyPlus
ON
OFF
1
2
3 4 5 6
Page 23
EN
SMART
HyPlus
Function description
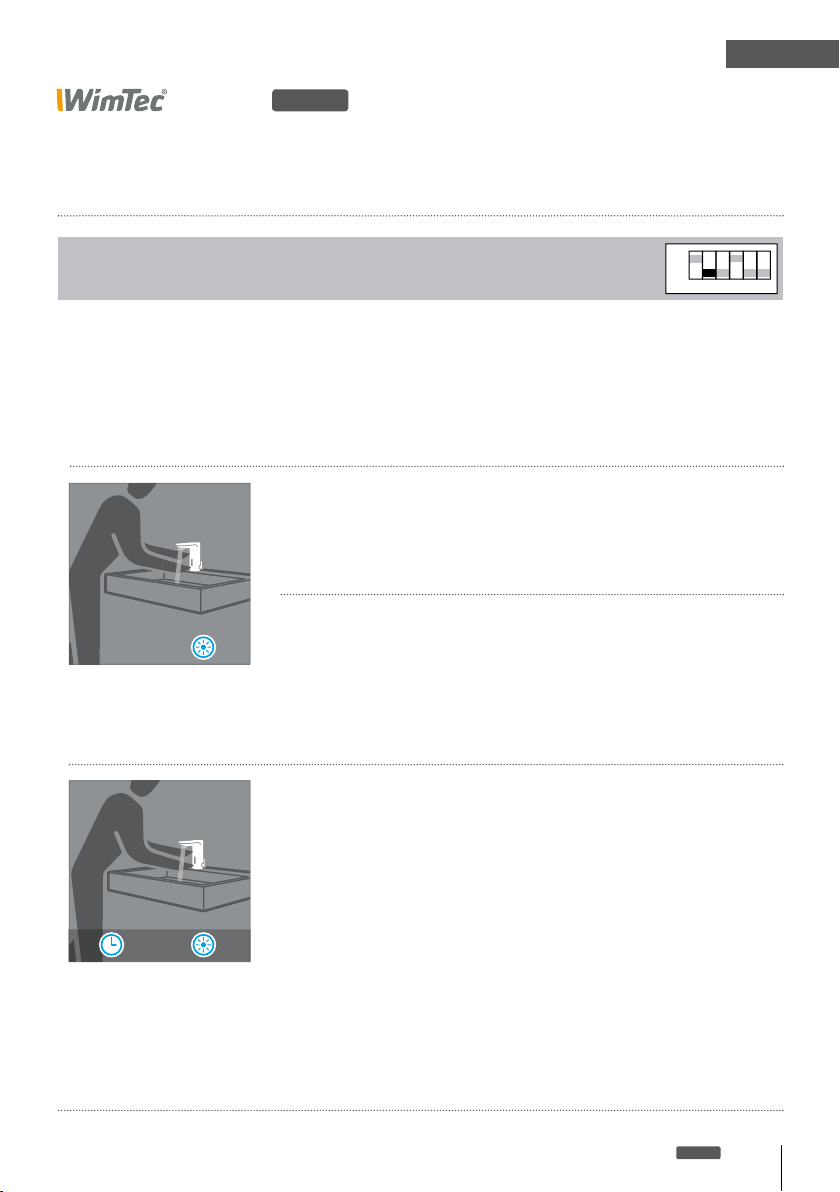
Cleaning stop:
DIP switch 2
Serves to disable the fi tting prior to cleaning.
‘ON’ position = Cleaning stop function enabled.
‘OFF’ position = Cleaning stop function disabled (default setting).
Activate cleaning stop:
1. Approach the infrared sensor with your hand
(approx. 3 cm) and dwell - the water fl ow starts.
2. After the control LED fl ashes 5 times the water fl ow
stops and the cleaning stop is activated for 3 min.
During the cleaning stop the controll LED will
fl ash 2 times every 3 s.
5x
OFF
ON
2
1
3 4 5 6
Deactivate cleaning stop:
3 min |
3x
Automatic:
The fi tting will resume normal operation after 3 min.
Manual:
1. To instantly end the cleaning stop, approach the infrared
sensor with your hand (approx. 3 cm) again and dwell.
2. After the control LED fl ashes 3 times the cleaning stopp
is disabled and the fi tting will resume normal operation.
Washbasin fi tting WimTec SMART
HyPlus
23
Page 24
EN
SMART
HyPlus
Function description
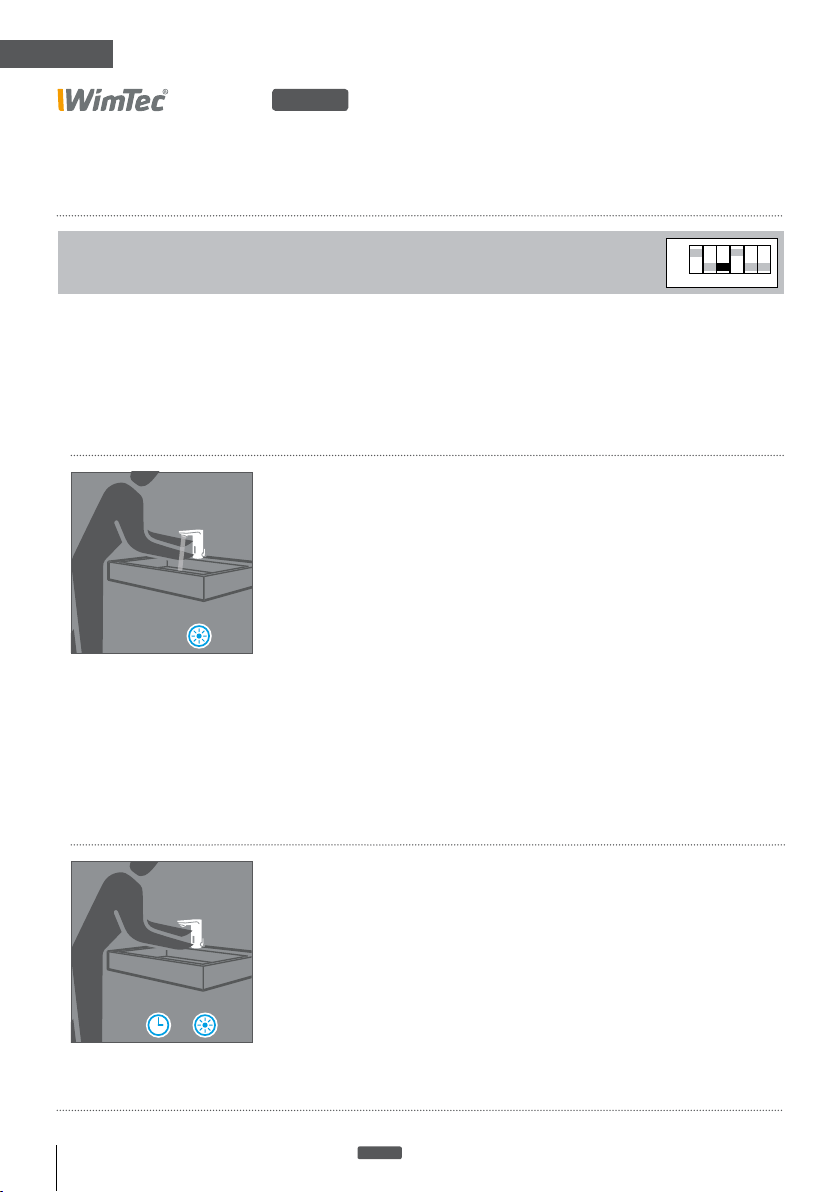
Continuous flow:
DIP switch 3
Enable the continuous flow function to fill the washbasin or a container.
‘ON’ position = Continuous flow function is enabled.
‘OFF’ position = Continuous flow function is disabled (default setting).
Activate continuous flow:
1. Approach the infrared sensor with your hand
(approx. 3 cm) and dwell - the water flow starts.
2. After the control LED flashes 3 times the continuous
flow will be activated for the set flush stop time.
Cleaning stop activated:
3 x
1. Approach the infrared sensor with your hand
(approx. 3 cm) and dwell - the water flow starts.
2. After the control LED flashes 5 times the water flow
stops and the cleaning stop is activated for 3 min.
3. After further 3 times flashing the water flow starts again and
the continuous flow is enabled for the set flush stop time.
ON
OFF
1
2
3 4 5 6
Deactivate continuous flow:
Automatic:
After the flush stop time has elapsed
(DIP switch 5, see page 26).
Manual:
1. To instantly end the continuous flow, approach the infrared
sensor with your hand (approx. 3 cm) again and dwell.
|
3x
2. After the control LED flashes 3 times the continuous flow
is disabled and the fitting will resume normal operation.
24 Washbasin fitting WimTec SMART
HyPlus
Page 25
EN
SMART
HyPlus
Function description
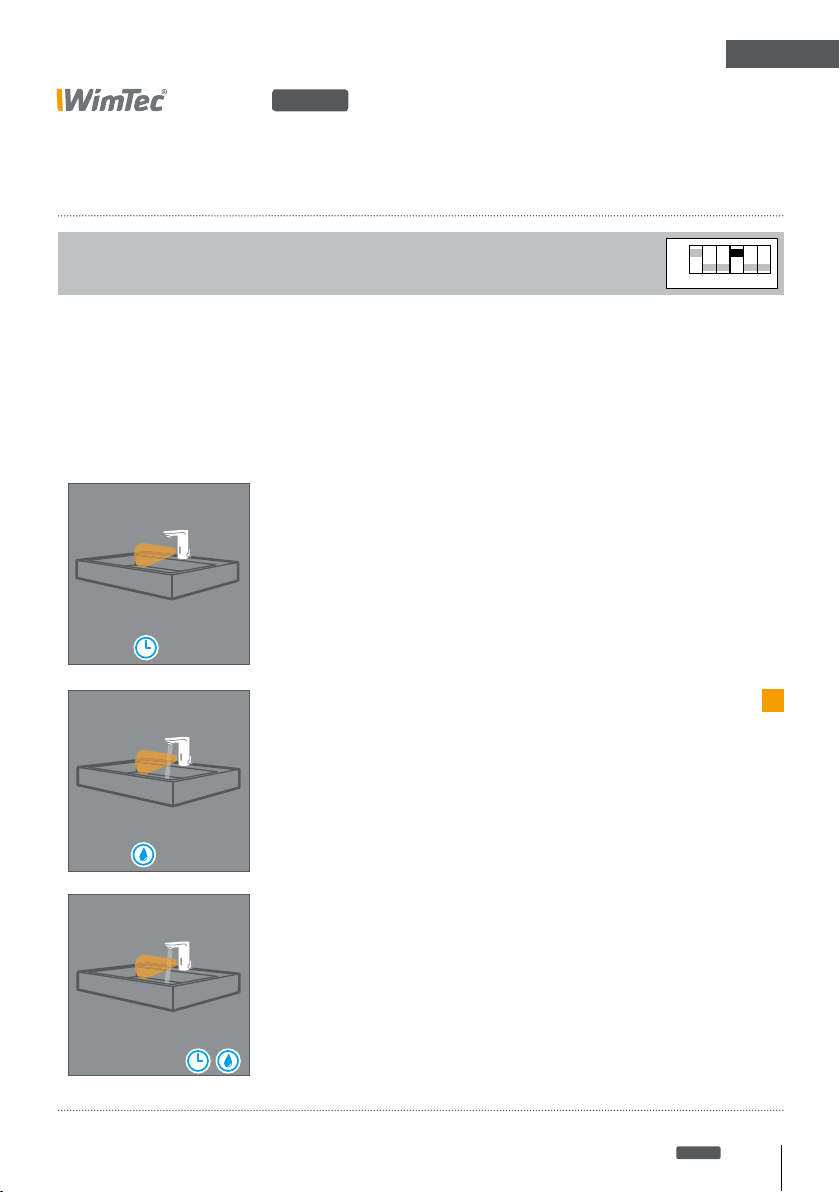
Intelligent stagnation flush:
DIP switch 4
Serves to flush water supply lines in order to remove stagnant
water that accumulates during longer periods of disuse.
‘ON’ position = Intelligent stagnation flush is enabled (default setting).
‘OFF’ position = Intelligent stagnation flush is disabled.
Flushing interval
Specifies the time span between the
stagnation flushing processes.
Adjustable from 0,5 to 24 h via the
interval control (see page 20).
0,5 - 24 h
ON
OFF
1
2
3 4 5 6
10 - 180 s
Minimum flushing duration
Specifies the minumum waterflow
duration within the set time interval.
Adjustable from 10 to 180 s via the
minimum flushing duration control
(see page 20).
Intelligent stagnation flush
If the fitting has not been in use at least for
the minimum flushing duration, an automatic flush for the remaining duration will be
actuated.
Otherwise no automatic flushing will occur.
Washbasin fitting WimTec SMART
Tip
Minimum flushing
duration visualizati-
on see page 27!
HyPlus
25
i
Page 26
EN
SMART
HyPlus
Function description
Flushing stop time:
DIP switch 5
You can select one of two predefined flushing stop times (1 min or 10 min).
‘ON’ position = Flushing stop time is set to 10 min.
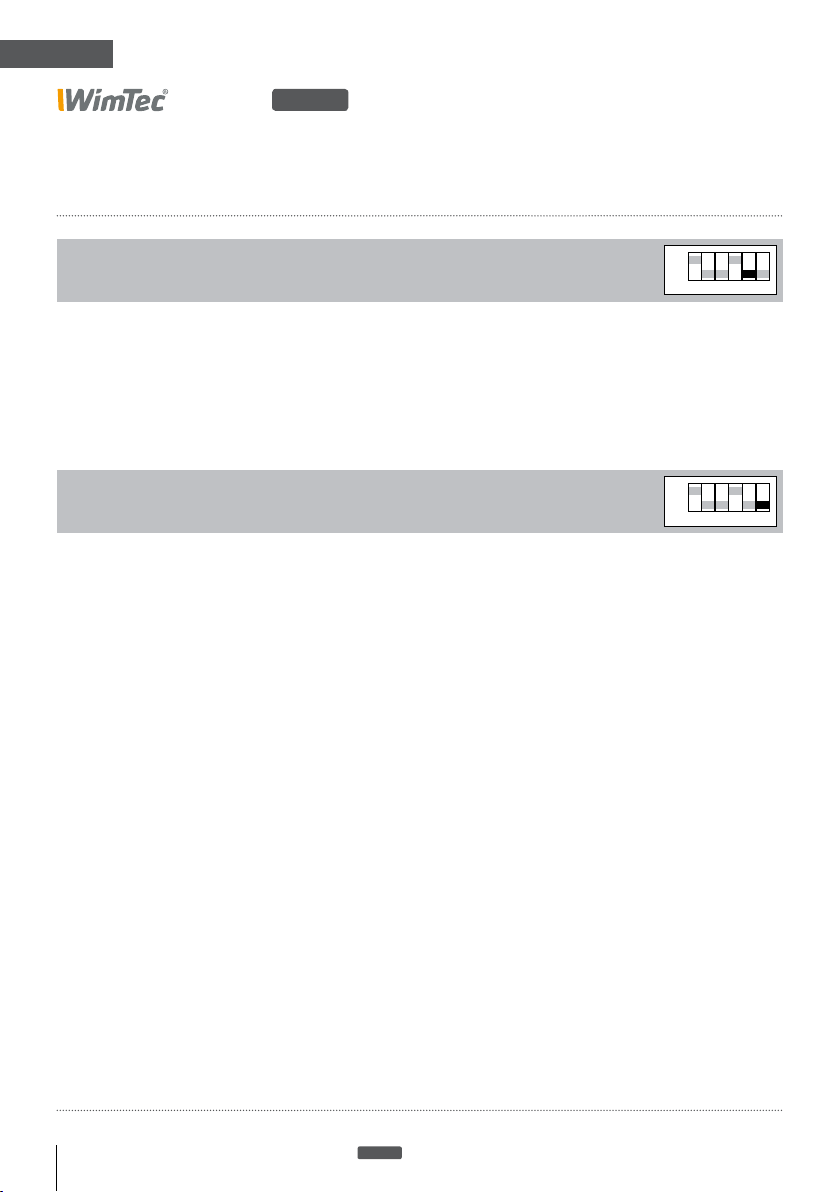
‘OFF’ position = Flushing stop time is set to 1 min (default setting).
Shut-off delay:
DIP switch 6
You can select one of two predefined shut-off delay times (1 s or 3 s).
‘ON’ position = Shut-off delay is 3 s.
‘OFF’ position = Shut-off delay is 1 s (default setting).
ON
OFF
ON
OFF
1
1
2
3 4 5 6
2
3 4 5 6
26 Washbasin fitting WimTec SMART
HyPlus
Page 27
EN
SMART
HyPlus
Function description
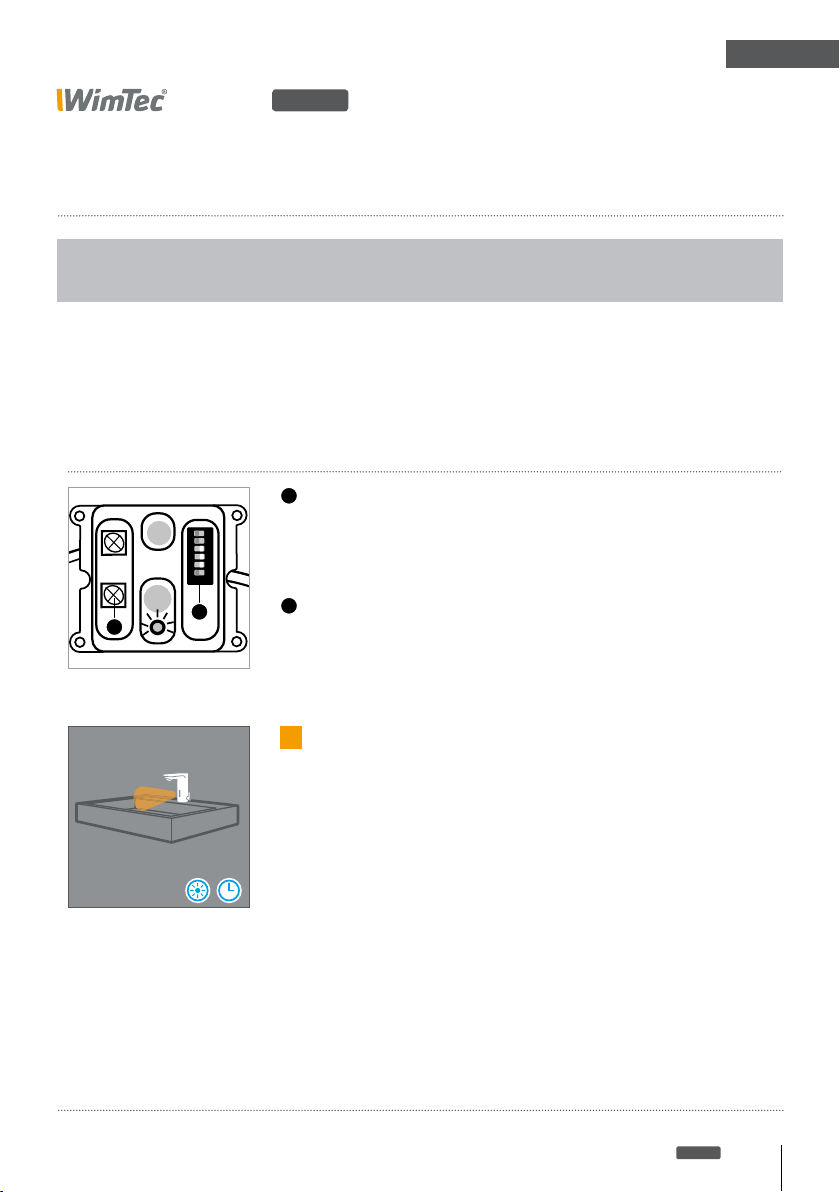
Minimum flushing duration visualisation:
The time set at the minimum flushing duration control (see page 20)
can be monitored through the flashing control LED.
Activate minimum flushing duration visualisation:
1
DIP switch 4
By changing the DIP switch position to ‚ON‘ the control LED
starts flashing every second for the time set at the minimum
123456
ON
OFF
2
1
flushing duration control.
2
Minimum flusing duration control (if DIP switch 4 = ‚ON‘)
When altering the time set at the minimum flushing duration
control, 5 s after the last adjustment occured the control LED
starts flashing every second.
i
Tip:
While the set minimum flushing duration is visualised
through the flashing control LED, the fitting is out of service.
The fitting will resume normal operation as soon as the
visualisation is finished.
By changing the position of DIP switch 4 to ‚OFF‘ the intelligent stagnation flush will be disabled and visualisation of
minimum flushing duration will be aborted.
Washbasin fitting WimTec SMART
HyPlus
27
Page 28
EN
SMART
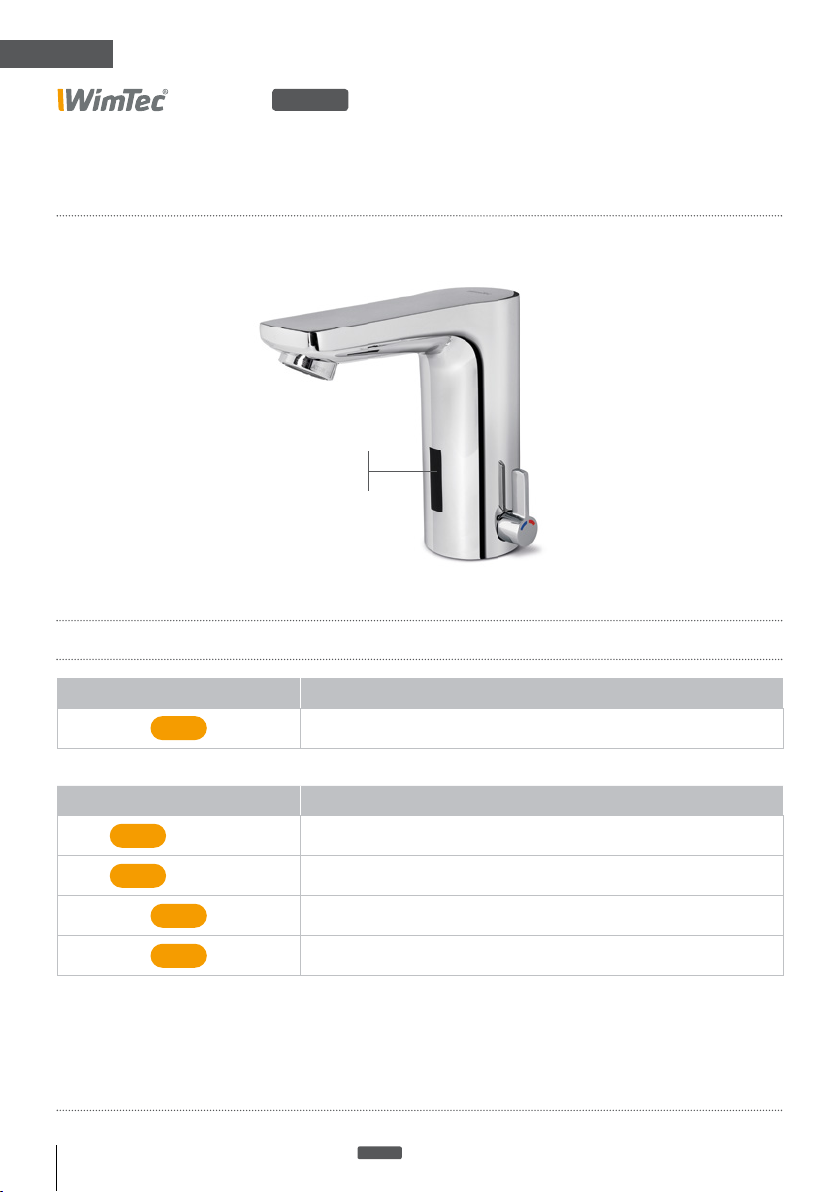
LED signals
Signal type description:
HyPlus
Infrared sensor
with control LED
Flashing signal Description
Nx
Flashing code Description
every 4 s
1x
every 3 s
2x
1x
2x
28 Washbasin fi tting WimTec SMART
N times short fl ashing
change battery! low battery, no function
cleaning stop active
opening magnetic valve
closing magnetic valve
HyPlus
Page 29
EN
SMART
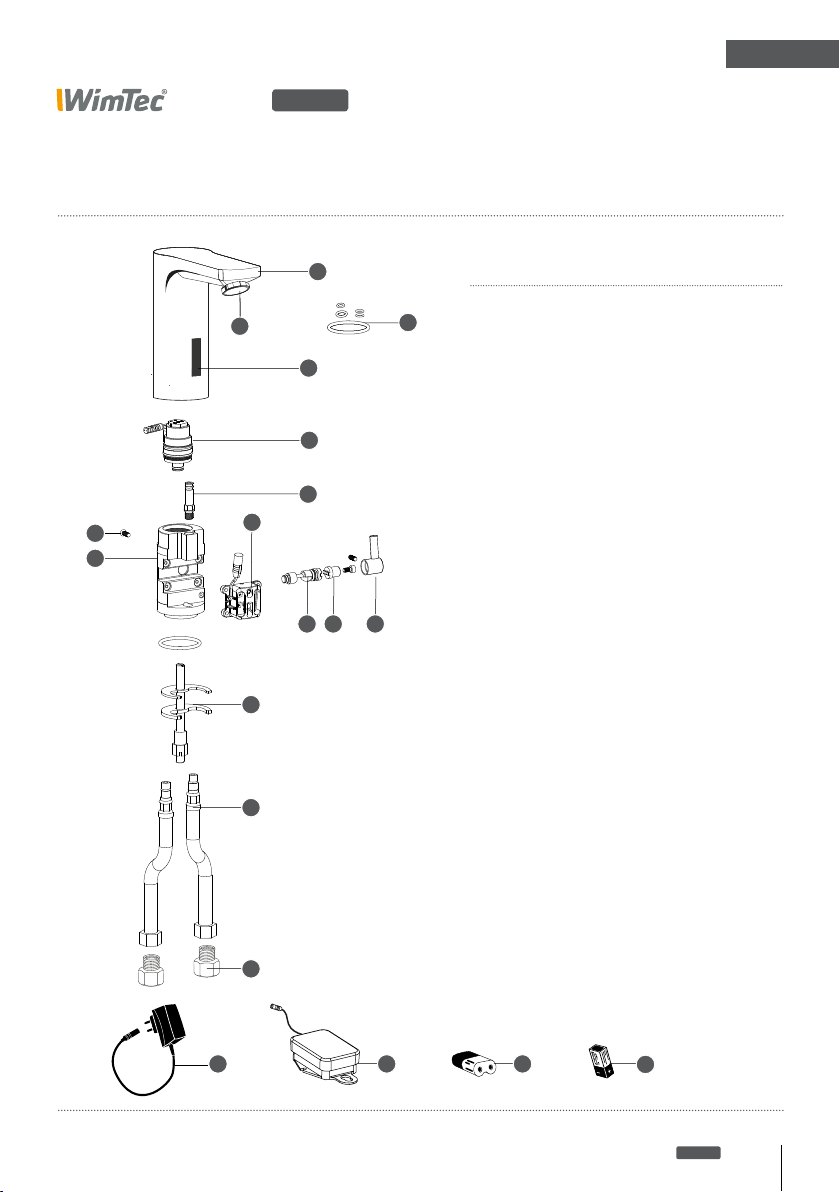
Spare parts
7
8
HyPlus
1
4
3
2
No. Designation Art.no.:
1 Upper fitting incl. viewing panel &
stream regulator laminar
Mixed water 109 092
Cold water 109 269
2 O-ring set 109 108
3 Viewing panel 109 047
5
4 Stream regulator laminar 120 714
5 Magnetic valve 6 V 231 205
6
9
6 Connection pipe 109 061
7 Countersink screw 109 115
8 Fitting base part
Mixed water 109 122
Cold water 109 221
9 Electronics module HyPlus 118 209
10 11 12
10 Mixing shaft 109 139
11 Adapter 109 146
12 Mischer lever 109 160
13 Mounting set 109 160
13
14 Connection tubing
350 mm long 230 291
500 mm long 230 307
15 Return flow valve 230 314
14
incl. prefilter
16 Power supply 230 V 101 065
17 Battery module
incl. 9 V battery 231 380
incl. 6 V battery 230 987
18 6 V lithium battery 230 741
19 9 V alkaline battery 230 086
15
1716 18
Washbasin fitting WimTec SMART
19
HyPlus
29
Page 30

Page 31

Page 32

www.wimtec.com
WimTec Sanitärprodukte GmbH
p: A - 3325 Ferschnitz, Freidegg 50, AUSTRIA
t: +43 (0) 7473 5000 f: +43 (0) 7473 5000 - 500
m: [email protected] i: www.wimtec.com
Auflage: 28 04 2016 Art.Nr. 1003084
 Loading...