

Page 1
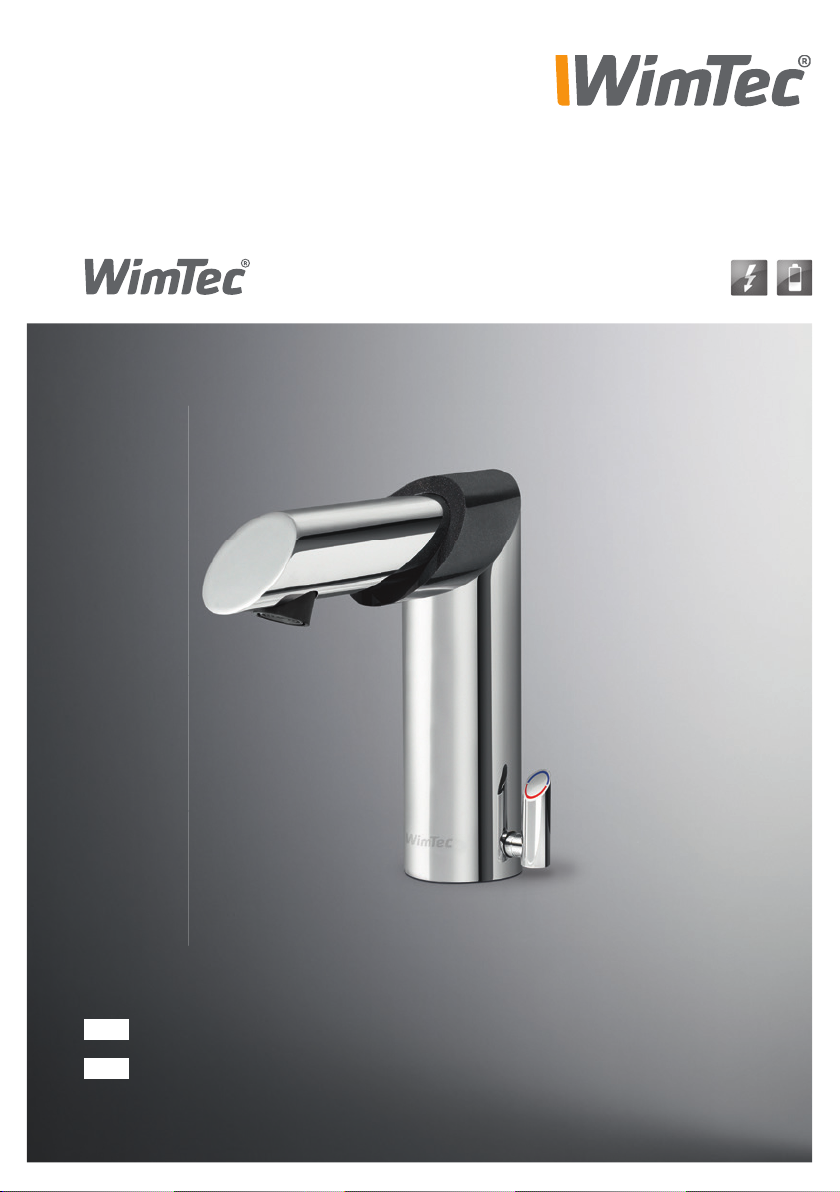
SKY
DE
Montage- und Bedienungsanleitung
EN
Assembly and operating instructions
Page 2

DE
SKY
Allgemeine Hinweise
Gratulation zum Kauf Ihrer Waschtischarmatur.
Damit Sie jahrelang Freude mit dieser hochwertigen Armatur
haben, empfehlen wir Ihnen folgende Punkte bei der Reinigung
und Pflege zu beachten:
Reinigungs- oder Desinfektionsmittel verwenden
Diese Anleitung ist gültig für folgende Produkte:
WimTec SKY Waschtischarmatur
HDK 6 V Art.Nr. 104 448
HDM 6 V Art.Nr. 104 424
milde, seifenhaltige Reinigungsmittel verwenden
keine kratzenden, scheuernden oder säurehaltigen
nur mit weichem Schwamm oder Tuch behandeln
keine Reinigung mit Dampfstrahlgeräten
HDK 230 V Art.Nr. 104 431
HDM 230 V Art.Nr. 104 417
Lieferumfang:
Armaturengehäuse mit Elektronikmodul und 230 V Netzteil oder 6 V
Batterie, Magnetventil, Anschlussschläuche, Schmutzsiebaufsätze
für Eckventil, Befestigungsmaterial und Rückflussverhinderer bei
Mischwasserausführung.
Wichtige Installationshinweise:
Die Montage und Installation darf nur durch einen konzessionierten
Fachbetrieb gemäß DIN 1988, ÖVE/ÖNORM E8001 sowie VDE 0100
!
Teil 701 erfolgen. Bei der Planung und Errichtung von Sanitäranla-
Es gelten die „Allgemeinen
Installationsbedingungen“
unter www.wimtec.com.
2 Waschtischarmatur WimTec SKY
gen sind die entsprechenden örtlichen, nationalen und internationalen Normen und Vorschriften zu beachten! Netzteil 230 V / 12 V
nicht in Schutzbereichen anbringen.
Page 3
SKY
Technische Daten
DE
WimTec SKY - 6 V:
Batterie: 6 V Lithium CR-P2 (im Lieferumfang)
Batterielebensdauer: ca. 100.000 Spülungen (max. 1,5 Jahre)
WimTec - SKY 230 V:
Betriebsspannung: 230 V 50 Hz
Leistungsaufnahme: ca. 0,2 VA
Weitere technische Daten:
Magnetventil: Kartusche 6 V
Ansprechbereich: automatisch
Spülung: solange Benutzer im Ansprechbereich
Spülstoppzeit: von 30 s - 10 min
Stagnationsfreispülung: aktivierbar, nach 3 h oder 24 h Nichtbenutzung für 10 s
Reinigungsstopp: aktivierbar, für 3 min
Fließdruck: 0,15 - 0,6 MPa (1,5 - 6 bar)
Statischer Druck: max. 0,8 MPa (8 bar)
Wassertemperatur: max. 70 °C (max. 80 °C für max. 10 min)
Durchflussmenge HD: ca. 6 l/min (druckunabhängig)
Wasseranschluss: G 3/8” IG
Anschlussschläuche: zugelassen nach DVGW W 270 und DVGW W 543
Nicht verwenden mit: Eckventil-Thermostat, UT-Mischer, UT-Speicher, Durchlauferhitzer
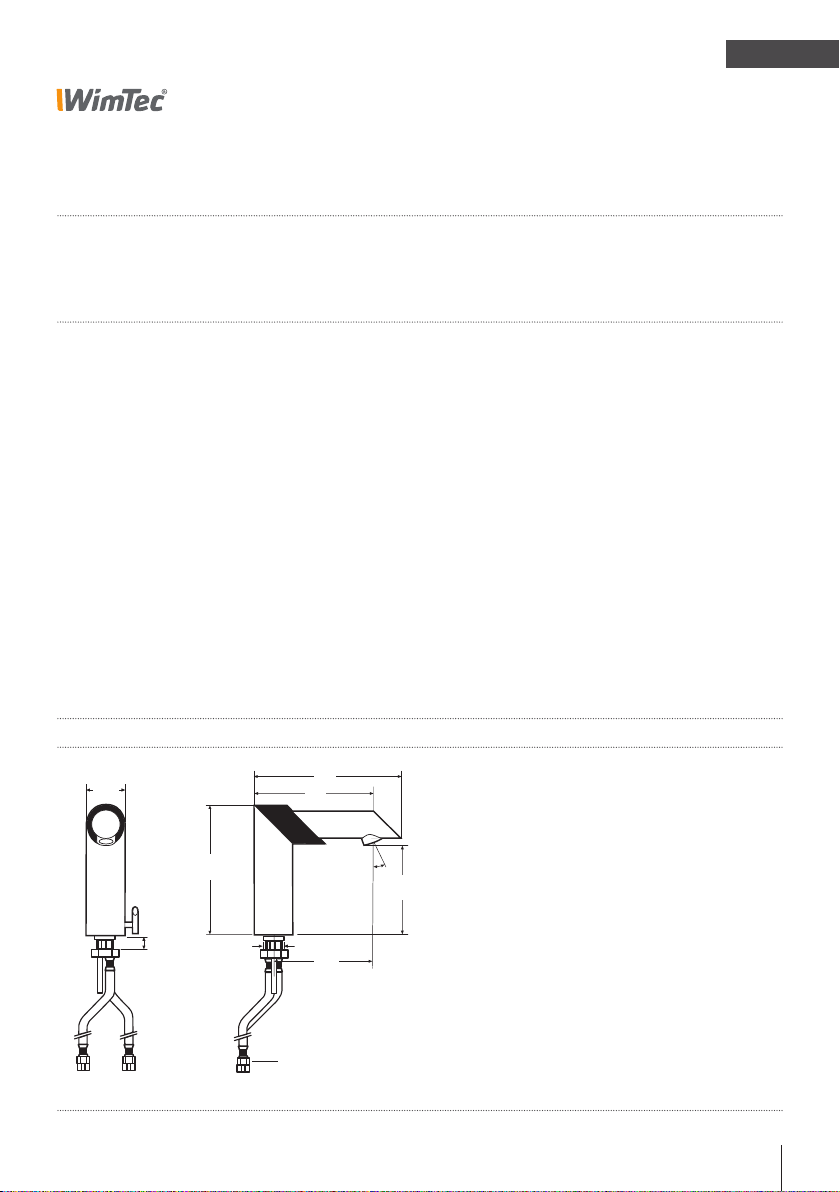
Abmessungen in mm
Ø 49
184
148
max. 45
165
20°
112
Ø 33
130
Rückflussverhinderer mit Vorfilter
Waschtischarmatur WimTec SKY 3
Page 4
DE
SKY
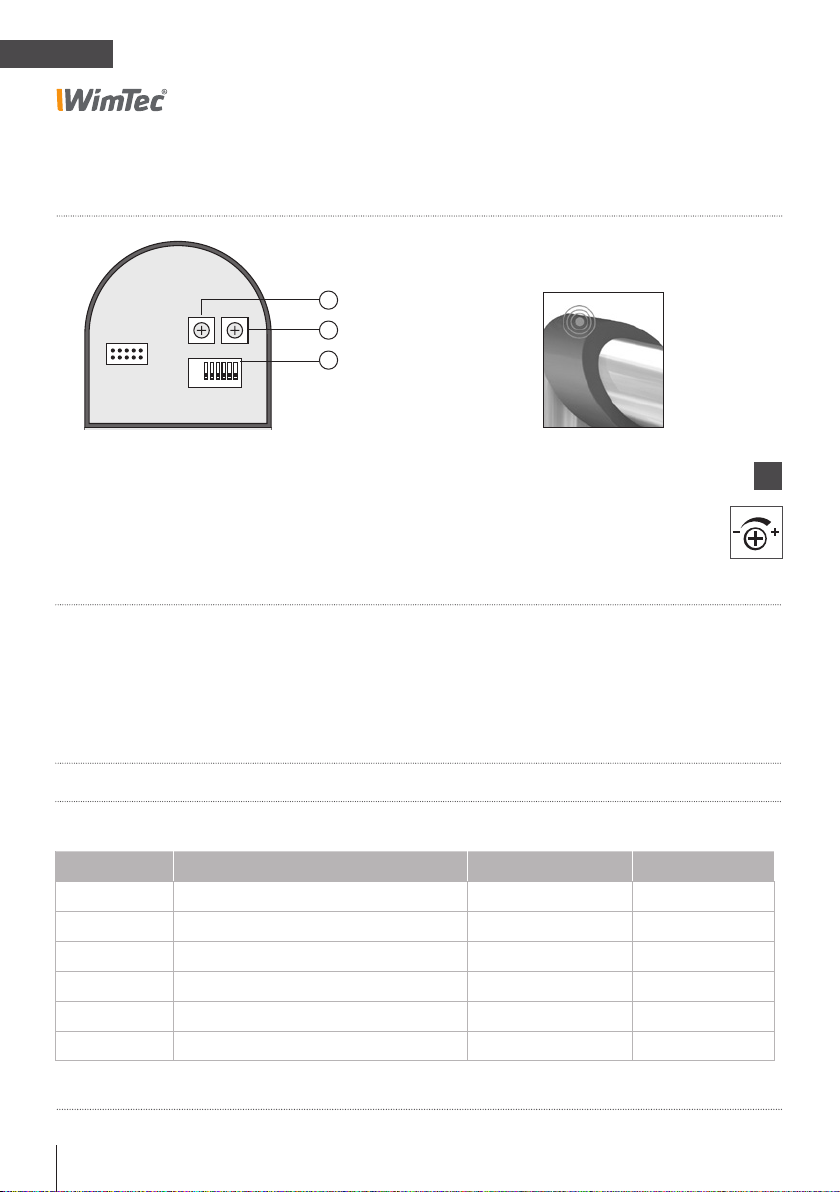
Einstellung der Funktionen
Position des
Touch-Sensors
ON
OFF
123456
1
Zeit-Regler
2
Empfindlichkeits-Regler
3
DIP-Schalter
Generell gilt für alle Regler:
Gegen den Uhrzeigersinn
zum Reduzieren.
Im Uhrzeigersinn zum Erhöhen.
Einstellregler:
1. Zeit-Regler
für die Spülstoppzeit,
1 min voreingestellt
(30 s - 10 min einstellbar).
2. Empfindlichkeits-Regler
regelt die Ausschaltempfindlihckeit der Armatur (1 =
empfindlich, 20 = unempfindlich)
3. Dip-Schalter:
Funktionsaktivierung: Dip-Schalter 1 - 6:
Dip-Schalter Funktion Werkseinstellung Beschreibung
1
2
3
4
5
6
Spülprogramm ON Seite 8
Reinigungsstopp OFF Seite 8
Dauerlauf OFF Seite 9
Stagnationsfreispülung OFF Seite 10
Stagnationsfreispülungsintervall OFF Seite 10
Nachlaufzeit (ON = 5 s, OFF = 3 s) OFF Seite 11
!
4 Waschtischarmatur WimTec SKY
Page 5

Funktion
DE
SKY
Wasserfluss startet
Sobald der Benutzer über
den Ansprechbereich rund
um den Armaturenauslauf
erfasst wird.
Wasserfluss stoppt
Wenn der Benutzer den
Ansprechbereich wieder
verlässt oder nach Ablauf der
eingestellten Spülstoppzeit.
Waschtischarmatur WimTec SKY 5
Page 6
DE
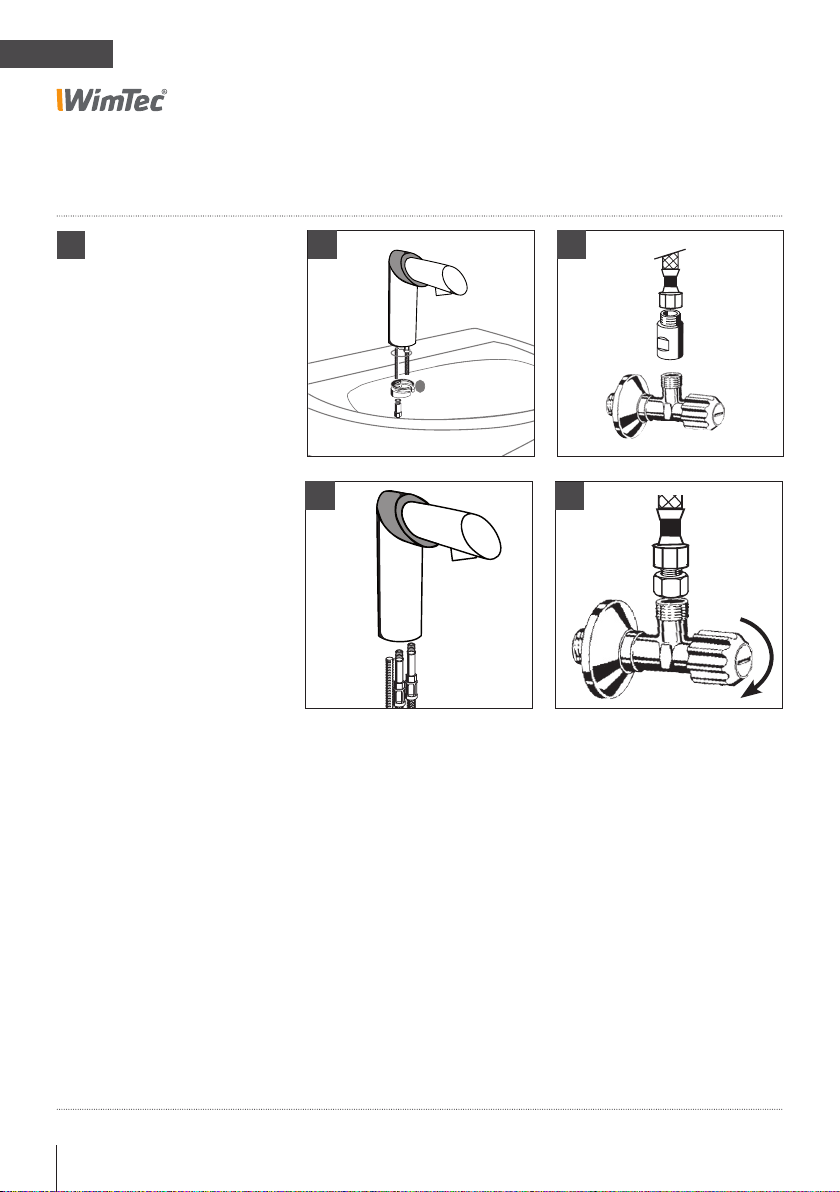
Montage
SKY
!
ACHTUNG!
Folgende Schritte unbedingt in beschriebener
Reihenfolge ausführen!
1 2
3
1. Armatur auf Waschtisch befestigen.
Nicht verwenden mit: Eckventil-Thermostat, UT-Mischer,
UT-Speicher und Durchlauferhitzer
4
2. Bei Mischwasserausführung Rückflussverhinderer mit
3. Achtung! Schläuche am Armaturenkörper nicht nachziehen.
4. Bei Batterievariante: Vor dem Batterieeinlegen bzw.
6 Waschtischarmatur WimTec SKY
Vorfilter bzw. generell Eckventil mit Vorfilter verwenden.
-wechsel Eckventile abdrehen.
Page 7

Montage
DE
SKY
5a
6
5. a) Batterievariante: Armaturenoberteil abnehmen und Batterie
einsetzen, Armaturenoberteil aufsetzen und befestigen,
Eckventile öffnen.
5. b) Netzvariante: Steckverbindung zwischen Armatur und
Netzteil herstellen.
5b
7
!
ACHTUNG!
Folgende Schritte unbe-
dingt in beschriebener
Reihenfolge ausführen!
3. Automatischer Reichweitenabgleich. Die Armatur (inkl. Eckventile
und Anschlussschläuche) für 15 s nicht berühren.
4. Die SKY Waschtischarmatur ist jetzt betriebsbereit.
Waschtischarmatur WimTec SKY 7
Page 8
DE
SKY
Einstellung der Funktionen
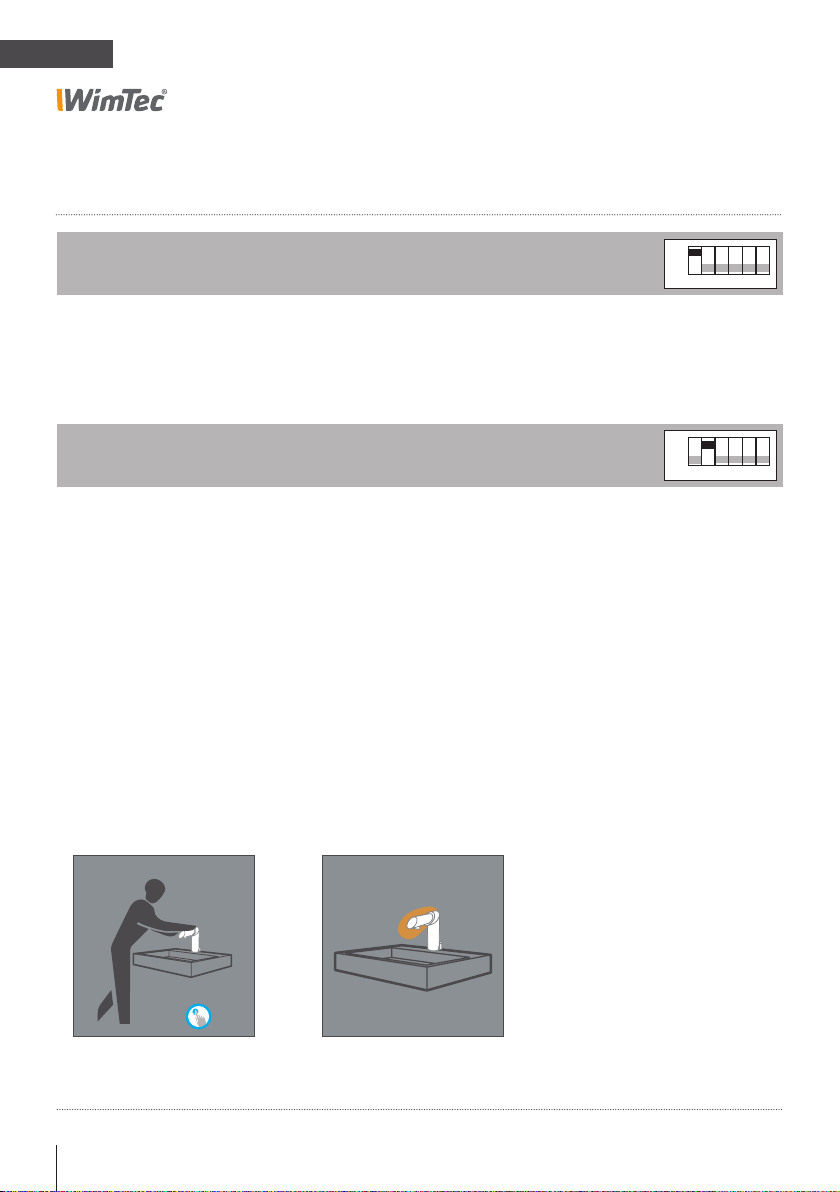
Spülprogramm:
DIP Schalter 1
Stellung „ON“: Aktiviert das Automatik-Programm.
Stellung „OFF“: Aktiviert das manuelle Programm.
Reinigungsstopp:
DIP Schalter 2
Dient zum Deaktivieren der Armatur zur Reinigung.
Stellung „ON“: Reinigungsstopp-Funktion aktiviert.
Stellung „OFF“: Reinigungsstopp-Funktion deaktiviert (voreingestellt).
Reinigungsstopp aktivieren
Armatur vor dem Auslösen
am Auslauf berühren und
gleichzeitig 5x auf den
Sensorring tippen. Danach
stoppt der Wasserfluss und
die Armatur befindet sich im
Reinigunsstopp-Modus.
Reinigungsstopp deaktivieren
Die Armatur geht 3 min nach
Verlassen des Ansprechbereichs automatisch wieder in
den Normalbetrieb über.
ON
OFF
ON
OFF
1
1
2
3 4 5 6
2
3 4 5 6
5 x
8 Waschtischarmatur WimTec SKY
Page 9
SKY
Einstellung der Funktionen
DE
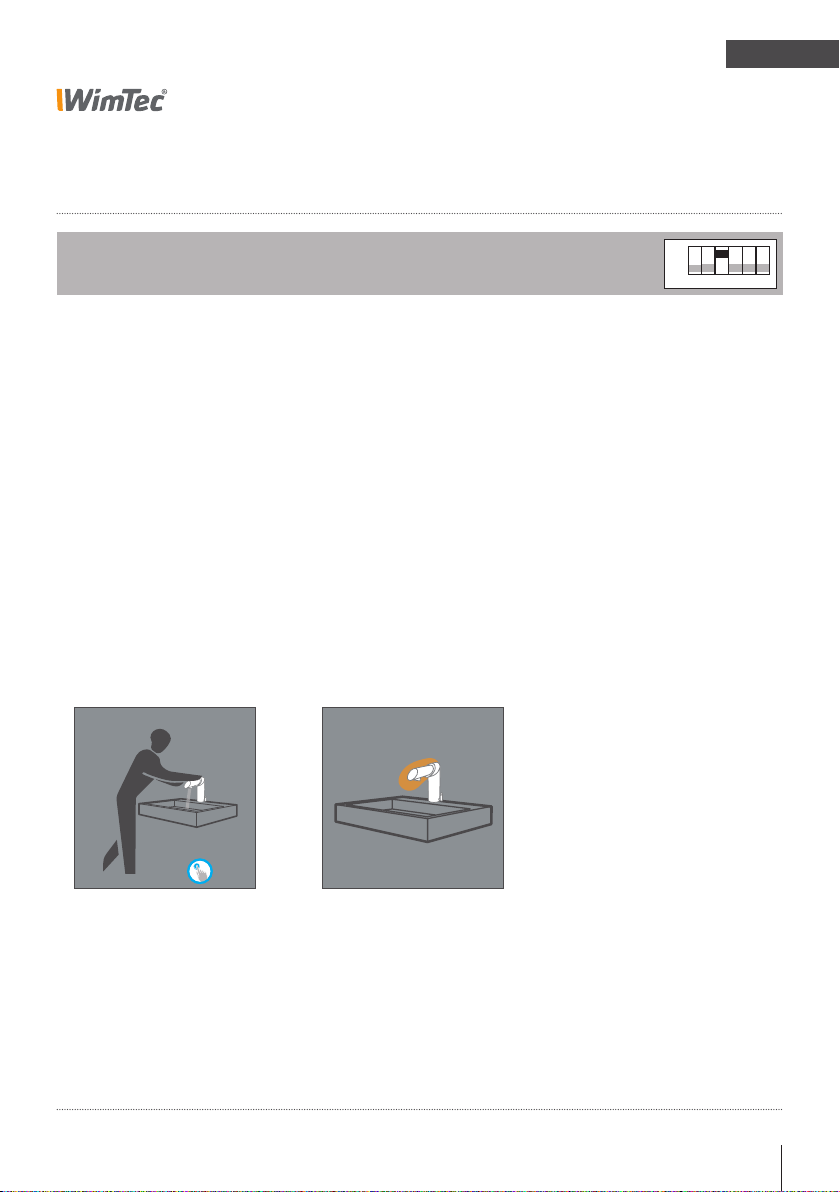
Dauerlauf:
DIP Schalter 3
Zum Füllen des Beckens oder eines Behälters kann der Dauerlauf aktiviert werden.
Stellung „ON“: Dauerlauf-Funktion aktiviert.
Stellung „OFF“: Dauerlauf-Funktion deaktiviert (voreingestellt).
Dauerlauf aktivieren
Heranführen der Hand an den
Ansprechbereich. Nach dem
Start des Wasserflusses für 3 s
den Sensorring berühren.
Dauerlauf deaktivieren
Automatisch nach Ablauf der
am Zeit-Regler eingestellten
Spülstoppzeit.
Zum vorzeitigen Beenden des
Dauerlaufs gehen Sie wie bei
„Dauerlauf aktivieren“ vor.
ON
OFF
1
2
3 4 5 6
3 s
Waschtischarmatur WimTec SKY 9
Page 10
DE
SKY
Einstellung der Funktionen
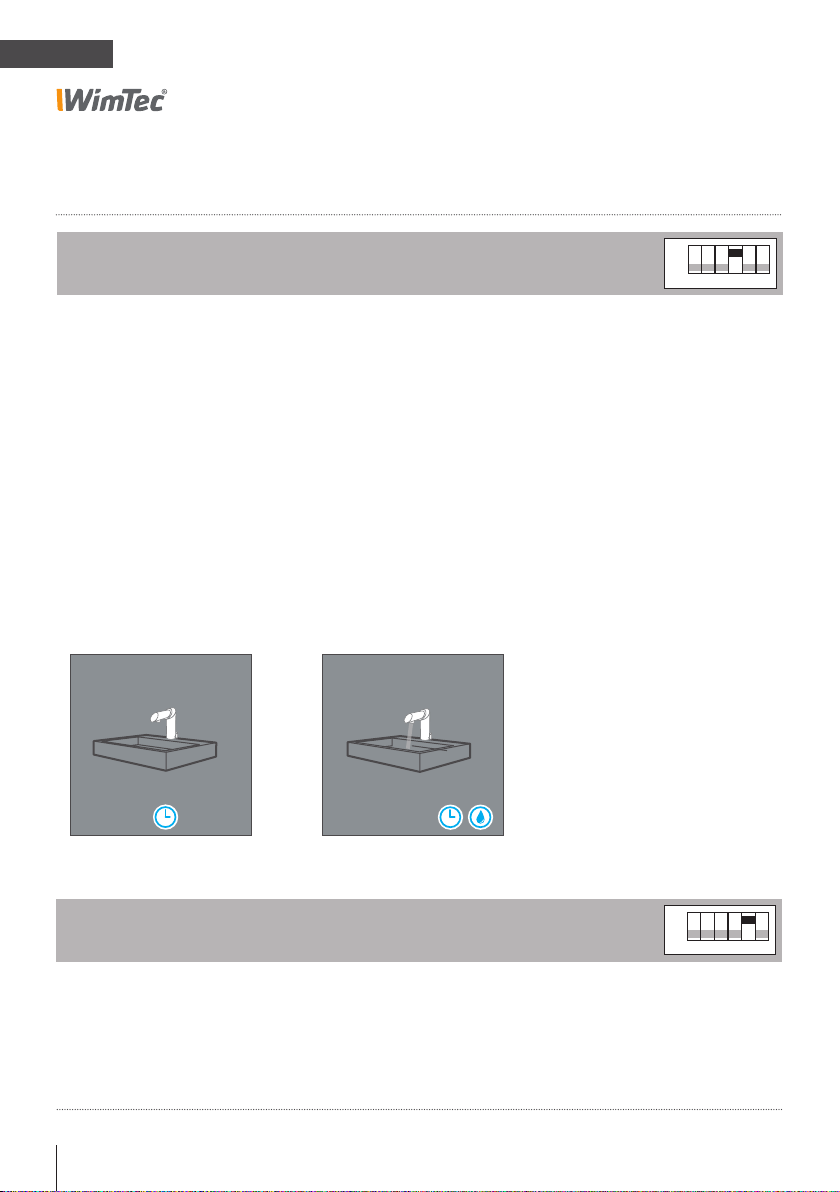
Stagnationsfreispülung:
DIP Schalter 4
Dient zum Freispülen der Wasserzuleitungen, um Stagnationswasser
bei längerer Nichtbenutzung zu vermeiden
Stellung „ON“: Stagnationsfreispülungs-Funktion aktiviert.
Stellung „OFF“: Stagnationsfreispülungs-Funktion deaktiviert (voreingestellt).
Zeitintervall
Einstellbar am DIP Schalter 5
für 3 bzw. 48 h.
3/24 h
Automatische Stagnationsfreispülung
Wird die Armatur für die eingestellte Zeit nicht benützt,
wird eine Stagnationsfreispülung für 10 s ausgelöst.
ON
OFF
1
2
3 4 5 6
Stagnationsfreispülungsintervall:
DIP Schalter 5
Es kann zwischen 2 vordefinierten Intervallen (3 h bzw. 24 h) gewählt werden.
Stellung „ON“: Stagnationsfreispülungsintervall beträgt 3 h.
Stellung „OFF“: Stagnationsfreispülungsintervall beträgt 24 h.
10 Waschtischarmatur WimTec SKY
OFF
ON
2
1
3 4 5 6
Page 11

SKY
Einstellung der Funktionen
DE
Nachlaufzeit:
DIP Schalter 6
Es kann zwischen 2 vordefinierten Nachlaufzeit (3 s bzw. 5 s) gewählt werden.
Stellung „ON“: Nachlaufzeit beträgt 5 s.
Stellung „OFF“: Nachlaufzeit beträgt 3 s (voreingestellt).
OFF
ON
2
1
3 4 5 6
Waschtischarmatur WimTec SKY 11
Page 12
DE
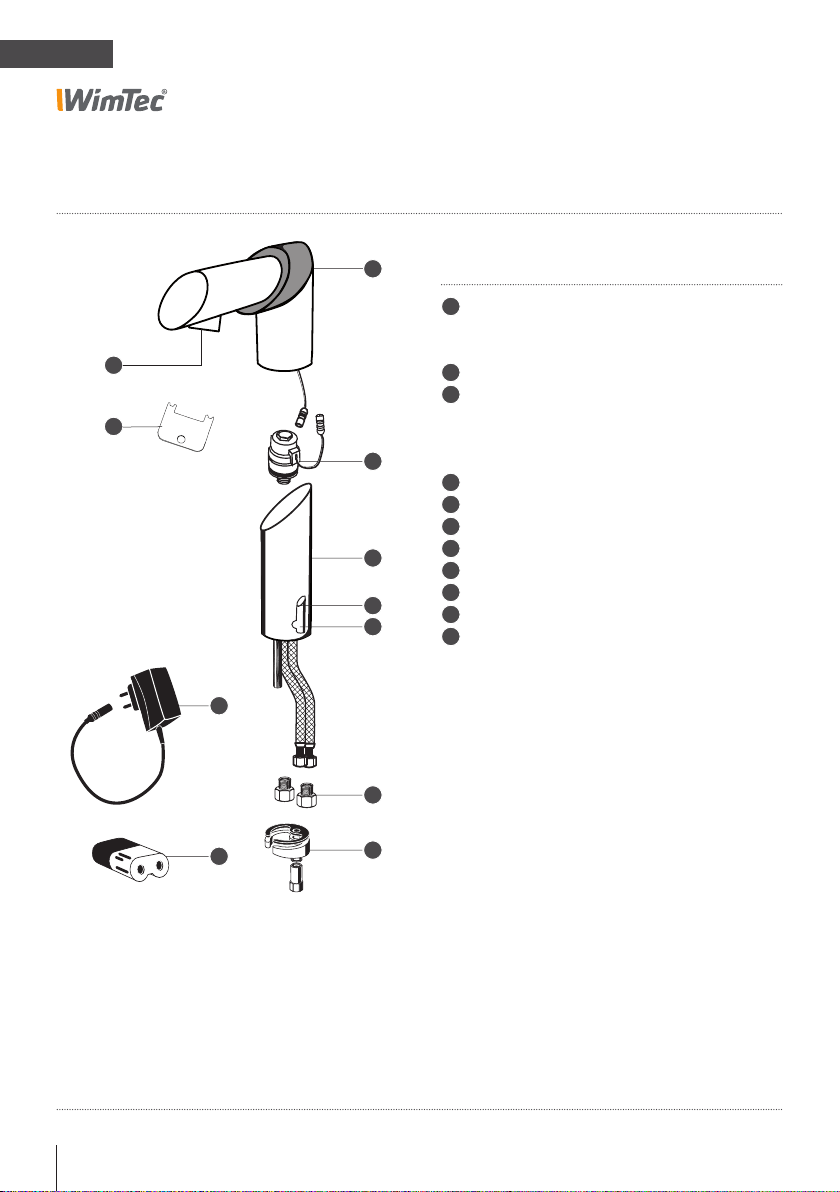
Ersatzteile
SKY
1
Nr. Bezeichnung Art.Nr.:
1
Auslauf
mit Elektronikmodul 230 V 106 251
8
9
2
3
4
5
10
6
mit Elektronikmodul 6 V 106 244
2
Magnetventil 6 V 231 205
3
Armaturenunterteil inkl.
Anschlussschläuche
Mischwasser 104 745
Kaltwasser 104 752
4
Mischergriff 107 111
5
Mischerwelle 107 098
6
Rückflussverhinderer 230 314
7
Befestigungsset 105 131
8
Strahlregler 105 155
9
Serviceschlüssel für Strahlregler 109 276
10
Netzteil 230 V 101 065
11
Lithium-Batterie 6 V 230 741
11
12 Waschtischarmatur WimTec SKY
7
Page 13

SKY
General notes
EN
Congratulations on purchasing the WimTec SMART fitting.
In order to ensure that you will be able to enjoy this high-quality
product for many years, please take note of the following cleaning
and maintenance recommendations:
Use mild cleaning agents containing soap
Do not use abrasive, scrubbing, sealing or acidic
cleaning agents or disinfectants
Clean the fitting with a soft sponge or cloth only
Do not use steam cleaners
This manual is valid for the following products
WimTec SKY washbasin fitting
6 V without mixer Art.No. 104 448
6 V with mixer Art.No. 104 424
!
The “General installation
terms and conditions”
provided at
www.wimtec.com apply.
230 V without mixer Art.No. 104 431
230 V with mixer Art.No. 104 417
Delivery scope
Tap housing with electronic module and 9 V battery or 230 V power
unit, magnetic valve, connnection hoses, dirt-filter attachment for
corner valve, mounting material and reflux preventers at variant with
premixed water model.
Important installation notes:
Mounting and installation may only be performed by a qualified
service provider in accordance with DIN 1988, ÖVE/ÖNORM E8001
and VDE 0100 Part 701. When planning and installing sanitary
facilities, all relevant local, national and inter-national standards
and provisions must be observed! Provide for 230 V / 12 V power
unit outside of the protected zone.
Washbasin fitting WimTec SKY 13
Page 14
EN
SKY
Specifications
WimTec SKY - 6 V:
Battery: 6 V Lithium CR-P2 (in scope of supply)
Battery life: approx. 100.000 flushings (max. 1,5 y.)
WimTec SKY - 230 V:
Operating voltage: 230 V 50 Hz
Power consumption: approx 0.2 VA
Further technical specifications:
Magnetic valve: cartridge 6 V
Active range: automatic
Flushing: as long as user is in active range
Flushing stop: from 30 s - 10 min
Stagnation rinse: activatable, after 3 h or 24 h of none-usage for 10 s
Continuous flow: activatable, for 3 min
Cleaning stopp: 3 min (switchable)
Flow rate: 0,15 - 0,6 MPa (1,5 - 6 bar)
Static pressure: max. 0,8 MPa (8 bar)
Water temperature: max. 70 °C (max. 80 °C for max. 10 min)
Flow rate high pressure: 6 l/min (independent of pressure)
Water connection: G 3/8” IT
Connection hoses: approved by DVGW W 270 and DVGW W 543
Not suitable with: Corner valve thermostat, UC-mixer, UC-tank, boiler
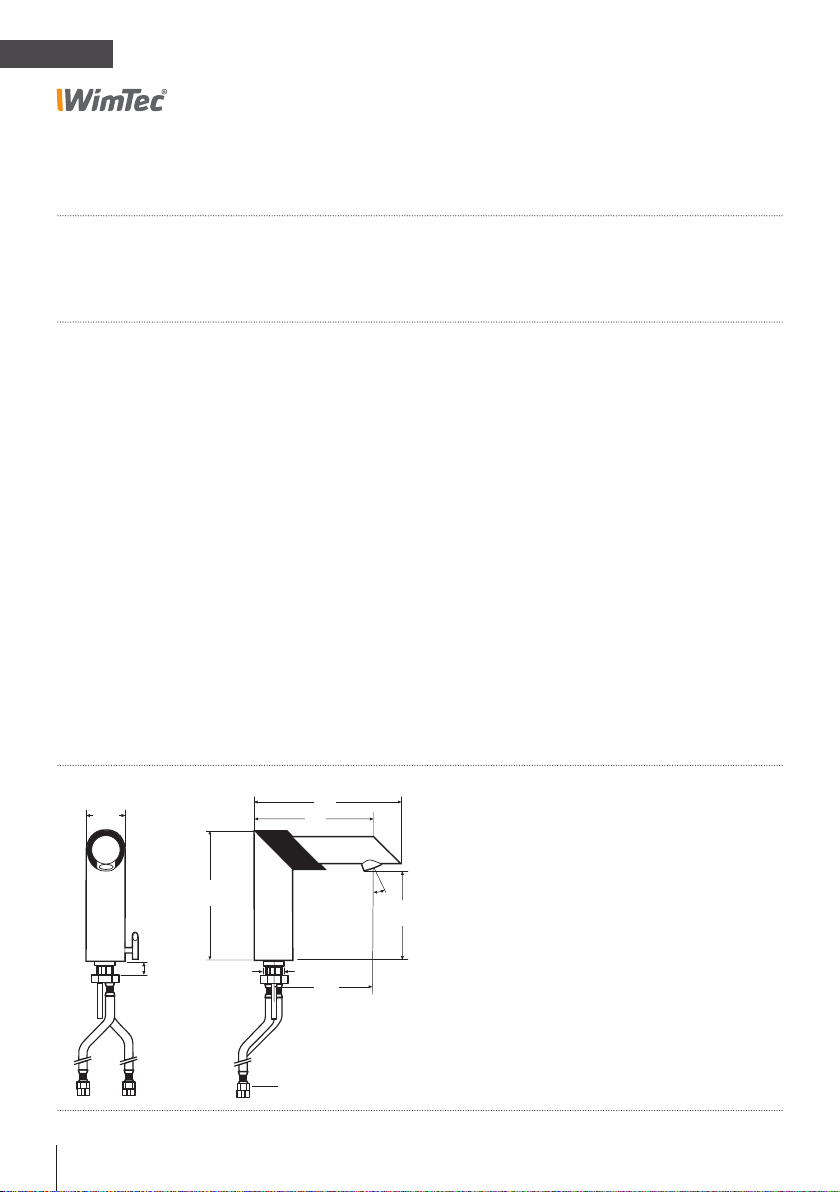
Dimensions in mm
Ø 49
184
148
165
max. 45
Ø 33
Reflux preventer with pre-filter
14 Washbasin fitting WimTec SKY
20°
112
130
Page 15
SKY
Configuring the functions
EN
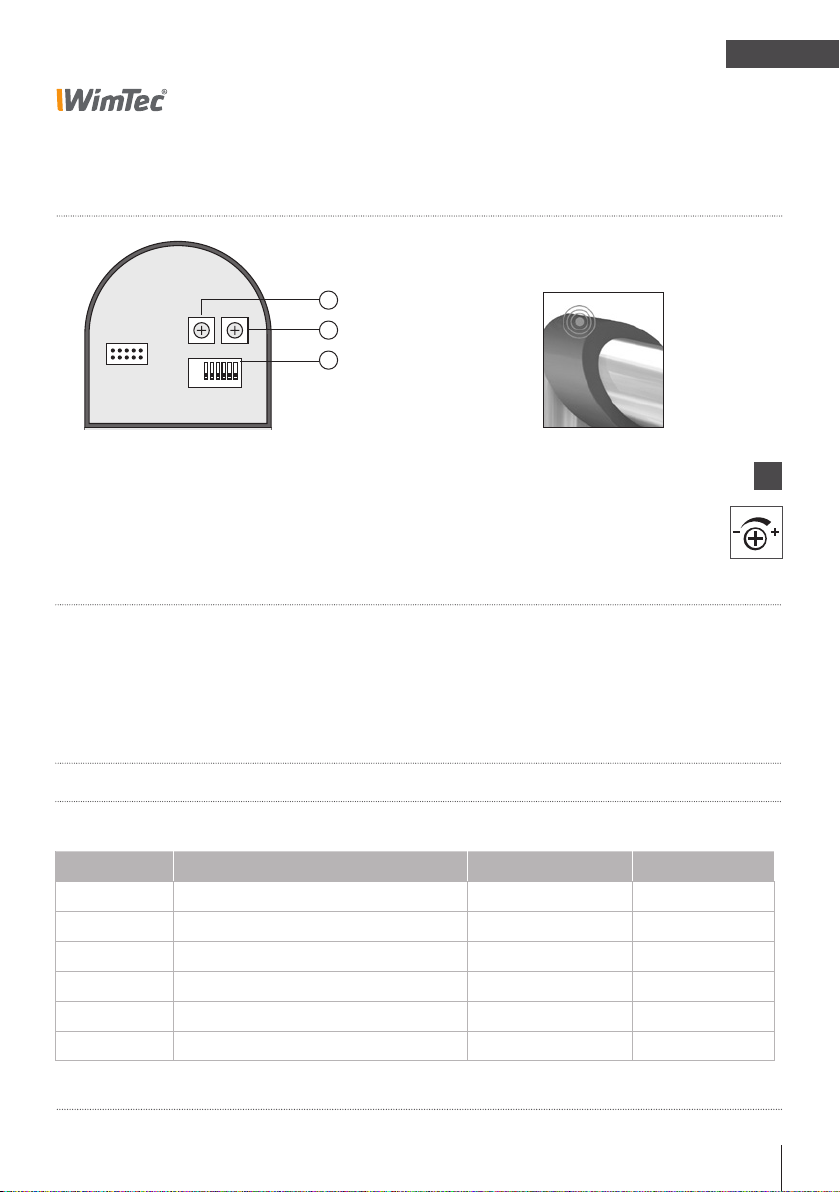
Position of the
touch sensor
ON
OFF
123456
1
Time control
2
Sensitivity control
3
DIP switches
Move counterclockwise to decrease the setting.
Rule applies to all controls:
Move clockwise to increase the setting.
Einstellregler:
1. Time control
for water arrest, default setting 1 min (setting range 30 s
to 10 min).
2. Sensitivity control
regulates the shut-off sensitivity of the fitting (1 = sensitiv,
20 = insensitiv)
3. DIP switches:
Function activation – DIP switch 1–6:
DIP switch Function Factory setting Description
1
2
3
4
5
6
Flushing mode ON Page 19
Cleaning stop OFF Page 19
Continuous flow OFF Page 20
Stagnation rinse OFF Page 21
Stagnation rinse time OFF Page 21
Shut-off delay (ON = 5 s, OFF = 3 s) OFF Page 22
!
Washbasin fitting WimTec SKY 15
Page 16

EN
Functions
SKY
Water flow starts
As soon as the user steps
into the active range and is
recognized by the sensor.
Water flow stops
When the user leaves the
active range or after the set
flush-stop time.
16 Washbasin fitting WimTec SKY
Page 17
Assembly
EN
SKY
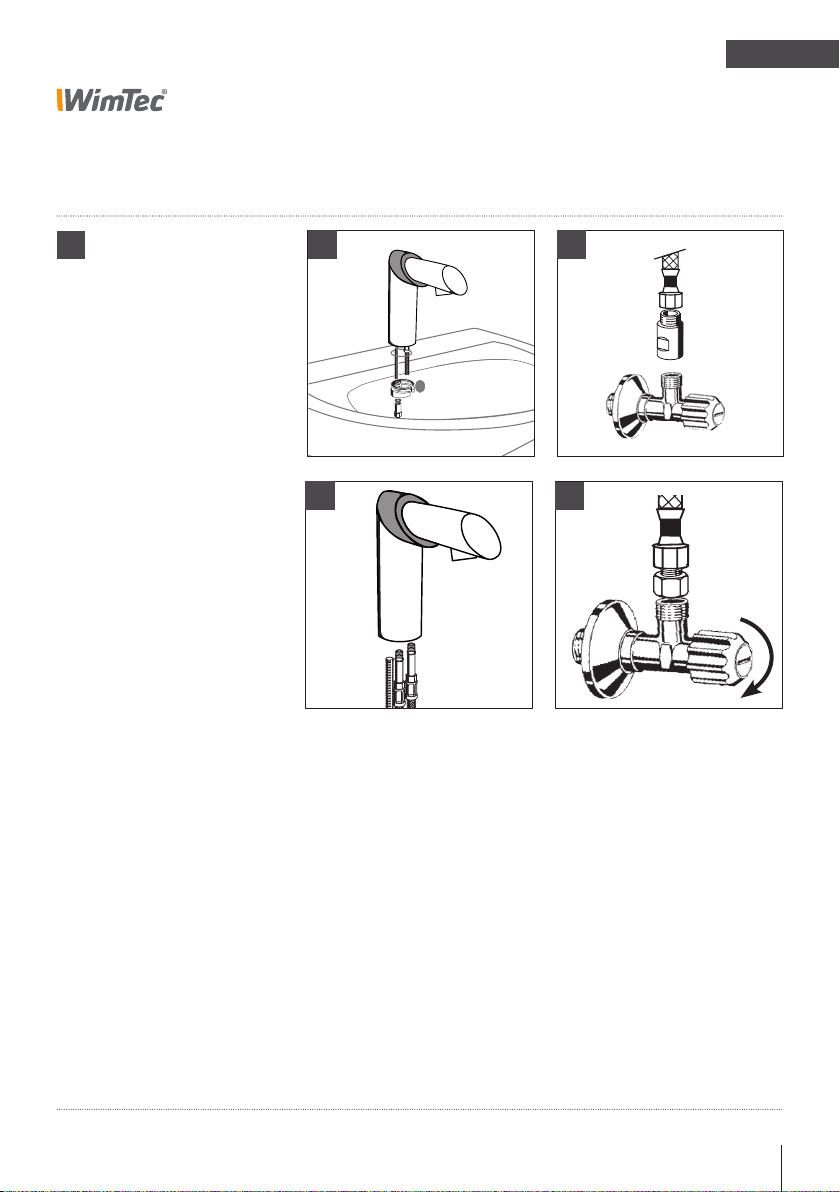
!
ATTENTION!
Perform the following steps
in the order indicated!
1 2
3
1. Fasten the fitting to the washbasin.
Not applicable with corner valve thermostat, UC-mixer, UC-
tank or boiler.
4
2. For premixed water model: Use reflux preventers with pre-
filter or corner valve with prefilter.
3. Attention! Don’t re-tighten the hoses on the body of the
fitting.
4. Battery version: Before battery inserting or changing turn
off corner valve.
Washbasin fitting WimTec SKY 17
Page 18
EN
Assembly
SKY
5a
6
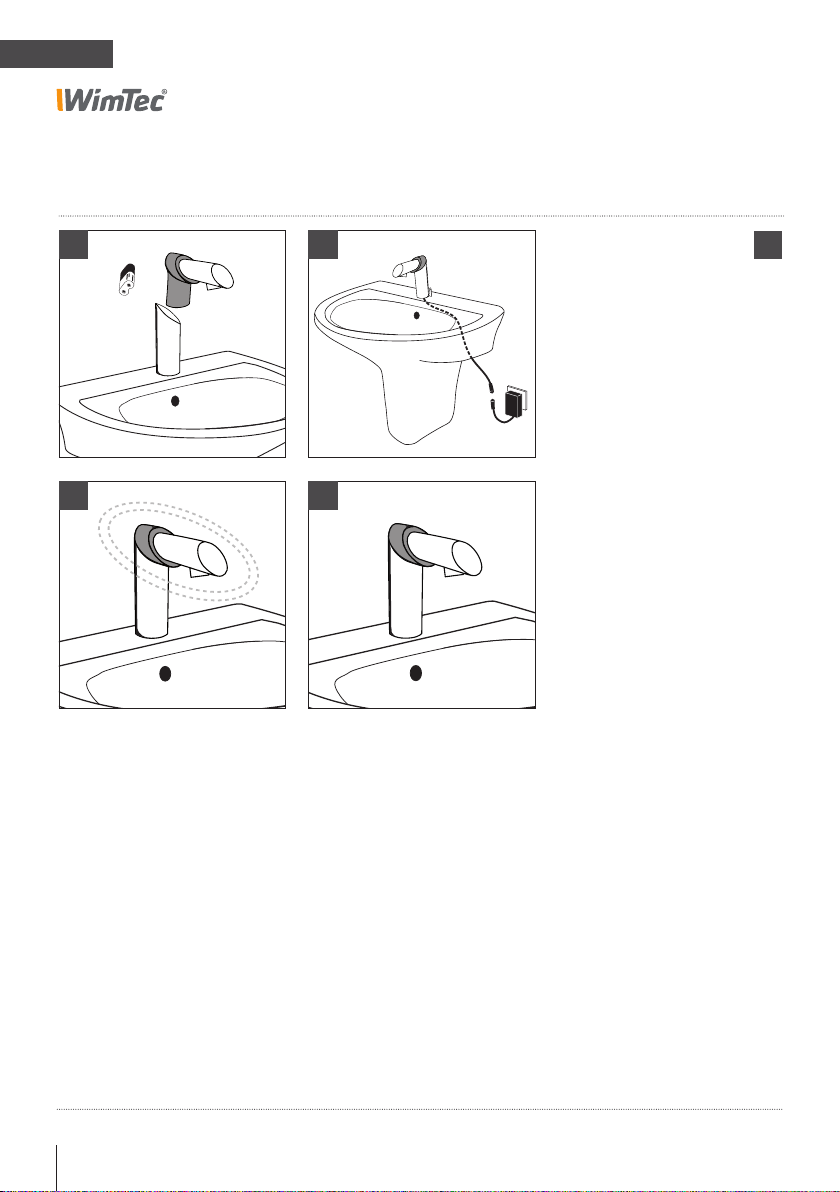
5. a) Battery version: Place the battery into the battery module
and connect the battery to the fitting – open the water
valve.
5. b) Wall outlet version: Connect the power supply to the fitting –
open the water valve.
5b
Perform the following steps
7
!
ATTENTION!
in the order indicated!
6. Automatic range adjustment. Do not touch the fitting (inkl. water
valve and mounting houses) for 15 s.
7. The fitting is now ready for operation.
18 Washbasin fitting WimTec SKY
Page 19
SKY
Configuring the functions
EN
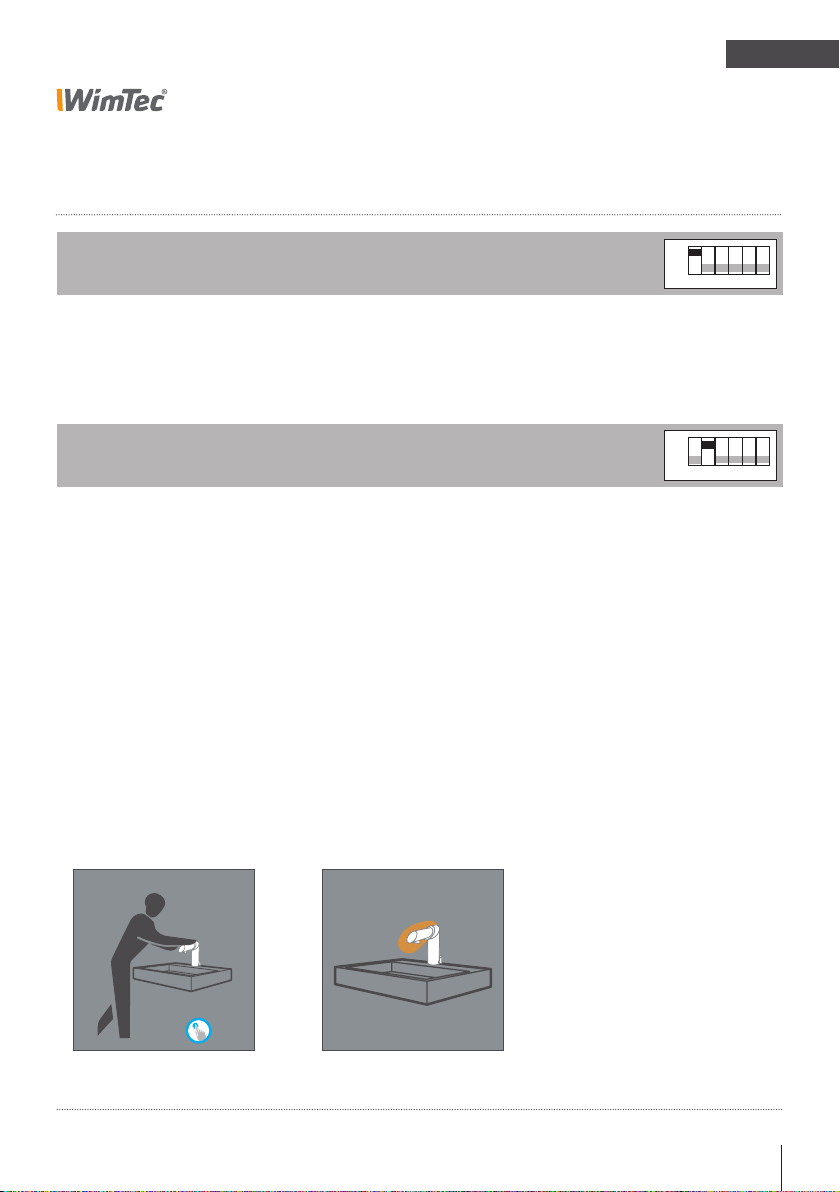
Flushing mode:
DIP switch 1
‘ON’ position: Automatic program enabled.
‘OFF’ position: Manual program enabled.
Cleaning stop:
DIP switch 2
Serves to disable the fitting prior to cleaning.
‘ON’ position: Cleaning stop function enabled.
‘OFF’ position: Cleaning stop function disabled (default setting).
Enable cleaning stop
Touch the metal outlet before
water flows starts and tip
on the sensor ring until the
water flow stops. (approx.
5 x in 2 s). The water flow
stops and the cleaning stop is
enabled.
Disable cleaning stop
3 min. after leaving the active
range the fitting switches into
normal mode.
OFF
OFF
ON
2
1
3 4 5 6
ON
2
1
3 4 5 6
5 x
Washbasin fitting WimTec SKY 19
Page 20
EN
SKY
Configuring the functions
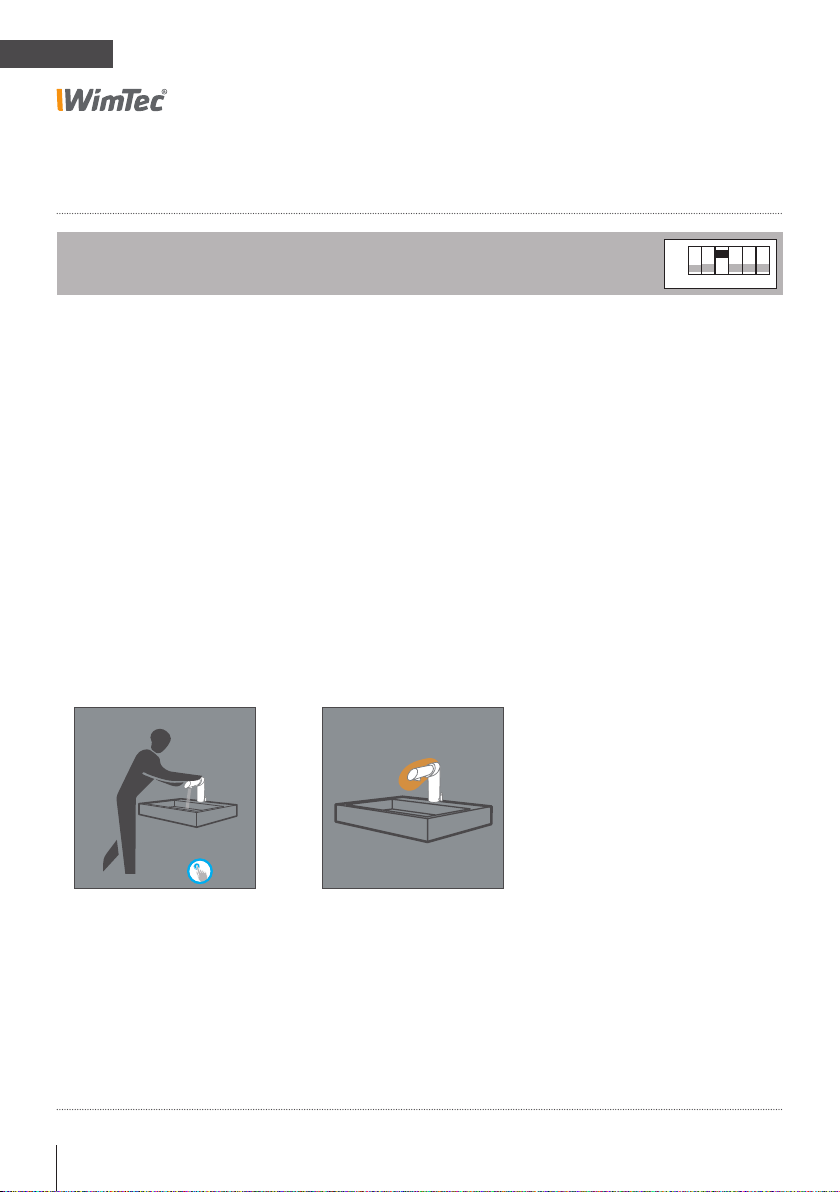
Continuous flow:
DIP switch 3
Enable the continuous flow function to fill the washbasin or a container.
‘ON’ position: Continuous flow function is enabled.
‘OFF’ position: Continuous flow function is disabled (default setting).
Enable continuous flow
Approach the active range
with your hand. After starting
the water flow tip for 3 s on
the sensor ring.
Disable continuous flow
The function automatically
ends after the water arrest
time set at time control has
elapsed.
To instantly end continuous
flow, perform the same steps
as used for ‘Enable
continuous flow’.
OFF
ON
2
1
3 4 5 6
3 s
20 Washbasin fitting WimTec SKY
Page 21
SKY
Configuring the functions
EN
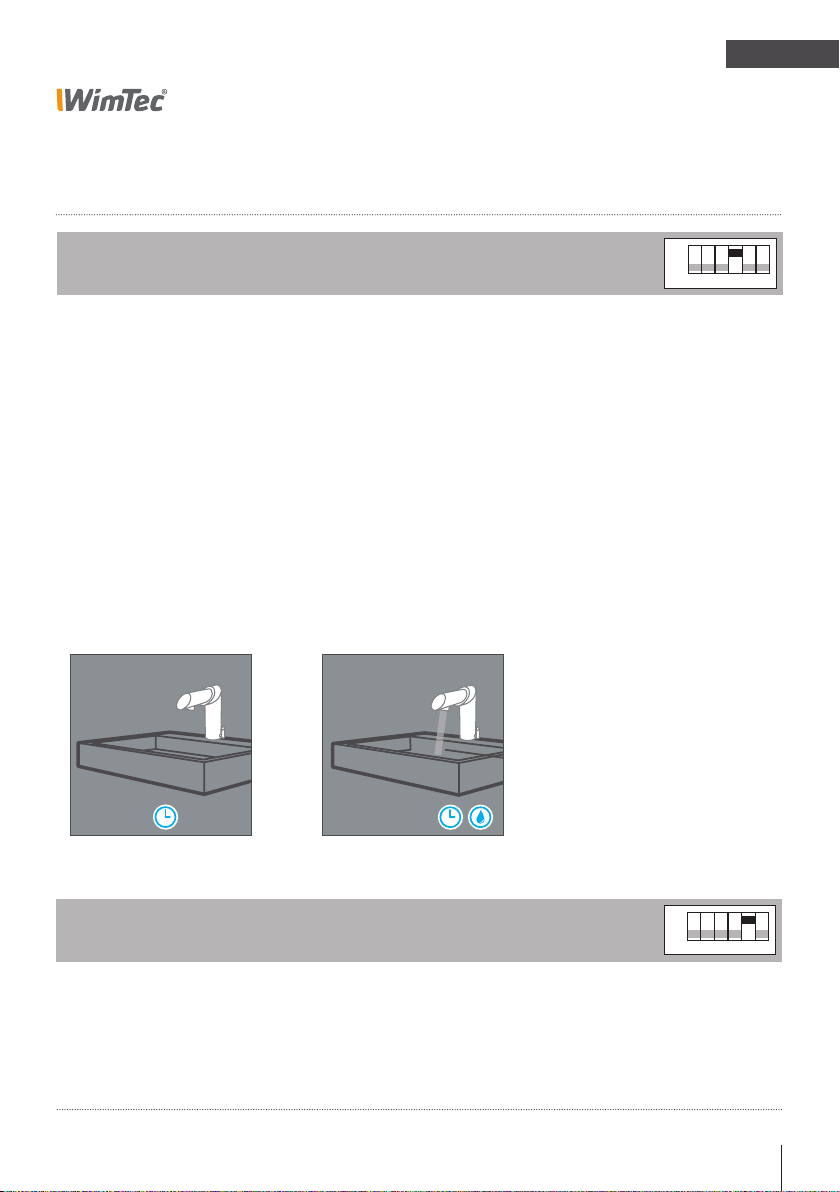
Stagnation rinse:
DIP switch 4
OFF
ON
2
1
3 4 5 6
Serves to rinse water supply lines in order to remove stagnant water that accumulates during
longer periods of disuse.
‘ON’ position: Stagnation rinse is enabled.
‘OFF’ position: Stagnation rinse function is disabled (default setting).
Time interval
Can be set at 3 or 24 h at
the interval control.
Automatic stagnation rinse
If the fitting has not been
used for the set period, a
stagnation rinse operation is
performed for the duration
configured.
3 / 24 h
Stagnation rinse inteval:
DIP switch 5
You can select one of two predefined intervals (3 h or 24 h).
‘ON’ position: Stagnation rinse interval is set to 3 h.
‘OFF’ position: Stagnation rinse interval is set to 24 h.
Washbasin fitting WimTec SKY 21
ON
OFF
1
2
3 4 5 6
Page 22

EN
SKY
Configuring the functions
Shut-off delay:
DIP switch 6
You can select one of two predefined shut-off delay times (3 s or 5 s).
‘ON’ position: Shut-off delay is 5 s.
‘OFF’ position: Shut-off delay is 3 s (default setting).
OFF
ON
2
1
3 4 5 6
22 Washbasin fitting WimTec SKY
Page 23
SKY
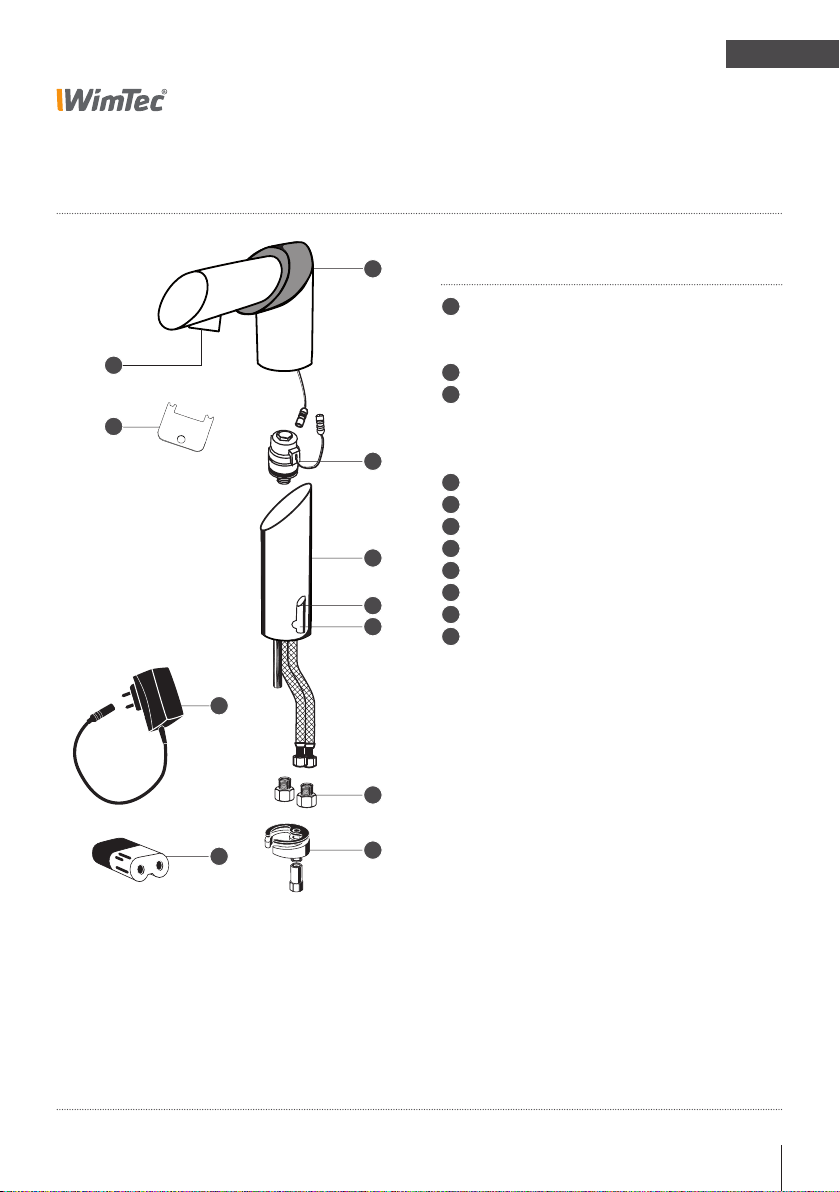
Replacement parts
EN
1
No. Designation Art. no.:
1
Outlet
with electronics module 230 V 106 251
8
9
2
3
4
5
10
6
with electronics module 6 V 106 244
2
Magnetic valve 6 V 231 205
3
Fitting bottom part incl.
connecting hoses
premixed water 104 745
cold water 104 752
4
Mixer handle 107 111
5
Mixer shaft 107 098
6
Reflux preventer 230 314
7
Mounting set 105 131
8
Flow regulator 105 155
9
Service key for flow regulator 109 276
10
Power supply 230 V 101 065
11
Lithium battery 6 V 230 741
11
7
Washbasin fitting WimTec SKY 23
Page 24

www.wimtec.com
WIMTEC Sanitärprodukte GmbH
p: A - 3325 Ferschnitz, Freidegg 50, AUSTRIA
t: +43 (0) 7473 5000 f: +43 (0) 7473 5000 - 500
m: [email protected] i: www.wimtec.com
Auflage: 25 11 2014 Art.Nr. 1000074
 Loading...