

Page 1
PROOF S6
DE
Montage- und Bedienungsanleitung
EN
Assembly and operating instructions
Page 2

DE
PROOF S6
Allgemeine Hinweise
Gratulation zum Kauf Ihrer Duschearmatur.
Damit Sie jahrelang Freude mit dieser hochwertigen Armatur
haben, empfehlen wir Ihnen, folgende Punkte bei der Reinigung
und Pflege zu beachten:
Reinigungs- oder Desinfektionsmittel verwenden
Diese Anleitung ist gültig für folgende Produkte:
WimTec PROOF S6 Duschearmatur:
Edelstahl Art.Nr. 118 940
Chrom Art.Nr. 118 957
Lieferumfang:
Frontplatte mit integrierter Elektronik, Montagerahmen,
Thermostatgriff mit Heißwassersperre und
Befestigungsmaterial.
milde, seifenhaltige Reinigungsmittel verwenden
keine kratzenden, scheuernden oder säurehaltigen
nur mit weichem Schwamm oder Tuch behandeln
keine Reinigung mit Dampfstrahlgeräten
sämtliches
Wichtige Installationshinweise:
UP-Dose für optionales Netzteil außerhalb des Schutzbereichs vorsehen. Die Montage und Installation darf nur durch einen konzessi-
!
Es gelten die „Allgemeinen
Installationsbedingungen“
gemäß www.wimtec.com.
2 Duschearmatur WimTec PROOF S6
onierten Fachbetrieb gemäß DIN 1988, ÖVE/ÖNORM E8001 sowie
VDE 0100 Teil 701 erfolgen. Bei der Planung und Errichtung von
Sanitäranlagen sind die entsprechenden örtlichen, nationalen und
internationalen Normen und Vorschriften zu beachten!
Page 3
PROOF S6
Technische Daten
Betriebsspannung: über WimTec Netzteil 230 V 50 Hz / 12 V=
Art.Nr. 117 899 - für eine Steuerung
Art.Nr. 113 792 - für bis zu 5 Steuerungen
Leistungsaufnahme: max. 3,5 W
Magnetventil: Kartusche 6 V
Ansprechbereich: von 15 cm bis 50 cm (50 cm Werkseinstellung)
Nah-Ansprechbereich: 1 cm bis 5 cm
Stagnationsfreispülung: aktivierbar, nach 3 h bis 48 h Nichtbenutzung für 10 s
Spülstoppzeit: von 10 s bis 10 min (im Manuell-Programm von 10 s bis 60 s)
Reinigungsstopp: für 10 min
Fließdruck: 0,05 bis 0,6 MPa (0,5 bis 6 bar)
Statischer Druck: max. 0,8 MPa (8 bar)
Wassertemperatur: max. 70 °C (max. 80 °C für max. 10 min)
Durchflussmenge: max. 22 l/min bei 0,3 MPa (3 bar)
Wasserzulauf: R 1/2“ IG
Wasserablauf: R 1/2“ IG
Frontplatte: Edelstahl / Messing verchromt
Thermostatgriff: Messing verchromt
DE
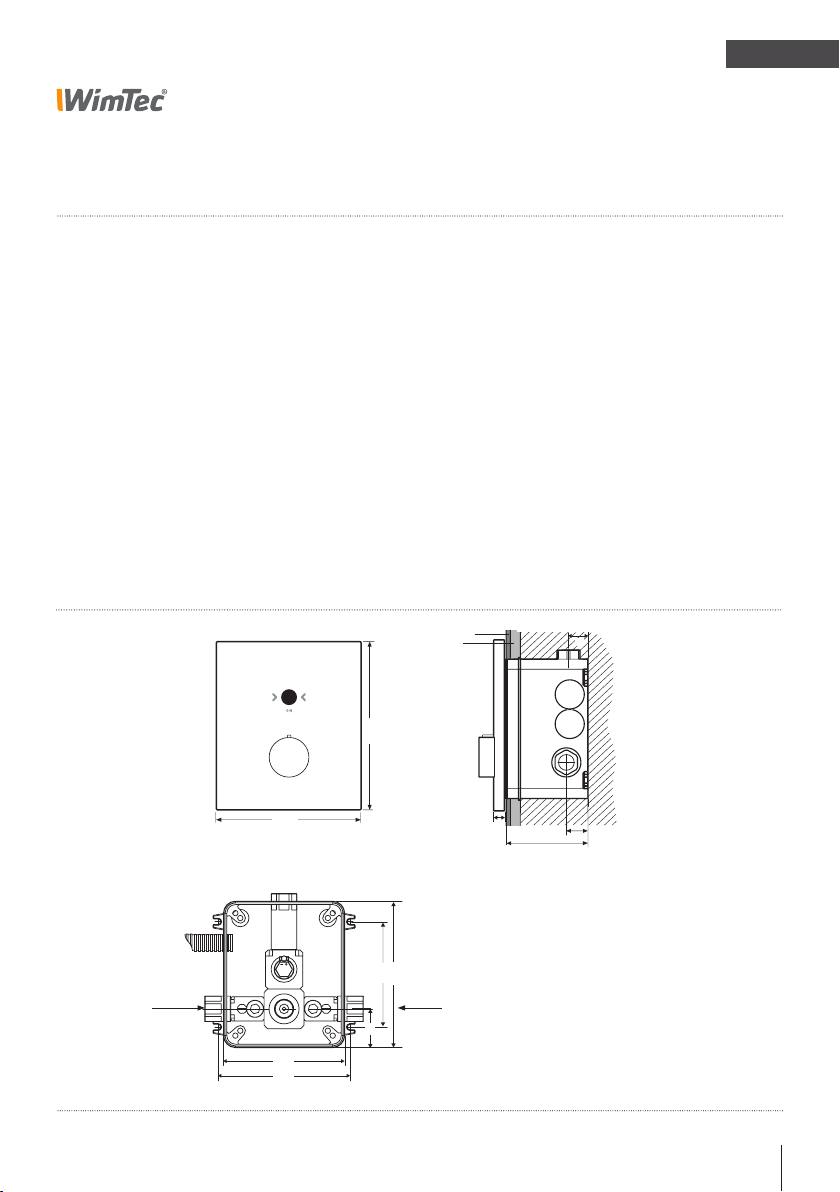
Abmessungen:
Alle Maße in mm
Elektro
Installationsrohr für 12 V=
R 1/2“ IG
WW
185
Abgang Kopfbrause
R 1/2“ IG
140
152
213
45
122
169
KW
R 1/2“ IG
11
Mauerwerk
min 95
max 120
23
26
Fliese
Putz
Duschearmatur WimTec PROOF S6 3
Page 4
DE
PROOF S6
Bedienelemente & Funktionen
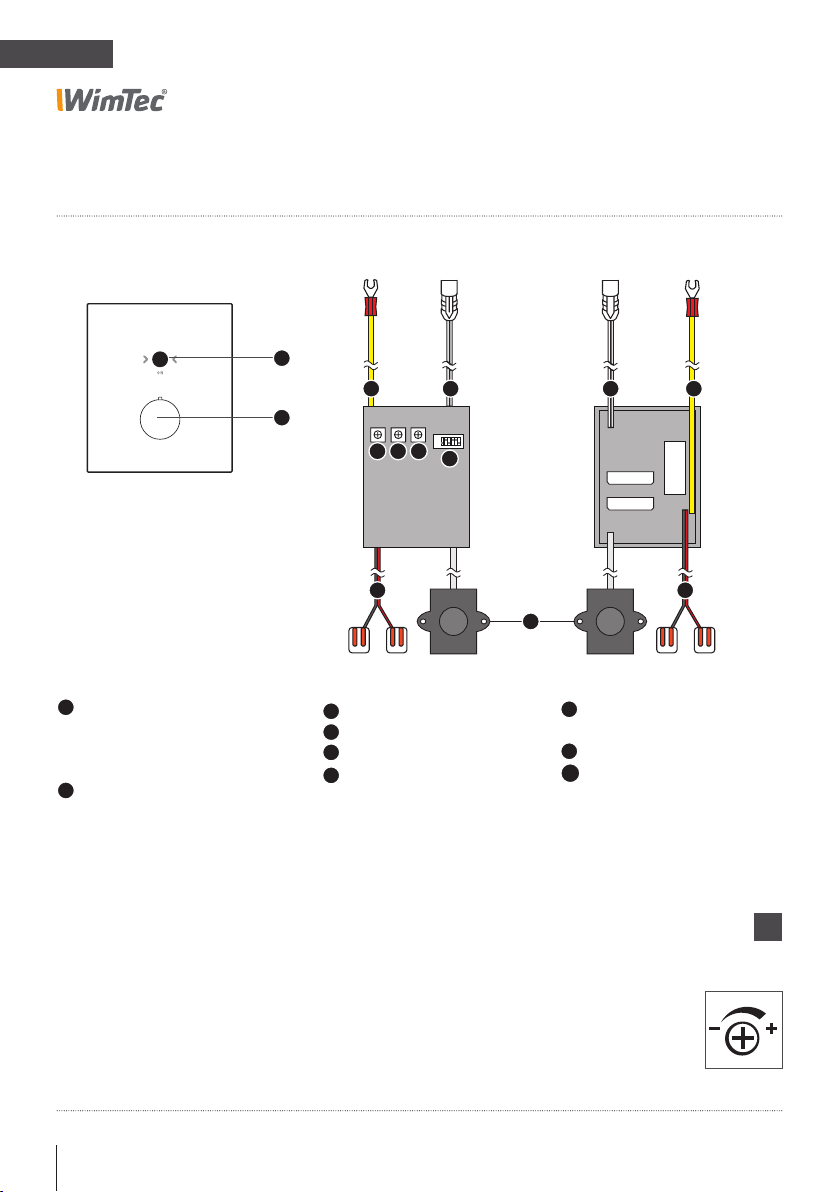
Bedienelemente:
Infrarot-Sensor zum Ein-/
A
Ausschalten der Kopfbrause
und zur Benutzererkennung
(Ansprechbereich)
B
Thermostatgriff zur Temperatur-
regelung mit Taste zum Ent riegeln der 38 °C Sicherheits sperre.
A
B
C
Reichweiten-Regler
D
Zeit-Regler
E
Dip-Schalter zum Einstellen
F
der Funktionen
Einstellelemente am E-Modul:
G H H G
ON
OFF
C D E
I I
1 2 3 4 5 6
F
A
G
Anschluss für Potential-
ausgleich
H
Intervall-Regler
Anschluss MV Kopfbrause
I
Anschlussklemme für 12 V
Spannungsversorgung
4 Duschearmatur WimTec PROOF S6
!
Generell gilt für alle Regler:
Gegen den Uhrzeiger-
sinn zum Reduzieren.
Im Uhrzeigersinn zum
Erhöhen.
Page 5

PROOF S6
Einstellung der Programme & Funktionen
Dip-Schalter:
Programm-Aktivierung - Dip-Schalter 1 und 2:
Programm Dip 1 Dip 2 Beschreibung
Halb-Automatik
Voll-Automatik
Manuell
Funktions-Aktivierung - Dip-Schalter 3 - 6:
Dip-Schalter Funktion Werkseinstellung Beschreibung
3
4
5
6
1)
Programm oder Funktionen
1)
Nachlaufzeit (ON = 5 s, OFF = 2 s) OFF
Warmlauffunktion ON Seite 13
nicht belegt - Stagnationsfreispülung OFF Seite 14
OFF ON
ON ON
OFF OFF
bereits werksseitig voreingestellt.
Seite 10
Seite 11
Seite 12
DE
Einstellregler:
C.
Reichweiten-Regler
für die Benutzererkennung
Ansprechbereich 50 cm
voreingestellt
(15 cm - 50 cm einstellbar).
Begrenzt die Reichweite
des Infrarot-Sensors von
15 cm - 50 cm. Automatische
Reichweiten-Adjustierung bis
zur eingestellten MaximalReichweite.
D.
Zeit-Regler
für den Sicherheitsspülstopp
10 min voreingestellt
(10 s bis 10 min einstellbar).
Selbstschluss-Programm:
10 s bis 60 s einstellbar.
Nach Ablauf der eingestellten
Maximallaufzeit schaltet die
Duschearmatur automatisch
ab. Um bei einer unbeabsichtigten Daueraktivierung
Wasser zu sparen.
Duschearmatur WimTec PROOF S6 5
E.
Intervall-Regler
für die Stagnationsfreispülung
(3 h - 48 h einstellbar).
Wird die Duschearmatur für
die voreingestellte Zeit nicht
benutzt, löst die Armatur
selbstständig eine Spülung für
10 s aus, um die Rohrleitungen von Stagnationswasser
freizuspülen.
Page 6
DE
PROOF S6
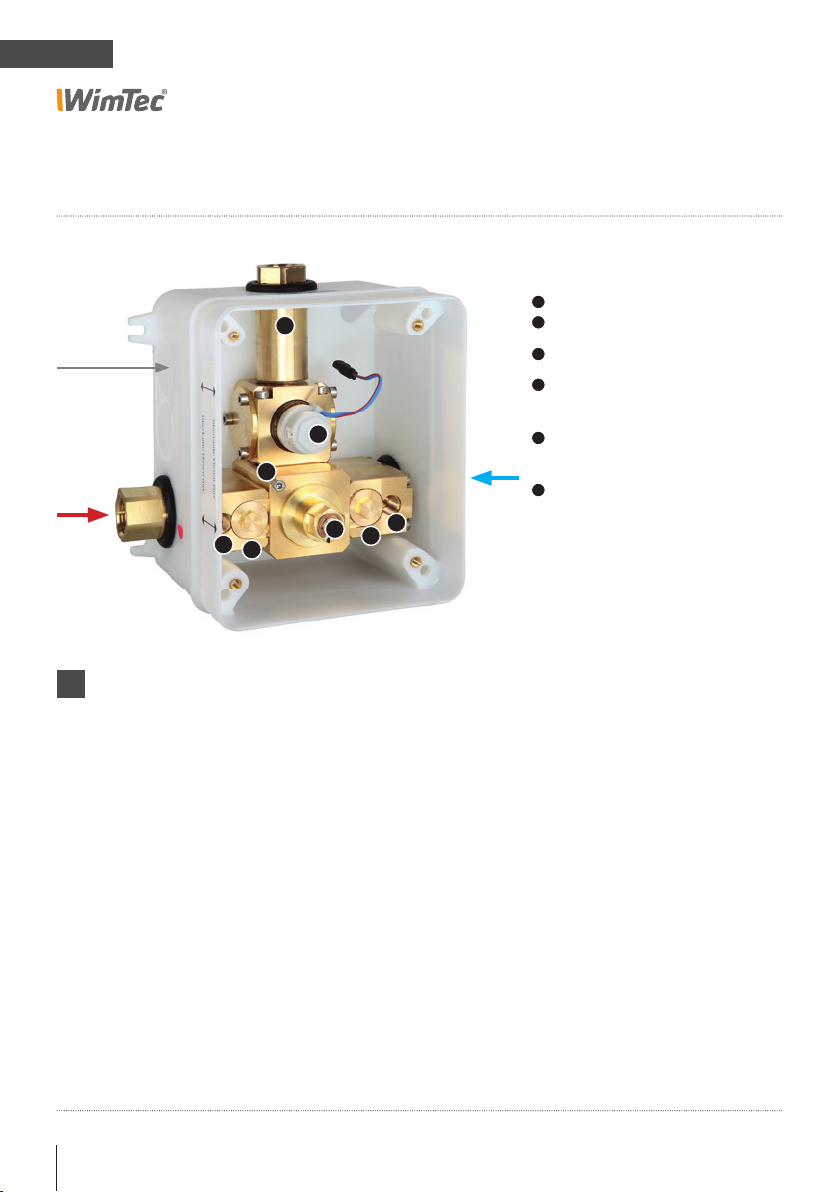
Rohbauset
12 V=
WW
1
Abgang Kopfbrause
2
Magnetventil für Kopfbrause
1
3
Thermostat mit Adapter
4
Absperrventil
bei Auslieferung geschlossen
2
6
4
5
3
4
5
5
Schmutzsieb und
Rückfl ussverhinderer
KW
6
Fixierschraube zum Anschluss
des Kabels für den Potential ausgleichs
Netzteil nicht in Rohbauset oder
!
Schutzbereichen anbringen.
6 Duschearmatur WimTec PROOF S6
Page 7
PROOF S6
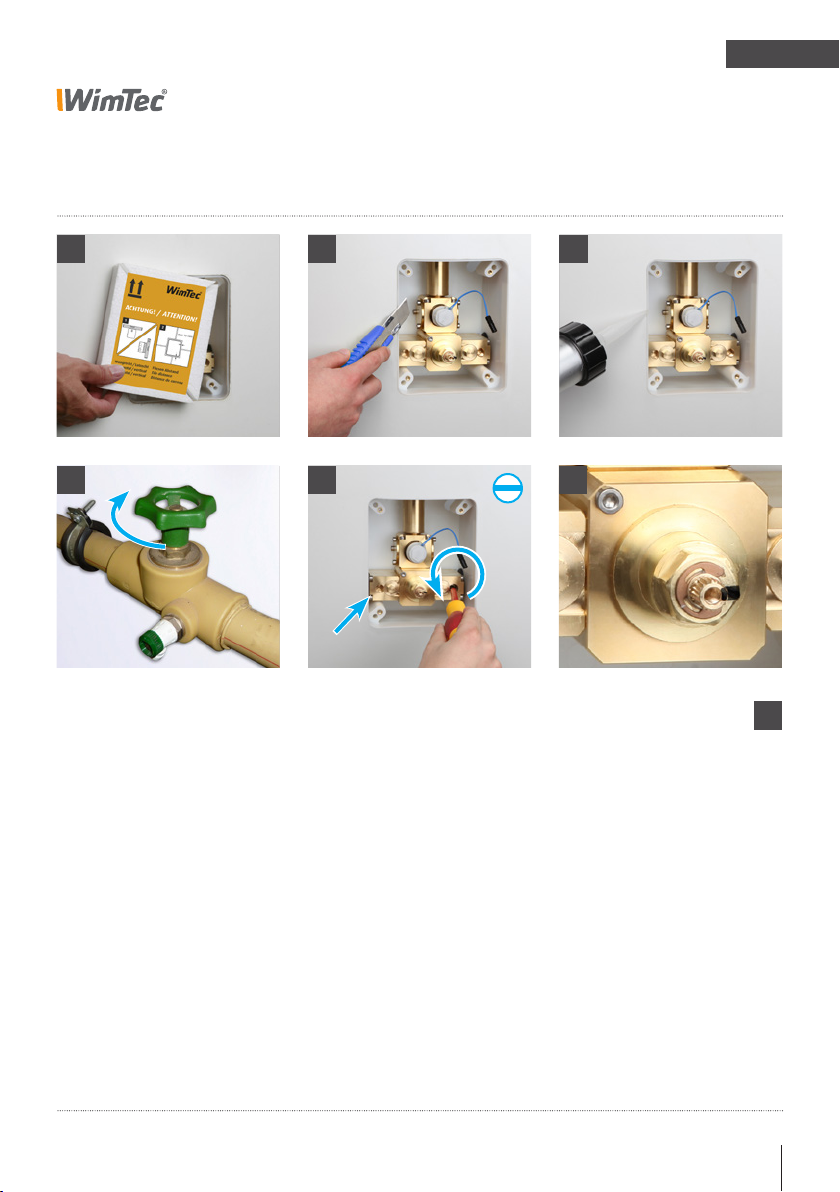
Montage
1 2 3
DE
4 6
1. Rohbauschutz abnehmen.
2. Vorstehenden Teil des Rohbaukastens fliesenbündig
abschneiden.
3. Ggf. zwischen Wand und Rohbauset mit Silikon abdichten.
4. Wasserzuleitung absperren.
5. Beide Vorabsperrungen mit einem Schraubendreher öffnen.
6. Markierungen an Mischerwelle und Thermatostatkartusche
kontrollieren und ggf. richtig ausrichten.
5
!
ACHTUNG!
Folgende Schritte unbe-
dingt in beschriebener
Reihenfolge ausführen!
Duschearmatur WimTec PROOF S6 7
Page 8

DE
Montage
PROOF S6
8
11
7. Adapter für Thermostat mit Inbus 2,5 montieren (Pfeil nach oben ausrichten).
8. Anschlusskabel in den UP-Kasten einziehen und am Netzteil
(Art.Nr. 117 899 bzw. 113 792) anschließen.
Achtung: Netzteil darf nicht im Rohbauset verbaut werden!
9. Montagerahmen mit 4 beiliegenden Schrauben befestigen (M5 x 40 mm).
Dabei auf die Kabelverbindungen achten und die Kabel nicht quetschen.
97
1210
10. Montagerahmen exakt ausrichten und Schrauben festziehen. Beim Festziehen
der Schrauben darauf achten, dass sich der Montagerahmen nicht verformt.
Beigelegtes Spezialfett an der Dichtung vorne auftragen.
11. Magnetventil an der Elektronik anstecken und Kabel für den Potentialausgleich
der Elektronik an der dafür vorgesehenen Schraube befestigen.
12. Elektro-Anschluss am Elektronikmodul herstellen (+/- Polung beachten!).
12 V Stromversorgung anstecken und Spannungsversorgung einschalten
(Sicherheitsschließimpuls der Magnetventile erfolgt).
8 Duschearmatur WimTec PROOF S6
Page 9

Montage
DE
PROOF S6
1413
1716 18
13. Gewünschte Funktions-Einstellungen am Elektronikmodul
vornehmen (siehe Seite 5) und Elektronik in das Rohbauset geben.
14. Position des Thermostatknopfes kontrollieren -
Absperrknopf zeigt senkrecht nach oben.
15
!
ACHTUNG!
Folgende Schritte unbe-
dingt in beschriebener
Reihenfolge ausführen!
15. Frontplatte schräg aufsetzen und mit Druck in die waag-
rechte Position nach links drehen.
16. Frontplatte mit Sicherungsschraube rechts unten sichern.
17. Wasserleitung öffnen.
18. Funktionstest durchführen.
Duschearmatur WimTec PROOF S6 9
Page 10

DE
Halbautomatik:
Warmlauf:
ON
OFF
1 2 3 4 5 6
Reinigungsstopp:
ON
OFF
1 2 3 4 5 6
Hygienespülung:
ON
OFF
1 2 3 4 5 6
PROOF S6
Programm-Beschreibung
Programm Halb-Automatik (voreingestellt):
DIP Schalter 1=OFF, 2=ON
EINSCHALTEN:
Infrarot-Sensor
Wasserfluss startet,
sobald der Benutzer den
Infrarot-Sensor antippt.
AUSSCHALTEN:
Infrarot-Sensor
Durch erneutes Antippen
des Infrot-Sensors schaltet
die Dusche ab.
10 Duschearmatur WimTec PROOF S6
Automatik
Dusche stoppt nach Ablauf
der Nachlaufzeit wenn der
Benutzer den Ansprechbereich
verlässt oder nach Ablauf der
Sicherheitsspülstopp-Zeit.
ON
OFF
1 2 3 4 5 6
Page 11

PROOF S6
Halbautomatik:
Vollautomatik:
Warmlauf:
ON
OFF
1 2 3 4 5 6
ON
OFF
1 2 3 4 5 6
Reinigungsstopp:
ON
OFF
1 2 3 4 5 6
Hygienespülung:
ON
OFF
1 2 3 4 5 6
Programm-Beschreibung
DE
Programm Voll-Automatik:
DIP Schalter 1=ON, 2=ON
EINSCHALTEN:
Benutzererkennung
Der Benutzer tritt vor die
Dusche und wird von der
Armatur erkannt.
15-50 cm
AUSSCHALTEN:
Infrarot-Sensor
Antippen des Infrarot-Sensors
schaltet die Dusche ab.
Automatisch
Die Dusche schaltet sich
automatisch 2 s nach der
Benutzererkennung ein.
Automatisch
Dusche stoppt nach Ablauf
der Nachlaufzeit wenn der
Benutzer den Ansprechbereich
verlässt oder nach Ablauf der
Sicherheitsspülstopp-Zeit.
Duschearmatur WimTec PROOF S6 11
ON
OFF
1 2 3 4 5 6
Page 12

DE
Halbautomatik:
Vollautomatik:
Manuell:
Warmlauf:
ON
OFF
1 2 3 4 5 6
ON
OFF
1 2 3 4 5 6
ON
OFF
1 2 3 4 5 6
Reinigungsstopp:
ON
OFF
1 2 3 4 5 6
Hygienespülung:
ON
OFF
1 2 3 4 5 6
PROOF S6
Programm-Beschreibung
Programm Manuell:
DIP Schalter 1=OFF, 2=OFF
EINSCHALTEN:
Infrarot-Sensor
Durch Antippen des
Infrarot-Sensors schaltet
die Dusche ein.
AUSSCHALTEN:
Infrarot-Sensor
Durch erneutes Antippen
des Infrot-Sensors schaltet
die Dusche ab.
12 Duschearmatur WimTec PROOF S6
Sicherheitsspülstopp
Nach Ablauf der eingestellten
Spülstopp-Zeit (siehe S. 5)
schaltet die Dusche automatisch ab.
ON
OFF
1 2 3 4 5 6
Page 13

PROOF S6
Warmlauf:
Funktions-Beschreibung
DE
Warmlauf:
DIP Schalter 4
Dient zum Freispülen der Warmwasserleitung, ohne dass der
Benutzer vor der Dusche im Ansprechbereich verweilen muss.
Dip Schalter 4 ON = Warmlauf-Funktion aktiviert (voreingestellt).
Dip Schalter 4 OFF = Warmlauf-Funktion deaktiviert.
Einschalten
Durch Antippen des InfrarotSensors wird die Warmlauffunktion aktiviert.
Betrieb
Das Wasser läuft für 30 s
zuzüglich der eingestellten
Nachlaufzeit ohne dass sich
der Benutzer im Ansprechbereich befinden muss und
schaltet danach automatisch
ab. Tritt während dieser 30 s
der Benutzer für mindestens
5 s in den Ansprechbereich
geht die Dusche in den Normalbetrieb über.
ON
OFF
1 2 3 4 5 6
!
Es wird empfohlen, die
Warmlauffunktion nicht
mit dem Programm
„Voll-Automatik“ zu
kombinieren!
Duschearmatur WimTec PROOF S6 13
Page 14

DE
Warmlauf:
ON
OFF
1 2 3 4 5 6
Reinigungsstopp:
ON
OFF
1 2 3 4 5 6
Hygienespülung:
PROOF S6
Stagnationsfreispülung:
DIP Schalter 6
Dient zum Freispülen der Wasserzuleitungen, um Stagnationswasser
bei längerer Nichtbenutzung zu vermeiden.
Dip Schalter 6 ON = Stagnationsfreispülungs-Funktion aktiviert.
Dip Schalter 6 OFF = Stagnationsfreispülungs-Funktion deaktiviert (voreingestellt).
Zeitintervall
Einstellbar am Intervall-Regler
von 3 - 48 h (siehe Seite 5).
Automatische
Stagnationsfreispülung
Wird die Armatur für die eingestellte Zeit nicht benützt,
löst die Armatur eine automatische Stagnationsfreispülung
für 10 s aus.
Sicherheit
Befindet sich ein Benutzer
im Ansprechbereich oder ist
der Reinigungsstopp aktiviert,
löst die Stagnationsfreispülung
erst 2 min nach deren Deaktivierung aus.
ON
OFF
1 2 3 4 5 6
3 - 48 h
14 Duschearmatur WimTec PROOF S6
10
s
15-50 cm
Page 15

PROOF S6
Funktions-Beschreibung
Reinigungsstopp:
Dient zum Deaktivieren der Armatur beim Reinigen.
DE
Einschalten
Der Benutzer tritt seitlich
an die Dusche und durch
heranführen der Hand an
den Infrarot-Sensor (1 - 5 cm
Abstand) wird der Wasserluss
ausgelöst.
Reinigungsstopp aktivieren
Nach einer Verweilzeit von
5 s im Abstand von 1 - 5 cm
vor dem Infrarot-Sensor wird
der Wasserfluss gestoppt und
der Reinigungsstopp ist für
10 min aktiviert.
Während dieser Zeit blinkt die
rote LED im Infrarot-Sensor.
1-5 cm
Reinigungsstopp deaktivieren
Automatisch wenn 10 Minuten
kein Benutzer erkannt wurde.
Zum manuellen Deaktivieren
gleich vorgehen wie beim
Aktivieren. Nach Verlassen des
Ansprechbereiches geht die
Armatur nach einer Sicherheitszeit von 3 s wieder in den
Normalbetrieb über.
10 min
Duschearmatur WimTec PROOF S6 15
Page 16
DE
PROOF S6
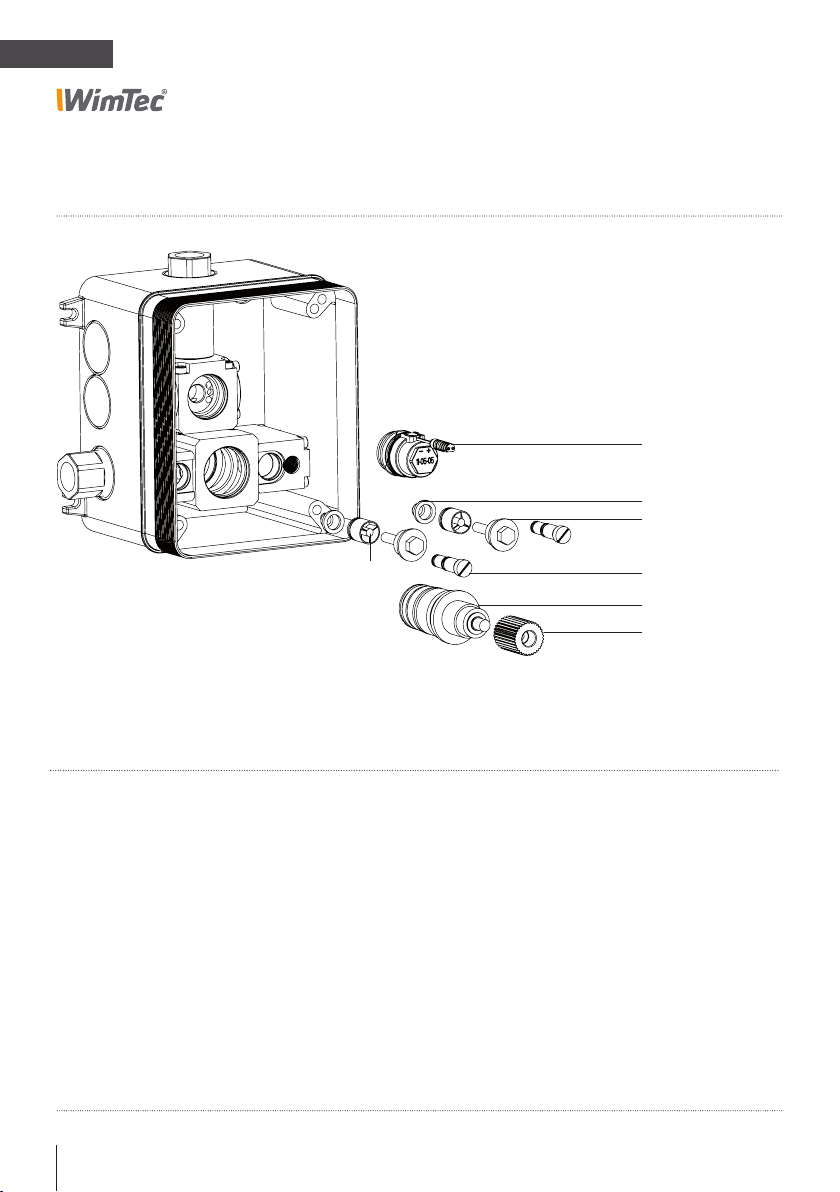
Ersatzteile: WimTec Rohbauset S6
Art.Nr.:
231 205
119 770
119 794
119 787
Art.Nr.:
231 205
119 770
119 787
119 794
119 763
120 530
120 547
16 Duschearmatur WimTec PROOF S6
Bezeichnung
Magnetventil (1 Stk.)
Schmutzfilter (1 Stk.)
Rückflussverhinderer (1 Stk.)
Filterabdeckung (1 Stk.)
Absperrung (1 Stk.)
Thermostat komplett
Adapter für Thermostat
119 763
120 530
120 547
Page 17
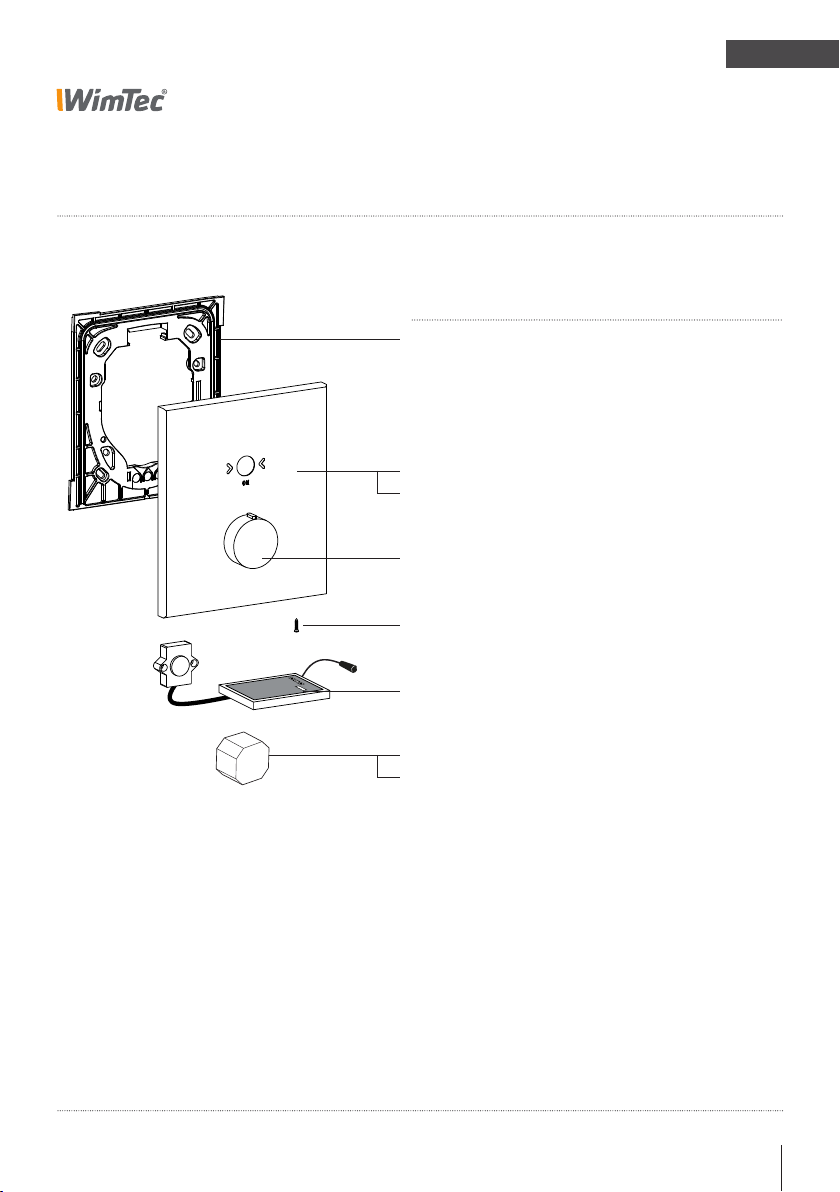
Ersatzteile: WimTec PROOF S6
DE
Art.Nr.:
120 646
120 677
120 660
115 536
113 877
120 363
117 899
113 792
Bezeichnung
Montagerahmen
Frontplatte mit Mischergriff, Edelstahl
Frontplatte mit Mischergriff, Chrom
Thermostatgriff
Sicherungsschraube
Elektronikmodul
Netzteil 1-fach
Netzteil 5-fach
Duschearmatur WimTec PROOF S6 17
Page 18

EN
PROOF S6
General notes
The “General installation
terms and conditions”
provided at
www.wimtec.com apply.
Congratulations on purchasing the WimTec PROOF S4.
In order to ensure that you will be able to enjoy this high-quality
product for many years, please take note of the following cleaning
and maintenance recommendations:
Use mild cleaning agents containing soap
Do not use abrasive, scrubbing, sealing or acidic
cleaning agents or disinfectants
Clean the fitting with a soft sponge or cloth only
Do not use steam cleaners
This manual is valid for the following products:
WimTec PROOF S6:
Stainless steel Art.No. 118 940
Chrome Art.No. 118 957
Delivery scope:
Front plate with integrated electronics, mounting frame, thermostat
handle with hot water barrier and necessary fixing materials.
Important installation notes:
Mounting and installation may only be performed by a qualified
service provider in accordance with DIN 1988, ÖVE/ÖNORM E8001
and VDE 0100 Part 701. When planning and installing sanitary
facilities, all relevant local, national and inter-national standards and
provisions must be observed! Provide for 230 V / 12 V power unit
outside of the protected zone.
!
According to the Austrian ÖNORM B 5019, thermal disinfection
requires a minimum temperature of 60 °C for at least 10 min at the
relevant system locations. The operator must ensure that all parts of
the installation (e.g., piping) can withstand the temperatures applied
during thermal disinfection.
18 Shower control WimTec PROOF S6
Page 19
PROOF S6
Specifications
Operating voltage: via power supply 230 V 50 Hz / 12 V=
Art.No. 117 899 - power supply for one control unit
Art.No. 113 792 - power supply for up to 5 control units
Power consumption: max. 3.5 W
Magnetic valve: cartridge 6 V
Active range: from 15 cm - 50 cm (50 cm factory setting)
Close-Active range: 1 - 5 cm
Stagnation rinse: activatable, after 3 h - 48 h of none-use for 10 s
Flushing stop: from 10 s - 10 min (in manual program from 10 s - 60 s)
Cleaning stopp: for 10 min
Flow rate: 0,05 - 0,6 MPa (0,5 - 6 bar)
Static pressure: max. 0,8 MPa (8 bar)
Water temperature: max. 70 °C (max. 80 °C for max. 10 min)
Flow rate: max. 22 l/min at 0,3 MPa (3 bar)
Water inlet: R 1/2“ IT
Water outlet: R 1/2“ IT
Front plate: Stainless steel / chromed brass
Thermost handle: Chromed brass
EN
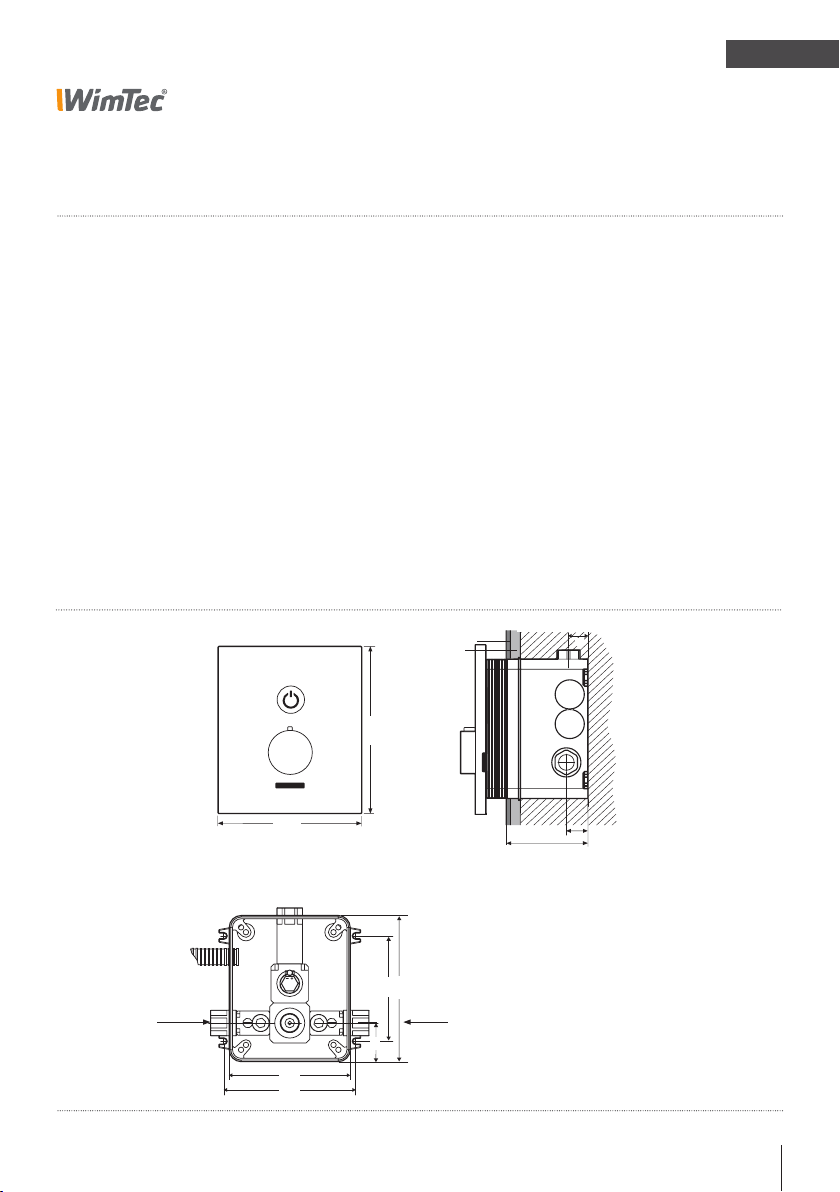
All dimensions in mm:
Electr. installation pipe
for 12 V=
WW
R 1/2“ IG
185
R 1/2” IG outlet to
showerhead
140
152
213
tile
plaster
122
169
CW
R 1/2“ IG
45
masonry
23
11
min 95
max 120
26
Shower control WimTec PROOF S6 19
Page 20
EN
PROOF S6
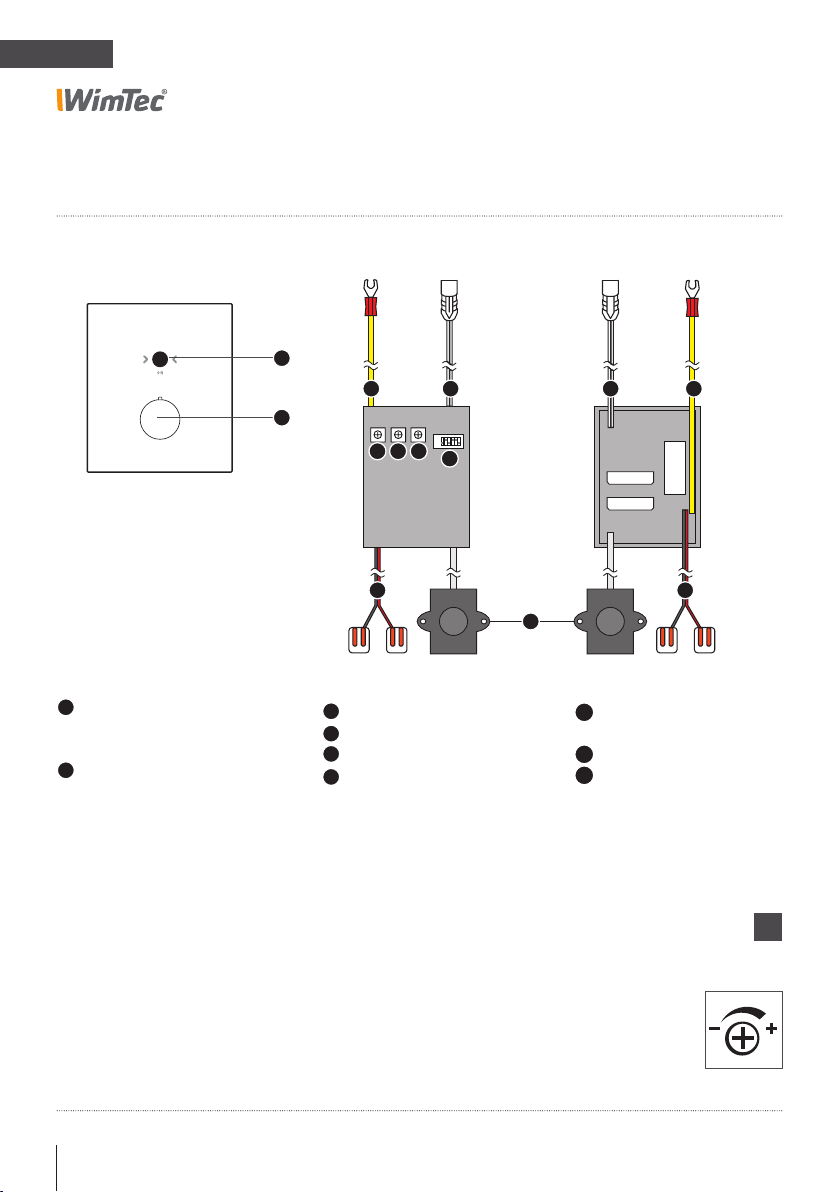
Configuring the programs & functions
Front plate:
A
B
A
Infrared sensor to turn off the
showerhead and for user
recognition
B
Thermostat knob to adjust the
temperature, including a button
for releasing the 38 °C safety
lock.
Electronics module controls:
G H H G
ON
OFF
C D E
I I
C
Range control
D
Time control
E
Interval control
DIP switches for configuring
F
the functions
1 2 3 4 5 6
F
A
G
equalisation
H
I
power supply
Connection, potential
Connection, MV shower head
Connection clips for 12 V
20 Shower control WimTec PROOF S6
!
The general rule applies to all controls:
Move anticlockwise to
decrease the setting.
Move clockwise to
increase the setting.
Page 21

PROOF S6
Configuring the programs & functions
DIP switches:
Program activation – DIP switches 1 and 2:
Program DIP switch 1 DIP switch 2 Description
Semi automatic mode
Fully automatic mode
Manual mode
Function activation – DIP switches 3–6:
DIP switch Function Factory setting Description
3
4
5
6
1)
Preset program.
1)
Shut-off delay ON = 5 s / OFF = 2 s OFF
Warm water rinse ON Page 32
Not allocated - Stagnation rinse OFF Page 34
OFF ON
ON ON
OFF OFF
Page 29
Page 30
Page 31
EN
Einstellregler:
D.
Range control
to detect user interaction
Sensor range preset to 50 cm
(configurable from 15 cm to
50 cm).
Sets the infrared sensor range
from 15 cm – 50 cm.
Automatic range adjustment
within the preset maximum
range.
E.
Time control
set to safety flow arrest after
10 min (configurable from
10 s to 10 min).
self-closing program mode:
10 s to 60 s.
After the configured maximum
flow time has elapsed, the
water stops automatically to
prevent unintentional continuous activation.
Shower control WimTec PROOF S6 21
F.
Interval control
for stagnation rinse
(configurable from 3 h to 48 h).
If the fitting has not been
used for the set period, the
device will automatically
perform a 10 s rinse to flush
stagnant water from the
pipes.
Page 22
EN
PROOF S6
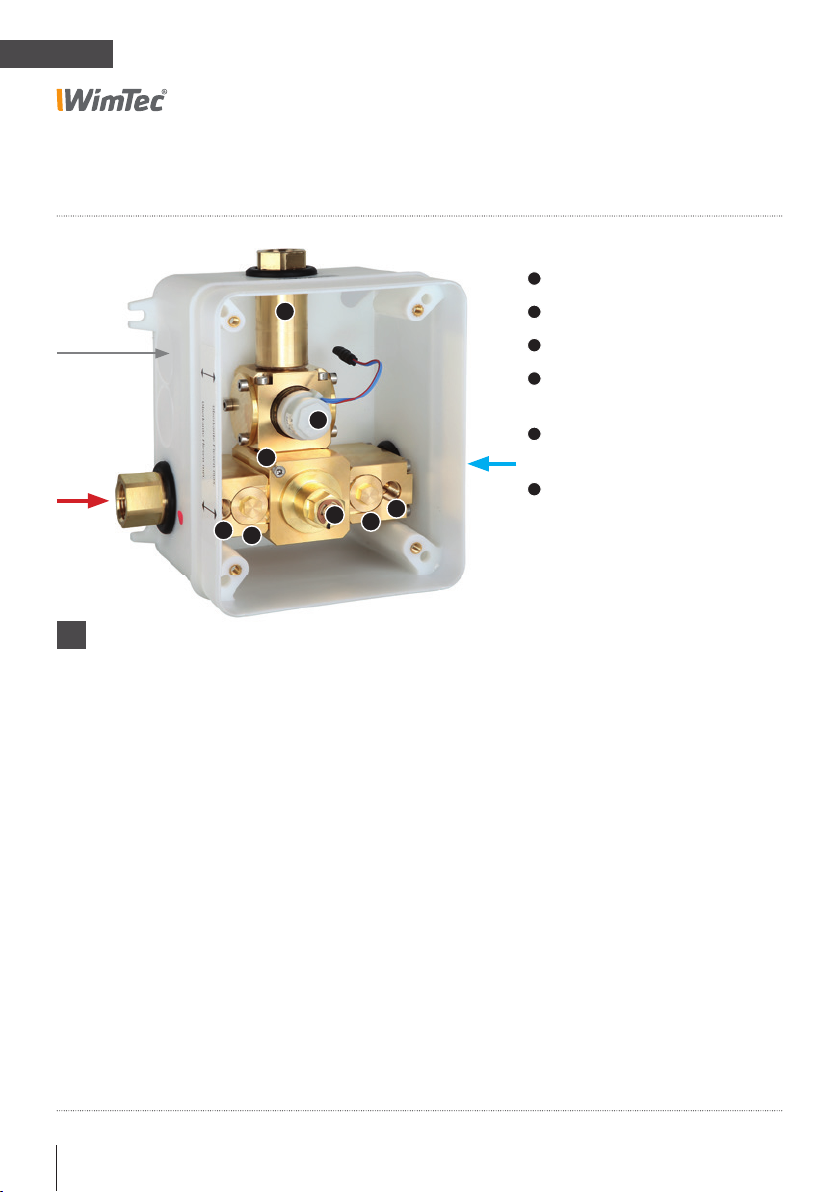
Flush-mount set
12 V=
WW
4
5
!
Power supply not mountable
in basic kit or in any
protective areas.
1
outlet rain shower
1
2
Magnetic valve for rain shower
3
Thermostat with adapter
4
Cut-off valve
(closed upon delivery)
2
6
3
4
5
5
Dirt fi lter and return
CW
fl ow valve
5
Fixing screw, for connection
of potential equalisation
22 Shower control WimTec PROOF S6
Page 23
PROOF S6
Assembly
1 2 3
EN
4 6
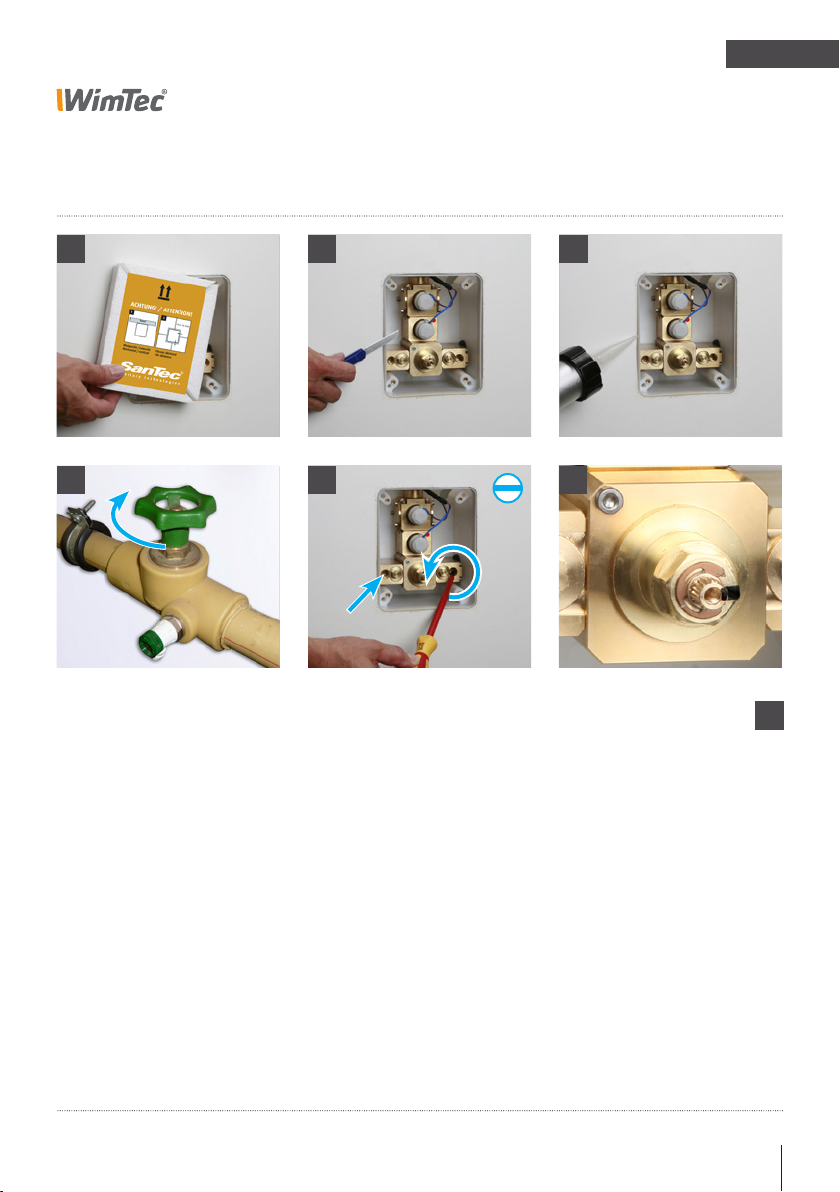
1. Remove the flush-mount protective cover.
2. Cut off protruding parts from the flush-mount box so it
aligns with the tiles.
3. Where necessary, seal off space between wall and flush-
mount set with silicone.
4. Close the main water valve.
5. Open both integrated stop valves using a screwdriver.
6. Control marks on mixing shaft and thermostat cartridge and
align them if necessary.
5
!
ATTENTION!
Perform the following steps
in the order indicated!
Shower control WimTec PROOF S6 23
Page 24
EN
Assembly
PROOF S6
7
10
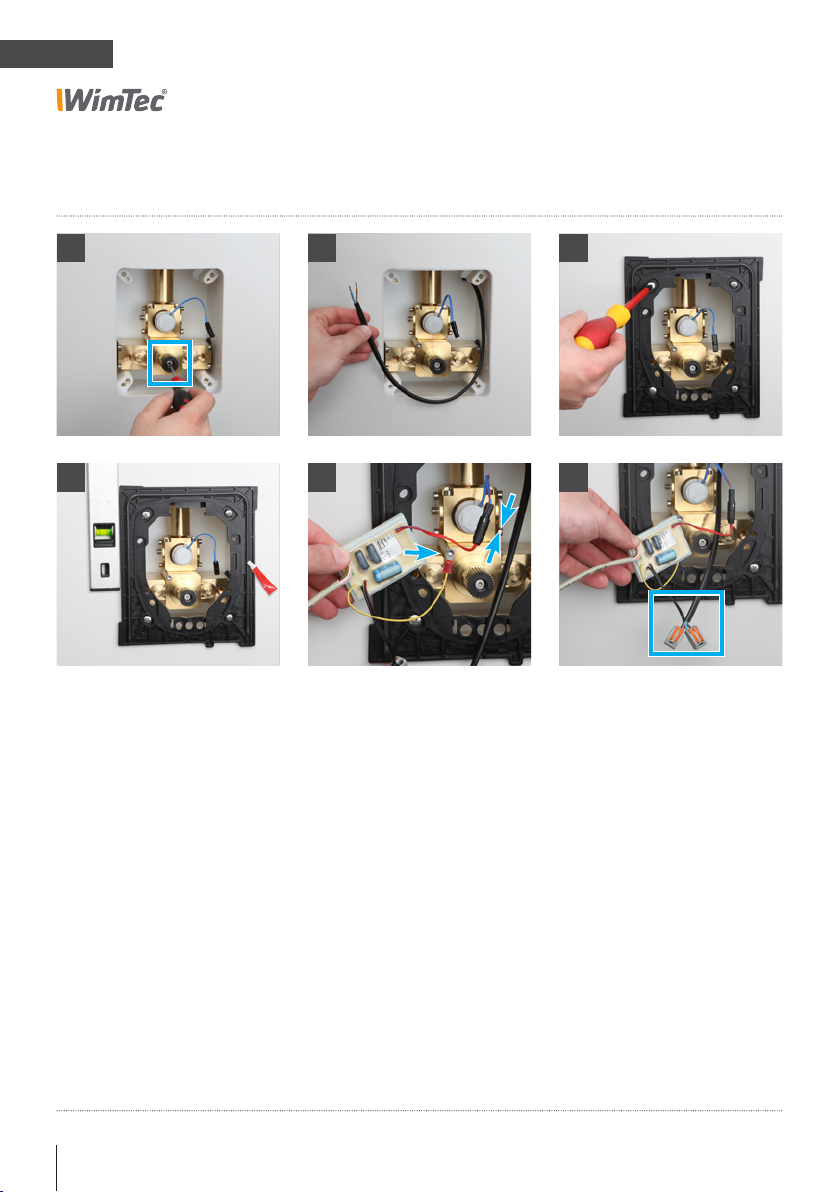
7. Mount adapter for thermostat using the 2.5 Allen key.
8. Feed the connection cable into the flush-mount set and connect it to the pow-
er supply (art. no. 117 899 and art. no. 113 792).
Attention: The power supply must not be installed in the flush-mount set!
8
11
9
12
9. Attach the mounting frame using the 4 screws. Make sure that the cable con-
nections remain intact and the cables are not crimped.
10. Correctly align the mounting frame and securely fasten the screws. When
tightening the screws, ensure that the mounting frame does not get warped.
Apply the included special grease to the front of the valve.
11. Connect the magnetic valve to the electronics module.
12. Connect the power cables to the electronics module (mind correct +/- polarity).
Plug the power cable and switch on the power supply (the safety lock mechanism of the magnetic valve will activate).
24 Shower control WimTec PROOF S6
Page 25
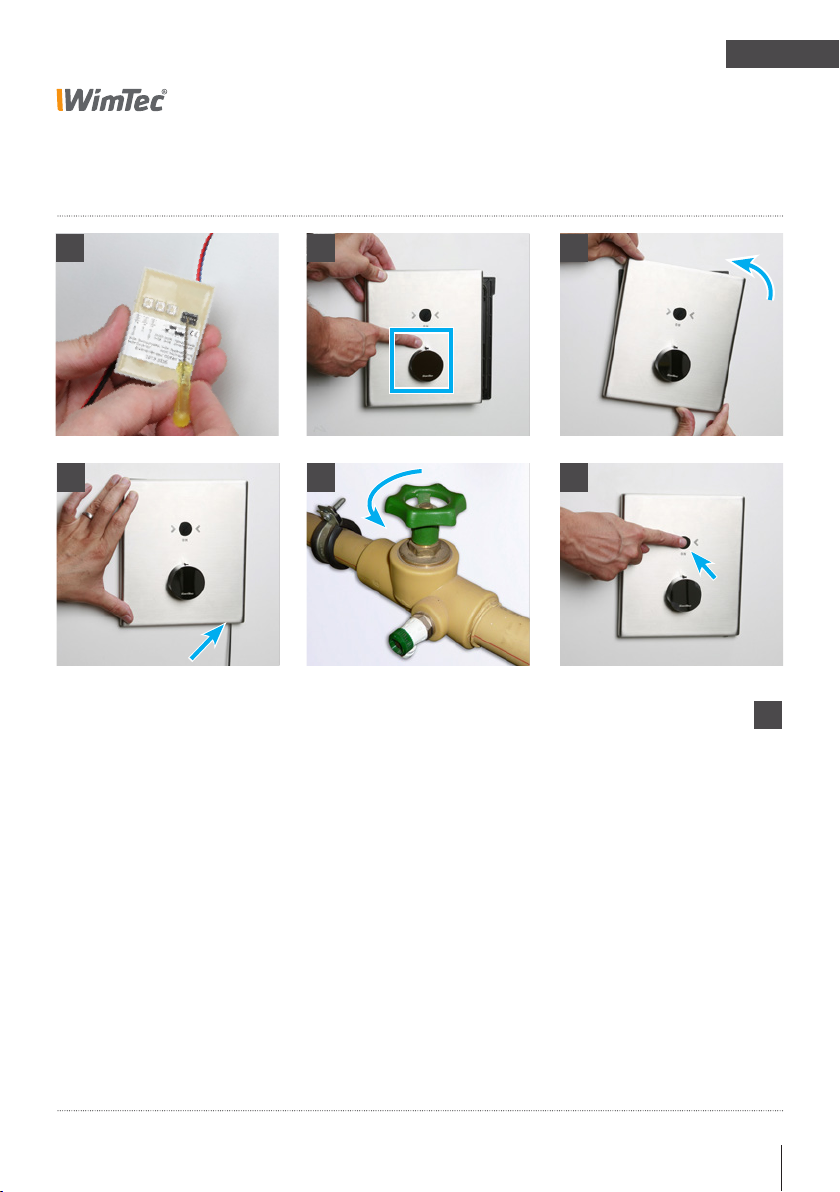
Assembly
EN
PROOF S6
1413 15
1716 18
13.Configure the desired functions at the electronics module
and insert the electronics module into the flush-mounted set.
14. Control position of the thermostat handle - shutter button
points vertical upwards.
15. Insert the front plate at an angle and apply some pressure
while turning it to the left to align it horizontally.
16. Arrest front plate by fastening the locking screw at the
lower right.
17. Open the main water valve and turn on the power supply.
18. Perform a system test.
Shower control WimTec PROOF S6 25
!
ATTENTION!
Perform the following steps
in the order indicated!
Page 26

EN
Halbautomatik:
Warmlauf:
ON
OFF
1 2 3 4 5 6
Reinigungsstopp:
ON
OFF
1 2 3 4 5 6
Hygienespülung:
ON
OFF
1 2 3 4 5 6
PROOF S6
Program description
Semi automatic program mode (default setting):
DIP switch 1=OFF, 2=ON
SWITCH ON:
Infrared sensor
Water starts flowing as soon as
you tap the infrared sensor.
SWITCH OFF:
Infrared sensor
Tap on the infrared sensor
again to switch off.
26 Shower control WimTec PROOF S6
Automatic function
The water flow stops at the
end of the shut-off delay once
the user leaves the sensor
range or after the configured
water arrest time has elapsed.
ON
OFF
1 2 3 4 5 6
Page 27

PROOF S6
Halbautomatik:
Vollautomatik:
Warmlauf:
ON
OFF
1 2 3 4 5 6
ON
OFF
1 2 3 4 5 6
Reinigungsstopp:
ON
OFF
1 2 3 4 5 6
Hygienespülung:
ON
OFF
1 2 3 4 5 6
Program description
EN
Fully automatic program mode:
DIP switch 1=ON, 2=ON
SWITCH ON:
User detection
When you step in front of the
shower, the system will detect
you.
15-50 cm
Automatic function
The shower automatically
activates 2 s after detecting
the user.
SWITCH OFF:
Infrared sensor
Tap on the infrared sensor to
switch off.
Automatic function
The water flow stops at the
end of the shut-off delay once
the user leaves the sensor
range or after the configured
water arrest time has elapsed.
ON
OFF
1 2 3 4 5 6
Shower control WimTec PROOF S6 27
Page 28

EN
Halbautomatik:
Vollautomatik:
Manuell:
Warmlauf:
ON
OFF
1 2 3 4 5 6
ON
OFF
1 2 3 4 5 6
ON
OFF
1 2 3 4 5 6
Reinigungsstopp:
ON
OFF
1 2 3 4 5 6
Hygienespülung:
ON
OFF
1 2 3 4 5 6
PROOF S6
Program description
Manual program mode:
DIP switch 1=OFF, 2=OFF
SWITCH ON:
Infrared sensor
Water starts flowing as soon as
you tap the infrared sensor.
SWITCH OFF:
Infrared sensor
Tap on the infrared sensor
again to switch off.
28 Shower control WimTec PROOF S6
Safety flow arrest
After the configured water
arrest time (see p. 21) has
elapsed, the shower will automatically shut off.
ON
OFF
1 2 3 4 5 6
Page 29

PROOF S6
Warmlauf:
Description of the functions
EN
Warm water rinse:
DIP switch 4
Serves to rinse the warm water pipe without the need for you to
remain within the sensor range of the shower.
DIP switch 4 ON = Warm water rinse function enabled
(default setting).
DIP switch 4 OFF = Warm water rinse function disabled.
Switch on
By tapping the infrared sensor
the user activates the warm
water rinse function.
Operation
Water will flow for 30 s plus
the configured shut-off delay
without the need for you to remain within the sensor range;
it will then automatically shut
down again.
If you enter the sensor range
for at least 5 s during these
30 s, the shower will switch to
normal operation.
ON
OFF
1 2 3 4 5 6
!
We do not recommend
using the warm water rinse
function in combination
with the fully automatic
program mode.
Shower control WimTec PROOF S6 29
Page 30

EN
Warmlauf:
ON
OFF
1 2 3 4 5 6
Reinigungsstopp:
ON
OFF
1 2 3 4 5 6
Hygienespülung:
PROOF S6
Description of the functions
Stagnation rinse:
DIP switch 6
Serves to rinse water supply lines in order to remove stagnant water that
accumulates during longer periods of disuse.
DIP switch 6 ON = Stagnation rinse enabled.
DIP switch 6 OFF = Stagnation rinse function disabled (default setting).
Time interval
Can be set from 3–48 h at the
interval control (see p. 21).
Automatic stagnation rinse
If the fitting has not been used
for the set period, the stagnation rinse operation is automatically executed for 10 s.
Safety
If you are in the sensor range
or if the cleaning stop function
is enabled, the stagnation rinse function will not start until
2 min after it has been
disabled.
ON
OFF
1 2 3 4 5 6
3 - 48 h
30 Shower control WimTec PROOF S6
10
s
15-50 cm
Page 31

PROOF S6
Description of the functions
Cleaning stop:
Serves to disable the fitting prior to cleaning.
EN
User detection
By stepping laterally to the
shower and approaching the
infrared sensor with your hand
(1 - 5 cm distance) the water
flow will be activated.
Enable cleaning stop
After a dwell period of 5 s in
1 - 5 cm distance infront of the
infrared sensor the water flow
stops and the cleaning stop
will be activated for 10 min.
During this period the red
LED inside the infrared sensor
flashes.
1-5 cm
Disable cleaning stop
The function automatically
stops if no user was detected
for 10 minutes.
You can manually disable the
function following the same
procedure used to enable it.
The fitting will resume normal
operation with a safety delay
of 3 s after you leave the
sensor range.
10 min
Shower control WimTec PROOF S6 31
Page 32
EN
PROOF S6
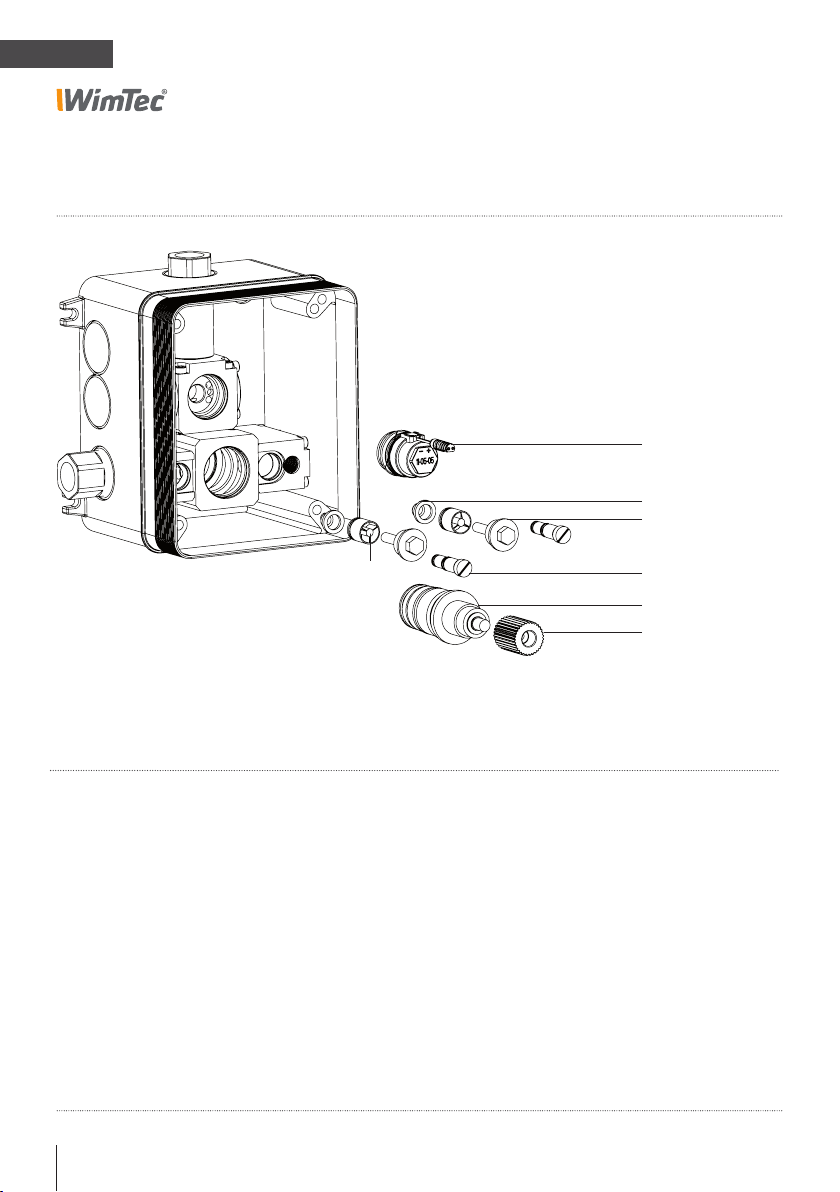
Replacement parts
Art.Nr.:
231 205
119 770
119 794
119 787
Art. no.:
231 205
119 770
119 787
119 794
119 763
120 530
120 547
32 Shower control WimTec PROOF S6
Description
Magnetic valve (1 pc.)
Dirt filter (1 pc.)
Return flow valve (1 pc.)
Filter cover
Blocking pin (1 pc.)
Complete thermostat
Adapter for thermostat
119 763
120 530
120 547
Page 33
PROOF S6
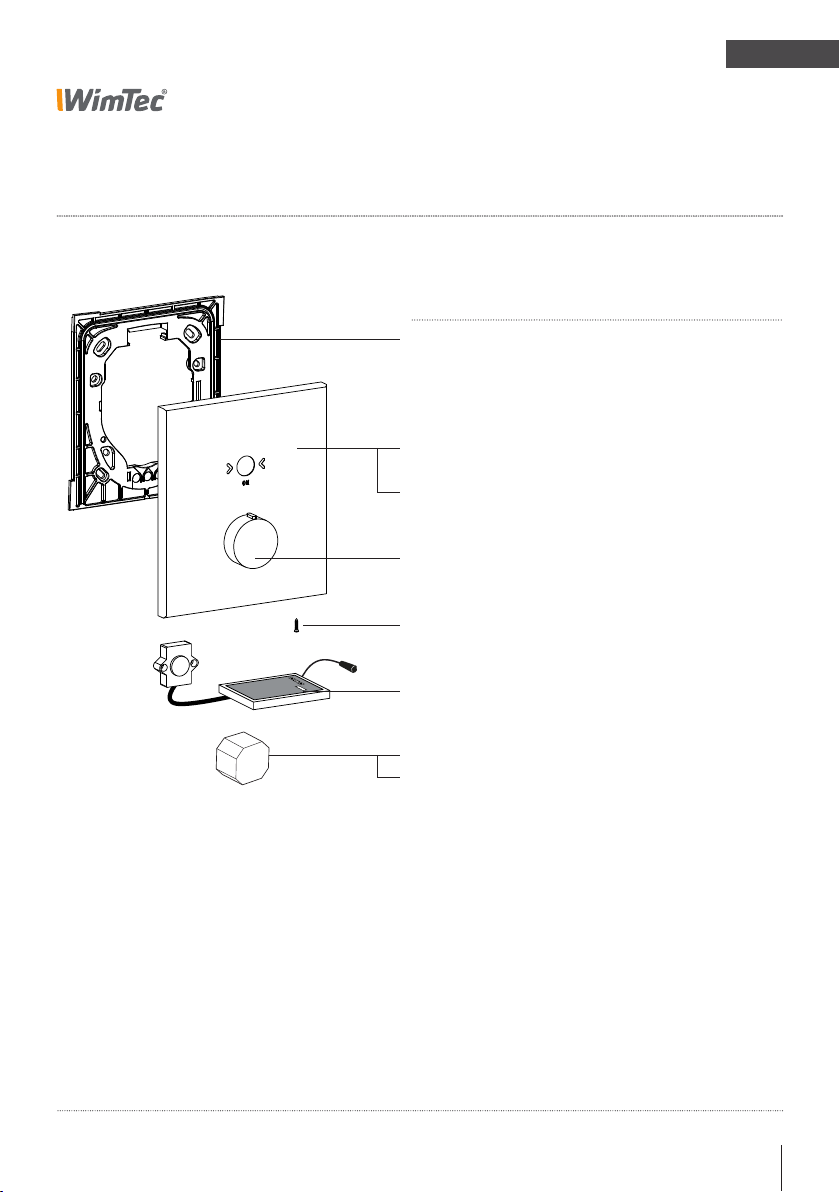
Replacement parts
EN
Art.Nr.:
120 646
120 677
120 660
115 536
113 877
120 363
117 899
113 792
Bezeichnung
Mounting frame
Front plate stainless steel,
inc. thermostat handle
Front plate chrome,
inc. thermostat handle
Thermostat handle
Locking screw
Electronics module
Power supply (1-connection)
Power supply (5-connections)
Shower control WimTec PROOF S6 33
Page 34

EN
PROOF S6
34 Shower control WimTec PROOF S6
Page 35

PROOF S6
EN
Shower control WimTec PROOF S6 35
Page 36

www.wimtec.com
WIMTEC Sanitärprodukte GmbH
p: A - 3325 Ferschnitz, Freidegg 50, AUSTRIA
t: +43 (0) 7473 5000 f: +43 (0) 7473 5000 - 500
m: [email protected] i: www.wimtec.com
Auflage: 09 09 2014 Art.Nr. 1002044
 Loading...