

Page 1
PROOF P6
DE
DE
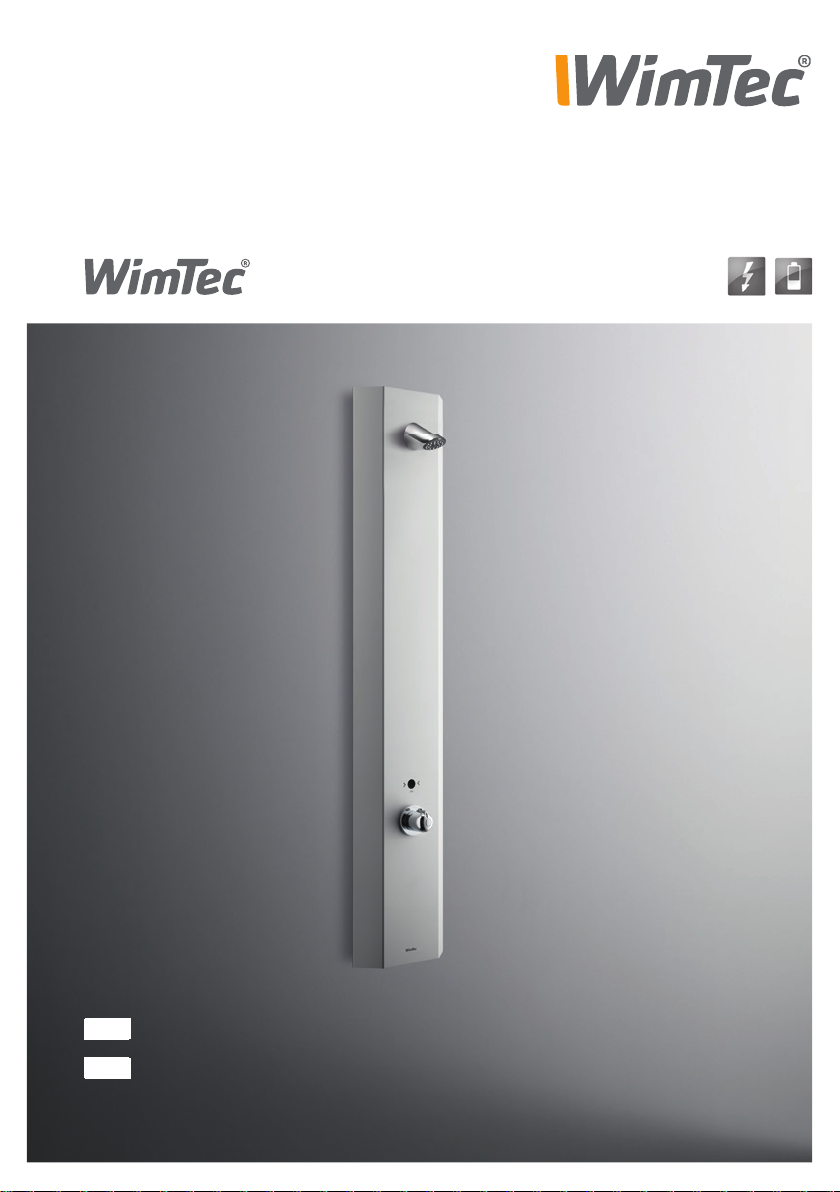
Montage- und Bedienungsanleitung
GB
EN
Installation and operating instructions
Page 2

DE
PROOF P6
Allgemeine Hinweise
Gratulation zum Kauf Ihres Dusche-Paneels WimTec PROOF P6.
Damit Sie jahrelang Freude mit dieser hochwertigen Armatur
haben, empfehlen wir Ihnen folgende Punkte bei der Reinigung
und Pflege zu beachten:
Reinigungs- oder Desinfektionsmittel verwenden
Diese Anleitung ist gültig für folgende Produkte:
WimTec PROOF P6 - 6 V Art.Nr. 121 148
WimTec PROOF P6 - 12 V Art.Nr. 121 155
Lieferumfang:
Aufputz-Aluminiumgehäuse mit integrierter Elektronik, Thermostat
mit Heißwassersperre, vandalensicherer Duschkopf, Magnetventil,
6 V Batteriemodul inkl. Batterie (bei Batterieversion) und Befestigungsmaterial, ohne UP-Netzteil.
milde, seifenhaltige Reinigungsmittel verwenden
keine kratzenden, scheuernden oder säurehaltigen
nur mit weichem Schwamm oder Tuch behandeln
keine Reinigung mit Dampfstrahlgeräten
Wichtige Installationshinweise:
UP-Dose für optionales Netzteil außerhalb des Schutzbereichs vorsehen. Die Montage und Installation darf nur durch einen konzessi-
!
onierten Fachbetrieb gemäß DIN 1988, ÖVE/ÖNORM E8001 sowie
Es gelten die „Allgemeinen
Installationsbedingungen“
gemäß www.wimtec.com.
2 Dusche-Paneel WimTec PROOF P6
VDE 0100 Teil 701 erfolgen. Bei der Planung und Errichtung von
Sanitäranlagen sind die entsprechenden örtlichen, nationalen und
internationalen Normen und Vorschriften zu beachten!
Page 3

PROOF P6
Technische Daten
6 V Batteriebetrieb:
Batterie: 6 V Lithium CR-P2 (im Lieferumfang enthalten)
Batterielebensdauer: ca. 100.000 Spülungen (max. 2 Jahre)
12 V externe Versorgung:
Betriebsspannung: über WimTec Netzteil 230 V 50 Hz / 12 V=
Art.Nr. 117 899 - für eine Steuerung
Art.Nr. 113 792 - für bis zu 5 Steuerungen
Leistungsaufnahme: max. 3 W
Weitere technische Daten:
Magnetventil: Kartusche 6 V
Fern-Ansprechbereich: 15 - 50 cm
Nah-Ansprechbereich: 1 cm bis 5 cm
Spülstoppzeit: von 10 s bis 10 min
(im Manuell-Programm von 10 s bis 60 s)
Stagnationsfreispülung: aktivierbar, nach 3 h bis 48 h
Nichtbenutzung für 10 s
Reinigungsstopp: für 10 min
Fließdruck: 0,05 bis 0,6 MPa (0,5 bis 6 bar)
Statischer Druck: max. 0,8 MPa (8 bar)
Wassertemperatur: max. 70 °C (max. 80 °C für max. 10 min)
Durchflussmenge: ca. 9 l/min bei 0,3 MPa (3 bar)
Wasserzulauf: R 1/2“ IG
Temperatureinstellung: Thermostat mit Heißwassersperre
DE
Werkstoffe:
Paneel: Aluminium eloxiert
Brausekopf und
Thermostatgriff: Messing verchromt
Dusche-Paneel WimTec PROOF P6 3
Page 4

DE
Legende
PROOF P6
Duschepaneel:
A Infrarotsensor für die Benutzererken-
nung und ON-/OFF-Taster zum Ein-/Aus
schalten der Dusche.
B Thermostatgriff zur Temperatur-
regelung mit Taste zum Entriegeln
der 38 °C Sicherheitssperre.
Elektronikmodul - 6 V Batterieversion:
C D E
A
Elektronikmodul - 12 V Netzversion:
B
F C D E
C Zeit-Regler
D Intervall-Regler
E Dip-Schalter zum Einstellen
der Funktionen
E Reichweiten-Regler
!
Generell gilt für alle Regler:
4 Dusche-Paneel WimTec PROOF P6
Gegen den Uhrzeiger-
sinn zum Reduzieren.
Im Uhrzeigersinn zum
Erhöhen.
Page 5

PROOF P6
Einstellung der Programme & Funktionen
Dip-Schalter:
Programm-Aktivierung - Dip-Schalter 1 und 2:
Programm Dip 1 Dip 2 Beschreibung
Halb-Automatik
1)
Voll-Automatik
Manuell
Funktions-Aktivierung - Dip-Schalter 3 - 6:
Dip-Schalter Funktion Beschreibung
3
4
5
6
1)
Programm oder Funktionen
werksseitig voreingestellt.
Nachlaufzeit ON = 5 s / OFF
Warmlauffunktion
Reinigungsstopp
Stagnationsfreispülung Seite 16
OFF ON
ON ON
OFF OFF
1)
1)
bereits
1)
= 2 s
Seite 11
Seite 12
Seite 13
Seite 14
Seite 15
DE
Einstellregler:
C. Zeit-Regler
für den Sicherheitsspülstopp
10 min voreingestellt
(10 s - 10 min einstellbar).
Manuell-Programm:
10 s - 60 s einstellbar.
Nach Ablauf der eingestellten
Maximallaufzeit schaltet die
Duschearmatur automatisch
ab, um bei einer unbeabsichtigten Daueraktivierung
Wasser zu sparen.
D. Intervall-Regler
für die Stagnationsfreispülung
48 h voreingestellt
(3 - 48 h einstellbar).
Wird die Duschearmatur für
die voreingestellte Zeit nicht
benutzt, löst die Armatur
selbstständig eine Spülung für
10 s aus, um das Stagnationswasser auszuspülen.
Dusche-Paneel WimTec PROOF P6 5
F. Intervall-Regler
für die Benutzererkennung
Ansprechbereich 50 cm
voreingestellt (15 - 50 cm
einstellbar).
Begrenzt die Rechweite des
IR-Sensors von 15 - 50 cm.
Page 6
DE
PROOF P6
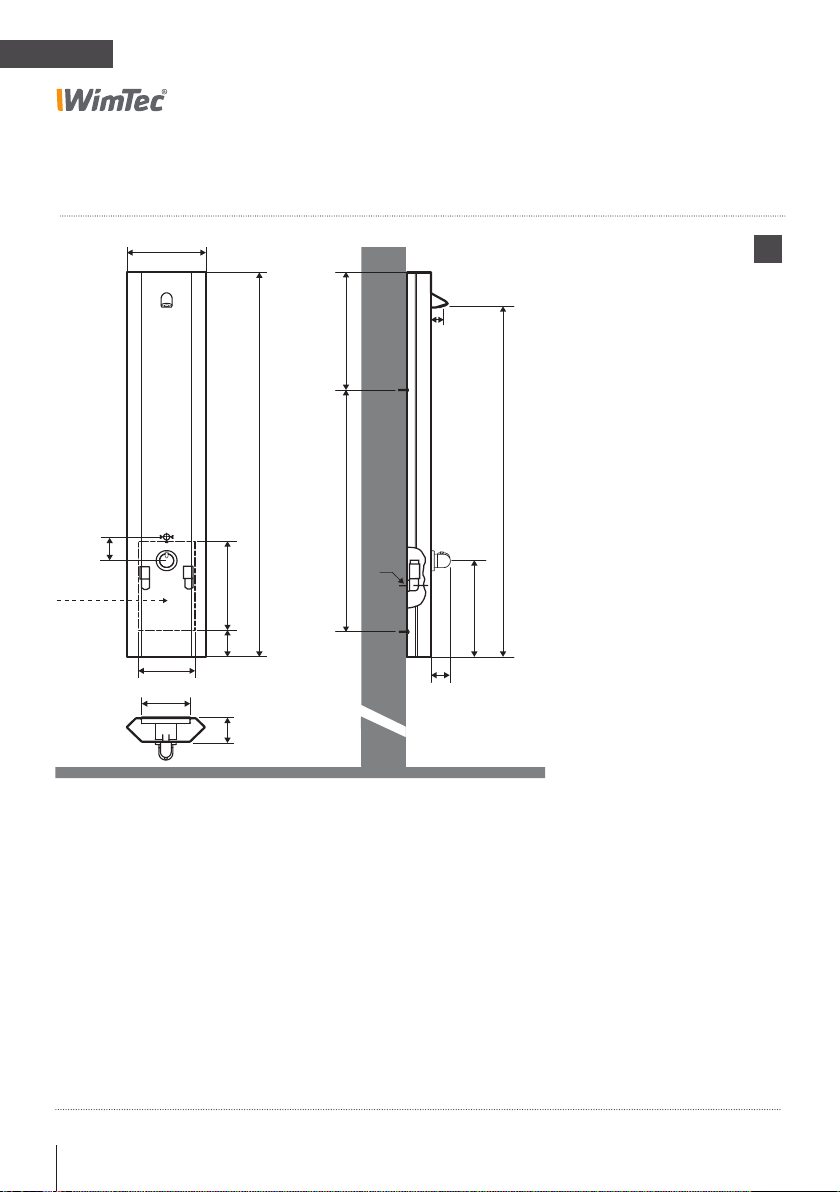
Abmessungen Alle Maße in mm:
256
405
1300
810
80
* E-Anschluss
12 V=
185
166
Eine Nachrüstung ist auf bestehenden Anschlüssen im Standardmaß
150 mm möglich.
300
90
80
½"
40
1190
325
65
* Bei externer Versorgung E-Anschluss 12 V= vorsehen.
!
ACHTUNG!
Netzteil nicht in Duschepa-
neel oder Schutzbereichen
anbringen.
6 Dusche-Paneel WimTec PROOF P6
Page 7
PROOF P6
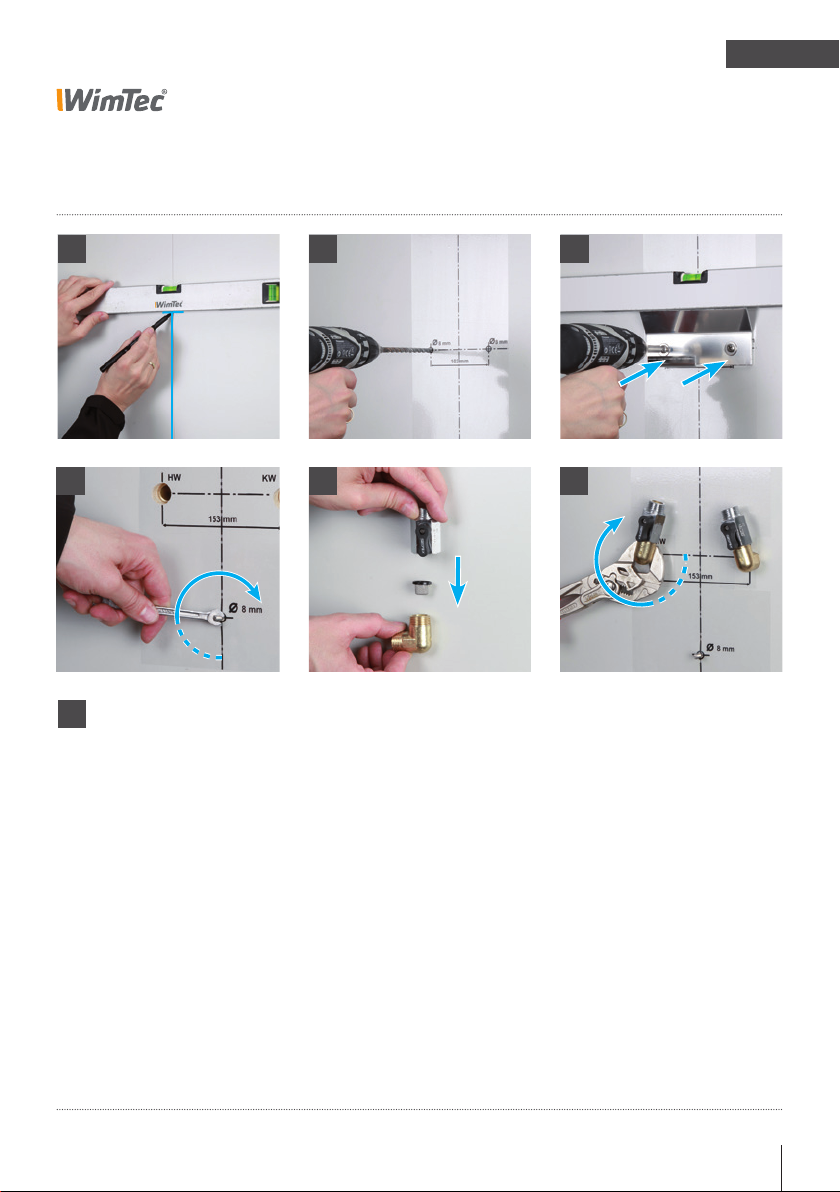
Montage
1 2 3
DE
4
!
ACHTUNG!
Folgende Schritte unbedingt in beschriebener
Reihenfolge ausführen!
5 6
1. Mittellinie und Oberkante des Paneels anzeichnen.
2. Selbstklebende Bohrschablone aufkleben.
3x Ø 8 mm bohren und Dübel einsetzen.
3. Montagebügel mit Befestigungsschraube und Beilagscheiben befestigen.
4. Bei Batterieversion: Stockschraube für Befestigung
eindrehen und Befestigungsbügel für Batteriemodul dabei
einhängen.
5. Korbfilter in 90° Anschlusswinkel einsetzen und
Absperrung aufdichten.
6. Anschlusswinkel mit Absperrung aufdichten und in
Zuleitungen einschrauben – Vorabsperrung dabei schräg
nach innen ausrichten.
Dusche-Paneel WimTec PROOF P6 7
Page 8
DE
PROOF P6
Montage: 6 V Batterie-Version Art.Nr. 121 148
i
12 V Netz-Version
weiter auf Seite 10.
!
ACHTUNG!
Folgende Schritte unbedingt in beschriebener
Reihenfolge ausführen!
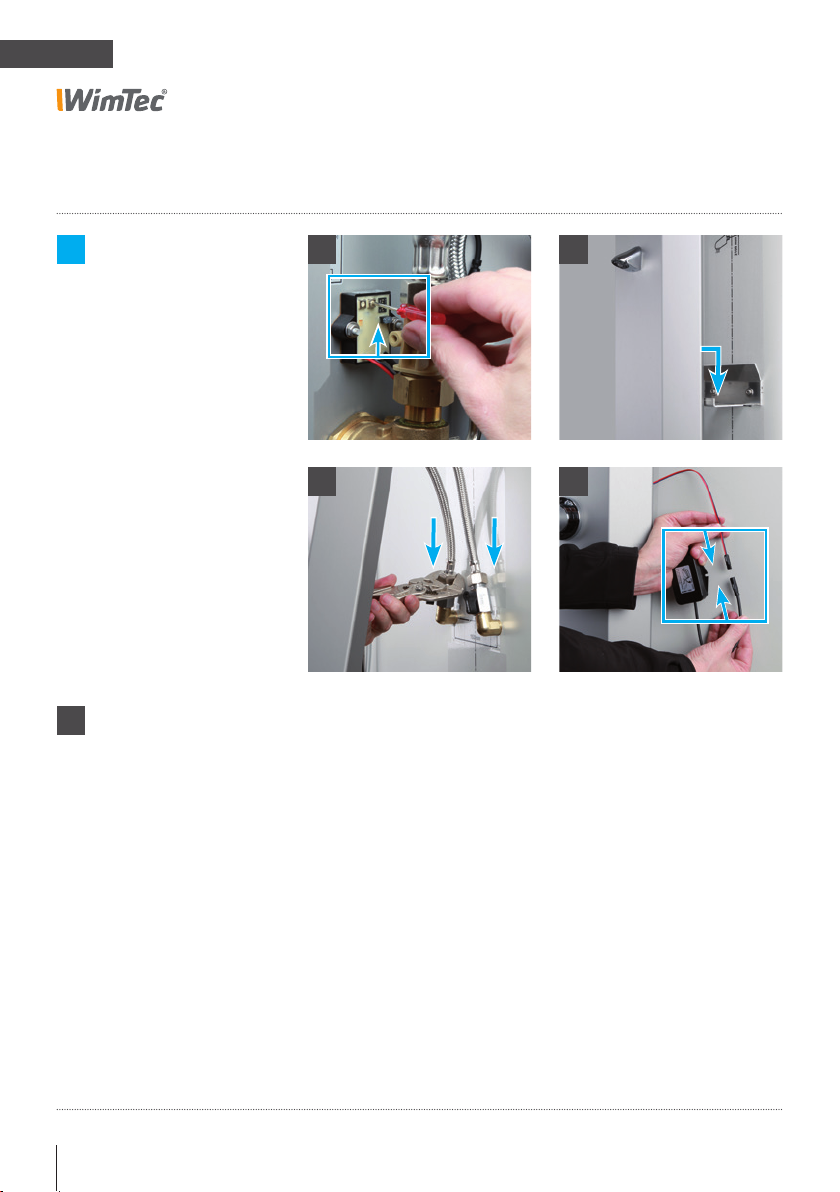
7
7. Gewünschte Funktionseinstellungen am Elektronikmodul
vornehmen (siehe S. 5).
8. Dusche-Paneel in die vordere Bügellasche einhängen.
9. Flexschläuche mit beigelegter Dichtung an Wasserzuleitung
anschließen.
8
109
10. Batteriemodul anstecken. (Sicherheitsschließimpuls beim
Magnetventil erfolgt).
8 Dusche-Paneel WimTec PROOF P6
Page 9
DE
PROOF P6
Montage: 6 V Batterie-Version Art.Nr. 121 148
131211
14
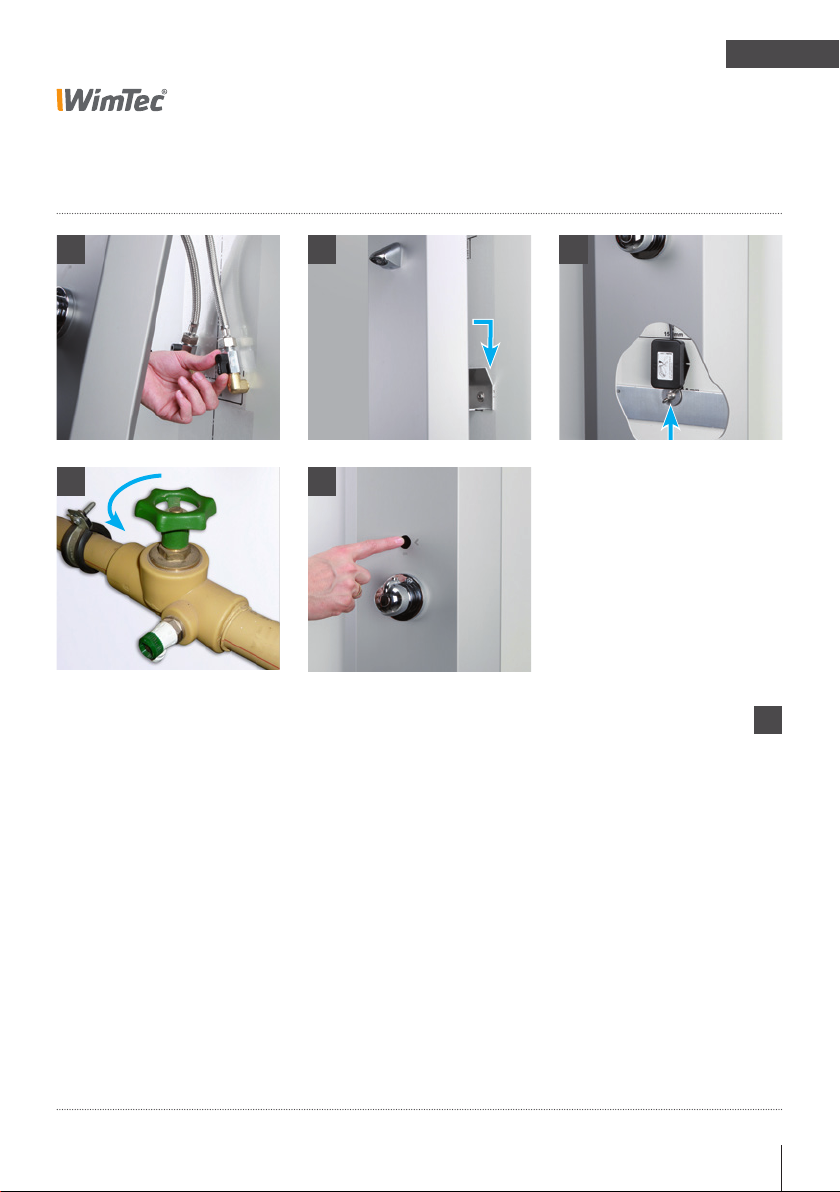
11. Kontrollieren, ob Vorabsperrungen geöffnet sind
(Riegel stehen parallel zur Flussrichtung).
12. Dusche-Paneel in die hintere Bügellasche einhängen.
ACHTUNG! Keine Kabel oder Schläuche quetschen
oder knicken.
13. Batteriemodul von unten mit Beilagscheibe und Flügelmutter
an der Stockschraube befestigen.
14. Hauptwasserleitung öffnen.
15. Funktionstest durchführen.
15
!
ACHTUNG!
Folgende Schritte unbe-
dingt in beschriebener
Reihenfolge ausführen!
Dusche-Paneel WimTec PROOF P6 9
Page 10
DE
PROOF P6
Montage: 12 V Netz-Version Art.Nr. 121 155
!
ACHTUNG!
Folgende Schritte unbedingt in beschriebener
Reihenfolge ausführen!
8
10
97
11
+-
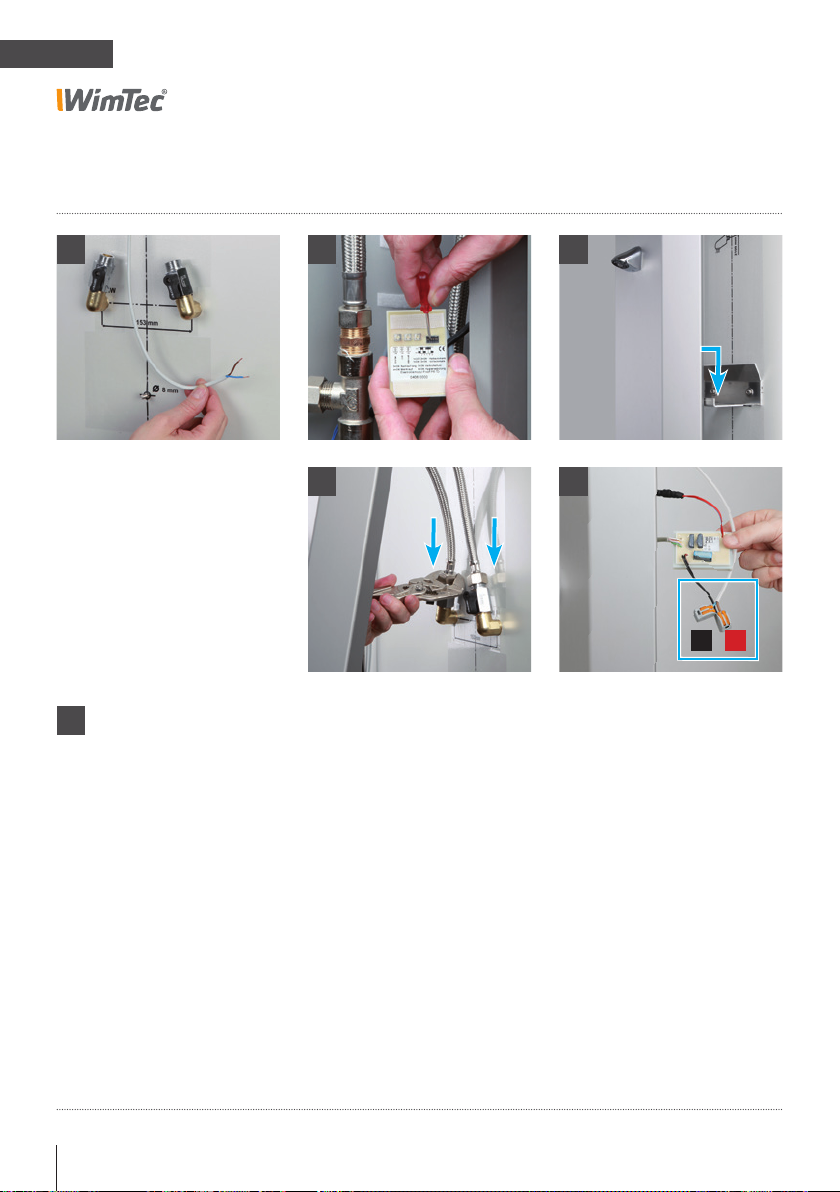
7. Anschlusskabel (Kabeltyp: 2 x 0,5 mm2) einziehen
und am Netzteil (Art.Nr. 117 899 für 1 Steuerung oder
Art.Nr. 113 792 für bis zu 5 Steuerungen) anschließen.
Achtung: Stromversorgung muss abgeschaltet sein und
Netzteil darf nicht im Duschepaneel bzw. Schutzbereich
verbaut werden!
8. Elektronikmodul vom Klettverschluss abnehmen und ge-
wünschte Funktionseinstellungen vornehmen (siehe S. 5).
9. Dusche-Paneel in die vordere Bügellasche einhängen.
10. Flexschläuche mit beigelegter Dichtung an Wasserzuleitung
anschließen.
11. Elektro-Anschluss am Elektronikmodul herstellen
(Auf +/- Polung achten) und Stromversorgung einschalten
(Sichertheitsschließimpuls beim Magnetventil erfolgt).
10 Dusche-Paneel WimTec PROOF P6
Page 11
DE
PROOF P6
Montage: 12 V Netz-Version Art.Nr. 121 155
12
15
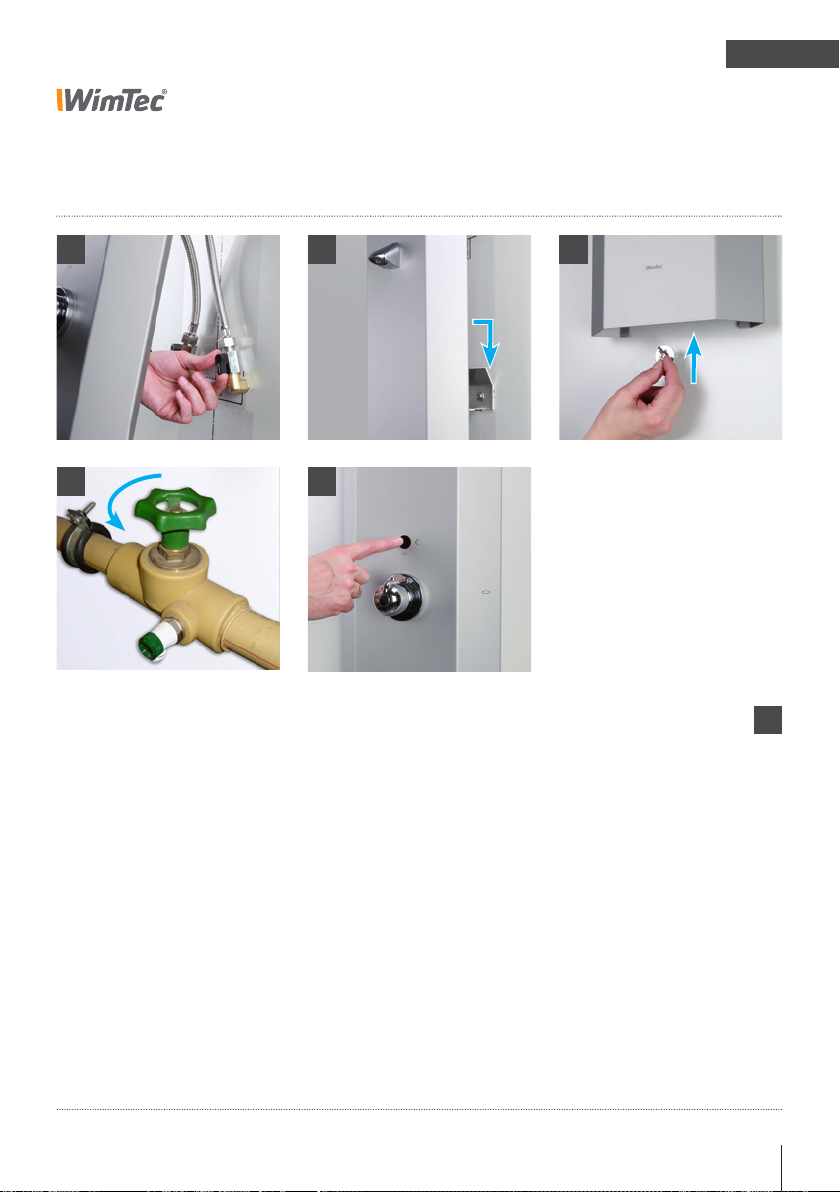
12. Kontrollieren, ob Vorabsperrungen geöffnet sind
(Riegel stehen parallel zur Flussrichtung).
13. Dusche-Paneel in die hintere Bügellasche einhängen.
ACHTUNG! Keine Kabel oder Schläuche quetschen
oder knicken.
16
1413
!
ACHTUNG!
Folgende Schritte unbe-
dingt in beschriebener
Reihenfolge ausführen!
14. Duschepaneel von unten mit Beilagscheibe und
Flügelmutter an der Stockschraube sichern.
15. Hauptwasserleitung öffnen.
16. Funktionstest durchführen.
Dusche-Paneel WimTec PROOF P6 11
Page 12
DE
Halbautomatik:
Warmlauf:
ON
OFF
1 2 3 4 5 6
Reinigungsstopp:
ON
OFF
1 2 3 4 5 6
Hygienespülung:
ON
OFF
1 2 3 4 5 6
PROOF P6
Programm-Beschreibung
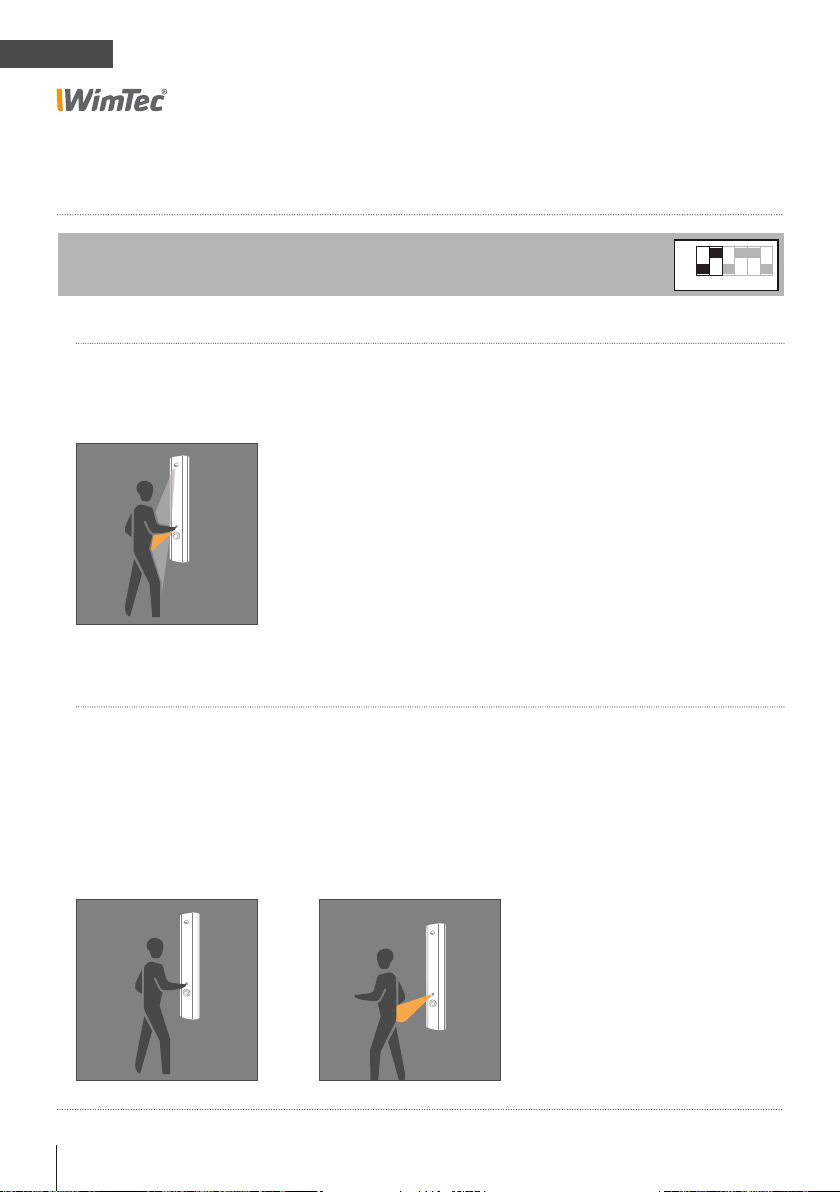
Programm Halb-Automatik (voreingestellt):
DIP Schalter 1=OFF, 2=ON
EINSCHALTEN:
Taster
Wasserfluss startet,
sobald der Benutzer den
ON/OFF Taster betätigt.
AUSSCHALTEN:
Taster
Durch erneutes Antippen der
ON/OFF Taste schaltet die
Dusche ab.
12 Dusche-Paneel WimTec PROOF P6
Automatik
Dusche stoppt nach Ablauf
der Nachlaufzeit, wenn der
Benutzer den Ansprechbereich
verlässt oder nach Ablauf der
Sicherheitsspülstopp-Zeit.
ON
OFF
1 2 3 4 5 6
Page 13
PROOF P6
Halbautomatik:
Vollautomatik:
Warmlauf:
ON
OFF
1 2 3 4 5 6
ON
OFF
1 2 3 4 5 6
Reinigungsstopp:
ON
OFF
1 2 3 4 5 6
Hygienespülung:
ON
OFF
1 2 3 4 5 6
Programm-Beschreibung
DE
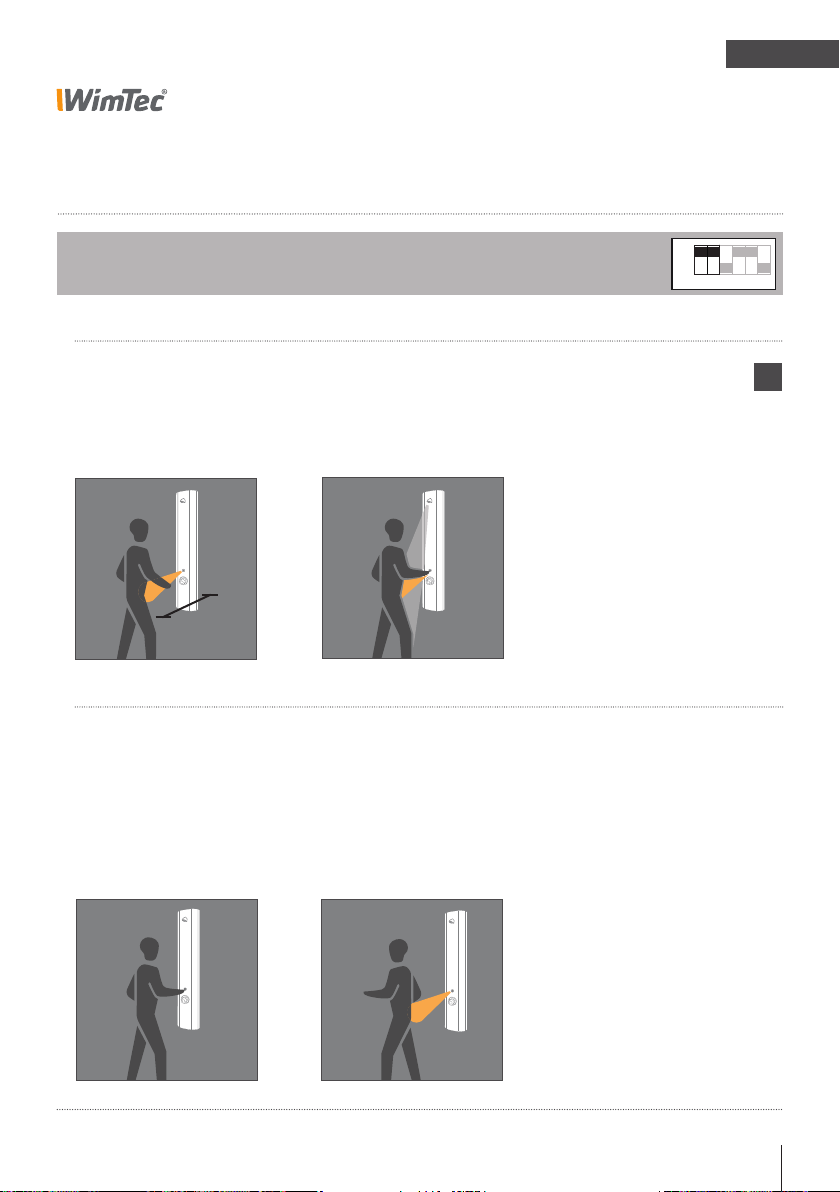
Programm Voll-Automatik:
DIP Schalter 1=ON, 2=ON
EINSCHALTEN:
Benutzererkennung
Der Benutzer tritt vor die
Dusche und wird von der
Armatur erkannt.
50 cm
AUSSCHALTEN:
Taster
Durch Antippen der ON/OFF
Taste schaltet die Dusche ab.
Durch erneutes Tippen kann
die Dusche wieder aktiviert
werden.
Automatisch
Nach der Benutzererkennung
schaltet die Dusche automatisch nach 2 s ein.
Automatisch
Dusche stoppt nach Ablauf
der Nachlaufzeit, wenn der
Benutzer den Ansprechbereich
Automatisch
verlässt oder nach Ablauf der
Sicherheitsspülstopp-Zeit.
Dusche-Paneel WimTec PROOF P6 13
ON
OFF
1 2 3 4 5 6
i
Bei deaktivierter
Reinigungsstopp-Funktion
schaltet sich die Dusche
ohne Verzögerung ein!
Page 14
DE
Halbautomatik:
Vollautomatik:
Manuell:
Warmlauf:
ON
OFF
1 2 3 4 5 6
ON
OFF
1 2 3 4 5 6
ON
OFF
1 2 3 4 5 6
Reinigungsstopp:
ON
OFF
1 2 3 4 5 6
Hygienespülung:
ON
OFF
1 2 3 4 5 6
PROOF P6
Programm-Beschreibung
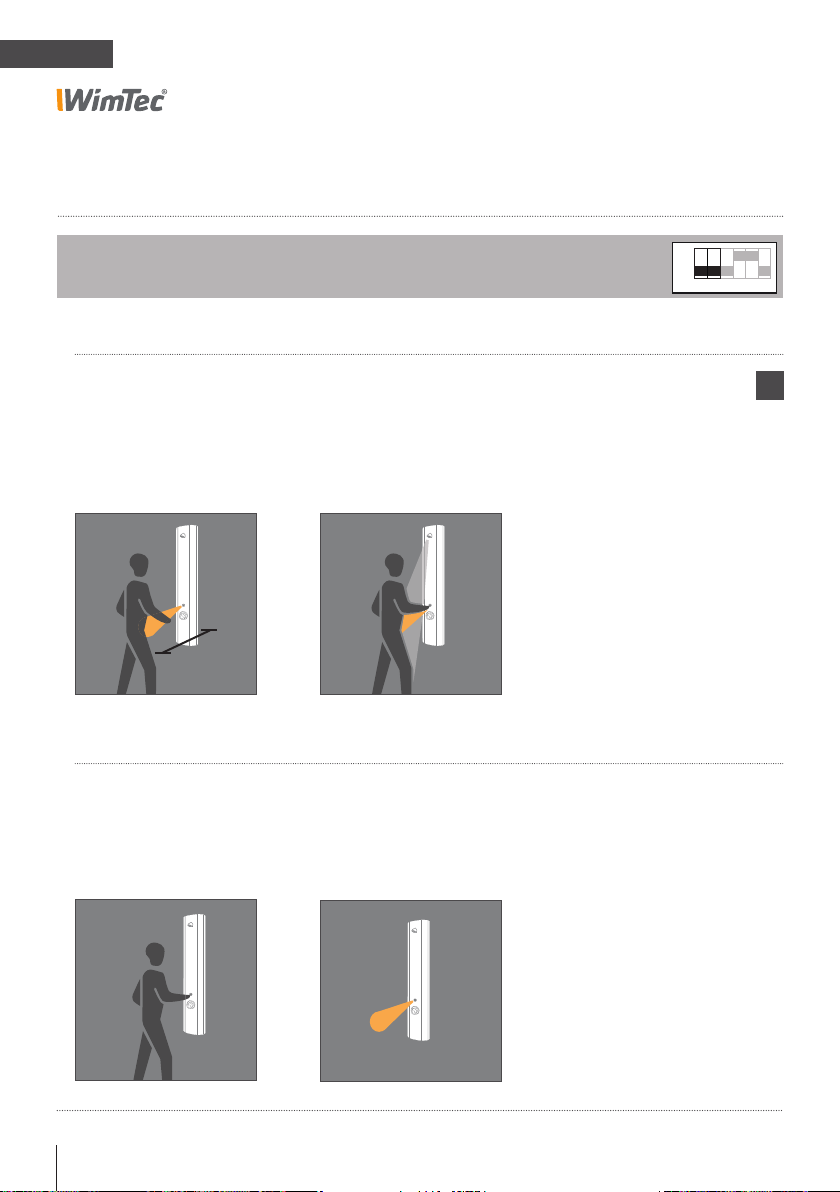
Programm Manuell:
DIP Schalter 1=OFF, 2=OFF
EINSCHALTEN:
Benutzererkennung
Der Benutzer tritt vor die Dusche und wird von der Armatur
erkannt.
50 cm
AUSSCHALTEN:
Taster
Durch erneutes Antippen der
ON/OFF Taste kann die Dusche
immer wieder aus- und eingeschaltet werden.
14 Dusche-Paneel WimTec PROOF P6
Taster
Durch Antippen der ON/OFF
Taste schaltet die Dusche ein.
Sicherheitsspülstopp
Nach Ablauf der eingestellten
Spülstopp-Zeit (siehe S. 5)
schaltet die Dusche automatisch ab.
ON
OFF
1 2 3 4 5 6
i
Es wird empfohlen, die
Warmlauffunktion nicht
mit dem Programm
„Voll-Automatik“ zu
kombinieren!
Page 15
PROOF P6
Warmlauf:
Funktions-Beschreibung
DE
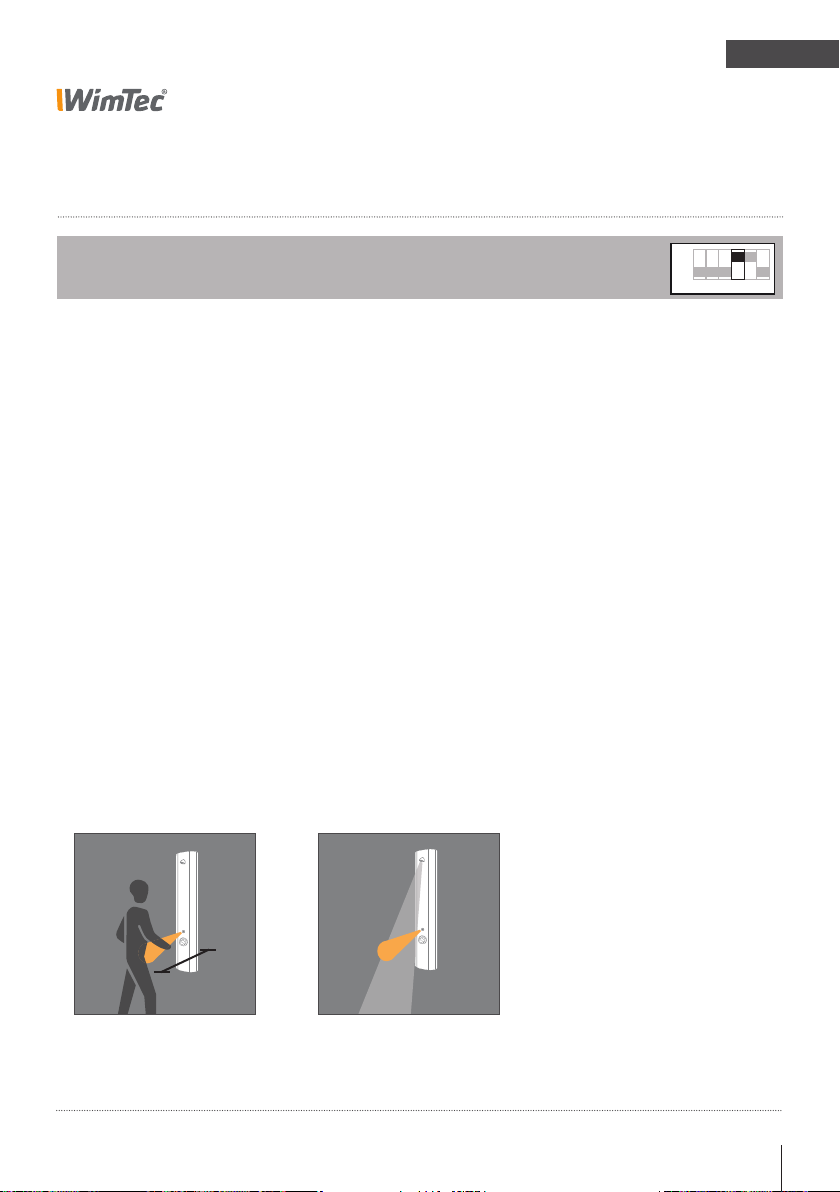
Warmlauf:
DIP Schalter 4
Dient zum Freispülen der Warmwasserleitung, ohne dass der
Benutzer vor der Dusche im Ansprechbereich verweilen muss.
Dip Schalter 4 ON = Warmlauf-Funktion aktiviert (voreingestellt).
Dip Schalter 4 OFF = Warmlauf-Funktion deaktiviert.
Benutzererkennung
Der Benutzer tritt vor die
Dusche und wird von der
Armatur erkannt.
Betrieb
Nach dem Einschalten läuft
das Wasser für 30 s zuzüglich
der eingestellten Nachlaufzeit
ohne dass sich der Benutzer
im Ansprechbereich befinden
muss und schaltet danach
automatisch ab.
Tritt während dieser 30 s der
Benutzer für mindestens 5 s in
den Ansprechbereich geht die
Dusche wieder in den Normalbetrieb über.
ON
OFF
1 2 3 4 5 6
50 cm
Dusche-Paneel WimTec PROOF P6 15
Page 16
DE
Warmlauf:
ON
OFF
1 2 3 4 5 6
Reinigungsstopp:
PROOF P6
Funktions-Beschreibung
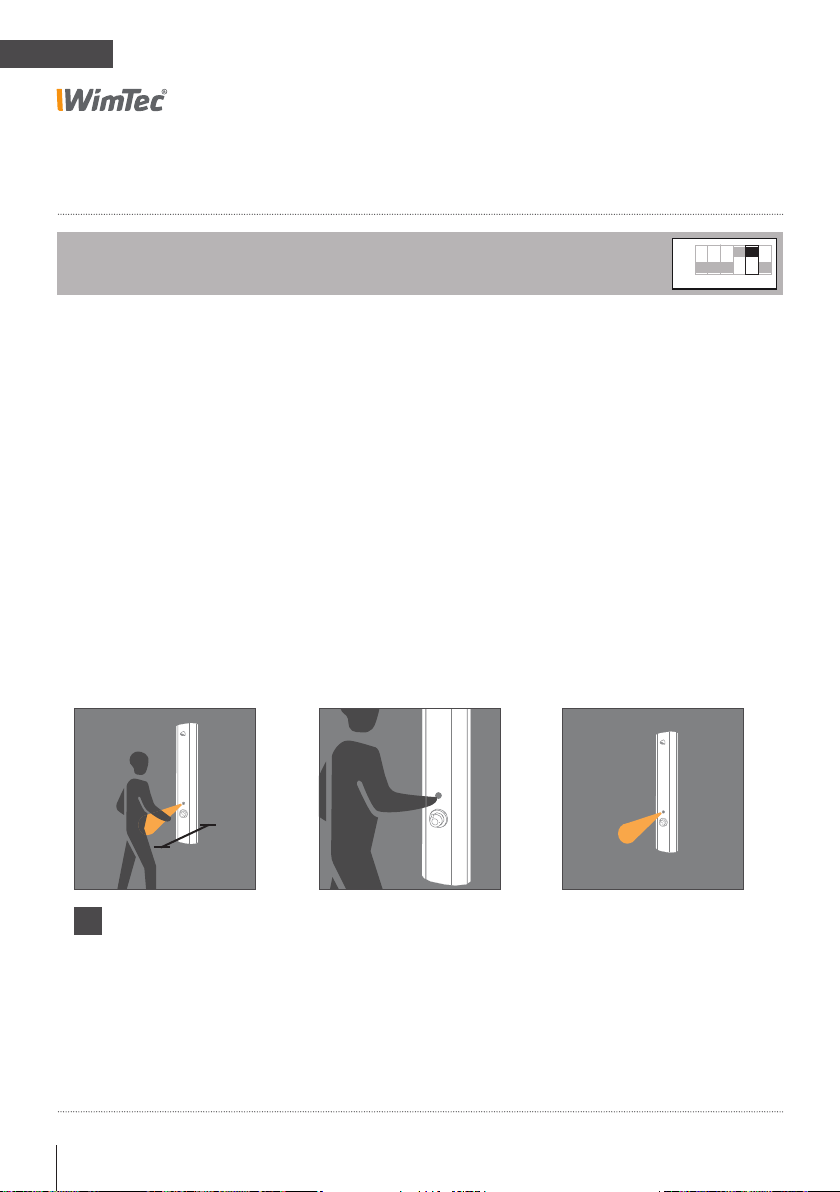
Reinigungsstopp:
DIP Schalter 5
Dient zum Deaktivieren der Armatur beim Reinigen.
Dip Schalter 5 ON = Reinigungsstopp-Funktion aktiviert (voreingestellt).
Dip Schalter 5 OFF = Reinigungsstopp-Funktion deaktiviert.
Benutzererkennung
Der Benutzer tritt vor die Dusche und wird von der Armatur
erkannt.
Reinigungsstopp aktivieren
Heranführen der Hand an den
Infrarot-Sensor (siehe Bild) und
etwa 5 s verweilen (bis LED 5
x blinkt).
Die Reinigungsstoppzeit dauert
10 Minuten ab Verlassen des
Ansprechbereiches.
ON
OFF
1 2 3 4 5 6
Reinigungsstopp deaktivieren
Automatisch wenn 10 Minuten
kein Benutzer erkannt wurde.
Manuelles Deaktivieren gleich
wie beim Aktivieren. Nach
Verlassen des Ansprechbereiches geht die Armatur
nach einer Sicherheitszeit von
3 s wieder in den Normalbetrieb über.
50 cm
!
Im Vollautomatikmodus
muss die Hand innerhalb
einer Sekunde ab dem Herantreten an den InfrarotSensor herangeführt
werden, andernfalls löst
die Armatur aus.
16 Dusche-Paneel WimTec PROOF P6
Page 17
PROOF P6
Warmlauf:
ON
OFF
1 2 3 4 5 6
Reinigungsstopp:
ON
OFF
1 2 3 4 5 6
Hygienespülung:
Funktions-Beschreibung
DE
Stagnationsfreispülung:
DIP Schalter 6
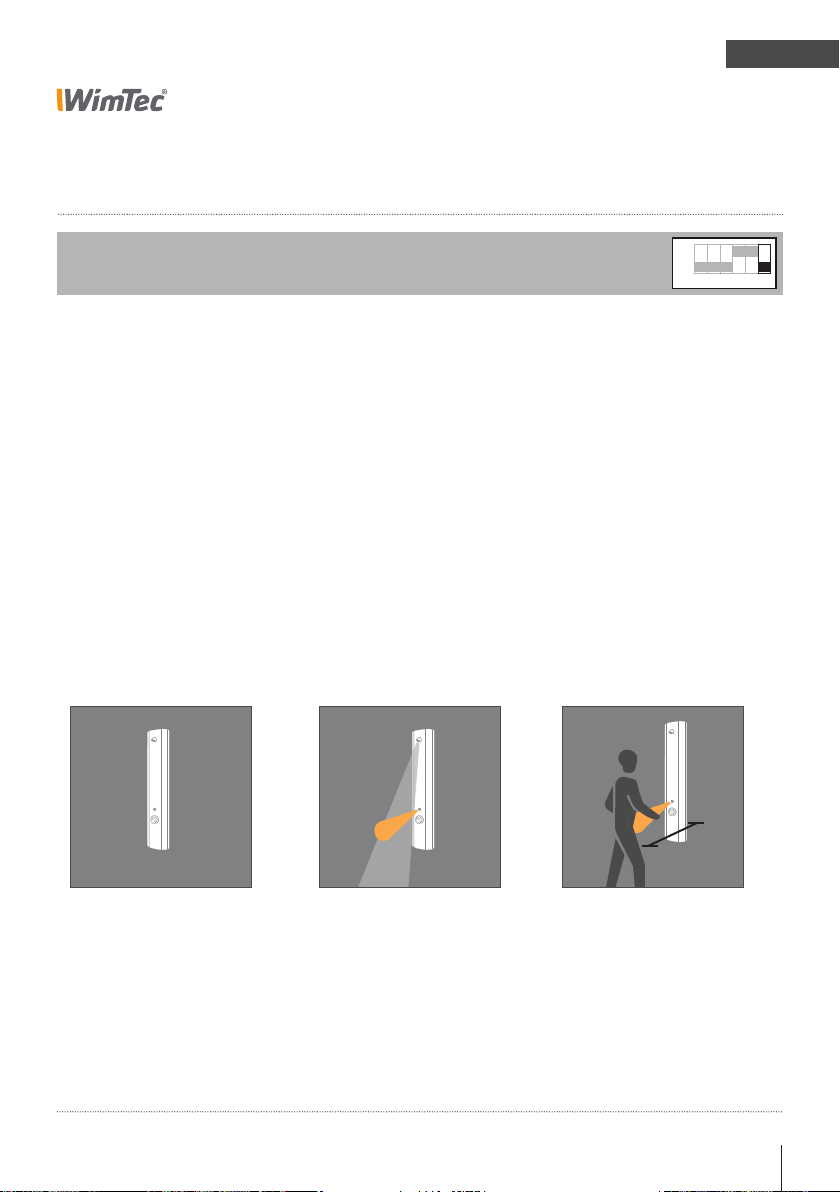
Dient zum Ausspülen des Stagnationswasser bei längerer Nichtbenutzung.
Dip Schalter 6 ON = Stagnationsfreispülungs-Funktion aktiviert.
Dip Schalter 6 OFF = Stagnationsfreispülungs-Funktion deaktiviert (voreingestellt).
Zeitintervall
Einstellbar am Intervall-Regler
von 3 - 48 h (siehe Seite 6).
Automatische
Stagnationsfreispülung
Wird die Armatur für die eingestellte Zeit nicht benützt, löst
die Armatur eine automatische
Stagnationsfreispülung für
10 s aus.
Sicherheit
Ist der Reinigungsstopp
aktiviert, löst die Stagnationsfreispülung erst 2 min nach
dessen Deaktivierung aus.
ON
OFF
1 2 3 4 5 6
3 - 48 h
50 cm
10
s
Dusche-Paneel WimTec PROOF P6 17
Page 18
DE
PROOF P6
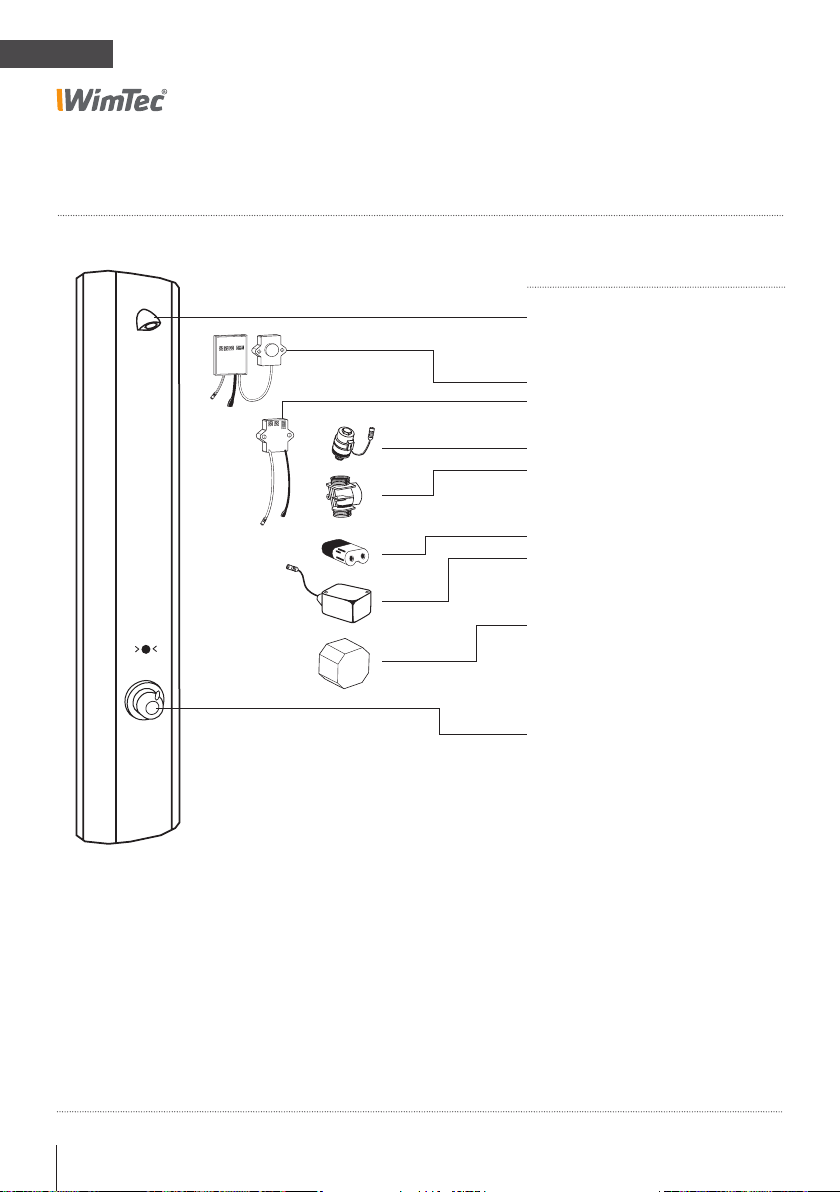
Ersatzteile
Art.Nr.:
120 165
120 363
122 671
231 205
221 312
230 741
230 987
117 899
113 792
107 159
Bezeichnung
Duschkopf WimTec PROOF
Elektronikmodul 12 V
Elektronikmodul 6 V
Magnetventil
Magnetventil-Adapter
6 V Lithium Batterie
Batteriemodul 6 V
Netzteil (1-fach)
Netzteil (5-fach)
Thermostat
18 Dusche-Paneel WimTec PROOF P6
Page 19

PROOF P6
DE
Dusche-Paneel WimTec PROOF P6 19
Page 20

EN
PROOF P6
General notes
Congratulations on purchasing the WimTec PROOF P6.
In order to ensure that you will be able to enjoy this high-quality
product for many years, please take note of the following cleaning
and maintenance recommendations:
Use mild cleaning agents containing soap
Do not use abrasive, scrubbing, sealing or acidic
cleaning agents or disinfectants
Clean the fitting with a soft sponge or cloth only
Do not use steam cleaners
This manual is valid for the following products:
WimTec PROOF P6 - 6 V Art.Nr. 121 148
WimTec PROOF P6 - 12 V Art.Nr. 121 155
Delivery scope:
On wall aluminium housing with integrated electronics, thermostat
with hot-water barrier, vandalproof shower head, 1 magnetic valve,
connection module for external supply or battery module incl.
battery and mounting parts.
Important installation notes:
Mounting and installation may only be performed by a qualified
!
service provider in accordance with DIN 1988, ÖVE/ÖNORM E8001
The “General installation
terms and conditions”
provided at
www.wimtec.com apply.
20 Shower control WimTec PROOF P6
and VDE 0100 Part 701. When planning and installing sanitary
facilities, all relevant local, national and inter-national standards
and provisions must be observed! Provide for 230 V / 12 V power
unit outside of the protected zone.
Page 21

PROOF P6
Technical specifications
6 V battery operation:
Battery: 6 V Lithium CR-P2 (included in scope of supply)
Battery life: approx. 100.000 flushings (max. 2 years)
12 V external supply:
Operating voltage: via power supply 230 V 50 Hz / 12 V=
Art.No. 117 899 - power supply for one control unit
Art.No. 113 792 - power supply for up to 5 control units
Power consumption: max. 3 W
Further technical specifications:
Magnetic valve: cartridge 6 V
Far active range: 15 - 50 cm
Close-Active range: 1 - 5 cm
Flushing stop: from 10 s - 10 min (manual program: from 10 s - 60 s)
Stagnation rinse: activatable, after 3 h - 48 h of none usage for 10 s
Cleaning stopp: for 10 min
Flow pressure: 0,05 - 0,6 MPa (0,5 - 6 bar)
Static pressure: max. 0,8 MPa (8 bar)
Water temperature: max. 70 °C (max. 80 °C for max. 10 min)
Flow rate: 9 l/min at 0,3 MPa (3 bar)
Water inlet: R 1/2“ IG
Temperature adjustment: Thermostat with hot-water barrier (not frost resistant)
EN
Material:
Panel: Aluminium anodized
Fittings: chromed brass
Shower control WimTec PROOF P6 21
Page 22
EN
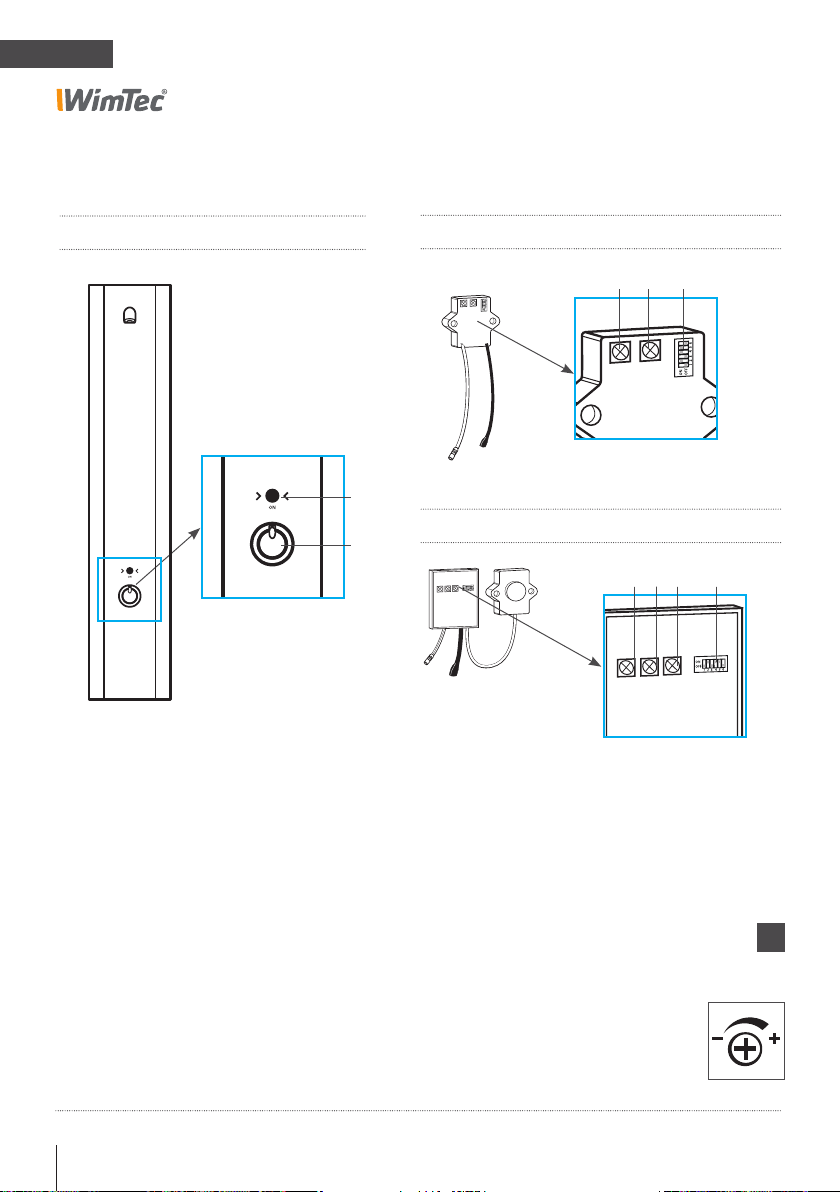
Legend
PROOF P6
Shower panel:
A Infrared sensor for user detection and
ON/OFF button to turn the shower
ON/OFF.
B Thermostat knob to adjust the
temperature, including a button for
bypassing the 38 °C safety lock.
Elektronics module - 6 V battery operation:
C D E
A
Elektronics module - 12 V external supply:
B
F C D E
C Time control
D Interval control
E DIP switches for configuring the functions
F Range control
22 Shower control WimTec PROOF P6
!
The general rule applies to all controls:
Move counterclockwise to
decrease the setting.
Move clockwise to increase
the setting.
Page 23

PROOF P6
Configuring the programs & functions
DIP switches:
Program activation – DIP switches 1 and 2:
Program DIP switch 1 DIP switch 2 Description
Semi automatic mode
1)
Fully automatic mode ON ON Page 31
Manual mode OFF OFF Page 32
Function activation – DIP switches 3–6:
DIP switch Function Description
3
4
5
6
1)
Program or functions already configured
ex factory.
Shut-off delay ON = 5 s / OFF
Warm water rinse
Shower monitoring
Stagnation rinse Page 35
OFF ON
1)
= 2 s
1)
1)
Page 30
Page 33
Page 34
EN
Regulator controls:
C. Time control
set to safety flow arrest after
10 min (configurable from
10 s to 10 min).
Manual program mode: configurable from 10–60 s.
After the configured maximum
flow time has elapsed, the
water stops automatically to
prevent unintentional continuous activation.
D. Interval control
for stagnation rinse, default
setting 48 h (configurable
from 3–48 h).
If the fitting has not been
used for the set period, the
device will automatically
perform a 10-s rinse to clear
stagnation water from the
pipes.
Shower control WimTec PROOF P6 23
C. Range control
User detection range preset
to 50 cm (configurable from
15–50 cm).
Sets the infrared sensor range
from 15–50 cm.
Page 24
EN
PROOF P6
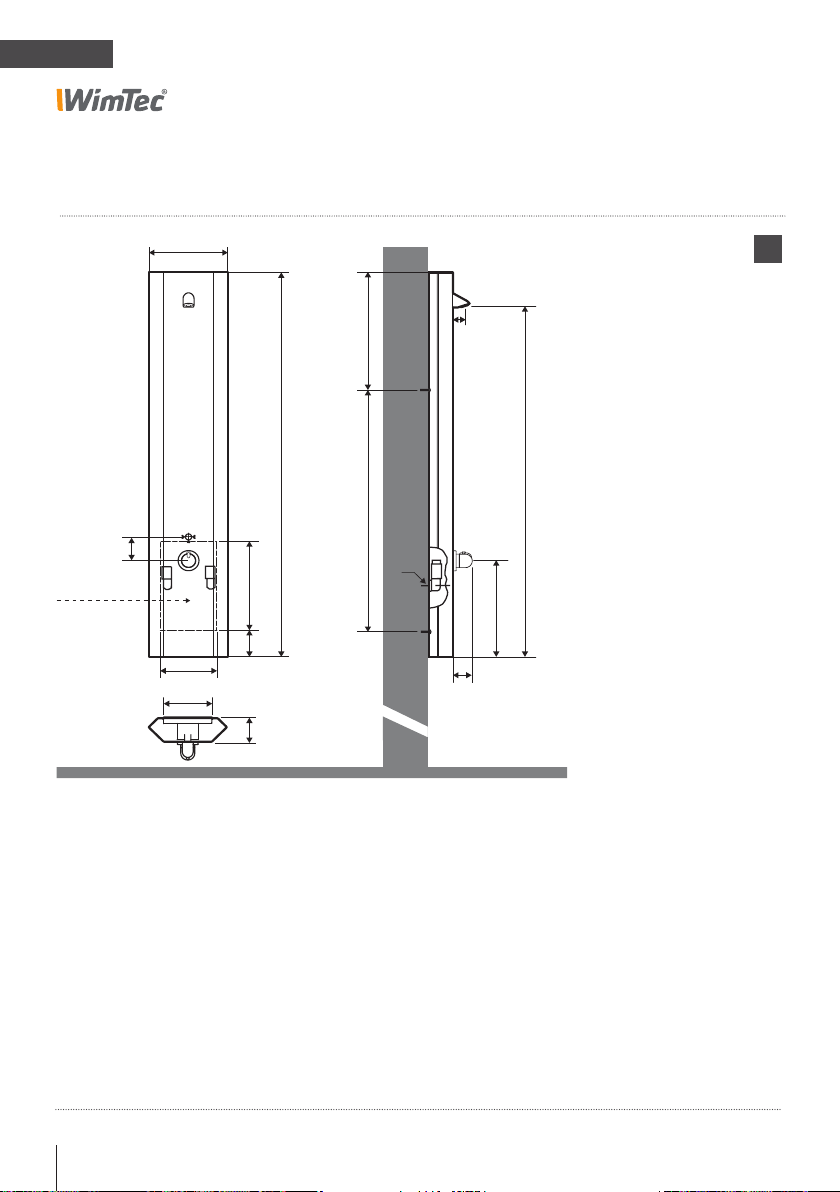
Dimensions All dimensions in mm:
256
405
1300
810
80
* E-connect.
12 V=
185
166
Retrofitting using existing connections can be performed for the
standard size 150 mm.
300
90
80
½"
40
65
* Provide for 12 V= elec. connection.
!
Do not install the
power supply in the shower
panel or protected zones.
1190
325
24 Shower control WimTec PROOF P6
Page 25
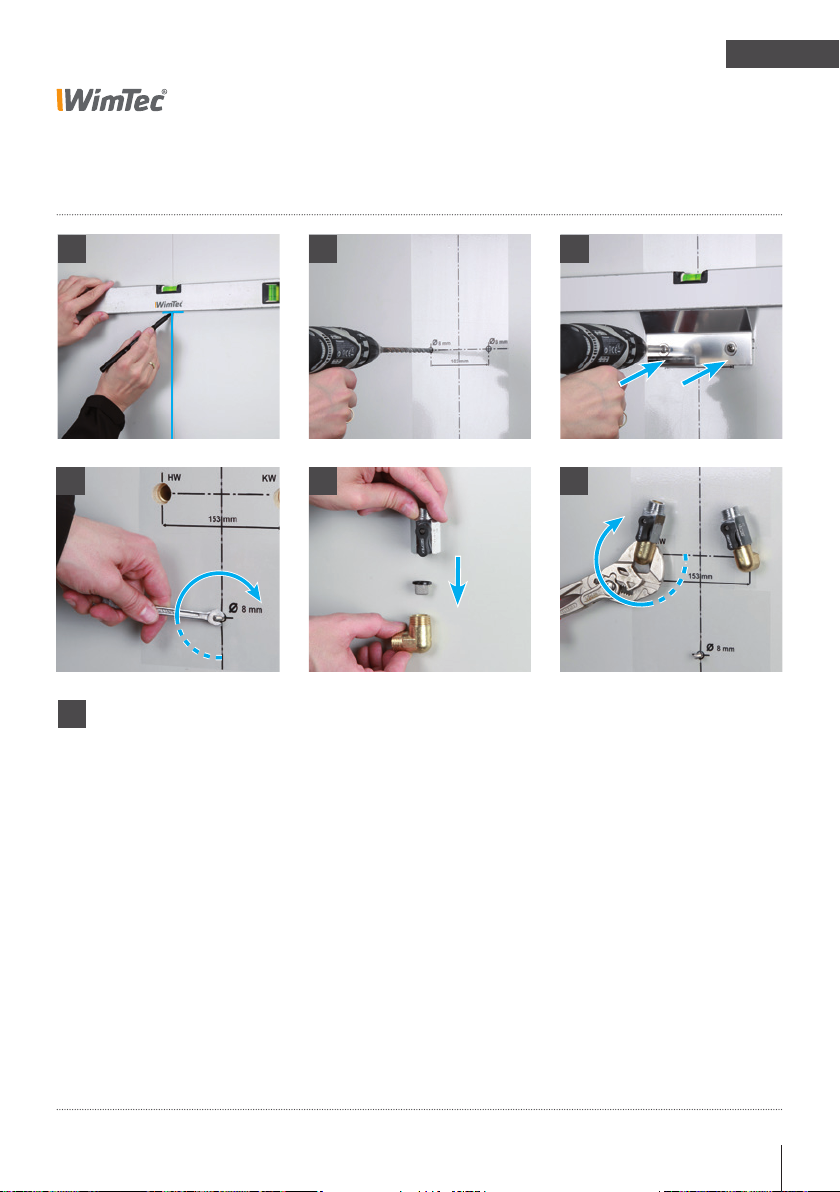
PROOF P6
Assembly
1 2 3
EN
4
!
ATTENTION!
Perform the following steps
in the order indicated!
5 6
1. Mark the centre line and upper edge of the panel on the
wall.
2. Attach the self-adhesive drilling template.
Drill 3x Ø 8-mm holes and insert dowels.
3. Attach mounting bracket using the screws and washers.
4. Only for battery version: Screw in the hanger screw and
hook in the mounting bracket for the battery module.
5. Insert the basket filter into the 90° angled connector and
attach locking pin at the top.
6. Seal off the angled connector by attaching the locking
pin and screw the connector into the inlets, aligning the
locking pins towards the inside at an angle as indicated.
Shower control WimTec PROOF P6 25
Page 26
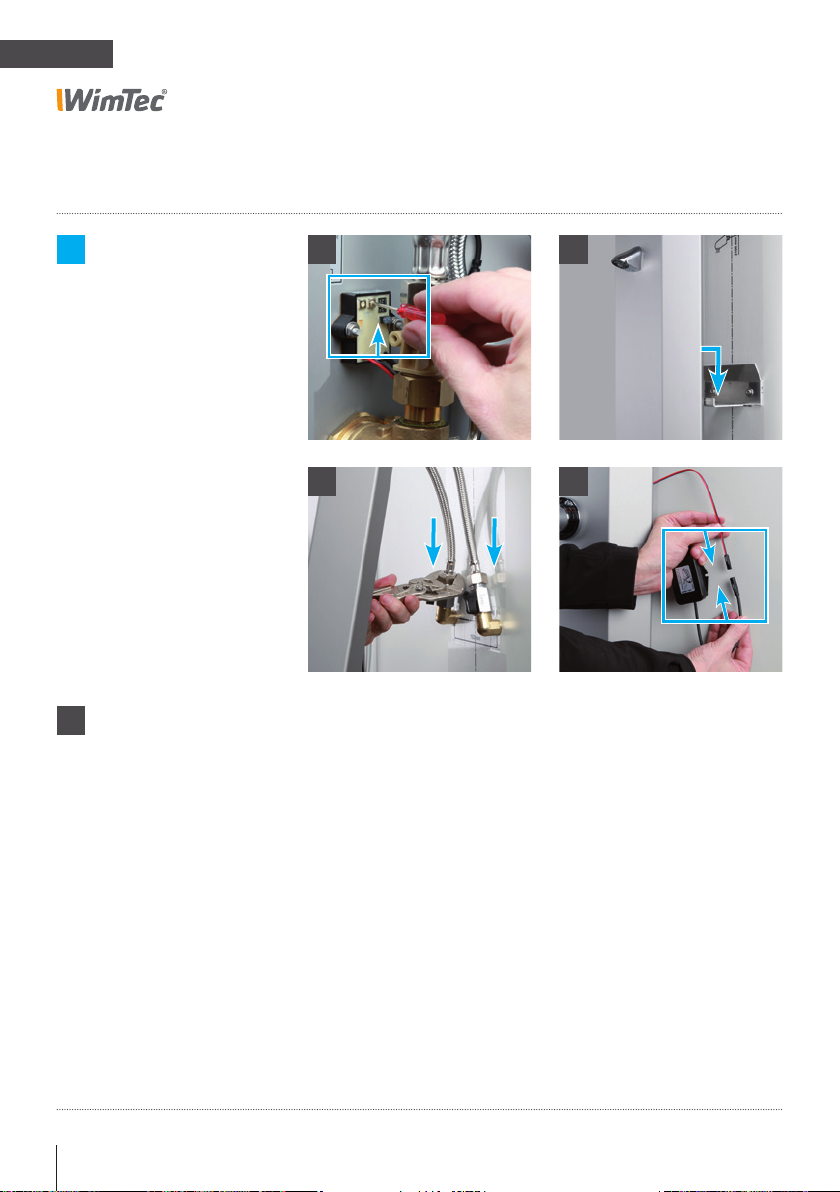
EN
PROOF P6
Assembly: 6 V battery version Art.No. 121 148
i
See 12 V version
at page 28.
!
ATTENTION!
Perform the following steps
in the order indicated!
7
7. Configure the desired functions using the electronics module
(see p. 23).
8. Hook the shower panel into the front bracket strap.
9. Connect the flexible tubes and included valves to the water
inlets.
8
109
10. Plug-in the battery module. (safety locking mechanism of the
magnetic valve starts).
26 Shower control WimTec PROOF P6
Page 27
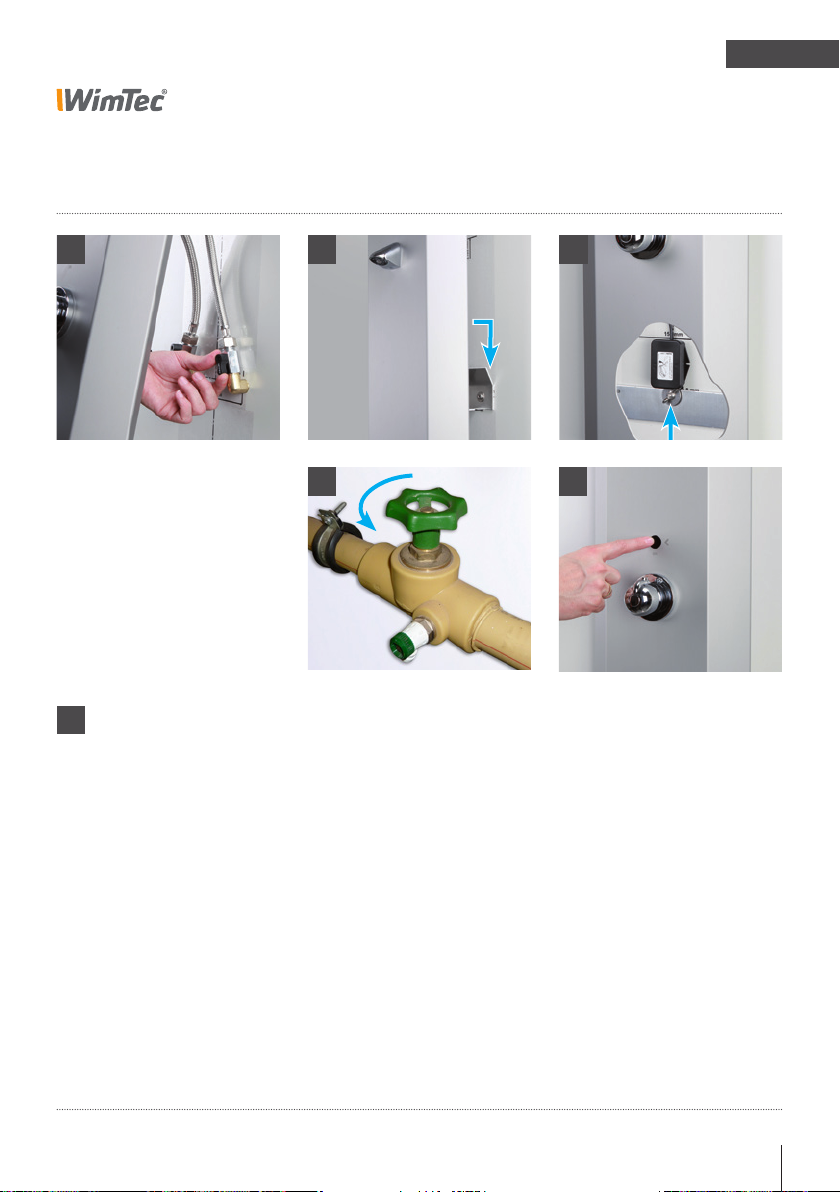
EN
PROOF P6
Assembly: 6 V battery version Art.No. 121 148
131211
!
ATTENTION!
Perform the following steps
in the order indicated!
14
11. Check whether the stop valves are open (knobs are aligned
alongside the water pipes).
12. Hook the shower panel into the rear bracket strap.
ATTENTION! Be careful not to bend or crimp any
cables or tubes.
13. Secure the battery module at the hanger screw using a
washer and wing nut.
14. Open the main water valve.
15. Perform a system test.
15
Shower control WimTec PROOF P6 27
Page 28
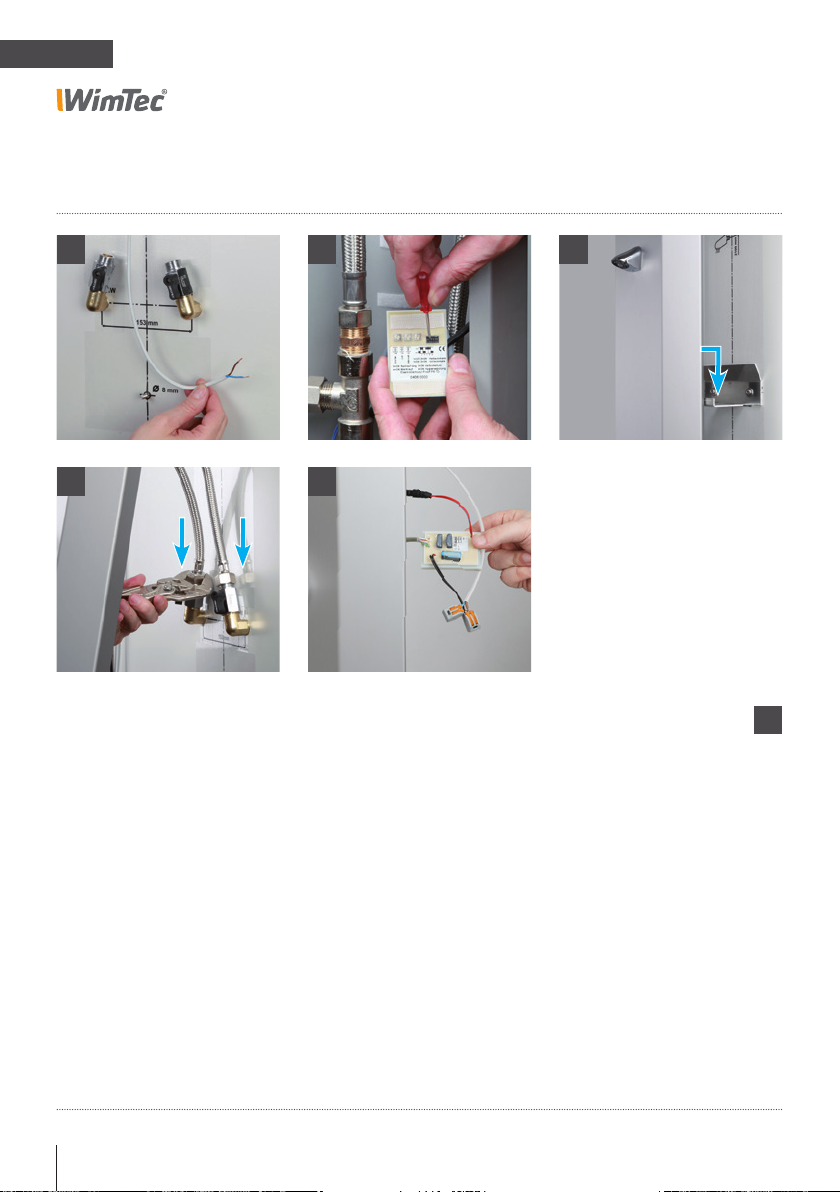
EN
PROOF P6
Assembly: 12 V version Art.No. 121 155
8
10
7. Feed the connection cable into the installation space
and connect it to the power supply (art. no. 117 899 for
1 control or art. no. 113 792 for up to 5 controls).
Attention: The power must be switched off, and the
power supply must not be installed in the shower
panel or the protected zone!
11
97
!
ATTENTION!
Perform the following steps
in the order indicated!
8. Remove the electronics module from the Velcro fastener
and configure the desired functions (see p. 23).
9. Hook the shower panel into the front bracket strap.
10. Connect the flexible tubes and included valves to the
water inlets.
11. Connect the power cables to the electronics module and
turn on the power (causing the safety locking mechanism
of the magnetic valve to activate).
28 Shower control WimTec PROOF P6
Page 29
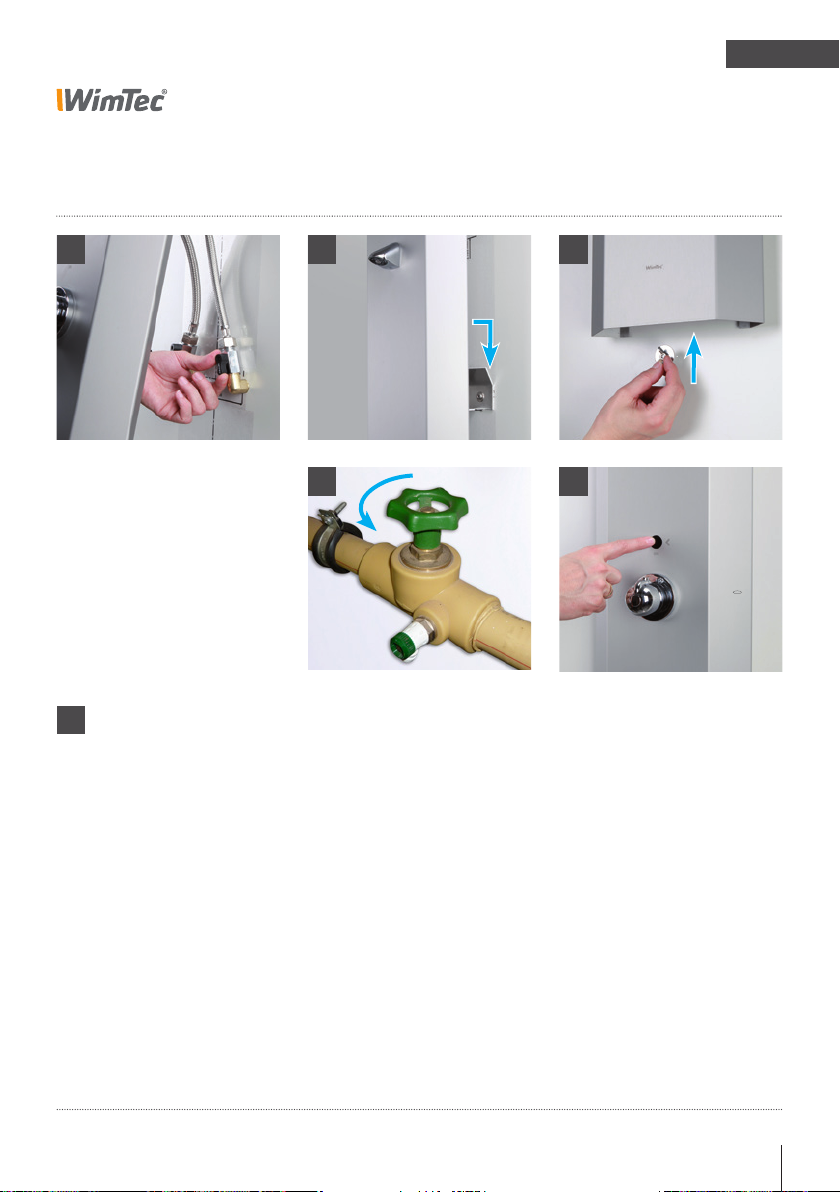
EN
PROOF P6
Assembly: 12 V version Art.No. 121 155
12
!
ATTENTION!
Perform the following steps
in the order indicated!
1413
15
12. Check whether the stop valves are open (knobs are aligned
alongside the water pipes).
13. Hook the shower panel into the rear bracket strap.
ATTENTION! Be careful not to bend or crimp any
cables or tubes.
16
14. Secure the shower panel from below at the hanger screw
using a washer and wing nut.
15. Open the main water valve.
16. Perform a system test.
Shower control WimTec PROOF P6 29
Page 30
EN
Halbautomatik:
Warmlauf:
ON
OFF
1 2 3 4 5 6
Reinigungsstopp:
ON
OFF
1 2 3 4 5 6
Hygienespülung:
ON
OFF
1 2 3 4 5 6
PROOF P6
Program description
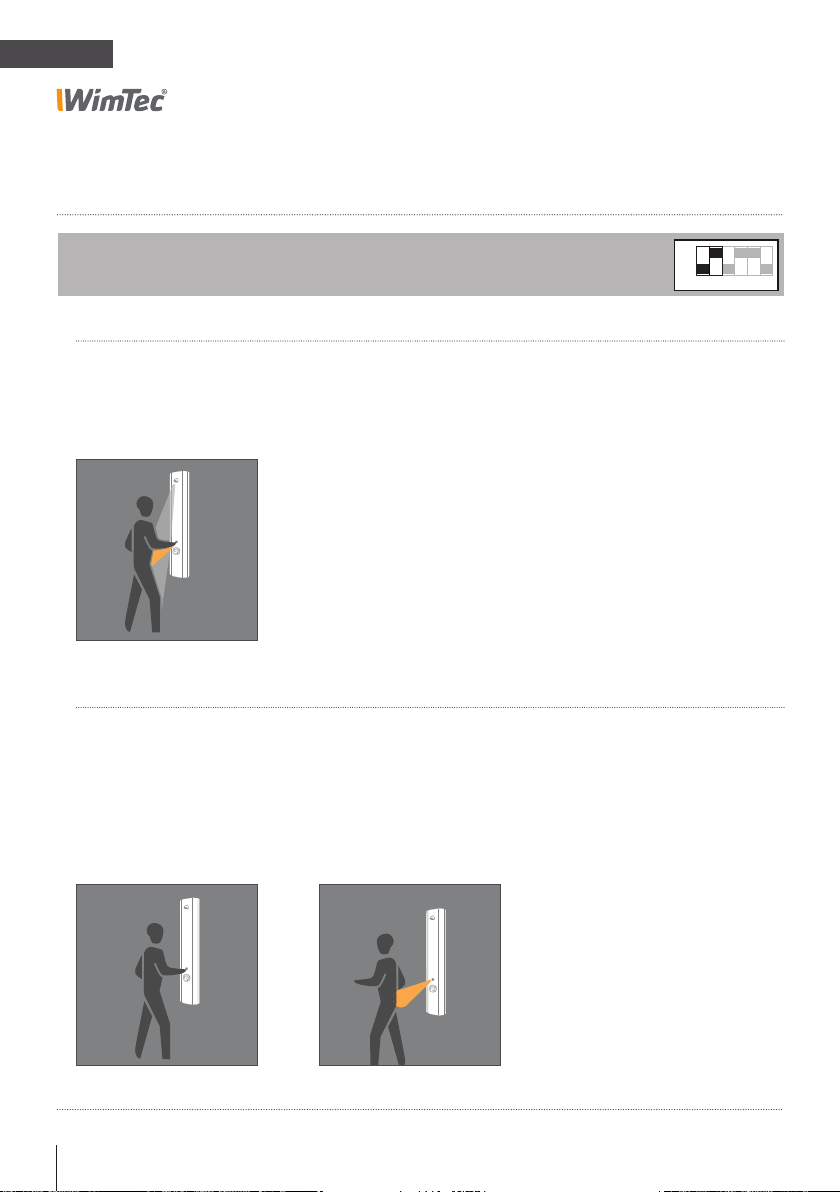
Semi automatic program mode (default setting):
DIP switch 1=OFF, 2=ON
SWITCH ON:
Button
Water starts flowing as soon as
you press the ON/OFF button.
SWITCH OFF:
Button
Press the ON/OFF button again
to turn off the shower.
30 Shower control WimTec PROOF P6
Automatic function
The water flow stops at the
end of the shut-off delay once
the user leaves the sensor
range or after the configured
water arrest time has elapsed.
ON
OFF
1 2 3 4 5 6
Page 31
PROOF P6
Halbautomatik:
Vollautomatik:
Warmlauf:
ON
OFF
1 2 3 4 5 6
ON
OFF
1 2 3 4 5 6
Reinigungsstopp:
ON
OFF
1 2 3 4 5 6
Hygienespülung:
ON
OFF
1 2 3 4 5 6
Program description
EN
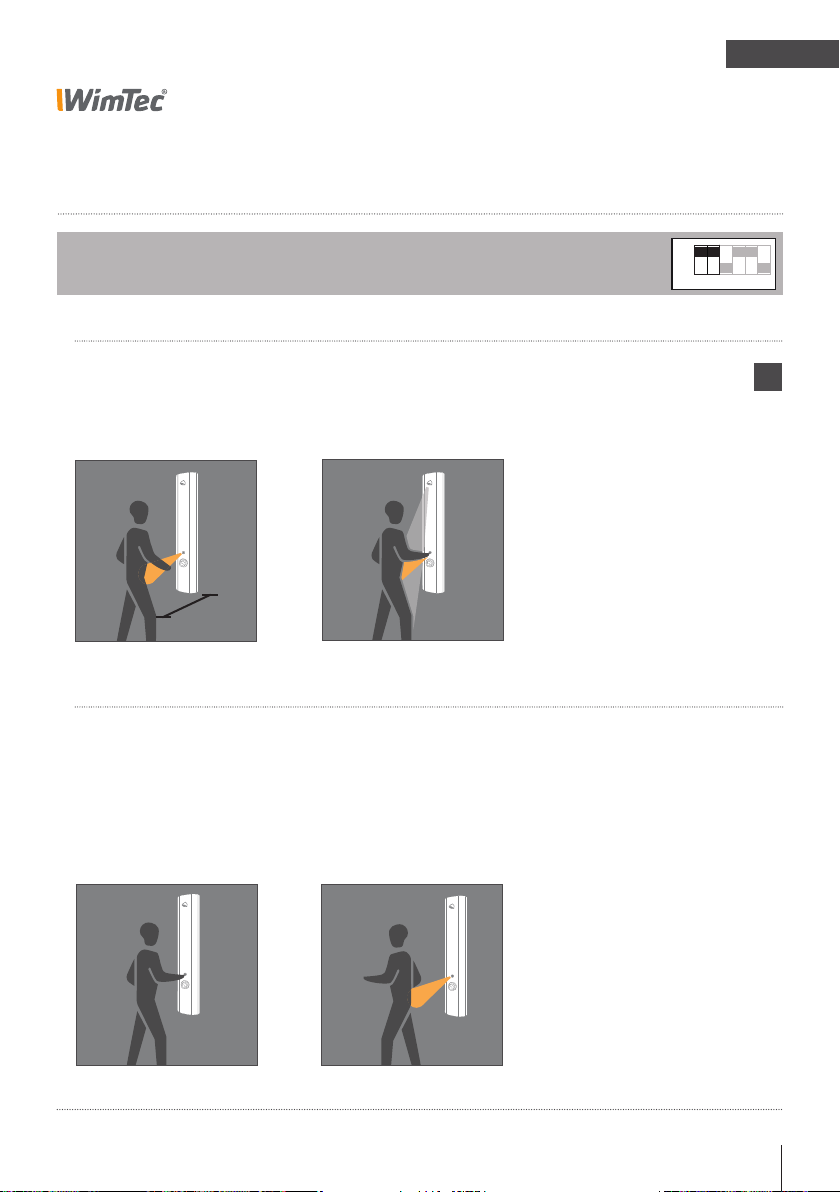
Fully automatic program mode:
DIP switch 1=ON, 2=ON
SWITCH ON:
User detection
When you step in front of the
shower, the system will detect
you.
50 cm
Automatic function
The shower automatically
activates 2 s after detecting
the user.
SWITCH OFF:
Button
Press the ON/OFF button to
turn off the shower.
Automatic function
The water flow stops at the
end of the shut-off delay
once the user leaves the
Press the ON/OFF button
once more to turn the shower on again.
sensor range or after the
configured water arrest time
has elapsed.
ON
OFF
1 2 3 4 5 6
When cleaning stop is
disabled the shower starts
without any delay.
Shower control WimTec PROOF P6 31
i
Page 32
EN
Halbautomatik:
Vollautomatik:
Manuell:
Warmlauf:
ON
OFF
1 2 3 4 5 6
ON
OFF
1 2 3 4 5 6
ON
OFF
1 2 3 4 5 6
Reinigungsstopp:
ON
OFF
1 2 3 4 5 6
Hygienespülung:
ON
OFF
1 2 3 4 5 6
PROOF P6
Program description
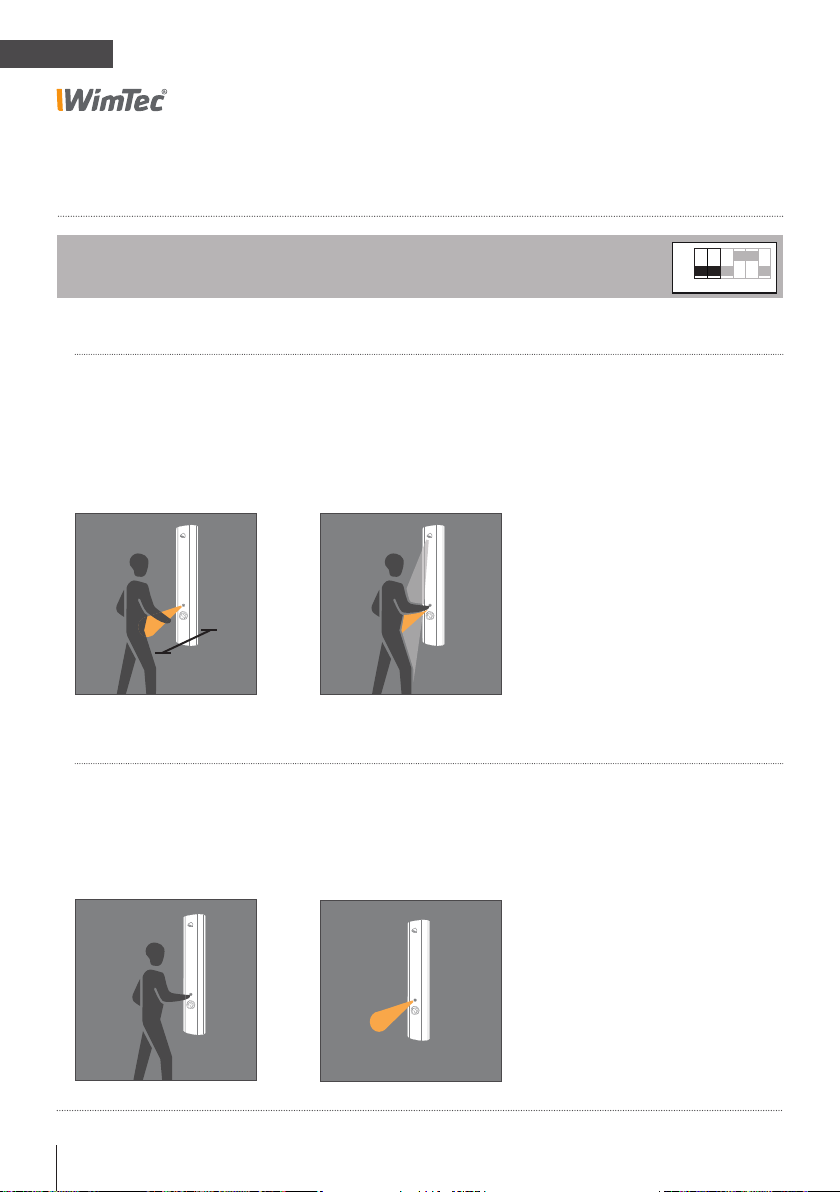
Manual program mode:
DIP switch 1=OFF, 2=OFF
SWITCH ON:
User detection
When you step in front of the
shower, the system will detect
you.
50 cm
SWITCH OFF:
Button
Each subsequent activation of
the ON/OFF button will turn
the shower off/on again.
32 Shower control WimTec PROOF P6
Button
Press the ON/OFF button to
turn on the shower.
Safety flow arrest
After the configured water
arrest time (see p. 23) has
elapsed, the shower will auto-
matically shut off.
ON
OFF
1 2 3 4 5 6
Page 33
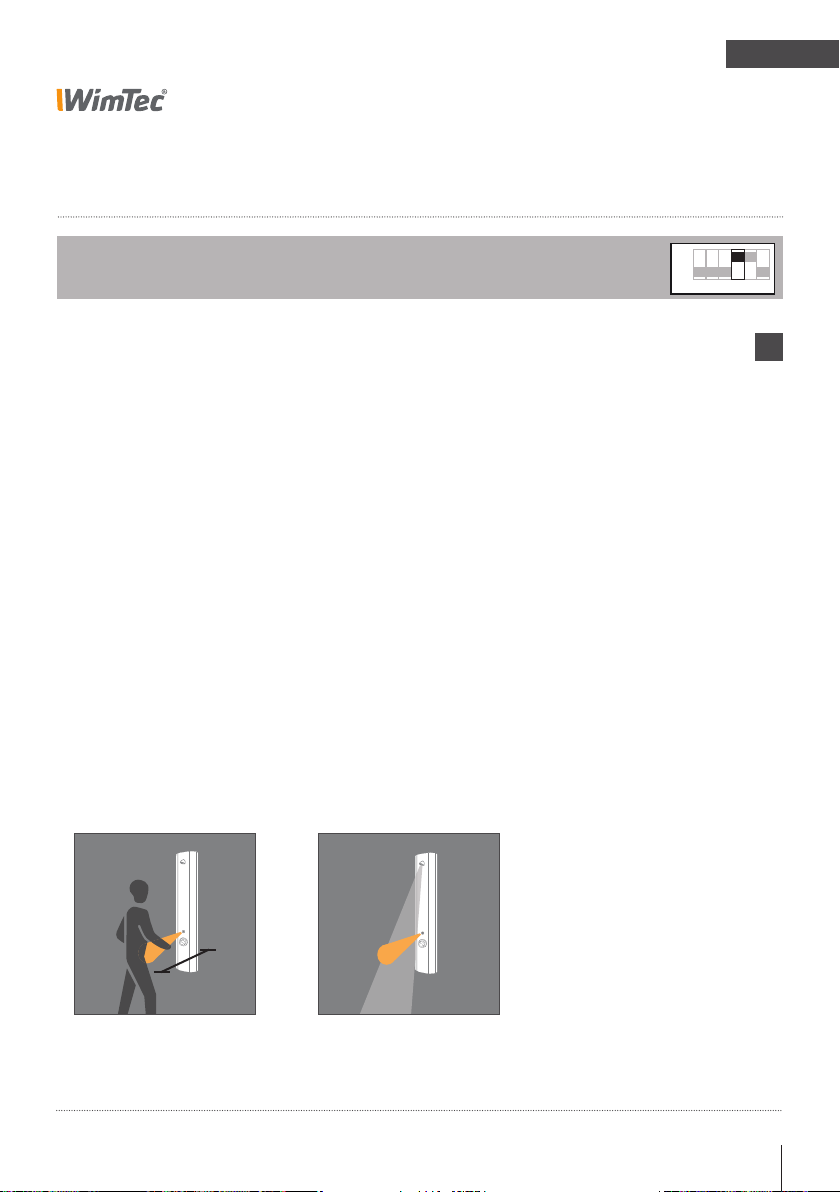
PROOF P6
Warmlauf:
Description of the functions
EN
Warm water rinse:
DIP switch 4
Serves to rinse the warm water pipe without the need for you to
remain within the sensor range of the shower.
DIP switch 4 ON = Warm water rinse function enabled
(default setting).
DIP switch 4 OFF = Warm water rinse function disabled.
User detection
When you step in front of the
shower, the system will detect
you.
Operation
After activation, water will
flow for 30 s plus the configured shut-off delay without the
need for you to remain within
the sensor range; it will then
automatically shut down again.
If you enter the sensor range
for at least 5 s during these
30 s, the shower will resume
normal operation.
ON
OFF
1 2 3 4 5 6
It is recommended not
to combine the warm
water rinse with the fully
automatic program mode!
i
50 cm
Shower control WimTec PROOF P6 33
Page 34
EN
Warmlauf:
ON
OFF
1 2 3 4 5 6
Reinigungsstopp:
PROOF P6
Description of the functions
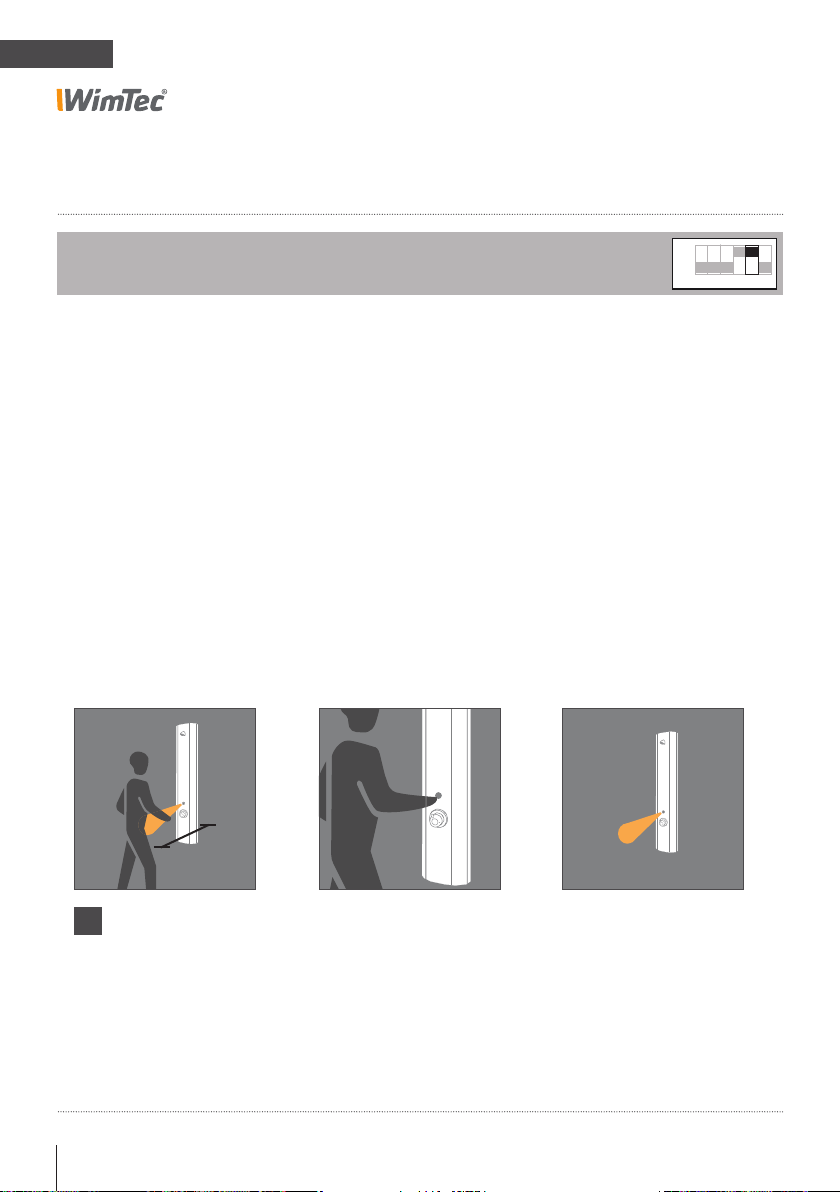
Cleaning stop:
DIP switch 5
Serves to disable the fitting prior to cleaning.
DIP switch 5 ON = Cleaning stop function enabled (default setting).
DIP switch 5 OFF = Cleaning stop function disabled.
User detection
When you step in front of the
shower, the system will detect
you.
Enable cleaning stop
Approach the infrared sensor
with your hand (see image)
and remove it after the LED
has flashed 5 times.
The cleaning stop remains enabled for 10 min after leaving
the sensor range.
ON
OFF
1 2 3 4 5 6
Disable cleaning stop
The function automatically
stops if no user was detected
for 10 minutes.
You can manually disable the
function following the same
procedure used to enable it.
The fitting will resume normal
operation with a safety delay
of 3 s after you leave the
sensor range.
50 cm
!
In fully automatic mode,
you must approach the
infrared sensor with your
hand within one second
after entering the sensor
range to prevent the fitting
from activating.
34 Shower control WimTec PROOF P6
Page 35
PROOF P6
Warmlauf:
ON
OFF
1 2 3 4 5 6
Reinigungsstopp:
ON
OFF
1 2 3 4 5 6
Hygienespülung:
Description of the functions
EN
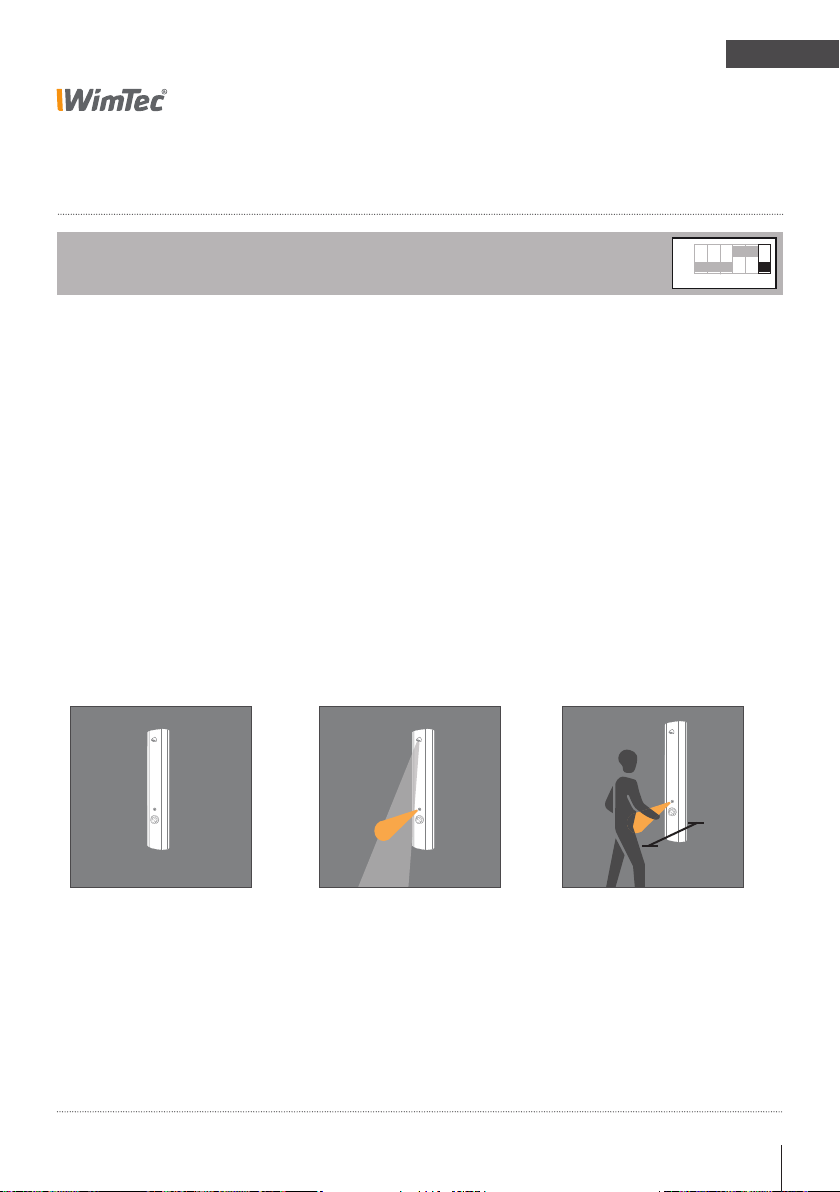
Stagnation rinse:
DIP switch 6
Serves to remove stagnant water that accumulates during longer periods of disuse.
DIP switch 6 ON = Stagnation rinse function enabled.
DIP switch 6 OFF = Stagnation rinse function disabled (default setting).
Time interval
Can be set from 3–48 h at the
interval control (see p. 23).
Automatic stagnation rinse
If the fitting has not been used
for the set period, the stagnation rinse operation is automatically executed for 10 s.
Safety
If the cleaning stop function is
enabled, the stagnation rinse
function will only start 2 min
after the cleaning stop function
has been disabled.
ON
OFF
1 2 3 4 5 6
3 - 48 h
50 cm
10
s
Shower control WimTec PROOF P6 35
Page 36
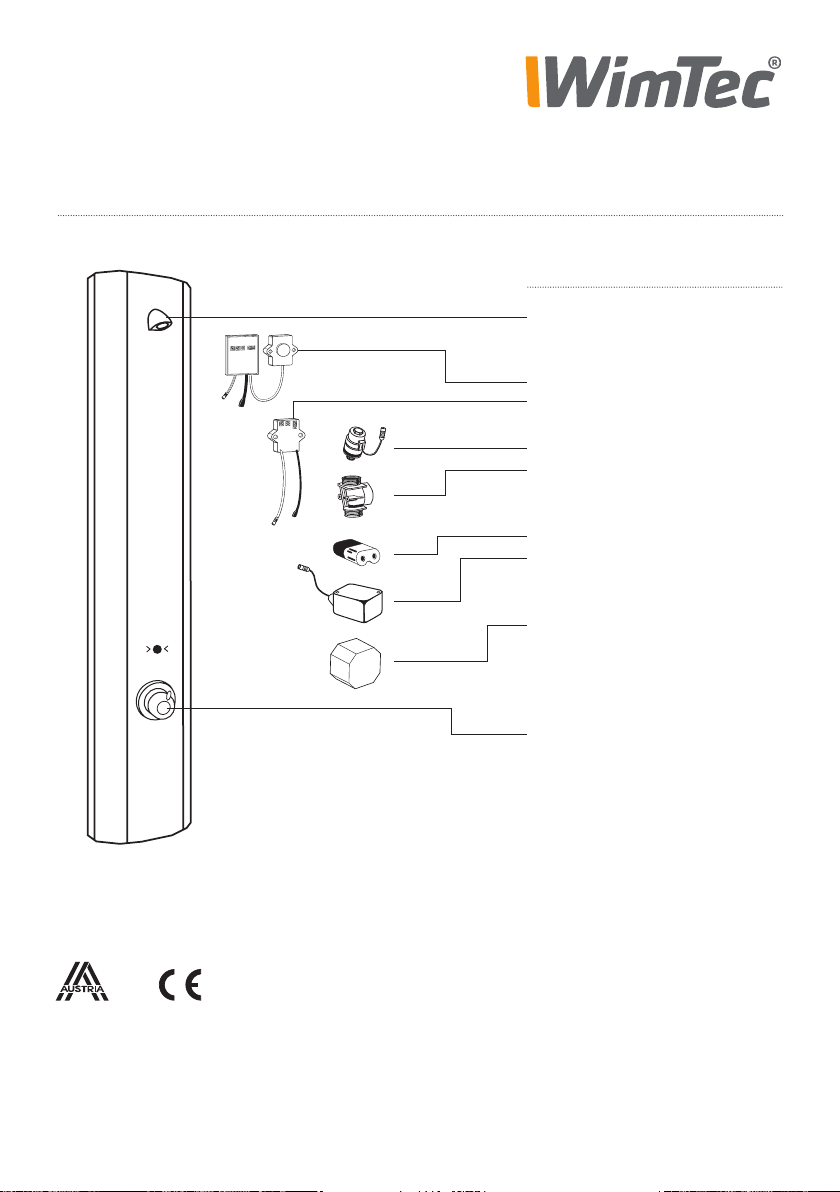
Replacement parts
Art. no.:
120 165
120 363
122 671
231 205
221 312
230 741
230 987
117 899
113 792
107 159
Designation
WimTec PROOF
shower unit
Electronics module 12 V
Electronics module 6 V
Magnetic valve
Magnetic valve adapter
6-V lithium battery
6-V battery module
Power supply (1-connect.)
Power supply (5-connect.)
Thermostat
WIMTEC Sanitärprodukte GmbH
p: A - 3325 Ferschnitz, Freidegg 50, AUSTRIA
t: +43 (0) 7473 5000 f: +43 (0) 7473 5000 - 500
m: [email protected] i: www.wimtec.com
Auflage: 05 09 2014 Art.Nr. 1002148
Page 37
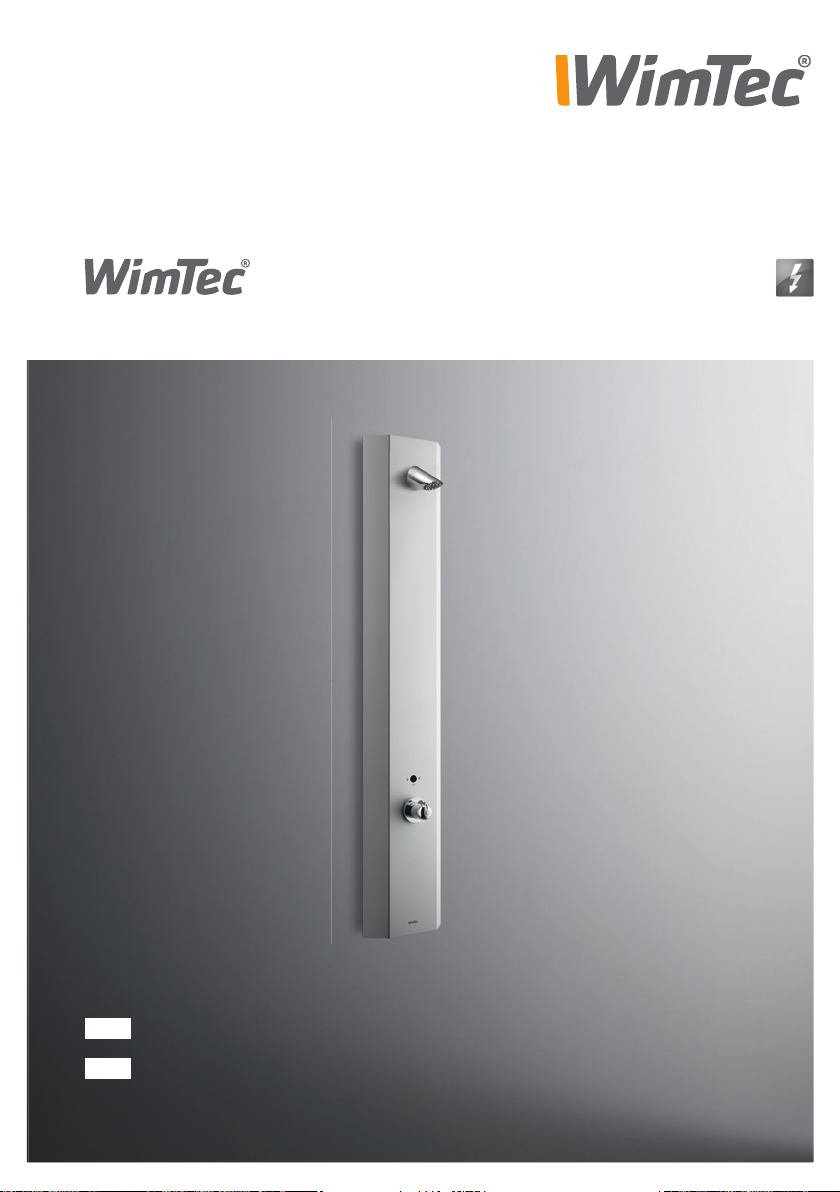
PROOF P6
mit thermischer Desinfektion
DE
DE
Montage- und Bedienungsanleitung
Montage- und Bedienungsanleitung
GB
EN
Assembly and operating instructions
Installation and operating instructions
Page 38

DE
PROOF P6 mit thermischer Desinfektion
Allgemeine Hinweise
Gratulation zum Kauf Ihres Dusche-Paneels WimTec PROOF P6
mit thermischer Desinfektion.
Damit Sie jahrelang Freude mit dieser hochwertigen Armatur
haben, empfehlen wir Ihnen folgende Punkte bei der Reinigung
und Pflege zu beachten:
Reinigungs- oder Desinfektionsmittel verwenden
Diese Anleitung ist gültig für folgende Produkte:
WimTec PROOF P6 - TD 12 V Art.Nr. 121 032
mit thermischer Desinfektion
Lieferumfang:
Aufputz-Aluminiumgehäuse mit integrierter Elektronik, Thermostat
mit Heißwassersperre, vandalensicherer Duschkopf, Magnetventil
und Befestigungsmaterial, ohne UP-Netzteil
Wichtige Installationshinweise:
UP-Dose für optionales Netzteil außerhalb des Schutzbereichs vorsehen. Die Montage und Installation darf nur durch einen konzessionierten Fachbetrieb gemäß DIN 1988, ÖVE/ÖNORM E8001 sowie
VDE 0100 Teil 701 erfolgen. Bei der Planung und Errichtung von
Sanitäranlagen sind die entsprechenden örtlichen, nationalen und
internationalen Normen und Vorschriften zu beachten!
Gemäß ÖNORM B 5019 ist für die thermische Desinfektion an
!
den Abgabestellen eine Mindesttemperatur von 60 °C über
Es gelten die „Allgemeinen
Installationsbedingungen“
gemäß www.wimtec.com.
mindestens 10 Minuten erforderlich. Es ist sicherzustellen, dass
alle Anlagenteile (z.B. Rohrwerkstoff) für die bei der thermischen Desinfektion eingesetzten Temperaturen tauglich sind.
milde, seifenhaltige Reinigungsmittel verwenden
keine kratzenden, scheuernden oder säurehaltigen
nur mit weichem Schwamm oder Tuch behandeln
keine Reinigung mit Dampfstrahlgeräten
2 Dusche-Paneel WimTec PROOF P6 mit thermischer Desinfektion
Page 39

PROOF P6 mit thermischer Desinfektion
Technische Daten
12 V externe Versorgung:
Betriebsspannung: über Netzteil 230 V 50 Hz / 12 V=
Art.Nr. 117 899 - Netzteil für eine Steuerung
Art.Nr. 113 792 - Netzteil für bis zu 5 Steuerungen
Leistungsaufnahme: max. 3 W
Weitere technische Daten:
Magnetventil: Kartusche 6 V
Fern-Ansprechbereich: 15 - 50 cm
Nah-Ansprechbereich: 1 cm bis 5 cm
Spülstoppzeit: von 10 s bis 10 min
(im Manuell-Programm von 10 s bis 60 s)
Stagnationsfreispülung: aktivierbar, nach 3 h bis 48 h
Nichtbenutzung für 10 s
Reinigungsstopp: für 10 min
Fließdruck: 0,05 bis 0,6 MPa (0,5 bis 6 bar)
Statischer Druck: max. 0,8 MPa (8 bar)
Wassertemperatur: max. 70 °C (max. 80 °C für max. 10 min)
Durchflussmenge: ca. 9 l/min bei 0,3 MPa (3 bar)
Wasserzulauf: R 1/2“ IG
Temperatureinstellung: Thermostat mit Heißwassersperre
DE
Werkstoffe:
Paneel: Aluminium eloxiert
Brausekopf und
Thermostatgriff: Messing verchromt
Dusche-Paneel WimTec PROOF P6 mit thermischer Desinfektion 3
Page 40
DE
PROOF P6 mit thermischer Desinfektion
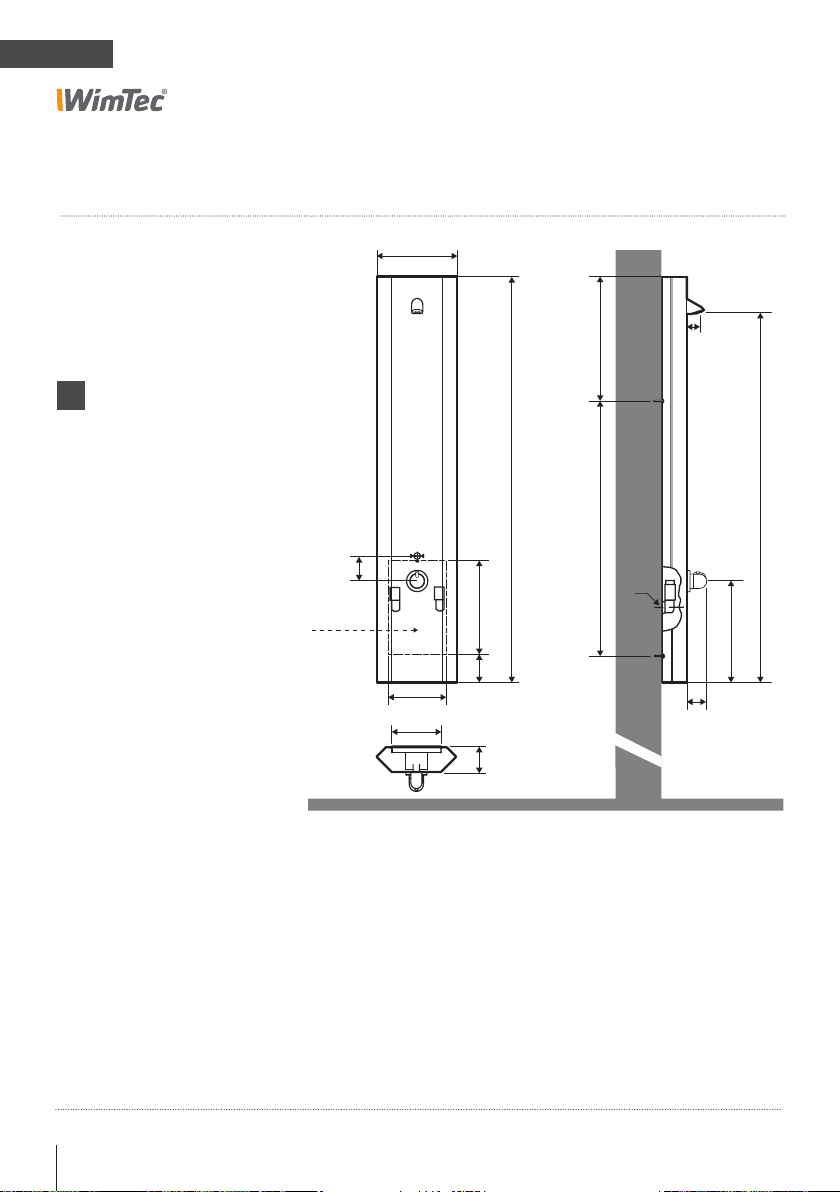
Abmessungen Alle Maße in mm:
Eine Nachrüstung ist auf bestehenden
Anschlüssen im Standardmaß 150 mm
möglich.
* E-Anschluss 12 V= vorsehen.
Netzteil 230 V / 12 V nicht
!
in Duschepaneel oder Schutzbereichen anbringen.
* E-Anschluss
12 V=
256
405
1300
810
80
300
90
185
166
80
½"
40
1190
325
65
4 Dusche-Paneel WimTec PROOF P6 mit thermischer Desinfektion
Page 41
PROOF P6 mit thermischer Desinfektion
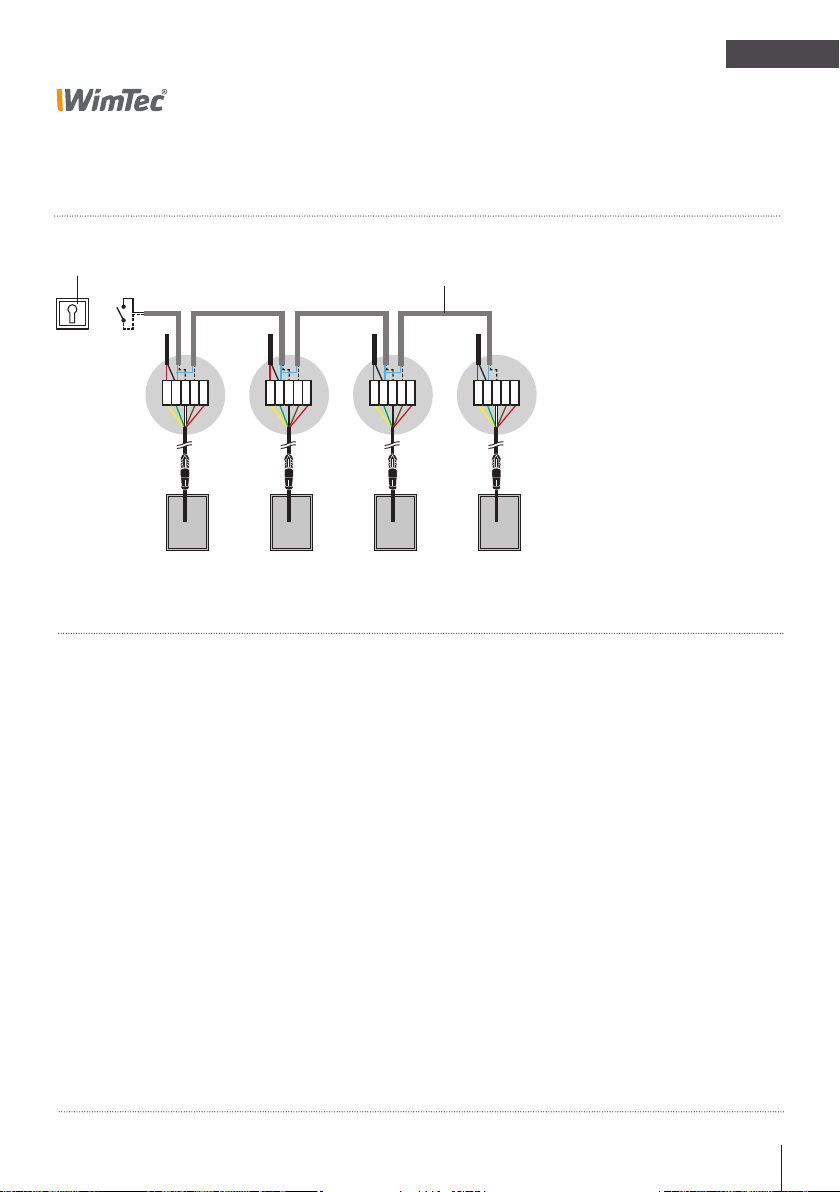
Verdrahtungsschema für thermische Desinfektion
WimTec PROOF P6 - TD
Schlüsselschalter (ohne Zylinder) Art.Nr. 110 418
12 V= 12 V= 12 V= 12 V=
Steuerleitung für thermische Desinfektion
2 x 0,5 mm
2
max. 100 m Gesamt-Kabellänge
DE
Armatur 3
+–
34521
Spannungsversorgung:
2 x 0,5 mm
Gesamt-Kabellänge
Netzteil 1-fach Art.Nr. 117 899
Armatur 4
Netzteil 5-fach Art.Nr. 113 792
2
max. 100 m
1...Gelb
2...Grün
3...Weiss
4...Braun
5...Rot
+–
Armatur 2
+–
34521
+–
34521
Armatur 1
34521
Thermische Desinfektion:
Durch Umlegen des Schlüsselschalters geht die gesamte Anlage in den Betriebsmodus der
thermischen Desinfektion, sämtliche Anlagen gehen außer Funktion - es ist keine Auslösung
über Taster oder Raumüberwachung möglich. Nach einer Sicherheitspause von 30 s beginnt die erste
Armatur mit einem Desinfektionszyklus.
Mit Beginn eines Desinfektionszyklus beginnt die LED schnell zu blitzen. Das Bypass-Magnetventil
wird geöffnet. Die thermische Desinfektion dauert 12 Minuten, wird jedoch bei aktivierter Raumüberwachung (Dip 5 = On) sofort vorzeitig abgebrochen, falls sich ein Benutzer in den Aktivbereich begibt.
In diesem Fall beginnt die thermische Desinfektion erneut, wenn sich 2 Minuten kein Benutzer im
Aktivbereich aufgehalten hat.
Nach dem Schließen des Bypassventils wird in jedem Fall 10 s Kaltwasser gespült. Danach beginnt
die LED dauerhaft zu leuchten, und visualisiert so den Abschluss des Desinfektionszyklus. Dann startet
Armatur 2 den Desinfektionszyklus, danach Armatur 3 usw.
Wird der Schlüsselschalter wieder in die Ausgangssituation gebracht, so wird die thermische
Desinfektion unmittelbar abgebrochen (die gerade spülende Armatur spült 10 s Kaltwasser nach).
Erneutes Umlegen des Schlüsselschalters startet die thermische Desinfektion wieder bei der
Armatur 1.
Es muss für eine ausreichende Entlüftung gesorgt werden, damit die Raumüberwachung
zuverlässig funktioniert. Näheres siehe Seite 15.
Dusche-Paneel WimTec PROOF P6 mit thermischer Desinfektion 5
Page 42
DE
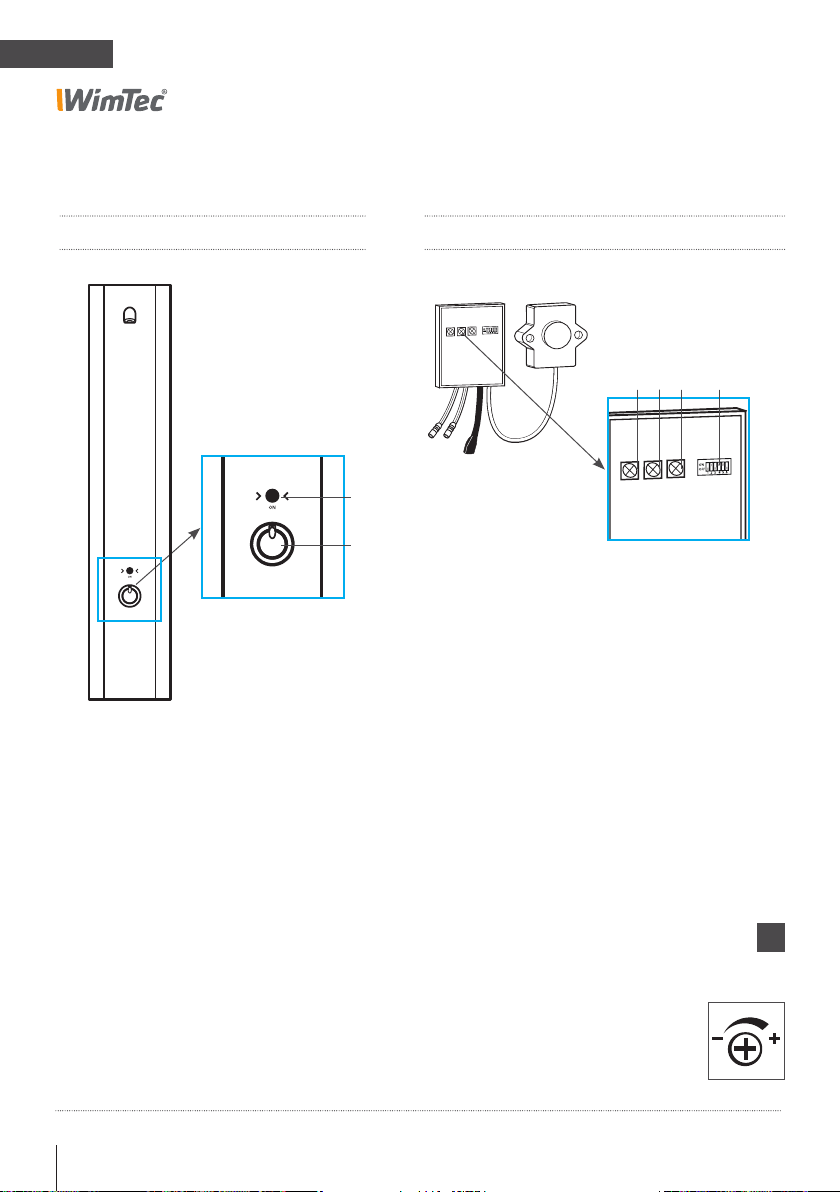
Legende
PROOF P6 mit thermischer Desinfektion
Elektronikmodul:Duschepaneel:
C D E F
A
B
A Infrarotsensor für die Benutzererken-
nung und ON-/OFF-Taster zum Ein-/Aus
schalten der Dusche.
B Thermostatgriff zur Temperatur-
regelung mit Taste zum Entriegeln
der 38 °C Sicherheitssperre.
6 Dusche-Paneel WimTec PROOF P6 mit thermischer Desinfektion
C Reichweiten-Regler
D Zeit-Regler
E Intervall-Regler
F Dip-Schalter zum Einstellen
der Funktionen
Generell gilt für alle Regler:
Gegen den Uhrzeiger-
sinn zum Reduzieren.
Im Uhrzeigersinn zum
!
Erhöhen.
Page 43

PROOF P6 mit thermischer Desinfektion
Einstellung der Programme & Funktionen
Dip-Schalter:
Programm-Aktivierung - Dip-Schalter 1 und 2:
Programm Dip 1 Dip 2 Beschreibung
Halb-Automatik
1)
Voll-Automatik
Manuell
Funktions-Aktivierung - Dip-Schalter 3 - 6:
Dip-Schalter Funktion Beschreibung
3
4
5
6
1)
Programm oder Funktionen
werksseitig voreingestellt.
Nachlaufzeit ON = 5 s / OFF
Warmlauffunktion
Verbrühschutz
Stagnationsfreispülung Seite 16
OFF ON
ON ON
OFF OFF
1)
1)
bereits
1)
= 2 s
Seite 11
Seite 12
Seite 13
Seite 14
Seite 15
DE
Einstellregler:
C. Reichweiten-Regler
für die Benutzererkennung
Ansprechbereich 50 cm
voreingestellt (10 - 50 cm
einstellbar).
Begrenzt die Rechweite des
IR-Sensors von 10 - 50 cm.
Dusche-Paneel WimTec PROOF P6 mit thermischer Desinfektion 7
D. Zeit-Regler
für den Sicherheitsspülstopp
10 min voreingestellt
(10 s - 10 min einstellbar).
Manuell-Programm:
10 s - 60 s einstellbar.
Nach Ablauf der eingestellten
Maximallaufzeit schaltet die
Duschearmatur automatisch
ab, um bei einer unbeabsichtigten Daueraktivierung
Wasser zu sparen.
E. Intervall-Regler
für die Stagnationsfreispülung
48 h voreingestellt
(3 - 48 h einstellbar).
Wird die Duschearmatur für
die voreingestellte Zeit nicht
benutzt, löst die Armatur
selbstständig eine Spülung für
10 s aus, um das Stagnationswasser auszuspülen.
Page 44
DE
PROOF P6 mit thermischer Desinfektion
Montage
1 2 3
4
!
ACHTUNG!
Folgende Schritte unbedingt in beschriebener
Reihenfolge ausführen!
5 6
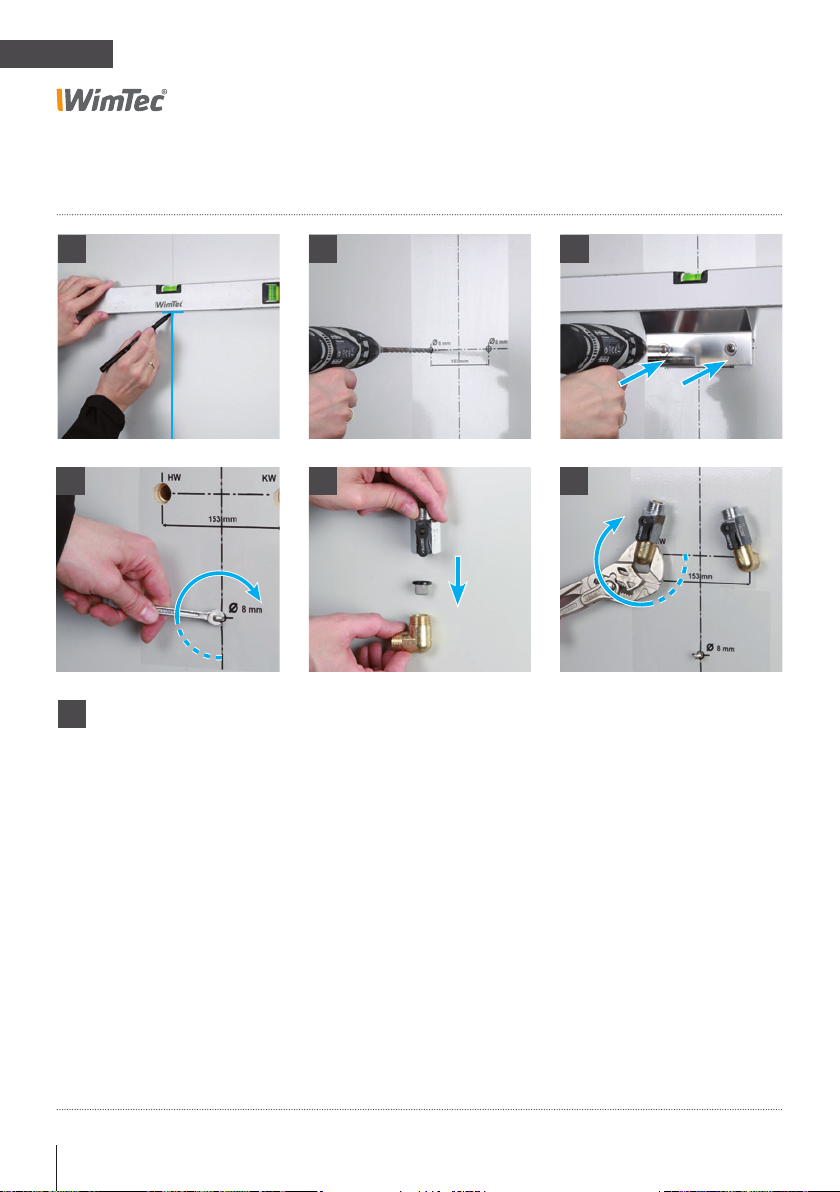
1. Mittellinie und Oberkante des Paneels anzeichnen.
2. Selbstklebende Bohrschablone aufkleben.
3x Ø 8 mm bohren und Dübel einsetzen.
3. Montagebügel mit Befestigungsschraube und Beilagscheiben befestigen.
4. Stockschraube für Befestigung eindrehen.
5. Korbfilter in 90° Anschlusswinkel einsetzen und
Absperrung aufdichten.
6. Anschlusswinkel mit Absperrung aufdichten und in
Zuleitungen einschrauben – Vorabsperrung dabei schräg
nach innen ausrichten.
8 Dusche-Paneel WimTec PROOF P6 mit thermischer Desinfektion
Page 45
DE
PROOF P6 mit thermischer Desinfektion
Montage: Art.Nr. 121 032
7 8
1110
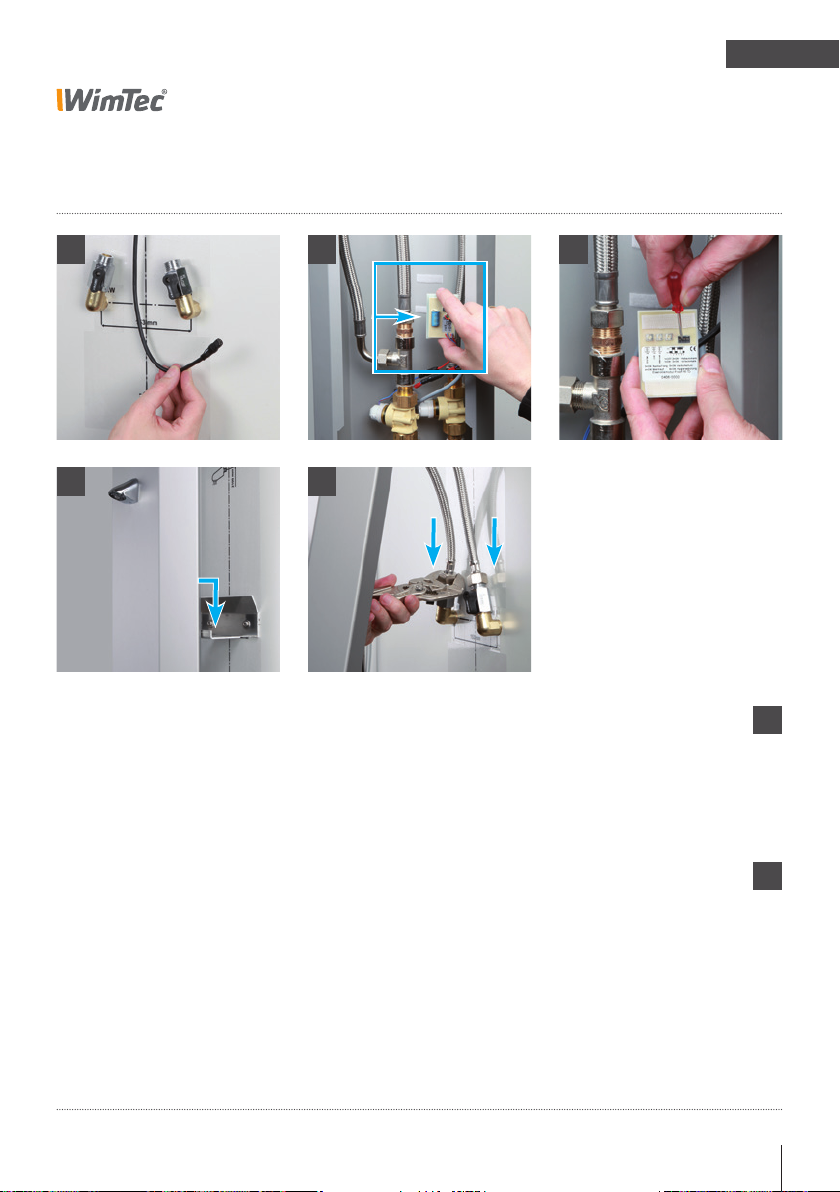
7. Beigelegtes Anschlusskabel einziehen und am Netzteil
(Art.Nr. 117 899 für 1 Steuerung, oder Art.Nr. 113 792 für
bis zu 5 Steuerungen) anschließen.
Achtung: Stromversorgung muss abgeschaltet sein und
Netzteil darf nicht im Duschepaneel bzw. Schutzbereich
verbaut werden!
9
!
ACHTUNG!
Folgende Schritte unbe-
dingt in beschriebener
Reihenfolge ausführen!
8. Zur Einstellung der Programme und Funktionen das Elektronik-
modul vom Klettverschluss abnehmen und umdrehen.
9. Gewünschte Funktionseinstellungen am Elektronikmodul
vornehmen (siehe S. 5).
10. Dusche-Paneel in die vordere Bügellasche einhängen.
11. Flexschläuche mit beigelegter Dichtung an Wasserzuleitung
anschließen.
Dusche-Paneel WimTec PROOF P6 mit thermischer Desinfektion 9
!
ACHTUNG!
Verdrahtungsschema
Seite 7 und Polarität
(grün = + / gelb = -)
beachten!
Page 46
DE
PROOF P6 mit thermischer Desinfektion
Montage: Art.Nr. 121 032
!
ACHTUNG!
Folgende Schritte unbedingt in beschriebener
Reihenfolge ausführen!
13
16
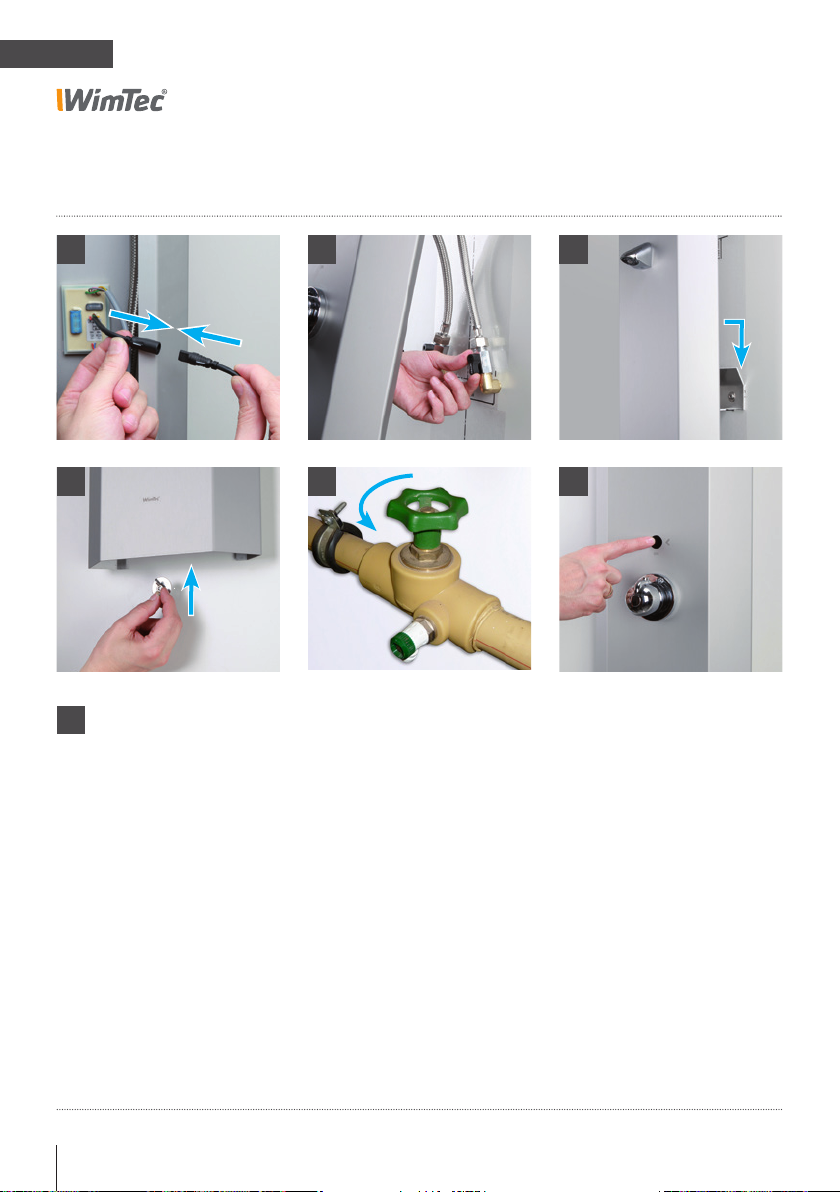
12. Elektro-Anschluss am Elektronikmodul herstellen
und Stromversorgung einschalten (Sicherheitsschließimpuls
beim Magnetvenil erfolgt).
13. Kontrollieren, ob Vorabsperrungen geöffnet sind
(Riegel stehen parallel zur Flussrichtung).
1412
1715
14. Dusche-Paneel in die hintere Bügellasche einhängen.
ACHTUNG! Keine Kabel oder Schläuche quetschen
oder knicken.
15. Duschepaneel von unten mit Beilagscheibe und
Flügelmutter an der Stockschraube sichern.
16. Hauptwasserleitung öffnen.
17. Funktionstest durchführen.
10 Dusche-Paneel WimTec PROOF P6 mit thermischer Desinfektion
Page 47
PROOF P6 mit thermischer Desinfektion
Halbautomatik:
Warmlauf:
ON
OFF
1 2 3 4 5 6
Reinigungsstopp:
ON
OFF
1 2 3 4 5 6
Hygienespülung:
ON
OFF
1 2 3 4 5 6
Programm-Beschreibung
DE
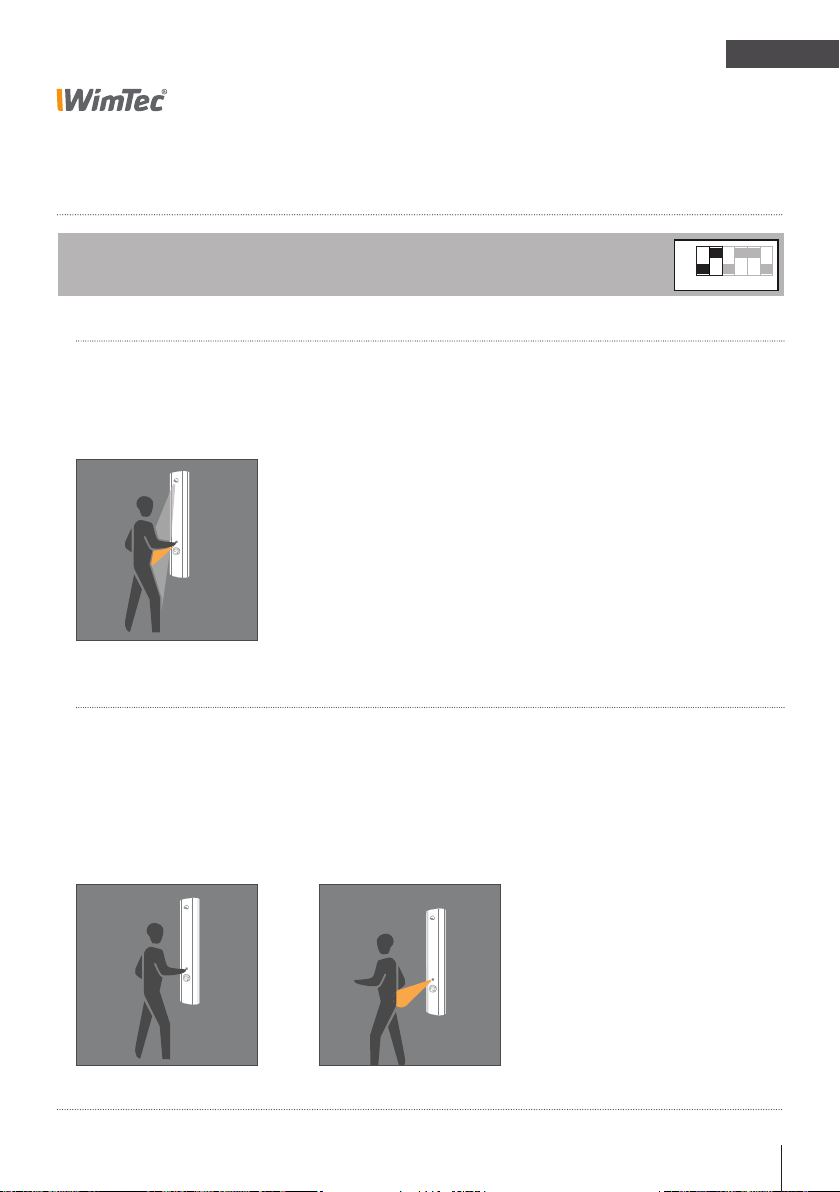
Programm Halb-Automatik (voreingestellt):
DIP Schalter 1=OFF, 2=ON
EINSCHALTEN:
Taster
Wasserfluss startet,
sobald der Benutzer den
ON/OFF Taster betätigt.
AUSSCHALTEN:
Taster
Durch erneutes Antippen der
ON/OFF Taste schaltet die
Dusche ab.
Dusche-Paneel WimTec PROOF P6 mit thermischer Desinfektion 11
Automatik
Dusche stoppt nach Ablauf
der Nachlaufzeit, wenn der
Benutzer den Ansprechbereich
verlässt oder nach Ablauf der
Sicherheitsspülstopp-Zeit.
ON
OFF
1 2 3 4 5 6
Page 48
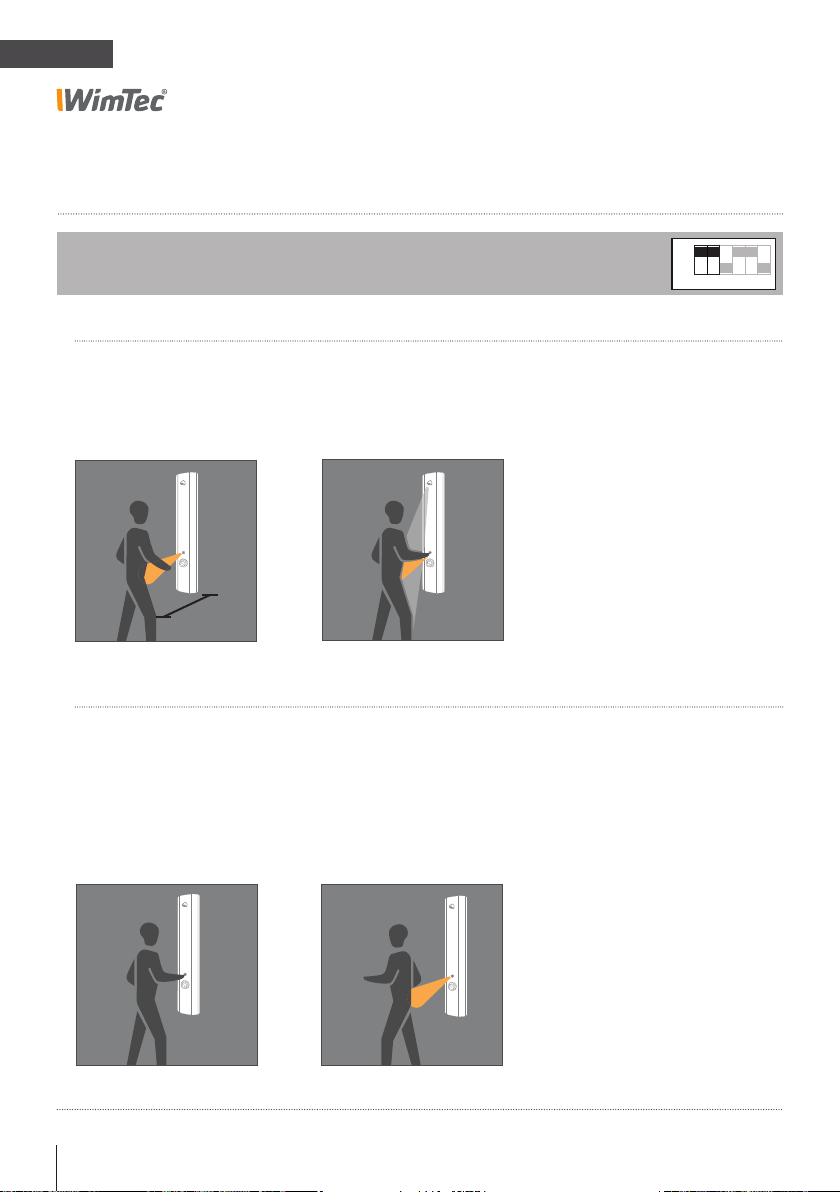
DE
Halbautomatik:
Vollautomatik:
Warmlauf:
ON
OFF
1 2 3 4 5 6
ON
OFF
1 2 3 4 5 6
Reinigungsstopp:
ON
OFF
1 2 3 4 5 6
Hygienespülung:
ON
OFF
1 2 3 4 5 6
PROOF P6 mit thermischer Desinfektion
Programm-Beschreibung
Programm Voll-Automatik:
DIP Schalter 1=ON, 2=ON
EINSCHALTEN:
Benutzererkennung
Der Benutzer tritt vor die
Dusche und wird von der
Armatur erkannt.
50 cm
Automatisch
Nach der Benutzererkennung
schaltet sich die Dusche automatisch nach 2 s ein.
AUSSCHALTEN:
Automatisch
Dusche stoppt nach Ablauf
der Nachlaufzeit, wenn der
Benutzer den Ansprechbereich
verlässt oder nach Ablauf der
Sicherheitsspülstopp-Zeit.
Taster
Antippen der ON/OFF Taste
schaltet die Dusche ab.
Durch erneutes Tippen kann
die Dusche wieder aktiviert
werden.
12 Dusche-Paneel WimTec PROOF P6 mit thermischer Desinfektion
ON
OFF
1 2 3 4 5 6
Page 49
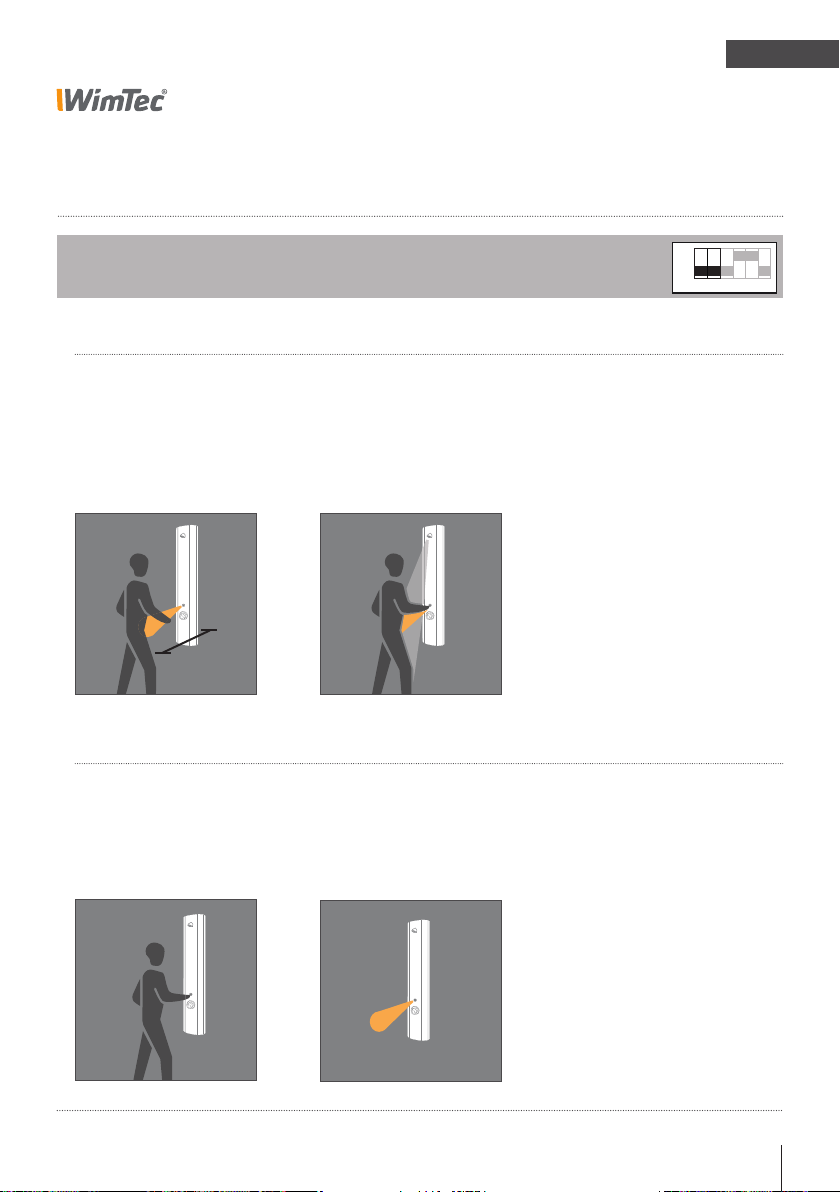
PROOF P6 mit thermischer Desinfektion
Halbautomatik:
Vollautomatik:
Manuell:
Warmlauf:
ON
OFF
1 2 3 4 5 6
ON
OFF
1 2 3 4 5 6
ON
OFF
1 2 3 4 5 6
Reinigungsstopp:
ON
OFF
1 2 3 4 5 6
Hygienespülung:
ON
OFF
1 2 3 4 5 6
Programm-Beschreibung
DE
Programm Manuell:
DIP Schalter 1=OFF, 2=OFF
EINSCHALTEN:
Benutzererkennung
Der Benutzer tritt vor die Dusche und wird von der Armatur
erkannt.
50 cm
AUSSCHALTEN:
Taster
Durch erneutes Antippen der
ON/OFF Taste kann die Dusche
immer wieder aus- und eingeschaltet werden.
Dusche-Paneel WimTec PROOF P6 mit thermischer Desinfektion 13
Taster
Durch Antippen der ON/OFF
Taste schaltet die Dusche ein.
Sicherheitsspülstopp
Nach Ablauf der eingestellten
Spülstopp-Zeit (siehe S. 5)
schaltet die Dusche automatisch ab.
ON
OFF
1 2 3 4 5 6
Page 50
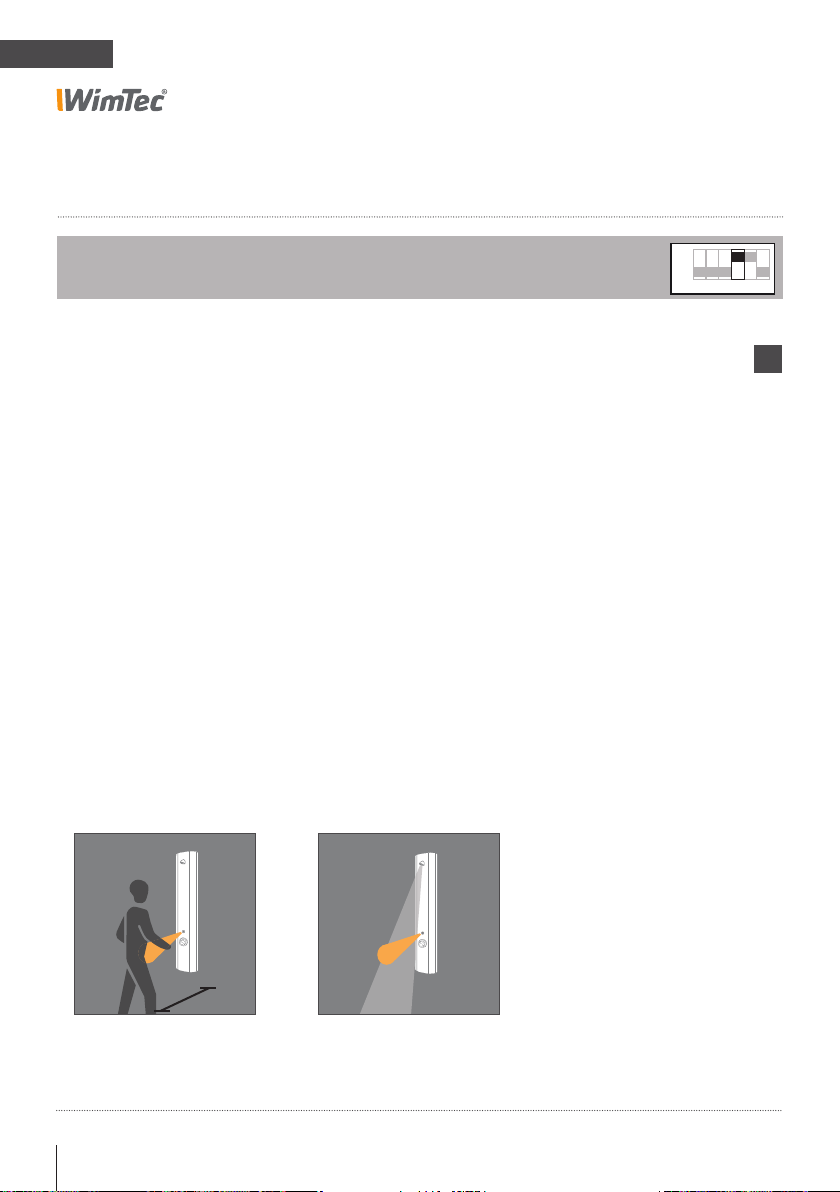
DE
Warmlauf:
PROOF P6 mit thermischer Desinfektion
Funktions-Beschreibung
Warmlauf:
DIP Schalter 4
Dient zum Freispülen der Warmwasserleitung, ohne dass der
Benutzer vor der Dusche im Ansprechbereich verweilen muss.
Dip Schalter 4 ON = Warmlauf-Funktion aktiviert (voreingestellt).
Dip Schalter 4 OFF = Warmlauf-Funktion deaktiviert.
Benutzererkennung
Der Benutzer tritt vor die
Dusche und wird von der
Armatur erkannt.
Betrieb
Nach dem Einschalten läuft
das Wasser für 30 s zuzüglich
der eingestellten Nachlaufzeit
ohne dass sich der Benutzer
im Ansprechbereich befinden
muss und schaltet danach
automatisch ab.
Tritt während dieser 30 s der
Benutzer für mindestens 5 s in
den Ansprechbereich geht die
Dusche wieder in den Normalbetrieb über.
ON
OFF
1 2 3 4 5 6
i
Es wird empfohlen, die
Warmlauffunktion nicht
mit dem Programm
„Voll-Automatik“ zu
kombinieren!
50 cm
14 Dusche-Paneel WimTec PROOF P6 mit thermischer Desinfektion
Page 51

PROOF P6 mit thermischer Desinfektion
Warmlauf:
ON
OFF
1 2 3 4 5 6
Reinigungsstopp:
Funktions-Beschreibung
DE
Verbrühschutz1):
DIP Schalter 5
Dient zum Überwachen des Aktivbereiches während der thermischen
Desinfektion.
Bei sehr starker Dampfentwicklung vor der Duschearmatur kann es zu
einem unbeabsichtigen Abbruch der thermischen Desinfektion führen.
Für diesen Fall sollte die Verbrühschutz-Funktion deaktiviert werden.
Dip Schalter 5 ON = Verbrühschutz-Funktion aktiviert (voreingestellt).
Dip Schalter 5 OFF = Verbrühschutz-Funktion deaktiviert.
Raumüberwachung
Während der thermischen
Desinfektion überwacht die
Infrarot-Optik den Ansprechbereich.
Sicherheitsstopp
Der Wasserfluss stoppt sofort,
wenn sich ein Benutzer dem
Paneel annähert.
ON
OFF
1 2 3 4 5 6
!
Diese Sicherheits-
Funktion sollte nach
Möglichkeit immer
aktiviert bleiben!
Dusche-Paneel WimTec PROOF P6 mit thermischer Desinfektion 15
Page 52
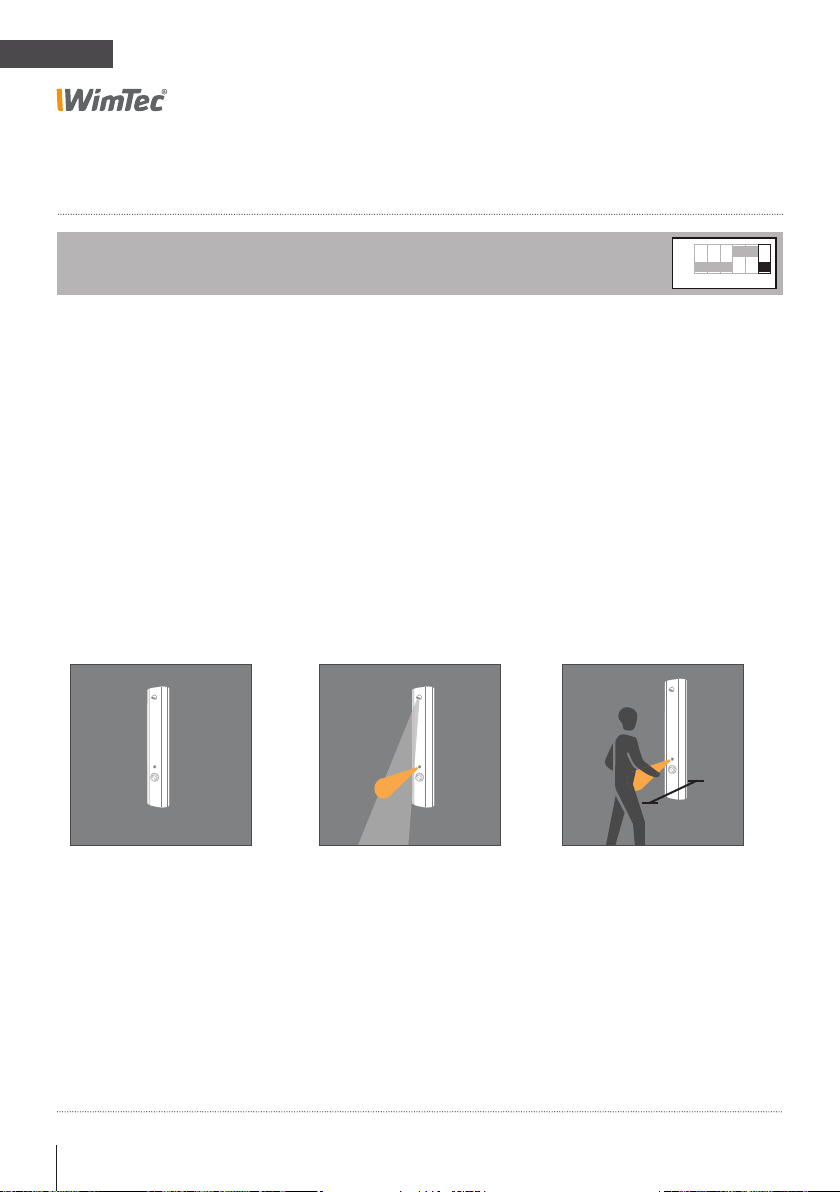
DE
Warmlauf:
ON
OFF
1 2 3 4 5 6
Reinigungsstopp:
ON
OFF
1 2 3 4 5 6
Hygienespülung:
PROOF P6 mit thermischer Desinfektion
Funktions-Beschreibung
Stagnationsfreispülung:
DIP Schalter 6
Dient zum Ausspülen des Stagnationswassers bei längerer Nichtbenutzung
Dip Schalter 6 ON = Stagnationsfreispülungs-Funktion aktiviert.
Dip Schalter 6 OFF = Stagnationsfreispülungs-Funktion deaktiviert (voreingestellt).
Zeitintervall
Einstellbar am Intervall-Regler
von 3 - 48 h (siehe Seite 5).
Automatische
Stagnationsfreispülung
Wird die Armatur für die eingestellte Zeit nicht benützt, löst
die Armatur eine automatische
Stagnationsfreispülung für
10 s aus.
Sicherheit
Ist der Reinigungsstopp
aktiviert, löst die Stagnationsfreispülung erst 2 min nach
dessen Deaktivierung aus.
ON
OFF
1 2 3 4 5 6
50 cm
3 - 48 h
10
s
16 Dusche-Paneel WimTec PROOF P6 mit thermischer Desinfektion
Page 53
PROOF P6 mit thermischer Desinfektion
Funktions-Beschreibung
Reinigungsstopp:
Funktion ist dauerhaft aktiviert
Dient zum Deaktivieren der Armatur beim Reinigen.
DE
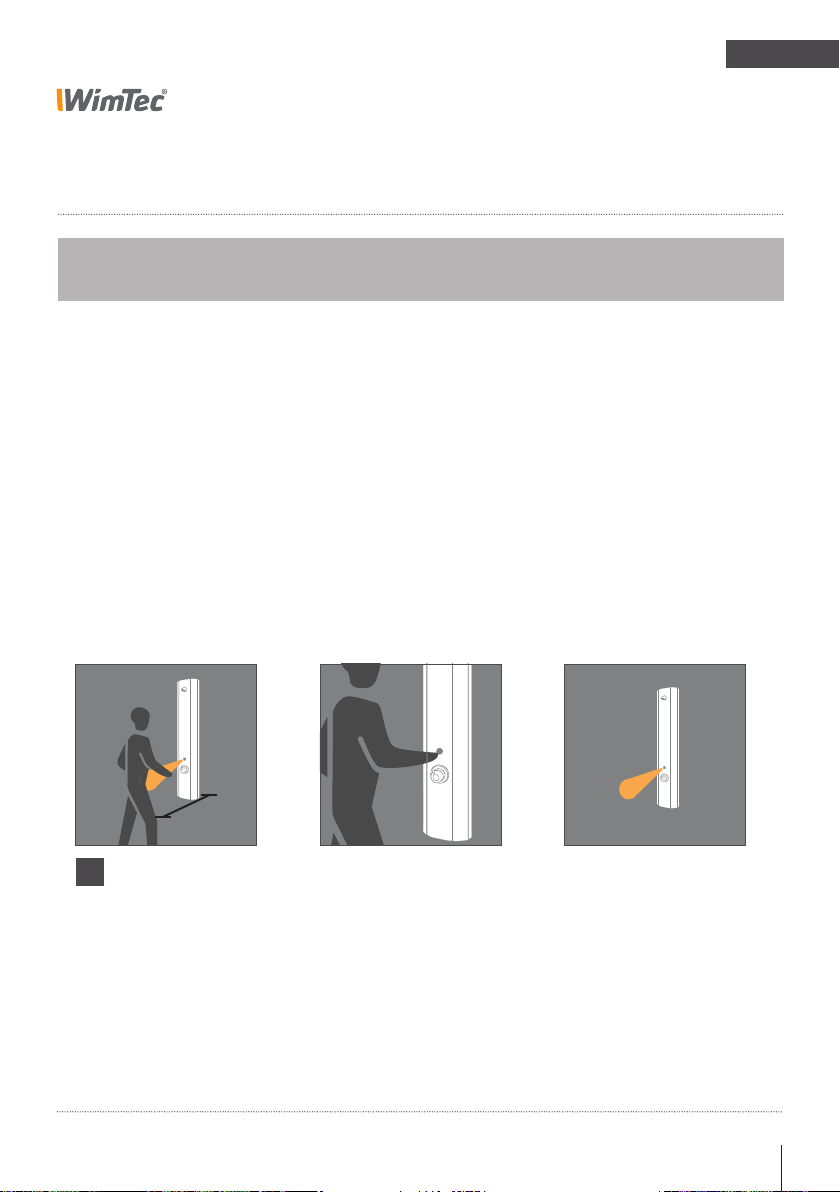
Benutzererkennung
Der Benutzer tritt vor die
Dusche und wird von der
Armatur erkannt.
!
Im Vollautomatikmodus
muss die Hand innerhalb
einer Sekunde ab dem Herantreten an den InfrarotSensor herangeführt
werden, andernfalls löst
die Armatur aus.
50 cm
Reinigungsstopp aktivieren
Heranführen der Hand an den
Infrarot-Sensor (siehe Bild)
und nach 5 x Blinken der LED
wegführen.
Die Reinigungsstoppzeit dauert
10 Minuten ab Verlassen des
Ansprechbereiches.
Reinigungsstopp deaktivieren
Automatisch wenn 10 Minuten
kein Benutzer erkannt wurde.
Zum manuellen Deaktivieren
gehen Sie wie beim Aktivieren vor. Nach Verlassen des
Ansprechbereiches geht die
Armatur nach einer Sicherheitszeit von 3 s wieder in den
Normalbetrieb über.
Dusche-Paneel WimTec PROOF P6 mit thermischer Desinfektion 17
Page 54
DE
PROOF P6 mit thermischer Desinfektion
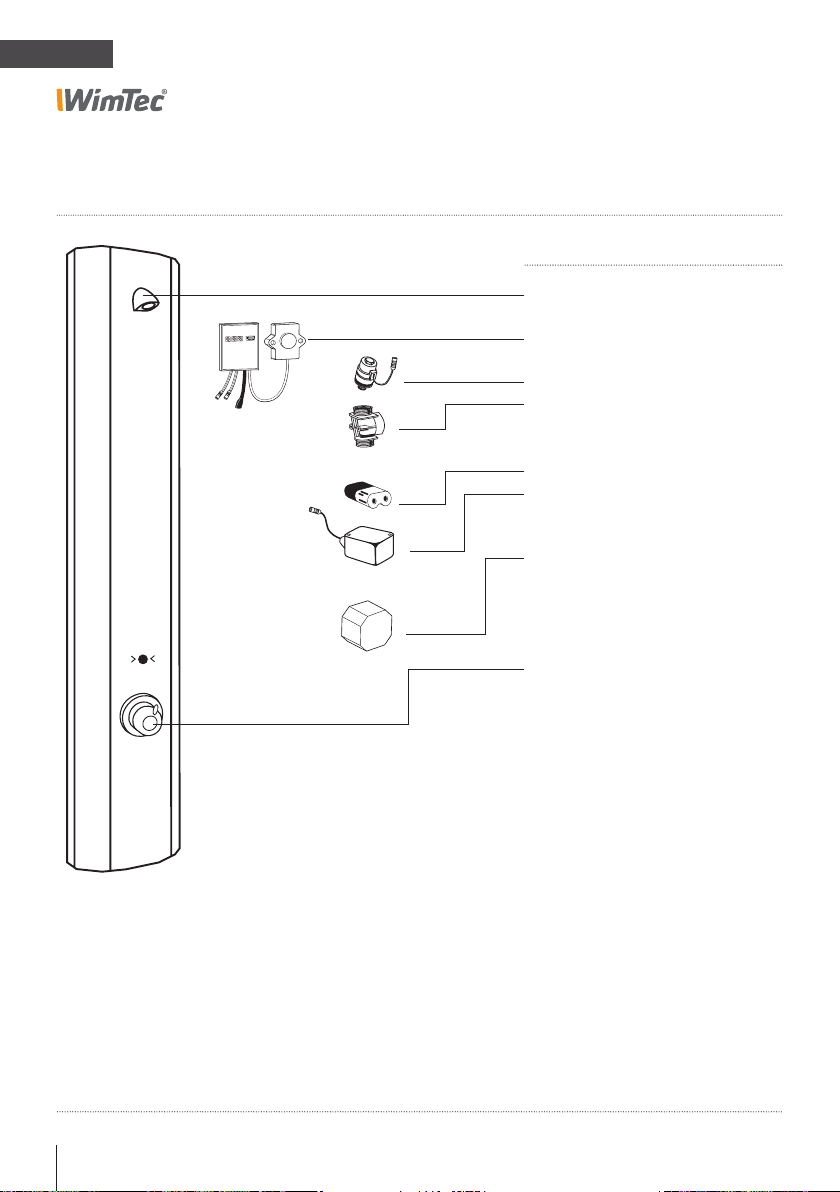
Ersatzteile
Art.Nr.:
120 165
120 349
231 205
221 312
230 741
230 987
117 899
113 792
107 159
Bezeichnung
Duschkopf WimTec PROOF
Elektronikmodul TD
Magnetventil
Magnetventil-Adapter
6 V Lithium Batterie
Batteriemodul 6 V
Netzteil (1-fach)
Netzteil (5-fach)
Thermostat
18 Dusche-Paneel WimTec PROOF P6 mit thermischer Desinfektion
Page 55

PROOF P6 mit thermischer Desinfektion
DE
Dusche-Paneel WimTec PROOF P6 mit thermischer Desinfektion 19
Page 56

EN
PROOF P6 with thermal disinfection
General notes
Congratulations on purchasing the WimTec PROOF P6 TD.
In order to ensure that you will be able to enjoy this high-quality
product for many years, please take note of the following cleaning
and maintenance recommendations:
Use mild cleaning agents containing soap
Do not use abrasive, scrubbing, sealing or acidic
cleaning agents or disinfectants
Clean the fitting with a soft sponge or cloth only
Do not use steam cleaners
This manual is valid for the following products:
WimTec PROOF P6 - TD 12 V Art.Nr. 121 032
with thermal disinfection
Delivery scope:
On wall aluminium housing with integrated electronics, thermostat
with hot-water barrier, vandalproof shower head, magnetic valves,
mounting material, without power supply.
Important installation notes:
Mounting and installation may only be performed by a qualified
service provider in accordance with DIN 1988, ÖVE/ÖNORM E8001
and VDE 0100 Part 701. When planning and installing sanitary
facilities, all relevant local, national and inter-national standards
and provisions must be observed! Provide for 230 V / 12 V power
unit outside of the protected zone.
!
According to the Austrian ÖNORM B 5019, thermal disinfection re-
The “General installation
terms and conditions”
provided at
www.wimtec.com apply.
20 Shower control WimTec OCEAN P6 with thermal disinfection
quires a minimum temperature of 60 °C for at least 10 min at the
relevant system locations. The operator must ensure that all parts
of the installation (e.g., piping) can withstand the temperatures
applied during thermal disinfection.
Page 57

PROOF P6 with thermal disinfection
Technical specifications
12 V external supply:
Operating voltage: via power supply 230 V 50 Hz / 12 V=
Art.No. 117 899 - power supply for one control unit
Art.No. 113 792 - power supply for up to 5 control units
Power consumption: max. 3 W
Further technical specifications:
Magnetic valve: cartridge 6 V
Far active range: 15 - 50 cm
Close-Active range: 1 - 5 cm
Flushing stop: from 10 s - 10 min (manual program: from 10 s - 60 s)
Stagnation rinse: activatable, after 3 h - 48 h of none usage for 10 s
Cleaning stopp: for 10 min
Flow pressure: 0,05 - 0,6 MPa (0,5 - 6 bar)
Static pressure: max. 0,8 MPa (8 bar)
Water temperature: max. 70 °C (max. 80 °C for max. 10 min)
Flow rate: 9 l/min at 0,3 MPa (3 bar)
Water inlet: R 1/2“ IG
Temperature adjustment: Thermostat with hot-water barrier (not frost resistant)
EN
Material:
Panel: Aluminium anodized
Fittings: chromed brass
Shower control WimTec OCEAN P6 with thermal disinfection 21
Page 58
EN
PROOF P6 with thermal disinfection
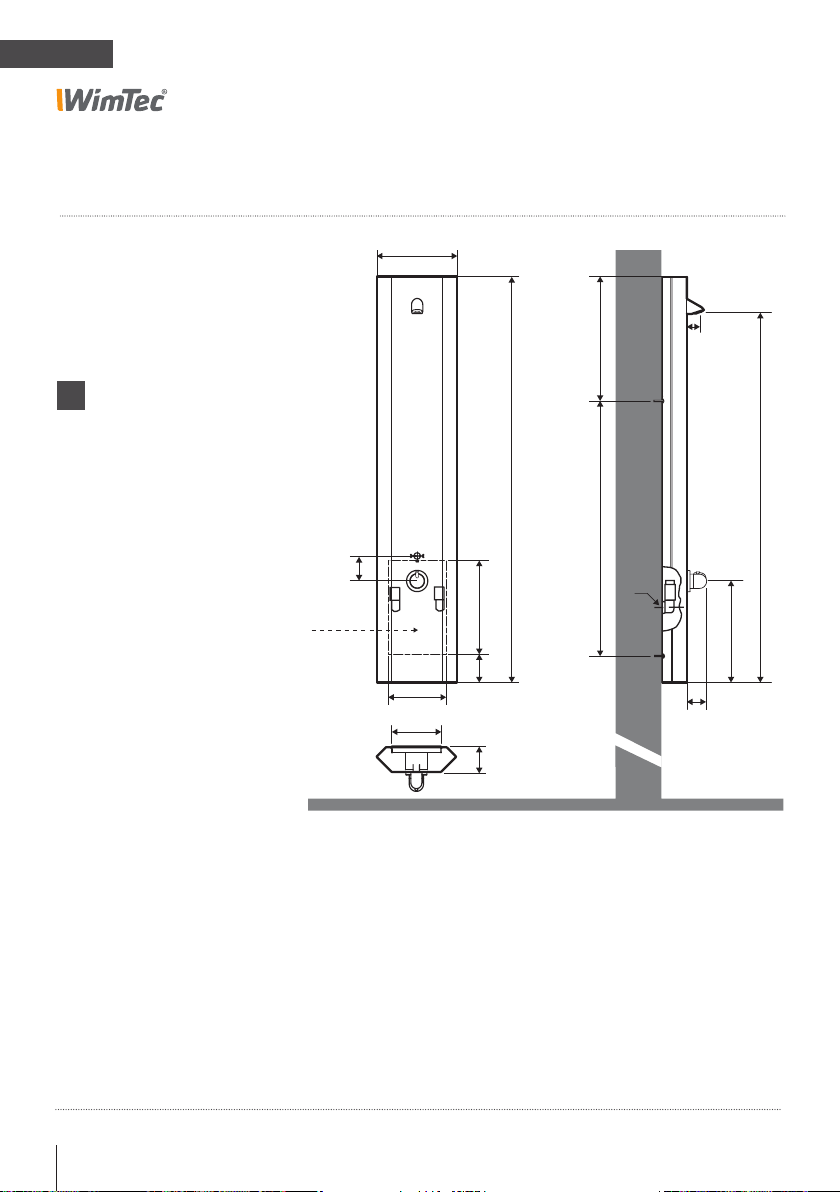
Dimensions All dimensions in mm:
Retrofitting using existing connections
can be performed for the standard size
150 mm.
* Provide for 12 V= elec. connection.
Do not install the 230 V /
!
12 V power supply in the
shower panel or protected
zones.
* E-connect.
12 V=
256
405
1300
810
80
80
300
90
185
166
80
½"
40
1190
325
65
22 Shower control WimTec OCEAN P6 with thermal disinfection
Page 59
PROOF P6 with thermal disinfection
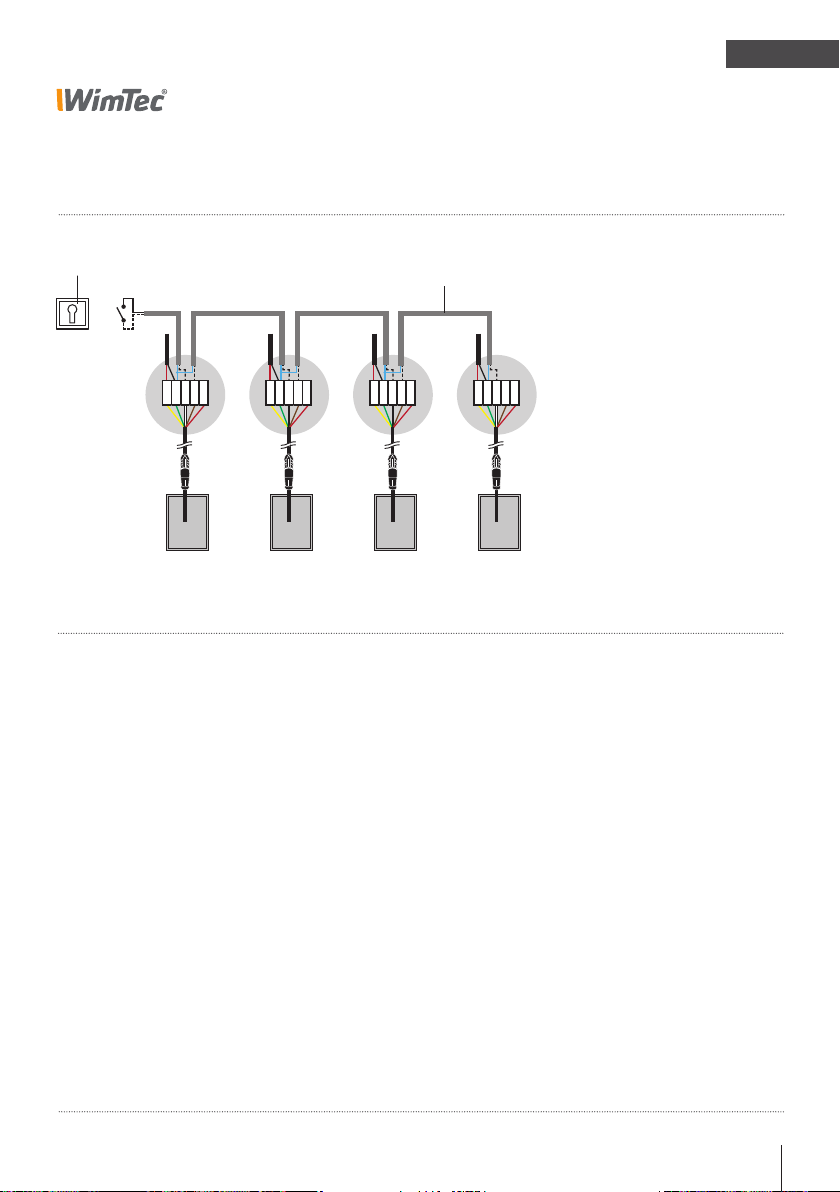
Wiring diagram for thermal disinfection
WimTec PROOF P6 - TD
Key switch (without cylinder) Art. no. 110 418
12 V= 12 V= 12 V= 12 V=
Control line for thermal disinfection
2 x 0.5 mm
2
total cable length max. 100 m
EN
+–
34521
Power supply:
2 x 0.5 mm
max. 100 m
Power supply, 1-connect.
Device 3
Device 4
art. no. 117 899
Power supply, 5-connect.
art. no. 113 792
2
total cable length
1...yellow
2...green
3...white
4...brown
5...red
+–
+–
34521
Device 1
34521
+–
34521
Device 2
Thermal disinfection:
Turning the key switch will cause the entire system to change into thermal disinfection operating
mode. This will disable all other functions, making it impossible to trigger any operations via buttons or
the IR sensor. After a safety delay of 30 s, the first device will execute a disinfection cycle.
This is indicated by a rapidly flashing LED. The bypass magnetic valve is unlocked. The thermal
disinfection takes 12 minutes; however, if shower monitoring (DIP 5 = On) has been enabled, it will be
immediately aborted if a user enters the sensor range. In this case, thermal disinfection will start again
2 minutes after no user has been present in the sensor range.
After closing the bypass valve, a cold water rinse will be performed in any case for 10 s. After this
the LED lights up to indicate that the disinfection cycle has been completed. Next, device 2 starts the
disinfection cycle, followed by device 3 etc.
If you return the key switch to the off position, thermal disinfection is immediately aborted (the device
that was performing a cycle will perform a 10-s cold water rinse).
If you turn the key switch again, thermal disinfection will start again at device 1.
Provide for adequate ventilation to ensure proper operation of the shower monitoring function.
Shower control WimTec OCEAN P6 with thermal disinfection 23
Page 60
EN
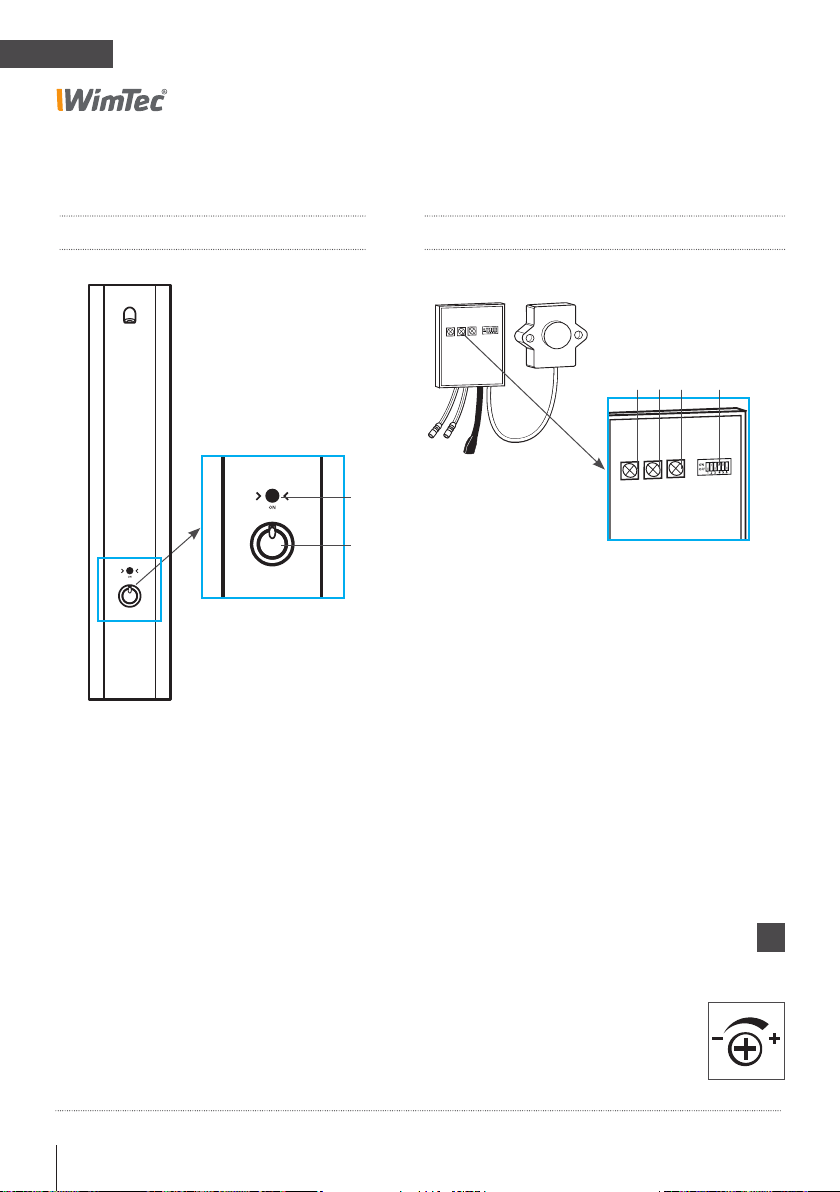
Legend
PROOF P6 with thermal disinfection
Electronics module:Shower panel:
C D E F
A
B
A Infrared sensor for user detection and
ON/OFF button to turn the shower
ON/OFF.
B Thermostat knob to adjust the
temperature, including a button for
bypassing the 38 °C safety lock.
24 Shower control WimTec OCEAN P6 with thermal disinfection
C Range control
D Time control
E Interval control
F DIP switches for configuring the functions
The general rule applies to all controls:
Move counterclockwise to
decrease the setting.
Move clockwise to increase
!
the setting.
Page 61

PROOF P6 with thermal disinfection
Configuring the programs & functions
DIP switches:
Program activation – DIP switches 1 and 2:
Program DIP switch 1 DIP switch 2 Description
Semi automatic mode
1)
Fully automatic mode ON ON Page 30
Manual mode OFF OFF Page 31
Function activation – DIP switches 3–6:
DIP switch Function Description
3
4
5
6
1)
Program or functions already configured ex factory.
Shut-off delay ON = 5 s / OFF
Warm water rinse
Protection from scalding
Stagnation rinse Page 34
OFF ON
1)
= 2 s
1)
1)
Page 29
Page 32
Page 33
EN
Regulator controls:
C. Range control
User detection range preset
to 50 cm (configurable from
10–50 cm).
Sets the infrared sensor range
from 10–50 cm.
Shower control WimTec OCEAN P6 with thermal disinfection 25
D. Time control
set to safety flow arrest after
10 min (configurable from
10 s to 10 min).
Manual program mode: configurable from 10–60 s.
After the configured maximum
flow time has elapsed, the
water stops automatically to
prevent unintentional continuous activation.
E. Interval control
for stagnation rinse, default
setting 48 h (configurable
from 3–48 h).
If the fitting has not been
used for the set period, the
device will automatically
perform a 10-s rinse to clear
stagnation water from the
pipes.
Page 62
EN
PROOF P6 with thermal disinfection
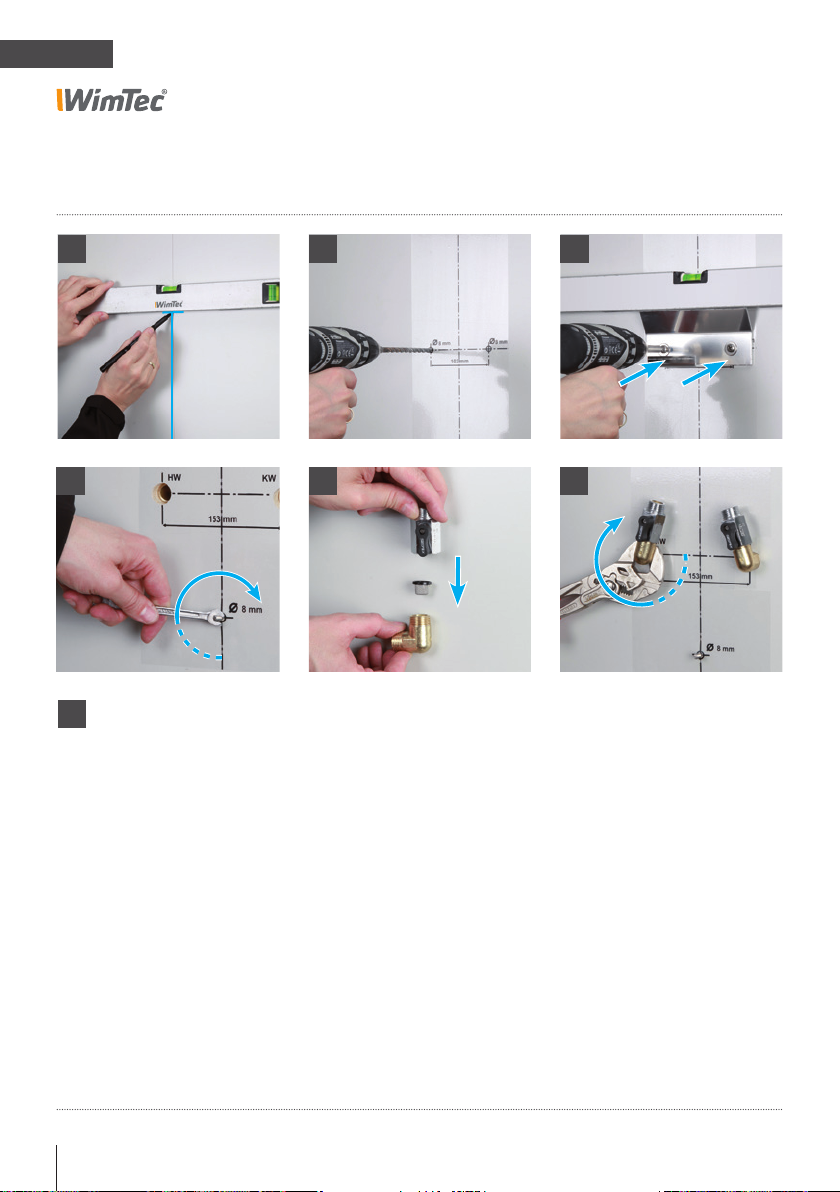
Assembly
1 2 3
4
!
ATTENTION!
Perform the following steps
in the order indicated!
5 6
1. Mark the centre line and upper edge of the panel on the
wall.
2. Attach the self-adhesive drilling template.
Drill 3x Ø 8-mm holes and insert dowels.
3. Attach mounting bracket using the screws and washers.
4. Screw in the hanger screw.
5. Insert the basket filter into the 90° angled connector and
attach locking pin at the top.
6. Seal off the angled connector by attaching the locking
pin and screw the connector into the inlets, aligning the
locking pins towards the inside at an angle as indicated.
26 Shower control WimTec OCEAN P6 with thermal disinfection
Page 63
EN
PROOF P6 with thermal disinfection
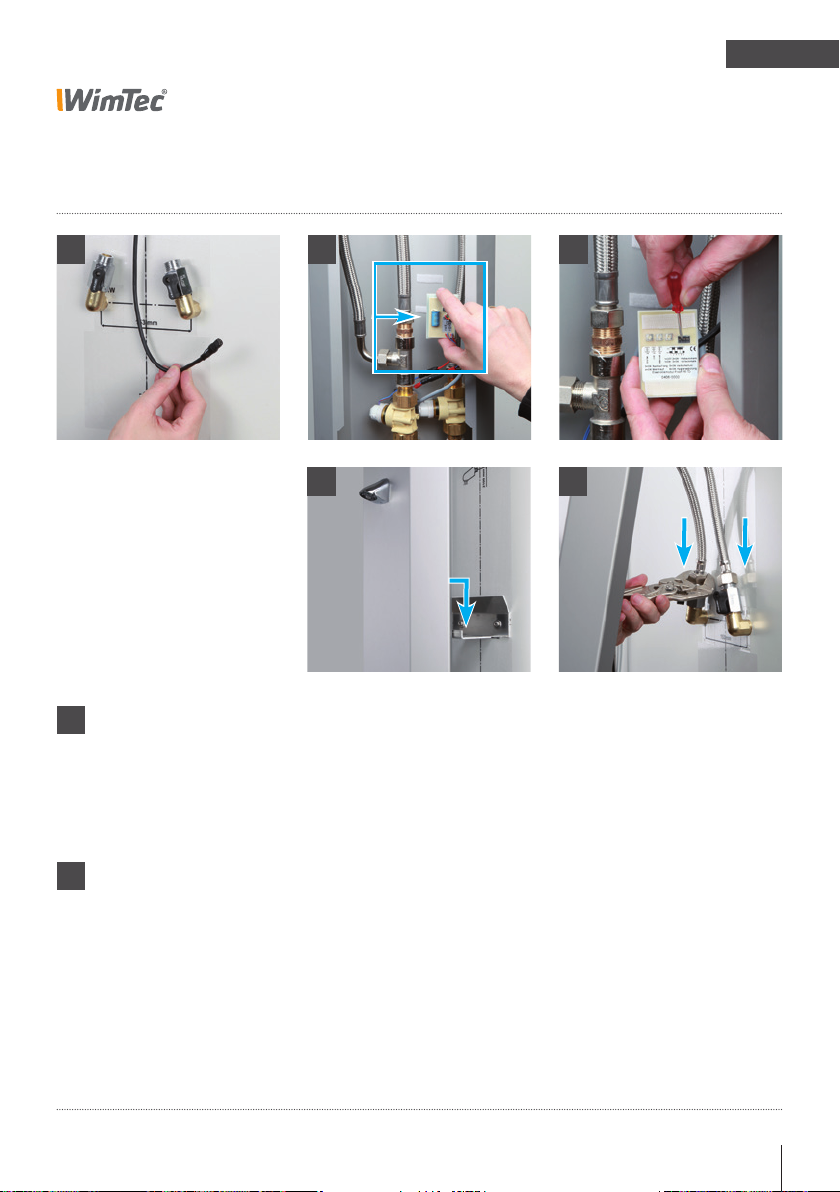
Assembly Art. no. 121 032
7 8
!
ATTENTION!
Perform the following steps
in the order indicated!
9
1110
7. Feed the included connection cable into the installation
space and connect it to the power supply (art. no. 117 899
for 1 control or art. no. 113 792 for up to 5 controls).
Attention: The power must be switched off, and the po-
wer supply must not be installed in the shower panel or
the protected zone!
!
ATTENTION!
Observe the wiring diagram
on page 6 and the polarity
(green = + / yellow = -)!
Shower control WimTec OCEAN P6 with thermal disinfection 27
8. Remove the electronics module from the Velcro fastener and
turn it around to configure programs and functions.
9. Configure the desired functions using the electronics module
(see p. 23).
10. Hook the shower panel into the front bracket strap.
11. Connect the flexible tubes and included valves to the water
inlets.
Page 64
EN
PROOF P6 with thermal disinfection
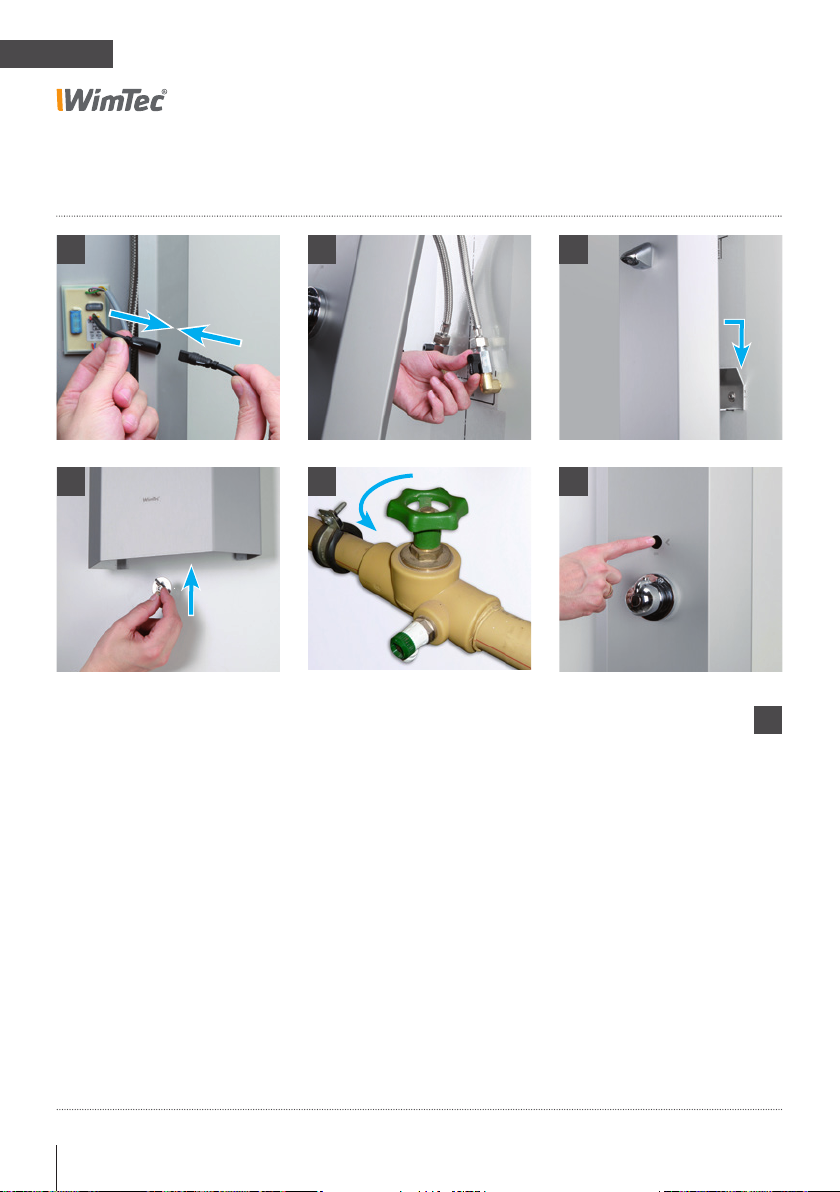
Assembly Art. no. 121 032
13
16
12. Connect the power cables to the electronics module and turn
on the power (causing the safety locking mechanism of the
magnetic valve to activate).
13. Check whether the stop valves are open (knobs are aligned
alongside the water pipes).
1412
1715
!
ATTENTION!
Perform the following steps
in the order indicated!
14. Hook the shower panel into the rear bracket strap.
ATTENTION! Be careful not to bend or crimp any cables or
tubes.
15. Secure the shower panel from below at the hanger screw
using a washer and wing nut.
16. Open the main water valve.
17. Perform a system test.
28 Shower control WimTec OCEAN P6 with thermal disinfection
Page 65
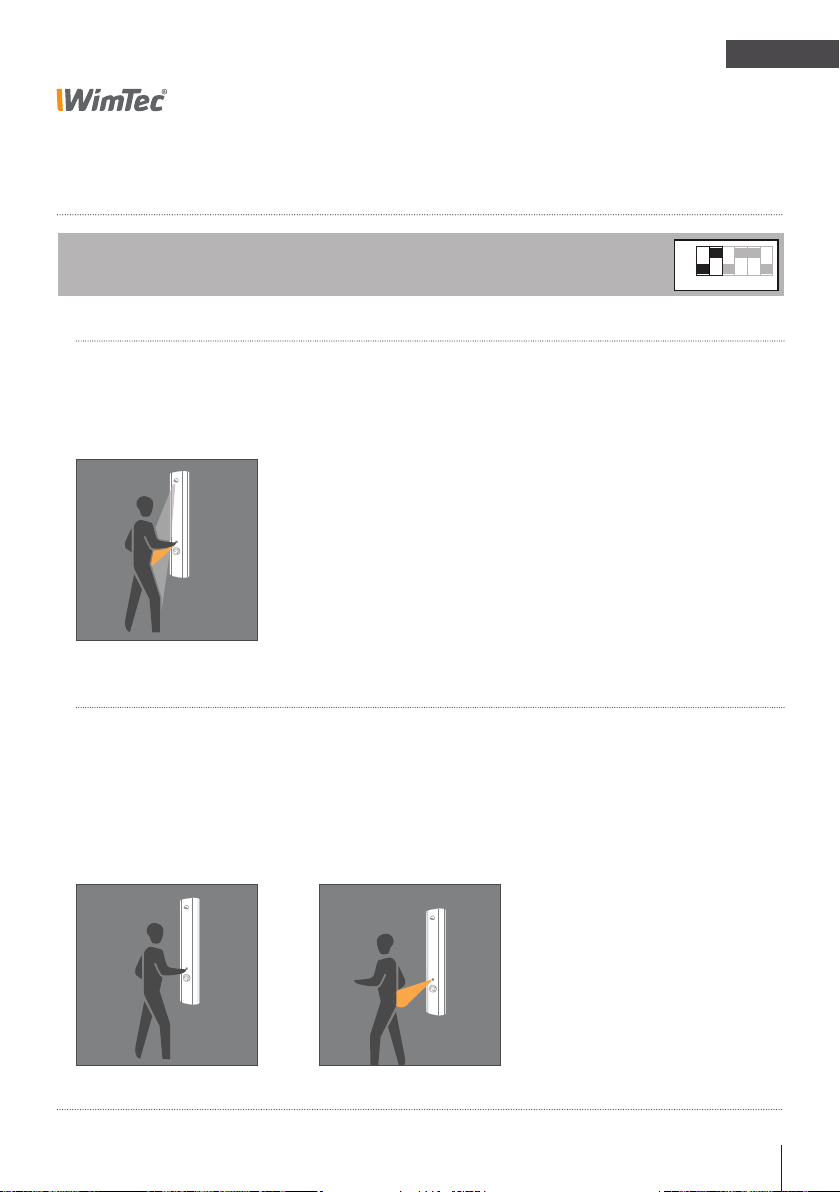
PROOF P6 with thermal disinfection
Halbautomatik:
Warmlauf:
ON
OFF
1 2 3 4 5 6
Reinigungsstopp:
ON
OFF
1 2 3 4 5 6
Hygienespülung:
ON
OFF
1 2 3 4 5 6
Program description
EN
Semi automatic program mode (default setting):
DIP switch 1=OFF, 2=ON
SWITCH ON:
Button
Water starts flowing as soon as
you press the ON/OFF button.
SWITCH OFF:
Button
Press the ON/OFF button again
to turn off the shower.
Shower control WimTec OCEAN P6 with thermal disinfection 29
Automatic function
The water flow stops at the
end of the shut-off delay once
the user leaves the sensor
range or after the configured
water arrest time has elapsed.
ON
OFF
1 2 3 4 5 6
Page 66
EN
Halbautomatik:
Vollautomatik:
Warmlauf:
ON
OFF
1 2 3 4 5 6
ON
OFF
1 2 3 4 5 6
Reinigungsstopp:
ON
OFF
1 2 3 4 5 6
Hygienespülung:
ON
OFF
1 2 3 4 5 6
PROOF P6 with thermal disinfection
Program description
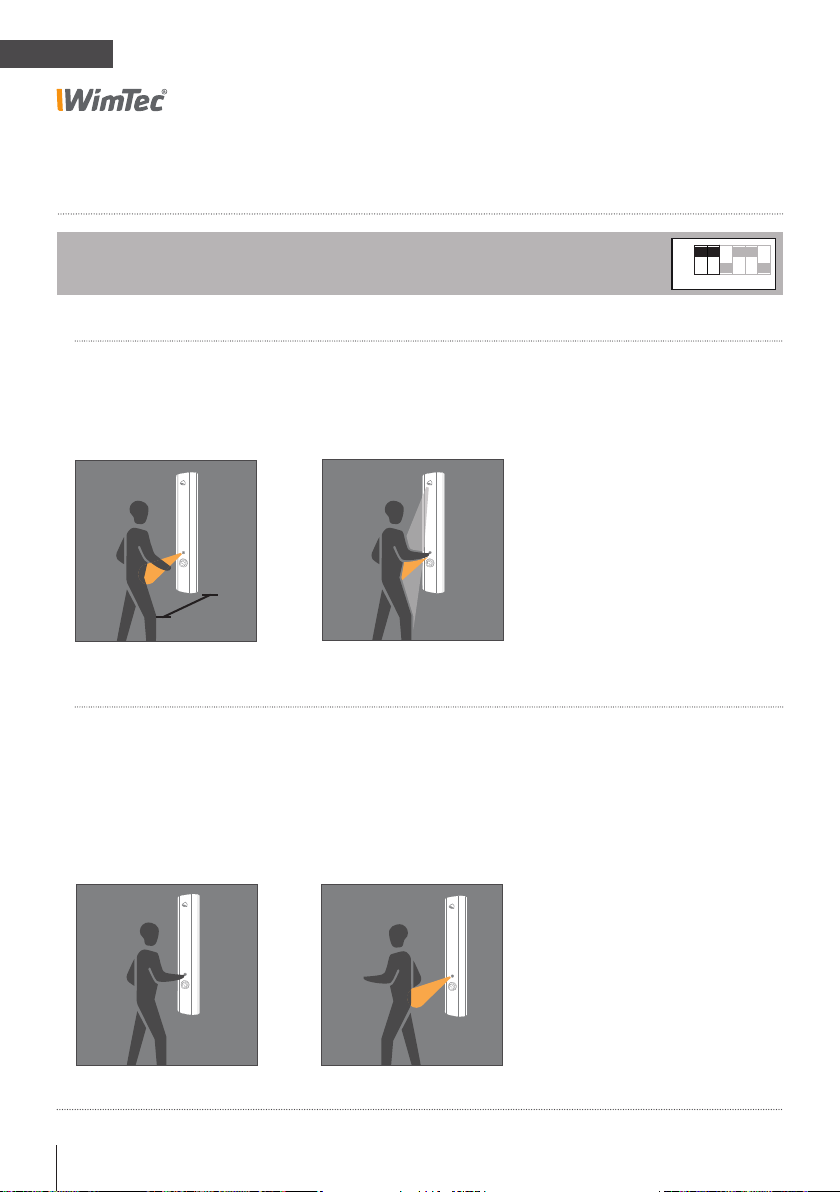
Fully automatic program mode:
DIP switch 1=ON, 2=ON
SWITCH ON:
User detection
When you step in front of the
shower, the system will detect
you.
50 cm
Automatic function
The shower automatically
activates 2 s after detecting
the user.
SWITCH OFF:
Automatic function
The water flow stops at the
end of the shut-off delay once
the user leaves the sensor
range or after the configured
water arrest time has elapsed.
Button
Press the ON/OFF button to
turn off the shower.
Press the ON/OFF button
once more to turn the shower on again.
30 Shower control WimTec OCEAN P6 with thermal disinfection
ON
OFF
1 2 3 4 5 6
Page 67
PROOF P6 with thermal disinfection
Halbautomatik:
Vollautomatik:
Manuell:
Warmlauf:
ON
OFF
1 2 3 4 5 6
ON
OFF
1 2 3 4 5 6
ON
OFF
1 2 3 4 5 6
Reinigungsstopp:
ON
OFF
1 2 3 4 5 6
Hygienespülung:
ON
OFF
1 2 3 4 5 6
Program description
EN
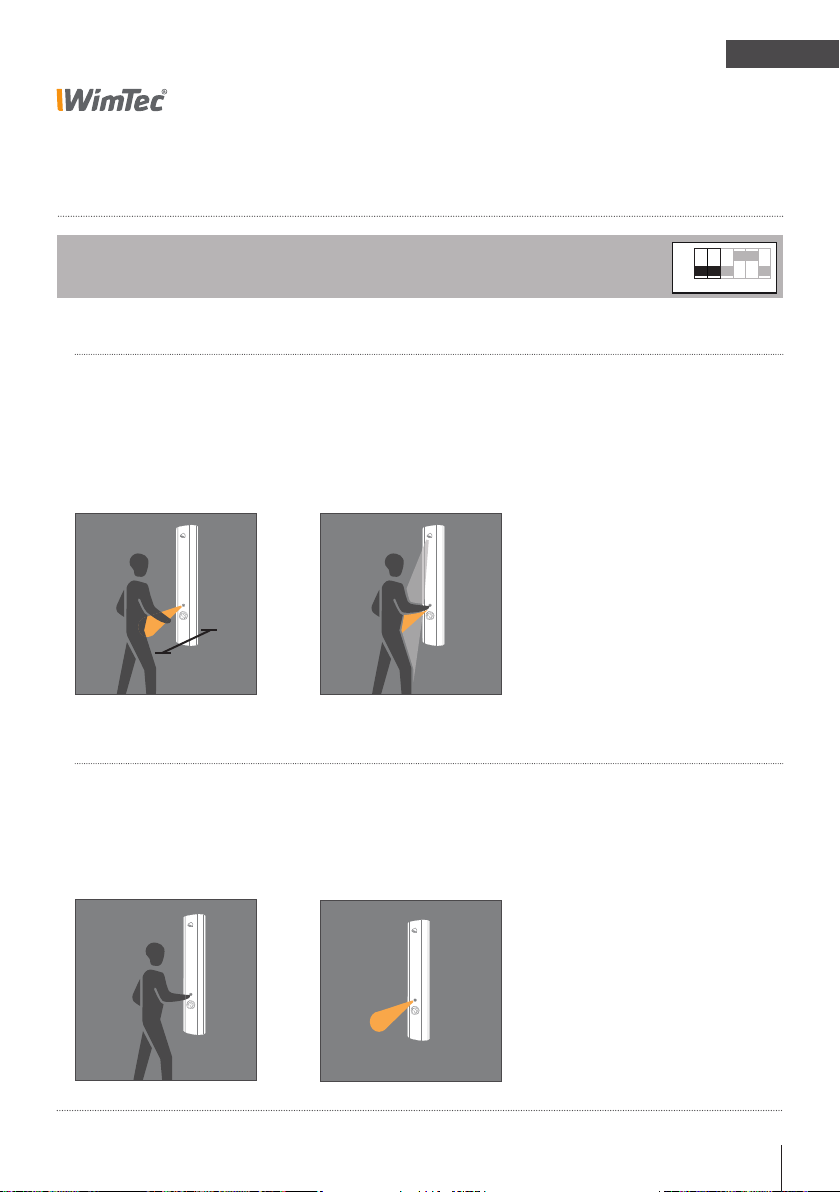
Manual program mode:
DIP switch 1=OFF, 2=OFF
SWITCH ON:
User detection
When you step in front of the
shower, the system will detect
you.
50 cm
SWITCH OFF:
Button
Each subsequent activation of
the ON/OFF button will turn
the shower off/on again.
Shower control WimTec OCEAN P6 with thermal disinfection 31
Button
Press the ON/OFF button to
turn on the shower.
Safety flow arrest
After the configured water
arrest time (see p. 23) has
elapsed, the shower will automatically shut off.
ON
OFF
1 2 3 4 5 6
Page 68
EN
Warmlauf:
PROOF P6 with thermal disinfection
Description of the functions
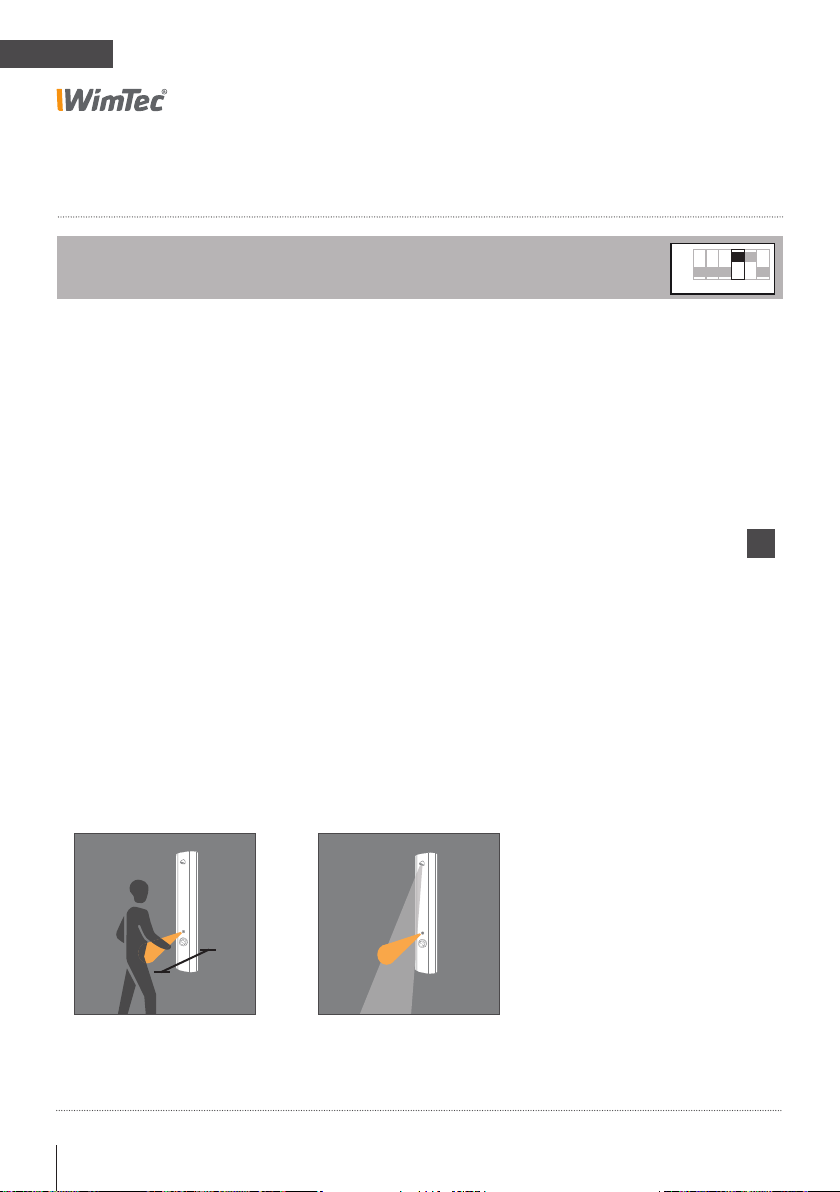
Warm water rinse:
DIP switch 4
Serves to rinse the warm water pipe without the need for
you to remain within the sensor range of the shower.
DIP switch 4 ON = Warm water rinse function enabled
(default setting).
DIP switch 4 OFF = Warm water rinse function disabled.
User detection
When you step in front of the
shower, the system will detect
you.
Operation
After activation, water will
flow for 30 s plus the configured shut-off delay without the
need for you to remain within
the sensor range; it will then
automatically shut down again.
If you enter the sensor range
for at least 5 s during these
30 s, the shower will resume
normal operation.
ON
OFF
1 2 3 4 5 6
i
It is recommended not to
combine the warm water
rinse with the fully automa-
tic program mode!
50 cm
32 Shower control WimTec OCEAN P6 with thermal disinfection
Page 69

PROOF P6 with thermal disinfection
Warmlauf:
ON
OFF
1 2 3 4 5 6
Reinigungsstopp:
Description of the functions
EN
Protection from scalding:
DIP switch 5
This function serves to monitor the sensor range during thermal
disinfection.
Thermal disinfection may be accidently aborted if dense steam
forms in front of the shower fitting. If this happens, disable the
function to protect against exposure to scalding water.
DIP switch 5 ON = Function to protect against exposure to scalding
water enabled (default setting).
DIP switch 5 OFF = Function to protect against exposure to scalding
water disabled.
Shower monitoring
This function causes the
infrared sensor to monitor the
sensor range during thermal
disinfection.
Safety flow arrest
The water flow is immediately
cut off if you approach the
panel.
ON
OFF
1 2 3 4 5 6
!
If possible, this safety
function should always
be activated.
Shower control WimTec OCEAN P6 with thermal disinfection 33
Page 70
EN
Warmlauf:
ON
OFF
1 2 3 4 5 6
Reinigungsstopp:
ON
OFF
1 2 3 4 5 6
Hygienespülung:
PROOF P6 with thermal disinfection
Description of the functions
Stagnation rinse:
DIP switch 6
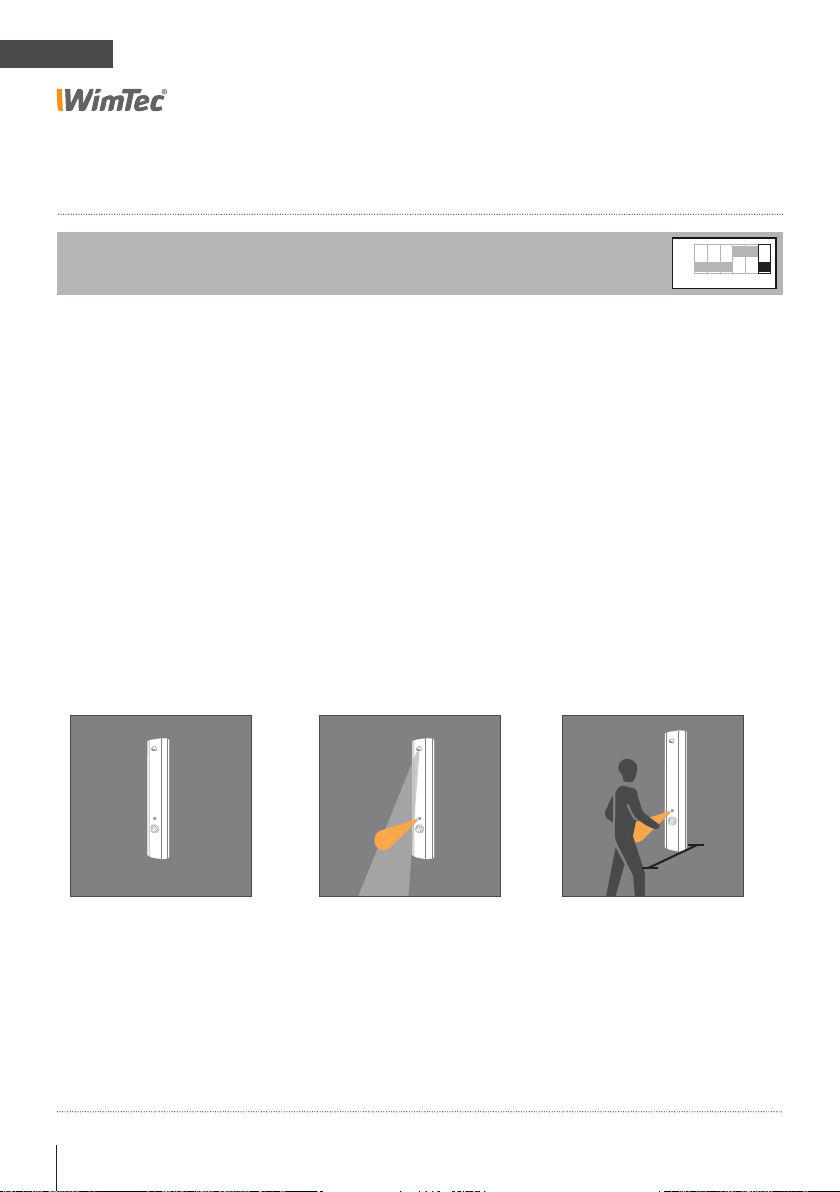
Serves to remove stagnant water that accumulates during longer periods of
disuse.
DIP switch 6 ON = Stagnation rinse function enabled.
DIP switch 6 OFF = Stagnation rinse function disabled (default setting).
Time interval
Can be set from 3–48 h at the
interval control (see p. 23).
Automatic stagnation rinse
If the fitting has not been used
for the set period, the stagnation rinse operation is automatically executed for 10 s.
Safety
If the cleaning stop function is
enabled, the stagnation rinse
function will only start 2 min
after the cleaning stop function
has been disabled.
ON
OFF
1 2 3 4 5 6
3–48 h
10
34 Shower control WimTec OCEAN P6 with thermal disinfection
50 cm
s
Page 71
PROOF P6 with thermal disinfection
Description of the functions
Cleaning stop:
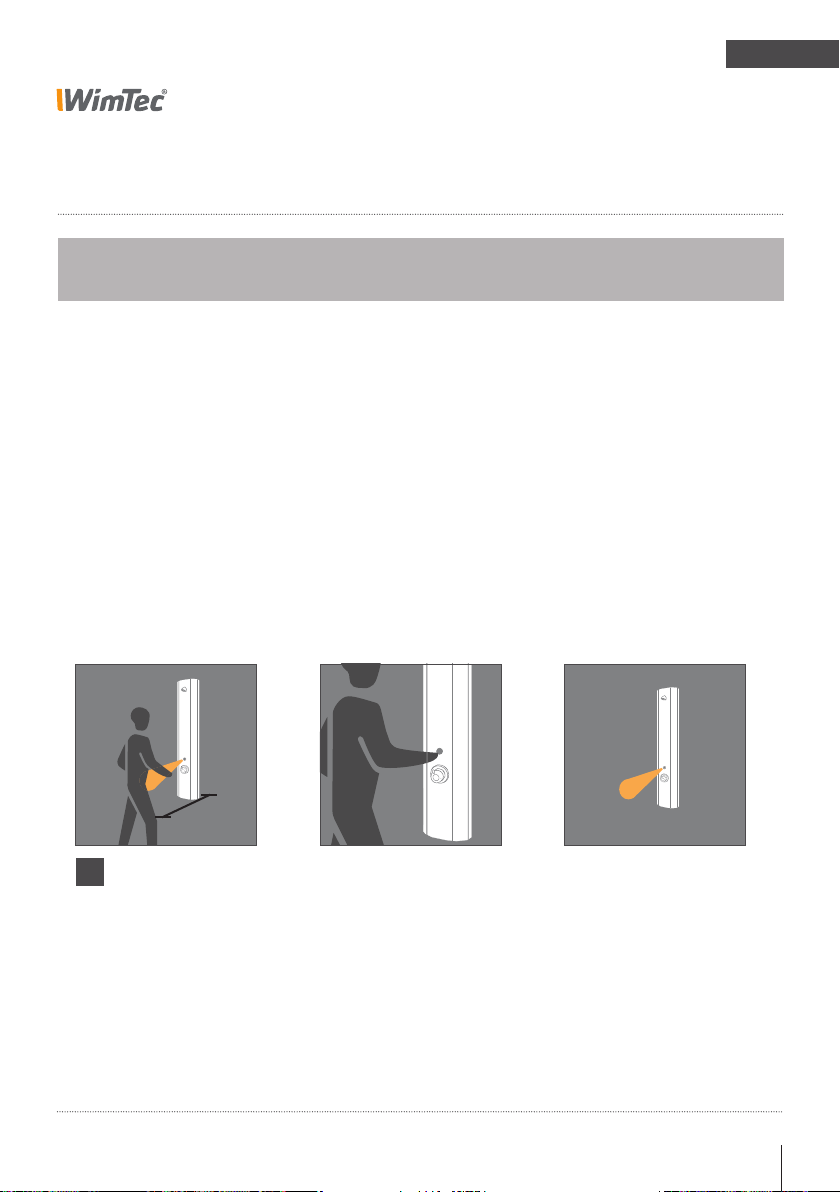
This function is always enabled
Serves to disable the fitting prior to cleaning.
EN
User detection
When you step in front of the
shower, the system will detect
you.
!
In fully automatic mode,
you must approach the
infrared sensor with your
hand within one second
after entering the sensor
range to prevent the fitting
from activating.
50 cm
Enable cleaning stop
Approach the infrared sensor
with your hand (see image)
and remove it after the LED
has flashed 5 times.
The cleaning stop remains enabled for 10 min after leaving
the sensor range.
Disable cleaning stop
The function automatically
stops if no user was detected
for 10 minutes.
You can manually disable the
function following the same
procedure used to enable it.
The fitting will resume normal
operation with a safety delay
of 3 s after you leave the
sensor range.
Shower control WimTec OCEAN P6 with thermal disinfection 35
Page 72
Replacement parts
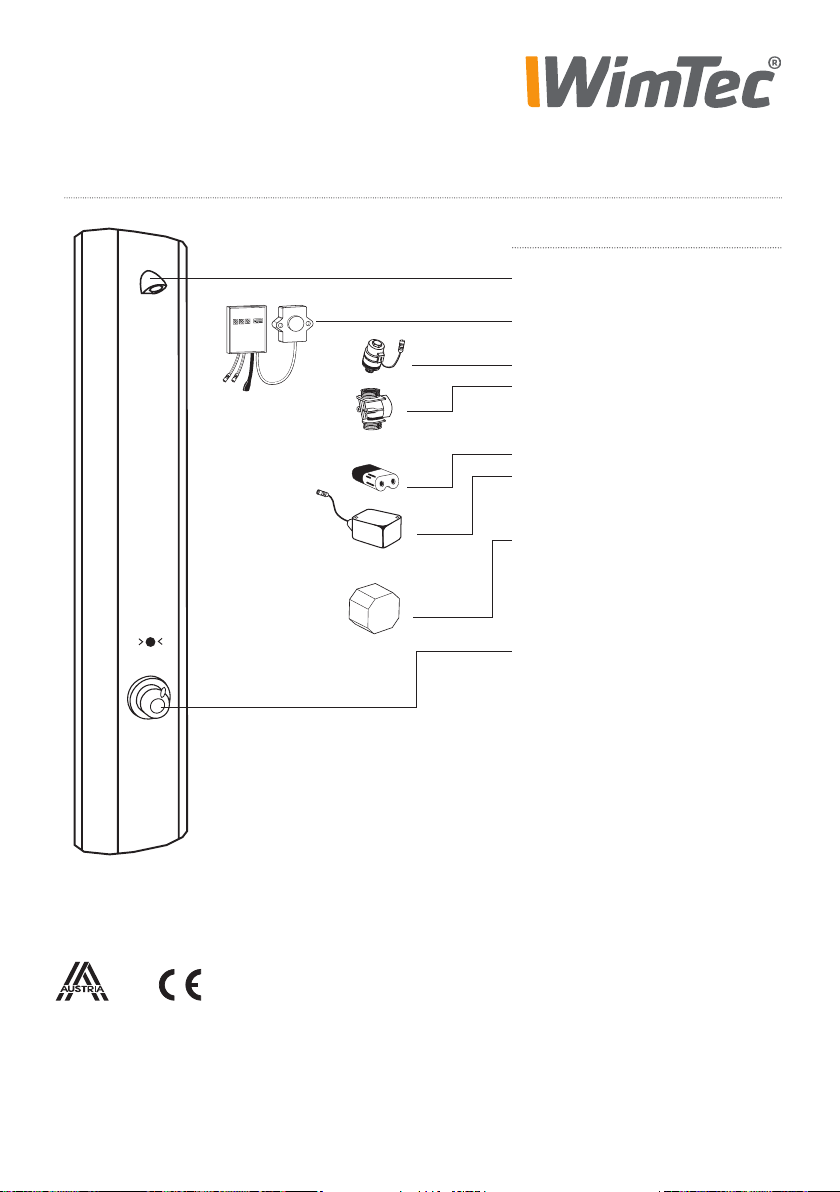
Art. no.:
120 165
120 349
231 205
221 312
230 741
230 987
117 899
113 792
107 159
Designation
WimTec PROOF shower unit
TD electronics module
Magnetic valve
Magnetic valve adapter
6-V lithium battery
6-V battery module
Power supply (1-connect.)
Power supply (5-connect.)
Thermostat
WIMTEC Sanitärprodukte GmbH
p: A - 3325 Ferschnitz, Freidegg 50, AUSTRIA
t: +43 (0) 7473 5000 f: +43 (0) 7473 5000 - 500
m: [email protected] i: www.wimtec.com
Auflage: 09 09 2014 Art.Nr. 1002178
 Loading...