

Page 1
FIX
DE
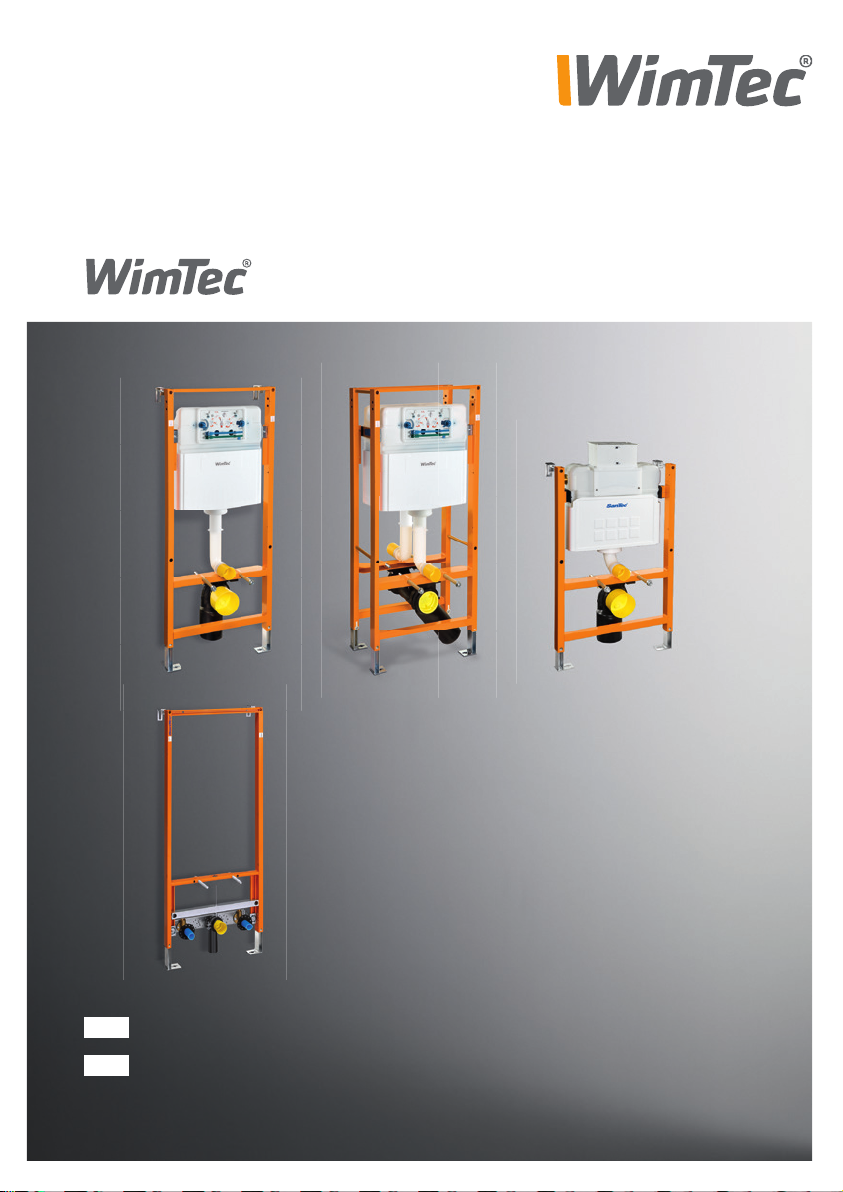
Montageanleitung - WC Montageelemente
EN
Installation Guide - WC assembly elements
Page 2
FIX
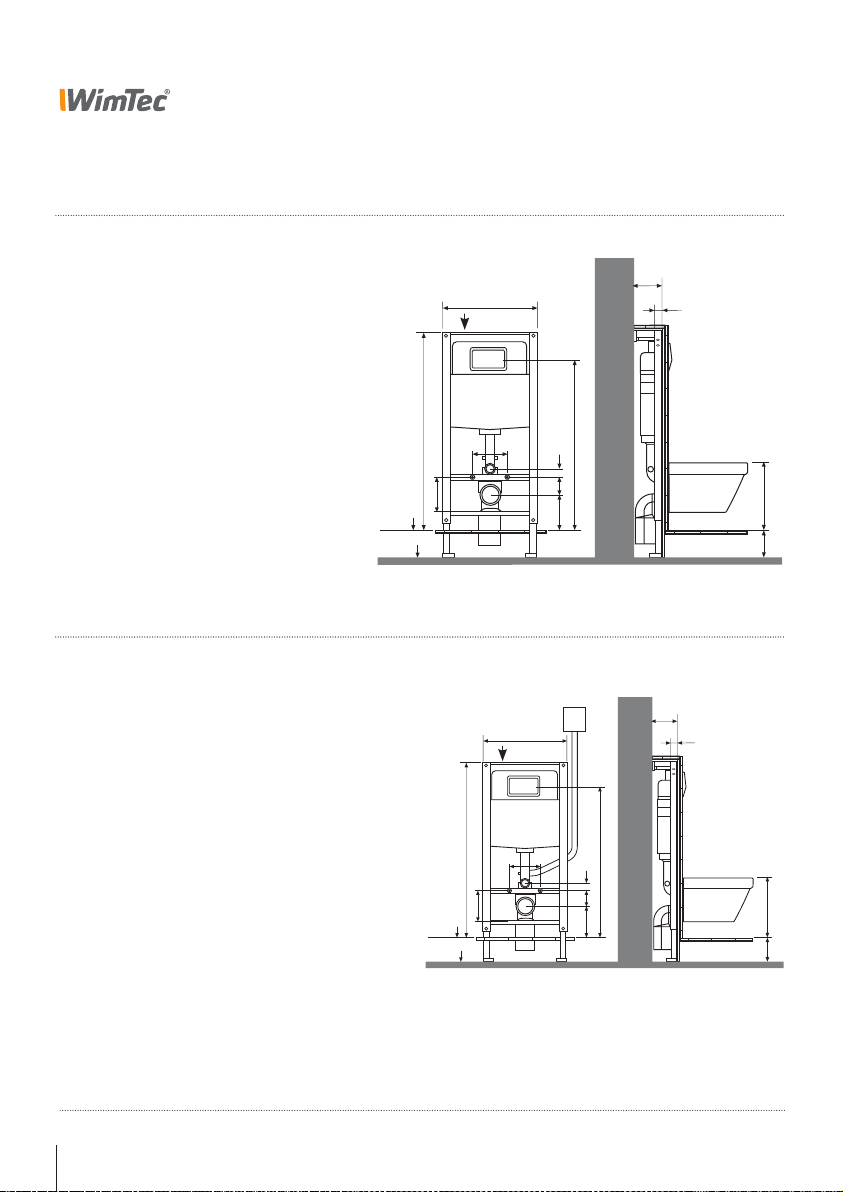
Abmessungen / Dimensions
WimTec FIX WC SLK
Spülkasten WimTec SLK
Art.Nr. 102 918
WimTec FIX WC UP320
Spülkasten Geberit UP320
Art.Nr. 101 829
WC Montageelement pulverbeschichtet in WimTec
orange, mit isoliertem 2-Mengen-UP-Spülkasten für
Betätigung von vorne. Für Massiv- und Trockenbau
zur Vor- und Inwandinstallation geeignet.
WimTec FIX WC SLK
mit Geruchsabsaugung, Spülkasten WimTec SLK
Art.Nr. 103 076
WimTec FIX WC UP320
mit Geruchsabsaugung, Spülkasten Geberit UP320
Art.Nr. 102 055
WC Montageelement pulverbeschichtet in WimTec
orange, mit isoliertem 2-Mengen-UP-Spülkasten für
Betätigung von vorne. Für Massiv- und Trockenbau zur
Vor- und Inwandinstallation geeignet. Mit Geruchsabsaugung über Spülrohr Ø=50 mm mit Anschluss DN 50.
15,5 - 19
100 OKFFB - Mitte Betätigung
3,5
10
22
4,5
100 OKFFB - Mitte Betätigung
51,5
DN 15
115
OK-FFB
OK-RFB
Bautiefe: 15,5 - 19 cm
OK-FFB
OK-RFB
18
21
Lüfter muss höher als
Spülkasten montiert werden
115
21
Bautiefe: 15,5 - 19 cm
Achtung!
Geruchsabsaugung wasserdicht anschließen bis OK Spülkasten!
Falls die Geruchsabsaugung nicht verwendet wird, muss der Lüfteranschluss
abgedichtet werden!
3,5
10
22
51,5
DN 15
18
Fußbodenaufbau
15,5 - 19
4,5
Fußbodenaufbau
41
0 -25
41
0 -25
2 WimTec FIX
Page 3
FIX
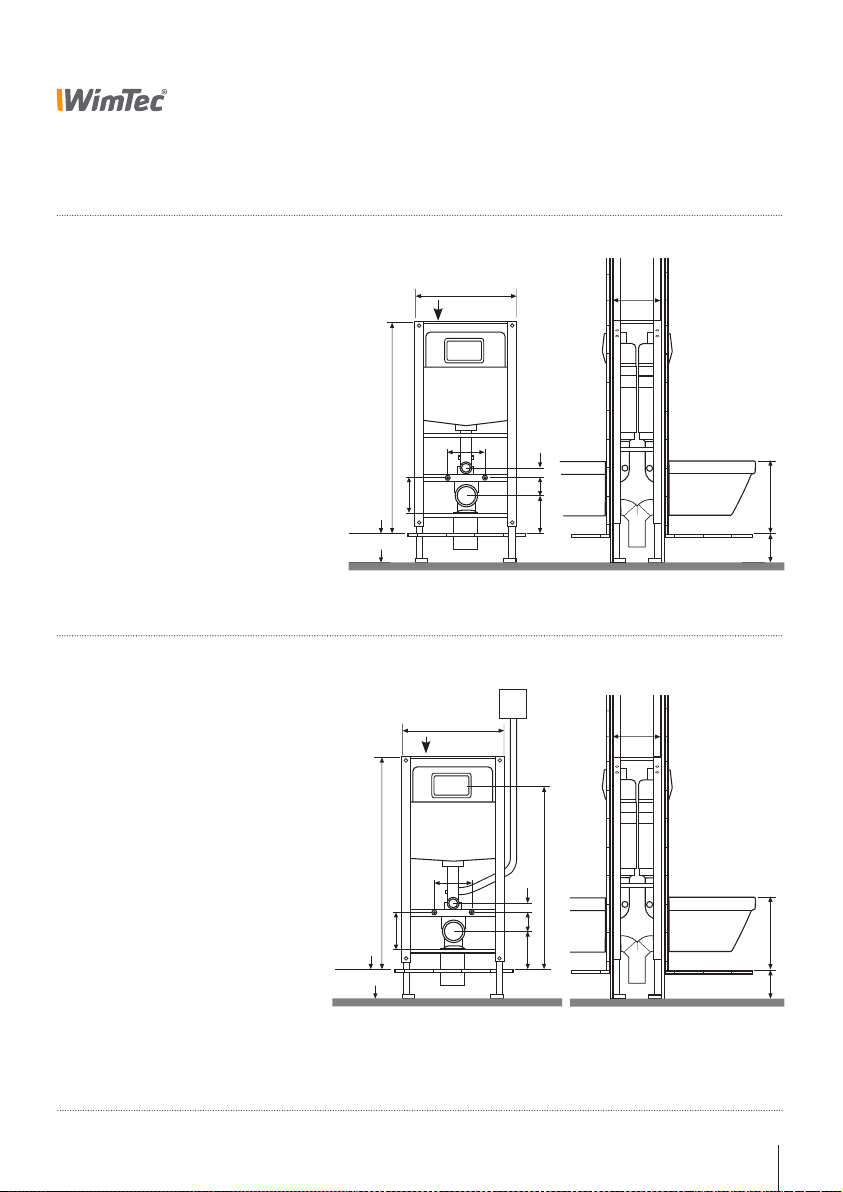
Abmessungen / Dimensions
WimTec FIX WC SLK - DUO
Spülkasten WimTec SLK
Art.Nr. 103 656
WimTec FIX WC UP320 - DUO
Spülkasten Geberit UP320
Art.Nr. 102 574
WC-Doppel Montageelement mit isoliertem
2-Mengen-UP-Spülkasten für Betätigung von vorne.
Für Massiv- und Trockenbau zur Inwandinstallation
geeignet, Bautiefe 260 mm.
115
21
OK-FFB
OK-RFB
Bautiefe: 26 cm
(Bautiefen von 27 cm bis 38 cm auf Anfrage möglich)
51,5
DN 15
18
26
3,5
10
22
Fußbodenaufbau
0 -25 41
WimTec FIX WC SLK - DUO
mit Geruchsabsaugung, Spülkasten WimTec SLK
Art.Nr. 122 237
WimTec FIX WC UP320 - DUO
mit Geruchsabsaugung, Spülkasten Geberit UP320
Art.Nr. 122 244
WC-Doppel Montageelement mit isoliertem
2-Mengen-UP-Spülkasten für Betätigung von vorne.
Für Massiv- und Trockenbau zur Inwandinstallation
geeignet, Bautiefe 260 mm.
Mit Geruchsabsaugung über Spülrohr Ø=50 mm mit
Anschluss DN 50.
OK-FFB
OK-RFB
Bautiefe: 26 cm
(Bautiefen von 27 cm bis 38 cm auf Anfrage möglich)
115
51,5
DN 15
18
21
3,5
10
100 OKFFB - Mitte Betätigung
22
26
Fußbodenaufbau
WimTec FIX 3
0 -25 41
Page 4
FIX
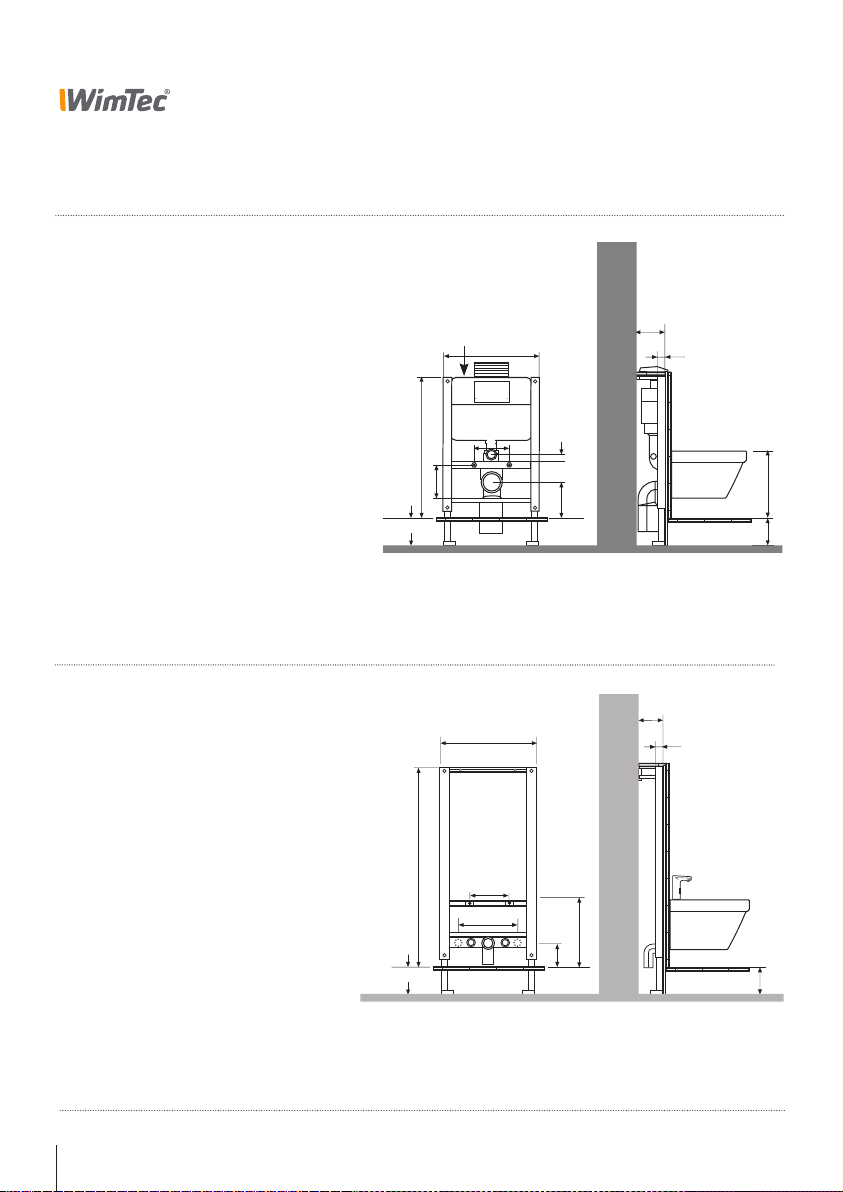
Abmessungen / Dimensions
WimTec FIX WC UP200
mit Betätigung von vorne/oben
Art.Nr. 104 486
WC Montageelement pulverbeschichtet in WimTec
orange, mit isoliertem 2-Mengen-UP-Spülkasten für
Betätigung von oben/vorne. Für Massiv- und Trockenbau
zur Vor- und Inwandinstallation geeignet.
DN 15
51,5
15,5 - 19
4,5
WimTec FIX DV - Bidet
Art.Nr. 101 874
Bidet Montageelement geeignet für Massiv- und
Trockenbau zur Vor- und Inwandinstallation.
82
21
OK-FFB
OK-RFB
Bautiefe: 15,5 - 19 cm
115
30,5/15,3/10/8
OK-FFB
OK-RFB
Bautiefen:
Vorwand 7,5 bis 19 cm
Trockenbau min. 7,55 cm
51,5
18
18
22 10 3,5
Fußbodenaufbau
7,5 - 19
4,5
29 - 36
10 - 13
Fußbodenaufbau
41
0 -25
0 -25
4 WimTec FIX
Page 5
FIX
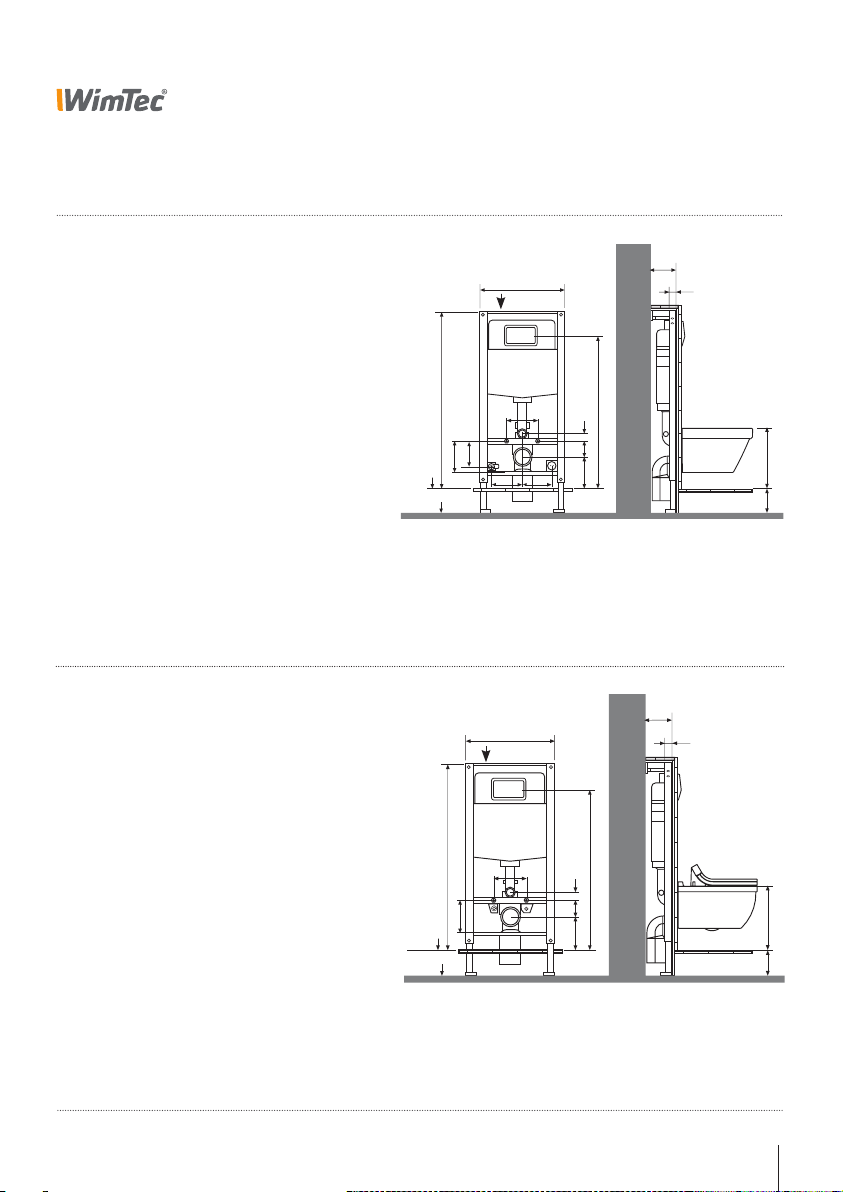
Abmessungen / Dimensions
WimTec FIX WC SLK - für Dusch WC
WimTec FIX WC SLK - for shower toilet
Art.Nr. 119 282
WimTec FIX WC SLK GA - für Dusch WC
mit Geruchsabsaugung
WimTec FIX WC SLK GA - for shower toilet
with odour extraction
Art.Nr. 119 305
WC Montageelement pulverbeschichtet in WimTec
orange, mit isoliertem 2-Mengen-UP-Spülkasten für
Betätigung von vorne zum Anschluss für Dusch-WC. Für
Massiv- und Trockenbau zur Vor- und Inwandinstallation geeignet. Wahlweise mit Geruchsabsaugung über
Spülrohr Ø 50 mm mit Anschluss DN 50.
Powder coated WC assembly element in WimTec orange with insulated 2 quantity cistern for front flushing
and connection with shower-WC. Suitable for solid and
dry-wall construction, pre-wall and in-wall installation.
Optionally available with odour extraction via flush pipe
with connection DN 50.
WimTec FIX WC SLK - SensoWash C
WimTec FIX WC SLK - SensoWash C
Art.Nr. 119 299
WimTec FIX WC SLK - SensoWash C
mit Geruchsabsaugung
WimTec FIX WC SLK - SensoWash C
with odour extraction
Art.Nr. 119 688
WC Montageelement pulverbeschichtet in WimTec
orange, mit isoliertem 2-Mengen-UP-Spülkasten
WimTec SLK für Betätigung von vorne. Zum Anschluss
für Duravit SensoWash C Dusch-WC mit verdeckten
Anschlüssen. Für Massiv- und Trockenbau zur Vor- und
Inwandinstallation geeignet.
Powder coated WC assembly element in WimTec orange with insulated 2 quantity cistern for front flushing.
Suitable for solid and dry-wall construction, pre-wall
and in-wall installation.Optionally available with odour
extraction via flush pipe with connection DN 50.
115
21
17
OK-FFB
OK-RFB
Bautiefe: 15,5 - 19 cm
115
21
OK-FFB
OK-RFB
Bautiefe: 15,5 - 19 cm
51,5
DN 15
20 19
51,5
DN 15
18
15,5 - 19
4,5
18
3,5
10
100 OKFFB - Mitte Betätigung
22
Fußbodenaufbau
15,5 - 19
4,5
3,5
10
100 OKFFB - Mitte Betätigung
22
Fußbodenaufbau
41
0 -25
41
0 -25
WimTec FIX 5
Page 6
FIX
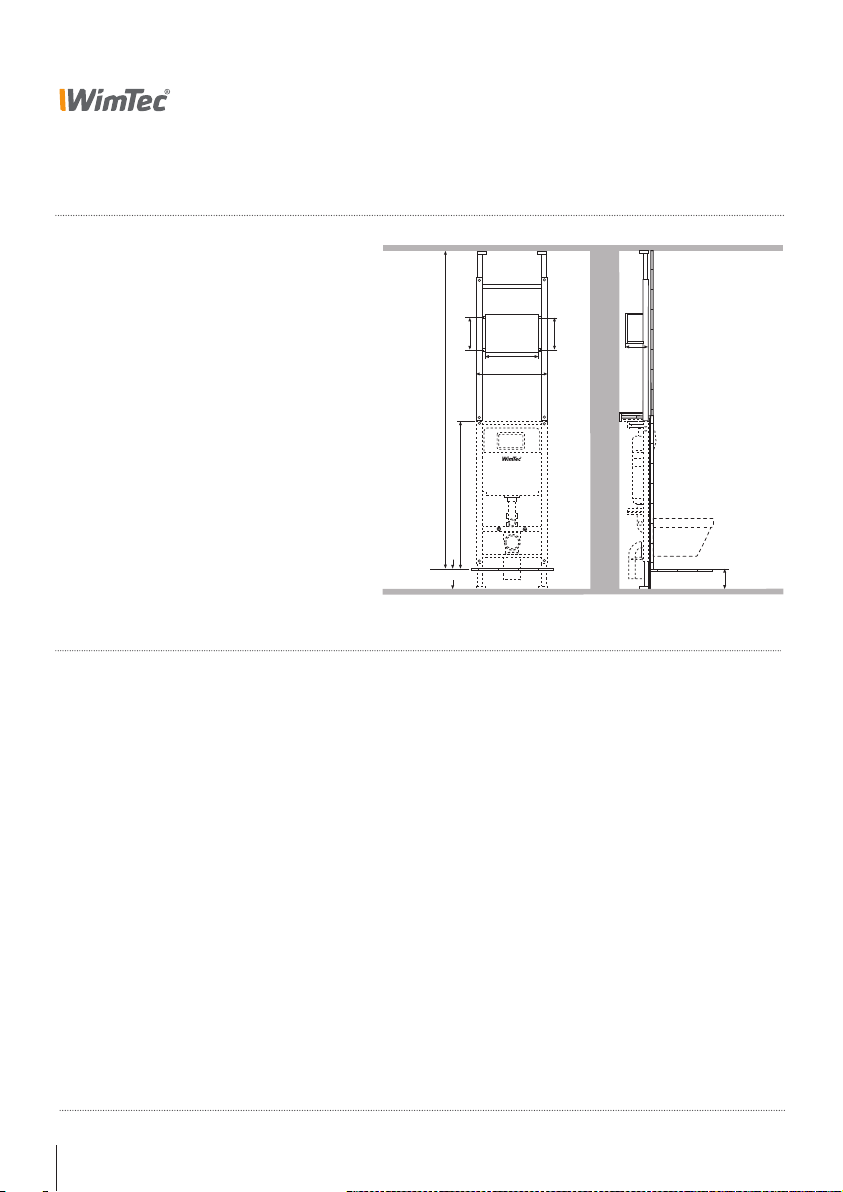
Abmessungen / Dimensions
107 746 WimTec FIX DV Vario
Montageelement, pulverbeschichtet in
WimTec orange mit feuchtigkeitsbeständiger
Schichtholzplatte zB für die Montage von Lüftern.
Für Massiv- und Trockenbau zur Vor- und Inwandinstallation geeignet.
Mounting element with laminated wood fixing
plate f.ex. for the assembling of ventilator.
Suitable for light construction, front-wall
installation, front-wall bar installation and
brick lining.
30
250 - 270
115
39
51,5
verstellbar
in Höhe
und Tiefe
12 - 19
tiefenverstellbar
Bautiefe:
min. 12 - 19 cm
OK-FFB
OK-RFB
Fußbodenaufbau
0 -25
6 WimTec FIX
Page 7
FIX
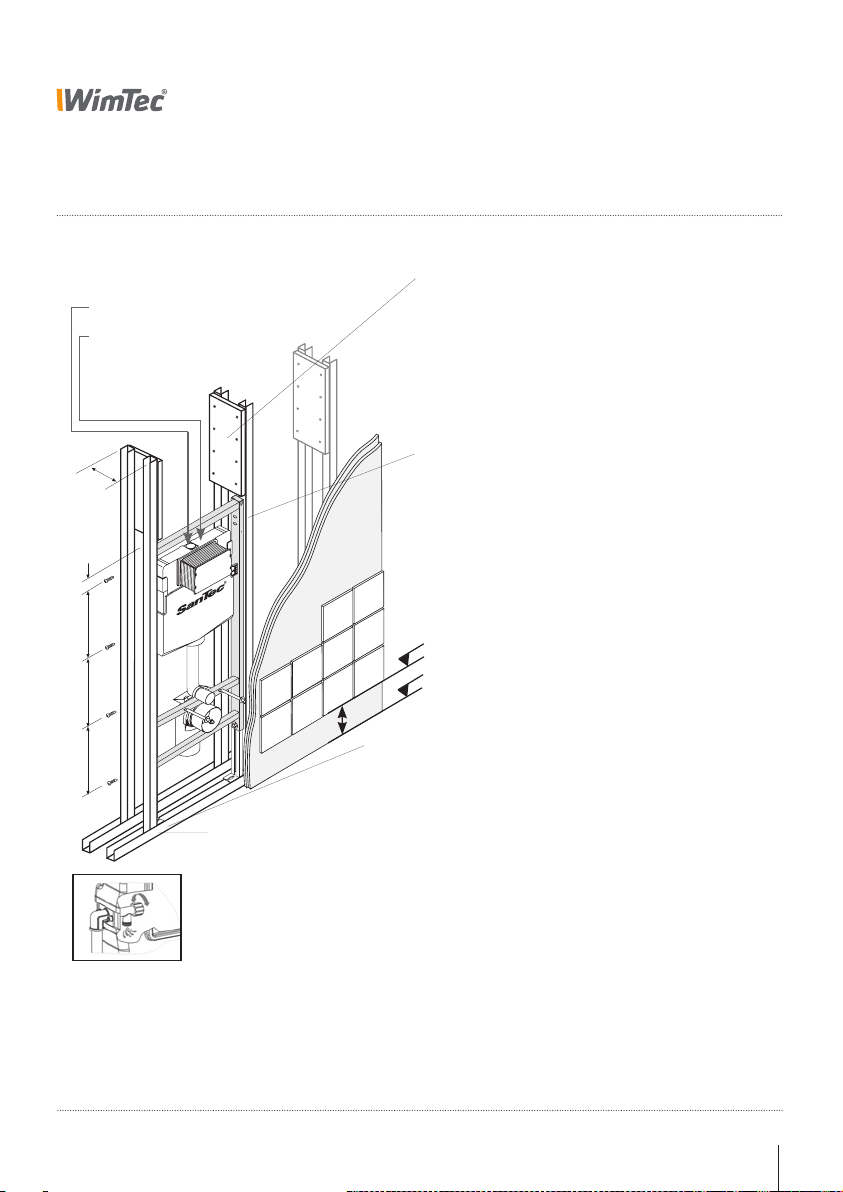
Montage / Installation
Montage in der Leichtbauwand
Installation in light construction walls
Wasser DN15
Water DIN 15
12 V Anschluss bei Verwendung von WimTec FLUSH
oder WimTec PROOF
12 V connection at use of WimTec PROOF
min. 15,5
5
30
30
30
U-Profil
Oberhalb des Elements ist bei doppelschaligen Wänden gemäß
DIN 18183 bauseitig eine Aussteifung als Zugkraftverbindung
einzubringen (Höhe min. 30 cm). Bei einschaligen Wänden ist
diese nicht erforderlich.
At double-lightweight wall constructions, there have to be
fixed above the element a stiffening as tractive fource-connection (height at least 30 cm) according to DIN 18183. At singlelightweight wall construction this is not necessary.
Befestigung an den Seiten
Aussteifungsprofil bündig mit dem Elementrahmen ausrichten
und das Element je Ständerseite mit M8 Schraube und
4 Selbstbohrschrauben verschrauben (Abstand ca. 30 cm).
Fixing on the sides
Align stiffening profile flush with the element frame and screw
the element on each side with screw M8 and 4 self-cutting
screws (distance approx. 30 cm).
OK-FFB
OK-FFB
0-25
Befestigung am Boden (U - Profil)
Die Langlöcher der Stellfüße durchzeichnen Löcher mit D=10 mm bohren
und Dübel einsetzen. Element mit Sechskantschrauben und U - Scheiben
befestigen.
Fixing to floor (U-section)
Mark on the floor the shape of the elongated holes in the legs of the
assembly element. Drill 10 mm holes in the floor and insert plugs. Fix
assembly element with hexagonal bolts and U-washers to the floor.
ACHTUNG! Vorspülung durchführen.
!
Alle einstellbaren Maße unbedingt beim Einbau auf die jeweilige Keramiktype bzw. Einbausituation anpassen.
Vorderkante des Montageelements muss unbedingt mit der
Vorderkante der Aussteifungsprofile bündig sein.
Montageelement im Bereich von keramischen Belägen mehrmalig beplanken (lt. ÖNORM B 3415).
Beim Einbau in Leichtbauständerwände sind die technischen
und bauphysikalischen Datenblätter zu berücksichtigen.
Aussteifungsprofile ober dem Montageelement mit
Gipskartonplatten verbinden.
Vor dem Anschluss des Füllventils ist unbedingt eine Vorspülung
durchzuführen.
ATTENTION! Carry-out preflushing.
Before connecting charging valve a preflushing has to be made.
Make sure to adjust any adjustable measurement to the type
of ceramics used and provide for the individual situation and
construction. Ensure, that front edge of assembly element is flush
with front edge of stiffening profiles.
Use several layers of plaster board as per applicable codes and
regulations before aplying ceramic tiles.
Adhere to any applicable technical data sheet and statical
requirement when installing assembly elements into lightweight
wall constructions. Connect stiffening profiles uprights above the
assembly element with plaster boards.
WimTec FIX 7
Page 8
FIX
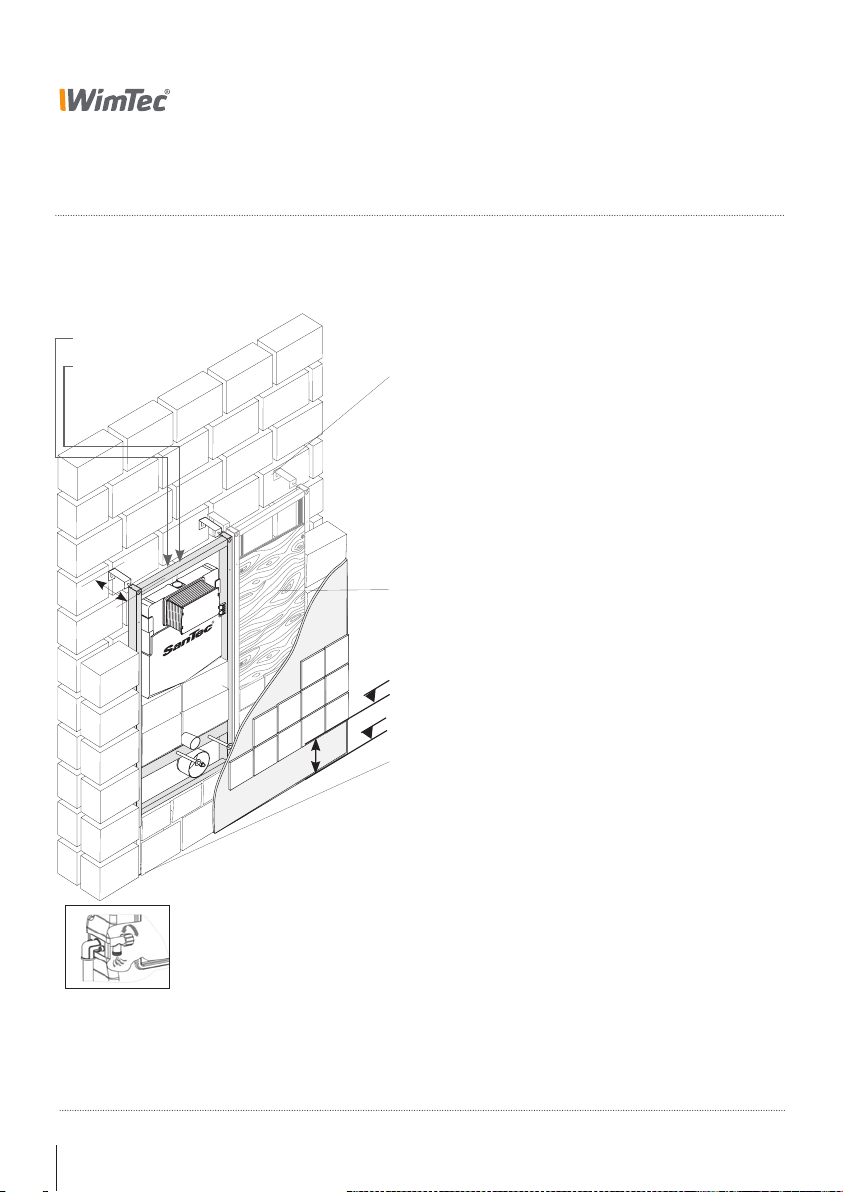
Montage / Installation
Ausmauerung
Brick-lining
Wasser DN 15
Water DIN 15
12 V Anschluss bei Verwendung von WimTec FLUSH
oder WimTec PROOF
12 V connection at use of WimTec PROOF
min. 15,5
Befestigung an der Wand
Den Wandabstand an der Einzelbefestigung auf gleiche
Abstände einstellen.
Löcher mit D=10 mm bohren und Dübel einsetzen.
Element mit Sechskantschrauben und U - Scheiben befestigen.
Fixing to brick wall
Adjust mounting frame with fixing bolts parallel to wall.
Drill 10 mm holes and insert plugs.
Fix mounting frame with hexagonal bolts and U-washers to
the wall.
Zubehör: Befestigungsplatte Art.Nr.: 101 881 für Stützgriffe.
Accessories: Installation board Art.No.101 881 for the
installation of prop handles.
OK-FFB
0-25
ACHTUNG! Vorspülung durchführen.
!
Alle einstellbaren Maße unbedingt beim Einbau auf die jeweilige
Keramiktype bzw. Einbausituation anpassen.
Die Ausmauerung des Elements muss vollflächig erfolgen.
Putzgitter verwenden.
Vor dem Anschluss des Füllventils ist unbedingt eine Vorspülung
durchzuführen.
ATTENTION! Carry-out preflushing.
Before connecting charging valve a preflushing has to be made.
8 WimTec FIX
OK-RFB
Befestigung am Boden
Die Langlöcher der Stellfüße durchzeichnen Löcher mit D=10 mm
bohren und Dübel einsetzen. Element mit Sechskantschrauben
und U - Scheiben befestigen.
Fixing to floor (U-section)
Mark on the floor the shape of the elongated holes in the legs of the
assembly element. Drill 10 mm holes in the floor and insert plugs. Fix
mounting frame with hexagonal bolts and U-washers to the floor.
Make sure to adjust any adjustable measurement to the type of ceramic used and provide for the individual situation and construction.
After installation the assembly element shall be completely covered
with bricks in accordance with applicable codes and regulations.
Page 9
FIX
Montage / Installation
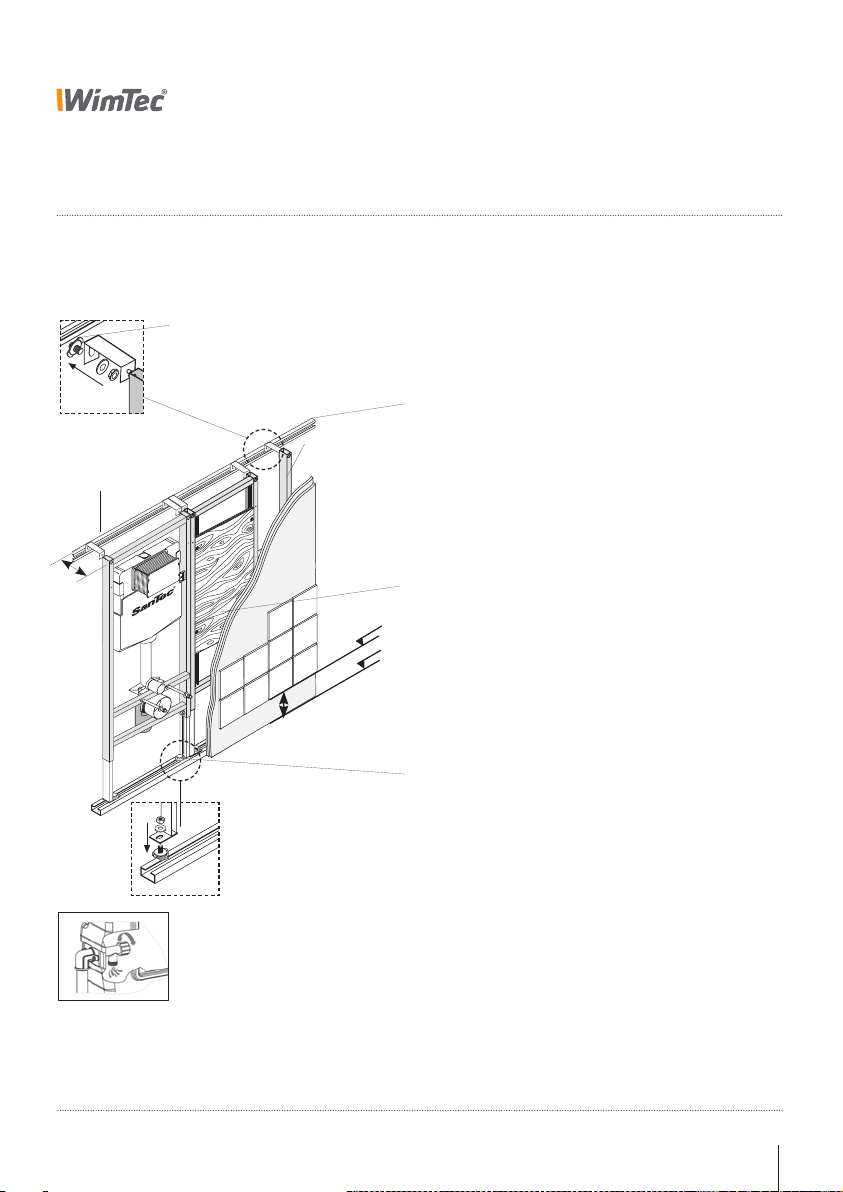
Vorwandmontage
Front-wall installation
Zubehör:
Schnellverschlussschraube
Accessory:
Quick fastener screw
Art. Nr.: 102 604
VPE 50 Stk.
Montageschiene
Installation track
2 m Art. Nr.: 102 581
min. 15,5
Stützelement
Backing element
Art. Nr.: 102 635
OK-FFB
OK-RFB
Befestigung an der Wand
Montageschiene an Wand befestigen.
Den Wandabstand an der Vorwand-befestigung auf
gleiche Abstände einstellen. Mit Schnellverschlussschraube das
Element in der Montageschiene befestigen.
Fixing to wall
Fix installation track to wall.
Adjust distance to wall (max.19 cm) at the front-wall-fixing-set
to the same distances. Fix element with quick fastener screw in
installation track.
Zubehör: Befestigungsplatte Art.Nr.: 101 881 für Stützgriffe.
Accessories: Installation board Art.No.101 881 for the installation
of prop handles.
0-25
ACHTUNG! Vorspülung durchführen.
!
Alle einstellbaren Maße unbedingt beim Einbau auf die jeweilige
Keramiktype bzw. Einbausituation anpassen.
Montageelement im Bereich von keramischen Belägen mehrmalig
beplanken (lt. ÖNORM B 3415).
Vor dem Anschluss des Füllventils ist unbedingt eine Vorspülung
durchzuführen.
ATTENTION! Carry-out preflushing.
Before connecting charging valve a preflushing has to be made.
Befestigung am Boden
Montageschiene am Boden (Rohdecke) befestigen und
Element mit Schnellverschlussschraube einsetzen.
Fixing to floor
Fix installation track to floor (raw floor) and
insert assembly element with quick fastener screw.
Make sure to adjust any adjustable measurement to the type of ceramictiles used and provide for the individual situation and construction.
Use several layers of plaster board as per applicable codes and
regulations before applying ceramic tiles.
WimTec FIX 9
Page 10
FIX
Montage / Installation
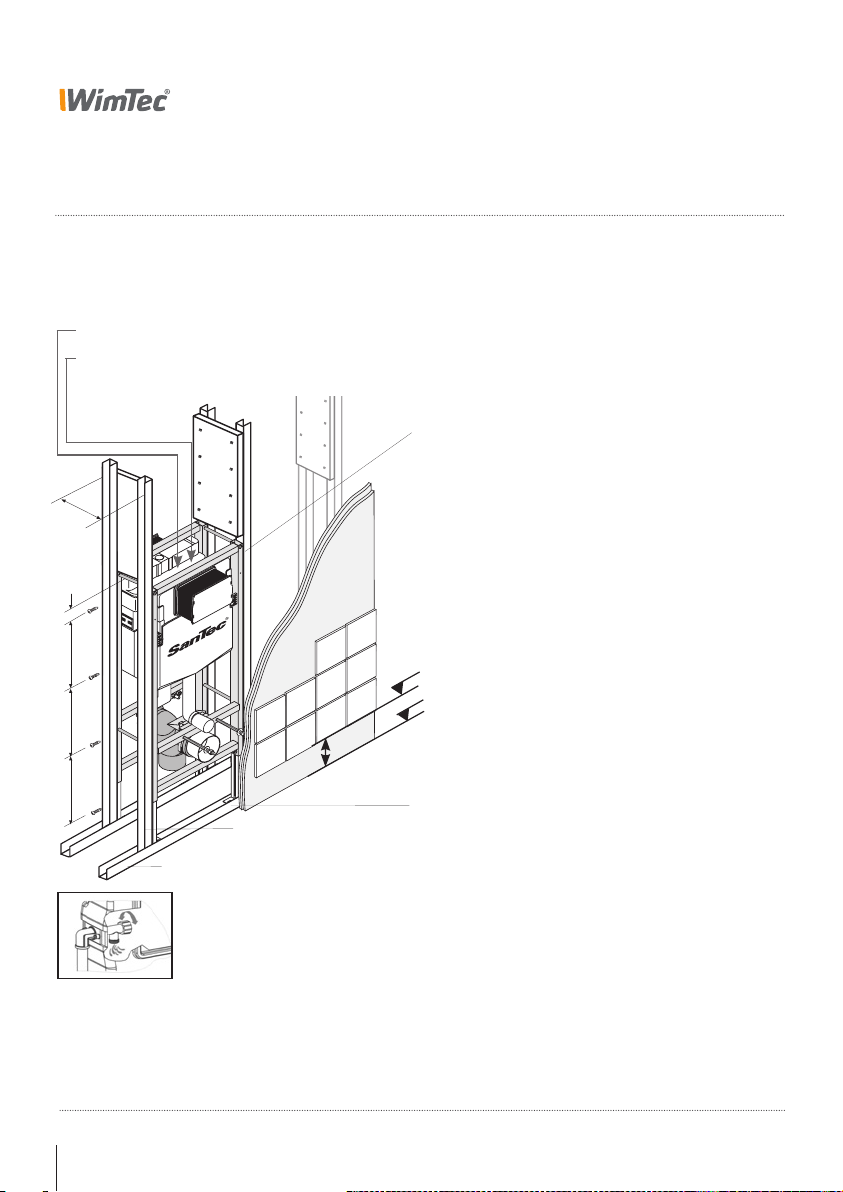
WC Doppelelement Leichbaumontage
Double WC element for installation in light construction walls
Wasser DN 15 Anschluss je WC
Water DIN 15 connection per WC
12 V Anschluss bei Verwendung von WimTec FLUSH
oder WimTec PROOF je WC
12 V connection at use of WimTec PROOF per WC
Bautiefe
26 cm
Außenkante
5
30
30
30
U-Profil
ACHTUNG! Vorspülung durchführen.
!
Vor dem Anschluss des Füllventils ist unbedingt eine Vorspülung durchzuführen.
ATTENTION! Carry-out preflushing.
Before connecting charging valve a preflushing has to be made.
Aussteifungsprofil
stiffening profile
0-25
Befestigung an den Seiten
Aussteifungsprofil bündig mit dem Elementrahmen ausrichten
und das Element je Ständerseite mit M8 Schraube und
4 Selbstbohrschrauben verschrauben (Abstand ca. 30 cm).
Fixing on the sides
Align stiffening profile flush with the element frame and screw
the element on each side with screw M8 and 4 self-cutting
screws (distance approx. 30 cm).
Zubehör: Befestigungsplatte Art.Nr.: 116 021 für Stützgriffe.
Accessories: Installation board Art.No. 116 021 for the
installation of prop handles.
OK-FFB
OK-RFB
Befestigung am Boden
Die Langlöcher der Stellfüße durchzeichnen Löcher mit D=10 mm bohren
und Dübel einsetzen. Element mit Sechskantschrauben und U - Scheiben
befestigen.
Fixing to floor (U-section)
Mark on the floor the shape of the elongated
assembly element. Drill 10 mm holes in the floor and insert plugs. Fix
mounting frame with hexagonal bolts and U-washers to the floor.
holes in the legs of the
Alle einstellbaren Maße unbedingt beim Einbau auf die
jeweilige Keramiktype bzw. Einbausituation anpassen.
Befestigung als auch Beplankung muss laut ÖNORM B 3415
bzw. DIN 18181 und 18183-1 ausgeführt werden.
Montageelement im Bereich von keramischen Belägen
mehrmalig beplanken (lt. ÖNORM B 3415).
10 WimTec FIX
Make sure to adjust any adjustable measurement to the type of
ceramictiles used and provide for the individual situation and
construction.
Anchor and planking have to be accomplished according to ÖNORM
B 3415 respectively DIN 18181 and 18183-1.
Use several layers of plaster board as per applicable codes and
regulations before applying ceramic tiles.
Page 11

Notizen
FIX
WimTec FIX 11
Page 12
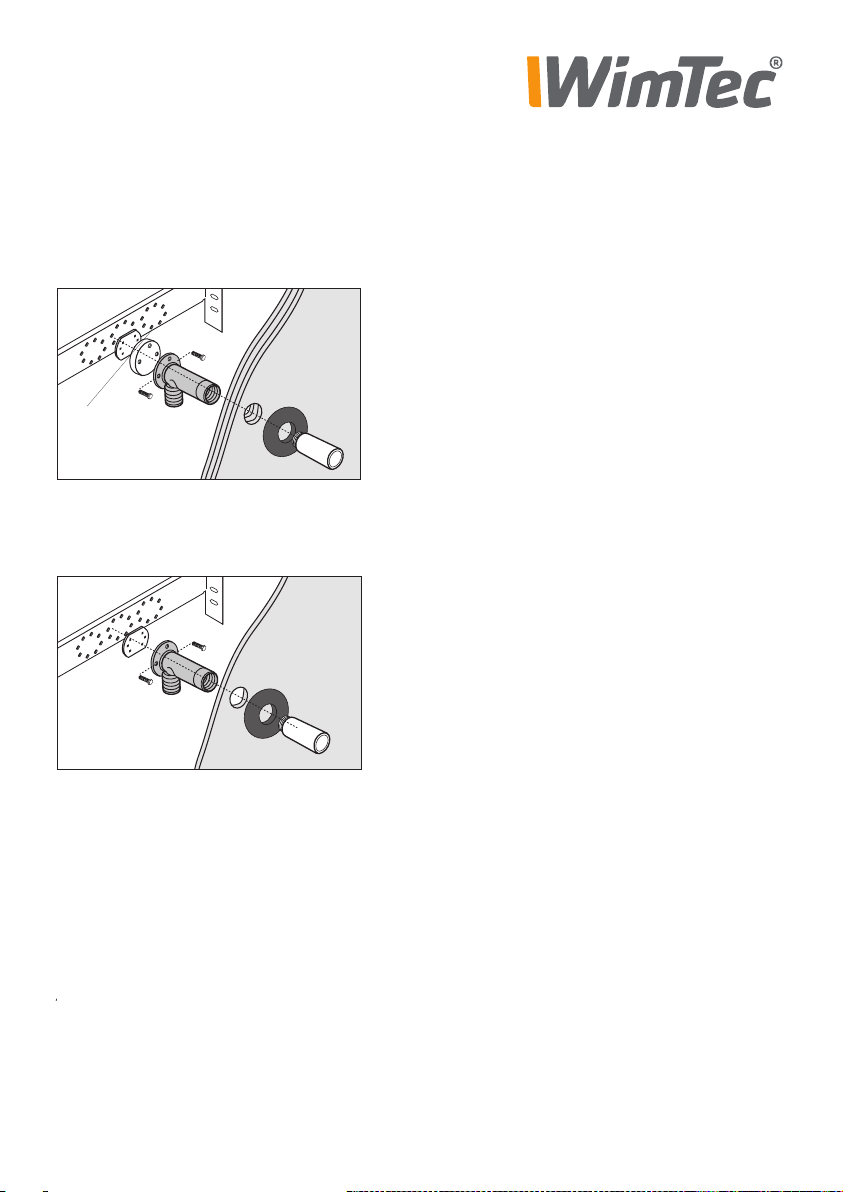
Montage Armaturenanschlusswinkel
Installation tap connecting angles
Doppelte Beplankung
Double planking
Distanzscheiben verwenden
use distance washer
Einfache Beplankung
Single planking
Die Montage und Installation darf nur durch einen konzessionierten
Fachbetrieb erfolgen.
Bei der Planung und Errichtung von Sanitäranlagen sind die entsprechenden örtlichen, nationalen und internationalen Normen und
Vorschriften zu beachten. Insbesondere: DIN 1988 und ÖNorm B 5410
Der Schallschutz wird erfüllt, sofern die Planung sowie die fachgerechte Ausführung der gesamten Sanitärinstallation im Sinne der
DIN 4109 durchgeführt wird.
WIMTEC Sanitärprodukte GmbH
p: A - 3325 Ferschnitz, Freidegg 50, AUSTRIA
Installation of fixing board in accordance with applicable codes and
regulations only by companies certified for this type of work.
Planning and installation of sanitary systems are to be based solely
on codes and regulations applicable at the site of installation.
Applicable noise protection codes and regulations must be adhered
to.
Auflage: 05 06 2014 Art.Nr. 902945
 Loading...