

Page 1
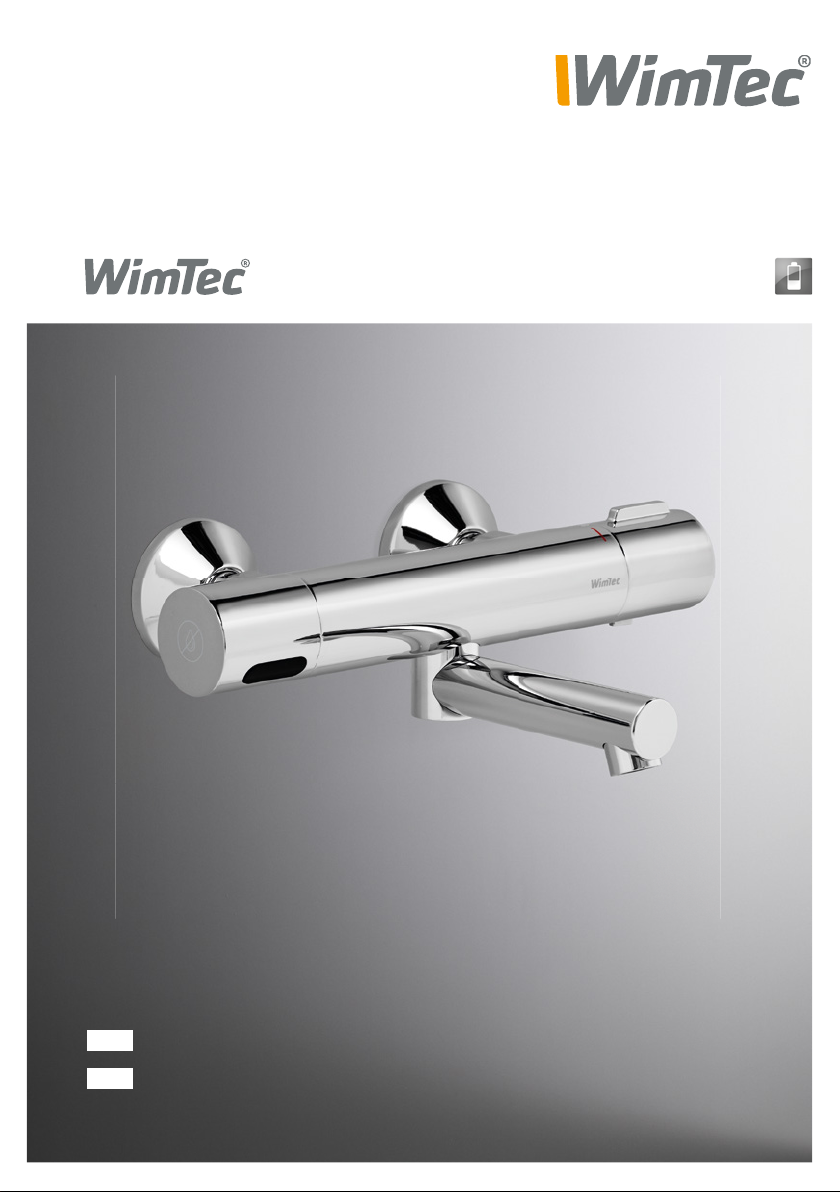
ECOSAN W6
DE
Montage- und Bedienungsanleitung
EN
Assembly and operating instructions
Page 2
DE
ECOSAN W6
Allgemeine Hinweise
Diese Anleitung ist gültig für folgende Produkte:
WimTec ECOSAN W6 - 6V
Ausladung 180 mm Art�Nr� 125 184
Ausladung 225 mm Art�Nr� 125 207
Lieferumfang:
Zweipunkt Wandarmatur mit S-Anschlüssen, integrierter Elektronik,
Thermostat mit Heißwassersperre, 6 V Batterie, Magnetventil,
Vorfi lter, Rückfl ussverhinderer, Rosetten und Magnetstift�
PFLEGEHINWEISE:
Damit Sie jahrelang Freude mit dieser hochwertigen Armatur
haben, empfehlen wir Ihnen, folgende Punkte bei der Reinigung
und Pfl ege zu beachten:
milde, seifenhaltige Reinigungsmittel verwenden
keine kratzenden, scheuernden oder säurehaltigen
Reinigungs- oder Desinfektionsmittel verwenden
nur mit weichem Schwamm oder Tuch behandeln
keine Reinigung mit Dampfstrahlgeräten
!
Es gelten die „Allgemeinen
Installationsbedingungen“
unter www.wimtec.com.
2 Wandarmatur WimTec ECOSAN W6
WICHTIGE INSTALLATIONSHINWEISE:
Die Montage und Installation darf nur durch einen konzessionierten
Fachbetrieb gemäß DIN 1988, ÖVE/ÖNORM E 8001 sowie VDE 0100
Teil 701 erfolgen� Bei der Planung und Errichtung von Sanitäranlagen
sind die entsprechenden örtlichen, nationalen und internationalen
Normen und Vorschriften zu beachten!
Page 3

Inhalt
DE
ECOSAN W6
Seite
Technische Daten ������������������������������������������������������������������������� 4
Abmessungen ������������������������������������������������������������������������������� 5
Legende ����������������������������������������������������������������������������������������� 6
Armatur �������������������������������������������������������������������������������������� 6
Elektronik-Modul ������������������������������������������������������������������������ 6
Funktionseinstellung ������������������������������������������������������������������� 7
Einstellregler ������������������������������������������������������������������������������ 7
DIP-Schalter ������������������������������������������������������������������������������� 7
Montage & Inbetriebnahme ������������������������������������������������������ 8
Funktionseinstellungen am Elektronik-Modul ���������������������� 10
Ausrichten des Infrarotsensors ������������������������������������������������ 11
Bedienung �����������������������������������������������������������������������������������12
Einschalten ������������������������������������������������������������������������������ 12
Ausschalten������������������������������������������������������������������������������ 12
Funktionsbeschreibung ������������������������������������������������������������� 13
Maximale Abschalt-Reichweite ���������������������������������������������� 13
Reinigungsstopp ���������������������������������������������������������������������� 14
Dauerlauf ��������������������������������������������������������������������������������� 15
Intelligente Freispül-Automatik ���������������������������������������������� 16
Freispül-Dauer ������������������������������������������������������������������������� 17
Nachlaufzeit ����������������������������������������������������������������������������� 17
Thermische Desinfektion �������������������������������������������������������� 18
LED Signale ����������������������������������������������������������������������������������19
Wartung - Batteriewechsel�������������������������������������������������������20
Ersatzteile ������������������������������������������������������������������������������������ 21
Wandarmatur WimTec ECOSAN W6 3
Page 4

DE
ECOSAN W6
Technische Daten
WimTec ECOSAN W6 - 6 V
Batterie: 6 V Lithium CR-P2 (im Lieferumfang enthalten)
Batterielebensdauer: ca� 200�000 Spülungen (max� 4 Jahre)
Weitere technische Daten:
Magnetventil: Kartusche 6 V
Ansprechbereich: 1 cm bis 30 cm einstellbar
Spülstoppzeit: 10 s bis 10 min einstellbar
Freispül-Automatik: aktivierbar, Spülintervall:
nach 3 h bis 48 h Nichtbenutzung,
Spüldauer: 10 s oder 20 s
Dauerlauf: aktivierbar, für die Dauer der Spülstoppzeit
Reinigungsstopp: aktivierbar, für 3 min
Fließdruck: 0,05 bis 0,5 MPa (0,5 bis 5 bar)
Statischer Druck: max� 0,8 MPa (8 bar)
Wassertemperatur: max� 70 °C (max� 80 °C für max� 10 min)
Durchflussmenge: ca� 6 l/min (druckunabhängig)
Wasseranschluss: R 1/2“ AG
Achsmaß: 150 mm
4 Wandarmatur WimTec ECOSAN W6
Page 5
ECOSAN W6
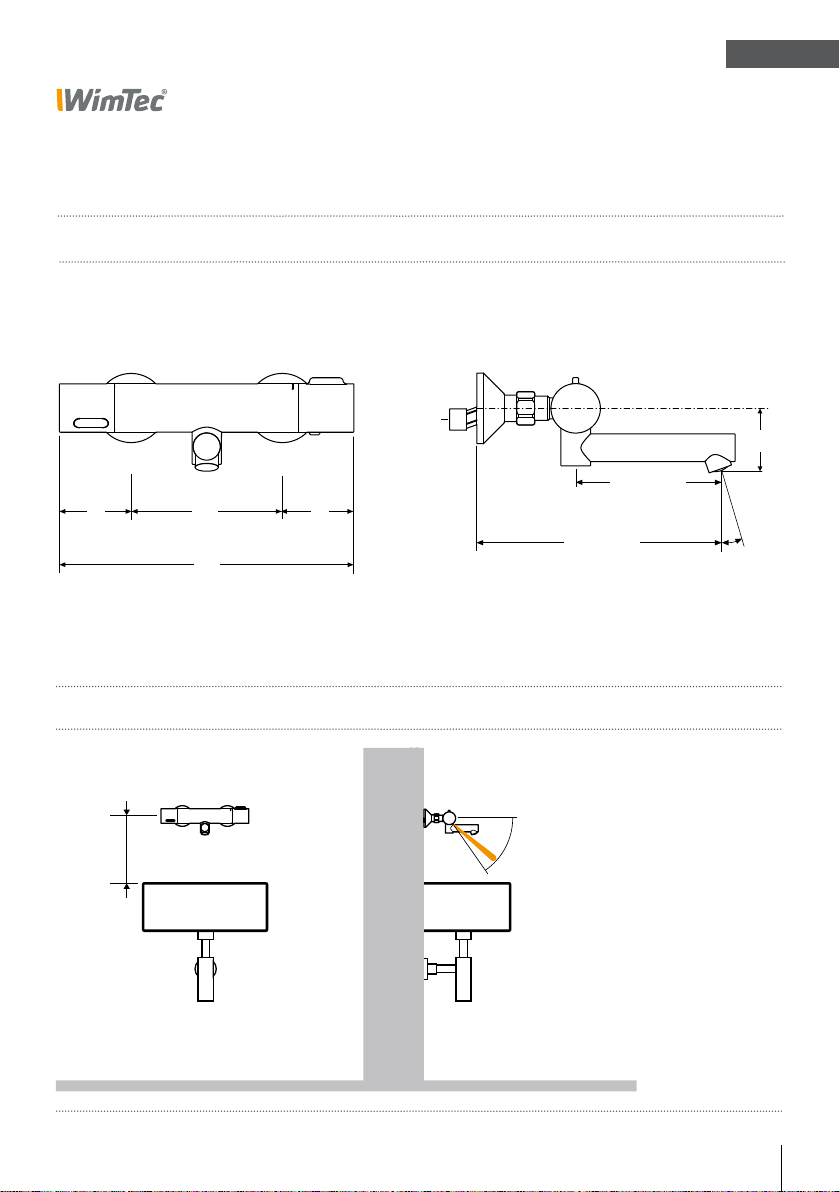
Abmessungen
Maße in mm:
Elektronik Thermostat
Anschluss WW
R 1/2“ AG
75 75150
Anschluss KW
R 1/2“ AG
300
R 1/2“ AG
85 oder 130
180 oder 225
DE
63
20°
Montage:
min� 15 cm
max� 26 cm
Ansprechbereich
(1 - 30 cm einstellbar, 0 - 55° neigbar)
Wandarmatur WimTec ECOSAN W6 5
Page 6
DE
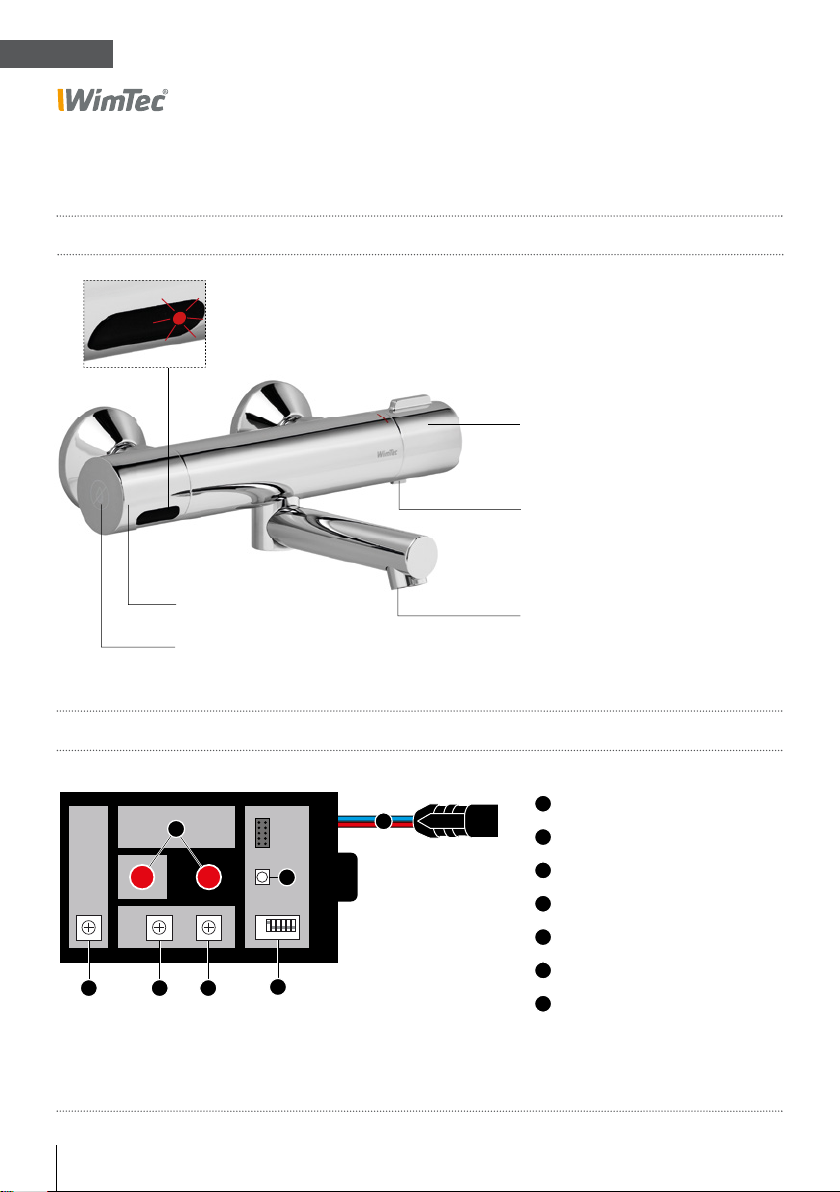
Legende
Armatur:
ECOSAN W6
Infrarot-Sensortaste
mit Kontroll-LED
Thermostatgriff
Entriegelung der
Heißwassersperre
Sensorhaube
Reinigungsstopp-Sensor
für Magnetstift
Elektronik-Modul:
A
C
ON
ON
OFF
OFF
1 2 3 4 5 6
1 2 3 4 5 6
D E F
G
Für Einstellungen am Elektronik-Modul
Sensorhaube öffnen - siehe Seite 10.
6 Wandarmatur WimTec ECOSAN W6
Strahlregler
A
Infrarot-Sensortaste
B
B
Anschluss Magnetventil
C
Kontroll-LED
D
Intervall-Regler
E
Zeit-Regler
F
Reichweiten-Regler
G
DIP-Schalter
Page 7
ECOSAN W6
Funktionseinstellung
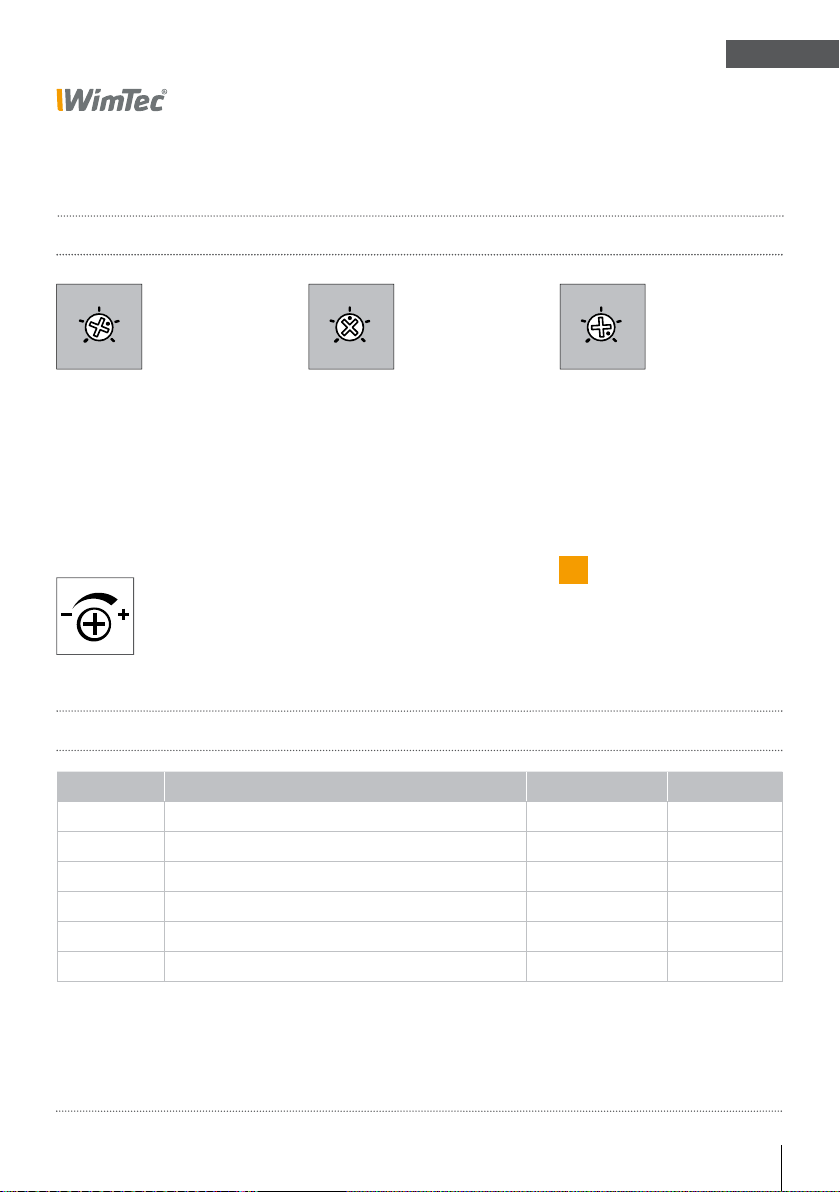
Einstellregler:
Einstellregler:
DE
12
24
6
3
48
h
D.
Intervall-Regler
für die Freispül-Automatik,
24 h voreingestellt
(3 h bis 48 h einstellbar)�
Generell gilt für alle Regler:
Gegen den Uhrzeigersinn
zum Reduzieren.
Im Uhrzeigersinn zum Erhöhen.
60
300
30
10
600
s
E.
Zeit-Regler
für den Sicherheitsspülstopp,
1 min voreingestellt
(10 s bis 10 min einstellbar)�
10
20
5
1
30
cm
F.
Reichweiten-Regler
für den Ansprechbereich,
30 cm voreingestellt
(1 cm bis 30 cm einstellbar)�
!
Hinweis:
Max� Reichweite wird
durch Abschalt-Reichweite
(DIP-Schalter 1) begrenzt!
G. DIP-Schalter:
DIP-Schalter Funktion Werkseinstellung Beschreibung
1
2
3
4
5
6
Abschalt-Reichweite (ON = 30 cm | OFF = 20 cm) ON Seite 13
Reinigungsstopp OFF Seite 14
Dauerlauf OFF Seite 15
Intelligente Freispül-Automatik OFF Seite 16
Freispül-Dauer (ON = 20 s | OFF = 10 s) OFF Seite 17
Nachlaufzeit (ON = 3 s | OFF = 1 s) OFF Seite 17
Wandarmatur WimTec ECOSAN W6 7
Page 8
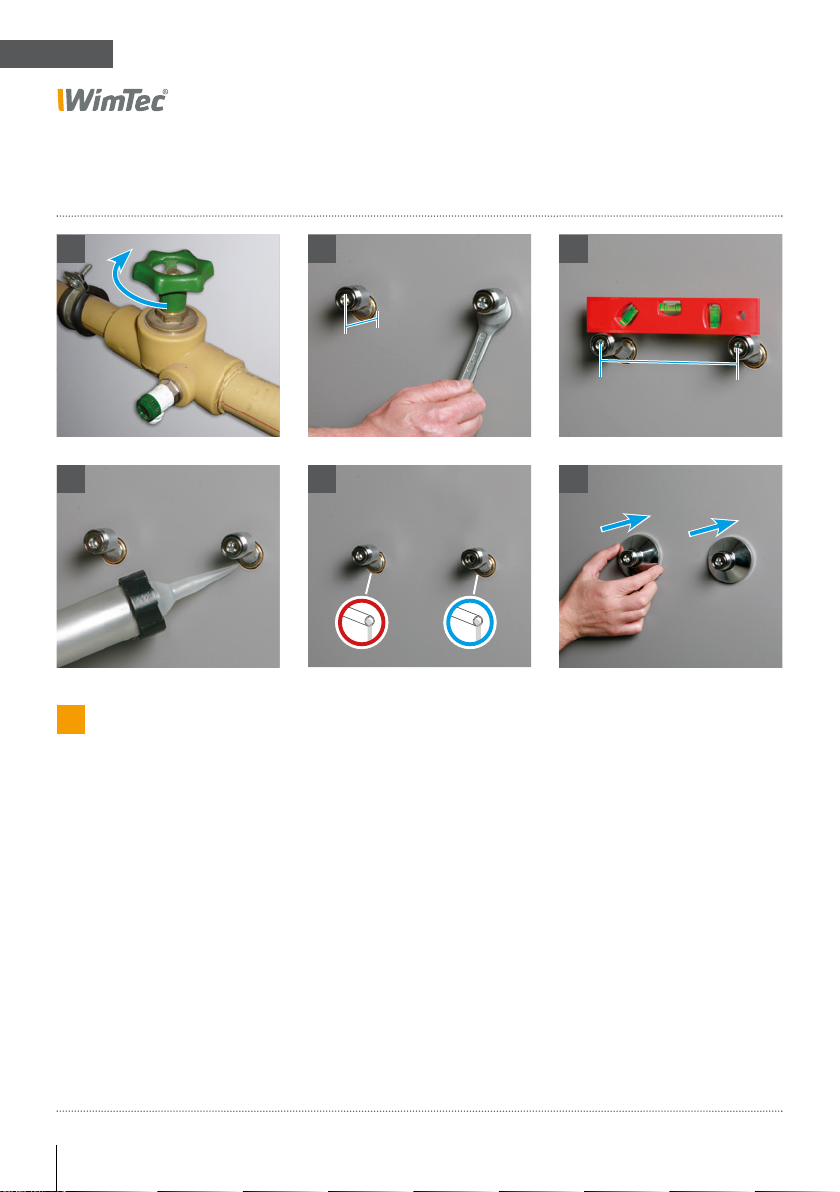
DE
Montage
ECOSAN W6
1
4
!
ACHTUNG!
Folgende Schritte unbedingt in beschriebener
Reihenfolge ausführen!
2
34 mm
5
30 s
1. Wasserzuleitung absperren�
2� Beide S-Anschüsse aufdichten und in Warm- bzw�
Kaltwasserleitung einschrauben�
Montagemaß von 34 mm beachten!
3. Achsmaß der S-Anschlüsse auf 150 mm einstellen
und auf waagrechte Ausrichtung achten!
3
150 mm
6
4. Zwischen Wand und S-Anschluss mit Silikon abdichten�
5. Wasserzuleitung öffnen und Warm- sowie Kaltwasserleitung
für mind� 30 s vorspülen� Anschließend Wasserzuleitung
wieder schließen�
6. Abdeck-Rosette auf beide Wasseranschlüsse aufsetzen
8 Wandarmatur WimTec ECOSAN W6
Page 9
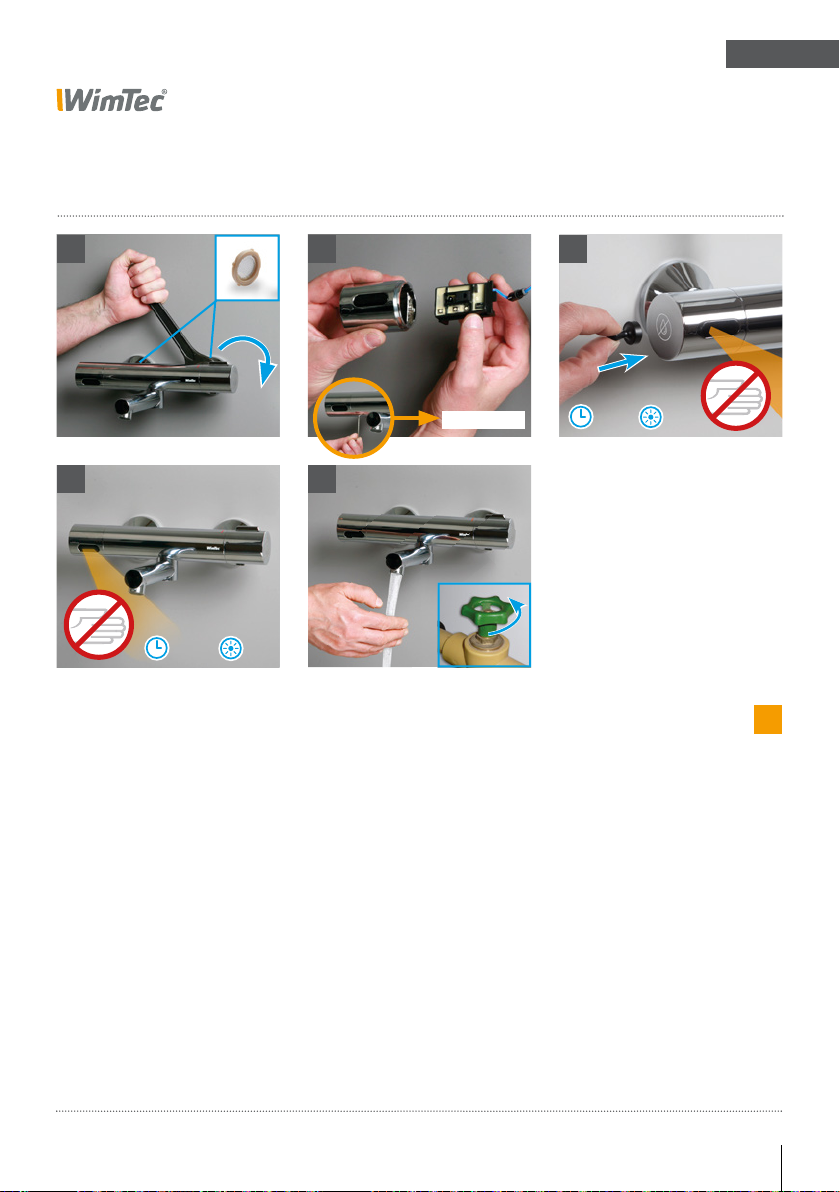
ECOSAN W6
Montage | Inbetriebnahme
DE
7
10
3 s |
7. Armatur aufsetzen und mit S-Anschlüssen verschrauben (SW30)�
8. Ggf� Einstellungen am Elektronik-Modul vornehmen�
Öffnen der Sensorhaube, siehe Seite 10�
9. Bei Erstinbetriebnahme den Magnetstift für 5 s an das seitlich
angebrachte Symbol halten� Die Inbetriebnahme wird durch
5 x Blinken der Kontroll-LED bestätigt�
3 x
8
Siehe S. 10
11
9
5 s |
Folgende Schritte unbe-
dingt in beschriebener
Reihenfolge ausführen!
5 x
ACHTUNG!
!
10. Nach der Magnetventil-Erkennung wird ein automatischer
Reichweitenabgleich durchgeführt, um den Ansprechbereich
bestmöglich an die Montagesituation anzupassen�
Dabei darf sich der Benutzer nicht im Ansprechbereich
der Armatur befi nden� Nach ca� 3 s blinkt die Kontroll-LED
3 x und die Armatur ist betriebsbereit�
11. Wasserzuleitung öffnen und Funktionstest durchführen�
Wandarmatur WimTec ECOSAN W6 9
Page 10
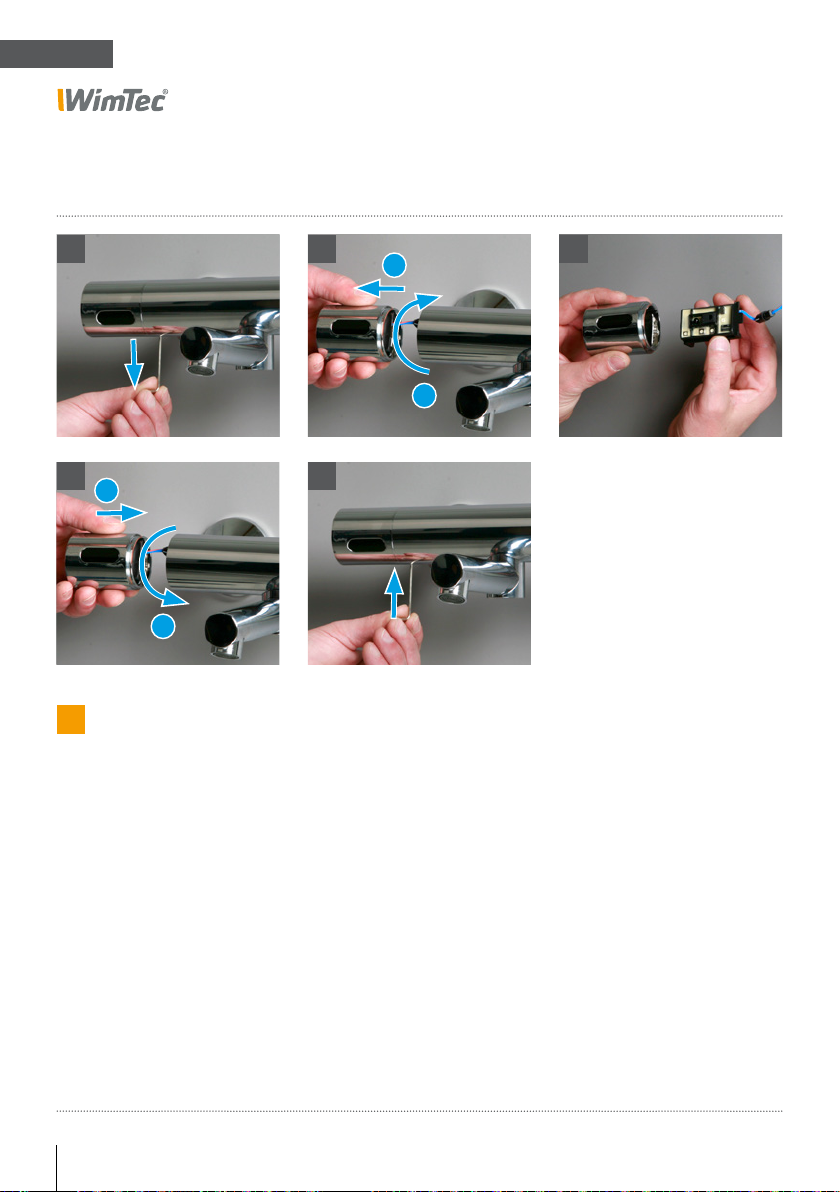
DE
ECOSAN W6
Funktionseinstellungen am Elektronik-Modul
4
1
2
!
Hinweis:
Wenn nach der Erstinbetriebnahme Einstellungen am
Elektronik-Modul vorgenommen werden, wird
empfohlen, vorher den
Reinigungsstopp zu
aktivieren (siehe Seite 14)�
21
2
1
5
1. Sicherungsschraube auf der Unterseite der Sensor-
haube mit beiliegendem Inbusschlüssel (SW 2)
lockern (3 Umdrehungen)�
2. Haube nach oben drehen und seitlich abziehen�
3. Elektronik-Modul aus Sensorhaube entnehmen und
gewünschte Einstellungen vornehmen (siehe Seite 7)�
4. Elektronik-Modul in Sensorhaube einsetzen�
Sensorhaube aufsetzen (Sensorfenster leicht nach oben
geneigt) und nach unten bis zum Anschlag drehen�
5. Anschließend Sicherungsschraube handfest anziehen�
3
10 Wandarmatur WimTec ECOSAN W6
Page 11
ECOSAN W6
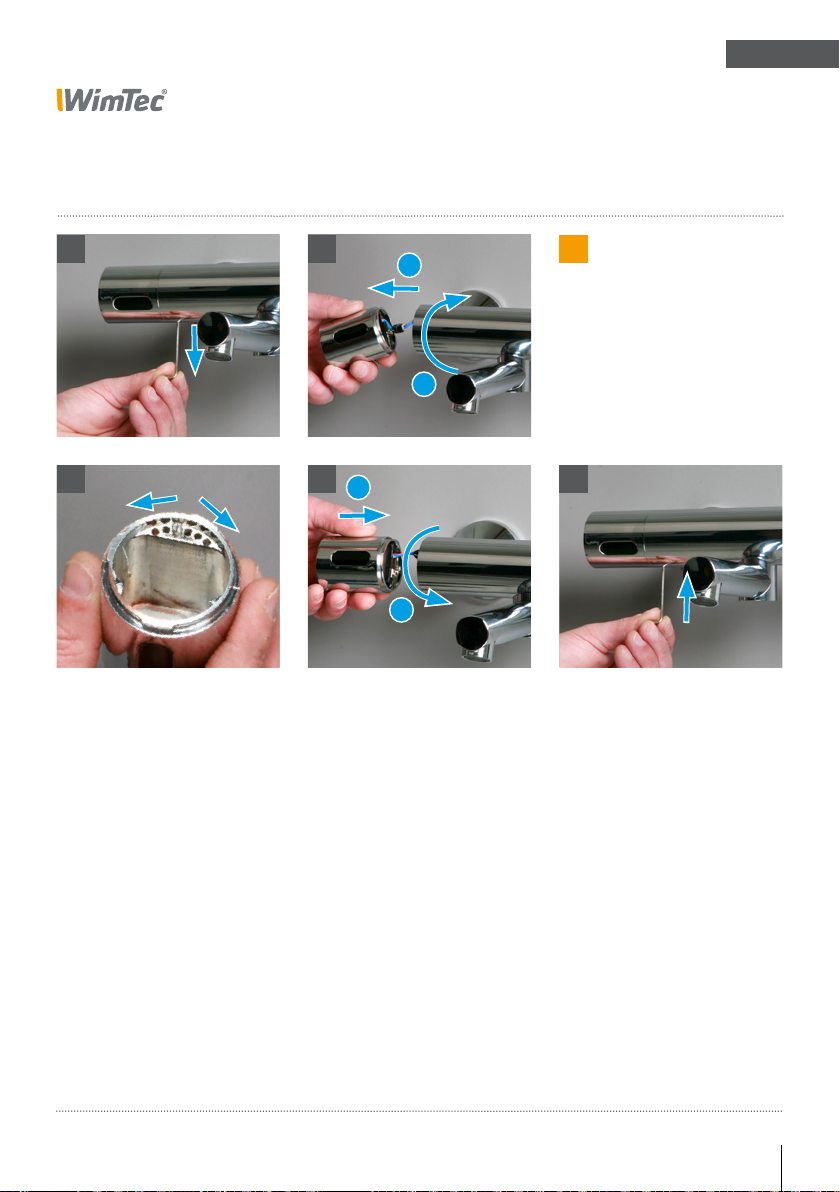
Ausrichten des Infrarotsensors
DE
1a
1. a) Sicherungsschraube auf der Unterseite der Sensor-
haube mit beiliegendem Inbusschlüssel (SW 2)
lockern (3 Umdrehungen)�
b) Haube nach oben drehen und seitlich abziehen�
1b
3a
2
1
1
2
!
Bei einer Installation
abweichend der
empfohlenen Montagehöhe
ist ein Nachjustieren des
Sensorgriffes nötig.
3b2
2. Sensor weiter unten ausrichten:
Anschlagstift nach Bedarf im Uhrzeigersinn versetzen�
Sensor weiter oben ausrichten:
Anschlagstift nach Bedarf gegen den Uhrzeigersinn versetzen�
3. a) Sensorhaube aufsetzen (Sensorfenster leicht nach oben
geneigt) und nach unten bis zum Anschlag drehen�
b) Anschließend Sicherungsschraube handfest anziehen�
Wandarmatur WimTec ECOSAN W6 11
Page 12
DE
ECOSAN W6
Bedienung
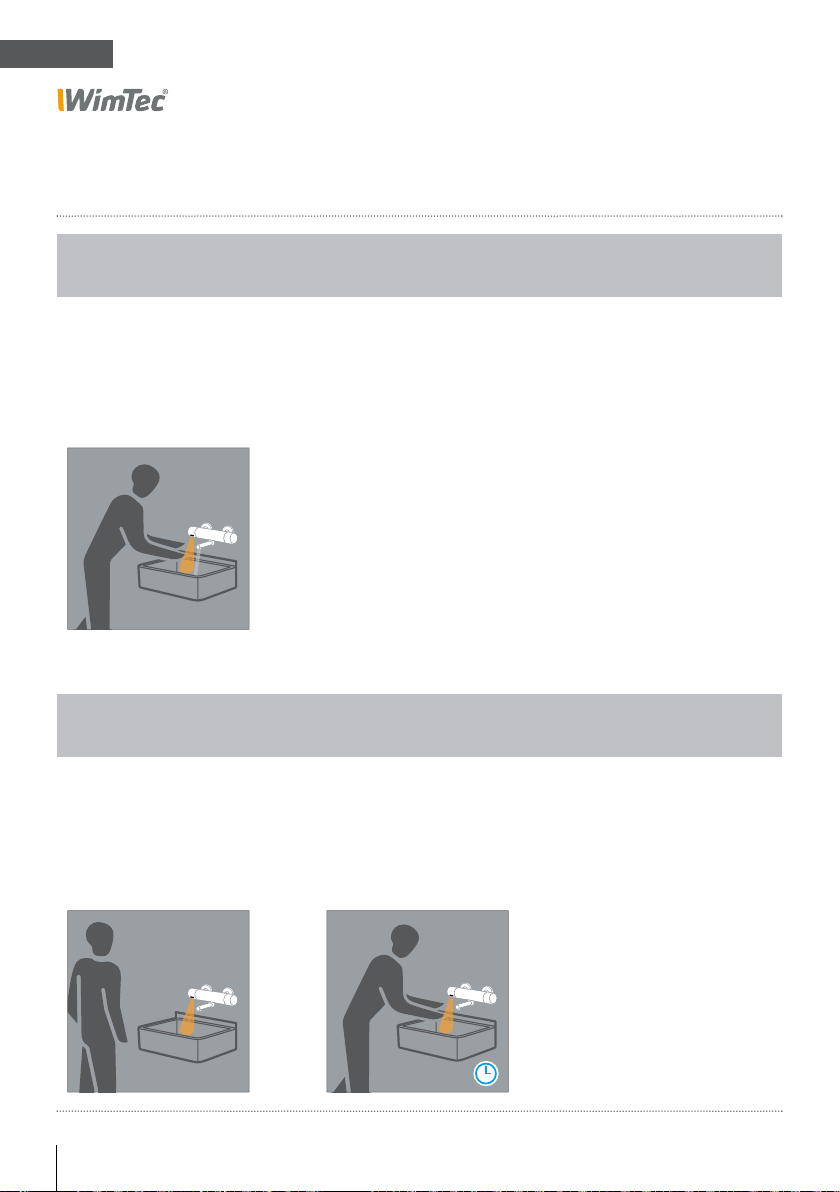
Einschalten:
Automatisch
Der Wasserfl uss startet,
sobald der Benutzer von der
Infrarotsensorik erfasst wird�
Ausschalten:
Automatisch
Nach Ablauf der Nachlaufzeit,
sobald der Benutzer den
Ansprechbereich der Infrarotsensorik verlässt�
12 Wandarmatur WimTec ECOSAN W6
Sicherheitsspülstopp
Nach Ablauf der eingestellten
Spülstoppzeit (siehe Seite 7)
stoppt der Wasserfl uss�
Page 13
ECOSAN W6
Funktionsbeschreibung
DE
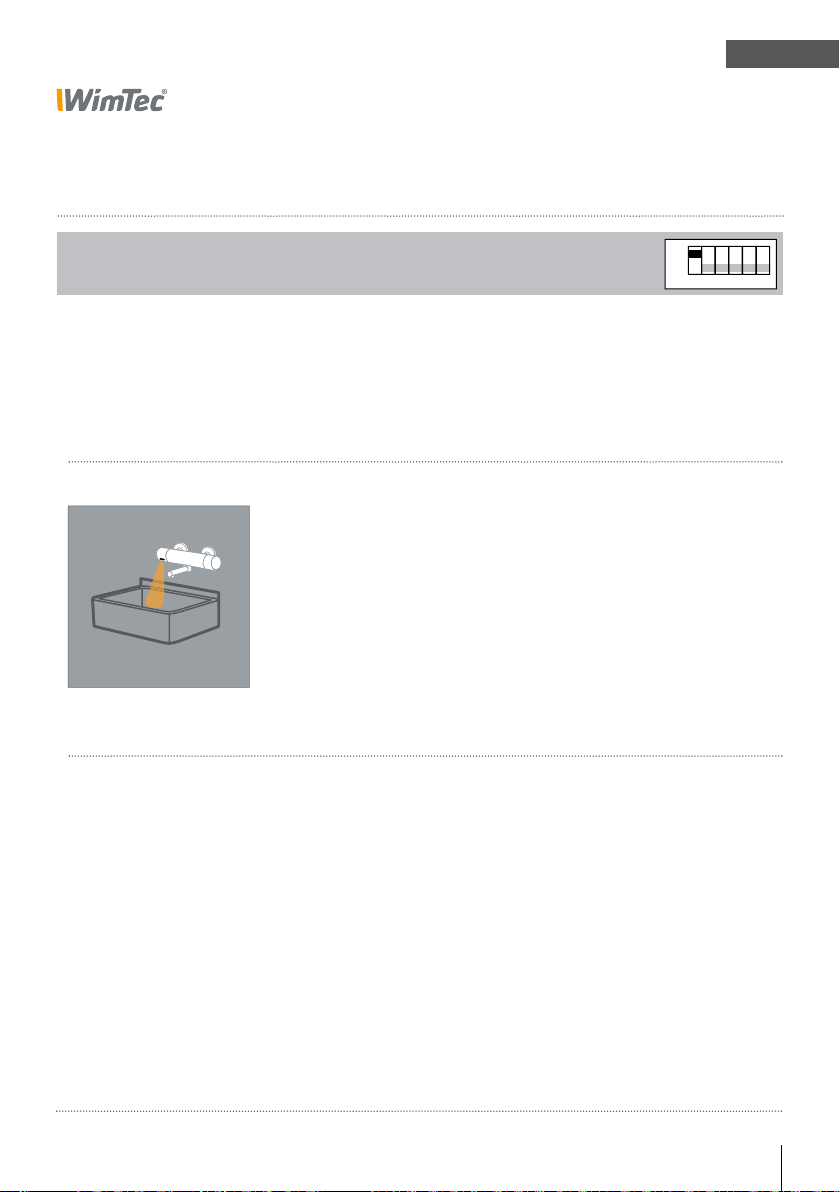
Maximale Abschalt-Reichweite:
DIP-Schalter 1
Defi niert die maximale Abschalt-Reichweite des Infrarotsensors
und begrenzt somit den Ansprechbereich�
Stellung „ON“ = Abschaltreichweite beträgt 30 cm (voreingestellt)�
Stellung „OFF“ = Abschaltreichweite beträgt 20 cm�
Maximale Abschalt-Reichweite
Bei besonderen Montagesituationen
(z�B� kleinem Waschbecken) kann die
maximale Abschalt-Reichweite auf
20 cm begrenzt werden�
20 oder 30 cm
OFF
ON
2
1
3 4 5 6
Wandarmatur WimTec ECOSAN W6 13
Page 14
DE
ECOSAN W6
Funktionsbeschreibung
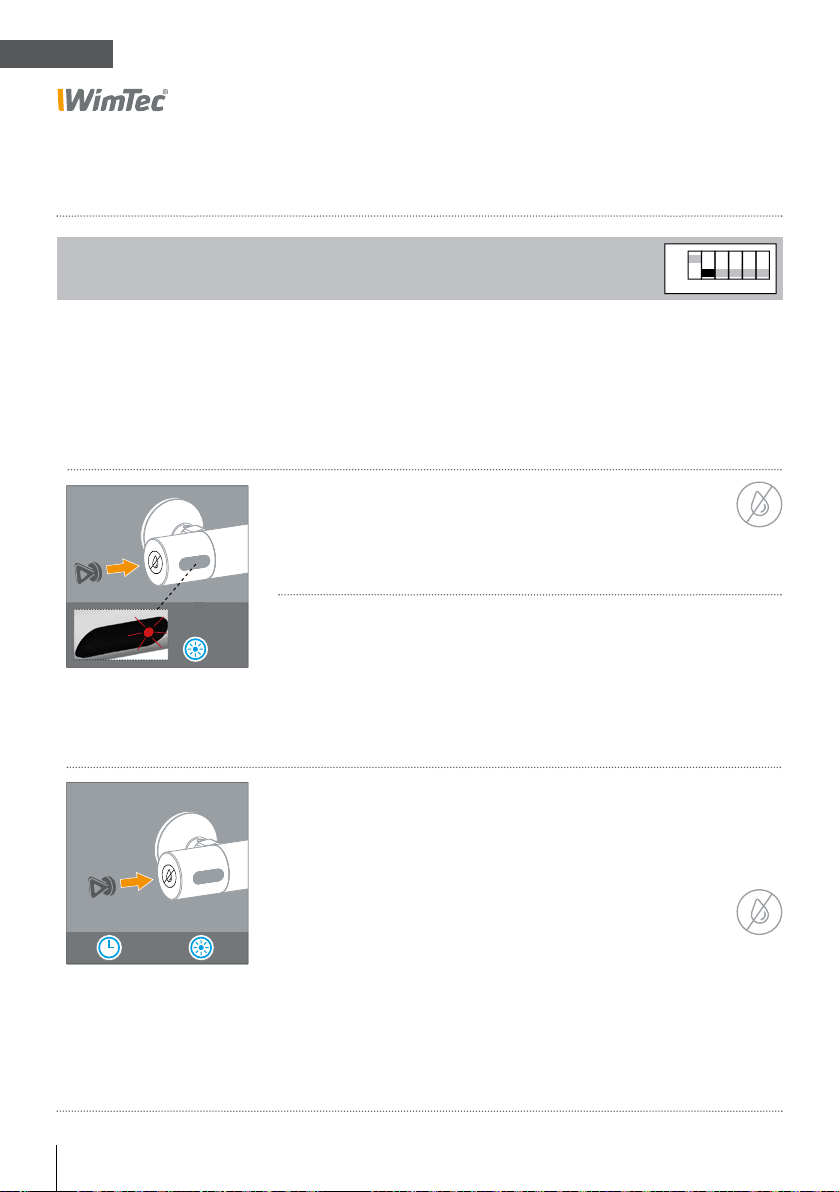
Reinigungsstopp:
DIP-Schalter 2
Dient zum Deaktivieren der Armatur beim Reinigen�
Stellung „ON“ = Reinigungsstopp-Funktion aktiviert�
Stellung „OFF“ = Reinigungsstopp-Funktion deaktiviert (voreingestellt)�
Reinigungsstopp aktivieren:
1. Magnetstift an den Reinigungsstopp-Sensor halten�
2. Nach 5 x Blinken der Kontroll-LED ist der
Reinigungsstopp für 3 min aktiviert�
Während des Reinigungsstopps blinkt die
5 x
Reinigungsstopp deaktivieren:
Kontroll-LED 2 x alle 3 s�
Automatisch:
Die Armatur geht 3 min nach dem Aktivieren des Reinigungsstopps automatisch wieder in den Normalbetrieb über�
ON
OFF
2
3 4 5 6
Manuell:
1. Zum vorzeitigen Beenden den Magnetstift erneut
an den Reinigungsstopp-Sensor halten�
3 min |
14 Wandarmatur WimTec ECOSAN W6
3 x
2. Nach 3 x Blinken ist der Reinigungsstopp
beendet und die Armatur befi ndet sich wieder
im Normalbetrieb�
Page 15
ECOSAN W6
Funktionsbeschreibung
DE
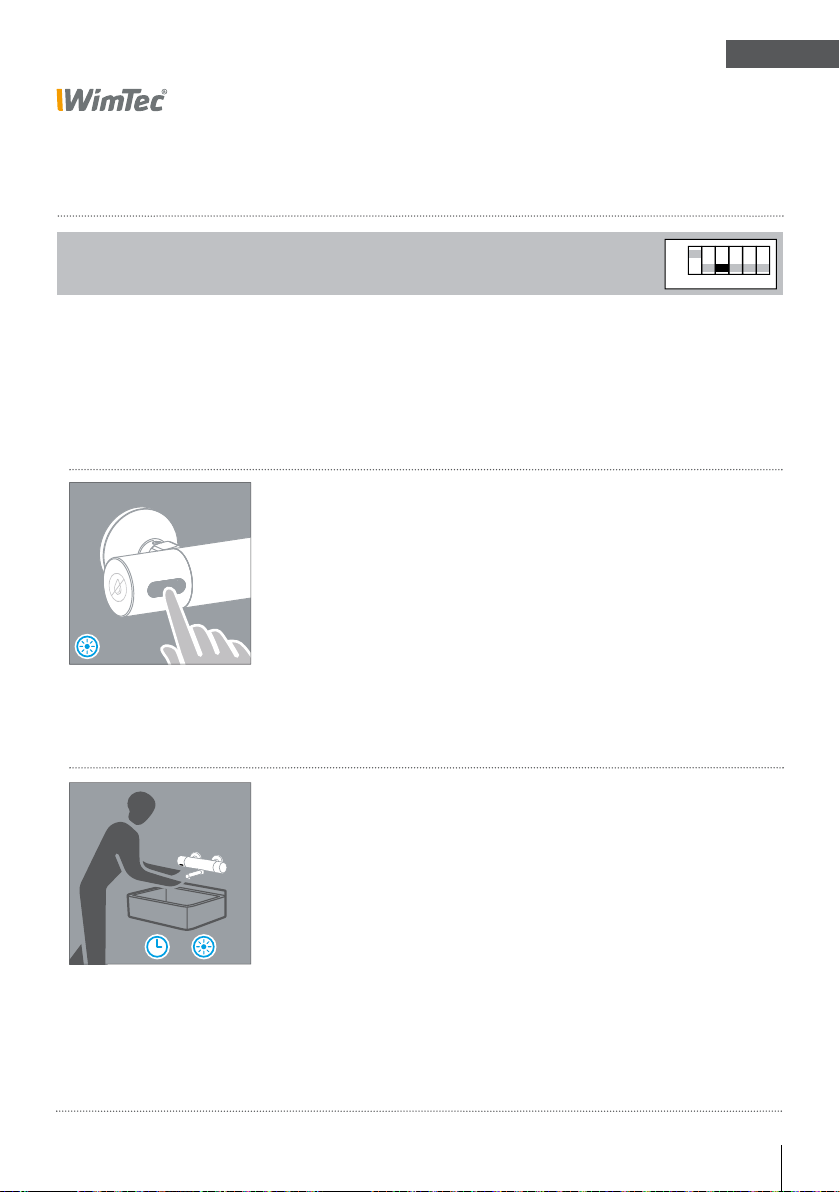
Dauerlauf:
DIP-Schalter 3
Zum Füllen des Beckens oder eines Behälters sowie zur thermischen
Desinfektion kann der Dauerlauf aktiviert werden�
Stellung „ON“ = Dauerlauf-Funktion aktiviert�
Stellung „OFF“ = Dauerlauf-Funktion deaktiviert (voreingestellt)�
Dauerlauf aktivieren:
1. Das Infrarotsensor-Feld mittig sanft antippen -
der Wasserfl uss startet - und verweilen�
2. Nach 3 x Blinken der Kontroll-LED wird der Wasser-
fl uss kurz unterbrochen und der Dauerlauf ist für
die eingestellte Spülstoppzeit aktiviert�
3 x
Dauerlauf deaktivieren:
Automatisch:
Nach Ablauf der eingestellten Spülstoppzeit
(Zeit-Regler, siehe Seite 7)�
OFF
ON
2
1
3 4 5 6
Manuell:
1. Zum vorzeitigen Beenden erneut das Infrarotsensor-Feld
antippen und verweilen�
|
3 x
2. Nach 3 x Blinken ist der Dauerlauf beendet und die
Armatur geht wieder in den Normalbetrieb über�
Wandarmatur WimTec ECOSAN W6 15
Page 16
DE
ECOSAN W6
Funktionsbeschreibung
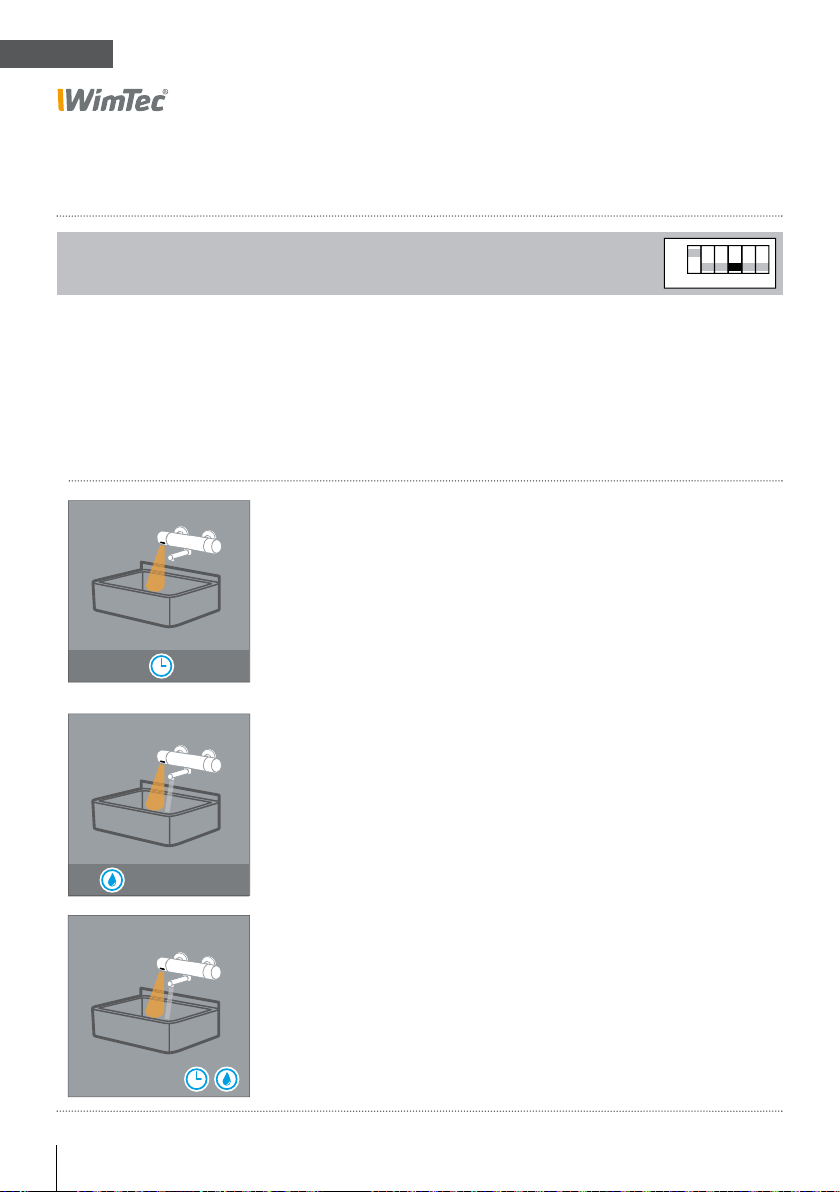
Intelligente Freispül-Automatik:
DIP-Schalter 4
Dient zum automatischen Freispülen der Wasserzuleitungen, um bei längerer
Nichtbenutzung das Wachstum mikrobieller Erreger wie Legionellen zu unterbinden und die Gesundheit der Nutzer zu schützen�
Stellung „ON“ = Intelligente Freispül-Automatik aktiviert�
Stellung „OFF“ = Intelligente Freispül-Automatik deaktiviert (voreingestellt)�
Zum Einstellen wie folgt vorgehen:
1. Zeitintervall festlegen
Gibt die Zeit zwischen den automatischen Freispülungen an�
Einstellbar von 3 bis 48 h (24 h voreingestellt) mit dem
Intervall-Regler (siehe Seite 7)�
3 - 48 h
2. Freispül-Dauer festlegen
Gibt die Spüldauer der automatischen Freispülung an�
Einstellbar für 10 s oder 20 s (10 s voreingestellt)
am DIP-Schalter 5 (siehe Seite 17)�
ON
OFF
1
2
3 4 5 6
10 s oder 20 s
3. Intelligente Freispül-Automatik
Wird die Armatur für die eingestellte Zeit nicht benützt,
wird eine automatische Spülung ausgelöst�
Befi ndet sich ein Benutzer im Ansprechbereich oder ist der
Reinigungsstopp aktiviert, löst die Freispül-Automatik erst
2 min nach dem Verlassen des Ansprechbereichs bzw� dem
Deaktivieren des Reinigungsstopps aus�
16 Wandarmatur WimTec ECOSAN W6
Page 17
ECOSAN W6
Funktionsbeschreibung
DE
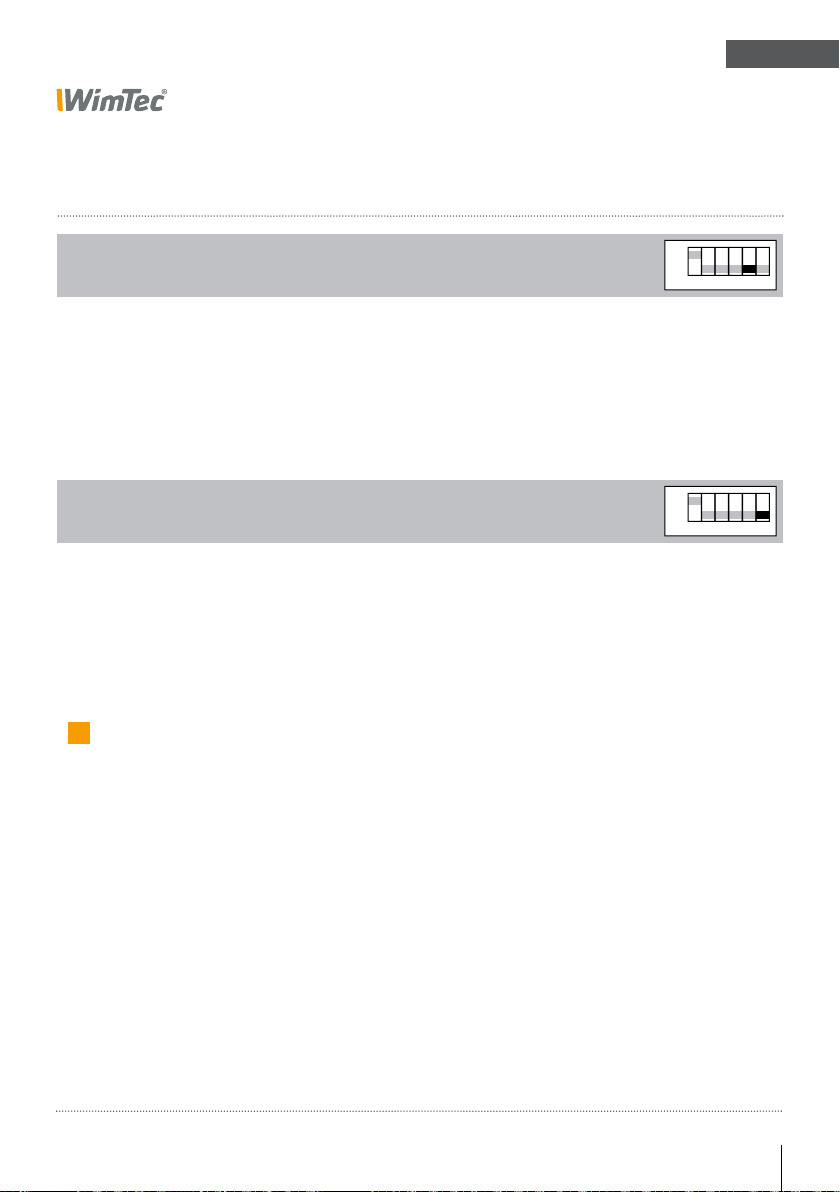
Freispül-Dauer:
DIP-Schalter 5
Es kann zwischen 2 vordefi nierten Zeiten (10 s bzw� 20 s) gewählt werden�
Stellung „ON“ = Die Freispülzeit beträgt 20 s�
Stellung „OFF“ = Die Freispülzeit beträgt 10 s (voreingestellt)�
Nachlaufzeit:
DIP-Schalter 6
Es kann zwischen 2 vordefi nierten Nachlaufzeiten (1 s bzw� 3 s) gewählt werden�
Stellung „ON“ = Nachlaufzeit beträgt 3 s�
Stellung „OFF“= Nachlaufzeit beträgt 1 s (voreingestellt)�
i
Hinweis:
Wenn beim Händewaschen die Armatur unbeabsichtigt
abschaltet, wird empfohlen die verlängerte Nachlaufzeit
von 3 s zu aktivieren (DIP 6 = ON)�
ON
OFF
ON
OFF
21
3 4 5 6
21
3 4 5 6
Bei Durchlaufthermen kann die verlängerte Nachlaufzeit eingestellt werden, um die Anzahl der Zündvorgänge zu minimieren�
Wandarmatur WimTec ECOSAN W6 17
Page 18
DE
ECOSAN W6
Funktionsbeschreibung
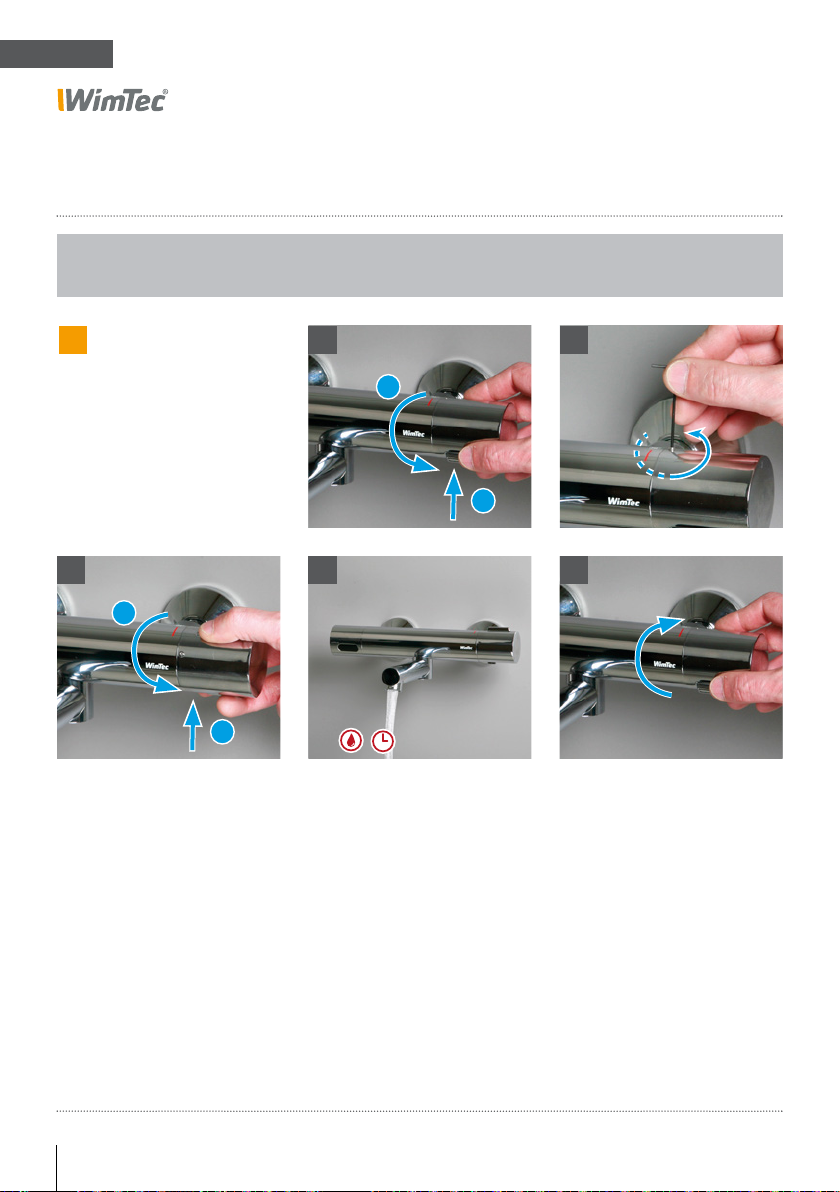
Thermische Desinfektion:
!
Hinweis:
Um eine normgerechte thermische Desinfektion durchführen zu können, müssen
Dauerlauf Funktion aktiviert
(siehe Seite 15) und die Spülstoppzeit auf 3 bzw� 10 min
(siehe Seite 7) eingestellt
werden! Öffnen der Sensorhaube siehe Seite 10�
3
2
1
1
2
1
4 5
3 min / 10 min
1. Entriegelung der Heißwassersperre: Knopf drücken und
nach unten bis zum Anschlag drehen�
2� Mit Inbusschlüssel (SW 1,5) Wurmschraube lockern
(3 Umdrehungen)�
3. Erneut den Heißwasserbegrenzungs-Knopf drücken und
wieder bis zum Anschlag nach unten drehen�
2
4. Dauerlauf auslösen (siehe Seite 15)�
5. Nach Durchführung der thermischen Desinfektion
Wasserfl uss stoppen, Thermostatgriff wieder nach oben
zurückdrehen und Wurmschraube leicht anziehen�
18 Wandarmatur WimTec ECOSAN W6
Page 19
ECOSAN W6
LED Signale
DE
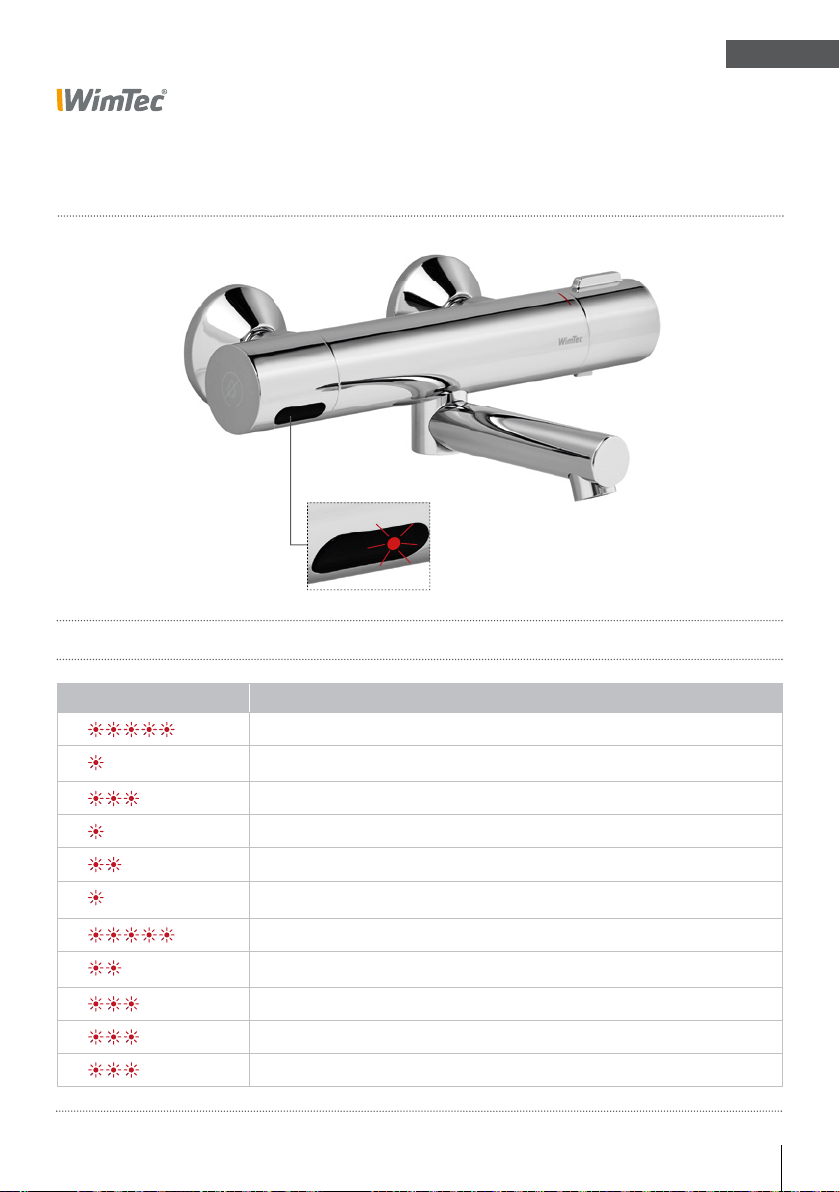
Infrarot-Sensortaste
mit Kontroll-LED
Beschreibung der Signal-Typen:
Blinkcode Bedeutung
bei erstmaliger Inbetriebnahme mit Magnetstift
bei Inbetriebnahme wenn kein Magnetventil angeschlossen ist
bei Inbetriebnahme nach RW-Abgleich
Magnetventil wird geöffnet
Magnetventil wird geschlossen
Batterie wechseln! Niedriger Batterie-Ladestand, keine Funktion
Aktivierung Reinigungsstopp (mittels Magnetstift)
Reinigungsstopp aktiv
Deaktivierung Reinigungsstopp (mittels Magnetstift)
Dauerlauf aktivieren
Dauerlauf deaktivieren
alle 4 s
alle 4 s
alle 3 s
Wandarmatur WimTec ECOSAN W6 19
Page 20
DE
ECOSAN W6
Wartung - Batteriewechsel
4
1
2
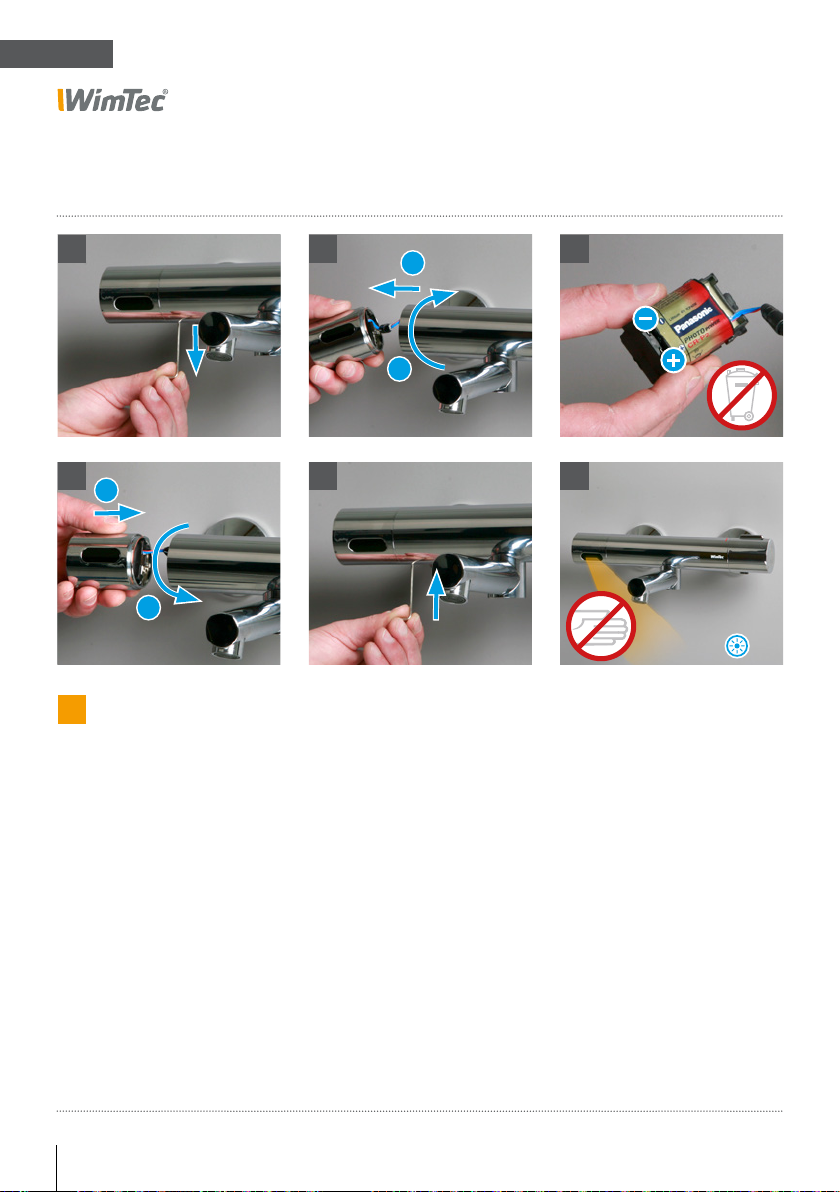
!
Hinweis:
Bei niedrigem Batterieladestand blinkt die Kontroll-LED
alle 4 s einmal - es ist keine
Auslösung möglich!
Die Armatur geht erst nach
dem Batteriewechsel wieder
in den Normalbetrieb über!
21
1. Sicherungsschraube auf der Unterseite der Sensor-
haube mit beiliegendem Inbusschlüssel (SW 2)
lockern (3 Umdrehungen)�
2. Haube nach oben drehen und seitlich abziehen�
3. Elektronik-Modul aus Sensorhaube entnehmen und neue
Batterie einsetzen� Auf +/- Polarität achten!
4. Elektronik-Modul in Sensorhaube einsetzen�
Sensorhaube aufsetzen (Sensorfenster leicht nach oben
geneigt) und nach unten bis zum Anschlag drehen�
5. Anschließend Sicherungsschraube handfest anziehen�
6. Nach der Magnetventil-Erkennung wird ein automatischer
Reichweitenabgleich durchgeführt� Dabei darf sich der
Benutzer nicht im Ansprechbereich der Armatur befinden�
Nachdem die Kontroll-LED 3 x blinkt, ist die Armatur
betriebsbereit�
2
1
3
65
3 x
20 Wandarmatur WimTec ECOSAN W6
Page 21
Ersatzteile
DE
ECOSAN W6
1
6 1615
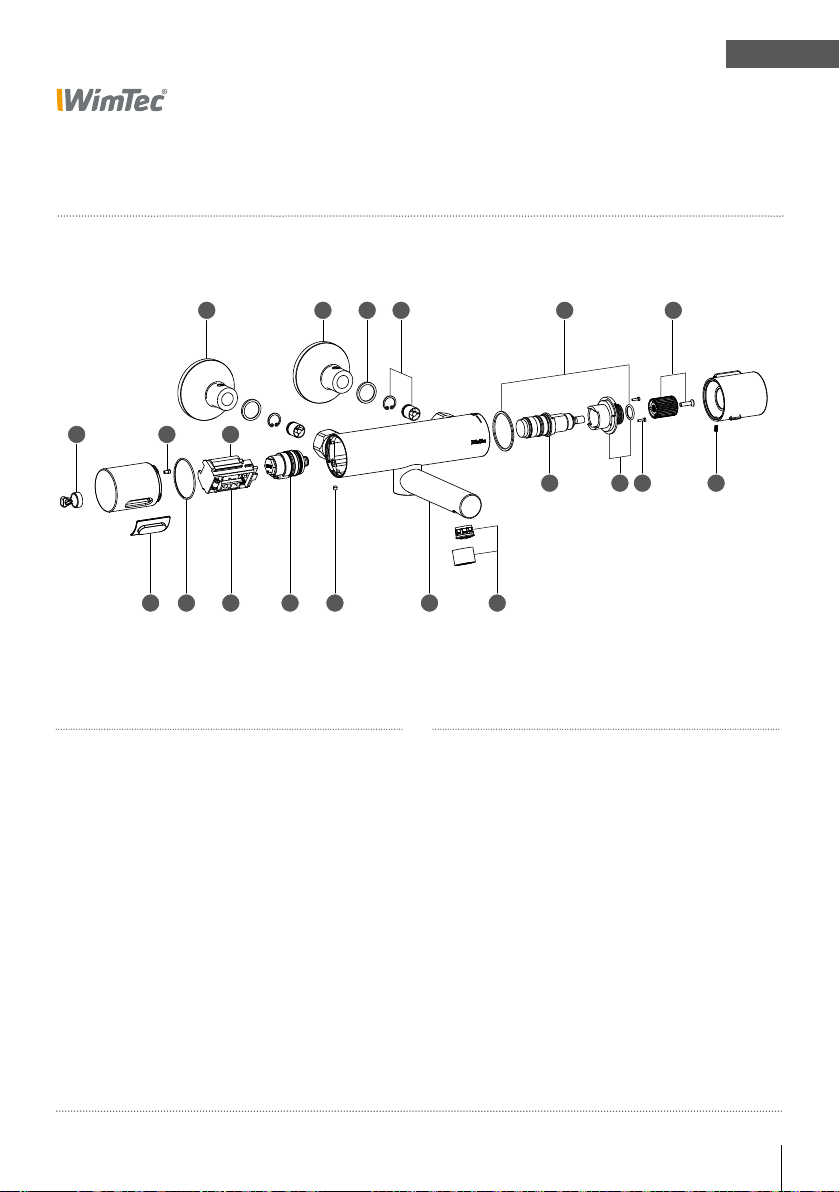
Nr� Bezeichnung Art�Nr�:
1 2 3 4
611121314
1 S-Anschluss-Set 126 297
2 Scheibenfilter 3/4“ (2 Stk�) 126 051
3 Rückflussverhinderer inkl�
Sicherungsring (jeweils 2 Stk�) 126 150
4 Gleitring-Set 126 068
5 Themostat Adapter 120 547
6 Schraubenset ECOSAN W6 126 129
7 Thermostathalter ECOSAN W6 126 112
8 Thermostat 125 993
5
8
10
Nr� Bezeichnung Art�Nr�:
9
7
66
9 Strahlregler 108 637
10 Auslauf 136 mm 126 143
Auslauf 90 mm 126 136
11 Magnetventil 231 205
12 Elektronik-Modul 126 075
13 O-Ring (2 Stk�) 125 450
14 Sichtfenster Infrarotsensor 231 434
15 Magnetstift 124 385
16 Batterie 6 V Lithium 230 741
Wandarmatur WimTec ECOSAN W6 21
Page 22
EN
ECOSAN W6
General notes
This manual is valid for the following products:
WimTec ECOSAN W6 - 6V
Projection 180 mm Art� no� 125 184
Projection 225 mm Art� no� 125 207
Delivery scope:
Two-point wall fi tting with S connections, integrated electronics,thermostat with hot-water blocking mechanism, 6-V battery,
magnetic valve, dirt fi lter and rosettes�
MAINTENANCE NOTE:
Please take note of the following cleaning and maintenance
recommendations in order to ensure that you will be able to enjoy
this high-quality fi tting for many years:
Use mild cleaning agents containing soap
Do not use abrasive, scrubbing or acidic cleaning agents or
disinfectants
Clean the fi tting with a soft sponge or cloth only
Do not use steam cleaners
!
The “General installation
terms and conditions”
provided at
www.wimtec.com apply.
22 Washbasin fi tting WimTec ECOSAN W6
IMPORTANT INSTALLATION NOTES:
Mounting and installation may only be performed by a qualifi ed service provider in accordance with DIN 1988, ÖVE/ÖNORM E 8001 and
VDE 0100 Part 701� When planning and installing sanitary facilities,
all relevant local, national and international standards and provisions
must be observed�
Page 23

Contents
EN
ECOSAN W6
Seite
Technical data ����������������������������������������������������������������������������� 24
Dimensions ���������������������������������������������������������������������������������� 25
Legend �����������������������������������������������������������������������������������������26
Fitting ��������������������������������������������������������������������������������������� 26
Electronics module ������������������������������������������������������������������ 26
Function configuration �������������������������������������������������������������� 27
Regulator controls ������������������������������������������������������������������� 27
DIP switches ���������������������������������������������������������������������������� 27
Assembly & start-up ������������������������������������������������������������������28
Function settings on the electronics module ������������������������ 30
Alignment of the infrared sensor �������������������������������������������31
Operation ������������������������������������������������������������������������������������� 32
Switch on ���������������������������������������������������������������������������������32
Switch off ��������������������������������������������������������������������������������� 32
Description of the functions ����������������������������������������������������� 33
Maximum switch off range ���������������������������������������������������� 33
Cleaning stop ��������������������������������������������������������������������������� 34
Continuous flow ����������������������������������������������������������������������� 35
Intelligent stagnation flush ����������������������������������������������������� 36
Stagnation flush duration�������������������������������������������������������� 37
Shut-off delay �������������������������������������������������������������������������� 37
Thermal disinfection ���������������������������������������������������������������38
LED signals ����������������������������������������������������������������������������������� 39
Maintenance - battery replacement ��������������������������������������� 40
Spare parts ���������������������������������������������������������������������������������� 41
Washbasin fitting WimTec ECOSAN W6 23
Page 24

EN
ECOSAN W6
Technical data
WimTec ECOSAN W6 - 6 V
Battery: 6-V lithium CR-P2 (part of the delivery scope)
Battery service-life: approx� 200,000 flushing activations (max� 4 years)
Further technical data:
Magnetic valve: cartridge 6 V
Detection range: adjustable from 1–30 cm
flushing stop time: adjustable from 10 s to 10 min
Stagnation flush: can be enabled, flushing interval:
After 3 h to 48 h of non-usage,
flushing duration: 10 or 20 s
Continuous flow: can be enabled, for the duration of the flushing stop time
Cleaning stop: can be activated, for 3 min
Flow pressure: 0�05 to 0�5 MPa (0�5 to 5 bar)
Static pressure: max� 0�8 MPa (8 bar)
Water temperature: max� 70 °C (max� 80 °C for max� 10 min)
Flow rate: approx� 6 l/min (independent of pressure)
Water connection: R 1/2” OT
Centre line length: 150 mm
24 Washbasin fitting WimTec ECOSAN W6
Page 25
ECOSAN W6
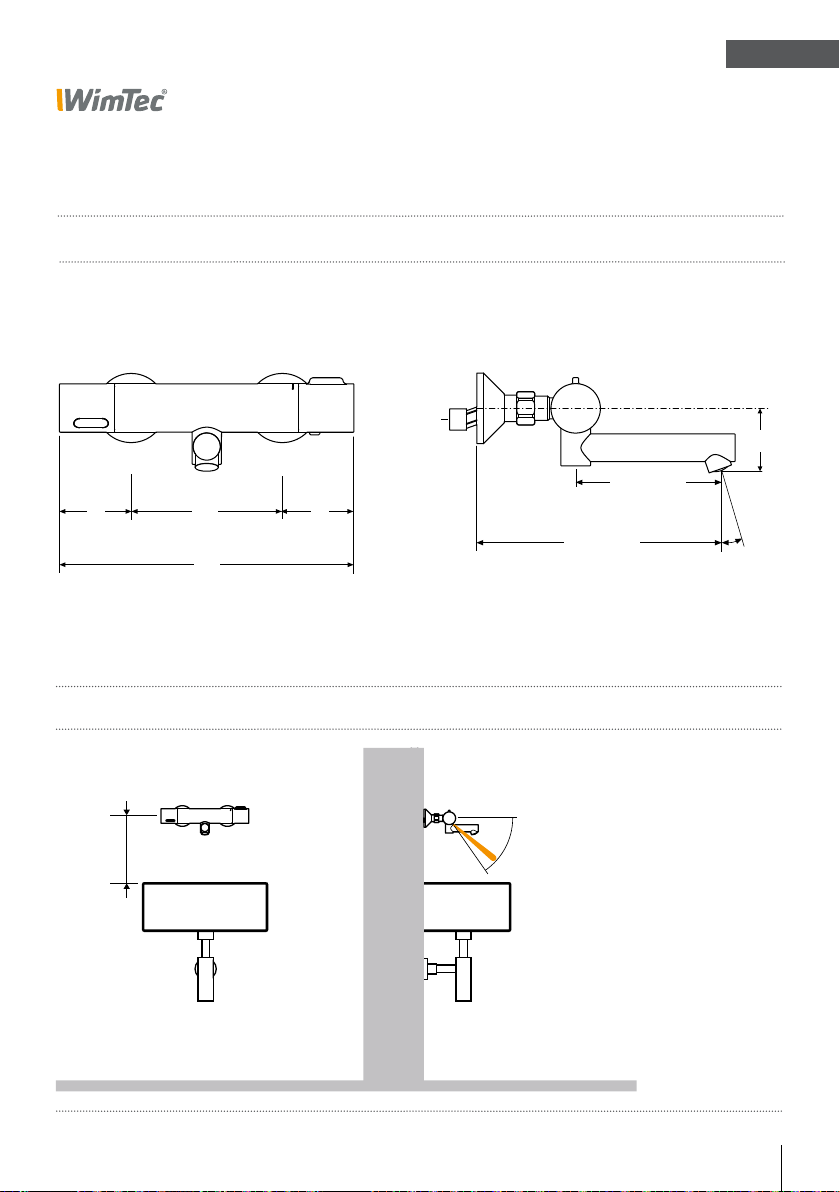
Dimensions
Dimensions in mm:
Electronics Thermostat
PWH connection
R 1/2“ AG
75 75150
PWC connection
R 1/2“ AG
300
R 1/2“ AG
180 or 225
EN
63
85 or 130
20°
Assembly:
min� 15 cm
max� 26 cm
Detection range
(adjustable from 1 – 30 cm, inclinable 0 - 55°)
Washbasin fitting WimTec ECOSAN W6 25
Page 26
EN
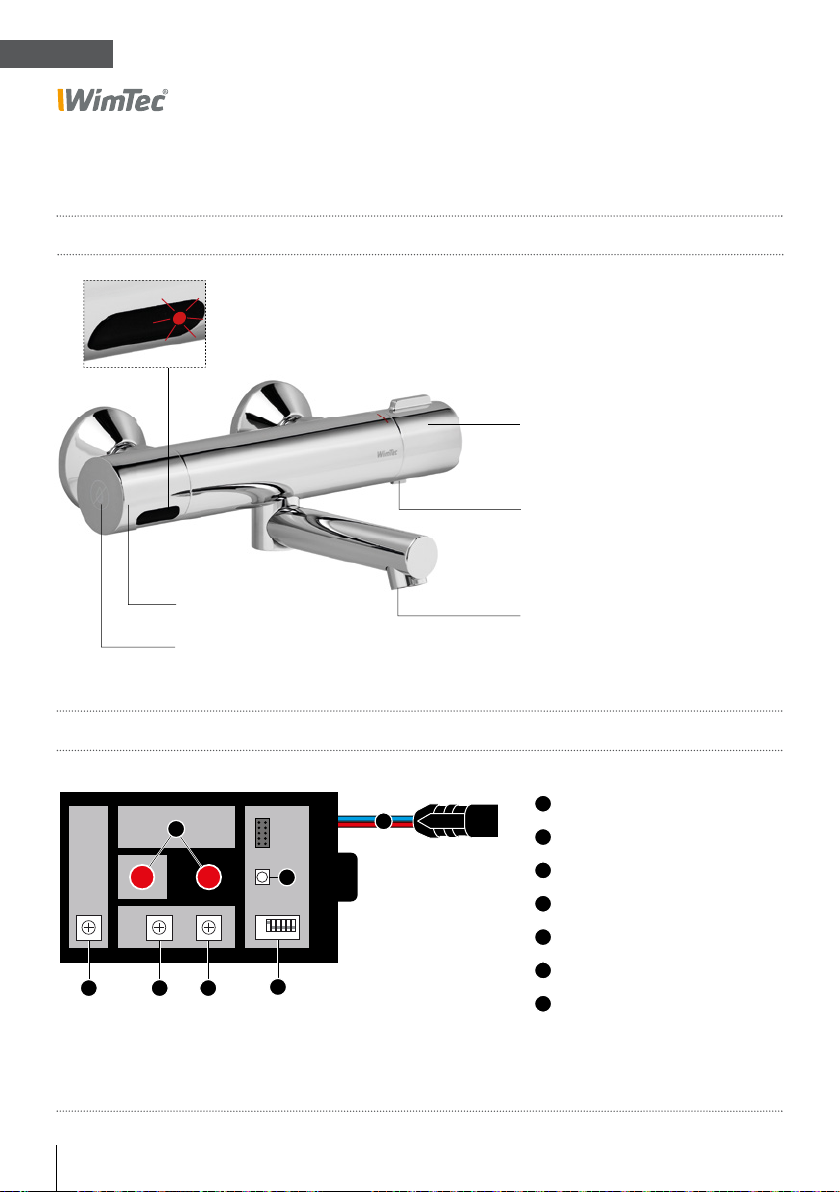
Legend
Fitting:
ECOSAN W6
Infrared sensor
with monitoring LED
Thermostat hood
Button for hot-water blocking
mechanism
Sensor hood
Cleaning stop sensor
for magnetic pen
Electronics module:
A
C
ON
ON
OFF
OFF
1 2 3 4 5 6
1 2 3 4 5 6
D E F
G
26 Washbasin fi tting WimTec ECOSAN W6
Jet regulator
A
Infrared sensor
B
B
Connector for magnetic valve
C
Monitoring LED
D
Interval control
E
Flushing stop time control
F
Range control
G
DIP switches
Page 27
ECOSAN W6
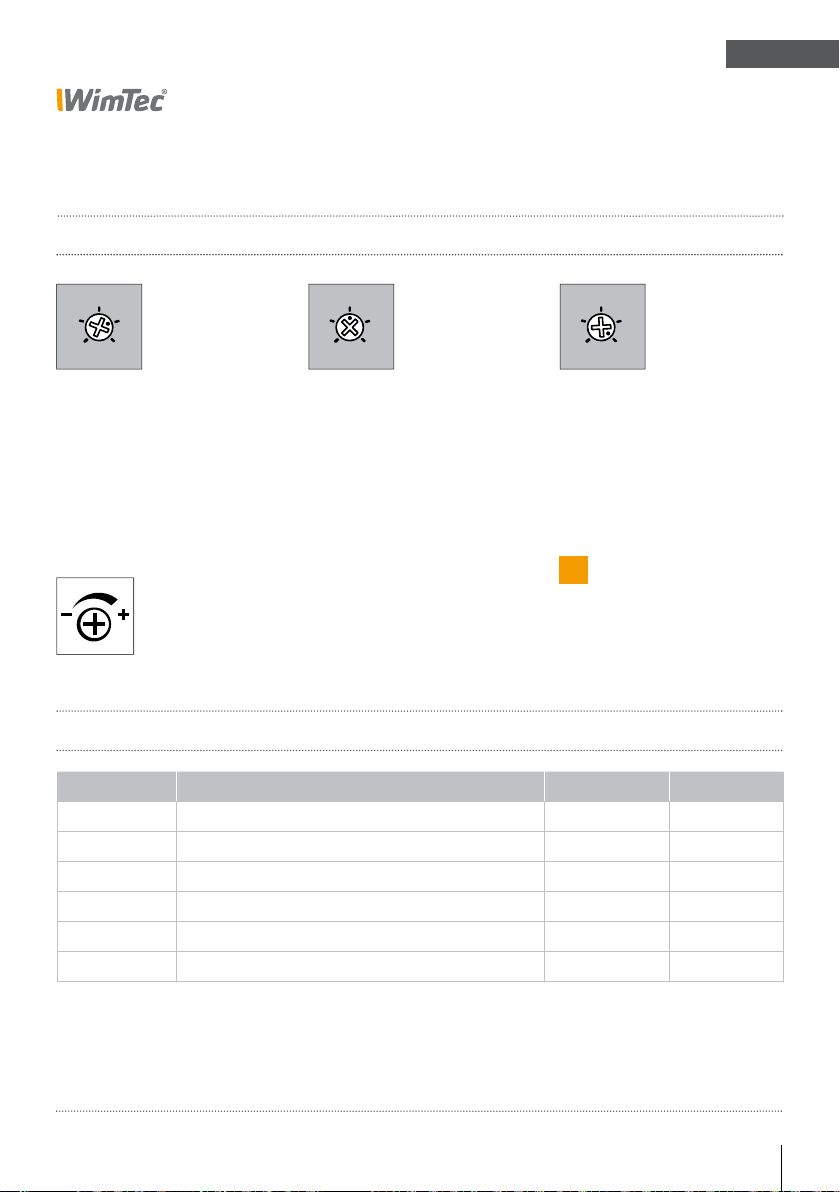
Function confi guration
Regulator controls:
EN
12
24
6
3
48
h
D.
Interval control
for the stagnation fl ush function, preset to 24 h (adjustable
from 3–48 h)�
60
30
10
s
E.
Flushing stop time control
for the safety fl ow arrest, preset to 1 min (adjustable from
10 s to 10 min)�
The general rule applies to all controls:
Move anticlockwise to
decrease the setting.
Move clockwise to
increase the setting.
300
600
10
20
5
1
30
cm
F.
Range control
for the detection range, preset
to 30 cm (adjustable from
1 cm to 30 cm)�
!
Note:
Max� range is limited by
the switch off range
(DIP switch 1)!
G. DIP switches:
DIP switches Function Factory setting Description
1
2
3
4
5
6
Switch off range (ON = 30 cm | OFF = 20 cm) ON
Cleaning stop OFF
Page 33
Page 34
Continuous fl ow OFF Page 35
Intelligent stagnation fl ush OFF Page 36
Stagnation fl ush duration (ON = 20 s | OFF = 10 s) OFF Page 37
Shut-off delay (ON = 3 s | OFF = 1 s) OFF Page 37
Washbasin fi tting WimTec ECOSAN W6 27
Page 28
EN
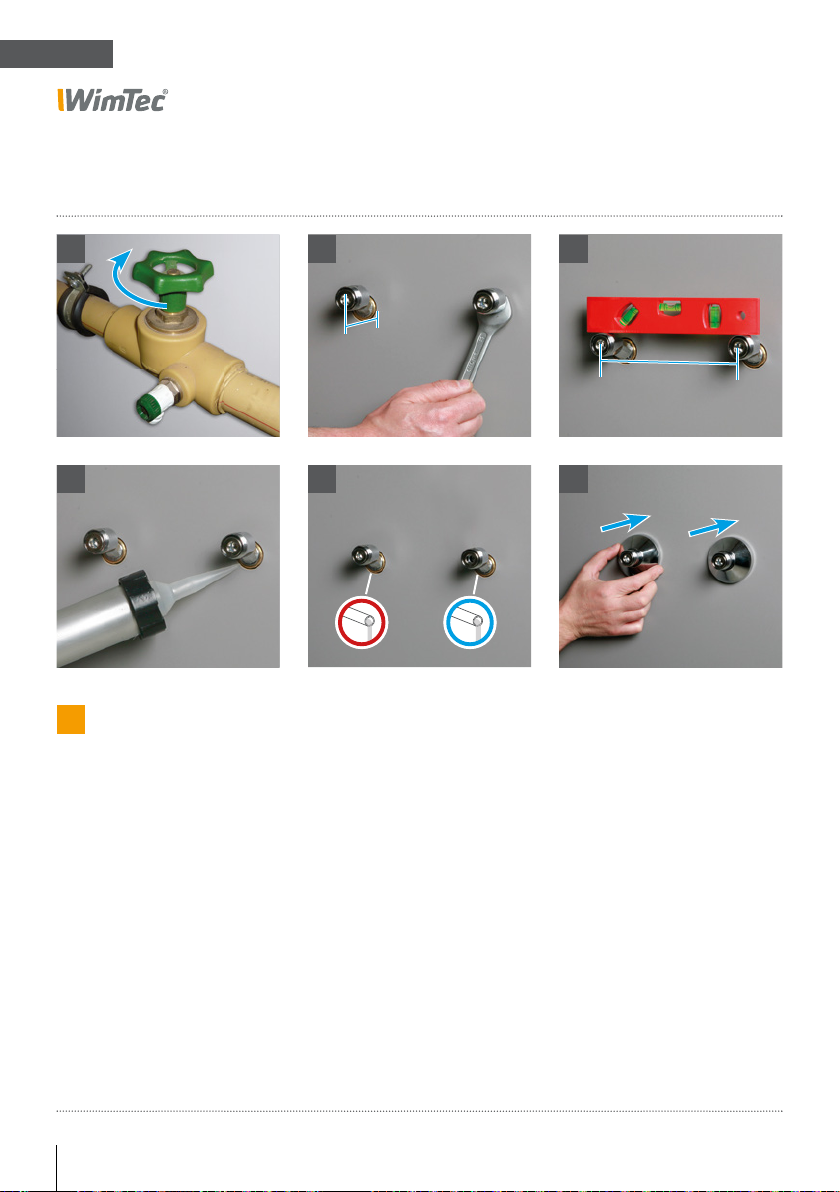
Assembly
ECOSAN W6
1
4
!
ATTENTION!
Perform the following
steps in the order
indicated!
2
34 mm
5
30 s
1. Close the main water valve�
2. Attach the two S-connections and screw into the warm and
PWC line� Observe assembly dimension of 34 mm!
3. Set the centre line length of S-connections to 150 mm and
ensure it is horizontally aligned�
3
150 mm
6
4. Where necessary, seal off space between wall and S-connec-
tion with silicone�
5. Open the main water valve pre-fl ush PWC and PWH line for
min� 30 s� Then close the main water valve again�
6. Position the cover rosette on both water connections
28 Washbasin fi tting WimTec ECOSAN W6
Page 29
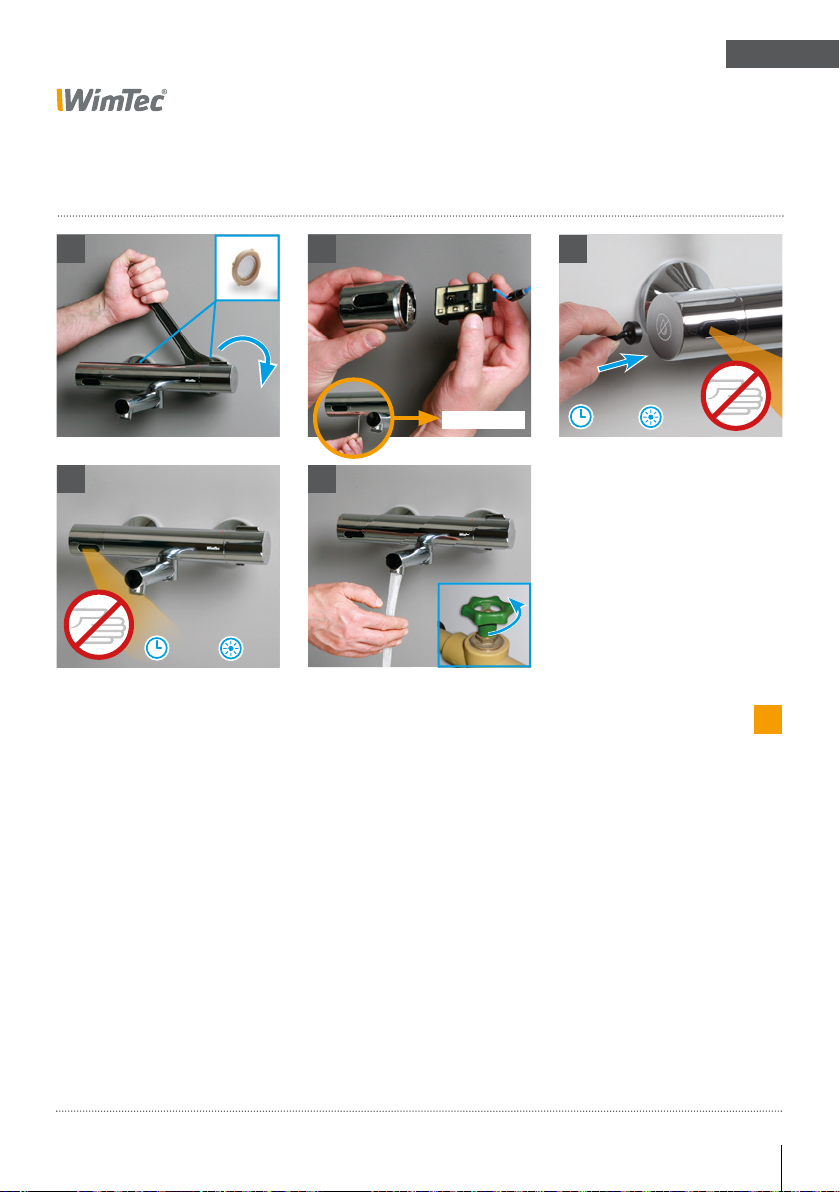
ECOSAN W6
Assembly | start-up
EN
7
10
3 s |
7. Attach the fi tting and securely fasten with S-connections
(size 30)�
8. If necessary, make settings on the electronic module� Open the
sensor hood, see page 30
9. When using the device for the fi rst time, hold the magnetic pen
5 s to the symbol on the side� Commissioning is confi rmed by
fl ashing for 5 times of the control LED�
3 x
8
see p. 30
11
9
5 s |
Perform the following
5 x
ATTENTION!
steps in the order
!
indicated!
10. After the solenoid valve detection, an automatic range adjust-
ment in order to optimally adjust the response range to the
mounting situation is done� The user may not be in the operating range of the fi tting� The control LED fl ashes after about 3 s
for 3 times and the fi tting is ready for operation�
11. Open water supply and perform functional test�
Washbasin fi tting WimTec ECOSAN W6 29
Page 30
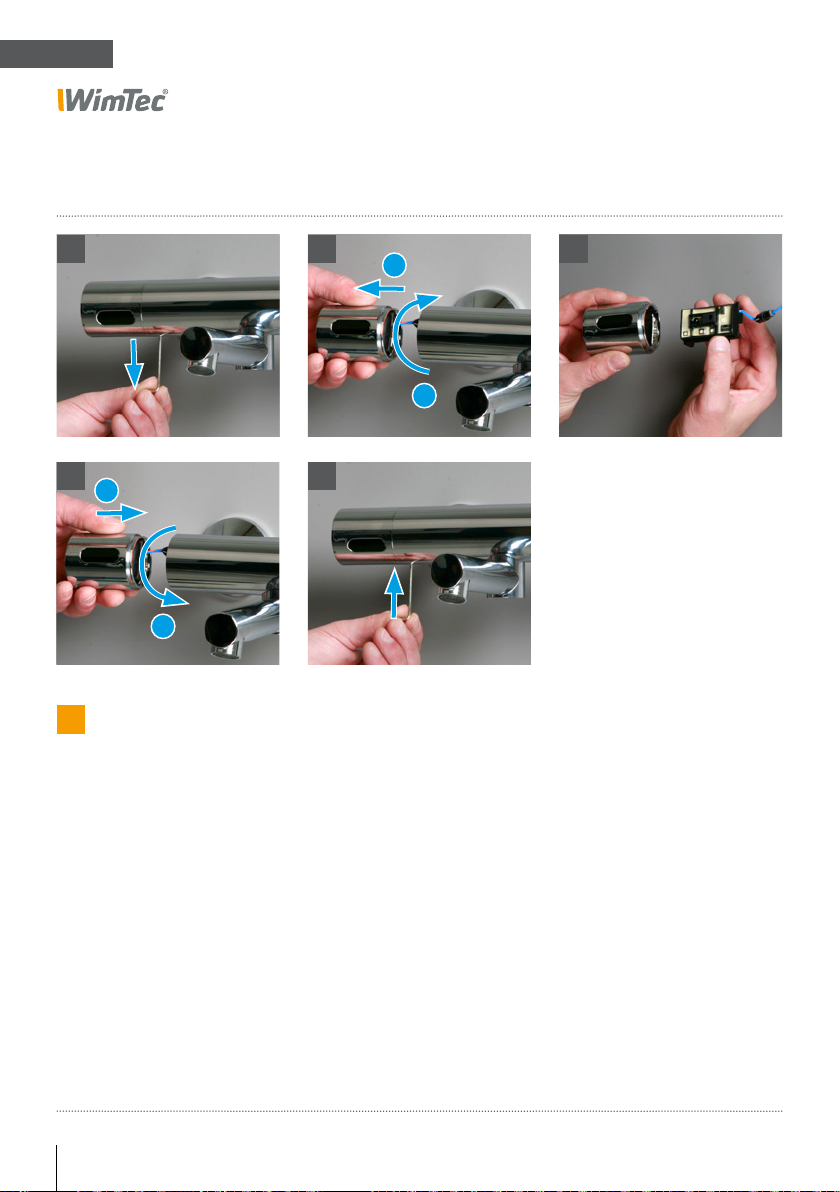
EN
ECOSAN W6
Function settings on the electronics module
4
1
2
!
Note:
If adjustments are made to the
electronic module after initial
start-up, it is recommended
to activate the cleaning stop
beforehand (see page 34)�
21
2
1
5
1. Loosen locking screw on the underside of the sensor hood
using the Allen key (size 2) provided (3 rotations)�
2. Rotate hood anticlockwise and remove to the side�
3. Remove the electronics module from the sensor hood and
make the desired settings (see page 27)�
4. Insert the electronics module into the sensor hood�
Position sensor hood (sensor window gently tilted
upwards) and rotate clockwise until the stop�
5. Then tighten the locking screw by hand�
3
30 Washbasin fitting WimTec ECOSAN W6
Page 31
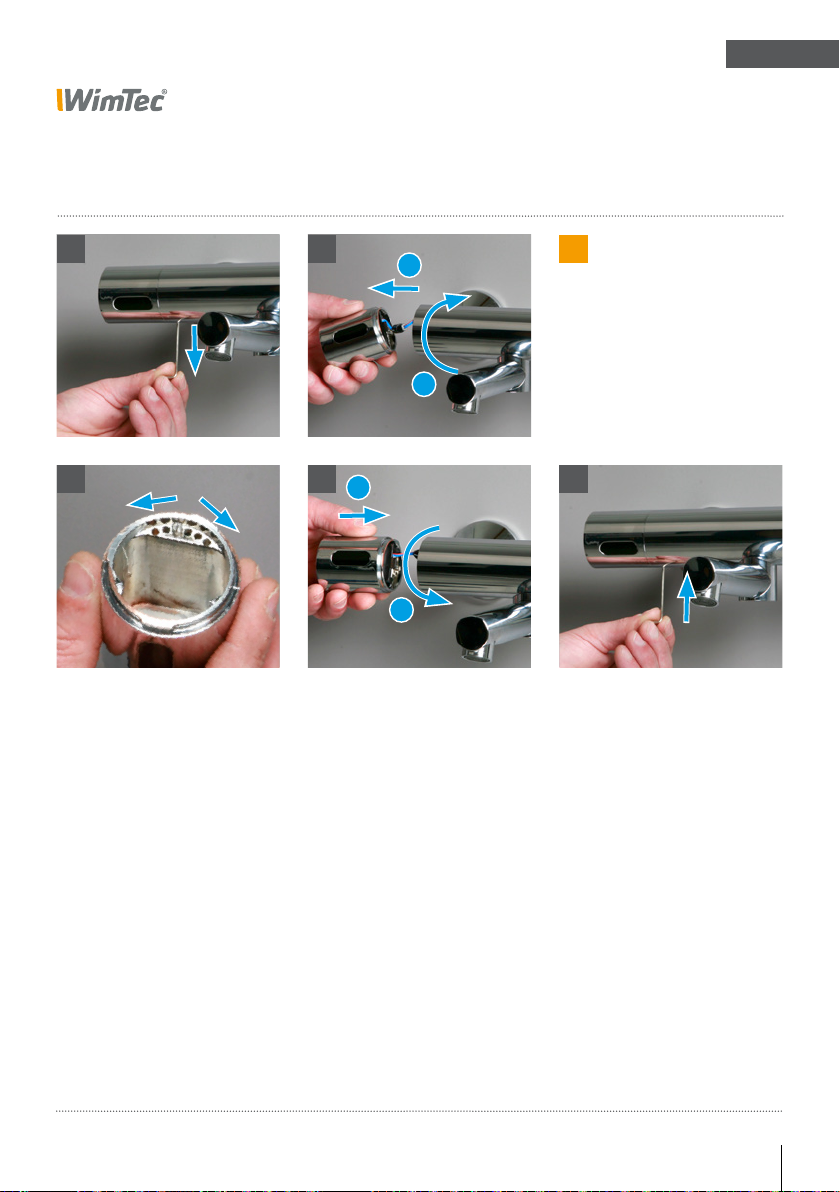
ECOSAN W6
Alignment of the infrared sensor
EN
1a
1. a) Loosen locking screw on the underside of the sensor hood
using the Allen key (size 2) provided (3 rotations)�
b) Turn the hood upwards and remove to the side�
2. Align the sensor further downwards:
shift stop pin as required in clockwise direction�
1b
3a
2
1
1
2
!
If the installation deviates
from the recommended
assembly height, re-adjustment of the sensor handle
is possible.
3b2
Align the sensor further upwards:
shift stop pin as required in anticlockwise direction�
3. a) Position sensor hood (sensor window gently tilted
upwards) and rotate clockwise until the stop�
b) Then tighten the locking screw by hand�
Washbasin fitting WimTec ECOSAN W6 31
Page 32
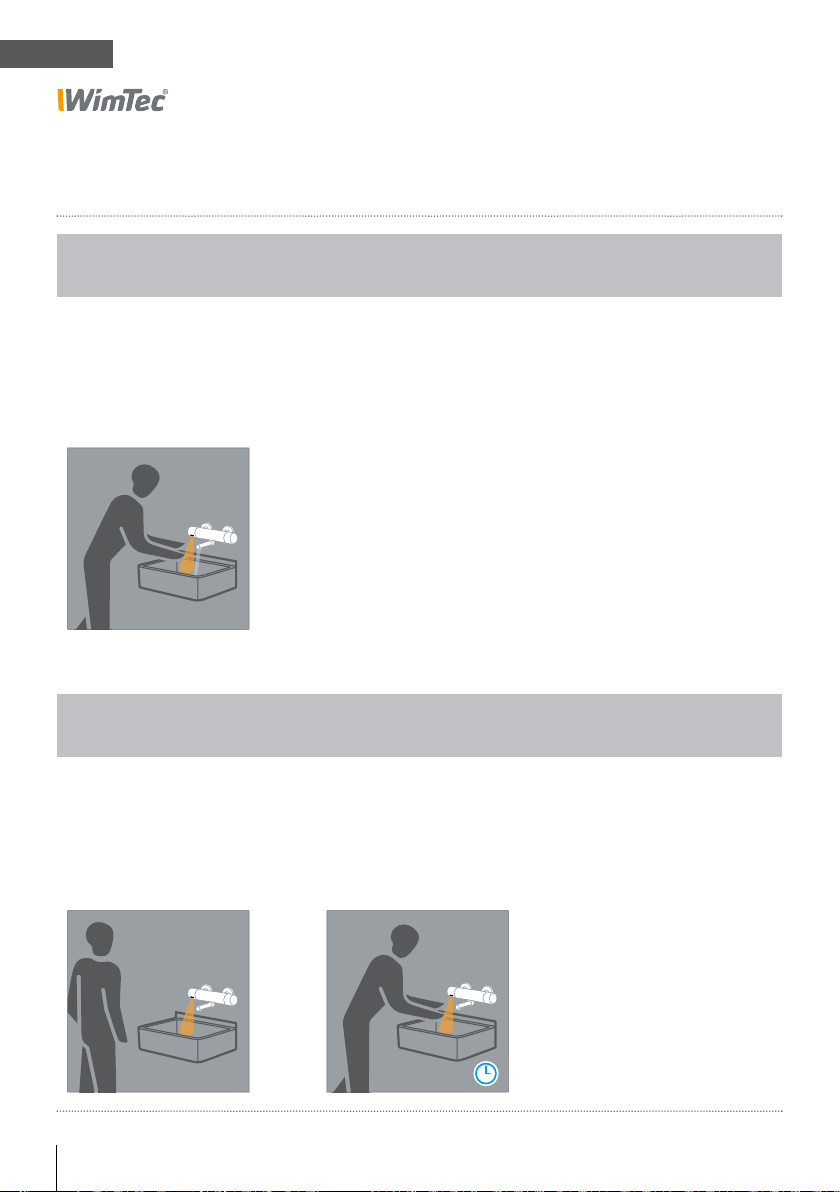
EN
ECOSAN W6
Operation
Switch on:
Automatic
As soon as the infrared
sensor detects the user, the
water starts to fl ow�
Switch off:
Automatic
Once the shut-off delay time
elapses, as soon as the user
leaves the detection range of
the infrared sensor�
32 Washbasin fi tting WimTec ECOSAN W6
Safety fl ow arrest
Once the confi gured fl ushing
stop time has elapsed (see
p� 27), the water fl ow stops�
Page 33
ECOSAN W6
Description of the functions
EN
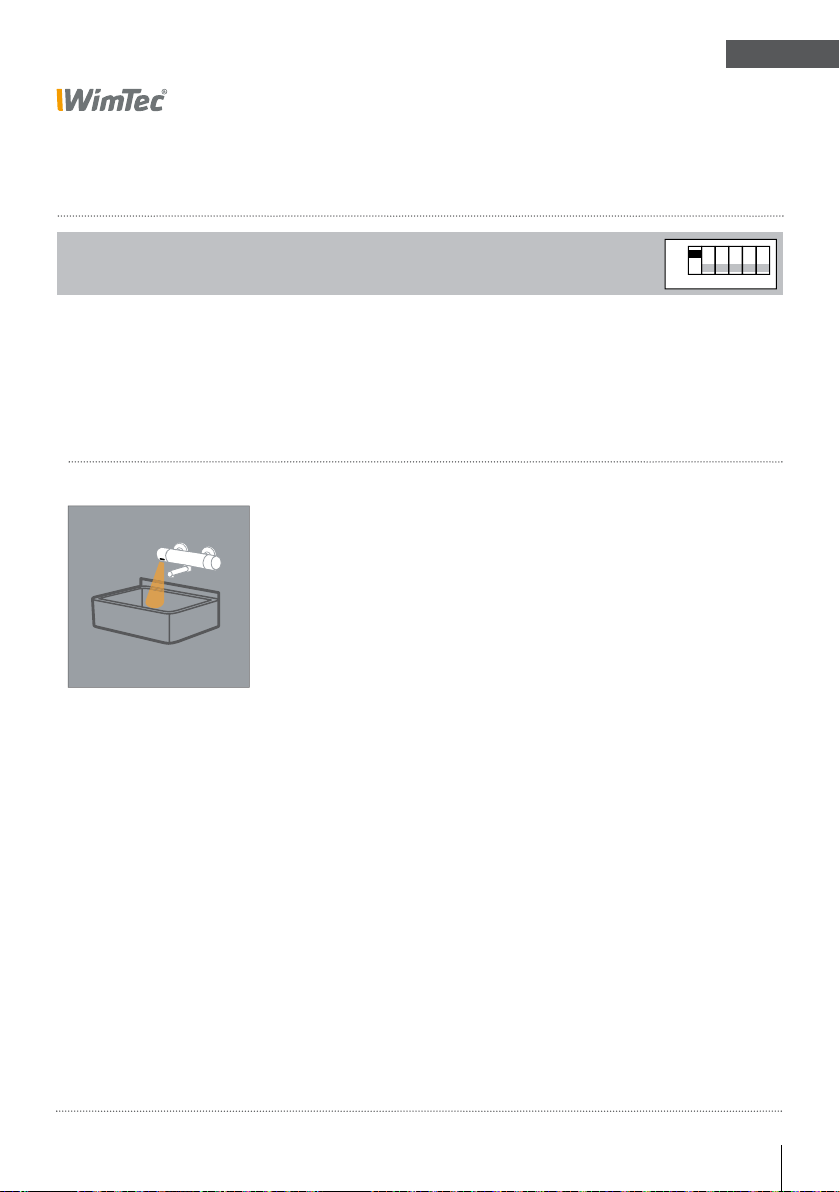
Maximum switch off range:
DIP switch 1
Defi nes the maximum switch off range of the infrared sensor and thus limits
the detection range�
“ON” position = Switch off range is set to 30 cm (preset)�
“OFF” position= Switch off range is set to 20 cm�
Maximum switch off range
In special assembly cases (e�g� small washbasin), the maximum switch off range can
be limited to 20 cm�
20 or 30 cm
ON
OFF
1
2
3 4 5 6
Washbasin fi tting WimTec ECOSAN W6 33
Page 34
EN
ECOSAN W6
Description of the functions
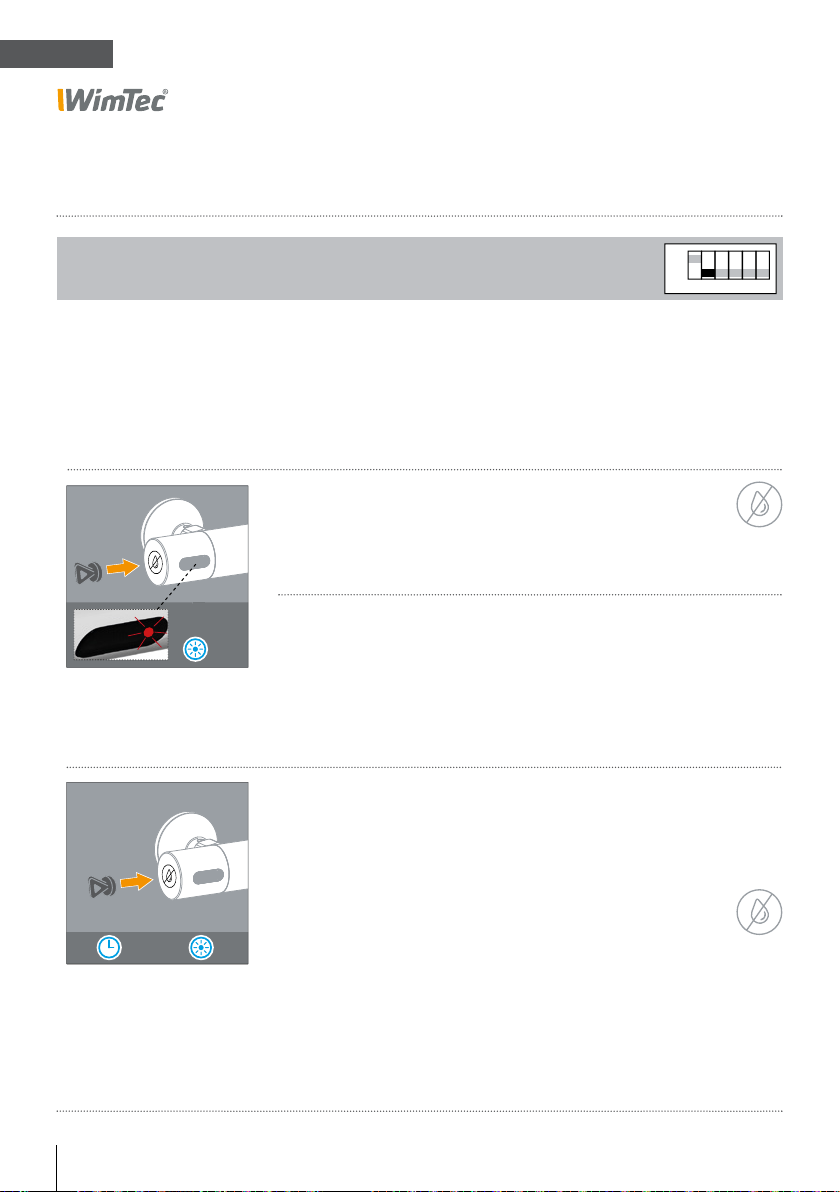
Cleaning stop:
DIP switch 2
Serves to disable the fi tting prior to cleaning�
“ON” position = Cleaning stop function enabled�
“OFF” position = Cleaning stop function disabled (preset)�
Activate cleaning stop:
1. Hold the magnetic pen to the cleaning stop sensor�
2.
After the monitoring LED fl ashes fi ve times, the water fl ow
is stopped and the cleaning stop is enabled for 3 min�
While the cleaning stop function is enabled,
5 x
Deactivate cleaning stop:
3 min |
the monitoring LED will light up two times every 3 s�
Automatic:
The fi tting will automatically resume normal operation 3 min
after activating the cleaning stop function�
Manuell:
1. To resume prematurely, continue holding the
magnetic pen to the cleaning stop sensor�
2. After the LED fl ashes three times, the water fl ow is
3 x
started and the cleaning stop is stopped� The fi tting
will resume normal operation�
ON
OFF
2
3 4 5 6
34 Washbasin fi tting WimTec ECOSAN W6
Page 35
ECOSAN W6
Description of the functions
EN
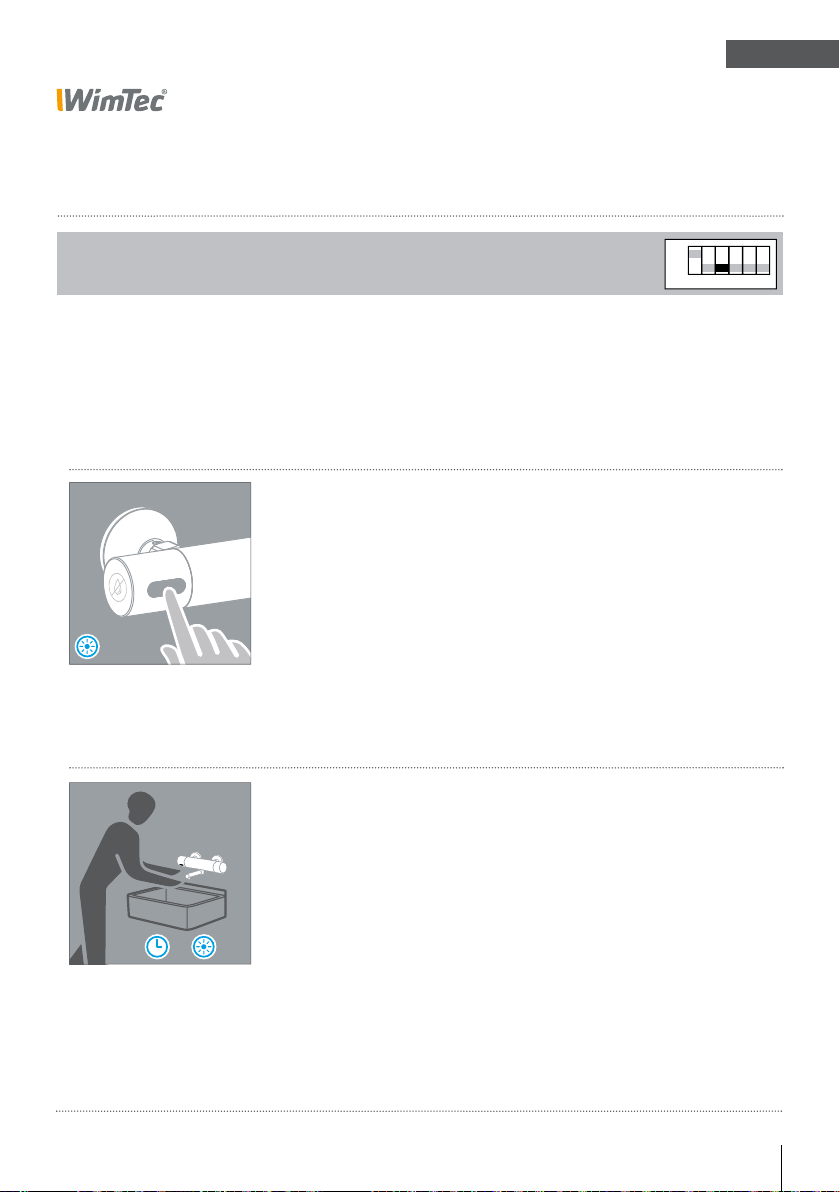
Continuous fl ow:
DIP switch 3
Enable the continuous fl ow function to fi ll the washbasin or a container as well as
for thermal disinfection�
“ON” position = Continuous fl ow function enabled�
“OFF” position = Continuous fl ow function disabled (preset)�
Enable continuous fl ow:
1. Touch the infrared sensor fi eld gently in the center - the water fl ow
starts - and stay�
2. After the monitoring LED fl ashes three times, the water fl ow is
briefl y interrupted and continuous fl ow is activated for the fl ushing
stop time confi gured�
3 x
Disable continuous fl ow:
Automatic:
Once the confi gured fl ushing stop time has elapsed (fl ushing stop
time control, see p� 27)�
OFF
ON
2
1
3 4 5 6
Manual:
1. To instantly end the fl ushing stop, approach
with your hand again
|
3 x
2. After the icon fl ashes three times, continuous fl ow is disabled
(approx� 3 cm) and hold it there�
the infrared sensor
and the fi tting will resume normal operation�
Washbasin fi tting WimTec ECOSAN W6 35
Page 36
EN
ECOSAN W6
Description of the functions
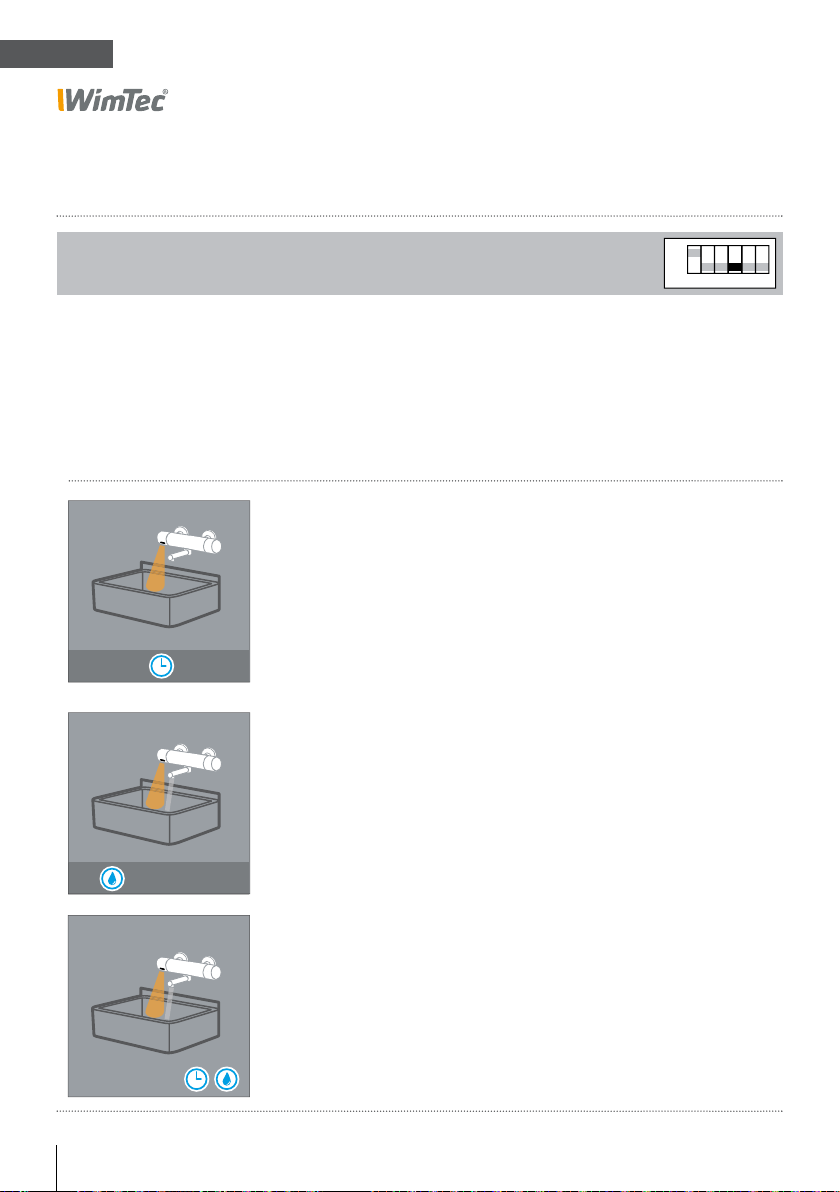
Intelligent stagnation fl ush:
DIP switch 4
Serves to rinse water supply lines in order to prevent the growth of microbial
pathogens such as legionella and to protect the health of the users when prolonged�
“ON” position = Intelligent stagnation fl ush activated�
“OFF” position = Intelligent stagnation fl ush deactivated (preset)�
To adjust, proceed as follows:
1. Time interval
Specifi es the time between the last use and stagnation
fl ush� Adjustable from 3 to 48 h (24 h preset) at the interval
control (see p� 27)�
3 - 48 h
2. Set the stagnation fl ush duration
Indicates the automatic stagnation fl ush duration� Adjustable
for 10 s or 20 s (10 s preset) on DIP switch 5 (see p� 27)�
ON
OFF
1
2
3 4 5 6
10 s or 20 s
3. Intelligent stagnation fl ush
If the fi tting has not been used for the set period, stagnation
fl ushing is triggered for the duration confi gured�
If a user is in the response range or the cleaning stop is
activated, the automatic stagnation fl ush is triggered only 2
minutes after leaving the response range or deactivating the
cleaning stop�
36 Washbasin fi tting WimTec ECOSAN W6
Page 37
ECOSAN W6
Description of the functions
EN
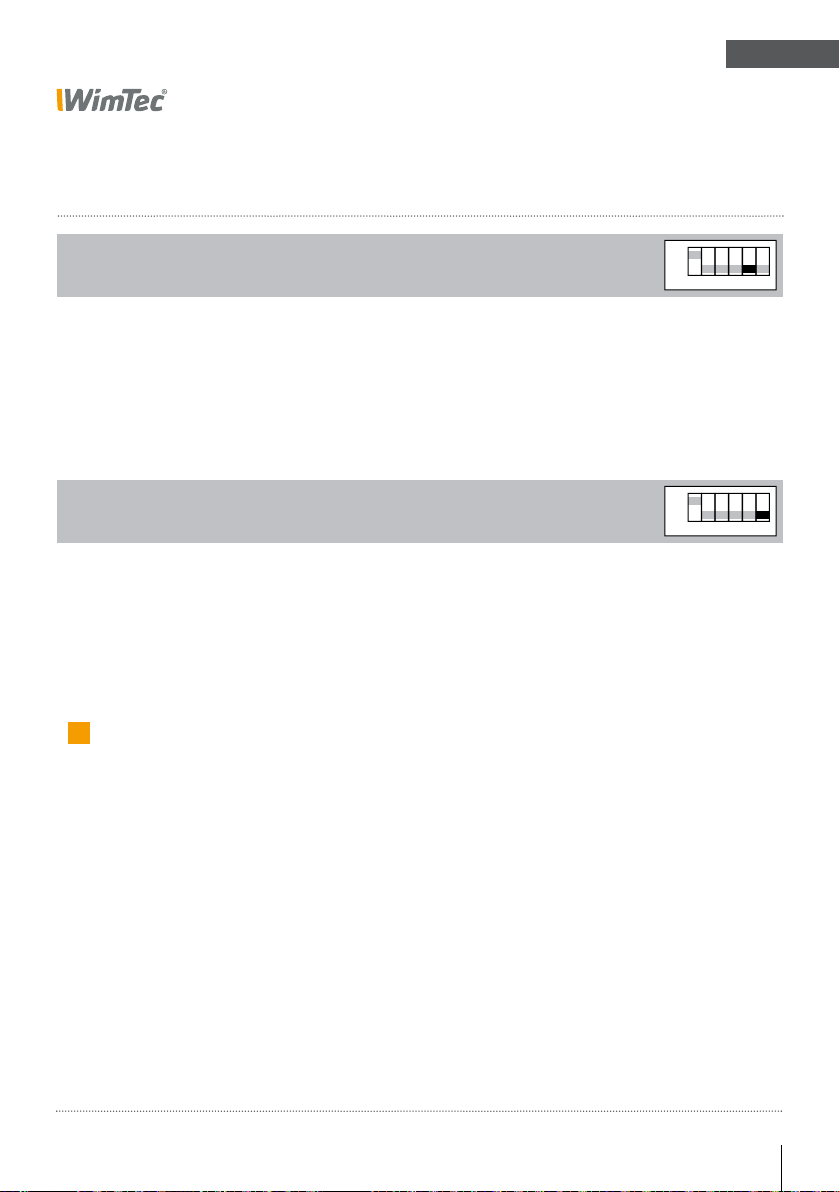
Stagnation fl ush duration:
DIP switch 5
You can select one of two predefi ned times (10 s or 20 s)�
“ON” position = The fl ush time is 20 s�
“OFF” position= The fl ush time is 10 s (preset)�
Shut-off delay:
DIP switch 6
You can select one of two predefi ned shut-off delay times (1 s or 3 s)�
“ON” position = Shut-off delay is 3 s�
“OFF” position = Shut-off delay is 1 s (preset)�
i
Note:
If your hands frequently leave the detection range while washing your hands, for example, causing the fi tting to switch off,
you can extend the shut-off delay to 3 s�
When using an instantaneous water heater, the extended shutoff delay helps to minimise the number of ignition processes�
ON
OFF
ON
OFF
21
3 4 5 6
21
3 4 5 6
Washbasin fi tting WimTec ECOSAN W6 37
Page 38
EN
ECOSAN W6
Description of the functions
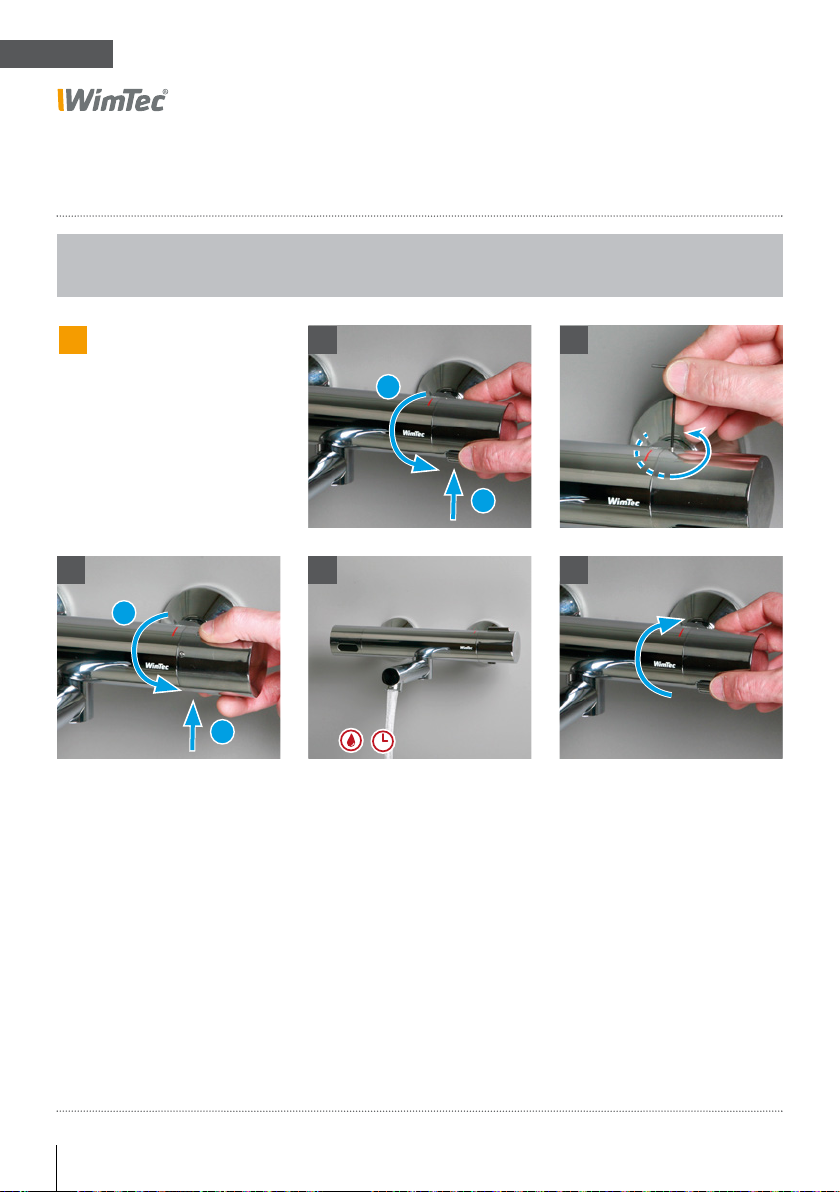
Thermal desinfection:
!
Note:
In order to guarantee the
correct thermal disinfection,
the continuous fl ow function
must be activated (see page
35) and fl ushing stop time set
to 10 min (see page 27)�
3
2
1
1
2
1
4 5
3 min / 10 min
1. Press the hot water restricting button and rotate anticlock-
wise until the stop�
2� Use the Allen key (size 1�5) to loosen the Allen screw
(3 rotations)�
3. Press the hot water restricting button again and rotate
anticlockwise until the stop�
2
4. Trigger continuous fl ow (see page 35)�
5. Once thermal disinfection has been performed, turn the
thermostat handle back clockwise and gently tighten the
Allen screw�
38 Washbasin fi tting WimTec ECOSAN W6
Page 39
ECOSAN W6
LED signals
EN
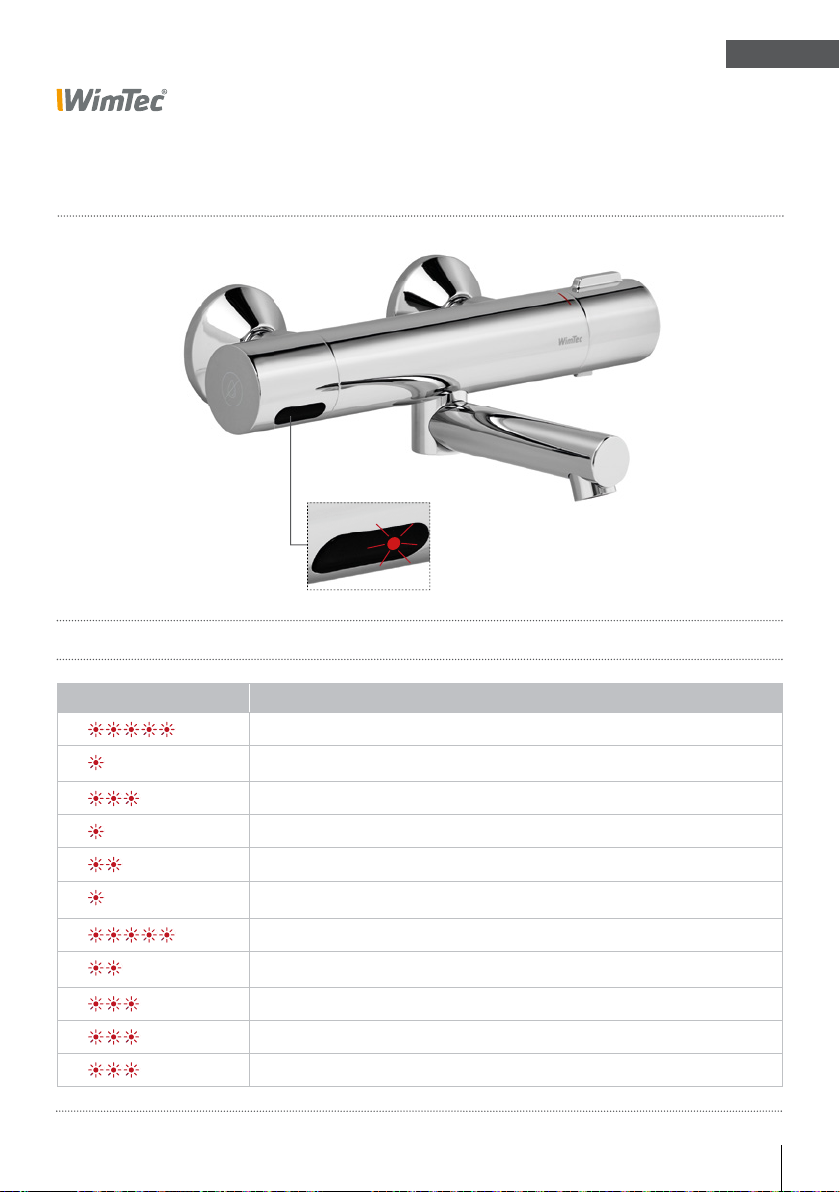
Infrared sensor
with monitoring LED
Description of the signal types:
Flash code Meaning
upon initial start up with magnetic pen
at start up if no solenoid valve is connected
at start up after RW-matching
Magnetic valve is opened
Magnetic valve is closed
Replace battery! Low battery charge, no function
Aktivate cleaning stop (with magnetic pen)
Cleaning stop active
Deaktivate cleaning stop (with magnetic pen)
Aktivate continuous fl ow
Deaktivate continuous fl ow
every 4 s
every 4 s
every 3 s
Washbasin fi tting WimTec ECOSAN W6 39
Page 40
EN
ECOSAN W6
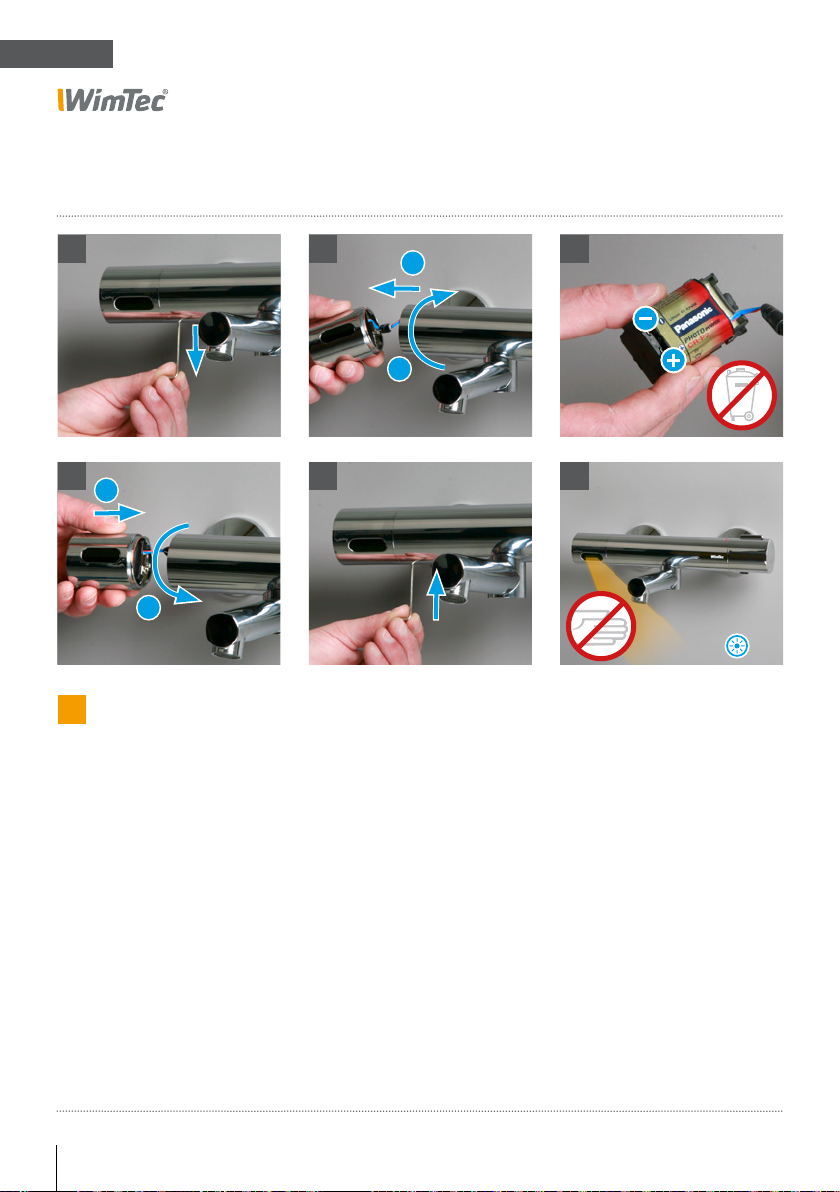
Maintenance - battery replacement
4
1
2
!
Note:
At low battery level, the monitoring LED flashes once every
4 s - triggering is not possible!
The fitting will only resume
normal operation once the
battery has been replaced!
21
1. Loosen locking screw on the underside of the sensor hood
using the Allen key (size 2) provided (3 rotations)�
2. Rotate hood anticlockwise and remove to the side�
3. Remove the electronics module from the sensor hood and
insert new battery� Use the correct +/- polarity!
4. Insert the electronics module into the sensor hood� Position
sensor hood (sensor window gently tilted upwards) and
rotate clockwise until the stop�
5. Then tighten the locking screw by hand�
6. After the solenoid valve detection, an automatic range-
span adjustment is performed� The user must not be in the
operating range of the valve� After the control LED flashes
3 times, the valve is ready for operation�
2
1
3
65
3 x
40 Washbasin fitting WimTec ECOSAN W6
Page 41
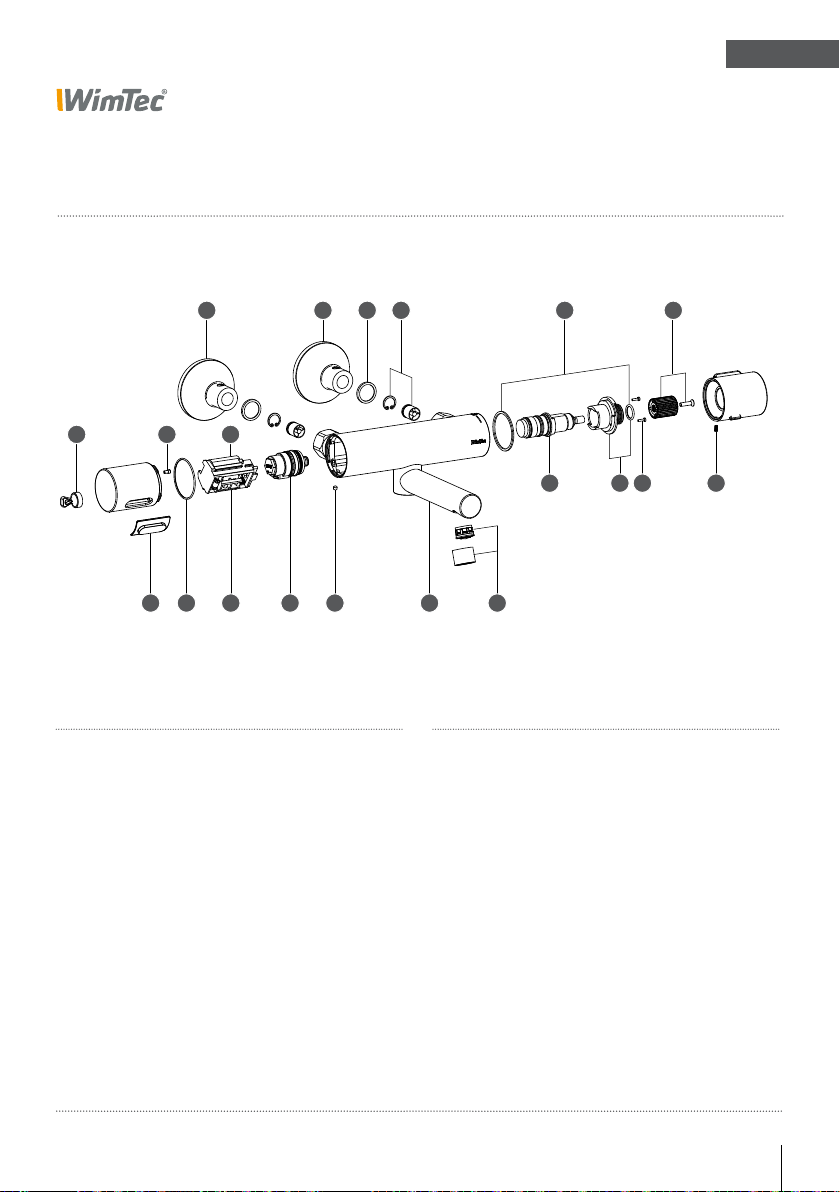
ECOSAN W6
Spare parts
EN
1
6 1615
No� Designation Art� no�:
1 2 3 4
611121314
1 S-connection set 126 297
2 Disc filter 3/4“ (2 pcs�) 126 051
3 reflux preventers incl�
safety ring (each 2 pcs�) 126 150
4 slip ring set 126 068
5 Thermostat adapter 120 547
6 ECOSAN screw set 126 129
7 ECOSAN thermostat holder 126 112
8 Thermostat 125 993
5
8
10
No� Designation Art� no�:
9
7
66
9 Jet regulator 108 637
10 Spout 136 mm 126 143
Spout 90 mm 126 136
11 Magnetic valve 231 205
12 Electronics module 126 075
13 O-ring (2 pcs�) 125 450
14 Sensor window infrared sensor 231 434
15 Magnetic pen 124 385
16 6-V lithium battery 230 741
Washbasin fitting WimTec ECOSAN W6 41
Page 42

Page 43

Page 44

www.wimtec.com
WimTec Sanitärprodukte GmbH
p: A - 3325 Ferschnitz, Freidegg 50, AUSTRIA
t: +43 (0) 7473 5000 f: +43 (0) 7473 5000 - 500
m: [email protected] i: www.wimtec.com
Auflage: 27 09 2017 Art�Nr� 1003522
 Loading...