

Page 1
Safety Information
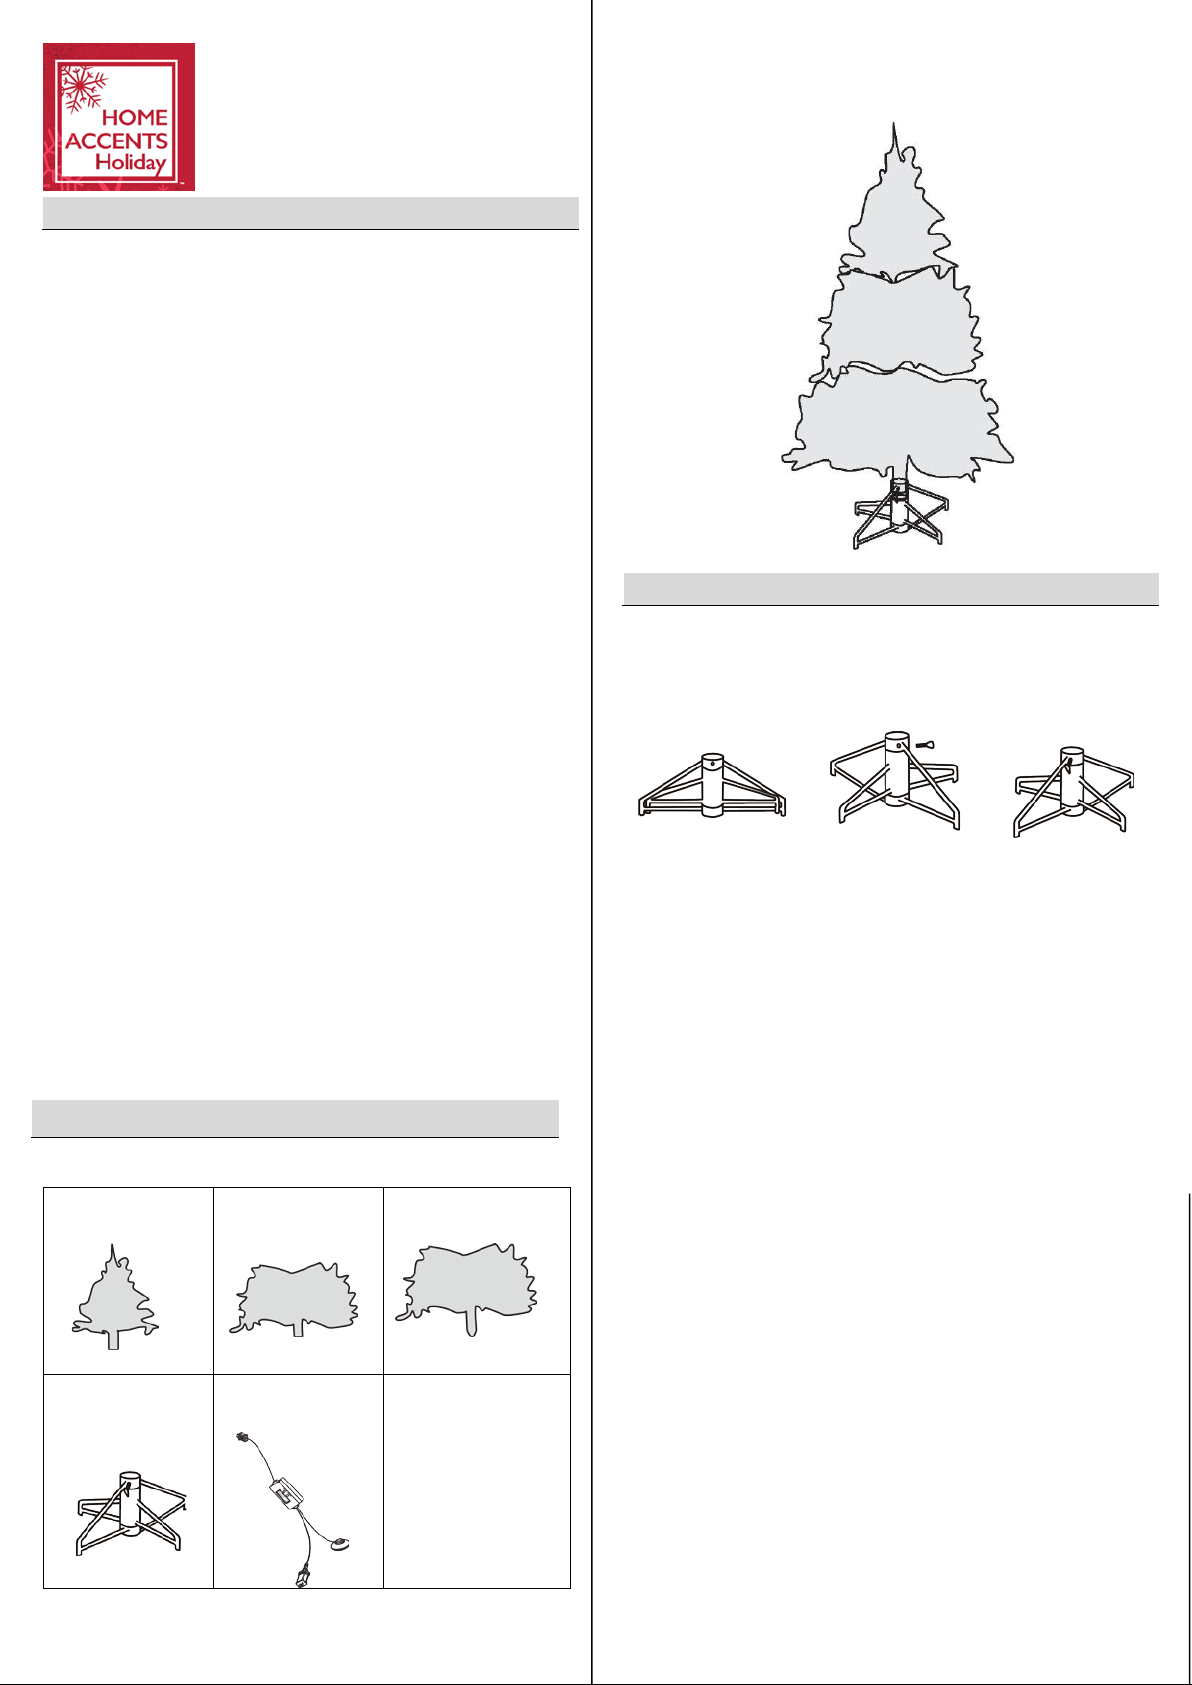
A. Tree top
B. Tree center
C. Tree bottom
D. Stand with an eye
E. Power cord
HAPEVILLE TREE WIFI VOICE C6 196 LE D
Assembly
Pre-Assembly
SKU# 1004213771
IMPORTANT SAFETY INSTRUCTIONS
When using electrical products, basic precautions should always be
followed including the following:
READ AND FOLLOW ALL SAFETY
a)
INSTRUCTIONS.
b) This product is for indoor use only. The electrical rating 120V 60Hz 0.5A
Max.
c) Do not use seasonal products outdoors unless marked suitable for
indoor and outdoor use. When products are used in outdoor applications,
connect the product to a Ground Fault Circuit Interrupting (GFCI) outlet. If
one is not provided, contact a qualified electrician for proper installation.
d) This seasonal use product is not intended for permanent installation or
use.
e) Do not mount or place near gas or electric heaters, fireplace, candles or
other similar sources of heat.
f) Do not secure the wiring of the product with staples or nails, or place on
sharp hooks or nails.
g) Do not let lamps rest on the supply cord or on any wire.
h) Unplug the product when leaving the house, when retiring for the night,
or if left unattended.
i) This is an electric product – not a toy ! To avoid risk of fire, burns perso nal
injury and electric shock it should not be played with or placed where small
children can reach it.
j) Do not use this product for other than its intended use.
k) Do not hang ornaments or other objects from cord, wire, or light string.
l) Do not close doors or windows on the product or extension cords as this
may damage the wire insulation.
m) Do not cover the product with cloth, paper or any material not part of the
product when in use.
n) Read and follow all instructions that are on the product or provided with
the product.
SAVE THESE INSTRUCTIONS.
o)
Package Contents
Qty: 1
bolt
Qty: 1
Qty: 1
Qty: 1
Qty: 1
Assembling the tree stand
Step 1. Choose a location near a wall outlet.
Step 2. Open the stand to a 90 degree angle until the hole lines up with the
hole on the tube.
Step 3. Screw an eye bolt into the hole.
CAUTION! – ALWAYS UNPLUG YOUR TREE
FROM ITS POWER SOURCE BEFORE ASSEMBLING OR
DISASSEMBLING.
Assembling the tree
Please remove protective covers from the base of the pole for each tree
section before assembling.
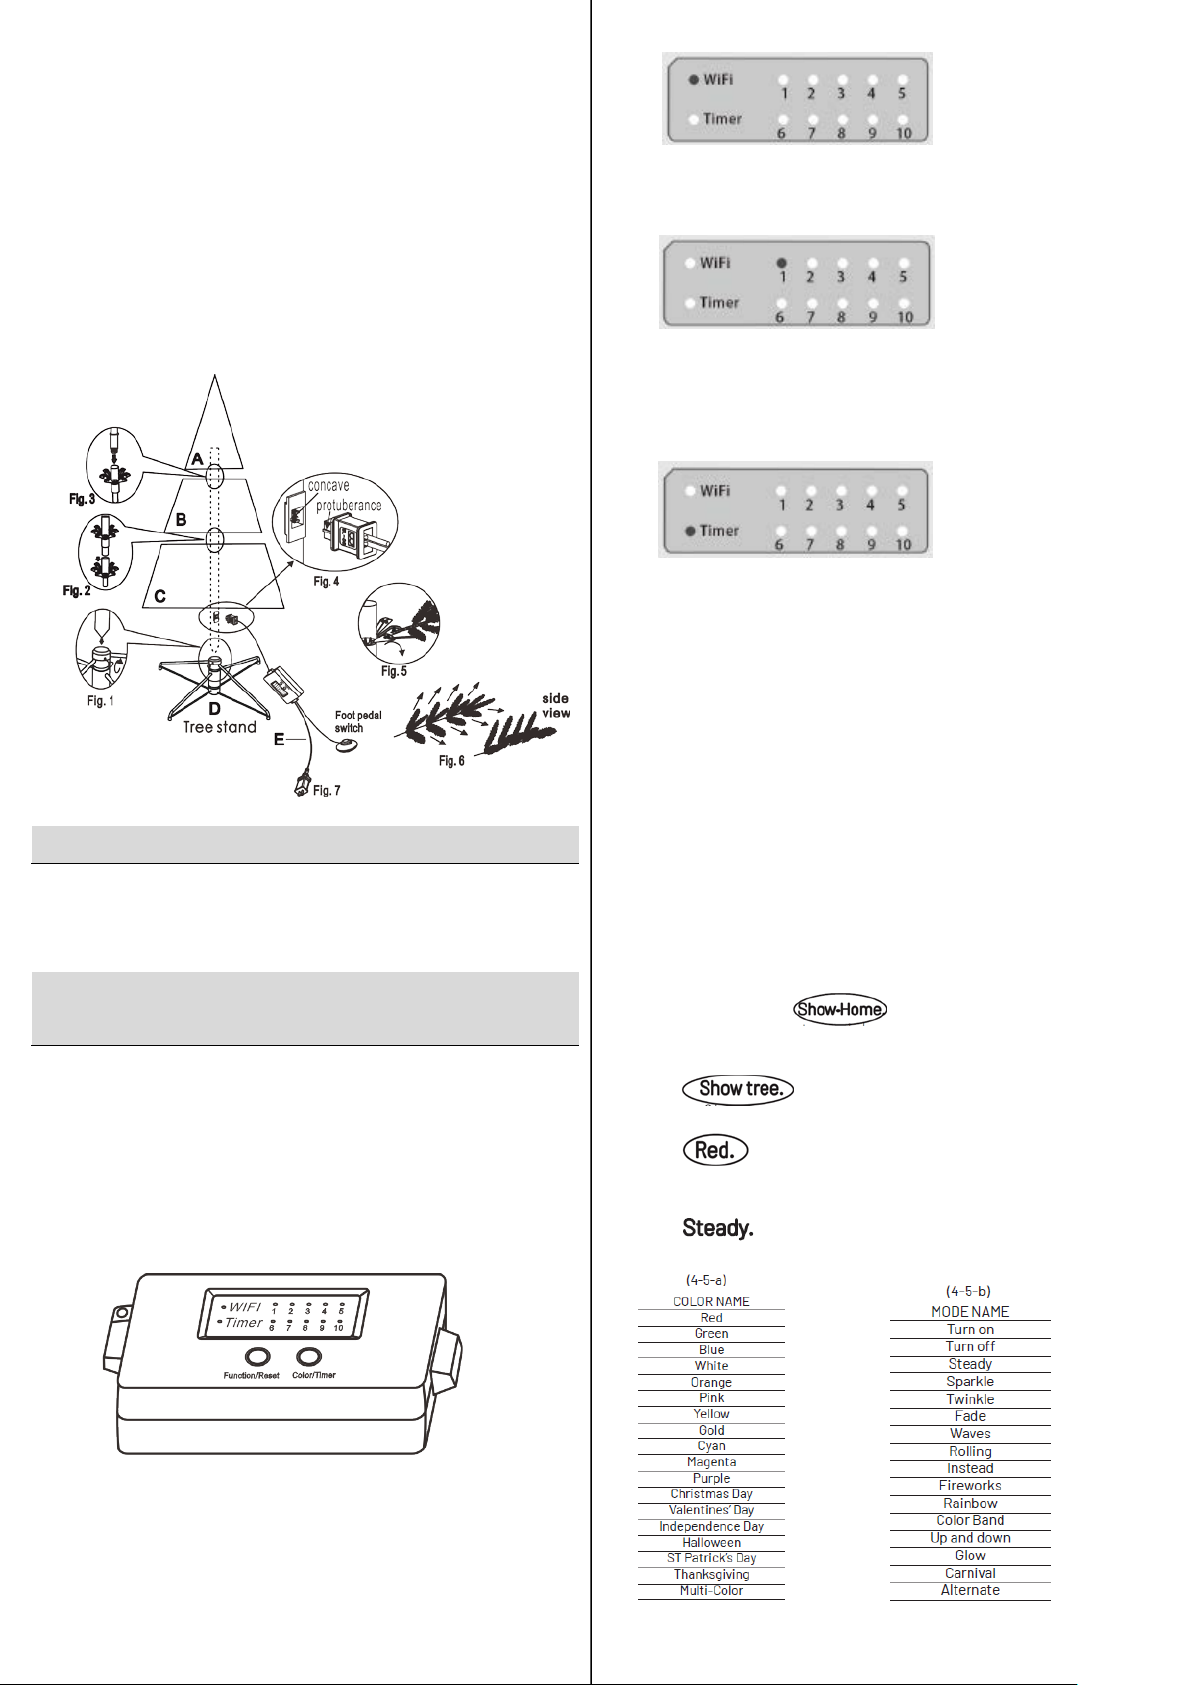
Step 1. Insert tree bottom (C) into the tree stand and tighten the screw.
(See Fig. 1)
Step 2. Insert middle section (B) into the tree bottom (C). (See Fig. 2)
Step 3. Insert tree top (A) into the middle section (B). (See Fig. 3)
Step 4. Insert the provided power cord into the connector on the tree
bottom (C) in right direction porperly and tightly (always match the
protuberance of the end connector of power cord to the concave
of the connector found on the tree bottom (C) according to the
magnified drawing on fig. 4.).
Step 5. Allow branches to fall into place or gently pull branches up and out.
When adjusting branches be sure that all wires are free of branch
hinges. (See Fig. 5)
Step 6. Shape the branches. Starting with tips closest to the pole, shape
one tip to the right, one to the left and one at the center of the main
stem. Repeat pattern for each branch. (See Fig. 6)
Step 7. Plug the power cord into a proper outlet. This tree comes with a
control box and a foot pedal switch for easy illumination and
changing functions. This tree is Color Changing, the 15 lighting
options available are:
1. Steady On
2. Twinkle
3. Sparkle
4. Instead
5. Fade
6. Rolling
Page 2
7. Waves
Operation
Instruction of control box, wifi connection
and Show Tree App
8. Fireworks
9. Rainbow
10. Color Band
11. Up and Down
12. Snow
13. Glow
14. Carnival
15. Alternate
These functions can be changed by using control box or foot
pedal switch.
Please see Instructions of control box as below.
Turning on the tree
Step 1. Connect each tree section well and plug the well-connected power
cord into a wall outlet.
b. Function status indicator (White Leds).
The number corresponding to the LED is the serial number of the mode.
c. Timer status indicator (Green Led)
● When the green led is on, it indicates that the timer is on.
● When setting the timer, the corresponding number will flash
three times to prompt the hours have been set.
Instruction of Wifi connection
There are two ways for Wifi connection:
1. Networking mode: Wifi signal indicator light stays on fast flash.
2. Direct connection mode: Wifi signal indicator keeps flickering slowly.
This two modes can be switchover by long pressing the “Function/Reset”
button at least for 5s.
The wifi signal indicator on the control box flashes continuously for 3
minutes after the power is on.
You can connect wifi when wifi signal indicator is flashing.
Voice
If you need to use voice control, please ensure that:
● Show tree is connected to the network.
● Your Google assistant or Amazon alexa is connected to the network.
Voice control example for google:
Function of the button on the control box
1. Press the Function/Reset button on control box:
Short press: switch 15 functions.
Long press at least for 5s: reset the Wi-Fi.
2. Press the Color/Timer button on control box:
Short press: switchover to 29 colors and theme.
Long press at least for 2s: set timer.
Description of the indicators on the control box
a. WiFi status indicator (Blue Led).
● Slow Flash (2 times every 3 seconds): Indicates that Wi-Fi is working in direct connection mode.
● Fast Flash (2 times every 1 second): Indicates that Wi-Fi is working in networking mode.
●User: Ok, google, ask
○Google: You have voice converter and show tree and ultimate sting,
which device do you want to control?
●User:
○Google: Ok, voice converter is ready, which function do you want to try?
●User:
table 4-5-a)
○Google: Ok, the color has changed to red.
●User:
○Google: Ok, the mode has changed to steady.
(This is the product name.)
(Color name. Other colors and themes are shown as
(Mode name. Other modes are shown as table 4-5-b)
(This is the brand name.)
Page 3
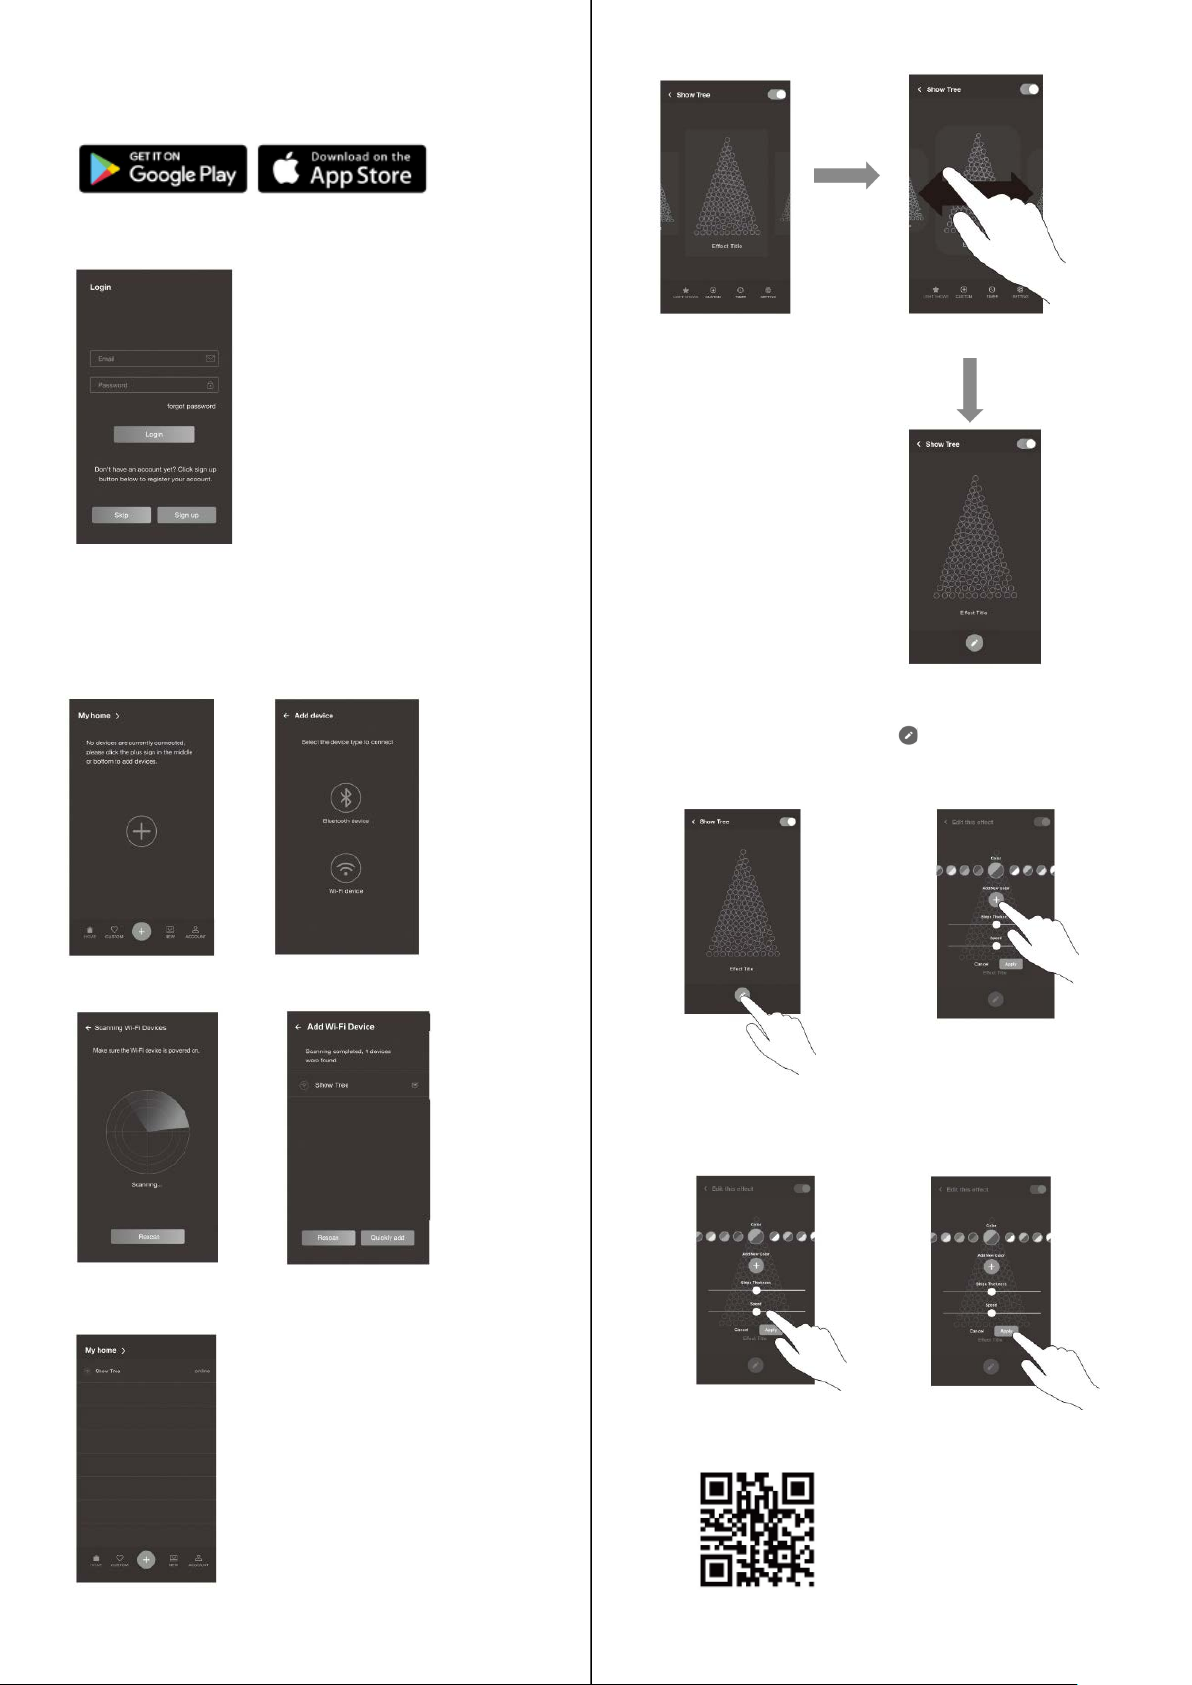
How to control your Show Tree with APP
Browse effects by swiping left or right
Tap to select an effect
1. Download the “Holiday Showhome” App from App Store (IOS) or
Google Play (Android).
2. Open the “Holiday Showhome” App and sign in.
Notes: You can also click the skip button to skip the login screen and use
the visitor mode, but you will not be able to use voice control at this time.
3. Click the Add Device button and select the Wi-Fi.
4. Click the Quickly add button after the scan is complete.
5. Return to the home interface and click on the device to enter the
operation interface.
6. Now you have entered the operation interface of Show Tree.
7. Edit Effects
a. While playing an effect, press “
b. Tap the color sample to change colors or “+” to create a custom
color.
c. Move sliders to increase/decrease speed and intensity of the
effect.
d. Tap “Apply” to store changes.
8. For more details, please scan the QR code below.
” to show current settings.
Page 4
CAUTION: The product consists of non-replaceable LED
Care and Cleaning
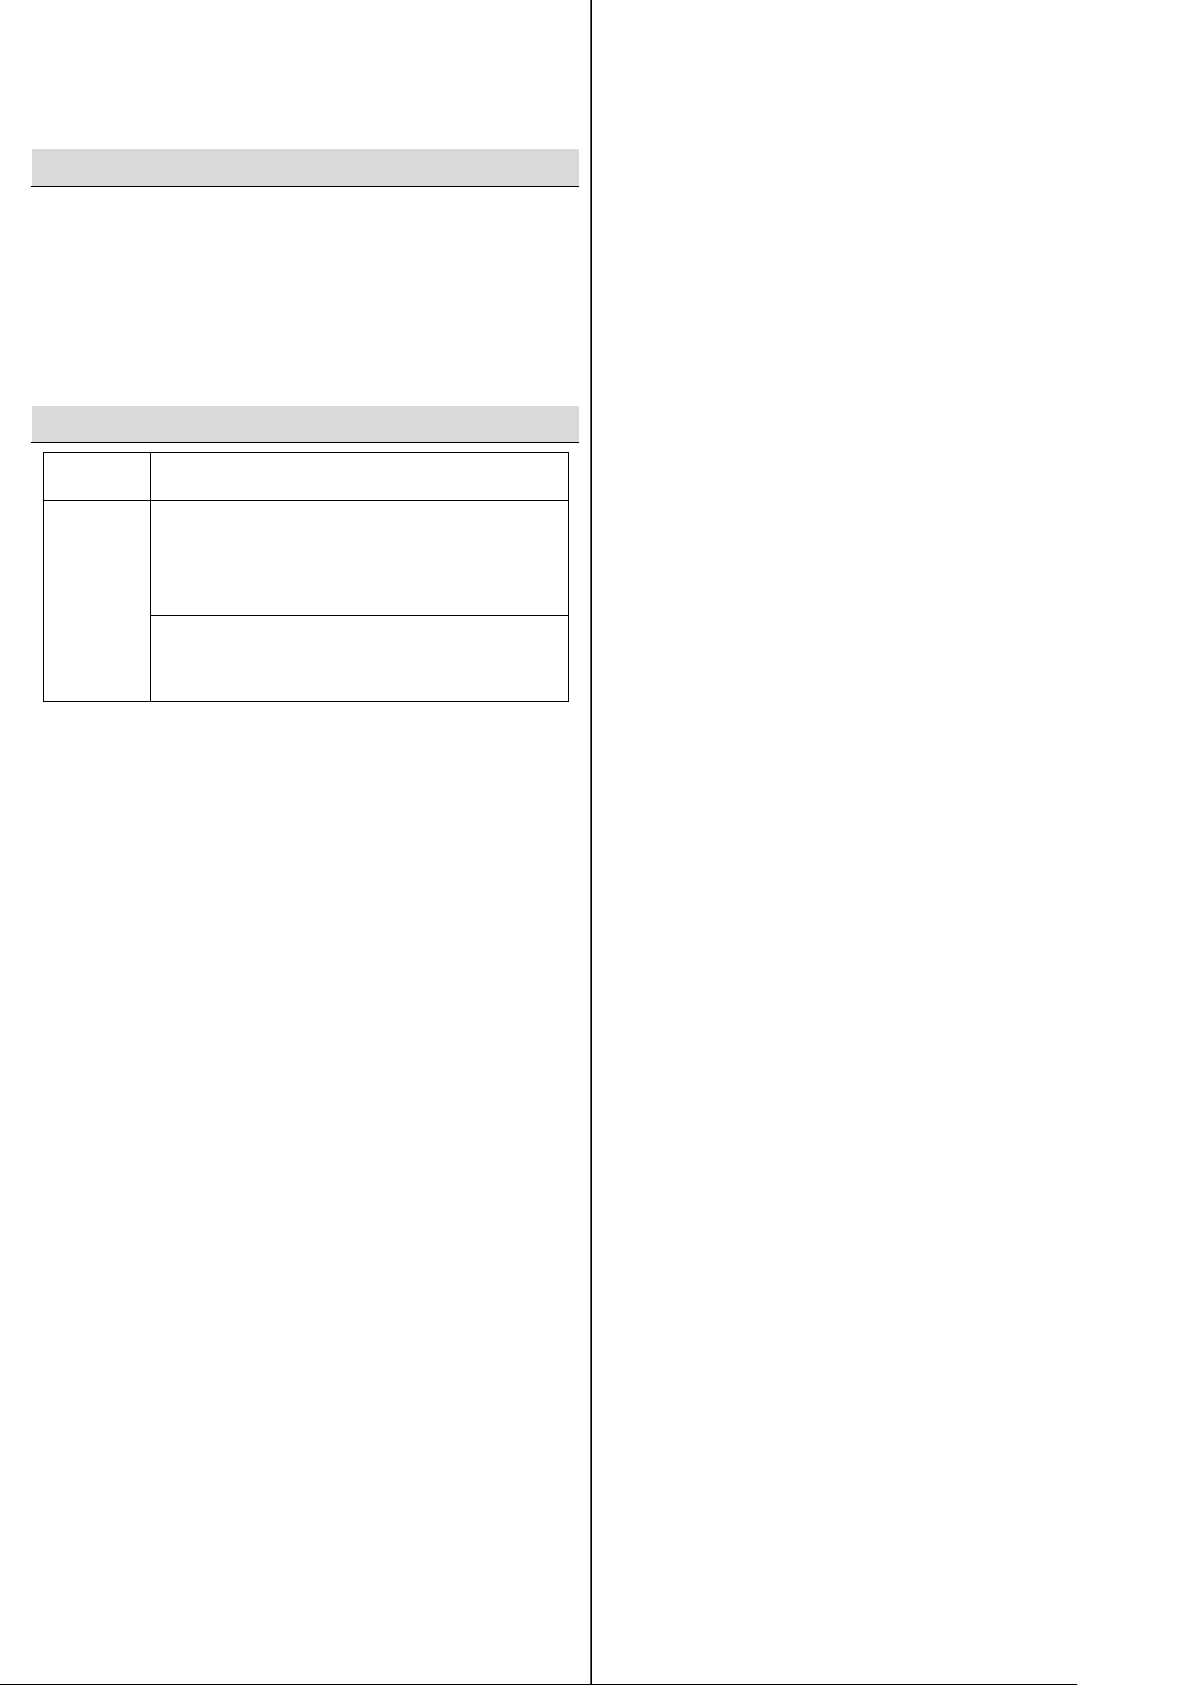
Troubleshooting
Problem
Ensure that all tree sections are connected into each
outlet.
lamps. To reduce the risk of fire or electric shock, do not attempt to
replace lamps or modify string.
Step 1. Remove all ornaments and decorations.
Step 2. Unplug the power cord from the wall outlet. And remove your
power cord from tree bottom (C) and save them.
Step 3. Gently lift the tree top straight up to remove from the center section
and fold all branches towards the pole.
Step 4. Repeat this step for the center and bottom tree sections.
Step 5. Carefully place all tree sections into a shipping box and tape it shut.
Step 6. Store your tree in a cool, dry place away from sunlight.
Solution
The tree
does not
light
other well by pressing each section down and rotating.
Make sure the power cord is well connected to the tree
bottom (C) and that the tree is plugged into the wall
If you are still experiencing problems with the tree please
call 1-877-527-0313 for instructions.
FCC Caution.
This device complies with part 15 of the FCC Rules. Operation is
subject to the following two conditions: (1) This device may not
cause harmful interference, and ( 2) this device must accept any
interference received, including interference that may cause
undesired operation.
Any Changes or modifications not expressly approved by the party
responsible for compliance could void the user's authority to
operate the equipment.
Note: This equipment has been tested and found to comply with
the limits for a Class B digital device, pursuant to part 15 of the
FCC Rules. These limits are desig ned to provide reasonable
protection against harmful inter ference in a residential installation.
This equipment generates uses and can radiate radio frequency
energy and, if not installed and used in accordance with the
instructions, may cause harmf ul i nterference to radio
communications. However, there is no guarantee that interference
will not occur in a particular installation. If this equipment does
cause harmful interference to radi o or television reception, which
can be determined by turning the equipment off and on, the user is
encouraged to try to correct the interference by one or more of the
following measures:
-Reorient or relocate the receiving a ntenna.
-Increase the separation between the equipment and receiver.
-Connect the equipment into an outlet on a circuit different from
that to which the receiver is connect ed.
-Consult the dealer or an experienced radio/TV technician for help.
*RF warning for Mobile device:
This equipment complies with FCC radiation exposure limits set
forth for an uncontrolled environment. This equipment should be
installed and operated with minimum distance 20cm between the
radiator & your body.
Importer: Home Depot
Address: 2455 PACES FERRY ROAD ATLANTA, GA 30339
Tel: 1-877-527-0313
Adapter Model No. XY24S-2401000L-UO
 Loading...