

Page 1

This manual covers the Installation, Operation and Routine Maintenance requirements
for the following Williams Refrigeration products:
MHC10
MHC16
Provided the instructions in this Operating Manual are read and implemented correctly,
the optimum performance and reliability of your equipment should be maintained.
The Williams Mobile Heated Cabinet range temperature parameters are set as follows:
+78°C (172°F) / +82°C (180°F)
Declaration of Conformity References:
Low Voltage Directive 2006/95/EC
Machinery Directive 2006/42/EC
Electromagnetic Compatibility Directive 2004/108/EC
Pressure Equipment Directive 97/23/EC
Waste Electrical and Electronic Equipment Directive (WEEE) 2002/96/EC
Restriction on Use of Certain Hazardous Substances Directive (RoHS) 2002/95/EC
Williams Refrigeration declares that all products manufactured by Williams Refrigeration
comply with the above directives as they apply to those products, and those products are
therefore declared to be in conformity with the provisions of the above legislation.
Model No.:
Serial No.:
OPERATING MANUAL for
MOBILE HEATED CABINETS
Page 2
INSTALLATION
Removal of Redundant Cabinets
Please ensure the old or redundant refrigeration cabinets and equipment are disposed of safely and legally. It is
recommended that doors are removed prior to disposal in order to ensure safety.
Unpacking
Remove all external and interior packing and accessories. Ensure all such material is disposed of safely.
Ventilation
Do not block vents by stacking boxes on top or in front of the unit as this could affect performance.
Castors
The cabinet should stand level to ensure correct operation of self-closing doors. Castors are non-adjustable. When cabinet
has been positioned, please ensure brakes have been activated by pressing metal bar down. Remember to release brakes
before trying to move cabinet.
Mains Connection
The cabinet comes fitted with a moulded plug for safety and must be earthed. If plug or cable fail, please contact the
spares office on +44 (0)1553 817017 for a replacement.
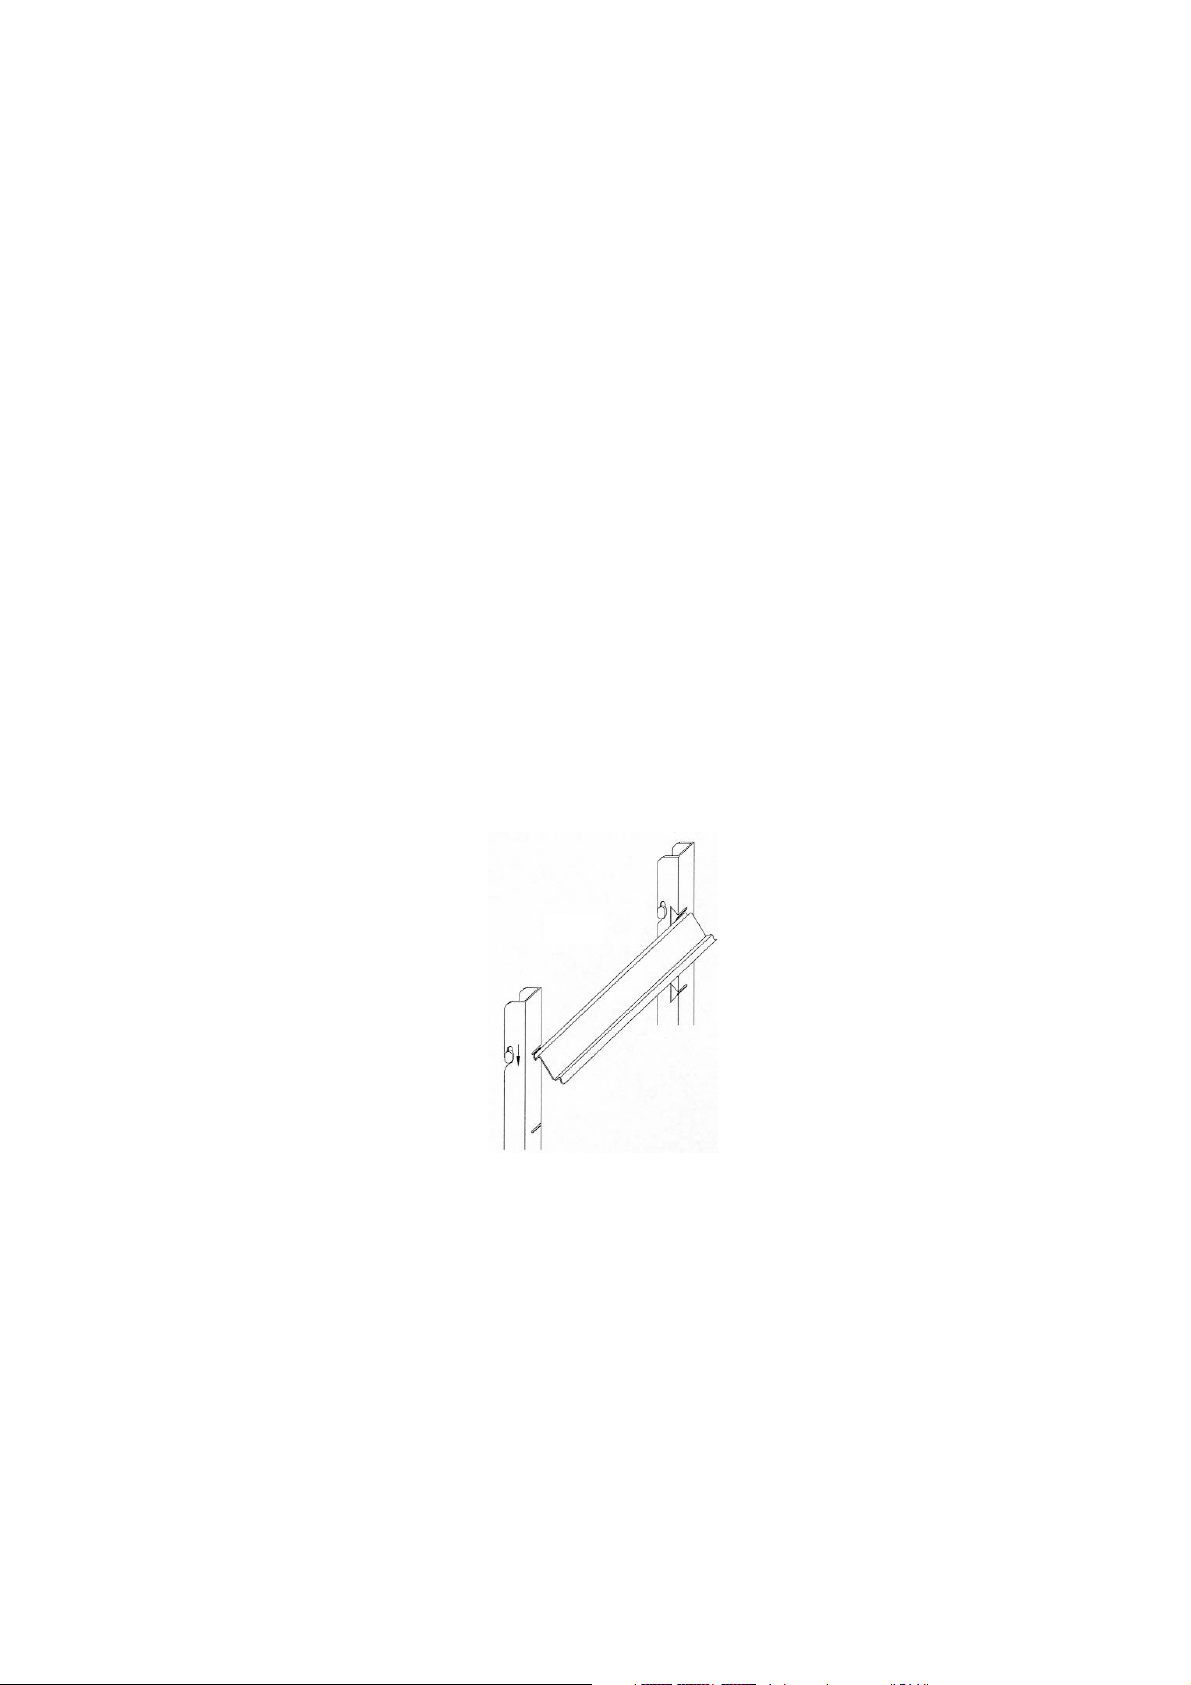
Shelf/Slide Fitting
When positioning slides on standard cabinets, present slide to racking by holding it in the opposite hand to the side of
the cabinet to that which they are to be applied. Present slide at a 45° angle (see Figure 1). When in place, let slide
drop into position to create a horizontal ledge on which the shelves will sit.
Shelf Weight Distribution
Before loading, allow cabinet to reach normal operating temperature.
When loading cabinet, please ensure that load is equally distributed throughout and ensure air can circulate around
and through stored products. Ensure all items are covered and that raw and cooked foods are stored separately.
THERMOMETER
The controller is marked in Centigrade or Fahrenheit.
The Thermometer should be checked daily to ensure that correct temperature is being maintained.
Fig. 1
Page 3
CONTROL PANEL
Initial Operation
The cabinet is designed to operate at a fixed temperature of +80°C once it has warmed up.
A safety device is fitted which will switch off the cabinet if the operating temperature exceeds a safe working level.
Please adhere to the operating temperatures. If the machine does switch off due to an excessive temperature, call a
service engineer immediately.
Switch cabinet on by pressing the on/off switch, when the temperature has reached the desired operating level, load
the food into the cabinet.
Adjusting the Operating Temperature
The operating temperature is adjustable between +50° and +85°C if required. However the food should be kept at
+70°C and above to ensure safety. To adjust the operating temperature follow the procedure below:
- Press and hold the green enter button
- Use the red up and down arrows to adjust the temperature
- When you are happy with the temperature release the green enter button
If no further adjustments are made within 10 seconds, the desired operating temperature will be stored and display will
revert to the actual cabinet operating temperature.
NB: All machines are preset at the factory, however conditions on site will vary compared with test conditions
and it may be necessary to perform the above adjustments several times in order to obtain a perfect
temperature cycle.
ROUTINE MAINTENANCE
All maintenance should be carried out by a competent, qualified person. We recommend regular preventative
maintenance using a qualified service provider in order to get the best from your equipment.
CLEANING
Exterior: If cabinet exterior is looked after correctly it will retain an “as new” finish for many years. Normal day to
day cleaning should be carried out with a soft cloth and soapy water. For a stainless steel finish, always wipe
cabinet in same direction as the grain. Whilst stainless steel is robust, the satin smooth finish can be spoilt by wiping
against the grain. Never use abrasive materials or cleaners, or chemical cleaners.
These can damage the surface and cause corrosion. Occasionally, the exterior surface should be polished with a good
stainless steel polish to protect it.
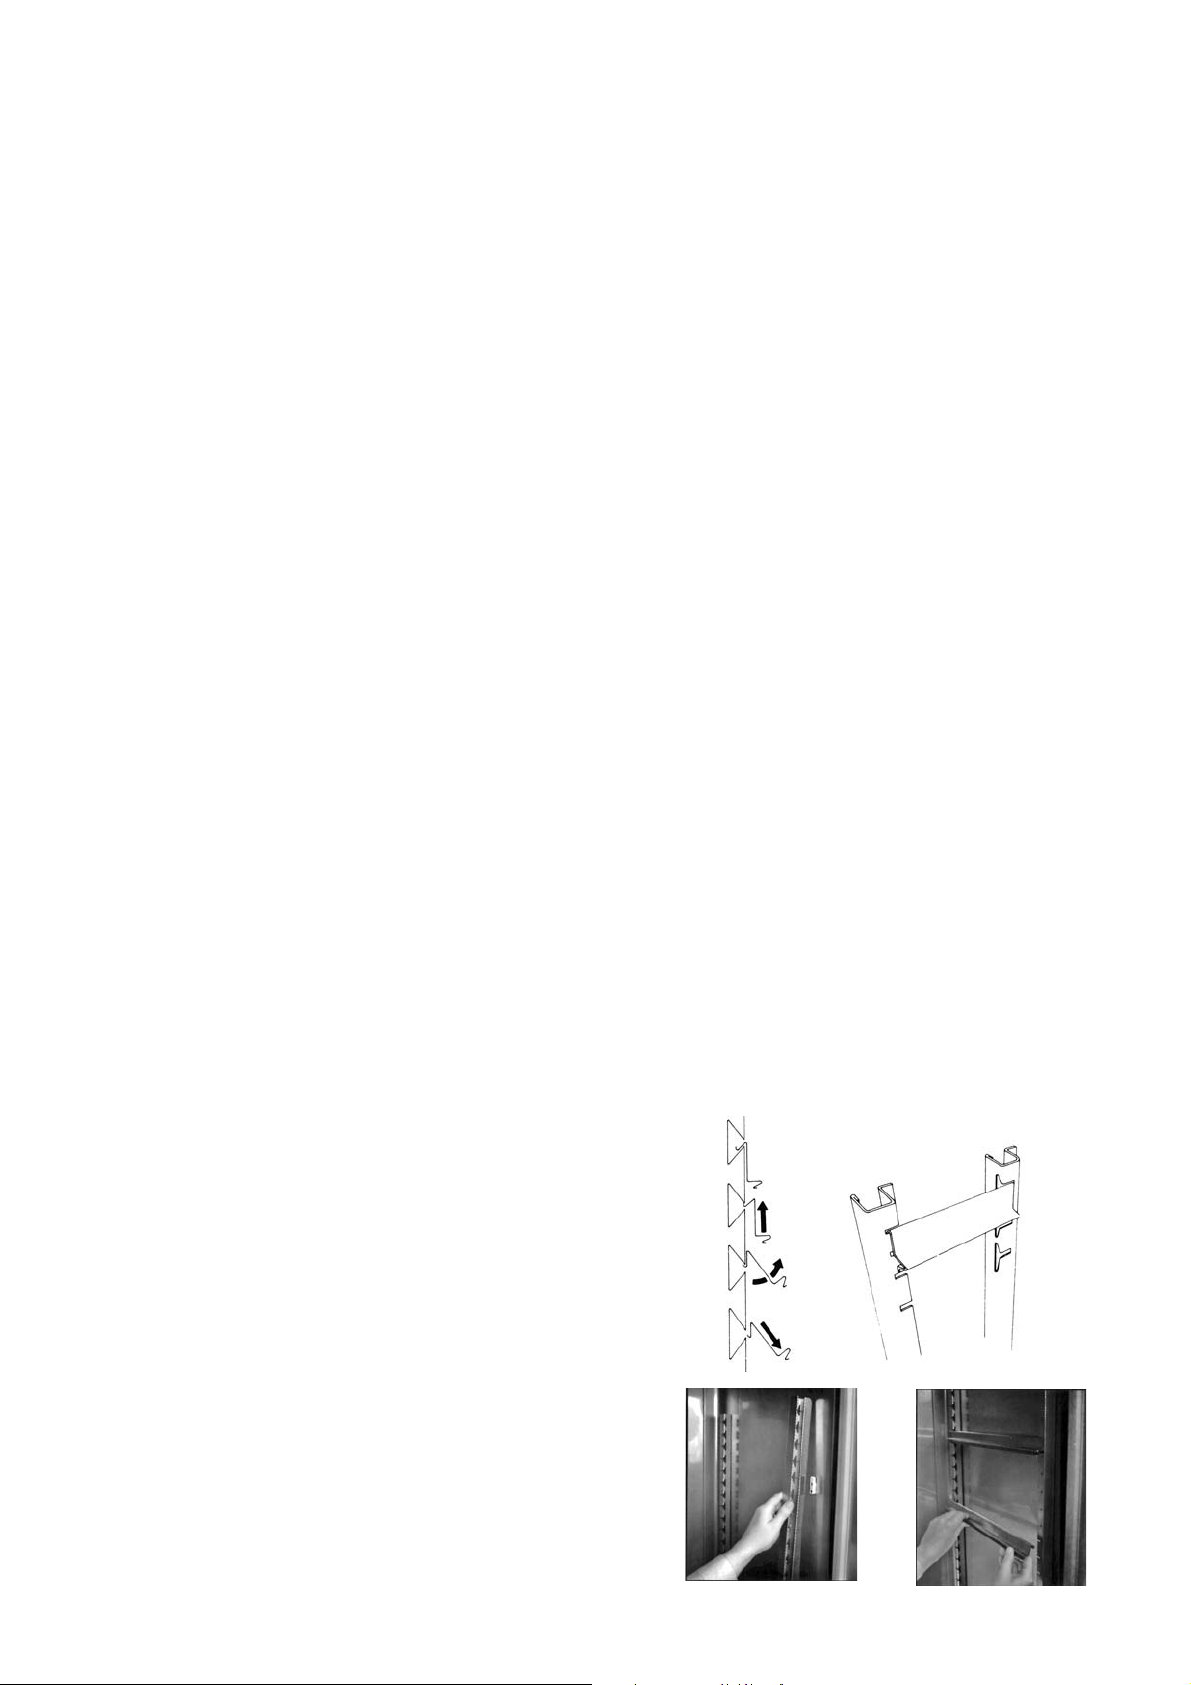
Interior: Racking can be removed for easy cleaning (see Figure 2),
cabinet interior should be cleaned regularly with warm soapy water
and a soft cloth. Dry thoroughly afterwards and where possible remove
all racking and shelving to aid the process.
To remove racking and shelf supportd, follow this procedure:
First remove shelves, then supportd by gripping formly at the centre
and lifting slighlty. Turn shelf support towards cabinet interior by
pushing at the centre as you twist support through 90°. The shelf
support will be released. (Note: the supports are designed to be
anti-tilt and some resistance may be experienced at first. This will be
overcome with practice). When all shelves have been removed,
remove the racking by lifting up and over the nylon retaining blocks.
Fig. 2
Page 4

REPLACING THE GASKET
Door gaskets should be checked and cleaned regularly and replaced if damaged. To clean the gasket, wipe with warm
soapy water and a soft cloth, ensuring it is completely dry before closing the door. DO NOT use a sharp knife to clean
or scrape the gasket. Damaged gaskets do not seal correctly and can increase the amount of electricity consumed,
seriously affecting the efficiency and performance of the cabinet. Damaged gaskets are easily replaced. Simply pull
out existing part and push new gasket into channel (gasket retainer) at centre and work along, pushing gasket into
channel. Continue with additional three sides, pushing corners in last.
BREAKDOWN
In the event of a breakdown, please check thermostat setting and fuse before calling service engineer. When
calling, please advise model and serial number. This information can be found on identification plate inside cabinet.
It should also be noted on the cover of this booklet. Please ensure that all redundant parts are disposed of safely
and legally.
Page 5

PARTS & LABOUR WARRANTY POLICY - UK ONLY
Our warranty applies to equipment manufactured by Williams Refrigeration and
equipment bearing the Williams name plate and serial number identification
tag.
We undertake, in conjunction with the supplying agent, distributor or
representative, to repair free of charge during our standard business hours any
such piece of equipment or part thereof used which is found to be faulty in
either materials or workmanship subject to the further conditions below:-
Warranty Terms and products Covered
We offer a 24 months Warranty from our original date of sale with the
following Williams equiment:
1. Garnet / Sapphire / Zircon / Jade / Amber (stainless) / Mobile Heated
/ Mobile Refrigerated.
2. Reach-in Blast Chillers / Reach-in Blast Chiller Freezers.
3. Opal / Emerald / Onyx / Aztra / Salad Counters.
4. Crystal Bakery Cabinets and Counters.
We offer a 12 months Warranty from our original date of sale for all other
Williams equipment including:
1. All Modular Products (including coldrooms).
2. Remote Systems (including glycol).
3. Bottle Coolers.
4. Multidecks and merchandiser cases.
5. GEM product range.
6. Bottle Well / Meat Freezer Well.
7. Thermowell.
8. Coral Wall Mounted Units.
9. Non standard and other products.
10.Front of House display cases.
11.White Goods.
Warranty Terms
Our warranty is offered where the equipment has been installed correctly and
has not been subject to misuse or abuse and is functioning correctly.
The equipment was purchased by the authorised supplying distributor direct
from Williams Refrigeration and not through a wholesaler or other supplier
whose warranty terms may be different.
The Warranty Policy shall be non-transferable.
Replacement of defective equipment can only be made with the approval of
Williams Refrigeration.
Any repair under warranty will only be carried out with the product in its
position of operation or in a suitable location on the customer’s premises. If the
product has to be removed for security or any other reason, this will be subject
to additional charge (may include hydrocarbon charged equipment).
Warranty work will be covered by Williams Refrigeration or by one of its
appointed service agents between the hours of 8.00am and 5.00pm
Monday to Friday.
Any works undertaken outside of these hours are chargeable.
Claims Procedure
If a customer wishes to make a claim under the terms of this warranty, the
following procedure should be observed:
1. Contact the supplying agent, representative or distributor.
2. Quote the equipment model, serial number and date of installation.
The serial number is located on the product identification plate inside the
cabinet, modular product door frame or similar location. It is recommended
that operators should also record the serial number on the operating
instruction booklet supplied with the product.
3. Contents risk and insurance responsibility remains at all times with the
customer.
Exceptions to Standard Warranties
1. The Standard warranty applies to equipment located in Mainland GB only
and excludes locations subject to restricted or secure access,offshore and
marine applications. Additional time and travel charges may be applied to
the following locations – Isle of Wight, Channel Islands, Isle of Man,
Northern Ireland and Scottish Isles.
2. Any fault that is not reported within 10 working days of being discovered.
3. Service calls to equipment under warranty, or service calls made under
chargeable arrangements will be carried out in accordance with standard
conditions of sale. Unless otherwise specified, a maximum of 15 minutes of
administrative time, not spent directly carrying out servicing work, is
provided for within the supply.
Any requirement for staff attending the call to spendgreater time than 15
minutes due to administrative requirements, such as on waiting time or
security clearance, or health and safety risk assessments, will be
chargeable at our prevailing rate. We reserve the right to apply Time
Travel & Call out charges if no fault is found with the product or access
is either restricted or denied to our attending engineer.
4. No claim shall exceed the original selling price.
5. Claims for Food and / or contents stored in the equipment supplied
(including pharmaceutical or other items) and any consequential loss
how so ever arising are excluded under our warranty terms.
6. Components including gaskets, doors, drawers, handles, shelves, tray
slides, all internal fixings, plug and lead, connectors, the outer shell,
castors / legs, food probes, refrigerant and blockages as well as
consumable items such as (but not limited to) batteries, fuses, light bulbs,
printer cartridges, keys, glass and paper roll.
7. Equipment manufactured to the customers’ own design, Williams
Refrigeration will not be liable for any defect, non performance or
improper operation of the equipment arising from any drawing design or
specification supplied by the customer, their representative or agent.
8. Second hand equipment.
9. The customer uses or installs the equipment in such a way that it
exceeds its design envelope or operates the equipment at control
parameters other than those provided as standard factory settings.
10.The customer fails to observe commonly accepted operating practices.
11.The customer has not properly cleaned or maintained the equipment or
carried out necessary servicing, including cleaning of the condenser, in
accordance with instructions, literature or directions issued by Williams
Refrigeration. (Operating Instructions are supplied with all equipment but
also available at www.williams-refrigeration.co.uk
).
12.Equipment fails through improper installation by others, misuse, abuse,
accidental damage, power loss or fluctuations, fire, flooding or acts of
god.
13.Any third party item(s) connected to the equipment that may affect
performance.
14.The customer permits persons other than those authorised by Williams
Refrigeration to perform or affect repairs or adjustments to the
equipment.
15.If authorised representatives of Williams Refrigeration are denied full and
free rights of access to the equipment for inspection during normal
business hours as previously stated.
16.If Repairs are made using spare parts or replacement items not supplied
or preauthorised by Williams Refrigeration.
17.The initial equipment supply date shall apply for warranty validity for the
subsequent supply of replacement of parts or products.
Extended Warranty
Extended Warranty offers the opportunity to protect your equipment (subject
to conditions outlined) for an additional period of up to 5 years inclusive of
original warranty periods.
Should you require Extended Warranty, state on your order or notify the
Dealer or Williams Sales Manager at the time of purchase and they will be
able to arrange it for you.
To ensure your Extended Warranty Policy remains valid, at least one
maintenance / service visit per year must take place in years 2, 3, 4 and 5.
For further information or clarification please call 01553 817000 or email
to info@williams-refrigeration.co.uk
or write to Williams Refrigeration,
Bryggen Road, Kings Lynn, Norfolk, PE30 2HZ
Page 6

Cette notice concerne l’installation, le fonctionnement et le maintenance périodique
des produits suivants, fabriqués par Williams Refrigeration:
MHC10
MHC20
A condition de lire et de suivre correctement les consignes qui se trouvent dans cette
notice d’utilisation, la performance et la fiabilité de votre produit devront être
assurées.
La plage de température des chariots chauds mobiles Williams est:
de +78°C à +82°C
Déclaration de conformité du Fabricant:
Directive 2006/95/EC relative à la BASSE TENSION
Directive 2006/42/EC relative aux MACHINES
Directive 2004/108/EC relative à la COMPATIBILITE ELECTROMAGNETIQUE
Directive 97/23/EC relative à l’EQUIPMENT PRESSURISE
Directive (WEEE) 2002/96/EC relative aux déchets d’équipements électriques et
électroniques
Directive (RoHS) 2002/95/EC relative à la limitation de l’utilisation de certaines
substances dangereuses
Williams Refrigeration déclare que tous les produits fabriqués par Williams Refrigeration sont
conformes aux directives précitées dans la mesure où elles s’appliquent à ces produits et,
par conséquent, ces produits sont déclarés conformes aux dispositions de la législation
précitée.
Modèle No.:
No de Série.:
NOTICE D’UTILISATION pour
CHARIOT CHAUD MOBILE
Page 7

INSTALLATION
Armoires Frigorifiques Usagees
S'assurer que toute armoire frigorifique usagée, ou tout équipement frigorifique usagé, soient mis au rebut en toute
sécurité et selon les lois en vigueur.
Deballage
Déballer l'appareil et ses accessoires avec précaution. Les emballages doivent être jeter en toute sécurité.
Ventilation du Local
Les grilles de ventilation ne doivent pas être obstruées par des cartons empilés sur ou devant le système frigorifique
car cela peut affecter le fonctionnement des votre appareil.
Mise en Place
L'appareil doit être posé de niveau de façon à assurer le bon fonctionnement de la fermeture automatique des portes
et de l'écoulement des eaux de dégivrage. L'aplomb des modèles sur pieds peut être ajusté en vissant ou dévissant
la parti inférieure des pieds. Les armoires sur roulettes, non réglables, doivent quant à eu être installés sur un sol de
niveau.
Raccordement Secteur
L’appareil est fourni avec une fiche surmoulée pour la sécurité. Cet appareil doit être raccordé à la Terre. Si une usure
ou un défaut est constaté sur le câble ou la fiche, contacter le service des pièces détachées pour échange.
Clayettes/Glissières
Pour positionner les glissières, tenir dans la main opposée du côté à aménager. Incliner la glissière à 45° (voir fig 1).
Dès que la glissière est en position, la baisser afin de créer un méplat pour accepter la grille.
Répartition du poids sur la grille
L’armoire doit atteindre sa température de fonctionnement avant d’être chargée. S’assurer de la bonne répartition du
poids sur la grille ainsi que de la circulation de l’air autour des aliments. S’assurer également que les aliments sont
couverts et séparés selon les législations en vigueur.
THERMOMETRE
L'affichage se fait en degrés Celsius. L'indication de température doit être suivie quotidiennement pour vérifier le bon
fonctionnement de l'appareil.
Fig 1
Page 8

PANNEAUX DE CONTROLE
Première Utilisation
L’armoire chaude est conçue pour fonctionner à une température fixé de +80°C. Cet appareil est équipé d’un thermostat de sécurité qui coupe lorsque la température de fonctionnement dépasse le niveau de sécurité. Les températures de fonctionnement doivent être respectées. Si l’appareil s’éteint, dû à la température trop élevée, contactez votre
installateur.
- Appuyer sur le bouton marche/arrêt
- L’armoire doit atteindre sa température de fonctionnement avant d’être chargée.
S’assurer de la bonne réparition du poids sur la grille ainsi que de la circulation de l’air autour des aliments.
Réglage des températures de fonctionnement
La température de fonctionnement de ces armoires se règle entre +50°C et +85°C. Cependant la température idéale
pour les aliments est de +70°C. Pour régler la température:
- Appuyer et maintenir le bouton vert ENTER
- Utiliser les flèches rouges pour régler la température
- Dès que la température souhaitée est atteinte, relâcher le bouton vert ENTER
Après 10 secondes sans autre modification, la nouvelle température sera mémorisée et l’afficheur indiquera la
température de fonctionnement actuelle.
NOTA : Les appareils sont préréglés à l'usine. Puisque les conditions d'utilisation sur site ne sont pas
comparables à celles de l'usine, il sera peut être nécessaire de régler le températures plusieurs fois afin de
trouver la bonne température de fonctionnement.
MAINTENANCE PERIODIQUE
Toute maintenance doit être effectuée par un personnel qualifié et compétent. Nous recommandons une maintenance
périodique, effectuée par un technicien spécialisé, afin de prolonger la vie de votre appareil.
NETTOYAGE
Extérieur: Le revêtement extérieur est en acier inoxydable austénitique et peut garder un aspect neuf durant de
longues années pour peu qu’il soit correctement entretenu. Le
nettoyage quotidien doit être effectué à l’aide d’une éponge et d’eau
savonneuse.
Toujours respecter le sens du grain de i’inox. Bien que l’acier inox soit
un matériau dur et robuste, la finition brossée peut être abîmée en ne
frottant pas dans le sens du grain. Ne jamais utiliser de matériaux abrasifs ou de produits chimiques. Ceux-ci peuvent
endommager la surface et causer des corrosions. De temps à autre, le
revêtement peut être poli à l’aide d’un produit spécifique de qualité.
Intérieur: Les crémaillères peuvent être démontées sans outil pour
faciliter le nettoyage (voir fig. 2). Celui-ci doit être fait régulièrement à
l’aide d’une éponge et d’eau tiède savonneuse; essuyer ensuite
soigneusement. Enlever tout d’abord les clayettes, puis retirer les
glissières en les tenant fermement par leur partie centrale, et en les
soulevant légèrement. Faire basculer la glissière vers l’intérieur de
l’armoire en poussant sur sa partie centrale et en la tournant de 45°;
elle sera alors dégagée. (Nota: Equipées d’un système
anti-basculement, les glissières présenteront une certaine résistance
au début et un peu de pratique sera nécessaire.)
Lorsque toutes les glissières sont déposées, démonter les
crémaillères en les soulevant et en les dégageant de leurs supports.
Fig. 2
Page 9

CHANGEMENT
Contrôler régulièrement l’état du joint. Nettoyer le joint chaque semaine en utilisant une éponge douce et de l’eau
savonneuse, et s’assurer que le joint est sec avant de fermer la porte. Ne JAMAIS UTILISER un couteau pour
nettoyer ou gratter le joint. Un joint endommagé provoque une surconsommation électrique et un disfonctionnement
de l’équipement. Le joint est facilement interchangeable. Tirer simplement l'ancien joint hors de la gorge. Clipser le
nouveau joint à partir du centre en suivant la gorge au long du joint, continue sur les autres côtés en clipsant les coins
en dernier.
ANOMALIES DE FONCTIONNEMENT
Avant toute chose, contrôler l'arrivée électrique et le point de consigne du régulateur. Si l'intervention d'un technicien
spécialisé est nécessaire, préciser lors de votre appel le modèle et le numéro de série de l'appareil. Ces informations
se trouvent sur la plaque signalétique et au dos du présent fascicule. Toute pièce remplacée doit mis au rebut en toute
sécurité et selon la loi en vigueur.
Page 10

CONDITIONS GENERALES DE VENTE
1) Généralités
Les présentes conditions régissent les ventes de produits entre la société WILLIAMS SILVER FROST et l’acheteur. Toute
dérogation aux présentes conditions devra faire l’objet d’une convention particulière par écrit.
Toute commande ou acceptation de nos offres implique de la part de l’acheteur son adhésion aux présentes conditions et sa renon-
ciation à ses propres conditions générales d’achat. L’acheteur reconnaît avoir été informé des caractéristiques et des spécifications
techniques WILLIAMS SILVER FROST et, sous son entière responsabilité, avoir vérifié la comptabilité des produits achetés avec
l’usage auquel il les destine.
2) Principes de la garantie
Nos appareils et matériels, sont vendus à des installateurs-revendeurs professionnels qui s’engagent fermement à en assurer la
mise en place, l’installation, la garantie et le service après-vente auprès de leur clientèle. La responsabilité de WILLIAMS SILVER
FROST se limite seulement au remplacement gratuit des pièces défectueuses contre leur retour port payé.
Tous nos produits sont garantis à compter de la date de livraison. Pendant la période de garantie, WILLIAMS SILVER FROST
prend en charge les pièces détachees reconnus défectueuses; les frais de main d’oeuvre, déplacement et petites fournitures étant
à la charge de l’installateur.
EXCLUSIONS
La garantie ne s’applique pas:
- en cas de mauvaise utilisation, de manque de maintenance préventive, d’installation non-conforme;
- en cas de détérioration dûe à des causes extérieures (foudre, parasites, dégâts des eaux);
- sur les pièces d’usure (joints de porte, fusibles, ampôules, éclairage etc.) ainsi que le fluide frigorigène;
- sur d’eventuelles pertes de denrées, mesure conservatoires etc., la garantie contractuelle relevant d’une obligation de moyens.
3) Prix
Tous nos prix s’entendent hors taxe Franco France Métropolitaine et exprimés en Euros. La facturation est donc établie suivant les
prix et taxes en vigueur le jour de l’expédition.
4) Commande
* Toute commande de matériel et/ou d’accessoires doit faire l’objet d’un ordre écrit de la part de l’acheteur
* Toute commande de matériel et/ou d’accessoires ne pourra être considérée comme définitive qu’après acceptation de WILLIAMS
SILVER FROST. Elle est cependant considérée comme définitive pour l’acquéreur dès la remise du bon de commande.
* La confirmation d’une commande fait l’objet d’un accusé de réception de commande qui confirme l’acceptation de WILLIAMS
SILVER FROST et stipule les conditions d’exécution, spécifications des expéditions, paiement. L’acheteur se tient à vérifier
soigneusement cet accusé de réception et de signaler toute erreur éventuelle dans les 48h après réception.
Aucune contestation ne pourra être acceptée passée ce délai.
* Une commande acceptée par le vendeur pourra être annulée par ce dernier en cas d’arrêt de fabrication par le constructeur pour
quelque cause que ce soit ou de modifications dans la solvabilité de l’acheteur.
* Toute commande de matériel spécial à exécuter ne peur faire l’objet d’une annulation
5) Délai de livraison
Les délais de livraison ne sont donnés qu’à titre indicatif et WILLIAMS SILVER FROST ne sera tenu à aucun dommage et intérêt,
indemnité ou pénalité de retard. Un retard dans la livraison ne donne pas à l acheteur le droit d’annuler la commande.
6) Transport
Le transport des marchandises s effectue aux risques et périls de l’acheteur quelles que soient les conditions de ventes car la
livraison a eu lieu par remise directe des produits à l acheteur ou à un transporteur désigné par nous pour le compte de l acheteur.
Il incombe à l acheteur, comme destinataire, de ne donner décharge qu au dernier transporteur qu’après s être assuré que les
produits lui ont été remis en bon état. Dans le cas contraire, des réserves motivées et précises seront mentionnées sur le document
de transport et une lettre recommandée avec accusé de réception confirmant les dites réserves devra être adressée au transporteur
dans le délai légal, fixé à trois jours. Lorsqu une réception est prévue, celle-ci est réputée définitivement acquise si l’acheteur
n a pas formulé de réserves par lettre recommandée avec accusé de réception dans les quinze jours qui suivent la livraison.
Page 11

7) Conditions de paiement
Sauf convention contraire, les factures sont payables à 30 jours fin de mois par traite acceptée et domiciliée. Les traites devront
être retournées à l’adresse indiquée dûment acceptées dans un délai de 10 jours à compter de leur émission. Le défaut de retour
de nos traites dûment acceptées dans le délai stipulé ci-dessus, ou le non paiement d une seule facture ou d un seul effet à son
échéance rend immédiatement exigible, sans mise en demeure au préalable, l intégrité de nos créances sur l acheteur non encore
venues à échéance. En cas de défaut de paiement du client ou de non respect des conditions de paiement, nous nous réservons
le droit d’annuler les commandes en cours et ou de suspendre toute exécution de travaux. En l’absence de références jugées
satisfaisantes, nous nous réservons le droit de demander à tout moment soit le paiement comptant à la commande, soit la garantie
de paiement que nous estimons nécessaires. A défaut de les obtenir, nous nous réservons le droit d annuler immédiatement toute
commande. Nous nous réservons la possibilité, à tout moment, en fonction de notre appréciation des risques encourues et des
garanties offertes, de fixer ou de réduire le plafond des découverts consentis à un acheteur et de modifier ses délais de paiement.
8) Retard de paiement
Lorsque le règlement intervient après l échéance figurant sur la facture et postérieurement à la date de paiement prévue aux
conditions générales de vente, des pénalités de retard seront appliquées. Ces pénalités, dont le taux est fixé à une fois et demie le
taux de l’intérêt légal en vigueur, courrant à compter de la date de règlement résultant des conditions générales de vente. Si des
poursuites judiciaires devraient être entreprises en vu de recouvrir la créance dont il s’agit, le montant de la créance réclamée serait
alors augmenté des frais de justice dont le minimum ne saurait être inférieur de 15% de la créance litigieuse et cela à titre de
clauses pénales. Le non paiement d une échéance quelconque entraînera d autre part automatiquement, l exigibilité de la totalité
du solde restant du est la suspension des livraisons.
9) Résolution
En cas de défaut de paiement à l’échéance, nous nous réservons le droit de constater la résolution de plein droit de la vente cinq
jours après une mise en demeure par lettre recommandée non suivie d effet et de reprendre possessions des produits sans
préjudice de tous autres dommages et intérêts.
10) Réserves de propriété
Conformément aux dispositions de la loi du 12 mai 1980, les produits vendus restent notre propriété jusqu’au complet
encaissement du prix de vente. Nous nous réservons le droit de revendiquer nos produits en cas de défaut de paiement d’une seule
échéance, l’acheteur s’engageant à nous les restituer, tous frais à sa charge, sur première demande de notre part. L’acheteur s’in-
terdit jusqu’au complet règlement du prix de nos produits de les donner en gage ou de transférer la propriété à titre de garantie.
L’acheteur s’engage à apporter tous ses soins à la garde et à la conservation du matériel et à souscrire toute assurance afin de
couvrir les dommages et sinistres susceptibles d’être causé au matériel et par celui-ci. Au cas ou les marchandises seraient
vendues, l’acheteur s’engage à céder au vendeur le prix d’achat à titre de garantie du paiement du matériel et le fournisseur est
autorisé par la présente; à réclamer le paiement directement aux clients de l’acheteur. En cas d’accord à l’amiable avec des
créanciers ou en cas de dépôt de bilan, d’ouverture d’une procédure de redressement judiciaire ou de liquidation de biens, l’a-
cheteur devra nous en aviser sans délai qui puisse être immédiatement dressé un inventaire de nos produits, si bon nous
semble. Il ne devra en outre ni vendre nos produits, ni en effectuer ou en faire effectuer l’installation sauf autorisation expresse de
notre part. Dans tous les cas où nous serons amenés à faire jouer la réserve de propriété, les acomptes reçus nous resterons acquis
définitivement.
11) Juridiction
Tous les contrats conclus par la société WILLIAMS SILVER FROST sont soumis au droit français. Tout litige de quelque ordre en
nature qu’il soit est de convention express, de la compétence de tribunal de Commerce de Guéret auquel il est fait attribution
exclusive de juridiction nonobstant toute clauses contraintes pouvant figurer sur tout document émanant du client.
Page 12

WILLIAMS REFRIGERATION
Bryggen Road,
North Lynn Industrial Estate
King’s Lynn, Norfolk PE30 2HZ
Sales Tel: +44 1553 817000 Fax: +44 1553 817111
Spares Tel: +44 1553 817017 Fax: +44 1553 817020
Email: info@williams-refrigeration.co.uk
Website: www.williams-refrigeration.co.uk
WILLIAMS SILVER FROST
2 rue Conventionnel Huguet
23000 GUERET
France
Tel: +33 5 55 52 27 88 Fax: +33 5 55 62 10 61
Email: cmalabre@williams-silverfrost.com
Website: www.williams-silverfrost.com
WILLIAMS REFRIGERATION AUSTRALIA
38-42 Gaine Road
Dandenong South, Victoria 3175
Australia
Tel: +61 3 8787 4747 Fax: +61 3 8787 4787
Email: sales@williamsref.com.au
Website: www.williamsref.com.au
WILLIAMS HONG KONG
4A Harrington Building,
36-50 Wang Wo Tsai Street, Tsuen Wan,
North Territories, Hong Kong
Tel: +852 2407 5422 Fax: +852 2407 3767
Email: mfco@williams-hongkong.com
Website: www.williams-hongkong.com
MHC O&M
Rev 5
February 2013
 Loading...