

Page 1
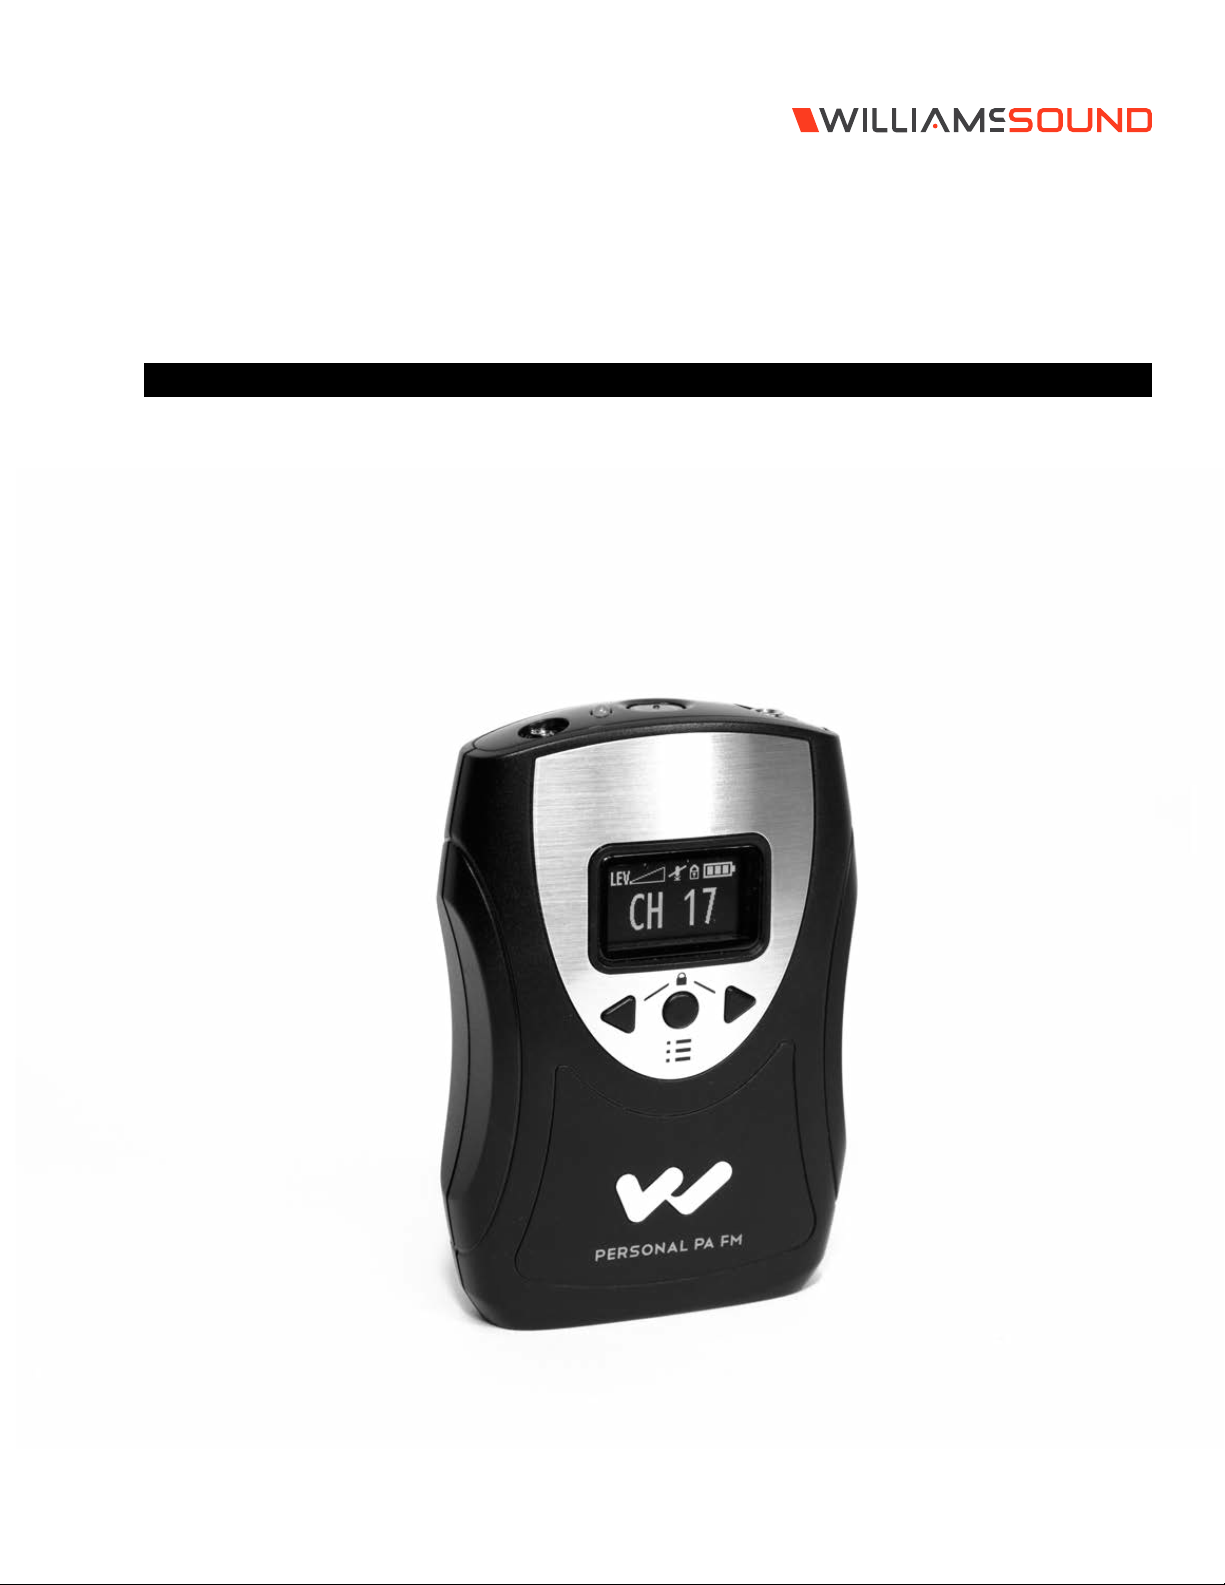
PPA T46
Personal PA® 72-76 MHz Body Pack Transmitter
USER Manual
MAN 175E
Page 2

PPA T46 Personal PA 72-76 MHz Transmitter
Contents
Safety Warnings .................................................................................................................................................................................................3
System Overview ..............................................................................................................................................................................................3
Recycling Instructions ......................................................................................................................................................................................3
PPA T46 Included Parts ...................................................................................................................................................................................3
Transmitter Applications .................................................................................................................................................................................4
Important Note about OLED Care ...............................................................................................................................................................4
Features ...............................................................................................................................................................................................................4
Quick Setup ........................................................................................................................................................................................................4
Basic Setup ........................................................................................................................................................................................................ 6
Advanced Setup ............................................................................................................................................................................................... 6
Dual-Preset Mode ............................................................................................................................................................................................ 8
Specifications .................................................................................................................................................................................................... 9
Troubleshooting ..............................................................................................................................................................................................10
Supported Microphones ...............................................................................................................................................................................10
2-Year Limited Warranty ................................................................................................................................................................................. 11
2
Page 3
PPA T46 Personal PA 72-76 MHz Transmitter
Safety Warnings
HEARING SAFETY
CAUTION!
Many Williams AV receivers are designed to amplify sounds to a
high volume level, which could potentially cause hearing damage
if used improperly. To protect your hearing and the hearing of
others:
1. Make sure the volume is turned down before putting on the
earphone or headphone—only then adjust the volume to a
comfortable level.
2. Set the volume level at the minimum setting that you need to
hear.
3. If you experience feedback (a squealing or howling sound),
reduce the volume setting and move the microphone away
from the earphone or headphone.
4. Do not allow children or other unauthorized persons access to
this product.
BATTERY SAFETY AND DISPOSAL
System Overview
Thank you for purchasing the PPA T46 Personal PA™ Body-pack
Transmitter.
Much like a miniature radio station, the PPA T46
transmitter broadcasts over an FM radio signal.
Receivers are used to pick up the broadcast up to 150
feet away. The system helps large or small groups
overcome background noise and distance to clearly
hear the speaker.
The PPA T46 FM transmitter broadcasts voice and/or
audio programs on one of 17 available channels, 72-76
MHz. Listeners use PPA R35-8 / PPA R37 receivers
equipped with headphones, earphones, or neckloops to hear
the broadcast. (An R1600 speaker can also be used.) The PPA
T46 features a convenient, dual preset mode that allows users to
set separate channel/volume/auxiliary gain levels for each preset
and then toggle back and forth between them. The OLED user
interface on the PPA T46 is an easy-to-read digital display and
active read-out. The unit also features flexible microphone and
auxiliary inputs, push-button on/o/mute controls, settings lock and
selectable compression.
To avoid diculties, please read through these instructions, and
keep them for reference.
CAUTION!
Williams AV T46 transmitters are supplied with non-rechargeable
alkaline batteries. Do not attempt to recharge non-rechargeable
batteries; they may explode, release dangerous chemicals, cause
burns, or cause other serious harm to the user or product.
PACEMAKER SAFETY
CAUTION!
If you have a pacemaker or other medical device, make sure
that you are using the Williams AV transmitter in accordance with
safety guidelines established by your physician or the pacemaker/
medical device manufacturer.
Servicing or attempting to service this device will void the warranty
Refer servicing to qualified personnel. Servicing is required when
the system has been damaged in any way: if liquid has been
spilled or objects have fallen into the unit, if the unit has been
exposed to moisture, if the unit does not operate normally, or if the
unit has been dropped.
Recycling Instructions
Help Williams AV protect the environment! Please take the time to
dispose of your equipment properly.
Product Recycling Instructions:
Please do NOT dispose of your Williams AV equipment in the
household trash. Please take the equipment to an electronics
recycling center; OR, return the product to the factory for proper
disposal.
Battery Recycling Instructions:
Please do NOT dispose of used batteries in the household trash.
Please take the batteries to a retail or community collection point
for recycling.
PPA T46 Included Parts
(1) PPA T46 transmitter
(1) BAT 001-2 AA batteries
(1) WCA 087 auxiliary input cable
Microphone sold separately.
All items can be purchased separately
Note: The PPA T46 now replaces the PPA T36 transmitter in the
Williams AV Personal PA TGS PRO 737 and TGS PRO MULTI FM
tour guide systems, and the FM ADA KIT 37 and FM ADA KIT 37
RCH compliance kits.
3
Page 4
PPA T46 Personal PA 72-76 MHz Transmitter
T46 TOP
POWER ON/OFF,
MUTE BUTTON
Transmitter Applications
· Tours
· Schools
· Hearing Assistance
· Conference Rooms
Important Note about OLED Care
The PPA T46 must be powered o before removing the batteries.
Failure to do so may decrease the life of the OLED display.
Features
Sleek, ergonomic design
Range of up to 150’ (with PPA R37 receiver)
1.25” OLED interface displays:
· master volume level · channel/frequency
· mic mute · settings lock
· battery level · settings menus
Accepts electret mic with 3.5mm mono plug or audio source
(MP3, CD player)
Belt clip for hands-free operation
Made in the USA
17-channel selectable, wideband, 72-76 MHz
Digitally synthesized frequencies
Easy-to-use menu-access controls:
· microphone and auxiliary levels
· 8 or 17-channel mode selection
· current frequency/channel number
· compression (1:1 or 2:1)
· display settings
Lifetime PLUS Limited Warranty(90 days on accessories)
Meets ADA Accessibility guidelines
Quick Setup
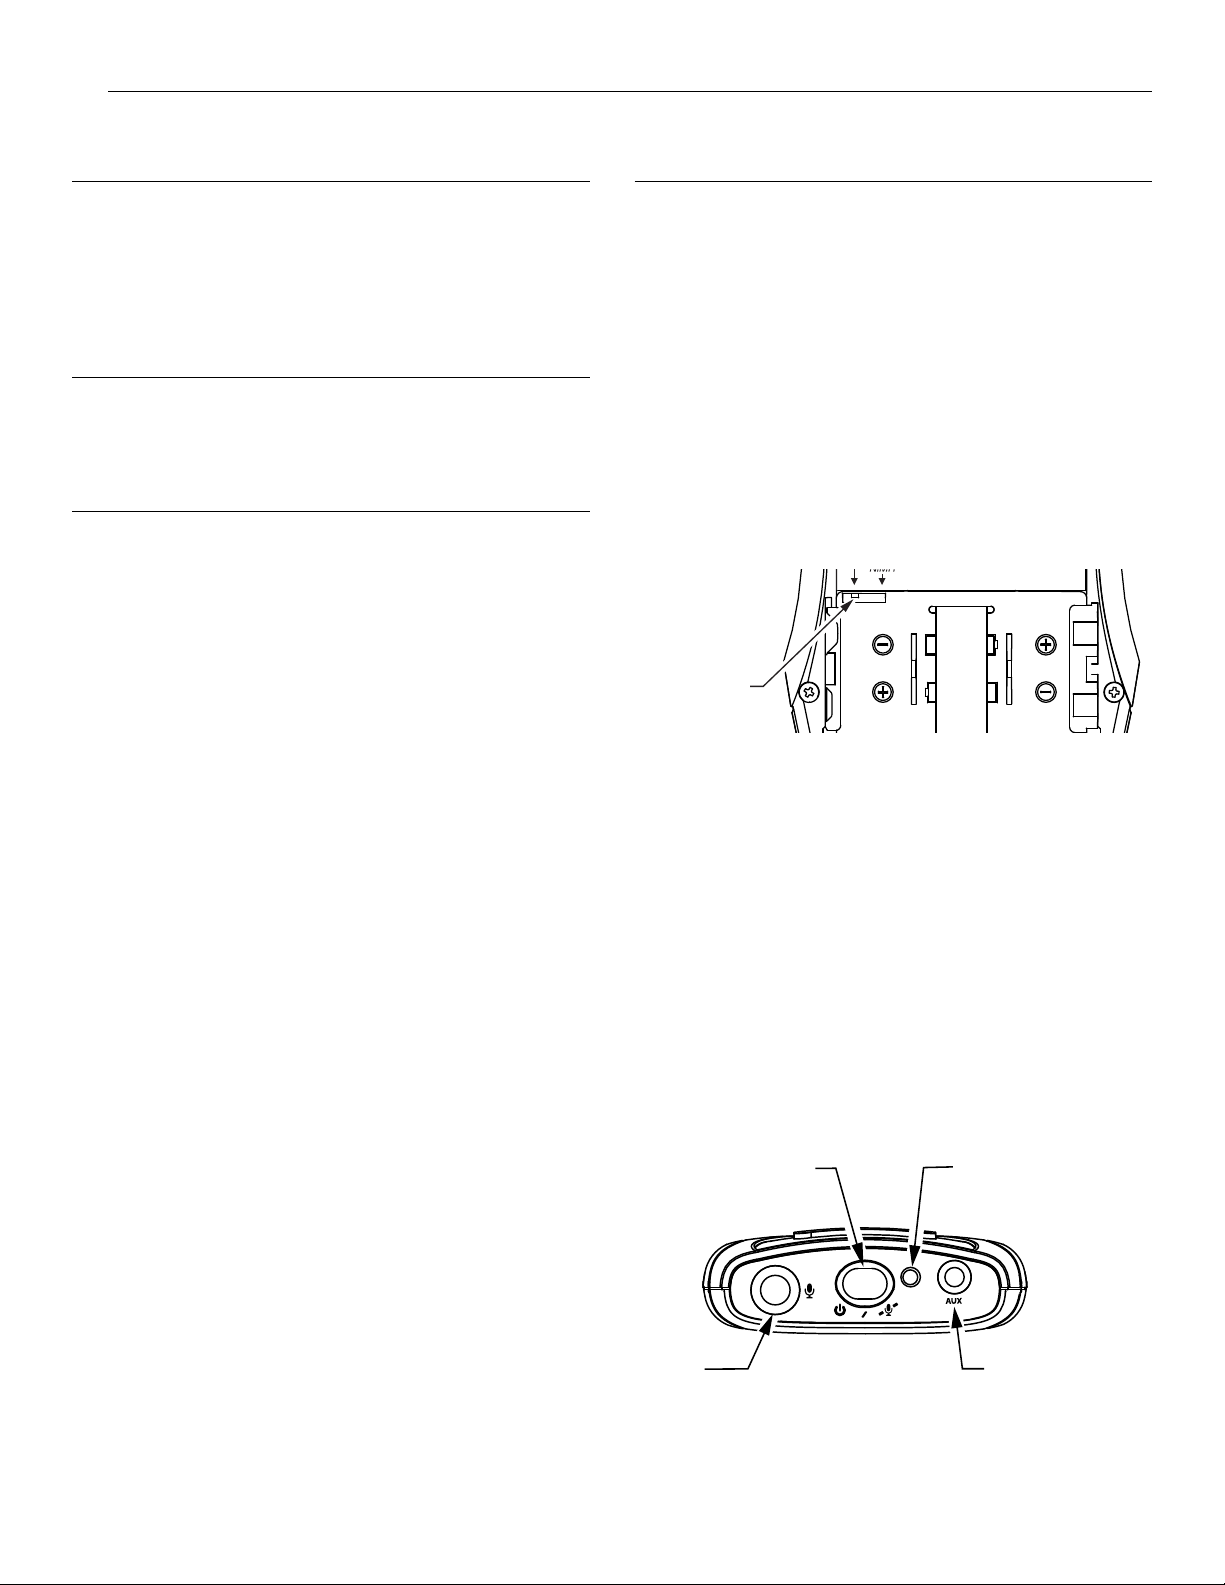
1. Open the battery compartment. Slide the battery selection
switch to the correct position for the type of batteries that will
be used. Use “Alkaline” for non-rechargeable batteries, “NiMH”
for rechargeable NiMH batteries (only). (FIG. A) IMPORTANT:
If the battery switch is not in the correct position, damage may be
caused to the unit.
2. Install the AA batteries. Be sure to observe proper polarity
(+/-). Damage due to improper battery installation may void
the warranty on the product. The battery icon on the display
and the “Power On” LED on top of the unit will flash when the
batteries are getting low; you may continue to use until the unit
quits operating, then replace or recharge the batteries.
(Figure. A)
Figure A: Battery Compartment
ALKALINE/
NiMH SWITCH
3. Plug in the microphone cord (sold separately) using the “Mic
Jack” on top of the transmitter (Figure B).
4. Optionally, plug in a desired audio source such as a CD or
MP3 player using the “Auxiliary Input” jack (WCA 087 stereo
auxiliary input cable included). If mic and auxiliary sources
are used together, the audio will be mixed. If only an auxiliary
source is desired, the mic can be muted. Do not remove the
mic from the “Mic Jack” as the microphone cable is also the
transmitting antenna. (Figure B)
5. Turn the unit on: press and hold the “ON/OFF/MUTE” button for
three seconds. The “Power On” indicator will illuminate green.
(Figure B)
Figure B: Top of Transmitter
MIC
JACK
POWER "ON",
LOW BATTERY
LED
AUXILIARY
INPUT JACK
4
Page 5
PPA T46 Personal PA 72-76 MHz Transmitter
T46 FRONT
MIC + AUX
AUDIO LEVEL
MIC MUTED
SETTINGS
LOCKED
TRANSMIT
CHANNEL
BATTERY
LIFE
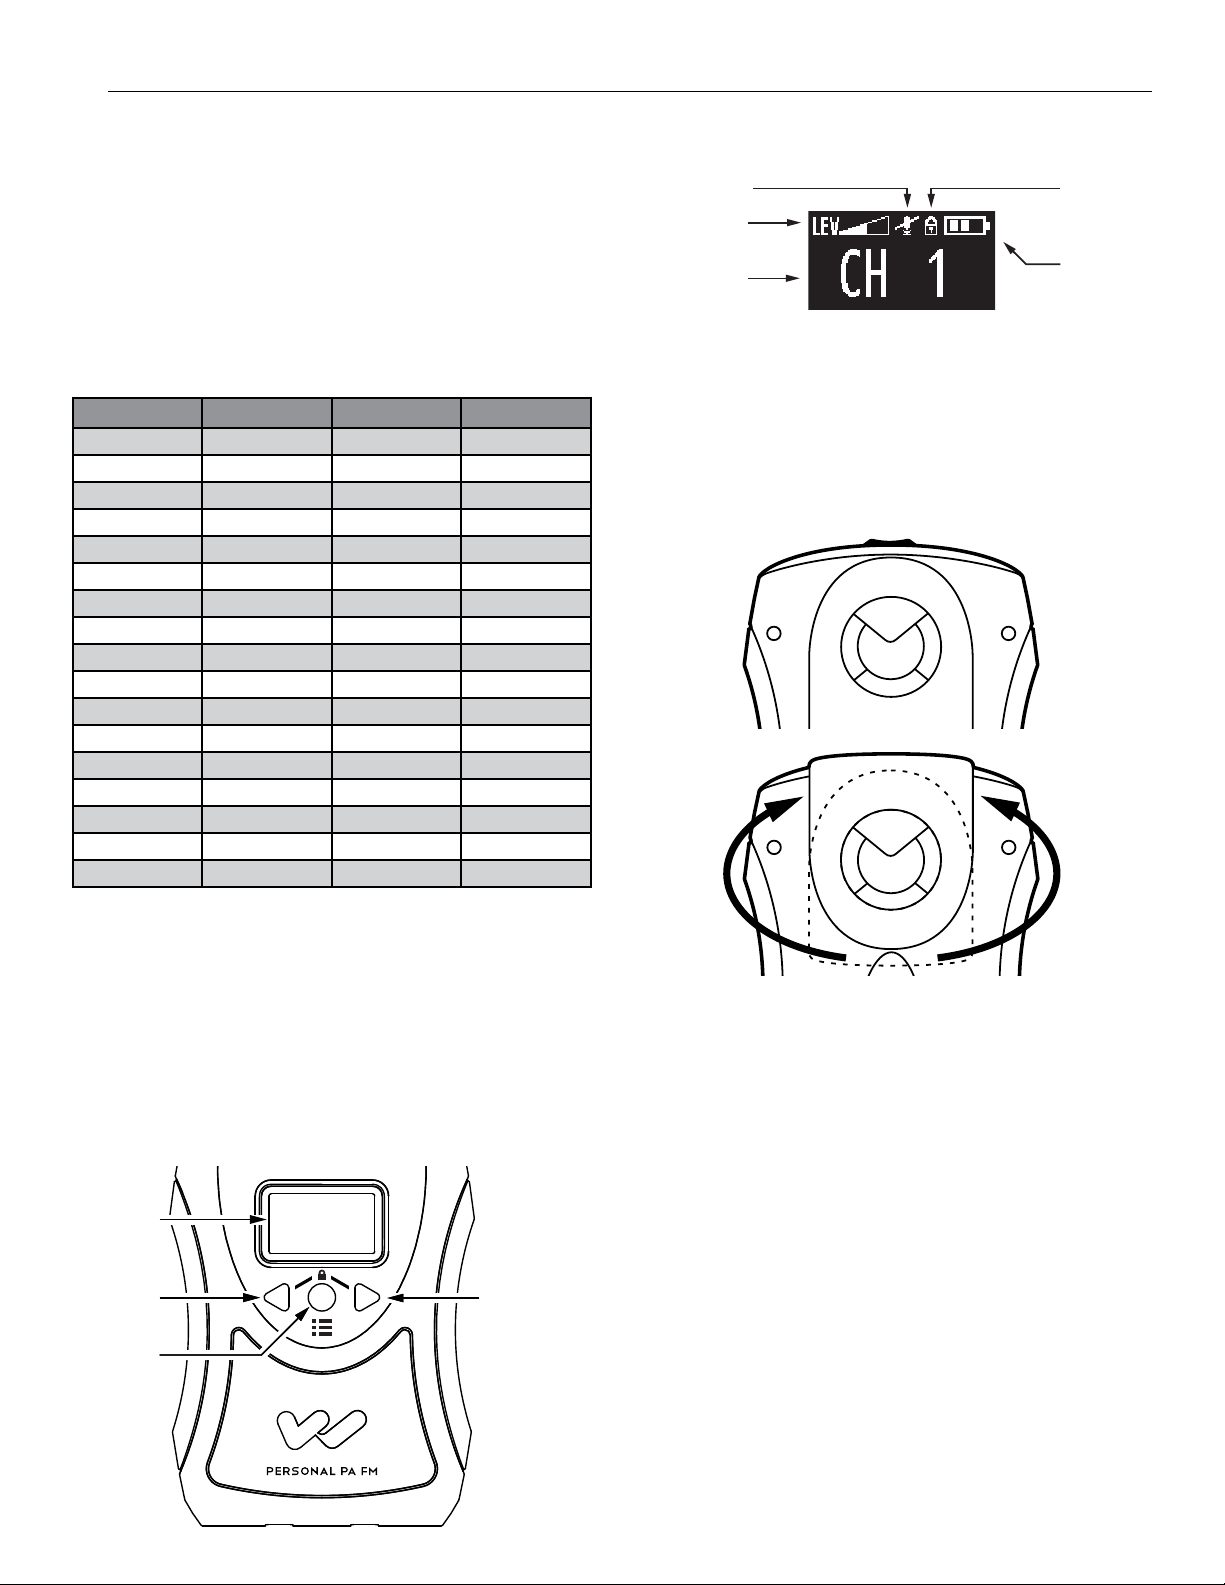
6. Select the desired operating frequency. Refer to the
following channel selection chart. Make sure the transmitter
and receiver channels match. Up to eight T46’s can operate
simultaneously on dierent channels. If this is desired, set
each T46 to 8-channel mode (see Advanced Settings, Step 4).
The frequencies in 8-channel mode correspond to the R35-8
channel set shown in the chart. This preset eight channel/
frequency selection is the only configuration that will allow
simultaneous eight channel use. (FIG. C)
Figure C: Channel Selection Chart
T46 CH Letter Freq. (MHz) R35-8 Ch
1 A 72.1 1
2 B 72.3 2
3 O 72.6 3
4 P 72.8 4
5 I 74.7 5
6 R 75.4 6
7 G 75.7 7
8 H 75.9 8
9 C 72.5
10 K 72.2
11 N 72.4
12 D 72.7
13 E 72.9
14 J 75.3
15 S 75.6
16 T 75.8
17 F 75.5
Figure E: Menu Display
9. To install the belt clip on the rear of the T46, position the belt
clip on the back of transmitter. Turn the belt clip 180˚ left or right
to secure the clip. The transmitter can now be clipped onto a
belt. To remove, turn the belt clip 180˚ so the open end of the
clip points up, and gently pull the belt clip o. (FIG. F)
Figure F: Belt Clip Installation
7. Change the transmitter to the desired channel. To access
the channel setting, push the menu button until you see the
channel displayed. Change the channel by pushing the left or
right arrow buttons. Push the menu button to save the channel.
(Figure D, Figure E) Note: To choose by frequency, see
Advanced Settings.
8. To access additional settings, push the menu button repeatedly
until you see the setting you want. If no buttons are pushed,
the screen will time-out and shut o.
Figure D: Menu Buttons
OLED
DISPLAY
LEFT
ARROW
BUTTON
MENU
BUTTON
RIGHT
ARROW
BUTTON
10. Position the headset microphone boom as close to the
speaker’s mouth as possible without actually touching. Lapel
clip microphones should be attached to a collar or lapel, as
close to the speaker’s mouth as possible.
11. When you pause from speaking, you may mute the microphone
by pressing the “ON/OFF/MUTE” button once momentarily. The
button will flash. The front display will also indicate the mic is
muted. To unmute the mic, press the button once momentarily
again. Note: The AUX Audio Input is unaected by the mic
mute.
12. When the T46 transmitter is not being used, turn the unit OFF
by pressing and holding the “ON/OFF/MUTE” button for three
seconds. The Power On indicator will go o.
5
Page 6
PPA T46 Personal PA 72-76 MHz Transmitter
Basic Setup
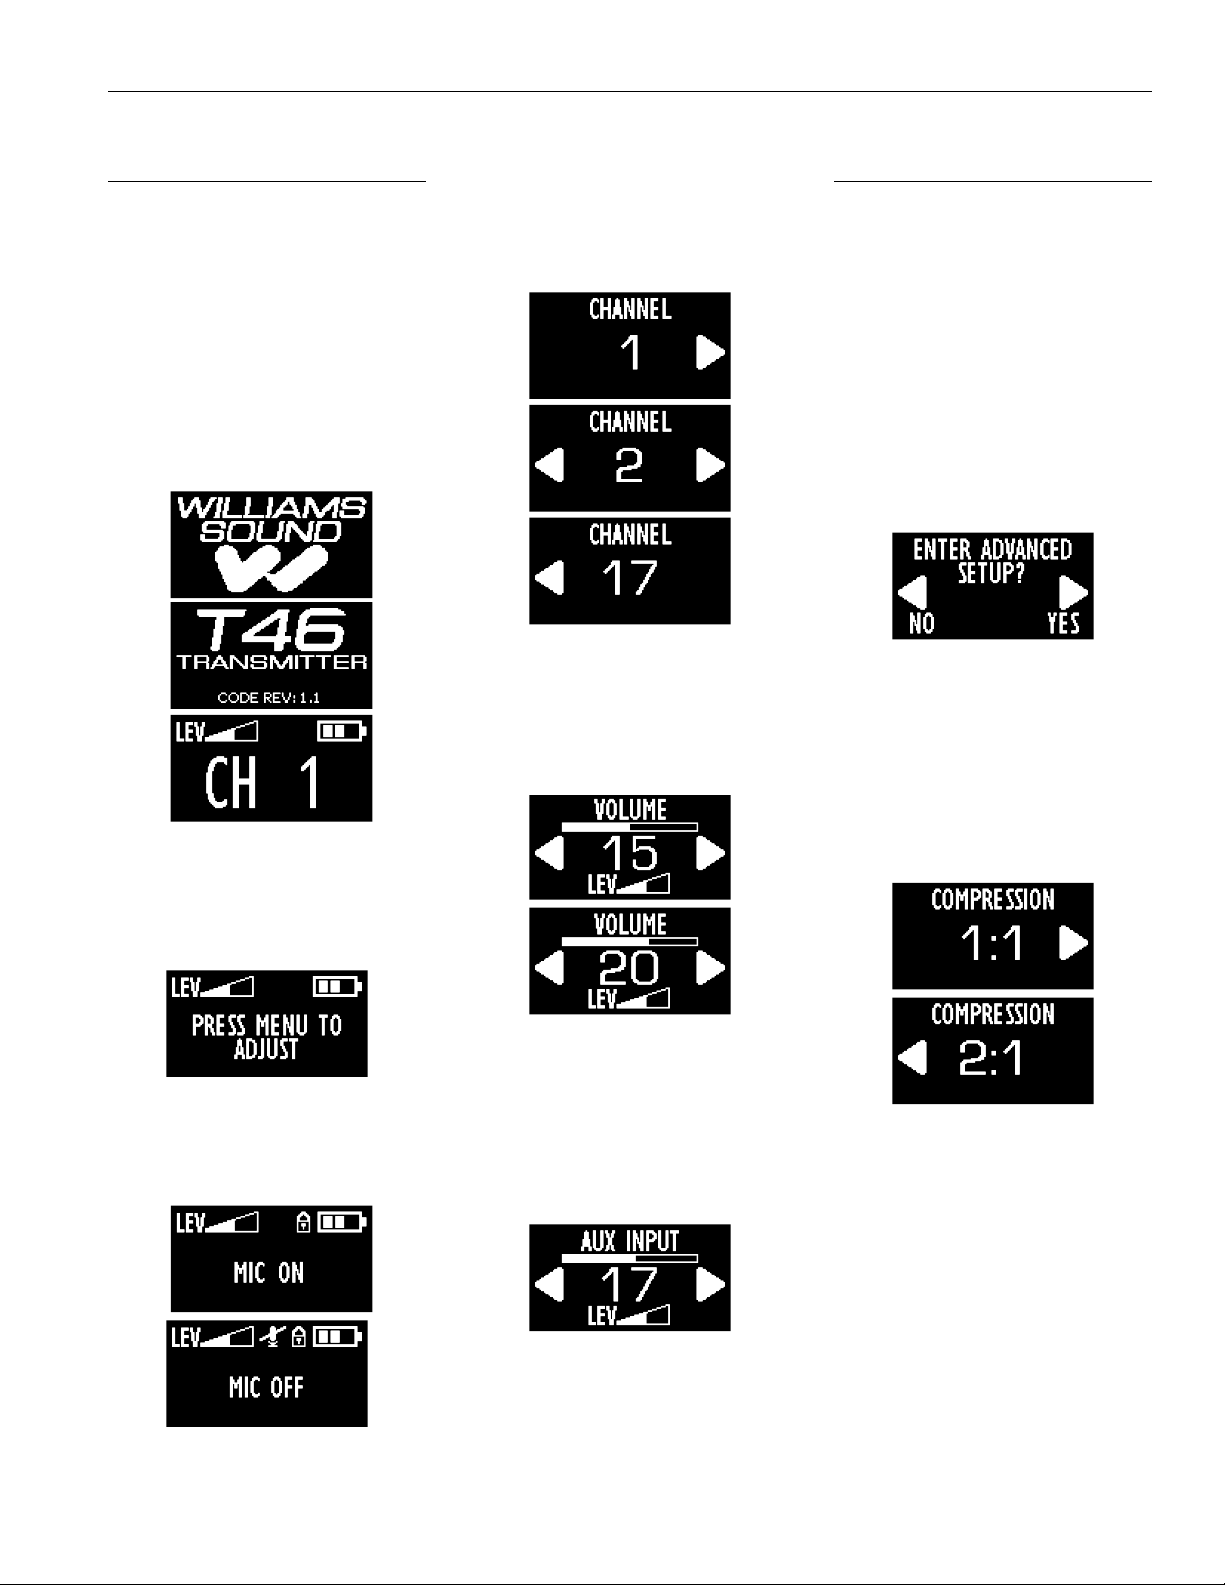
The Basic Setup Menu allows the user
to change the most frequently used
settings easily. The User can change the
transmitting channel (or frequency), the
master volume level, and the auxiliary
volume level.
1. Turn on the transmitter by pushing
and holding the power button for 3
seconds. The transmitter will start up
and show the following three screens.
Note: While on the main screen, if the
left or right arrow button is pushed, the
following screen will show, indicating
that you need to enter the menu in
order to change any settings.
3. To set the transmit channel, push
the menu button until you see the
channel set screen, below. Use the
arrow buttons to select one of the 17
channels (see Channel Selection Chart
in Quick Setup, Fig. C).
4. To set the Master Volume Level (this
is the microphone + auxiliary input
volume), push the menu button until
you see the master volume screen,
below. Use the arrow buttons to
adjust the volume level (1-30).
Advanced Setup
The Advanced Setup Menu allows the
user to turn compression on/o, change
between channel and frequency display
mode, change the transmitter to 8 or
17-channel mode, change the amount
of time for display time-out, set screen
brightness, and restore factory default
settings.
1. To access the Advanced Setup Menu,
push the Menu button repeatedly to
toggle through all of the basic settings,
until you see the following screen.
Push the right arrow to enter the
advanced setup menu.
2. Audio Compression reduces the
volume dierence between loud
and quiet sounds. To set the audio
compression ratio, push the menu
button until you see the compression
screen, below. Use the left,
right arrow buttons to toggle the
compression (1:1 = compression o,
and 2:1 = compression on).
2. To mute the microphone, push and
release the power button on the top of
the transmitter. To unmute, push and
release the power button again.
5. To set the Auxiliary Volume Level (this
is the auxiliary input volume before it
is mixed with the microphone), push
the menu button until you see the
auxiliary volume screen, below. Use
the arrow buttons to adjust the volume
level (1-30).
3. To change the display to show
either frequency (72.1-75.9MHz) or
channel number (1-17), push the menu
button until you see the frequency
display mode screen, below. Use
the arrow buttons to toggle between
“FREQUENCY” or “CH NUMBER” .
6
Page 7
PPA T46 Personal PA 72-76 MHz Transmitter
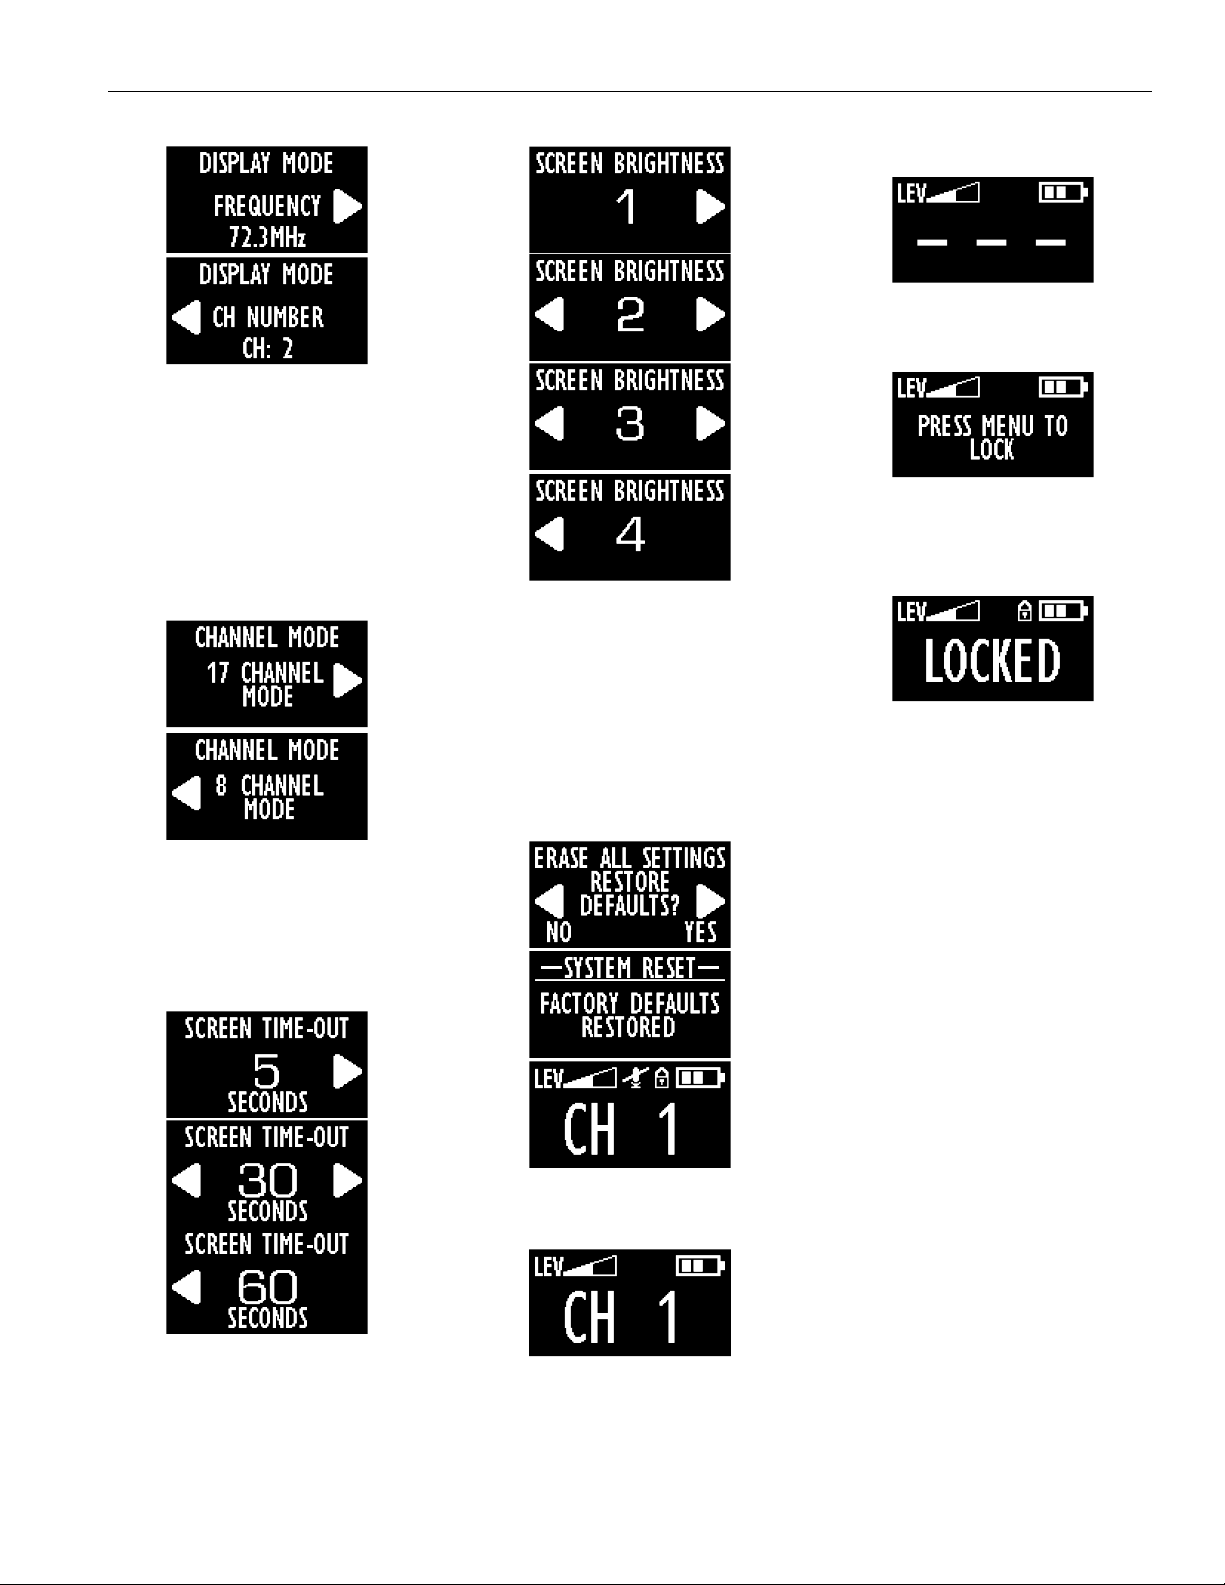
4. 8-channel mode restricts the
transmitter to just the 8 non-interfering
(simultaneous broadcast) channels.
To change the transmitter between
8-channel and 17-channel modes,
push the menu button until you see
the channel selection mode screen,
below. Use the arrow buttons to
toggle between “17 CHANNEL MODE”
or “8 CHANNEL MODE”.
buttons until all three lines disappear.
The display will then show “PRESS
MENU TO LOCK”. Push the Menu
button.
The display will then indicate “LOCKED”.
To unlock the settings, follow these
same steps in order.
7. To erase all user settings and return to
factory defaults, push the menu button
until you see the factory reset screen,
“ERASE ALL SETTINGS RESTORE
DEFAULTS?”, below. Push the right
arrow button to choose “YES”. After
this you will see the confirmation
screen “FACTORY DEFAULTS
RESTORED”. The transmitter will then
return back to the main screen.
5. To change the display time-out period
(5, 30, or 60 seconds), push the menu
button until you see the time-out
screen, below. Use the arrow buttons
to toggle between “5 SECONDS” “30
SECONDS” or “60 SECONDS”.
6. To change the screen brightness
(level 1-4), push the menu button until
you see the brightness screen, below.
Use the left, right arrow buttons to
toggle between “1” “2” “3” or “4”.
8. To lock (or unlock) the settings, you
must first be on the Main Screen.
Then, push and hold the left- and right-
arrow buttons together. While holding
the buttons, you will see the following
dashed-line display. Keep holding the
7
Page 8
PPA T46 Personal PA 72-76 MHz Transmitter
Dual-Preset Mode
Dual-Preset Mode allows the user to
instantly access one of two independent
transmitting modes. Each preset
can have it’s own frequency, master
volume, and auxiliary volume settings.
After setup, the user can easily toggle
between the two presets.
Note: only one frequency/channel can
be transmitted at a time.
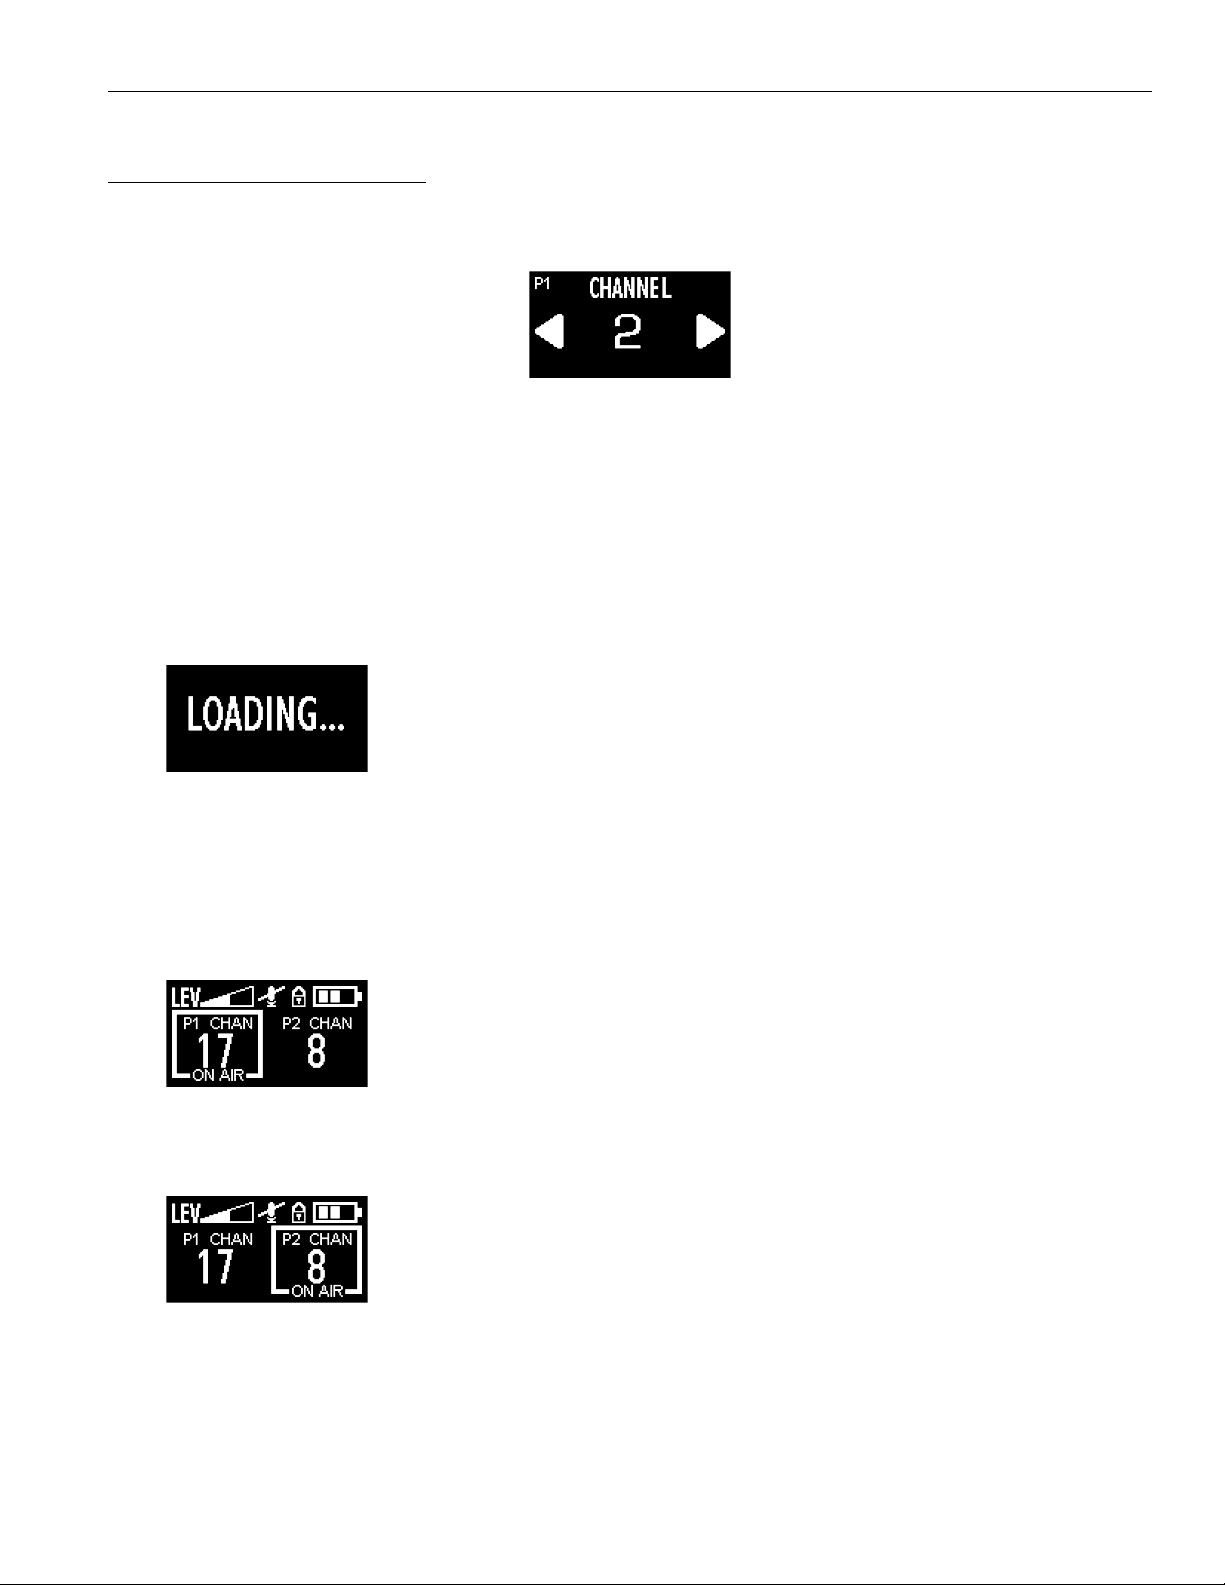
1. Turn the transmitter o by holding
the power button for 3 seconds.
The transmitter must be OFF before
performing the next step.
2. To access Dual-Preset Mode, pushand-hold the Power and Menu buttons
together and keep holding them
until you see the following screen
“LOADING...” below.
5 . Push the Menu button and note
that either “P1” or “P2” shows up
on the top left corner of the screen.
This indicates which Preset you are
adjusting.
6. Follow the steps under “Basic Setup”
(starting at step 3) to set up each
preset and “Advanced Setup” (starting
at step 1) to change settings that aect
both presets.
7. To toggle between the two presets,
exit out of the menu and use the arrow
buttons to change between presets.
Note: In Dual-Preset Mode, if settings
are locked, the arrow buttons will
allow you to toggle between presets,
and the mic can be muted. All other
settings are locked.
3. The T46 will power up in Dual-Preset
Mode looking similar to the following
screen. “P1” and “P2” indicate the two
presets. The currently selected preset
is surrounded by the box showing “ON
AIR”. “ON AIR” means that this preset
is currently transmitting.
4. Use the left or right arrow buttons to
move the “ON AIR” box to the preset
you want to adjust. (Note that you are
now transmitting on this preset.)
8
Page 9

PPA T46 Personal PA 72-76 MHz Transmitter
Specifications
Dimensions: 4.1” L x 2.8” W x 1.1” D (104 mm x 71 mm x 28 mm)
Weight: 2.6 oz (74 g), no batteries
Color: Black/Silver
Enclosure Material: Shatter-resistant PC/ABS plastic with textured scratch-resistant aluminum faceplate
Battery Type options: Two (2) AA 1.5 V non-rechargeable Alkaline batteries (BAT 001-2), 75 mA nominal current drain, up
to 30 hours battery life
Two (2) AA 1.5 V NiMH rechargeable batteries (BAT 026-2), 75 mA nominal current drain, up to 20
hours battery life per charge, recharges in 14–16 hours, uses CHG 3502 or CHG 3512 Charger
Operating Frequencies: Selectable, 17 channels, 72.1 – 75.9 MHz*. Switchable 8 or 17 Channel Mode. (8-channel mode
setting corresponds with PPA R35-8 receiver channels)
Stability: ± .005%, frequency synthesized, crystal reference, PLL
Modulation: Wide-band FM, 75 kHz peak, 75 µS pre-emphasis
RF Output: 80 mV/m at 3 m (max. allowed by FCC rules)
Frequency Response: 180 Hz to 13 kHz, ± 3 dB at 1% max. THD
Signal-to-Noise Ratio: 65 dB (typical) transmitted
Transmit Antenna: Integral with microphone cord
Microphone: Electret type, 3.5 mm mono plug
External Display: OLED for status and menu information.
Status: Ch/Freq, Mic Audio Level, Auxiliary Input Audio Level, Battery Status, Mic Mute, Channel
Lock, Dual-Preset mode.
Menu: Ch/Freq display mode select, Volume, Aux Input, Compression,
17 or 8-channel mode, screen time out, screen brightness, restore default settings
External Controls: Momentary push button: push and hold 3 seconds for power On/O, push and release for
microphone mute On/O. “Up”, “Down” and “Menu” buttons for accessing and changing
transmitter settings. Battery type switch (Alkaline or NiMH) located behind the battery compartment
door
External Indicators: Power LED - Green, flashes when battery is low
Mic Input: 3.5 mm mono jack with electret mic bias, adjustable gain with
25 dB range
Aux Input: 2.5 mm stereo jack, adjustable gain with 60 dB range
Audio Compression: 1:1 (o) or 2:1 (on) selectable in menu
Compatible Receivers: PFM R31, PFM R32, PFM R33, PFM R36, PPA R35, PPA R37, PPA R35-8, PPA R1600,
Approvals/Directives: FCC, Industry Canada, RoHS, WEEE
Warranty: 2-year Warranty, 90 Days on most accessories.
Note: FCC regulations, section 15.21, requires the user to comply with the rules of transmitter operation. Any changes or modifications made
by the user not expressly approved for compliance may result in the loss of all privileges and authority to operate the equipment.
NOTE: SPECIFICATIONS SUBJECT TO CHANGE WITHOUT NOTICE.
9
Page 10

PPA T46 Personal PA 72-76 MHz Transmitter
Troubleshooting
Problem Solution
Can’t hear the person speaking/no audio · Verify Transmitter and Receiver are both ON
· Verify Transmitter and Receiver are both on the same channel/frequency.
· Verify Transmitter mic is not muted.
· Verify mic volume and aux volume levels - try turning them up.
· Verify the microphone with cord is plugged in. The cord acts as the transmitting
antenna.
- Similar to the transmitter, the receiver earphone/headphone cord is the receiving
antenna. Verify the earphone/headphone cord is plugged in all the way on the
receiver.
· If using the aux input, verify the aux source is playing, and the level indicator (on the
front of the transmitter) is pulsing.
Can’t hear the person speaking above the
room noise
Limited Range · The microphone cord is the transmitting antenna. Make sure it is not
· Adjust the microphone volume in the menu
· Reposition the microphone closer to the mouth
coiled up or obstructed, and that it is a Williams AV approved mic.
Feedback (squealing) · Lower the microphone volume in the menu
Supported Microphones
TYPE MANUFACTURER / FABRICANT MODEL / MODÈLE
Unidirectional condenser
Omnidirectional condenser
· Verify the transmitter distance from the receiver - try bringing them closer.
· Verify there are no other transmitters in the area on the same (interfering) channels.
· Transmitter batteries low? Receiver batteries low? Try new batteries and if this
works, recycle the old ones.
· Increase the distance between the microphone and the listening speaker
Williams AV MIC 100
Williams AV MIC 090
10
Page 11

PPA T46 Personal PA 72-76 MHz Transmitter
2-Year Limited Warranty
Williams AV products are engineered, designed, and manufactured under carefully controlled conditions to provide you with many
years of reliable service.
Williams AV warrants the Personal PA® FM Listening transmitters and receivers (models PPA T35, PPA T27, PPA T46, PPA R37, and PPA
R35-8) against defects in materials and workmanship under normal use and conditions for 2-years from date of purchase.
This warranty is available to the original end purchaser of the product and CAN BE transferred to subsequent purchasers of the
product.
Microphones, earphones, headphones, batteries, chargers, cables, carry cases, and most other accessory products carry a 90-day
warranty.
Williams AV has no control over the conditions under which this product is used. Williams AV, therefore, disclaims all warranties not
set forth above, both express and implied, with respect to the Personal PA® FM Listening System, including but not limited to, any
implied warranty of merchantability or fitness of use of such equipment including, without limitation, any warranty that the use of such
equipment for any purpose will comply with applicable laws and regulations. Williams AV shall not be liable to any person or entity for
any medical expenses or any direct, incidental or consequential damages caused by any use, defect, failure or malfunctioning of the
product, whether a claim for such damages is based upon warranty, contract, tort or otherwise, the sole remedy for any defect, failure
or malfunction of the products is replacement of the product. No person has any authority to bind Williams AV to any representation
or warranty with respect to the Personal PA® FM Listening System. Unauthorized repairs or modifications will void the warranty. This
warranty is void if damage occurred because of misuse, or if the product has been repaired or modified by anyone other than a factory
authorized service technician. Warranty does not cover normal wear and tear on the product or any other physical damage unless the
damage was the result of a manufacturing defect. Williams AV is not liable for consequential damages due to any failure of equipment
to perform as intended. Williams AV shall bear no responsibility or obligation with respect to the manner of use of any equipment sold
by it.
This warranty does not cover reimbursement for your costs of removing and transporting the product for warranty service evaluation or
installation of any replacement product provided under this warranty.
The exclusions and limitations set out above are not intended to, and should not be construed so as to contravene mandatory
provisions of applicable law. If any part or term of this Disclaimer of Warranty is held to be illegal, unenforceable, or in conflict with
applicable law by a court of competent jurisdiction, the validity of the remaining portions of this Disclaimer of Warranty shall not be
aected, and all rights and obligations shall be construed and enforced as if this Limited Warranty did not contain the particular part or
term held to be invalid. The terms of the warranty are governed by the laws of the State of Minnesota.
Prices and the specifications of the products are subject to change without notice.
*For Complete Warranty Statement go to: www.williamsav.com/warranty-statement
NOTICE: Williams AV products are NOT designed for use in extreme temperature, humidity or chemical environments. The introduction
of chemicals such as chlorine, salt water or human sweat into the product will cause damage to the circuitry. Damage due to these
causes is NOT covered under the Product Warranty.
If you experience diculty with your system, call toll-free for customer assistance:
1-800-843-3544 (U.S.A.) or +1 952 9432252 (outside the U.S.A.)
If it is necessary to return the system for service, your Customer Service Representative will give you a Return Authorization
Number (RA) and shipping instructions.
Pack the system carefully and send it to:
Williams AV
Attn: Repair Dept.
10300 Valley View Road
Eden Prairie, MN 55344 USA
Your warranty becomes eective the date you purchase your system. If your sales receipt is not available, the date code on
the product will determine your warranty status.
11
Page 12

[email protected] / www.williamsav.com
800-843-3544 / INTL: +1-952-943-2252
©2020 Williams AV, LLC MAN 175E
 Loading...