

Page 1
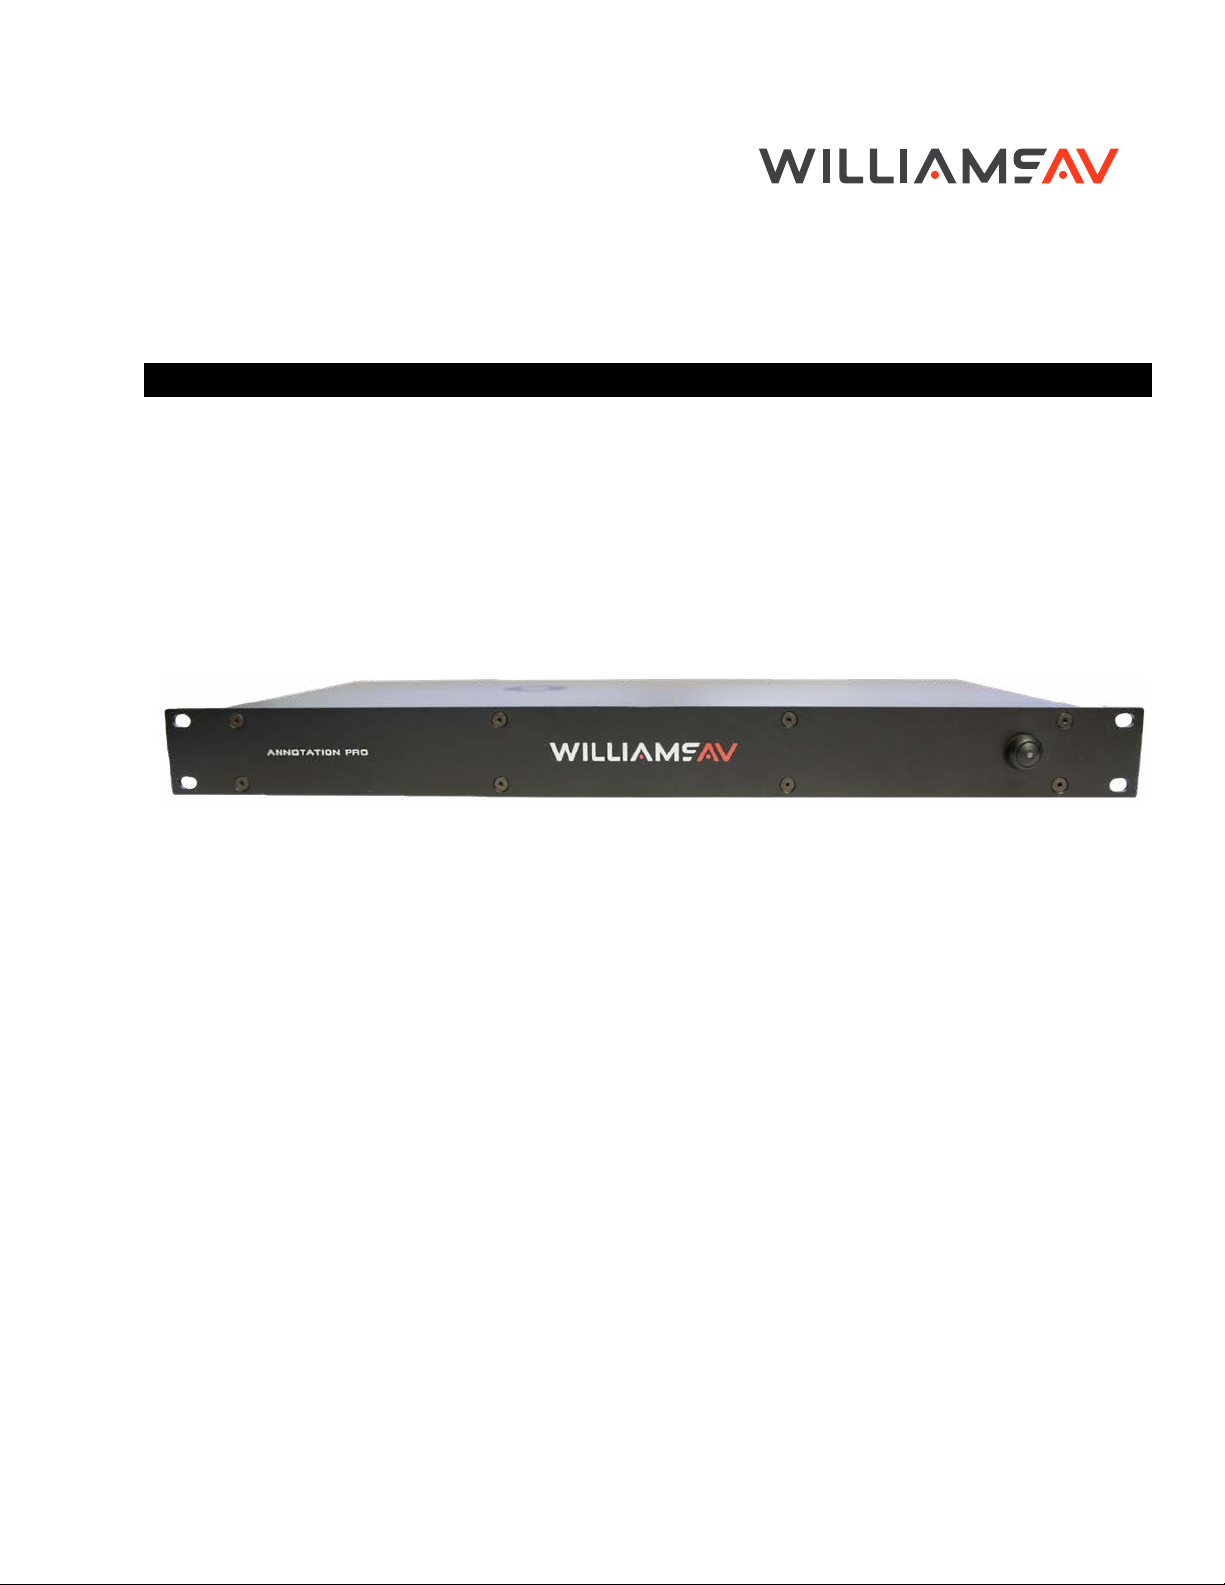
Annotation Pro
AN C5
USER MANUAL
MAN 264B
Page 2

Annotation Pro
Table of Contents
Safety Warnings and Instructions ..........................................................................................................................6
Maintenance and Recycling Instructions .............................................................................................................7
Overview .......................................................................................................................................................................8
Introduction ............................................................................................................................................................................ 8
This Manual .............................................................................................................................................................................. 8
Save, Print, and Share Images ........................................................................................................................................... 8
Annotation ................................................................................................................................................................................ 8
Features ....................................................................................................................................................................................9
General Installation .................................................................................................................................................. 10
The Back Panel ......................................................................................................................................................................10
Connecting the Video Source and Outputs ................................................................................................................10
Connecting Devices ............................................................................................................................................................10
Power On .................................................................................................................................................................................11
Controllers/Markers Overview ...............................................................................................................................12
Toolbar ...........................................................................................................................................................................13
Clear All Marking ................................................................................................................................................................... 13
Erase Tool ...............................................................................................................................................................................13
Drawing Tools ........................................................................................................................................................................13
Line Color ...............................................................................................................................................................................13
White Board ............................................................................................................................................................................ 13
HDMI ......................................................................................................................................................................................... 13
USB Camera ........................................................................................................................................................................... 13
Record ......................................................................................................................................................................................13
Save Image ............................................................................................................................................................................. 13
Annotation Pro Menu System ................................................................................................................................14
Overview .................................................................................................................................................................................14
Using the Annotation Pro Menu System ....................................................................................................................... 14
Menu Basics ........................................................................................................................................................................... 14
Menu Conventions ...............................................................................................................................................................15
Making menu selections ....................................................................................................................................................15
System Information ...................................................................................................................................................15
System Info .............................................................................................................................................................................15
Scheduling Restarts .............................................................................................................................................................16
Detecting and Assigning Devices ........................................................................................................................16
Serial Port Settings ...............................................................................................................................................................16
Manual Serial Port Assignment ........................................................................................................................................ 17
Viewing a USB Device Type .............................................................................................................................................18
2
Page 3

Annotation Pro
Manually Assigning a USB Device ................................................................................................................................ 20
Integrating the Annotation Pro with Other Systems ................................................................................................ 20
Setting COMM Port Parameters ..................................................................................................................................... 20
Preparing Video Sources and Outputs ..............................................................................................................21
Setting Video Output ...........................................................................................................................................................21
EDID ..........................................................................................................................................................................................21
Video Source Options........................................................................................................................................................22
Default Video Source .........................................................................................................................................................22
Picture-In-Picture (PIP) Setup ...........................................................................................................................................23
Networking (TCP/IP, TFTP, SMB) ..........................................................................................................................24
Network Setup......................................................................................................................................................................24
Configure TFTP Settings ...................................................................................................................................................25
Configure Windows Share (SMB) Settings ..................................................................................................................25
Calibrating and Configuring Touch Screens ................................................................................................... 26
Calibrating Annotation Pro Touch Screen Controllers ............................................................................................ 26
Touch Screen Command Areas ..................................................................................................................................... 28
Customizing Markers and Pointers .................................................................................................................... 30
Customizing the Color Palette ........................................................................................................................................ 30
Selecting Colors for a Presentation .............................................................................................................................. 30
Selecting a Brightness Level ............................................................................................................................................31
Zap Icon Toggle ....................................................................................................................................................................32
Using Markers ............................................................................................................................................................32
Overview ................................................................................................................................................................................32
Assigning Marker Colors ...................................................................................................................................................32
Entering the Marking Mode..............................................................................................................................................34
Drawing ................................................................................................................................................................................... 34
Selecting Pointers ................................................................................................................................................................34
Creating a Pointer ................................................................................................................................................................35
Turning the Active Pointer On/O ...................................................................................................................................35
Typing Text Labels ...............................................................................................................................................................36
Displaying the Date/Time .................................................................................................................................................36
Clearing All Markers ............................................................................................................................................................36
Undoing a Marker ................................................................................................................................................................ 37
Erasing Markers ................................................................................................................................................................... 37
Using The Chalkboard .......................................................................................................................................................38
Saving and Storing Images and Video ..............................................................................................................38
Overview ................................................................................................................................................................................38
Capture Options ...................................................................................................................................................................38
Freezing Video .....................................................................................................................................................................39
3
Page 4

Annotation Pro
Printing Images ..........................................................................................................................................................42
Updating the Annotation Pro ................................................................................................................................43
Glossary .......................................................................................................................................................................44
Troubleshooting Guide............................................................................................................................................45
Appendix ..................................................................................................................................................................... 47
Outside copyright information for Software .....................................................................................................52
Specifications ............................................................................................................................................................ 58
Regulatory Statements ........................................................................................................................................... 58
Limited Warranty ...................................................................................................................................................... 59
Setting the Destination for Saved Files ........................................................................................................................40
Setting the Verify Option ...................................................................................................................................................40
Saving Images ......................................................................................................................................................................40
Retrieving Images .................................................................................................................................................................41
Printer Setup .........................................................................................................................................................................42
Print an image ....................................................................................................................................................................... 42
Verifying Saved or Printed Images .................................................................................................................................43
Quick Reference for Keyboard ........................................................................................................................................ 47
Quick Reference for Touch Screens and Whiteboards ...........................................................................................49
Symbol Font Chart .............................................................................................................................................................. 50
Map Font Chart ......................................................................................................................................................................51
RS-232 (COMM Port) Pinout and Commands.............................................................................................................52
United States - FCC ........................................................................................................................................................... 58
Canada IC .............................................................................................................................................................................. 58
4
Page 5

Annotation Pro
5
Page 6

Annotation Pro
Safety Warnings and Instructions
WARNING! TO REDUCE THE RISK OF FIRE OR ELECTRIC SHOCK, DO NOT EXPOSE THIS APPLIANCE TO RAIN OR
MOISTURE.
CAUTION! TO REDUCE THE RISK OF ELECTRIC SHOCK, DO NOT REMOVE COVER. NO USER-SERVICEABLE PARTS INSIDE.
REFER SERVICING TO QUALIFIED SERVICE PERSONNEL.
POWER CORD NOTICE FOR INTERNATIONAL OPERATION - Please call Williams AV Customer Service at 800.328.6190
to order the appropriate power cord for the country of use.
Important Safety Instructions:
1. Read these instructions
2. Keep these instructions
3. Heed all warnings
4. Follow all instructions
5. Do not use this apparatus near water.
6. Clean only with dry cloth.
7. Do not block any ventilation openings. Install in accordance with the manufacturer’s instructions.
8. Do not install near any heat sources such as radiators, heat registers, stoves, or other apparatus (including
amplifiers) that produce heat.
9. Do not defeat the safety purpose of the polarized or grounding-type plug. A polarized plug has two blades with
one wider than the other. A grounding type plug has two blades and a third grounding prong. The wide blade or
the third prong is provided for your safety. If the provided plug does not fit into your outlet, consult an electrician
for replacement of the obsolete outlet.
10. Protect the power cord from being walked on or pinched particularly at plugs, convenience receptacles, and the
point where they exit from the apparatus.
11. Only use attachments/accessories specified by the manufacturer.
12. Unplug this apparatus during lightning storms or when unused for long periods of time.
13. Refer all servicing to qualified service personnel.
14. The apparatus shall not be exposed to liquids.
15. Carts and Stands - The appliance should be used only with a cart or stand that is recommended by the
manufacturer. An appliance and cart combination should be moved with care. Quick stops, excessive force and
uneven surfaces may cause the appliance and cart combination to overturn.
16. Power Sources - The appliance should be connected to a power supply only of the type described in the
operating instructions or as marked on the appliance.
17. Object and Liquid Entry - Care should be taken so that objects do not fall and liquids are not spilled into the
enclosure through the openings.
18. Servicing - The user should not attempt to service the appliance beyond that described in the operating
instructions. All other servicing should be referred to qualified service personnel.
6
Page 7
Precautions:
1. Power – WARNING, BEFORE TURNING ON THE POWER FOR THE FIRST TIME, READ THE FOLLOWING SECTION
CAREFULLY. The unit is designed for use only with the line cord of the region in which it will be operated.
2. Voltage Label (Rear Panel) – A label located at the rear panel power connection indicates the DC power input for
the unit. The label will read 19VDC. Note: use the Williams AV TFP 060 power supply for this unit.
3. Do Not Plug in the HDMI input, output, Comm 1, Comm 2, Ethernet, or USB connections while the power switch is
switched to the ON position.
4. Do Not Touch any part of the Annotation Pro with wet hands. Do not handle any part of system, including
the power cord, when your hands are wet or damp. If water or any other liquid enters the Annotation Pro or
Annotation Pro‘s location, take the device to qualified service personnel for inspection.
5. Place all components of the Annotation Pro in a well ventilated location. Take special care to provide plenty of
ventilation on all sides of the system components, especially when it is placed in a small location, such as a rack.
If ventilation is blocked, the system may over heat and malfunction.
6. Do not expose the Annotation Pro to direct sun light or heating units as the system’s internal components
temperature may rise and shorten the life of the components. Avoid damp and dusty places.
7. Care – From time to time you should wipe o the front and side panels and the cabinet with a soft cloth. Do not
use rough material, thinners, alcohol or other chemical solvents or cloths since this may damage the finish or
remove the panel graphics.
Annotation Pro
Maintenance and Recycling Instructions
Help Williams AV protect the environment. Please take the time to dispose of your equipment properly.
Product Recycling:
Please do NOT dispose of your equipment in the household trash. Take the equipment to a electronics
recycling center.
Servicing or attempting to service this device will void the warranty
Refer servicing to qualified personnel. Servicing is required when the system has been damaged in any way: if liquid
has been spilled or objects have fallen into the unit, if the unit has been exposed to moisture, if the unit does not
operate normally, or if the unit has been dropped.
Do not block any ventilation openings. Install in accordance with manufacturer’s instructions.
Do not install near any heat sources such as radiators, heat registers, stoves, or other apparatus that produces heat.
Use only attachments/accessories specified by the manufacturer.
Unplug the transmitter during lightning storms or when unused for long periods of time.
Be advised that dierent operating voltages require the use of dierent types of line cord and attachment plugs.
Check the voltage in your area and use the correct type.
Use only the power supply provided by Williams AV. Other power supplies may have similar specifications, but
may not be equivalent in emissions ratings, in-rush current, etc. Use of an unapproved power supply may leave the
device partially or completely inoperable, and will void the warranty.
This apparatus has been designed with class-1 construction and must be connected to a main socket outlet with a
protective ground connection (the third grounding prong).
Protect the power cord from being walked on or pinched, particularly at plugs, receptacles, and near the power jack
on the transmitter.
The MAINS plug or an appliance coupler is used as the disconnect device, so the disconnect device should remain
readily operable.
7
Page 8
Annotation Pro
Overview
Introduction
The Annotation Pro (AN C5) is a professional, hardware-based video processor, designed so that users can display
content from multiple video and computer sources connected directly to the Annotation Pro. Users can write
annotations and markers directly on the video content to help explain any content.
Note on HDCP
HDCP functions are only available on the Annotation Pro Plus (AN C5 P).
This Manual
This manual provides instructions for configuring your Annotation Pro, using the built in system menu, creating
annotations, providing video sources, and connecting and using physical controllers (such as a keyboard or mouse).
The Annotation Pro oers many control options to create powerful presentations with a touch screen. You can also
use an HDMI cable to manually connect to the Annotation Pro, or a USB video input.
It is also possible to control Annotation Pro with Crestron, or AMX type room control system.For instructions on
configuring RS-232 devices to send commands to the Annotation Pro, follow the instructions in this manual for
proper wiring and configuration. Once your RS-232 device is properly wired, please see the RS-232 (COMM Port)
Pinout and Commands section, and reference the Programmer’s Guide. The Programmer’s Guide has a list of
detailed commands that can be sent to the Annotation Pro.
Save, Print, and Share Images
The Annotation Pro gives the user the ability to save, print, and share annotated images. An annotated image can be
saved to a USB storage device, such as a flash drive. Users can also print annotated images to a printer. Images can
be shared over a TCP/IP network through Windows Share.
Annotation
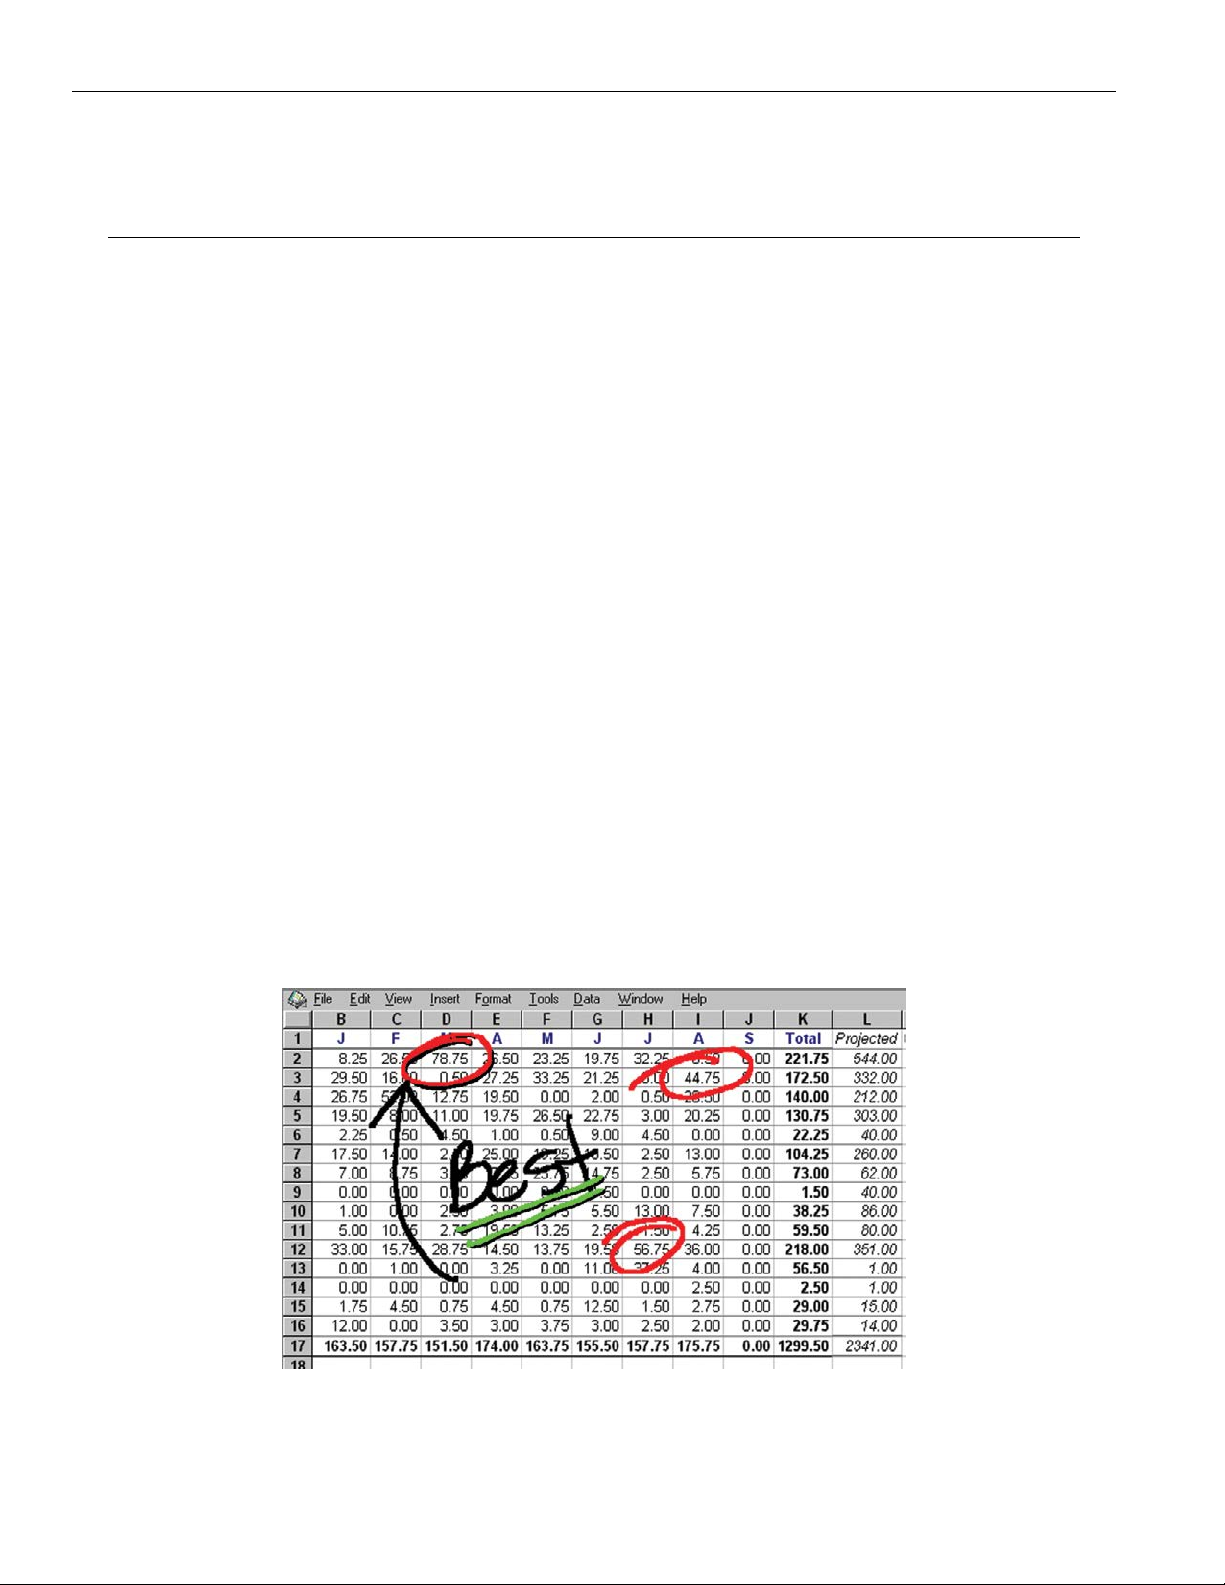
The user has a variety of options for drawing lines and markers during a presentation. The Annotation Pro is
compatible with most touch screens, keyboards and mouse devices. An smartphone or tablet can also be used for
annotation.
Marking example over an image of a spreadsheet
8
Page 9

Video is annotated using several simple-to-use graphics called markers. There are two types of markers: pointers
(such as an arrow) and freehand drawing. Pointers and drawings may be used in combination to annotate. Markers
are easily erased either one at a time until the screen is clear, or all at once.
When a keyboard is attached, text, a date/time stamp, and straight line drawing are available. With the various
marker selections available, users can choose the best option to increase contrast over the image or video
displayed in the monitor.
Users may also display a white background on the screen and use it like a whiteboard on which to “draw out” your
point.
Features
• Two marking tools.
º 2 pointers with 8 arrows of various angles, plus 2 dots and 2 cross hairs in a small or large size.
º Freehand draw in 7 solid line colors, 4 dierent line thicknesses (with or without drop shadows), plus 3
highlight colors.
• Four additional marking tools with keyboard connected.
º Straight line drawing mode allows underscoring, mapping or other wise drawing a straight line.
º Text can be typed on the video image in one of 6 dierent fonts, each available in one or more sizes. A text
background may be added to further highlight the text on the video image.
º An active date/time label (sometimes called a date/time stamp) can be placed on the video image to time an
event. This label is very useful for record keeping when saving or printing images because it is embedded in
the image.
• The ability to position and anchor a combination of several markers and drawings on the screen at once.
• Easily save, print, and share annotated images.
• Options for clearing lines and pointers from an overlay all at once or one at a time, beginning with the most
recently anchored marker.
• Ability to assign a unique marker color (up to 7) to each marking device and switch between colors during a
presentation.
• 3 highlight colors can be used to create a see-through colored overlay, just like highlighters on paper.
• A drop shadow eect may be selected to further optimize the display of annotated lines over the background.
• Compatibility with HDMI equip ment.
• A solid white chalkboard can be selected for drawing when the video image is no longer needed.
• Sync generation allows the Annotation Pro to automatically select the sync if no live video is desired. In the
event that sync from a poor video source is lost, the Annotation Pro will automatically switch to chalkboard
mode if auto-chalkboard is enabled.
• Keyboard control provides a quick way to select many of the Menu System options without having to go to the
Menu System. Instead, function keys provide choices for pointer type, background, marker colors, brightness
levels, video source selection, and more.
• Brightness adjustment gives you the opportunity to set the brightness of the Annotation Pro markers to coincide
with the brightness level of the video signal, so that the markers are displayed optimally for standard video or
for professional broadcasting.
• AV programmable so that AV control systems can control the Annotation Pro using programmable commands.
• Two RS-232 ports allow the simultaneous use of two RS-232 communications devices, such as tablets or
touchscreens.
• Five USB 3.0 ports allow the simultaneous use USB tablets, USB touch screens, or other USB control devices.
The use of USB hubs increases the device limit to more USB control devices.
• Options available to multiple users to designate which RS-232 tablet or touchscreen takes pri ority over the
other when both are drawing.
Annotation Pro
9
Page 10
Annotation Pro
• Record the entire presentation as an MP4 to archive or replay.
• Easily switch between content, sources, and presentation materials.
• Annotate regions of interest to focus your audience’s attention.
• Display a whiteboard to further explain key or complex thoughts, then return to the presentation seamlessly.
• Shows 4K video, allowing for the most eye catching images and critical details to be clearly examined.
General Installation
The Back Panel
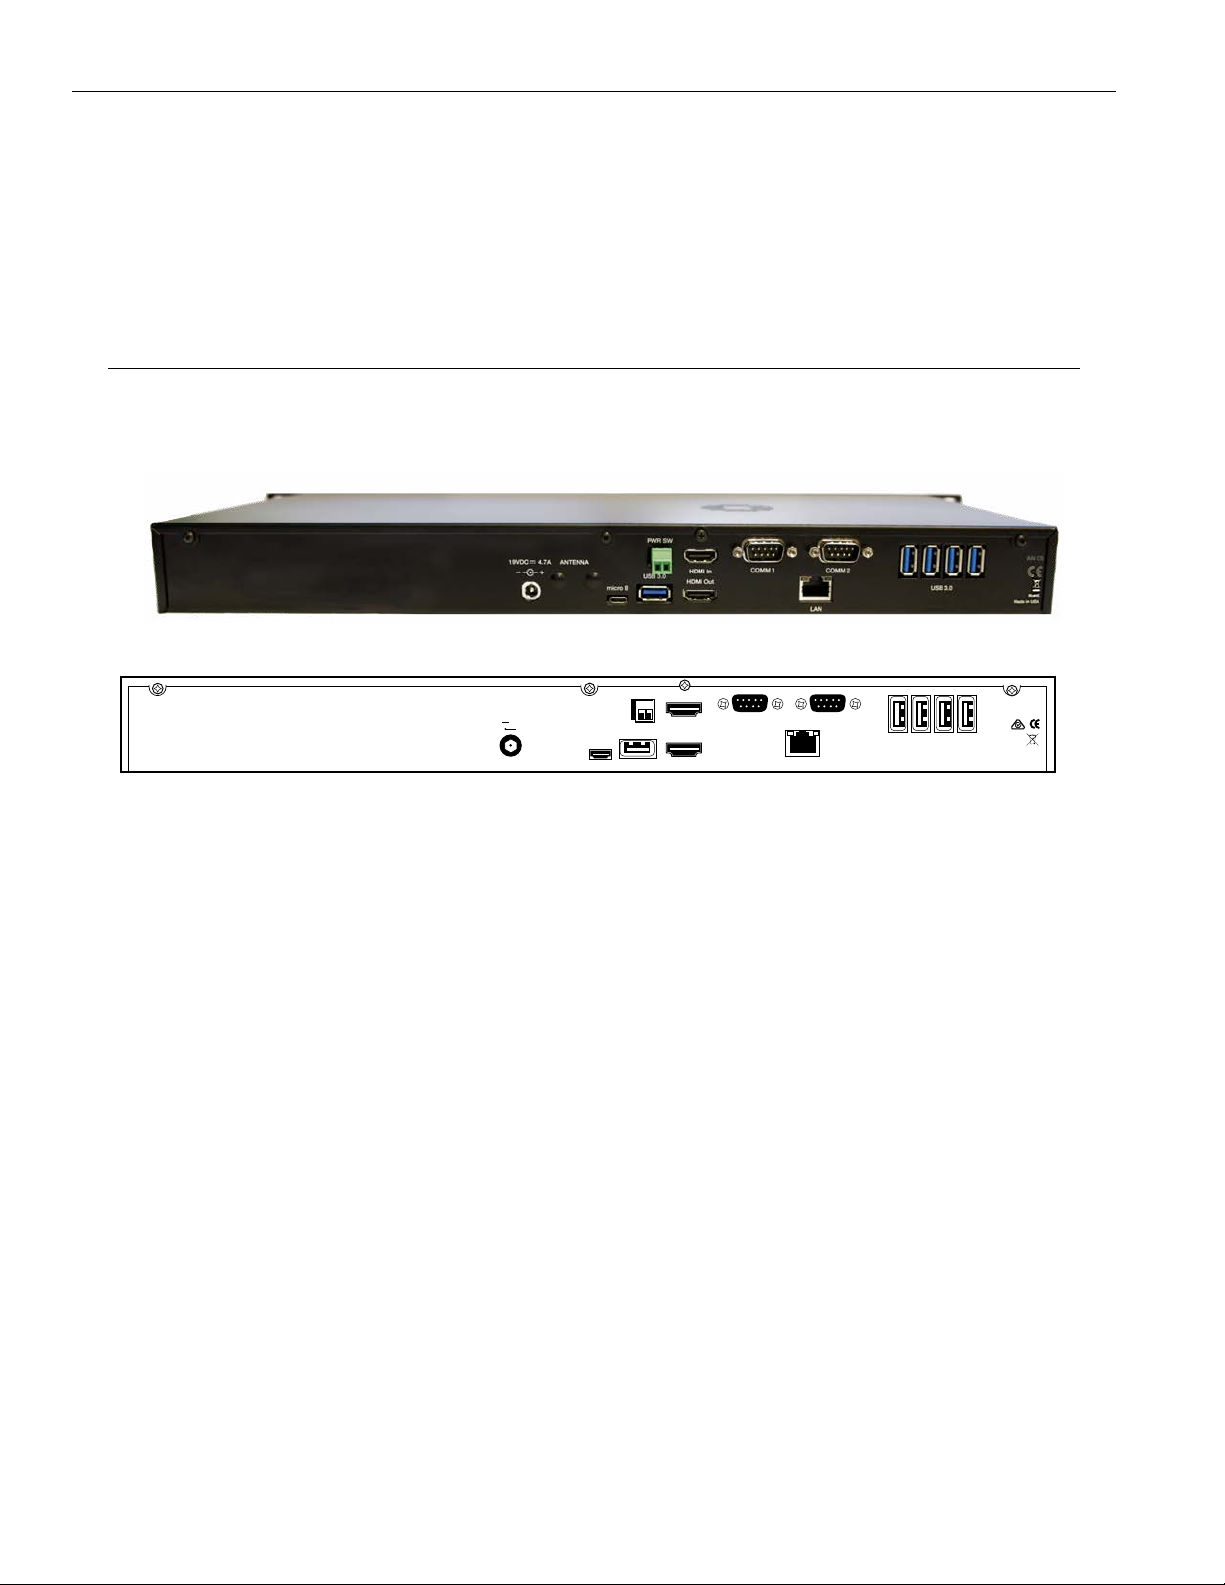
Most wired devices will connect via one of the ports on the back panel. There are numerous ports to connect to,
including USB, HDMI, COMM ports and a Phoenix-Style connector.
Back Panel
19VDC --- 4.7A
--C +
PWR SW
HDMI In
USB 3.0
B
HDMI Out
COMM 1
COMM 2
USB 3.0
LAN
AN C5
Made in USA
RoHS
Back Panel Diagram
Connecting the Video Source and Outputs
HDMI Connectors
To connect HDMI video:
HDMI Input into Annotation Pro: Using HDMI video cable, connect the cable to the HDMI In port on the back panel
of the Annotation Pro.
HDMI Output from Annotation Pro: Using HDMI video cable, connect the cable to the HDMI Out port on the back of
the Annotation Pro to HDMI In on a HDMI display.
Note on HDCP: HDCP functions are only available on the Annotation Pro Plus (AN C5 P).
Connecting Devices
Here are some guidelines for setting up these devices.
IMPORTANT: Be sure to power down the Annotation Pro before connecting or disconnecting any controllers. The
Annotation Pro will automatically detect installed controllers upon turning the power on. If you change controllers or
add a new controller, you need to turn power o, install the new controller(s), then turn the power on.
Connecting the Keyboard, Tablet or other USB Devices
Connect the device(s) to any USB port on the Annotation Pro. The system supports up to 5 USB 3.0 devices and 1
USB B device.
10
Page 11

Annotation Pro
Connecting the Phoenix Connector
Connect the wires from your power controller (or other device) to the Annotation Pro’s Phoenix-style connector
(labeled on the back of the device as PWR SW). When the relay is thrown, the Annotation Pro will power on or o, as
a toggle.
Connecting Touch Screens and Electronic Whiteboards
The Annotation Pro is compatible with many types of touch screens (call Williams AV for compatibility), and each
device will have it’s own method of connection. Use the instructions for your touch screen or whiteboard for help
connecting to the Annotation Pro.
Annotation Pro is compatible with HID devices.
Connecting a 3rd Party Controller - COMM Port Wiring Issues
Customers sometimes encounter issues with the wiring of controllers. The following information may be helpful in
resolving any issues.
• Annotation Pro’s COMM ports sometimes use pin 9 to supply power to the RS-232 line drivers. Pin 9 was
selected because it’s specification is seldom used. If you are connecting a device other than a line driver to a
COMM port, the voltage may cause unexpected issues with the device.
• COMM 2 is set up as the default control port.
• COMM 1 and COMM 2 have jumpers for power on pin 9, and are set to OFF when shipped from the factory. If
you require power from either or both of these COMM ports, please contact technical support.
Connecting USB Devices
1. Make video connections as indicated earlier in this section, and install the touch screen to the monitor as directed
by your touch screen man ufacturer.
2. Connect a USB cable and extension to the USB port on the Annotation Pro.
Power On
To power on the Annotation Pro:
1. Plug the power cord into the back of the Annotation Pro and then into any grounded outlet.
2. Plug the power cords from any video source(s), controller(s), and display(s) into any grounded outlet.
3. Turn on each of the connected units, and then press the power button on the front panel of the Annotation Pro.
NOTE: In order for the Annotation Pro to properly sync with the video signals, the sources should be turned on first.
After a moment, a Annotation Pro splash screen will appear, followed by the initializing of the ports, and ending with a
copyright message.
After the startup process, the default input source will be shown.
If this process is dierent for you, recheck your installation and power on again. Call Williams AV for support if it is
still unsuccessful.
NOTE: To bypass port initialization, press ESC during startup.
11
Page 12

Annotation Pro
Controllers/Markers Overview
The following categories of controllers can be used with the Annotation Pro via cables:
• Touch Screens
• Electronic Whiteboards
• Keyboard
• Mouse devices
The Annotation Pro can support most of the common devices you might use. The Annotation Pro supports up to two
RS-232 devices and up to 5 USB devices. With the addition of a powered USB hub, more devices can be used.
Keyboard
With a keyboard, you can select, type, position, save, and erase the markers on the overlay. You also use the
keyboard to access the menu system and change the appearance of markers. More details on each key’s functions
can be found in the Appendix under Quick Reference for Keyboard.
Keyboard Controller Functions
The keyboard functions can display markers or aect their appearance. The keyboard can also control operations of
the unit, such as changing to a di erent marker overlay or switching to a dierent video source.
Marker and Cursor Movement
When operating the Annotation Pro with the keyboard controller, you can position active markers using the arrow
keys. For fine movement, press the CTRL key along with one of the arrow keys.
Within menus, you can move cursors among the options by using the arrow keys.
Touch Screens and Whiteboards
The Annotation Pro is engineered for use with many touch screens or interactive whiteboards sold by other
manufacturers. Contact Williams AV for compatibility information.
In general, you use the touch screen to draw, position arrows and pointers, or make menu selections.
Calibrating the touch screen enhances the intuitive feel of drawing on the dis play. It’s essential to do a calibration
the first time you start the unit after connecting the touch screen for accurate control.
Function Areas
Function areas are regions on the touch screen that activate a function when tapped. Function areas can be found
in the lower left and upper left of the touch screen.
Upon initial set-up, the Menu can be accessed from the upper center touch screen function area. Once initial set-up
is completed, a user can assign desired functions to the touch screen areas.
If you are drawing and move across one of these areas, the function is not activated. Only tapping will trigger the
function area.
Details on touch screen functions can be found in the Appendix under Quick Reference for Touch Screens and
Whiteboard.
Marker and Cursor Movement
When operating the Annotation Pro with a touch screen, you position arrows or pointers anytime you tap the screen.
You cannot reposition an anchored arrow or pointer; how ever, you can clear or erase a pointer and begin again.
Mouse Devices
The Annotation Pro can also be used with a variety of PC-compatible mouse with two buttons.
12
Left Button
The Left Button on a mouse allows you to draw when pressed, or anchor an arrow or pointer when clicked.
Right Button
The Right Button on a mouse allows you to undo or clear a marker.
Page 13
Marker and Cursor Movement
When operating the Annotation Pro with a mouse, you can move the cursor or active pointer anywhere on the
screen by moving the mouse’s positioning. The active pointer or cursor will move respectively.
Toolbar
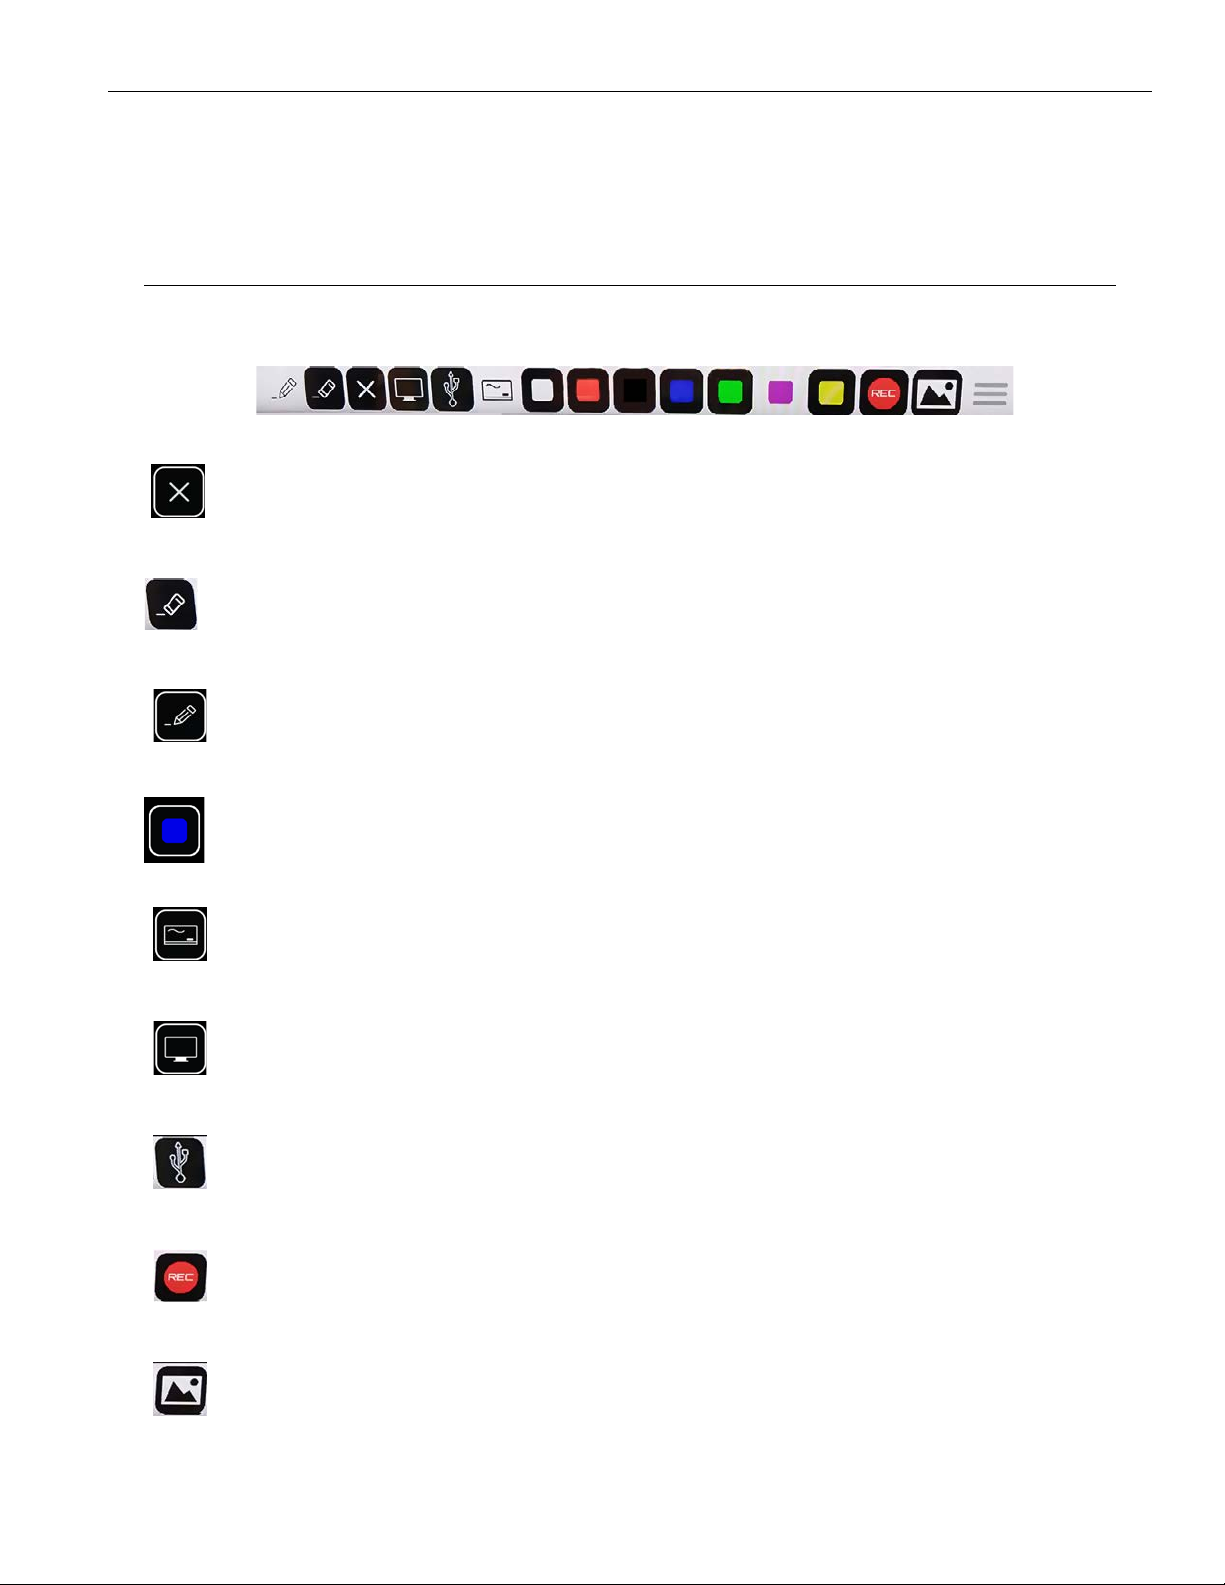
When using the touchscreen, a toolbar is available to switch between sources and to quickly annotate. More
features are available using the full menu system documented in this manual. Buttons in white are selected.
Clear All Marking
Clear all of the current annotations.
Erase Tool
Remove specific areas of your annotation
Annotation Pro
Drawing Tools
Edit the appearance of your on-screen annotations.
Line Color
Select the color you want to draw with.
White Board
Display a white board.
HDMI
Display the HDMI source.
USB Camera
Display the USB/Document camera.
Record
Record the presentation to a USB flash drive.
Save Image
Saves a screen shot of the what is currently displayed. See “Saving and Storing Images and Video” on page 38.
13
Page 14
Annotation Pro
Annotation Pro Menu System
Overview
There are two Annotation Pro menus. One is a series of icons that runs along the bottom of the screen with
commands a presenter would use frequently, such as changing marker color or video source. This menu is available
by activating the hamburger icon at the bottom of the screen.
The other menu is a large, hidden main menu system mostly used for setup and configuration. This menu will need
to be accessed to get your device connected to the network or calibrated properly.
Using the Annotation Pro Menu System
This section describes how to access the menu system and make selections from it.
Menu Basics
If the keyboard is installed, it is the only way you can enter the menu sys tem. If the keyboard is not installed, you can
access the menu system from one of the other control devices.
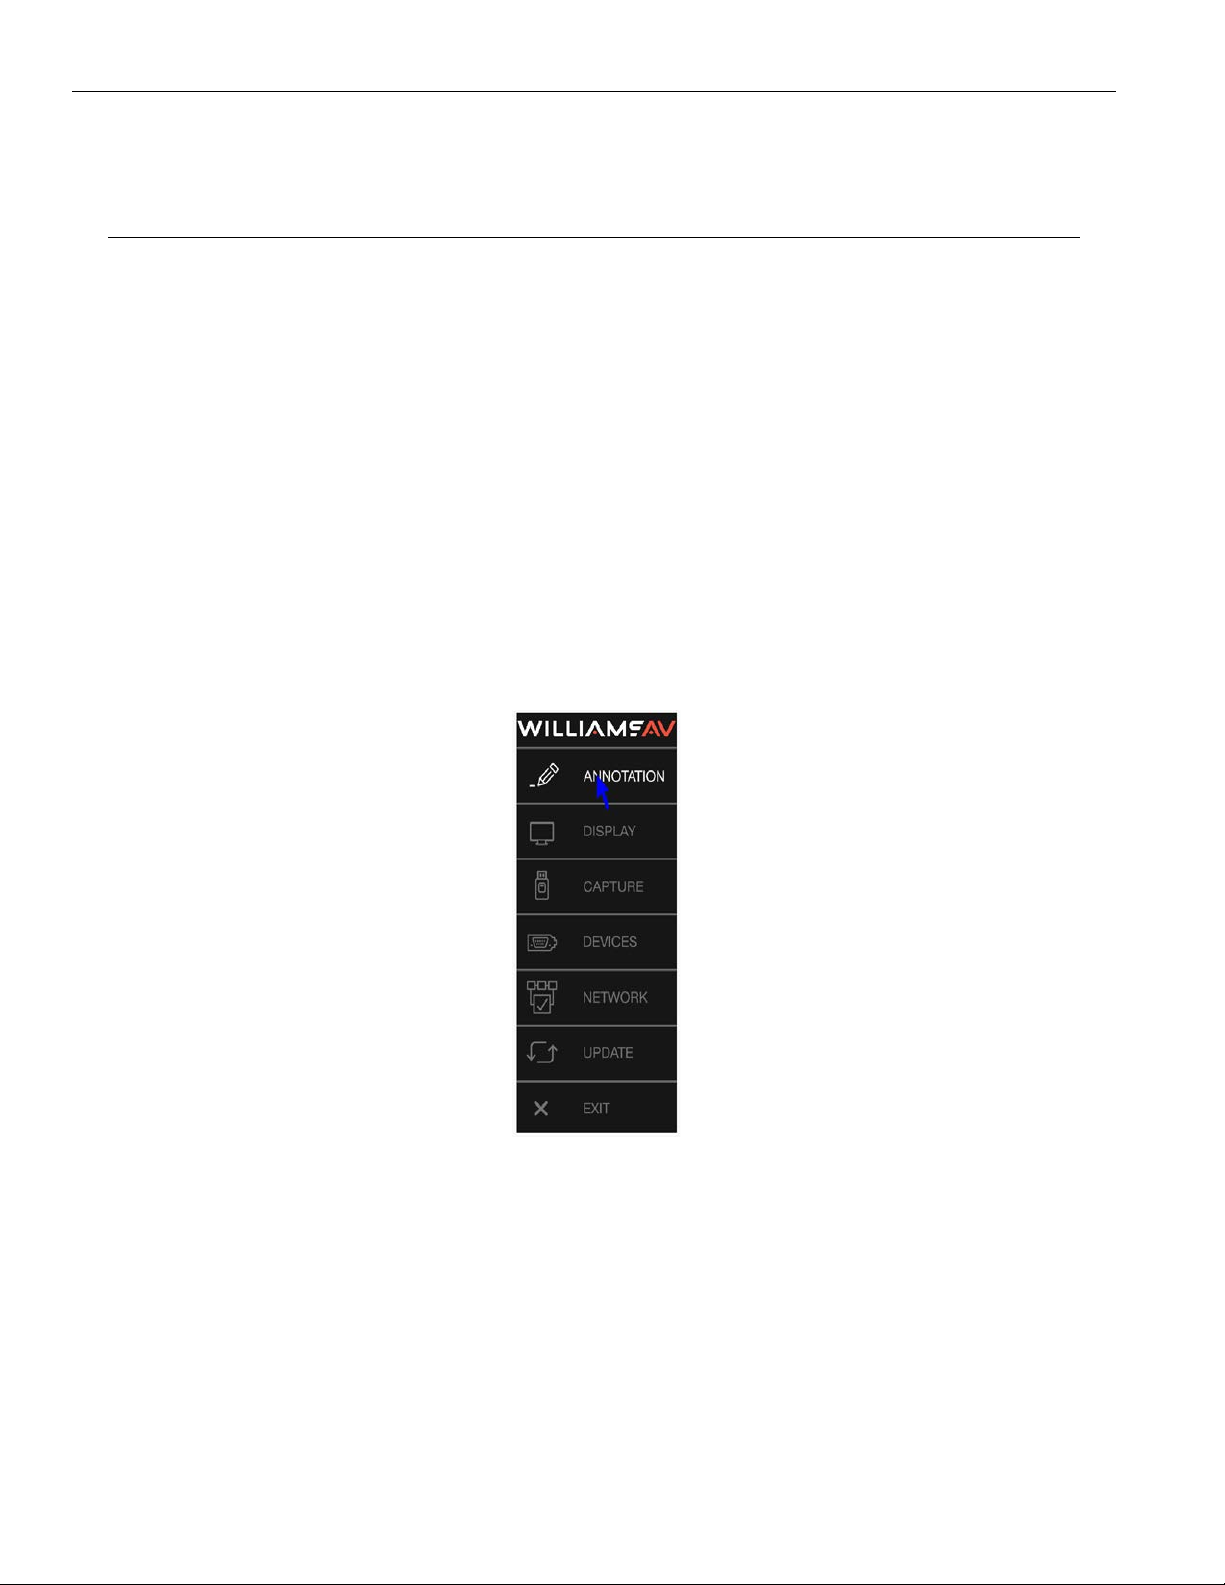
The Main Menu appears over the video image.
Main Menu
Activating the Menu
Keyboard: Press Setup Menu (Print Screen) key.
NOTE: Press the tip button soon after the barrel button, or the Annotation Pro may interpret the barrel button press as a
clear command.
Touch Screen (or Whiteboard): Tap upper center function area (or whatever function area you assigned for Menu
access). This works only if no keyboard is connected.
Menu Conventions
Once the menu system is displayed, you can make selections from it to navi gate to the option(s) you wish to change.
Each menu selection has the appearance of a rounded-corner button.
14
Page 15
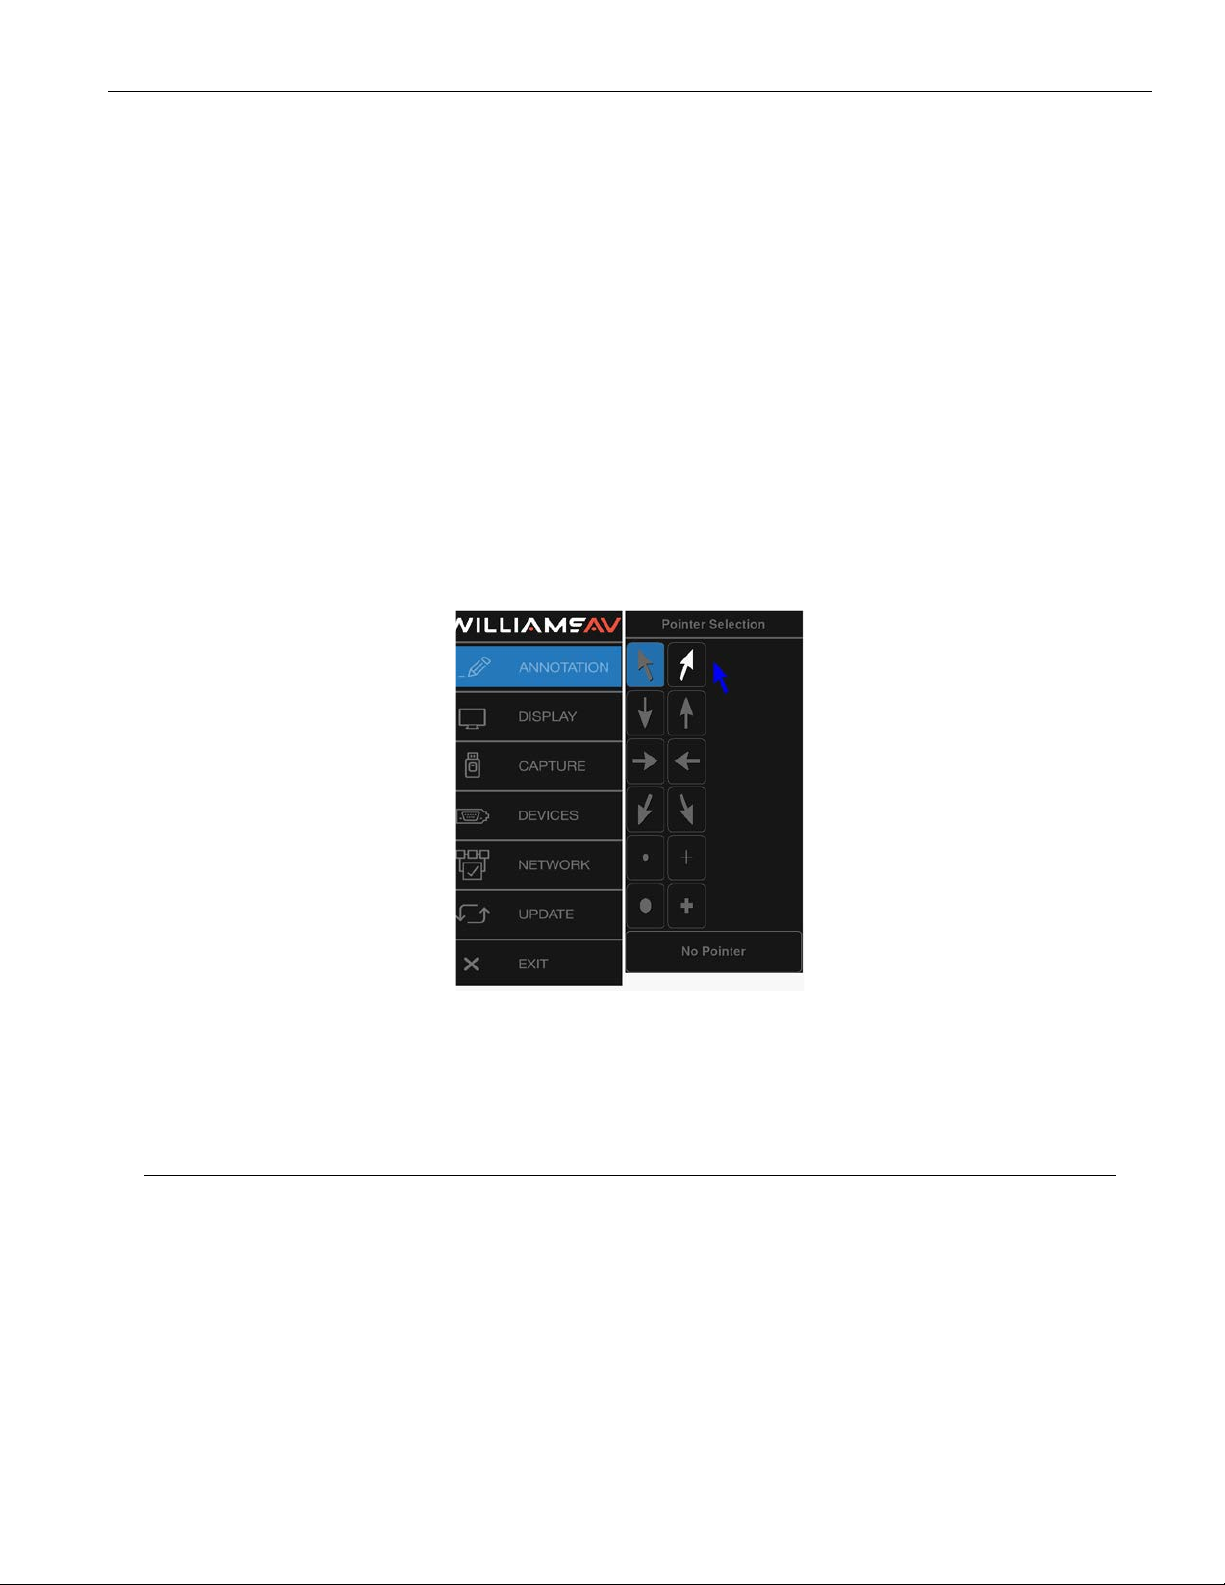
Not Selected: If a button is not selected, it has a black background.
Selected: When a button is selected, it changes to a blue background.
Hovering: As you move the selection arrow over a button (hovering), it will either
• Display blue behind the button text.
• Turn the text in the menu to white.
Submenus: A selection from the Main Menu causes a submenu to appear alongside it. A selection from the
submenu sometimes dis plays a second submenu of choices based on the selection you make.
Outline Format: The entire menu system is an outline format that allows you to drill down to the specific option you
wish to change. Whenever the Main Menu is visible, you can select directly from it to activate a dierent branch of
submenus.
Making menu selections
Keyboard: Use arrow to move to your selection and press the Enter key.
Touch Screen, Whiteboard, or App: Tap the screen over the option you want to select.
Mouse Devices: Click Left Button on your selection.
Annotation Pro
Sample Submenu
Exiting Menus
Exit a submenu by selecting any option in the Main Menu. Exit the menu system by selecting Exit.
System Information
Certain menu items are used to view and update information about your Annotation Pro.
System Info
This selection presents a readout of relevant information concerning your unit. This information can be useful in
troubleshooting, especially if you are contacting technical support.
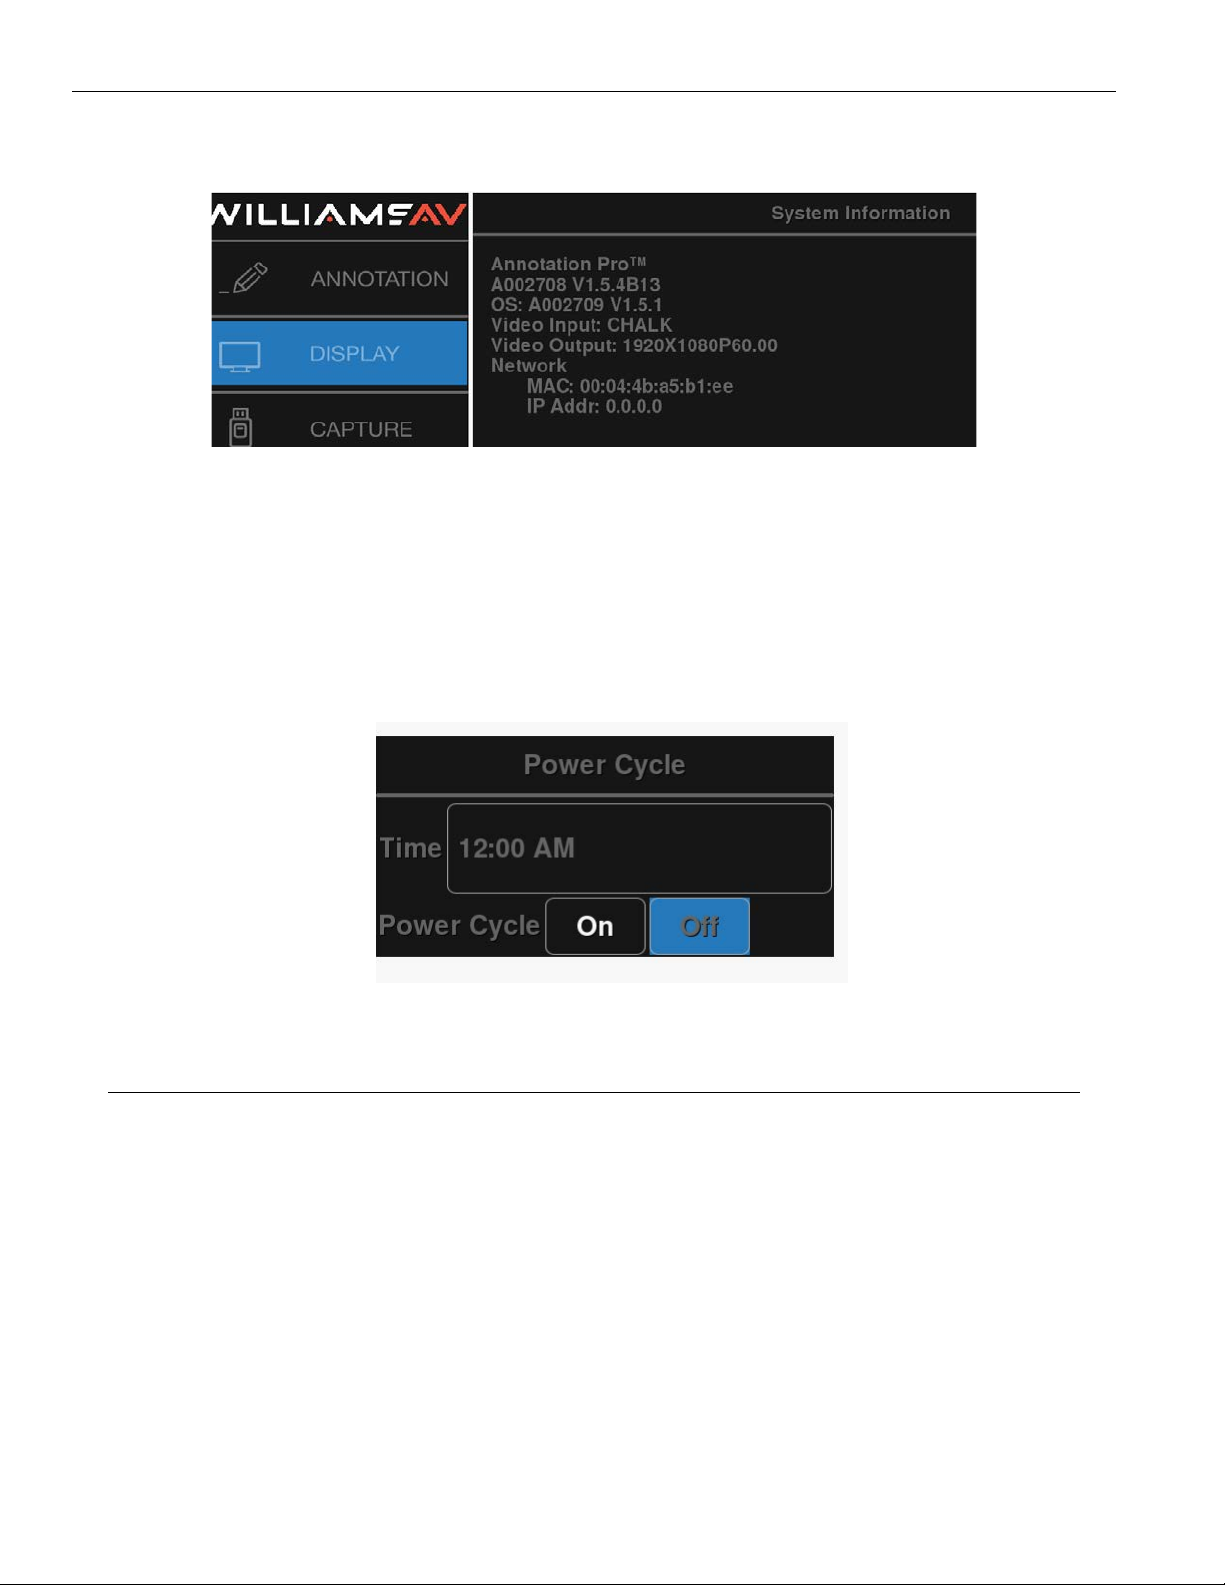
1. Activate the menu system. The Main Menu appears.
2. Select Display. The Display menu appears.
15
Page 16
Annotation Pro
3. Select System Info.
Example of System Information dialog
NOTE: Your numbers will be dierent than those of the menu above. Please write down all numbers when contacting
technical support.
Scheduling Restarts
The Annotation Pro can be set to cycle the power at a set time of day. This will force the device to re-establish the
connection with any controllers or screens connected to it. The time to power cycle can be set from this menu, as
well as disabling or enabling the daily power cycling.
The Power Cycle Menu
Detecting and Assigning Devices
Devices connected to any ports will often be autodetected by the Annotation Pro. However, sometimes these
devices will need to be manually added or need additional configuration.
Serial Port Settings
Serial ports are used for connecting controller/marker devices and used for connecting to other systems. The Serial
Port dialog also allows you to assign a priority system to control users if multiple controller/markers are connected.
Initialization of Controller/Marker Device Types
Serial ports are initialized when the Annotation Pro is powered on. During this process, the Annotation Pro attempts
to determine what device type is connected to each port. This procedure can be lengthy since the Annotation Pro
accommodates a wide range of devices, and in its default autodetect mode, it will run through the entire list of
possibilities for each port.
NOTE: The Annotation Pro can only automatically detect controller/marker device types; other devices will need to be
set up manually.
16
Page 17
Annotation Pro
It is possible to limit the initialization process for a designated port by permanently assigning the device type. The
Annotation Pro will look for only the permanently assigned device type. This speeds up the initialization process
considerably. The next time the Annotation Pro is powered up, the autodetect procedure will skip the permanently
assigned port. If the assigned device needs to be ini tialized at startup, it will be initialized according to the device
type listed.
Viewing a Serial Device Type
1. Activate the menu system. The Main Menu appears.
2. Select Devices. The Devices menu appears.
3. Select Serial Ports. The Serial Ports menu appears.
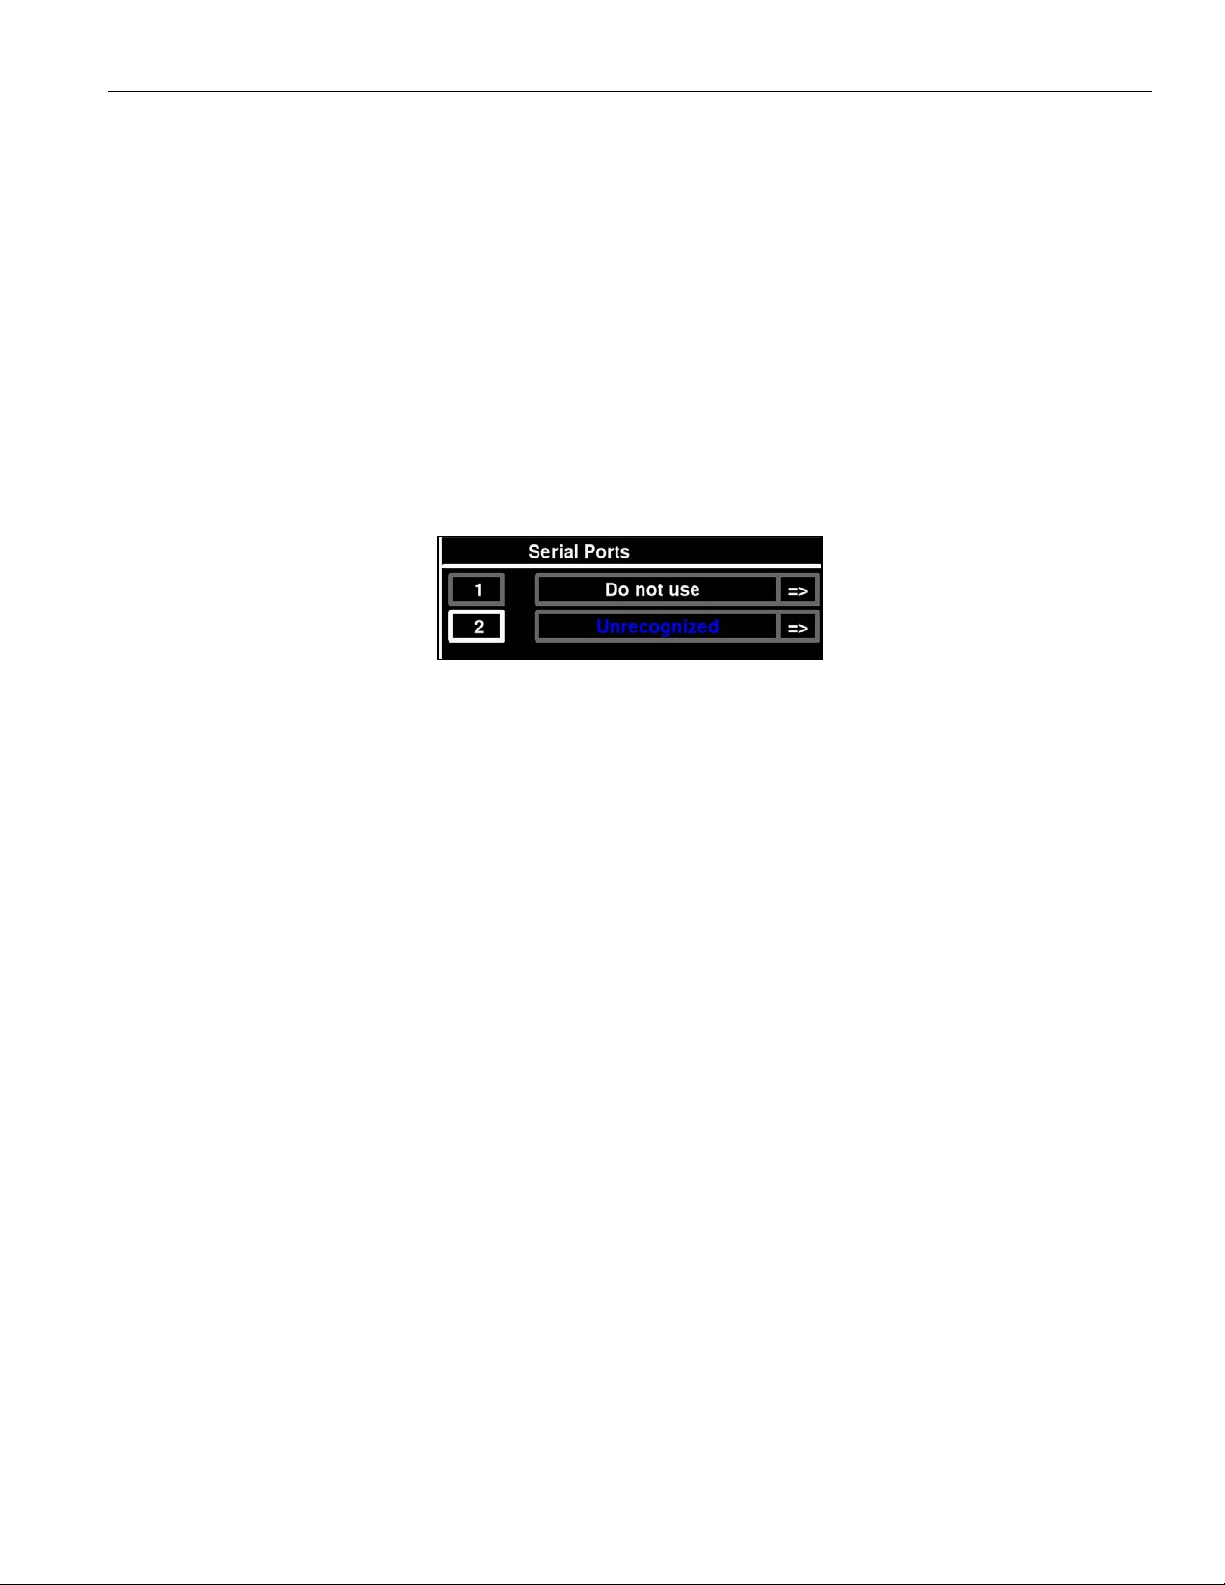
NOTE: All the serial ports installed on your Annotation Pro are listed by port number, with the device type displayed to
the right of each num ber. If the device type is in blue, it has been assigned through the autodetect procedure at
startup.
Example of Serial Ports menu
If the device appears to be assigned incorrectly and is not functioning, contact Tech Blue, Williams AV’s technical
support for assistance in getting your device working.
Manual Serial Port Assignment
WARNING: The following process should only be performed when your Williams AV rep has directed you to do so.
Doing so without guidance can corrupt your Annotation Pro system and may require repair.
The Annotation Pro can also attempt to manually assign a device. This depends on the system having the correct
driver installed on it; having the wrong driver may corrupt your system. Do not do this process without the
guidance of Tech Blue, Williams AV Tech Support.
1. Select the device type you wish to have permanently assigned. If the device type can be permanently assigned
(some types cannot), the color changes from blue to black.
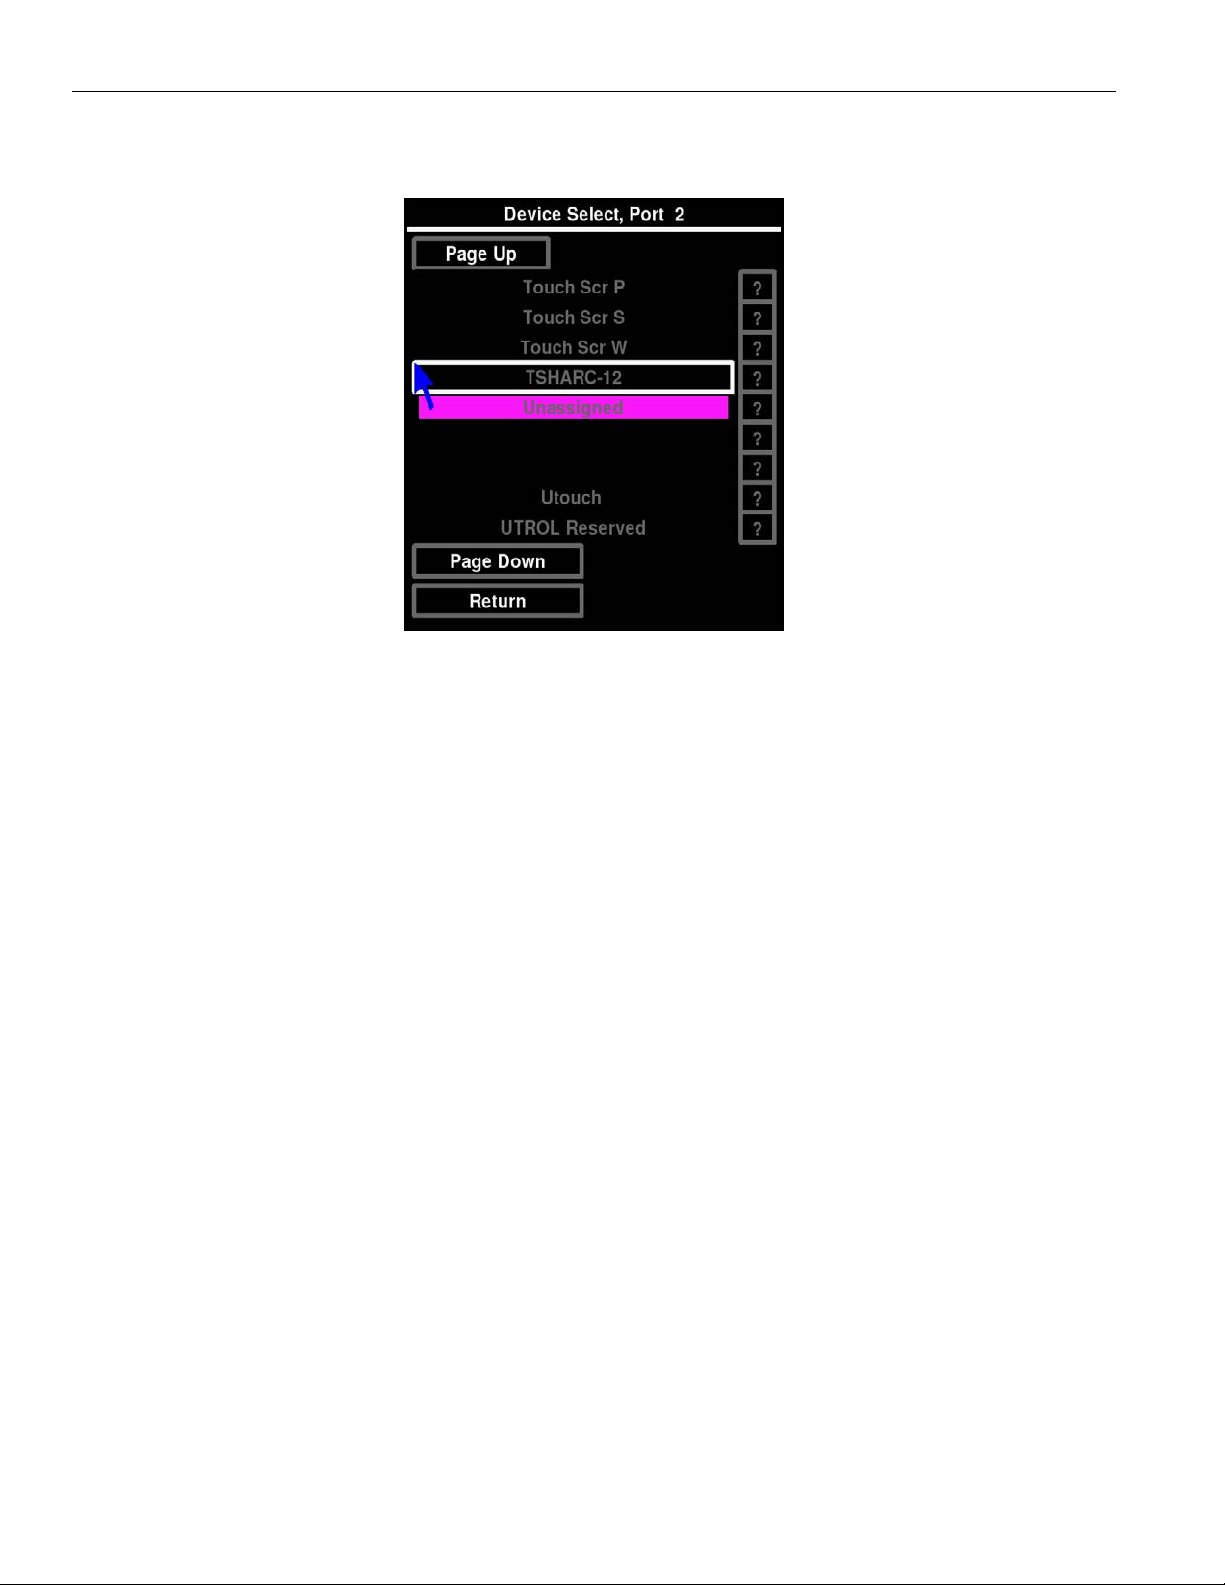
2. Select the arrow to the right of the device type you wish to change. The Device Select menu appears. This dialog
presents a scrolling list of all device types currently supported by the Annotation Pro in alphabetical order. The
Page Up and Page Down buttons allow you to quickly scroll through the names until you find the device type you
desire.
17
Page 18
Annotation Pro
When you locate and select the name you wish to assign, it will move to the center of the list, where it will be
highlighted. The new device type is now assigned. Device types which cannot be selected are in white.
Device Select menu
When a ? button is selected, a screen with further information about that device type will be displayed.
If a device type that is used for communicating with other systems is selected, an arrow button will replace the ?
button. Selecting that arrow button will activate the control port’s submenu.
You can return to the Serial Ports menu to make further changes by selecting the Return button, or by selecting Input
Devices and then selecting Serial Ports.
3. (Optional) Select the device type name you wish to change. This method is only recommended for those with
more extensive experience in assigning device types.
When the device type name, instead of the arrow to its right, is activated, the device type will change without having
to display the submenu. Each time the name is selected, it causes a dierent device type to appear. The list of
devices available using this method is an abbreviated version of the list in the Device Select dialog.
A click on the right side of the name moves forward one device. A click on the left side of the name moves
backward one device. Keep clicking until the device type you desire is displayed. It will be assigned permanently
when the Annotation Pro is rebooted.
If you are using the keyboard to select, it moves backward through the list only.
NOTE: If you are designating a port for use with another system, you will need to set COMM Port parameters before
exiting the menu system. See the Setting COMM Port Parameters section.
4. Exit the menu system and recycle the power on the Annotation Pro.
5. The Annotation Pro must either be rebooted for the new device type assignments to be made permanent, or you
can return to the Serial Ports dialog and select the numbered red box next to the new assignment to activate the
device immediately.
Viewing a USB Device Type
1. Activate the menu system. The Main Menu appears.
2. Select Devices. The Devices menu appears.
18
Page 19
Annotation Pro
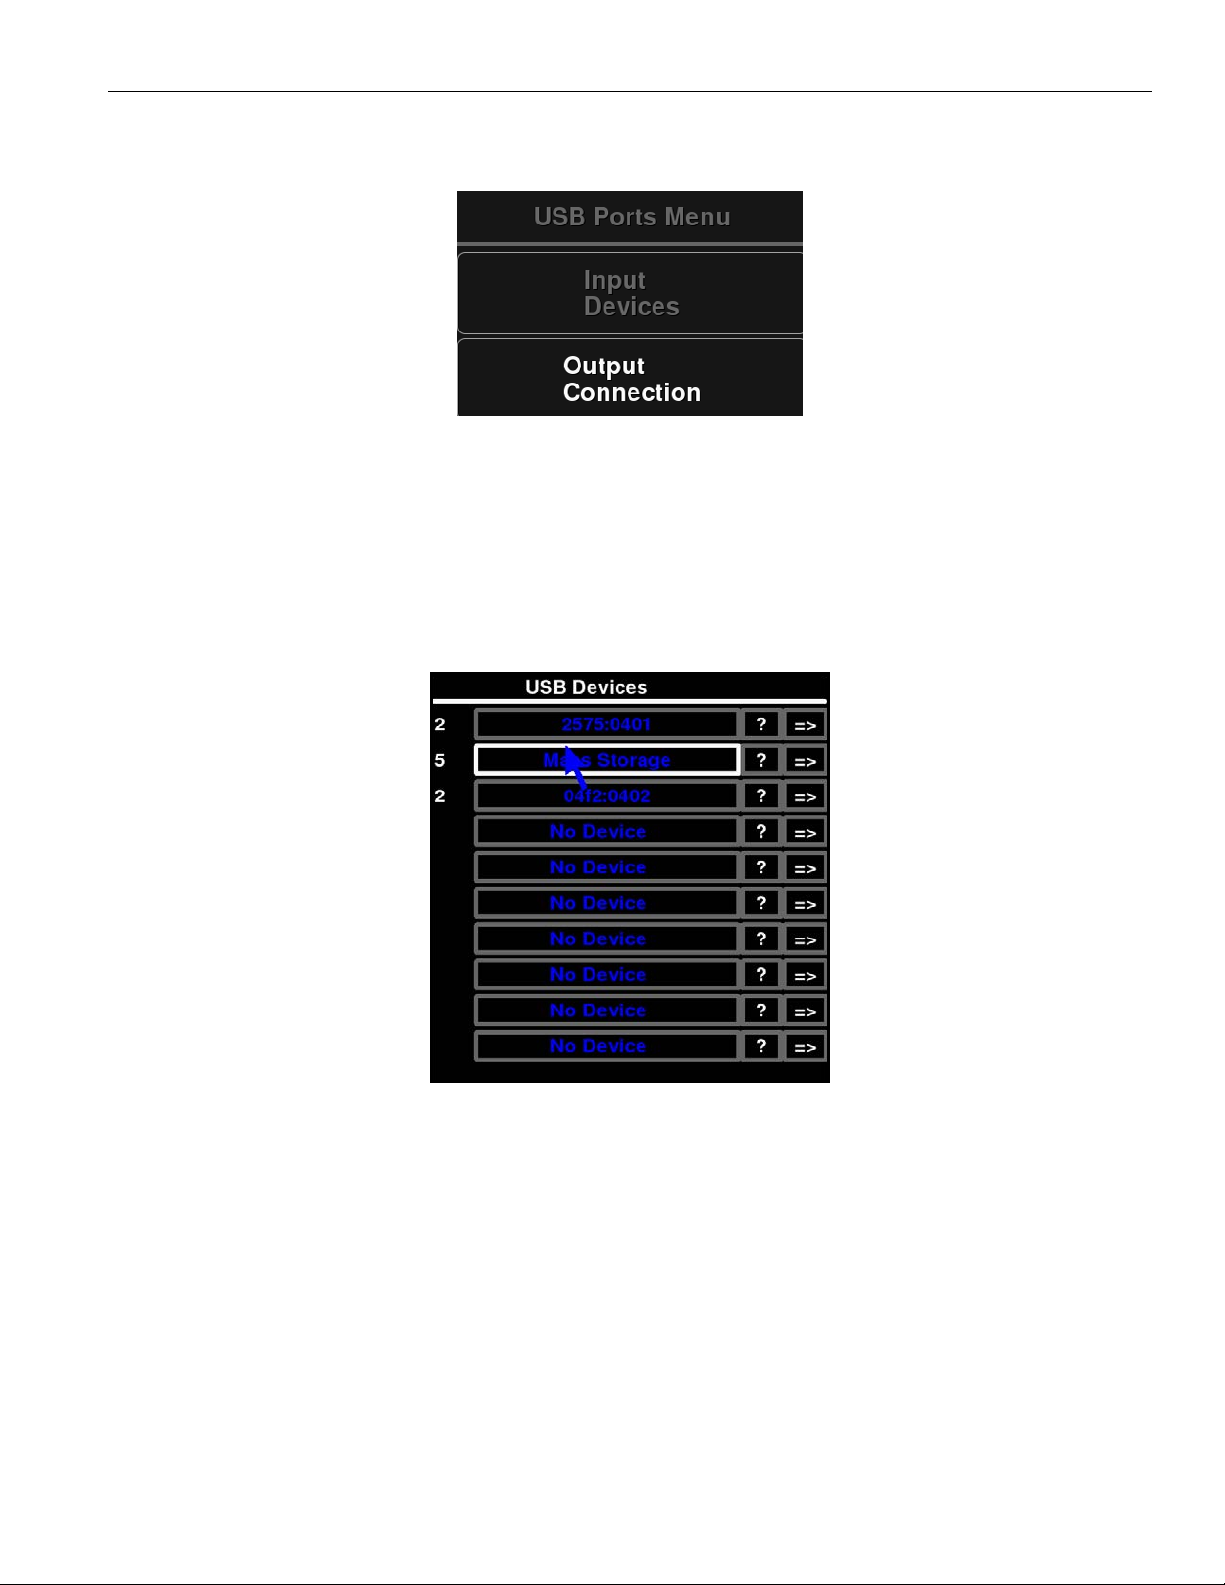
3. Select USB Ports. The USB Devices menu appears.
USB Devices menu
4. Select Input Devices. The USB Devices menu appears. 5 USB devices can be connected, and more could be
added through the use of additional hubs.
NOTE: All the USB devices installed on your Annotation Pro are listed by port number, with the device type displayed to
the right of each number. If the device type is in blue, it has been assigned through the autodetect procedure at
startup.
NOTE: When the ? button is selected, the system displays the vendor and product ID in the Device Select menu.
Example of USB Devices menu
If the device appears to be assigned incorrectly and is not functioning, contact Tech Blue, Williams AV’s technical
support for assistance in getting your device working.
19
Page 20

Annotation Pro
Manually Assigning a USB Device
WARNING: The following process should only be performed when your Williams AV rep has directed you to do so.
Doing so without guidance can corrupt your Annotation Pro system and may require repair.
The Annotation Pro can also attempt to manually assign a device. This depends on the system having the correct
driver installed on it; having the wrong driver may corrupt your system. Do not do this process without the
guidance of Tech Blue, Williams AV Tech Support.
1. Select the device type you wish to have permanently assigned. The text color then changes from blue to black.
For USB Devices, autodetect immediately detects and rec ognizes devices, even when their position on the hub
changes. You might want to permanently assign a device type to a port if the device was marketed after your
Annotation Pro system was manufactured, or if the system misidentifies the device.
2. (optional) To manually change the device type, select the arrow to the right of the device type you wish to
change. The Device Select menu appears.
This menu shows a scrolling list of all device types currently supported by the Annotation Pro in alphabetical order.
The Page Up and Page Down buttons allow you to quickly scroll through the names until you find the device type
you desire. When you locate and select the name you wish to assign, it will move to the center of the list, where it
will be highlighted. The new device type is now assigned.
When a ? button is selected, a screen with further information about that device type will be displayed.
3. Select the Return button to view the Device Select dialog.
Integrating the Annotation Pro with Other Systems
Since only controller/marker device types are able to be recognized during the initialization process, all other
devices must be set up manually. The Annotation Pro allows you to manually adjust communication settings for
either of its ports. This allows the Annotation Pro to be integrated with
• an AV system as a control command station where it can both control AV devices and mark over any images
presented.
• a control system which can send commands to the Annotation Pro, controlling its various functions, like AMX/
Crestron device.
Setting COMM Port Parameters
If you are assigning a port for communicating with another system, you must select either Control Port or PVI to PVI
as your device type. The Annotation Pro sup ports assigning only one port for each type.
Control Port: Choose this option if the Annotation Pro is being used as an AV remote control command station, if it
is being controlled remotely using RS-232 commands, or if it is being connected to a PC.
PVI-to-PVI: Use this selection if the Annotation Pro is being used in a videoconferencing system.
1. Select the appropriate device type in the Device Select menu for the port where you are connecting the other
system. Where a question mark is usually found, you will instead see an arrow.
NOTE: Only one of the two COMM ports may be set to Control Port. Either COMM port may be set to Control Port,
but only one at a time may be assigned as Control Port. If the device type you desire for connecting to other
systems is unavailable, check to see if it is assigned to another port.
2. Activate the arrow next to the device type to set its communication parameters. The corresponding submenu
appears. Select the desired baud rate, parity, and stop bits.
NOTE: Factory settings are 9600 baud, no parity, 1 stop bit. Data bits, which cannot be manually set, are 8 data bits.
3. Exit the menu system and cycle the power on the Annotation Pro. The Annotation Pro implements the new
settings.
20
Page 21
Preparing Video Sources and Outputs
Note on HDCP: HDCP functions are only available on the Annotation Pro Plus (AN C5 P).
Setting Video Output
The Annotation Pro gives you a wide range of video parameters for fine tuning your video output.
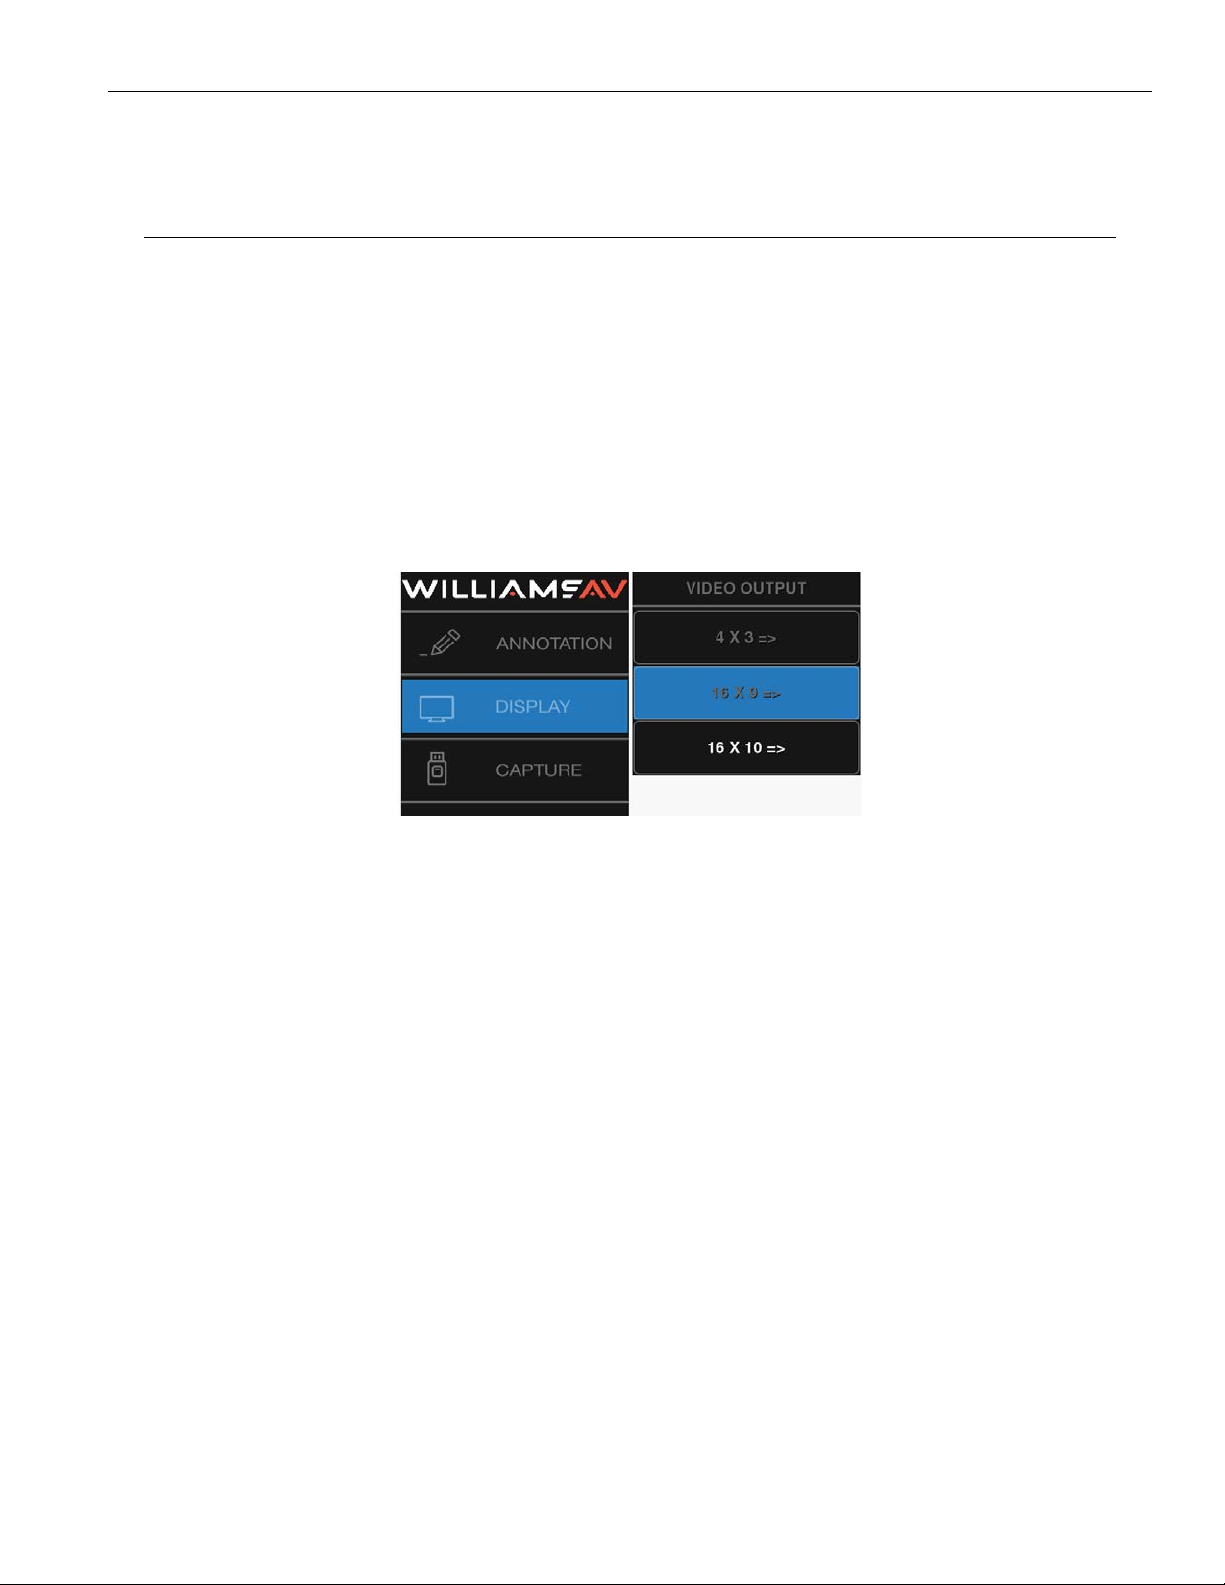
1. Activate the menu system. The Main Menu appears.
2. Select Display. The Display menu appears.
3. Select Video Output. The Video Output dialog appears next to the Main Menu.
4. Select an output ratio. The associated Video Output Aspect Formats dialog appears next to the Main Menu.
Annotation Pro
Video Output Formats Dialog for 16 x 9 Ratio
5. Select a format. The Annotation Pro will immediately switch to the output format selected.
6. Exit the menu system.
EDID
This dialog allows you to set the Annotation Pro’s preferred EDID resolution which tells the video source what
resolution to send.
1. Activate the menu system. The Main Menu appears.
2. Select Display. The Display menu appears.
3. Select EDID. The EDID menu appears.
4. Turn Force On or O. When o, the Annotation Pro will not try to set the incoming source resolution. When on,
select your desired resolution and the Annotation Pro will force your device to output the set resolution.
21
Page 22
Annotation Pro
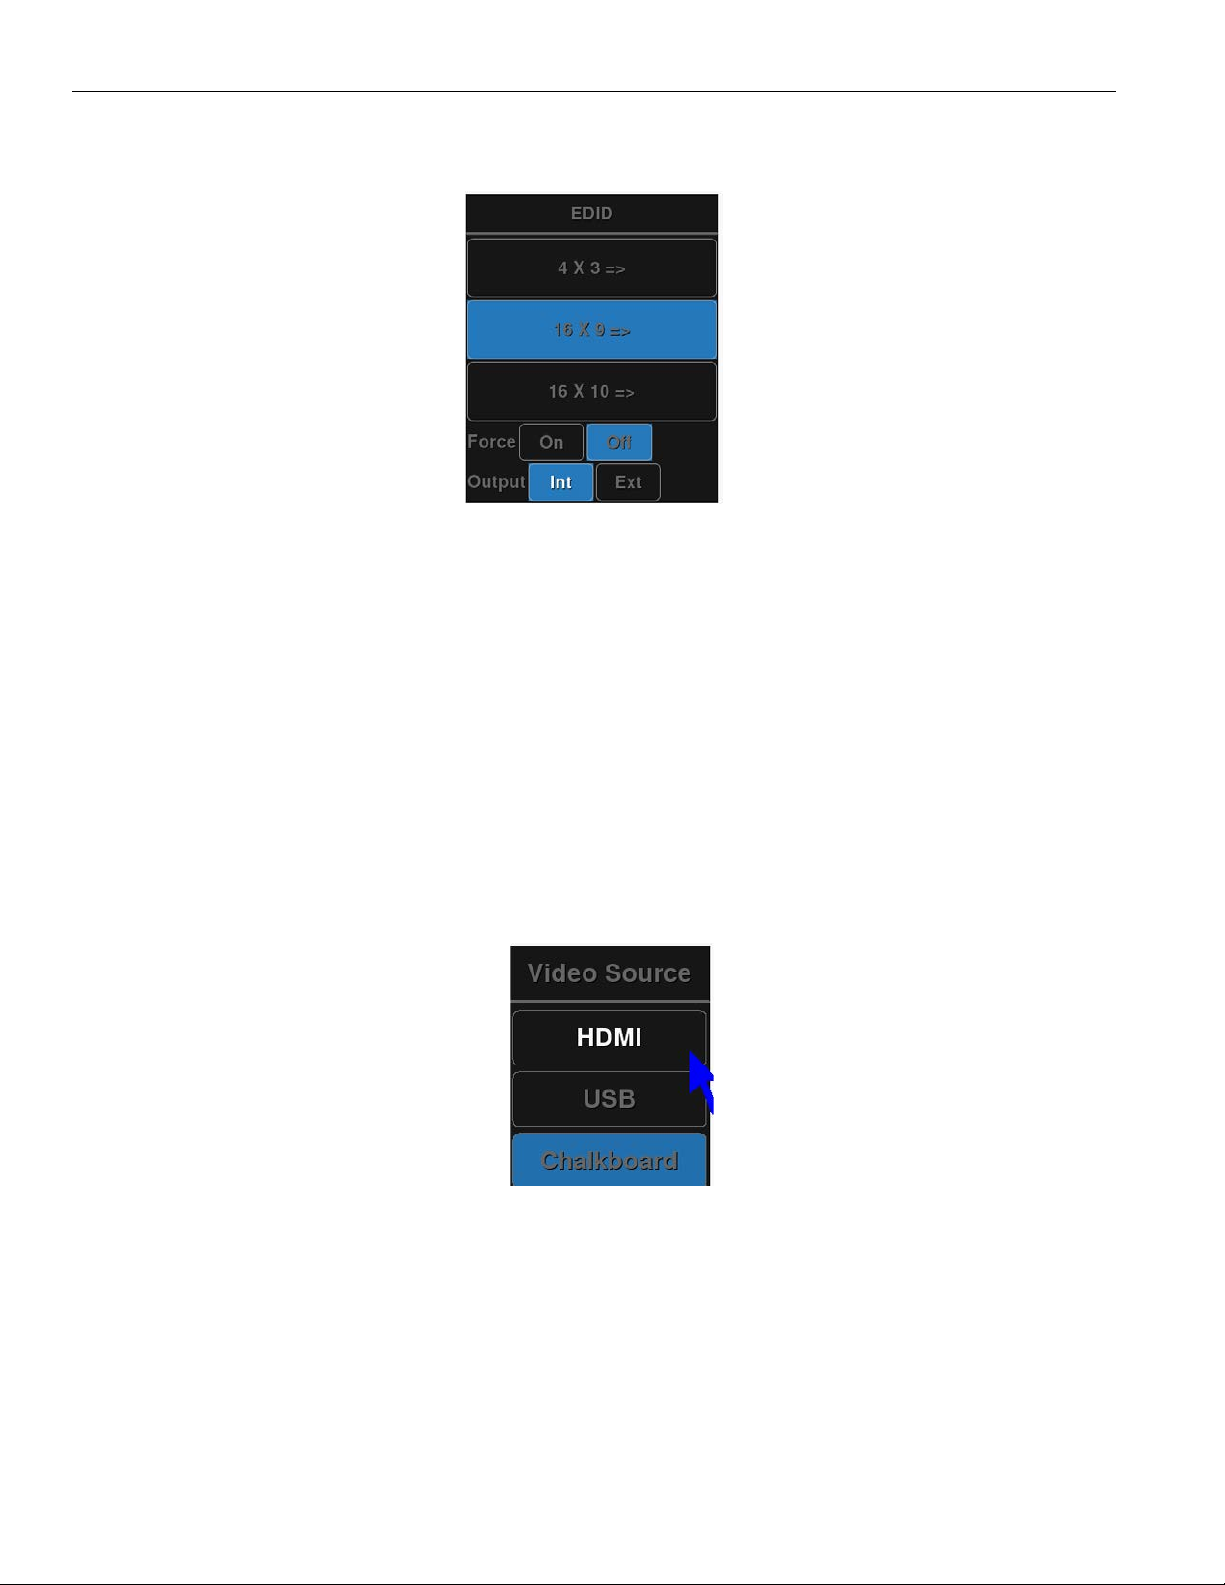
5. Select an EDID format. The associated EDID Format submenu appears.
6. Set Output to Int (for Internal) to broadcast in 1080p video. If the Annotation Pro cannot send a 1080p signal, it
will send s 1024 x 768 resolution video instead. Set Output to Ext (For External) to use the optimal resolution for
connected, external devices.
EDID Submenu
7. Select a resolution.
8. Exit the menu system.
Video Source Options
The Video Source menu allows you to select between your current Source Video or the Chalkboard background.
From the Touch Screen:
1. Activate the menu system. The Main Menu appears.
2. Select Display. The Display menu appears.
3. Select Video Source.
Video Source Menu
4. Choose from your desired video source.
5. Exit the menu system.
Default Video Source
Each time the Annotation Pro starts, a specific video source can be selected as the default source to show. If the
video source changes often, the last selected source used may be the desired default.
22
Page 23
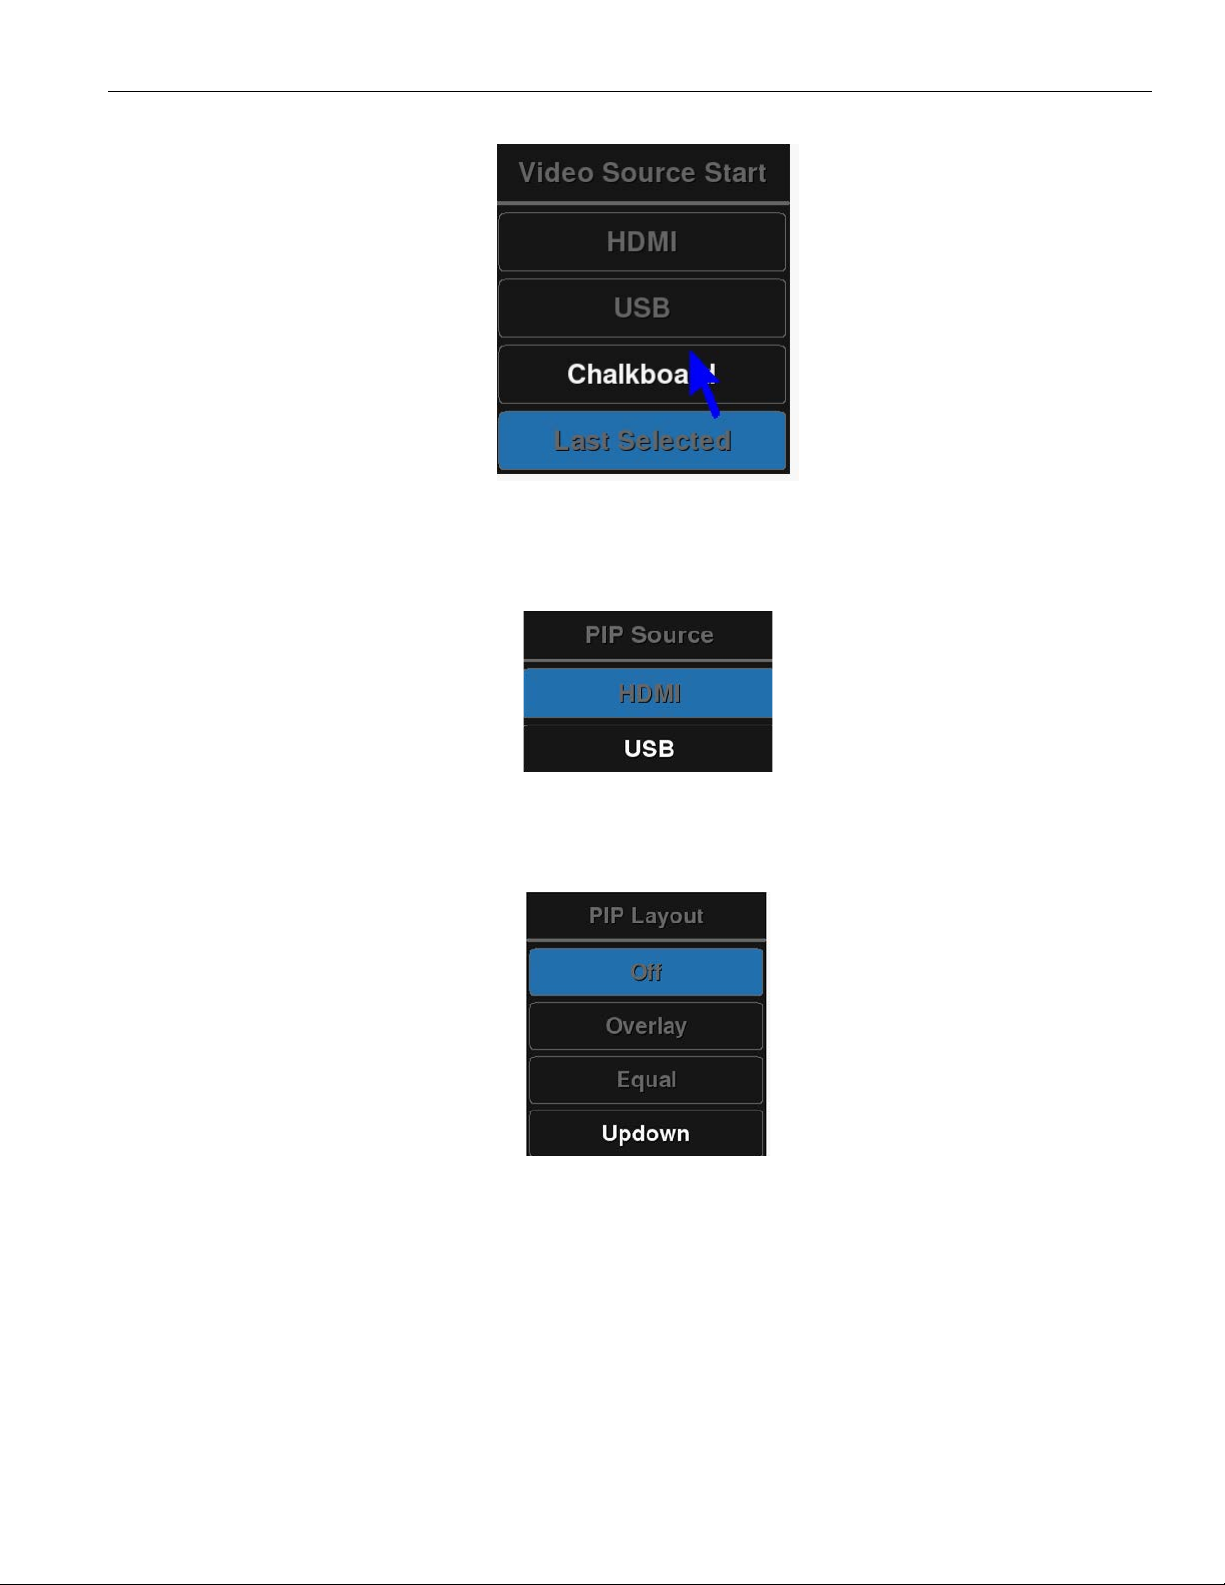
The Video Source Start menu
Picture-In-Picture (PIP) Setup
Picture-in-Picure mode allows two images or videos to be shown at once.
Annotation Pro
The PIP Source Menu
The Picture-in-Picture image or video can be provided via the HDMI or the USB. The chalkboard cannot be used as
a source for Picture-in-Picture.
The PIP Layout Menu
The PIP Layout setting selects where the Picture-in-Picture will appear on the screen:
• Overlay will appear in the upper right
• Equal will split the screen, with both images/videos appearing side by side.
• Updown will appear in the top center
23
Page 24
Annotation Pro
Networking (TCP/IP, TFTP, SMB)
The networking capabilities built into the Annotation Pro support various func tions on a TCP/IP network. You can
print to a printer, or send the Annotation Pro remote commands.
Network Setup
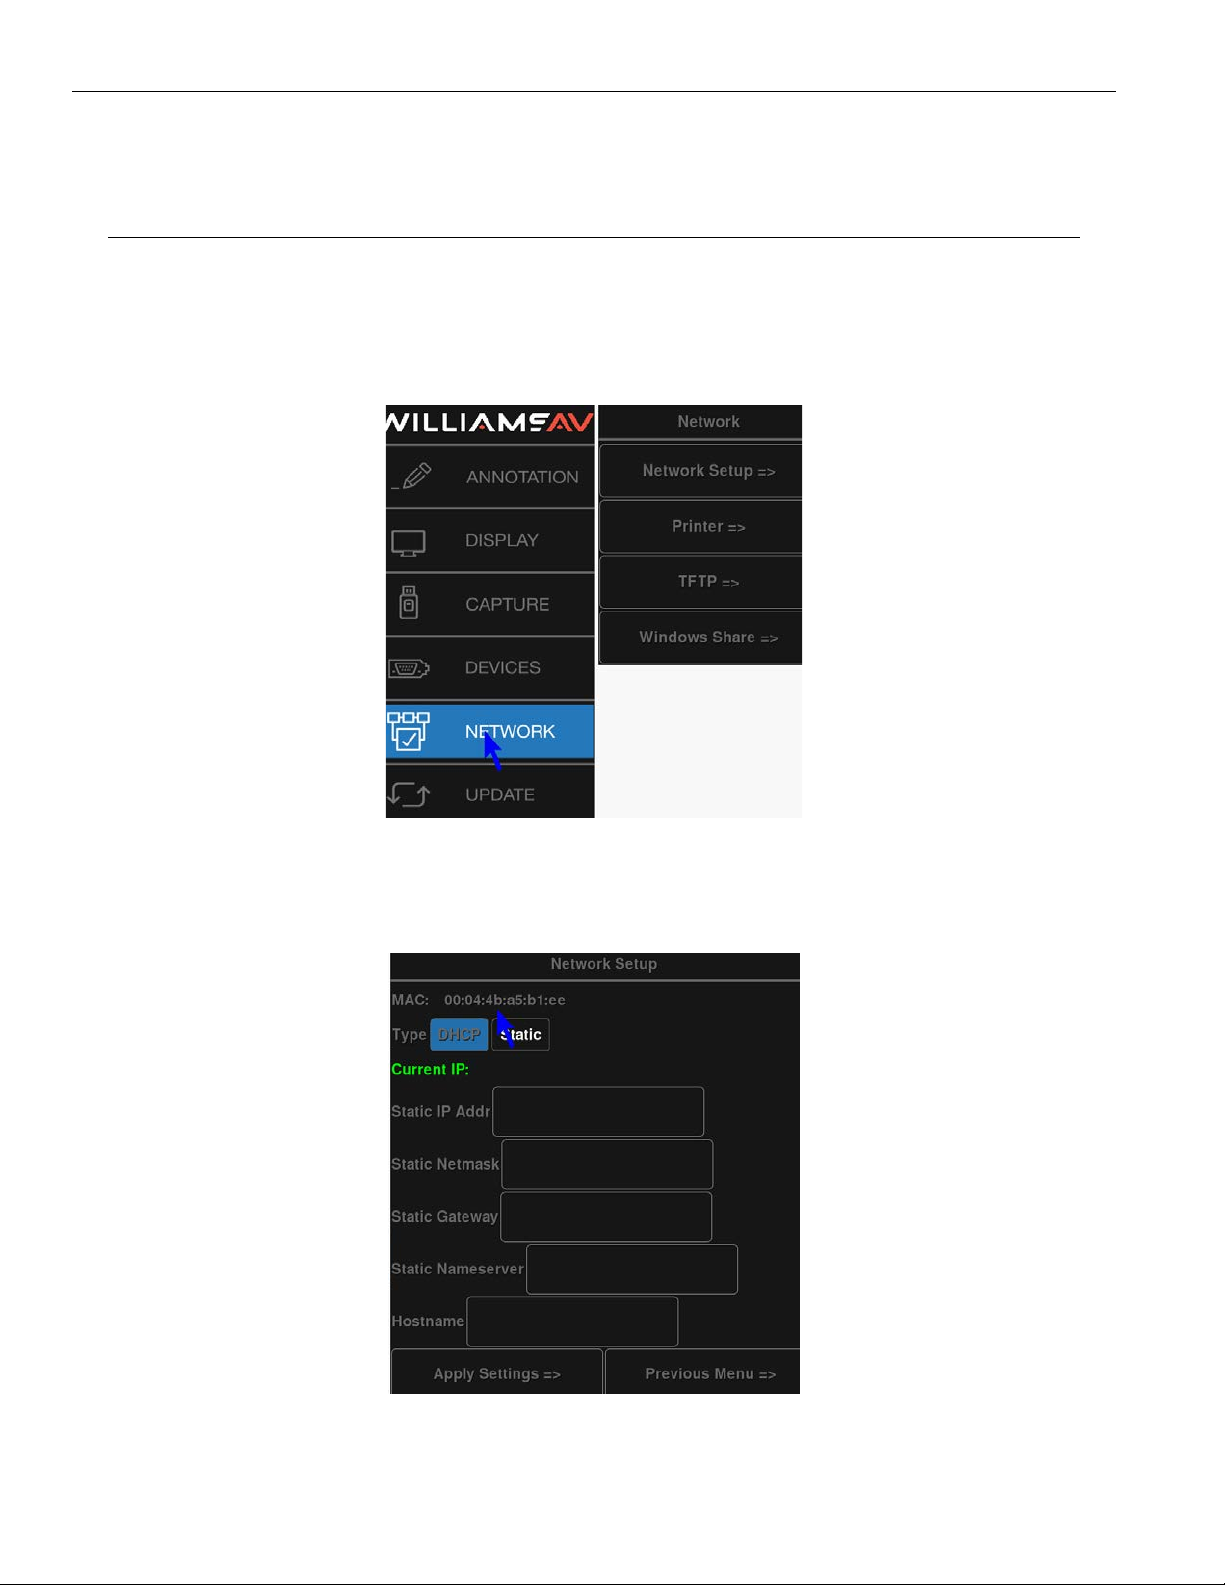
1. Activate the menu system. The Main Menu appears. Select the Network option. The Network Menu appears.
Network menu
2. Select Network Setup.
Example of Network Setup menu
The Network Setup menu appears. This dialog prepares the Annotation Pro for communicating on your network.
24
Page 25
3. Select DHCP or STATIC.
• If DHCP is selected, IP Address, Netmask, Gateway and Nameserver are assigned automatically.
• If STATIC is selected, you must make entries for IP Address, Netmask, Gateway and Nameserver. (This is the
default setting.)
Consult with your IT administrator if you need help with these entries.
4. Select Apply Settings to finish the network configuration.
5. Exit the menu system.
Configure TFTP Settings
The Annotation Pro TFTP feature gives you the ability to save and retrieve images using the TFTP protocol. To save
a file using TFTP, you must first install a TFTP server on the computer which will receive the file(s). You will need the
IP address of the computer where TFTP is installed. Make sure your firewall does not block access to your TFTP
server.
The following steps are required to allow the Annotation Pro to communicate with the TFTP server.
1. Activate the menu system. The Main Menu appears.
2. Select the Network option. The Network Menu appears.
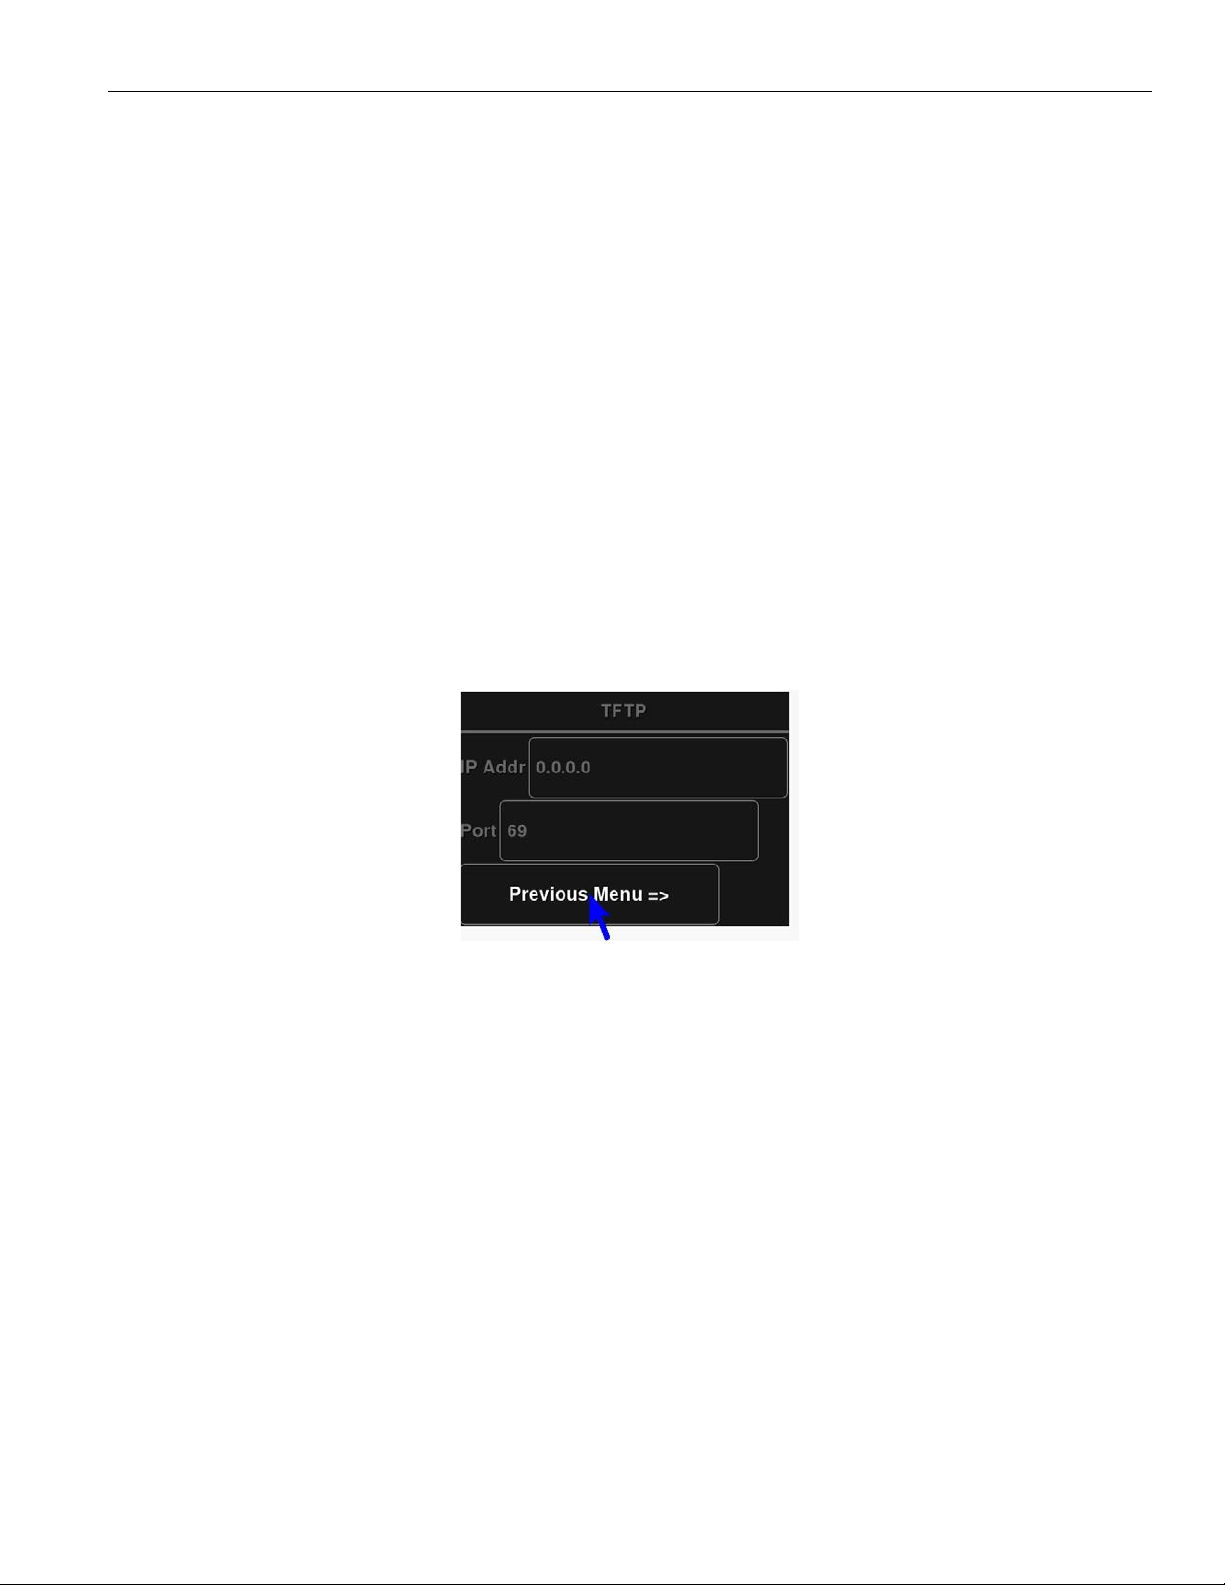
3. Select the TFTP option. The TFTP menu appears.
Annotation Pro
TFTP menu
4. Enter the IP address of the TFTP server. Check with your IT administrator if you do not know the IP address.
5. Enter the Port number. This is usually port 69. Check with your IT administrator if you are unsure.
6. Exit this dialog by selecting Previous Menu.
Configure Windows Share (SMB) Settings
The Annotation Pro Windows Share (SMB) feature gives you the ability to save and retrieve images using the SMB
protocol. To save a file using SMB, you must first activate a Share on a server with the SMB protocol running.
The setup dialog requires a Server and Share name. If the Share is password protected, you will need the username
and password. Make sure your firewall does not block access to your SMB share.
The following steps are required to allow the Annotation Pro to communicate with SMB share.
1. Activate the menu system. The Main Menu appears.
2. Select the Network option. The Network menu appears.
25
Page 26
Annotation Pro
3. Select the Windows Share option.
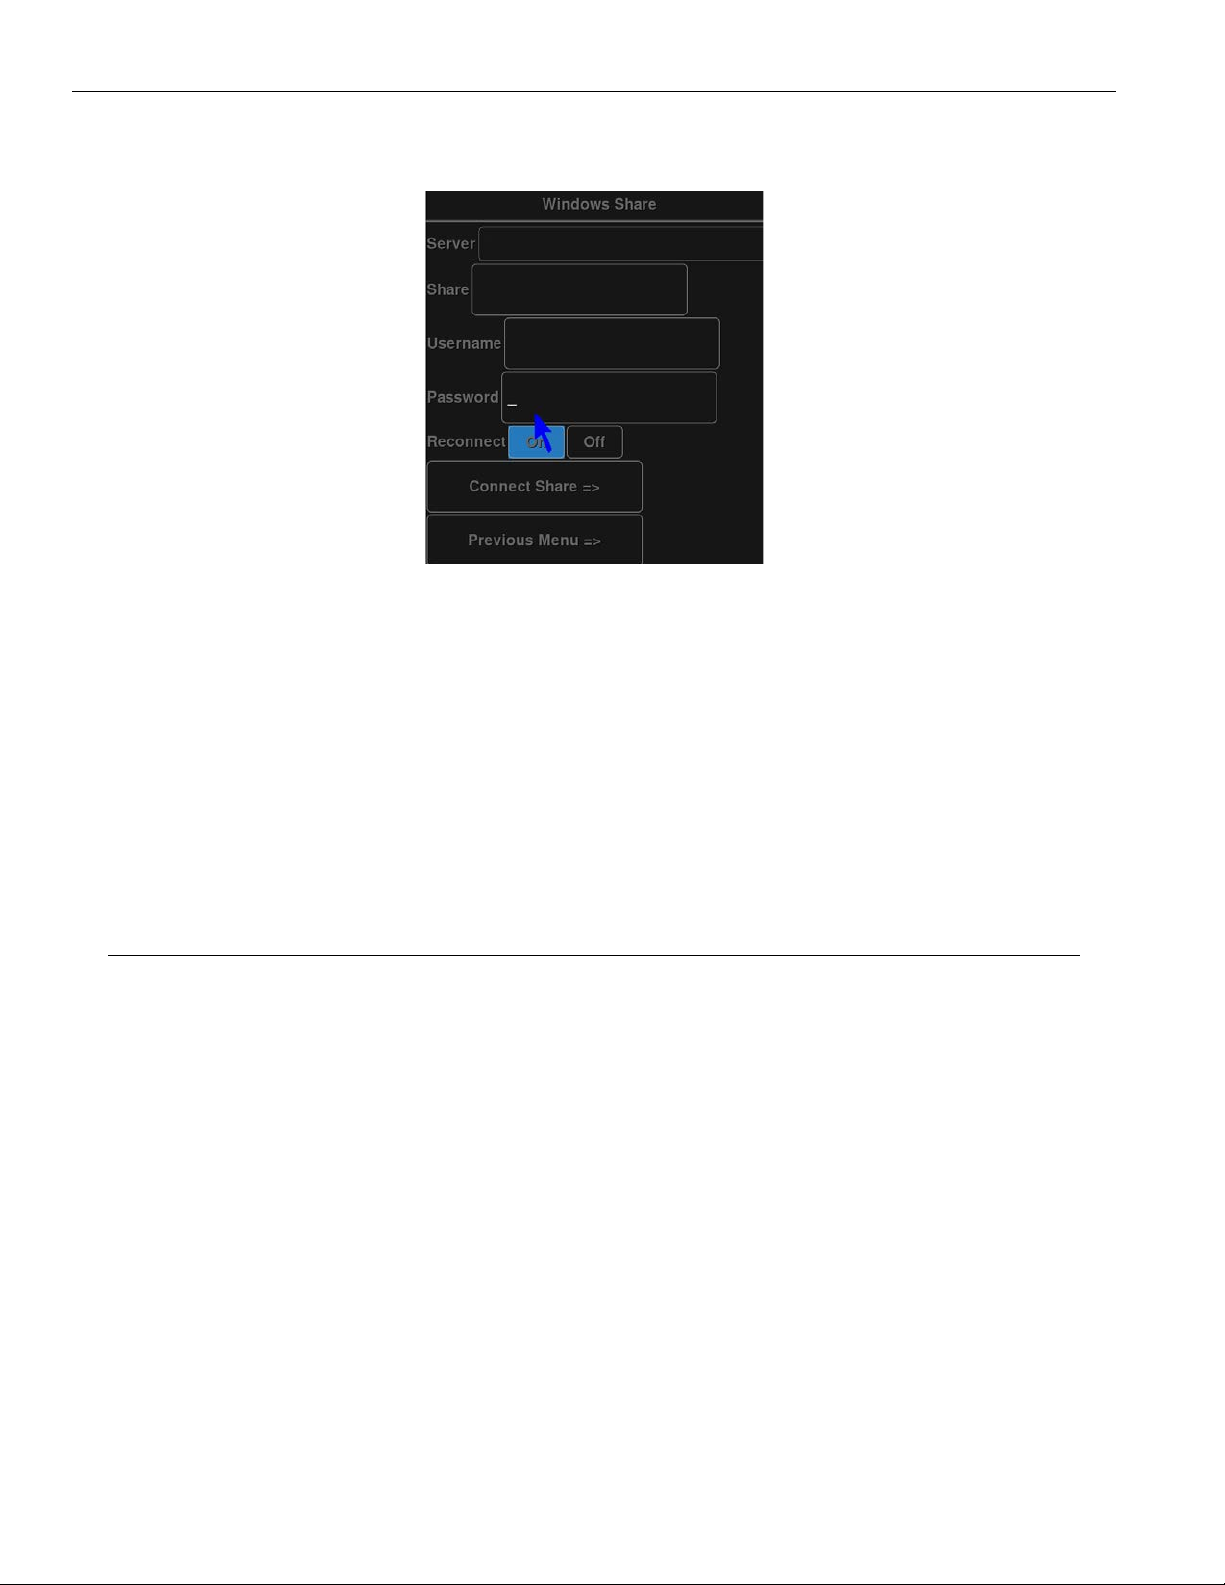
4. Enter the Server name where your share is located. Check with your IT administrator if you do not know the
name.
Example of Windows Share menu
5. Enter the Share name. This is the name assigned to the location on the server. Check with your IT administrator if
you do not know the name.
6. Enter the Username and Password, if any. Check with your IT administrator if you do not know this information.
7. Select the Connect Share button to connect the Annotation Pro to the Windows Share. The Annotation Pro will
indicate if it is able to connect to your Share. If it fails, check your settings.
8. Exit this dialog by selecting Previous Menu.
Calibrating and Configuring Touch Screens
Calibrating Annotation Pro Touch Screen Controllers
Touch screens need to be calibrated on their first installation. Calibration ensures an intuitive and precise feel to
drawing.
Calibrations are automatically saved for each video port. If you have a touch screen display with multiple video
inputs, you should calibrate the touch screen for each input.
If you move a touch screen to a dierent port, run the calibration again.
All calibrations are stored in battery backed-up memory. The most recent cali bration will be recalled any time power
is cycled o and on.
Calibration
From the Menu System
1. Activate the menu system. The Main Menu appears.
26
Page 27
2. Select Devices. The Devices menu appears
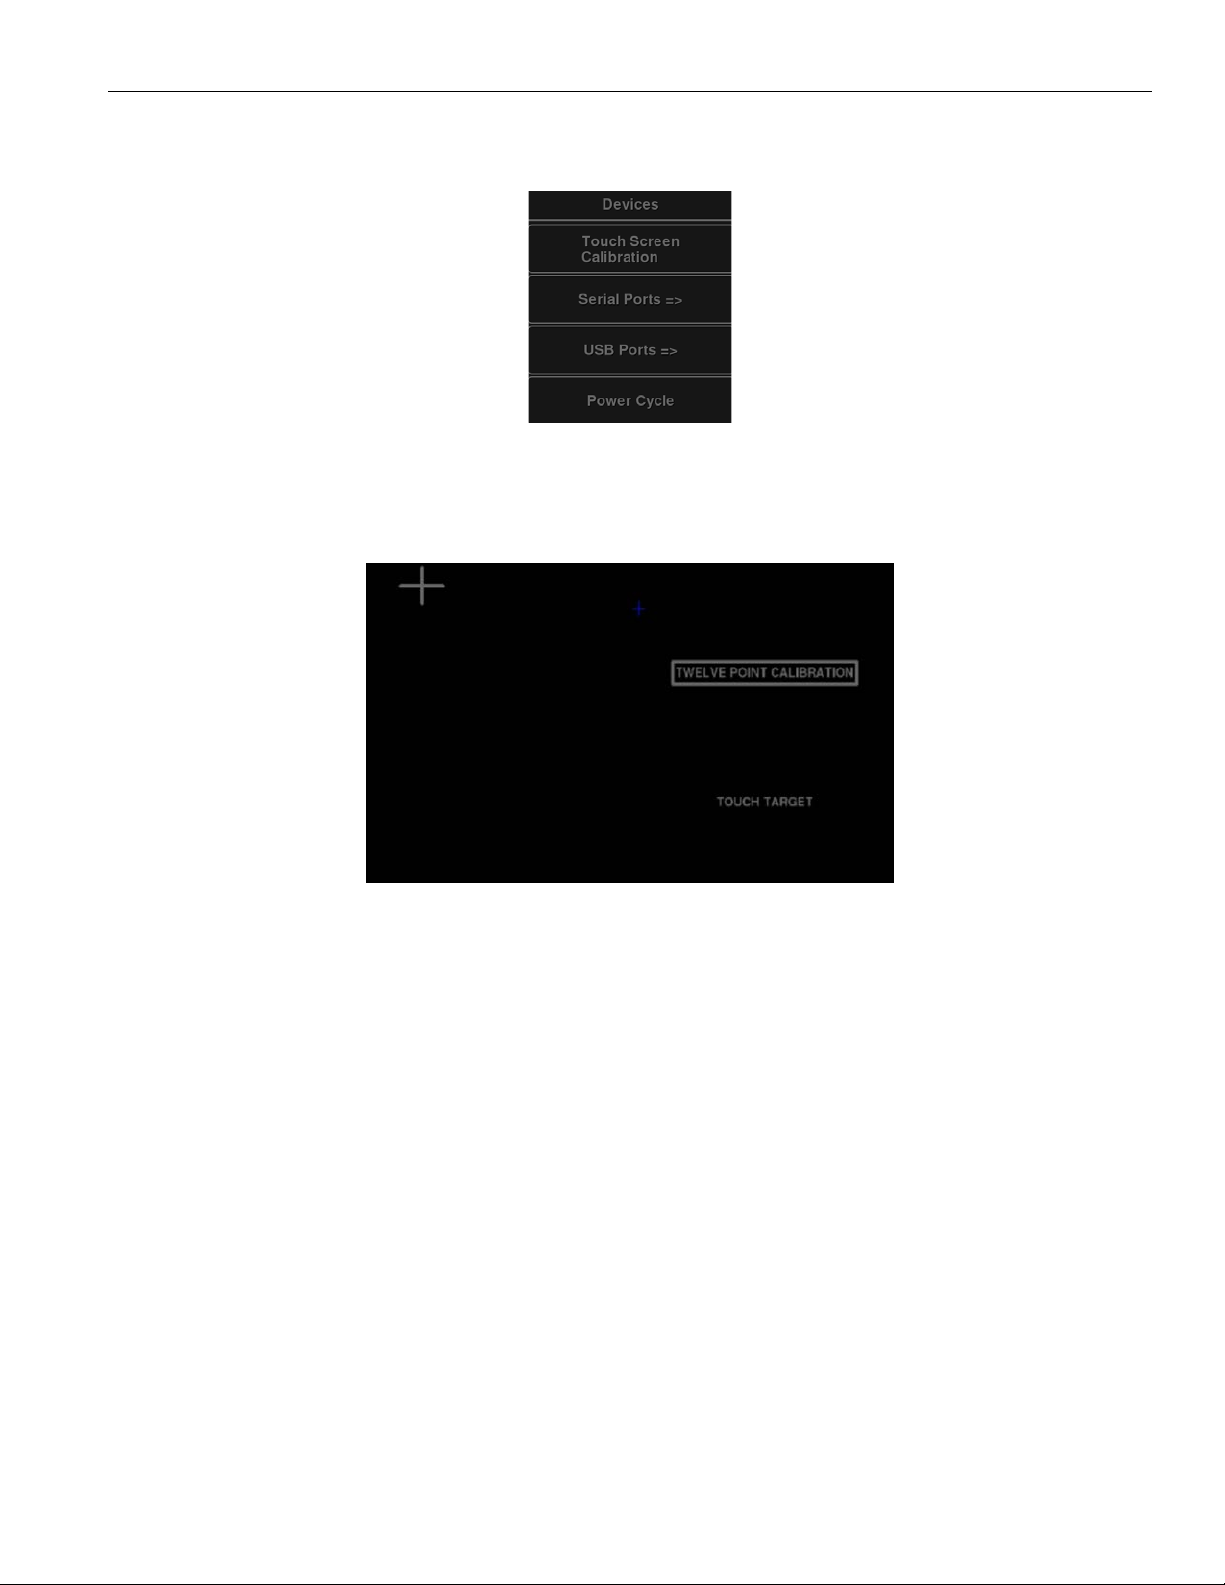
Devices menu
3. Select Touch Screen Calibration. The Calibration Menu appears.
Annotation Pro
Example of calibration screen
4. Follow the calibration instructions displayed on-screen. As you touch the target, it will disappear and the next
target will appear. Repeat until all 12 targets have been calibrated. After you perform final calibration procedures,
the Calibration dialog automatically disappears, and you return to the menu system.
5. Exit the menu system. Repeat this process for each video input on your touch screen display.
Copying (Saving) a Calibration
For each video output, the Annotation Pro has nine memory locations where cali brations can be stored for later
recall. They are numbered 1 through 9. If you anticipate changing calibrations on a frequent basis, storing your
calibrations in locations 1 through 9 makes it easy to change the active calibration without going through the
calibration procedure and having to reboot the Annotation Pro.
1. Activate the menu system. The Main Menu appears.
2. Select Devices. The Devices menu appears.
3. Select the Calibration. The Calibration Menu appears.
27
Page 28

Annotation Pro
4. Select Copy Calibration. The Copy Calibration Menu appears.
Copy Calibration Menu
5. Choose the number under which you want to save the last manual calibration.
NOTE If there was a calibration previously stored in the location/number you select, it will be overwritten.
NOTE: Since the Annotation Pro keeps only the location number, you may want to make a written record of which cali-
brations you have stored in each location.
6. Exit the menu system.
Select a Calibration
When you are ready, you can choose to use a calibration you have previously stored.
1. Activate the menu system. The Main Menu appears.
2. Select Devices. The Devices menu appears.
3. Select the Calibration. The Calibration Menu appears.
4. Select the Select Calibration. The Select Calibration Menu appears.
Select Calibration Menu
5. Choose the number under which you saved the calibration you desire to use. The calibration stored in that
location becomes the active calibration.
6. Exit the menu system.
Touch Screen Command Areas
This dialog allows you to assign touch screen commands to the various areas of your touch screen. Touching the
screen in that area (after exiting the menu) will activate the command. Areas assigned to None are inactive.
1. Activate the menu system. The Main Menu appears.
2. Select Display. The Display menu appears.
3. Select Touch Areas. The Touch Areas menu appears.
28
Page 29
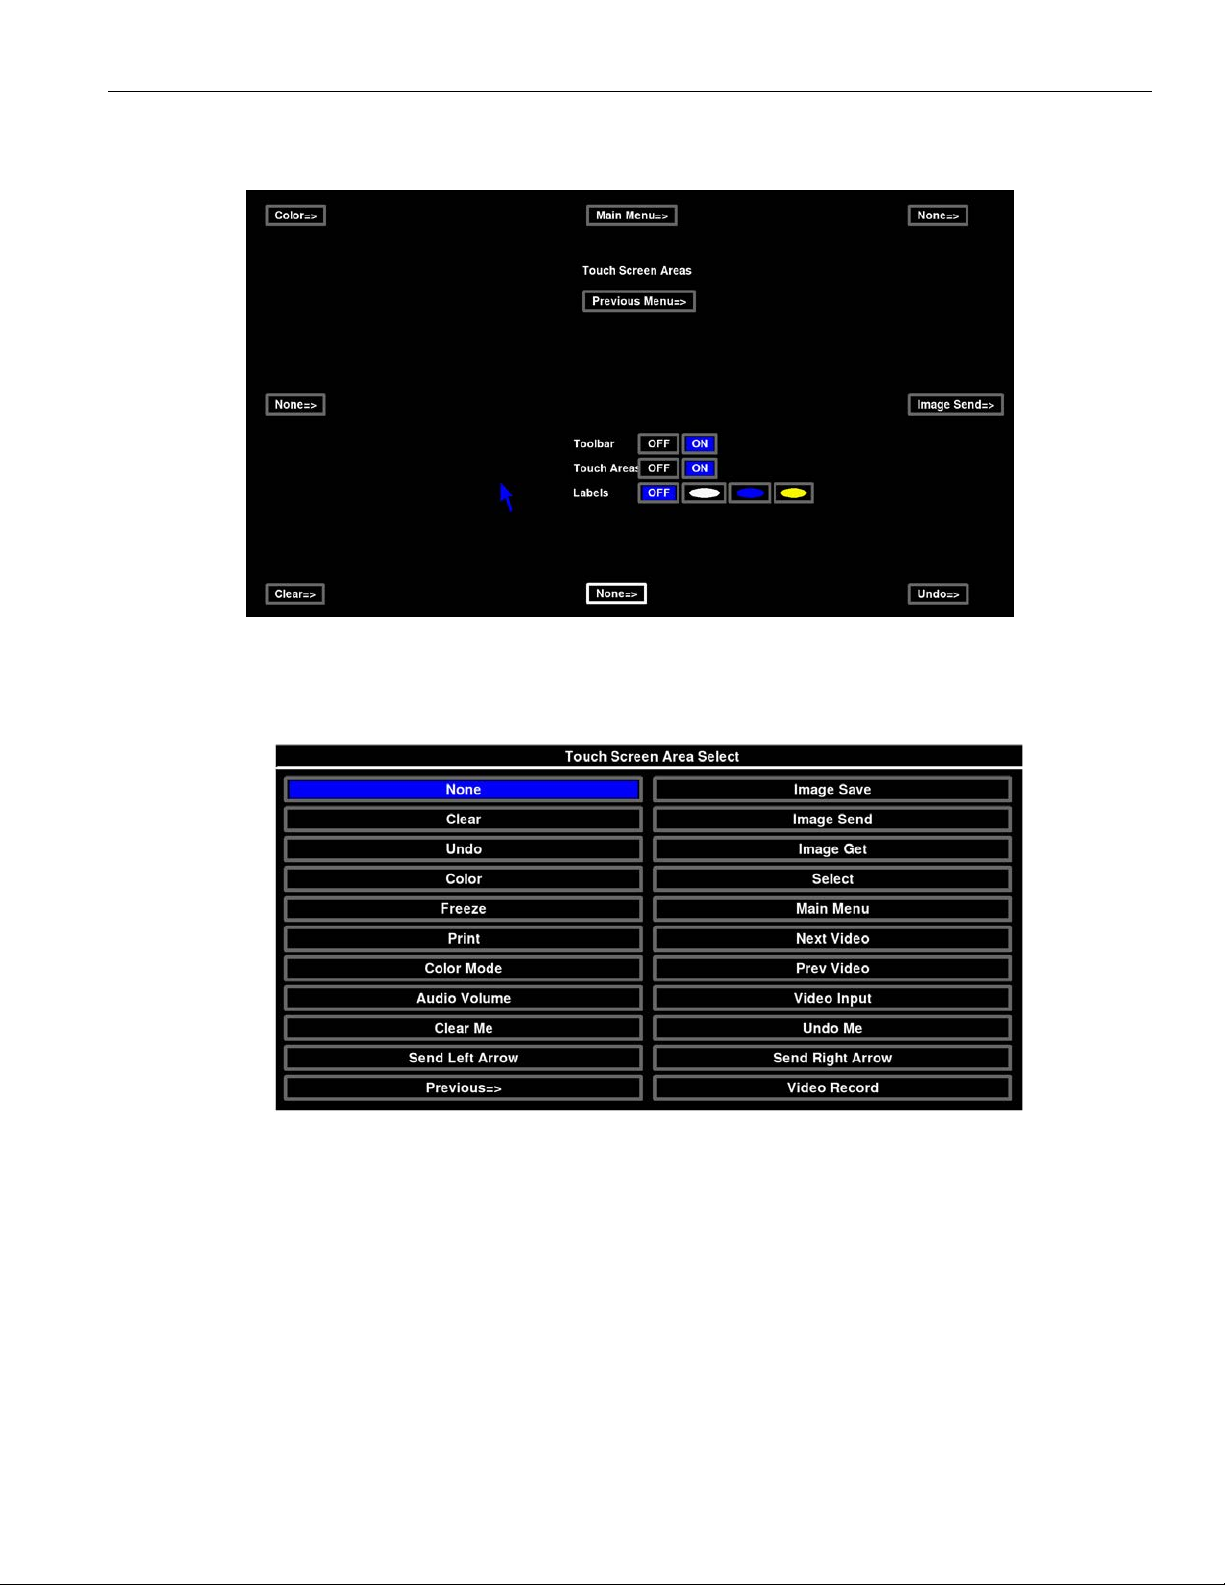
4. Select Touch Screen Areas.
Annotation Pro
Touch Areas menu
5. Select one of the areas. The Touch Screen Area Select menu appears. Select the command you wish to assign.
The list of touch screen areas.
6. Select Previous. The Touch Areas menu reappears
7. Repeat steps 4, 5, and 6 until you are finished assigning touch areas.
8. If you desire, you can turn o touch corner labels, or change their color to contrast with the video image using the
menu in the middle of the screen.
9. When finished, select Previous Menu and exit the menu system.
29
Page 30
Annotation Pro
Customizing Markers and Pointers
This section covers the menu system functions that are usually set before mak ing a presentation. Once set, the
Annotation Pro will save them in memory, even when powered down. Some of the functions can also be accessed
directly through the keyboard.
The options commonly used during a presentation are covered in Using Markers.
Customizing the Color Palette
During a presentation, all controllers allow you to select a marking color by cycling through each of the seven
available colors. To streamline color selection, the Color Palette allows you to pre-select which of the Annotation
Pro’s seven marking colors you wish to use during a pre sentation.
When the Color Palette command is activated, the seven colors appear over whatever video input signal is currently
selected. This allows you to see how well the colors contrast with the image, making it easy to select colors that
work well with the images you are presenting.
Selecting Colors for a Presentation
From the Menu System
1. Activate the menu system. The Main Menu appears.
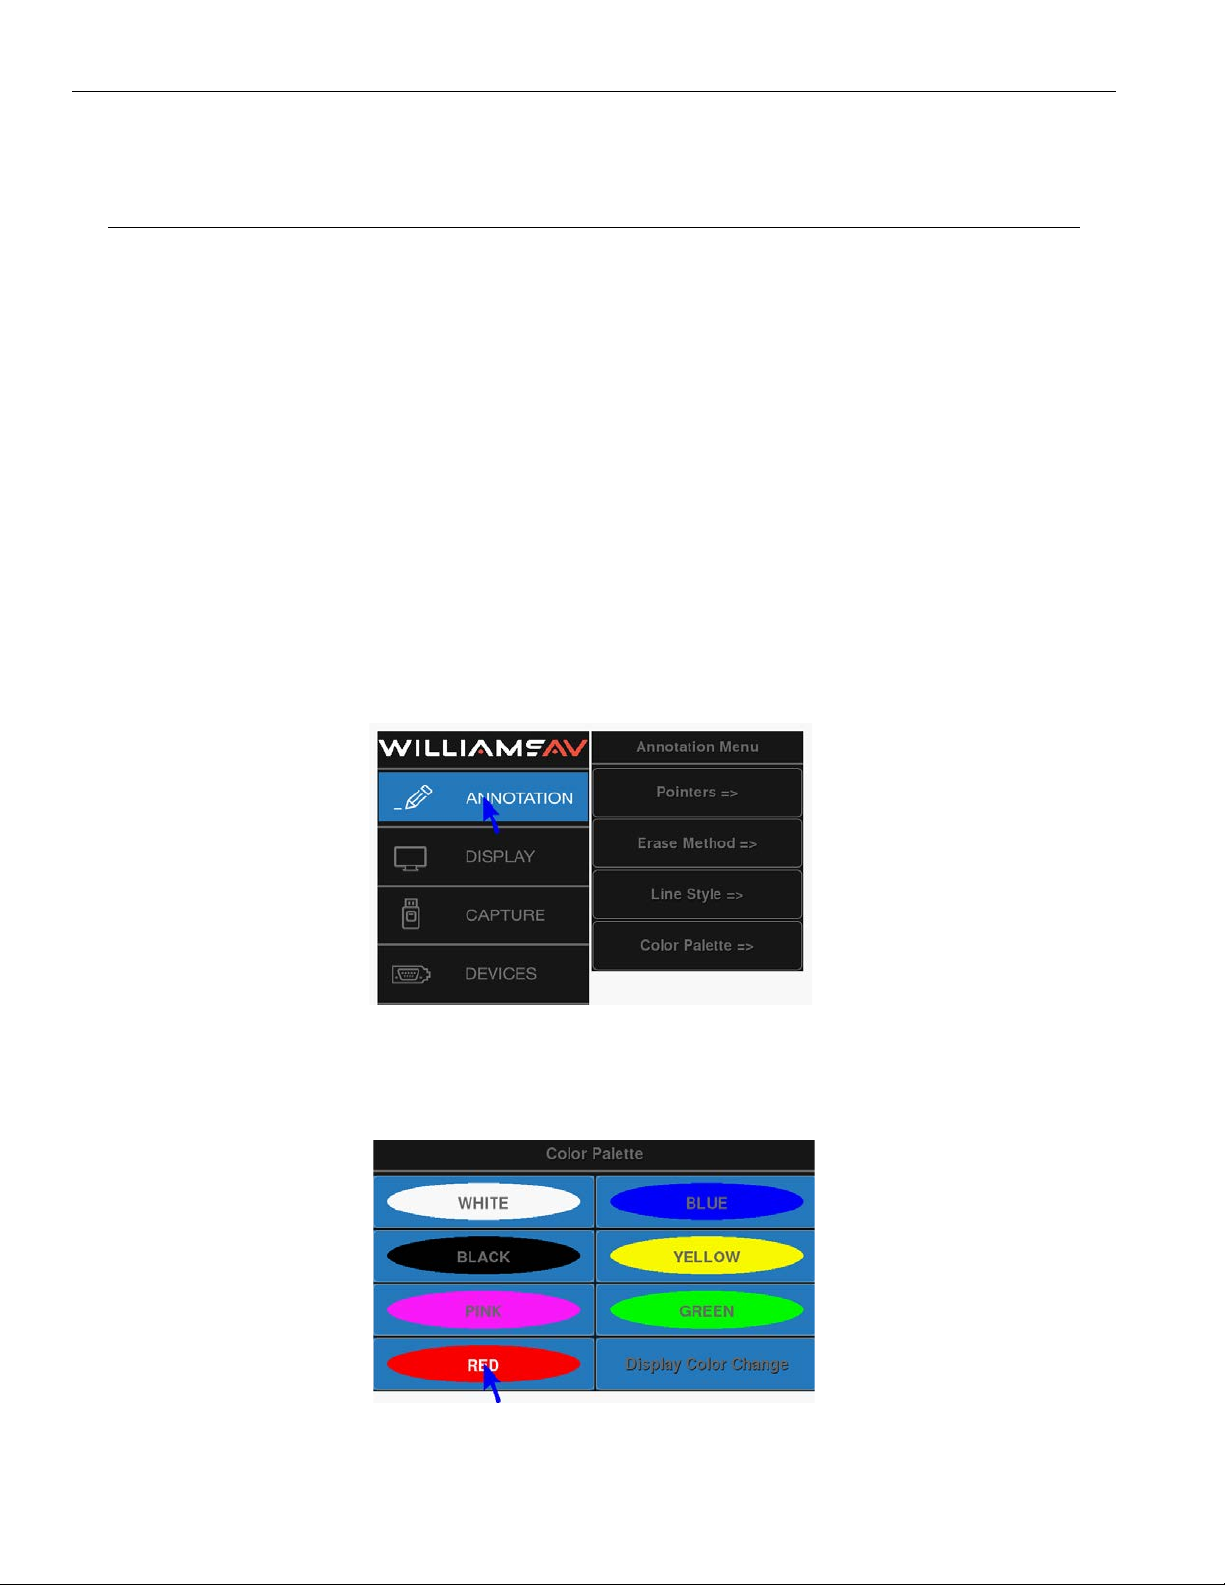
2. Select Annotation. The Annotation Menu appears.
Annotation Menu
3. Select Color Palette. The Color Palette Menu next to the Main Menu.
30
Color Palette with all colors selected.
4. Select the color or colors that you would like to have available during the presentation.
Page 31

Annotation Pro
NOTE: These selections toggle on and o. Selected colors are sur rounded by a solid white fill.
You must select a minimum of one color. If you select only one color, you will not be able to deselect that color until
you select a second color in the menu.
5. Activate or disable the Display Color Change option.
If Activated, during presentations, a small block of color appears briefly in the lower-right of your display each time
you activate the Change Color command. Normally, the active pointer will indicate the current color, but if the pointer
is turned o, this small color block will show the current color instead.
NOTE: When enabled, this option will be surrounded by a white fill. If disabled, no color block will appear when the
Change Color command is activated. Broadcasters and certain other presenters may desire this setting.
6. Exit the Color Palette Menu.
From the Touch Screen
1. Tap the pencil icon.
2. A bar will open at the top of the screen. You may select line thickness and color from here.
Selecting a Brightness Level
You can select a brightness level for all of the markers on an overlay. Adjusting the brightness creates optimum
contrast between graphics and the video image. The brightness selection is only applied to the current overlay, so
there can be a dierent brightness level for each of the overlays.
Brightness is best controlled from the keyboard, but you can also adjust bright ness with other devices using the
menu system or the tablet template. Key board and tablet settings override any settings made in the menu system.
Be sure to display the overlay before adjusting the brightness so you can see the eects of the change.
From the Tablet
Activate the Brightness Command by pressing the tip button on the Brightness scale.
Selections to the left decrease brightness, while selections to the right increase brightness.
From the Keyboard
Repeatedly activate the Change Brightness command (F10) until the mark ers display the desired brightness level.
NOTE: You can move backwards through the brightness levels by activating the reverse toggle command (Shift +
Function Key).
Exit the Brightness mode by selecting any other function.
From the Menu System
1. Activate the menu system. The Main Menu appears.
2. Select Annotation. The Annotation Menu appears.
31
Page 32
Annotation Pro
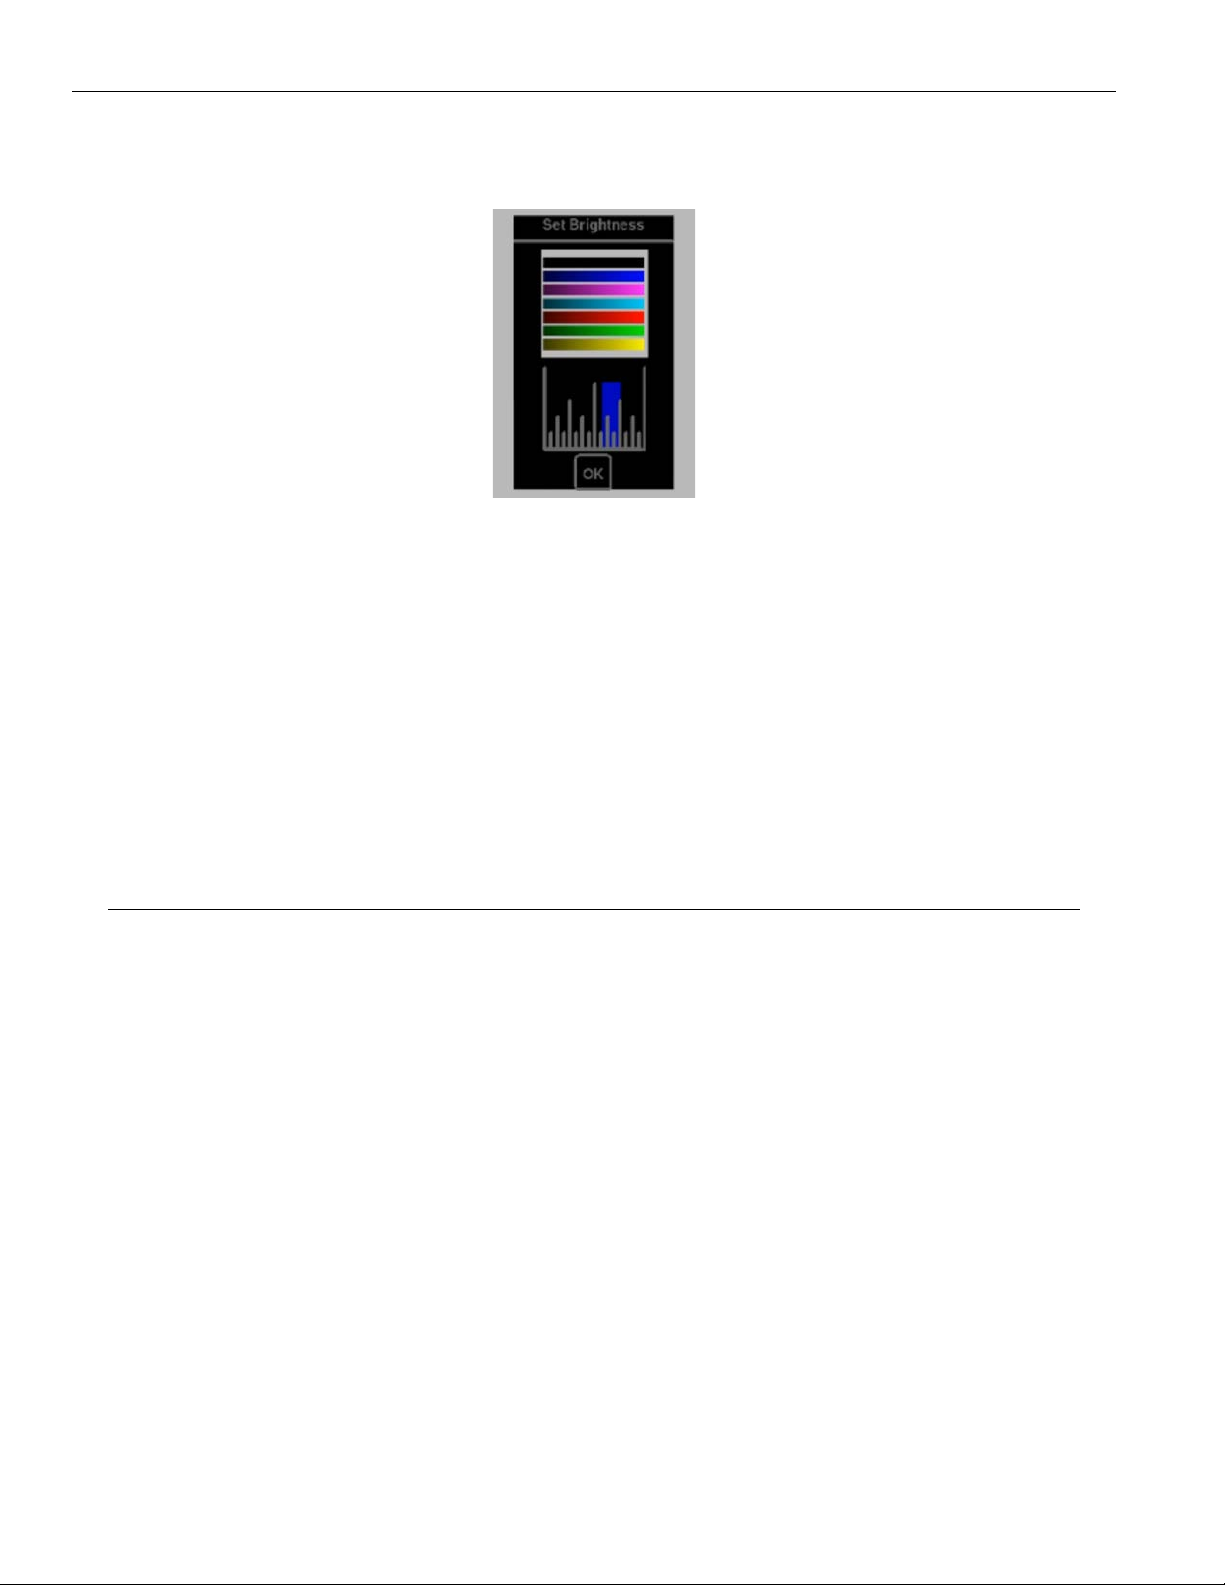
3. Select Brightness. The Set Brightness dialog appears in place of the Main Menu, featuring a transparent
background that allows you to adjust brightness in accordance with your image.
Set Brightness Dialog
4. Select the level of brightness you desire.
NOTE: Moving the indicator to the left will decrease brightness of Annotation Pro markers and menus. Moving the
indicator to the right will increase brightness. If the brightness is set too high for the display, the markers will
smear across the image.
5. Click the OK button to exit the menu.
Zap Icon Toggle
This feature is currently disabled on all systems, but may be returning in the future. If your software is displaying this
menu option, no changes are occurring based on your choice.
Using Markers
Overview
The Annotation Pro features a variety of graphics, called markers, which you place over a video image to draw
attention to or explain details of the image. The markers available include freehand drawing and a variety of pointers.
With the keyboard installed, you can type text, draw straight lines, and anchor a date/time label. You can place any
combination of these markers on the screen, in any combination of available colors. Such a combination of markers
is called a marker overlay. With the keyboard installed, you can save and retrieve up to 25 dierent marker overlays.
This section covers marking procedures to follow while making a pre sentation. It is assumed that you have made
set-up selections sometime before your presentation.
Assigning Marker Colors
The color that the active marker displays is the color that the marker will be anchored in. You can anchor markers of
dierent colors on a single overlay.
The colors available during a presentation are based on those activated in the Color Palette menu.
If the color of the markers does not change from black, the brightness level is too low and must be increased before
selecting the color.
From Any Controller
Activate the Change Color command from your control device.
All markers anchored from this point on will appear in the newly selected color.
NOTE: If the pointer has been disengaged, and the Display Color Change option in the Color Palette Menu has been
32
Page 33
activated, a small block of color will briefly appear in the lower right of the screen to help you identify the new
marker color.
Assigning Line Styles
You can change line style directly from the key board. You can also change the line style from other devices by
accessing the menu system. When the keyboard is installed, you can only access the menu system from the
keyboard.
When a line style is selected from a marking device, the Annotation Pro keeps track of the style and the device. The
device will draw with that style until a dierent style is selected. This allows each marking device to have its own line
style. You can have drawn lines of dierent styles on a single overlay. Once you draw the line, or anchor a straight
line, you cannot change that line style. How ever, you can erase or undo the drawing and begin again.
From the Keyboard
1. Activate the Line Style command. A small sample of the active line style will appear briefly in the lower-right hand
corner of the screen.
2. Repeatedly activate the Line Style command until the desired line style appears in the on screen sample. You can
scroll backwards through the line options, by activating the Reverse Toggle command.
3. All lines drawn from this point on will appear in the newly selected line width and style.
From the Menu System
1. Activate the menu system. The Main Menu appears.
Annotation Pro
2. Select the Annotation option. The Annotation menu appears.
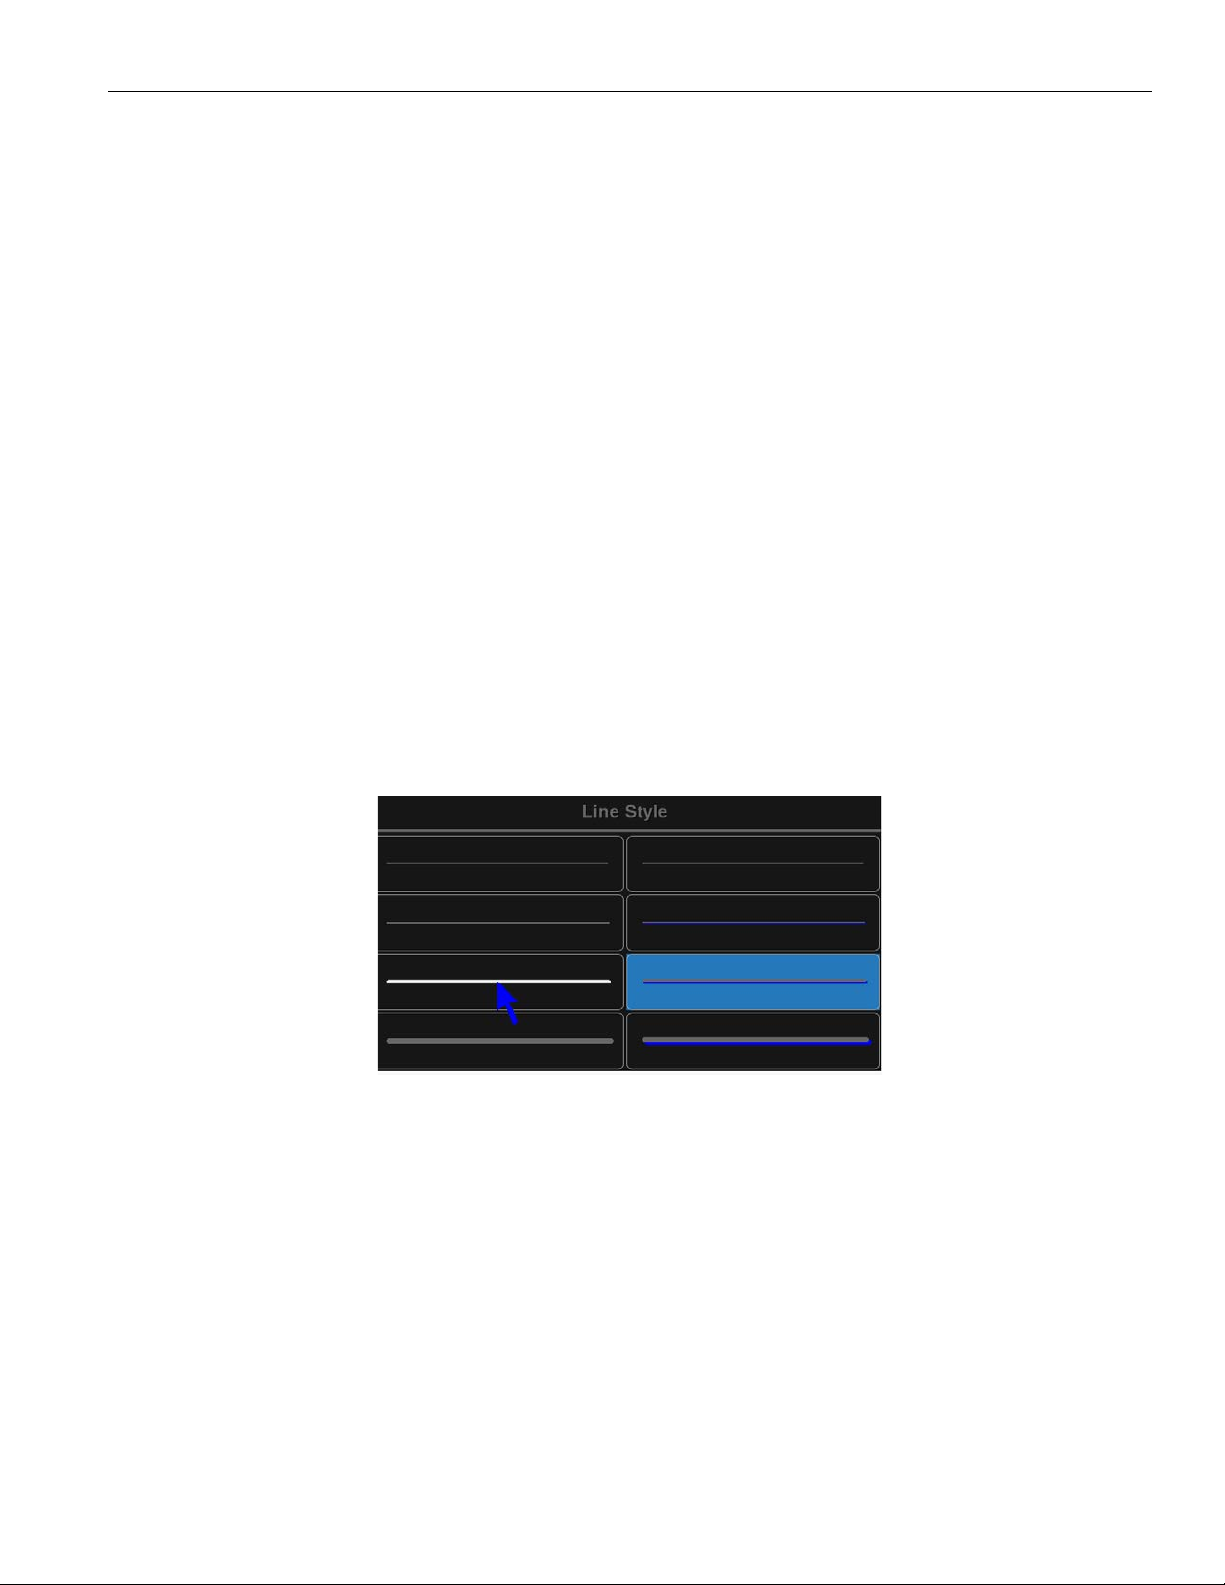
3. Select the Line Style option. The Line Style Menu appears.
Line Style Menu
4. Select the desired line thickness, with or without a drop shadow.
NOTE: Drop shadows are always black, therefore, black lines do not have drop shadows.
5. Exit the menu system. All lines drawn from this point on will appear in the newly selected line width and style.
33
Page 34

Annotation Pro
Entering the Marking Mode
The Annotation Pro is in the marking mode by default. The only time it is not in marking mode is when a menu is
displayed. In the Marking mode, the image from the video source is displayed along with any stored markers. An
active pointer is also displayed, unless it was disabled during setup.
Drawing
You can draw on the Annotation Pro’s overlay simply by beginning to draw. The drawing feature allows you to circle
important parts of the image, write on the image, or underscore particular parts of text. You can draw freehand
curves or straight lines.
To draw, you can use your finger on a touch screen. You can also use other mouse devices to draw. You cannot
freehand draw using the keyboard, but you can use it for straight line drawing.
Before drawing, you may change the drawing line color or the width and style of the drawing line.
Drawing Freehand
1. Position the active pointer (if one is displayed) anywhere on the video image where the drawing is to begin.
2. Activate the Draw command from your particular drawing device.
3. Reposition the active marker (if one is displayed) and repeat the above procedures for another drawn line.
Straight Line Drawing
NOTE: This feature works only using the keyboard.
1. Activate the Straight Draw command from the keyboard. A cursor appears representing the first endpoint of the
straight line.
2. Position the cursor anywhere on the screen where the line is to begin, and anchor it. A second cursor appears,
joined by a line to the first endpoint.
3. Position the second cursor where the line is to end and anchor it. The line segment is complete.
4. If desired, draw another straight line by positioning the new active cursor and anchoring it.
Selecting Pointers
You select a pointer type while the pointer is active, or positionable. After you anchor the pointer, you cannot change
that pointer’s type. However, you can erase or undo the anchored pointer and begin again.
From the Keyboard
Repeatedly activate the Pointers command until the desired pointer type appears on screen. You can scroll
backwards through the pointer options, by activating the Reverse Toggle command. The pointer you selected
appears on screen, ready for positioning.
From the Menu System
1. Activate the menu system. The Main Menu appears.
2. Select the Annotation option. The Annotation menu appears.
34
Page 35
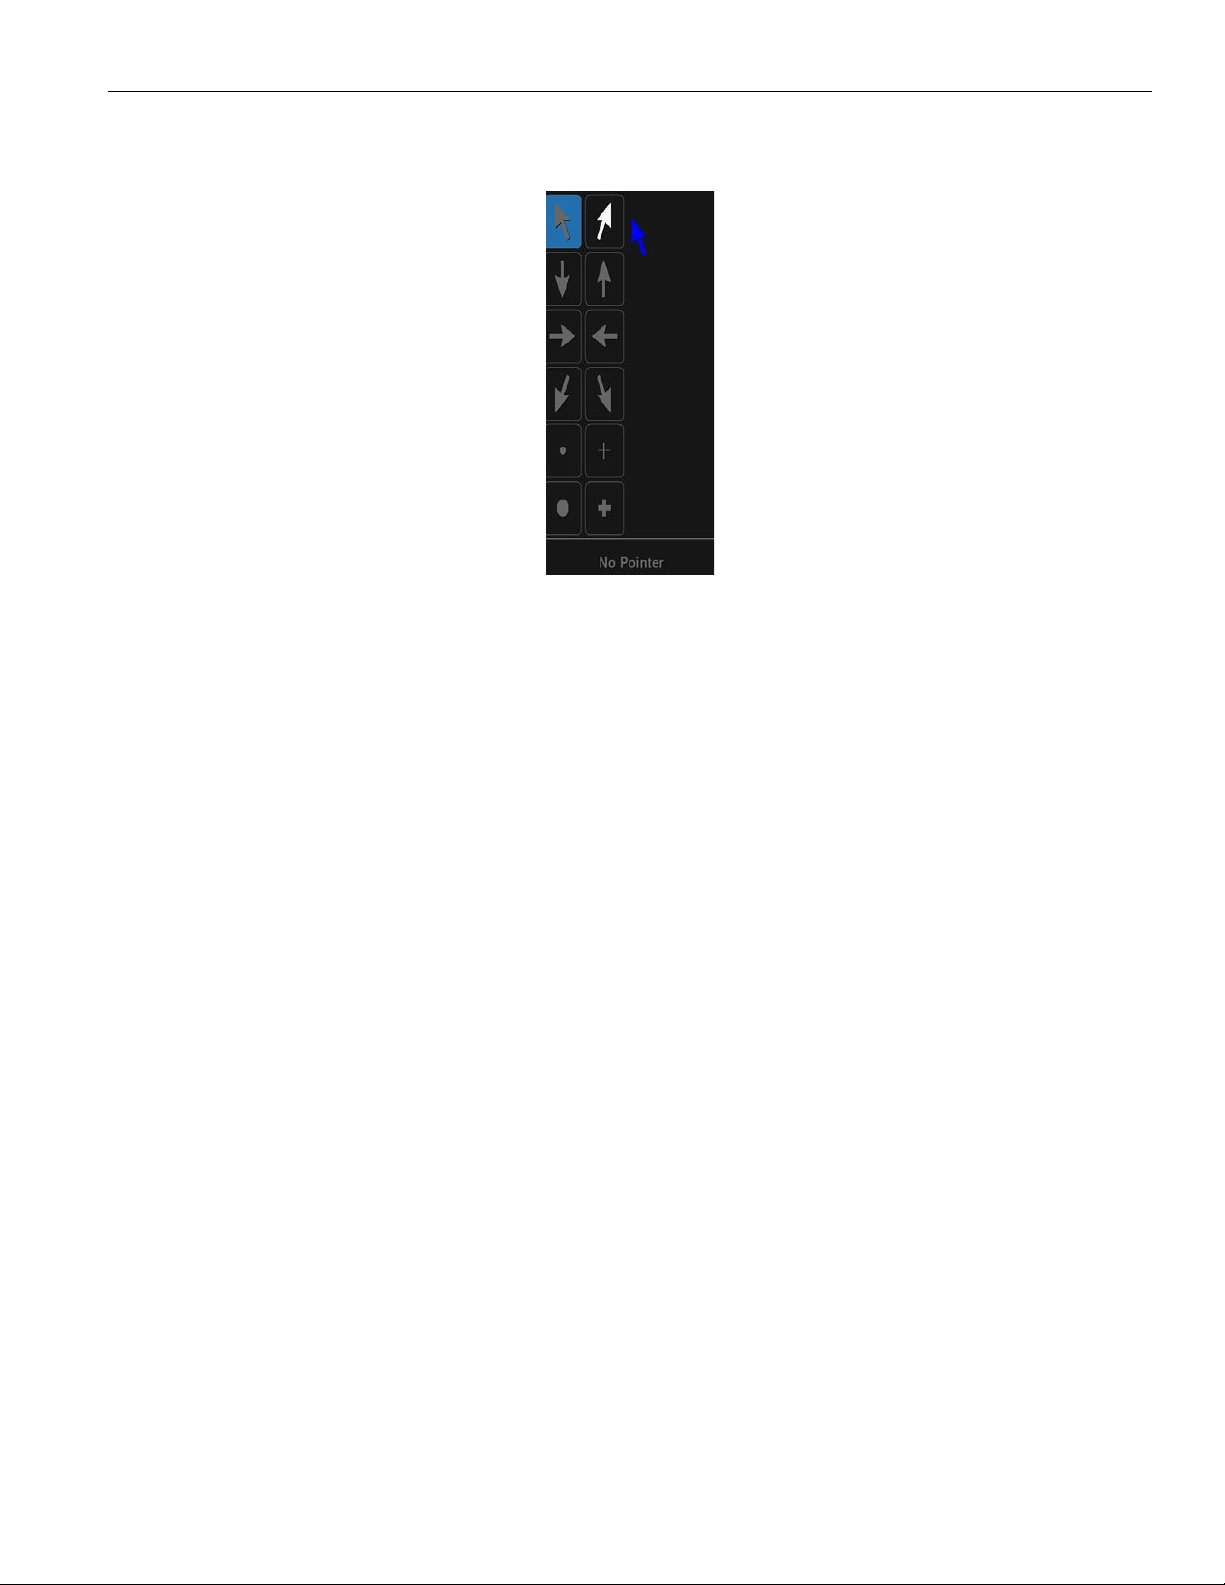
3. Select the Pointers option. The Pointers dialog appears.
Pointers dialog
4. Select a pointer type. The active option displays a white fill. Selecting No Pointer turns the pointer o.
Annotation Pro
5. Exit the menu system.
Creating a Pointer
You can move the pointer around the screen, using it to direct the viewer’s attention without anchoring it. You
can also position and anchor several point ers on the overlay, giving you the opportunity to point in a more lasting
man ner on several areas of the image.
Before using or anchoring a pointer, you may want to select a new pointer type. Or you may change the pointer
color.
From Any Controller
1. Position the pointer anywhere on the video image to direct attention to an image detail.
2. If desired, reposition the same active pointer anywhere on the image to make your second point, and continue as
often as desired.
3. If desired, anchor the active pointer. A new active pointer appear on screen, identical to the first.
NOTE: Active pointers are not displayed for touch screens, only anchored markers.
4. Repeat any of these steps as often as desired.
Turning the Active Pointer On/Off
Sometimes a presenter chooses not to have the pointer showing during a pre sentation. This command allows you to
turn the visibility of the pointer o or on. When the active pointer is turned o, you can still anchor pointers.
NOTE: Since touch screens and whiteboards do not display active pointers, you do not need to use the Pointer On/O
command with those devices.
From the Keyboard
Activate the Pointer On/O command. The pointer disappears.
To make the pointer reappear, repeat the procedure.
NOTE: To turn o all active markers, use the keyboard Active Marker On/O command.
35
Page 36

Annotation Pro
From the Menu System
Pointers are turned o in the same dialog where they are selected.
Typing Text Labels
Anytime you press an alphanumeric key on the keyboard, a text label begins. Before you anchor a line of text, you
can choose to display it in one of six fonts, each of which oers various sizes. These fonts are: TI Roman (4 sizes);
Helvetica (4 sizes); TI Dom Casual (4 sizes); Fargo (3 sizes); Symbol (1 size); and Map (1 size). The Symbol and Map
fonts are documented in the Appendices.
1. Position the active marker anywhere on the image.
2. Create a line of text by pressing the desired text keys.
NOTE: Do not anchor this line of text yet, since only an active line of text will display the font options.
3. Select the desired font by repeatedly activating the Fonts command until the font appears on screen. You can
scroll backwards through the font options, by activating the Reverse Toggle command.
4. Select a font size by repeatedly activating the Font Size command until the correct size appears on screen. You
can scroll backwards through the size options, by activating the Reverse Toggle command.
5. Turn the text background on or o by activating the Text Back ground On/O command.
NOTE: The color of the background is always blue.
6. Position the active label anywhere on the video image, then anchor the label. The line of text is anchored. You
can anchor a new line of text imme diately below the previously anchored text line by not moving the cursor. Or
you can position the second line of text anywhere on the screen.
NOTE: To create a paragraph of several lines of text, remember that text does not wrap, so press Enter or Drop at the
end of each line.
7. Exit text typing mode by pressing any other function key.
Displaying the Date/Time
NOTE: This feature works only using the keyboard.
You can place an overlay with the current date and/or time, depending on which display mode you selected in the
Set Date/Time Menu.
While active, the date/time is represented by an icon. The numerical date and/or time will appear as soon as you
anchor the icon. You can anchor only one Date/Time icon on each overlay.
To reposition an icon, activate the command again. The old icon disappears and the new icon appears, ready for
positioning.
1. Activate the Show Date/Time command. A date/time icon appears.
2. Position the date/time icon anywhere on the video image.
3. To select a solid or transparent label background, activate the Text Background On/O command.
4. Anchor the date/time icon. The current date/time icon appears.
5. A cursor appears on screen, ready for the next action.
Clearing All Markers
Follow these instructions to clear the entire screen of markers. If you need to temporarily remove the marker overlay,
then use the Marker Overlay On/O command.
36
Page 37
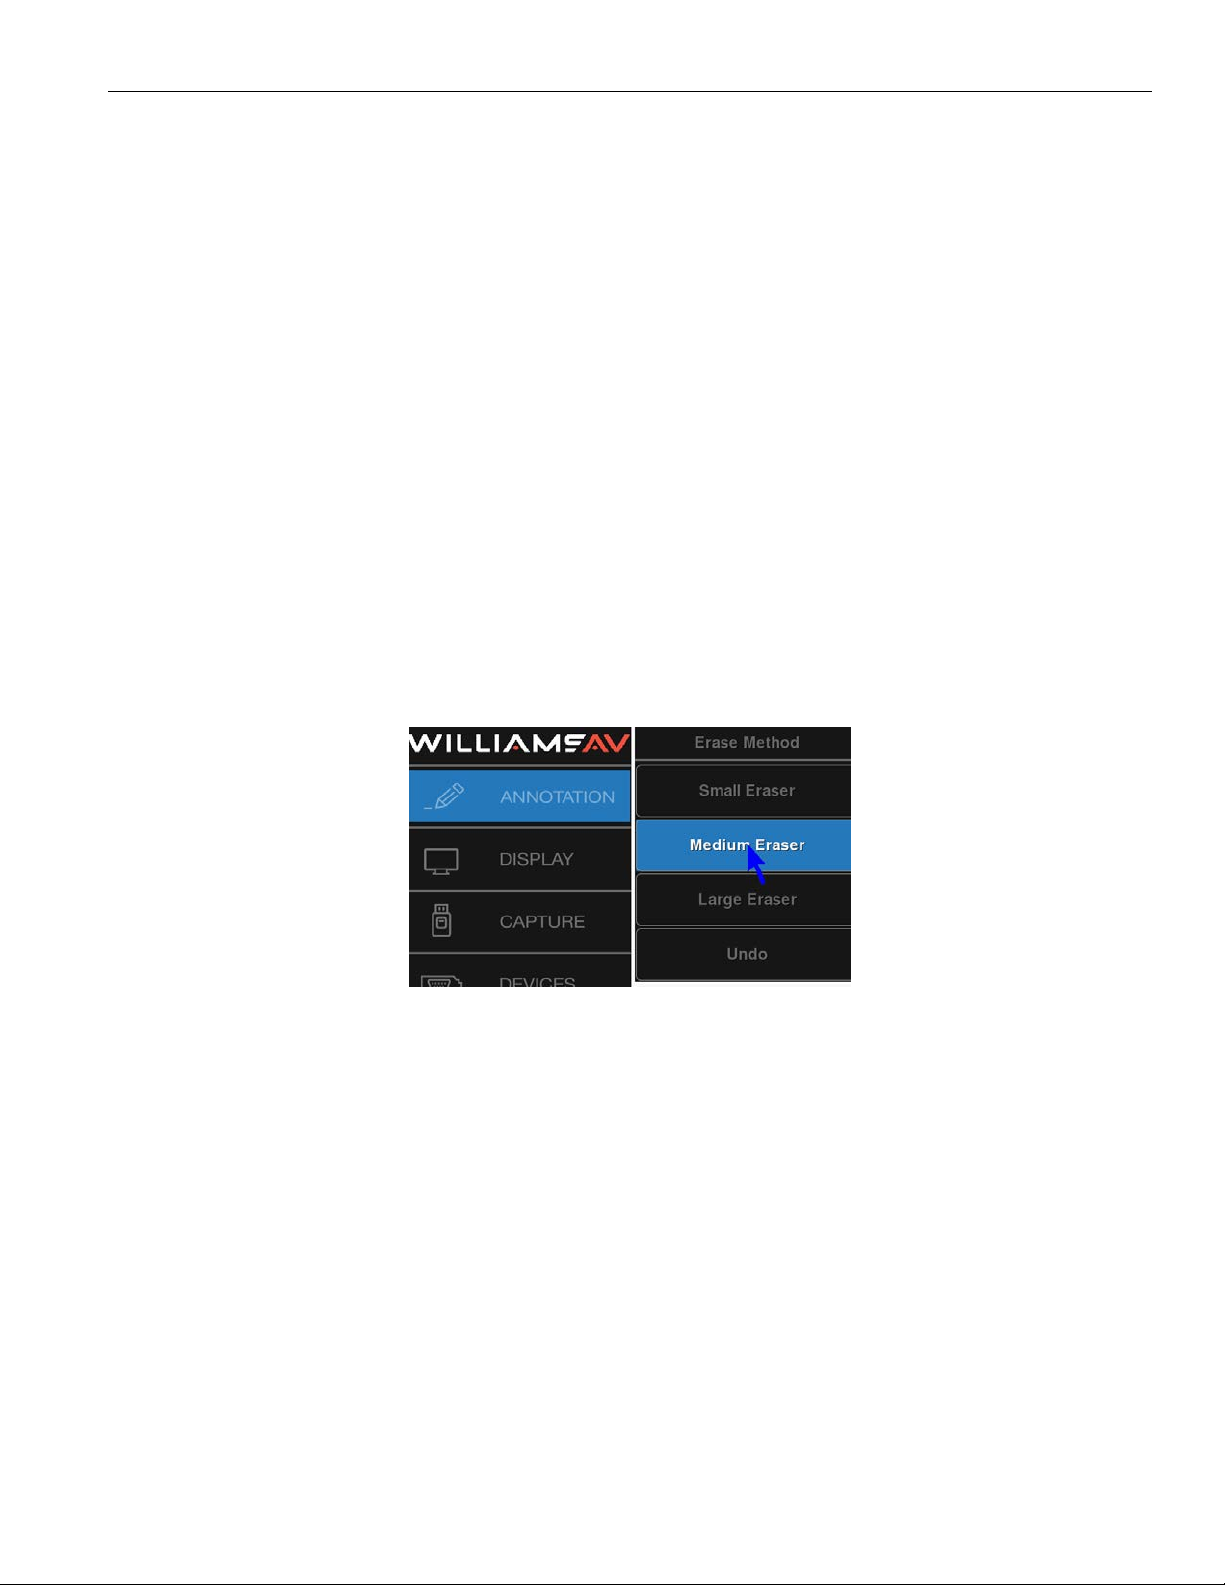
Activate the Clear command for your particular controller. All markers disappear. An active pointer remains on
screen unless the pointer has been disengaged.
Undoing a Marker
To undo a marker, beginning with the most recently anchored marker or line segment. You can repeat this command
as often as needed until the screen is clear of markers.
When you are in Undo Mode, you cannot erase markers.
Activate the Undo command for your particular controller. The most recently anchored marker disappears. An active
pointer remains on screen unless the pointer has been disengaged.
Erasing Markers
Follow these instructions to erase markers from the overlay, wiping them clear like a traditional eraser. You activate
Erase mode from the menu system, but you erase the markers using your drawing device.
When you are in Erase mode, you can no longer undo markers.
NOTE: Entering Erase mode clears markers from any overlays that you might have stored.
Activating Erase Mode
From the Main Menu
1. Activate the menu system. The Main Menu appears.
2. Select the Annotation option. The Annotation menu appears.
Annotation Pro
3. Select Erase Method. The Erase Method menu appears.
Erase Method Menu
4. Select an eraser size: Small, Medium, or Large.
NOTE: The larger the eraser size, the more area you can clear in a single motion. If you do not select an eraser size, the
Annotation Pro will default to Medium.
5. Exit the menu system.
Erasing
Be sure you are in Erase mode before following these steps. See Activating Erase Mode for instructions.
1. After marking, activate the Undo/Erase command for your particu lar controller. A square eraser appears on
screen, ready for positioning.
2. Activate the Draw command, and drag the eraser over the markers. The markers disappear as you wipe. When
you lift the drawing device, the Annotation Pro closes the eraser function, and enters Marking Mode. If you need
to erase again, repeat these steps.
37
Page 38

Annotation Pro
Using The Chalkboard
You can mark on a solid background, or chalkboard, instead of the video image. When turned on, the chalkboard will
continue to be displayed, even when you select a new marker overlay. The chalkboard will remain on screen until
you turn it o. The chalkboard is most easily selected from the menu system or keyboard.
Activating the Chalkboard
Use these procedures to turn on the chalkboard.
From the Keyboard
Activate the Chalkboard On/O command. The chalkboard appears, along with any markers you may have already
anchored.
To close the chalkboard, press the Chalkboard On/O command again. The video source returns, along with any
markers you may have anchored on the chalkboard.
From the Menu System
1. Activate the menu system. The Main Menu appears.
2. Select the Display option. The display menu appears.
3. Select the Video Source option. The Video Source menu appears.
4. Turn the Chalkboard option On.
5. Exit the menu system. The chalkboard appears, along with any markers you may have already anchored.
6. To exit the Chalkboard, repeat these steps, but turn the Chalkboard option O.
7. The video source returns, along with any markers you may have anchored on the chalkboard.
Saving and Storing Images and Video
Overview
The Annotation Pro makes it easy to access annotated or captured images, giving you newfound flexibility in the
cre ation and sharing of your presentations.
It is now easy to capture images, with or without annotations, by either saving or printing them. Previously saved
images can be retrieved from the storage device at will. You can also retrieve an image created on computer, as
long as it conforms to the file specifications.
Capture Options
A captured frame or field can be saved as an image to a USB memory device, to a computer running TFTP, or an
SMB share. Files can be saved in the bitmap format (bmp) or as jpg. The captured frame will be the size of the
screen resolution.
The File Defaults menu selection allows you to set the default settings for how the images are saved. It includes the
directory, name and sequence numbering. This allows for fast saving with no dialog boxes involved.
38
1. Activate the menu system. The Main Menu appears.
Page 39
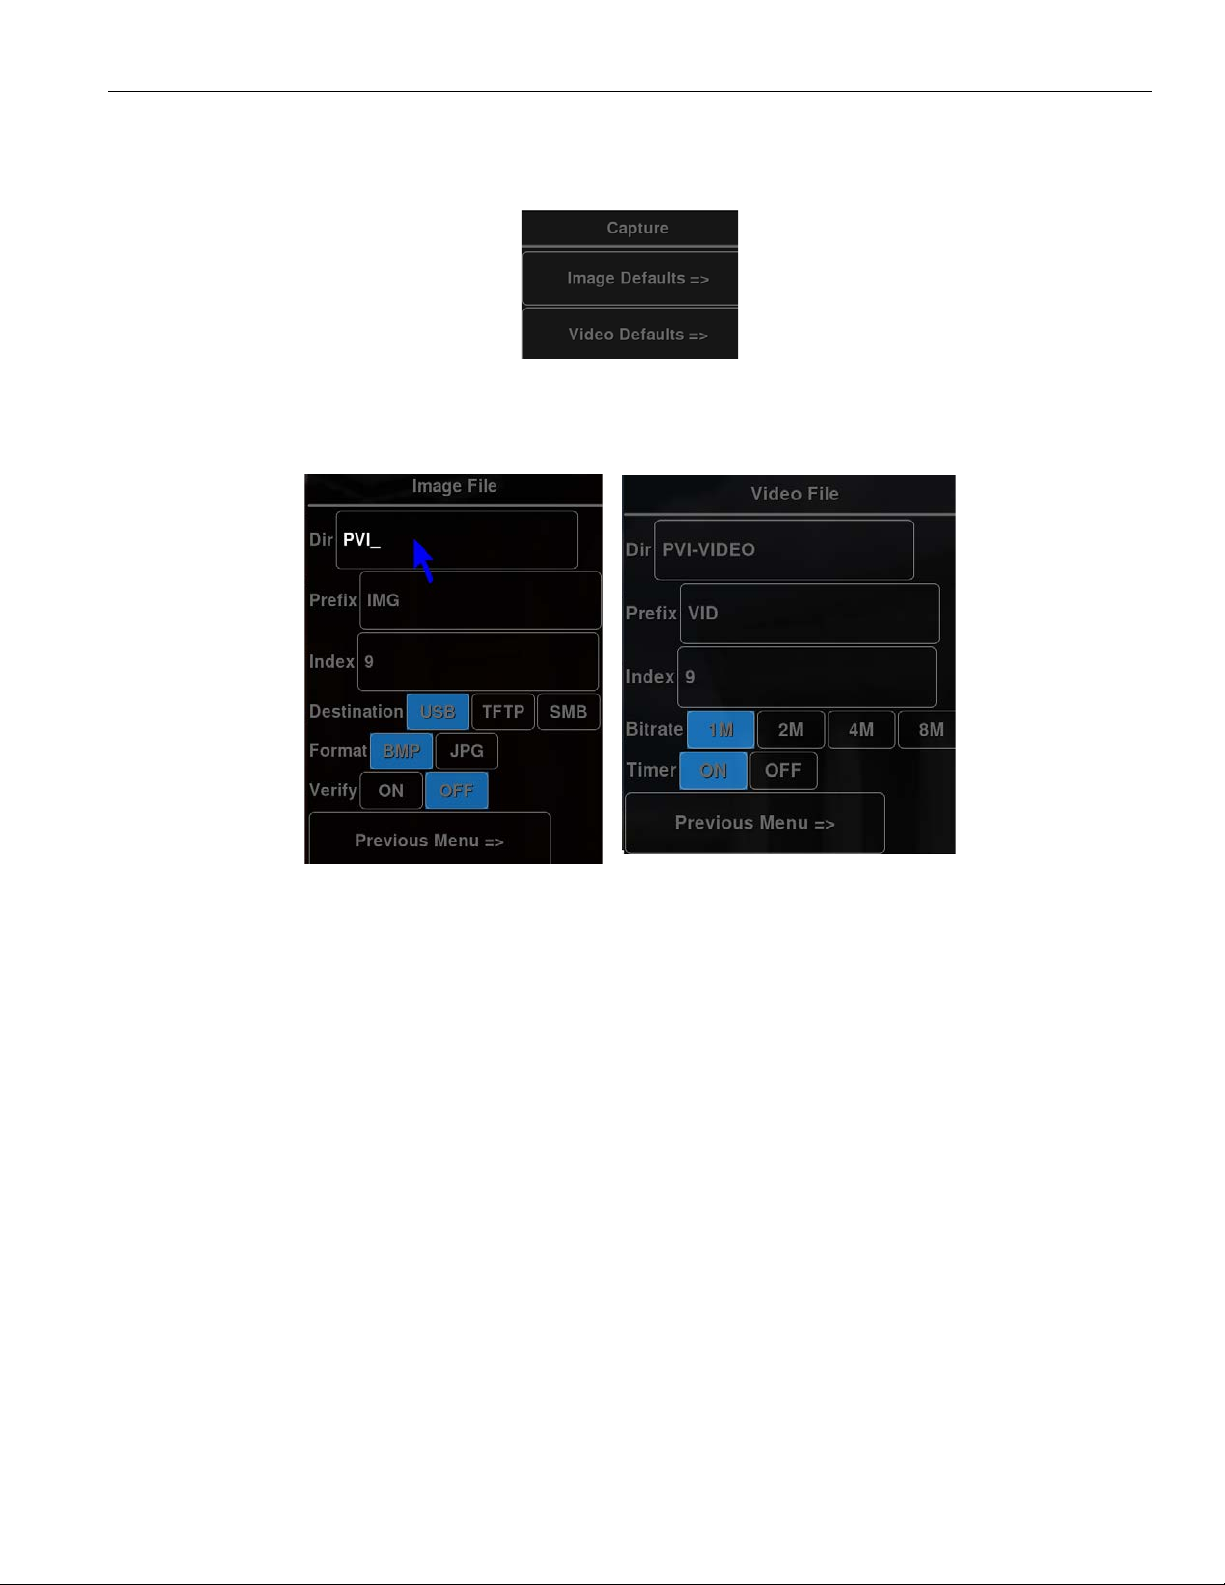
2. Select Capture. The Capture menu appears.
Capture menu
3. Select Image or Video Defaults. The selected menu appears.
Annotation Pro
Image File menu and Video File menu
4. In the Dir field, enter the directory name where you wish to save the file. It must be 8 alphanumeric characters or
less, no spaces and no subdi rectories. A default is entered automatically.
5. In the Prefix field, enter whatever letters you want each filename to begin with. The prefix must be 5
alphanumeric characters or less, no spaces. The default is entered automatically.
6. In the Index field, enter the number to start numbering from. Each time an image is saved, the number will
increment. The default is 1. The num bering is remembered by the Annotation Pro, even through cycling of power.
An example filename is img1.bmp. The next images would be img2.bmp, img3.bmp, and so on.
7. For images, select if the Destination to save is a USB, TFTP Location, or SMB location. Select if the image Format
should be a BMP or JPG. Turn Verify on if you want to be prompted that the image has saved.
8. For video, select the Bitrate of the output. Turn the Timer on to display a timer on screen and on the recorded
footage.
9. Exit by selecting the Previous Menu button.
10. Exit the menu system.
Freezing Video
If video files are being shown as part of a presentation, the Annotation Pro can freeze it at any point so you can
draw attention to a particular frame’s contents.
39
Page 40

Annotation Pro
1. Activate the Freeze command in one of the following ways:
• Touch screen: Touch the Top-Right command area.
• Keyboard: Type ALT+F1.
The current video frame will be frozen on the screen. This command does not actually stop the video from playing.
You will need to activate the Pause or Stop button on your video playback unit to do that.
2. You can now annotate the frozen image.
3. You can Save or Print the image at any time.
4. Activate the Freeze command again to toggle the command o. The running video will be displayed again.
Setting the Destination for Saved Files
After setting up the file defaults for saving images, you will want to select the destination for your saved files. Files
can be saved to USB memory devices, a computer running TFTP, or an SMB share.
1. Activate the menu system. The Main Menu appears.
2. Select Capture. The Capture menu appears.
3. Select the Destination as USB, TFTP or SMB. The Annotation Pro will use your selection whenever you activate
the Save command from the touch screen, or keyboard.
4. Exit the menu system.
Setting the Verify Option
In circumstances where it is important to know that a file has been successfully saved or printed, this setting allows
you to verify the end result. If you turn Verify on, a dialog will appear after each save or print command, asking you
to verify that the image was successfully saved or printed.
1. Activate the menu system. The Main Menu appears.
2. Select Capture. The Capture menu appears.
3. Set Verify On or O.
4. Exit the menu system.
Saving Images
The Annotation Pro can save displayed images in the following ways:
• moving images can first be frozen and then saved.
• a single frame of a moving image can be captured “on-the-fly” as it goes by on the screen.
• any still image can be saved.
The image can be saved to a USB memory device or to another computer using TFTP or SMB (Windows Share).
The image is saved based on the settings you’ve chosen. Files are saved in bitmap format, 24 bit true color with the
extension .bmp. The captured frame will be the size of the screen resolution.
The USB memory device must be a single device, like a memory stick. It cannot be connected through a multiple
port memory card reader. It must also be format ted as FAT16 or FAT 32.
To save an image file to a USB device
1. Save the image file in one of the following ways:
• Touch Screen: Touch the Image Save command area (center-left).
NOTE: Be sure the Capture File Defaults has been set to USB. If you want to use the tablet or touch screen commands, be
sure to set the Destination to USB first.
40
Page 41

• Keyboard: Type ALT+F2. The ALT+F2 keyboard command is programmed to save to the USB device. The other
two commands are dependent on the Destination setting in the Capture dialog.
2. The image is saved to the USB memory device. A counter appears at the lower-right portion of the screen,
indicating the percentage of the image saved to the USB storage device. When the counter reaches 100, it
disappears. The system is then ready to save another image. The name of the file is determined by the settings in
the File Defaults dialog.
To save an image file using TFTP
To save a file using TFTP, you must first install a TFTP server on the computer which will receive the file(s). See
Configure TFTP Settings.
The name of the file is determined by the settings in the File Defaults dialog.
1. Save the image file in one of the following ways. If you want to use the tablet or touch screen commands, be sure
to set the Destination to USB first.
• Touch Screen: Touch the Image Save Command area (center-left). Be sure that Capture File Defaults has been
set to TFTP.
• Keyboard: Type ALT+F6. The ALT+F6 keyboard command is programmed to save to the Computer where TFTP
is installed. The other two commands are dependent on the Destination setting in the Capture dialog.
2. The image is saved to the computer you have designated. A counter appears at the lower-right portion of the
screen, indicating the percentage of the image saved to the TFTP server. When the counter reaches 100, it
disappears. The system is then ready to save another image.
NOTE: Operation of the Annotation Pro will slow down during the saving process.
Annotation Pro
To save an image file using Windows Share (SMB)
To save a file using SMB, you must first install and setup Windows Share on the computer. See Configure Windows
Share (SMB) Settings.
The name of the file is determined by the settings in the File Defaults dialog.
3. Save the image file in one of the following ways:
• Touch Screen: Touch the Image Save Command area (default is center-left). Be sure that Capture File Defaults
has been set to SMB.
• Keyboard: Type ALT+F8. The image is saved to the computer you have designated. A counter appears at the
lower-right portion of the screen, indicating the percentage of the image saved to the computer. When the
counter reaches 100, it disappears. The system is then ready to save another image.
NOTE: Operation of the Annotation Pro will slow down during the saving process.
Retrieving Images
To retrieve an image file from USB
1. Retrieve an image in one of the following ways:
• Touch Screen: Touch the appropriate area if you assigned this command.
• Keyboard: Type ALT+F3.
2. The Get Image dialog appears. Select the image you wish to retrieve from the list that is presented. The image is
displayed on the screen.
To retrieve an image file using TFTP
1. Type ALT+F7 on your keyboard or touch the area on your touch screen if you assigned this command. The Get
Image dialog appears.
2. Enter the image index number for the image you wish to retrieve and select OK.
41
Page 42
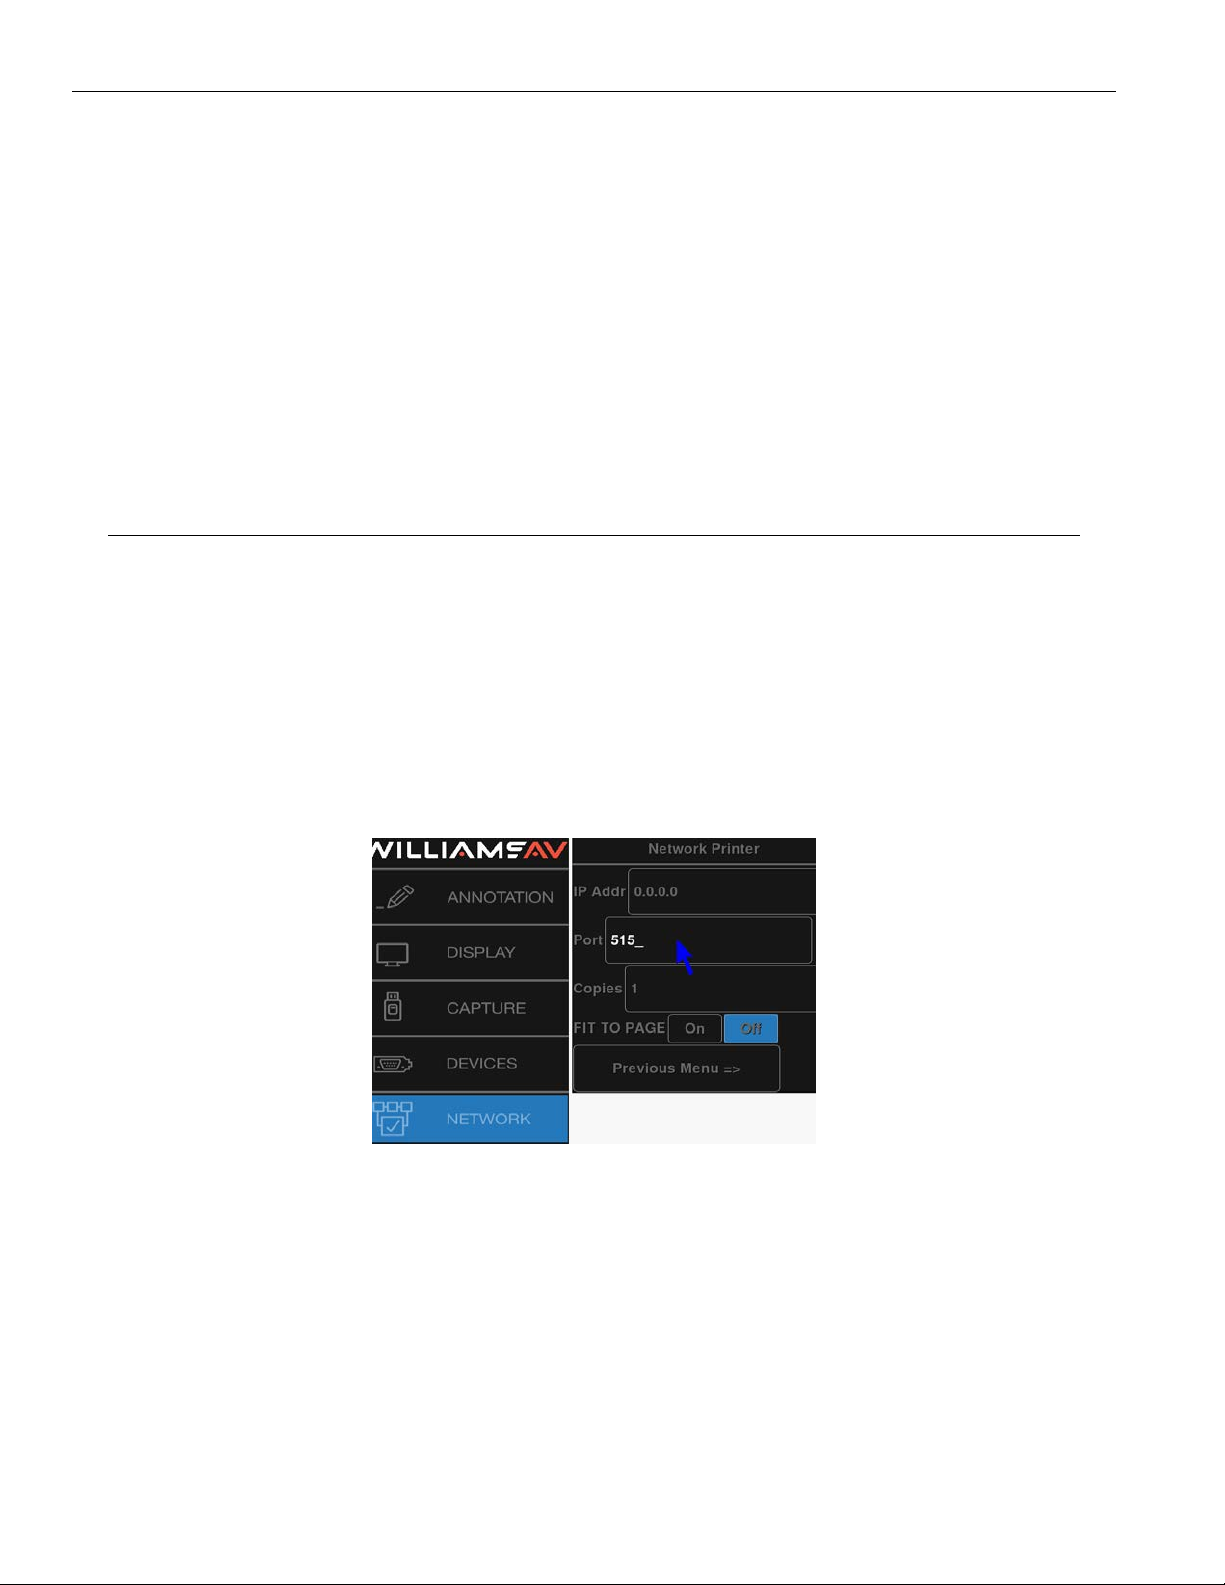
Annotation Pro
Only the number is to be entered. The prefix of the file is determined by the settings in the Image File dialog. If you
have changed the prefix setting in order to help group files for a particular purpose, make sure the prefix in the
Image File dialog matches the prefix of the file you are attempting to retrieve. The file extension must be .bmp.
The image is displayed on the screen.
To retrieve an image using Windows Share (SMB)
1. Retrieve an image in one of the following ways:
• Touch Screen: Touch the appropriate area if you assigned this command.
• Keyboard: Type ALT+F3.
The Get Image dialog appears.
2. Select the image you wish to retrieve from the list that is presented. The image is displayed on the screen.
Printing Images
The Annotation Pro allows you to print to a printer either directly or over a TCP/IP network. If you print directly, the
configuration requires a USB to Centronics cable. To print over a TCP/IP network requires an Ethernet cable and the
address of the printer.
Printer Setup
The Annotation Pro can print to a printer over a TCP/IP network. This section shows you how to set it up.
1. Activate the menu system. The Main Menu appears.
2. Select the Network option. The Network Menu appears.
3. Select the Printer option. The Network Printer dialog menu.
Network Printer menu
4. Enter the IP address of the printer. Check with your IT administrator if you don’t know this address.
5. Enter the Port number. This is usually 515.
6. Enter the number of copies to be printed each time you give the Print command.
7. Exit this dialog by selecting Previous Menu. The next time you give the Print command, it will use these settings.
Print an image
1. Print an image in one of the following ways:
• Touch Screen: Touch the appropriate area if you assigned this command.
• Keyboard: Type ALT+F4.
42
Page 43
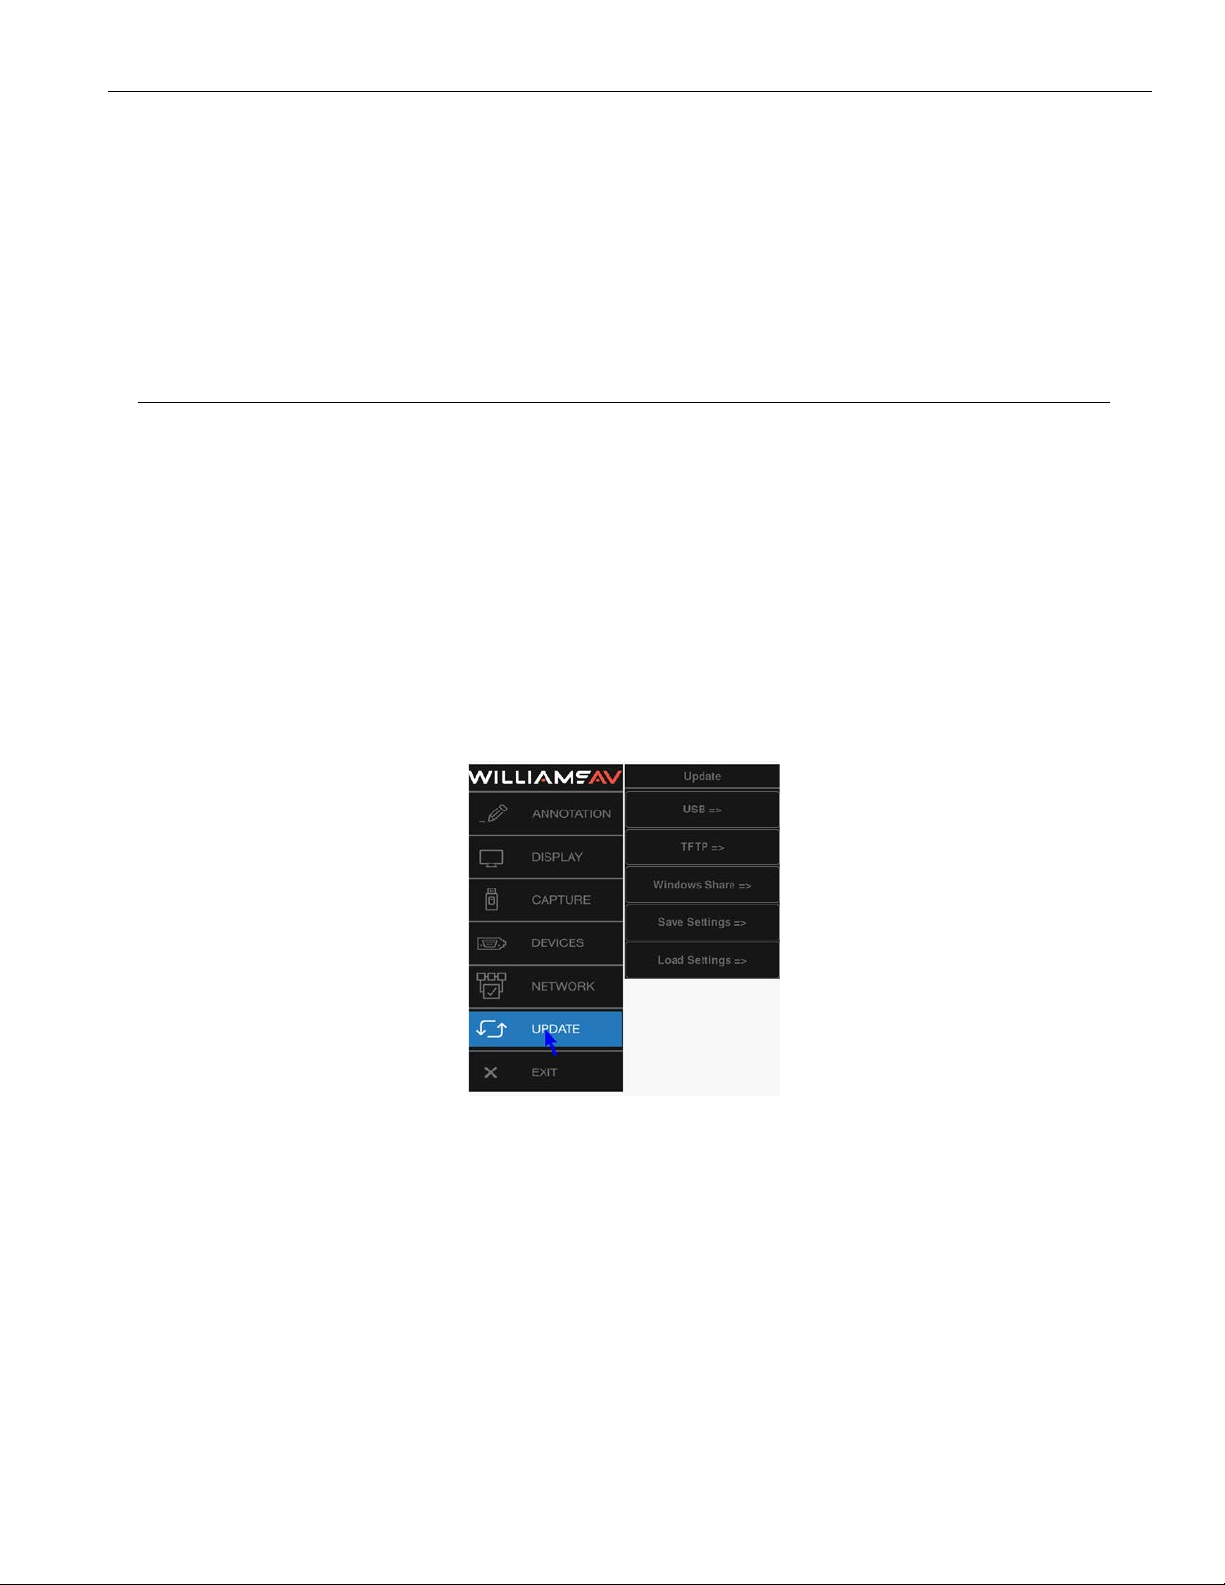
Annotation Pro
2. The image is sent to the printer. A counter appears at the lower-right portion of the screen, indicating the
percentage of the image sent to the printer. When the counter reaches 100, it disappears. The system is then
ready to print another image.
Verifying Saved or Printed Images
In circumstances where it is important to know that a file has been successfully saved or printed, you will want to
activate the Verify setting. Once it is active, each time you print or save a file, a dialog will appear, asking you to
verify that the image was successfully saved or printed.
Updating the Annotation Pro
The Annotation Pro firmware can be updated through USB or TFTP to provide new features, improve functionality or
bug fixes.
NOTE: The Annotation Pro must be connected to the internet to update, even when updating from a USB device.
Before activating the Update command, the update file must be copied into a directory on the flash drive or TFTP
location called BIIUPG. Create this directory directly under the main (Root) directory. It cannot be inside any other
folder. Ensure there is an internet connection to the Annotation Pro before starting the update.
1. Before activating the Update command, the update file must be copied into a directory on a USB flash drive or in
TFTP location named BIIUPG. You must create the BIIUPG directory in the root directory.
2. Activate the menu system. The Main Menu appears.
3. Select Update. The Update dialog appears.
Update dialog
4. Select USB, Windows Share or TFTP, depending on where you have placed the update file. The screen will
display various information as the update takes place. Then it will request that you cycle the power.
NOTE: Do not shut o the device, remove the update file, or restrict access to the update file until the update is finished.
5. Turn the Annotation Pro o, then turn it back on. The system will start up using the new firmware.
43
Page 44

Annotation Pro
Glossary
ACTIVE MARKER
-- the pointer, text label or date/time label which is positionable. Often used as a marker, but also used to position
the starting point of a drawing line. When the active marker is anchored, another identical active marker appears
on-screen. One active marker is always displayed, unless the marker has been turned o.
ANCHORED MARKER
-- the opposite of an active marker. An anchored marker has been placed in a fixed position on the Annotation Pro
overlay and cannot be moved again. How ever, anchored markers may be erased or cleared.
BACKGROUND
-- text background refers to the area immediately surrounding a line of text or a text label. For video background, see
Chalkboard.
BLOOM
-- markers or text which enlarge or blur on the monitor due to excessive brightness.
BUTTON, TABLET
-- the square or rectangular zone on the tablet Menu Strip that represents a Annotation Pro function. When this zone
is clicked on with the pen tip, that func tion is engaged.
CHALKBOARD
-- the solid area behind the Annotation Pro markers when in the Chalkboard mode. Presenters may choose a source
background or a solid background.
CLEAR
-- removing all the overlay of all markers at once. A single active marker will remain on-screen unless the marker has
been disabled.
CLICK
-- quickly depressing and releasing a button on the Annotation Pro auxiliary controller, as opposed to a press of the
button.
COLOR PALETTE
-- a user-defined group of colors which may be attributed to each active marker before anchored. From 1 to 7 colors
are available.
COMM PORT
-- a serial port used for communications. Serial devices that connect to these ports (such as a mouse or touch screen),
send and receive data in single bits of information one after the other, thus the term serial.
CONNECTOR
-- hardware installed on cable ends to provide cable attachment to an input or output device. Input and output device
ports which mate with this hardware are also called connectors.
CONTROLLER
-- a device that controls the selection, positioning, anchoring and clearing of markers on the Annotation Pro overlay.
Some other compatible controllers are most touch screens and certain mouse devices.
DRAW
-- freehand drawing or writing over a video or computer image.
44
DROP SHADOW
-- a shadow on drawing lines, or straight lines for the purpose of creating a line that stands out from the video image.
Most colors have a black drop shadow. Black has no drop shadow.
ERASE
-- remove markers from the overlay, rather than undo them using an on screen eraser. Erasing has the same eect
as erasing with a pencil or chalkboard eraser; only the markers you touch (or parts of them) will erase.
Page 45

Annotation Pro
FONT
-- a particular style of text such as Helvetica or Times Roman. The fonts installed in the Annotation Pro are available
in one or more sizes.
ICON/BUTTON, TABLET
-- see button, tablet.
MARKERS
-- pointers (arrows, cross hairs, dots), date/time labels, freehand draw ings and straight lines which can be placed and
anchored on a marker overlay.
OVERLAY
-- a combination of one or more markers placed on the screen using the capa bilities of the Annotation Pro. These
markers overlay a chosen video image. While the markers are visible, the actual overlay is invisible, allowing you to
mark directly on top of a video image (or solid background if selected in the menu system).
POINTERS
-- the dierent arrows, cross hairs and dot pointers which may be selected and placed on a overlay, in any number
and in combina tion with other markers. Pointers are considered markers. However, not all markers are pointers.
PRESS
-- on the keyboard, the action of pressing then releasing the function key. On auxiliary controllers, a press is often the
action of depressing and not releasing a button until the desired eect takes place on the screen (as opposed to a
click of the button).
PROXIMITY
-- on a tablet, when proximity is activated, the active pointer automatically disappears each time the pen is lifted from
the drawing area.
UNDO
-- remove anchored markers on an overlay one at a time, beginning with the most recently anchored marker.
VIDEO SOURCE
-- a device from which the Annotation Pro receives a video image, incorporates the graphic overlay capabilities, then
outputs to the corresponding display. Examples of video sources include DVD players, cameras, VGA computers,
standard television sets, teleconference equipment, slide-to-video converters, visual presenters and more. The
source can be from HDMI or USB.
Troubleshooting Guide
The following table describes common problems and their solutions. If, after refer ring to this table, a problem still
exists, call Williams AV and ask for technical assistance.
There are no user serviceable parts in the Annotation Pro. Do not open the cabinet.
The Annotation Pro can be soft booted/power cycled by pressing CTRL + ALT + DEL. Factory default settings are
restored by pressing CTRL + ALT + END.
WARNING: executing a factory reset will erase all user settings including calibrations, COMM port settings, etc.
SYMPTOMS POSSIBLE SOLUTIONS
The green indicator light on
the front of the Annotation Pro
does not light up.
Check that the Annotation Pro is plugged into a live outlet.
45
Page 46

Annotation Pro
SYMPTOMS POSSIBLE SOLUTIONS
Monitor does not light up. Check that the monitor is plugged into a live outlet.
Check that the monitor is switched on.
Check that the monitor brightness and contrast controls are properly adjusted.
HDMI audio is missing. Reboot the Annotation Pro using CTRL + ALT + DEL.
The Annotation Pro markers
appear to bloom.
Monitor lights up but does not
display a picture.
Monitor automatically adjusts
brightness so that video image
is dull while markers are bright.
Monitor displays a scrambled
picture.
Adjust system parameters on the video output device, moni tor, or camera (if in use)
such as contrast, gain, brightness, color, light, and intensity.
Decrease brightness of Annotation Pro markers or use a dierent marker color.
Check that the video source and Annotation Pro are plugged into a live outlet.
Check that the video source and Annotation Pro are both switched on.
Check that the proper cables are connected to the proper con nectors on the video
source, the Annotation Pro, and the monitor. Some sources and monitors have
multiple output and input connectors. Consult your video or computer manuals for
cor rect connection information.
Bypass the Annotation Pro by connecting the monitor directly to the video source.
If the video image still does not appear, have the video source and monitor
checked.
Monitor is automatically adjusting for the overall brightness level of the markers
and the video image. On the Annotation Pro, activate the Change Brightness
command. Tone down the brightness level of the markers. The monitor will adjust
accordingly.
Check the horizontal hold control on the video monitor for proper adjustment.
Check that the Dual Voltage Switch (110V/220V) located on the back panel of the
Annotation Pro is properly set.
Monitor is not compatible with video source. Use compatible system.
Check to be sure that the video in and out connectors on the Annotation Pro are
secure.
Mouse device will not operate
properly.
Touch screen will not operate
properly.
46
Refer to the specific section in this manual that describes installa tion of your
controller.
For touch screens, you may need to calibrate settings. Refer to Calibrating
Annotation Pro Touch Screen Controllers in this full user manual.
Page 47

Annotation Pro
SYMPTOMS POSSIBLE SOLUTIONS
PC display scrolls. You may need to adjust your computer’s Display or Monitor Type setting for a
video scan rate compatible with the Annotation Pro.
For display utilities that permit the user to change the hori zontal scan rate or
vertical refresh rate:
Select a resolution, maximum horizontal scan rate, and a maximum vertical scan
rate that are compatible with the computer hardware, the Annotation Pro, and the
display monitor/projector. You will need to restart the computer before changes
can be activated.
For Windows 7/8/10 Display Settings that permit a change in monitor type:
If an independent display utility or video driver was not installed, you may want to
change the display type by using the settings commands in Windows 7/8/10.
1. Go to the Display settings for your system.
2. In the Display window find the Screen Resolution listing.
3. Select the desired resolution.
4. With some operating systems you may need to click Apply for the change in
resolution to take eect. Some operating systems update automatically.
Appendix
Quick Reference for Keyboard
The commands in these tables are for a keyboard when used with the Annotation Pro.
MARKING COMMAND KEY
Date/Time Display F8
Date/Time Setup CTRL + F8
Font Selection for Text Labels (typed text) F6
Font Size for Text Labels (typed text) CTRL + F6
Line Style Selection F2
Straight Line Draw F5
Text Labels (typed text) AlphaNumeric Keys
Text Background On/O F7
ACTION OPS COMMAND KEY
Anchor Marker Insert
Change Brightness F10
Chalkboard On/O F11
Clear All Markers End
Color Change of Active Marker F9
Delete a Marker (undo) Delete
Freeze Video Image ALT + F1
Get Image ALT + F3
Next Overlay Page Down
Overlay of Markers On/O F12
47
Page 48

Annotation Pro
ACTION OPS COMMAND KEY
Overlay, Go to # Scroll Lock
Positioning Marker or Cursor Arrow Keys
Positioning Marker, Fine Control CTRL + Arrow Key
Previous Overlay Page Up
Print Image ALT + F4
Recall Settings (at copyright screen) CTRL + ALT + Page Down(on Num Pad)
Reverse Toggle Order Shift + Function Key
Save Image ALT + F2
Save Settings (at copyright screen) CTRL + ALT + Enter(on Num Pad)
Select Enter
Send Image ALT + F5
Menu System Print Screen
Video In Composite CTRL + F11
Video In Y/C CTRL + F12
48
Page 49

Quick Reference for Touch Screens and Whiteboards
The commands in this table are for a compatible touch screen or whiteboard, when used with the Annotation Pro. If
a function you want is not listed in this table, then you must select that function in the menu system.
MARKING COMMAND KEY
Anchor a Marker Quickly tap screen where you want the marker anchored.
Clear Markers Tap lower left corner. All markers are cleared from the screen.
Color, Change Tap top left corner. The marker color is changed to the next
color activated in the Color Palette.
Draw Press and drag finger.
Freeze Video Tap top-right corner. A frame of running video is grabbed and
displayed. Tap same spot again to return to video.
Point Lightly drag finger across he drawable area to position pointer.
To keep pointer positionable, do not tap or press.
Print Screen Image Tap the right-center area on the screen. The current image is
sent to the printer.
Save Screen Image Tap the left-center area on the screen. The current image is
saved to the USB storage device.
Annotation Pro
Send Screen Image Tap the bottom-center area on the screen. The current image
is sent to the printer.
Undo/Erase Marker Tap upper right corner. Activates either undo or erase
com mand, depending on which mode has been chosen in the
menu system.
Menu System, Access Tap top center area. The menu system is activated.
(Operational only when keyboard not installed.)
49
Page 50
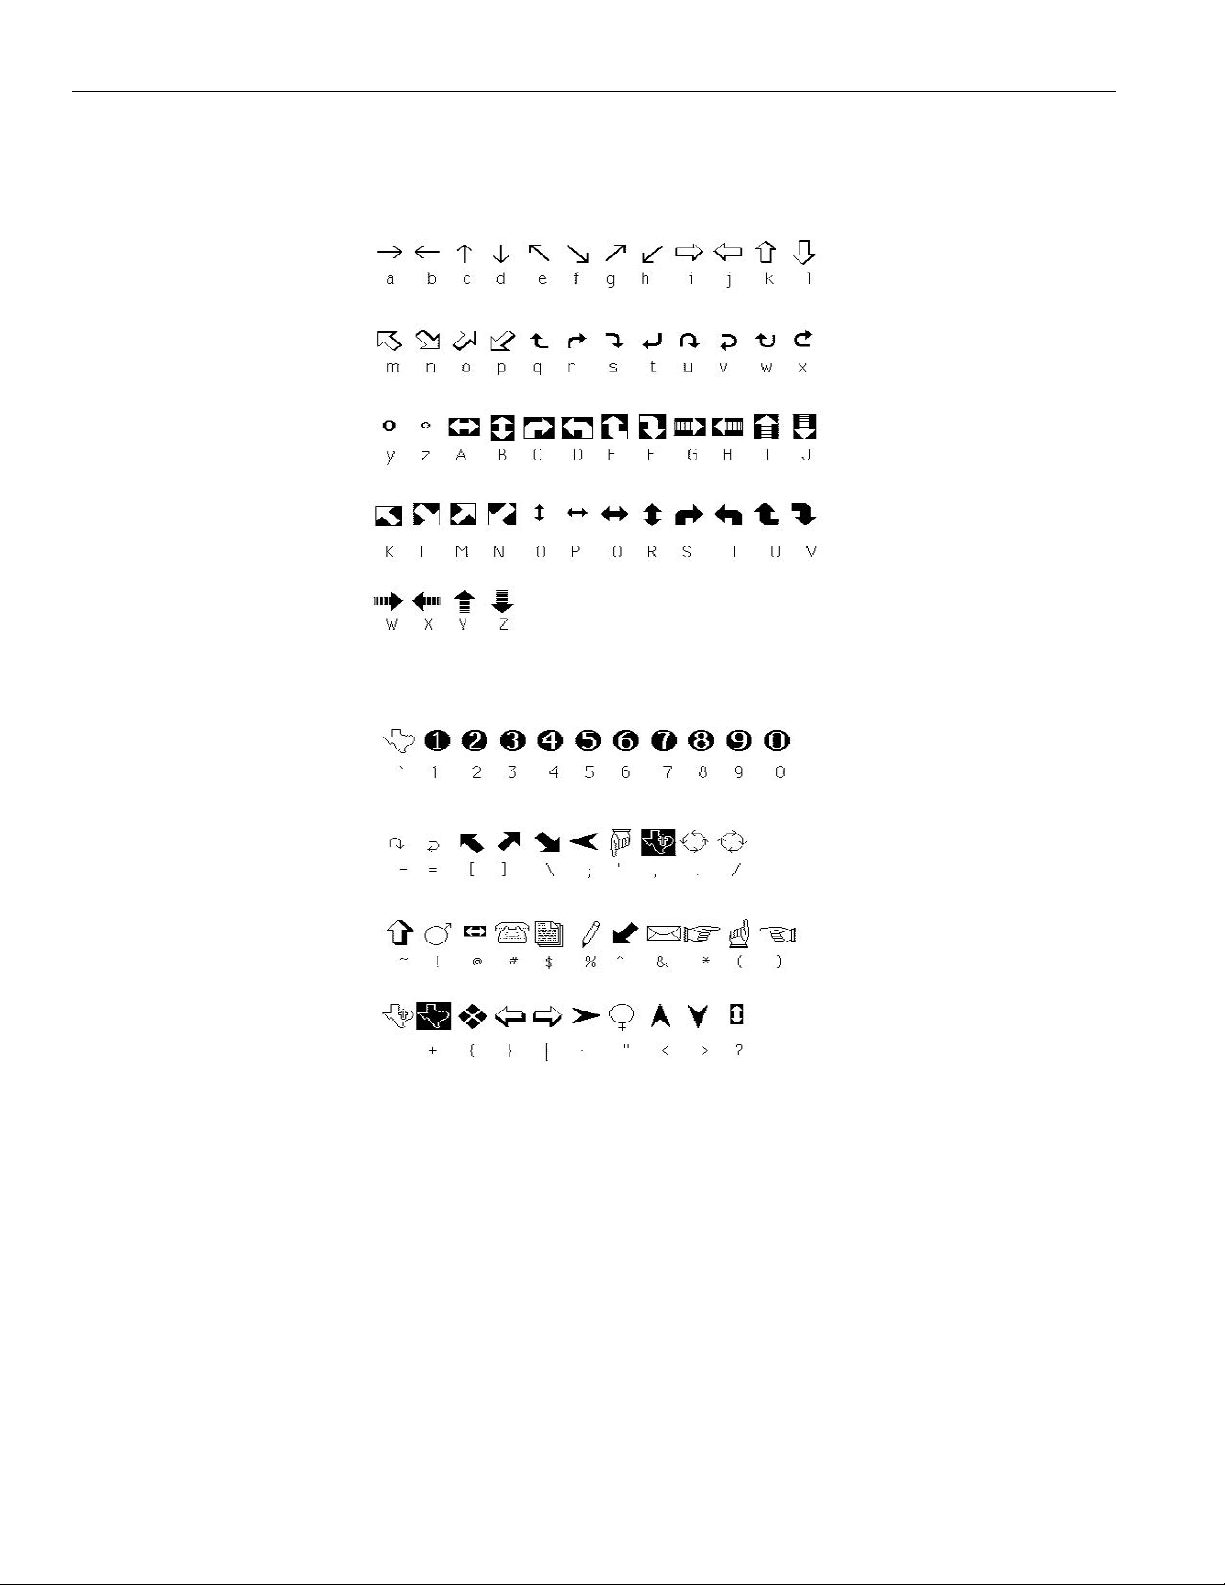
Annotation Pro
Symbol Font Chart
50
Page 51
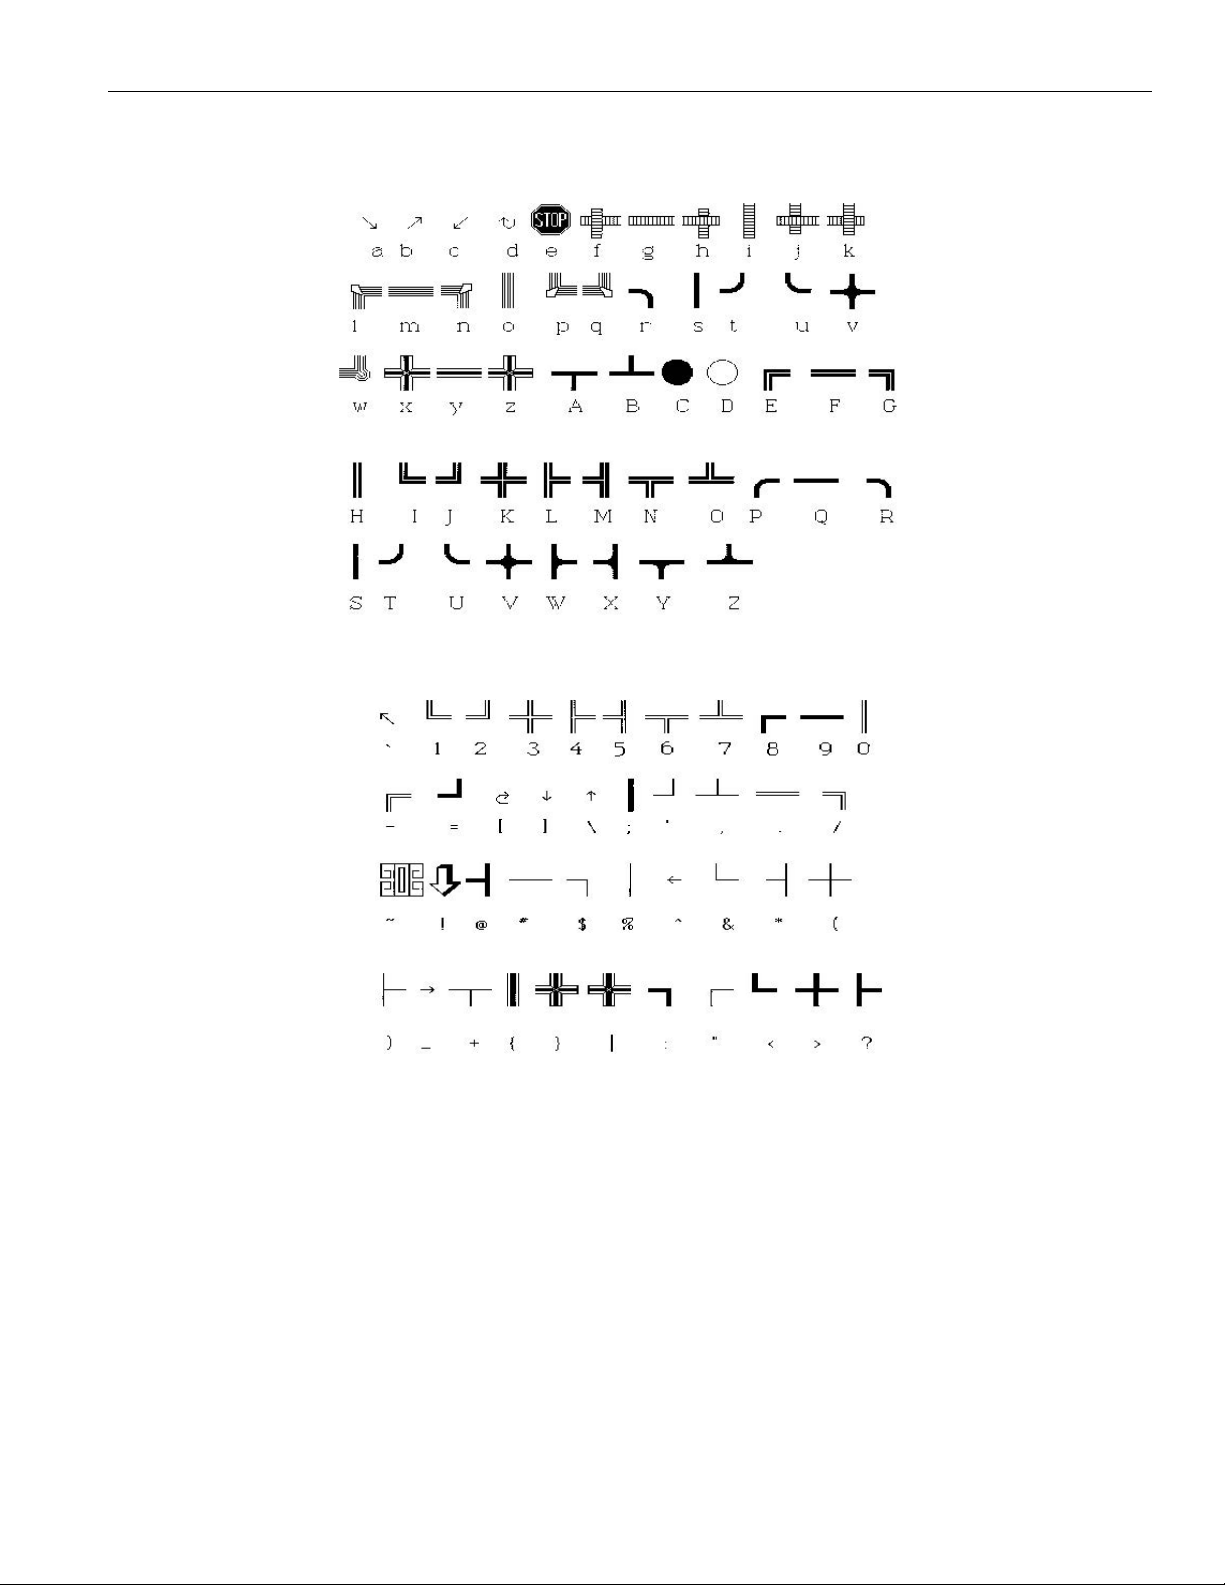
Map Font Chart
Annotation Pro
51
Page 52
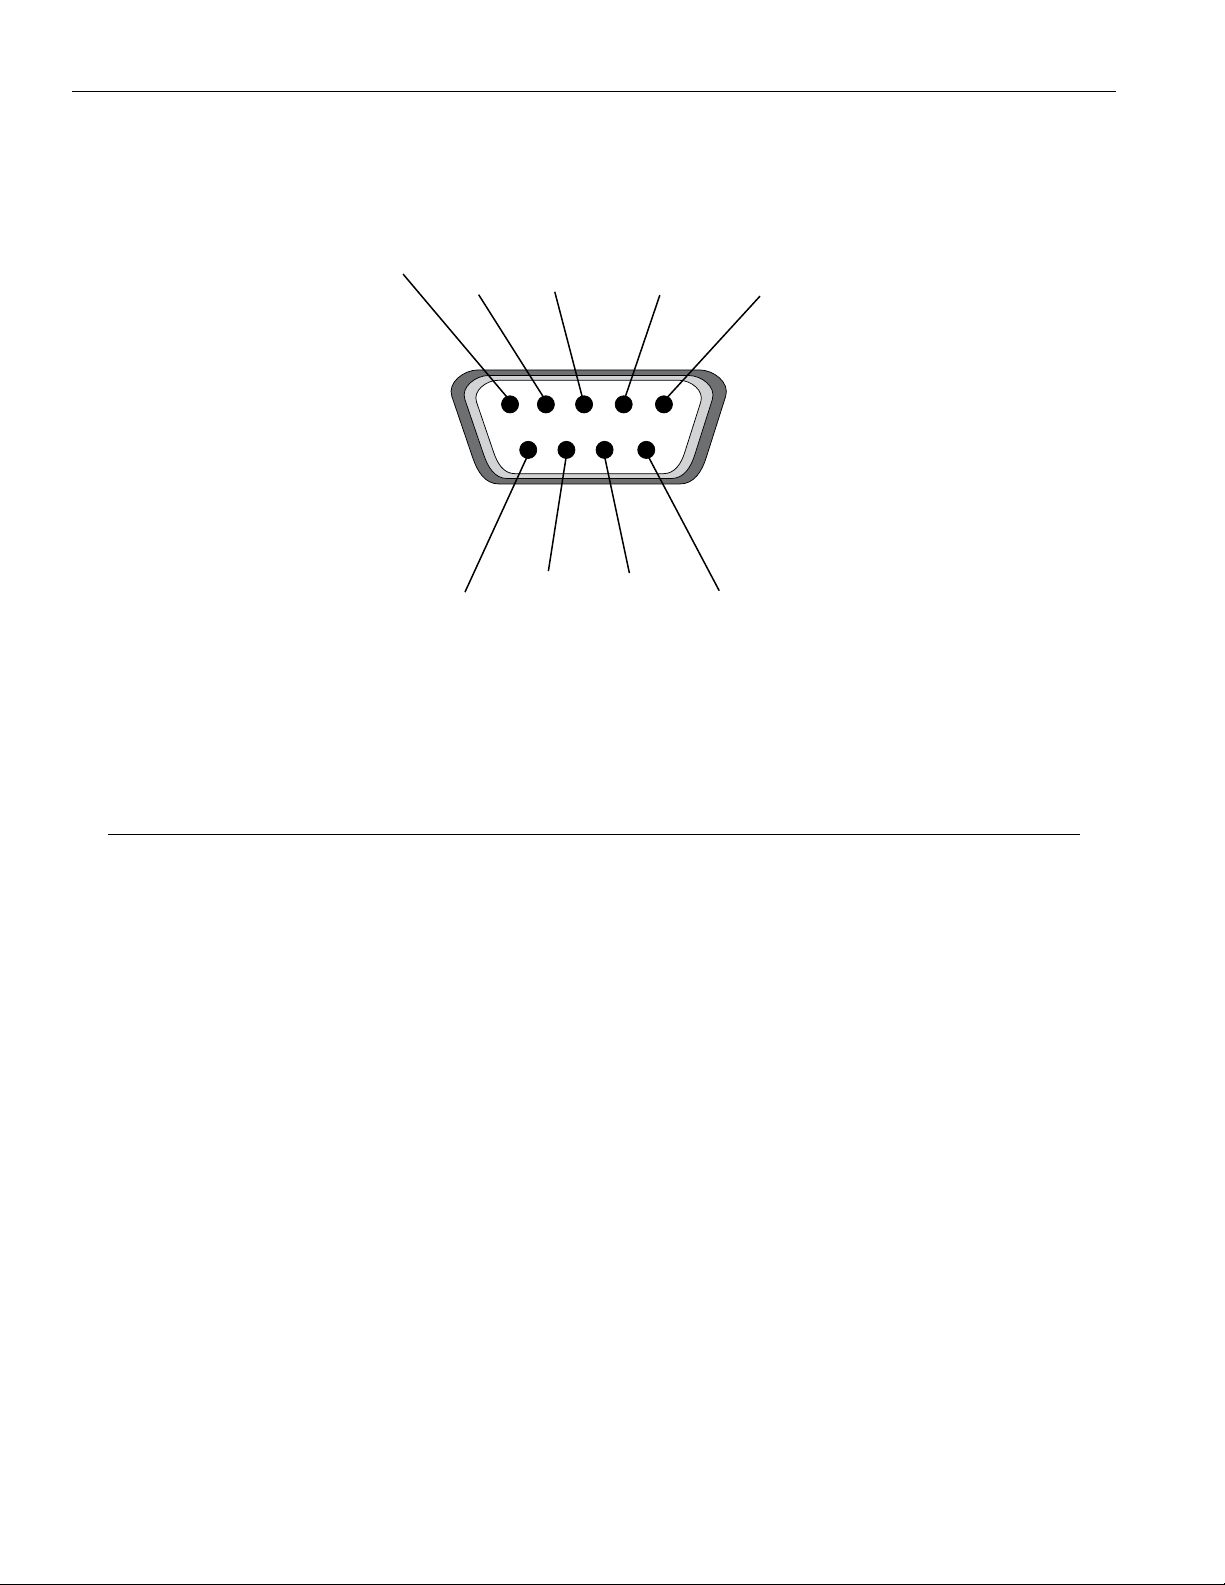
Annotation Pro
RS-232 (COMM Port) Pinout and Commands
Pin 1
Pin 2
Receive
Data
Pin 6
Pin 3
Transmit
Data
Pin 7
Request
to Send
Pin 4
Data
Term Rdy
Pin 8
Clear
to Send
Pin 5
Signal
Ground
Pin 9
RS-232 COMM Port Pinout
The Annotation Pro accept commands from third-party devices via the RS-232 port. For a list of these commands,
please read the Programmer’s Guide, available on the Williams AV website.
Outside copyright information for Software
(1) University of California, Berkeley
[1a]
Copyright (c) 1990 The Regents of the University of California.
All rights reserved.
Redistribution and use in source and binary forms are permitted provided that the above copyright notice and this paragraph are
duplicated in all such forms and that any documentation, and other materials related to such distribution and use acknowledge that
the software was developed by the University of California, Berkeley. The name of the University may not be used to endorse or
promote products derived from this software without specific prior written permission.
THIS SOFTWARE IS PROVIDED ``AS IS’’ AND WITHOUT ANY EXPRESS OR IMPLIED WARRANTIES, INCLUDING, WITHOUT
LIMITATION, THE IMPLIED WARRANTIES OF MERCHANTABILITY AND FITNESS FOR A PARTICULAR PURPOSE.
[1b]
Copyright (c) 1990 The Regents of the University of California.
All rights reserved.
Redistribution and use in source and binary forms are permitted provided that the above copyright notice and this paragraph are
duplicated in all such forms and that any documentation, advertising materials, and other materials related to such distribution and
use acknowledge that the software was developed by the University of California, Berkeley. The name of the University may not be
used to endorse or promote products derived from this software without specific prior written permission.
THIS SOFTWARE IS PROVIDED ``AS IS’’ AND WITHOUT ANY EXPRESS OR IMPLIED WARRANTIES, INCLUDING, WITHOUT
LIMITATION, THE IMPLIED WARRANTIES OF MERCHANTABILITY AND FITNESS FOR A PARTICULAR PURPOSE.
[1c]
Copyright (c) 1981, 1983, 1986, 1988, 1989, 1991, 1992, 1993, 1994
The Regents of the University of California.
All rights reserved.
Redistribution and use in source and binary forms, with or without modification, are permitted provided that the following
conditions are met:
1. Redistributions of source code must retain the above copyright notice, this list of conditions and the following disclaimer.
2. Redistributions in binary form must reproduce the above copyright notice, this list of conditions and the following disclaimer in
the documentation and/or other materials provided with the distribution.
52
Page 53

Annotation Pro
3. Neither the name of the University nor the names of its contributors may be used to endorse or promote products derived from
this software without specific prior written permission.
THIS SOFTWARE IS PROVIDED BY THE REGENTS AND CONTRIBUTORS ``AS IS’’ AND ANY EXPRESS OR IMPLIED WARRANTIES,
INCLUDING, BUT NOT LIMITED TO, THE IMPLIED WARRANTIES OF MERCHANTABILITY AND FITNESS FOR A PARTICULAR
PURPOSE ARE DISCLAIMED. IN NO EVENT SHALL THE REGENTS OR CONTRIBUTORS BE LIABLE
FOR ANY DIRECT, INDIRECT, INCIDENTAL, SPECIAL, EXEMPLARY, OR CONSEQUENTIAL DAMAGES (INCLUDING, BUT NOT
LIMITED TO, PROCUREMENT OF SUBSTITUTE GOODS OR SERVICES; LOSS OF USE, DATA, OR PROFITS; OR BUSINESS
INTERRUPTION) HOWEVER CAUSED AND ON ANY THEORY OF LIABILITY, WHETHER IN CONTRACT, STRICT
LIABILITY, OR TORT (INCLUDING NEGLIGENCE OR OTHERWISE) ARISING IN ANY WAY OUT OF THE USE OF THIS SOFTWARE,
EVEN IF ADVISED OF THE POSSIBILITY OF SUCH DAMAGE.
[1d]
Copyright (c) 1988, 1990, 1993 Regents of the University of California.
All rights reserved.
Redistribution and use in source and binary forms, with or without modification, are permitted provided that the following
conditions are met:
1. Redistributions of source code must retain the above copyright notice, this list of conditions and the following disclaimer.
2. Redistributions in binary form must reproduce the above copyright notice, this list of conditions and the following disclaimer in
the documentation and/or other materials provided with the distribution.
3. Neither the name of the University nor the names of its contributors may be used to endorse or promote products derived from
this software without specific prior written permission.
THIS SOFTWARE IS PROVIDED BY THE REGENTS AND CONTRIBUTORS ``AS IS’’ AND ANY EXPRESS OR IMPLIED WARRANTIES,
INCLUDING, BUT NOT LIMITED TO, THE IMPLIED WARRANTIES OF MERCHANTABILITY AND FITNESS FOR A PARTICULAR
PURPOSE ARE DISCLAIMED. IN NO EVENT SHALL THE REGENTS OR CONTRIBUTORS BE LIABLE FOR ANY DIRECT, INDIRECT,
INCIDENTAL, SPECIAL, EXEMPLARY, OR CONSEQUENTIAL DAMAGES (INCLUDING, BUT NOT LIMITED TO, PROCUREMENT OF
SUBSTITUTE GOODS OR SERVICES; LOSS OF USE, DATA, OR PROFITS; OR BUSINESS INTERRUPTION) HOWEVER CAUSED
AND ON ANY THEORY OF LIABILITY, WHETHER IN CONTRACT, STRICT LIABILITY, OR TORT (INCLUDING NEGLIGENCE OR
OTHERWISE) ARISING IN ANY WAY OUT OF THE USE OF THIS SOFTWARE, EVEN IF ADVISED OF THE POSSIBILITY OF SUCH
DAMAGE.
[1e]
Copyright (c) 1982, 1986, 1989, 1991, 1993, 1994
The Regents of the University of California. All rights reserved.
(c) UNIX System Laboratories, Inc.
All or some portions of this file are derived from material licensed to the University of California by American Telephone and
Telegraph Co. or Unix System Laboratories, Inc. and are reproduced herein with the permission of UNIX System Laboratories, Inc.
Redistribution and use in source and binary forms, with or without modification, are permitted provided that the following
conditions are met:
1. Redistributions of source code must retain the above copyright notice, this list of conditions and the following disclaimer.
2. Redistributions in binary form must reproduce the above copyright notice, this list of conditions and the following disclaimer in
the documentation and/or other materials provided with the distribution.
3. Neither the name of the University nor the names of its contributors may be used to endorse or promote products derived from
this software without specific prior written permission.
THIS SOFTWARE IS PROVIDED BY THE REGENTS AND CONTRIBUTORS ``AS IS’’ AND ANY EXPRESS OR IMPLIED WARRANTIES,
INCLUDING, BUT NOT LIMITED TO, THE IMPLIED WARRANTIES OF MERCHANTABILITY AND FITNESS FOR A PARTICULAR
PURPOSE ARE DISCLAIMED. IN NO EVENT SHALL THE REGENTS OR CONTRIBUTORS BE LIABLE
FOR ANY DIRECT, INDIRECT, INCIDENTAL, SPECIAL, EXEMPLARY, OR CONSEQUENTIAL DAMAGES (INCLUDING, BUT NOT
LIMITED TO, PROCUREMENT OF SUBSTITUTE GOODS OR SERVICES; LOSS OF USE, DATA, OR PROFITS; OR BUSINESS
INTERRUPTION) HOWEVER CAUSED AND ON ANY THEORY OF LIABILITY, WHETHER IN CONTRACT, STRICT
LIABILITY, OR TORT (INCLUDING NEGLIGENCE OR OTHERWISE) ARISING IN ANY WAY OUT OF THE USE OF THIS SOFTWARE,
EVEN IF ADVISED OF THE POSSIBILITY OF SUCH DAMAGE.
[1f]
Copyright (c) 1987, 1988, 2000 Regents of the University of California.
All rights reserved.
Redistribution and use in source and binary forms are permitted provided that: (1) source distributions retain this entire copyright
notice and comment, and (2) distributions including binaries display the following acknowledgement: ``This product includes
software developed by the University of California, Berkeley and its contributors’’ in the documentation or other materials provided
with the distribution.
Neither the name of the University nor the names of its contributors may be used to endorse or promote products derived from
this software without specific prior written permission.
THIS SOFTWARE IS PROVIDED ``AS IS’’ AND WITHOUT ANY EXPRESS OR IMPLIED WARRANTIES, INCLUDING, WITHOUT
LIMITATION, THE IMPLIED WARRANTIES OF MERCHANTABILITY AND FITNESS FOR A PARTICULAR PURPOSE.
(3) David M. Gay at AT&T
The author of this software is David M. Gay.
Copyright (c) 1991 by AT&T.
53
Page 54

Annotation Pro
Permission to use, copy, modify, and distribute this software for any purpose without fee is hereby granted, provided that this
entire notice is included in all copies of any software which is or includes a copy or modification of this software and in all copies of
the supporting documentation for such software.
THIS SOFTWARE IS BEING PROVIDED “AS IS”, WITHOUT ANY EXPRESS OR IMPLIED WARRANTY. IN PARTICULAR, NEITHER THE
AUTHOR NOR AT&T MAKES ANY REPRESENTATION OR WARRANTY OF ANY KIND CONCERNING THE MERCHANTABILITY OF
THIS SOFTWARE OR ITS FITNESS FOR ANY PARTICULAR PURPOSE.
(11) Christopher G. Demetriou
Copyright (c) 2001 Christopher G. Demetriou
All rights reserved.
Redistribution and use in source and binary forms, with or without modification, are permitted provided that the following
conditions are met:
1. Redistributions of source code must retain the above copyright notice, this list of conditions and the following disclaimer.
2. Redistributions in binary form must reproduce the above copyright notice, this list of conditions and the following disclaimer in
the documentation and/or other materials provided with the distribution.
3. The name of the author may not be used to endorse or promote products derived from this software without specific prior
written permission.
THIS SOFTWARE IS PROVIDED BY THE AUTHOR ``AS IS’’ AND ANY EXPRESS OR IMPLIED WARRANTIES, INCLUDING, BUT NOT
LIMITED TO, THE IMPLIED WARRANTIES OF MERCHANTABILITY AND FITNESS FOR A PARTICULAR PURPOSE ARE DISCLAIMED.
IN NO EVENT SHALL THE AUTHOR BE LIABLE FOR ANY DIRECT, INDIRECT, INCIDENTAL, SPECIAL, EXEMPLARY, OR
CONSEQUENTIAL DAMAGES (INCLUDING, BUT NOT LIMITED TO, PROCUREMENT OF SUBSTITUTE GOODS OR SERVICES; LOSS
OF USE, DATA, OR PROFITS; OR BUSINESS INTERRUPTION) HOWEVER CAUSED AND ON ANY THEORY OF LIABILITY, WHETHER
IN CONTRACT, STRICT LIABILITY, OR TORT (INCLUDING NEGLIGENCE OR OTHERWISE) ARISING IN ANY WAY OUT OF THE USE
OF THIS SOFTWARE, EVEN IF ADVISED OF THE POSSIBILITY OF SUCH DAMAGE.
(13) Royal Institute of Technology
Copyright (c) 1999 Kungliga Tekniska Högskolan
(Royal Institute of Technology, Stockholm, Sweden).
All rights reserved.
Redistribution and use in source and binary forms, with or without modification, are permitted provided that the following
conditions are met:
1. Redistributions of source code must retain the above copyright notice, this list of conditions and the following disclaimer.
2. Redistributions in binary form must reproduce the above copyright notice, this list of conditions and the following disclaimer in
the documentation and/or other materials provided with the distribution.
3. Neither the name of KTH nor the names of its contributors may be used to endorse or promote products derived from this
software without specific prior written permission.
THIS SOFTWARE IS PROVIDED BY KTH AND ITS CONTRIBUTORS ``AS IS’’ AND ANY EXPRESS OR IMPLIED WARRANTIES,
INCLUDING, BUT NOT LIMITED TO, THE IMPLIED WARRANTIES OF MERCHANTABILITY AND FITNESS FOR A PARTICULAR
PURPOSE ARE DISCLAIMED. IN NO EVENT SHALL KTH OR ITS CONTRIBUTORS BE LIABLE FOR ANY DIRECT, INDIRECT,
INCIDENTAL, SPECIAL, EXEMPLARY, OR CONSEQUENTIAL DAMAGES (INCLUDING, BUT NOT LIMITED TO, PROCUREMENT OF
SUBSTITUTE GOODS OR SERVICES; LOSS OF USE, DATA, OR PROFITS; OR BUSINESS INTERRUPTION) HOWEVER CAUSED
AND ON ANY THEORY OF LIABILITY, WHETHER IN CONTRACT, STRICT LIABILITY, OR TORT (INCLUDING NEGLIGENCE OR
OTHERWISE) ARISING IN ANY WAY OUT OF THE USE OF THIS SOFTWARE, EVEN IF ADVISED OF THE POSSIBILITY OF SUCH
DAMAGE.
(14) Alexey Zelkin
Copyright (c) 2000, 2001 Alexey Zelkin <[email protected]>
All rights reserved.
54
Redistribution and use in source and binary forms, with or without modification, are permitted provided that the following
conditions are met:
1. Redistributions of source code must retain the above copyright notice, this list of conditions and the following disclaimer.
2. Redistributions in binary form must reproduce the above copyright notice, this list of conditions and the following disclaimer in
the documentation and/or other materials provided with the distribution.
Page 55

Annotation Pro
THIS SOFTWARE IS PROVIDED BY THE AUTHOR AND CONTRIBUTORS ``AS IS’’ AND ANY EXPRESS OR IMPLIED WARRANTIES,
INCLUDING, BUT NOT LIMITED TO, THE IMPLIED WARRANTIES OF MERCHANTABILITY AND FITNESS FOR A PARTICULAR
PURPOSE ARE DISCLAIMED. IN NO EVENT SHALL THE AUTHOR OR CONTRIBUTORS BE LIABLE FOR ANY DIRECT, INDIRECT,
INCIDENTAL, SPECIAL, EXEMPLARY, OR CONSEQUENTIAL DAMAGES (INCLUDING, BUT NOT LIMITED TO, PROCUREMENT OF
SUBSTITUTE GOODS OR SERVICES; LOSS OF USE, DATA, OR PROFITS; OR BUSINESS INTERRUPTION) HOWEVER CAUSED
AND ON ANY THEORY OF LIABILITY, WHETHER IN CONTRACT, STRICT LIABILITY, OR TORT (INCLUDING NEGLIGENCE OR
OTHERWISE) ARISING IN ANY WAY OUT OF THE USE OF THIS SOFTWARE, EVEN IF ADVISED OF THE POSSIBILITY OF SUCH
DAMAGE.
(15) Andrey A. Chernov
Copyright (C) 1997 by Andrey A. Chernov, Moscow, Russia.
All rights reserved.
Redistribution and use in source and binary forms, with or without modification, are permitted provided that the following
conditions are met:
1. Redistributions of source code must retain the above copyright notice, this list of conditions and the following disclaimer.
2. Redistributions in binary form must reproduce the above copyright notice, this list of conditions and the following disclaimer in
the documentation and/or other materials provided with the distribution.
THIS SOFTWARE IS PROVIDED BY THE AUTHOR ``AS IS’’ AND ANY EXPRESS OR IMPLIED WARRANTIES, INCLUDING, BUT NOT
LIMITED TO, THE IMPLIED WARRANTIES OF MERCHANTABILITY AND FITNESS FOR A PARTICULAR PURPOSE ARE DISCLAIMED.
IN NO EVENT SHALL THE REGENTS OR CONTRIBUTORS BE LIABLE FOR ANY DIRECT, INDIRECT, INCIDENTAL, SPECIAL,
EXEMPLARY, OR CONSEQUENTIAL DAMAGES (INCLUDING, BUT NOT LIMITED TO, PROCUREMENT OF SUBSTITUTE GOODS
OR SERVICES; LOSS OF USE, DATA, OR PROFITS; OR BUSINESS INTERRUPTION) HOWEVER CAUSED AND ON ANY THEORY OF
LIABILITY, WHETHER IN CONTRACT, STRICT
LIABILITY, OR TORT (INCLUDING NEGLIGENCE OR OTHERWISE) ARISING IN ANY WAY OUT OF THE USE OF THIS SOFTWARE,
EVEN IF ADVISED OF THE POSSIBILITY OF SUCH DAMAGE.
(16) FreeBSD
Copyright (c) 1997-2002 FreeBSD Project.
All rights reserved.
Redistribution and use in source and binary forms, with or without modification, are permitted provided that the following
conditions are met:
1. Redistributions of source code must retain the above copyright notice, this list of conditions and the following disclaimer.
2. Redistributions in binary form must reproduce the above copyright notice, this list of conditions and the following disclaimer in
the documentation and/or other materials provided with the distribution.
THIS SOFTWARE IS PROVIDED BY THE AUTHOR AND CONTRIBUTORS ``AS IS’’ AND ANY EXPRESS OR IMPLIED WARRANTIES,
INCLUDING, BUT NOT LIMITED TO, THE IMPLIED WARRANTIES OF MERCHANTABILITY AND FITNESS FOR A PARTICULAR
PURPOSE ARE DISCLAIMED. IN NO EVENT SHALL THE AUTHOR OR CONTRIBUTORS BE LIABLE FOR ANY DIRECT, INDIRECT,
INCIDENTAL, SPECIAL, EXEMPLARY, OR CONSEQUENTIAL DAMAGES (INCLUDING, BUT NOT LIMITED TO, PROCUREMENT OF
SUBSTITUTE GOODS OR SERVICES; LOSS OF USE, DATA, OR PROFITS; OR BUSINESS INTERRUPTION) HOWEVER CAUSED
AND ON ANY THEORY OF LIABILITY, WHETHER IN CONTRACT, STRICT LIABILITY, OR TORT (INCLUDING NEGLIGENCE OR
OTHERWISE) ARISING IN ANY WAY OUT OF THE USE OF THIS SOFTWARE, EVEN IF ADVISED OF THE POSSIBILITY OF SUCH
DAMAGE.
(17) S. L. Moshier
Author: S. L. Moshier.
Copyright (c) 1984,2000 S.L. Moshier
Permission to use, copy, modify, and distribute this software for any purpose without fee is hereby granted, provided that this
entire notice is included in all copies of any software which is or includes a copy or modification of this software and in all copies of
the supporting documentation for such software.
THIS SOFTWARE IS BEING PROVIDED “AS IS”, WITHOUT ANY EXPRESS OR IMPLIED WARRANTY. IN PARTICULAR, THE AUTHOR
MAKES NO REPRESENTATION OR WARRANTY OF ANY KIND CONCERNING THE MERCHANTABILITY OF THIS SOFTWARE OR ITS
FITNESS FOR ANY PARTICULAR PURPOSE.
(18) Citrus Project
Copyright (c)1999 Citrus Project,
55
Page 56

Annotation Pro
All rights reserved.
Redistribution and use in source and binary forms, with or without modification, are permitted provided that the following
conditions are met:
1. Redistributions of source code must retain the above copyright notice, this list of conditions and the following disclaimer.
2. Redistributions in binary form must reproduce the above copyright notice, this list of conditions and the following disclaimer in
the documentation and/or other materials provided with the distribution.
THIS SOFTWARE IS PROVIDED BY THE AUTHOR AND CONTRIBUTORS ``AS IS’’ AND ANY EXPRESS OR IMPLIED WARRANTIES,
INCLUDING, BUT NOT LIMITED TO, THE IMPLIED WARRANTIES OF MERCHANTABILITY AND FITNESS FOR A PARTICULAR
PURPOSE ARE DISCLAIMED. IN NO EVENT SHALL THE AUTHOR OR CONTRIBUTORS BE LIABLE
FOR ANY DIRECT, INDIRECT, INCIDENTAL, SPECIAL, EXEMPLARY, OR CONSEQUENTIAL DAMAGES (INCLUDING, BUT NOT
LIMITED TO, PROCUREMENT OF SUBSTITUTE GOODS OR SERVICES; LOSS OF USE, DATA, OR PROFITS; OR BUSINESS
INTERRUPTION) HOWEVER CAUSED AND ON ANY THEORY OF LIABILITY, WHETHER IN CONTRACT, STRICT
LIABILITY, OR TORT (INCLUDING NEGLIGENCE OR OTHERWISE) ARISING IN ANY WAY OUT OF THE USE OF THIS SOFTWARE,
EVEN IF ADVISED OF THE POSSIBILITY OF SUCH DAMAGE.
(19) Todd C. Miller
Copyright (c) 1998 Todd C. Miller <[email protected]>
All rights reserved.
Redistribution and use in source and binary forms, with or without modification, are permitted provided that the following
conditions are met:
1. Redistributions of source code must retain the above copyright notice, this list of conditions and the following disclaimer.
2. Redistributions in binary form must reproduce the above copyright notice, this list of conditions and the following disclaimer in
the documentation and/or other materials provided with the distribution.
3. The name of the author may not be used to endorse or promote products derived from this software without specific prior
written permission.
THIS SOFTWARE IS PROVIDED ``AS IS’’ AND ANY EXPRESS OR IMPLIED WARRANTIES, INCLUDING, BUT NOT LIMITED TO, THE
IMPLIED WARRANTIES OF MERCHANTABILITY AND FITNESS FOR A PARTICULAR PURPOSE ARE DISCLAIMED. IN NO EVENT
SHALL THE AUTHOR BE LIABLE FOR ANY DIRECT, INDIRECT, INCIDENTAL, SPECIAL, EXEMPLARY, OR CONSEQUENTIAL
DAMAGES (INCLUDING, BUT NOT LIMITED TO, PROCUREMENT OF SUBSTITUTE GOODS OR SERVICES; LOSS OF USE, DATA,
OR PROFITS; OR BUSINESS INTERRUPTION) HOWEVER CAUSED AND ON ANY THEORY OF LIABILITY, WHETHER IN CONTRACT,
STRICT LIABILITY, OR TORT (INCLUDING NEGLIGENCE OR OTHERWISE) ARISING IN ANY WAY OUT OF THE USE OF THIS
SOFTWARE, EVEN IF ADVISED OF THE POSSIBILITY OF SUCH DAMAGE.
(26) Mike Barcroft
Copyright (c) 2001 Mike Barcroft <[email protected]>
All rights reserved.
Redistribution and use in source and binary forms, with or without modification, are permitted provided that the following
conditions are met:
1. Redistributions of source code must retain the above copyright notice, this list of conditions and the following disclaimer.
2. Redistributions in binary form must reproduce the above copyright notice, this list of conditions and the following disclaimer in
the documentation and/or other materials provided with the distribution.
THIS SOFTWARE IS PROVIDED BY THE AUTHOR AND CONTRIBUTORS ``AS IS’’ AND ANY EXPRESS OR IMPLIED WARRANTIES,
INCLUDING, BUT NOT LIMITED TO, THE IMPLIED WARRANTIES OF MERCHANTABILITY AND FITNESS FOR A PARTICULAR
PURPOSE ARE DISCLAIMED. IN NO EVENT SHALL THE AUTHOR OR CONTRIBUTORS BE LIABLE FOR ANY DIRECT, INDIRECT,
INCIDENTAL, SPECIAL, EXEMPLARY, OR CONSEQUENTIAL DAMAGES (INCLUDING, BUT NOT LIMITED TO, PROCUREMENT OF
SUBSTITUTE GOODS OR SERVICES; LOSS OF USE, DATA, OR PROFITS; OR BUSINESS INTERRUPTION) HOWEVER CAUSED
AND ON ANY THEORY OF LIABILITY, WHETHER IN CONTRACT, STRICT LIABILITY, OR TORT (INCLUDING NEGLIGENCE OR
OTHERWISE) ARISING IN ANY WAY OUT OF THE USE OF THIS SOFTWARE, EVEN IF ADVISED OF THE POSSIBILITY OF SUCH
DAMAGE.
(28) Red Hat Incorporated
56
Unless otherwise stated in each remaining newlib file, the remaining files in the newlib subdirectory default to the following
copyright.
It should be noted that Red Hat Incorporated now owns copyrights belonging to Cygnus Solutions and Cygnus Support.
Copyright (c) 1994, 1997, 2001, 2002, 2003, 2004 Red Hat Incorporated.
All rights reserved.
Page 57

Annotation Pro
Redistribution and use in source and binary forms, with or without modification, are permitted provided that the following
conditions are met:
Redistributions of source code must retain the above copyright notice, this list of conditions and the following disclaimer.
Redistributions in binary form must reproduce the above copyright notice, this list of conditions and the following disclaimer in the
documentation and/or other materials provided with the distribution.
The name of Red Hat Incorporated may not be used to endorse or promote products derived from this software without specific
prior written permission.
THIS SOFTWARE IS PROVIDED BY THE COPYRIGHT HOLDERS AND CONTRIBUTORS “AS IS” AND ANY EXPRESS OR IMPLIED
WARRANTIES, INCLUDING, BUT NOT LIMITED TO, THE IMPLIED WARRANTIES OF MERCHANTABILITY AND FITNESS FOR
A PARTICULAR PURPOSE ARE DISCLAIMED. IN NO EVENT SHALL RED HAT INCORPORATED BE LIABLE FOR ANY DIRECT,
INDIRECT, INCIDENTAL, SPECIAL, EXEMPLARY, OR CONSEQUENTIAL DAMAGES (INCLUDING, BUT NOT LIMITED TO,
PROCUREMENT OF SUBSTITUTE GOODS OR SERVICES; LOSS OF USE, DATA, OR PROFITS; OR BUSINESS INTERRUPTION)
HOWEVER CAUSED AND ON ANY THEORY OF LIABILITY, WHETHER IN CONTRACT, STRICT LIABILITY, OR TORT (INCLUDING
NEGLIGENCE OR OTHERWISE) ARISING IN ANY WAY OUT OF THE USE OF THIS
SOFTWARE, EVEN IF ADVISED OF THE POSSIBILITY OF SUCH DAMAGE.
Copyright (c) 2001, 2002 Swedish Institute of Computer Science.
All rights reserved.
Redistribution and use in source and binary forms, with or without modification, are permitted provided that the following
conditions are met:
1. Redistributions of source code must retain the above copyright notice, this list of conditions and the following disclaimer.
2. Redistributions in binary form must reproduce the above copyright notice, this list of conditions and the following disclaimer in
the documentation and/or other materials provided with the distribution.
3. The name of the author may not be used to endorse or promote products derived from this software without specific prior
written permission.
THIS SOFTWARE IS PROVIDED BY THE AUTHOR ``AS IS’’ AND ANY EXPRESS OR IMPLIED WARRANTIES, INCLUDING, BUT NOT
LIMITED TO, THE IMPLIED WARRANTIES OF MERCHANTABILITY AND FITNESS FOR A PARTICULAR PURPOSE ARE DISCLAIMED.
IN NO EVENT SHALL THE AUTHOR BE LIABLE FOR ANY DIRECT, INDIRECT, INCIDENTAL, SPECIAL, EXEMPLARY, OR
CONSEQUENTIAL DAMAGES (INCLUDING, BUT NOT LIMITED TO, PROCURE MENT OF SUBSTITUTE GOODS OR SERVICES; LOSS
OF USE, DATA, OR PROFITS; OR BUSINESS INTERRUPTION) HOWEVER CAUSED AND ON ANY THEORY OF LIABILITY, WHETHER
IN CONTRACT, STRICT LIABILITY, OR TORT (INCLUDING NEGLIGENCE OR OTHERWISE) ARISING IN ANY WAY OUT OF THE USE
OF THIS SOFTWARE, EVEN IF ADVISED OF THE POSSIBILITY OF SUCH DAMAGE.
This file is part of the lwIP TCP/IP stack.
Author: Adam Dunkels <[email protected]>
57
Page 58
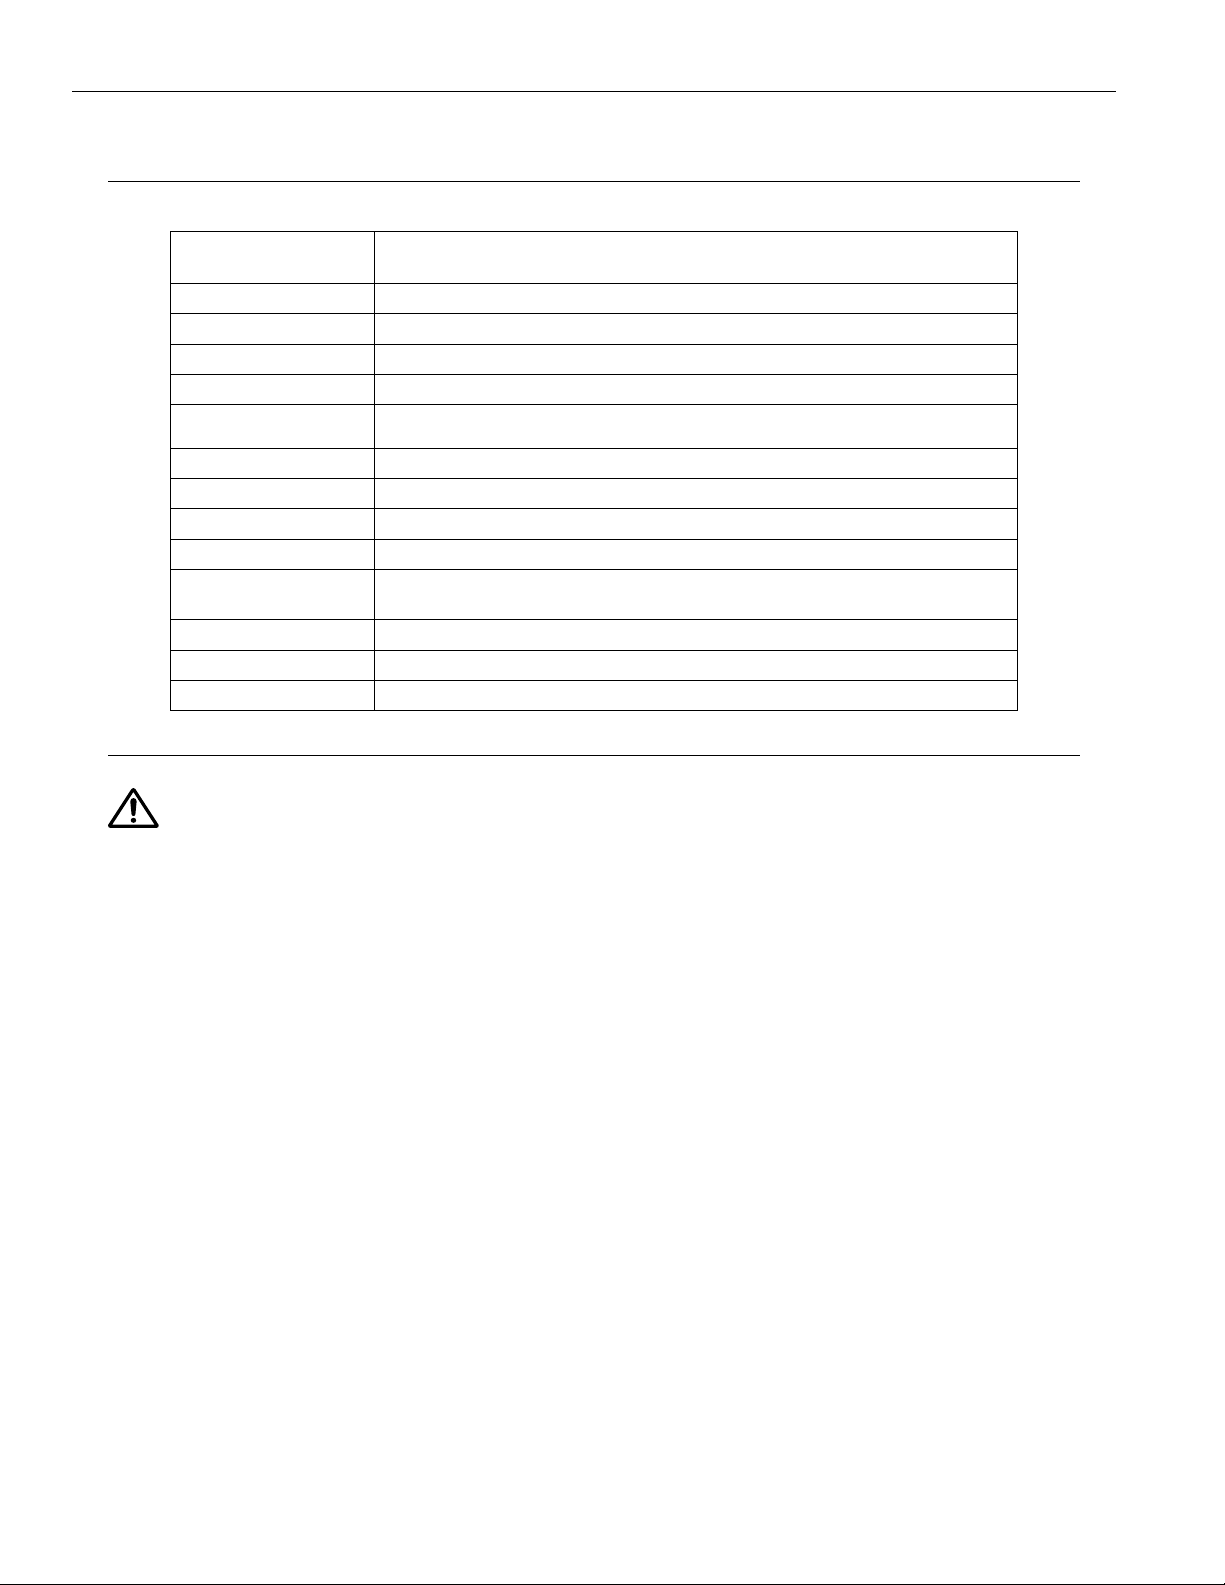
Annotation Pro
Specifications
Annotation Pro
Video Output HDMI up to 3840 x 2160 @ 60 fps
Remote Power 2-pole Phoenix-style connector (Euroblock)
Power Supply TFP 060 VP1 – 100-240VAC 50/60Hz Input
Power Source 19VDC 4.7A (center positive)
Power Indicator Green LED
HDCP Support Only for the Annotation Pro Plus (AN C5 P)
Dimensions 1 RU - 19” (W) x 1.75” (H) x 7.625” (D)
(48.26 cm x 4.45 cm x 19.37 cm)
Weight 5 lbs. (2.3 kg)
Video Input HDMI up to 3840 x 2160 @ 24/25/30 fps
USB 5 USB 3.0 ports, plus one USB B-Micro port
Network LAN port for printing and saving images and third-party remote control
Operating
Temperature
Warranty Two (2) year, parts and labor
Approvals CE, FCC, Industry Canada, WEEE, RoHS, CB Scheme, RCM, PSE
Approximately 32° F to 131° F (0° C to 55° C)
Regulatory Statements
Caution: Unauthorized modifications or changes not expressly approved by Williams AV could void compliance
with regulatory rules, and thereby your authority to use this equipment.
United States - FCC
This device complies with Part 15 of the FCC Rules. Operation is subject to the following two conditions: (1)
this device may not cause harmful interference, and (2) this device must accept any interference received,
including interference that may cause undesired operation.
Canada IC
This device complies with Industry Canada license-exempt RSS standard(s). Operation is subject to the
following two conditions: (1) this device may not cause harmful interference, and (2) this device must accept
any interference received, including interference that may cause undesired operation.
Le présent appareil est conforme aux CNR d’Industrie Canada applicables aux appareils radio exempts
de licence. L’exploitation est autorisée aux deux conditions suivantes: (1) l’appareil ne doit pas produire
de brouillage, et (2) l’utilisateur de l’appareil doit accepter tout brouillage radioélectrique subi, même si le
brouillage est susceptible d’en compromettre le fonctionnement.
58
Page 59

Limited Warranty
Williams AV products are engineered, designed, and manufactured under carefully controlled conditions to
provide many years of reliable service. Williams AV warrants the Annotation Pro against defects in materials and
workmanship for two (2) years. During the first two years from the purchase date, we will promptly repair or replace
the Annotation Pro system.
Microphones, earphones, headphones, batteries, chargers, cables, carry cases, and all other accessory products
carry a 90-day warranty.
WILLIAMS AV HAS NO CONTROL OVER THE CONDITIONS UNDER WHICH THIS PRODUCT IS USED. WILLIAMS
AV, THEREFORE, DISCLAIMS ALL WARRANTIES NOT SET FORTH ABOVE, BOTH EXPRESS AND IMPLIED, WITH
RESPECT TO THE Annotation Pro SYSTEM, INCLUDING BUT NOT LIMITED TO, ANY IMPLIED WARRANTY OF
MERCHANTABILITY OR FITNESS FOR A PARTICULAR PURPOSE. WILLIAMS AV SHALL NOT BE LIABLE TO
ANY PERSON OR ENTITY FOR ANY MEDICAL EXPENSES OR ANY DIRECT, INCIDENTAL OR CONSEQUENTIAL
DAMAGES CAUSED BY ANY USE, DEFECT, FAILURE OR MALFUNCTIONING OF THE PRODUCT, WHETHER A CLAIM
FOR SUCH DAMAGES IS BASED UPON WARRANTY, CONTRACT, TORT OR OTHERWISE, THE SOLE REMEDY FOR
ANY DEFECT, FAILURE OR MALFUNCTION OF THE PRODUCTS REPLACEMENT OF THE PRODUCT. NO PERSON
HAS ANY AUTHORITY TO BIND WILLIAMS AV TO ANY REPRESENTATION OR WARRANTY WITH RESPECT TO THE
Annotation Pro SYSTEM. UNAUTHORIZED REPAIRS OR MODIFICATIONS WILL VOID THE WARRANTY.
The exclusions and limitations set out above are not intended to, and should not be construed so as to contravene
mandatory provisions of applicable law. If any part or term of this Disclaimer of Warranty is held to be illegal,
unenforceable, or in conflict with applicable law by a court of competent jurisdiction, the validity of the remaining
portions of this Disclaimer of Warranty shall not be aected, and all rights and obligations shall be construed and
enforced as if this Limited Warranty did not contain the particular part or term held to be invalid.
Annotation Pro
If you experience diculty with your system, call toll-free for customer assistance: 1-800-843-3544 (U.S.A.) or +1
952 943 2252 (outside the U.S.A.)
If it is necessary to return the system for service, your Customer Service Representative will give you a Return
Authorization Number (RA) and shipping instructions.
Pack the system carefully and send it to:
Williams AV
Attn: Repair Dept.
10300 Valley View Road
Eden Prairie, MN 55344 USA
Your warranty becomes eective the date you purchase your system. If your sales receipt is not available, the date
code on the product will determine your warranty status.
59
Page 60

[email protected] / www.williamsav.com
800-843-3544 / INTL: +1-952-943-2252
© 2019, Williams AV, LLC MAN 264B
 Loading...